Embed Size (px)
Citation preview
16 PATTERN PIECES 16 PIEZAS DE PATRON
B
B
B
C
C
1
A
B
C
2
A
B
C
3
A
B
C
4
A
B
C
5
6
7
8
A
B
C
9
A
B
C
10
A
B
C
11
12
13
14
15
16
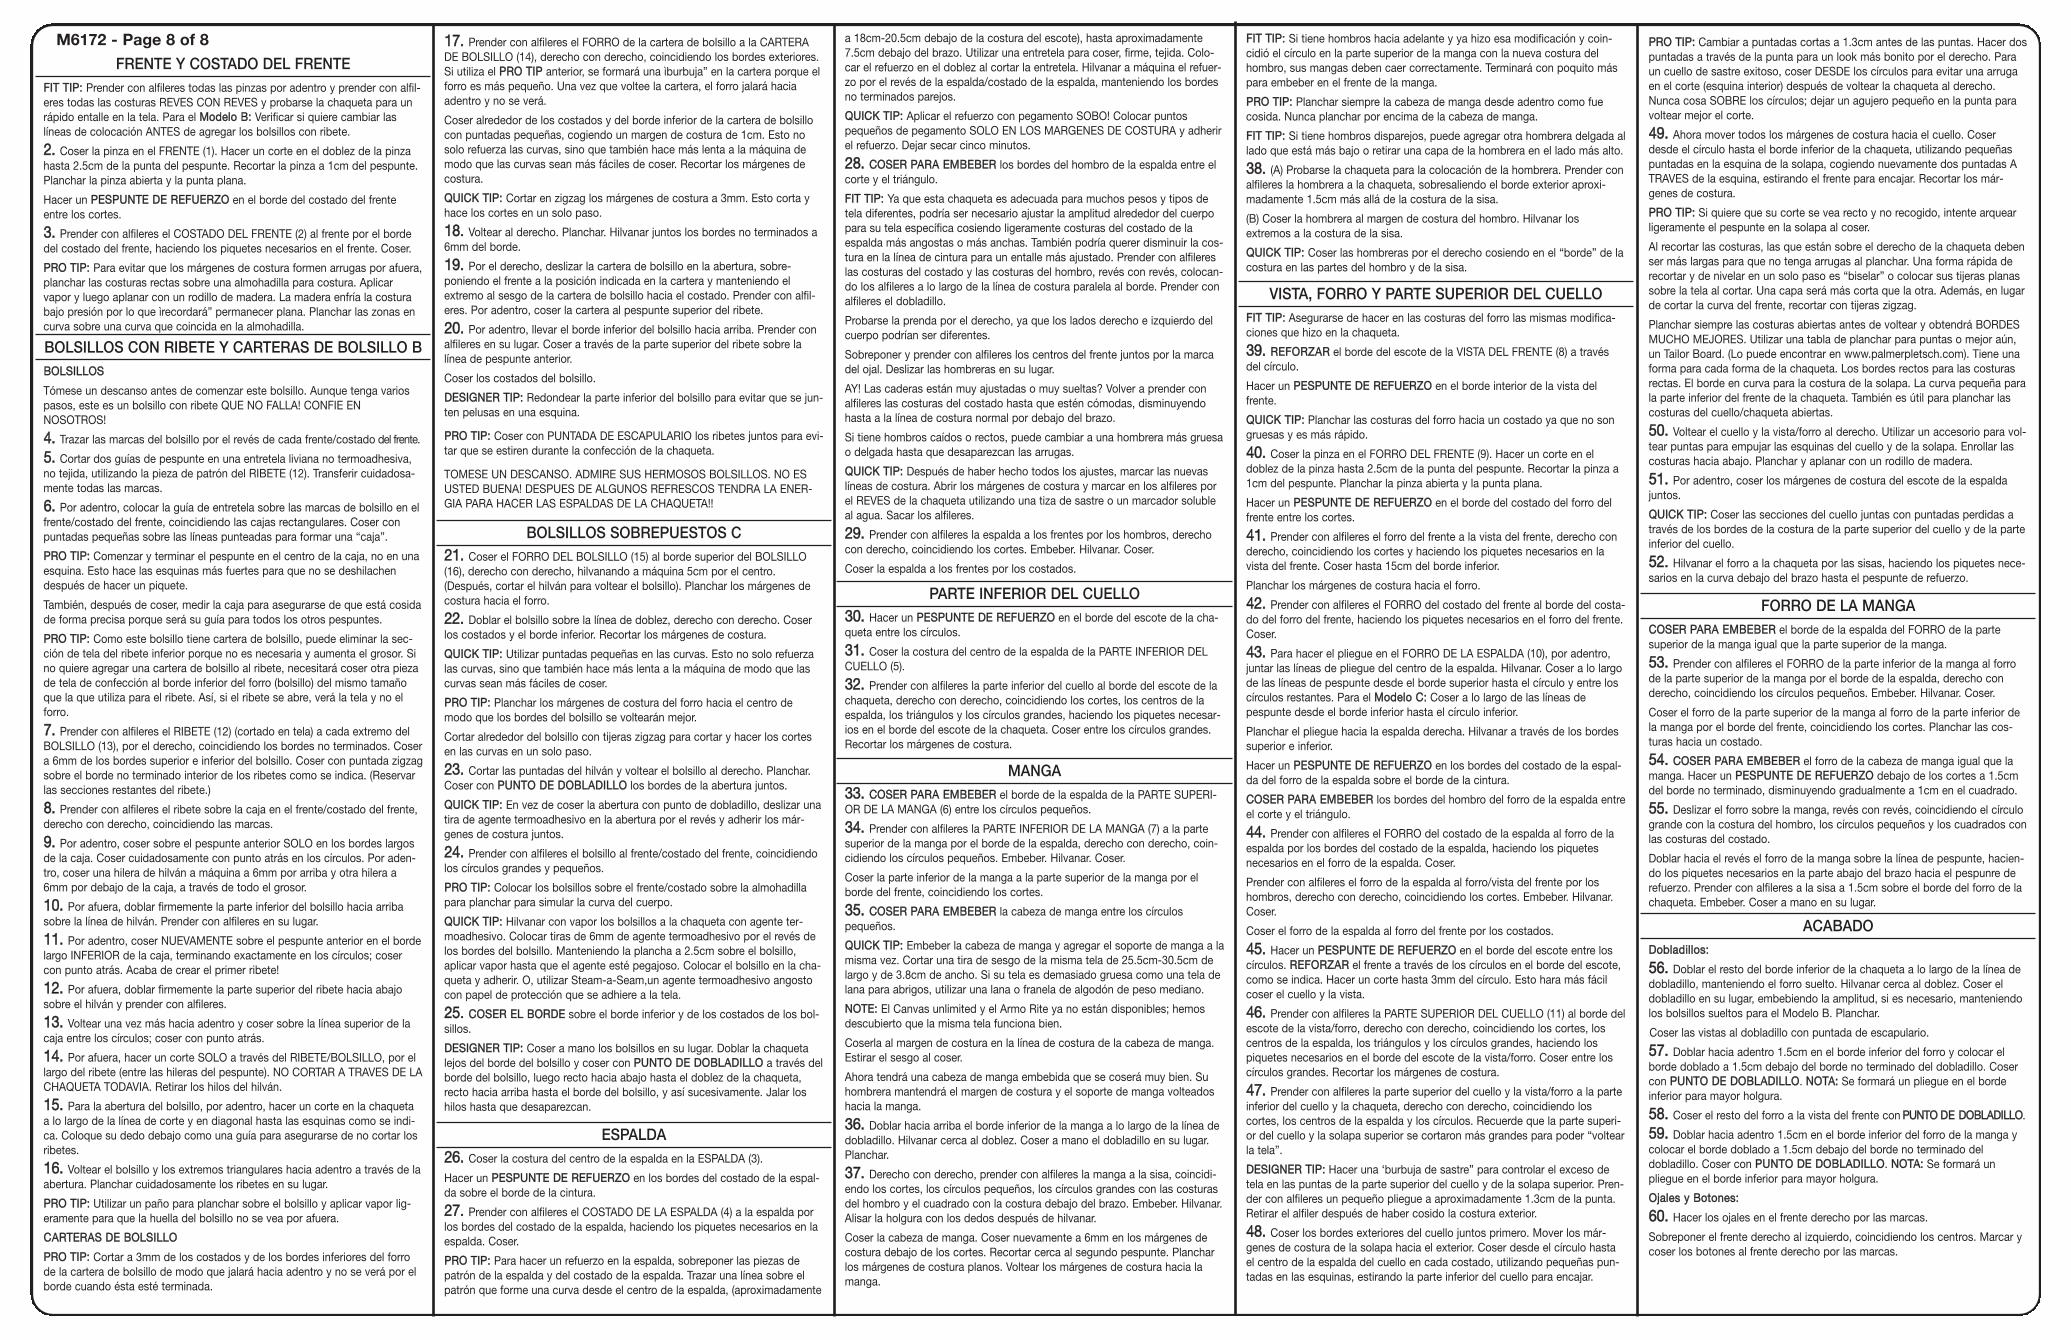
JJAACCKKEETT AA,, BB,, CC11 FRONT22 SIDE FRONT33 BACK44 SIDE BACK55 UNDER COLLAR66 UPPER SLEEVE77 UNDER SLEEVE88 FRONT FACING99 FRONT LINING1100 BACK LINING1111 UPPER COLLAR1122 WELT B1133 POCKET B1144 FLAP B1155 POCKET LINING C1166 POCKET C
CCHHAAQQUUEETTAA AA,, BB,, CC11 FRENTE22 COSTADO DEL FRENTE33 ESPALDA44 COSTADO DE LA ESPALDA55 PARTE INFERIOR DEL CUELLO66 PARTE SUPERIOR DE LA MANGA77 PARTE INFERIOR DE LA MANGA88 VISTA DEL FRENTE99 FORRO DEL FRENTE1100 FORRO DE LA ESPALDA1111 PARTE SUPERIOR DEL CUELLO1122 RIBETE B1133 BOLSILLO B1144 CARTERA DE BOLSILLO B1155 FORRO DEL BOLSILLO C1166 BOLSILLO C
McCALL'S®M6172 This is my 30-Year Anniversary Designing for McCall's!My first ever pattern for McCall’s was the 1980 8-hour blazer that happened to coincidewith John Molloy’s book, Dress For Success, where he told women that to succeed inbusiness they needed to wear suits like men. That sent my 8-hour blazer pattern torecord sales. It sold 20,000 units the second week it was out and more each followingweek.
I have been teaching tailoring since the 70s and WOW, have things changed. The mainchange is in the interfacings. Today’s weft fusibles out-perform just about anythingfrom the past. In the 70s you would never put a machine buttonhole in a tailored jacket,but today they are an acceptable choice. This guide sheet reflects what we feel are ourbest jacket techniques.
This jacket is a wardrobe basic. If you make it in a quality fabric and have a custom fit,you can compare it to a $1,500 designer jacket. The design of this jacket is the mostflattering you can wear. By having side panels, you get subtle shaping and many seamswhere you can alter the shaping to be flattering to YOUR figure. We gave it a low “v-neckline” to frame your face. HOW LONG WILL IT TAKE YOU? If you sew it without apocket or with a patch pocket, you should be able to sew it in a long day or over aweekend. It may take you more than 8-hours, but it won’t take you 80!! Plus, think ofhow many hours of wear you will get out of it.
Choose a no-fail fabric—-natural fibers, looser weaves, body, texture (tweeds, linen, silksuiting, wool crepe), and a medium color. White has see-through issues and black ishard to sew at night unless you are in your 20’s.
Be sure to tissue-fit BEFORE you cut out your fabric. Then, fit-as-you-sew to tweak thefit in the fabric. Try on the jacket many times to catch issues before you go too farwhere it may be impossible to fix.
FIT FEATURES:
Don’t waste time sewing a garment that doesn’t fit! FIRST, BUY THERIGHT SIZE. Measure your high bust and use that in place of bust onthe measurement chart. If between sizes, buy the smaller size.
Tissue-fit the pattern before you cut. To make altering easier, we have placed alterationlines on the pattern tissue for the most common adjustments. Tuck or cut and spread atthese lines until the pattern fits you. For this pattern, we will focus on how to make afull-bust adjustment. We will also show how to do a high round back adjustment andforward shoulders—-both important to a well-fitted jacket. For more in-depth fit infor-mation, see our book Fit For Real People. Also, our book Jackets for Real People cov-ers fitting jackets as well as tons of info on sewing them and we have a companionDVD where Marta Alto sews a jacket step by step.
Happy Sewing!
Pati Palmer and Associates
FULL HIPS
44.. The center front and center back shouldcome to your center front and center back.If you need more hip and waist room, tapetissue to the side seams of the side frontand side back pattern pieces. Try on andwith center front and center back pinned toyours, pin the side seams to fit at yoursides. NNOOTTEE:: If you do a full bust or broadback alteration, you will get more hip width,so wait until those are done before addingto the side seams.
WAIST LENGTH
55.. If waist marking is not at your waist, cut andspread to lengthen or tuck to shorten above waiston all pieces.
BROAD OR NARROW BACK
66.. First check the back WIDTH. WHY? If youhave a broad back, the front won’t fit until youfix the back!
Usually we are no more than about 1/2”-1”(1.3cm-2.5cm) broader or narrower than average.
After making adjustments on back, make sameadjustments on back lining piece.
BBRROOAADD BBAACCKK
77.. Cut full length on the broad/narrow back adjustment line.After spreading back, true stitching and cutting lines. BACK
TISSUE FITTING INSTRUCTIONS
BUILT-IN FITThe pattern pieces have BUILT-IN fit help and the alteration lines are printed on the tis-sue.
GETTING THE TISSUE READY
11.. Trim around the tissue OUTSIDE theblack cutting line for your size. Presstissue with a dry iron set at WOOL set-ting. With tissue right side up, tape thefollowing inside the stitching line to pre-vent the tissue from tearing when tryingon:
* round neckline
* front and back armhole
* inside curve on back above waistlineand front between notches
Use small pieces of tape around curves,lapping them. Use 1/2” (1.3cm)ScotchTM MagicTM Tape (green box).Clip the curves to the tape. DO NOTCUT TAPE.
22.. Tug lightly on tissue to see if it is taped securely.
Pin seams and darts to outside, making adjustingeasier.
TRY ON THE TISSUETISSUE FITTING IS A NO GUESS METHOD! Try on. Pin center front and center back toyour center front and center back–to your slip that is!
33.. Slip the shoulder pad you plan to wear underjacket in place.
Pull tissue snugly over your bust, but if patternwon’t reach your center front or center back readon....
Center frontLa frente central
COSTADO DELESPALDA
SIDE FRONT
FRENTECOSTADO DE LA
FRONT
BACK
SIDE BACK
ANCHO/ESTRECHA EL AJUSTE DE ESPALDA FORRA LAS LINEAS
LA ESPALDA REDONDA INFERIOR
COSTADO DELESPALDA
SIDEBACK
Page 1 of 8Pagina 1 de 8 English/Español
© The McCall Pattern Co., 2010 All Rights Reserved.Printed in U.S.A.
© The McCall Pattern Co., 2010 Derechos Reservados.Impreso en U.S.A.
For easy altering, look for PatiPalmer’s Perfect Pattern Paper forMcCalls. It is a 1/8” (3mm) grid withsolid 1” (2.5cm) grid lines. A packagecontains TWO 48” X 84” (122cm x213cm) sheets of sturdy tissue. Mystudents LOVE IT!! If you cannot findit, go to www.palmerpletsch.com.

BROAD OR NARROW SHOULDER
1188.. Take the back andfront shoulders in or let outas shown:
SLEEVE ADJUSTMENTLLEENNGGTTHH
Pin sleeve to jacket at underarm. Try on. Check length. If sleeve is notthe right length, cut and spread to lengthen or tuck to shorten on bothsleeve pieces.
WWIIDDTTHH
1199.. Pinch the tissue where yourupper arm is fullest. If you can’tpinch an inch, the sleeve is tootight.
2200.. Cut on the horizontal and verticalalterations lines. ALWAYS CUT TOHEM AND STITCHING LINES, NOT TOOUTER EDGES. SEAM AND HEM-LINES BECOME THE “HINGES”.
Pull on the tissue at the sides of thehorizontal cut and widen sleeve theamount you need. Insert tissue andtape in place. Try on again to check fit.
If you’ve widened the sleeve more than3/4” (2cm), add a wider seamallowance to the top of the cap just incase you need it.
For a narrower sleeve, push in on sidesand sleeve will lap vertically.
NNOOTTEE:: Make same adjustments to facing and lining pattern pieces.
LOW ROUND BACK
1144.. This is rarer, but ifyou have this, you’llappreciate our help. Havea friend cut across theback about on the alter-ation line to nothing in thearmhole and raise thatpiece to your neck. Tapethe pattern to your back.
Lift the pattern off andinsert tissue under tape.
Sew the seam at the cen-ter back so it will curve tofit your body.
SWAY BACK OR FLAT DERRIERE
1155.. If your sidefront seam swingsforward and pat-tern hangs longerat center back,take a tuck at thetuck lines to noth-ing at the sideback seam untilthe back is leveland side seam isstraight.
SQUARE OR SLOPING SHOULDER
1166.. Take shallower ordeeper seam at outeredge of shoulder tonormal seam line atneckline.
Raise or lower under-arm the same amount.
FORWARD SHOULDER1177.. The use of computers and sitting at desks has contributed to anew fit phenomenon for all ages, the forward shoulder.
If your clothes won’t stay on your shoulders, you are a candidate.Look at your shoulder seam. Is it in the middle of your arm? If not,pivot it forward from the neck seam to the armhole edge.
Alter by pivoting the shoulder seam forward and leaving 5/8” (1.5cm)seam allowances.
SHOULDER SEAMSHOULD BE HERECOSTURA DE HOMBRO
DEBE ESTAR AQUI
OOPPTTIIOONNAALL ““YY”” BBUUSSTT AALLTTEERRAATTIIOONN::
This is how you know you needa “Y” bust alteration.
If you are very full busted or barrel chest-ed and need more chest width, cut onboth Line 1 and Line 1a and spread inboth areas.
SStteepp 22.. Cut on Line 2, to, but not through,Line 1. Lower side edge until Line 1 edgesare parallel.
SStteepp 33.. Cut on Line 3 and spread until loweredges are even. Anchor as shown.
SStteepp 44.. Insert alteration tissue. Tape lightly. The open-ing at Line 2 becomes a dart. Redraw pocket linesand vertical dart lines equal distance from dart’s cen-ter.
SStteepp 55.. CCHHEECCKK FFIITT:: Pin pattern pieces togetherand try on. The front fits AND the armhole gap isgone.
5
1
2
3
1A
4
1
2
3
1A
3
1
2
3
2
1A
1
2
3
1A
too muchshows herese muestrademasiado aqui
NNAARRRROOWW BBAACCKK
88.. Cut full length on the broad/narrow back adjustmentline. Lap to make back narrower.
99.. To make the front fit the back at theshoulder, take off from the front as shown ifback was made narrower.
1100.. OR, for broad back, ease back to fit front.
FULL BUST
1111.. Now look at the front. Ifyou have a full bust AND youhave made sure the back widthis correct, measure from thecenter front on the pattern toyour center front. That is theamount you will need to alterthe pattern.
You will probably also see a gapat the armhole which will disap-pear after the front is altered.
FULL BUST ALTERATIONS
SStteepp 11.. Cut on Line 1 from centerof waist dart to, but not through,armhole seam and spread thewidth you need at arrow. Anchorpattern to cardboard cutting boardwith pins angled as shown.
1
2
3
1A
1
ABERTURA
CENTRO DE SU FRENTE
CENTRO DEL FRENTE DEL PATRON
MEDIRLADISTANCIA
EMBEBER
M6172 - Page 2 of 8SStteepp 66.. Raise or lower the bust dart if it doesn’t point to your bustpoint.
OR, transfer the new bust dart to thevertical dart.
Close horizontal dart. Vertical dartbecomes wider (deeper). Make point ofvertical dart 1/2” to 1” (1.3cm to 2.5cm)from your bust point. The depth of thisdart will depend on how full your tummyis. You can pin it when you have the tis-sue on.
FRONT GAPE1122.. If the lapel gapes, make a tuck in front and front facing. True theroll line.
HIGH ROUND BACK1133.. If the neck seam does not come to the base of your neck (wherea necklace would sit), cut on alteration line and raise 1/4” to 3/8”(6mm to 1cm). Add tissue.
ESPALDA ALTAREDONDA
new dart linenueva linea de pinza
6
If you altered to the edge, the seamline will getlonger. Instead, cut seam allowance to, BUTNOT THROUGH, seamline from both sides. Thisis so armhole won’t get larger when you spreadthe tissue. Instead, the seam allowance will lap.
seamlinespreads
la linea de costura se exitende
hinge
bisagra
spread
hinge
tissueoverlaps
bisagra
sobreponeel papel se
se extiende
The circle at the top of the sleeve will matchthe NEW shoulder seam and your sleeve willhang straight with your arm. No more need torotate the sleeve cap!
LINING B / FORRO Buse pieces/use piezas: 2, 4, 6, 7, 9, 10, 13, 14
45" (115 cm) all sizes/todas las tallas
JACKET C / CHAQUETA Cuse pieces/use piezas: 1, 2, 3, 4, 5, 6, 7, 8, 11, 16
45" (115 cm) with or without napcon o sin pelillosizes/tallas 8-10
45" */**6172 JACKET [C]Size 10 Plot 1064
1
63
8
7
4
2
11 5
16
FOLD
SELVAGES
45" **6172 LINING [B]Size 22 Plot 1043
10
49
6
2
13
7
14
FOLD
SELVAGES
FUSIBLE INTERFACING AENTRETELA TERMOADHESIVAAuse pieces/use piezas: 1, 2, 3, 4, 5, 8, 11
18",20" (46,51 cm) sizes/tallas 8-10-12-14
18",20" (46,51 cm) without nap/sin pelillosizes/tallas 16-18-20-22
LINING A / FORRO Ause pieces/use piezas: 2, 4, 6, 7, 9, 10
45" (115 cm) all sizes/todas las tallas
45" **6172 LINING [A]Size 22 Plot 1012
106
49 72
FOLD
SELVAGES
18" **6172 FUSIBLE INTERFACING [A]Size 22 Plot 1018
11
1
3
2
4 5
CR
OS
SFO
LD
SELVAGE
SELVAGE
8
18" **6172 FUSIBLE INTERFACING [A]Size 14 Plot 1022
11
12
4
5
CR
OS
SFO
LD
SELVAGE
SELVAGE
8
3
JACKET A / CHAQUETA Ause pieces/use piezas: 1, 2, 3, 4, 5, 6, 7, 8, 11
45" (115 cm) with or without napcon o sin pelillosizes/tallas 8-10
45" (115 cm) with or without napcon o sin pelillosizes/tallas 12-14- 16-18-20-22
60" (150 cm) with or without napcon o sin pelillosizes/tallas 8-10-12
60" (150 cm) with or without napcon o sin pelillosizes/tallas 14-16-18-20-22
60" */**6172 JACKET [A]Size 22 Plot 1007
1
3
6
4
8
7
11
5
2
FOLD
SELVAGES60" */**6172 JACKET [A]Size 12 Plot 1010
42
1
3
6
811
5
7
FOLD
SELVAGES45" */**6172 JACKET [A]Size 22 Plot 1001
3
1
4
6
8
7
2
11 5FOLD
SELVAGES45" */**6172 JACKET [A]Size 10 Plot 1005
1 8
63
4
7 2
11 5FOLD
SELVAGES
JACKET B / CHAQUETA Buse pieces/use piezas: 1, 2, 3, 4, 5, 6, 7, 8, 11, 12, 14
45" (115 cm) with or without napcon o sin pelillosizes/tallas 8-10
45" (115 cm) with or without napcon o sin pelillosizes/tallas 12-14-16-18-20-22
60" (150 cm) with or without napcon o sin pelillosizes/tallas 8-10-12
60" */**6172 JACKET [B]Size 12 Plot 1040
3 8
6
7
142
5
12
1
4
11FOLD
SELVAGES45" */**6172 JACKET [B]Size 22 Plot 1026
3
1 6
4
7
2
8
11 5
12 14
FOLD
SELVAGES
45" */**6172 JACKET [B]Size 10 Plot 1033
1
6
8
3
7
4
11 5 12
2
14
FOLD
SELVAGES
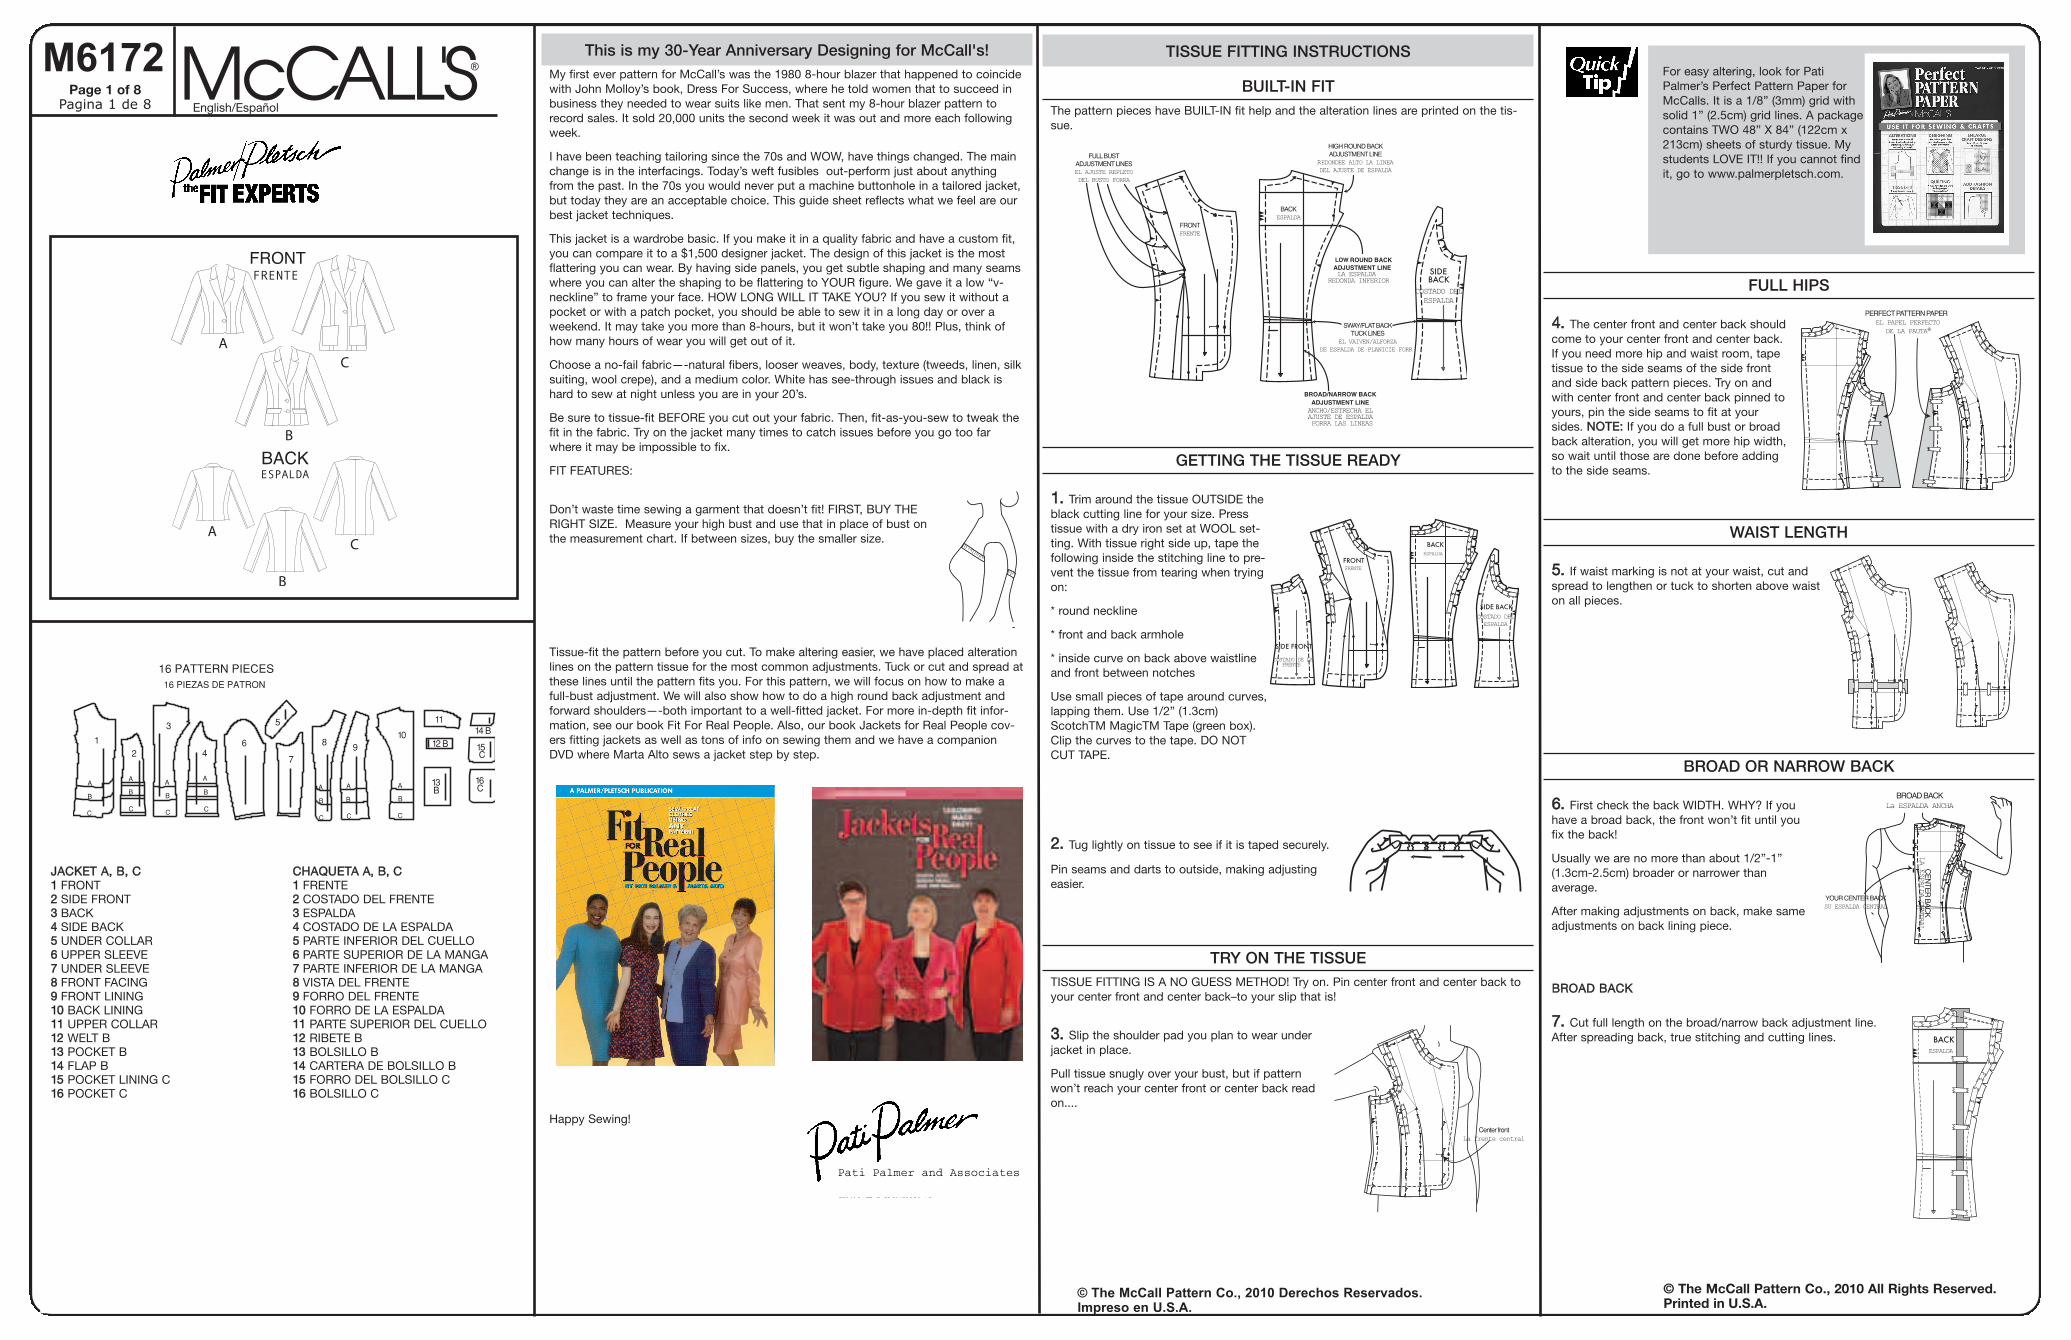
ADJUST IF NECESSARY
Lengthen or Shorten at adjustment lines (=) or where indicated on pattern. Ifsubstantial length is added, you may need to purchase additional fabric.
TO SHORTEN: Crease along adjustment line. Make afold half the amount needed. Tape in place.
TO LENGTHEN: Slash between adjustment lines.Spread amount as needed, keeping edges parallel.Tape over paper.
When Alteration lines are not on tissue, lengthen orshorten at lower edge.
PATTERN MARKINGSGRAINLINE: Place on straight grain of fabric, parallel to selvage or fold.
FOLDLINE: Place line on fold of fabric.
BUTTONHOLE MARKING: Indicates exact length and place ment of buttonholes.
BUTTON MARKING: Indicates button placement.
NOTCHES AND SYMBOLS: For matching seams and construction details.
Indicates the Bustline, Waistline, Hip and/or Biceps. Measurements refer to circumfer-ence of Finished Garment (Body Measurement + Wearing Ease + Design Ease). Adjustpattern if necessary. The measurement excludes pleats, tucks, darts and seamallowances.
SEAM ALLOWANCE: 5/8” (1.5cm) included unless otherwise indicated, but not printedon tissue.
SHRINK FABRIC if not labeled pre-shrunk. Press.
CIRCLE LAYOUT for View, Size, Fabric Width.
Use WITH NAP layout for fabrics with one-way designs, nap, pile or surface shad-ing. Because most knits have surface shading, a with nap layout is used.
For DOUBLE THICKNESS (WITH FOLD) - fold fabric with right sides together.
DOUBLE THICKNESS (WITHOUT FOLD) -For fabrics with nap, fold fabric crosswise, rightsides together. Mark as shown. Cut along cross-wise fold of fabric (A). Turn upper layer 180° soarrows go in same direction and place over lowerlayer, right sides together (B).
For SINGLE THICKNESS - place fabric right side up. (For Fur Pile fabrics, placepile side down.)
A B
Cut other pieces first, allowing enough fabric to cut this piece. Open fabric.For “Cut 1” pieces, cut piece once on single layer of fabric with piece face up onright side of fabric.
Pattern may have cutting lines for several sizes. Select the proper cutting line orpattern pieces for your size.
Before CUTTING place all pieces on fabric according to layout. Pin. (Layoutsshow approximate position of pattern pieces; position may vary accordingto your pattern size.). Cut ACCURATELY, cutting notches outward.
Before removing pattern, TRANSFER MARKINGS and lines of construction toWrong Side of fabric, using the Pin and Chalk Pencil method or Tracing Paperand Dressmaker Wheel. Markings needed on right side of fabric should be threadtraced.
NOTE: Broken-line boxes (a! b! c!) in layouts represent pieces cut by measure-ments provided.
CUTTING AND MARKING
AJUSTAR SI ES NECESARIOAlargar o Acortar por las líneas de ajuste (=) o donde se indica en el patrón. Sise agrega un largo considerable, puede ser necesario comprar tela adicional.
PARA ACORTAR: Doblar a lo largo de la línea deajuste. Hacer un doblez de la mitad de la cantidad nece-saria. Asegurar con cinta adhesiva en su lugar. PARA
ALARGAR: Hacer un corte entre las líneas de ajuste.Extender la cantidad necesaria, manteniendo los bordesparalelos. Asegurar con cinta adhesiva sobre el papel.
Cuando las líneas de Modificación no se encuentran enel patrón, alargar o acortar por el borde inferior.
ENCOGER LA TELA si no se indica "preencogida". Planchar.HACER UN CIRCULO EN EL TRAZO para el Modelo, la Talla, el Ancho de laTela.Usar el trazo para el corte CON PELILLO para las telas con diseños de unasola dirección, superficie aterciopelada o con pelillo. Dado que la mayoría delos tejidos tienen una superficie tornasolada, se utiliza un trazo con pelillo.
Para DOBLE GROSOR (CON DOBLEZ) - doblar la tela derecho con derecho.
Para DOBLE GROSOR (SIN DOBLEZ) - Paratelas con pelillo, doblar la tela transversalmente, dere-cho con derecho. Marcar como se indica. Cortartransversalmente a lo largo del doblez de la tela (A).Voltear la capa superior a 180o para que las flechasvayan en la misma dirección y colocarla sobre la capainferior, derecho con derecho (B).
Para un SOLO GROSOR - colocar la tela con el derecho hacia arriba. (Para telasde piel con pelillo, colocar el lado con pelillo hacia abajo).
A B
CORTES Y MARCASCortar las otras piezas primero, dejando suficiente tela para cortar esta
pieza. Abrir la tela. Para las piezas “Cortar 1”, cortar una vez la pieza sobreuna capa simple de tela con la pieza hacia arriba sobre el derecho de la tela.
El patrón puede tener líneas de corte para varias tallas. Seleccionar la líneade corte apropiada o las piezas de patrón para su talla.
Antes de CORTAR, colocar todas las piezas sobre la tela de acuerdo con eltrazo. Prender con alfileres. (Los trazos de corte muestran la posiciónaproximada de las piezas de patrón; la posición puede variar de acuerdoa la talla del patrón). Cortar con EXACTITUD, manteniendo los cortes haciaafuera.
Antes de retirar el patrón, TRANSFERIR LAS MARCAS y las líneas de mon-taje al Revés de la Tela, utilizando el método de Tiza y Alfileres o el Papel deCalcar y la Rueda de Marcar. Las marcas necesarias sobre el derecho de latela deben hacerse con hilo.
NOTA: Las cajas de líneas punteadas (a! b! c!) en los trazos, representan laspiezas cortadas a las medidas provistas.
MARCAS DEL PATRONHILO RECTO DE LA TELA: Colocar sobre el hilo recto de la tela, paralelo al orillo odoblez. LINEA DE DOBLEZ: Colocar en el doblez de la tela.
LINEA DE DOBLEZ: Colocar la línea en el doblez de la tela.
MARCA DE OJAL: Indica el largo exacto y la ubicación de los ojales.
MARCA DE BOTON: Indica la ubicación de los botones
CORTES Y SIMBOLOS: Para coincidir las costuras y los detalles de montaje.
Indica la Línea del Busto, Línea de la Cintura, Caderas y/o Bíceps. Las medidas serefieren a la circunferencia de la Prenda Acabada (Medidas del Cuerpo + Holgura dela Prenda + Holgura del Diseño). Ajustar el patrón si es necesario. Las medidas noincluyen pliegues, pinzas ni márgenes de costura.
MARGEN DE COSTURA: se incluye 1.5cm a menos que se indique lo contrario, perono está impreso en el patrón.
Fold=DoblezSelvage=OrilloSelvages=Orillos
Edge=BordeEdges=BordesCrossfold=Doblez Transversal
CUTTING LAYOUTSTRAZOS DE CORTE
M6172 - Page 3 of 8
60" (150 cm) with or without napcon o sin pelillosizes/tallas 14-16-18-20-22
FUSIBLE INTERFACING BENTRETELA TERMOADHESIVABuse pieces/use piezas: 1, 2, 3, 4, 5, 8, 11, 14
18",20" (46,51 cm) sizes/tallas 8-10-12-14
18",20" (46,51 cm) sizes/tallas 16-18- 20-22
18" **6172 FUSIBLE INTERFACING [B]Size 22 Plot 1051
1
11
4
3
2
85
14CR
OS
SFO
LD
SELVAGE
SELVAGE
18" **6172 FUSIBLE INTERFACING [B]Size 14 Plot 1056
11
1
3 4
2
5 14
CR
OS
SFO
LD
SELVAGE
SELVAGE
8
60" */**6172 JACKET [B]Size 22 Plot 1035
3
4
1
8
11 5
12 14
6
72
FOLD
SELVAGES
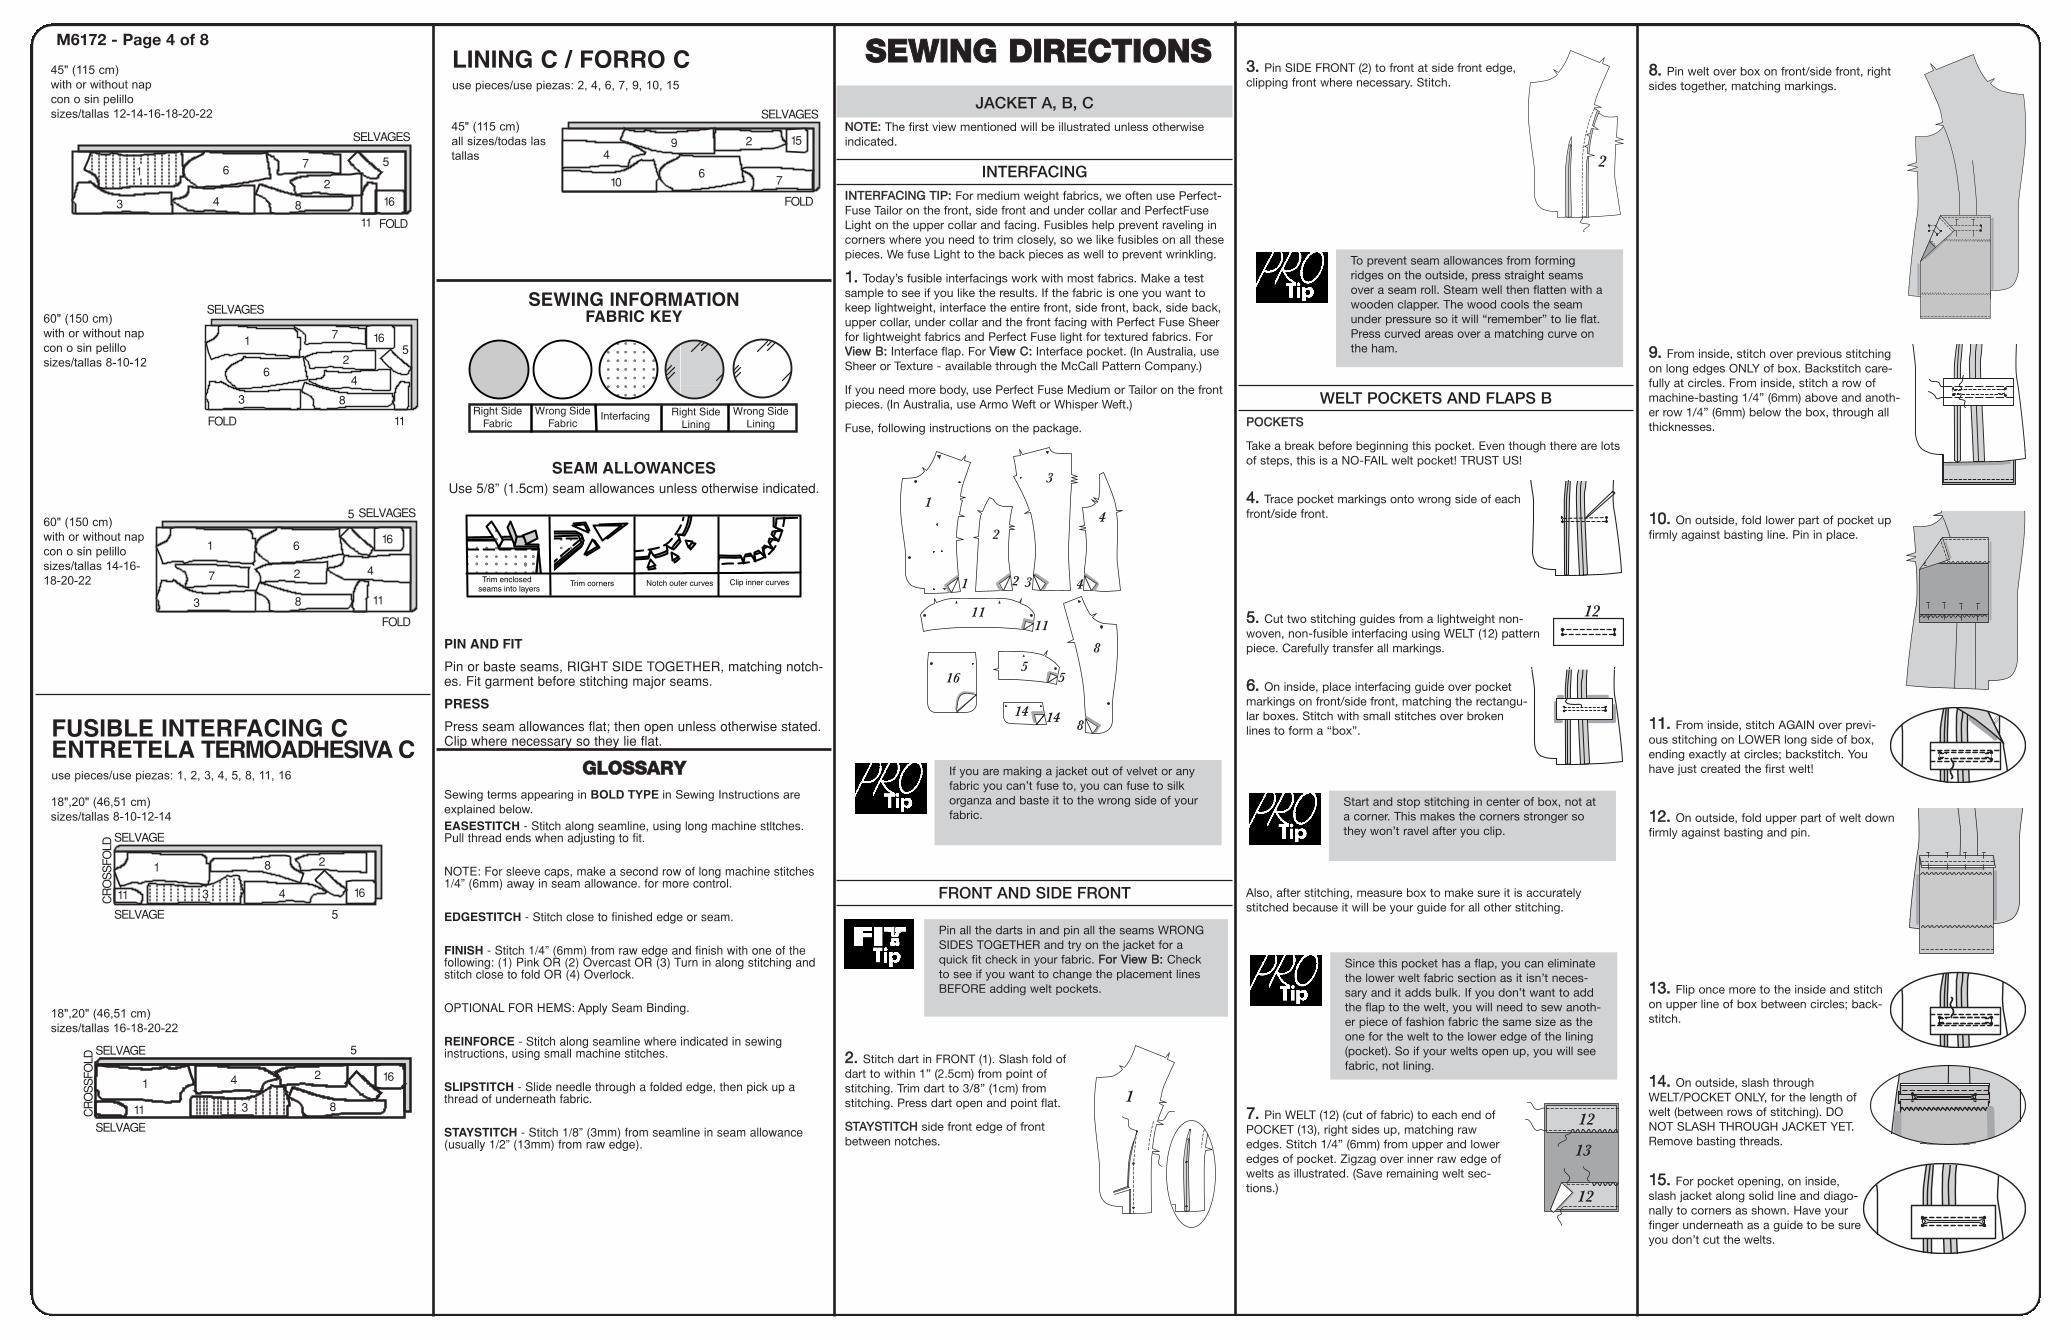
88.. Pin welt over box on front/side front, rightsides together, matching markings.
99.. From inside, stitch over previous stitchingon long edges ONLY of box. Backstitch care-fully at circles. From inside, stitch a row ofmachine-basting 1/4” (6mm) above and anoth-er row 1/4” (6mm) below the box, through allthicknesses.
1100.. On outside, fold lower part of pocket upfirmly against basting line. Pin in place.
1111.. From inside, stitch AGAIN over previ-ous stitching on LOWER long side of box,ending exactly at circles; backstitch. Youhave just created the first welt!
1122.. On outside, fold upper part of welt downfirmly against basting and pin.
1133.. Flip once more to the inside and stitchon upper line of box between circles; back-stitch.
1144.. On outside, slash throughWELT/POCKET ONLY, for the length ofwelt (between rows of stitching). DONOT SLASH THROUGH JACKET YET.Remove basting threads.
1155.. For pocket opening, on inside,slash jacket along solid line and diago-nally to corners as shown. Have yourfinger underneath as a guide to be sureyou don’t cut the welts.
33.. Pin SIDE FRONT (2) to front at side front edge,clipping front where necessary. Stitch.
WELT POCKETS AND FLAPS BPPOOCCKKEETTSS
Take a break before beginning this pocket. Even though there are lotsof steps, this is a NO-FAIL welt pocket! TRUST US!
44.. Trace pocket markings onto wrong side of eachfront/side front.
55.. Cut two stitching guides from a lightweight non-woven, non-fusible interfacing using WELT (12) patternpiece. Carefully transfer all markings.
66.. On inside, place interfacing guide over pocketmarkings on front/side front, matching the rectangu-lar boxes. Stitch with small stitches over brokenlines to form a “box”.
Also, after stitching, measure box to make sure it is accuratelystitched because it will be your guide for all other stitching.
77.. Pin WELT (12) (cut of fabric) to each end ofPOCKET (13), right sides up, matching rawedges. Stitch 1/4” (6mm) from upper and loweredges of pocket. Zigzag over inner raw edge ofwelts as illustrated. (Save remaining welt sec-tions.)
13
12
12
12
2
LINING C / FORRO Cuse pieces/use piezas: 2, 4, 6, 7, 9, 10, 15
45" (115 cm) all sizes/todas las tallas
SEWING INFORMATIONFABRIC KEY
SEAM ALLOWANCESUse 5/8” (1.5cm) seam allowances unless otherwise indicated.
PIN AND FIT
Pin or baste seams, RIGHT SIDE TOGETHER, matching notch-es. Fit garment before stitching major seams.
PRESS
Press seam allowances flat; then open unless otherwise stated.Clip where necessary so they lie flat.
GGLLOOSSSSAARRYYSewing terms appearing in BOLD TYPE in Sewing Instructions areexplained below.EASESTITCH - Stitch along seamline, using long machine stltches.Pull thread ends when adjusting to fit.
NOTE: For sleeve caps, make a second row of long machine stitches1/4” (6mm) away in seam allowance. for more control.
EDGESTITCH - Stitch close to finished edge or seam.
FINISH - Stitch 1/4” (6mm) from raw edge and finish with one of thefollowing: (1) Pink OR (2) Overcast OR (3) Turn in along stitching andstitch close to fold OR (4) Overlock.
OPTIONAL FOR HEMS: Apply Seam Binding.
REINFORCE - Stitch along seamline where indicated in sewinginstructions, using small machine stitches.
SLIPSTITCH - Slide needle through a folded edge, then pick up athread of underneath fabric.
STAYSTITCH - Stitch 1/8” (3mm) from seamline in seam allowance(usually 1/2” (13mm) from raw edge).
45" **6172 LINING [C]Size 22 Plot 1074
10
49
6
2
7
15
FOLD
SELVAGES
45" (115 cm) with or without napcon o sin pelillosizes/tallas 12-14-16-18-20-22
60" (150 cm) with or without napcon o sin pelillosizes/tallas 8-10-12
60" (150 cm) with or without napcon o sin pelillosizes/tallas 14-16-18-20-22
FUSIBLE INTERFACING CENTRETELA TERMOADHESIVA Cuse pieces/use piezas: 1, 2, 3, 4, 5, 8, 11, 16
18",20" (46,51 cm) sizes/tallas 8-10-12-14
18",20" (46,51 cm) sizes/tallas 16-18-20-22
18" **6172 FUSIBLE INTERFACING [C]Size 22 Plot 1082
1
11
4
3 8
2
5
16
CR
OS
SFO
LD
SELVAGE
SELVAGE
18" **6172 FUSIBLE INTERFACING [C]Size 14 Plot 1086
11 3
1
4
2
5
16
CR
OS
SFO
LD
SELVAGE
SELVAGE
8
60" */**6172 JACKET [C]Size 22 Plot 1066
6
3
1
7
8 11
2 4
5
16
FOLD
SELVAGES
60" */**6172 JACKET [C]Size 12 Plot 1071
3
1
6
7
8
4
11
16
25
FOLD
SELVAGES
45" */**6172 JACKET [C]Size 22 Plot 1060
3
1 6
4 8
7
2
11
5
16
FOLD
SELVAGES
M6172 - Page 4 of 8 SSEEWWIINNGG DDIIRREECCTTIIOONNSSJACKET A, B, C
NNOOTTEE:: The first view mentioned will be illustrated unless otherwiseindicated.
INTERFACINGIINNTTEERRFFAACCIINNGG TTIIPP:: For medium weight fabrics, we often use Perfect-Fuse Tailor on the front, side front and under collar and PerfectFuseLight on the upper collar and facing. Fusibles help prevent raveling incorners where you need to trim closely, so we like fusibles on all thesepieces. We fuse Light to the back pieces as well to prevent wrinkling.
11.. Today’s fusible interfacings work with most fabrics. Make a testsample to see if you like the results. If the fabric is one you want tokeep lightweight, interface the entire front, side front, back, side back,upper collar, under collar and the front facing with Perfect Fuse Sheerfor lightweight fabrics and Perfect Fuse light for textured fabrics. ForVViieeww BB:: Interface flap. For VViieeww CC:: Interface pocket. (In Australia, useSheer or Texture - available through the McCall Pattern Company.)
If you need more body, use Perfect Fuse Medium or Tailor on the frontpieces. (In Australia, use Armo Weft or Whisper Weft.)
Fuse, following instructions on the package.
FRONT AND SIDE FRONT
22.. Stitch dart in FRONT (1). Slash fold ofdart to within 1” (2.5cm) from point ofstitching. Trim dart to 3/8” (1cm) fromstitching. Press dart open and point flat.
SSTTAAYYSSTTIITTCCHH side front edge of frontbetween notches.
1
2
3
3
8
8
4
4
55
1111
1414
16
1
1
2
If you are making a jacket out of velvet or anyfabric you can’t fuse to, you can fuse to silkorganza and baste it to the wrong side of yourfabric.
Pin all the darts in and pin all the seams WRONGSIDES TOGETHER and try on the jacket for aquick fit check in your fabric. FFoorr VViieeww BB:: Checkto see if you want to change the placement linesBEFORE adding welt pockets.
To prevent seam allowances from formingridges on the outside, press straight seamsover a seam roll. Steam well then flatten with awooden clapper. The wood cools the seamunder pressure so it will “remember” to lie flat.Press curved areas over a matching curve onthe ham.
Start and stop stitching in center of box, not ata corner. This makes the corners stronger sothey won’t ravel after you clip.
Since this pocket has a flap, you can eliminatethe lower welt fabric section as it isn’t neces-sary and it adds bulk. If you don’t want to addthe flap to the welt, you will need to sew anoth-er piece of fashion fabric the same size as theone for the welt to the lower edge of the lining(pocket). So if your welts open up, you will seefabric, not lining.
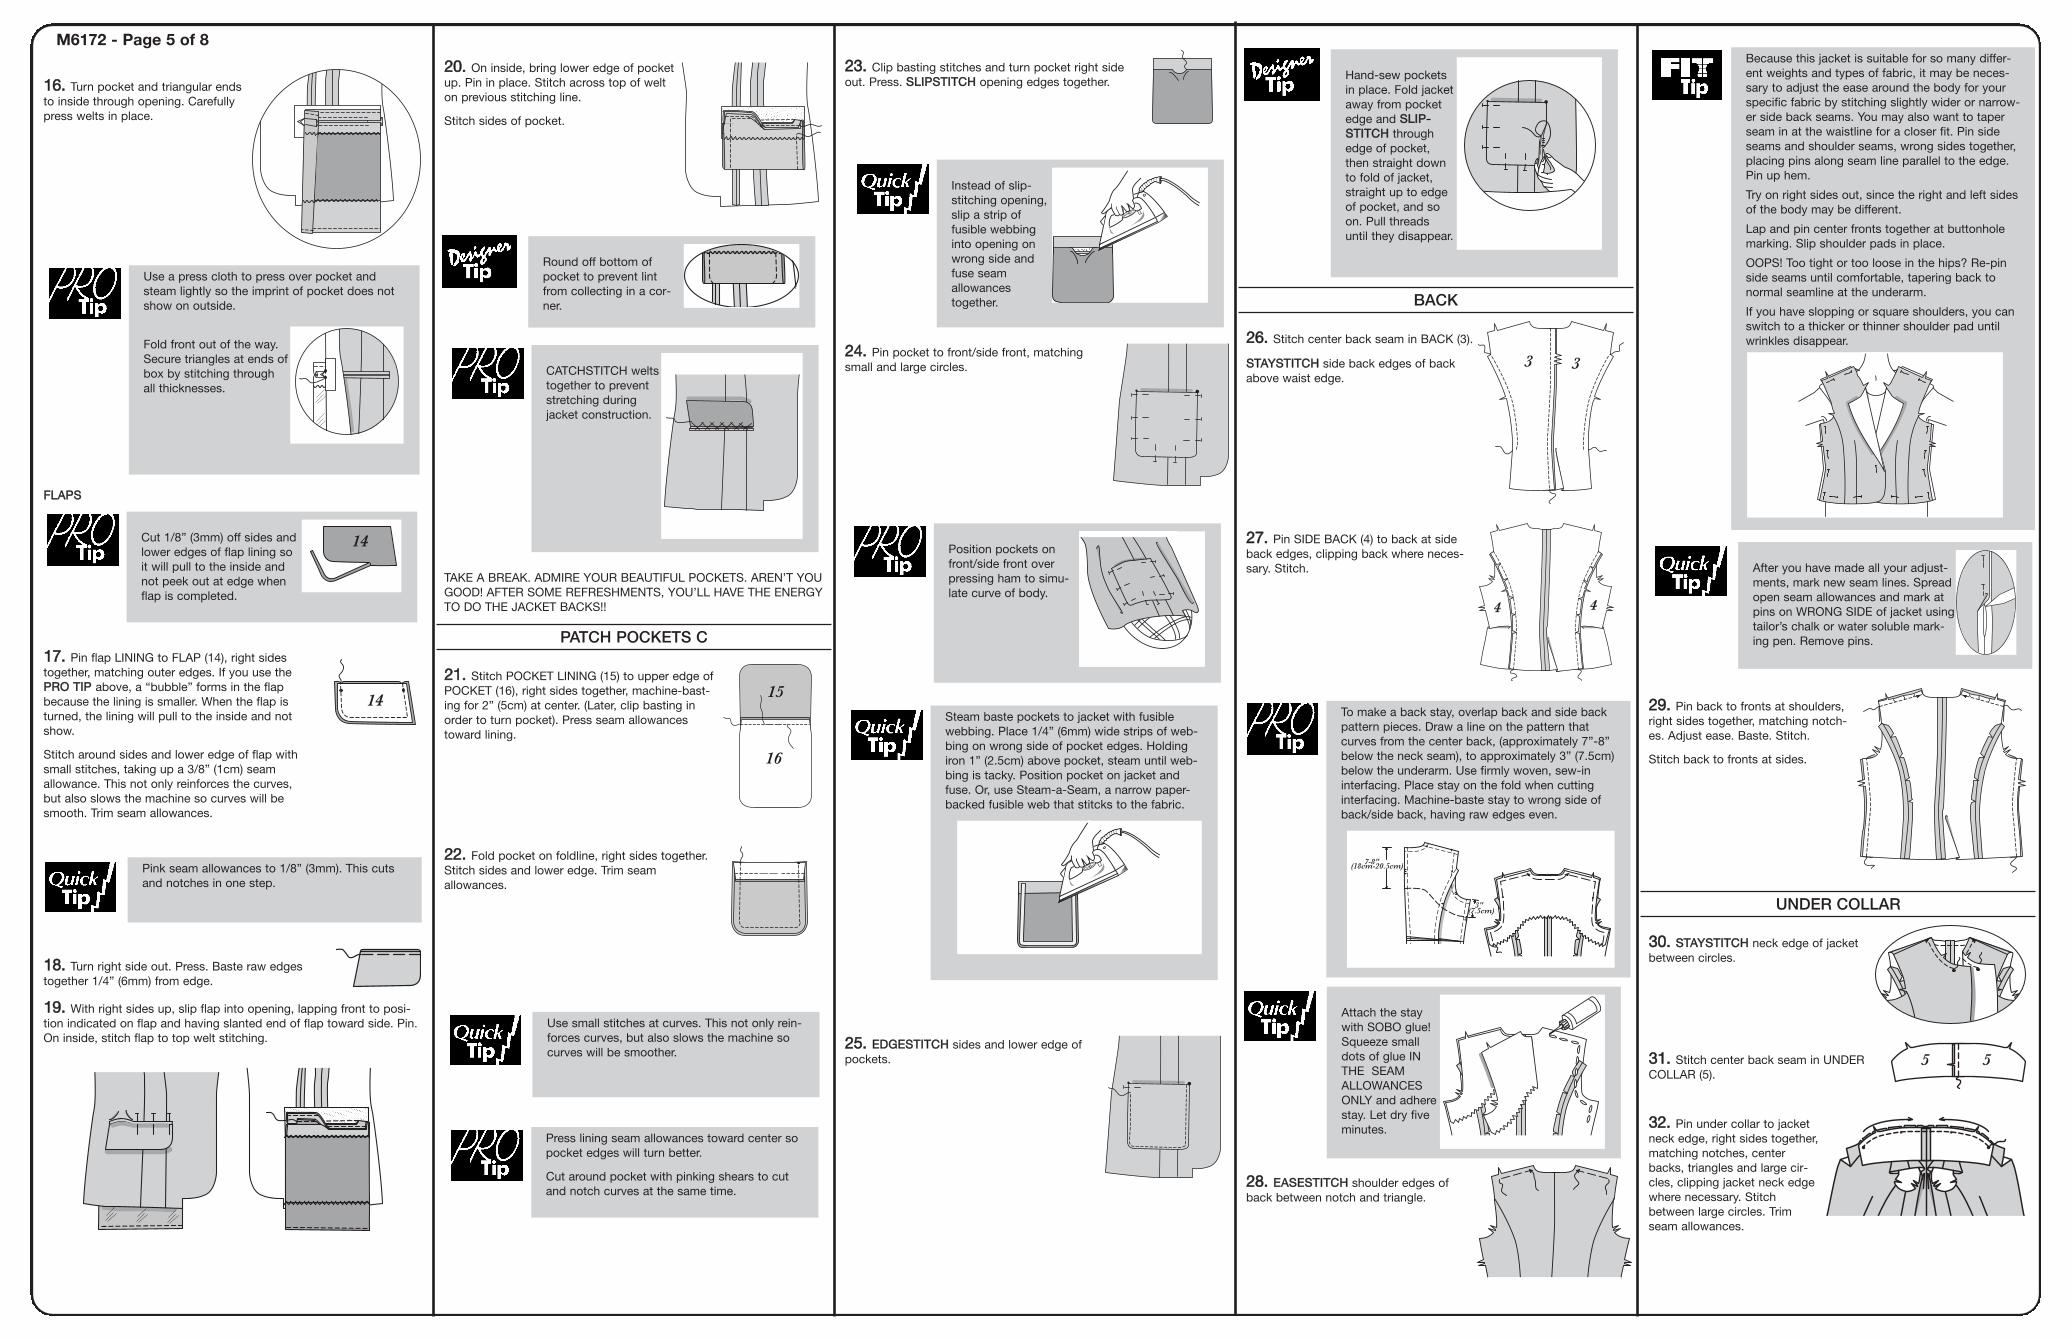
2299.. Pin back to fronts at shoulders,right sides together, matching notch-es. Adjust ease. Baste. Stitch.
Stitch back to fronts at sides.
UNDER COLLAR
3300.. SSTTAAYYSSTTIITTCCHH neck edge of jacketbetween circles.
3311.. Stitch center back seam in UNDERCOLLAR (5).
3322.. Pin under collar to jacketneck edge, right sides together,matching notches, centerbacks, triangles and large cir-cles, clipping jacket neck edgewhere necessary. Stitchbetween large circles. Trimseam allowances.
5 5
BACK
2266.. Stitch center back seam in BACK (3).
SSTTAAYYSSTTIITTCCHH side back edges of backabove waist edge.
2277.. Pin SIDE BACK (4) to back at sideback edges, clipping back where neces-sary. Stitch.
2288.. EEAASSEESSTTIITTCCHH shoulder edges ofback between notch and triangle.
4 4
3 3
2200.. On inside, bring lower edge of pocketup. Pin in place. Stitch across top of welton previous stitching line.
Stitch sides of pocket.
TAKE A BREAK. ADMIRE YOUR BEAUTIFUL POCKETS. AREN’T YOUGOOD! AFTER SOME REFRESHMENTS, YOU’LL HAVE THE ENERGYTO DO THE JACKET BACKS!!
PATCH POCKETS C
2211.. Stitch POCKET LINING (15) to upper edge ofPOCKET (16), right sides together, machine-bast-ing for 2” (5cm) at center. (Later, clip basting inorder to turn pocket). Press seam allowancestoward lining.
2222.. Fold pocket on foldline, right sides together.Stitch sides and lower edge. Trim seamallowances.
15
16
1166.. Turn pocket and triangular endsto inside through opening. Carefullypress welts in place.
FFLLAAPPSS
1177.. Pin flap LINING to FLAP (14), right sidestogether, matching outer edges. If you use thePPRROO TTIIPP above, a “bubble” forms in the flapbecause the lining is smaller. When the flap isturned, the lining will pull to the inside and notshow.
Stitch around sides and lower edge of flap withsmall stitches, taking up a 3/8” (1cm) seamallowance. This not only reinforces the curves,but also slows the machine so curves will besmooth. Trim seam allowances.
1188.. Turn right side out. Press. Baste raw edgestogether 1/4” (6mm) from edge.
1199.. With right sides up, slip flap into opening, lapping front to posi-tion indicated on flap and having slanted end of flap toward side. Pin.On inside, stitch flap to top welt stitching.
14
M6172 - Page 5 of 8
2233.. Clip basting stitches and turn pocket right sideout. Press. SSLLIIPPSSTTIITTCCHH opening edges together.
2244.. Pin pocket to front/side front, matchingsmall and large circles.
2255.. EEDDGGEESSTTIITTCCHH sides and lower edge ofpockets.
Use a press cloth to press over pocket andsteam lightly so the imprint of pocket does notshow on outside.
Fold front out of the way.Secure triangles at ends ofbox by stitching throughall thicknesses.
Cut 1/8” (3mm) off sides andlower edges of flap lining soit will pull to the inside andnot peek out at edge whenflap is completed.
14
Pink seam allowances to 1/8” (3mm). This cutsand notches in one step.
CATCHSTITCH weltstogether to preventstretching duringjacket construction.
Round off bottom ofpocket to prevent lintfrom collecting in a cor-ner.
Instead of slip-stitching opening,slip a strip offusible webbinginto opening onwrong side andfuse seamallowancestogether.
Use small stitches at curves. This not only rein-forces curves, but also slows the machine socurves will be smoother.
Press lining seam allowances toward center sopocket edges will turn better.
Cut around pocket with pinking shears to cutand notch curves at the same time.
Position pockets onfront/side front overpressing ham to simu-late curve of body.
Steam baste pockets to jacket with fusiblewebbing. Place 1/4” (6mm) wide strips of web-bing on wrong side of pocket edges. Holdingiron 1” (2.5cm) above pocket, steam until web-bing is tacky. Position pocket on jacket andfuse. Or, use Steam-a-Seam, a narrow paper-backed fusible web that stitcks to the fabric.
Hand-sew pocketsin place. Fold jacketaway from pocketedge and SSLLIIPP--SSTTIITTCCHH throughedge of pocket,then straight downto fold of jacket,straight up to edgeof pocket, and soon. Pull threadsuntil they disappear.
To make a back stay, overlap back and side backpattern pieces. Draw a line on the pattern thatcurves from the center back, (approximately 7”-8”below the neck seam), to approximately 3” (7.5cm)below the underarm. Use firmly woven, sew-ininterfacing. Place stay on the fold when cuttinginterfacing. Machine-baste stay to wrong side ofback/side back, having raw edges even.
7-8"(18cm-20.5cm)
3"(7.5cm)
Attach the staywith SOBO glue!Squeeze smalldots of glue INTHE SEAMALLOWANCESONLY and adherestay. Let dry fiveminutes.
Because this jacket is suitable for so many differ-ent weights and types of fabric, it may be neces-sary to adjust the ease around the body for yourspecific fabric by stitching slightly wider or narrow-er side back seams. You may also want to taperseam in at the waistline for a closer fit. Pin sideseams and shoulder seams, wrong sides together,placing pins along seam line parallel to the edge.Pin up hem.
Try on right sides out, since the right and left sidesof the body may be different.
Lap and pin center fronts together at buttonholemarking. Slip shoulder pads in place.
OOPS! Too tight or too loose in the hips? Re-pinside seams until comfortable, tapering back tonormal seamline at the underarm.
If you have slopping or square shoulders, you canswitch to a thicker or thinner shoulder pad untilwrinkles disappear.
After you have made all your adjust-ments, mark new seam lines. Spreadopen seam allowances and mark atpins on WRONG SIDE of jacket usingtailor’s chalk or water soluble mark-ing pen. Remove pins.
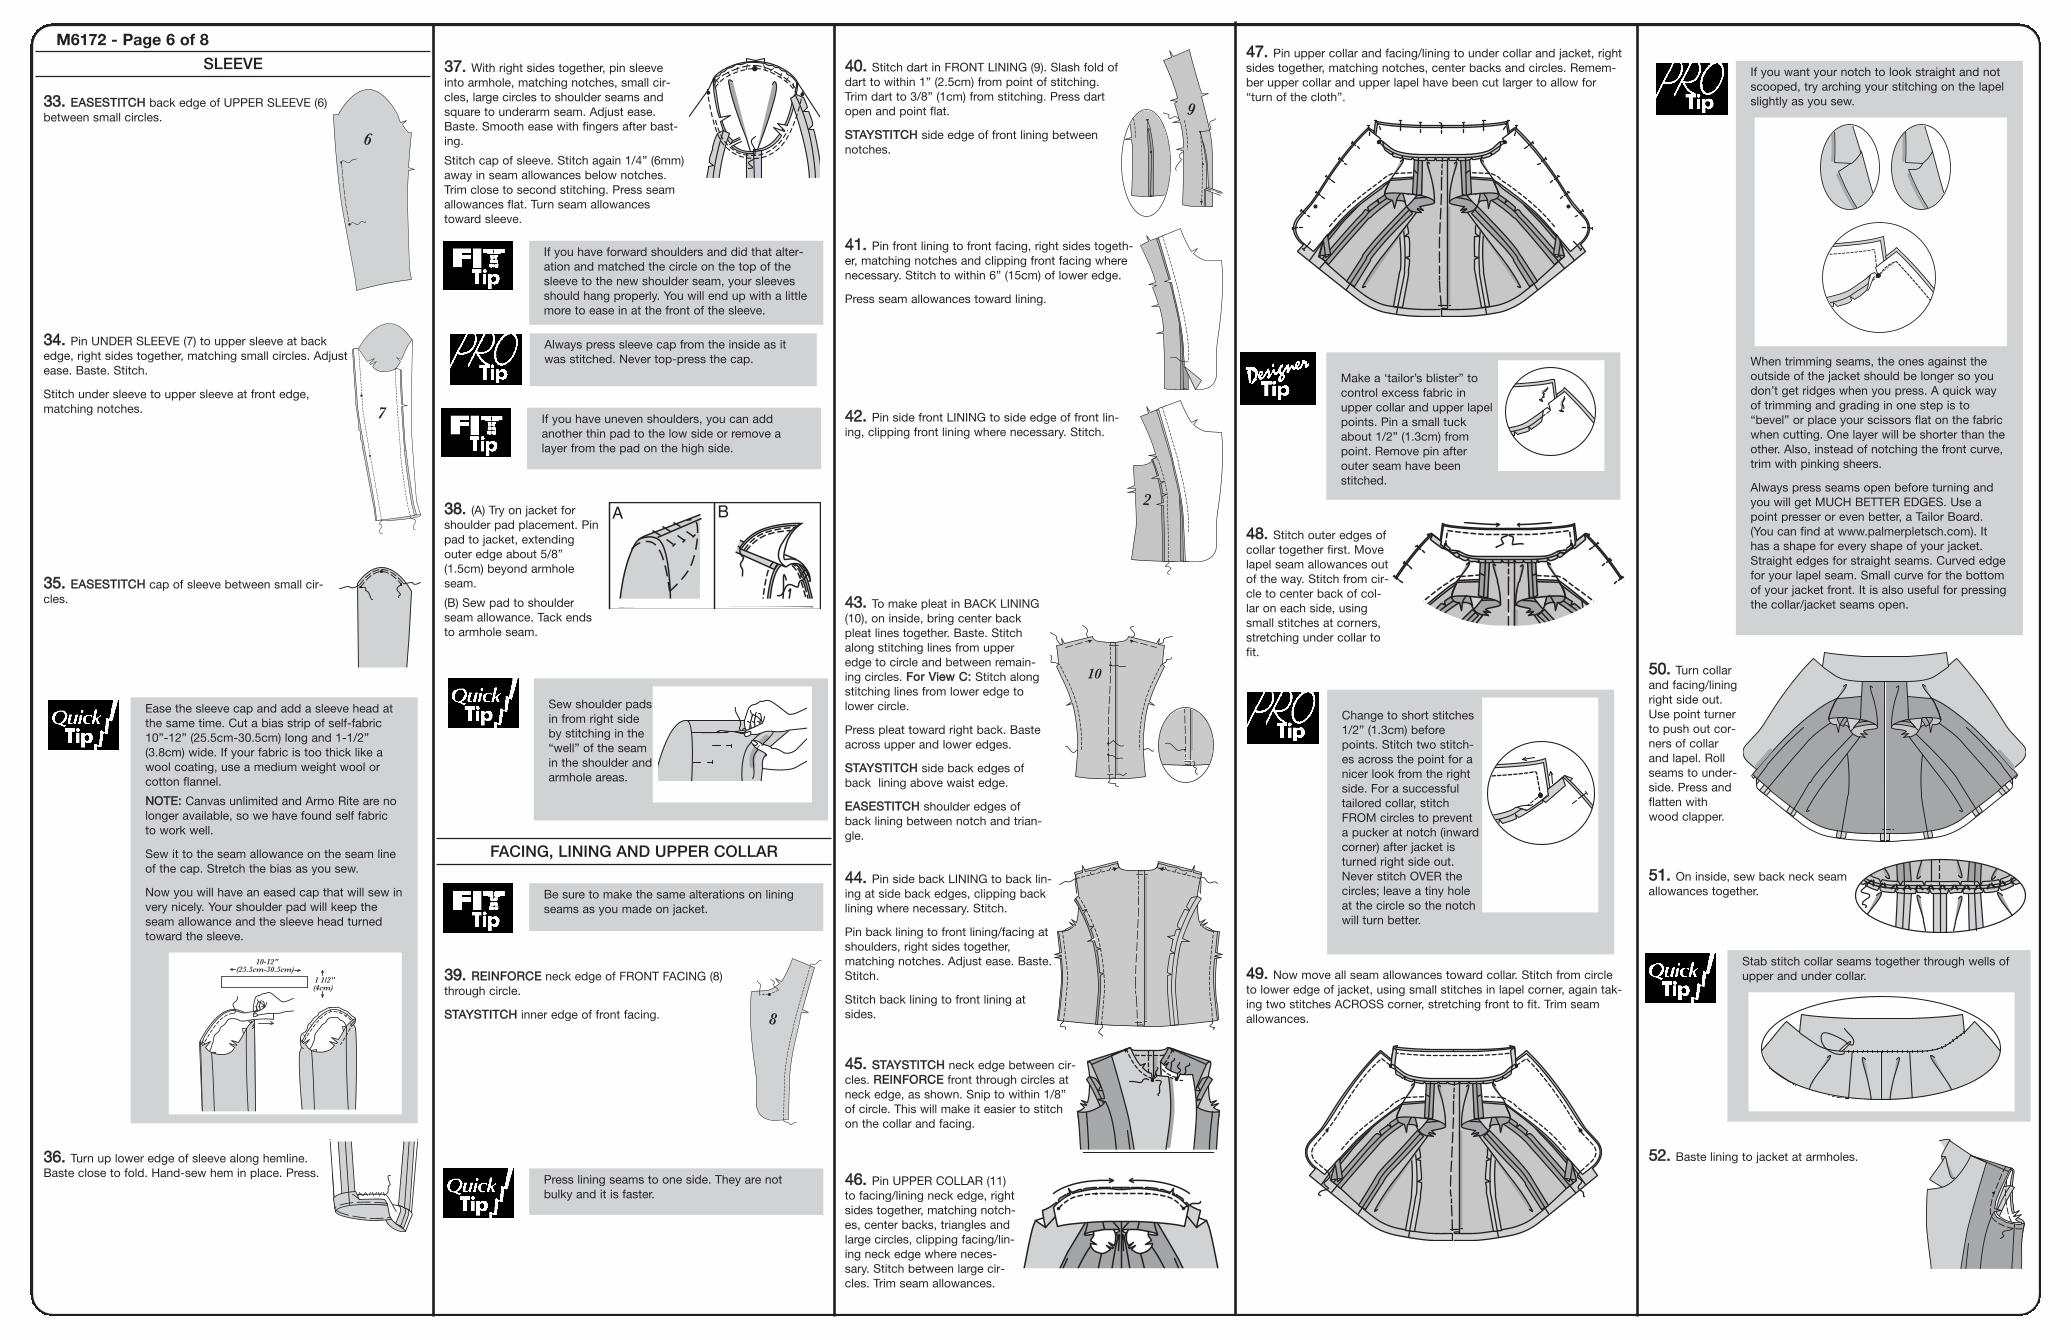
5500.. Turn collarand facing/liningright side out.Use point turnerto push out cor-ners of collarand lapel. Rollseams to under-side. Press andflatten withwood clapper.
5511.. On inside, sew back neck seamallowances together.
5522.. Baste lining to jacket at armholes.
4477.. Pin upper collar and facing/lining to under collar and jacket, rightsides together, matching notches, center backs and circles. Remem-ber upper collar and upper lapel have been cut larger to allow for“turn of the cloth”.
4488.. Stitch outer edges ofcollar together first. Movelapel seam allowances outof the way. Stitch from cir-cle to center back of col-lar on each side, usingsmall stitches at corners,stretching under collar tofit.
4499.. Now move all seam allowances toward collar. Stitch from circleto lower edge of jacket, using small stitches in lapel corner, again tak-ing two stitches ACROSS corner, stretching front to fit. Trim seamallowances.
3377.. With right sides together, pin sleeveinto armhole, matching notches, small cir-cles, large circles to shoulder seams andsquare to underarm seam. Adjust ease.Baste. Smooth ease with fingers after bast-ing.
Stitch cap of sleeve. Stitch again 1/4” (6mm)away in seam allowances below notches.Trim close to second stitching. Press seamallowances flat. Turn seam allowancestoward sleeve.
3388.. (A) Try on jacket forshoulder pad placement. Pinpad to jacket, extendingouter edge about 5/8”(1.5cm) beyond armholeseam.
(B) Sew pad to shoulderseam allowance. Tack endsto armhole seam.
FACING, LINING AND UPPER COLLAR
3399.. RREEIINNFFOORRCCEE neck edge of FRONT FACING (8)through circle.
SSTTAAYYSSTTIITTCCHH inner edge of front facing. 8
SLEEVE
3333.. EEAASSEESSTTIITTCCHH back edge of UPPER SLEEVE (6)between small circles.
3344.. Pin UNDER SLEEVE (7) to upper sleeve at backedge, right sides together, matching small circles. Adjustease. Baste. Stitch.
Stitch under sleeve to upper sleeve at front edge,matching notches.
3355.. EEAASSEESSTTIITTCCHH cap of sleeve between small cir-cles.
3366.. Turn up lower edge of sleeve along hemline.Baste close to fold. Hand-sew hem in place. Press.
7
6
M6172 - Page 6 of 8
4400.. Stitch dart in FRONT LINING (9). Slash fold ofdart to within 1” (2.5cm) from point of stitching.Trim dart to 3/8” (1cm) from stitching. Press dartopen and point flat.
SSTTAAYYSSTTIITTCCHH side edge of front lining betweennotches.
4411.. Pin front lining to front facing, right sides togeth-er, matching notches and clipping front facing wherenecessary. Stitch to within 6” (15cm) of lower edge.
Press seam allowances toward lining.
4422.. Pin side front LINING to side edge of front lin-ing, clipping front lining where necessary. Stitch.
4433.. To make pleat in BACK LINING(10), on inside, bring center backpleat lines together. Baste. Stitchalong stitching lines from upperedge to circle and between remain-ing circles. FFoorr VViieeww CC:: Stitch alongstitching lines from lower edge tolower circle.
Press pleat toward right back. Basteacross upper and lower edges.
SSTTAAYYSSTTIITTCCHH side back edges ofback lining above waist edge.
EEAASSEESSTTIITTCCHH shoulder edges ofback lining between notch and trian-gle.
4444.. Pin side back LINING to back lin-ing at side back edges, clipping backlining where necessary. Stitch.
Pin back lining to front lining/facing atshoulders, right sides together,matching notches. Adjust ease. Baste.Stitch.
Stitch back lining to front lining atsides.
4455.. SSTTAAYYSSTTIITTCCHH neck edge between cir-cles. RREEIINNFFOORRCCEE front through circles atneck edge, as shown. Snip to within 1/8”of circle. This will make it easier to stitchon the collar and facing.
4466.. Pin UPPER COLLAR (11)to facing/lining neck edge, rightsides together, matching notch-es, center backs, triangles andlarge circles, clipping facing/lin-ing neck edge where neces-sary. Stitch between large cir-cles. Trim seam allowances.
10
2
9
Ease the sleeve cap and add a sleeve head atthe same time. Cut a bias strip of self-fabric10”-12” (25.5cm-30.5cm) long and 1-1/2”(3.8cm) wide. If your fabric is too thick like awool coating, use a medium weight wool orcotton flannel.
NNOOTTEE:: Canvas unlimited and Armo Rite are nolonger available, so we have found self fabricto work well.
Sew it to the seam allowance on the seam lineof the cap. Stretch the bias as you sew.
Now you will have an eased cap that will sew invery nicely. Your shoulder pad will keep theseam allowance and the sleeve head turnedtoward the sleeve.
10-12"(25.5cm-30.5cm)
1 1/2"(4cm)
If you have forward shoulders and did that alter-ation and matched the circle on the top of thesleeve to the new shoulder seam, your sleevesshould hang properly. You will end up with a littlemore to ease in at the front of the sleeve.
Always press sleeve cap from the inside as itwas stitched. Never top-press the cap.
If you have uneven shoulders, you can addanother thin pad to the low side or remove alayer from the pad on the high side.
Sew shoulder padsin from right sideby stitching in the“well” of the seamin the shoulder andarmhole areas.
Be sure to make the same alterations on liningseams as you made on jacket.
Press lining seams to one side. They are notbulky and it is faster.
Make a ‘tailor’s blister” tocontrol excess fabric inupper collar and upper lapelpoints. Pin a small tuckabout 1/2” (1.3cm) frompoint. Remove pin afterouter seam have beenstitched.
Change to short stitches1/2” (1.3cm) beforepoints. Stitch two stitch-es across the point for anicer look from the rightside. For a successfultailored collar, stitchFROM circles to preventa pucker at notch (inwardcorner) after jacket isturned right side out.Never stitch OVER thecircles; leave a tiny holeat the circle so the notchwill turn better.
If you want your notch to look straight and notscooped, try arching your stitching on the lapelslightly as you sew.
When trimming seams, the ones against theoutside of the jacket should be longer so youdon’t get ridges when you press. A quick wayof trimming and grading in one step is to“bevel” or place your scissors flat on the fabricwhen cutting. One layer will be shorter than theother. Also, instead of notching the front curve,trim with pinking sheers.
Always press seams open before turning andyou will get MUCH BETTER EDGES. Use apoint presser or even better, a Tailor Board.(You can find at www.palmerpletsch.com). Ithas a shape for every shape of your jacket.Straight edges for straight seams. Curved edgefor your lapel seam. Small curve for the bottomof your jacket front. It is also useful for pressingthe collar/jacket seams open.
Stab stitch collar seams together through wells ofupper and under collar.
INFORMACION DE COSTURACLAVE DE LA TELA
MARGENES DE COSTURAUtilizar margenes de costura de 1.5cm a menos que se indique lo con-
trario.
PRENDER CON ALFILERES Y ENTALLAR
Prender con alfileres o hilvanar las costuras. DERECHO CON DERE-CHO, coincidiendo los cortes. Entallar la prenda antes de coser lascosturas principales.
PLANCHADO
Planchar los margenes de costura planos; luego abrirlos a menos quese indique lo contrario. Hacer los piquetes necesarios de modo quequeden planos.
GLOSARIOLos términos de costura que aparecen en NEGRITAS en las Instrucciones deCostura se explican a continuación.COSER PARA EMBEBER - Coser a lo largo de la línea de costura, utilizandopuntadas largas a máquina. Jalar el hilo al ajustar para encajar.NOTA: Para las cabezas de manga, hacer una segunda fila de puntadaslargas a máquina a 6mm del margen de costura para mayor control.COSER EL BORDE - Coser cerca al borde acabado o a la costura.ACABAR - Coser a 6mm del borde no terminado y acabar con una de lassiguientes formas: cortar en zigzag, sobrehilar o doblar hacia adentro a lolargo del pespunte y coser cerca al doblez o remallar.OPCIONAL PARA DOBLADILLOS: Aplicar cinta de extrafort.REFORZAR - Coser a lo largo de la línea de costura donde se indica en lasinstrucciones de costura, utilizando puntadas pequeñas a máquina.PUNTO DE DOBLADILLO - (Este se utiliza para unir dos bordes doblados oun borde doblado con una superficie plana). Deslizar la aguja a través delborde doblado; luego coger un hilo del doblez o de la superficie opuestos).PESPUNTE DE REFUERZO - Coser a 3mm de la línea de costura en el mar-gen de costura (por lo general a 1.3cm del borde no terminado).
INSTRUCCIONES DE COSTURA
CHAQUETA A, B, CNNOOTTAA:: Se muestra el primer modelo, a menos que se indique lo contrario.
ENTRETELACCOONNSSEEJJOO PPAARRAA LLAA EENNTTRREETTEELLAA:: Para las telas de peso mediano, general-mente utilizamos PerfectFuse Tailor en el frente, en el costado del frente y enla parte inferior del cuello y PerfectFuse Light en la parte superior del cuello yen la vista. Las entretelas termoadhesivas ayudan a evitar que se deshilachenlas esquinas donde necesita recortar a ras, por eso preferimos las entretelastermoadhesivas en todas estas piezas. Adherimos las entretelas Light a laspiezas de la espalda para evitar también que se arruguen.
11.. Las entretelas termoadhesivas de hoy funcionan bien con la mayoría detelas. Hacer una muestra para ver los resultados. Si la tela es una tela quedesea mantenerla liviana, aplicar entretela a todo el frente, costado del frente,espalda, costado de la espalda, parte superior del cuello, parte inferior delcuello y vista del frente, Perfect Fuse Sheer para telas livianas y Perfect Fuselight para telas con textura. Para el MMooddeelloo BB: Aplicarla a la cartera de bolsil-lo. Para el MMooddeelloo CC:: Aplicarla al bolsillo. (En Australia, utilizar Sheer o Tex-ture - disponibles en McCall Pattern Company.)
Si necesita más cuerpo, utilizar Perfect Fuse Medium o Tailor en las piezasdel frente. (En Australia, utilizar Armo Weft o Whisper Weft.)
Adherir, siguiendo las instrucciones del paquete.
PPRROO TTIIPP:: Si está haciendo una chaqueta en terciopelo o en cualquier tela enla que no se puede adherir, puede adherirla a la organza de seda e hilvanarlapor el revés de su tela.
Cerrar la pinza horizontal. La pinza vertical se vuelve más ancha (profunda).Hacer la punta de la pinza vertical de 1.3cm a 2.5cm del punto del busto. Laprofundidad de esta pinza dependerá de cuán grande sea su vientre. Puedeprenderla con alfileres cuando tenga puesto el patrón.
ABERTURA DEL FRENTE1122.. Si la solapa se abre, hacer un pliegue en la vista del frente y en el frente.Rectificar la línea de vuelta.
ESPALDA ALTA REDONDA1133.. Si la costura del escote no llega a la base de su escote (donde se colo-caría un collar), cortar sobre la línea de modificación y levantar de 6mm a1cm. Agregar papel de modificación.
ESPALDA BAJA REDONDA1144.. Esto no es común, pero si es su caso, apreciará nuestra ayuda. Hagaque una amiga corte a través de la espalda en la línea de modificación hastacero en la sisa y subir esa pieza hasta el escote. Adherir el patrón a su espal-da.
Levantar el patrón e introducir papel debajo de la cinta.
Coser la costura por el centro de la espalda de modo que se adapte a lacurva de su cuerpo.
ESPALDA ARQUEADA O DERRIERE PLANO1155.. Si la costura del costado del frente se balancea hacia adelante y elpatrón cuelga más largo por el centro de la espalda, hacer un pliegue en laslíneas de pliegue hasta cero en la costura del costado de la espalda hastaque la espalda esté nivelada y la costura del costado del frente esté recta.
HOMBROS RECTOS O CAIDOS1166.. Hacer una costura más superficial o más profunda en el borde exteriordel hombro hasta la línea de costura normal en el escote.
Levantar o bajar la costura debajo del brazo la misma cantidad.
HOMBROS HACIA ADELANTE1177.. El uso de computadoras y el tener que sentarse delante de escritorioshan contribuido a un nuevo fenómeno de entalle para todas las edades, loshombros hacia adelante.
Si sus prendas no permanecen sobre sus hombros, usted es una candidata.Mire la costura de su hombro. Está en medio de su brazo? Si no, gírela haciaadelante desde la costura del escote hasta el borde de la sisa.
Modificar girando la costura del hombro hacia adelante y dejando márgenesde costura de 1.5cm.
FFIITT TTIIPP:: El círculo en la parte superior de la manga coincidirá con la NUEVAcostura del hombro y la manga caera recta con su brazo. Ya no es necesariogirar la cabeza de manga.
HOMBRO ANCHO O ANGOSTO1188.. Meter o sacar los hombros de la espalda y del frente como se indica:
AJUSTE DE LA MANGALLAARRGGOO
Prender con alfileres la manga a la chaqueta por debajo del brazo. Probarse.Revisar el largo. Si la manga no es del largo correcto, cortar y extender paraalargar o hacer un pliegue para acortar en ambas piezas de la manga.
AANNCCHHOO
1199.. Pellizcar el patrón en la parte más gruesa de la parte superior de subrazo. Si no puede pellizcar ni un centímetro, la manga está muy ajustada.
2200.. Cortar sobre las líneas de modificación horizontal y vertical. CORTARSIEMPRE HASTA LAS LINEAS DE PESPUNTE Y LAS LINEAS DE DOBLADIL-LO, NO HASTA LOS BORDES EXTERIORES. LAS LINEAS DE COSTURA YDE DOBLADILLO SON LAS “BISAGRAS”.
Jalar el patrón por los costados del corte horizontal y ensanchar la manga lacantidad necesaria. Introducir papel de modificación y adherir en su lugar.Probarse nuevamente para verificar el entalle.
Si ensanchó la manga por más de 2cm, agregar un margen de costura másancho a la parte superior de la cabeza de manga, sólo en caso necesario.
Para una manga más angosta, empujar sobre los costados y la manga sesuperpondrá verticalmente.
NNOOTTAA:: Hacer los mismos ajustes a las piezas de patrón de la vista y del forro.
EspañolEste es mi Aniversario Número 30 Diseñando para
McCall's!Mi primer patrón para McCall’s lo hice en 1980, una chaqueta deportiva en 8horas que coincidió con el libro de John Molloy, Dress For Success, en el quedijo a las mujeres que para tener éxito en los negocios necesitaban vestir tra-jes como los hombres. Esto hizo que mi patrón de chaqueta deportiva en 8horas sea un récord de ventas. Vendió 20,000 unidades en la segunda sem-ana que salió a la venta y más aún en cada semana consecutiva.
He estado enseñando confección de prendas a medida desde los años 70 yVAYA! cómo han cambiado las cosas. El cambio principal es en las entretelas.Las entretelas termoadhesivas con trama actuales superan a cualquiera delpasado. En los 70 nunca habría hecho ojales a máquina en una chaquetasastre, pero hoy en día son una opción aceptable. Esta guía refleja lo quesentimos como nuestras mejores técnicas para hacer una chaqueta.
Esta chaqueta es un básico del guardarropa. Si la hace en una tela de buenacalidad y tiene un entalle a la medida, la puede comparar a una chaqueta dediseñador de $1,500. El diseño de esta chaqueta es el más favorecedor quepuede vestir. Con un panel al costado, obtiene formas sutiles y muchas cos-turas en las que puede modificar la forma haciéndola favorecedora a SU figu-ra. Le hicimos un escote en “v” bajo para enmarcar su rostro. CUANTO TIEM-PO LE TOMARA? Si la cose sin un bolsillo o con un bolsillo sobrepuesto, serácapaz de coserla en un día o en un fin de semana. Le puede tomar más de 8horas pero no 80!! Además, piense cuántas horas lo podrá usar.
Elija una tela que no falle—de fibras naturales, ondas sueltas, con cuerpo,textura (tweeds, lino, seda para trajes, crepé de lana), y de un color mediano.El blanco tiene puntos transparentes y el negro es difícil de coser en la nocheal menos que tenga 20 años.
Asegúrese de entallar el patrón ANTES de cortar la tela. Luego, entalle alcoser para ajustar el entalle en la tela. Pruébese la chaqueta varias vecespara ver errores antes de avanzar más y que sea imposible arreglarlos.
CARACTERISTICAS DE ENTALLE:
No pierda tiempo cosiendo una prenda que no entalla! PRIMERO, COMPRARLA TALLA CORRECTA. Medir el busto alto y utilizar esta medida en lugar delbusto en la tabla de medidas. Si su talla se encuentra entre dos tallas, com-prar la talla más pequeña.
Entalle el patrón antes de cortar. Para hacer la modificación más fácil, hemosagregado líneas de modificación en el papel de patrón para los entalles máscomunes. Hacer un pliegue o cortar y extender en estas líneas hasta que elpatrón se entalle a su cuerpo. Para este patrón, nos centraremos en cómohacer ajustes para un busto grande. También mostraremos cómo hacerajustes para una espalda alta redonda y hombros hacia adelante—ambosimportantes para una chaqueta bien entallada. Para mayor información deentalle, remítase a nuestro libro Fit For Real People. También, nuestro libroJackets for Real People incluye entalle de chaquetas así como mucha infor-mación sobre la costura de las mismas y contamos con un DVD en el queMarta Alto cose una chaqueta paso a paso.
Feliz Costura!
Pati Palmer y Asociados
INSTRUCCIONES PARA ENTALLAR EL PATRON
ENTALLE INCORPORADOLas piezas de patrón tienen la ayuda del ENTALLE INCORPORADO: Laslíneas de modificación están impresas en el patrón.
PREPARACION DEL PATRON11.. Recortar alrededor del patrón POR AFUERA de la línea de corte negrapara su talla. Planchar el patrón con plancha seca fija en LANA. Con el patrónpor el derecho, pegar con cinta adhesiva lo siguiente dentro de la línea depespunte para evitar que el patrón se rompa al probárselo:* escote redondo* sisa del frente y de la espalda* curva interior en la espalda sobre la cintura y frente entre los cortes
Utilizar piezas pequeñas de cinta adhesiva alrededor de las curvas, sobre-poniéndolas. Utilizar cinta adhesiva Scotchô Magicô Tape de 1.3cm (cajaverde). Hacer piquetes en las curvas hacia la cinta adhesiva. NO CORTAR LACINTA.
22.. Jalar suavemente el patrón para ver si está firmemente pegado.
Prender con alfileres las costuras hacia afuera, haciendo más fácil el ajuste.
PROBARSE EL PATRONENTALLAR EL PATRON NO ES UN METODO DE ADIVINANZA! Probarse elpatrón. Prender con alfileres el centro del frente y el centro de la espalda alcentro del frente y al centro de la espalda de su cuerpoñes decir a su fustán!
33.. Deslizar la hombrera que piensa utilizar debajo de la chaqueta en su lugar.
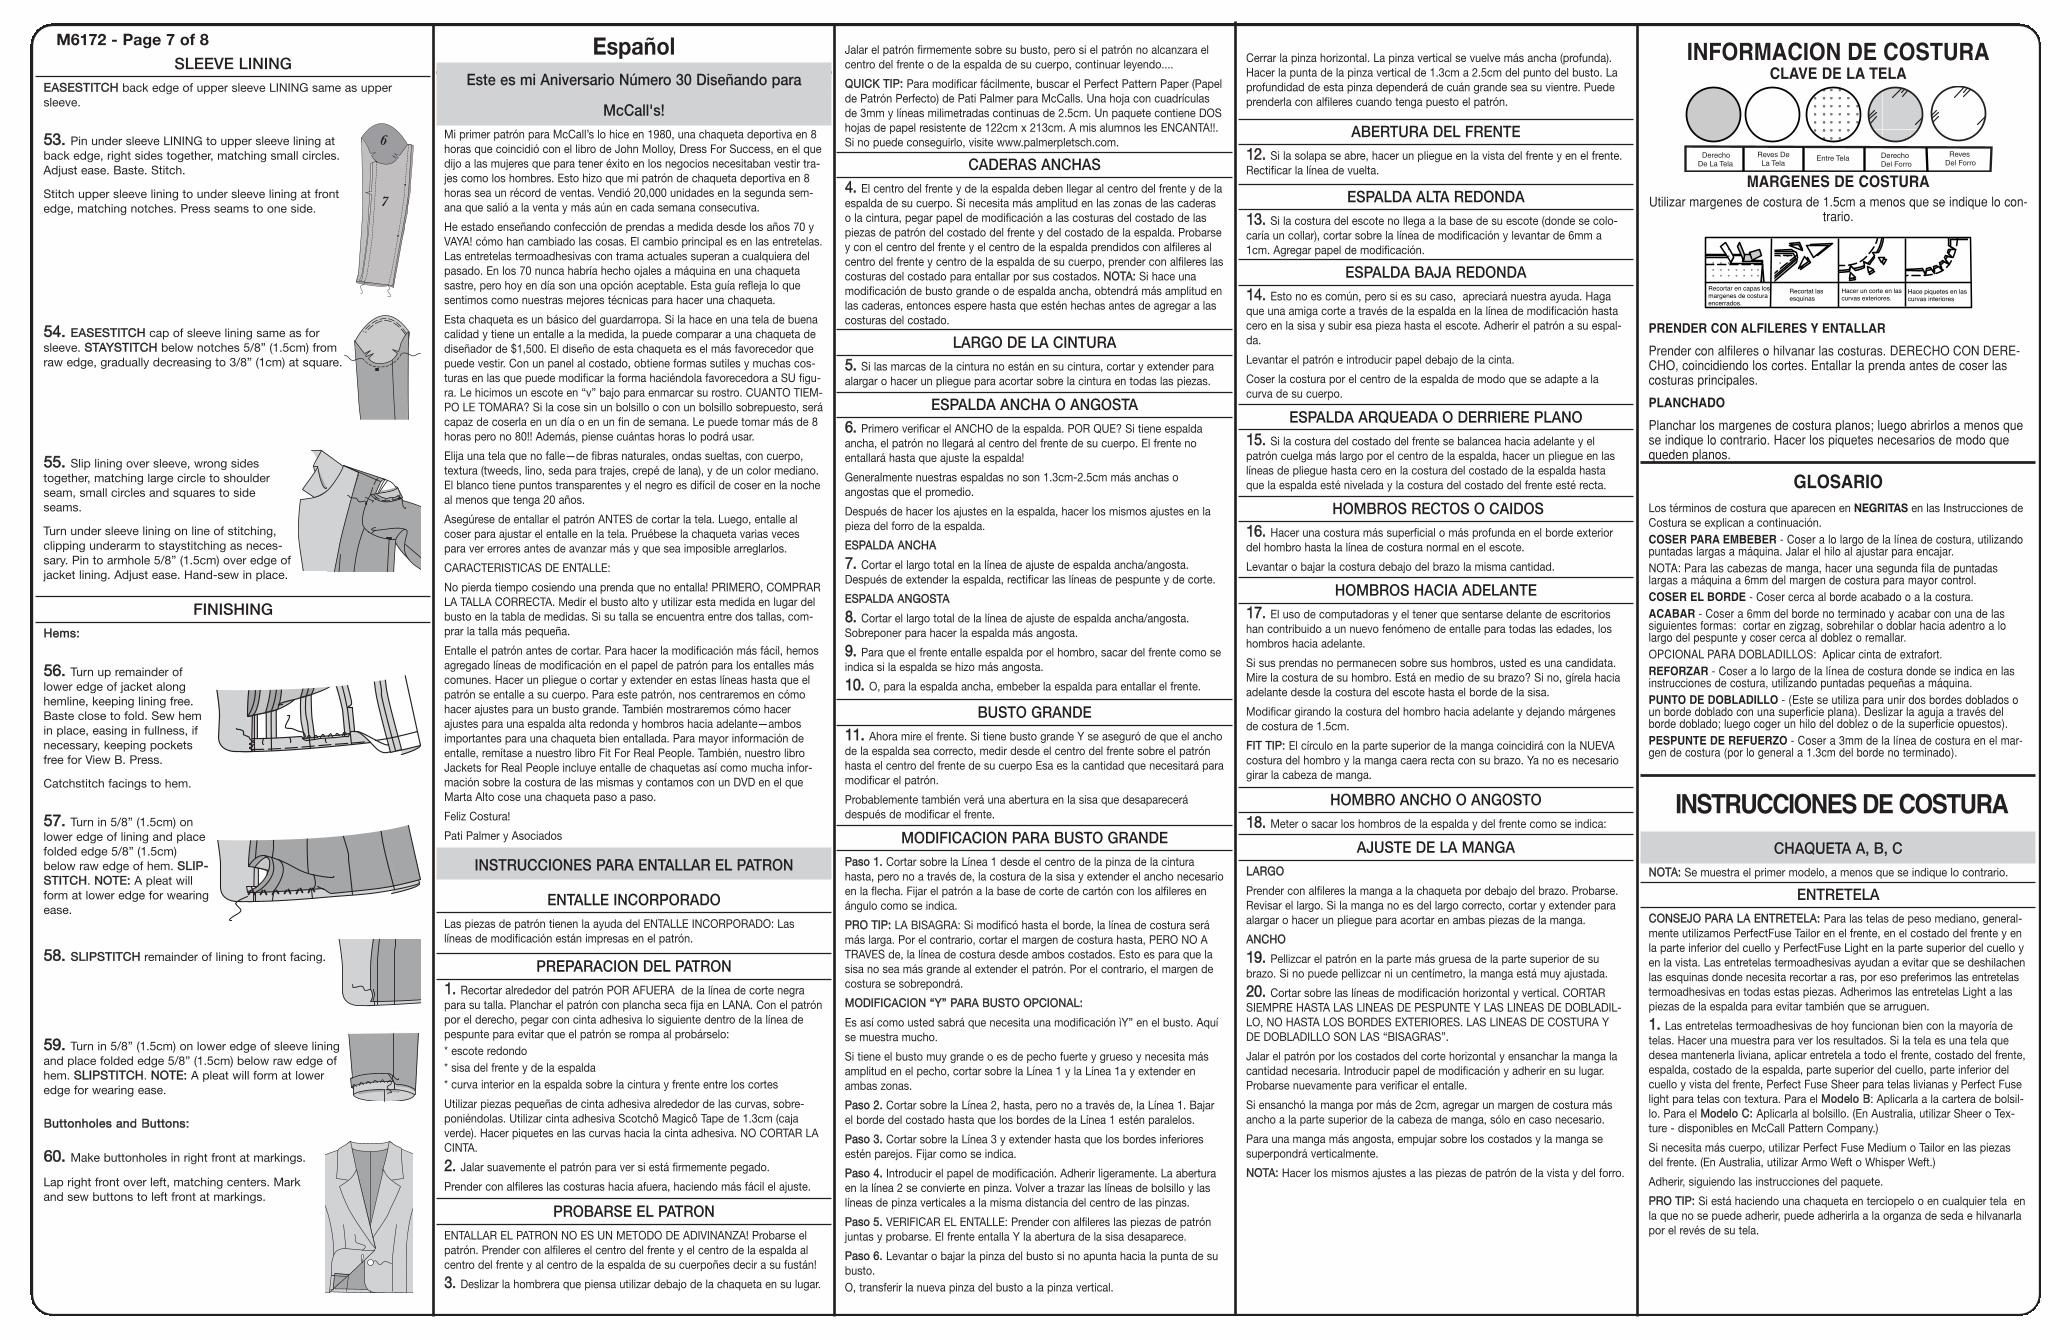
SLEEVE LININGEEAASSEESSTTIITTCCHH back edge of upper sleeve LINING same as uppersleeve.
5533.. Pin under sleeve LINING to upper sleeve lining atback edge, right sides together, matching small circles.Adjust ease. Baste. Stitch.
Stitch upper sleeve lining to under sleeve lining at frontedge, matching notches. Press seams to one side.
5544.. EEAASSEESSTTIITTCCHH cap of sleeve lining same as forsleeve. SSTTAAYYSSTTIITTCCHH below notches 5/8” (1.5cm) fromraw edge, gradually decreasing to 3/8” (1cm) at square.
5555.. Slip lining over sleeve, wrong sidestogether, matching large circle to shoulderseam, small circles and squares to sideseams.
Turn under sleeve lining on line of stitching,clipping underarm to staystitching as neces-sary. Pin to armhole 5/8” (1.5cm) over edge ofjacket lining. Adjust ease. Hand-sew in place.
FINISHINGHHeemmss::
5566.. Turn up remainder oflower edge of jacket alonghemline, keeping lining free.Baste close to fold. Sew hemin place, easing in fullness, ifnecessary, keeping pocketsfree for View B. Press.
Catchstitch facings to hem.
5577.. Turn in 5/8” (1.5cm) onlower edge of lining and placefolded edge 5/8” (1.5cm)below raw edge of hem. SSLLIIPP--SSTTIITTCCHH. NNOOTTEE:: A pleat willform at lower edge for wearingease.
5588.. SSLLIIPPSSTTIITTCCHH remainder of lining to front facing.
5599.. Turn in 5/8” (1.5cm) on lower edge of sleeve liningand place folded edge 5/8” (1.5cm) below raw edge ofhem. SSLLIIPPSSTTIITTCCHH. NNOOTTEE:: A pleat will form at loweredge for wearing ease.
BBuuttttoonnhhoolleess aanndd BBuuttttoonnss::
6600.. Make buttonholes in right front at markings.
Lap right front over left, matching centers. Markand sew buttons to left front at markings.
6
7
M6172 - Page 7 of 8Jalar el patrón firmemente sobre su busto, pero si el patrón no alcanzara elcentro del frente o de la espalda de su cuerpo, continuar leyendo....
QQUUIICCKK TTIIPP:: Para modificar fácilmente, buscar el Perfect Pattern Paper (Papelde Patrón Perfecto) de Pati Palmer para McCalls. Una hoja con cuadrículasde 3mm y líneas milimetradas continuas de 2.5cm. Un paquete contiene DOShojas de papel resistente de 122cm x 213cm. A mis alumnos les ENCANTA!!.Si no puede conseguirlo, visite www.palmerpletsch.com.
CADERAS ANCHAS44.. El centro del frente y de la espalda deben llegar al centro del frente y de laespalda de su cuerpo. Si necesita más amplitud en las zonas de las caderaso la cintura, pegar papel de modificación a las costuras del costado de laspiezas de patrón del costado del frente y del costado de la espalda. Probarsey con el centro del frente y el centro de la espalda prendidos con alfileres alcentro del frente y centro de la espalda de su cuerpo, prender con alfileres lascosturas del costado para entallar por sus costados. NNOOTTAA:: Si hace unamodificación de busto grande o de espalda ancha, obtendrá más amplitud enlas caderas, entonces espere hasta que estén hechas antes de agregar a lascosturas del costado.
LARGO DE LA CINTURA55.. Si las marcas de la cintura no están en su cintura, cortar y extender paraalargar o hacer un pliegue para acortar sobre la cintura en todas las piezas.
ESPALDA ANCHA O ANGOSTA66.. Primero verificar el ANCHO de la espalda. POR QUE? Si tiene espaldaancha, el patrón no llegará al centro del frente de su cuerpo. El frente noentallará hasta que ajuste la espalda!
Generalmente nuestras espaldas no son 1.3cm-2.5cm más anchas oangostas que el promedio.
Después de hacer los ajustes en la espalda, hacer los mismos ajustes en lapieza del forro de la espalda.
EESSPPAALLDDAA AANNCCHHAA
77.. Cortar el largo total en la línea de ajuste de espalda ancha/angosta.Después de extender la espalda, rectificar las líneas de pespunte y de corte.
EESSPPAALLDDAA AANNGGOOSSTTAA
88.. Cortar el largo total de la línea de ajuste de espalda ancha/angosta.Sobreponer para hacer la espalda más angosta.
99.. Para que el frente entalle espalda por el hombro, sacar del frente como seindica si la espalda se hizo más angosta.
1100.. O, para la espalda ancha, embeber la espalda para entallar el frente.
BUSTO GRANDE1111.. Ahora mire el frente. Si tiene busto grande Y se aseguró de que el anchode la espalda sea correcto, medir desde el centro del frente sobre el patrónhasta el centro del frente de su cuerpo Esa es la cantidad que necesitará paramodificar el patrón.
Probablemente también verá una abertura en la sisa que desaparecerádespués de modificar el frente.
MODIFICACION PARA BUSTO GRANDEPPaassoo 11.. Cortar sobre la Línea 1 desde el centro de la pinza de la cinturahasta, pero no a través de, la costura de la sisa y extender el ancho necesarioen la flecha. Fijar el patrón a la base de corte de cartón con los alfileres enángulo como se indica.
PPRROO TTIIPP:: LA BISAGRA: Si modificó hasta el borde, la línea de costura serámás larga. Por el contrario, cortar el margen de costura hasta, PERO NO ATRAVES de, la línea de costura desde ambos costados. Esto es para que lasisa no sea más grande al extender el patrón. Por el contrario, el margen decostura se sobrepondrá.
MMOODDIIFFIICCAACCIIOONN ““YY”” PPAARRAA BBUUSSTTOO OOPPCCIIOONNAALL::
Es así como usted sabrá que necesita una modificación ìY” en el busto. Aquíse muestra mucho.
Si tiene el busto muy grande o es de pecho fuerte y grueso y necesita másamplitud en el pecho, cortar sobre la Línea 1 y la Línea 1a y extender enambas zonas.
PPaassoo 22.. Cortar sobre la Línea 2, hasta, pero no a través de, la Línea 1. Bajarel borde del costado hasta que los bordes de la Línea 1 estén paralelos.
PPaassoo 33.. Cortar sobre la Línea 3 y extender hasta que los bordes inferioresestén parejos. Fijar como se indica.
PPaassoo 44.. Introducir el papel de modificación. Adherir ligeramente. La aberturaen la línea 2 se convierte en pinza. Volver a trazar las líneas de bolsillo y laslíneas de pinza verticales a la misma distancia del centro de las pinzas.
PPaassoo 55.. VERIFICAR EL ENTALLE: Prender con alfileres las piezas de patrónjuntas y probarse. El frente entalla Y la abertura de la sisa desaparece.
PPaassoo 66.. Levantar o bajar la pinza del busto si no apunta hacia la punta de subusto.O, transferir la nueva pinza del busto a la pinza vertical.
PPRROO TTIIPP:: Cambiar a puntadas cortas a 1.3cm antes de las puntas. Hacer dospuntadas a través de la punta para un look más bonito por el derecho. Paraun cuello de sastre exitoso, coser DESDE los círculos para evitar una arrugaen el corte (esquina interior) después de voltear la chaqueta al derecho.Nunca cosa SOBRE los círculos; dejar un agujero pequeño en la punta paravoltear mejor el corte.
4499.. Ahora mover todos los márgenes de costura hacia el cuello. Coserdesde el círculo hasta el borde inferior de la chaqueta, utilizando pequeñaspuntadas en la esquina de la solapa, cogiendo nuevamente dos puntadas ATRAVES de la esquina, estirando el frente para encajar. Recortar los már-genes de costura.
PPRROO TTIIPP:: Si quiere que su corte se vea recto y no recogido, intente arquearligeramente el pespunte en la solapa al coser.
Al recortar las costuras, las que están sobre el derecho de la chaqueta debenser más largas para que no tenga arrugas al planchar. Una forma rápida derecortar y de nivelar en un solo paso es “biselar” o colocar sus tijeras planassobre la tela al cortar. Una capa será más corta que la otra. Además, en lugarde cortar la curva del frente, recortar con tijeras zigzag.
Planchar siempre las costuras abiertas antes de voltear y obtendrá BORDESMUCHO MEJORES. Utilizar una tabla de planchar para puntas o mejor aún,un Tailor Board. (Lo puede encontrar en www.palmerpletsch.com). Tiene unaforma para cada forma de la chaqueta. Los bordes rectos para las costurasrectas. El borde en curva para la costura de la solapa. La curva pequeña parala parte inferior del frente de la chaqueta. También es útil para planchar lascosturas del cuello/chaqueta abiertas.
5500.. Voltear el cuello y la vista/forro al derecho. Utilizar un accesorio para vol-tear puntas para empujar las esquinas del cuello y de la solapa. Enrollar lascosturas hacia abajo. Planchar y aplanar con un rodillo de madera.
5511.. Por adentro, coser los márgenes de costura del escote de la espaldajuntos.
QQUUIICCKK TTIIPP:: Coser las secciones del cuello juntas con puntadas perdidas através de los bordes de la costura de la parte superior del cuello y de la parteinferior del cuello.
5522.. Hilvanar el forro a la chaqueta por las sisas, haciendo los piquetes nece-sarios en la curva debajo del brazo hasta el pespunte de refuerzo.
FORRO DE LA MANGACCOOSSEERR PPAARRAA EEMMBBEEBBEERR el borde de la espalda del FORRO de la partesuperior de la manga igual que la parte superior de la manga.
5533.. Prender con alfileres el FORRO de la parte inferior de la manga al forrode la parte superior de la manga por el borde de la espalda, derecho conderecho, coincidiendo los círculos pequeños. Embeber. Hilvanar. Coser.
Coser el forro de la parte superior de la manga al forro de la parte inferior dela manga por el borde del frente, coincidiendo los cortes. Planchar las cos-turas hacia un costado.
5544.. CCOOSSEERR PPAARRAA EEMMBBEEBBEERR el forro de la cabeza de manga igual que lamanga. Hacer un PPEESSPPUUNNTTEE DDEE RREEFFUUEERRZZOO debajo de los cortes a 1.5cmdel borde no terminado, disminuyendo gradualmente a 1cm en el cuadrado.
5555.. Deslizar el forro sobre la manga, revés con revés, coincidiendo el círculogrande con la costura del hombro, los círculos pequeños y los cuadrados conlas costuras del costado.
Doblar hacia el revés el forro de la manga sobre la línea de pespunte, hacien-do los piquetes necesarios en la parte abajo del brazo hacia el pespunre derefuerzo. Prender con alfileres a la sisa a 1.5cm sobre el borde del forro de lachaqueta. Embeber. Coser a mano en su lugar.
ACABADODDoobbllaaddiillllooss::
5566.. Doblar el resto del borde inferior de la chaqueta a lo largo de la línea dedobladillo, manteniendo el forro suelto. Hilvanar cerca al doblez. Coser eldobladillo en su lugar, embebiendo la amplitud, si es necesario, manteniendolos bolsillos sueltos para el Modelo B. Planchar.
\Coser las vistas al dobladillo con puntada de escapulario.
5577.. Doblar hacia adentro 1.5cm en el borde inferior del forro y colocar elborde doblado a 1.5cm debajo del borde no terminado del dobladillo. Cosercon PPUUNNTTOO DDEE DDOOBBLLAADDIILLLLOO. NNOOTTAA:: Se formará un pliegue en el bordeinferior para mayor holgura.
5588.. Coser el resto del forro a la vista del frente con PPUUNNTTOO DDEE DDOOBBLLAADDIILLLLOO.
5599.. Doblar hacia adentro 1.5cm en el borde inferior del forro de la manga ycolocar el borde doblado a 1.5cm debajo del borde no terminado deldobladillo. Coser con PPUUNNTTOO DDEE DDOOBBLLAADDIILLLLOO. NNOOTTAA:: Se formará unpliegue en el borde inferior para mayor holgura.
OOjjaalleess yy BBoottoonneess::
6600.. Hacer los ojales en el frente derecho por las marcas.
Sobreponer el frente derecho al izquierdo, coincidiendo los centros. Marcar ycoser los botones al frente derecho por las marcas.
FFIITT TTIIPP:: Si tiene hombros hacia adelante y ya hizo esa modificación y coin-cidió el círculo en la parte superior de la manga con la nueva costura delhombro, sus mangas deben caer correctamente. Terminará con poquito máspara embeber en el frente de la manga.
PPRROO TTIIPP:: Planchar siempre la cabeza de manga desde adentro como fuecosida. Nunca planchar por encima de la cabeza de manga.
FFIITT TTIIPP:: Si tiene hombros disparejos, puede agregar otra hombrera delgada allado que está más bajo o retirar una capa de la hombrera en el lado más alto.
3388.. (A) Probarse la chaqueta para la colocación de la hombrera. Prender conalfileres la hombrera a la chaqueta, sobresaliendo el borde exterior aproxi-madamente 1.5cm más allá de la costura de la sisa.
(B) Coser la hombrera al margen de costura del hombro. Hilvanar losextremos a la costura de la sisa.
QQUUIICCKK TTIIPP:: Coser las hombreras por el derecho cosiendo en el “borde” de lacostura en las partes del hombro y de la sisa.
VISTA, FORRO Y PARTE SUPERIOR DEL CUELLOFFIITT TTIIPP:: Asegurarse de hacer en las costuras del forro las mismas modifica-ciones que hizo en la chaqueta.
3399.. RREEFFOORRZZAARR el borde del escote de la VISTA DEL FRENTE (8) a travésdel círculo.
Hacer un PPEESSPPUUNNTTEE DDEE RREEFFUUEERRZZOO en el borde interior de la vista delfrente.
QQUUIICCKK TTIIPP:: Planchar las costuras del forro hacia un costado ya que no songruesas y es más rápido.
4400.. Coser la pinza en el FORRO DEL FRENTE (9). Hacer un corte en eldoblez de la pinza hasta 2.5cm de la punta del pespunte. Recortar la pinza a1cm del pespunte. Planchar la pinza abierta y la punta plana.
Hacer un PPEESSPPUUNNTTEE DDEE RREEFFUUEERRZZOO en el borde del costado del forro delfrente entre los cortes.
4411.. Prender con alfileres el forro del frente a la vista del frente, derecho conderecho, coincidiendo los cortes y haciendo los piquetes necesarios en lavista del frente. Coser hasta 15cm del borde inferior.
Planchar los márgenes de costura hacia el forro.
4422.. Prender con alfileres el FORRO del costado del frente al borde del costa-do del forro del frente, haciendo los piquetes necesarios en el forro del frente.Coser.
4433.. Para hacer el pliegue en el FORRO DE LA ESPALDA (10), por adentro,juntar las líneas de pliegue del centro de la espalda. Hilvanar. Coser a lo largode las líneas de pespunte desde el borde superior hasta el círculo y entre loscírculos restantes. Para el MMooddeelloo CC:: Coser a lo largo de las líneas depespunte desde el borde inferior hasta el círculo inferior.
Planchar el pliegue hacia la espalda derecha. Hilvanar a través de los bordessuperior e inferior.
Hacer un PPEESSPPUUNNTTEE DDEE RREEFFUUEERRZZOO en los bordes del costado de la espal-da del forro de la espalda sobre el borde de la cintura.
CCOOSSEERR PPAARRAA EEMMBBEEBBEERR los bordes del hombro del forro de la espalda entreel corte y el triángulo.
4444.. Prender con alfileres el FORRO del costado de la espalda al forro de laespalda por los bordes del costado de la espalda, haciendo los piquetesnecesarios en el forro de la espalda. Coser.
Prender con alfileres el forro de la espalda al forro/vista del frente por loshombros, derecho con derecho, coincidiendo los cortes. Embeber. Hilvanar.Coser.
Coser el forro de la espalda al forro del frente por los costados.
4455.. Hacer un PPEESSPPUUNNTTEE DDEE RREEFFUUEERRZZOO en el borde del escote entre loscírculos. RREEFFOORRZZAARR el frente a través de los círculos en el borde del escote,como se indica. Hacer un corte hasta 3mm del círculo. Esto hara más fácilcoser el cuello y la vista.
4466.. Prender con alfileres la PARTE SUPERIOR DEL CUELLO (11) al borde delescote de la vista/forro, derecho con derecho, coincidiendo los cortes, loscentros de la espalda, los triángulos y los círculos grandes, haciendo lospiquetes necesarios en el borde del escote de la vista/forro. Coser entre loscírculos grandes. Recortar los márgenes de costura.
4477.. Prender con alfileres la parte superior del cuello y la vista/forro a la parteinferior del cuello y la chaqueta, derecho con derecho, coincidiendo loscortes, los centros de la espalda y los círculos. Recuerde que la parte superi-or del cuello y la solapa superior se cortaron más grandes para poder “voltearla tela”.
DDEESSIIGGNNEERR TTIIPP:: Hacer una ‘burbuja de sastre” para controlar el exceso detela en las puntas de la parte superior del cuello y de la solapa superior. Pren-der con alfileres un pequeño pliegue a aproximadamente 1.3cm de la punta.Retirar el alfiler después de haber cosido la costura exterior.
4488.. Coser los bordes exteriores del cuello juntos primero. Mover los már-genes de costura de la solapa hacia el exterior. Coser desde el círculo hastael centro de la espalda del cuello en cada costado, utilizando pequeñas pun-tadas en las esquinas, estirando la parte inferior del cuello para encajar.
1177.. Prender con alfileres el FORRO de la cartera de bolsillo a la CARTERADE BOLSILLO (14), derecho con derecho, coincidiendo los bordes exteriores.Si utiliza el PPRROO TTIIPP anterior, se formará una ìburbuja” en la cartera porque elforro es más pequeño. Una vez que voltee la cartera, el forro jalará haciaadentro y no se verá.
Coser alrededor de los costados y del borde inferior de la cartera de bolsillocon puntadas pequeñas, cogiendo un margen de costura de 1cm. Esto nosolo refuerza las curvas, sino que también hace más lenta a la máquina demodo que las curvas sean más fáciles de coser. Recortar los márgenes decostura.
QQUUIICCKK TTIIPP:: Cortar en zigzag los márgenes de costura a 3mm. Esto corta yhace los cortes en un solo paso.
1188.. Voltear al derecho. Planchar. Hilvanar juntos los bordes no terminados a6mm del borde.
1199.. Por el derecho, deslizar la cartera de bolsillo en la abertura, sobre-poniendo el frente a la posición indicada en la cartera y manteniendo elextremo al sesgo de la cartera de bolsillo hacia el costado. Prender con alfil-eres. Por adentro, coser la cartera al pespunte superior del ribete.
2200.. Por adentro, llevar el borde inferior del bolsillo hacia arriba. Prender conalfileres en su lugar. Coser a través de la parte superior del ribete sobre lalínea de pespunte anterior.
Coser los costados del bolsillo.
DDEESSIIGGNNEERR TTIIPP:: Redondear la parte inferior del bolsillo para evitar que se jun-ten pelusas en una esquina.
PPRROO TTIIPP:: Coser con PUNTADA DE ESCAPULARIO los ribetes juntos para evi-tar que se estiren durante la confección de la chaqueta.
TOMESE UN DESCANSO. ADMIRE SUS HERMOSOS BOLSILLOS. NO ESUSTED BUENA! DESPUES DE ALGUNOS REFRESCOS TENDRA LA ENER-GIA PARA HACER LAS ESPALDAS DE LA CHAQUETA!!
BOLSILLOS SOBREPUESTOS C2211.. Coser el FORRO DEL BOLSILLO (15) al borde superior del BOLSILLO(16), derecho con derecho, hilvanando a máquina 5cm por el centro.(Después, cortar el hilván para voltear el bolsillo). Planchar los márgenes decostura hacia el forro.
2222.. Doblar el bolsillo sobre la línea de doblez, derecho con derecho. Coserlos costados y el borde inferior. Recortar los márgenes de costura.
QQUUIICCKK TTIIPP:: Utilizar puntadas pequeñas en las curvas. Esto no solo refuerzalas curvas, sino que también hace más lenta a la máquina de modo que lascurvas sean más fáciles de coser.
PPRROO TTIIPP:: Planchar los márgenes de costura del forro hacia el centro demodo que los bordes del bolsillo se voltearán mejor.
Cortar alrededor del bolsillo con tijeras zigzag para cortar y hacer los cortesen las curvas en un solo paso.
2233.. Cortar las puntadas del hilván y voltear el bolsillo al derecho. Planchar.Coser con PPUUNNTTOO DDEE DDOOBBLLAADDIILLLLOO los bordes de la abertura juntos.
QQUUIICCKK TTIIPP:: En vez de coser la abertura con punto de dobladillo, deslizar unatira de agente termoadhesivo en la abertura por el revés y adherir los már-genes de costura juntos.
2244.. Prender con alfileres el bolsillo al frente/costado del frente, coincidiendolos círculos grandes y pequeños.
PPRROO TTIIPP:: Colocar los bolsillos sobre el frente/costado sobre la almohadillapara planchar para simular la curva del cuerpo.
QQUUIICCKK TTIIPP:: Hilvanar con vapor los bolsillos a la chaqueta con agente ter-moadhesivo. Colocar tiras de 6mm de agente termoadhesivo por el revés delos bordes del bolsillo. Manteniendo la plancha a 2.5cm sobre el bolsillo,aplicar vapor hasta que el agente esté pegajoso. Colocar el bolsillo en la cha-queta y adherir. O, utilizar Steam-a-Seam,un agente termoadhesivo angostocon papel de protección que se adhiere a la tela.
2255.. CCOOSSEERR EELL BBOORRDDEE sobre el borde inferior y de los costados de los bol-sillos.
DDEESSIIGGNNEERR TTIIPP:: Coser a mano los bolsillos en su lugar. Doblar la chaquetalejos del borde del bolsillo y coser con PPUUNNTTOO DDEE DDOOBBLLAADDIILLLLOO a través delborde del bolsillo, luego recto hacia abajo hasta el doblez de la chaqueta,recto hacia arriba hasta el borde del bolsillo, y así sucesivamente. Jalar loshilos hasta que desaparezcan.
ESPALDA2266.. Coser la costura del centro de la espalda en la ESPALDA (3).
Hacer un PPEESSPPUUNNTTEE DDEE RREEFFUUEERRZZOO en los bordes del costado de la espal-da sobre el borde de la cintura.
2277.. Prender con alfileres el COSTADO DE LA ESPALDA (4) a la espalda porlos bordes del costado de la espalda, haciendo los piquetes necesarios en laespalda. Coser.
PPRROO TTIIPP:: Para hacer un refuerzo en la espalda, sobreponer las piezas depatrón de la espalda y del costado de la espalda. Trazar una línea sobre elpatrón que forme una curva desde el centro de la espalda, (aproximadamente
FRENTE Y COSTADO DEL FRENTEFFIITT TTIIPP:: Prender con alfileres todas las pinzas por adentro y prender con alfil-eres todas las costuras REVES CON REVES y probarse la chaqueta para unrápido entalle en la tela. Para el MMooddeelloo BB:: Verificar si quiere cambiar laslíneas de colocación ANTES de agregar los bolsillos con ribete.
22.. Coser la pinza en el FRENTE (1). Hacer un corte en el doblez de la pinzahasta 2.5cm de la punta del pespunte. Recortar la pinza a 1cm del pespunte.Planchar la pinza abierta y la punta plana.
Hacer un PPEESSPPUUNNTTEE DDEE RREEFFUUEERRZZOO en el borde del costado del frenteentre los cortes.
33.. Prender con alfileres el COSTADO DEL FRENTE (2) al frente por el bordedel costado del frente, haciendo los piquetes necesarios en el frente. Coser.
PPRROO TTIIPP:: Para evitar que los márgenes de costura formen arrugas por afuera,planchar las costuras rectas sobre una almohadilla para costura. Aplicarvapor y luego aplanar con un rodillo de madera. La madera enfría la costurabajo presión por lo que ìrecordará” permanecer plana. Planchar las zonas encurva sobre una curva que coincida en la almohadilla.
BOLSILLOS CON RIBETE Y CARTERAS DE BOLSILLO BBBOOLLSSIILLLLOOSS
Tómese un descanso antes de comenzar este bolsillo. Aunque tenga variospasos, este es un bolsillo con ribete QUE NO FALLA! CONFIE ENNOSOTROS!
44.. Trazar las marcas del bolsillo por el revés de cada frente/costado del frente.
55.. Cortar dos guías de pespunte en una entretela liviana no termoadhesiva,no tejida, utilizando la pieza de patrón del RIBETE (12). Transferir cuidadosa-mente todas las marcas.
66.. Por adentro, colocar la guía de entretela sobre las marcas de bolsillo en elfrente/costado del frente, coincidiendo las cajas rectangulares. Coser conpuntadas pequeñas sobre las líneas punteadas para formar una “caja”.
PPRROO TTIIPP:: Comenzar y terminar el pespunte en el centro de la caja, no en unaesquina. Esto hace las esquinas más fuertes para que no se deshilachendespués de hacer un piquete.
También, después de coser, medir la caja para asegurarse de que está cosidade forma precisa porque será su guía para todos los otros pespuntes.
PPRROO TTIIPP:: Como este bolsillo tiene cartera de bolsillo, puede eliminar la sec-ción de tela del ribete inferior porque no es necesaria y aumenta el grosor. Sino quiere agregar una cartera de bolsillo al ribete, necesitará coser otra piezade tela de confección al borde inferior del forro (bolsillo) del mismo tamañoque la que utiliza para el ribete. Así, si el ribete se abre, verá la tela y no elforro.
77.. Prender con alfileres el RIBETE (12) (cortado en tela) a cada extremo delBOLSILLO (13), por el derecho, coincidiendo los bordes no terminados. Cosera 6mm de los bordes superior e inferior del bolsillo. Coser con puntada zigzagsobre el borde no terminado interior de los ribetes como se indica. (Reservarlas secciones restantes del ribete.)
88.. Prender con alfileres el ribete sobre la caja en el frente/costado del frente,derecho con derecho, coincidiendo las marcas.
99.. Por adentro, coser sobre el pespunte anterior SOLO en los bordes largosde la caja. Coser cuidadosamente con punto atrás en los círculos. Por aden-tro, coser una hilera de hilván a máquina a 6mm por arriba y otra hilera a6mm por debajo de la caja, a través de todo el grosor.
1100.. Por afuera, doblar firmemente la parte inferior del bolsillo hacia arribasobre la línea de hilván. Prender con alfileres en su lugar.
1111.. Por adentro, coser NUEVAMENTE sobre el pespunte anterior en el bordelargo INFERIOR de la caja, terminando exactamente en los círculos; cosercon punto atrás. Acaba de crear el primer ribete!
1122.. Por afuera, doblar firmemente la parte superior del ribete hacia abajosobre el hilván y prender con alfileres.
1133.. Voltear una vez más hacia adentro y coser sobre la línea superior de lacaja entre los círculos; coser con punto atrás.
1144.. Por afuera, hacer un corte SOLO a través del RIBETE/BOLSILLO, por ellargo del ribete (entre las hileras del pespunte). NO CORTAR A TRAVES DE LACHAQUETA TODAVIA. Retirar los hilos del hilván.
1155.. Para la abertura del bolsillo, por adentro, hacer un corte en la chaquetaa lo largo de la línea de corte y en diagonal hasta las esquinas como se indi-ca. Coloque su dedo debajo como una guía para asegurarse de no cortar losribetes.
1166.. Voltear el bolsillo y los extremos triangulares hacia adentro a través de laabertura. Planchar cuidadosamente los ribetes en su lugar.
PPRROO TTIIPP:: Utilizar un paño para planchar sobre el bolsillo y aplicar vapor lig-eramente para que la huella del bolsillo no se vea por afuera.
CCAARRTTEERRAASS DDEE BBOOLLSSIILLLLOO
PPRROO TTIIPP:: Cortar a 3mm de los costados y de los bordes inferiores del forrode la cartera de bolsillo de modo que jalará hacia adentro y no se verá por elborde cuando ésta esté terminada.
M6172 - Page 8 of 8 a 18cm-20.5cm debajo de la costura del escote), hasta aproximadamente7.5cm debajo del brazo. Utilizar una entretela para coser, firme, tejida. Colo-car el refuerzo en el doblez al cortar la entretela. Hilvanar a máquina el refuer-zo por el revés de la espalda/costado de la espalda, manteniendo los bordesno terminados parejos.
QQUUIICCKK TTIIPP:: Aplicar el refuerzo con pegamento SOBO! Colocar puntospequeños de pegamento SOLO EN LOS MARGENES DE COSTURA y adherirel refuerzo. Dejar secar cinco minutos.
2288.. CCOOSSEERR PPAARRAA EEMMBBEEBBEERR los bordes del hombro de la espalda entre elcorte y el triángulo.
FFIITT TTIIPP:: Ya que esta chaqueta es adecuada para muchos pesos y tipos detela diferentes, podría ser necesario ajustar la amplitud alrededor del cuerpopara su tela específica cosiendo ligeramente costuras del costado de laespalda más angostas o más anchas. También podría querer disminuir la cos-tura en la línea de cintura para un entalle más ajustado. Prender con alfilereslas costuras del costado y las costuras del hombro, revés con revés, colocan-do los alfileres a lo largo de la línea de costura paralela al borde. Prender conalfileres el dobladillo.
Probarse la prenda por el derecho, ya que los lados derecho e izquierdo delcuerpo podrían ser diferentes.
Sobreponer y prender con alfileres los centros del frente juntos por la marcadel ojal. Deslizar las hombreras en su lugar.
AY! Las caderas están muy ajustadas o muy sueltas? Volver a prender conalfileres las costuras del costado hasta que estén cómodas, disminuyendohasta a la línea de costura normal por debajo del brazo.
Si tiene hombros caídos o rectos, puede cambiar a una hombrera más gruesao delgada hasta que desaparezcan las arrugas.
QQUUIICCKK TTIIPP:: Después de haber hecho todos los ajustes, marcar las nuevaslíneas de costura. Abrir los márgenes de costura y marcar en los alfileres porel REVES de la chaqueta utilizando una tiza de sastre o un marcador solubleal agua. Sacar los alfileres.
2299.. Prender con alfileres la espalda a los frentes por los hombros, derechocon derecho, coincidiendo los cortes. Embeber. Hilvanar. Coser.
Coser la espalda a los frentes por los costados.
PARTE INFERIOR DEL CUELLO3300.. Hacer un PPEESSPPUUNNTTEE DDEE RREEFFUUEERRZZOO en el borde del escote de la cha-queta entre los círculos.
3311.. Coser la costura del centro de la espalda de la PARTE INFERIOR DELCUELLO (5).
3322.. Prender con alfileres la parte inferior del cuello al borde del escote de lachaqueta, derecho con derecho, coincidiendo los cortes, los centros de laespalda, los triángulos y los círculos grandes, haciendo los piquetes necesar-ios en el borde del escote de la chaqueta. Coser entre los círculos grandes.Recortar los márgenes de costura.
MANGA3333.. CCOOSSEERR PPAARRAA EEMMBBEEBBEERR el borde de la espalda de la PARTE SUPERI-OR DE LA MANGA (6) entre los círculos pequeños.
3344.. Prender con alfileres la PARTE INFERIOR DE LA MANGA (7) a la partesuperior de la manga por el borde de la espalda, derecho con derecho, coin-cidiendo los círculos pequeños. Embeber. Hilvanar. Coser.
Coser la parte inferior de la manga a la parte superior de la manga por elborde del frente, coincidiendo los cortes.
3355.. CCOOSSEERR PPAARRAA EEMMBBEEBBEERR la cabeza de manga entre los círculospequeños.
QQUUIICCKK TTIIPP:: Embeber la cabeza de manga y agregar el soporte de manga a lamisma vez. Cortar una tira de sesgo de la misma tela de 25.5cm-30.5cm delargo y de 3.8cm de ancho. Si su tela es demasiado gruesa como una tela delana para abrigos, utilizar una lana o franela de algodón de peso mediano.
NNOOTTEE:: El Canvas unlimited y el Armo Rite ya no están disponibles; hemosdescubierto que la misma tela funciona bien.
Coserla al margen de costura en la línea de costura de la cabeza de manga.Estirar el sesgo al coser.
Ahora tendrá una cabeza de manga embebida que se coserá muy bien. Suhombrera mantendrá el margen de costura y el soporte de manga volteadoshacia la manga.
3366.. Doblar hacia arriba el borde inferior de la manga a lo largo de la línea dedobladillo. Hilvanar cerca al doblez. Coser a mano el dobladillo en su lugar.Planchar.
3377.. Derecho con derecho, prender con alfileres la manga a la sisa, coincidi-endo los cortes, los círculos pequeños, los círculos grandes con las costurasdel hombro y el cuadrado con la costura debajo del brazo. Embeber. Hilvanar.Alisar la holgura con los dedos después de hilvanar.
Coser la cabeza de manga. Coser nuevamente a 6mm en los márgenes decostura debajo de los cortes. Recortar cerca al segundo pespunte. Plancharlos márgenes de costura planos. Voltear los márgenes de costura hacia lamanga.


![DECISION 2013 NSUARB 175 NOVA SCOTIA UTILITY AND … Decision - South Canoe Appeals.pdf3.1.2 David McCall [12] In essence the Board ruled Mr. McCall’s proposed evidence to be inadmissible](https://img.pdfslide.us/doc/110x75/5ed5c1bf421af74cf20f98e3/decision-2013-nsuarb-175-nova-scotia-utility-and-decision-south-canoe-appealspdf.jpg)