Embed Size (px)
Citation preview
M1Portable CinemaUser Guide
Model No. VS17337
IMPORTANT: Please read this User Guide to obtain important information on installing and using your product in a safe manner, as well as registering your product for future service. Warranty information contained in this User Guide will describe your limited coverage from ViewSonic Corporation, which is also found on our web site at http://www.viewsonic.com in English, or in specific languages using the Regional selection box in the upper right corner of our website. “Antes de operar su equipo lea cu idadosamente las instrucciones en este manual”
i
Compliance InformationFCC StatementThis device complies with part 15 of FCC Rules. Operation is subject to the follow-ing two conditions: (1) this device may not cause harmful interference, and (2) this device must accept any interference received, including interference that may cause undesired operation.This equipment has been tested and found to comply with the limits for a Class B digital device, pursuant to part 15 of the FCC Rules. These limits are designed to provide reasonable protection against harmful interference in a residential installa-tion. This equipment generates, uses, and can radiate radio frequency energy, and if not installed and used in accordance with the instructions, may cause harmful interference to radio communications. However, there is no guarantee that interfer-ence will not occur in a particular installation. If this equipment does cause harmful interference to radio or television reception, which can be determined by turning the equipment off and on, the user is encouraged to try to correct the interference by one or more of the following measures:
y Reorient or relocate the receiving antenna. y Increase the separation between the equipment and receiver. y Connect the equipment into an outlet on a circuit different from that to which the
receiver is connected. y Consult the dealer or an experienced radio/TV technician for help.
Warning: You are cautioned that changes or modifications not expressly approved by the party responsible for compliance could void your authority to operate the equipment.
For CanadaCAN ICES-3 (B)/NMB-3(B)
CE Conformity for European CountriesThe device complies with the EMC Directive 2014/30/EU and Low Voltage Directive 2014/35/EU.
Following information is only for EU-member states:The mark is in compliance with the Waste Electrical and Electronic Equipment Directive 2012/19/EU (WEEE).The mark indicates the requirement NOT to dispose the equipment including any spent or discarded batteries or accumulators as unsorted municipal waste, but use the return and collection systems available. If the batteries, accumulators and button cells included with this equipment, display the chemical symbol Hg, Cd, or Pb, then it means that the battery has a heavy metal content of more than 0.0005% Mercury or more than, 0.002% Cadmium, or more than 0.004% Lead.
ii
Important Safety Instructions1. Read these instructions.2. Keep these instructions.3. Heed all warnings.4. Follow all instructions.5. Do not use this unit near water.6. Clean with a soft, dry cloth.7. Do not block any ventilation openings. Install the unit in accordance with the
manufacturer’s instructions.8. Do not install near any heat sources such as radiators, heat registers, stoves,
or other devices (including amplifiers) that produce heat.9. Do not defeat the safety purpose of the polarized or grounding-type plug. A
polarized plug has two blades with one wider than the other. A grounding type plug has two blades and a third grounding prong. The wide blade and the third prong are provided for your safety. If the provided plug does not fit into your outlet, consult an electrician for replacement of the obsolete outlet.
10. Protect the power cord from being walked on or pinched particularly at plugs. Convenience receptacles and the point where they exit from the unit. Be sure that the power outlet is located near the unit so that it is easily accessible.
11. Only use attachments/accessories specified by the manufacturer.12. Use only with the cart, stand, tripod, bracket, or table specified by
the manufacturer, or sold with the unit. When a cart is used, use caution when moving the cart/unit combination to avoid injury from tipping over.
13. Unplug this unit when unused for long periods of time.14. Refer all servicing to qualified service personnel. Servicing is required when the
unit has been damaged in any way, such as: if the power-supply cord or plug is damaged, if liquid is spilled onto or objects fall into the unit, if the unit is exposed to rain or moisture, or if the unit does not operate normally or has been dropped.
iii
Declaration of RoHS2 ComplianceThis product has been designed and manufactured in compliance with Directive 2011/65/EU of the European Parliament and the Council on restriction of the use of certain hazardous substances in electrical and electronic equipment (RoHS2 Directive) and is deemed to comply with the maximum concentration values issued by the European Technical Adaptation Committee (TAC) as shown below:
Substance Proposed Maximum Concentration Actual Concentration
Lead (Pb) 0.1% < 0.1%Mercury (Hg) 0.1% < 0.1%Cadmium (Cd) 0.01% < 0.01%Hexavalent Chromium (Cr6+) 0.1% < 0.1%Polybrominated biphenyls (PBB) 0.1% < 0.1%Polybrominated diphenyl ethers (PBDE) 0.1% < 0.1%
Certain components of products as stated above are exempted under the Annex III of the RoHS2 Directives as noted below:Examples of exempted components are:1. Lead in glass of cathode ray tubes.2. Lead in glass of fluorescent tubes not exceeding 0.2% by weight.3. Lead as an alloying element in aluminium containing up to 0.4% lead by weight.4. Copper alloy containing up to 4% lead by weight.5. Lead in high melting temperature type solders (i.e. lead-based alloys containing
85% by weight or more lead).6. Electrical and electronic components containing lead in a glass or ceramic other
than dielectric ceramic in capacitors, e.g. piezoelectronic devices, or in a glass or ceramic matrix compound.
iv
Copyright InformationCopyright © ViewSonic® Corporation, 2018. All rights reserved.Macintosh and Power Macintosh are registered trademarks of Apple Inc.Microsoft, Windows, Windows NT, and the Windows logo are registered trademarks of Microsoft Corporation in the United States and other countries.ViewSonic, the three birds logo, OnView, ViewMatch, and ViewMeter are registered trademarks of ViewSonic Corporation.VESA is a registered trademark of the Video Electronics Standards Association. DPMS and DDC are trademarks of VESA.PS/2, VGA and XGA are registered trademarks of International Business Machines Corporation.Disclaimer: ViewSonic Corporation shall not be liable for technical or editorial errors or omissions contained herein; nor for incidental or consequential damages resulting from furnishing this material, or the performance or use of this product.In the interest of continuing product improvement, ViewSonic Corporation reserves the right to change product specifications without notice. Information in this docu-ment may change without notice.No part of this document may be copied, reproduced, or transmitted by any means, for any purpose without prior written permission from ViewSonic Corporation.
Product RegistrationTo fulfill possible future product needs, and to receive additional product information as it becomes available, please visit your region section on ViewSonic’s website to register your product online.The ViewSonic CD also provides an opportunity for you to print the product registration form. Upon completion, please mail or fax to a respective ViewSonic office. To find your registration form, use the directory “:\CD\Registration”. Registering your product will best prepare you for future customer service needs.Please print this user guide and fill the information in the “For Your Records” section. For additional information, please see the “Customer Support” section in this guide.
For Your RecordsProduct Name: M1
ViewSonic LED ProjectorModel Number: VS17337Document Number: M1_UG_ENG Rev. 1B 07-25-18Serial Number: ________________________________________Purchase Date: ________________________________________
Product disposal at end of product lifeViewSonic respects the environment and is committed to working and living green. Thank you for being part of Smarter, Greener Computing. Please visit ViewSonic website to learn more.USA & Canada: http://www.viewsonic.com/company/green/recycle-program/Europe: http://www.viewsoniceurope.com/eu/support/call-desk/Taiwan: http://recycle.epa.gov.tw
v
Table of Contents
Introduction ........................................................................ 1Projector features .................................................................................................................1
Shipping contents ............................................................. 2Package Overview................................................................................................................2Product Overview .................................................................................................................3
Controls and functions .................................................... 4
Setting up .......................................................................... 7Power On/Off ........................................................................................................................8Mount the Projector ........................................................................................................... 10Open the smart stand and adjust the focus ring .................................................................11Adjust Projected Image ..................................................................................................... 12
Positioning your projector .............................................. 13Using the menus................................................................................................................ 14Adjusting your projector’s settings ..................................................................................... 16Connect the projector to your device ................................................................................. 17Different menu options ...................................................................................................... 18M1 FW Upgrade ................................................................................................................ 20Wallpaper .......................................................................................................................... 21Image Settings................................................................................................................... 21About the aspect ratio........................................................................................................ 22Auto Keystone ................................................................................................................... 23V Keystone ........................................................................................................................ 23Brightness.......................................................................................................................... 23Contrast ............................................................................................................................. 23Optimizing the image ......................................................................................................... 24Harman Kardon - Adjusting the audio settings .................................................................. 24Muting the Sound .............................................................................................................. 24Adjusting the Sound level .................................................................................................. 24

vi
Adjusting the Audio Mode .................................................................................................. 25Adjusting the Light source settings .................................................................................... 25Reset All Settings .............................................................................................................. 26Eye Protection ................................................................................................................... 26Viewing different file .......................................................................................................... 26Using the 3D function ........................................................................................................ 30OSD Menu System ............................................................................................................ 32Specification sheet ............................................................................................................ 34HDMI Support Video Timing .............................................................................................. 36HDMI Support PC Timing .................................................................................................. 373D Support Timing ............................................................................................................. 38USB-C Support Timing ...................................................................................................... 39
1
Introduction
Projector featuresThe Portable Cinema providing users with high-performance LED projection and a user-friendly design to deliver high reliability and ease of use.Some of the features may not be available on your projector. Actual performance may vary and subject to model specifications.• 360 degree smart stand enable instant Power ON / OFF (with Lens cover function).• Auto keystone to correct distorted image automatically.• Eye Protection function avoiding objects get close to the direct light from optical
engine (30cm distance / 30 degree).• USB-C for video transmission and power supply.• Embedded battery for easy outdoor projection (up to 6 hours). • Switchable light source mode to extend your battery usage hours.• 16GB internal storage ( Max. 12GB available storage for users).• User-friendly UI design for easy navigation.• Music mode enables users to enjoy music without projection image.• Short throw lens design to allow 1.6m distance to project 60” screen size.• LED light source with excellent light source life (30,000 hrs).• Supports 3D display.• Color modes providing choices for different projection purposes.• Multi-language On-Screen Display (OSD) menus.
The apparent brightness of the projected image will vary depending on the ambient lighting conditions, selected input signal contrast/brightness settings, and is directly proportional to projection distance.
2
Shipping contents
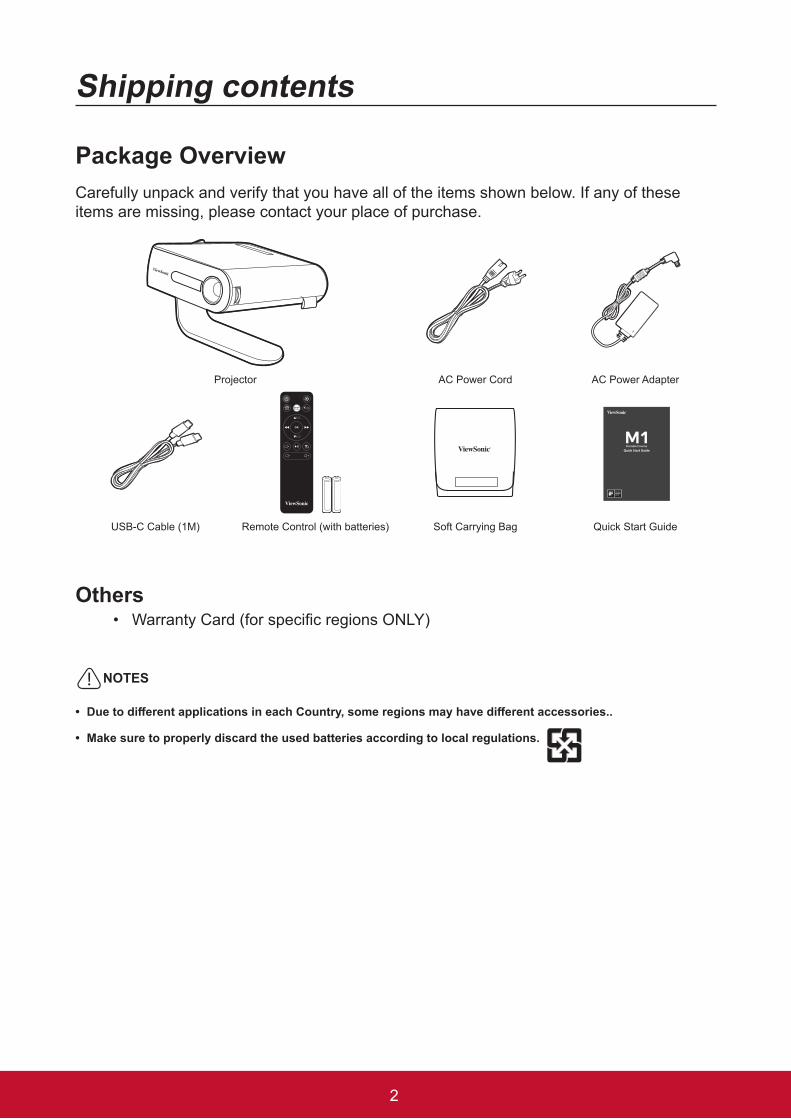
Package OverviewCarefully unpack and verify that you have all of the items shown below. If any of these items are missing, please contact your place of purchase.
Quick Start Guide
Quick Start Guide
Quick Start Guide
Projector AC Power Cord AC Power Adapter
Quick Start Guide
Quick Start GuideQuick Start GuideQuick Start Guide
USB-C Cable (1M) Remote Control (with batteries) Soft Carrying Bag Quick Start Guide
Others• Warranty Card (for specific regions ONLY)
NOTES
• DuetodifferentapplicationsineachCountry,someregionsmayhavedifferentaccessories..
• Make sure to properly discard the used batteries according to local regulations.
3
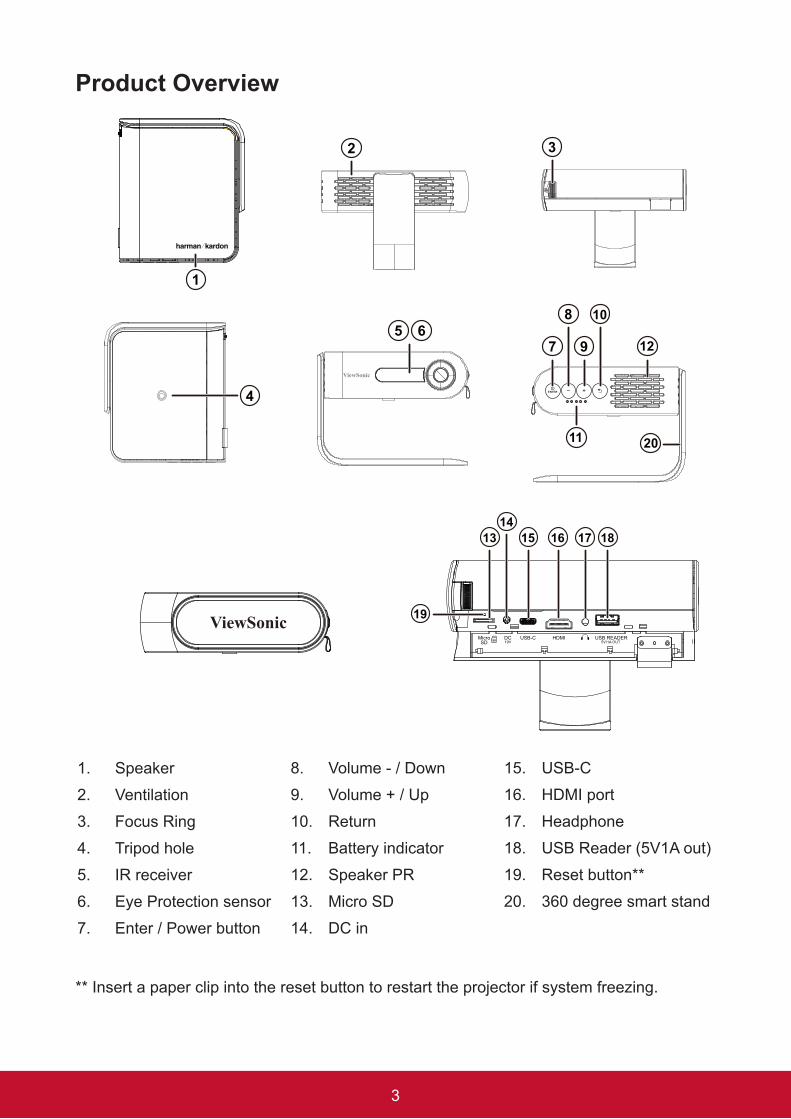
Product Overview
ENTER
1
2
5 6 7
8 10
19
1513 16 17 18
9 12
11 20
3
4
14
ENTER
1
2
5 6 7
8 10
19
1513 16 17 18
9 12
11 20
3
4
14
ENTER
1
2
5 6 7
8 10
19
1513 16 17 18
9 12
11 20
3
4
14
ENTER
1
2
5 6 7
8 10
19
1513 16 17 18
9 12
11 20
3
4
14
ENTER
1
2
5 6 7
8 10
19
1513 16 17 18
9 12
11 20
3
4
14
ENTER
1
2
5 6 7
8 10
19
1513 16 17 18
9 12
11 20
3
4
14
ENTER
1
2
5 6 7
8 10
19
1513 16 17 18
9 12
11 20
3
4
14
ENTER
1
2
5 6 7
8 10
19
1513 16 17 18
9 12
11 20
3
4
14
1. Speaker 2. Ventilation3. Focus Ring4. Tripod hole5. IR receiver6. Eye Protection sensor7. Enter / Power button
8. Volume - / Down9. Volume + / Up10. Return11. Battery indicator12. Speaker PR13. Micro SD14. DC in
15. USB-C16. HDMI port17. Headphone18. USB Reader (5V1A out)19. Reset button**20. 360 degree smart stand
** Insert a paper clip into the reset button to restart the projector if system freezing.
4
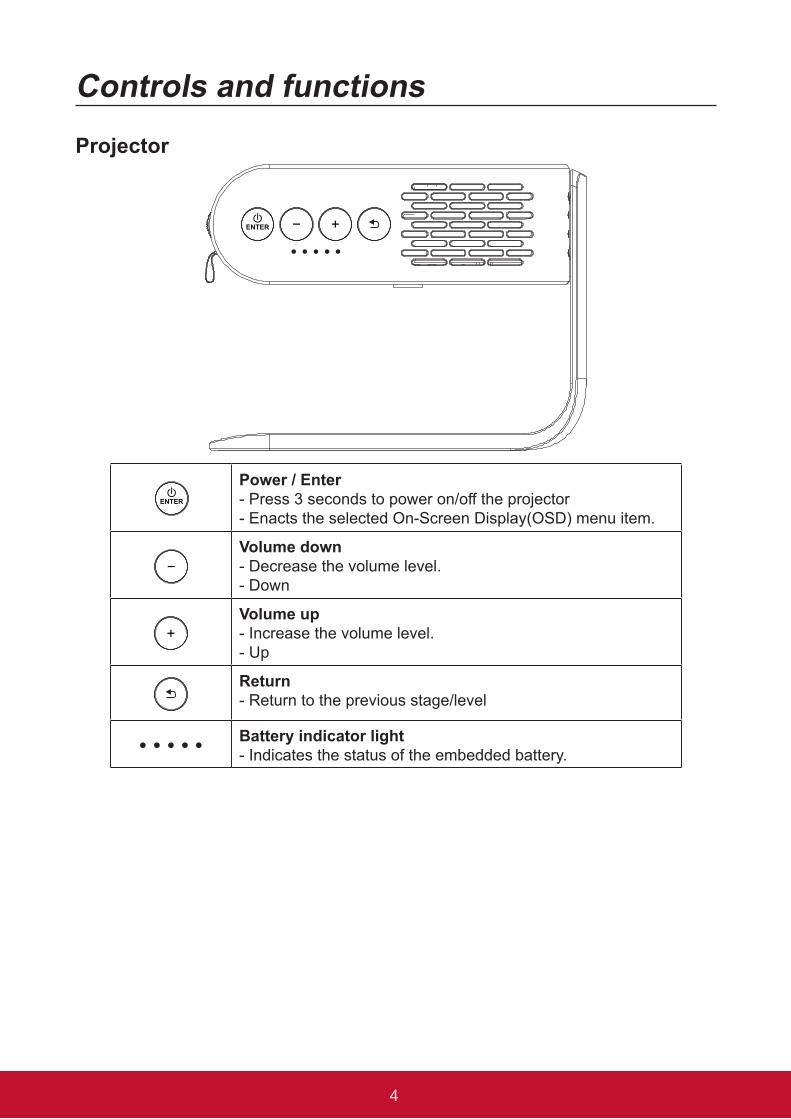
Controls and functions Projector
ENTER
ENTER
Power / Enter- Press 3 seconds to power on/off the projector- Enacts the selected On-Screen Display(OSD) menu item.
ENTER
Volume down- Decrease the volume level.- Down
ENTER
Volume up- Increase the volume level.- Up
ENTER
Return- Return to the previous stage/level
ENTER
Battery indicator light- Indicates the status of the embedded battery.
5
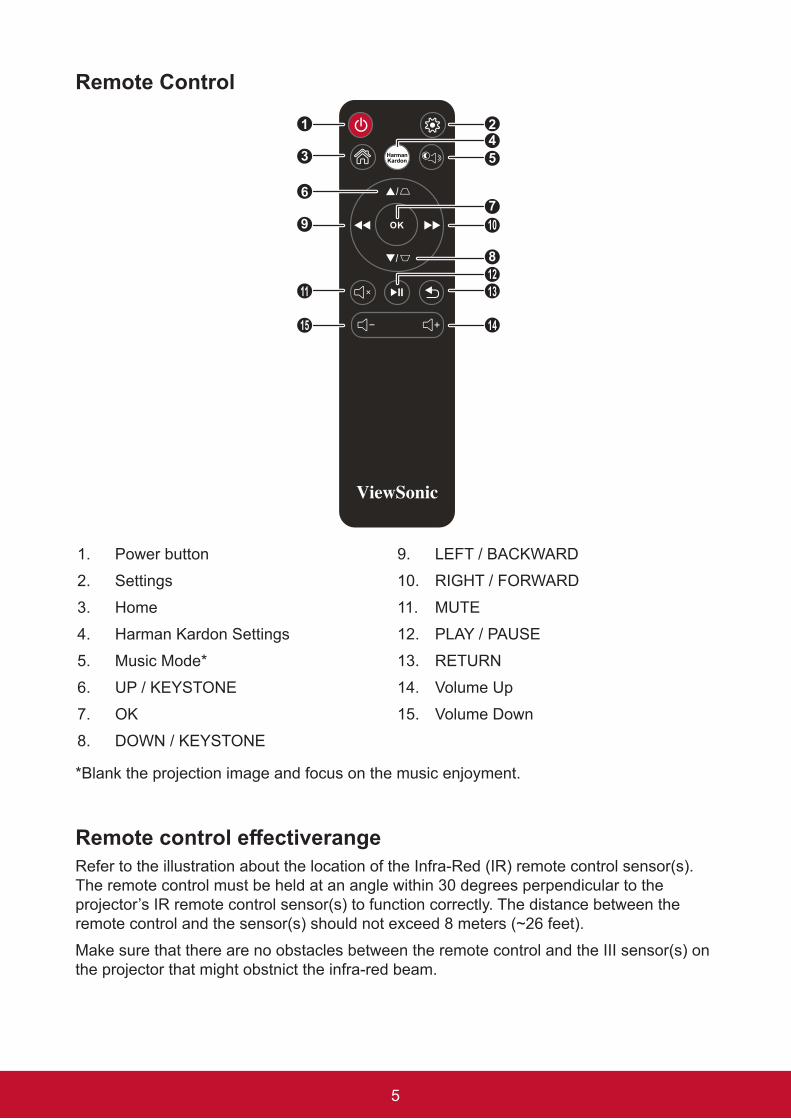
Remote Control
1
3
6
9
11
15
245
710
812
14
13
1. Power button2. Settings3. Home4. Harman Kardon Settings5. Music Mode*6. UP / KEYSTONE7. OK8. DOWN / KEYSTONE
9. LEFT / BACKWARD10. RIGHT / FORWARD11. MUTE12. PLAY / PAUSE13. RETURN14. Volume Up 15. Volume Down
*Blank the projection image and focus on the music enjoyment.
RemotecontroleffectiverangeRefer to the illustration about the location of the Infra-Red (IR) remote control sensor(s). The remote control must be held at an angle within 30 degrees perpendicular to the projector’s IR remote control sensor(s) to function correctly. The distance between the remote control and the sensor(s) should not exceed 8 meters (~26 feet). Make sure that there are no obstacles between the remote control and the III sensor(s) on the projector that might obstnict the infra-red beam.
6
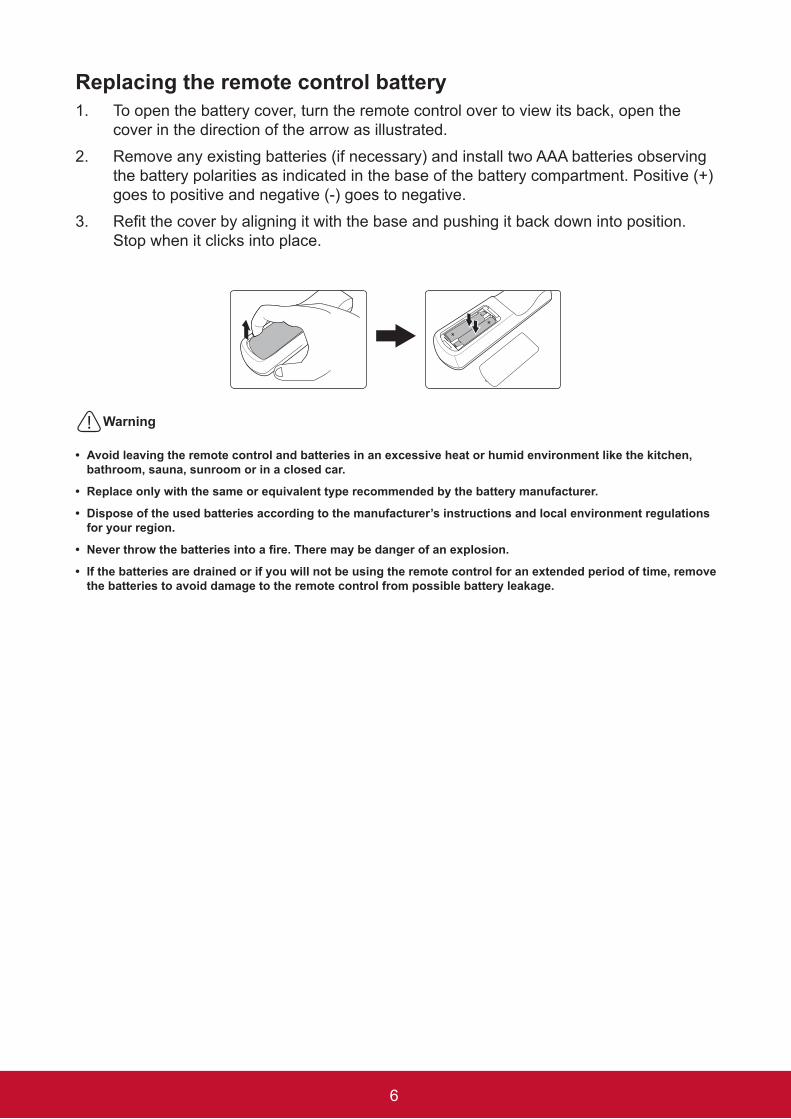
Replacing the remote control battery1. To open the battery cover, turn the remote control over to view its back, open the
cover in the direction of the arrow as illustrated.2. Remove any existing batteries (if necessary) and install two AAA batteries observing
the battery polarities as indicated in the base of the battery compartment. Positive (+) goes to positive and negative (-) goes to negative.
3. Refit the cover by aligning it with the base and pushing it back down into position. Stop when it clicks into place.
Warning
• Avoid leaving the remote control and batteries in an excessive heat or humid environment like the kitchen, bathroom, sauna, sunroom or in a closed car.
• Replace only with the same or equivalent type recommended by the battery manufacturer.
• Dispose of the used batteries according to the manufacturer’s instructions and local environment regulations for your region.
• Neverthrowthebatteriesintoafire.Theremaybedangerofanexplosion.
• If the batteries are drained or if you will not be using the remote control for an extended period of time, remove the batteries to avoid damage to the remote control from possible battery leakage.
7
Setting up Operating your projectorThis portable projector allows you to plug and play your devices so you can easily open multimedia files and hear audio straight from it’s built-in Harman Kardon speakers.For your safety and to maintain the quailty of this unit, refer to the following steps when operating your Projector.
8
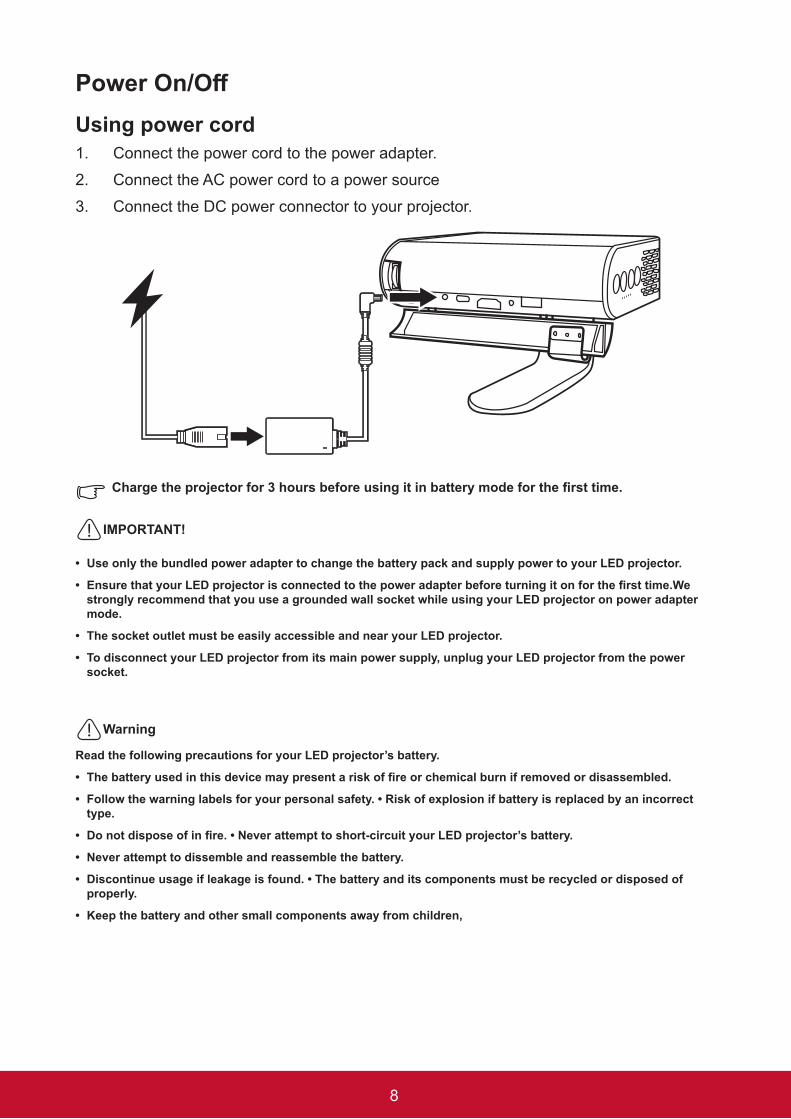
PowerOn/OffUsing power cord1. Connect the power cord to the power adapter.2. Connect the AC power cord to a power source3. Connect the DC power connector to your projector.
Chargetheprojectorfor3hoursbeforeusingitinbatterymodeforthefirsttime.
IMPORTANT!
• Use only the bundled power adapter to change the battery pack and supply power to your LED projector.
• EnsurethatyourLEDprojectorisconnectedtothepoweradapterbeforeturningitonforthefirsttime.Westrongly recommend that you use a grounded wall socket while using your LED projector on power adapter mode.
• The socket outlet must be easily accessible and near your LED projector.
• To disconnect your LED projector from its main power supply, unplug your LED projector from the power socket.
Warning
Read the following precautions for your LED projector’s battery.
• Thebatteryusedinthisdevicemaypresentariskoffireorchemicalburnifremovedordisassembled.
• Followthewarninglabelsforyourpersonalsafety.•Riskofexplosionifbatteryisreplacedbyanincorrecttype.
• Donotdisposeofinfire.•Neverattempttoshort-circuityourLEDprojector’sbattery.
• Never attempt to dissemble and reassemble the battery.
• Discontinueusageifleakageisfound.•Thebatteryanditscomponentsmustberecycledordisposedofproperly.
• Keep the battery and other small components away from children,
9
Using The BatteryWarning message is displayed when the battery is running out.As your battery is low, the projector will be turned off in a minute.If the screen shows a low battery message, be sure to charge the battery.
Battery using time informationStatus Time and Display
Charging About 3 hours
Usage Hours Up to 6hrs battery life (with Battery Saving mode and without USB power supply)
Battery Level indicator (Charging)
• During charging: Power button with Red LED light up• Full charge: Power button with White LED light up
There will be a very low power consumption during standby mode, suggest to full charge the battery before usage every time.
10
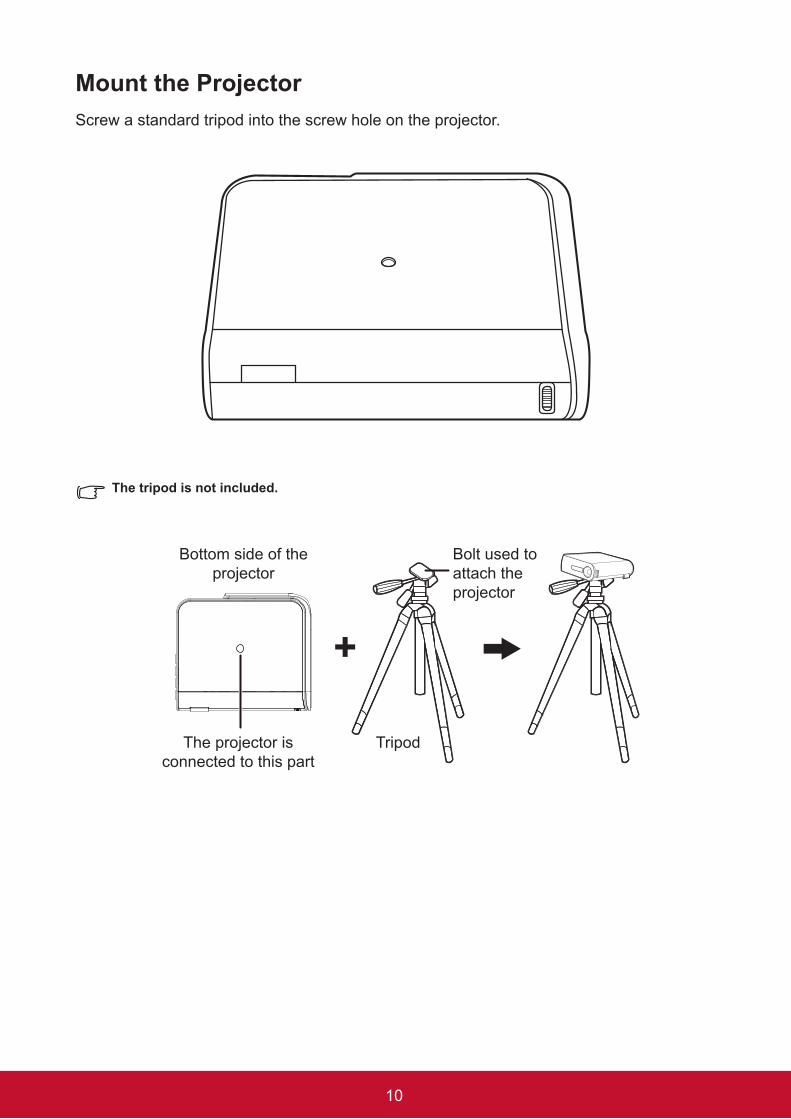
Mount the ProjectorScrew a standard tripod into the screw hole on the projector.
The tripod is not included.
+
Bottom side of the projector
Bolt used to attach the projector
The projector is connected to this part
Tripod
11
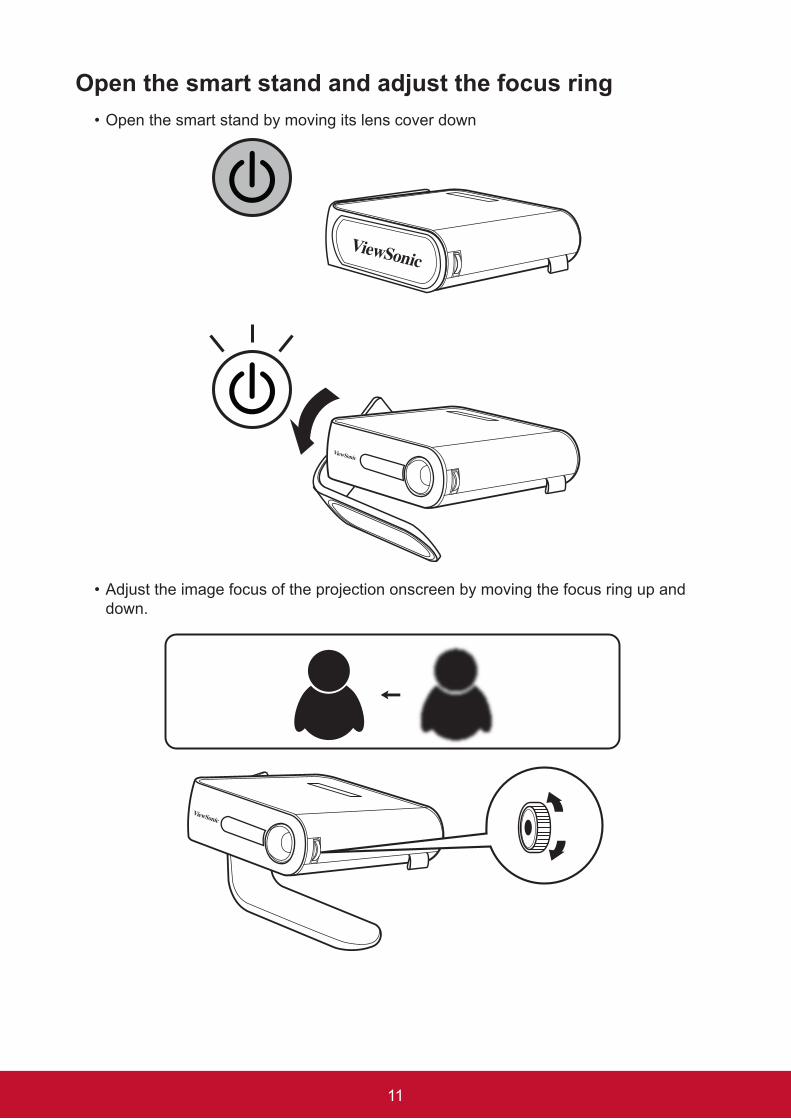
Open the smart stand and adjust the focus ring• Open the smart stand by moving its lens cover down
• Adjust the image focus of the projection onscreen by moving the focus ring up and down.
12
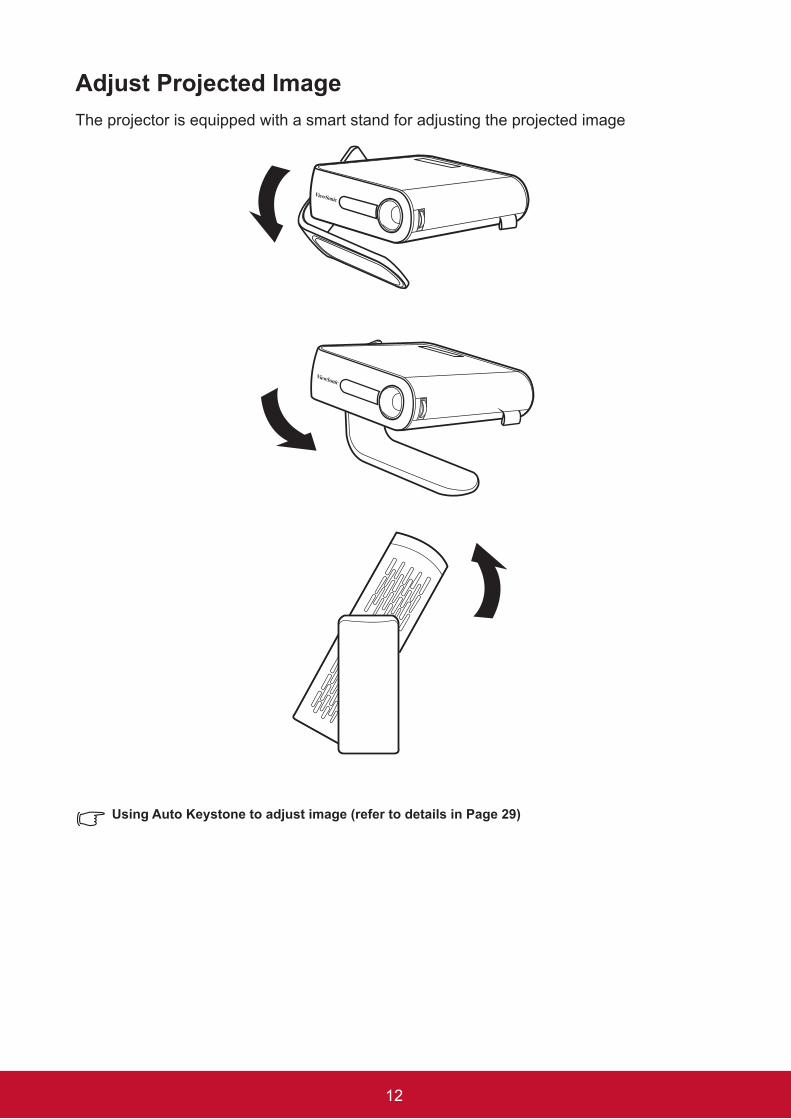
Adjust Projected ImageThe projector is equipped with a smart stand for adjusting the projected image
Using Auto Keystone to adjust image (refer to details in Page 29)
13
Positioning your projector
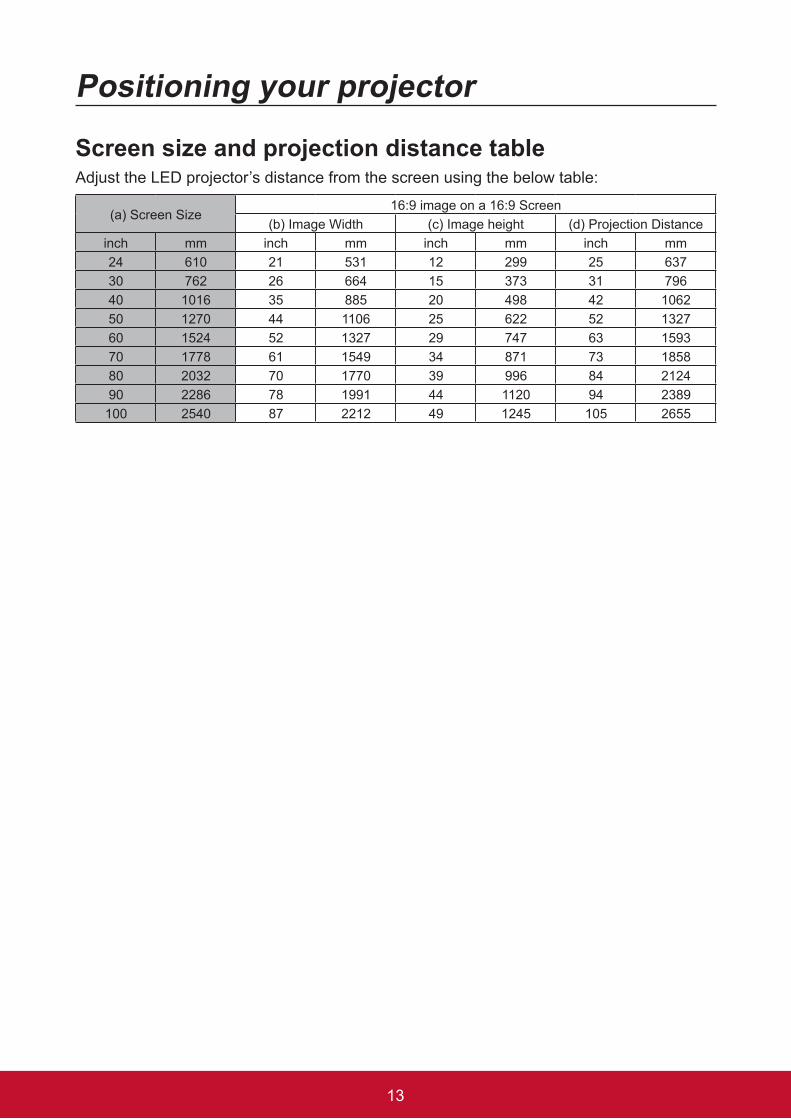
Screen size and projection distance tableAdjust the LED projector’s distance from the screen using the below table:
(a) Screen Size16:9 image on a 16:9 Screen
(b) Image Width (c) Image height (d) Projection Distanceinch mm inch mm inch mm inch mm24 610 21 531 12 299 25 63730 762 26 664 15 373 31 79640 1016 35 885 20 498 42 106250 1270 44 1106 25 622 52 132760 1524 52 1327 29 747 63 159370 1778 61 1549 34 871 73 185880 2032 70 1770 39 996 84 212490 2286 78 1991 44 1120 94 2389100 2540 87 2212 49 1245 105 2655
14
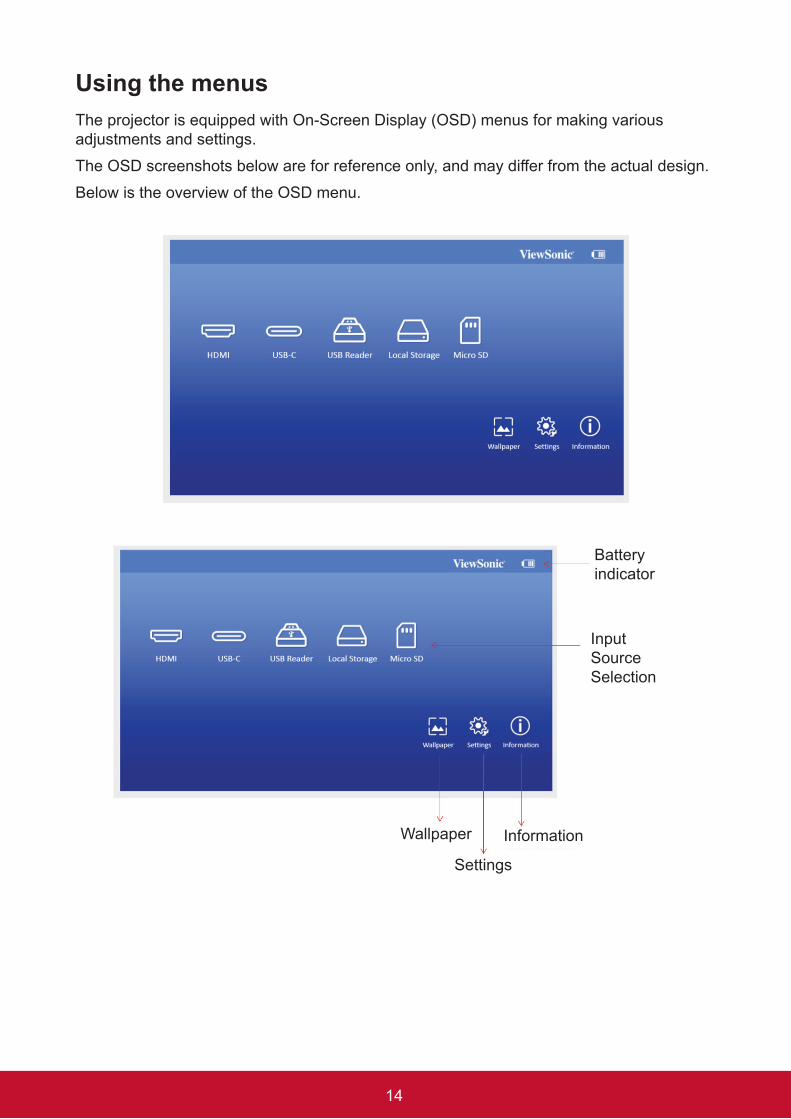
Using the menusThe projector is equipped with On-Screen Display (OSD) menus for making various adjustments and settings.The OSD screenshots below are for reference only, and may differ from the actual design.Below is the overview of the OSD menu.
Battery indicator
Wallpaper
Settings
Information
Input Source Selection
15
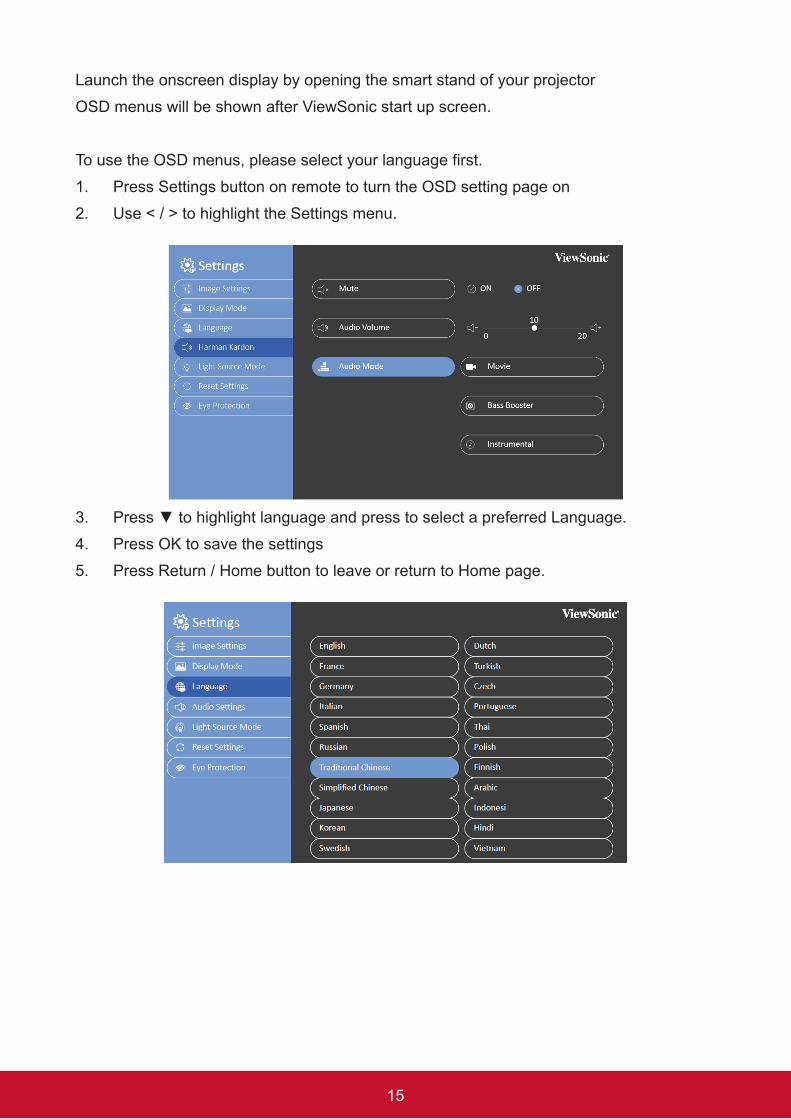
Launch the onscreen display by opening the smart stand of your projectorOSD menus will be shown after ViewSonic start up screen.
To use the OSD menus, please select your language first.1. Press Settings button on remote to turn the OSD setting page on2. Use < / > to highlight the Settings menu.
3. Press ▼ to highlight language and press to select a preferred Language.4. Press OK to save the settings5. Press Return / Home button to leave or return to Home page.
16
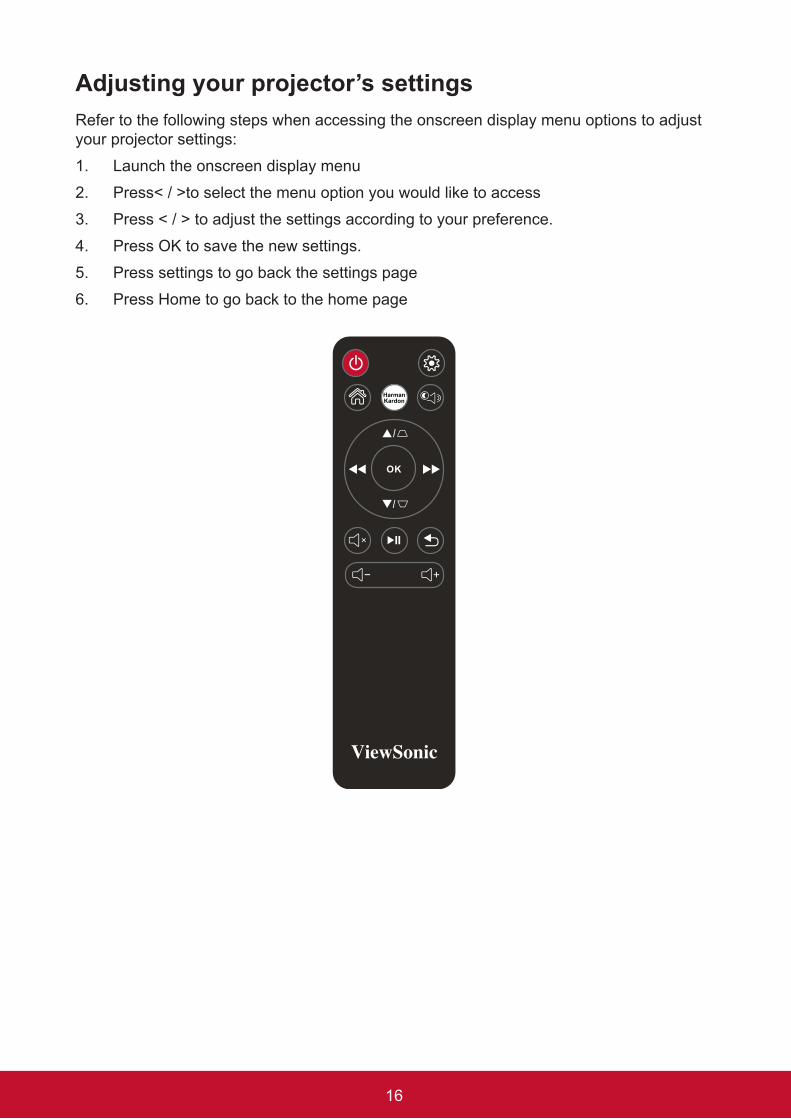
Adjusting your projector’s settingsRefer to the following steps when accessing the onscreen display menu options to adjust your projector settings:1. Launch the onscreen display menu2. Press< / >to select the menu option you would like to access3. Press < / > to adjust the settings according to your preference.4. Press OK to save the new settings.5. Press settings to go back the settings page6. Press Home to go back to the home page
1
3
6
9
11
15
245
710
812
14
13
17
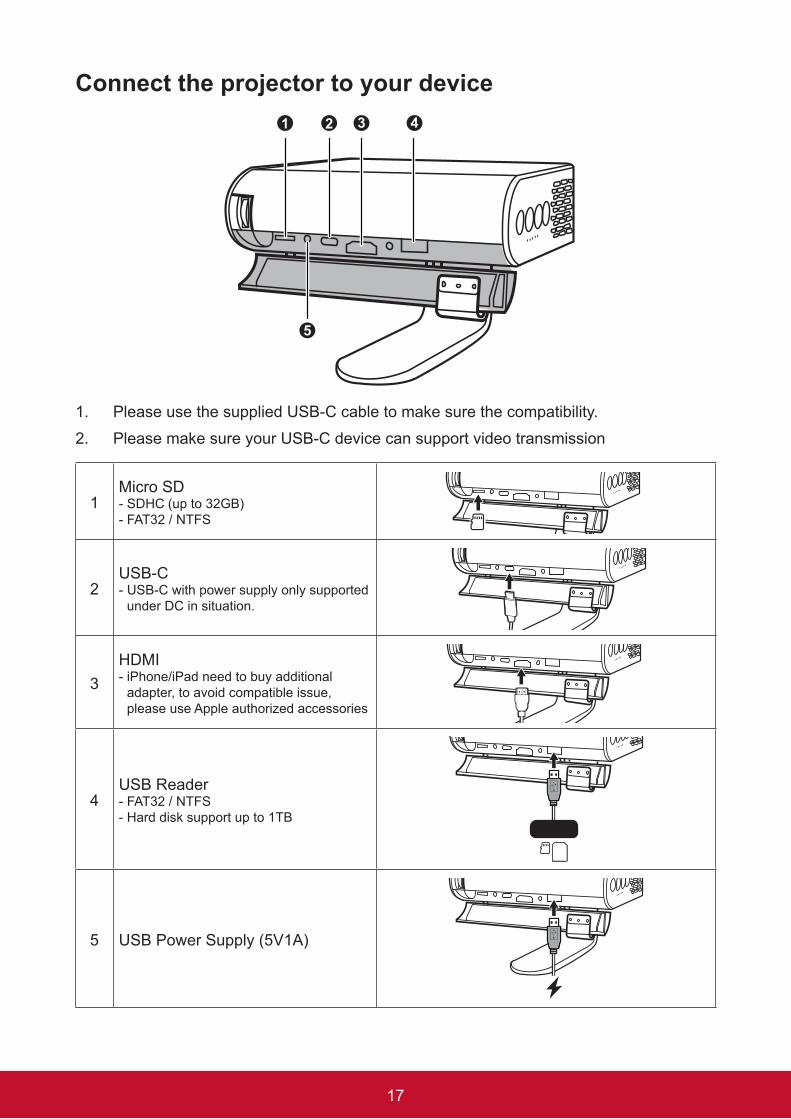
Connect the projector to your device1 32 4
5
1. Please use the supplied USB-C cable to make sure the compatibility.2. Please make sure your USB-C device can support video transmission
1Micro SD- SDHC (up to 32GB)- FAT32 / NTFS
2USB-C- USB-C with power supply only supported
under DC in situation.
3HDMI- iPhone/iPad need to buy additional
adapter, to avoid compatible issue, please use Apple authorized accessories
4USB Reader- FAT32 / NTFS - Hard disk support up to 1TB
5 USB Power Supply (5V1A)
18
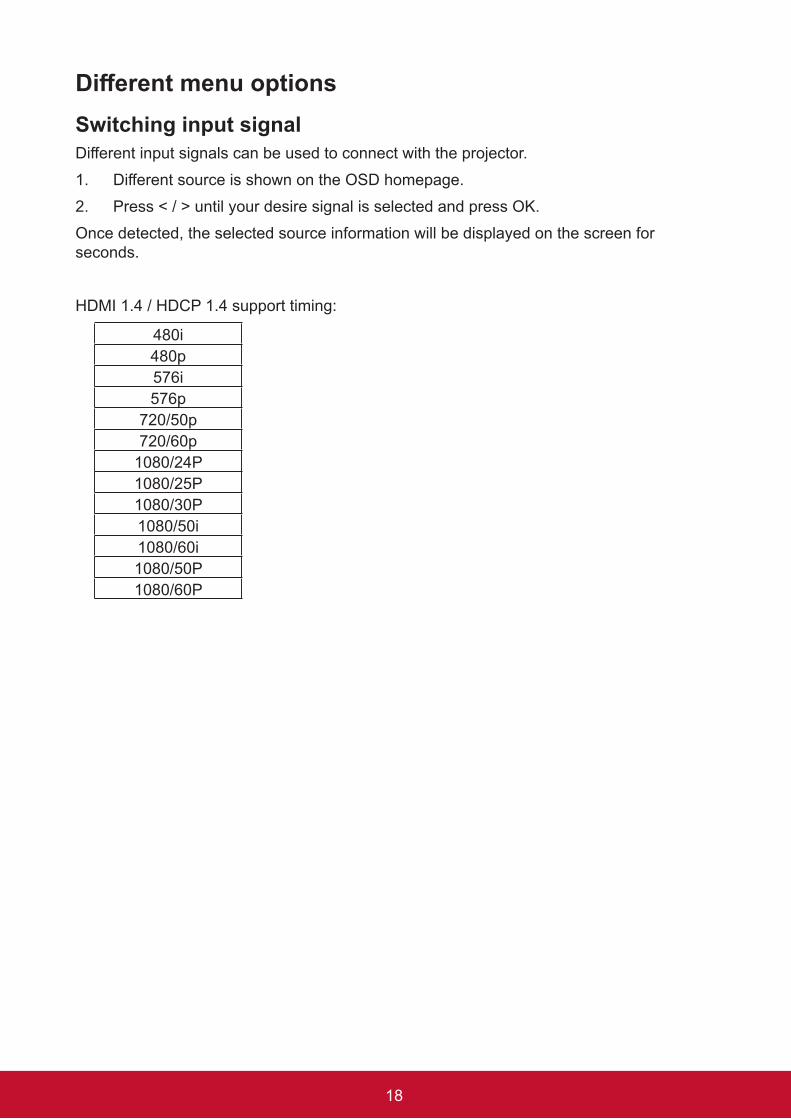
DifferentmenuoptionsSwitching input signalDifferent input signals can be used to connect with the projector.1. Different source is shown on the OSD homepage.2. Press < / > until your desire signal is selected and press OK. Once detected, the selected source information will be displayed on the screen for seconds.
HDMI 1.4 / HDCP 1.4 support timing:
480i480p576i576p
720/50p720/60p
1080/24P1080/25P1080/30P1080/50i1080/60i1080/50P1080/60P

19
USB C Conditions:• Using Power adapter: Video & Data trasmission / Power Supply• Using Embedded battery: Video & Data transmission
USB Reader• Flash Drive support up to 128GB• Format: FAT32 / NTFS• Hard disk support up to 1TB• FW update
20
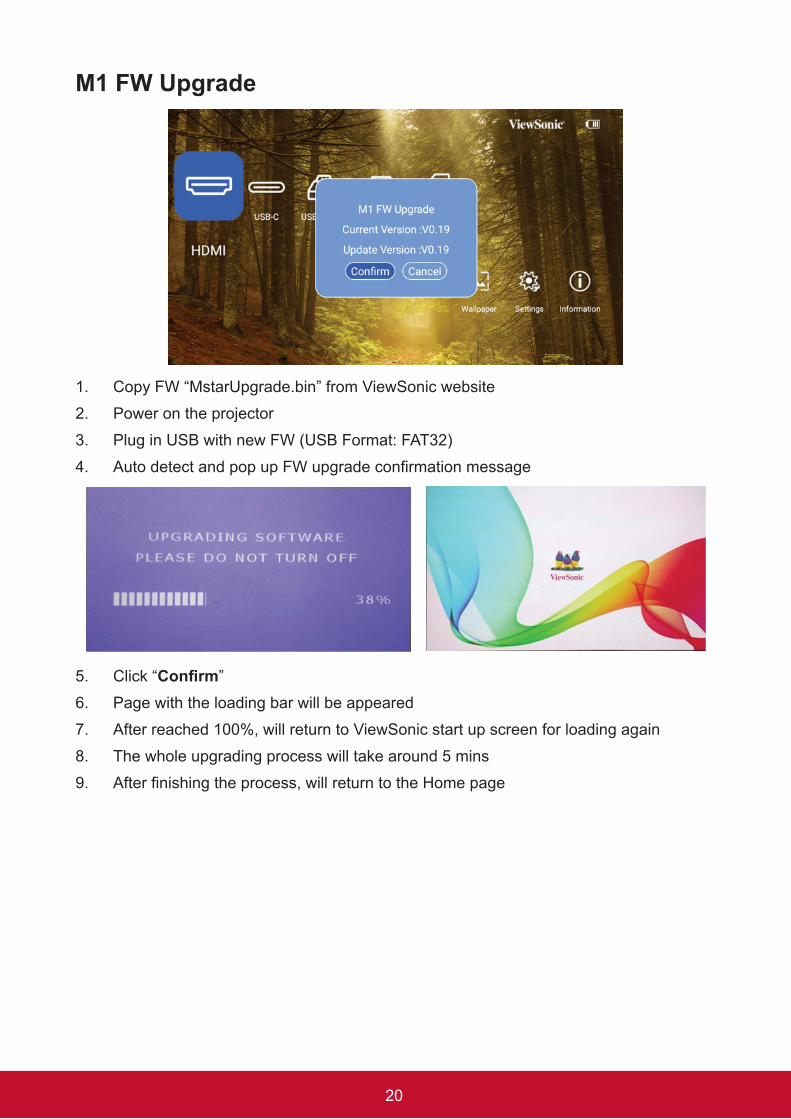
M1 FW Upgrade
1. Copy FW “MstarUpgrade.bin” from ViewSonic website 2. Power on the projector3. Plug in USB with new FW (USB Format: FAT32) 4. Auto detect and pop up FW upgrade confirmation message
5. Click “Confirm”6. Page with the loading bar will be appeared7. After reached 100%, will return to ViewSonic start up screen for loading again8. The whole upgrading process will take around 5 mins9. After finishing the process, will return to the Home page
21
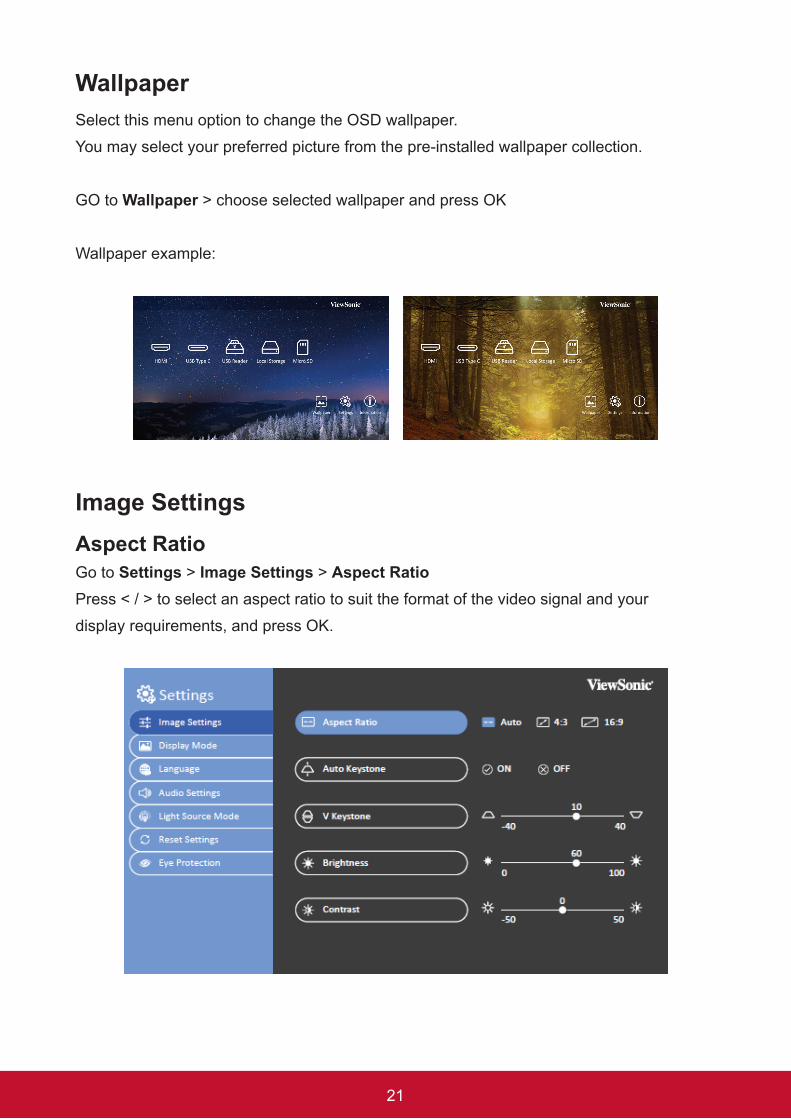
WallpaperSelect this menu option to change the OSD wallpaper.You may select your preferred picture from the pre-installed wallpaper collection.
GO to Wallpaper > choose selected wallpaper and press OK
Wallpaper example:
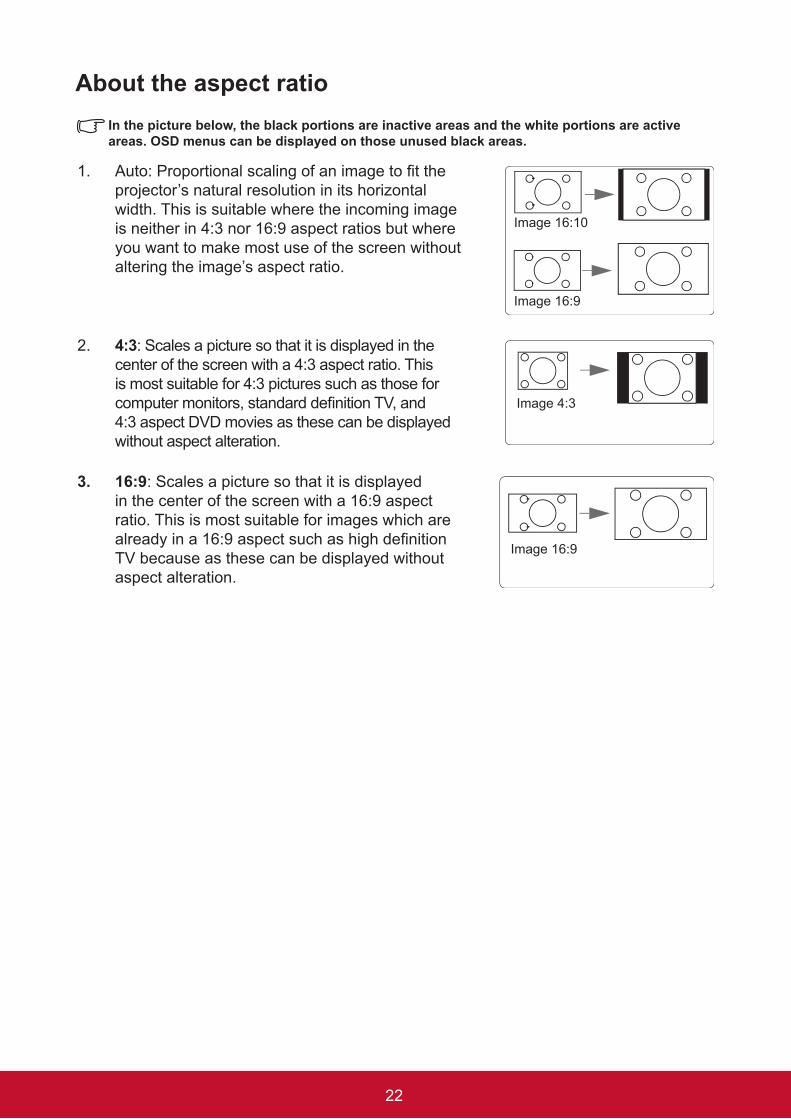
Image SettingsAspect RatioGo to Settings > Image Settings > Aspect RatioPress < / > to select an aspect ratio to suit the format of the video signal and yourdisplay requirements, and press OK.
22
About the aspect ratio In the picture below, the black portions are inactive areas and the white portions are active areas. OSD menus can be displayed on those unused black areas.
1. Auto: Proportional scaling of an image to fit the projector’s natural resolution in its horizontal width. This is suitable where the incoming image is neither in 4:3 nor 16:9 aspect ratios but where you want to make most use of the screen without altering the image’s aspect ratio.
Image 16:10
Image 16:9
2. 4:3: Scales a picture so that it is displayed in the center of the screen with a 4:3 aspect ratio. This is most suitable for 4:3 pictures such as those for computer monitors, standard definition TV, and 4:3 aspect DVD movies as these can be displayed without aspect alteration.
Image 4:3
3. 16:9: Scales a picture so that it is displayed in the center of the screen with a 16:9 aspect ratio. This is most suitable for images which are already in a 16:9 aspect such as high definition TV because as these can be displayed without aspect alteration.
Image 16:9
23
Auto KeystoneAuto Keystone provides a rectangular screen image by automatically adjusting the Keystone number when there is a trapezoidal screen image caused by tilting of the projector.Go to Settings > Image Settings > Auto KeystonePress < / > to select:
• ON: Automatically adjusts the Keystone number.• OFF: Manually adjusts the Keystone number.
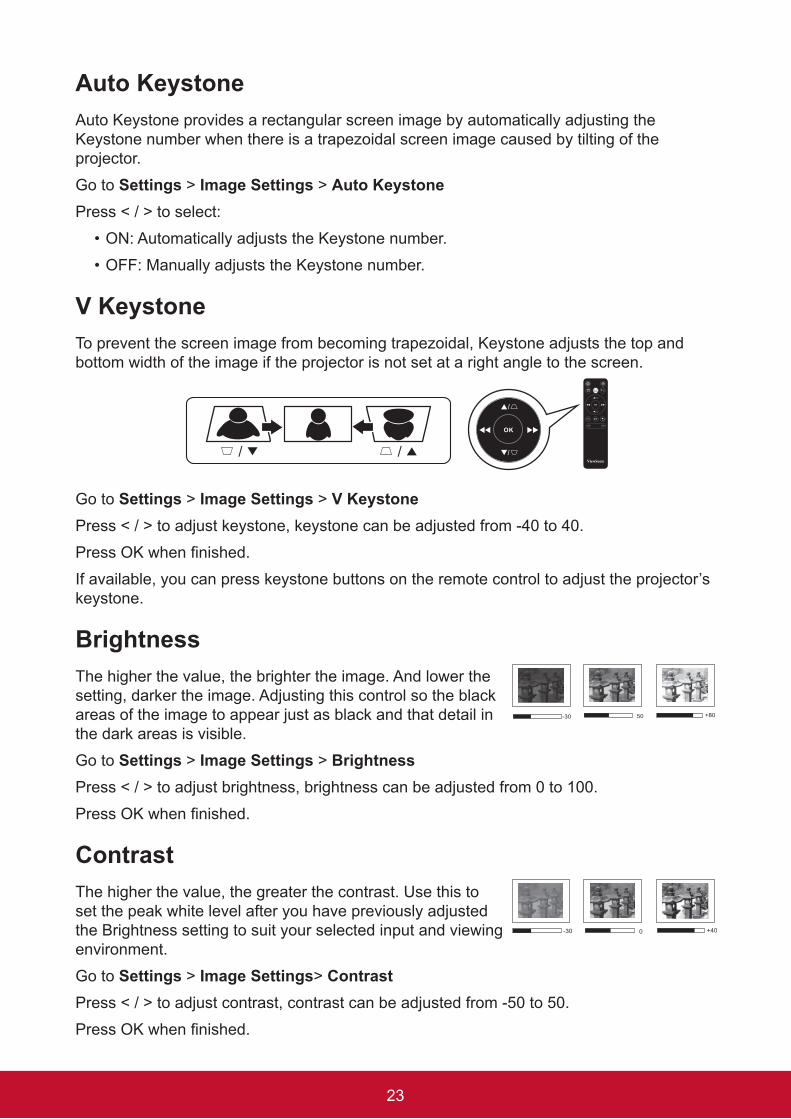
V KeystoneTo prevent the screen image from becoming trapezoidal, Keystone adjusts the top and bottom width of the image if the projector is not set at a right angle to the screen.
Go to Settings > Image Settings > V KeystonePress < / > to adjust keystone, keystone can be adjusted from -40 to 40.Press OK when finished.If available, you can press keystone buttons on the remote control to adjust the projector’s keystone.
BrightnessThe higher the value, the brighter the image. And lower the setting, darker the image. Adjusting this control so the black areas of the image to appear just as black and that detail in the dark areas is visible.Go to Settings > Image Settings > BrightnessPress < / > to adjust brightness, brightness can be adjusted from 0 to 100.Press OK when finished.
ContrastThe higher the value, the greater the contrast. Use this to set the peak white level after you have previously adjusted the Brightness setting to suit your selected input and viewing environment.Go to Settings > Image Settings> ContrastPress < / > to adjust contrast, contrast can be adjusted from -50 to 50.Press OK when finished.
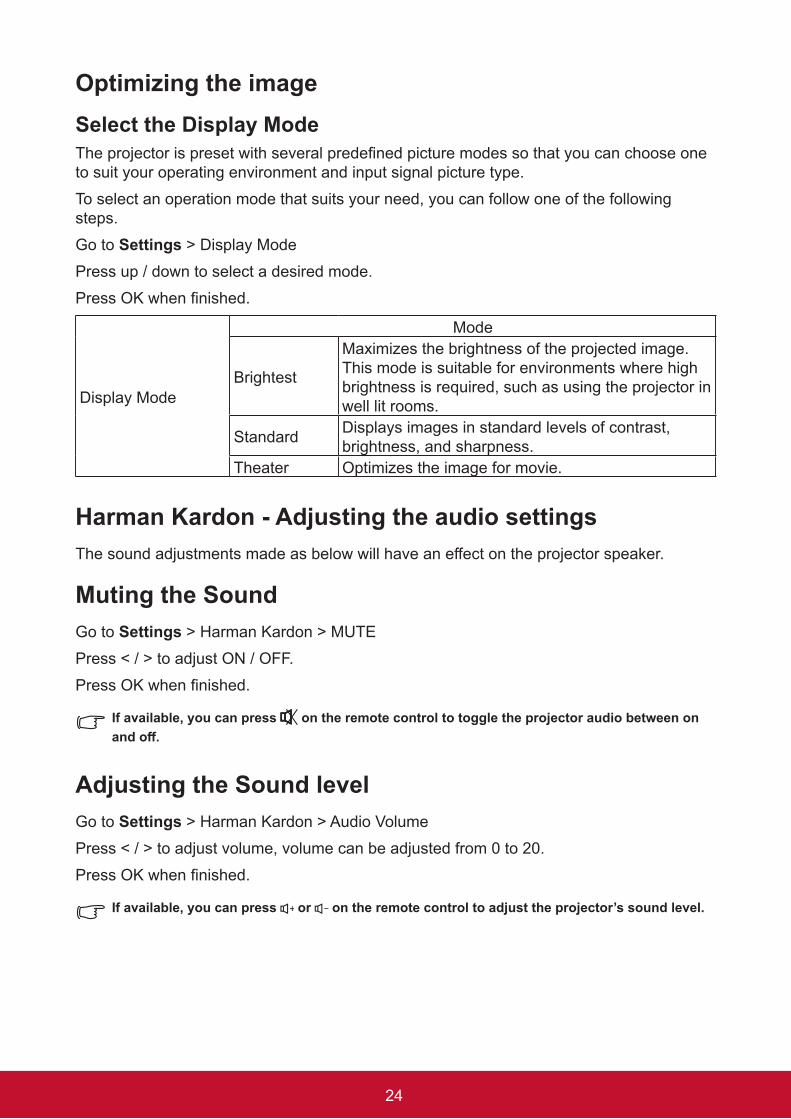
24
Optimizing the imageSelect the Display ModeThe projector is preset with several predefined picture modes so that you can choose one to suit your operating environment and input signal picture type.To select an operation mode that suits your need, you can follow one of the following steps.Go to Settings > Display ModePress up / down to select a desired mode.Press OK when finished.
Display Mode
Mode
Brightest
Maximizes the brightness of the projected image. This mode is suitable for environments where high brightness is required, such as using the projector in well lit rooms.
Standard Displays images in standard levels of contrast, brightness, and sharpness.
Theater Optimizes the image for movie.
Harman Kardon - Adjusting the audio settingsThe sound adjustments made as below will have an effect on the projector speaker.
Muting the SoundGo to Settings > Harman Kardon > MUTEPress < / > to adjust ON / OFF.Press OK when finished.
If available, you can press on the remote control to toggle the projector audio between on andoff.
Adjusting the Sound levelGo to Settings > Harman Kardon > Audio VolumePress < / > to adjust volume, volume can be adjusted from 0 to 20.Press OK when finished.
If available, you can press or on the remote control to adjust the projector’s sound level.
25
Adjusting the Audio ModeGo to Settings > Harman Kardon > Audio ModePress up / down to select a desired mode.Press OK when finished.
Sound Mode
ModeMovie
Sets audio optimized for a specific genre.Bass BoosterInstrumental
If available, you can press Harman Kardon on the remote control to adjust the projector’s sound mode.
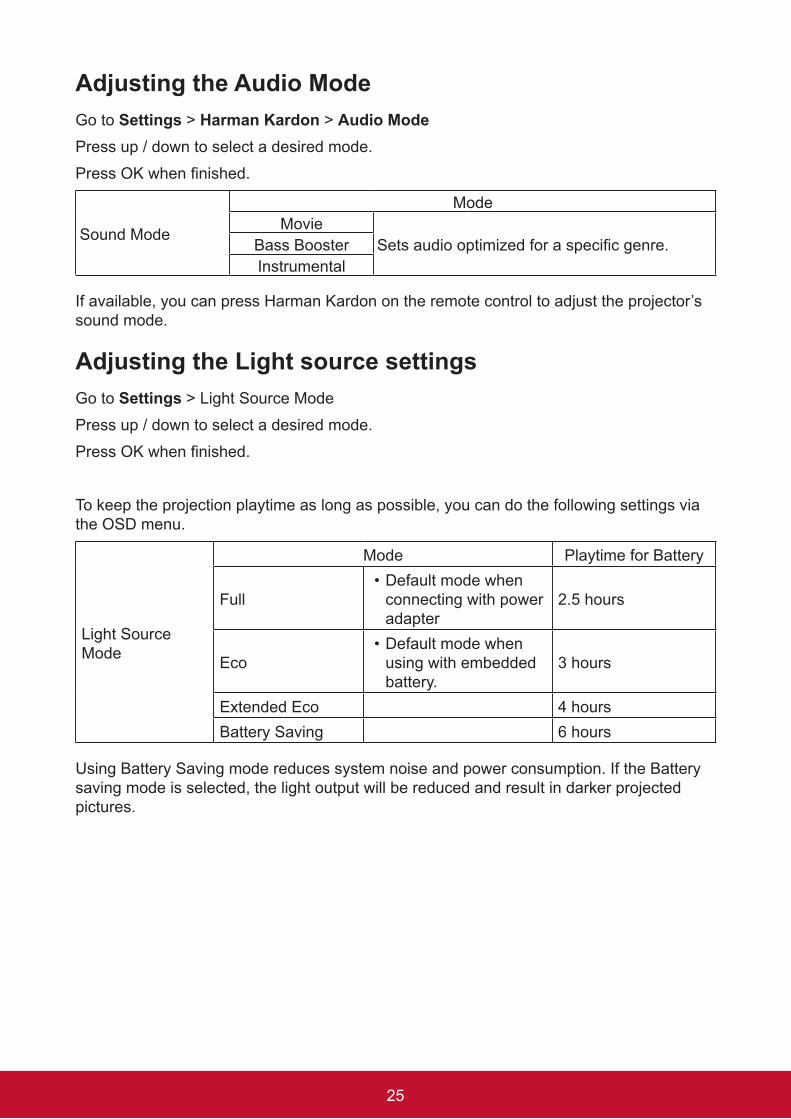
Adjusting the Light source settingsGo to Settings > Light Source ModePress up / down to select a desired mode.Press OK when finished.
To keep the projection playtime as long as possible, you can do the following settings via the OSD menu.
Light Source Mode
Mode Playtime for Battery
Full• Default mode when
connecting with power adapter
2.5 hours
Eco• Default mode when
using with embedded battery.
3 hours
Extended Eco 4 hoursBattery Saving 6 hours
Using Battery Saving mode reduces system noise and power consumption. If the Battery saving mode is selected, the light output will be reduced and result in darker projected pictures.
26
Reset All SettingsReturns all settings to the factory preset values.The following settings will still remain: Language, Keystone, Go to Settings > Reset Settings > All SettingsPress < / > to select Reset / Cancel.Press OK when finished.
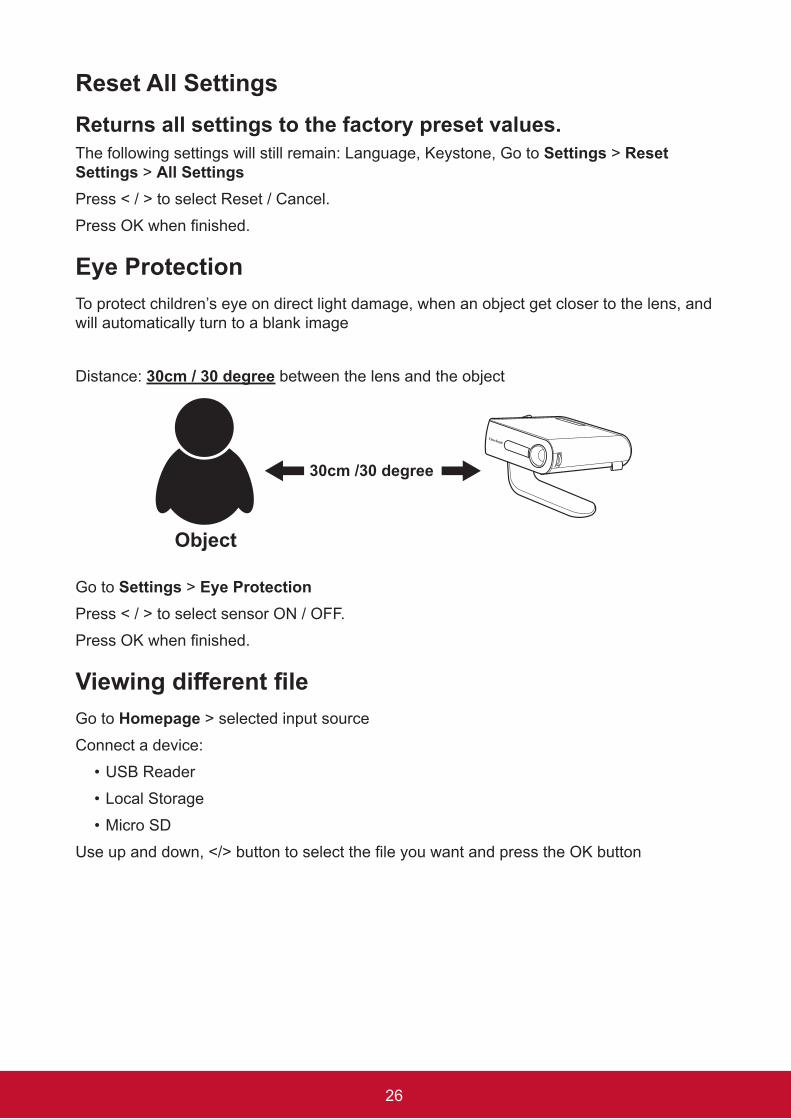
Eye ProtectionTo protect children’s eye on direct light damage, when an object get closer to the lens, and will automatically turn to a blank image
Distance: 30cm / 30 degree between the lens and the object
30cm /30 degree
Object
Go to Settings > Eye ProtectionPress < / > to select sensor ON / OFF.Press OK when finished.
ViewingdifferentfileGo to Homepage > selected input sourceConnect a device:
• USB Reader• Local Storage• Micro SD
Use up and down, </> button to select the file you want and press the OK button
27
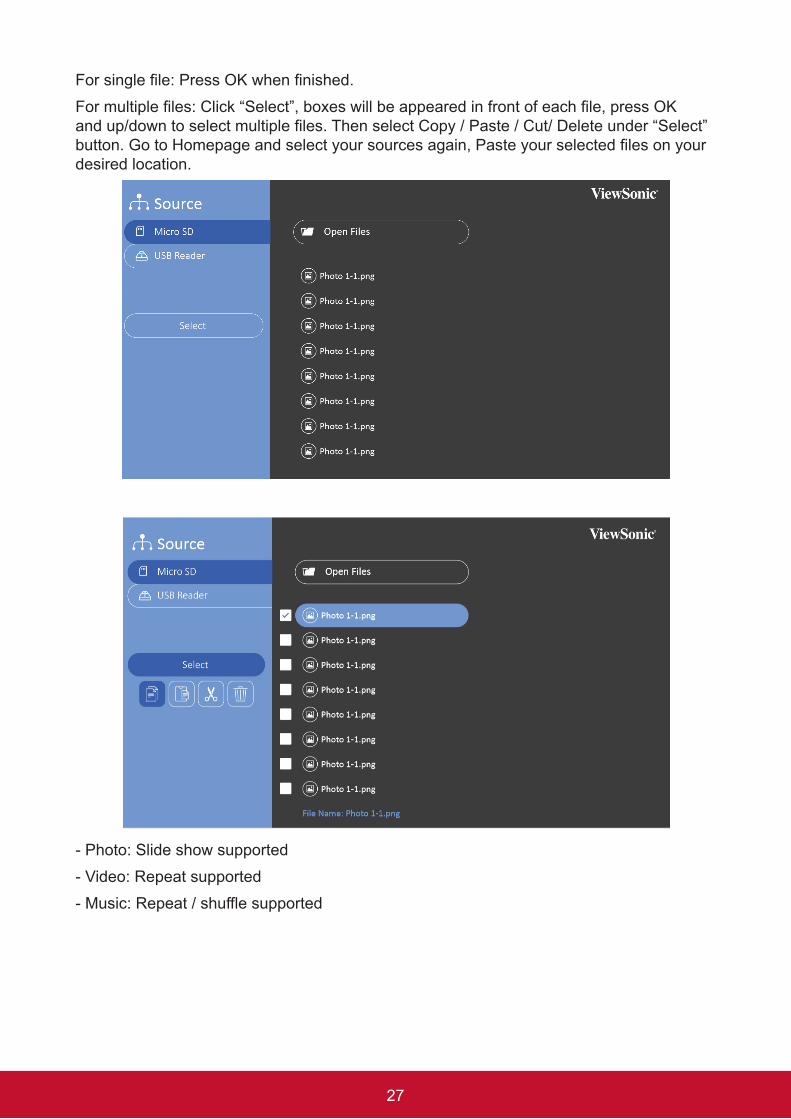
For single file: Press OK when finished.For multiple files: Click “Select”, boxes will be appeared in front of each file, press OK and up/down to select multiple files. Then select Copy / Paste / Cut/ Delete under “Select” button. Go to Homepage and select your sources again, Paste your selected files on your desired location.
- Photo: Slide show supported- Video: Repeat supported- Music: Repeat / shuffle supported
28
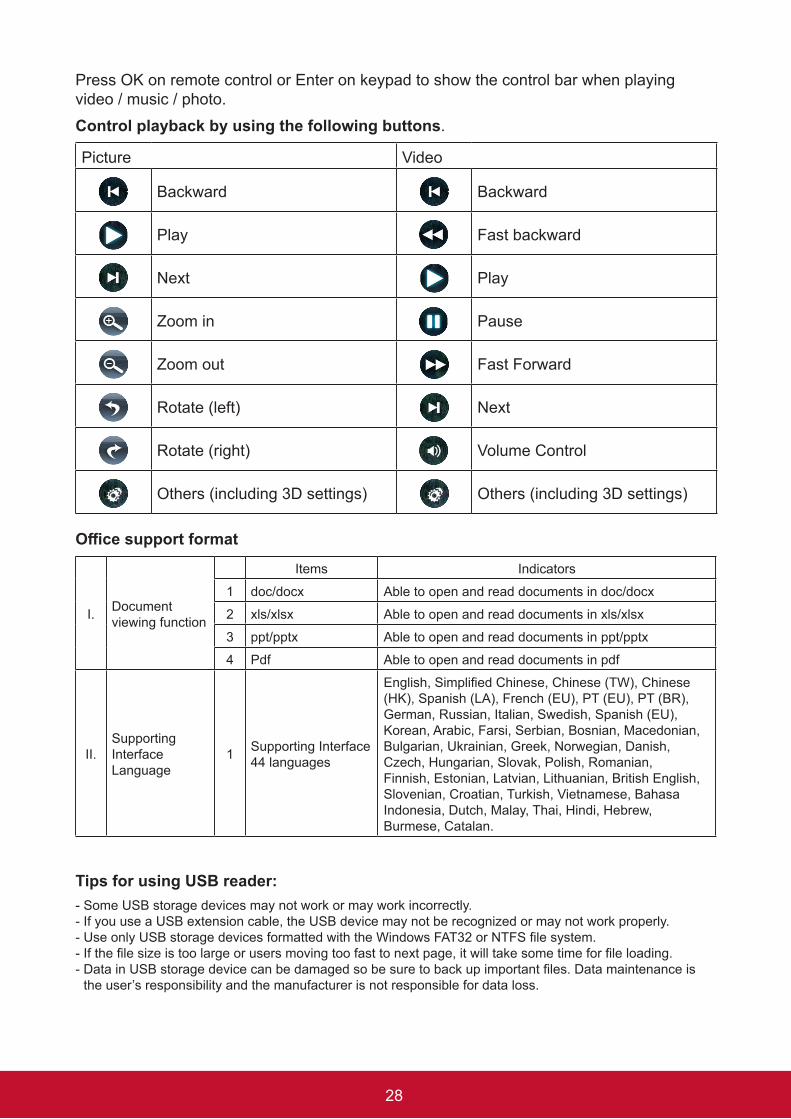
Press OK on remote control or Enter on keypad to show the control bar when playing video / music / photo.Control playback by using the following buttons.
Picture Video
Backward Backward
Play Fast backward
Next Play
Zoom in Pause
Zoom out Fast Forward
Rotate (left) Next
Rotate (right) Volume Control
Others (including 3D settings) Others (including 3D settings)
Officesupportformat
I. Document viewing function
Items Indicators
1 doc/docx Able to open and read documents in doc/docx
2 xls/xlsx Able to open and read documents in xls/xlsx
3 ppt/pptx Able to open and read documents in ppt/pptx
4 Pdf Able to open and read documents in pdf
II.Supporting Interface Language
1 Supporting Interface 44 languages
English, Simplified Chinese, Chinese (TW), Chinese (HK), Spanish (LA), French (EU), PT (EU), PT (BR), German, Russian, Italian, Swedish, Spanish (EU), Korean, Arabic, Farsi, Serbian, Bosnian, Macedonian, Bulgarian, Ukrainian, Greek, Norwegian, Danish, Czech, Hungarian, Slovak, Polish, Romanian, Finnish, Estonian, Latvian, Lithuanian, British English, Slovenian, Croatian, Turkish, Vietnamese, Bahasa Indonesia, Dutch, Malay, Thai, Hindi, Hebrew, Burmese, Catalan.
Tips for using USB reader:- Some USB storage devices may not work or may work incorrectly.- If you use a USB extension cable, the USB device may not be recognized or may not work properly.- Use only USB storage devices formatted with the Windows FAT32 or NTFS file system.- If the file size is too large or users moving too fast to next page, it will take some time for file loading.- Data in USB storage device can be damaged so be sure to back up important files. Data maintenance is
the user’s responsibility and the manufacturer is not responsible for data loss.
29
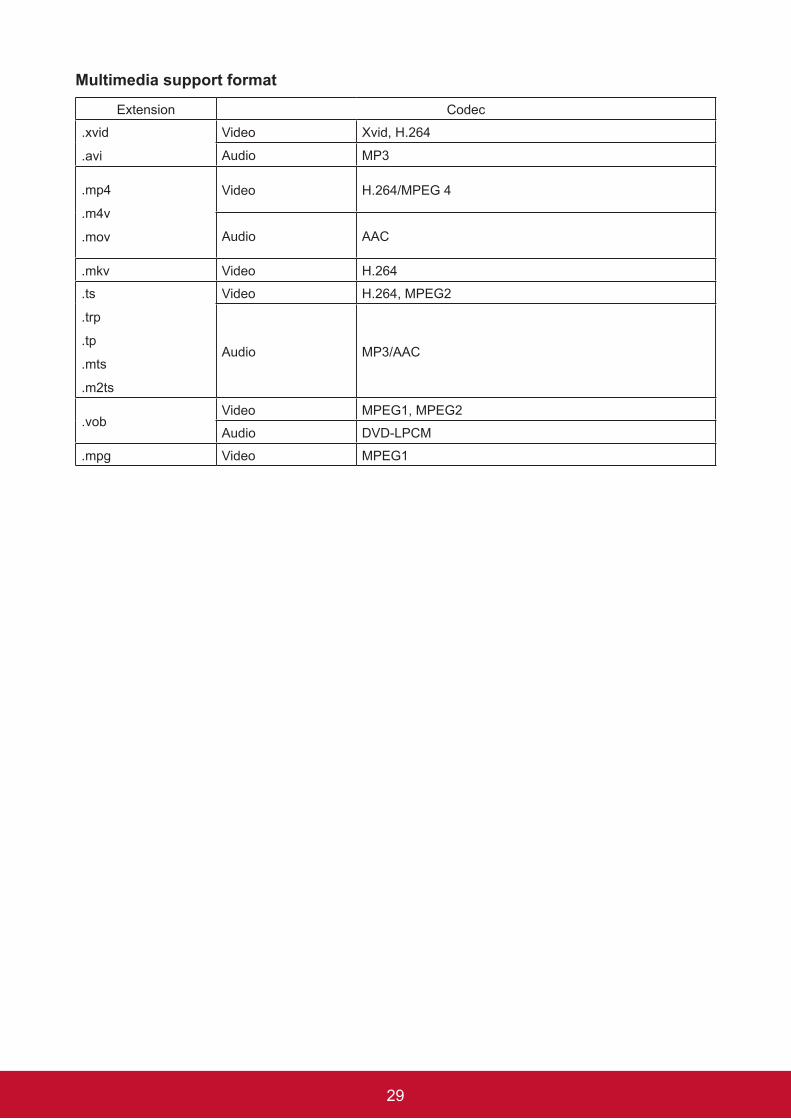
Multimedia support format
Extension Codec
.xvid
.avi
Video Xvid, H.264
Audio MP3
.mp4
.m4v
.mov
Video H.264/MPEG 4
Audio AAC
.mkv Video H.264
.ts
.trp
.tp
.mts
.m2ts
Video H.264, MPEG2
Audio MP3/AAC
.vobVideo MPEG1, MPEG2
Audio DVD-LPCM
.mpg Video MPEG1
30
Using the 3D functionThis portable cinema features 3D function which enables you to enjoy 3D movies, videos, and sporting events in a more realistic way by presenting the depth of the images. You need to wear a pair of 3D glasses to view 3D images.If the 3D signal is input from an HDMI 1.4a compatible device, the portable cinema detects the signal for 3D Sync information and once detected, it projects images in 3D format automatically. To activate 3D functions:1. Press OK, video control bar will pop up when playing videos2. Select the 3D settings icon, the 3D Settings menu is displayed in the right bottom
corner. 3. Highlight 3D self detect and change to Auto.When the 3D Sync function is on:
• The brightness level of the projected image will decrease.• The Color Mode cannot be adjusted.
If you discover the inversion of the 3D image depth, set the 3D Sync Invert function to ON to correct the problem.
31
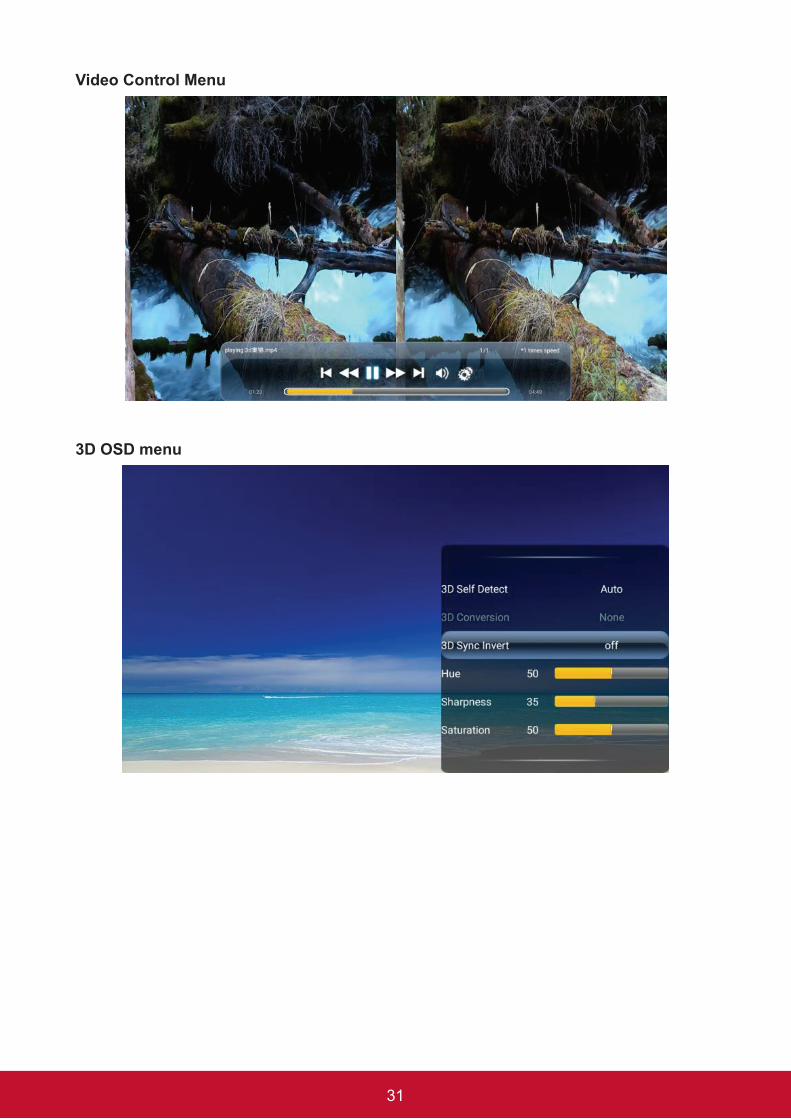
Video Control Menu
3D OSD menu
32
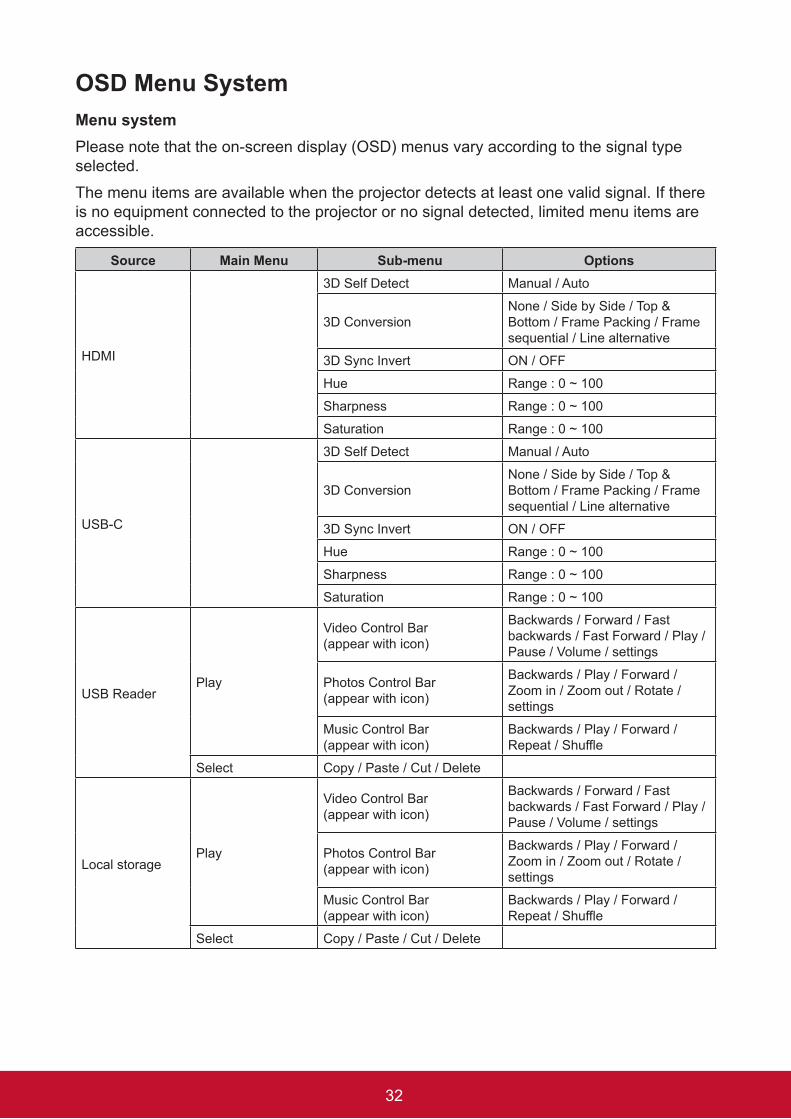
OSD Menu SystemMenu systemPlease note that the on-screen display (OSD) menus vary according to the signal type selected.The menu items are available when the projector detects at least one valid signal. If there is no equipment connected to the projector or no signal detected, limited menu items are accessible.
Source Main Menu Sub-menu Options
HDMI
3D Self Detect Manual / Auto
3D ConversionNone / Side by Side / Top & Bottom / Frame Packing / Frame sequential / Line alternative
3D Sync Invert ON / OFF
Hue Range : 0 ~ 100
Sharpness Range : 0 ~ 100
Saturation Range : 0 ~ 100
USB-C
3D Self Detect Manual / Auto
3D ConversionNone / Side by Side / Top & Bottom / Frame Packing / Frame sequential / Line alternative
3D Sync Invert ON / OFF
Hue Range : 0 ~ 100
Sharpness Range : 0 ~ 100
Saturation Range : 0 ~ 100
USB ReaderPlay
Video Control Bar (appear with icon)
Backwards / Forward / Fast backwards / Fast Forward / Play / Pause / Volume / settings
Photos Control Bar (appear with icon)
Backwards / Play / Forward / Zoom in / Zoom out / Rotate / settings
Music Control Bar (appear with icon)
Backwards / Play / Forward / Repeat / Shuffle
Select Copy / Paste / Cut / Delete
Local storagePlay
Video Control Bar (appear with icon)
Backwards / Forward / Fast backwards / Fast Forward / Play / Pause / Volume / settings
Photos Control Bar (appear with icon)
Backwards / Play / Forward / Zoom in / Zoom out / Rotate / settings
Music Control Bar (appear with icon)
Backwards / Play / Forward / Repeat / Shuffle
Select Copy / Paste / Cut / Delete
33
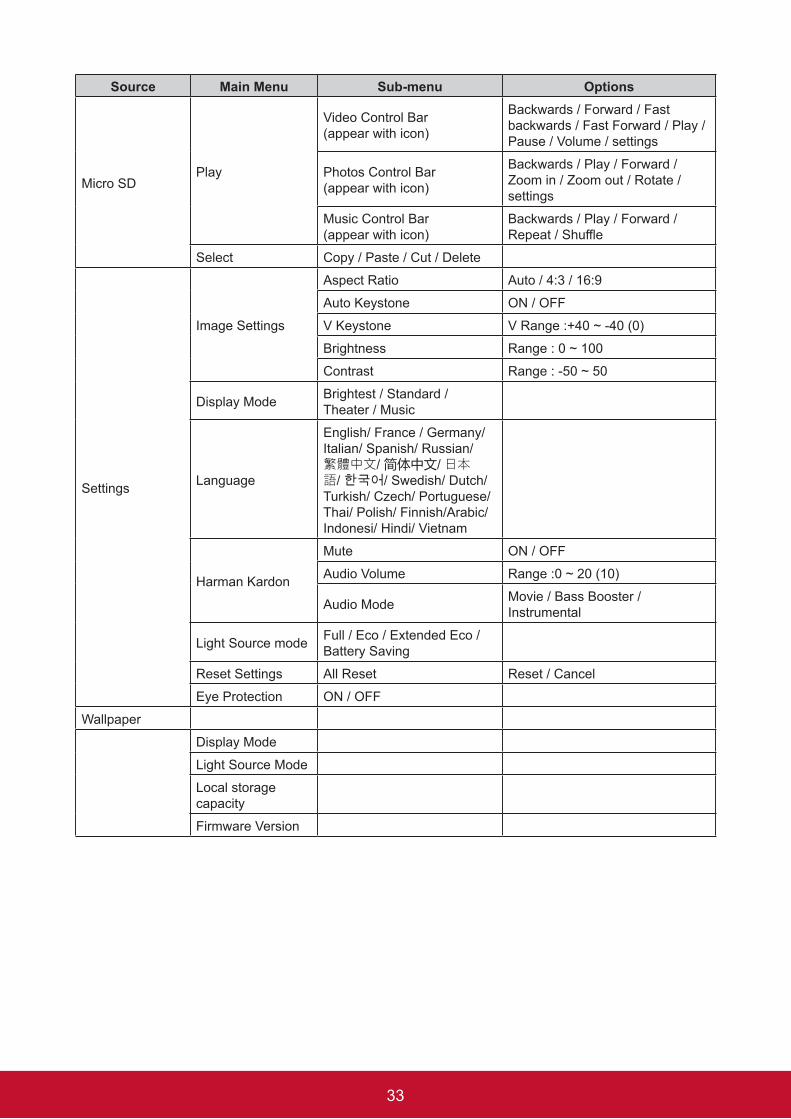
Source Main Menu Sub-menu Options
Micro SDPlay
Video Control Bar (appear with icon)
Backwards / Forward / Fast backwards / Fast Forward / Play / Pause / Volume / settings
Photos Control Bar (appear with icon)
Backwards / Play / Forward / Zoom in / Zoom out / Rotate / settings
Music Control Bar (appear with icon)
Backwards / Play / Forward / Repeat / Shuffle
Select Copy / Paste / Cut / Delete
Settings
Image Settings
Aspect Ratio Auto / 4:3 / 16:9
Auto Keystone ON / OFF
V Keystone V Range :+40 ~ -40 (0)
Brightness Range : 0 ~ 100
Contrast Range : -50 ~ 50
Display Mode Brightest / Standard / Theater / Music
Language
English/ France / Germany/ Italian/ Spanish/ Russian/ 繁體中文/ 简体中文/ 日本語/ 한국어/ Swedish/ Dutch/ Turkish/ Czech/ Portuguese/ Thai/ Polish/ Finnish/Arabic/ Indonesi/ Hindi/ Vietnam
Harman Kardon
Mute ON / OFF
Audio Volume Range :0 ~ 20 (10)
Audio Mode Movie / Bass Booster / Instrumental
Light Source mode Full / Eco / Extended Eco / Battery Saving
Reset Settings All Reset Reset / Cancel
Eye Protection ON / OFF
Wallpaper
Display Mode
Light Source Mode
Local storage capacity
Firmware Version
34
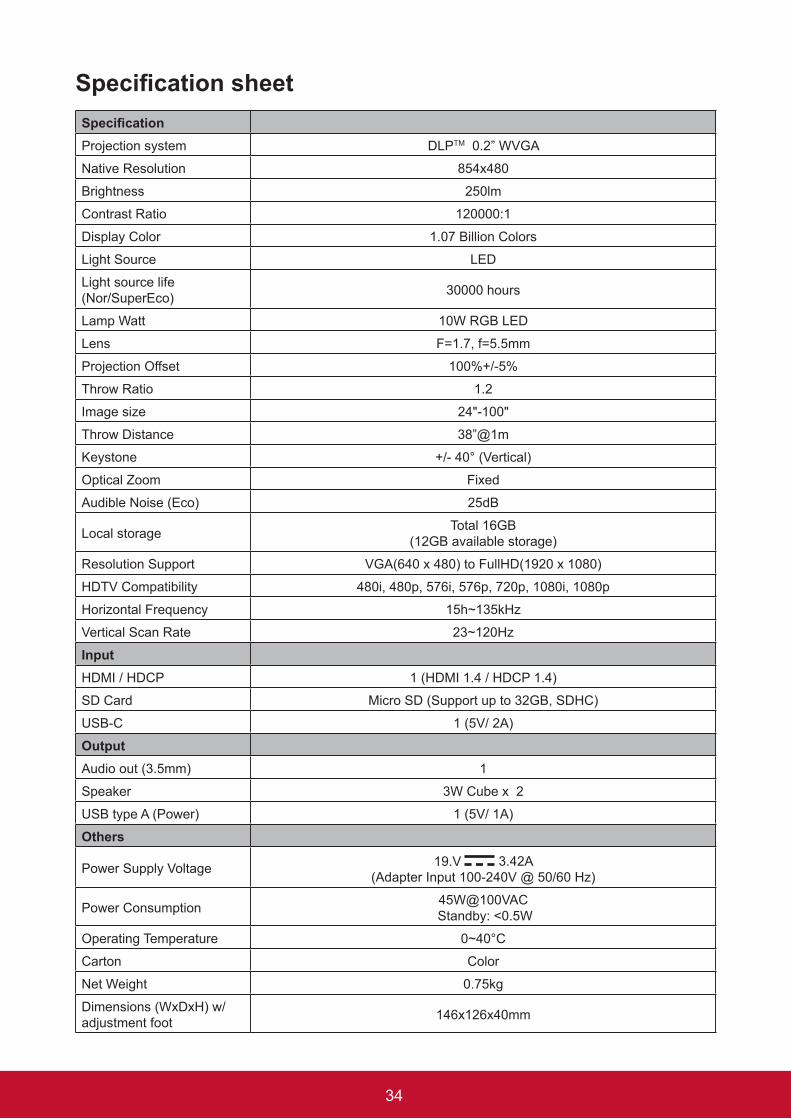
SpecificationsheetSpecificationProjection system DLPTM 0.2” WVGA
Native Resolution 854x480
Brightness 250lm
Contrast Ratio 120000:1
Display Color 1.07 Billion Colors
Light Source LED
Light source life (Nor/SuperEco) 30000 hours
Lamp Watt 10W RGB LED
Lens F=1.7, f=5.5mm
Projection Offset 100%+/-5%
Throw Ratio 1.2
Image size 24"-100"
Throw Distance 38”@1m
Keystone +/- 40° (Vertical)
Optical Zoom Fixed
Audible Noise (Eco) 25dB
Local storage Total 16GB (12GB available storage)
Resolution Support VGA(640 x 480) to FullHD(1920 x 1080)
HDTV Compatibility 480i, 480p, 576i, 576p, 720p, 1080i, 1080p
Horizontal Frequency 15h~135kHz
Vertical Scan Rate 23~120Hz
InputHDMI / HDCP 1 (HDMI 1.4 / HDCP 1.4)
SD Card Micro SD (Support up to 32GB, SDHC)
USB-C 1 (5V/ 2A)
OutputAudio out (3.5mm) 1
Speaker 3W Cube x 2
USB type A (Power) 1 (5V/ 1A)
Others
Power Supply Voltage 19.V 3.42A(Adapter Input 100-240V @ 50/60 Hz)
Power Consumption 45W@100VAC Standby: <0.5W
Operating Temperature 0~40°C
Carton Color
Net Weight 0.75kg
Dimensions (WxDxH) w/adjustment foot 146x126x40mm

35
LanguageEnglish, French, Spanish, Thai, Korean, German, Italian, Russian, Swedish,
Dutch, Polish, Czech, T-Chinese, S-Chinese, Japanese, Turkish, Portuguese, Finnish, Indonesian, India, Arabic, Vietnamese
Standard Accessory Power Cord 1
Remote Control 1
QSG 1
USB-C Cable 1 (1m)
Optional Accessory Warranty Card Yes (for specific regions only)
Carry Bag 1
Feature MapSuperColor ●
3D Blu-ray ●
3D Ready ●
SonicExpert ●
SonicMode ●
360° Tilt Angle Projection ●
Porait mode ●
Auto V Keystone ●
USB Reader ●
Quick Power On ●
Quick Power Off ●
Eye Protection ●
36
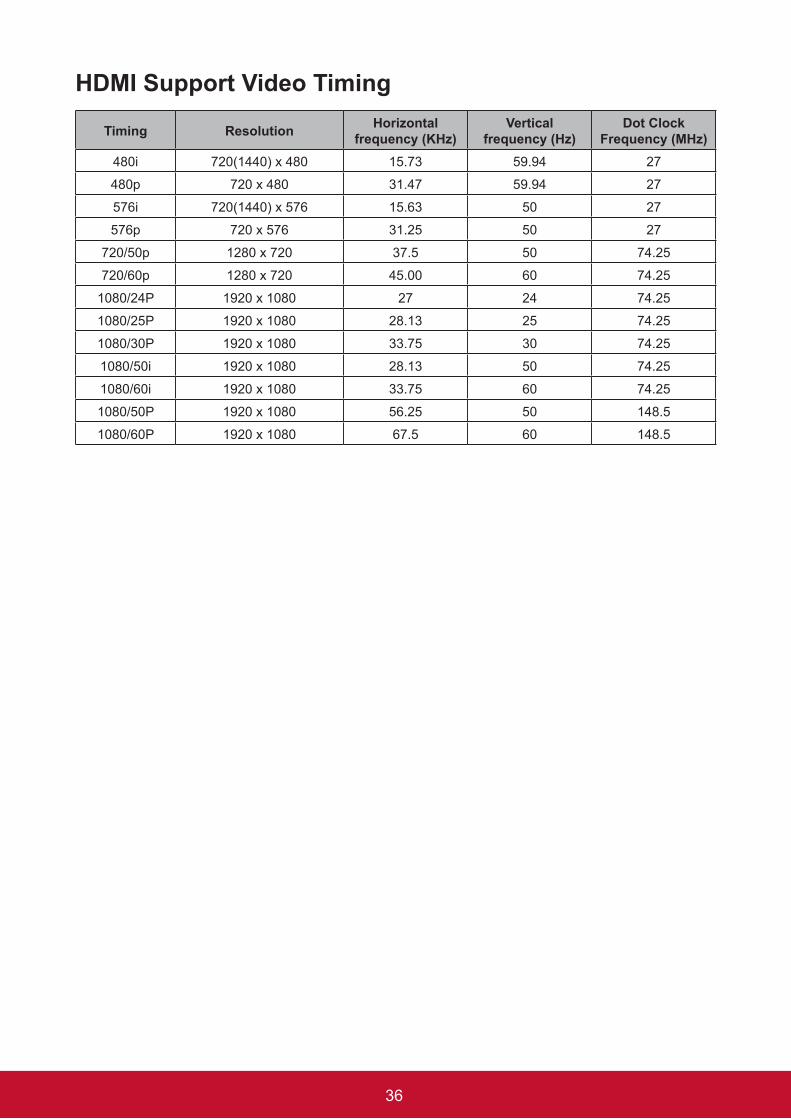
HDMI Support Video Timing
Timing Resolution Horizontal frequency (KHz)
Vertical frequency (Hz)
Dot Clock Frequency (MHz)
480i 720(1440) x 480 15.73 59.94 27
480p 720 x 480 31.47 59.94 27
576i 720(1440) x 576 15.63 50 27
576p 720 x 576 31.25 50 27
720/50p 1280 x 720 37.5 50 74.25
720/60p 1280 x 720 45.00 60 74.25
1080/24P 1920 x 1080 27 24 74.25
1080/25P 1920 x 1080 28.13 25 74.25
1080/30P 1920 x 1080 33.75 30 74.25
1080/50i 1920 x 1080 28.13 50 74.25
1080/60i 1920 x 1080 33.75 60 74.25
1080/50P 1920 x 1080 56.25 50 148.5
1080/60P 1920 x 1080 67.5 60 148.5
37
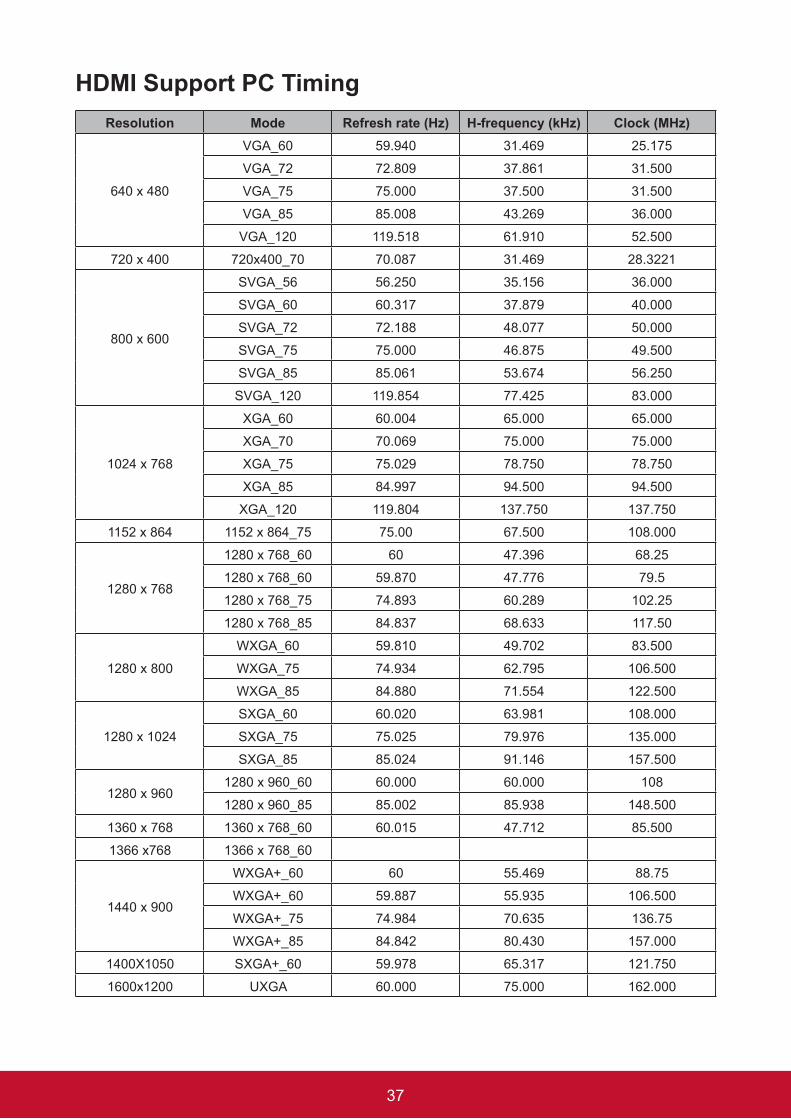
HDMI Support PC TimingResolution Mode Refresh rate (Hz) H-frequency (kHz) Clock (MHz)
640 x 480
VGA_60 59.940 31.469 25.175
VGA_72 72.809 37.861 31.500
VGA_75 75.000 37.500 31.500
VGA_85 85.008 43.269 36.000
VGA_120 119.518 61.910 52.500
720 x 400 720x400_70 70.087 31.469 28.3221
800 x 600
SVGA_56 56.250 35.156 36.000
SVGA_60 60.317 37.879 40.000
SVGA_72 72.188 48.077 50.000
SVGA_75 75.000 46.875 49.500
SVGA_85 85.061 53.674 56.250
SVGA_120 119.854 77.425 83.000
1024 x 768
XGA_60 60.004 65.000 65.000
XGA_70 70.069 75.000 75.000
XGA_75 75.029 78.750 78.750
XGA_85 84.997 94.500 94.500
XGA_120 119.804 137.750 137.750
1152 x 864 1152 x 864_75 75.00 67.500 108.000
1280 x 768
1280 x 768_60 60 47.396 68.25
1280 x 768_60 59.870 47.776 79.5
1280 x 768_75 74.893 60.289 102.25
1280 x 768_85 84.837 68.633 117.50
1280 x 800
WXGA_60 59.810 49.702 83.500
WXGA_75 74.934 62.795 106.500
WXGA_85 84.880 71.554 122.500
1280 x 1024
SXGA_60 60.020 63.981 108.000
SXGA_75 75.025 79.976 135.000
SXGA_85 85.024 91.146 157.500
1280 x 9601280 x 960_60 60.000 60.000 108
1280 x 960_85 85.002 85.938 148.500
1360 x 768 1360 x 768_60 60.015 47.712 85.500
1366 x768 1366 x 768_60
1440 x 900
WXGA+_60 60 55.469 88.75
WXGA+_60 59.887 55.935 106.500
WXGA+_75 74.984 70.635 136.75
WXGA+_85 84.842 80.430 157.000
1400X1050 SXGA+_60 59.978 65.317 121.750
1600x1200 UXGA 60.000 75.000 162.000
38
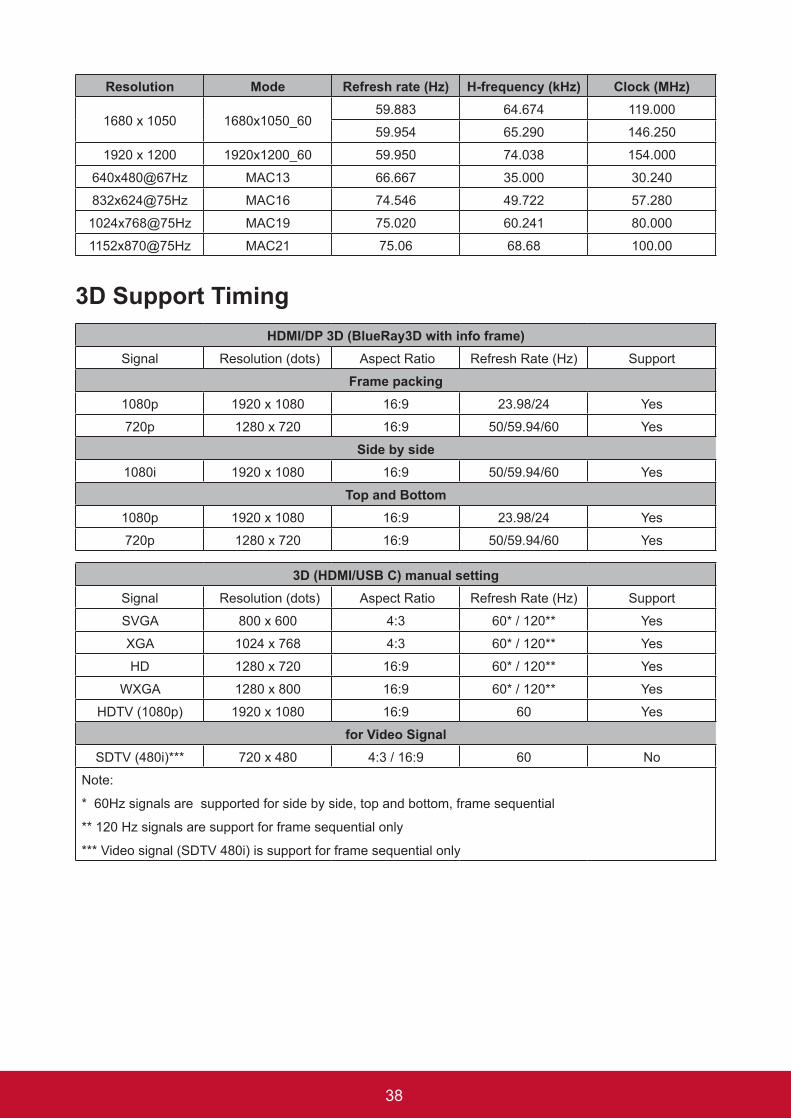
Resolution Mode Refresh rate (Hz) H-frequency (kHz) Clock (MHz)
1680 x 1050 1680x1050_6059.883 64.674 119.000
59.954 65.290 146.250
1920 x 1200 1920x1200_60 59.950 74.038 154.000
640x480@67Hz MAC13 66.667 35.000 30.240
832x624@75Hz MAC16 74.546 49.722 57.280
1024x768@75Hz MAC19 75.020 60.241 80.000
1152x870@75Hz MAC21 75.06 68.68 100.00
3D Support TimingHDMI/DP 3D (BlueRay3D with info frame)
Signal Resolution (dots) Aspect Ratio Refresh Rate (Hz) Support
Frame packing1080p 1920 x 1080 16:9 23.98/24 Yes
720p 1280 x 720 16:9 50/59.94/60 Yes
Side by side1080i 1920 x 1080 16:9 50/59.94/60 Yes
Top and Bottom1080p 1920 x 1080 16:9 23.98/24 Yes
720p 1280 x 720 16:9 50/59.94/60 Yes
3D (HDMI/USB C) manual settingSignal Resolution (dots) Aspect Ratio Refresh Rate (Hz) Support
SVGA 800 x 600 4:3 60* / 120** Yes
XGA 1024 x 768 4:3 60* / 120** Yes
HD 1280 x 720 16:9 60* / 120** Yes
WXGA 1280 x 800 16:9 60* / 120** Yes
HDTV (1080p) 1920 x 1080 16:9 60 Yes
for Video SignalSDTV (480i)*** 720 x 480 4:3 / 16:9 60 No
Note:
* 60Hz signals are supported for side by side, top and bottom, frame sequential
** 120 Hz signals are support for frame sequential only
*** Video signal (SDTV 480i) is support for frame sequential only
39
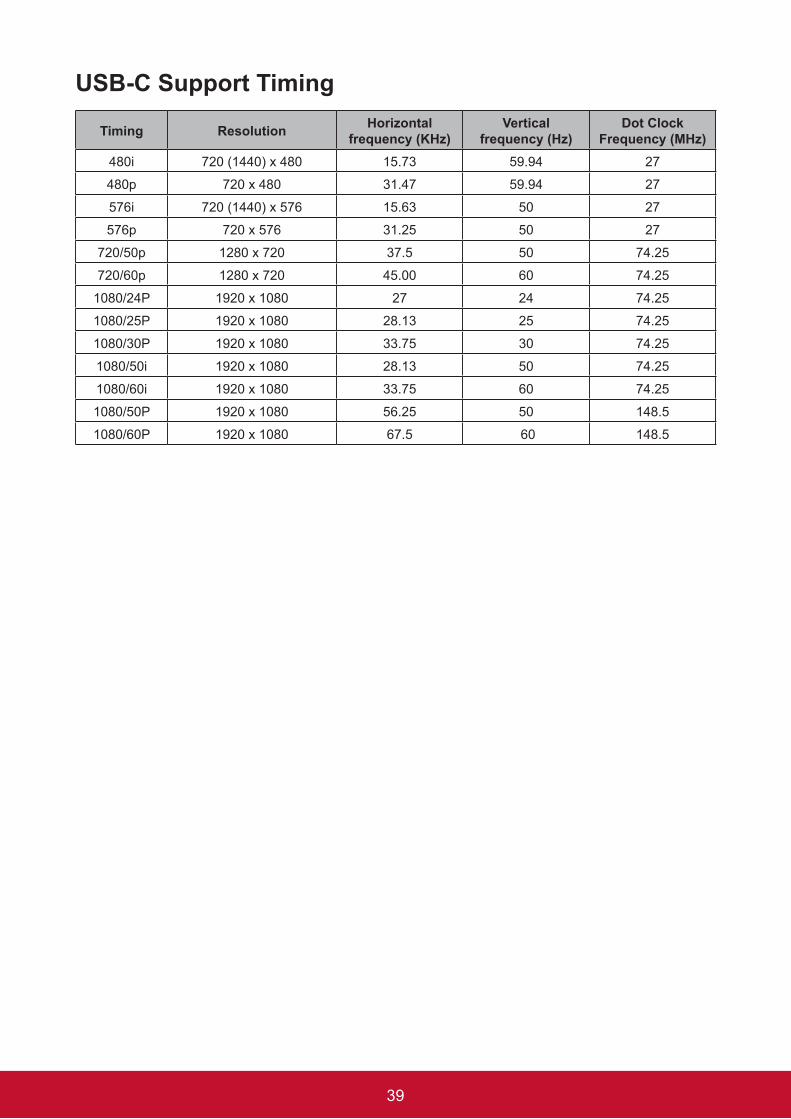
USB-C Support Timing
Timing Resolution Horizontal frequency (KHz)
Vertical frequency (Hz)
Dot Clock Frequency (MHz)
480i 720 (1440) x 480 15.73 59.94 27
480p 720 x 480 31.47 59.94 27
576i 720 (1440) x 576 15.63 50 27
576p 720 x 576 31.25 50 27
720/50p 1280 x 720 37.5 50 74.25
720/60p 1280 x 720 45.00 60 74.25
1080/24P 1920 x 1080 27 24 74.25
1080/25P 1920 x 1080 28.13 25 74.25
1080/30P 1920 x 1080 33.75 30 74.25
1080/50i 1920 x 1080 28.13 50 74.25
1080/60i 1920 x 1080 33.75 60 74.25
1080/50P 1920 x 1080 56.25 50 148.5
1080/60P 1920 x 1080 67.5 60 148.5
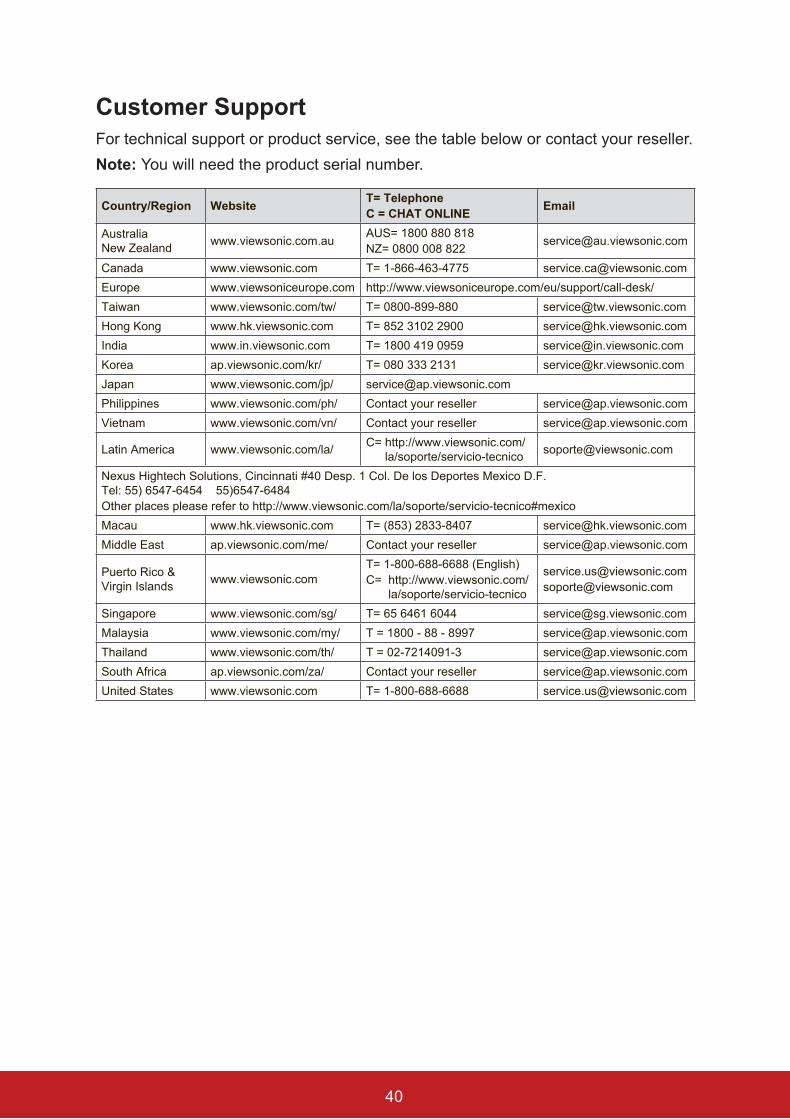
Customer SupportFor technical support or product service, see the table below or contact your reseller.Note: You will need the product serial number.
Country/Region Website T= TelephoneC = CHAT ONLINE Email
Australia New Zealand www.viewsonic.com.au AUS= 1800 880 818
NZ= 0800 008 822 [email protected]
Canada www.viewsonic.com T= 1-866-463-4775 [email protected] www.viewsoniceurope.com http://www.viewsoniceurope.com/eu/support/call-desk/Taiwan www.viewsonic.com/tw/ T= 0800-899-880 [email protected] Kong www.hk.viewsonic.com T= 852 3102 2900 [email protected] www.in.viewsonic.com T= 1800 419 0959 [email protected] ap.viewsonic.com/kr/ T= 080 333 2131 [email protected] www.viewsonic.com/jp/ [email protected] www.viewsonic.com/ph/ Contact your reseller [email protected] www.viewsonic.com/vn/ Contact your reseller [email protected]
Latin America www.viewsonic.com/la/ C= http://www.viewsonic.com/la/soporte/servicio-tecnico [email protected]
Nexus Hightech Solutions, Cincinnati #40 Desp. 1 Col. De los Deportes Mexico D.F. Tel: 55) 6547-6454 55)6547-6484Other places please refer to http://www.viewsonic.com/la/soporte/servicio-tecnico#mexicoMacau www.hk.viewsonic.com T= (853) 2833-8407 [email protected] East ap.viewsonic.com/me/ Contact your reseller [email protected]
Puerto Rico & Virgin Islands www.viewsonic.com
T= 1-800-688-6688 (English)C= http://www.viewsonic.com/
la/soporte/servicio-tecnico
[email protected]@viewsonic.com
Singapore www.viewsonic.com/sg/ T= 65 6461 6044 [email protected] www.viewsonic.com/my/ T = 1800 - 88 - 8997 [email protected] www.viewsonic.com/th/ T = 02-7214091-3 [email protected] Africa ap.viewsonic.com/za/ Contact your reseller [email protected] States www.viewsonic.com T= 1-800-688-6688 [email protected]
40
Limited WarrantyViewSonic® Projector
What the warranty covers: ViewSonic warrants its products to be free from defects in material and workmanship, under normal use, during the warranty period. If a product proves to be defective in material or workmanship during the warranty period, ViewSonic will, at its sole option, repair or replace the product with a like product. Replacement product or parts may include remanufactured or refurbished parts or components.
Limited One (1) year General Warranty ViewSonic’s standard warranty period is one (1) year for any product model in any country, unless a longer warranty period is specified and provided by ViewSonic . Please refer to the ViewSonic website in your country to check the local terms and model variants, and see if the product model in your country is eligible for a longer warranty period.
Limited One (1) year Heavy Usage Warranty:Under heavy usage settings, where a projector’s use includes more than fourteen (14) hours average daily usage, North and South America: One (1) year warranty for all parts excluding the Light Source, one (1) year for labor, and ninety (90) days for the original Light Source from the date of the first consumer purchase; Europe: One (1) year warranty for all parts excluding the Light Source, one (1) year for labor, and ninety (90) days for the original Light Source from the date of the first consumer purchase. Other regions or countries: Please check with your local dealer or local ViewSonic office for the warranty information.Light Source warranty subject to terms and conditions, verification and approval. Applies to manufacturer’s installed Light Source only. All accessory Light Source purchased separately are warranted for 90 days.
Who the warranty protects:This warranty is valid only for the first consumer purchaser.
What the warranty does not cover:1. Any product on which the serial number has been defaced, modified or removed.2. Damage, deterioration, failure, or malfunction resulting from:
a. Accident, abuse, misuse, neglect, fire, water, lightning, or other acts of nature, improper maintenance, unauthorized product modification, or failure to follow instructions supplied with the product.
b. Operation outside of product specifications.c. Operation of the product for other than the normal intended use or not under
normal conditions.d. Repair or attempted repair by anyone not authorized by ViewSonic.e. Any damage of the product due to shipment.f. Removal or installation of the product.g. Causes external to the product, such as electric power fluctuations or failure.h. Use of supplies or parts not meeting ViewSonic’s specifications.i. Normal wear and tear.j. Any other cause which does not relate to a product defect.
3. Removal, installation, and set-up service charges.
41
How to get service: 1. For information about receiving service under warranty, contact ViewSonic
Customer Support (please refer to “Customer Support” page). You will need to provide your product’s serial number.
2. To obtain warranted service, you will be required to provide (a) the original dated sales slip, (b) your name, (c) your address, (d) a description of the problem, and (e) the serial number of the product.
3. Take or ship the product freight prepaid in the original container to an authorized ViewSonic service center or ViewSonic.
4. For additional information or the name of the nearest ViewSonic service center, contact ViewSonic.
Limitation of implied warranties: There are no warranties, express or implied, which extend beyond the description contained herein including the implied warranty of merchantability and fitness for a particular purpose.
Exclusion of damages: ViewSonic’s liability is limited to the cost of repair or replacement of the product. ViewSonic shall not be liable for: 1. Damage to other property caused by any defects in the product, damages based
upon inconvenience, loss of use of the product, loss of time, loss of profits, loss of business opportunity, loss of goodwill, interference with business relationships, or other commercial loss, even if advised of the possibility of such damages.
2. Any other damages, whether incidental, consequential or otherwise. 3. Any claim against the customer by any other party.
Effectoflocallaw:This warranty gives you specific legal rights, and you may also have other rights which vary from local authority. Some local governances do not allow limitations on implied warranties and/or do not allow the exclusion of incidental or consequential damages, so the above limitations and exclusions may not apply to you.
Sales outside the U.S.A. and Canada: For warranty information and service on ViewSonic products sold outside of the U.S.A. and Canada, contact ViewSonic or your local ViewSonic dealer. The warranty period for this product in mainland China (Hong Kong, Macao and Taiwan Excluded) is subject to the terms and conditions of the Maintenance Guarantee Card.For users in Europe and Russia, full details of warranty provided can be found in www.viewsoniceurope.com under Support/Warranty Information.
Projector Warranty Term Template In UG VSC_TEMP_2005
42
Mexico Limited WarrantyViewSonic® Projector
What the warranty covers:ViewSonic warrants its products to be free from defects in material and workmanship, under normal use, during the warranty period. If a product proves to be defective in material or workmanship during the warranty period, ViewSonic will, at its sole option, repair or replace the product with a like product. Replacement product or parts may include remanufactured or refurbished parts or components & accessories.Howlongthewarrantyiseffective:ViewSonic’s standard warranty period is one (1) year for any product model in any country, unless a longer warranty period is specified and provided by ViewSonic . Please refer to the ViewSonic website in your country to check the local terms and model variants, and see if the product model in your country is eligible for a longer warranty period.Who the warranty protects:This warranty is valid only for the first consumer purchaser.What the warranty does not cover:1. Any product on which the serial number has been defaced, modified or removed.2. Damage, deterioration or malfunction resulting from: a. Accident, misuse, neglect, fire, water, lightning, or other acts of nature, unauthorized product
modification, unauthorized attempted repair, or failure to follow instructions supplied with the product.
b. Any damage of the product due to shipment. c. Causes external to the product, such as electrical power fluctuations or failure. d. Use of supplies or parts not meeting ViewSonic’s specifications. e. Normal wear and tear. f. Any other cause which does not relate to a product defect.3. Any product exhibiting a condition commonly known as “image burn-in” which results when a static
image is displayed on the product for an extended period of time.4. Removal, installation, insurance, and set-up service charges.How to get service:For information about receiving service under warranty, contact ViewSonic Customer Support (Please refer to the attached Customer Support page). You will need to provide your product’s serial number, so please record the product information in the space provided below on your purchase for your future use. Please retain your receipt of proof of purchase to support your warranty claim.For Your RecordsProduct Name: ________________________ Model Number: ____________________________Document Number: ____________________ Serial Number: ____________________________Purchase Date: ________________________ Extended Warranty Purchase? _____________(Y/N) If so, what date does warranty expire? __________1. To obtain warranty service, you will be required to provide (a) the original dated sales slip, (b) your
name, (c) your address, (d) a description of the problem, and (e) the serial number of the product.2. Take or ship the product in the original container packaging to an authorized ViewSonic service
center.3. Round trip transportation costs for in-warranty products will be paid by ViewSonic.Limitation of implied warranties:There are no warranties, express or implied, which extend beyond the description contained herein including the implied warranty of merchantability and fitness for a particular purpose.Exclusion of damages:ViewSonic’s liability is limited to the cost of repair or replacement of the product. ViewSonic shall not be liable for:1. Damage to other property caused by any defects in the product, damages based upon
inconvenience, loss of use of the product, loss of time, loss of profits, loss of business opportunity, loss of goodwill, interference with business relationships, or other commercial loss, even if advised of the possibility of such damages.
2. Any other damages, whether incidental, consequential or otherwise.3. Any claim against the customer by any other party.4. Repair or attempted repair by anyone not authorized by ViewSonic.
43
Contact Information for Sales & Authorized Service (Centro Autorizado de Servicio) within Mexico:Name, address, of manufacturer and importers:México, Av. de la Palma #8 Piso 2 Despacho 203, Corporativo Interpalmas,Col. San Fernando Huixquilucan, Estado de MéxicoTel: (55) 3605-1099 http://www.viewsonic.com/la/soporte/index.htmNÚMERO GRATIS DE ASISTENCIA TÉCNICA PARA TODO MÉXICO: 001.866.823.2004Hermosillo:Distribuciones y Servicios Computacionales SA de CV.Calle Juarez 284 local 2Col. Bugambilias C.P: 83140Tel: 01-66-22-14-9005E-Mail: [email protected]
Villahermosa:Compumantenimietnos Garantizados, S.A. de C.V.AV. GREGORIO MENDEZ #1504COL, FLORIDA C.P. 86040Tel: 01 (993) 3 52 00 47 / 3522074 / 3 52 20 09E-Mail: [email protected]
Puebla, Pue. (Matriz):RENTA Y DATOS, S.A. DE C.V. Domicilio:29 SUR 721 COL. LA PAZ72160 PUEBLA, PUE.Tel: 01(52).222.891.55.77 CON 10 LINEASE-Mail: [email protected]
Veracruz, Ver.:CONEXION Y DESARROLLO, S.A DE C.V. Av. Americas # 419ENTRE PINZÓN Y ALVARADOFracc. Reforma C.P. 91919Tel: 01-22-91-00-31-67E-Mail: [email protected]
ChihuahuaSoluciones Globales en ComputaciónC. Magisterio # 3321 Col. MagisterialChihuahua, Chih.Tel: 4136954E-Mail: [email protected]
Cuernavaca Compusupport de Cuernavaca SA de CVFrancisco Leyva # 178 Col. Miguel HidalgoC.P. 62040, Cuernavaca MorelosTel: 01 777 3180579 / 01 777 3124014E-Mail: [email protected]
Distrito Federal: QPLUS, S.A. de C.V.Av. Coyoacán 931Col. Del Valle 03100, México, D.F.Tel: 01(52)55-50-00-27-35E-Mail : [email protected]
Guadalajara, Jal.:SERVICRECE, S.A. de C.V.Av. Niños Héroes # 2281Col. Arcos Sur, Sector Juárez44170, Guadalajara, JaliscoTel: 01(52)33-36-15-15-43E-Mail: [email protected]
Guerrero AcapulcoGS Computación (Grupo Sesicomp)Progreso #6-A, Colo Centro39300 Acapulco, GuerreroTel: 744-48-32627
Monterrey:Global Product ServicesMar Caribe # 1987, Esquina con Golfo PérsicoFracc. Bernardo Reyes, CP 64280Monterrey N.L. MéxicoTel: 8129-5103E-Mail: [email protected]
MERIDA: ELECTROSERAv Reforma No. 403Gx39 y 41Mérida, Yucatán, México CP97000Tel: (52) 999-925-1916E-Mail: [email protected]
Oaxaca, Oax.:CENTRO DE DISTRIBUCION YSERVICIO, S.A. de C.V.Murguía # 708 P.A., Col. Centro, 68000, OaxacaTel: 01(52)95-15-15-22-22Fax: 01(52)95-15-13-67-00 E-Mail. [email protected]
Tijuana:STDAv Ferrocarril Sonora #3780 L-C Col 20 de NoviembreTijuana, Mexico
FOR USA SUPPORT: ViewSonic Corporation 14035 Pipeline Ave. Chino, CA 91710, USATel: 800-688-6688E-Mail: http://www.viewsonic.com
Projector Mexico Warranty Term Template In UGVSC_TEMP_2006
44