Embed Size (px)
Citation preview
LYNX HELI INNOVATIONS Page 1 Ver 1.3 www.lynxheli.com
INSTALLATION INSTRUCTIONS
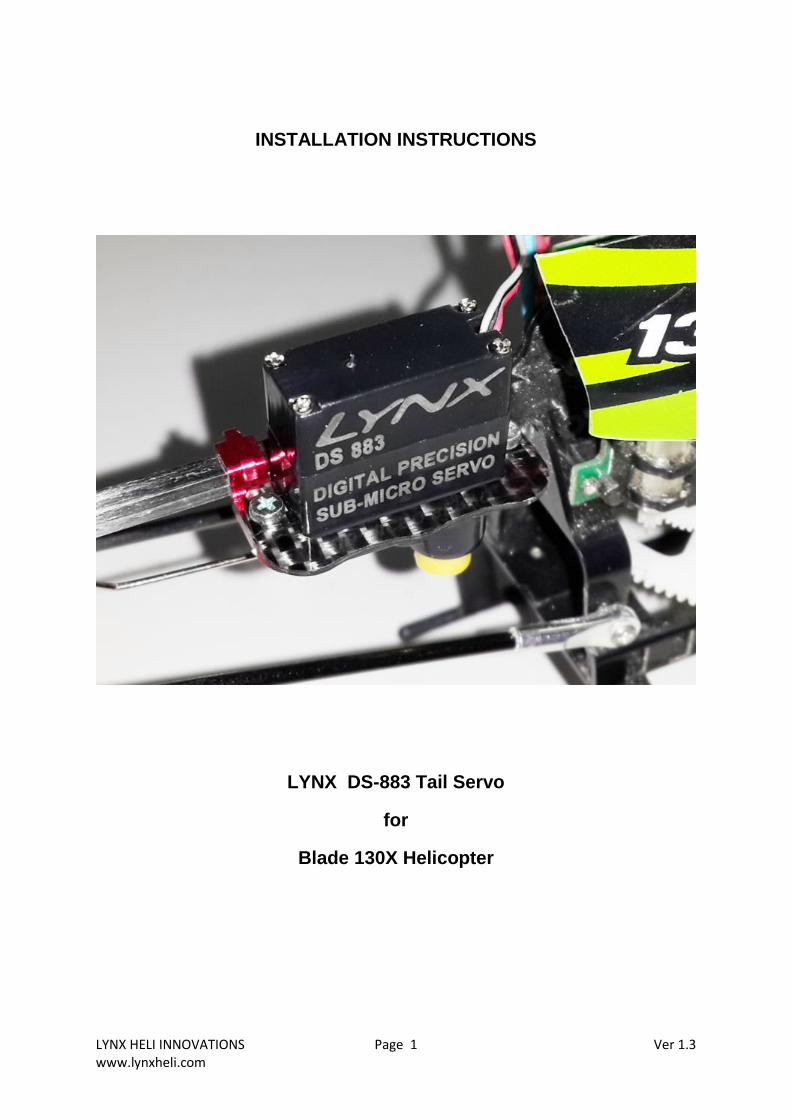
LYNX DS-883 Tail Servo
for
Blade 130X Helicopter
LYNX DS-883 Servo - Installation Instructions for Blade 130X Helicopter
LYNX HELI INNOVATIONS Page 2 Ver 1.31 www.lynxheli.com
NOTICE
All instructions, warranties and other collateral documentation are subject to change at the sole
discretion of Lynx Heli Innovations. For up-to-date product literature, please visit lynxheli.com
and click on the product page for this item.
WARNING
Please read this ENTIRE document to become familiar with the process and features of this
product before installation. Failure to operate this product correctly and in a safe and responsible
manner can result in damage to the product, personal property and may cause serious injury. It
is essential to read and follow all the instructions and warnings in this document, prior to
assembly, setup or use, in order to operate correctly and avoid damage or serious injury.
DS-883 SERVO FEATURES
- Direct replacement for the standard Blade 130X linear tail servo.
- Metal Gear Digital Precision Servo
- Input (V-in): 3.5 to 5 V
- Frequency: 450 Hz
- Neutral Point: 1500μs
- Speed: 0.08 sec / 60° at 3.5V
0.07 sec / 60° at 5 V
- Stall Torque: 1.25 kg/cm at 3.5V
1.60 kg/cm at 5 V
- Dimension: 19.60 x 8.00 x 19.40 mm
- Weight including 160 mm cable connector: 5.25g
- Output Gear support: Radial bearing 4x7 W2
- Servo Arms: 5 type included (see extra pictures)
- Servo Case Material: Technopolymer base plastic.
SERVO SUPPORT TECHNICAL SPECIFICATIONS:
- Tail servo support material: Aluminium 7075-T6 – Silver anodized finish
- Screw material: Carbon steel plated
- Assembled weight: 0.25g
WHAT’S IN THE BAG
Your new Lynx DS-883 servo will come with the following items:
- 1 x Lynx DS-883 Servo
- 1 x Bag servo horns
- 1 x Lynx Carbon Mounting Frame
- 2 x Lynx CNC Metal Mounting Brackets
- 1 x Screws for Servo Horn and Mounting Hardware
LYNX DS-883 Servo - Installation Instructions for Blade 130X Helicopter
LYNX HELI INNOVATIONS Page 3 Ver 1.31 www.lynxheli.com
INSTALLATION OF SERVO
This document will guide you through the installation of your new Lynx DS-883 tail servo for the
Blade 130X helicopter. The install process of your new DS-883 servo onto your Blade 130X
helicopter will only take a short time to complete. You will need a small Philips-head screw driver
to complete this process.
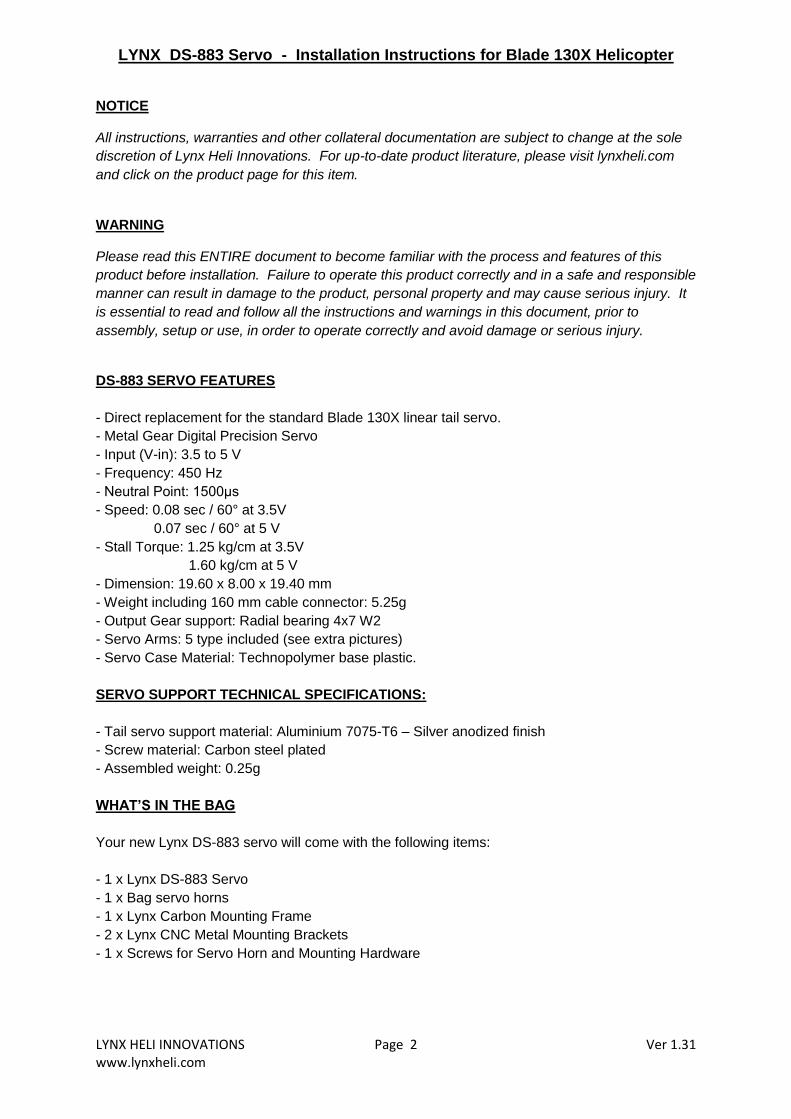
Step 1 - Start by removing the rear (left hand side) cyclic servo to gain access to the existing tail
servo cable which runs under this cyclic servo. Unplug the existing tail servo lead from the 3-in-1
control board (illustrated below) and remove the existing servo from the frame.
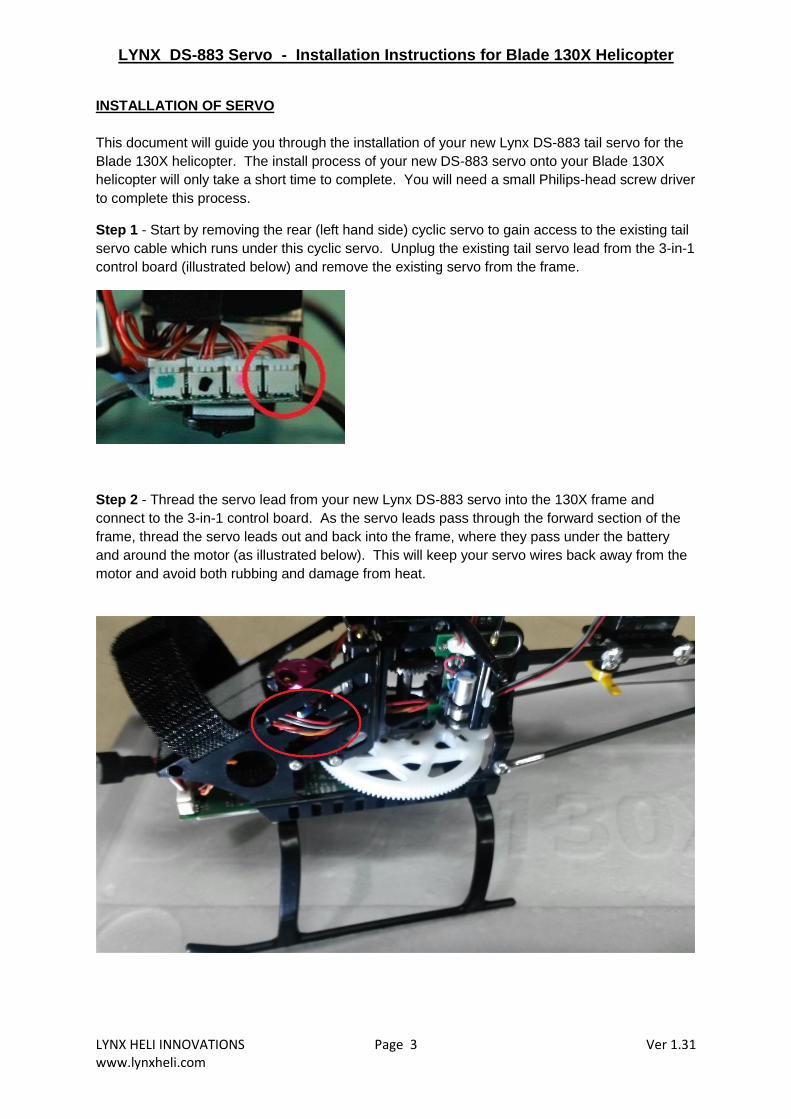
Step 2 - Thread the servo lead from your new Lynx DS-883 servo into the 130X frame and
connect to the 3-in-1 control board. As the servo leads pass through the forward section of the
frame, thread the servo leads out and back into the frame, where they pass under the battery
and around the motor (as illustrated below). This will keep your servo wires back away from the
motor and avoid both rubbing and damage from heat.

LYNX DS-883 Servo - Installation Instructions for Blade 130X Helicopter
LYNX HELI INNOVATIONS Page 4 Ver 1.31 www.lynxheli.com
Step 3 – Mount your new Lynx DS-883 servo to the tail boom of your 130x helicopter as shown
below. Leave the mounting screws loose for now, so that position adjustment on the carbon
boom can be completed later.
Step 4 - Connect your 130X tail pushrod to your new Lynx DS-883 servo. Give the pushrod a
quarter turn in the ball-link to line up with the servo arm, and hook it onto the servo arm, as
shown below. You need to select a servo horn and hole position that will position the pushrod
approximately 5.5mm out from the centre.
LYNX DS-883 Servo - Installation Instructions for Blade 130X Helicopter
LYNX HELI INNOVATIONS Page 5 Ver 1.31 www.lynxheli.com
POSITIONING SERVO ON BOOM
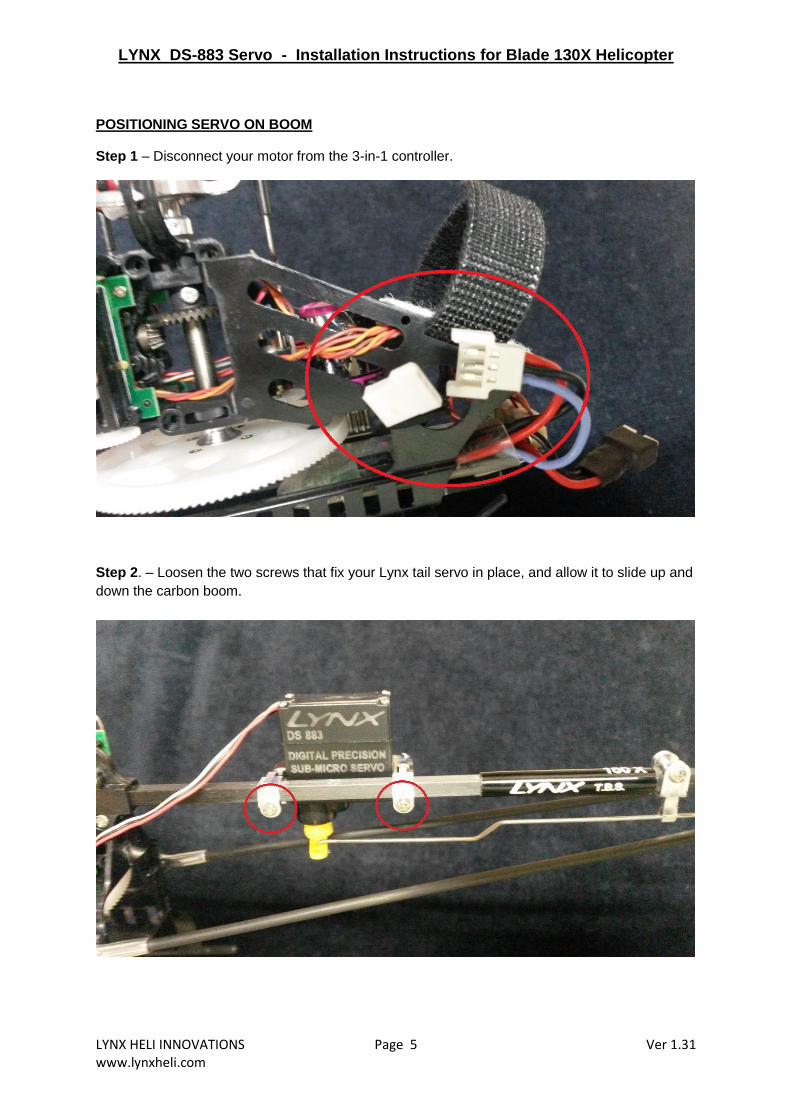
Step 1 – Disconnect your motor from the 3-in-1 controller.
Step 2. – Loosen the two screws that fix your Lynx tail servo in place, and allow it to slide up and
down the carbon boom.
LYNX DS-883 Servo - Installation Instructions for Blade 130X Helicopter
LYNX HELI INNOVATIONS Page 6 Ver 1.31 www.lynxheli.com
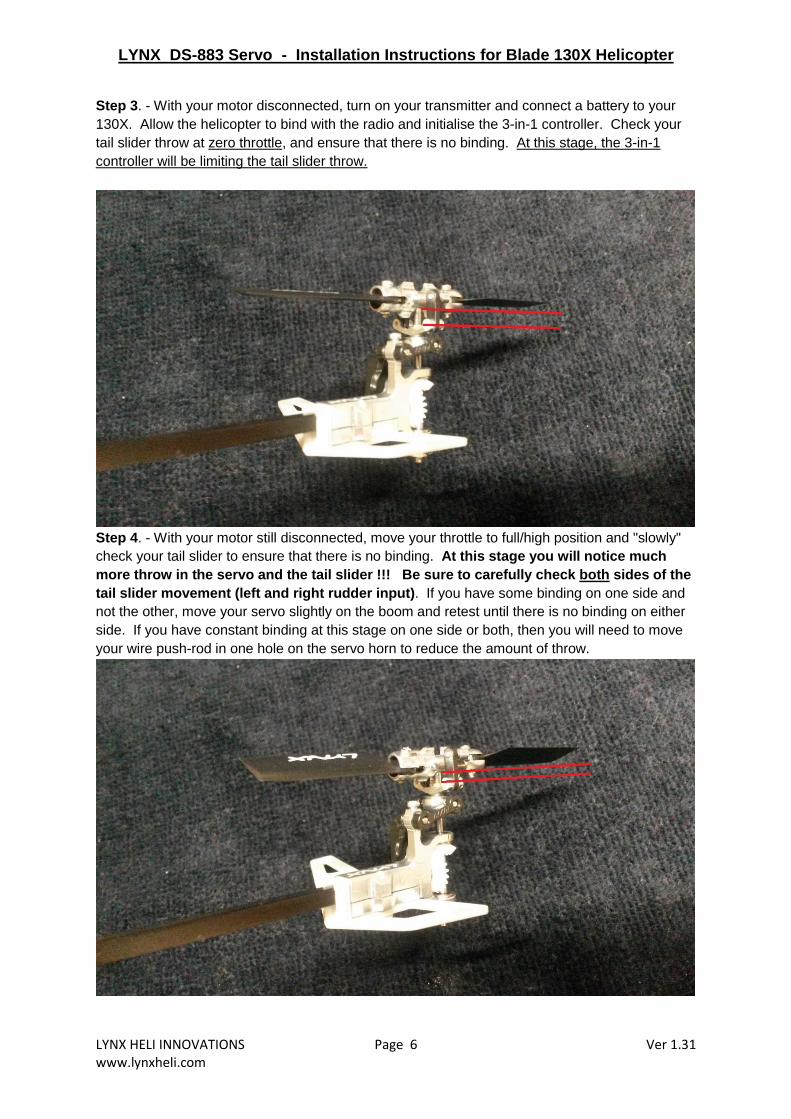
Step 3. - With your motor disconnected, turn on your transmitter and connect a battery to your
130X. Allow the helicopter to bind with the radio and initialise the 3-in-1 controller. Check your
tail slider throw at zero throttle, and ensure that there is no binding. At this stage, the 3-in-1
controller will be limiting the tail slider throw.
Step 4. - With your motor still disconnected, move your throttle to full/high position and "slowly"
check your tail slider to ensure that there is no binding. At this stage you will notice much
more throw in the servo and the tail slider !!! Be sure to carefully check both sides of the
tail slider movement (left and right rudder input). If you have some binding on one side and
not the other, move your servo slightly on the boom and retest until there is no binding on either
side. If you have constant binding at this stage on one side or both, then you will need to move
your wire push-rod in one hole on the servo horn to reduce the amount of throw.
LYNX DS-883 Servo - Installation Instructions for Blade 130X Helicopter
LYNX HELI INNOVATIONS Page 7 Ver 1.31 www.lynxheli.com
Step 5. - Once you have confirmed no binding (both sides) at full throttle position, disconnect the
battery on the 130X helicopter and turn off your radio. Reconnect your motor to the 3-in-1 control
board and tighten your servo mount screws, being careful not to move the servo on the carbon
boom.
If you have a little bit of room to move (without binding), position your Lynx DS-883 tail servo
ever so slightly to the rear of centre to give a little bit of right rudder at centre position. This will
counter the torque from the main rotor disk. Check once again that you still having no binding in
either direction on the tail slider.
IMPORTANT NOTES – PLEASE READ
Positioning the Lynx DS-883 servo on the tail boom is probably the MOST IMORTANT
STEP IN SETUP OF YOUR NEW SERVO. Failure to position your servo correctly on the
boom can cause binding of the tail slider and possibly result in burning out your new
servo and/or the 3-in-1 control board.
Don't forget to set your servo position and throw correctly, as outlined above, and don't
rush this process. Get it right, and this will ensure the longevity of your new Lynx DS-883
servo and ultimate performance of your 130X tail.
POST CRASH CHECK
In the event that you should happen to crash your Blade 130X helicopter, PLEASE
ENSURE THAT YOU RECHECK THE TAIL SLIDER FOR BINDING. Even if all appears to be
ok and your 130X is still flyable, the tail boom may happen to slide out of either end
slightly, and this may change your servo positioning resulting in binding and possible
servo and/or 3-in-1 control board burn out.
LYNX DS-883 Servo - Installation Instructions for Blade 130X Helicopter
LYNX HELI INNOVATIONS Page 8 Ver 1.31 www.lynxheli.com
GYRO GAINS
We recommend that you should reduce the tail rotor gyro gains a few steps before your initial
test flight. This should give you a solid locked in tail with no wag. If you notice a small wag in
your tail then you should further reduce your tail gain in the 3-in-1 control board. If the tail is not
holding or appears to be wondering a little, then you should increase the tail gain slightly.
To adjust your 3-in-1 gyro gains, follow the procedure below as outlined by Horizon Hobby, Inc.
Blade 130X Optional Gyro Gain Menu To Enter Programming Mode: 1. Move the throttle stick to the full throttle (100%) position and power on the transmitter. 2. Connect the flight battery to the helicopter control board. 3. The Status LED will go solid blue, then there will be a sequence of Red, Green, and Blue Flashing LED’s 4. The RED LED will now be solid and the status LED will be flashing. The controller is now in programming mode. Move the Elevator stick forward and backward to change between axes. Red LED = Elevator Green LED = Aileron Blue LED = Rudder Move the Aileron stick left or right to change the gain value. There are ten steps available in either direction, giving a total of 20 gain values for each axis. The highest and lowest values are within a predetermined range and do not prevent the helicopter from being flyable. Programming adjusts the gain in a range that Eflite determined was useful to the consumer. Right Aileron increases the gain, the LED lights will start flashing faster. Left Aileron decreases the gain, the LED lights will start flashing slower. When the Axis LED is solid that is default value (neutral gain). To reset the gain values to the default setting: 1. Adjust the Rudder travel value to 100% in both directions. 2. Hold right rudder for 5 seconds while in programming mode. There will be a sequence of Red, Green and Blue flashing LED’s to signify the default settings have been applied. To exit the menu: 1. Disconnect the flight battery from the control unit. 2. Move the throttle stick to the low/idle position or activate Throttle Hold. 3. Leave the transmitter powered on. 4. Connect the flight battery to the helicopter control board.
LYNX DS-883 Servo - Installation Instructions for Blade 130X Helicopter
LYNX HELI INNOVATIONS Page 9 Ver 1.31 www.lynxheli.com
LIMITATION OF LIABILITY Lynx Heli Innovations shall not be held liable for special, indirect, incidental or consequential damages, loss of profits or production or commercial loss in any way, regardless of whether such claim is based in contract, warranty, tort, negligence, strict liability or any other theory of liability, even if Lynx Heli Innovations has been advised of the possibility of such damages. As Lynx Heli Innovations has no control over use, setup, final assembly, modification or misuse, no liability shall be assumed nor accepted for any resulting damage or injury. By the act of use, setup or assembly, the user accepts all resulting liability. If you as the purchaser or user are not prepared to accept the liability associated with the use of this product, the purchaser is advised to return the product immediately in new and unused condition to the place of purchase.