Embed Size (px)
Citation preview
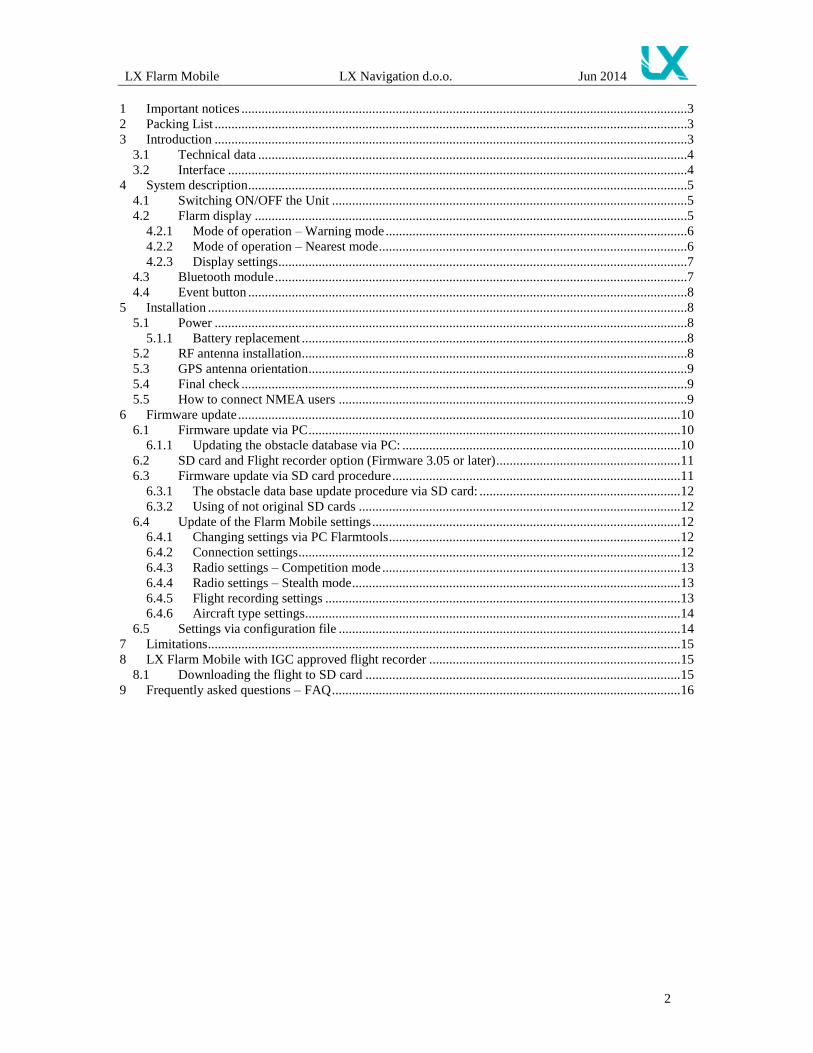
LX Mobile with optionally SD-card interface and IGC
approved flight recorder
User manual
LX navigation d.o.o., Tkalska 10 SLO 3000 Celje,
tel: + 386 3 490 46 70, fax: + 386 3 490 46 71 [email protected] ; www.lxnavigation.com
LX Flarm Mobile LX Navigation d.o.o. Jun 2014
2
1 Important notices .....................................................................................................................................3 2 Packing List .............................................................................................................................................3 3 Introduction .............................................................................................................................................3
3.1 Technical data ................................................................................................................................4 3.2 Interface .........................................................................................................................................4
4 System description ...................................................................................................................................5 4.1 Switching ON/OFF the Unit ..........................................................................................................5 4.2 Flarm display .................................................................................................................................5
4.2.1 Mode of operation – Warning mode ..........................................................................................6 4.2.2 Mode of operation – Nearest mode ............................................................................................6 4.2.3 Display settings ..........................................................................................................................7
4.3 Bluetooth module ...........................................................................................................................7 4.4 Event button ...................................................................................................................................8
5 Installation ...............................................................................................................................................8 5.1 Power .............................................................................................................................................8
5.1.1 Battery replacement ...................................................................................................................8 5.2 RF antenna installation ...................................................................................................................8 5.3 GPS antenna orientation .................................................................................................................9 5.4 Final check .....................................................................................................................................9 5.5 How to connect NMEA users ........................................................................................................9
6 Firmware update .................................................................................................................................... 10 6.1 Firmware update via PC ............................................................................................................... 10
6.1.1 Updating the obstacle database via PC: ................................................................................... 10 6.2 SD card and Flight recorder option (Firmware 3.05 or later) ....................................................... 11 6.3 Firmware update via SD card procedure ...................................................................................... 11
6.3.1 The obstacle data base update procedure via SD card: ............................................................ 12 6.3.2 Using of not original SD cards ................................................................................................ 12
6.4 Update of the Flarm Mobile settings ............................................................................................ 12 6.4.1 Changing settings via PC Flarmtools ....................................................................................... 12 6.4.2 Connection settings .................................................................................................................. 12 6.4.3 Radio settings – Competition mode ......................................................................................... 13 6.4.4 Radio settings – Stealth mode .................................................................................................. 13 6.4.5 Flight recording settings .......................................................................................................... 13 6.4.6 Aircraft type settings................................................................................................................ 14
6.5 Settings via configuration file ...................................................................................................... 14 7 Limitations ............................................................................................................................................. 15 8 LX Flarm Mobile with IGC approved flight recorder ........................................................................... 15
8.1 Downloading the flight to SD card .............................................................................................. 15 9 Frequently asked questions – FAQ ........................................................................................................ 16
LX Flarm Mobile LX Navigation d.o.o. Jun 2014
3
1 Important notices The LX Flarm Mobile system is designed for VFR use only as an aid to prudent navigation. All information is presented for reference only. Information in this document is subject to change without notice. LX Navigation reserves the right to change or improve their products and to make changes in the content of this material without obligation to notify any person or organization of such changes or improvements.
2 Packing List Flarm Mobile unit
RF antenna
SD card adapter
USB power supply cable
Wall charger (eu)
Barogram (optional if IGC)
Manual
3 Introduction Flarm is a collision avoidance system developed by Flarm Technologies from Switzerland. LX Navigation and Flarm Technologies signed a contract under which LX Navigation got rights to integrate Flarm technology into LX Navigation products. FLARM® is in widespread use and features include: • Display of nearby Flarm traffic with warning visually and acoustically of approaching other aircraft or fixed obstacles (where database has been installed) • Intelligent motion prediction which minimizes nuisance alarms and supports situational awareness • Integration with over 50 compatible products by other manufacturers (e.g. PDA moving maps) through open serial port protocol • All versions feature microSD card for easy uploads and downloads, IGC-format flight recording and OLC-approval • based on award-winning original FLARM® design, endorsed by FAI, IGC/OSTIV and EASA (AMC Part 21, Part M) • Optional up to diamond-level IGC-approval with/without engine noise sensor (ENL) • A typical 2-6 km radio range that can be verified with online radio range analyzer • Powerful 16-channel high-precision uBlox LEA6-GPS module • Embedded database that covers Italian, Swiss, Austrian, French and German obstacles with updates (functionality at cost, not preloaded). • Full compatibility with wide range of Flarm-licensed products • Operation on a license-free radio band, not based on transponder technology • Small size and simple installation LX Flarm Mobile is available in three variants: 1. LX Flarm Mobile without a logger, with enabled SAR (search and rescue) function 2. LX Flarm Mobile with IGC approved Flight recorder (Up to Diamonds), with enabled SAR function 3. LX Flarm Mobile with IGC approved Flight recorder (Up to Diamonds), Engine Noise Sensor and SAR function
LX Flarm Mobile LX Navigation d.o.o. Jun 2014
4
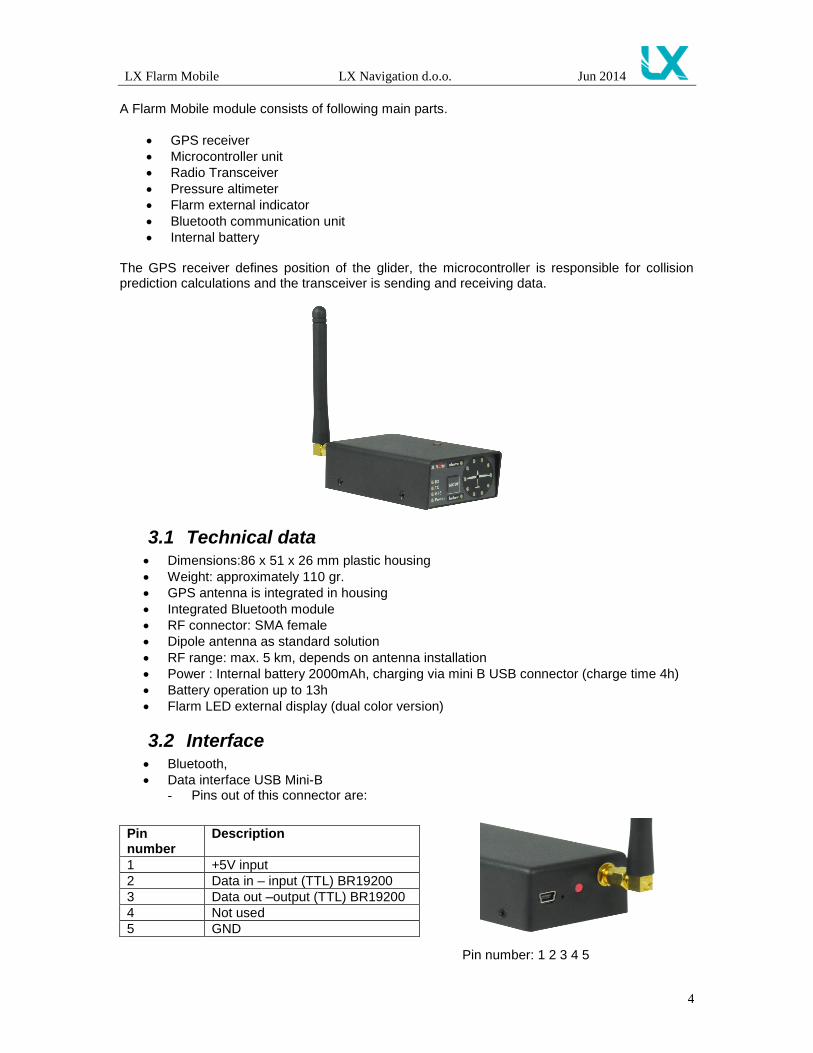
A Flarm Mobile module consists of following main parts.
GPS receiver
Microcontroller unit
Radio Transceiver
Pressure altimeter
Flarm external indicator
Bluetooth communication unit
Internal battery The GPS receiver defines position of the glider, the microcontroller is responsible for collision prediction calculations and the transceiver is sending and receiving data.
3.1 Technical data Dimensions:86 x 51 x 26 mm plastic housing
Weight: approximately 110 gr.
GPS antenna is integrated in housing
Integrated Bluetooth module
RF connector: SMA female
Dipole antenna as standard solution
RF range: max. 5 km, depends on antenna installation
Power : Internal battery 2000mAh, charging via mini B USB connector (charge time 4h)
Battery operation up to 13h
Flarm LED external display (dual color version)
3.2 Interface Bluetooth,
Data interface USB Mini-B - Pins out of this connector are:
Pin number: 1 2 3 4 5
Pin number
Description
1 +5V input
2 Data in – input (TTL) BR19200
3 Data out –output (TTL) BR19200
4 Not used
5 GND
LX Flarm Mobile LX Navigation d.o.o. Jun 2014
5
4 System description
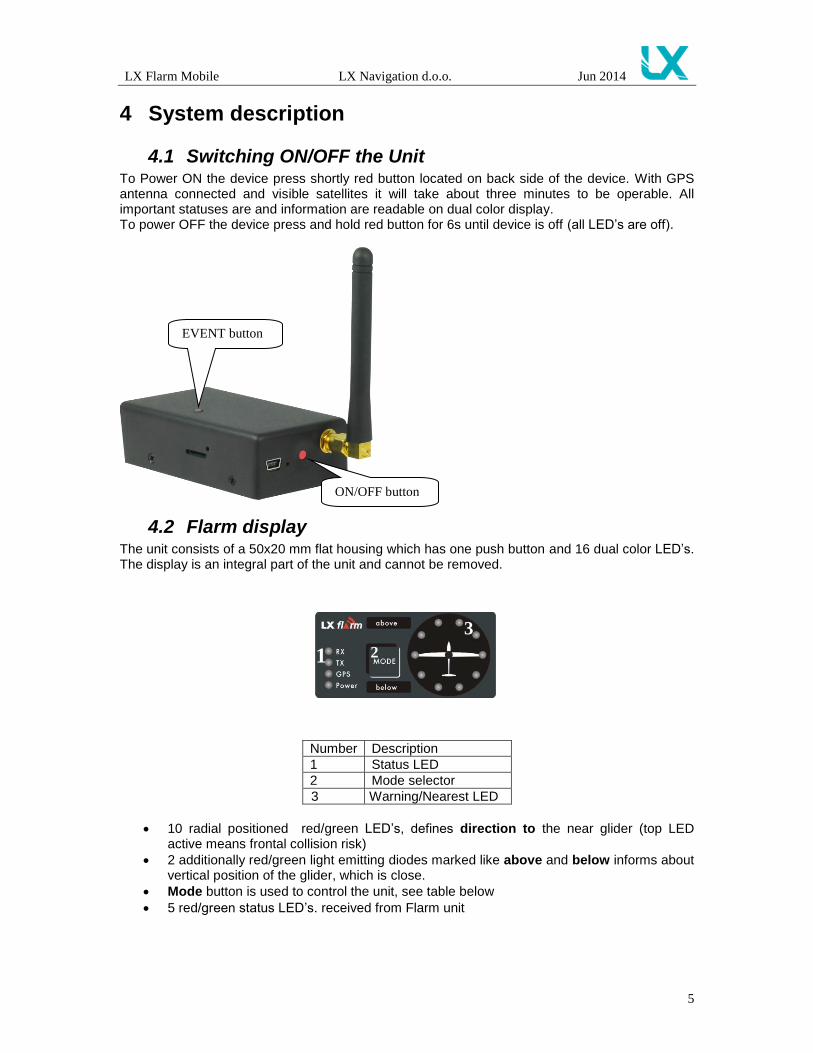
4.1 Switching ON/OFF the Unit To Power ON the device press shortly red button located on back side of the device. With GPS antenna connected and visible satellites it will take about three minutes to be operable. All important statuses are and information are readable on dual color display. To power OFF the device press and hold red button for 6s until device is off (all LED’s are off).
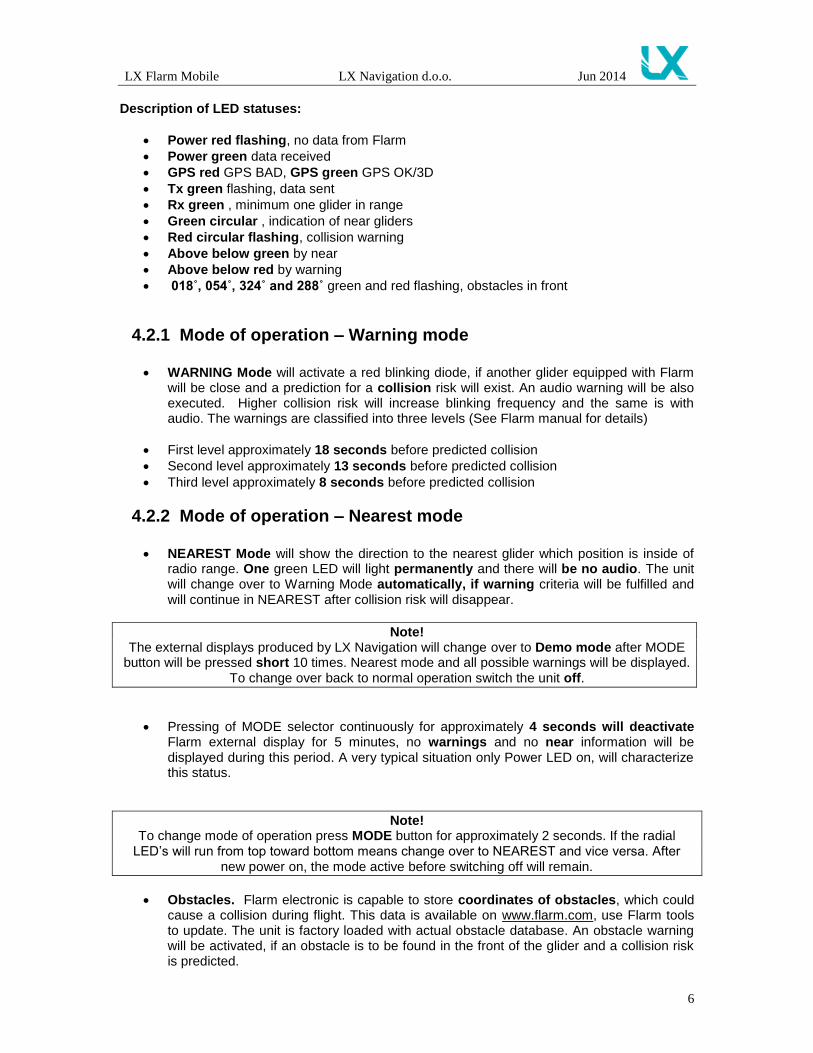
4.2 Flarm display The unit consists of a 50x20 mm flat housing which has one push button and 16 dual color LED’s. The display is an integral part of the unit and cannot be removed.
Number Description
1 Status LED
2 Mode selector
3 Warning/Nearest LED
10 radial positioned red/green LED’s, defines direction to the near glider (top LED active means frontal collision risk)
2 additionally red/green light emitting diodes marked like above and below informs about vertical position of the glider, which is close.
Mode button is used to control the unit, see table below
5 red/green status LED’s. received from Flarm unit
1 2
3
EVENT button
ON/OFF button
LX Flarm Mobile LX Navigation d.o.o. Jun 2014
6
Description of LED statuses:
Power red flashing, no data from Flarm
Power green data received
GPS red GPS BAD, GPS green GPS OK/3D
Tx green flashing, data sent
Rx green , minimum one glider in range
Green circular , indication of near gliders
Red circular flashing, collision warning
Above below green by near
Above below red by warning
018˚, 054˚, 324˚ and 288˚ green and red flashing, obstacles in front
4.2.1 Mode of operation – Warning mode
WARNING Mode will activate a red blinking diode, if another glider equipped with Flarm will be close and a prediction for a collision risk will exist. An audio warning will be also executed. Higher collision risk will increase blinking frequency and the same is with audio. The warnings are classified into three levels (See Flarm manual for details)
First level approximately 18 seconds before predicted collision
Second level approximately 13 seconds before predicted collision
Third level approximately 8 seconds before predicted collision
4.2.2 Mode of operation – Nearest mode
NEAREST Mode will show the direction to the nearest glider which position is inside of radio range. One green LED will light permanently and there will be no audio. The unit will change over to Warning Mode automatically, if warning criteria will be fulfilled and will continue in NEAREST after collision risk will disappear.
Note! The external displays produced by LX Navigation will change over to Demo mode after MODE
button will be pressed short 10 times. Nearest mode and all possible warnings will be displayed. To change over back to normal operation switch the unit off.
Pressing of MODE selector continuously for approximately 4 seconds will deactivate Flarm external display for 5 minutes, no warnings and no near information will be displayed during this period. A very typical situation only Power LED on, will characterize this status.
Note! To change mode of operation press MODE button for approximately 2 seconds. If the radial
LED’s will run from top toward bottom means change over to NEAREST and vice versa. After new power on, the mode active before switching off will remain.
Obstacles. Flarm electronic is capable to store coordinates of obstacles, which could cause a collision during flight. This data is available on www.flarm.com, use Flarm tools to update. The unit is factory loaded with actual obstacle database. An obstacle warning will be activated, if an obstacle is to be found in the front of the glider and a collision risk is predicted.
LX Flarm Mobile LX Navigation d.o.o. Jun 2014
7
After a low level warning has been activated two upper LEDs will be active (such a situation will newer appear by glider collision risk). Medium and high risk will be indicated with more LED’s active and more frequent audio signal.
To change audio warning volume press short mode selector, each press will increase audio volume (three levels and mute available).
Note! To change mode of operation press MODE button for approximately 2 seconds. If the radial
LED’s will run from top toward bottom means change over to NEAREST and vice versa. After each new power on, the unit will start in Nearest mode.
4.2.3 Display settings
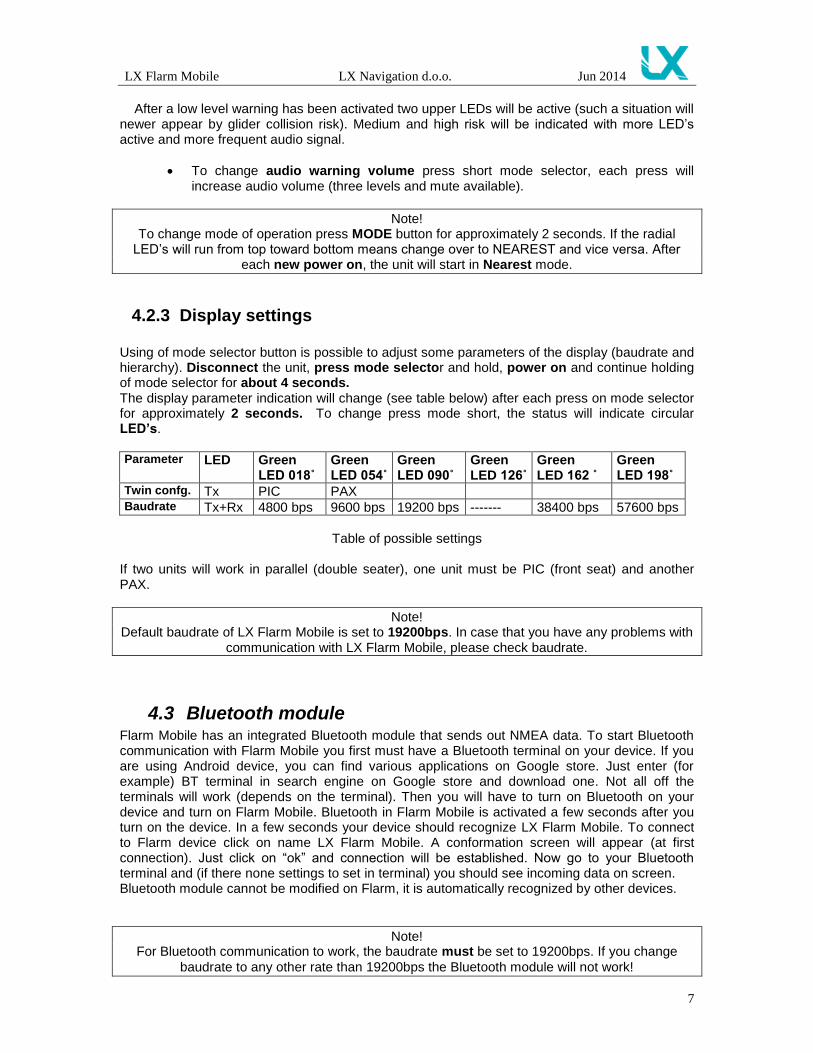
Using of mode selector button is possible to adjust some parameters of the display (baudrate and hierarchy). Disconnect the unit, press mode selector and hold, power on and continue holding of mode selector for about 4 seconds. The display parameter indication will change (see table below) after each press on mode selector for approximately 2 seconds. To change press mode short, the status will indicate circular LED’s. Parameter LED Green
LED 018˚ Green LED 054˚
Green LED 090˚
Green LED 126˚
Green LED 162 ˚
Green LED 198˚
Twin confg. Tx PIC PAX Baudrate Tx+Rx 4800 bps 9600 bps 19200 bps ------- 38400 bps 57600 bps
Table of possible settings
If two units will work in parallel (double seater), one unit must be PIC (front seat) and another PAX.
Note! Default baudrate of LX Flarm Mobile is set to 19200bps. In case that you have any problems with
communication with LX Flarm Mobile, please check baudrate.
4.3 Bluetooth module Flarm Mobile has an integrated Bluetooth module that sends out NMEA data. To start Bluetooth communication with Flarm Mobile you first must have a Bluetooth terminal on your device. If you are using Android device, you can find various applications on Google store. Just enter (for example) BT terminal in search engine on Google store and download one. Not all off the terminals will work (depends on the terminal). Then you will have to turn on Bluetooth on your device and turn on Flarm Mobile. Bluetooth in Flarm Mobile is activated a few seconds after you turn on the device. In a few seconds your device should recognize LX Flarm Mobile. To connect to Flarm device click on name LX Flarm Mobile. A conformation screen will appear (at first connection). Just click on “ok” and connection will be established. Now go to your Bluetooth terminal and (if there none settings to set in terminal) you should see incoming data on screen. Bluetooth module cannot be modified on Flarm, it is automatically recognized by other devices.
Note! For Bluetooth communication to work, the baudrate must be set to 19200bps. If you change
baudrate to any other rate than 19200bps the Bluetooth module will not work!
LX Flarm Mobile LX Navigation d.o.o. Jun 2014
8
4.4 Event button If you press the event button the logger will save data every second for 20 sec (else its saved every 4sec).
5 Installation The unit is designed to be installed on the top of the instrument panel to ensure GPS and Bluetooth reception. As the unit needs some manipulation during flight, please respect this fact.
5.1 Power Each unit has an internal battery which can be charged with enclosed USB cable connected directly to PC or connected with power and data cable (for example LX Colibri II power and data interface).
Note! There is no internal fuse built in the unit. If using power and data cable use external fuse 1A. The
unit is prevented against wrong polarity of input voltage.
5.1.1 Battery replacement If the battery life time is over, Flarm Mobile must be sent to manufacturer for factory replacement.
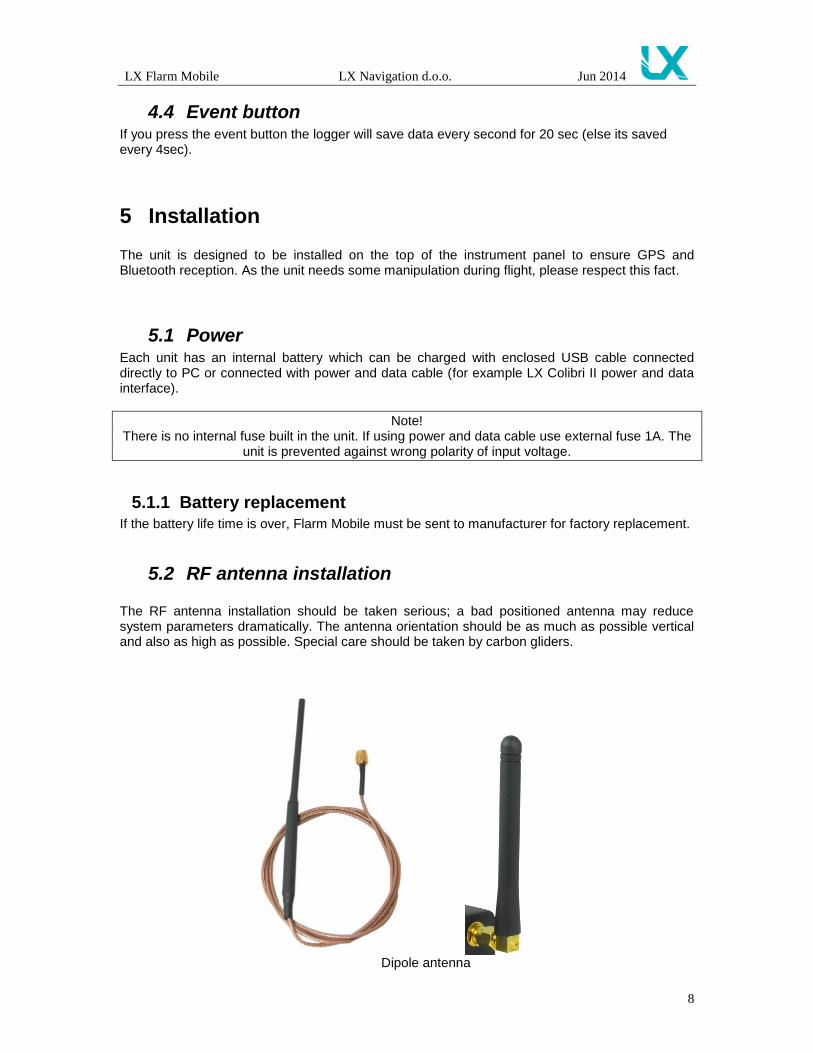
5.2 RF antenna installation The RF antenna installation should be taken serious; a bad positioned antenna may reduce system parameters dramatically. The antenna orientation should be as much as possible vertical and also as high as possible. Special care should be taken by carbon gliders.
Dipole antenna
LX Flarm Mobile LX Navigation d.o.o. Jun 2014
9
5.3 GPS antenna orientation The GPS antenna is integrated into the unit and can’t be removed. Don’t cover units housing with metal parts to ensure GPS reception.
Note! Flarm unit will not work until having GPS 3D, means antenna installation is an important fact.
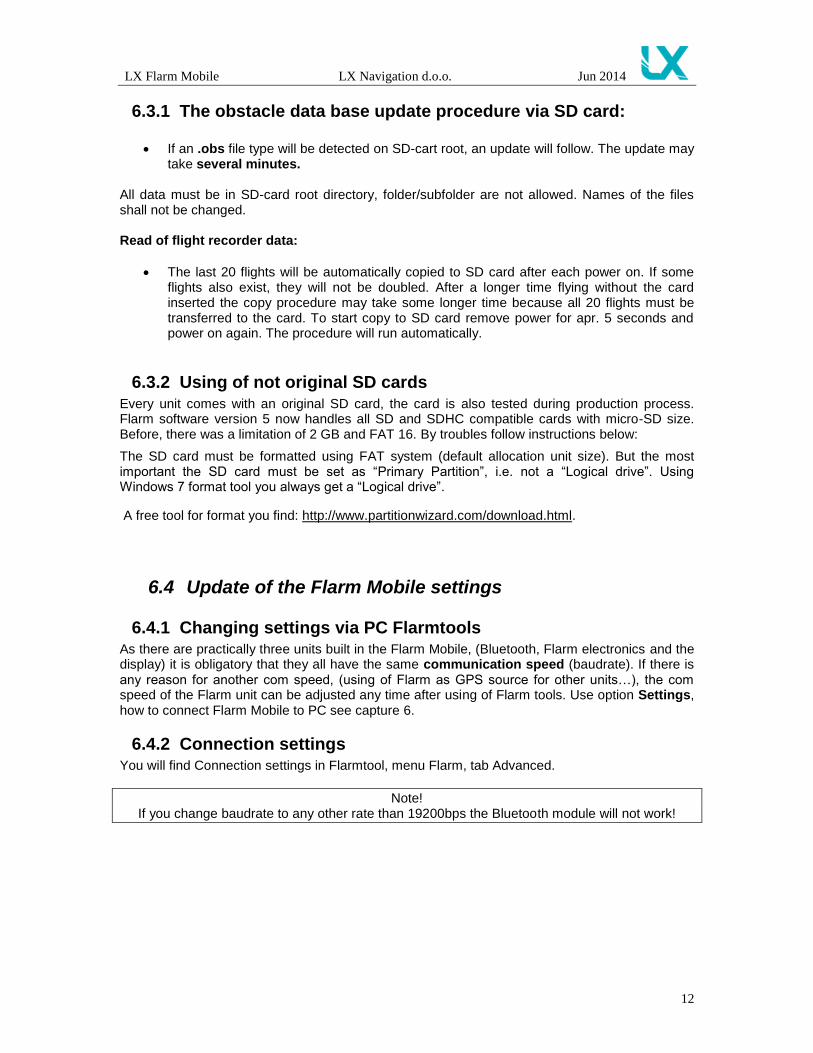
5.4 Final check After LX Flarm unit will receive power, the display will pass initial routine and this procedure will take several seconds. Check LED status indicators and observe, if they indicate any error.
1. Power red flashing, no data from Flarm…………ERROR 2. Power green data received………………………..OK 3. GPS red GPS BAD, GPS green GPS OK/3D……OK 4. Tx green flashing, data sent……………………….OK 5. Rx green minimum one glider received…………...OK
Note! After installation obligatory check functionality from 1 to 3 and 5. Tx lamp flashing is connected
with GPS status, if bad no transition.
5.5 How to connect NMEA users LX Flarm Mobile may supply other navigation devices with NMEA position data. Mentioned data is available on the USB miniB type connector situated on the back side of the unit, the same connector also serves for the power supply and/or for charging the internal battery of Flarm. If you want to connect other devices to Flarm Mobile you should use LX Colibri II Power and Data interface cable.

LX Flarm Mobile LX Navigation d.o.o. Jun 2014
10
6 Firmware update
6.1 Firmware update via PC Flarm software expires and therefore periodically firmware upgrades are necessary. Flarm original tools should be used, available on www.flarm.com. You can use the USB cable that came with the unit. Use IGC compatible cables, for instance Colibri/LX20 power and data adapter (COL-
AC-PC).
Note! Colibri power adapter will also power Flarm Mobile
The procedure:
Run actual Flarm tool on PC
Connect Flarm mobile to PC with power and data adapter
Power ON Flarm Mobile
Wait (apr.30 seconds) until connect status on tools will appear
Click on Flarm
Select kind of transfer (Recover for firmware update)
Follow wizard
Wait until finish
Disconnect comport
Switch Flarm unit off and after again on
6.1.1 Updating the obstacle database via PC: Flarm Mobile does not have a preloaded obstacle database. If you want to update obstacle database you have to visit http://shop.flarm.com/ and buy the obstacle database. To make a purchase you have to enter the serial number of your device. The serial number (s.n.) is written on the bottom side of your device and you can also see the serial number when connecting Flarm Mobile to PC in Flarmtool. Once you have obstacle database you will find the possibility to update obstacle database under the menu item “Flarm” in Flarmtool. In this menu you can also change settings in your Flarm Mobile.
s.n.

LX Flarm Mobile LX Navigation d.o.o. Jun 2014
11
6.2 SD card and Flight recorder option (Firmware 3.05 or later) LX Flarm Mobile may be optionally delivered with SD card interface. The card slot is an integral part of the unit.
One already formatted SD card is delivered with the unit. The functionality of SD card is as follows:
Storing of flights
Note! The flight recorder hasn’t IGC approval.
Update of obstacle data base
Flarm firmware update
Note! Flarm traffic avoidance functionality does not depend on SD card status (inserted or not).
Files for any update are available on www.flarm.com/support/updates/. All files should be copied to the SD card (no folders permitted), also it is not allowed to change any file name.
6.3 Firmware update via SD card procedure Ready for update: -Insert the card and switch the Flarm unit off, for minimum 5 seconds -Power on Flarm unit Firmware update: -An update will follow after a file having extension .fw will be detected; the procedure will take approximately one minute and will run automatically.
SD card slot
LX Flarm Mobile LX Navigation d.o.o. Jun 2014
12
6.3.1 The obstacle data base update procedure via SD card:
If an .obs file type will be detected on SD-cart root, an update will follow. The update may take several minutes.
All data must be in SD-card root directory, folder/subfolder are not allowed. Names of the files shall not be changed. Read of flight recorder data:
The last 20 flights will be automatically copied to SD card after each power on. If some flights also exist, they will not be doubled. After a longer time flying without the card inserted the copy procedure may take some longer time because all 20 flights must be transferred to the card. To start copy to SD card remove power for apr. 5 seconds and power on again. The procedure will run automatically.
6.3.2 Using of not original SD cards
Every unit comes with an original SD card, the card is also tested during production process. Flarm software version 5 now handles all SD and SDHC compatible cards with micro-SD size. Before, there was a limitation of 2 GB and FAT 16. By troubles follow instructions below:
The SD card must be formatted using FAT system (default allocation unit size). But the most important the SD card must be set as “Primary Partition”, i.e. not a “Logical drive”. Using Windows 7 format tool you always get a “Logical drive”.
A free tool for format you find: http://www.partitionwizard.com/download.html.
6.4 Update of the Flarm Mobile settings
6.4.1 Changing settings via PC Flarmtools As there are practically three units built in the Flarm Mobile, (Bluetooth, Flarm electronics and the display) it is obligatory that they all have the same communication speed (baudrate). If there is any reason for another com speed, (using of Flarm as GPS source for other units…), the com speed of the Flarm unit can be adjusted any time after using of Flarm tools. Use option Settings, how to connect Flarm Mobile to PC see capture 6.
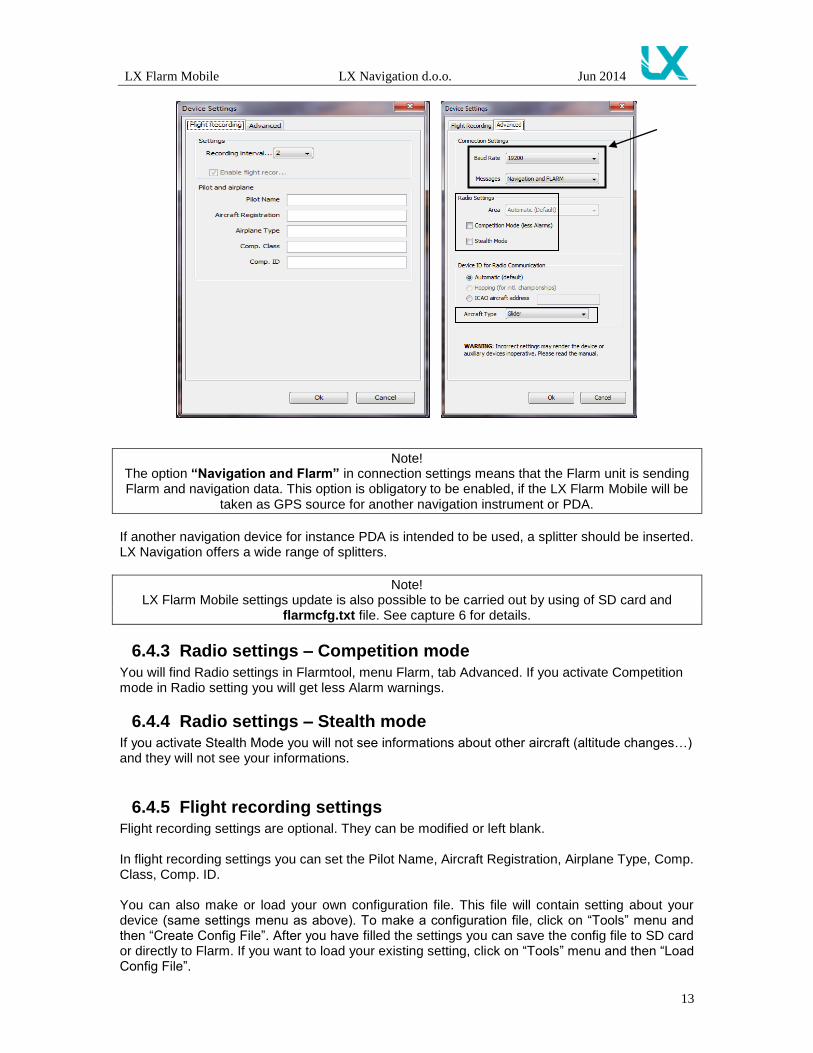
6.4.2 Connection settings You will find Connection settings in Flarmtool, menu Flarm, tab Advanced.
Note! If you change baudrate to any other rate than 19200bps the Bluetooth module will not work!
LX Flarm Mobile LX Navigation d.o.o. Jun 2014
13
Note! The option “Navigation and Flarm” in connection settings means that the Flarm unit is sending Flarm and navigation data. This option is obligatory to be enabled, if the LX Flarm Mobile will be
taken as GPS source for another navigation instrument or PDA.
If another navigation device for instance PDA is intended to be used, a splitter should be inserted. LX Navigation offers a wide range of splitters.
Note! LX Flarm Mobile settings update is also possible to be carried out by using of SD card and
flarmcfg.txt file. See capture 6 for details.
6.4.3 Radio settings – Competition mode
You will find Radio settings in Flarmtool, menu Flarm, tab Advanced. If you activate Competition mode in Radio setting you will get less Alarm warnings.
6.4.4 Radio settings – Stealth mode If you activate Stealth Mode you will not see informations about other aircraft (altitude changes…) and they will not see your informations.
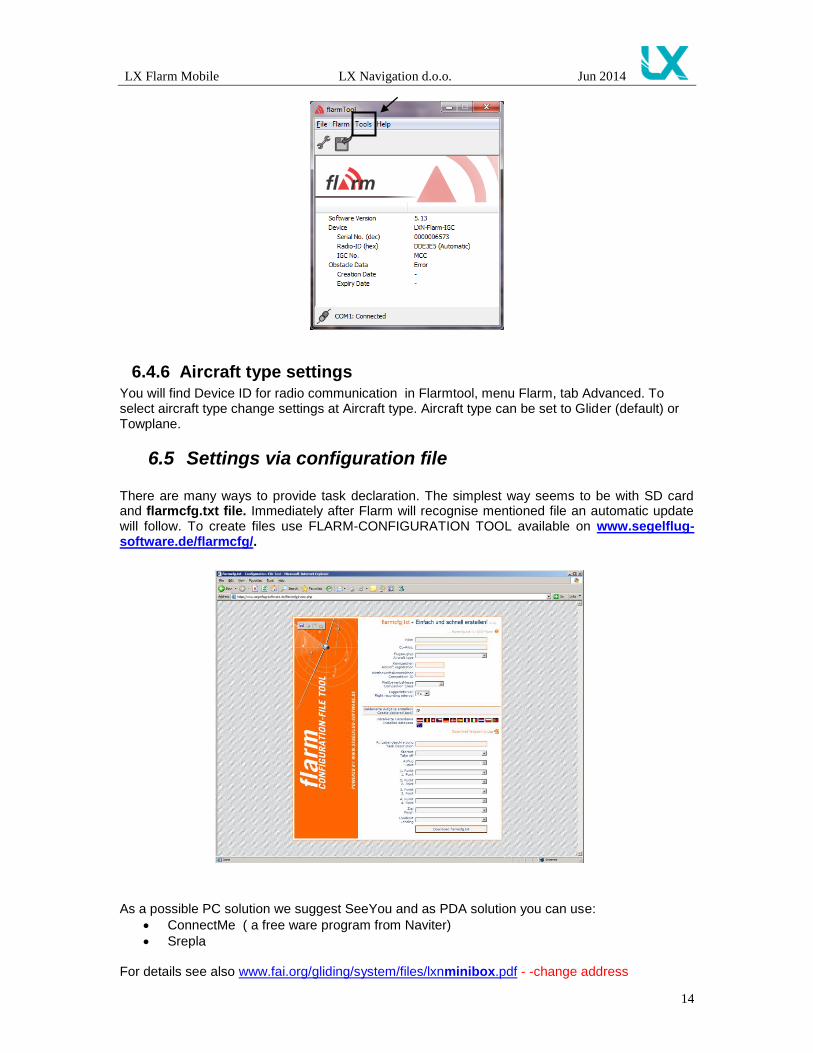
6.4.5 Flight recording settings Flight recording settings are optional. They can be modified or left blank. In flight recording settings you can set the Pilot Name, Aircraft Registration, Airplane Type, Comp. Class, Comp. ID. You can also make or load your own configuration file. This file will contain setting about your device (same settings menu as above). To make a configuration file, click on “Tools” menu and then “Create Config File”. After you have filled the settings you can save the config file to SD card or directly to Flarm. If you want to load your existing setting, click on “Tools” menu and then “Load Config File”.
LX Flarm Mobile LX Navigation d.o.o. Jun 2014
14
6.4.6 Aircraft type settings You will find Device ID for radio communication in Flarmtool, menu Flarm, tab Advanced. To select aircraft type change settings at Aircraft type. Aircraft type can be set to Glider (default) or Towplane.
6.5 Settings via configuration file There are many ways to provide task declaration. The simplest way seems to be with SD card and flarmcfg.txt file. Immediately after Flarm will recognise mentioned file an automatic update will follow. To create files use FLARM-CONFIGURATION TOOL available on www.segelflug-software.de/flarmcfg/. As a possible PC solution we suggest SeeYou and as PDA solution you can use:
ConnectMe ( a free ware program from Naviter)
Srepla For details see also www.fai.org/gliding/system/files/lxnminibox.pdf - -change address
LX Flarm Mobile LX Navigation d.o.o. Jun 2014
15
7 Limitations
Note! Using of Flarm will NOT reduce responsibility of the pilot to monitor the airspace and to react in
case of a collision risk.
See Flarm manual for details.
8 LX Flarm Mobile with IGC approved flight recorder LX Flarm Mini Box is offered also with “diamond level” IGC approved flight recorder. Units having this option differ against to non approved units in following:
On the label you see a three character IGC designation code (for instance MR0)
The unit is protected with two safety label against non authorized opening of the box
A push button marked as event is positioned on the top of the box, its main function is setting of additionally records after activation
Note! The label should remain not damaged, after damage the flight data will become invalid.
8.1 Downloading the flight to SD card Procedure in details:
1. After landing, let the Red Box or Mini Box run for up to 5 minutes to allow it to finish writing flight data to memory
2. Switch off the device
3. Insert SD card in its slot (if it is not already there)
4. Switch the Red Box on and let it run for up to 5 minutes
5. Remove the card; the flight will have been transferred from the Red Box memory to the SD card and will be available for badge claim, SeeYou flight analysis software, etc.
In the event of difficulties use Flarm Tools (www.flarm.com) to access the Flarm using a cable
LX Flarm Mobile LX Navigation d.o.o. Jun 2014
16
9 Frequently asked questions – FAQ POWER RED LED LIGHT IS BLINKING? Set Flarm display baudarate to 19200bps, or Flarm does not send data – check connection settings in chapter 6 for details (Messages – Flarm and navigation). GPS RED LIGHT IS BLINKING? Bad GPS signal (see chapter 5 for details). OTHER FLARM OBJECTS NOT VISIBLE? Check Radio Settings in chapter 6. Flarm might be in competition mode or in stealth mode. Or check your software version (might be old and needs update), or there might be some hardware problems. NO COMMUNICATION WITH OTHER DEVICE? Check baudrate on your device and on other devices – it MUST be set on 19200bps. Check chapter 6 for details. HOW TO SET TOWPLANE? You can change the aircraft type in advanced setting – check chapter 6 for details.