Embed Size (px)
Citation preview

www.lorextechnology.com LW1741AC1_QSG_TRILINGUAL_R1 Page 1
ADD-ON CAMERALW1741AC1
QUICK START GUIDE
lorextechnology.com/support
x1 x3 x1
Attach the camera stand to the camera.2
1 Use the included mounting screws to attach the camera stand to the mounting surface:
a. Mark the positions of the screw holes on the mounting surface with the base of the mounting stand.
b. Drill holes and insert the drywall anchors (included) as needed.c. Firmly attach camera stand to the surface using the included screws.
Camera SetupBefore installing the camera, carefully plan where andhow it will be positioned, and where you will route thecable that connects the camera to the power adapter.
4 Connect one end of the camera’s power adapter tothe camera and the other end to an electrical outlet.Make sure the power connector is fully inserted toavoid water getting in the plug.
5 Remove the protective film from the front of the camera. If the film is not removed, it will affect picture quality.
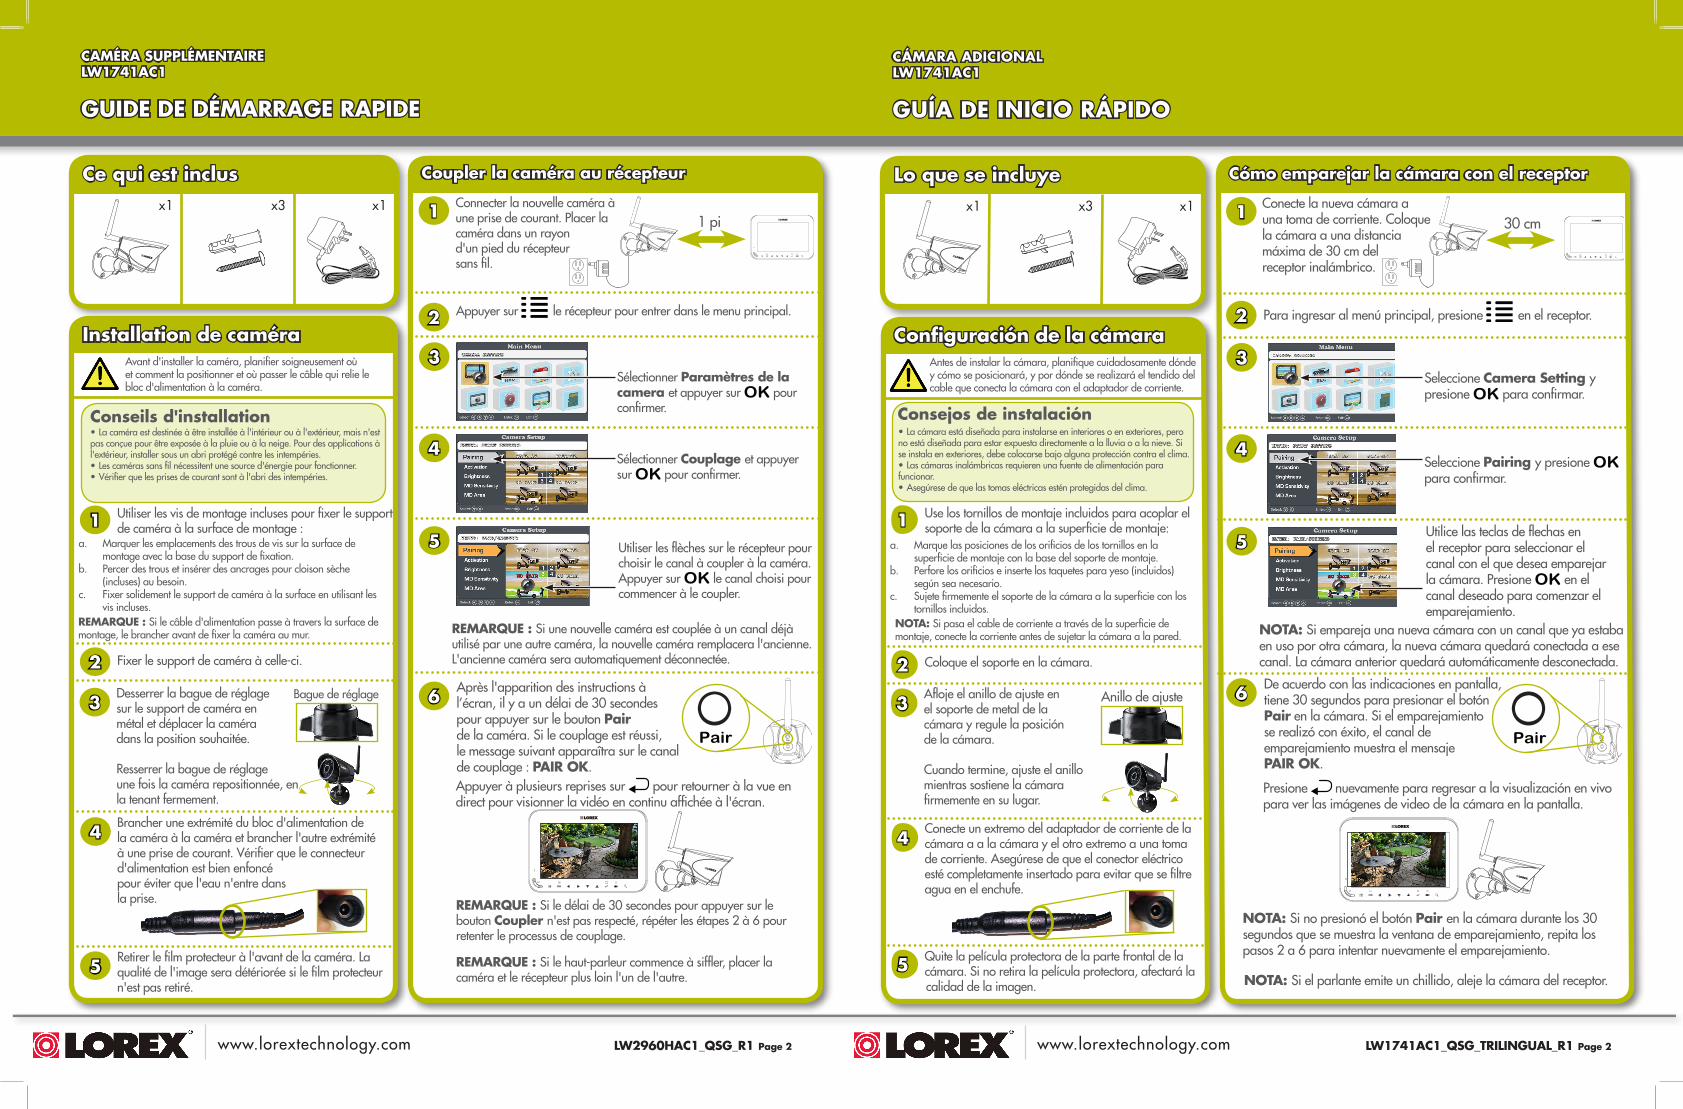
• Camera is rated for indoor/outdoor installation, but is not intended for direct exposure to rain or snow. For outdoor applications, install under shelter protected from the elements.• Wireless cameras require a power source to operate.• Ensure power outlets are sheltered from the elements.
Installation Tips
NOTE: If you run the power cable through the mounting surface, connect power before attaching the camera to the wall.
Press on the receiver to enter the main menu.2
1 Connect the new camera to a power outlet. Place the camera within 1ft of the wireless receiver.
Pairing the Camera with the Receiver
3Select Camera Setting and press OK to confirm.
What’s Included
6
NOTE: If you pair a new camera to a channel that is already being used by an existing camera, the new camera will be connected to that channel. The old camera will automatically be disconnected.
Following the on-screen prompt,you have 30 seconds to pressthe Pair button on the camera. If pairing was successful, the pairing channel shows the statement PAIR OK.
NOTE: If you do not press the Pair button on the camera during the 30 second pairing window, repeat steps 2~6 to try the pairing process again.
NOTE: If the speaker begins squealing, move the camera and receiver away from each other.
1ft
OK
PairPair
Press repeatedly to return to live view to see the camera’s video feed displayed on-screen.
OK
4Select Pairing and press OK to confirm.
5 Use the arrow keys on the receiver to select the channel you want to pair the camera to. Press OK on the desired channel to begin pairing.
3 Loosen the adjustment ring on the metal camera stand and move the camera to the desired position.
Tighten the adjustment ring when finished, holding the camera firmly in position.
Adjustment ring
www.lorextechnology.com LW2960HAC1_QSG_R1 Page 2 www.lorextechnology.com LW1741AC1_QSG_TRILINGUAL_R1 Page 2
CAMÉRA SUPPLÉMENTAIRELW1741AC1
GUIDE DE DÉMARRAGE RAPIDE
x1 x3 x1
Fixer le support de caméra à celle-ci.2
1 Utiliser les vis de montage incluses pour fixer le support de caméra à la surface de montage :
a. Marquer les emplacements des trous de vis sur la surface de montage avec la base du support de fixation.
b. Percer des trous et insérer des ancrages pour cloison sèche (incluses) au besoin.
c. Fixer solidement le support de caméra à la surface en utilisant les vis incluses.
Installation de caméraAvant d'installer la caméra, planifier soigneusement oùet comment la positionner et où passer le câble qui relie le bloc d'alimentation à la caméra.
4Brancher une extrémité du bloc d'alimentation de la caméra à la caméra et brancher l'autre extrémité à une prise de courant. Vérifier que le connecteur d'alimentation est bien enfoncépour éviter que l'eau n'entre dans la prise.
5 Retirer le film protecteur à l'avant de la caméra. La qualité de l'image sera détériorée si le film protecteur n'est pas retiré.
• La caméra est destinée à être installée à l'intérieur ou à l'extérieur, mais n'est pas conçue pour être exposée à la pluie ou à la neige. Pour des applications à l'extérieur, installer sous un abri protégé contre les intempéries.• Les caméras sans fil nécessitent une source d'énergie pour fonctionner.• Vérifier que les prises de courant sont à l'abri des intempéries.
Conseils d'installation
REMARQUE : Si le câble d'alimentation passe à travers la surface de montage, le brancher avant de fixer la caméra au mur.
Appuyer sur le récepteur pour entrer dans le menu principal.2
1 Connecter la nouvelle caméra à une prise de courant. Placer la caméra dans un rayon d'un pied du récepteur sans fil.
Coupler la caméra au récepteur
3Sélectionner Paramètres de la camera et appuyer sur OK pour confirmer.
Ce qui est inclus
6
REMARQUE : Si une nouvelle caméra est couplée à un canal déjà utilisé par une autre caméra, la nouvelle caméra remplacera l'ancienne. L'ancienne caméra sera automatiquement déconnectée.
Après l'apparition des instructions à l’écran, il y a un délai de 30 secondes pour appuyer sur le bouton Pair de la caméra. Si le couplage est réussi, le message suivant apparaîtra sur le canal de couplage : PAIR OK.
REMARQUE : Si le délai de 30 secondes pour appuyer sur le bouton Coupler n'est pas respecté, répéter les étapes 2 à 6 pour retenter le processus de couplage.
REMARQUE : Si le haut-parleur commence à siffler, placer la caméra et le récepteur plus loin l'un de l'autre.
1 pi
OK
PairPair
Appuyer à plusieurs reprises sur pour retourner à la vue en direct pour visionner la vidéo en continu affichée à l'écran.
OK
4Sélectionner Couplage et appuyer sur OK pour confirmer.
5 Utiliser les flèches sur le récepteur pour choisir le canal à coupler à la caméra. Appuyer sur OK le canal choisi pour commencer à le coupler.
3Desserrer la bague de réglage sur le support de caméra en métal et déplacer la caméra dans la position souhaitée.
Resserrer la bague de réglage une fois la caméra repositionnée, en la tenant fermement.
Bague de réglage
CÁMARA ADICIONALLW1741AC1
GUÍA DE INICIO RÁPIDO
x1 x3 x1
Coloque el soporte en la cámara.2
1 Use los tornillos de montaje incluidos para acoplar el soporte de la cámara a la superficie de montaje:
a. Marque las posiciones de los orificios de los tornillos en la superficie de montaje con la base del soporte de montaje.
b. Perfore los orificios e inserte los taquetes para yeso (incluidos) según sea necesario.
c. Sujete firmemente el soporte de la cámara a la superficie con los tornillos incluidos.
Configuración de la cámaraAntes de instalar la cámara, planifique cuidadosamente dónde y cómo se posicionará, y por dónde se realizará el tendido del cable que conecta la cámara con el adaptador de corriente.
4Conecte un extremo del adaptador de corriente de la cámara a a la cámara y el otro extremo a una toma de corriente. Asegúrese de que el conector eléctrico esté completamente insertado para evitar que se filtre agua en el enchufe.
5 Quite la película protectora de la parte frontal de la cámara. Si no retira la película protectora, afectará la calidad de la imagen.
• La cámara está diseñada para instalarse en interiores o en exteriores, pero no está diseñada para estar expuesta directamente a la lluvia o a la nieve. Si se instala en exteriores, debe colocarse bajo alguna protección contra el clima.• Las cámaras inalámbricas requieren una fuente de alimentación para funcionar.• Asegúrese de que las tomas eléctricas estén protegidas del clima.
Consejos de instalación
NOTA: Si pasa el cable de corriente a través de la superficie de montaje, conecte la corriente antes de sujetar la cámara a la pared.
Para ingresar al menú principal, presione en el receptor.2
1 Conecte la nueva cámara a una toma de corriente. Coloque la cámara a una distancia máxima de 30 cm del receptor inalámbrico.
Cómo emparejar la cámara con el receptor
3Seleccione Camera Setting y presione OK para confirmar.
Lo que se incluye
6
NOTA: Si empareja una nueva cámara con un canal que ya estaba en uso por otra cámara, la nueva cámara quedará conectada a ese canal. La cámara anterior quedará automáticamente desconectada.
De acuerdo con las indicaciones en pantalla,tiene 30 segundos para presionar el botón Pair en la cámara. Si el emparejamiento se realizó con éxito, el canal de emparejamiento muestra el mensaje PAIR OK.
NOTA: Si no presionó el botón Pair en la cámara durante los 30 segundos que se muestra la ventana de emparejamiento, repita los pasos 2 a 6 para intentar nuevamente el emparejamiento.
NOTA: Si el parlante emite un chillido, aleje la cámara del receptor.
30 cm
OK
PairPair
Presione nuevamente para regresar a la visualización en vivo para ver las imágenes de video de la cámara en la pantalla.
OK
4Seleccione Pairing y presione OK para confirmar.
5Utilice las teclas de flechas en el receptor para seleccionar el canal con el que desea emparejar la cámara. Presione OK en el canal deseado para comenzar el emparejamiento.
3Afloje el anillo de ajuste en el soporte de metal de la cámara y regule la posición de la cámara.
Cuando termine, ajuste el anillo mientras sostiene la cámara firmemente en su lugar.
Anillo de ajuste