Embed Size (px)
DESCRIPTION
Moodle
Citation preview

Teaching with Moodle An introduction to the
Virtual Learning Environment
UCP Marjon | v 0.6


2011 UCP Marjon | v 0.6
Teaching with Moodle Page | 1
Welcome to Teaching with Moodle
Moodle is the platform for our Virtual Learning Environment (VLE) which we call LearningSpace. You can use
LearningSpace to deliver a blended learning approach for your courses; combining face-to-face lessons with
engaging online activities and resources.
This guide covers the basics of using Moodle and gives a feel for the range of the tools and activities available.
2011 UCP Marjon | v 0.6
Teaching with Moodle Page | 2
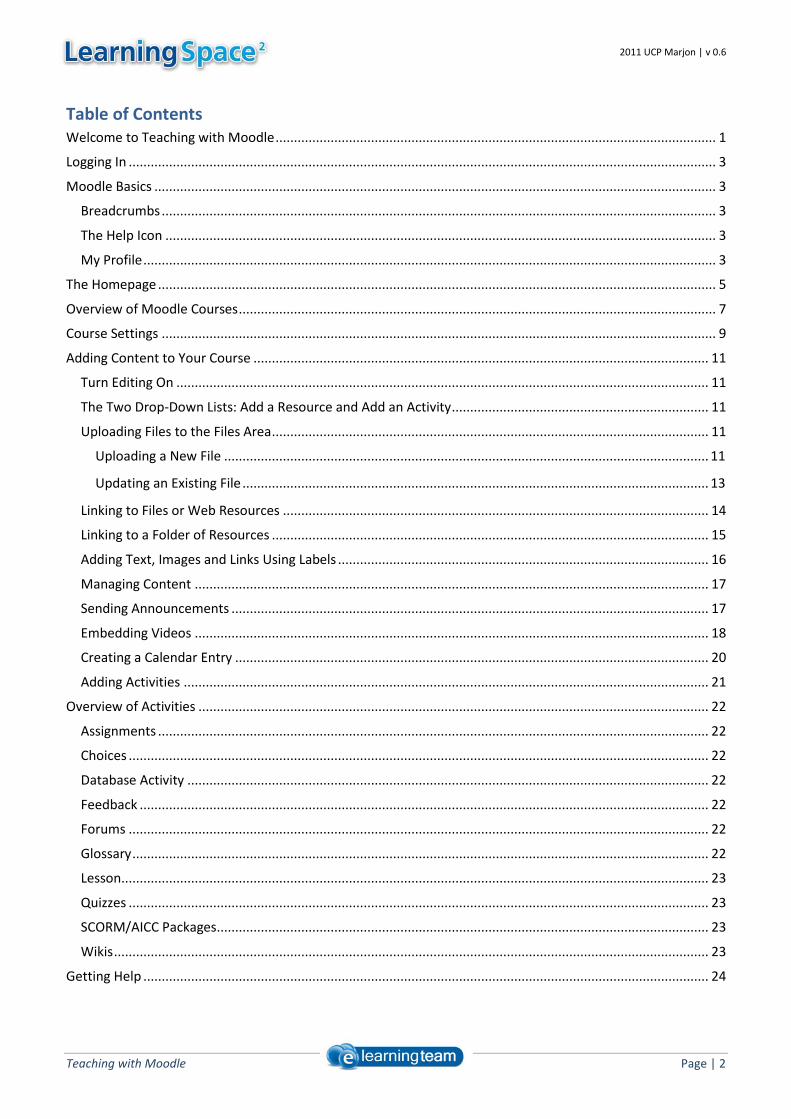
Table of Contents Welcome to Teaching with Moodle ........................................................................................................................ 1
Logging In ................................................................................................................................................................ 3
Moodle Basics ......................................................................................................................................................... 3
Breadcrumbs ....................................................................................................................................................... 3
The Help Icon ...................................................................................................................................................... 3
My Profile ............................................................................................................................................................ 3
The Homepage ........................................................................................................................................................ 5
Overview of Moodle Courses .................................................................................................................................. 7
Course Settings ....................................................................................................................................................... 9
Adding Content to Your Course ............................................................................................................................ 11
Turn Editing On ................................................................................................................................................. 11
The Two Drop-Down Lists: Add a Resource and Add an Activity ...................................................................... 11
Uploading Files to the Files Area ....................................................................................................................... 11
Uploading a New File .................................................................................................................................... 11
Updating an Existing File ............................................................................................................................... 13
Linking to Files or Web Resources .................................................................................................................... 14
Linking to a Folder of Resources ....................................................................................................................... 15
Adding Text, Images and Links Using Labels ..................................................................................................... 16
Managing Content ............................................................................................................................................ 17
Sending Announcements .................................................................................................................................. 17
Embedding Videos ............................................................................................................................................ 18
Creating a Calendar Entry ................................................................................................................................. 20
Adding Activities ............................................................................................................................................... 21
Overview of Activities ........................................................................................................................................... 22
Assignments ...................................................................................................................................................... 22
Choices .............................................................................................................................................................. 22
Database Activity .............................................................................................................................................. 22
Feedback ........................................................................................................................................................... 22
Forums .............................................................................................................................................................. 22
Glossary ............................................................................................................................................................. 22
Lesson ................................................................................................................................................................ 23
Quizzes .............................................................................................................................................................. 23
SCORM/AICC Packages ...................................................................................................................................... 23
Wikis .................................................................................................................................................................. 23
Getting Help .......................................................................................................................................................... 24

2011 UCP Marjon | v 0.6
Teaching with Moodle Page | 3
Logging In
You can access LearningSpace from anywhere in the world – all
you need is a browser with Internet access. Open a web
browser and navigate to http://LS.marjon.ac.uk
In the username and password fields enter your normal UCP
Marjon account (the same details you use to logon to a
campus PC).
If you’ve forgotten your password you can reset it online using
the password reset manager (click the Forgotten your
username or password? link).
Clicking the login button will take you to the Moodle homepage.
Moodle Basics
Before we jump in and start using Moodle there are a few things you need to familiarise yourself with first.
Breadcrumbs
On every page (except the homepage) you’ll find breadcrumbs in
the top-left under the LearningSpace logo. Think of breadcrumbs as a trail, showing you how you navigated
to the current page. Breadcrumbs appear as clickable links, giving you an easy way to backtrack to previous
pages.
Note: you can click the ‘Home’ link on a breadcrumb trail to get back to the homepage.
The Help Icon
As you navigate throughout Moodle you’ll notice the blue help icon dotted around:
Clicking the help icon will open a pop-up window with additional information relating to that item.
My Profile
Every Moodle user has their own profile which is visible to other staff
and students. You can view your profile at any time by clicking your
name next to the ‘Logout’ link in the top-right.
This will present you will an overview of your profile (as it appears to other users).

2011 UCP Marjon | v 0.6
Teaching with Moodle Page | 4
If you want to amend or add information click the ‘Edit profile’ tab to the left of your profile page. Try the
following:
1. Update Your Description
Enter some information about yourself in
the description field. It might be helpful to
add some basic contact information
(remember this is visible to other
logged-on users).
2. Add a Photo
You can upload a photo to your Moodle
profile. This could be useful to help your
students identify you.
To upload a picture click the Choose a file
button and locate your image. Images will
be resized automatically.
Note: To save any changes to your profile click the ‘Update Profile’ button.
Your Blog: Moodle users have their own blog, to use however they like. You can use this blog to keep a running journal of
what you’re doing, researching, interested-in etc. Content can be tagged by keyword and you can share your posts with
other staff and students. Posts are not publically visible outside of Moodle.
To add a post to your blog click the Blog tab from your profile > then Add a New Entry.

2011 UCP Marjon | v 0.6
Teaching with Moodle Page | 5
The Homepage
Return to the Moodle homepage using the breadcrumbs.
The homepage is the first thing staff and students see when they log in to Moodle. It contains a number of
different boxes around the outside (known as ‘Blocks’), some of which are only found on the homepage.
1. My Courses
This block shows you all the modules and groups you are a member of on Moodle. You can click the
appropriate link to navigate to a module/group or click ‘All Courses’ to browse the entire catalogue.
Important: The catalogue will be useful for gaining guest access to other modules or self-enrolling on groups, so you
should spend some time familiarising yourself with this.
Remember: A ‘Moodle Course’ is a term used to describe any study module or community group on LearningSpace.
2. Settings
Click this link to expand various options to change your profile.
3. What’s New on Learning Space
New and updated information which may be of interest to you.

2011 UCP Marjon | v 0.6
Teaching with Moodle Page | 6
4. Information Bar
Drop down boxes that contain links to useful areas.
5. Site News
A news feed controlled by the LearningSpace team. In order to avoid users’ Moodle homepage becoming
clogged up with general information we will only post important system messages (e.g. upgrades,
downtime etc) or academic news (e.g. term dates, exam changes) in this area. All other student news can
be posted on the other community areas.
6. Logged-in Status / Logout
This provides a quick way to access your Moodle profile (by clicking your name) and is the best way to
logout of LearningSpace when you’re finished.
7. My Calendar
Helps staff and students keep on top of upcoming events. Staff can add calendar events in modules which
are then displayed in student calendars as a clickable link. You might use the calendar to set assignment
deadlines/reminders. You can also add personal events to keep yourself organised!
Note: you can view a more detailed calendar by clicking on the current month. From here you can view all entries or add
new personal events by clicking the ‘New Event’ button in the top-right. To add calendar entries for a particular study
module (e.g. PEDC01), you need to navigate to that study module and then click the calendar link.
8. Homepage Information Area
This section will be managed by the LS team to advertise important VLE services or events. In the first
instance it will provide fast access to Academic Skills, Student Opportunities and Online Results, and
provide links to various community forums.
9. Mahara Portfolio
Although out of the scope of this document, the Mahara ePortfolio gives every Moodle user a personal
space to reflect on their learning and present appropriate evidence. Portfolios can be shared between staff
and students or made available externally.
Note: Keep an eye out for other training materials/courses for using the Mahara ePortfolio system in your teaching.
2011 UCP Marjon | v 0.6
Teaching with Moodle Page | 7
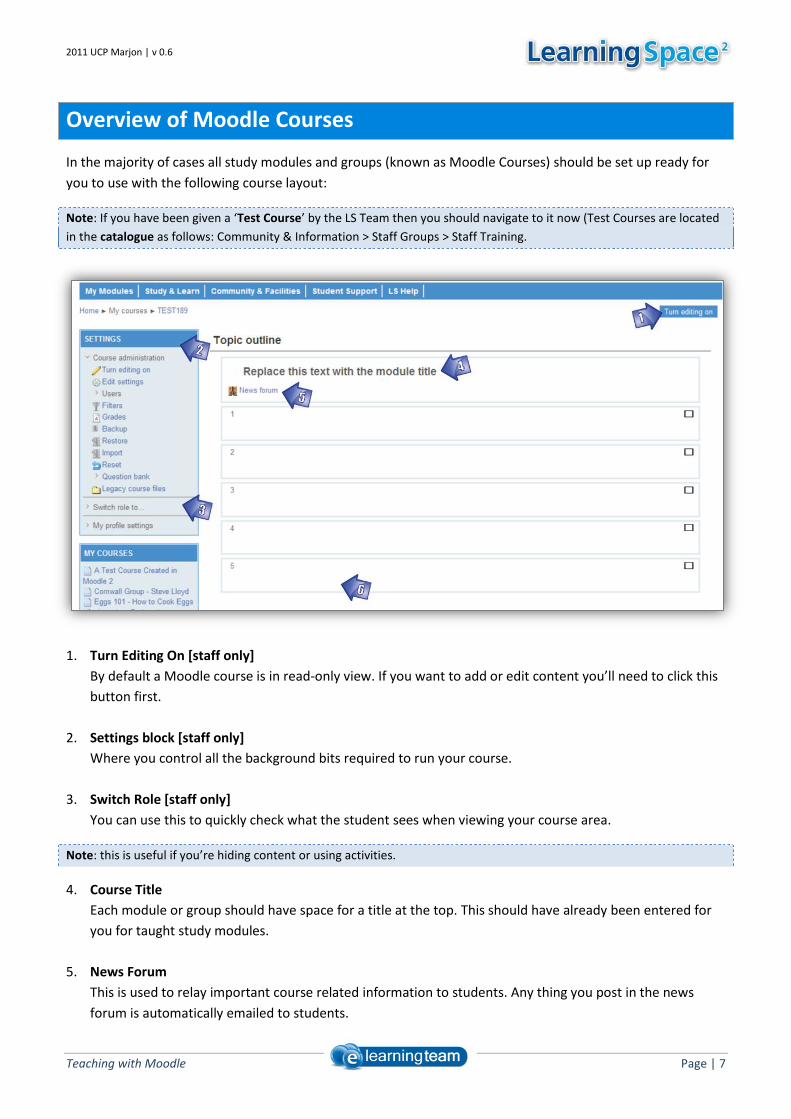
Overview of Moodle Courses
In the majority of cases all study modules and groups (known as Moodle Courses) should be set up ready for
you to use with the following course layout:
Note: If you have been given a ‘Test Course’ by the LS Team then you should navigate to it now (Test Courses are located
in the catalogue as follows: Community & Information > Staff Groups > Staff Training.
1. Turn Editing On [staff only]
By default a Moodle course is in read-only view. If you want to add or edit content you’ll need to click this
button first.
2. Settings block [staff only]
Where you control all the background bits required to run your course.
3. Switch Role [staff only]
You can use this to quickly check what the student sees when viewing your course area.
Note: this is useful if you’re hiding content or using activities.
4. Course Title
Each module or group should have space for a title at the top. This should have already been entered for
you for taught study modules.
5. News Forum
This is used to relay important course related information to students. Any thing you post in the news
forum is automatically emailed to students.
2011 UCP Marjon | v 0.6
Teaching with Moodle Page | 8
Note: The News Forum is the Moodle equivalent of the Announcement tool, found in the previous version of LS.
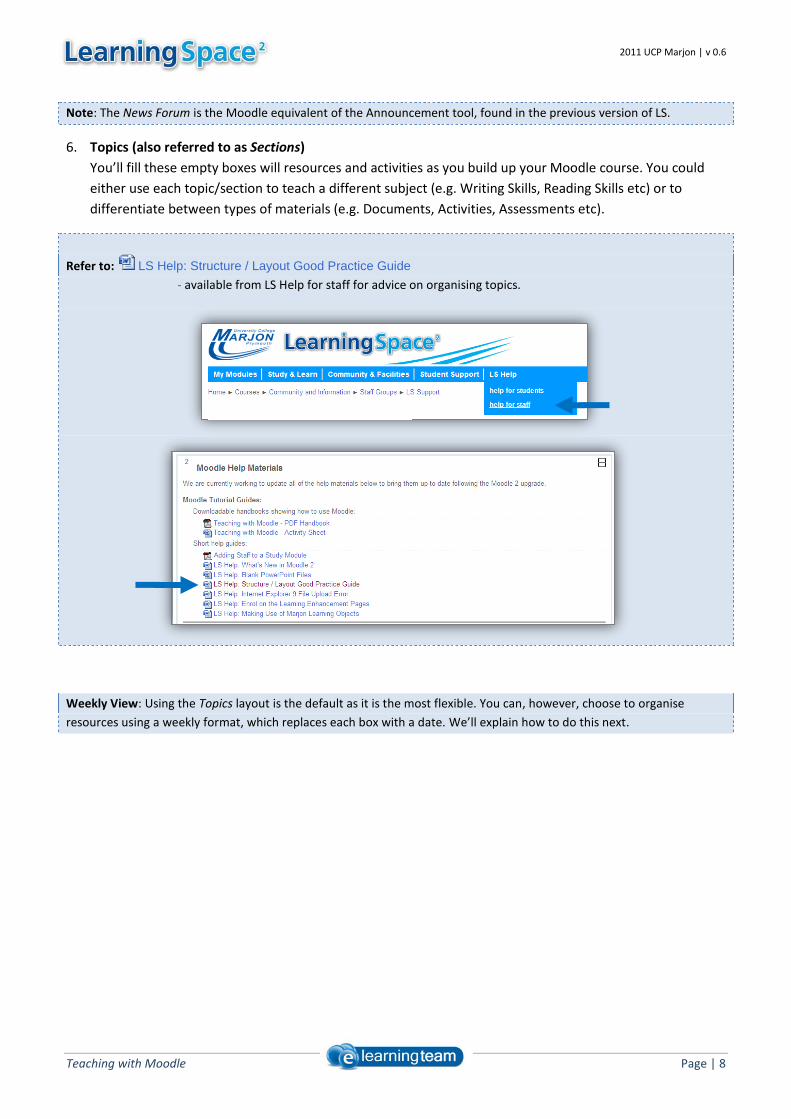
6. Topics (also referred to as Sections)
You’ll fill these empty boxes will resources and activities as you build up your Moodle course. You could
either use each topic/section to teach a different subject (e.g. Writing Skills, Reading Skills etc) or to
differentiate between types of materials (e.g. Documents, Activities, Assessments etc).
Refer to: LS Help: Structure / Layout Good Practice Guide
- available from LS Help for staff for advice on organising topics.
Weekly View: Using the Topics layout is the default as it is the most flexible. You can, however, choose to organise
resources using a weekly format, which replaces each box with a date. We’ll explain how to do this next.
2011 UCP Marjon | v 0.6
Teaching with Moodle Page | 9
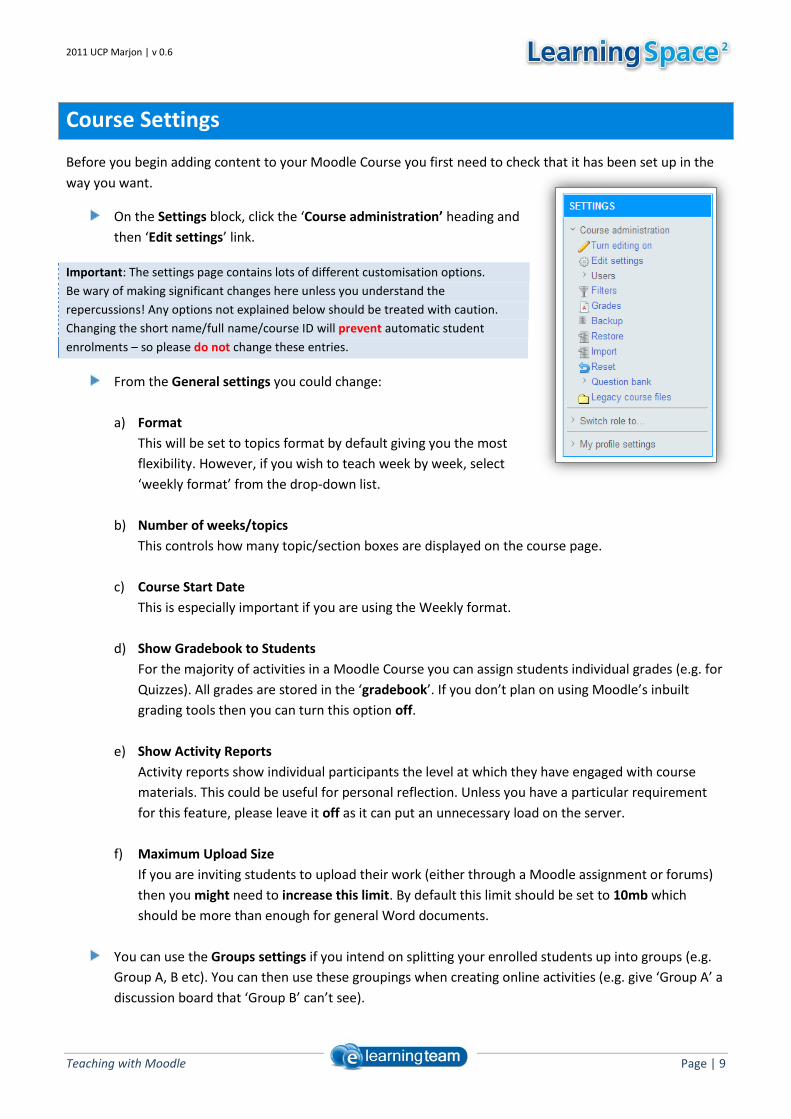
Course Settings
Before you begin adding content to your Moodle Course you first need to check that it has been set up in the
way you want.
On the Settings block, click the ‘Course administration’ heading and
then ‘Edit settings’ link.
Important: The settings page contains lots of different customisation options.
Be wary of making significant changes here unless you understand the
repercussions! Any options not explained below should be treated with caution.
Changing the short name/full name/course ID will prevent automatic student
enrolments – so please do not change these entries.
From the General settings you could change:
a) Format
This will be set to topics format by default giving you the most
flexibility. However, if you wish to teach week by week, select
‘weekly format’ from the drop-down list.
b) Number of weeks/topics
This controls how many topic/section boxes are displayed on the course page.
c) Course Start Date
This is especially important if you are using the Weekly format.
d) Show Gradebook to Students
For the majority of activities in a Moodle Course you can assign students individual grades (e.g. for
Quizzes). All grades are stored in the ‘gradebook’. If you don’t plan on using Moodle’s inbuilt
grading tools then you can turn this option off.
e) Show Activity Reports
Activity reports show individual participants the level at which they have engaged with course
materials. This could be useful for personal reflection. Unless you have a particular requirement
for this feature, please leave it off as it can put an unnecessary load on the server.
f) Maximum Upload Size
If you are inviting students to upload their work (either through a Moodle assignment or forums)
then you might need to increase this limit. By default this limit should be set to 10mb which
should be more than enough for general Word documents.
You can use the Groups settings if you intend on splitting your enrolled students up into groups (e.g.
Group A, B etc). You can then use these groupings when creating online activities (e.g. give ‘Group A’ a
discussion board that ‘Group B’ can’t see).
2011 UCP Marjon | v 0.6
Teaching with Moodle Page | 10
There are three different group modes:
a) No Groups – everyone interacts together (default option)
b) Separate Groups – Each group can only interact with the other students from that group. In this
case you could create a single discussion board activity, which you can roll out to separate cohorts.
c) Visible Groups – Each group works individually but can also see materials posted by other
students.
Finally the Availability settings can be adjusted to suit your preferences:
a) Availability – By default you should see that ‘this course is available to students’. This means that
as soon as students are enrolled onto your module, they can see and interact with any
resources/activities you have created. If you want some time to build your course before letting
students in, change this to ‘this course is not available to students’ – just remember to reopen it
later!
b) Enrolment Key – this is a special password which you can use to allow students to enrol on a
course (e.g. so they can interact with activities such as forums). A student will be prompted to
enter the enrolment key before they are enrolled. This can be used for group areas which are not
controlled by automatic enrolments.
IMPORTANT! You should not use an enrolment key on a Marjon study module (e.g. ABCD01) nor should you add/remove
students from a study module. It is vital that enrolments are an accurate reflection of student records.
c) Guest Access – by default all Moodle courses (both Modules and Associations) are set to allow
guests in without a key (a guest being any logged-on user). It is hoped that this will give students
the potential to find out about a module they are thinking of taking. Guests can view any course
materials including discussion forums. They cannot, however, post or interact in any way. If you
are having sensitive discussions we recommend that you disable guest access by setting this to ‘do
not allow guests in’.
2011 UCP Marjon | v 0.6
Teaching with Moodle Page | 11
Adding Content to Your Course
If used effectively a Moodle course can become an engaging learning environment, and be used to extend the
time that students interact with your module materials. To use Moodle successfully you’ll want to bin any bad
habits you might have picked up previously (e.g. only uploading PowerPoint slides, or not providing
information about documents) and start exploring the more interactive (and fun) features Moodle offers.
When you first enter a Moodle course you’ll be accessing it in a ‘read-only’ view – it won’t be immediately
obvious how to add or manage content.
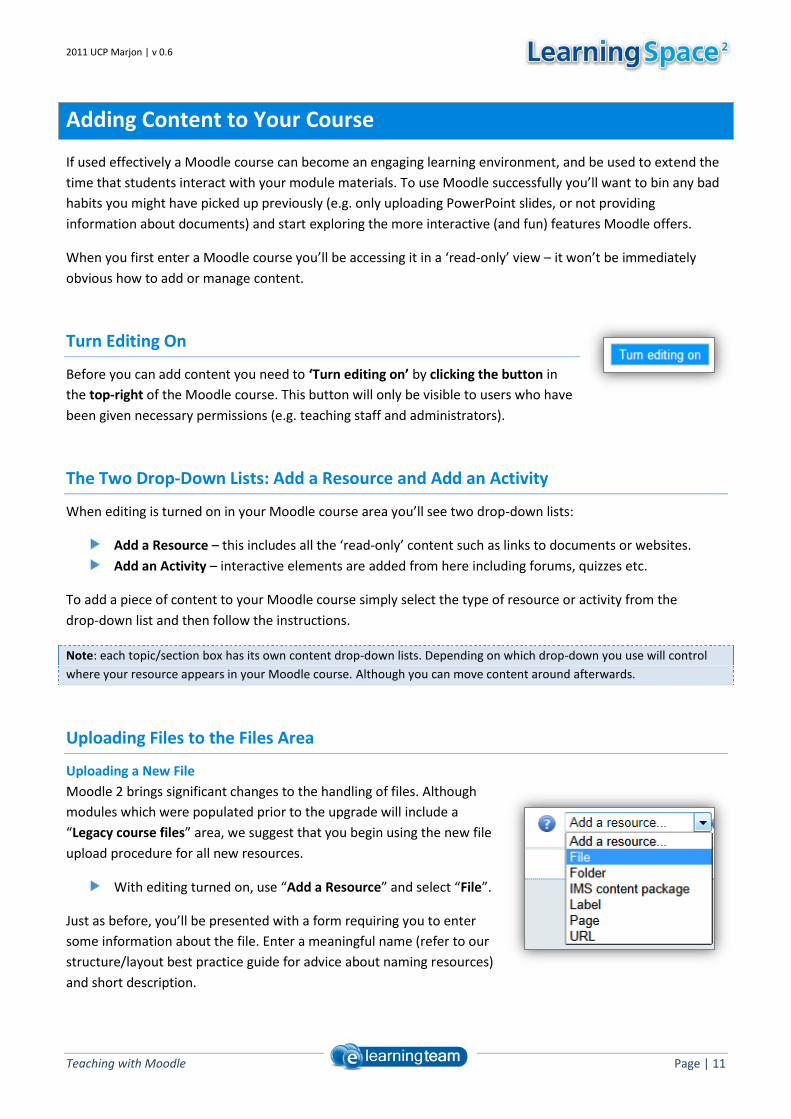
Turn Editing On
Before you can add content you need to ‘Turn editing on’ by clicking the button in
the top-right of the Moodle course. This button will only be visible to users who have
been given necessary permissions (e.g. teaching staff and administrators).
The Two Drop-Down Lists: Add a Resource and Add an Activity
When editing is turned on in your Moodle course area you’ll see two drop-down lists:
Add a Resource – this includes all the ‘read-only’ content such as links to documents or websites.
Add an Activity – interactive elements are added from here including forums, quizzes etc.
To add a piece of content to your Moodle course simply select the type of resource or activity from the
drop-down list and then follow the instructions.
Note: each topic/section box has its own content drop-down lists. Depending on which drop-down you use will control
where your resource appears in your Moodle course. Although you can move content around afterwards.
Uploading Files to the Files Area
Uploading a New File
Moodle 2 brings significant changes to the handling of files. Although
modules which were populated prior to the upgrade will include a
“Legacy course files” area, we suggest that you begin using the new file
upload procedure for all new resources.
With editing turned on, use “Add a Resource” and select “File”.
Just as before, you’ll be presented with a form requiring you to enter
some information about the file. Enter a meaningful name (refer to our
structure/layout best practice guide for advice about naming resources)
and short description.
2011 UCP Marjon | v 0.6
Teaching with Moodle Page | 12
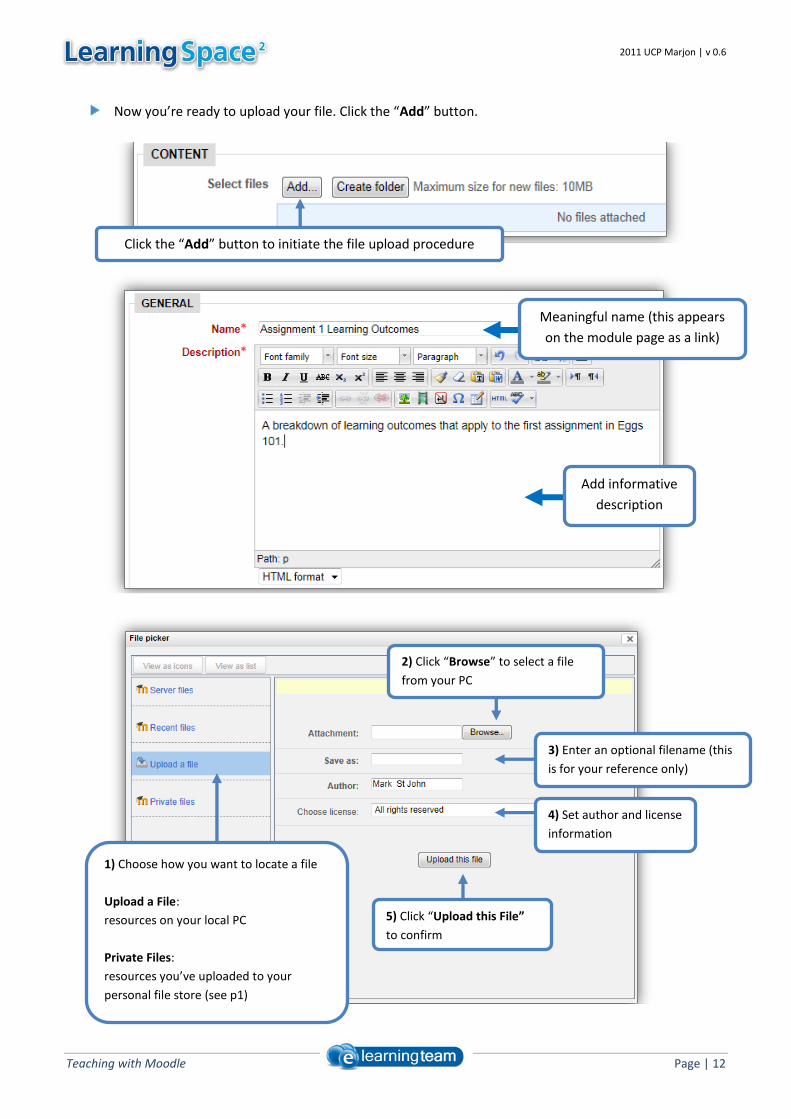
Now you’re ready to upload your file. Click the “Add” button.
Click the “Add” button to initiate the file upload procedure
Add informative
description
Meaningful name (this appears
on the module page as a link)
1) Choose how you want to locate a file
Upload a File:
resources on your local PC
Private Files:
resources you’ve uploaded to your
personal file store (see p1)
4) Set author and license
information
2) Click “Browse” to select a file
from your PC
3) Enter an optional filename (this
is for your reference only)
5) Click “Upload this File”
to confirm

2011 UCP Marjon | v 0.6
Teaching with Moodle Page | 13
Note: Internet Explorer 9 users might receive the error message “file not specified”. This is a bug. You’ll need
to run IE9 in “compatibility mode” for the time being. See LS Help: Problem with File Uploading in Internet
Explorer 9 available from LS Help for Staff on LearningSpace.
You’ll be taken back to the ‘add a file’ form. Once you’ve set any additional options or restrictions you may
want, click “Save and Return to Course”. The link to your file will now be visible from your course page.
Updating an Existing File
From time to time you might need to upload an amended document, replacing an existing file on
LearningSpace. To do this make sure editing is turned on, and navigate to the existing link on your course
page. Locate the “Update” icon (represented by a yellow pencil) and click it.
On the content section you’ll notice that your existing file is displayed. Click the “Add” button to begin the
process of uploading a new version.
Update resource
Update resource
1) Click “Browse” to select the
new file from your PC
2) Click “Upload this File” to
confirm
Existing
document
Adding a version number
in the Save As box will be
helpful here

2011 UCP Marjon | v 0.6
Teaching with Moodle Page | 14
Back on the add a file form you’ll see that you now
have more than one file in the content list.
At the moment, LearningSpace will continue to link
to the previous version of the file, it is up to us to set the current (or ‘main’) version. To do so, click the small
icon to the right of the file you’ve just uploaded. A pop-up menu appears. From here you have the option to
“Set main file”.
Click “Save and Return to Course” to confirm the changes.
Note: you can either keep the previous versions of files in case you ever need to roll-back, or delete unwanted
versions to save file space.
Linking to Files or Web Resources
1. With editing turned on, select URL from one of the Add a Resource drop-
down lists.
2. Moodle will load the URL form. Here you’ll need to specify the name of
the item (this will be used as the clickable link on the course page). You
also need to provide a summary.
3. To link to a website or other web resource then you can copy and paste
the URL (web address) in to the location field, then click save and return to
course.
2) Click “Set main file” from the
pop-up menu
Note that you can also rename
/ delete files from here
1) Click the menu icon to
the right of the new file
2011 UCP Marjon | v 0.6
Teaching with Moodle Page | 15
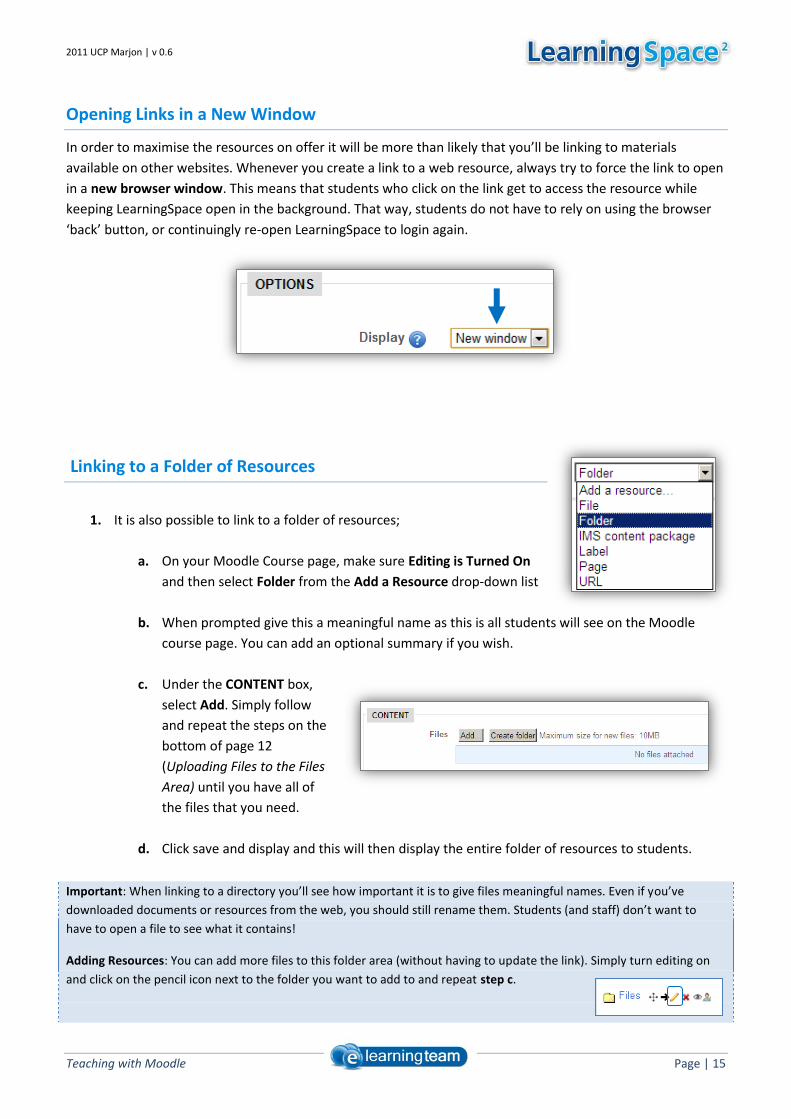
Opening Links in a New Window
In order to maximise the resources on offer it will be more than likely that you’ll be linking to materials
available on other websites. Whenever you create a link to a web resource, always try to force the link to open
in a new browser window. This means that students who click on the link get to access the resource while
keeping LearningSpace open in the background. That way, students do not have to rely on using the browser
‘back’ button, or continuingly re-open LearningSpace to login again.
Linking to a Folder of Resources
1. It is also possible to link to a folder of resources;
a. On your Moodle Course page, make sure Editing is Turned On
and then select Folder from the Add a Resource drop-down list
b. When prompted give this a meaningful name as this is all students will see on the Moodle
course page. You can add an optional summary if you wish.
c. Under the CONTENT box,
select Add. Simply follow
and repeat the steps on the
bottom of page 12
(Uploading Files to the Files
Area) until you have all of
the files that you need.
d. Click save and display and this will then display the entire folder of resources to students.
Important: When linking to a directory you’ll see how important it is to give files meaningful names. Even if you’ve
downloaded documents or resources from the web, you should still rename them. Students (and staff) don’t want to
have to open a file to see what it contains!
Adding Resources: You can add more files to this folder area (without having to update the link). Simply turn editing on
and click on the pencil icon next to the folder you want to add to and repeat step c.

2011 UCP Marjon | v 0.6
Teaching with Moodle Page | 16
Adding Text, Images and Links Using Labels
The label tool is a quick way to add more descriptive information directly onto a Moodle course page. This is
useful for providing an introduction to a subject, or adding textual information about a document. To start:
1. With editing turned on, click the Add a Resource drop-down list and then select Label.
2. To link to an external website (such as Google) or a file in your Moodle Files Area:
a. Select some text then click the Insert Web Link button (represented as a chain).
b. Either insert the URL of the website or continue to step 3.
3. Click browse and select the file you wish to link to (you can upload a new file if you need to).To add a
picture click the Insert Image button. You can either specify the URL for an external picture or upload
one. Remember to add alternative text (description of the image). Click Insert to add your image; you
should be able to resize it by dragging the corners.
4. Press Save and Return to Course to add the label to your Moodle page.
Insert web link
Insert an image

2011 UCP Marjon | v 0.6
Teaching with Moodle Page | 17
Managing Content
Once you’ve added some content to your Moodle Course you’ll notice a number of icons appear next to each
resource (when editing is turned on). You can use these to control the content as follows:
Icon Function Explanation
Move Click and drag this icon to move resources around on the page.
Indent Moves the resource to the right to give the impression of an ordered list.
Update Update the resource or change its settings.
/ Show / Hide Make a resource in/visible to students.
Delete Deletes the resource from the course page.
Groups Changes how groups of students interact. This is only available on some items.
Note: You can also add, edit, move or delete blocks on your course page. Blocks add extra
functionality to your Moodle Course.
To add a block make sure edit mode is switched on, then select one from the drop-down.
Sending Announcements
Announcements are a fast way of contacting all students enrolled in a Moodle Course. As well as being
displayed in the News Forum, students will also receive these messages by email.
1. Open your Moodle Course and click the News Forum link underneath
your module/group name.
2. This should take you to a general news and announcements forum
specific to your Moodle Course. Click the Add a New Topic button.
3. You need to specify a Subject (e.g. the title of the announcement) and the message itself. You can
copy and paste text into here, and add web links etc.
You can also add an attachment, although be wary about attaching large files which could
quickly clog-up student mail boxes.
If ticked, Mail Now will send the announcement immediately after posting. Without this ticked
the message will be emailed when Moodle runs its next batch job (around every 15 minutes).
Unless your message is urgent you do not need to worry about ticking this.
4. Once you’re happy with your message, click the Post to Forum button. The message will be emailed to
students as well as being visible in the News Forum.
2011 UCP Marjon | v 0.6
Teaching with Moodle Page | 18
IMPORTANT: Unless you ticked the Mail Now button you will receive a message telling you have 30 minutes to
edit/update the post. We recommend that you DO NOT edit a post if you spot an error because your revised message
may not be emailed to students. It is much better to create a new announcement, so that students receive the updated
message by email.
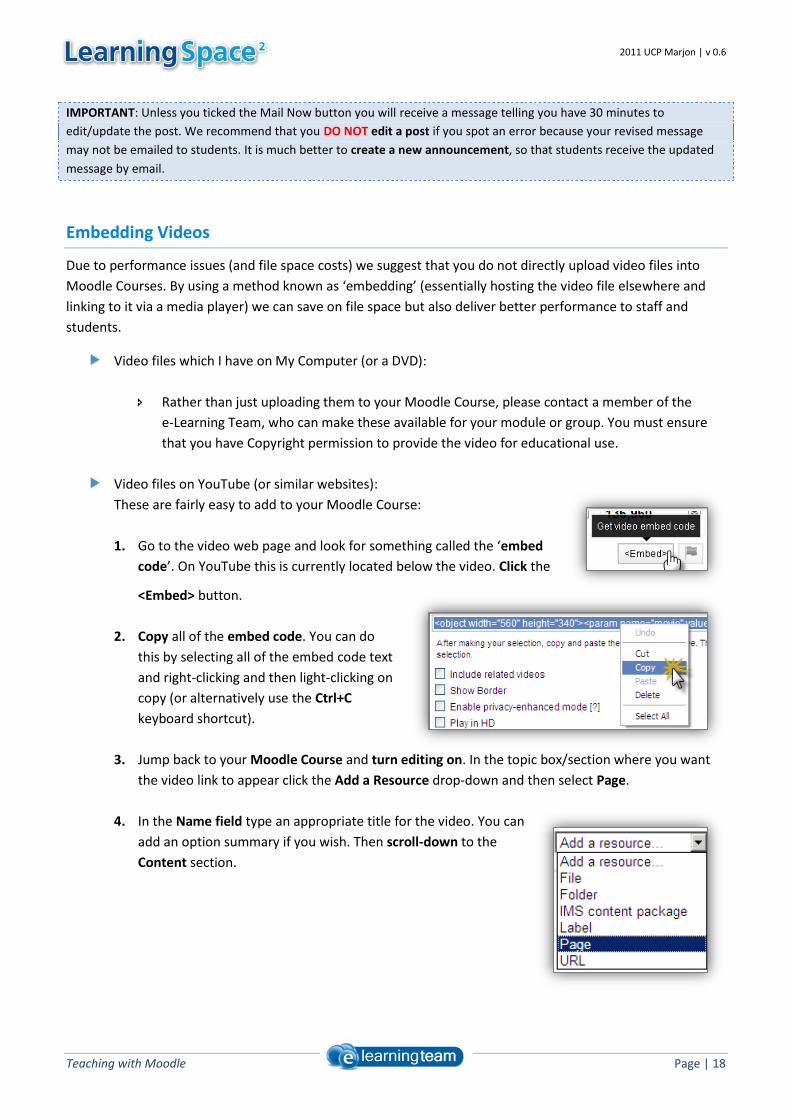
Embedding Videos
Due to performance issues (and file space costs) we suggest that you do not directly upload video files into
Moodle Courses. By using a method known as ‘embedding’ (essentially hosting the video file elsewhere and
linking to it via a media player) we can save on file space but also deliver better performance to staff and
students.
Video files which I have on My Computer (or a DVD):
Rather than just uploading them to your Moodle Course, please contact a member of the
e-Learning Team, who can make these available for your module or group. You must ensure
that you have Copyright permission to provide the video for educational use.
Video files on YouTube (or similar websites):
These are fairly easy to add to your Moodle Course:
1. Go to the video web page and look for something called the ‘embed
code’. On YouTube this is currently located below the video. Click the
<Embed> button.
2. Copy all of the embed code. You can do
this by selecting all of the embed code text
and right-clicking and then light-clicking on
copy (or alternatively use the Ctrl+C
keyboard shortcut).
3. Jump back to your Moodle Course and turn editing on. In the topic box/section where you want
the video link to appear click the Add a Resource drop-down and then select Page.
4. In the Name field type an appropriate title for the video. You can
add an option summary if you wish. Then scroll-down to the
Content section.
2011 UCP Marjon | v 0.6
Teaching with Moodle Page | 19
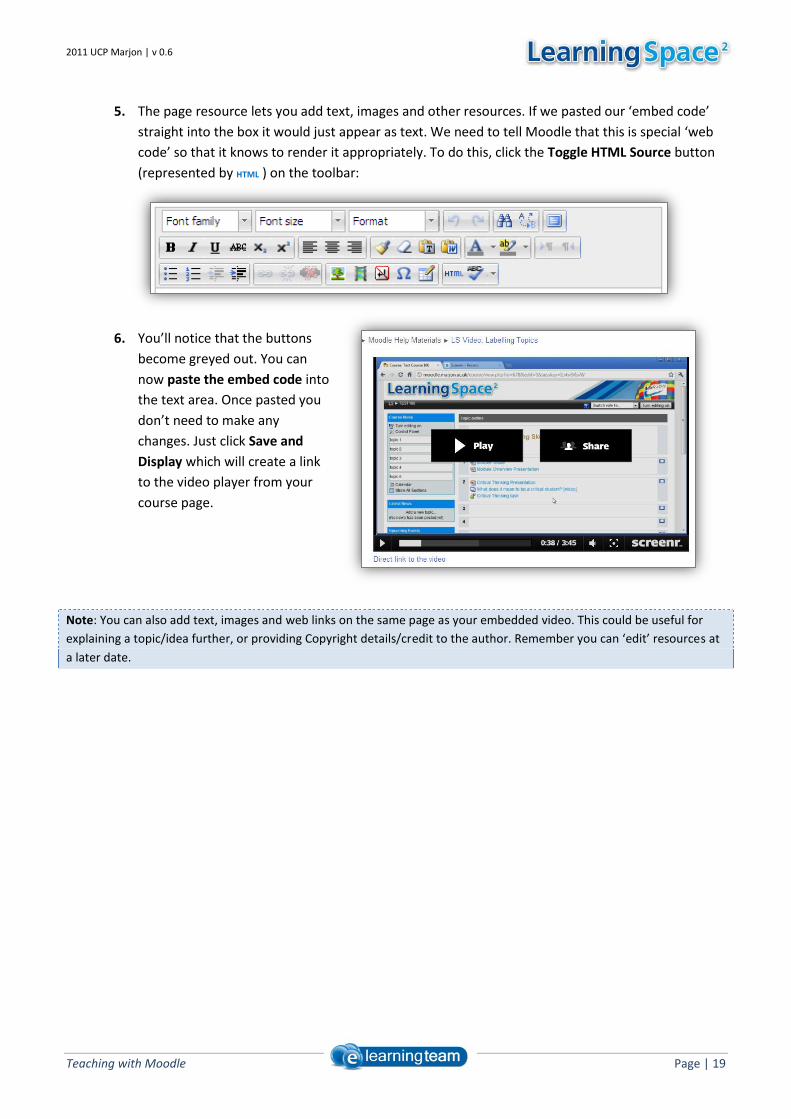
5. The page resource lets you add text, images and other resources. If we pasted our ‘embed code’
straight into the box it would just appear as text. We need to tell Moodle that this is special ‘web
code’ so that it knows to render it appropriately. To do this, click the Toggle HTML Source button
(represented by HTML ) on the toolbar:
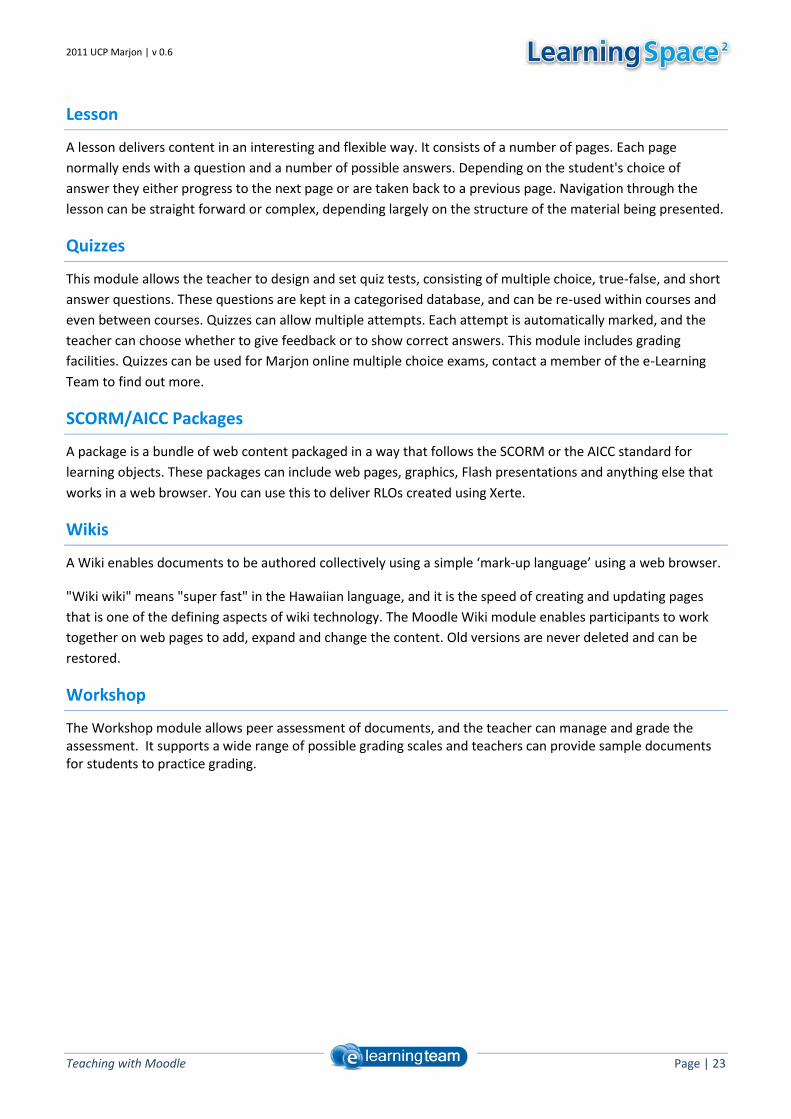
6. You’ll notice that the buttons
become greyed out. You can
now paste the embed code into
the text area. Once pasted you
don’t need to make any
changes. Just click Save and
Display which will create a link
to the video player from your
course page.
Note: You can also add text, images and web links on the same page as your embedded video. This could be useful for
explaining a topic/idea further, or providing Copyright details/credit to the author. Remember you can ‘edit’ resources at
a later date.

2011 UCP Marjon | v 0.6
Teaching with Moodle Page | 20
Creating a Calendar Entry
You can use the calendar to schedule any events, such as assignment deadlines
or information about general teaching sessions. Calendar entries are added
through the Moodle Course to which they apply.
Click the Calendar link from the Course Menu block (top-right of a Moodle
Course page).
Note: If the calendar block isn’t visible then you will need to add it to your course by following these instructions;
1. Go into your course and select the Turn Editing On button which can be found at the
top right of the screen;
2. Next select Calendar from the drop down box in the ADD A BLOCK section.
3. The calendar block should now be visible on the right hand side of your course
page and you can click Turn Editing Off.
This takes you to the calendar page:

2011 UCP Marjon | v 0.6
Teaching with Moodle Page | 21
1. Identifies the module or group which the calendar page is currently representing. You can use this to
quickly jump between calendar events for different Moodle Courses.
2. To create a New Event click this button then:
a. When asked for the type of event you wish to add, select ‘Course Event’.
b. Enter a meaningful name (such as ‘Assignment 1 Deadline’).
c. Enter the details into the Description box (e.g. ‘please hand your assignment into the
Programmes Office before 12noon’).
d. Select appropriate date/time options. You can specify duration or whether the event reoccurs
if you need to. Once you’re happy with the date/time settings click Save Changes to add the
event to the course calendar.
e. Your calendar entry should now appear as a blue link on the
monthly calendar (see arrow 3) for the date you specified.
3. The Monthly overview. Calendar events appear here as clickable
links.
Adding Activities
Documenting how each activity works and how to set them up is a mammoth task and outside the scope of
this training document. However, a brief summary of the activities available is provided overleaf, with a few
suggestions on things to consider. Please check for individual tutorials for the activities on our LearningSpace
help section, or alternatively contact a member of the e-Learning team.

2011 UCP Marjon | v 0.6
Teaching with Moodle Page | 22
Overview of Activities
There are a large variety of different activities/tools you can use in your Moodle Course, all of which can be
used in different ways.
Assignments
Assignments allow the teacher to specify a task that requires students to prepare digital content (any format)
and submit it by uploading it to the server. Typical assignments include essays, projects, reports and so on.
This module includes grading facilities.
Chat
The Chat module allows smooth, synchronous text interaction, each chat area can be limited to group members or roles, or be for anyone in the course. It supports URLs, smilies, embedded HTML, images etc .
Choices
A choice activity is very simple - the teacher asks a question and specifies a choice of multiple responses. It can
be useful as a quick poll to stimulate thinking about a topic; to allow the class to vote on a direction for the
course; or to gather research consent.
Database
The Database module allows the teacher and/or students to build, display and search a bank of record entries
about any conceivable topic. The format and structure of these entries can be almost unlimited, including
images, files, URLs, numbers and text amongst other things.
Feedback
With this module you can create a custom survey and invite responses from students.
Forums
This tool can be the most important activity in your Moodle course - it is here that most discussion takes place.
Forums can be structured in different ways, and can include peer rating of each posting, or require students to
add some content before they can see what their peers have contributed. By subscribing to a forum,
participants will receive copies of each new posting in their email.
Glossary
This activity allows participants (staff and students) to create and maintain a list of definitions, like a
dictionary. The entries can be searched or browsed in many different formats. The glossary also allows
teachers to export entries from one glossary to another (the main one) within the same course. By turning
‘auto-linking’ on, Moodle will automatically create links to glossary entries from throughout the course.
2011 UCP Marjon | v 0.6
Teaching with Moodle Page | 23
Lesson
A lesson delivers content in an interesting and flexible way. It consists of a number of pages. Each page
normally ends with a question and a number of possible answers. Depending on the student's choice of
answer they either progress to the next page or are taken back to a previous page. Navigation through the
lesson can be straight forward or complex, depending largely on the structure of the material being presented.
Quizzes
This module allows the teacher to design and set quiz tests, consisting of multiple choice, true-false, and short
answer questions. These questions are kept in a categorised database, and can be re-used within courses and
even between courses. Quizzes can allow multiple attempts. Each attempt is automatically marked, and the
teacher can choose whether to give feedback or to show correct answers. This module includes grading
facilities. Quizzes can be used for Marjon online multiple choice exams, contact a member of the e-Learning
Team to find out more.
SCORM/AICC Packages
A package is a bundle of web content packaged in a way that follows the SCORM or the AICC standard for
learning objects. These packages can include web pages, graphics, Flash presentations and anything else that
works in a web browser. You can use this to deliver RLOs created using Xerte.
Wikis
A Wiki enables documents to be authored collectively using a simple ‘mark-up language’ using a web browser.
"Wiki wiki" means "super fast" in the Hawaiian language, and it is the speed of creating and updating pages
that is one of the defining aspects of wiki technology. The Moodle Wiki module enables participants to work
together on web pages to add, expand and change the content. Old versions are never deleted and can be
restored.
Workshop
The Workshop module allows peer assessment of documents, and the teacher can manage and grade the assessment. It supports a wide range of possible grading scales and teachers can provide sample documents for students to practice grading.

2011 UCP Marjon | v 0.6
Teaching with Moodle Page | 24
Getting Help
Technical Problems (e.g. error messages, file issues etc)
Computing Services: [email protected] | ext: 4333
VLE Administrator: [email protected]
Queries about Teaching with Moodle (e.g. using activities, best practice, content etc)
e-Learning Team:
[email protected] | ext: 5673
[email protected]| ext: 5673
Enrolment Problems
Students missing from modules: [email protected]
Staff can’t access a Study Module: see the module leader
![Digital Laser Sensor ]Amplifier-separated] LS-400 SERIES · LS SRIS 254 Guide Amplifier Built-in-Amplifier-separated LS LS FIBER SENSORS LASER SENSORS PHOTOELECTRIC SENSORS MICRO](https://img.pdfslide.us/doc/110x75/5f895c9c3456a569b428f831/digital-laser-sensor-amplifier-separated-ls-400-series-ls-sris-254-guide-amplifier.jpg)