Embed Size (px)
Citation preview
tvpjournal.com | September/October 2016 | TODAY’S VETERINARY PRACTICE
ENDOSCOPY ESSENTIALS Peer Reviewed
77
Lower gastrointestinal (GI) endoscopy is a mini-mally invasive diagnostic technique that allows the clinician to evaluate the mucosal surfaces of the rectum, colon, ileocolic sphincter, cecum, and distal small intestine (ileum).
The fi rst article in this series—Part 1: Overview of Lower Gastrointestinal Endoscopy (July/August 2016)—reviewed indications for lower GI endoscopy, appearance of the normal lower GI tract, and common diseases. This article discusses patient preparation, instrumentation, and instructions on performing lower GI endoscopy.
PATIENT PREPARATIONColonic LavageThorough evaluation of the mucosal surfaces of the lower GI tract requires adequate patient preparation to remove feces from the colon (Figure 1). 1. Withhold food from the patient for 24 to 48
hours before colonoscopy. 2. Approximately 12 hours prior to the procedure,
place an orogastric or nasoesophageal (NE) tube for administration of the lavage solution; NE tubes are indicated in cats and any dogs that are intolerant of orogastric tubes.
3. After placement of the NE tube, take radio-graphs to confi rm correct placement of the tube in order to avoid fatal aspiration.
4. Once placement is confi rmed, administer a high-
Lower Gastrointestinal Endoscopy Series
PART 2: LOWER GASTROINTESTINAL ENDOSCOPY TECHNIQUES Patrick S. Moyle, DVM, and Alex Gallagher, DVM, MS, Diplomate ACVIMUniversity of Florida
Welcome to Endoscopy Essentials, a column that discusses endoscopic evaluation of specifi c body systems, reviewing indications, disease abnormalities, and proper endoscopic techniques. Visit tvpjournal.com to read the fi rst four Endoscopy Essentials articles:• Overview of Upper Gastrointestinal Endoscopy (November/December 2014)• Upper Gastrointestinal Endoscopy Techniques (March/April 2015)• Endoscopic Foreign Body Retrieval (November/December 2015)• Overview of Lower Gastrointestinal Endoscopy (July/August 2016).
FIGURE 1. Colonoscopic images of 2 dogs demonstrating poor (A) and excellent (B) colon preparation. Poor colon preparation limits the ability to visualize the mucosal surface for lesions and the lumen for safe scope passage.
A
B
TODAY’S VETERINARY PRACTICE | September/October 2016 | tvpjournal.com
ENDOSCOPY ESSENTIALSPeer Reviewed
78
volume colonic lavage solution (eg, polyethylene glycol solution with electrolytes [PEG 3350-E]) in 2 doses of 40 to 60 mL/kg in dogs or 30 mL/kg in cats over 2 H, repeated 2 to 4 H later.
5. Alternatively, the entire volume can be delivered as a constant rate infusion via NE tube over 6 to 8 H. Rarely, the most enthusiastic dogs may be encouraged to consume the PEG 3350-E fl avored with broth, ice cream, or small amounts of canned dog food.
6. Make sure to clamp or kink off the tube during extubation to prevent inadvertent and potentially fatal aspiration of colonic lavage solution.
EnemaIn addition to the lavage solution, all patients should receive multiple warm water enemas. 1. Administer an enema 30 to 60 minutes after
each successful administration of PEG 3350-E and repeat 1 to 2 H before the procedure.
2. Insert a well-lubricated red rubber catheter into the rectum and advance it to the level of the last rib.
3. Instill 20 to 30 mL/kg warm water. 4. In cats, administer the enema slowly because
rapid administration may cause vomiting and potential aspiration of colonic lavage solution.
ANESTHESIA & MONITORINGFor complete lower GI endoscopy, general anesthesia is recommended. If a focal lesion of interest exists in the distal descending colon or rectum, sedation may be used for rigid colonoscopy. However, if signifi cant insuffl ation is used (fl exible endoscopy), evaluation of the transverse or ascending colon or ileum is desired, or deep biopsies are performed, general anesthesia is recommended to improve patient comfort and cooperation.
EQUIPMENT CONSIDERATIONSDepending on the goals of lower GI endoscopy and the area of interest, rigid or fl exible endoscopes may be used.
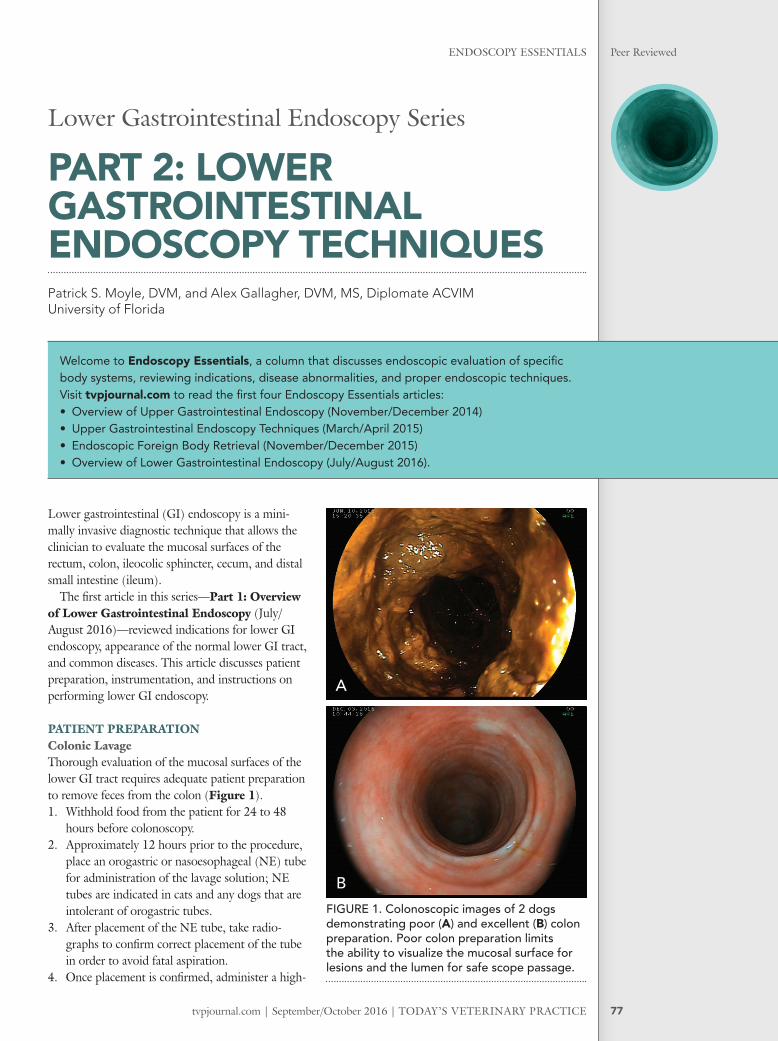
Rigid ColonoscopyRigid endoscopy can be used to evaluate the descending colon and rectum, and is primarily performed with human sigmoidoscopes or proctoscopes (Figure 2).
These scopes are available in pediatric (9–15 mm) and adult (19–23 mm) diameters, and their lengths range from 10 to 35 cm. As a rule, the largest scope that permits successful evaluation of the area of interest should be chosen. If instruments are
used, they need to be longer than the endoscope’s speculum.
Compared with fl exible endoscopy, magnifi cation and detailed examination of the mucosal surface are poor; however, proctoscopes and sigmoidoscopes are relatively inexpensive and allow for large biopsy samples.
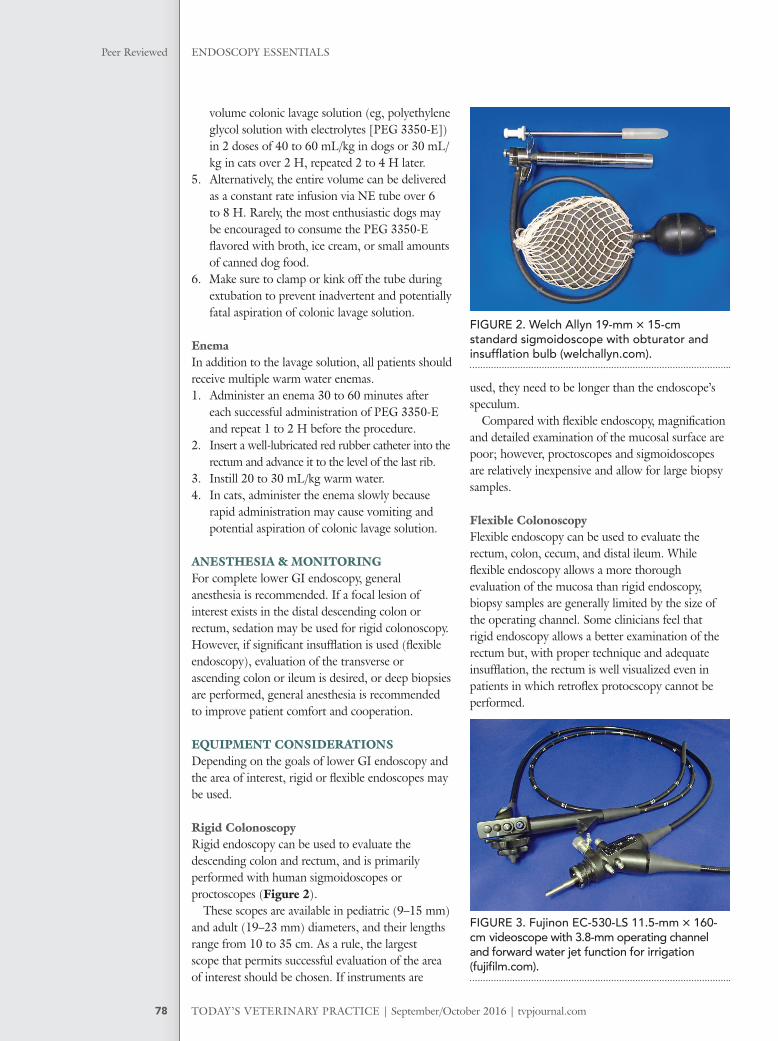
Flexible ColonoscopyFlexible endoscopy can be used to evaluate the rectum, colon, cecum, and distal ileum. While fl exible endoscopy allows a more thorough evaluation of the mucosa than rigid endoscopy, biopsy samples are generally limited by the size of the operating channel. Some clinicians feel that rigid endoscopy allows a better examination of the rectum but, with proper technique and adequate insuffl ation, the rectum is well visualized even in patients in which retrofl ex protocscopy cannot be performed.
FIGURE 2. Welch Allyn 19-mm × 15-cm standard sigmoidoscope with obturator and insuffl ation bulb (welchallyn.com).
FIGURE 3. Fujinon EC-530-LS 11.5-mm × 160-cm videoscope with 3.8-mm operating channel and forward water jet function for irrigation (fujifi lm.com).

tvpjournal.com | September/October 2016 | TODAY’S VETERINARY PRACTICE
ENDOSCOPY ESSENTIALS Peer Reviewed
79
A gastroscope or a colonoscope may be used (Figure 3), and the largest-diameter endoscope that permits evaluation of the areas of interest is recom-mended. Subsequently, selection of a fl exible endo-scope depends on patient size. With advancements in video endoscopy, fl exible endoscopes for colonos-copy can have an insertion tube as small as 5.9 mm in diameter. This generally permits intubation of the ileocolic junction and evaluation of the distal ileum even in small dogs and cats.
An operating channel of at least 2.8 mm is recommended for adequate biopsy sample size and may not be available on smaller diameter scopes. Gastroscopes or colonoscopes generally have a working length between 100 cm and 170 cm. For large- or giant-breed dogs, an endoscope with a working length of at least 140 cm may be needed to evaluate the ascending colon, cecum, or ileum.
Additional Instrumentation• If the preparation is inadequate, colonic lavage
pumps may be used to promote visualization of the colonic mucosa (Figure 4).
• For rigid colonoscopy, mare uterine biopsy forceps may be used to obtain large biopsy samples of intraluminal masses. Alternatively, rigid biopsy instruments can be used to biopsy more discrete mucosal lesions.
• For flexible endoscopy, a wide array of biopsy forceps is available, and selection depends primarily on the operating channel of the endoscope and operator preference.
• If a rectal polyp or a pedunculated mass is identified, a snare may be used to remove it at its stalk. Note: This technique is not recommended for the novice endoscopist; insufficient training may result in substantial hemorrhage and/or colonic perforation.
• Balloon dilators in a variety of sizes can be used to sequentially balloon-open rectal strictures.
GENERAL GUIDELINESRegardless of whether rigid or fl exible endoscopy is used, clinicians should follow several important guidelines to avoid potential complications. • Frequent insufflation is imperative to maintain
a visual field during GI endoscopy, but avoid overinsufflation because it can lead to patient discomfort or increased risk for GI rupture.
• The anesthetist or an assistant should monitor the abdomen frequently for evidence of distension.
• Only advance the insertion tube when a clear luminal view is present (except when using blind
“slide-by” technique, see Step 5, page 80). If the lumen cannot be visualized, do not advance the scope until the lumen is centered again.
• If visualization becomes impaired from feces or mucus, use irrigation to clean the distal tip. If this is unsuccessful, clean the distal tip by touching it to a clear area of mucosa.
Rigid ColonoscopyNavigating the Anatomy1. Rigid colonoscopy can be performed with the
animal in any recumbency, but right lateral recumbency is preferred to minimize the angle of the rectocolic junction.
2. Before inserting the endoscope into the rectum, make sure the obturator and end of the endoscope are well lubricated.
3. Remove the obturator once it is advanced into the rectum; then rotate the viewing lens into place. Closure of the lens allows insuffl ation and visualization of the colonic mucosa.
4. Advance the endoscope, with continual insuffl ation, ensuring that a clear luminal view is maintained.
Collecting Biopsy Samples1. If biopsy specimens need to be obtained,
advance the endoscope to within a centimeter of the desired area.
2. Open the viewing lens and advance the rigid biopsy forceps through the speculum to the mucosa.
3. Open the jaws of the biopsy forceps, advance into the desired tissue, close, and remove the sample.
FIGURE 4. Erbe EIP2 irrigation pump (erbe-med.com).
TODAY’S VETERINARY PRACTICE | September/October 2016 | tvpjournal.com
ENDOSCOPY ESSENTIALSPeer Reviewed
80
4. Make sure there is 1 cm between sampled areas to avoid repeated biopsy in the same location. This helps ensure adequate representation of disease and reduces the risk for perforation.
Flexible ColonoscopyNavigating the Anatomy1. Flexible colonoscopy is performed with the
patient in left lateral recumbency. 2. Before inserting the endoscope into the
rectum, make sure the distal tip of the scope is well lubricated, with care taken to avoid the objective lens.
3. Once the endoscope is inserted into the rectum, have an assistant hold the anus closed to prevent air from escaping. After a seal has been formed, insuffl ate the rectum, providing visualization.
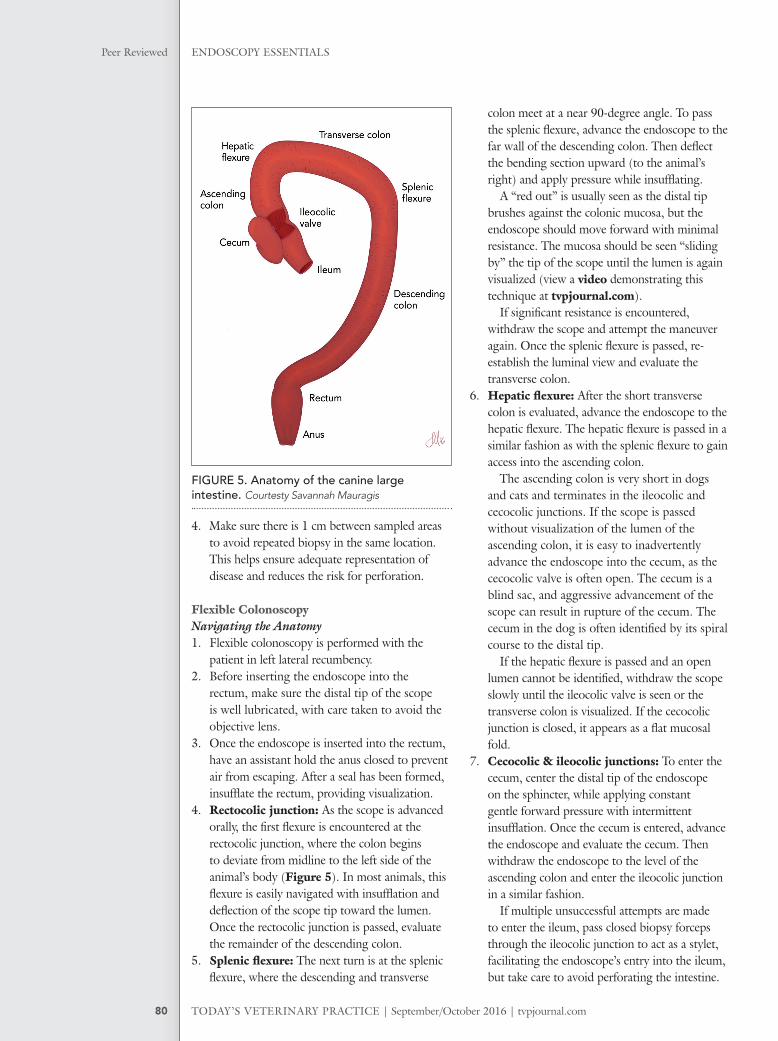
4. Rectocolic junction: As the scope is advanced orally, the fi rst fl exure is encountered at the rectocolic junction, where the colon begins to deviate from midline to the left side of the animal’s body (Figure 5). In most animals, this fl exure is easily navigated with insuffl ation and defl ection of the scope tip toward the lumen. Once the rectocolic junction is passed, evaluate the remainder of the descending colon.
5. Splenic � exure: The next turn is at the splenic fl exure, where the descending and transverse
colon meet at a near 90-degree angle. To pass the splenic fl exure, advance the endoscope to the far wall of the descending colon. Then defl ect the bending section upward (to the animal’s right) and apply pressure while insuffl ating.
A “red out” is usually seen as the distal tip brushes against the colonic mucosa, but the endoscope should move forward with minimal resistance. The mucosa should be seen “sliding by” the tip of the scope until the lumen is again visualized (view a video demonstrating this technique at tvpjournal.com).
If signifi cant resistance is encountered, withdraw the scope and attempt the maneuver again. Once the splenic fl exure is passed, re-establish the luminal view and evaluate the transverse colon.
6. Hepatic � exure: After the short transverse colon is evaluated, advance the endoscope to the hepatic fl exure. The hepatic fl exure is passed in a similar fashion as with the splenic fl exure to gain access into the ascending colon.
The ascending colon is very short in dogs and cats and terminates in the ileocolic and cecocolic junctions. If the scope is passed without visualization of the lumen of the ascending colon, it is easy to inadvertently advance the endoscope into the cecum, as the cecocolic valve is often open. The cecum is a blind sac, and aggressive advancement of the scope can result in rupture of the cecum. The cecum in the dog is often identifi ed by its spiral course to the distal tip.
If the hepatic fl exure is passed and an open lumen cannot be identifi ed, withdraw the scope slowly until the ileocolic valve is seen or the transverse colon is visualized. If the cecocolic junction is closed, it appears as a fl at mucosal fold.
7. Cecocolic & ileocolic junctions: To enter the cecum, center the distal tip of the endoscope on the sphincter, while applying constant gentle forward pressure with intermittent insuffl ation. Once the cecum is entered, advance the endoscope and evaluate the cecum. Then withdraw the endoscope to the level of the ascending colon and enter the ileocolic junction in a similar fashion.
If multiple unsuccessful attempts are made to enter the ileum, pass closed biopsy forceps through the ileocolic junction to act as a stylet, facilitating the endoscope’s entry into the ileum, but take care to avoid perforating the intestine.
FIGURE 5. Anatomy of the canine large intestine. Courtesty Savannah Mauragis

tvpjournal.com | September/October 2016 | TODAY’S VETERINARY PRACTICE
ENDOSCOPY ESSENTIALS Peer Reviewed
81
Collecting Biopsy Samples1. To collect biopsy samples, advance the closed
biopsy instrument through the operating channel into the lumen of the intestine, open it, and then retract it to the tip of the endoscope.
2. Angle the endoscope toward the mucosa and advance the biopsy instrument into the wall as close to a perpendicular angle as possible.
3. Close the biopsy instrument and allow the distal bending section to relax before swiftly retracting the instrument. Removing some air from the lumen can help improve purchase of the biopsy instrument on the mucosa.
4. If the ileocolic valve cannot be intubated, blind biopsies of the ileum may be performed. To accomplish this, pass closed biopsy forceps through the ileocolic junction, open and then advance the forceps until resistance is encountered. Close the biopsy instrument; then retract.
5. Once the ileum has been biopsied, slowly withdraw the endoscope.
Additional biopsy samples should be taken from the cecum; the ascending, transverse, and
descending colon; and the rectum. Focus biopsy samples on abnormal areas but also obtain samples from all sections of the large intestine, regardless of appearance. A minimum of 2 to 3 samples from each region should be obtained—more if the samples are not good quality.
Examining the RectumOnce the biopsy samples are collected, the aboral-most portion of the rectum may be evaluated in some larger dogs. To accomplish this: 1. Withdraw the endoscope so that the distal tip
is 10 to 20 cm from the anus; then defl ect the endoscope upward to achieve an approximate 90-degree angle in the distal bending section.
2. Seat the distal tip against the colonic mucosa and advance the insertion tube as additional upward defl ection is applied. This enables the distal bending section to “roll over” itself to achieve full retrofl exion.
3. Withdraw the insertion tube until the terminal rectum can be evaluated (Figure 6) and rotate the scope clockwise and counterclockwise so that the mucosa hidden behind the insertion tube can be evaluated.
4. Once fi nished, advance the scope into the proximal rectum/descending colon and perform the reverse maneuver to straighten the scope tip before withdrawal.
IN SUMMARYLower GI endoscopy is a minimally invasive diagnostic technique that permits the clinician to evaluate the rectum, colon, cecum, and ileum for a wide variety of lesions. Depending on the area of interest and the goals of endoscopy, either a rigid or fl exible endoscope may be used. Regardless of the type of endoscope used, it is critical to prepare the patient adequately, and use appropriate equipment and technique to maximize diagnostic and therapeutic value as well as ensure patient safety.
GI = gastrointestinal; NE = nasoesophageal
ALEX GALLAGHERAlex Gallagher, DVM, MS, Diplomate ACVIM, is a clinical assistant professor of small animal medicine at University of Florida College of Veterinary Medicine, where he also received his DVM. He completed a rotating internship at Virginia–Maryland College of Veterinary Medicine; an internal medicine internship at Affi liated Veterinary Specialists in Maitland, Florida; and a residency in internal medicine at Virginia–Maryland College of Veterinary Medicine.
PATRICK S. MOYLE Patrick S. Moyle, DVM, is a second-year resident in small animal internal medicine at University of Florida College of Veterinary Medicine. He received his DVM from Auburn University and completed an internship at Wheat Ridge Animal Hospital in Wheat Ridge, Colorado.
PATRICK S. MOYLE Patrick S. Moyle, DVM, is a
FIGURE 6. Retrofl ex colonoscopic view of the rectocolic junction. The insertion tube (black) should be rotated clockwise and counterclockwise to ensure the mucosa behind the endoscope is visualized.