Embed Size (px)
Citation preview
BIRD OBSERVER Vol. 38, No. 3, 2010 151
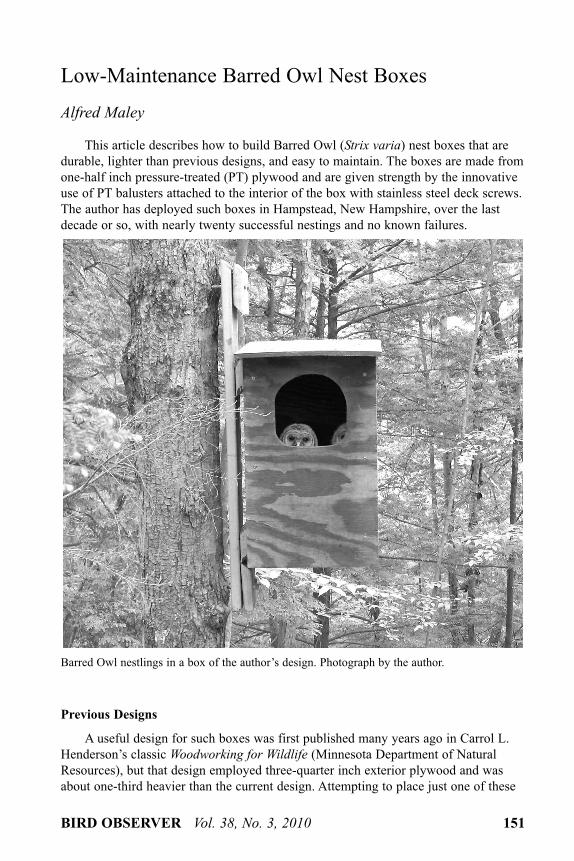
Low-Maintenance Barred Owl Nest BoxesAlfred MaleyThis article describes how to build Barred Owl (Strix varia) nest boxes that are
durable, lighter than previous designs, and easy to maintain. The boxes are made fromone-half inch pressure-treated (PT) plywood and are given strength by the innovativeuse of PT balusters attached to the interior of the box with stainless steel deck screws.The author has deployed such boxes in Hampstead, New Hampshire, over the lastdecade or so, with nearly twenty successful nestings and no known failures.
Previous DesignsA useful design for such boxes was first published many years ago in Carrol L.
Henderson’s classic Woodworking for Wildlife (Minnesota Department of NaturalResources), but that design employed three-quarter inch exterior plywood and wasabout one-third heavier than the current design. Attempting to place just one of these
Barred Owl nestlings in a box of the author’s design. Photograph by the author.
152 BIRD OBSERVER Vol. 38, No. 3, 2010
boxes in a tree made it clear to me that there had to be a better way. Other designsusing wide pine boards were similarly heavy as well as prone to rapid decay. A New Approach Because of its laminate structure, nailing or screwing the edges of plywood
together just wouldn’t work. However, placing square, PT balusters in the four interiorcorners of the box and screwing the sides to the balusters made it possible to uselighter one-half inch plywood, dramatically reducing the weight of the finished boxesand making for a box that was also very strong.Needed MaterialsPressure-treated (PT) plywood is normally wet and green when purchased at the
local lumber yard. Thus it is prudent to buy a 4 x 8 sheet of one-half inch PT plywoodseveral months before constructing the boxes. Summertime is the ideal time to do this.The plywood can be stood up in the garage or other protected area and will be dryenough to accept boiled linseed oil or other protective finishes when the boxes arecompleted. Square PT balusters come in lengths up to 48 inches; two of those aresufficient for each box. It’s best to buy these at the same time as the plywood andsticker them so they dry out as well. Buy an extra one or two in case they warpexcessively or you make a mistake in cutting.Because current PT products contain lots of copper, which corrodes base metals,
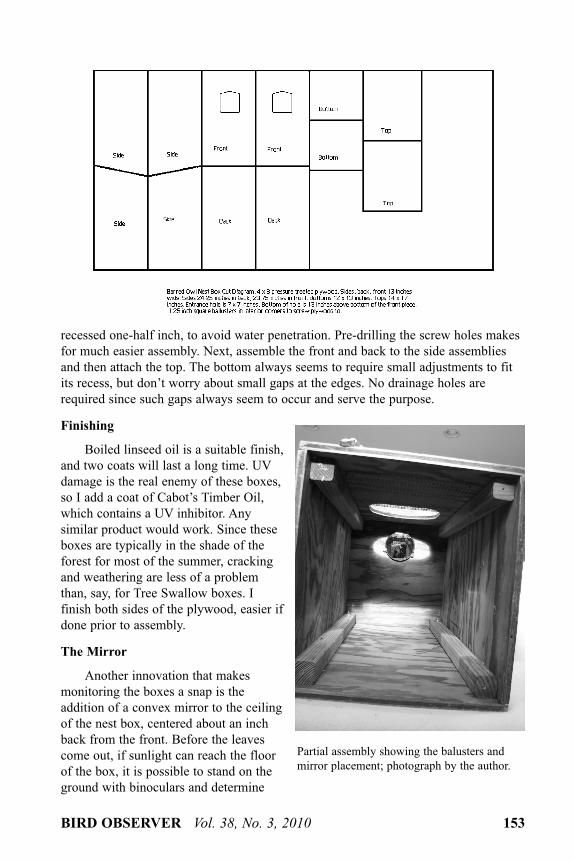
it is essential to use stainless steel screws for assembly. Square-drive 1 5/8” screwswork well. Stainless steel trim washers (available through<http://www.mcfeeleys.com>) are great for spreading the pressure of the screw headover a wider area of plywood, and they dress up the box as well.Cutting and AssemblyOnce the plywood is dry, the depicted cutting pattern can be used to make two
boxes, with enough plywood left over for a meat feeder, another topic. Note that thereis a gentle slope to the roof so that water runs off. All sides of the roof have anoverhang to avoid water penetration, although some snow and rain will inevitablycome in through the entrance hole, which should be cut before assembly begins.The Duck LadderChances are your owl box will be occupied by Wood Ducks at some point if it is
anywhere near water. Because ducklings cannot climb up the smooth plywood interiorof the box, I always include a duck ladder in my owl boxes. This consists of a pieceof quarter-inch hardware cloth, a wire mesh, screwed to the inside of the front of thebox. Even if ducks use the box for a year or two, owls may eventually take over.Assembly, ContinuedI recommend you start by attaching pieces of baluster to both the front and back
corners of both sides of the box. Place a baluster one inch from the bottom of the sideand mark the top for cutting, following the slope. This will allow the bottom to be
BIRD OBSERVER Vol. 38, No. 3, 2010 153
recessed one-half inch, to avoid water penetration. Pre-drilling the screw holes makesfor much easier assembly. Next, assemble the front and back to the side assembliesand then attach the top. The bottom always seems to require small adjustments to fitits recess, but don’t worry about small gaps at the edges. No drainage holes arerequired since such gaps always seem to occur and serve the purpose.FinishingBoiled linseed oil is a suitable finish,
and two coats will last a long time. UVdamage is the real enemy of these boxes,so I add a coat of Cabot’s Timber Oil,which contains a UV inhibitor. Anysimilar product would work. Since theseboxes are typically in the shade of theforest for most of the summer, crackingand weathering are less of a problemthan, say, for Tree Swallow boxes. Ifinish both sides of the plywood, easier ifdone prior to assembly.The MirrorAnother innovation that makes
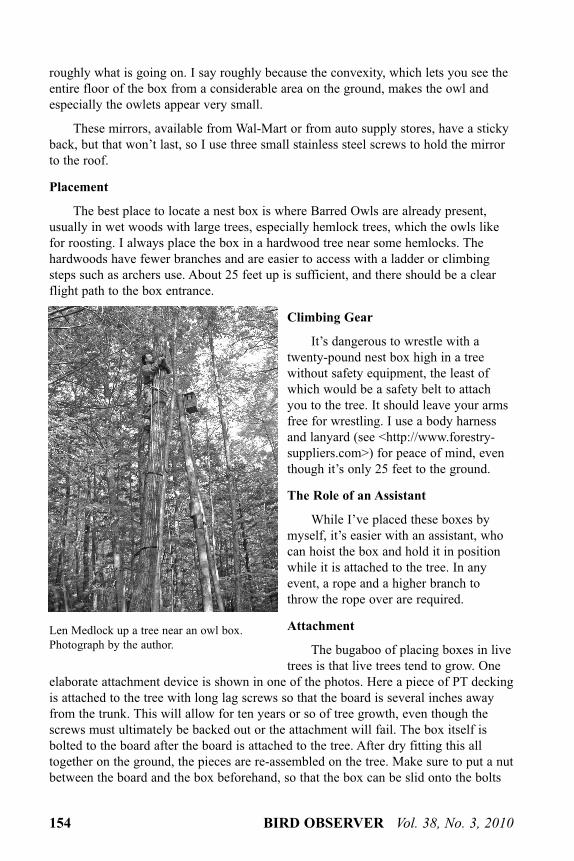
monitoring the boxes a snap is theaddition of a convex mirror to the ceilingof the nest box, centered about an inchback from the front. Before the leavescome out, if sunlight can reach the floorof the box, it is possible to stand on theground with binoculars and determine
Partial assembly showing the balusters andmirror placement; photograph by the author.
154 BIRD OBSERVER Vol. 38, No. 3, 2010
roughly what is going on. I say roughly because the convexity, which lets you see theentire floor of the box from a considerable area on the ground, makes the owl andespecially the owlets appear very small.These mirrors, available from Wal-Mart or from auto supply stores, have a sticky
back, but that won’t last, so I use three small stainless steel screws to hold the mirrorto the roof.PlacementThe best place to locate a nest box is where Barred Owls are already present,
usually in wet woods with large trees, especially hemlock trees, which the owls likefor roosting. I always place the box in a hardwood tree near some hemlocks. Thehardwoods have fewer branches and are easier to access with a ladder or climbingsteps such as archers use. About 25 feet up is sufficient, and there should be a clearflight path to the box entrance.
Climbing GearIt’s dangerous to wrestle with a
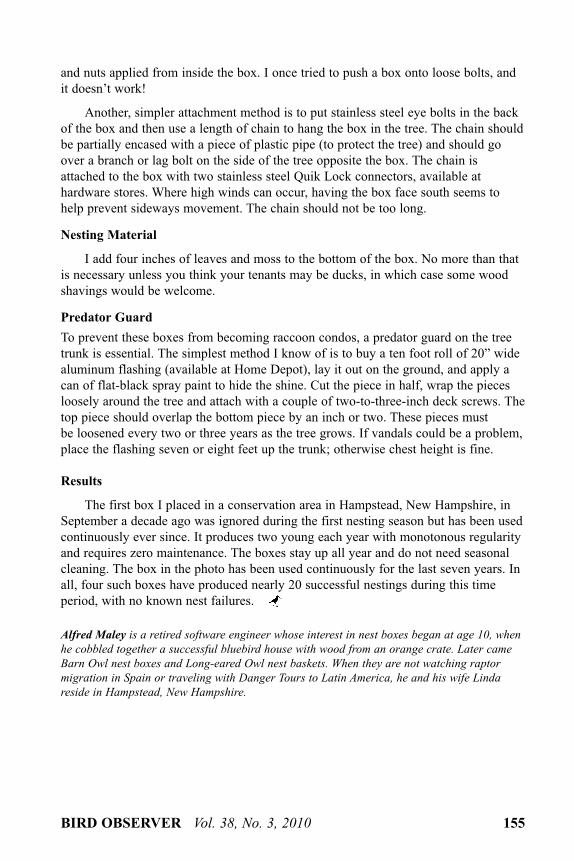
twenty-pound nest box high in a treewithout safety equipment, the least ofwhich would be a safety belt to attachyou to the tree. It should leave your armsfree for wrestling. I use a body harnessand lanyard (see <http://www.forestry-suppliers.com>) for peace of mind, eventhough it’s only 25 feet to the ground.The Role of an AssistantWhile I’ve placed these boxes by
myself, it’s easier with an assistant, whocan hoist the box and hold it in positionwhile it is attached to the tree. In anyevent, a rope and a higher branch tothrow the rope over are required.AttachmentThe bugaboo of placing boxes in live
trees is that live trees tend to grow. Oneelaborate attachment device is shown in one of the photos. Here a piece of PT deckingis attached to the tree with long lag screws so that the board is several inches awayfrom the trunk. This will allow for ten years or so of tree growth, even though thescrews must ultimately be backed out or the attachment will fail. The box itself isbolted to the board after the board is attached to the tree. After dry fitting this alltogether on the ground, the pieces are re-assembled on the tree. Make sure to put a nutbetween the board and the box beforehand, so that the box can be slid onto the bolts
Len Medlock up a tree near an owl box.Photograph by the author.
BIRD OBSERVER Vol. 38, No. 3, 2010 155
and nuts applied from inside the box. I once tried to push a box onto loose bolts, andit doesn’t work!Another, simpler attachment method is to put stainless steel eye bolts in the back
of the box and then use a length of chain to hang the box in the tree. The chain shouldbe partially encased with a piece of plastic pipe (to protect the tree) and should goover a branch or lag bolt on the side of the tree opposite the box. The chain isattached to the box with two stainless steel Quik Lock connectors, available athardware stores. Where high winds can occur, having the box face south seems tohelp prevent sideways movement. The chain should not be too long.Nesting MaterialI add four inches of leaves and moss to the bottom of the box. No more than that
is necessary unless you think your tenants may be ducks, in which case some woodshavings would be welcome.Predator GuardTo prevent these boxes from becoming raccoon condos, a predator guard on the treetrunk is essential. The simplest method I know of is to buy a ten foot roll of 20” widealuminum flashing (available at Home Depot), lay it out on the ground, and apply acan of flat-black spray paint to hide the shine. Cut the piece in half, wrap the piecesloosely around the tree and attach with a couple of two-to-three-inch deck screws. Thetop piece should overlap the bottom piece by an inch or two. These pieces mustbe loosened every two or three years as the tree grows. If vandals could be a problem,place the flashing seven or eight feet up the trunk; otherwise chest height is fine.
ResultsThe first box I placed in a conservation area in Hampstead, New Hampshire, in
September a decade ago was ignored during the first nesting season but has been usedcontinuously ever since. It produces two young each year with monotonous regularityand requires zero maintenance. The boxes stay up all year and do not need seasonalcleaning. The box in the photo has been used continuously for the last seven years. Inall, four such boxes have produced nearly 20 successful nestings during this timeperiod, with no known nest failures.
Alfred Maley is a retired software engineer whose interest in nest boxes began at age 10, whenhe cobbled together a successful bluebird house with wood from an orange crate. Later cameBarn Owl nest boxes and Long-eared Owl nest baskets. When they are not watching raptormigration in Spain or traveling with Danger Tours to Latin America, he and his wife Lindareside in Hampstead, New Hampshire.
294 BIRD OBSERVER Vol. 43, No. 5, 2015
Barred Owl Adventures in HampsteadAlfred Maley
Field of Dreams
Twenty-five years ago I put up a Barred Owl nest box on our one-acre lot in Hampstead, New Hampshire, because I had heard owls in the forest behind the house and I am an optimist. Alas, Hampstead proved to be a desirable location for people. The forest was subdivided, followed by high-grade lumber harvest, lot clearing, road building, and 22 new houses on 2–10 acre lots. Towhees began to nest.
Plan B
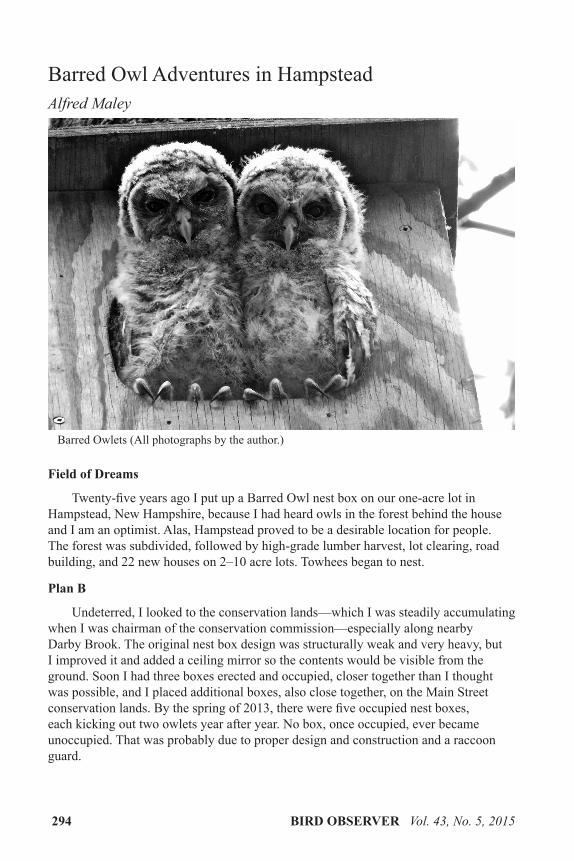
Undeterred, I looked to the conservation lands—which I was steadily accumulating when I was chairman of the conservation commission—especially along nearby Darby Brook. The original nest box design was structurally weak and very heavy, but I improved it and added a ceiling mirror so the contents would be visible from the ground. Soon I had three boxes erected and occupied, closer together than I thought was possible, and I placed additional boxes, also close together, on the Main Street conservation lands. By the spring of 2013, there were five occupied nest boxes, each kicking out two owlets year after year. No box, once occupied, ever became unoccupied. That was probably due to proper design and construction and a raccoon guard.
Barred Owlets (All photographs by the author.)
BIRD OBSERVER Vol. 43, No. 5, 2015 295
Back home my original owl nest box had long been a favorite of Wood Ducks, so I had concentrated on duck nest boxes instead. By the spring of 2014, there were 11 nests in the yard (eight Wood Duck, three Hooded Merganser). For good measure I had also put up another owl nest box of the new design with a mirror so that I could monitor the contents from the ground, even if it was only ducks.
Return of the Forest and the Owls
Fast forward to 2014 and the forest behind me had grown. The canopy had closed over again, the towhees were gone, and the trees were getting big again. The road and the houses were still there, but they began to blend in with the trees more and more.
In the fall, I placed my usual frozen Thanksgiving turkey out near the nest boxes and noticed one or more Barred Owls visiting the turkey early in the morning, 4:00–5:00 am. I took that as a good sign as we headed off for the winter in Spain.
Not So Many Ducks
When we returned in late April 2015, there were fewer duck nests in the yard—six—which I ascribed to the gray squirrels which had taken advantage of the absence of any skilled marksmen. But NO, there were owls in the ’hood! The mirror revealed an amorphous gray blob in the bottom of the new owl box, which over the course of May resolved itself into three gray blobs. The adults were around, but reticent to show themselves.
Crafty Ducks
When the ducklings started to fledge in May, the females were keenly aware of the owls. Normally only the female owl would be present, close to and guarding her nest box. The ducks went to great lengths to circumnavigate the nest box and remain out of sight of the owl. Just one duck nest, which was 15 yards from the owl nest box and facing right at the female owl, suffered losses, but only two ducklings.
Bad Weather Strikes
May 2015 was dry, good for hunting owls that listen for mice, voles, and shrews scurrying though the leaves on the forest floor. But early June turned rainy and stress soon became evident. Only the adult male hunts, and he had to feed four mouths plus himself. After three days of rain, it became very difficult.
The Sora-like Call of the Female Barred Owl
About this time we began to hear the female owl give a nearly constant contact call, sounding like a listless Sora with the same upward inflection. She would give the call every 20 seconds or so for hours on end during daylight. I interpreted the call as “We’re here, bring food soon!” It was then that I began to notice that the male would announce his arrival with a food item and a downward whoaah. The female would go to him, receive the food, and take it to the young who were still in the box.
296 BIRD OBSERVER Vol. 43, No. 5, 2015
The Irresistible Urge to Intervene
It was at this time, with the female complaining incessantly, the male having trouble hunting, and the third owlet about to become lunch for its siblings that I started a rodent trapline in the yard. I put the catch on a platform in the woods below the nest box and the female quickly figured it out. On the best day my handouts included six chipmunks, two mice, and a shrew. The complaining nearly stopped.
The Young Fledge, But Don’t Go Far
At the nest boxes on the conservation lands, once the young fledged they were impossible to find as they secreted themselves high in the canopy. So I thought that perhaps they moved away in a matter of days. But at the box in the yard the young stayed around for over two weeks after fledging, perhaps because it took a while for the third owlet to get fully-grown and flying. As it was, he or she fledged nearly a week after the others. By the end of June, they were all ready to go.
The Sora Call Revisited
Once the young had fledged, the female, after receiving a food item, would turn around and issue the same Sora-like call but with some subtle difference to the ending that provoked the young to hiss, much like young Barn Owls do while still in their nest. I interpreted this call as “I’ve got food. Who wants it?” How the female interprets the responses of the young is unclear to me, but it may guide her as to which one to feed.
The Sora Call Yet Again
In late July, after the young had been wandering around the neighborhood for a month, they returned to the yard one night and I heard them giving a new call. Instead of just a hiss, they were giving a scratchy version of the Sora-like call with a hiss on the end, as if they were practicing for later in life. They wanted food and they wanted it now.
The Danger Call Around the Nest
The owls in the yard were habituated to us and never seemed to give an alarm call of any sort, at least when we were around the yard or at the nest tree. However, when I’d visit the owls in the conservation lands, they would frequently give a series of two to four loud rising hoop calls and fly about if there were young nearby that were fledged or nearly fledged.
What Goes Into Who Cooks For You
One afternoon in June, the male brought in a food item while the female was perched in the yard, clearly visible to us on the deck. The male, invisible in the foliage, gave the who cooks for you call. In response the female spread and lowered her wings and while pumping her tail down expelled each of the four syllables of the call. It’s an effort like one of the prairie grouse go through and tells me why they don’t do it for long. It must be exhausting. After one call the female took the prey item up to one
BIRD OBSERVER Vol. 43, No. 5, 2015 297
of the fledglings in a nearby tree. I now suspect that when I hear this call on a late afternoon in June or July, it is related to a food drop, rather than territorial conversation.
Suburbia As Barred Owl Habitat
Is it good for Barred Owls to nest in suburbia? No, if there is a high-speed highway close by. No, if the neighbors use leaf blowers all spring long—a deaf owl is a dead owl. No, if your neighbors use rodenticides in their gardens “to control those pesky voles.” Otherwise, sure. The food supply is probably better in the winter because of the rodents at bird feeders, worse in spring and summer when the owls have to hunt all day long and human activity is at its peak. There has to be some good area close by to hunt in, with few human-inspired dangers.
How Many Owls Are Feasible?
This year, 2015, I had seven occupied Barred Owl nest boxes in Hampstead, and I may have another one or two next year. The number of Barred Owls seems to have increased locally, at least I hear them almost every night. Boxes that
were initially unoccupied for several years all have become occupied. It seems clear to me that a shortage of suitable natural nest sites in second growth forest is more of a limiting factor than food supply, judging by the number of chipmunks I see.
Design Changes
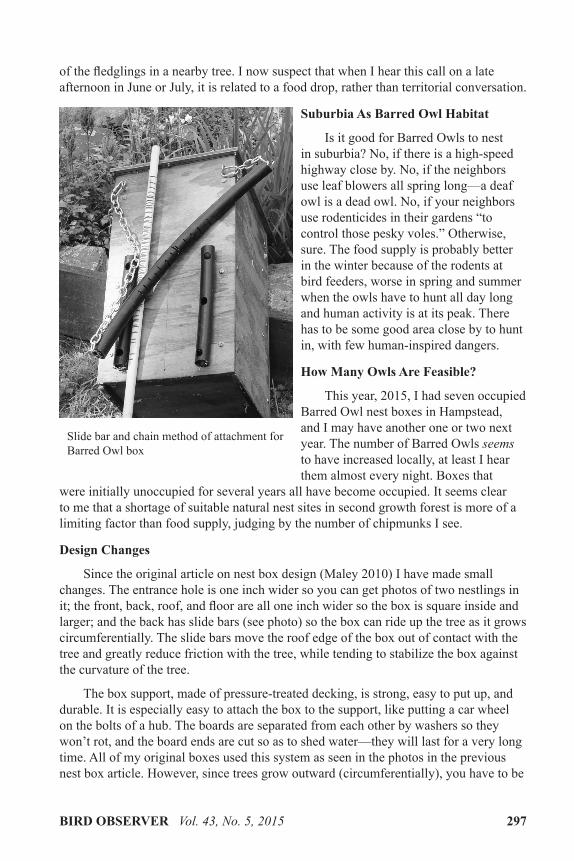
Since the original article on nest box design (Maley 2010) I have made small changes. The entrance hole is one inch wider so you can get photos of two nestlings in it; the front, back, roof, and floor are all one inch wider so the box is square inside and larger; and the back has slide bars (see photo) so the box can ride up the tree as it grows circumferentially. The slide bars move the roof edge of the box out of contact with the tree and greatly reduce friction with the tree, while tending to stabilize the box against the curvature of the tree.
The box support, made of pressure-treated decking, is strong, easy to put up, and durable. It is especially easy to attach the box to the support, like putting a car wheel on the bolts of a hub. The boards are separated from each other by washers so they won’t rot, and the board ends are cut so as to shed water—they will last for a very long time. All of my original boxes used this system as seen in the photos in the previous nest box article. However, since trees grow outward (circumferentially), you have to be
Slide bar and chain method of attachment for Barred Owl box
298 BIRD OBSERVER Vol. 43, No. 5, 2015
able to climb the tree every ten years or so and back out the lag bolts to accommodate the tree’s increase in diameter. Though perhaps not clear from the article photo, there are four long lag screws that hold the board off the tree. There are also four galvanized bolts that go through the board in the opposite direction and into the box, which is secured with washers and nuts from inside via the entrance hole. Make sure to put a nut between the board and the box so the bolts don’t move when attaching the box.
The new chain method (see photo) simply loops a chain attached to the box around the tree trunk and over a branch or a long lag bolt on the opposite side. The box hangs against the trunk by gravity and, as the tree widens in diameter, the box rises. This scheme might last for 15-20 years, and is especially useful where access is inconvenient.
The chain is partially encased in one inch black polypropylene water pipe, of the kind commonly used for wells. As it is somewhat rigid, I cut kerfs in the pipe so that it bends easily around the tree trunk. A 7/8-inch birch dowel inside the pipe keeps it straight while the kerfs are made using a table saw.
The two vertical pieces of pipe bolted to the back of the box serve not only to facilitate the box riding up the tree but also to conform the back of the box to the curvature of the trunk. Separate the pieces such that they just contact the trunk of a tree similar in diameter to the tree that will hold the box.
Placement Advice
The owls need to be able to approach the nest box head-on. There should be a clear flight path in front of the box, but not so clear that the young can’t find a branch to fly to when they fledge. I place all my boxes in hardwood trees near hemlocks or thick white pines. Hardwoods have few low branches and admit sunlight into the nest box so that the mirror works during the spring months when the trees are leafless.
To place the box at a reasonable height without great effort, try to find an elevation within the forest such as a small hillock with a suitable tree. Alternatively, put the box in a stream valley, facing the stream but up one valley side. My boxes are 15–25 feet above the ground, but there is no magic number. If you place a box in suburbia, try to get it as far away from leaf blowers and fireworks as possible.
Drop me a line at [email protected] with questions or comments on your successes.
References
Maley, Alfred. 2010. Low-Maintenance Barred Owl Nest Boxes. Bird Observer 38:151–155. Accessed August 4, 2015 at: http://www.owlpages.com/download/Low-Maintenance_Barred_Owl_Nest_Box_Plans_by_Alfred_Maley.pdf
Alfred Maley is a retired software engineer whose interest in nest boxes began at age 10, when he cobbled together a successful bluebird house with wood from an orange crate. Later came Barn Owl nest boxes and Long-eared Owl nest baskets. When they are not watching raptor migration in Spain or traveling with Danger Tours to Latin America, he and his wife Linda reside in Hampstead, New Hampshire.
394 BIRD OBSERVER Vol. 44, No. 6, 2016
Placing and Protecting Barred Owl Nest BoxesAlfred Maley
In my previous articles on Barred Owl nest box construction (Maley 2010, 2015), I glossed over the placement of the box in a tree and providing protection from raccoons. This note describes a simple, safe way to get a box up in a tree and a relatively simple, easy-to-maintain flashing system to keep raccoons from taking over the nest box.
The problem of attaching the box to a tree is discussed in the previous articles, and two methods of doing so are described therein. Regardless of the method used, it is critical to have both hands free to perform this task. That means that, in addition to a safety belt that secures you to the tree, you will need a way to raise the box and secure it in position while you attach it.
Raising the Box Into Position
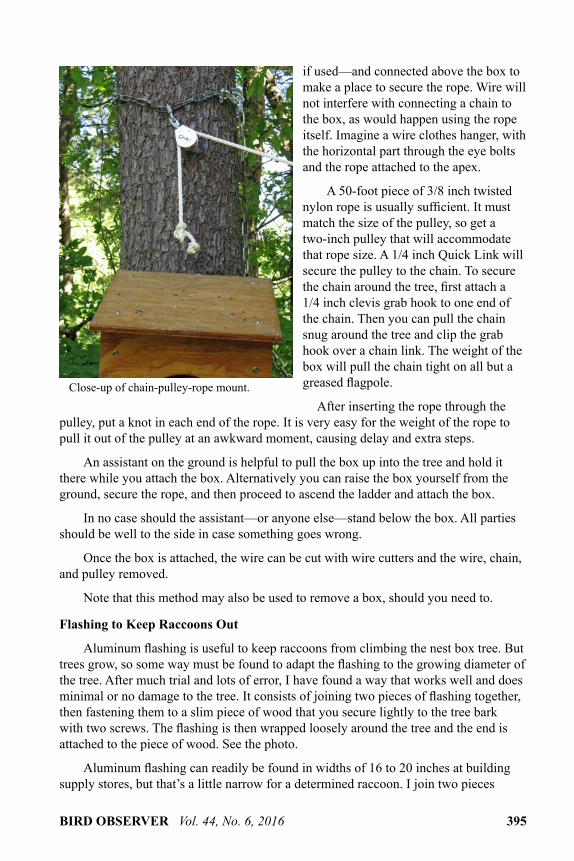
A scheme that is simple and works well is to attach a piece of light, 3/16 inch Grade 30 chain snugly around the tree above where the box will be, with a pulley attached to the chain over the box location. A rope is used then to hoist the box into position. First a piece of 16-gauge tie wire is attached to the box—through the eye bolts
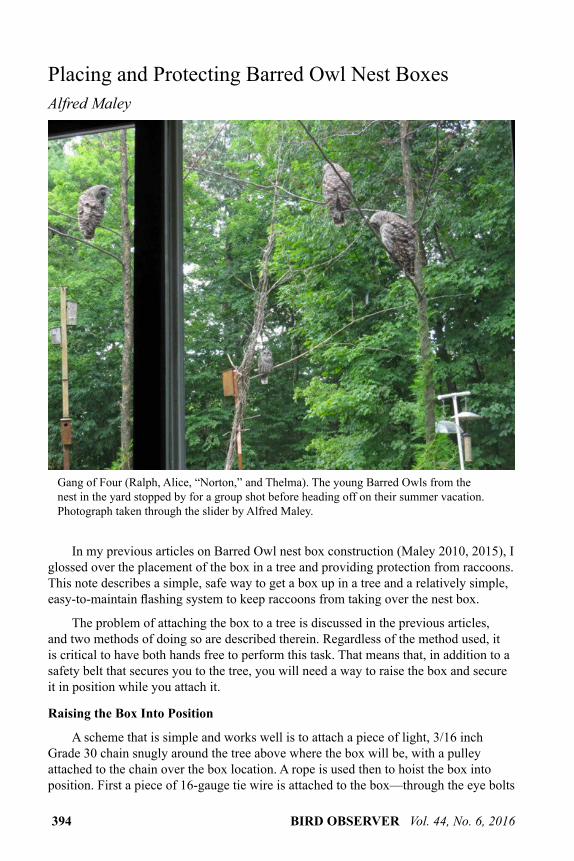
Gang of Four (Ralph, Alice, “Norton,” and Thelma). The young Barred Owls from the nest in the yard stopped by for a group shot before heading off on their summer vacation. Photograph taken through the slider by Alfred Maley.
BIRD OBSERVER Vol. 44, No. 6, 2016 395
if used—and connected above the box to make a place to secure the rope. Wire will not interfere with connecting a chain to the box, as would happen using the rope itself. Imagine a wire clothes hanger, with the horizontal part through the eye bolts and the rope attached to the apex.
A 50-foot piece of 3/8 inch twisted nylon rope is usually sufficient. It must match the size of the pulley, so get a two-inch pulley that will accommodate that rope size. A 1/4 inch Quick Link will secure the pulley to the chain. To secure the chain around the tree, first attach a 1/4 inch clevis grab hook to one end of the chain. Then you can pull the chain snug around the tree and clip the grab hook over a chain link. The weight of the box will pull the chain tight on all but a greased flagpole.
After inserting the rope through the pulley, put a knot in each end of the rope. It is very easy for the weight of the rope to pull it out of the pulley at an awkward moment, causing delay and extra steps.
An assistant on the ground is helpful to pull the box up into the tree and hold it there while you attach the box. Alternatively you can raise the box yourself from the ground, secure the rope, and then proceed to ascend the ladder and attach the box.
In no case should the assistant—or anyone else—stand below the box. All parties should be well to the side in case something goes wrong.
Once the box is attached, the wire can be cut with wire cutters and the wire, chain, and pulley removed.
Note that this method may also be used to remove a box, should you need to.
Flashing to Keep Raccoons Out
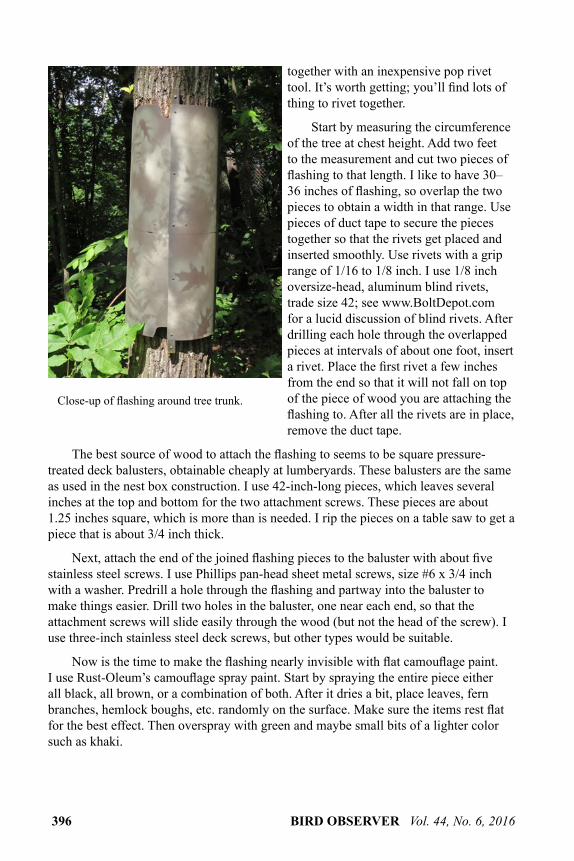
Aluminum flashing is useful to keep raccoons from climbing the nest box tree. But trees grow, so some way must be found to adapt the flashing to the growing diameter of the tree. After much trial and lots of error, I have found a way that works well and does minimal or no damage to the tree. It consists of joining two pieces of flashing together, then fastening them to a slim piece of wood that you secure lightly to the tree bark with two screws. The flashing is then wrapped loosely around the tree and the end is attached to the piece of wood. See the photo.
Aluminum flashing can readily be found in widths of 16 to 20 inches at building supply stores, but that’s a little narrow for a determined raccoon. I join two pieces
Close-up of chain-pulley-rope mount.
396 BIRD OBSERVER Vol. 44, No. 6, 2016
together with an inexpensive pop rivet tool. It’s worth getting; you’ll find lots of thing to rivet together.
Start by measuring the circumference of the tree at chest height. Add two feet to the measurement and cut two pieces of flashing to that length. I like to have 30–36 inches of flashing, so overlap the two pieces to obtain a width in that range. Use pieces of duct tape to secure the pieces together so that the rivets get placed and inserted smoothly. Use rivets with a grip range of 1/16 to 1/8 inch. I use 1/8 inch oversize-head, aluminum blind rivets, trade size 42; see www.BoltDepot.com for a lucid discussion of blind rivets. After drilling each hole through the overlapped pieces at intervals of about one foot, insert a rivet. Place the first rivet a few inches from the end so that it will not fall on top of the piece of wood you are attaching the flashing to. After all the rivets are in place, remove the duct tape.
The best source of wood to attach the flashing to seems to be square pressure-treated deck balusters, obtainable cheaply at lumberyards. These balusters are the same as used in the nest box construction. I use 42-inch-long pieces, which leaves several inches at the top and bottom for the two attachment screws. These pieces are about 1.25 inches square, which is more than is needed. I rip the pieces on a table saw to get a piece that is about 3/4 inch thick.
Next, attach the end of the joined flashing pieces to the baluster with about five stainless steel screws. I use Phillips pan-head sheet metal screws, size #6 x 3/4 inch with a washer. Predrill a hole through the flashing and partway into the baluster to make things easier. Drill two holes in the baluster, one near each end, so that the attachment screws will slide easily through the wood (but not the head of the screw). I use three-inch stainless steel deck screws, but other types would be suitable.
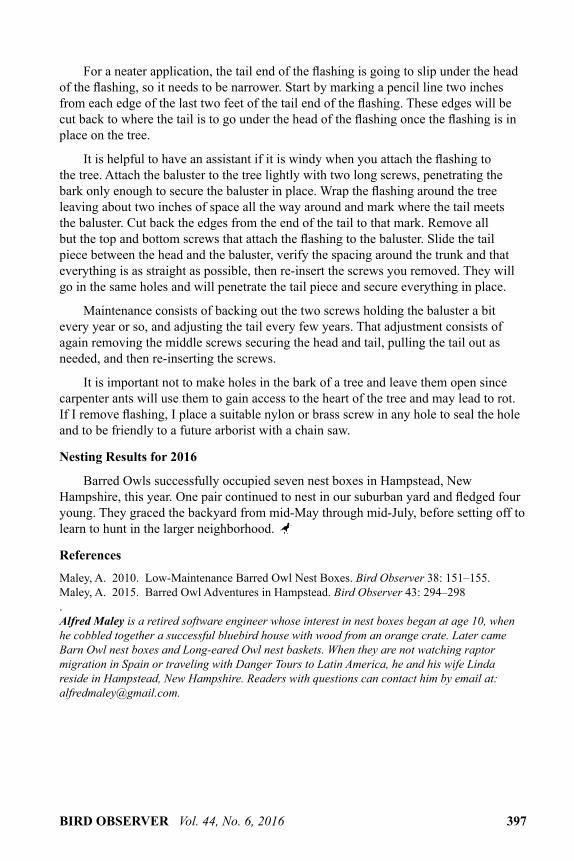
Now is the time to make the flashing nearly invisible with flat camouflage paint. I use Rust-Oleum’s camouflage spray paint. Start by spraying the entire piece either all black, all brown, or a combination of both. After it dries a bit, place leaves, fern branches, hemlock boughs, etc. randomly on the surface. Make sure the items rest flat for the best effect. Then overspray with green and maybe small bits of a lighter color such as khaki.
Close-up of flashing around tree trunk.
BIRD OBSERVER Vol. 44, No. 6, 2016 397
For a neater application, the tail end of the flashing is going to slip under the head of the flashing, so it needs to be narrower. Start by marking a pencil line two inches from each edge of the last two feet of the tail end of the flashing. These edges will be cut back to where the tail is to go under the head of the flashing once the flashing is in place on the tree.
It is helpful to have an assistant if it is windy when you attach the flashing to the tree. Attach the baluster to the tree lightly with two long screws, penetrating the bark only enough to secure the baluster in place. Wrap the flashing around the tree leaving about two inches of space all the way around and mark where the tail meets the baluster. Cut back the edges from the end of the tail to that mark. Remove all but the top and bottom screws that attach the flashing to the baluster. Slide the tail piece between the head and the baluster, verify the spacing around the trunk and that everything is as straight as possible, then re-insert the screws you removed. They will go in the same holes and will penetrate the tail piece and secure everything in place.
Maintenance consists of backing out the two screws holding the baluster a bit every year or so, and adjusting the tail every few years. That adjustment consists of again removing the middle screws securing the head and tail, pulling the tail out as needed, and then re-inserting the screws.
It is important not to make holes in the bark of a tree and leave them open since carpenter ants will use them to gain access to the heart of the tree and may lead to rot. If I remove flashing, I place a suitable nylon or brass screw in any hole to seal the hole and to be friendly to a future arborist with a chain saw.
Nesting Results for 2016
Barred Owls successfully occupied seven nest boxes in Hampstead, New Hampshire, this year. One pair continued to nest in our suburban yard and fledged four young. They graced the backyard from mid-May through mid-July, before setting off to learn to hunt in the larger neighborhood.
References
Maley, A. 2010. Low-Maintenance Barred Owl Nest Boxes. Bird Observer 38: 151–155.Maley, A. 2015. Barred Owl Adventures in Hampstead. Bird Observer 43: 294–298.Alfred Maley is a retired software engineer whose interest in nest boxes began at age 10, when he cobbled together a successful bluebird house with wood from an orange crate. Later came Barn Owl nest boxes and Long-eared Owl nest baskets. When they are not watching raptor migration in Spain or traveling with Danger Tours to Latin America, he and his wife Linda reside in Hampstead, New Hampshire. Readers with questions can contact him by email at: [email protected].