Embed Size (px)
Citation preview

Low Frequency
Pure Sine Wave Inverter
Operatinal Manual

2
Ⅰ.Operating Instruction---------------------------2
Ⅱ.Outlook drawing of inverter---------------------3
---------------------Ⅲ.Description of front board 3
-----Ⅳ. Function setting and meaning of the button 4
--------------Ⅴ.Connection way of input & output 6
-------------------------Ⅵ.Battery wiring diagram 8
-----------------------Ⅶ.Care and maintenance 11
--Ⅷ. Convenient method of maintenance & fixing 11
-------------------------------Ⅸ. Technical Data 12
Content1-1. Open-package inspection 1). After opening the package, please check the attached parts and components, including operation manual and checking whether the inverter is in good condition? If found any inverter broken or components missing, do not turn on the machine , feedback to the carrier or supplier.
Note: 1). Please keep the box and packing materials in case the use in future. 2). The product is very heavy (check attachment as reference), please be careful to carry.1-2. Installation notice: 1). The products should be well-ventilated, away from water and the corrosive and combustible gases. 2). Do not set it in a corner, ensure the bottom of the front panel, the rear panel fan outlet and the side of the machine are well-ventilated. 3). The environment temperature should remain 0 - 40 ℃. 4). If the machine operates under low temperature environment, it would cause water condense, only in a absolute dry condition can the machine would work normal, otherwise there will be a electric shock. 5). Install the inverter near the mains input socket or nearby the switch, to draw out plugs then cut off mains supply once there is an emergency. Attention: 1). Load should be turned off before connecting to inverter and turned on one by one after connecting completed. 2). The inverter should be connected to a socket with a corresponding current protection. 3). All power sockets should link with ground protection. 4). No matter input power cable inserts to mains socket or not, the inverter will also continue outputing possibly, turning off the inverter can not guarantee there is no current inside the machine. In order to make sure to cut off the output of inverter, you should turn off all the switches then turn off the main supply. 5). To load inductive appliances such as electromotor, displayer and laser printer, inverter capacity should be twice as loading machine’s rated power at least.
Ⅰ.Operating Instruction

2. 4000W/5000W/6000W Series
43
1. 1000W/2000W/3000W Series
Ⅱ.Outlook drawing of inverter
AC voltage
Working mode
Output voltage
Buzzer
Load
Battery
Ⅲ.Description of front board
Meaning of indicate lamp&button
FunctionUp Down
AC mode
Battery mode
Fault
Turn on or turn off
AC input
Ⅳ. Function setting and meaning of the button
ON/OFF Button:
Battery type Charging current
(24V*2;48V*4;96V*8;108V*9;120V*10)
GEL U.S.A. 13.7V
A.G .M.1 13.4V
A.G .M.2 13.7V
Sealed Lead Acid 13.6V
Gel European 13.8V
Open Lead Acid 13.8V
Calcuim (Open) 13.6V
De sulphation cycle 14.5V
01 Normal Mode - AC input priority to supply the load and batteries, battery
supply the loads without AC input.
02 Saving Mode - AC input advanced to supply the load and the battery,
battery supply the loads without AC input. But the load must >5% of the
inverter capacity. otherwise the machine will continue to startup and
shutdown.
03 Battery Mode - Battery priority to supply the load, when battery is low of
power or voltage, will automatically switch to AC mains supply, when the battery
full of charge, automatically transfer to the battery supply.
Press this button to display the data below:
Output voltage , Battery capacity ,
Output frequency , Load capacity .
Note:(The Max. charging current is 15A, from 0% to 100%)
Function Button :
(P1 Working mode, P2 Battery type choose, P3 Charging current adjust, P4)
→OK →
5 sec.→ setting(P0),
Model P1: AC 02:Auto 03: Battery →OK
→ Model P2: →OK Type
Model P3: → →OK 0-15A
→ Model P4: →OK or
Note: Restart the inverter after each setting.
3 sec. ON→ 3 sec. OFF→
or press two times can back to the main interface.
→ (01,02,03) first 01:

5
1. 1000W / 2000W / 3000W series wiring
6
1.Main interface data:
2.Function setting interface:
Main interface Output frequency Load capacity
Battery capacity
Note:Inverter without the data of the solar panels.
Back to interface Working mode Battery type
Buzzer Charging current
Back panel illustration
Ⅴ.Connection way of input & output
Connect with AC input and load output by connecting terminal, load oputput
can connect both by terminal blocks and output plug.
Note: Output plug only can connect with each load less than 1500W.
DC -
DC +AC INPUT
AC OUTPUT
Battery negative polarity connection
AC input connection
Universal socket output pr connection terminal output
Battery positive polarity connection
USE ONLY WITH 250V FUSE AC input and output over current protection
BATTERY ON/OFF Switch on/off the battery
AC INPUT ON/OFF Switch on/off the AC input

7
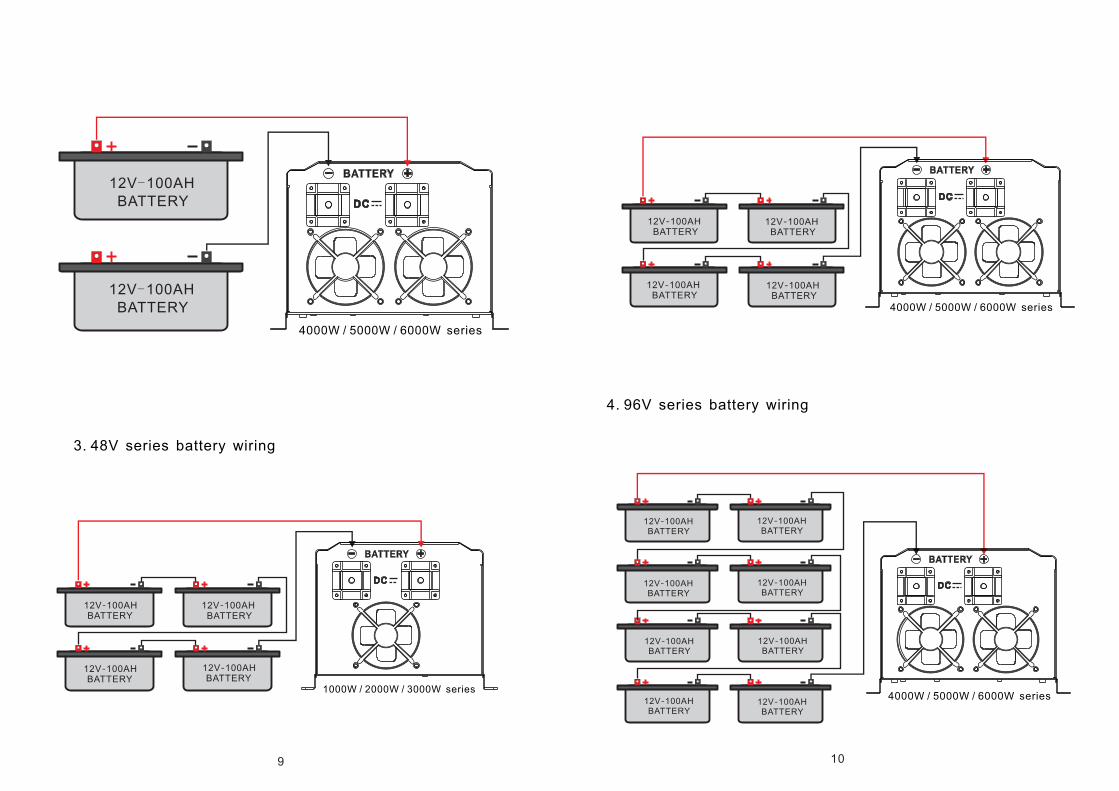
1.12V series battery wiring
4BATTERY
12V-100AH
8
2.4000W/5000W/6000W series wiring
4
2. 24V series battery wiring
4
A C INPUT
A C OUTPUT
1000W / 2000W / 3000W series
1000W / 2000W / 3000W series
Ⅵ.Battery wiring diagram:
BATTERY12V-100AH
BATTERY12V-100AH
9 10
3. 48V series battery wiring
4. 96V series battery wiring
BATTERY12V-100AH
4000W / 5000W / 6000W series
4BATTERY
12V-100AH
4000W / 5000W / 6000W series
BATTERY12V-100AH
BATTERY12V-100AH 12V-100AH
1000W / 2000W / 3000W series
BATTERY
BATTERY12V-100AH
BATTERY12V-100AH
BATTERY12V-100AH
4000W / 5000W / 6000W series
BATTERY12V-100AH
BATTERY12V-100AH
BATTERY12V-100AH
BATTERY12V-100AH
BATTERY12V-100AH
BATTERY12V-100AH
BATTERY12V-100AH
BATTERY12V-100AH
BATTERY12V-100AH
BATTERY12V-100AH

Mo
de
lG
SI-
15
2
Ra
ted ca
pa
cit
y1
00
0W
30
00
W4
00
0W
50
00
W6
00
0W
Inp
ut
Vo
lta
ge
(1
70
-26
5)V
AC
Fre
qu
en
cy
45
-65
Hz
Vo
lta
ge
A
C2
20
V+
2%
(Ba
tte
ry m
od
e)
Ou
tpu
tF
req
ue
ncy
50
/60
Hz+
1%
(Ba
tte
ry m
od
e)
Ou
tpu
t w
ave fo
rmP
ure sin
e w
ave
Eff
icie
ncy
>8
7%
Ba
tte
ryO
pti
on
al
Ba
tte
ry ra
ted
vo
lta
ge
12
/24
/48
VD
C2
4/4
8/9
6V
DC
Pro
tecti
on
Tra
nsfo
rmIn
tera
ctiv
e
Ove
rlo
ad
Co
mm
un
ica
tio
nR
S-2
32
Tem
pe
ratu
re
-2
0-
+7
5℃
En
vir
on
-m
en
tH
um
idit
y
Pro
du
ct S
ize L
*W*H
(mm
)
We
igh
t(N.
W.)
(kg
)
GS
I-2
02
20
00
W 0--
35
A(O
pti
on
al)(
96
V M
ax.
15
A)
10
%-9
0%
47
5*2
70
*20
5m
m6
40
*27
0*2
05
mm
12
kg
15
.3kg
16
.8kg
24
kg
26
.5kg
31
.5kg
GS
I-3
02
GS
I-4
02
GS
I-5
02
GS
I-6
02
Ma
x A
C c
ha
rgin
g cu
rre
nt
11 12
Switch off with loads
Terminal heating
Switch on failure
Alarm when switch on
Ⅷ. Convenient method of maintenance & fixing:
Fault
Battery no energy or overload
Fault connection with city power or battery
Fault or loose connection
Recoverable fuse popup
Battery no energy or overload
Cause
Press fuse back
Fasten again
Charge battery or reduce loads
Check connection with battery or connect again
Charge battery or reduce loads
Solution
Buzzer scream 2 secs every 1 sec stop
Over temperature alarm (85 alarm-90 shut down)
Check if fan heat dissipation hole jammed
Fan twirls sometimes fast as well as slowly
Fan twirls fast when inside temperature reaches 45 degree, twirls slowly when 42 degree
Normal phenomenon, fan is under intelligent control
No city power input
Ⅶ. Care and maintenance 1). This series of products seldom need to be fix. The standard model battery is like a adjusting tap. Low maintenance, ensuring better life only by charging often. When connecting to mains supply, no matter whether the inverter is on or not, it still keeps charging for battery, and provides over charge, over discharge protection. 2). If there has been long time no using the inverter, it would be better to charge on after four to six months. 3). The normal working life of battery is 3 or 5 years, if it doesn’t work, please change as early as possible by professionals. 4). Don’t change the single battery , changing the battery should according to the suppliers instructions. 5). In normal, the battery should discharge then recharge after working each four or six months , start to charge and finish discharge, standard charging time should be more than 12 hours. 6). In high temperature area, the battery should be charged and discharged every 2 months and the standard charging time is more than 12 hours.
Note: 1). Before changing battery, must turn off inverter and disconnect the mains supply. 2). Remove metal object like ring, watch etc. 3). Please don’t put the metal objects on the battery. 4). It is a normal phenomenon that the wire will appear a small spark when connecting to the inverter, but it will not does harm to the people or the inverter. 5). Be attention to do not reverse connecting between the positive pole and the negative pole.If connected to the generator, the following steps should be required.
1).To start the generator till it runs steadily, then connect the generator output to the inverter input terminal. And turn on the inverter step by step according to the operating instruction. After the inverter starts, connect the load one by one to the inverter.2).Please select the inverter capacity two or three times over than the capacity of the generator.
Ⅸ.
Te
ch
nic
al
Da
ta
Ove
rlo
ad
, sh
ort
cir
cu
it,
ba
tte
ry h
igh
an
d lo
w v
olt
ag
e a
nd
AC
in
pu
t h
igh
an
d lo
w v
olt
ag
e p
rote
cti
on
11
0%
~1
20
% t
urn t
o b
yp
ass
aft
er
30
se
cs,
16
0%
ma
inta
in 3
00
ms
an
d t
he
n sh
ut
do
wn
Ab
ove p
ara
me
ter
revis
ion c
ha
ng
e w
ith
ou
t n
oti
fica
tio
n.