Embed Size (px)
Citation preview
Lone PineThe AnzAc’s FinesT hour: 7-9 AugusT, 1915 By John Bianchi
Still, Allied victory in the Gallipoli campaign was always tantalizingly visible. By August, Hamilton determined that a new landing was needed to bypass the fully engaged Turks. His plan to take the commanding heights at Sari Bair – thereby wining the campaign – was approved by Kitchener, who made five divisions available for the assault at Suvla Bay, the last major offensive of the campaign.
Suvla was a perfect target. Landing troops would only have to travel four miles to take the heights at Sari Bair and there was no opposition to speak of. In order to keep the beach open, allowing the green troops of IX Corps and supporting divisions to take the heights unopposed, diversions would be needed.
These were launched at Cape Helles and ANZAC. The Helles demonstration
swiftly turned into the sort of debacle that General Hunter-Weston (known unflatteringly as “Hunter-Bunter”) specialized in. Instead of a token action tying troops down, it turned into another pointless frontal assault on the heights at Krithia. Easily dealt with by the Ottoman 9th Division, and resulting in massive Allied casualties, it did not prevent troops from heading north.
ANZAC’s demonstrations were of a different character, reflecting the professionalism of the leaders and the bravery of these troops. Reinforced by part of 13th Division and the 29th Indian Brigade, ANZAC would launch two attacks against the heights at Chunuk Bair and Rhododendron Spur to link their beachhead with Suvla. To keep reinforcements from Suvla and Chunuk Bair, ANZAC’s beloved General
Birdwood devised a plan to fool the Turks into believing that the south sector of ANZAC Cove was the point of breakout.
Birdwood called for a series of attacks to be carried out. The first and most important of these were to be launched by the 3rd Australian Light Horse Brigade at Russell’s Top and by the First Australian Division at the place called Lone Pine, to be followed by attacks at German Officer’s Trench and Johnston’s Jolly.
The heights here were named early on in the battle because of a lonesome pine tree visible as the only landmark – by the date of the battle, it had been largely shot up. The First Australian (New South Wales) Brigade would lead the assault on a very narrow, 250-yard front, supported by the 7th and 12th Australian Battalions of the First Division’s 2nd and 3rd Brigades. The Ottomans knew their trenches, roofed with heavy timbers and well sited on heights, were nearly immune to the frontal, uphill assault that must be mounted to take them. Therefore, Birdwood and his commanders elected to dig underground; the approach was well-planned and novel.
After an artillery barrage designed to cut the Turkish wire and break through their
The story of the Dardanelles campaign is one of missed opportunities. From failure to press on at the narrows despite losses, to the failure of general hunter Weston’s command to occupy the deserted heights at Krithia, a pattern emerged: the chances for ultimate victory, secured by bravery and sacrifice, were repeatedly thrown away by incompetent local commanders or went unrecognized by general hamilton.
roofed trenches, First Brigade’s assault would be launched from subterranean tunnels a few yards from the Ottoman earthworks. The surprise, coupled with the pounding of field and naval artillery, should be enough to allow the Australians to take the trenches, reinforce them, and draw down reserves that would otherwise be destined for Suvla Bay.
Despite strong preparations, the operation did not go to plan. The artillery barrage was desultory and off-target, leaving the Ottoman wire partially intact and the Arabs of the 72nd Division largely untouched, well aware of what was coming. Still, the appearance of howling Australian troops immediately before their trenches was a nearly complete surprise, and after only a half hour of frontal assault, the First Brigade had accomplished the seemingly impossible. In only 30 minutes time, 2nd 3rd and 4th
Battalions had - with terrible casualties - taken the seemingly impregnable Lone Pine position by frontal assault. It should not have worked, but the determination of the ANZAC troops, and the quality of their preparations, showed.
Interspersed throughout the Ottoman trench system, units consolidated themselves, repairing damage to the dugouts and creating strong points. They began preparing for the Ottoman counterattack that the Lone Pine operation was designed to instigate.
The posts were vulnerable and did not support each other, and so, 1st Battalion, held in reserve, moved up to link the strongpoints into a continuous line. The bulk of First Battalion was ordered to the right; which was the thinnest section of the captured trench network and most exposed to counterattack.
First Battlion did not have to wait for long. Having built the trenches, Ottoman commanders knew its weakest point was the southern end. The first counterattack hit just past noon on the 7th, launched by the Turkish 72nd Regiment, on the sectors named after the commanders of the 1st Battalion companies that held them: Cook’s and Youden’s Posts.
It was here that L/Cpl Leonard Keysor - a London-born Jew who had entered Australian service - won the first of the seven Victioria Crosses (VC) earned in the Lone Pine action. Keysor broke cover, ignoring the bullets whizzing past him from three sides, to smother Ottoman grenades with whatever came to hand, including sandbags and his coat. His citation read:
“On August 7th, 1915, he was in a trench that was being heavily bombed by the enemy. He picked up two live bombs and threw them back at the enemy at great risk to his own life, and continued throwing bombs, although himself wounded, thereby saving a portion of the trench which it was most important to hold. On August 8th, at the same place, Private Keysor successfully bombed the enemy out of a position from which a temporary mastery over his own trench had been obtained and was again wounded. Although marked for hospital, he declined to leave, and volunteered to throw bombs for another company which had lost its bomb-throwers. He continued to bomb the enemy till the situation was relieved.”
Keysor’s insanely selfless example kept his comrades in the two posts from breaking under the relentless onslaught.
MAgniFicenT WArgAMing TABle By grand Manner
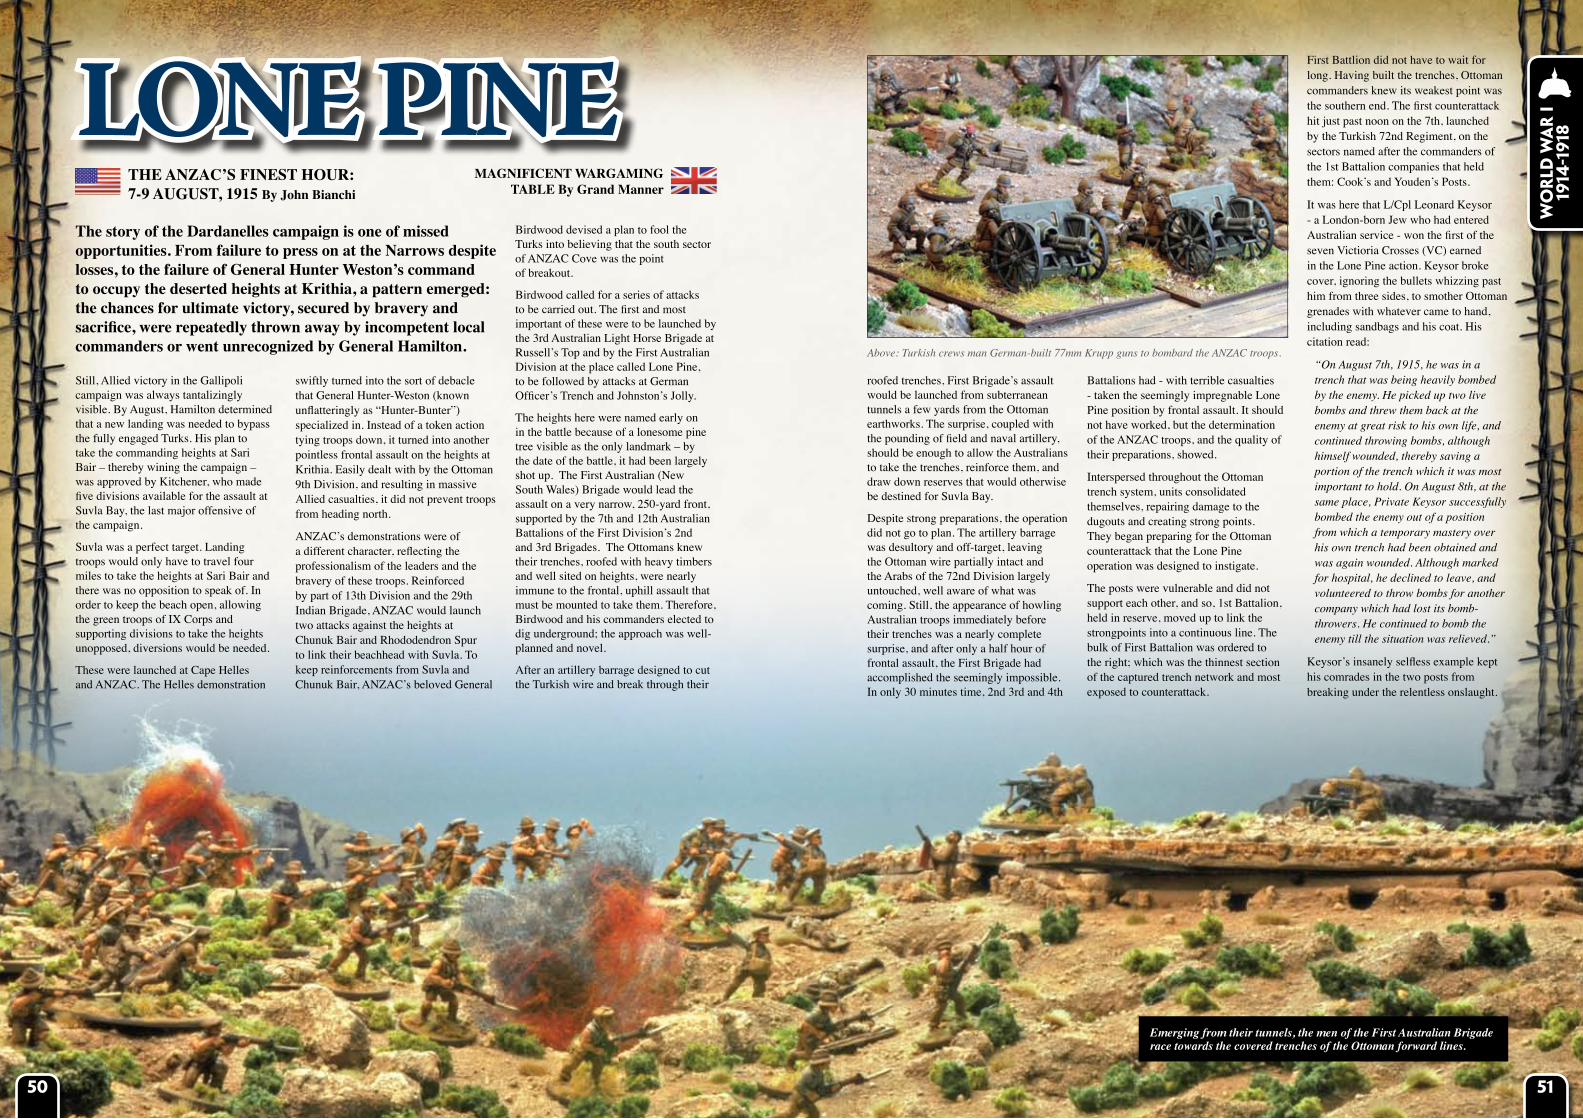
Emerging from their tunnels, the men of the First Australian Brigade race towards the covered trenches of the Ottoman forward lines.
Above: Turkish crews man German-built 77mm Krupp guns to bombard the ANZAC troops.
Wo
rld
Wa
r I
19
14-1
918
5150
By 1530 on the 7th, troops from all three of Ottoman 19th Division’s regiments now hit the southern end of the Lone Pine trenches like a tidal wave. Lt. Col Scobie, commanding 2nd Battalion, was killed as the Arabs and Turks swept forward. They finally struck against a long, roofed trench held by Capt. H. Jacobs and his company of 1st Battalion. Jacobs and his troopers, taking horrible casualties – assisted voluntarily by the indispensable Keysor – managed to hold against repeated Ottoman counterattacks lasting all day and into the night.
On 8 August, the depleted and exhausted men of 1st and 2nd Battalion – having lost so many senior officers they were now under the command of 1st Battalion’s Capt. Cecil Sasse, were relieved by the 7th (Victoria) under Lt. Col. Harold Elliot. Elliot’s men took advantage of a lull in the action to sever connections between the captured trenches and the Ottoman trench network south of “the Cup”. However, the first wave of counterattacks was launched before this work was completed; by 1900, a major effort to retake the trenches was launched by 19th Division’s CO. Lt. Symons’ D Company held the ground from Wood’s Post on the left to Goldentedt’s barricade in the center,
while Lt. G.J.C. Dyett’s company held the isolated Jacob’s trench on the right.
Elliot’s position was vulnerable, but his men turned it into the proverbial “tough nut.” Jacob’s Trench was formed into three strongpoints, and the trench itself was roofed with heavy timbers and wire mesh designed to prevent bomb attacks. Goldenstedt’s barricade was also outfitted by Lt. Symons with a sandbagged and wire-mesh-protected pocket that held a reserve section designated the company’s counterattack squad. Every time the Turks gained the trenches on the eminence, this section issued forth, fresh and furious, and drove them out at bayonet point.
Still the Ottoman counterattack was deadly persistent, and Turkish steel in the form of bombs, bullets and bayonets took a fearful toll on the ANZAC defenders. Ottoman attacks chipped away at Dyett’s survivors, until they had to be pulled back, replaced by Capt. Fred Tubb’s reserve B Company. Lt. J.M. West was ordered to hold the extreme, exposed right with his now depleted company.
The heaviest Ottoman attack came at 0400. on the morning of the 9th. Predictably, 19th Division threw the weight of several hundred troops against
Jacob’s trench and the far right. Through sheer force of numbers and tenacity, they waded into the fire of two Australian HMGs, brought forward into Jacob’s Trench to help repel attacks, and took the trenches there, pushing back Tubb’s and West’s companies, and wiping out the entire garrison of the open trench adjacent to and protecting Jacob’s Trench. The situation was as desperate as it would ever become during the entire Lone Pine action. The Ottomans now had a lodgment and, if followed up with a further mass attack, this foothold had the chance to turn the position and make Lone Pine untenable for the ANZACs. The Australians would have to retire back on their original trenches, now stripped of all but support weapons, artillery and a few reserves.
It was at this point that Lt. Col. Elliot turned to Lt. Symons, who had been repelling Ottoman attacks at Goldentedt’s Post, to take a party of his company into Jacob’s trench to recapture it. Elliot handed the unarmed Symons his revolver and told him “I don’t expect to see you again, but we must not lose that post.”
Symons, leading the sections of Cpl. G. Ball and Cpl. J.H. Wadeson, charged downhill, into the end of the trench, shooting two Turks with his borrowed
gun, while his men bayoneted and shot enemy soldiers, ripping through the trench. The Ottomans, unable to fire against the frenzied though small group of soldiers, either fell or fled back on the troops to their left. In just a few minutes, Symons had cleared the trench of Turks, brought his strength up to a platoon of 40 men, and begun to repair the barricade for the next wave of counterattacks, which struck almost immediately at 0430. Attacked from front, flank and rear, Symons desperately held on. The Turks set fire to the roof of Jacob’s trench, as Symons’s men shot at them through the mesh and down the communication trenches. Twice, Symons countercharged the Ottomans, pushing them back. On one pursuit, his men brought back a captured Vickers machine gun, which was pressed into service, though how effective it was is unknown.
While Symons was managing his desperate battle on the right, at Goldenstedt’s post, things had gone from bad to worse. Fred Tubb, lately pushed out of Jacob’s Trench, had rallied his understrength B Company and brought them forward to the left. Lt. Col. Elliot had, in this action, proven that a peacetime attorney could be turned into a superior tactical battlefield manager. He pressed Tubb’s troops into the stripped Goldenstedt’s Post, further detailing Capt. Tubb to take ten picked men into the frontmost section of the redoubt to repell Ottoman attacks. Tubb and Cpls. Burton and Dunstan were charged with throwing back enemy bombs. The relentlessness of the attack that followed matched what Symons was facing on their right. Their joint VC citation read in part:
“In the early morning, the enemy made a determined counterattack on the center of a newly captured trench held by Lt. Tubb, Cpls. Burton and Dunston, and a few men. They advanced up a sap and blew in a sandbag barricade, leaving only one foot standing, but Lt. Tubb, with the two Cpls., repulsed the enemy and rebuilt the barricade, although Lt. Tubb was wounded in the head and arm and Cpl. Burton was killed by a bomb while most gallantly building up the parapet under a hail of bombs.”
The citation fails to mention that all the defenders were casualties, and yet, those that lived kept up the unbreakable defense.
Back on the right, Symons was down to 15 men able to wield a rifle. He sent for an additional platoon of 25 men to be despatched to Jacob’s Trench. No sooner was he back up to 40 men than the final Turkish push to drive Symons and his men out of this key to the Lone Pine position was launched. The Turks had
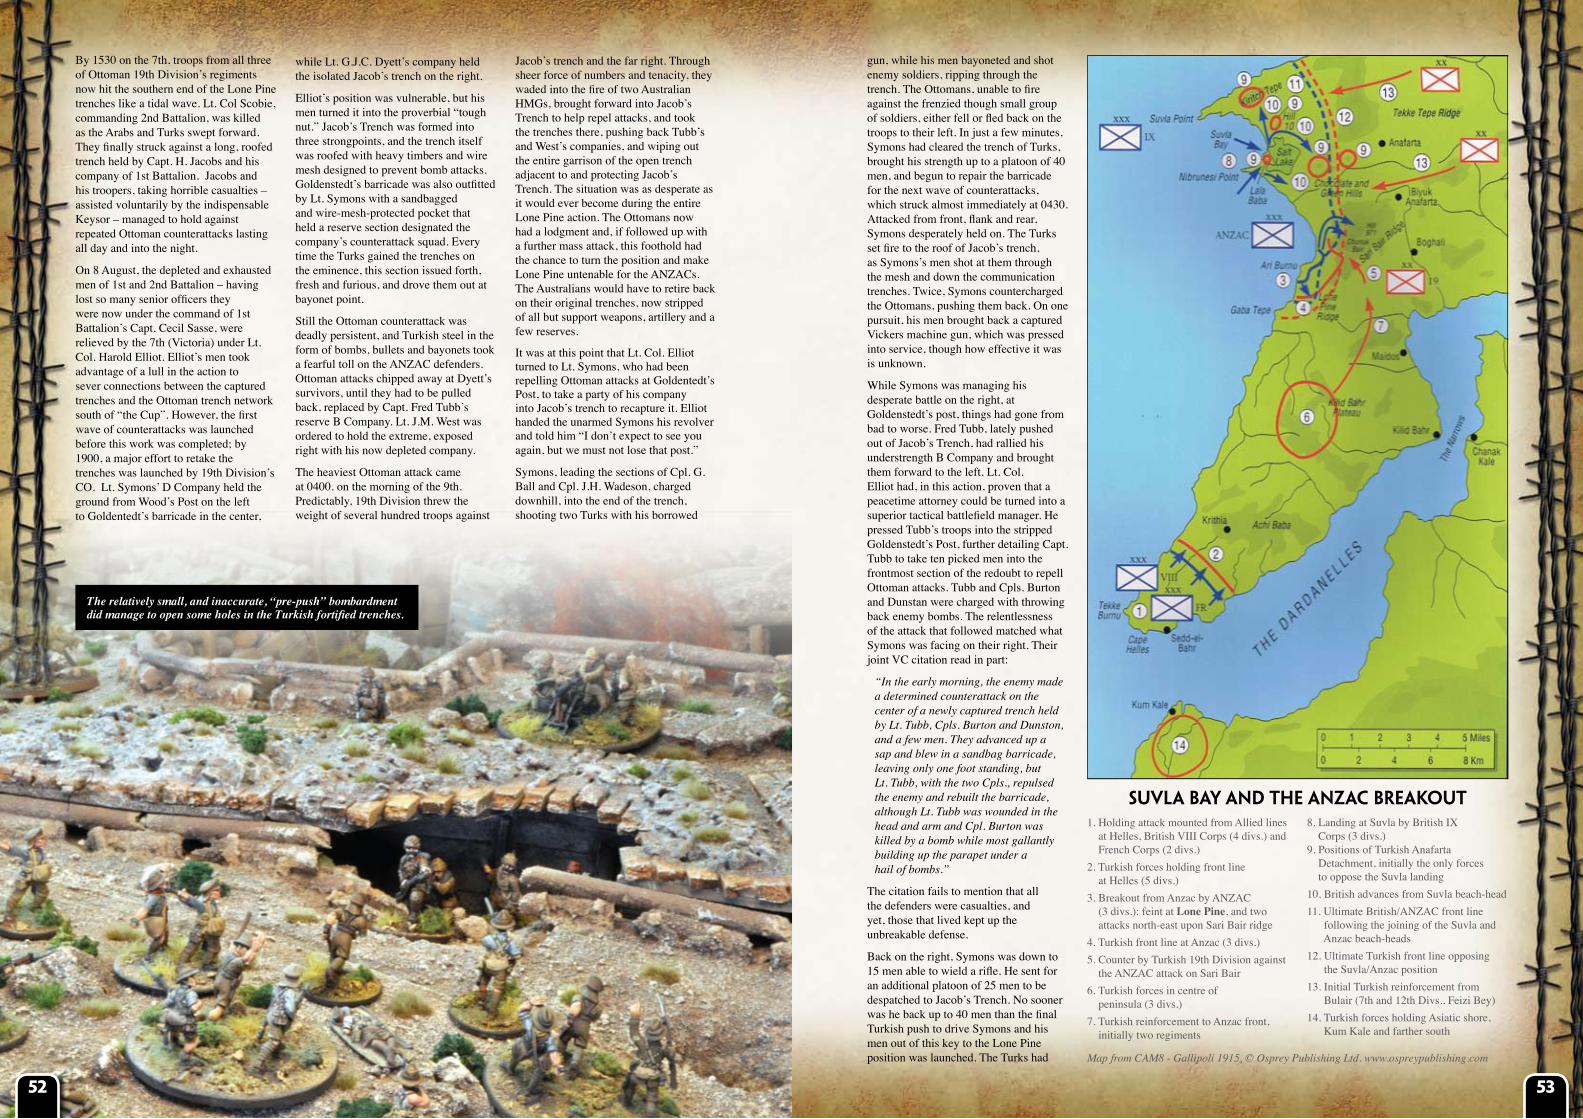
1. Holding attack mounted from Allied lines at Helles, British VIII Corps (4 divs.) and French Corps (2 divs.)2. Turkish forces holding front line at Helles (5 divs.)3. Breakout from Anzac by ANZAC (3 divs.): feint at lone Pine, and two attacks north-east upon Sari Bair ridge4. Turkish front line at Anzac (3 divs.)5. Counter by Turkish 19th Division against the ANZAC attack on Sari Bair6. Turkish forces in centre of peninsula (3 divs.)7. Turkish reinforcement to Anzac front, initially two regiments
8. Landing at Suvla by British IX Corps (3 divs.) 9. Positions of Turkish Anafarta Detachment, initially the only forces to oppose the Suvla landing10. British advances from Suvla beach-head11. Ultimate British/ANZAC front line following the joining of the Suvla and Anzac beach-heads12. Ultimate Turkish front line opposing the Suvla/Anzac position13. Initial Turkish reinforcement from Bulair (7th and 12th Divs., Feizi Bey)14. Turkish forces holding Asiatic shore, Kum Kale and farther south
Suvla Bay and the Anzac Breakout
The relatively small, and inaccurate, “pre-push” bombardment did manage to open some holes in the Turkish fortified trenches.
Map from CAM8 - Gallipoli 1915, © Osprey Publishing Ltd. www.ospreypublishing.com
5352
killed or wounded every man in Jacob’s Trench when they were finally stopped by a fearful fusillade from the old Australian trenches. The Ottoman avenue of attack - from the extreme right and rear of Jacob’s trench, exposed their platoons to the fire of ANZAC supporting troops. The explosion of HMG and rifle fire was enough to inflict not only horrendous casualties, but to utterly demoralize the remaining Turkish and Arab troops, who fled for safety, bringing the final Ottoman assault to a bloody close at 0630.
By the 9th, the cost of the diversions had become apparent. First Brigade had taken some 1,700 casualties out of 2,900 effectives engaged; its Second Battalion had lost a staggering three-quarters of its strength. Symons’s Company D had been reduced to approximately 40, every one of whom was wounded. Tubb was the
last man standing in his detachment of 11 men. Col. Elliot recommended both company COs for the Victoria Cross, as well as Cpls. Burton and Dunston. In addition to these four and Keysor, VCs were also awarded to two men from the position of the 3rd and 4th Australian Battalions on the far left of Lone Pine: the brave Private Hamilton, who had so recklessly thrown back enemy bombs as well as firing completely exposed on the parapet of his trench to pick off Turkish attackers, and the inspiring Capt. Alfred Shout, who had held off Turkish attacks with bombs at Sasse’s Sap before mortally suffering the loss of his hand when a bomb he had lit exploded prematurely.
The attack at German Officers Trench had been a disaster, so the Johnston’s Jolly attacks were called off to preserve life.
The 3rd Australian Light Horse Brigade was wasted in pointless, suicidal attacks at Russell’s Top. In an action emblematic of the waste of brave men the campaign embodied, the Light Horse lost nearly 75% of its strength of 600 men, thrown repeatedly into the teeth of Ottoman machine guns. Tragically, Ghurkas and Lancashire troops had successfully taken the heights at Chunuk Bair. The objective of the entire land campaign had been achieved, and yet, no reinforcements ever reached them. They were finally chased off the objective by a deadly accurate and effective artillery barrage – fired from British ships.
The First Australian Brigade’s capture and subsequent defense of Lone Pine was arguably the finest hour of the ANZAC forces in the Dardanelles campaign, but in military terms, what had it achieved? It
had held down 19th Division as planned, but its intended super-objective – drawing down Ottoman reserves to the south, away from the landings at Suvla - was not accomplished. Hamilton misread the situation, as he so often did commanding on board ship or from the distance of Imbros. Liman von Sanders instead pulled troops from the stable Helles front and sent them north to ANZAC, where they were in a much better position to be fed into the defense of the high ground above Suvla by Mustafa Kemal. In an ironic twist, Lone Pine, the most
successful diversionary attack made on the ANZAC front, contributed to the failure of Stopford’s IX Corps at Suvla Bay.
But, Lone Pine had still accomplished something. It was, when taken with all the experiences of the ANZACs at Gallipoli – including their victories and the circumstance of having been wasted, thrown away, and mishandled by incompetent generals and a disconnected high command – an event that led to the making of the Australians and New
Zealanders. Just as the campaign was the fulcrum which launched the Turkish Republic and which gave the Turks the father of their new country, Lone Pine and the ANZAC beachhead were the crucible that cast the modern Australian and New Zealander identities. They had shown, through their heroism and tenacity, that there were no better fighters in any army in the world. ANZACs had proven themselves beyond a doubt, and demonstrated that they could be pressed, even misused, but they would never be broken.
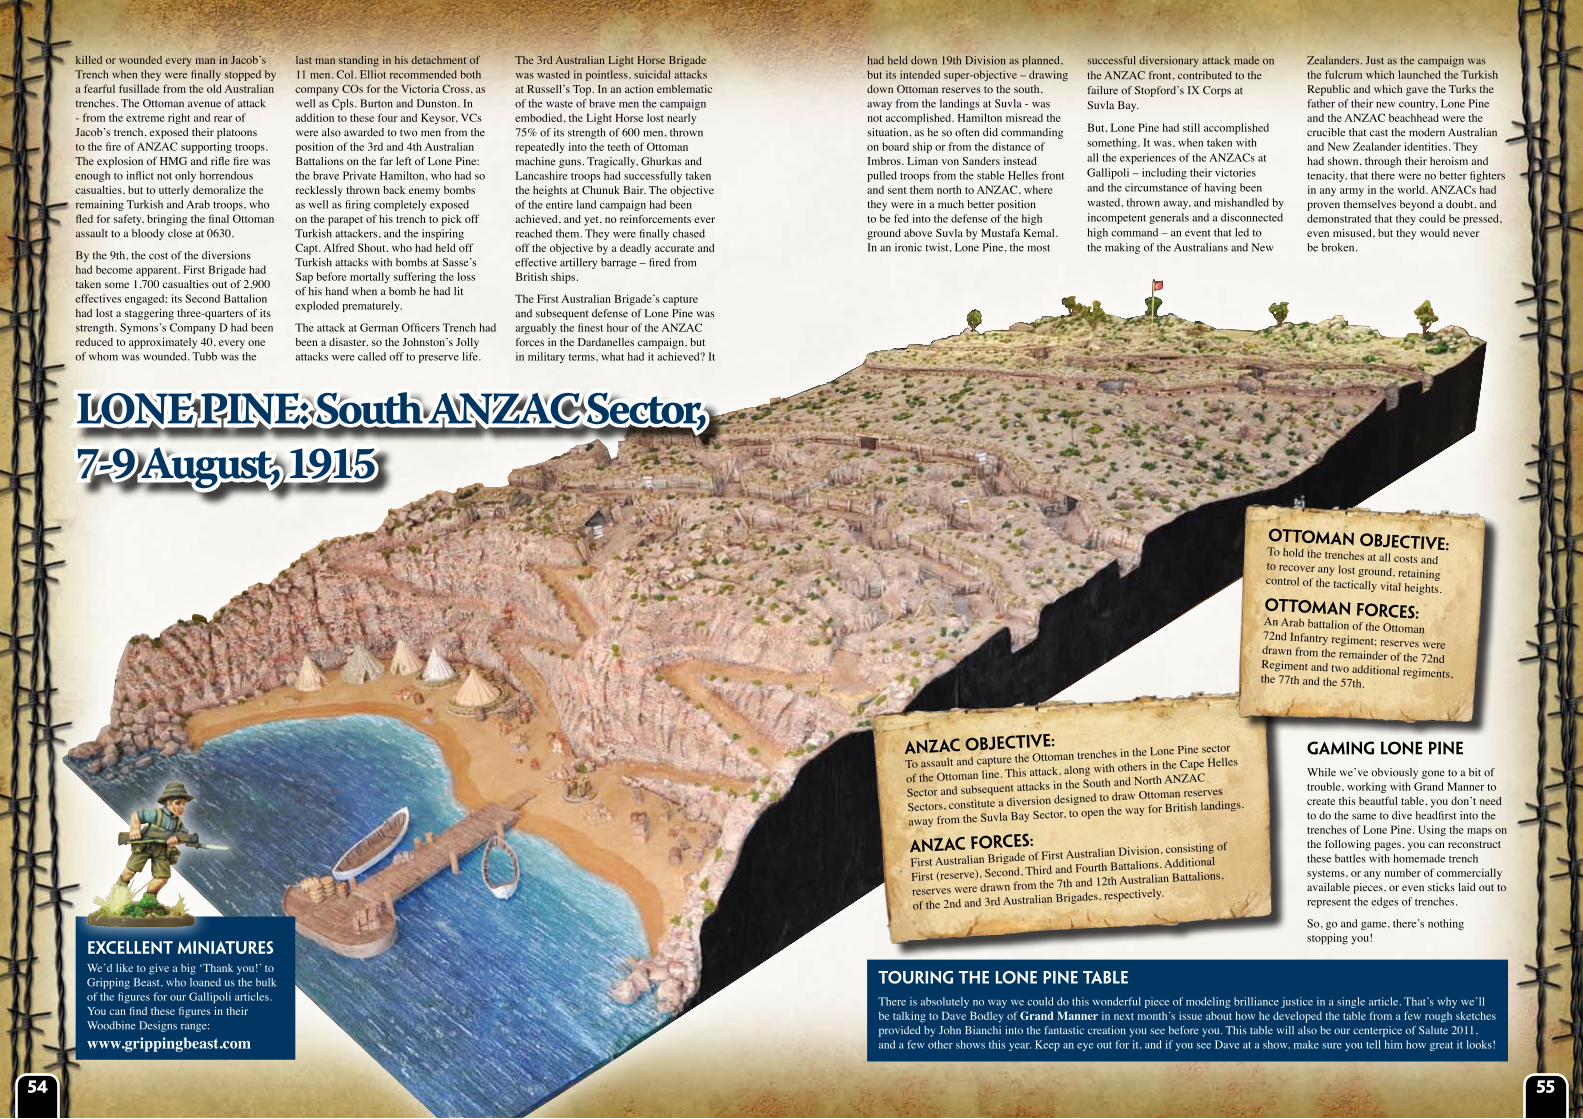
Lone Pine: South AnZAC Sector, 7-9 August, 1915
ANZAC Objective: To assault and capture the Ottoman trenches in the Lone Pine sector
of the Ottoman line. This attack, along with others in the Cape Helles
Sector and subsequent attacks in the South and North ANZAC
Sectors, constitute a diversion designed to draw Ottoman reserves
away from the Suvla Bay Sector, to open the way for British landings.
ANZAC forces: First Australian Brigade of First Australian Division, consisting of
First (reserve), Second, Third and Fourth Battalions. Additional
reserves were drawn from the 7th and 12th Australian Battalions,
of the 2nd and 3rd Australian Brigades, respectively.
Ottoman Objective: To hold the trenches at all costs and to recover any lost ground, retaining control of the tactically vital heights.Ottoman forces: An Arab battalion of the Ottoman 72nd Infantry regiment; reserves were drawn from the remainder of the 72nd Regiment and two additional regiments, the 77th and the 57th.
Touring the Lone Pine TableThere is absolutely no way we could do this wonderful piece of modeling brilliance justice in a single article. That’s why we’ll be talking to Dave Bodley of grand Manner in next month’s issue about how he developed the table from a few rough sketches provided by John Bianchi into the fantastic creation you see before you. This table will also be our centerpice of Salute 2011, and a few other shows this year. Keep an eye out for it, and if you see Dave at a show, make sure you tell him how great it looks!
Gaming Lone PineWhile we’ve obviously gone to a bit of trouble, working with Grand Manner to create this beautful table, you don’t need to do the same to dive headfirst into the trenches of Lone Pine. Using the maps on the following pages, you can reconstruct these battles with homemade trench systems, or any number of commercially available pieces, or even sticks laid out to represent the edges of trenches.
So, go and game, there’s nothing stopping you!
Excellent MiniaturesWe’d like to give a big ‘Thank you!’ to Gripping Beast, who loaned us the bulk of the figures for our Gallipoli articles. You can find these figures in their Woodbine Designs range:www.grippingbeast.com
5554
DePloyMenT AnD ArMAMenT
AnzAc: Australian First Brigade line troopers – armed with rifle and homemade bombs - emerge from the secret trench system’s dugouts, 35 to 40 yards from the Ottoman first line trenches and use the cover provided by shell holes from the piecemeal artillery bombardment (less than 400 shells fired) and three massive craters created by mines blown just prior to the assault. The First Brigade’s heavy weapons were kept in the ANZAC trenches to provide covering fire and support. These weapons include all battalion HMGs, any trench catapults or mortars, and field artillery pieces.
ottoman: the 72nd Regiment’s supporting weapons were sited well forward to discourage and suppress Australian attacks and troop movements. First line troopers are armed with rifles and lit-fuse grenades only, but the Arab Battalion’s machine guns are sited among the second line trenches. Ottoman trench catapults or mortars are sited on the board in open dugouts to the rear of the Arab Battalion’s position. Ottoman artillery is sited on or off table.
Who goes FirsT?
The ANZAC troopers take first turn.
eFFecTs oF TerrAin, Wire AnD cover
• Troops in the subterranean trenches cannot be targeted. The mine craters and shell holes provide the following:
- Heavy cover in Price of Glory - 4+ save in The Great War - Medium cover in If the Lord Spares Us
• Ottoman wire was only partially hit by the naval and 18-pounder bombardment, so in some cases it provides obstruction to movement. Roll a D6 for each Anzac unit that contacts Ottoman wire to determine whether or not that section of wire is intact. On a roll of 3+, the wire is obliterated and does not effect movement. If the roll is failed, ANZAC units need to go through the process of cutting the wire (check each ruleset for effects of wire). All ANZAC units are equipped with wire cutters.
Note: If using If the Lords Spares Us or other ruleset with a wire table, refer to that table using a “barrage of two turns” for the modifier.
• Ottoman forward trenches are roofed with earth, logs and heavy timber. While this protects them very well from artillery and small arms fire, it is also limits the Ottoman soldier’s ability to see.
Roofed trenches count as fortifications or bunkers, but Ottoman soldiers within
them can only see in the 180-degree forward arc in front of their position, making further reductions for terrain that interrupts or blocks line of sight. They can also see down any saps or communication trenches that connect to the trench they hold.
• Troops who are attacking an Ottoman trench from above, the side or behind cannot be targeted by the troops within (unless they enter a sap or communication trench and line of sight can be drawn to them), but they can come under fire from troops in second line trenches or any other troops that can draw line of sight to them.
• Attackers treat Ottoman roofed trenches as buildings, and use the relevant rules set forth in their ruleset for attacking troops in buildings. Because shellfire damaged some of the trenches, roll a D6 for every unit that attacks the soldiers in a trench in melee.
- On a roll of 1-4, the artillery has failed to damage the roof and it continues to be treated as a building until the next turn. - On a roll of 5 or 6, the trench roof has been damaged and the attackers are able to push aside the roof. The trench is no longer treated as a building.
• The attackers may once again attempt to blow the trench in their next turn if they are making a fresh assault on the trench, or if they remain locked in combat.
scenArio vicTory conDiTions
AnzAc: The Australian First Brigade wins the scenario if it is able to control the first and second line of Ottoman trenches after six turns of play.
ottoman: The Ottoman Battalion wins the scenario if it retains control of the second line trenches after six turns of play. The ANZAC position is untenable and they are pulled back.
However, should the ANZAC troops gain control of part of the second line by the sixth turn, the scenario can continue.
The ANZAC player may now commit each battalion’s reserve company to clearing the Ottoman trenches.
• Prior to beginning turn eight, deploy ANZAC reserves at the exit of the subterranean trenches.
• Deploy Ottoman reserves in any Ottoman-controlled or uncontested trench or sap on the Ottoman players’ short or long table edge.
• Play an additional five turns. If the ANZAC player controls the second line trench, it’s an ANZAC victory. If the
Ottoman player manages to retain control of any second line trenches, it’s an Ottoman tactical victory.
PossiBle TWeAKs
• If the Turks consistently win this scenario, reduce the number of HMGs by one or two.
• If the ANZACs consistently win, make the wire and dugout roofs a little bit tougher to break through by adding +1 to the dice rolls required to break through them.
Lone Pine: Scenario oneFirsT AusTrAliAn BrigADe’s ATTAcK AT lone Pine
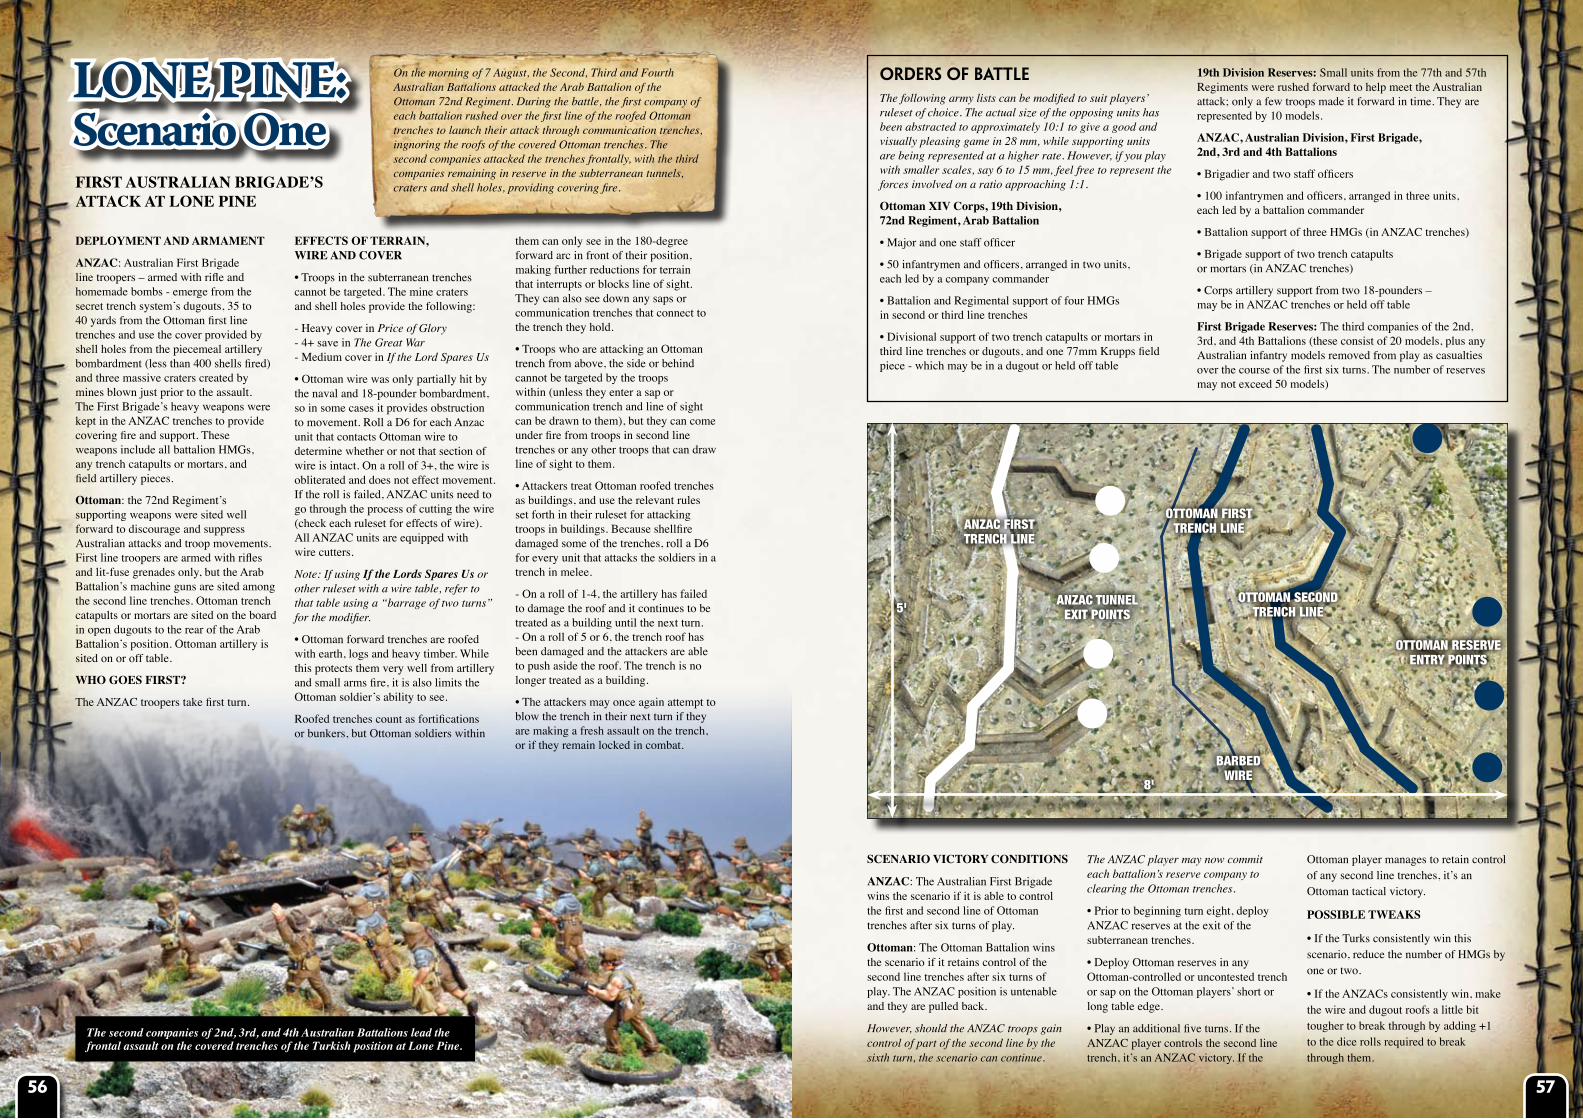
On the morning of 7 August, the Second, Third and Fourth Australian Battalions attacked the Arab Battalion of the Ottoman 72nd Regiment. During the battle, the first company of each battalion rushed over the first line of the roofed Ottoman trenches to launch their attack through communication trenches, ingnoring the roofs of the covered Ottoman trenches. The second companies attacked the trenches frontally, with the third companies remaining in reserve in the subterranean tunnels, craters and shell holes, providing covering fire.
OrdErS Of BATTLEThe following army lists can be modified to suit players’ ruleset of choice. The actual size of the opposing units has been abstracted to approximately 10:1 to give a good and visually pleasing game in 28 mm, while supporting units are being represented at a higher rate. However, if you play with smaller scales, say 6 to 15 mm, feel free to represent the forces involved on a ratio approaching 1:1.
ottoman Xiv corps, 19th Division, 72nd regiment, Arab Battalion
• Major and one staff officer
• 50 infantrymen and officers, arranged in two units, each led by a company commander
• Battalion and Regimental support of four HMGs in second or third line trenches
• Divisional support of two trench catapults or mortars in third line trenches or dugouts, and one 77mm Krupps field piece - which may be in a dugout or held off table
19th Division reserves: Small units from the 77th and 57th Regiments were rushed forward to help meet the Australian attack; only a few troops made it forward in time. They are represented by 10 models.
AnzAc, Australian Division, First Brigade, 2nd, 3rd and 4th Battalions
• Brigadier and two staff officers
• 100 infantrymen and officers, arranged in three units, each led by a battalion commander
• Battalion support of three HMGs (in ANZAC trenches)
• Brigade support of two trench catapults or mortars (in ANZAC trenches)
• Corps artillery support from two 18-pounders – may be in ANZAC trenches or held off table
First Brigade reserves: The third companies of the 2nd, 3rd, and 4th Battalions (these consist of 20 models, plus any Australian infantry models removed from play as casualties over the course of the first six turns. The number of reserves may not exceed 50 models)
The second companies of 2nd, 3rd, and 4th Australian Battalions lead the frontal assault on the covered trenches of the Turkish position at Lone Pine.
AnzAc First trench line
AnzAc tunnel exit Points
ottomAn second trench line
ottomAn First trench line
BArBed wire
ottomAn reserve entry Points
5'
8'
5756
DePloyMenT AnD ArMAMenT
AnzAc: Symons’s Company D, Australian 7th Battalion, is armed with rifles and bombs (homemade jam tin and hairbrush bombs) and attack the Ottomans in Jacob’s Trench from the left flank, issuing from Goldenstedt’s Post.
The First Brigade’s heavy weapons were kept in the ANZAC trenches to provide covering fire and support and remain in the same position from Scenario One. These weapons include battalion- and brigade-level HMGs, trench catapults and mortars. They cannot fire unless Ottoman troops are exposed by positioning themselves to the rear (north) or flank (west) of Jacob’s Trench to attack Symons’s position in the rear.
There is one captured HMG in Jacob’s Trench, but it may be out of commission; roll a D6 every turn to see if it can be used; on a 4+ the gun can fire that turn.
ottoman: a depleted company of the 72nd Regiment holds the open trench just behind Jacob’s Trench, as well as Jacob’s Trench. Ottoman troopers are armed with rifles and lit-fuse grenades only; 72nd Regiment supporting HMGs play no role in this nighttime action for fear of hitting their own men. In the second part of this scenario, two full platoons of the 72nd attack the Jacob’s trench position from the Ottoman table edge and the Ottoman player’s left table edge.
Who goes FirsT?
In the first part of the scenario, the ANZAC troopers take first turn. The first part of the scenario continues until D Company takes Jacob’s Trench.
The game pauses, then enters the second stage of the scenario, where D Company must hold Jacob’s Trench. The Ottoman player takes first turn; his troops do not deploy on table, and instead make their move by entering from the table edges.
eFFecTs oF TerrAin, cover, AnD DArKness
• The Ottoman forward trenches are roofed with earth, logs and heavy timber. While this protects them very well from artillery and small arms fire, it is also limits the ANZAC and Ottoman soldiers’ ability to see.
Roofed trenches count as fortifications or bunkers; now that they have been dismantled and hastily reconstructed, soldiers within them can see in the 180-degree arc in front of their position and in the 180-degree arc to the rear of their position. The flanks of the position remain blind spots, and can conceal attackers. Make further reductions for terrain that interrupts or blocks line of sight. Troopers can see down any saps or communication trenches that connect to the trench they hold. Jacob’s Trench is attached to other trenches, which provide vulnerable avenues of attack.
• Troops who are approaching Jacob’s Trench from the side cannot be targeted by the troops within (unless they enter a sap or communication trench and line of sight can be drawn to them), but they can come under fire from troops in second line trenches or any other troops that can draw line of sight to them (i.e. reserves or support weapons).
• Support weapons in the ANZAC trenches cannot draw line of sight to Ottoman troops prior to turn two of the second part of the battle – as dawn begins to light the field.
• Support weapons in the ANZAC trenches will only fire at Ottoman troopers assaulting from the right flank (west) or the rear (north) for fear of hitting their own men.
scenArio vicTory conDiTions
AnzAc & ottoman: Either side will win the scenario if it is able to wrest control of Jacob’s Trench and then retain control of it for six turns of play.
Lone Pine: Scenario Two
OrdErS Of BATTLEThe following army lists represent the soldiers involved in this action on a ratio of 1:1.
AnzAc, Australian Division, second Brigade, seventh Battalion, D company:
• Lt. Symons, a company Sergeant Major, and three troopers (rated as Elites with highest possible leadership)
• A platoon of 40 infantrymen, led by a 2nd Lt. and a Sergeant, containing three sections, each led by a Corporal (rated as Elites)
• Battalion support of two HMGs (in ANZAC trenches)
• One captured Ottoman HMG is available to the Jacob’s Trench defenders (subject to a 4+ roll on a D6); it is crewed by three of Symons’s defenders
• Brigade support of one trench catapult or mortar (in ANZAC trenches)
D company reserves: The second and third platoons of D Company fed whatever available troops they could spare into Jacob’s Trench to support Symons. When Symons’ strength falls to between 20 and 15 men at the end of a turn, pull enough reserves to bring Symons back up to a strength of 40. The reserves come from a full off-table second platoon of 40
men, constructed the same as the first platoon. Any troops left over may be brought on table during the movement phase of any subsequent turn.
ottoman Xiv corps, 19th Division, 72nd regiment:
• A Lt. and 24 men hold Jacob’s Trench and the open trench behind it. They will receive no help from reserves and must try to hold against Symons’s determined assault (rated as Veterans with average leadership).
• In the turn after Symons gains control of Jacobs’ Trench the Ottoman player assaults the trench with two platoons of 35 men, each led by a Lt., and a Platoon Sergeant, consisting of three sections each led by a Corporal (rated as Veterans with average leadership).
19th Division reserves: In the event that a platoon is driven back or if it is voluntarily withdrawn (if a platoon is brought below half strength, a player may decide to move it off-table), the Ottoman player may attack with a fresh platoon.
• The Ottoman player may never attack with more than two platoons at a time. He may have four platoons on the table at any one time if two are retiring,
• Aside from the first two platoons to attack, the Ottoman player may bring four additional platoons forward against this position over the course of the six-turn game.
7Th BATTAlion’s DeFense oF cAPTureD TurKish Trenches AT lone Pine; lT. syMons’ vc-Winning AcTion
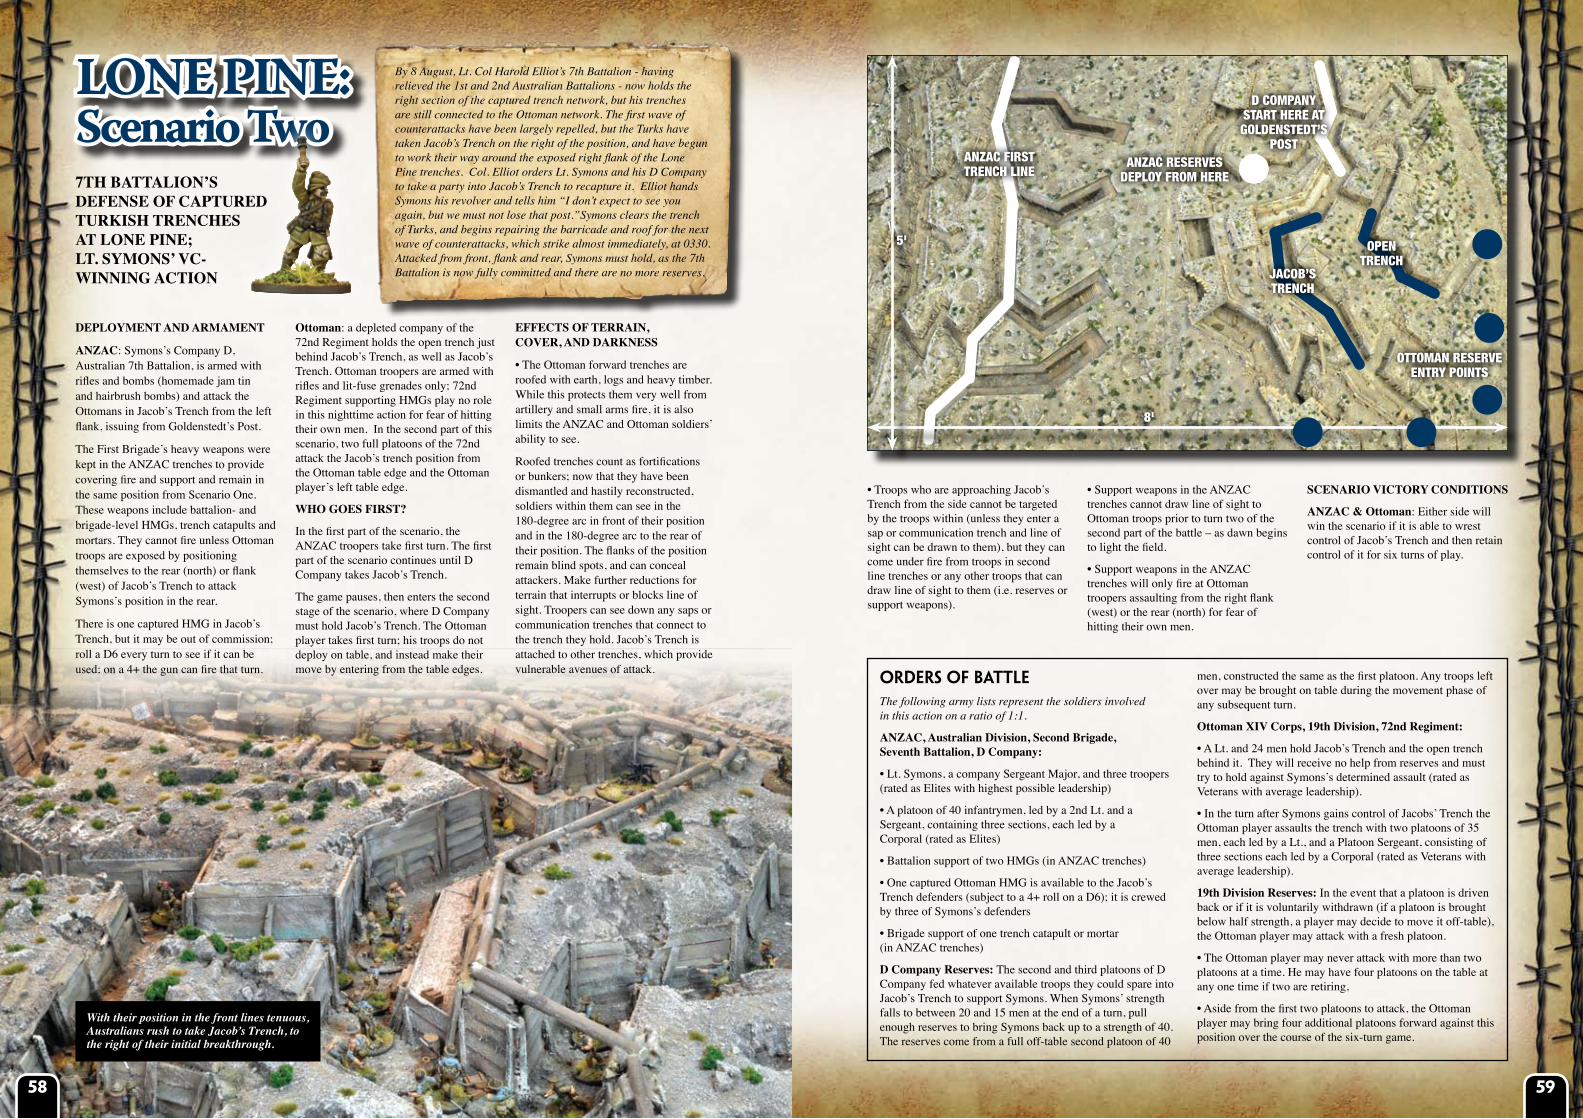
By 8 August, Lt. Col Harold Elliot’s 7th Battalion - having relieved the 1st and 2nd Australian Battalions - now holds the right section of the captured trench network, but his trenches are still connected to the Ottoman network. The first wave of counterattacks have been largely repelled, but the Turks have taken Jacob’s Trench on the right of the position, and have begun to work their way around the exposed right flank of the Lone Pine trenches. Col. Elliot orders Lt. Symons and his D Company to take a party into Jacob’s Trench to recapture it. Elliot hands Symons his revolver and tells him “I don’t expect to see you again, but we must not lose that post.”Symons clears the trench of Turks, and begins repairing the barricade and roof for the next wave of counterattacks, which strike almost immediately, at 0330. Attacked from front, flank and rear, Symons must hold, as the 7th Battalion is now fully committed and there are no more reserves.
With their position in the front lines tenuous, Australians rush to take Jacob’s Trench, to the right of their initial breakthrough.
AnzAc First trench line
AnzAc reserves dePloy From here
JAcoB’s trench
ottomAn reserve entry Points
5'
8'
oPen trench
d comPAny stArt here At Goldenstedt’s
Post
5958
DePloyMenT AnD ArMAMenT
AnzAc: Tubb’s Company B, Australian 7th Battalion, are armed with rifles and a nearly inexhaustible supply of homemade bombs (jam tin and hairbrush).
ottoman: A scratch force of troops from the 72nd, 77th and 57th Regiments is ordered to retake Goldenstedt’s Post. The Ottoman troopers are armed with rifles and lit-fuse grenades only; 72nd Regiment supporting HMGs play no role in this early dawn action for fear of hitting their own men.
Who goes FirsT?
The Ottoman player takes first turn; his troops do not deploy on table, and instead make their move by entering from the Ottoman back table edge. The Ottomans will attempt to re-take the trench until driven off. If driven back, they will attempt to rally, and if successful, they will make another attempt to re-take the trench. If driven back a second time, they will attempt to rally, and if successful will make one last attempt to take Goldenstedt’s Post.
eFFecTs oF TerrAin AnD cover
• The Ottoman forward trenches are roofed with earth, logs and heavy timber. While this protects them very well from artillery and small arms fire, it is also limits the ANZAC and Ottoman soldiers’ ability to see.
Roofed trenches count as fortifications or bunkers; now that they have been dismantled and hastily reconstructed, soldiers within them can see in the 180-degree arc in front of their position and in the 180-degree arc to the rear of their position. The flanks of the position remain blind spots, and can conceal attackers. Make further reductions for terrain that interrupts or blocks line of sight. Troopers can see down any saps or communication trenches that connect to the trench they hold. Goldenstedt’s Post is linked to other trenches, which provide vulnerable avenues of attack.
However, Tubb’s men have managed to fill the communications saps, which
linked Goldenstedt’s Post with the Turkish trench lines, with logs and other debris to create cover.
• Troops who are in base-to-base contact with Goldenstedt’s Post, whether front, rear, above or the side, can now be seen and targeted by the troops within.
• Attackers treat Goldenstedt’s Post as a building, and use the relevant rules set forth in their ruleset for attacking troops in buildings.
scenArio vicTory conDiTions
AnzAc: Tubb’s B Company detachment wins the scenario if it is able to hold Goldentstedt’s Post at the end of three Ottoman assaults. If only one trooper is left standing and no Ottomans are in the trench, this counts as an ANZAC victory.
ottoman: The 72nd Regiment wins if able to regain control of Goldenstedt’s Post by killing all of the defenders.
If both Ottomans and Australians are left battling over the trench, the battle is a tie.
sPeciAl BoMBing rules
Some skirmish level rulesets (The Great War and Price of Glory among them) specify that a unit throw their grenades at the same time during assault, with a successful grenade throw allowing the throwing unit to strike first in close combat. Apply the following special bombing rules to these rulesets, allowing the side that “wins” the bomb toss to strike first.
Throw it Back!: Any of Tubb’s troopers may throw back a bomb attack – or safely dispose of a bomb – on a D6 roll of 3+. If Tubb, Burton or Dunstan remain alive, bombs may be thrown back or safely disposed of on a roll of 2+. Ottoman troopers may throw back a bomb or safely dispose of it on a roll of 4+.
• Once a bomb attack has been thrown back, every subsequent roll each side makes is taken at a +1 increment. For
example, an Ottoman unit that has had its bomb thrown back takes his roll at 5+; if that bomb is successfully thrown back again, the Ottoman unit takes his roll at 6+. If that bomb is thrown back yet again, the Ottoman player cannot make the roll, as the fuse has burnt down, and the bomb explodes.
• If the roll to throw back a bomb, or safely dispose of it, is failed, the bomb explodes. Consult your ruleset for the effect of the grenade.
What Bombs?: Some rulesets do not have provision for bombs. In that case, apply the following rules tweaks to your games:
• Bombs may be thrown at enemy troops up to 12 yards away – consult your ruleset or opponents to determine the equivalent in inches/cms.
• Option 1: Units making a charge into close combat may re-roll one miss from each successful bomb throw made during
an assault or charge move. Roll bomb throws for each individual trooper before making close combat attacks to see if they get the re-roll.
• Option 2: A bomb may kill or wound troopers. For every soldier in a unit that is hit by a bomb attack, roll a D6 and consult the Bomb Damage Chart.
Lone Pine: Scenario Three7Th BATTAlion’s DeFense oF cAPTureD TurKish Trenches AT lone Pine; vc-Winning AcTion oF cAPT. TuBB AnD cPls. BurTon AnD DunsTon
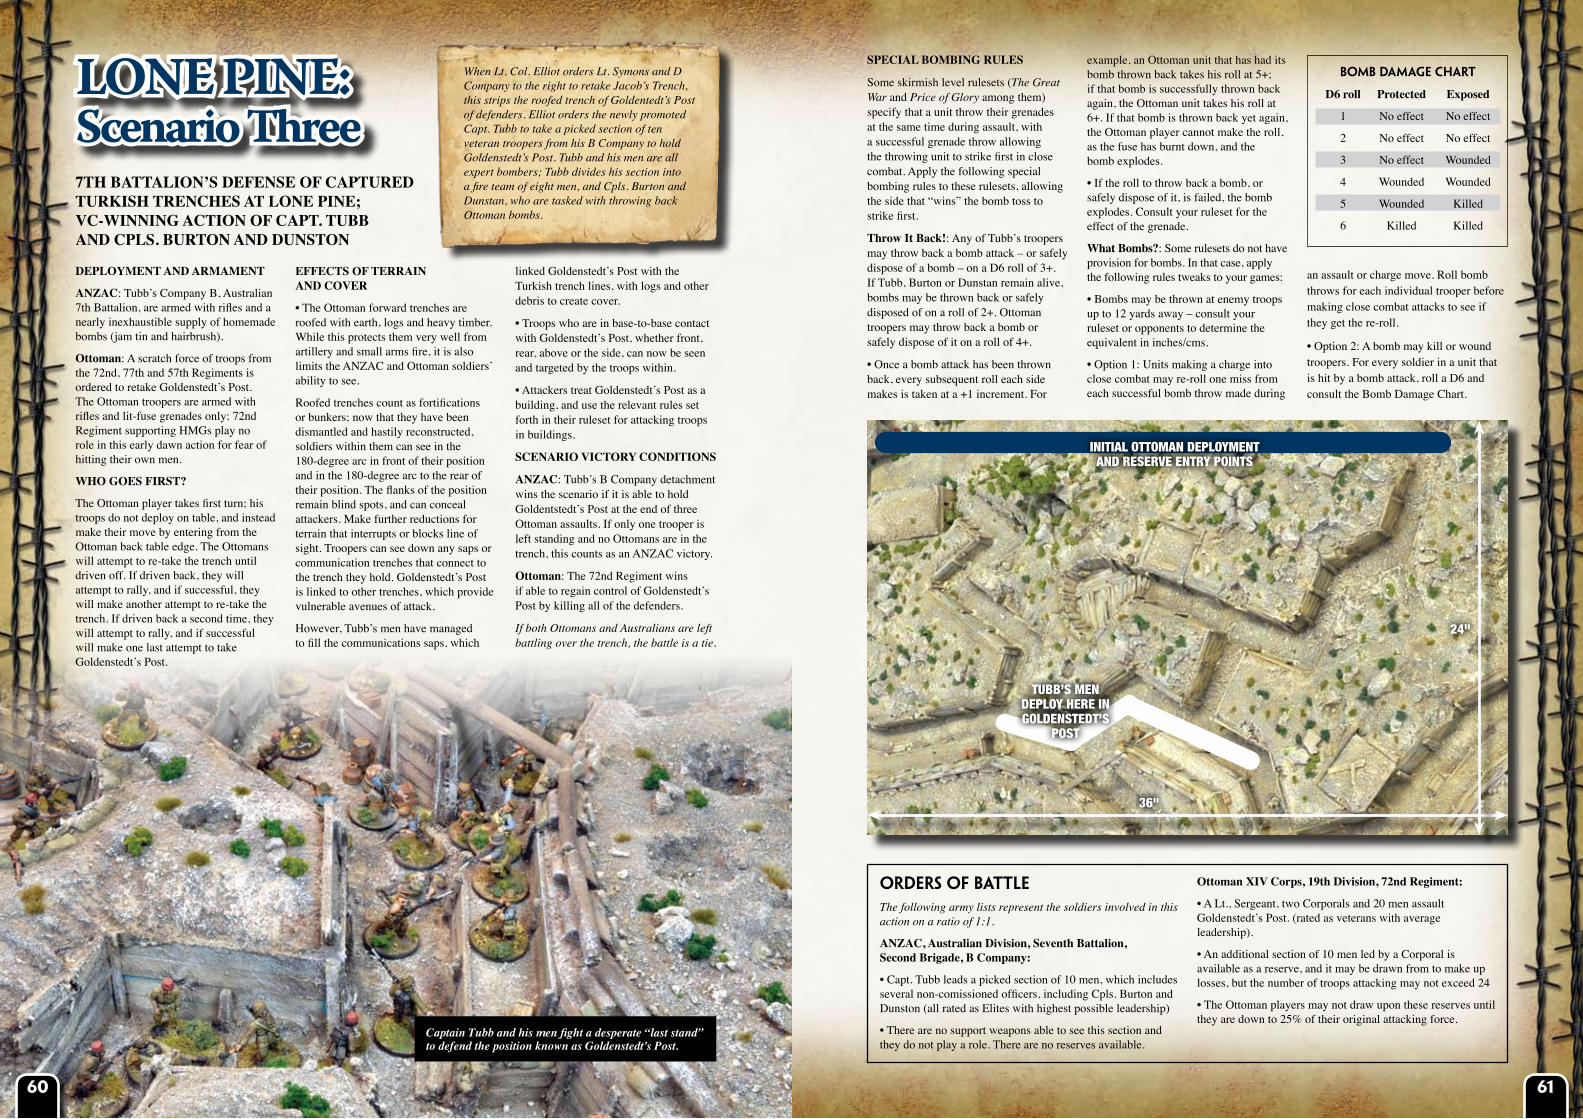
When Lt. Col. Elliot orders Lt. Symons and D Company to the right to retake Jacob’s Trench, this strips the roofed trench of Goldentedt’s Post of defenders. Elliot orders the newly promoted Capt. Tubb to take a picked section of ten veteran troopers from his B Company to hold Goldenstedt’s Post. Tubb and his men are all expert bombers; Tubb divides his section into a fire team of eight men, and Cpls. Burton and Dunstan, who are tasked with throwing back Ottoman bombs.
OrdErS Of BATTLEThe following army lists represent the soldiers involved in this action on a ratio of 1:1.
AnzAc, Australian Division, seventh Battalion, second Brigade, B company:
• Capt. Tubb leads a picked section of 10 men, which includes several non-comissioned officers, including Cpls. Burton and Dunston (all rated as Elites with highest possible leadership)
• There are no support weapons able to see this section and they do not play a role. There are no reserves available.
ottoman Xiv corps, 19th Division, 72nd regiment:
• A Lt., Sergeant, two Corporals and 20 men assault Goldenstedt’s Post. (rated as veterans with average leadership).
• An additional section of 10 men led by a Corporal is available as a reserve, and it may be drawn from to make up losses, but the number of troops attacking may not exceed 24
• The Ottoman players may not draw upon these reserves until they are down to 25% of their original attacking force.
Bomb damage Chart
D6 roll Protected exposed
1 No effect No effect
2 No effect No effect
3 No effect Wounded
4 Wounded Wounded
5 Wounded Killed
6 Killed Killed
Captain Tubb and his men fight a desperate “last stand” to defend the position known as Goldenstedt’s Post.
24"
36"
tuBB’s men dePloy here in Goldenstedt’s
Post
initiAl ottomAn dePloyment And reserve entry Points
6160