Embed Size (px)
Citation preview
LogTag Temperature Monitoring Device
Software and Device Initial Set up
1
2
Page Title
3 Items in your LogTag box
4 Vial and Stand Placement Within Storage Unit
5 Logtag and Bracket Placement Outside Storage Unit
6 Install the Software
7 Set up the LogTag Analyzer Software Options
8 Summary Statistics
9 Charts
10 Automation
11-12 File and Folder Settings
13 Date and Time Settings
14 Communication Reports
15 User Server
16 Updates
17 Configuration Logs
18 Configure Logtag Device
19 LogTag Wizard
20-23 LogTag Wizard – Refrigerator/Freezer
24 Start Recording
Table of Contents

3
1) LogTag Device 2) Vial with probe in
glycol and cord 3) Vial stand 4) Zip ties 5) Zip tie brackets 6) Spare battery
#CR2032 7) Warranty and
calibration registration
8) Certificate of Calibration
9) Aluminum tape 10) LogTag holding
bracket with two-sided tape
11) LogTag USB cradle
Items in your LogTag Box
4
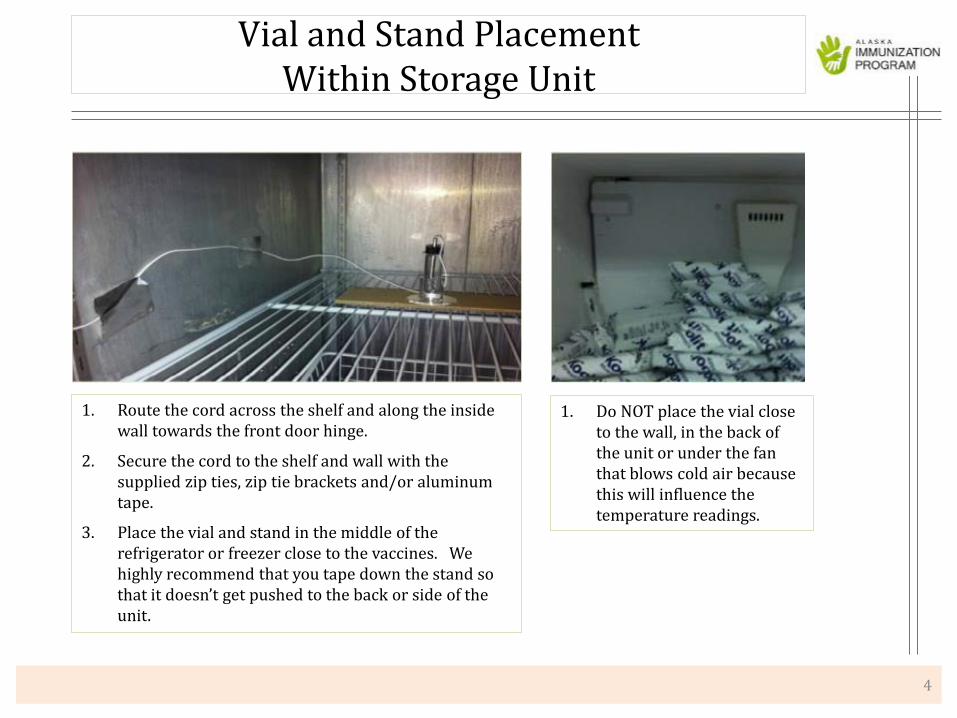
1. Route the cord across the shelf and along the inside wall towards the front door hinge.
2. Secure the cord to the shelf and wall with the supplied zip ties, zip tie brackets and/or aluminum tape.
3. Place the vial and stand in the middle of the refrigerator or freezer close to the vaccines. We highly recommend that you tape down the stand so that it doesn’t get pushed to the back or side of the unit.
Vial and Stand Placement Within Storage Unit
1. Do NOT place the vial close to the wall, in the back of the unit or under the fan that blows cold air because this will influence the temperature readings.

1. Route the cord through the hinge side of the door. 2. Secure the holding bracket to the outside of the storage unit with the two-sided tape. 3. You are now ready to install the LogTag Analyzer software on your computer. 4. **We highly recommend that you install the software on more than one computer so that
multiple staff have access.
5
LogTag and Bracket Placement Outside Storage Unit

6
1. Click on the scrolling banner at the top of the page that says “Click Here to download LogTag Analyzer.”
2. Click “Download Now” on the right-hand side of the page.
3. Fill out the form and click “submit.”
4. Click the link next to “Installer:”
5. Click “Run”.
Install the Software Install the LogTag Analyzer software from www.LogTagrecorders.com by following these steps:
(You may need IT assistance if you do not have Administration Rights to install software).

7
Click on “Edit” then click on “Options”
Set up the LogTag Analyzer Software Options
Click on the LogTag Analyzer icon on your desktop to open the
software.

8
Options – General Settings
1. Show temperatures in Fahrenheit
2. Click on “Summary Statistics” to continue editing
3. (Do not click “OK” yet. Clicking “OK” will exit from options)
9
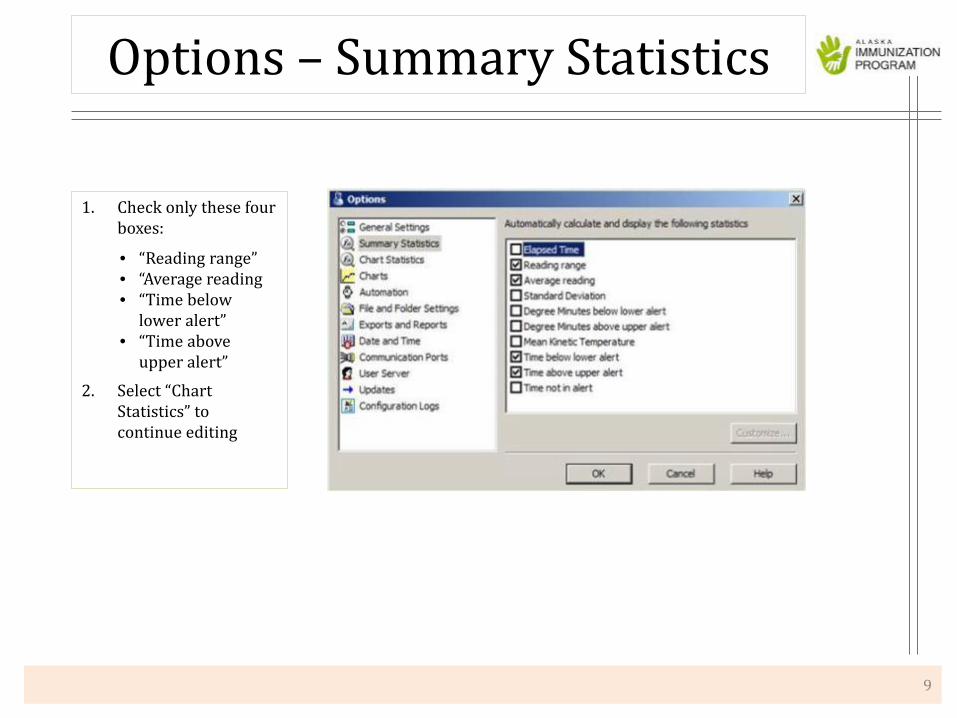
1. Check only these four boxes:
• “Reading range” • “Average reading • “Time below
lower alert” • “Time above
upper alert” 2. Select “Chart
Statistics” to continue editing
Options – Summary Statistics
10
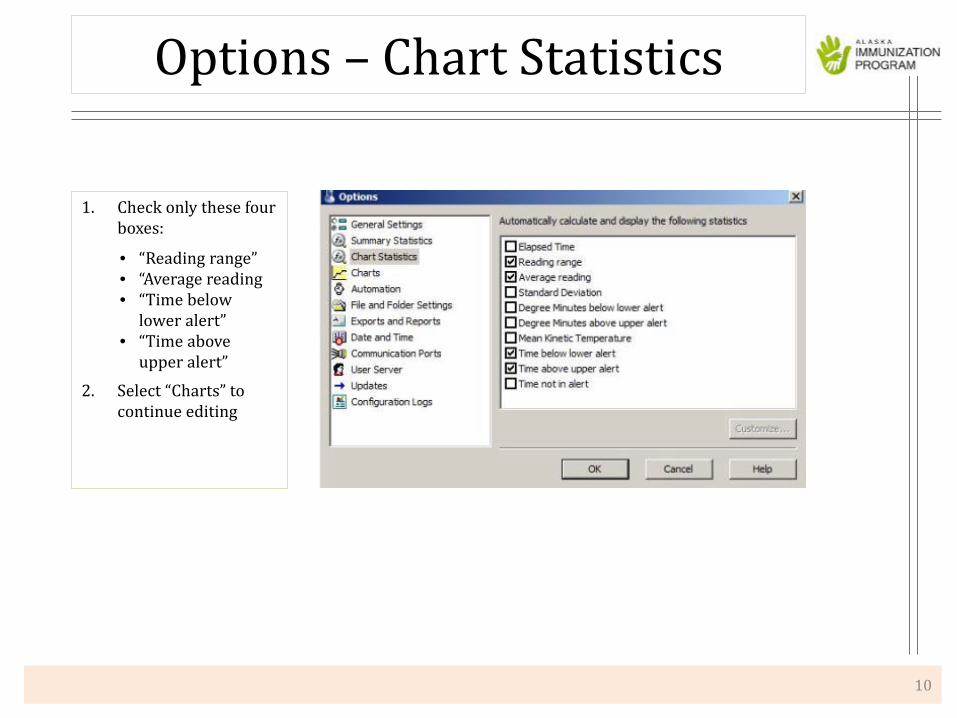
1. Check only these four boxes:
• “Reading range” • “Average reading • “Time below
lower alert” • “Time above
upper alert” 2. Select “Charts” to
continue editing
Options – Chart Statistics
11
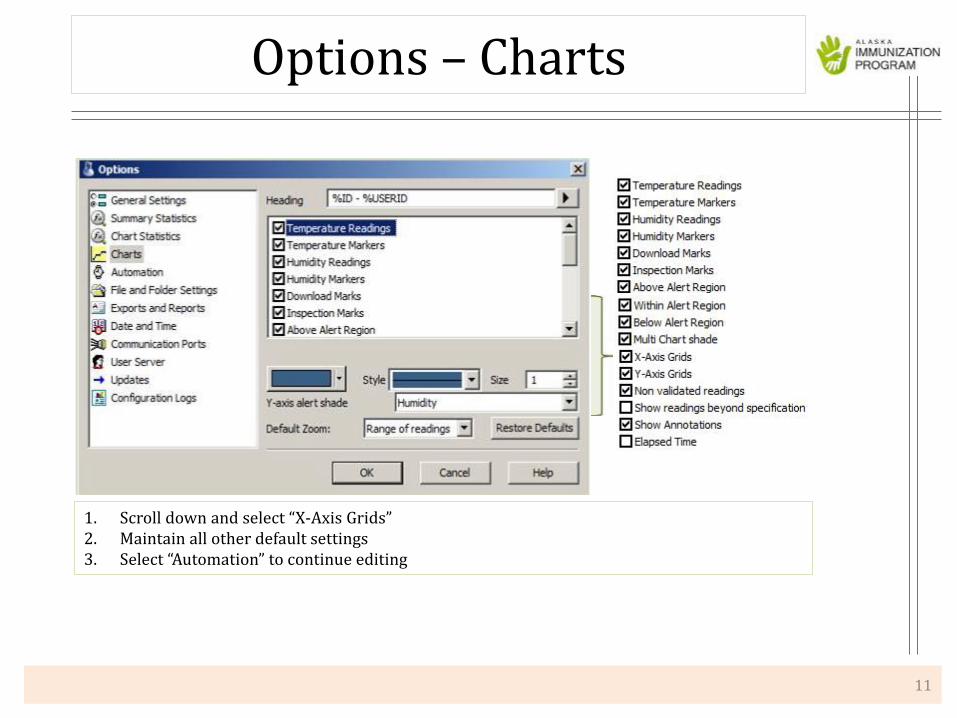
Options – Charts
1. Scroll down and select “X-Axis Grids” 2. Maintain all other default settings 3. Select “Automation” to continue editing
12
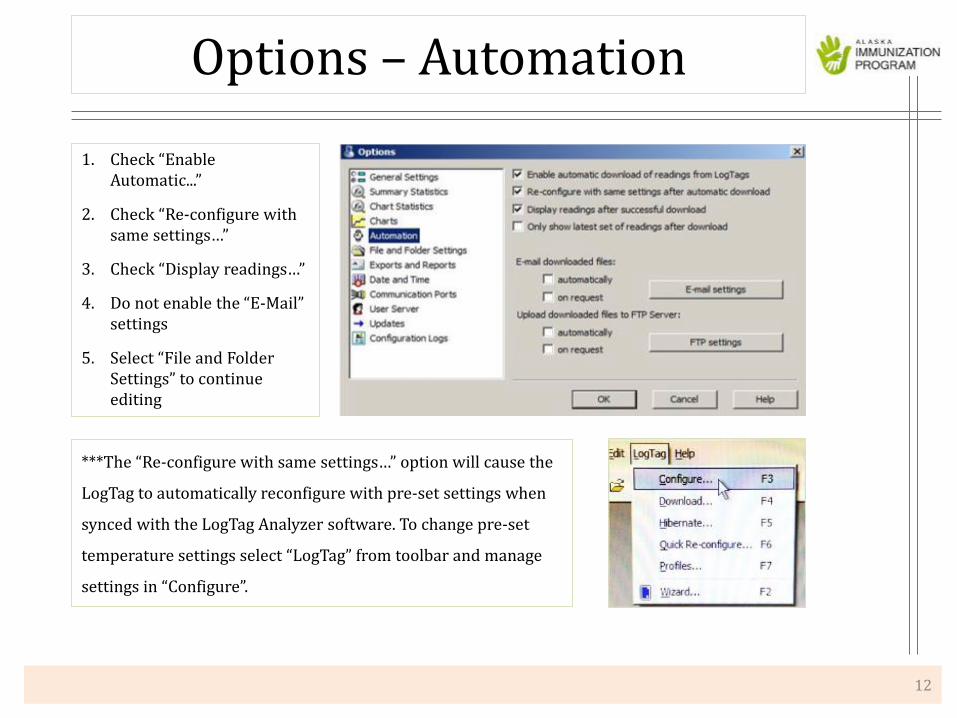
1. Check “Enable Automatic...”
2. Check “Re-configure with same settings…”
3. Check “Display readings…”
4. Do not enable the “E-Mail” settings
5. Select “File and Folder Settings” to continue editing
Options – Automation
***The “Re-configure with same settings…” option will cause the
LogTag to automatically reconfigure with pre-set settings when
synced with the LogTag Analyzer software. To change pre-set
temperature settings select “LogTag” from toolbar and manage
settings in “Configure”.

13
**It is highly recommended that you save the “LogTag Folder” within a shared drive so that multiple staff, including the Vaccine Coordinator and the Back-up Vaccine Coordinator, can access LogTag graphs.
Options- File and Folder Settings
1. File name should read as follows: %USERID%ID Started %START-DATE, Finished %FINISH-DATE. Click the right arrow after File Name to view and choose each component of the file name
2. By default the software will create a “My LogTag” folder within your “My Documents” folder and all graphs will be automatically saved to this folder**
3. If you prefer for your graphs to be automatically saved to a different folder or drive, click on the “…” button to browse and choose another location**
4. Click on “Exports and Reports” to continue editing
14
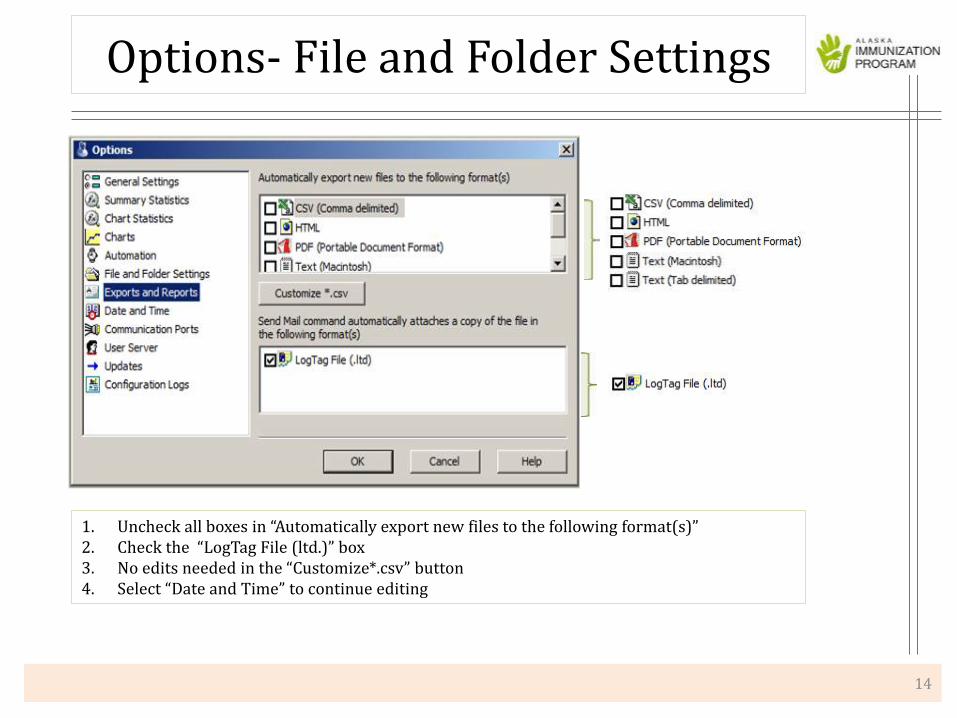
1. Uncheck all boxes in “Automatically export new files to the following format(s)” 2. Check the “LogTag File (ltd.)” box 3. No edits needed in the “Customize*.csv” button 4. Select “Date and Time” to continue editing
Options- File and Folder Settings
15
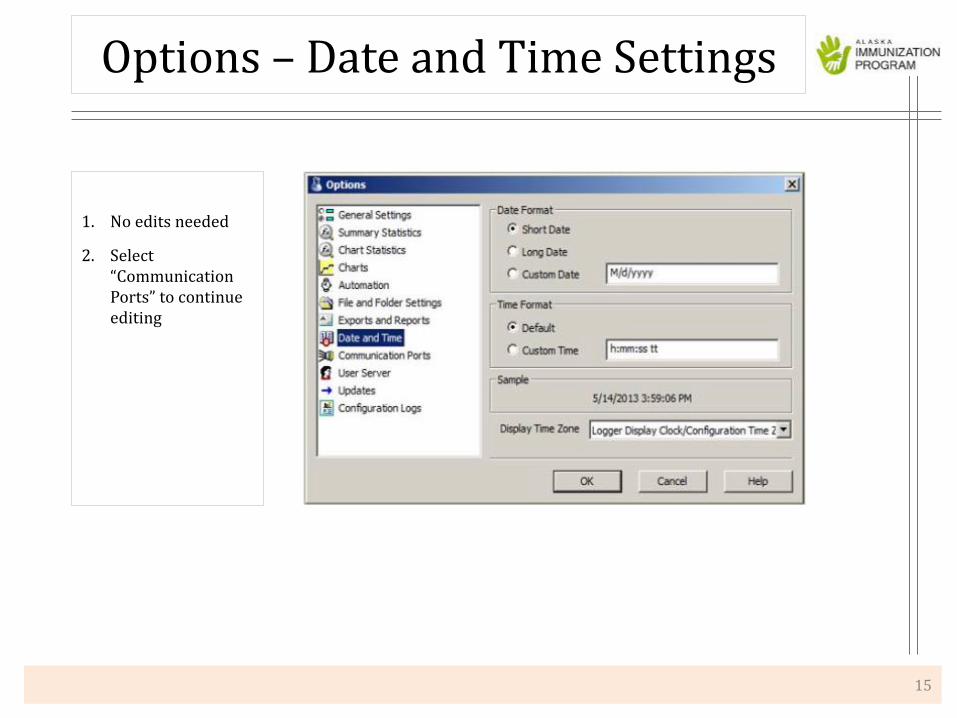
Options – Date and Time Settings
1. No edits needed
2. Select “Communication Ports” to continue editing
16
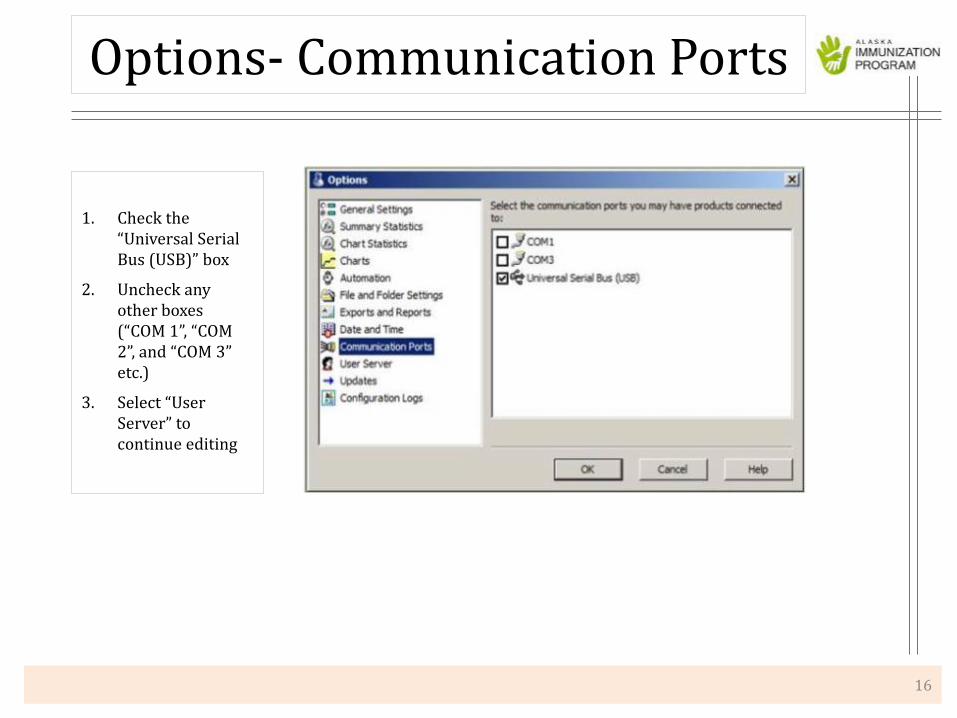
1. Check the “Universal Serial Bus (USB)” box
2. Uncheck any other boxes (“COM 1”, “COM 2”, and “COM 3” etc.)
3. Select “User Server” to continue editing
Options- Communication Ports

17
Options- User Server
1. No edits needed
2. Select “Updates” to continue editing

18
Options- Updates
1. No edits needed
2. Select “Configuration Logs” to continue editing
19
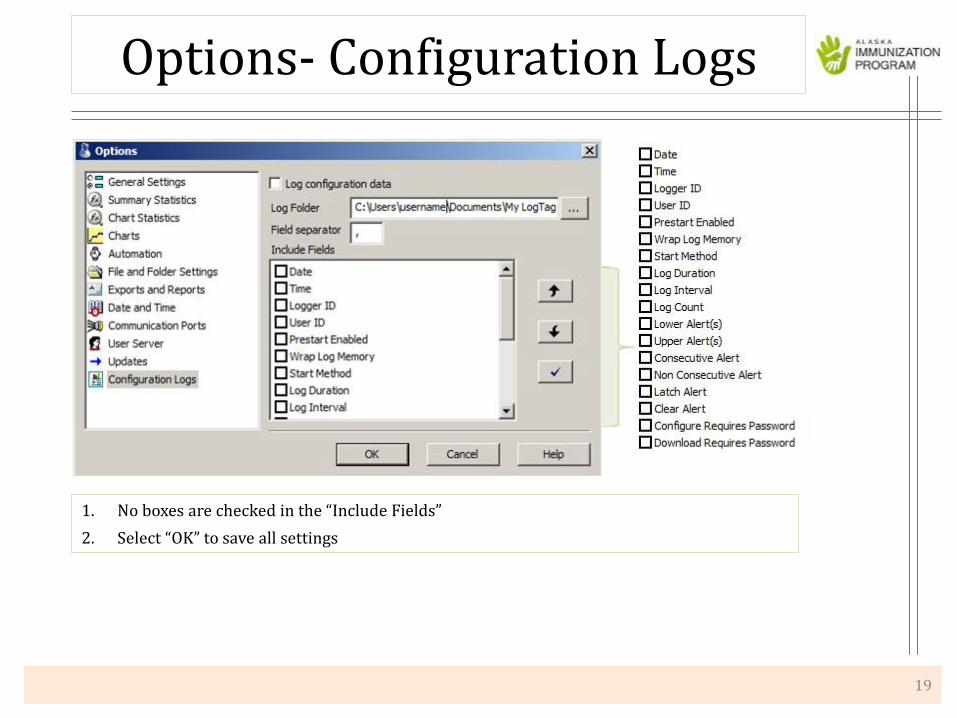
1. No boxes are checked in the “Include Fields” 2. Select “OK” to save all settings
Options- Configuration Logs

20
Now that your software options are set up, you will now configure the settings on the actual LogTag device: 1. Open the LogTag Analyzer software 2. Plug the LogTag USB cradle into a USB port on your computer 3. Insert the LogTag device down into the cradle
Configure the LogTag Device
1 2 3
21
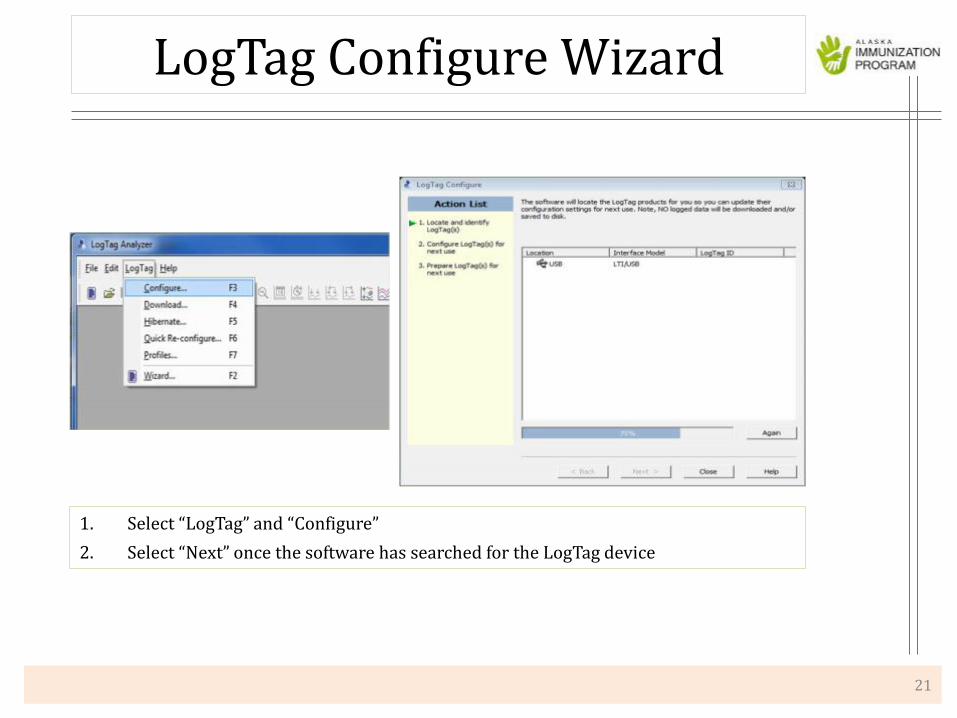
1. Select “LogTag” and “Configure” 2. Select “Next” once the software has searched for the LogTag device
LogTag Configure Wizard
22
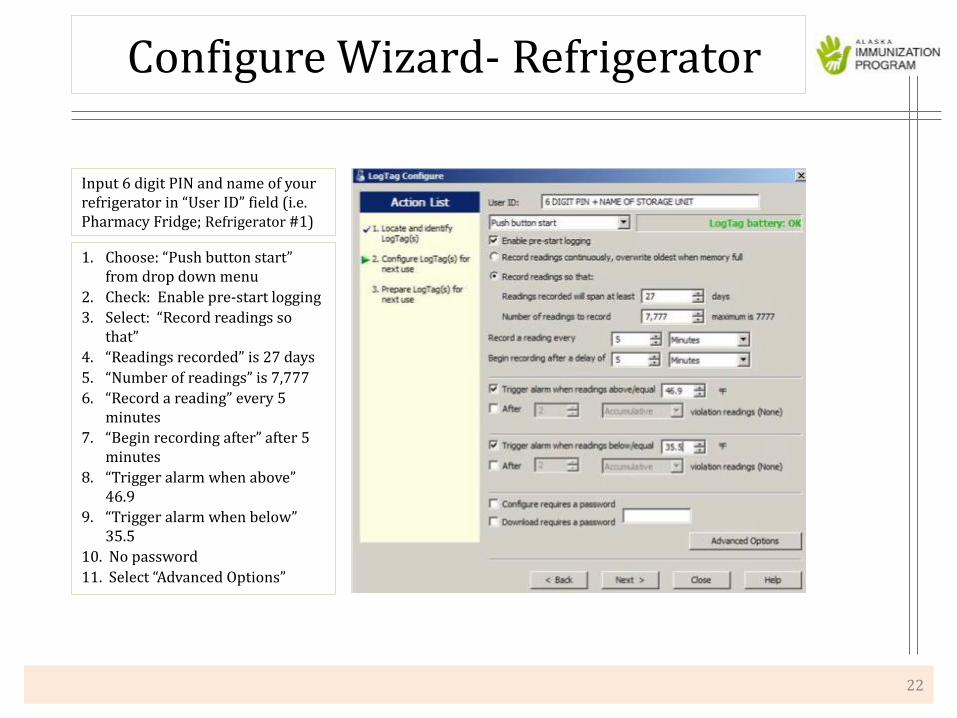
Input 6 digit PIN and name of your refrigerator in “User ID” field (i.e. Pharmacy Fridge; Refrigerator #1)
1. Choose: “Push button start” from drop down menu
2. Check: Enable pre-start logging 3. Select: “Record readings so
that” 4. “Readings recorded” is 27 days 5. “Number of readings” is 7,777 6. “Record a reading” every 5
minutes 7. “Begin recording after” after 5
minutes 8. “Trigger alarm when above”
46.9 9. “Trigger alarm when below”
35.5 10. No password 11. Select “Advanced Options”
Configure Wizard- Refrigerator
23
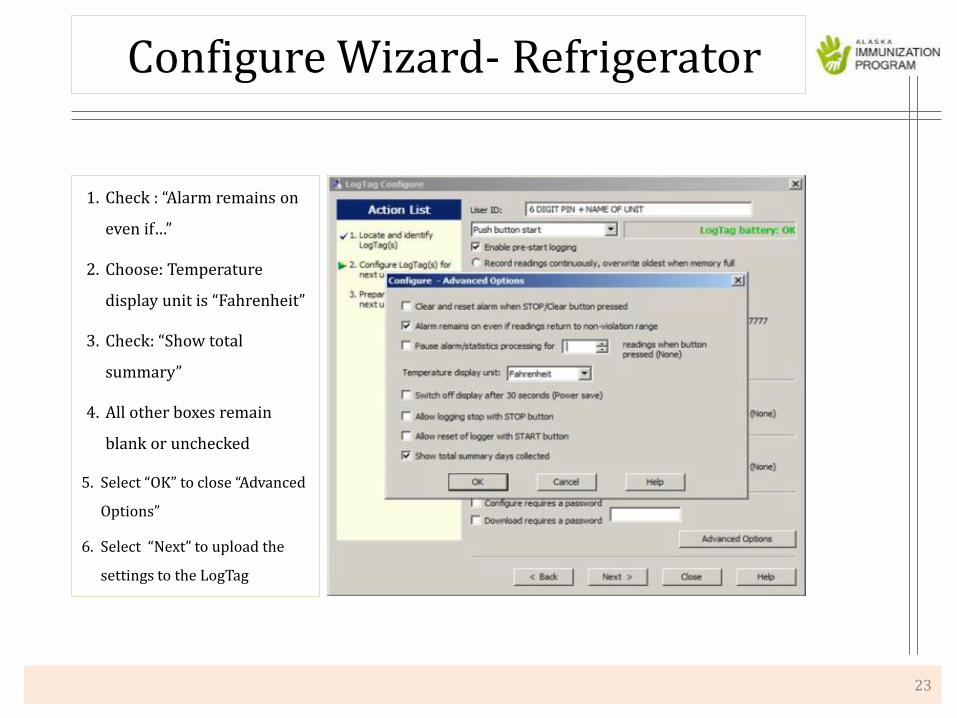
Configure Wizard- Refrigerator
1. Check : “Alarm remains on
even if…”
2. Choose: Temperature
display unit is “Fahrenheit”
3. Check: “Show total
summary”
4. All other boxes remain
blank or unchecked
5. Select “OK” to close “Advanced
Options”
6. Select “Next” to upload the
settings to the LogTag
24
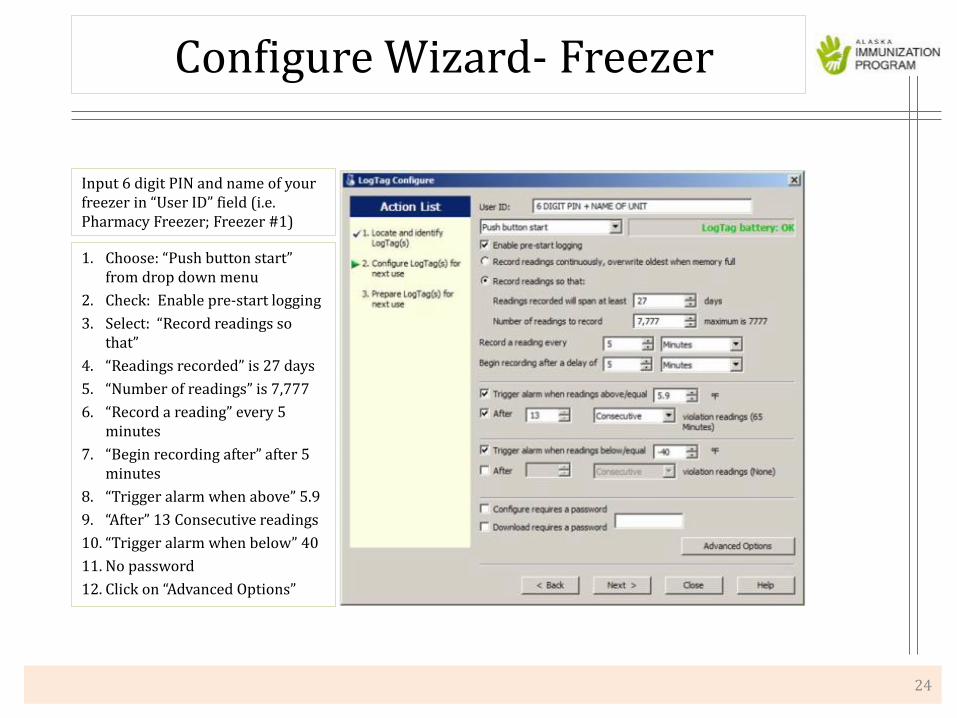
1. Choose: “Push button start” from drop down menu
2. Check: Enable pre-start logging 3. Select: “Record readings so
that” 4. “Readings recorded” is 27 days 5. “Number of readings” is 7,777 6. “Record a reading” every 5
minutes 7. “Begin recording after” after 5
minutes 8. “Trigger alarm when above” 5.9 9. “After” 13 Consecutive readings 10. “Trigger alarm when below” 40 11. No password 12. Click on “Advanced Options”
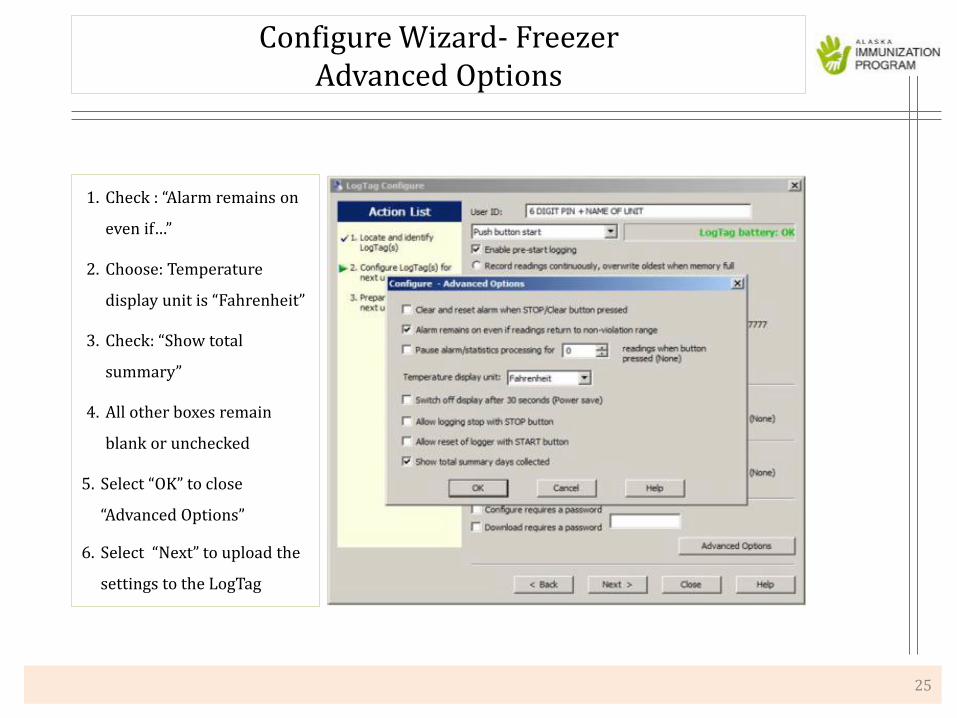
Configure Wizard- Freezer
Input 6 digit PIN and name of your freezer in “User ID” field (i.e. Pharmacy Freezer; Freezer #1)
25
1. Check : “Alarm remains on
even if…”
2. Choose: Temperature
display unit is “Fahrenheit”
3. Check: “Show total
summary”
4. All other boxes remain
blank or unchecked
5. Select “OK” to close
“Advanced Options”
6. Select “Next” to upload the
settings to the LogTag
Configure Wizard- Freezer Advanced Options

1. Remove the LogTag from the USB cradle, it should read “Ready”
2. Take the LogTag device immediately to your storage unit and plug the cord in to the left side of the LogTag
3. Press and hold the start button for 4 - 6 seconds and observe that the “Starting” icon starts flashing
4. Release the Start button when the “Starting” icon stops flashing. A 5 minute countdown will appear on the screen. If “Ready” still appears on the LogTag screen, this means that you did not hold the start button long enough. (Press and hold the “Start” button again)
5. Place the LogTag into the bracket on the outside of the storage unit
6. When the 5 minute countdown is finished, the LogTag will start recording and the current temperature will display on the screen
26
Start Recording
To learn how to download a graph and use the LogTag on a daily basis, please refer to the next set of instructions titled: “#2- LogTag Instructions for
Daily Use”
1 2 3