Embed Size (px)
Citation preview

SP
IKE
BA
LL
LO
G B
OO
K
Volleyball Ireland
Transition Year Girls SpikeBall Leaders Award Programme
LOG BOOK
Leader:
School:
[email protected] Ph: 085-7650867 (Dwyne Hill)
[email protected] Ph: 085-7650868 (Jessie Carmody)
Volleyball Ireland
First Floor 141 Thomas Street Dublin 8 Ireland.
Fax No: 01-6707167
www.volleyballireland.com/ty
© VOLLEYBALL IRELAND 2017
LOG BOOK
For more information on the TY Leaders Programme
log onto the TY Website
www.volleyballireland.com/ty & Facebook page, just search for:
VAI TY Girls SpikeBall Leaders Award Programme
© VOLLEYBALL IRELAND 2017
1 © VOLLEYBALL IRELAND 2017
To achieve certification TY’s MUST fulfil the following criteria
• Students MUST have studied Pre-course reading material & passed TY Exam PRIOR to the
Skills Session. This is ESSENTIAL to their continued invovement in the programme.
• Students MUST attend all sessions.
• Contact TY Team if absent due to exceptional circumstances.
• Contact TY Team if session is cancelled or if any other issues occur.
• Students must have the SpikeBall Logbook & Worksheets completed and have their
coaching lesson plans with them at each session.
• Logbooks & Worksheets may be inspected by TY Team at any time prior to course
completion.
•
• Be actively involved in Blitz organisation.
• Students MUST KNOW THE RULES of the game and APPLY them.
• The Students must ensure volleyballs are ACCOUNTED for and surplus are returned to
the TY Team on completion of the Blitz.
• Students COMPLETE and RETURN Review & Evaluation Form in order to receive
their certificate.
A T-shirt (ssppeecciiffiicc to SpikeBall Programme displaying SpikeBall Coaches Badge), MUST be worn
when coaching and on day of Blitz
CERTIFICATE CRITERIA
2
“Leaders are not born, they are made.
And they are made just like anything else, through hard work.
And that's the price we'll pay to achieve that goal
or any goal."
Vince Lombardi
3 © VAI 2013
Code of ethics are very important to sports leaders and coaches, this is because they set out the ground rules that both should follow when conducting sessions with children as the participants. Some of the rules that should be followed are:
• The activity should be suitable for the ability, age and experience of the participants.
• The environment should help participants to feel and believe that they all have an equally important contribution to make to the activity.
• The standards of behavior of both children and sports leaders should be considered as important as sports performance.
Where possible sports leaders/coaches should avoid:
• Spending excessive amounts of time with children away from others.
• Taking sessions alone.
Sports Leaders/coaches should not:
• Use any form of corporal punishment or physical abuse on a child.
• Engage in rough physical games, sexually provocative games or allow or engage in inappropriate touching of any kind, and/or make any sexually suggestive comments about or to a child.
• Subject children to constant criticism, sarcasm, or rejection.
• Deprive children of proper supervision and safety.
Remember children in sport are entitled to:
• Be Safe.
• Participate in sport on an equal basis, appropriate to their ability and stage of development.
• Be treated with dignity, sensitivity and respect.
• Be happy, have fun and enjoy sport.
• Be listened to.
CODE OF ETHICS
18 4
“Always do your best what you plant now, you will harvest later.
Og Mandino
“Our greatest weakness lies in giving up. The most certain way to
succeed is always to try just one more time."
Thomas Edison
4 © VAI 2013
5 © VAI 2013
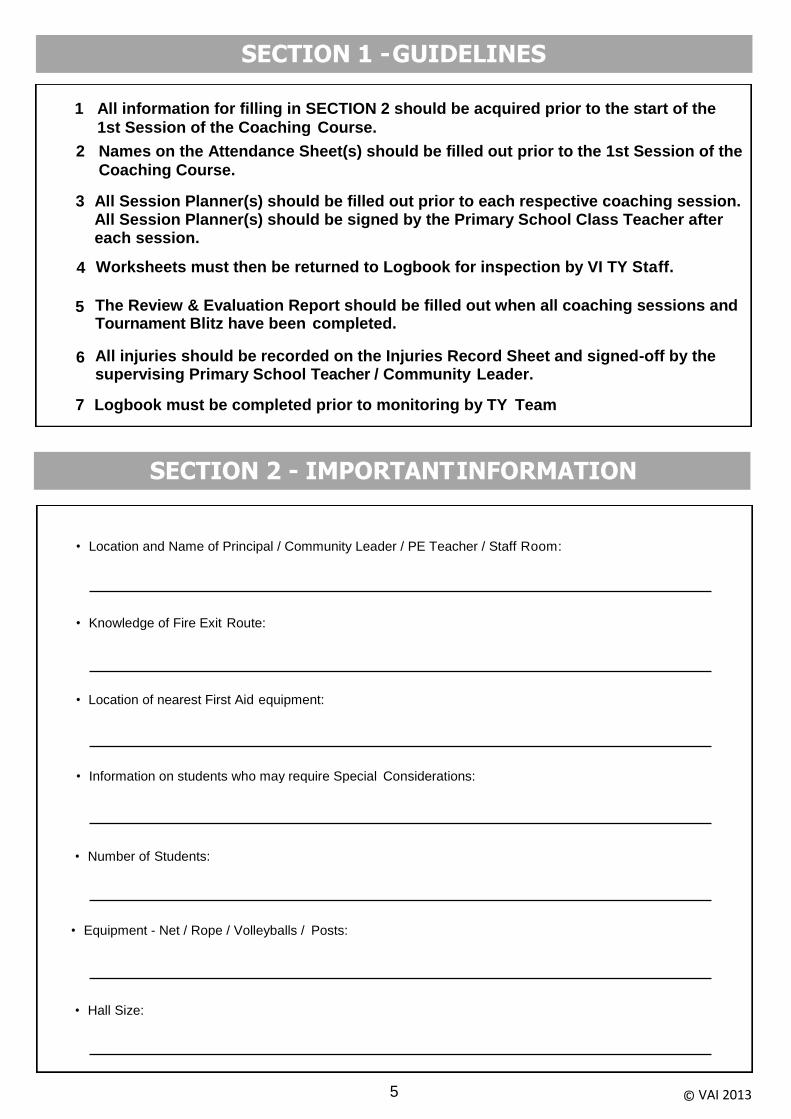
SECTION 1 - GUIDELINES
1 All information for filling in SECTION 2 should be acquired prior to the start of the
1st Session of the Coaching Course.
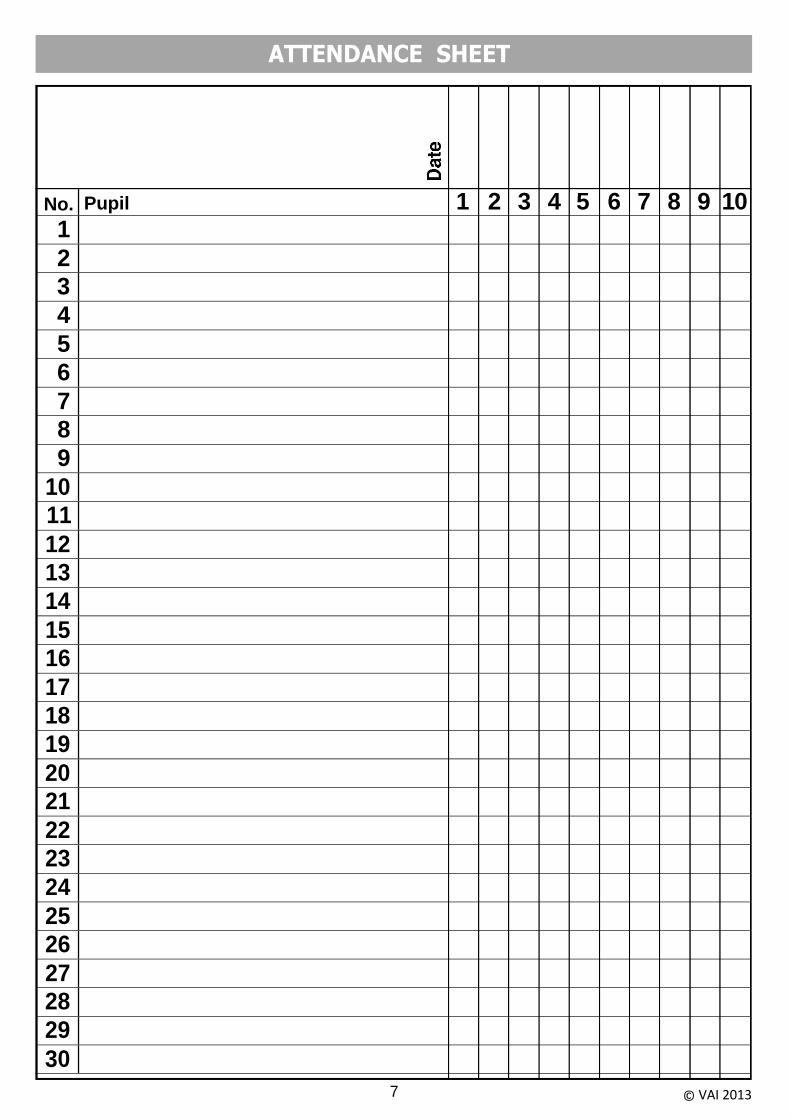
2 Names on the Attendance Sheet(s) should be filled out prior to the 1st Session of the
Coaching Course.
3 All Session Planner(s) should be filled out prior to each respective coaching session. All Session Planner(s) should be signed by the Primary School Class Teacher after each session.
4 Worksheets must then be returned to Logbook for inspection by VI TY Staff.
5 The Review & Evaluation Report should be filled out when all coaching sessions and Tournament Blitz have been completed.
6 All injuries should be recorded on the Injuries Record Sheet and signed-off by the supervising Primary School Teacher / Community Leader.
7 Logbook must be completed prior to monitoring by TY Team
SECTION 2 - IMPORTANT INFORMATION
• Location and Name of Principal / Community Leader / PE Teacher / Staff Room:
• Knowledge of Fire Exit Route:
• Location of nearest First Aid equipment:
• Information on students who may require Special Considerations:
• Number of Students:
• Equipment - Net / Rope / Volleyballs / Posts:
• Hall Size:
6 © VAI 2013
“To be prepared is
half the victory.”
Miguel Cervante
“The only place where success comes
before work is in the dictionary.”
Vidal Sassoon
7 © VAI 2013
No. Pupil 1 2 3 4 5 6 7 8 9 10 1
2
3
4
5
6
7
8
9
10
11
12
13
14
15
16
17
18
19
20
21
22
23
24
25
26
27
28
29
30
ATTENDANCE SHEET
8 © VAI 2013
"Don't let what you cannot do interfere with what you can do."
“Communication is a two-way street!”
© VAI 2013 9
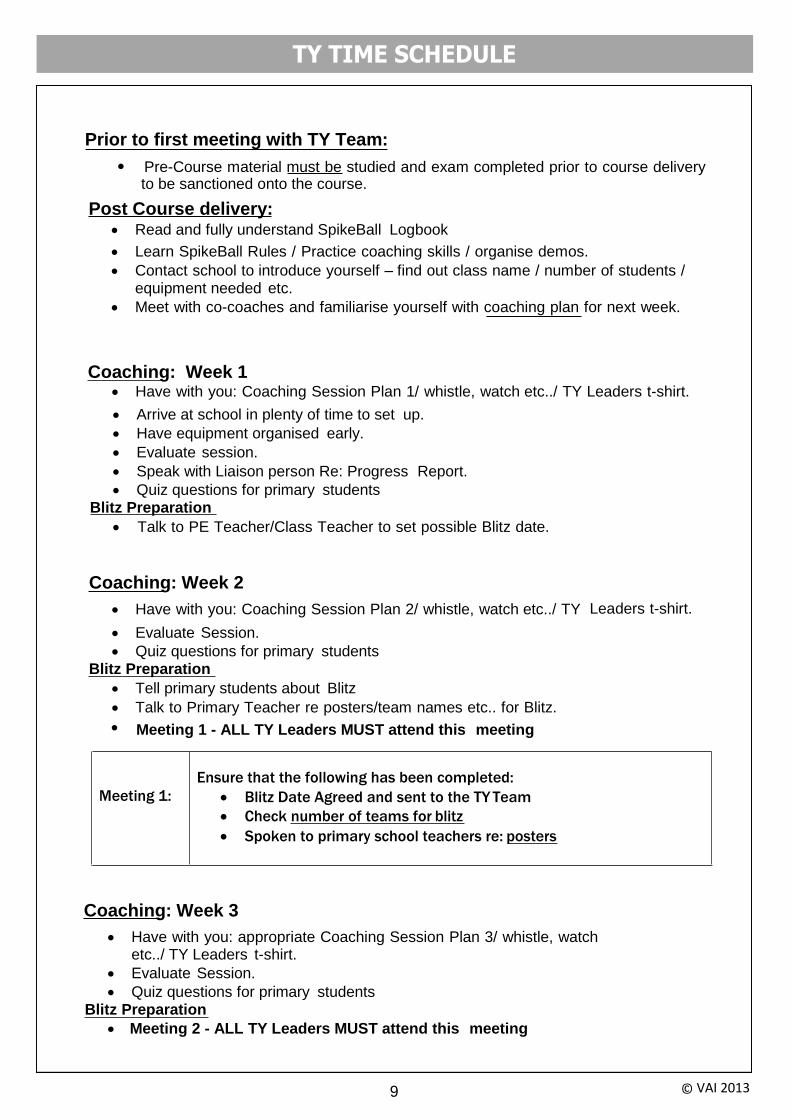
Prior to first meeting with TY Team:
• Pre-Course material must be studied and exam completed prior to course delivery
Post Course delivery:
• Read and fully understand SpikeBall Logbook
• Learn SpikeBall Rules / Practice coaching skills / organise demos.
• Contact school to introduce yourself – find out class name / number of students / equipment needed etc.
• Meet with co-coaches and familiarise yourself with coaching plan for next week.
Coaching: Week 1
• Have with you: Coaching Session Plan 1/ whistle, watch etc../ TY Leaders t-shirt.
• Arrive at school in plenty of time to set up.
• Have equipment organised early.
• Evaluate session.
• Speak with Liaison person Re: Progress Report.
• Quiz questions for primary students Blitz Preparation
• Talk to PE Teacher/Class Teacher to set possible Blitz date.
Coaching: Week 2
• Have with you: Coaching Session Plan 2/ whistle, watch etc../ TY Leaders t-shirt.
• Evaluate Session.
• Quiz questions for primary students Blitz Preparation
• Tell primary students about Blitz
• Talk to Primary Teacher re posters/team names etc.. for Blitz.
• Meeting 1 - ALL TY Leaders MUST attend this meeting
Ensure that the following has been completed:
Meeting 1: • Blitz Date Agreed and sent to the TY Team
• Check number of teams for blitz
• Spoken to primary school teachers re: posters
Coaching: Week 3
• Have with you: appropriate Coaching Session Plan 3/ whistle, watch etc../ TY Leaders t-shirt.
• Evaluate Session.
• Quiz questions for primary students Blitz Preparation
• Meeting 2 - ALL TY Leaders MUST attend this meeting
to be sanctioned onto the course.
TY TIME SCHEDULE
10 © VAI 2013
“Some of us are like wheelbarrows - Only useful when pushed
and very easily upset."
“Nothing great was ever achieved without enthusiasm"
11 © VAI 2013
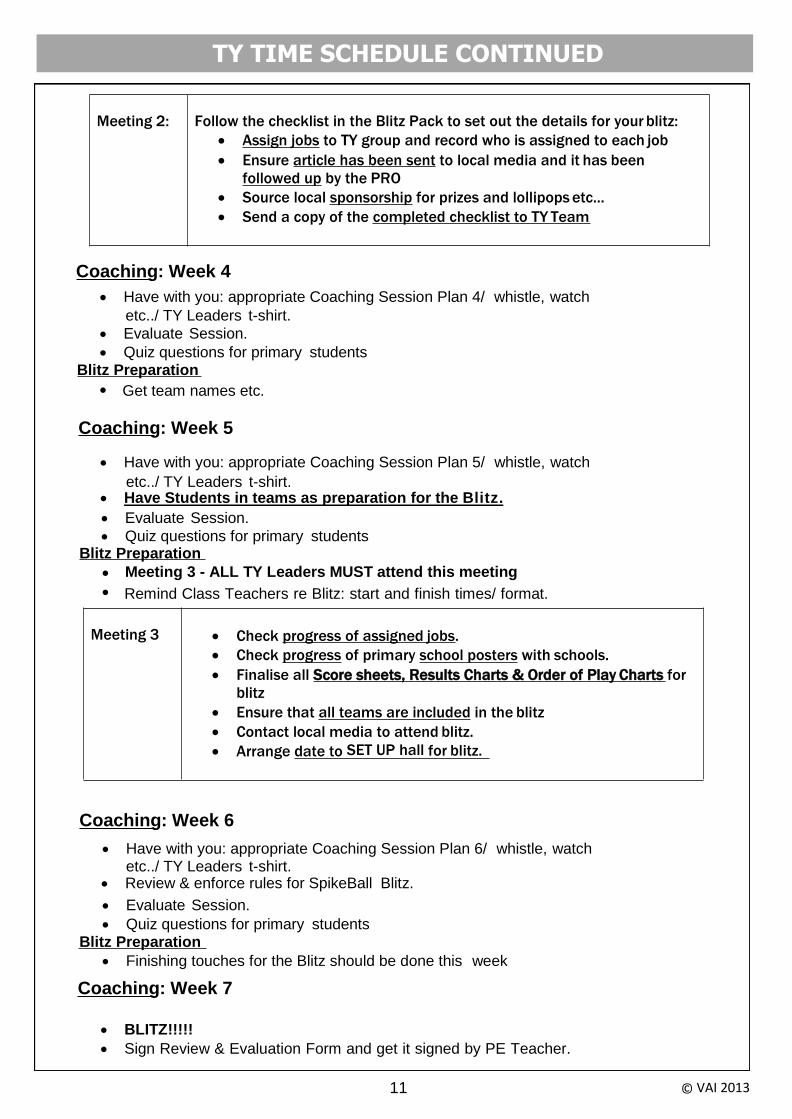
Meeting 2: Follow the checklist in the Blitz Pack to set out the details for your blitz:
• Assign jobs to TY group and record who is assigned to each job
• Ensure article has been sent to local media and it has been
followed up by the PRO
• Source local sponsorship for prizes and lollipops etc...
• Send a copy of the completed checklist to TY Team
Coaching: Week 4
• Have with you: appropriate Coaching Session Plan 4/ whistle, watch
etc../ TY Leaders t-shirt.
• Evaluate Session.
• Quiz questions for primary students Blitz Preparation
• Get team names etc.
Coaching: Week 5
• Have with you: appropriate Coaching Session Plan 5/ whistle, watch
etc../ TY Leaders t-shirt.
• Evaluate Session.
• Quiz questions for primary students Blitz Preparation
• Meeting 3 - ALL TY Leaders MUST attend this meeting
• Remind Class Teachers re Blitz: start and finish times/ format.
Meeting 3 • Check progress of assigned jobs.
• Check progress of primary school posters with schools.
• Finalise all Score sheets, Results Charts & Order of Play Charts for
blitz
• Ensure that all teams are included in the blitz
• Contact local media to attend blitz.
• Arrange date to SET UP hall for blitz.
Coaching: Week 6
• Have with you: appropriate Coaching Session Plan 6/ whistle, watch etc../ TY Leaders t-shirt.
• Evaluate Session.
• Quiz questions for primary students Blitz Preparation
• Finishing touches for the Blitz should be done this week
Coaching: Week 7
• BLITZ!!!!!
• Sign Review & Evaluation Form and get it signed by PE Teacher.
• Have Students in teams as preparation for the Blitz.
• Review & enforce rules for SpikeBall Blitz.
TY TIME SCHEDULE CONTINUED
12 © VAI 2013
"A wise man will make more
opportunities than he finds."
Francis Bacon
“Many receive advice; only the wise
profit from it!"
13 © VAI 2013
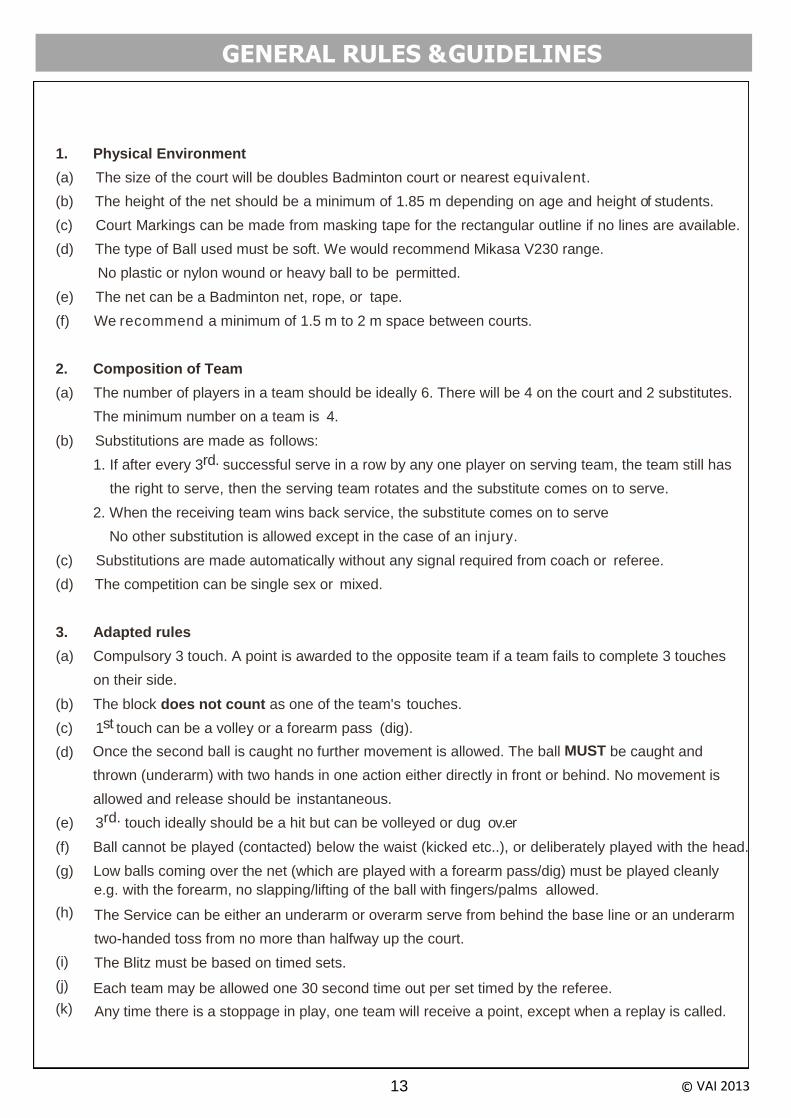
1. Physical Environment
(a) The size of the court will be doubles Badminton court or nearest equivalent.
(b) The height of the net should be a minimum of 1.85 m depending on age and height of students.
(c) Court Markings can be made from masking tape for the rectangular outline if no lines are available.
(d) The type of Ball used must be soft. We would recommend Mikasa V230 range.
No plastic or nylon wound or heavy ball to be permitted.
(e) The net can be a Badminton net, rope, or tape.
(f) We recommend a minimum of 1.5 m to 2 m space between courts.
2. Composition of Team
(a) The number of players in a team should be ideally 6. There will be 4 on the court and 2 substitutes.
The minimum number on a team is 4.
(b) Substitutions are made as follows:
1. If after every 3rd. successful serve in a row by any one player on serving team, the team still has
the right to serve, then the serving team rotates and the substitute comes on to serve.
2. When the receiving team wins back service, the substitute comes on to serve
No other substitution is allowed except in the case of an injury.
(c) Substitutions are made automatically without any signal required from coach or referee.
(d) The competition can be single sex or mixed.
3. Adapted rules
(a) Compulsory 3 touch. A point is awarded to the opposite team if a team fails to complete 3 touches
on their side.
(b) The block does not count as one of the team's touches.
(c) 1st touch can be a volley or a forearm pass (dig).
(d) Once the second ball is caught no further movement is allowed. The ball MUST be caught and
thrown (underarm) with two hands in one action either directly in front or behind. No movement is
allowed and release should be instantaneous.
(e) 3rd. touch ideally should be a hit but can be volleyed or dug ov.er
(f) Ball cannot be played (contacted) below the waist (kicked etc..), or deliberately played with the head.
(g)
(h)
(i)
(j)
(k)
Low balls coming over the net (which are played with a forearm pass/dig) must be played cleanly
e.g. with the forearm, no slapping/lifting of the ball with fingers/palms allowed.
The Service can be either an underarm or overarm serve from behind the base line or an underarm
two-handed toss from no more than halfway up the court.
The Blitz must be based on timed sets.
Each team may be allowed one 30 second time out per set timed by the referee.
Any time there is a stoppage in play, one team will receive a point, except when a replay is called.
GENERAL RULES & GUIDELINES

14 © VAI 2013
INTRODUCE THE SKILL: Give the name of the skill and state when it is used in the game.
DEMO: Demonstrate the whole skill
DO: Participants try the whole skill
DEMO: Demo whole skill with focus on one aspect of the skill. For example. thumbs together
DO: Participants do whole skill
working on that one focus
FEEDBACK: Give specific positive
feedback on that one focus
GAME: Put the new skill into the game
THE LEARNING ROUTE
15 © VAI 2013
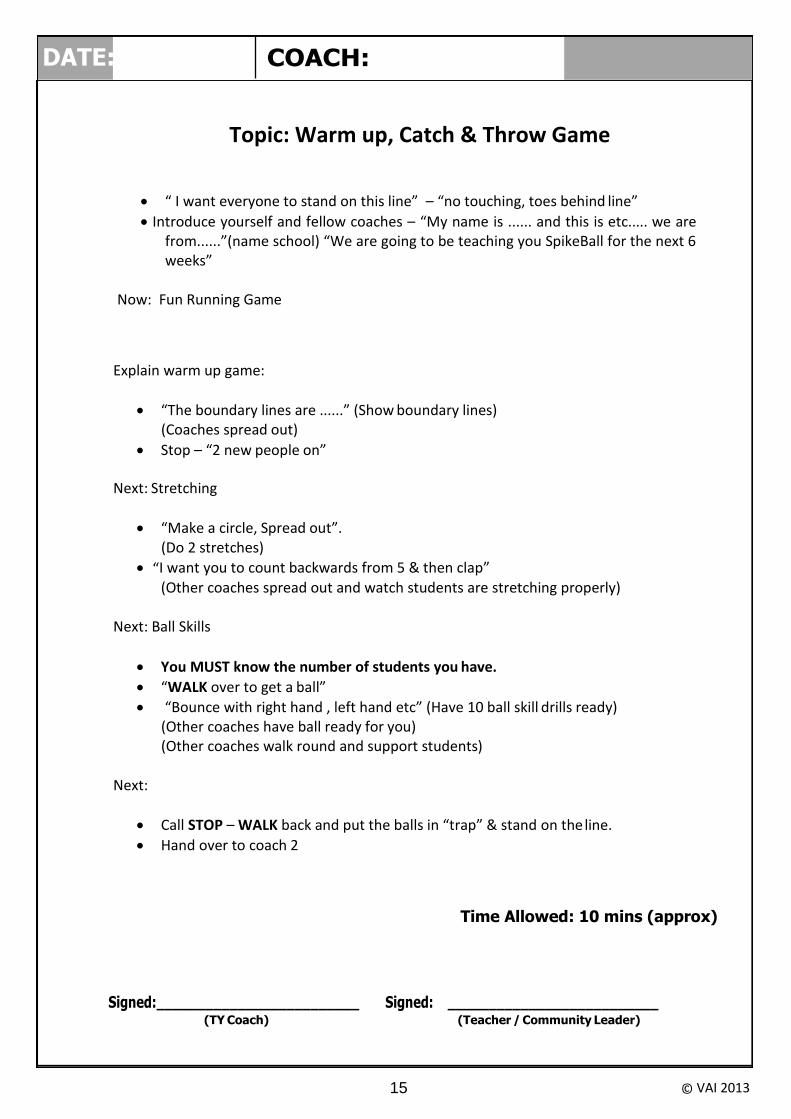
COACH: SESSION 1
Topic: Warm up, Catch & Throw Game
• “ I want everyone to stand on this line” – “no touching, toes behind line”
• Introduce yourself and fellow coaches – “My name is ...... and this is etc..... we are from......”(name school) “We are going to be teaching you SpikeBall for the next 6 weeks”
Now: Fun Running Game
Explain warm up game:
• “The boundary lines are ......” (Show boundary lines)
(Coaches spread out)
• Stop – “2 new people on”
Next: Stretching
• “Make a circle, Spread out”. (Do 2 stretches)
• “I want you to count backwards from 5 & then clap” (Other coaches spread out and watch students are stretching properly)
Next: Ball Skills
• You MUST know the number of students you have.
• “WALK over to get a ball”
• “Bounce with right hand , left hand etc” (Have 10 ball skill drills ready) (Other coaches have ball ready for you) (Other coaches walk round and support students)
Next:
• Call STOP – WALK back and put the balls in “trap” & stand on the line.
• Hand over to coach 2
Time Allowed: 10 mins (approx)
Signed:_________________________ Signed: __________________________
(TY Coach) (Teacher / Community Leader)
DATE:
16 © VAI 2013
DATE: COACH: SESSION 1
Topic: Warm up, Catch & Throw Game
You MUST know the number of students you have so you can make teams:
• “Now we are going to introduce you to a 4v4 Catch & Throw Game”
• “The court is the outside lines of the badminton court” (or whatever court you have)
• “Each team must have 3 catches before they can send the ball back over the net."
Put students on the court:
• “You and you stand in the back court here, you and you in the front court and you two are
my subs. Stand off the court at the right back corner."
• Repeat above for the other side of the court.
(Leave rest of students on the side line with one coach supervising them.)
• “The person in the right back position starts the game, with a 2 handed underarm throw
from half way up the court”
• “Hold the ball until I come back”(Now go to the other side)
• “Because this team do not have the ball to start –they have a different shape”
• “Person in RIGHT front goes to the net with RIGHT shoulder at the net”
• “ the other 3 divide the court into 3 equal parts – making a T – Shape”
• “Whoever catches the first ball over –throws it to the person at the net”
• “That person can throw it to any of the 3 who run up to catch and throw it over the net”
• “After 3rd throw across the net -go back to square shape – 2 at the front and 2 at the back”
Start the game and introduce the following rules of the game whenever the opportunity arises in
the game:
• Scoring system
• Rotation & substitutions when are the 2 times they rotate
3rd Touch:
• Ask the students what the purpose of the 3rd touch is? (to score a point)
• “How” and “where”
(By throwing the ball into space)
(You may have to ask several different questions to get to the answer)
Continue play
Next:
• Call “STOP – WALK back and put the balls in “trap” and stand on the line.”
• Hand over to coach 3
Time Allowed: 20 mins (approx)
Signed:_________________________ Signed: __________________________
(TY Coach) (Teacher / Community Leader)
17 © VAI 2013
Topic: Warm up, Catch & Throw Game
Time Allowed: 25 mins (approx)
Signed:_________________________ Signed: __________________________ (TY Coach) (Teacher / Community Leader)
COACH:
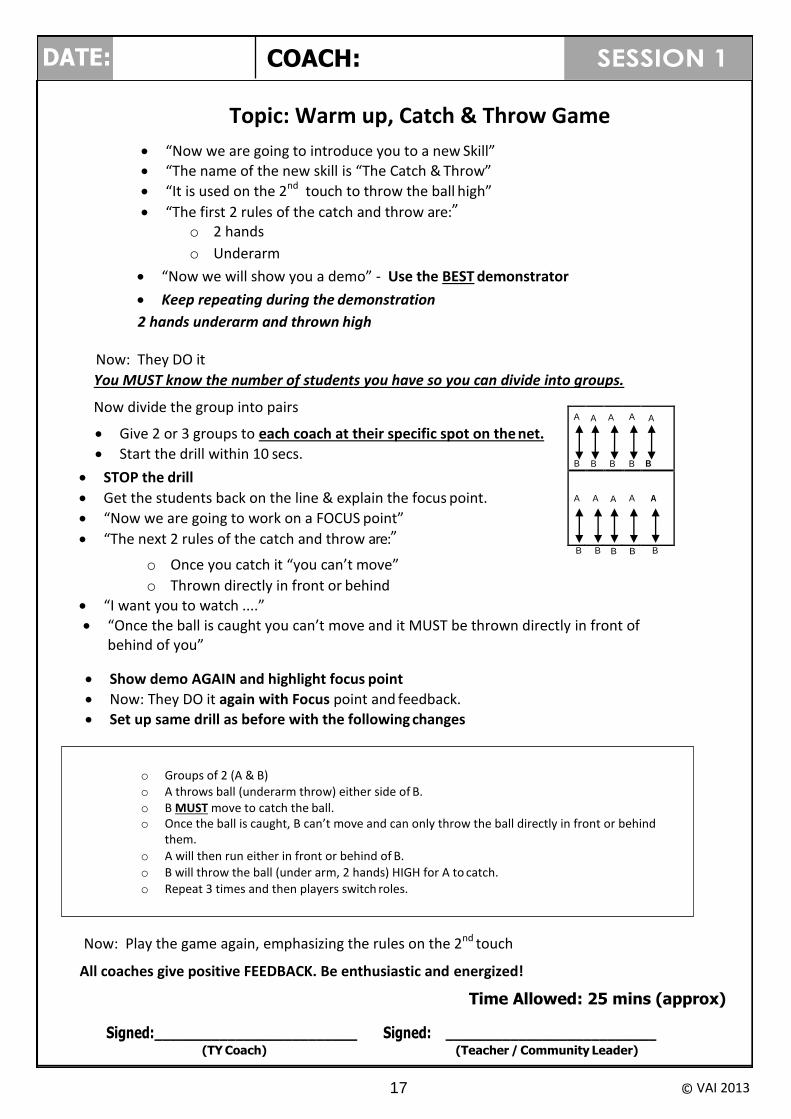
• “Now we are going to introduce you to a new Skill” • “The name of the new skill is “The Catch & Throw”
• “It is used on the 2nd touch to throw the ball high”
• “The first 2 rules of the catch and throw are:” o 2 hands
o Underarm
• “Now we will show you a demo” - Use the BEST demonstrator
• Keep repeating during the demonstration
2 hands underarm and thrown high
Now: They DO it
You MUST know the number of students you have so you can divide into groups.
Now divide the group into pairs
• Give 2 or 3 groups to each coach at their specific spot on the net.
• Start the drill within 10 secs.
• STOP the drill
• Get the students back on the line & explain the focus point.
• “Now we are going to work on a FOCUS point”
• “The next 2 rules of the catch and throw are:” B B B B B
o Once you catch it “you can’t move”
o Thrown directly in front or behind • “I want you to watch ....”
• “Once the ball is caught you can’t move and it MUST be thrown directly in front of behind of you”
• Show demo AGAIN and highlight focus point
• Now: They DO it again with Focus point and feedback.
• Set up same drill as before with the following changes
Now: Play the game again, emphasizing the rules on the 2nd touch
All coaches give positive FEEDBACK. Be enthusiastic and energized!
o Groups of 2 (A & B) o A throws ball (underarm throw) either side of B. o B MUST move to catch the ball. o Once the ball is caught, B can’t move and can only throw the ball directly in front or behind
them.
o A will then run either in front or behind of B. o B will throw the ball (under arm, 2 hands) HIGH for A to catch. o Repeat 3 times and then players switch roles.
DATE: SESSION 1
A
B
A
B
A
B
A
B
A
B
A
A
A
A
A
18 © VAI 2013
QUIZ QUESTIONS WEEK 1
Week 1:
What is the game that you learned to day called? Answer: SpikeBall Catch & Throw Game
How many touches must a team have? Answer: Three
What are the special rules on the second touch? Answer: Must be thrown with 2 hands
Ball must be thrown underarm Once caught no further movement is allowed Ball can only be thrown directly in front or behind
REMEMBER: Throw the ball high
What shape do you stand in when you are receiving serve? Answer: T-Shape
When does a team rotate? Answer: When a team wins the ball back to serve & aftet 3 consecutive serves by the same person.
“Success generally depends
on knowing how long it takes
to succeed.”
Montesquieu
19 © VAI 2013
DATE: COACH: SESSION 2
Topic: Coaching the Spike
• Warm-up & Stretch • Review the skills from the previous session in a game situation.
Introduce the Spike
• “Now we are going to introduce you to a new Skill” • “The name of the new skill is The Spike/Hit”
• “It is used on the 3rd touch to score a point”
• “Now we will show you a demo” - Use the BEST demonstrator
• Keep repeating during the demonstration “This is called the SPIKE and it is used on the 3RD TOUCH to score a point”
Now: They DO it
You MUST know the number of students you have so you can divide into groups.
DIVIDE group (give them numbers 1,2,3,1,2,3 etc) into 3 groups- all stay on the line except YOUR group 1,
Show how the drill works with YOUR group
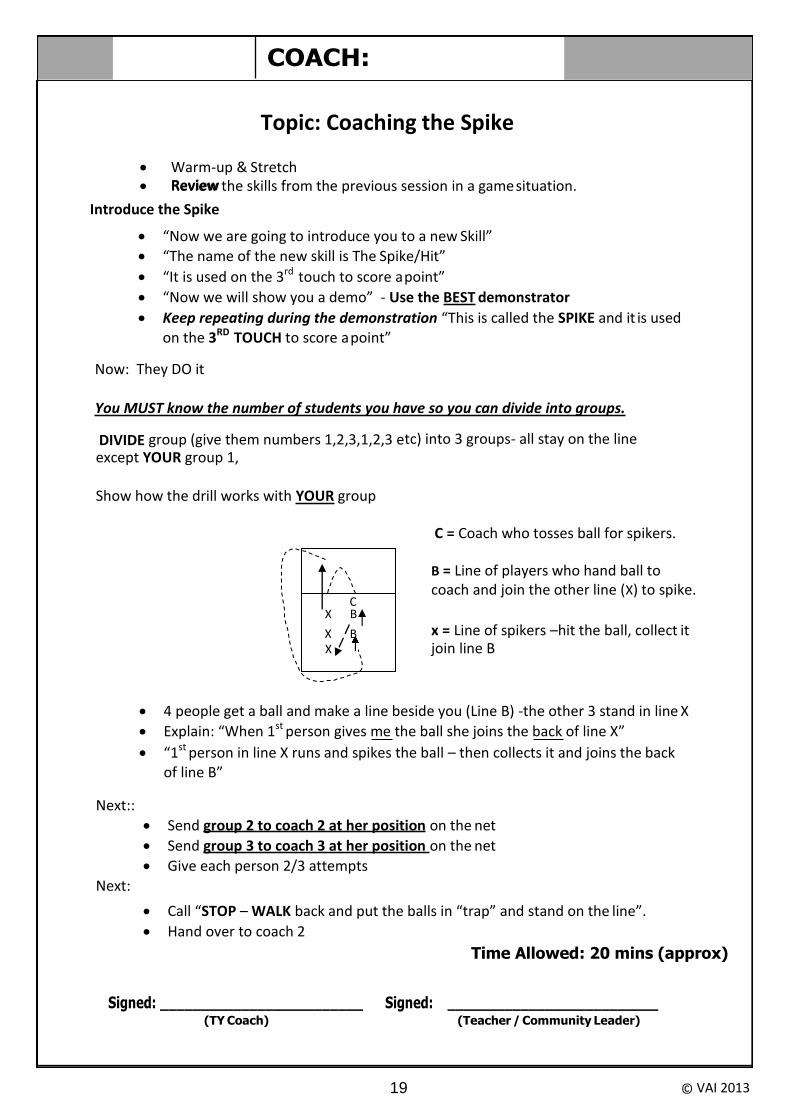
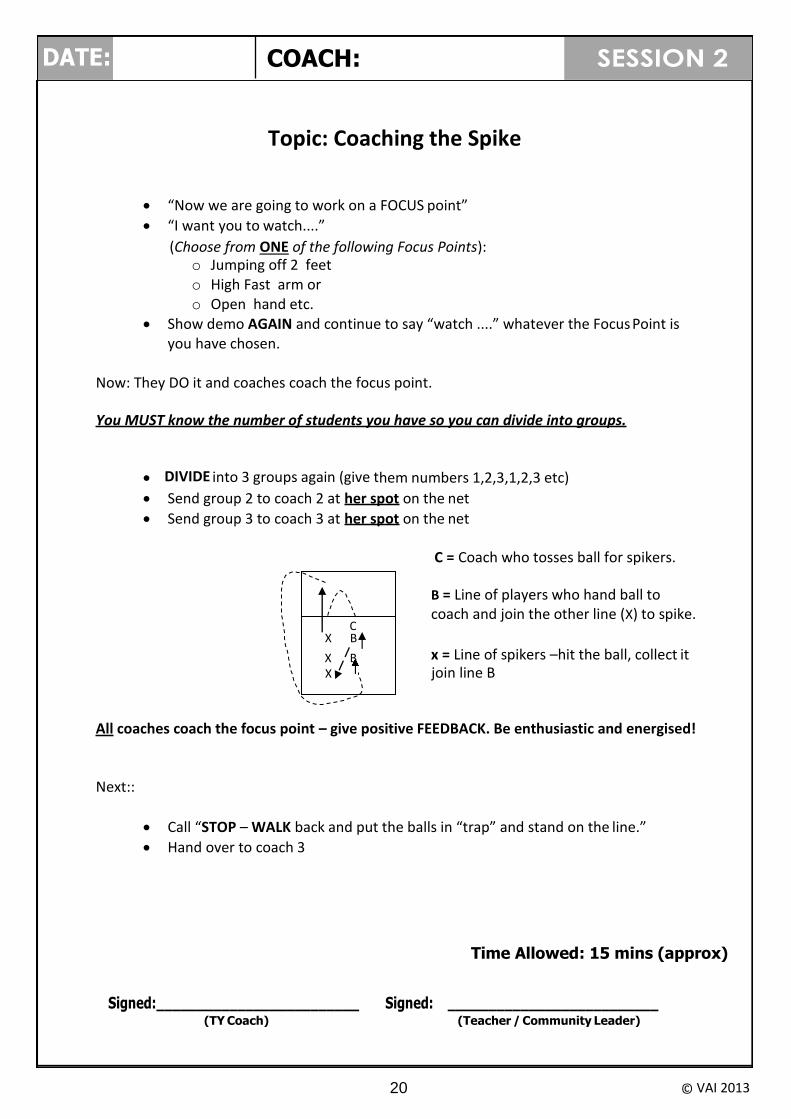
C = Coach who tosses ball for spikers.
B = Line of players who hand ball to coach and join the other line (X) to spike.
C X B
X B x = Line of spikers –hit the ball, collect it X join line B
• 4 people get a ball and make a line beside you (Line B) -the other 3 stand in line X
• Explain: “When 1st person gives me the ball she joins the back of line X”
• “1st person in line X runs and spikes the ball – then collects it and joins the back of line B”
Next::
• Send group 2 to coach 2 at her position on the net
• Send group 3 to coach 3 at her position on the net
• Give each person 2/3 attempts Next:
• Call “STOP – WALK back and put the balls in “trap” and stand on the line”.
• Hand over to coach 2
Time Allowed: 20 mins (approx)
Review
Signed: _________________________ Signed: __________________________ (TY Coach) (Teacher / Community Leader)
20 © VAI 2013
Topic: Coaching the Spike
• “Now we are going to work on a FOCUS point”
• “I want you to watch....”
o Jumping off 2 feet o High Fast arm or o Open hand etc.
• Show demo AGAIN and continue to say “watch ....” whatever the Focus Point is you have chosen.
Now: They DO it and coaches coach the focus point.
You MUST know the number of students you have so you can divide into groups.
• DIVIDE into 3 groups again (give them numbers 1,2,3,1,2,3 etc)
• Send group 2 to coach 2 at her spot on the net
• Send group 3 to coach 3 at her spot on the net
C = Coach who tosses ball for spikers.
B = Line of players who hand ball to coach and join the other line (X) to spike.
C X B
X B x = Line of spikers –hit the ball, collect it X join line B
All coaches coach the focus point – give positive FEEDBACK. Be enthusiastic and energised!
Next::
• Call “STOP – WALK back and put the balls in “trap” and stand on the line.”
• Hand over to coach 3
Time Allowed: 15 mins (approx)
Signed:_________________________ Signed: __________________________
(TY Coach) (Teacher / Community Leader)
COACH:
(Choose from ONE of the following Focus Points):
DATE: SESSION 2
21 © VAI 2013
DATE: COACH: SESSION 2
Topic: Coaching the Spike
“Now we are going to put the spike into the game”
• “Remember the game we played earlier” • “We are going to play again only this time:
o On the 3rd Touch instead of throwing the ball over the net, we are going to use the Spike
o So what will be important about the height of the 2nd Touch?”(needs to be high)
You MUST know the number of students you have so you can decide how many teams you can have!!
If the number of teams you can have is 4 - then divide as follows:
• Divide into 4 teams(apple/orange/pear/banana etc)
• Send each group to a half court.
• Play game to 7/9 points etc.
• Then Switch teams and all play again. (like little tournament)
All coaches give positive FEEDBACK. Be enthusiastic and energised!
• Call “STOP – WALK back and put the balls in “trap” and stand on the line.”
• Ask quiz questions.
• Cool down!
Time Allowed: 15 mins (approx)
Signed: _________________________ Signed: __________________________ (TY Coach) (Teacher / Community Leader)
22 © VAI 2013
QUIZ QUESTIONS WEEK 2
Week 2:
What is the name of the skill we learned today? Answer: The Spike/Hit
When is it used? Answer: It is used on the 3rd touch to score a point.
What was the focus point we worked on? Answer: One of the following - Jumping off 2 feet/ Open hand / Straight arm / Snap wrist on contact with ball
How many touches must a team have? Answer: Three
What should you do with the 2nd touch so that your teammates have time to RUN JUMP & SPIKE/HIT the 3rd touch? Answer: Throw the second touch high and towards the net.
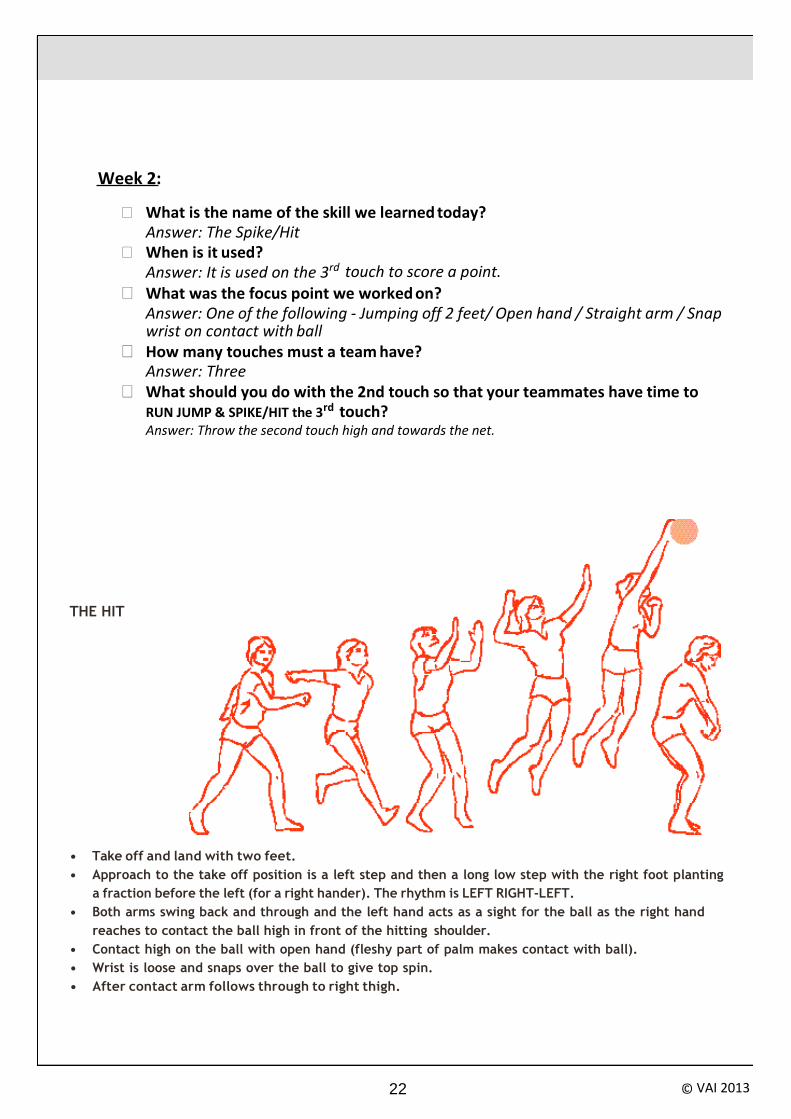
THE HIT
• Take off and land with two feet.
• Approach to the take off position is a left step and then a long low step with the right foot planting
a fraction before the left (for a right hander). The rhythm is LEFT RIGHT-LEFT.
• Both arms swing back and through and the left hand acts as a sight for the ball as the right hand
reaches to contact the ball high in front of the hitting shoulder.
• Contact high on the ball with open hand (fleshy part of palm makes contact with ball).
• Wrist is loose and snaps over the ball to give top spin.
• After contact arm follows through to right thigh.
23 © VAI 2013
DATE: COACH: SESSION 3
Topic: Coaching the Forearm Pass/Dig
D
A A A
C C C
B B B
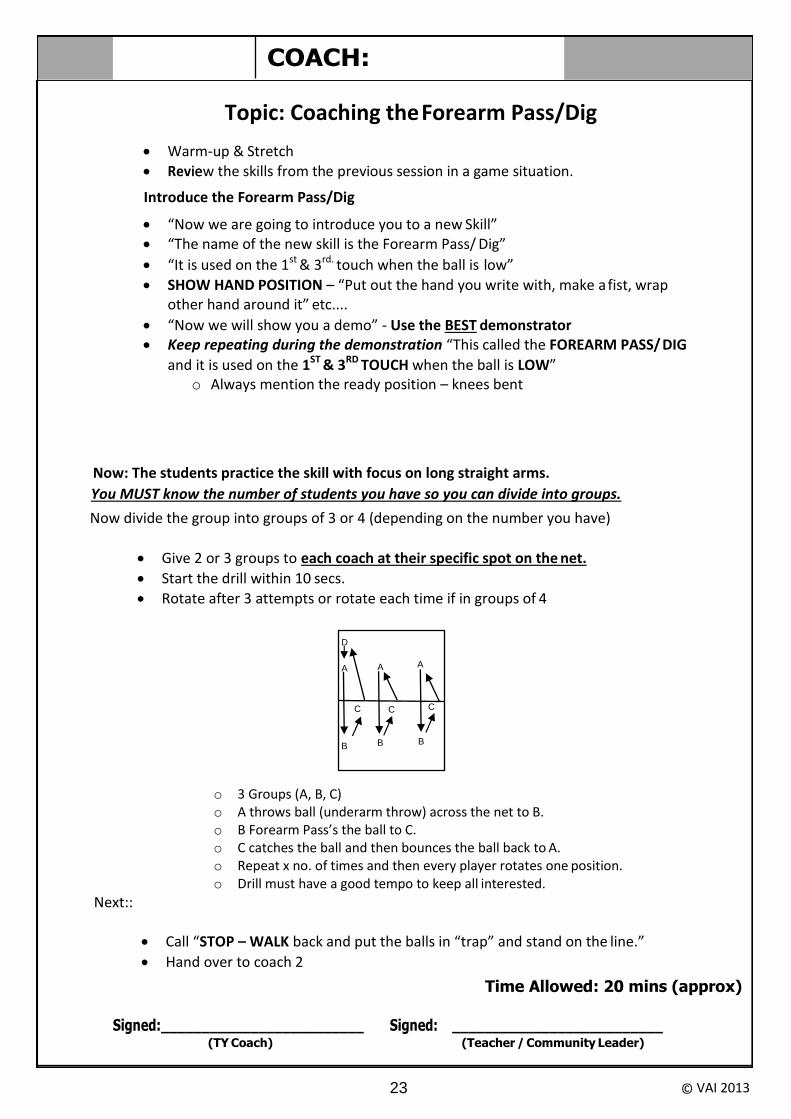
o 3 Groups (A, B, C) o A throws ball (underarm throw) across the net to B. o B Forearm Pass’s the ball to C. o C catches the ball and then bounces the ball back to A. o Repeat x no. of times and then every player rotates one position. o Drill must have a good tempo to keep all interested.
Next::
• Call “STOP – WALK back and put the balls in “trap” and stand on the line.”
• Hand over to coach 2
Time Allowed: 20 mins (approx)
Signed:_________________________ Signed: __________________________ (TY Coach) (Teacher / Community Leader)
• Warm-up & Stretch • Reviieew the skills from the previous session in a game situation.
Introduce the Forearm Pass/Dig
• “Now we are going to introduce you to a new Skill” • “The name of the new skill is the Forearm Pass/ Dig”
• “It is used on the 1st & 3rd. touch when the ball is low”
• SHOW HAND POSITION – “Put out the hand you write with, make a fist, wrap other hand around it” etc....
• “Now we will show you a demo” - Use the BEST demonstrator • Keep repeating during the demonstration “This called the FOREARM PASS/ DIG
and it is used on the 1ST & 3RD TOUCH when the ball is LOW” o Always mention the ready position – knees bent
Now: The students practice the skill with focus on long straight arms.
You MUST know the number of students you have so you can divide into groups.
Now divide the group into groups of 3 or 4 (depending on the number you have)
• Give 2 or 3 groups to each coach at their specific spot on the net.
• Start the drill within 10 secs.
• Rotate after 3 attempts or rotate each time if in groups of 4
24 © VAI 2013
DATE: COACH: SESSION 3
Topic: Coaching the Forearm Pass/Dig
All coaches coach the focus point – give positive FEEDBACK. Be enthusiastic and energised!
Next::
• Call “STOP – WALK back and put the balls in “trap” and stand on the line.”
• Hand over to coach 3 Time Allowed: 15 mins (approx)
Signed:_________________________ Signed: __________________________
(TY Coach) (Teacher / Community Leader)
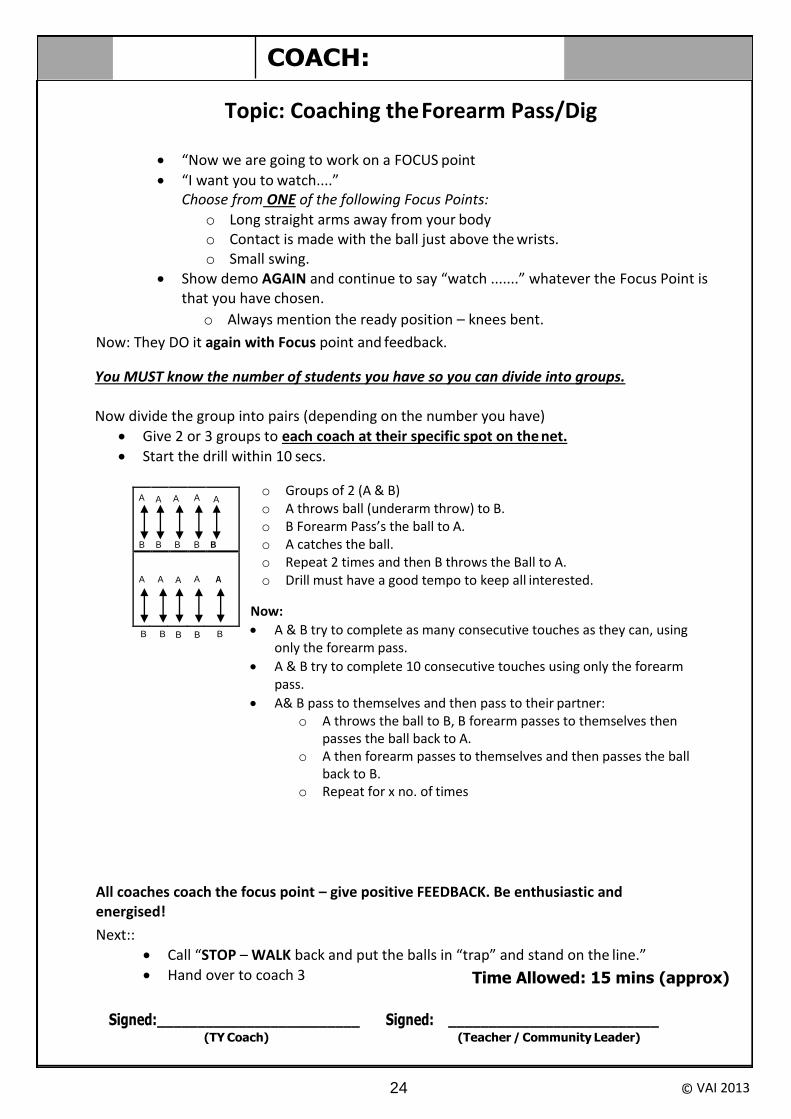
• “Now we are going to work on a FOCUS point
• “I want you to watch....” Choose from ONE of the following Focus Points:
o Long straight arms away from your body o Contact is made with the ball just above the wrists. o Small swing.
• Show demo AGAIN and continue to say “watch .......” whatever the Focus Point is that you have chosen.
o Always mention the ready position – knees bent.
Now: They DO it again with Focus point and feedback.
You MUST know the number of students you have so you can divide into groups.
Now divide the group into pairs (depending on the number you have)
• Give 2 or 3 groups to each coach at their specific spot on the net.
• Start the drill within 10 secs.
o Groups of 2 (A & B) o A throws ball (underarm throw) to B. o B Forearm Pass’s the ball to A. o A catches the ball. o Repeat 2 times and then B throws the Ball to A. o Drill must have a good tempo to keep all interested.
B B B B B
Now:
• A & B try to complete as many consecutive touches as they can, using only the forearm pass.
• A & B try to complete 10 consecutive touches using only the forearm pass.
• A& B pass to themselves and then pass to their partner: o A throws the ball to B, B forearm passes to themselves then
passes the ball back to A. o A then forearm passes to themselves and then passes the ball
back to B. o Repeat for x no. of times
A
B
A
B
A
B
A
B
A
B
A
A
A
A
A
25 © VAI 2013
DATE: COACH: SESSION 3
Topic: Coaching the Forearm Pass/Dig
Time Allowed: 15 mins (approx)
Signed:_________________________ Signed: __________________________
(TY Coach) (Teacher / Community Leader)
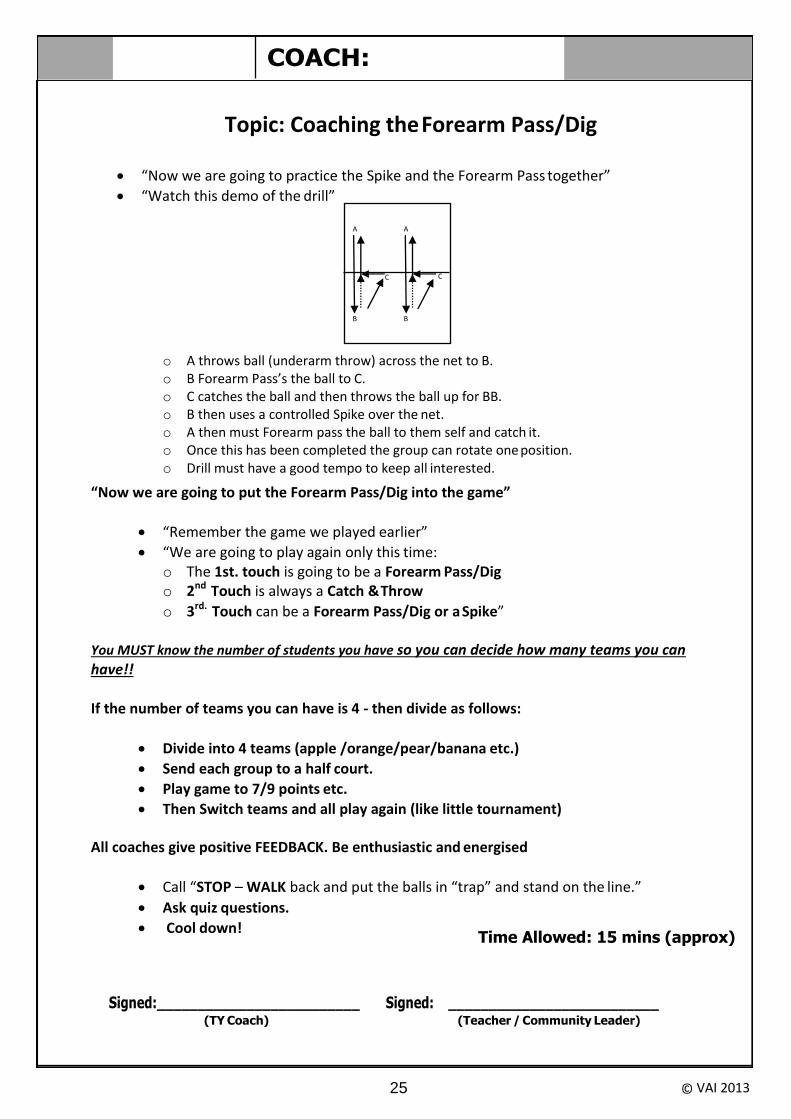
• “Now we are going to practice the Spike and the Forearm Pass together”
• “Watch this demo of the drill”
o A throws ball (underarm throw) across the net to B. o B Forearm Pass’s the ball to C. o C catches the ball and then throws the ball up for BB. o B then uses a controlled Spike over the net. o A then must Forearm pass the ball to them self and catch it. o Once this has been completed the group can rotate one position. o Drill must have a good tempo to keep all interested.
“Now we are going to put the Forearm Pass/Dig into the game”
• “Remember the game we played earlier”
• “We are going to play again only this time: o The 1st. touch is going to be a Forearm Pass/Dig o 2nd Touch is always a Catch & Throw
o 3rd. Touch can be a Forearm Pass/Dig or a Spike”
You MUST know the number of students you have so you can decide how many teams you can have!!
If the number of teams you can have is 4 - then divide as follows:
• Divide into 4 teams (apple /orange/pear/banana etc.)
• Send each group to a half court.
• Play game to 7/9 points etc.
• Then Switch teams and all play again (like little tournament)
All coaches give positive FEEDBACK. Be enthusiastic and energised
• Call “STOP – WALK back and put the balls in “trap” and stand on the line.”
• Ask quiz questions.
• Cool down!
A A
C C
B B
26 © VAI 2013
QUIZ QUESTIONS WEEK 3
Week 3:
What is the name of the skill we learned today? Answer: The Forearm Pass/ Dig
When is it used? Answer: It is used when the ball is low and can be used on the 1 st or 3rd touch
What was the focus point we worked on? Answer: One of the following - Long Straight Arms Away from your body/ Hand Position / Ready Position/ Contact Point
Can you play the ball with the palms of your hand? Answer: No, must be played clean on the forearms and above the wrists.
What shape do you stand in when the other team is serving? Answer: T-Shape
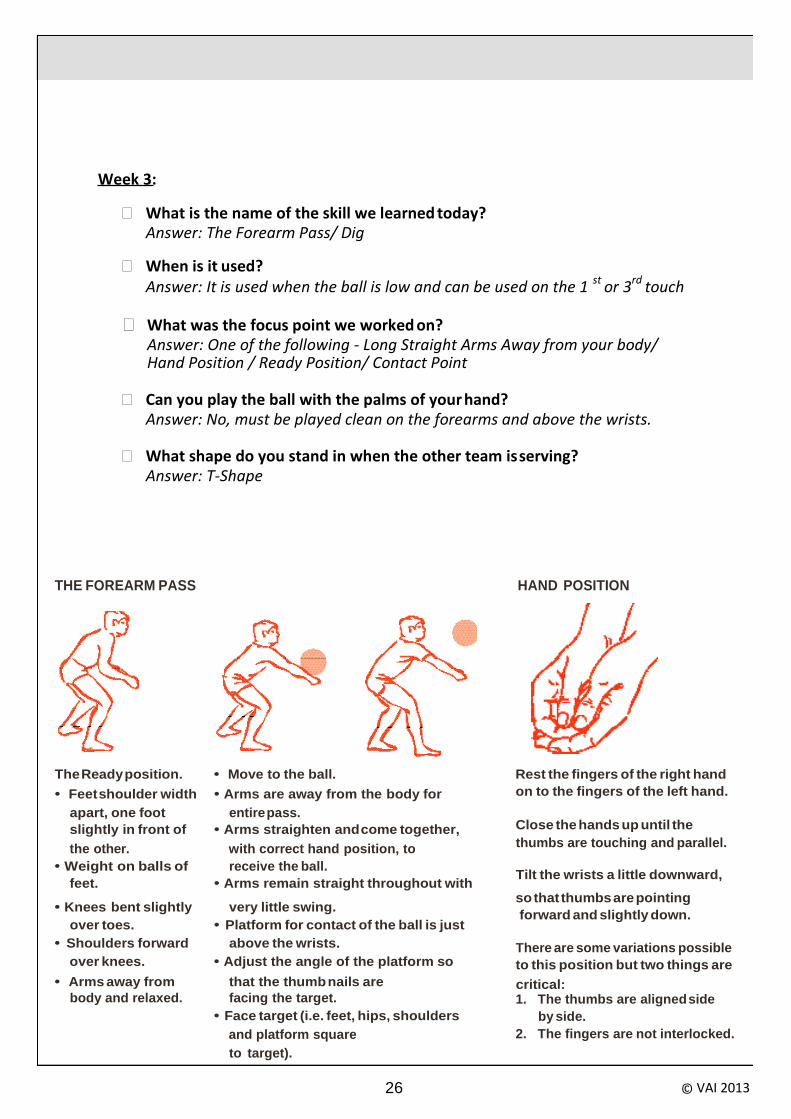
THE FOREARM PASS HAND POSITION
The Ready position. • Move to the ball. Rest the fingers of the right hand
• Feet shoulder width • Arms are away from the body for on to the fingers of the left hand.
apart, one foot entire pass.
slightly in front of • Arms straighten and come together, Close the hands up until the
the other. with correct hand position, to thumbs are touching and parallel.
• Weight on balls of receive the ball.
feet. • Arms remain straight throughout with Tilt the wrists a little downward,
• Knees bent slightly very little swing. so that thumbs are pointing
forward and slightly down. over toes. • Platform for contact of the ball is just
• Shoulders forward above the wrists. There are some variations possible over knees. • Adjust the angle of the platform so to this position but two things are
• Arms away from that the thumb nails are critical:
body and relaxed. facing the target. 1. The thumbs are aligned side
• Face target (i.e. feet, hips, shoulders by side.
and platform square 2. The fingers are not interlocked.
to target).
27 © VAI 2013
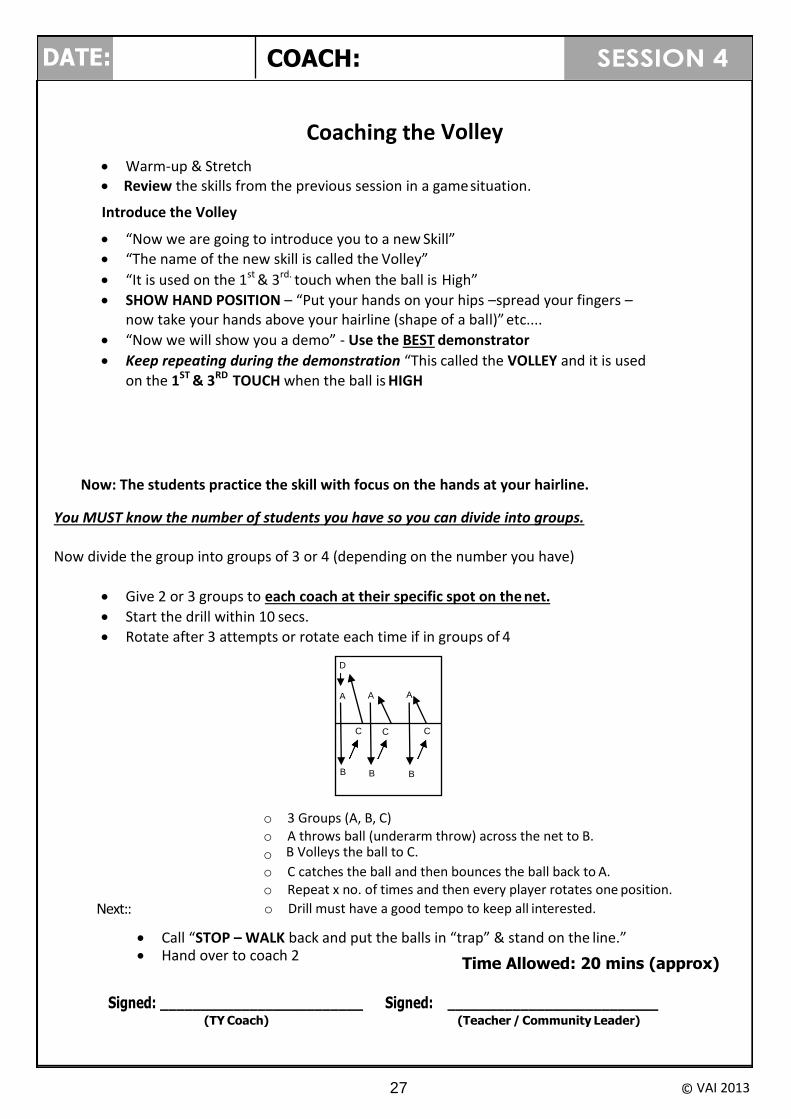
Coaching the Volley
D
A A A
C C C
B B B
o 3 Groups (A, B, C) o A throws ball (underarm throw) across the net to B. o
o C catches the ball and then bounces the ball back to A. o Repeat x no. of times and then every player rotates one position.
Next:: o Drill must have a good tempo to keep all interested.
• Call “STOP – WALK back and put the balls in “trap” & stand on the line.” • Hand over to coach 2
Time Allowed: 20 mins (approx)
COACH:
• Warm-up & Stretch • Review the skills from the previous session in a game situation.
Introduce the Volley
• “Now we are going to introduce you to a new Skill” • “The name of the new skill is called the Volley”
• “It is used on the 1st & 3rd. touch when the ball is High”
• SHOW HAND POSITION – “Put your hands on your hips –spread your fingers – now take your hands above your hairline (shape of a ball)” etc....
• “Now we will show you a demo” - Use the BEST demonstrator
• Keep repeating during the demonstration “This called the VOLLEY and it is used
on the 1ST & 3RD TOUCH when the ball is HIGH
Now: The students practice the skill with focus on the hands at your hairline.
You MUST know the number of students you have so you can divide into groups.
Now divide the group into groups of 3 or 4 (depending on the number you have)
• Give 2 or 3 groups to each coach at their specific spot on the net.
• Start the drill within 10 secs.
• Rotate after 3 attempts or rotate each time if in groups of 4
B Volleys the ball to C.
Signed: _________________________ Signed: __________________________ (TY Coach) (Teacher / Community Leader)
DATE: SESSION 4
28 © VAI 2013
Coaching the Volley
All coaches coach the focus point – give positive FEEDBACK. Be enthusiastic and energised!
Next: Time Allowed: 15 mins (approx)
• Call “STOP – WALK back and put the balls in “trap” & stand on the line.”
• Hand over to coach 3
Signed:_________________________ Signed: __________________________ (TY Coach) (Teacher / Community Leader)
COACH:
• “Now we are going to work on a FOCUS point
• “Want you to watch....” Choose from ONE of the following Focus Points:
o Hands are at your hairline before the ball comes over the net. o Play the ball with the pads of your fingers not the palms o Straighten your arms to the ceiling
• Show demo AGAIN and continue to say “watch......” whatever the Focus Point is you have chosen
• Ready position
Now: They DO it again with Focus point and feedback
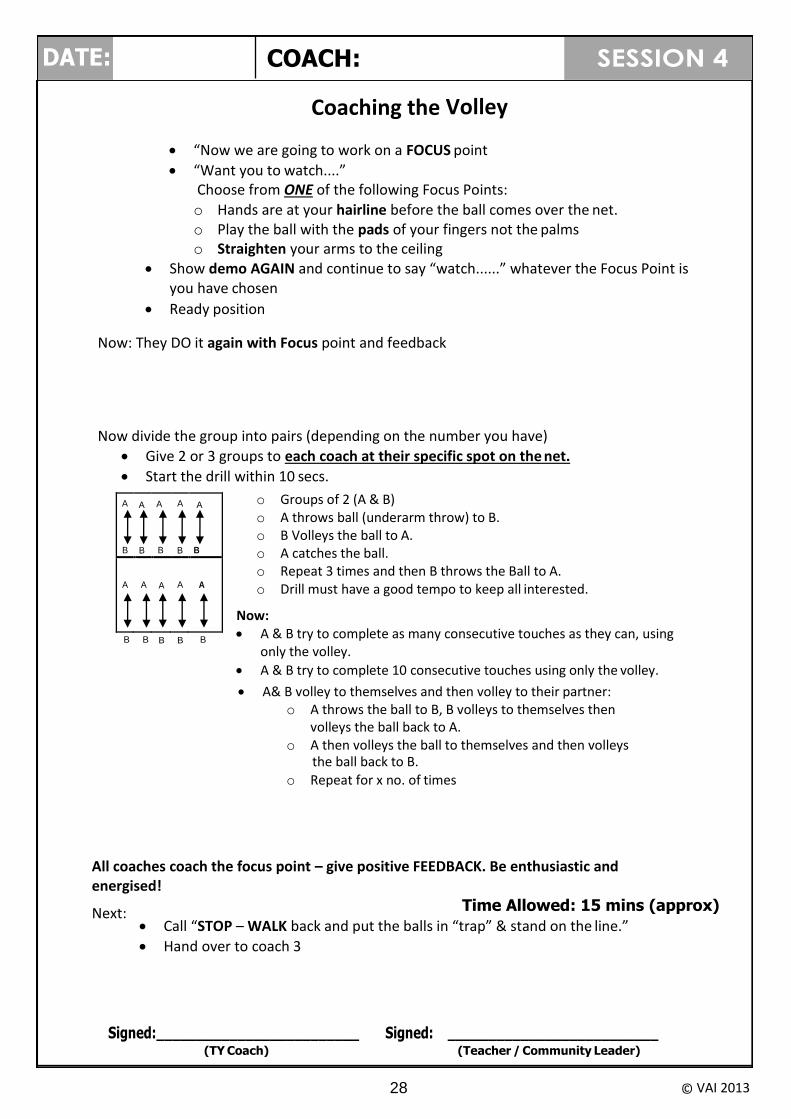
Now divide the group into pairs (depending on the number you have)
• Give 2 or 3 groups to each coach at their specific spot on the net.
• Start the drill within 10 secs.
o Groups of 2 (A & B) o A throws ball (underarm throw) to B. o B Volleys the ball to A. o A catches the ball. o Repeat 3 times and then B throws the Ball to A. o Drill must have a good tempo to keep all interested.
Now:
B B B B B • A & B try to complete as many consecutive touches as they can, using
only the volley.
• A & B try to complete 10 consecutive touches using only the volley.
• A& B volley to themselves and then volley to their partner: o A throws the ball to B, B volleys to themselves then
volleys the ball back to A. o A then volleys the ball to themselves and then volleys
the ball back to B. o Repeat for x no. of times
DATE: SESSION 4
A
B
A
B
A
B
A
B
A
B
A
A
A
A
A
29 © VAI 2013
Coaching the Volley
Time Allowed: 15 mins (approx)
Signed:_________________________ Signed: __________________________
(TY Coach) (Teacher / Community Leader)
COACH:
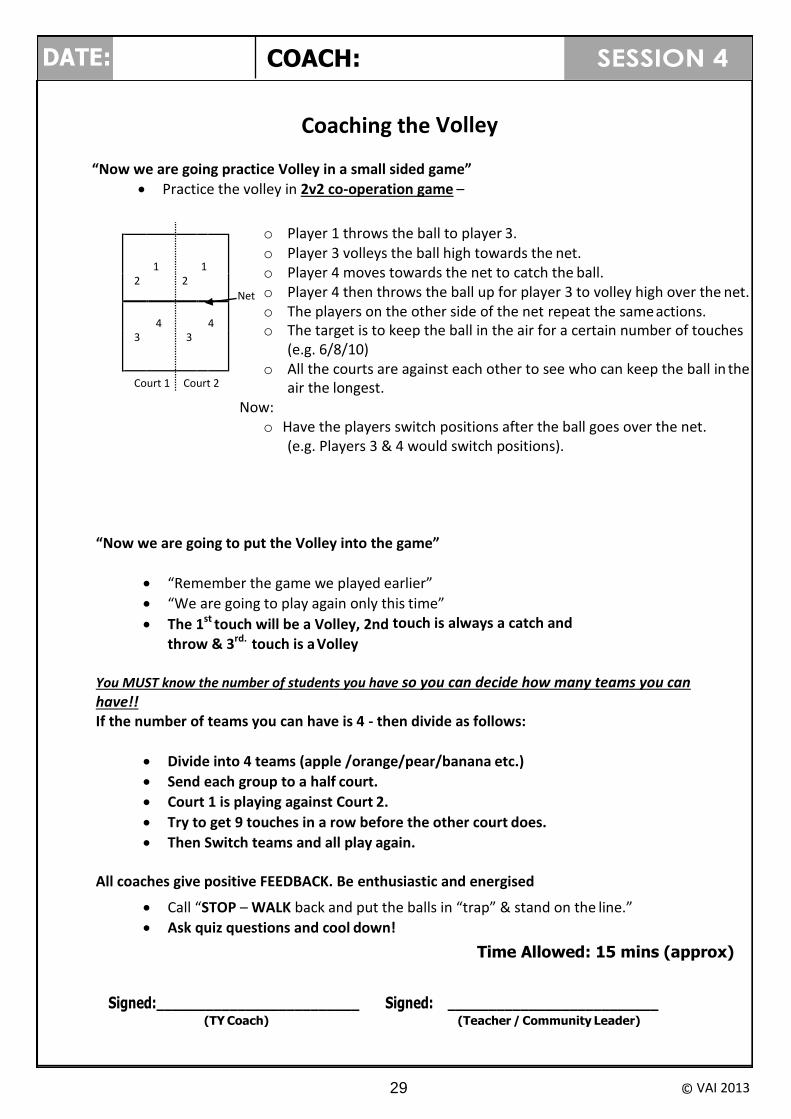
“Now we are going practice Volley in a small sided game” • Practice the volley in 2v2 co-operation game –
Net
o Player 1 throws the ball to player 3. o Player 3 volleys the ball high towards the net. o Player 4 moves towards the net to catch the ball. o Player 4 then throws the ball up for player 3 to volley high over the net. o The players on the other side of the net repeat the same actions. o The target is to keep the ball in the air for a certain number of touches
(e.g. 6/8/10) o All the courts are against each other to see who can keep the ball in the
air the longest. Now:
o Have the players switch positions after the ball goes over the net. (e.g. Players 3 & 4 would switch positions).
“Now we are going to put the Volley into the game”
• “Remember the game we played earlier”
• “We are going to play again only this time”
• The 1st touch will be a Volley, 2nd touch is always a catch and throw & 3rd. touch is a Volley
You MUST know the number of students you have so you can decide how many teams you can have!! If the number of teams you can have is 4 - then divide as follows:
• Divide into 4 teams (apple /orange/pear/banana etc.)
• Send each group to a half court.
• Court 1 is playing against Court 2.
• Try to get 9 touches in a row before the other court does.
• Then Switch teams and all play again.
All coaches give positive FEEDBACK. Be enthusiastic and energised
• Call “STOP – WALK back and put the balls in “trap” & stand on the line.”
• Ask quiz questions and cool down!
DATE: SESSION 4
1
1
2 2
4
4 3 3
Court 1 Court 2
13
QUIZ QUESTIONS WEEK 4
Week 4:
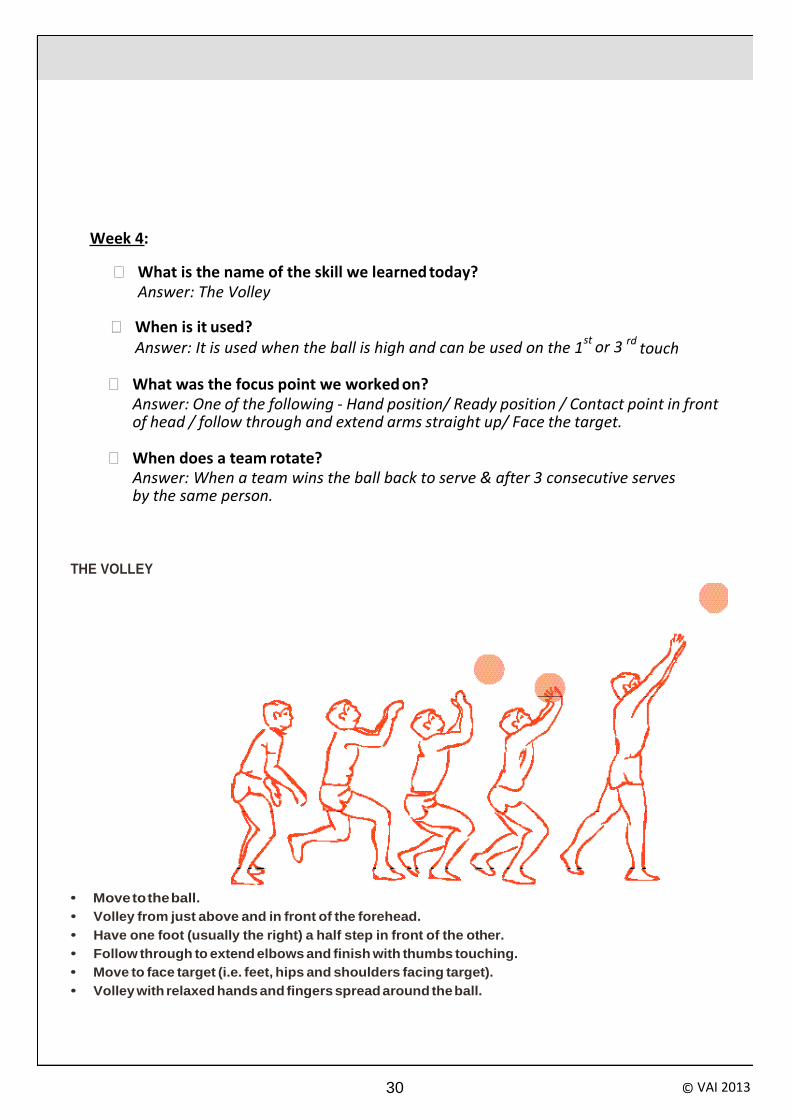
What is the name of the skill we learned today? Answer: The Volley
When is it used? Answer: It is used when the ball is high and can be used on the 1
st or 3 rd
touch
What was the focus point we worked on? Answer: One of the following - Hand position/ Ready position / Contact point in front of head / follow through and extend arms straight up/ Face the target.
When does a team rotate? Answer: When a team wins the ball back to serve & after 3 consecutive serves by the same person.
THE VOLLEY
• Move to the ball.
• Volley from just above and in front of the forehead.
• Have one foot (usually the right) a half step in front of the other.
• Follow through to extend elbows and finish with thumbs touching.
• Move to face target (i.e. feet, hips and shoulders facing target).
• Volley with relaxed hands and fingers spread around the ball.
© VAI 2013 30
31 © VAI 2013
Topic: Reviewing the previous skills & rules in
Session 5 will be used to review all the skills that have been taught in the previous sessions:
• 2nd Touch - Catch & Throw
• The Spike
• The Forearm Pass
• The Volley
To review these skills go through the focus points from each skill session.
Have the students playing many matches in their teams for the tournament.
Remember to:
• Look back at previous session plans for drills and focus points. • Encourage the students. • Give feedback on the specific skill and focus point.
• Play games up to seven or nine points. • Be enthusiastic and energised! • Remember to focus on the skill that needs most work.
preparation for the Blitz
Signed: _________________________ Signed: __________________________ (TY Coach) (Teacher / Community Leader)
Date: ____________
SESSION 5
32 © VAI 2013
Week 5:
Why should we play the 1st ball to the person closest to/at the net? Answer: It is easier to throw the ball parallel and high for the other 3 players to Spike/Hit & score a point.
What skill did we work on today? Answer: This will be based on your session on week 5
What was the focus point we worked on? Answer: This will be based on your session on week 5
Quality is not an act, it is a habit.
Aristotle
QUIZ QUESTIONS WEEK 5
33 © VAI 2013
Topic: Reviewing the previous skills & rules in
Session 6 will be used to review all the skills that have been taught in the previous sessions:
• 2nd Touch - Catch & Throw
• The Spike
• The Forearm Pass
• The Volley
To review these skills go through the focus points from each skill session.
Have the students playing many matches in their teams for the tournament.
Remember to:
• Look back at previous session plans for drills and focus points. • Encourage the students. • Give feedback on the specific skill and focus point.
• Play games up to seven or nine points. • Be enthusiastic and energised! • Remember to focus on the skill that needs most work.
preparation for the Blitz
Play a mini tournament in preparation for Blitz day.
Signed: _________________________ Signed: __________________________ (TY Coach) (Teacher / Community Leader)
Date: ____________
SESSION 6
13
QUIZ QUESTIONS WEEK 6
Week 6:
In the T Shape what are the areas that each player is responsible for? Answer: Your 1/3 of the court from the base line to the net. A ball between players - the player on the left plays it.
What skill did we work on today? Answer: This will be based on your session on week
What was the focus point we worked on? Answer: This will be based on your session on week
“Man’s mind stretched
to a new idea, never goes back
to its original dimensions”
Oliver Wendall Holmes
6
6
© VAI 2013 34
35 © VAI 2013
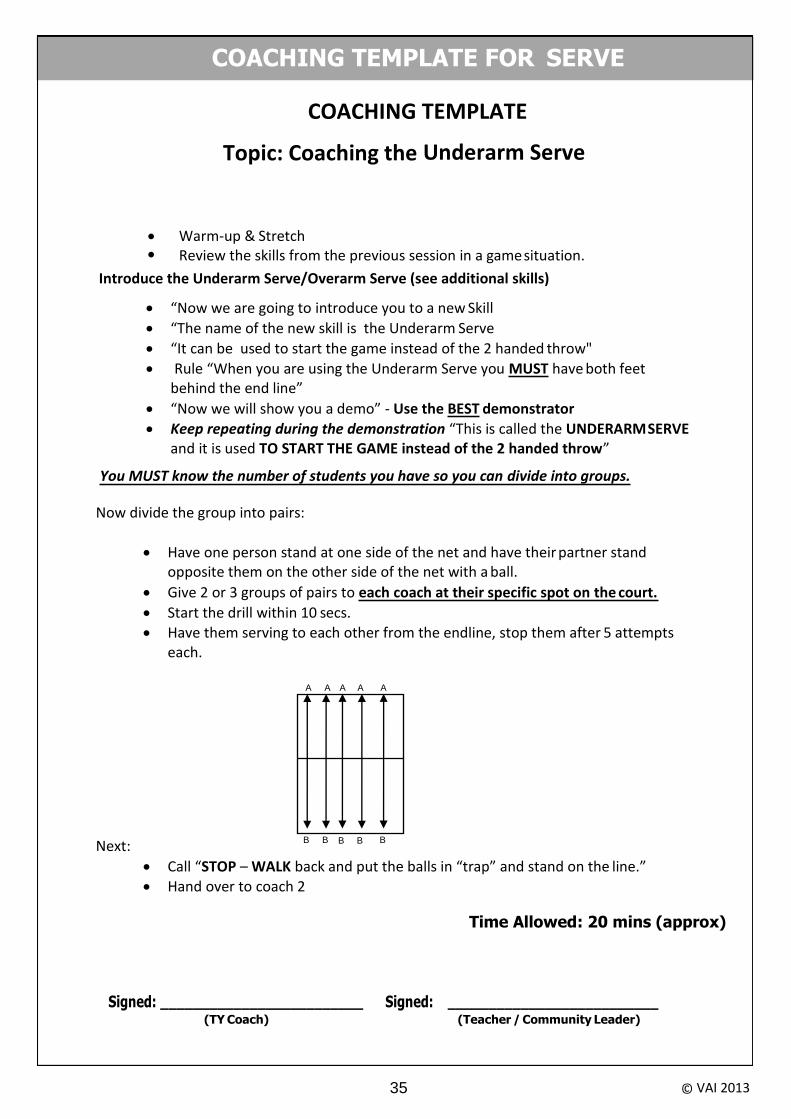
Topic: Coaching the Underarm Serve
• Warm-up & Stretch • Review the skills from the previous session in a game situation.
Introduce the Underarm Serve/Overarm Serve (see additional skills)
• “Now we are going to introduce you to a new Skill
• “The name of the new skill is the Underarm Serve
• “It can be used to start the game instead of the 2 handed throw"
• Rule “When you are using the Underarm Serve you MUST have both feet behind the end line”
• “Now we will show you a demo” - Use the BEST demonstrator
• Keep repeating during the demonstration “This is called the UNDERARM SERVE and it is used TO START THE GAME instead of the 2 handed throw”
You MUST know the number of students you have so you can divide into groups.
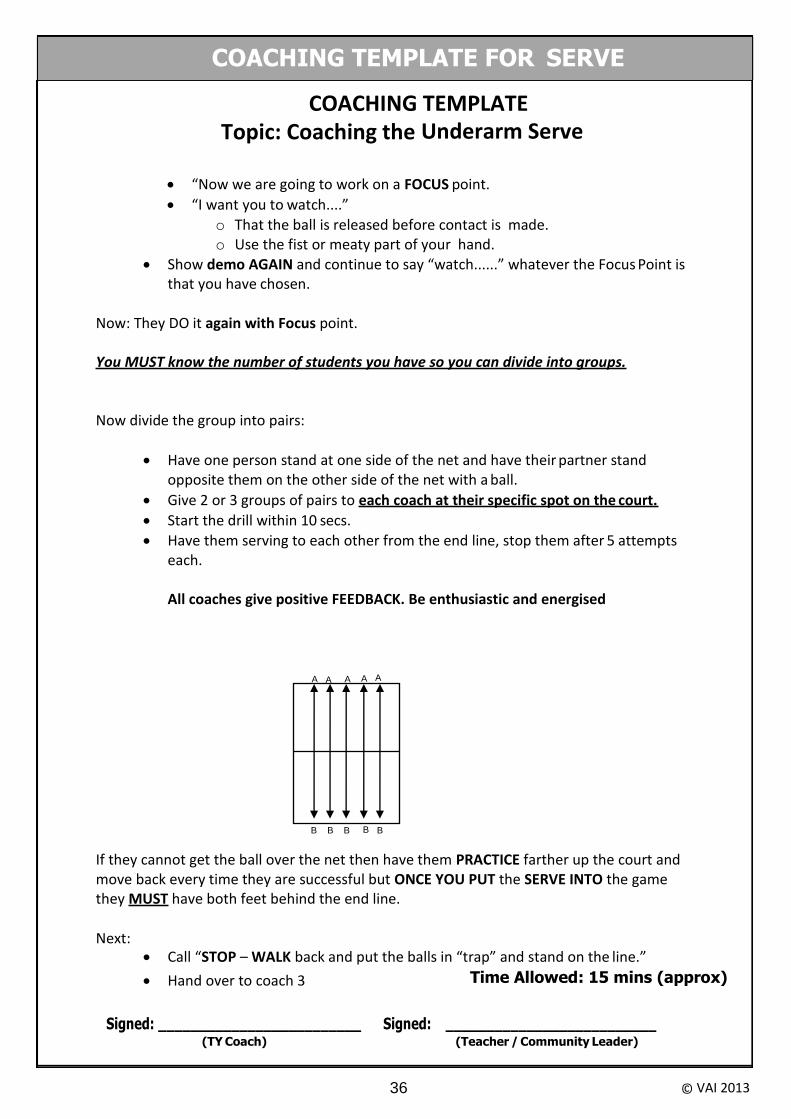
Now divide the group into pairs:
• Have one person stand at one side of the net and have their partner stand opposite them on the other side of the net with a ball.
• Give 2 or 3 groups of pairs to each coach at their specific spot on the court.
• Start the drill within 10 secs. • Have them serving to each other from the endline, stop them after 5 attempts
each.
A A A A A
Next: B B B B B
• Call “STOP – WALK back and put the balls in “trap” and stand on the line.” • Hand over to coach 2
Time Allowed: 20 mins (approx)
COACHING TEMPLATE
Signed: _________________________ Signed: __________________________ (TY Coach) (Teacher / Community Leader)
COACHING TEMPLATE FOR SERVE
36 © VAI 2013
Topic: Coaching the Underarm Serve
• “Now we are going to work on a FOCUS point.
• “I want you to watch....”
o That the ball is released before contact is made. o Use the fist or meaty part of your hand.
• Show demo AGAIN and continue to say “watch......” whatever the Focus Point is that you have chosen.
Now: They DO it again with Focus point.
You MUST know the number of students you have so you can divide into groups.
Now divide the group into pairs:
• Have one person stand at one side of the net and have their partner stand opposite them on the other side of the net with a ball.
• Give 2 or 3 groups of pairs to each coach at their specific spot on the court.
• Start the drill within 10 secs.
• Have them serving to each other from the end line, stop them after 5 attempts each.
All coaches give positive FEEDBACK. Be enthusiastic and energised
A A A A A
B B B B B
If they cannot get the ball over the net then have them PRACTICE farther up the court and move back every time they are successful but ONCE YOU PUT the SERVE INTO the game they MUST have both feet behind the end line.
Next:
• Call “STOP – WALK back and put the balls in “trap” and stand on the line.”
• Hand over to coach 3 Time Allowed: 15 mins (approx)
COACHING TEMPLATE
Signed: _________________________ Signed: __________________________ (TY Coach) (Teacher / Community Leader)
COACHING TEMPLATE FOR SERVE
37 © VAI 2013
Topic: Coaching the Underarm Serve
Now we are going to put the Underarm Serve into the game
• Remember the game we played earlier
• We are going to play again only this time • To start the game you must use the Underarm Serve.
• The 1st touch can be a Forearm Pass or a Volley & 3rd touch can be a Spike, Forearm pass or a Volley.
You MUST know the number of students you have so you can decide how many teams you can have!!
If the number of teams you can have is 4 - then divide as follows:
• Divide into 4 teams (apple/orange/pear/banana etc)
• Send each group to a half court.
• Play game to 7/9 points etc.
• Then Switch teams and all play again ( like little tournament)
All coaches give positive FEEDBACK. Be enthusiastic and energised.
• Call STOP – WALK back and put the balls in “trap” and stand on the line.
• Ask quiz questions and cool down!
Time Allowed: 15 mins (approx)
COACHING TEMPLATE
Signed: _________________________ Signed: __________________________ (TY Coach) (Teacher / Community Leader)
COACHING TEMPLATE FOR SERVE
13
QUIZ QUESTIONS
Week 5:
Why should we play the 1st ball to the person closest to/at the net? Answer: It is easier to throw the ball parallel and high for the other 3 players to Spike/Hit & score a point.
What skill did we work on today? Answer: This will be based on your session on week 5
What was the focus point we worked on? Answer: This will be based on your session on week 5
REMINDER: Have you introduced the serve?
If Yes, please ask the following questions:
Where must you serve from if you are using the underarm or over arm serve? Answer: Behind the white end line.
Are you allowed to play the ball off your hand? Answer: No, the ball must be released before contact is made.
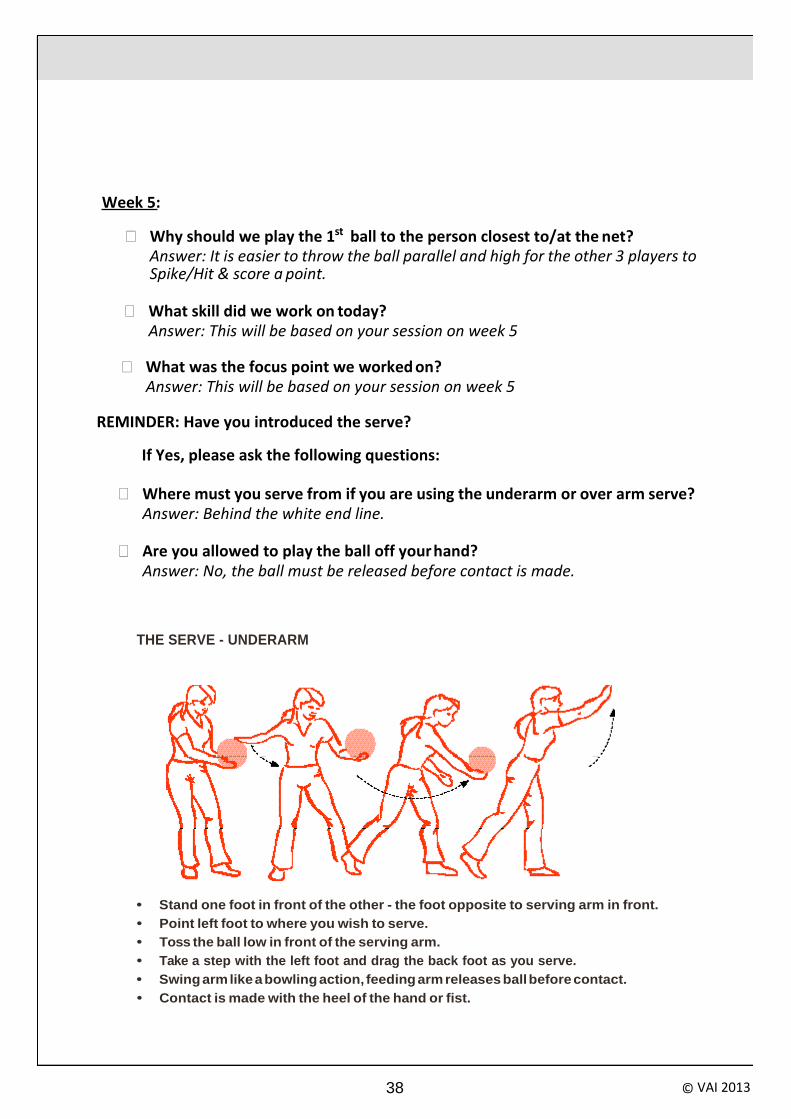
THE SERVE - UNDERARM
• Stand one foot in front of the other - the foot opposite to serving arm in front.
• Point left foot to where you wish to serve.
• Toss the ball low in front of the serving arm.
• Take a step with the left foot and drag the back foot as you serve.
• Swing arm like a bowling action, feeding arm releases ball before contact.
• Contact is made with the heel of the hand or fist.
© VAI 2013 38
39 © VAI 2013
ADDITIONAL SKILLS
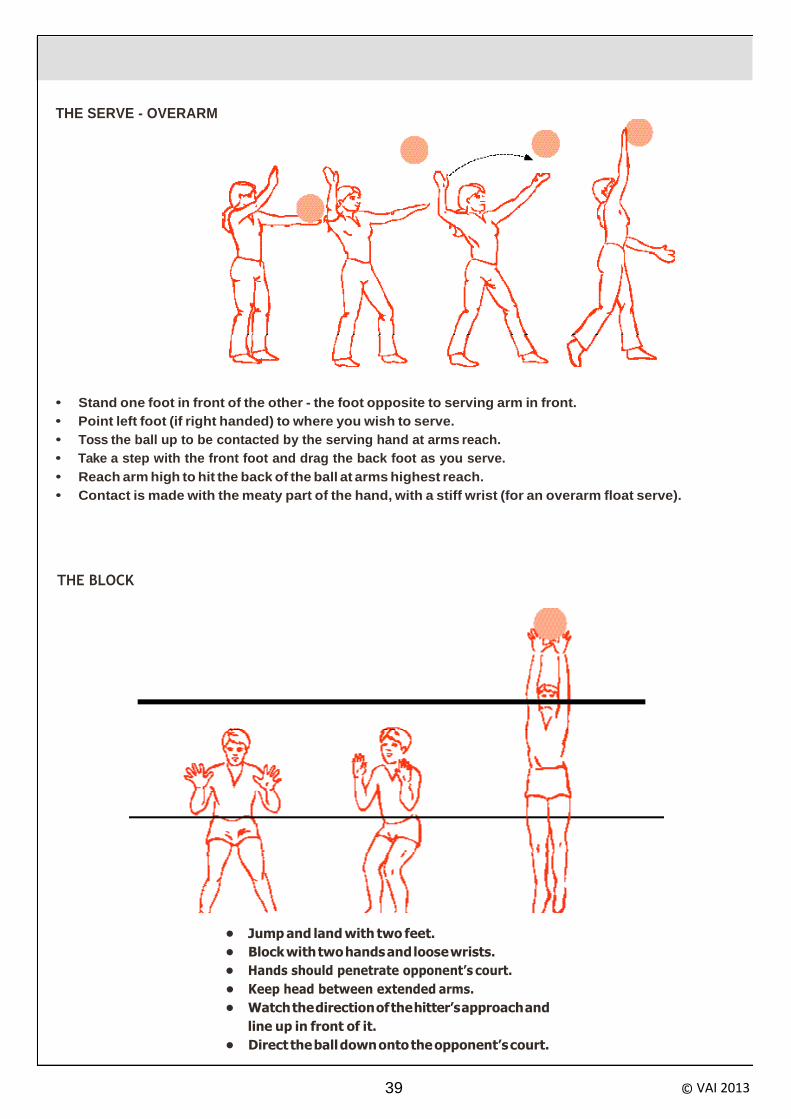
THE SERVE - OVERARM
• Stand one foot in front of the other - the foot opposite to serving arm in front.
• Point left foot (if right handed) to where you wish to serve.
• Toss the ball up to be contacted by the serving hand at arms reach.
• Take a step with the front foot and drag the back foot as you serve.
• Reach arm high to hit the back of the ball at arms highest reach.
• Contact is made with the meaty part of the hand, with a stiff wrist (for an overarm float serve).
THE BLOCK
• Jump and land with two feet.
• Block with two hands and loose wrists.
• Hands should penetrate opponent’s court.
• Keep head between extended arms.
• Watch the direction of the hitter’s approach and
line up in front of it.
• Direct the ball down onto the opponent’s court.

40 © VAI 2013
• Bounce ball on floor with two hands.
• Bounce ball with one hand, then the other.
• Bounce ball as above while looking at coach.
• Bounce ball as above with eyes closed.
• Bounce ball while walking or running a set distance.
• Bounce ball around body, under legs to partner etc...
• Throw and catch the ball.
• Throw and catch while standing on a fixed spot.
• Throw and catch as above while clapping in between.
• Throw and catch as above while turning in between.
• Throw ball, sit down, catch ball.
• Sit down, throw ball, stand up, catch ball.
• Throw and catch starting and finishing above the head.
• Now lessen the time which ball is held until the release is automatic.
• Throw ball, jump, and catch ball above head.
• Jump, throw ball, and catch above head.
• Practice forearm passing ball on one arm.
• Practice forearm passing on alternative arms.
• With partner – long throwing and catching.
• With partner – bounce ball of floor from overhead.
• Throw the ball to oneself near the net, jump off two feet and tip the ball over the
net.
• Throw the ball to oneself near the net, jump off two feet and hit the ball over the
net.
• In pairs, underarm throw with two hands. The throw must be high enough for the
partner to catch the ball above their head.
COOL DOWN DRILLS • Have students walk round hall:
o On tip-toes o On Heels o taking giant steps o Make sure students are slowing down and NOT RUNNING!
• Let students sit down or lie down for ten seconds. You count the ten seconds!!
BALL HANDLING & COOL DOWN DRILLS
41 © VAI 2013
S
S
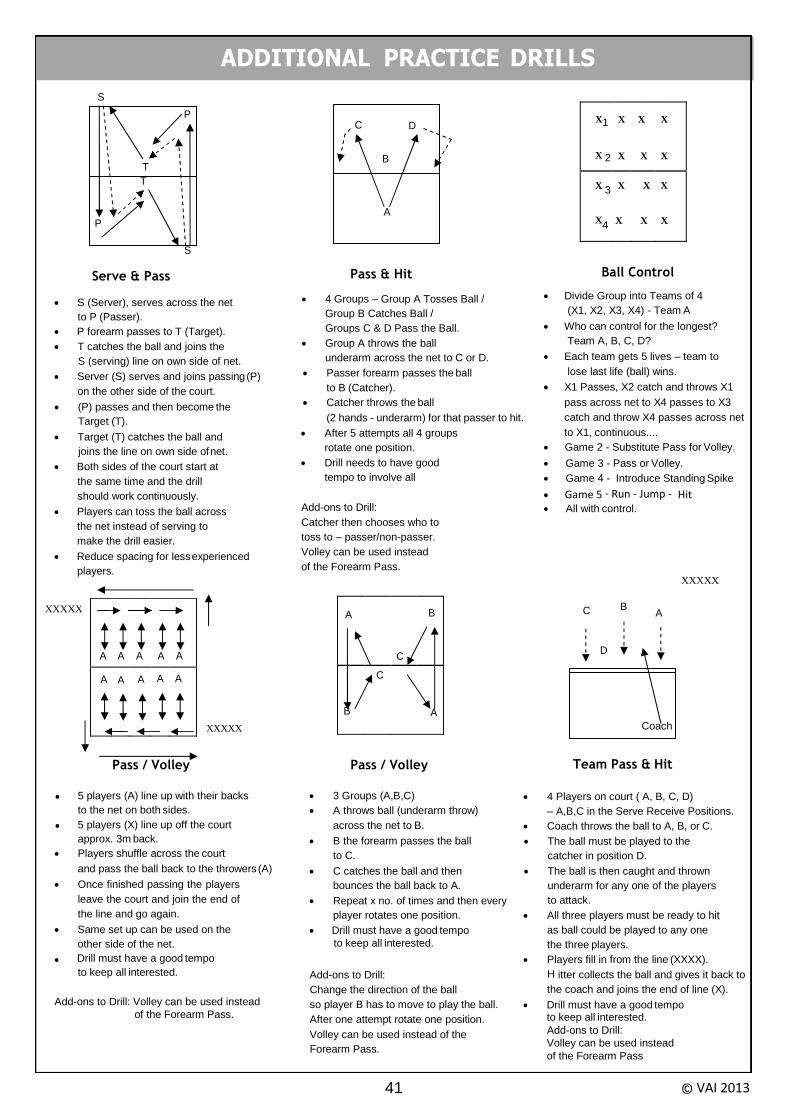
Serve & Pass
Pass & Hit
Ball Control
• S (Server), serves across the net
to P (Passer).
• P forearm passes to T (Target).
• T catches the ball and joins the
S (serving) line on own side of net.
• Server (S) serves and joins passing (P)
on the other side of the court.
• (P) passes and then become the
Target (T).
• Target (T) catches the ball and
joins the line on own side of net.
• Both sides of the court start at
the same time and the drill
should work continuously.
• Players can toss the ball across
the net instead of serving to
make the drill easier.
• Reduce spacing for less experienced
players.
XXXXX
XXXXX
• 4 Groups – Group A Tosses Ball /
Group B Catches Ball /
Groups C & D Pass the Ball.
• Group A throws the ball
underarm across the net to C or D.
• Passer forearm passes the ball
to B (Catcher).
• Catcher throws the ball
(2 hands - underarm) for that passer to hit.
• After 5 attempts all 4 groups
rotate one position.
• Drill needs to have good
tempo to involve all
Add-ons to Drill:
Catcher then chooses who to
toss to – passer/non-passer.
Volley can be used instead
of the Forearm Pass.
• Divide Group into Teams of 4
(X1, X2, X3, X4) - Team A
• Who can control for the longest?
Team A, B, C, D?
• Each team gets 5 lives – team to
lose last life (ball) wins.
• X1 Passes, X2 catch and throws X1
pass across net to X4 passes to X3
catch and throw X4 passes across net
to X1, continuous....
• Game 2 - Substitute Pass for Volley.
• Game 3 - Pass or Volley.
• Game 4 - Introduce Standing Spike
• Game 5 - Run - Jump - Hit • All with control.
XXXXX
Pass / Volley Pass / Volley Team Pass & Hit
• 5 players (A) line up with their backs
to the net on both sides.
• 5 players (X) line up off the court
approx. 3m back.
• Players shuffle across the court
and pass the ball back to the throwers (A)
• Once finished passing the players
leave the court and join the end of
the line and go again.
• Same set up can be used on the
other side of the net.
• Drill must have a good tempo
to keep all interested.
Add-ons to Drill: Volley can be used instead
of the Forearm Pass.
• 3 Groups (A,B,C)
• A throws ball (underarm throw)
across the net to B.
• B the forearm passes the ball
to C.
• C catches the ball and then
bounces the ball back to A.
• Repeat x no. of times and then every
player rotates one position.
• Drill must have a good tempo
to keep all interested.
Add-ons to Drill:
Change the direction of the ball
so player B has to move to play the ball.
After one attempt rotate one position.
Volley can be used instead of the
Forearm Pass.
• 4 Players on court ( A, B, C, D)
– A,B,C in the Serve Receive Positions.
• Coach throws the ball to A, B, or C.
• The ball must be played to the
catcher in position D.
• The ball is then caught and thrown
underarm for any one of the players
to attack.
• All three players must be ready to hit
as ball could be played to any one
the three players.
• Players fill in from the line (XXXX).
H itter collects the ball and gives it back to
the coach and joins the end of line (X).
• Drill must have a good tempo to keep all interested.
Add-ons to Drill:
Volley can be used instead
of the Forearm Pass
P
T
ADDITIONAL PRACTICE DRILLS
P C D
T B
A
C B A
D
Coach
X1
X 2
X
X
X
X
X
X
X 3
X
4
X
X
X
X
X
X
A
A
A
A
A
A A A A A
A
C
B
B
C
A
42 © VAI 2013
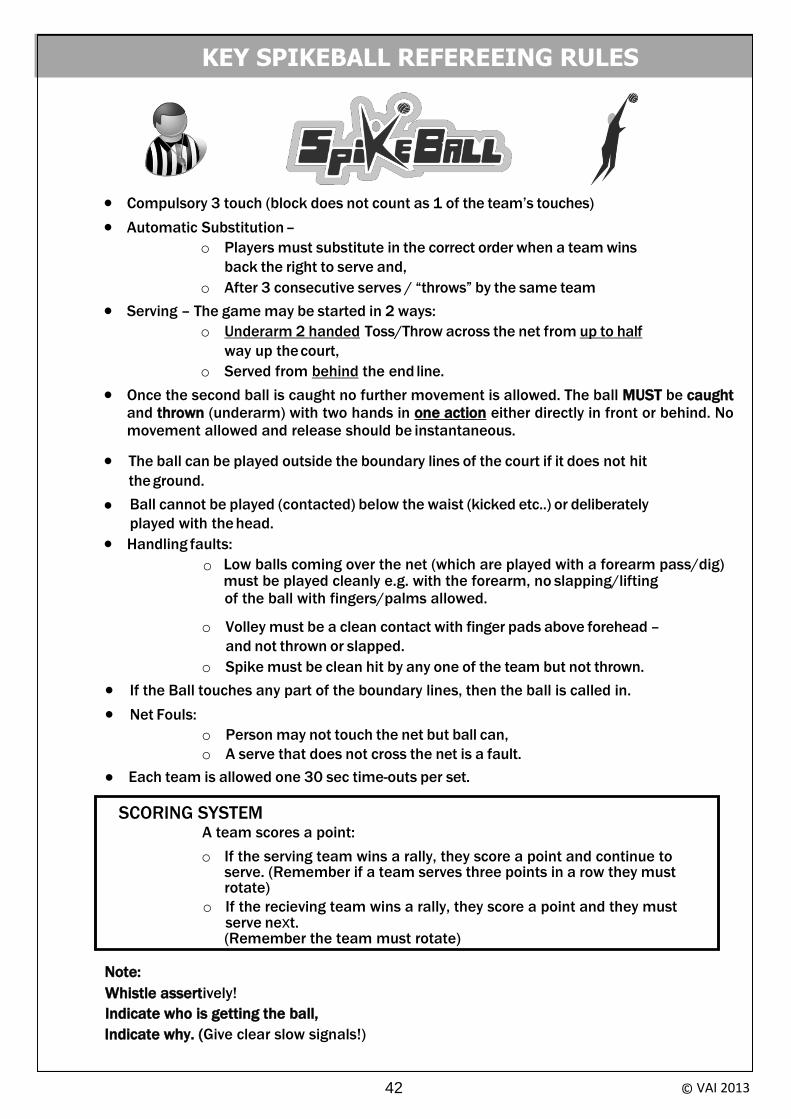
• Compulsory 3 touch (block does not count as 1 of the team’s touches)
• Automatic Substitution –
o Players must substitute in the correct order when a team wins
back the right to serve and,
o After 3 consecutive serves / “throws” by the same team
• Serving – The game may be started in 2 ways:
o Underarm 2 handed Toss/Throw across the net from up to half
way up the court,
o Served from behind the end line.
• Once the second ball is caught no further movement is allowed. The ball MUST be caught and thrown (underarm) with two hands in one action either directly in front or behind. No movement allowed and release should be instantaneous.
• The ball can be played outside the boundary lines of the court if it does not hit
the ground.
• Ball cannot be played (contacted) below the waist (kicked etc..) or deliberately played with the head.
• Handling faults:
o Low balls coming over the net (which are played with a forearm pass/dig) must be played cleanly e.g. with the forearm, no slapping/lifting of the ball with fingers/palms allowed.
o Volley must be a clean contact with finger pads above forehead –
and not thrown or slapped.
o Spike must be clean hit by any one of the team but not thrown.
• If the Ball touches any part of the boundary lines, then the ball is called in.
• Net Fouls:
o Person may not touch the net but ball can,
o A serve that does not cross the net is a fault.
• Each team is allowed one 30 sec time-outs per set.
Note:
Whistle assertively!
Indicate who is getting the ball,
Indicate why. (Give clear slow signals!)
KEY SPIKEBALL REFEREEING RULES
SCORING SYSTEM A team scores a point:
o If the serving team wins a rally, they score a point and continue to serve. (Remember if a team serves three points in a row they must rotate)
o If the recieving team wins a rally, they score a point and they must serve next. (Remember the team must rotate)
43 © VAI 2013
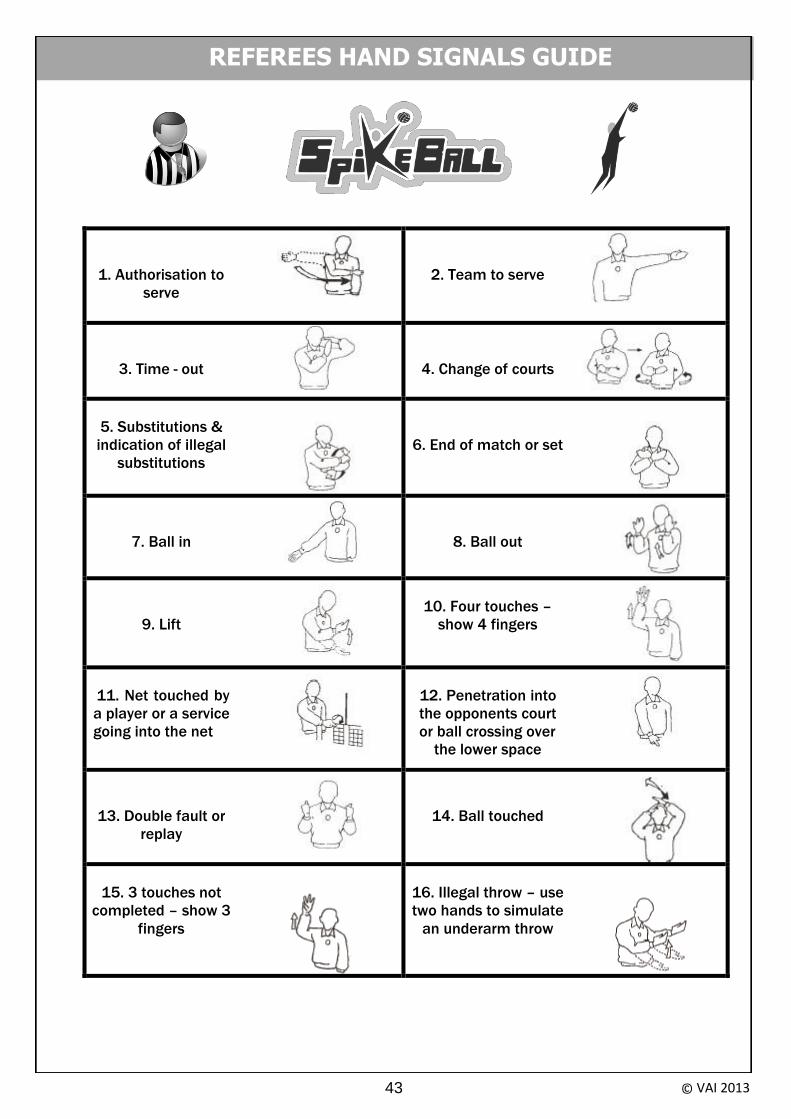
1. Authorisation to
serve
2. Team to serve
3. Time - out
4. Change of courts
5. Substitutions &
indication of illegal
substitutions
6. End of match or set
7. Ball in
8. Ball out
9. Lift
10. Four touches –
show 4 fingers
11. Net touched by
a player or a service
going into the net
12. Penetration into
the opponents court
or ball crossing over
the lower space
13. Double fault or
replay
14. Ball touched
15. 3 touches not
completed – show 3
fingers
16. Illegal throw – use
two hands to simulate
an underarm throw
REFEREES HAND SIGNALS GUIDE
44 © VAI 2013
SpikeBall Facebook Page:
Get in contact with other TY Students!
Go to the TY SpikeBall Facebook Page.
Search for:
VAI TY Girls SpikeBall Leaders Award Programme
Under the Pages Section
“Talent without discipline is like an
octopus on roller skates. There is plenty of movement, but you never know
if it's going to be forward, backwards
or sideways."
25
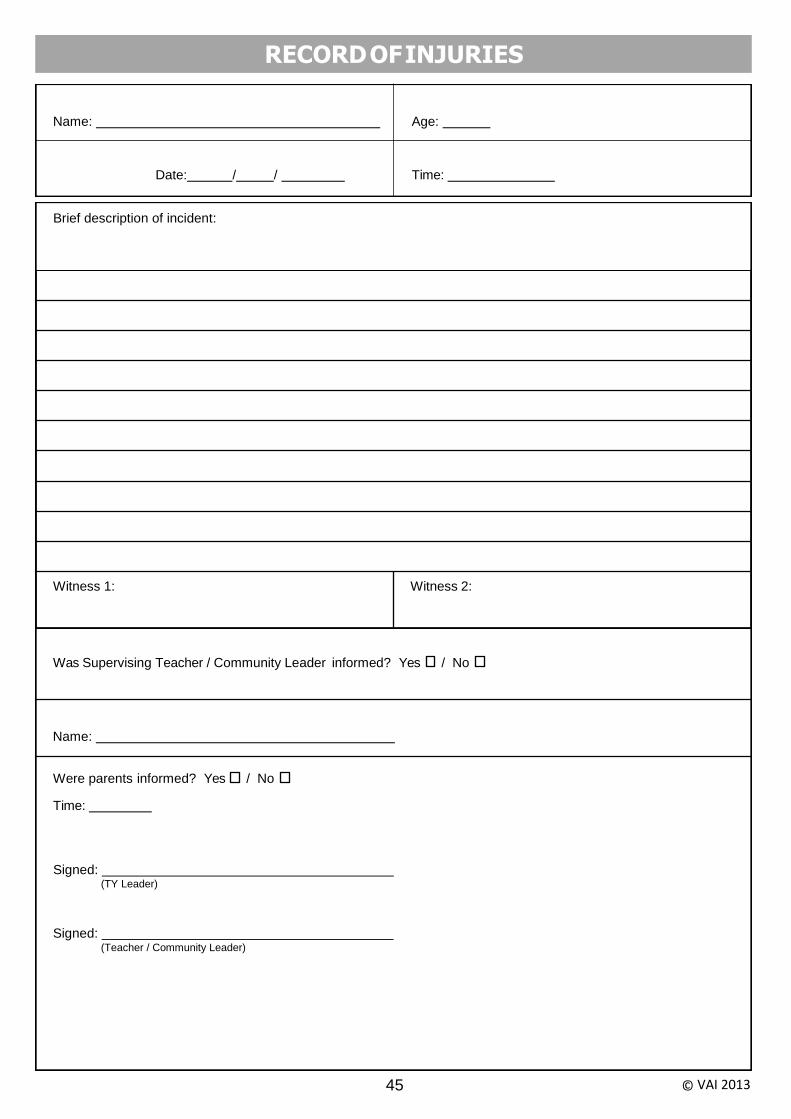
Brief description of incident:
Witness 1: Witness 2:
Was Supervising Teacher / Community Leader informed? Yes / No
Name:
Were parents informed? Yes / No
Time:
Signed: (TY Leader)
Signed: (Teacher / Community Leader)
© VAI 2013
RECORD OF INJURIES
Name: Age:
Date: / / Time:
45
46 © VAI 2013
“The best way
to cheer yourself up is to
cheer everybody
else up.”
Mark Twain
“Communication is a two-way street!”
47 © VAI 2013
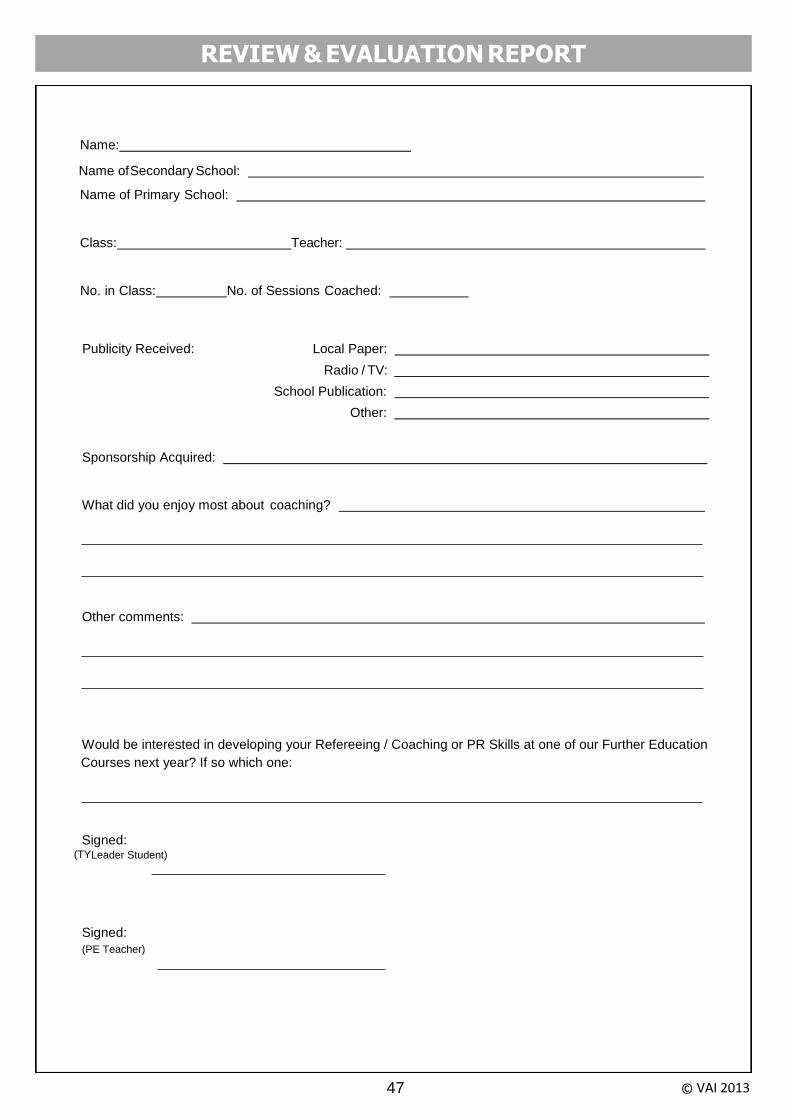
Name:
Name of Secondary School:
Name of Primary School:
Class: Teacher:
No. in Class: No. of Sessions Coached:
Publicity Received: Local Paper:
Radio / TV:
School Publication:
Other:
Sponsorship Acquired:
What did you enjoy most about coaching?
Other comments:
Would be interested in developing your Refereeing / Coaching or PR Skills at one of our Further Education
Courses next year? If so which one:
Signed: (TYLeader Student)
Signed:
(PE Teacher)
REVIEW & EVALUATION REPORT
48 © VAI 2013
“Lord, deliver me from the man
who never makes a mistake, and also
from the man who makes the same
mistake twice.”
Dr. William J. Mayo
“Man’s mind stretched
to a new idea, never goes back
to its original dimensions”
Oliver Wendall Holmes

49 © VAI 2013
NOTES
50 © VAI 2013
“Attitude is a choice we make every day”
© VAI 2013
“The future belongs to
those who believe in the beauty of their dreams.”
Eleanor Roosevelt
“Think positive,
it does not cost any more!”
“The will to win
is important, the will to prepare
is vital!”
“Minds are like parachutes,
They only function when they are open!”
“The best time to do
something worthwhile is between yesterday and
tomorrow!”

© VOLLEYBALL IRELAND 2017
Volleyball Ireland,
First Floor, 141 Thomas Street,
Dublin 8, Ireland.
Phone: 353 1 670 7165 Fax: 353 1 670 7167
Email: [email protected]
Web: www.volleyballireland.com