Embed Size (px)
Citation preview

1
User Manual for Loan and Advances IGNOU
2
Loans and Advances Navigation: Portal ���� Launch HCM Application ���� Self Service ���� Loans & Advances
2. Loans & Advances Request
Navigation: Launch HCM Application ���� Self Service ���� Loans & Advances ���� Raise Loan Request
Tab1: Find an Existing Value
Find an Existing Value: You can search the existing Loan by using the one of the following different searching criteria i.e.
1. EmplID: shows the employee id of logged in user. 2. Loan Id: You can search the existing Loan by entering the Loan Id. 3. Type of Loan: You can also search the existing Loan by entering the types of
loans are listed below.
a) Festival Advance b) Moped Advance c) Motor Cycle Advance d) Motor Car Advance e) Personal Computer Advance f) Scooter Advance
A. Enter the Loan Id
B. Select the type of Loan
3
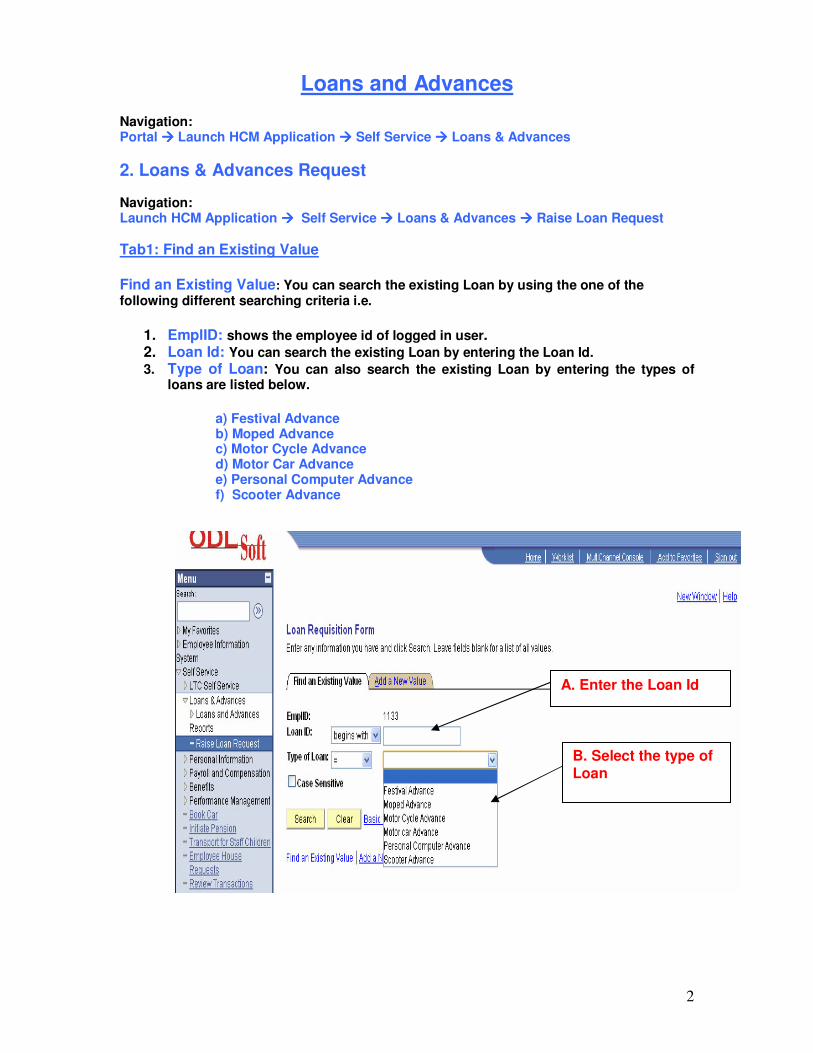
Loan Requisition Tab2: Add a New Value Click on the Add a New Value Tab
1. Shows your employee id 2. Click on Add button
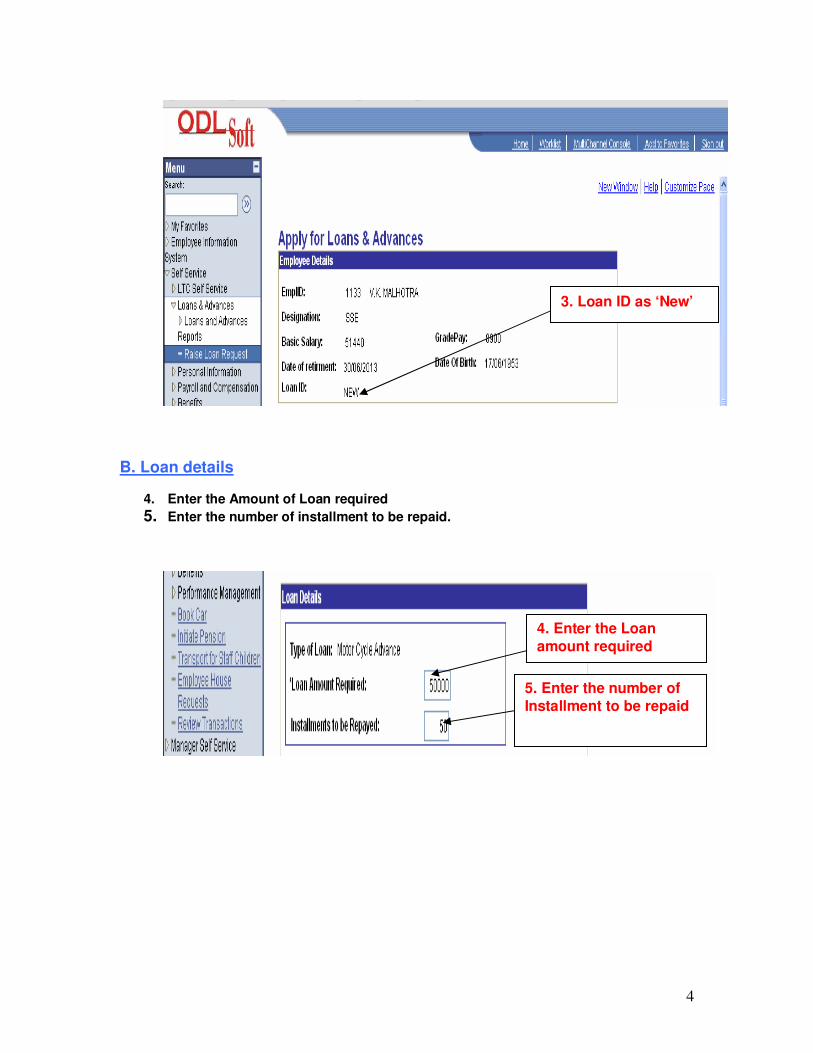
2. After Clicking the ADD button A. Shows Employee Details
3. When you apply for a Loan in that case Loan ID status always be as ‘NEW’ as below.
1. Shows your Employee Id
2. Select the Type of Loan
4
B. Loan details
4. Enter the Amount of Loan required
5. Enter the number of installment to be repaid.
3. Loan ID as ‘New’
4. Enter the Loan
amount required
5. Enter the number of
Installment to be repaid
5
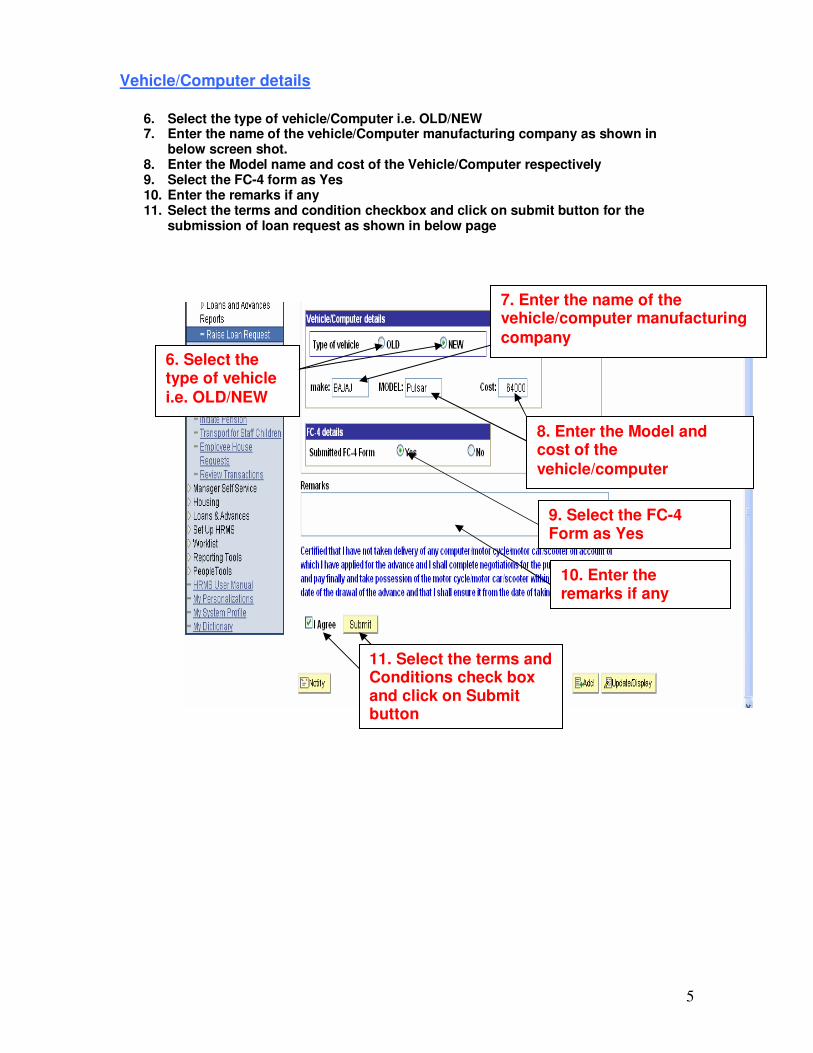
Vehicle/Computer details
6. Select the type of vehicle/Computer i.e. OLD/NEW 7. Enter the name of the vehicle/Computer manufacturing company as shown in
below screen shot. 8. Enter the Model name and cost of the Vehicle/Computer respectively 9. Select the FC-4 form as Yes 10. Enter the remarks if any 11. Select the terms and condition checkbox and click on submit button for the
submission of loan request as shown in below page
6. Select the type of vehicle
i.e. OLD/NEW
7. Enter the name of the vehicle/computer manufacturing
company
8. Enter the Model and cost of the
vehicle/computer
9. Select the FC-4 Form as Yes
10. Enter the remarks if any
11. Select the terms and Conditions check box and click on Submit button

6
After Submitting the Loan request
12. After submission of request a pop is populate to intimate for the submission of necessary documents based on the type of loan request as shown in below screen shot
13. Click on OK button
Note: - After clicking on the Ok button the Popup details also populate below your Loan request details
12. After the submission of request a popup populates to intimate for the submission of necessary documents based on the type of
Loan request
13. Click on ok
Button

7
14. After the submission of loan request ,loan id is generated as shown below
14. After submission of request, Loan ID
is generated
8
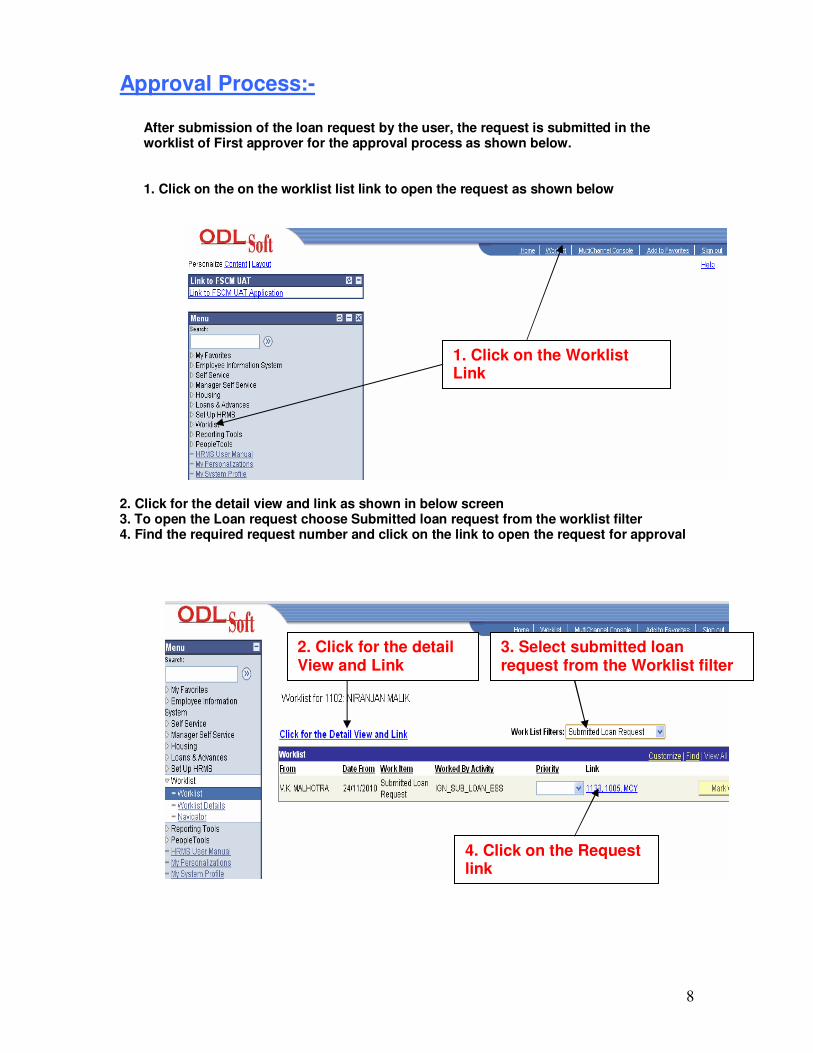
Approval Process:-
After submission of the loan request by the user, the request is submitted in the worklist of First approver for the approval process as shown below. 1. Click on the on the worklist list link to open the request as shown below
2. Click for the detail view and link as shown in below screen 3. To open the Loan request choose Submitted loan request from the worklist filter 4. Find the required request number and click on the link to open the request for approval
1. Click on the Worklist Link
2. Click for the detail View and Link
3. Select submitted loan request from the Worklist filter
4. Click on the Request link
9
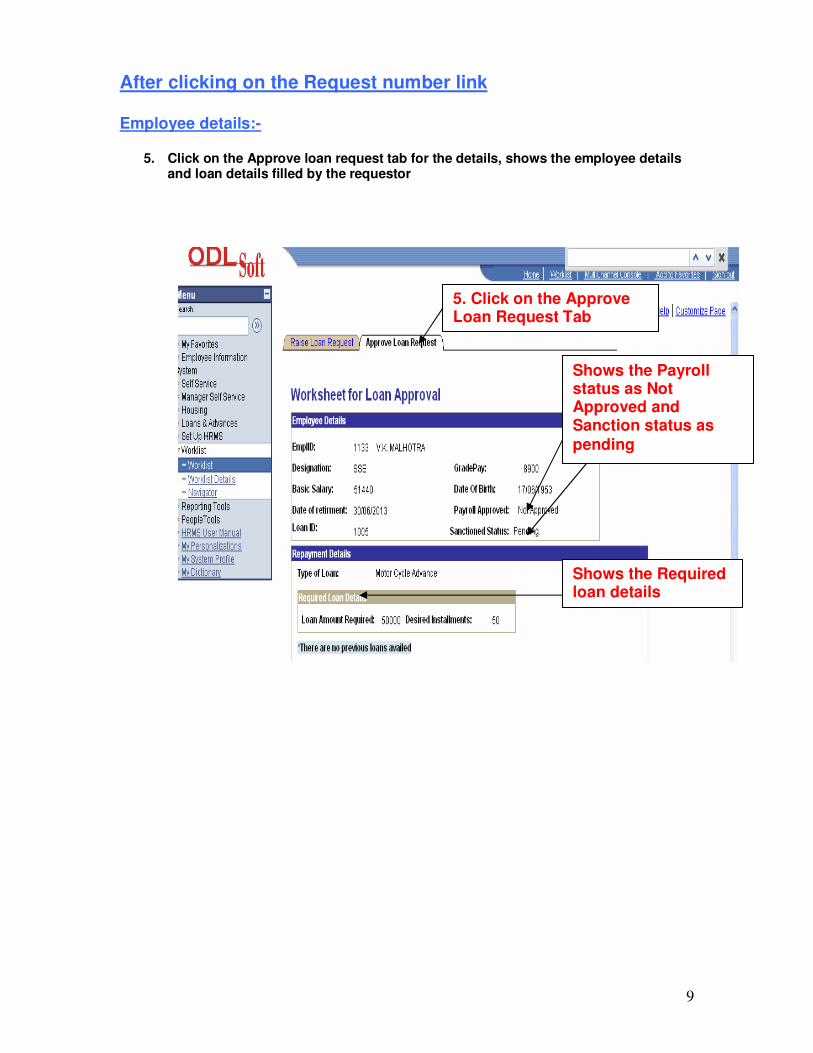
After clicking on the Request number link Employee details:-
5. Click on the Approve loan request tab for the details, shows the employee details and loan details filled by the requestor
5. Click on the Approve Loan Request Tab
Shows the Payroll status as Not Approved and Sanction status as pending
Shows the Required loan details

10
For sanction Loan please refer below Screen
Sanctioned Loan Details:-
6. Enter the Sanctioned loan amount 7. Enter the number of installment 8. click on the Calculate Principle installment Amount button 9. After clicking the button it shows the Monthly amount and last installment if any 10. Enter the number of installments in interest details as shown in below screen shot 11. Set the loan period 12. Enter the remarks if any and click on Approve button for the approval of request
Note: - If approver not finds the request according to the terms and conditions, it can be rejected by clicking on the reject button by the approver as shown in below screen
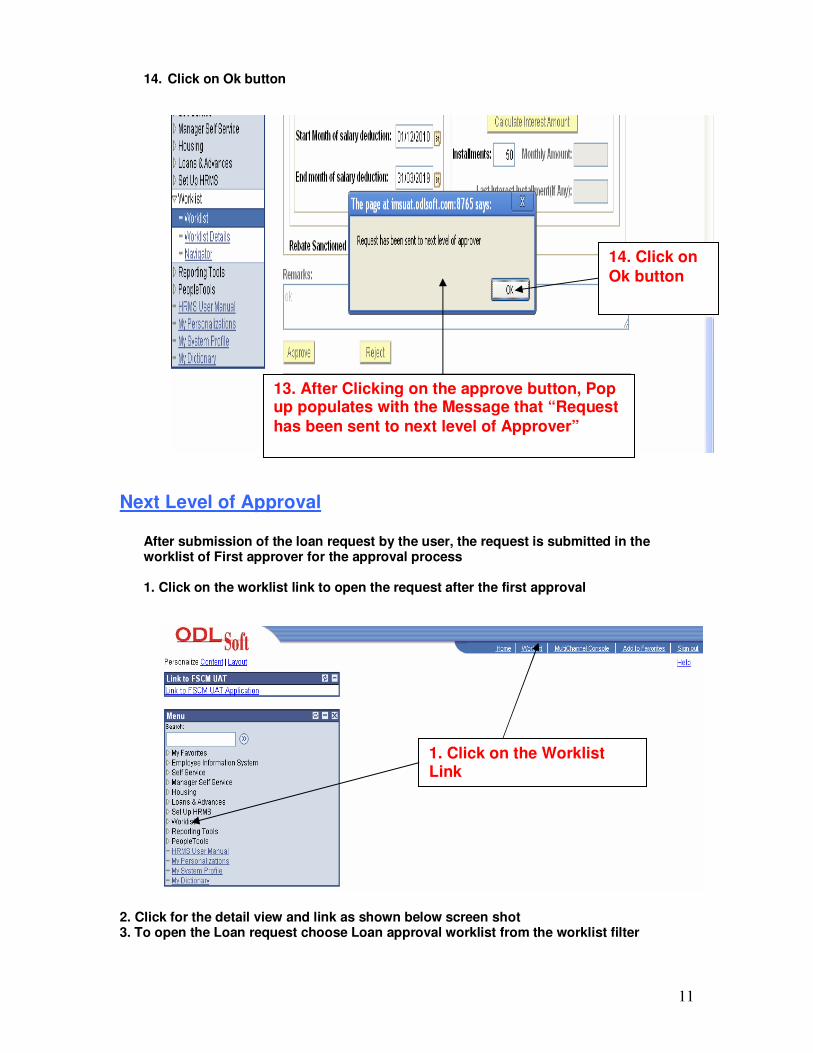
13. After the approval of first approver a popup is populate with the message “Request has been sent to next level of approver”
6. Enter the Sanctioned Loan amount 7. Enter the Number of
installments
8. After entering the installment, click on the Principle Installment amount
button
9. After clicking the button it shows the monthly amount and
the Last installment
10. Enter the number of installment in the Interest Details
11. Enter the Start Month of salary deduction
12. Enter the remarks and
Click on Approve button
If any problem, request can also be cancelled by clicking
on the reject button
11
14. Click on Ok button
Next Level of Approval
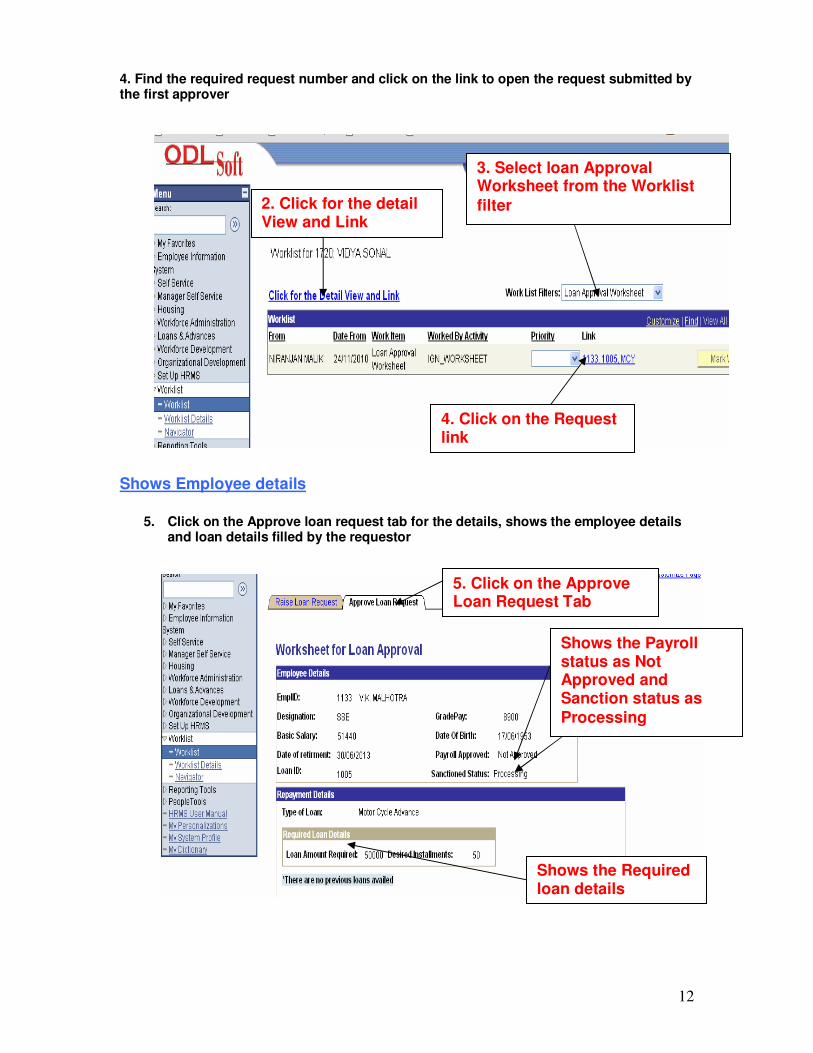
After submission of the loan request by the user, the request is submitted in the worklist of First approver for the approval process 1. Click on the worklist link to open the request after the first approval
2. Click for the detail view and link as shown below screen shot 3. To open the Loan request choose Loan approval worklist from the worklist filter
1. Click on the Worklist Link
13. After Clicking on the approve button, Pop up populates with the Message that “Request
has been sent to next level of Approver”
14. Click on
Ok button
12
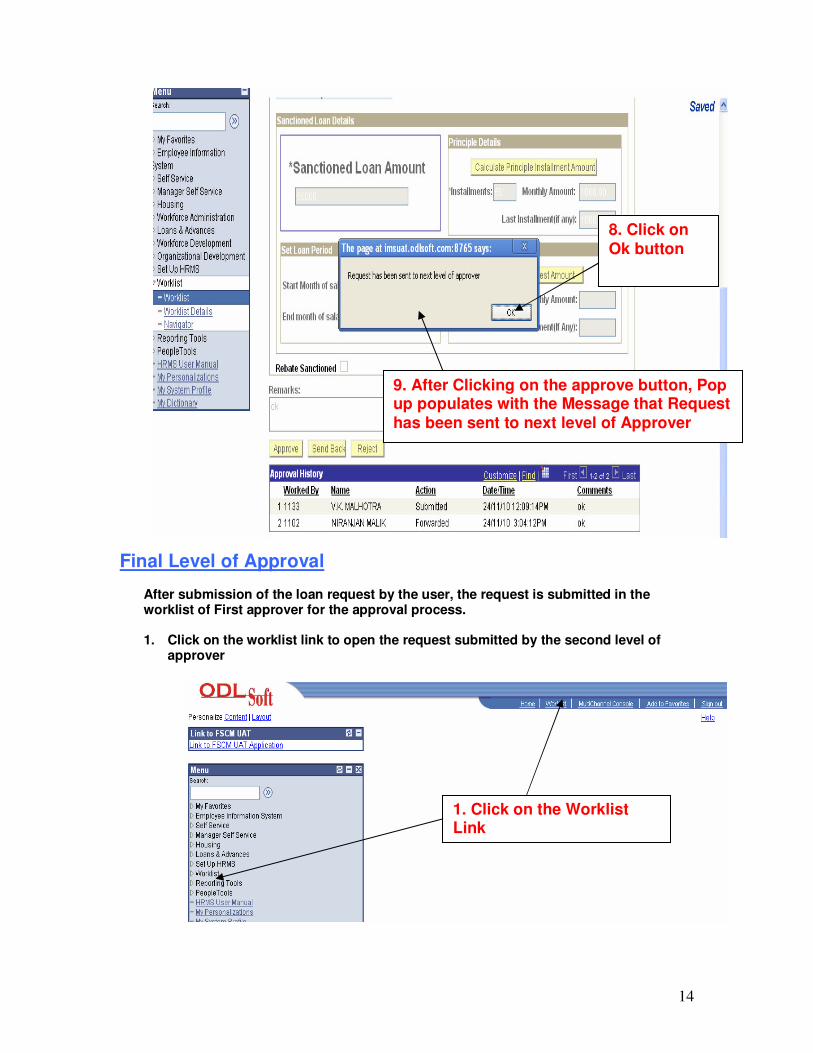
4. Find the required request number and click on the link to open the request submitted by the first approver
Shows Employee details
5. Click on the Approve loan request tab for the details, shows the employee details
and loan details filled by the requestor
2. Click for the detail View and Link
3. Select loan Approval Worksheet from the Worklist
filter
4. Click on the Request link
5. Click on the Approve Loan Request Tab
Shows the Payroll status as Not Approved and Sanction status as
Processing
Shows the Required loan details

13
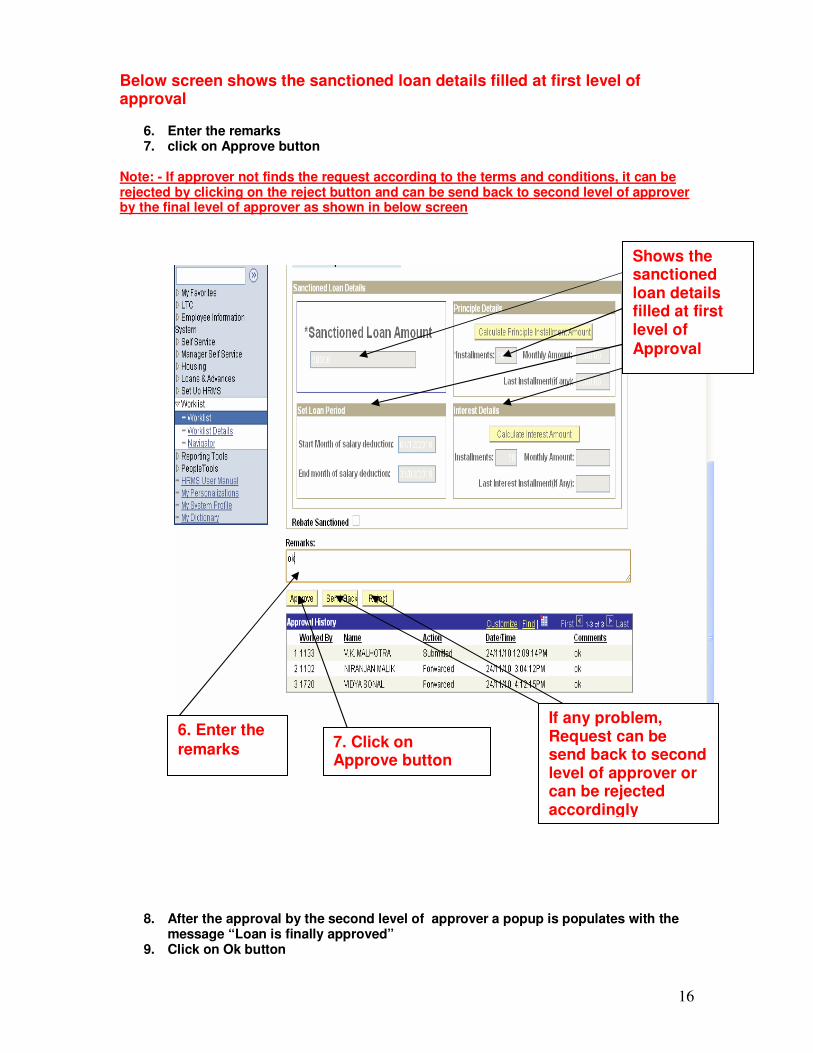
Below screen shows the sanctioned loan details filled at first level of approval
6. Enter the remarks 7. click on Approve button
Note: - If approver not finds the request according to the terms and conditions, it can be rejected by clicking on the reject button and can be send back to first level of approver by the second level of approver as shown in below screen
8. After the approval by the second level of approver a popup is populate with the message “Request has been sent to next level of approver”
9. Click on Ok button
Shows the sanctioned loan details filled at first level of
Approval
6. Enter the
remarks 7. Click on Approve button
If any problem, Request can be send back to second approver or can be
rejected accordingly
14
Final Level of Approval
After submission of the loan request by the user, the request is submitted in the worklist of First approver for the approval process. 1. Click on the worklist link to open the request submitted by the second level of
approver
1. Click on the Worklist Link
9. After Clicking on the approve button, Pop up populates with the Message that Request has been sent to next level of Approver
8. Click on
Ok button

15
2. Click for the detail view and link as shown below screen shot 3. To open the Loan request choose Loan approval worklist from the worklist filter 4. Find the required request number and click on the link to open the request submitted by second level of approver
Employee details
5. Click on the “Approve loan request tab” for the details, shows the employee and
loan details filled by the requestor Shows the Employee and required loan details as below
5. Click on the Approve Loan Request Tab
Shows the Payroll status as Not Approved and Sanction status as
Processing
Shows the Required loan details
2. Click for the detail View and Link
3. Select loan Approval Worksheet from the
Worklist filter
4. Click on the Request link
16
Below screen shows the sanctioned loan details filled at first level of approval
6. Enter the remarks 7. click on Approve button
Note: - If approver not finds the request according to the terms and conditions, it can be rejected by clicking on the reject button and can be send back to second level of approver by the final level of approver as shown in below screen
8. After the approval by the second level of approver a popup is populates with the message “Loan is finally approved”
9. Click on Ok button
Shows the sanctioned loan details filled at first level of
Approval
6. Enter the
remarks 7. Click on Approve button
If any problem, Request can be send back to second level of approver or can be rejected accordingly

17
Note: - After the final approval of loan, expense sheet is created by the first level of approver .Request is submitted in the worklist of first approver as shown below
1. Click on the worklist link to open the request submitted after the final approval of loan for the creation of Expense sheet
2. Click for the detail view and link as shown below screen shot 3. To open the Loan request choose Loan approval worklist from the worklist filter
1. Click on the Worklist Link
13. After Clicking on the approve button, Pop up populates with the Message that “Loan is
finally approved”
14. Click on Ok button

18
4. Find the required request number and click on the link to open the request again submitted after the final approval of loan by the last level of approver
- 5. After opening the required request a popup is populate with message that “Please
Click on Create Expense Sheet Button” 6. Click on OK button
7. Click on Create Expense Sheet Button as shown below
2. Click for the detail View and Link
3. Select loan Approval Worksheet from the
Worklist filter
4. Click on the Request link
5. After Clicking on the request link button, Pop up populates with the Message that “Please click on Create Expense Sheet Button”
6. Click on Ok button

19
8. Click on Goto Expense Sheet ID link for the creation of Expense Sheet number
Note:-After the creation of Expense sheet, request is submitted in the worklist of salary section approver’s Id
7. Click on Create Expense Sheet
Button
8. Click on Goto Expense Sheet ID
link
20
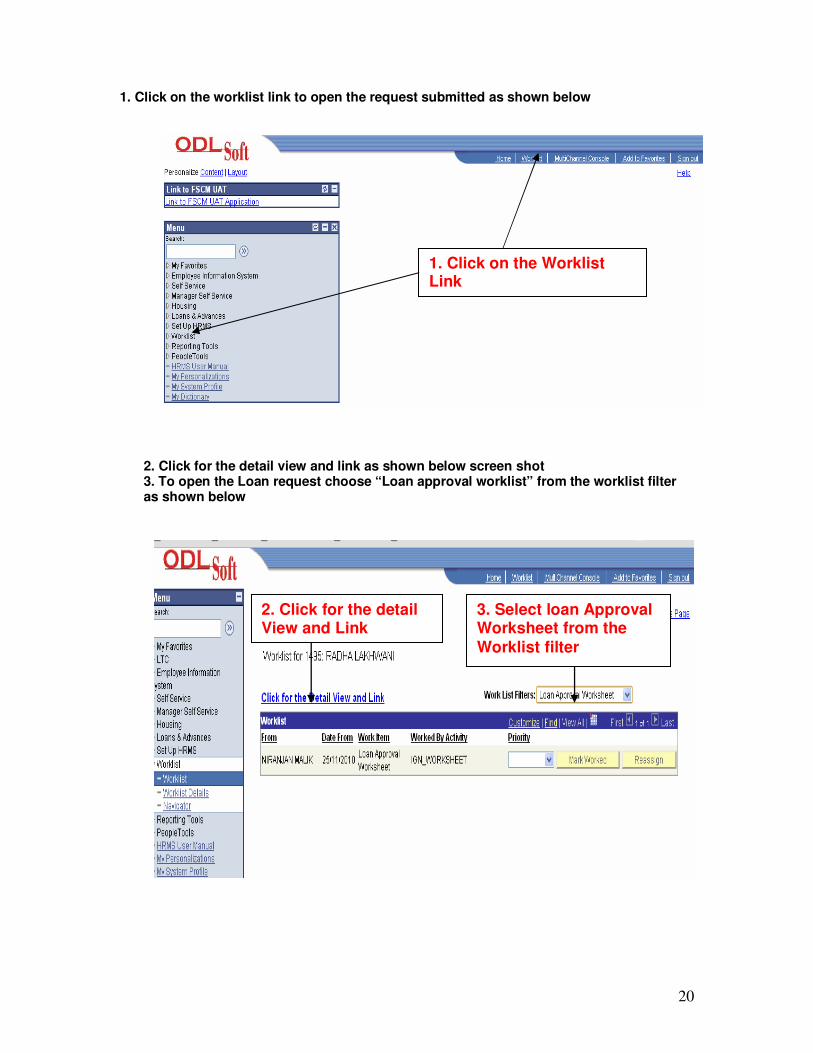
1. Click on the worklist link to open the request submitted as shown below
2. Click for the detail view and link as shown below screen shot 3. To open the Loan request choose “Loan approval worklist” from the worklist filter as shown below
1. Click on the Worklist Link
2. Click for the detail View and Link
3. Select loan Approval Worksheet from the Worklist filter

21
5. Click on Approve Loan Request Tab - Shows the expense sheet Id number - Shows the Employee and Required loan details
5. Click on the Approve Loan Request Tab Shows the Expense
sheet ID number
Shows the Payroll status as Not Approved and Sanction status as
Sanctioned
Shows the Required loan details

22
Sanctioned Loan Details are as below Note: - Calculate Interest Amount button is enabled only in case of Salary Section Approval
6. Click on the Calculate Interest Amount Button 7. Enter the remarks 8. Click on the Payroll Section Approved Button
Shows the sanctioned loan details filled by first level of
Approval
6. Click on Calculate interest Amount button in Interest details, It is enabled in case of salary section
7. Enter the Remarks
8. Click on Payroll Section Approved Button

23
Note:-After the Payroll section Approval, request is submitted for Loan Rebate Process Approval at first level approver’s Worklist
Loan Rebate Approval Process:- 1. Click on the worklist link to open the request submitted as shown below
2. Click for the detail view and link as shown below screen shot 3. To open the Loan request choose “Loan Rebate Approval” from the worklist filter as shown below 4. Find the required request number and click on the link to open the request
1. Click on the Worklist Link
After clicking on the Payroll Section Approved, Payroll Approved status changes as “Approved”.

24
5. Click on the Approve Loan Request Tab
2. Click for the detail View and Link
3. Select loan Rebate Approval from the
Worklist filter
4. Click on the Request link
5. Click on the Approve Loan Request Tab
25
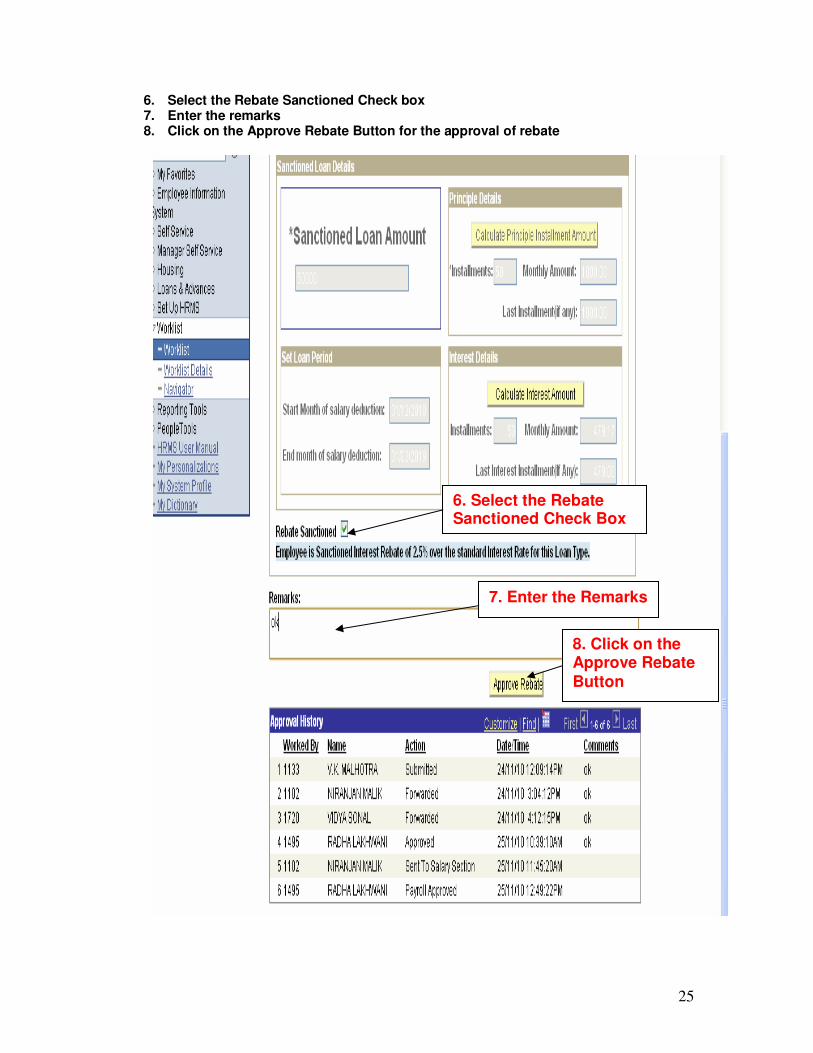
6. Select the Rebate Sanctioned Check box 7. Enter the remarks 8. Click on the Approve Rebate Button for the approval of rebate
6. Select the Rebate Sanctioned Check Box
7. Enter the Remarks
8. Click on the Approve Rebate
Button
26
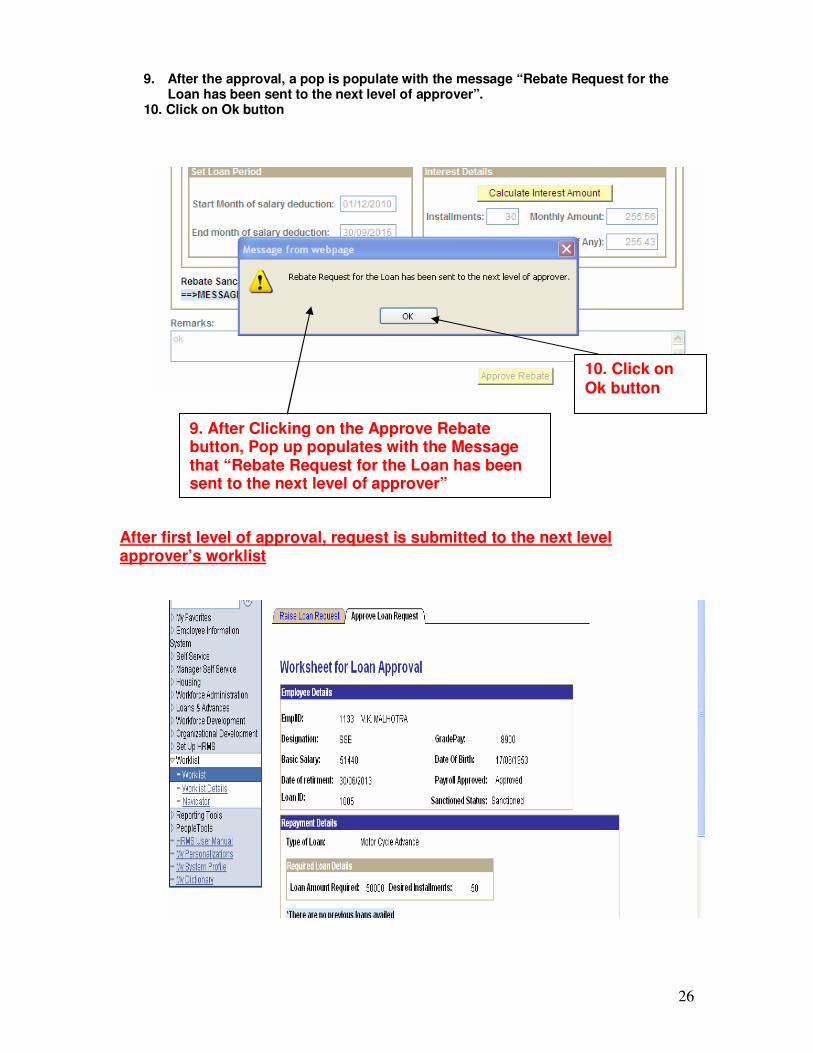
9. After the approval, a pop is populate with the message “Rebate Request for the Loan has been sent to the next level of approver”.
10. Click on Ok button
After first level of approval, request is submitted to the next level approver’s worklist
9. After Clicking on the Approve Rebate button, Pop up populates with the Message that “Rebate Request for the Loan has been sent to the next level of approver”
10. Click on
Ok button
27
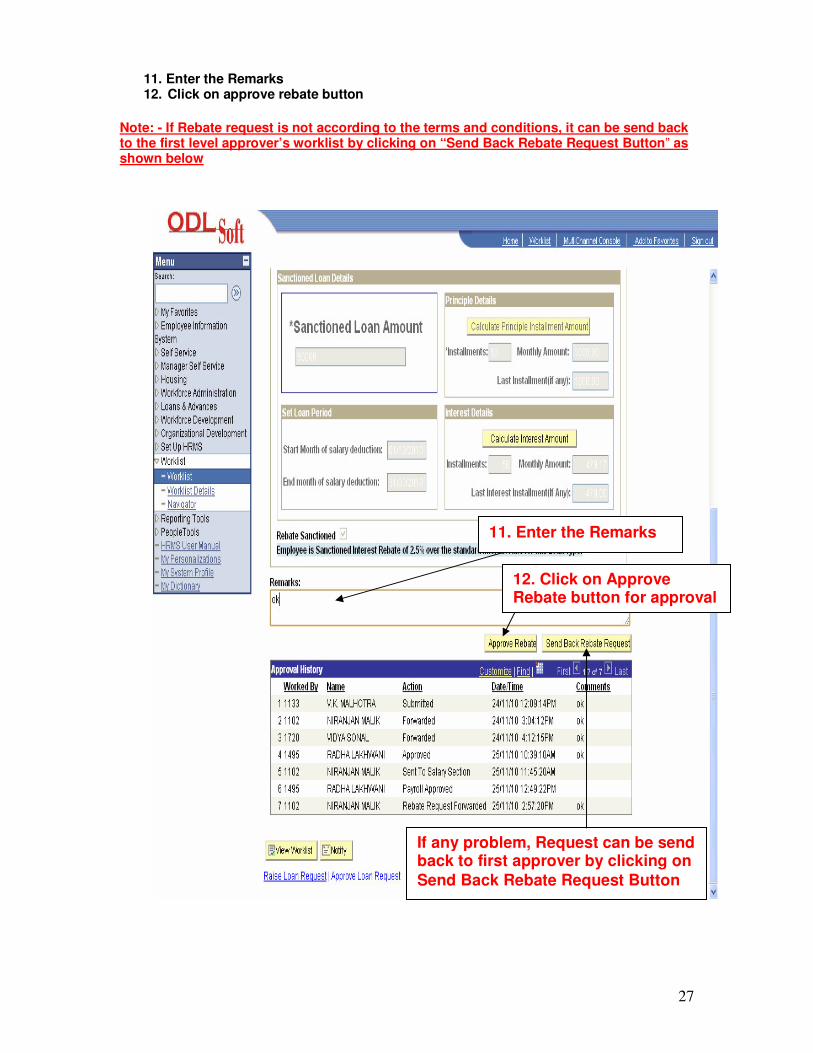
11. Enter the Remarks 12. Click on approve rebate button
Note: - If Rebate request is not according to the terms and conditions, it can be send back to the first level approver’s worklist by clicking on “Send Back Rebate Request Button” as shown below
11. Enter the Remarks
12. Click on Approve Rebate button for approval
If any problem, Request can be send back to first approver by clicking on
Send Back Rebate Request Button
28
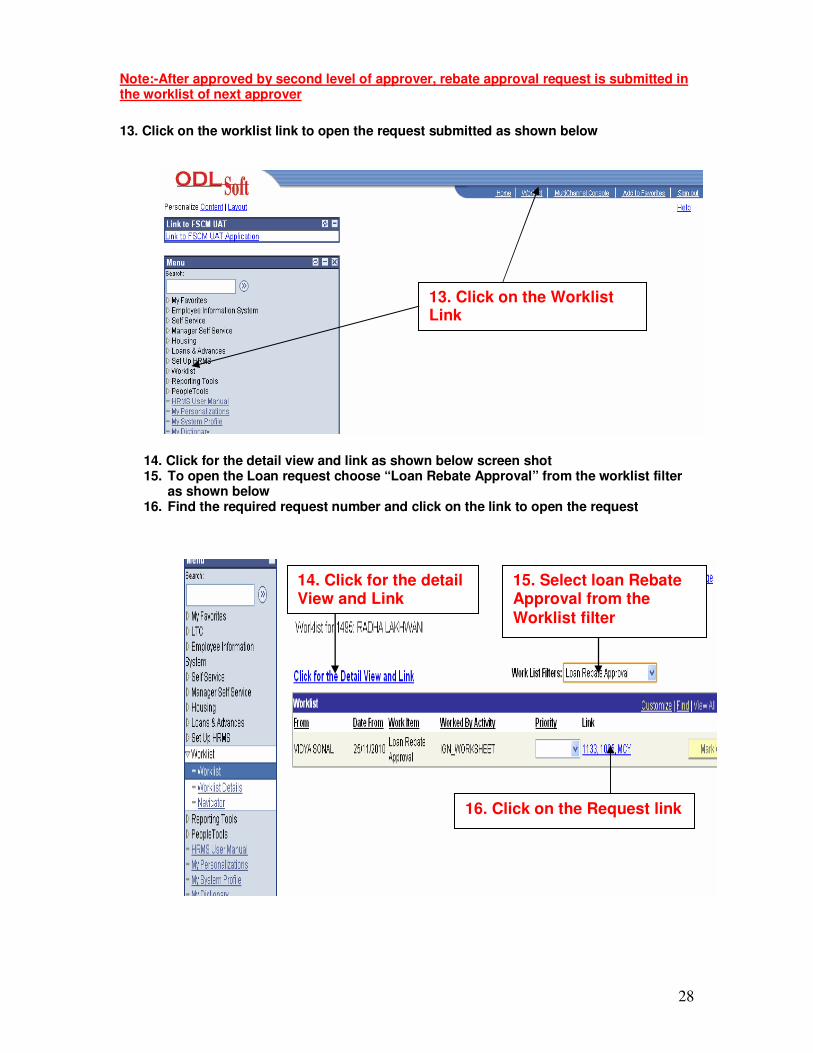
Note:-After approved by second level of approver, rebate approval request is submitted in the worklist of next approver
13. Click on the worklist link to open the request submitted as shown below
14. Click for the detail view and link as shown below screen shot 15. To open the Loan request choose “Loan Rebate Approval” from the worklist filter
as shown below 16. Find the required request number and click on the link to open the request
13. Click on the Worklist Link
14. Click for the detail View and Link
15. Select loan Rebate Approval from the Worklist filter
16. Click on the Request link
29
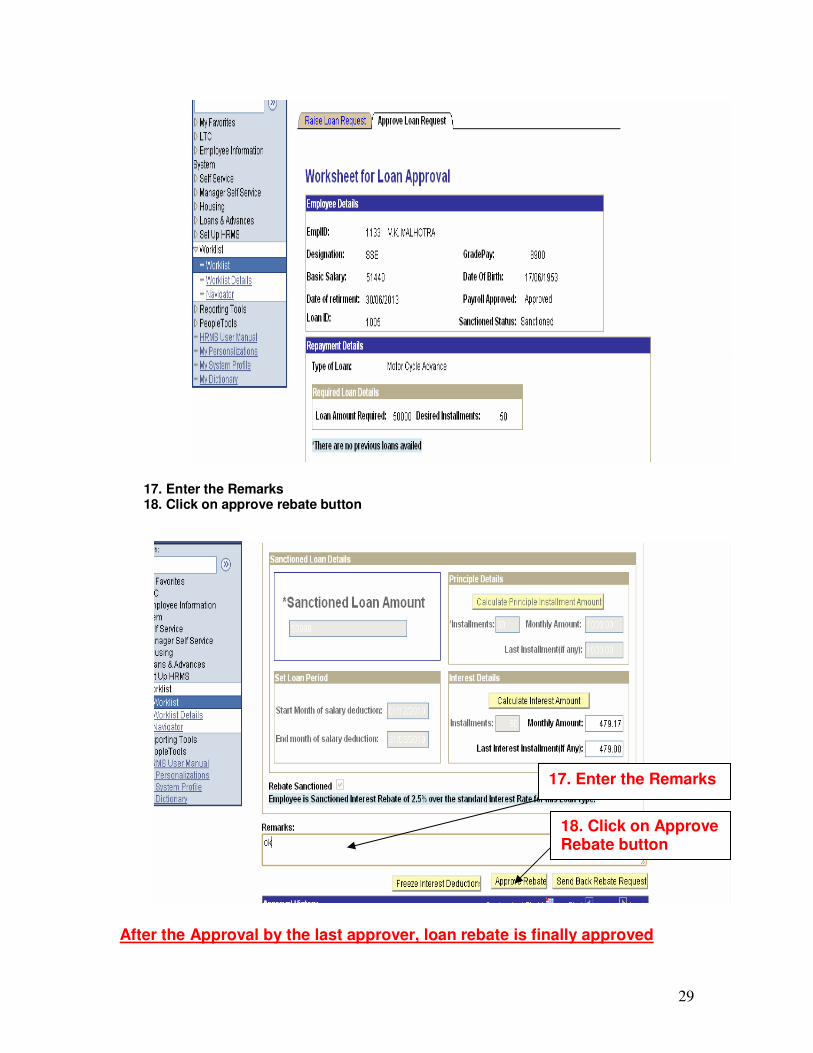
17. Enter the Remarks 18. Click on approve rebate button
After the Approval by the last approver, loan rebate is finally approved
17. Enter the Remarks
18. Click on Approve Rebate button
30
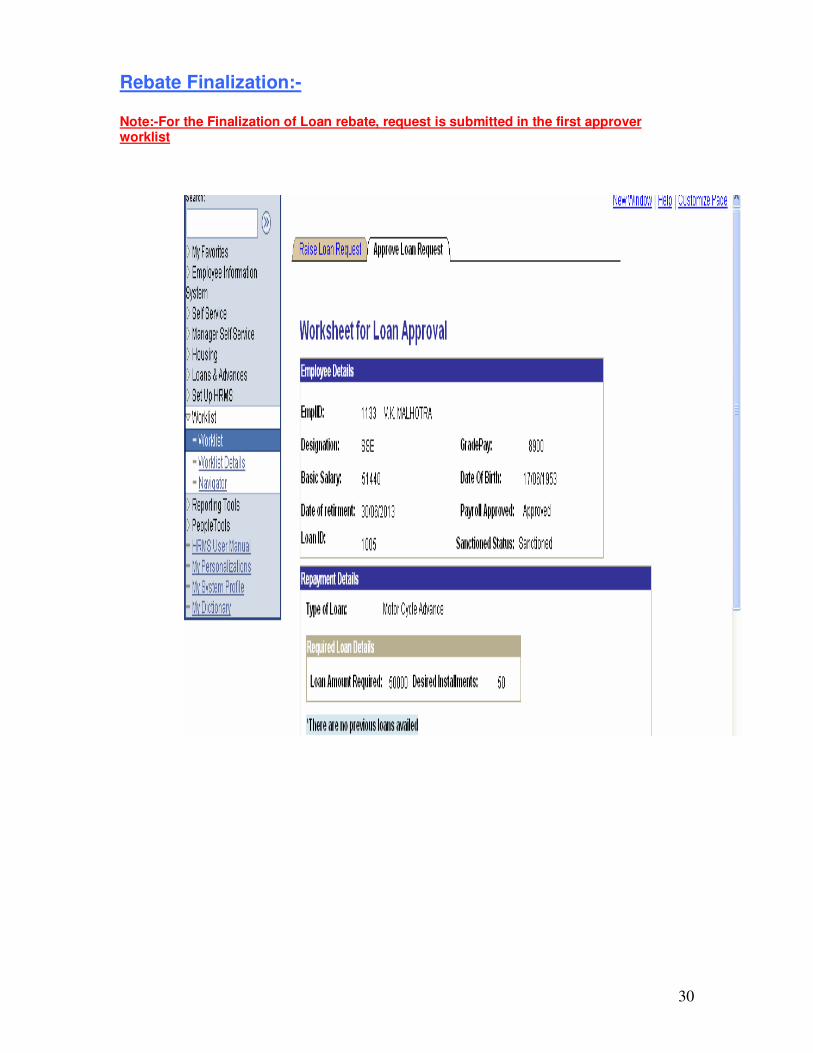
Rebate Finalization:- Note:-For the Finalization of Loan rebate, request is submitted in the first approver worklist

31
19. Click on Finalize rebate button as shown below
19. Click on the Finalize
Rebate Button

32
Freeze Interest Deduction Note: - After the Finalization of Loan rebate by first approver, request is submitted in Payroll Section approver’s worklist
33
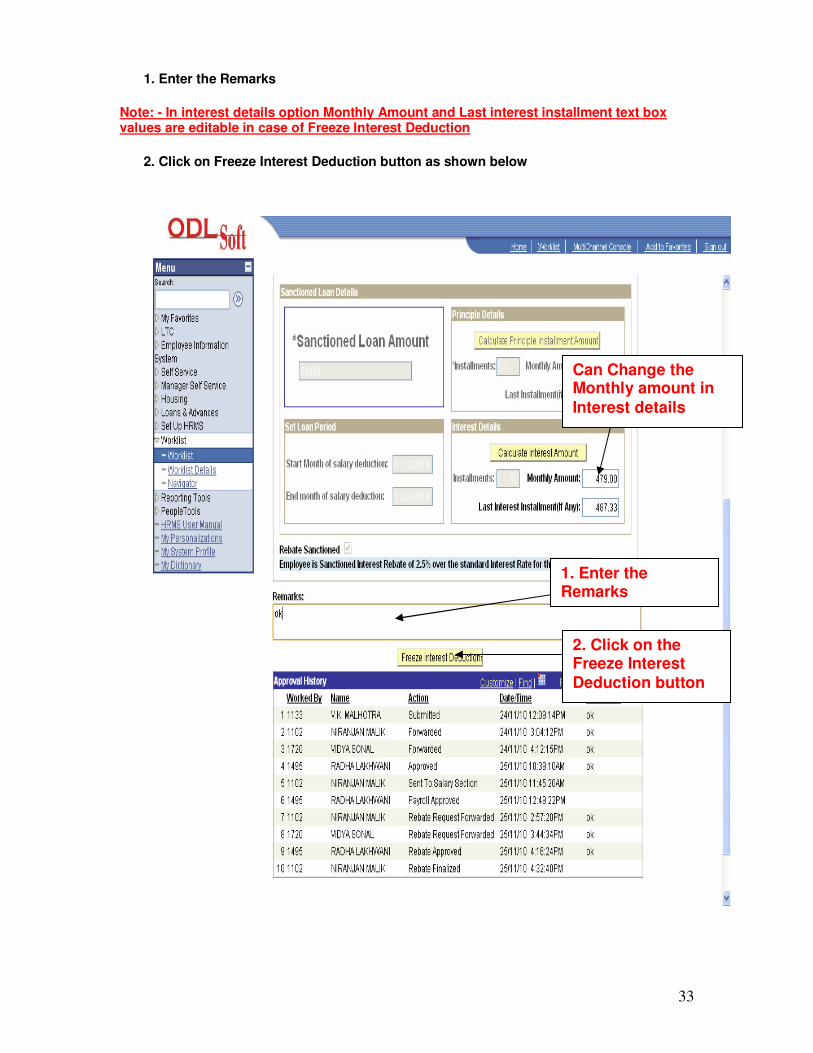
1. Enter the Remarks
Note: - In interest details option Monthly Amount and Last interest installment text box values are editable in case of Freeze Interest Deduction
2. Click on Freeze Interest Deduction button as shown below
Can Change the Monthly amount in
Interest details
1. Enter the Remarks
2. Click on the Freeze Interest
Deduction button

34
After Freezing the Interest Deduction, sanction Status changes as Sanction&Deduction Finalized