Embed Size (px)
Citation preview

910-2339-001 Rev A, October 2005
LSMS with EAGLE® 5 SASLNP Database Synchronization Manual
Table of ChaptersTable of Contents
List of Figures
List of Tables
Chapter 1. Introduction
Chapter 2. LNP Database Synchronization Overview
Chapter 3. Choosing a Database Maintenance Procedure
Chapter 4. Managing Resynchronization from the LSMS
Chapter 5. Auditing and Reconciling Network Elements from the LSMS
Chapter 6. Managing Bulk Load from the LSMS
Chapter 7. Copying One RTDB from Another RTDB
Chapter 8. Distributing the LNP Database after LSMS-Based Operation or RTDB Copy
Appendix A. LSMS GUI Messages
Appendix B. Enabling LSMS Audit on ELAP
Appendix C. LNP Database Synchronization Files
Appendix D. Synchronization Performance Estimates
Index

910-2339-001 Rev A, October 2005
Tekelec LSMSwith EAGLE® 5 SAS
LNP Database Synchronization Manual910-2339-01 Revision A
October 2005
Copyright 2005 Tekelec.All Rights ReservedPrinted in U.S.A.
NoticeInformation in this documentation is subject to change without notice. Unauthorized use or copying of this documentation can result in civil or criminal penalties.
Any export of Tekelec products is subject to the export controls of the United States and the other countries where Tekelec has operations.
No part of this documentation may be reproduced or transmitted in any form or by any means, electronic or mechanical, including photocopying or recording, for any purpose without the express written permission of an authorized representative of Tekelec.
Other product names used herein are for identification purposes only, and may be trademarks of their respective companies.
TrademarksThe Tekelec logo, EAGLE, G-Flex, G-Port, IP7, IP7Edge, IP7 Secure Gateway, and TALI are registered trademarks of Tekelec, Inc. TekServer is a trademark of Tekelec, Inc. All other trademarks are the property of their respective owners.
PatentsThis product is covered by one or more of the following U.S. and foreign patents:
U.S. Patent Numbers:
5,008,929, 5,953,404, 6,167,129, 6,324,183, 6,327,350, 6,606,379, 6,639,981, 6,647,113, 6,662,017, 6,735,441, 6,745,041, 6,765,990, 6,795,546, 6,819,932, 6,836,477, 6,839,423, 6,885,872
Ordering InformationAdditional copies of this document can be ordered from:
Tekelec Network Signaling Group Attention: Central Logistics 5200 Paramount Parkway Morrisville, North Carolina, 27560
Or e-mail your request to [email protected].
910-2339-001 Rev A, October 2005 i
Table of Contents
Chapter 1. Introduction
Overview ............................................................................................. 1-1
Releases Described in This Manual ................................................. 1-2What’s New in This Manual ............................................................. 1-2
Manual Organization ........................................................................ 1-4Related Publications .......................................................................... 1-5
EAGLE 5 SAS Documentation Set ............................................ 1-5LSMS Documentation Set ......................................................... 1-10
Documentation Packaging, Delivery, and Updates .................... 1-13Documentation Admonishments .................................................. 1-13
Tekelec Customer Care Center ...................................................... 1-14Emergency Response ....................................................................... 1-14
List of Acronyms and Abbreviations ............................................ 1-15
Chapter 2. LNP Database Synchronization Overview
Introduction ........................................................................................ 2-2
LSMS Connectivity ...................................................................... 2-3LSMS Functions ........................................................................... 2-3
LNP Configuration ............................................................................ 2-7Overview of Synchronization Methods .......................................... 2-7
Resynchronizing LSMS and Network Element Data ............. 2-7Auditing and Reconciling Network Element Data ................ 2-9
Bulk Loading LNP Data ........................................................... 2-10Maximum Number of Simultaneous Synchronization
Operations .................................................................................. 2-11Maximum Number of Simultaneous Synchronization
Operations for LSMS Releases Prior to 8.0 ...................... 2-11
Maximum Number of Simultaneous Synchronization Operations for LSMS Release 8.0 ...................................... 2-12
Chapter 3. Choosing a Database Maintenance Procedure
Introduction ........................................................................................ 3-2
Notifications that Database Maintenance Is Required ................. 3-3Choosing a Synchronization Procedure ......................................... 3-3
Understanding Sequence of Procedures to Be Performed ........... 3-5
ii 910-2339-001 Rev A, October 2005
Table of Contents
Chapter 4. Managing Resynchronization from the LSMS
Introduction ........................................................................................4-2Automatic Resynchronization Process ...........................................4-2
User-Initiated Resynchronization Overview .................................4-4Managing User-Initiated Resynchronization from the LSMS .....4-6
User-Initiated Resynchronization Procedure ..........................4-6User-Initiated Resynchronization Log File ............................ 4-18
User-Initiated Resynchronization Error Messages ............... 4-21
Chapter 5. Auditing and Reconciling Network Elements from the LSMS
Introduction ........................................................................................5-2
Methods of Auditing and Reconciling .....................................5-2Operator Action at Network Element ......................................5-2
Types of Data to Audit and Reconcile ......................................5-3How Records Are Compared During an Audit ......................5-4
Displaying Audit Results ...........................................................5-7Reconciling ...................................................................................5-8
Audit and Reconcile Function Summary .................................5-9Audit Restrictions ........................................................................5-9
Audit and Reconcile Timeline ........................................................ 5-10Single SV/NPB Audit and Reconcile Timeline ..................... 5-10
Range Audit and Reconcile Timeline ..................................... 5-11Managing Audit and Reconcile from the LSMS GUI ................. 5-13
Audit Error Messages ............................................................... 5-13Single SV/NPB Audit and Optional Reconcile from the LSMS
GUI ........................................................................................5-13Range Audit and Optional Reconcile from the LSMS GUI .5-18
Post-Audit Reconcile from the GUI ........................................ 5-28Performing an Audit Using the Command Line .........................5-32
Audit Log File ................................................................................... 5-37Viewing Audit Log Files ........................................................... 5-37
Audit Log File Contents ............................................................ 5-38Continuing an Interrupted Object Range Audit ...................5-40
Chapter 6. Managing Bulk Load from the LSMS
Introduction ........................................................................................6-2
When to Perform a Bulk Load ...................................................6-2Bulk Load Restrictions ................................................................6-2
Bulk Load Overview .........................................................................6-3Managing Bulk Load from the LSMS ..............................................6-5
Table of Contents
910-2339-001 Rev A, October 2005 iii
Bulk Load Procedure .................................................................. 6-5
Bulk Load Log File .................................................................... 6-20Bulk Load Error Messages ....................................................... 6-23
Chapter 7. Copying One RTDB from Another RTDB
Introduction ........................................................................................ 7-2Copying RTDB from Mated ELAP ........................................... 7-2
Copying RTDB from ELAP on Remote Mated NE ................. 7-3Verifying RTDB Status ...................................................................... 7-4
Verifying RTDB Status at the EAGLE 5 SAS Terminal .......... 7-4Verifying RTDB Status at the ELAP User Interface ................ 7-5
Procedure to Copy an RTDB from the Mate ELAP ....................... 7-7Procedure to Copy RTDB from Remote Mated NE .................... 7-12
Chapter 8. Distributing the LNP Database after LSMS-Based Operation or RTDB Copy
Introduction ........................................................................................ 8-2
Distributing an RTDB LNP Database to DSMs ............................. 8-2
Appendix A. LSMS GUI Messages
Introduction ....................................................................................... A-2
GUI Messages Start Here ................................................................ A-3
Appendix B. Enabling LSMS Audit on ELAP
Introduction ........................................................................................B-2Enabling an LSMS Audit ..................................................................B-2
Appendix C. LNP Database Synchronization Files
Introduction ....................................................................................... C-2Log Files .............................................................................................. C-2
Location of LNP Database Synchronization Log Files .......... C-2Viewing an LNP Database Synchronization Log File ........... C-3
LNP Database Synchronization Log File Contents ............... C-3Discrepancy Files ............................................................................ C-13
Location of Discrepancy Files ................................................. C-13Viewing a Discrepancy File ..................................................... C-13
Discrepancy File Contents ....................................................... C-14
iv 910-2339-001 Rev A, October 2005
Table of Contents
Appendix D. Synchronization Performance Estimates
Introduction .......................................................................................D-2Recommended Network Bandwidth .............................................D-2
Performance of LSMS to NE Operations .......................................D-3Performance of NE to NE Operations ............................................D-4
Index
910-2339-001 Rev A, October 2005 v
List of Figures
Figure 2-1. Local Number Portability Network ..................................2-2
Figure 2-2. LNP Configuration ..............................................................2-7
Figure 4-1. User-Initiated Resynchronization Timeline .....................4-4
Figure 4-2. ELAP Main Menu ................................................................4-8
Figure 4-3. Disabling LSMS Connection ..............................................4-8
Figure 4-4. Enabling Change HS Bulk Download ...............................4-9
Figure 4-5. Re-sync Window ................................................................ 4-10
Figure 4-6. Abort Resynchronization Dialog ..................................... 4-11
Figure 4-7. Resynchronization Complete ...........................................4-12
Figure 4-8. Disable LSMS Connection Window ................................ 4-13
Figure 4-9. Stopping Software on the ELAP GUI .............................. 4-14
Figure 4-10. Reload from Remote ELAP ............................................ 4-15
Figure 4-11. Confirming a Reload ....................................................... 4-15
Figure 4-12. Reload from Mate Successful ......................................... 4-16
Figure 4-13. Starting Software on the ELAP GUI .............................. 4-16
Figure 4-14. Software Started on the ELAP GUI ............................... 4-16
Figure 4-15. Change LSMS HS Bulk Download Enabled Screen ....4-17
Figure 4-16. Bulk Load Disabled Success ...........................................4-17
Figure 4-17. Enable LSMS Connection Window ............................... 4-18
Figure 4-18. LSMS Connection Enabled on the ELAP GUI ............. 4-18
Figure 4-19. Browsing for Resynchronization Log Files .................. 4-19
Figure 4-20. Example of a User-Initiated Resynchronization Log File ................................................................................ 4-20
Figure 5-1. Timeline for a Single SV/NPB Audit with Reconcile ...5-11
Figure 5-2. Timeline for a Range Audit with Reconcile ................... 5-12
Figure 5-3. Single SV/NPB Audit Window, Audit Range Tab .......5-15
Figure 5-4. Single SV/NPB Audit Window, Audit Results Tab .....5-16
Figure 5-5. Reconcile Complete ........................................................... 5-18
Figure 5-6. Audit Window, Audit Range Tab ................................... 5-20
Figure 5-7. Audit Window, Audit Results Tab ..................................5-23
vi 910-2339-001 Rev A, October 2005
List of Figures
Figure 5-8. Abort Operation Dialog ....................................................5-25
Figure 5-9. Audit Complete Information Dialog ............................... 5-25
Figure 5-10. Audit Complete ................................................................ 5-26
Figure 5-11. Reconcile Complete .........................................................5-27
Figure 5-12. Reconcile Operation Complete ...................................... 5-27
Figure 5-13. Post-Audit Reconcile Window, Input File Tab ............ 5-30
Figure 5-14. Post Audit Reconcile Initialized .................................... 5-30
Figure 5-15. Audit Results Tab ............................................................ 5-31
Figure 5-16. Reconcile Complete ......................................................... 5-31
Figure 5-17. Reconcile Operation Complete ...................................... 5-32
Figure 5-18. Browsing for Audit Log Files ......................................... 5-37
Figure 5-19. Example of an Audit Log File for Two Completed Audits .................................................................................. 5-38
Figure 5-20. Example of Audit Log File for Partially Completed Audit .................................................................................... 5-39
Figure 6-1. Bulk Load Timeline .............................................................6-3
Figure 6-2. ELAP Main Menu ................................................................6-6
Figure 6-3. Disabling the LSMS Connection .......................................6-7
Figure 6-4. Enabling Change HS Bulk Download ..............................6-7
Figure 6-5. Change Simplex Mode Screen ...........................................6-8
Figure 6-6. Enabling the LSMS Connection .........................................6-9
Figure 6-7. Bulk Load Window ............................................................ 6-10
Figure 6-8. Abort Bulk Load Operation Dialog ................................. 6-12
Figure 6-9. Bulk Load Complete Information Dialog ....................... 6-12
Figure 6-10. Bulk Load Complete ........................................................ 6-13
Figure 6-11. Disable LSMS Connection Window .............................. 6-14
Figure 6-12. Stopping Software on the ELAP GUI ............................ 6-15
Figure 6-13. Reload from Remote ELAP ............................................ 6-16
Figure 6-14. Confirming a Reload ....................................................... 6-16
Figure 6-15. Reload from Mate Successful ......................................... 6-17
Figure 6-16. Starting Software on the ELAP GUI .............................. 6-17
Figure 6-17. Software Started on the ELAP GUI ............................... 6-17
Figure 6-18. Change Simplex Mode Screen ....................................... 6-18
Figure 6-19. Change LSMS HS Bulk Download Enabled Screen ....6-18
Figure 6-20. Bulk Load Disabled Success ...........................................6-19
Figure 6-21. Enable LSMS Connection Window ............................... 6-19
Figure 6-22. LSMS Connection Enabled on the ELAP GUI ............. 6-20
List of Figures
910-2339-001 Rev A, October 2005 vii
Figure 6-23. Browsing for a Bulk Load Log Files .............................. 6-21
Figure 6-24. Example Bulk Load Log File .......................................... 6-22
Figure 7-1. ELAP Main Menu ................................................................ 7-5
Figure 7-2. ELAP RTDB Status .............................................................. 7-6
Figure 7-3. View Enabled Window ....................................................... 7-7
Figure 7-4. Disable LSMS Connection Window .................................. 7-8
Figure 7-5. Stopping Software on the ELAP GUI ............................... 7-8
Figure 7-6. Reload from Remote ELAP ................................................ 7-9
Figure 7-7. Confirming a Reload ........................................................... 7-9
Figure 7-8. Reload from Mate Successful ........................................... 7-10
Figure 7-9. Starting Software on the ELAP GUI ............................... 7-10
Figure 7-10. Software Started on the ELAP GUI ............................... 7-10
Figure 7-11. Enable LSMS Connection Window ............................... 7-11
Figure 7-12. LSMS Connection Enabled on the ELAP GUI ............. 7-11
Figure 7-13. View Enabled Window ................................................... 7-15
Figure 7-14. Disable LSMS Connection Window .............................. 7-15
Figure 7-15. Stopping Software on the ELAP GUI ........................... 7-16
Figure 7-16. Reload from Remote Mated NE’s ELAP ...................... 7-17
Figure 7-17. Confirm Reload from Remote Mated NE’s ELAP ...... 7-17
Figure 7-18. Reload from Remote Mated NE Successful ................. 7-18
Figure 7-19. Starting Software on the ELAP GUI ............................. 7-18
Figure 7-20. Software Started on the ELAP GUI ............................... 7-19
Figure 7-21. Enable LSMS Connection Window ............................... 7-19
Figure 7-22. LSMS Connection Enabled on the ELAP GUI ............. 7-19
Figure B-1. ELAP Main Menu ................................................................B-2
Figure B-2. Enabling Change HS Audit ..............................................B-3
Figure C-1. Header Section Example ................................................... C-4
Figure C-2. Audit Section Example ...................................................... C-5
Figure C-3. Reconcile Section Example ............................................... C-6
Figure C-4. Bulk Load Section Example .............................................. C-7
Figure C-5. Resynchronization Section Example ............................... C-9
Figure C-6. Audit Summary Section Example for NPA-NXX Range .............................................................. C-11
Figure C-7. Audit Summary Section Example for Time Range ..... C-11
Figure C-8. Download Summary Section Example ......................... C-12
Figure C-9. Download Commit/Discard Section Example ............ C-12
Figure C-10. Example of a Discrepancy File Header Section ......... C-14
viii 910-2339-001 Rev A, October 2005
List of Figures
Figure C-11. Discrepancy Section Example, Audit of NPBs .......... C-15
Figure C-12. Discrepancy Section Example, Audit of TNs ............. C-15
Figure C-13. Discrepancy Summary Section Example .................... C-16
910-2339-001 Rev A, October 2005 ix
List of Tables
Table 2-1. Bulk Load Options .............................................................. 2-11
Table 2-2. Maximum Number of Simultaneous Synchronization Operations for LSMS Releases Prior to 8.0 ...................... 2-12
Table 2-3. Maximum Number of Simultaneous Synchronization Operations for LSMS Release 8.0 ...................................... 2-13
Table 3-1. Procedures Required for Synchronization Phases ............ 3-6
Table 5-1. LNP Data Type Attributes Included in Checksums ......... 5-5
Table 5-2. Audit Data Discrepancies ..................................................... 5-6
Table 5-3. Audit Types and Functions .................................................. 5-9
Table 5-4. Audit Results Fields ............................................................ 5-17
Table 5-5. Audit Range Values ............................................................ 5-21
Table 5-6. Audit Results Fields ............................................................ 5-24
Table 5-7. Parameters Used by Command-Line Interface ............... 5-34
Table 5-8. Audit Command Parameters ............................................. 5-35
Table C-1. LNP Database Synchronization Log File Directories ..... C-2
Table C-2. LNP Database Synchronization Log File Contents ......... C-3
Table C-3. LNP Data Type Key Fields ................................................. C-4
Table C-4. LNP Data Type Key Fields ................................................. C-5
Table C-5. LNP Database Synchronization Log File Directories ... C-13
Table D-1. LNP Database Synchronization Performance Estimates D-3
Table D-2. Estimating Time to Copy RTDB Across Customer Network .............................................................. D-4

x 910-2339-001 Rev A, October 2005
910-2339-001 Rev A, October 2005 1-1
1
Introduction
Overview .......................................................................................................... 1–1
Releases Described in This Manual .............................................................. 1–2
What’s New in This Manual .......................................................................... 1–2
Manual Organization ...................................................................................... 1–4
Related Publications........................................................................................ 1–5
EAGLE 5 SAS Documentation Set .......................................................... 1–5
LSMS Documentation Set ...................................................................... 1–10
Documentation Packaging, Delivery, and Updates.................................. 1–13
Documentation Admonishments ................................................................ 1–13
Tekelec Customer Care Center .................................................................... 1–14
List of Acronyms and Abbreviations.......................................................... 1–15
Overview
Local Number Portability (LNP) provides a user with the ability to move the telephone service from one service provider to another without changing the telephone number. LNP is managed by Number Portability Administration Centers (NPACs), which serve different geographical regions. NPACs distribute LNP data to local service management systems (LSMSs), which, in turn, distribute the LNP data to network elements, for example, Eagle STPs. The LSMS keeps data for each NPAC region in a separate regional database. The data for any telephone number must be the same at the NPAC, the LSMS, and the network elements.
1-2 910-2339-001 Rev A, October 2005
Introduction
In addition, the LSMS stores locally provisioned data in a database separate from the regional databases and sends that data to all network elements. Locally provisioned data must also be the same between the LSMS and the network elements.
If the LNP databases of the LSMS and the network element get out of synchronization (for example, after an outage), the LSMS LNP database is used as the master database to synchronize the network element LNP database.
The LSMS and the network element use the following methods to synchronize their databases:
• Resynchronizing - the LSMS resends all transactions to the network element up to a maximum number of transactions (automatic resynchronization) or a maximum period of time (optional user-initiated resynchronization).
• Reconciling - after an audit of the network element LNP data, the user can reconcile any differences discovered during the audit.
• Bulk Loading - complete replacement of the network element LNP database.
Releases Described in This Manual
Until superseded by a future release of this manual using a part number different from 910-2339-001, this manual describes LSMS Release 6.5 and all later releases of LSMS, EAGLE 5 SAS release 30.0 and all later releases, and ELAP 3.0.0 and all later releases.
NOTE: Not all combinations of LSMS, ELAP, and EAGLE 5 SAS releases covered in this manual are supported. To determine which releases of other products are compatible with a given product, refer to the Feature Notice for that product.
What’s New in This Manual
All changes to this manual since it was last released as 910-4751 Rev D, March 2005, are marked with change bars. The following items summarize the changes made for this revision:
• The EAGLE® 5 SAS brand name has been applied.
• The following items have been added for LSMS Release 8.0. These functions are not available for LSMS releases prior to 8.0.
— The LSMS audit function has been enhanced to allow users to audit a single subscription version or number pool block while any other database synchronization is occurring. This function is called Single SV/NPB Audit. A user can perform one Single SV/NPB Audit at a time to
Introduction
910-2339-001 Rev A, October 2005 1-3
each network element simultaneously (LSMS supports up to eight network elements).
— The LSMS audit function that was available in previous releases of LSMS has been subdivided to two types of audit: Range Audit and Single SV/NPB Audit. This division allows a Single SV/NPB Audit and a Range Audit to be performed at the same time for a given network element.
NOTE: This manual uses the term Range Audit to describe all types of audits other than the Single SV/NPB Audit. For LSMS releases prior to 8.0, all audits are Range Audits, although the GUI menu item is simply called Audit.
— The LSMS audit function has been enhanced to allow users to perform one Range Audit of each supported network element simultaneously. In previous releases of LSMS, only four database synchronizations of any kind were allowed; the maximum of four synchronizations still applies to bulk loads and user-initiated resynchronizations. For more details about maximum number of simultaneous synchronizations, see “Maximum Number of Simultaneous Synchronization Operations” on page 2-11.
• Various editorial changes have been made.
1-4 910-2339-001 Rev A, October 2005
Introduction
Manual Organization
This manual is organized into these sections:
• Chapter 1, “Introduction,” contains general information about the organization of this manual.
• Chapter 2, “LNP Database Synchronization Overview,” presents an overview of the various methods available, depending on the features installed, for synchronizing the LNP database on the network element (NE) with the LNP database on the LSMS.
• Chapter 3, “Choosing a Database Maintenance Procedure,” describes the notifications that let you know that manual intervention is required when automatic resynchronization of the LNP databases cannot be accomplished, and guides you in choosing the most appropriate and efficient synchronization procedure, depending on the features installed at the LSMS and at the NE.
• Chapter 4, “Managing Resynchronization from the LSMS,” describes how automatic resynchronization (which resends all transactions that were previously sent from the LSMS to the NE up to a maximum number of transactions) occurs and how to manage from the LSMS optional, user-initiated resynchronization (which resends all transactions that were previously sent from the LSMS to the NE over a period of time not to exceed seven days). User-initiated resynchronization is available only if certain optional features are installed at the LSMS and at the NE (as described in Chapter 2, “LNP Database Synchronization Overview”).
• Chapter 5, “Auditing and Reconciling Network Elements from the LSMS,” describes how to audit network element data. At any time, unless certain conditions exist, an audit of the subscription data contained on the network element can be initiated from the LSMS. An audit compares the subscription version data at the network element with that at the LSMS. Some audit functions are available only if certain optional features (as described in Chapter 2, “LNP Database Synchronization Overview”) are installed at the LSMS and at the network element.
• Chapter 6, “Managing Bulk Load from the LSMS,” describes how to initiate and manage an electronic bulk download at the LSMS. Bulk loading completely replaces an LNP database (all subscription version, NPA Split, Translation Type Service, default Global Title Translation and override Global Title Translation data) at a network element. Electronic bulk loading from the LSMS is available only if certain optional features (as described in Chapter 2, “LNP Database Synchronization Overview”) are installed at the LSMS and at the network element.
• Chapter 7, “Copying One RTDB from Another RTDB,” describes how to copy the contents of the Real-Time Database (RTDB) that exists on the mated EAGLE LNP Application Processor (ELAP) server to an RTDB within the same network element that needs database restoration or to copy the contents
Introduction
910-2339-001 Rev A, October 2005 1-5
of the Real-Time Database (RTDB) that exists on an ELAP on the mated network element to an RTDB that needs database restoration.
• Chapter 8, “Distributing the LNP Database after LSMS-Based Operation or RTDB Copy,” describes how the user distributes to all the Database Service Modules (DSMs) in the network element the NE LNP database that has been changed as a result of an LNP Database Synchronization operation. The NE LNP database may have been resynchronized as a result of a download from the LSMS as a result of a procedure in Chapter 6, “Managing Bulk Load from the LSMS.” Some of these operations are available only if certain optional features (as described in Chapter 2, “LNP Database Synchronization Overview”) are installed at the LSMS and at the network element.
• Appendix A, “LSMS GUI Messages,” lists in alphabetical order the messages that can appear when you are using the LSMS graphical user interface (GUI) functions described in this manual.
• Appendix B, “Enabling LSMS Audit on ELAP,” shows how to enable an LSMS audit when it has been disabled. By default, an ELAP allows an audit from the LSMS, but the user may have disabled this ability in order to debug a problem. An LSMS audit, as described in Chapter 5, “Auditing and Reconciling Network Elements from the LSMS,” cannot be performed unless the ELAP has this setting enabled.
• Appendix C, “LNP Database Synchronization Files,” describes the files that are recorded when the various types of LNP database synchronization are performed by the user.
• Appendix D, “Synchronization Performance Estimates,” provides estimates of the transaction rates for the various LNP database synchronization operations. Using these estimates can help you decide which type of operation to use, as described in Chapter 3, “Choosing a Database Maintenance Procedure.”
Related Publications
The LNP Database Synchronization Manual is part of the EAGLE 5 SAS and the LSMS documentation sets and may refer to related manuals of these sets.
EAGLE 5 SAS Documentation Set
The EAGLE 5 SAS documentation set consists of the following manuals:
• The Commands Manual contains procedures for logging into or out of the EAGLE 5 SAS, a general description of the terminals, printers, the disk drive used on the system, and a description of all the commands used in the system.
• The Commands Pocket Guide is an abridged version of the Commands Manual. It contains all commands and parameters, and it shows the command-parameter syntax.
1-6 910-2339-001 Rev A, October 2005
Introduction
• The Commands Quick Reference Guide contains an alphabetical listing of the commands and parameters. The guide is sized to fit a shirt-pocket.
• The Commands Error Recovery Manual contains the procedures to resolve error message conditions generated by the commands in the Commands Manual. These error messages are presented in numerical order.
• The Database Administration Manual – Features contains procedural information required to configure the EAGLE 5 SAS to implement these features:
— X.25 Gateway
— STP LAN
— Database Transport Access
— GSM MAP Screening
— EAGLE 5 SAS Support for Integrated Sentinel
• The Database Administration Manual - Gateway Screening contains a description of the Gateway Screening (GWS) feature and the procedures necessary to configure the EAGLE 5 SAS to implement this feature.
• The Database Administration Manual – Global Title Translation contains procedural information required to configure an EAGLE 5 SAS to implement these features:
— Global Title Translation
— Enhanced Global Title Translation
— Variable Length Global Title Translation
— Interim Global Title Modification
— Intermediate GTT Load Sharing
— ANSI-ITU-China SCCP Conversion
• The Database Administration Manual - IP7 Secure Gateway contains procedural information required to configure the EAGLE 5 SAS to implement the SS7-IP Gateway.
• The Database Administration Manual – SEAS contains the EAGLE 5 SAS configuration procedures that can be performed from the Signaling Engineering and Administration Center (SEAC) or a Signaling Network Control Center (SNCC). Each procedure includes a brief description of the procedure, a flowchart showing the steps required, a list of any EAGLE 5 SAS commands that may be required for the procedure but that are not supported
Introduction
910-2339-001 Rev A, October 2005 1-7
by SEAS, and a reference to optional procedure-related information, which can be found in one of these manuals:
— Database Administration Manual – Gateway Screening
— Database Administration Manual – Global Title Translation
— Database Administration Manual – SS7
• The Database Administration Manual – SS7 contains procedural information required to configure an EAGLE 5 SAS to implement the SS7 protocol.
• The Database Administration Manual – System Management contains procedural information required to manage the EAGLE 5 SAS database and GPLs, and to configure basic system requirements such as user names and passwords, system-wide security requirements, and terminal configurations.
• The Dimensioning Guide for EPAP Advanced DB Features is used to provide EPAP planning and dimensioning information. This manual is used by Tekelec personnel and EAGLE 5 SAS customers to aid in the sale, planning, implementation, deployment, and upgrade of EAGLE 5 SAS systems equipped with one of the EAGLE 5 SAS EPAP Advanced Database (EADB) Features.
• The ELAP Administration Manual defines the user interface to the EAGLE 5 SAS LNP Application Processor on the MPS/ELAP platform. The manual defines the methods for accessing the user interface, menus, screens available to the user and describes their impact. It provides the syntax and semantics of user input and defines the output the user receives, including information and error messages, alarms, and status.
• The EPAP Administration Manual describes how to administer the EAGLE 5 SAS Provisioning Application Processor on the MPS/EPAP platform. The manual defines the methods for accessing the user interface, menus, and screens available to the user and describes their impact. It provides the syntax and semantics of user input and defines the output the user receives, including messages, alarms, and status.
• The Feature Manual - EIR provides instructions and information on how to install, use, and maintain the EIR feature on the Multi-Purpose Server (MPS) platform of the EAGLE 5 SAS. The feature provides network operators with the capability to prevent stolen or disallowed GSM mobile handsets from accessing the network.
• The Feature Manual - G-Flex C7 Relay provides an overview of a feature supporting the efficient management of Home Location Registers in various networks. This manual gives the instructions and information on how to install, use, and maintain the G-Flex feature on the Multi-Purpose Server (MPS) platform of the EAGLE 5 SAS.
• The Feature Manual - G-Port provides an overview of a feature providing the capability for mobile subscribers to change the GSM subscription network
1-8 910-2339-001 Rev A, October 2005
Introduction
within a portability cluster while retaining their original MSISDNs. This manual gives the instructions and information on how to install, use, and maintain the G-Port feature on the Multi-Purpose Server (MPS) platform of the EAGLE 5 SAS.
• The Feature Manual - INP provides the user with information and instructions on how to implement, utilize, and maintain the INAP-based Number Portability (INP) feature on the Multi-Purpose Server (MPS) platform of the EAGLE 5 SAS.
• The FTP-Based Table Retrieve Application (FTRA) User Guide describes how to set up and use a PC to serve as the offline application for the EAGLE 5 SAS FTP Retrieve and Replace feature.
• The Hardware Manual - EAGLE 5 SAS contains hardware descriptions and specifications of Tekelec’s signaling products. These include the EAGLE 5 SAS, OEM-based products such as the ASi 4000 Service Control Point (SCP), the Netra-based Multi-Purpose Server (MPS), and the Integrated Sentinel with Extended Services Platform (ESP) subassembly.
• The Hardware Manual provides an overview of each system and its subsystems, details of standard and optional hardware components in each system, and basic site engineering. Refer to this manual to obtain a basic understanding of each type of system and its related hardware, to locate detailed information about hardware components used in a particular release, and to help configure a site for use with the system hardware.
• The Hardware Manual - Tekelec 1000 Application Server provides general specifications and a description of the Tekelec 1000 Applications Server (T1000 AS). This manual also includes site preparation, environmental and other requirements, procedures to physically install the T1000 AS, and troubleshooting and repair of Field Replaceable Units (FRUs).
• The Hardware Manual - Tekelec 1100 Application Server provides general specifications and a description of the Tekelec 1100 Applications Server (T1100 AS). This manual also includes site preparation, environmental and other requirements, procedures to physically install the T1100 AS, and troubleshooting and repair of Field Replaceable Units (FRUs).
• The Installation Manual - EAGLE 5 SAS contains cabling requirements, schematics, and procedures for installing the EAGLE 5 SAS along with LEDs, connectors, cables, and power cords to peripherals. Refer to this manual to install components or the complete systems.
• The Installation Manual - Integrated Applications provides the installation information for integrated applications such as EPAP 4.0 or earlier (Netra-based Multi-Purpose Server (MPS) platform) and Sentinel. The manual includes information about frame floors and shelves, LEDs, connectors, cables, and power cords to peripherals. Refer to this manual to install components or the complete systems.
Introduction
910-2339-001 Rev A, October 2005 1-9
• The LNP Database Synchronization Manual - LSMS with EAGLE 5 SAS describes how to keep the LNP databases at the LSMS and at the network element (the EAGLE 5 SAS is a network element) synchronized through the use of resynchronization, audits and reconciles, and bulk loads. This manual is contained in both the LSMS documentation set and in the EAGLE 5 SAS documentation set.
• The LNP Feature Activation Guide contains procedural information required to configure the EAGLE 5 SAS for the LNP feature and to implement these parts of the LNP feature on the EAGLE 5 SAS:
— LNP services
— LNP options
— LNP subsystem application
— Automatic call gapping
— Triggerless LNP feature
— Increasing the LRN and NPANXX Quantities on the EAGLE 5 SAS
— Activating and Deactivating the LNP Short Message Service (SMS) feature
• The Maintenance Manual contains procedural information required for maintaining the EAGLE 5 SAS and the card removal and replacement procedures. The Maintenance Manual provides preventive and corrective maintenance procedures used in maintaining the different systems.
• The Maintenance Pocket Guide is an abridged version of the Maintenance Manual and contains all the corrective maintenance procedures used in maintaining the EAGLE 5 SAS.
• The Maintenance Emergency Recovery Pocket Guide is an abridged version of the Maintenance Manual and contains the corrective maintenance procedures for critical and major alarms generated on the EAGLE 5 SAS.
• The MPS Platform Software and Maintenance Manual - EAGLE 5 SAS with Tekelec 1000 Application Server describes the platform software for the Multi-Purpose Server (MPS) based on the Tekelec 1000 Application Server (T1000 AS) and describes how to perform preventive and corrective maintenance for the T1000 AS-based MPS. This manual should be used with the EPAP-based applications (EIR, G-Port, G-Flex, and INP).
• The MPS Platform Software and Maintenance Manual - EAGLE 5 SAS with Tekelec 1100 Application Server describes the platform software for the Multi-Purpose Server (MPS) based on the Tekelec 1100 Application Server (T1100 AS) and describes how to perform preventive and corrective maintenance for the T1100 AS-based MPS. This manual should be used with the ELAP-based application (LNP).
• The Provisioning Database Interface Manual defines the programming interface that populates the Provisioning Database (PDB) for the EAGLE 5 SAS features
1-10 910-2339-001 Rev A, October 2005
Introduction
supported on the MPS/EPAP platform. The manual defines the provisioning messages, usage rules, and informational and error messages of the interface. The customer uses the PDBI interface information to write his own client application to communicate with the MPS/EPAP platform.
• The Previously Released Features Manual summarizes the features of previous EAGLE, EAGLE 5 SAS, and IP7 Secure Gateway releases, and it identifies the release number of their introduction.
• The Release Documentation contains the following documents for a specific release of the system:
— Feature Notice - Describes the features contained in the specified release. The Feature Notice also provides the hardware baseline for the specified release, describes the customer documentation set, provides information about customer training, and explains how to access the Customer Support website.
— Release Notice - Describes the changes made to the system during the lifecycle of a release. The Release Notice includes Generic Program Loads (GPLs), a list of PRs resolved in a build, and all known PRs.
NOTE: The Release Notice is maintained solely on Tekelec’s Customer Support site to provide you with instant access to the most up-to-date release information.
— System Overview - Provides high-level information on SS7, the IP7 Secure Gateway, system architecture, LNP, and EOAP.
— Master Glossary - Contains an alphabetical listing of terms, acronyms, and abbreviations relevant to the system.
— Master Index - Lists all index entries used throughout the documentation set.
• The System Manual – EOAP describes the Embedded Operations Support System Application Processor (EOAP) and provides the user with procedures on how to implement the EOAP, replace EOAP-related hardware, device testing, and basic troubleshooting information.
LSMS Documentation Set
The LSMS documentation set includes the following publications:
• The Hardware Manual - Tekelec 1100 Application Server provides general specifications and a description of the Tekelec 1100 Applications Server (T1100 AS). This manual also includes site preparation, environmental and other requirements, procedures to physically install the T1100 AS, and troubleshooting and repair of Field Replaceable Units (FRUs).
• The LNP Database Synchronization Manual - LSMS with EAGLE 5 SAS describes how to keep the LNP databases at the LSMS and at the network element (the
Introduction
910-2339-001 Rev A, October 2005 1-11
EAGLE 5 SAS is a network element) synchronized through the use of resynchronization, audits and reconciles, and bulk loads. This manual is contained in both the LSMS documentation set and in the EAGLE 5 SAS documentation set.
• The LSMS Configuration Manual contains information you need to configure the LSMS. Topics include integrating LSMS into your network, using key lists, configuring and starting LSMS processes, configuration components and service provider contact information, working with NPAC associations, configuring optional features, and configuring the query server.
• The LSMS Database Administration Manual provides information about using the LSMS (Local Service Management System) local and web-based graphical user interface (GUI), using the command-line interface, managing NPAC relations, managing locally provisioned data, report generation, logs and measurements, and local time calculation and world time zone data.
• The LSMS Maintenance Manual describes the LSMS design for high availability, the LSMS software, and procedures for routine, preventive, and corrective maintenance. The manual also contains a reference of LSMS commands and notifications.
• The LSMS Release Documentation consists of the Feature Notice and the Release Notice.
– The Feature Notice describes the features for a specified release. It also includes the following information:
* Feature Overview
* Compatibility of the features of the current LSMS release with the releases of interfacing systems
* LSMS supported hardware configurations
* LSMS customer documentation
* How to locate the LSMS Release Notice on the Internet
* How to access customer training information
* Technical services and support information
* List of acronyms used in the Feature Notice
– The Release Notice lists the PRs that have been resolved in this release, and the PRs that are known to exist in this release.
Note: This document is only published on the Tekelec Secure website.
1-12 910-2339-001 Rev A, October 2005
Introduction
• The following related publications are also included with the LSMS documentation set:
— The Commands Error Recovery Manual contains the procedures to resolve error message conditions generated by the commands in the Commands Manual. These error messages are presented in numerical order.
— The ELAP Administration Manual defines the user interface to the EAGLE 5 SAS LNP Application Processor on the MPS/ELAP platform. The manual defines the methods for accessing the user interface, menus, screens available to the user and describes their impact. It provides the syntax and semantics of user input and defines the output the user receives, including information and error messages, alarms, and status.
— The LNP Feature Activation Guide contains procedural information required to configure the EAGLE 5 SAS for the LNP feature and to implement these parts of the LNP feature on the EAGLE 5 SAS:
- LNP services
- LNP options
- LNP subsystem application
- Automatic call gapping
- Triggerless LNP feature
- Increasing the LRN and NPANXX Quantities on the EAGLE 5 SAS
- Activating and Deactivating the LNP Short Message Service (SMS) feature
— The Maintenance Manual contains procedural information required for maintaining the EAGLE 5 SAS and the card removal and replacement procedures. The Maintenance Manual provides preventive and corrective maintenance procedures used in maintaining the different systems.
— The MPS Platform Software and Maintenance Manual - EAGLE 5 SAS with Tekelec 1100 Application Server describes the platform software for the Multi-Purpose Server (MPS) based on the Tekelec 1100 Application Server (T1100 AS) and describes how to perform preventive and corrective maintenance for the T1100 AS-based MPS. This manual should be used with the ELAP-based application (LNP).
Introduction
910-2339-001 Rev A, October 2005 1-13
Documentation Packaging, Delivery, and Updates
Customer documentation is provided with each system in accordance with the contract agreements.
Customer documentation is updated whenever significant changes that affect system operation or configuration are made.
Customer documentation updates may be issued in the form of an addendum, or a reissue of the affected documentation.
The document part number is shown on the title page along with the current revision of the document, the date of publication, and the software release that the document covers. The bottom of each page contains the document part number and the date of publication.
Two types of releases are major software releases and maintenance releases. Maintenance releases are issued as addenda with a title page and change bars. On the changed pages, the date and document part number are changed. On any unchanged pages that accompany the changed pages, the date and document part number are unchanged.
In the event a software release has minimum affect on documentation, an addendum is provided. The addendum provides an instruction page, a new title page, a change history page, and replacement chapters bearing the date of publication, the document part number, and change bars.
If a new release has a major impact on documentation, such as a new feature, the entire documentation set is reissued with a new part number and a new release number.
Documentation Admonishments
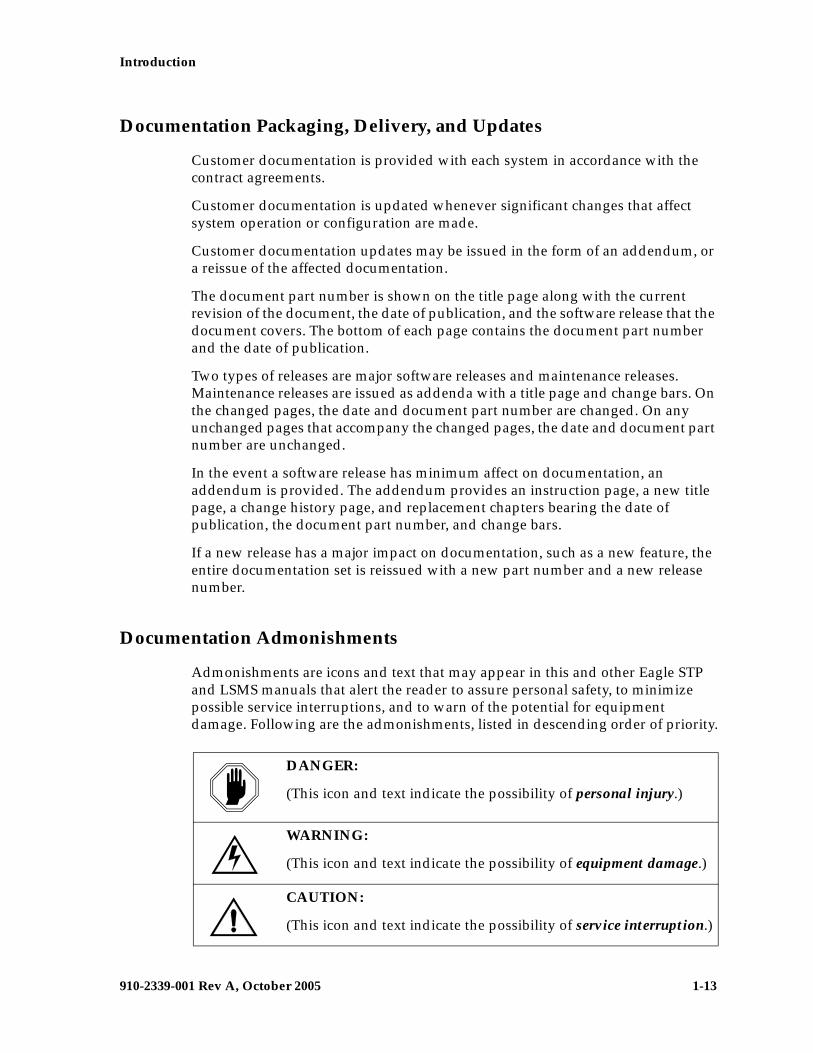
Admonishments are icons and text that may appear in this and other Eagle STP and LSMS manuals that alert the reader to assure personal safety, to minimize possible service interruptions, and to warn of the potential for equipment damage. Following are the admonishments, listed in descending order of priority.
DANGER:
(This icon and text indicate the possibility of personal injury.)
WARNING:
(This icon and text indicate the possibility of equipment damage.)
CAUTION:
(This icon and text indicate the possibility of service interruption.)

1-14 910-2339-001 Rev A, October 2005
Introduction
Tekelec Customer Care Center
The Customer Care Center offers a point of contact through which customers can receive support for problems that may be encountered during the use of Tekelec’s products. The Customer Care Center is staffed with highly trained engineers to provide solutions to your technical questions and issues seven days a week, twenty-four hours a day. A variety of service programs are available through the Customer Care Center to maximize the performance of Tekelec products that meet and exceed customer needs.
To receive technical assistance, call the Customer Care Center at one of the following locations:
• Tekelec, UK
Phone: +44 1784 467 804Fax: +44 1784 477 120Email: [email protected]
• Tekelec, USA
Phone (within the continental US) 888-367-8552 (888-FOR-TKLC)(outside the continental US) +1 919-460-2150.
Email: [email protected].
When your call is received, the Customer Care Center issues a Customer Service Report (CSR). Each CSR includes an individual tracking number. When a CSR is issued, the Customer Care Center determines the classification of the trouble. The CSR contains the serial number of the system, problem symptoms, and messages. The Customer Care Center assigns the CSR to a primary engineer, who will work to solve the problem. The Customer Care Center closes the CSR when the problem is resolved.
If a critical problem exists, the Customer Care Center initiates emergency procedures (see the following topic, “Emergency Response”).
Emergency Response
If a critical service situation occurs, the Tekelec Customer Care Center offers emergency response twenty-four hours a day, seven days a week. The emergency response provides immediate coverage, automatic escalation, and other features to ensure a rapid resolution to the problem.
A critical situation is defined as an problem that severely affects service, traffic, or maintenance capabilities, and requires immediate corrective action. Critical problems affect service or system operation, resulting in:
• Failure in the system that prevents transaction processing
• Reduction in system capacity or in system traffic-handling capability
Introduction
910-2339-001 Rev A, October 2005 1-15
• Inability to restart the system
• Corruption of the database
• Inability to perform maintenance or recovery operations
• Inability to provide any required critical or major trouble notification
• Any other problem severely affecting service, capacity, traffic, and billing. Maintenance capabilities may be defined as critical by prior discussion and agreement with the Tekelec Customer Care Center.
List of Acronyms and Abbreviations
ACM ...................................Application Communications Module
ACTV..................................Active
AIN .....................................Advanced Intelligent Network
ANSI ...................................American National Standards Institute
APPL...................................Application
AUD....................................Audit Indicator
BIP.......................................Board ID PROM
BLM ....................................Bulk Load Module
CLLI ....................................Common Language Location Identifier
CNCF..................................Calling Name Conversion Facility
CPC .....................................Capability Point Code
DB........................................Database
DBTS ...................................Database Time Stamp
DCM ..................................Database Communication Module
DLK.....................................Data Link
DPC.....................................Destination Point Code
DSM ...................................Database Services Module
DV .......................................Digits Valid
ELAP...................................EAGLE LNP Application Processor
EMS.....................................Element Management System
Gbyte ..................................Gigabyte
GLS .....................................Gateway Loading Services — The application software for the gateway screening loading services
GPL .....................................Generic Program Load
1-16 910-2339-001 Rev A, October 2005
Introduction
GSM ....................................Global System for Mobile Communication
GT........................................Global Title Routing Indicator
GTT .....................................Global Title Translation
GWS ....................................Gateway Screening
ID.........................................Identity
IMT......................................Interprocessor Message Transport
IN.........................................Intelligent Network
INAP ...................................IN Application Processor
INP ......................................INAP-based Number Portability
IS-NR ..................................In Service - Normal
ITU ......................................International Telecommunications Union
ITU-I....................................ITU International
ITU-N..................................ITU National
JRS .......................................Job Routing Server
LAN ....................................Local Area Network
LFS ......................................Link Fault Sectionalization
LIM .....................................Link Interface Module
LNP .....................................Local Number Portability
LRN.....................................Location Routing Number
LS.........................................Link Set
LSMS...................................Local Service Management System
LSN .....................................Link Set Name
MASP..................................Maintenance and Administration Subsystem Processor
MDAL.................................Maintenance Disk and Alarm Card
MR.......................................Message Relay
MPS.....................................Multi-Purpose Server
NGT ....................................New Global Title Translation Type
NPA.....................................Numbering Plan Area (Area Code)
NPAC..................................Number Portability Administration Center
NPANXX ............................Area Code and Office Prefix
NPB .....................................Number Pool Block
Introduction
910-2339-001 Rev A, October 2005 1-17
OOS.....................................Out of Service
OOS-MT-DSBLD...............Out of Service - Maintenance Disabled
PCA.....................................ANSI Point Code
PU........................................Program Update
REPT-STAT.........................Report Status
RGTA ..................................Replace Global Title Address
RI .........................................Routing Indicator
RMV....................................Remove
SA........................................Security Administration
SCCP...................................Signaling Connection Control Part – The application software for the global title translation (GTT) feature
SEAC...................................Signaling Engineering and Administration Center
SEAS ...................................Signaling Engineering and Administration System
SERV ...................................LNP Service
SLK......................................Signaling Link
SP.........................................Service Provider
SSN......................................Subsystem Number
STDBY ................................Standby
STP LAN ............................A feature in the Eagle STP that copies MSUs selected through the gateway screening process and sends these MSUs over the ethernet to an external host computer for further processing
SV ........................................Subscription Version
SYS ......................................System Maintenance
TCAP ..................................Transaction Capability Application Part
TCP .....................................Transmission Control Protocol
TDM....................................Terminal Disk Module
TLNP ..................................Triggerless LNP
TMOUT ..............................The maximum amount of time that a login session on a terminal port can remain idle before the user is automatically logged off
TN .......................................Telephone Number
TSM.....................................Translation Service Module
TT ........................................Translation Type
1-18 910-2339-001 Rev A, October 2005
Introduction
TTN .....................................Translation Type Name
UAM ...................................Unsolicited Alarm Message
UID......................................User ID
UIM .....................................Unsolicited Information Message
WNP....................................Wireless Number Portability
XLAT...................................Translate Indicator
910-2339-001 Rev A, October 2005 2-1
2
LNP Database SynchronizationOverview
Introduction...................................................................................................... 2–2
LSMS Functions .......................................................................................... 2–3
LNP Configuration.......................................................................................... 2–7
Overview of Synchronization Methods ....................................................... 2–7
Resynchronizing LSMS and Network Element Data ............................ 2–7
Auditing and Reconciling Network Element Data................................ 2–9
Bulk Loading LNP Data .......................................................................... 2–10
Maximum Number of Simultaneous Synchronization Operations ....... 2–11
2-2 910-2339-001 Rev A, October 2005
LNP Database Synchronization Overview
Introduction
Local Number Portability (LNP) provides the ability to change (port) the telephone service from one service provider to another service provider without changing the telephone number.
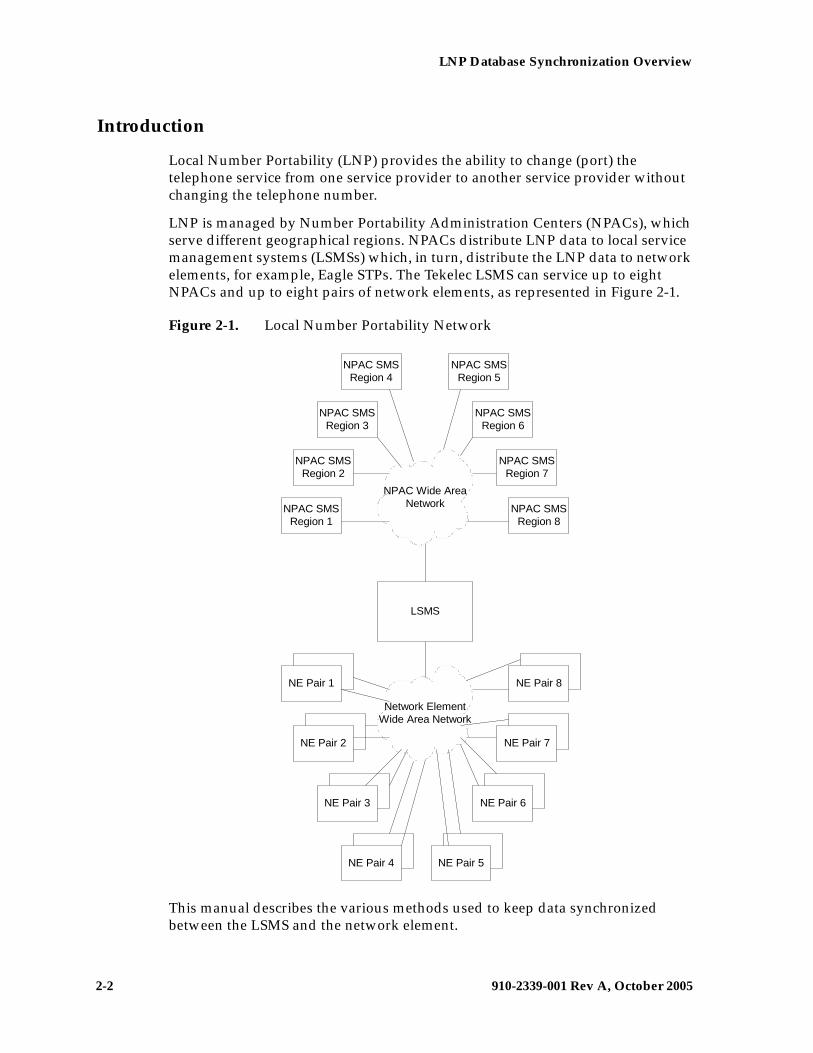
LNP is managed by Number Portability Administration Centers (NPACs), which serve different geographical regions. NPACs distribute LNP data to local service management systems (LSMSs) which, in turn, distribute the LNP data to network elements, for example, Eagle STPs. The Tekelec LSMS can service up to eight NPACs and up to eight pairs of network elements, as represented in Figure 2-1.
Figure 2-1. Local Number Portability Network
This manual describes the various methods used to keep data synchronized between the LSMS and the network element.
NPAC Wide AreaNetwork
Network ElementWide Area Network
LSMS
NPAC SMSRegion 1
NPAC SMSRegion 2
NPAC SMSRegion 3
NPAC SMSRegion 4
NPAC SMSRegion 5
NPAC SMSRegion 6
NPAC SMSRegion 7
NPAC SMSRegion 8
NE Pair 1
NE Pair 2
NE Pair 3
NE Pair 4 NE Pair 5
NE Pair 6
NE Pair 7
NE Pair 8
LNP Database Synchronization Overview
910-2339-001 Rev A, October 2005 2-3
This manual does not describe synchronization activities between the NPAC and the LSMS. For information about how data is synchronized between the NPAC and the LSMS, refer to the LSMS Database Administration Manual.
LSMS Connectivity
The main function of the LSMS is to provision LNP data to the EAGLE 5 SAS. In order to perform this task, the LSMS maintains active connections with one or more NPAC region servers and one or more EAGLE 5 SAS nodes. While it is the goal of the LSMS to maintain active connections to each NPAC server and EAGLE 5 SAS node as nearly full-time as possible, the more important goal is to reliably forward the data from the NPAC to the EAGLE 5 SAS as quickly as possible. To that end, a number of protective problem detection and recovery mechanisms are built into the LSMS design. Several of these protections actually allow for the termination of application connectivity in order to gracefully restore full connectivity and guarantee total recovery of data.
In the following situations, the LSMS proactively terminates and re-establishes application connectivity with the NPAC and EAGLE 5 SASs:
• If the LSMS detects network level connectivity failures with either the NPAC or EAGLE 5 SAS, the respective LSMS processes terminate the socket level connection and then reconnect. This disconnect and reconnect occurs in a matter of seconds. Built in resynchronization mechanisms ensure data recovery. The data transmission is delayed by the time required to disconnect and reconnect, but the execution of the recovery procedures prevents data loss.
• If the LSMS detects critical internal errors that would cause system outages, the LSMS processes are designed to terminate and allow the LSMS sentry process to restart them. This is only done for significant internal errors that jeopardize internal LSMS communications. Once the sentry process restarts the LSMS processes, resynchronization provides full data recovery. The restart time for processes by sentry consists of the detection time plus the restart time. Processes typically are restarted within 30 seconds.
LSMS Functions
The LSMS is responsible for the following functions:
• Sending normal updates to network elements
• Ensuring that supported network element’s LNP database is synchronized with the LSMS LNP database
2-4 910-2339-001 Rev A, October 2005
LNP Database Synchronization Overview
Sending Normal Updates
Normal updates sent by the LSMS consist of:
• NPAC data that is received from NPACs and forwarded to the network elements. The LSMS keeps data for each NPAC region in a separate regional database. The NPAC, LSMS, and the network elements all must have the same LNP data for a given region.
• Locally provisioned data that is entered by the customer in a centralized place (the LSMS) and then forwarded to one or more network elements. The LSMS stores locally provisioned data in the supplemental database, which is separate from the regional databases. The LSMS sends the locally provisioned data in the supplemental database to multiple network elements. Locally provisioned data must also be the same between the LSMS and the network elements.
Normal updates are sent from the LSMS to the active ELAP at a rate of 25 TNs per second over a connection that uses the High-Speed Operations Protocol (HSOP) over TCP/IP. The ELAP forwards the messages to all DSMs using an IP multicast protocol (for more information, refer to the ELAP Administration Manual).
Synchronizing LNP Databases
In this book, the term LNP database is used to mean a combination of regional and locally provisioned data:
• At the LSMS the LNP database is considered to be the combination of regional data and locally provisioned data that corresponds to the network element to be synchronized.
• At a network element the LNP database is considered to be one database which contains both regional data and data that was provisioned at the LSMS. The network element’s LNP database usually has multiple copies at the network element; each configuration described in this manual specifies where in the network element the main LNP database is located. Synchronization methods between the main network element LNP database and its copies within a network element are described in other manuals; references are stated where appropriate.
The LSMS synchronizes with only a single copy of the network element’s LNP database. Usually the synchronization occurs with the main network element LNP database; exceptions are noted as appropriate.
The LSMS is responsible for ensuring that the network element’s LNP database is synchronized with the LNP database at the LSMS. If the LNP databases of the LSMS and network element get out of synchronization (for example, after an outage), the network element’s LNP database must be synchronized to match the LSMS LNP database, which is considered to be the master database.

LNP Database Synchronization Overview
910-2339-001 Rev A, October 2005 2-5
The LSMS and the network element use the following methods to synchronize their LNP databases. For information about which method to choose, see Chapter 3, “Choosing a Database Maintenance Procedure.” Some methods permit synchronization from another network element LNP database that is known to be synchronized with the LSMS LNP database.
• Resynchronizing—the LSMS resends all transactions that were previously sent from the LSMS to the network element up to a maximum number of transactions or a maximum period of time. The following types of resynchronization are available (for a more detailed overview, see “Resynchronizing LSMS and Network Element Data” on page 2-7):
– Automatic resynchronization—After any outage between the LSMS and a network element, the LSMS and the network element automatically attempt to resynchronize. If the number of transactions that needs to be retransmitted is less than the maximum number of transactions that can be stored in the LSMS resynchronization database (which can store a maximum of one million transactions), automatic resynchronization occurs without operator intervention. For more information, see “Automatic Resynchronization Process” on page 4-2.
– User-initiated resynchronization—User-initiated resynchronization can be performed as long as the database time stamp (DBTS) on the network element’s database is no more than seven days earlier than the current date at the LSMS. If the DBTS is within seven days, the user-initiated resynchronization retransmits all transactions that were previously sent in the last seven days.
• Reconciling—after an audit of network element LNP data, the user can reconcile any differences discovered by the audit. Reconciling allows the user to update only the LNP database records that are found to be different during an audit. An audit compares certain types of LNP data at the LSMS with the same types of data at the network element.
The user can choose to perform only an audit or to perform an audit and reconcile; the options are described later in this manual (see Chapter 5, “Auditing and Reconciling Network Elements from the LSMS”). Although auditing without reconciling does not result in synchronized LNP databases, that option is also described in this manual.
The LSMS allows various types of audit and also allows the user to choose to reconcile any discrepancies found during the audit. Reconcile records are sent as normal updates and are available after any kind of audit. For a more detailed overview, see “Auditing and Reconciling Network Element Data” on page 2-9).
• Bulk loading—completely replaces a network element LNP database. Sometimes so much data needs to be corrected that neither reconciling audited data nor resynchronizing the data is sufficient. The following types of
2-6 910-2339-001 Rev A, October 2005
LNP Database Synchronization Overview
bulk loading are available (for a more detailed overview, see “Bulk Loading LNP Data” on page 2-10):
– Electronic bulk load from the LSMS—Available if certain optional features are installed at the LSMS and at the network element.
– Bulk load (reload) from RTDB on mated ELAP—Available if certain optional features are installed at the network element.
– Bulk load (reload) from RTDB on mated network element’s standby ELAP—Available if certain optional features are installed at the network element and if both network elements are treated similarly by the LSMS. This choice requires steps to be performed at the LSMS to determine whether the network elements are treated similarly by the LSMS, but actual loading of data involves only the mated network elements.
Additional information about synchronization methods is available in overview form in “Overview of Synchronization Methods” on page 2-7, and more detailed information about each synchronization method is presented in the remaining chapters of this manual.
LNP Database Synchronization Overview
910-2339-001 Rev A, October 2005 2-7
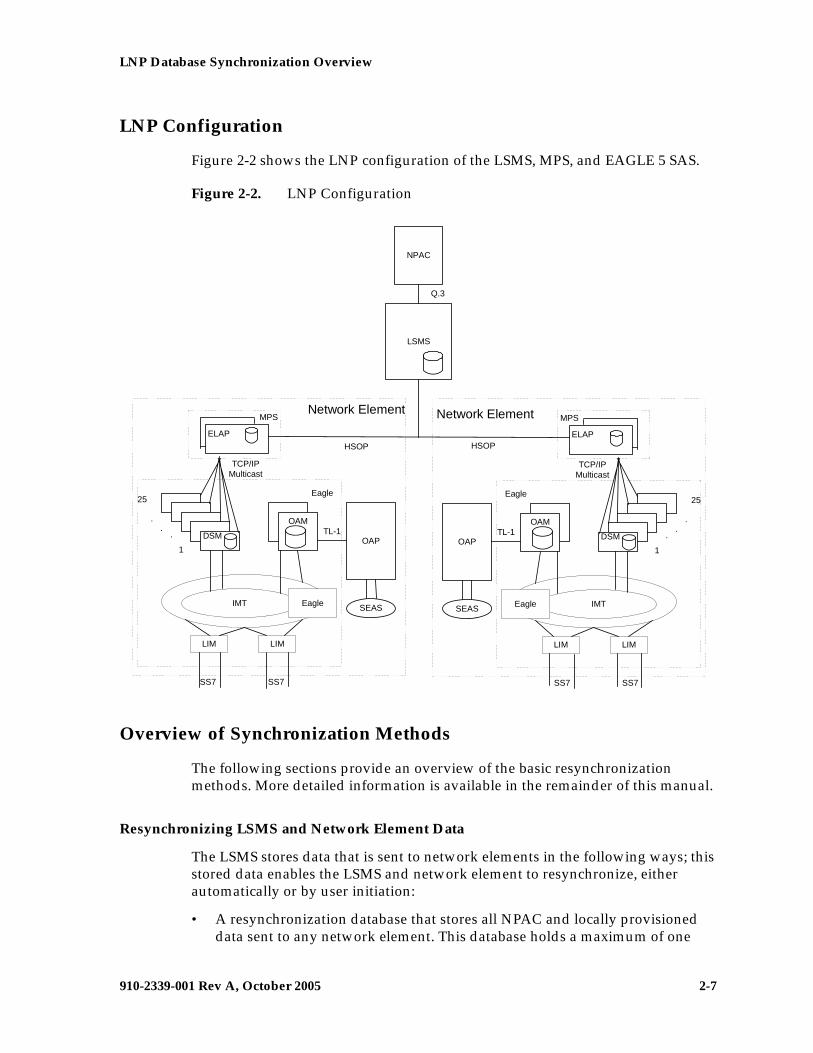
LNP Configuration
Figure 2-2 shows the LNP configuration of the LSMS, MPS, and EAGLE 5 SAS.
Figure 2-2. LNP Configuration
Overview of Synchronization Methods
The following sections provide an overview of the basic resynchronization methods. More detailed information is available in the remainder of this manual.
Resynchronizing LSMS and Network Element Data
The LSMS stores data that is sent to network elements in the following ways; this stored data enables the LSMS and network element to resynchronize, either automatically or by user initiation:
• A resynchronization database that stores all NPAC and locally provisioned data sent to any network element. This database holds a maximum of one
NPAC
Q.3
LSMS
IMTEagle
DSM
1
..
.
25
OAM
OAPTL-1
SEAS
Eagle
SS7SS7
LIMLIM
ELAP
TCP/IPMulticast
MPS Network Element
IMT Eagle
DSM
1
..
.
25
OAM
OAPTL-1
SEAS
Eagle
SS7 SS7
LIM LIM
ELAP
TCP/IPMulticast
MPS Network Element
HSOPHSOP
2-8 910-2339-001 Rev A, October 2005
LNP Database Synchronization Overview
million entries. This database is used for automatic resynchronization, as described in “Automatic Resynchronization” on page 2-8.
• For each network element, a log file that records all NPAC and locally provisioned data sent to that network element for the last seven days. These log files are used for user-initiated resynchronization, as described in “User-Initiated Resynchronization” on page 2-8.
While resynchronization is occurring, any new updates received at the LSMS are stored in the pending queue. When an automatic resynchronization is complete and normal traffic between the LSMS and network element resumes, the updates in the pending queue are transmitted as normal updates.
Automatic Resynchronization
The LSMS and network element attempt to resynchronize automatically after any outage between the LSMS and a network element. When the LSMS and network element reconnect, the network element sends the LSMS the Database Time Stamp (DBTS) of the last update it received before the outage. If the LSMS finds that DBTS in the LSMS resynchronization database, it begins automatic resynchronization using the same protocol as is used for normal updates.
For information about the actions performed by the LSMS and network element during automatic resynchronization, see “Automatic Resynchronization Process” on page 4-2. If the LSMS determines that automatic resynchronization cannot be performed because the DBTS is not found in the resynchronization database, notifications are posted at both the LSMS and the network element (see “Notifications that Database Maintenance Is Required” on page 3-3). If those notifications are posted, you can choose among various options for proceeding with synchronization (see “Choosing a Synchronization Procedure” on page 3-3).
Automatic resynchronization uses the same protocol as is used for normal updates.
User-Initiated Resynchronization
This optional method of resynchronization can be initiated by the LSMS user when automatic resynchronization cannot be performed because more transactions need to be retransmitted than can be accommodated by automatic resynchronization. The number of transactions accommodated by user-initiated resynchronization is limited only by the fact that the log files are maintained only for seven days.
LNP Database Synchronization Overview
910-2339-001 Rev A, October 2005 2-9
Auditing and Reconciling Network Element Data
The user can initiate from the LSMS an audit of various types of data at any time except as noted in “Audit and Reconcile Function Summary” on page 5-9. An audit compares the record for the specified data type at the network element with that at the LSMS. The user can also choose to reconcile any discrepancies found during an audit.
The following types of audit and reconcile are available; the first type can be performed simultaneously for a given network element with either of the other two types:
• Audit and optional reconcile of a single SV or NPB —This type of audit uses the normal update channel to compare a specified subscription version or number pool block record in the LSMS LNP database to the corresponding record in the LNP database. If any discrepancies are found, they can be reconciled immediately.
NOTE: This type of audit is not available for LSMS releases prior to 8.0.
• Audit and optional reconcile of SVs and/or NPBs by NPA-NXX range, or of SVs and/or NPBs by time range —This type of audit uses the normal update channel to compare a checksum for each subscription version or number pool block record within a range of numbers or within a time range in the LSMS LNP database to the checksum of the corresponding record in the LNP database. If the checksums match, it is assumed that the records are the same.
After the audit completes, if differences were found, the LSMS user can choose to view the full records of each encountered difference. In addition, the LSMS user can specify whether any differences found should be reconciled.
• All other audit and optional reconcile (for example of DGTT, OGTT, and NPA Splits, of all TNs and/or NPBs) —This type of audit compares the checksum for each specified record in the LSMS LNP database to the checksum of the corresponding record in the LNP database. If the checksums match, it is assumed that the records are the same. For information about the types of data that can be audited with this type of audit, see “Types of Data to Audit and Reconcile” on page 5-3.
After the audit has completed, the LSMS user can specify whether differences found should be reconciled.
NOTE: For LSMS releases prior to 8.0, any reconcile must be done as soon as the audit completes. For LSMS Release 8.0, a reconcile for a Single SV/NPB audit must be performed as soon as the audit complete, but reconciles for the other types of audits can be performed immediately or can be postponed for reconciling later. The postponement can be up to seven days.
2-10 910-2339-001 Rev A, October 2005
LNP Database Synchronization Overview
Bulk Loading LNP Data
Bulk loading completely replaces the main LNP database at a network element. The LNP database consists of regional and locally provisioned data. Bulk loading is required in the following situations:
• The network element is being initialized for one of the following reasons:
– Bringing the network element into the system for the first time
– Modifying the network element’s area of service by reconfiguring EMS routing
• A user-initiated resynchronization is not possible for one of the following reasons:
– A failure at the LSMS causes loss of resynchronization logs
– A bulk download from the NPAC to the LSMS has been performed. For more information on resynchronizing the NPAC and LSMS databases, refer to the LSMS Maintenance Manual.
The following types of bulk loading are available:
• Electronic bulk load from the LSMS to ELAP—extracts the LNP database from the LSMS and downloads it to the RTDB of the active ELAP at the network element. The transmission from the LSMS to the ELAP requires about one hour for each million numbers in the LNP database. The distribution of the LNP database from the active ELAP to the standby ELAP and to the Database Services Modules (DSMs) is part of a separate procedure (see “Distributing an RTDB LNP Database to DSMs” on page 8-2).
• Bulk load (reload) from RTDB on mated ELAP—copies the RTDB on the ELAP mate to the RTDB that needs restoration. This type of bulk loading usually takes under ten minutes.
• Bulk load (reload) from RTDB on mated network element’s standby ELAP—copies the RTDB on standby ELAP at the mated network element to the RTDB that needs restoration. This choice requires steps to be performed at the LSMS to determine whether the network elements are treated similarly by the LSMS, but actual loading of data involves only the mated network elements.
Both network elements must be treated similarly by the LSMS.
Table 2-1 compares the various bulk load options available.
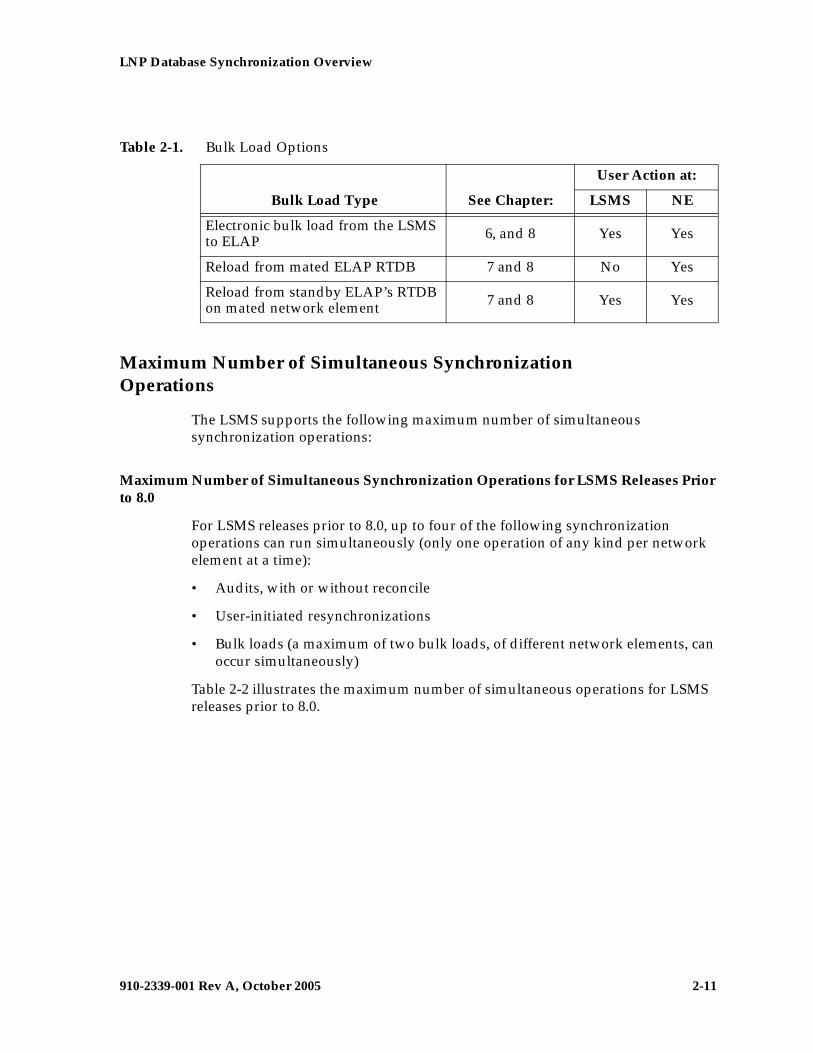
LNP Database Synchronization Overview
910-2339-001 Rev A, October 2005 2-11
Maximum Number of Simultaneous Synchronization Operations
The LSMS supports the following maximum number of simultaneous synchronization operations:
Maximum Number of Simultaneous Synchronization Operations for LSMS Releases Prior to 8.0
For LSMS releases prior to 8.0, up to four of the following synchronization operations can run simultaneously (only one operation of any kind per network element at a time):
• Audits, with or without reconcile
• User-initiated resynchronizations
• Bulk loads (a maximum of two bulk loads, of different network elements, can occur simultaneously)
Table 2-2 illustrates the maximum number of simultaneous operations for LSMS releases prior to 8.0.
Table 2-1. Bulk Load Options
Bulk Load Type See Chapter:
User Action at:
LSMS NE
Electronic bulk load from the LSMS to ELAP 6, and 8 Yes Yes
Reload from mated ELAP RTDB 7 and 8 No Yes
Reload from standby ELAP’s RTDB on mated network element 7 and 8 Yes Yes
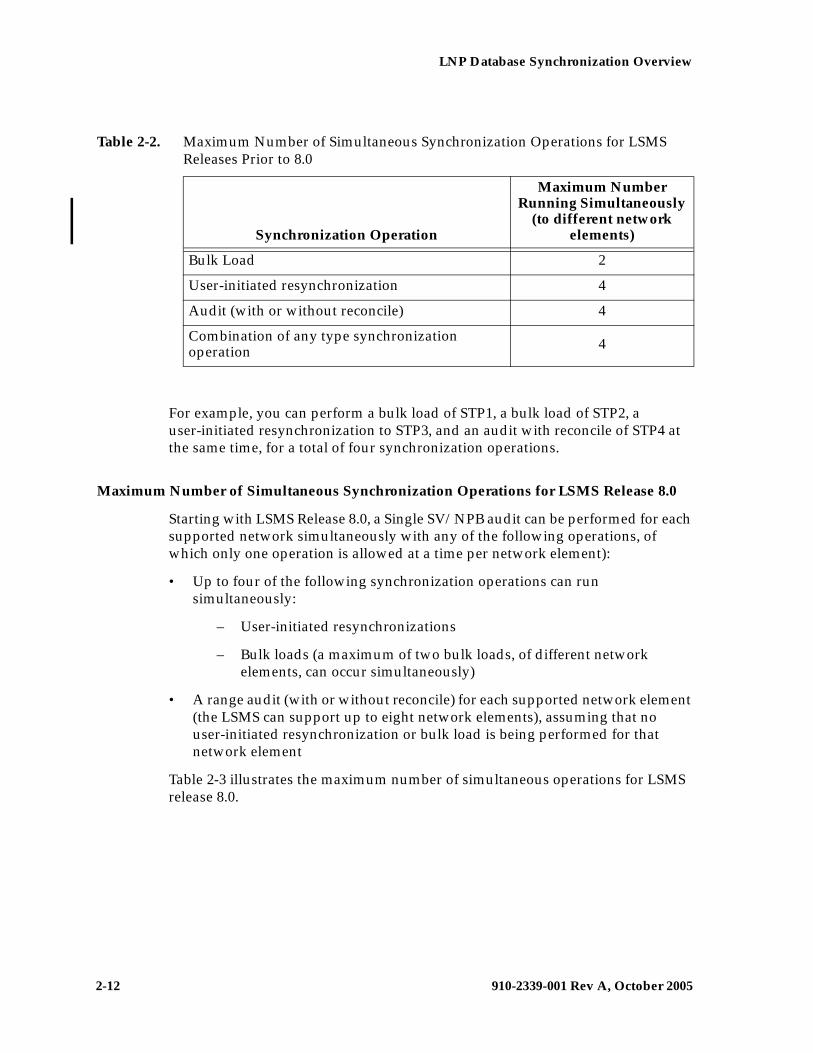
2-12 910-2339-001 Rev A, October 2005
LNP Database Synchronization Overview
For example, you can perform a bulk load of STP1, a bulk load of STP2, a user-initiated resynchronization to STP3, and an audit with reconcile of STP4 at the same time, for a total of four synchronization operations.
Maximum Number of Simultaneous Synchronization Operations for LSMS Release 8.0
Starting with LSMS Release 8.0, a Single SV/NPB audit can be performed for each supported network simultaneously with any of the following operations, of which only one operation is allowed at a time per network element):
• Up to four of the following synchronization operations can run simultaneously:
– User-initiated resynchronizations
– Bulk loads (a maximum of two bulk loads, of different network elements, can occur simultaneously)
• A range audit (with or without reconcile) for each supported network element (the LSMS can support up to eight network elements), assuming that no user-initiated resynchronization or bulk load is being performed for that network element
Table 2-3 illustrates the maximum number of simultaneous operations for LSMS release 8.0.
Table 2-2. Maximum Number of Simultaneous Synchronization Operations for LSMS Releases Prior to 8.0
Synchronization Operation
Maximum Number Running Simultaneously
(to different network elements)
Bulk Load 2
User-initiated resynchronization 4
Audit (with or without reconcile) 4
Combination of any type synchronization operation 4
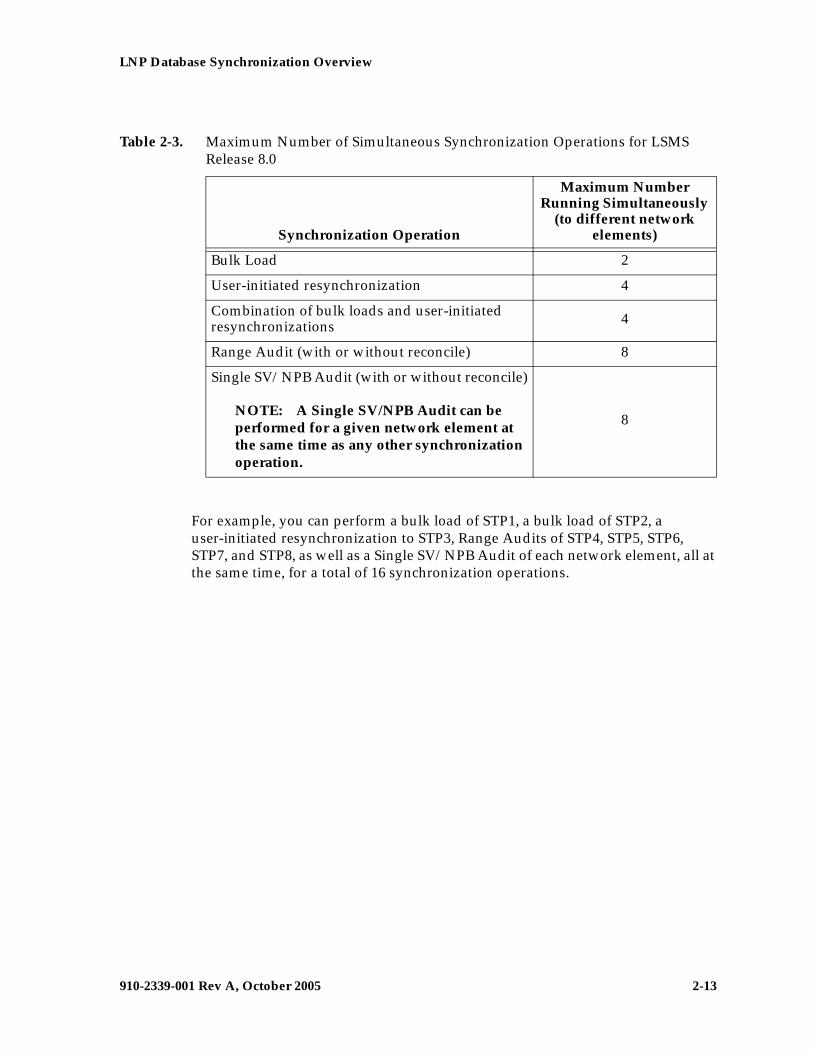
LNP Database Synchronization Overview
910-2339-001 Rev A, October 2005 2-13
For example, you can perform a bulk load of STP1, a bulk load of STP2, a user-initiated resynchronization to STP3, Range Audits of STP4, STP5, STP6, STP7, and STP8, as well as a Single SV/NPB Audit of each network element, all at the same time, for a total of 16 synchronization operations.
Table 2-3. Maximum Number of Simultaneous Synchronization Operations for LSMS Release 8.0
Synchronization Operation
Maximum Number Running Simultaneously
(to different network elements)
Bulk Load 2
User-initiated resynchronization 4
Combination of bulk loads and user-initiated resynchronizations 4
Range Audit (with or without reconcile) 8
Single SV/NPB Audit (with or without reconcile)
NOTE: A Single SV/NPB Audit can be performed for a given network element at the same time as any other synchronization operation.
8
2-14 910-2339-001 Rev A, October 2005
LNP Database Synchronization Overview
910-2339-001 Rev A, October 2005 3-1
3
Choosing a Database MaintenanceProcedure
Introduction................................................................................................................... 3–2
Notifications that Database Maintenance Is Required............................................ 3–3
Choosing a Synchronization Procedure .................................................................... 3–3
Understanding Sequence of Procedures to Be Performed...................................... 3–5
3-2 910-2339-001 Rev A, October 2005
Choosing a Database Maintenance Procedure
Introduction
This chapter describes how to determine if an LNP database needs to be restored, and assists in choosing one of the methods that can be used to complete the restoration. Chapter 2, “LNP Database Synchronization Overview” provides an overview of the variety of methods available; this chapter helps you determine when you need to perform one of the methods and helps you choose which method is most appropriate.
Once you have decided which restoration method to use, see “Understanding Sequence of Procedures to Be Performed” on page 3-5 for a summary of the various procedures you must perform in the order indicated. The remainder of this manual provides the detailed instructions for the procedures to be performed.
An LNP database in a given network element needs to be restored when a condition occurs that has caused the LNP database to be corrupted or back-level. The following are examples of conditions that cause a need to restore an LNP database:
• A network outage occurs
• A hardware failure occurs at the system where the network element’s LNP database resides
• Software that controls LNP databases has been stopped
When the condition has been repaired, the LSMS and network element attempt to perform automatic resynchronization, which requires no user action. For information about the actions performed by the LSMS and network element during automatic resynchronization, see “Automatic Resynchronization Process” on page 4-2.
When the LSMS and network element reconnect, the network element sends the LSMS the Database Time Stamp (DBTS) of the last update it received before the outage. If the LSMS finds that DBTS in the LSMS resynchronization database, it begins automatic resynchronization using the same protocol as is used for normal updates.
If the LSMS determines that automatic resynchronization cannot be performed because the DBTS cannot be found in the LSMS resynchronization database, notifications are posted at both the LSMS and the network element (see “Notifications that Database Maintenance Is Required” on page 3-3). If those notifications are posted, you can choose among various options for proceeding with synchronization (see “Choosing a Synchronization Procedure” on page 3-3).
Choosing a Database Maintenance Procedure
910-2339-001 Rev A, October 2005 3-3
Notifications that Database Maintenance Is Required
During an attempt to automatically resynchronize, if the LSMS cannot access necessary log files or cannot find the network element’s DBTS in the LSMS resynchronization database, the following actions occur:
1. The LSMS sends one of the following notifications (with event number 0002 or 8043) to the LSMS graphical user interface (in addition, Surveillance notifications with the same event numbers are posted):
[Critical]: <Timestamp> 0002 <CLLI> NE DB maintenance required
2. The LSMS informs the network element that database maintenance is required.
3. The network element displays the following notification on the network element terminal (the number xxxx indicates how many other notifications have already been displayed at the terminal):
rlghncxa03w 01-09-07 11:50:04 GMT EAGLE 31.3.0*C xxxx.0041 *C LSMS Connection A1 LNP DB Maintenance Required.
After any of these notifications, the LSMS administrator and the network element operator should confer and choose one of the synchronization options described in “Choosing a Synchronization Procedure” on page 3-3.
Choosing a Synchronization Procedure
When the LSMS and the network element require database maintenance (see “Notifications that Database Maintenance Is Required” on page 3-3), the LSMS and network element operators should confer to decide on the method they will use to perform the database restoration. After they have agreed which method to use, they work together to complete one or more procedures (see “Understanding Sequence of Procedures to Be Performed” on page 3-5).
Use one of the following procedures to restore an LNP database, listed by priority of least elapsed time and operator intervention (for more information about performance estimates for the various methods, see Appendix D, “Synchronization Performance Estimates”):
1. Copy the RTDB from the ELAP mate—If the RTDB on the mate ELAP is current or can be automatically resynchronized with the LSMS, copy the mate ELAP’s RTDB to the RTDB that requires restoration. This method can be completed in about 9 minutes; it requires:
• Determination that the mate ELAP’s RTDB is current with the LSMS (indicated by the EMS status indicator displaying yellow for this network
3-4 910-2339-001 Rev A, October 2005
Choosing a Database Maintenance Procedure
element on the LSMS graphical user interface). If the EMS status indicator displays red, choose among methods 2 through 4.
• Disconnection of both mated ELAPs from the LSMS for about nine minutes during the copy of the current RTDB to the RTDB that requires restoration.
For a detailed description of this method, see “Procedure to Copy an RTDB from the Mate ELAP” on page 7-7.
2. Copy the RTDB from the standby ELAP on the mated network element—If the mated network element (NE) has both RTDBs synchronized with the LSMS (as indicated by the EMS status indicator for the mated network element displaying green on the LSMS graphical user interface), copy the standby RTDB from the mated NE to the RTDB that requires restoration. This method requires:
• Determination that the mated NE’s standby ELAP RTDB is current with the LSMS (indicated by the EMS status indicator displaying green for the mated network element on the LSMS graphical user interface). If the EMS status indicator displays yellow or red, choose between method 3 and method 4.
• User action at the LSMS to verify that the mated NE is configured properly as a mate.
• Sufficient bandwidth in the customer network, which connects the mated NEs.
• Stopping software both on the ELAP from which the RTDB is being copied and also on the ELAP to which the RTDB is being copied.
This method is recommended when both RTDBs at a given NE require recovery (after one RTDB has been restored, its mate can be restored by copying the newly restored RTDB). The time required to complete this method depends on the bandwidth of the customer network, as shown in Table D-2 on page D-4 (then add approximately 9 minutes to copy to the local network element’s mate RTDB).
For a detailed description of this method, see “Procedure to Copy RTDB from Remote Mated NE” on page 7-12.
3. Attempt a user-initiated resynchronization from the LSMS—User-initiated resynchronization is possible as long as the database time stamp (DBTS) in the RTDB that requires restoration is no more than seven days older than the current time at the LSMS. This method requires:
• User action at NE to allow a user-initiated resynchronization or electronic bulk load from the LSMS to occur (this action prevents an inadvertent initiation of a user-initiated resynchronization).
Choosing a Database Maintenance Procedure
910-2339-001 Rev A, October 2005 3-5
• User action at the LSMS GUI to initiate and manage the resynchronization.
For instructions on performing a user-initiated resynchronization, see “Managing User-Initiated Resynchronization from the LSMS” on page 4-6.
4. Perform an electronic bulk load from the LSMS—If none of the other methods described in this section is possible, perform an electronic bulk load from the LSMS. This method requires:
• User action at NE to allow a user-initiated resynchronization or electronic bulk load from the LSMS to occur (this action prevents an inadvertent initiation of an electronic bulk load).
• User action at the LSMS GUI to initiate and manage the electronic bulk load.
For instructions on performing a electronic bulk load, see “Managing Bulk Load from the LSMS” on page 6-5.
Understanding Sequence of Procedures to Be Performed
For most synchronization methods, the following phases must be completed:
1. Preparing for synchronization.
2. Preparing and transporting data to be used for synchronization.
3. Distributing LNP database synchronization at the network element.
Some phases are accomplished automatically by the LSMS and network element, and some phases require operator intervention. Table 3-1 summarizes, for the various synchronization methods described in this manual, which phases are required for each method and where those phases are described in this manual.
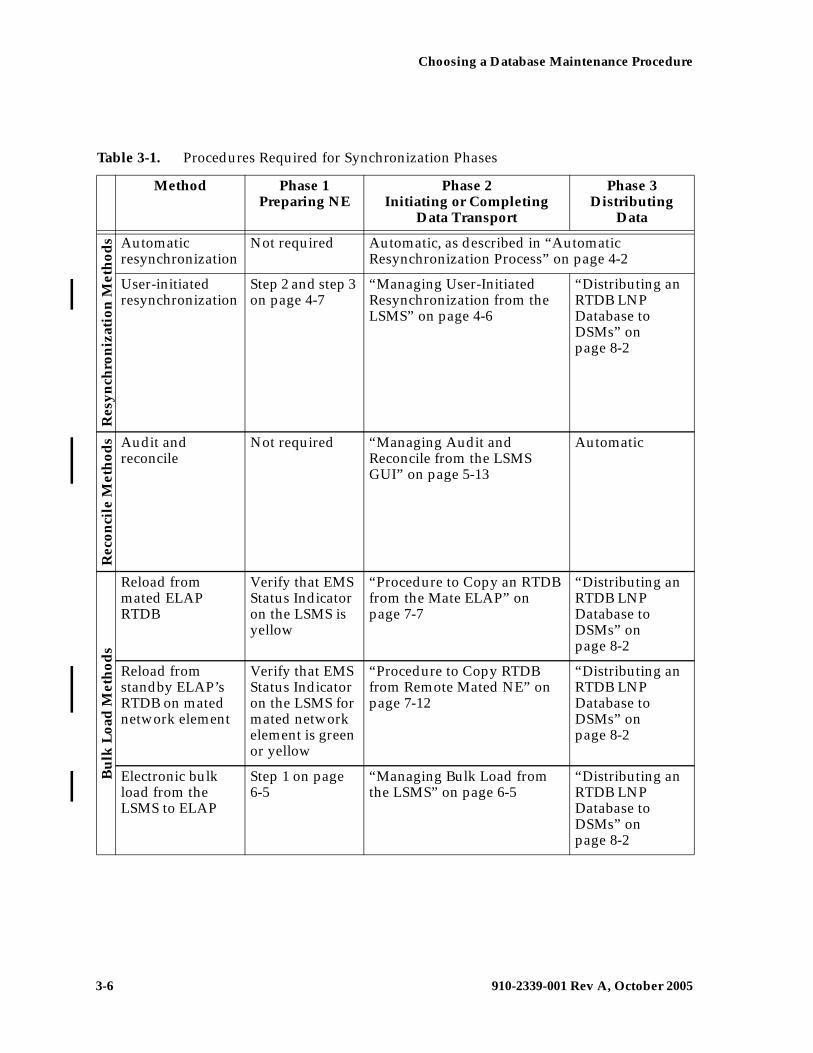
3-6 910-2339-001 Rev A, October 2005
Choosing a Database Maintenance Procedure
Table 3-1. Procedures Required for Synchronization Phases
Method Phase 1Preparing NE
Phase 2Initiating or Completing
Data Transport
Phase 3Distributing
Data
Res
ynch
ron
izat
ion
Met
hod
s Automatic resynchronization
Not required Automatic, as described in “Automatic Resynchronization Process” on page 4-2
User-initiated resynchronization
Step 2 and step 3 on page 4-7
“Managing User-Initiated Resynchronization from the LSMS” on page 4-6
“Distributing an RTDB LNP Database to DSMs” on page 8-2
Rec
onci
le M
eth
ods Audit and
reconcileNot required “Managing Audit and
Reconcile from the LSMS GUI” on page 5-13
Automatic
Bu
lk L
oad
Met
hod
s
Reload from mated ELAP RTDB
Verify that EMS Status Indicator on the LSMS is yellow
“Procedure to Copy an RTDB from the Mate ELAP” on page 7-7
“Distributing an RTDB LNP Database to DSMs” on page 8-2
Reload from standby ELAP’s RTDB on mated network element
Verify that EMS Status Indicator on the LSMS for mated network element is green or yellow
“Procedure to Copy RTDB from Remote Mated NE” on page 7-12
“Distributing an RTDB LNP Database to DSMs” on page 8-2
Electronic bulk load from the LSMS to ELAP
Step 1 on page 6-5
“Managing Bulk Load from the LSMS” on page 6-5
“Distributing an RTDB LNP Database to DSMs” on page 8-2
910-2339-001 Rev A, October 2005 4-1
4
Managing Resynchronization fromthe LSMS
Introduction...................................................................................................... 4–2
Automatic Resynchronization Process ......................................................... 4–2
User-Initiated Resynchronization Overview............................................... 4–4
Managing User-Initiated Resynchronization from the LSMS................... 4–6
User-Initiated Resynchronization Procedure ......................................... 4–6
User-Initiated Resynchronization Log File ........................................... 4–18
User-Initiated Resynchronization Error Messages .............................. 4–21
4-2 910-2339-001 Rev A, October 2005
Managing Resynchronization from the LSMS
Introduction
This chapter describes the features required for resynchronization, the resynchronization types, and how to initiate and manage resynchronization from the Local Service Management System (LSMS). Resynchronization resends all transactions that were previously sent from the LSMS to the network element up to a maximum number of transactions or a maximum period of time. The following types of resynchronization are available:
• Automatic resynchronization—After any network outage, the LSMS and network elements automatically attempt to resynchronize (see “Automatic Resynchronization Process” on page 4-2). This resynchronization occurs without operator intervention when the number of transactions that need to be retransmitted is less than or equal to the number that can be transmitted normally during a four-hour period under maximum provisioning load.
• User-initiated resynchronization—Resynchronization can be initiated after the network element operator has enabled the ability to receive a user-initiated resynchronization or electronic bulk load. User-initiated resynchronization is used usually as a alternative to a bulk load.
Automatic Resynchronization Process
Automatic resynchronization is the process of automatically resending transactions that have occurred during an outage up to the number of transactions that could occur under the maximum provisioning load during an outage of up to four hours.
After any problem has been resolved that caused network outage between the LSMS and the network element, the LSMS and the network element’s Element Management System (EMS) perform the actions described in the following sections to begin automatic resynchronization (also called “short synchronization”). The process does not require operator intervention unless it is unsuccessful, in which case notifications are posted, as described in “Notifications that Database Maintenance Is Required” on page 3-3.
The following actions are part of the automatic resynchronization process:
1. The Job Routing Server (JRS) of the active ELAP determines the database time stamp (DBTS) of both RTDBs (one on the active server and one on the standby server) and sends the DBTS that is the older of the two. An RTDB’s DBTS represents the last time the RTDB received an update from the LSMS.
2. The LSMS determines how many transactions in the log file have a time stamp equal to or after the DBTS and does one of the following:
• If the LSMS detects that the number of transactions requiring resynchronization exceeds the number that can be sent in four hours under maximum provisioning load, the LSMS posts at the LSMS
Managing Resynchronization from the LSMS
910-2339-001 Rev A, October 2005 4-3
notifications that database maintenance is required and sends a message to the network element indicating the automatic resynchronization cannot be performed. The active ELAP then sends the more recent DBTS of the two RTDBs (if the DBTS values were different), and this step is repeated. (If the more recent RTDB can be automatically resynchronized, you can copy the other RTDB from it after it has been automatically resynchronized, as described in Chapter 7, “Copying One RTDB from Another RTDB.”)
• If the LSMS detects that the number of transactions requiring resynchronization is less than or equal to the number that can be sent in four hours under maximum provisioning load, the LSMS and EMS proceed with automatic resynchronization as described in steps 3 through 6.
3. The LSMS displays the following notification at the LSMS user interface:
[Major]: <Timestamp> 8054 <CLLI>: Short Synchronization Started
NOTE: All notifications displayed during steps 3 through 6 are for information only; no user action is necessary.
4. The LSMS stores all new updates arriving at the LSMS in the pending queue.
5. In chronological order, the LSMS sends all transactions stored in the log file specific to the network element’s area of service. The chronological order starts at the first record that has a time stamp equal to or before the database time stamp (DBTS). For more information about DBTS, see step 2. Although the resynchronization may result in duplicate messages, duplicate messages do not result in database errors. Also, if the LSMS is able to perform automatic resynchronization based on the older DBTS, any transactions sent to update the older RTDB but not needed by the newer RTDB are ignored by the newer RTDB.
6. When resynchronization is complete, the LSMS displays the following notification at the LSMS user interface:
[Cleared]: <Timestamp> 8059 <CLLI>: Short Synchronization Complete
Automatic resynchronization is now complete; any updates stored in the LSMS pending queue are transmitted to the network element. Automatic resynchronization can occur for multiple network elements simultaneously.
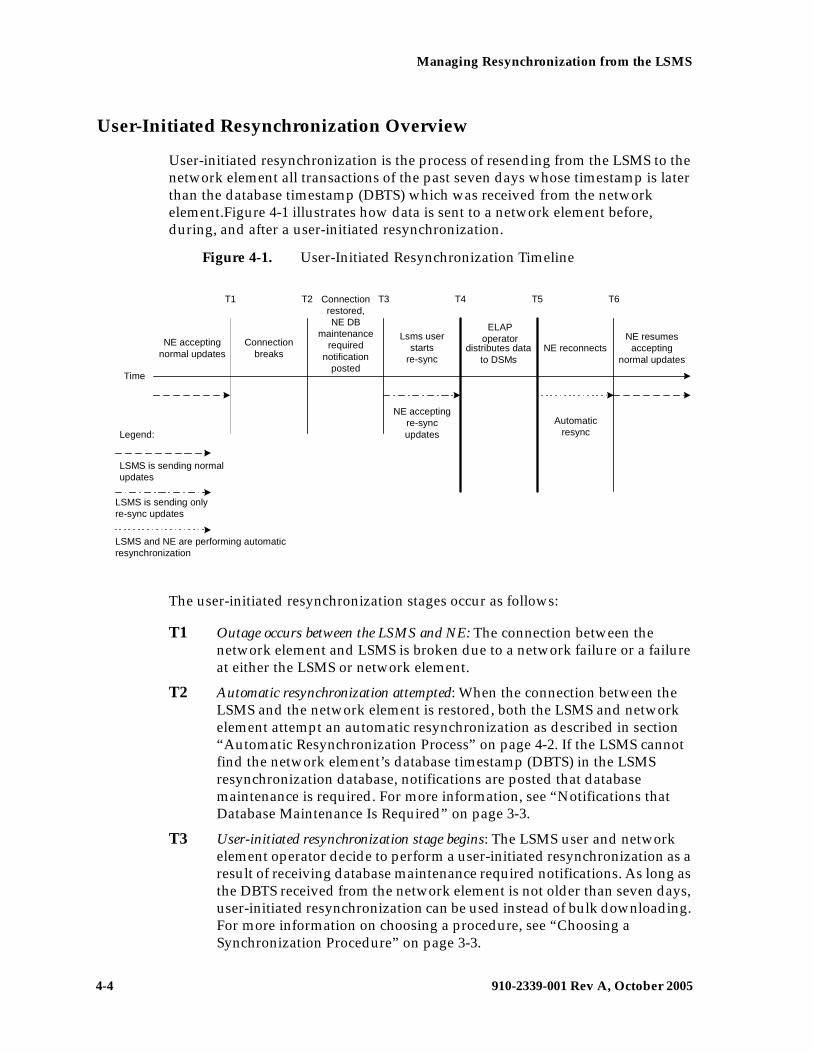
4-4 910-2339-001 Rev A, October 2005
Managing Resynchronization from the LSMS
User-Initiated Resynchronization Overview
User-initiated resynchronization is the process of resending from the LSMS to the network element all transactions of the past seven days whose timestamp is later than the database timestamp (DBTS) which was received from the network element.Figure 4-1 illustrates how data is sent to a network element before, during, and after a user-initiated resynchronization.
Figure 4-1. User-Initiated Resynchronization Timeline
The user-initiated resynchronization stages occur as follows:
T1 Outage occurs between the LSMS and NE: The connection between the network element and LSMS is broken due to a network failure or a failure at either the LSMS or network element.
T2 Automatic resynchronization attempted: When the connection between the LSMS and the network element is restored, both the LSMS and network element attempt an automatic resynchronization as described in section “Automatic Resynchronization Process” on page 4-2. If the LSMS cannot find the network element’s database timestamp (DBTS) in the LSMS resynchronization database, notifications are posted that database maintenance is required. For more information, see “Notifications that Database Maintenance Is Required” on page 3-3.
T3 User-initiated resynchronization stage begins: The LSMS user and network element operator decide to perform a user-initiated resynchronization as a result of receiving database maintenance required notifications. As long as the DBTS received from the network element is not older than seven days, user-initiated resynchronization can be used instead of bulk downloading. For more information on choosing a procedure, see “Choosing a Synchronization Procedure” on page 3-3.
NE acceptingnormal updates
Connectionbreaks
Connectionrestored,NE DB
maintenancerequired
notificationposted
Lsms userstarts
re-sync
ELAPoperator
distributes datato DSMs
NE reconnectsNE resumes
acceptingnormal updates
Time
Automaticresync
T1 T4 T5
NE acceptingre-syncupdates
T2 T6T3
LSMS is sending normalupdates
Legend:
LSMS is sending onlyre-sync updates
LSMS and NE are performing automaticresynchronization
Managing Resynchronization from the LSMS
910-2339-001 Rev A, October 2005 4-5
To start the user-initiated resynchronization at the LSMS, use the procedure described in “Managing User-Initiated Resynchronization from the LSMS” on page 4-6. The first few steps of that procedure direct you to ensure that the network element is ready to receive user-initiated resynchronization updates.
All NPAC and locally provisioned data updates with timestamps later than the NE’s DBTS until the current time are downloaded to the NE in the order in which they were received.
Some differences between the LSMS and NE databases (such as capacity) may cause the NE to reject some of the downloaded commands. These rejections would also during a normal update. All commands rejected by the network element are recorded in the resynchronization log file (see “User-Initiated Resynchronization Log File” on page 4-18).
At any time during this stage, the LSMS user can choose to abort the resynchronization. If aborted, this operation can be either restarted or terminated.
When this stage is complete, the LSMS user has the option to commit or discard the LNP data that was downloaded to the network element. If the user chooses to commit the changes, the NE’s DBTS is set to the time that this stage began. If the user chooses to discard the changes, the NE’s LNP database is left in a Database Maintenance Required (DMR) state.
T4 Network element database distribution stage begins: If the LSMS user chooses in stage T3 to commit the data downloaded to the NE’s database, he should inform the ELAP that the resynchronization has completed. Then the ELAP operator must disable the ability to receive a user-initiated resynchronization or electronic bulk load, copy the newly restored ELAP RTDB to the mate ELAP, and then distribute the data to the DSMs, as described in “Distributing an RTDB LNP Database to DSMs” on page 8-2.
T5 Automatic resynchronization stage begins: At this stage, the user-initiated resynchronization procedures are complete. The LSMS and network element reconnect and begin the normal automatic resynchronization described in “Automatic Resynchronization Process” on page 4-2. During this stage, the LSMS sends all NPAC updates or locally provisioned data updates that have occurred since stage T4.
T6 Normal operations resume.
4-6 910-2339-001 Rev A, October 2005
Managing Resynchronization from the LSMS
Managing User-Initiated Resynchronization from the LSMS
This section includes the procedure for starting a user-initiated resynchronization, the viewing of user-initiated resynchronization log files, and understanding user-initiated resynchronization error messages.
User-Initiated Resynchronization Procedure
Use the following procedure to manage user-initiated resynchronization from the LSMS user interface.
Procedure
1. At the LSMS, log in as a member of the lsmsuser, lsmsuext or lsmsall group.
2. Perform the following substeps to ensure that no NPA Split is scheduled to occur during the time required to perform a resynchronization.
NOTE: Automatic split activation during a high-speed bulk download can cause the network element to be out of synchronization with the LSMS database. To avoid this problem, first perform the following substeps.
a. Generate an NPA Split Report. Select Pending for Status and All NPAC Regions for NPAC Region. For information about creating and viewing NPA Split Data Reports, refer to the LSMS Database Administration Manual, (Chapter 5, “LSMS Reports”).
b. Determine if NPA Splits are scheduled to be activated during the time the resynchronization will occur (to estimate time required to perform the resynchronization, refer to Appendix D, “Synchronization Performance Estimates.”):
- If no Pending NPA Splits were listed in the report in substep a, or if none of the Pending NPA Splits has a PDP Start Date that occurs within the time period required to complete the resynchronization, go to step 3.
- If any Pending NPA Split has a PDP Start Date that occurs within the time period required to complete the Bulk Load, continue with next substep.
c. If any NPA Split is scheduled to be activated within the planned resynchronization period, delay the resynchronization until after the NPA Split has been activated.
Managing Resynchronization from the LSMS
910-2339-001 Rev A, October 2005 4-7
3. At the LSMS, ensure that the icon for the EMS that you plan to resynchronize is red; red indicates that a normal connection between the LSMS and the NE does not exist.
NOTE: If you attempt to start a user-initiated resynchronization for a network element (NE) when the normal connection to the NE exists, the following error message appears, where <CLLI> is the Common Language Location Indicator for the NE:
Re-sync operation is not permitted while the LSMS is connected with the NE.
While a normal connection exists, either an automatic resynchronization has already been performed or is in progress (for more information, see “Automatic Resynchronization Process” on page 4-2). If the normal connection exists and you think the LSMS and NE databases may be out of synchronization, try performing an audit and reconcile of All Database Objects using the normal update channel (use the procedure described in “Managing Audit and Reconcile from the LSMS GUI” on page 5-13, select All Database Objects in step 5 on page 5-20. If the reconcile seems to be taking too long, cancel the operation, disassociate from the network element (for information, refer to the LSMS Configuration Manual), and then try a user-initiated resynchronization.
4. Ensure that the network element is prepared to receive user-initiated resynchronization updates.
Connect the web browser to the ELAP user interface. Log in with the name and password of any user authorized to use the menu items contained in this procedure (for more information about connecting to the ELAP GUI and user authorization, refer to the ELAP Administration Manual).
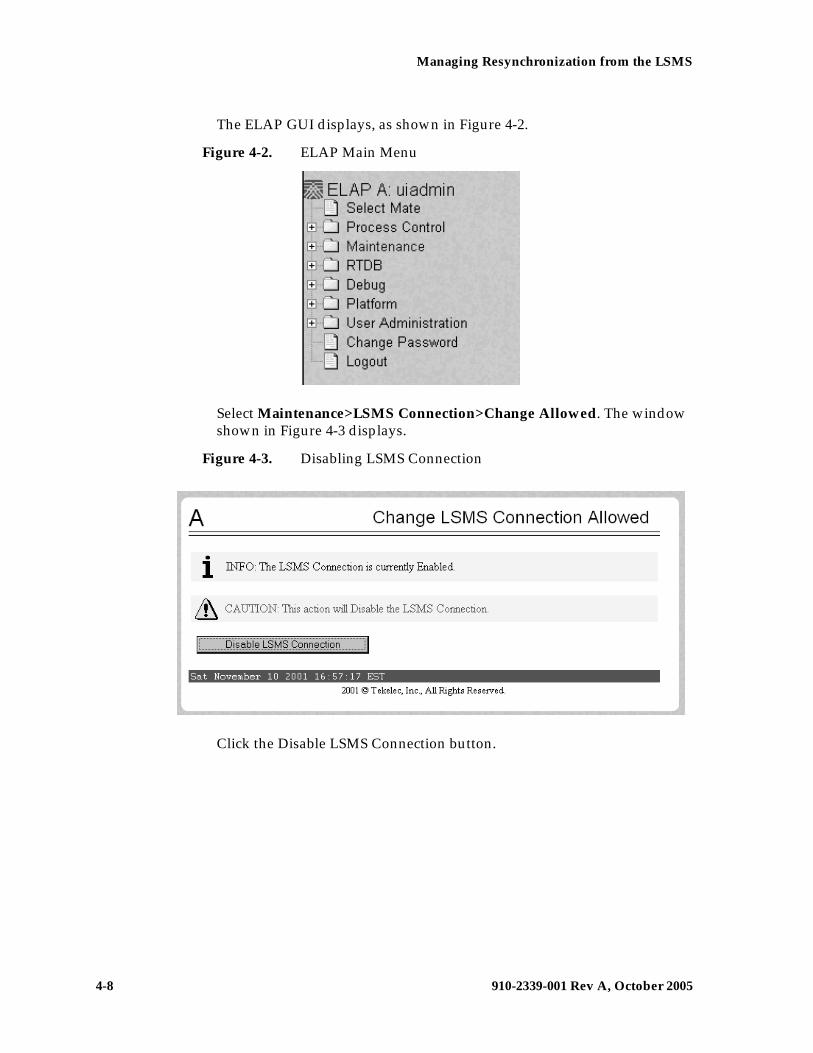
4-8 910-2339-001 Rev A, October 2005
Managing Resynchronization from the LSMS
The ELAP GUI displays, as shown in Figure 4-2.
Figure 4-2. ELAP Main Menu
Select Maintenance>LSMS Connection>Change Allowed. The window shown in Figure 4-3 displays.
Figure 4-3. Disabling LSMS Connection
Click the Disable LSMS Connection button.
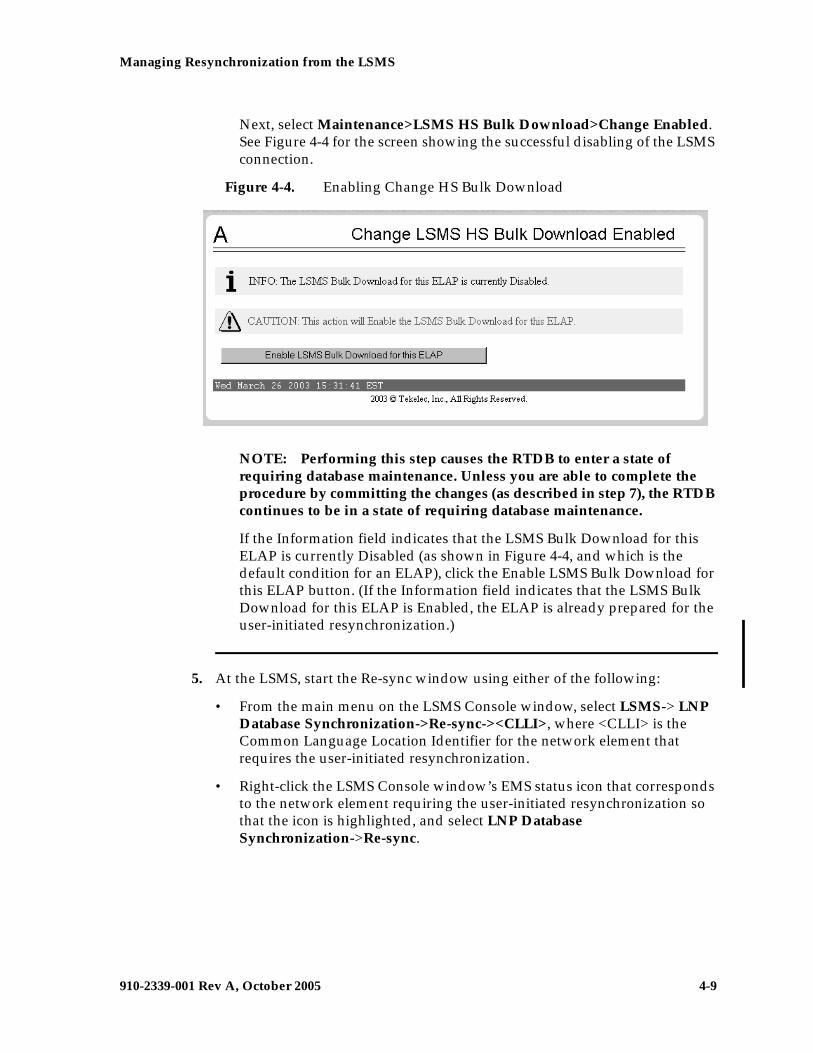
Managing Resynchronization from the LSMS
910-2339-001 Rev A, October 2005 4-9
Next, select Maintenance>LSMS HS Bulk Download>Change Enabled. See Figure 4-4 for the screen showing the successful disabling of the LSMS connection.
Figure 4-4. Enabling Change HS Bulk Download
NOTE: Performing this step causes the RTDB to enter a state of requiring database maintenance. Unless you are able to complete the procedure by committing the changes (as described in step 7), the RTDB continues to be in a state of requiring database maintenance.
If the Information field indicates that the LSMS Bulk Download for this ELAP is currently Disabled (as shown in Figure 4-4, and which is the default condition for an ELAP), click the Enable LSMS Bulk Download for this ELAP button. (If the Information field indicates that the LSMS Bulk Download for this ELAP is Enabled, the ELAP is already prepared for the user-initiated resynchronization.)
5. At the LSMS, start the Re-sync window using either of the following:
• From the main menu on the LSMS Console window, select LSMS-> LNP Database Synchronization->Re-sync-><CLLI>, where <CLLI> is the Common Language Location Identifier for the network element that requires the user-initiated resynchronization.
• Right-click the LSMS Console window’s EMS status icon that corresponds to the network element requiring the user-initiated resynchronization so that the icon is highlighted, and select LNP Database Synchronization->Re-sync.
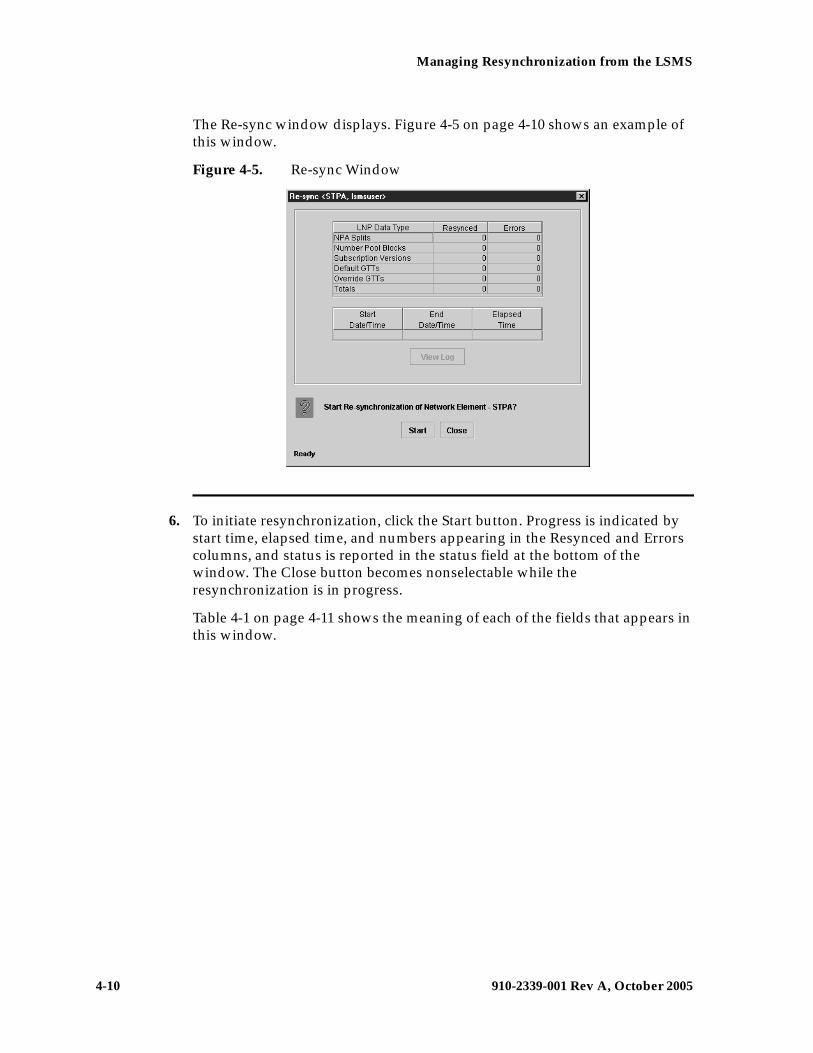
4-10 910-2339-001 Rev A, October 2005
Managing Resynchronization from the LSMS
The Re-sync window displays. Figure 4-5 on page 4-10 shows an example of this window.
Figure 4-5. Re-sync Window
6. To initiate resynchronization, click the Start button. Progress is indicated by start time, elapsed time, and numbers appearing in the Resynced and Errors columns, and status is reported in the status field at the bottom of the window. The Close button becomes nonselectable while the resynchronization is in progress.
Table 4-1 on page 4-11 shows the meaning of each of the fields that appears in this window.

Managing Resynchronization from the LSMS
910-2339-001 Rev A, October 2005 4-11
To view the user-initiated resynchronization log file, click the View Log button. For more information about the log file, see “User-Initiated Resynchronization Log File” on page 4-18.
To abort while resynchronization is in progress, click the Abort button. A confirmation dialog displays, as shown in Figure 4-6 on page 4-11.
Figure 4-6. Abort Resynchronization Dialog
Table 4-1. Fields in Re-sync Window
Field Description Possible Values
Resynced
Total number of commands that were successfully transmitted and applied to the NE’s LNP database during the resynchronization operation.
0—99,999,999
ErrorsTotal number of commands that were successfully transmitted but rejected by the NE during the resynchronization operation.
0—99,999,999
Start Date/Time
Time at which the resynchronization operation was started by the user. MM/DD hh:mm:ss1
End Date/Time
Time at which the resynchronization operation completed successfully or terminated abnormally.
MM/DD hh:mm:ss1
Elapsed Date/Time
Amount of time the resynchronization operation took to complete or the amount of time it ran before the user aborted it.
hh:mm:ss1[A|F]2
StatusAppears as text at the bottom left of the window to indicate the current status of the resynchronization operation.
Varies
1 MM indicates month, range 01—12DD indicates day, range 01—31hh indicates hour, range 00—23mm indicates minute, range 00—59ss indicates second, range 00—59
2 A is appended at the end of the time if the operation is aborted.F is appended at the end of the time if the operation fails.
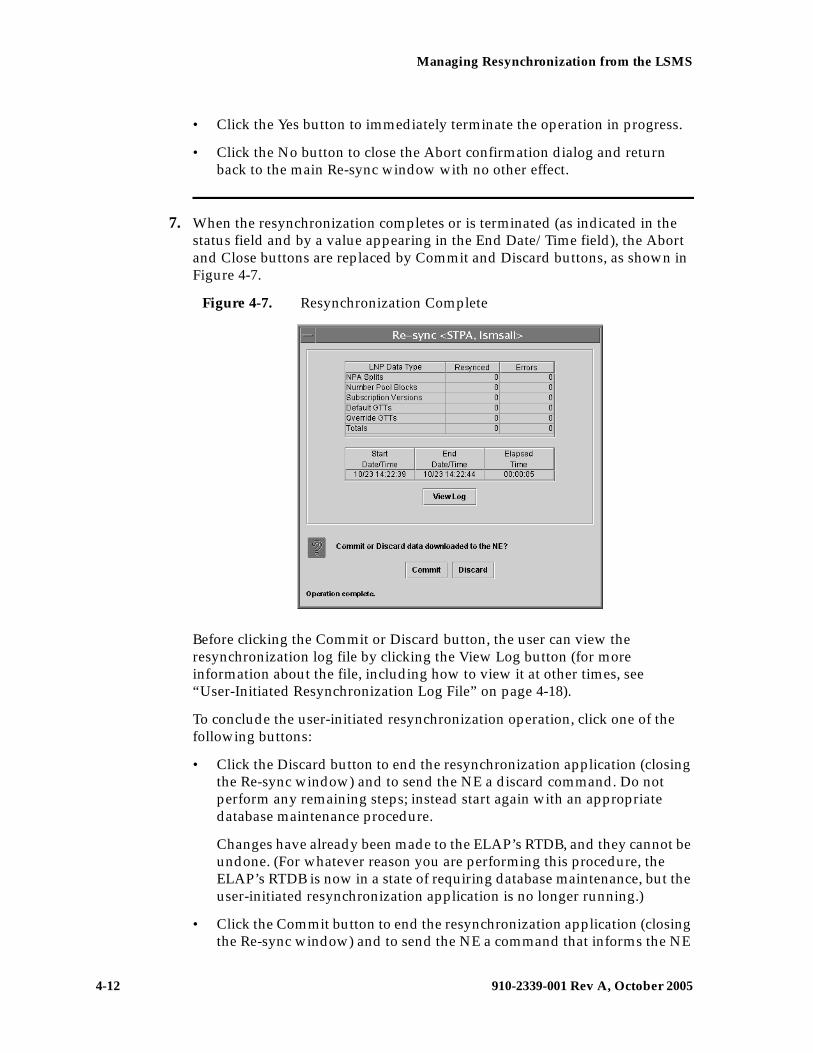
4-12 910-2339-001 Rev A, October 2005
Managing Resynchronization from the LSMS
• Click the Yes button to immediately terminate the operation in progress.
• Click the No button to close the Abort confirmation dialog and return back to the main Re-sync window with no other effect.
7. When the resynchronization completes or is terminated (as indicated in the status field and by a value appearing in the End Date/Time field), the Abort and Close buttons are replaced by Commit and Discard buttons, as shown in Figure 4-7.
Figure 4-7. Resynchronization Complete
Before clicking the Commit or Discard button, the user can view the resynchronization log file by clicking the View Log button (for more information about the file, including how to view it at other times, see “User-Initiated Resynchronization Log File” on page 4-18).
To conclude the user-initiated resynchronization operation, click one of the following buttons:
• Click the Discard button to end the resynchronization application (closing the Re-sync window) and to send the NE a discard command. Do not perform any remaining steps; instead start again with an appropriate database maintenance procedure.
Changes have already been made to the ELAP’s RTDB, and they cannot be undone. (For whatever reason you are performing this procedure, the ELAP’s RTDB is now in a state of requiring database maintenance, but the user-initiated resynchronization application is no longer running.)
• Click the Commit button to end the resynchronization application (closing the Re-sync window) and to send the NE a command that informs the NE
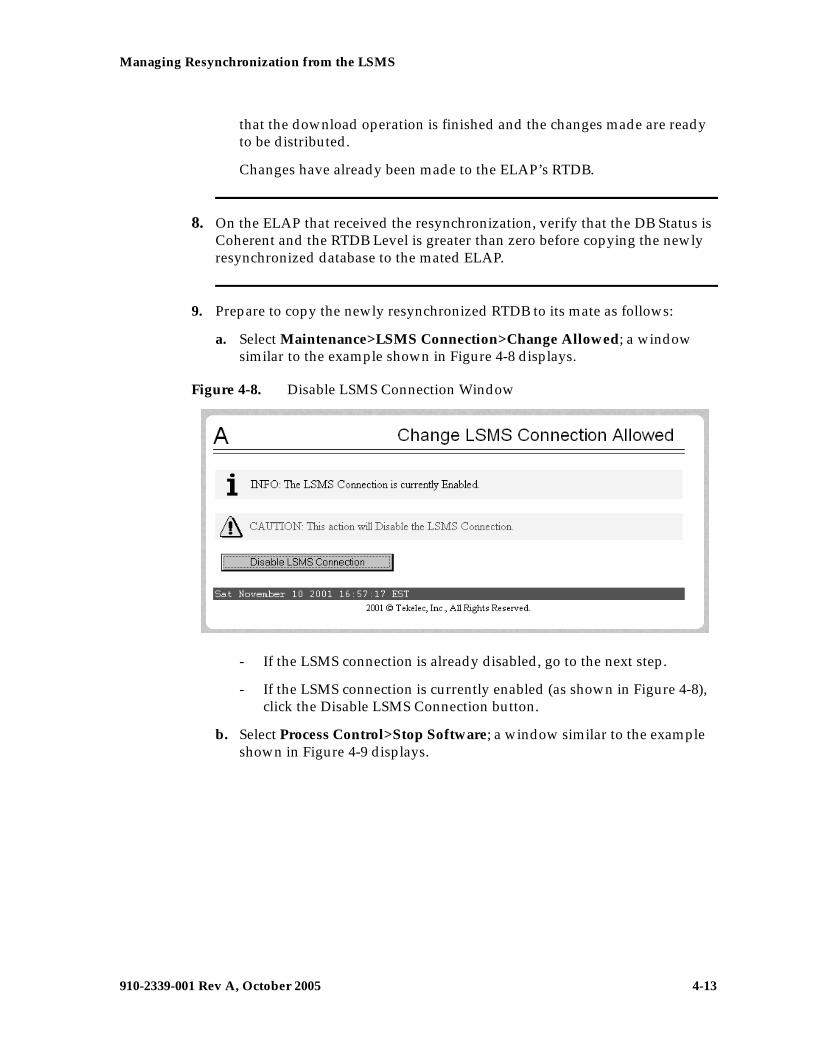
Managing Resynchronization from the LSMS
910-2339-001 Rev A, October 2005 4-13
that the download operation is finished and the changes made are ready to be distributed.
Changes have already been made to the ELAP’s RTDB.
8. On the ELAP that received the resynchronization, verify that the DB Status is Coherent and the RTDB Level is greater than zero before copying the newly resynchronized database to the mated ELAP.
9. Prepare to copy the newly resynchronized RTDB to its mate as follows:
a. Select Maintenance>LSMS Connection>Change Allowed; a window similar to the example shown in Figure 4-8 displays.
Figure 4-8. Disable LSMS Connection Window
- If the LSMS connection is already disabled, go to the next step.
- If the LSMS connection is currently enabled (as shown in Figure 4-8), click the Disable LSMS Connection button.
b. Select Process Control>Stop Software; a window similar to the example shown in Figure 4-9 displays.
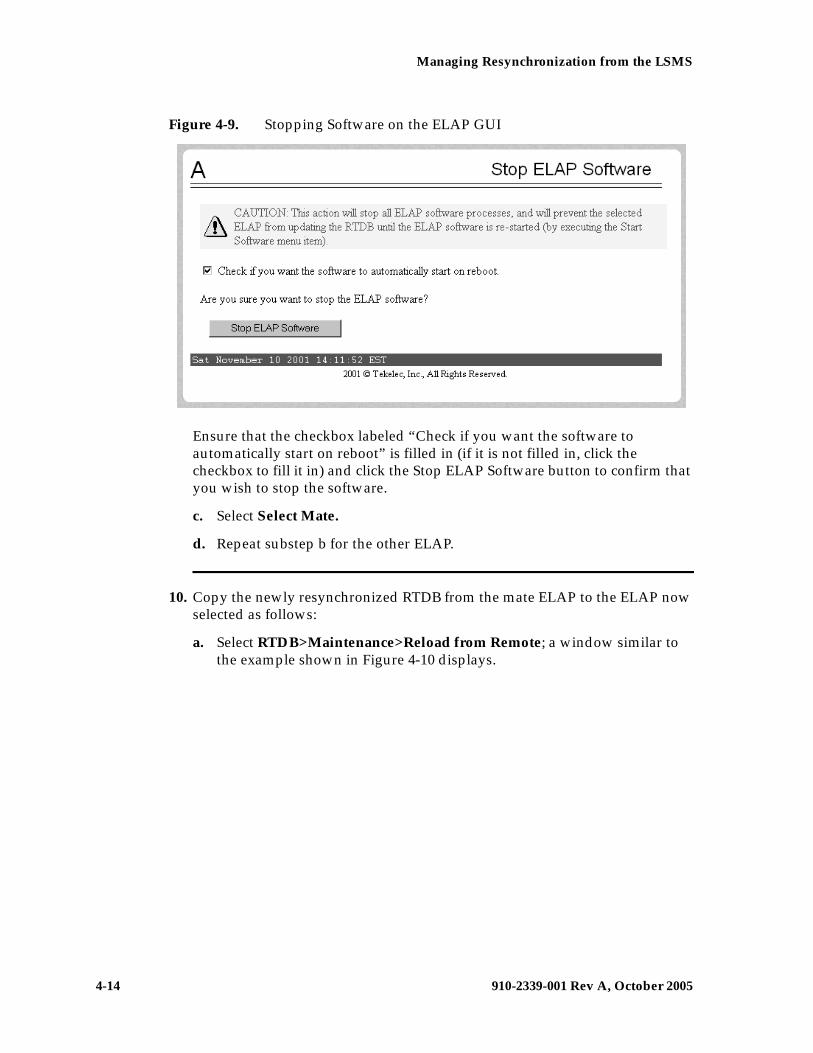
4-14 910-2339-001 Rev A, October 2005
Managing Resynchronization from the LSMS
Figure 4-9. Stopping Software on the ELAP GUI
Ensure that the checkbox labeled “Check if you want the software to automatically start on reboot” is filled in (if it is not filled in, click the checkbox to fill it in) and click the Stop ELAP Software button to confirm that you wish to stop the software.
c. Select Select Mate.
d. Repeat substep b for the other ELAP.
10. Copy the newly resynchronized RTDB from the mate ELAP to the ELAP now selected as follows:
a. Select RTDB>Maintenance>Reload from Remote; a window similar to the example shown in Figure 4-10 displays.
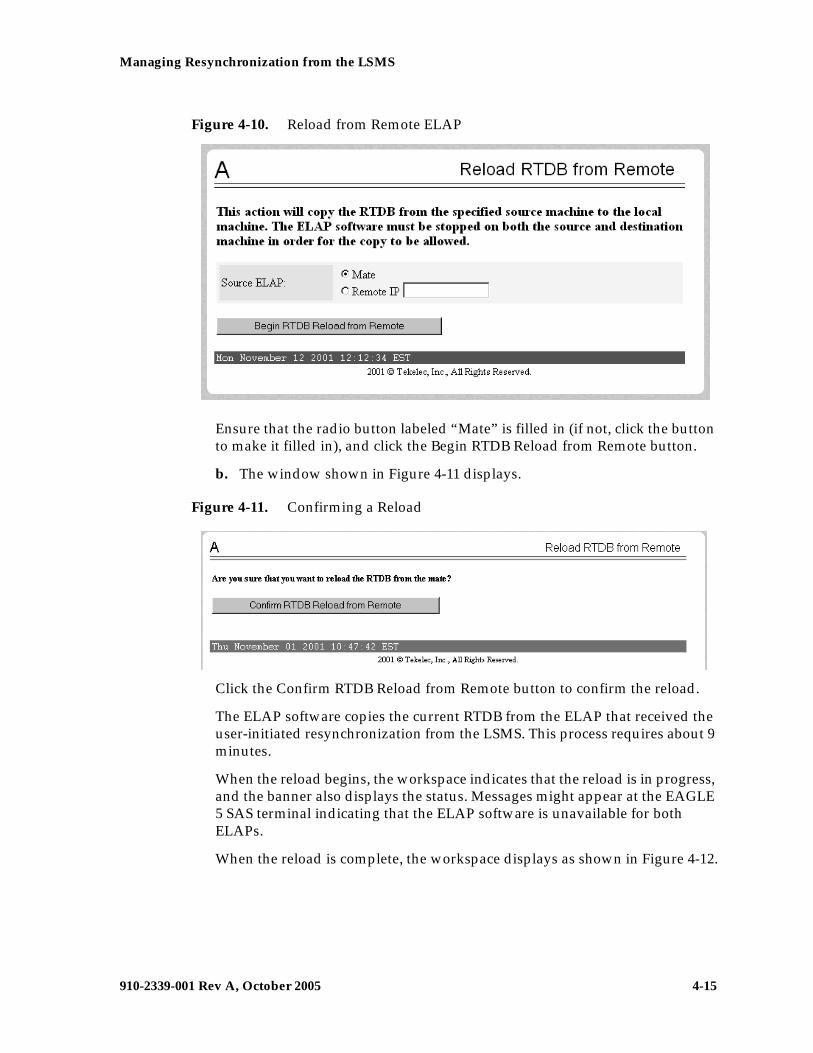
Managing Resynchronization from the LSMS
910-2339-001 Rev A, October 2005 4-15
Figure 4-10. Reload from Remote ELAP
Ensure that the radio button labeled “Mate” is filled in (if not, click the button to make it filled in), and click the Begin RTDB Reload from Remote button.
b. The window shown in Figure 4-11 displays.
Figure 4-11. Confirming a Reload
Click the Confirm RTDB Reload from Remote button to confirm the reload.
The ELAP software copies the current RTDB from the ELAP that received the user-initiated resynchronization from the LSMS. This process requires about 9 minutes.
When the reload begins, the workspace indicates that the reload is in progress, and the banner also displays the status. Messages might appear at the EAGLE 5 SAS terminal indicating that the ELAP software is unavailable for both ELAPs.
When the reload is complete, the workspace displays as shown in Figure 4-12.
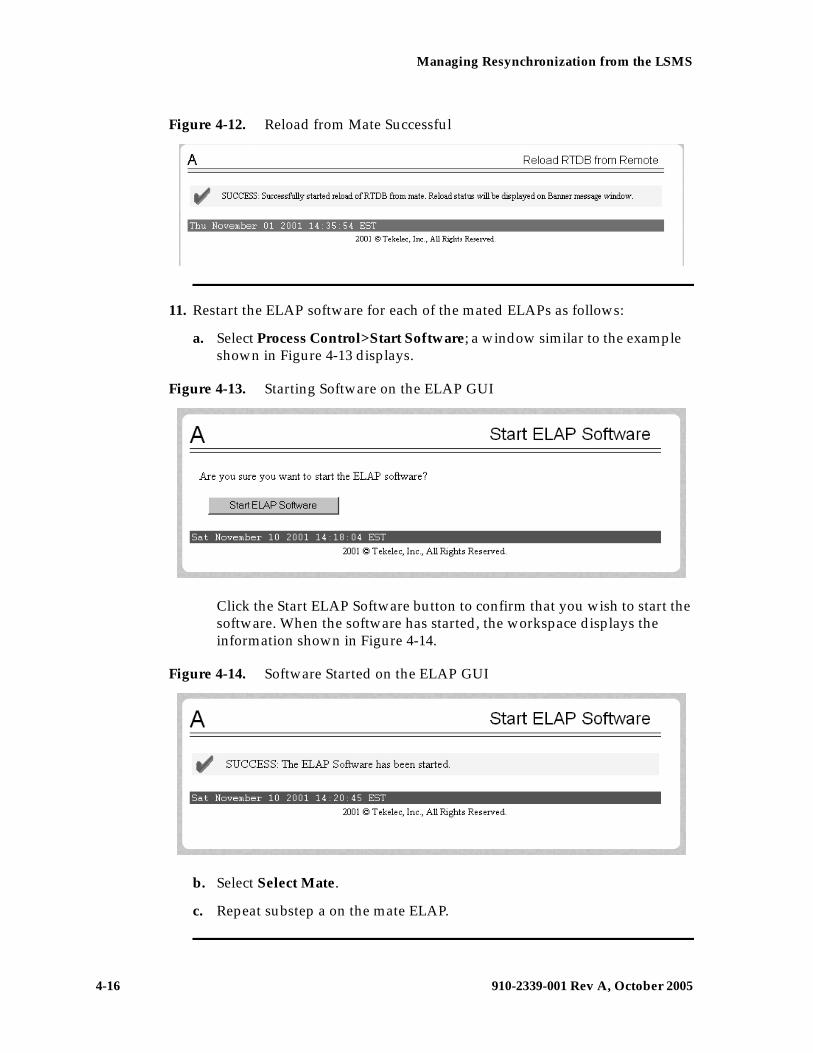
4-16 910-2339-001 Rev A, October 2005
Managing Resynchronization from the LSMS
Figure 4-12. Reload from Mate Successful
11. Restart the ELAP software for each of the mated ELAPs as follows:
a. Select Process Control>Start Software; a window similar to the example shown in Figure 4-13 displays.
Figure 4-13. Starting Software on the ELAP GUI
Click the Start ELAP Software button to confirm that you wish to start the software. When the software has started, the workspace displays the information shown in Figure 4-14.
Figure 4-14. Software Started on the ELAP GUI
b. Select Select Mate.
c. Repeat substep a on the mate ELAP.
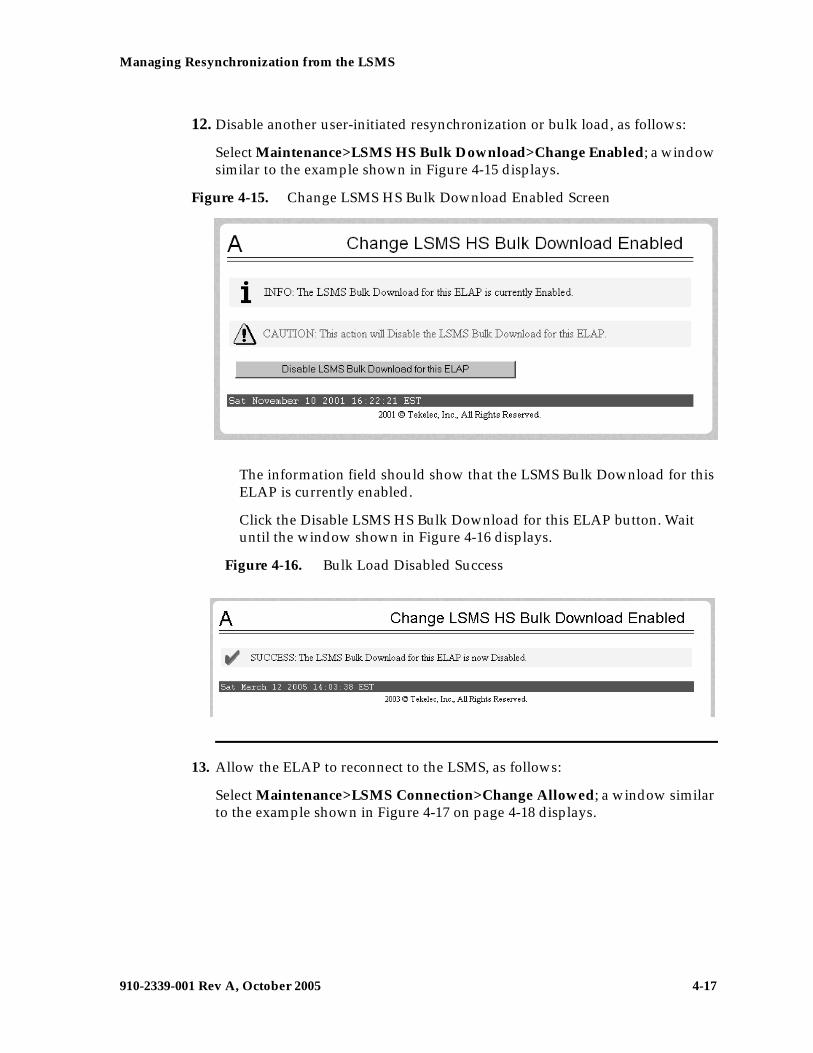
Managing Resynchronization from the LSMS
910-2339-001 Rev A, October 2005 4-17
12. Disable another user-initiated resynchronization or bulk load, as follows:
Select Maintenance>LSMS HS Bulk Download>Change Enabled; a window similar to the example shown in Figure 4-15 displays.
Figure 4-15. Change LSMS HS Bulk Download Enabled Screen
The information field should show that the LSMS Bulk Download for this ELAP is currently enabled.
Click the Disable LSMS HS Bulk Download for this ELAP button. Wait until the window shown in Figure 4-16 displays.
Figure 4-16. Bulk Load Disabled Success
13. Allow the ELAP to reconnect to the LSMS, as follows:
Select Maintenance>LSMS Connection>Change Allowed; a window similar to the example shown in Figure 4-17 on page 4-18 displays.
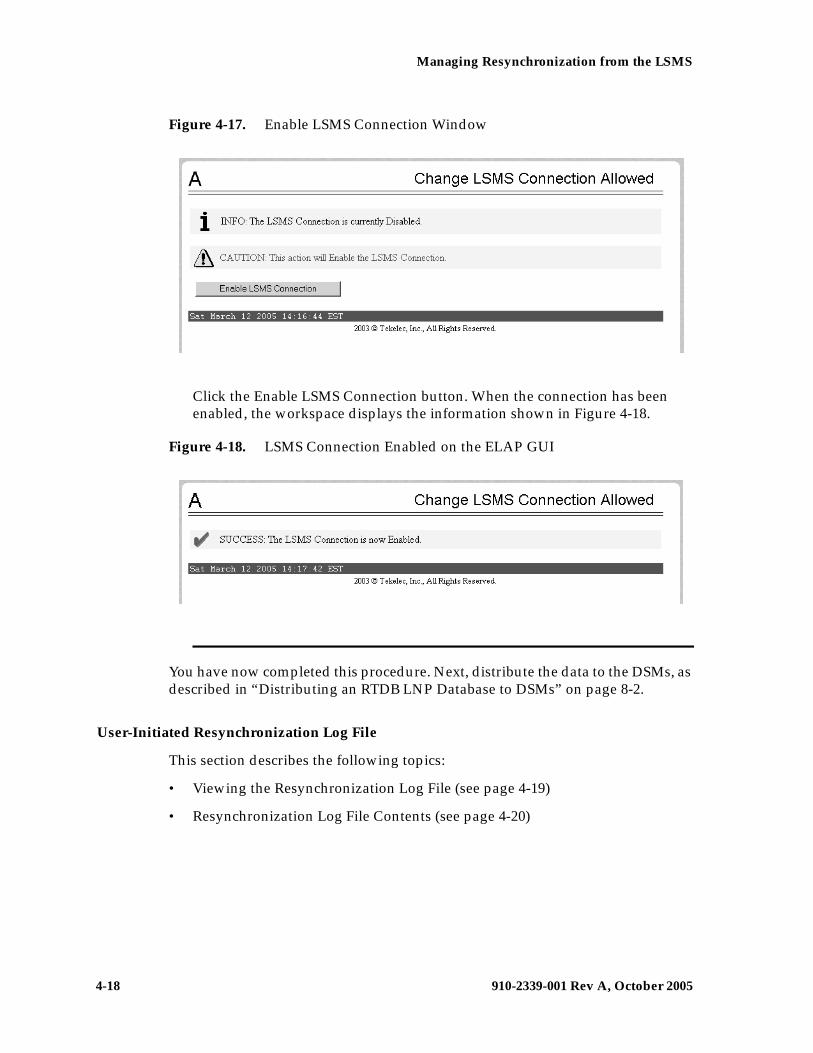
4-18 910-2339-001 Rev A, October 2005
Managing Resynchronization from the LSMS
Figure 4-17. Enable LSMS Connection Window
Click the Enable LSMS Connection button. When the connection has been enabled, the workspace displays the information shown in Figure 4-18.
Figure 4-18. LSMS Connection Enabled on the ELAP GUI
You have now completed this procedure. Next, distribute the data to the DSMs, as described in “Distributing an RTDB LNP Database to DSMs” on page 8-2.
User-Initiated Resynchronization Log File
This section describes the following topics:
• Viewing the Resynchronization Log File (see page 4-19)
• Resynchronization Log File Contents (see page 4-20)
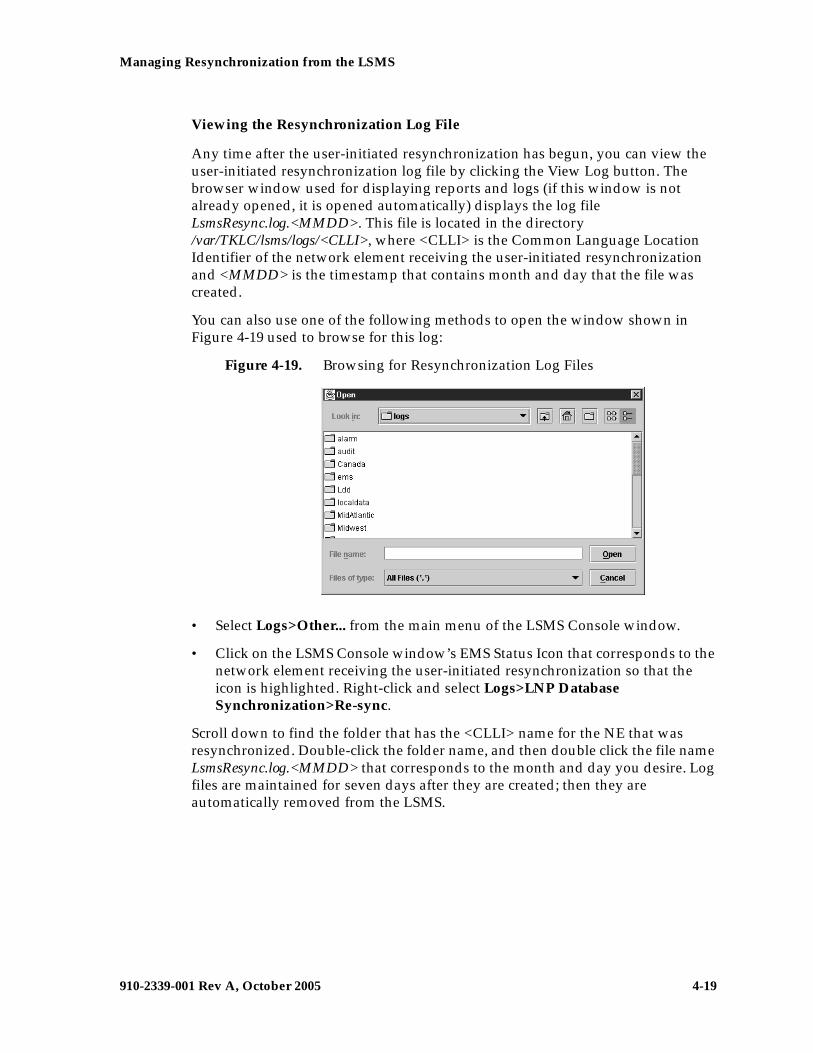
Managing Resynchronization from the LSMS
910-2339-001 Rev A, October 2005 4-19
Viewing the Resynchronization Log File
Any time after the user-initiated resynchronization has begun, you can view the user-initiated resynchronization log file by clicking the View Log button. The browser window used for displaying reports and logs (if this window is not already opened, it is opened automatically) displays the log file LsmsResync.log.<MMDD>. This file is located in the directory /var/TKLC/lsms/logs/<CLLI>, where <CLLI> is the Common Language Location Identifier of the network element receiving the user-initiated resynchronization and <MMDD> is the timestamp that contains month and day that the file was created.
You can also use one of the following methods to open the window shown in Figure 4-19 used to browse for this log:
Figure 4-19. Browsing for Resynchronization Log Files
• Select Logs>Other... from the main menu of the LSMS Console window.
• Click on the LSMS Console window’s EMS Status Icon that corresponds to the network element receiving the user-initiated resynchronization so that the icon is highlighted. Right-click and select Logs>LNP Database Synchronization>Re-sync.
Scroll down to find the folder that has the <CLLI> name for the NE that was resynchronized. Double-click the folder name, and then double click the file name LsmsResync.log.<MMDD> that corresponds to the month and day you desire. Log files are maintained for seven days after they are created; then they are automatically removed from the LSMS.
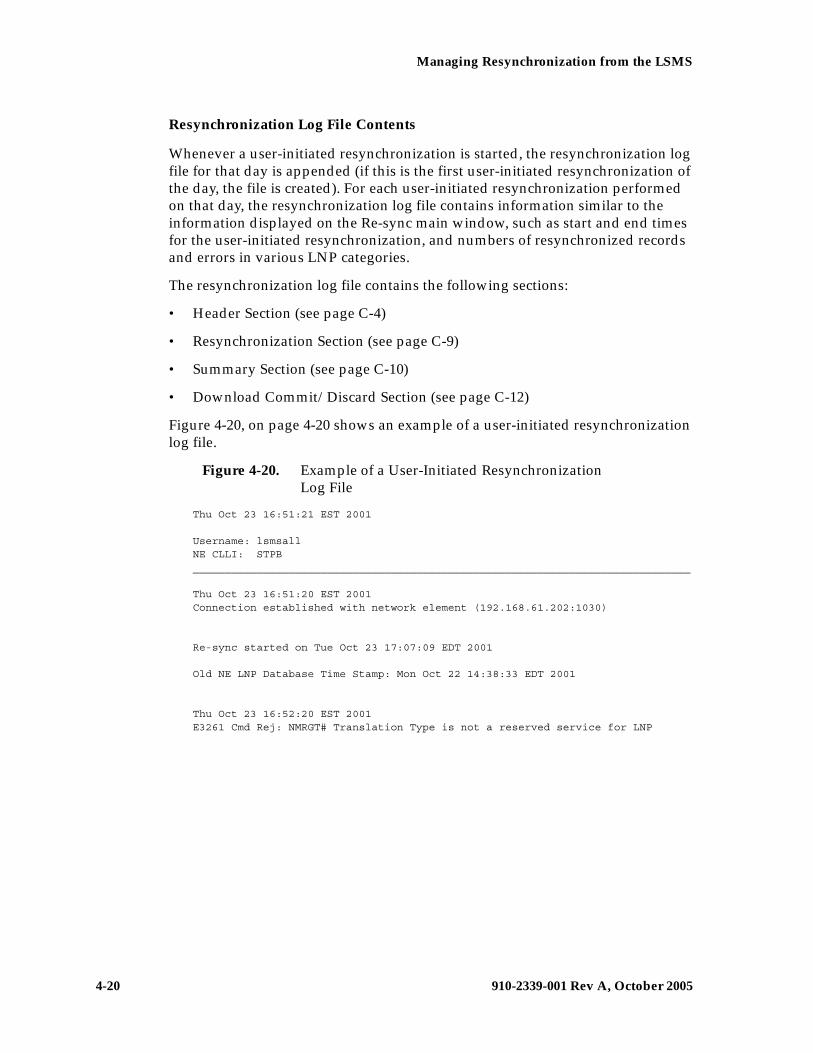
4-20 910-2339-001 Rev A, October 2005
Managing Resynchronization from the LSMS
Resynchronization Log File Contents
Whenever a user-initiated resynchronization is started, the resynchronization log file for that day is appended (if this is the first user-initiated resynchronization of the day, the file is created). For each user-initiated resynchronization performed on that day, the resynchronization log file contains information similar to the information displayed on the Re-sync main window, such as start and end times for the user-initiated resynchronization, and numbers of resynchronized records and errors in various LNP categories.
The resynchronization log file contains the following sections:
• Header Section (see page C-4)
• Resynchronization Section (see page C-9)
• Summary Section (see page C-10)
• Download Commit/Discard Section (see page C-12)
Figure 4-20, on page 4-20 shows an example of a user-initiated resynchronization log file.
Figure 4-20. Example of a User-Initiated Resynchronization Log File
Thu Oct 23 16:51:21 EST 2001
Username: lsmsallNE CLLI: STPB______________________________________________________________________________
Thu Oct 23 16:51:20 EST 2001Connection established with network element (192.168.61.202:1030)
Re-sync started on Tue Oct 23 17:07:09 EDT 2001
Old NE LNP Database Time Stamp: Mon Oct 22 14:38:33 EDT 2001
Thu Oct 23 16:52:20 EST 2001E3261 Cmd Rej: NMRGT# Translation Type is not a reserved service for LNP

Managing Resynchronization from the LSMS
910-2339-001 Rev A, October 2005 4-21
UPDATE-OVERRIDE-GTT: LRN: 1234567890 SPID: tklc TT: 001 DPC: 000000000 SSN: 000 RI: G NGT: 000 RGTA: T TT: 004 DPC: 000000000 SSN: 000 RI: G NGT: 000 RGTA: L TT: 003 DPC: 000000000 SSN: 000 RI: G NGT: 000 RGTA: T TT: 002 DPC: 000000000 SSN: 000 RI: G NGT: 000 RGTA: L
New NE LNP Database Time Stamp: Tue Oct 23 17:07:10 EDT 2001
Re-sync completed on Tue Oct 23 17:07:10 EDT 2001
NPA Splits 1 Downloaded 0 errors Number Pool Blocks 0 Downloaded 0 errors Subscription Versions 0 Downloaded 0 errors Default GTTs 0 Downloaded 0 errors Override GTTs 0 Downloaded 1 errors Total 1 Downloaded 1 errors
Discard completed on Tue Oct 23 17:07:21 EDT 2001.
User-Initiated Resynchronization Error Messages
For a listing of error messages that can appear on the GUI, along with explanation of possible cause and suggested recovery, see Appendix A, “LSMS GUI Messages.”
4-22 910-2339-001 Rev A, October 2005
Managing Resynchronization from the LSMS
910-2339-001 Rev A, October 2005 5-1
5
Auditing and Reconciling NetworkElements from the LSMS
Introduction...................................................................................................... 5–2
Methods of Auditing and Reconciling .................................................... 5–2
Operator Action at Network Element ..................................................... 5–2
Types of Data to Audit and Reconcile ..................................................... 5–3
How Records Are Compared During an Audit ..................................... 5–4
Displaying Audit Results .......................................................................... 5–7
Audit and Reconcile Function Summary................................................ 5–9
Audit and Reconcile Function Summary................................................ 5–9
Audit and Reconcile Timeline...................................................................... 5–10
Single SV/NPB Audit and Reconcile Timeline .................................... 5–10
Range Audit and Reconcile Timeline .................................................... 5–11
Managing Audit and Reconcile from the LSMS GUI............................... 5–13
Audit Error Messages............................................................................. 5–13
Single SV/NPB Audit and Optional Reconcile from the LSMS GUI5–13
Range Audit and Optional Reconcile from the LSMS GUI............... 5–18
Post-Audit Reconcile from the GUI...................................................... 5–28
Performing an Audit Using the Command Line ...................................... 5–32
Audit Log File ................................................................................................ 5–37
Viewing Audit Log Files.......................................................................... 5–37
5-2 910-2339-001 Rev A, October 2005
Auditing and Reconciling Network Elements from the LSMS
Audit Log File Contents...........................................................................5–38
Continuing an Interrupted Object Range Audit ..................................5–40
Introduction
This chapter describes auditing and optional reconciling of network element data. An audit compares the LNP data at the network element with that at the LSMS. At any time, except as noted in “Audit and Reconcile Function Summary” on page 5-9, you can initiate from the LSMS an audit of LNP data at the network element.
You can also choose to reconcile any discrepancies found during an audit. Reconciling allows you to update only the LNP database records that are found to be different during an audit.
Although auditing without reconciling does not result in synchronized LNP databases, you can perform an audit without a reconcile for information purposes.
Methods of Auditing and Reconciling
You can perform audits and optional reconciles in either of the following ways:
• Through the LSMS GUI; see “Managing Audit and Reconcile from the LSMS GUI” on page 5-13
• Through the lsmsclaa command line interface; see “Performing an Audit Using the Command Line” on page 5-32
Operator Action at Network Element
An audit does not require any operator action at the network element. However, it is possible for the NE operator to disable the ability to process an audit. This is sometimes necessary when the NE operator is trying to debug a problem. If the NE operator has disabled the ability to process an audit, the LSMS will receive a rejection that is posted on the GUI as the following error message:
Connection already in use or operation not enabled at NE '<IP address>'
If this message occurs, perform the procedure described in Appendix B, “Enabling LSMS Audit on ELAP.”
Auditing and Reconciling Network Elements from the LSMS
910-2339-001 Rev A, October 2005 5-3
Types of Data to Audit and Reconcile
The LSMS offers the following types of audits that compare records in the LSMS to records in a specified network element:
• Single SV/NPB Audit—This type allows you to audit a single subscription version or number pool block per supported network element at any time. If the audit reveals any discrepancy, you can choose to reconcile immediately.
NOTE: The Single SV/NPB audit is not available for LSMS releases prior to 8.0.
• Range Audit (simply called Audit for LSMS releases prior to 8.0)—You can audit the following types of ranges:
– Time Range Audit—One or both of the following types of regional data found to have been created, modified, or deleted by the LSMS between the specified start and end date and time for the audit (which must be during the previous seven days.
- Subscription version data
- Number pool block data
– Object Range Audit—One or more of the following types of data that are stored in the LSMS databases within the specified range of starting and ending values:
- Subscription version data
• All TNs in the network element’s LNP database
• All TNs within a TN range (this option is available only for LSMS releases prior to 8.0; for LSMS Release 8.0, use Single SV/NPB Audit)
• All TNs within an NPA-NXX range
- Number pool block data
• All NPBs in the network element’s LNP database
• All NPBs within an NPA-NXX-X range (this option is available only for LSMS releases prior to 8.0; for LSMS Release 8.0, use Single SV/NPB Audit)
• All NPBs within an NPA-NXX range
- NPA Split data
• All TNs in the network element’s LNP database with a specified Old NPA
• All TNs within a specified Old NPA range
5-4 910-2339-001 Rev A, October 2005
Auditing and Reconciling Network Elements from the LSMS
- Default GTT data
• All default GTTs in the network element’s LNP database with a specified NPA-NXX
• All default GTTs within an NPA-NXX range
- Override GTT data
• All override GTTs in the network element’s LNP database with a specified LRN
• All override GTTs within an LRN range
For more information about these types of data, refer to the LSMS Database Administration Manual.
How Records Are Compared During an Audit
LNP data is determined to be out of synchronization by calculating a CRC (Cyclic Redundancy Check)-32 checksum for each specified type of LNP data record at both the LSMS and at the network element, and then comparing the checksums. If the checksums do not match, it is assumed that the records do not match.
Because some network element LNP database objects may contain attributes that are not stored in the LSMS LNP database, and vice versa, the computation of a checksum may not include all attributes. In addition, some attributes, such as LNP type, that are common to both the LSMS and network element LNP databases but which have different values, are not included in the computation of the checksums. Table 5-1 on page 5-5 shows which attributes are included in checksums for each type of LNP data object.
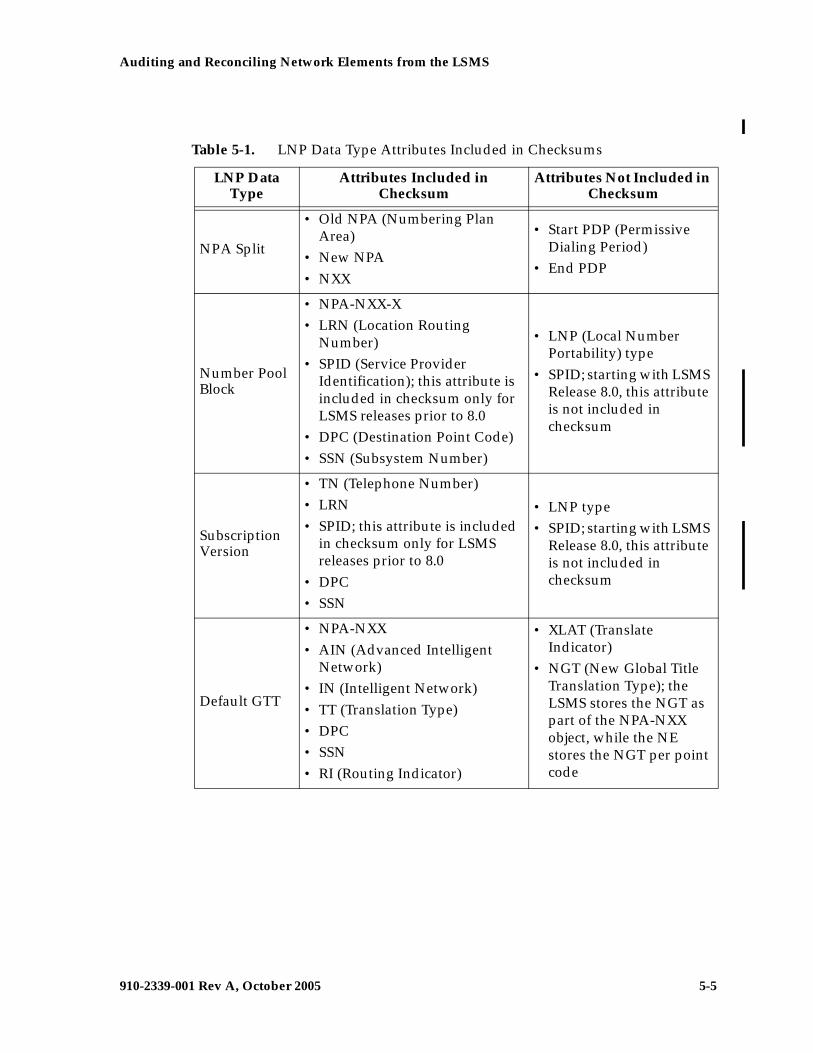
Auditing and Reconciling Network Elements from the LSMS
910-2339-001 Rev A, October 2005 5-5
Table 5-1. LNP Data Type Attributes Included in Checksums
LNP Data Type
Attributes Included in Checksum
Attributes Not Included in Checksum
NPA Split
• Old NPA (Numbering Plan Area)
• New NPA• NXX
• Start PDP (Permissive Dialing Period)
• End PDP
Number Pool Block
• NPA-NXX-X• LRN (Location Routing
Number)• SPID (Service Provider
Identification); this attribute is included in checksum only for LSMS releases prior to 8.0
• DPC (Destination Point Code)• SSN (Subsystem Number)
• LNP (Local Number Portability) type
• SPID; starting with LSMS Release 8.0, this attribute is not included in checksum
Subscription Version
• TN (Telephone Number)• LRN• SPID; this attribute is included
in checksum only for LSMS releases prior to 8.0
• DPC• SSN
• LNP type• SPID; starting with LSMS
Release 8.0, this attribute is not included in checksum
Default GTT
• NPA-NXX• AIN (Advanced Intelligent
Network)• IN (Intelligent Network)• TT (Translation Type)• DPC• SSN• RI (Routing Indicator)
• XLAT (Translate Indicator)
• NGT (New Global Title Translation Type); the LSMS stores the NGT as part of the NPA-NXX object, while the NE stores the NGT per point code
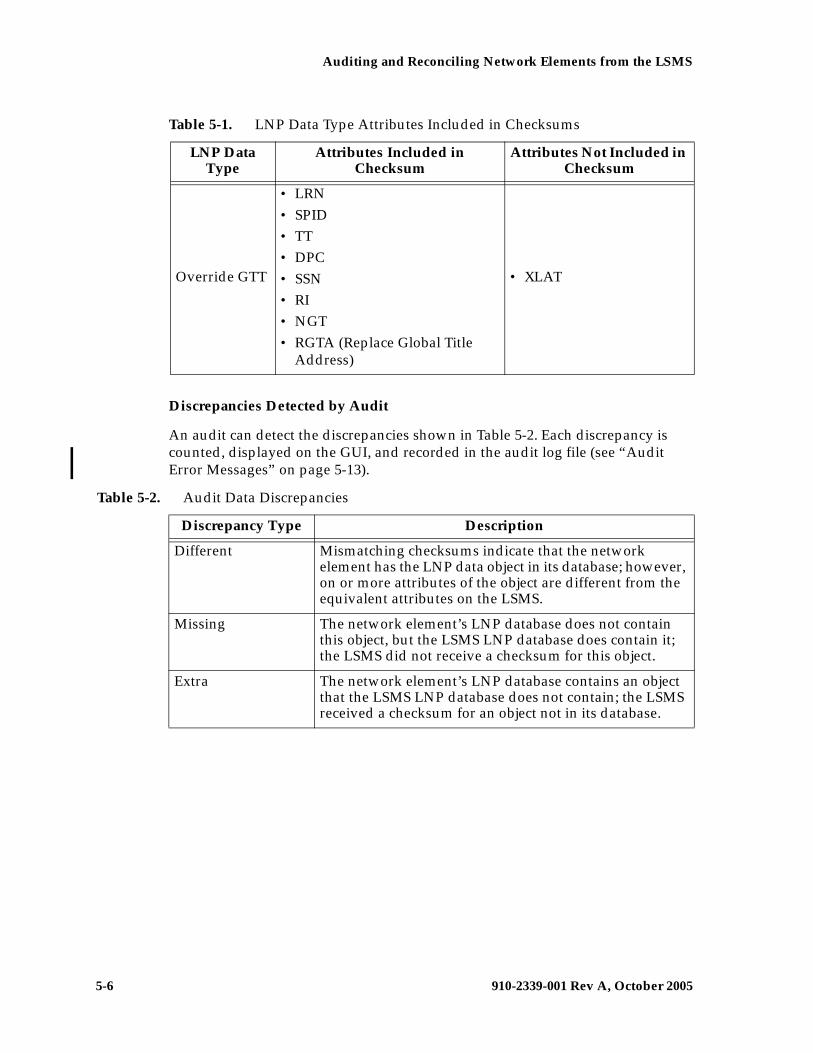
5-6 910-2339-001 Rev A, October 2005
Auditing and Reconciling Network Elements from the LSMS
Discrepancies Detected by Audit
An audit can detect the discrepancies shown in Table 5-2. Each discrepancy is counted, displayed on the GUI, and recorded in the audit log file (see “Audit Error Messages” on page 5-13).
Override GTT
• LRN• SPID• TT• DPC• SSN• RI• NGT• RGTA (Replace Global Title
Address)
• XLAT
Table 5-1. LNP Data Type Attributes Included in Checksums
LNP Data Type
Attributes Included in Checksum
Attributes Not Included in Checksum
Table 5-2. Audit Data Discrepancies
Discrepancy Type Description
Different Mismatching checksums indicate that the network element has the LNP data object in its database; however, on or more attributes of the object are different from the equivalent attributes on the LSMS.
Missing The network element’s LNP database does not contain this object, but the LSMS LNP database does contain it; the LSMS did not receive a checksum for this object.
Extra The network element’s LNP database contains an object that the LSMS LNP database does not contain; the LSMS received a checksum for an object not in its database.
Auditing and Reconciling Network Elements from the LSMS
910-2339-001 Rev A, October 2005 5-7
Duplicate Data Detected by Audit
In addition to detecting these discrepancies, all types of audit except auditing by time range also detect whether duplicate data resides in the LSMS and network element LNP databases. Duplicate data is not considered to be a discrepancy and cannot be corrected by performing a reconcile operation. Each duplicate LNP data object detected is counted and recorded in the audit log file. If duplicate LNP data is detected, contact the Tekelec Customer Care Center (see “Tekelec Customer Care Center” on page 1-14).
NOTE: It is recommended that you correct any duplicates as soon as they are found, even before performing a reconcile. If the duplicates are not corrected, future audits may show these duplicates as different types of discrepancies at different times, and it will be more difficult to determine whether the discrepancies have been caused by originally duplicate data.
Displaying Audit Results
Results of an audit are made available in the following ways:
• Displayed as they are calculated either on:
– The Audit Results tab of the GUI if the audit is initiated from the GUI (see “Single SV/NPB Audit and Optional Reconcile from the LSMS GUI” on page 5-13 or “Range Audit and Optional Reconcile from the LSMS GUI” on page 5-18)
– On the command line interface if the audit is initiated from the command line and the details parameter is specified (see “Performing an Audit Using the Command Line” on page 5-32)
• Stored in a log (see “Audit Error Messages” on page 5-13).
NOTE: Starting with LSMS Release 8.0, the audit log also contains information about partial audit results when an audit is aborted or otherwise interrupted. For more information about how this information can be used, see “Continuing an Interrupted Object Range Audit” on page 5-40.
• If discrepancies are found for either subscription versions or number pool blocks, discrepancy files are created with full details about how the information is different. For more information, see “Discrepancy Files” on page C-13.

5-8 910-2339-001 Rev A, October 2005
Auditing and Reconciling Network Elements from the LSMS
Reconciling
Any discrepancies detected during an audit can be optionally reconciled as soon as the audit completes in one of the following ways:
• The user clicks the Reconcile button at the completion of a Single SV/NPB audit initiated from the GUI (see “Single SV/NPB Audit and Optional Reconcile from the LSMS GUI” on page 5-13)
NOTE: The Single SV/NPB audit GUI menu item is not available for LSMS releases prior to 8.0. A single SV or NPB audit could be performed in LSMS releases prior to 8.0 by specifying the same value for the range start and end values.
• The user clicks the Reconcile Now button at the completion of a Range audit initiated from the GUI (see “Range Audit and Optional Reconcile from the LSMS GUI” on page 5-18)
NOTE: For LSMS releases prior to 8.0, the user clicks the Reconcile button.
• The user specifies the reconcile parameter when starting the audit from the command line (see “Performing an Audit Using the Command Line” on page 5-32)
Starting with LSMS 8.0, any discrepancies detected during an Object Range audit can also be reconciled up to seven days later by selecting the Save Reconcile button at the completion of the audit and then later initiating a Post-Audit Reconcile (see “Post-Audit Reconcile from the GUI” on page 5-28).
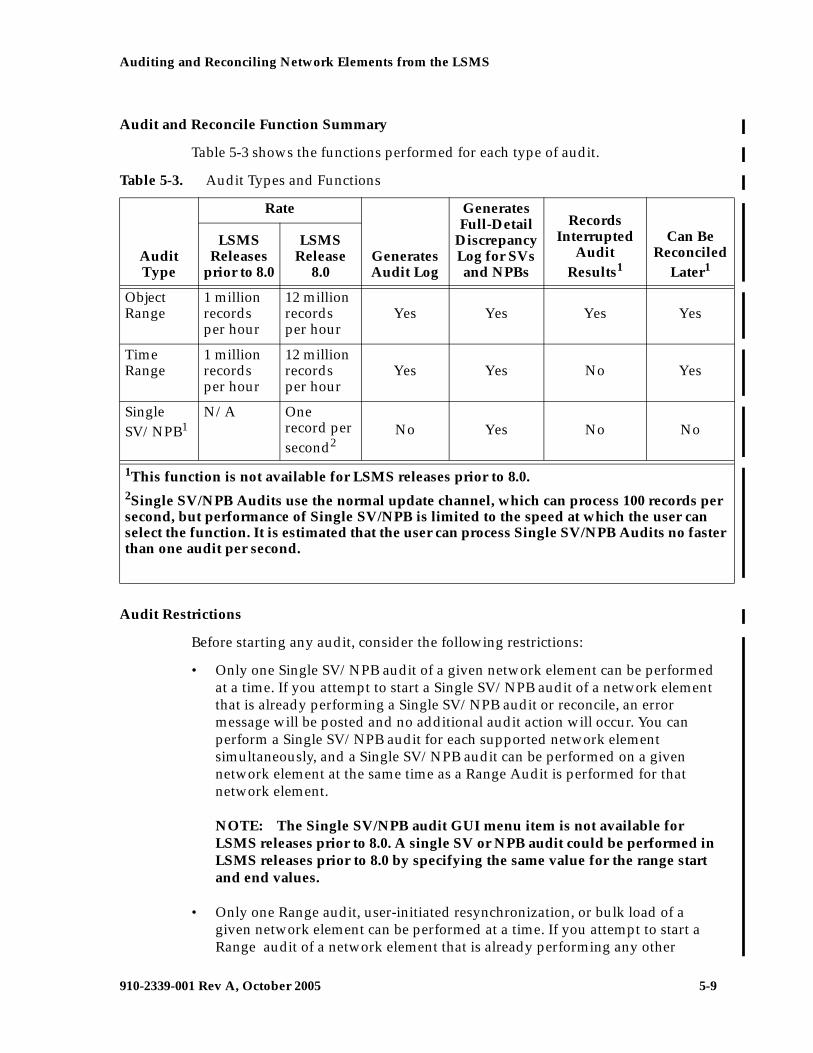
Auditing and Reconciling Network Elements from the LSMS
910-2339-001 Rev A, October 2005 5-9
Audit and Reconcile Function Summary
Table 5-3 shows the functions performed for each type of audit.
Audit Restrictions
Before starting any audit, consider the following restrictions:
• Only one Single SV/NPB audit of a given network element can be performed at a time. If you attempt to start a Single SV/NPB audit of a network element that is already performing a Single SV/NPB audit or reconcile, an error message will be posted and no additional audit action will occur. You can perform a Single SV/NPB audit for each supported network element simultaneously, and a Single SV/NPB audit can be performed on a given network element at the same time as a Range Audit is performed for that network element.
NOTE: The Single SV/NPB audit GUI menu item is not available for LSMS releases prior to 8.0. A single SV or NPB audit could be performed in LSMS releases prior to 8.0 by specifying the same value for the range start and end values.
• Only one Range audit, user-initiated resynchronization, or bulk load of a given network element can be performed at a time. If you attempt to start a Range audit of a network element that is already performing any other
Table 5-3. Audit Types and Functions
Audit Type
Rate
Generates Audit Log
Generates Full-Detail
Discrepancy Log for SVs and NPBs
Records Interrupted
Audit Results1
Can Be Reconciled
Later1
LSMS Releases
prior to 8.0
LSMS Release
8.0
Object Range
1 million records per hour
12 million records per hour
Yes Yes Yes Yes
Time Range
1 million records per hour
12 million records per hour
Yes Yes No Yes
Single SV/NPB1
N/A One record per second2
No Yes No No
1This function is not available for LSMS releases prior to 8.0.2Single SV/NPB Audits use the normal update channel, which can process 100 records per second, but performance of Single SV/NPB is limited to the speed at which the user can select the function. It is estimated that the user can process Single SV/NPB Audits no faster than one audit per second.
5-10 910-2339-001 Rev A, October 2005
Auditing and Reconciling Network Elements from the LSMS
database synchronization operation, an error message will be posted and no additional audit action will occur. You can perform a Range audit for each supported network element simultaneously, subject to the restrictions described in “Maximum Number of Simultaneous Synchronization Operations” on page 2-11.
• An audit performed at the same time that automatic resynchronization is occurring between the LSMS and the network element may result in false discrepancies because some of the LSMS data may not have been sent yet over the normal update connection to the network element. At the end of an audit, it is recommended that you determine whether an automatic resynchronization (also called short resynchronization) has occurred (look at the notifications area of the GUI). If an automatic resynchronization has occurred or is currently running, it is recommended that you perform another audit when the automatic resynchronization has completed.
• A Range audit may time out at other times, for example, when the network element is busy or when synchronization is occurring between the Number Portability Administration Center (NPAC) and the LSMS. (For more information about when NPAC-to-LSMS synchronization occurs, refer to the LSMS Maintenance Manual.) If the LSMS is processing a lot of other data, the audit may eventually time out, a time-out message will be posted, and no audit action will occur.
In addition, consider the following usage note about Audit by Time Range:
• Except in the case of a SV and/or NPB that has been deleted, the SV and/or NPB to audit will be retrieved from the LSMS database. For the case where an NPA Split has been created that changes the SV and/or NPB residing in the LSMS database, this feature will only audit the new, post-split SV and/or NPB. This is the case both during the NPA Splits’s permissive dialing period and after the period ends. For more information about NPA Splits, refer to the LSMS Database Administration Manual.
Audit and Reconcile Timeline
This section provides an overview of how audit and reconcile is performed.
Single SV/NPB Audit and Reconcile Timeline
NOTE: The Single SV/NPB audit is not available for LSMS releases prior to 8.0.
Figure 5-1 illustrates how data is sent to a network element before, during, and after a Single SV/NPB audit followed by a reconcile.
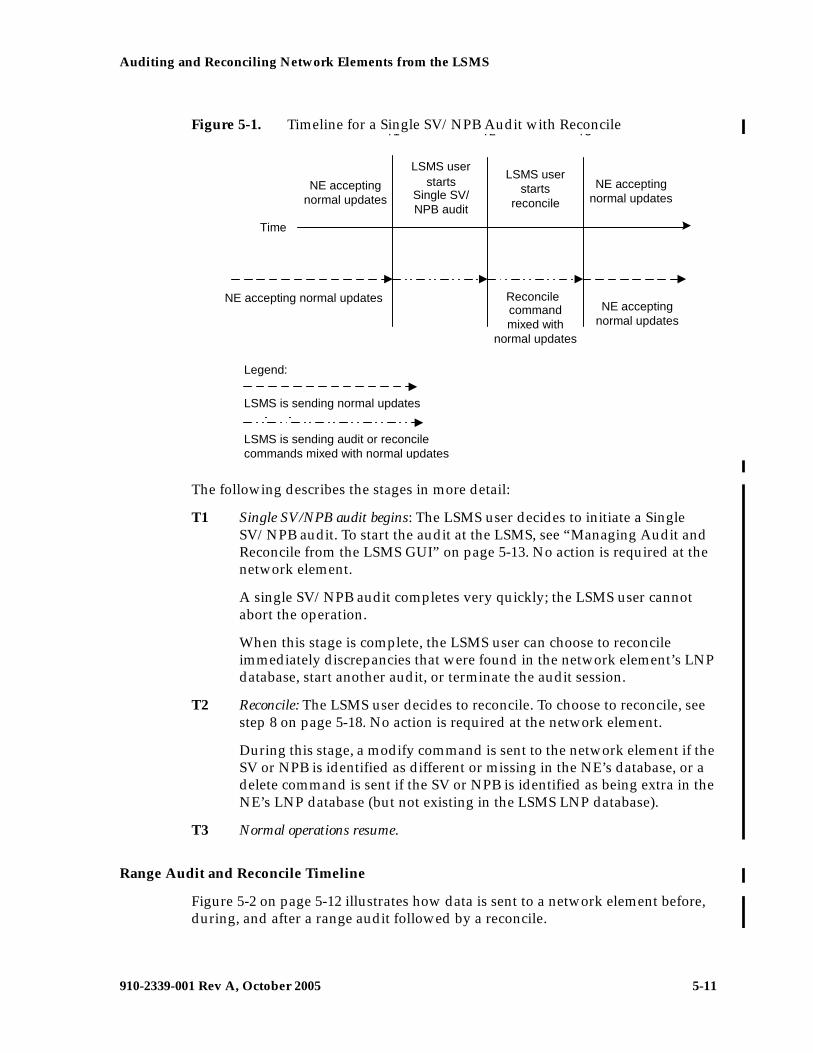
Auditing and Reconciling Network Elements from the LSMS
910-2339-001 Rev A, October 2005 5-11
Figure 5-1. Timeline for a Single SV/NPB Audit with Reconcile
The following describes the stages in more detail:
T1 Single SV/NPB audit begins: The LSMS user decides to initiate a Single SV/NPB audit. To start the audit at the LSMS, see “Managing Audit and Reconcile from the LSMS GUI” on page 5-13. No action is required at the network element.
A single SV/NPB audit completes very quickly; the LSMS user cannot abort the operation.
When this stage is complete, the LSMS user can choose to reconcile immediately discrepancies that were found in the network element’s LNP database, start another audit, or terminate the audit session.
T2 Reconcile: The LSMS user decides to reconcile. To choose to reconcile, see step 8 on page 5-18. No action is required at the network element.
During this stage, a modify command is sent to the network element if the SV or NPB is identified as different or missing in the NE’s database, or a delete command is sent if the SV or NPB is identified as being extra in the NE’s LNP database (but not existing in the LSMS LNP database).
T3 Normal operations resume.
Range Audit and Reconcile Timeline
Figure 5-2 on page 5-12 illustrates how data is sent to a network element before, during, and after a range audit followed by a reconcile.
NE acceptingnormal updates
LSMS userstarts
Single SV/NPB audit
LSMS userstarts
reconcile
Time
NE accepting normal updates
T1 T2 T3
NE acceptingnormal updates
Reconcilecommandmixed with
normal updates
NE acceptingnormal updates
LSMS is sending normal updates
LSMS is sending audit or reconcilecommands mixed with normal updates
Legend:
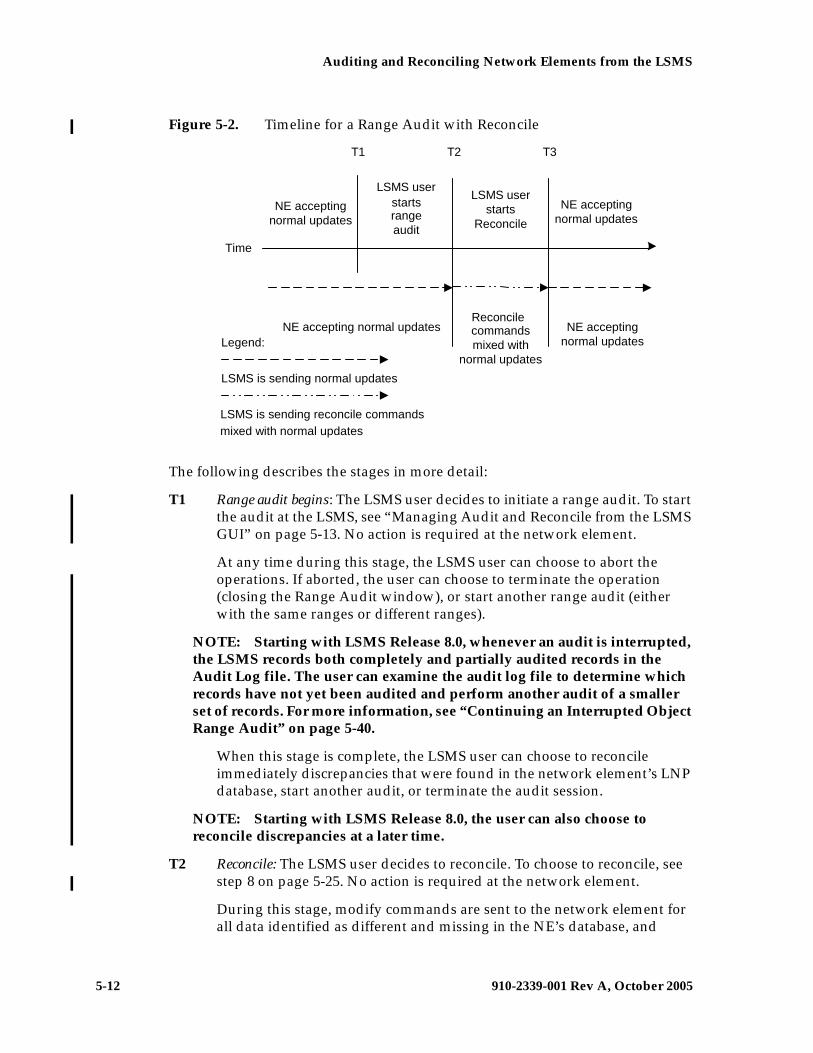
5-12 910-2339-001 Rev A, October 2005
Auditing and Reconciling Network Elements from the LSMS
Figure 5-2. Timeline for a Range Audit with Reconcile
The following describes the stages in more detail:
T1 Range audit begins: The LSMS user decides to initiate a range audit. To start the audit at the LSMS, see “Managing Audit and Reconcile from the LSMS GUI” on page 5-13. No action is required at the network element.
At any time during this stage, the LSMS user can choose to abort the operations. If aborted, the user can choose to terminate the operation (closing the Range Audit window), or start another range audit (either with the same ranges or different ranges).
NOTE: Starting with LSMS Release 8.0, whenever an audit is interrupted, the LSMS records both completely and partially audited records in the Audit Log file. The user can examine the audit log file to determine which records have not yet been audited and perform another audit of a smaller set of records. For more information, see “Continuing an Interrupted Object Range Audit” on page 5-40.
When this stage is complete, the LSMS user can choose to reconcile immediately discrepancies that were found in the network element’s LNP database, start another audit, or terminate the audit session.
NOTE: Starting with LSMS Release 8.0, the user can also choose to reconcile discrepancies at a later time.
T2 Reconcile: The LSMS user decides to reconcile. To choose to reconcile, see step 8 on page 5-25. No action is required at the network element.
During this stage, modify commands are sent to the network element for all data identified as different and missing in the NE’s database, and
NE acceptingnormal updates
LSMS userstartsrangeaudit
LSMS userstarts
Reconcile
Time
NE accepting normal updates
T1 T2 T3
NE acceptingnormal updates
LSMS is sending normal updates
Legend:
Reconcilecommandsmixed with
normal updates
NE acceptingnormal updates
LSMS is sending reconcile commandsmixed with normal updates
Auditing and Reconciling Network Elements from the LSMS
910-2339-001 Rev A, October 2005 5-13
delete commands are sent to the NE for all data identified as being extra in the NE’s LNP database (but not existing in the LSMS LNP database).
Some differences between the LSMS and NE databases (such as capacity) may cause the NE to reject some of the downloaded commands. These rejections would also occur during a normal update. All commands rejected by the network element are recorded in the audit log file (see “Audit Error Messages” on page 5-13).
At any time during this stage, the LSMS user can choose to abort the operations. If aborted, this operation can be either restarted or terminated.
T3 Normal operations resume.
Managing Audit and Reconcile from the LSMS GUI
This section describes the following audit and reconcile procedures you can perform through the LSMS GUI.
• “Single SV/NPB Audit and Optional Reconcile from the LSMS GUI” on page 5-13
NOTE: The Single SV/NPB audit is not available for LSMS releases prior to 8.0.
• “Range Audit and Optional Reconcile from the LSMS GUI” on page 5-18
• “Post-Audit Reconcile from the GUI” on page 5-28
You can also perform certain audit and reconcile functions of SVs or NPBs or both using the lsmsclaa AUDIT function (see “Performing an Audit Using the Command Line” on page 5-32).
Audit Error Messages
For a listing of error messages that can appear on the GUI, along with explanation of possible cause and suggested recovery, see Appendix A, “LSMS GUI Messages.”
Single SV/NPB Audit and Optional Reconcile from the LSMS GUI
NOTE: The Single SV/NPB audit is not available for LSMS releases prior to 8.0.
Use the following procedure to manage from the LSMS user interface an audit and optional reconcile of a single subscription version or number pool block at a network element.
5-14 910-2339-001 Rev A, October 2005
Auditing and Reconciling Network Elements from the LSMS
Procedure
1. Ensure that none of the restricted situations described in “Audit and Reconcile Function Summary” on page 5-9 is occurring.
2. Log in as a member of the lsmsadm, lsmsuser, lsmsuext, lsmsview, or lsmsall user group. If you plan to perform a reconcile if one is needed, log in as a member of the lsmsuser, lsmsuext, or lsmsall user group.
3. Because a Single SV/NPB Audit requires very little time, it is unlikely that an NPA Split will occur at the same time. However, if you plan to perform a reconcile, to ensure that the reconcile and NPA Split do not interfere perform the following substeps:
NOTE: Automatic split activation during a reconcile can cause the network element to be out of synchronization with the LSMS database.
a. Generate an NPA Split Report. Select Pending for Status and All NPAC Regions for NPAC Region. For information about creating and viewing NPA Split Data Reports, refer to the LSMS Database Administration Manual, (Chapter 5, “LSMS Reports”).
b. Determine whether NPA Splits are scheduled to be activated during the time the audit and reconcile are to be performed:
- If no Pending NPA Splits were listed in the report in substep a, or if none of the Pending NPA Splits has a PDP Start Date that occurs within the time period required to complete the audit and reconcile, go to step 4.
- If any Pending NPA Split has a PDP Start Date that occurs within the time period required to complete the audit and reconcile, continue with next substep.
c. If any NPA Split is scheduled to be activated within the planned resynchronization period, delay the reconcile until after the NPA Split has been activated.
4. Start the Audit window using either of the following:
• From the main menu on the LSMS Console window, select LSMS-> LNP Database Synchronization-> Single SV/NPB Audit -><CLLI>, where
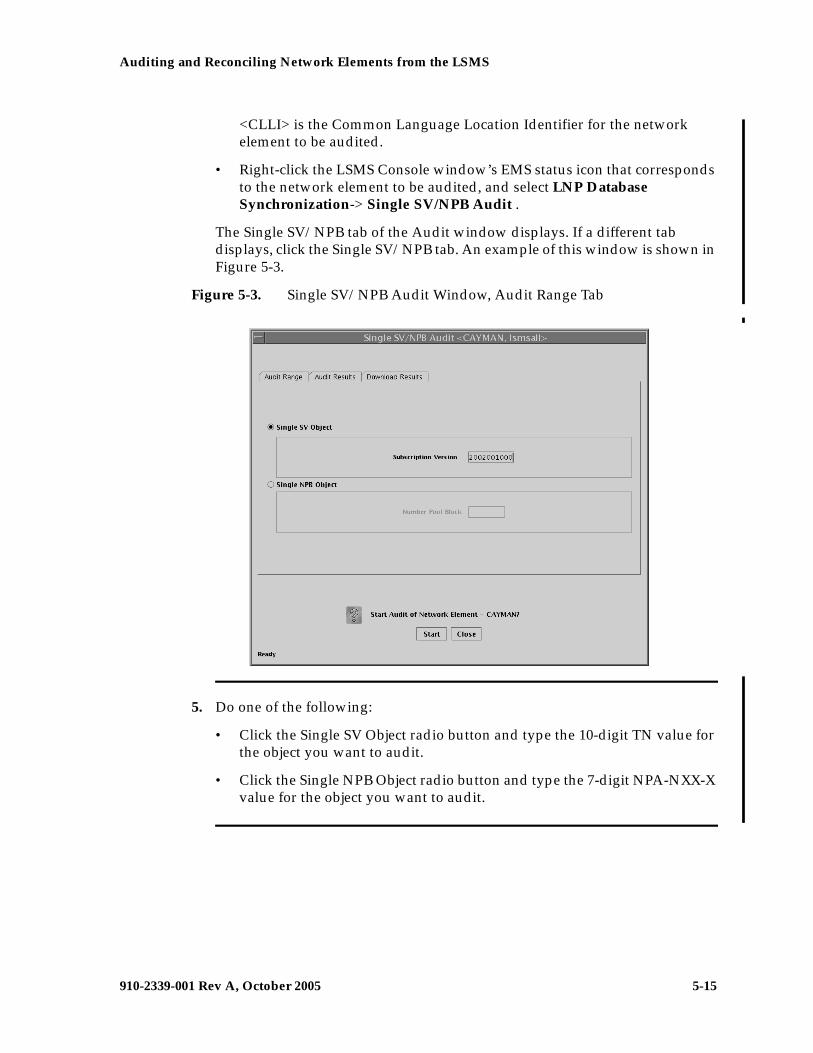
Auditing and Reconciling Network Elements from the LSMS
910-2339-001 Rev A, October 2005 5-15
<CLLI> is the Common Language Location Identifier for the network element to be audited.
• Right-click the LSMS Console window’s EMS status icon that corresponds to the network element to be audited, and select LNP Database Synchronization-> Single SV/NPB Audit .
The Single SV/NPB tab of the Audit window displays. If a different tab displays, click the Single SV/NPB tab. An example of this window is shown in Figure 5-3.
Figure 5-3. Single SV/NPB Audit Window, Audit Range Tab
5. Do one of the following:
• Click the Single SV Object radio button and type the 10-digit TN value for the object you want to audit.
• Click the Single NPB Object radio button and type the 7-digit NPA-NXX-X value for the object you want to audit.
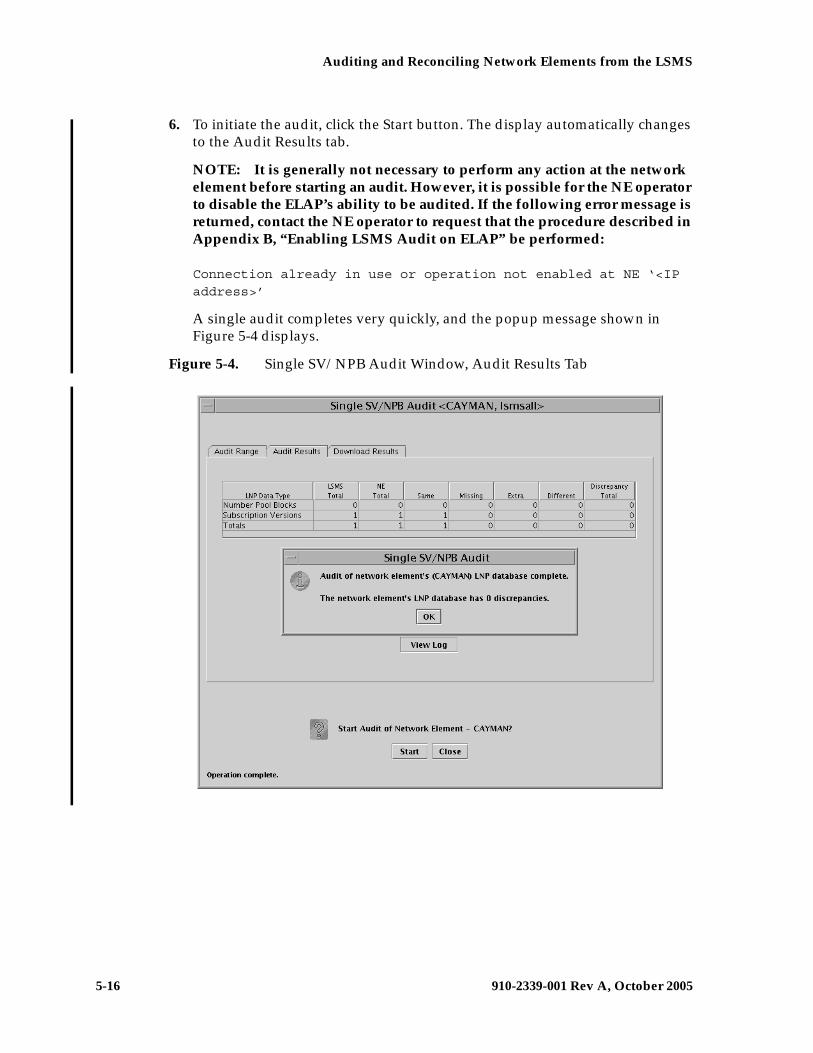
5-16 910-2339-001 Rev A, October 2005
Auditing and Reconciling Network Elements from the LSMS
6. To initiate the audit, click the Start button. The display automatically changes to the Audit Results tab.
NOTE: It is generally not necessary to perform any action at the network element before starting an audit. However, it is possible for the NE operator to disable the ELAP’s ability to be audited. If the following error message is returned, contact the NE operator to request that the procedure described in Appendix B, “Enabling LSMS Audit on ELAP” be performed:
Connection already in use or operation not enabled at NE ‘<IP address>’
A single audit completes very quickly, and the popup message shown in Figure 5-4 displays.
Figure 5-4. Single SV/NPB Audit Window, Audit Results Tab
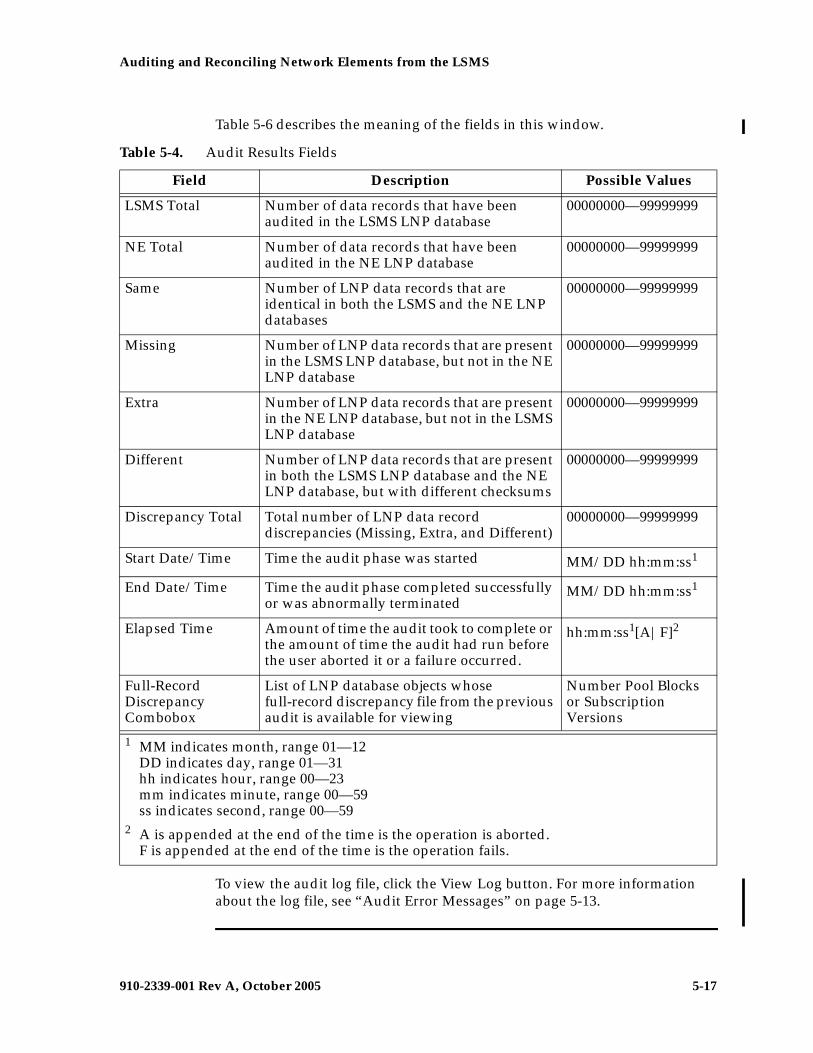
Auditing and Reconciling Network Elements from the LSMS
910-2339-001 Rev A, October 2005 5-17
Table 5-6 describes the meaning of the fields in this window.
To view the audit log file, click the View Log button. For more information about the log file, see “Audit Error Messages” on page 5-13.
Table 5-4. Audit Results Fields
Field Description Possible Values
LSMS Total Number of data records that have been audited in the LSMS LNP database
00000000—99999999
NE Total Number of data records that have been audited in the NE LNP database
00000000—99999999
Same Number of LNP data records that are identical in both the LSMS and the NE LNP databases
00000000—99999999
Missing Number of LNP data records that are present in the LSMS LNP database, but not in the NE LNP database
00000000—99999999
Extra Number of LNP data records that are present in the NE LNP database, but not in the LSMS LNP database
00000000—99999999
Different Number of LNP data records that are present in both the LSMS LNP database and the NE LNP database, but with different checksums
00000000—99999999
Discrepancy Total Total number of LNP data record discrepancies (Missing, Extra, and Different)
00000000—99999999
Start Date/Time Time the audit phase was started MM/DD hh:mm:ss1
End Date/Time Time the audit phase completed successfully or was abnormally terminated
MM/DD hh:mm:ss1
Elapsed Time Amount of time the audit took to complete or the amount of time the audit had run before the user aborted it or a failure occurred.
hh:mm:ss1[A|F]2
Full-Record Discrepancy Combobox
List of LNP database objects whose full-record discrepancy file from the previous audit is available for viewing
Number Pool Blocks or Subscription Versions
1 MM indicates month, range 01—12DD indicates day, range 01—31hh indicates hour, range 00—23mm indicates minute, range 00—59ss indicates second, range 00—59
2 A is appended at the end of the time is the operation is aborted.F is appended at the end of the time is the operation fails.
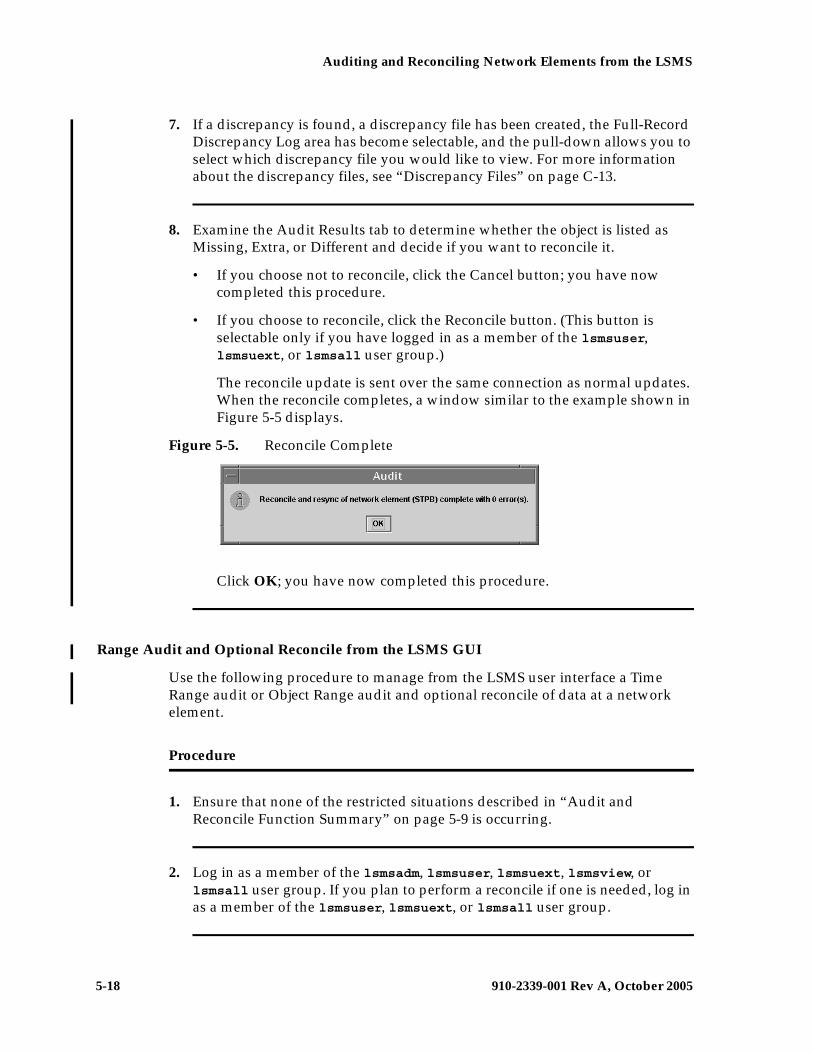
5-18 910-2339-001 Rev A, October 2005
Auditing and Reconciling Network Elements from the LSMS
7. If a discrepancy is found, a discrepancy file has been created, the Full-Record Discrepancy Log area has become selectable, and the pull-down allows you to select which discrepancy file you would like to view. For more information about the discrepancy files, see “Discrepancy Files” on page C-13.
8. Examine the Audit Results tab to determine whether the object is listed as Missing, Extra, or Different and decide if you want to reconcile it.
• If you choose not to reconcile, click the Cancel button; you have now completed this procedure.
• If you choose to reconcile, click the Reconcile button. (This button is selectable only if you have logged in as a member of the lsmsuser, lsmsuext, or lsmsall user group.)
The reconcile update is sent over the same connection as normal updates. When the reconcile completes, a window similar to the example shown in Figure 5-5 displays.
Figure 5-5. Reconcile Complete
Click OK; you have now completed this procedure.
Range Audit and Optional Reconcile from the LSMS GUI
Use the following procedure to manage from the LSMS user interface a Time Range audit or Object Range audit and optional reconcile of data at a network element.
Procedure
1. Ensure that none of the restricted situations described in “Audit and Reconcile Function Summary” on page 5-9 is occurring.
2. Log in as a member of the lsmsadm, lsmsuser, lsmsuext, lsmsview, or lsmsall user group. If you plan to perform a reconcile if one is needed, log in as a member of the lsmsuser, lsmsuext, or lsmsall user group.
Auditing and Reconciling Network Elements from the LSMS
910-2339-001 Rev A, October 2005 5-19
3. If you plan to perform a reconcile, perform the following substeps to ensure that no NPA Split is scheduled to occur during the time required to perform the audit with reconcile.
NOTE: Automatic split activation during a reconcile can cause the network element to be out of synchronization with the LSMS database. To avoid this problem, first perform the following substeps.
a. Generate an NPA Split Report. Select Pending for Status and All NPAC Regions for NPAC Region. For information about creating and viewing NPA Split Data Reports, refer to the LSMS Database Administration Manual, (Chapter 5, “LSMS Reports”).
b. Determine whether NPA Splits are scheduled to be activated during the time the audit and reconcile are to be performed (to estimate time required to perform the audit and reconcile, refer to Appendix D, “Synchronization Performance Estimates”):
- If no Pending NPA Splits were listed in the report in substep a, or if none of the Pending NPA Splits has a PDP Start Date that occurs within the time period required to complete the reconcile, go to step 4.
- If any Pending NPA Split has a PDP Start Date that occurs within the time period required to complete the audit and reconcile, continue with next substep.
c. If any NPA Split is scheduled to be activated within the planned resynchronization period, delay the reconcile until after the NPA Split has been activated.
4. Start the Audit window using either of the following:
• From the main menu on the LSMS Console window, select LSMS-> LNP Database Synchronization->Range Audit-><CLLI>, where <CLLI> is the Common Language Location Identifier for the network element to be audited.
NOTE: For LSMS releases prior to 8.0, the Range Audit menu selection appears simply as Audit for both the main menu selection and right-clicking on the EMS status icon.
• Right-click the LSMS Console window’s EMS status icon that corresponds to the network element to be audited, and select LNP Database Synchronization->Range Audit.
The Audit Range tab of the Audit window displays. If a different tab displays, click the Audit Range tab. An example of this window is shown in Figure 5-6 on page 5-20.
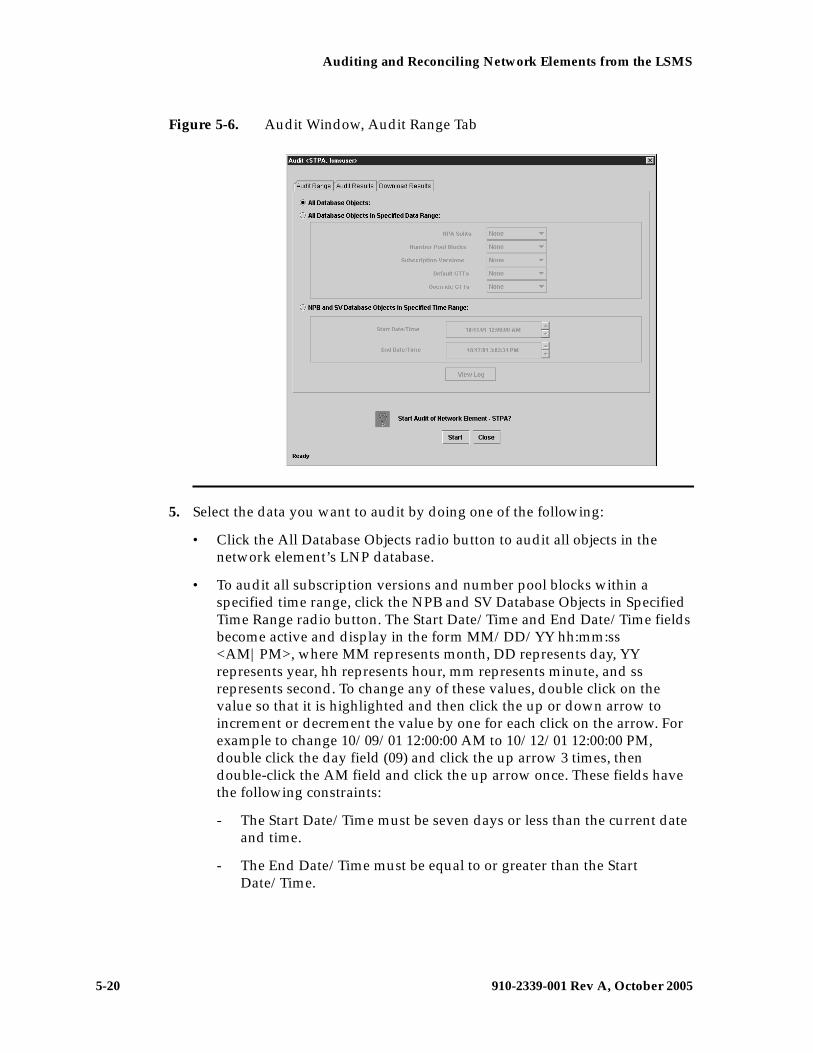
5-20 910-2339-001 Rev A, October 2005
Auditing and Reconciling Network Elements from the LSMS
Figure 5-6. Audit Window, Audit Range Tab
5. Select the data you want to audit by doing one of the following:
• Click the All Database Objects radio button to audit all objects in the network element’s LNP database.
• To audit all subscription versions and number pool blocks within a specified time range, click the NPB and SV Database Objects in Specified Time Range radio button. The Start Date/Time and End Date/Time fields become active and display in the form MM/DD/YY hh:mm:ss <AM|PM>, where MM represents month, DD represents day, YY represents year, hh represents hour, mm represents minute, and ss represents second. To change any of these values, double click on the value so that it is highlighted and then click the up or down arrow to increment or decrement the value by one for each click on the arrow. For example to change 10/09/01 12:00:00 AM to 10/12/01 12:00:00 PM, double click the day field (09) and click the up arrow 3 times, then double-click the AM field and click the up arrow once. These fields have the following constraints:
- The Start Date/Time must be seven days or less than the current date and time.
- The End Date/Time must be equal to or greater than the Start Date/Time.
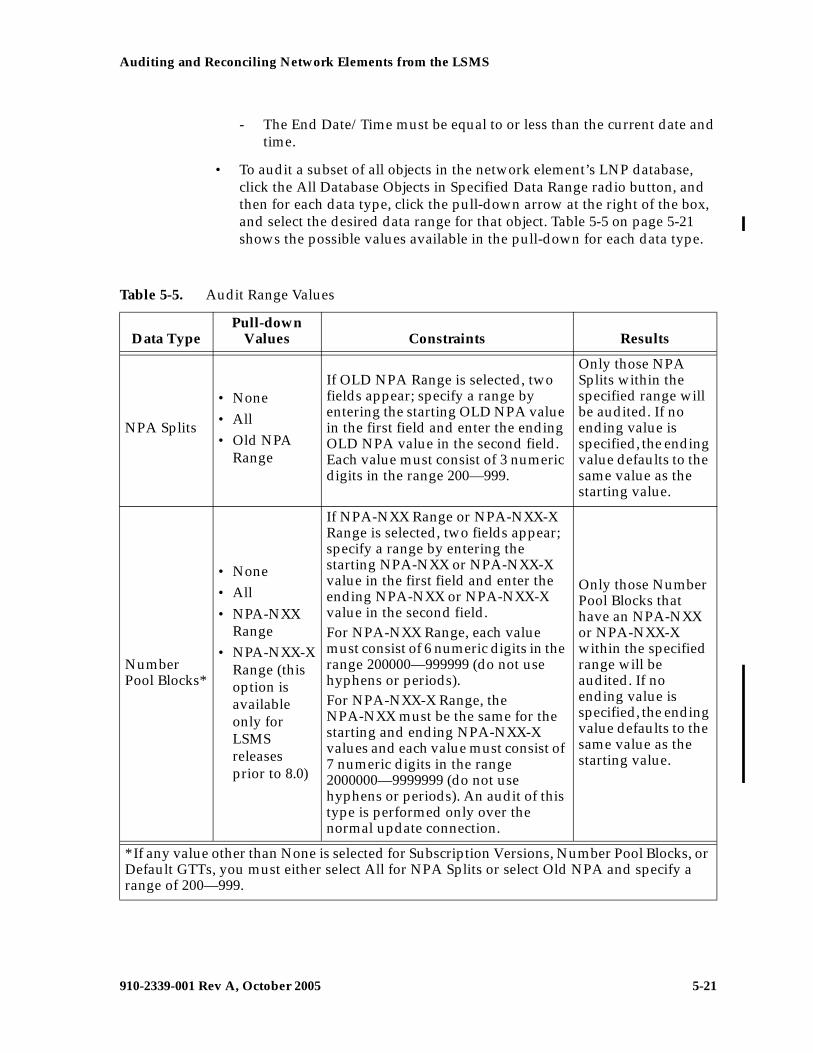
Auditing and Reconciling Network Elements from the LSMS
910-2339-001 Rev A, October 2005 5-21
- The End Date/Time must be equal to or less than the current date and time.
• To audit a subset of all objects in the network element’s LNP database, click the All Database Objects in Specified Data Range radio button, and then for each data type, click the pull-down arrow at the right of the box, and select the desired data range for that object. Table 5-5 on page 5-21 shows the possible values available in the pull-down for each data type.
Table 5-5. Audit Range Values
Data TypePull-down
Values Constraints Results
NPA Splits
• None• All• Old NPA
Range
If OLD NPA Range is selected, two fields appear; specify a range by entering the starting OLD NPA value in the first field and enter the ending OLD NPA value in the second field. Each value must consist of 3 numeric digits in the range 200—999.
Only those NPA Splits within the specified range will be audited. If no ending value is specified, the ending value defaults to the same value as the starting value.
Number Pool Blocks*
• None• All• NPA-NXX
Range• NPA-NXX-X
Range (this option is available only for LSMS releases prior to 8.0)
If NPA-NXX Range or NPA-NXX-X Range is selected, two fields appear; specify a range by entering the starting NPA-NXX or NPA-NXX-X value in the first field and enter the ending NPA-NXX or NPA-NXX-X value in the second field. For NPA-NXX Range, each value must consist of 6 numeric digits in the range 200000—999999 (do not use hyphens or periods). For NPA-NXX-X Range, the NPA-NXX must be the same for the starting and ending NPA-NXX-X values and each value must consist of 7 numeric digits in the range 2000000—9999999 (do not use hyphens or periods). An audit of this type is performed only over the normal update connection.
Only those Number Pool Blocks that have an NPA-NXX or NPA-NXX-X within the specified range will be audited. If no ending value is specified, the ending value defaults to the same value as the starting value.
* If any value other than None is selected for Subscription Versions, Number Pool Blocks, or Default GTTs, you must either select All for NPA Splits or select Old NPA and specify a range of 200—999.
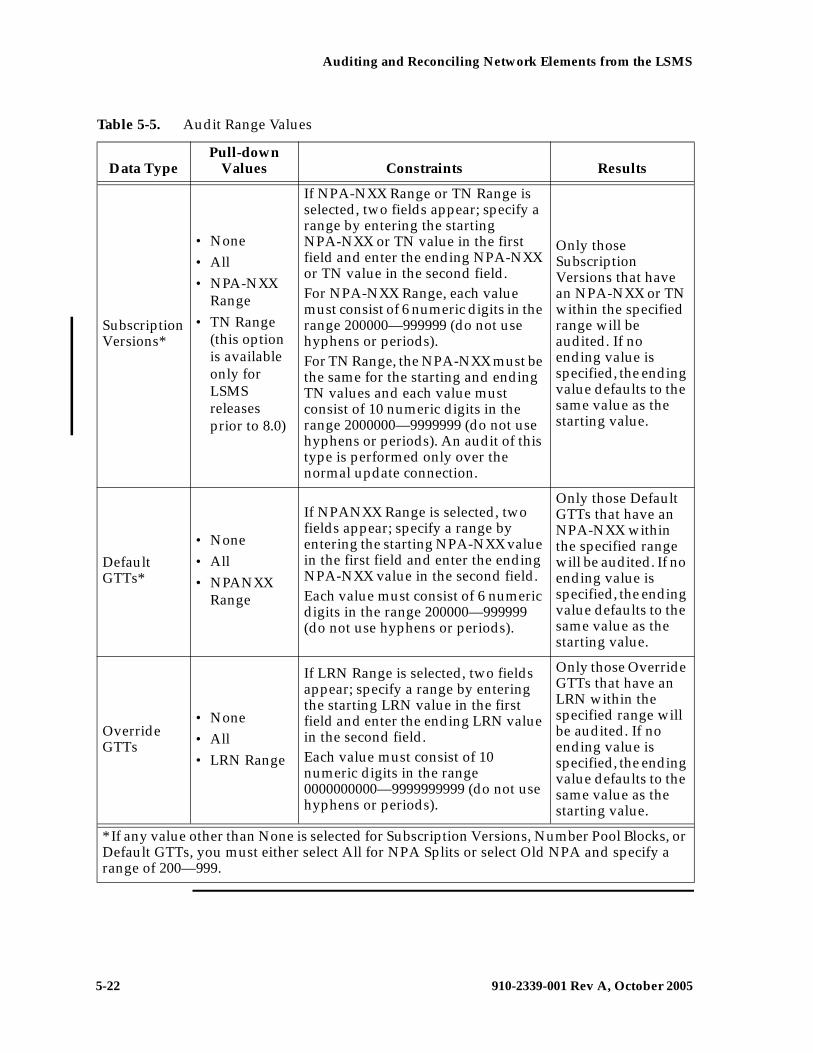
5-22 910-2339-001 Rev A, October 2005
Auditing and Reconciling Network Elements from the LSMS
Subscription Versions*
• None• All• NPA-NXX
Range• TN Range
(this option is available only for LSMS releases prior to 8.0)
If NPA-NXX Range or TN Range is selected, two fields appear; specify a range by entering the starting NPA-NXX or TN value in the first field and enter the ending NPA-NXX or TN value in the second field. For NPA-NXX Range, each value must consist of 6 numeric digits in the range 200000—999999 (do not use hyphens or periods). For TN Range, the NPA-NXX must be the same for the starting and ending TN values and each value must consist of 10 numeric digits in the range 2000000—9999999 (do not use hyphens or periods). An audit of this type is performed only over the normal update connection.
Only those Subscription Versions that have an NPA-NXX or TN within the specified range will be audited. If no ending value is specified, the ending value defaults to the same value as the starting value.
Default GTTs*
• None• All• NPANXX
Range
If NPANXX Range is selected, two fields appear; specify a range by entering the starting NPA-NXX value in the first field and enter the ending NPA-NXX value in the second field. Each value must consist of 6 numeric digits in the range 200000—999999 (do not use hyphens or periods).
Only those Default GTTs that have an NPA-NXX within the specified range will be audited. If no ending value is specified, the ending value defaults to the same value as the starting value.
Override GTTs
• None• All• LRN Range
If LRN Range is selected, two fields appear; specify a range by entering the starting LRN value in the first field and enter the ending LRN value in the second field. Each value must consist of 10 numeric digits in the range 0000000000—9999999999 (do not use hyphens or periods).
Only those Override GTTs that have an LRN within the specified range will be audited. If no ending value is specified, the ending value defaults to the same value as the starting value.
Table 5-5. Audit Range Values
Data TypePull-down
Values Constraints Results
* If any value other than None is selected for Subscription Versions, Number Pool Blocks, or Default GTTs, you must either select All for NPA Splits or select Old NPA and specify a range of 200—999.
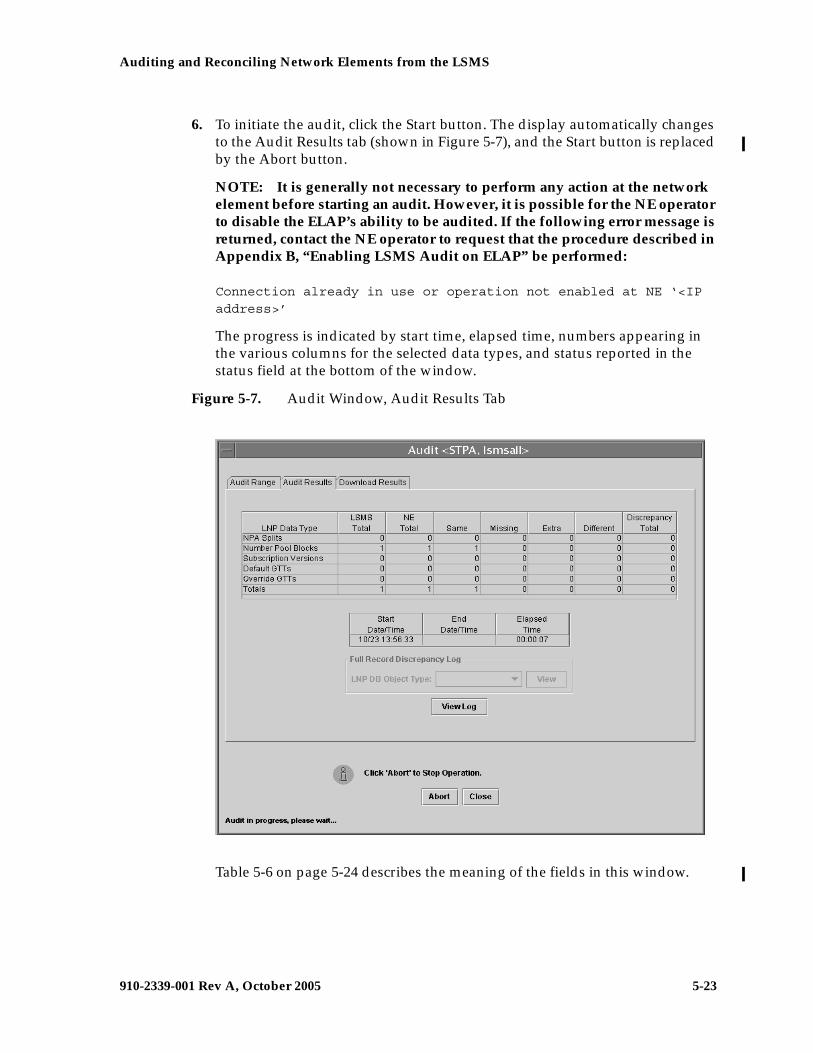
Auditing and Reconciling Network Elements from the LSMS
910-2339-001 Rev A, October 2005 5-23
6. To initiate the audit, click the Start button. The display automatically changes to the Audit Results tab (shown in Figure 5-7), and the Start button is replaced by the Abort button.
NOTE: It is generally not necessary to perform any action at the network element before starting an audit. However, it is possible for the NE operator to disable the ELAP’s ability to be audited. If the following error message is returned, contact the NE operator to request that the procedure described in Appendix B, “Enabling LSMS Audit on ELAP” be performed:
Connection already in use or operation not enabled at NE ‘<IP address>’
The progress is indicated by start time, elapsed time, numbers appearing in the various columns for the selected data types, and status reported in the status field at the bottom of the window.
Figure 5-7. Audit Window, Audit Results Tab
Table 5-6 on page 5-24 describes the meaning of the fields in this window.
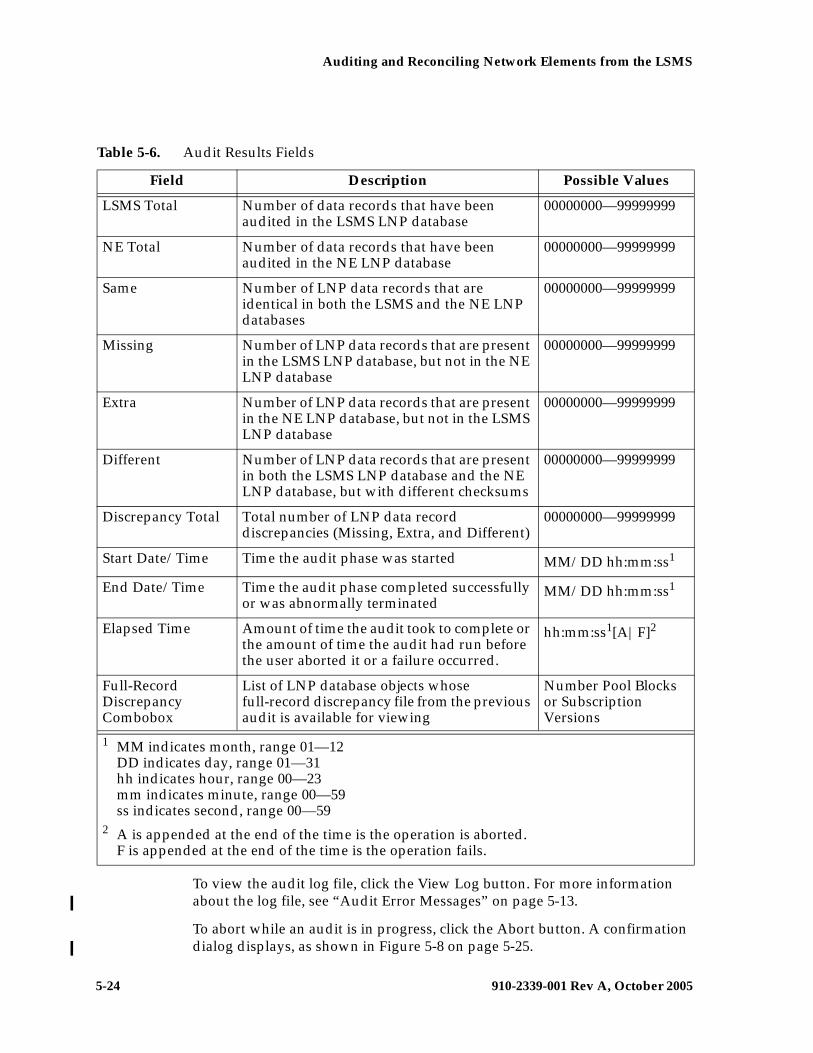
5-24 910-2339-001 Rev A, October 2005
Auditing and Reconciling Network Elements from the LSMS
To view the audit log file, click the View Log button. For more information about the log file, see “Audit Error Messages” on page 5-13.
To abort while an audit is in progress, click the Abort button. A confirmation dialog displays, as shown in Figure 5-8 on page 5-25.
Table 5-6. Audit Results Fields
Field Description Possible Values
LSMS Total Number of data records that have been audited in the LSMS LNP database
00000000—99999999
NE Total Number of data records that have been audited in the NE LNP database
00000000—99999999
Same Number of LNP data records that are identical in both the LSMS and the NE LNP databases
00000000—99999999
Missing Number of LNP data records that are present in the LSMS LNP database, but not in the NE LNP database
00000000—99999999
Extra Number of LNP data records that are present in the NE LNP database, but not in the LSMS LNP database
00000000—99999999
Different Number of LNP data records that are present in both the LSMS LNP database and the NE LNP database, but with different checksums
00000000—99999999
Discrepancy Total Total number of LNP data record discrepancies (Missing, Extra, and Different)
00000000—99999999
Start Date/Time Time the audit phase was started MM/DD hh:mm:ss1
End Date/Time Time the audit phase completed successfully or was abnormally terminated
MM/DD hh:mm:ss1
Elapsed Time Amount of time the audit took to complete or the amount of time the audit had run before the user aborted it or a failure occurred.
hh:mm:ss1[A|F]2
Full-Record Discrepancy Combobox
List of LNP database objects whose full-record discrepancy file from the previous audit is available for viewing
Number Pool Blocks or Subscription Versions
1 MM indicates month, range 01—12DD indicates day, range 01—31hh indicates hour, range 00—23mm indicates minute, range 00—59ss indicates second, range 00—59
2 A is appended at the end of the time is the operation is aborted.F is appended at the end of the time is the operation fails.
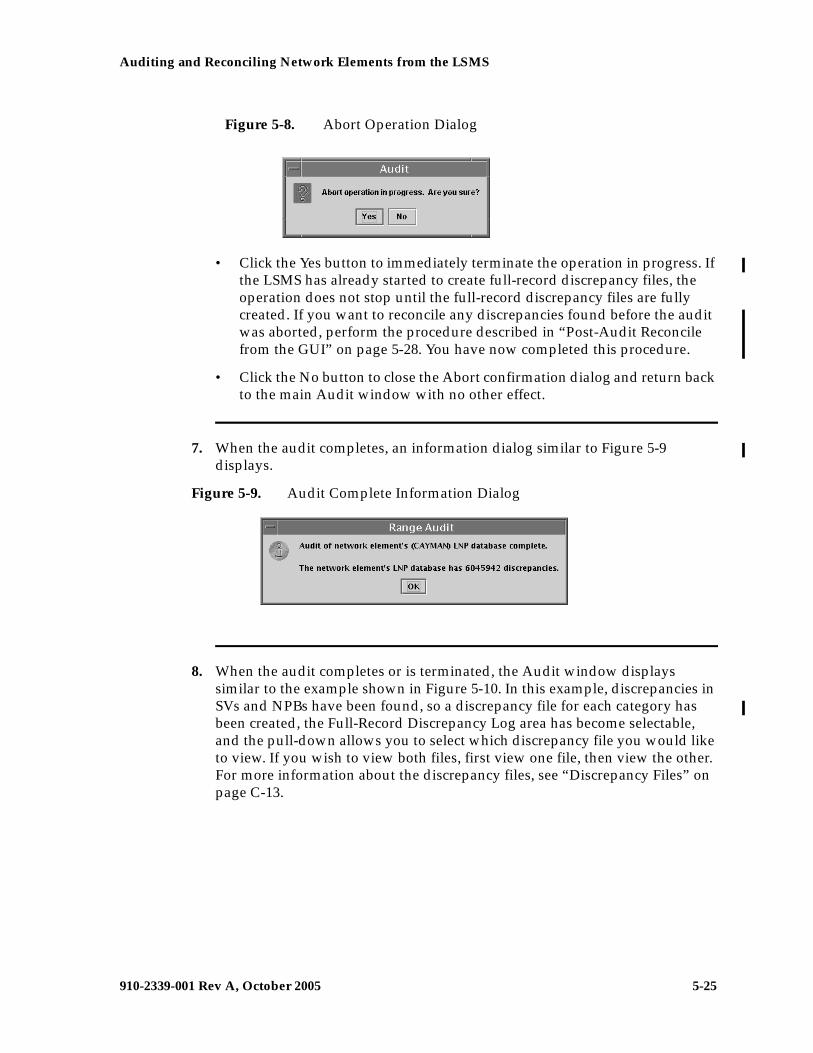
Auditing and Reconciling Network Elements from the LSMS
910-2339-001 Rev A, October 2005 5-25
Figure 5-8. Abort Operation Dialog
• Click the Yes button to immediately terminate the operation in progress. If the LSMS has already started to create full-record discrepancy files, the operation does not stop until the full-record discrepancy files are fully created. If you want to reconcile any discrepancies found before the audit was aborted, perform the procedure described in “Post-Audit Reconcile from the GUI” on page 5-28. You have now completed this procedure.
• Click the No button to close the Abort confirmation dialog and return back to the main Audit window with no other effect.
7. When the audit completes, an information dialog similar to Figure 5-9 displays.
Figure 5-9. Audit Complete Information Dialog
8. When the audit completes or is terminated, the Audit window displays similar to the example shown in Figure 5-10. In this example, discrepancies in SVs and NPBs have been found, so a discrepancy file for each category has been created, the Full-Record Discrepancy Log area has become selectable, and the pull-down allows you to select which discrepancy file you would like to view. If you wish to view both files, first view one file, then view the other. For more information about the discrepancy files, see “Discrepancy Files” on page C-13.
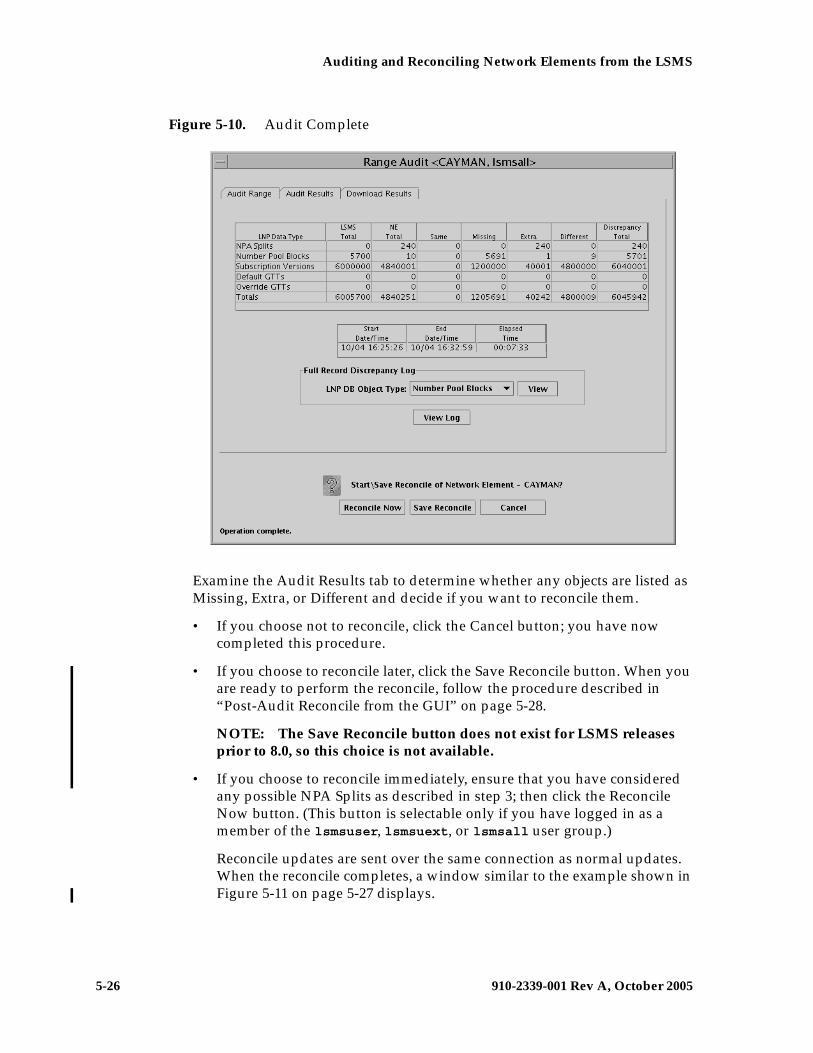
5-26 910-2339-001 Rev A, October 2005
Auditing and Reconciling Network Elements from the LSMS
Figure 5-10. Audit Complete
Examine the Audit Results tab to determine whether any objects are listed as Missing, Extra, or Different and decide if you want to reconcile them.
• If you choose not to reconcile, click the Cancel button; you have now completed this procedure.
• If you choose to reconcile later, click the Save Reconcile button. When you are ready to perform the reconcile, follow the procedure described in “Post-Audit Reconcile from the GUI” on page 5-28.
NOTE: The Save Reconcile button does not exist for LSMS releases prior to 8.0, so this choice is not available.
• If you choose to reconcile immediately, ensure that you have considered any possible NPA Splits as described in step 3; then click the Reconcile Now button. (This button is selectable only if you have logged in as a member of the lsmsuser, lsmsuext, or lsmsall user group.)
Reconcile updates are sent over the same connection as normal updates. When the reconcile completes, a window similar to the example shown in Figure 5-11 on page 5-27 displays.
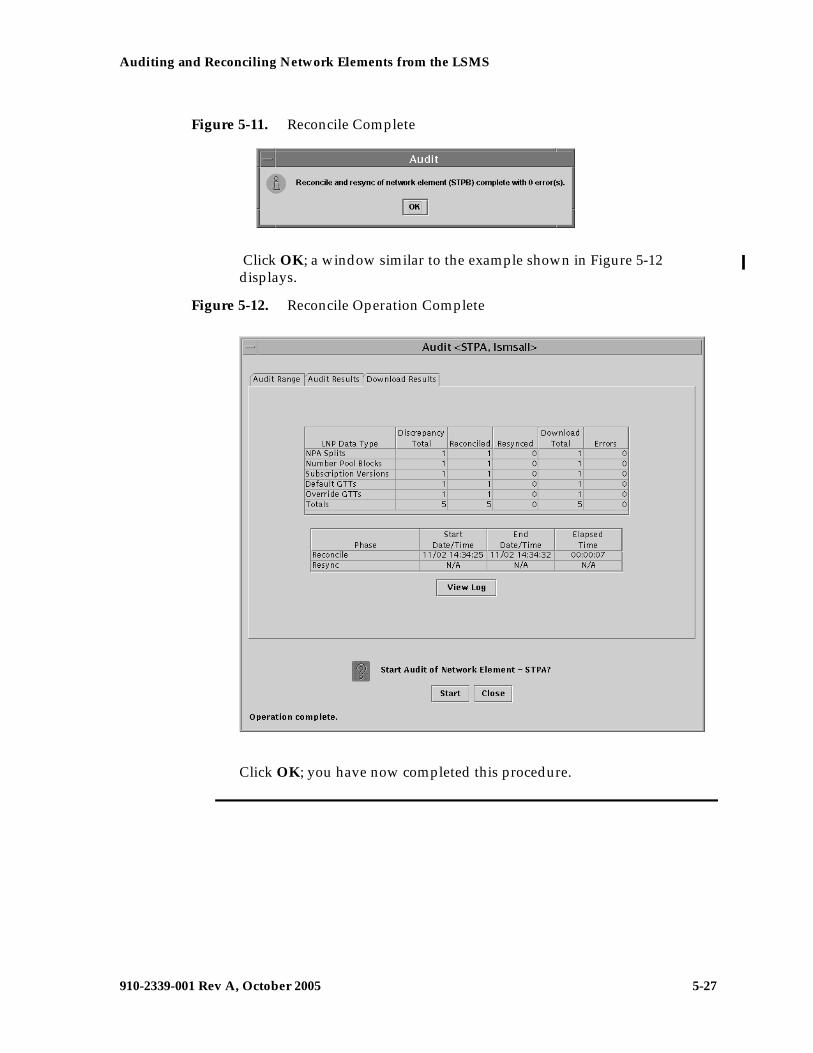
Auditing and Reconciling Network Elements from the LSMS
910-2339-001 Rev A, October 2005 5-27
Figure 5-11. Reconcile Complete
Click OK; a window similar to the example shown in Figure 5-12 displays.
Figure 5-12. Reconcile Operation Complete
Click OK; you have now completed this procedure.

5-28 910-2339-001 Rev A, October 2005
Auditing and Reconciling Network Elements from the LSMS
Post-Audit Reconcile from the GUI
NOTE: The Post-Audit Reconcile is not available for LSMS releases prior to 8.0. Also, it cannot be used for Single SV/NPB Audits or for Time Range Audits.
Starting with LSMS release 8.0, a reconcile of an Object Range Audit can be performed at a time later than immediately after an audit completes. This function can be used in the following situations:
• If a large number of discrepancies is found during an audit, you might want to postpone the reconcile until a later time to avoid impacting normal traffic.
• If an Object Range Audit is aborted or interrupted, you can perform a Post-Audit Reconcile for all of the objects that were successfully audited before the interruption. You can also examine the Audit log to determine which objects were successfully audited, and perform another audit for objects that were not completely audited (for more information, see “Continuing an Interrupted Object Range Audit” on page 5-40).
The Post-Audit reconcile function is enabled by the creation of a Reconcile file that contains all the discrepant data found during the corresponding audit. Reconcile files are kept eight days, and then deleted.
NOTE: Any reconcile (whether immediate or postponed) can be performed only once. When a reconcile has been performed, the reconcile file is no longer available for selection from the Post-Audit Reconcile window.
To perform a Post-Audit reconcile, perform the following procedure to choose among the available reconcile files.
Procedure
1. Log in as a member of the lsmsuser, lsmsuext, or lsmsall user group.
2. Perform the following substeps to ensure that no NPA Split is scheduled to occur during the time required to perform the reconcile.
NOTE: Automatic split activation during a reconcile can cause the network element to be out of synchronization with the LSMS database.
a. Generate an NPA Split Report. Select Pending for Status and All NPAC Regions for NPAC Region. For information about creating and viewing NPA Split Data Reports, refer to the LSMS Database Administration Manual, (Chapter 5, “LSMS Reports”).
b. Determine whether NPA Splits are scheduled to be activated during the
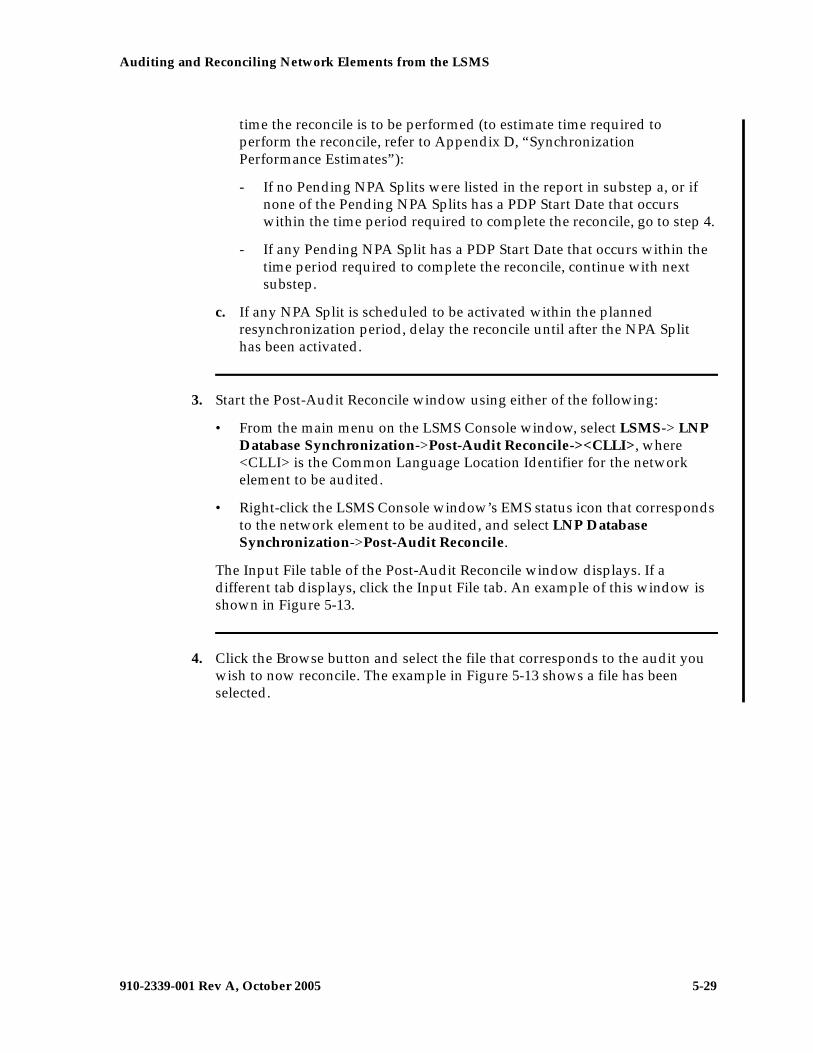
Auditing and Reconciling Network Elements from the LSMS
910-2339-001 Rev A, October 2005 5-29
time the reconcile is to be performed (to estimate time required to perform the reconcile, refer to Appendix D, “Synchronization Performance Estimates”):
- If no Pending NPA Splits were listed in the report in substep a, or if none of the Pending NPA Splits has a PDP Start Date that occurs within the time period required to complete the reconcile, go to step 4.
- If any Pending NPA Split has a PDP Start Date that occurs within the time period required to complete the reconcile, continue with next substep.
c. If any NPA Split is scheduled to be activated within the planned resynchronization period, delay the reconcile until after the NPA Split has been activated.
3. Start the Post-Audit Reconcile window using either of the following:
• From the main menu on the LSMS Console window, select LSMS-> LNP Database Synchronization->Post-Audit Reconcile-><CLLI>, where <CLLI> is the Common Language Location Identifier for the network element to be audited.
• Right-click the LSMS Console window’s EMS status icon that corresponds to the network element to be audited, and select LNP Database Synchronization->Post-Audit Reconcile.
The Input File table of the Post-Audit Reconcile window displays. If a different tab displays, click the Input File tab. An example of this window is shown in Figure 5-13.
4. Click the Browse button and select the file that corresponds to the audit you wish to now reconcile. The example in Figure 5-13 shows a file has been selected.
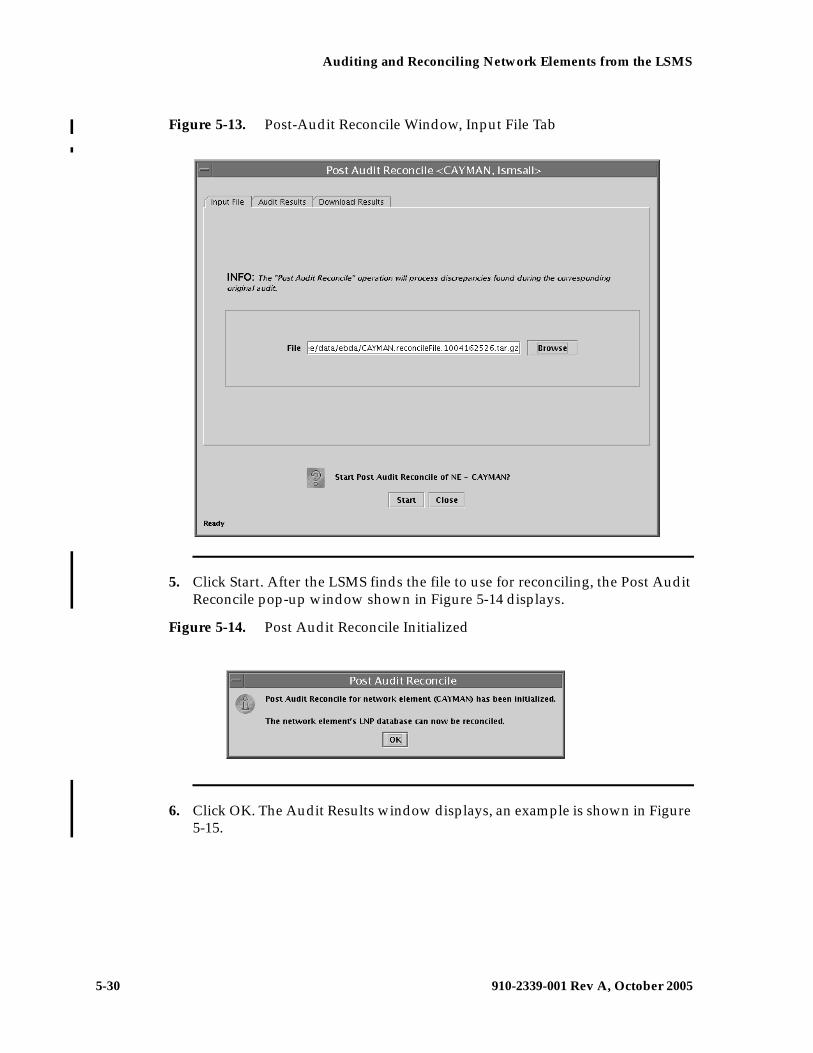
5-30 910-2339-001 Rev A, October 2005
Auditing and Reconciling Network Elements from the LSMS
Figure 5-13. Post-Audit Reconcile Window, Input File Tab
5. Click Start. After the LSMS finds the file to use for reconciling, the Post Audit Reconcile pop-up window shown in Figure 5-14 displays.
Figure 5-14. Post Audit Reconcile Initialized
6. Click OK. The Audit Results window displays, an example is shown in Figure 5-15.
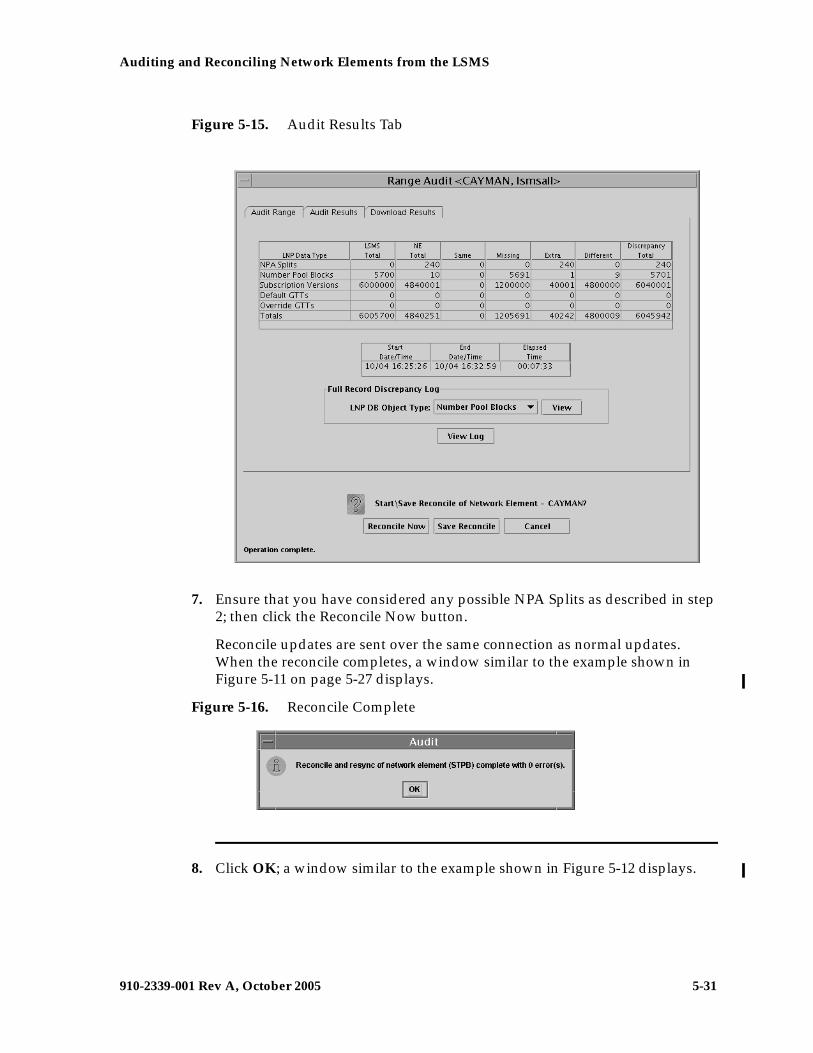
Auditing and Reconciling Network Elements from the LSMS
910-2339-001 Rev A, October 2005 5-31
Figure 5-15. Audit Results Tab
7. Ensure that you have considered any possible NPA Splits as described in step 2; then click the Reconcile Now button.
Reconcile updates are sent over the same connection as normal updates. When the reconcile completes, a window similar to the example shown in Figure 5-11 on page 5-27 displays.
Figure 5-16. Reconcile Complete
8. Click OK; a window similar to the example shown in Figure 5-12 displays.
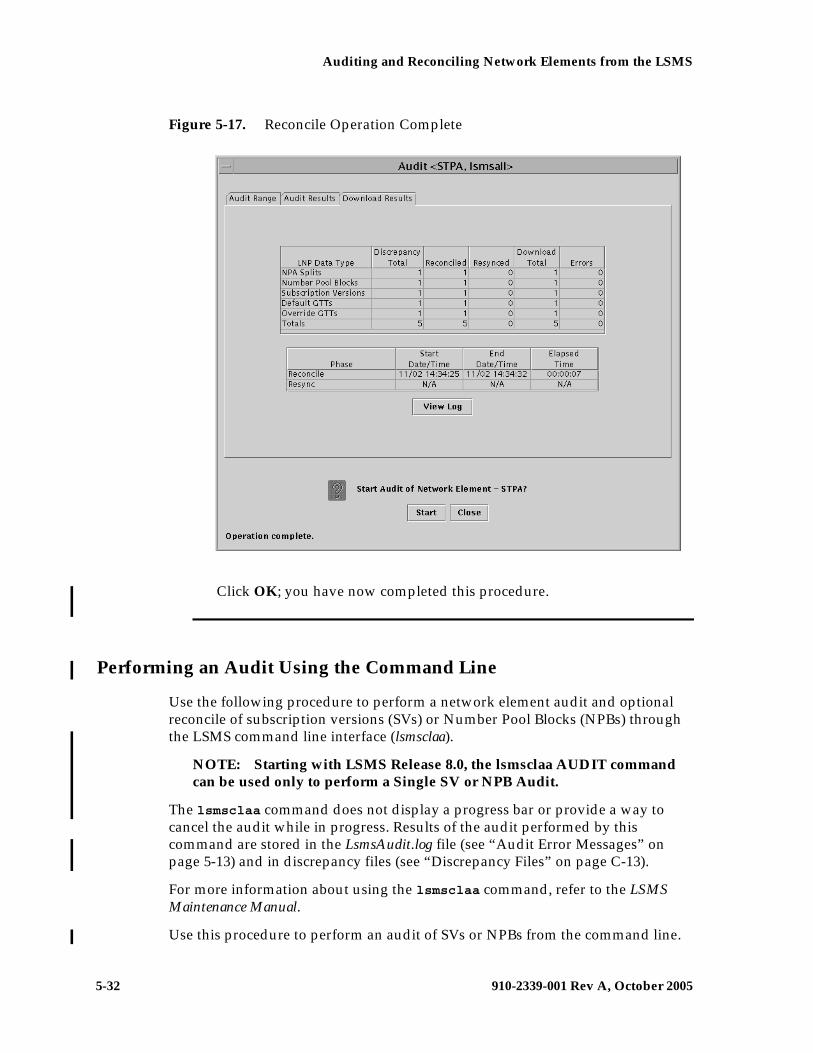
5-32 910-2339-001 Rev A, October 2005
Auditing and Reconciling Network Elements from the LSMS
Figure 5-17. Reconcile Operation Complete
Click OK; you have now completed this procedure.
Performing an Audit Using the Command Line
Use the following procedure to perform a network element audit and optional reconcile of subscription versions (SVs) or Number Pool Blocks (NPBs) through the LSMS command line interface (lsmsclaa).
NOTE: Starting with LSMS Release 8.0, the lsmsclaa AUDIT command can be used only to perform a Single SV or NPB Audit.
The lsmsclaa command does not display a progress bar or provide a way to cancel the audit while in progress. Results of the audit performed by this command are stored in the LsmsAudit.log file (see “Audit Error Messages” on page 5-13) and in discrepancy files (see “Discrepancy Files” on page C-13).
For more information about using the lsmsclaa command, refer to the LSMS Maintenance Manual.
Use this procedure to perform an audit of SVs or NPBs from the command line.
Auditing and Reconciling Network Elements from the LSMS
910-2339-001 Rev A, October 2005 5-33
Procedure
1. Ensure that none of the restricted situations are described in section “Audit and Reconcile Function Summary” on page 5-9 is occurring.
2. To perform an audit only, log into the LSMS as a member of any user group. If you need to perform a reconcile, log in as a member of the lsmsadm, lsmsuser, lsmsuext, or lsmsall user group.
3. If you plan to perform a reconcile, perform the following substeps to ensure that no NPA Split is scheduled to occur during the time required to perform the audit with reconcile.
NOTE: Automatic split activation during a reconcile can cause the network element to be out of synchronization with the LSMS database. To avoid this problem, first perform the following substeps.
a. Generate an NPA Split Report. Select Pending for Status and All NPAC Regions for NPAC Region. For information about creating and viewing NPA Split Data Reports, refer to the LSMS Database Administration Manual, (Chapter 5, “LSMS Reports”).
b. Determine whether NPA Splits are scheduled to be activated during the time the audit and reconcile are to be performed (to estimate time required to perform the audit and reconcile, refer to Appendix D, “Synchronization Performance Estimates”):
- If no Pending NPA Splits were listed in the report in substep a, or if none of the Pending NPA Splits has a PDP Start Date that occurs within the time period required to complete the reconcile, go to step 4.
- If any Pending NPA Split has a PDP Start Date that occurs within the time period required to complete the audit and reconcile, continue with next substep.
c. If any NPA Split is scheduled to be activated within the planned resynchronization period, delay the reconcile until after the NPA Split has been activated.
4. Start the command-line interface by entering the following command with parameters as defined in Table 5-7:
% $LSMS_DIR/start_cmdLine <SPID> <REGION> [<COMMANDFILE>]
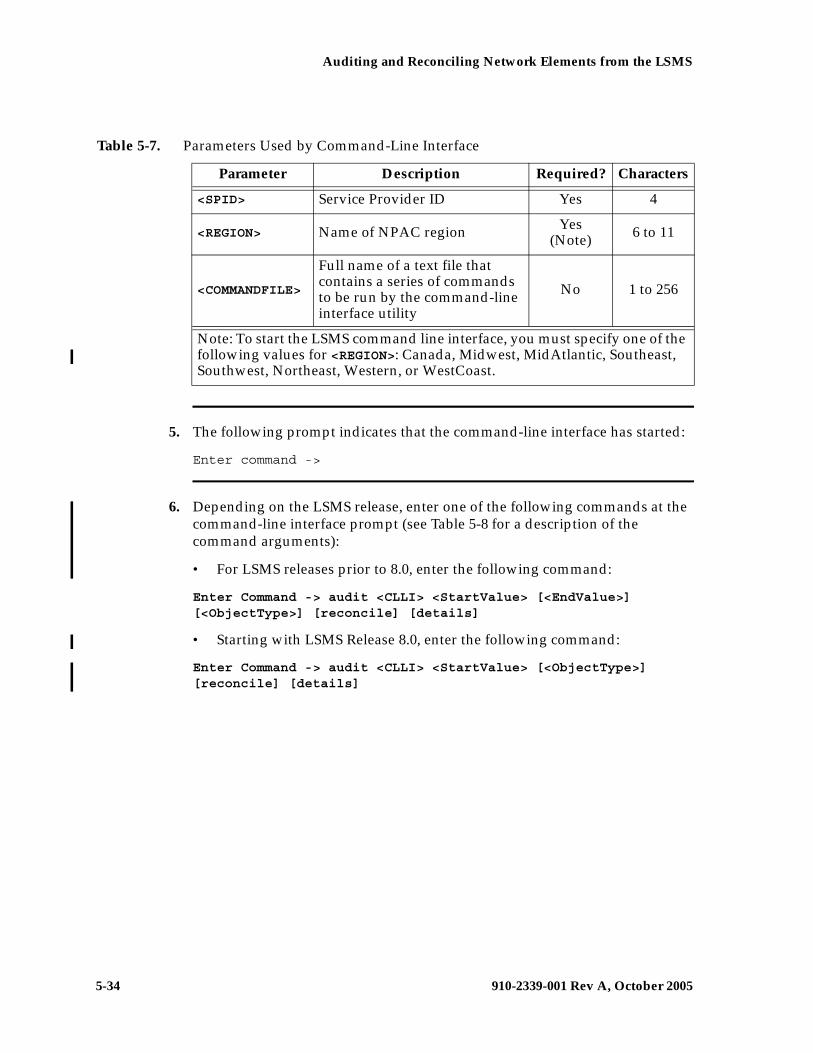
5-34 910-2339-001 Rev A, October 2005
Auditing and Reconciling Network Elements from the LSMS
5. The following prompt indicates that the command-line interface has started:
Enter command ->
6. Depending on the LSMS release, enter one of the following commands at the command-line interface prompt (see Table 5-8 for a description of the command arguments):
• For LSMS releases prior to 8.0, enter the following command:
Enter Command -> audit <CLLI> <StartValue> [<EndValue>] [<ObjectType>] [reconcile] [details]
• Starting with LSMS Release 8.0, enter the following command:
Enter Command -> audit <CLLI> <StartValue> [<ObjectType>] [reconcile] [details]
Table 5-7. Parameters Used by Command-Line Interface
Parameter Description Required? Characters
<SPID> Service Provider ID Yes 4
<REGION> Name of NPAC region Yes(Note) 6 to 11
<COMMANDFILE>
Full name of a text file that contains a series of commands to be run by the command-line interface utility
No 1 to 256
Note: To start the LSMS command line interface, you must specify one of the following values for <REGION>: Canada, Midwest, MidAtlantic, Southeast, Southwest, Northeast, Western, or WestCoast.
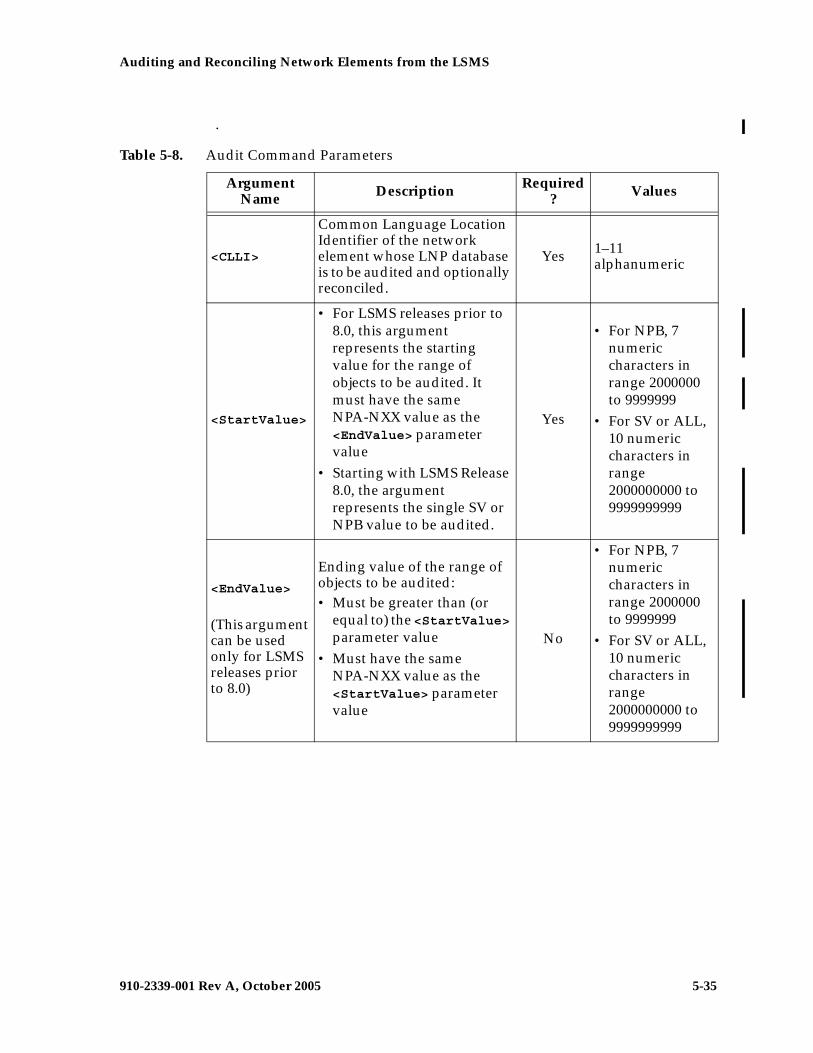
Auditing and Reconciling Network Elements from the LSMS
910-2339-001 Rev A, October 2005 5-35
.
Table 5-8. Audit Command Parameters
Argument Name Description Required
? Values
<CLLI>
Common Language Location Identifier of the network element whose LNP database is to be audited and optionally reconciled.
Yes 1–11 alphanumeric
<StartValue>
• For LSMS releases prior to 8.0, this argument represents the starting value for the range of objects to be audited. It must have the same NPA-NXX value as the <EndValue> parameter value
• Starting with LSMS Release 8.0, the argument represents the single SV or NPB value to be audited.
Yes
• For NPB, 7 numeric characters in range 2000000 to 9999999
• For SV or ALL, 10 numeric characters in range 2000000000 to 9999999999
<EndValue>
(This argument can be used only for LSMS releases prior to 8.0)
Ending value of the range of objects to be audited:• Must be greater than (or
equal to) the <StartValue> parameter value
• Must have the same NPA-NXX value as the <StartValue> parameter value
No
• For NPB, 7 numeric characters in range 2000000 to 9999999
• For SV or ALL, 10 numeric characters in range 2000000000 to 9999999999
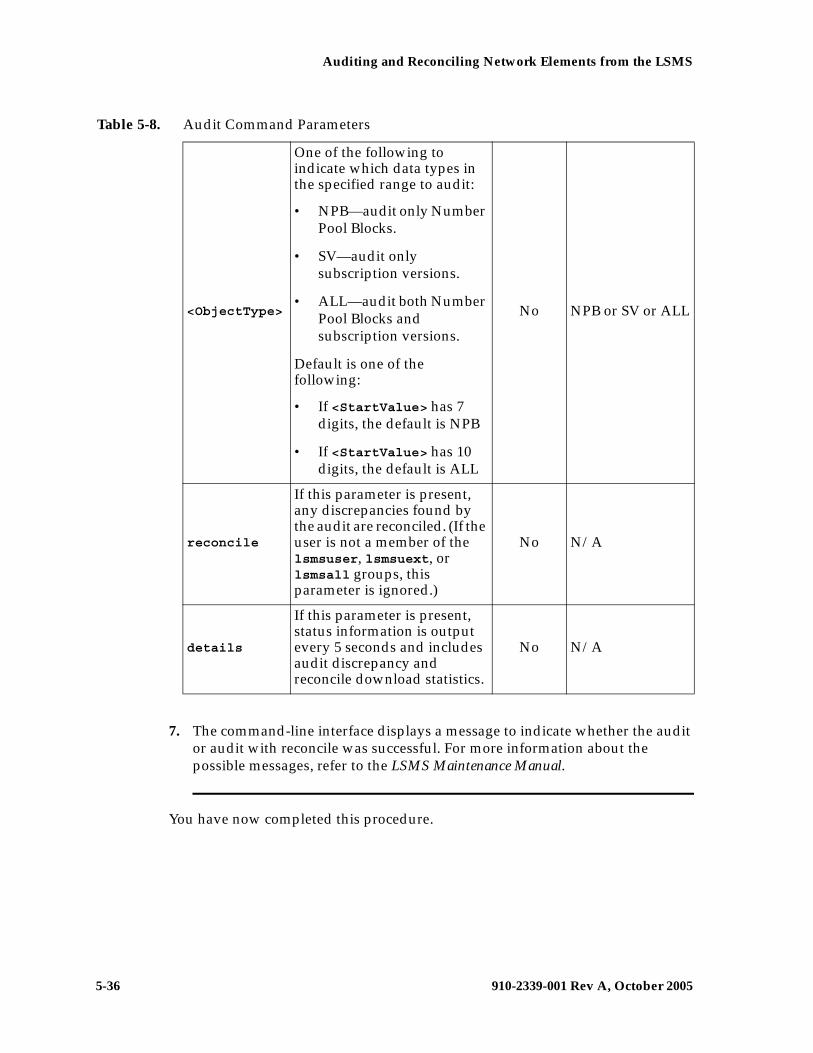
5-36 910-2339-001 Rev A, October 2005
Auditing and Reconciling Network Elements from the LSMS
7. The command-line interface displays a message to indicate whether the audit or audit with reconcile was successful. For more information about the possible messages, refer to the LSMS Maintenance Manual.
You have now completed this procedure.
<ObjectType>
One of the following to indicate which data types in the specified range to audit:
• NPB—audit only Number Pool Blocks.
• SV—audit only subscription versions.
• ALL—audit both Number Pool Blocks and subscription versions.
Default is one of the following:
• If <StartValue> has 7 digits, the default is NPB
• If <StartValue> has 10 digits, the default is ALL
No NPB or SV or ALL
reconcile
If this parameter is present, any discrepancies found by the audit are reconciled. (If the user is not a member of the lsmsuser, lsmsuext, or lsmsall groups, this parameter is ignored.)
No N/A
details
If this parameter is present, status information is output every 5 seconds and includes audit discrepancy and reconcile download statistics.
No N/A
Table 5-8. Audit Command Parameters
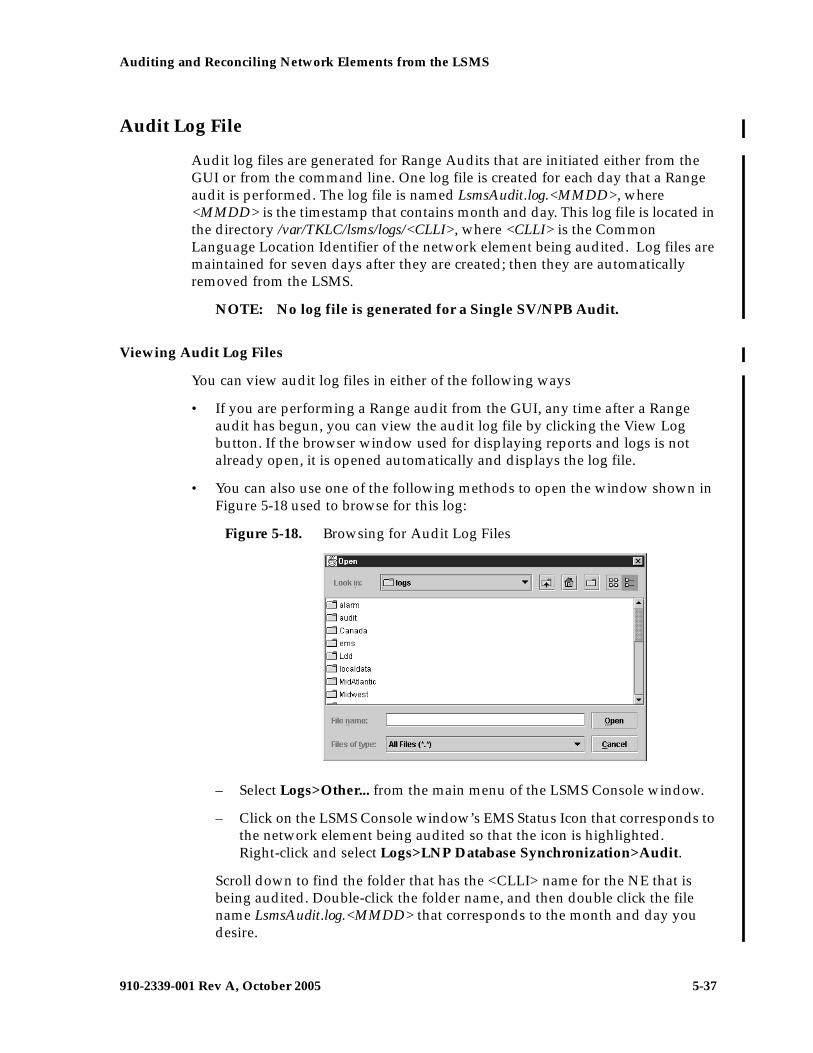
Auditing and Reconciling Network Elements from the LSMS
910-2339-001 Rev A, October 2005 5-37
Audit Log File
Audit log files are generated for Range Audits that are initiated either from the GUI or from the command line. One log file is created for each day that a Range audit is performed. The log file is named LsmsAudit.log.<MMDD>, where <MMDD> is the timestamp that contains month and day. This log file is located in the directory /var/TKLC/lsms/logs/<CLLI>, where <CLLI> is the Common Language Location Identifier of the network element being audited. Log files are maintained for seven days after they are created; then they are automatically removed from the LSMS.
NOTE: No log file is generated for a Single SV/NPB Audit.
Viewing Audit Log Files
You can view audit log files in either of the following ways
• If you are performing a Range audit from the GUI, any time after a Range audit has begun, you can view the audit log file by clicking the View Log button. If the browser window used for displaying reports and logs is not already open, it is opened automatically and displays the log file.
• You can also use one of the following methods to open the window shown in Figure 5-18 used to browse for this log:
Figure 5-18. Browsing for Audit Log Files
– Select Logs>Other... from the main menu of the LSMS Console window.
– Click on the LSMS Console window’s EMS Status Icon that corresponds to the network element being audited so that the icon is highlighted. Right-click and select Logs>LNP Database Synchronization>Audit.
Scroll down to find the folder that has the <CLLI> name for the NE that is being audited. Double-click the folder name, and then double click the file name LsmsAudit.log.<MMDD> that corresponds to the month and day you desire.
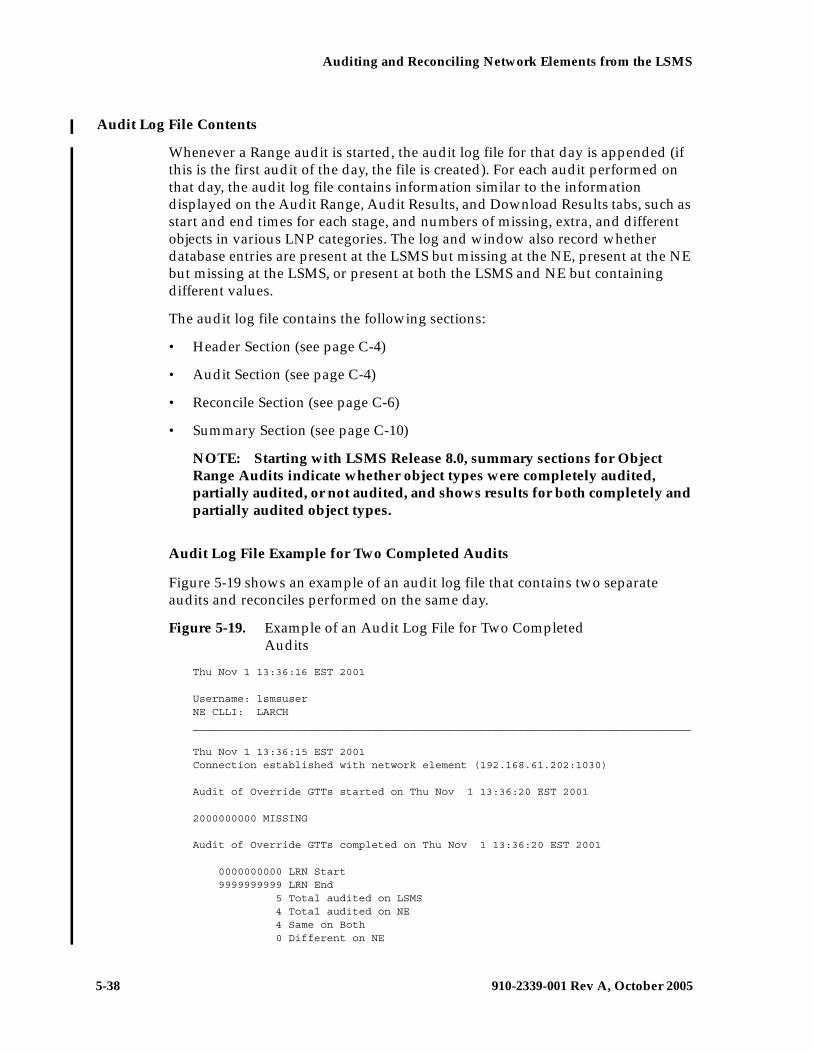
5-38 910-2339-001 Rev A, October 2005
Auditing and Reconciling Network Elements from the LSMS
Audit Log File Contents
Whenever a Range audit is started, the audit log file for that day is appended (if this is the first audit of the day, the file is created). For each audit performed on that day, the audit log file contains information similar to the information displayed on the Audit Range, Audit Results, and Download Results tabs, such as start and end times for each stage, and numbers of missing, extra, and different objects in various LNP categories. The log and window also record whether database entries are present at the LSMS but missing at the NE, present at the NE but missing at the LSMS, or present at both the LSMS and NE but containing different values.
The audit log file contains the following sections:
• Header Section (see page C-4)
• Audit Section (see page C-4)
• Reconcile Section (see page C-6)
• Summary Section (see page C-10)
NOTE: Starting with LSMS Release 8.0, summary sections for Object Range Audits indicate whether object types were completely audited, partially audited, or not audited, and shows results for both completely and partially audited object types.
Audit Log File Example for Two Completed Audits
Figure 5-19 shows an example of an audit log file that contains two separate audits and reconciles performed on the same day.
Figure 5-19. Example of an Audit Log File for Two Completed Audits
Thu Nov 1 13:36:16 EST 2001
Username: lsmsuserNE CLLI: LARCH______________________________________________________________________________
Thu Nov 1 13:36:15 EST 2001Connection established with network element (192.168.61.202:1030)
Audit of Override GTTs started on Thu Nov 1 13:36:20 EST 2001
2000000000 MISSING
Audit of Override GTTs completed on Thu Nov 1 13:36:20 EST 2001
0000000000 LRN Start 9999999999 LRN End 5 Total audited on LSMS 4 Total audited on NE 4 Same on Both 0 Different on NE
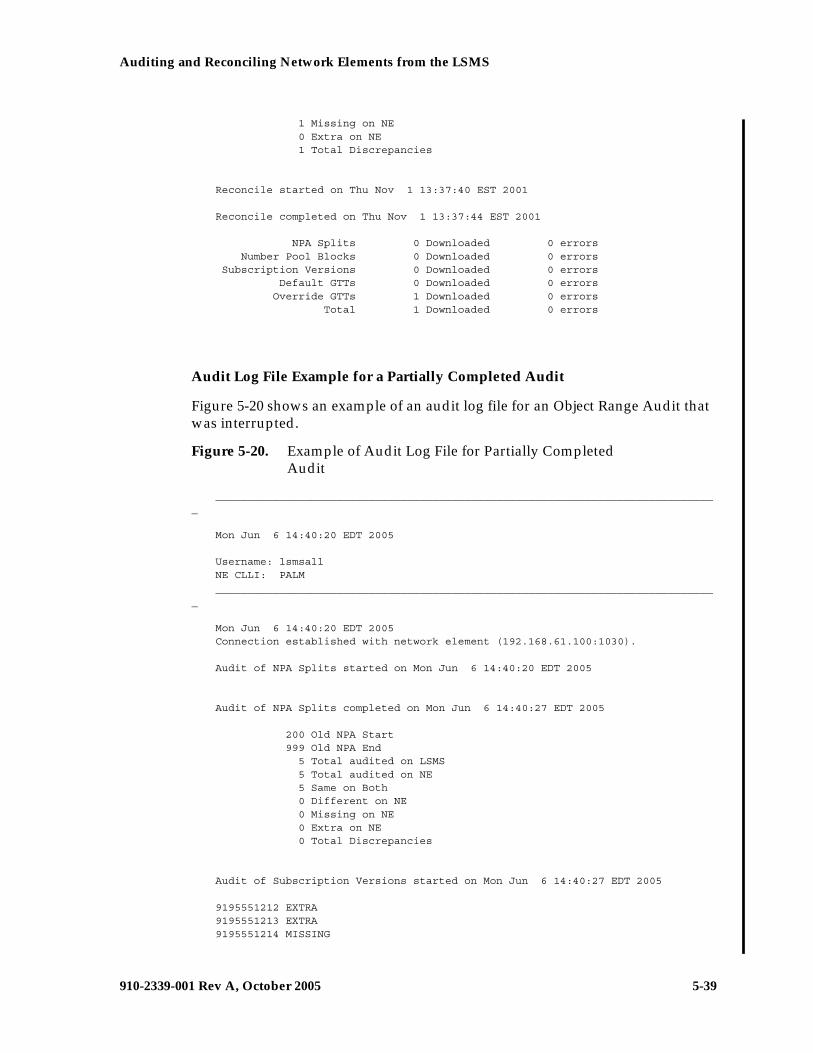
Auditing and Reconciling Network Elements from the LSMS
910-2339-001 Rev A, October 2005 5-39
1 Missing on NE 0 Extra on NE 1 Total Discrepancies
Reconcile started on Thu Nov 1 13:37:40 EST 2001
Reconcile completed on Thu Nov 1 13:37:44 EST 2001
NPA Splits 0 Downloaded 0 errors Number Pool Blocks 0 Downloaded 0 errors Subscription Versions 0 Downloaded 0 errors Default GTTs 0 Downloaded 0 errors Override GTTs 1 Downloaded 0 errors Total 1 Downloaded 0 errors
Audit Log File Example for a Partially Completed Audit
Figure 5-20 shows an example of an audit log file for an Object Range Audit that was interrupted.
Figure 5-20. Example of Audit Log File for Partially Completed Audit
_______________________________________________________________________________
Mon Jun 6 14:40:20 EDT 2005
Username: lsmsallNE CLLI: PALM______________________________________________________________________________
_
Mon Jun 6 14:40:20 EDT 2005Connection established with network element (192.168.61.100:1030).
Audit of NPA Splits started on Mon Jun 6 14:40:20 EDT 2005
Audit of NPA Splits completed on Mon Jun 6 14:40:27 EDT 2005
200 Old NPA Start 999 Old NPA End 5 Total audited on LSMS 5 Total audited on NE 5 Same on Both 0 Different on NE 0 Missing on NE 0 Extra on NE 0 Total Discrepancies
Audit of Subscription Versions started on Mon Jun 6 14:40:27 EDT 2005
9195551212 EXTRA9195551213 EXTRA9195551214 MISSING
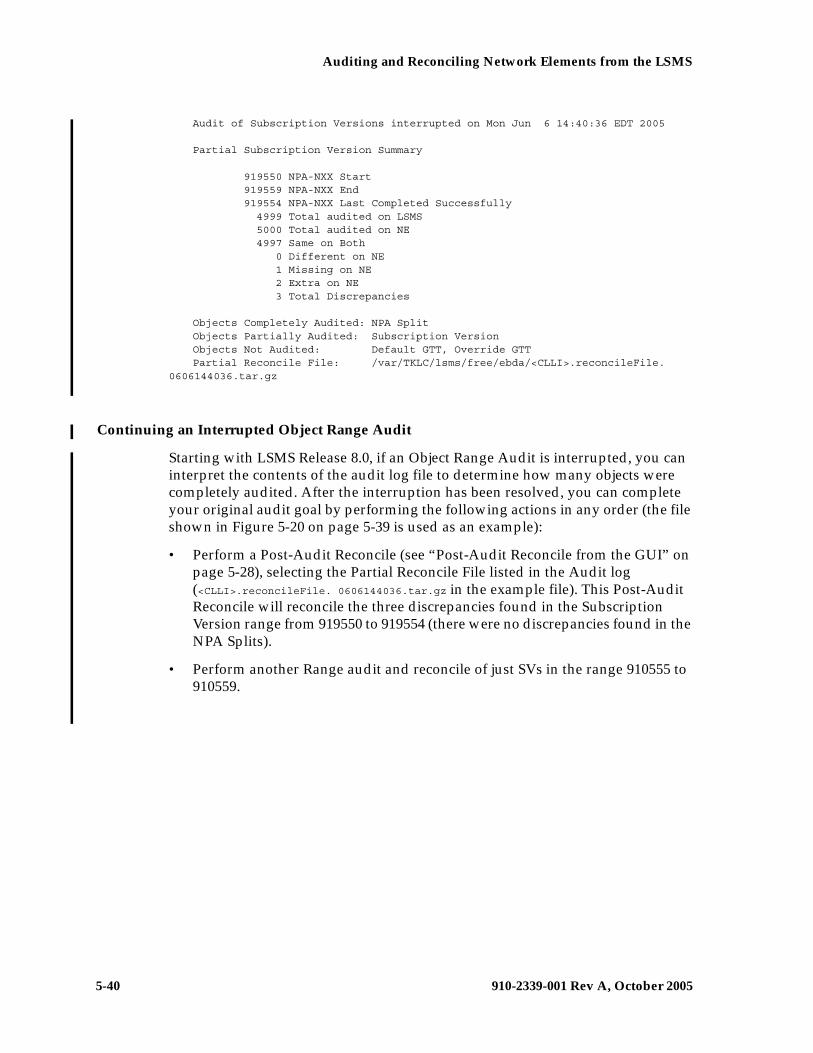
5-40 910-2339-001 Rev A, October 2005
Auditing and Reconciling Network Elements from the LSMS
Audit of Subscription Versions interrupted on Mon Jun 6 14:40:36 EDT 2005
Partial Subscription Version Summary
919550 NPA-NXX Start 919559 NPA-NXX End 919554 NPA-NXX Last Completed Successfully 4999 Total audited on LSMS 5000 Total audited on NE 4997 Same on Both 0 Different on NE 1 Missing on NE 2 Extra on NE 3 Total Discrepancies
Objects Completely Audited: NPA SplitObjects Partially Audited: Subscription VersionObjects Not Audited: Default GTT, Override GTTPartial Reconcile File: /var/TKLC/lsms/free/ebda/<CLLI>.reconcileFile.
0606144036.tar.gz
Continuing an Interrupted Object Range Audit
Starting with LSMS Release 8.0, if an Object Range Audit is interrupted, you can interpret the contents of the audit log file to determine how many objects were completely audited. After the interruption has been resolved, you can complete your original audit goal by performing the following actions in any order (the file shown in Figure 5-20 on page 5-39 is used as an example):
• Perform a Post-Audit Reconcile (see “Post-Audit Reconcile from the GUI” on page 5-28), selecting the Partial Reconcile File listed in the Audit log (<CLLI>.reconcileFile. 0606144036.tar.gz in the example file). This Post-Audit Reconcile will reconcile the three discrepancies found in the Subscription Version range from 919550 to 919554 (there were no discrepancies found in the NPA Splits).
• Perform another Range audit and reconcile of just SVs in the range 910555 to 910559.
910-2339-001 Rev A, October 2005 6-1
6
Managing Bulk Load from the LSMS
Introduction...................................................................................................... 6–2
Bulk Load Overview ....................................................................................... 6–3
Managing Bulk Load from the LSMS ........................................................... 6–5
Bulk Load Procedure ................................................................................ 6–5
Bulk Load Log File .................................................................................. 6–20
Bulk Load Error Messages ..................................................................... 6–23
6-2 910-2339-001 Rev A, October 2005
Managing Bulk Load from the LSMS
Introduction
This chapter describes the features required for electronic bulk load and how to initiate and manage electronic bulk load from the Local Service Management System (LSMS). Bulk loading completely replaces an LNP database (all subscription version, number pool block, NPA Split, Translation Type Service, default Global Title Translation, and override Global Title Translation data) at a network element.
When to Perform a Bulk Load
Bulk loading is required when:
• The network element is being initialized for one of the following reasons:
– Bringing the network element into the system for the first time
– Modifying the network element’s area of service by reconfiguring EMS routing
– The network element’s LNP database is corrupted and cannot be recovered using other synchronization methods
• The user-initiated resynchronization is not possible for one of the following reasons:
– An outage between the LSMS and the network element exceeds seven days
– A hardware failure at the LSMS causes loss of resynchronization logs
– A bulk download from the NPAC to the LSMS has been performed. For more information on resynchronizing the NPAC and LSMS databases, refer to the LSMS Maintenance Manual.
For information about procedures that may be used instead of bulk loading, see “Choosing a Synchronization Procedure” on page 3-3.
Bulk Load Restrictions
A maximum of two bulk loads (of different network elements) can be performed simultaneously. For more information about the maximum number of synchronization operations that can occur simultaneously, see “Maximum Number of Simultaneous Synchronization Operations” on page 2-11.
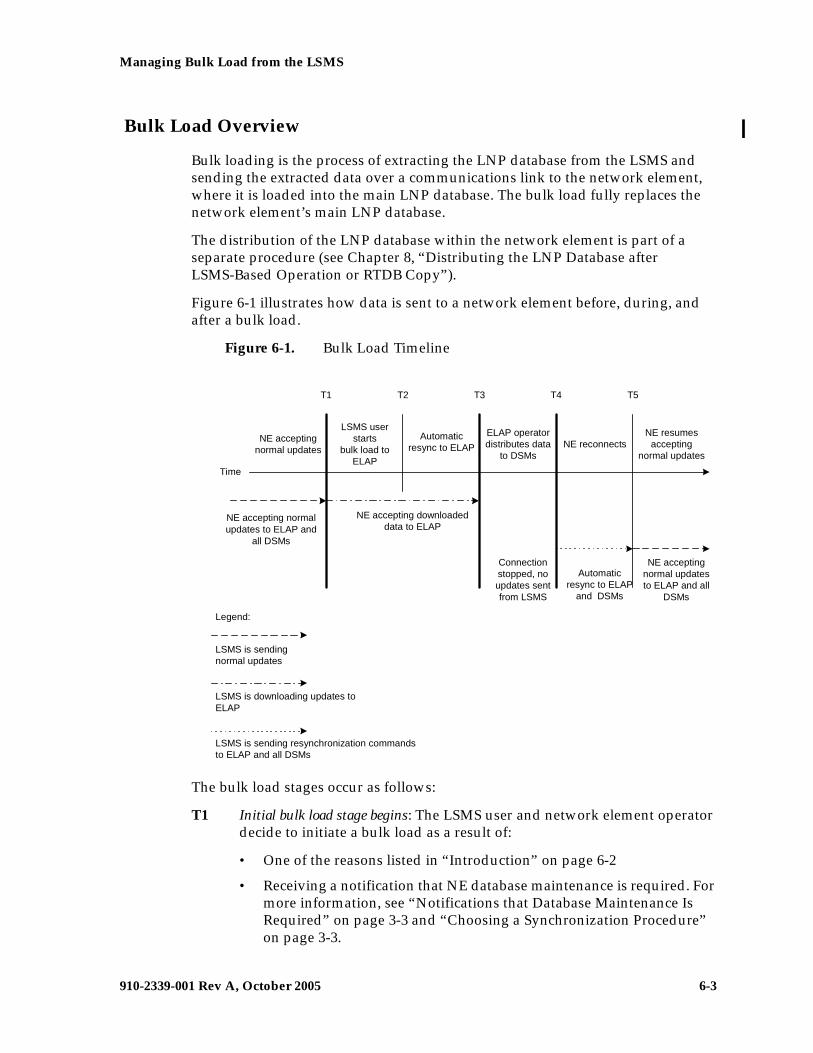
Managing Bulk Load from the LSMS
910-2339-001 Rev A, October 2005 6-3
Bulk Load Overview
Bulk loading is the process of extracting the LNP database from the LSMS and sending the extracted data over a communications link to the network element, where it is loaded into the main LNP database. The bulk load fully replaces the network element’s main LNP database.
The distribution of the LNP database within the network element is part of a separate procedure (see Chapter 8, “Distributing the LNP Database after LSMS-Based Operation or RTDB Copy”).
Figure 6-1 illustrates how data is sent to a network element before, during, and after a bulk load.
Figure 6-1. Bulk Load Timeline
The bulk load stages occur as follows:
T1 Initial bulk load stage begins: The LSMS user and network element operator decide to initiate a bulk load as a result of:
• One of the reasons listed in “Introduction” on page 6-2
• Receiving a notification that NE database maintenance is required. For more information, see “Notifications that Database Maintenance Is Required” on page 3-3 and “Choosing a Synchronization Procedure” on page 3-3.
NE acceptingnormal updates
LSMS userstarts
bulk load toELAP
Automaticresync to ELAP
ELAP operatordistributes data
to DSMsNE reconnects
NE resumesaccepting
normal updates
Time
Connectionstopped, noupdates sentfrom LSMS
Automaticresync to ELAP
and DSMs
NE acceptingnormal updatesto ELAP and all
DSMs
T1 T4 T5
NE accepting downloadeddata to ELAP
T2 T3
NE accepting normalupdates to ELAP and
all DSMs
LSMS is sendingnormal updates
LSMS is downloading updates toELAP
LSMS is sending resynchronization commandsto ELAP and all DSMs
Legend:
6-4 910-2339-001 Rev A, October 2005
Managing Bulk Load from the LSMS
To start the bulk load at the LSMS, see “Managing Bulk Load from the LSMS” on page 6-5.
During the bulk load, the network element’s LNP database is cleared (all LNP database entries are deleted), and the entire LSMS LNP database is downloaded to the network element.
Some differences between the LSMS and NE databases (such as capacity) may cause the NE to reject some of the downloaded commands. These rejections would also during a normal update. All commands rejected by the network element are recorded in the bulk load log file (see “Bulk Load Log File” on page 6-20) and can be viewed by clicking the View Log button on the Bulk Load dialog (see Figure 6-7, on Page 6-10).
At any time during this stage, the LSMS user can choose to abort the bulk load. If aborted, this operation can be either restarted or terminated.
T2 Automatic resynchronization stage begins: As soon as the previous stage completes, the LSMS automatically begins a resynchronization to update the network element with any updates received from NPACs or any data locally provisioned since stage T1.
This stage can also result in download commands being rejected by the NE. All commands rejected by the network element are recorded in the bulk load log file (see “Bulk Load Log File” on page 6-20) and can be viewed by clicking the View Log button on the Bulk Load dialog (see Figure 6-7, on Page 6-10).
When this stage is complete, the user has the option to commit or discard the LNP data downloaded to the network element. If the user chooses to commit the changes, the DBTS is set to the time that this stage began. If the user chooses to discard the changes, the network element’s LNP database is left in a Database Maintenance Required (DMR) state.
T3 Network element database distribution stage begins: If the LSMS user chooses in the previous stage to commit the data downloaded to the NE’s database, the ELAP operator copies the newly restored ELAP RTDB to the mate ELAP, and then distributes the data to the Data Services Module (DSM) cards as described in Chapter 8, “Distributing the LNP Database after LSMS-Based Operation or RTDB Copy.”.
T4 Automatic resynchronization stage begins: At this stage, the bulk load procedures are complete, and the LSMS and network element reconnect and begin the normal automatic resynchronization described in “Automatic Resynchronization Process” on page 4-2. During this stage, the LSMS sends all NPAC updates or locally provisioned data updates that have occurred since stage T2.
T5 Normal operations resume.
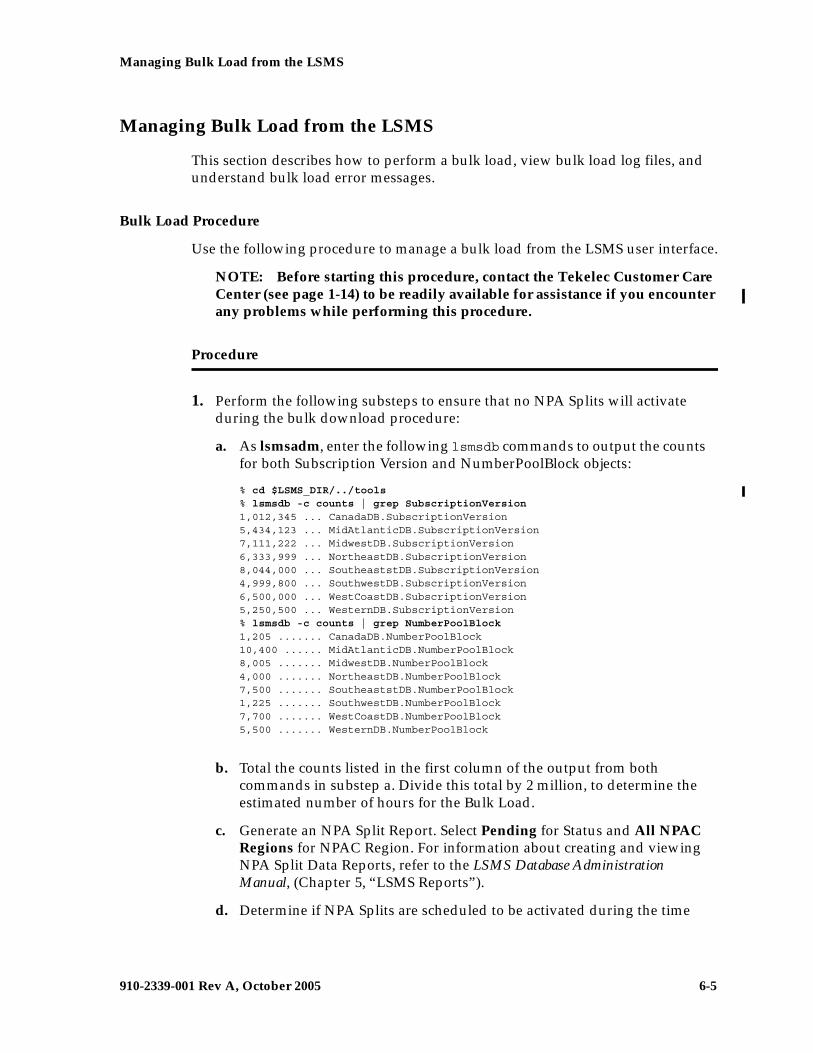
Managing Bulk Load from the LSMS
910-2339-001 Rev A, October 2005 6-5
Managing Bulk Load from the LSMS
This section describes how to perform a bulk load, view bulk load log files, and understand bulk load error messages.
Bulk Load Procedure
Use the following procedure to manage a bulk load from the LSMS user interface.
NOTE: Before starting this procedure, contact the Tekelec Customer Care Center (see page 1-14) to be readily available for assistance if you encounter any problems while performing this procedure.
Procedure
1. Perform the following substeps to ensure that no NPA Splits will activate during the bulk download procedure:
a. As lsmsadm, enter the following lsmsdb commands to output the counts for both Subscription Version and NumberPoolBlock objects:
% cd $LSMS_DIR/../tools% lsmsdb -c counts | grep SubscriptionVersion1,012,345 ... CanadaDB.SubscriptionVersion5,434,123 ... MidAtlanticDB.SubscriptionVersion7,111,222 ... MidwestDB.SubscriptionVersion6,333,999 ... NortheastDB.SubscriptionVersion8,044,000 ... SoutheaststDB.SubscriptionVersion4,999,800 ... SouthwestDB.SubscriptionVersion6,500,000 ... WestCoastDB.SubscriptionVersion5,250,500 ... WesternDB.SubscriptionVersion% lsmsdb -c counts | grep NumberPoolBlock1,205 ....... CanadaDB.NumberPoolBlock10,400 ...... MidAtlanticDB.NumberPoolBlock8,005 ....... MidwestDB.NumberPoolBlock4,000 ....... NortheastDB.NumberPoolBlock7,500 ....... SoutheaststDB.NumberPoolBlock1,225 ....... SouthwestDB.NumberPoolBlock7,700 ....... WestCoastDB.NumberPoolBlock5,500 ....... WesternDB.NumberPoolBlock
b. Total the counts listed in the first column of the output from both commands in substep a. Divide this total by 2 million, to determine the estimated number of hours for the Bulk Load.
c. Generate an NPA Split Report. Select Pending for Status and All NPAC Regions for NPAC Region. For information about creating and viewing NPA Split Data Reports, refer to the LSMS Database Administration Manual, (Chapter 5, “LSMS Reports”).
d. Determine if NPA Splits are scheduled to be activated during the time
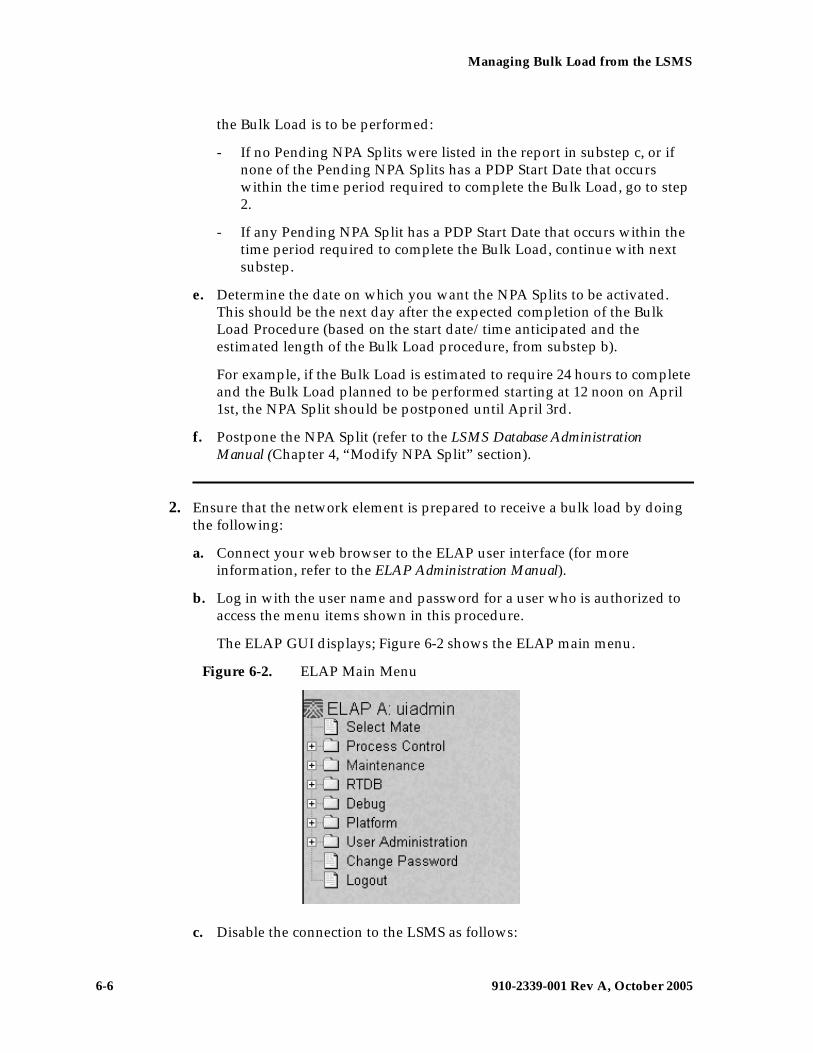
6-6 910-2339-001 Rev A, October 2005
Managing Bulk Load from the LSMS
the Bulk Load is to be performed:
- If no Pending NPA Splits were listed in the report in substep c, or if none of the Pending NPA Splits has a PDP Start Date that occurs within the time period required to complete the Bulk Load, go to step 2.
- If any Pending NPA Split has a PDP Start Date that occurs within the time period required to complete the Bulk Load, continue with next substep.
e. Determine the date on which you want the NPA Splits to be activated. This should be the next day after the expected completion of the Bulk Load Procedure (based on the start date/time anticipated and the estimated length of the Bulk Load procedure, from substep b).
For example, if the Bulk Load is estimated to require 24 hours to complete and the Bulk Load planned to be performed starting at 12 noon on April 1st, the NPA Split should be postponed until April 3rd.
f. Postpone the NPA Split (refer to the LSMS Database Administration Manual (Chapter 4, “Modify NPA Split” section).
2. Ensure that the network element is prepared to receive a bulk load by doing the following:
a. Connect your web browser to the ELAP user interface (for more information, refer to the ELAP Administration Manual).
b. Log in with the user name and password for a user who is authorized to access the menu items shown in this procedure.
The ELAP GUI displays; Figure 6-2 shows the ELAP main menu.
Figure 6-2. ELAP Main Menu
c. Disable the connection to the LSMS as follows:
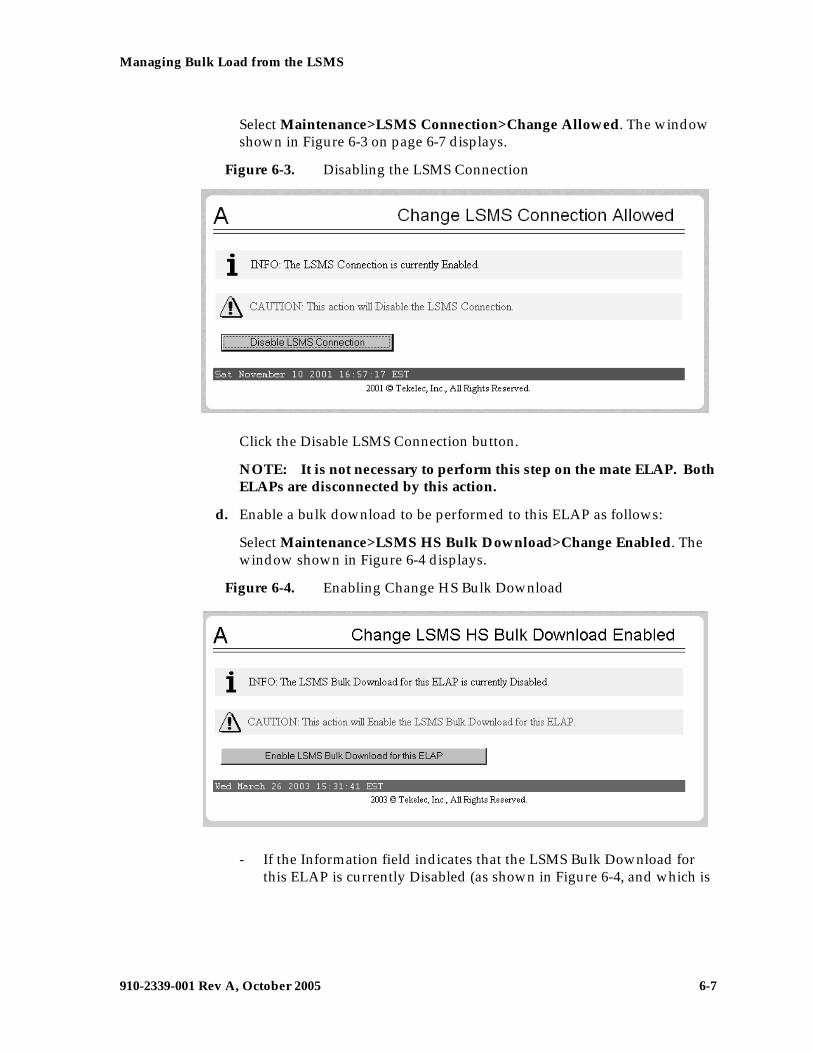
Managing Bulk Load from the LSMS
910-2339-001 Rev A, October 2005 6-7
Select Maintenance>LSMS Connection>Change Allowed. The window shown in Figure 6-3 on page 6-7 displays.
Figure 6-3. Disabling the LSMS Connection
Click the Disable LSMS Connection button.
NOTE: It is not necessary to perform this step on the mate ELAP. Both ELAPs are disconnected by this action.
d. Enable a bulk download to be performed to this ELAP as follows:
Select Maintenance>LSMS HS Bulk Download>Change Enabled. The window shown in Figure 6-4 displays.
Figure 6-4. Enabling Change HS Bulk Download
- If the Information field indicates that the LSMS Bulk Download for this ELAP is currently Disabled (as shown in Figure 6-4, and which is
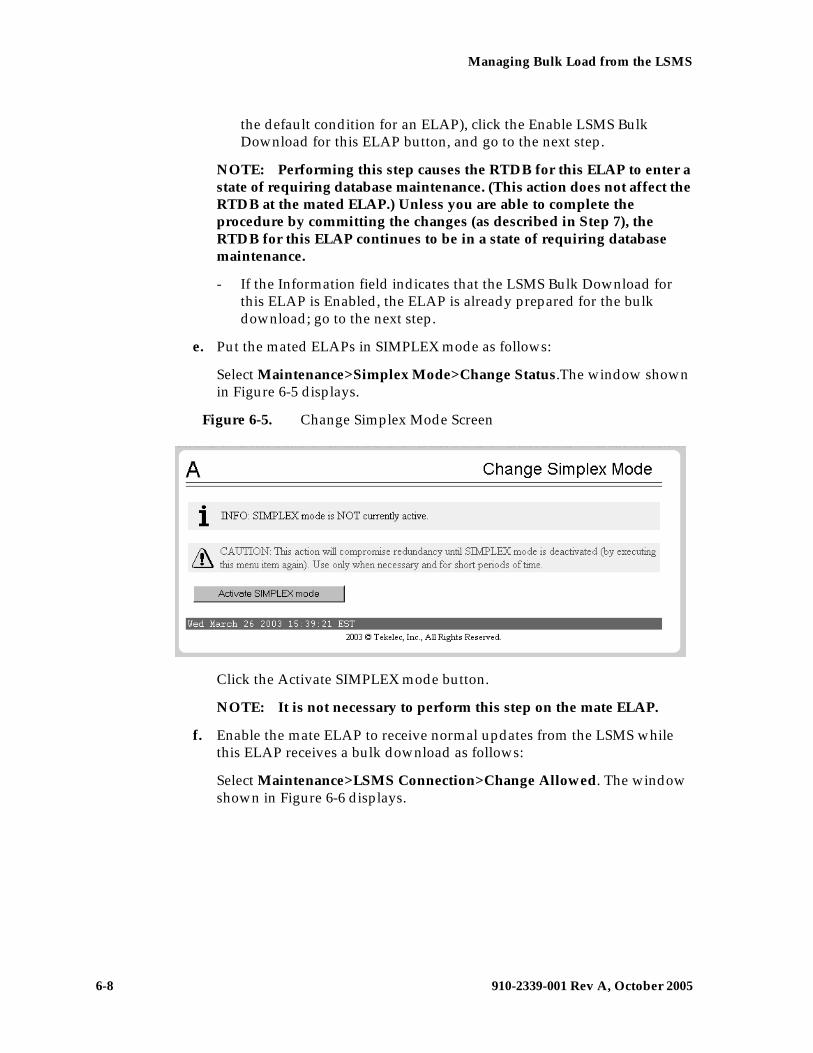
6-8 910-2339-001 Rev A, October 2005
Managing Bulk Load from the LSMS
the default condition for an ELAP), click the Enable LSMS Bulk Download for this ELAP button, and go to the next step.
NOTE: Performing this step causes the RTDB for this ELAP to enter a state of requiring database maintenance. (This action does not affect the RTDB at the mated ELAP.) Unless you are able to complete the procedure by committing the changes (as described in Step 7), the RTDB for this ELAP continues to be in a state of requiring database maintenance.
- If the Information field indicates that the LSMS Bulk Download for this ELAP is Enabled, the ELAP is already prepared for the bulk download; go to the next step.
e. Put the mated ELAPs in SIMPLEX mode as follows:
Select Maintenance>Simplex Mode>Change Status.The window shown in Figure 6-5 displays.
Figure 6-5. Change Simplex Mode Screen
Click the Activate SIMPLEX mode button.
NOTE: It is not necessary to perform this step on the mate ELAP.
f. Enable the mate ELAP to receive normal updates from the LSMS while this ELAP receives a bulk download as follows:
Select Maintenance>LSMS Connection>Change Allowed. The window shown in Figure 6-6 displays.
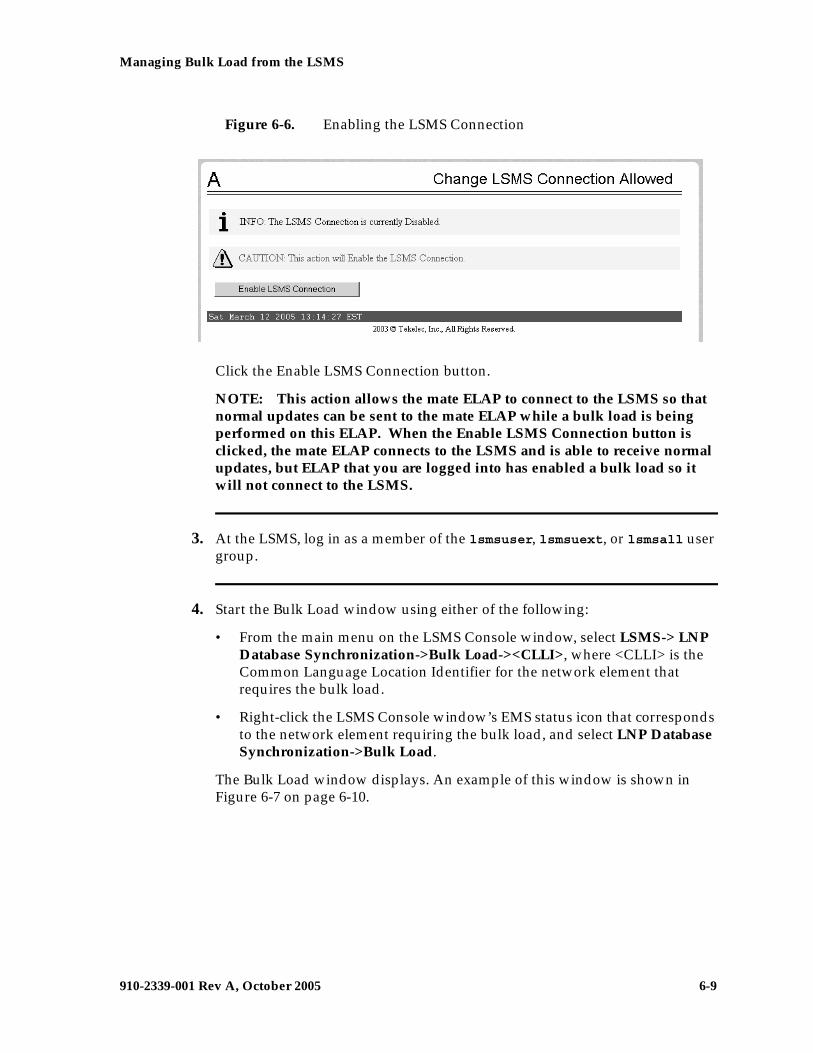
Managing Bulk Load from the LSMS
910-2339-001 Rev A, October 2005 6-9
Figure 6-6. Enabling the LSMS Connection
Click the Enable LSMS Connection button.
NOTE: This action allows the mate ELAP to connect to the LSMS so that normal updates can be sent to the mate ELAP while a bulk load is being performed on this ELAP. When the Enable LSMS Connection button is clicked, the mate ELAP connects to the LSMS and is able to receive normal updates, but ELAP that you are logged into has enabled a bulk load so it will not connect to the LSMS.
3. At the LSMS, log in as a member of the lsmsuser, lsmsuext, or lsmsall user group.
4. Start the Bulk Load window using either of the following:
• From the main menu on the LSMS Console window, select LSMS-> LNP Database Synchronization->Bulk Load-><CLLI>, where <CLLI> is the Common Language Location Identifier for the network element that requires the bulk load.
• Right-click the LSMS Console window’s EMS status icon that corresponds to the network element requiring the bulk load, and select LNP Database Synchronization->Bulk Load.
The Bulk Load window displays. An example of this window is shown in Figure 6-7 on page 6-10.
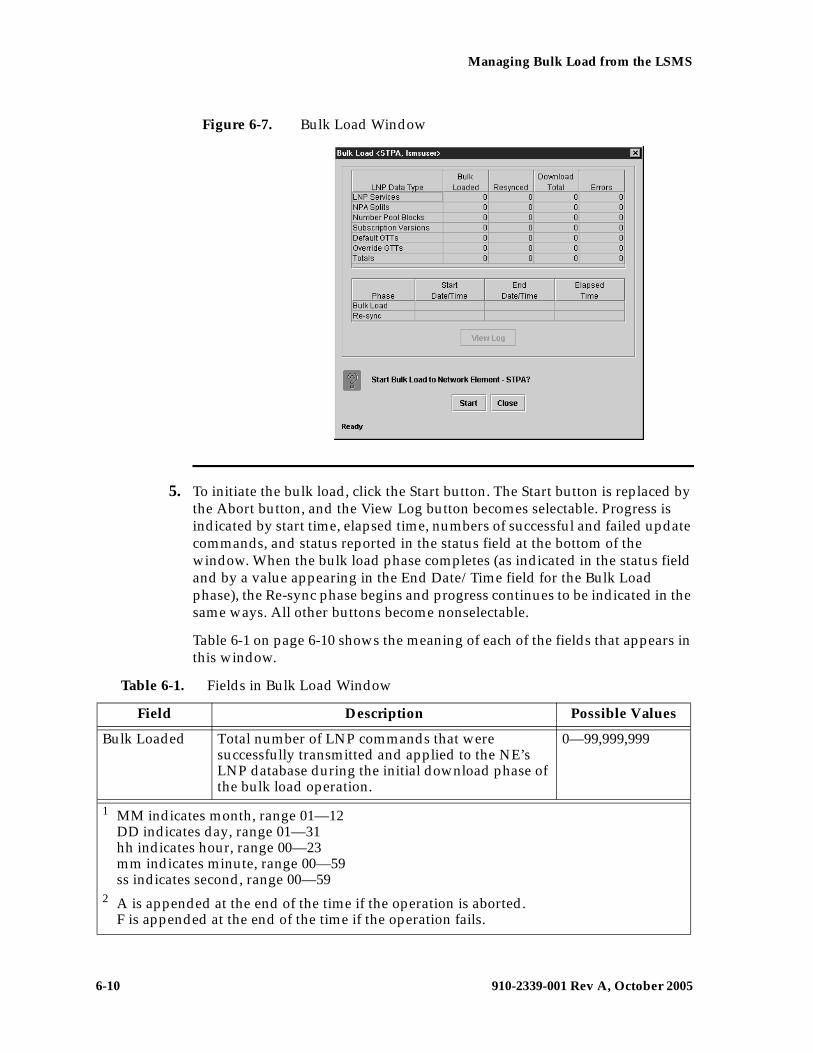
6-10 910-2339-001 Rev A, October 2005
Managing Bulk Load from the LSMS
Figure 6-7. Bulk Load Window
5. To initiate the bulk load, click the Start button. The Start button is replaced by the Abort button, and the View Log button becomes selectable. Progress is indicated by start time, elapsed time, numbers of successful and failed update commands, and status reported in the status field at the bottom of the window. When the bulk load phase completes (as indicated in the status field and by a value appearing in the End Date/Time field for the Bulk Load phase), the Re-sync phase begins and progress continues to be indicated in the same ways. All other buttons become nonselectable.
Table 6-1 on page 6-10 shows the meaning of each of the fields that appears in this window.
Table 6-1. Fields in Bulk Load Window
Field Description Possible Values
Bulk Loaded Total number of LNP commands that were successfully transmitted and applied to the NE’s LNP database during the initial download phase of the bulk load operation.
0—99,999,999
1 MM indicates month, range 01—12DD indicates day, range 01—31hh indicates hour, range 00—23mm indicates minute, range 00—59ss indicates second, range 00—59
2 A is appended at the end of the time if the operation is aborted.F is appended at the end of the time if the operation fails.
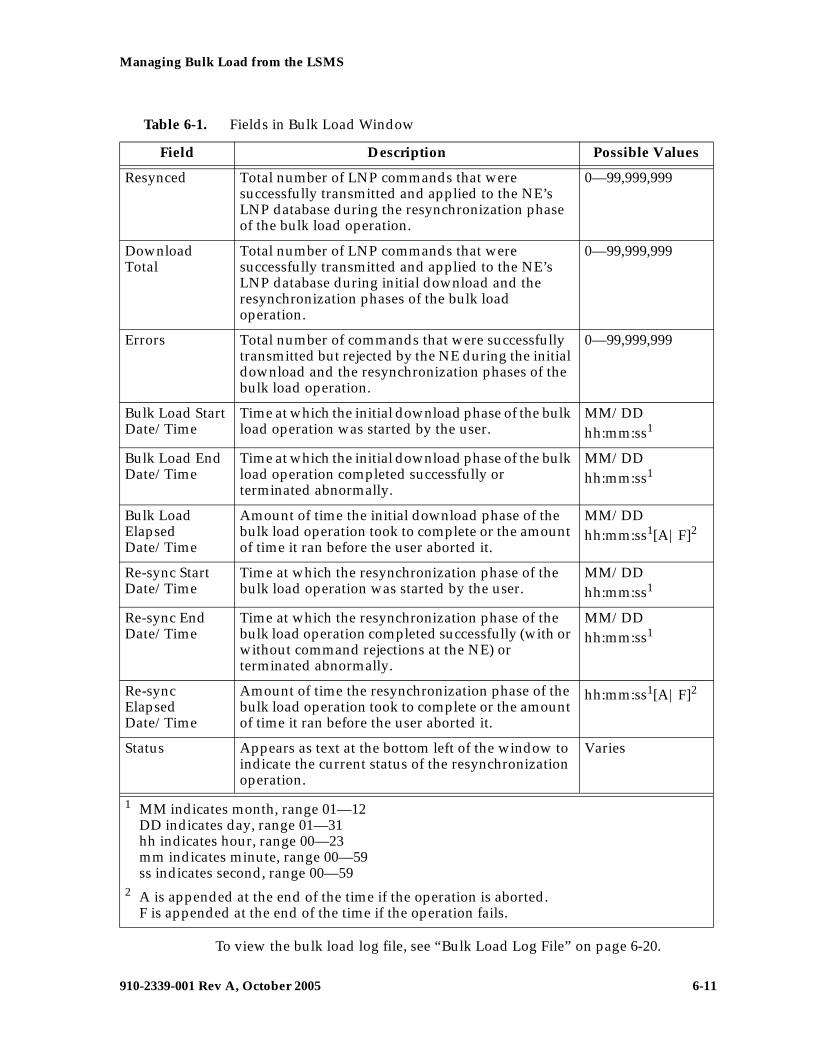
Managing Bulk Load from the LSMS
910-2339-001 Rev A, October 2005 6-11
To view the bulk load log file, see “Bulk Load Log File” on page 6-20.
Resynced Total number of LNP commands that were successfully transmitted and applied to the NE’s LNP database during the resynchronization phase of the bulk load operation.
0—99,999,999
Download Total
Total number of LNP commands that were successfully transmitted and applied to the NE’s LNP database during initial download and the resynchronization phases of the bulk load operation.
0—99,999,999
Errors Total number of commands that were successfully transmitted but rejected by the NE during the initial download and the resynchronization phases of the bulk load operation.
0—99,999,999
Bulk Load Start Date/Time
Time at which the initial download phase of the bulk load operation was started by the user.
MM/DD hh:mm:ss1
Bulk Load End Date/Time
Time at which the initial download phase of the bulk load operation completed successfully or terminated abnormally.
MM/DD hh:mm:ss1
Bulk Load Elapsed Date/Time
Amount of time the initial download phase of the bulk load operation took to complete or the amount of time it ran before the user aborted it.
MM/DD hh:mm:ss1[A|F]2
Re-sync Start Date/Time
Time at which the resynchronization phase of the bulk load operation was started by the user.
MM/DD hh:mm:ss1
Re-sync End Date/Time
Time at which the resynchronization phase of the bulk load operation completed successfully (with or without command rejections at the NE) or terminated abnormally.
MM/DD hh:mm:ss1
Re-sync Elapsed Date/Time
Amount of time the resynchronization phase of the bulk load operation took to complete or the amount of time it ran before the user aborted it.
hh:mm:ss1[A|F]2
Status Appears as text at the bottom left of the window to indicate the current status of the resynchronization operation.
Varies
Table 6-1. Fields in Bulk Load Window
Field Description Possible Values
1 MM indicates month, range 01—12DD indicates day, range 01—31hh indicates hour, range 00—23mm indicates minute, range 00—59ss indicates second, range 00—59
2 A is appended at the end of the time if the operation is aborted.F is appended at the end of the time if the operation fails.
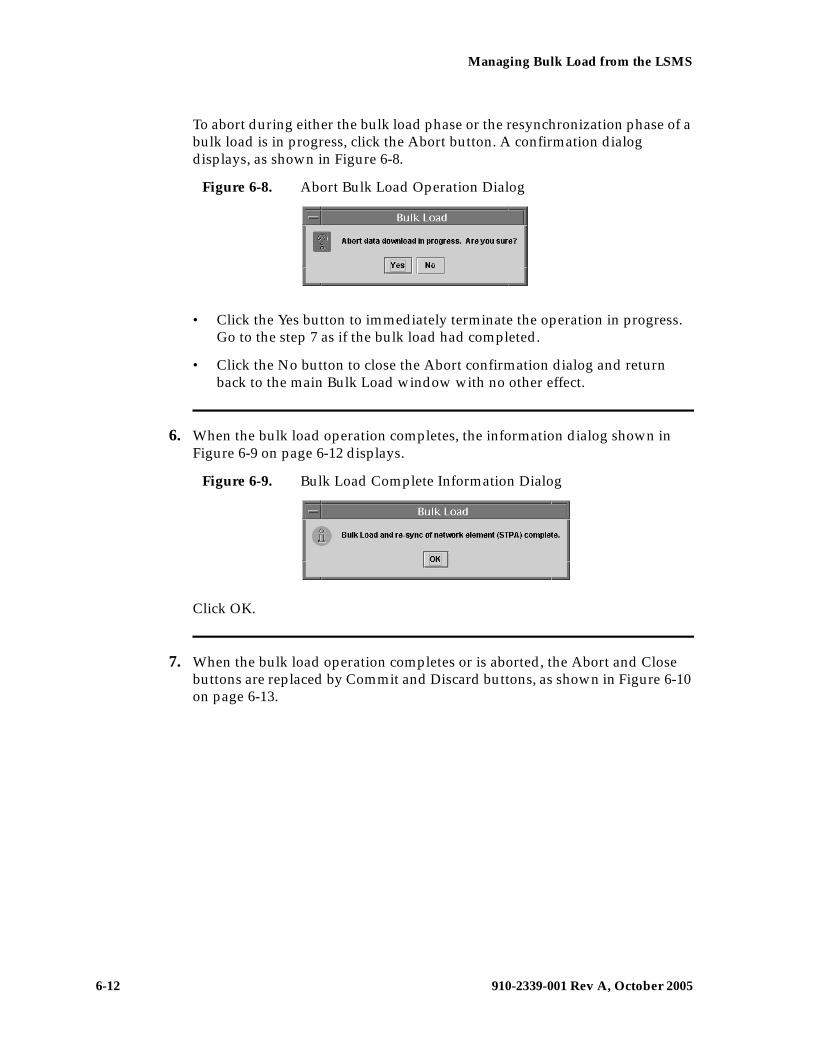
6-12 910-2339-001 Rev A, October 2005
Managing Bulk Load from the LSMS
To abort during either the bulk load phase or the resynchronization phase of a bulk load is in progress, click the Abort button. A confirmation dialog displays, as shown in Figure 6-8.
Figure 6-8. Abort Bulk Load Operation Dialog
• Click the Yes button to immediately terminate the operation in progress. Go to the step 7 as if the bulk load had completed.
• Click the No button to close the Abort confirmation dialog and return back to the main Bulk Load window with no other effect.
6. When the bulk load operation completes, the information dialog shown in Figure 6-9 on page 6-12 displays.
Figure 6-9. Bulk Load Complete Information Dialog
Click OK.
7. When the bulk load operation completes or is aborted, the Abort and Close buttons are replaced by Commit and Discard buttons, as shown in Figure 6-10 on page 6-13.
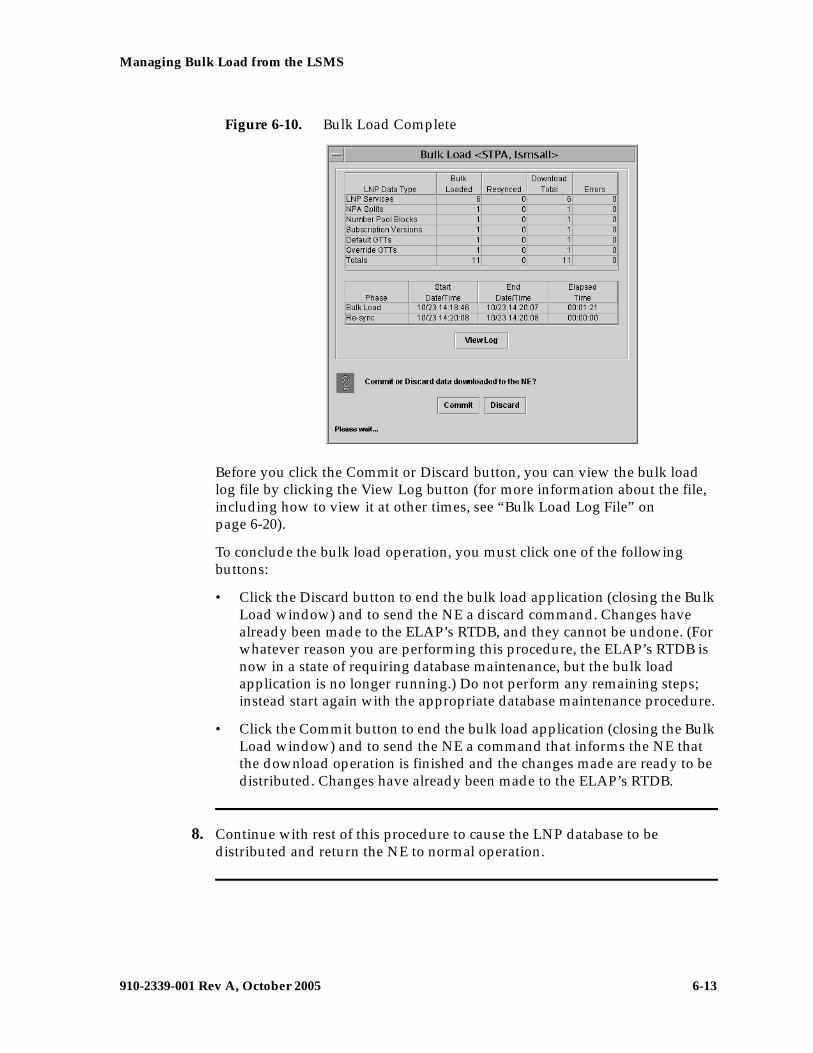
Managing Bulk Load from the LSMS
910-2339-001 Rev A, October 2005 6-13
Figure 6-10. Bulk Load Complete
Before you click the Commit or Discard button, you can view the bulk load log file by clicking the View Log button (for more information about the file, including how to view it at other times, see “Bulk Load Log File” on page 6-20).
To conclude the bulk load operation, you must click one of the following buttons:
• Click the Discard button to end the bulk load application (closing the Bulk Load window) and to send the NE a discard command. Changes have already been made to the ELAP’s RTDB, and they cannot be undone. (For whatever reason you are performing this procedure, the ELAP’s RTDB is now in a state of requiring database maintenance, but the bulk load application is no longer running.) Do not perform any remaining steps; instead start again with the appropriate database maintenance procedure.
• Click the Commit button to end the bulk load application (closing the Bulk Load window) and to send the NE a command that informs the NE that the download operation is finished and the changes made are ready to be distributed. Changes have already been made to the ELAP’s RTDB.
8. Continue with rest of this procedure to cause the LNP database to be distributed and return the NE to normal operation.
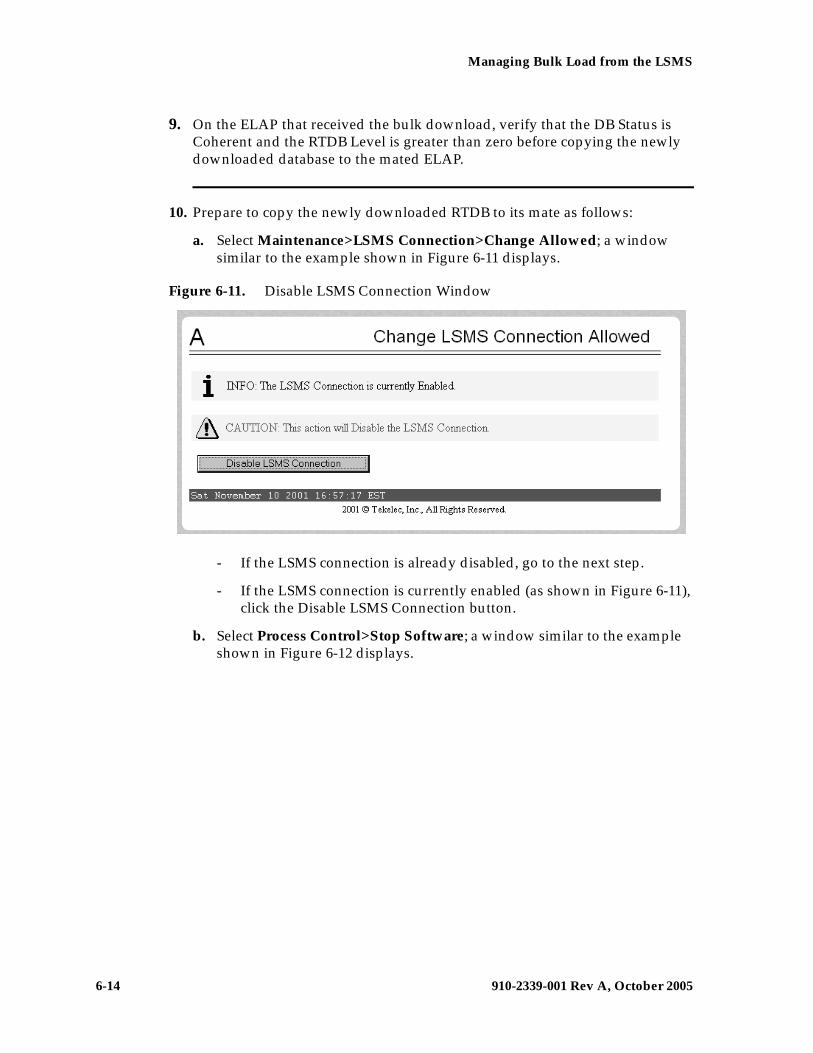
6-14 910-2339-001 Rev A, October 2005
Managing Bulk Load from the LSMS
9. On the ELAP that received the bulk download, verify that the DB Status is Coherent and the RTDB Level is greater than zero before copying the newly downloaded database to the mated ELAP.
10. Prepare to copy the newly downloaded RTDB to its mate as follows:
a. Select Maintenance>LSMS Connection>Change Allowed; a window similar to the example shown in Figure 6-11 displays.
Figure 6-11. Disable LSMS Connection Window
- If the LSMS connection is already disabled, go to the next step.
- If the LSMS connection is currently enabled (as shown in Figure 6-11), click the Disable LSMS Connection button.
b. Select Process Control>Stop Software; a window similar to the example shown in Figure 6-12 displays.
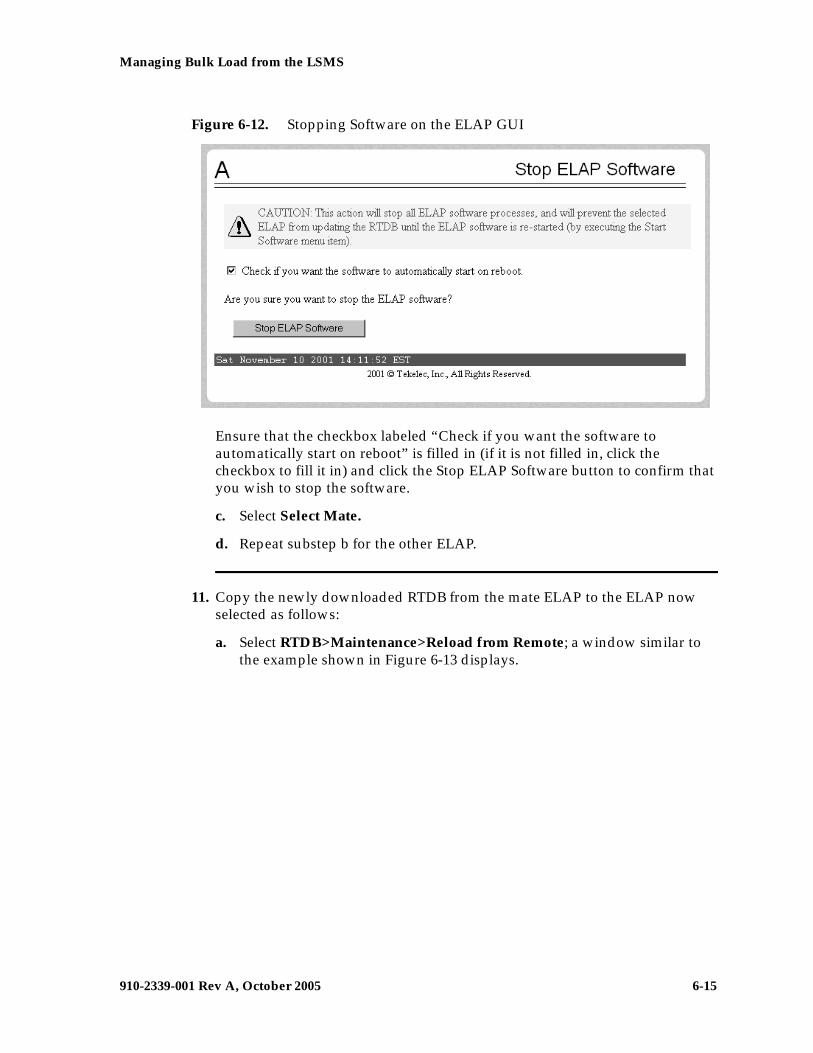
Managing Bulk Load from the LSMS
910-2339-001 Rev A, October 2005 6-15
Figure 6-12. Stopping Software on the ELAP GUI
Ensure that the checkbox labeled “Check if you want the software to automatically start on reboot” is filled in (if it is not filled in, click the checkbox to fill it in) and click the Stop ELAP Software button to confirm that you wish to stop the software.
c. Select Select Mate.
d. Repeat substep b for the other ELAP.
11. Copy the newly downloaded RTDB from the mate ELAP to the ELAP now selected as follows:
a. Select RTDB>Maintenance>Reload from Remote; a window similar to the example shown in Figure 6-13 displays.
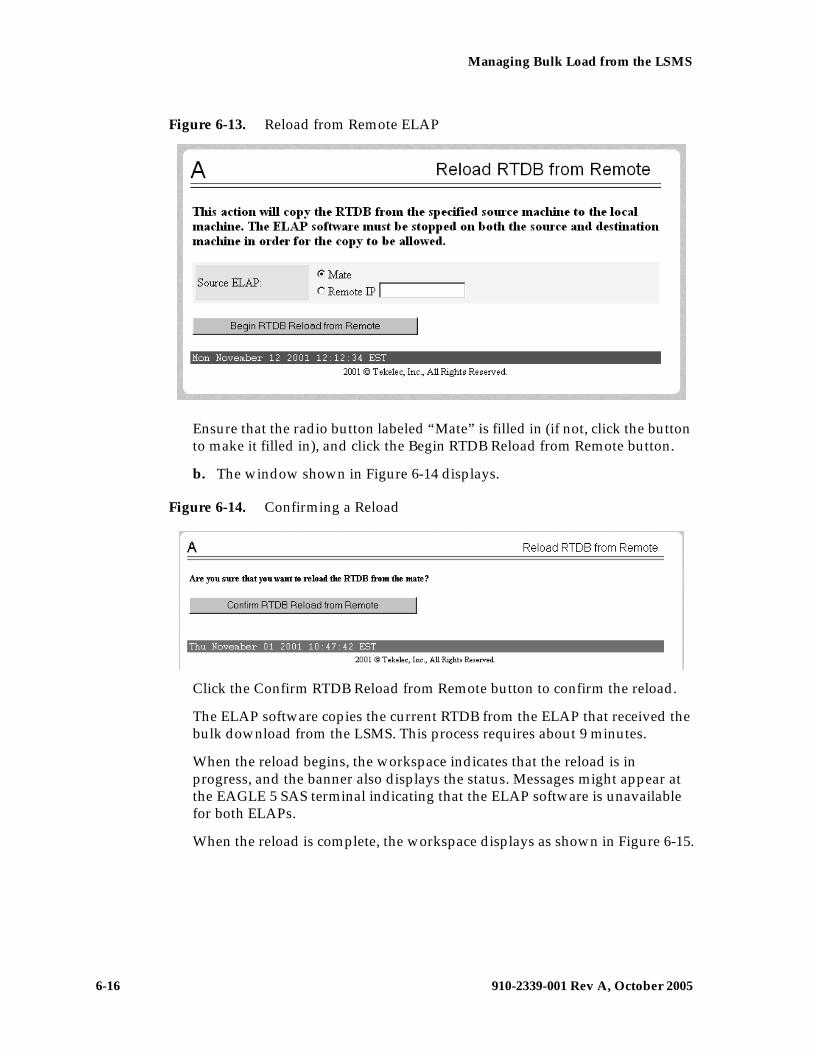
6-16 910-2339-001 Rev A, October 2005
Managing Bulk Load from the LSMS
Figure 6-13. Reload from Remote ELAP
Ensure that the radio button labeled “Mate” is filled in (if not, click the button to make it filled in), and click the Begin RTDB Reload from Remote button.
b. The window shown in Figure 6-14 displays.
Figure 6-14. Confirming a Reload
Click the Confirm RTDB Reload from Remote button to confirm the reload.
The ELAP software copies the current RTDB from the ELAP that received the bulk download from the LSMS. This process requires about 9 minutes.
When the reload begins, the workspace indicates that the reload is in progress, and the banner also displays the status. Messages might appear at the EAGLE 5 SAS terminal indicating that the ELAP software is unavailable for both ELAPs.
When the reload is complete, the workspace displays as shown in Figure 6-15.
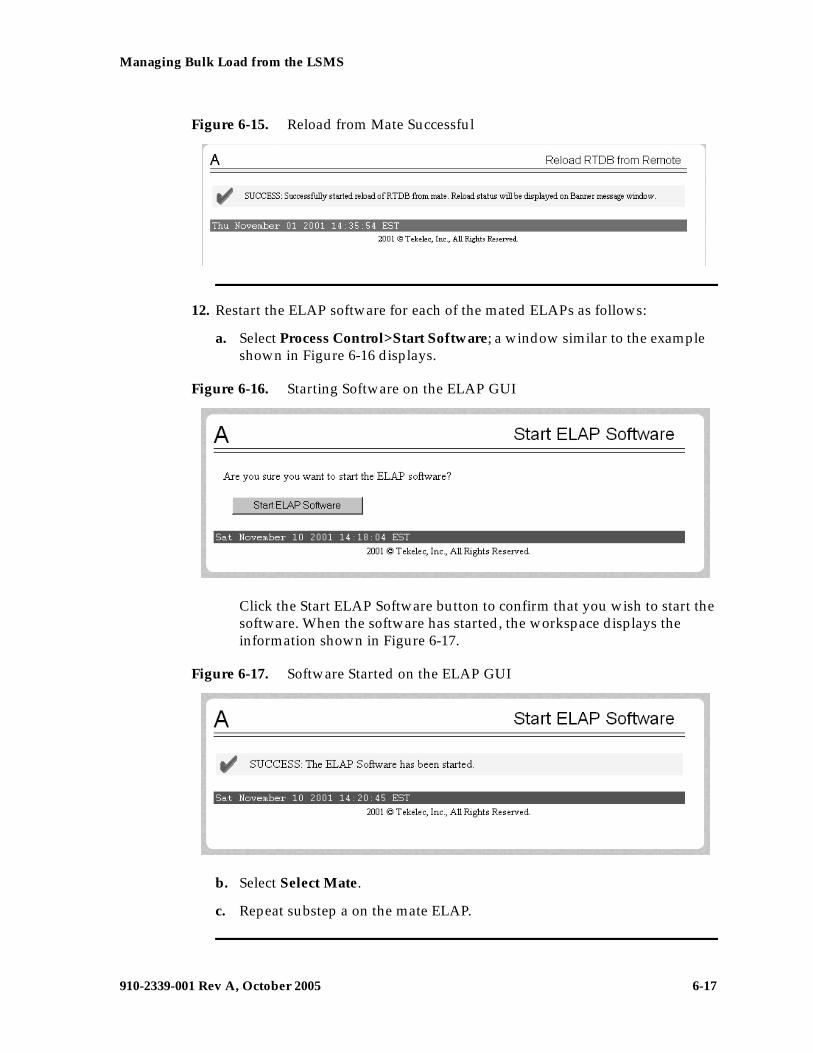
Managing Bulk Load from the LSMS
910-2339-001 Rev A, October 2005 6-17
Figure 6-15. Reload from Mate Successful
12. Restart the ELAP software for each of the mated ELAPs as follows:
a. Select Process Control>Start Software; a window similar to the example shown in Figure 6-16 displays.
Figure 6-16. Starting Software on the ELAP GUI
Click the Start ELAP Software button to confirm that you wish to start the software. When the software has started, the workspace displays the information shown in Figure 6-17.
Figure 6-17. Software Started on the ELAP GUI
b. Select Select Mate.
c. Repeat substep a on the mate ELAP.
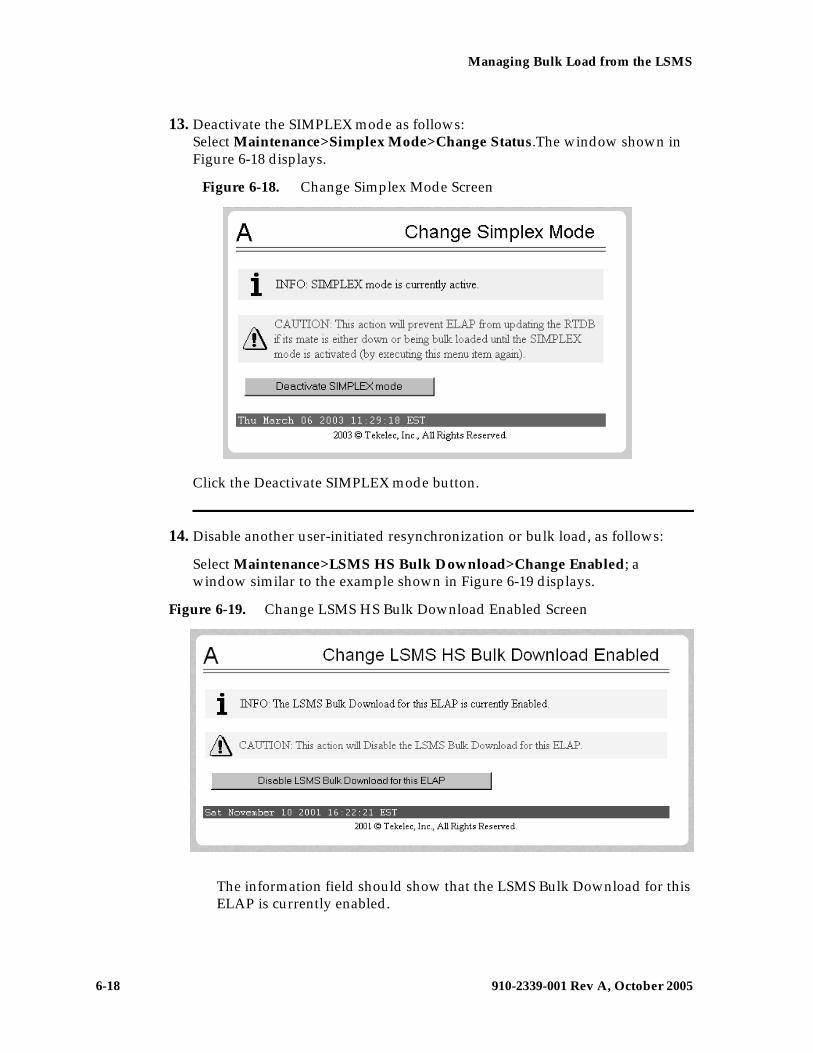
6-18 910-2339-001 Rev A, October 2005
Managing Bulk Load from the LSMS
13. Deactivate the SIMPLEX mode as follows: Select Maintenance>Simplex Mode>Change Status.The window shown in Figure 6-18 displays.
Figure 6-18. Change Simplex Mode Screen
Click the Deactivate SIMPLEX mode button.
14. Disable another user-initiated resynchronization or bulk load, as follows:
Select Maintenance>LSMS HS Bulk Download>Change Enabled; a window similar to the example shown in Figure 6-19 displays.
Figure 6-19. Change LSMS HS Bulk Download Enabled Screen
The information field should show that the LSMS Bulk Download for this ELAP is currently enabled.
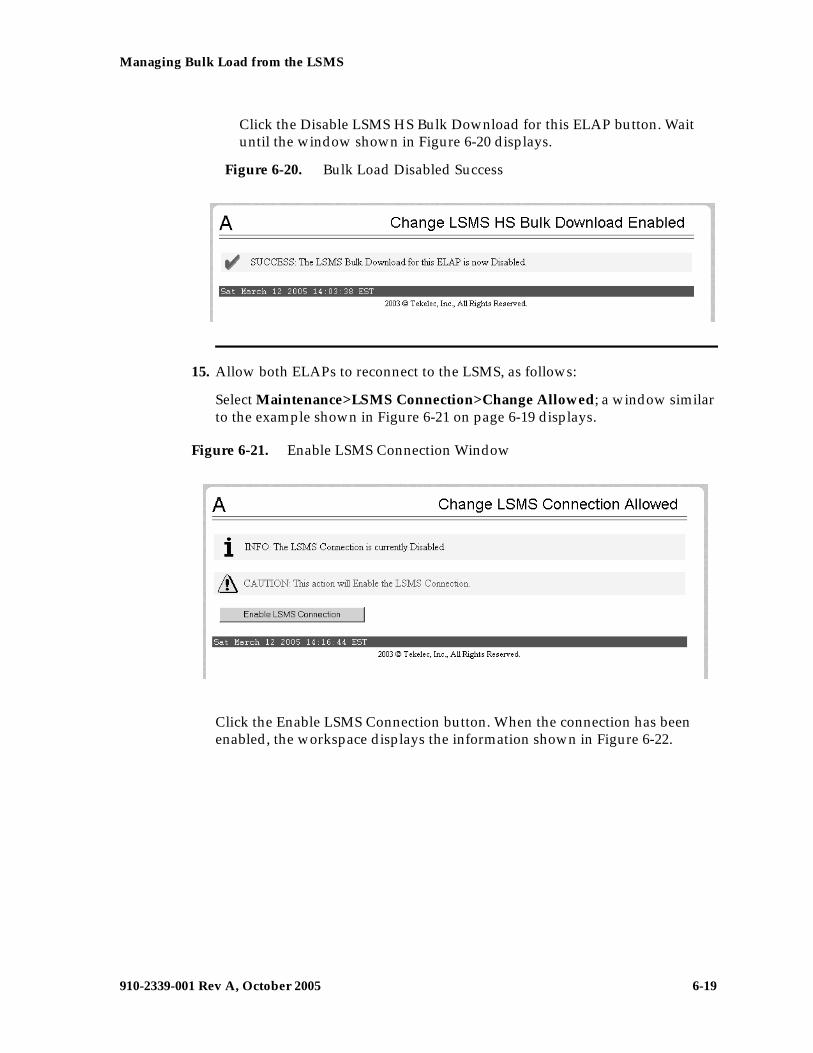
Managing Bulk Load from the LSMS
910-2339-001 Rev A, October 2005 6-19
Click the Disable LSMS HS Bulk Download for this ELAP button. Wait until the window shown in Figure 6-20 displays.
Figure 6-20. Bulk Load Disabled Success
15. Allow both ELAPs to reconnect to the LSMS, as follows:
Select Maintenance>LSMS Connection>Change Allowed; a window similar to the example shown in Figure 6-21 on page 6-19 displays.
Figure 6-21. Enable LSMS Connection Window
Click the Enable LSMS Connection button. When the connection has been enabled, the workspace displays the information shown in Figure 6-22.
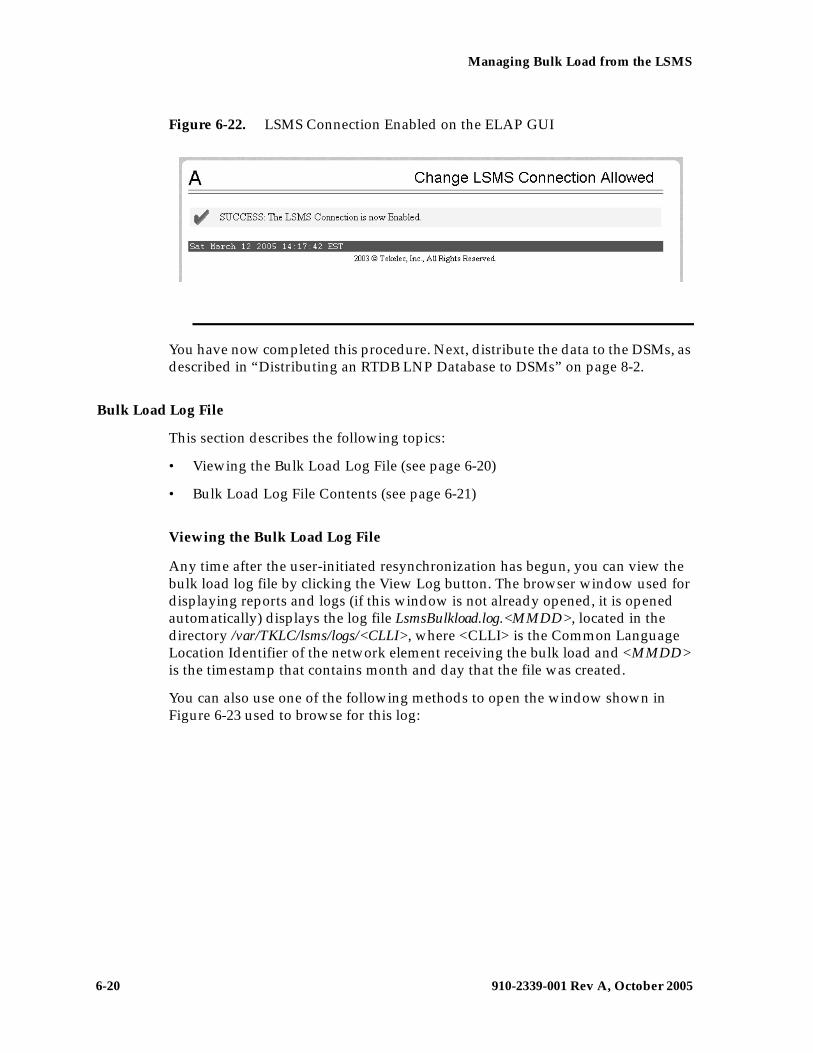
6-20 910-2339-001 Rev A, October 2005
Managing Bulk Load from the LSMS
Figure 6-22. LSMS Connection Enabled on the ELAP GUI
You have now completed this procedure. Next, distribute the data to the DSMs, as described in “Distributing an RTDB LNP Database to DSMs” on page 8-2.
Bulk Load Log File
This section describes the following topics:
• Viewing the Bulk Load Log File (see page 6-20)
• Bulk Load Log File Contents (see page 6-21)
Viewing the Bulk Load Log File
Any time after the user-initiated resynchronization has begun, you can view the bulk load log file by clicking the View Log button. The browser window used for displaying reports and logs (if this window is not already opened, it is opened automatically) displays the log file LsmsBulkload.log.<MMDD>, located in the directory /var/TKLC/lsms/logs/<CLLI>, where <CLLI> is the Common Language Location Identifier of the network element receiving the bulk load and <MMDD> is the timestamp that contains month and day that the file was created.
You can also use one of the following methods to open the window shown in Figure 6-23 used to browse for this log:

Managing Bulk Load from the LSMS
910-2339-001 Rev A, October 2005 6-21
Figure 6-23. Browsing for a Bulk Load Log Files
• Select Logs>Other... from the main menu of the LSMS Console window.
• Click on the LSMS Console window’s EMS Status Icon that corresponds to the network element receiving the bulk load so that the icon is highlighted. Right-click and select Logs>LNP Database Synchronization>Bulk Load.
Scroll down to find the folder that has the <CLLI> name for the NE that was bulk loaded. Double-click the folder name, and then double click the file name LsmsBulkload.log.<MMDD> that corresponds to the month and day you desire. Log files are maintained for seven days after they are created; then they are automatically removed from the LSMS.
Bulk Load Log File Contents
Whenever a bulk load is started, the bulk load log file for that day is appended (if this is the first bulk load of the day, the file is created). For each bulk load performed on that day, the bulk load log file contains information similar to the information displayed on the Bulk Load main window, such as start and end times for the bulk load, and numbers of successes and failures in various LNP categories.
The bulk load log file contains the following sections:
• Header Section (see page C-4)
• Bulk Load Section (see page C-7)
• Resynchronization Section (see page C-9)
• Summary Section (see page C-10)
• Download Commit/Discard Section (see page C-12)
Figure 6-24, on page 6-22 shows an example of a bulk load log file.
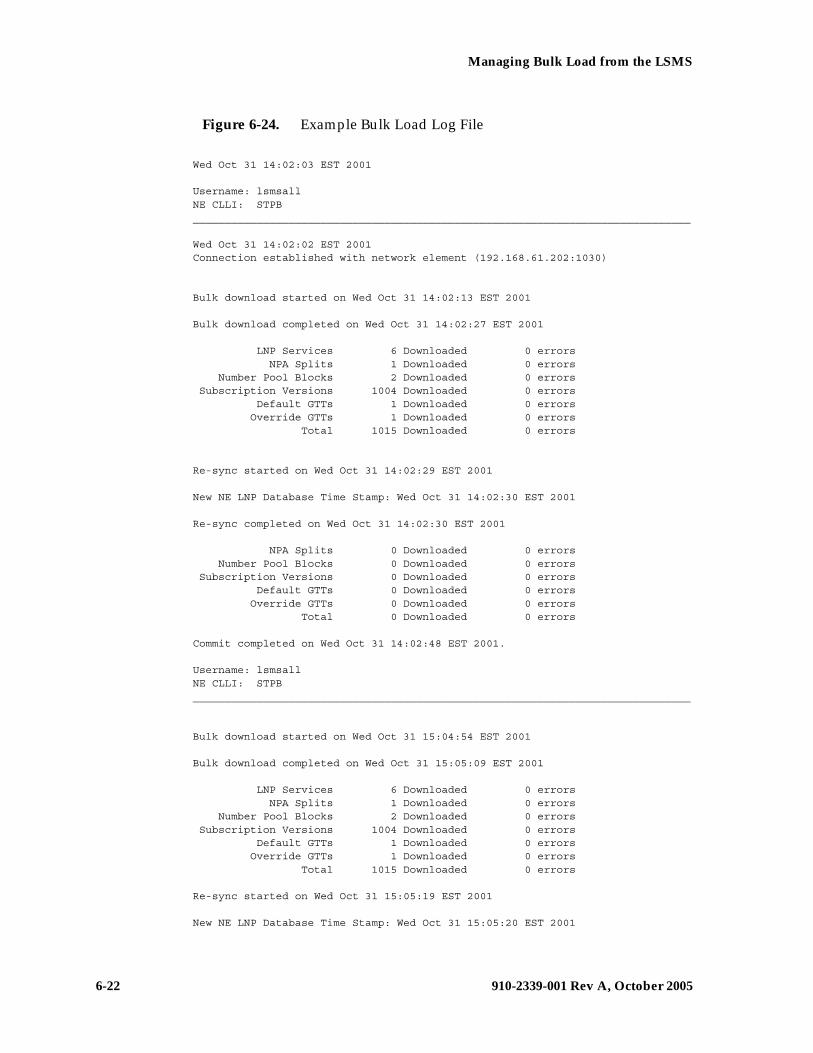
6-22 910-2339-001 Rev A, October 2005
Managing Bulk Load from the LSMS
Figure 6-24. Example Bulk Load Log File
Wed Oct 31 14:02:03 EST 2001
Username: lsmsallNE CLLI: STPB______________________________________________________________________________
Wed Oct 31 14:02:02 EST 2001Connection established with network element (192.168.61.202:1030)
Bulk download started on Wed Oct 31 14:02:13 EST 2001
Bulk download completed on Wed Oct 31 14:02:27 EST 2001
LNP Services 6 Downloaded 0 errors NPA Splits 1 Downloaded 0 errors Number Pool Blocks 2 Downloaded 0 errors Subscription Versions 1004 Downloaded 0 errors Default GTTs 1 Downloaded 0 errors Override GTTs 1 Downloaded 0 errors Total 1015 Downloaded 0 errors
Re-sync started on Wed Oct 31 14:02:29 EST 2001
New NE LNP Database Time Stamp: Wed Oct 31 14:02:30 EST 2001
Re-sync completed on Wed Oct 31 14:02:30 EST 2001
NPA Splits 0 Downloaded 0 errors Number Pool Blocks 0 Downloaded 0 errors Subscription Versions 0 Downloaded 0 errors Default GTTs 0 Downloaded 0 errors Override GTTs 0 Downloaded 0 errors Total 0 Downloaded 0 errors
Commit completed on Wed Oct 31 14:02:48 EST 2001.
Username: lsmsallNE CLLI: STPB______________________________________________________________________________
Bulk download started on Wed Oct 31 15:04:54 EST 2001
Bulk download completed on Wed Oct 31 15:05:09 EST 2001
LNP Services 6 Downloaded 0 errors NPA Splits 1 Downloaded 0 errors Number Pool Blocks 2 Downloaded 0 errors Subscription Versions 1004 Downloaded 0 errors Default GTTs 1 Downloaded 0 errors Override GTTs 1 Downloaded 0 errors Total 1015 Downloaded 0 errors
Re-sync started on Wed Oct 31 15:05:19 EST 2001
New NE LNP Database Time Stamp: Wed Oct 31 15:05:20 EST 2001
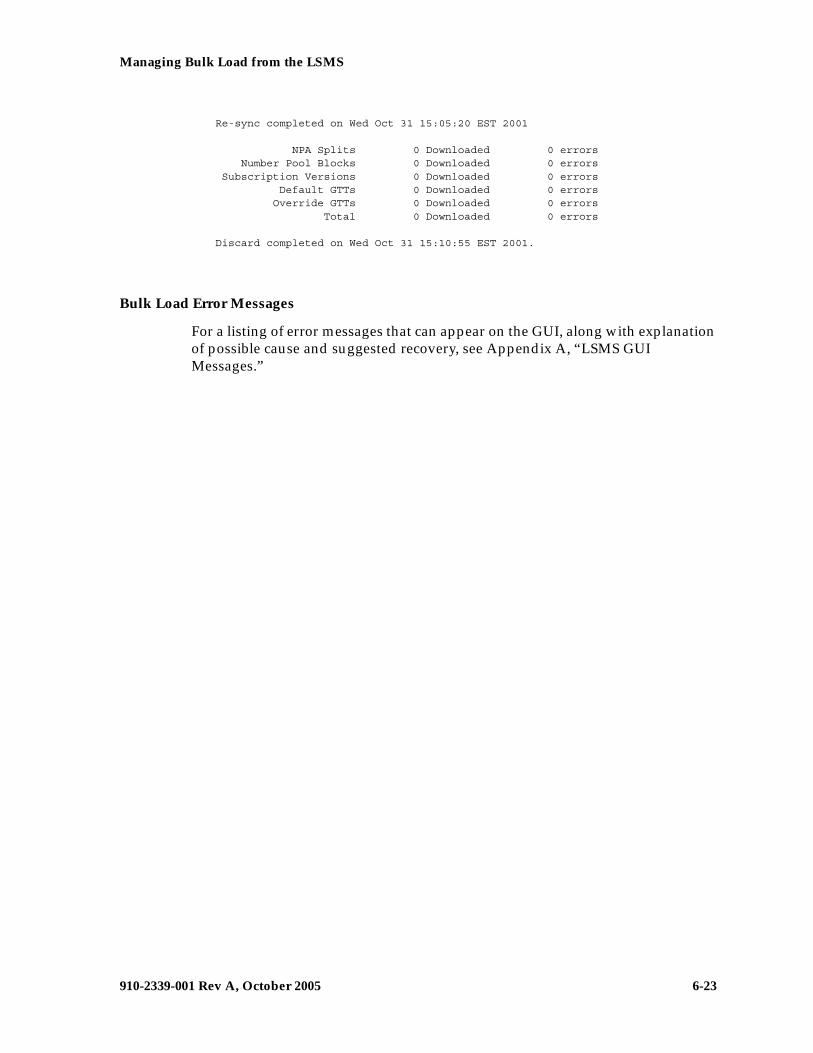
Managing Bulk Load from the LSMS
910-2339-001 Rev A, October 2005 6-23
Re-sync completed on Wed Oct 31 15:05:20 EST 2001
NPA Splits 0 Downloaded 0 errors Number Pool Blocks 0 Downloaded 0 errors Subscription Versions 0 Downloaded 0 errors Default GTTs 0 Downloaded 0 errors Override GTTs 0 Downloaded 0 errors Total 0 Downloaded 0 errors
Discard completed on Wed Oct 31 15:10:55 EST 2001.
Bulk Load Error Messages
For a listing of error messages that can appear on the GUI, along with explanation of possible cause and suggested recovery, see Appendix A, “LSMS GUI Messages.”

6-24 910-2339-001 Rev A, October 2005
Managing Bulk Load from the LSMS
910-2339-001 Rev A, October 2005 7-1
7
Copying One RTDB from AnotherRTDB
Introduction...................................................................................................... 7–2
Copying RTDB from Mated ELAP........................................................... 7–2
Copying RTDB from ELAP on Remote Mated NE ................................ 7–3
Verifying RTDB Status .................................................................................... 7–4
Verifying RTDB Status at the EAGLE 5 SAS Terminal .......................... 7–4
Verifying RTDB Status at the ELAP User Interface ............................... 7–5
Procedure to Copy an RTDB from the Mate ELAP .................................... 7–7
Procedure to Copy RTDB from Remote Mated NE .................................. 7–12
7-2 910-2339-001 Rev A, October 2005
Copying One RTDB from Another RTDB
Introduction
This chapter describes the procedures for copying an EAGLE LNP Application Processor (ELAP) Real-Time Database (RTDB) from another ELAP RTDB to reload a corrupted or backlevel RTDB. The following types of copy are covered by this chapter:
• Copying RTDB from Mated ELAP
• Copying RTDB from ELAP on Remote Mated NE
NOTE: For best results, the mated network element should have the same quantities of TNs, LRNs, and NPA-NXXs provisioned and the same ELAP release level as at the network element the copy is made to. It is possible to copy an RTDB from a mated network element that does not meet these conditions, but doing so should be done under the supervision of Tekelec Technical Services.
For more information about when to perform the procedures in this chapter, see “Choosing a Synchronization Procedure” on page 3-3.
Copying RTDB from Mated ELAP
An ELAP RTDB can be copied from the RTDB on the mate ELAP.
In order to perform a copy from the RTDB on the mate ELAP, the mate RTDB must be currently synchronized with the LSMS (the EMS status indicator on the LSMS graphical user interface for this network element must be yellow).
This copy is the fastest way to restore an RTDB. The RTDB can be reloaded from the mate in about 9 minutes. Provisioning will be interrupted while the copy occurs.
No user action is required at the LSMS, other than to verify the status of the network element’s EMS status indicator.
For instructions on performing this type of RTDB copy, see “Procedure to Copy an RTDB from the Mate ELAP” on page 7-7.
Copying One RTDB from Another RTDB
910-2339-001 Rev A, October 2005 7-3
Copying RTDB from ELAP on Remote Mated NE
An ELAP RTDB can be copied from either ELAP RTDB on the remote mated network element (NE). However, copying from either of the remote mated NE’s RTDBs interrupts provisioning on the remote mated network element, so this method should be chosen only when other methods for synchronizing the RTDBs on the local network element are not feasible. For more information about alternate methods, see Chapter 3, “Choosing a Database Maintenance Procedure.”
NOTE: For best results, the mated network element should have the same quantities of TNs, LRNs, and NPA-NXXs provisioned and the same ELAP release level as at the network element the copy is made to. It is possible to copy an RTDB from a mated network element that does not meet these conditions, but doing so should be done under the supervision of Tekelec Technical Services.
In order to perform a copy from the RTDB on the mated network element, the EMS status indicator on the LSMS graphical user interface for the remote mated network element must be green or yellow, which indicates that one or both of the RTDBs on the remote mated network element is currently synchronized with the LSMS:
The procedure can be used when both local RTDBs need reloading. If at least one of the remote RTDBs is currently synchronized, you can copy a remote RTDB to one of the local RTDBs. This copy may be faster than performing a user-initiated resynchronization or electronic bulk load from the LSMS to the network element that requires restoration, and, depending on the bandwidth of the customer network, may be faster than performing an audit and reconcile from the LSMS. The mate RTDB on the local network element can then be reloaded from the newly reloaded mate in about nine minutes, and then the DSMs must be rebooted, as described in “Distributing an RTDB LNP Database to DSMs” on page 8-2.
The time required to accomplish this method depends on the bandwidth of the customer network. For an estimate of the time required, see Table D-2, “Estimating Time to Copy RTDB Across Customer Network,” on page D-4.
No user action is required at the LSMS, other than to verify the status of the network elements’ EMS status indicators.
7-4 910-2339-001 Rev A, October 2005
Copying One RTDB from Another RTDB
Verifying RTDB Status
Before or after executing the procedure, verify the status of the RTDBs using either or both of the following methods:
• Verifying RTDB Status at the EAGLE 5 SAS Terminal
• Verifying RTDB Status at the ELAP User Interface
Verifying RTDB Status at the EAGLE 5 SAS Terminal
To verify the status of the ELAP RTDBs at the EAGLE 5 SAS terminal, enter the rept-stat-db:db=mps command.
The command output displays database timestamp (DBTS) of both ELAP RTDBs in the RTDB-EAGLE field, as shown in bold in the following example. The DBTS indicates the last time an update was received by this RTDB from the LSMS. If the two DBTS values are not the same, the RTDB with the lower DBTS may need database maintenance.
ELAP A ( ACTV ) C BIRTHDATE LEVEL EXCEPTION - ----------------- ---------- --------------RTDB Y 00-05-01 10:19:18 17283 -RTDB-EAGLE 00-05-03 16:01:48 17283 -
ELAP B ( STDBY ) C BIRTHDATE LEVEL EXCEPTION - ----------------- ---------- --------------RTDB Y 00-05-01 10:19:18 17283 -RTDB-EAGLE 00-05-03 16:01:48 17283 -
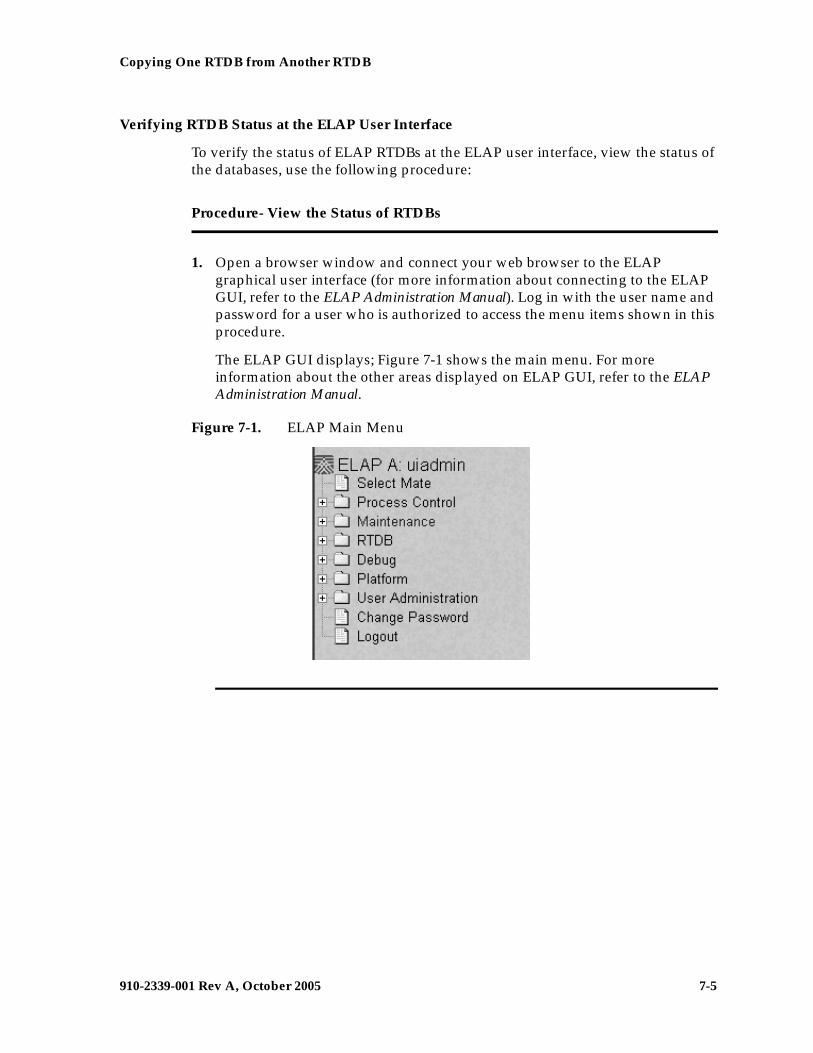
Copying One RTDB from Another RTDB
910-2339-001 Rev A, October 2005 7-5
Verifying RTDB Status at the ELAP User Interface
To verify the status of ELAP RTDBs at the ELAP user interface, view the status of the databases, use the following procedure:
Procedure- View the Status of RTDBs
1. Open a browser window and connect your web browser to the ELAP graphical user interface (for more information about connecting to the ELAP GUI, refer to the ELAP Administration Manual). Log in with the user name and password for a user who is authorized to access the menu items shown in this procedure.
The ELAP GUI displays; Figure 7-1 shows the main menu. For more information about the other areas displayed on ELAP GUI, refer to the ELAP Administration Manual.
Figure 7-1. ELAP Main Menu
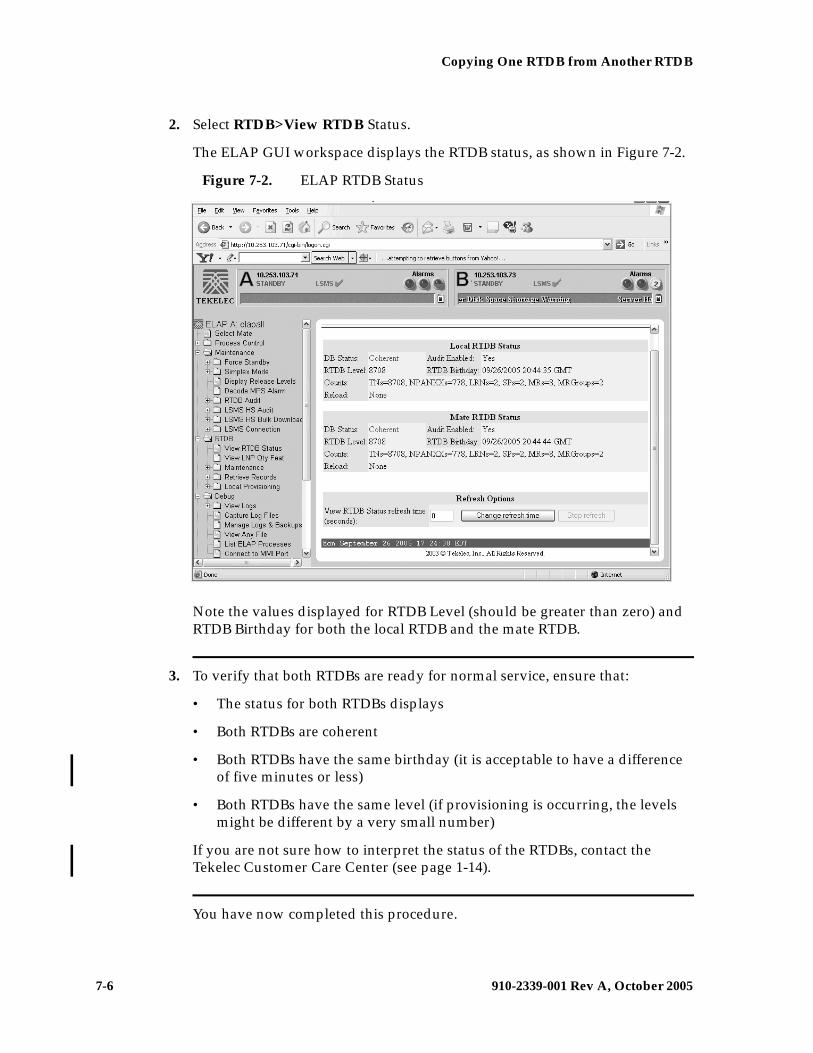
7-6 910-2339-001 Rev A, October 2005
Copying One RTDB from Another RTDB
2. Select RTDB>View RTDB Status.
The ELAP GUI workspace displays the RTDB status, as shown in Figure 7-2.
Figure 7-2. ELAP RTDB Status
Note the values displayed for RTDB Level (should be greater than zero) and RTDB Birthday for both the local RTDB and the mate RTDB.
3. To verify that both RTDBs are ready for normal service, ensure that:
• The status for both RTDBs displays
• Both RTDBs are coherent
• Both RTDBs have the same birthday (it is acceptable to have a difference of five minutes or less)
• Both RTDBs have the same level (if provisioning is occurring, the levels might be different by a very small number)
If you are not sure how to interpret the status of the RTDBs, contact the Tekelec Customer Care Center (see page 1-14).
You have now completed this procedure.
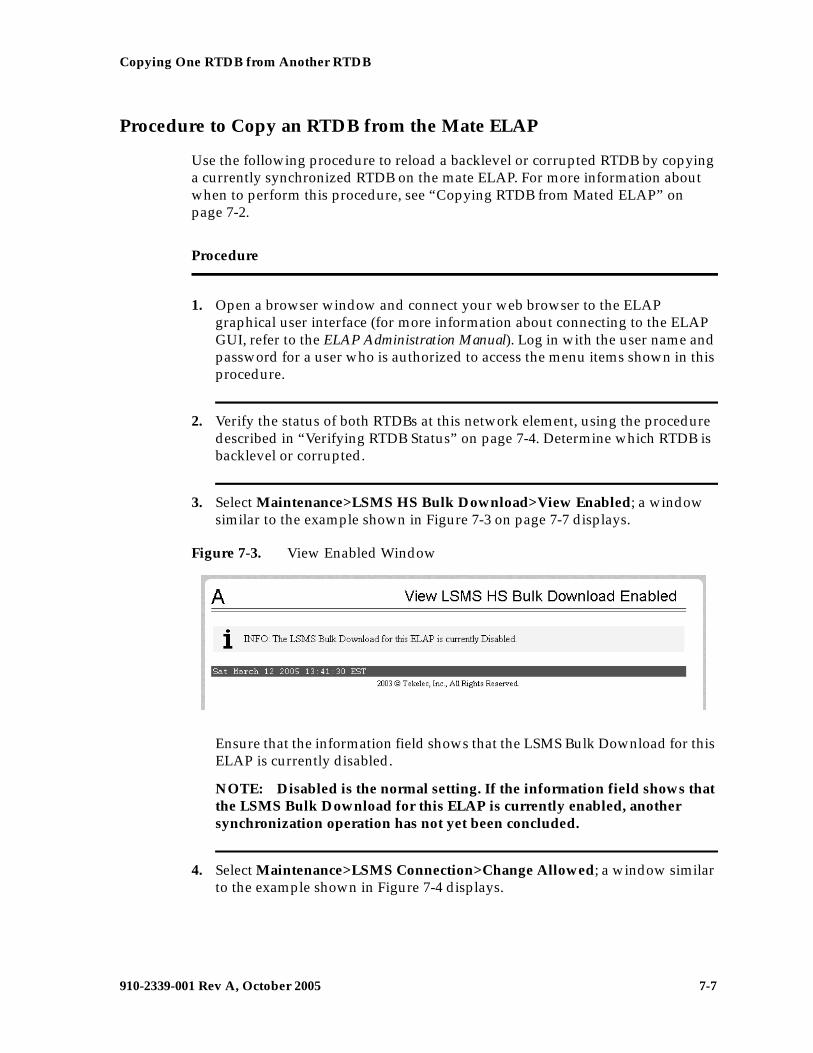
Copying One RTDB from Another RTDB
910-2339-001 Rev A, October 2005 7-7
Procedure to Copy an RTDB from the Mate ELAP
Use the following procedure to reload a backlevel or corrupted RTDB by copying a currently synchronized RTDB on the mate ELAP. For more information about when to perform this procedure, see “Copying RTDB from Mated ELAP” on page 7-2.
Procedure
1. Open a browser window and connect your web browser to the ELAP graphical user interface (for more information about connecting to the ELAP GUI, refer to the ELAP Administration Manual). Log in with the user name and password for a user who is authorized to access the menu items shown in this procedure.
2. Verify the status of both RTDBs at this network element, using the procedure described in “Verifying RTDB Status” on page 7-4. Determine which RTDB is backlevel or corrupted.
3. Select Maintenance>LSMS HS Bulk Download>View Enabled; a window similar to the example shown in Figure 7-3 on page 7-7 displays.
Figure 7-3. View Enabled Window
Ensure that the information field shows that the LSMS Bulk Download for this ELAP is currently disabled.
NOTE: Disabled is the normal setting. If the information field shows that the LSMS Bulk Download for this ELAP is currently enabled, another synchronization operation has not yet been concluded.
4. Select Maintenance>LSMS Connection>Change Allowed; a window similar to the example shown in Figure 7-4 displays.
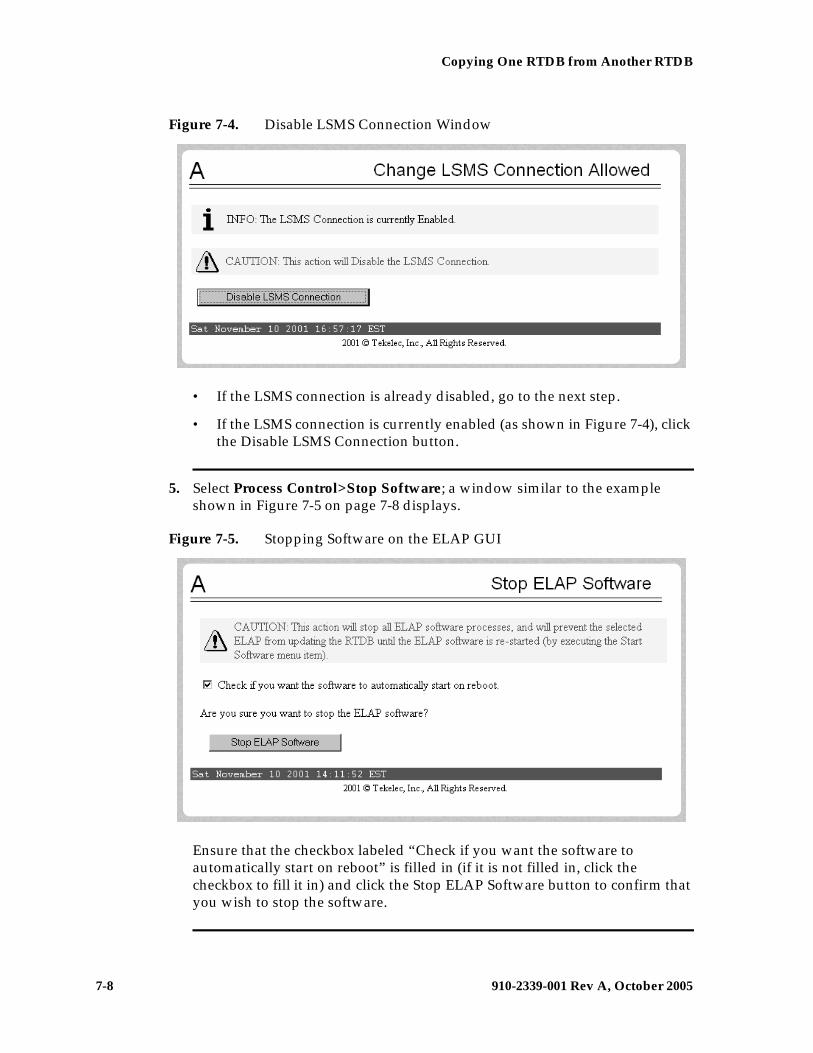
7-8 910-2339-001 Rev A, October 2005
Copying One RTDB from Another RTDB
Figure 7-4. Disable LSMS Connection Window
• If the LSMS connection is already disabled, go to the next step.
• If the LSMS connection is currently enabled (as shown in Figure 7-4), click the Disable LSMS Connection button.
5. Select Process Control>Stop Software; a window similar to the example shown in Figure 7-5 on page 7-8 displays.
Figure 7-5. Stopping Software on the ELAP GUI
Ensure that the checkbox labeled “Check if you want the software to automatically start on reboot” is filled in (if it is not filled in, click the checkbox to fill it in) and click the Stop ELAP Software button to confirm that you wish to stop the software.
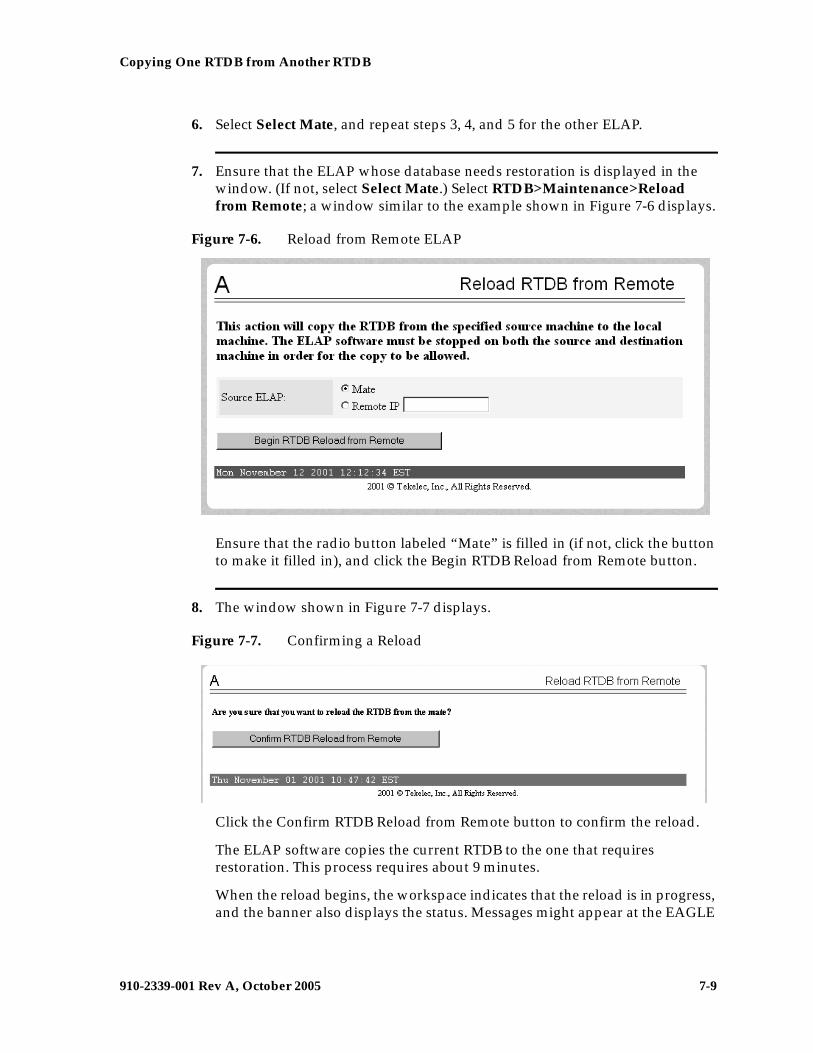
Copying One RTDB from Another RTDB
910-2339-001 Rev A, October 2005 7-9
6. Select Select Mate, and repeat steps 3, 4, and 5 for the other ELAP.
7. Ensure that the ELAP whose database needs restoration is displayed in the window. (If not, select Select Mate.) Select RTDB>Maintenance>Reload from Remote; a window similar to the example shown in Figure 7-6 displays.
Figure 7-6. Reload from Remote ELAP
Ensure that the radio button labeled “Mate” is filled in (if not, click the button to make it filled in), and click the Begin RTDB Reload from Remote button.
8. The window shown in Figure 7-7 displays.
Figure 7-7. Confirming a Reload
Click the Confirm RTDB Reload from Remote button to confirm the reload.
The ELAP software copies the current RTDB to the one that requires restoration. This process requires about 9 minutes.
When the reload begins, the workspace indicates that the reload is in progress, and the banner also displays the status. Messages might appear at the EAGLE
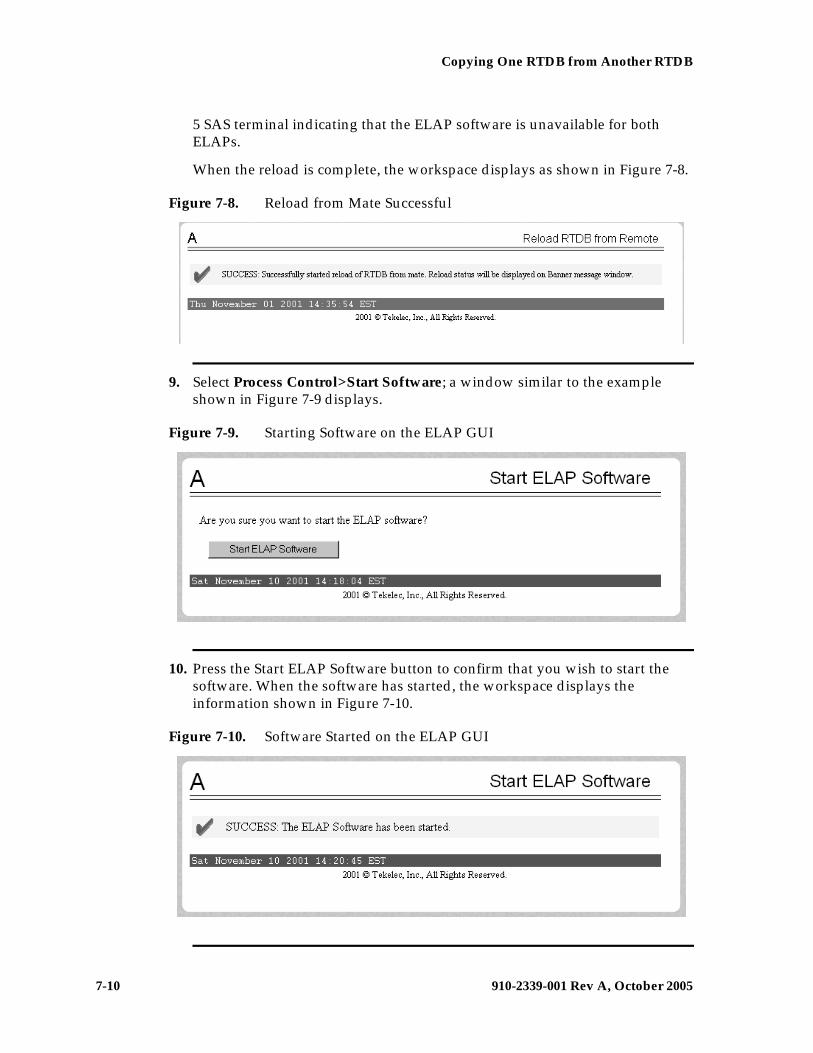
7-10 910-2339-001 Rev A, October 2005
Copying One RTDB from Another RTDB
5 SAS terminal indicating that the ELAP software is unavailable for both ELAPs.
When the reload is complete, the workspace displays as shown in Figure 7-8.
Figure 7-8. Reload from Mate Successful
9. Select Process Control>Start Software; a window similar to the example shown in Figure 7-9 displays.
Figure 7-9. Starting Software on the ELAP GUI
10. Press the Start ELAP Software button to confirm that you wish to start the software. When the software has started, the workspace displays the information shown in Figure 7-10.
Figure 7-10. Software Started on the ELAP GUI
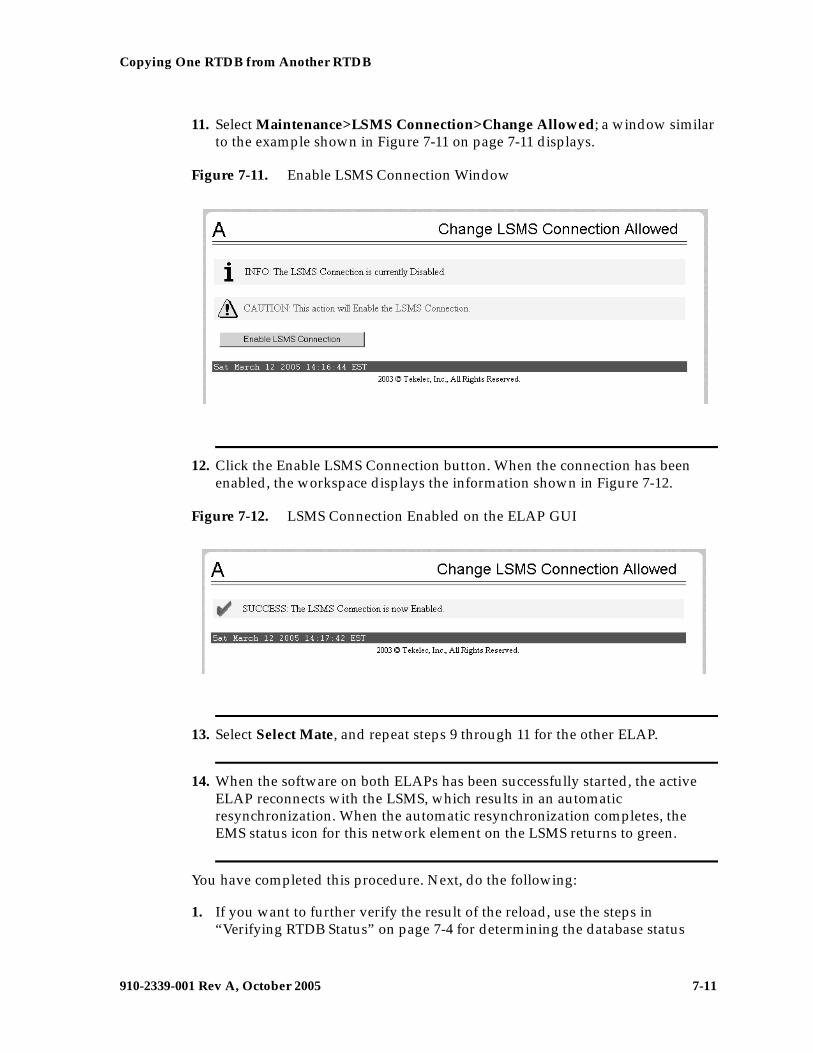
Copying One RTDB from Another RTDB
910-2339-001 Rev A, October 2005 7-11
11. Select Maintenance>LSMS Connection>Change Allowed; a window similar to the example shown in Figure 7-11 on page 7-11 displays.
Figure 7-11. Enable LSMS Connection Window
12. Click the Enable LSMS Connection button. When the connection has been enabled, the workspace displays the information shown in Figure 7-12.
Figure 7-12. LSMS Connection Enabled on the ELAP GUI
13. Select Select Mate, and repeat steps 9 through 11 for the other ELAP.
14. When the software on both ELAPs has been successfully started, the active ELAP reconnects with the LSMS, which results in an automatic resynchronization. When the automatic resynchronization completes, the EMS status icon for this network element on the LSMS returns to green.
You have completed this procedure. Next, do the following:
1. If you want to further verify the result of the reload, use the steps in “Verifying RTDB Status” on page 7-4 for determining the database status
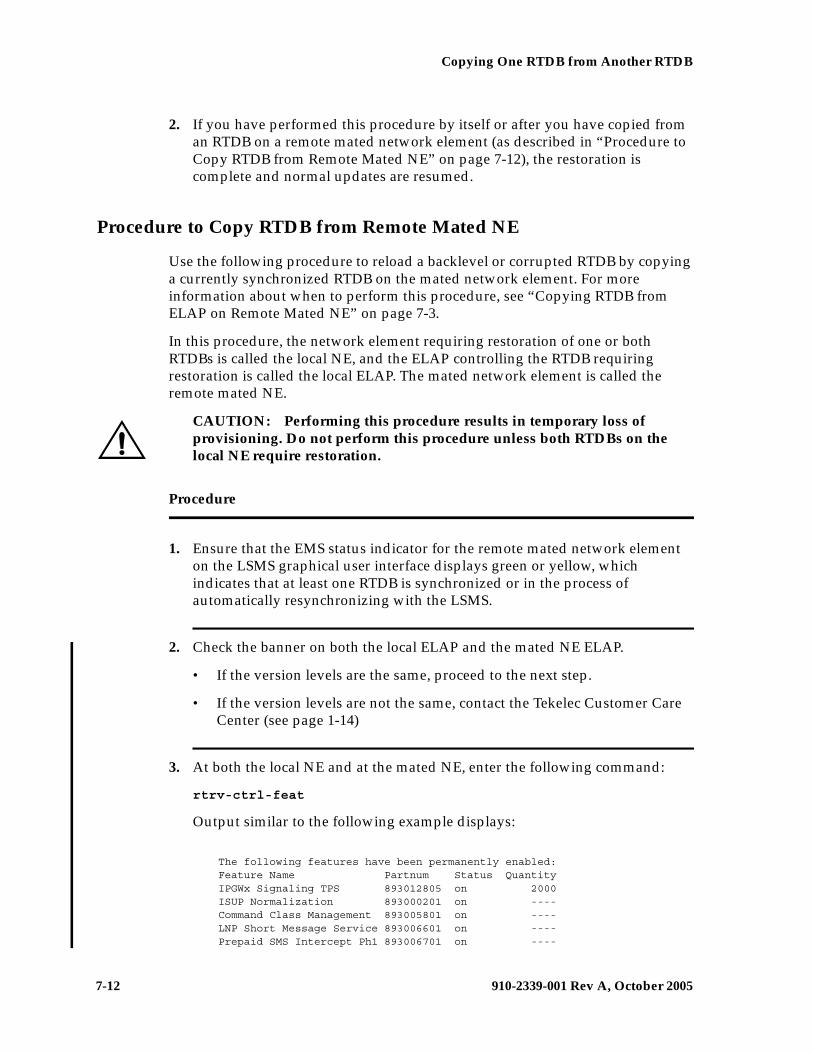
7-12 910-2339-001 Rev A, October 2005
Copying One RTDB from Another RTDB
2. If you have performed this procedure by itself or after you have copied from an RTDB on a remote mated network element (as described in “Procedure to Copy RTDB from Remote Mated NE” on page 7-12), the restoration is complete and normal updates are resumed.
Procedure to Copy RTDB from Remote Mated NE
Use the following procedure to reload a backlevel or corrupted RTDB by copying a currently synchronized RTDB on the mated network element. For more information about when to perform this procedure, see “Copying RTDB from ELAP on Remote Mated NE” on page 7-3.
In this procedure, the network element requiring restoration of one or both RTDBs is called the local NE, and the ELAP controlling the RTDB requiring restoration is called the local ELAP. The mated network element is called the remote mated NE.
CAUTION: Performing this procedure results in temporary loss of provisioning. Do not perform this procedure unless both RTDBs on the local NE require restoration.
Procedure
1. Ensure that the EMS status indicator for the remote mated network element on the LSMS graphical user interface displays green or yellow, which indicates that at least one RTDB is synchronized or in the process of automatically resynchronizing with the LSMS.
2. Check the banner on both the local ELAP and the mated NE ELAP.
• If the version levels are the same, proceed to the next step.
• If the version levels are not the same, contact the Tekelec Customer Care Center (see page 1-14)
3. At both the local NE and at the mated NE, enter the following command:
rtrv-ctrl-feat
Output similar to the following example displays:
The following features have been permanently enabled: Feature Name Partnum Status Quantity IPGWx Signaling TPS 893012805 on 2000 ISUP Normalization 893000201 on ---- Command Class Management 893005801 on ---- LNP Short Message Service 893006601 on ---- Prepaid SMS Intercept Ph1 893006701 on ----
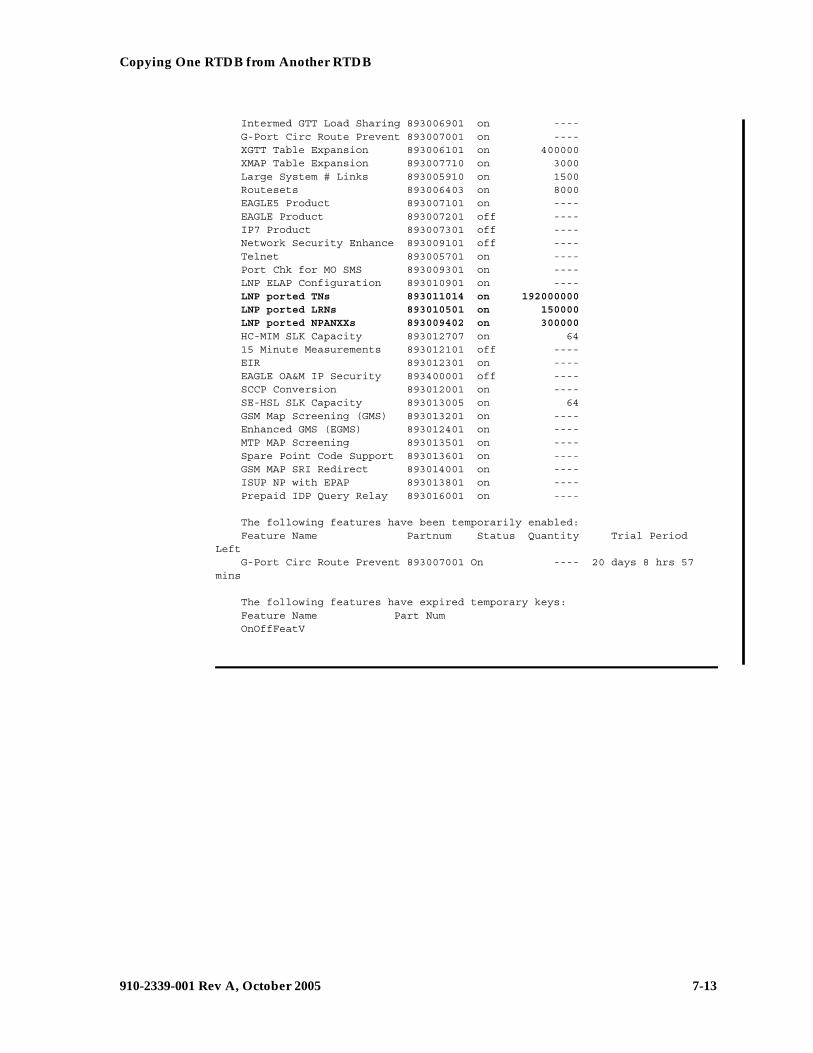
Copying One RTDB from Another RTDB
910-2339-001 Rev A, October 2005 7-13
Intermed GTT Load Sharing 893006901 on ---- G-Port Circ Route Prevent 893007001 on ---- XGTT Table Expansion 893006101 on 400000 XMAP Table Expansion 893007710 on 3000 Large System # Links 893005910 on 1500 Routesets 893006403 on 8000 EAGLE5 Product 893007101 on ---- EAGLE Product 893007201 off ---- IP7 Product 893007301 off ---- Network Security Enhance 893009101 off ---- Telnet 893005701 on ---- Port Chk for MO SMS 893009301 on ---- LNP ELAP Configuration 893010901 on ---- LNP ported TNs 893011014 on 192000000 LNP ported LRNs 893010501 on 150000 LNP ported NPANXXs 893009402 on 300000 HC-MIM SLK Capacity 893012707 on 64 15 Minute Measurements 893012101 off ---- EIR 893012301 on ---- EAGLE OA&M IP Security 893400001 off ---- SCCP Conversion 893012001 on ---- SE-HSL SLK Capacity 893013005 on 64 GSM Map Screening (GMS) 893013201 on ---- Enhanced GMS (EGMS) 893012401 on ---- MTP MAP Screening 893013501 on ---- Spare Point Code Support 893013601 on ---- GSM MAP SRI Redirect 893014001 on ---- ISUP NP with EPAP 893013801 on ---- Prepaid IDP Query Relay 893016001 on ----
The following features have been temporarily enabled: Feature Name Partnum Status Quantity Trial Period Left G-Port Circ Route Prevent 893007001 On ---- 20 days 8 hrs 57 mins
The following features have expired temporary keys: Feature Name Part Num OnOffFeatV
7-14 910-2339-001 Rev A, October 2005
Copying One RTDB from Another RTDB
4. Verify that, for all the fields highlighted in bold in the example above, the quantity values in the right column of the output at mated NE are less than or equal to the values in the output of the local NE.
• If the values for the mated NE are less than or equal to the values for the local NE for all three fields (TN, LRN, and NPA-NXX), proceed to the next step.
• If the values for the mated NE are greater than the values for the local NE for any one or more of the three fields (TN, LRN, and NPA-NXX), contact the Tekelec Customer Care Center (see page 1-14).
NOTE: Even if the mated NE supports a higher value for one or more of these fields, it may be possible to copy the RTDB as long as the actual quantity currently stored in the mated NE’s RTDB is less than or equal to the quantity supported by the local NE, but this should be done under the supervision of Tekelec Technical Services.
5. Open a browser window and connect to the remote mated network element (NE) using the IP address of the standby ELAP on the remote mated NE’s MPS on the customer (provisioning) network. Log in with the user name and password for a user who is authorized to access the menu items shown in this procedure (for more information about connecting to the ELAP GUI and user authorization, refer to the ELAP Administration Manual).
6. The banner above the menu indicates the whether each ELAP on the remote mated NE has Active or Standby status. Ensure that the ELAP you logged into has Standby status. (If you have logged into the active ELAP, select Select Mate.)
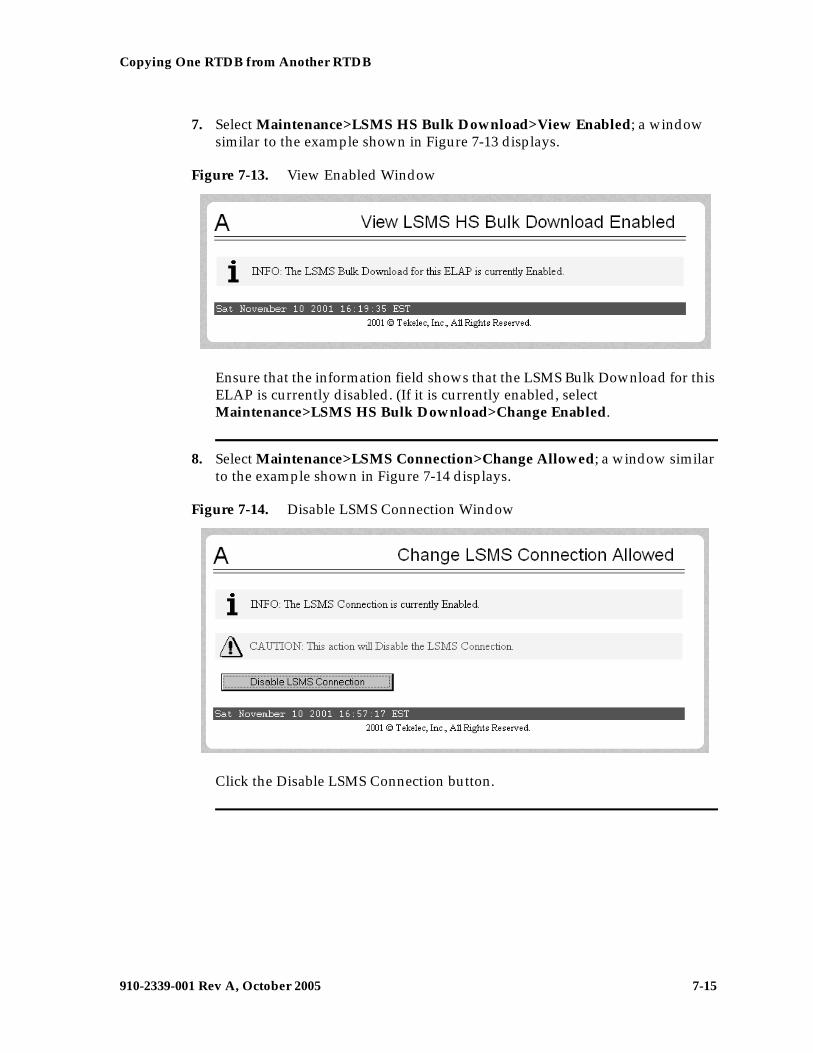
Copying One RTDB from Another RTDB
910-2339-001 Rev A, October 2005 7-15
7. Select Maintenance>LSMS HS Bulk Download>View Enabled; a window similar to the example shown in Figure 7-13 displays.
Figure 7-13. View Enabled Window
Ensure that the information field shows that the LSMS Bulk Download for this ELAP is currently disabled. (If it is currently enabled, select Maintenance>LSMS HS Bulk Download>Change Enabled.
8. Select Maintenance>LSMS Connection>Change Allowed; a window similar to the example shown in Figure 7-14 displays.
Figure 7-14. Disable LSMS Connection Window
Click the Disable LSMS Connection button.
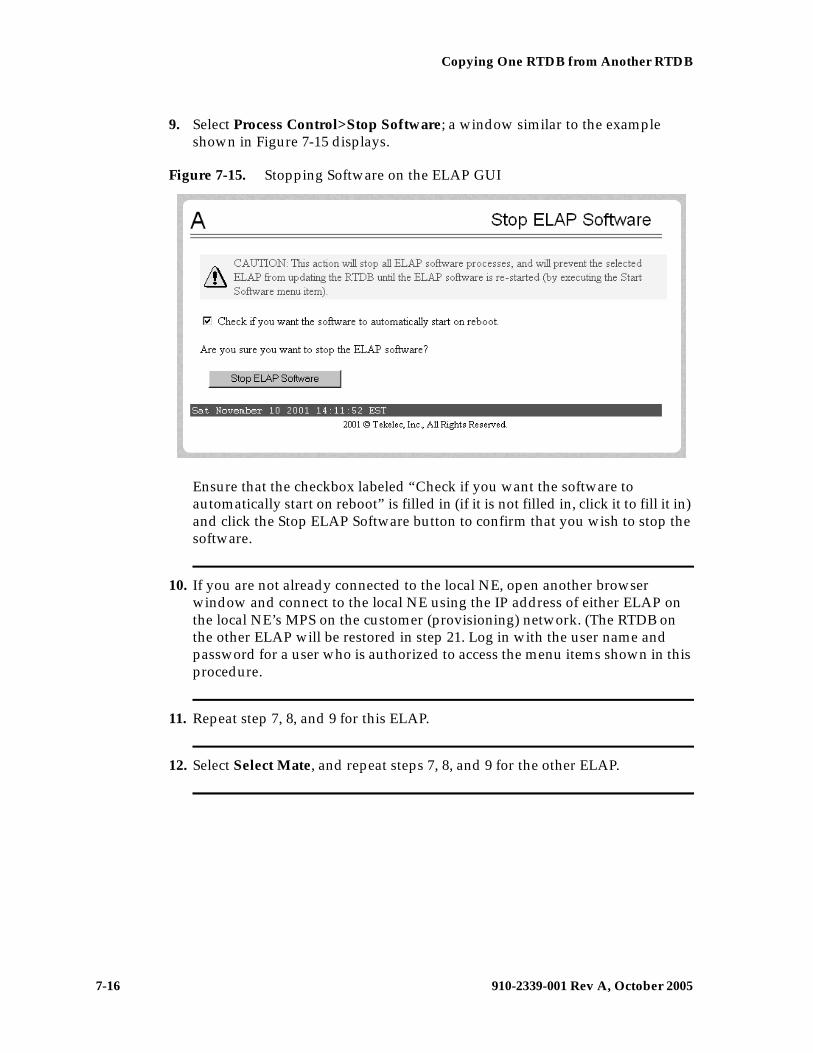
7-16 910-2339-001 Rev A, October 2005
Copying One RTDB from Another RTDB
9. Select Process Control>Stop Software; a window similar to the example shown in Figure 7-15 displays.
Figure 7-15. Stopping Software on the ELAP GUI
Ensure that the checkbox labeled “Check if you want the software to automatically start on reboot” is filled in (if it is not filled in, click it to fill it in) and click the Stop ELAP Software button to confirm that you wish to stop the software.
10. If you are not already connected to the local NE, open another browser window and connect to the local NE using the IP address of either ELAP on the local NE’s MPS on the customer (provisioning) network. (The RTDB on the other ELAP will be restored in step 21. Log in with the user name and password for a user who is authorized to access the menu items shown in this procedure.
11. Repeat step 7, 8, and 9 for this ELAP.
12. Select Select Mate, and repeat steps 7, 8, and 9 for the other ELAP.
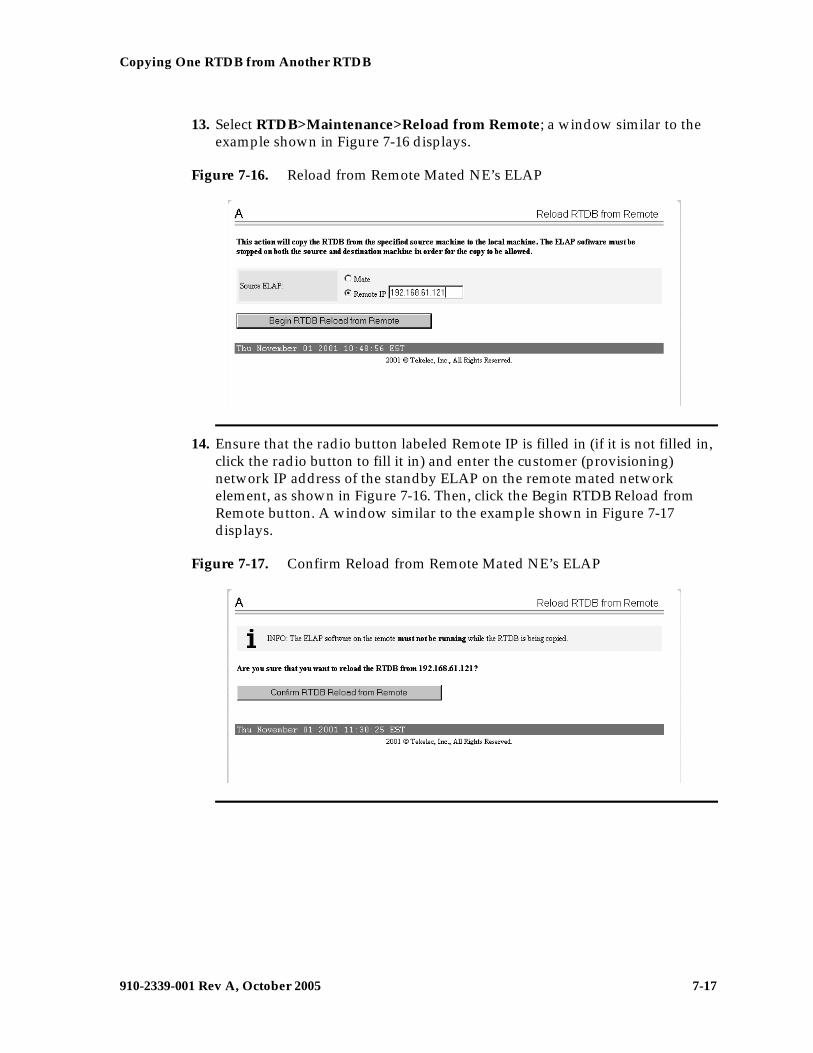
Copying One RTDB from Another RTDB
910-2339-001 Rev A, October 2005 7-17
13. Select RTDB>Maintenance>Reload from Remote; a window similar to the example shown in Figure 7-16 displays.
Figure 7-16. Reload from Remote Mated NE’s ELAP
14. Ensure that the radio button labeled Remote IP is filled in (if it is not filled in, click the radio button to fill it in) and enter the customer (provisioning) network IP address of the standby ELAP on the remote mated network element, as shown in Figure 7-16. Then, click the Begin RTDB Reload from Remote button. A window similar to the example shown in Figure 7-17 displays.
Figure 7-17. Confirm Reload from Remote Mated NE’s ELAP
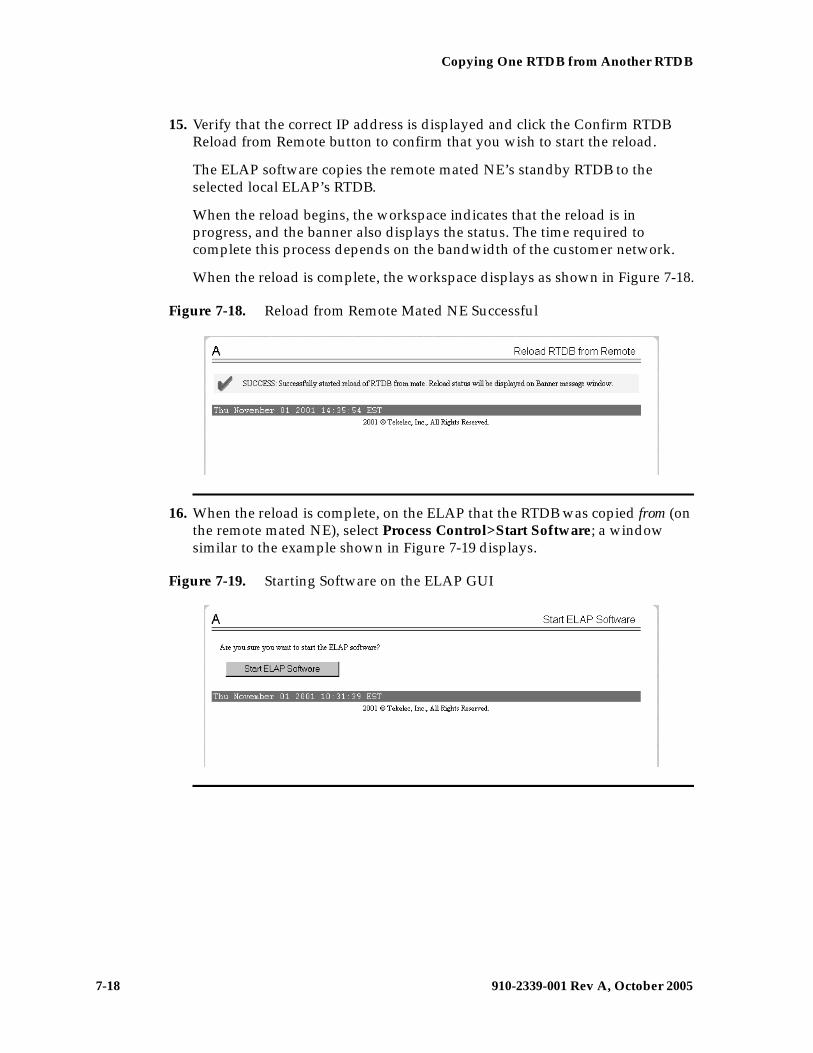
7-18 910-2339-001 Rev A, October 2005
Copying One RTDB from Another RTDB
15. Verify that the correct IP address is displayed and click the Confirm RTDB Reload from Remote button to confirm that you wish to start the reload.
The ELAP software copies the remote mated NE’s standby RTDB to the selected local ELAP’s RTDB.
When the reload begins, the workspace indicates that the reload is in progress, and the banner also displays the status. The time required to complete this process depends on the bandwidth of the customer network.
When the reload is complete, the workspace displays as shown in Figure 7-18.
Figure 7-18. Reload from Remote Mated NE Successful
16. When the reload is complete, on the ELAP that the RTDB was copied from (on the remote mated NE), select Process Control>Start Software; a window similar to the example shown in Figure 7-19 displays.
Figure 7-19. Starting Software on the ELAP GUI
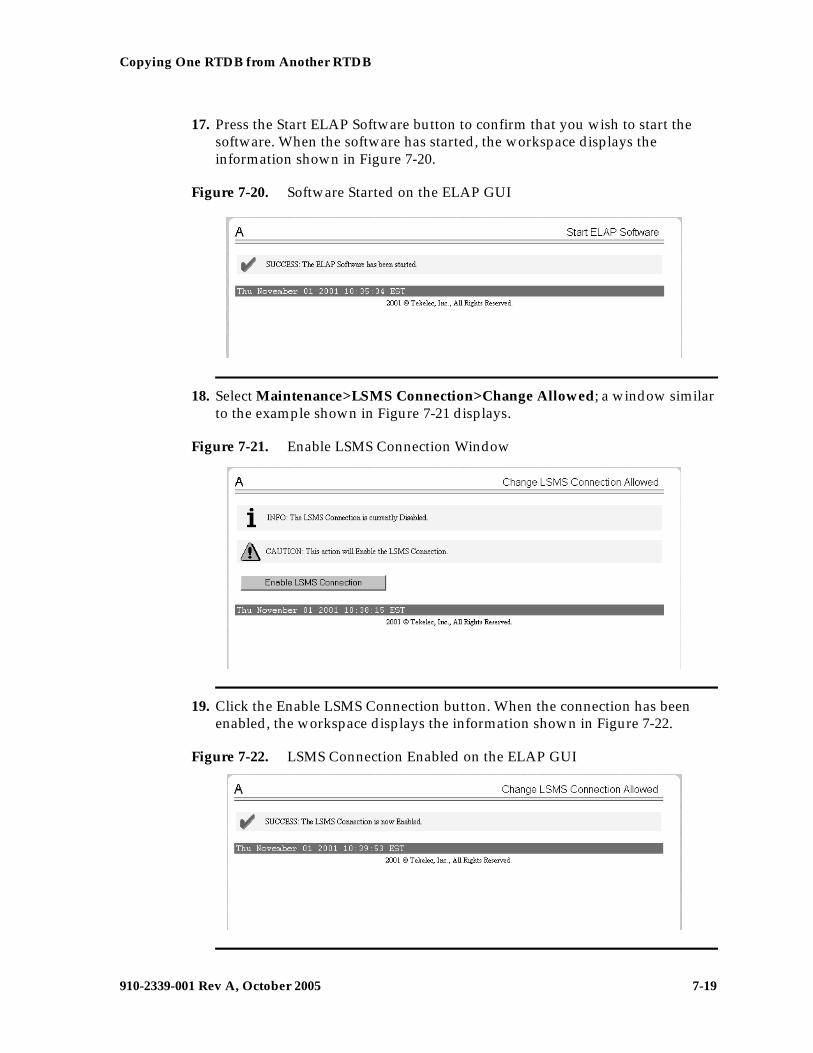
Copying One RTDB from Another RTDB
910-2339-001 Rev A, October 2005 7-19
17. Press the Start ELAP Software button to confirm that you wish to start the software. When the software has started, the workspace displays the information shown in Figure 7-20.
Figure 7-20. Software Started on the ELAP GUI
18. Select Maintenance>LSMS Connection>Change Allowed; a window similar to the example shown in Figure 7-21 displays.
Figure 7-21. Enable LSMS Connection Window
19. Click the Enable LSMS Connection button. When the connection has been enabled, the workspace displays the information shown in Figure 7-22.
Figure 7-22. LSMS Connection Enabled on the ELAP GUI

7-20 910-2339-001 Rev A, October 2005
Copying One RTDB from Another RTDB
20. Perform the procedure described in “Distributing an RTDB LNP Database to DSMs” on page 8-2.
21. If both RTDBs on the local ELAP require restoration, ensure that you are logged into the ELAP whose RTDB has not yet been restored. On the local ELAP, perform “Copying RTDB from Mated ELAP” on page 7-2 (start with step 7 on page 7-9); ensure that the GUI displays the ELAP whose RTDB has not yet been restored. Follow the instructions through the end of the procedure to copy the RTDB from its mate ELAP RTDB (which was restored in step 13 on page 7-17 through step 16 on page 7-18 of this procedure), restart the software, and enable the connections to the LSMS.
This restoration method is complete and normal updates are resumed.
Use the steps in “Verifying RTDB Status” on page 7-4 to verify database levels after the reloading is complete.

910-2339-001 Rev A, October 2005 8-1
8
Distributing the LNP Databaseafter LSMS-Based Operation or
RTDB Copy
Introduction................................................................................................................... 8–2
Distributing an RTDB LNP Database to DSMs ........................................................ 8–2
8-2 910-2339-001 Rev A, October 2005
Distributing the LNP Database after LSMS-Based Operation or RTDB Copy
Introduction
The network element has multiple copies of the LNP database. Synchronization operations are performed on one database. After an RTDB copy or a synchronization operation initiated from the LSMS GUI, the NE’s remaining LNP databases must be synchronized with the NE’s newly synchronized database in one of the following ways:
• Automatic data distribution—After the following LNP database synchronization operations, data is distributed automatically from the network element’s newly synchronized LNP database to all other LNP databases at the network element:
– Automatic resynchronization (see “Automatic Resynchronization Process” on page 4-2)
– Reconcile (see “Audit and Reconcile Timeline” on page 5-10)
• Network element database distribution is not required after copying an RTDB from its mate ELAP—If a network element’s database synchronization is accomplished only by copying an RTDB from its mate ELAP’s RTDB (but not when copying from the mate RTDB is performed after copying an RTDB from the remote mated network element or after a user-initiated resynchronization or bulk load from the LSMS), it is not necessary to distribute the data to the DSMs because they are already synchronized with the RTDB that was used to restore from. Therefore, after the copy, the DSMs are now synchronized with both RTDBs.
• Other network element database distribution—However, after other LNP database synchronization operations, the network element’s main LNP database must be distributed by operator intervention to other LNP databases within the network element (both the mate RTDB and the DSMs). Refer to “Distributing an RTDB LNP Database to DSMs” on page 8-2.
Distributing an RTDB LNP Database to DSMs
This section describes how to distribute the LNP database to the DSM cards after the RTDB has been updated by one of the following actions:
• Copied from an RTDB on the mated network element (see Chapter 7, “Copying One RTDB from Another RTDB”)
• Updated by one of the following operations sent from the LSMS:
– Resynchronized by user-initiated resynchronization (see Chapter 4, “Managing Resynchronization from the LSMS”)
– Bulk loaded from the LSMS (see Chapter 6, “Managing Bulk Load from the LSMS”)
Distributing the LNP Database after LSMS-Based Operation or RTDB Copy
910-2339-001 Rev A, October 2005 8-3
Perform the following procedure to distribute the data from the ELAP’s LNP database to the DSMs.
Procedure - Distributing an RTDB LNP Database to DSMs
1. Distribute the imported LNP database onto each DSM, which will also silence the LNP database alarms. Use one of the following methods:
• Method A loads the imported LNP database onto one DSM at a time by reloading each DSM.
This method allows the global title translation and LNP functions to continue running while the new LNP database is being loaded. When the DSM is reinitializing, its database goes temporarily out of service for the period of time that it takes to reload the database on the DSM. The time required to reload the database depends upon the size of the database and can take as long as 15 minutes for an LNP database containing 2,000,000 LNP subscriptions.
NOTE: Method A is the preferred method.
• Method B loads the imported LNP database onto all DSMs in the system by reinitializing all the DSMs at once.
CAUTION: This method not only loads the imported LNP database onto the DSMs at the same time, but takes all the DSMs out of service and causes the LNP subsystem to be offline. This method should only be used in emergency situations.
Method A: Perform steps a and b in this method for each DSM, one DSM at a time.
a. Take the DSM out of service with the rmv-card command specifying the card location of the DSM. If there is only one DSM in the system, the force=yes parameter must be specified with the rmv-card command. For this example, Enter this command:
rmv-card:loc=1101
After successful completion of this command, the system returns the following output:
rlghncxa03w 01-09-07 11:11:28 GMT EAGLE 31.3.0Card has been inhibited.
b. Return the DSM to service with the rst-card command with the card location of the DSM and the option DATA=PERSIST to allow a warm restart if possible. This command validates that the LNP database on the specified DSM is correct. If the LNP database is correct, no further loading is required. If the LNP database is not correct, it is automatically reloaded from the RTDB; loading may require up to an hour.
8-4 910-2339-001 Rev A, October 2005
Distributing the LNP Database after LSMS-Based Operation or RTDB Copy
For this example, enter this command:
rst-card:loc=1101:DATA=PERSIST
After successful completion of this command, the system returns the following output:
rlghncxa03w 01-09-07 11:11:28 GMT EAGLE 31.3.0Card has been allowed.
c. When the DSM is returned to service, the major alarm is silenced and UAM 0431, LNP database has been corrected, is generated. For this example, this message is generated:
rlghncxa03w 01-09-07 11:11:28 GMT EAGLE 31.3.00012.0431 CARD 1101 SCCP LNP database has been corrected
d. Repeat steps a and b for the other DSMs in the system.
If any of the DSMs continue to boot, contact the Tekelec Customer Care Center (see page 1-14).
Method B: Enter the init-card:appl=vsccp command.
CAUTION: This command initializes all the DSMs at once and not only loads the imported LNP database onto the DSMs at the same time, but takes all the DSMs out of service and the LNP subsystem will be offline. This method should only be used in emergency situations.
NOTE: A more graceful way of initializing the DSMs is to reroute all global title translation traffic, including LNP traffic, to the mate network element using the inh-map-ss command. The inh-map-ss command takes the mated application subsystem out of service. When the mated application subsystem is out of service, all global title translation traffic, including LNP traffic, is rerouted to the mate network element.
The mated application subsystem must be inhibited with the inh-map-ss command before the DSMs are reinitialized with the init-card:appl=vsccp command. After the init-card:appl=vsccp command has finished executing and all the DSMs have reinitialized, return the mated application subsystem to service with the alw-map-ss command.
When the imported database has been loaded onto each DSM, UAM 0431 is displayed for each DSM showing that the UAM 0429 has been cleared and the database on the DSM matches the database on the MASPs. This is an example of UAM 0431.
rlghncxa03w 01-09-07 11:11:28 GMT EAGLE 31.3.00012.0431 CARD 1101 SCCP LNP database has been corrected
If any of the DSMs continue to boot, contact the Tekelec Customer Care Center (see page 1-14).
Distributing the LNP Database after LSMS-Based Operation or RTDB Copy
910-2339-001 Rev A, October 2005 8-5
2. Verify that the DSMs are in-service by entering the rept-stat-sccp command. The state of the DSMs, shown in the PST field of the rept-stat-sccp command output, should be IS-NR (in-service normal). This is an example of the possible output:
rlghncxa03w 01-09-07 16:10:50 GMT EAGLE 31.3.0SCCP SUBSYSTEM REPORT IS-NR Active -----SCCP Cards Configured= 4 Cards IS-NR= 4 Capacity Threshold = 100%CARD VERSION PST SST AST MSU USAGE CPU USAGE-------------------------------------------------------------------------1101 002-202-000 IS-NR Active ----- 47% 32%1206 002-202-000 IS-NR Active ----- 34% 22%1213 002-202-000 IS-NR Active ----- 25% 18%1214 002-202-000 IS-NR Active ----- 68% 44%-------------------------------------------------------------------------SCCP Service Average MSU Capacity = 44% Average CPU Capacity = 29%Command Completed.
If the state of any DSMs is not IS-NR, contact the Tekelec Customer Care Center department (see page 1-14).
You have now completed this procedure.
8-6 910-2339-001 Rev A, October 2005
Distributing the LNP Database after LSMS-Based Operation or RTDB Copy
910-2339-001 Rev A, October 2005 A-1
A
LSMS GUI Messages
Introduction.....................................................................................................A–2
GUI Messages Start Here...............................................................................A–3
A-2 910-2339-001 Rev A, October 2005
LSMS GUI Messages
Introduction
This appendix lists in alphabetical order the messages that can appear when you are using the LSMS graphical user interface (GUI) functions described in this book. For each message, this appendix shows the probable cause for the message, which LSMS LNP Database Synchronization GUI functions the message can appear for, and suggested recovery steps if the message indicates an error situation.
For information about other messages that may occur during the procedures described in this manual, refer to one of the following:
• LSMS Maintenance Manual for error messages that may occur from LSMS commands
• Eagle STP Commands Error Recovery Manual for error messages that may occur from commands entered at the network element
NOTE: If you cannot find the message in this appendix, contact the Tekelec Customer Care Center (see page 1-14).
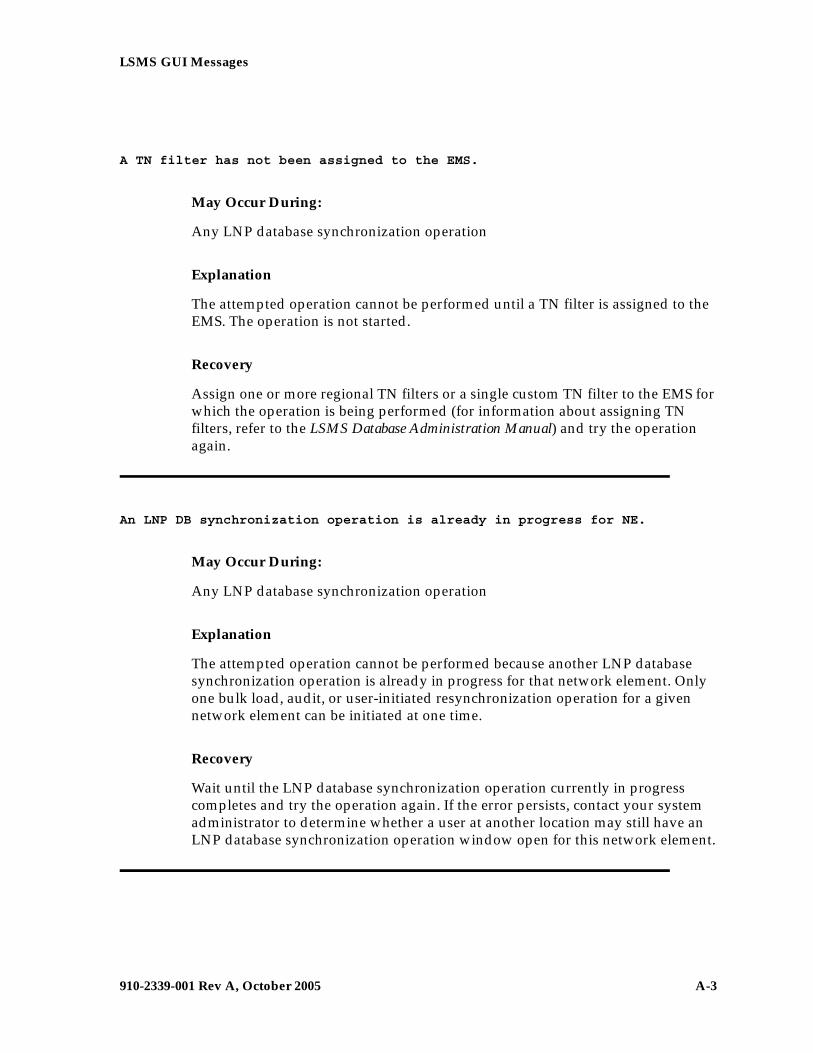
LSMS GUI Messages
910-2339-001 Rev A, October 2005 A-3
A TN filter has not been assigned to the EMS.
May Occur During:
Any LNP database synchronization operation
Explanation
The attempted operation cannot be performed until a TN filter is assigned to the EMS. The operation is not started.
Recovery
Assign one or more regional TN filters or a single custom TN filter to the EMS for which the operation is being performed (for information about assigning TN filters, refer to the LSMS Database Administration Manual) and try the operation again.
An LNP DB synchronization operation is already in progress for NE.
May Occur During:
Any LNP database synchronization operation
Explanation
The attempted operation cannot be performed because another LNP database synchronization operation is already in progress for that network element. Only one bulk load, audit, or user-initiated resynchronization operation for a given network element can be initiated at one time.
Recovery
Wait until the LNP database synchronization operation currently in progress completes and try the operation again. If the error persists, contact your system administrator to determine whether a user at another location may still have an LNP database synchronization operation window open for this network element.
A-4 910-2339-001 Rev A, October 2005
LSMS GUI Messages
Audit input queue failure
May Occur During:
Audit
Explanation
The auditor was attempting to read LSMS data to be audited, but that queue had a failure. The audit is not completed.
Recovery
Contact the Tekelec Customer Care Center (see page 1-14).
Audit input queue shutdown
May Occur During:
Audit
Explanation
The auditor was attempting to read LSMS data to be audited, but that queue was shut down. The audit is not completed.
Recovery
Contact the Tekelec Customer Care Center (see page 1-14).
Audit input queue timeout. Please contact Tekelec Technical Services
May Occur During:
Audit
Explanation
The auditor was attempting to read LSMS data to be audited, but that queue has stayed empty too long. The audit is not completed.

LSMS GUI Messages
910-2339-001 Rev A, October 2005 A-5
Recovery
Contact the Tekelec Customer Care Center (see page 1-14).
Audit NE input queue failure
May Occur During:
Audit
Explanation
The auditor was attempting to read network element data to be audited, but that queue had a failure. The audit is not completed.
Recovery
Contact the Tekelec Customer Care Center (see page 1-14).
Audit NE input queue shutdown
May Occur During:
Audit
Explanation
The auditor was attempting to read data to be audited from the network element, but that queue was shut down. The audit is not completed.
Recovery
Contact the Tekelec Customer Care Center (see page 1-14).
Audit NE input queue timeout. Please contact Tekelec Technical Services
May Occur During:
Audit
A-6 910-2339-001 Rev A, October 2005
LSMS GUI Messages
Explanation
The auditor was attempting to read data to be audited from the network element, but no response was received in the allowed time. The audit is not completed.
Recovery
Try the operation again. If the error persists, contact the Tekelec Customer Care Center (see page 1-14).
Auditing of <objType> is not supported by the NE.
May Occur During:
Audit
Explanation
An audit was attempted to be performed on a network element that does not support the object type indicated by <objType>, where <objType> is one of the following:
• NPA Split
• Number Pool Blocks
• Subscription Versions
• Default GTTs
• Override GTTs
The audit is not performed.
Recovery
Select “All Database Objects in Specified Ranges” radio button and select only the object types that are supported by the version of software running on the network element.
Bulk Load is required. NE's LNP DB timestamp (<timestamp>) is invalid
May Occur During:
Reconcile or user-initiated resynchronization
LSMS GUI Messages
910-2339-001 Rev A, October 2005 A-7
Explanation
The network element's LNP database timestamp (DBTS) is invalid. The operation is not started.
Recovery
A bulk download is required. Contact the Tekelec Customer Care Center (see page 1-14).
Bulk Load is required. NE's LNP DB timestamp (<timestamp>) is older than 7 days
May Occur During:
Reconcile or user-initiated resynchronization
Explanation
The LSMS user attempted to reconcile or resynchronize a network element's LNP database whose DBTS is older than seven days. (The transaction logs needed to perform this operation go back only seven days.) The operation is not started.
Recovery
A bulk download is required.
Connection already in use at NE '<IP address>'
May Occur During:
Any non-ELAP-based LNP database synchronization operation
Explanation
An attempt was made to start an LNP database synchronization operation to a network element for which an LNP database synchronization operation is already running. The operation is not performed.
A-8 910-2339-001 Rev A, October 2005
LSMS GUI Messages
Recovery
Do the following:
1. Examine the notifications area of the LSMS GUI to determine whether another LNP database synchronization operation is already running (look for event numbers 8066 through 8085 and read the message text to determine what has occurred). If another LNP database synchronization operation is in progress, wait until it has completed, and try your operation again.
2. If this error still occurs, contact the Tekelec Customer Care Center (see page 1-14).
Connection already in use or operation not enabled at NE '<IP address>'
May Occur During:
Any LNP database synchronization operation
Explanation
An attempt was made to start an LNP database synchronization operation to a network element for which one of the following is true:
• An LNP database synchronization operation is already running
• The ELAP is not enabled to receive the operation.
The operation is not performed.
Recovery
Do the following:
1. Examine the notifications area of the LSMS GUI to determine whether another LNP database synchronization operation is already running (look for event numbers 8066 through 8085 and read the message text to determine what has
LSMS GUI Messages
910-2339-001 Rev A, October 2005 A-9
occurred). If another LNP database synchronization operation is in progress, wait until it has completed, and try your operation again.
2. Contact the NE operator to determine whether the ELAP has been enabled for this synchronization operation. For more information about enabling the ELAP, see step 4 on page 4-7.
3. If this error still occurs, contact the Tekelec Customer Care Center (see page 1-14).
Disk space in <directory> is insufficient for operation.
May Occur During:
Audit
Explanation
The directory identified by <directory> is used for storing temporary files. It does not have sufficient space to perform the operation. The audit is not performed.
Recovery
Remove all unnecessary files from the specified directory (to determine the amount of disk space needed for the operation, look at the LSMSTrace.log). Try the operation again.
EBDA session ID already in use. Retry operation.
May Occur During:
Any LNP database synchronization operation
Explanation
An attempt was made to start an LNP database synchronization operation to a network element using a session ID that was already in use by another LNP database synchronization operation. The operation did not start.
A-10 910-2339-001 Rev A, October 2005
LSMS GUI Messages
Recovery
Try the operation again.
Error in receiving NE data (errno=<nnn>)
May Occur During:
Any LNP database synchronization operation
Explanation
An error occurred while waiting to receive a message from the network element. The operation is not completed. The connection was probably dropped.
Recovery
Find out why the error occurred and try it again. If the error persists, contact the Tekelec Customer Care Center (see page 1-14).
Failed aborting operation in progress.
May Occur During:
Any LNP database synchronization operation
Explanation
The operation in progress cannot be aborted.
Recovery
Look in the LSMSTrace.log for the reason for the failure. Correct the problem and retry the operation. If the error persists, contact the Tekelec Customer Care Center (see page 1-14).
Failed committing data downloaded to the NE.
May Occur During:
Any LNP database synchronization operation
LSMS GUI Messages
910-2339-001 Rev A, October 2005 A-11
Explanation
The operation was not completed. One of the following may have occurred:
• The NE operator canceled the download
• A timeout occurred while waiting for an acknowledgement
• The connection has been dropped.
Changes have not been committed, so the download has had no effect.
Recovery
Try the operation again.
Failed connecting to NE '<IP address>'.
May Occur During:
Any LNP database synchronization operation
Explanation
An attempt was made to start an operation to a network element, but an error prevented the establishment of the connection. The operation is not performed.
Recovery
Verify that the displayed IP address is correct. Then, try the operation again. If the error persists, contact the Tekelec Customer Care Center (see page 1-14).
Failed discarding data downloaded to the network element’s LNP database.
May Occur During:
Any LNP database synchronization operation

A-12 910-2339-001 Rev A, October 2005
LSMS GUI Messages
Explanation
The operation was not completed. One of the following may have occurred:
• A timeout occurred while waiting for an acknowledgement
• The connection has been dropped
• The network element operator has canceled the download
Recovery
Try the operation again.
Failed initializing EBDA process.
May Occur During:
Any LNP database synchronization operation
Explanation
An error occurred during the initialization of the EBDA process. The operation is not performed.
Recovery
Look in the LSMSTrace.log for the reason for the failure. Correct the problem and retry the operation. If the error persists, contact the Tekelec Customer Care Center (see page 1-14).
Failed receiving data over normal update connection with NE (errno=<nn>)
May Occur During:
Audit only or audit and reconcile.
Explanation
An attempt was made to read a message from the network element, but no response was received in the allowed time. The cause may be a dropped connection with the network element. The operation is not performed.
LSMS GUI Messages
910-2339-001 Rev A, October 2005 A-13
Recovery
Try the operation again. If the error persists, contact the Tekelec Customer Care Center (see page 1-14).
Failed sending data over normal update connection with NE (errno=<nn>
May Occur During:
Audit and reconcile.
Explanation
A failure occurred while auditing or reconciling the network element’s LNP database using the normal update connection with the network element. The operation is terminated.
Recovery
To determine the reason for failure, look in the LSMSTrace.log. Try the operation again. If the error persists, contact the Tekelec Customer Care Center (see page 1-14).
Failed starting operation
May Occur During:
Any LNP database synchronization operation
Explanation
The requested operation failed to start.
Recovery
Look in the LSMSTrace.log for the reason for the failure. Correct the problem and retry the operation. If the error persists, contact the Tekelec Customer Care Center (see page 1-14).
A-14 910-2339-001 Rev A, October 2005
LSMS GUI Messages
LSMS’s normal update connection with NE is not currently established
May Occur During:
Audit and Reconcile
Explanation
The LSMS user attempted to perform an operation that requires the normal update, but that connection is not currently established. The normal update connection is the connection between the LSMS and one of the following at the MPS. The operation is not started.
Recovery
Establish the connection and try the operation again.
Maximum number of discrepancies has been reached - Bulk Load required.
May Occur During:
Audit
Explanation
The maximum number of discrepancies that can be detected in the network element’s LNP database by an audit before a bulk load is required has been reached. The operation is terminated.
Recovery
Perform a Bulk Load operation to the network element (for more information, see “Choosing a Synchronization Procedure” on page 3-3).
Maximum number of simultaneous Bulk Load LNP DB synchronization operations has been reached.
May Occur During:
Bulk Load
LSMS GUI Messages
910-2339-001 Rev A, October 2005 A-15
Explanation
The LSMS user attempted to perform a Bulk Load LNP database synchronization operation while the maximum permitted number of Bulk Load operations are currently in progress. The operation was not started.
Recovery
Try the operation again.
Maximum number of simultaneous LNP DB synchronization operations has been reached.
May Occur During:
Any LNP database synchronization operation
Explanation
The LSMS user attempted to perform an LNP database synchronization operation while the maximum permitted number of LNP database synchronization operations are currently in progress. The operation was not started.
Recovery
Try the operation again.
NE dropped the connection (errno=<nn>)
May Occur During:
Any LNP database synchronization operation
Explanation
A message was sent to the network element, but the network element dropped the connection without sending a response message. The operation has failed.
A-16 910-2339-001 Rev A, October 2005
LSMS GUI Messages
Recovery
Try the operation again. If the problem persists, contact the Tekelec Customer Care Center with the errno (see page 1-14).
NE has reset the connection (errno=<nn>)
May Occur During:
Any LNP database synchronization operation
Explanation
A message was sent to the network element, but the network element reset the connection without sending a response message. The operation has failed.
Recovery
Try the operation again. If the problem persists, contact the Tekelec Customer Care Center with the errno (see page 1-14).
Network element is currently being re-synced with the LSMS. Operation terminated.
May Occur During:
Audit only or audit and reconcile
Explanation
The user attempted to perform an operation that uses the normal update connection with the network element while an automatic resynchronization (also called a short synchronization) is in progress. The operation is not started.
Recovery
Do either of the following and then try the operation again:
• Look in the notifications area of the LSMS GUI console window for the following notifications, where <CLLI> is the Common Language Location
LSMS GUI Messages
910-2339-001 Rev A, October 2005 A-17
Identifier for the network element for which you wish to perform the operation.
1. Verify that the following notification has been posted:
[Major]: <Timestamp> 8054 <CLLI>: Short Synchronization Started
2. Wait until the following notification is posted before trying the operation again:
[Cleared]: <Timestamp> 8059 <CLLI>: Short Synchronization Complete
• Perform the following steps to determine whether the eagle agent process is currently using the normal update connection:
1. Log in to the active server as root.
2. Enter the following command:
# $LSMS_DIR/eagle status <CLLI>
3. Examine the output to determine whether the eagle agent is currently resynchronizing with the network element.
One or more NPAC regions in the regional TN filter are set inactive.
May Occur During:
Any LNP database synchronization operation
Explanation
The regional TN filters for the EMS of this network element include at least one NPAC region that is currently set to inactive. The operation is not performed.
A-18 910-2339-001 Rev A, October 2005
LSMS GUI Messages
Recovery
Do one of the following and then try the operation again:
• Activate all NPAC regions that are selected in the EMS’s regional TN filter by doing the following:
1. On the LSMS GUI console window, right-click anywhere in the NPAC status area and ensure that all NPAC regions are clicked (this ensures that even inactive regions are displayed on the console window).
2. From the main menu, select LSMS>EMS Routing>View.
3. Determine whether any of the NPAC regions shown as highlighted in the View EMS Routing window are shown as having inactive status on the console. Activate those NPAC regions by right-clicking the NPAC status icon and selecting Associate.
• Deselect all inactive NPAC regions that are selected in the EMS’s regional TN filter by doing the following:
1. On the LSMS GUI console window, right-click anywhere in the NPAC status area and ensure that all NPAC regions are clicked (this ensures that even inactive regions are displayed on the console window).
2. From the main menu, select LSMS>EMS Routing>View.
3. Select only the NPAC regions that have active status on the console.
4. Click OK.
One or more NPAC regions must be set active.
May Occur During:
Any LNP database synchronization operation
Explanation
There are currently no active NPAC regions. The operation is not performed.

LSMS GUI Messages
910-2339-001 Rev A, October 2005 A-19
Recovery
Do the following and then try the operation again:
• Activate all NPAC regions that are selected in the EMS’s regional TN filter by doing the following:
1. On the LSMS GUI console window, right-click anywhere in the NPAC status area and ensure that all NPAC regions are clicked (this ensures that even inactive regions are displayed on the console window).
2. From the main menu, select LSMS>EMS Routing>View.
3. Determine whether any of the NPAC regions shown as highlighted in the View EMS Routing window are shown as having inactive status on the console. Activate those NPAC regions by right-clicking the NPAC status icon and selecting Associate.
Operation automatically terminated - client unexpectedly disconnected.
May Occur During:
Any LNP database synchronization operation (only recorded in log file)
Explanation
The operation in progress is terminated. The Local Service Manager (lsman) server process terminated its connection with the EBDA process.
Recovery
Verify that the lsman process is running using the sup status command (for information about using this command, refer to the LSMS Maintenance Manual.
• If the lsman process is currently running, it may have been automatically restarted since the LNP database synchronization operation was attempted. Try the operation again.
• If the lsman process is not currently running, it should be restarted automatically within a few minutes. Wait a few minutes and repeat the sup status command. If it is now running, try the operation again.
If the error persists, contact the Tekelec Customer Care Center (see page 1-14).

A-20 910-2339-001 Rev A, October 2005
LSMS GUI Messages
Operation forcefully terminated by external process.
May Occur During:
Any LNP database synchronization operation (only recorded in log file)
Explanation
The operation in progress is terminated. The LSMS user has logged out while an LNP database operation is in progress.
Recovery
Log back in and try the operation again.
Out of memory
May Occur During:
Audit
Explanation
The operation process discovered it was out of heap space when sending a message to another thread within this operation. The operation is not completed.
Recovery
Contact the Tekelec Customer Care Center (see page 1-14).
Problem with the NE connection (errno=<nn>)
May Occur During:
Any LNP database synchronization operation
Explanation
An attempt to send a message to the network element failed with an unexpected error. The operation did not complete.
LSMS GUI Messages
910-2339-001 Rev A, October 2005 A-21
Recovery
Try the operation again. If the error persists, contact the Tekelec Customer Care Center (see page 1-14).
Protocol violation on connection with NE. Please contact Tekelec Technical Services.
May Occur During:
Any LNP database synchronization operation
Explanation
An attempt was made to send a message to the network element, but the network element was not in the proper state to accept that kind of message. Probably the network element is in a reset state because the connection was dropped or the network element operator issued a chg-db:action=canceledl command. The operation was not completed.
Recovery
Try the operation again. A different error message should appear. Follow the recovery procedure recommended for that error message.
Re-sync operation is not permitted while the LSMS is connected with the NE.
May Occur During:
User-initiated resynchronization
Explanation
The user attempted to initiate a resynchronization when the LSMS is connected to the network element.
Recovery
When the LSMS has a connection to the MPS, there is no need for a user-initiated resynchronization. If the connection to the MPS is down and this error still appears, contact the Tekelec Customer Care Center (see page 1-14).
A-22 910-2339-001 Rev A, October 2005
LSMS GUI Messages
Received unexpected response from the NE
May Occur During:
Audit
Explanation
A message that is neither a normal response nor any of the expected error responses was received from the network element in response to an audit request. The audit is not completed.
Recovery
Try the operation again. If the problem persists, contact the Tekelec Customer Care Center (see page 1-14).
Received unexpected response over normal update connection - protocol violation
May Occur During:
Audit only or audit and reconcile
Explanation
A message that is neither a normal response nor any of the expected error responses was received from the network element over the normal update connection in response to an audit or update request. The operation is terminated.
Recovery
Try the operation again. If the problem persists, contact the Tekelec Customer Care Center (see page 1-14).
The entire range of NPA Splits must be selected if auditing NPBs, SVs and/or Default GTTs.
May Occur During:
Audit
LSMS GUI Messages
910-2339-001 Rev A, October 2005 A-23
Explanation
The user attempted to initiate an audit of one or more of the following without specifying the entire range of NPA Splits:
• Default GTTs
• NPBs by NPA-NXX range
• SVs by NPA-NXX range
The operation is not started. (An audit by time range or of NPBs by NPA-NXX-X range and/or SVs by TN range does not require or support auditing of NPA Splits.)
Recovery
Select one of the following values for the Old NPA range and try the operation again:
• ALL
• 200-999
Timeout connecting to NE. IP-address '<IP address>' (errno=<nnn>)
May Occur During:
Any LNP database synchronization operation
Explanation
An attempt was made to start an operation to a network element, but the connection was not established because of an unexpected error. The operation is not performed.
Recovery
Verify that the displayed IP address is correct, then try again. If the error persists, contact the Tekelec Customer Care Center (see page 1-14).
A-24 910-2339-001 Rev A, October 2005
LSMS GUI Messages
Timeout receiving data from the NE
May Occur During:
Any LNP database synchronization operation
Explanation
An attempt was made to read a message from the network element (NE), but no response was received in the allowed time. The operation is not completed. The connection was probably dropped.
Recovery
Try the operation again. If the error persists, contact the Tekelec Customer Care Center (see page 1-14).
Timeout sending data to NE (errno=<nn>)
May Occur During:
Any LNP database synchronization operation
Explanation
Too much time elapsed while trying to send a message to the network element. The operation is not completed. The connection was probably dropped.
Recovery
Find out why the timeout occurred, and try the operation again. If the error persists, contact the Tekelec Customer Care Center (see page 1-14).
Unable to access normal update connection.
May Occur During:
Audit only or audit and reconcile
LSMS GUI Messages
910-2339-001 Rev A, October 2005 A-25
Explanation
The EBDA process was not able to connect to an eagle agent process to perform the requested synchronization operation to an NE’s LNP database. Either the eagle agent is not running or it is currently performing an automatic resynchronization with the LSMS. The operation is not performed.
Recovery
Do the following:
1. Use the eagle status command to verify that the eagle agent process is running (for information about using this command, refer to the LSMS Maintenance Manual).
2. If the eagle agent process is not running, contact the system administrator to determine whether the eagle agent process was manually stopped. If it was not manually stopped, it should be automatically restarted soon.
3. Try the operation again. If the error persists, contact the Tekelec Customer Care Center (see page 1-14).
Unable to connect to EBDA process
May Occur During:
Any LNP database synchronization operation
Explanation
Although the EBDA process started when the LNP database synchronization operation was started through the GUI, by the time the Local Services Manager (lsman) needed to connect to an EBDA process to start the requested synchronization operation to an NE’s LNP database, it was unable to connect. The operation is not performed.
Recovery
Do the following:
1. Log in to the active server as root.
2. Determine whether the EBDA process is running by entering the following command, where <CLLI> is the Common Language Location Identifier for the
A-26 910-2339-001 Rev A, October 2005
LSMS GUI Messages
network element for which you wish to perform an LNP database synchronization operation:
# ps -ef|grep ebda|grep -v <CLLI>
3. If no output appears, the EBDA process is no longer running, so try the operation again.
4. If output appears, the EBDA process is running although the lsman process is unable to connect to it. Enter the following command to kill the EBDA process (where <pid> is the process ID returned by the command in step 2), and then try the operation again.
# kill -SIGKILL <pid>
5. If the error persists, contact the Tekelec Customer Care Center (see page 1-14).
Unable to start EBDA process
May Occur During:
Any LNP database synchronization operation
Explanation
The Local Services Manager (lsman) was not able to start an EBDA process for the requested synchronization operation to an NE’s LNP database. The operation is not performed.
Recovery
Try the operation again. If the error persists, contact the Tekelec Customer Care Center (see page 1-14).
Unknown EBDA session ID. Connection to EBDA process has been lost.
May Occur During:
Any LNP database synchronization operation
LSMS GUI Messages
910-2339-001 Rev A, October 2005 A-27
Explanation
In the course of performing the operation, the EBDA process died. The operation was not completed.
Recovery
Contact the Tekelec Customer Care Center (see page 1-14).
User is not authorized to perform operation to NE’s LNP database.
May Occur During:
Any LNP database synchronization operation
Explanation
SPID security is enabled. The LSMS user is not authorized to perform the LNP database synchronization operation for the specified network element. The operation was not started.
Recovery
Contact your system administrator to be given authorization to access the data of the login SPID.

A-28 910-2339-001 Rev A, October 2005
LSMS GUI Messages
910-2339-001 Rev A, October 2005 B-1
B
Enabling LSMS Audit on ELAP
Introduction......................................................................................................B–2
Enabling an LSMS Audit ................................................................................B–2
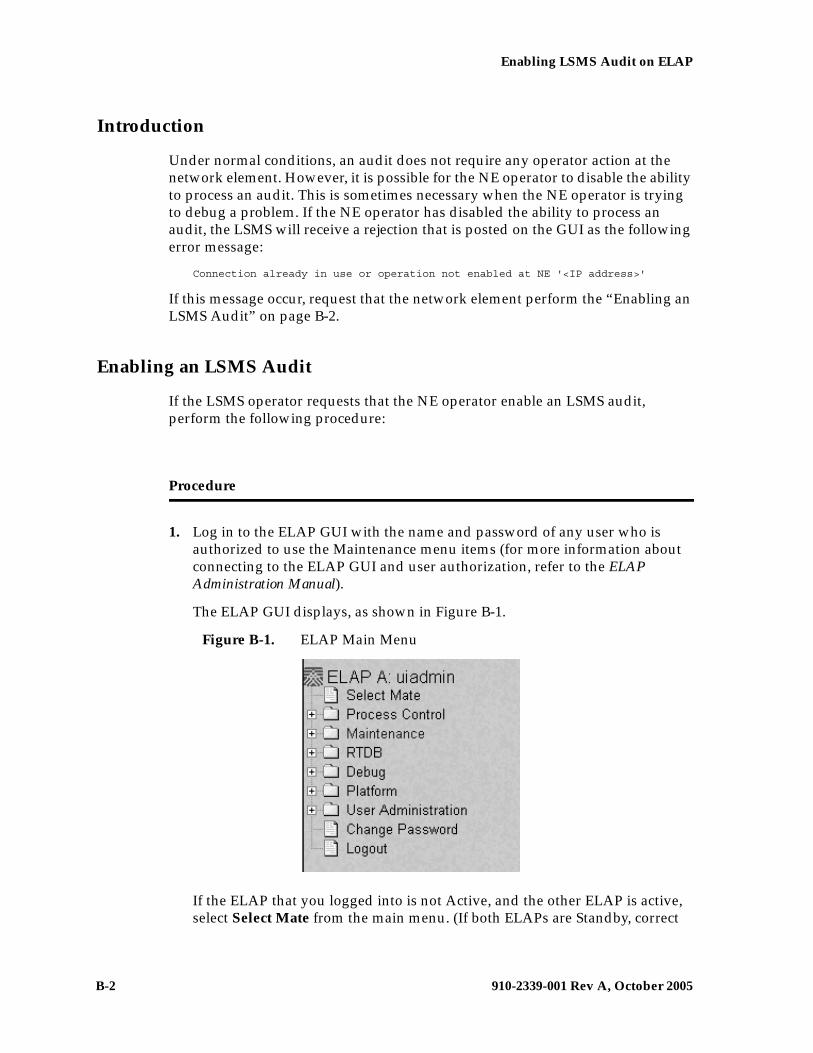
B-2 910-2339-001 Rev A, October 2005
Enabling LSMS Audit on ELAP
Introduction
Under normal conditions, an audit does not require any operator action at the network element. However, it is possible for the NE operator to disable the ability to process an audit. This is sometimes necessary when the NE operator is trying to debug a problem. If the NE operator has disabled the ability to process an audit, the LSMS will receive a rejection that is posted on the GUI as the following error message:
Connection already in use or operation not enabled at NE '<IP address>'
If this message occur, request that the network element perform the “Enabling an LSMS Audit” on page B-2.
Enabling an LSMS Audit
If the LSMS operator requests that the NE operator enable an LSMS audit, perform the following procedure:
Procedure
1. Log in to the ELAP GUI with the name and password of any user who is authorized to use the Maintenance menu items (for more information about connecting to the ELAP GUI and user authorization, refer to the ELAP Administration Manual).
The ELAP GUI displays, as shown in Figure B-1.
Figure B-1. ELAP Main Menu
If the ELAP that you logged into is not Active, and the other ELAP is active, select Select Mate from the main menu. (If both ELAPs are Standby, correct
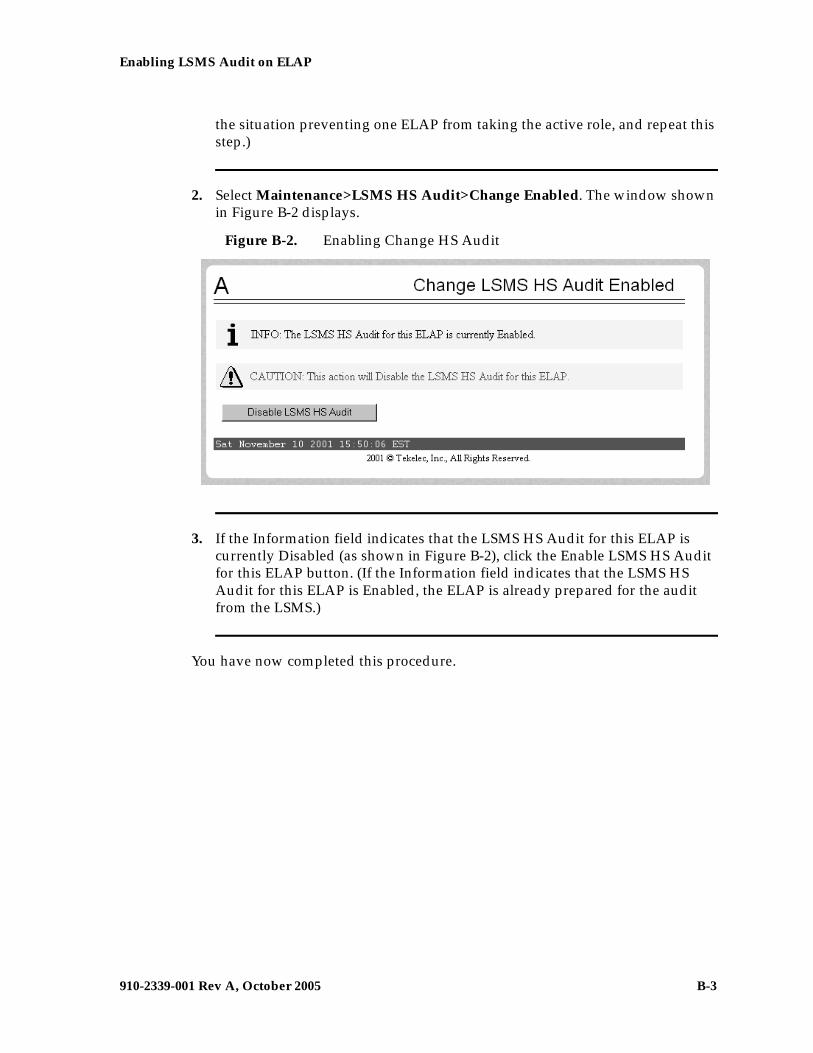
Enabling LSMS Audit on ELAP
910-2339-001 Rev A, October 2005 B-3
the situation preventing one ELAP from taking the active role, and repeat this step.)
2. Select Maintenance>LSMS HS Audit>Change Enabled. The window shown in Figure B-2 displays.
Figure B-2. Enabling Change HS Audit
3. If the Information field indicates that the LSMS HS Audit for this ELAP is currently Disabled (as shown in Figure B-2), click the Enable LSMS HS Audit for this ELAP button. (If the Information field indicates that the LSMS HS Audit for this ELAP is Enabled, the ELAP is already prepared for the audit from the LSMS.)
You have now completed this procedure.

B-4 910-2339-001 Rev A, October 2005
Enabling LSMS Audit on ELAP

910-2339-001 Rev A, October 2005 C-1
C
LNP Database SynchronizationFiles
Introduction..................................................................................................... C–2
Log Files ........................................................................................................... C–2
Location of LNP Database Synchronization Log Files.......................... C–2
Viewing an LNP Database Synchronization Log File ........................... C–3
LNP Database Synchronization Log File Contents................................ C–3
Discrepancy Files .......................................................................................... C–13
Location of Discrepancy Files ................................................................. C–13
Viewing a Discrepancy File ..................................................................... C–13
Discrepancy File Contents....................................................................... C–14
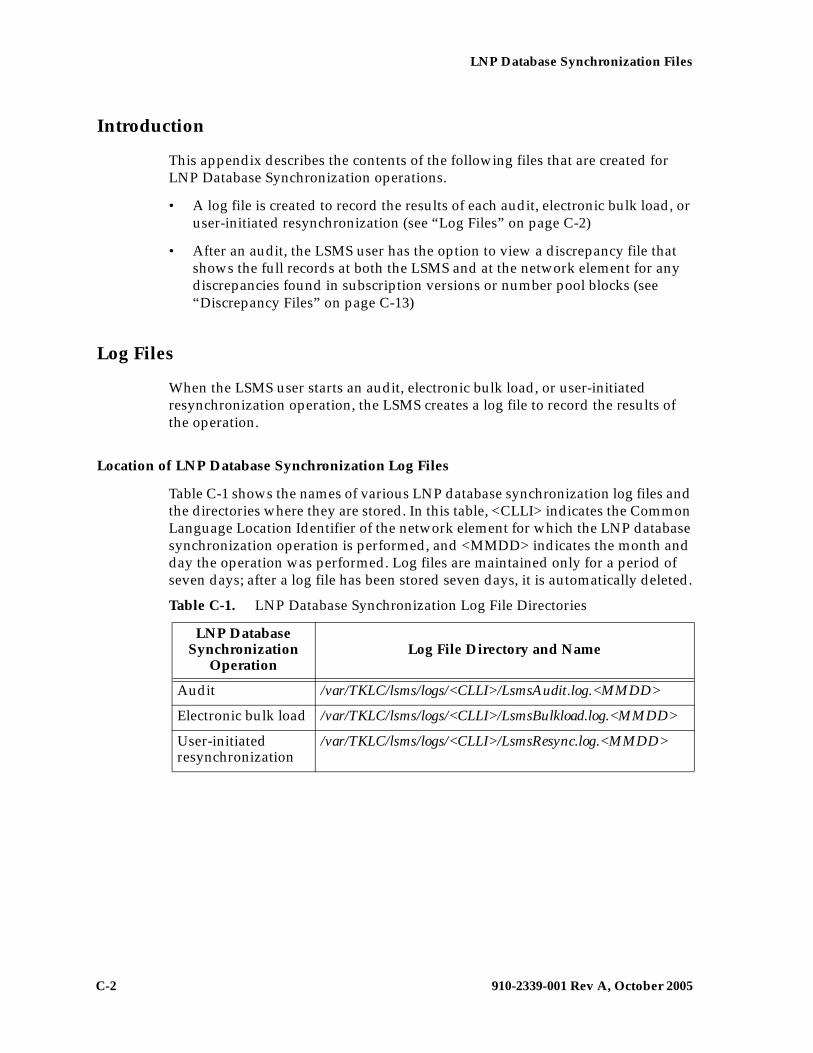
C-2 910-2339-001 Rev A, October 2005
LNP Database Synchronization Files
Introduction
This appendix describes the contents of the following files that are created for LNP Database Synchronization operations.
• A log file is created to record the results of each audit, electronic bulk load, or user-initiated resynchronization (see “Log Files” on page C-2)
• After an audit, the LSMS user has the option to view a discrepancy file that shows the full records at both the LSMS and at the network element for any discrepancies found in subscription versions or number pool blocks (see “Discrepancy Files” on page C-13)
Log Files
When the LSMS user starts an audit, electronic bulk load, or user-initiated resynchronization operation, the LSMS creates a log file to record the results of the operation.
Location of LNP Database Synchronization Log Files
Table C-1 shows the names of various LNP database synchronization log files and the directories where they are stored. In this table, <CLLI> indicates the Common Language Location Identifier of the network element for which the LNP database synchronization operation is performed, and <MMDD> indicates the month and day the operation was performed. Log files are maintained only for a period of seven days; after a log file has been stored seven days, it is automatically deleted.
Table C-1. LNP Database Synchronization Log File Directories
LNP Database Synchronization
OperationLog File Directory and Name
Audit /var/TKLC/lsms/logs/<CLLI>/LsmsAudit.log.<MMDD>
Electronic bulk load /var/TKLC/lsms/logs/<CLLI>/LsmsBulkload.log.<MMDD>
User-initiated resynchronization
/var/TKLC/lsms/logs/<CLLI>/LsmsResync.log.<MMDD>
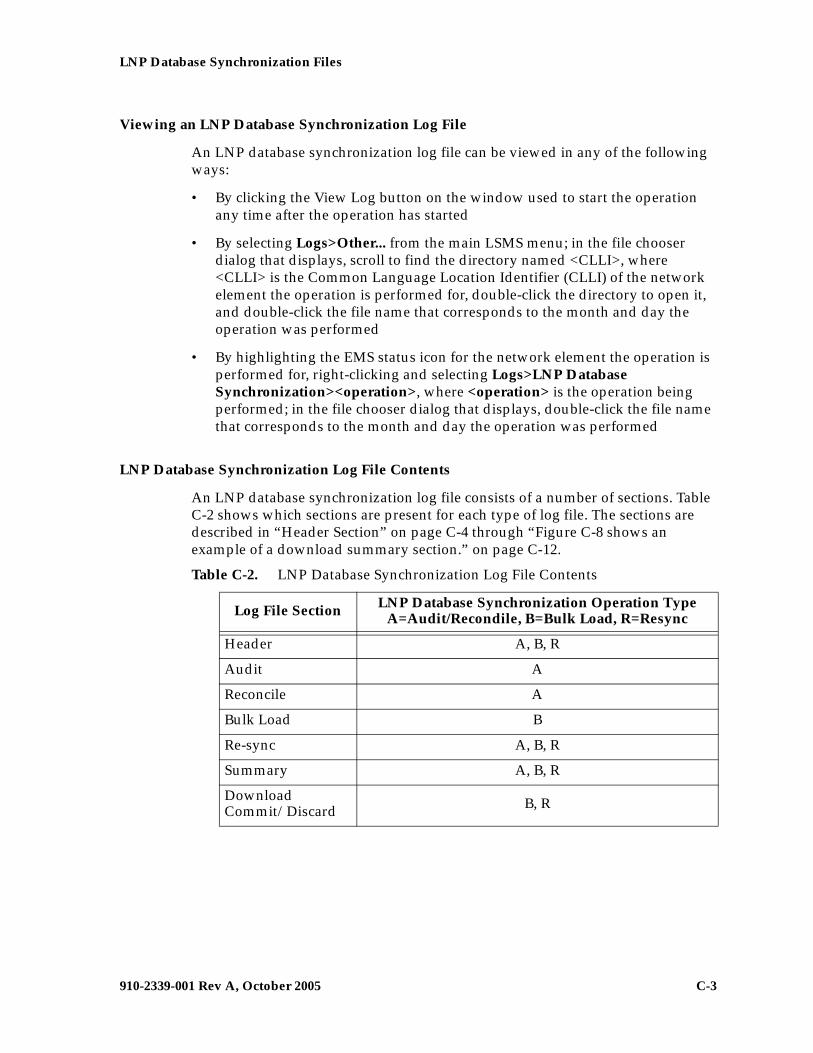
LNP Database Synchronization Files
910-2339-001 Rev A, October 2005 C-3
Viewing an LNP Database Synchronization Log File
An LNP database synchronization log file can be viewed in any of the following ways:
• By clicking the View Log button on the window used to start the operation any time after the operation has started
• By selecting Logs>Other... from the main LSMS menu; in the file chooser dialog that displays, scroll to find the directory named <CLLI>, where <CLLI> is the Common Language Location Identifier (CLLI) of the network element the operation is performed for, double-click the directory to open it, and double-click the file name that corresponds to the month and day the operation was performed
• By highlighting the EMS status icon for the network element the operation is performed for, right-clicking and selecting Logs>LNP Database Synchronization><operation>, where <operation> is the operation being performed; in the file chooser dialog that displays, double-click the file name that corresponds to the month and day the operation was performed
LNP Database Synchronization Log File Contents
An LNP database synchronization log file consists of a number of sections. Table C-2 shows which sections are present for each type of log file. The sections are described in “Header Section” on page C-4 through “Figure C-8 shows an example of a download summary section.” on page C-12.
Table C-2. LNP Database Synchronization Log File Contents
Log File Section LNP Database Synchronization Operation TypeA=Audit/Recondile, B=Bulk Load, R=Resync
Header A, B, R
Audit A
Reconcile A
Bulk Load B
Re-sync A, B, R
Summary A, B, R
Download Commit/Discard B, R
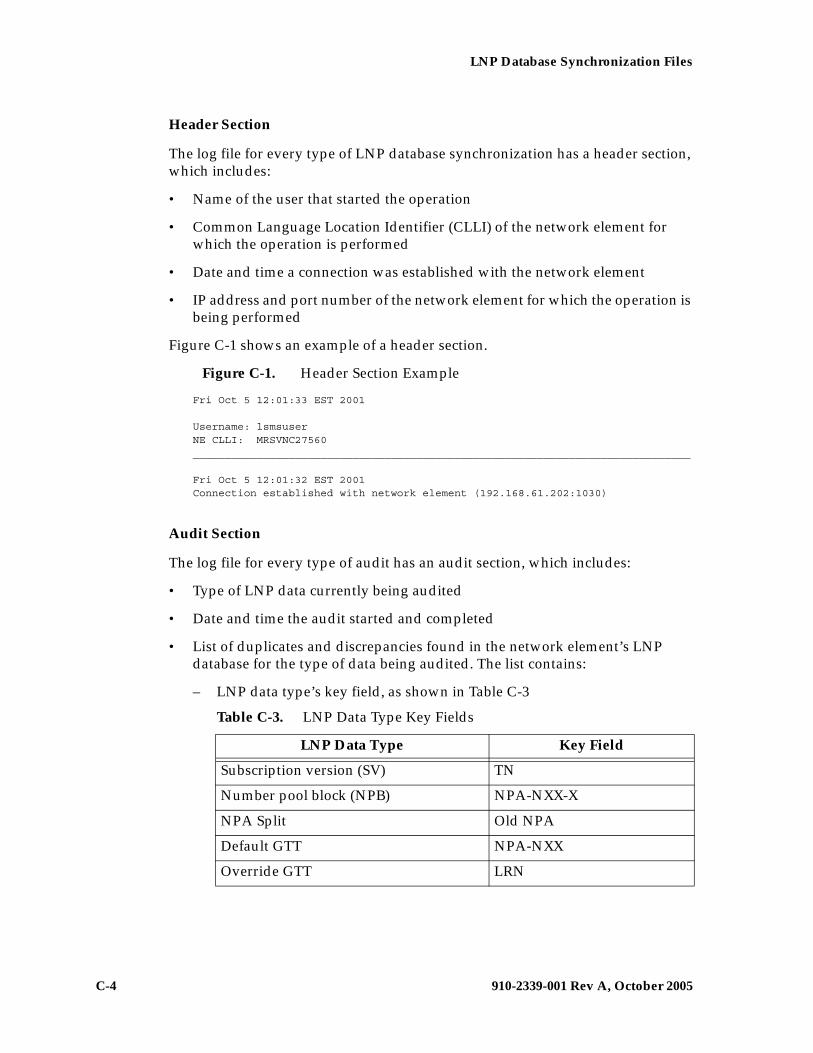
C-4 910-2339-001 Rev A, October 2005
LNP Database Synchronization Files
Header Section
The log file for every type of LNP database synchronization has a header section, which includes:
• Name of the user that started the operation
• Common Language Location Identifier (CLLI) of the network element for which the operation is performed
• Date and time a connection was established with the network element
• IP address and port number of the network element for which the operation is being performed
Figure C-1 shows an example of a header section.
Figure C-1. Header Section Example
Fri Oct 5 12:01:33 EST 2001
Username: lsmsuserNE CLLI: MRSVNC27560______________________________________________________________________________
Fri Oct 5 12:01:32 EST 2001 Connection established with network element (192.168.61.202:1030)
Audit Section
The log file for every type of audit has an audit section, which includes:
• Type of LNP data currently being audited
• Date and time the audit started and completed
• List of duplicates and discrepancies found in the network element’s LNP database for the type of data being audited. The list contains:
– LNP data type’s key field, as shown in Table C-3
Table C-3. LNP Data Type Key Fields
LNP Data Type Key Field
Subscription version (SV) TN
Number pool block (NPB) NPA-NXX-X
NPA Split Old NPA
Default GTT NPA-NXX
Override GTT LRN
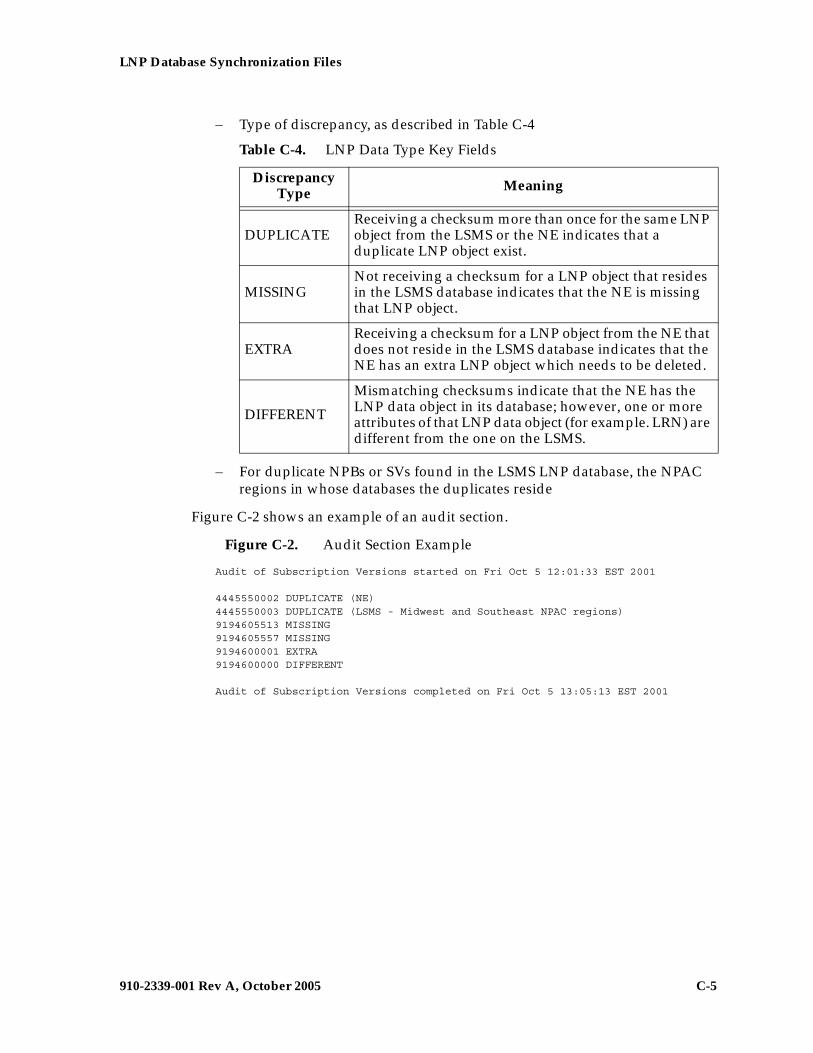
LNP Database Synchronization Files
910-2339-001 Rev A, October 2005 C-5
– Type of discrepancy, as described in Table C-4
– For duplicate NPBs or SVs found in the LSMS LNP database, the NPAC regions in whose databases the duplicates reside
Figure C-2 shows an example of an audit section.
Figure C-2. Audit Section Example
Audit of Subscription Versions started on Fri Oct 5 12:01:33 EST 2001
4445550002 DUPLICATE (NE)4445550003 DUPLICATE (LSMS - Midwest and Southeast NPAC regions)9194605513 MISSING9194605557 MISSING9194600001 EXTRA 9194600000 DIFFERENT
Audit of Subscription Versions completed on Fri Oct 5 13:05:13 EST 2001
Table C-4. LNP Data Type Key Fields
Discrepancy Type Meaning
DUPLICATEReceiving a checksum more than once for the same LNP object from the LSMS or the NE indicates that a duplicate LNP object exist.
MISSINGNot receiving a checksum for a LNP object that resides in the LSMS database indicates that the NE is missing that LNP object.
EXTRAReceiving a checksum for a LNP object from the NE that does not reside in the LSMS database indicates that the NE has an extra LNP object which needs to be deleted.
DIFFERENT
Mismatching checksums indicate that the NE has the LNP data object in its database; however, one or more attributes of that LNP data object (for example. LRN) are different from the one on the LSMS.
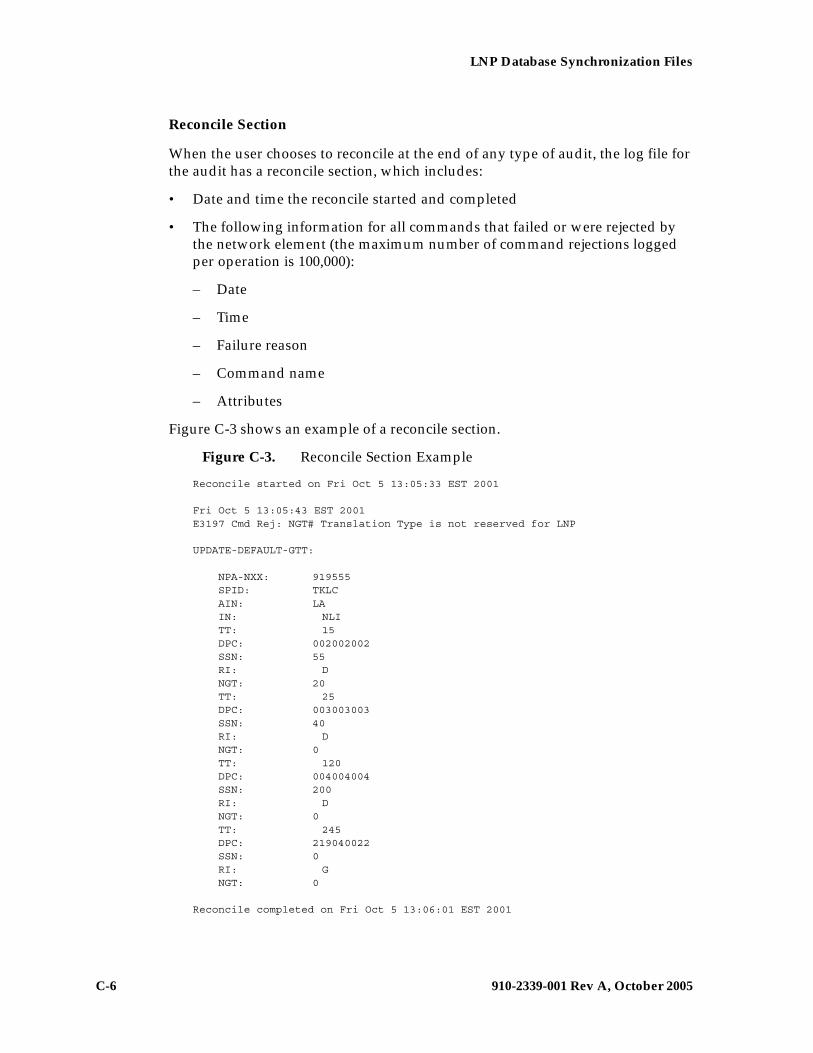
C-6 910-2339-001 Rev A, October 2005
LNP Database Synchronization Files
Reconcile Section
When the user chooses to reconcile at the end of any type of audit, the log file for the audit has a reconcile section, which includes:
• Date and time the reconcile started and completed
• The following information for all commands that failed or were rejected by the network element (the maximum number of command rejections logged per operation is 100,000):
– Date
– Time
– Failure reason
– Command name
– Attributes
Figure C-3 shows an example of a reconcile section.
Figure C-3. Reconcile Section Example
Reconcile started on Fri Oct 5 13:05:33 EST 2001
Fri Oct 5 13:05:43 EST 2001E3197 Cmd Rej: NGT# Translation Type is not reserved for LNP
UPDATE-DEFAULT-GTT:
NPA-NXX: 919555 SPID: TKLC AIN: LA IN: NLI TT: 15 DPC: 002002002 SSN: 55 RI: D NGT: 20 TT: 25 DPC: 003003003 SSN: 40 RI: D NGT: 0 TT: 120 DPC: 004004004 SSN: 200 RI: D NGT: 0 TT: 245 DPC: 219040022 SSN: 0 RI: G NGT: 0
Reconcile completed on Fri Oct 5 13:06:01 EST 2001
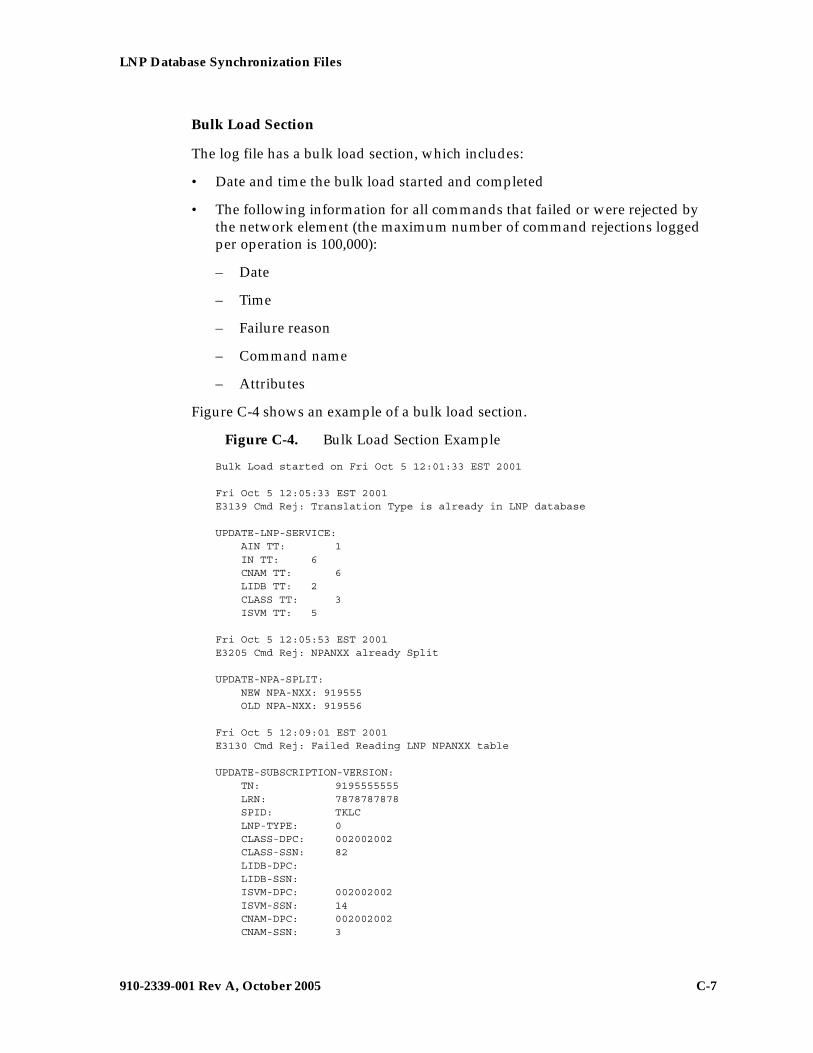
LNP Database Synchronization Files
910-2339-001 Rev A, October 2005 C-7
Bulk Load Section
The log file has a bulk load section, which includes:
• Date and time the bulk load started and completed
• The following information for all commands that failed or were rejected by the network element (the maximum number of command rejections logged per operation is 100,000):
– Date
– Time
– Failure reason
– Command name
– Attributes
Figure C-4 shows an example of a bulk load section.
Figure C-4. Bulk Load Section Example
Bulk Load started on Fri Oct 5 12:01:33 EST 2001
Fri Oct 5 12:05:33 EST 2001E3139 Cmd Rej: Translation Type is already in LNP database
UPDATE-LNP-SERVICE: AIN TT: 1 IN TT: 6 CNAM TT: 6 LIDB TT: 2 CLASS TT: 3 ISVM TT: 5
Fri Oct 5 12:05:53 EST 2001E3205 Cmd Rej: NPANXX already Split
UPDATE-NPA-SPLIT: NEW NPA-NXX: 919555 OLD NPA-NXX: 919556
Fri Oct 5 12:09:01 EST 2001E3130 Cmd Rej: Failed Reading LNP NPANXX table
UPDATE-SUBSCRIPTION-VERSION: TN: 9195555555 LRN: 7878787878 SPID: TKLC LNP-TYPE: 0 CLASS-DPC: 002002002 CLASS-SSN: 82 LIDB-DPC: LIDB-SSN: ISVM-DPC: 002002002 ISVM-SSN: 14 CNAM-DPC: 002002002 CNAM-SSN: 3
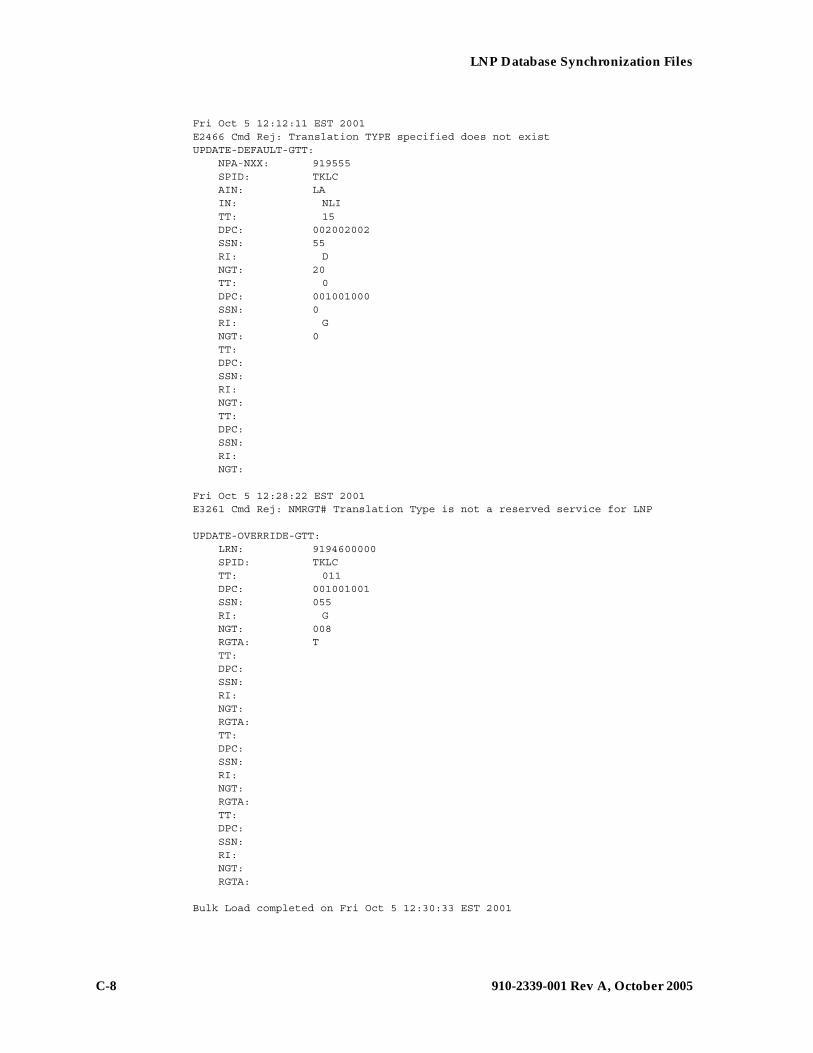
C-8 910-2339-001 Rev A, October 2005
LNP Database Synchronization Files
Fri Oct 5 12:12:11 EST 2001E2466 Cmd Rej: Translation TYPE specified does not existUPDATE-DEFAULT-GTT: NPA-NXX: 919555 SPID: TKLC AIN: LA IN: NLI TT: 15 DPC: 002002002 SSN: 55 RI: D NGT: 20 TT: 0 DPC: 001001000 SSN: 0 RI: G NGT: 0 TT: DPC: SSN: RI: NGT: TT: DPC: SSN: RI: NGT:
Fri Oct 5 12:28:22 EST 2001E3261 Cmd Rej: NMRGT# Translation Type is not a reserved service for LNP
UPDATE-OVERRIDE-GTT: LRN: 9194600000 SPID: TKLC TT: 011 DPC: 001001001 SSN: 055 RI: G NGT: 008 RGTA: T TT: DPC: SSN: RI: NGT: RGTA: TT: DPC: SSN: RI: NGT: RGTA: TT: DPC: SSN: RI: NGT: RGTA:
Bulk Load completed on Fri Oct 5 12:30:33 EST 2001
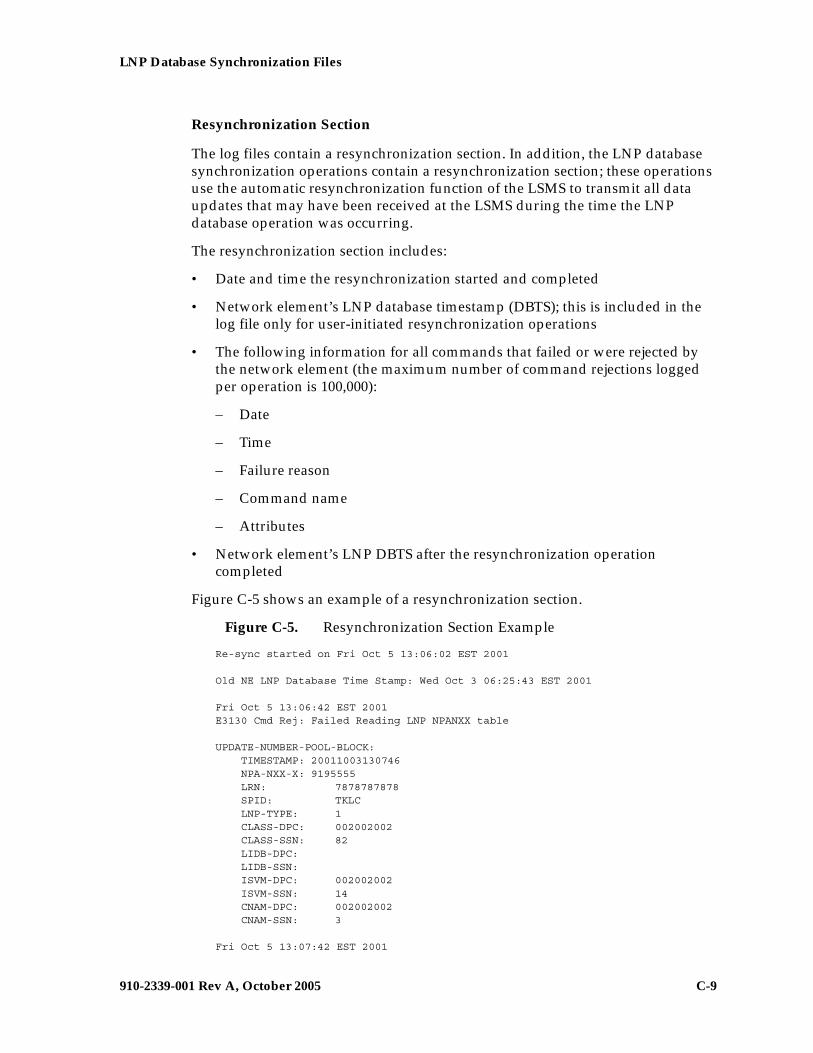
LNP Database Synchronization Files
910-2339-001 Rev A, October 2005 C-9
Resynchronization Section
The log files contain a resynchronization section. In addition, the LNP database synchronization operations contain a resynchronization section; these operations use the automatic resynchronization function of the LSMS to transmit all data updates that may have been received at the LSMS during the time the LNP database operation was occurring.
The resynchronization section includes:
• Date and time the resynchronization started and completed
• Network element’s LNP database timestamp (DBTS); this is included in the log file only for user-initiated resynchronization operations
• The following information for all commands that failed or were rejected by the network element (the maximum number of command rejections logged per operation is 100,000):
– Date
– Time
– Failure reason
– Command name
– Attributes
• Network element’s LNP DBTS after the resynchronization operation completed
Figure C-5 shows an example of a resynchronization section.
Figure C-5. Resynchronization Section Example
Re-sync started on Fri Oct 5 13:06:02 EST 2001
Old NE LNP Database Time Stamp: Wed Oct 3 06:25:43 EST 2001
Fri Oct 5 13:06:42 EST 2001E3130 Cmd Rej: Failed Reading LNP NPANXX table
UPDATE-NUMBER-POOL-BLOCK: TIMESTAMP: 20011003130746 NPA-NXX-X: 9195555 LRN: 7878787878 SPID: TKLC LNP-TYPE: 1 CLASS-DPC: 002002002 CLASS-SSN: 82 LIDB-DPC: LIDB-SSN: ISVM-DPC: 002002002 ISVM-SSN: 14 CNAM-DPC: 002002002 CNAM-SSN: 3
Fri Oct 5 13:07:42 EST 2001
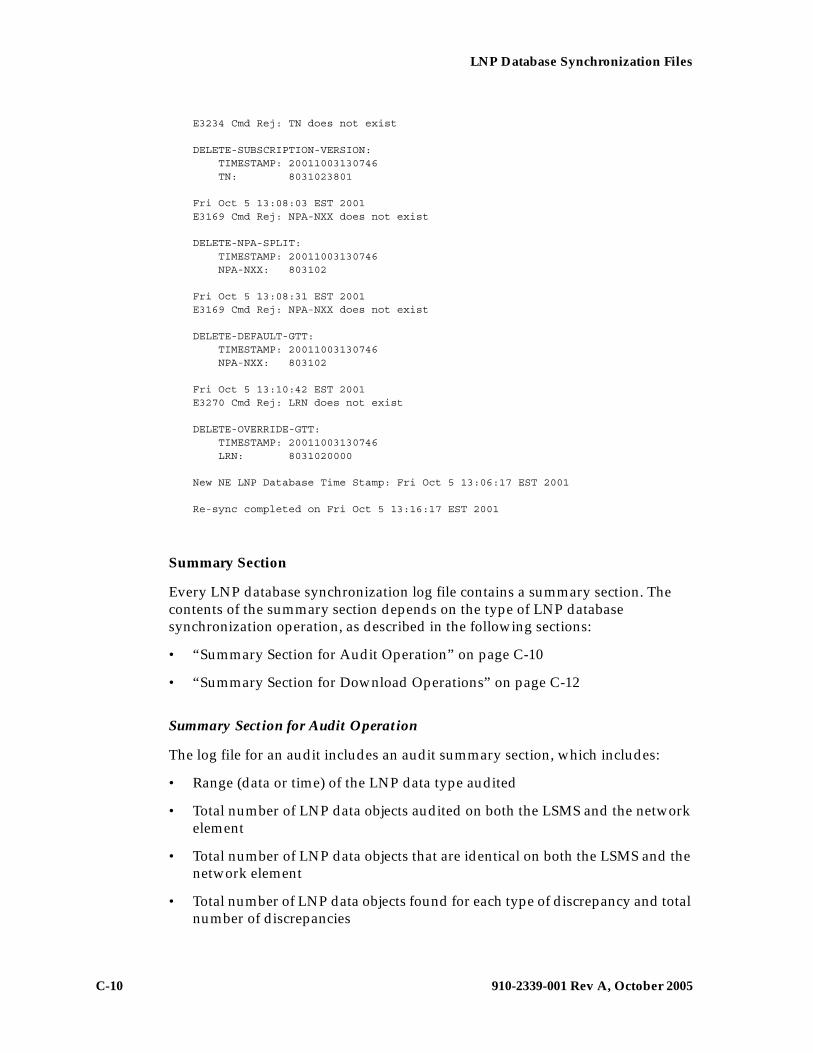
C-10 910-2339-001 Rev A, October 2005
LNP Database Synchronization Files
E3234 Cmd Rej: TN does not exist
DELETE-SUBSCRIPTION-VERSION: TIMESTAMP: 20011003130746 TN: 8031023801
Fri Oct 5 13:08:03 EST 2001E3169 Cmd Rej: NPA-NXX does not exist
DELETE-NPA-SPLIT: TIMESTAMP: 20011003130746 NPA-NXX: 803102
Fri Oct 5 13:08:31 EST 2001E3169 Cmd Rej: NPA-NXX does not exist
DELETE-DEFAULT-GTT: TIMESTAMP: 20011003130746 NPA-NXX: 803102
Fri Oct 5 13:10:42 EST 2001E3270 Cmd Rej: LRN does not exist
DELETE-OVERRIDE-GTT: TIMESTAMP: 20011003130746 LRN: 8031020000
New NE LNP Database Time Stamp: Fri Oct 5 13:06:17 EST 2001
Re-sync completed on Fri Oct 5 13:16:17 EST 2001
Summary Section
Every LNP database synchronization log file contains a summary section. The contents of the summary section depends on the type of LNP database synchronization operation, as described in the following sections:
• “Summary Section for Audit Operation” on page C-10
• “Summary Section for Download Operations” on page C-12
Summary Section for Audit Operation
The log file for an audit includes an audit summary section, which includes:
• Range (data or time) of the LNP data type audited
• Total number of LNP data objects audited on both the LSMS and the network element
• Total number of LNP data objects that are identical on both the LSMS and the network element
• Total number of LNP data objects found for each type of discrepancy and total number of discrepancies
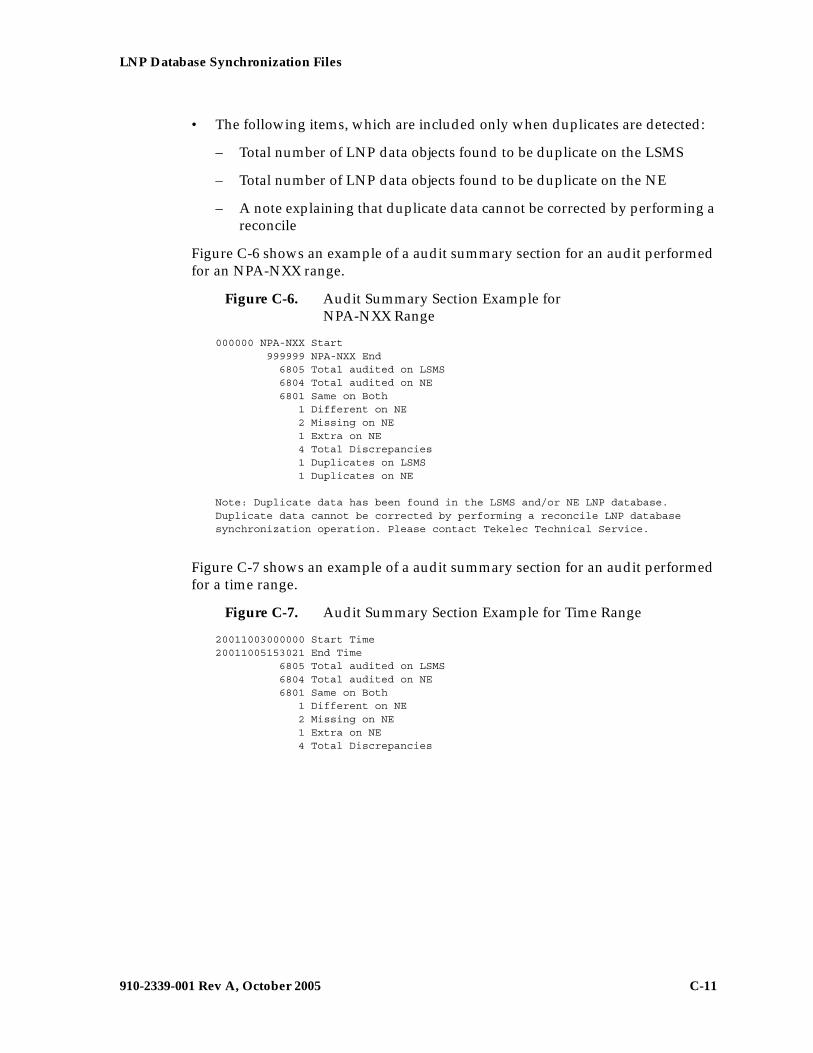
LNP Database Synchronization Files
910-2339-001 Rev A, October 2005 C-11
• The following items, which are included only when duplicates are detected:
– Total number of LNP data objects found to be duplicate on the LSMS
– Total number of LNP data objects found to be duplicate on the NE
– A note explaining that duplicate data cannot be corrected by performing a reconcile
Figure C-6 shows an example of a audit summary section for an audit performed for an NPA-NXX range.
Figure C-6. Audit Summary Section Example for NPA-NXX Range
000000 NPA-NXX Start 999999 NPA-NXX End 6805 Total audited on LSMS 6804 Total audited on NE 6801 Same on Both 1 Different on NE 2 Missing on NE 1 Extra on NE 4 Total Discrepancies 1 Duplicates on LSMS 1 Duplicates on NE
Note: Duplicate data has been found in the LSMS and/or NE LNP database. Duplicate data cannot be corrected by performing a reconcile LNP databasesynchronization operation. Please contact Tekelec Technical Service.
Figure C-7 shows an example of a audit summary section for an audit performed for a time range.
Figure C-7. Audit Summary Section Example for Time Range
20011003000000 Start Time20011005153021 End Time 6805 Total audited on LSMS 6804 Total audited on NE 6801 Same on Both 1 Different on NE 2 Missing on NE 1 Extra on NE 4 Total Discrepancies
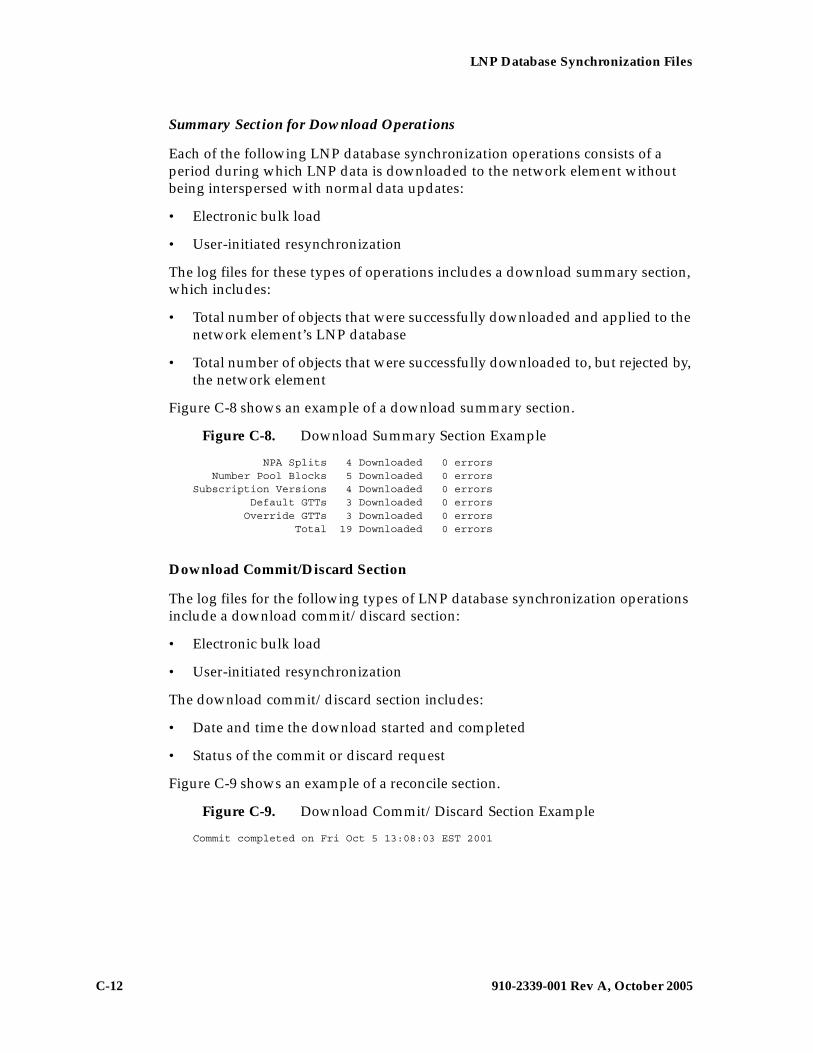
C-12 910-2339-001 Rev A, October 2005
LNP Database Synchronization Files
Summary Section for Download Operations
Each of the following LNP database synchronization operations consists of a period during which LNP data is downloaded to the network element without being interspersed with normal data updates:
• Electronic bulk load
• User-initiated resynchronization
The log files for these types of operations includes a download summary section, which includes:
• Total number of objects that were successfully downloaded and applied to the network element’s LNP database
• Total number of objects that were successfully downloaded to, but rejected by, the network element
Figure C-8 shows an example of a download summary section.
Figure C-8. Download Summary Section Example
NPA Splits 4 Downloaded 0 errors Number Pool Blocks 5 Downloaded 0 errorsSubscription Versions 4 Downloaded 0 errors Default GTTs 3 Downloaded 0 errors Override GTTs 3 Downloaded 0 errors Total 19 Downloaded 0 errors
Download Commit/Discard Section
The log files for the following types of LNP database synchronization operations include a download commit/discard section:
• Electronic bulk load
• User-initiated resynchronization
The download commit/discard section includes:
• Date and time the download started and completed
• Status of the commit or discard request
Figure C-9 shows an example of a reconcile section.
Figure C-9. Download Commit/Discard Section Example
Commit completed on Fri Oct 5 13:08:03 EST 2001
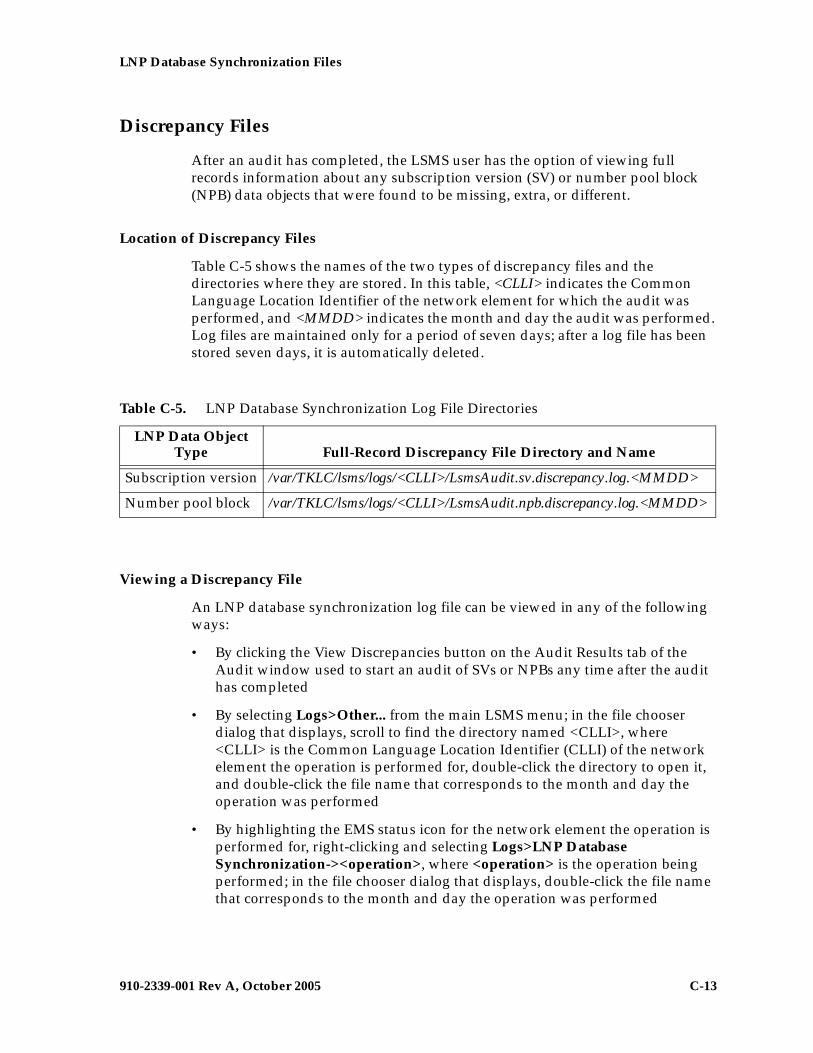
LNP Database Synchronization Files
910-2339-001 Rev A, October 2005 C-13
Discrepancy Files
After an audit has completed, the LSMS user has the option of viewing full records information about any subscription version (SV) or number pool block (NPB) data objects that were found to be missing, extra, or different.
Location of Discrepancy Files
Table C-5 shows the names of the two types of discrepancy files and the directories where they are stored. In this table, <CLLI> indicates the Common Language Location Identifier of the network element for which the audit was performed, and <MMDD> indicates the month and day the audit was performed. Log files are maintained only for a period of seven days; after a log file has been stored seven days, it is automatically deleted.
Viewing a Discrepancy File
An LNP database synchronization log file can be viewed in any of the following ways:
• By clicking the View Discrepancies button on the Audit Results tab of the Audit window used to start an audit of SVs or NPBs any time after the audit has completed
• By selecting Logs>Other... from the main LSMS menu; in the file chooser dialog that displays, scroll to find the directory named <CLLI>, where <CLLI> is the Common Language Location Identifier (CLLI) of the network element the operation is performed for, double-click the directory to open it, and double-click the file name that corresponds to the month and day the operation was performed
• By highlighting the EMS status icon for the network element the operation is performed for, right-clicking and selecting Logs>LNP Database Synchronization-><operation>, where <operation> is the operation being performed; in the file chooser dialog that displays, double-click the file name that corresponds to the month and day the operation was performed
Table C-5. LNP Database Synchronization Log File Directories
LNP Data Object Type Full-Record Discrepancy File Directory and Name
Subscription version /var/TKLC/lsms/logs/<CLLI>/LsmsAudit.sv.discrepancy.log.<MMDD>
Number pool block /var/TKLC/lsms/logs/<CLLI>/LsmsAudit.npb.discrepancy.log.<MMDD>
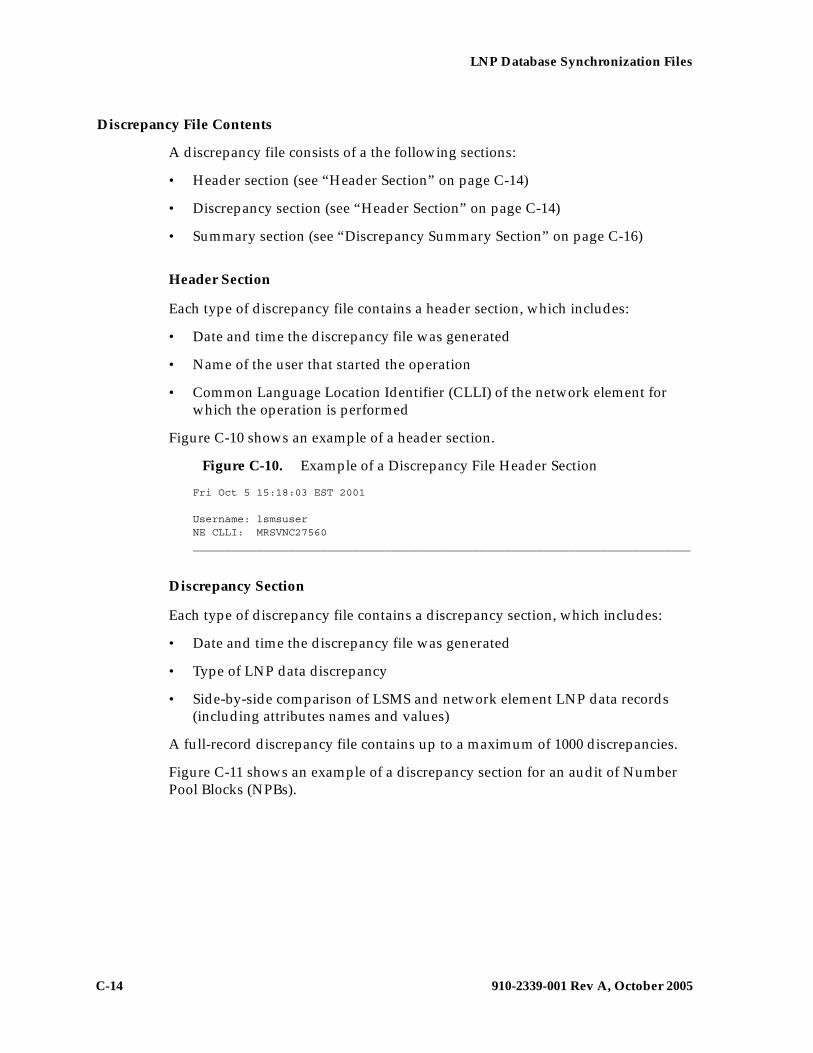
C-14 910-2339-001 Rev A, October 2005
LNP Database Synchronization Files
Discrepancy File Contents
A discrepancy file consists of a the following sections:
• Header section (see “Header Section” on page C-14)
• Discrepancy section (see “Header Section” on page C-14)
• Summary section (see “Discrepancy Summary Section” on page C-16)
Header Section
Each type of discrepancy file contains a header section, which includes:
• Date and time the discrepancy file was generated
• Name of the user that started the operation
• Common Language Location Identifier (CLLI) of the network element for which the operation is performed
Figure C-10 shows an example of a header section.
Figure C-10. Example of a Discrepancy File Header Section
Fri Oct 5 15:18:03 EST 2001
Username: lsmsuserNE CLLI: MRSVNC27560______________________________________________________________________________
Discrepancy Section
Each type of discrepancy file contains a discrepancy section, which includes:
• Date and time the discrepancy file was generated
• Type of LNP data discrepancy
• Side-by-side comparison of LSMS and network element LNP data records (including attributes names and values)
A full-record discrepancy file contains up to a maximum of 1000 discrepancies.
Figure C-11 shows an example of a discrepancy section for an audit of Number Pool Blocks (NPBs).
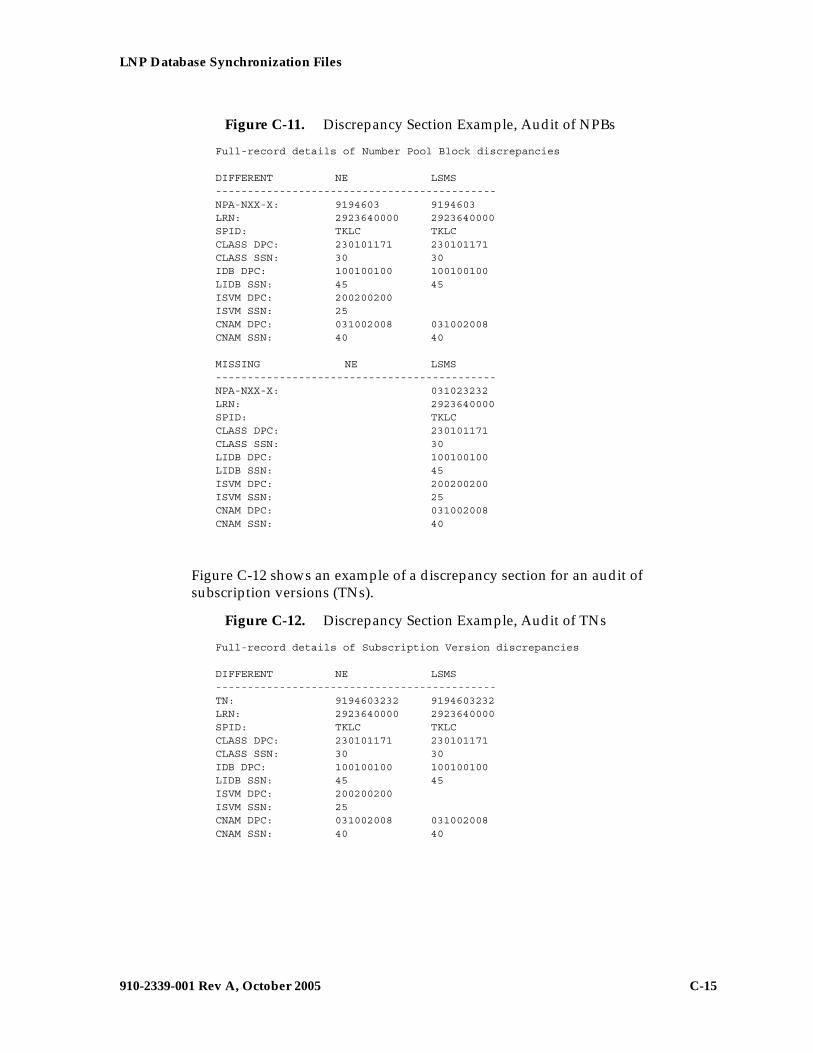
LNP Database Synchronization Files
910-2339-001 Rev A, October 2005 C-15
Figure C-11. Discrepancy Section Example, Audit of NPBs
Full-record details of Number Pool Block discrepancies
DIFFERENT NE LSMS--------------------------------------------NPA-NXX-X: 9194603 9194603LRN: 2923640000 2923640000SPID: TKLC TKLCCLASS DPC: 230101171 230101171CLASS SSN: 30 30IDB DPC: 100100100 100100100LIDB SSN: 45 45ISVM DPC: 200200200ISVM SSN: 25CNAM DPC: 031002008 031002008CNAM SSN: 40 40
MISSING NE LSMS--------------------------------------------NPA-NXX-X: 031023232LRN: 2923640000SPID: TKLCCLASS DPC: 230101171CLASS SSN: 30LIDB DPC: 100100100LIDB SSN: 45ISVM DPC: 200200200ISVM SSN: 25CNAM DPC: 031002008CNAM SSN: 40
Figure C-12 shows an example of a discrepancy section for an audit of subscription versions (TNs).
Figure C-12. Discrepancy Section Example, Audit of TNs
Full-record details of Subscription Version discrepancies
DIFFERENT NE LSMS--------------------------------------------TN: 9194603232 9194603232LRN: 2923640000 2923640000SPID: TKLC TKLCCLASS DPC: 230101171 230101171CLASS SSN: 30 30IDB DPC: 100100100 100100100LIDB SSN: 45 45ISVM DPC: 200200200ISVM SSN: 25CNAM DPC: 031002008 031002008CNAM SSN: 40 40

C-16 910-2339-001 Rev A, October 2005
LNP Database Synchronization Files
Discrepancy Summary Section
Each type of discrepancy file contains a summary section, which includes:
• Total number of each type of discrepancy included in the report
• Date and time the discrepancy file was completed
Figure C-13 shows an example of a discrepancy summary section.
Figure C-13. Discrepancy Summary Section Example
SUMMARY -------------------------------------------- 1 Different on NE 0 Missing on NE 1 Extra on NE 2 Total Discrepancies
Fri Oct 5 15:18:03 EST 2001
910-2339-001 Rev A, October 2005 D-1
D
Synchronization PerformanceEstimates
Introduction.....................................................................................................D–2
Recommended Network Bandwidth...........................................................D–2
Performance of LSMS to NE Operations.....................................................D–3
Performance of NE to NE Operations .........................................................D–4
D-2 910-2339-001 Rev A, October 2005
Synchronization Performance Estimates
Introduction
This appendix provides estimates of the transaction rates for the various LNP database synchronization operations. Using these estimates can help you decide which type of operation to use.
Recommended Network Bandwidth
To use any LNP database synchronization operation other than manual bulk load, it is recommended that the network connection between the LSMS and each network element have a minimum bandwidth that is equal to or greater than 50% of a T1 line (a minimum bandwidth of at least 96,000 bytes per second).
The estimates shown in this appendix assume that the LNP database synchronization operation uses bandwidth of 96,000 bytes per second.
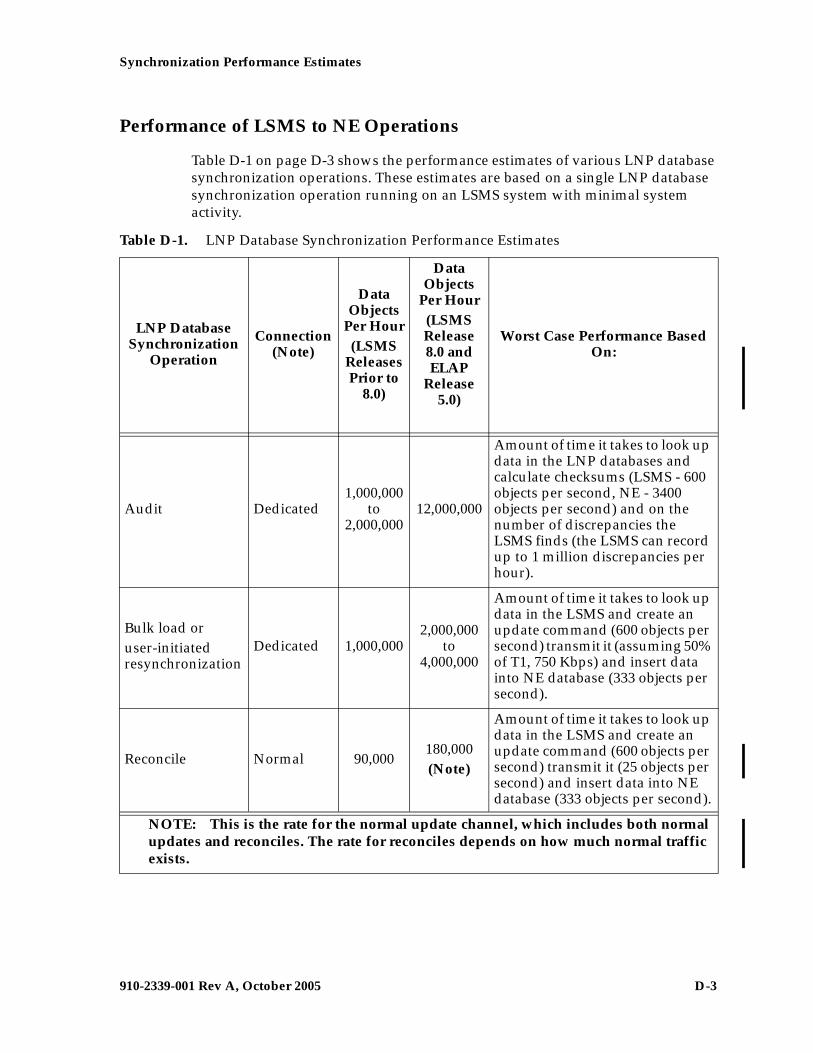
Synchronization Performance Estimates
910-2339-001 Rev A, October 2005 D-3
Performance of LSMS to NE Operations
Table D-1 on page D-3 shows the performance estimates of various LNP database synchronization operations. These estimates are based on a single LNP database synchronization operation running on an LSMS system with minimal system activity.
Table D-1. LNP Database Synchronization Performance Estimates
LNP Database Synchronization
Operation
Connection (Note)
Data Objects
Per Hour(LSMS
Releases Prior to
8.0)
Data Objects
Per Hour(LSMS Release 8.0 and ELAP
Release 5.0)
Worst Case Performance Based On:
Audit Dedicated1,000,000
to 2,000,000
12,000,000
Amount of time it takes to look up data in the LNP databases and calculate checksums (LSMS - 600 objects per second, NE - 3400 objects per second) and on the number of discrepancies the LSMS finds (the LSMS can record up to 1 million discrepancies per hour).
Bulk load oruser-initiated resynchronization
Dedicated 1,000,0002,000,000
to 4,000,000
Amount of time it takes to look up data in the LSMS and create an update command (600 objects per second) transmit it (assuming 50% of T1, 750 Kbps) and insert data into NE database (333 objects per second).
Reconcile Normal 90,000180,000(Note)
Amount of time it takes to look up data in the LSMS and create an update command (600 objects per second) transmit it (25 objects per second) and insert data into NE database (333 objects per second).
NOTE: This is the rate for the normal update channel, which includes both normal updates and reconciles. The rate for reconciles depends on how much normal traffic exists.
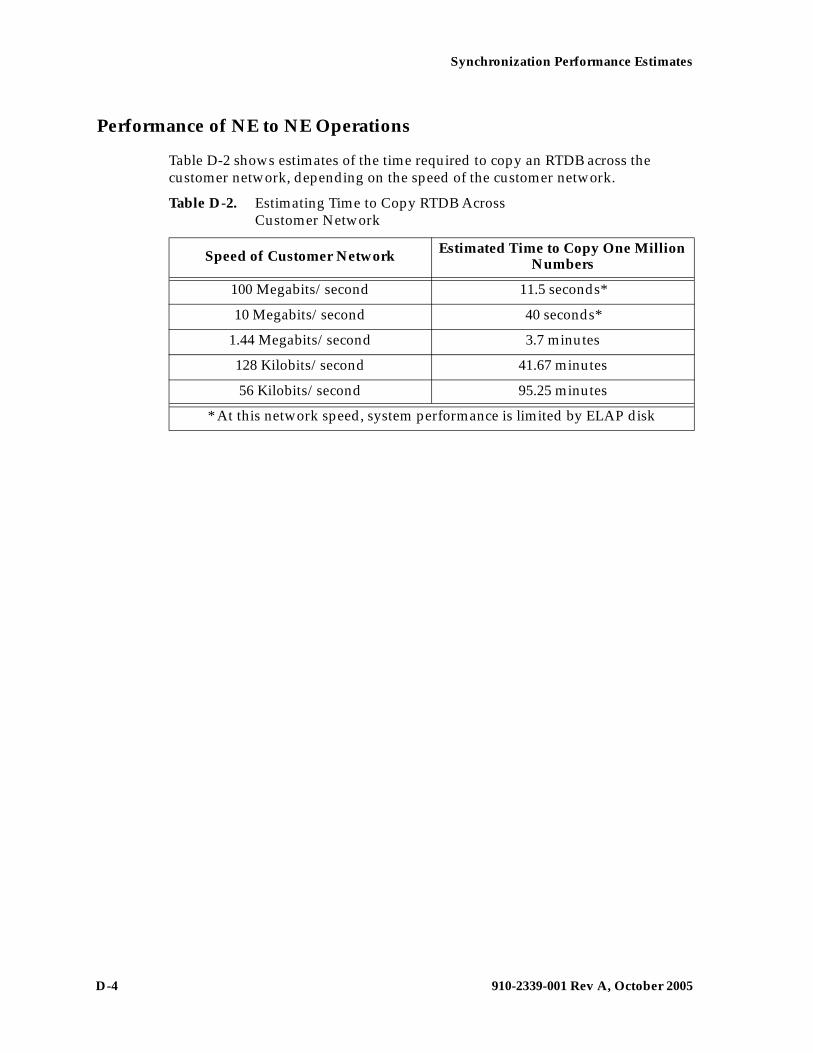
D-4 910-2339-001 Rev A, October 2005
Synchronization Performance Estimates
Performance of NE to NE Operations
Table D-2 shows estimates of the time required to copy an RTDB across the customer network, depending on the speed of the customer network.
Table D-2. Estimating Time to Copy RTDB Across Customer Network
Speed of Customer Network Estimated Time to Copy One Million Numbers
100 Megabits/second 11.5 seconds*
10 Megabits/second 40 seconds*
1.44 Megabits/second 3.7 minutes
128 Kilobits/second 41.67 minutes
56 Kilobits/second 95.25 minutes
* At this network speed, system performance is limited by ELAP disk
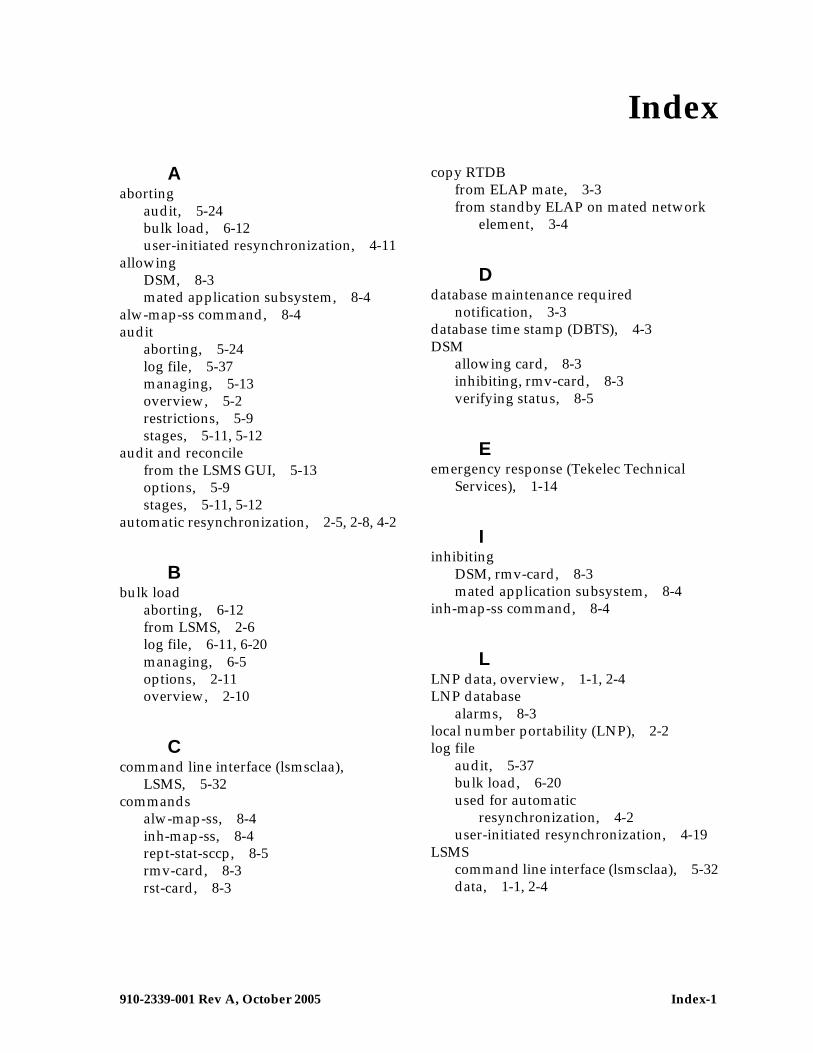
910-2339-001 Rev A, October 2005 Index-1
Aaborting
audit, 5-24bulk load, 6-12user-initiated resynchronization, 4-11
allowingDSM, 8-3mated application subsystem, 8-4
alw-map-ss command, 8-4audit
aborting, 5-24log file, 5-37managing, 5-13overview, 5-2restrictions, 5-9stages, 5-11, 5-12
audit and reconcilefrom the LSMS GUI, 5-13options, 5-9stages, 5-11, 5-12
automatic resynchronization, 2-5, 2-8, 4-2
Bbulk load
aborting, 6-12from LSMS, 2-6log file, 6-11, 6-20managing, 6-5options, 2-11overview, 2-10
Ccommand line interface (lsmsclaa),
LSMS, 5-32commands
alw-map-ss, 8-4inh-map-ss, 8-4rept-stat-sccp, 8-5rmv-card, 8-3rst-card, 8-3
copy RTDBfrom ELAP mate, 3-3from standby ELAP on mated network
element, 3-4
Ddatabase maintenance required
notification, 3-3database time stamp (DBTS), 4-3DSM
allowing card, 8-3inhibiting, rmv-card, 8-3verifying status, 8-5
Eemergency response (Tekelec Technical
Services), 1-14
Iinhibiting
DSM, rmv-card, 8-3mated application subsystem, 8-4
inh-map-ss command, 8-4
LLNP data, overview, 1-1, 2-4LNP database
alarms, 8-3local number portability (LNP), 2-2log file
audit, 5-37bulk load, 6-20used for automatic
resynchronization, 4-2user-initiated resynchronization, 4-19
LSMScommand line interface (lsmsclaa), 5-32data, 1-1, 2-4
Index
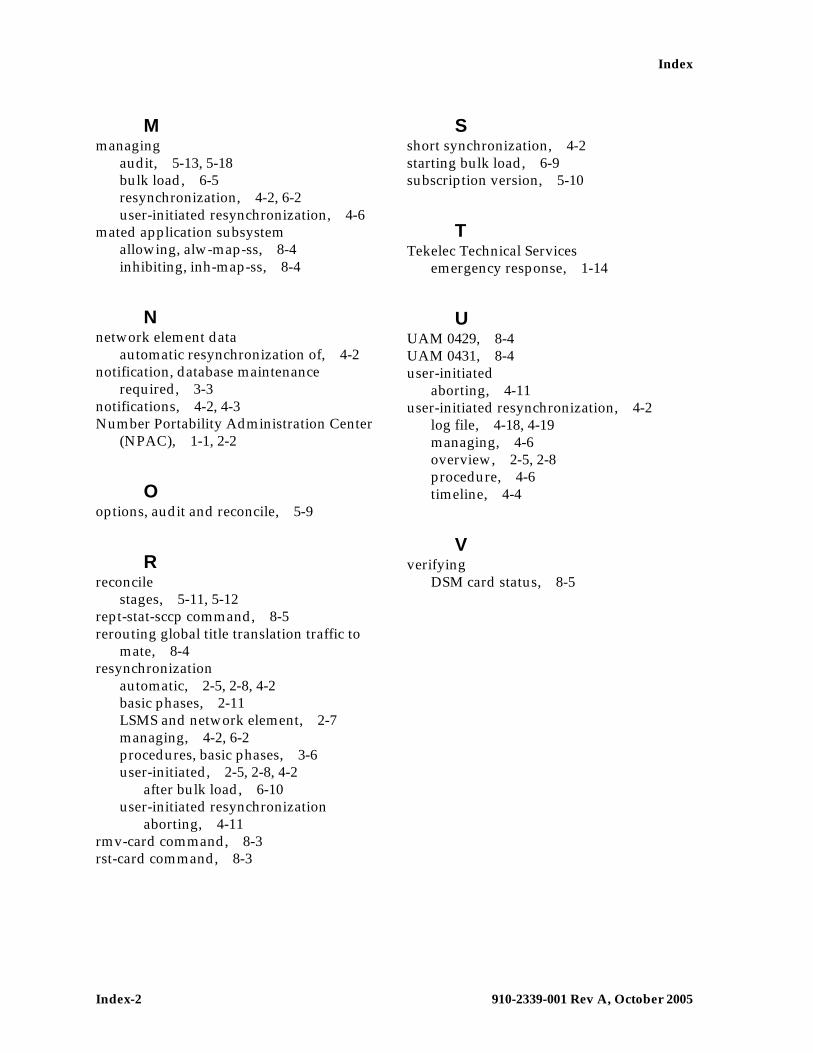
Index-2 910-2339-001 Rev A, October 2005
Index
Mmanaging
audit, 5-13, 5-18bulk load, 6-5resynchronization, 4-2, 6-2user-initiated resynchronization, 4-6
mated application subsystemallowing, alw-map-ss, 8-4inhibiting, inh-map-ss, 8-4
Nnetwork element data
automatic resynchronization of, 4-2notification, database maintenance
required, 3-3notifications, 4-2, 4-3Number Portability Administration Center
(NPAC), 1-1, 2-2
Ooptions, audit and reconcile, 5-9
Rreconcile
stages, 5-11, 5-12rept-stat-sccp command, 8-5rerouting global title translation traffic to
mate, 8-4resynchronization
automatic, 2-5, 2-8, 4-2basic phases, 2-11LSMS and network element, 2-7managing, 4-2, 6-2procedures, basic phases, 3-6user-initiated, 2-5, 2-8, 4-2
after bulk load, 6-10user-initiated resynchronization
aborting, 4-11rmv-card command, 8-3rst-card command, 8-3
Sshort synchronization, 4-2starting bulk load, 6-9subscription version, 5-10
TTekelec Technical Services
emergency response, 1-14
UUAM 0429, 8-4UAM 0431, 8-4user-initiated
aborting, 4-11user-initiated resynchronization, 4-2
log file, 4-18, 4-19managing, 4-6overview, 2-5, 2-8procedure, 4-6timeline, 4-4
Vverifying
DSM card status, 8-5


![Dry and moist dynamics shape regional patterns of extreme … · Correspondingly, the dry/moist decomposition can be applied to the EPS ( lnP): lnP = lnP D + ln(1+ ), [1] where lnP](https://img.pdfslide.us/doc/110x75/60c1d52cccd73b2a9201e4ac/dry-and-moist-dynamics-shape-regional-patterns-of-extreme-correspondingly-the-drymoist.jpg)


![[LNP] Durarara!! Vol. 04 Prólogo](https://img.pdfslide.us/doc/110x75/577cd5a11a28ab9e789b4a58/lnp-durarara-vol-04-prologo.jpg)