Embed Size (px)
Citation preview
Page | 1
HHS Learning Portal
LMS MANAGER/SUPERVISOR USER GUIDE
National Institutes of Health OHR/HRSAID/CSBAB

Page | iii
HHS LEARNING PORTAL
LMS MANAGER/SUPERVISOR
Version 4.0
Page | iv
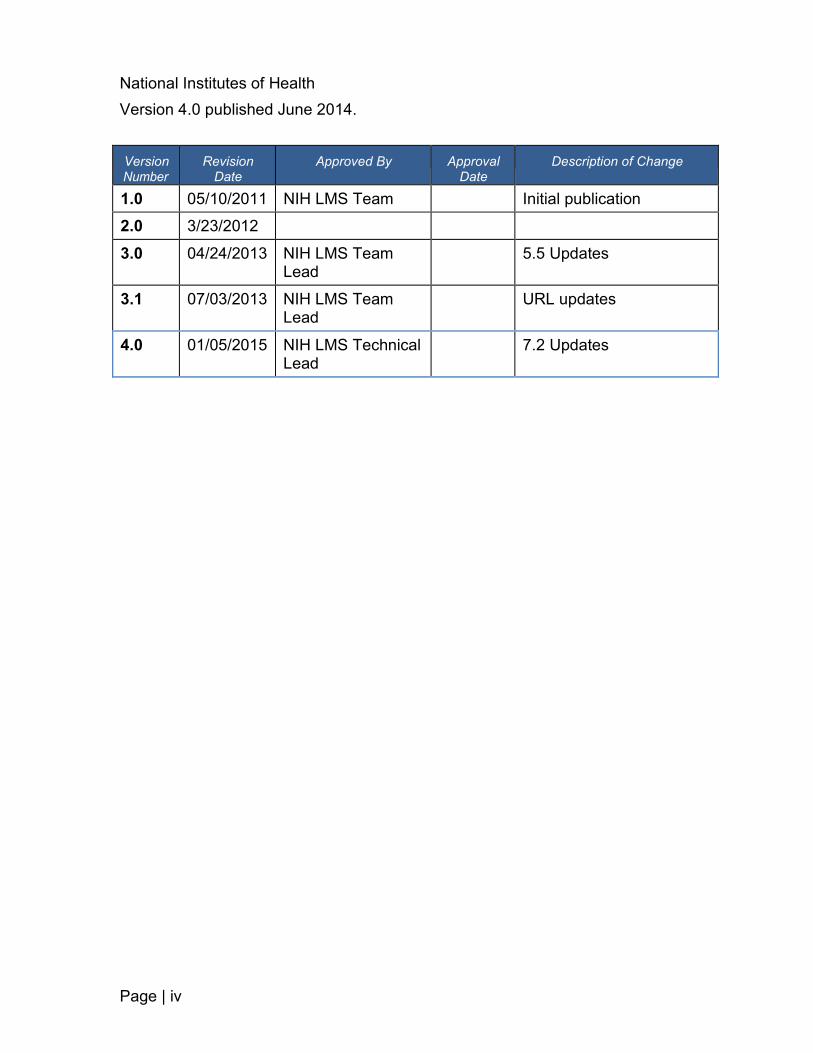
National Institutes of Health Version 4.0 published June 2014.
Version Number
Revision Date
Approved By Approval Date
Description of Change
1.0 05/10/2011 NIH LMS Team Initial publication 2.0 3/23/2012
3.0 04/24/2013 NIH LMS Team Lead
5.5 Updates
3.1 07/03/2013 NIH LMS Team Lead
URL updates
4.0 01/05/2015 NIH LMS Technical Lead
7.2 Updates

Page | V
TABLE OF CONTENTS
LMS Manager/Supervisor
Preface: About This Guide .................................................................................... 7 Intended Audience ............................................................................................ 7 How to Get Help ................................................................................................ 7 Additional HHS Learning Portal Information ...................................................... 7 Accessing the LMS ............................................................................................ 8
Getting Started ...................................................................................................... 8 Using web Browsers.......................................................................................... 8 PC Users ........................................................................................................... 8 Mac Users ......................................................................................................... 8 Pop-Ups and Downloads ................................................................................... 8 LMS Terms and Definitions ............................................................................... 8
The HHS Learning Portal Defined....................................................................... 11 What is the HHS learning portal? .................................................................... 11
Overview of the LMS User Interface ................................................................... 11 The Menu Bar ................................................................................................. 11 LMS Preferences ............................................................................................ 11
Step-By-Step (Setting Your LMS Preferences) ............................................ 12 The Team Home Role ......................................................................................... 13
Overview ......................................................................................................... 13 The Team Home Page .................................................................................... 14
My Team’s Home Page Portlets .................................................................. 14 Team Directory ................................................................................................ 16
Step-by-step (View a Team Member’s Profile)............................................. 17 The NIH Manager’s Learning Dashboard ........................................................ 18
Registrations ................................................................................................ 19 Step-by-step (Approving Pending Registrations For Team Members) ......... 19
Message Center -- NEW! ................................................................................ 22 Step-By-Step (View Registrations using the Message Center) .................... 22
Manage Team Curricula .................................................................................. 23 Step-By-Step (View Member Curriculum) .................................................... 23 Step-By-Step (Add Curriculum To a Team Member) ................................... 26
Manage Team Transcripts .............................................................................. 28
Page | vi
LMS Manager/Supervisor Step-By-Step (View Team Member Transcript) ........................................... 28
Register Team Members For Courses ............................................................ 30 Step-By-Step (Search the LMS Catalog and Register Team Members) ...... 30
View Team Order History ................................................................................ 36 Step-By-Step (View Team Order History) .................................................... 36 Step-By-Step (Actions: Add the CAN to an Order) ....................................... 38
Managing Certifications ................................................................................... 41 Step-By-Step (View Team Member Certifications) ....................................... 41 Step-By-Step (Add Certifications to Team Members) .................................. 43
Competencies ................................................................................................. 45 Step-By-Step (View Competency Rollup Across Team) .............................. 45 Step-By-Step (View Team Member Competencies Summary) .................... 47 Step-By-Step (Actions: Delete a Required Competency) ............................. 48 Step-By-Step (Add a Required Competency) .............................................. 50 Step-By-Step (View Team Member Assessments) ...................................... 53 Step-By-Step (Create New Manager Assessment) ...................................... 55
Reports for the Manager ..................................................................................... 59 Running Reports ............................................................................................. 59
Step-By-Step (Generate a Report) ............................................................... 59 Step-By-Step (Print a Report) ...................................................................... 61 Step-By-Step (Email a Report) ..................................................................... 62 Step-By-Step (Subscribe to a Report) .......................................................... 63
Learning Plans .................................................................................................... 66 Managing your Learning Plan .......................................................................... 66
Step-By-Step (View Activities for a Team Member in Team Plans) ............ 66 Step-By-Step (Add Activity to a Team Member in Team Plans) ................... 68 Step-By-Step (Delete an Activity in a Team Member’s Plan) ....................... 70 Step-By-Step (Register a Team Member for Training From a Learning Plan) .....................................................................................................................73
Helpful Information .............................................................................................. 77
LMS Manager/Supervisor
Page | 7
INTENDED AUDIENCE
This guide is intended to provide guidance to NIH Managers/Supervisors who need to access the HHS Learning Portal and manage their team’s learning. Management of team learning consists of the following:
• View team member enrollments • Approve training for your team members • Update a team member’s transcript • Assign a curriculum or certification to a team member • Register a team member for a course • Add a competency requirement to a team member • Manage the learning plan of a team member • Perform an assessment on a required competency for a team member • Run reports based on team member learning
You will need to have a team in order to perform these tasks. A team consists of people that have you designated as manager in their HHS Learning Portal profile. The manager for federal employees is the ITAS Timecard Approver which is received directly from the ITAS system. Contractors may have their managers entered manually. Management of your team extends down to your team members’ subordinates as well.
HOW TO GET HELP
If you encounter technical difficulties with the LMS or while performing any tasks in this user guide, please submit a ticket at: https://nihohrweb.nih.gov:1010/ WiTS_IntraHR/index.aspx If you have questions about the NIH training center policy, please contact the NIH Training Center at [email protected], or call the NIH Training Center at 301-496-6211 and ask to speak with a NIH Training Center representative.
ADDITIONAL HHS LEARNING PORTAL INFORMATION
Additional information about the HHS Learning Portal can be found at: http://trainingcenter.nih.gov/lms_courses.html https://hr.nih.gov/hr-systems/lms
QRG’s for Manager/Supervisor tasks are located at: https://hr.nih.gov/hr-systems/lms
PREFACE: ABOUT THIS GUIDE
LMS Manager/Supervisor
Page |8
GETTING STARTED
ACCESSING THE LMS
The HHS Learning Portal can be accessed by navigating to the HHS Learning Portal/LMS URL (https://lms.learning.hhs.gov/), You will automatically be redirected to the AMS log on page. If you need help accessing the HHS Learning Portal through HHS Access Management System (AMS), please refer to the NIH-specific log on instructions found at: https://hr.nih.gov/sites/default/files/public/documents/hr-systems/lms/pdf/ts02-l- employee-log.pdf
USING WEB BROWSERS
The LMS can be used online with multiple computer platforms. The recommended web browsers for each major platform are listed below.
PC USERS
PC users should use Microsoft Internet Explorer to access the HHS Learning Portal.
MAC USERS
Mac users should use Safari to access the HHS Learning Portal.
POP-UPS AND DOWNLOADS
Many functions in the LMS require pop-up windows. Make sure your browser allows pop-ups from the HHS Learning Portal. For help with this, please contact the NIH IT Service Desk at http://itservicedesk.nih.gov/ Some LMS functions require you to download files, such as printing a certificate of completion from your transcript. You can facilitate this function by checking your browser security settings and allowing file downloads from the HHS Learning Portal. For help with this, please contact the NIH IT Help Desk at http://itservicedesk.nih.gov/
LMS TERMS AND DEFINITIONS
Audience Types - Audience Types are used to group organizations and learners in the system. Similarly, Audience Sub-Types allow for the Audience Types to be grouped further into smaller groups. These groups can then be used to control access to learning offerings in the LMS.
Behavioral Descriptors – Behavioral descriptors are descriptions associated with proficiency levels. They are intended to help establish an anchor that raters and viewers can use when assessing the proficiency level of a competency holder.
LMS Manager/Supervisor
Page | 9
Certification – A certification is a predefined set of courses, other certifications, or any combination thereof, that have been grouped together with a deadline for completion. Credentials earned by completing the certification may expire on a predetermined date.
Competency – A competency is a skill, knowledge, ability, or behavior that can be measured, calculated, acquired, specified, or tested. Examples of competencies include “Project Management”, “Written Communications”, and “Interpersonal Communications”. Competencies are notated as either “held” or “required” in the LMS.
Competency Gap – A competency gap is the numerical difference between the required level of a competency and the individual’s currently assessed level of a competency.
Course – A course is organized training with planned objectives for learners to complete. Courses may be offered using a variety of delivery types and may have multiple offerings.
Curriculum – A curriculum is a predefined set of courses, other curricula, or any combination thereof, that have been grouped together. A learner must complete all courses and curricula to complete the curriculum.
Enrollment – An enrollment is an offering that a learner is registered for, but has not yet completed.
Held Competency – A competency receives the status of held in the LMS when it is assessed by the user or others.
Job Family – A job family is a collection of related jobs.
Job Role – A job role is a group of specific skills required to perform a job function. Roles can be shared across multiple jobs.
Jobs – A job is a collection of job roles.
Learning Plan – A Learning plan is a list of learning items a user intends to take and other tasks you need to perform as part of your general development. All LMS users have a single learning plan. Progress is monitored for all items on the plan.
LMS Manager/Supervisor
Page |10
Location – A location is either a geographic location, such as Bethesda, or a name that serves as an identifier, such as NIH Main Campus.
Multi-Rater Assessment (MRA) – A multi-rater assessment (MRA) is an assessment of competencies by a user’s supervisors, peers, and subordinates.
Order – An order is a summary of registrations for learners. An order may include multiple learners or offerings.
Proficiency Level – A proficiency level represents the scale on which a competency is measured. Examples of the proficiency levels used at NIH include “Fundamental Awareness”, “Novice”, “Intermediate”, “Advanced”, and “Expert”.
Ratee – A rate is he employee whose performance is evaluated.
Rater – A rater is an individual that will evaluate the performance of another employee in a multi-rater assessment.
Registration – A registration is a process that creates an enrollment for a learner and places their name on the roster for physical training or provides access to other methods of delivery such as online training.
Required Competency – A competency receives the status of required when it has been assigned to a user.
Surveys – A survey is a questionnaire that a respondent uses to evaluate a service or provide general feedback.
Transcript – a record or history of training taken by a learner.
User Profile – The User Profile contains information about the learner such as the employee status, start date, name, and organization. The profile does not contain sensitive information such as the employee’s social security number or date of birth.
LMS Manager/Supervisor
Page | 11
WHAT IS THE HHS LEARNING PORTAL?
OVERVIEW OF THE LMS USER INTERFACE
THE MENU BAR
The HHS Learning Portal is a Department-wide training system designed to facilitate management of training for all Health and Human Services employees. It is also known as the Learning Management System or simply LMS. As we proceed through this manual, the term LMS will be used when referring to the HHS Learning Portal.
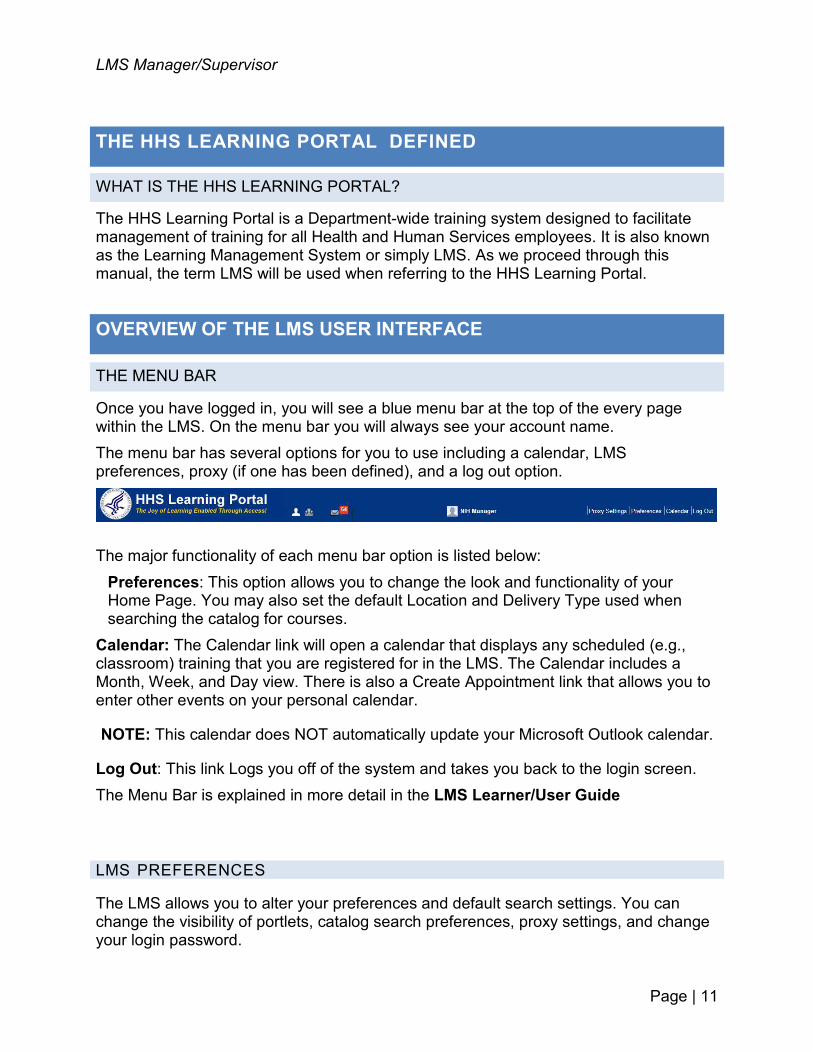
Once you have logged in, you will see a blue menu bar at the top of the every page within the LMS. On the menu bar you will always see your account name. The menu bar has several options for you to use including a calendar, LMS preferences, proxy (if one has been defined), and a log out option.
The major functionality of each menu bar option is listed below:
Preferences: This option allows you to change the look and functionality of your Home Page. You may also set the default Location and Delivery Type used when searching the catalog for courses.
Calendar: The Calendar link will open a calendar that displays any scheduled (e.g., classroom) training that you are registered for in the LMS. The Calendar includes a Month, Week, and Day view. There is also a Create Appointment link that allows you to enter other events on your personal calendar.
NOTE: This calendar does NOT automatically update your Microsoft Outlook calendar.
Log Out: This link Logs you off of the system and takes you back to the login screen. The Menu Bar is explained in more detail in the LMS Learner/User Guide
LMS PREFERENCES
The LMS allows you to alter your preferences and default search settings. You can change the visibility of portlets, catalog search preferences, proxy settings, and change your login password.
THE HHS LEARNING PORTAL DEFINED
LMS Manager/Supervisor
Page |12
Preferences
Save and Close
1. Log on to the LMS.
NOTE: NOTE: For instruction about logging on, see the QRG- LMS Log on Instructions at: http://hr.od.nih.gov/hrsystems/benefits/lms/documents/TS02- L_EmployeeLogOn.pdf
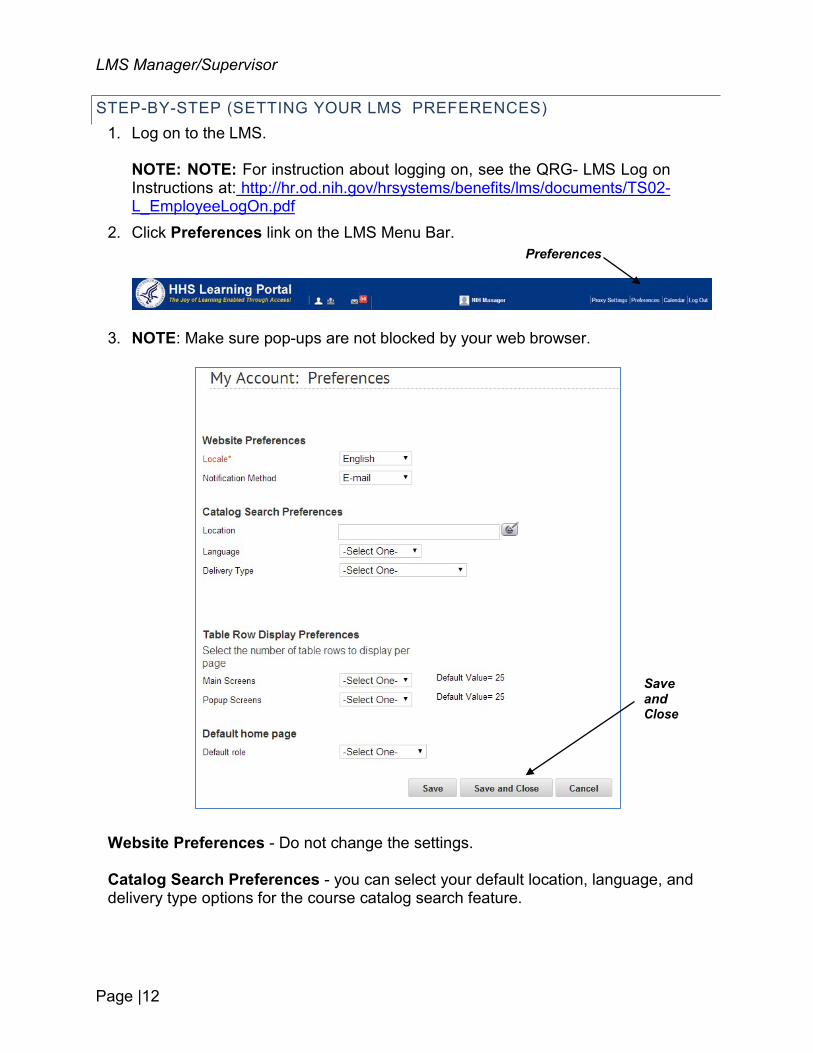
2. Click Preferences link on the LMS Menu Bar.
3. NOTE: Make sure pop-ups are not blocked by your web browser.
Website Preferences - Do not change the settings.
Catalog Search Preferences - you can select your default location, language, and delivery type options for the course catalog search feature.
STEP-BY-STEP (SETTING YOUR LMS PREFERENCES)
LMS Manager/Supervisor
Page | 13
THE TEAM HOME ROLE
Table Row Display Preferences- you can edit the number of search results the LMS will display in the results tables and pop-up screens. (default value = 25)
Default Home Page - you can choose which role you would like to start in when you login to the LMS (for users with multiple roles).
4. Click Save and Close.
OVERVIEW
The Team Home role gives supervisors permissions to managing the learning of their employees. As a supervisor, you can:
• View your team member’s profiles
• View and add competencies
• View previous competency assessments
• Identify competency gaps
• View team member’s enrollments
• Update team member’s transcripts • Assign curriculum/ certification to tem members
• Register a team member for an offering
• Approve first level training registrations
• Verify and update CAN • Create new competency assessments
• Run reports
• Manage the team’s learning plans.
To access the Team Home role, follow these steps:
1. Log on to the LMS. NOTE: For instruction about logging on, see the QRG- LMS Log on Instructions at: hhttps://hr.nih.gov/sites/default/files/public/documents/hr-systems/ lms/pdf/ts02-l-employee-log.pdf
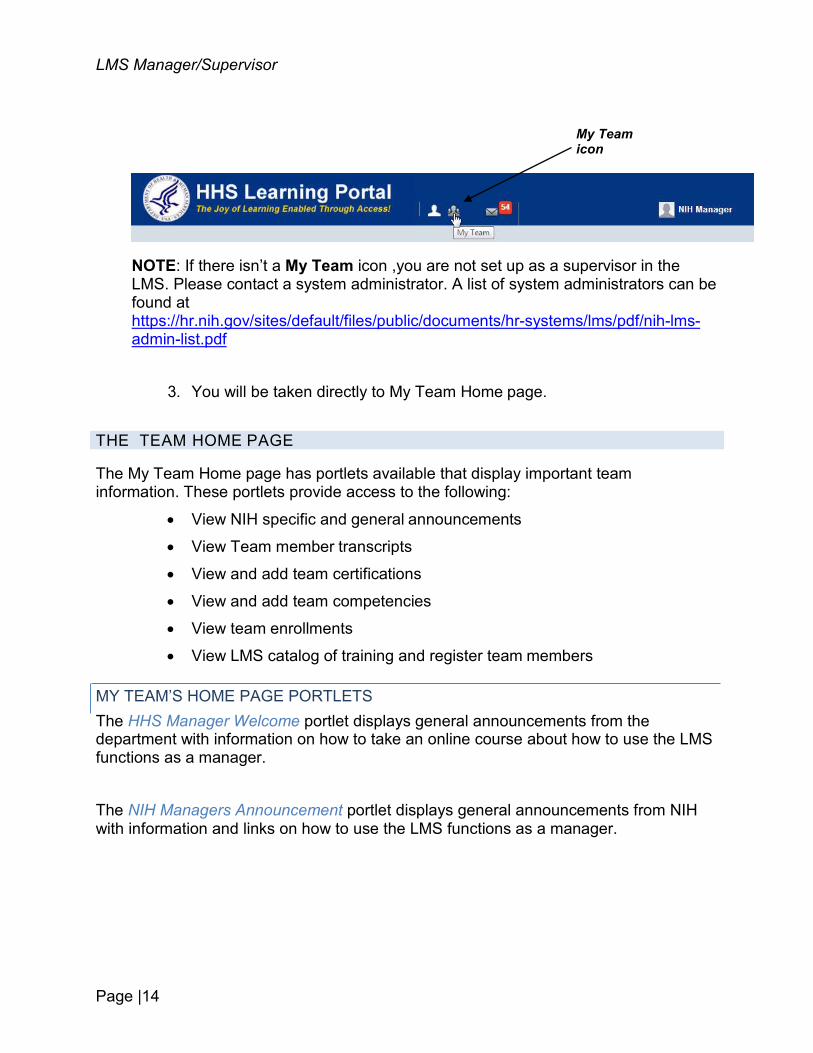
2. Select the My Team icon on the LMS menu bar on the top.
LMS Manager/Supervisor
Page |14
MY TEAM’S HOME PAGE PORTLETS
NOTE: If there isn’t a My Team icon ,you are not set up as a supervisor in the LMS. Please contact a system administrator. A list of system administrators can be found at https://hr.nih.gov/sites/default/files/public/documents/hr-systems/lms/pdf/nih-lms- admin-list.pdf
3. You will be taken directly to My Team Home page.
THE TEAM HOME PAGE
The My Team Home page has portlets available that display important team information. These portlets provide access to the following:
• View NIH specific and general announcements
• View Team member transcripts
• View and add team certifications
• View and add team competencies
• View team enrollments
• View LMS catalog of training and register team members
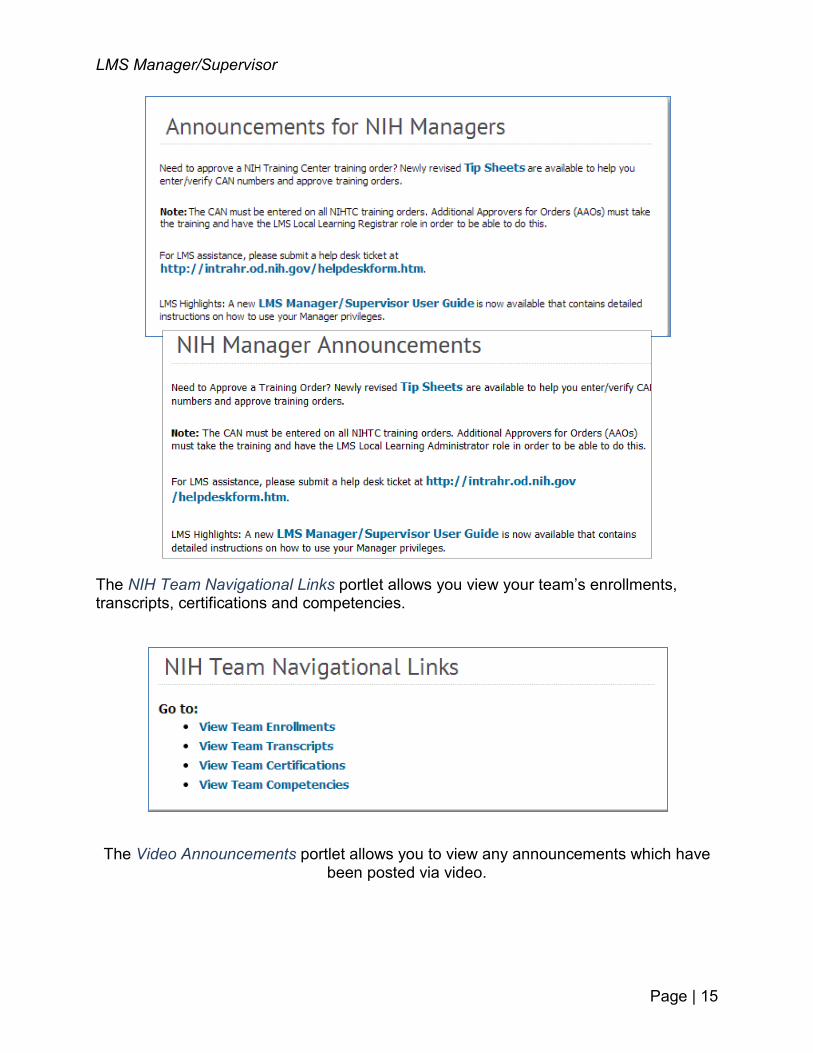
The HHS Manager Welcome portlet displays general announcements from the department with information on how to take an online course about how to use the LMS functions as a manager.
The NIH Managers Announcement portlet displays general announcements from NIH with information and links on how to use the LMS functions as a manager.
My Team icon
LMS Manager/Supervisor
Page | 15
The NIH Team Navigational Links portlet allows you view your team’s enrollments, transcripts, certifications and competencies.
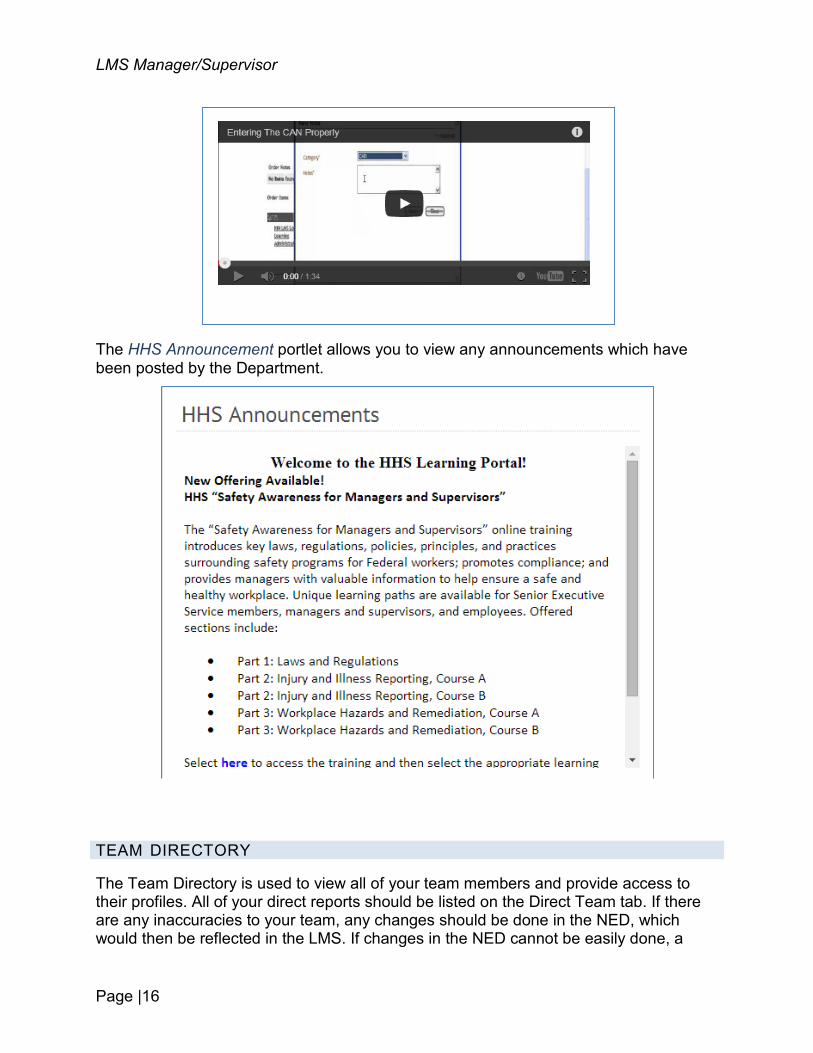
The Video Announcements portlet allows you to view any announcements which have been posted via video.
LMS Manager/Supervisor
Page |16
The HHS Announcement portlet allows you to view any announcements which have been posted by the Department.
TEAM DIRECTORY
The Team Directory is used to view all of your team members and provide access to their profiles. All of your direct reports should be listed on the Direct Team tab. If there are any inaccuracies to your team, any changes should be done in the NED, which would then be reflected in the LMS. If changes in the NED cannot be easily done, a
LMS Manager/Supervisor
Page | 17
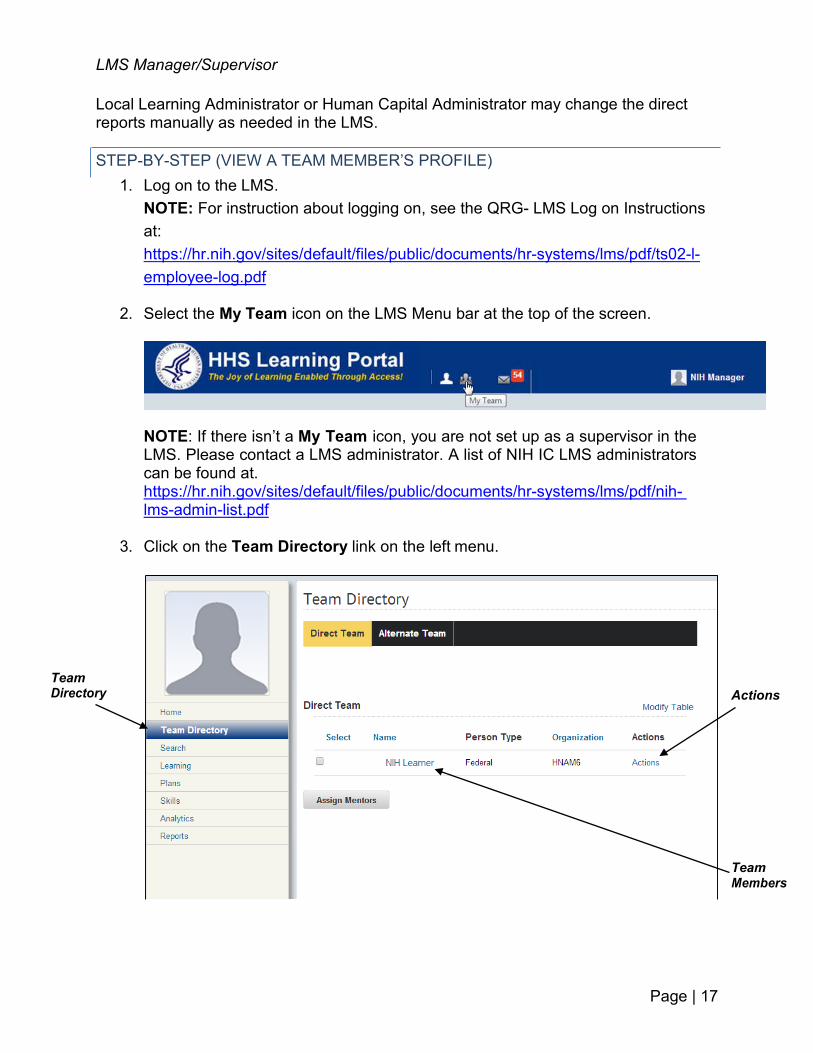
STEP-BY-STEP (VIEW A TEAM MEMBER’S PROFILE)
Team Directory Actions
Team Members
Local Learning Administrator or Human Capital Administrator may change the direct reports manually as needed in the LMS.
1. Log on to the LMS. NOTE: For instruction about logging on, see the QRG- LMS Log on Instructions at: https://hr.nih.gov/sites/default/files/public/documents/hr-systems/lms/pdf/ts02-l- employee-log.pdf
2. Select the My Team icon on the LMS Menu bar at the top of the screen.
NOTE: If there isn’t a My Team icon, you are not set up as a supervisor in the LMS. Please contact a LMS administrator. A list of NIH IC LMS administrators can be found at. https://hr.nih.gov/sites/default/files/public/documents/hr-systems/lms/pdf/nih- lms-admin-list.pdf
3. Click on the Team Directory link on the left menu.
LMS Manager/Supervisor
Page |18
View Profile
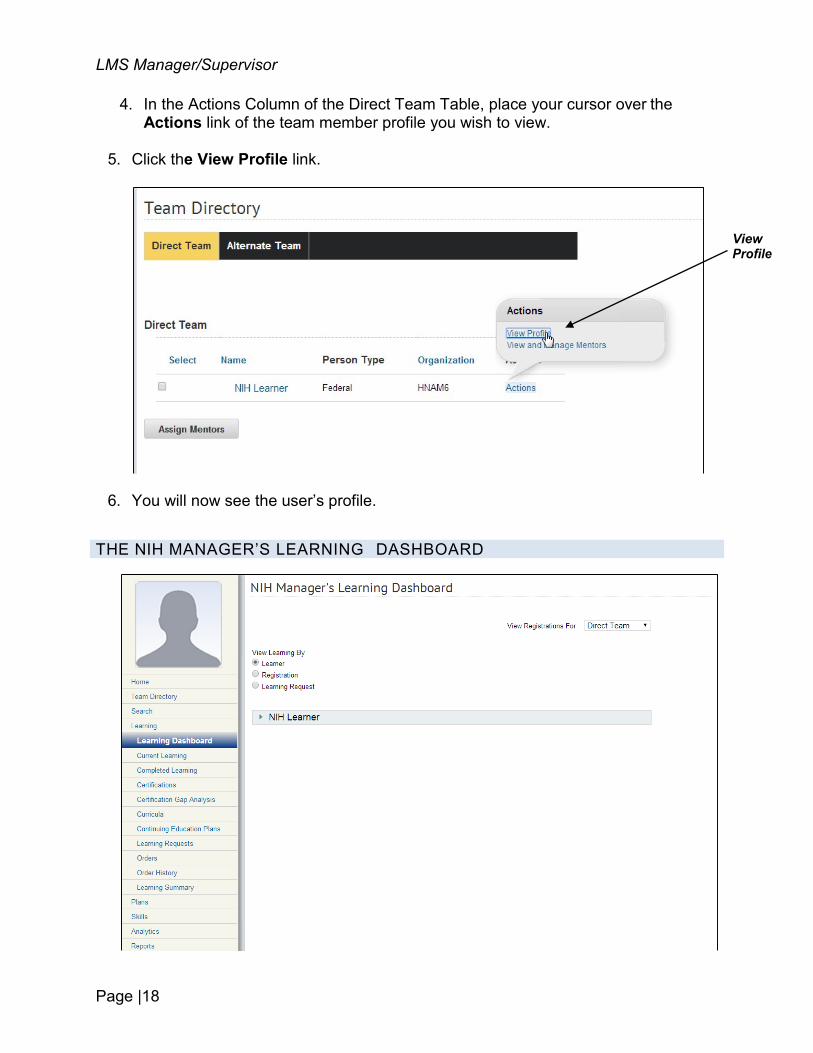
4. In the Actions Column of the Direct Team Table, place your cursor over the Actions link of the team member profile you wish to view.
5. Click the View Profile link.
6. You will now see the user’s profile.
THE NIH MANAGER’S LEARNING DASHBOARD
LMS Manager/Supervisor
Page | 19
My Team icon
REGISTRATIONS
STEP-BY-STEP (APPROVING PENDING REGISTRATIONS FOR TEAM MEMBERS)
The Learning Dashboard provides quick access to the major components of your team’s learning in one location. From the Learning Dashboard screen you have access to the following:
• Learner- View Registrations and Learning request for specific team members.
• Registrations – view your team members registrations.
• Learning Requests –view learning requests for your team members.
As a supervisor, you may manage your team members’ registrations. When a team member is registered for a course, the LMS creates a registration. A registration is confirmed immediately unless a supervisor is required to approve the training. Until a supervisor approves the training, the team member is not officially part of the training. The following steps will guide you through the process of viewing and approving any unapproved training as well as rejecting or dropping the registration altogether.
1. Log on to the LMS. NOTE: For instruction about logging on, see the QRG- LMS Log on Instructions at: https://hr.nih.gov/sites/default/files/public/documents/hr-systems/lms/pdf/ ts02-l-employee-log.pdf.
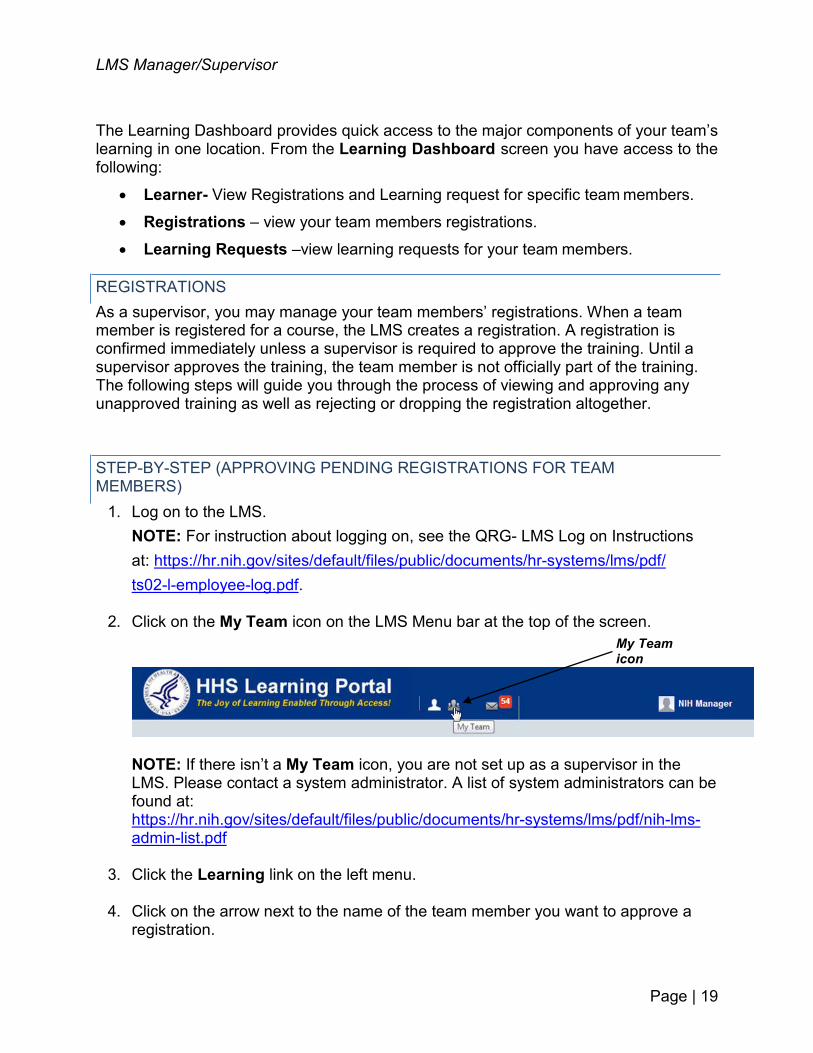
2. Click on the My Team icon on the LMS Menu bar at the top of the screen.
NOTE: If there isn’t a My Team icon, you are not set up as a supervisor in the LMS. Please contact a system administrator. A list of system administrators can be found at: https://hr.nih.gov/sites/default/files/public/documents/hr-systems/lms/pdf/nih-lms- admin-list.pdf
3. Click the Learning link on the left menu.
4. Click on the arrow next to the name of the team member you want to approve a
registration.
LMS Manager/Supervisor
Page |20
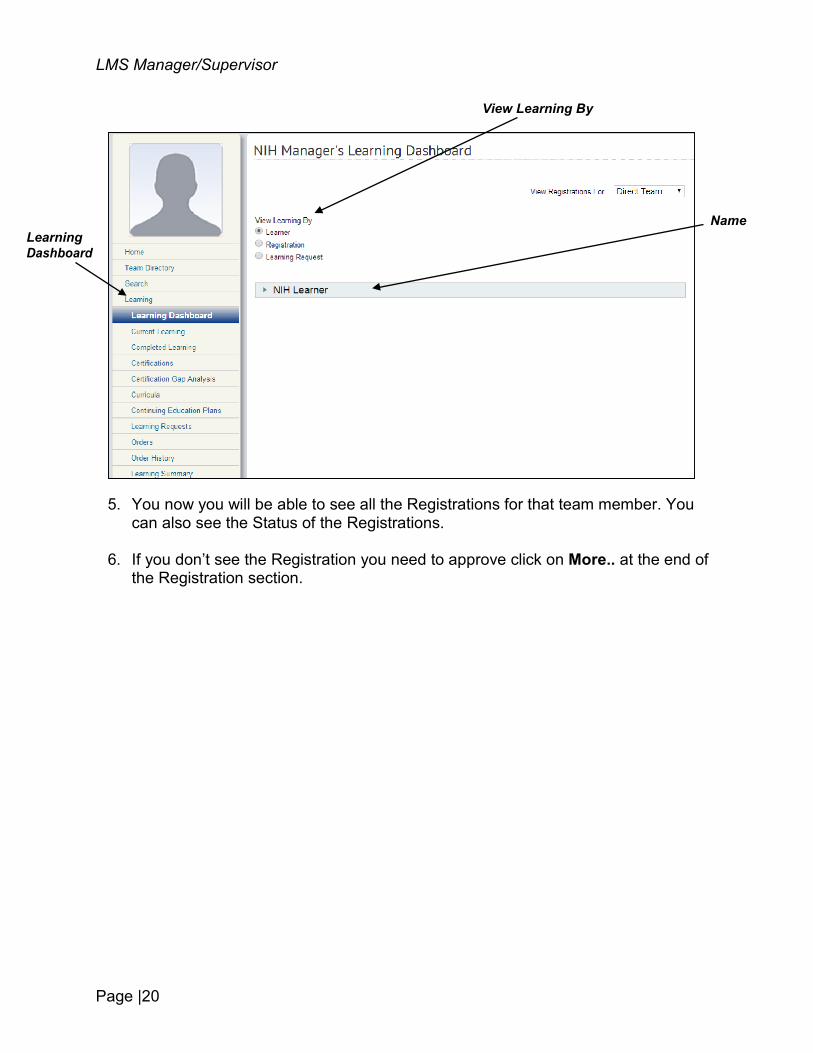
5. You now you will be able to see all the Registrations for that team member. You can also see the Status of the Registrations.
6. If you don’t see the Registration you need to approve click on More.. at the end of
the Registration section.
View Learning By
Name Learning Dashboard
LMS Manager/Supervisor
Page | 21
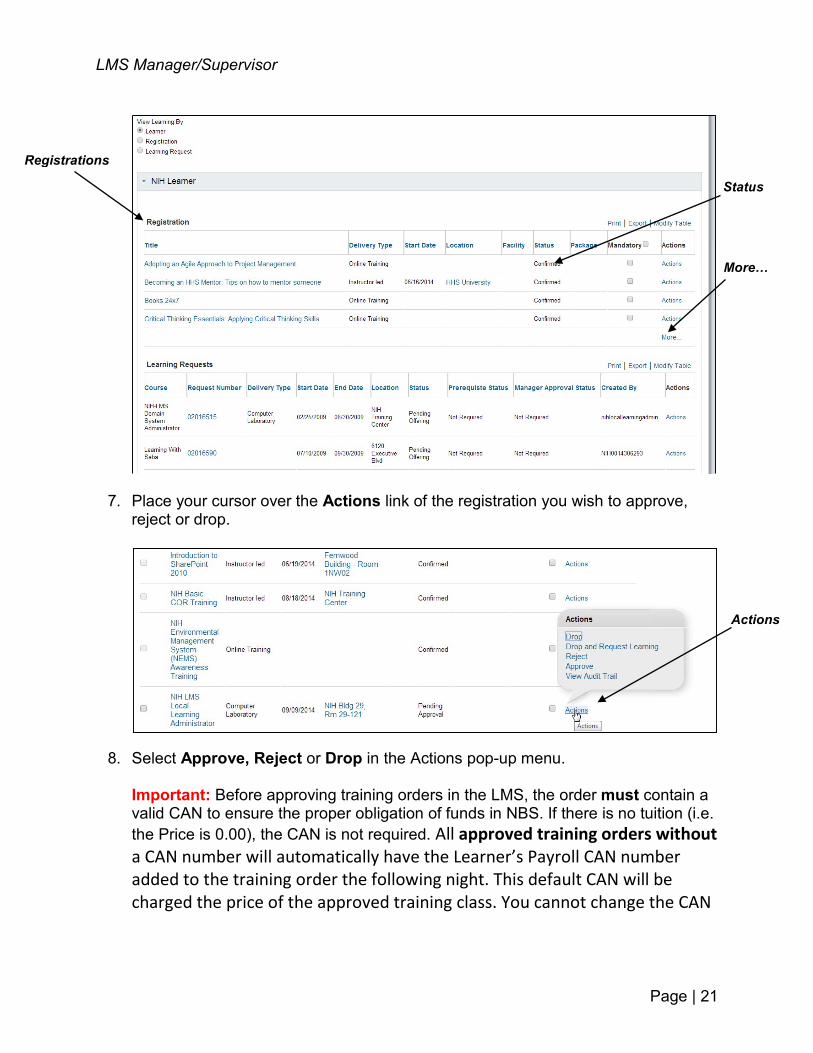
7. Place your cursor over the Actions link of the registration you wish to approve, reject or drop.
8. Select Approve, Reject or Drop in the Actions pop-up menu.
Important: Before approving training orders in the LMS, the order must contain a valid CAN to ensure the proper obligation of funds in NBS. If there is no tuition (i.e. the Price is 0.00), the CAN is not required. All approved training orders without a CAN number will automatically have the Learner’s Payroll CAN number added to the training order the following night. This default CAN will be charged the price of the approved training class. You cannot change the CAN
Registrations
Status
More…
Actions

LMS Manager/Supervisor
Page |22
number on an approved order; the Learner must be dropped, and then re- registered.
Note: To view all team registrations, select Learning and then Current Learning from the menu on the left.
Note: The number of enrollments needing your approval is displayed under the View Registrations Pending Approval column. For more details you can click on Actions and then click on View Registrations Pending Approval.
The new message center in 7.2 provides a central place for Managers to see registrations waiting for approval.
1. Click on the envelop icon to access the Message Center on the LMS Menu bar.
Note: The number next to the icon is for the total number of unread messages.
Message Center Icon
Team Registrations
View Registrations Pending Approval
Current Learning
MESSAGE CENTER -- NEW!
STEP-BY-STEP (VIEW REGISTRATIONS USING THE MESSAGE CENTER)

LMS Manager/Supervisor
Page | 23
2. Click on Approve Team Enrollments link.
3. Click on Actions next to the registration you need to approve, reject or drop.
4. Select Approve, Reject or Drop in the Actions pop-up menu.
MANAGE TEAM CURRICULA
A curriculum is a group of one or more training items. You can view the training items needed to complete each curriculum as well as the progress made for all of your team members.
1. Log on to the LMS.
NOTE: For instruction about logging on, see the QRG- LMS Log on Instructions at: hhttps://hr.nih.gov/sites/default/files/public/documents/hr-systems/lms/pdf/ts02-l- employee-log.pdf
2.
Approve Team Registrations
Actions
STEP-BY-STEP (VIEW MEMBER CURRICULUM)
Click on the My Team icon. My Team icon
LMS Manager/Supervisor
Page |24
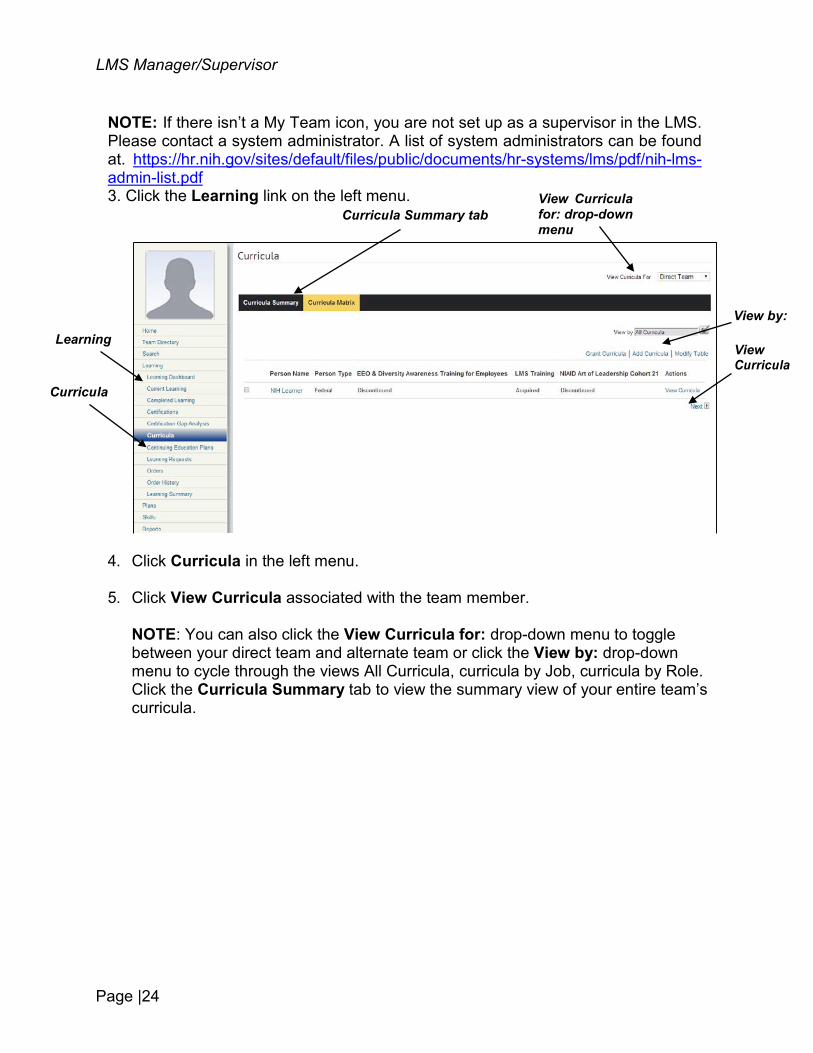
3. Click the Learning link on the left menu. Curricula Summary tab
View Curricula for: drop-down menu
View by:
Learning View Curricula
Curricula
NOTE: If there isn’t a My Team icon, you are not set up as a supervisor in the LMS. Please contact a system administrator. A list of system administrators can be found at. https://hr.nih.gov/sites/default/files/public/documents/hr-systems/lms/pdf/nih-lms- admin-list.pdf
4. Click Curricula in the left menu.
5. Click View Curricula associated with the team member.
NOTE: You can also click the View Curricula for: drop-down menu to toggle between your direct team and alternate team or click the View by: drop-down menu to cycle through the views All Curricula, curricula by Job, curricula by Role. Click the Curricula Summary tab to view the summary view of your entire team’s curricula.
LMS Manager/Supervisor
Page | 25
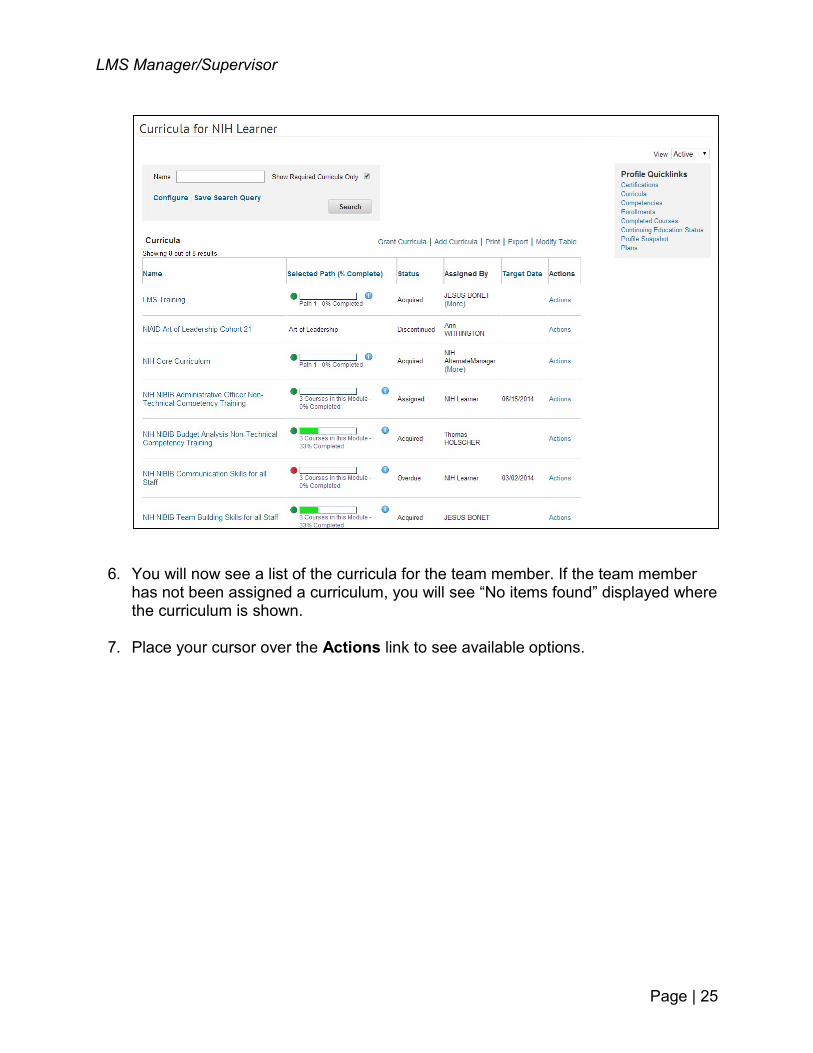
6. You will now see a list of the curricula for the team member. If the team member has not been assigned a curriculum, you will see “No items found” displayed where the curriculum is shown.
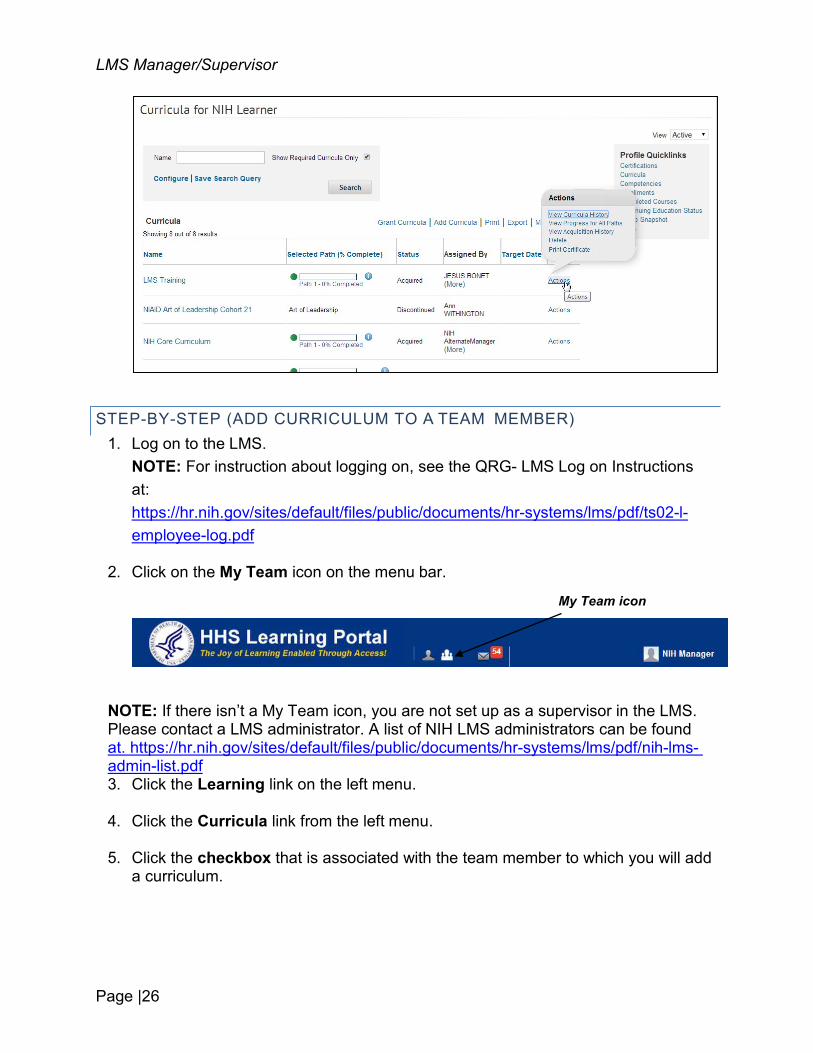
7. Place your cursor over the Actions link to see available options.
LMS Manager/Supervisor
Page |26
1. Log on to the LMS. NOTE: For instruction about logging on, see the QRG- LMS Log on Instructions at: https://hr.nih.gov/sites/default/files/public/documents/hr-systems/lms/pdf/ts02-l- employee-log.pdf
2. Click on the My Team icon on the menu bar.
NOTE: If there isn’t a My Team icon, you are not set up as a supervisor in the LMS. Please contact a LMS administrator. A list of NIH LMS administrators can be found at. https://hr.nih.gov/sites/default/files/public/documents/hr-systems/lms/pdf/nih-lms- admin-list.pdf 3. Click the Learning link on the left menu.
4. Click the Curricula link from the left menu.
5. Click the checkbox that is associated with the team member to which you will add
a curriculum.
STEP-BY-STEP (ADD CURRICULUM TO A TEAM MEMBER)
My Team icon
LMS Manager/Supervisor
Page | 27
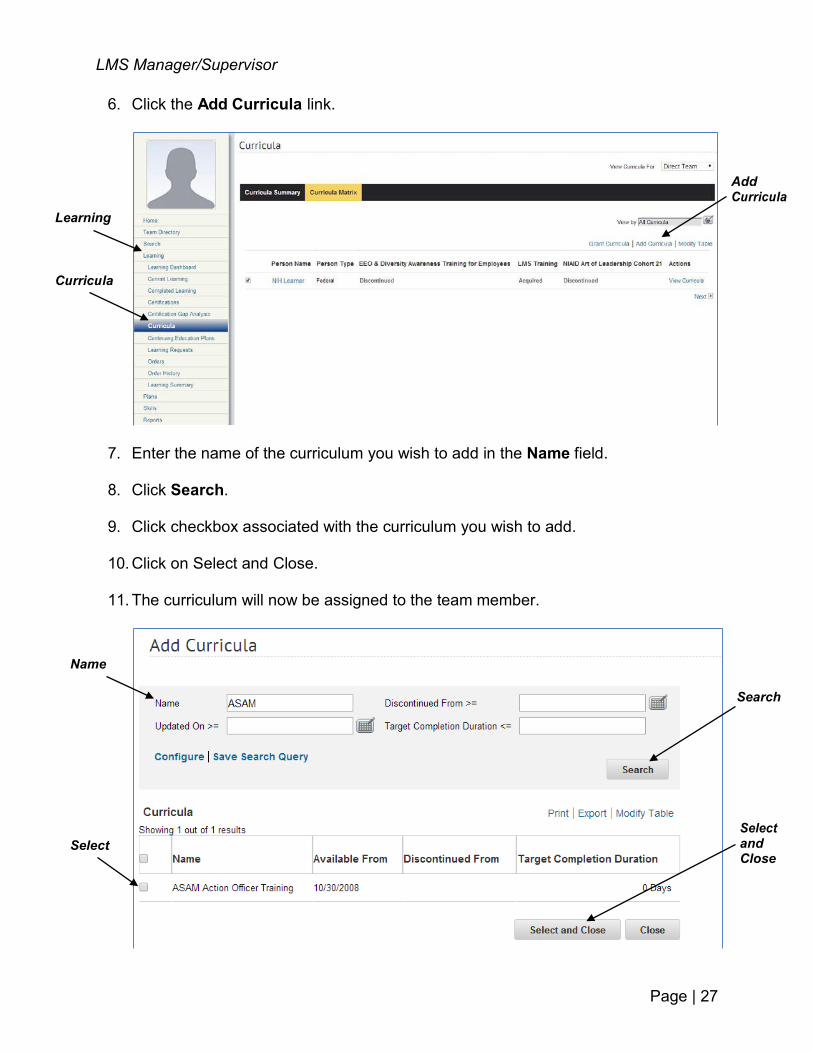
6. Click the Add Curricula link.
7. Enter the name of the curriculum you wish to add in the Name field.
8. Click Search.
9. Click checkbox associated with the curriculum you wish to add.
10. Click on Select and Close.
11. The curriculum will now be assigned to the team member.
Name
Search
Select Select and Close
Add Curricula
Learning
Curricula
LMS Manager/Supervisor
Page |28
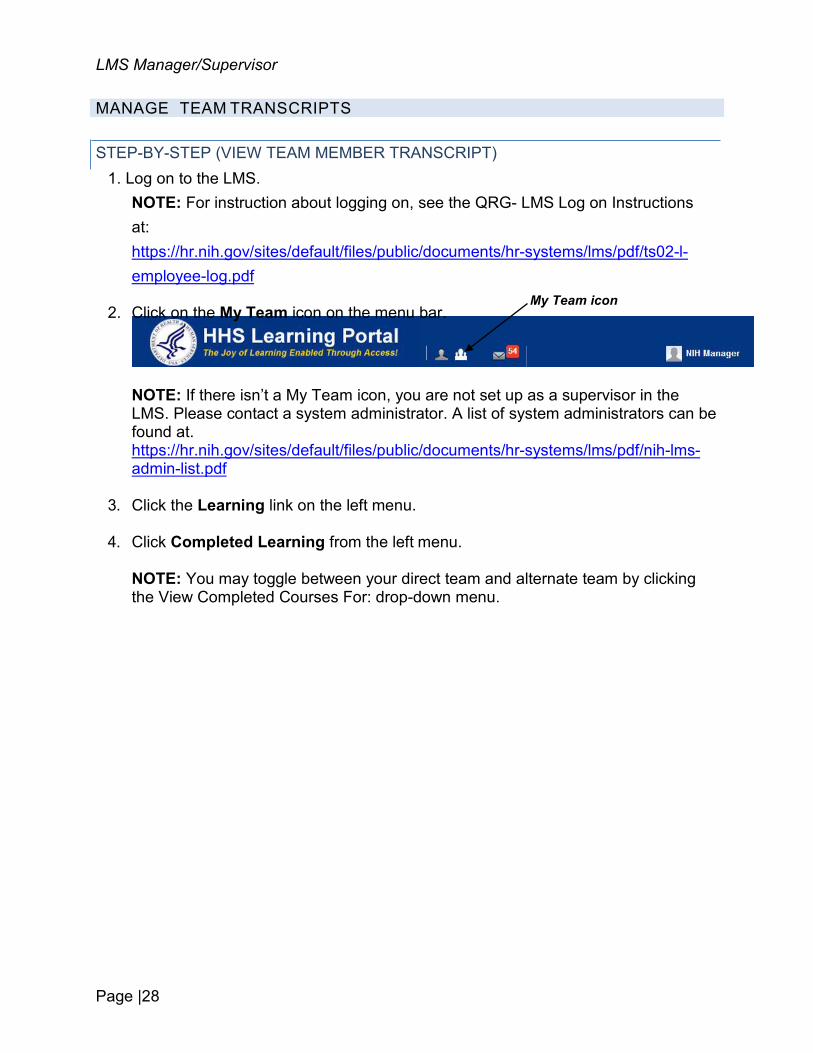
Click on the My Team icon on the menu bar. My Team icon
MANAGE TEAM TRANSCRIPTS
1. Log on to the LMS. NOTE: For instruction about logging on, see the QRG- LMS Log on Instructions at: https://hr.nih.gov/sites/default/files/public/documents/hr-systems/lms/pdf/ts02-l- employee-log.pdf
2.
NOTE: If there isn’t a My Team icon, you are not set up as a supervisor in the LMS. Please contact a system administrator. A list of system administrators can be found at. https://hr.nih.gov/sites/default/files/public/documents/hr-systems/lms/pdf/nih-lms- admin-list.pdf
3. Click the Learning link on the left menu.
4. Click Completed Learning from the left menu.
NOTE: You may toggle between your direct team and alternate team by clicking the View Completed Courses For: drop-down menu.
STEP-BY-STEP (VIEW TEAM MEMBER TRANSCRIPT)

LMS Manager/Supervisor
Page | 29
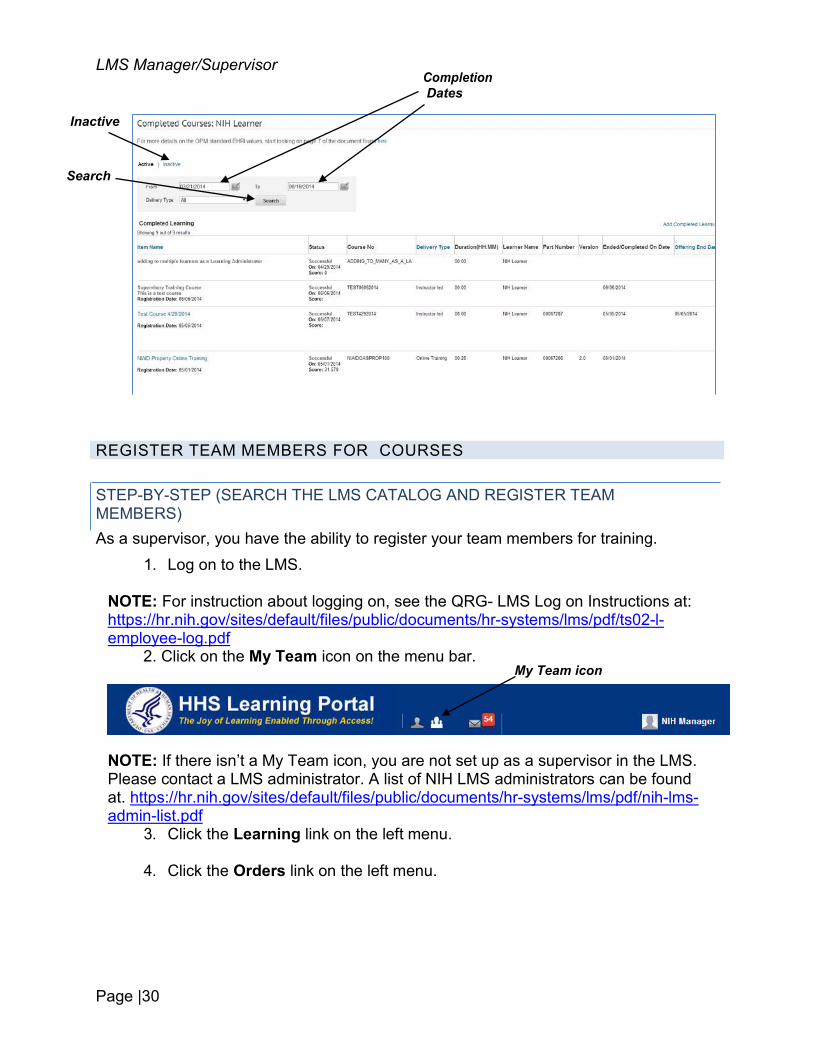
5. Click the View Completed Courses link associated with the desired team member.
6. You will now see the team member’s transcript. (By default the last 3 months is displayed.)
NOTE: You may view a larger/smaller range of transcript history by changing the Completion Dates and clicking Search. Also, you may view inactive transcript items by clicking the Inactive link.
View Completed Courses For drop-down menu
View Completed Courses
Learning
Completed Learning
LMS Manager/Supervisor
Page |30
REGISTER TEAM MEMBERS FOR COURSES
As a supervisor, you have the ability to register your team members for training. 1. Log on to the LMS.
NOTE: For instruction about logging on, see the QRG- LMS Log on Instructions at: https://hr.nih.gov/sites/default/files/public/documents/hr-systems/lms/pdf/ts02-l- employee-log.pdf
NOTE: If there isn’t a My Team icon, you are not set up as a supervisor in the LMS. Please contact a LMS administrator. A list of NIH LMS administrators can be found at. https://hr.nih.gov/sites/default/files/public/documents/hr-systems/lms/pdf/nih-lms- admin-list.pdf
3. Click the Learning link on the left menu.
4. Click the Orders link on the left menu.
2. Click on the My Team icon on the menu bar. My Team icon
Completion Dates
Inactive
Search
STEP-BY-STEP (SEARCH THE LMS CATALOG AND REGISTER TEAM MEMBERS)
LMS Manager/Supervisor
Page | 31
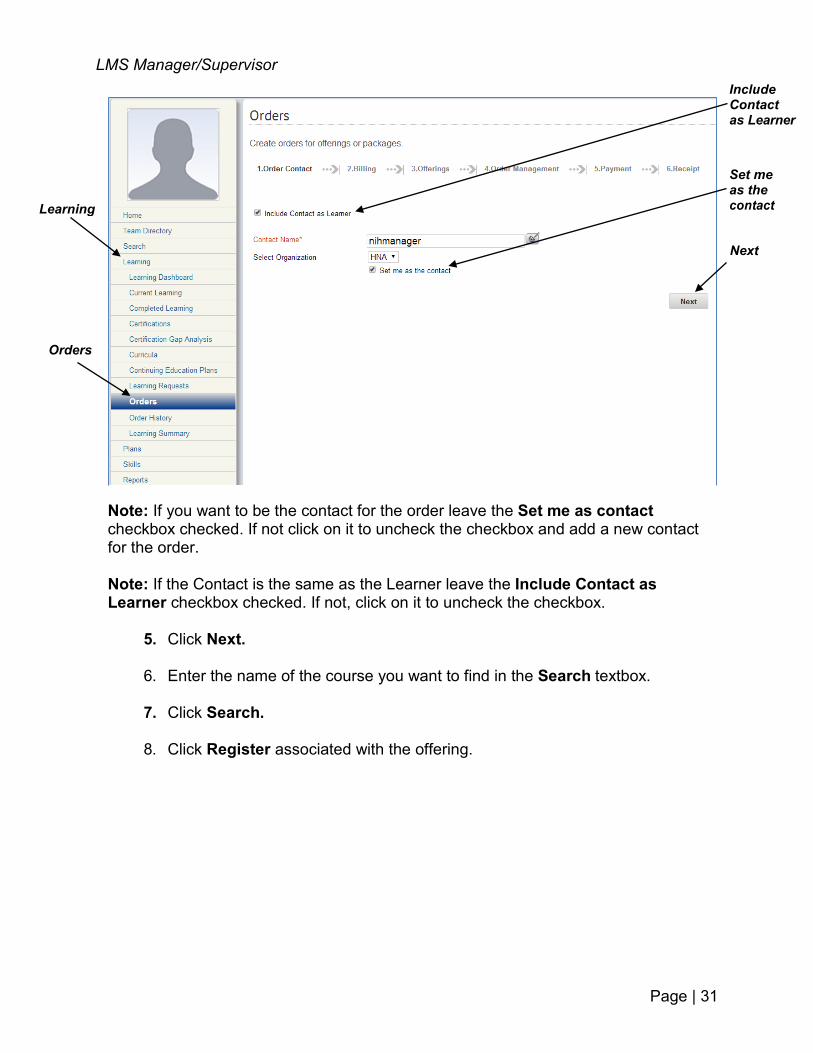
Note: If you want to be the contact for the order leave the Set me as contact checkbox checked. If not click on it to uncheck the checkbox and add a new contact for the order.
Note: If the Contact is the same as the Learner leave the Include Contact as Learner checkbox checked. If not, click on it to uncheck the checkbox.
5. Click Next.
6. Enter the name of the course you want to find in the Search textbox.
7. Click Search.
8. Click Register associated with the offering.
Include Contact as Learner
Learning
Set me as the contact
Next
Orders
LMS Manager/Supervisor
Page |32
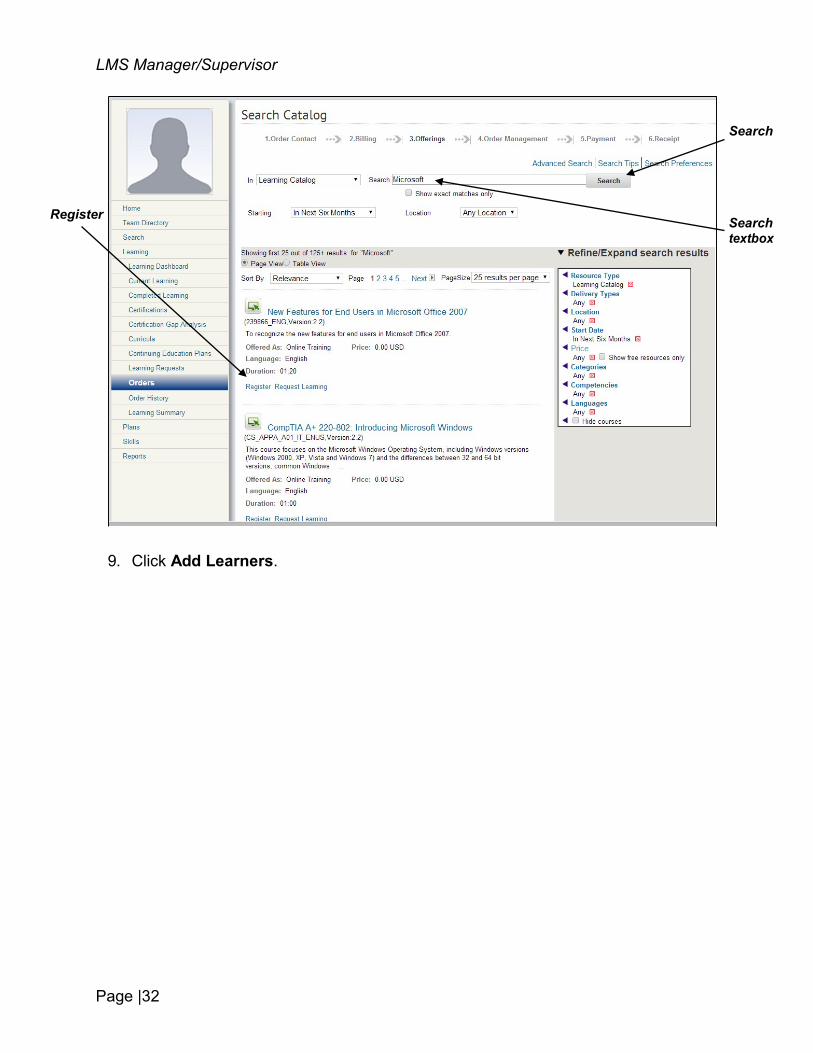
9. Click Add Learners.
Search
Register Search textbox
LMS Manager/Supervisor
Page | 33
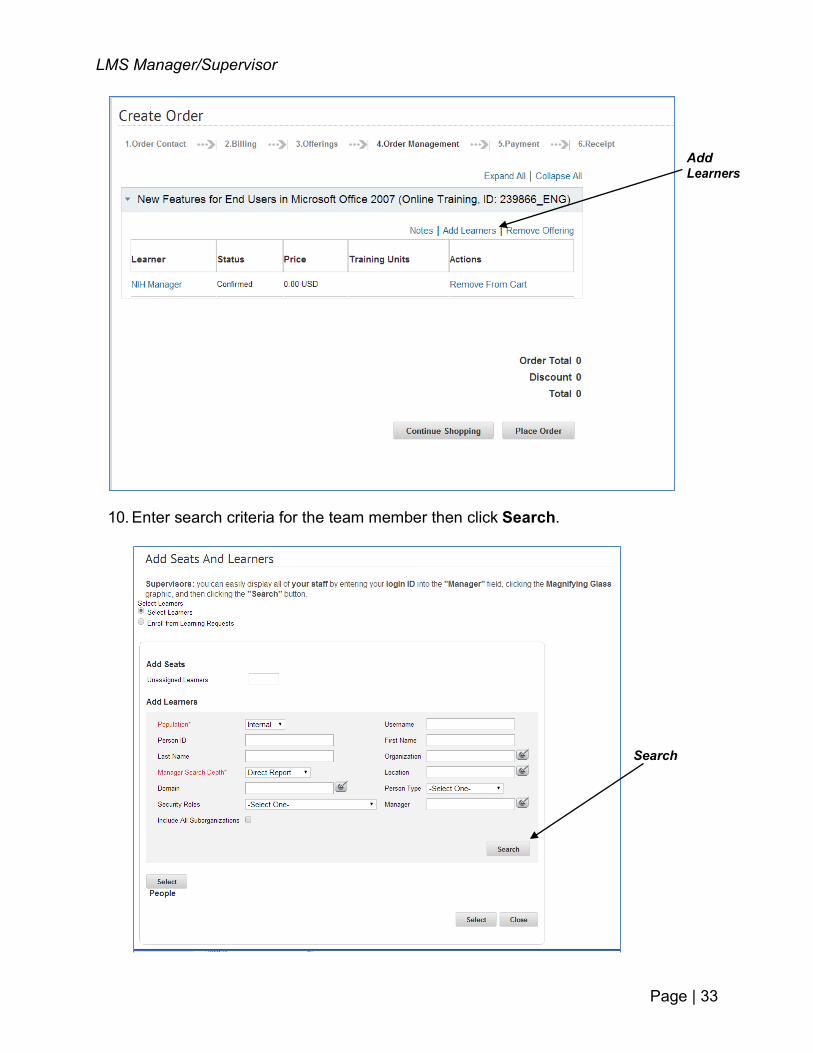
10. Enter search criteria for the team member then click Search.
Add Learners
Search
LMS Manager/Supervisor
Page |34
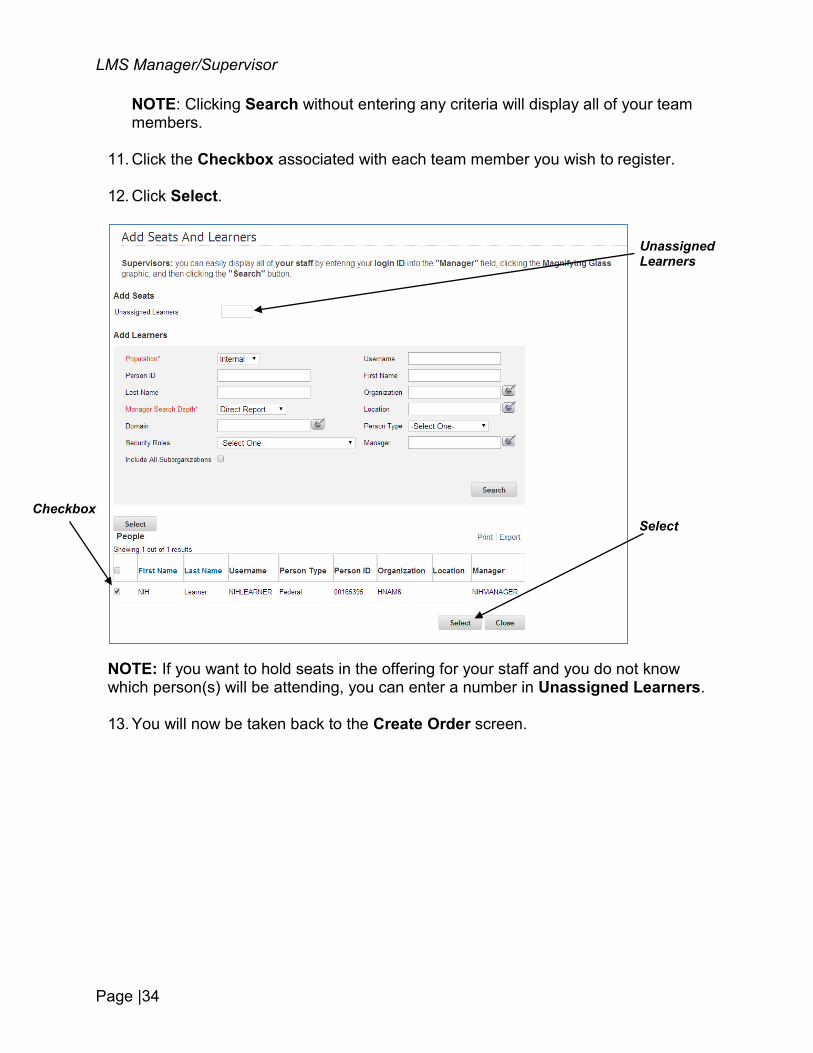
NOTE: Clicking Search without entering any criteria will display all of your team members.
11. Click the Checkbox associated with each team member you wish to register.
12. Click Select.
NOTE: If you want to hold seats in the offering for your staff and you do not know which person(s) will be attending, you can enter a number in Unassigned Learners.
13. You will now be taken back to the Create Order screen.
Unassigned Learners
Checkbox Select
LMS Manager/Supervisor
Page | 35
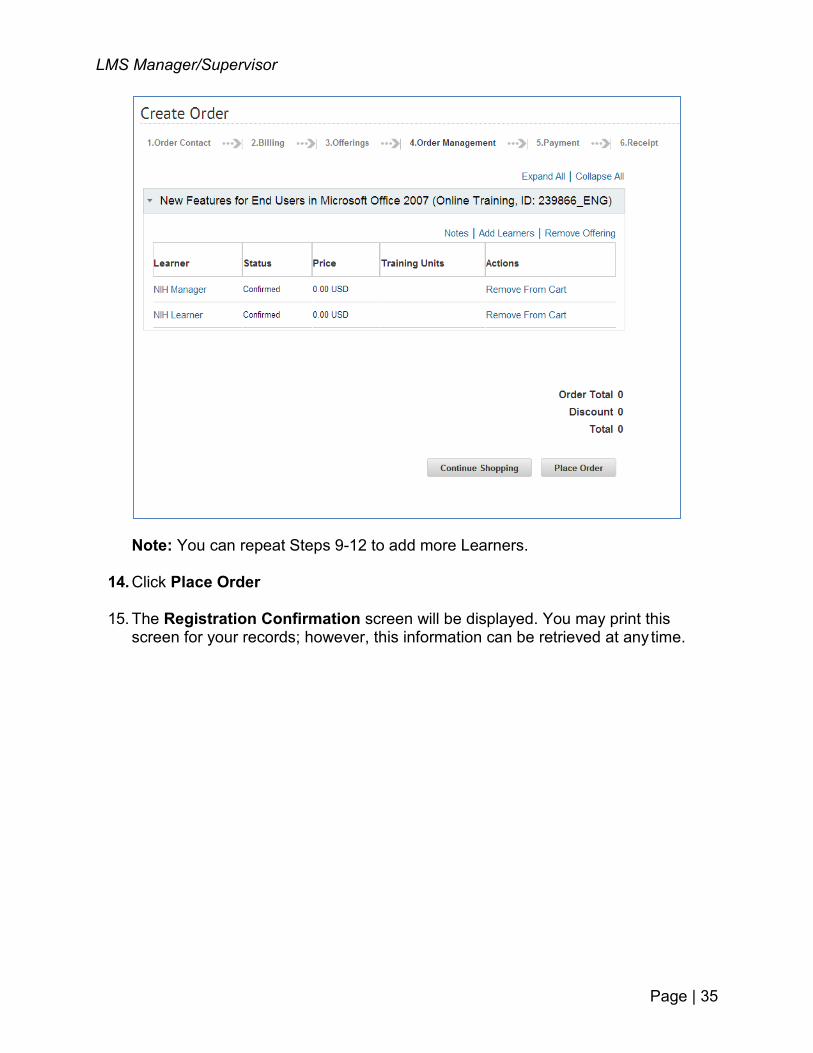
Note: You can repeat Steps 9-12 to add more Learners.
14. Click Place Order
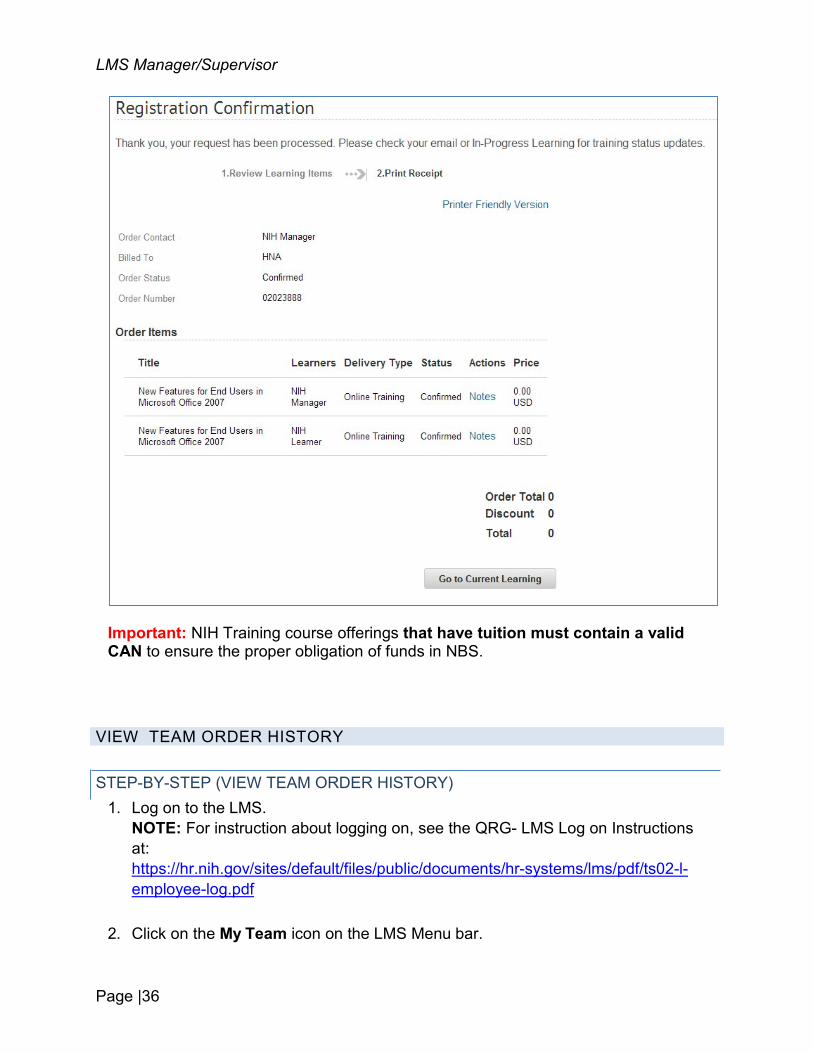
15. The Registration Confirmation screen will be displayed. You may print this screen for your records; however, this information can be retrieved at any time.
LMS Manager/Supervisor
Page |36
Important: NIH Training course offerings that have tuition must contain a valid CAN to ensure the proper obligation of funds in NBS.
VIEW TEAM ORDER HISTORY
1. Log on to the LMS. NOTE: For instruction about logging on, see the QRG- LMS Log on Instructions at: https://hr.nih.gov/sites/default/files/public/documents/hr-systems/lms/pdf/ts02-l- employee-log.pdf
2. Click on the My Team icon on the LMS Menu bar.
STEP-BY-STEP (VIEW TEAM ORDER HISTORY)
LMS Manager/Supervisor
Page | 37
Search
Learning
Order History
Order Number
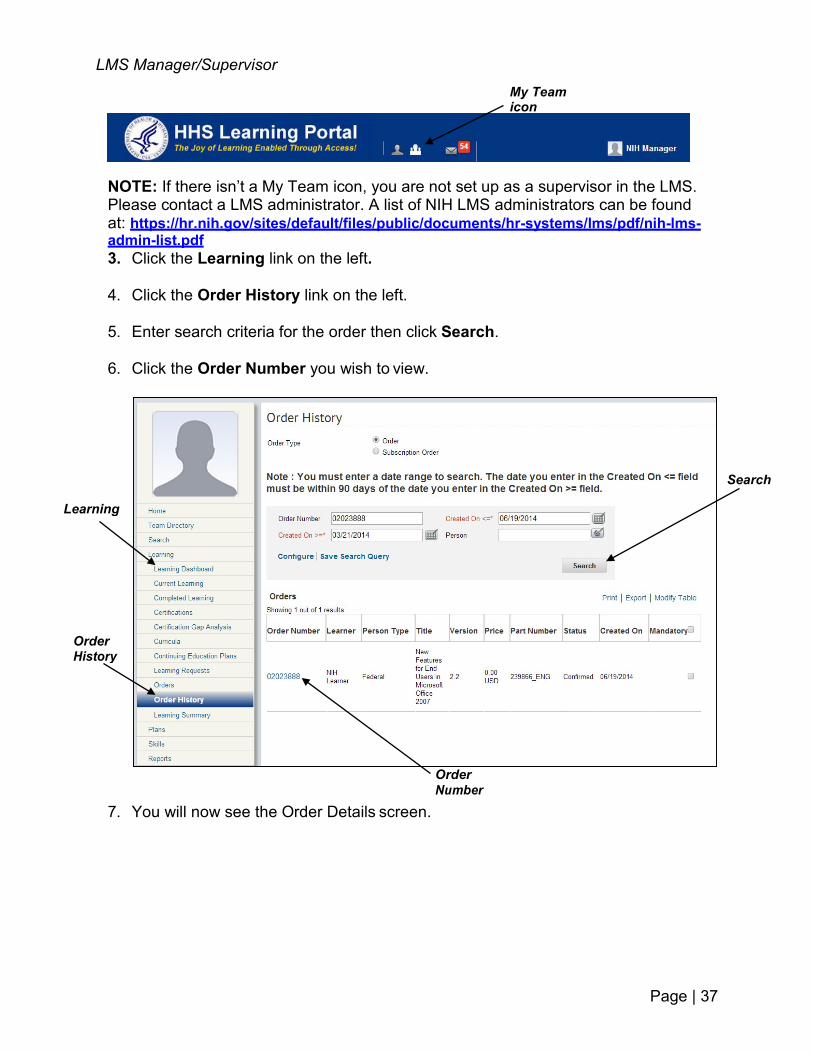
NOTE: If there isn’t a My Team icon, you are not set up as a supervisor in the LMS. Please contact a LMS administrator. A list of NIH LMS administrators can be found at: https://hr.nih.gov/sites/default/files/public/documents/hr-systems/lms/pdf/nih-lms- admin-list.pdf 3. Click the Learning link on the left.
4. Click the Order History link on the left.
5. Enter search criteria for the order then click Search.
6. Click the Order Number you wish to view.
7. You will now see the Order Details screen.
My Team icon
LMS Manager/Supervisor
Page |38
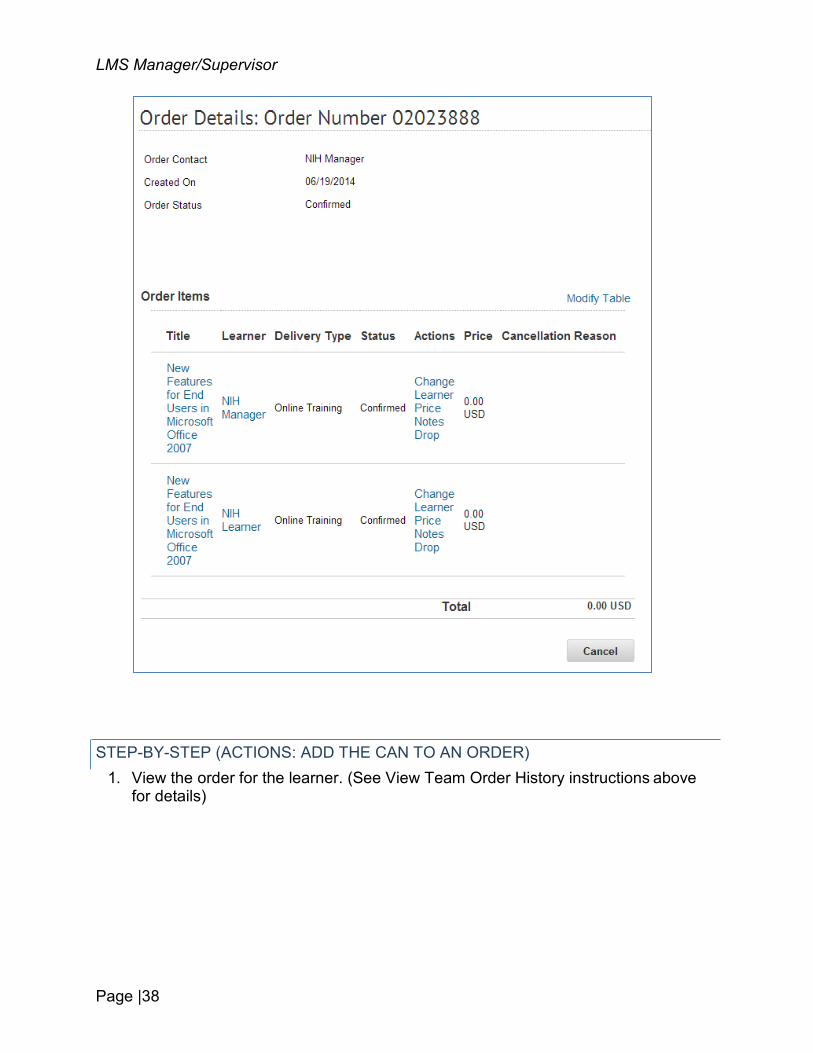
1. View the order for the learner. (See View Team Order History instructions above for details)
STEP-BY-STEP (ACTIONS: ADD THE CAN TO AN ORDER)
LMS Manager/Supervisor
Page | 39
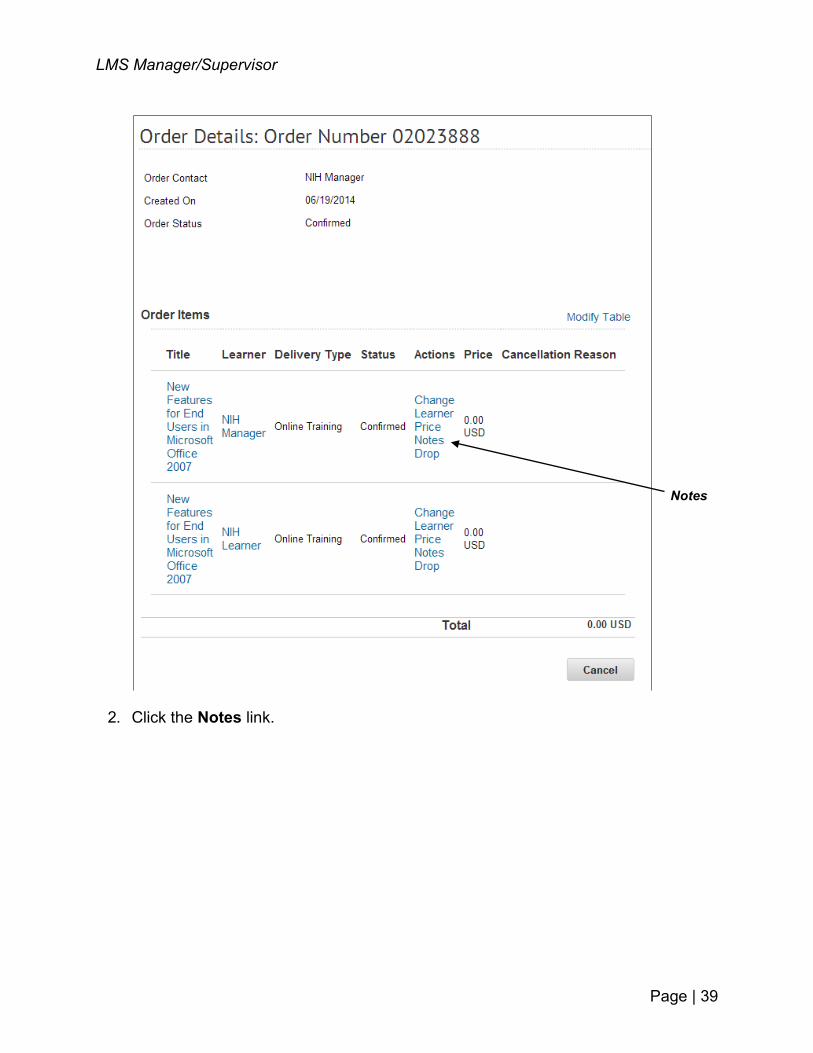
2. Click the Notes link.
Notes
LMS Manager/Supervisor
Page |40
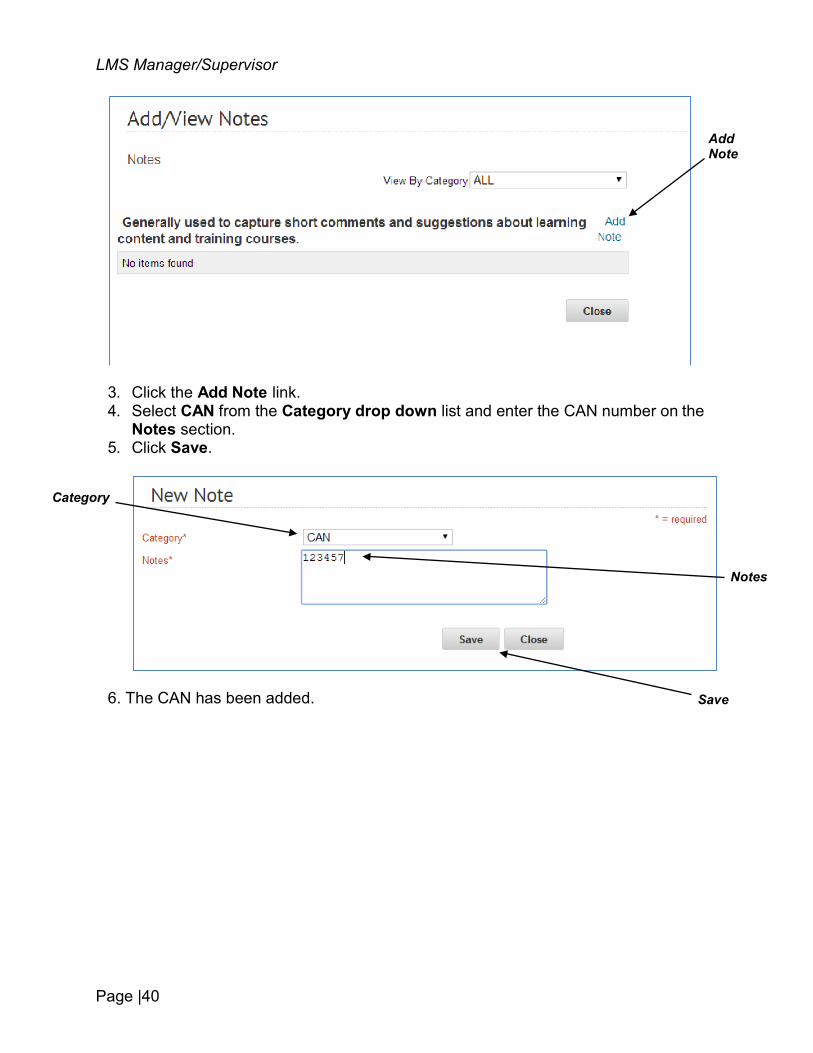
3. Click the Add Note link. 4. Select CAN from the Category drop down list and enter the CAN number on the
Notes section. 5. Click Save.
Add Note
Category
Notes
6. The CAN has been added. Save
LMS Manager/Supervisor
Page | 41
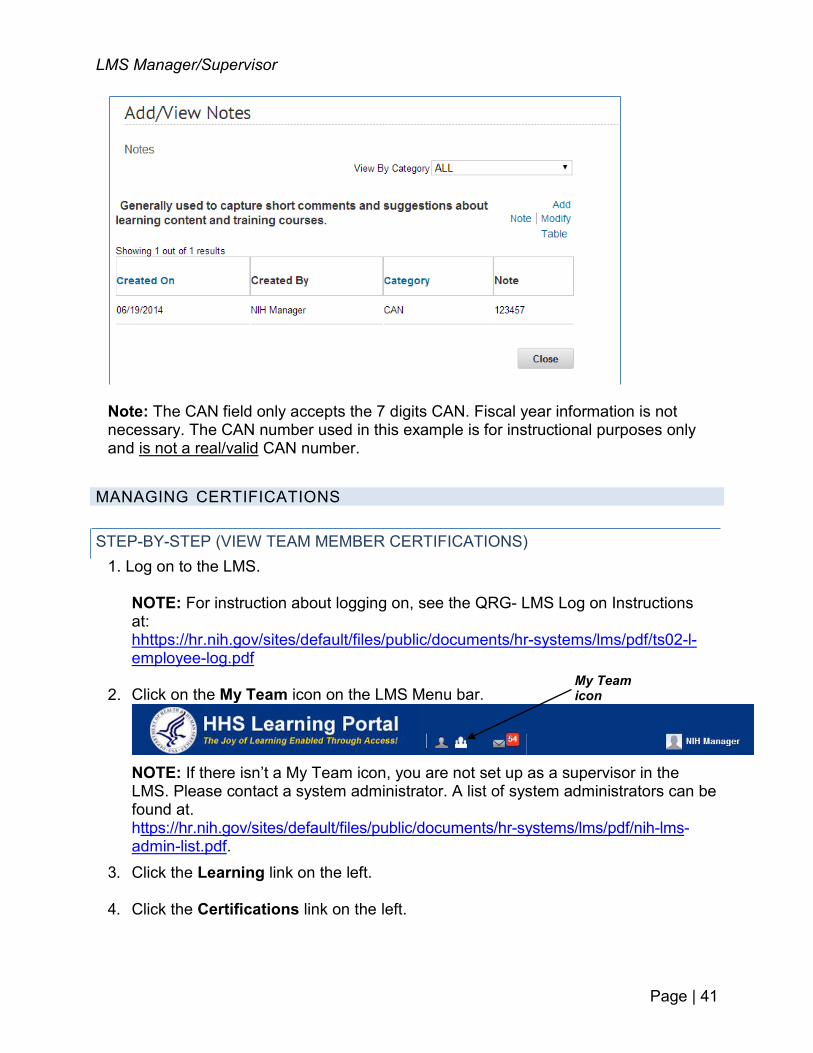
Note: The CAN field only accepts the 7 digits CAN. Fiscal year information is not necessary. The CAN number used in this example is for instructional purposes only and is not a real/valid CAN number.
MANAGING CERTIFICATIONS
1. Log on to the LMS.
NOTE: For instruction about logging on, see the QRG- LMS Log on Instructions at: hhttps://hr.nih.gov/sites/default/files/public/documents/hr-systems/lms/pdf/ts02-l- employee-log.pdf
2.
NOTE: If there isn’t a My Team icon, you are not set up as a supervisor in the LMS. Please contact a system administrator. A list of system administrators can be found at. https://hr.nih.gov/sites/default/files/public/documents/hr-systems/lms/pdf/nih-lms- admin-list.pdf.
3. Click the Learning link on the left.
4. Click the Certifications link on the left.
STEP-BY-STEP (VIEW TEAM MEMBER CERTIFICATIONS)
Click on the My Team icon on the LMS Menu bar. My Team icon
Page |42
LMS Manager/Supervisor
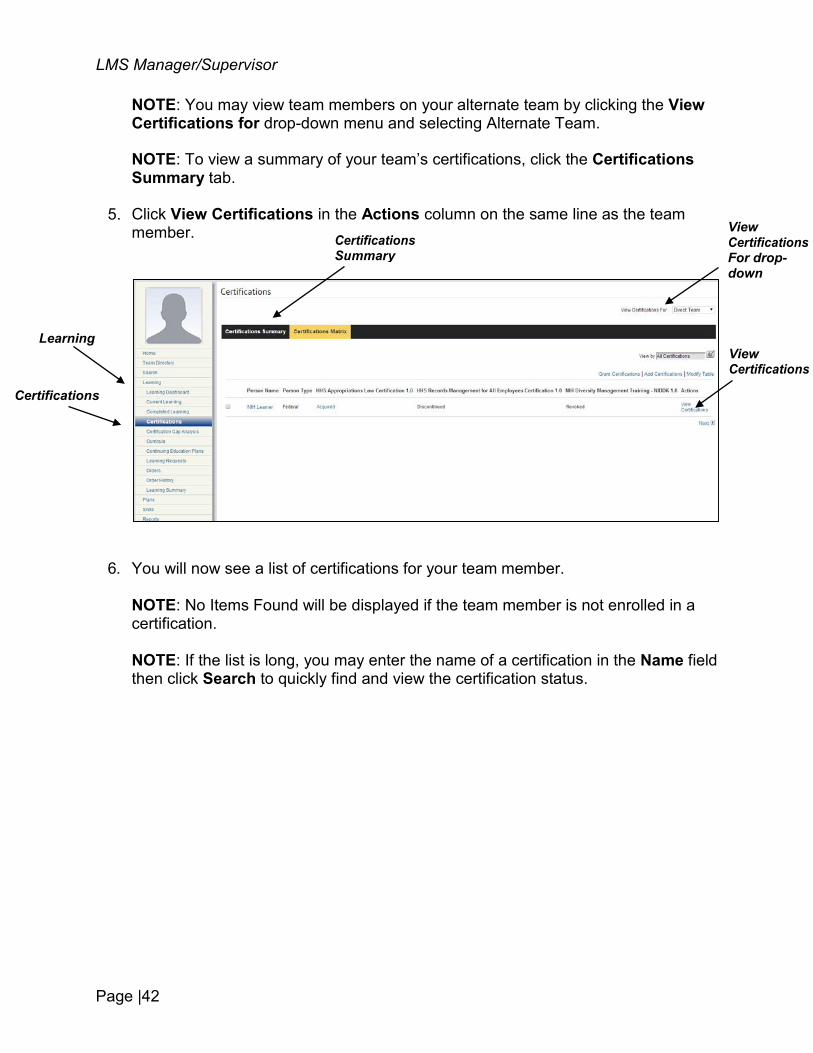
NOTE: You may view team members on your alternate team by clicking the View Certifications for drop-down menu and selecting Alternate Team.
NOTE: To view a summary of your team’s certifications, click the Certifications Summary tab.
5.
6. You will now see a list of certifications for your team member.
NOTE: No Items Found will be displayed if the team member is not enrolled in a certification.
NOTE: If the list is long, you may enter the name of a certification in the Name field then click Search to quickly find and view the certification status.
Learning
Certifications
Click View Certifications in the Actions column on the same line as the team member. Certifications
Summary
View Certifications For drop- down
View Certifications
Page | 43
LMS Manager/Supervisor
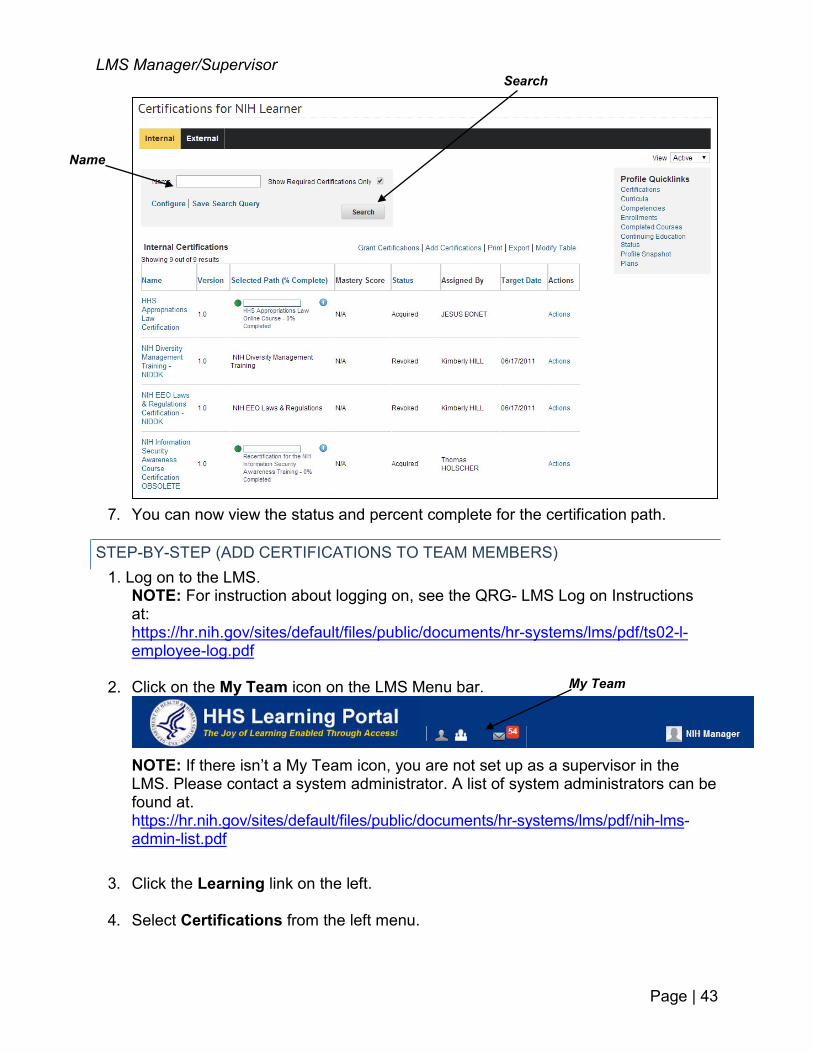
7. You can now view the status and percent complete for the certification path.
1. Log on to the LMS. NOTE: For instruction about logging on, see the QRG- LMS Log on Instructions at: https://hr.nih.gov/sites/default/files/public/documents/hr-systems/lms/pdf/ts02-l- employee-log.pdf
2.
NOTE: If there isn’t a My Team icon, you are not set up as a supervisor in the LMS. Please contact a system administrator. A list of system administrators can be found at. https://hr.nih.gov/sites/default/files/public/documents/hr-systems/lms/pdf/nih-lms- admin-list.pdf
3. Click the Learning link on the left.
4. Select Certifications from the left menu.
Search
Name
STEP-BY-STEP (ADD CERTIFICATIONS TO TEAM MEMBERS)
Click on the My Team icon on the LMS Menu bar. My Team
Page |44
LMS Manager/Supervisor
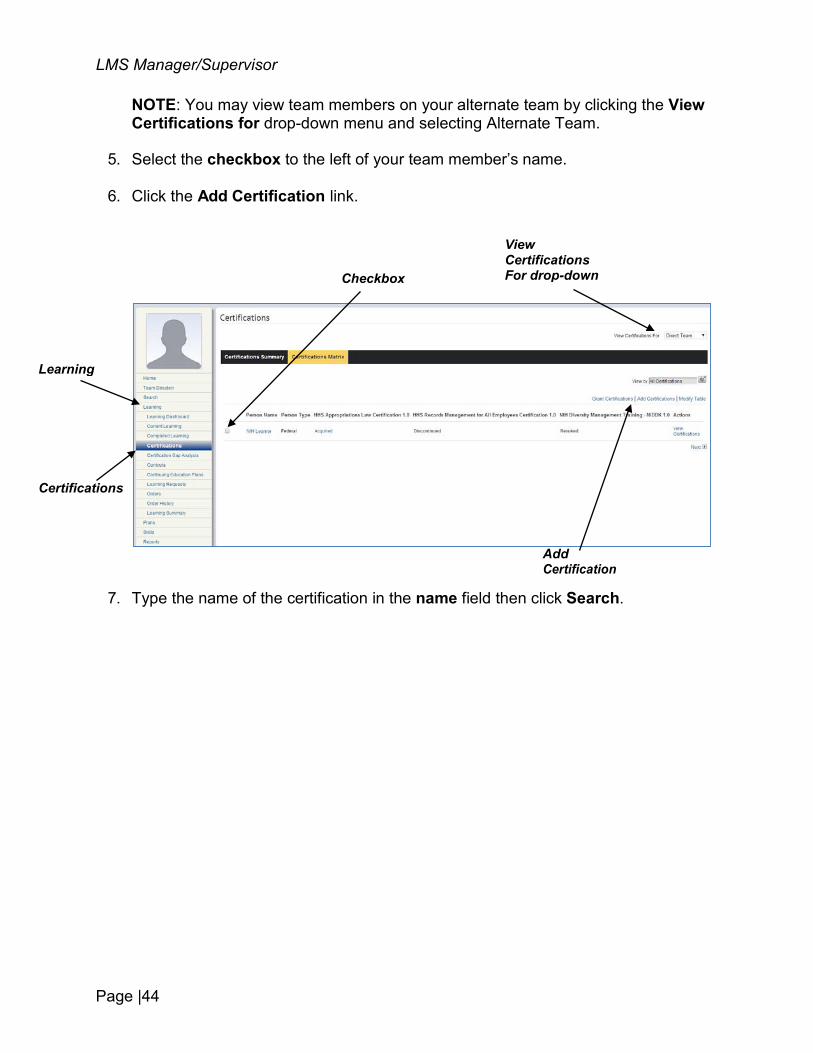
NOTE: You may view team members on your alternate team by clicking the View Certifications for drop-down menu and selecting Alternate Team.
5. Select the checkbox to the left of your team member’s name.
6. Click the Add Certification link.
7. Type the name of the certification in the name field then click Search.
View Certifications For drop-down
Learning
Certifications
Add Certification
Checkbox
Page | 45
LMS Manager/Supervisor
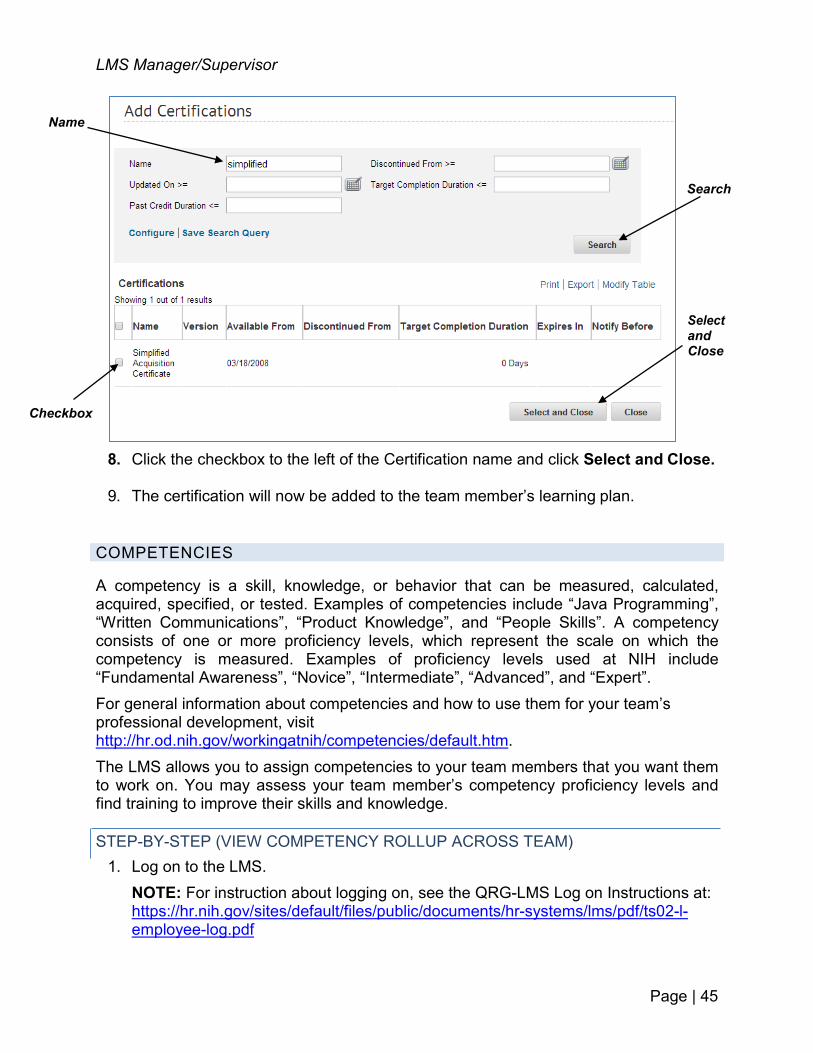
8. Click the checkbox to the left of the Certification name and click Select and Close.
9. The certification will now be added to the team member’s learning plan.
COMPETENCIES
A competency is a skill, knowledge, or behavior that can be measured, calculated, acquired, specified, or tested. Examples of competencies include “Java Programming”, “Written Communications”, “Product Knowledge”, and “People Skills”. A competency consists of one or more proficiency levels, which represent the scale on which the competency is measured. Examples of proficiency levels used at NIH include “Fundamental Awareness”, “Novice”, “Intermediate”, “Advanced”, and “Expert”. For general information about competencies and how to use them for your team’s professional development, visit http://hr.od.nih.gov/workingatnih/competencies/default.htm. The LMS allows you to assign competencies to your team members that you want them to work on. You may assess your team member’s competency proficiency levels and find training to improve their skills and knowledge.
1. Log on to the LMS. NOTE: For instruction about logging on, see the QRG-LMS Log on Instructions at: https://hr.nih.gov/sites/default/files/public/documents/hr-systems/lms/pdf/ts02-l- employee-log.pdf
STEP-BY-STEP (VIEW COMPETENCY ROLLUP ACROSS TEAM)
Name
Search
Select and Close
Checkbox
Page |46
LMS Manager/Supervisor
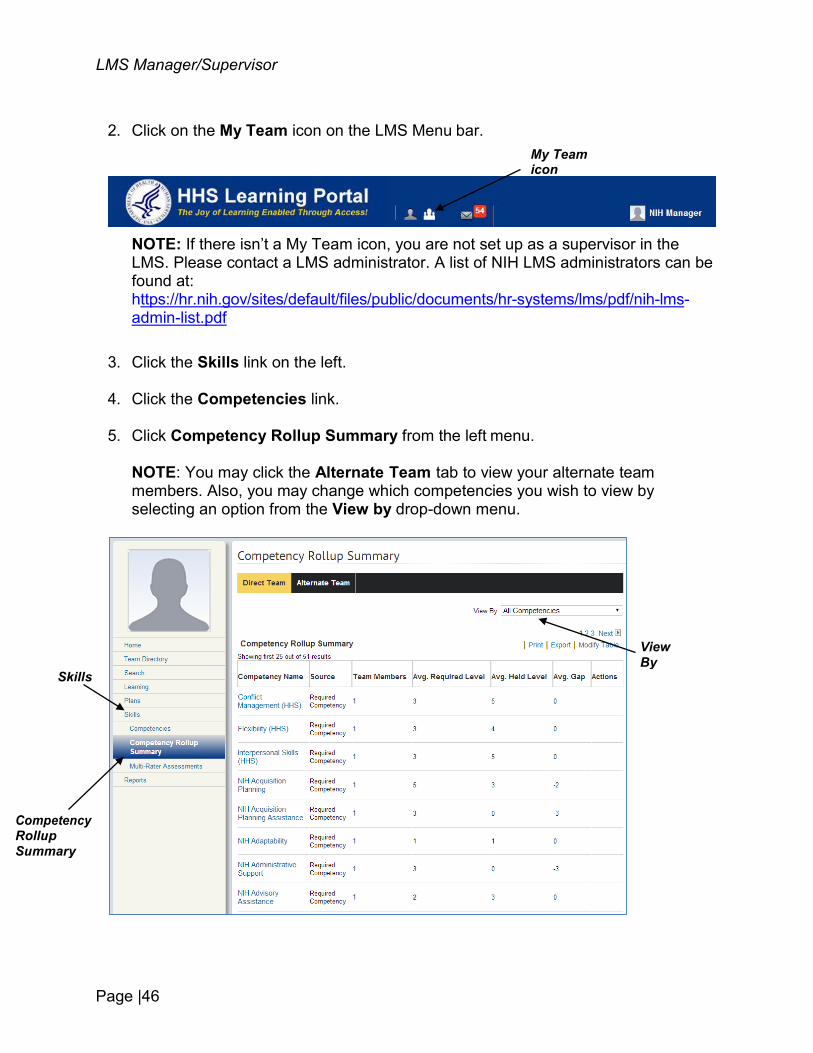
2. Click on the My Team icon on the LMS Menu bar.
NOTE: If there isn’t a My Team icon, you are not set up as a supervisor in the LMS. Please contact a LMS administrator. A list of NIH LMS administrators can be found at: https://hr.nih.gov/sites/default/files/public/documents/hr-systems/lms/pdf/nih-lms- admin-list.pdf
3. Click the Skills link on the left.
4. Click the Competencies link.
5. Click Competency Rollup Summary from the left menu.
NOTE: You may click the Alternate Team tab to view your alternate team members. Also, you may change which competencies you wish to view by selecting an option from the View by drop-down menu.
View By
Skills
Competency Rollup Summary
My Team icon
Page | 47
LMS Manager/Supervisor
My Team icon
1. Log on to the LMS.
NOTE: For instruction about logging on, see the QRG- LMS Log on Instructions at: https://hr.nih.gov/sites/default/files/public/documents/hr-systems/lms/pdf/ts02-l- employee-log.pdf
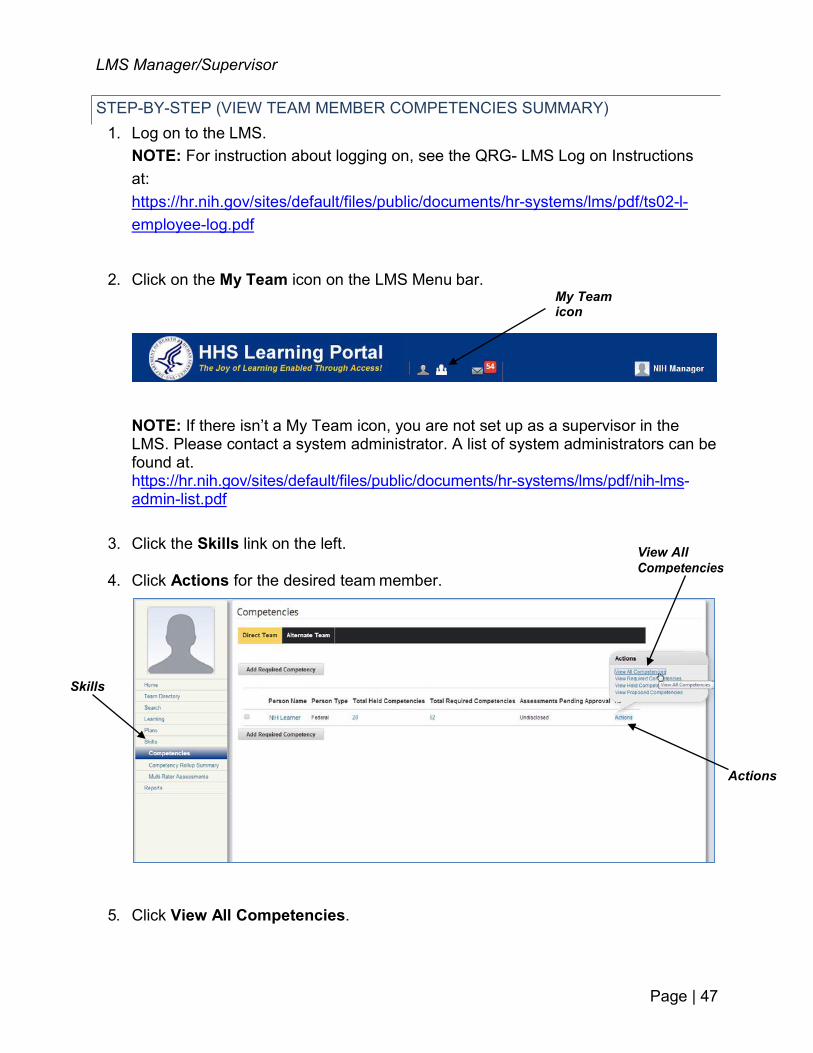
2. Click on the My Team icon on the LMS Menu bar.
NOTE: If there isn’t a My Team icon, you are not set up as a supervisor in the LMS. Please contact a system administrator. A list of system administrators can be found at. https://hr.nih.gov/sites/default/files/public/documents/hr-systems/lms/pdf/nih-lms- admin-list.pdf
5. Click View All Competencies.
STEP-BY-STEP (VIEW TEAM MEMBER COMPETENCIES SUMMARY)
3. Click the Skills link on the left. 4. Click Actions for the desired team member.
View All Competencies
Skills
Actions

Page |48
LMS Manager/Supervisor
My Team icon
6. You will now see a summary of all required competencies for the team member.
1. Log on to the LMS.
NOTE: For instruction about logging on, see the QRG- LMS Log on Instructions at: https://hr.nih.gov/sites/default/files/public/documents/hr-systems/ lms/pdf/ts02-l-employee-log.pdf
2. Click on the My Team icon on the LMS Menu bar.
NOTE: If there isn’t a My Team icon, you are not set up as a supervisor in the LMS. Please contact a system administrator. A list of system administrators can be found at. https://hr.nih.gov/sites/default/files/public/documents/hr-systems/lms/pdf/nih-lms- admin-list.pdf
3. Click on the Skills link on the left.
STEP-BY-STEP (ACTIONS: DELETE A REQUIRED COMPETENCY)
Page | 49
LMS Manager/Supervisor
4. Click Competencies from the vertical navigation on the left side of the page.
5. Click Actions and then View All Competencies
6. Follow instructions to View Team Member Competencies Summary (Previous Section).
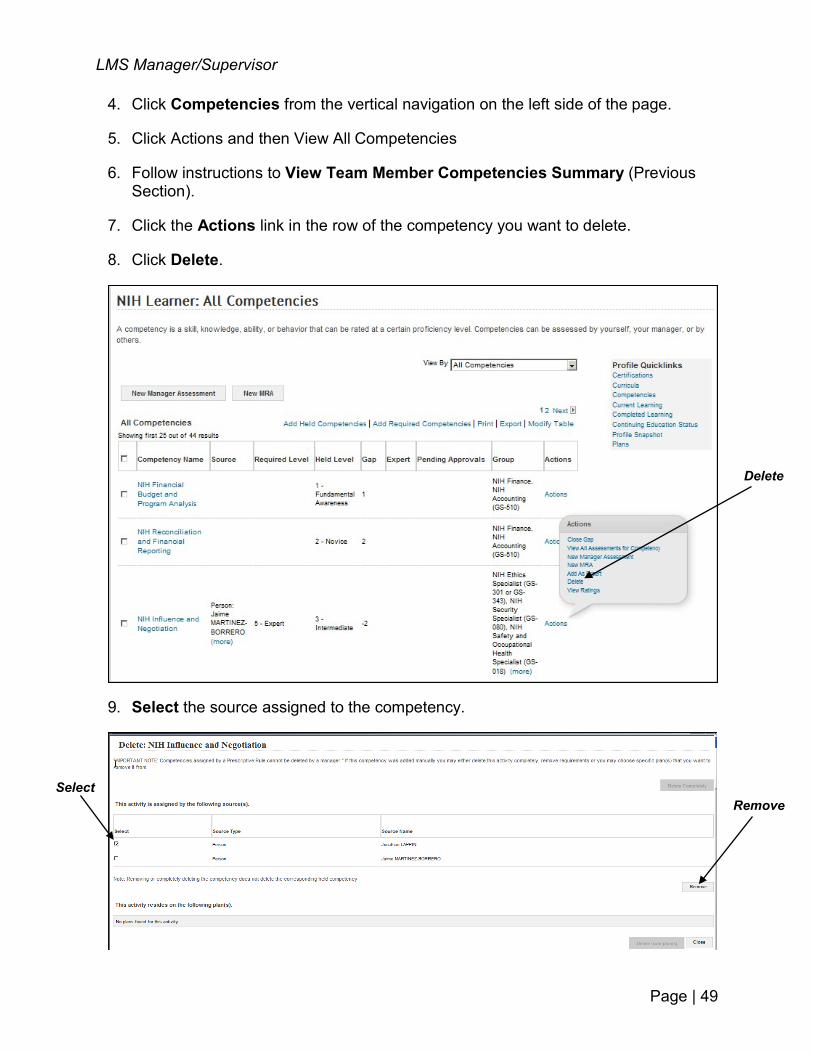
7. Click the Actions link in the row of the competency you want to delete.
8. Click Delete.
9. Select the source assigned to the competency.
Delete
Select Remove
Page |50
LMS Manager/Supervisor
10. Click Remove.
11. Click Ok on the confirmation pop-up.
12. You will see a confirmation message that the competency was removed.
1. Log on to the LMS. NOTE: For instruction about logging on, see the QRG- LMS Log on Instructions at: https://hr.nih.gov/sites/default/files/public/documents/hr-systems/lms/pdf/ts02-l- employee-log.pdf
2. Click on the My Team icon on the LMS Menu bar..
NOTE: If there isn’t a drop down list, you are not set up as a supervisor in the LMS. Please contact a system administrator. A list of system administrators can be found at. https://hr.nih.gov/sites/default/files/public/documents/hr-systems/lms/pdf/nih-lms- admin-list.pdf
3. Click on the Skills tab.
4. Click Competencies from the vertical navigation on the left side of the page.
5. Click the checkbox next to the name of one or more team members.
6. Click Add Required Competency.
STEP-BY-STEP (ADD A REQUIRED COMPETENCY)
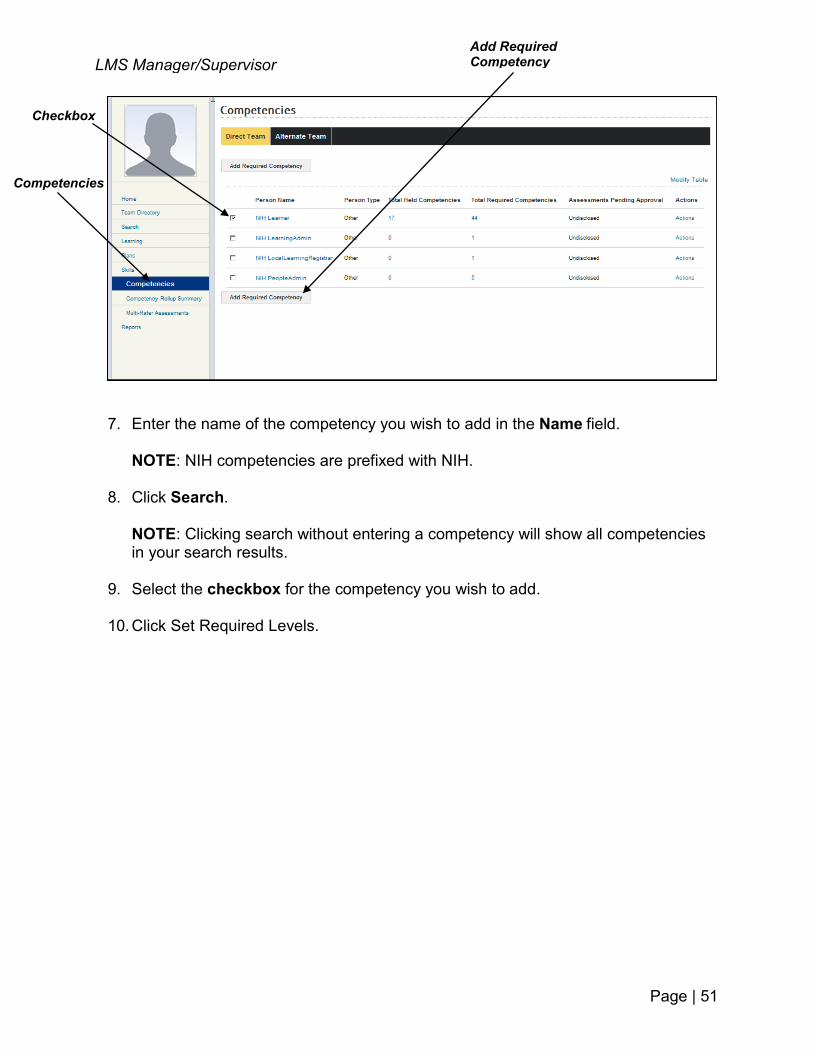
Page | 51
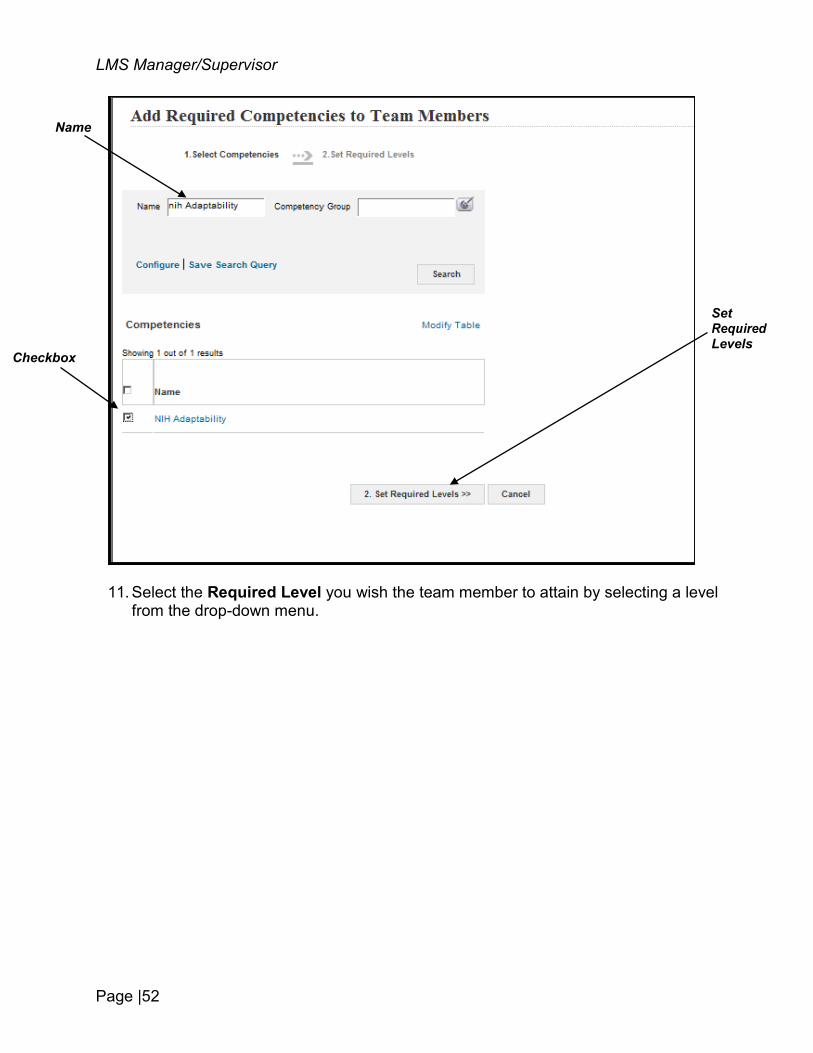
7. Enter the name of the competency you wish to add in the Name field.
NOTE: NIH competencies are prefixed with NIH.
8. Click Search.
NOTE: Clicking search without entering a competency will show all competencies in your search results.
9. Select the checkbox for the competency you wish to add.
10. Click Set Required Levels.
LMS Manager/Supervisor Add Required Competency
Checkbox
Competencies
Page |52
LMS Manager/Supervisor
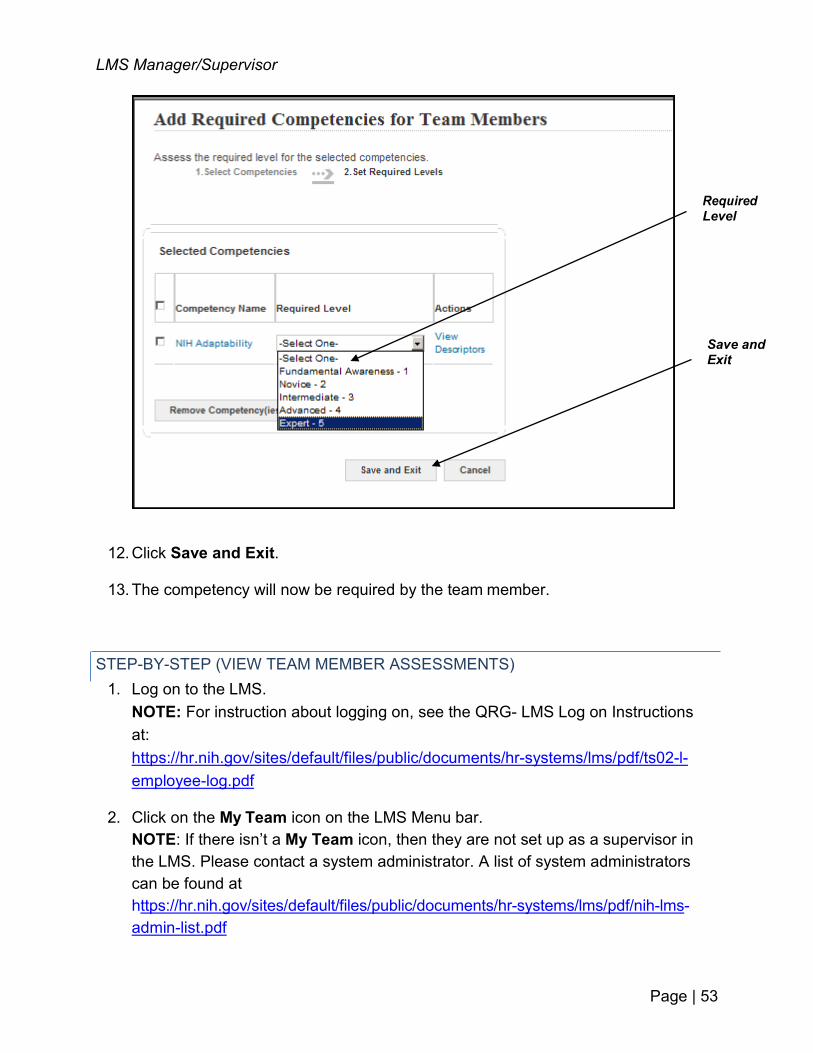
11. Select the Required Level you wish the team member to attain by selecting a level from the drop-down menu.
Name
Set Required Levels
Checkbox
Page | 53
LMS Manager/Supervisor
12. Click Save and Exit.
13. The competency will now be required by the team member.
1. Log on to the LMS. NOTE: For instruction about logging on, see the QRG- LMS Log on Instructions at: https://hr.nih.gov/sites/default/files/public/documents/hr-systems/lms/pdf/ts02-l- employee-log.pdf
2. Click on the My Team icon on the LMS Menu bar. NOTE: If there isn’t a My Team icon, then they are not set up as a supervisor in the LMS. Please contact a system administrator. A list of system administrators can be found at https://hr.nih.gov/sites/default/files/public/documents/hr-systems/lms/pdf/nih-lms- admin-list.pdf
STEP-BY-STEP (VIEW TEAM MEMBER ASSESSMENTS)
Required Level
Save and Exit
LMS Manager/Supervisor
Page |54
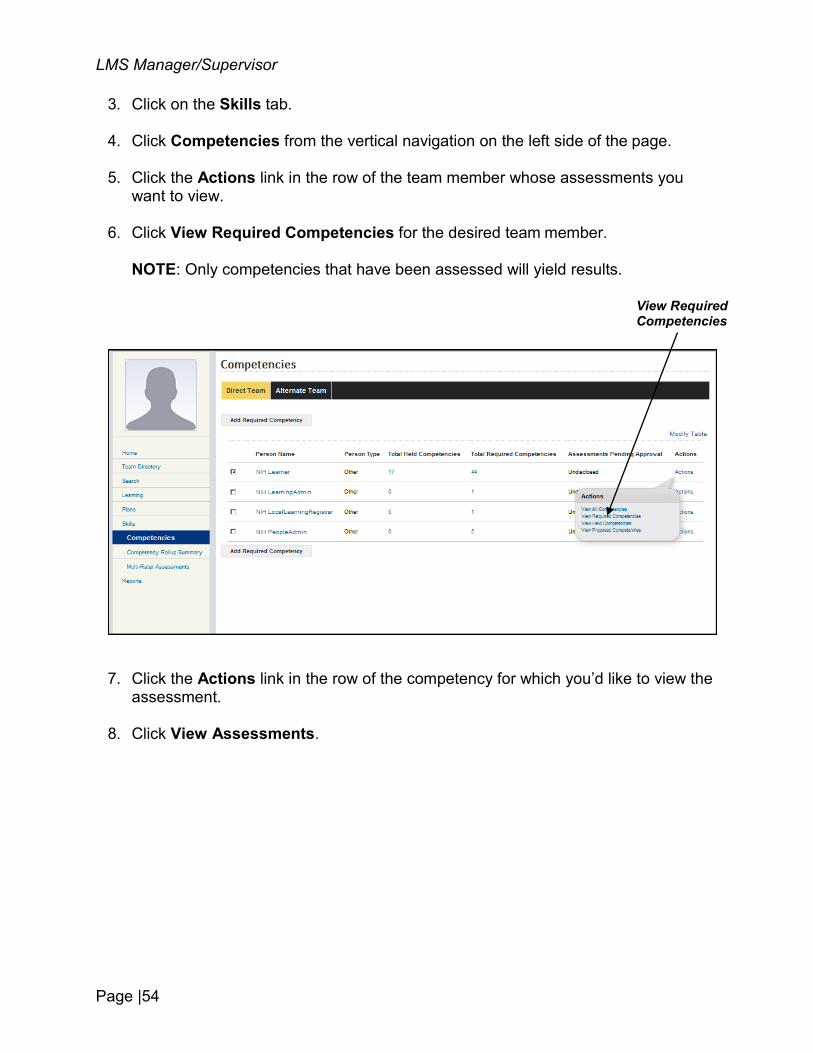
3. Click on the Skills tab.
4. Click Competencies from the vertical navigation on the left side of the page.
5. Click the Actions link in the row of the team member whose assessments you want to view.
6. Click View Required Competencies for the desired team member.
NOTE: Only competencies that have been assessed will yield results.
7. Click the Actions link in the row of the competency for which you’d like to view the assessment.
8. Click View Assessments.
View Required Competencies
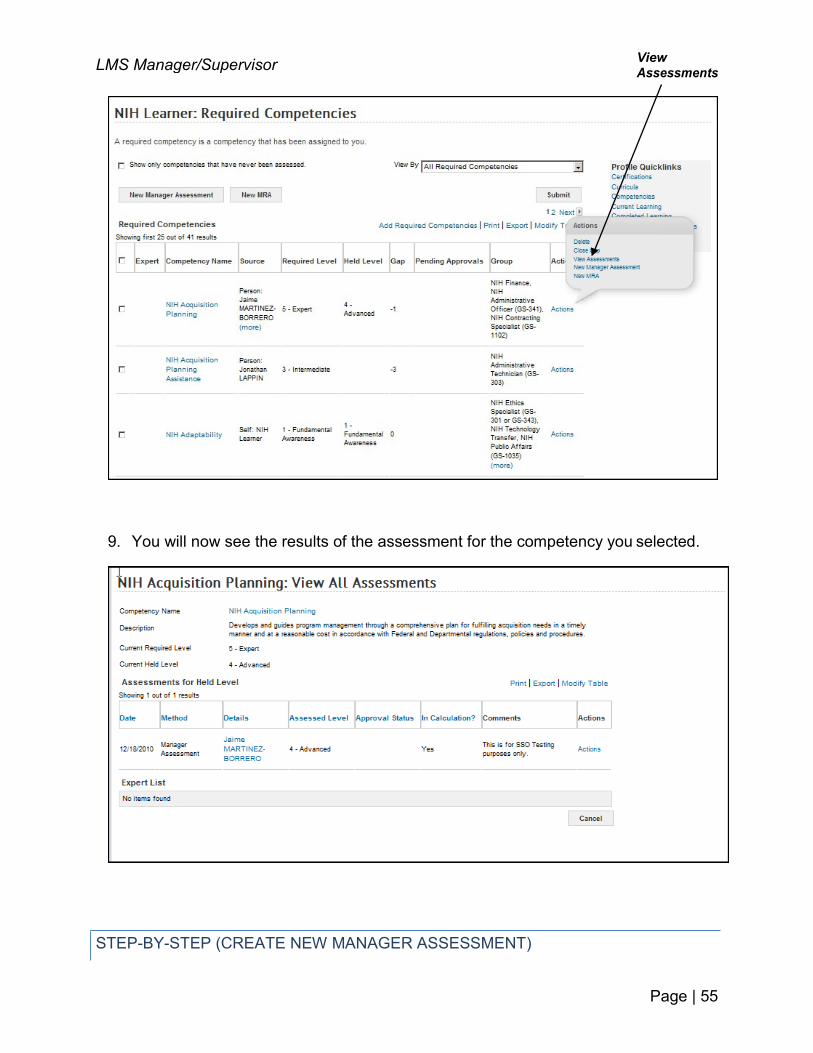
Page | 55
9. You will now see the results of the assessment for the competency you selected.
LMS Manager/Supervisor View Assessments
STEP-BY-STEP (CREATE NEW MANAGER ASSESSMENT)
LMS Manager/Supervisor
Page |56
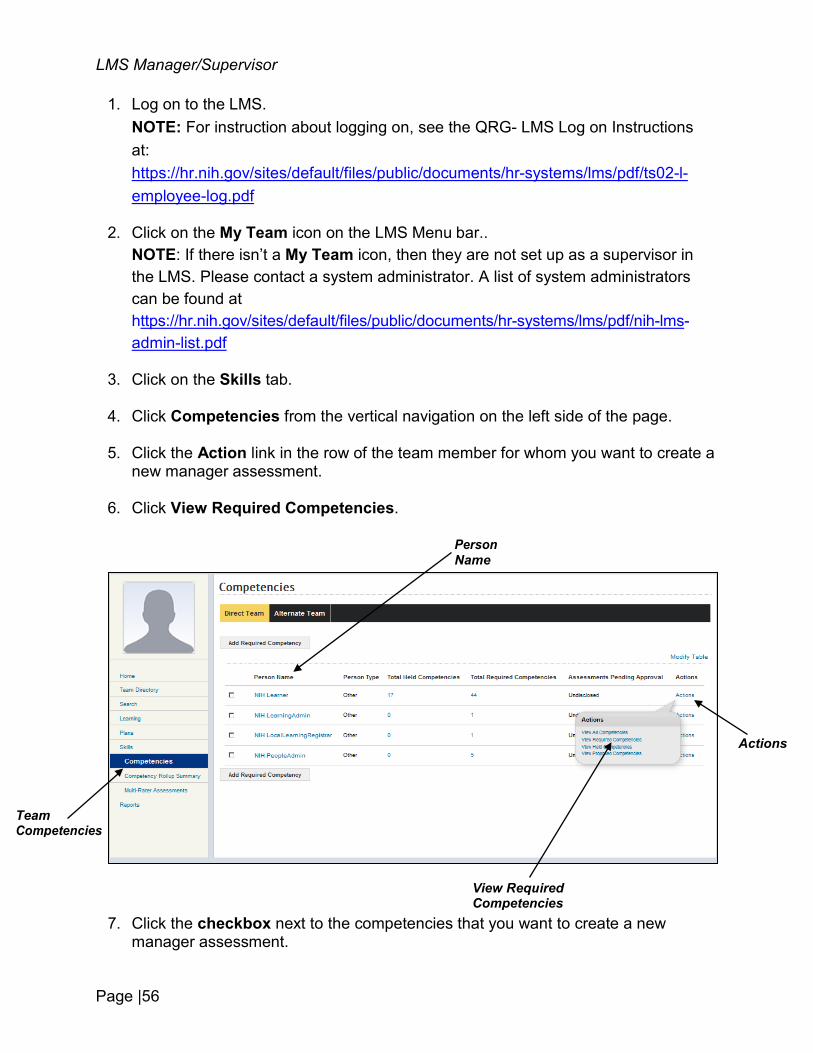
1. Log on to the LMS. NOTE: For instruction about logging on, see the QRG- LMS Log on Instructions at: https://hr.nih.gov/sites/default/files/public/documents/hr-systems/lms/pdf/ts02-l-employee-log.pdf
2. Click on the My Team icon on the LMS Menu bar.. NOTE: If there isn’t a My Team icon, then they are not set up as a supervisor in the LMS. Please contact a system administrator. A list of system administrators can be found at https://hr.nih.gov/sites/default/files/public/documents/hr-systems/lms/pdf/nih-lms- admin-list.pdf
3. Click on the Skills tab.
4. Click Competencies from the vertical navigation on the left side of the page.
5. Click the Action link in the row of the team member for whom you want to create a new manager assessment.
6. Click View Required Competencies.
7. Click the checkbox next to the competencies that you want to create a new manager assessment.
Person Name
Actions
Team Competencies
View Required Competencies
LMS Manager/Supervisor
Page | 57
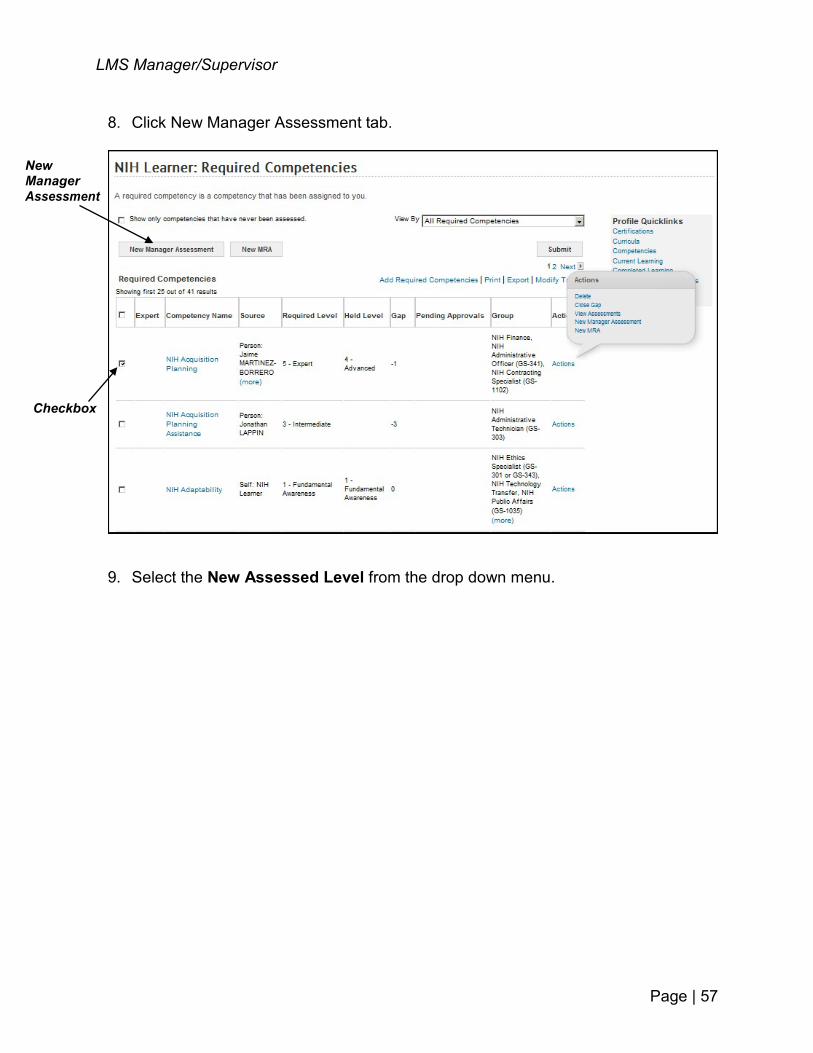
8. Click New Manager Assessment tab.
9. Select the New Assessed Level from the drop down menu.
New Manager Assessment
Checkbox
LMS Manager/Supervisor
Page |58
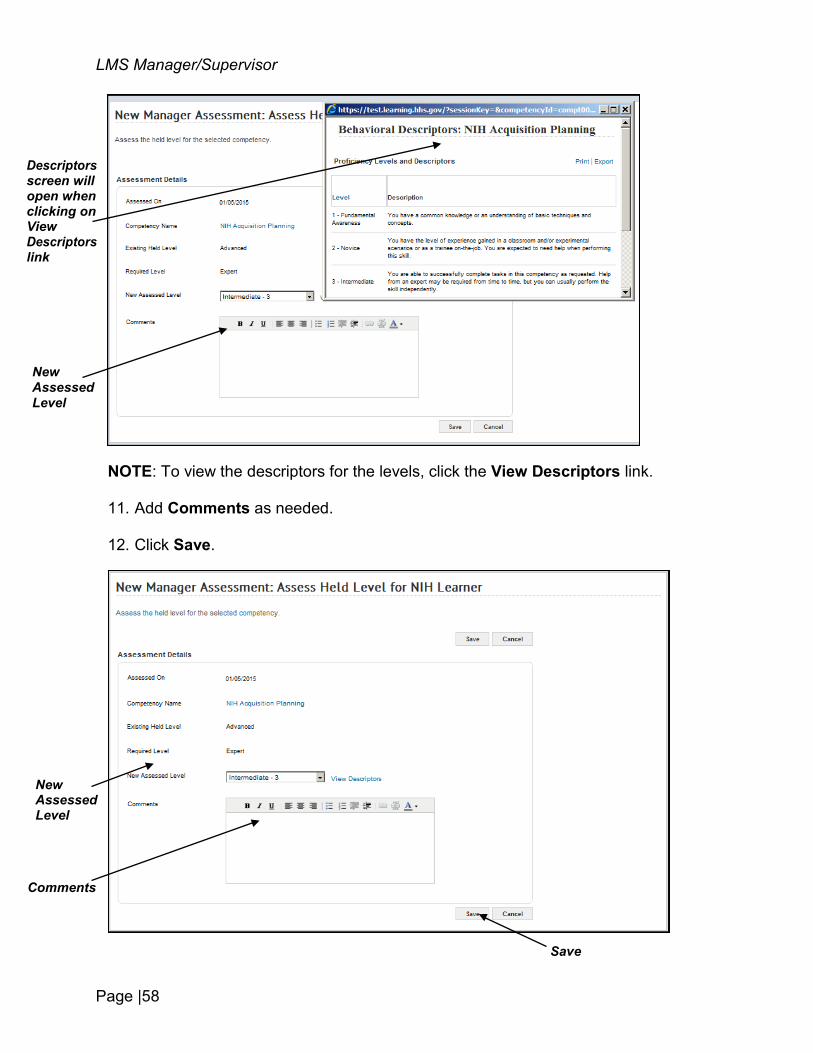
NOTE: To view the descriptors for the levels, click the View Descriptors link.
11. Add Comments as needed.
12. Click Save.
Descriptors screen will open when clicking on View Descriptors link
New Assessed Level
New Assessed Level
Comments
Save
LMS Manager/Supervisor
Page | 59
13. The team member will now hold the new level for the competency.
RUNNING REPORTS
Under the Reports tab on the Team Home page, the manager/supervisor has access to a variety of reports in the LMS. Reports can be generated, exported, printed, emailed and subscribed to if desired. Below you will find instructions on how to work with reports in the LMS.
1. Log on to the LMS. NOTE: For instruction about logging on, see the QRG- LMS Log on Instructions at: https://hr.nih.gov/sites/default/files/public/documents/hr-systems/lms/pdf/ts02-l- employee-log.pdf
2. Click on the My Team icon on the LMS Menu bar. NOTE: If there isn’t a My Team icon, then they are not set up as a supervisor in the LMS. Please contact a system administrator. A list of system administrators can be found at https://hr.nih.gov/sites/default/files/public/documents/hr-systems/lms/pdf/nih-lms- admin-list.pdf
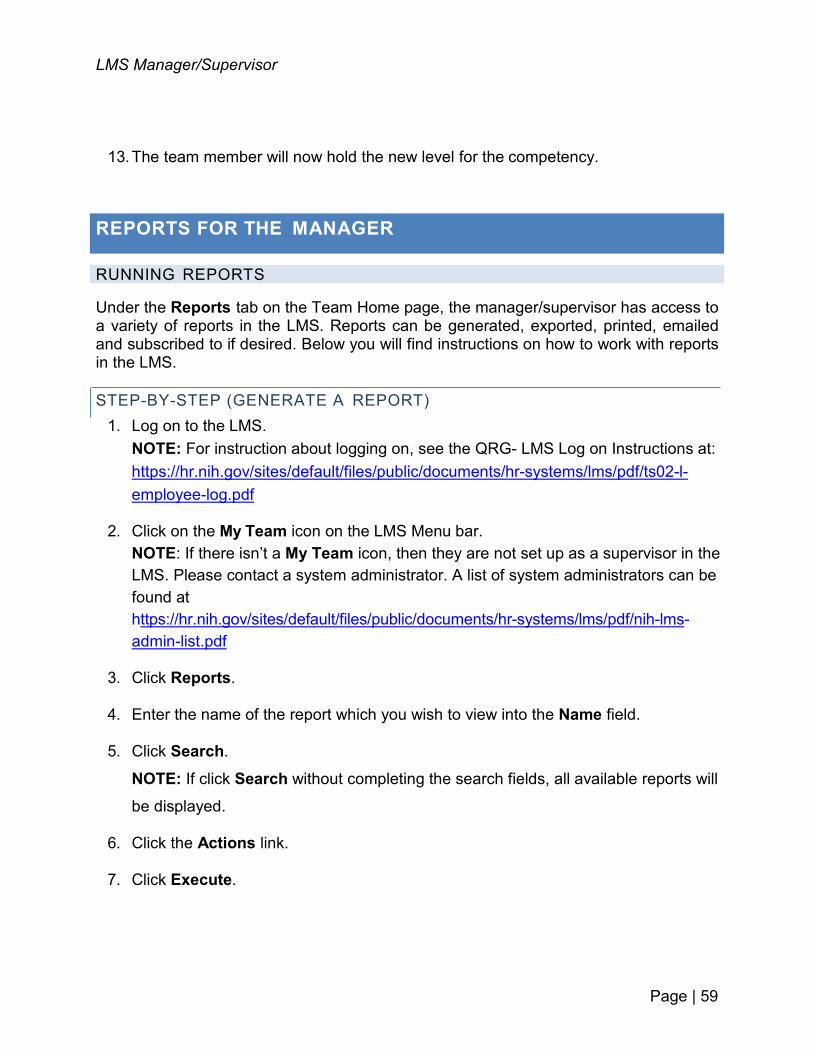
3. Click Reports.
4. Enter the name of the report which you wish to view into the Name field.
5. Click Search.
NOTE: If click Search without completing the search fields, all available reports will
be displayed.
6. Click the Actions link.
7. Click Execute.
REPORTS FOR THE MANAGER
STEP-BY-STEP (GENERATE A REPORT)
LMS Manager/Supervisor
Page |60
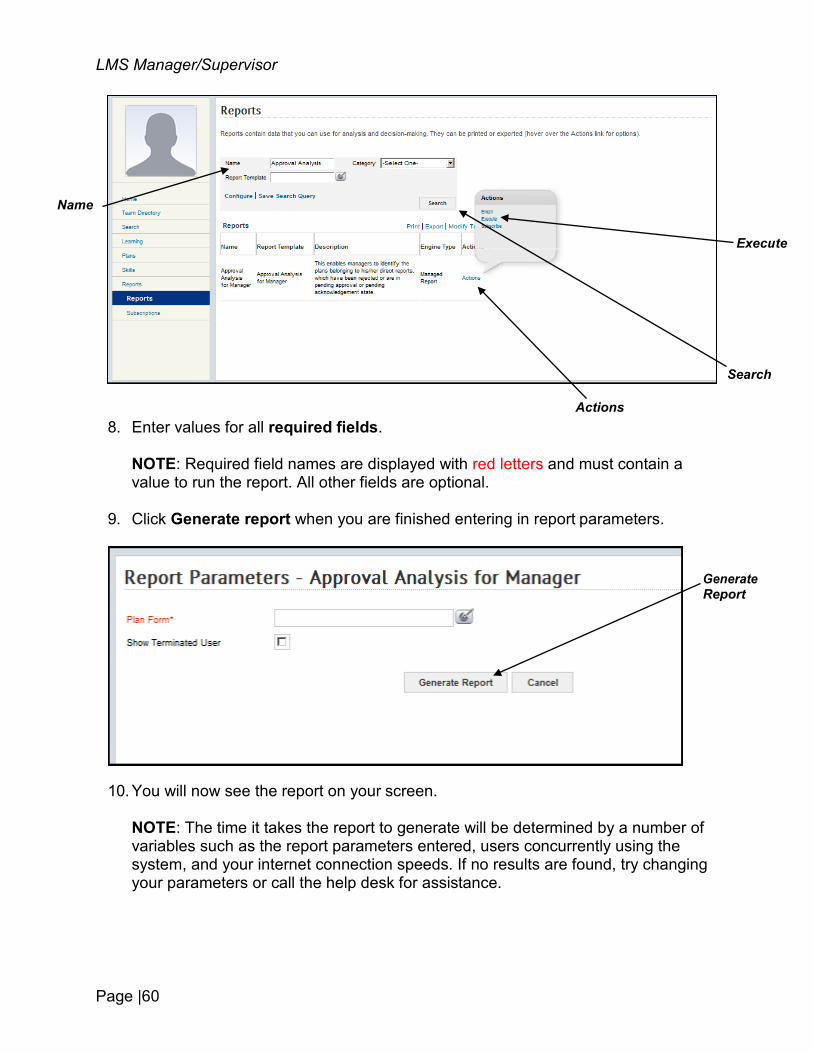
8. Enter values for all required fields.
NOTE: Required field names are displayed with red letters and must contain a value to run the report. All other fields are optional.
9. Click Generate report when you are finished entering in report parameters.
10. You will now see the report on your screen.
NOTE: The time it takes the report to generate will be determined by a number of variables such as the report parameters entered, users concurrently using the system, and your internet connection speeds. If no results are found, try changing your parameters or call the help desk for assistance.
Name
Execute
Search
Actions
Generate Report
LMS Manager/Supervisor
Page | 61
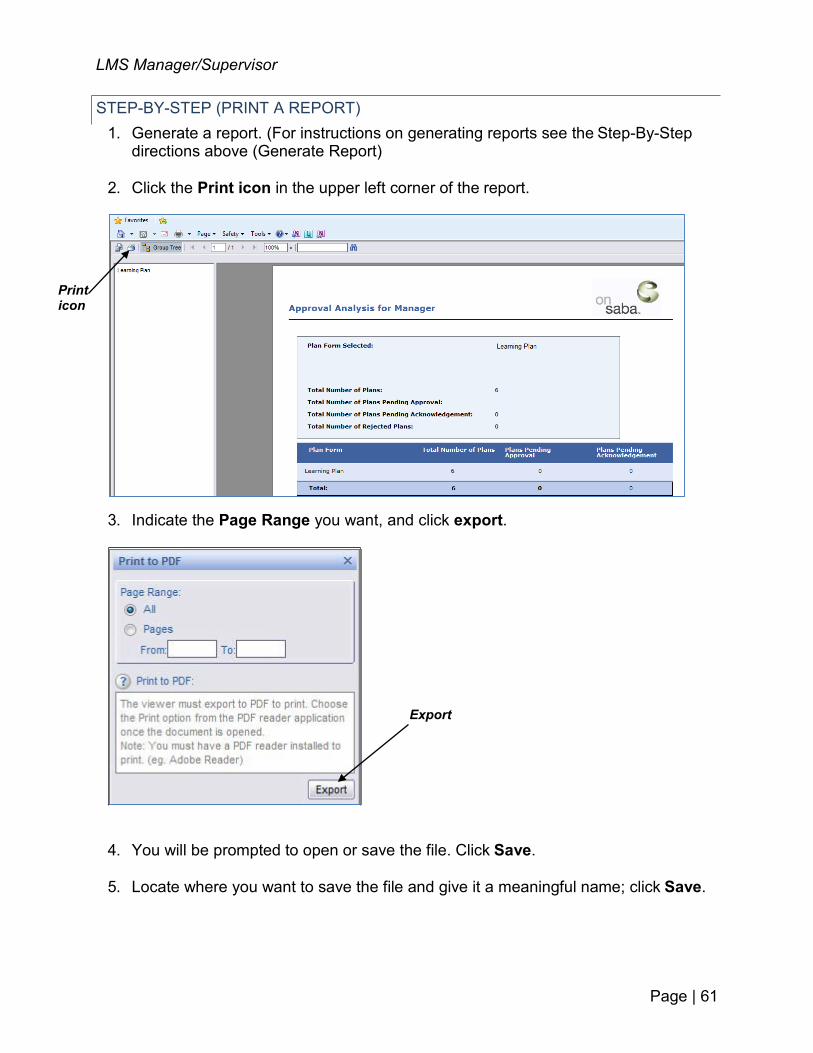
1. Generate a report. (For instructions on generating reports see the Step-By-Step
directions above (Generate Report)
2. Click the Print icon in the upper left corner of the report.
3. Indicate the Page Range you want, and click export.
4. You will be prompted to open or save the file. Click Save.
5. Locate where you want to save the file and give it a meaningful name; click Save.
STEP-BY-STEP (PRINT A REPORT)
Print icon
Export
LMS Manager/Supervisor
Page |62
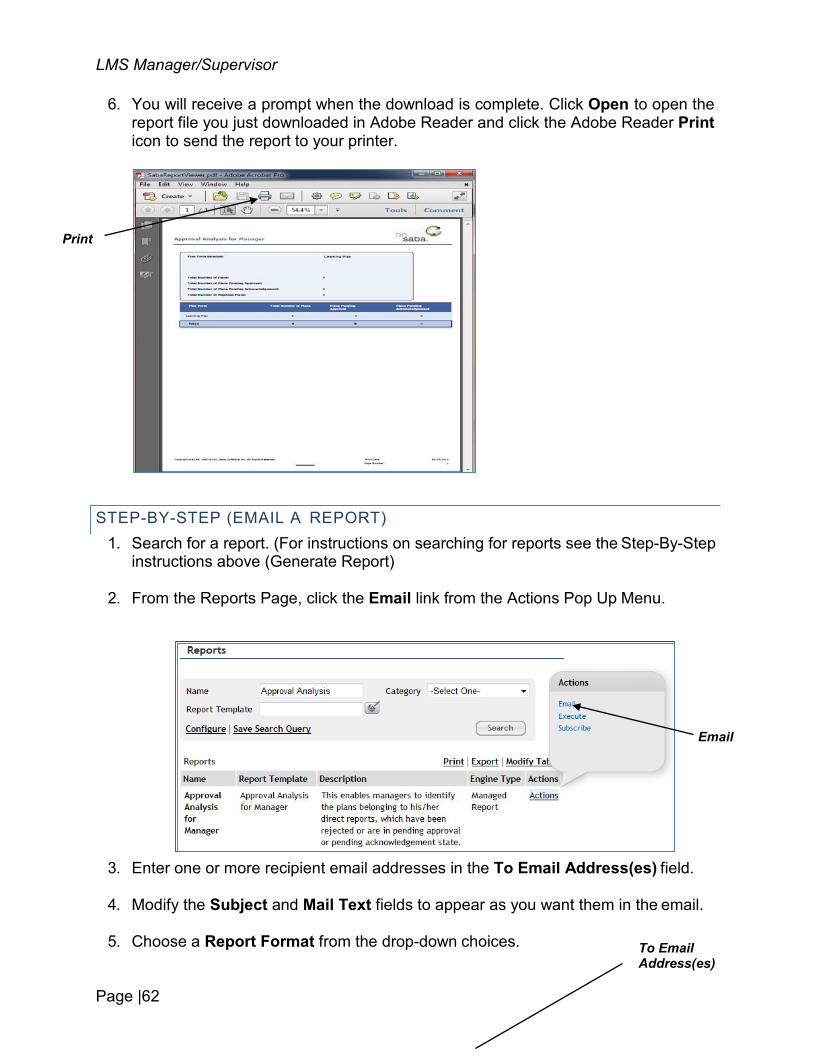
6. You will receive a prompt when the download is complete. Click Open to open the report file you just downloaded in Adobe Reader and click the Adobe Reader Print icon to send the report to your printer.
1. Search for a report. (For instructions on searching for reports see the Step-By-Step instructions above (Generate Report)
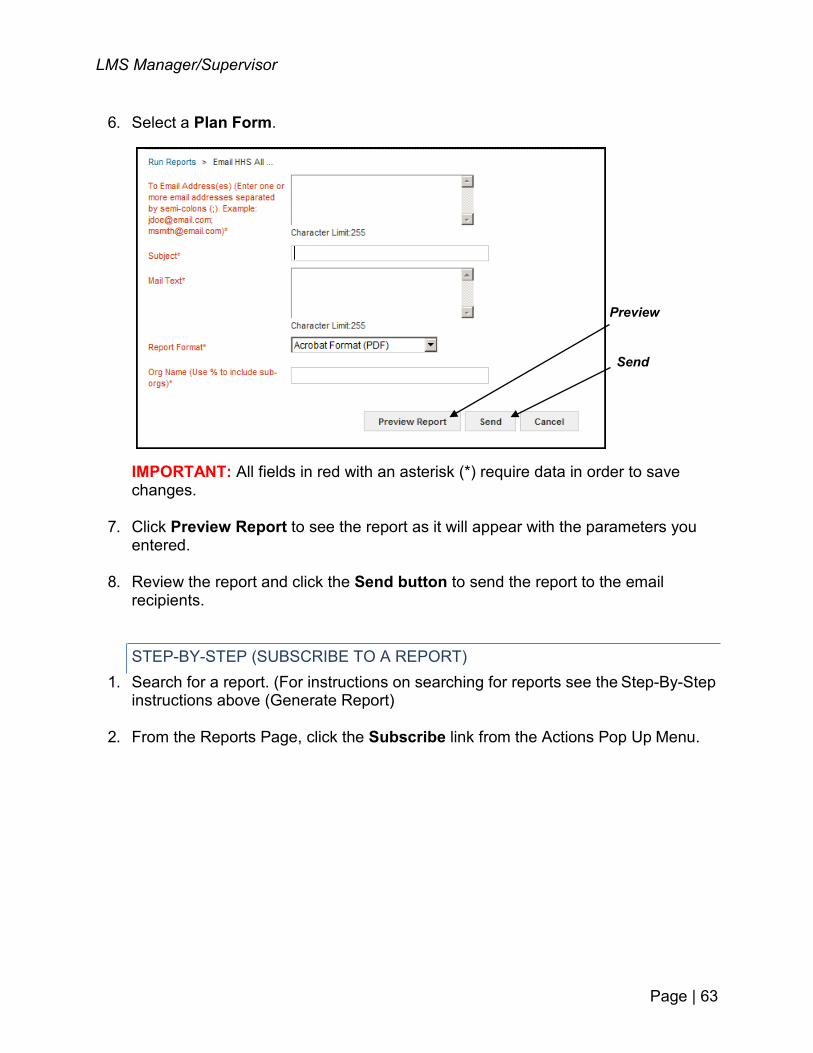
2. From the Reports Page, click the Email link from the Actions Pop Up Menu.
3. Enter one or more recipient email addresses in the To Email Address(es) field.
4. Modify the Subject and Mail Text fields to appear as you want them in the email.
5. Choose a Report Format from the drop-down choices.
STEP-BY-STEP (EMAIL A REPORT)
To Email Address(es)
LMS Manager/Supervisor
Page | 63
6. Select a Plan Form.
IMPORTANT: All fields in red with an asterisk (*) require data in order to save changes.
7. Click Preview Report to see the report as it will appear with the parameters you
entered.
8. Review the report and click the Send button to send the report to the email recipients.
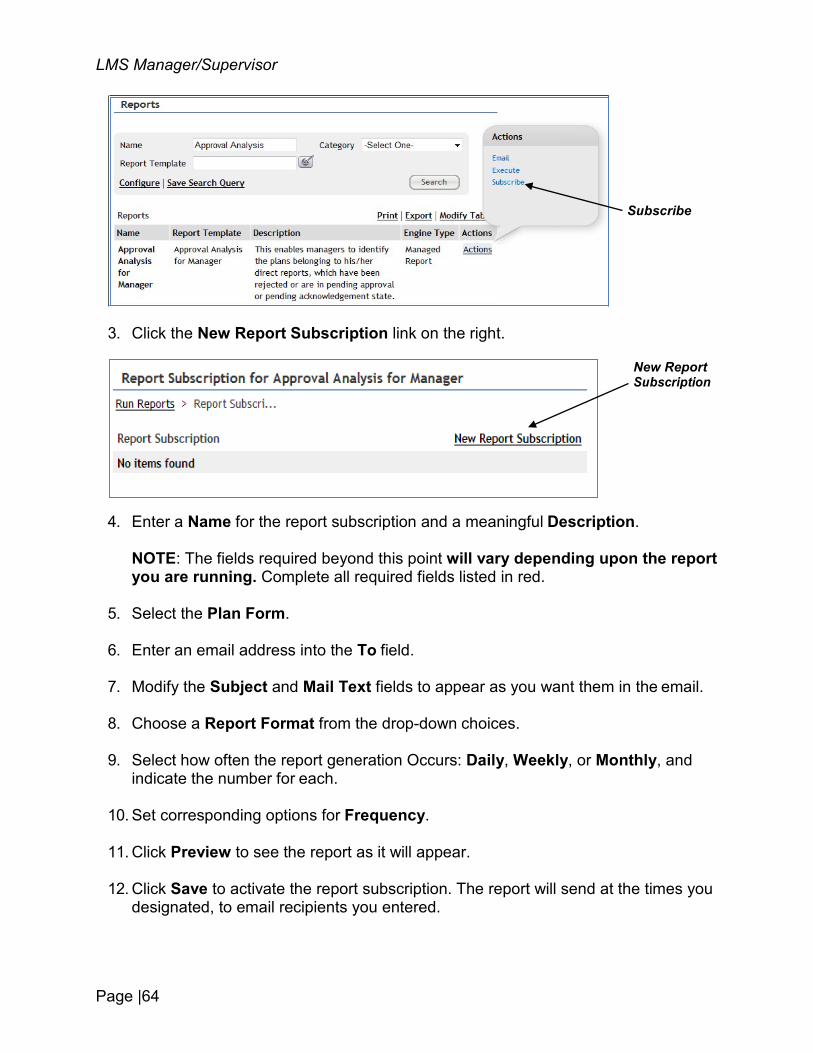
1. Search for a report. (For instructions on searching for reports see the Step-By-Step instructions above (Generate Report)
2. From the Reports Page, click the Subscribe link from the Actions Pop Up Menu.
Preview
Send
STEP-BY-STEP (SUBSCRIBE TO A REPORT)
LMS Manager/Supervisor
Page |64
3. Click the New Report Subscription link on the right.
4. Enter a Name for the report subscription and a meaningful Description.
NOTE: The fields required beyond this point will vary depending upon the report you are running. Complete all required fields listed in red.
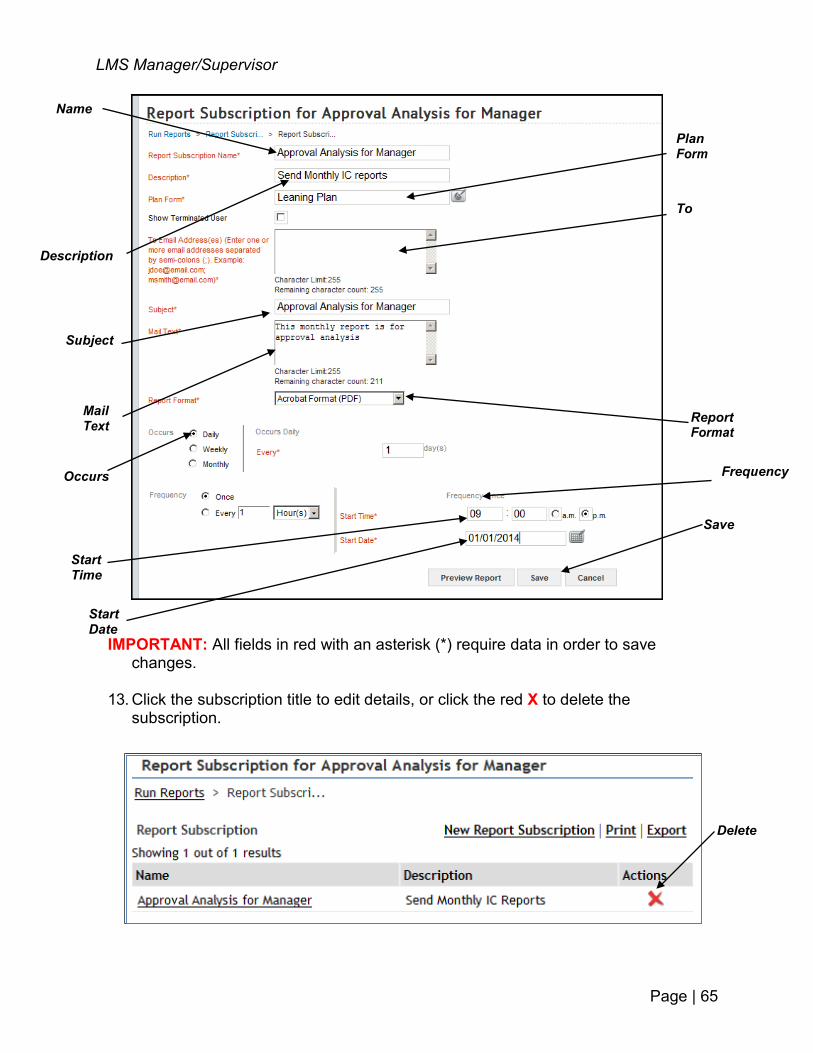
5. Select the Plan Form.
6. Enter an email address into the To field.
7. Modify the Subject and Mail Text fields to appear as you want them in the email.
8. Choose a Report Format from the drop-down choices.
9. Select how often the report generation Occurs: Daily, Weekly, or Monthly, and
indicate the number for each.
10. Set corresponding options for Frequency.
11. Click Preview to see the report as it will appear.
12. Click Save to activate the report subscription. The report will send at the times you designated, to email recipients you entered.
Subscribe
New Report Subscription
LMS Manager/Supervisor
Page | 65
IMPORTANT: All fields in red with an asterisk (*) require data in order to save
changes.
13. Click the subscription title to edit details, or click the red X to delete the subscription.
Name
Plan Form
To
Description
Subject
Mail Text Report
Format
Occurs Frequency
Save
Start Time
Start Date
Delete
LMS Manager/Supervisor
Page |66
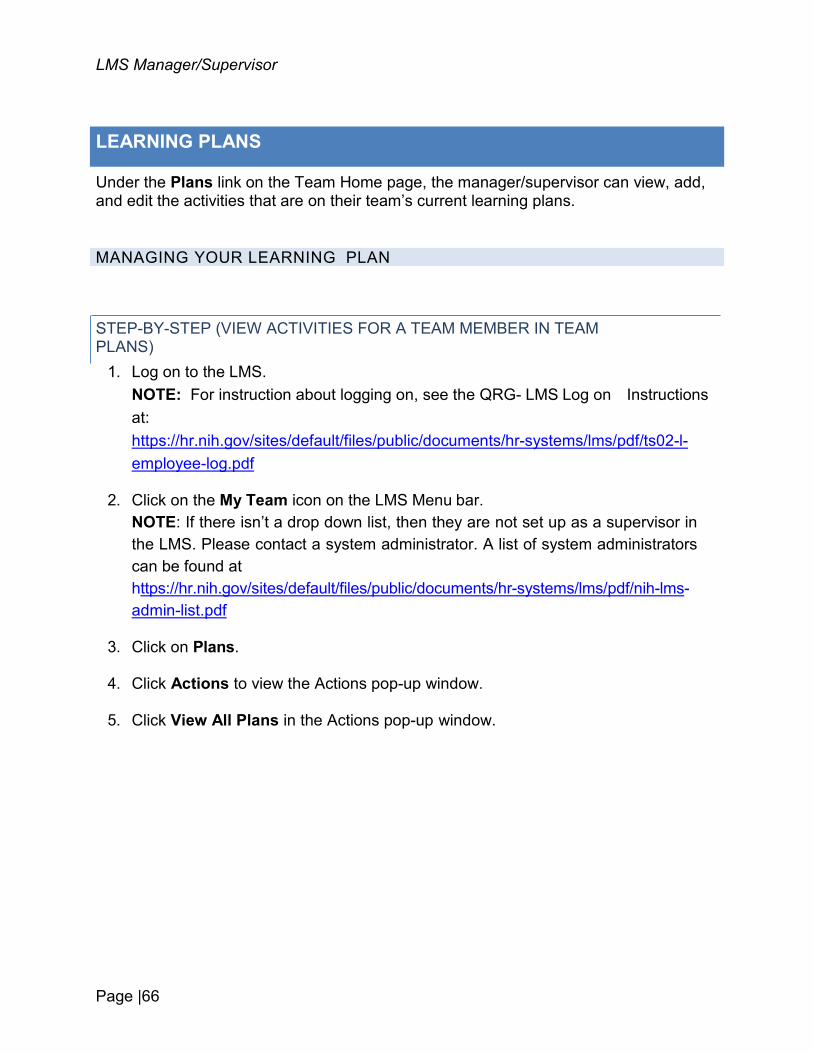
Under the Plans link on the Team Home page, the manager/supervisor can view, add, and edit the activities that are on their team’s current learning plans.
MANAGING YOUR LEARNING PLAN
1. Log on to the LMS. NOTE: For instruction about logging on, see the QRG- LMS Log on Instructions at: https://hr.nih.gov/sites/default/files/public/documents/hr-systems/lms/pdf/ts02-l- employee-log.pdf
2. Click on the My Team icon on the LMS Menu bar. NOTE: If there isn’t a drop down list, then they are not set up as a supervisor in the LMS. Please contact a system administrator. A list of system administrators can be found at https://hr.nih.gov/sites/default/files/public/documents/hr-systems/lms/pdf/nih-lms- admin-list.pdf
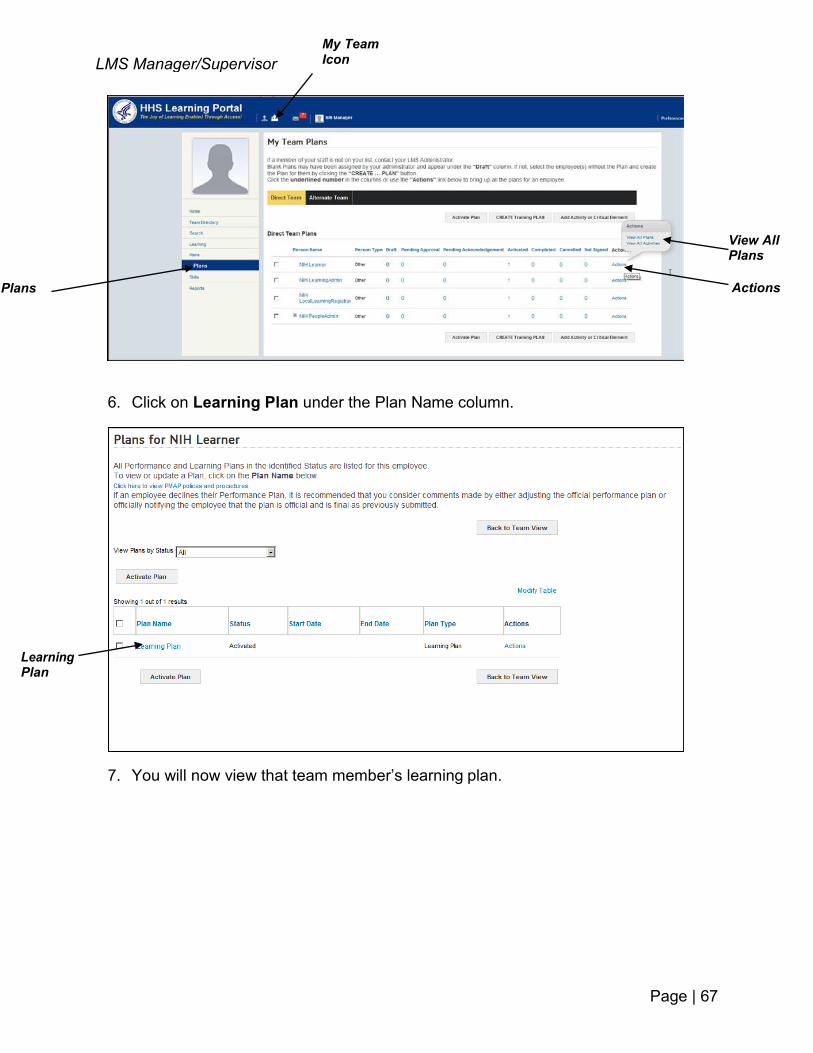
3. Click on Plans.
4. Click Actions to view the Actions pop-up window.
5. Click View All Plans in the Actions pop-up window.
LEARNING PLANS
STEP-BY-STEP (VIEW ACTIVITIES FOR A TEAM MEMBER IN TEAM PLANS)
Page | 67
6. Click on Learning Plan under the Plan Name column.
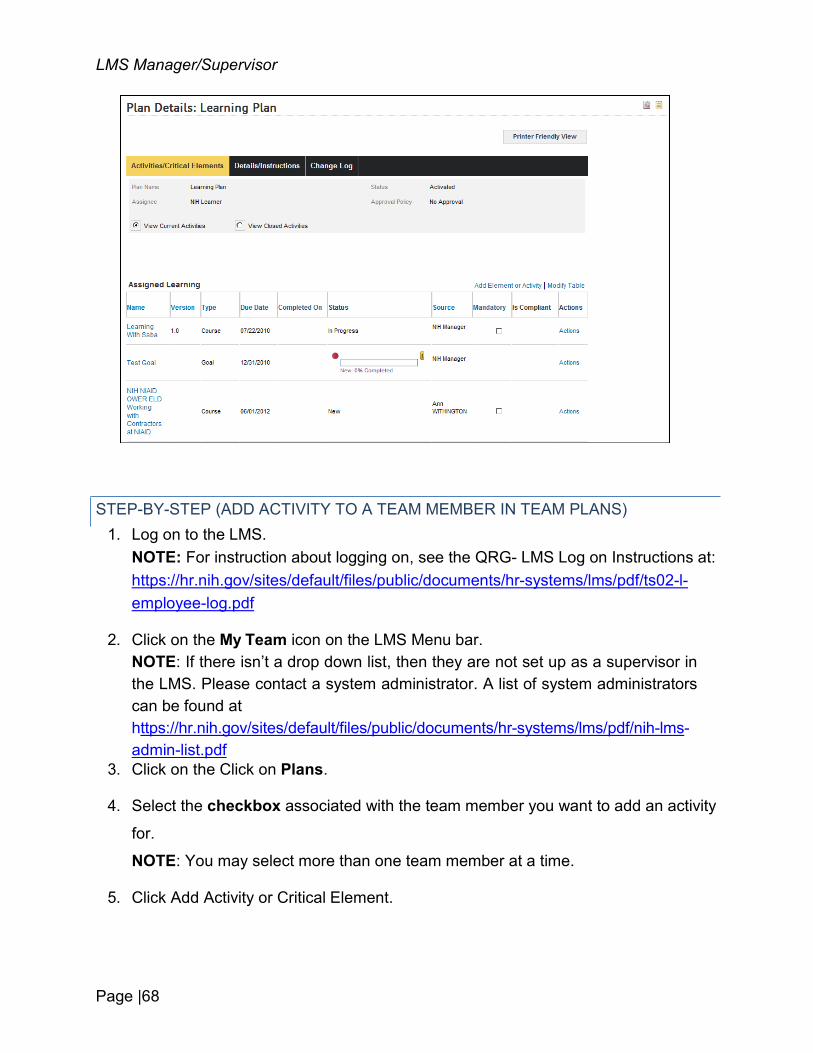
7. You will now view that team member’s learning plan.
LMS Manager/Supervisor My Team Icon
View All Plans
Plans Actions
Learning Plan
Page |68
LMS Manager/Supervisor
1. Log on to the LMS. NOTE: For instruction about logging on, see the QRG- LMS Log on Instructions at: https://hr.nih.gov/sites/default/files/public/documents/hr-systems/lms/pdf/ts02-l- employee-log.pdf
2. Click on the My Team icon on the LMS Menu bar. NOTE: If there isn’t a drop down list, then they are not set up as a supervisor in the LMS. Please contact a system administrator. A list of system administrators can be found at https://hr.nih.gov/sites/default/files/public/documents/hr-systems/lms/pdf/nih-lms- admin-list.pdf
3. Click on the Click on Plans.
4. Select the checkbox associated with the team member you want to add an activity
for.
NOTE: You may select more than one team member at a time.
5. Click Add Activity or Critical Element.
STEP-BY-STEP (ADD ACTIVITY TO A TEAM MEMBER IN TEAM PLANS)
Page | 69
LMS Manager/Supervisor
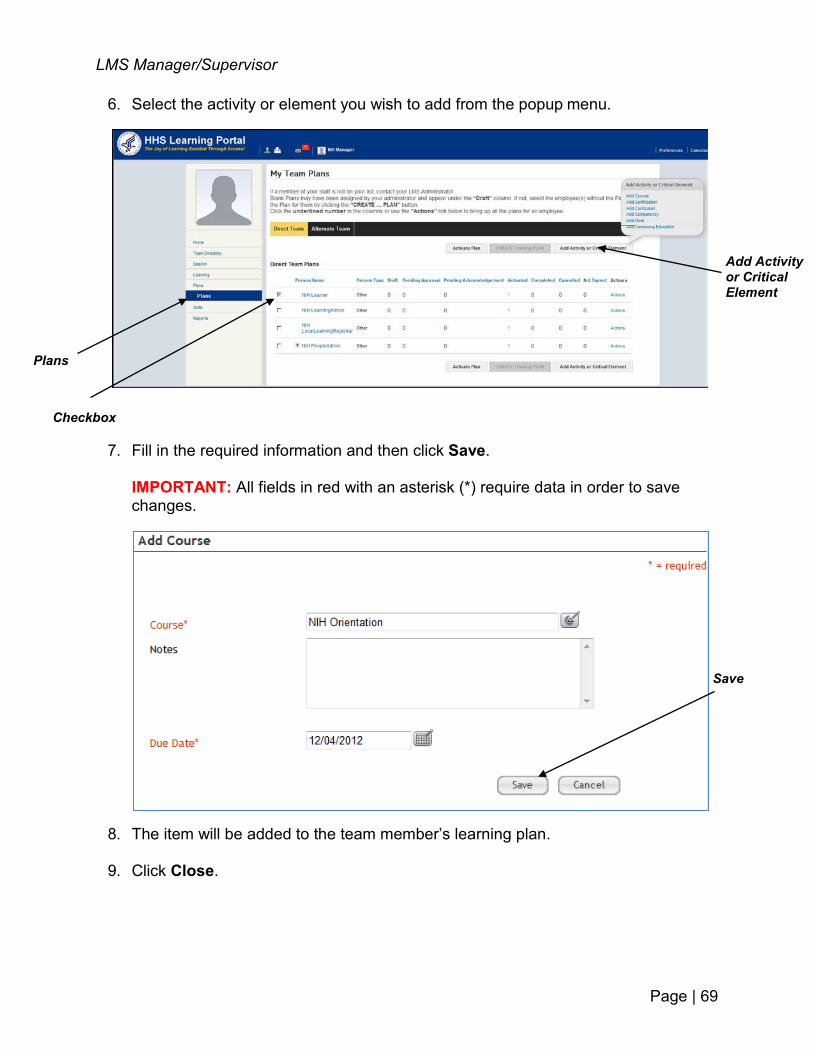
6. Select the activity or element you wish to add from the popup menu.
7. Fill in the required information and then click Save.
IMPORTANT: All fields in red with an asterisk (*) require data in order to save changes.
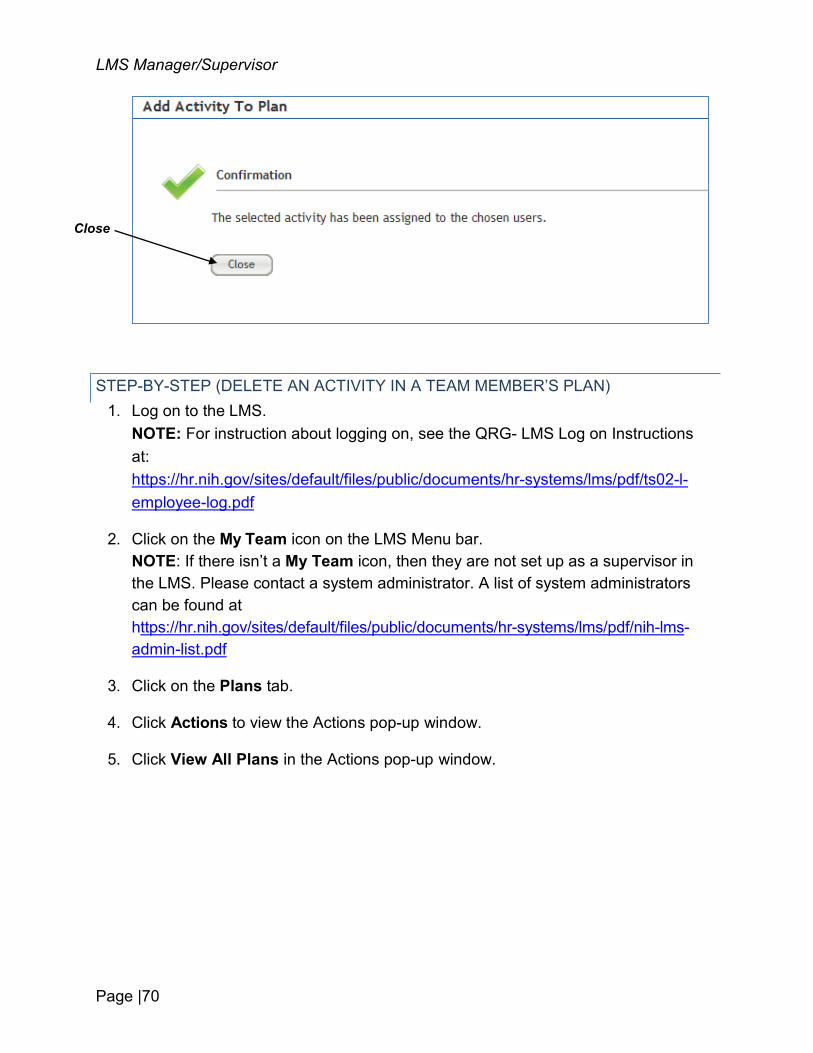
8. The item will be added to the team member’s learning plan.
9. Click Close.
Save
Add Activity or Critical Element
Plans
Checkbox
Page |70
LMS Manager/Supervisor
1. Log on to the LMS. NOTE: For instruction about logging on, see the QRG- LMS Log on Instructions at: https://hr.nih.gov/sites/default/files/public/documents/hr-systems/lms/pdf/ts02-l- employee-log.pdf
2. Click on the My Team icon on the LMS Menu bar. NOTE: If there isn’t a My Team icon, then they are not set up as a supervisor in the LMS. Please contact a system administrator. A list of system administrators can be found at https://hr.nih.gov/sites/default/files/public/documents/hr-systems/lms/pdf/nih-lms- admin-list.pdf
3. Click on the Plans tab.
4. Click Actions to view the Actions pop-up window.
5. Click View All Plans in the Actions pop-up window.
Close
STEP-BY-STEP (DELETE AN ACTIVITY IN A TEAM MEMBER’S PLAN)
Page | 71
LMS Manager/Supervisor
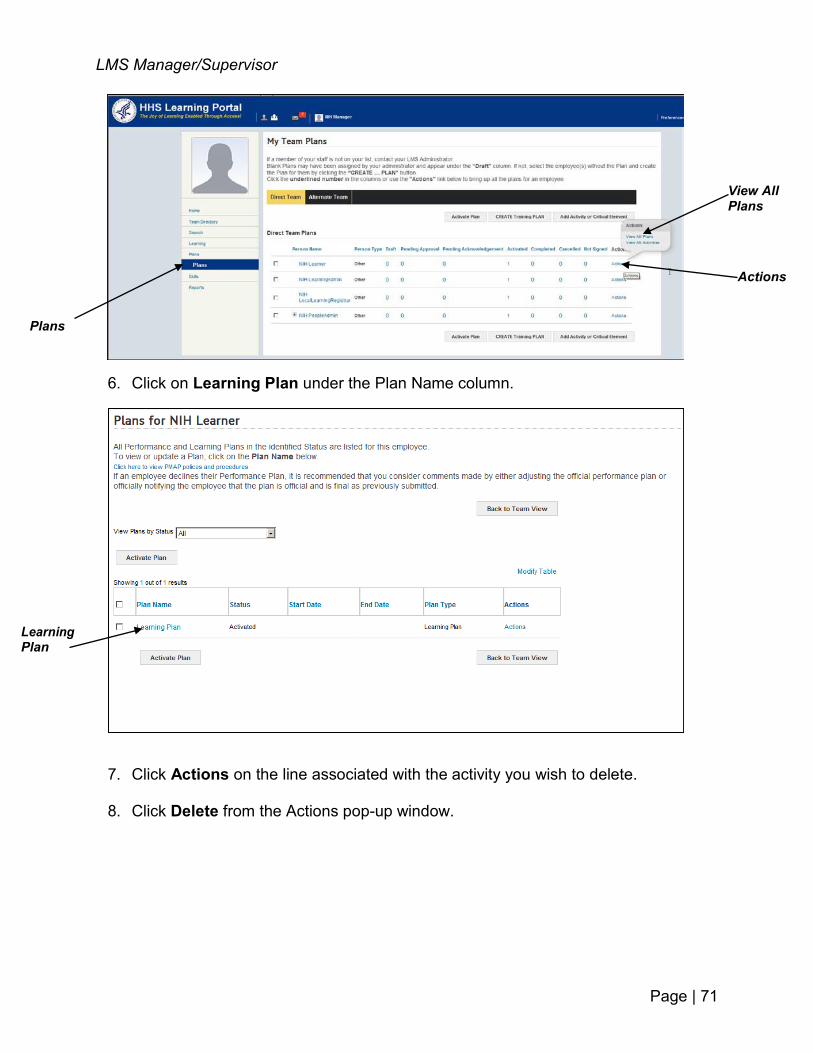
6. Click on Learning Plan under the Plan Name column.
7. Click Actions on the line associated with the activity you wish to delete.
8. Click Delete from the Actions pop-up window.
View All Plans
Actions
Plans
Learning Plan
Page |72
LMS Manager/Supervisor
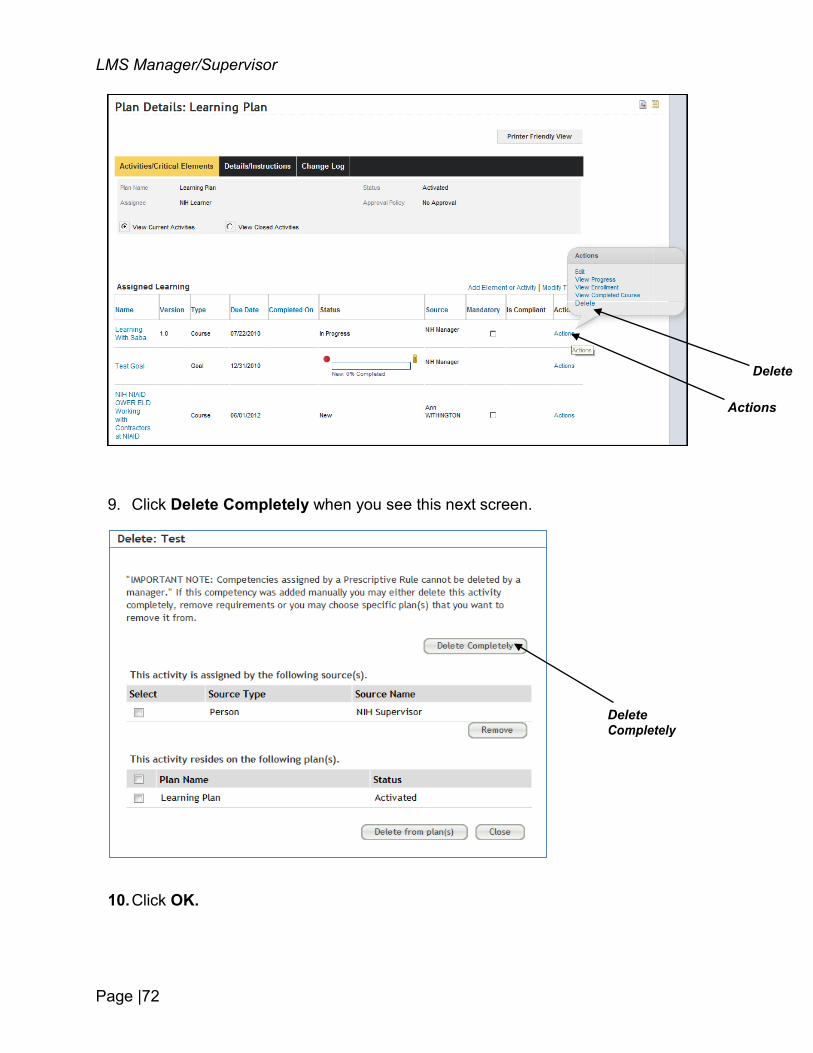
9. Click Delete Completely when you see this next screen.
10. Click OK.
Delete Actions
Delete Completely
Page | 73
LMS Manager/Supervisor
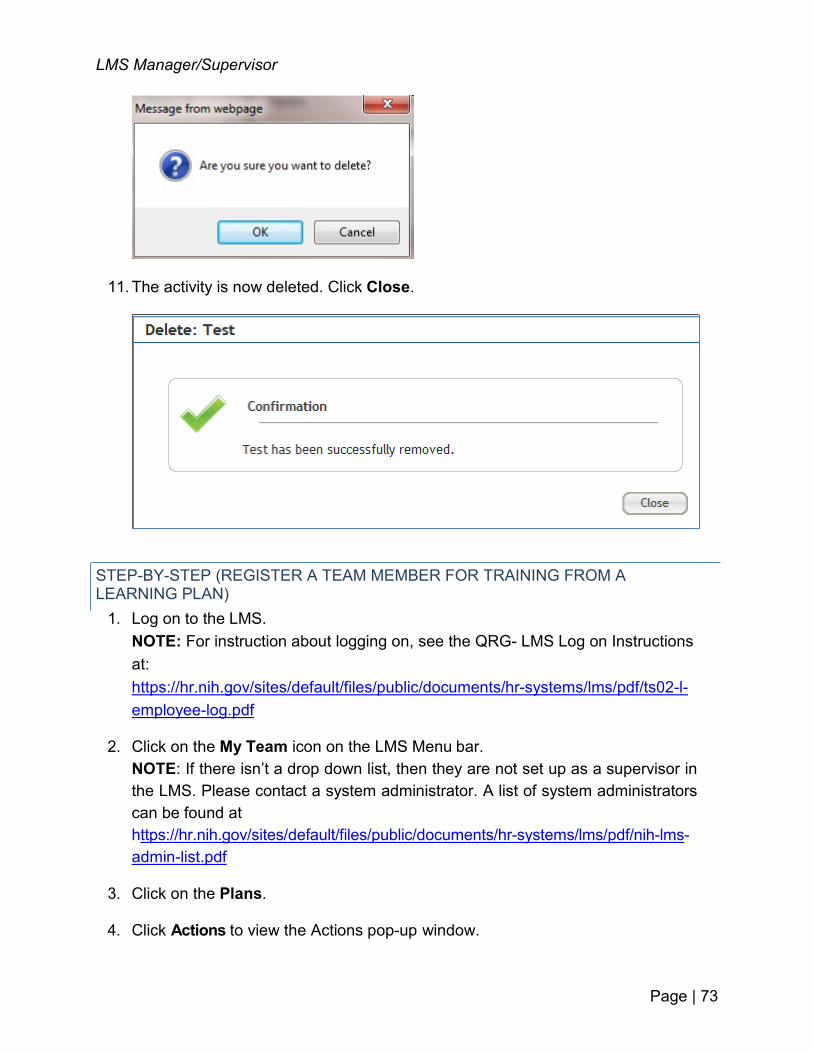
11. The activity is now deleted. Click Close.
1. Log on to the LMS. NOTE: For instruction about logging on, see the QRG- LMS Log on Instructions at: https://hr.nih.gov/sites/default/files/public/documents/hr-systems/lms/pdf/ts02-l- employee-log.pdf
2. Click on the My Team icon on the LMS Menu bar. NOTE: If there isn’t a drop down list, then they are not set up as a supervisor in the LMS. Please contact a system administrator. A list of system administrators can be found at https://hr.nih.gov/sites/default/files/public/documents/hr-systems/lms/pdf/nih-lms- admin-list.pdf
3. Click on the Plans.
4. Click Actions to view the Actions pop-up window.
STEP-BY-STEP (REGISTER A TEAM MEMBER FOR TRAINING FROM A LEARNING PLAN)
Page |74
LMS Manager/Supervisor
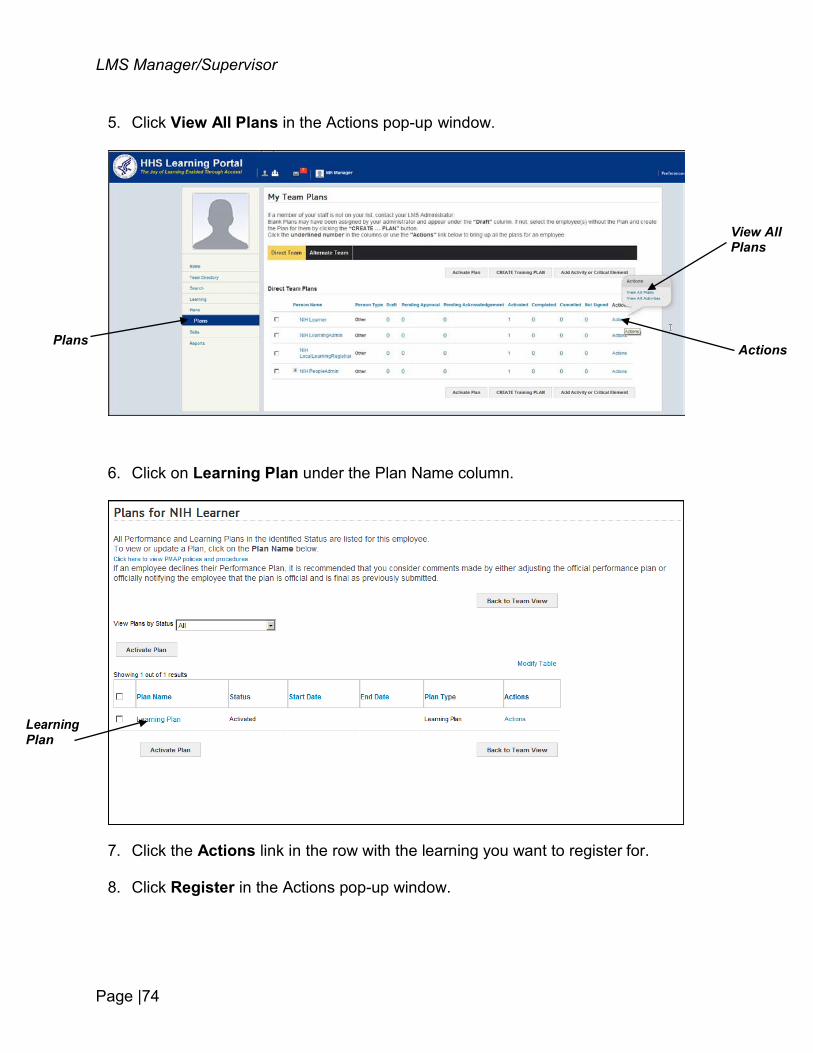
5. Click View All Plans in the Actions pop-up window.
6. Click on Learning Plan under the Plan Name column.
7. Click the Actions link in the row with the learning you want to register for.
8. Click Register in the Actions pop-up window.
View All Plans
Plans Actions
Learning Plan
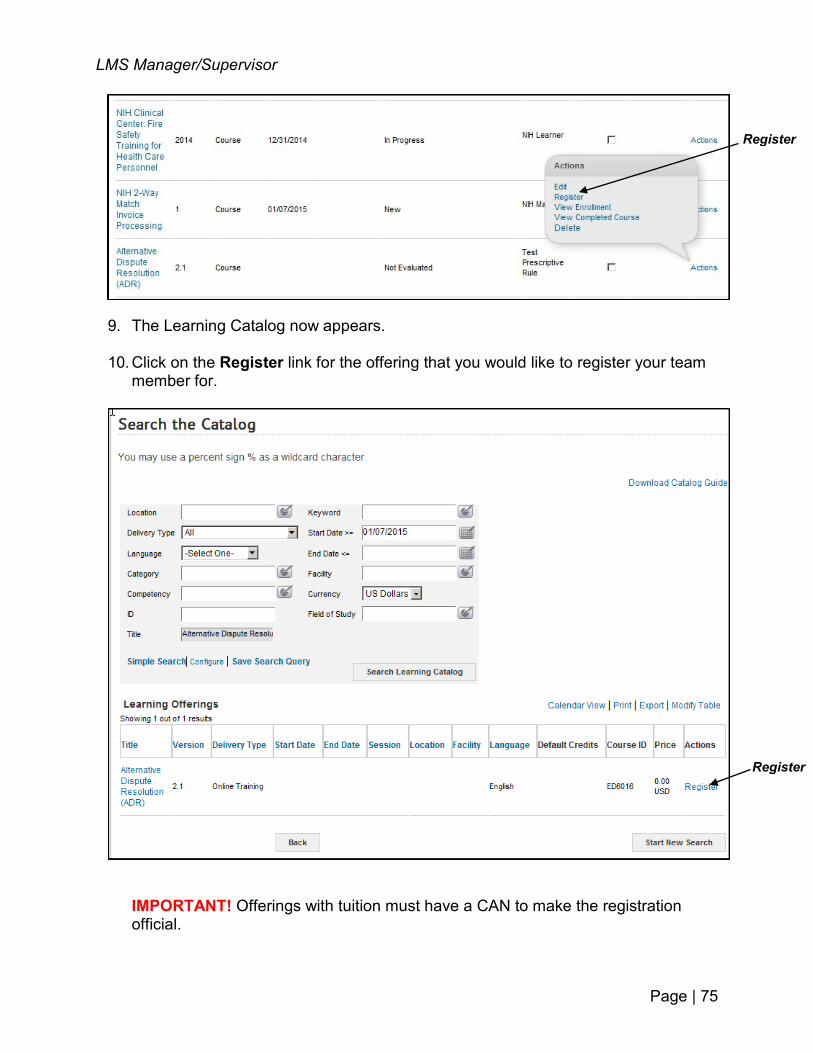
Page | 75
LMS Manager/Supervisor
9. The Learning Catalog now appears.
10. Click on the Register link for the offering that you would like to register your team member for.
IMPORTANT! Offerings with tuition must have a CAN to make the registration official.
Register
Register
Page |76
LMS Manager/Supervisor
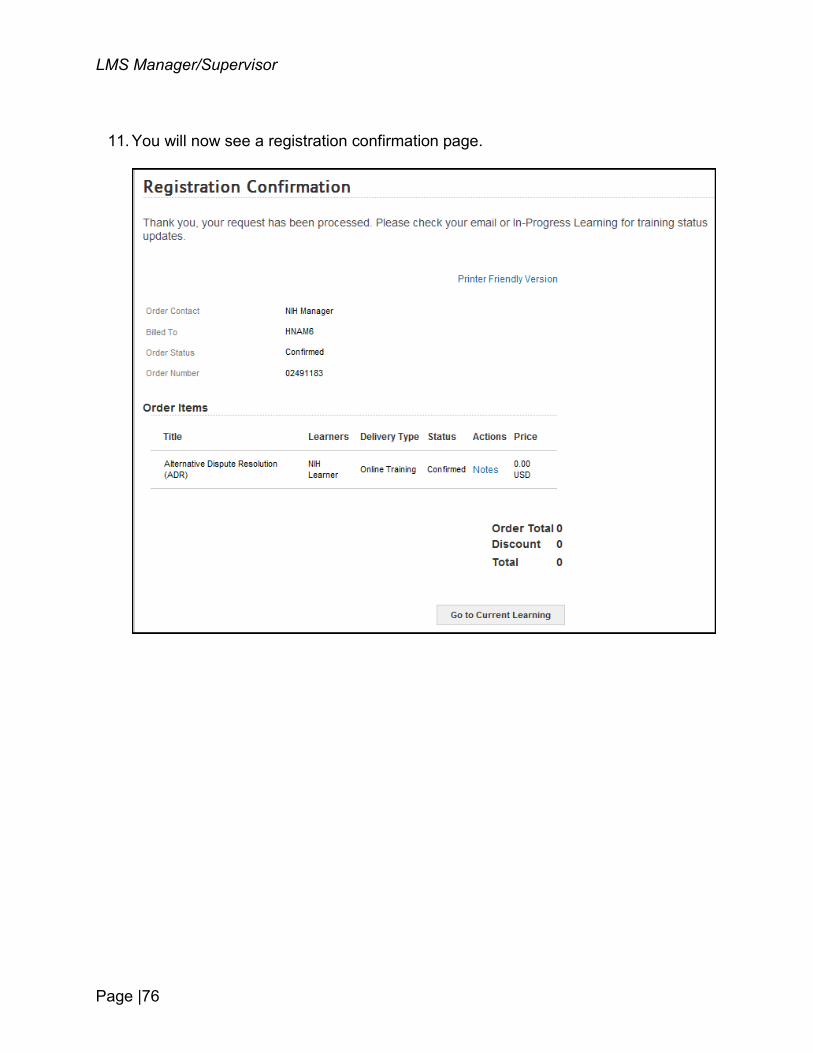
11. You will now see a registration confirmation page.
Page | 77
LMS Manager/Supervisor
HHS Learning Portal log on page https://lms.learning.hhs.gov
NIH LMS Help Desk
Submit your LMS Help Desk Tickets to: https://nihohrweb.nih.gov:1010/ WiTS_IntraHR/index.aspx
NIH Training Center web site http://trainingcenter.nih.gov
NIH LMS Information and support information http://trainingcenter.nih.gov/lms_courses.html https://hr.nih.gov/hr-systems/lms
LMS Administrators in the ICs
https://hr.nih.gov/sites/default/files/public/documents/hr-systems/lms/pdf/nih-lms- admin-list.pdf
NIH CIT Help Desk http://itservicedesk.nih.gov/
HELPFUL INFORMATION