Embed Size (px)
Citation preview
Livestreaming with YouTube and Google
If you are from a nonprofit organization, it is recommended that you enroll in Google for Nonprofits http://www.google.com/nonprofits/ Some of the great Google Apps available through Google for Nonprofist are: Gmail, Calendar, Drive, Docs, Hangouts, AdWords, Analytics, other Enterprise Apps, and YouTube Live. For more help on applying for Google for Nonprofits, go here step by step instructions are available here: https://support.google.com/nonprofits/ To do Livestreaming with YouTube, you will need a YouTube account, which you can associate with your Google account. You will need to active Live Events for your YouTube account.
PAGE 20
Using Google+ Hangouts on Air You and your copresenters must have a Google+ account. You and your copresenters will also need a webcam and headphones on your computer.
1. Go to YouTube.com 2. Click on the dropdown menu next to the wheel icon in the upper right of the screen and
click on the Creator Studio button 3. Click on Video Manager on the left side of the screen 4. Click on Live Streaming (if you do not have this option, you may need to enable Live
Streaming for your account) 5. Click on Events 6. Click on the New live event button 7. Give your event a name 8. Select Public, Unlisted or Private 9. Under Type, select Quick 10. Click on the blue Go live now button
Your Hangout has now begun, but you are not yet live on the air.
1. Invite your copresenters (10 maximum) by clicking on the Invite People icon on the top center of the screen
2. Change your copresenters microphone and video settings using the Control Room controls
3. Click the green Start broadcast button to begin broadcasting 4. Click on the Links button in the bottom right corner of the screen to get the link to share
with your viewers (via Facebook, etc.) Using YouTube Live and Wirecast Play Setting Up YouTube Live Event We will now walk through the steps required to set up an event in YouTube for your live stream, how to download the free software (Wirecast Play for YouTube) they provide, how to hook up your camera(s), get audio, and start live streaming! STEP 1. **SET UP EVENT FIRST then get Wirecast for YouTube (you only need to install Wirecast For YouTube once per machine).
PAGE 20
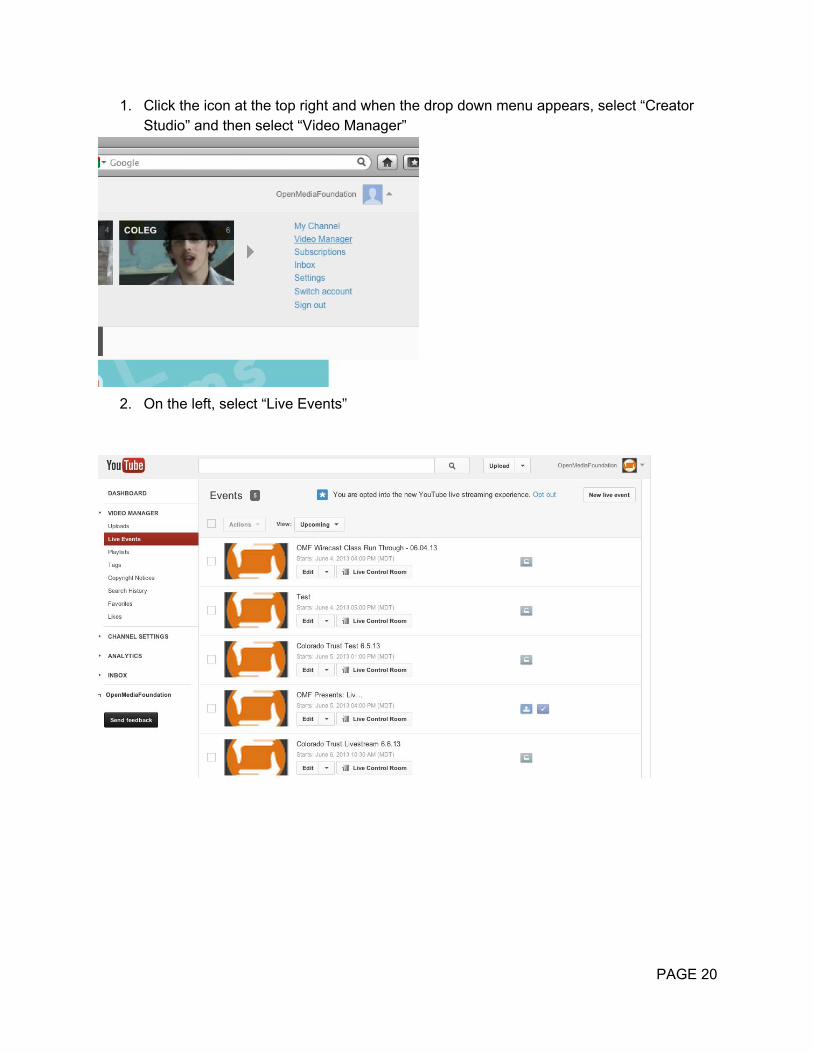
1. Click the icon at the top right and when the drop down menu appears, select “Creator Studio” and then select “Video Manager”
2. On the left, select “Live Events”
PAGE 20
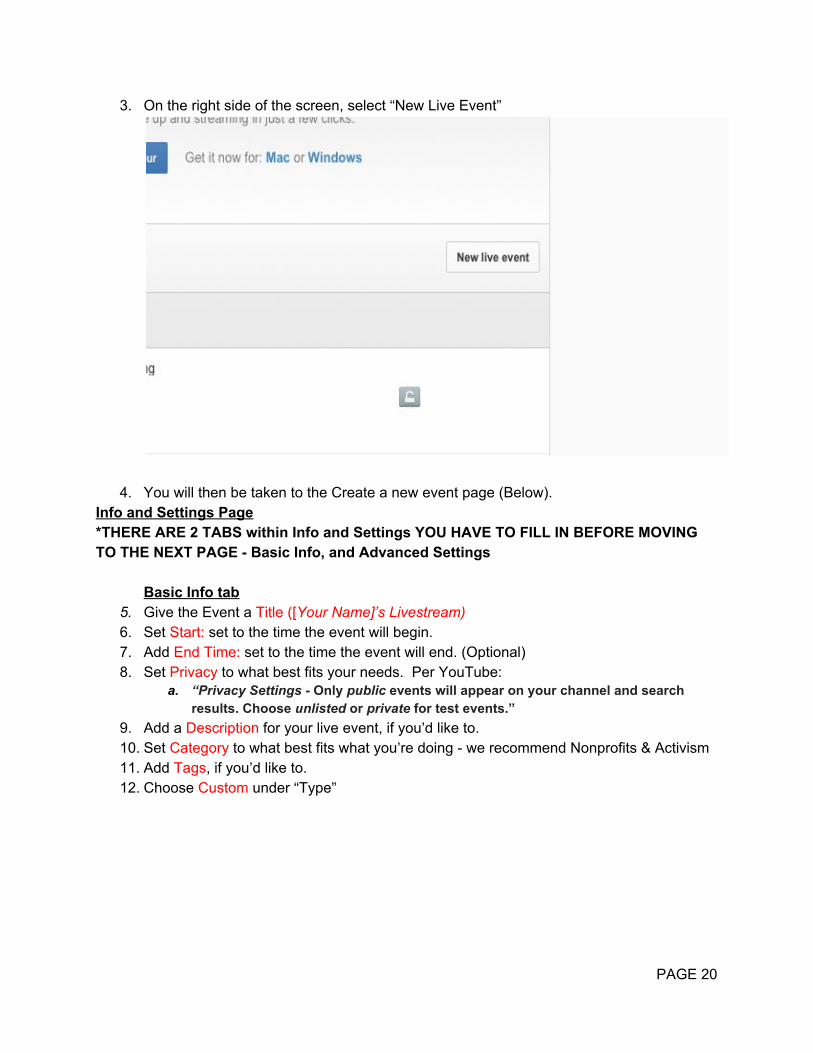
3. On the right side of the screen, select “New Live Event”
4. You will then be taken to the Create a new event page (Below). Info and Settings Page *THERE ARE 2 TABS within Info and Settings YOU HAVE TO FILL IN BEFORE MOVING TO THE NEXT PAGE Basic Info, and Advanced Settings
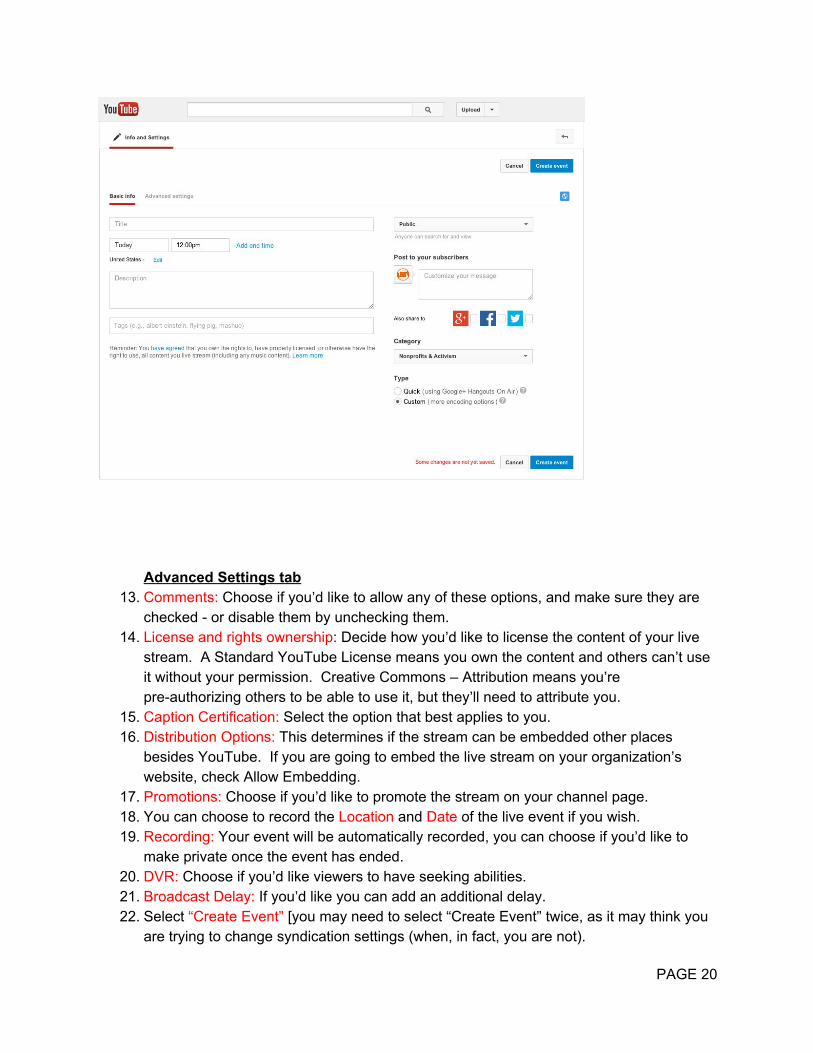
Basic Info tab 5. Give the Event a Title ([Your Name]’s Livestream) 6. Set Start: set to the time the event will begin. 7. Add End Time: set to the time the event will end. (Optional) 8. Set Privacy to what best fits your needs. Per YouTube:
a. “Privacy Settings Only public events will appear on your channel and search results. Choose unlisted or private for test events.”
9. Add a Description for your live event, if you’d like to. 10. Set Category to what best fits what you’re doing we recommend Nonprofits & Activism 11. Add Tags, if you’d like to. 12. Choose Custom under “Type”
PAGE 20
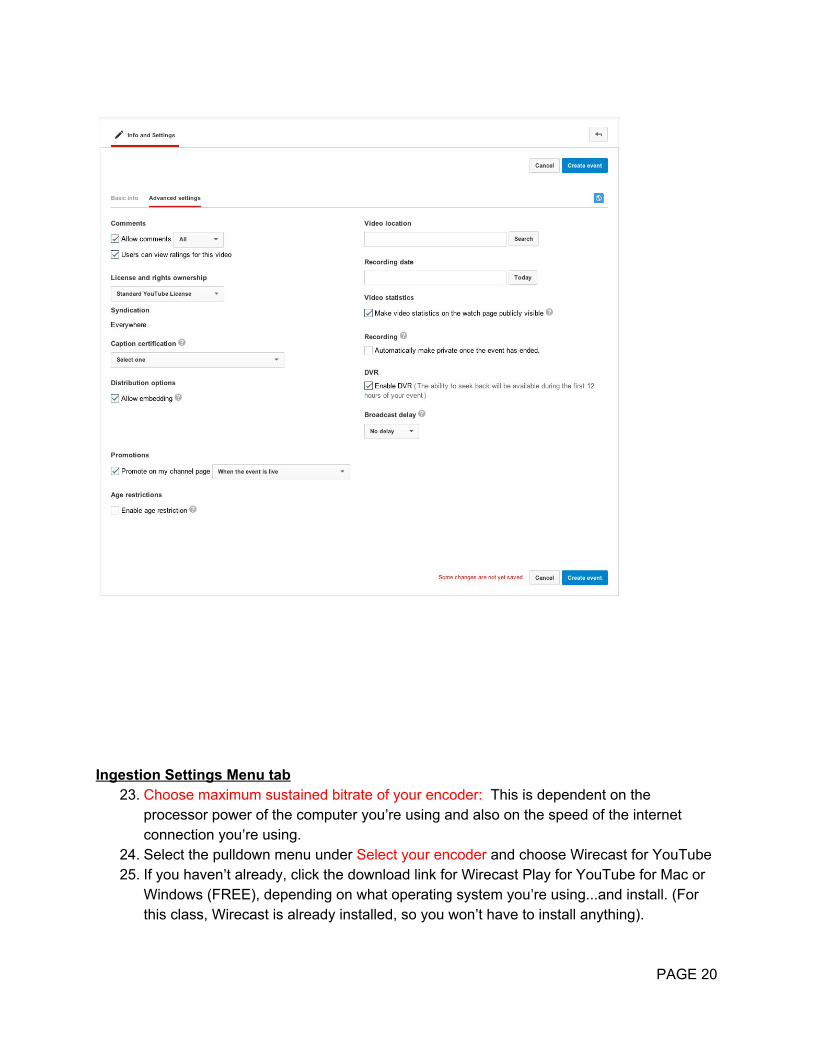
Advanced Settings tab
13. Comments: Choose if you’d like to allow any of these options, and make sure they are checked or disable them by unchecking them.
14. License and rights ownership: Decide how you’d like to license the content of your live stream. A Standard YouTube License means you own the content and others can’t use it without your permission. Creative Commons – Attribution means you’re preauthorizing others to be able to use it, but they’ll need to attribute you.
15. Caption Certification: Select the option that best applies to you. 16. Distribution Options: This determines if the stream can be embedded other places
besides YouTube. If you are going to embed the live stream on your organization’s website, check Allow Embedding.
17. Promotions: Choose if you’d like to promote the stream on your channel page. 18. You can choose to record the Location and Date of the live event if you wish. 19. Recording: Your event will be automatically recorded, you can choose if you’d like to
make private once the event has ended. 20. DVR: Choose if you’d like viewers to have seeking abilities. 21. Broadcast Delay: If you’d like you can add an additional delay. 22. Select “Create Event” [you may need to select “Create Event” twice, as it may think you
are trying to change syndication settings (when, in fact, you are not).
PAGE 20
Ingestion Settings Menu tab
23. Choose maximum sustained bitrate of your encoder: This is dependent on the processor power of the computer you’re using and also on the speed of the internet connection you’re using.
24. Select the pulldown menu under Select your encoder and choose Wirecast for YouTube 25. If you haven’t already, click the download link for Wirecast Play for YouTube for Mac or
Windows (FREE), depending on what operating system you’re using...and install. (For this class, Wirecast is already installed, so you won’t have to install anything).
PAGE 20
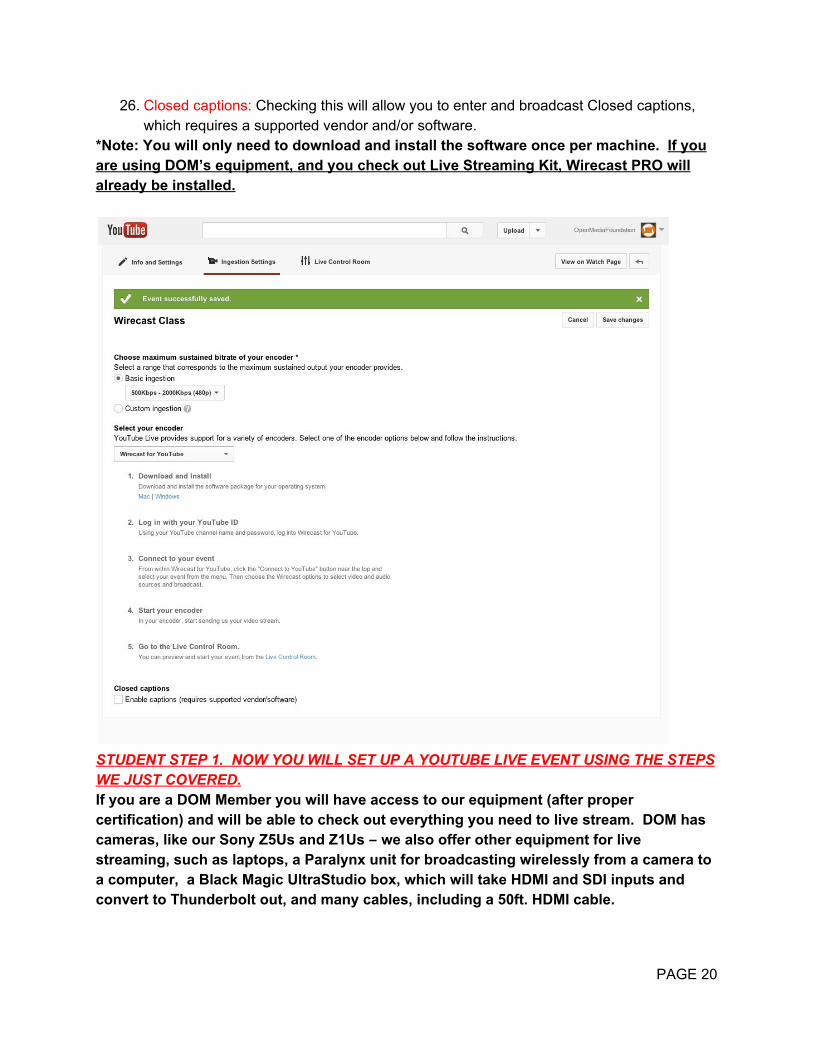
26. Closed captions: Checking this will allow you to enter and broadcast Closed captions, which requires a supported vendor and/or software.
*Note: You will only need to download and install the software once per machine. If you are using DOM’s equipment, and you check out Live Streaming Kit, Wirecast PRO will already be installed.
STUDENT STEP 1. NOW YOU WILL SET UP A YOUTUBE LIVE EVENT USING THE STEPS WE JUST COVERED. If you are a DOM Member you will have access to our equipment (after proper certification) and will be able to check out everything you need to live stream. DOM has cameras, like our Sony Z5Us and Z1Us – we also offer other equipment for live streaming, such as laptops, a Paralynx unit for broadcasting wirelessly from a camera to a computer, a Black Magic UltraStudio box, which will take HDMI and SDI inputs and convert to Thunderbolt out, and many cables, including a 50ft. HDMI cable.
PAGE 20
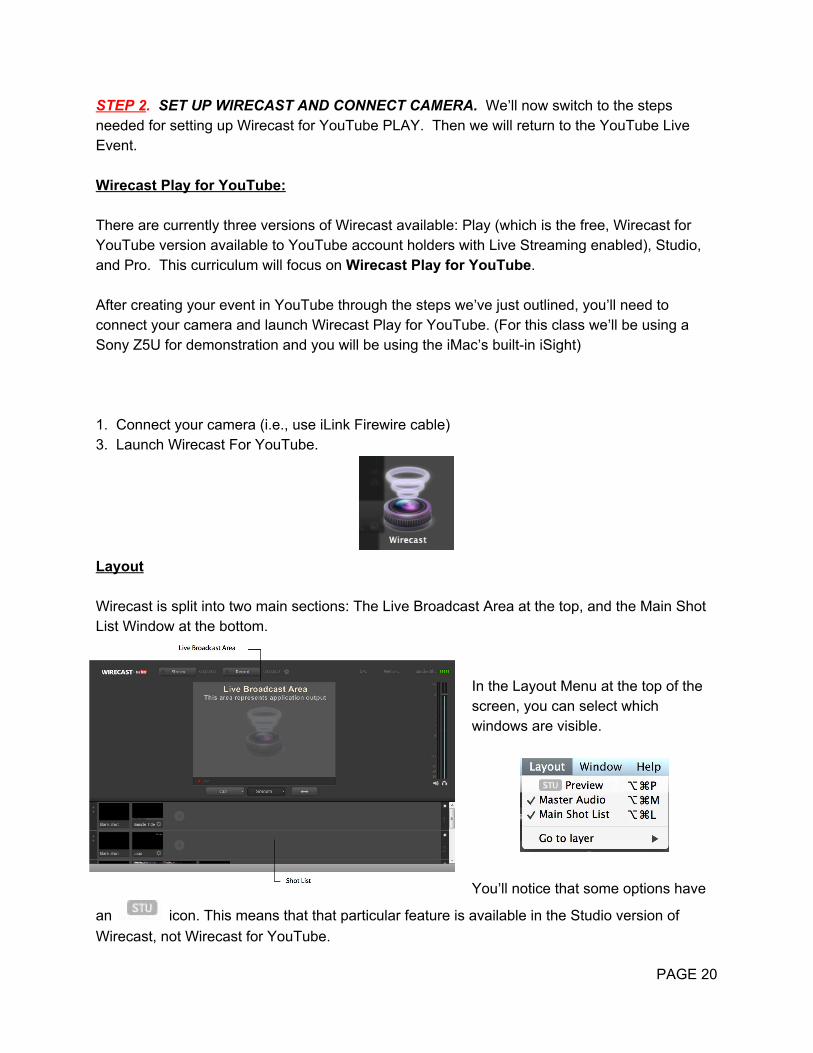
STEP 2. SET UP WIRECAST AND CONNECT CAMERA. We’ll now switch to the steps needed for setting up Wirecast for YouTube PLAY. Then we will return to the YouTube Live Event. Wirecast Play for YouTube: There are currently three versions of Wirecast available: Play (which is the free, Wirecast for YouTube version available to YouTube account holders with Live Streaming enabled), Studio, and Pro. This curriculum will focus on Wirecast Play for YouTube. After creating your event in YouTube through the steps we’ve just outlined, you’ll need to connect your camera and launch Wirecast Play for YouTube. (For this class we’ll be using a Sony Z5U for demonstration and you will be using the iMac’s builtin iSight) 1. Connect your camera (i.e., use iLink Firewire cable) 3. Launch Wirecast For YouTube.
Layout Wirecast is split into two main sections: The Live Broadcast Area at the top, and the Main Shot List Window at the bottom.
In the Layout Menu at the top of the screen, you can select which windows are visible.
You’ll notice that some options have
an icon. This means that that particular feature is available in the Studio version of Wirecast, not Wirecast for YouTube.
PAGE 20

To the right of the Broadcast Area, you’ll see your master audio meter. Clicking the speaker mutes all output. Clicking the Headphone icon maintains broadcast output, but mutes the speakers and/or headphones only. Setting your Canvas Size Ideally, this should match the resolution you are streaming in. If it does not, your video may have black on the top and bottom, or left and right.
Adding Shots Shots in Wirecast can be images, videos, cameras, another desktop or a section of your own desktop. In the Shot List Window, on the default layer (layer 3), You’ll notice a small plus sign. This plus sign provides access to lives sources, file sources, the Desktop Presenter program, shot graphics, shot audio, and shot templates.
PAGE 20
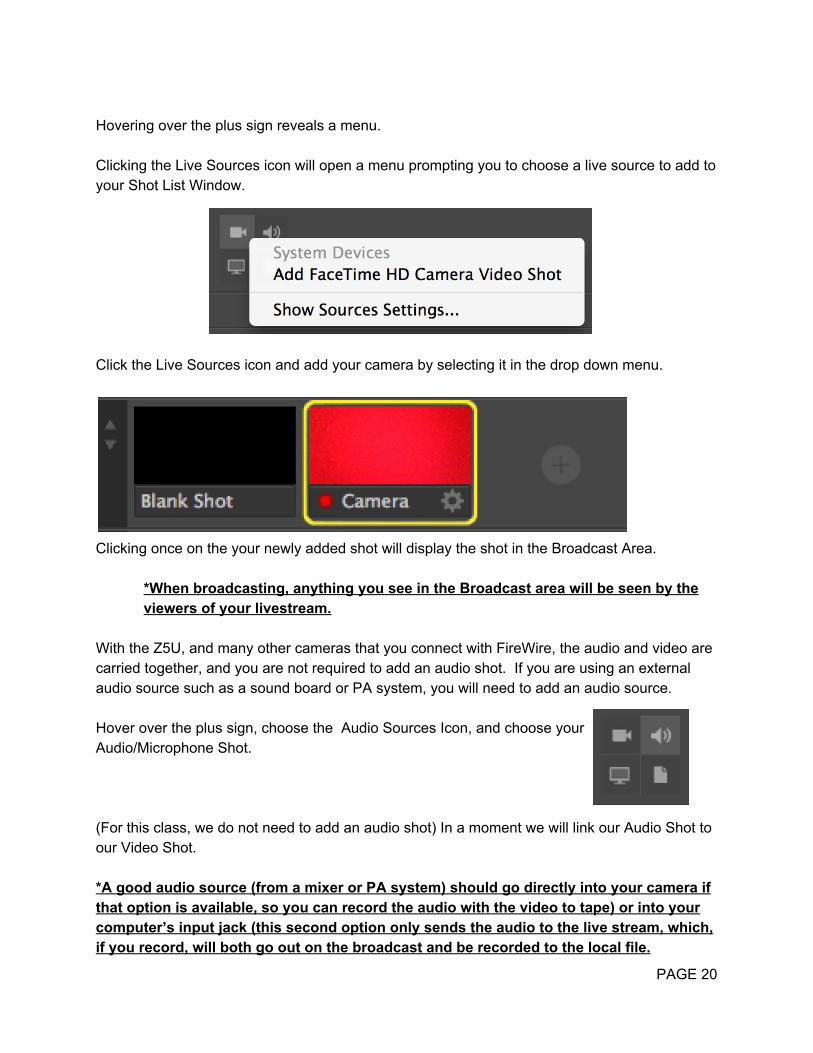
Hovering over the plus sign reveals a menu. Clicking the Live Sources icon will open a menu prompting you to choose a live source to add to your Shot List Window. Click the Live Sources icon and add your camera by selecting it in the drop down menu.
Clicking once on the your newly added shot will display the shot in the Broadcast Area.
*When broadcasting, anything you see in the Broadcast area will be seen by the viewers of your livestream.
With the Z5U, and many other cameras that you connect with FireWire, the audio and video are carried together, and you are not required to add an audio shot. If you are using an external audio source such as a sound board or PA system, you will need to add an audio source. Hover over the plus sign, choose the Audio Sources Icon, and choose your Audio/Microphone Shot. (For this class, we do not need to add an audio shot) In a moment we will link our Audio Shot to our Video Shot. *A good audio source (from a mixer or PA system) should go directly into your camera if that option is available, so you can record the audio with the video to tape) or into your computer’s input jack (this second option only sends the audio to the live stream, which, if you record, will both go out on the broadcast and be recorded to the local file.
PAGE 20

To remove a shot, simply right click on the shot and choose Delete Shot. STUDENT STEP 2. NOW YOU WILL SET UP WIRECAST AND CONNECT A CAMERA. STEP 3. Adding Media Shots Wirecast for YouTube allows you to cut media files into your broadcast. Click the File Sources Icon. Choose “Add Picture Shot...” Navigate to your desktop and choose the “Livestreaming for Nonprofits” folder. In that folder, choose “Opening Still.jpg” and click Open. Use the same method and also add “Closing Still.jpg” You now have a Camera Shot, and two Picture Shots in your Main Shot List Window. Clicking on the shot will send it to the Broadcast Area. Next, click the File Sources Icon again. This time, choose “Add Video Shot...” Navigate to your desktop and choose the “Livestreaming for Nonprofits” folder. In that folder, choose “Opening Animation.mov” and click Open. Add a Music shot by clicking the File Sources Icon once more and choosing “Add Music Shot...” On your desktop in the “Livestreaming for Nonprofits” folder, choose “Opening Music.mp3” You should now have a Camera Shot, a Microphone Shot, two Picture Shots, a Video Shot and a Music Shot in your Main Shot List Window. Clicking on the Video Shot or Music Shot will play it in the Broadcast Area. *In Wirecast for Youtube, you cannot edit the Audio or Video shot. Once you click it, the video/audio will play until you choose another shot. Returning to the Video Shot resumes playback from the point it was switched. There is no way to get the video to play from the beginning except for letting it loop and cutting just before it begins again. Video playback control is available in the Studio version of Wirecast. Adding a Desktop Presenter Shot
PAGE 20
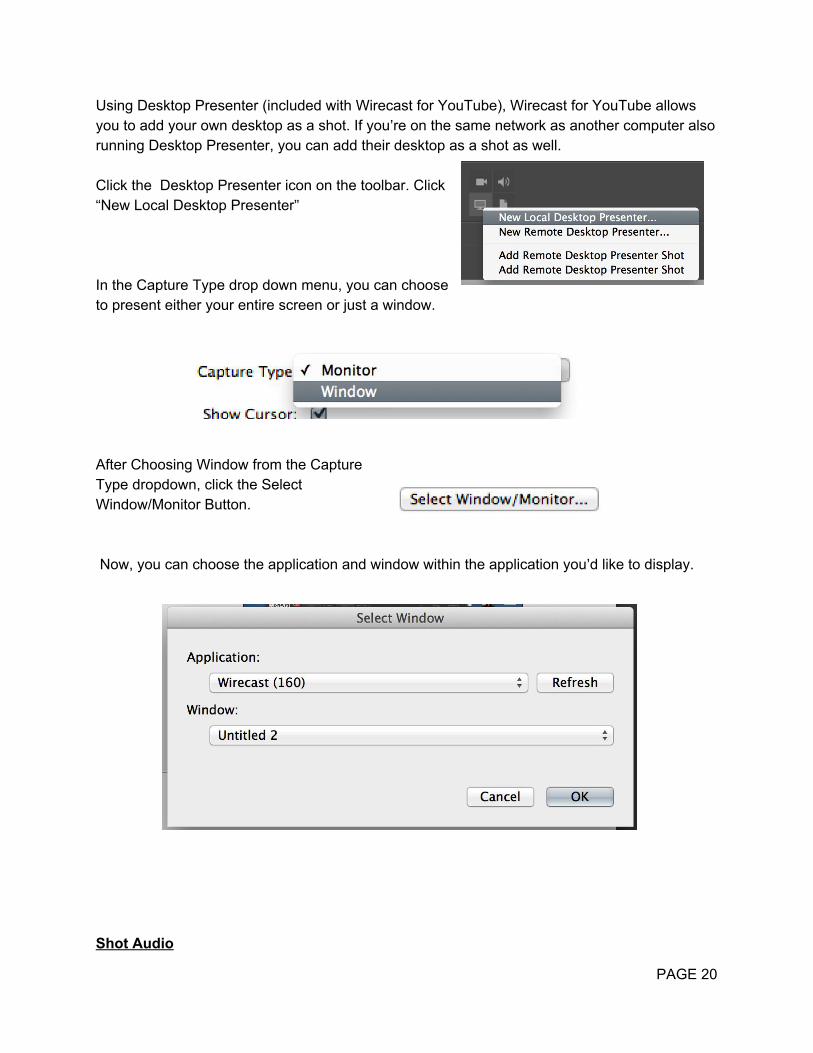
Using Desktop Presenter (included with Wirecast for YouTube), Wirecast for YouTube allows you to add your own desktop as a shot. If you’re on the same network as another computer also running Desktop Presenter, you can add their desktop as a shot as well. Click the Desktop Presenter icon on the toolbar. Click “New Local Desktop Presenter” In the Capture Type drop down menu, you can choose to present either your entire screen or just a window. After Choosing Window from the Capture Type dropdown, click the Select Window/Monitor Button. Now, you can choose the application and window within the application you’d like to display.
Shot Audio
PAGE 20
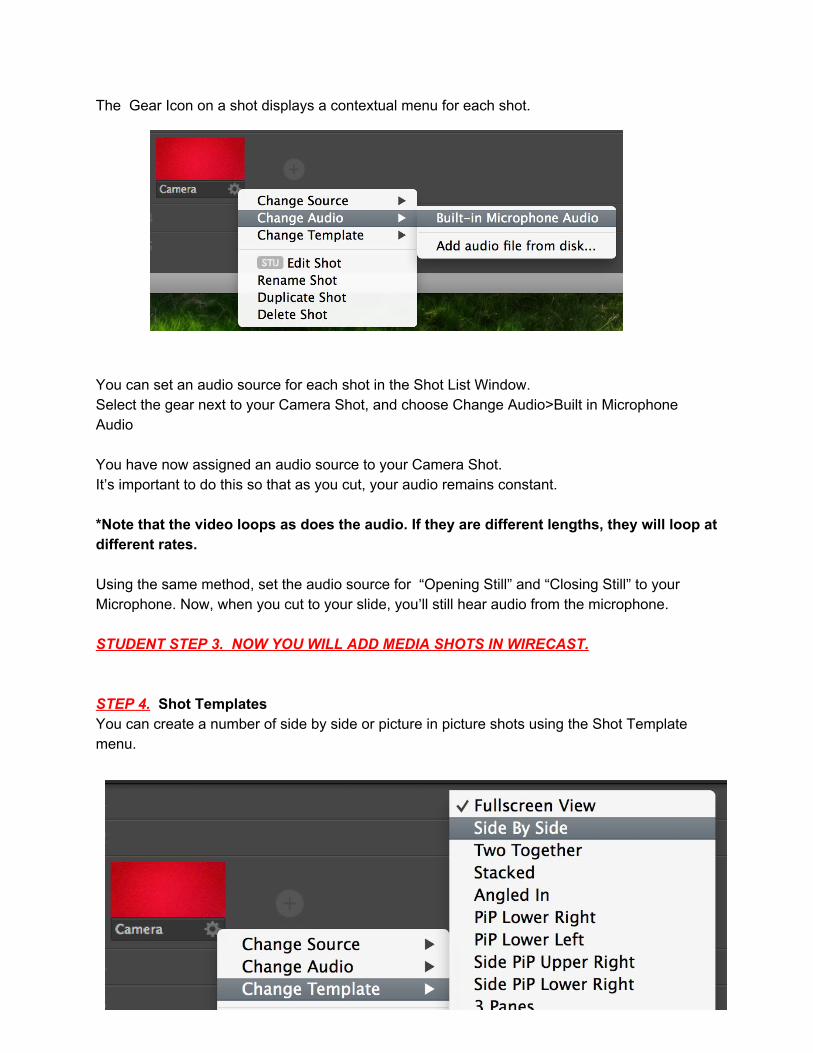
The Gear Icon on a shot displays a contextual menu for each shot. You can set an audio source for each shot in the Shot List Window. Select the gear next to your Camera Shot, and choose Change Audio>Built in Microphone Audio You have now assigned an audio source to your Camera Shot. It’s important to do this so that as you cut, your audio remains constant. *Note that the video loops as does the audio. If they are different lengths, they will loop at different rates. Using the same method, set the audio source for “Opening Still” and “Closing Still” to your Microphone. Now, when you cut to your slide, you’ll still hear audio from the microphone. STUDENT STEP 3. NOW YOU WILL ADD MEDIA SHOTS IN WIRECAST. STEP 4. Shot Templates You can create a number of side by side or picture in picture shots using the Shot Template menu.
PAGE 20
Select your camera shot, and choose Change Template> Side by Side You’ll notice that the New Shot now has two boxes: “A” and “B”. Choose the gear menu again, Change Source>Source B> Opening Still If Source A is set to your Camera shot, you’ll now have the Camera in the Left box, and the Still in the right box. STUDENT STEP 4. NOW YOU WILL LOOK AT SOME OF THE SHOT TEMPLATES IN WIRECAST. STEP 5. Cutting Between Shots Autolive
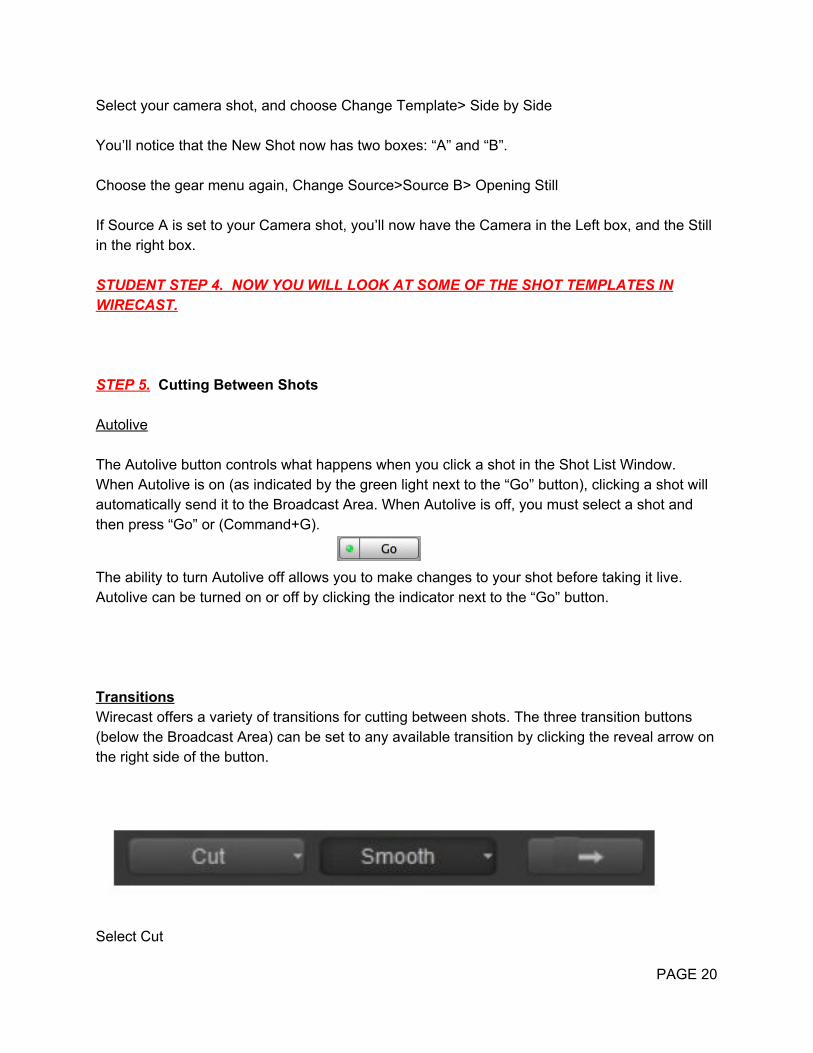
The Autolive button controls what happens when you click a shot in the Shot List Window. When Autolive is on (as indicated by the green light next to the “Go” button), clicking a shot will automatically send it to the Broadcast Area. When Autolive is off, you must select a shot and then press “Go” or (Command+G).
The ability to turn Autolive off allows you to make changes to your shot before taking it live. Autolive can be turned on or off by clicking the indicator next to the “Go” button. Transitions Wirecast offers a variety of transitions for cutting between shots. The three transition buttons (below the Broadcast Area) can be set to any available transition by clicking the reveal arrow on the right side of the button.
Select Cut
PAGE 20
Try clicking on various shots. You’ll notice that it makes a hard cut Select smooth Again, switch between shots. You’ll notice a smooth transition instead of a hard cut. Try cutting with some different transitions. STUDENT STEP 5. NOW YOU WILL CUT BETWEEN SHOTS IN WIRECAST. STEP 6. Preparing your Broadcast
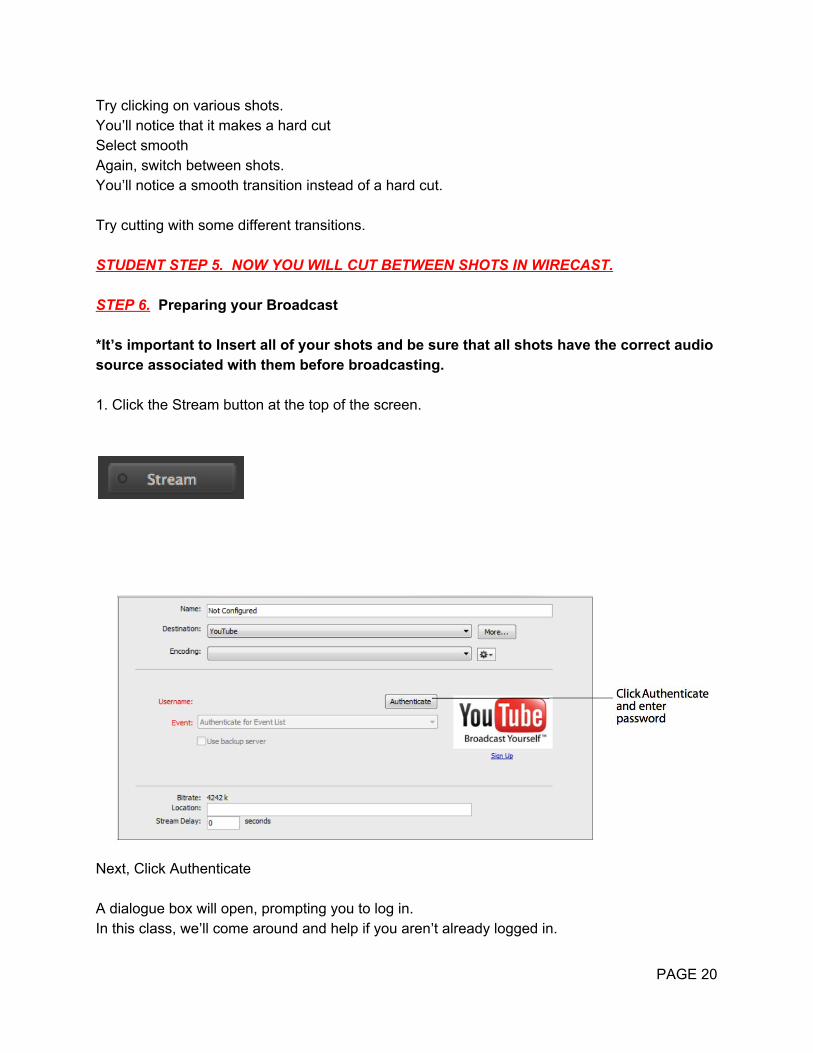
*It’s important to Insert all of your shots and be sure that all shots have the correct audio source associated with them before broadcasting. 1. Click the Stream button at the top of the screen.
Next, Click Authenticate A dialogue box will open, prompting you to log in. In this class, we’ll come around and help if you aren’t already logged in.
PAGE 20
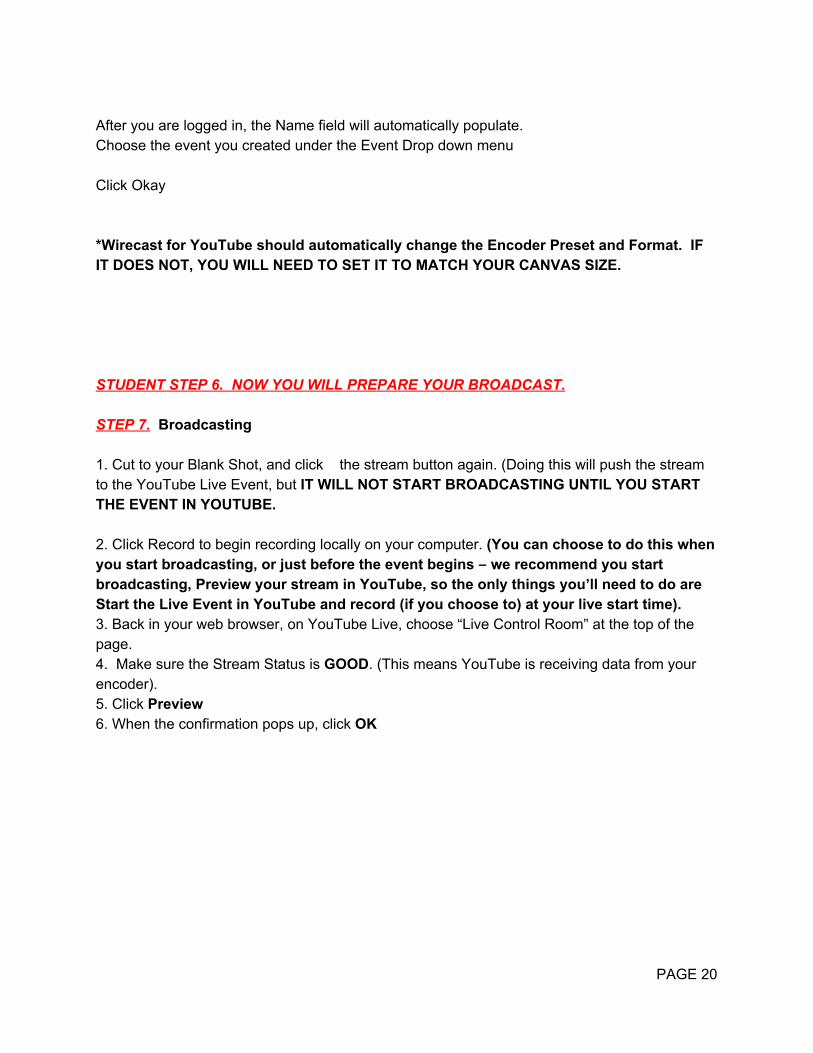
After you are logged in, the Name field will automatically populate. Choose the event you created under the Event Drop down menu Click Okay *Wirecast for YouTube should automatically change the Encoder Preset and Format. IF IT DOES NOT, YOU WILL NEED TO SET IT TO MATCH YOUR CANVAS SIZE. STUDENT STEP 6. NOW YOU WILL PREPARE YOUR BROADCAST. STEP 7. Broadcasting 1. Cut to your Blank Shot, and click the stream button again. (Doing this will push the stream to the YouTube Live Event, but IT WILL NOT START BROADCASTING UNTIL YOU START THE EVENT IN YOUTUBE. 2. Click Record to begin recording locally on your computer. (You can choose to do this when you start broadcasting, or just before the event begins – we recommend you start broadcasting, Preview your stream in YouTube, so the only things you’ll need to do are Start the Live Event in YouTube and record (if you choose to) at your live start time). 3. Back in your web browser, on YouTube Live, choose “Live Control Room” at the top of the page. 4. Make sure the Stream Status is GOOD. (This means YouTube is receiving data from your encoder). 5. Click Preview 6. When the confirmation pops up, click OK
PAGE 20

7. You will need to wait until the preview appears. 8. You can click on the PREVIEW area (see below) to preview the stream. THIS IS NOT GOING OUT, SINCE YOU HAVEN’T HIT START STREAMING.
PAGE 20
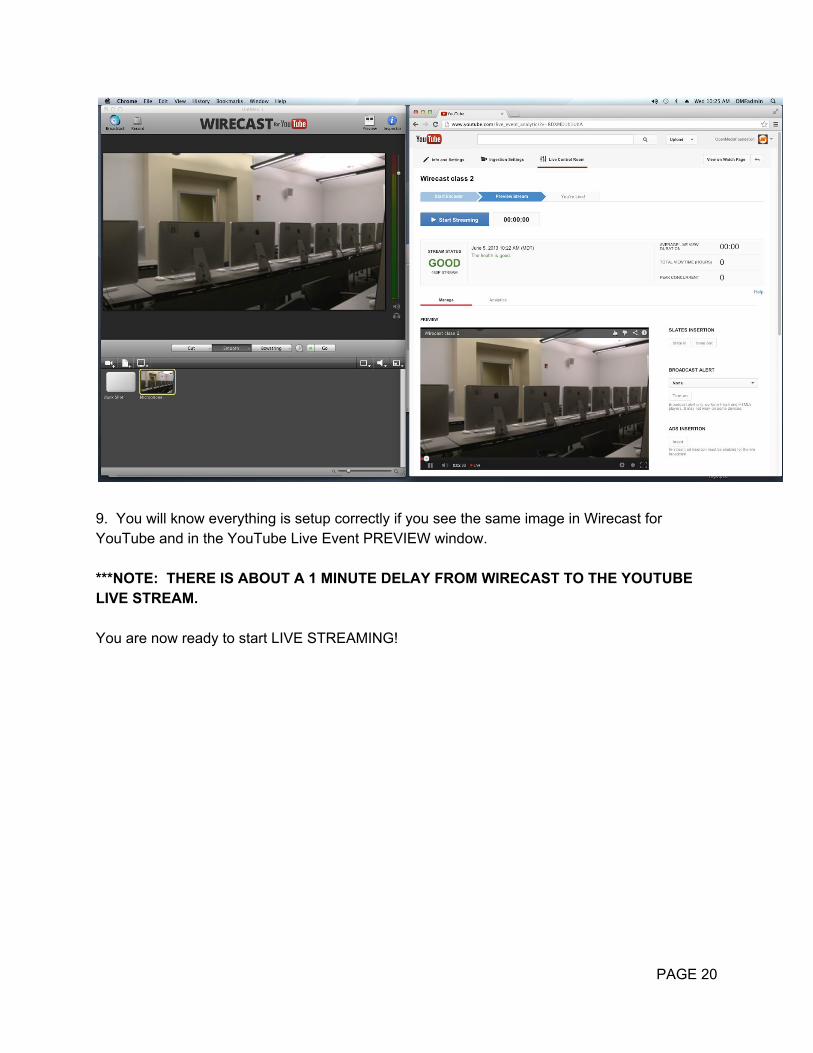
9. You will know everything is setup correctly if you see the same image in Wirecast for YouTube and in the YouTube Live Event PREVIEW window. ***NOTE: THERE IS ABOUT A 1 MINUTE DELAY FROM WIRECAST TO THE YOUTUBE LIVE STREAM. You are now ready to start LIVE STREAMING!
PAGE 20
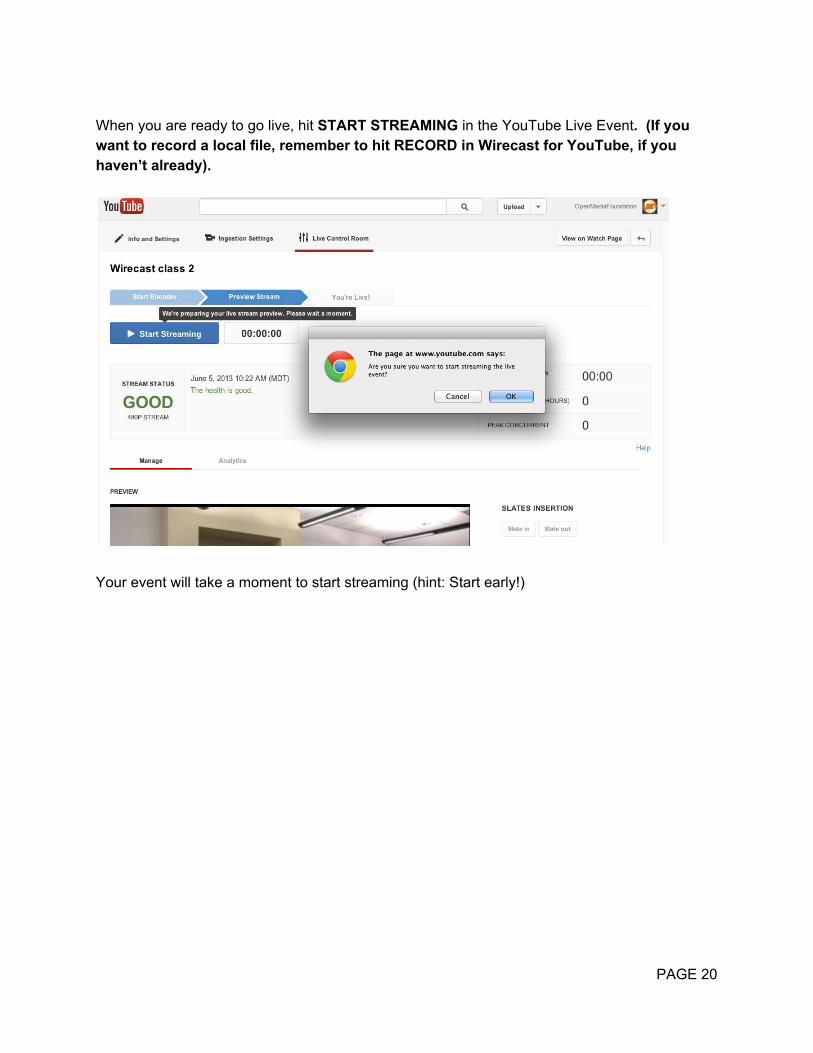
When you are ready to go live, hit START STREAMING in the YouTube Live Event. (If you want to record a local file, remember to hit RECORD in Wirecast for YouTube, if you haven’t already).
Your event will take a moment to start streaming (hint: Start early!)
PAGE 20
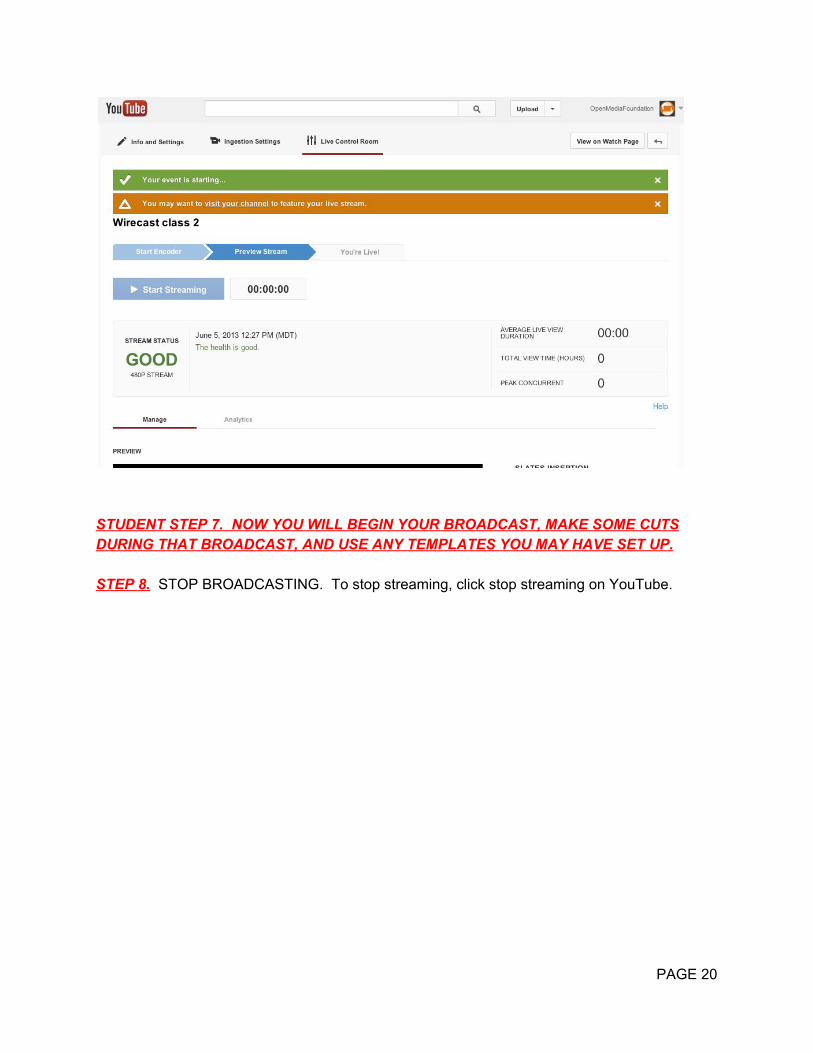
STUDENT STEP 7. NOW YOU WILL BEGIN YOUR BROADCAST, MAKE SOME CUTS DURING THAT BROADCAST, AND USE ANY TEMPLATES YOU MAY HAVE SET UP. STEP 8. STOP BROADCASTING. To stop streaming, click stop streaming on YouTube.
PAGE 20
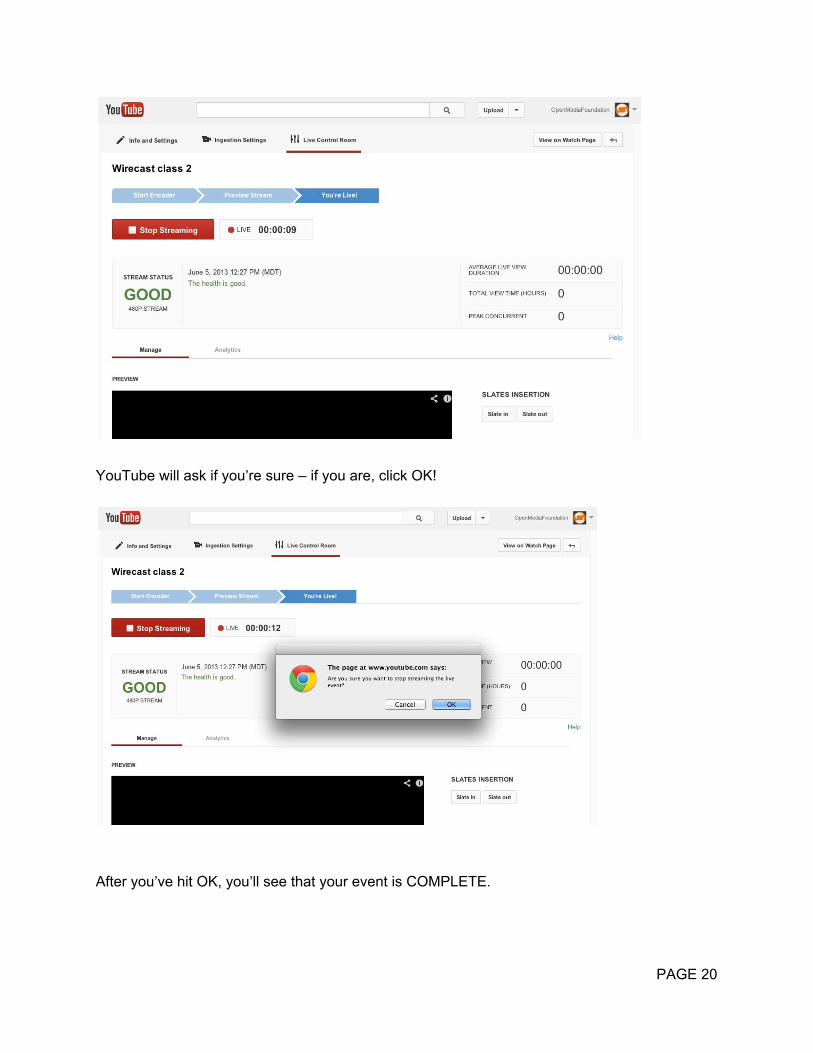
YouTube will ask if you’re sure – if you are, click OK!
After you’ve hit OK, you’ll see that your event is COMPLETE.
PAGE 20
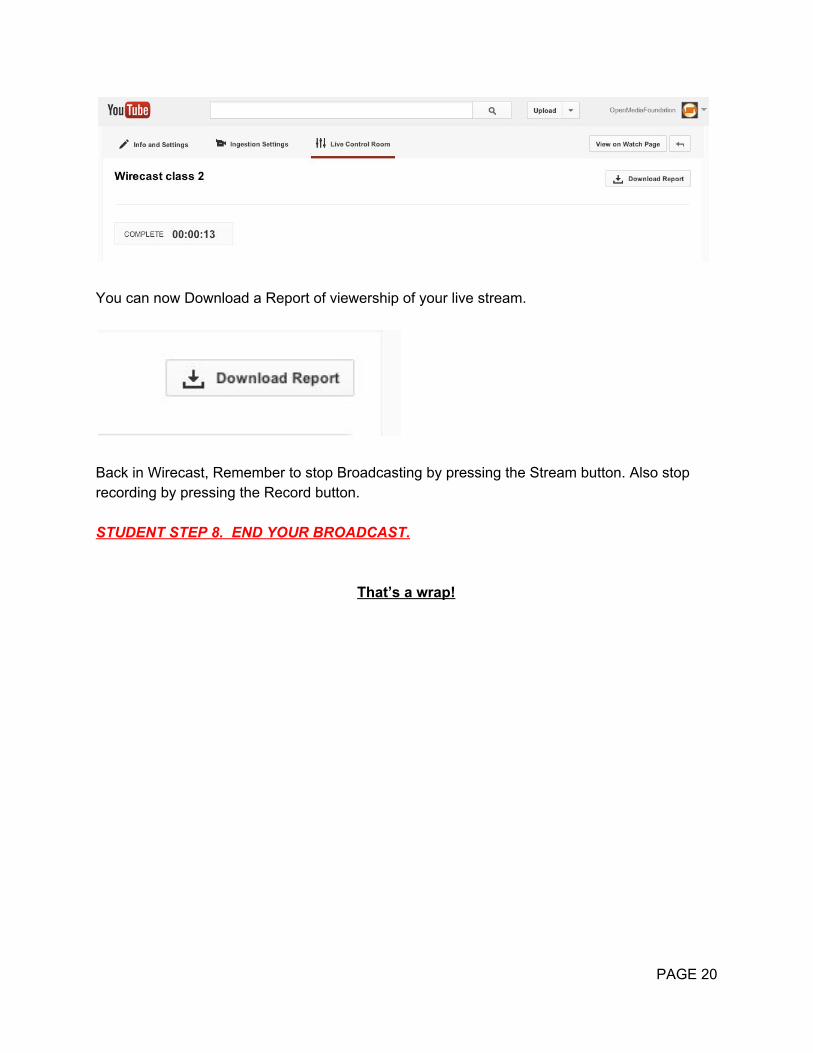
You can now Download a Report of viewership of your live stream.
Back in Wirecast, Remember to stop Broadcasting by pressing the Stream button. Also stop recording by pressing the Record button. STUDENT STEP 8. END YOUR BROADCAST.
That’s a wrap!
PAGE 20