Embed Size (px)
Citation preview
1
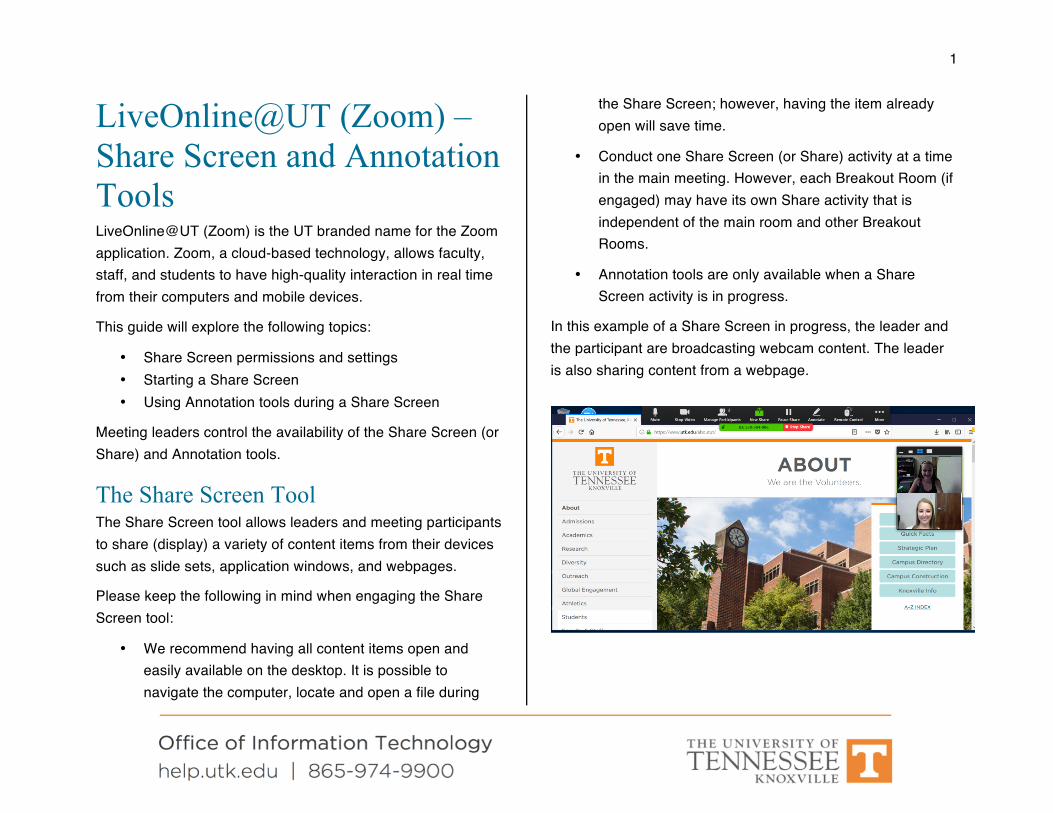
LiveOnline@UT (Zoom) – Share Screen and Annotation Tools LiveOnline@UT (Zoom) is the UT branded name for the Zoom application. Zoom, a cloud-based technology, allows faculty, staff, and students to have high-quality interaction in real time from their computers and mobile devices.
This guide will explore the following topics:
• Share Screen permissions and settings • Starting a Share Screen • Using Annotation tools during a Share Screen
Meeting leaders control the availability of the Share Screen (or Share) and Annotation tools.
The Share Screen Tool The Share Screen tool allows leaders and meeting participants to share (display) a variety of content items from their devices such as slide sets, application windows, and webpages.
Please keep the following in mind when engaging the Share Screen tool:
• We recommend having all content items open and easily available on the desktop. It is possible to navigate the computer, locate and open a file during
the Share Screen; however, having the item already open will save time.
• Conduct one Share Screen (or Share) activity at a time in the main meeting. However, each Breakout Room (if engaged) may have its own Share activity that is independent of the main room and other Breakout Rooms.
• Annotation tools are only available when a Share Screen activity is in progress.
In this example of a Share Screen in progress, the leader and the participant are broadcasting webcam content. The leader is also sharing content from a webpage.

2
Share Screen Permissions and Settings The Share Screen icon on the main toolbar is available for leaders and participants. Depending on the device, the icon may also appear as Share on the toolbar.
Before getting started with the Share Screen tool, please note the chevron icon beside the Share Screen icon on the meeting toolbar.
Select the chevron to review sharing permissions. The leader may change these permissions at any time. Zoom will maintain the most recent permission setting for the leader’s next meeting.
• For example, if the leader selects to enable one participant to share at a time, the same setting will be enabled for the leader’s next meeting.
• Select the chevron to review the current settings.
• Select Advanced Sharing Options to access additional permissions and make any changes.
• On the Advanced Sharing Options window, leaders may choose to allow participants access to the Share Screen tool or remove access to the Share Screen tool.
Start a Share Screen (or Share) Activity After selecting the Share Screen (or Share) icon on the meeting toolbar, indicate which share option you would like to engage.
There are two tabs at the top of the sharing window.
• On the Basic tab, select to share the entire screen/desktop, or select to share an indiviudual application. Also, please note the Whiteboard option. The virtual Whiteboard may be engaged in the main

3
meeting room or within a Breakout Room. Annotation tools are available for use with a Whiteboard and the meeting leader may save a Whiteboard. The Whiteboard saves in a .png format.
• On the Advanced tab, select to share a portion of the screen, computer audio only (no images), or content from a secondary webcam.
An example of options available on the Basic tab of the Share Screen window is available below.
An example of items available on the Advanced tab of the Share Screen window is available below.
After choosing an item to share from the Basic or Advanced tab, select the Share icon at the bottom of the window to broadcast the shared content within the meeting.
Please keep in mind that participants do not view content until a selection is made and the Share icon is selected.
Using Annotation Tools Annotation tools enable users to draw or highlight in the screen or on a Whiteboard. Annotation tools are only available during a share activity. The meeting leader may deactivate

4
annotation tools for participants on the Share Screen toolbar at any time.
To markup an image on the screen, select Annotate from the Share Screen toolbar and the Annotation toolbar will appear.
To remove access to the annotation tools from participants, select More on the Share Screen toolbar and then choose Disable Attendee Annotation.
In the example below, the leader is sharing a slide set and is accessing the More icon on the share toolbar.
An example of an annotation toolbar is listed below.
Annotation tools include:
• Mouse – Select this icon to return to mouse functions or move an item on the Whiteboard
• Select – This icon will select an item on the Whiteboard
• Text – Use this icon to add a text box to the Whiteboard
• Draw – Choose a drawing object like a pencil or highlighter
• Spotlight – Select a spotlighting icon to follow your mouse movements on screen
• Eraser – Erase an item from the Whiteboard
• Format – Choose a color of a drawing object
• Undo – Undo the last action
• Redo – Redo the last completed action
• Clear – The leader of the share activity (the person who began it) may clear the Whiteboard
• Save – The meeting leader may save the Whiteboard. The Whiteboard will save in .png format
Additional Information about Share Screen and Annotation
• Meeting leaders should review the Share Screen settings when starting a meeting. Select the chevron

5
icon by the Share Screen (or Share) item on the meeting toolbar to review or make changes to the permissions.
• Annotation tools are only available during a share activity. Meeting leaders may remove access to the Annotation tools from meeting participants at any time.
• A virtual Whiteboard may be shared during the meeting. All meeting attendees may markup the Whiteboard with the Annotation tools. The meeting leader may save the Whiteboard at any time, and the Whiteboard will save as a .png file.