Embed Size (px)
Citation preview

Live Recording with M7CL or PM5D
Via MMAADDII
Using Steinberg Cubase 4 or Nuendo 4
USO
RES
TRIT
O
Live Recording via MADI
2
Summary:
This guide will show how quick and easy it is to achieve a high quality, live multi-track recording using a Yamaha digital mixer and a Personal Computer. With the right selection of interface cards and software, an elegant solution
can be built using just one cable between mixer and recorder. Such a system is ideal for use as a virtual sound-check tool, and to create a
concert archive for later mix-down using Steinberg or other professional Digital Audio Workstation software.
CONTENTS
Page
Introduction 3
Equipment List 3 Computer Requirements 4
Hardware Setup 5 Mixer Patching and Direct Outputs 5
Sound Card Settings 8
Nuendo 4 / Cubase 4 Setup 9 Device Setup 9 Templates 10
Start Recording 12
Playback 13 Playback through PM5D-V2 13 Playback through M7CL 14 Tip: Avoiding Audio Loops 16
Appendix 1 17 MY-Card setup 17 Installing the MY-Cards 18
Appendix 2 19 Create a new Nuendo / Cubase Template 19
USO
RES
TRIT
O
Live Recording via MADI
3
Introduction
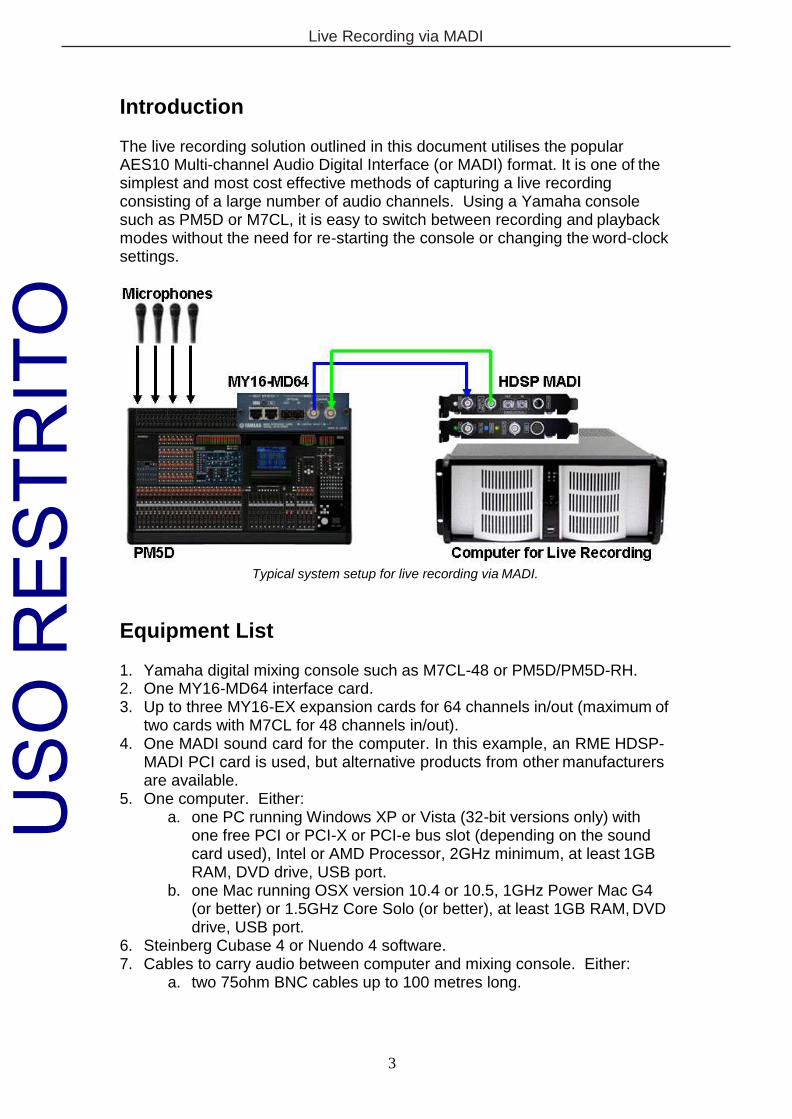
The live recording solution outlined in this document utilises the popular AES10 Multi-channel Audio Digital Interface (or MADI) format. It is one of the simplest and most cost effective methods of capturing a live recording consisting of a large number of audio channels. Using a Yamaha console such as PM5D or M7CL, it is easy to switch between recording and playback modes without the need for re-starting the console or changing the word-clock settings.
Typical system setup for live recording via MADI.
Equipment List
1. Yamaha digital mixing console such as M7CL-48 or PM5D/PM5D-RH. 2. One MY16-MD64 interface card. 3. Up to three MY16-EX expansion cards for 64 channels in/out (maximum of
two cards with M7CL for 48 channels in/out). 4. One MADI sound card for the computer. In this example, an RME HDSP-
MADI PCI card is used, but alternative products from other manufacturers are available.
5. One computer. Either: a. one PC running Windows XP or Vista (32-bit versions only) with
one free PCI or PCI-X or PCI-e bus slot (depending on the sound card used), Intel or AMD Processor, 2GHz minimum, at least 1GB RAM, DVD drive, USB port.
b. one Mac running OSX version 10.4 or 10.5, 1GHz Power Mac G4 (or better) or 1.5GHz Core Solo (or better), at least 1GB RAM, DVD drive, USB port.
6. Steinberg Cubase 4 or Nuendo 4 software. 7. Cables to carry audio between computer and mixing console. Either:
a. two 75ohm BNC cables up to 100 metres long.
USO
RES
TRIT
O

Live Recording via MADI
4
b. one multimode fibre-optic cable (50/125µm or 62.5/125µm diameter) with SC connectors up to 2000 metres long.
8. CAT5e cables to connect the MY16-EX cards to the MY16-MD64 card, maximum of 3 metres long. (6 cables are needed for a 64-channel system, 4 cables for a 48-channel system: 2 cables are needed for each MY16-EX card).
Computer Requirements It is strongly recommended to use a computer with at least 2GHz processing speed, and at least 2GB RAM. With regard to disk storage, allow 500MB per hour for each mono track at an audio quality of 48kHz 24-bit. So for example, 120GB will be able to record 60 tracks for 4 hours. Or for a 2 hour show consisting of 48 tracks, allow 50GB of storage.
USO
RES
TRIT
O
Live Recording via MADI
5
Hardware Setup
The mixing console (PM5D or M7CL for example) will need to have the correct MY-cards installed (1x MY16-MD64 plus 2 or 3x MY16-EX), but first the dip switches on the cards must be set correctly. See Appendix 1 for information about MY-card installation and setup. The relevant product manuals will also contain further information.
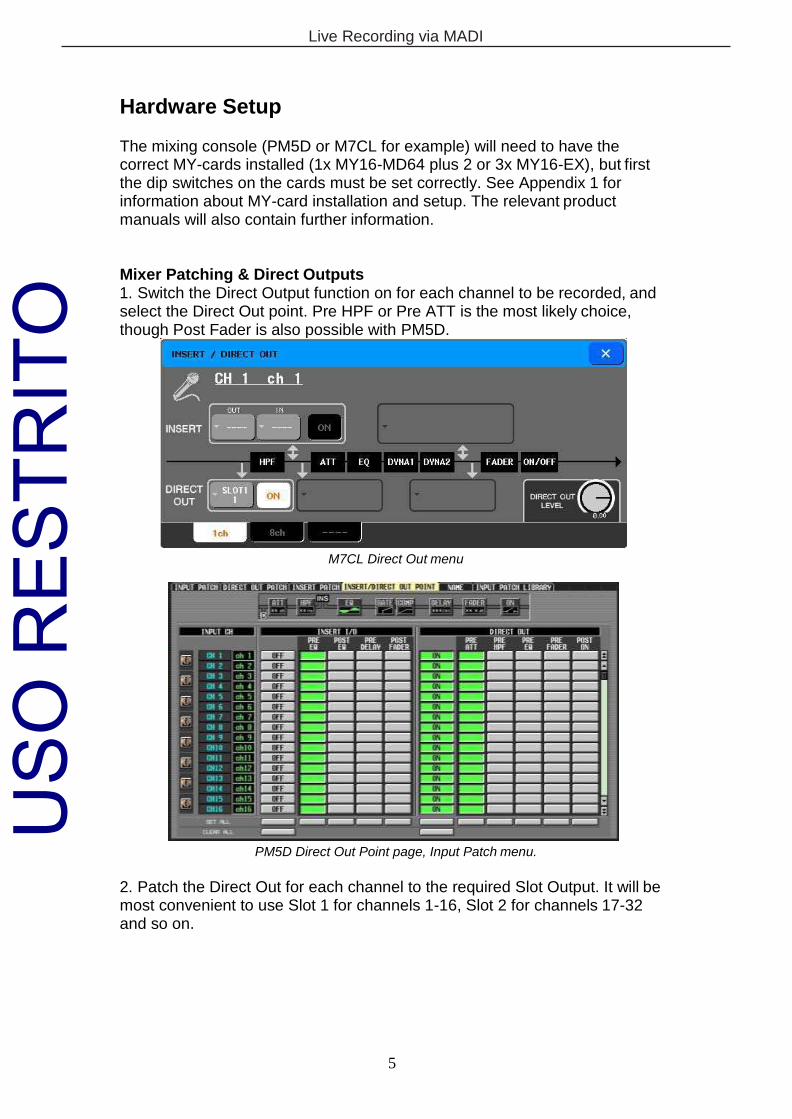
Mixer Patching & Direct Outputs 1. Switch the Direct Output function on for each channel to be recorded, and select the Direct Out point. Pre HPF or Pre ATT is the most likely choice, though Post Fader is also possible with PM5D.
M7CL Direct Out menu
PM5D Direct Out Point page, Input Patch menu.
2. Patch the Direct Out for each channel to the required Slot Output. It will be most convenient to use Slot 1 for channels 1-16, Slot 2 for channels 17-32 and so on.
USO
RES
TRIT
O
Live Recording via MADI
6
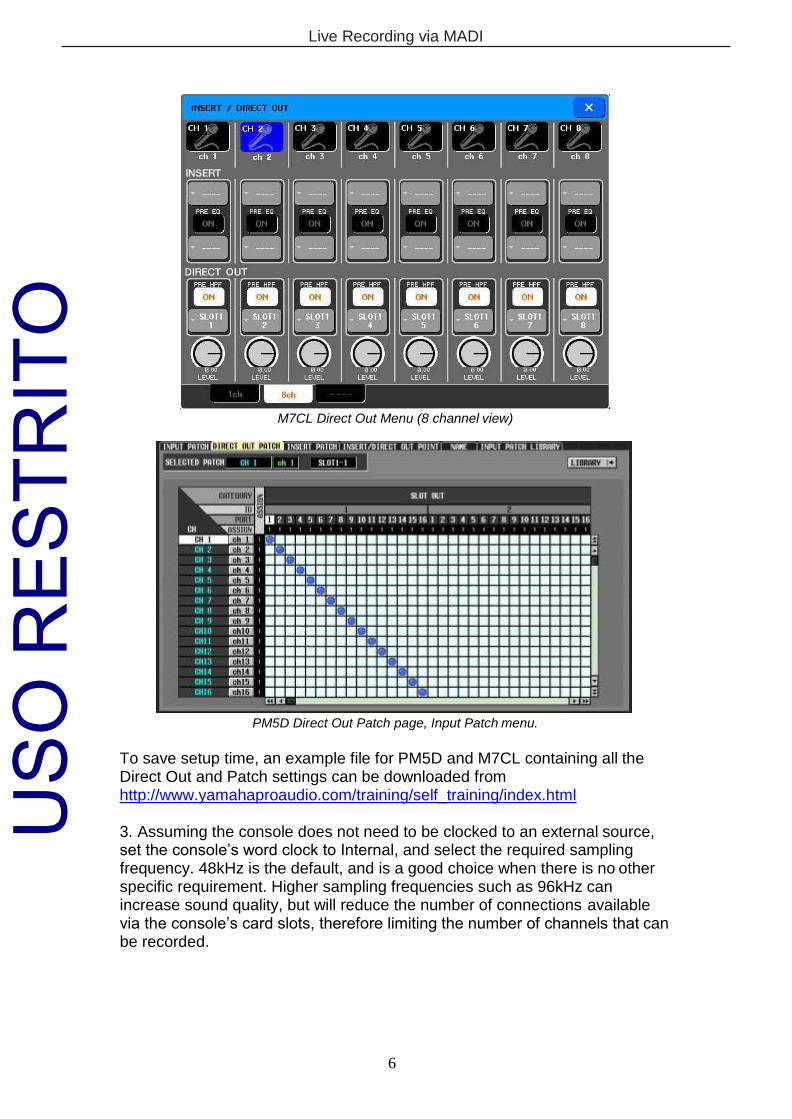
M7CL Direct Out Menu (8 channel view)
PM5D Direct Out Patch page, Input Patch menu.
To save setup time, an example file for PM5D and M7CL containing all the Direct Out and Patch settings can be downloaded from http://www.yamahaproaudio.com/training/self_training/index.html
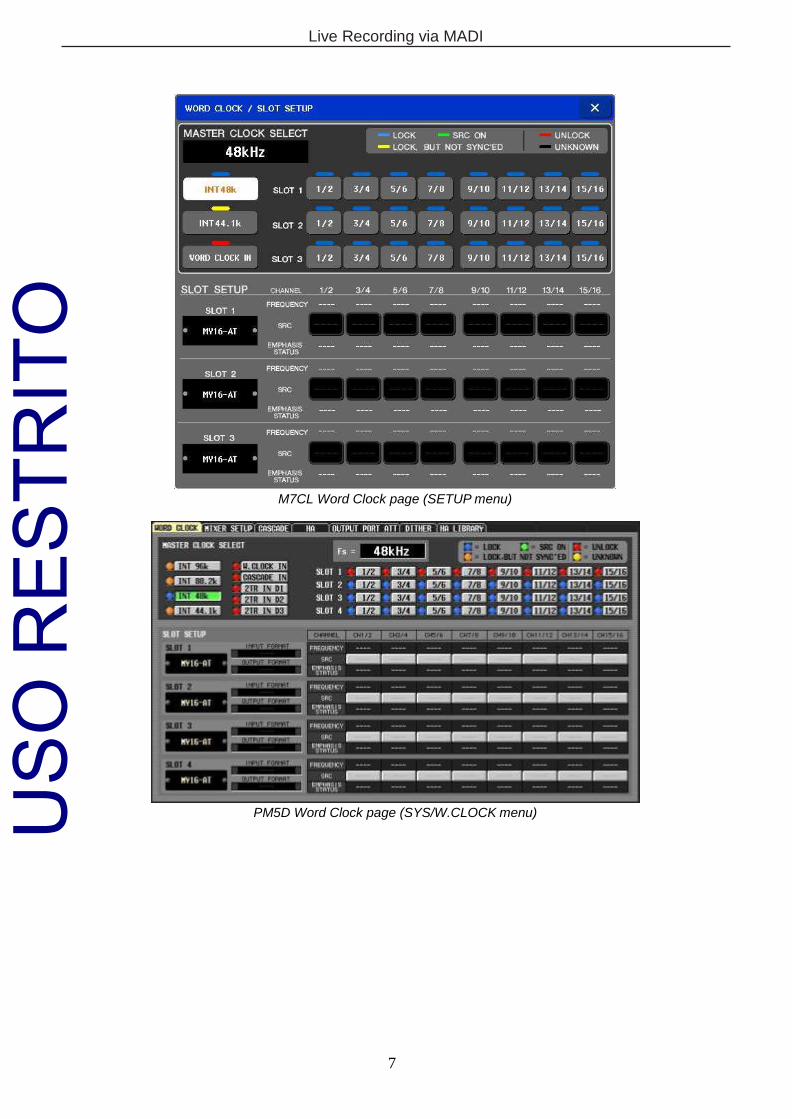
3. Assuming the console does not need to be clocked to an external source, set the console’s word clock to Internal, and select the required sampling frequency. 48kHz is the default, and is a good choice when there is no other specific requirement. Higher sampling frequencies such as 96kHz can increase sound quality, but will reduce the number of connections available via the console’s card slots, therefore limiting the number of channels that can be recorded.
USO
RES
TRIT
O
Live Recording via MADI
7
M7CL Word Clock page (SETUP menu)
PM5D Word Clock page (SYS/W.CLOCK menu) USO
RES
TRIT
O
Live Recording via MADI
8
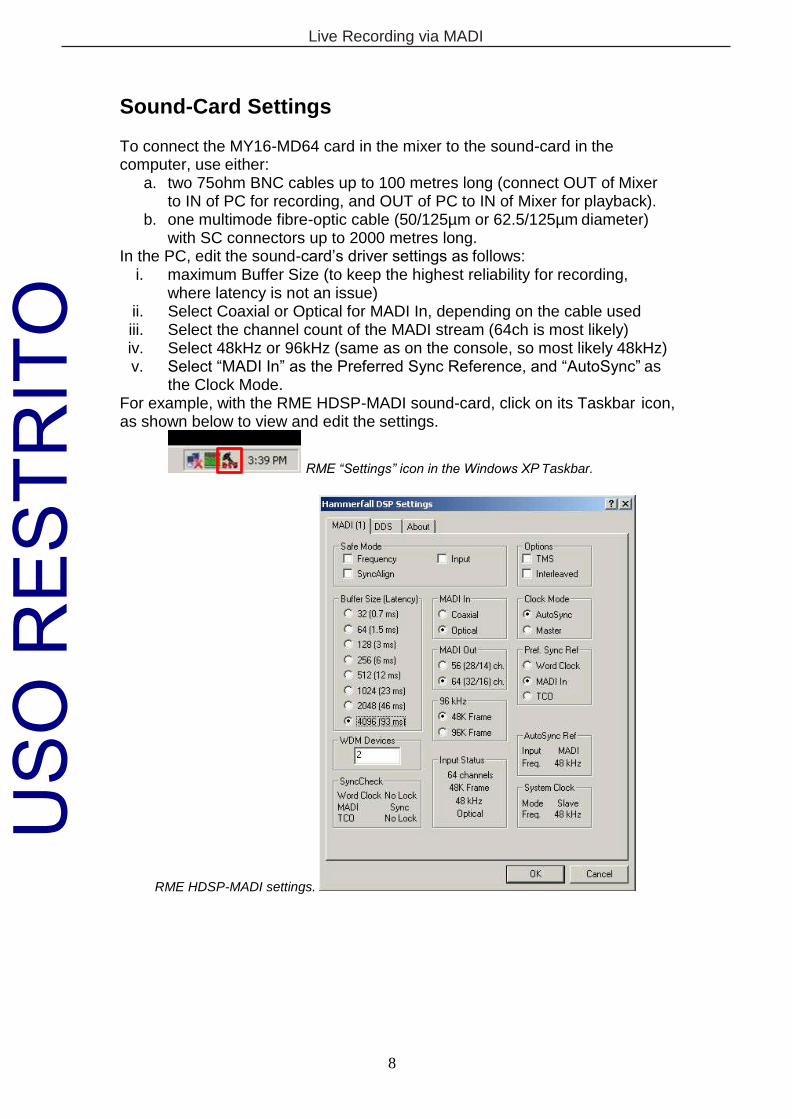
Sound-Card Settings
To connect the MY16-MD64 card in the mixer to the sound-card in the computer, use either:
a. two 75ohm BNC cables up to 100 metres long (connect OUT of Mixer to IN of PC for recording, and OUT of PC to IN of Mixer for playback).
b. one multimode fibre-optic cable (50/125µm or 62.5/125µm diameter) with SC connectors up to 2000 metres long.
In the PC, edit the sound-card’s driver settings as follows: i. maximum Buffer Size (to keep the highest reliability for recording,
where latency is not an issue) ii. Select Coaxial or Optical for MADI In, depending on the cable used iii. Select the channel count of the MADI stream (64ch is most likely) iv. Select 48kHz or 96kHz (same as on the console, so most likely 48kHz) v. Select “MADI In” as the Preferred Sync Reference, and “AutoSync” as
the Clock Mode. For example, with the RME HDSP-MADI sound-card, click on its Taskbar icon, as shown below to view and edit the settings.
RME “Settings” icon in the Windows XP Taskbar.
RME HDSP-MADI settings.
USO
RES
TRIT
O
Live Recording via MADI
9
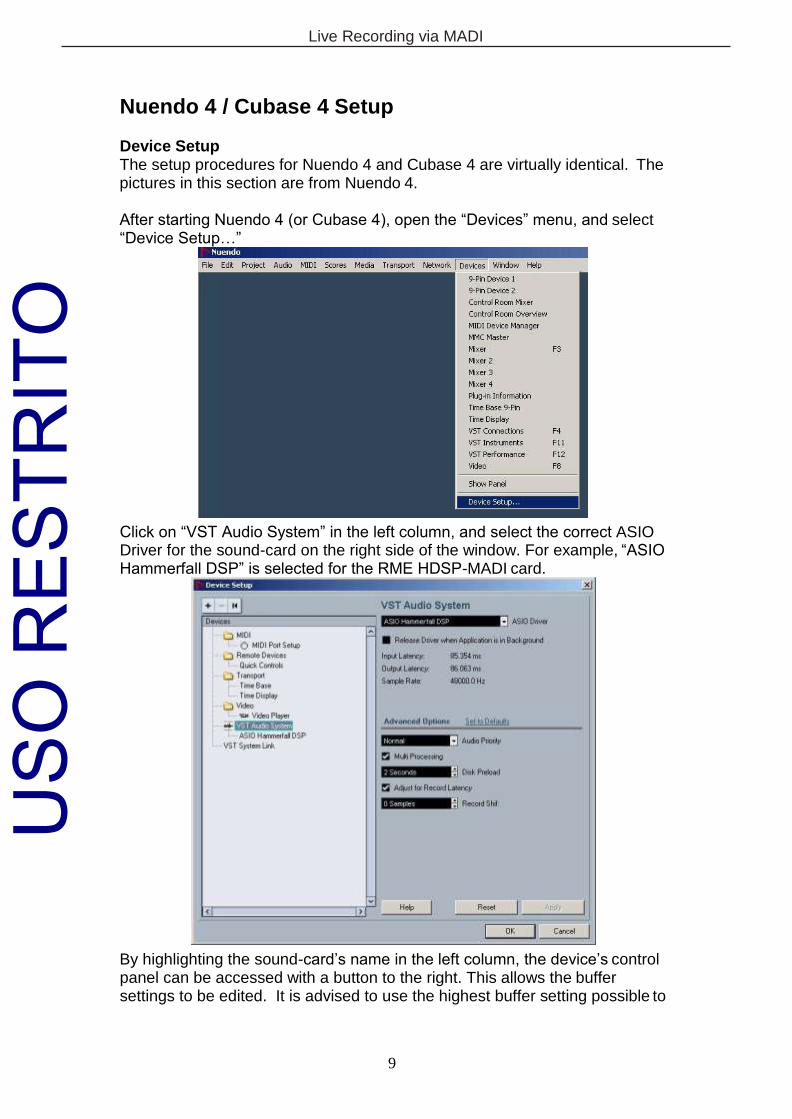
Nuendo 4 / Cubase 4 Setup
Device Setup The setup procedures for Nuendo 4 and Cubase 4 are virtually identical. The pictures in this section are from Nuendo 4.
After starting Nuendo 4 (or Cubase 4), open the “Devices” menu, and select “Device Setup…”
Click on “VST Audio System” in the left column, and select the correct ASIO Driver for the sound-card on the right side of the window. For example, “ASIO Hammerfall DSP” is selected for the RME HDSP-MADI card.
By highlighting the sound-card’s name in the left column, the device’s control panel can be accessed with a button to the right. This allows the buffer settings to be edited. It is advised to use the highest buffer setting possible to
USO
RES
TRIT
O
Live Recording via MADI
10
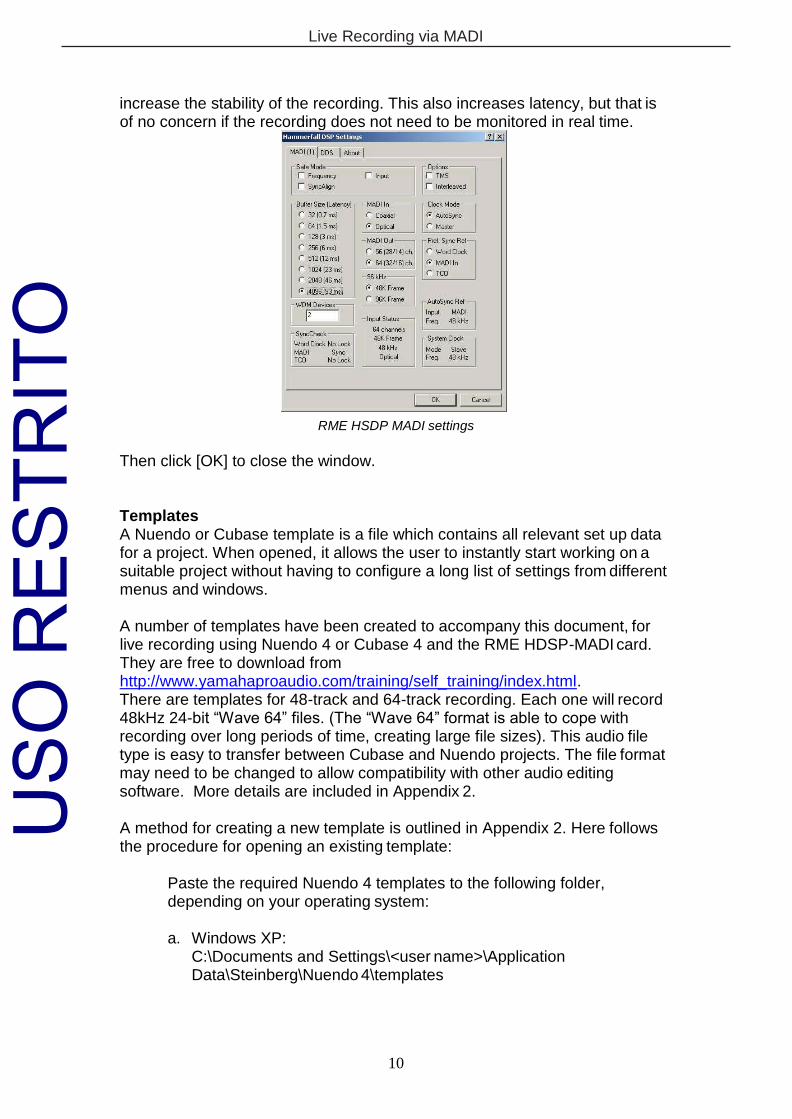
increase the stability of the recording. This also increases latency, but that is of no concern if the recording does not need to be monitored in real time.
RME HSDP MADI settings
Then click [OK] to close the window.
Templates A Nuendo or Cubase template is a file which contains all relevant set up data for a project. When opened, it allows the user to instantly start working on a suitable project without having to configure a long list of settings from different menus and windows.
A number of templates have been created to accompany this document, for live recording using Nuendo 4 or Cubase 4 and the RME HDSP-MADI card. They are free to download from http://www.yamahaproaudio.com/training/self_training/index.html. There are templates for 48-track and 64-track recording. Each one will record 48kHz 24-bit “Wave 64” files. (The “Wave 64” format is able to cope with recording over long periods of time, creating large file sizes). This audio file type is easy to transfer between Cubase and Nuendo projects. The file format may need to be changed to allow compatibility with other audio editing software. More details are included in Appendix 2.
A method for creating a new template is outlined in Appendix 2. Here follows the procedure for opening an existing template:
Paste the required Nuendo 4 templates to the following folder, depending on your operating system:
a. Windows XP:
C:\Documents and Settings\<user name>\Application Data\Steinberg\Nuendo 4\templates
USO
RES
TRIT
O
Live Recording via MADI
11
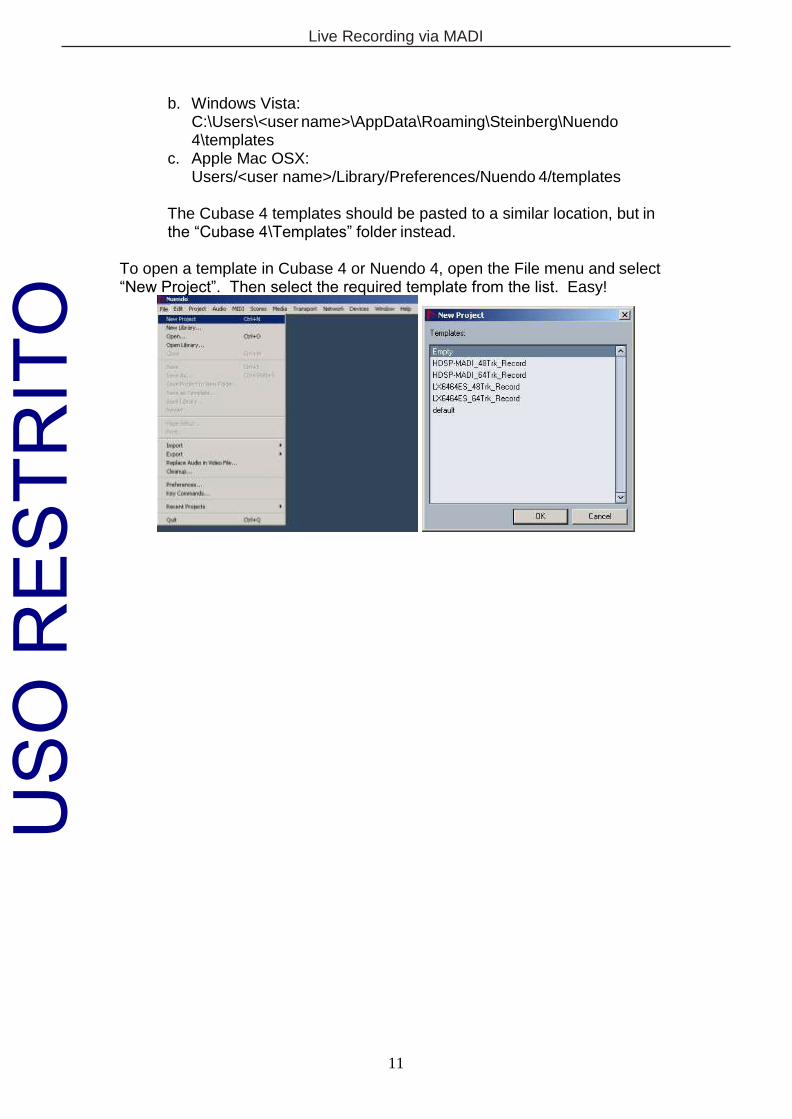
b. Windows Vista: C:\Users\<user name>\AppData\Roaming\Steinberg\Nuendo 4\templates
c. Apple Mac OSX: Users/<user name>/Library/Preferences/Nuendo 4/templates
The Cubase 4 templates should be pasted to a similar location, but in the “Cubase 4\Templates” folder instead.
To open a template in Cubase 4 or Nuendo 4, open the File menu and select “New Project”. Then select the required template from the list. Easy!
USO
RES
TRIT
O
Live Recording via MADI
12
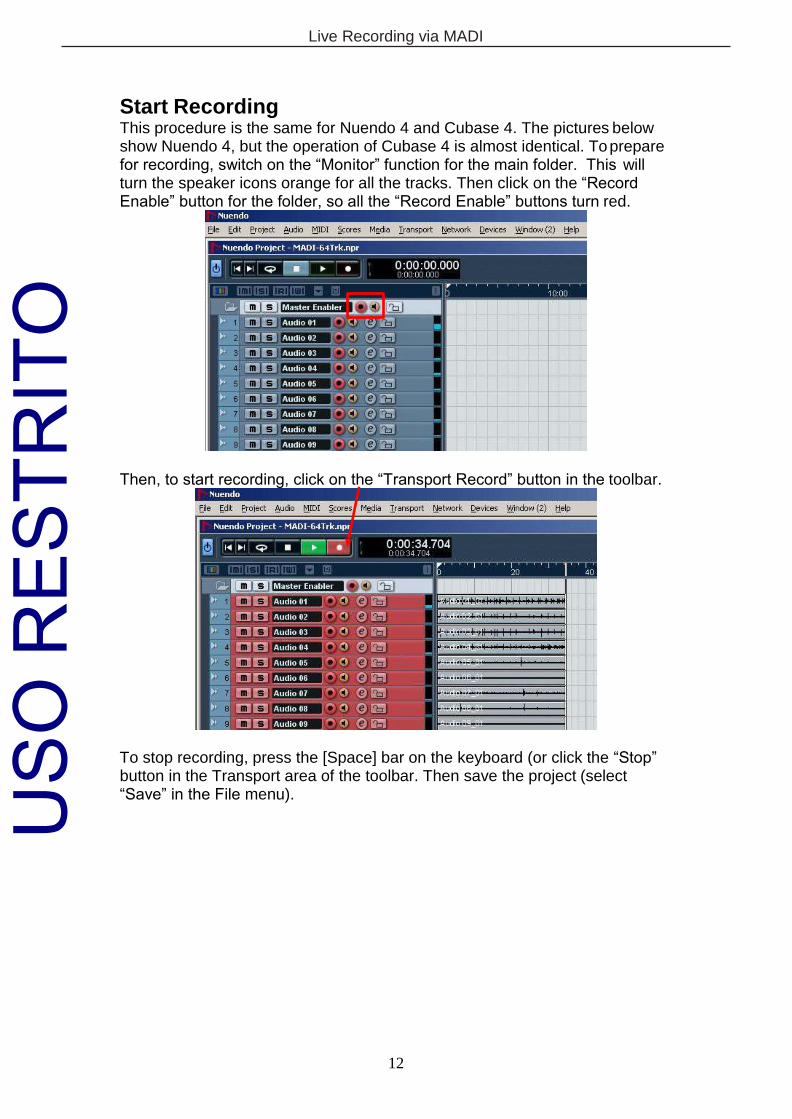
Start Recording This procedure is the same for Nuendo 4 and Cubase 4. The pictures below show Nuendo 4, but the operation of Cubase 4 is almost identical. To prepare for recording, switch on the “Monitor” function for the main folder. This will turn the speaker icons orange for all the tracks. Then click on the “Record Enable” button for the folder, so all the “Record Enable” buttons turn red.
Then, to start recording, click on the “Transport Record” button in the toolbar.
To stop recording, press the [Space] bar on the keyboard (or click the “Stop” button in the Transport area of the toolbar. Then save the project (select “Save” in the File menu). U
SO R
ESTR
ITO
Live Recording via MADI
13
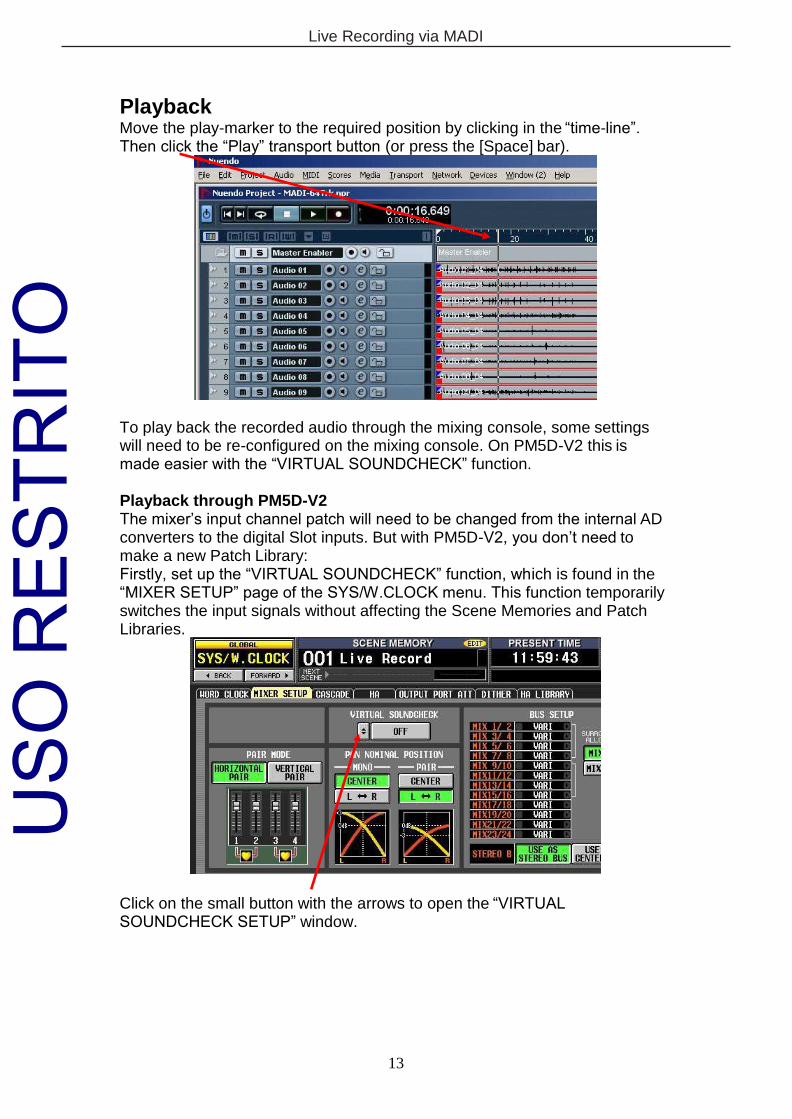
Playback Move the play-marker to the required position by clicking in the “time-line”. Then click the “Play” transport button (or press the [Space] bar).
To play back the recorded audio through the mixing console, some settings will need to be re-configured on the mixing console. On PM5D-V2 this is made easier with the “VIRTUAL SOUNDCHECK” function.
Playback through PM5D-V2 The mixer’s input channel patch will need to be changed from the internal AD converters to the digital Slot inputs. But with PM5D-V2, you don’t need to make a new Patch Library: Firstly, set up the “VIRTUAL SOUNDCHECK” function, which is found in the “MIXER SETUP” page of the SYS/W.CLOCK menu. This function temporarily switches the input signals without affecting the Scene Memories and Patch Libraries.
Click on the small button with the arrows to open the “VIRTUAL SOUNDCHECK SETUP” window.
USO
RES
TRIT
O
Live Recording via MADI
14
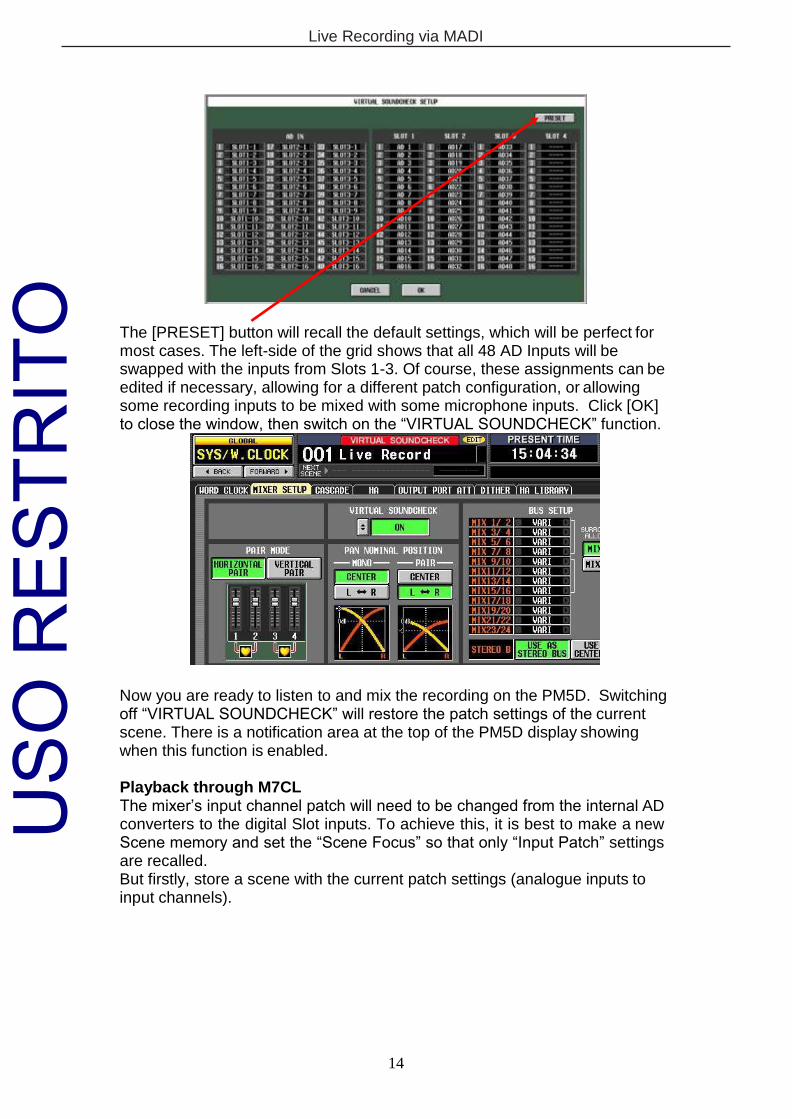
The [PRESET] button will recall the default settings, which will be perfect for most cases. The left-side of the grid shows that all 48 AD Inputs will be swapped with the inputs from Slots 1-3. Of course, these assignments can be edited if necessary, allowing for a different patch configuration, or allowing some recording inputs to be mixed with some microphone inputs. Click [OK] to close the window, then switch on the “VIRTUAL SOUNDCHECK” function.
Now you are ready to listen to and mix the recording on the PM5D. Switching off “VIRTUAL SOUNDCHECK” will restore the patch settings of the current scene. There is a notification area at the top of the PM5D display showing when this function is enabled.
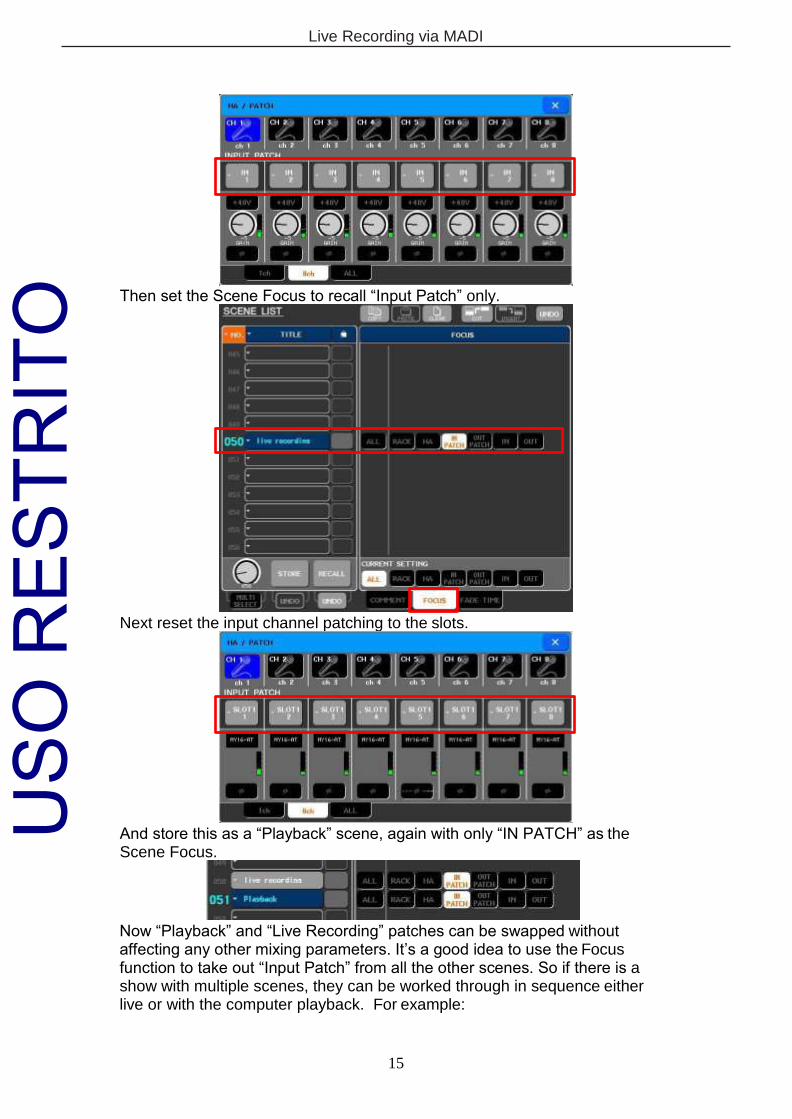
Playback through M7CL The mixer’s input channel patch will need to be changed from the internal AD converters to the digital Slot inputs. To achieve this, it is best to make a new Scene memory and set the “Scene Focus” so that only “Input Patch” settings are recalled. But firstly, store a scene with the current patch settings (analogue inputs to input channels).
USO
RES
TRIT
O
Live Recording via MADI
15
Then set the Scene Focus to recall “Input Patch” only.
Next reset the input channel patching to the slots.
And store this as a “Playback” scene, again with only “IN PATCH” as the Scene Focus.
Now “Playback” and “Live Recording” patches can be swapped without affecting any other mixing parameters. It’s a good idea to use the Focus function to take out “Input Patch” from all the other scenes. So if there is a show with multiple scenes, they can be worked through in sequence either live or with the computer playback. For example:
USO
RES
TRIT
O
Live Recording via MADI
16
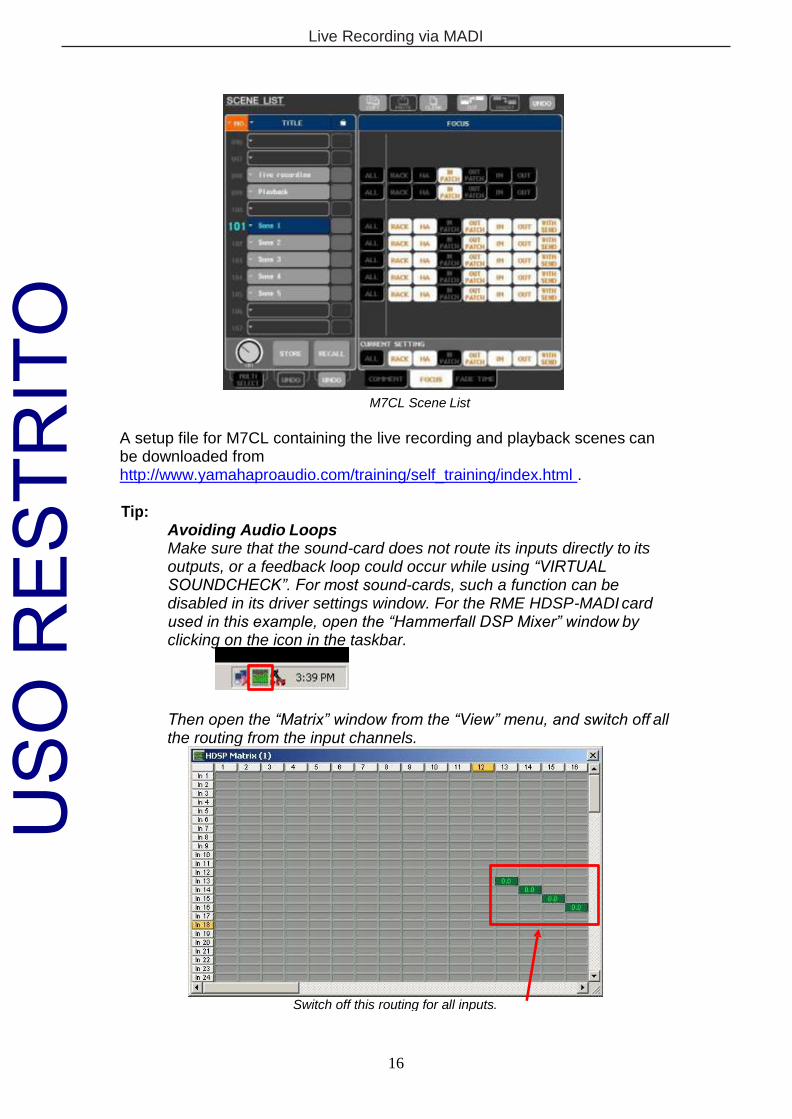
M7CL Scene List
A setup file for M7CL containing the live recording and playback scenes can be downloaded from http://www.yamahaproaudio.com/training/self_training/index.html .
Tip: Avoiding Audio Loops Make sure that the sound-card does not route its inputs directly to its outputs, or a feedback loop could occur while using “VIRTUAL SOUNDCHECK”. For most sound-cards, such a function can be disabled in its driver settings window. For the RME HDSP-MADI card used in this example, open the “Hammerfall DSP Mixer” window by clicking on the icon in the taskbar.
Then open the “Matrix” window from the “View” menu, and switch off all the routing from the input channels.
Switch off this routing for all inputs.
USO
RES
TRIT
O
Live Recording via MADI
17
Appendix 1
MY-Card setup Before inserting the MY-cards into the mixing console, some switches need to be configured as follows:
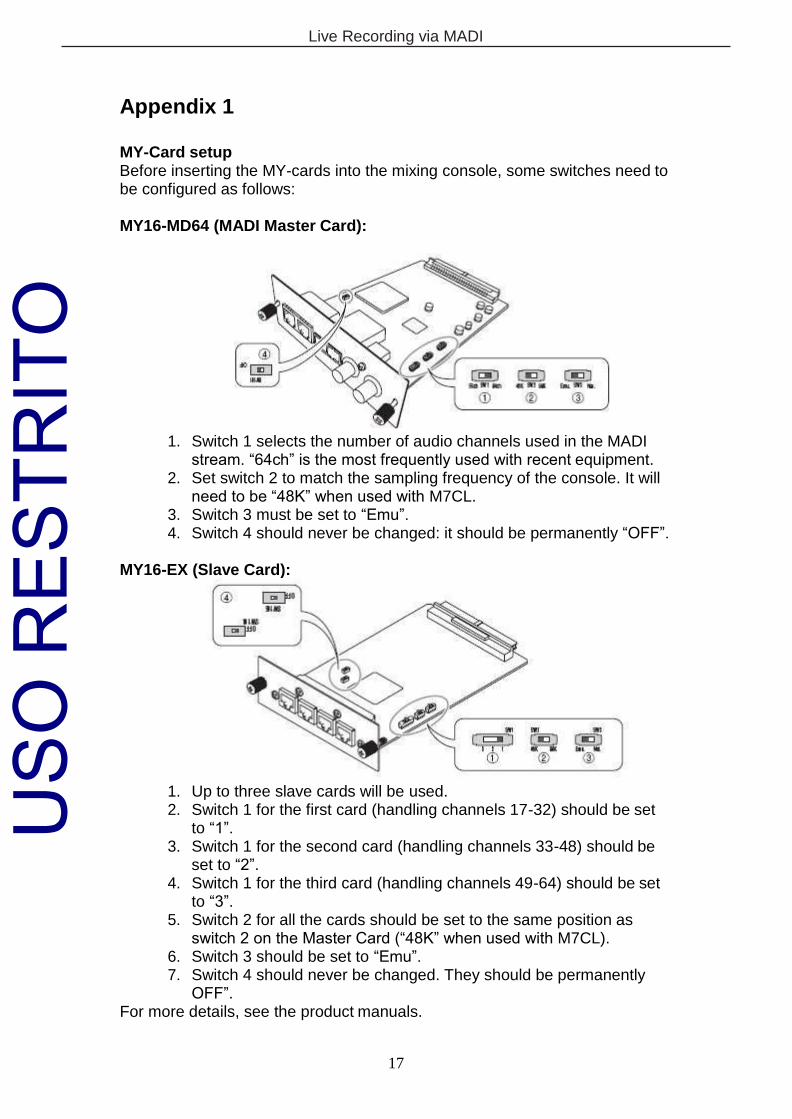
MY16-MD64 (MADI Master Card):
1. Switch 1 selects the number of audio channels used in the MADI stream. “64ch” is the most frequently used with recent equipment.
2. Set switch 2 to match the sampling frequency of the console. It will need to be “48K” when used with M7CL.
3. Switch 3 must be set to “Emu”. 4. Switch 4 should never be changed: it should be permanently “OFF”.
MY16-EX (Slave Card):
1. Up to three slave cards will be used. 2. Switch 1 for the first card (handling channels 17-32) should be set
to “1”. 3. Switch 1 for the second card (handling channels 33-48) should be
set to “2”. 4. Switch 1 for the third card (handling channels 49-64) should be set
to “3”. 5. Switch 2 for all the cards should be set to the same position as
switch 2 on the Master Card (“48K” when used with M7CL). 6. Switch 3 should be set to “Emu”. 7. Switch 4 should never be changed. They should be permanently
OFF”. For more details, see the product manuals.
USO
RES
TRIT
O
Live Recording via MADI
18
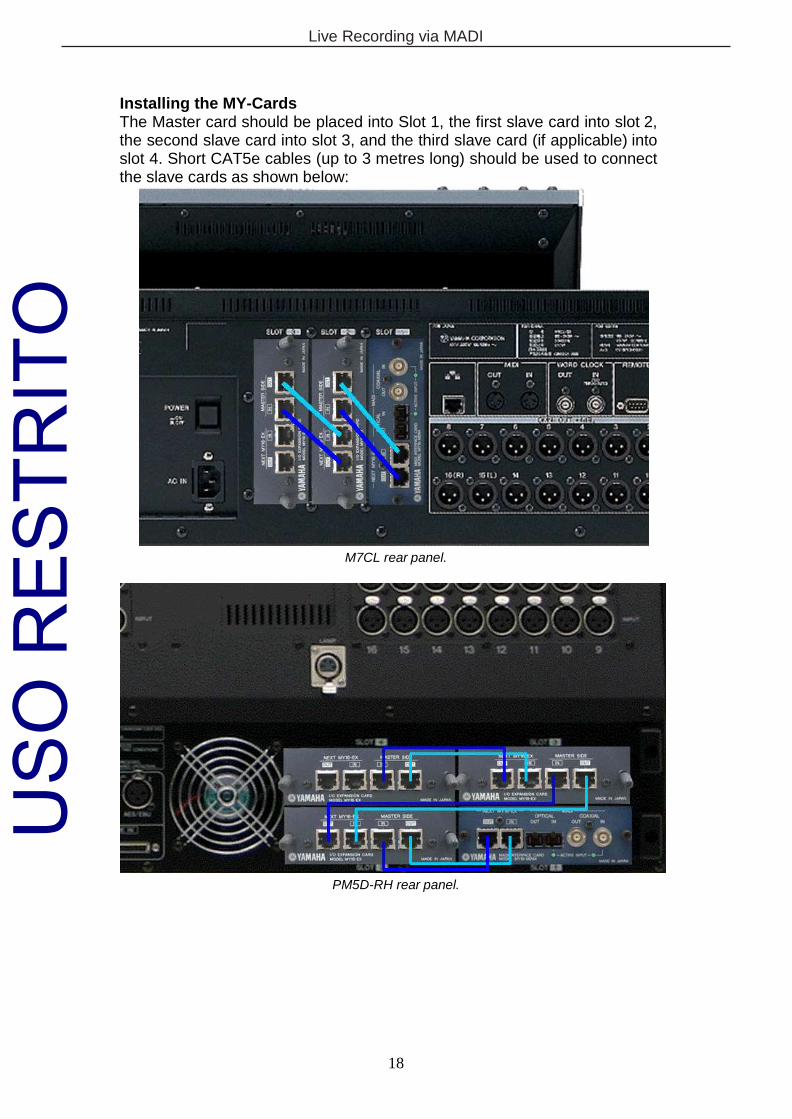
Installing the MY-Cards The Master card should be placed into Slot 1, the first slave card into slot 2, the second slave card into slot 3, and the third slave card (if applicable) into slot 4. Short CAT5e cables (up to 3 metres long) should be used to connect the slave cards as shown below:
M7CL rear panel.
PM5D-RH rear panel.
USO
RES
TRIT
O
Live Recording via MADI
19
Appendix 2
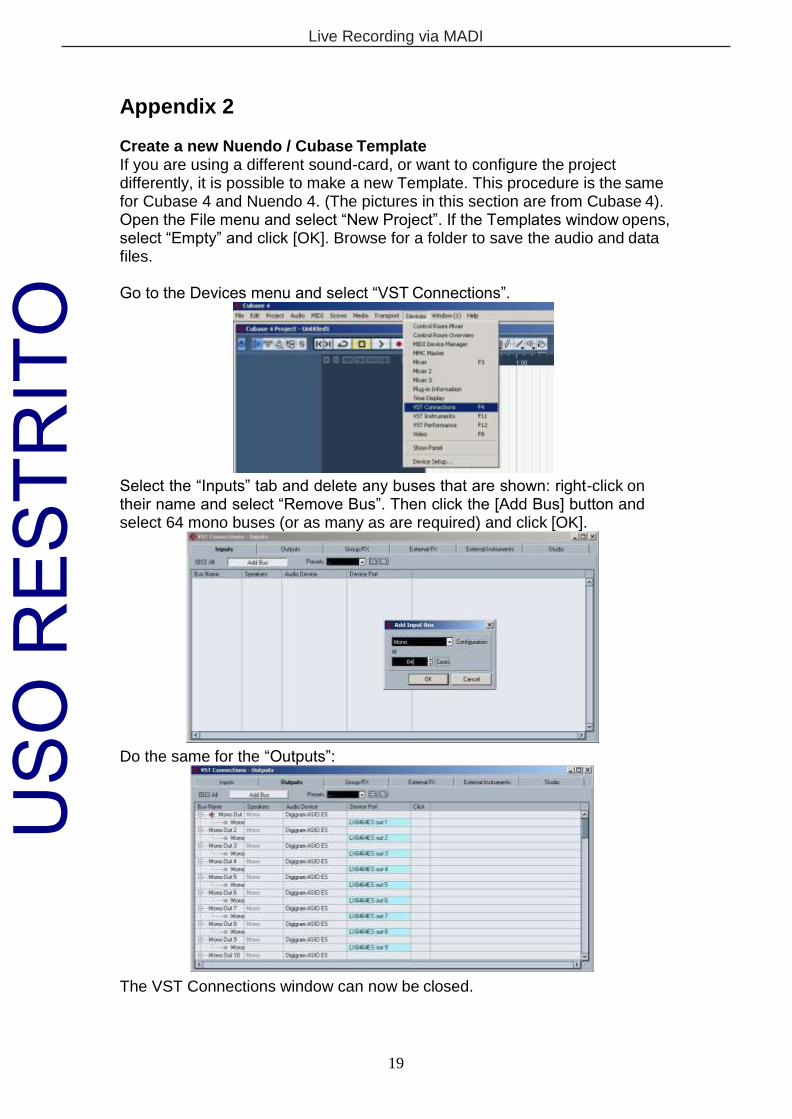
Create a new Nuendo / Cubase Template If you are using a different sound-card, or want to configure the project differently, it is possible to make a new Template. This procedure is the same for Cubase 4 and Nuendo 4. (The pictures in this section are from Cubase 4). Open the File menu and select “New Project”. If the Templates window opens, select “Empty” and click [OK]. Browse for a folder to save the audio and data files.
Go to the Devices menu and select “VST Connections”.
Select the “Inputs” tab and delete any buses that are shown: right-click on their name and select “Remove Bus”. Then click the [Add Bus] button and select 64 mono buses (or as many as are required) and click [OK].
Do the same for the “Outputs”:
The VST Connections window can now be closed.
USO
RES
TRIT
O
Live Recording via MADI
20
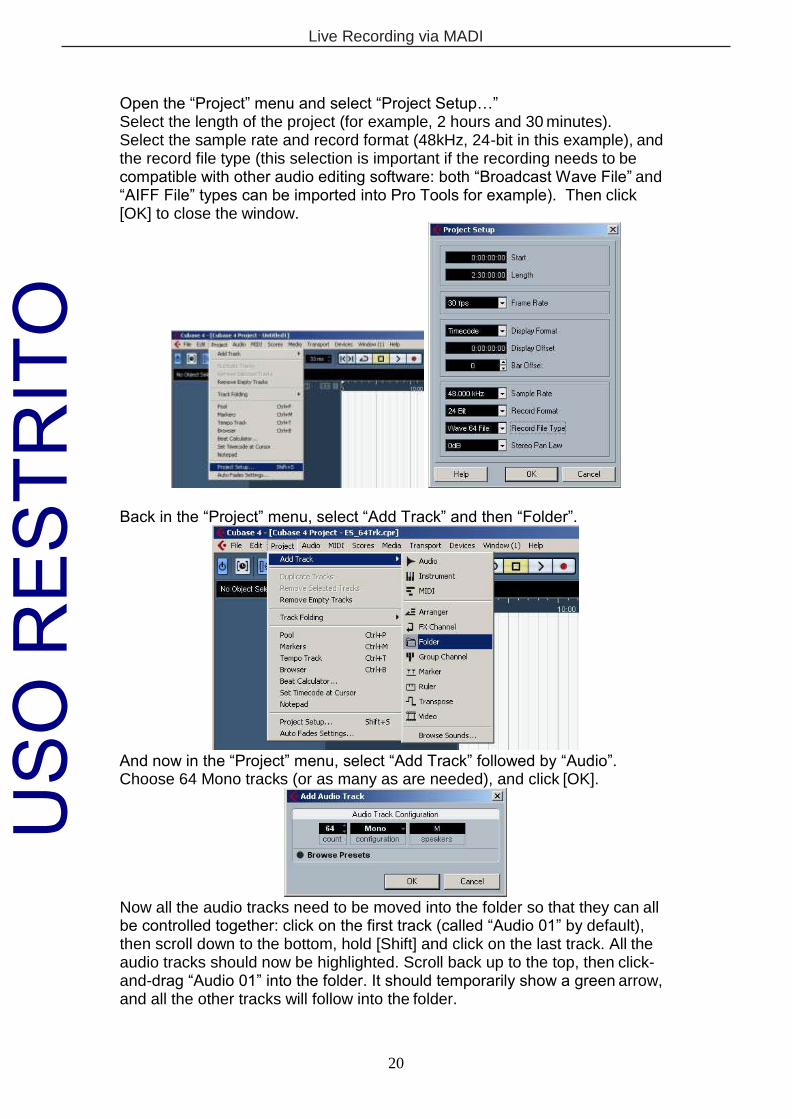
Open the “Project” menu and select “Project Setup…” Select the length of the project (for example, 2 hours and 30 minutes). Select the sample rate and record format (48kHz, 24-bit in this example), and the record file type (this selection is important if the recording needs to be compatible with other audio editing software: both “Broadcast Wave File” and “AIFF File” types can be imported into Pro Tools for example). Then click [OK] to close the window.
Back in the “Project” menu, select “Add Track” and then “Folder”.
And now in the “Project” menu, select “Add Track” followed by “Audio”. Choose 64 Mono tracks (or as many as are needed), and click [OK].
Now all the audio tracks need to be moved into the folder so that they can all be controlled together: click on the first track (called “Audio 01” by default), then scroll down to the bottom, hold [Shift] and click on the last track. All the audio tracks should now be highlighted. Scroll back up to the top, then click- and-drag “Audio 01” into the folder. It should temporarily show a green arrow, and all the other tracks will follow into the folder.
USO
RES
TRIT
O
Live Recording via MADI
21
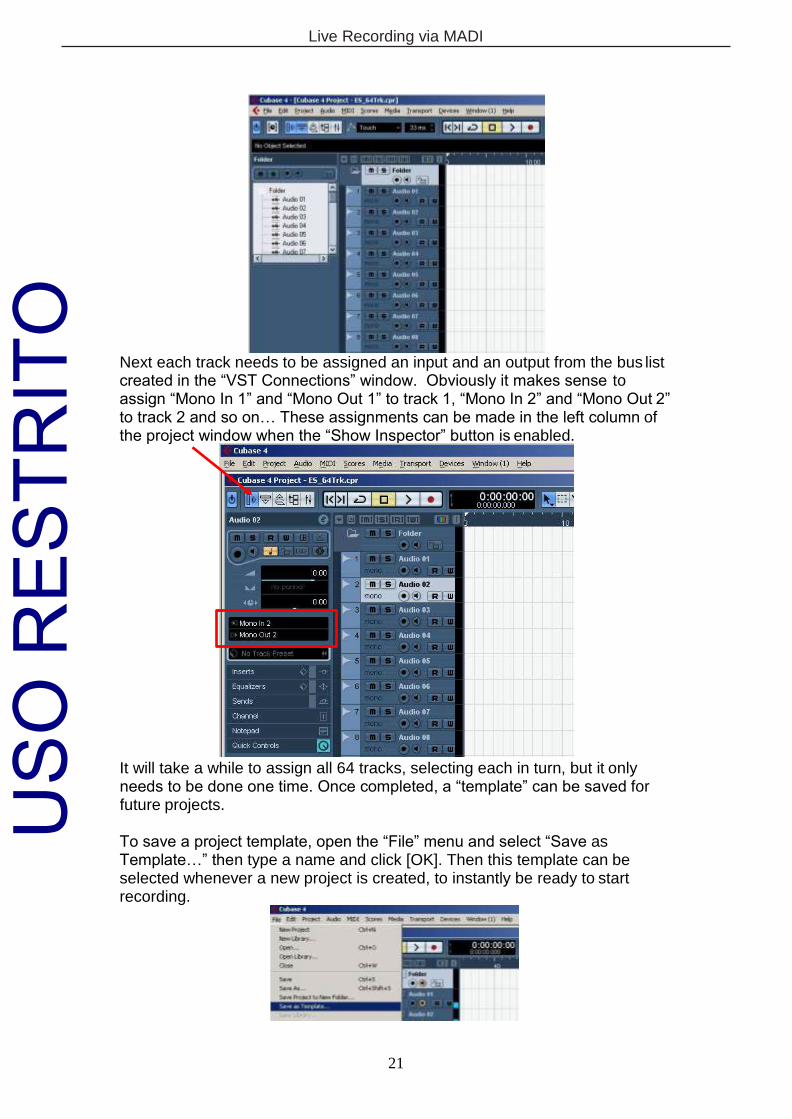
Next each track needs to be assigned an input and an output from the bus list created in the “VST Connections” window. Obviously it makes sense to assign “Mono In 1” and “Mono Out 1” to track 1, “Mono In 2” and “Mono Out 2” to track 2 and so on… These assignments can be made in the left column of the project window when the “Show Inspector” button is enabled.
It will take a while to assign all 64 tracks, selecting each in turn, but it only needs to be done one time. Once completed, a “template” can be saved for future projects.
To save a project template, open the “File” menu and select “Save as Template…” then type a name and click [OK]. Then this template can be selected whenever a new project is created, to instantly be ready to start recording.
USO
RES
TRIT
O