Embed Size (px)
Citation preview

1
List Preface – Getting Started ............................................................................................... 1
What’s Arduino? .................................................................................................... 1 1.Arduino IDE Installation .............................................................................. 2 2.Language Reference .................................................................................... 2
What’s ArduBlock? ................................................................................................. 3 1. ArduBlock Installation ............................................................................... 3 2. ArduBlock Interface Function ................................................................... 5
Crowtail Modules Introduction ............................................................................ 10 Lessons ......................................................................................................................... 17
Lesson 1 LED Control ......................................................................................... 17 Lesson 2 Button Control LED ............................................................................. 19 Lesson 3 Buzzer ................................................................................................. 22 Lesson 4 Touch .................................................................................................. 24 Lesson 5 Vibration Motor ................................................................................. 26 Lesson 6 Intelligent Temperature Control Fan .................................................. 28 Lesson 7 Linear Potentiometer Control Breathing LED .................................... 30 Lesson 8 Moisture Sensor ................................................................................. 32 Lesson 9 Sound-light Control LED ..................................................................... 33 Lesson 10 OLED ................................................................................................. 36
Preface – Getting Started
Welcome to the world of Crowtail! Crowtail is a modulated, ready-to-use toolset, it takes a building block approach to assembling electronics. It simplifies and condenses the learning process significantly.
Crowtail – Ardublock Start Kit is a arduino fan graphical programming start kit. All programming can be done by building blocks, each one comes with clear documentation and demo code to help you get started with designing and creating your own interactive creations.
Before we discuss those Crowtail modules one by one, you need to seat yourself and finish some preparations:
What’s Arduino?
Arduino is a flexible and easy-to-learn open source development platform that enjoys great fame among makers, geeks and interactive artists. It ignited the
2
prosperity of the ongoing maker movement. Tons of creative projects are brought to life surrounding Arduino and its collaborative community, including our Crowtail system. To get started with Arduino, you need to own one first. The Elecrow Crowtail – Ardublock Start Kit helps you get the basic understanding of Aduino. It contains the most popular accessories for DIY projects, such as RGB LED, Buzzer, Button, etc. With the straight forward instructions with the kit, you can easily dig into the Arduino word and start you own Arduino project.
1.Arduino IDE Installation
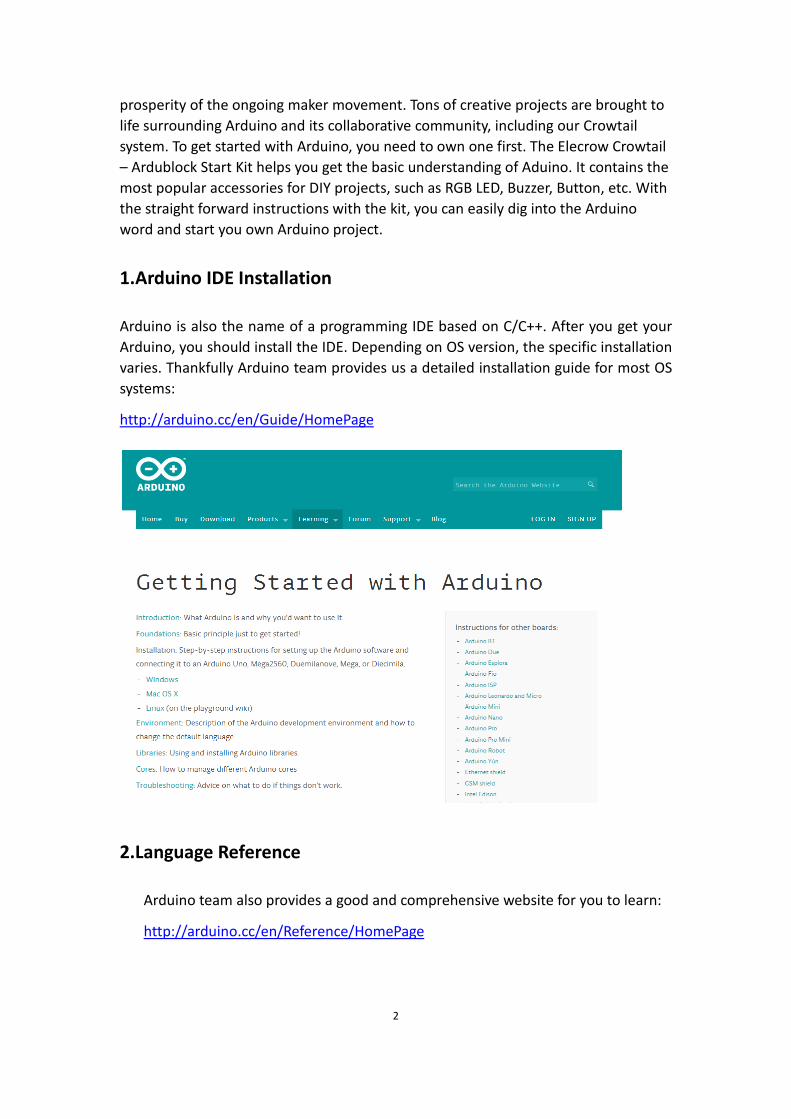
Arduino is also the name of a programming IDE based on C/C++. After you get your Arduino, you should install the IDE. Depending on OS version, the specific installation varies. Thankfully Arduino team provides us a detailed installation guide for most OS systems:
http://arduino.cc/en/Guide/HomePage
2.Language Reference
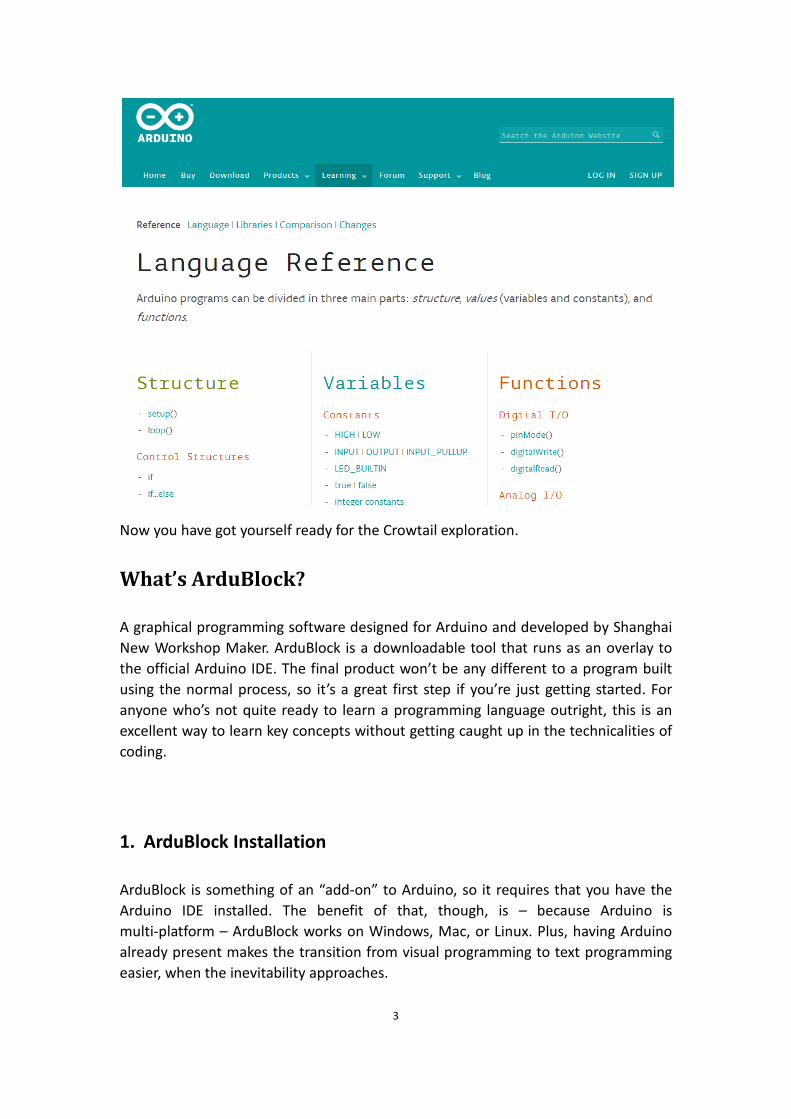
Arduino team also provides a good and comprehensive website for you to learn:
http://arduino.cc/en/Reference/HomePage
3
Now you have got yourself ready for the Crowtail exploration.
What’s ArduBlock?
A graphical programming software designed for Arduino and developed by Shanghai New Workshop Maker. ArduBlock is a downloadable tool that runs as an overlay to the official Arduino IDE. The final product won’t be any different to a program built using the normal process, so it’s a great first step if you’re just getting started. For anyone who’s not quite ready to learn a programming language outright, this is an excellent way to learn key concepts without getting caught up in the technicalities of coding.
1. ArduBlock Installation
ArduBlock is something of an “add-on” to Arduino, so it requires that you have the Arduino IDE installed. The benefit of that, though, is – because Arduino is multi-platform – ArduBlock works on Windows, Mac, or Linux. Plus, having Arduino already present makes the transition from visual programming to text programming easier, when the inevitability approaches.
4
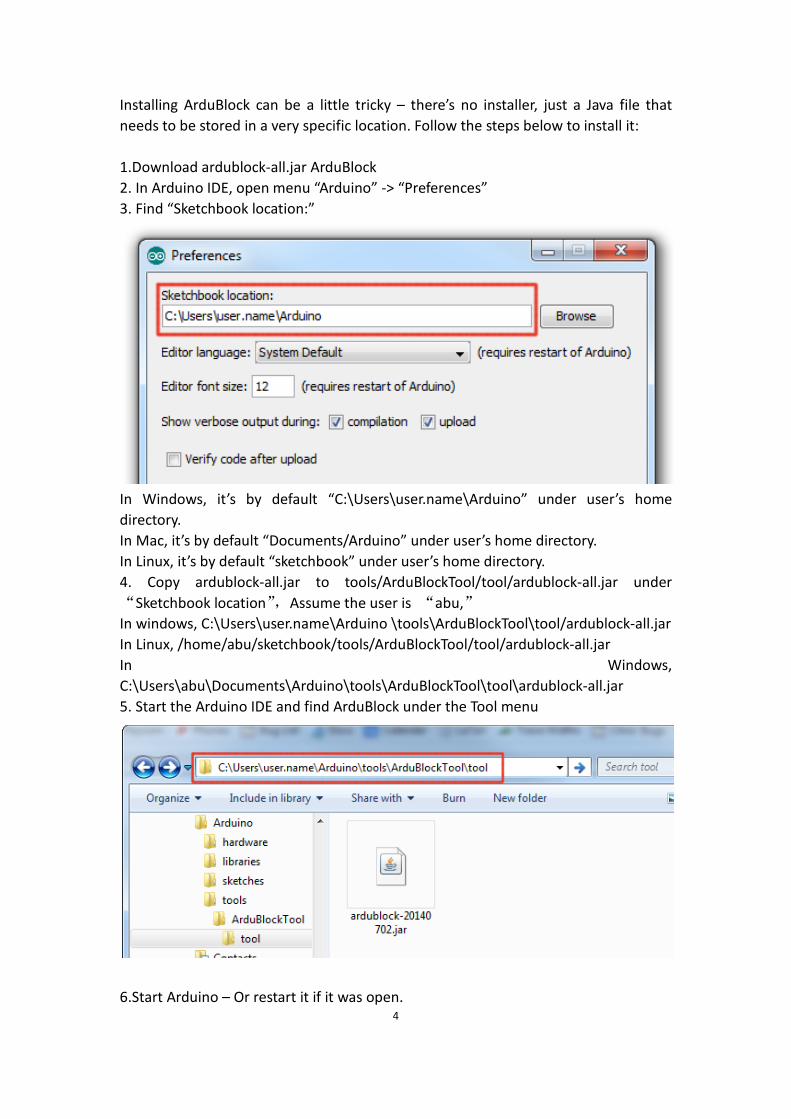
Installing ArduBlock can be a little tricky – there’s no installer, just a Java file that needs to be stored in a very specific location. Follow the steps below to install it: 1.Download ardublock-all.jar ArduBlock 2. In Arduino IDE, open menu “Arduino” -> “Preferences” 3. Find “Sketchbook location:”
In Windows, it’s by default “C:\Users\user.name\Arduino” under user’s home directory. In Mac, it’s by default “Documents/Arduino” under user’s home directory. In Linux, it’s by default “sketchbook” under user’s home directory. 4. Copy ardublock-all.jar to tools/ArduBlockTool/tool/ardublock-all.jar under “Sketchbook location”,Assume the user is “abu,” In windows, C:\Users\user.name\Arduino \tools\ArduBlockTool\tool/ardublock-all.jar In Linux, /home/abu/sketchbook/tools/ArduBlockTool/tool/ardublock-all.jar In Windows, C:\Users\abu\Documents\Arduino\tools\ArduBlockTool\tool\ardublock-all.jar 5. Start the Arduino IDE and find ArduBlock under the Tool menu
6.Start Arduino – Or restart it if it was open.

5
7.Select the Board and Serial Port – Just as you would if you were using Arduino, make your board and serial port selections from the “Tools” menu. 8.Open ArduBlock – Run ArduBlock by clicking Tools > ArduBlock. If you don’t see an entry for ArduBlock here, double-check to make sure your directories are all correctly typed and cased.
2. ArduBlock Interface Function
*Control
This is a structural in charge of logic control.

6
*Pins
These pin modules as virtual pins in the arduino template.(Digital and Analog pins).
*Tests
It include common figures “and”, “or” and ”not”. Also include comparison operator
7
such as comparison between digital and analog.
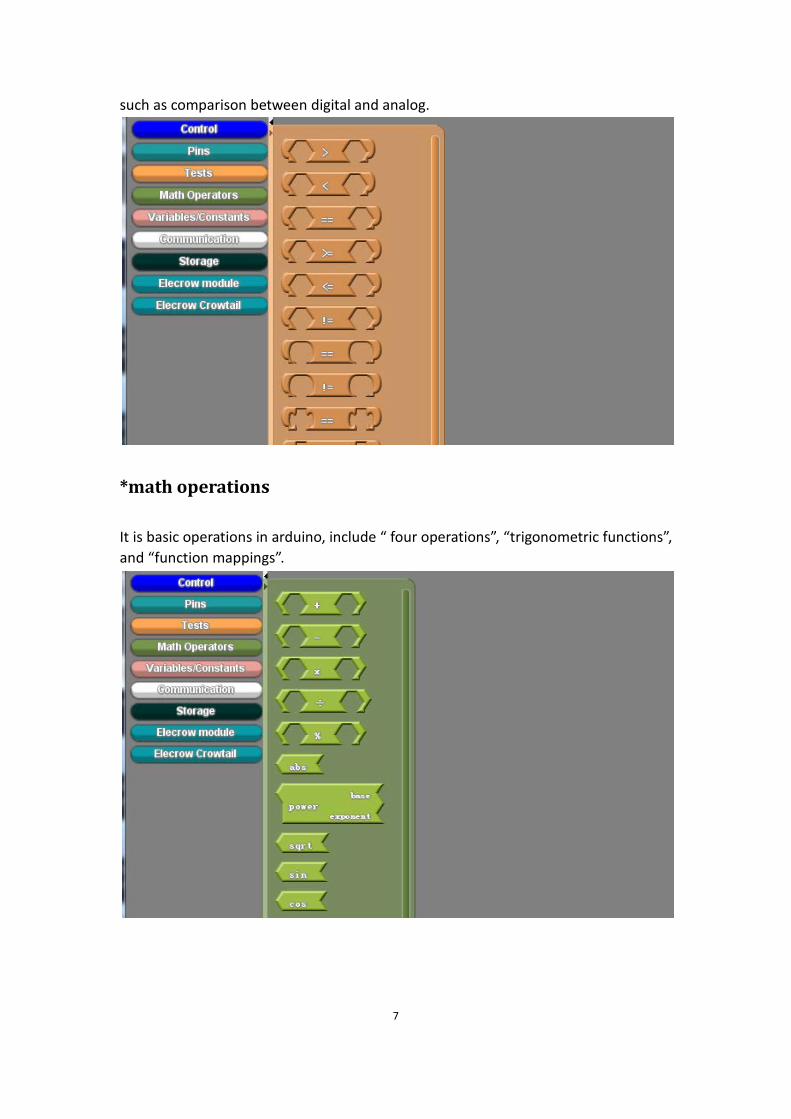
*math operations
It is basic operations in arduino, include “ four operations”, “trigonometric functions”, and “function mappings”.

8
*Variable/Constant
These variable/constant mainly include digital, analog, character, string cariables and their corresponding constants.
*Communication
It include some common command such as set, delay, serial monitor and IR control.
9
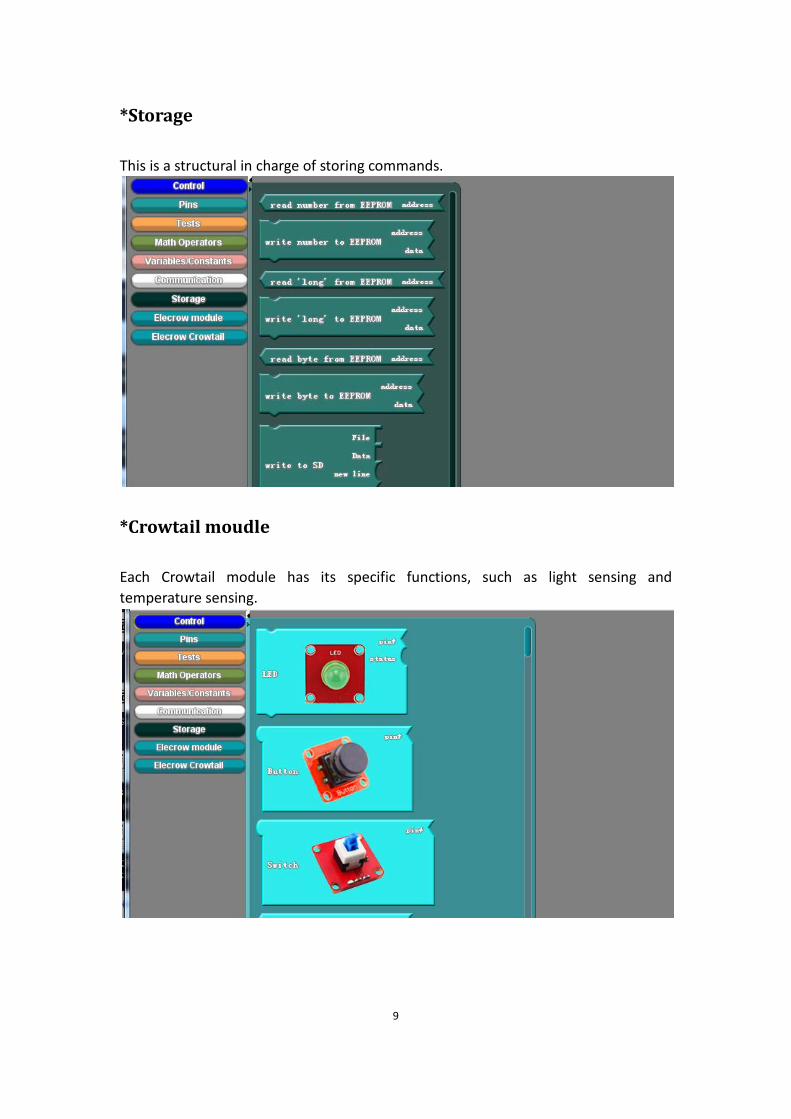
*Storage
This is a structural in charge of storing commands.
*Crowtail moudle
Each Crowtail module has its specific functions, such as light sensing and temperature sensing.

10
Crowtail Modules Introduction
*Crowtail - Base Shield
The Crowtail -Base Shield plugs into an Arduino and is the foundation of the Crowtail system. All I/O ports of the Arduino are exposed and adapted into 22 Crowtail connectors which include digital I/O, analog I/O, and specialized ports (I2C, UART).
There are 11 digital I/O ports (D2~D12), these ports can be used to read and control digital Crowtail modules, such as the Button and LEDs. Some of the digital I/O ports can also be used as PWM (pulse width modulation) outputs. By generating PWM waves, the Arduino can control the movement of a stepper motor or fade an LED. There are 3 UART ports on this shied, it is included one hardware serial port (D0,D1 ) and two software serial ports(D2,D3 and D7,D8). You will use it when you communication with the serial wifi module or the serial Bluetooth module. There are 6 analog input ports (A0~A5). Analog inputs are typically used to read analog sensors, like a potentiometer or a temperature sensor but these ports can also be used as digital I/O ports. There are 2 I2C ports on this shield, you’ll use these special ports with more sophisticated Crowtail modules, like the BMP180 Barometer. The Crowtail compatible sensors contained in this pack will use one of the following ports: a digital port, an analog port, or an I2C/UART port. Refer to the wiring instructions and sample code below for each Crowtail sensor. Seventeen Crowtail cables are included in this pack. Simply plug the Crowtail cables into the sensors and base shield. This enables plug and play operations with no soldering.

11
* Crowtail- LED
Description
The Crowtail-LED is designed for the beginners of Arduino. It is the best way to step into the Aduino from it’s I/O pins. The LED is the best choice to help you learn I/O pins.
12
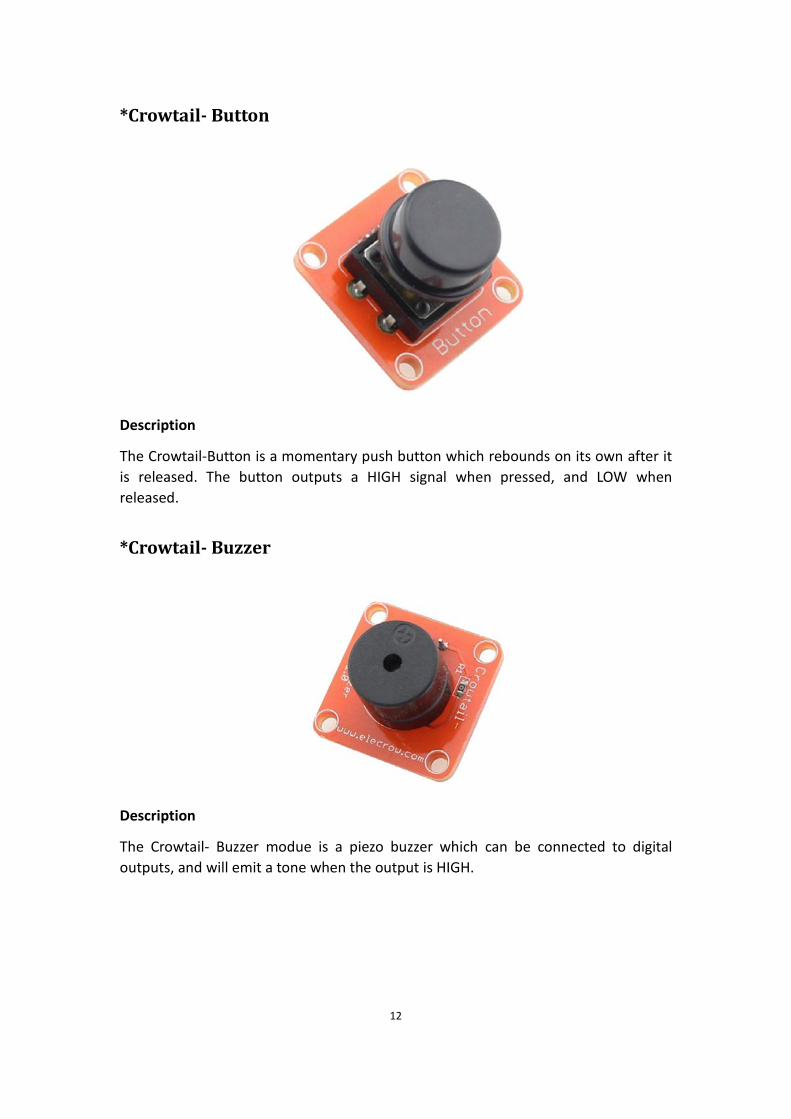
*Crowtail- Button
Description
The Crowtail-Button is a momentary push button which rebounds on its own after it is released. The button outputs a HIGH signal when pressed, and LOW when released.
*Crowtail- Buzzer
Description
The Crowtail- Buzzer modue is a piezo buzzer which can be connected to digital outputs, and will emit a tone when the output is HIGH.

13
* Crowtail- Touch Sensor
Description
The Crowtail- Touch Sensor can help us use our body current to control the electronic device. It is connected to digital I/O port, it can generate a high voltage when we touch the touch pad.
*Crowtail- Vibration Motor
Description This is a mini vibration motor suitable as a non-audible indicator. When the input is HIGH, the motor will vibrate just like your cell phone on silent mode.
*Crowtail- Tilt Switch
Description

14
The Crowtail- Tilt Switch is the equivalent of a button, and is used as a digital input. Inside the tilt switch is a pair of balls that make contact with the pins when the case is upright. Tilt the case over and the balls don't touch, thus not making a connection.
*Crowtail- Relay
*Description The Crowtail- Relay module is a digital normally-open switch. Through it, you can control circuit of high voltage with low voltage, say 5V on the controller.
*Crowtail- Linear Potentiometer
Description The Crowtail- Linear Potentiometer module incorporates a linear variable resistor with a maximum resistance of 10KΩ. When you move the slider from one side to the other, its output voltage will range from 0 V to the Vcc you apply.
*Crowtail- Moisture Sensor
Description
This Moisture Sensor can be used to detect the moisture of soil or your pet plant's water level, let the plants in your garden reach out for human help. It is connected to
15
Analog I/O port.
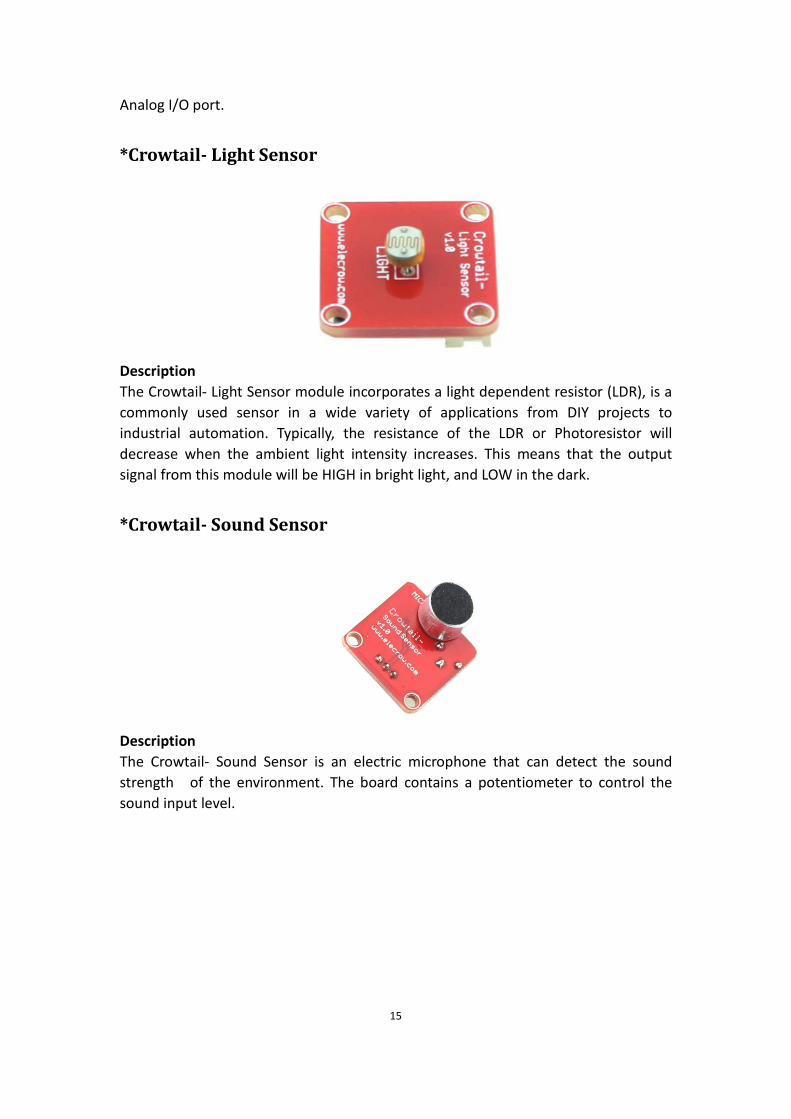
*Crowtail- Light Sensor
Description The Crowtail- Light Sensor module incorporates a light dependent resistor (LDR), is a commonly used sensor in a wide variety of applications from DIY projects to industrial automation. Typically, the resistance of the LDR or Photoresistor will decrease when the ambient light intensity increases. This means that the output signal from this module will be HIGH in bright light, and LOW in the dark.
*Crowtail- Sound Sensor
Description The Crowtail- Sound Sensor is an electric microphone that can detect the sound strength of the environment. The board contains a potentiometer to control the sound input level.

16
Crowtail- Thermistor Temperaturen Sensor
Description The Crowtail- Thermistor Temperaturen Sensor uses a Thermistor to detect the ambient temperature. The resistance of a thermistor will increase when the ambient temperature decreases. It's this characteristic that we use to calculate the ambient temperature.The detection range of this sensor is between -40 to 125 degrees Celsius with an accuracy of ±1.5℃. However it doesn’t output the temperature value directly. To get the specific temperature value, we will use the formula in the code below.
*Crowtail- OLED
Description The Crowtail- OLED is constructed from 128 x 64 dot matrix OLED module. The display offers high brightness, self-emission, high contrast ratio, slim/thin outline, wide viewing angle, wide temperature range and low power consumption. Now, it is time to go on the ArduBlock exploration!

17
Lessons
Lesson 1 LED Control
LED control is basic in Arduino. In this lesson we will learn how to control the LED, you can make the led blink and control how long it shines or the brightness. Material:
Arduino UNO x 1 Crowtail- Base Shield x 1 Crowtail- LED x 1 Crowtail- Cable x 1 USB cable x 1
Hardware Connection Plug the Crowtail- Base Shield onto the Arduino Board.
Then connect the Crowtail- LED to the Shield as following.
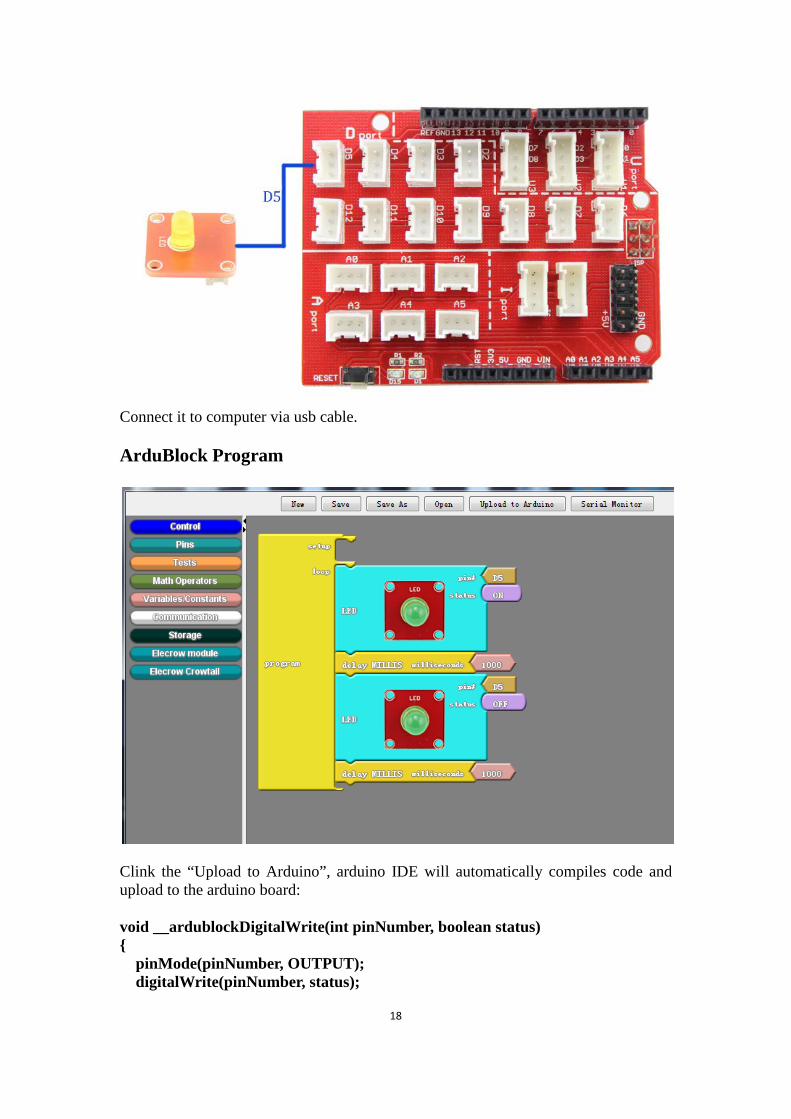
18
Connect it to computer via usb cable. ArduBlock Program
Clink the “Upload to Arduino”, arduino IDE will automatically compiles code and upload to the arduino board: void __ardublockDigitalWrite(int pinNumber, boolean status) { pinMode(pinNumber, OUTPUT); digitalWrite(pinNumber, status);

19
} void setup() { } void loop() { __ardublockDigitalWrite(5, HIGH); delay( 1000 ); __ardublockDigitalWrite(5, LOW); delay( 1000 ); } Note: Please select the arduino board and the port before upload the code.
The Crowtail-LED will be blinking every one second.
Lesson 2 Button Control LED
In the lesson1, we learn how to control a led turn on for one second, and turn off for one second. Do you want to control it by yourself use the button? In this lesson, we

20
will tell you how to realize it. When pressed the button, the led was lighten and turn off when released. Material:
Crowtail- LED x 1 Crowtail- Button x 1
HardwareConnection
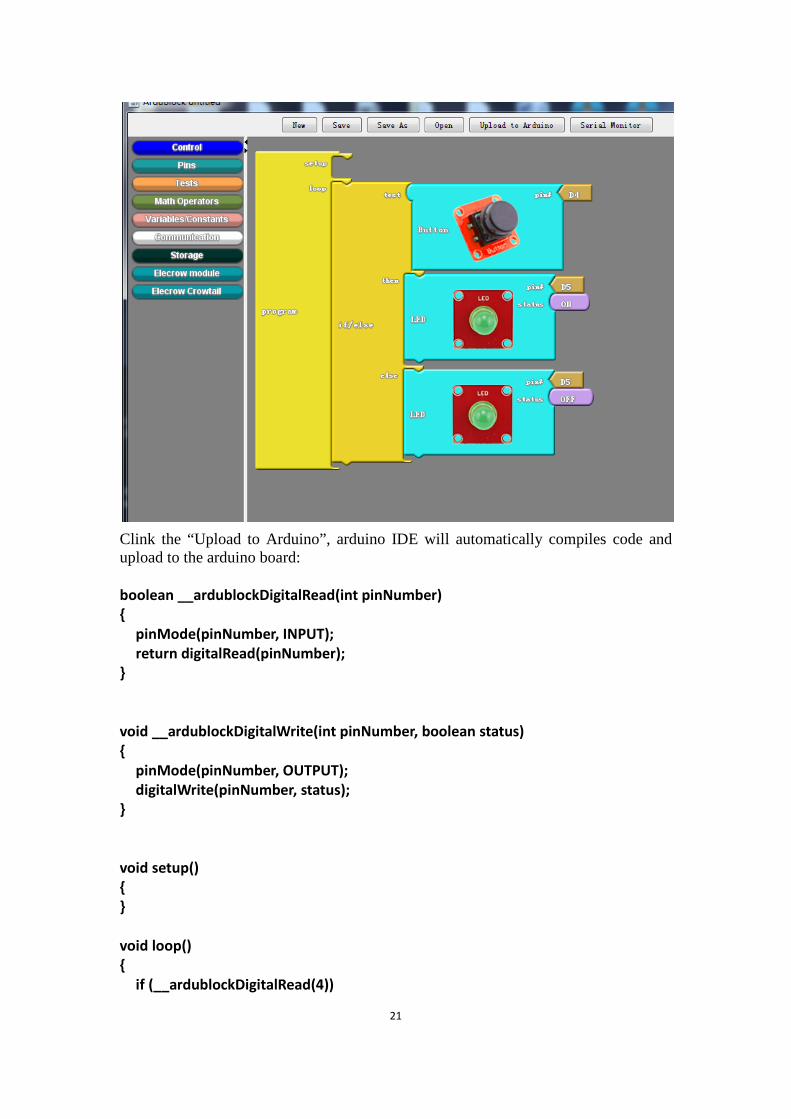
ArduBlock Program
21
Clink the “Upload to Arduino”, arduino IDE will automatically compiles code and upload to the arduino board: boolean __ardublockDigitalRead(int pinNumber) { pinMode(pinNumber, INPUT); return digitalRead(pinNumber); } void __ardublockDigitalWrite(int pinNumber, boolean status) { pinMode(pinNumber, OUTPUT); digitalWrite(pinNumber, status); } void setup() { } void loop() { if (__ardublockDigitalRead(4))
22
{ __ardublockDigitalWrite(5, HIGH); } else { __ardublockDigitalWrite(5, LOW); } } Upload successfully. When the button is pressed, the LED turns ON. Otherwise, the LED turns OFF. In this lesson, we learn how to read the digital input with Arduino. Learn the function of digitalRead()by playing with Crowtail- Button.
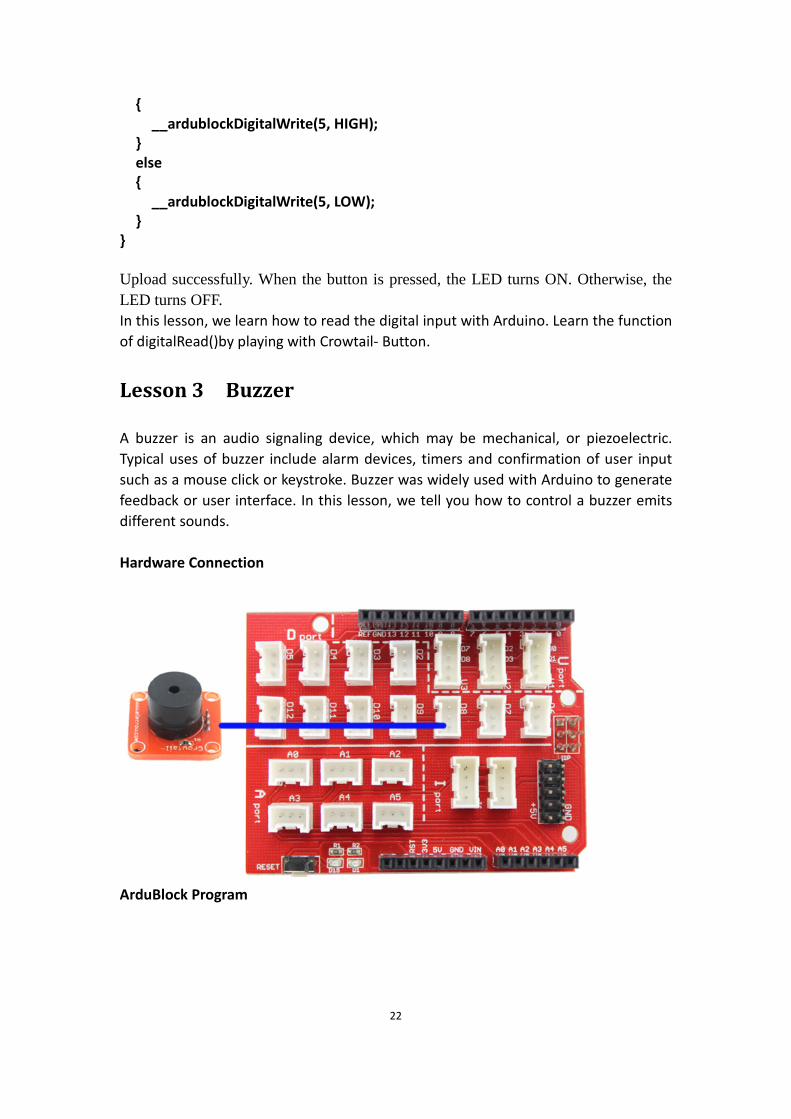
Lesson 3 Buzzer
A buzzer is an audio signaling device, which may be mechanical, or piezoelectric. Typical uses of buzzer include alarm devices, timers and confirmation of user input such as a mouse click or keystroke. Buzzer was widely used with Arduino to generate feedback or user interface. In this lesson, we tell you how to control a buzzer emits different sounds. Hardware Connection
ArduBlock Program

23
Clink the “Upload to Arduino”, arduino IDE will automatically compiles code and upload to the arduino board: void __ardublockDigitalWrite(int pinNumber, boolean status) { pinMode(pinNumber, OUTPUT); digitalWrite(pinNumber, status);

24
} void setup() { } void loop() { __ardublockDigitalWrite(8, HIGH); tone(8, 262, 200); delay( 350 ); tone(8, 294, 200); delay( 350 ); tone(8, 330, 200); delay( 350 ); tone(8, 349, 200); delay( 350 ); tone(8, 392, 200); delay( 350 ); tone(8, 440, 200); delay( 350 ); tone(8, 494, 200); delay( 350 ); tone(8, 523, 200); delay( 350 ); tone(8, 578, 200); delay( 350 ); } Upload successfully. The Crowtail_Buzzer emits sounds with different frequency when Aduino drive the buzzer with different frequency.Such as “DO RE ME FA SO LA XI DO”.
Lesson 4 Touch
Do you want to control a LED just by your finger touch a pad not was a button? The Crowtail- Touch Sensor can help you do it. Crowtail - Touch Sensor enables you to replace press with touch. It can detect the change in capacitance when a finger is

25
near by. That means no matter your finger directly touches the pad or just stays close to the pad, Crowtail - Touch Sensor would outputs HIGH also. Hardware Connection
ArduBLock Program
Clink the “Upload to Arduino”, arduino IDE will automatically compiles code and upload to the arduino board: void __ardublockDigitalWrite(int pinNumber, boolean status) { pinMode(pinNumber, OUTPUT); digitalWrite(pinNumber, status);
26
} boolean __ardublockDigitalRead(int pinNumber) { pinMode(pinNumber, INPUT); return digitalRead(pinNumber); } void setup() { } void loop() { __ardublockDigitalWrite(5, __ardublockDigitalRead(4)); } Why it can do that? The Touch Sensor can help us use our body current to control the electronic device. It can generate a high voltage when we touch the touch pad or near by it.
Lesson 5 Vibration Motor
Tilt Switch is the equivalent of a button, it can output different signal when it upright and tilt. In this lesson, we will learn how to control the vibration motor by the tilt switch. When the tilt switch is slant, the vibration motor will be vibrating. Material:
Crowtail- Vibration Motor x 1 Crowtail- Tilt Switchx 1
Hardware Connection

27
ArduBLock Program
Clink the “Upload to Arduino”, arduino IDE will automatically compiles code and upload to the arduino board: void __ardublockDigitalWrite(int pinNumber, boolean status) { pinMode(pinNumber, OUTPUT); digitalWrite(pinNumber, status); } boolean __ardublockDigitalRead(int pinNumber) { pinMode(pinNumber, INPUT);
28
return digitalRead(pinNumber); } void setup() { } void loop() { __ardublockDigitalWrite(5, __ardublockDigitalRead(4)); } Upload successfully. When tilt the Tilt Switch moudle, the vibration motor vibrating. Otherwise, the vibration motor was not vibrating.
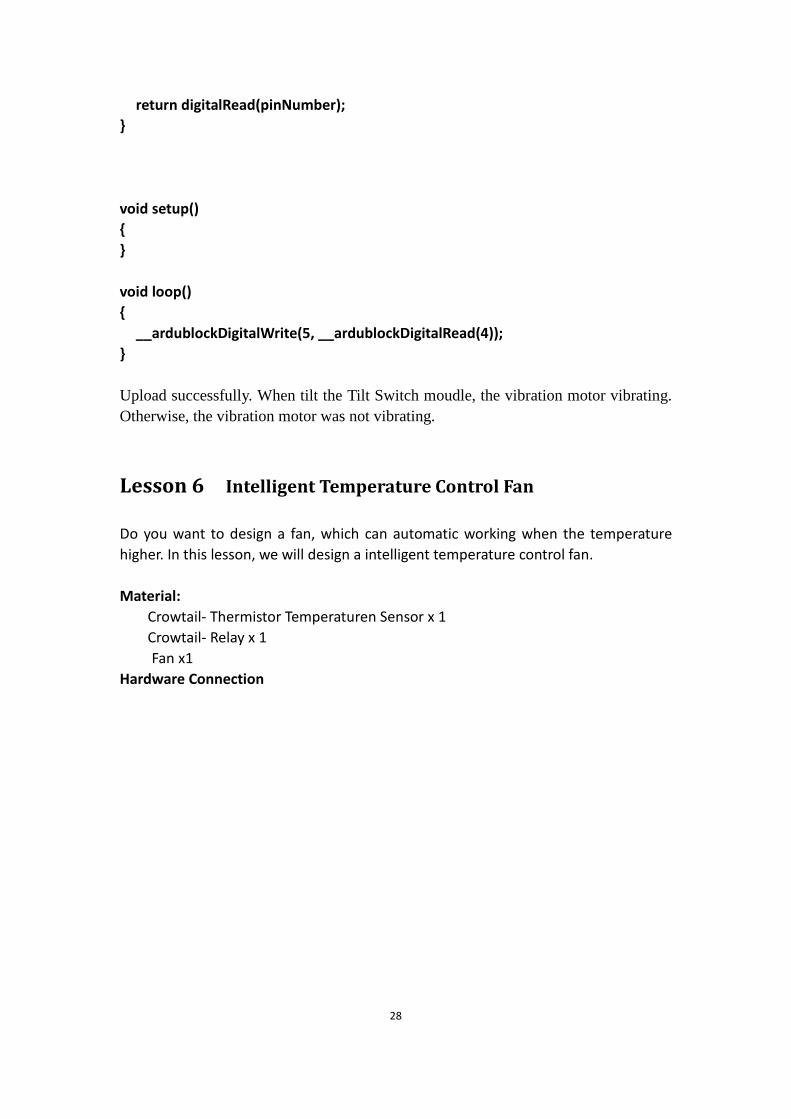
Lesson 6 Intelligent Temperature Control Fan
Do you want to design a fan, which can automatic working when the temperature higher. In this lesson, we will design a intelligent temperature control fan. Material:
Crowtail- Thermistor Temperaturen Sensor x 1 Crowtail- Relay x 1
Fan x1 Hardware Connection
29
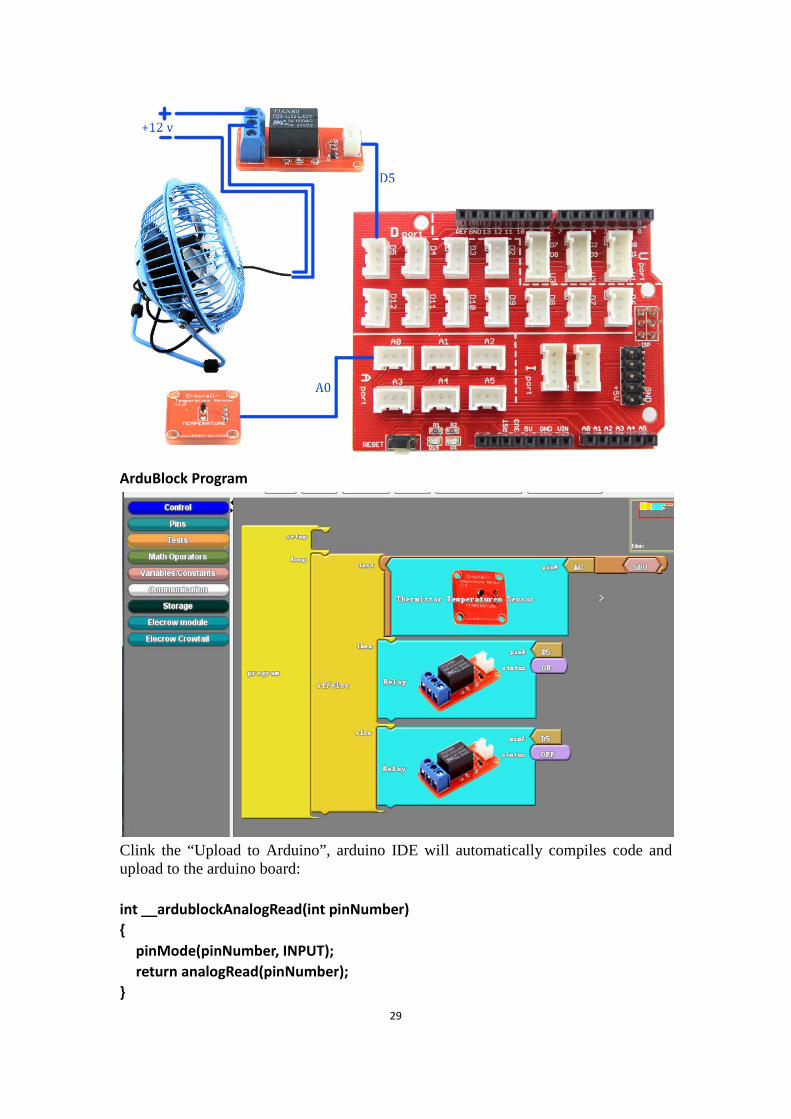
ArduBlock Program
Clink the “Upload to Arduino”, arduino IDE will automatically compiles code and upload to the arduino board: int __ardublockAnalogRead(int pinNumber) { pinMode(pinNumber, INPUT); return analogRead(pinNumber); }

30
void setup() { Serial.begin(9600); } void loop() { Serial.print("message"); Serial.print(" "); Serial.print(__ardublockAnalogRead(A0)); Serial.print(" "); Serial.println(); delay( 1000 ); } Upload successfully. You can set a threshold temperature value to control the realy ON or OFF, then control the fan work or not. You can change the sensitivity value
according to the requirements.
Lesson 7 Linear Potentiometer Control Breathing LED
Do you want to control a LED light as human breathing? It means that a LED adopts PWM control to achieve the effect as a breathing light. Material:
Crowtail- Linear Potentiometer x 1 Crowtail- LED x 1
Hardware Connection

31
ArduBlock Program
Clink the “Upload to Arduino”, arduino IDE will automatically compiles code and upload to the arduino board: int __ardublockAnalogRead(int pinNumber) { pinMode(pinNumber, INPUT); return analogRead(pinNumber); } void setup() { }

32
void loop() { analogWrite(5 , map ( __ardublockAnalogRead(A0) , 0 , 1023 , 0 , 255 ) ); } Upload successfully. You can see the brightness of the led change with the linear potentiometer by your control.
Lesson 8 Moisture Sensor
Do you want to know which pet plant need some water in your garden? The Moisture sensor can help you. This Moisture Sensor can be used to detect the moisture of soil or judge if there is water around the sensor, let the plants in your garden reach out for human help. They can be very easy to use, just insert it into the soil and then read it. With the help of this sensor, it will be realizable to make the plant remind you : hey, i am thirsty now, please give me some water. Hardware Connection
ArduBlock Program

33
Clink the “Upload to Arduino”, arduino IDE will automatically compiles code and upload to the arduino board: int __ardublockAnalogRead(int pinNumber) { pinMode(pinNumber, INPUT); return analogRead(pinNumber); } void setup() { Serial.begin(9600); } void loop() { Serial.print("message"); Serial.print(" "); Serial.print(__ardublockAnalogRead(A0)); Serial.print(" "); Serial.println(); delay( 1000 ); } Upload successfully. Open the serial monitor, you can see the sensor value in the serial monitor.
Lesson 9 Sound-Light Control LED
In our daily life, you must notice that the stair light during the day, when somebody up or down stair, it is not work, but in the night, it would light up. Why is this? In this lesson, we will simulate an intelligent switch, control the light turns OFF in the day

34
and turns ON in the night when have come in. We will read light information from the light sensor and read sound information from the sound sensor. Then set a threshold value to control the LED ON or OFF. Simulate intelligent switch. Material:
Crowtail- Sound Sensor x 1 Crowtail- Light Sensor x 1 Crowtail- LED x 1
Hardware Connection
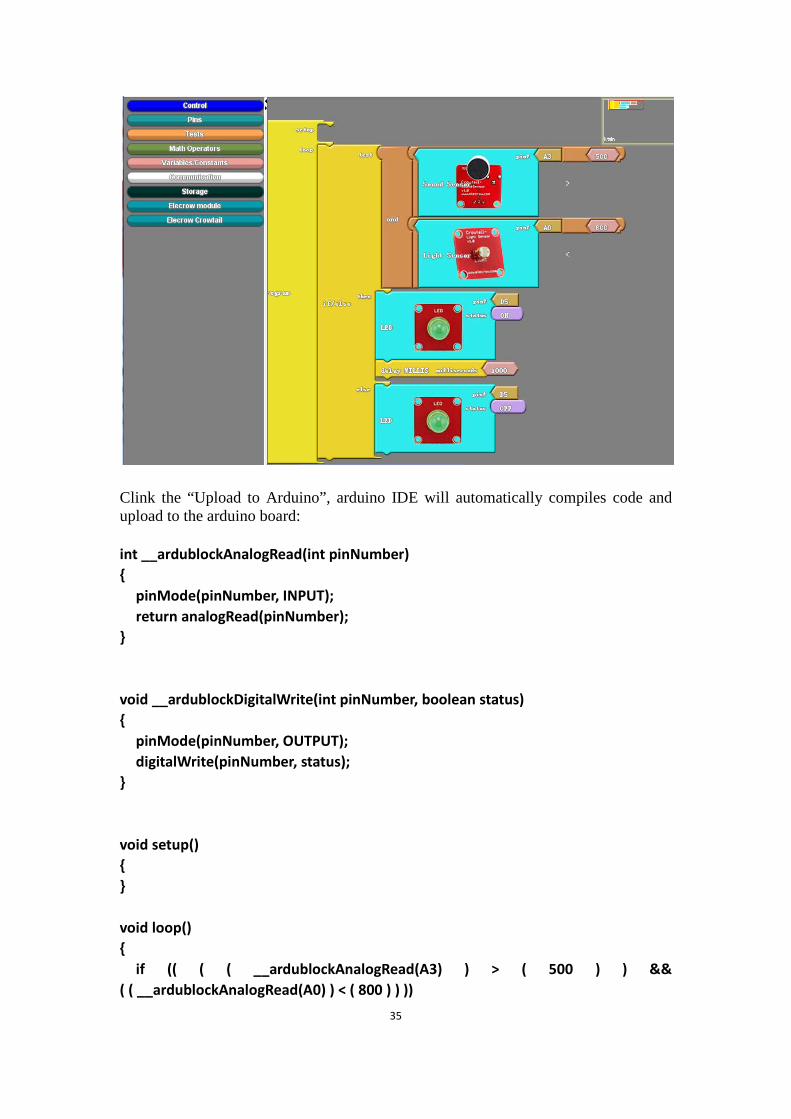
ArduBlock Program
35
Clink the “Upload to Arduino”, arduino IDE will automatically compiles code and upload to the arduino board: int __ardublockAnalogRead(int pinNumber) { pinMode(pinNumber, INPUT); return analogRead(pinNumber); } void __ardublockDigitalWrite(int pinNumber, boolean status) { pinMode(pinNumber, OUTPUT); digitalWrite(pinNumber, status); } void setup() { } void loop() { if (( ( ( __ardublockAnalogRead(A3) ) > ( 500 ) ) && ( ( __ardublockAnalogRead(A0) ) < ( 800 ) ) ))

36
{ __ardublockDigitalWrite(5, HIGH); delay( 1000 ); } else { __ardublockDigitalWrite(5, LOW); } } After successfully uploading the code, the LED turns OFF under the lamp and the environment was be quiet. When hiding the senor by hand and make a sound the LED turns ON 1s.
Lesson 10 OLED
Do you want to have a displayer to display some information? Like a “Hello world”. The Crowtail- OLED may help you. It is easy to use. The Crowtail- OLED is constructed from 128 x 64 dot matrix OLED module. The display offers high brightness, self-emission, high contrast ratio, slim/thin outline, wide viewing angle, wide temperature range and low power consumption. Hardware Connection
ArduBlock Progarm

37
Before upload the code, you need to put the U8glib.h library files in the the path : …\arduino\libraries. Clink the “Upload to Arduino”, arduino IDE will automatically compiles code and upload to the arduino board: #include <U8glib.h> //libraries at https://www.elecrow.com/wiki/images/0/0f/U8glib.zip U8GLIB_SSD1306_128X64 u8g(U8G_I2C_OPT_NONE); void setup() { u8g.setColorIndex(1); u8g.setFont(u8g_font_unifont); } void loop() { u8g.firstPage(); do { u8g.drawStr( 35,54, + "hello world"); } while( u8g.nextPage() ); } Upload successfully. You can see the “hello world” was display.