Embed Size (px)
Citation preview
e-mail: [email protected] For latest product manuals:
www.omegamanual.info
Shop online at omega.com ®
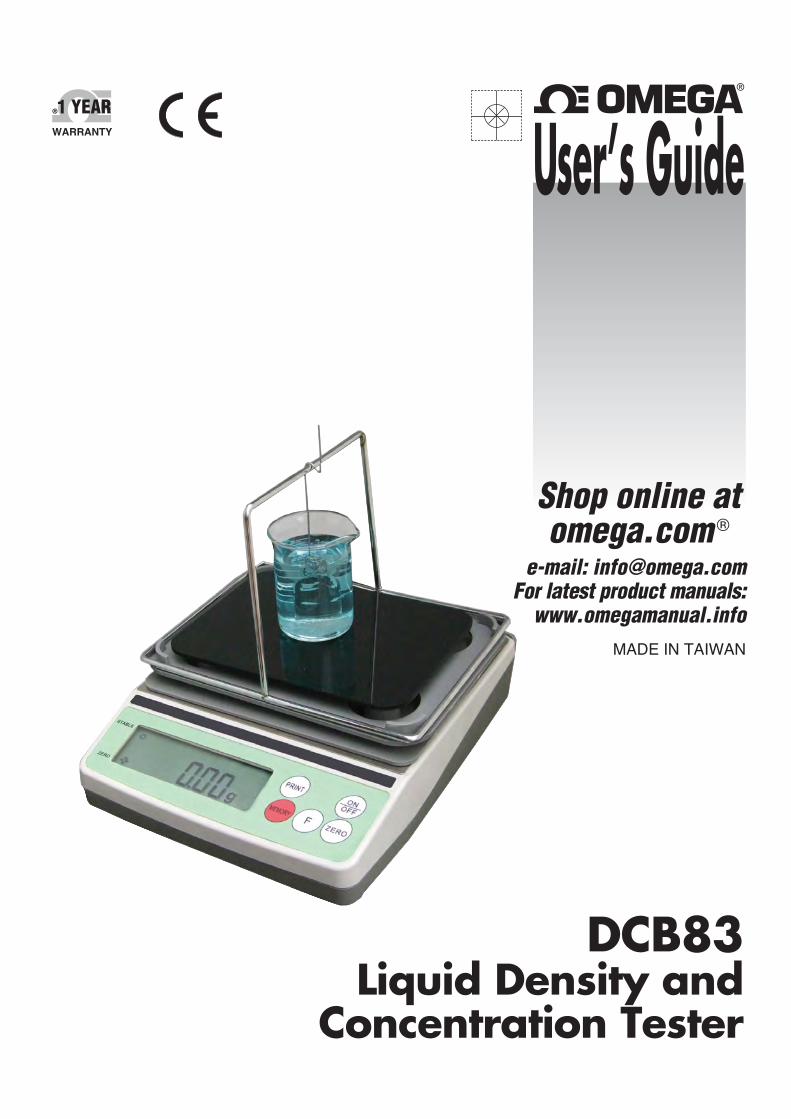
User’s Guide
DCB83Liquid Density and
Concentration Tester
MADE IN TAIWAN
Servicing North America:U.S.A.: Omega Engineering, Inc., One Omega Drive, P.O. Box 4047 Stamford, CT 06907-0047 USA
Toll-Free: 1-800-826-6342 (USA & Canada only) Customer Service: 1-800-622-2378 (USA & Canada only) Engineering Service: 1-800-872-9436 (USA & Canada only) Tel: (203) 359-1660 Fax: (203) 359-7700 e-mail: [email protected]
For Other Locations Visit omega.com/worldwide
www.omega.com [email protected]
The information contained in this document is believed to be correct, but OMEGA accepts no liability for any errors it contains, and reserves the right to alter specifications without notice.WARNING: These products are not designed for use in, and should not be used for, human applications.
Electronic Densimeter (Liquid Density & Concentration Tester)
DCB83
Instruction Manual
Before using this instrument, please read the instructions carefully. Please keep
manual in a ready reference.
1
A. Density calculation: According to the buoyancy method of Archimedean principle, the unknown liquid density can be calculated by using the standard glass weight. The weight species can be chosen according to the liquid property.
B. Concentration calculation: According to the transformation formula of density and concentration (y= a + bx), y is concentration, x is density, and it can be calculated by using back-stepping linear.
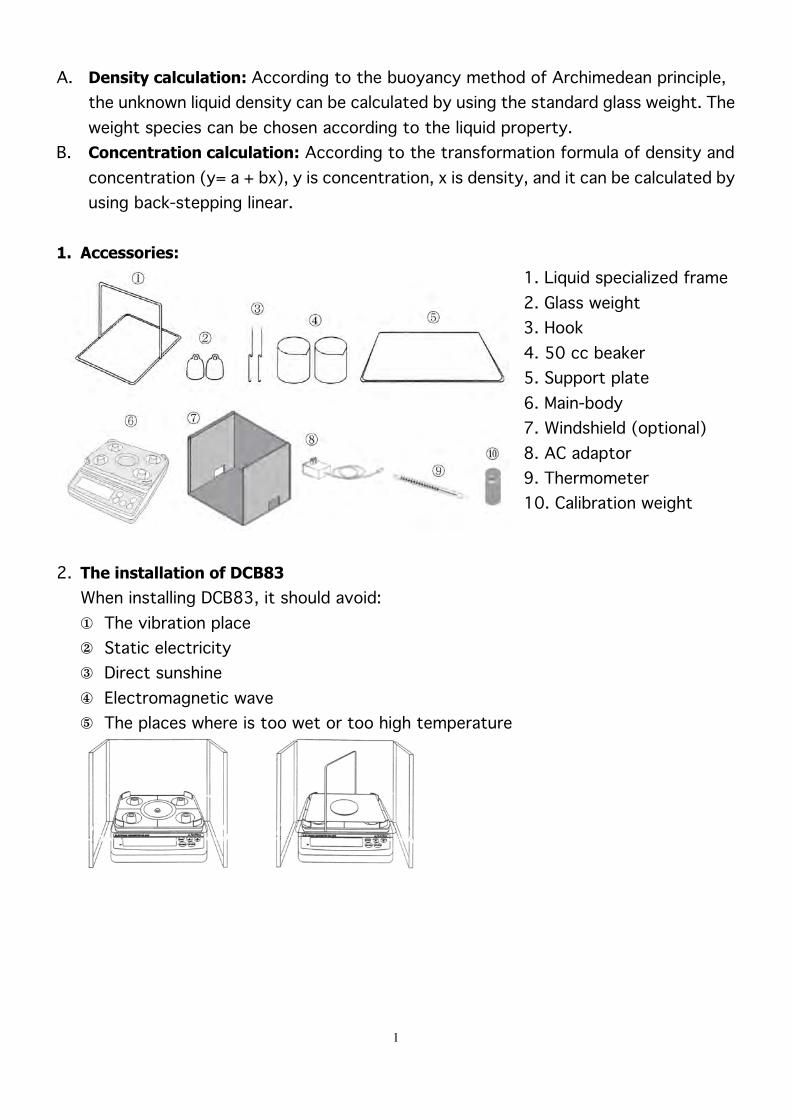
1. Accessories:
1. Liquid specialized frame 2. Glass weight 3. Hook 4. 50 cc beaker 5. Support plate 6. Main-body 7. Windshield (optional) 8. AC adaptor 9. Thermometer 10. Calibration weight
2. The installation of DCB83
When installing DCB83, it should avoid: ¨ The vibration place ≠ Static electricity Æ Direct sunshine Ø Electromagnetic wave ∞ The places where is too wet or too high temperature
2
Installation Steps:
¨ After placing the DCB83 body in the windshield, adjust the 4 feet of main-body, adjust the level bubble on the after side of the main-body to the center.
≠ Put the liquid specialized frame on the weighing scale, and using the four feet getting stuck the frame.
Æ Embedding the 4 round feet of the black support plate into the 4 round hole of the main-body.
Ø Place the two pieces removable doors of the windshield on the top and the front, then the installation finishes.
3. Warming up:
It takes about 10 minutes for an electric circuit to become stable after plugged in and turn on the power. 4. Calibration:
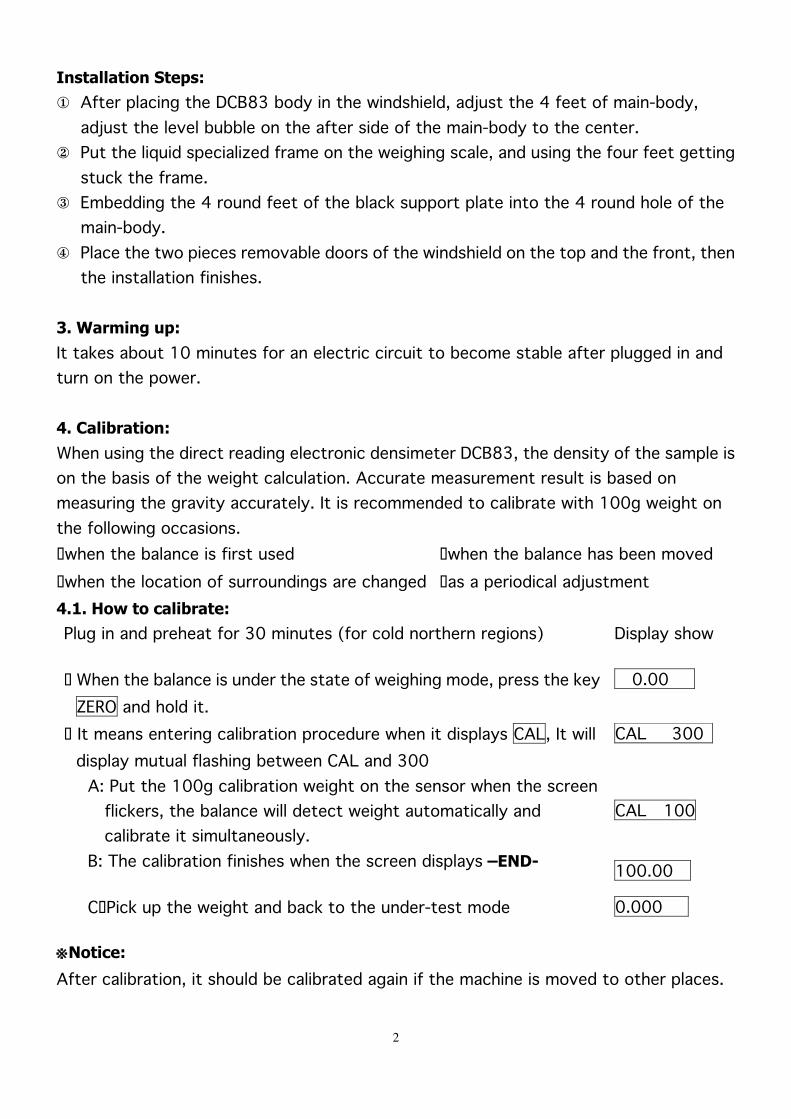
When using the direct reading electronic densimeter DCB83, the density of the sample is on the basis of the weight calculation. Accurate measurement result is based on measuring the gravity accurately. It is recommended to calibrate with 100g weight on the following occasions. �when the balance is first used �when the balance has been moved �when the location of surroundings are changed �as a periodical adjustment 4.1. How to calibrate: Plug in and preheat for 30 minutes (for cold northern regions) Display show
� When the balance is under the state of weighing mode, press the key ZERO and hold it.
0.00
� It means entering calibration procedure when it displays CAL, It will display mutual flashing between CAL and 300
CAL 300
A: Put the 100g calibration weight on the sensor when the screen flickers, the balance will detect weight automatically and calibrate it simultaneously.
CAL 100
B: The calibration finishes when the screen displays –END- 100.00
C�Pick up the weight and back to the under-test mode 0.000
※Notice:
After calibration, it should be calibrated again if the machine is moved to other places.
3
5. Setting the weight of glass weight, the high limit and low limit of density
When the screen displays 0.00, press the key F and hold it to enter parameter setting, click the key F to enter the next parameter setting, the parameter setting procedure is A2�d�SG Hi �SG Lo�E1�E2, press PRINT to enter the mode to modify the parameter, the methods of data-modifying are as follows:
1. Increase the value 2. Press PRINT and hold it to give up modifying
1. Digital shift 2. Press Fand hold it to go off the options
1. Confirm changes
5.1 Setting the weight of glass weight A2: weighing the glass weight first, and then
input the weight of glass weight to A2
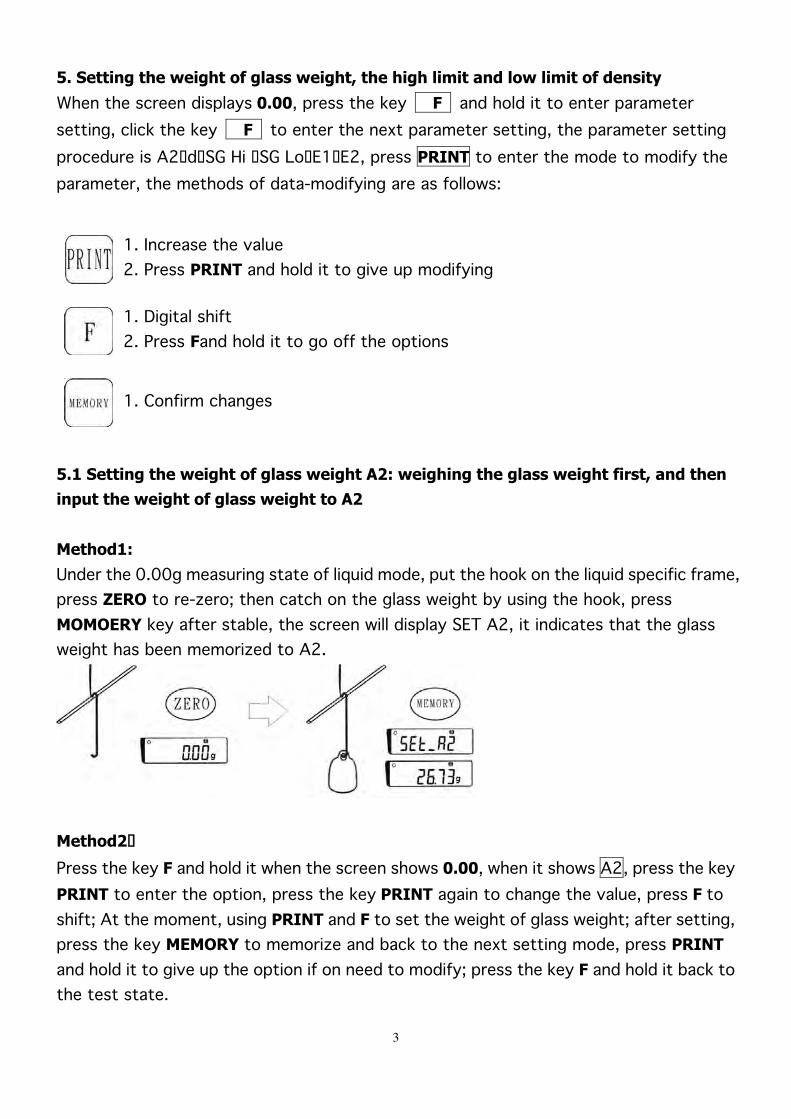
Method1:
Under the 0.00g measuring state of liquid mode, put the hook on the liquid specific frame, press ZERO to re-zero; then catch on the glass weight by using the hook, press MOMOERY key after stable, the screen will display SET A2, it indicates that the glass weight has been memorized to A2.
Method2�
Press the key F and hold it when the screen shows 0.00, when it shows A2, press the key PRINT to enter the option, press the key PRINT again to change the value, press F to shift; At the moment, using PRINT and F to set the weight of glass weight; after setting, press the key MEMORY to memorize and back to the next setting mode, press PRINT and hold it to give up the option if on need to modify; press the key F and hold it back to the test state.
4
5.2 Setting the density of glass weight:
After setting the weight of glass weight, when it shows d , press the key PRINT to enter the option, press the key PRINT again to change the value, press F to shift; At the moment, using PRINT and F to set the density of glass weight; If the density of glass weight is 2.226, input d 2.226 , press the key MEMORY to memorize and back to the next setting mode, press PRINT and hold it to give up the option if on need to modify; press the key F and hold it back to the test state. 5.3 The function of high limit and low limit setting: (Setting of SG Hi, SG Lo)
DCB83 has the function of high limit and low limit, the range of high limit and low limit can be set freely. If the density of the sample is higher than the high limit, the screen will display Hi; if lower than the low limit, it will show Lo; If the density is between the high limit and low limit, the screen will show OK. Notice: When the setting of high limit and low limit is 00.000, the function is closed.
5.3.1 The density setting of high limit: SG Hi
The steps are as follows: Enter setting mode, press F for several times until the screen displays the density setting of high limit SG Hi, press PRINT to enter the option; then press PRINT again to modify the value, and press F to shift; At the moment press PRINT and F to set the value needed, press the key MEMORY to back to the next setting mode after finishing setting, press PRINT and hold it to give up the option if on need to modify; press the key F and hold it back to the test state. 5.3.2 The density setting of low limit: SG Lo
The steps are as follows: Enter setting mode, press F for several times until the screen displays the density setting of low limit SG Lo, press PRINT to enter the option, then press PRINT again to modify the value, and press F to shift; At the moment using PRINT and F setting the value needed, press the key MEMORY to memorize and back to the next setting mode after finishing the setting, press PRINT and hold it to give up the option if on need to modify; press the key F and hold it back to the test state.
5
5.4 Setting E1, E2 for testing concentration
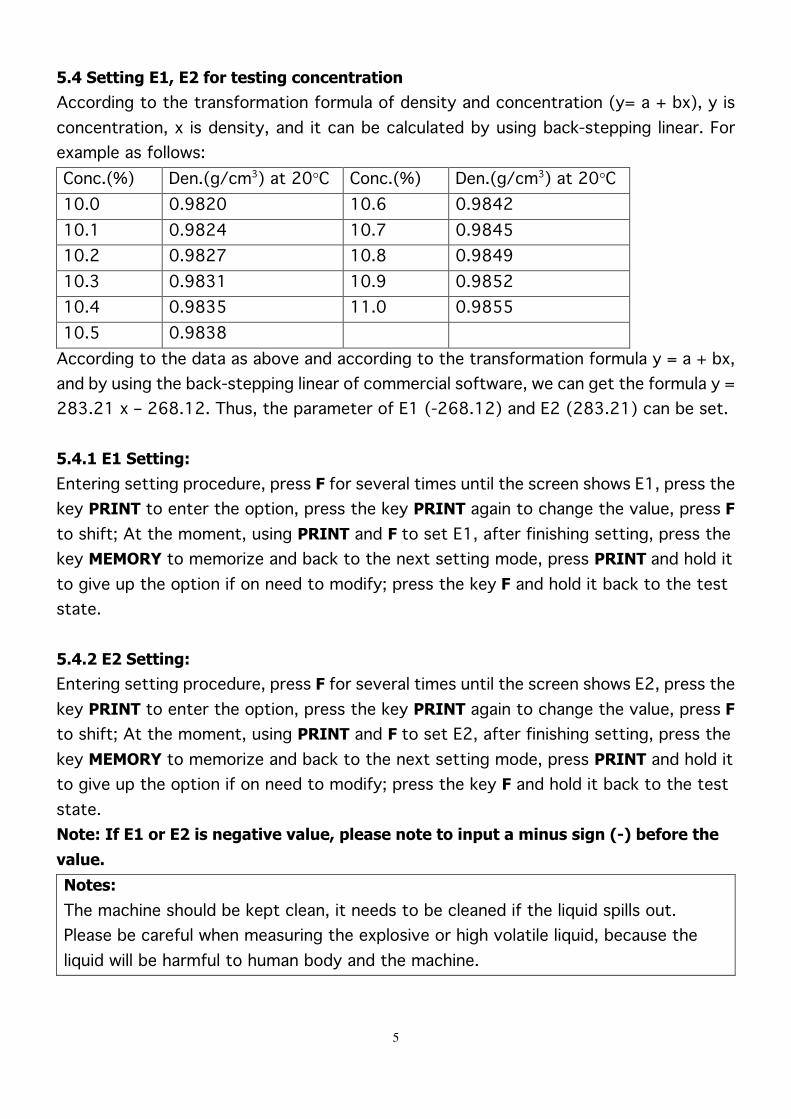
According to the transformation formula of density and concentration (y= a + bx), y is concentration, x is density, and it can be calculated by using back-stepping linear. For example as follows: Conc.(%) Den.(g/cm3) at 20°C Conc.(%) Den.(g/cm3) at 20°C 10.0 0.9820 10.6 0.9842 10.1 0.9824 10.7 0.9845 10.2 0.9827 10.8 0.9849 10.3 0.9831 10.9 0.9852 10.4 0.9835 11.0 0.9855 10.5 0.9838
According to the data as above and according to the transformation formula y = a + bx, and by using the back-stepping linear of commercial software, we can get the formula y = 283.21 x – 268.12. Thus, the parameter of E1 (-268.12) and E2 (283.21) can be set.
5.4.1 E1 Setting:
Entering setting procedure, press F for several times until the screen shows E1, press the key PRINT to enter the option, press the key PRINT again to change the value, press F to shift; At the moment, using PRINT and F to set E1, after finishing setting, press the key MEMORY to memorize and back to the next setting mode, press PRINT and hold it to give up the option if on need to modify; press the key F and hold it back to the test state.
5.4.2 E2 Setting:
Entering setting procedure, press F for several times until the screen shows E2, press the key PRINT to enter the option, press the key PRINT again to change the value, press F
to shift; At the moment, using PRINT and F to set E2, after finishing setting, press the key MEMORY to memorize and back to the next setting mode, press PRINT and hold it to give up the option if on need to modify; press the key F and hold it back to the test state. Note: If E1 or E2 is negative value, please note to input a minus sign (-) before the
value. Notes:
The machine should be kept clean, it needs to be cleaned if the liquid spills out. Please be careful when measuring the explosive or high volatile liquid, because the liquid will be harmful to human body and the machine.
6
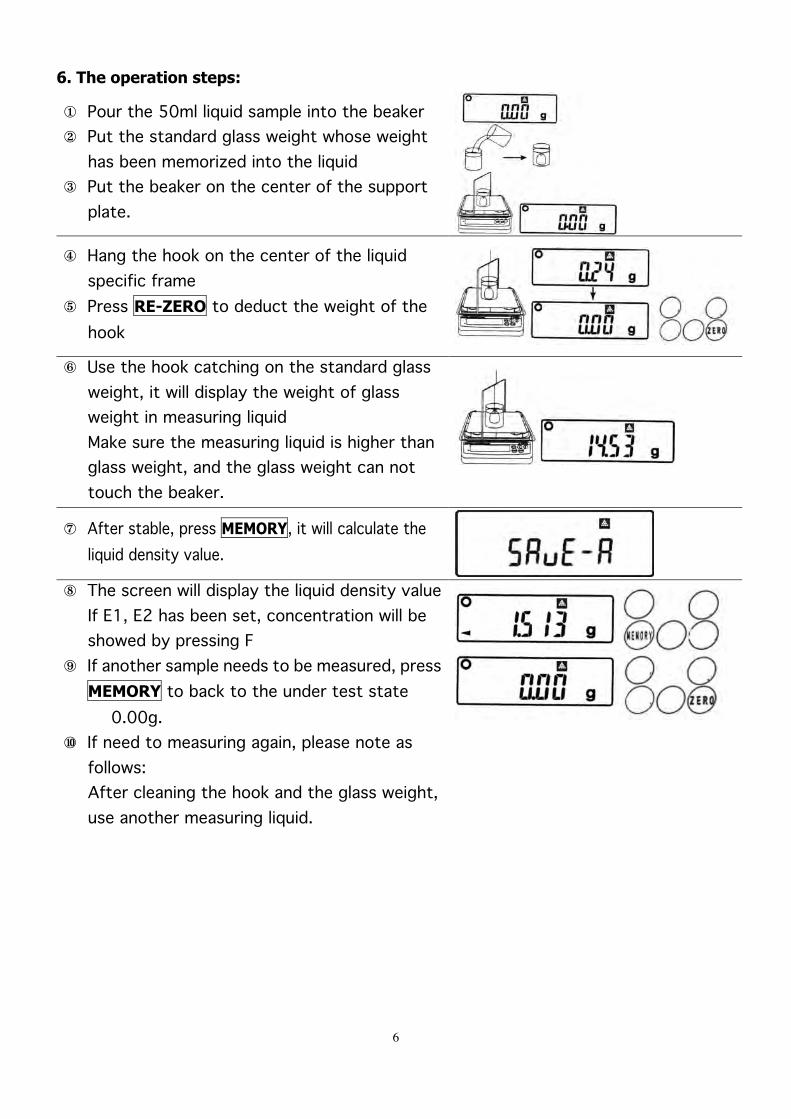
6. The operation steps:
¨ Pour the 50ml liquid sample into the beaker ≠ Put the standard glass weight whose weight
has been memorized into the liquid Æ Put the beaker on the center of the support
plate.
Ø Hang the hook on the center of the liquid specific frame
∞ Press RE-ZERO to deduct the weight of the hook
± Use the hook catching on the standard glass weight, it will display the weight of glass weight in measuring liquid Make sure the measuring liquid is higher than glass weight, and the glass weight can not touch the beaker.
≤ After stable, press MEMORY, it will calculate the liquid density value.
≥ The screen will display the liquid density value
If E1, E2 has been set, concentration will be showed by pressing F
¥ If another sample needs to be measured, press MEMORY to back to the under test state
0.00g. µ If need to measuring again, please note as
follows: After cleaning the hook and the glass weight, use another measuring liquid.
7
7. Operating Notes
¨ Electronic densimeter belongs to precise electronic balance, please assign specific person to be responsible for management and operating.
≠ If water and other liquid spill out from the container carelessly during measuring, notify the director timely, or it will delay the repair time.
Æ Make sure if the machine is at the condition of being immersed or having any fault, before going off duty everyday, it should be checked by director to make sure the screen can show 0.00g , if displays 88888 , it means the machine has broken down.
Ø How to do if the body is flooded? Cut off the power first and turn over the body, dry it. Notify the professional maintenance staff of sellers to check and maintain it. Do not dismantle it by yourself, or it will damage load cells.
8. Maintenance
¨ DCB83 can not measure objects over 300g, and it should avoid loading the sample over 300g during the process of installation or operating.
≠ The surface of the machine must be cleaned by dry cloth, please avoid the accumulation of dust.
Æ Remove the sink if the machine is non-use for a long time. Ø The machine should avoid crash�squeeze and damp, if non-use for a long time,
remove the power supply and cover it with dust cover.
WARRANTY/DISCLAIMEROMEGA ENGINEERING, INC. warrants this unit to be free of defects in materials and workmanship for a period of 13 months from date of purchase. OMEGA’s WARRANTY adds an additional one (1) month grace period to the normal one (1) year product warranty to cover handling and shipping time. This ensures that OMEGA’s customers receive maximum coverage on each product. If the unit malfunctions, it must be returned to the factory for evaluation. OMEGA’s Customer Service Department will issue an Authorized Return (AR) number immediately upon phone or written request. Upon examination by OMEGA, if the unit is found to be defective, it will be repaired or replaced at no charge. OMEGA’s WARRANTY does not apply to defects resulting from any action of the purchaser, including but not limited to mishandling, improper interfacing, operation outside of design limits, improper repair, or unauthorized modification. This WARRANTY is VOID if the unit shows evidence of having been tampered with or shows evidence of having been damaged as a result of excessive corrosion; or current, heat, moisture or vibration; improper specification; misapplication; misuse or other operating conditions outside of OMEGA’s control. Components in which wear is not warranted, include but are not limited to contact points, fuses, and triacs.OMEGA is pleased to offer suggestions on the use of its various products. However, OMEGA neither assumes responsibility for any omissions or errors nor assumes liability for any damages that result from the use of its products in accordance with information provided by OMEGA, either verbal or written. OMEGA warrants only that the parts manufactured by it will be as specified and free of defects. OMEGA MAKES NO OTHER WARRANTIES OR REPRESENTATIONS OF ANY KIND WHATSOEVER, EXPRESS OR IMPLIED, EXCEPT THAT OF TITLE, AND ALL IMPLIED WARRANTIES INCLUDING ANY WARRANTY OF MERCHANTABILITY AND FITNESS FOR A PARTICULAR PURPOSE ARE HEREBY DISCLAIMED. LIMITATION OF LIABILITY: The remedies of purchaser set forth herein are exclusive, and the total liability of OMEGA with respect to this order, whether based on contract, warranty, negligence, indemnification, strict liability or otherwise, shall not exceed the purchase price of the component upon which liability is based. In no event shall OMEGA be liable for consequential, incidental or special damages.CONDITIONS: Equipment sold by OMEGA is not intended to be used, nor shall it be used: (1) as a “Basic Component” under 10 CFR 21 (NRC), used in or with any nuclear installation or activity; or (2) in medical applications or used on humans. Should any Product(s) be used in or with any nuclear installation or activity, medical application, used on humans, or misused in any way, OMEGA assumes no responsibility as set forth in our basic WARRANTY / DISCLAIMER language, and, additionally, purchaser will indemnify OMEGA and hold OMEGA harmless from any liability or damage whatsoever arising out of the use of the Product(s) in such a manner.
OMEGA’s policy is to make running changes, not model changes, whenever an improvement is possible. This affords our customers the latest in technology and engineering.OMEGA is a registered trademark of OMEGA ENGINEERING, INC.© Copyright 2013 OMEGA ENGINEERING, INC. All rights reserved. This document may not be copied, photocopied, reproduced, translated, or reduced to any electronic medium or machine-readable form, in whole or in part, without the prior written consent of OMEGA ENGINEERING, INC.
FOR WARRANTY RETURNS, please have the following information available BEFORE contacting OMEGA:1. Purchase Order number under which the product
was PURCHASED,2. Model and serial number of the product under
warranty, and3. Repair instructions and/or specific problems relative to the product.
FOR NON-WARRANTY REPAIRS, consult OMEGA for current repair charges. Have the following information available BEFORE contacting OMEGA:1. Purchase Order number to cover the COST
of the repair,2. Model and serial number of the product, and3. Repair instructions and/or specific problems relative to the product.
RETURN REQUESTS/INQUIRIESDirect all warranty and repair requests/inquiries to the OMEGA Customer Service Department. BEFORE RETURNING ANY PRODUCT(S) TO OMEGA, PURCHASER MUST OBTAIN AN AUTHORIZED RETURN (AR) NUMBER FROM OMEGA’S CUSTOMER SERVICE DEPARTMENT (IN ORDER TO AVOID PROCESSING DELAYS). The assigned AR number should then be marked on the outside of the return package and on any correspondence.The purchaser is responsible for shipping charges, freight, insurance and proper packaging to prevent breakage in transit.
M5366/1213
Where Do I Find Everything I Need for Process Measurement and Control?
OMEGA…Of Course!Shop online at omega.com sm
TEMPERATUREMU Thermocouple, RTD & Thermistor Probes, Connectors, Panels & Assemblies MU Wire: Thermocouple, RTD & ThermistorMU Calibrators & Ice Point ReferencesMU Recorders, Controllers & Process MonitorsMU Infrared Pyrometers
PRESSURE, STRAIN AND FORCEMU Transducers & Strain GagesMU Load Cells & Pressure GagesMU Displacement TransducersMU Instrumentation & Accessories
FLOW/LEVELMU Rotameters, Gas Mass Flowmeters & Flow ComputersMU Air Velocity IndicatorsMU Turbine/Paddlewheel SystemsMU Totalizers & Batch Controllers
pH/CONDUCTIVITYMU pH Electrodes, Testers & AccessoriesMU Benchtop/Laboratory MetersMU Controllers, Calibrators, Simulators & PumpsMU Industrial pH & Conductivity Equipment
DATA ACQUISITIONMU Data Acquisition & Engineering SoftwareMU Communications-Based Acquisition SystemsMU Plug-in Cards for Apple, IBM & CompatiblesMU Data Logging SystemsMU Recorders, Printers & Plotters
HEATERSMU Heating CableMU Cartridge & Strip HeatersMU Immersion & Band HeatersMU Flexible HeatersMU Laboratory Heaters
ENVIRONMENTAL MONITORING AND CONTROLMU Metering & Control InstrumentationMU RefractometersMU Pumps & TubingMU Air, Soil & Water MonitorsMU Industrial Water & Wastewater TreatmentMU pH, Conductivity & Dissolved Oxygen Instruments