Embed Size (px)
Citation preview
www.armdesigner.com
IDEA6410 Linux User Manual 1
IDEA6410 Linux User Manual
1. Introduction 1.1. About this Manual This manual is intended to provide the user with an overview of the board and benefits, complete features specifications, and set up procedures. It contains important safety information as well. 1.2. Feedback and Update to this Manual To help our customers make the most of our products, we are continually making additional and updated resources available on the Boardcon website (www.armdesigner.com). These include manuals, application notes, programming examples, and updated software and hardware. Check in periodically to see what’s new! When we are prioritizing work on these updated resources, feedback from customers is the number one influence, If you have questions, comments, or concerns about your product or project, please no hesitate to contact us at [email protected]. 1.3. Limited Warranty Boardcon warrants this product to be free of defects in material and workmanship for a period of one year from date of buy. During this warranty period Boardcon will repair or replace the defective unit in accordance with the following process: A copy of the original invoice must be included when returning the defective unit to Boardcon. This limited warranty does not cover damages resulting from lighting or other power surges, misuse, abuse, abnormal conditions of operation, or attempts to alter or modify the function of the product. This warranty is limited to the repair or replacement of the defective unit .In no event shall Boardcon be liable or responsible for any loss or damages, including but not limited to any lost profits, incidental or consequential damages, loss of business, or anticipatory profits arising from the use or inability to use this products. Repairs make after the expiration of the warranty period are subject to a repair charge and the cost of return shipping. Please contact Boardcon to arrange for any repair service and to obtain repair charge information.
www.armdesigner.com
IDEA6410 Linux User Manual 2
IDEA6410 Linux User Manual ......................................................................................................1 1. Wok Environment.......................................................................................................................3
1.1. Install Cross-compile .........................................................................................................3 1.2. Check the complies installation status ...............................................................................3
2. Compile u-boot ...........................................................................................................................4 2.1. Compile u-boot-movi.bin...................................................................................................4 2.2. Compile u-boot-nand.bin ...................................................................................................4
3. Compile Kernel ...........................................................................................................................4 4. Burn Image .................................................................................................................................5
4.1. Burn u-boot-movi.bin to SD Card......................................................................................5 4.2. Download u-boot-nand.bin into Nand Flash ......................................................................7 4.2. Set “bootargs’” and “bootcmd”..........................................................................................9 4.3. Burn zImage into Nand Flash 0x100000..........................................................................10 4.4. Burn “rootfs_qt.cramfs” into Nand Flash ........................................................................11
5. Interface Drivers test ...............................................................................................................12 5.1. SD Card test .....................................................................................................................12 5.2. Audio Test ........................................................................................................................14 5.3. Video test..........................................................................................................................15 5.4. Ethernet Interface test ......................................................................................................16 5.5. 7inch TFT LCD test .........................................................................................................18 5.6. VGA test...........................................................................................................................18 5.7. Camera test.......................................................................................................................19 5.8. Serial interface test...........................................................................................................20
www.armdesigner.com
1. Wok Environment . Version: Idea6410_Linux2.6.24_V0.19 . Linux Working Environment: Ubuntu-9.04
1.1. Install Cross-compile
. Open Linux-2.6.24_v0.19\cross_compile\ to copy files: arm-none-linux-gnueabi-arm-2008q3-72-for-linux.tar.bz2, cross-4.2.2-eabi.tar.bz2, cross-3.3.2.tar.bz2, cross-3.4.1.tar.bz2 to the place of running Linux PC. Note that “/home/fusq/test” is working directory ( fusq is user name of linux PC). . Under the directory /usr/local/arm, install arm-none-linux-gnueabi-arm-2008q3-72-for-linux.tar.bz2. The commend is: fusq@fusq-urbetter: ~ /test$ tar jxvf arm-none-linux-gnueabi-arm-2008q3-72-for-linux.tar.bz2 Note: The default path is /usr/local/arm/, do not need to assign again. . Under the directory /usr/local/arm, install cross-4.2.2-eabi.tar.bz2, The command is: fusq@fusq-urbetter: ~ /test$ tar jxvf cross-4.2.2-eabi.tar.bz2 –C /usr/local/arm/ . Under the directory /usr/local/arm, install cross-3.3.2.tar.bz2 The command is: fusq@fusq-urbetter: ~ /test$ tar jxvf cross-3.3.2.tar.bz2 –C /usr/local/arm . Under the directory /usr/local/arm, install cross-3.4.1.tar.bz2 The command is: fusq@fusq-urbetter: ~ /test$ tar jxvf cross-3.4.1.tar.bz2 –C /usr/local/arm
1.2. Check the complies installation status
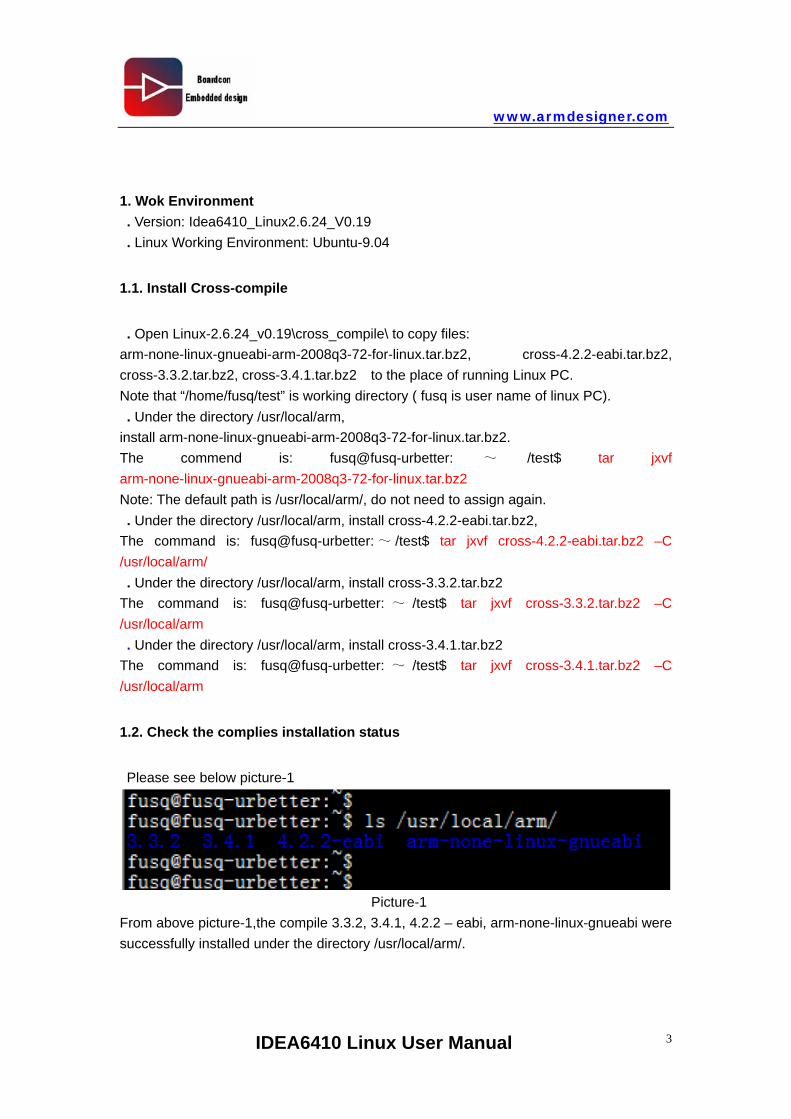
Please see below picture-1
Picture-1 From above picture-1,the compile 3.3.2, 3.4.1, 4.2.2 – eabi, arm-none-linux-gnueabi were successfully installed under the directory /usr/local/arm/.
IDEA6410 Linux User Manual 3
www.armdesigner.com
IDEA6410 Linux User Manual 4
2. Compile u-boot
There are two kinds of u-boot, one is u-boot-movi.bin that is ported in SD card, another is u-boot-nand.bin that is ported in Nandflash for Nand Flash booting use.
2.1. Compile u-boot-movi.bin
The file u-boot-movi.bin is at the directory /image/, only providing bin file, no source code.
2.2. Compile u-boot-nand.bin
Please copy the file “linux-2.6.24_v0.18\u-boot\u-boot-1.1.6-ut-s3c6410-nand.tar.gz” to /home/fusq/test, and decompress “u-boot-1.1.6-ut-s3c6410-nand.tar.gz” to the current directory, then execute below commands: fusq@fusq-urbetter:~/test$ tar zxvfu-boot-1.1.6-ut-s3c6410-nand.tar.gz fusq@fusq-urbetter:~/test$ cd u-boot-1.1.6-ut-s3c6410-nand/ fusq@fusq-urbetter:~/test$ make clean fusq@fusq-urbetter:~/test$ make smdk6410_config fusq@fusq-urbetter:~/test$ make fusq@fusq-urbetter:~/test$ ./maknand The u-boot-nand.bin will be made under the current directory u-boot-nand.bin
3. Compile Kernel
Please copy the file “linux-2.6.24_v0.19\urbetter_linux-2.6.24.tar.gz” to /home/fusq/test, and decompress “urbetter_linux-2.6.24.tar.gz” to the current directory, then execute below commands: fusq@fusq-urbetter:~/test$ tar zxvf urbetter_linux-2.6.24.tar.gz fusq@fusq-urbetter:~/test$ cd linux-2.6.24/ fusq@fusq-urbetter:~/test$ make clean fusq@fusq-urbetter:~/test$ make menuconfig fusq@fusq-urbetter:~/test$ make The zImage will be made under the current directory \arch\arm\boot\
www.armdesigner.com
4. Burn Image
4.1. Burn u-boot-movi.bin to SD Card
Please insert SD Card to the SD Card Reader, then connect PC. . Under Windows XP working environment,
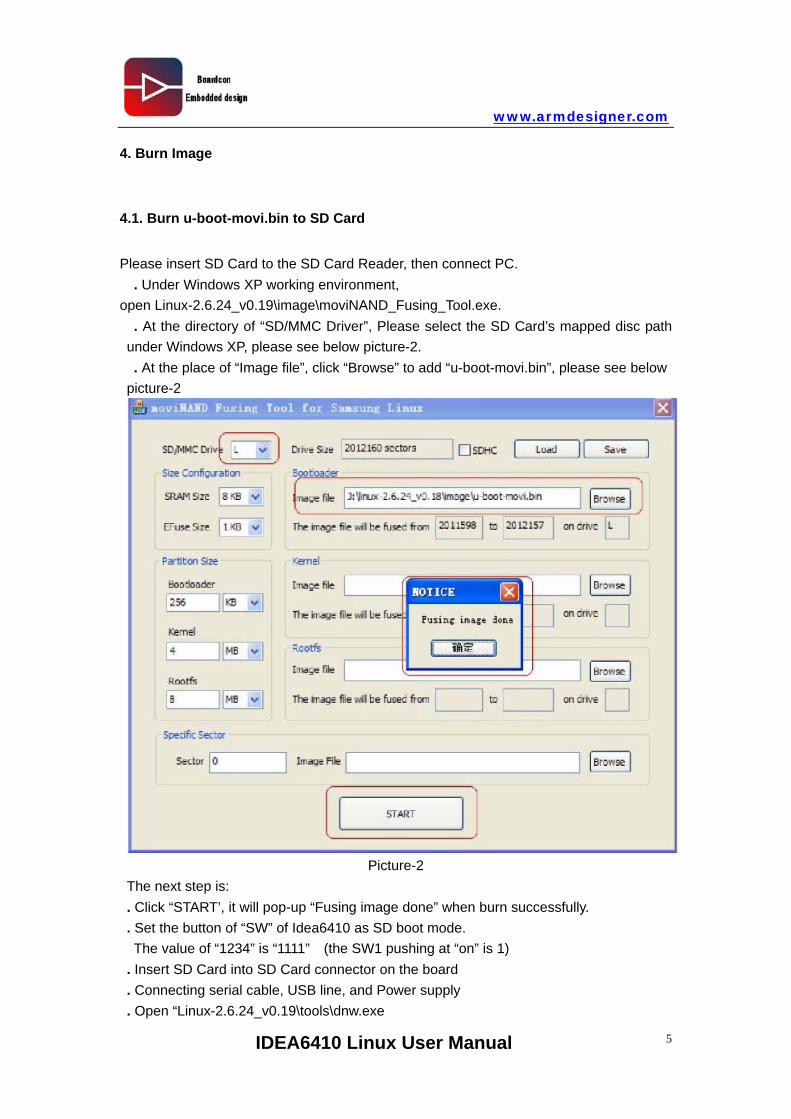
open Linux-2.6.24_v0.19\image\moviNAND_Fusing_Tool.exe. . At the directory of “SD/MMC Driver”, Please select the SD Card’s mapped disc path under Windows XP, please see below picture-2. . At the place of “Image file”, click “Browse” to add “u-boot-movi.bin”, please see below picture-2
Picture-2
The next step is: . Click “START’, it will pop-up “Fusing image done” when burn successfully. . Set the button of “SW” of Idea6410 as SD boot mode. The value of “1234” is “1111” (the SW1 pushing at “on” is 1) . Insert SD Card into SD Card connector on the board . Connecting serial cable, USB line, and Power supply . Open “Linux-2.6.24_v0.19\tools\dnw.exe
IDEA6410 Linux User Manual 5

www.armdesigner.com
. Click “Serial Port” “Connect”, please see below picture-3
Picutre-3
. Switch power on Idea6410, much printing information is coming soon, then click the key “SPACE” to enter u-boot. Please see below picture-4.
Picture-4
IDEA6410 Linux User Manual 6
www.armdesigner.com
4.2. Download u-boot-nand.bin into Nand Flash
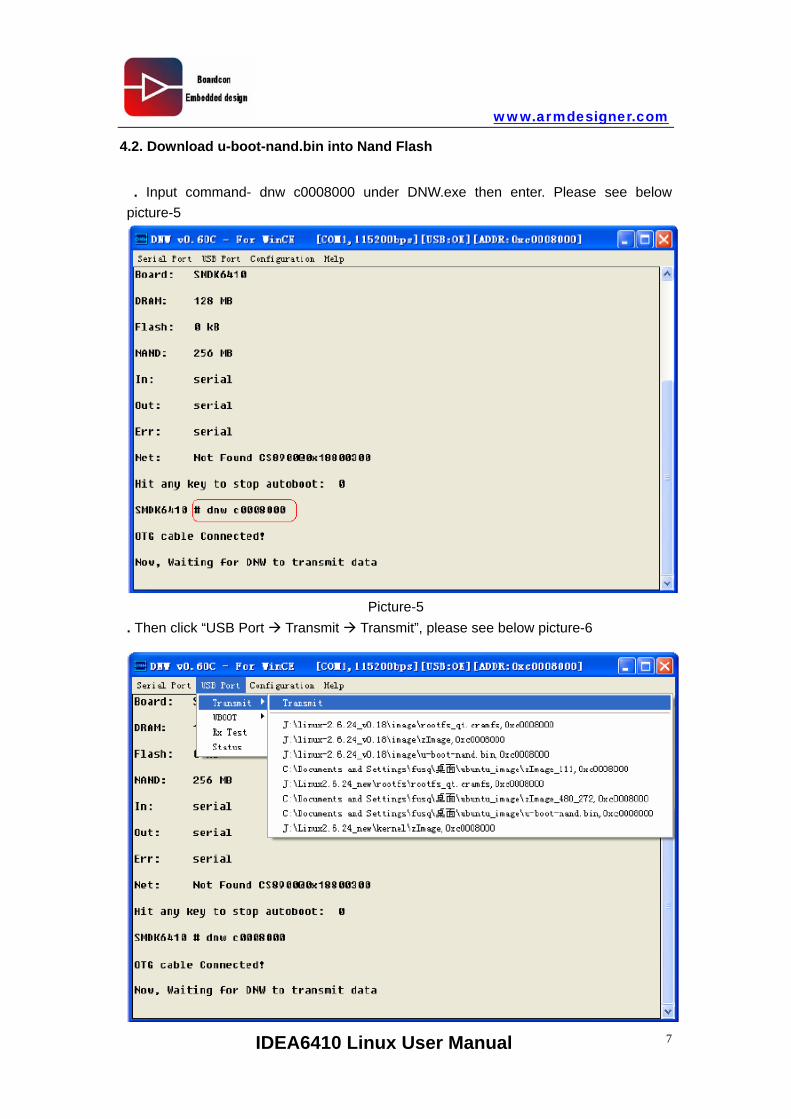
. Input command- dnw c0008000 under DNW.exe then enter. Please see below picture-5
Picture-5
. Then click “USB Port Transmit Transmit”, please see below picture-6
IDEA6410 Linux User Manual 7
www.armdesigner.com
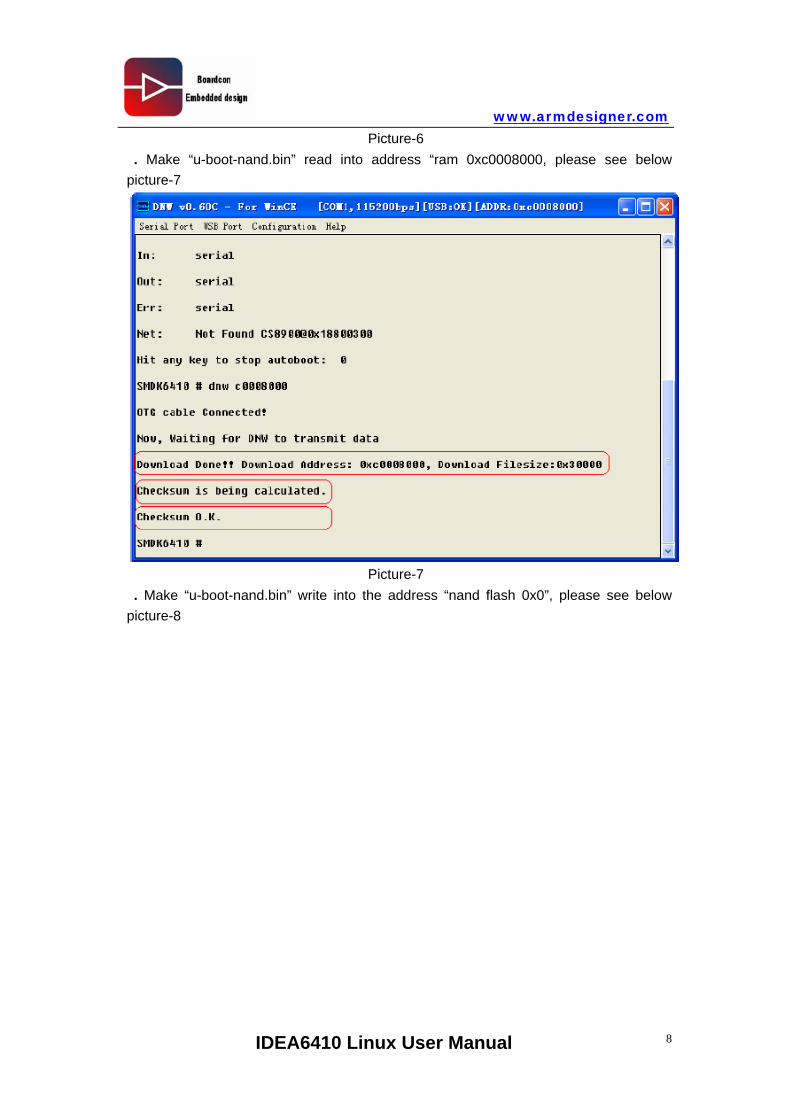
Picture-6 . Make “u-boot-nand.bin” read into address “ram 0xc0008000, please see below picture-7
Picture-7
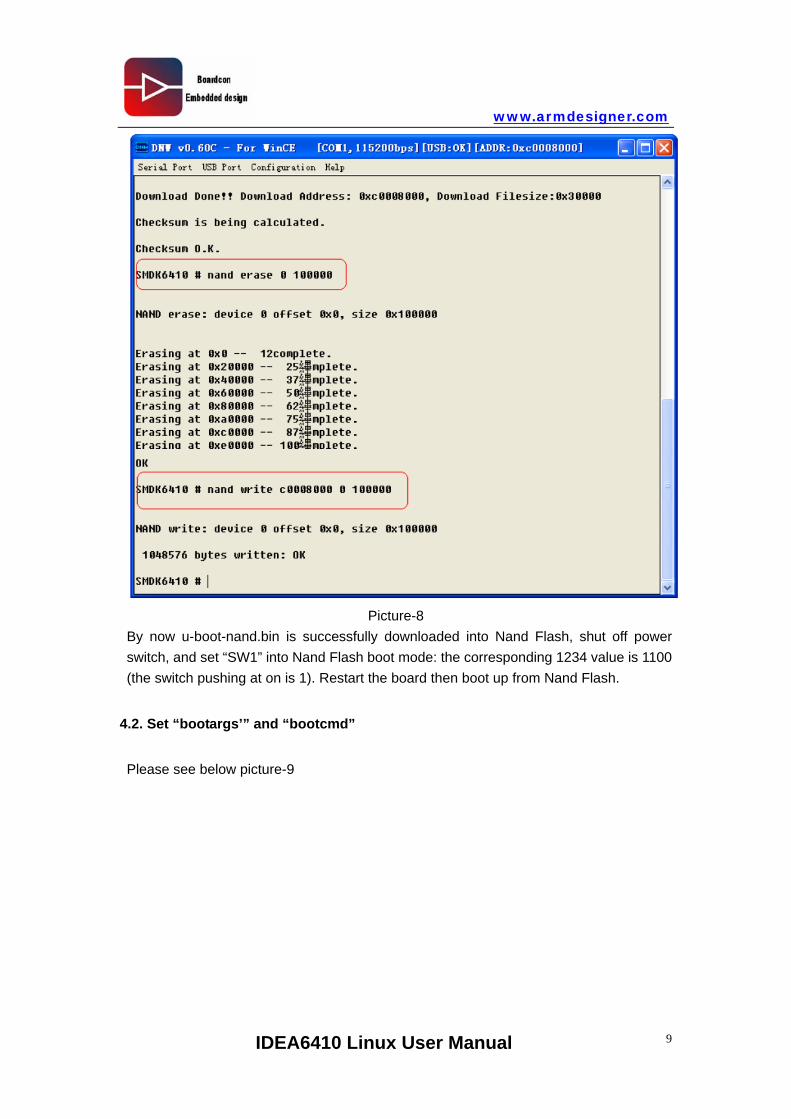
. Make “u-boot-nand.bin” write into the address “nand flash 0x0”, please see below picture-8
IDEA6410 Linux User Manual 8
www.armdesigner.com
IDEA6410 Linux User Manual 9
Picture-8
By now u-boot-nand.bin is successfully downloaded into Nand Flash, shut off power switch, and set “SW1” into Nand Flash boot mode: the corresponding 1234 value is 1100 (the switch pushing at on is 1). Restart the board then boot up from Nand Flash.
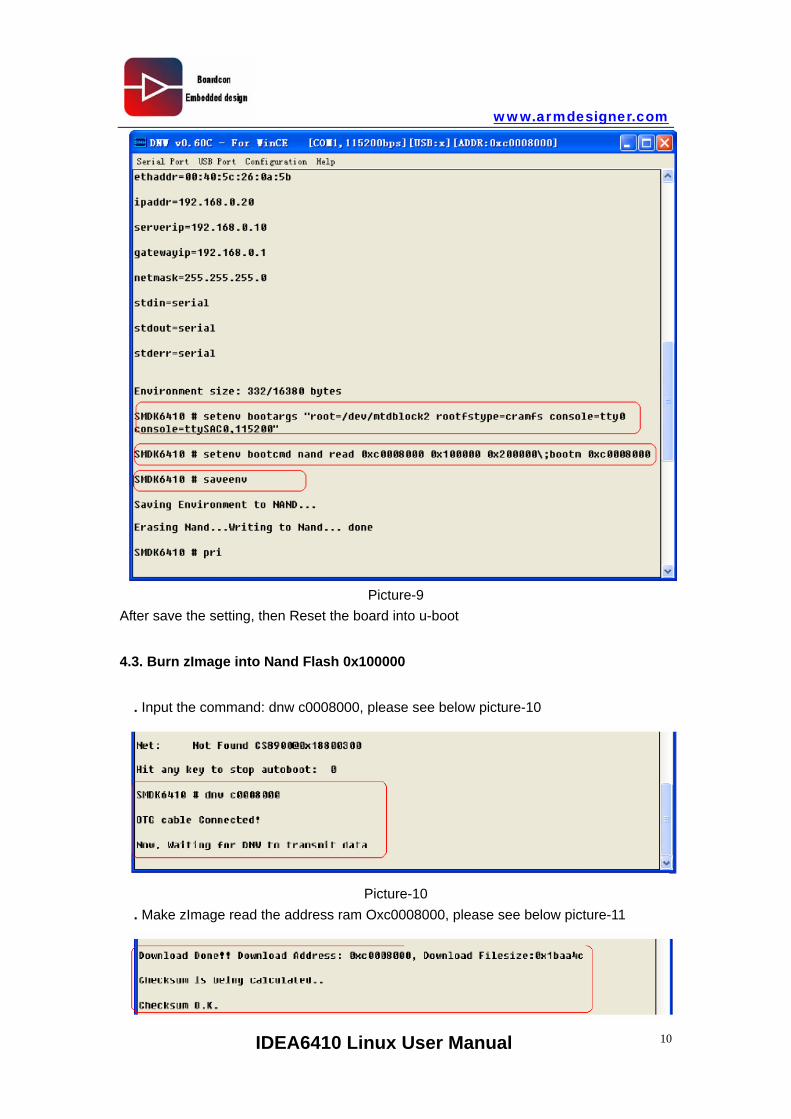
4.2. Set “bootargs’” and “bootcmd”
Please see below picture-9
www.armdesigner.com
IDEA6410 Linux User Manual 10
Picture-9
After save the setting, then Reset the board into u-boot
4.3. Burn zImage into Nand Flash 0x100000
. Input the command: dnw c0008000, please see below picture-10
Picture-10 . Make zImage read the address ram Oxc0008000, please see below picture-11
www.armdesigner.com
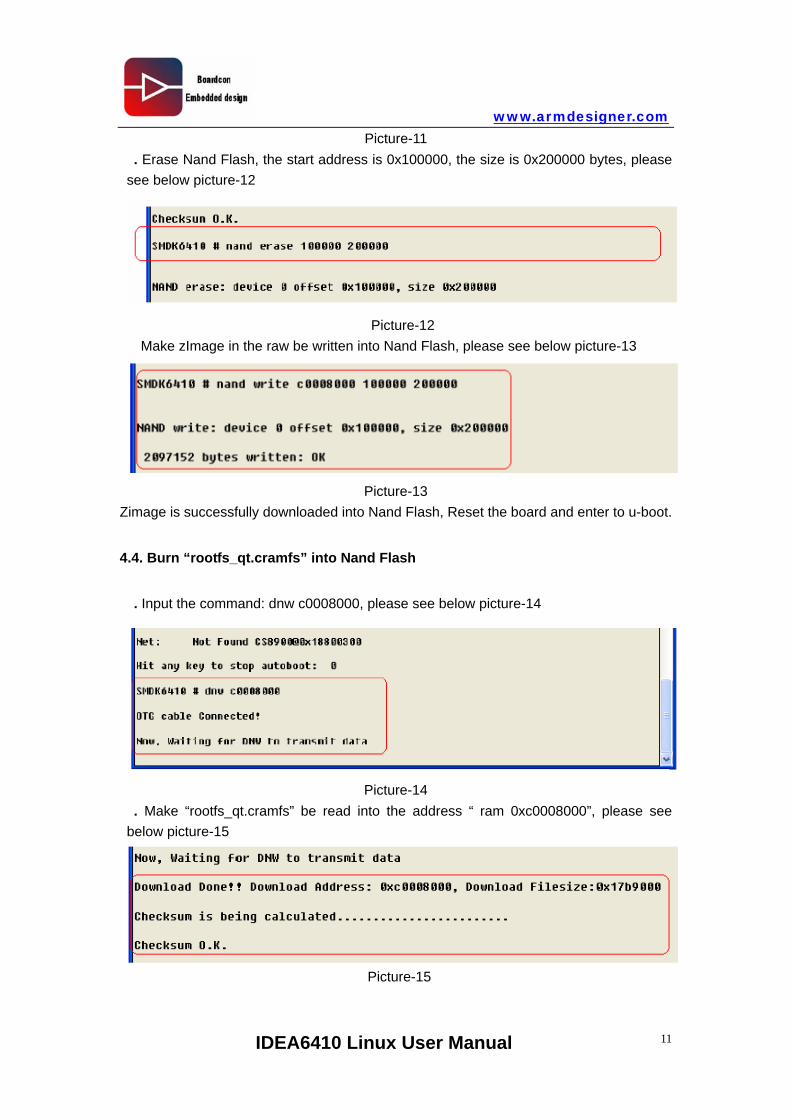
Picture-11 . Erase Nand Flash, the start address is 0x100000, the size is 0x200000 bytes, please see below picture-12
Picture-12 Make zImage in the raw be written into Nand Flash, please see below picture-13
Picture-13
Zimage is successfully downloaded into Nand Flash, Reset the board and enter to u-boot.
4.4. Burn “rootfs_qt.cramfs” into Nand Flash
. Input the command: dnw c0008000, please see below picture-14
Picture-14 . Make “rootfs_qt.cramfs” be read into the address “ ram 0xc0008000”, please see below picture-15
Picture-15
IDEA6410 Linux User Manual 11
www.armdesigner.com
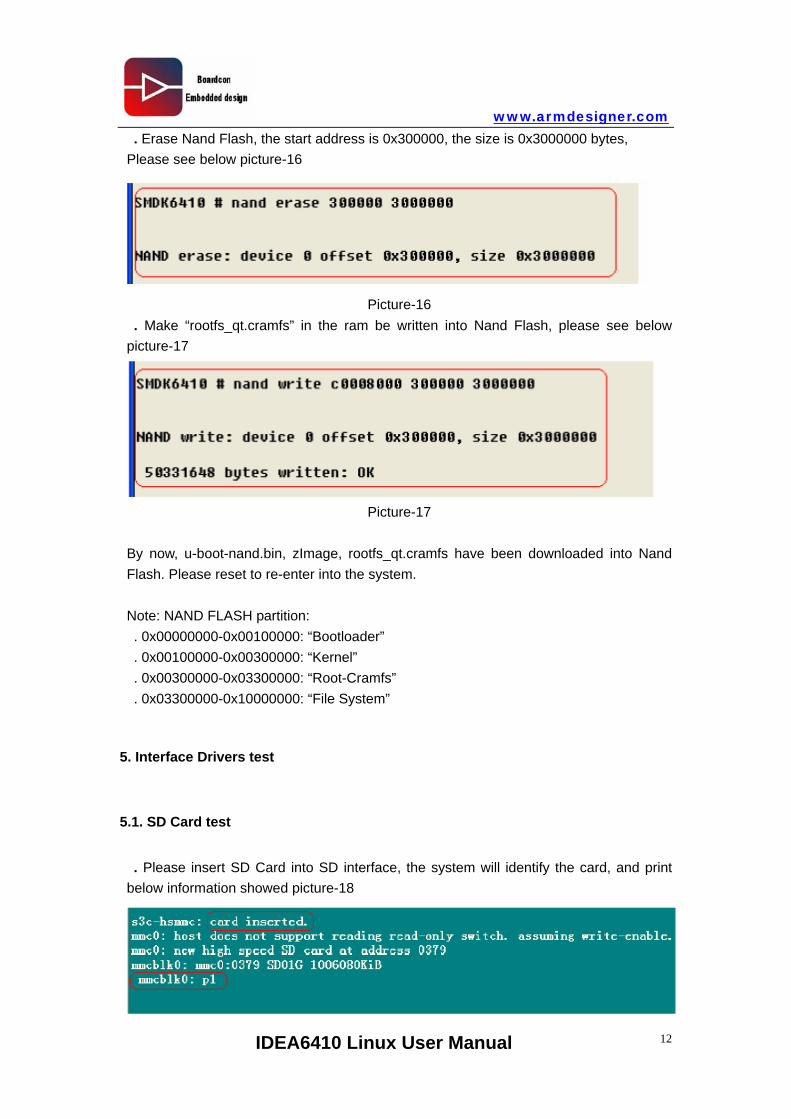
. Erase Nand Flash, the start address is 0x300000, the size is 0x3000000 bytes, Please see below picture-16
Picture-16 . Make “rootfs_qt.cramfs” in the ram be written into Nand Flash, please see below picture-17
Picture-17
By now, u-boot-nand.bin, zImage, rootfs_qt.cramfs have been downloaded into Nand Flash. Please reset to re-enter into the system. Note: NAND FLASH partition: . 0x00000000-0x00100000: “Bootloader” . 0x00100000-0x00300000: “Kernel” . 0x00300000-0x03300000: “Root-Cramfs” . 0x03300000-0x10000000: “File System”
5. Interface Drivers test
5.1. SD Card test
. Please insert SD Card into SD interface, the system will identify the card, and print below information showed picture-18
IDEA6410 Linux User Manual 12
www.armdesigner.com
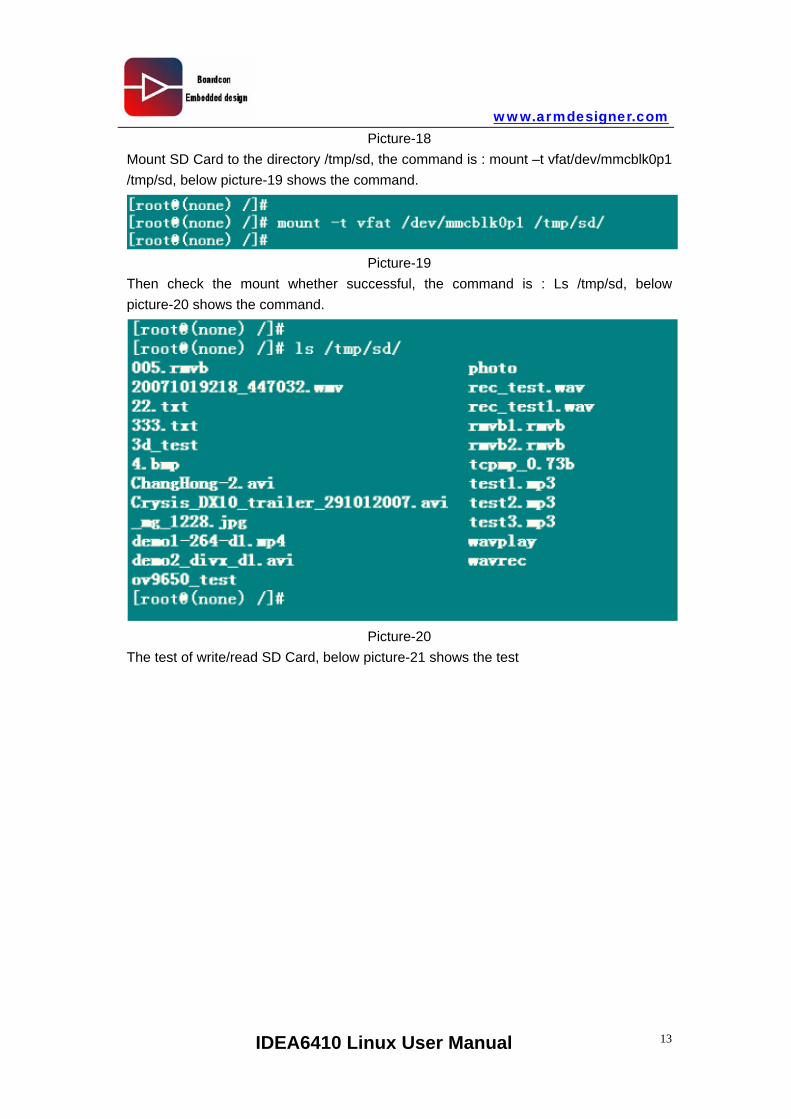
Picture-18 Mount SD Card to the directory /tmp/sd, the command is : mount –t vfat/dev/mmcblk0p1 /tmp/sd, below picture-19 shows the command.
Picture-19
Then check the mount whether successful, the command is : Ls /tmp/sd, below picture-20 shows the command.
Picture-20
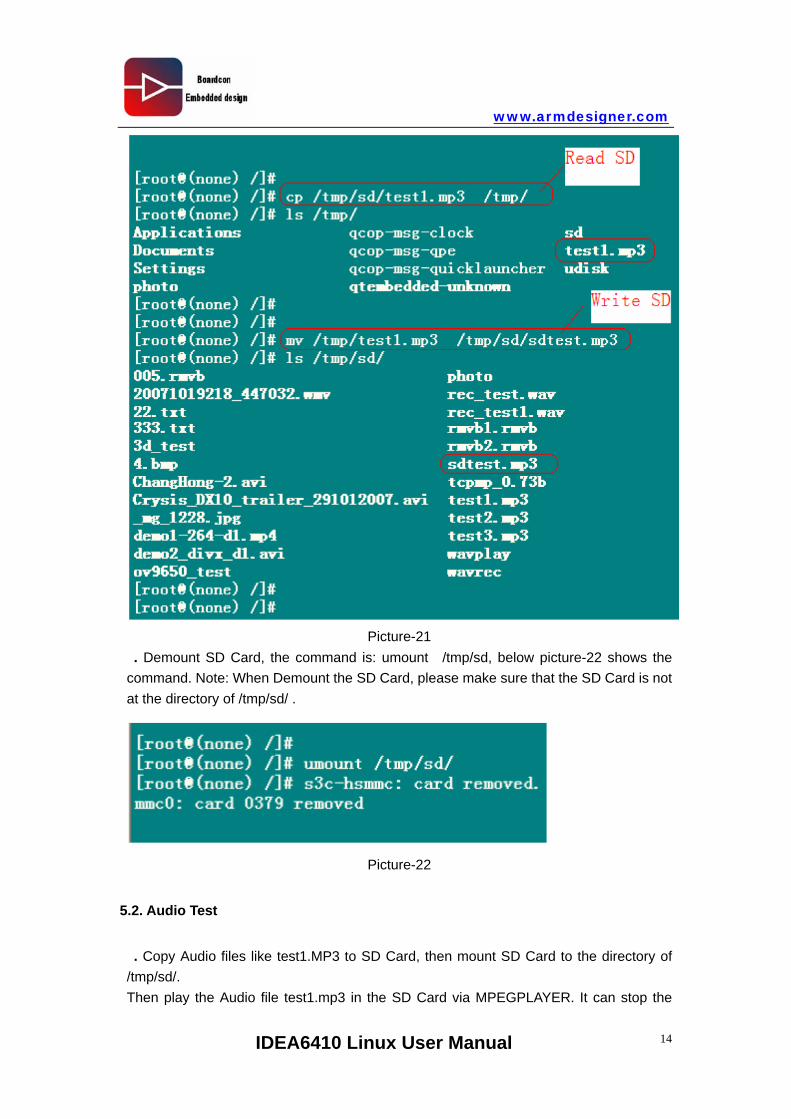
The test of write/read SD Card, below picture-21 shows the test
IDEA6410 Linux User Manual 13
www.armdesigner.com
IDEA6410 Linux User Manual 14
Picture-21
. Demount SD Card, the command is: umount /tmp/sd, below picture-22 shows the command. Note: When Demount the SD Card, please make sure that the SD Card is not at the directory of /tmp/sd/ .
Picture-22
5.2. Audio Test
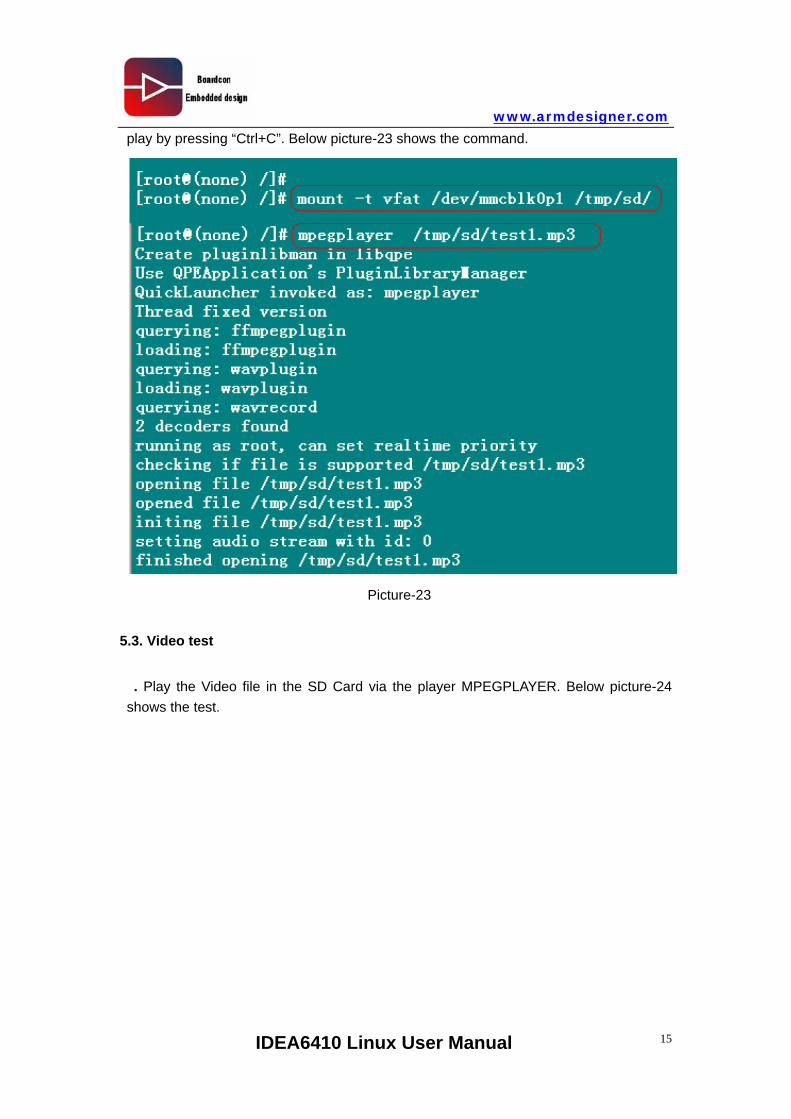
. Copy Audio files like test1.MP3 to SD Card, then mount SD Card to the directory of /tmp/sd/. Then play the Audio file test1.mp3 in the SD Card via MPEGPLAYER. It can stop the
www.armdesigner.com
play by pressing “Ctrl+C”. Below picture-23 shows the command.
Picture-23
5.3. Video test
. Play the Video file in the SD Card via the player MPEGPLAYER. Below picture-24 shows the test.
IDEA6410 Linux User Manual 15

www.armdesigner.com
IDEA6410 Linux User Manual 16
Picture-24
5.4. Ethernet Interface test
. When the system started up, using the Ethernet line provided connects Exchanger with the board’s Ethernet interface, then it will print below information showed picture-25.
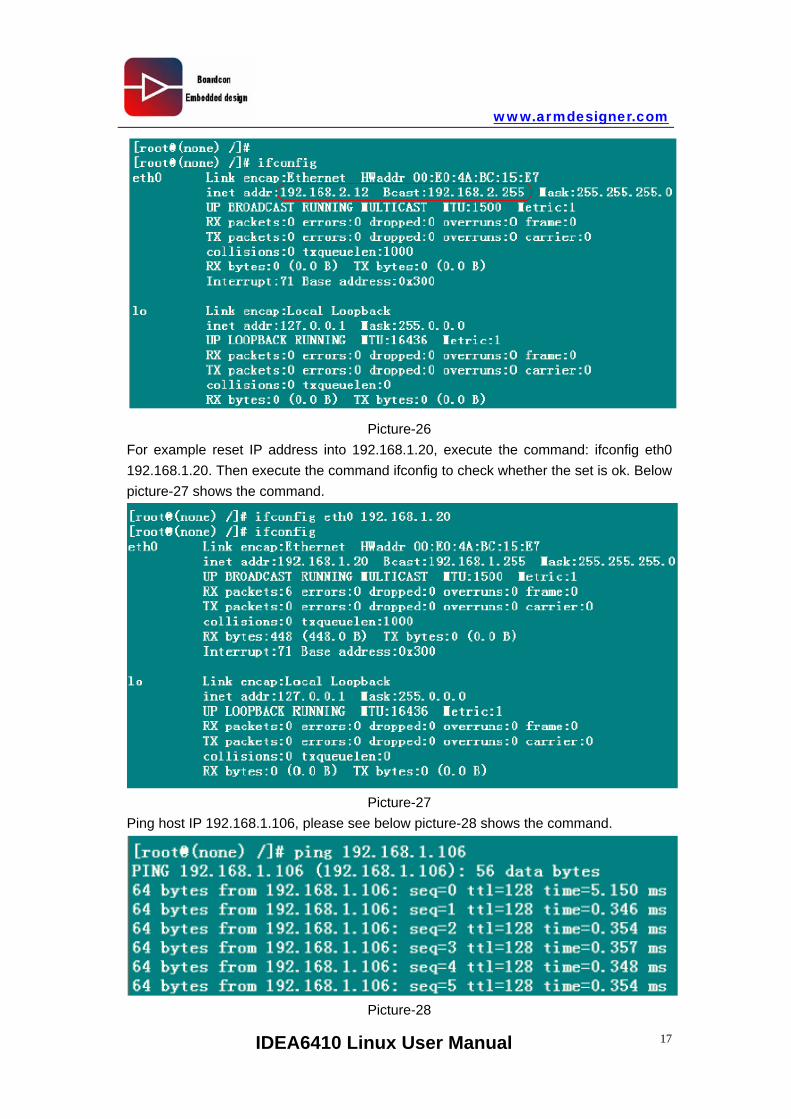
Picture-25 Use the command ifconfig to check IP Setting, if the IP address, Bcast and Mask do not meet your working place’s configuration, please reset the IP address, Bcast and Mask. Below picture-26 shows the command.
www.armdesigner.com
IDEA6410 Linux User Manual 17
Picture-26 For example reset IP address into 192.168.1.20, execute the command: ifconfig eth0 192.168.1.20. Then execute the command ifconfig to check whether the set is ok. Below picture-27 shows the command.
Picture-27
Ping host IP 192.168.1.106, please see below picture-28 shows the command.
Picture-28
www.armdesigner.com
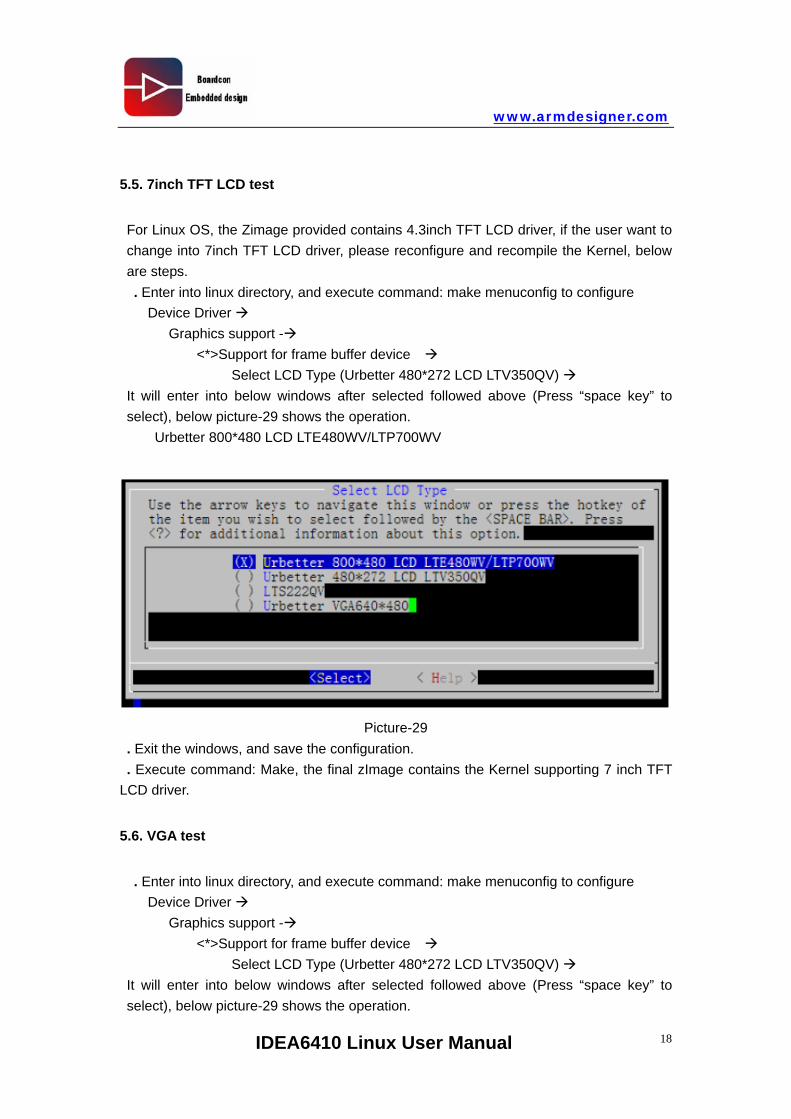
5.5. 7inch TFT LCD test
For Linux OS, the Zimage provided contains 4.3inch TFT LCD driver, if the user want to change into 7inch TFT LCD driver, please reconfigure and recompile the Kernel, below are steps. . Enter into linux directory, and execute command: make menuconfig to configure Device Driver Graphics support - <*>Support for frame buffer device Select LCD Type (Urbetter 480*272 LCD LTV350QV) It will enter into below windows after selected followed above (Press “space key” to select), below picture-29 shows the operation.
Urbetter 800*480 LCD LTE480WV/LTP700WV
Picture-29 . Exit the windows, and save the configuration. . Execute command: Make, the final zImage contains the Kernel supporting 7 inch TFT LCD driver.
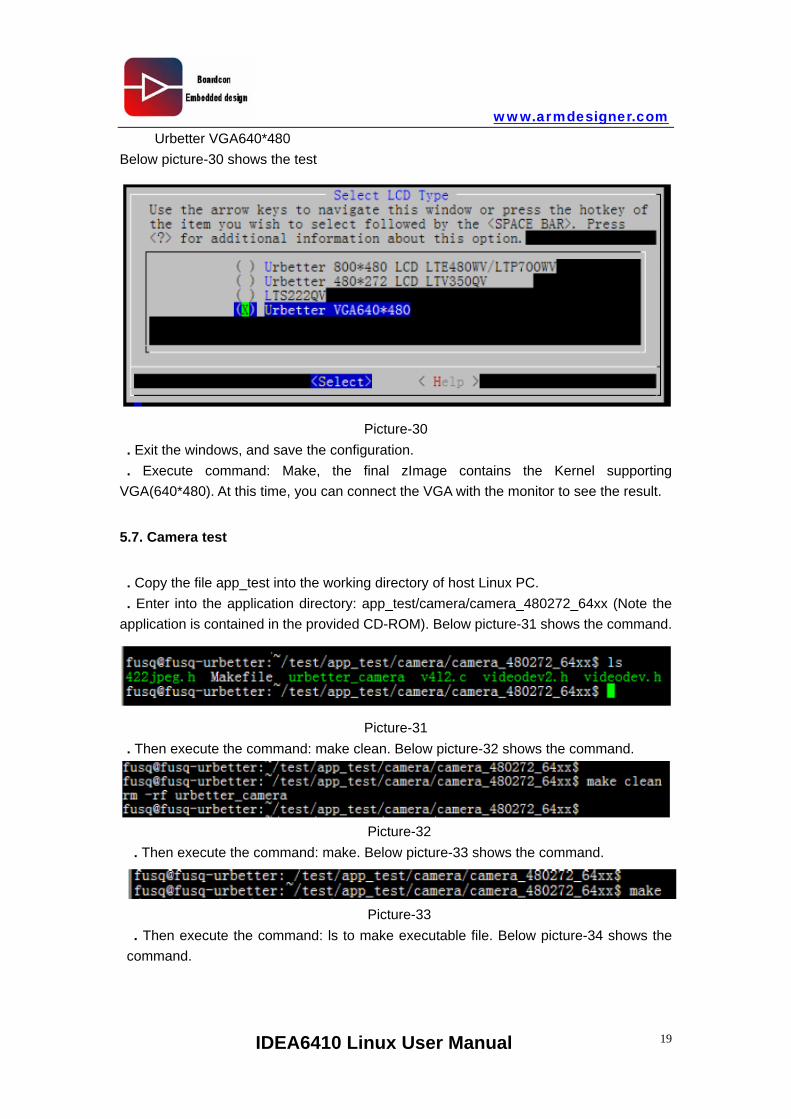
5.6. VGA test
. Enter into linux directory, and execute command: make menuconfig to configure Device Driver Graphics support - <*>Support for frame buffer device Select LCD Type (Urbetter 480*272 LCD LTV350QV) It will enter into below windows after selected followed above (Press “space key” to select), below picture-29 shows the operation.
IDEA6410 Linux User Manual 18
www.armdesigner.com
Urbetter VGA640*480 Below picture-30 shows the test
Picture-30 . Exit the windows, and save the configuration.
. Execute command: Make, the final zImage contains the Kernel supporting VGA(640*480). At this time, you can connect the VGA with the monitor to see the result.
5.7. Camera test
. Copy the file app_test into the working directory of host Linux PC. . Enter into the application directory: app_test/camera/camera_480272_64xx (Note the application is contained in the provided CD-ROM). Below picture-31 shows the command.
Picture-31 . Then execute the command: make clean. Below picture-32 shows the command.
Picture-32
. Then execute the command: make. Below picture-33 shows the command.
Picture-33
. Then execute the command: ls to make executable file. Below picture-34 shows the command.
IDEA6410 Linux User Manual 19
www.armdesigner.com
IDEA6410 Linux User Manual 20
Picture-34 . Copy the executable file urbetter_camera into SD Card After system started up, mount SD Card to /tmp/sd . Execute command: chmod 777 urbetter_camera, below picture-35 shows the command.
Picture-35
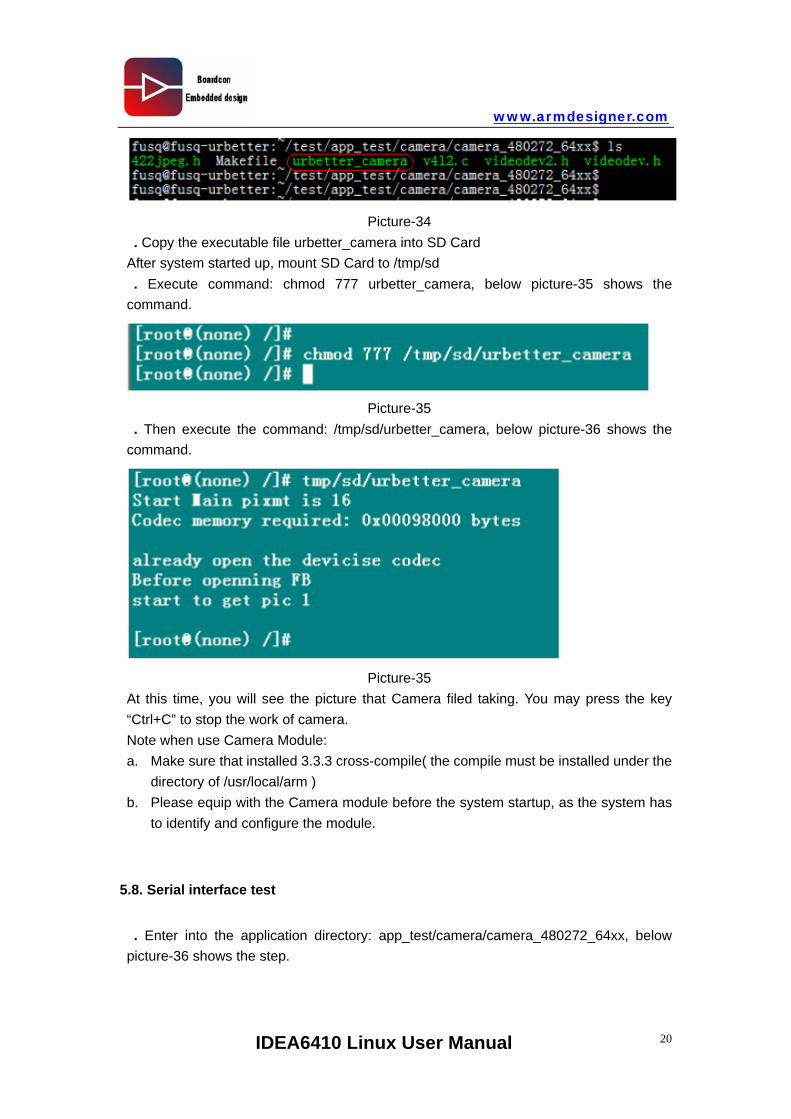
. Then execute the command: /tmp/sd/urbetter_camera, below picture-36 shows the command.
Picture-35
At this time, you will see the picture that Camera filed taking. You may press the key “Ctrl+C” to stop the work of camera. Note when use Camera Module: a. Make sure that installed 3.3.3 cross-compile( the compile must be installed under the
directory of /usr/local/arm ) b. Please equip with the Camera module before the system startup, as the system has
to identify and configure the module.
5.8. Serial interface test
. Enter into the application directory: app_test/camera/camera_480272_64xx, below picture-36 shows the step.
www.armdesigner.com
Picture-36
. The next step, execute command: make clean, below picture-37 shows the step.
Picture-37
. The next step, execute command: make, below picture-38 shows the step.
Picture-38 . The next step, execute command: ls, then check the executable file, below picture-39 shows the step.
Picture-39
The next step: . Copy the executable file ext_uart to SD Card
. After system started up, mount SD Card to /tmp/sd . Execute command: chmod 777 urbetter_uart, below picture-40 shows the command.
Picture-40
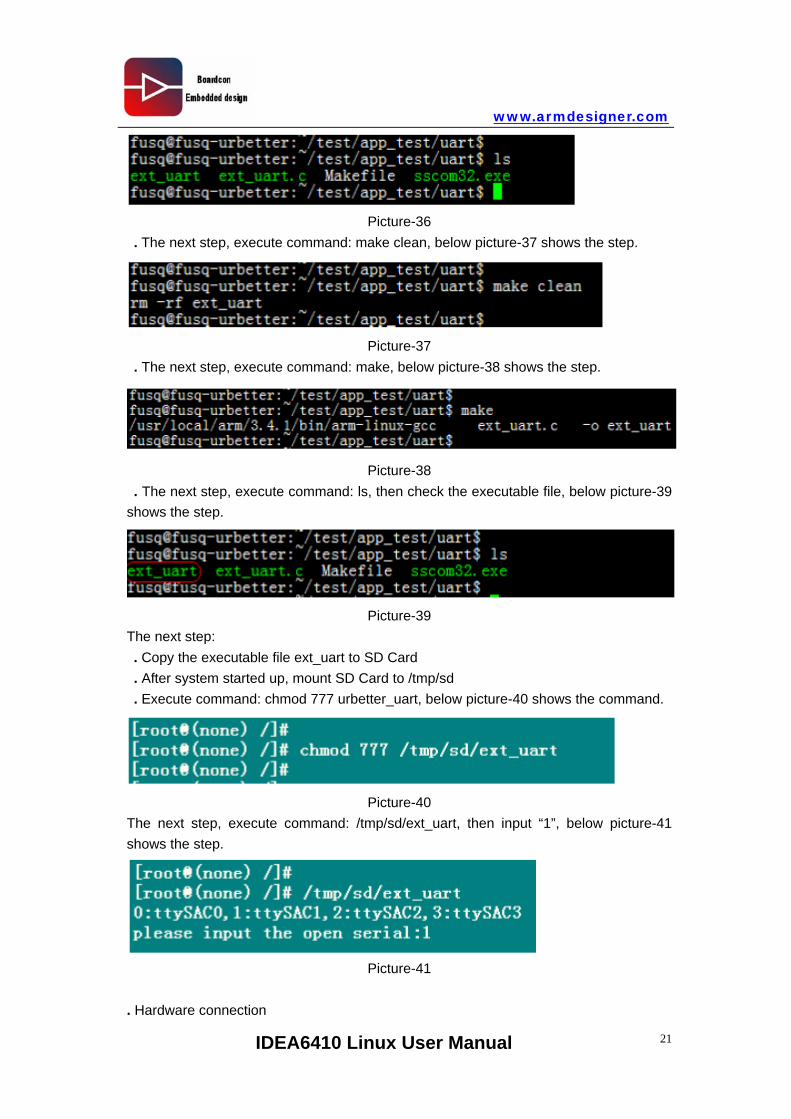
The next step, execute command: /tmp/sd/ext_uart, then input “1”, below picture-41 shows the step.
Picture-41
. Hardware connection
IDEA6410 Linux User Manual 21
www.armdesigner.com
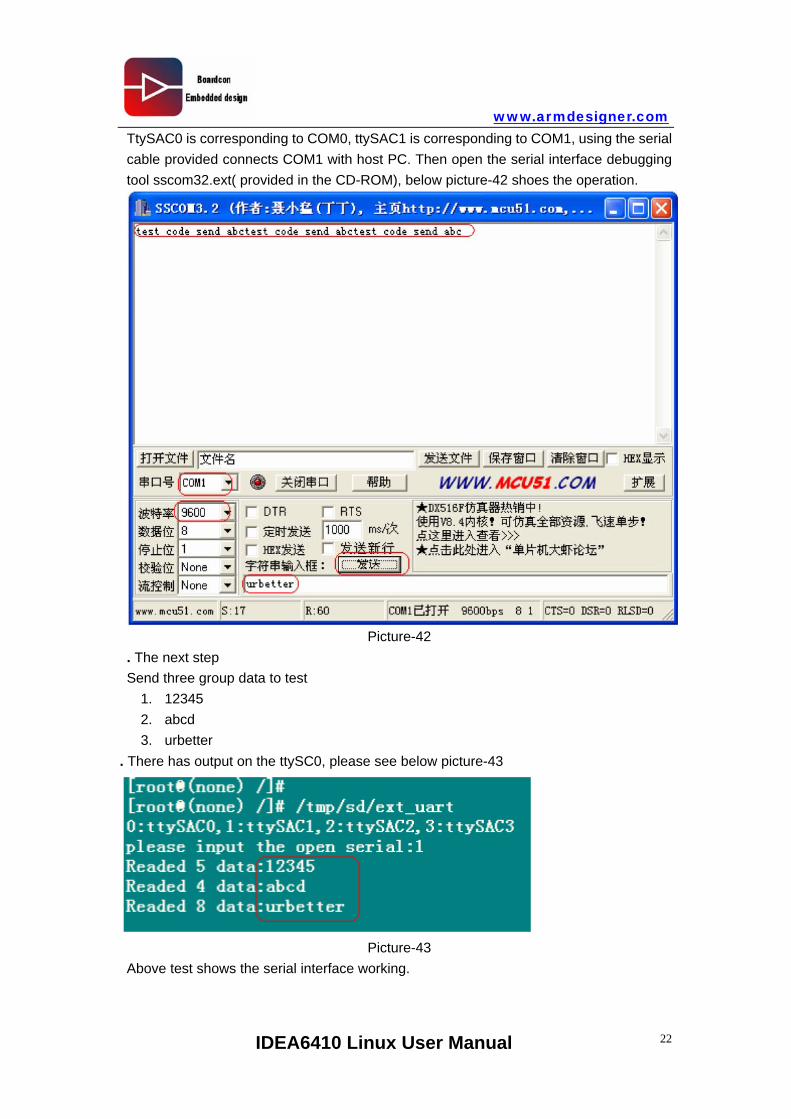
TtySAC0 is corresponding to COM0, ttySAC1 is corresponding to COM1, using the serial cable provided connects COM1 with host PC. Then open the serial interface debugging tool sscom32.ext( provided in the CD-ROM), below picture-42 shoes the operation.
Picture-42
. The next step Send three group data to test
1. 12345 2. abcd 3. urbetter
. There has output on the ttySC0, please see below picture-43
Picture-43
Above test shows the serial interface working.
IDEA6410 Linux User Manual 22