Embed Size (px)
Citation preview

Linux® on IBM® System z®
Hands-on Installation on DASD Workshop
SUSE® Linux Enterprise Server 11 SP1
IBM Deutschland Research & Development GmbH
August 2011
1
Table of Contents1 Introduction....................................................................................................................................22 Preparations...................................................................................................................................3
2.1 Connect to z/VM......................................................................................................................32.2 Transferring Installation System to z/VM Guest.......................................................................5
3 Starting Installation........................................................................................................................83.1 Booting (IPL of) Linux Installation System...............................................................................83.2 Initial Parameters for Preparing Network Installation..............................................................93.3 Connect to Linux Installation System....................................................................................14
4 Installation Phase 1.......................................................................................................................154.1 Language / License Agreement.............................................................................................154.2 Disk Activation......................................................................................................................16
4.2.1 Configure DASD Disks...................................................................................................174.3 Install vs. Upgrade................................................................................................................204.4 Clock and Time Zone............................................................................................................214.5 Installation Settings..............................................................................................................224.6 Software Packages Selection................................................................................................234.7 Confirmation of Software Package Licenses..........................................................................234.8 Confirmation Before Modifying Disks....................................................................................24
4.8.1 Progress on Package Installation...................................................................................244.9 End of Phase 1......................................................................................................................24
5 Installation Phase 2.......................................................................................................................255.1 Boot of Installed System.......................................................................................................255.2 Root Password......................................................................................................................265.3 Hostname.............................................................................................................................275.4 Network Configuration..........................................................................................................285.5 Test Internet Connection.......................................................................................................295.6 Online Update.......................................................................................................................295.7 Services Configuration..........................................................................................................305.8 User and Group Configuration...............................................................................................31
5.8.1 First Local User Account................................................................................................325.9 Release Notes.......................................................................................................................335.10 Hardware Configuration......................................................................................................34
5.10.1 Configure Printers.......................................................................................................345.10.2 Progress on Writing Autoyast File................................................................................35
5.11 Transition to Installed System.............................................................................................366 Congratulations............................................................................................................................367 Troubleshooting............................................................................................................................37
7.1 Installation Phase 1 (linuxrc).................................................................................................377.2 Installation Phase 2 (YaST)....................................................................................................37
8 Information Resources..................................................................................................................38
1 Introduction 2
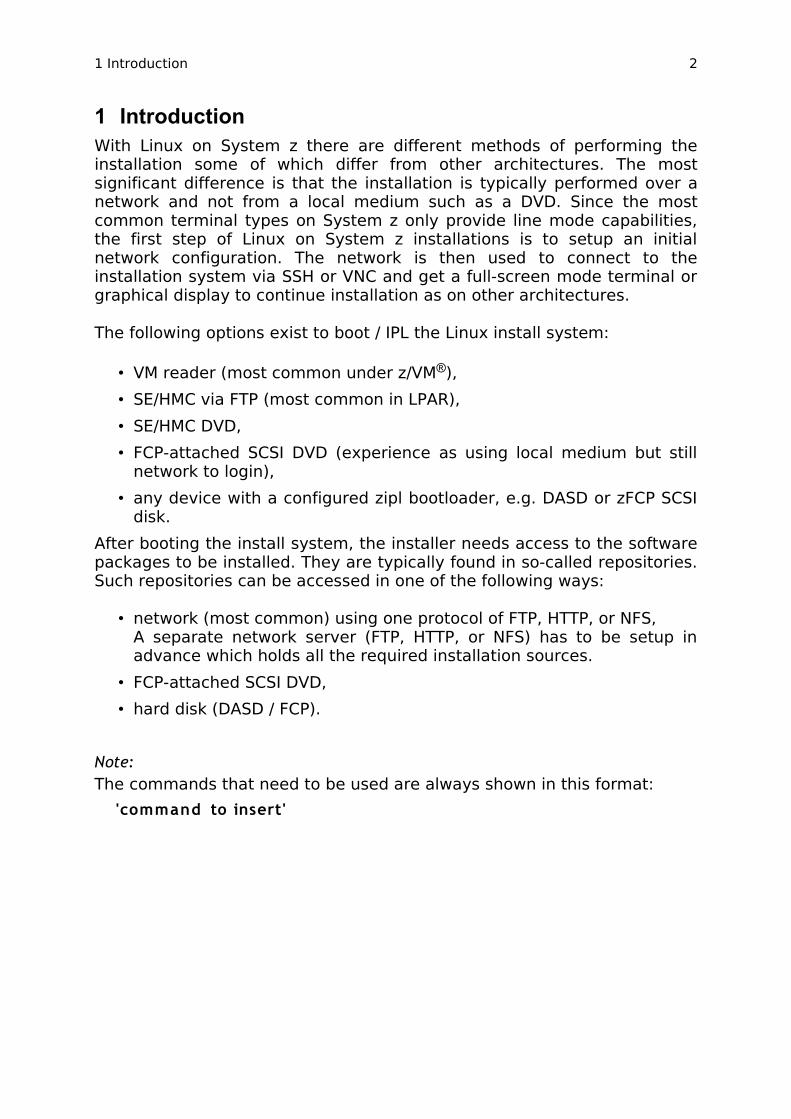
1 IntroductionWith Linux on System z there are different methods of performing the installation some of which differ from other architectures. The most significant difference is that the installation is typically performed over a network and not from a local medium such as a DVD. Since the most common terminal types on System z only provide line mode capabilities, the first step of Linux on System z installations is to setup an initial network configuration. The network is then used to connect to the installation system via SSH or VNC and get a full-screen mode terminal or graphical display to continue installation as on other architectures.
The following options exist to boot / IPL the Linux install system:
• VM reader (most common under z/VM®),• SE/HMC via FTP (most common in LPAR),• SE/HMC DVD,• FCP-attached SCSI DVD (experience as using local medium but still
network to login),• any device with a configured zipl bootloader, e.g. DASD or zFCP SCSI
disk.After booting the install system, the installer needs access to the software packages to be installed. They are typically found in so-called repositories. Such repositories can be accessed in one of the following ways:
• network (most common) using one protocol of FTP, HTTP, or NFS,A separate network server (FTP, HTTP, or NFS) has to be setup in advance which holds all the required installation sources.
• FCP-attached SCSI DVD,• hard disk (DASD / FCP).
Note:The commands that need to be used are always shown in this format: 'command to insert'
2 Preparations 3
2 Preparations
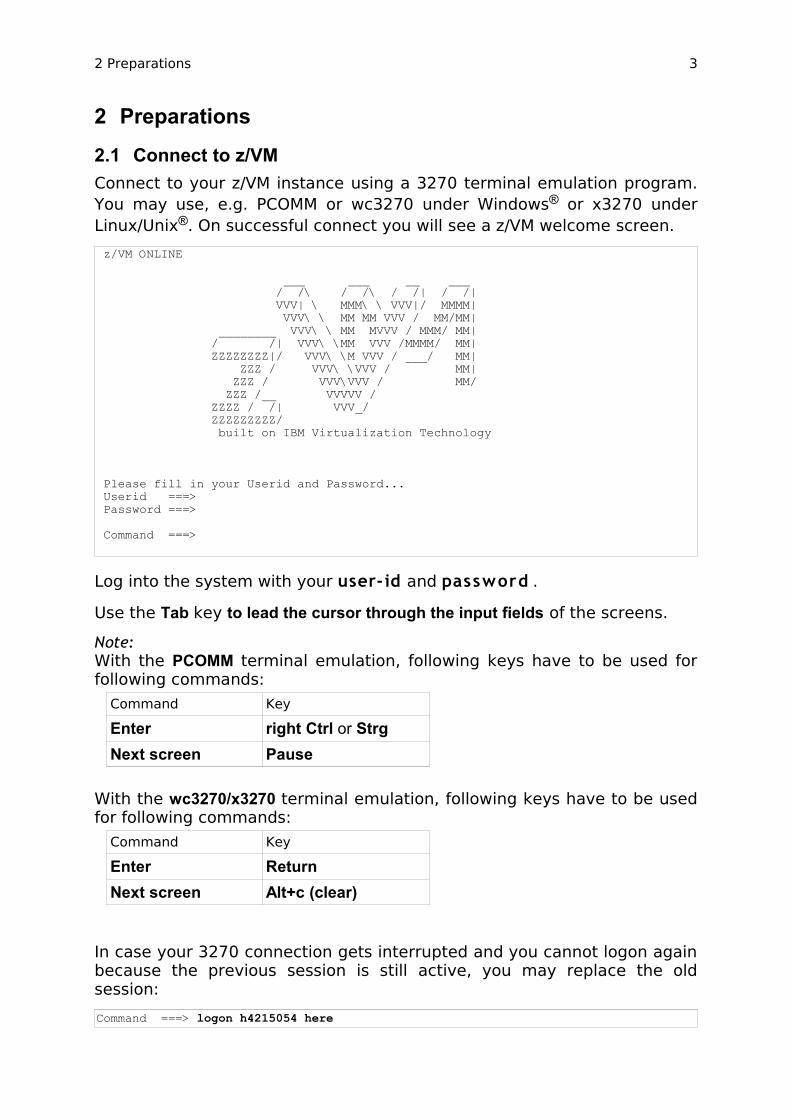
2.1 Connect to z/VMConnect to your z/VM instance using a 3270 terminal emulation program. You may use, e.g. PCOMM or wc3270 under Windows® or x3270 under Linux/Unix®. On successful connect you will see a z/VM welcome screen. z/VM ONLINE ___ ___ __ ___ / /\ / /\ / /| / /| VVV| \ MMM\ \ VVV|/ MMMM| VVV\ \ MM MM VVV / MM/MM| ________ VVV\ \ MM MVVV / MMM/ MM| / /| VVV\ \MM VVV /MMMM/ MM| ZZZZZZZZ|/ VVV\ \M VVV / ___/ MM| ZZZ / VVV\ \VVV / MM| ZZZ / VVV\VVV / MM/ ZZZ /__ VVVVV / ZZZZ / /| VVV_/ ZZZZZZZZZ/ built on IBM Virtualization Technology Please fill in your Userid and Password... Userid ===> Password ===> Command ===>
Log into the system with your user-id and password .
Use the Tab key to lead the cursor through the input fields of the screens. Note:With the PCOMM terminal emulation, following keys have to be used for following commands:
Command Key
Enter right Ctrl or StrgNext screen Pause
With the wc3270/x3270 terminal emulation, following keys have to be used for following commands:
Command Key
Enter ReturnNext screen Alt+c (clear)
In case your 3270 connection gets interrupted and you cannot logon again because the previous session is still active, you may replace the old session:Command ===> logon h4215054 here

2.1 Connect to z/VM 4
You will see z/VM messages, first from CP and then from CMS.LOGON H4215054 00: NIC F500 is created; devices F500-F502 defined 00: NIC F503 is created; devices F503-F505 defined 00: z/VM Version 6 Release 1.0, Service Level 1003 (64-bit), 00: built on IBM Virtualization Technology 00: There is no logmsg data 00: FILES: NO RDR, NO PRT, NO PUN 00: LOGON AT 12:55:27 CST MONDAY 08/22/11 z/VM V6.1.0 2011-01-28 13:23
If you do not see the 'Ready' messages on the screen, ipl CMS. For this, use the hypervisor command 'cp ipl cms' , which can be abbreviated as 'cp I cms' .cp i cmsz/VM V6.1.0 2011-01-28 13:23 Ready; T=0.01/0.01 14:00:28
You have also to use the same command, when you are in CP READ mode (right bottom corner of screen), to ipl CMS again and to get again the CMS prompt.
Check if the required memory is available (512 MB or more is required for the installation). For this, use the the hypervisor command 'cp query virtual storage' which can be abbreviated as 'cp q v stor' .cp q v stor00: STORAGE = 1GReady; T=0.01/0.01 11:31:07
Use the CMS guest operating system command 'query disk' (abbreviated 'q disk' ) to show the disks available to CMS.q diskLABEL VDEV M STAT CYL TYPE BLKSZ FILES BLKS USED-(%) BLKS LEFT BLK TOTAL191 191 A R/W 100 3390 4096 5 12-01 17988 18000MNT190 190 S R/O 100 3390 4096 700 15280-85 2720 18000TCM592 592 T R/O 70 3390 4096 910 10897-86 1703 12600MNT19E 19E Y/S R/O 250 3390 4096 1128 29629-66 15371 45000Ready; T=0.01/0.01 14:02:28
Although we see many disks attached, only disk 191 is available for read and write operations (R/W). We use the so-called A-disk 191 to hold the SLES install bootstrap files.
If you do not have TCP/IP-tools disk TCM592 displayed, access the disk to your guest with the CMS command 'acc 592 t'.

2.2 Transferring Installation System to z/VM Guest 5
2.2 Transferring Installation System to z/VM GuestA Linux installation on System z requires some preparation. The installation itself is split into two parts. In the first part, a system is loaded from a virtual punch card reader device into the main memory (volatile boot/IPL into RAM) . Three files have to be made available to your z/VM guest and a small REXX script has to be prepared to simplify the boot/IPL from the z/VM virtual reader.
Transfer the files from your installation server in the proper format using the FTP client of CMS. For file transfer use your userid and password.
ftp r1760060VM TCP/IP FTP Level 610 Connecting to R1760060 9.152.142.255, port 21 220-Welcome to Pure-FTPd. 220-You are user number 1 of 10 allowed. 220-This is a private system - No anonymous login 220-IPv6 connections are also welcome on this server. 220 You will be disconnected after 15 minutes of inactivity. USER (identify yourself to the host): suse>>>USER suse331 User suse OK. Password required Password:>>>PASS ********230 Login successful.Command:cd SLES-11.1/DVD>>>CWD SLES-11.1/DVD 250 OK. Current directory is /SLES-11.1/DVD Command:locsite fix 80Command:bin>>>TYPE i200 TYPE is now 8-bit binary Command:cd boot/s390x>>>CWD boot/s390x250 OK. Current directory is /SLES-11.1/DVD/boot/s390x Command:get vmrdr.ikr sles11.image>>>PORT 9,152,110,15,4,229 200 PORT command successful. Consider using PASV.>>>RETR vmrdr.ikr150 6724.2 kbytes to download 808400 bytes transferred. 226-File successfully transferred 226 14.480 seconds (measured here), 464.39 Kbytes per second 6885680 bytes transferred in 14.484 seconds. Transfer rate 475.40 Kbytes/sec.Command:get initrd sles11.initrd>>>PORT 9,152,110,15,4,230 200 PORT command successful >>>RETR initrd 150-Connecting to port 1254 150 13011.1 kbytes to download 226-File successfully transferred 226 3.499 seconds (measured here), 3.63 Mbytes per second 13323360 bytes transferred in 3.501 seconds. Transfer rate 3805.59 Kbytes/sec. Command:ascii>>>TYPE a200 TYPE is now ASCII Command:get parmfile sles11.parmfile>>>PORT 9,152,110,15,4,231 200 PORT command successful
2.2 Transferring Installation System to z/VM Guest 6
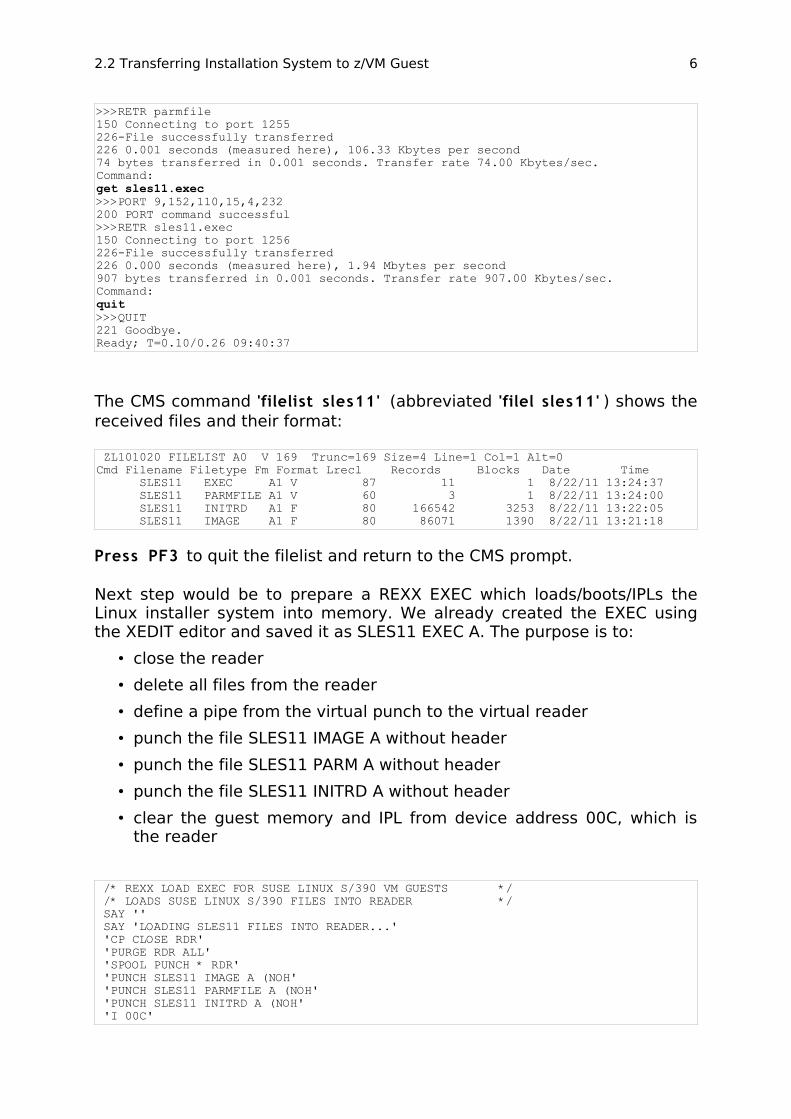
>>>RETR parmfile 150 Connecting to port 1255 226-File successfully transferred 226 0.001 seconds (measured here), 106.33 Kbytes per second 74 bytes transferred in 0.001 seconds. Transfer rate 74.00 Kbytes/sec. Command:get sles11.exec >>>PORT 9,152,110,15,4,232 200 PORT command successful >>>RETR sles11.exec 150 Connecting to port 1256 226-File successfully transferred 226 0.000 seconds (measured here), 1.94 Mbytes per second 907 bytes transferred in 0.001 seconds. Transfer rate 907.00 Kbytes/sec. Command:quit>>>QUIT221 Goodbye.Ready; T=0.10/0.26 09:40:37
The CMS command 'filelist sles11' (abbreviated 'filel sles11' ) shows the received files and their format:
ZL101020 FILELIST A0 V 169 Trunc=169 Size=4 Line=1 Col=1 Alt=0Cmd Filename Filetype Fm Format Lrecl Records Blocks Date Time SLES11 EXEC A1 V 87 11 1 8/22/11 13:24:37 SLES11 PARMFILE A1 V 60 3 1 8/22/11 13:24:00 SLES11 INITRD A1 F 80 166542 3253 8/22/11 13:22:05 SLES11 IMAGE A1 F 80 86071 1390 8/22/11 13:21:18
Press PF3 to quit the filelist and return to the CMS prompt.
Next step would be to prepare a REXX EXEC which loads/boots/IPLs the Linux installer system into memory. We already created the EXEC using the XEDIT editor and saved it as SLES11 EXEC A. The purpose is to:
• close the reader• delete all files from the reader• define a pipe from the virtual punch to the virtual reader• punch the file SLES11 IMAGE A without header• punch the file SLES11 PARM A without header• punch the file SLES11 INITRD A without header• clear the guest memory and IPL from device address 00C, which is
the reader
/* REXX LOAD EXEC FOR SUSE LINUX S/390 VM GUESTS */ /* LOADS SUSE LINUX S/390 FILES INTO READER */ SAY '' SAY 'LOADING SLES11 FILES INTO READER...' 'CP CLOSE RDR' 'PURGE RDR ALL' 'SPOOL PUNCH * RDR' 'PUNCH SLES11 IMAGE A (NOH' 'PUNCH SLES11 PARMFILE A (NOH' 'PUNCH SLES11 INITRD A (NOH' 'I 00C'
2.2 Transferring Installation System to z/VM Guest 7
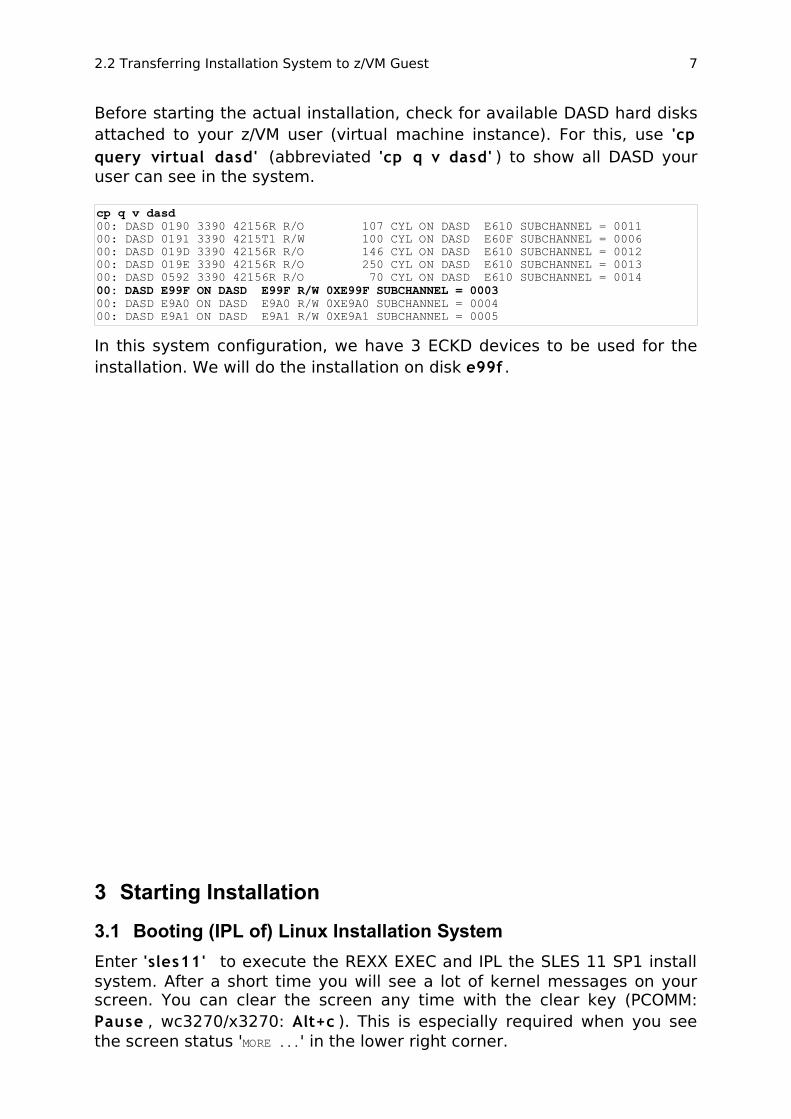
Before starting the actual installation, check for available DASD hard disks attached to your z/VM user (virtual machine instance). For this, use 'cp query virtual dasd' (abbreviated 'cp q v dasd' ) to show all DASD your user can see in the system.
cp q v dasd00: DASD 0190 3390 42156R R/O 107 CYL ON DASD E610 SUBCHANNEL = 0011 00: DASD 0191 3390 4215T1 R/W 100 CYL ON DASD E60F SUBCHANNEL = 0006 00: DASD 019D 3390 42156R R/O 146 CYL ON DASD E610 SUBCHANNEL = 0012 00: DASD 019E 3390 42156R R/O 250 CYL ON DASD E610 SUBCHANNEL = 0013 00: DASD 0592 3390 42156R R/O 70 CYL ON DASD E610 SUBCHANNEL = 0014 00: DASD E99F ON DASD E99F R/W 0XE99F SUBCHANNEL = 0003 00: DASD E9A0 ON DASD E9A0 R/W 0XE9A0 SUBCHANNEL = 0004 00: DASD E9A1 ON DASD E9A1 R/W 0XE9A1 SUBCHANNEL = 0005
In this system configuration, we have 3 ECKD devices to be used for the installation. We will do the installation on disk e99f .
3 Starting Installation
3.1 Booting (IPL of) Linux Installation SystemEnter 'sles11' to execute the REXX EXEC and IPL the SLES 11 SP1 install system. After a short time you will see a lot of kernel messages on your screen. You can clear the screen any time with the clear key (PCOMM: Pause , wc3270/x3270: Alt+c ). This is especially required when you see the screen status 'MORE ...' in the lower right corner.

3.1 Booting (IPL of) Linux Installation System 8
sles11 LOADING SLES11 FILES INTO READER... 00: NO FILES PURGED 00: RDR FILE 0008 SENT FROM H4215054 PUN WAS 0008 RECS 086K CPY 001 A NOHOLD NOKEEP 00: RDR FILE 0009 SENT FROM H4215054 PUN WAS 0009 RECS 0003 CPY 001 A NOHOLD NOKEEP 00: RDR FILE 0010 SENT FROM H4215054 PUN WAS 0010 RECS 167K CPY 001 A NOHOLD NOKEEP 00: NO FILES CHANGED Initializing cgroup subsys cpuset Initializing cgroup subsys cpu Linux version 2.6.32.12-0.7-default (geeko§buildhost) (gcc version 4.3.4 ¬gcc-4_3-branch revision 152973| (SUSE Linux) ) #1 SMP 2010-05-20 11:14:20 +0200 setup.1a06a7: Linux is running as a z/VM guest operating system in 64-bit mode Zone PFN ranges: DMA 0x00000000 -> 0x00080000 Normal 0x00080000 -> 0x00080000 Movable zone start PFN for each node early_node_map¬1| active PFN ranges 0: 0x00000000 -> 0x00040000 PERCPU: Embedded 11 pages/cpu §000000000234e000 s12544 r8192 d24320 u65536 pcpu-alloc: s12544 r8192 d24320 u65536 alloc=16*4096 pcpu-alloc: ¬0| 00 ¬0| 01 ¬0| 02 ¬0| 03 ¬0| 04 ¬0| 05 ¬0| 06 ¬0| 07 pcpu-alloc: ¬0| 08 ¬0| 09 ¬0| 10 ¬0| 11 ¬0| 12 ¬0| 13 ¬0| 14 ¬0| 15 pcpu-alloc: ¬0| 16 ¬0| 17 ¬0| 18 ¬0| 19 ¬0| 20 ¬0| 21 ¬0| 22 ¬0| 23 pcpu-alloc: ¬0| 24 ¬0| 25 ¬0| 26 ¬0| 27 ¬0| 28 ¬0| 29 ¬0| 30 ¬0| 31 pcpu-alloc: ¬0| 32 ¬0| 33 ¬0| 34 ¬0| 35 ¬0| 36 ¬0| 37 ¬0| 38 ¬0| 39 pcpu-alloc: ¬0| 40 ¬0| 41 ¬0| 42 ¬0| 43 ¬0| 44 ¬0| 45 ¬0| 46 ¬0| 47 pcpu-alloc: ¬0| 48 ¬0| 49 ¬0| 50 ¬0| 51 ¬0| 52 ¬0| 53 ¬0| 54 ¬0| 55 pcpu-alloc: ¬0| 56 ¬0| 57 ¬0| 58 ¬0| 59 ¬0| 60 ¬0| 61 ¬0| 62 ¬0| 63 Built 1 zonelists in Zone order, mobility grouping on. Total pages: 258560 Kernel command line: ramdisk_size=65536 root=/dev/ram1 ro init=/linuxrc TERM=dumb manual=1 PID hash table entries: 4096 (order: 3, 32768 bytes) Dentry cache hash table entries: 131072 (order: 8, 1048576 bytes) Inode-cache hash table entries: 65536 (order: 7, 524288 bytes) Memory: 1007452k/1048576k available (4382k kernel code, 0k reserved, 2114k data, 228k init) Write protected kernel read-only data: 0x100000 - 0x5fffff Hierarchical RCU implementation. console ¬ttyS0| enabled allocated 10485760 bytes of page_cgroup
MORE... BOEH4215
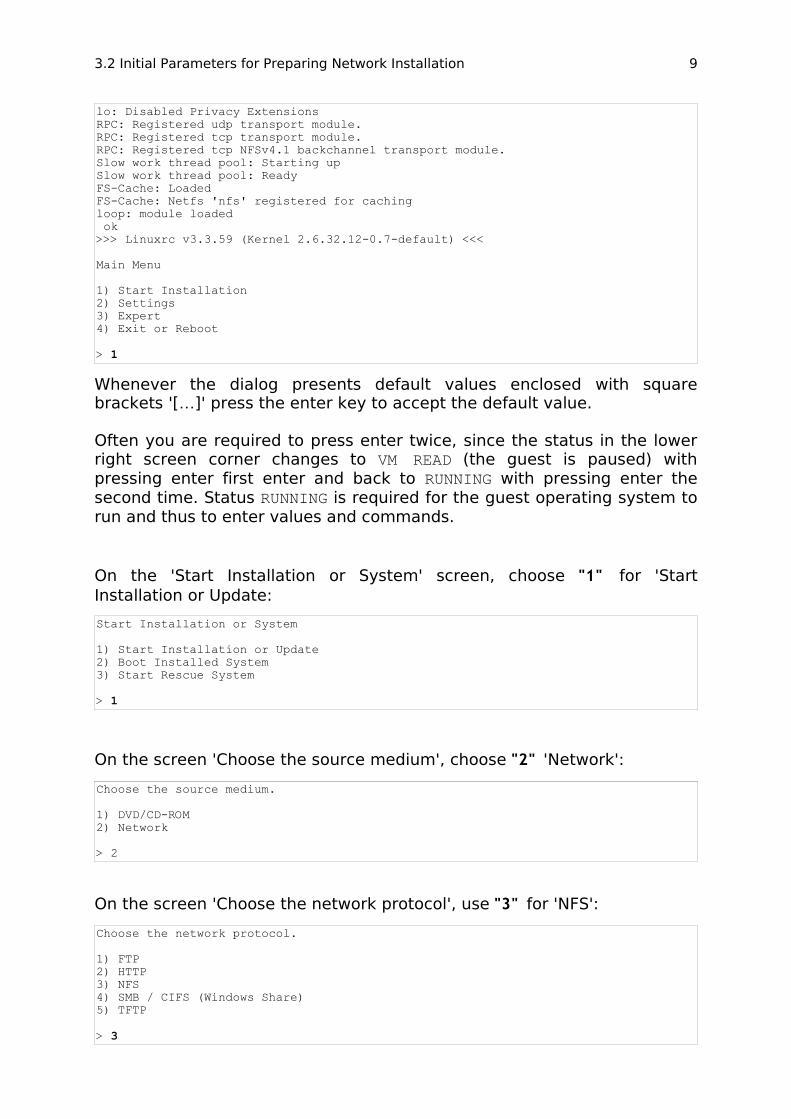
3.2 Initial Parameters for Preparing Network InstallationThe second part prepares a network connection (OSA in this lab) and prepares the install interface. After scrolling down some screens with Linux boot messages, the 'Main Menu' screen appears:
>>> SUSE Linux Enterprise Server 11 installation program v3.3.59 (c) 1996-2010 SUSE Linux Products GmbH <<< Starting udev... udevd version 128 started qeth.87067b: loading core functions vmur.c793e5: z/VM virtual unit record device driver loaded. ok Loading basic drivers...SCSI subsystem initialized NET: Registered protocol family 17 NET: Registered protocol family 10
3.2 Initial Parameters for Preparing Network Installation 9
lo: Disabled Privacy Extensions RPC: Registered udp transport module. RPC: Registered tcp transport module. RPC: Registered tcp NFSv4.1 backchannel transport module. Slow work thread pool: Starting up Slow work thread pool: Ready FS-Cache: Loaded FS-Cache: Netfs 'nfs' registered for caching loop: module loaded ok >>> Linuxrc v3.3.59 (Kernel 2.6.32.12-0.7-default) <<< Main Menu 1) Start Installation 2) Settings 3) Expert 4) Exit or Reboot > 1
Whenever the dialog presents default values enclosed with square brackets '[…]' press the enter key to accept the default value.
Often you are required to press enter twice, since the status in the lower right screen corner changes to VM READ (the guest is paused) with pressing enter first enter and back to RUNNING with pressing enter the second time. Status RUNNING is required for the guest operating system to run and thus to enter values and commands.
On the 'Start Installation or System' screen, choose "1" for 'Start Installation or Update:Start Installation or System 1) Start Installation or Update 2) Boot Installed System 3) Start Rescue System > 1
On the screen 'Choose the source medium', choose "2" 'Network':Choose the source medium. 1) DVD/CD-ROM 2) Network > 2
On the screen 'Choose the network protocol', use "3" for 'NFS':Choose the network protocol. 1) FTP 2) HTTP 3) NFS 4) SMB / CIFS (Windows Share) 5) TFTP > 3
3.2 Initial Parameters for Preparing Network Installation 10
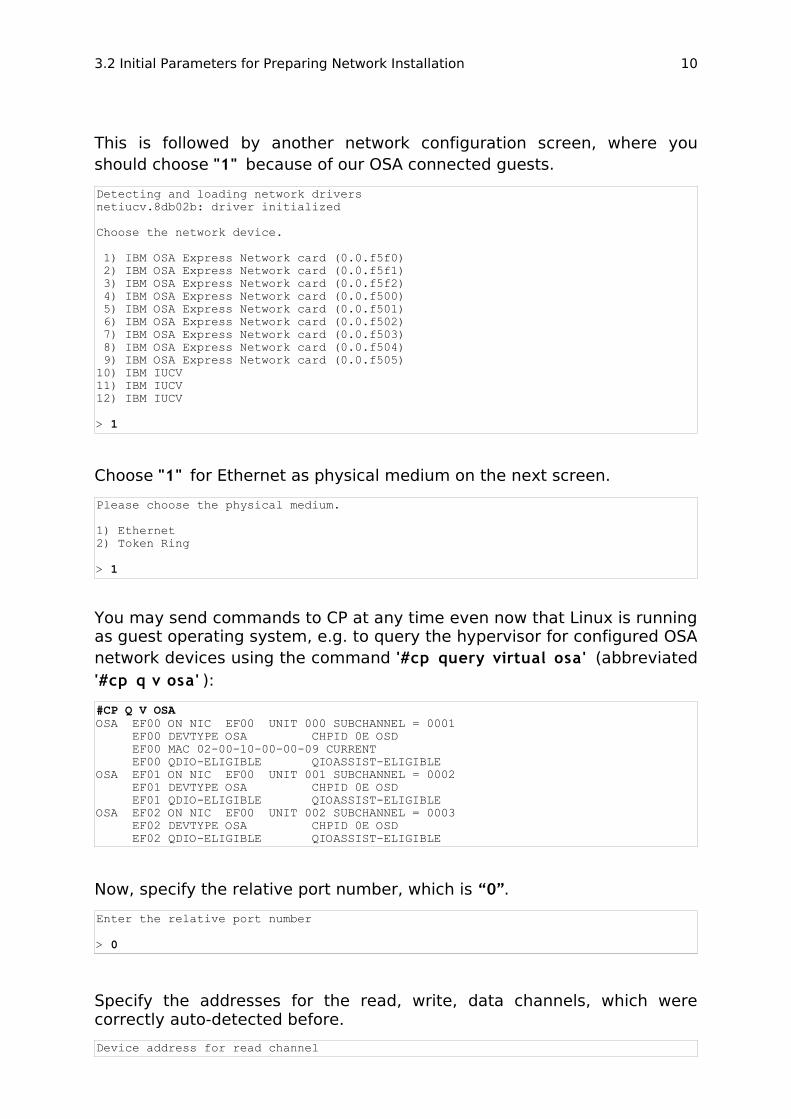
This is followed by another network configuration screen, where you should choose "1" because of our OSA connected guests.Detecting and loading network drivers netiucv.8db02b: driver initialized Choose the network device. 1) IBM OSA Express Network card (0.0.f5f0) 2) IBM OSA Express Network card (0.0.f5f1) 3) IBM OSA Express Network card (0.0.f5f2) 4) IBM OSA Express Network card (0.0.f500) 5) IBM OSA Express Network card (0.0.f501) 6) IBM OSA Express Network card (0.0.f502) 7) IBM OSA Express Network card (0.0.f503) 8) IBM OSA Express Network card (0.0.f504) 9) IBM OSA Express Network card (0.0.f505) 10) IBM IUCV 11) IBM IUCV 12) IBM IUCV > 1
Choose "1" for Ethernet as physical medium on the next screen.Please choose the physical medium. 1) Ethernet 2) Token Ring > 1
You may send commands to CP at any time even now that Linux is running as guest operating system, e.g. to query the hypervisor for configured OSA network devices using the command '#cp query virtual osa' (abbreviated '#cp q v osa' ):#CP Q V OSAOSA EF00 ON NIC EF00 UNIT 000 SUBCHANNEL = 0001 EF00 DEVTYPE OSA CHPID 0E OSD EF00 MAC 02-00-10-00-00-09 CURRENT EF00 QDIO-ELIGIBLE QIOASSIST-ELIGIBLE OSA EF01 ON NIC EF00 UNIT 001 SUBCHANNEL = 0002 EF01 DEVTYPE OSA CHPID 0E OSD EF01 QDIO-ELIGIBLE QIOASSIST-ELIGIBLE OSA EF02 ON NIC EF00 UNIT 002 SUBCHANNEL = 0003 EF02 DEVTYPE OSA CHPID 0E OSD EF02 QDIO-ELIGIBLE QIOASSIST-ELIGIBLE
Now, specify the relative port number, which is “0”.Enter the relative port number
> 0
Specify the addresses for the read, write, data channels, which were correctly auto-detected before.Device address for read channel

3.2 Initial Parameters for Preparing Network Installation 11
0.0.e5f0> 0.0.e5f0 Device address for write channel0.0.e5f1> 0.0.e5f1 Device address for data channel0.0.e5f2> 0.0.e5f2
You can omit the portname since it is not needed anymore, so simply press the enter key twice . Portname to use>
The OSI Layer 2 support is not used in this installation, please enter "2" .Enable OSI Layer 2 support? 1) Yes 2) No > 2
Since all necessary information for configuring the network device has been entered, the system loads the network device driver, whose output you see on the screen prefixed with 'qeth:', and then configures and enables the network device.qeth.2c6def: register layer 3 discipline (Port 0) qdio: 0.0.f5f2 OSA on SC 2 using AI:1 QEBSM:1 PCI:1 TDD:1 SIGA: W AO qeth.736dae: 0.0.f5f0: Device is a OSD Express card (level: 0310) with link type OSD_1000 (portname: ) qeth.f02020: 0.0.f5f0: QDIO data connection isolation is deactivated qeth.47953b: 0.0.f5f0: Hardware IP fragmentation not supported on eth0 qeth.d7fdb4: 0.0.f5f0: VLAN enabled qeth.e90c78: 0.0.f5f0: Multicast enabled qeth.5a9d02: 0.0.f5f0: IPV6 enabled qeth.184d8a: 0.0.f5f0: Broadcast enabled qeth.dac2aa: 0.0.f5f0: Using SW checksumming on eth0. qeth.e32959: 0.0.f5f0: Outbound TSO enabled
An automatic configuration via DHCP is not supported in our environment, answer “2” here. Automatic configuration via DHCP? 1) Yes 2) No > 2
In the next steps enter the required network parameters. Substitute the underscored values in the examples with your values. You find the needed information on the card on your desk.Enter your IP address , netmask , and the default gateway :
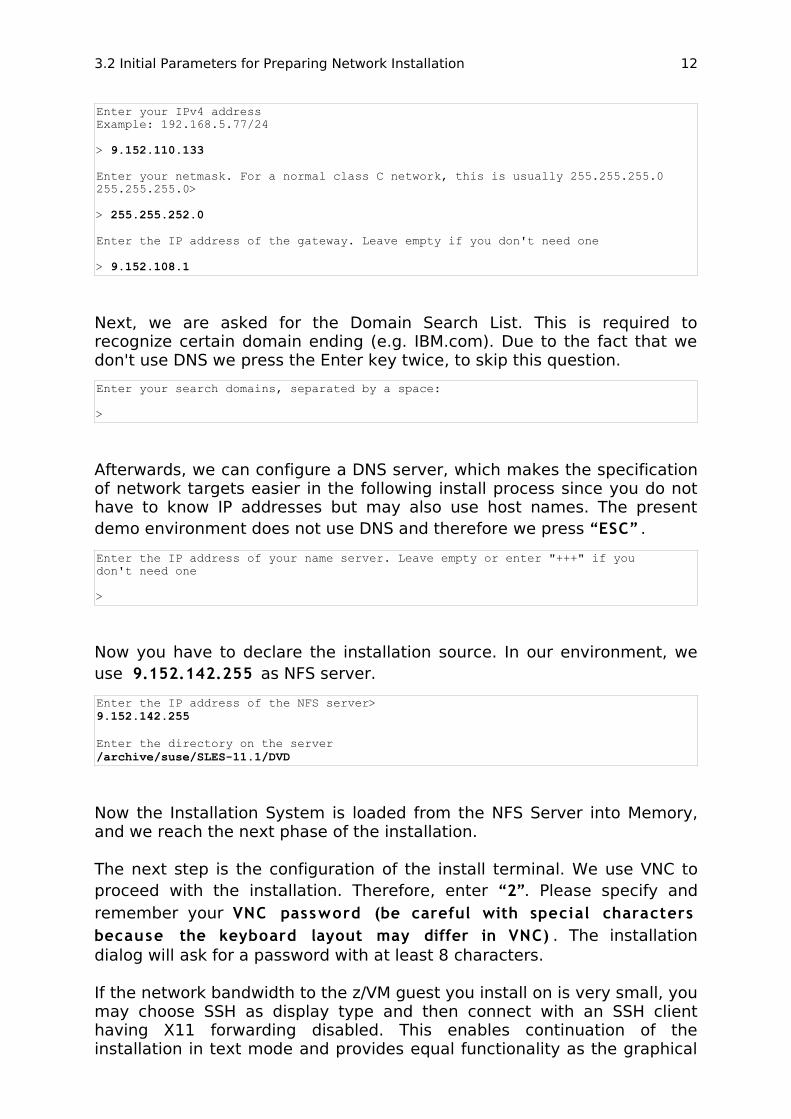
3.2 Initial Parameters for Preparing Network Installation 12
Enter your IPv4 addressExample: 192.168.5.77/24
> 9.152.110.133Enter your netmask. For a normal class C network, this is usually 255.255.255.0 255.255.255.0>
> 255.255.252.0 Enter the IP address of the gateway. Leave empty if you don't need one
> 9.152.108.1
Next, we are asked for the Domain Search List. This is required to recognize certain domain ending (e.g. IBM.com). Due to the fact that we don't use DNS we press the Enter key twice, to skip this question.Enter your search domains, separated by a space:
>
Afterwards, we can configure a DNS server, which makes the specification of network targets easier in the following install process since you do not have to know IP addresses but may also use host names. The present demo environment does not use DNS and therefore we press “ESC” .Enter the IP address of your name server. Leave empty or enter "+++" if you don't need one
>
Now you have to declare the installation source. In our environment, we use 9.152.142.255 as NFS server.Enter the IP address of the NFS server> 9.152.142.255Enter the directory on the server /archive/suse/SLES-11.1/DVD
Now the Installation System is loaded from the NFS Server into Memory, and we reach the next phase of the installation.
The next step is the configuration of the install terminal. We use VNC to proceed with the installation. Therefore, enter “2”. Please specify and remember your VNC password (be careful with special characters because the keyboard layout may differ in VNC) . The installation dialog will ask for a password with at least 8 characters.
If the network bandwidth to the z/VM guest you install on is very small, you may choose SSH as display type and then connect with an SSH client having X11 forwarding disabled. This enables continuation of the installation in text mode and provides equal functionality as the graphical
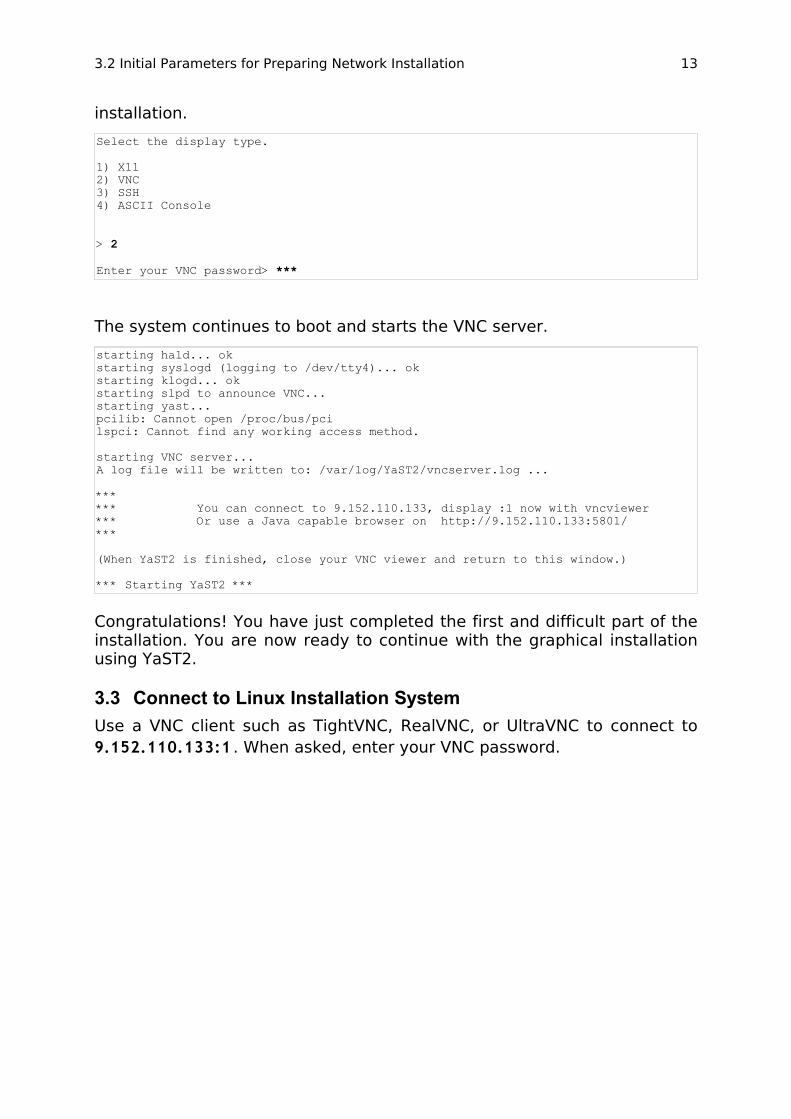
3.2 Initial Parameters for Preparing Network Installation 13
installation.Select the display type. 1) X11 2) VNC 3) SSH 4) ASCII Console
> 2 Enter your VNC password> ***
The system continues to boot and starts the VNC server. starting hald... ok starting syslogd (logging to /dev/tty4)... ok starting klogd... ok starting slpd to announce VNC... starting yast... pcilib: Cannot open /proc/bus/pci lspci: Cannot find any working access method. starting VNC server... A log file will be written to: /var/log/YaST2/vncserver.log ... *** *** You can connect to 9.152.110.133, display :1 now with vncviewer *** Or use a Java capable browser on http://9.152.110.133:5801/ *** (When YaST2 is finished, close your VNC viewer and return to this window.) *** Starting YaST2 ***
Congratulations! You have just completed the first and difficult part of the installation. You are now ready to continue with the graphical installation using YaST2.
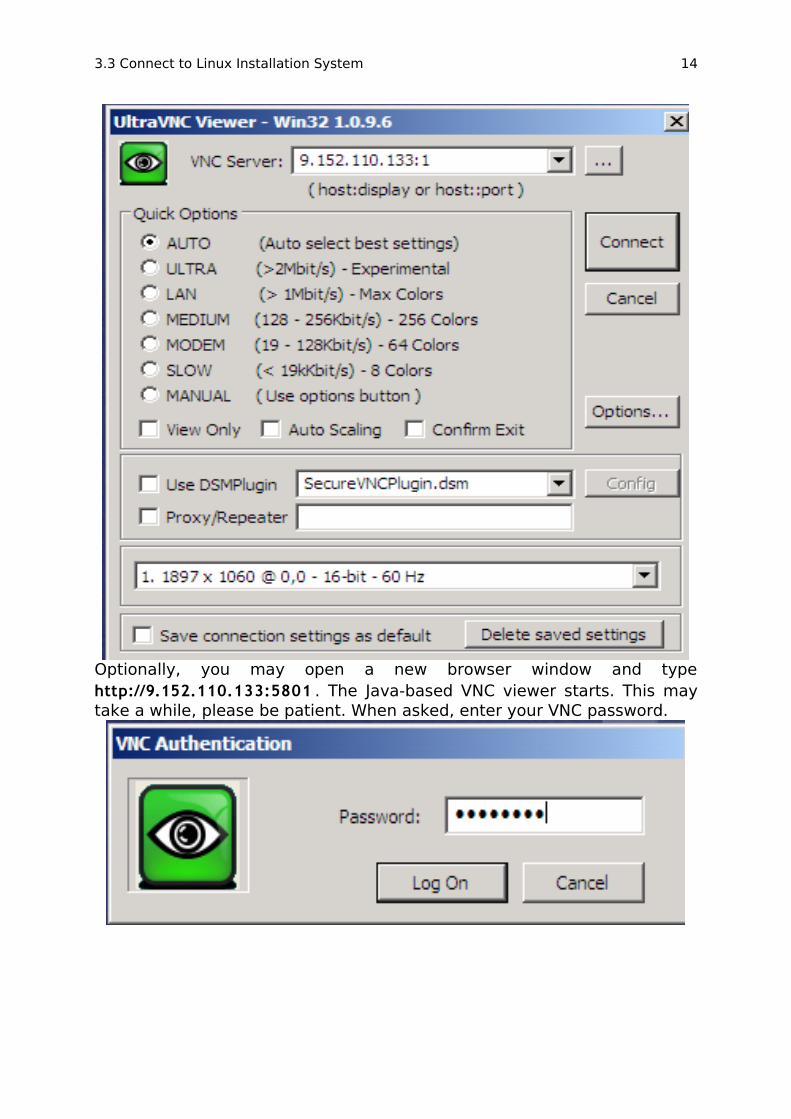
3.3 Connect to Linux Installation SystemUse a VNC client such as TightVNC, RealVNC, or UltraVNC to connect to 9.152.110.133:1 . When asked, enter your VNC password.
3.3 Connect to Linux Installation System 14
Optionally, you may open a new browser window and type http://9.152.110.133:5801 . The Java-based VNC viewer starts. This may take a while, please be patient. When asked, enter your VNC password.

4 Installation Phase 1 15
4 Installation Phase 1The next part includes the customization of the installation system (language, networking, target disk devices, and software) and the installation of a permanent Linux system. Installation Phase 1 consists of a number of wizard screens provided by the SLES installer YaST.
4.1 Language / License AgreementThe YaST install session starts with the language selection. On the left hand side you see a preview on the next steps. In the right frame select English as language.
On the same screen also press the radio button: 'Yes, I agree to the License Terms' . Then continue with 'Next '.
4.1 Language / License Agreement 16
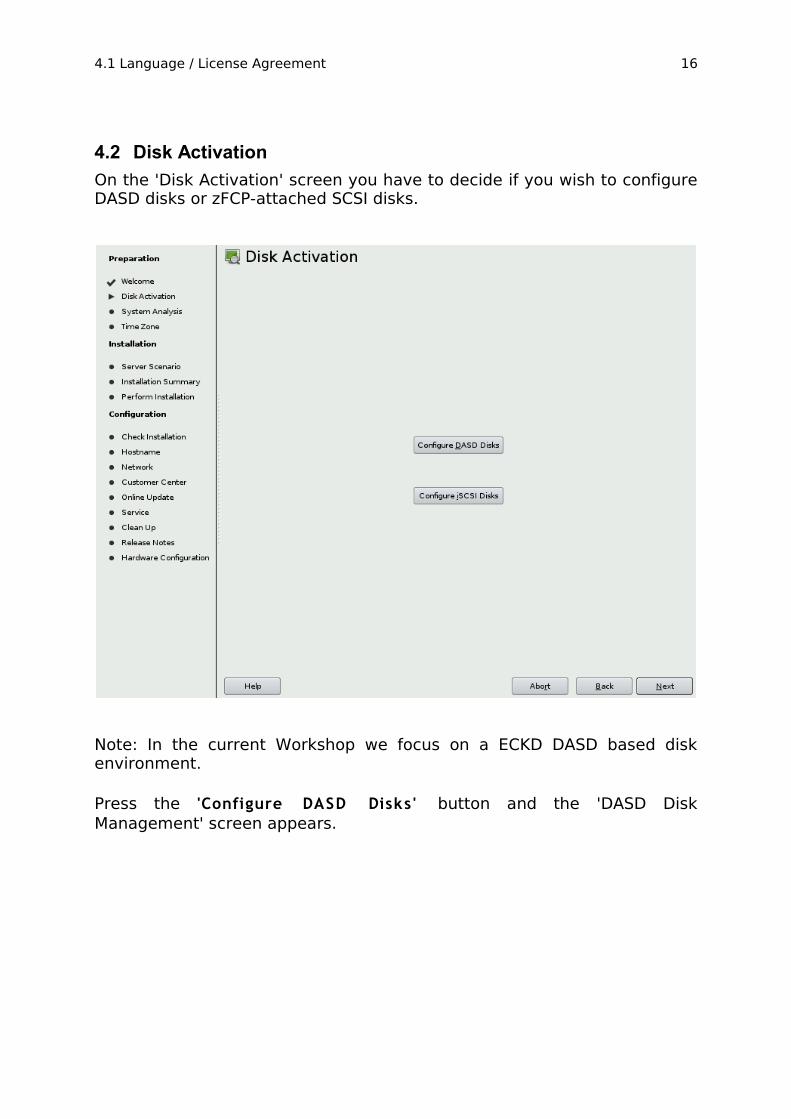
4.2 Disk ActivationOn the 'Disk Activation' screen you have to decide if you wish to configure DASD disks or zFCP-attached SCSI disks.
Note: In the current Workshop we focus on a ECKD DASD based disk environment.
Press the 'Configure DASD Disks' button and the 'DASD Disk Management' screen appears.

4.2 Disk Activation 17
4.2.1 Configure DASD DisksOn the 'DASD Disk Management' screen a list of disk appear.
Within the current class room environment each virtual machine is configured with one DASD disk, represented by the virtual device id 0.0.e99f. We'll use that disk for the installation of the operating system.
Mark the devices used for installation and make sure that you select the that entry (disk e99f) in the dialog by pressing the “Select or Deselect” button. Subsequently press the “Perform Action” button and select “Activate” . Once this operation is completed, the corresponding line for this particular disk should contain more entries, as shown in the screen below:

4.2 Disk Activation 18
Press the “Perform Action” button again. This time select “Format”. You will see a prompt about the parallel formatting of dasd disks. The initial lowlevel format of a dasd disk, depending on the size, can take quite some time. This is why it is under normal circumstances recommended to perform multiple disks at a time.
For this workshop we only use one disk. Therefore the setting is not important. Press the “OK” button to continue to the next screen.

4.2 Disk Activation 19
We are promoted to confirm that we are really sure, to format the following disk. Select “Yes” to continue.
Once this operation is completed, you return automatically to the original “DASD Disk Management” dialog. This offers the possibility to activate additional disks. At the moment this is not necessary. Therefore press “Next” twice to advance to the next step of the installation dialog.

4.3 Install vs. Upgrade 20
4.3 Install vs. UpgradeWe have to do a new installation, which might be the only mode you can select. Proceed with “Next”.

4.4 Clock and Time Zone 21
4.4 Clock and Time ZoneNow choose the timezone. Continue with 'Next' .
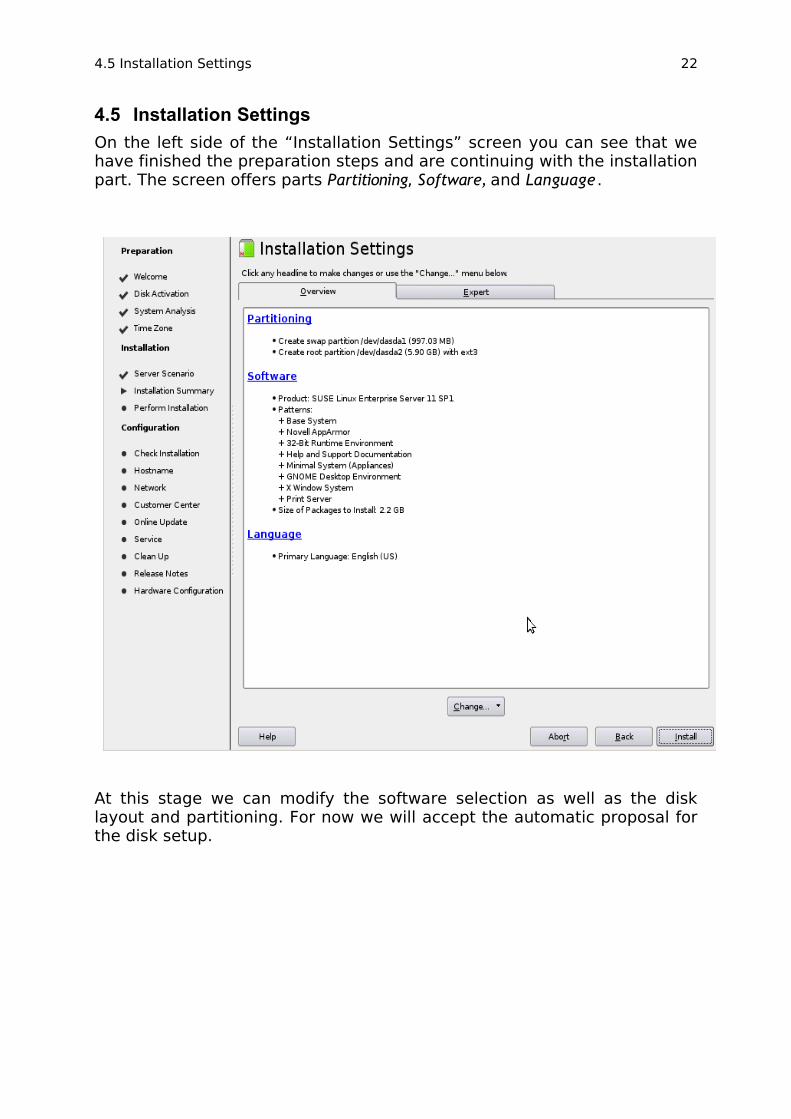
4.5 Installation Settings 22
4.5 Installation SettingsOn the left side of the “Installation Settings” screen you can see that we have finished the preparation steps and are continuing with the installation part. The screen offers parts Partitioning, Software, and Language .
At this stage we can modify the software selection as well as the disk layout and partitioning. For now we will accept the automatic proposal for the disk setup.
4.6 Software Packages Selection 23
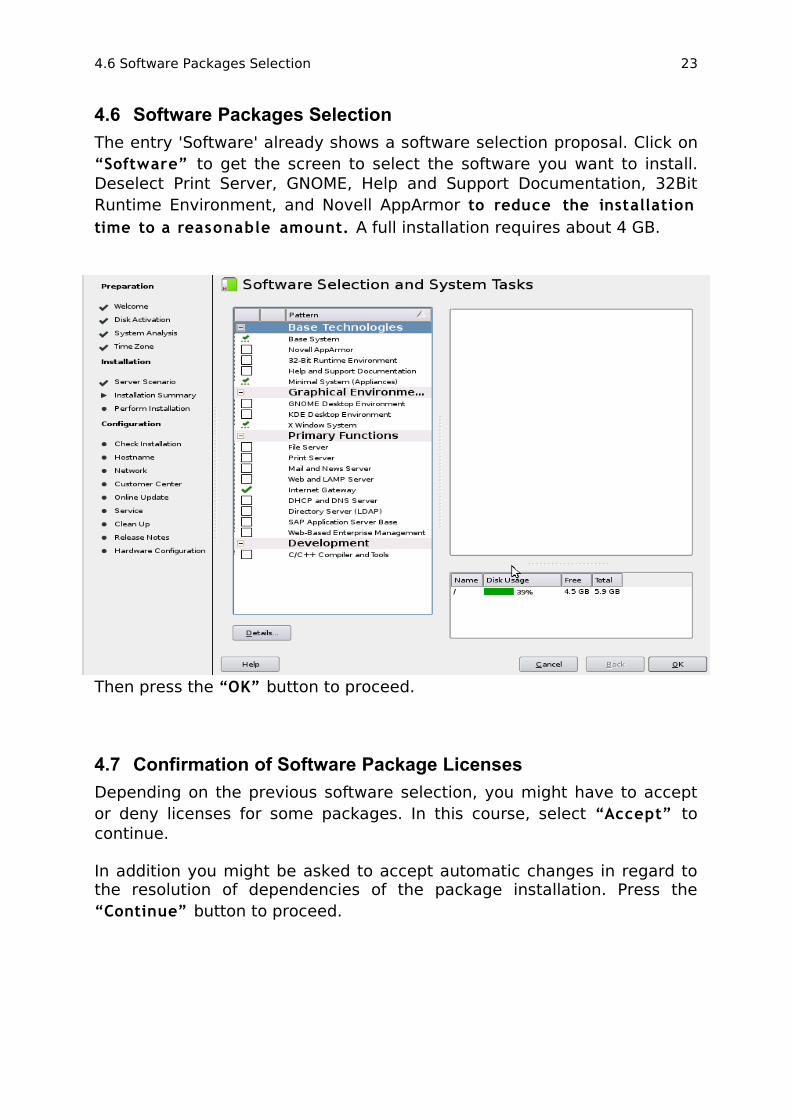
4.6 Software Packages SelectionThe entry 'Software' already shows a software selection proposal. Click on “Software” to get the screen to select the software you want to install. Deselect Print Server, GNOME, Help and Support Documentation, 32Bit Runtime Environment, and Novell AppArmor to reduce the installation time to a reasonable amount. A full installation requires about 4 GB.
Then press the “OK” button to proceed.
4.7 Confirmation of Software Package LicensesDepending on the previous software selection, you might have to accept or deny licenses for some packages. In this course, select “Accept” to continue.
In addition you might be asked to accept automatic changes in regard to the resolution of dependencies of the package installation. Press the “Continue” button to proceed.
4.8 Confirmation Before Modifying Disks 24
4.8 Confirmation Before Modifying DisksNow the installation process is ready to start. Click 'Install' on the 'Installation Settings' screen to start the installation and confirm with “Install” in the pop up window.
Remember that you are still working on a Linux image which was loaded in the volatile storage of your z/VM guest only.
The installation starts formatting the disks.
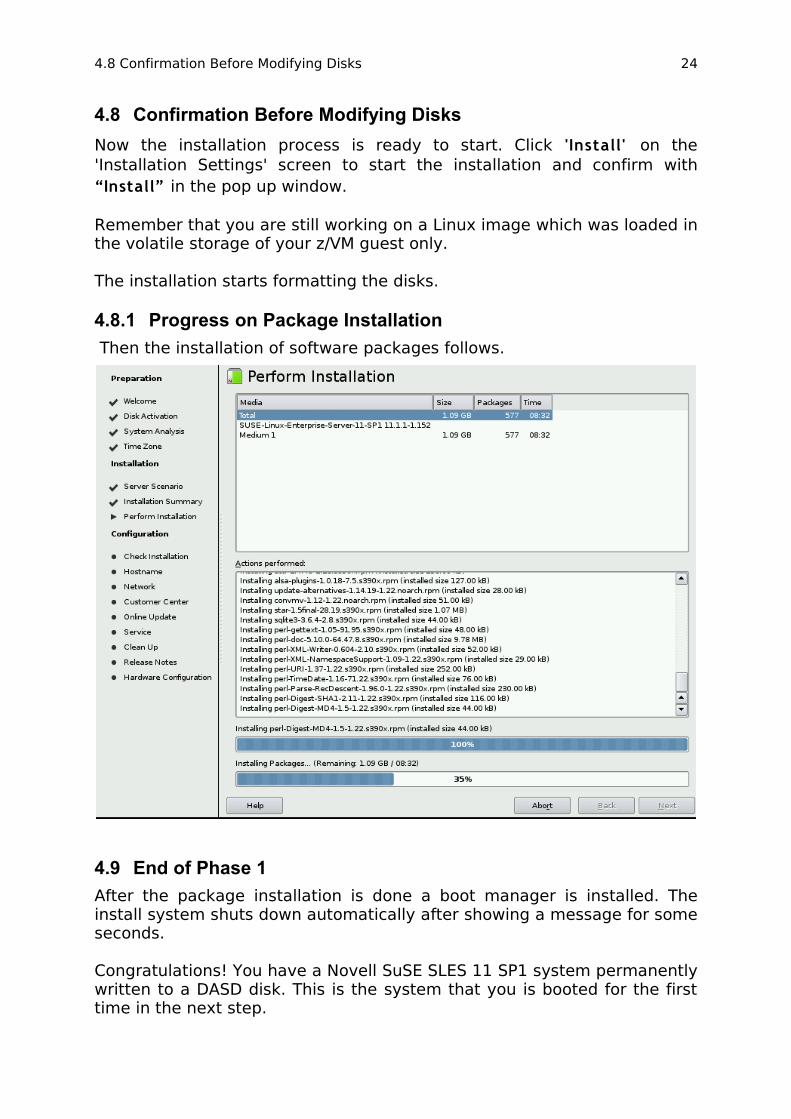
4.8.1 Progress on Package Installation Then the installation of software packages follows.
4.9 End of Phase 1After the package installation is done a boot manager is installed. The install system shuts down automatically after showing a message for some seconds.
Congratulations! You have a Novell SuSE SLES 11 SP1 system permanently written to a DASD disk. This is the system that you is booted for the first time in the next step.
5 Installation Phase 2 25
5 Installation Phase 2
5.1 Boot of Installed SystemNow the Linux system boots automatically.
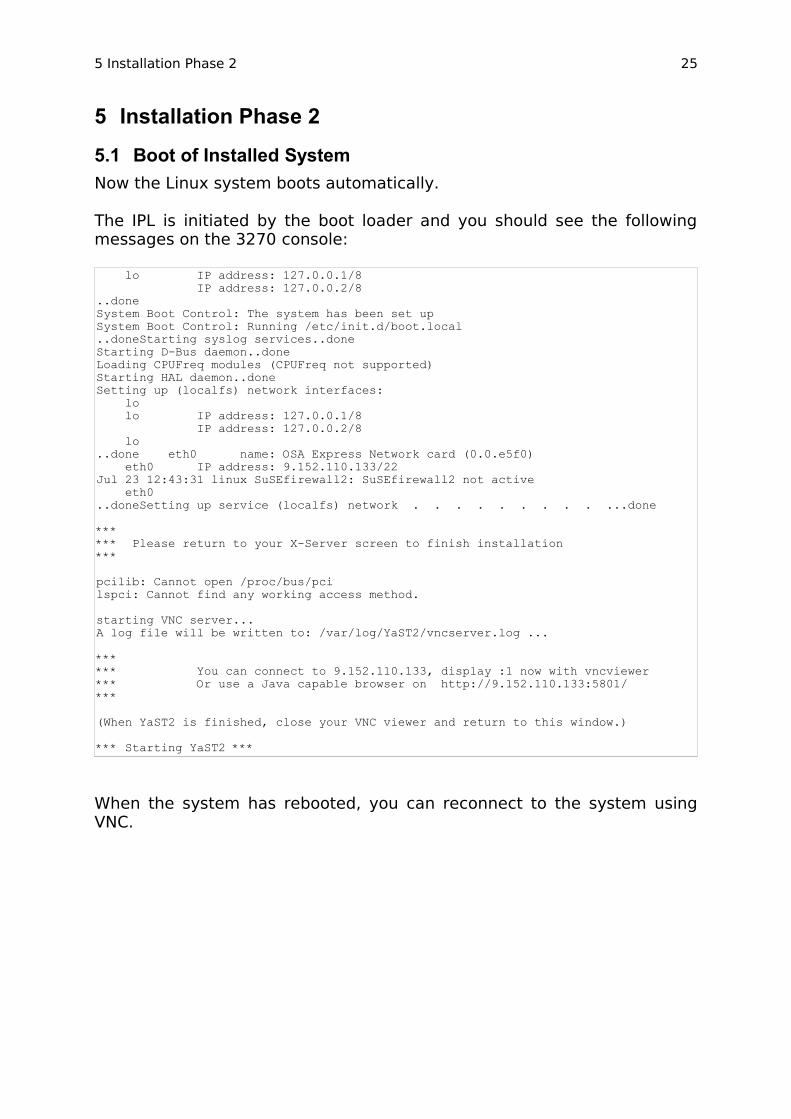
The IPL is initiated by the boot loader and you should see the following messages on the 3270 console:
lo IP address: 127.0.0.1/8 IP address: 127.0.0.2/8 ..done System Boot Control: The system has been set up System Boot Control: Running /etc/init.d/boot.local ..doneStarting syslog services..done Starting D-Bus daemon..done Loading CPUFreq modules (CPUFreq not supported) Starting HAL daemon..done Setting up (localfs) network interfaces: lo lo IP address: 127.0.0.1/8 IP address: 127.0.0.2/8 lo ..done eth0 name: OSA Express Network card (0.0.e5f0) eth0 IP address: 9.152.110.133/22 Jul 23 12:43:31 linux SuSEfirewall2: SuSEfirewall2 not active eth0 ..doneSetting up service (localfs) network . . . . . . . . . ...done *** *** Please return to your X-Server screen to finish installation *** pcilib: Cannot open /proc/bus/pci lspci: Cannot find any working access method. starting VNC server... A log file will be written to: /var/log/YaST2/vncserver.log ... *** *** You can connect to 9.152.110.133, display :1 now with vncviewer *** Or use a Java capable browser on http://9.152.110.133:5801/ *** (When YaST2 is finished, close your VNC viewer and return to this window.) *** Starting YaST2 ***
When the system has rebooted, you can reconnect to the system using VNC.

5.2 Root Password 26
5.2 Root PasswordThen you have to specify a root user password . Please remember the password since you will need it later in this session.
Hint: With the Java-based VNC client, you might have to point the cursor into the fields.
When you have specified your root password, press the “Next” button.
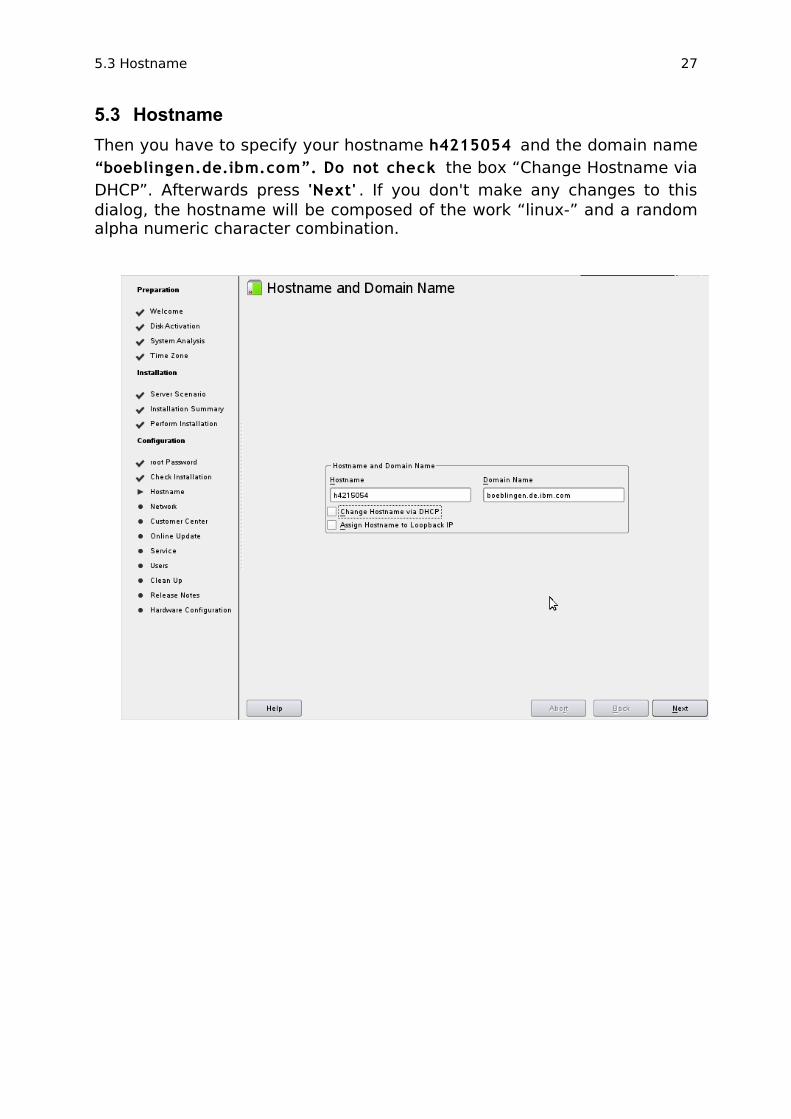
5.3 Hostname 27
5.3 HostnameThen you have to specify your hostname h4215054 and the domain name “boeblingen.de.ibm.com”. Do not check the box “Change Hostname via DHCP”. Afterwards press 'Next' . If you don't make any changes to this dialog, the hostname will be composed of the work “linux-” and a random alpha numeric character combination.
5.4 Network Configuration 28
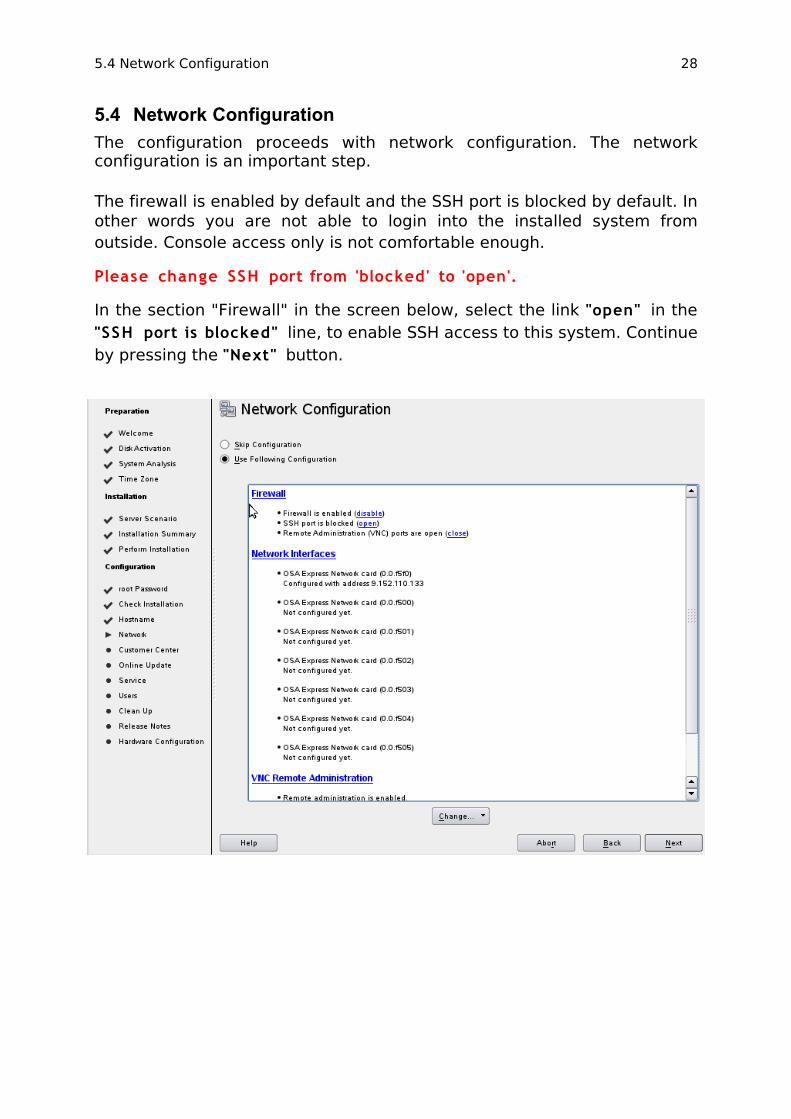
5.4 Network ConfigurationThe configuration proceeds with network configuration. The network configuration is an important step.
The firewall is enabled by default and the SSH port is blocked by default. In other words you are not able to login into the installed system from outside. Console access only is not comfortable enough.
Please change SSH port from 'blocked' to 'open'.
In the section "Firewall" in the screen below, select the link "open" in the "SSH port is blocked" line, to enable SSH access to this system. Continue by pressing the "Next" button.

5.5 Test Internet Connection 29
5.5 Test Internet ConnectionThe system offers to test the Internet connection and to check for updates. Please skip this test , since our limited environment has no connection to the Internet and proceed with the “Next” button.
5.6 Online UpdateSince we don't have access to the Internet and have already skipped the Internet connection test, the dialog for online updates is skipped and does not appear.

5.7 Services Configuration 30
5.7 Services ConfigurationSkip the services configuration on the next screen too and press “Next”.

5.8 User and Group Configuration 31
5.8 User and Group ConfigurationThe next panel deals with the configuration of user accounts and corresponding user groups. Here in the class we use the “Local ” authentication method. Continue with “Next”.

5.8 User and Group Configuration 32
5.8.1 First Local User AccountIn the next step you have to define the first user for the system. You may skip this by entering nothing. Normally it is advisable, to create an unprivileged user, especially when you are new to Linux / Unix in general. Continue with 'Next' .

5.9 Release Notes 33
5.9 Release NotesAfter the automatic configuration and cleanup, the release notes are shown for SLES11 SP1. You can read the release notes or press “Next”.

5.10 Hardware Configuration 34
5.10 Hardware Configuration
5.10.1 Configure PrintersIn the last steps the system tries to detect hardware such as printers (CUPS). The installation finishes successfully with this screen. Continue with “Next”.

5.10 Hardware Configuration 35
5.10.2 Progress on Writing Autoyast FilePress 'Finish' and the system stores an autoyast.xml file for future cloning by means of unattended installation. The file will be stored in the /root/ directory.
5.11 Transition to Installed System 36
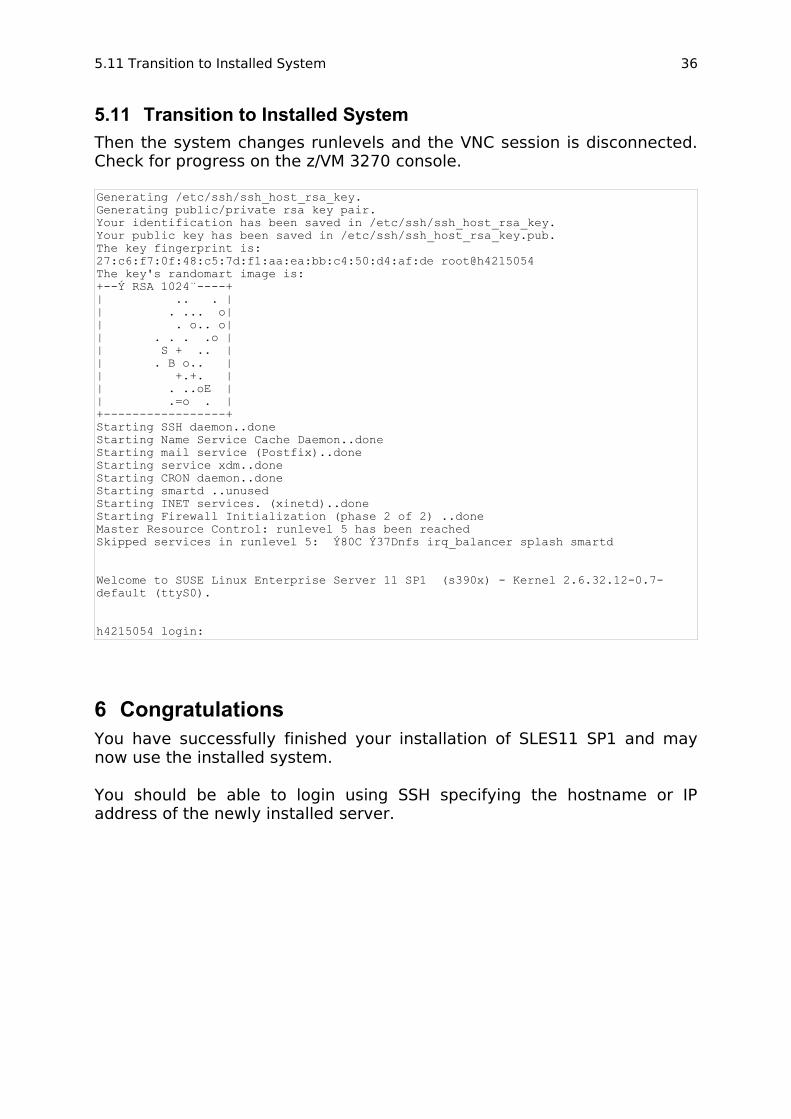
5.11 Transition to Installed SystemThen the system changes runlevels and the VNC session is disconnected. Check for progress on the z/VM 3270 console.
Generating /etc/ssh/ssh_host_rsa_key. Generating public/private rsa key pair. Your identification has been saved in /etc/ssh/ssh_host_rsa_key. Your public key has been saved in /etc/ssh/ssh_host_rsa_key.pub. The key fingerprint is: 27:c6:f7:0f:48:c5:7d:f1:aa:ea:bb:c4:50:d4:af:de root@h4215054 The key's randomart image is: +--Ý RSA 1024¨----+ | .. . | | . ... o| | . o.. o| | . . . .o | | S + .. | | . B o.. | | +.+. | | . ..oE | | .=o . | +-----------------+ Starting SSH daemon..done Starting Name Service Cache Daemon..done Starting mail service (Postfix)..done Starting service xdm..done Starting CRON daemon..done Starting smartd ..unused Starting INET services. (xinetd)..done Starting Firewall Initialization (phase 2 of 2) ..done Master Resource Control: runlevel 5 has been reached Skipped services in runlevel 5: Ý80C Ý37Dnfs irq_balancer splash smartd Welcome to SUSE Linux Enterprise Server 11 SP1 (s390x) - Kernel 2.6.32.12-0.7-default (ttyS0). h4215054 login:
6 CongratulationsYou have successfully finished your installation of SLES11 SP1 and may now use the installed system.
You should be able to login using SSH specifying the hostname or IP address of the newly installed server.

7 Troubleshooting 37
7 Troubleshooting
7.1 Installation Phase 1 (linuxrc)If anything goes wrong during the steps between booting the install environment and the message that you may now login over the network, you may reboot into the installer using debug options. To do so, please add the following options to SLES11.PARM:
linuxrcstderr=/dev/console linuxrcdebug=4 startshell=1
This gives debug output on the 3270 console and it also provides a shell on the 3270 console, before the message about logging in over the network. You may use this shell for looking into the current system configuration or for issuing simple commands. Please note, that the 3270 console is a “dumb” terminal, i.e. it does not support full screen applications such as common text editors like “vi”. You may switch to line mode based editors such as “ed”, “ex”, or “sed” to edit text files if necessary. Please be also aware, that long running commands might not be interruptible, so call commands with options that make them return in time voluntarily. Installation will continue on exiting the shell.
7.2 Installation Phase 2 (YaST)If you have chosen SSH as display type, you may perform arbitrarily many more SSH logins over the network to get full screen capable terminals usable for troubleshooting in parallel to the running YaST installer. Depending on your local terminal capabilities those SSH sessions do not have the limitations of the 3270 console. For troubleshooting YaST later on, you may start looking at the directory “/var/log/YaST2/”, especially the files “y2start.log” and “y2log”. You may produce a snapshot of essential installation progress information, which can later be used for problem determination, by executing the following command:
save_y2logs /tmp/y2logs.tgz
Please note that any directory tree besides “/mnt/” only resides in a temporary RAM disk which will vanish with the next reboot. You may save files using “scp” from the install system to remote computers but probably not the other way round. This way, you can store, e.g., /tmp/y2logs.tgz in a safe place.
If you use VNC as display method for the graphical installation, you may want to consider to specify both UseVNC and UseSSH (with passwords for each one) in your parm file. This enables the login via SSH, after the install starts via VNC.

8 Information Resources 38
8 Information ResourcesDetailed Information can be find on the SUSE Linux Enterprise Server 11 SP1 documentation Web page at: www.novell.com/documentation/sles11
We recommend the following documents: • Release Notes for SUSE Linux Enterprise Server 11 SP1• “Architecture-Specific Information (IBM System z)” (part 1)• “SLES 11 SP1 Installation and Administration Guide” (part 2)
• “SLES 11 SP1 Starter System for System z Installation Guide”• “SLES 11 Storage Administration Guide”
IBM provides additional information from the Linux on System z development team to Linux on System z distribution releases available at: ibm.com/developerworks/linux/linux390/distribution_hints.html

8 Information Resources 39
Copyright IBM Corporation 2011IBM Systems and Technology Group Route 100 Somers, New York 10589 U.S.A.Produced in the United States of America, 05/2011
IBM, IBM logo, System z, and z/VM are trademarks or registered trademarks of the International Business Machines Corporation.Linux is a registered trademark of Linus Torvalds in the United States, other countries, or both. UNIX is a registered trademark of The Open Group in the United States and other countries.Microsoft, Windows, Windows NT, and the Windows logo are trademarks of Microsoft Corporation in the United States, other countries, or both.Intel, Intel logo, Intel Inside, Intel Inside logo, Intel Centrino, Intel Centrino logo, Celeron, Intel Xeon, Intel SpeedStep, Itanium, and Pentium are trademarks or registered trademarks of Intel Corporation or its subsidiaries in the United States and other countries.Java and all Java based trademarks and logos are trademarks or registered trademarks of Oracle and/or its affiliates. Performance is in Internal Throughput Rate (ITR) ratio based on measurements and projections using standard IBM benchmarks in a controlled environment. The actual throughput that any user will experience will vary depending upon considerations such as the amount of multiprogramming in the user’s job stream, the I/O configuration, the storage configuration, and the workload processed. Therefore, no assurance can be given that an individual user will achieve throughput improvements equivalent to the performance ratios stated here.All statements regarding IBM’s future direction and intent are subject to change or withdrawal without notice, and represent goals and objectives only.