Embed Size (px)
DESCRIPTION
Linux Certification Ch. 2 PPT
Citation preview
Linux+ Guide to Linux Certification, Third Edition
Chapter 2Linux Installation and Usage
Linux+ Guide to Linux Certification, 3e 2
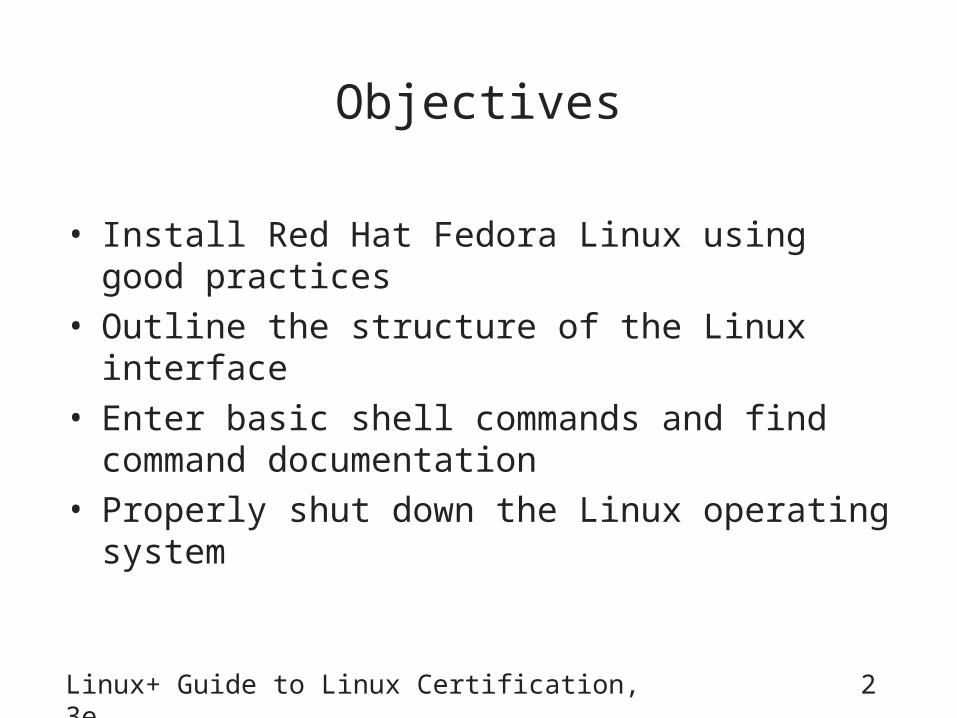
Objectives
• Install Red Hat Fedora Linux using good practices
• Outline the structure of the Linux interface
• Enter basic shell commands and find command documentation
• Properly shut down the Linux operating system
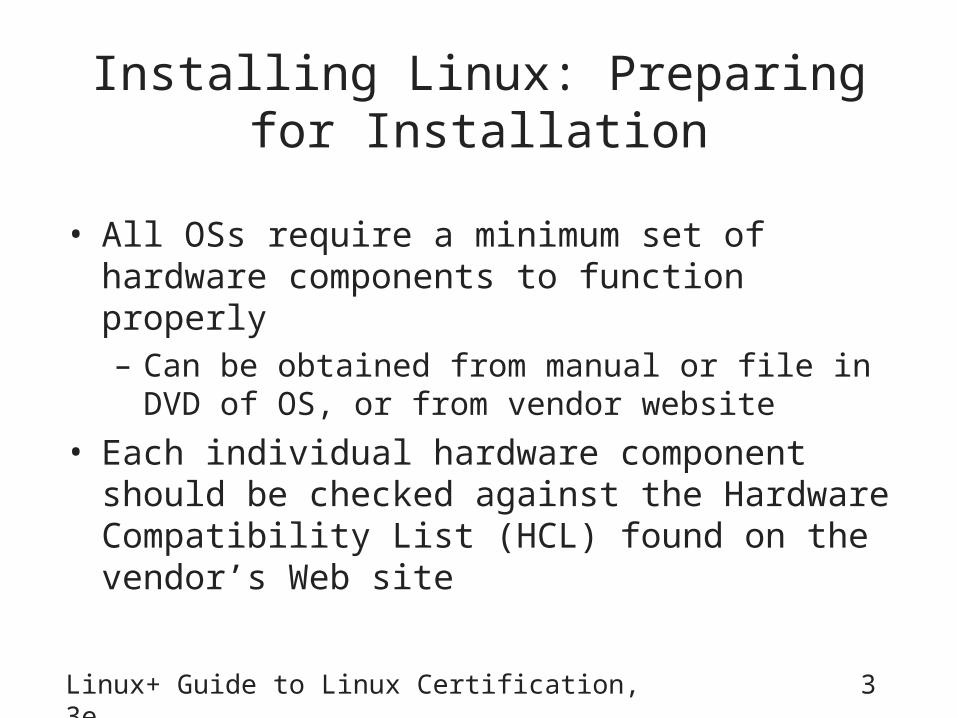
Installing Linux: Preparing for Installation
• All OSs require a minimum set of hardware components to function properly– Can be obtained from manual or file in DVD of OS,
or from vendor website
• Each individual hardware component should be checked against the Hardware Compatibility List (HCL) found on the vendor’s Web site
Linux+ Guide to Linux Certification, 3e 3
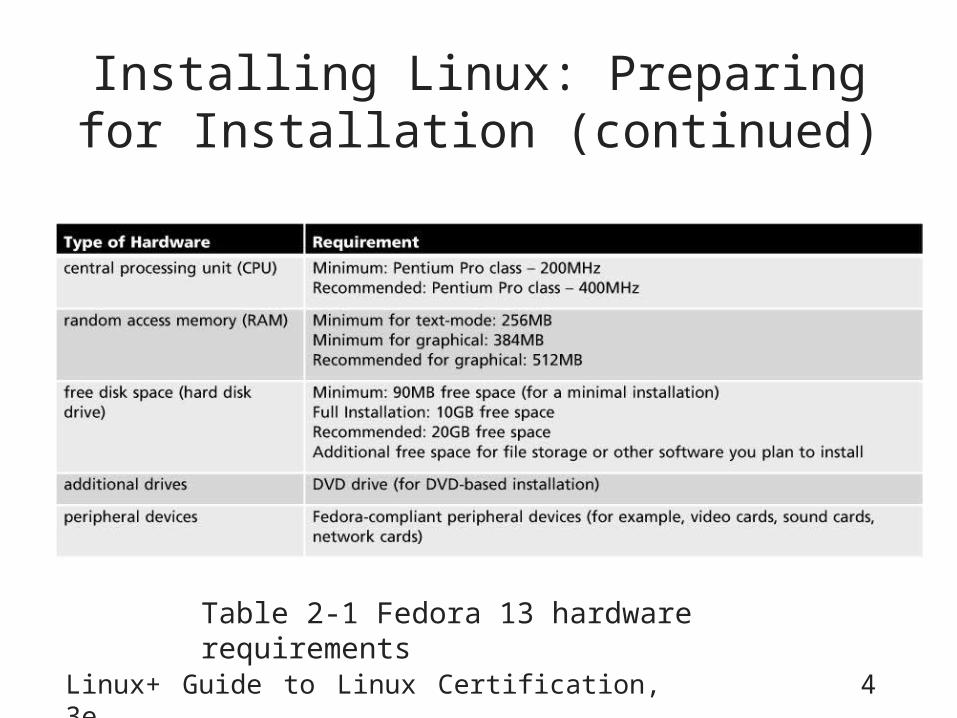
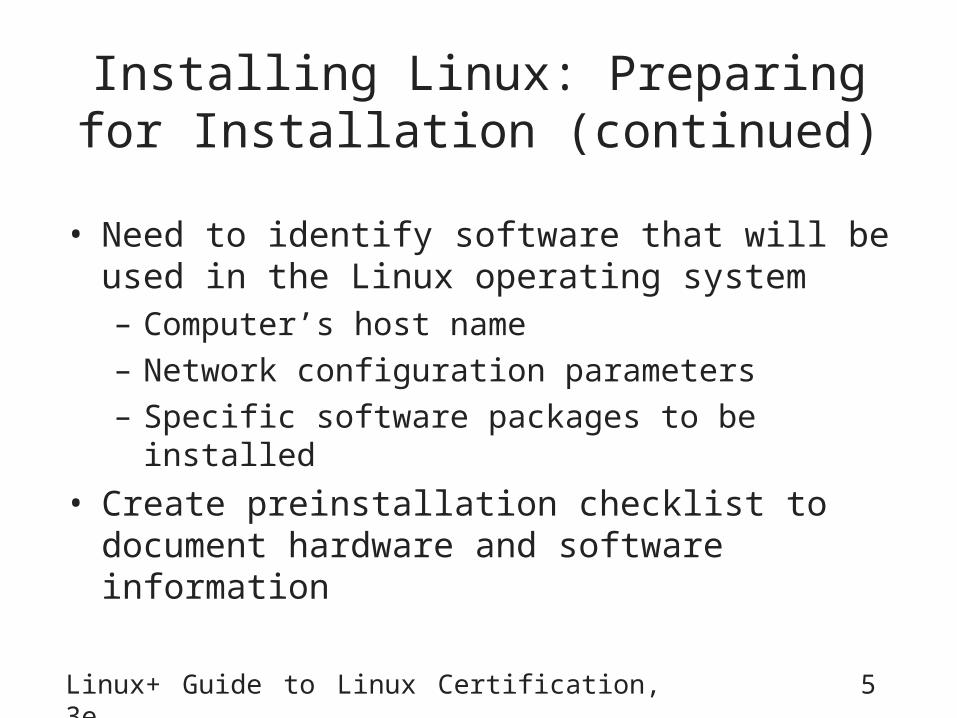
Installing Linux: Preparing for Installation (continued)
Linux+ Guide to Linux Certification, 3e 4
Table 2-1 Fedora 13 hardware requirements
Installing Linux: Preparing for Installation (continued)
• Need to identify software that will be used in the Linux operating system– Computer’s host name– Network configuration parameters– Specific software packages to be installed
• Create preinstallation checklist to document hardware and software information
Linux+ Guide to Linux Certification, 3e 5
Linux+ Guide to Linux Certification, 3e 6
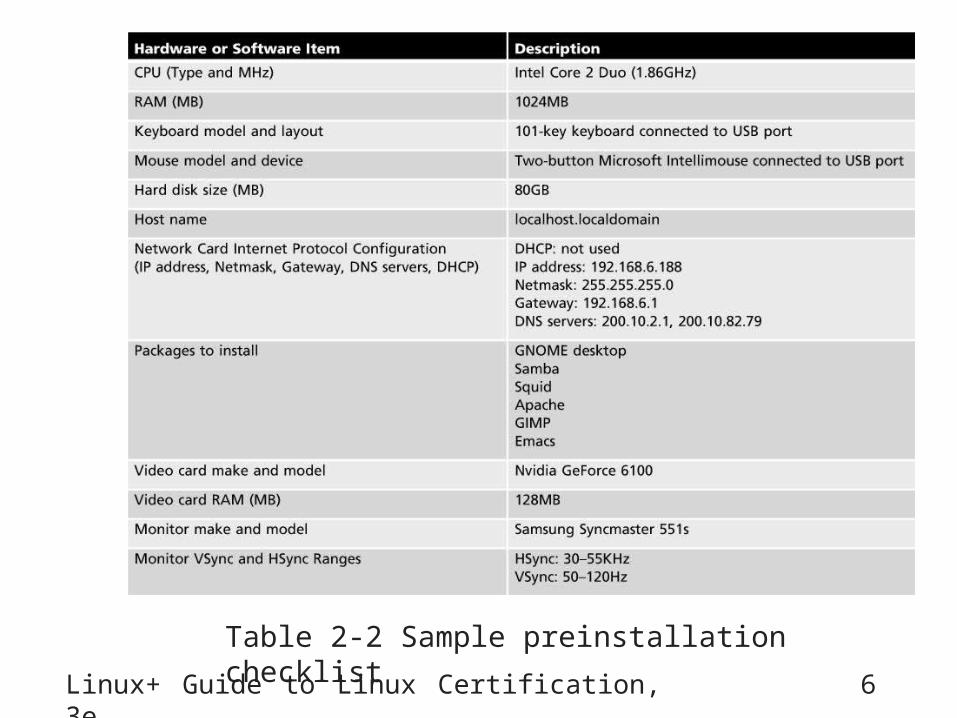
Table 2-2 Sample preinstallation checklist
Linux+ Guide to Linux Certification, 3e 7
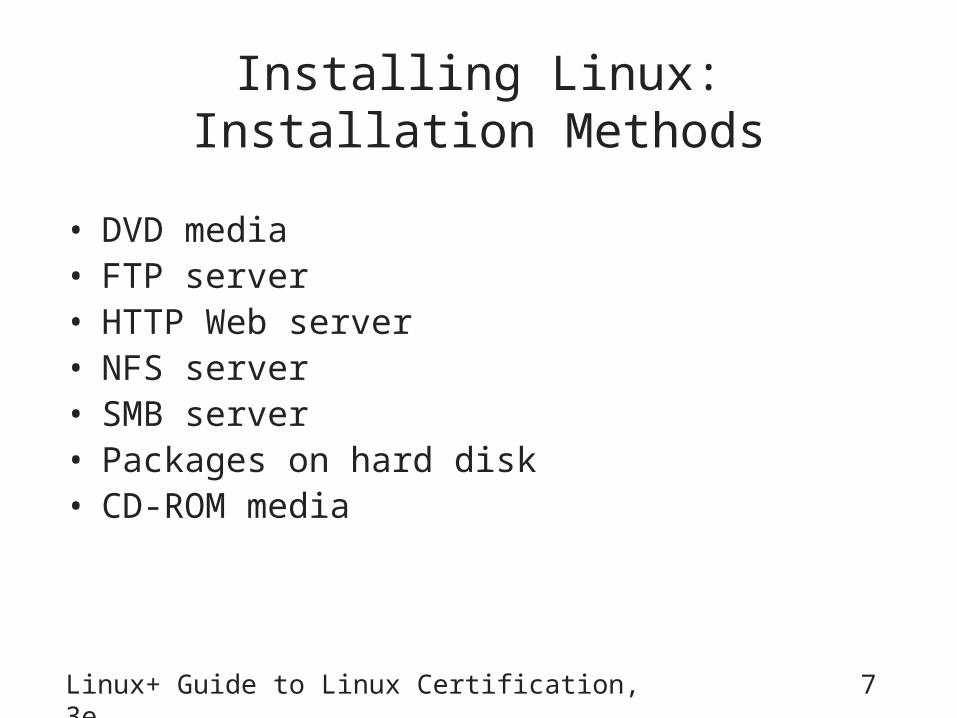
Installing Linux: Installation Methods
• DVD media• FTP server• HTTP Web server• NFS server• SMB server• Packages on hard disk• CD-ROM media
Linux+ Guide to Linux Certification, 3e 8
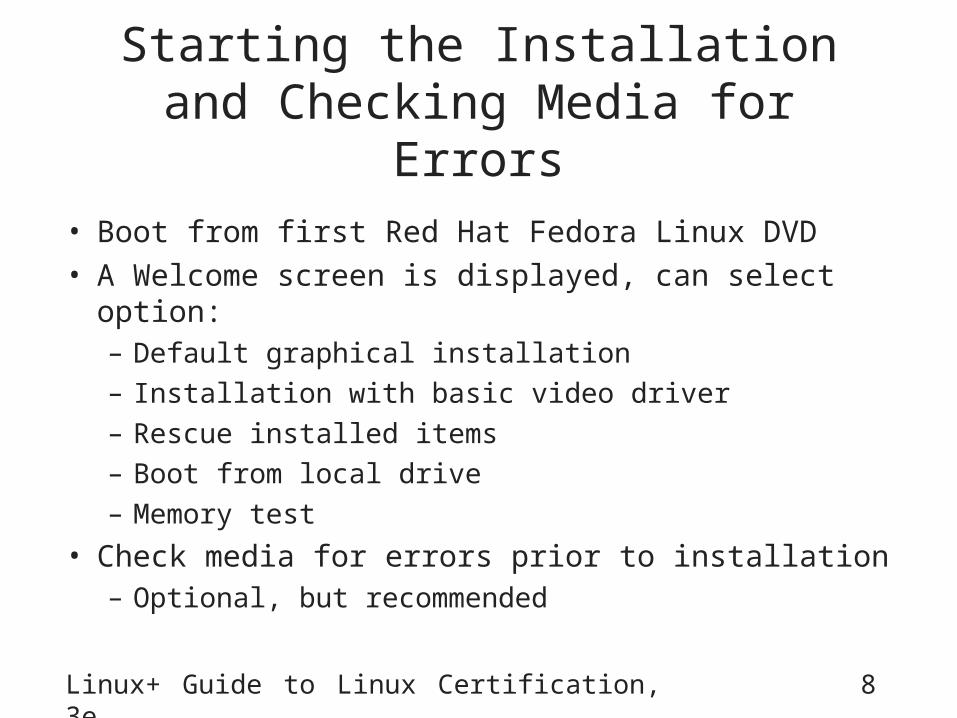
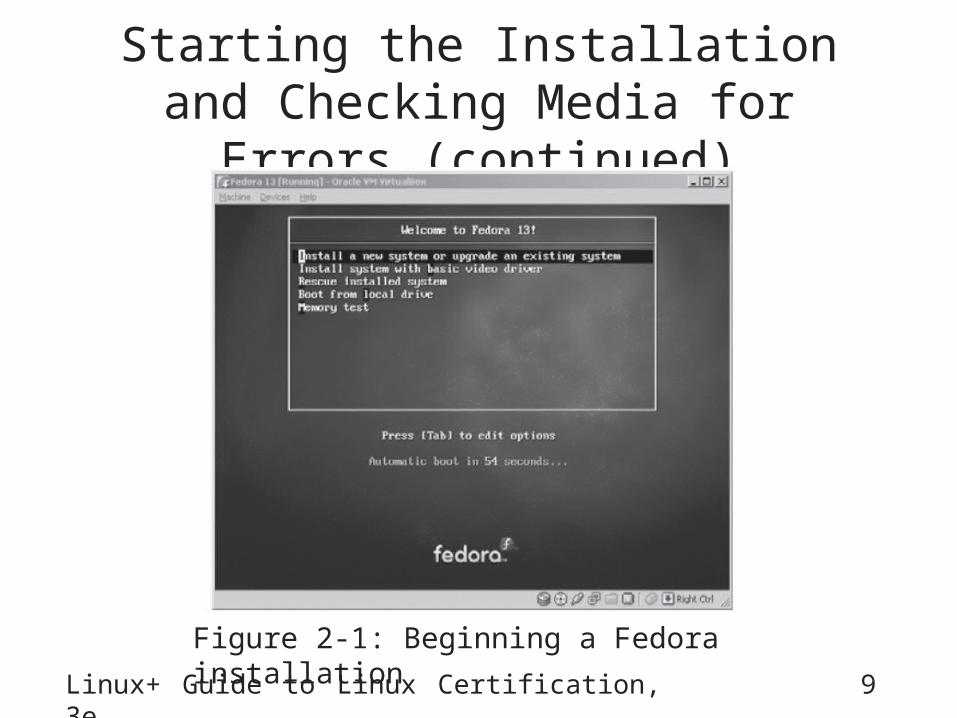
Starting the Installation and Checking Media for Errors
• Boot from first Red Hat Fedora Linux DVD
• A Welcome screen is displayed, can select option:– Default graphical installation– Installation with basic video driver– Rescue installed items– Boot from local drive– Memory test
• Check media for errors prior to installation– Optional, but recommended
Linux+ Guide to Linux Certification, 3e 9
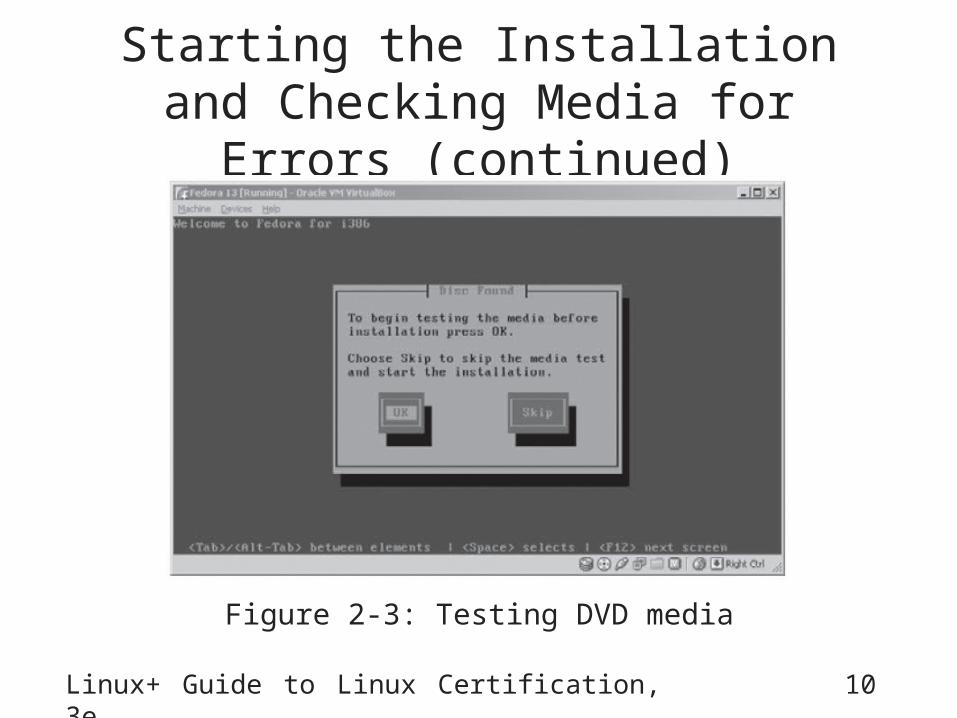
Starting the Installation and Checking Media for Errors (continued)
Figure 2-1: Beginning a Fedora installation
Linux+ Guide to Linux Certification, 3e 10
Starting the Installation and Checking Media for Errors (continued)
Figure 2-3: Testing DVD media
Linux+ Guide to Linux Certification, 3e 11
Choosing the Language, Keyboard, and Storage Type
• Allowed to choose installation language
• Choose keyboard configuration– Keyboard model and layout automatically detected
• Select types of storage devices used to host the Linux OS– For internal or locally attached hard drive installation,
select Basic Storage Devices– For installation on SAN or DASD, select Specialized
Storage Devices
Linux+ Guide to Linux Certification, 3e 12
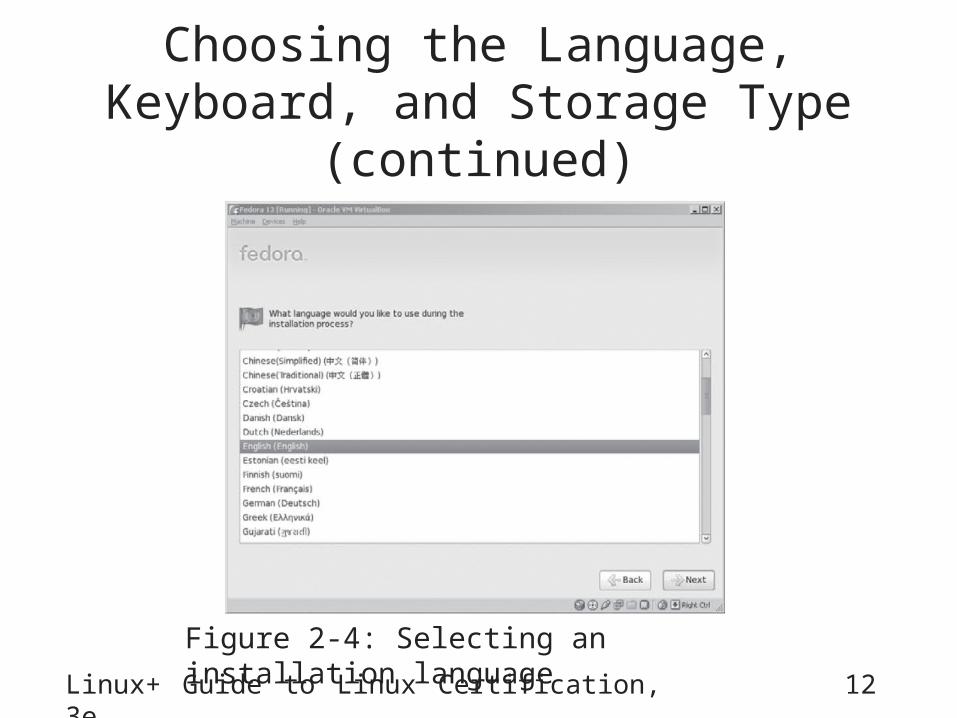
Choosing the Language, Keyboard, and Storage Type (continued)
Figure 2-4: Selecting an installation language
Linux+ Guide to Linux Certification, 3e 13
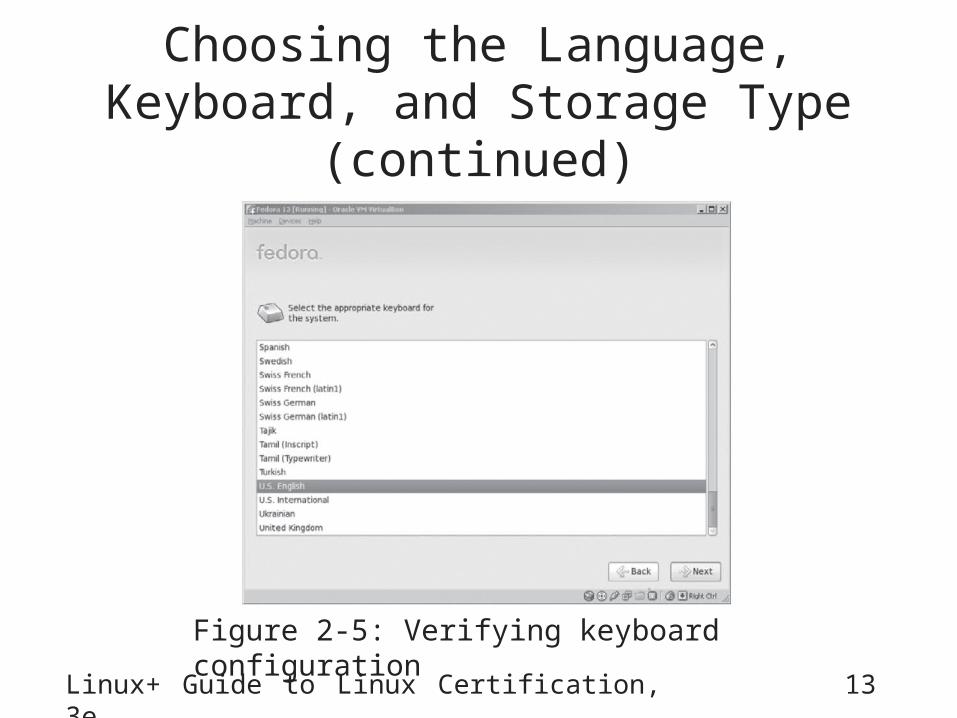
Choosing the Language, Keyboard, and Storage Type (continued)
Figure 2-5: Verifying keyboard configuration
Linux+ Guide to Linux Certification, 3e 14
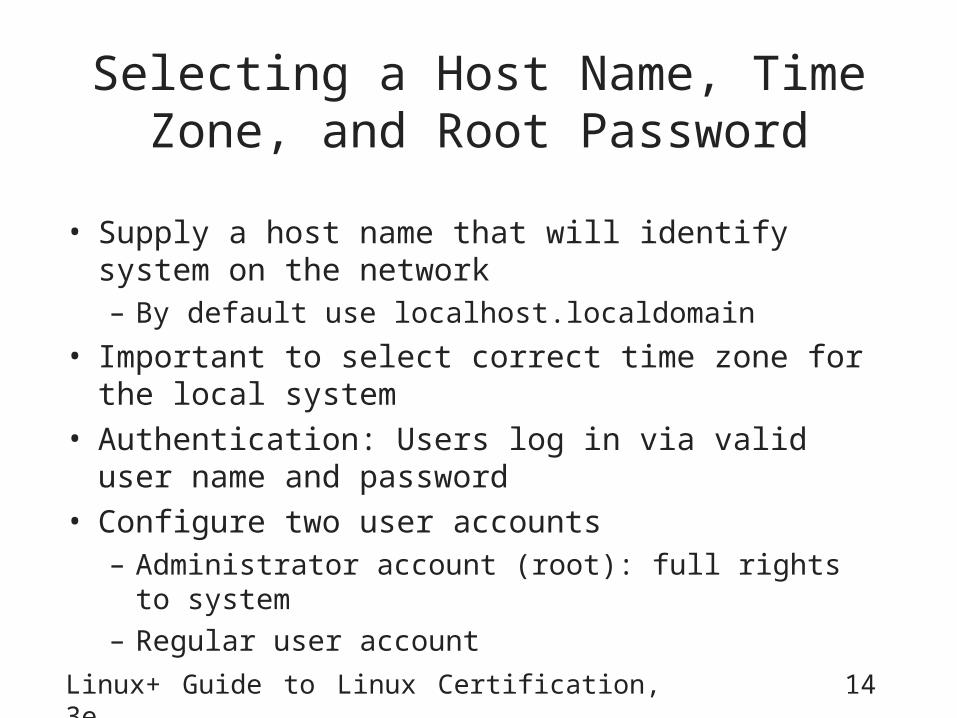
Selecting a Host Name, Time Zone, and Root Password
• Supply a host name that will identify system on the network– By default use localhost.localdomain
• Important to select correct time zone for the local system
• Authentication: Users log in via valid user name and password
• Configure two user accounts– Administrator account (root): full rights to system– Regular user account

Selecting a Host Name, Time Zone, and Root Password (continued)
Linux+ Guide to Linux Certification, 3e 15
Figure 2-7: Selecting a host name
Linux+ Guide to Linux Certification, 3e 16
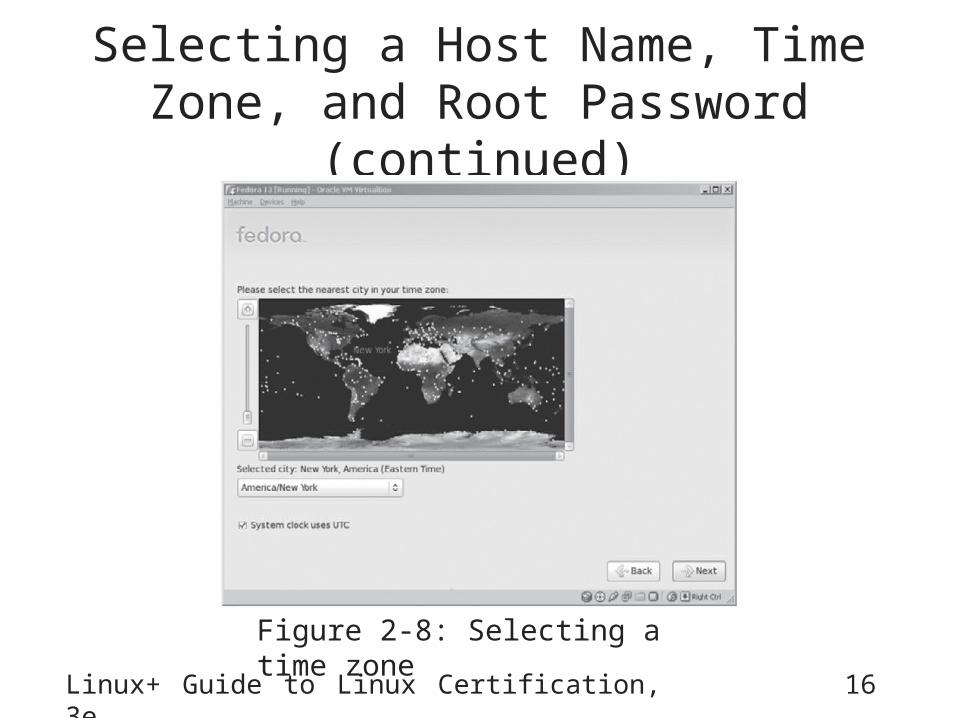
Selecting a Host Name, Time Zone, and Root Password (continued)
Figure 2-8: Selecting a time zone
Linux+ Guide to Linux Certification, 3e 17
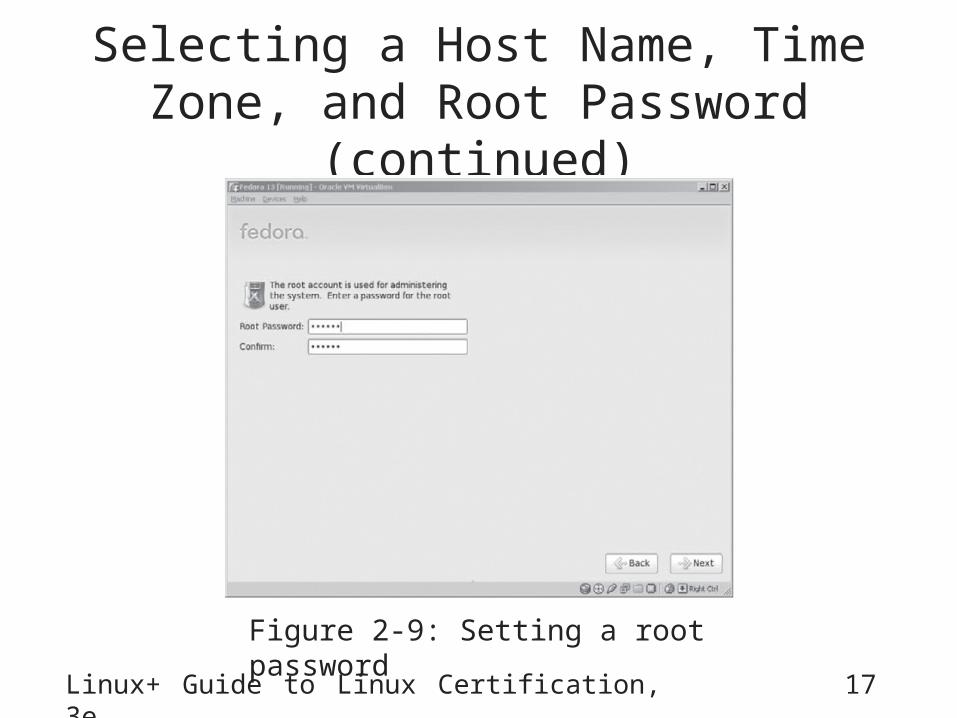
Selecting a Host Name, Time Zone, and Root Password (continued)
Figure 2-9: Setting a root password
Linux+ Guide to Linux Certification, 3e 18
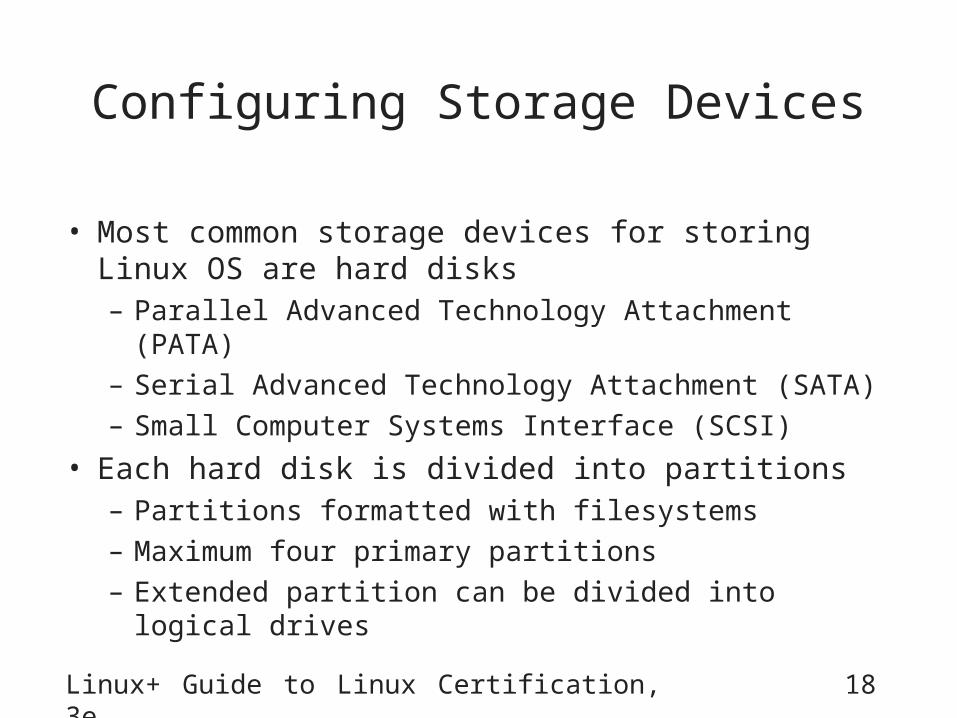
Configuring Storage Devices
• Most common storage devices for storing Linux OS are hard disks– Parallel Advanced Technology Attachment (PATA)– Serial Advanced Technology Attachment (SATA)– Small Computer Systems Interface (SCSI)
• Each hard disk is divided into partitions– Partitions formatted with filesystems– Maximum four primary partitions– Extended partition can be divided into logical drives
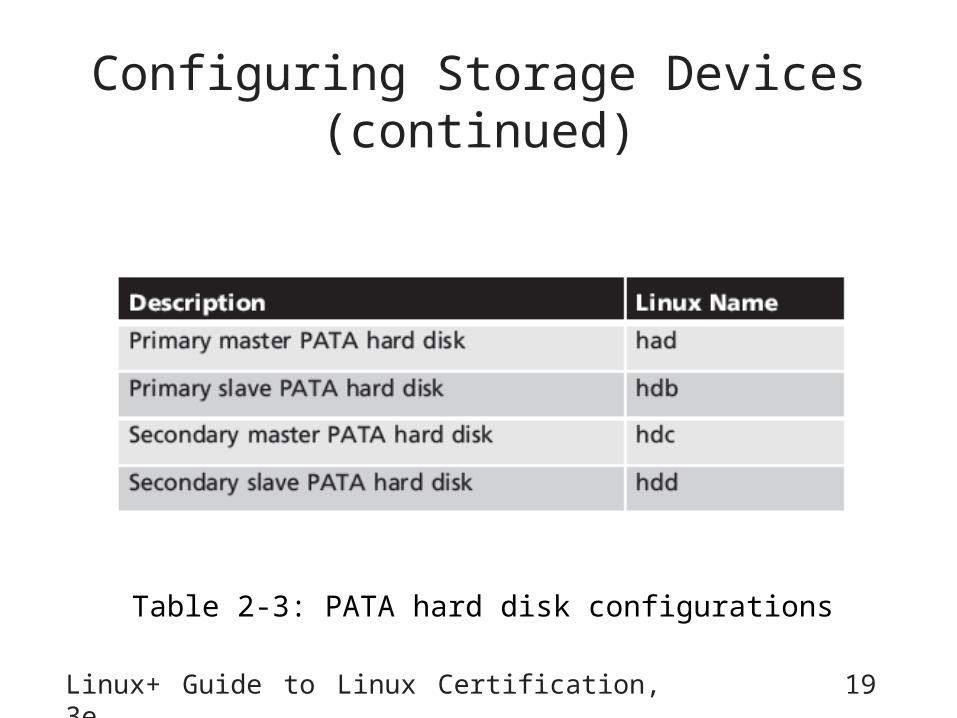
Configuring Storage Devices (continued)
Linux+ Guide to Linux Certification, 3e 19
Table 2-3: PATA hard disk configurations
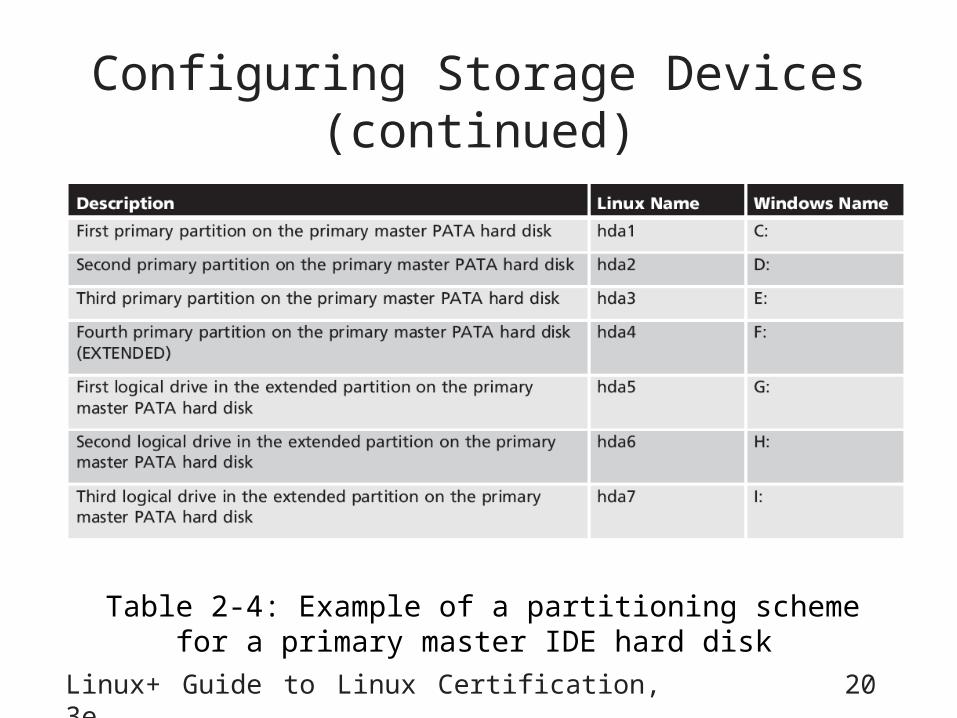
Configuring Storage Devices (continued)
Linux+ Guide to Linux Certification, 3e 20
Table 2-4: Example of a partitioning scheme for a primary master IDE hard disk
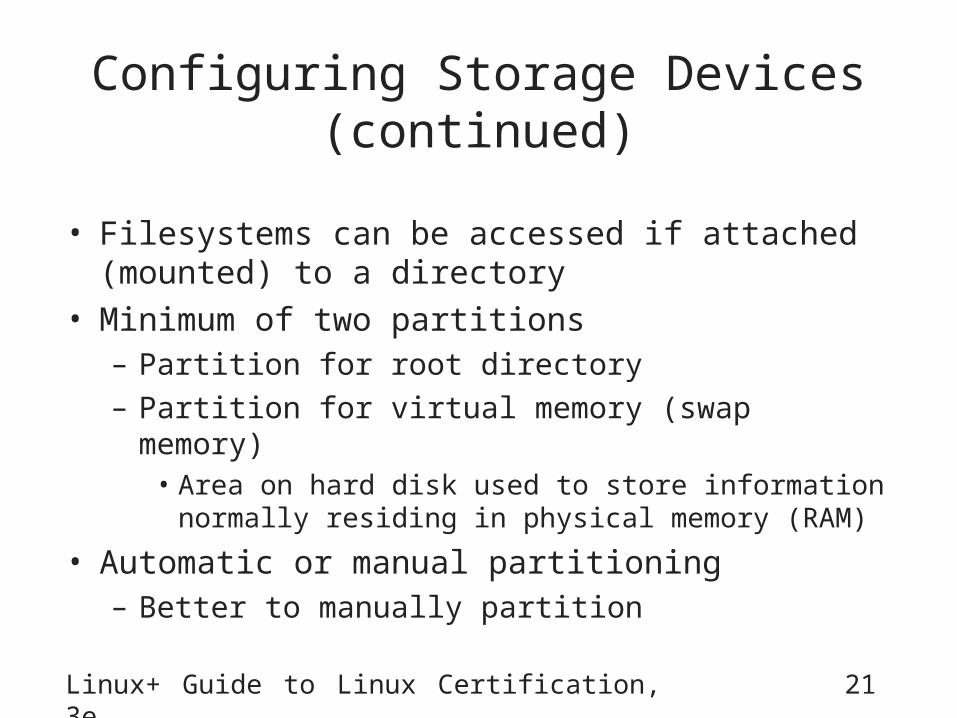
Configuring Storage Devices (continued)
• Filesystems can be accessed if attached (mounted) to a directory
• Minimum of two partitions– Partition for root directory– Partition for virtual memory (swap memory)
• Area on hard disk used to store information normally residing in physical memory (RAM)
• Automatic or manual partitioning– Better to manually partition
Linux+ Guide to Linux Certification, 3e 21
Linux+ Guide to Linux Certification, 3e 22
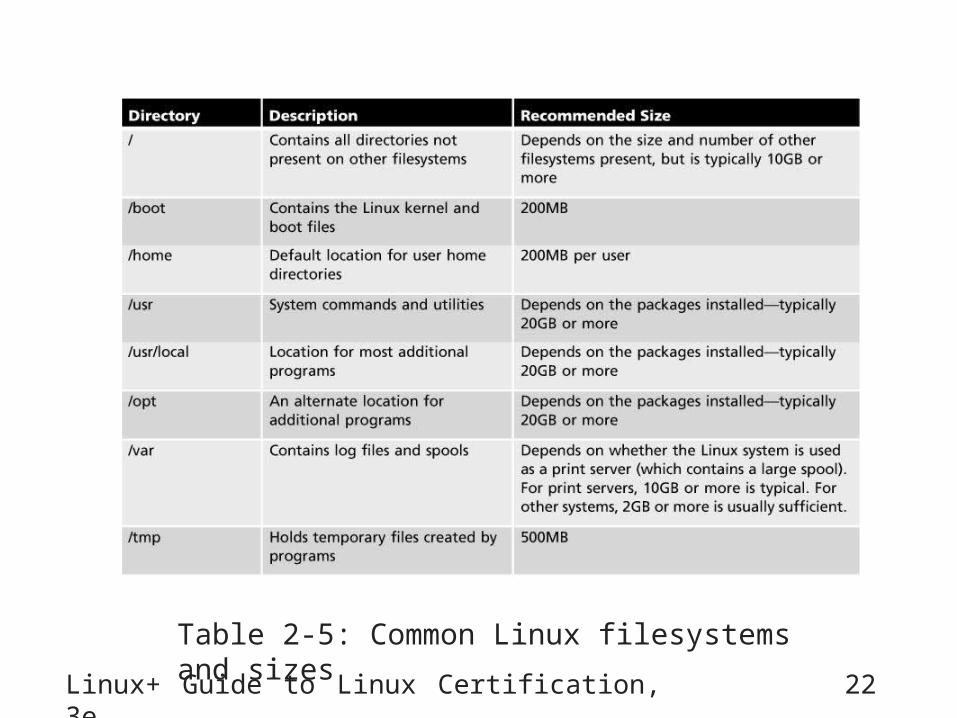
Table 2-5: Common Linux filesystems and sizes
Linux+ Guide to Linux Certification, 3e 23
Configuring Storage Devices (continued)
• Different types of filesystems– Ext2: used on most Linux computers– Ext3, Ext4: performs journaling– Vfat: compatible with Windows’ FAT filesystem– REISER: performs journaling
• Journaling: keeps track of the information written to the hard drive
Linux+ Guide to Linux Certification, 3e 24
Configuring Storage Devices (continued)
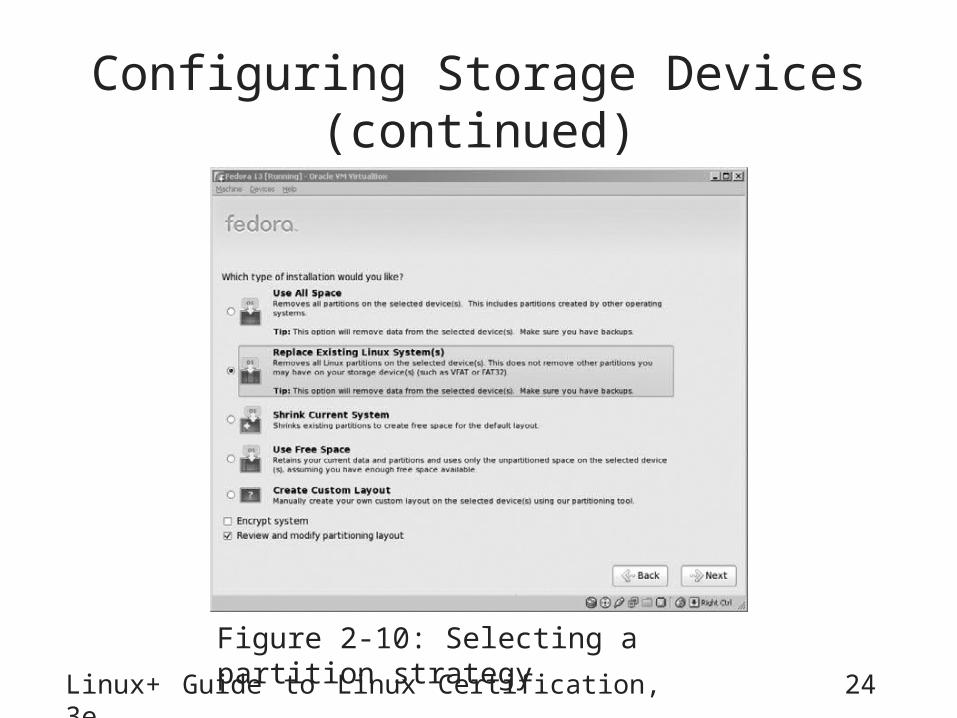
Figure 2-10: Selecting a partition strategy
Linux+ Guide to Linux Certification, 3e 25
Configuring Storage Devices (continued)
• When creating a partition, specify the partition technology
• For standard disk partitions need to provide information regarding size, filesystem type, encryption options and mount point
• Instead of standard partitions, can create volumes that span multiple disks– Logical Volume Manager (LVM)– Redundant Array of Inexpensive Disks (RAID)
Linux+ Guide to Linux Certification, 3e 26
Configuring the Boot Loader
• Boot loader: program started by BIOS at system startup– Loads Linux kernel into memory from hard disk– Can also boot other existing OSs
• GRand Unified Bootloader (GRUB): boot loader configured during Fedora Linux installation
• Dual booting: choose OS to boot at startup
Linux+ Guide to Linux Certification, 3e 27
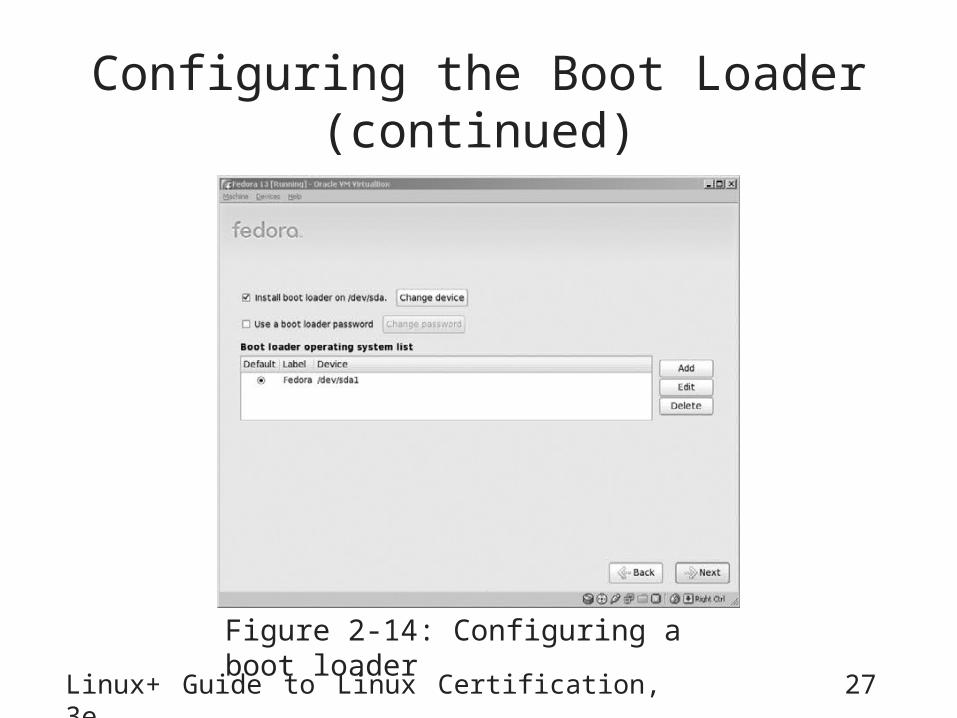
Configuring the Boot Loader (continued)
Figure 2-14: Configuring a boot loader
Linux+ Guide to Linux Certification, 3e 28
Configuring the Boot Loader (continued)
• Boot loader usually resides on the MBR or on first sector of / or /boot partition
• Kernel parameters: information passed to Linux kernel via the boot loader
• Large Block Addressing 32-bit (LBA32): enables Large Block Addressing in boot loader– For large hard disks not fully supported by the BIOS
Linux+ Guide to Linux Certification, 3e 29
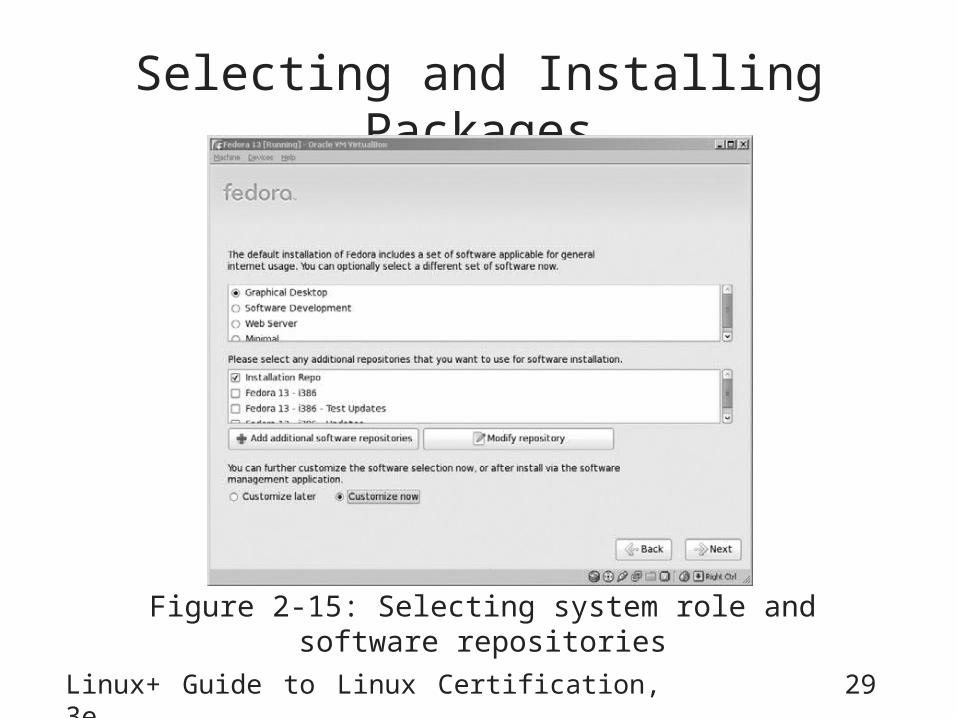
Selecting and Installing Packages
Figure 2-15: Selecting system role and software repositories
Linux+ Guide to Linux Certification, 3e 30
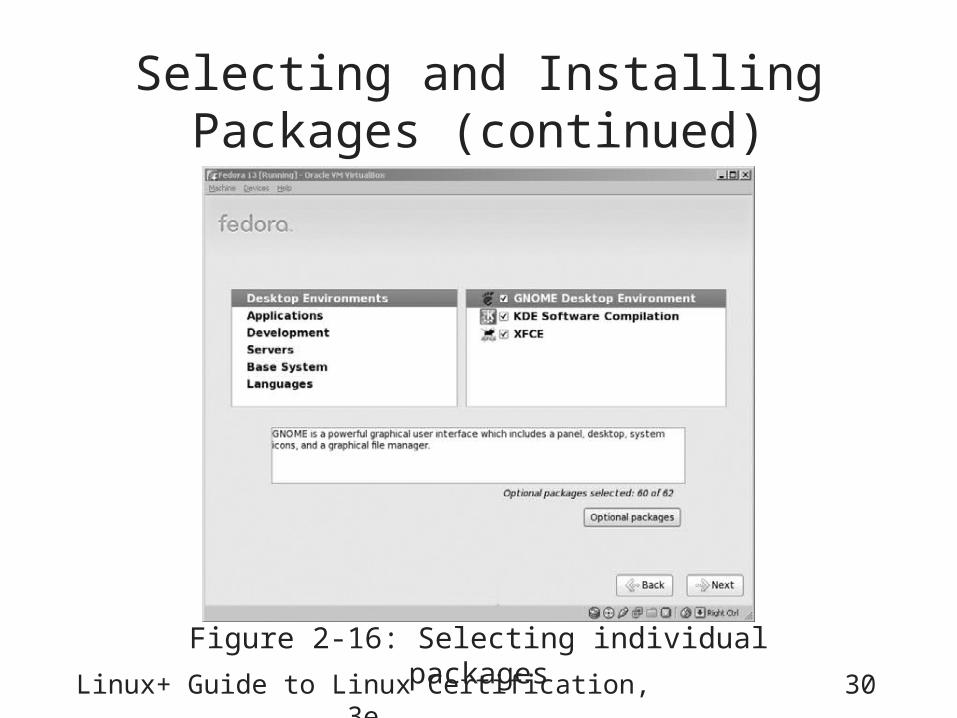
Selecting and Installing Packages (continued)
Figure 2-16: Selecting individual packages

Linux+ Guide to Linux Certification, 3e 31
Completing the Firstboot Wizard
• Complete the installation– License agreement– User accounts and authentication– Date and time
• Network Time Protocol (NTP)
– Confirmation of hardware to be used
• Log in with user account for daily tasks
• Use Network Login: authenticate users based on an external database
Linux+ Guide to Linux Certification, 3e 32
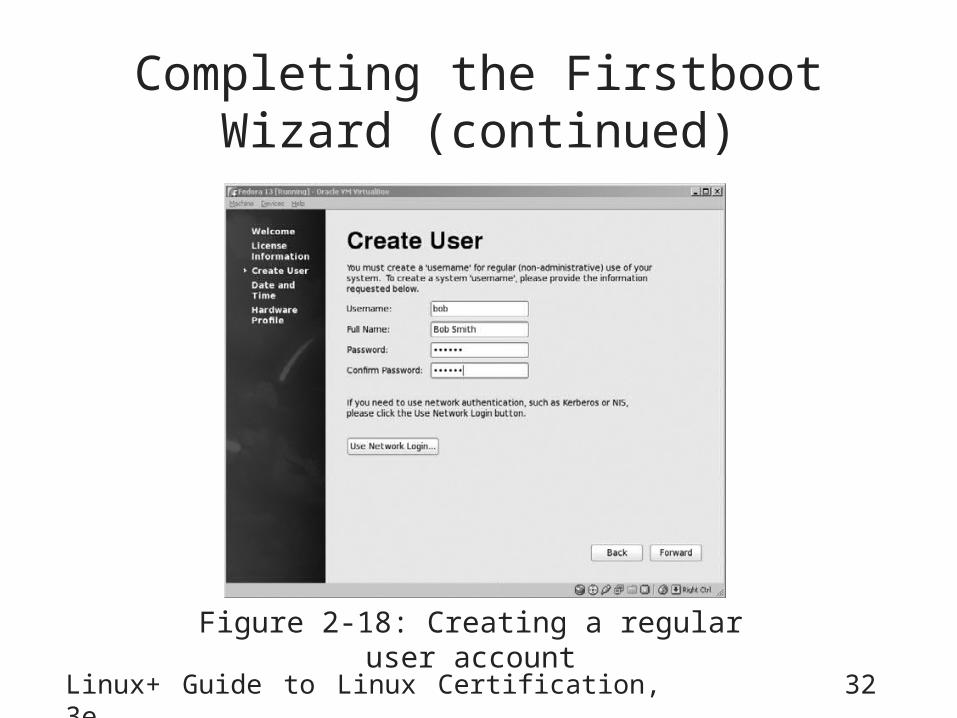
Completing the Firstboot Wizard (continued)
Figure 2-18: Creating a regular user account
Linux+ Guide to Linux Certification, 3e 33
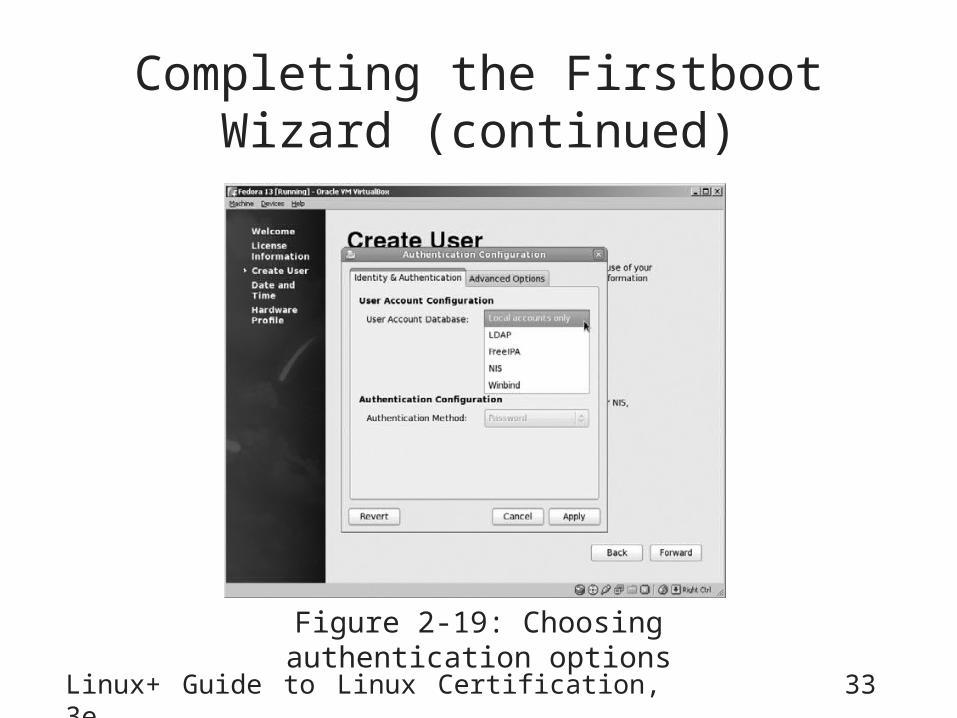
Completing the Firstboot Wizard (continued)
Figure 2-19: Choosing authentication options
Linux+ Guide to Linux Certification, 3e 34
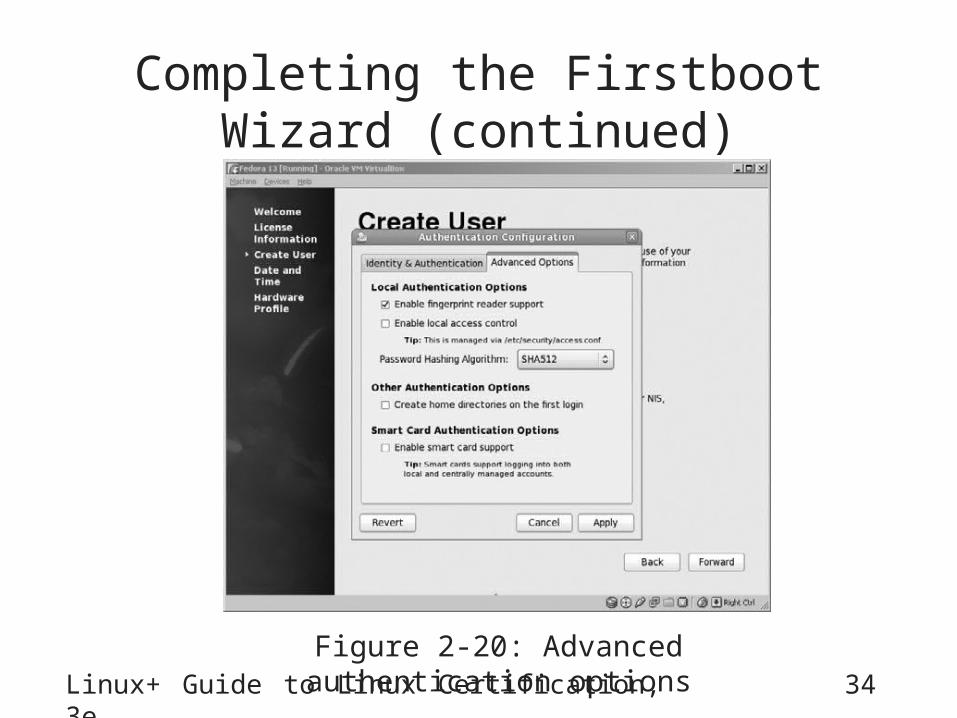
Completing the Firstboot Wizard (continued)
Figure 2-20: Advanced authentication options
Linux+ Guide to Linux Certification, 3e 35
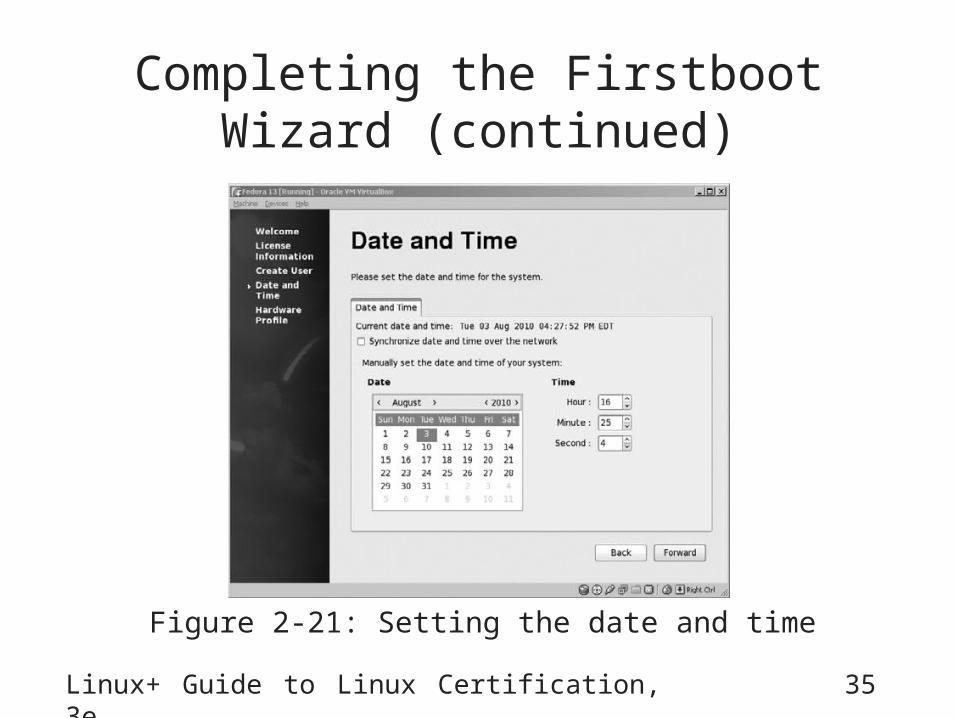
Completing the Firstboot Wizard (continued)
Figure 2-21: Setting the date and time
Linux+ Guide to Linux Certification, 3e 36
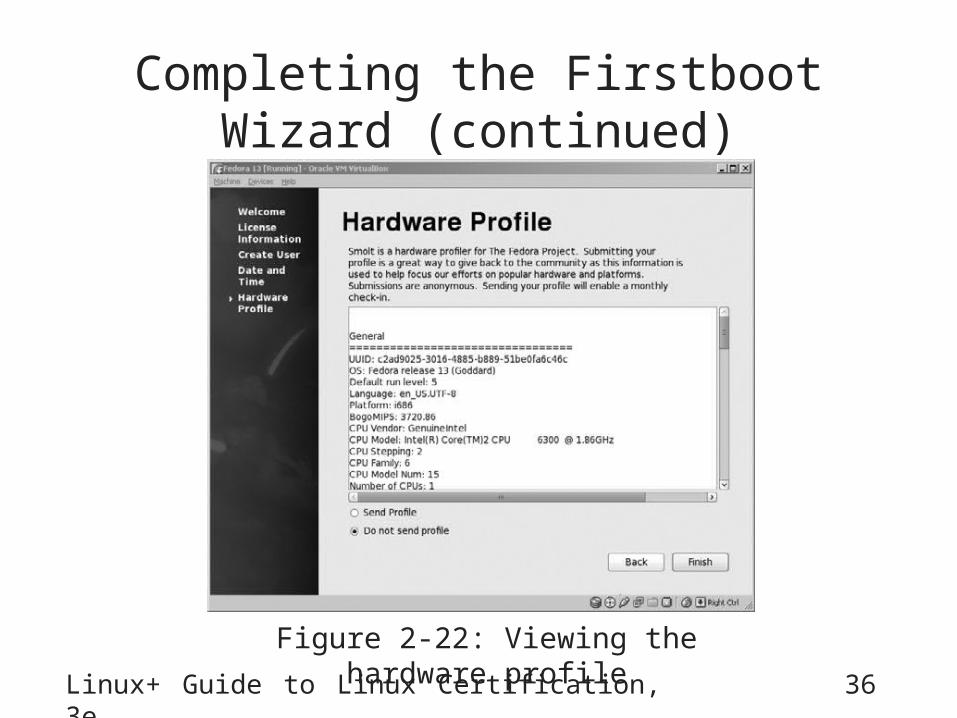
Completing the Firstboot Wizard (continued)
Figure 2-22: Viewing the hardware profile
Linux+ Guide to Linux Certification, 3e 37
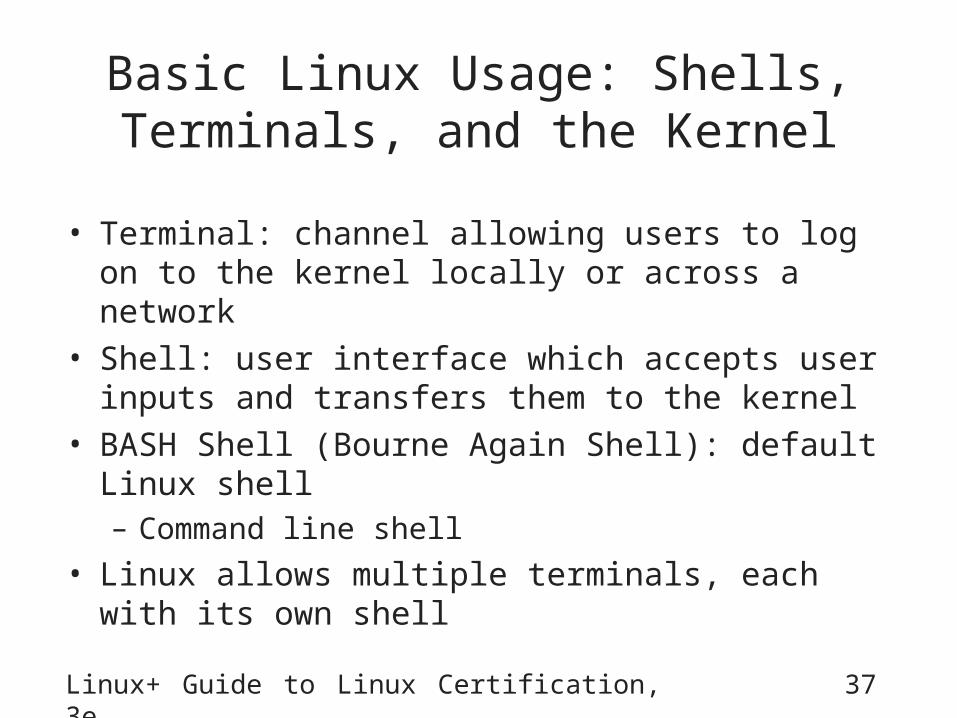
Basic Linux Usage: Shells, Terminals, and the Kernel
• Terminal: channel allowing users to log on to the kernel locally or across a network
• Shell: user interface which accepts user inputs and transfers them to the kernel
• BASH Shell (Bourne Again Shell): default Linux shell– Command line shell
• Linux allows multiple terminals, each with its own shell
Linux+ Guide to Linux Certification, 3e 38
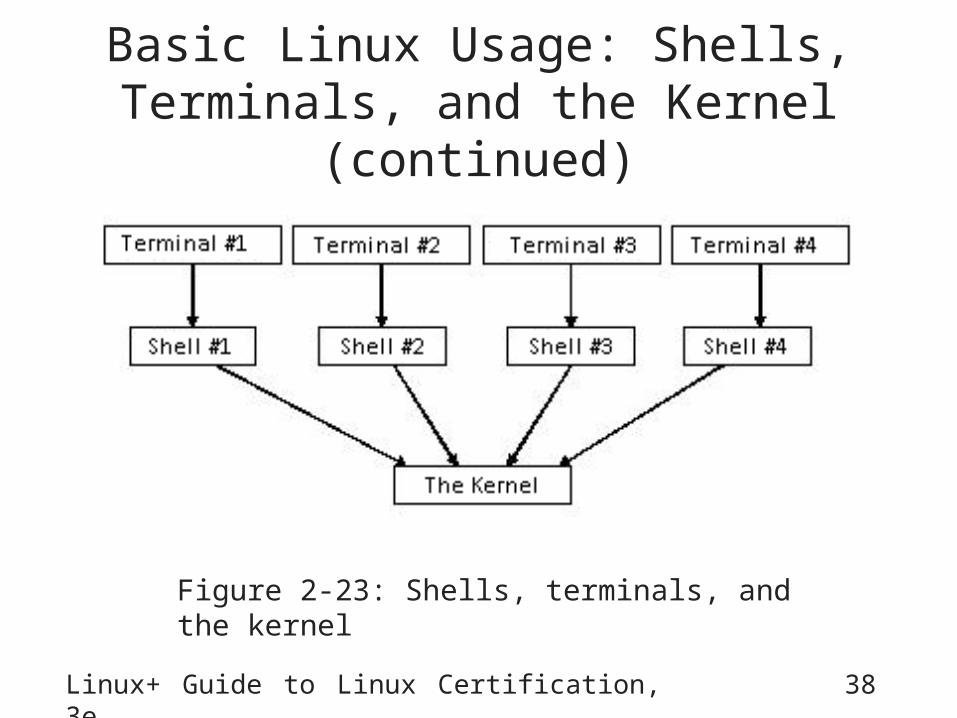
Basic Linux Usage: Shells, Terminals, and the Kernel (continued)
Figure 2-23: Shells, terminals, and the kernel
Linux+ Guide to Linux Certification, 3e 39
Basic Linux Usage: Shells, Terminals, and the Kernel (continued)
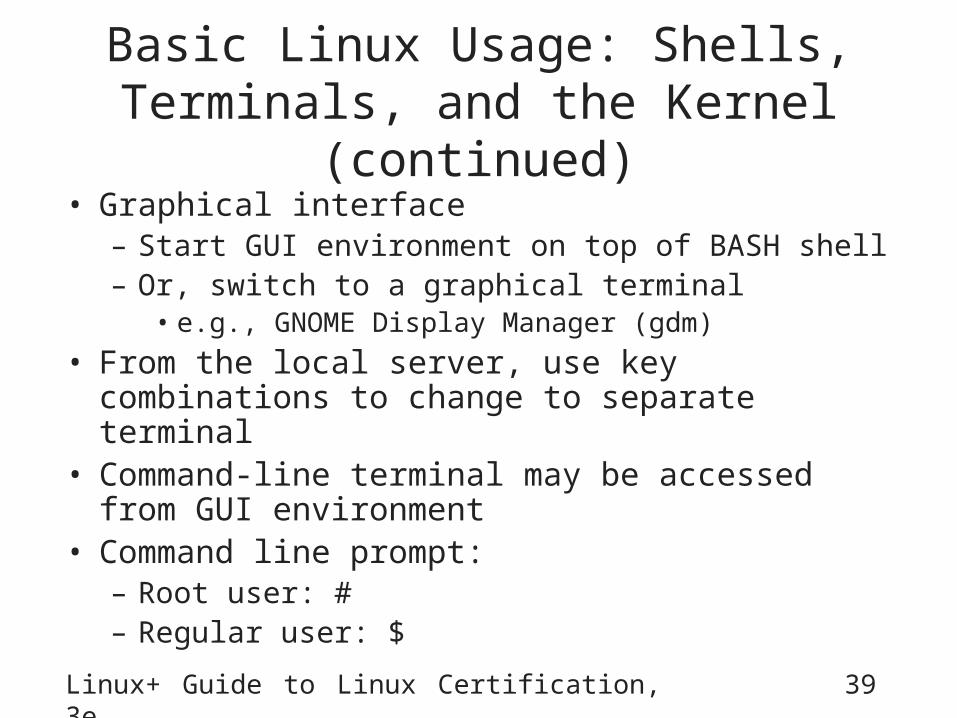
• Graphical interface– Start GUI environment on top of BASH shell– Or, switch to a graphical terminal
• e.g., GNOME Display Manager (gdm)
• From the local server, use key combinations to change to separate terminal
• Command-line terminal may be accessed from GUI environment
• Command line prompt:– Root user: #– Regular user: $
Linux+ Guide to Linux Certification, 3e 40
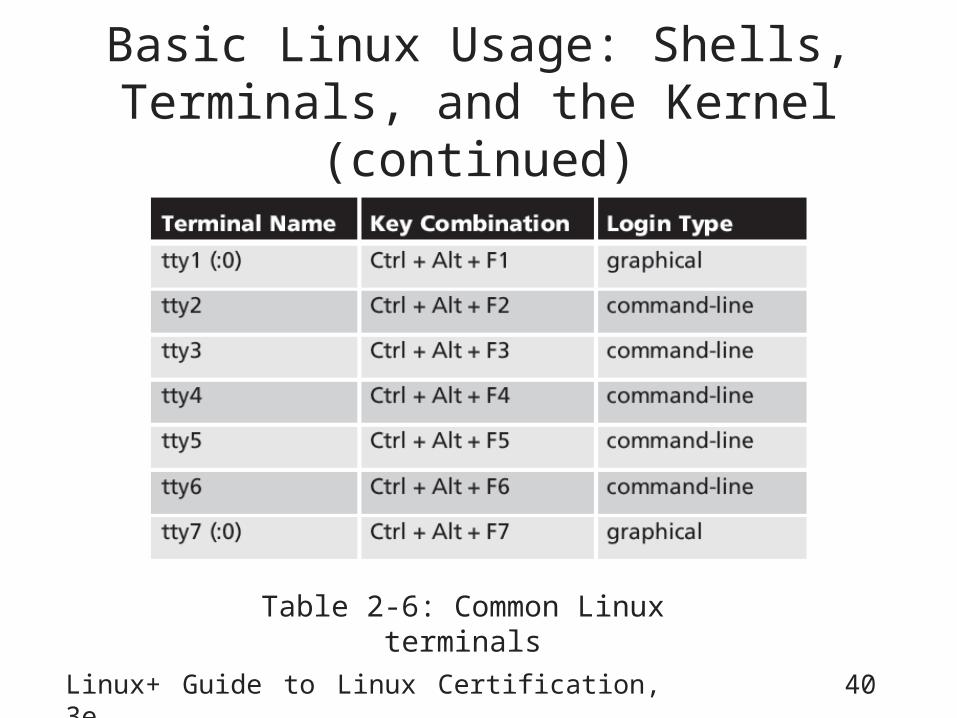
Basic Linux Usage: Shells, Terminals, and the Kernel (continued)
Table 2-6: Common Linux terminals
Linux+ Guide to Linux Certification, 3e 41
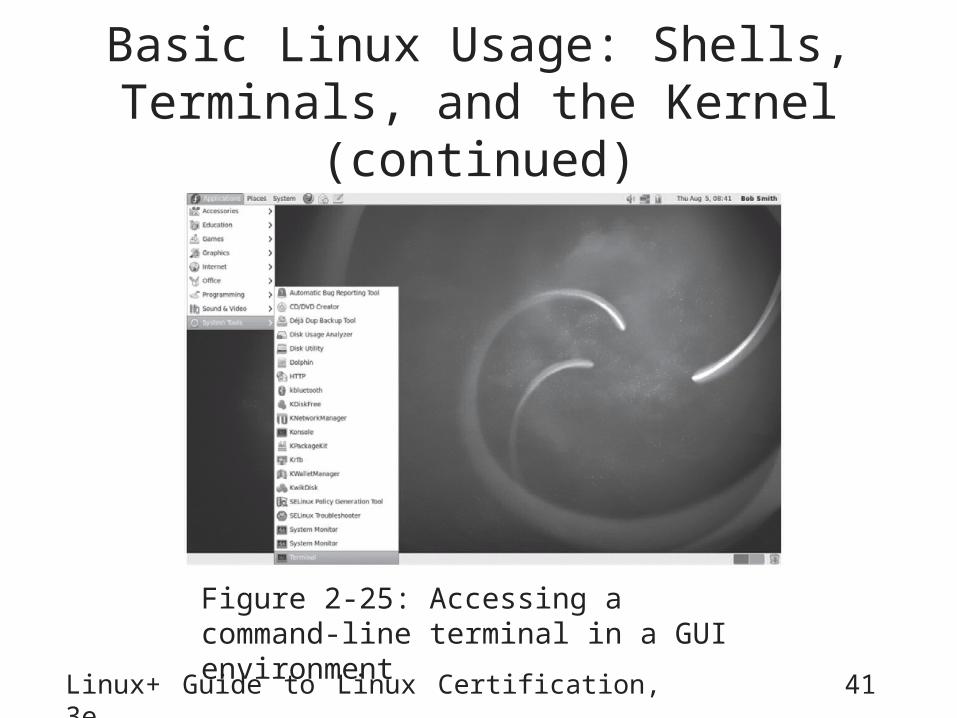
Basic Linux Usage: Shells, Terminals, and the Kernel (continued)
Figure 2-25: Accessing a command-line terminal in a GUI environment
Linux+ Guide to Linux Certification, 3e 42
Basic Shell Commands
• Commands: indicate name of program to execute
– Case sensitive• Options: specific letters starting with “-” appearing
after command name – Alter way command works
• Arguments: specify a command’s specific working parameters
Linux+ Guide to Linux Certification, 3e 43
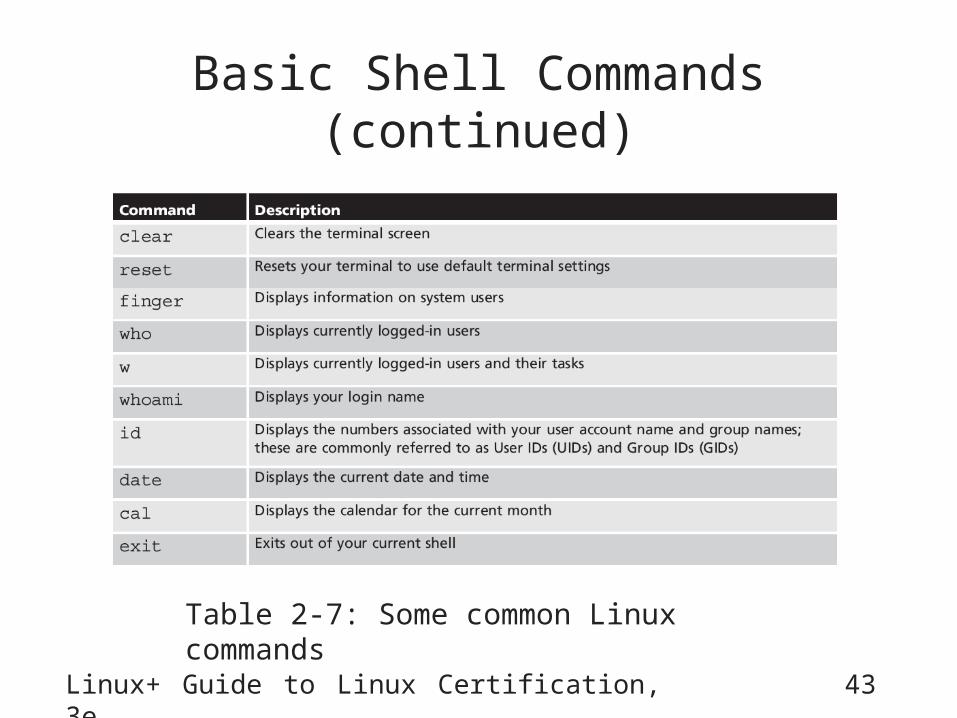
Basic Shell Commands (continued)
Table 2-7: Some common Linux commands

Linux+ Guide to Linux Certification, 3e 44
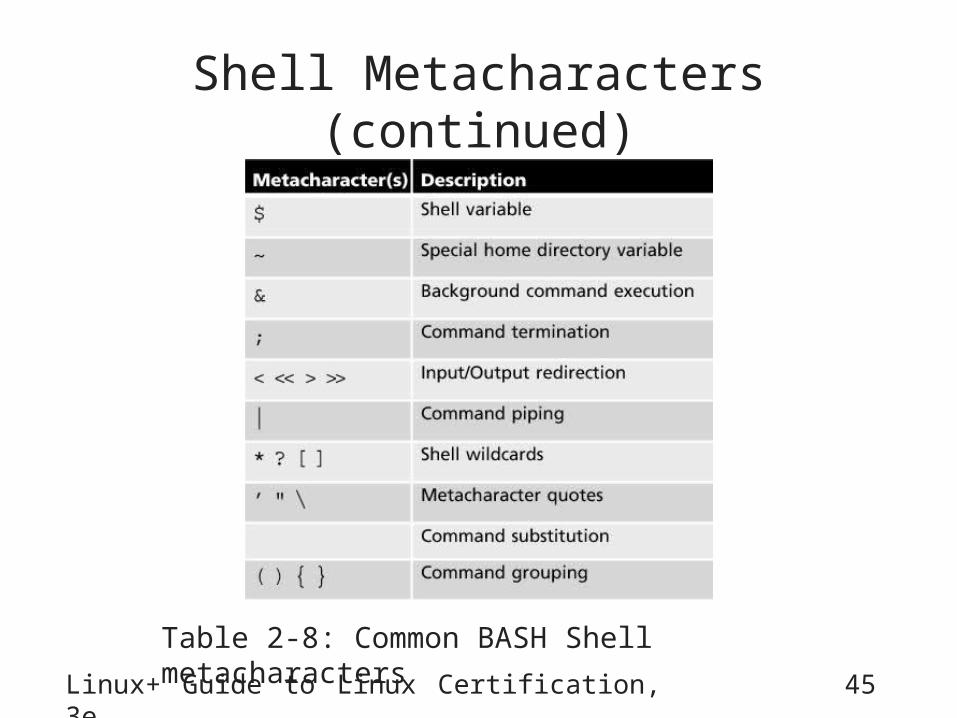
Shell Metacharacters
• Metacharacters: characters with a special meaning– e.g., $
• Refers to a variable
– Avoid use of metacharacters when typing commands unless using their special functionality
– Single quotation marks ‘ ’ protect metacharacter from being interpreted specially by the shell
Linux+ Guide to Linux Certification, 3e 45
Shell Metacharacters (continued)
Table 2-8: Common BASH Shell metacharacters
Getting Command Help
• Manual (man) pages: most common form of documentation for Linux commands– At command prompt, type “man” followed by
command name– Contain different sections– Searchable by keyword
• Info pages: set of local, easy-to-read command syntax documentation– At command prompt, type “info” followed by a
command name
Linux+ Guide to Linux Certification, 3e 46
Linux+ Guide to Linux Certification, 3e 47
Getting Command Help (continued)
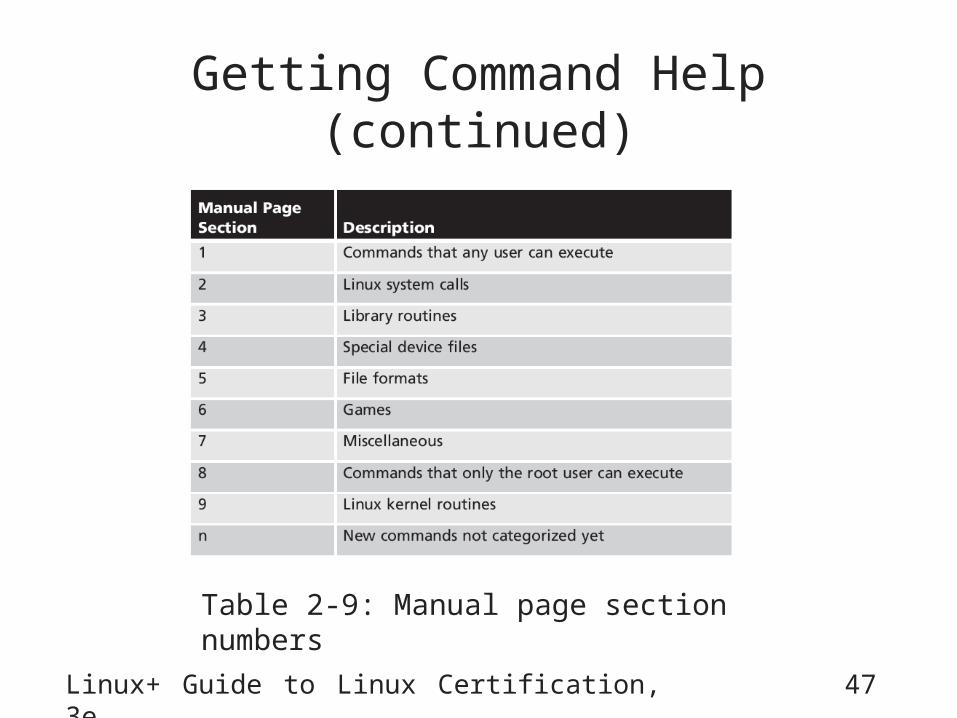
Table 2-9: Manual page section numbers
Linux+ Guide to Linux Certification, 3e 48
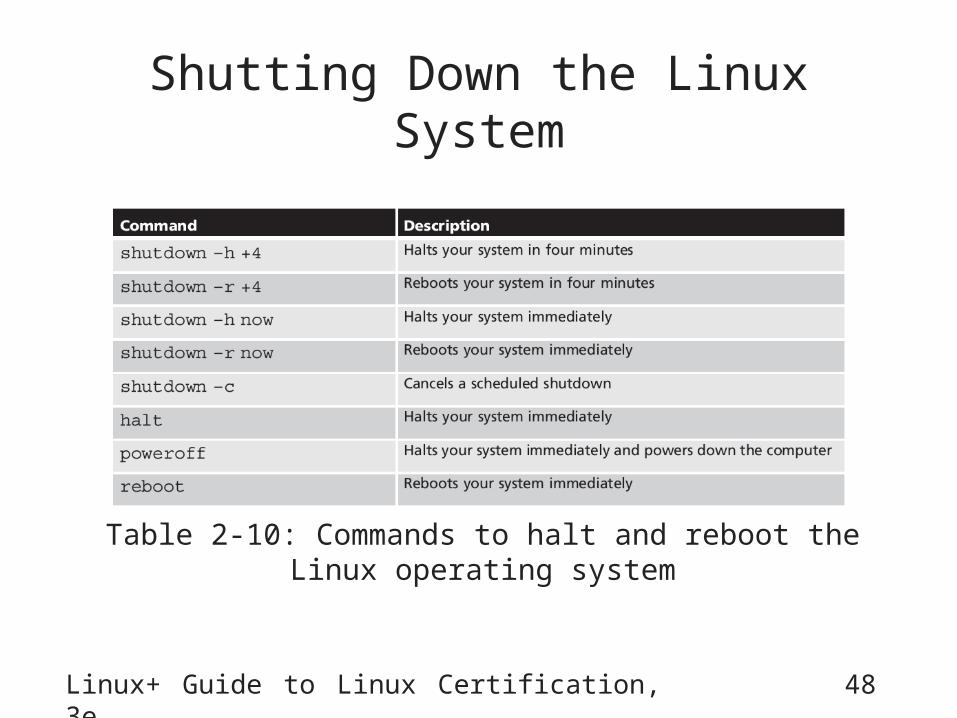
Shutting Down the Linux System
Table 2-10: Commands to halt and reboot the Linux operating system
Linux+ Guide to Linux Certification, 3e 49
Summary
• Prior to installation– Verify hardware requirements using HCL– Create preinstallation checklist
• DVD–based installation– Easiest– Most common
Linux+ Guide to Linux Certification, 3e 50
Summary (continued)
• Installation prompts for language, host name, date, time zone, keyboard layout, user account configuration, storage configuration, boot loader configuration, and package selection
• Users must log in to a terminal and receive a shell before they are able to interact with the Linux system and kernel
Linux+ Guide to Linux Certification, 3e 51
Summary (continued)
• From any type of terminal you can enter commands, options, and arguments at a shell prompt to perform system tasks, obtain command help, or shut down the Linux system
• The shell is case sensitive and understands a variety of special characters called shell metacharacters, which should be protected if their special meaning is not required