Embed Size (px)
Citation preview

LinearMaster Compact Linear IC Tester
Copyright 1993-2011 ABI Electronics Limited
LINEARMASTER COMPACT PROFESSIONAL LINEAR IC TESTER
OPERATOR’S MANUAL
LINEARMASTER COMPACT PROFESSIONELL ANALOGER IC TESTER
BEDIENUNGSANLEITUNG
LINEARMASTER COMPACT PROFESSIONNEL TESTEUR LINÉAIRE DE CI MANUEL D’UTILISATION
LinearMaster Compact Linear IC Tester
Copyright 1993-2011 ABI Electronics Limited
CONTENTS 1. introduction - english .......................................................................1
2. DC input ..........................................................................................1
3. battery eliminator.............................................................................2
4. switching on.....................................................................................2
5. operating modes .............................................................................3
6. entering test numbers .....................................................................3
7. testing the IC ...................................................................................4
8. test results .......................................................................................4
9. testing further ICs............................................................................6
10. continuous testing .......................................................................6
11. search mode ...............................................................................7
12. self test mode .............................................................................8
13. CompactLink mode.....................................................................8
14. specifications ..............................................................................9
15. Einführung - Deutsch ................................................................10
16. Stromversorgung ......................................................................10
17. Netzteil ......................................................................................11
18. Einschalten ...............................................................................11
19. Betriebsarten.............................................................................12
20. Eingabe der IC-Nummern.........................................................12
21. Testen des ICs..........................................................................13
22. Testergebnisse .........................................................................13
23. Testen weiterer ICs...................................................................15
24. Fortlaufendes Testen................................................................16
25. Suchmodus...............................................................................17
26. Selbstdiagnosemodus...............................................................17
27. Spezifikation..............................................................................18
28. Introduction - Français ..............................................................19
29. Alimentation continue (DC) .......................................................19
30. Eliminateur de piles...................................................................20
31. Mise sous tension .....................................................................20
LinearMaster Compact Linear IC Tester
Copyright 1993-2011 ABI Electronics Limited
32. Modes d’opération ....................................................................21
33. Introduction des numéros de CI................................................21
34. Test d’un CI ..............................................................................22
35. Résultats...................................................................................23
36. Test de plusieurs CI..................................................................24
37. Test en continu .........................................................................24
38. Mode test de démarrage...........................................................25
39. Mode de recherche...................................................................26
40. Mode CompactLink...................................................................26
41. Spécifications............................................................................27
42. IC support list/IC Liste/Liste des CI soutenus ...........................28
42.1. introduction/Einführung/introduction.....................................28
42.2. operational amplifiers ...........................................................28
42.3. comparators .........................................................................31
42.4. switches and multiplexers ....................................................32
42.5. regulators, references and virtual grounds...........................32
42.6. opto couplers and isolators ..................................................33
42.7. miscellaneous.......................................................................34

LinearMaster Compact Linear IC Tester
Copyright 1993-2011 ABI Electronics Limited
Page 1
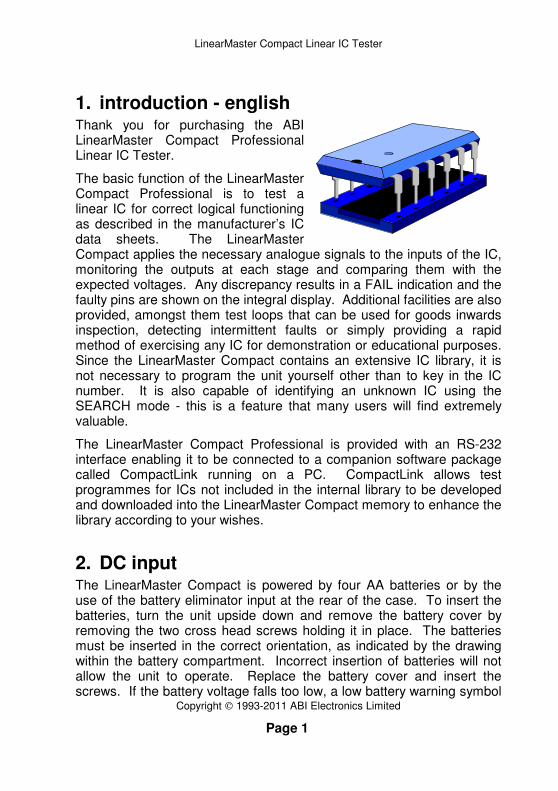
1. introduction - english Thank you for purchasing the ABI LinearMaster Compact Professional Linear IC Tester.
The basic function of the LinearMaster Compact Professional is to test a linear IC for correct logical functioning as described in the manufacturer’s IC data sheets. The LinearMaster Compact applies the necessary analogue signals to the inputs of the IC, monitoring the outputs at each stage and comparing them with the expected voltages. Any discrepancy results in a FAIL indication and the faulty pins are shown on the integral display. Additional facilities are also provided, amongst them test loops that can be used for goods inwards inspection, detecting intermittent faults or simply providing a rapid method of exercising any IC for demonstration or educational purposes. Since the LinearMaster Compact contains an extensive IC library, it is not necessary to program the unit yourself other than to key in the IC number. It is also capable of identifying an unknown IC using the SEARCH mode - this is a feature that many users will find extremely valuable.
The LinearMaster Compact Professional is provided with an RS-232 interface enabling it to be connected to a companion software package called CompactLink running on a PC. CompactLink allows test programmes for ICs not included in the internal library to be developed and downloaded into the LinearMaster Compact memory to enhance the library according to your wishes.
2. DC input The LinearMaster Compact is powered by four AA batteries or by the use of the battery eliminator input at the rear of the case. To insert the batteries, turn the unit upside down and remove the battery cover by removing the two cross head screws holding it in place. The batteries must be inserted in the correct orientation, as indicated by the drawing within the battery compartment. Incorrect insertion of batteries will not allow the unit to operate. Replace the battery cover and insert the screws. If the battery voltage falls too low, a low battery warning symbol
LinearMaster Compact Linear IC Tester
Copyright 1993-2011 ABI Electronics Limited
Page 2
will be displayed at the top left hand cell of the display in normal operating mode. A low battery warning will also be displayed during a result display. Test results may be inconsistent under these conditions.
3. battery eliminator An external battery eliminator is available for prolonged use of the LinearMaster Compact. Some ICs consume a significant amount of current when powered up, and battery life can be conserved by using the eliminator. There is no need to remove the batteries prior to inserting the battery eliminator. However, please note that during prolonged periods of non-use batteries are prone to leakage and should be removed. Note that to avoid damage to the unit we strongly advise that you only use the recommended battery eliminator that is available by contacting your distributor. Note that using an incorrect battery eliminator voltage may damage the unit and invalidate the warranty.
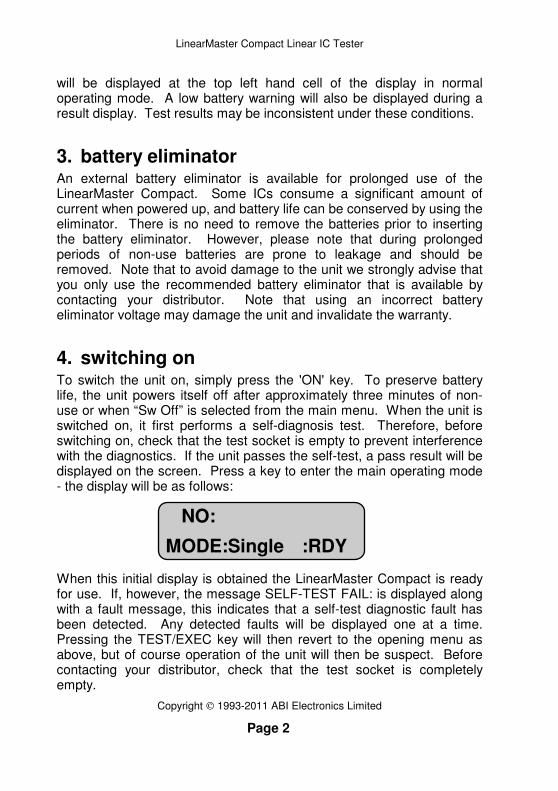
4. switching on To switch the unit on, simply press the 'ON' key. To preserve battery life, the unit powers itself off after approximately three minutes of non-use or when “Sw Off” is selected from the main menu. When the unit is switched on, it first performs a self-diagnosis test. Therefore, before switching on, check that the test socket is empty to prevent interference with the diagnostics. If the unit passes the self-test, a pass result will be displayed on the screen. Press a key to enter the main operating mode - the display will be as follows:
When this initial display is obtained the LinearMaster Compact is ready for use. If, however, the message SELF-TEST FAIL: is displayed along with a fault message, this indicates that a self-test diagnostic fault has been detected. Any detected faults will be displayed one at a time. Pressing the TEST/EXEC key will then revert to the opening menu as above, but of course operation of the unit will then be suspect. Before contacting your distributor, check that the test socket is completely empty.
NO:
MODE:Single :RDY
LinearMaster Compact Linear IC Tester
Copyright 1993-2011 ABI Electronics Limited
Page 3
5. operating modes The LinearMaster Compact has a number of test modes that are selected using the MODE/CLEAR key from the initial screen. The test modes are as follows:
Single - execute a single test on the IC in the socket. Loop - execute test repeatedly, regardless of the result. P Loop - execute test repeatedly, provided the result was PASS. F Loop - execute test repeatedly, provided the result was FAIL. Search - identify the number of the IC in the socket. Diags - execute the diagnostic self-test. CmLink - enter remote mode for CompactLink software. Sw Off - turn off the unit
6. entering test numbers Press the MODE/CLEAR key until the desired test mode is displayed. Enter the number of the IC you wish to test. Pressing the MODE/CLEAR key will clear the last digit from the display if a mistake is made.
Note: The NUMERIC information only is entered, leaving out the manufacturers prefixes and suffixes and IC family information. As an example, all the following linear ICs should be entered as 7, 4, 1 on the keypad:
e.g. uA741CP, uA741M, uA741C etc
Some ICs are available in different pin outs or package types, and also there may be several different types of IC with the same numerical part number. In these cases the LinearMaster will automatically determine which test to perform. If however the IC is faulty the unit may not be able to determine the correct IC type - if this happens a warning message will be displayed. A complete list of all ICs supported by the LinearMaster Compact is contained in the IC SUPPORT LIST at the end of this manual together with notes on any special requirements for certain ICs.
Note that if you have stored a user library using CompactLink, an IC in the user library with the same number as one in the internal library will take precedence. This allows a new test to be written for an existing IC.
LinearMaster Compact Linear IC Tester
Copyright 1993-2011 ABI Electronics Limited
Page 4
If you wish both tests to be available, use a different number for your user test.
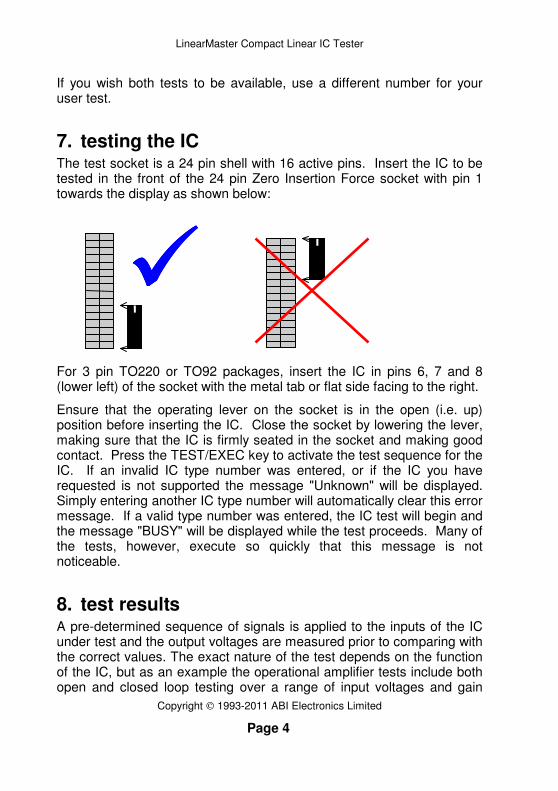
7. testing the IC The test socket is a 24 pin shell with 16 active pins. Insert the IC to be tested in the front of the 24 pin Zero Insertion Force socket with pin 1 towards the display as shown below:
For 3 pin TO220 or TO92 packages, insert the IC in pins 6, 7 and 8 (lower left) of the socket with the metal tab or flat side facing to the right.
Ensure that the operating lever on the socket is in the open (i.e. up) position before inserting the IC. Close the socket by lowering the lever, making sure that the IC is firmly seated in the socket and making good contact. Press the TEST/EXEC key to activate the test sequence for the IC. If an invalid IC type number was entered, or if the IC you have requested is not supported the message "Unknown" will be displayed. Simply entering another IC type number will automatically clear this error message. If a valid type number was entered, the IC test will begin and the message "BUSY" will be displayed while the test proceeds. Many of the tests, however, execute so quickly that this message is not noticeable.
8. test results A pre-determined sequence of signals is applied to the inputs of the IC under test and the output voltages are measured prior to comparing with the correct values. The exact nature of the test depends on the function of the IC, but as an example the operational amplifier tests include both open and closed loop testing over a range of input voltages and gain

LinearMaster Compact Linear IC Tester
Copyright 1993-2011 ABI Electronics Limited
Page 5
settings. If all the outputs respond correctly, the result PASS will be displayed at the top right of the display. A scrolling message will contain the IC function and power pin information.
If a short circuit between the power pins of the IC is detected, a warning ‘SHT!' will appear on the top right of the display and, since no valid test is then possible, the result will FAIL. If the IC under test takes an excessive amount of current when power is applied, a warning 'ICC!' will appear. Press the TEST/EXEC key to continue with the test, or MODE/CLEAR to abandon. Depending on the condition of the batteries there may also be a ‘BAT!’ warning which indicates that the batteries are incapable of supplying the current required by the IC under test. You can continue with the test by pressing the TEST/EXEC key, but the unit may malfunction because of a drop in battery voltage. To avoid this, change the batteries or use a battery eliminator. Note that a faulty IC may demand more operating current and therefore will quickly drain the batteries.
Some ICs require external components to be fitted prior to the test - in these cases the message EXT or CAP will be displayed at the top right of the display. Please refer to the IC lists at the end of this manual for details of the component(s) required. After fitting the component the test can be carried out by a further press of the TEST key. If you wish you can abandon the test by pressing the CLEAR key.
In the case of a FAIL result, the error conditions at all the non-functional pins of the IC will be scrolled on the display, and the IC function will be shown. The various failure conditions that can be displayed are as follows:
V<< - the voltage on the pin was lower than expected. V>> - the voltage on the pin was higher than expected. D<< - the diode drop voltage was lower than expected. D>> - the diode drop voltage was higher than expected. LOAD - the input cannot be driven.
In some cases, the scrolling test results may include one or more WARNING indications. These warnings indicate conditions that may result in an incorrect test result, and are as follows:
D/F - result may be invalid because last self-test failed. BAT - battery voltage too low during test ICC - large current taken by IC under test
LinearMaster Compact Linear IC Tester
Copyright 1993-2011 ABI Electronics Limited
Page 6
The scrolling message can be cancelled by pressing the MODE/CLEAR key, or paused by pressing and holding a numeric key. If you want to test the IC again, press the TEST/EXEC to abandon the scroll and perform another test.
Some ICs are available in various packages, and also there are some ICs in the library which have the same numerical part number even though the IC functions are different. In these cases the LinearMaster will automatically determine the IC type prior to the test, provided that the IC is functional. If the IC is faulty, the following warning will appear after the test:
WARNING: All Part Types FAIL
This indicates that the IC is faulty, but the pin information cannot be displayed since the exact part type cannot be identified.
Before discarding a failed IC check that the correct IC type number was entered and also check that the IC pins are clean and making good contact with the test socket. Note that there is no way of stopping a test once it has commenced, but see the description of loop functions later in this manual.
9. testing further ICs After a test is completed, the test result will be displayed. To test another IC of the same type, simply insert the next IC and press the TEST/EXEC key again. To test a different IC, enter the new IC type number in the usual way, noticing that pressing the first digit of the new number automatically clears the previous number from the display. Remember that the MODE/CLEAR key can be used if an error is made during the entry of the IC type number.
10. continuous testing It is possible to test the same IC repeatedly to detect intermittent or temperature-related faults, or to rapidly test a batch of identical ICs. There are three types of test loop modes:
Loop - execute a test repeatedly, regardless of the result. P Loop - execute a test repeatedly, provided the result is PASS. F Loop - execute a test repeatedly, provided the result was FAIL.
LinearMaster Compact Linear IC Tester
Copyright 1993-2011 ABI Electronics Limited
Page 7
The LinearMaster Compact is configured into one of the loop modes using the MODE/CLEAR key as described earlier. Insert the IC and press TEST/EXEC in the usual way to start the continuous test process. The result of each test is displayed as PASS or FAIL on the top right of the display. In LOOP mode, this allows a large batch of identical ICs to be tested, without any action on the part of the operator other than inserting the IC. When the IC is inserted, sufficient time must be allowed for the test to take place before the result status is updated, so if in doubt the IC should be tested in single mode so that the approximate test time can be determined. It will be found that high throughput can be obtained using this mode.
To stop any of the test loops, press MODE/CLEAR, but note that the test in progress is completed before the command is obeyed. The effect of this is usually unnoticeable, but where the test takes a reasonable time to execute there will be a delay before the instrument responds to the MODE/CLEAR key.
Note: Testing high current ICs in loop mode will drain the batteries quickly, and it is recommended that a battery eliminator is used if you wish to perform loop tests.
11. search mode This feature allows the type number of an unknown IC to be determined, provided the IC is actually contained in the LinearMaster Compact library, and it is a correctly functioning IC. This facility is useful when the IC type number is illegible or has been removed.
Use the MODE/CLEAR key to choose SEARCH mode, insert the unknown IC into the socket and press the TEST/EXEC key. You will be prompted to choose the number of pins of the IC you wish to identify - use the MODE/CLEAR key to select from 3 to 16 pins or 'QUIT' to abandon this mode. Press the TEST/EXEC key again to start the SEARCH or to quit as required.
During the identification process the display will indicate the number of ICs identified (IDENT:) and will show graphically how far through the library the SEARCH has progressed. At the end of the SEARCH, a list of all the similar ICs will be scrolled onto the display. The list may be scrolled again by pressing the TEST/EXEC key. The scrolling message
LinearMaster Compact Linear IC Tester
Copyright 1993-2011 ABI Electronics Limited
Page 8
can be cancelled by pressing the MODE/CLEAR key, or paused by pressing and holding a numeric key.
If the IC cannot be identified the message "Not in Library" will be displayed. This means either that the IC is not in the library or it is non-functional. Note that if the Compact detects excessive supply current (ICC! or BAT! warnings), the IC will not be identified during the SEARCH, but can still be tested in SINGLE mode.
If you have a user library present the search will extend to user ICs in that library also. However, CompactLink contains a facility for excluding ICs from the search if required.
12. self test mode This feature allows you to check the integrity of the unit, including the pin drivers and receivers, power supplies and other internal hardware. The test executes automatically at switch on, but you can if you wish perform a self-test at any time by selecting Self-Test (DIAGS) mode using the MODE/CLEAR key and pressing TEST/EXEC.
If a fault is discovered a brief description will be displayed which will help our engineers to locate and rectify the fault. This message should be noted and quoted in any correspondence relating to a unit fault. Contact your distributor in the event of a self-test fail, but first of all ensure that the socket was empty when the diagnostics were run.
13. CompactLink mode The LinearMaster Compact Professional is provided with an RS-232 interface to connect to a PC with a serial COM port or using a USB to RS-232 converter. A companion software package CompactLink is available which provides library management, test development and debugging and user library update facilities. You can also use CompactLink to update the software of your LinearMaster Compact without replacing the internal memory or opening the case.
To enter CompactLink mode, user the MODE/CLEAR key to enter CMLINK mode, then press TEST/EXEC. Press TEST/EXEC again to confirm that you wish to enter CompactLink mode, and the display will show “Not Connected”. Run the CompactLink software on your PC,
LinearMaster Compact Linear IC Tester
Copyright 1993-2011 ABI Electronics Limited
Page 9
connect the serial cable and follow the CompactLink manual instructions to connect to the LinearMaster Compact Professional.
For comprehensive instructions on using CompactLink please refer to the manual and built-in help supplied with the software.
Note that in CompactLink mode, including waiting for a connection, the normal power down timeout is disabled and the unit will remain on for ever. We recommend using a battery eliminator when using CompactLink mode to develop test programmes.
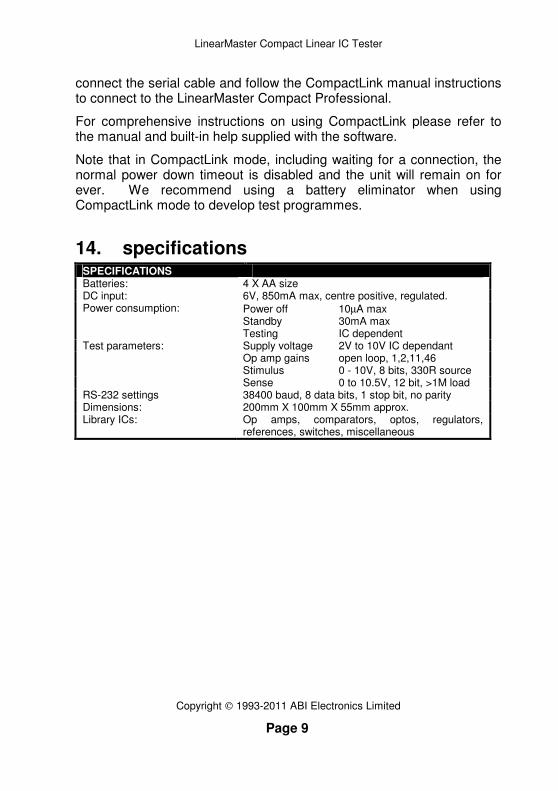
14. specifications SPECIFICATIONS Batteries: 4 X AA size DC input: 6V, 850mA max, centre positive, regulated. Power consumption:
Power off 10µA max Standby 30mA max Testing IC dependent
Test parameters: Supply voltage 2V to 10V IC dependant Op amp gains open loop, 1,2,11,46 Stimulus 0 - 10V, 8 bits, 330R source Sense 0 to 10.5V, 12 bit, >1M load RS-232 settings 38400 baud, 8 data bits, 1 stop bit, no parity Dimensions: 200mm X 100mm X 55mm approx. Library ICs: Op amps, comparators, optos, regulators,
references, switches, miscellaneous
LinearMaster Compact Linear IC Tester
Copyright 1993-2011 ABI Electronics Limited
Page 10
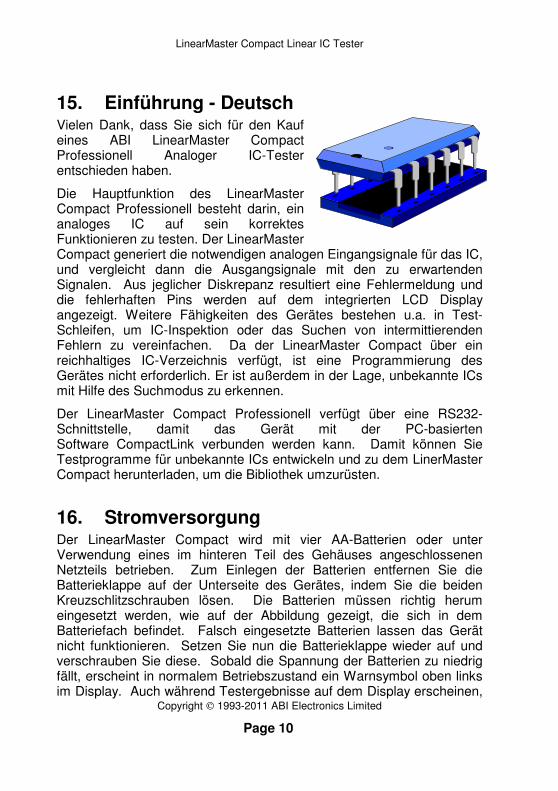
15. Einführung - Deutsch Vielen Dank, dass Sie sich für den Kauf eines ABI LinearMaster Compact Professionell Analoger IC-Tester entschieden haben.
Die Hauptfunktion des LinearMaster Compact Professionell besteht darin, ein analoges IC auf sein korrektes Funktionieren zu testen. Der LinearMaster Compact generiert die notwendigen analogen Eingangsignale für das IC, und vergleicht dann die Ausgangsignale mit den zu erwartenden Signalen. Aus jeglicher Diskrepanz resultiert eine Fehlermeldung und die fehlerhaften Pins werden auf dem integrierten LCD Display angezeigt. Weitere Fähigkeiten des Gerätes bestehen u.a. in Test-Schleifen, um IC-Inspektion oder das Suchen von intermittierenden Fehlern zu vereinfachen. Da der LinearMaster Compact über ein reichhaltiges IC-Verzeichnis verfügt, ist eine Programmierung des Gerätes nicht erforderlich. Er ist außerdem in der Lage, unbekannte ICs mit Hilfe des Suchmodus zu erkennen.
Der LinearMaster Compact Professionell verfügt über eine RS232-Schnittstelle, damit das Gerät mit der PC-basierten Software CompactLink verbunden werden kann. Damit können Sie Testprogramme für unbekannte ICs entwickeln und zu dem LinerMaster Compact herunterladen, um die Bibliothek umzurüsten.
16. Stromversorgung Der LinearMaster Compact wird mit vier AA-Batterien oder unter Verwendung eines im hinteren Teil des Gehäuses angeschlossenen Netzteils betrieben. Zum Einlegen der Batterien entfernen Sie die Batterieklappe auf der Unterseite des Gerätes, indem Sie die beiden Kreuzschlitzschrauben lösen. Die Batterien müssen richtig herum eingesetzt werden, wie auf der Abbildung gezeigt, die sich in dem Batteriefach befindet. Falsch eingesetzte Batterien lassen das Gerät nicht funktionieren. Setzen Sie nun die Batterieklappe wieder auf und verschrauben Sie diese. Sobald die Spannung der Batterien zu niedrig fällt, erscheint in normalem Betriebszustand ein Warnsymbol oben links im Display. Auch während Testergebnisse auf dem Display erscheinen,
LinearMaster Compact Linear IC Tester
Copyright 1993-2011 ABI Electronics Limited
Page 11
leuchtet das Warnsymbol auf. Unter diesen Umständen kann es zu unstimmigen Ergebnissen kommen.
17. Netzteil Für einen längeren Gebrauch des LinearMaster Compact ist ein externes Netzteil erhältlich. Viele ICs verbrauchen verhältnismäßig viel Strom wenn sie eingeschaltet werden, und die Haltbarkeit der Batterien kann durch den Gebrauch eines Netzteils verlängert werden. Es ist nicht nötig, die Batterien vor dem Einsetzen des Netzteils zu entfernen. Doch beachten Sie bitte, dass nach längerer Nicht-Benutzung die Batterien dazu neigen, auszulaufen und daher rechtzeitig entfernt werden sollten. Um Schäden an dem Gerät zu vermeiden raten wir Ihnen dringend, nur das von uns empfohlene Netzteil zu benutzen, das Sie über Ihren Vertreter erwerben können. Beachten Sie bitte, dass eine falsche Ausgangsspannung des Netzteils das Gerät beschädigen kann und die Garantie nicht gewährleistet werden kann.
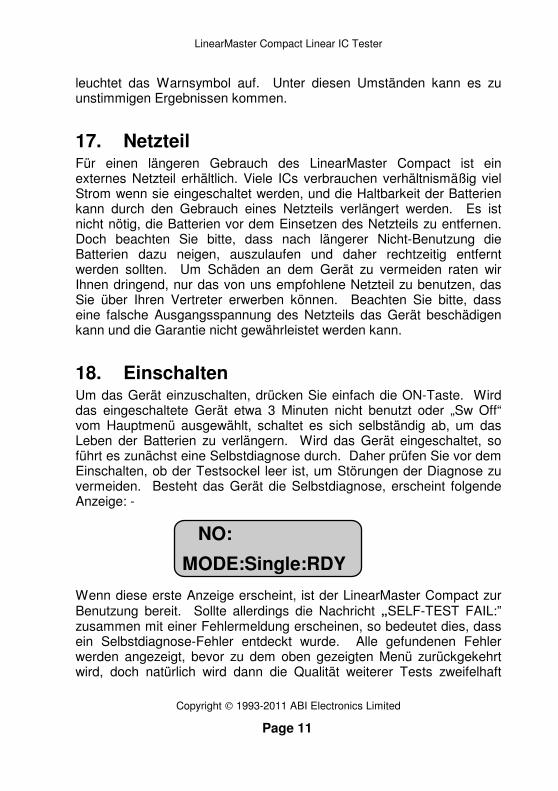
18. Einschalten Um das Gerät einzuschalten, drücken Sie einfach die ON-Taste. Wird das eingeschaltete Gerät etwa 3 Minuten nicht benutzt oder „Sw Off“ vom Hauptmenü ausgewählt, schaltet es sich selbständig ab, um das Leben der Batterien zu verlängern. Wird das Gerät eingeschaltet, so führt es zunächst eine Selbstdiagnose durch. Daher prüfen Sie vor dem Einschalten, ob der Testsockel leer ist, um Störungen der Diagnose zu vermeiden. Besteht das Gerät die Selbstdiagnose, erscheint folgende Anzeige: -
Wenn diese erste Anzeige erscheint, ist der LinearMaster Compact zur Benutzung bereit. Sollte allerdings die Nachricht „SELF-TEST FAIL:” zusammen mit einer Fehlermeldung erscheinen, so bedeutet dies, dass ein Selbstdiagnose-Fehler entdeckt wurde. Alle gefundenen Fehler werden angezeigt, bevor zu dem oben gezeigten Menü zurückgekehrt wird, doch natürlich wird dann die Qualität weiterer Tests zweifelhaft
NO:
MODE:Single:RDY

LinearMaster Compact Linear IC Tester
Copyright 1993-2011 ABI Electronics Limited
Page 12
sein. Bevor Sie sich an ihren Vertreter wenden, stellen Sie sicher, dass der Testsockel komplett leer ist.
19. Betriebsarten Der LinearMaster Compact verfügt über verschiedene Testarten, zwischen denen man innerhalb des Startmenüs mittels der MODE/CLEAR-Taste wählen kann. Es gibt folgende Testarten: -
Single - führt einen einzelnen Test des ICs durch. Loop - wiederholter Test unabhängig von dem Ergebnis. P Loop - wiederholter Test solange das Ergebnis gut ist. F Loop - wiederholter Test solange das Ergebnis schlecht ist. Search - identifiziert die Nummer des ICs. Diags - führt die Selbstdiagnose durch. CmLink - ferngesteuerter Modus für CompactLink-Software. Sw Off - Gerät auschalten.
20. Eingabe der IC-Nummern Drücken Sie die MODE/CLEAR-Taste bis die gewünschte Testart angezeigt wird. Geben Sie nun die Nummer des zu testenden ICs ein. Sollten Sie einen Fehler bei der Eingabe machen, wird die Anzeige durch Drücken der MODE/CLEAR-Taste gelöscht und Sie können die Eingabe wiederholen. Bitte beachten Sie: Es wird nur die numerische Information eingegeben, alle Angaben zum Hersteller oder zur IC-Familie werden nicht berücksichtigt. So sollten zum Beispiel alle folgenden ICs als 7,4,1 auf der Tastatur eingegeben werden: -
z.B. uA741CP, uA741M, uA741C usw.
Manche ICs sind mit unterschiedlichen Pinkonfigurationen bzw. Gehäusen vorhanden, und es gibt ICs mit unterschiedlichen Funktionen, die trotzdem die gleiche Nummer haben. In diesen Fällen entscheidet sich der LinearMaster Compact selbst, welcher Test durchgeführt werden soll. Wenn aber das IC fehlerhaft ist, kann der LinearMaster den richtigen Test nicht identifizieren. In diesem Fall erscheint eine Warnmeldung, nachdem Sie den richtigen Test auswählen können.
Eine komplette Liste von den unterstüzten ICs (wenn notwendig mit Anmerkungen) wird am Ende dieser Anleitung angezeigt.
LinearMaster Compact Linear IC Tester
Copyright 1993-2011 ABI Electronics Limited
Page 13
Wenn Sie eine Benutzer-IC-Bibliothek installiert haben, bitte merken Sie sich, dass ein Benutzer-IC mit der identischen Nummer zu einem IC in der eingebauten Bibilothek bevorzugt wird. Dies erlaubt, dass ein neuer Test für ein existierendes IC geschrieben werden kann. Wenn Sie beide Tests benutzen wollen, benutzen Sie eine andere Nummer für Ihren Benutzer-IC-Test.
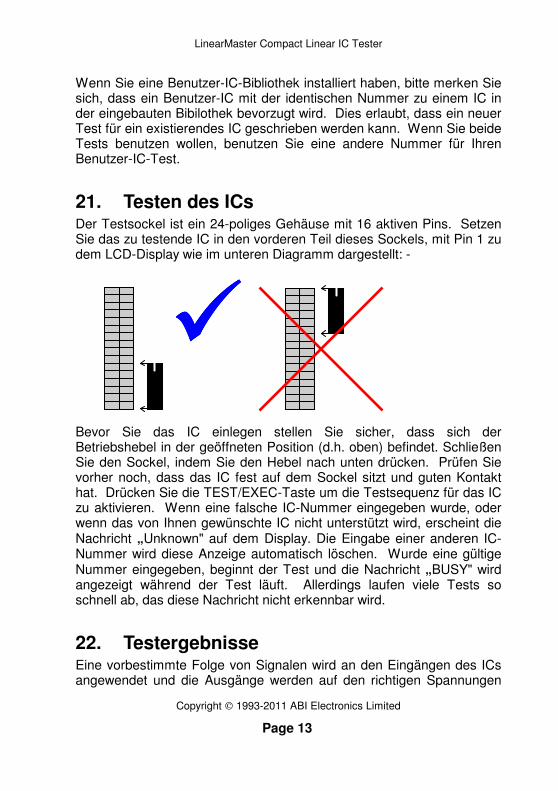
21. Testen des ICs Der Testsockel ist ein 24-poliges Gehäuse mit 16 aktiven Pins. Setzen Sie das zu testende IC in den vorderen Teil dieses Sockels, mit Pin 1 zu dem LCD-Display wie im unteren Diagramm dargestellt: -
Bevor Sie das IC einlegen stellen Sie sicher, dass sich der Betriebshebel in der geöffneten Position (d.h. oben) befindet. Schließen Sie den Sockel, indem Sie den Hebel nach unten drücken. Prüfen Sie vorher noch, dass das IC fest auf dem Sockel sitzt und guten Kontakt hat. Drücken Sie die TEST/EXEC-Taste um die Testsequenz für das IC zu aktivieren. Wenn eine falsche IC-Nummer eingegeben wurde, oder wenn das von Ihnen gewünschte IC nicht unterstützt wird, erscheint die Nachricht „Unknown" auf dem Display. Die Eingabe einer anderen IC-Nummer wird diese Anzeige automatisch löschen. Wurde eine gültige Nummer eingegeben, beginnt der Test und die Nachricht „BUSY" wird angezeigt während der Test läuft. Allerdings laufen viele Tests so schnell ab, das diese Nachricht nicht erkennbar wird.
22. Testergebnisse Eine vorbestimmte Folge von Signalen wird an den Eingängen des ICs angewendet und die Ausgänge werden auf den richtigen Spannungen
LinearMaster Compact Linear IC Tester
Copyright 1993-2011 ABI Electronics Limited
Page 14
überwacht. Die exakte Folge der Signale ist IC-abhängig, aber beim Test eines Operationsverstärkers werden beispielsweise sowohl die Leerlaufverstärkung als auch die Verstärkung mit unterschiedlichen Gegenkopplungsfaktoren getestet. Reagieren alle Ausgänge korrekt, wird oben rechts auf dem Display das Ergebnis PASS angezeigt. Eine rollende Nachricht enthält sowohl die IC-Funktion als auch die Versorgungspin-Information.
Wird ein Kurzschluss zwischen den Stromversorgungspins des getesten ICs entdeckt, erscheint oben rechts auf dem Display die Warnung „SHT!” und das Ergebnis wird FAIL (schlecht), weil kein gültiger Test möglich ist. Wenn das getestete IC beim Stromeinschalten einen übermäßigen Stromverbrauch hat, erscheint oben rechts auf dem Display die Warnung „ICC!”. Drücken Sie die TEST/EXEC-Taste, um mit dem Test fortzufahren, oder die CLEAR-Taste, um den Vorgang abzubrechen. Abhängig vom Zustand der Batterien kann auch die Warnung „BAT!” erscheinen. Dies bedeutet, dass die Batterien nicht in der Lage sind, die von dem getesteten IC benötigte Energie zu liefern. Durch drücken der TEST/EXEC-Taste können Sie mit dem Test fortfahren, doch es könnte zu Funktionsstörungen des Gerätes aufgrund von zu geringer Batteriespannung kommen. Wechseln Sie die Batterien oder benutzen Sie ein externes Netzteil. Beachten Sie, dass ein fehlerhafter IC mehr Strom verbrauchen kann und dadurch schnell die Batterien verbraucht.
Manche ICs benötigen externe Komponenten vor dem Test – in diesen Fällen erscheint die Meldung „EXT“ oben rechts auf dem Display. Die notwendigen Komponenten sind in der IC-Liste am Ende dieser Anleitung angegeben. Nachdem Sie die Komponenten eingesetzt haben, können Sie den Test durchführen mit der TEST/EXEC-Taste. Wenn Sie wünschen können Sie den Test mit der CLEAR-Taste abbrechen.
Im Falle des Ergebnisses „FAIL”, werden die Fehler an allen nicht funktionierenden Pins des ICs auf dem Display gerollt, und die IC-Funktion wird angezeigt. Die verschiedenen Fehler werden wie folgt angezeigt: -
V<< - die Ausgangsspannung war niedriger als erwartet. V>> - die Ausgangsspannung war höher als erwartet. D<< - die Diodenspannung war niedriger als erwartet. D>> - die Diodenspannung war niedriger als erwartet.
LinearMaster Compact Linear IC Tester
Copyright 1993-2011 ABI Electronics Limited
Page 15
LOAD - der Eingang kann nicht getrieben werd
In manchen Fällen können die rollenden Testergebnisse eine oder mehrere Warnmeldungen enthalten. Diese Warnungen weisen auf Bedingungen hin, die ein falsches Testergebnis zur Folge haben könnten: -
D/F - das Ergebnis kann ungültig sein, da die letzte Selbstdiagnose fehlgeschlagen ist. BAT! - die Batteriespannung war während des Tests zu niedrig. ICC! - das getestete IC hatte einen hohen Stromverbrauch
Manche ICs sind mit unterschiedlichen Pinkonfigurationan bzw. Gehäusen vorhanden, und es gibt ICs mit unterschiedlichen Funktionen, die trotzdem die gleiche Nummer haben. In diesen Fällen entscheidet sich der LinearMaster Compact selbst, welcher Test durchgeführt werden soll, vorausgesetzt, dass das IC fehlerfrei ist. Wenn aber das IC fehlerhaft ist, erscheint folgende Warnung:
WARNING: All Part Types FAIL (alle IC-Typen fehlerhaft)
Dies bedeutet, dass das IC fehlerhaft ist, Pin-Informationen können jedoch nicht angezeigt werden, weil das genaue IC nicht identifiziert werden kann
Bevor Sie einen fehlerhaften IC aussortieren überprüfen Sie, ob die korrekte IC-Nummer eingegeben wurde und ob die Pins des ICs alle sauber sind und fest im Testsockel sitzen. Beachten Sie, dass ein begonnener Test nicht abgebrochen werden kann (sehen Sie aber die Schleiftestfunktionen).
23. Testen weiterer ICs Nachdem ein Test beendet ist, wird das Ergebnis angezeigt. Um ein anderes IC desselben Typs zu testen, legen Sie dies einfach ein und drücken Sie wieder die TEST/EXEC-Taste. Um ein unterschiedliches IC zu testen, geben Sie auf dem üblichen Wege die neue IC-Nummer ein. Beachten Sie, dass die Eingabe der ersten Ziffer der neuen Nummer die vorige Nummer automatisch von der Anzeige löscht. Wieder kann die CLEAR-Taste benutzt werden, falls es zu einem Fehler während der Eingabe kommt.
LinearMaster Compact Linear IC Tester
Copyright 1993-2011 ABI Electronics Limited
Page 16
24. Fortlaufendes Testen Es ist möglich, das gleiche IC wiederholt zu testen, um es auf intermittierende oder temperaturabhängige Fehler zu testen, oder um eine größere Menge identischer ICs in sehr kurzer Zeit zu testen. Es gibt drei Arten dieser Testschleifen: -
Loop - wiederholt einen Test unabhängig von dem Ergebnis immer wieder durch. P Loop - wiederholt einen Test immer wieder, solange das Ergebnis PASS (gut) lautet. F Loop - wederholt einen Test immer wieder, solange das Ergebnis FAIL (schlecht) lautet.
Der LinearMaster Compact wird wie oben beschrieben mit der MODE/CLEAR-Taste auf einen der LOOP-Modi eingestellt. Legen Sie das IC ein und drücken Sie die TEST/EXEC-Taste, um das fortlaufende Testverfahren zu starten. Das Ergebnis jedes Tests wird als „PASS” oder „FAIL” oben rechts auf dem Display angezeigt. Im LOOP-Modus ermöglicht dies den Test einer großen Anzahl identischer ICs, ohne dass der Benutzer etwas anderes tun muss als die ICs einzulegen. Nachdem das IC eingelegt wird, besteht eine IC-abhängige Verzögerung, bis das Display aktualisiert wird. Im Zweifel kann der Test einmal im SINGLE-Modus durchgeführt werden, um die Testzeit ungefähr festzustellen. Sie werden bemerken, dass in diesem Modus eine höhere Durchgangsleistung erreicht werden kann.
Um eine Testschleife anzuhalten, drücken Sie die CLEAR-Taste. Der bereits laufende Test wird noch beendet, bevor das Gerät reagiert. Normalerweise ist das nicht zu bemerken, doch wenn ein Test länger andauert kommt es zu einer Verzögerung der Reaktion auf die CLEAR-Taste.
Bitte beachten Sie: Das Testen von ICs mit hohem Stromverbrauch wird die Batterien schnell verbrauchen, daher raten wir zum Gebrauch eines externen Netzteils, wenn Sie eine Testschleife starten wollen. Wenn die Warnung „ICC!“ erscheint, stellt sich das Gerät automatisch auf den SINGLE-Modus um, um eine komplette Entladung der Batterien zu vermeiden.
LinearMaster Compact Linear IC Tester
Copyright 1993-2011 ABI Electronics Limited
Page 17
25. Suchmodus Dieser Modus erlaubt es, die Typenummer eines unbekannten ICs festzustellen, vorausgesetzt, dass das IC fehlerfrei ist und sich in dem Verzeichnis des Gerätes befindet. Diese Funktion ist sehr nützlich wenn die IC-Nummer unleserlich ist oder entfernt wurde.
Benutzen Sie die MODE/CLEAR-Taste, um den Modus „SEARCH“ auszuwählen. Legen Sie das unbekannte IC ein und drücken Sie die TEST/EXEC-Taste. Sie werden nun aufgefordert, die Anzahl der Pins des zu identifizierenden ICs zu wählen – benutzen Sie die MODE/CLEAR-Taste um zwischen 3 bis 16 Pins zu wählen, oder die QUIT-Taste, um diesen Modus zu beenden. Drücken Sie nochmals die TEST/EXEC-Taste, um die Suche zu starten, oder wenn gewünscht abzubrechen.
Während der Suche wird die Anzahl der identifizierten ICs angezeigt (IDENT: xx) , und der Fortschritt der Suche wird graphisch dargestellt. Am Ende der Suche wird eine Liste von ähnlichen ICs auf dem Display gerollt. Diese Liste kann durch das Drücken der TEST/EXEC-Taste nochmals angezeigt werden
Kann das IC nicht identifiziert werden, so erscheint die Meldung „Not in Library" auf dem Display. Dies bedeutet entweder, dass das IC nicht gelistet oder fehlerhaft ist. Falls das Gerät während des Tests einen hohen Strom oder schwache Batterien entdeckt („ICC!“ order „BAT!“ Warnungen), wird das IC nicht identifiziert. Das IC kann troztdem aber im SINGLE-Modus getestet werden.
26. Selbstdiagnosemodus Diese Funktion ermöglicht es Ihnen, die Integrität des Gerätes zu überprüfen, einschließlich der Aus- und Eingänge, Stromversorgung und anderer interner Hardware. Der Test wird automatisch beim Einschalten durchgeführt, doch Sie können jederzeit eine Selbstdiagnose durchführen, indem Sie den Selbstdiagnosemodus (DIAGS) mit Hilfe der MODE/CLEAR-Taste auswählen und dann TEST/EXEC drücken.
Wird ein Fehler entdeckt, erscheint ein alphanumerischer Code auf dem Display, der unseren Ingenieuren bei der Fehlersuche und -Beseitigung helfen wird. Sie sollten diesen Code aufschreiben und bei jeder Korrespondenz angeben, die mit diesem Fehler des Gerätes zu tun hat.
LinearMaster Compact Linear IC Tester
Copyright 1993-2011 ABI Electronics Limited
Page 18
Bevor Sie Ihren Vertreter im Falle eines Selbstdiagnosefehlers benachrichtigen, prüfen Sie zunächst, ob der Sockel zum Zeitpunkt des Tests komplett leer war.
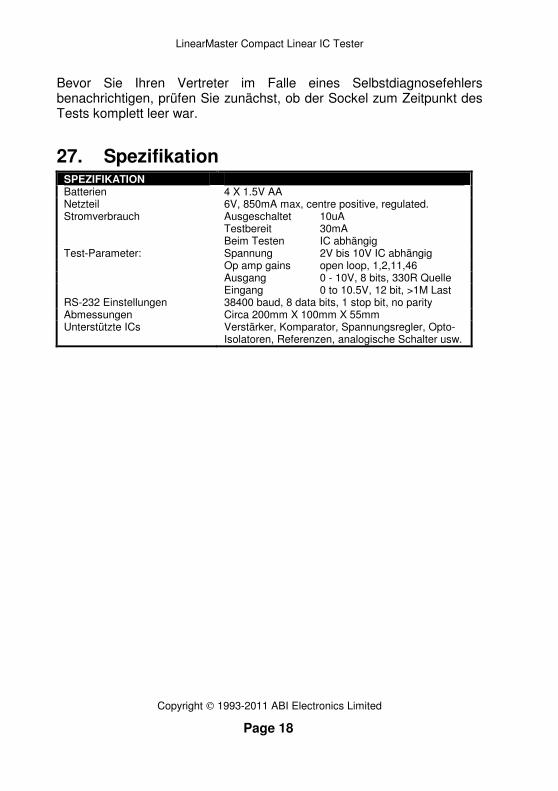
27. Spezifikation SPEZIFIKATION Batterien 4 X 1.5V AA Netzteil 6V, 850mA max, centre positive, regulated. Stromverbrauch
Ausgeschaltet 10uA Testbereit 30mA Beim Testen IC abhängig
Test-Parameter: Spannung 2V bis 10V IC abhängig Op amp gains open loop, 1,2,11,46 Ausgang 0 - 10V, 8 bits, 330R Quelle Eingang 0 to 10.5V, 12 bit, >1M Last RS-232 Einstellungen 38400 baud, 8 data bits, 1 stop bit, no parity Abmessungen Circa 200mm X 100mm X 55mm Unterstützte ICs Verstärker, Komparator, Spannungsregler, Opto-
Isolatoren, Referenzen, analogische Schalter usw.
LinearMaster Compact Linear IC Tester
Copyright 1993-2011 ABI Electronics Limited
Page 19
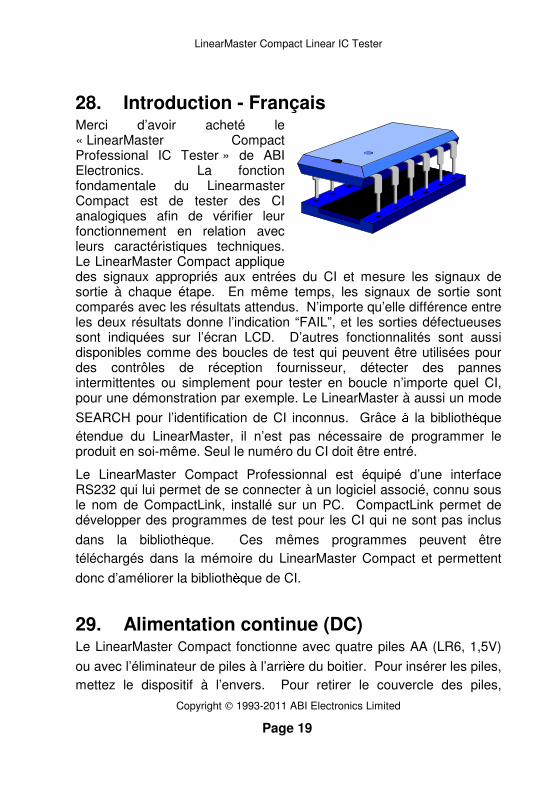
28. Introduction - Français Merci d’avoir acheté le « LinearMaster Compact Professional IC Tester » de ABI Electronics. La fonction fondamentale du Linearmaster Compact est de tester des CI analogiques afin de vérifier leur fonctionnement en relation avec leurs caractéristiques techniques. Le LinearMaster Compact applique des signaux appropriés aux entrées du CI et mesure les signaux de sortie à chaque étape. En même temps, les signaux de sortie sont comparés avec les résultats attendus. N’importe qu’elle différence entre les deux résultats donne l’indication “FAIL”, et les sorties défectueuses sont indiquées sur l’écran LCD. D’autres fonctionnalités sont aussi disponibles comme des boucles de test qui peuvent être utilisées pour des contrôles de réception fournisseur, détecter des pannes intermittentes ou simplement pour tester en boucle n’importe quel CI, pour une démonstration par exemple. Le LinearMaster à aussi un mode
SEARCH pour l’identification de CI inconnus. Grâce à la bibliothèque
étendue du LinearMaster, il n’est pas nécessaire de programmer le produit en soi-même. Seul le numéro du CI doit être entré.
Le LinearMaster Compact Professionnal est équipé d’une interface RS232 qui lui permet de se connecter à un logiciel associé, connu sous le nom de CompactLink, installé sur un PC. CompactLink permet de développer des programmes de test pour les CI qui ne sont pas inclus
dans la bibliothèque. Ces mêmes programmes peuvent être
téléchargés dans la mémoire du LinearMaster Compact et permettent
donc d’améliorer la bibliothèque de CI.
29. Alimentation continue (DC) Le LinearMaster Compact fonctionne avec quatre piles AA (LR6, 1,5V)
ou avec l’éliminateur de piles à l’arrière du boitier. Pour insérer les piles,
mettez le dispositif à l’envers. Pour retirer le couvercle des piles,

LinearMaster Compact Linear IC Tester
Copyright 1993-2011 ABI Electronics Limited
Page 20
enlevez les deux vis cruciformes. Insérez les piles dans le bon sens comme indiqué par le connecteur polarisé. Si les piles ne sont pas correctement insérées, le dispositif peut être endommagé. Remettez le couvercle des piles et les vis. Si la tension offerte par les piles est trop basse, le dispositif affichera un message d’alerte en haut à gauche de l’écran en mode d’opération normale. Dans ce cas, les résultats obtenus peuvent être erronés.
30. Eliminateur de piles Pour l’usage prolongé du LinearMaster Compact, nous conseillons l’usage d’un éliminateur de piles externe. Beaucoup de CI consomme une quantité importante de courant et par conséquent l’usage de l’éliminateur de pile permet d’augmenter la durée de vie des piles. Il n’est pas nécessaire d’enlever les piles pour utiliser l’éliminateur. Veuillez noter que pendant des périodes prolongées sans utilisation, les piles peuvent fuir et doivent être retirées. Pour éviter toute dégradation de votre appareil, il est conseillé de n’utiliser que l’éliminateur de piles recommandé, disponible chez votre distributeur. Veuillez noter qu’une mauvaise sélection entrainera des dégâts irréparables et annulera la garantie.
31. Mise sous tension Pour allumer le dispositif, appuyez sur la touche ON. Afin de préserver les piles, le dispositif s’éteindra s’il n’est pas utilisé pendant 3 minutes, ou quand “Sw Off” est sélectionné dans le menu principal. Lorsque le dispositif s’allume, il exécute un test automatique de démarrage. Pour cette raison, avant d’allumer le dispositif, vérifiez que le socle soit vide, afin d’éviter les interférences. Si il n’y a aucun problème avec le dispositif, l’écran affichera le message suivant:
Quand le message ci-dessus s’affiche, le LinearMaster Compact est prêt à l’utilisation. Si le dispositif affiche le message SELF-TEST FAIL, il y a une erreur dans le test de démarrage et le dispositif affichera un
NO:
MODE:Single:RDY
LinearMaster Compact Linear IC Tester
Copyright 1993-2011 ABI Electronics Limited
Page 21
code indiquant le type de défaut. Chaque problème détecté sera affiché
à la suite sur l’écran.
Il est possible de retourner au menu initial en appuyant sur la touche TEST/EXEC, cependant les résultats obtenus par le dispositif seront peu fiables. Avant de vous mettre en contact avec votre distributeur, veuillez vérifier que le socle soit totalement vide.
32. Modes d’opération Le LinearMaster compact dispose de plusieurs modes d’opération qui peuvent être sélectionnés en utilisant la touche MODE/CLEAR. Les modes sont les suivants :
Single - un seul test sur le CI dans le socle. Loop - répète un test en ignorant les résultats. P Loop - répète un test si le résultat est PASS. F Loop - répète un test si le résultat est FAIL. Search - identifie le numéro du CI dans le socle. Diags - exécute le test de démarrage. CmLink - mode de connexion pour CompactLink. Sw Off - éteint le dispositif.
33. Introduction des numéros de CI Appuyez sur la touche MODE/CLEAR jusqu’à l’obtention du mode désiré Introduisez le numéro du CI que vous désirez tester. Si vous faites une erreur, appuyez sur la touche MODE/CLEAR pour annuler.
NB: Il n’est pas nécessaire de taper les préfixes et suffixes du fabriquant, seuls les numéros suffisent. Par exemple, les CI suivants doivent être tapés comme 7, 4, 1 sur le clavier:
uA741CP, uA741M, uA741C etc.
Certains CI sont disponibles avec des brochages différents. Il y a également différents types de CI qui existent avec le même numéro. Dans ce cas, le LinearMaster décidera automatiquement quel test utiliser. Si le CI est défectueux, il est possible que le dispositif ne puisse pas déterminer le type de CI. Dans ce cas, l’écran affichera un message qui vous permettra de sélectionner le CI approprié. Une liste complète de tous les CI soutenus par le LinearMaster Compact se
LinearMaster Compact Linear IC Tester
Copyright 1993-2011 ABI Electronics Limited
Page 22
trouve à la fin de ce manuel. Il y a aussi des instructions spéciales pour les CI particuliers.
Veuillez noter que si une bibliothèque USER a été enregistrée avec
CompactLink et que si un nouveau CI a le même numéro qu’un CI
existant dans la bibliothèque interne, la bibliothèque USER prendra
priorité. Cela permet de créer un nouveau test pour un CI qui existe
déjà. Si vous désirez avoir accès aux deux tests, vous devez enregistrer le nouveau CI sous un nom différent.
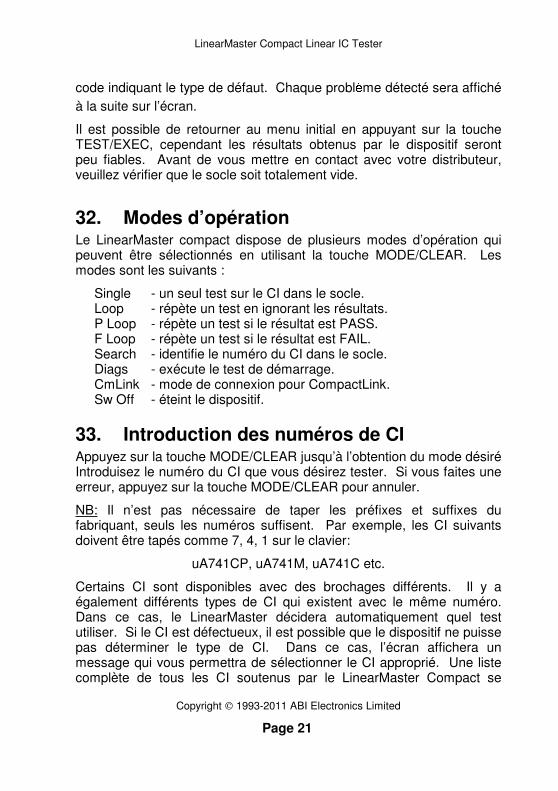
34. Test d’un CI Le socle à 24 broches, avec 16 broches actives. Insérez le CI à tester à l’avant du socle ZIF (Zero Insertion Force) avec la patte 1 face à l’écran :
Pour les CI à trois pattes de type TO220 et T092, insérez le composant dans les broches 6, 7 et 8 du socle (en bas à gauche) avec le détrompeur ou le plat dirigé vers la droite.
Vérifiez que le levier de commande sur le socle est “ouvert” avant d’insérer le CI. Fermez le socle en abaissant le levier en vérifiant que le CI soit bien placé. Appuyez sur la touche TEST-EXEC afin d’activer la séquence de test du CI. Si un numéro invalide de CI est entré, ou si le CI que vous désirez tester n’est pas dans la bibliothèque, le message “unknown” apparaîtra. Entrez un autre numéro pour effacer ce message. Si un numéro valide est entré, le test commencera automatiquement et “BUSY” apparaîtra sur l’écran. Cependant, la plupart des tests étant rapides, il est rare de voir ce message.
LinearMaster Compact Linear IC Tester
Copyright 1993-2011 ABI Electronics Limited
Page 23
35. Résultats Une séquence prédéterminée de signaux est appliquée aux entrées du CI et les tensions de sortie sont mesurées afin de les comparer avec les valeurs correctes. La séquence exacte d’un test dépend du type de CI mais un test sur un amplificateur opérationnel par exemple comprend à la fois boucle ouverte et boucle fermée, avec une gamme de tensions et de gain.
Si toutes les tensions de sortie sont correctes, le dispositif affichera PASS sur l’écran. Un message défilant décrira la fonction du CI et les pattes de puissance.
Si un court circuit entre les pattes de puissance est détecté, le message « SHT » apparaîtra en haut à droite de l’écran et, puisque un test valide n’est pas possible, le résultat sera FAIL. Si, lors de l’application du test, le CI reçoit trop de courant, un message « ICC » apparaîtra sur l’écran. Pour continuer le test, appuyez sur la touche TEST/EXEC, ou pour abandonner, appuyez sur CLEAR. Selon l’état des piles, un message « BAT! » peut apparaitre pour indiquer que les piles ne sont pas capables de fournir le courant nécessaire pour le test. Vous pouvez continuer le test en appuyant sur « TEST/EXEC » mais cela peut provoquer des problèmes avec le dispositif. Pour éviter ce problème, changez les piles ou utilisez un éliminateur des piles. Veuillez noter qu’un CI défectueux nécessitera plus de tension, ainsi réduisant la durée de vie des piles.
Certains CI nécessitent des composants externes pour leur test. Dans ce cas, le dispositif affichera le message EXT sur l’écran. Veuillez consulter la liste des CI à la fin de ce manuel pour les détails sur les composantes nécessaires. Après l’installation, vous pouvez exécuter le test en appuyant sur la touche TEST. Si vous le désirez, vous pouvez abandonner le test en appuyant sur CLEAR.
Dans le cas d’un résultat « FAIL », les erreurs de toutes les pattes défectueuses seront affichées en défilement ainsi que la fonction du CI. Les erreurs qui peuvent être affichées sont les suivantes :
V<< - La tension sur la patte est plus basse qu’anticipé. V>> - La tension sur la patte est plus haute qu’anticipé. D<< - La tension de chute de la diode est plus basse
qu’anticipé.
LinearMaster Compact Linear IC Tester
Copyright 1993-2011 ABI Electronics Limited
Page 24
D>> - La tension de chute de la diode est plus haute qu’anticipé.
LOAD - l’entrée ne peut pas être commandée.
Dans certains cas, le message d’erreur en défilement peut contenir quelques messages « WARNING ». Ces messages indiquent que certaines conditions peuvent rendre les résultats peu fiables comme :
D/F - Résultat peut être invalide dû à l’échec du dernier test de démarrage.
Bat - Tension des piles trop basse pendant le test. ICC - Courant trop grand pour le dispositif soumis au test.
Certains CI sont disponibles avec des brochages différents. Il y a également differents types de CI qui existent avec le même numéro même si leurs fonctions est différentes. Dans ce cas, avant le test, le LinearMaster déterminera automatiquement le type de CI, s’il est fonctionnel. Si le CI est défectueux, le message suivant apparaitra :
WARNING: All Part Types FAIL
Ce message indique que le CI est défectueux, mais aucune information ne peut être affichée parce que le type de CI n’est pas connu.
Avant de refuser un CI défectueux, vérifiez que le numéro approprié a été entré et vérifiez aussi que les broches du CI sont propres et font bon contact avec le socle. Veuillez noter qu’il n’est pas possible d’arrêter un test une fois qu’il est commencé – référez vous a la section « test en continu » pour plus d’informations.
36. Test de plusieurs CI Dès que le test est terminé, les résultats seront affichés. Pour tester un autre CI du même type, il faut simplement insérer le prochain CI et appuyer de nouveau sur la touche TEST/EXEC. Pour tester un CI différent, il faut de nouveau entrer le numéro du CI en notant que, en appuyant sur la première touche, l’ancien numéro sera effacé. Si vous faites une erreur, veuillez appuyer sur la touche CLEAR.
37. Test en continu Il est possible de tester le même CI à plusieurs reprises pour la détection de pannes intermittentes ou pour des problèmes dus à la
LinearMaster Compact Linear IC Tester
Copyright 1993-2011 ABI Electronics Limited
Page 25
température. Cela permet également de tester rapidement un lot de CI identiques. Il y a trois types de test en boucle:
Loop - exécute un test plusieurs fois, sans se soucier des résultats.
P Loop - exécute un test plusieurs fois, si le résultat est PASS. F Loop - exécute un test plusieurs fois, si le résultat est FAIL.
Le LinearMaster Compact peut être configuré pour un des modes en boucle en utilisant la touche MODE/CLEAR. Il faut insérer le CI et appuyer sur la touche TEST/EXEC pour commencer le test en continu. Le résultat de chaque test est affiché en PASS ou FAIL. Dans le mode LOOP, cela veut dire qu’un lot important de CI identiques peut être soumis à un test en entrant simplement le numéro du CI. Après avoir introduit le CI, laissez suffisamment de temps pour que le test se termine avant de mettre à jour les résultats. Pour cela, il faut tester le CI dans le mode normale pour découvrir le temps approximatif du test. Notez qu’avec cette technique, un haut débit de CI peut être testé.
Pour arrêter n’importe quelle boucle de test, appuyez sur CLEAR. Veuillez noter que le test en progrès terminera avant que la commande soit obéie. En général, l’effet d’arrêter la boucle est peu notable, mais si le test dure assez longtemps, il y aura un délai avant que le dispositif réponde à la touche CLEAR.
Note: tester un CI en boucle épuise les piles très rapidement. Si le message « ICC ! » apparaît, le dispositif se reconfigurera en mode SINGLE pour conserver les piles.
38. Mode test de démarrage Ce mode vous permet de vérifier l’intégrité du dispositif, comprenant le circuit de commande des broches, l’alimentation électrique et d’autres composants internes. Le diagnostic s’exécute automatiquement au moment d’allumer le dispositif, mais il est aussi possible de choisir un test de démarrage à tout moment en sélectionnant le mode (DIAGS) en utilisant la touche MODE/CLEAR et en appuyant sur TEST/EXEC.
Si une erreur est détectée, le dispositif affichera un code alphanumérique pour aider nos ingénieurs à trouver et corriger le défaut. Vous devez noter ce code et le citer dans toutes vos correspondances. Merci de contacter votre distributeur si le test de démarrage trouve une
LinearMaster Compact Linear IC Tester
Copyright 1993-2011 ABI Electronics Limited
Page 26
erreur, mais premièrement vérifiez que le socle soit vide pendant le diagnostique.
39. Mode de recherche Cette caractéristique permet de déterminer le numéro d’un CI inconnu si le CI est inclue dans la bibliothèque du Linearmaster Compact, et si le CI est fonctionnel. Ceci est particulièrement utile quand le numéro du CI n’est pas lisible ou n’est pas présent.
Utilisez la touche MODE/CLEAR, choisissez le mode SEARCH, insérez le CI inconnu dans le socle et appuyez sur la touche TEST/EXEC. Le LinearMaster demandera le nombre de pattes du CI à identifier. Veuillez utiliser la touche MODE/CLEAR pour choisir entre 3 et 16 pattes, ou appuyez sur QUIT pour sortir de ce mode. Appuyez sur TEST/EXEC encore une fois pour commencer la recherche (SEARCH) ou pour quitter.
Pendant le processus d’identification, l’écran affichera le numéro des CI identifiés (IDENT:) et montrera le progrès sur un graphique. A la fin de SEARCH, une liste de tous les CI identiques défilera sur l’écran. Vous pouvez voir de nouveau la liste en appuyant sur la touche TEST/EXEC.
S’il n’est pas possible d’identifier le CI, le message « Not in Library » apparaitra. Ce message veut dire que soit le CI n’est pas dans la bibliothèque, soit il n’est pas fonctionnel. Veuillez noter que si le dispositif reçoit trop de courant (ICC! ou BAT!), le CI ne sera pas identifié dans le mode SEARCH. Si une bibliothèque USER est présente, elle sera incluse dans la recherche du CI inconnu. Cependant, avec CompactLink, il est possible d’exclure un CI de la recherche si nécessaire.
40. Mode CompactLink Le LinearMaster Compact Professionnel est équipé d’une interface RS-232 pour permettre une connexion avec un PC munis d’un port série COM ou en utilisant un convertisseur USB-RS232. Le logiciel associé (CompactLink) est disponible en option et permet le contrôle de la bibliothèque, le développement et débogage de tests ainsi que la mise à jour et transfère de la bibliothèque USER.
LinearMaster Compact Linear IC Tester
Copyright 1993-2011 ABI Electronics Limited
Page 27
Il est aussi possible d’utiliser CompactLink pour mettre à jour le logiciel du LinearMaster Compact sans avoir à ouvrir le boitier ou retirer la mémoire.
Pour accéder au mode CompactLink, utilisez la touche MODE/CLEAR jusqu’à l’obtention du message CMLINK et appuyez sur TEST/EXEC. Appuyez sur TEST/EXEC de nouveau pour confirmer l’entrée dans le mode CompactLink. Le dispositif affichera “Not Connected”. Chargez le logiciel CompactLink sur votre PC, branchez le câble série et suivez les instructions données dans le manuel CompactLink pour établir la connexion avec le LinearMaster Compact.
Pour plus d’informations sur CompactLink, référez vous au manuel fournis ainsi qu’à l’aide active disponible dans le logiciel.
Veuillez noter que dans le mode CompactLink, le mode d’extinction automatique n’est pas actif et le dispositif sera sous tension en permanence. Nous recommandons l’utilisation d’un éliminateur de batterie pour conserver la durée de vie des piles.
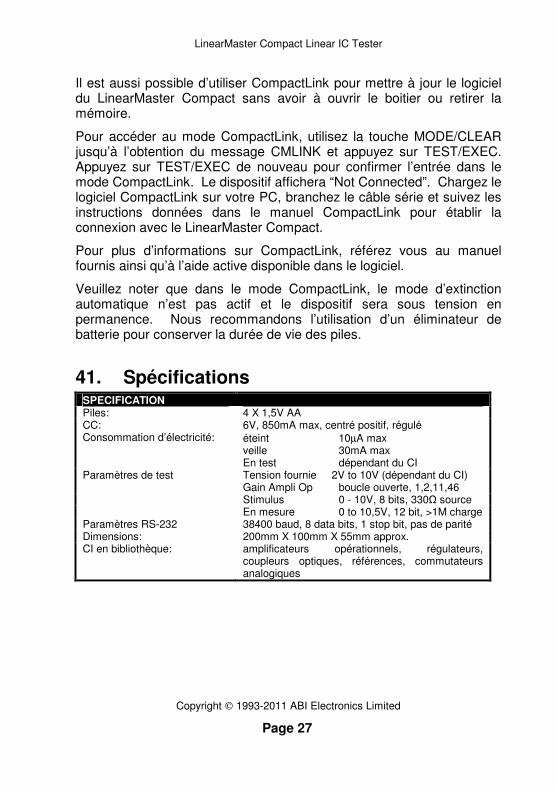
41. Spécifications SPECIFICATION Piles: 4 X 1,5V AA CC: 6V, 850mA max, centré positif, régulé Consommation d’électricité:
éteint 10µA max veille 30mA max En test dépendant du CI
Paramètres de test Tension fournie 2V to 10V (dépendant du CI) Gain Ampli Op boucle ouverte, 1,2,11,46 Stimulus 0 - 10V, 8 bits, 330Ω source En mesure 0 to 10,5V, 12 bit, >1M charge Paramètres RS-232 38400 baud, 8 data bits, 1 stop bit, pas de parité Dimensions: 200mm X 100mm X 55mm approx. CI en bibliothèque: amplificateurs opérationnels, régulateurs,
coupleurs optiques, références, commutateurs analogiques
LinearMaster Compact Linear IC Tester
Copyright 1993-2011 ABI Electronics Limited
Page 28
42. IC support list/IC Liste/Liste des CI soutenus
42.1. introduction/Einführung/introduction
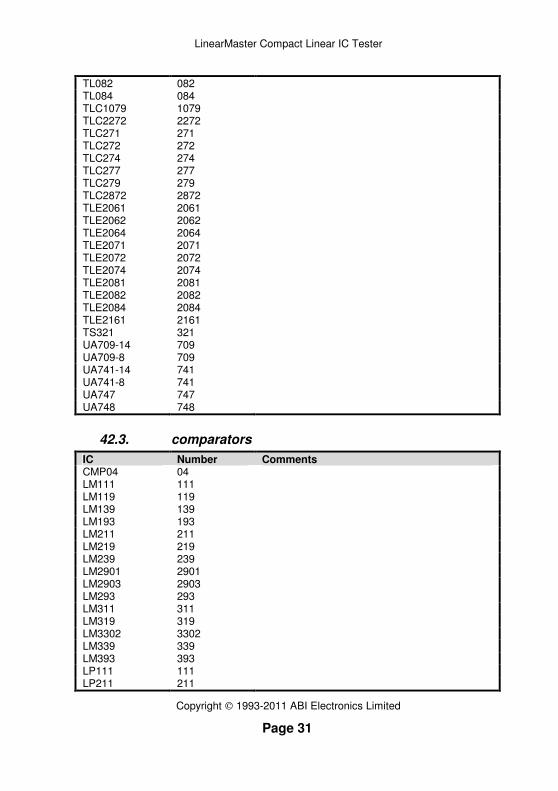
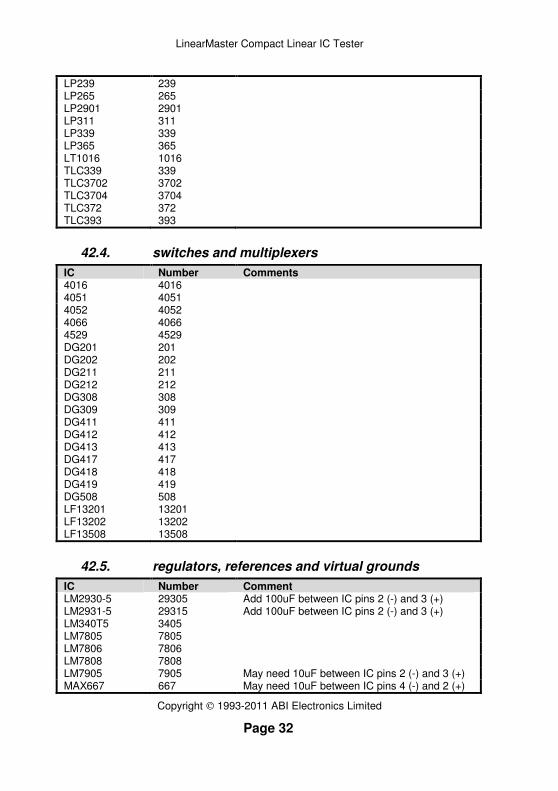
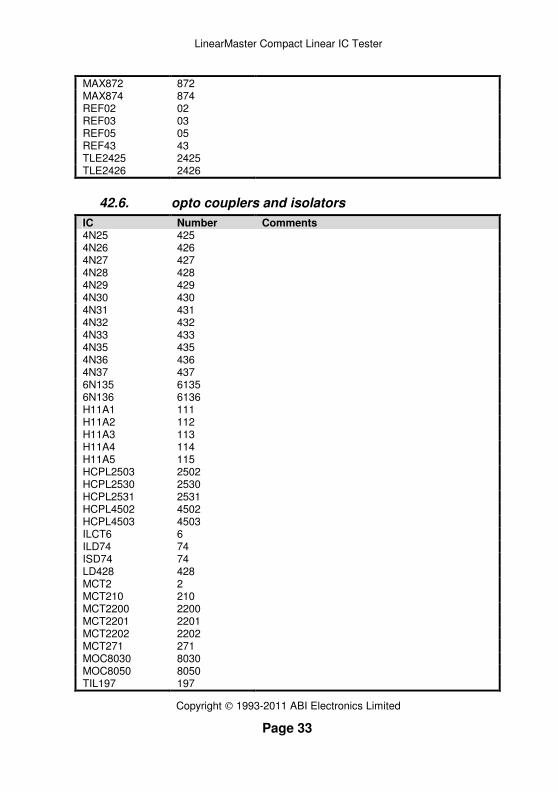
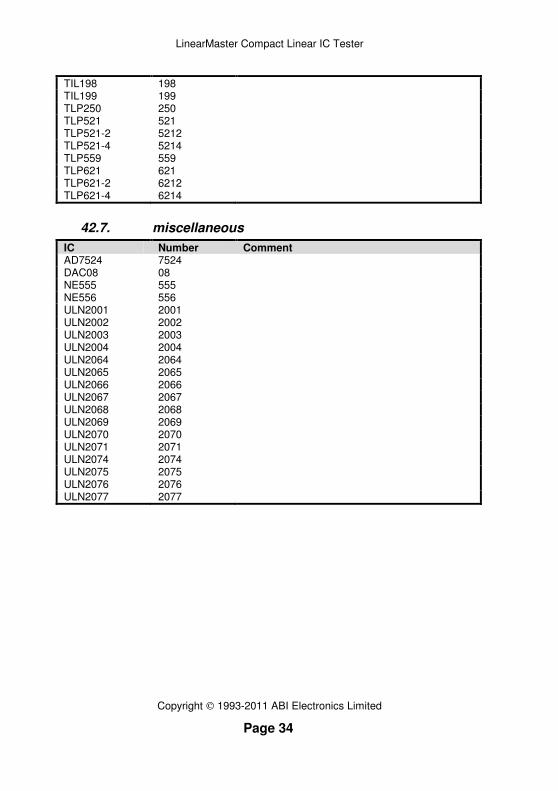
This section is a complete list of the ICs supported by the LinearMaster Compact. If there are any special requirements necessary for a particular IC, this will be indicated in the comments column in the table. Always consult this list before testing an IC you have not tested before, particularly when there is a comment present. Please note that the latest version of the LinearMaster Compact Professional software is available on the ABI Website www.abielectronics.co.uk.
Dieser Abschnitt beinhaltet eine vollständige Auflistung der vom LinearMaster Compact unterstützten ICs. Sollten für einen bestimmten IC besondere Anforderungen gelten, werden diese in der Comments-Spalte erklärt. Konsultieren Sie diese Liste immer, bevor Sie einen IC das erste Mal testen, vor allem dann, wenn diesem IC eine Bemerkung zugeordnet ist. Bitte merken Sie, dass die aktuelle Version der Software bei www.abielectronics.co.uk vorhanden ist.
Cette section comprend une liste complète des CI soutenus par le LinearMaster Compact. Si des conditions particulières sont requises pour un CI en particulier, un numéro entre parenthèses vous enverra vers des notes à la fin de ce manuel. Consultez toujours la liste des CI avant d’effectuer un test, surtout si une note est présente. Veuillez noter que notre dernière version logicielle pour les LinearMaster Compact Professional est en ligne sur notre site web: www.abielectronics.co.uk.
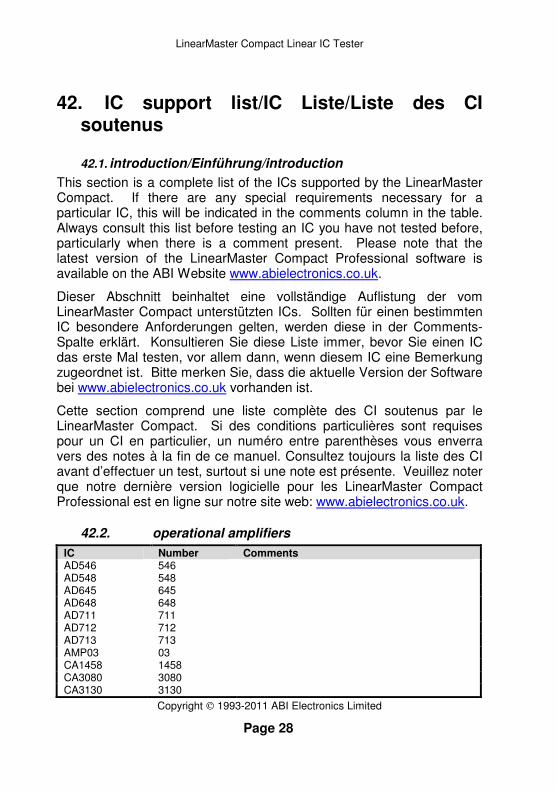
42.2. operational amplifiers
IC Number Comments AD546 546 AD548 548 AD645 645 AD648 648 AD711 711 AD712 712 AD713 713 AMP03 03 CA1458 1458 CA3080 3080 CA3130 3130
LinearMaster Compact Linear IC Tester
Copyright 1993-2011 ABI Electronics Limited
Page 29
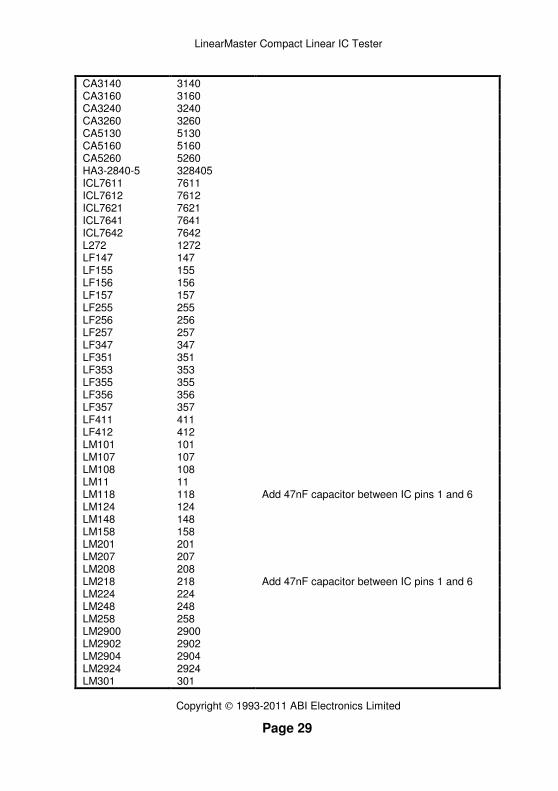
CA3140 3140 CA3160 3160 CA3240 3240 CA3260 3260 CA5130 5130 CA5160 5160 CA5260 5260 HA3-2840-5 328405 ICL7611 7611 ICL7612 7612 ICL7621 7621 ICL7641 7641 ICL7642 7642 L272 1272 LF147 147 LF155 155 LF156 156 LF157 157 LF255 255 LF256 256 LF257 257 LF347 347 LF351 351 LF353 353 LF355 355 LF356 356 LF357 357 LF411 411 LF412 412 LM101 101 LM107 107 LM108 108 LM11 11 LM118 118 Add 47nF capacitor between IC pins 1 and 6 LM124 124 LM148 148 LM158 158 LM201 201 LM207 207 LM208 208 LM218 218 Add 47nF capacitor between IC pins 1 and 6 LM224 224 LM248 248 LM258 258 LM2900 2900 LM2902 2902 LM2904 2904 LM2924 2924 LM301 301
LinearMaster Compact Linear IC Tester
Copyright 1993-2011 ABI Electronics Limited
Page 30
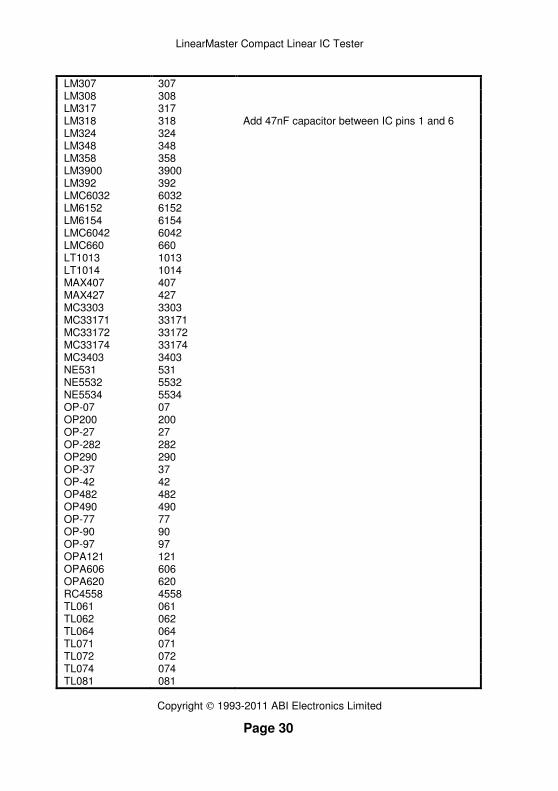
LM307 307 LM308 308 LM317 317 LM318 318 Add 47nF capacitor between IC pins 1 and 6 LM324 324 LM348 348 LM358 358 LM3900 3900 LM392 392 LMC6032 6032 LM6152 6152 LM6154 6154 LMC6042 6042 LMC660 660 LT1013 1013 LT1014 1014 MAX407 407 MAX427 427 MC3303 3303 MC33171 33171 MC33172 33172 MC33174 33174 MC3403 3403 NE531 531 NE5532 5532 NE5534 5534 OP-07 07 OP200 200 OP-27 27 OP-282 282 OP290 290 OP-37 37 OP-42 42 OP482 482 OP490 490 OP-77 77 OP-90 90 OP-97 97 OPA121 121 OPA606 606 OPA620 620 RC4558 4558 TL061 061 TL062 062 TL064 064 TL071 071 TL072 072 TL074 074 TL081 081
LinearMaster Compact Linear IC Tester
Copyright 1993-2011 ABI Electronics Limited
Page 31
TL082 082 TL084 084 TLC1079 1079 TLC2272 2272 TLC271 271 TLC272 272 TLC274 274 TLC277 277 TLC279 279 TLC2872 2872 TLE2061 2061 TLE2062 2062 TLE2064 2064 TLE2071 2071 TLE2072 2072 TLE2074 2074 TLE2081 2081 TLE2082 2082 TLE2084 2084 TLE2161 2161 TS321 321 UA709-14 709 UA709-8 709 UA741-14 741 UA741-8 741 UA747 747 UA748 748
42.3. comparators
IC Number Comments CMP04 04 LM111 111 LM119 119 LM139 139 LM193 193 LM211 211 LM219 219 LM239 239 LM2901 2901 LM2903 2903 LM293 293 LM311 311 LM319 319 LM3302 3302 LM339 339 LM393 393 LP111 111 LP211 211
LinearMaster Compact Linear IC Tester
Copyright 1993-2011 ABI Electronics Limited
Page 32
LP239 239 LP265 265 LP2901 2901 LP311 311 LP339 339 LP365 365 LT1016 1016 TLC339 339 TLC3702 3702 TLC3704 3704 TLC372 372 TLC393 393
42.4. switches and multiplexers
IC Number Comments 4016 4016 4051 4051 4052 4052 4066 4066 4529 4529 DG201 201 DG202 202 DG211 211 DG212 212 DG308 308 DG309 309 DG411 411 DG412 412 DG413 413 DG417 417 DG418 418 DG419 419 DG508 508 LF13201 13201 LF13202 13202 LF13508 13508
42.5. regulators, references and virtual grounds
IC Number Comment LM2930-5 29305 Add 100uF between IC pins 2 (-) and 3 (+) LM2931-5 29315 Add 100uF between IC pins 2 (-) and 3 (+) LM340T5 3405 LM7805 7805 LM7806 7806 LM7808 7808 LM7905 7905 May need 10uF between IC pins 2 (-) and 3 (+) MAX667 667 May need 10uF between IC pins 4 (-) and 2 (+)
LinearMaster Compact Linear IC Tester
Copyright 1993-2011 ABI Electronics Limited
Page 33
MAX872 872 MAX874 874 REF02 02 REF03 03 REF05 05 REF43 43 TLE2425 2425 TLE2426 2426
42.6. opto couplers and isolators
IC Number Comments 4N25 425 4N26 426 4N27 427 4N28 428 4N29 429 4N30 430 4N31 431 4N32 432 4N33 433 4N35 435 4N36 436 4N37 437 6N135 6135 6N136 6136 H11A1 111 H11A2 112 H11A3 113 H11A4 114 H11A5 115 HCPL2503 2502 HCPL2530 2530 HCPL2531 2531 HCPL4502 4502 HCPL4503 4503 ILCT6 6 ILD74 74 ISD74 74 LD428 428 MCT2 2 MCT210 210 MCT2200 2200 MCT2201 2201 MCT2202 2202 MCT271 271 MOC8030 8030 MOC8050 8050 TIL197 197
LinearMaster Compact Linear IC Tester
Copyright 1993-2011 ABI Electronics Limited
Page 34
TIL198 198 TIL199 199 TLP250 250 TLP521 521 TLP521-2 5212 TLP521-4 5214 TLP559 559 TLP621 621 TLP621-2 6212 TLP621-4 6214
42.7. miscellaneous
IC Number Comment AD7524 7524 DAC08 08 NE555 555 NE556 556 ULN2001 2001 ULN2002 2002 ULN2003 2003 ULN2004 2004 ULN2064 2064 ULN2065 2065 ULN2066 2066 ULN2067 2067 ULN2068 2068 ULN2069 2069 ULN2070 2070 ULN2071 2071 ULN2074 2074 ULN2075 2075 ULN2076 2076 ULN2077 2077


![ABI Group Organization Chartabishowatech.co.in/wp-content/uploads/2017/06/20170619...2017/06/19 · ABI Group - Footprint 3 1991 –Incorporation of ABI Showatech India Limited [ABI]](https://img.pdfslide.us/doc/110x75/60047efe48a8ad05f75fc13b/abi-group-organization-20170619-abi-group-footprint-3-1991-aincorporation.jpg)