Embed Size (px)
Citation preview
Tips of the Trade
www.amjorthopedics.com November/December 2016 The American Journal of Orthopedics ® E487
Limited-Incision Knotless Achilles Tendon RepairAndrew R. Hsu, MD
T he incidence of midsubstance Achilles tendon ruptures is increasing in patients 30 years to 50 years of age, and more than
50% of these injuries occur during recreational basketball.1,2 Achilles ruptures occur more in deconditioned individuals engaged in explosive push-off and jumping activities. Management of these injuries has been controversial over the past decade; there is no consensus on nonoper-ative treatment, surgical repair, or optimal repair technique.1,3-7 According to American Academy of Orthopaedic Surgeons (AAOS) clinical prac-tice guidelines, limited-incision approaches have fewer overall complications relative to traditional open repair.3,4
Modern repair techniques, such as the Percu-taneous Achilles Repair System (PARS; Arthrex), combine limited soft-tissue dissection with percutaneous suture insertion and knot tying.1,8 This limited-incision technique, employed since 2010, uses a 2-cm transverse incision and nondisposable metal jig with divergent needle passes and locking suture fixation options to secure and fix both tendon ends with minimal dissection of skin, subcutaneous tissue, and
paratenon. A review of 270 surgically treated Achilles tendon ruptures (101 PARS, 169 tradition-al open repair) found that, compared with the open repair group, the PARS group had signifi-cantly shorter operative times and more patients returning to baseline physical activities within 5 months after surgery.1 Although the difference was not statistically significant, the overall postoperative complication rate was 5% for the PARS group and 11% for the open repair group. The PARS group had no cases of sural neuritis or deep infection requiring reoperation.
Although the PARS technique has had good outcomes with few complications, care must be taken during surgery to prevent sutures from pulling through the tendon near the rupture site, which can result from overtensioning and from suture knot irritation against superficial soft tissues. Given these potential issues, the PARS procedure was modified (Achilles Midsubstance SpeedBridge; Arthrex) to provide knotless restoration of musculotendinous length in a reliable, reproducible fashion and direct fixation of tendon to bone for early mobilization.9 This new procedure bypasses suture fixation in the
AbstractAcute midsubstance Achilles tendon rup-tures, which are increasingly common among athletes, can result in significant functional limitations and decreased quality of life when not managed appropriately. The various surgical techniques for treat-ing Achilles ruptures include open repair with Krackow locking sutures, percutane-ous repair, and limited-incision repair with suture-passing jigs. Less invasive techniques have been developed to optimize the func-tional benefits of surgery while reducing delayed wound healing, infection, and other
postoperative complications.An important albeit subjective aspect of
Achilles tendon repair is suture knot tying and tensioning around the rupture site. Recently, a limited-incision knotless Achilles tendon re-pair technique (Achilles Midsubstance Speed-Bridge; Arthrex) was developed to minimize soft-tissue dissection, restore musculotendi-nous length, and directly fix tendon to bone to allow for early mobilization and more rapid functional recovery. The indications, contra-indications, details, pearls, and pitfalls of this surgical technique are discussed in this article.
Author’s Disclosure Statement: Dr. Hsu reports that he is a paid speaker for Arthrex.
Limited-Incision Knotless Achilles Tendon Repair
E488 The American Journal of Orthopedics ® November/December 2016 www.amjorthopedics.com
compromised tendon ends adjacent to the rup-ture site, thereby reducing suture slippage and allowing for potential early range of motion and weight-bearing relative to previous techniques. Preliminary results from a cohort of 34 patients treated with this technique are promising: Aver-age return to baseline activities was 18.2 weeks (range, 9-26 weeks), and there were no wound complications, nerve injuries, or reruptures.9
Indications are overall health and an acute midsubstance Achilles rupture that presents within 3 weeks after injury (the time limit is used to ensure that both tendon ends can be mobilized and repaired to appropriate length). A relative con-traindication is delayed presentation (≥4 weeks), which may require open reconstruction in com-bination with V-Y lengthening or other adjuvant procedures. Other relative contraindications are insertional rupture, Achilles tendinopathy, and a significant medical comorbidity that prohibits surgical intervention.
Surgical TechniqueOperating Room Setup and Approach
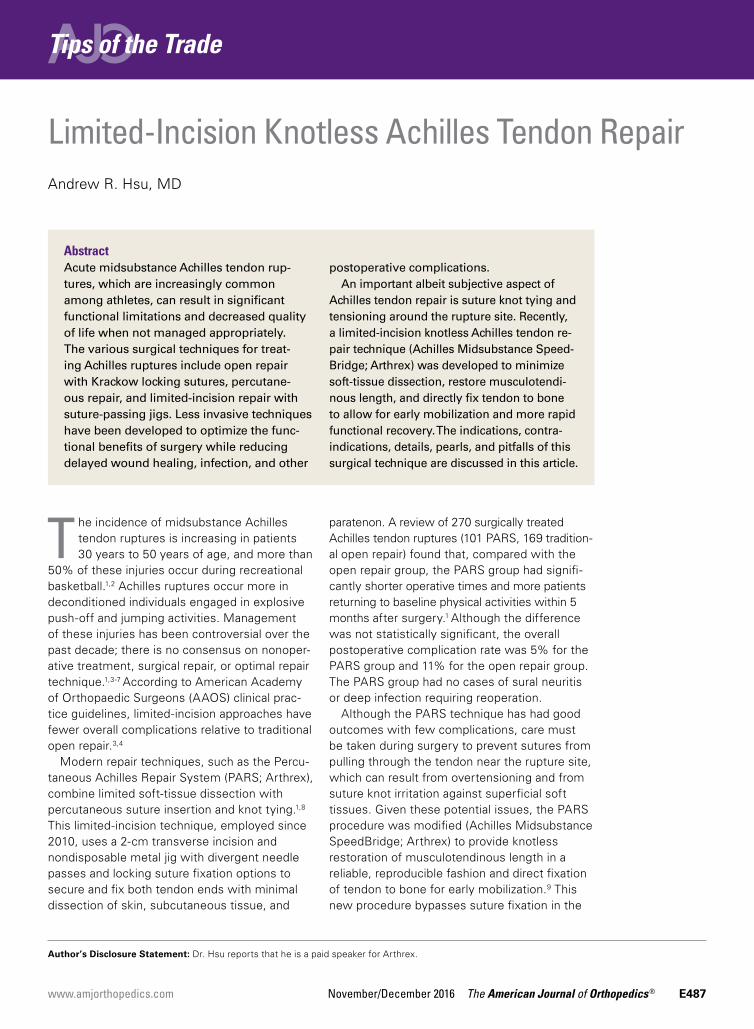
The patient is positioned prone with chest rolls and kneepads and with arms at <90° of ab-duction (Figures 1A-1E). A thigh tourniquet is placed on the operative extremity, and the feet are placed slightly hanging off the end of the bed with a small bump underneath to adjust the degree of ankle plantarflexion and Achilles tension during the case. It is important that the operative leg be in neutral rotation to allow
for central positioning of the PARS jig. After sterile preparation and draping, the extremity is exsanguinated and the tourniquet inflated. The defect within the Achilles tendon is palpated and marked out, and a 2-cm transverse skin incision is made along the proximal aspect of the rupture site.
A “no-touch” technique is used without pickups, and soft tissues are carefully dissected with small scissors down to the paratenon. The sural nerve typically is not visible in the opera-tive field, but, if it is, it can be dissected out and retracted out of the way. A transverse incision is made through the paratenon, and expression of rupture hematoma often follows. Paratenon preservation is key in minimizing disruption of the native vascular supply of the tendon and allowing for repair at the end of the case. A freer can be placed within the wound to confirm that the center of the rupture has been identified.
An Allis clamp is inserted into the wound, and the proximal tendon stump is secured and then pulled about 1 cm through the wound. A freer is circumferentially run along the sides of the prox-imal tendon to release any potential adhesions that may limit distal excursion.
PARS Jig Insertion and Suture Passing
The PARS jig is inserted into the wound with the inner prongs in the narrowest position possible. The curved jig is inserted proximally, and the center turn wheel is used to widen the inner prongs so they can slide along the sides of the
Figure 1. (A) Patient is positioned prone with leg in neutral rotation. Both feet are left hanging just off the end of the bed to allow for control of ankle plantarflexion during case. (B) Two-cm transverse skin incision is made over proximal aspect of palpable defect in midsubstance of Achilles tendon. Dissection is carried down to paratenon. (C) Paratenon is sharply incised in line with incision, and proximal tendon stump is secured with Allis clamp and gently pulled distally. (D) Percutaneous Achilles Repair System (Arthrex) jig is inserted into incision and advanced proximally within paratenon. Two su-ture passing needles are placed through the jig and tendon for preliminary fixation. (E) Suture needles and No. 2 FiberWire sutures (Arthrex) are passed using numbered holes along side of the jig.
A B C D E
A. R. Hsu
www.amjorthopedics.com November/December 2016 The American Journal of Orthopedics ® E489
tendon in the paratenon. Proper jig placement should be smooth and encounter little resis-tance. The proximal tendon is in a superficial location and can be palpated within the prongs of the jig to double-check that the tendon is cen-tered within the jig. A frequent error is to insert the jig too deep, which subsequently causes needles and sutures to miss the tendon and pull through.
Keeping the jig centralized in neutral rotation minimizes improper suture passing and avoids iatrogenic injury to the medial and lateral neu-rovascular structures. During suture passing, all needles (1.6 mm) with nitinol loops are first used unloaded without suture. The first 2 nee-dles are inserted into their respective, numbered holes, through the tendon, and then through the opposite side of the jig. Each needle is checked to make sure that it does not pass outside the jig. Having 2 needles within the jig and tendon at all times during suture passing helps stabilize the jig and avoids adjacent suture piercing with the subsequent needle.
A No. 2 FiberWire suture (Arthrex) is then passed through the first hole using the needle suture passer and made even in length on both sides. The specific colors of the suture are not important, but the order of the sutures placed is. An assistant can write down the colors and order of the sutures passed. Before the second suture is passed, the first needle is inserted back through the jig and tendon into the third hole. The third and fourth sutures (green-striped) differ from the other sutures in that one end has a loop and the other has a tail, and
they are passed in an oblique, crossing pattern. These sutures later help create a locking suture on either side of the tendon.
After these sutures are passed, the final result should be 1 green-striped loop and 1 green-striped tail on either side of the tendon. The fifth suture is passed straight across the tendon in a trajectory similar to that of the first suture. In large laborers, obese patients, and elite ath-letes, 2 additional green-striped sutures can be passed through the optional sixth and seventh holes to create an additional locking suture.
PARS Jig Removal and Suture Management
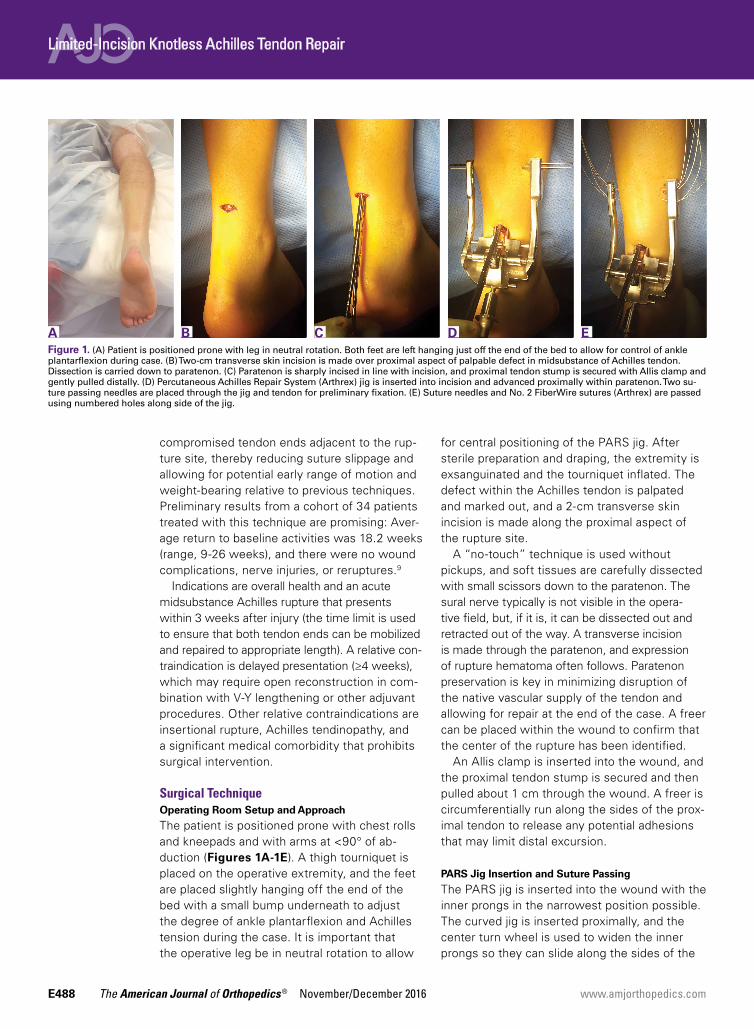
After all sutures are passed, the turn wheel is used to narrow the inner prongs while gentle, controlled tension is applied to the jig to remove it from the wound (Figures 2A-2C). All sutures from both sides of the tendon should emerge from the wound. Before the jig is completely pulled out, a hemostat is used through each loop of sutures to guide them out of the wound and reduce tangling. Both pairs of sutures are pulled distally to ensure adequate proximal fixation.
Pullout of any suture from the tendon in-dicates that the tendon was not centered in the jig or was not proximal enough along the tendon during suture passing. If a suture pulls out, it is removed, and the previous steps are repeated with close attention paid to tendon positioning within the jig. It is not advised to extend the incision longitudinally on either end of the transverse incision, as doing so can lead to potential wound-healing complications. After proximal fixation is achieved, all sutures on each
Figure 2. (A) Clamp and jig are removed through incision, and all suture pairs are pulled distally to ensure fixation and control of the proximal tendon. (B) Sutures are looped around each other and passed on both sides of the tendon to leave 2 non-locking sutures and 1 locking suture on either side of the tendon. (C) Each suture in each final pair is individually tensioned to remove any suture creep and to recheck proximal fixation.
A B C

Limited-Incision Knotless Achilles Tendon Repair
E490 The American Journal of Orthopedics ® November/December 2016 www.amjorthopedics.com
side of the tendon are neatly spread apart in the following order from proximal to distal: first suture, second suture, looped green-striped (third) suture, tail green-striped (fourth) suture, fifth suture. The second suture on both sides is then looped around the 2 green-striped sutures and back proximally through the looped end of the green-striped suture.
The green-striped suture tail is pulled through the tendon to the opposite side to create a locking suture on both sides of the tendon. In the end, there are 2 nonlocking sutures and 1 locking suture on either side of the tendon. Each pair of sutures is pulled distally to confirm fixation and remove any initial suture creep from the system. A hemostat is placed on each group of 3 sutures to keep them out of the way during distal anchor preparation.
Distal Anchor Preparation
and Banana SutureLasso Passing
Two longitudinal 5-mm incisions are made along the posterior aspect of the heel just distal to the area of maximal heel convexity. Incisions are spaced 1.5 cm apart along the sides of the Achilles tendon insertion. A 3.5-mm drill and a drill guide are used through each incision and placed flush against bone (Figures 3A-3E). The drill is inserted into bone oriented slightly proximally and toward midline until it bottoms out against the guide. Each drill hole is then tapped to receive a 4.75-mm SwiveLock anchor (Arthrex).
A Banana SutureLasso (Arthrex) with inner nitinol wire is passed through the center of the distal Achilles tendon stump and out the proxi-
mal incision to retrieve one side of the proximal sutures. SutureLasso passage through tendon can be facilitated with tactile feedback. The surgeon’s nondominant thumb is placed directly against the distal tendon while the dominant hand grasps the SutureLasso with the thumb near the tip. As the SutureLasso is advanced proximally through the tendon, the surgeon can feel its tip meeting mild resistance. Confirm that the tip of the Suture-Lasso is in the center of the distal tendon by direct visual inspection through the wound.
The inner nitinol wire is advanced 2 cm to 3 cm out of the tip of the SutureLasso, and sutures are passed through the distal Achilles tendon. During suture passing, the nitinol wire is drawn back to the tip of the SutureLasso, and then the entire SutureLasso is removed from the distal incision. Trying to pass the sutures only through the inner nitinol wire can result in suture tangling and increased resistance. The process is then repeated for the sutures on the opposite side. Suture pairs are placed under maximal tension and cycled multiple times (5-10) to remove any residual proximal suture creep.10
Achilles Tensioning and Anchor Insertion
The ankle is plantar flexed to tension the Achil-les tendon relative to the contralateral limb and is held in place by an assistant (Figures 4A-4E). At the same time, the assistant holds tension on the opposite pair of sutures to ensure that Achil-les length and tension do not change before initial anchor insertion. The rupture site can be palpated to confirm there is no residual gap or excessive overlap of the tendon ends. Sutures
Figure 3. (A) Two longitudinal 5-mm incisions are made along the posterior aspect of the heel along sides of Achilles tendon insertion. Drill (3.5 mm) and drill guide are used through each incision oriented slightly toward midline. (B) Each drill hole is tapped to receive 4.75-mm SwiveLock anchor (Ar-threx). (C) Banana SutureLasso (Arthrex) with inner nitinol wire is passed through distal Achilles tendon stump and through proximal incision to retrieve one side of proximal sutures. (D) Sutures are passed through the distal Achilles tendon, and process is repeated for other side. (E) Suture pairs are placed under maximal tension and cycled multiple times to remove any proximal residual creep.
A B C D E

A. R. Hsu
www.amjorthopedics.com November/December 2016 The American Journal of Orthopedics ® E491
are passed through the eyelet of the SwiveLock anchor, and then the anchor is gently malleted into the calcaneal drill hole and hand-tightened until flush with bone. Often, squeaking can be heard as the anchor reaches its final depth in bone.
Position of the drill holes can be rechecked with a Kirschner wire before anchor insertion, as their relative position changes with ankle plantar flexion. It is not necessary to premeasure and adjust suture length at the tip of the anchor as in other blind tunnel anchor insertion techniques (eg, InternalBrace; Arthrex). Once the anchor tip is malleted into bone, the free suture ends are released to avoid overtensioning the tendon. Before the anchor insertion handle is completely removed, the tip of a mosquito clamp can be used to feel the bony surface and confirm the anchor is completely seated.
With the ankle still held in the appropriate amount of plantarflexion, the process is repeat-ed and the other SwiveLock anchor inserted. Sutures are cut flush with the anchor, and the surgeon performs wound irrigation and layered closure, with absorbable suture, of the paraten-on and subcutaneous tissues. After skin closure with nylon suture, resting ankle plantarflexion is assessed and the Thompson test performed. The patient is placed in a well-padded non-weight-bearing plantar flexion splint for incision and initial tendon healing during the first 2 weeks after surgery.
DiscussionA key aspect of recovery is the balance achieved between skin and tendon healing and
early mobilization, as outcomes of surgical re-pair of Achilles ruptures are improved with early weight-bearing and functional rehabilitation.11-13 Some surgeons recommend weight-bearing im-mediately after surgery, given the direct tendon-to-bone fixation achieved with repair.9 I prefer 2 weeks of non-weight-bearing, which allows the skin to heal adequately and the initial soft-tissue inflammation to subside. If the incision is healed at 2 weeks, sutures are removed, and the patient is transitioned to a tall, non-weight-bearing CAM (controlled ankle motion) boot, worn for 1 to 2 weeks with initiation of gentle ankle range-of-motion exercises. If there is any concern about wound healing, sutures are maintained for another 1 to 2 weeks.
Between 3 and 8 weeks after surgery, pro-gressive weight-bearing is initiated with a peel-away heel lift (~2 cm thick total, 3 layers). Each lift layer is removed as pain allows, every 2 to 3 days. The goal is full weight-bearing with the foot flat 5 to 6 weeks after surgery. Physical therapy focusing on ankle motion and gentle Achilles stretching and strengthening is started 5 to 6 weeks after surgery, depending on progres-sion and functional needs. Between 8 and 12 weeks after surgery, the patient is transitioned to normal shoe wear with increased activities. Running and jumping are allowed, as pain and swelling allow, starting at 12 weeks.
Although preliminary outcomes and experience with the Achilles Midsubstance SpeedBridge have been favorable, long-term clinical and functional studies are needed to determine the specific advantages and disadvantages of this new tech-nique relative to other repairs. The main benefits
Figure 4. (A) Ankle is plantar flexed to appropriately tension Achilles tendon and is held in place by an assistant. Sutures are passed through the eyelet of SwiveLock anchor (Arthrex), and the anchor is gently malleted into calcaneal drill hole and hand-tightened until flush with bone. (B) Process is repeat-ed for insertion of other SwiveLock anchor. (C) Paratenon repair with absorbable sutures is followed by subcutaneous and skin closure. (D) After final repair, resting ankle plantar flexion is assessed and Thompson test performed. (E) Non-weight-bearing plantar flexion splint is worn for the next 2 weeks to allow for incision and initial tendon healing.
A B C D E
Limited-Incision Knotless Achilles Tendon Repair
E492 The American Journal of Orthopedics ® November/December 2016 www.amjorthopedics.com
observed thus far are reduced subjective knot tying and tensioning, decreased reliance on suture fixation in compromised tissue at the rupture site, reduced risk of FiberWire knot irritation of superficial soft tissues, lower risk of distal suture pullout, and earlier mobilization owing to bony fixation of the tendon. Potential complications include anchor-site heel pain caused by prominent anchors or by the bone ede-ma that occurs when a patient increases physical activity by a significant amount at 12 weeks.9 Heel pain caused by bone edema resolves by 20 weeks without intervention.
Stress shielding of the distal Achilles tendon is a theoretical concern given the tendon–bone construct, but there have been no reports of tendon atrophy or repair failure caused by stress shielding. The original PARS technique was often used to create Achilles tension with the ankle maximally plantar flexed—the idea being that the tendon would gradually stretch over time.1 Overtensioning the Achilles repair is a poten-tial complication with the SpeedBridge, as the distal anchors provide a more rigid point of distal fixation. Surgeons can avoid this complication by cycling the sutures to remove any residual creep and then tensioning the Achilles according to the contralateral limb and/or palpating tendon opposition at the rupture site.
Overall, this new limited-incision knotless Achilles tendon repair technique allows for mini-mal soft-tissue dissection, restoration of Achilles musculotendinous length, and direct tendon-to-bone fixation. Early results are promising, but long-term clinical outcomes and comparative analysis are needed. In addition, many details of this technique must be clarified—including inci-dence of short- and long-term complications in larger cohorts, optimal suture material and con-figuration, and risks and benefits of immediate (<2 weeks) and delayed (2-4 weeks) weight-bearing.
Dr. Hsu is Assistant Clinical Professor of Orthopaedic Surgery, Department of Orthopaedic Surgery, University of California–Irvine, Orange, California.
Address correspondence to: Andrew R. Hsu, MD, Department of Orthopaedic Surgery, University of Cali-fornia–Irvine, 101 City Drive S, Pavilion 3, Building 29A, Orange, CA 92868 (tel, 650-906-8923; fax, 714-456-7547; email, [email protected]).
Am J Orthop. 2016;45(7):E487-E492. Copyright Frontline Medical Communications Inc. 2016. All rights reserved.
References1. Hsu AR, Jones CP, Cohen BE, Davis WH, Ellington JK,
Anderson RB. Clinical outcomes and complications of Percutaneous Achilles Repair System versus open tech-nique for acute Achilles tendon ruptures. Foot Ankle Int. 2015;36(11):1279-1286.
2. Raikin SM, Garras DN, Krapchev PV. Achilles tendon injuries in a United States population. Foot Ankle Int. 2013;34(4): 475-480.
3. Chiodo CP, Glazebrook M, Bluman EM, et al; American Academy of Orthopaedic Surgeons. American Academy of Orthopaedic Surgeons clinical practice guideline on treatment of Achilles tendon rupture. J Bone Joint Surg Am. 2010;92(14):2466-2468.
4. Chiodo CP, Glazebrook M, Bluman EM, et al; American Academy of Orthopaedic Surgeons. Diagnosis and treatment of acute Achilles tendon rupture. J Am Acad Orthop Surg. 2010;18(8):503-510.
5. Khan RJ, Fick D, Keogh A, Crawford J, Brammar T, Parker M. Treatment of acute Achilles tendon ruptures. A meta-analy-sis of randomized, controlled trials. J Bone Joint Surg Am. 2005;87(10):2202-2210.
6. Renninger CH, Kuhn K, Fellars T, Youngblood S, Bellamy J. Operative and nonoperative management of Achilles tendon ruptures in active duty military population. Foot Ankle Int. 2016;37(3):269-273.
7. Khan RJ, Carey Smith RL. Surgical interventions for treating acute Achilles tendon ruptures. Cochrane Database Syst Rev. 2010;(9):CD003674.
8. McCullough KA, Shaw CM, Anderson RB. Mini-open repair of Achilles rupture in the National Football League. J Surg Orthop Adv. 2014;23(4):179-183.
9. McWilliam JR, Mackay G. The internal brace for midsub-stance Achilles ruptures. Foot Ankle Int. 2016;37(7):794-800.
10. Clanton TO, Haytmanek CT, Williams BT, et al. A biomechan-ical comparison of an open repair and 3 minimally invasive percutaneous Achilles tendon repair techniques during a simulated, progressive rehabilitation protocol. Am J Sports Med. 2015;43(8):1957-1964.
11. Aoki M, Ogiwara N, Ohta T, Nabeta Y. Early active motion and weightbearing after cross-stitch Achilles tendon repair. Am J Sports Med. 1998;26(6):794-800.
12. Kangas J, Pajala A, Ohtonen P, Leppilahti J. Achilles tendon elongation after rupture repair: a randomized comparison of 2 postoperative regimens. Am J Sports Med. 2007;35(1): 59-64.
13. Kangas J, Pajala A, Siira P, Hämäläinen M, Leppilahti J. Early functional treatment versus early immobilization in tension of the musculotendinous unit after Achilles rupture repair: a prospective, randomized, clinical study. J Trauma. 2003;54(6):1171-1180.