Embed Size (px)
Citation preview
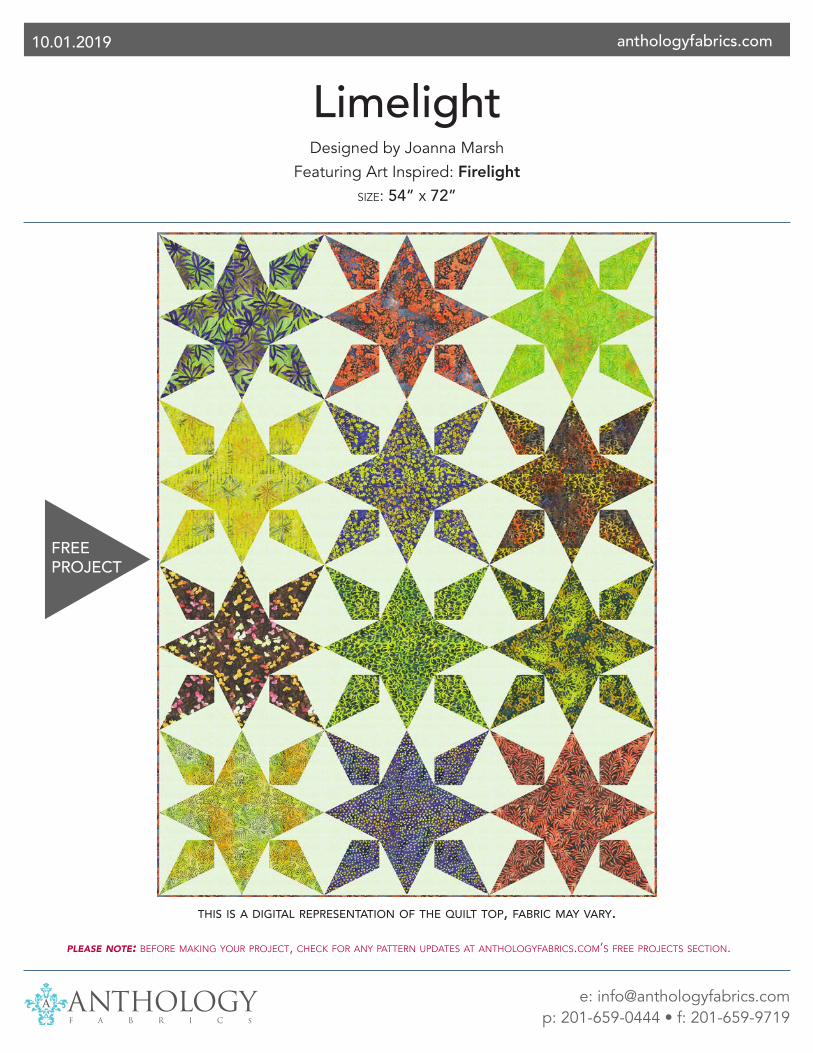
LimelightDesigned by Joanna Marsh
Featuring Art Inspired: Firelightsize: 54” x 72”
anthologyfabrics.com10.01.2019
please note: before making your project, check for any pattern updates at anthologyfabrics.com’s free projects section.
e: [email protected] p: 201-659-0444 • f: 201-659-9719
this is a digital representation of the quilt top, fabric may vary.
FREEPROJECT
1
LimelightA
anthologyfabrics.com
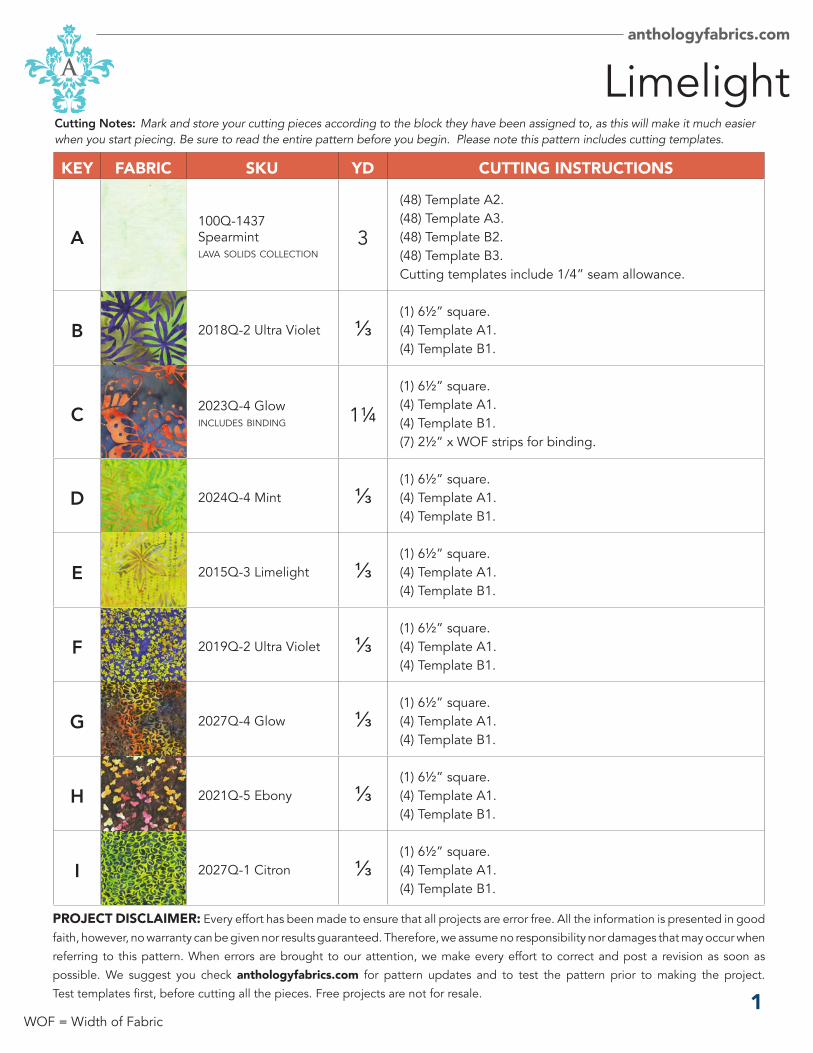
KEY FABRIC SKU YD CUTTING INSTRUCTIONS
A100Q-1437 Spearmintlava solids collection
3
(48) Template A2.(48) Template A3.(48) Template B2. (48) Template B3. Cutting templates include 1/4” seam allowance.
B 2018Q-2 Ultra Violet ⅓(1) 6½” square.(4) Template A1.(4) Template B1.
C 2023Q-4 Glowincludes binding 1¼
(1) 6½” square.(4) Template A1.(4) Template B1.(7) 2½” x WOF strips for binding.
D 2024Q-4 Mint ⅓(1) 6½” square.(4) Template A1.(4) Template B1.
E 2015Q-3 Limelight ⅓(1) 6½” square.(4) Template A1.(4) Template B1.
F 2019Q-2 Ultra Violet ⅓(1) 6½” square.(4) Template A1.(4) Template B1.
G 2027Q-4 Glow ⅓(1) 6½” square.(4) Template A1.(4) Template B1.
H 2021Q-5 Ebony ⅓(1) 6½” square.(4) Template A1.(4) Template B1.
I 2027Q-1 Citron ⅓(1) 6½” square.(4) Template A1.(4) Template B1.
WOF = Width of Fabric
Cutting Notes: Mark and store your cutting pieces according to the block they have been assigned to, as this will make it much easier when you start piecing. Be sure to read the entire pattern before you begin. Please note this pattern includes cutting templates.
PROJECT DISCLAIMER: Every effort has been made to ensure that all projects are error free. All the information is presented in good
faith, however, no warranty can be given nor results guaranteed. Therefore, we assume no responsibility nor damages that may occur when
referring to this pattern. When errors are brought to our attention, we make every effort to correct and post a revision as soon as
possible. We suggest you check anthologyfabrics.com for pattern updates and to test the pattern prior to making the project.
Test templates first, before cutting all the pieces. Free projects are not for resale.
2
LimelightA
anthologyfabrics.com
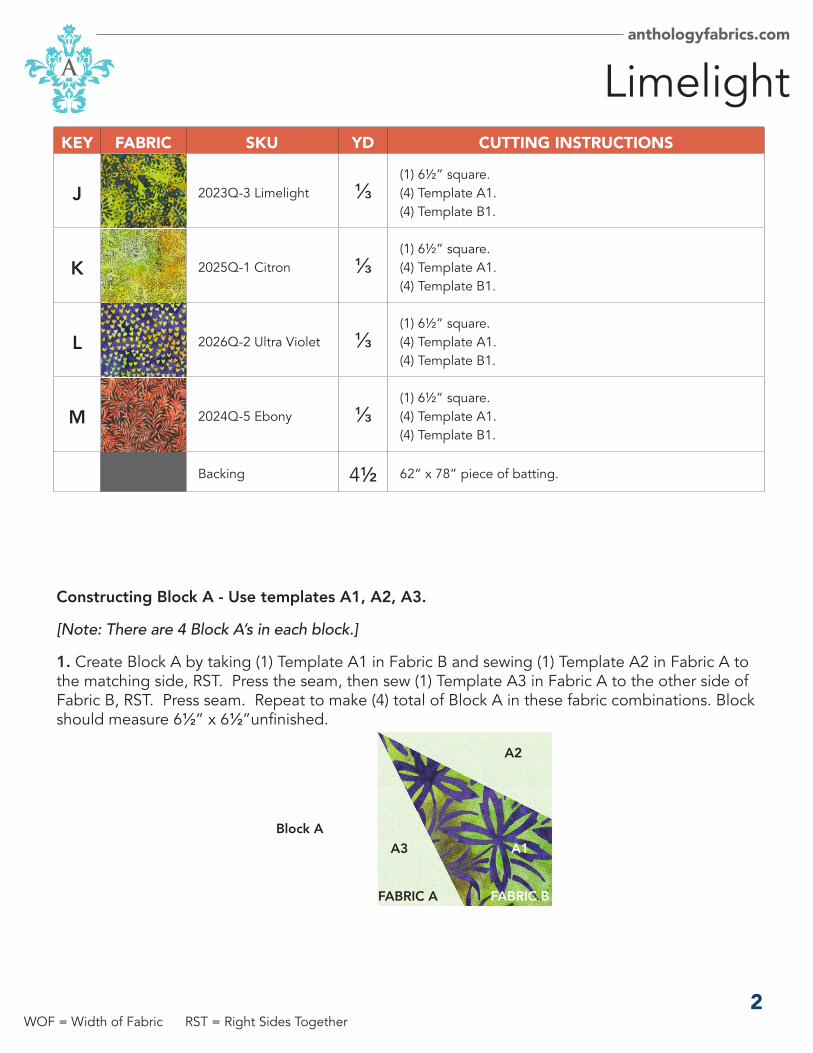
KEY FABRIC SKU YD CUTTING INSTRUCTIONS
J 2023Q-3 Limelight ⅓(1) 6½” square.(4) Template A1.(4) Template B1.
K 2025Q-1 Citron ⅓(1) 6½” square.(4) Template A1.(4) Template B1.
L 2026Q-2 Ultra Violet ⅓(1) 6½” square.(4) Template A1.(4) Template B1.
M 2024Q-5 Ebony ⅓(1) 6½” square.(4) Template A1.(4) Template B1.
Backing 4½ 62” x 78” piece of batting.
WOF = Width of Fabric RST = Right Sides Together
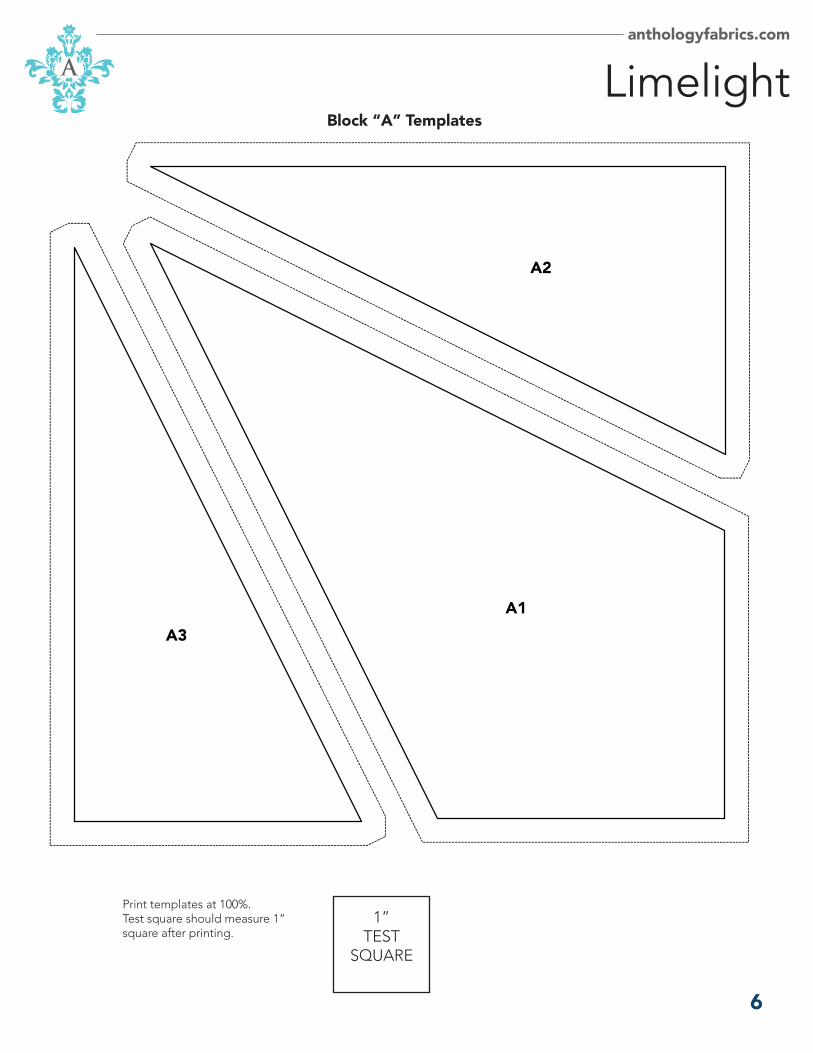
Constructing Block A - Use templates A1, A2, A3.
[Note: There are 4 Block A’s in each block.]
1. Create Block A by taking (1) Template A1 in Fabric B and sewing (1) Template A2 in Fabric A to the matching side, RST. Press the seam, then sew (1) Template A3 in Fabric A to the other side of Fabric B, RST. Press seam. Repeat to make (4) total of Block A in these fabric combinations. Block should measure 6½” x 6½”unfinished.
FABRIC BFABRIC A
A3
A2
A1Block A
3
LimelightA
anthologyfabrics.com
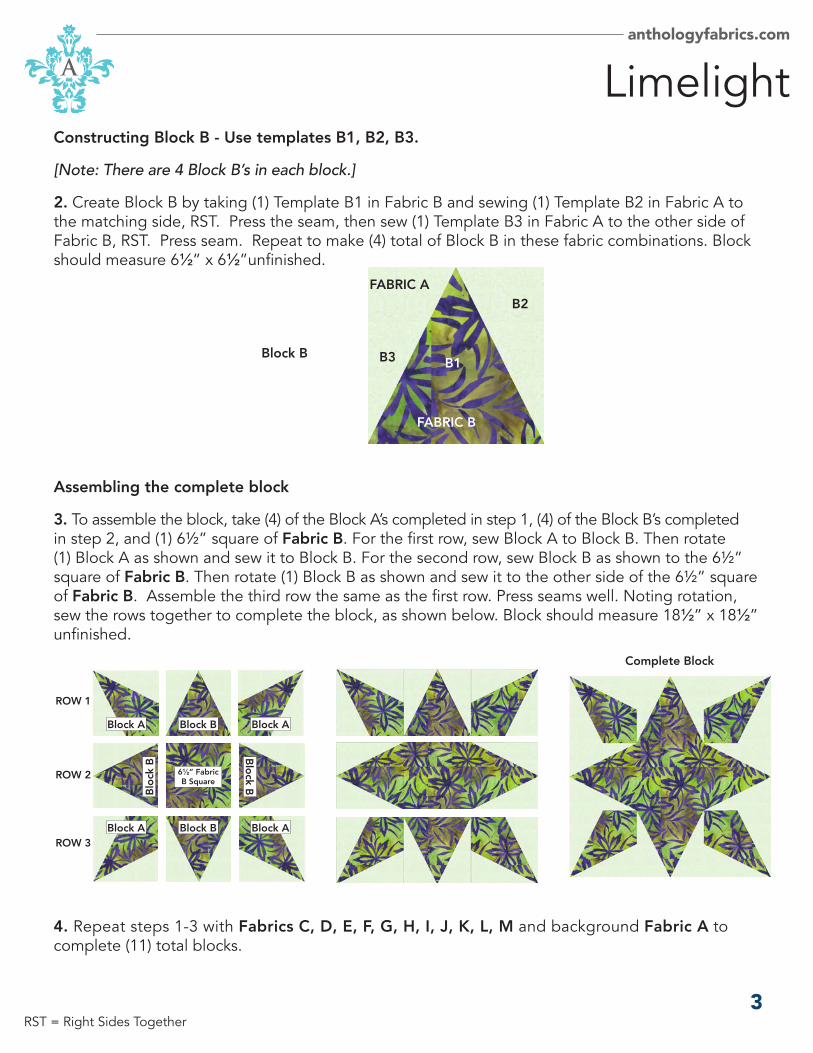
RST = Right Sides Together
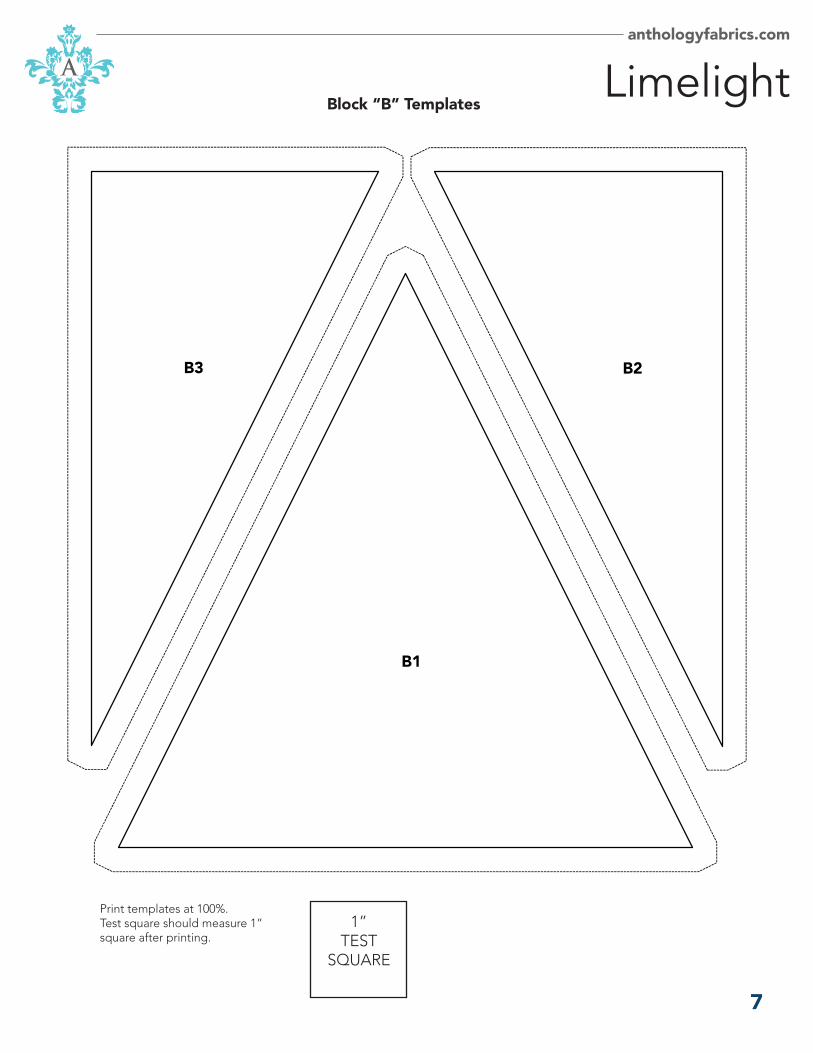
Constructing Block B - Use templates B1, B2, B3.
[Note: There are 4 Block B’s in each block.]
2. Create Block B by taking (1) Template B1 in Fabric B and sewing (1) Template B2 in Fabric A to the matching side, RST. Press the seam, then sew (1) Template B3 in Fabric A to the other side of Fabric B, RST. Press seam. Repeat to make (4) total of Block B in these fabric combinations. Block should measure 6½” x 6½”unfinished.
Assembling the complete block
3. To assemble the block, take (4) of the Block A’s completed in step 1, (4) of the Block B’s completed in step 2, and (1) 6½” square of Fabric B. For the first row, sew Block A to Block B. Then rotate (1) Block A as shown and sew it to Block B. For the second row, sew Block B as shown to the 6½” square of Fabric B. Then rotate (1) Block B as shown and sew it to the other side of the 6½” square of Fabric B. Assemble the third row the same as the first row. Press seams well. Noting rotation, sew the rows together to complete the block, as shown below. Block should measure 18½” x 18½” unfinished.
4. Repeat steps 1-3 with Fabrics C, D, E, F, G, H, I, J, K, L, M and background Fabric A to complete (11) total blocks.
FABRIC B
FABRIC A
B3 B1
B2
Block B
ROW 1
ROW 2
ROW 3
Block B
6½” Fabric B Square
Block B
Complete Block
Block A
Block A
Block A
Block A
Bloc
k B Block B
4
LimelightA
anthologyfabrics.com
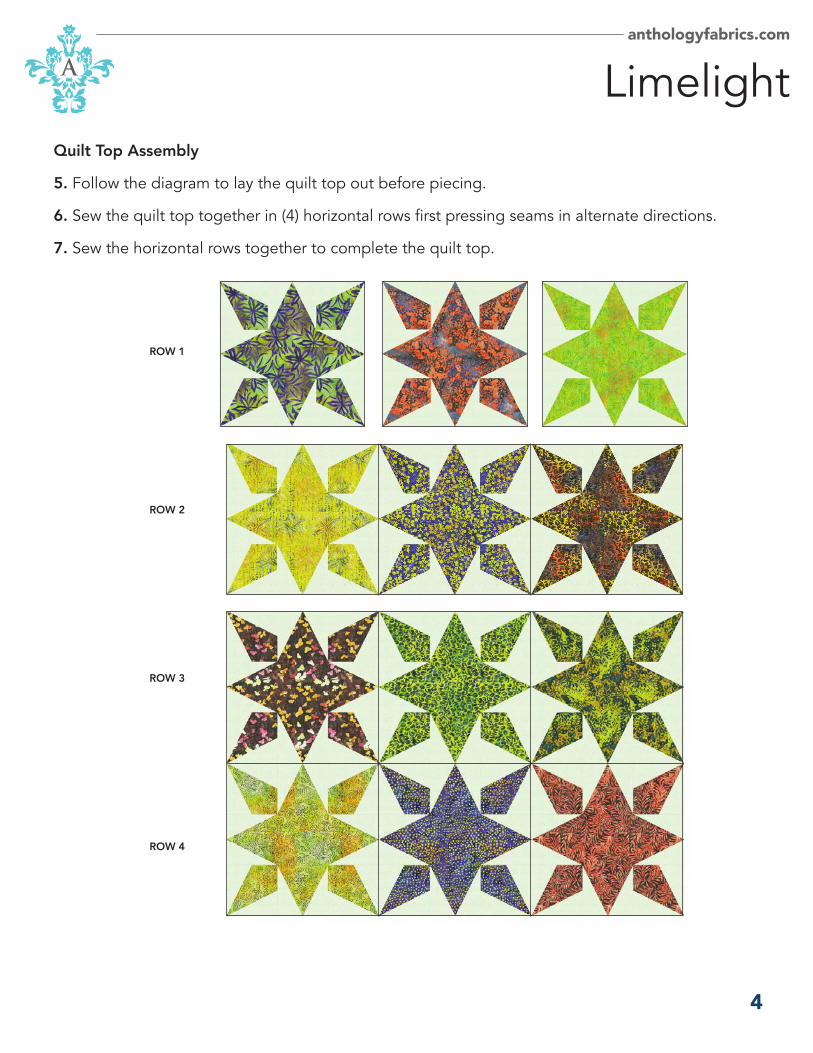
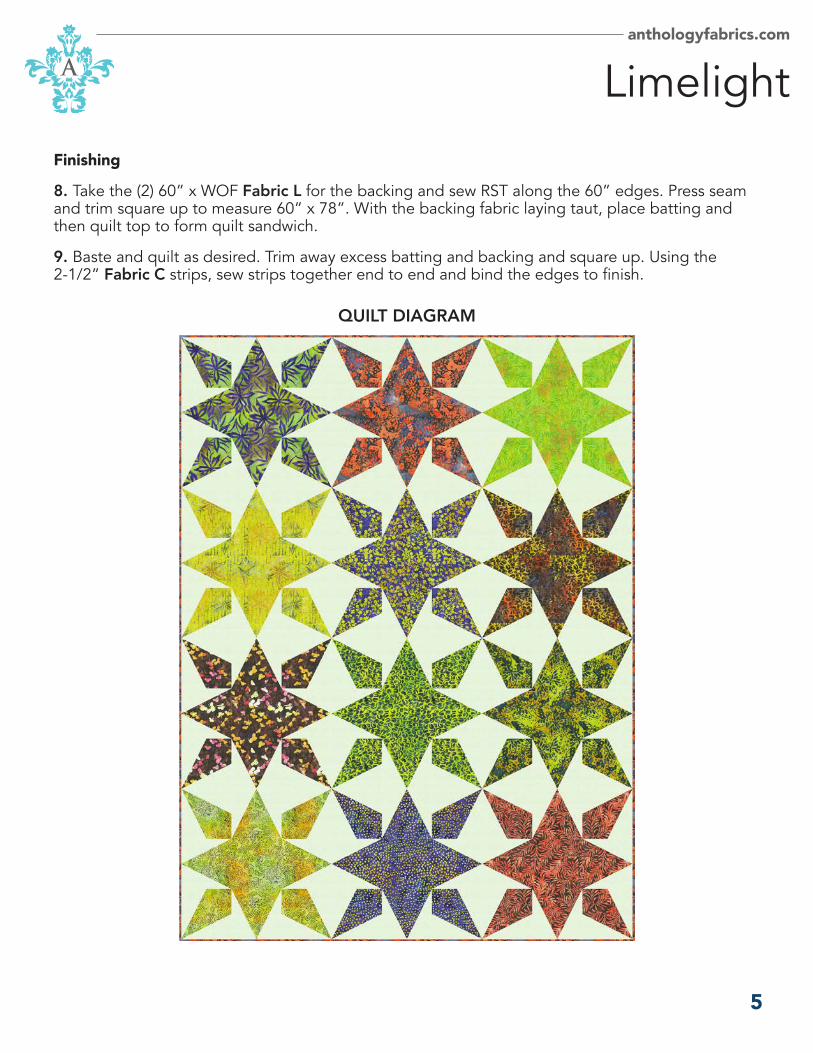
Quilt Top Assembly
5. Follow the diagram to lay the quilt top out before piecing.
6. Sew the quilt top together in (4) horizontal rows first pressing seams in alternate directions.
7. Sew the horizontal rows together to complete the quilt top.
ROW 1
ROW 2
ROW 3
ROW 4
5
LimelightA
anthologyfabrics.com
Finishing
8. Take the (2) 60” x WOF Fabric L for the backing and sew RST along the 60” edges. Press seam and trim square up to measure 60” x 78”. With the backing fabric laying taut, place batting and then quilt top to form quilt sandwich.
9. Baste and quilt as desired. Trim away excess batting and backing and square up. Using the 2-1/2” Fabric C strips, sew strips together end to end and bind the edges to finish.
QUILT DIAGRAM
6
LimelightA
anthologyfabrics.com
A2
A1A3
1”TEST
SQUARE
Print templates at 100%.Test square should measure 1” square after printing.
Block “A” Templates
7
LimelightA
anthologyfabrics.com
B3 B2
B1
Block “B” Templates
1”TEST
SQUARE
Print templates at 100%.Test square should measure 1” square after printing.