Embed Size (px)
Citation preview
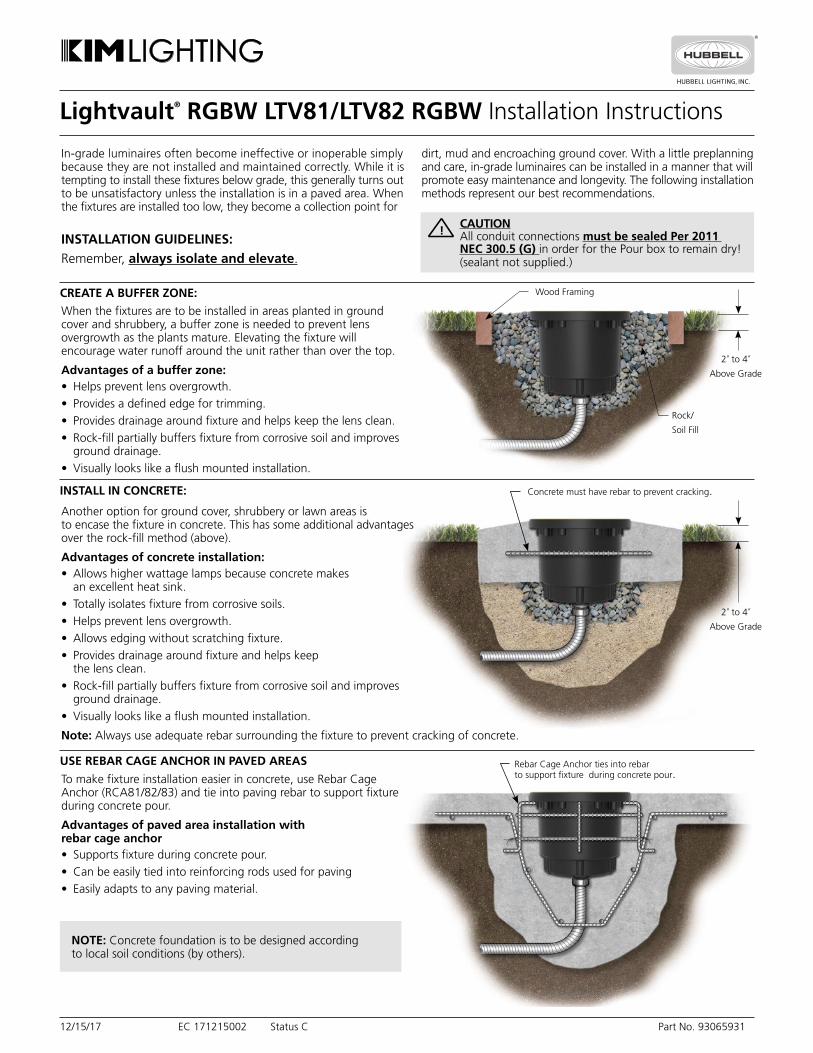
CREATE A BUFFER ZONE:
INSTALL IN CONCRETE:
USE REBAR CAGE ANCHOR IN PAVED AREAS
12/15/17 EC 171215002 Status C Part No. 93065931
Lightvault® RGBW LTV81/LTV82 RGBW Installation Instructions
In-grade luminaires often become ineffective or inoperable simply because they are not installed and maintained correctly. While it is tempting to install these fixtures below grade, this generally turns out to be unsatisfactory unless the installation is in a paved area. When the fixtures are installed too low, they become a collection point for
dirt, mud and encroaching ground cover. With a little preplanning and care, in-grade luminaires can be installed in a manner that will promote easy maintenance and longevity. The following installation methods represent our best recommendations.
When the fixtures are to be installed in areas planted in ground cover and shrubbery, a buffer zone is needed to prevent lens overgrowth as the plants mature. Elevating the fixture will encourage water runoff around the unit rather than over the top.
Advantages of a buffer zone:• Helps prevent lens overgrowth.• Provides a defined edge for trimming.• Provides drainage around fixture and helps keep the lens clean.• Rock-fill partially buffers fixture from corrosive soil and improves
ground drainage.• Visually looks like a flush mounted installation.
Wood Framing
INSTALLATION GUIDELINES: Remember, always isolate and elevate.
Another option for ground cover, shrubbery or lawn areas is to encase the fixture in concrete. This has some additional advantages over the rock-fill method (above).
Advantages of concrete installation:• Allows higher wattage lamps because concrete makes an excellent heat sink.• Totally isolates fixture from corrosive soils.• Helps prevent lens overgrowth.• Allows edging without scratching fixture.• Provides drainage around fixture and helps keep the lens clean.• Rock-fill partially buffers fixture from corrosive soil and improves
ground drainage.• Visually looks like a flush mounted installation.
Note: Always use adequate rebar surrounding the fixture to prevent cracking of concrete.
To make fixture installation easier in concrete, use Rebar Cage Anchor (RCA81/82/83) and tie into paving rebar to support fixture during concrete pour.
Advantages of paved area installation with rebar cage anchor• Supports fixture during concrete pour.• Can be easily tied into reinforcing rods used for paving • Easily adapts to any paving material.
NOTE: Concrete foundation is to be designed according to local soil conditions (by others).
2" to 4"
Above Grade
Rock/
Soil Fill
Concrete must have rebar to prevent cracking.
Rebar Cage Anchor ties into rebar to support fixture during concrete pour.
2" to 4"
Above Grade
CAUTION All conduit connections must be sealed Per 2011
NEC 300.5 (G) in order for the Pour box to remain dry! (sealant not supplied.)
!
Lightvault® RGBW LTV81/LTV82 RGBW Installation Instructions
IMPORTANT SAFETY INSTRUCTIONS TO AVOID RISK OF FIRE OR INJURY!
WARNING: Fixtures must be grounded in accordance with local codes or the National Electrical Code. Failure to take these steps may result in serious personal injury. All electrical work should be done by a qualified electrician
SAFETY WARNING: DO NOT install these fixtures in submersible installations such as fountains or swimming pools. Extreme caution should be taken when installed in paved areas. MAINTENANCE: To maintain light efficiency and prevent overheating, lenses must be kept clean and free of dirt, dust, leaves, trash and mineral deposits from water. For optimum performance a regularly scheduled maintenance program should be followed. DO NOT operate luminaire with missing or damaged lens.
KEEP THIS SHEET FOR FUTURE REFERENCE.
!
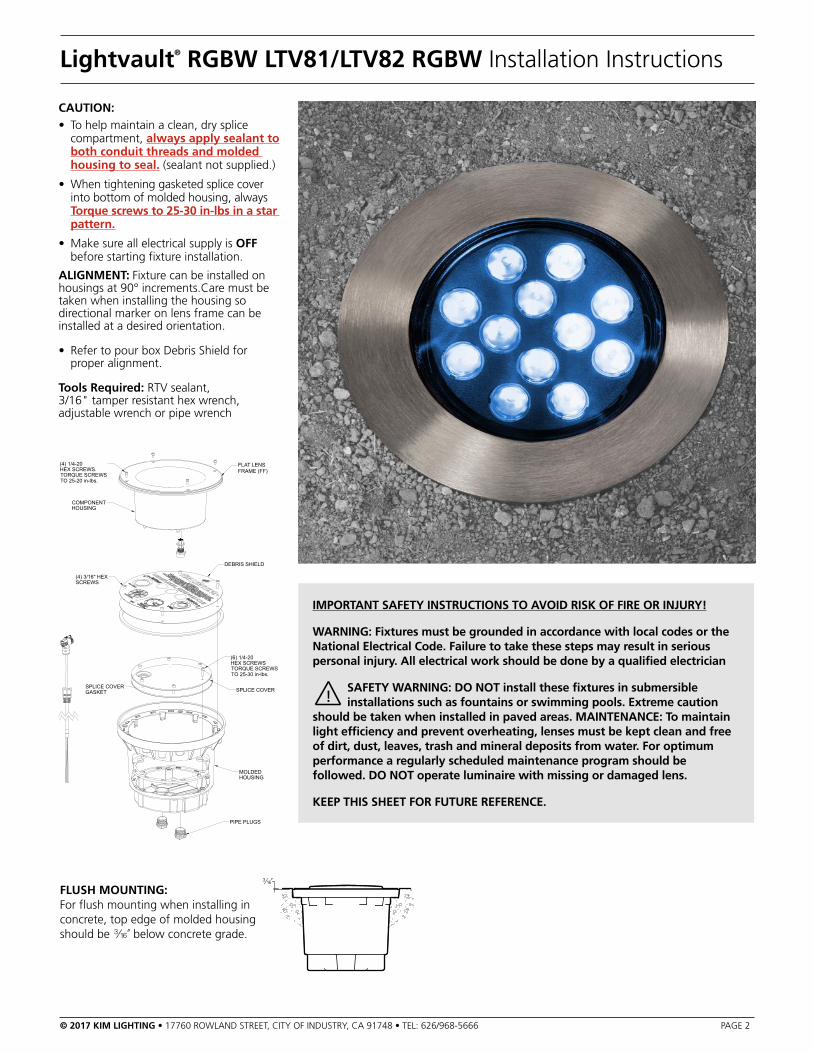
CAUTION:• To help maintain a clean, dry splice
compartment, always apply sealant to both conduit threads and molded housing to seal. (sealant not supplied.)
• When tightening gasketed splice cover into bottom of molded housing, always Torque screws to 25-30 in-lbs in a star pattern.
• Make sure all electrical supply is OFF before starting fixture installation.
ALIGNMENT: Fixture can be installed on housings at 90° increments.Care must be taken when installing the housing so directional marker on lens frame can be installed at a desired orientation.
• Refer to pour box Debris Shield for proper alignment.
Tools Required: RTV sealant, 3/16" tamper resistant hex wrench, adjustable wrench or pipe wrench
FLAT LENS FRAME (FF)
(4) 1/4-20HEX SCREWS.TORQUE SCREWSTO 25-20 in-lbs.
COMPONENTHOUSING
DEBRIS SHIELD
(4) 3/16" HEXSCREWS
(6) 1/4-20 HEX SCREWSTORQUE SCREWS TO 25-30 in-lbs.
SPLICE COVERSPLICE COVERGASKET
MOLDEDHOUSING
PIPE PLUGS
© 2017 KIM LIGHTING • 17760 ROWLAND STREET, CITY OF INDUSTRY, CA 91748 • TEL: 626/968-5666 PAGE 2
FLUSH MOUNTING: For flush mounting when installing in concrete, top edge of molded housing should be F" below concrete grade.
F"
CAUTION• Before installing de-energize circuit and
lock out.
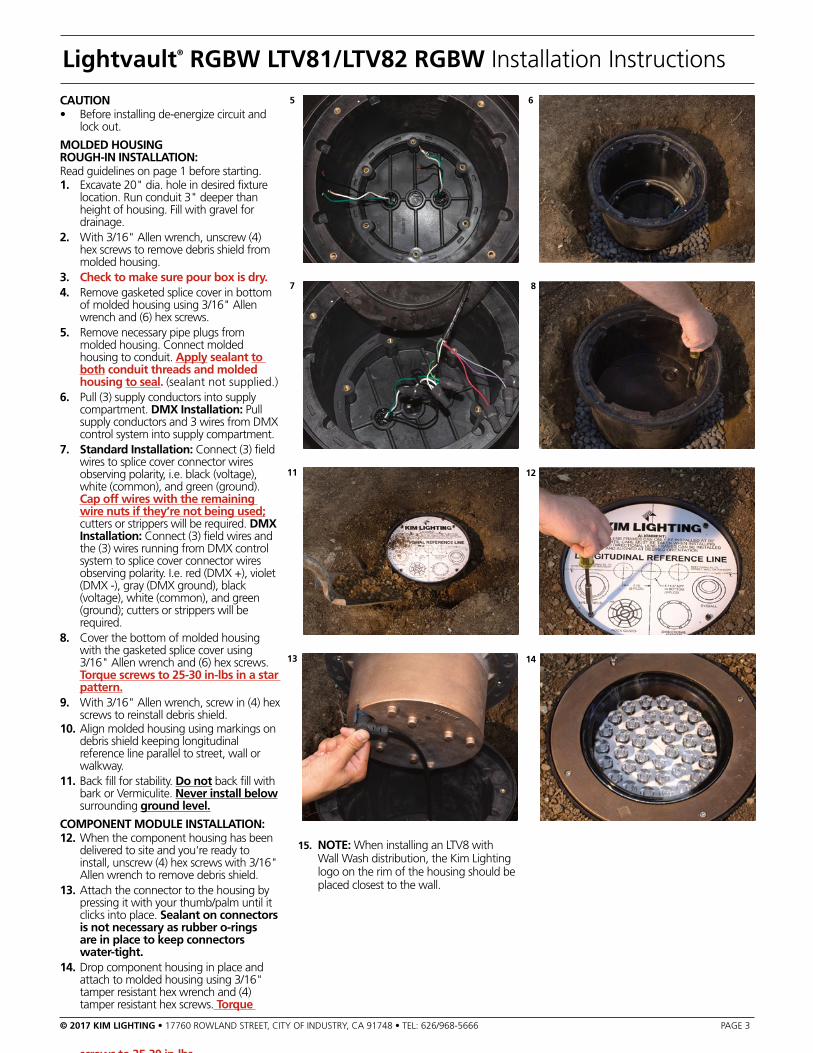
MOLDED HOUSING ROUGH-IN INSTALLATION: Read guidelines on page 1 before starting.1. Excavate 20" dia. hole in desired fixture
location. Run conduit 3" deeper than height of housing. Fill with gravel for drainage.
2. With 3/16" Allen wrench, unscrew (4) hex screws to remove debris shield from molded housing.
3. Check to make sure pour box is dry. 4. Remove gasketed splice cover in bottom
of molded housing using 3/16" Allen wrench and (6) hex screws.
5. Remove necessary pipe plugs from molded housing. Connect molded housing to conduit. Apply sealant to both conduit threads and molded housing to seal. (sealant not supplied.)
6. Pull (3) supply conductors into supply compartment. DMX Installation: Pull supply conductors and 3 wires from DMX control system into supply compartment.
7. Standard Installation: Connect (3) field wires to splice cover connector wires observing polarity, i.e. black (voltage), white (common), and green (ground). Cap off wires with the remaining wire nuts if they’re not being used; cutters or strippers will be required. DMX Installation: Connect (3) field wires and the (3) wires running from DMX control system to splice cover connector wires observing polarity. I.e. red (DMX +), violet (DMX -), gray (DMX ground), black (voltage), white (common), and green (ground); cutters or strippers will be required.
8. Cover the bottom of molded housing with the gasketed splice cover using 3/16" Allen wrench and (6) hex screws. Torque screws to 25-30 in-lbs in a star pattern.
9. With 3/16" Allen wrench, screw in (4) hex screws to reinstall debris shield.
10. Align molded housing using markings on debris shield keeping longitudinal reference line parallel to street, wall or walkway.
11. Back fill for stability. Do not back fill with bark or Vermiculite. Never install below surrounding ground level.
COMPONENT MODULE INSTALLATION: 12. When the component housing has been
delivered to site and you're ready to install, unscrew (4) hex screws with 3/16" Allen wrench to remove debris shield.
13. Attach the connector to the housing by pressing it with your thumb/palm until it clicks into place. Sealant on connectors is not necessary as rubber o-rings are in place to keep connectors water-tight.
14. Drop component housing in place and attach to molded housing using 3/16" tamper resistant hex wrench and (4) tamper resistant hex screws. Torque
screws to 25-30 in-lbs.
Lightvault® RGBW LTV81/LTV82 RGBW Installation Instructions
5
7 8
11 12
1413
6
© 2017 KIM LIGHTING • 17760 ROWLAND STREET, CITY OF INDUSTRY, CA 91748 • TEL: 626/968-5666 PAGE 3
15. NOTE: When installing an LTV8 with Wall Wash distribution, the Kim Lighting logo on the rim of the housing should be placed closest to the wall.
4. Open Hubbell RGBW Connect App.
Lightvault® RGBW LTV81/LTV82 RGBW Installation Instructions
2. Turn on Bluetooth.
5. Click the connect icon.
10. Swipe paired device left, tap satellite.
12. Tap pencil to rename group.
6. Select Device.
8. Change PIN and save.
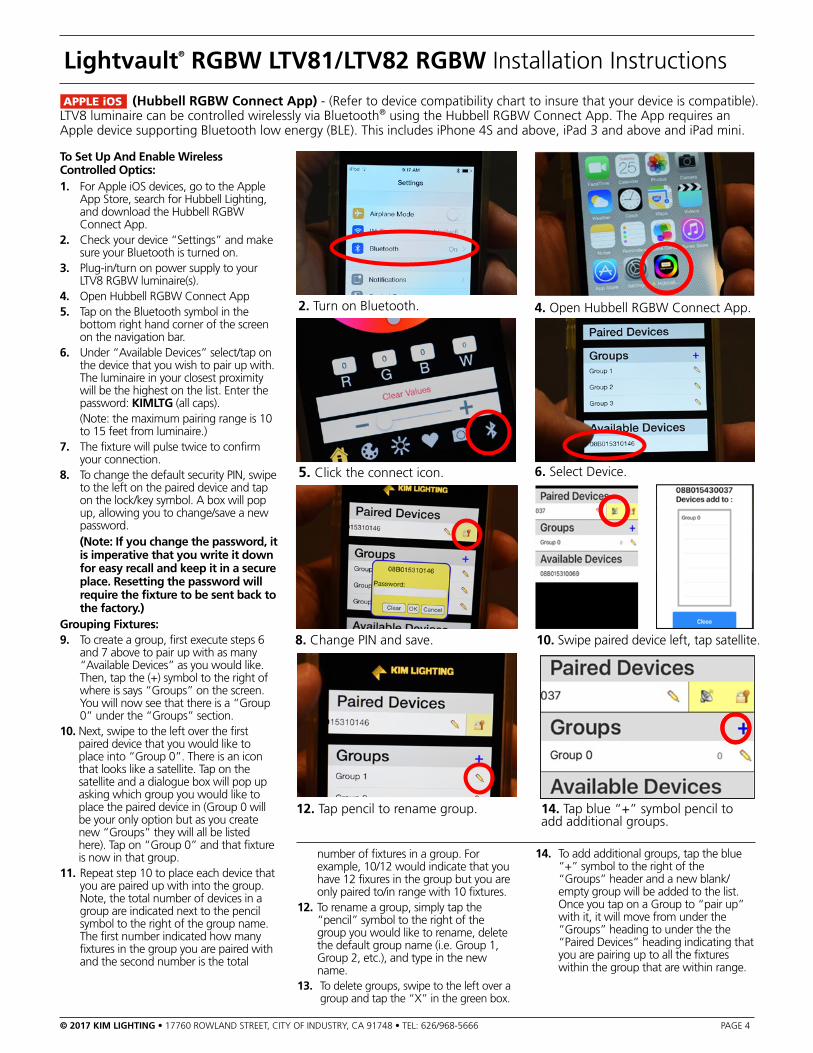
APPLE iOS (Hubbell RGBW Connect App) - (Refer to device compatibility chart to insure that your device is compatible). LTV8 luminaire can be controlled wirelessly via Bluetooth® using the Hubbell RGBW Connect App. The App requires an Apple device supporting Bluetooth low energy (BLE). This includes iPhone 4S and above, iPad 3 and above and iPad mini.
To Set Up And Enable Wireless Controlled Optics:1. For Apple iOS devices, go to the Apple
App Store, search for Hubbell Lighting, and download the Hubbell RGBW Connect App.
2. Check your device “Settings” and make sure your Bluetooth is turned on.
3. Plug-in/turn on power supply to your LTV8 RGBW luminaire(s).
4. Open Hubbell RGBW Connect App5. Tap on the Bluetooth symbol in the
bottom right hand corner of the screen on the navigation bar.
6. Under “Available Devices” select/tap on the device that you wish to pair up with. The luminaire in your closest proximity will be the highest on the list. Enter the password: KIMLTG (all caps).
(Note: the maximum pairing range is 10 to 15 feet from luminaire.)
7. The fixture will pulse twice to confirm your connection.
8. To change the default security PIN, swipe to the left on the paired device and tap on the lock/key symbol. A box will pop up, allowing you to change/save a new password.
(Note: If you change the password, it is imperative that you write it down for easy recall and keep it in a secure place. Resetting the password will require the fixture to be sent back to the factory.)
Grouping Fixtures:9. To create a group, first execute steps 6
and 7 above to pair up with as many “Available Devices” as you would like. Then, tap the (+) symbol to the right of where is says “Groups” on the screen. You will now see that there is a “Group 0” under the “Groups” section.
10. Next, swipe to the left over the first paired device that you would like to place into “Group 0”. There is an icon that looks like a satellite. Tap on the satellite and a dialogue box will pop up asking which group you would like to place the paired device in (Group 0 will be your only option but as you create new “Groups” they will all be listed here). Tap on “Group 0” and that fixture is now in that group.
11. Repeat step 10 to place each device that you are paired up with into the group.Note, the total number of devices in a group are indicated next to the pencil symbol to the right of the group name. The first number indicated how many fixtures in the group you are paired with and the second number is the total
number of fixtures in a group. For example, 10/12 would indicate that you have 12 fixures in the group but you are only paired to/in range with 10 fixtures.
12. To rename a group, simply tap the “pencil” symbol to the right of the group you would like to rename, delete the default group name (i.e. Group 1, Group 2, etc.), and type in the new name.
13. To delete groups, swipe to the left over a group and tap the “X” in the green box.
14. To add additional groups, tap the blue “+” symbol to the right of the “Groups” header and a new blank/empty group will be added to the list. Once you tap on a Group to “pair up” with it, it will move from under the “Groups” heading to under the the “Paired Devices” heading indicating that you are pairing up to all the fixtures within the group that are within range.
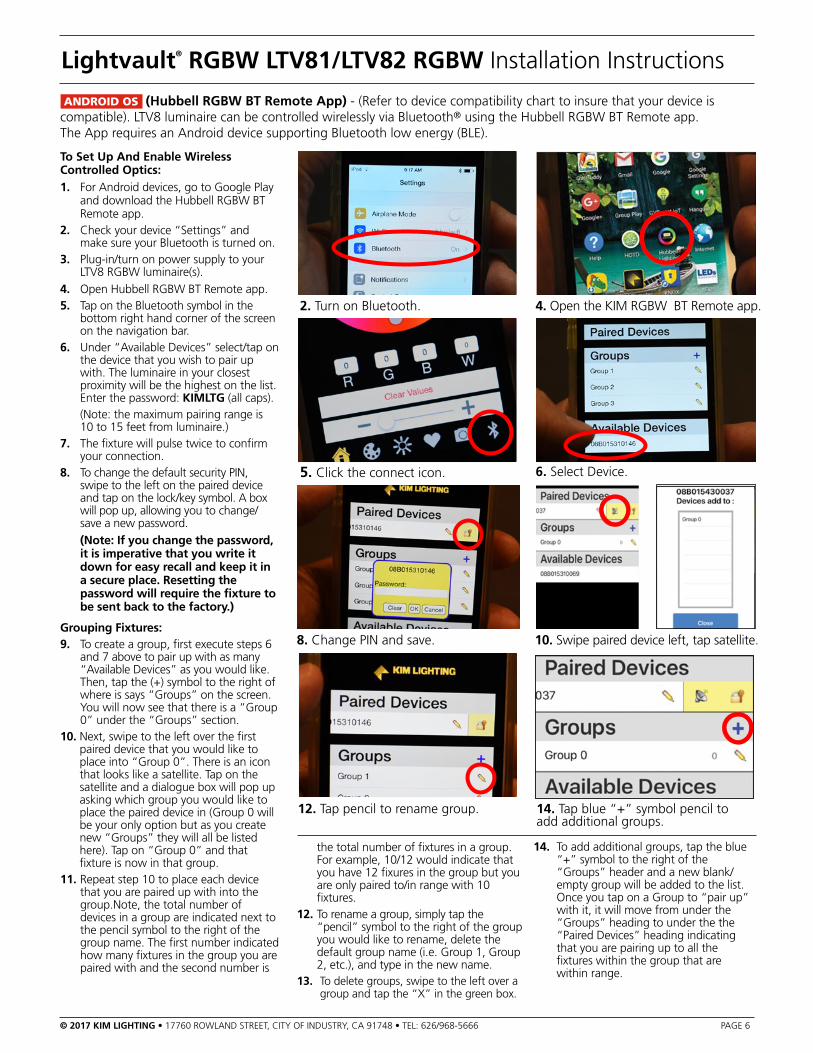
14. Tap blue “+” symbol pencil to add additional groups.
© 2017 KIM LIGHTING • 17760 ROWLAND STREET, CITY OF INDUSTRY, CA 91748 • TEL: 626/968-5666 PAGE 4
Lightvault® RGBW LTV81/LTV82 RGBW Installation Instructions
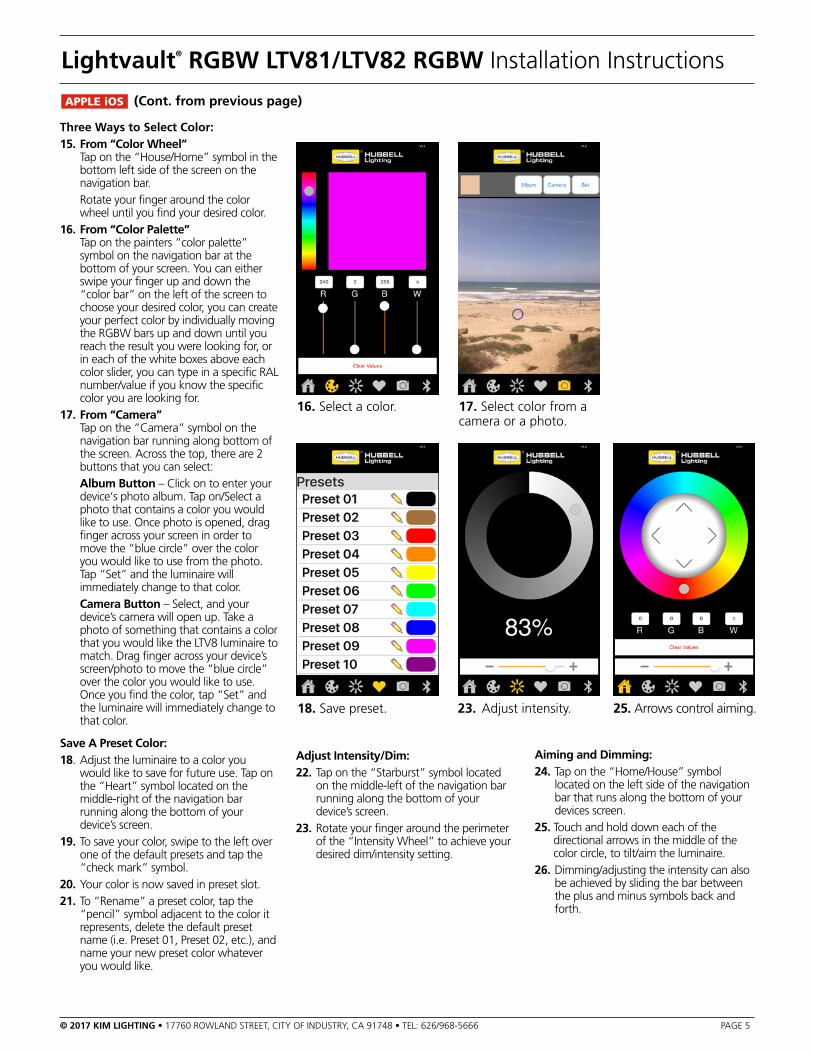
Three Ways to Select Color:15. From “Color Wheel” Tap on the “House/Home” symbol in the
bottom left side of the screen on the navigation bar.
Rotate your finger around the color wheel until you find your desired color.
16. From “Color Palette” Tap on the painters “color palette”
symbol on the navigation bar at the bottom of your screen. You can either swipe your finger up and down the “color bar” on the left of the screen to choose your desired color, you can create your perfect color by individually moving the RGBW bars up and down until you reach the result you were looking for, or in each of the white boxes above each color slider, you can type in a specific RAL number/value if you know the specific color you are looking for.
17. From “Camera” Tap on the “Camera” symbol on the
navigation bar running along bottom of the screen. Across the top, there are 2 buttons that you can select:
Album Button – Click on to enter your device‘s photo album. Tap on/Select a photo that contains a color you would like to use. Once photo is opened, drag finger across your screen in order to move the “blue circle” over the color you would like to use from the photo. Tap “Set” and the luminaire will immediately change to that color.
Camera Button – Select, and your device’s camera will open up. Take a photo of something that contains a color that you would like the LTV8 luminaire to match. Drag finger across your device’s screen/photo to move the “blue circle” over the color you would like to use. Once you find the color, tap “Set” and the luminaire will immediately change to that color.
Save A Preset Color:18. Adjust the luminaire to a color you
would like to save for future use. Tap on the “Heart” symbol located on the middle-right of the navigation bar running along the bottom of your device’s screen.
19. To save your color, swipe to the left over one of the default presets and tap the “check mark” symbol.
20. Your color is now saved in preset slot.21. To “Rename” a preset color, tap the
“pencil” symbol adjacent to the color it represents, delete the default preset name (i.e. Preset 01, Preset 02, etc.), and name your new preset color whatever you would like.
Adjust Intensity/Dim:22. Tap on the “Starburst” symbol located
on the middle-left of the navigation bar running along the bottom of your device’s screen.
23. Rotate your finger around the perimeter of the “Intensity Wheel” to achieve your desired dim/intensity setting.
Aiming and Dimming:24. Tap on the “Home/House” symbol
located on the left side of the navigation bar that runs along the bottom of your devices screen.
25. Touch and hold down each of the directional arrows in the middle of the color circle, to tilt/aim the luminaire.
26. Dimming/adjusting the intensity can also be achieved by sliding the bar between the plus and minus symbols back and forth.
16. Select a color.
23. Adjust intensity. 18. Save preset.
17. Select color from a camera or a photo.
25. Arrows control aiming.
APPLE iOS (Cont. from previous page)
© 2017 KIM LIGHTING • 17760 ROWLAND STREET, CITY OF INDUSTRY, CA 91748 • TEL: 626/968-5666 PAGE 5
Lightvault® RGBW LTV81/LTV82 RGBW Installation Instructions
2. Turn on Bluetooth.
5. Click the connect icon.
10. Swipe paired device left, tap satellite.
12. Tap pencil to rename group.
4. Open the KIM RGBW BT Remote app.
6. Select Device.
8. Change PIN and save.
ANDROID OS (Hubbell RGBW BT Remote App) - (Refer to device compatibility chart to insure that your device is compatible). LTV8 luminaire can be controlled wirelessly via Bluetooth® using the Hubbell RGBW BT Remote app. The App requires an Android device supporting Bluetooth low energy (BLE).
To Set Up And Enable Wireless Controlled Optics:1. For Android devices, go to Google Play
and download the Hubbell RGBW BT Remote app.
2. Check your device “Settings” and make sure your Bluetooth is turned on.
3. Plug-in/turn on power supply to your LTV8 RGBW luminaire(s).
4. Open Hubbell RGBW BT Remote app.5. Tap on the Bluetooth symbol in the
bottom right hand corner of the screen on the navigation bar.
6. Under “Available Devices” select/tap on the device that you wish to pair up with. The luminaire in your closest proximity will be the highest on the list. Enter the password: KIMLTG (all caps).
(Note: the maximum pairing range is 10 to 15 feet from luminaire.)
7. The fixture will pulse twice to confirm your connection.
8. To change the default security PIN, swipe to the left on the paired device and tap on the lock/key symbol. A box will pop up, allowing you to change/save a new password.
(Note: If you change the password, it is imperative that you write it down for easy recall and keep it in a secure place. Resetting the password will require the fixture to be sent back to the factory.)
Grouping Fixtures:9. To create a group, first execute steps 6
and 7 above to pair up with as many “Available Devices” as you would like. Then, tap the (+) symbol to the right of where is says “Groups” on the screen. You will now see that there is a “Group 0” under the “Groups” section.
10. Next, swipe to the left over the first paired device that you would like to place into “Group 0”. There is an icon that looks like a satellite. Tap on the satellite and a dialogue box will pop up asking which group you would like to place the paired device in (Group 0 will be your only option but as you create new “Groups” they will all be listed here). Tap on “Group 0” and that fixture is now in that group.
11. Repeat step 10 to place each device that you are paired up with into the group.Note, the total number of devices in a group are indicated next to the pencil symbol to the right of the group name. The first number indicated how many fixtures in the group you are paired with and the second number is
the total number of fixtures in a group. For example, 10/12 would indicate that you have 12 fixures in the group but you are only paired to/in range with 10 fixtures.
12. To rename a group, simply tap the “pencil” symbol to the right of the group you would like to rename, delete the default group name (i.e. Group 1, Group 2, etc.), and type in the new name.
13. To delete groups, swipe to the left over a group and tap the “X” in the green box.
14. To add additional groups, tap the blue “+” symbol to the right of the “Groups” header and a new blank/empty group will be added to the list. Once you tap on a Group to “pair up” with it, it will move from under the “Groups” heading to under the the “Paired Devices” heading indicating that you are pairing up to all the fixtures within the group that are within range.
14. Tap blue “+” symbol pencil to add additional groups.
© 2017 KIM LIGHTING • 17760 ROWLAND STREET, CITY OF INDUSTRY, CA 91748 • TEL: 626/968-5666 PAGE 6

Lightvault® RGBW LTV81/LTV82 RGBW Installation Instructions
Three Ways to Select Color:
15. From “Color Wheel” Tap on the “House/Home” symbol in
the bottom left side of the screen on the navigation bar.
Rotate your finger around the color wheel until you find your desired color.
16. From “Color Palette” Tap on the painter’s “color palette”
symbol on the navigation bar at the bottom of your screen. You can either swipe your finger up and down the “color bar” on the left of the screen to choose your desired color, or you can create your perfect color by individually moving the RGBW bars up and down until you reach the result you were looking for.
17. From “Camera” Tap on the “Camera” symbol on the
navigation bar running along bottom of the screen. Across the top, there are 2 buttons that you can select:
Album Button – Click on to enter your device‘s photo album. Tap on/Select a photo that contains a color you would like to use. Once photo is opened, drag finger across your screen in order to move the “blue circle” over the color you would like to use from the photo. Tap “Set” and the luminaire will immediately change to that color.
Camera Button – Select, and your device’s camera will open up. Take a photo of something that contains a color that you would like the LTV8 luminaire to match. Drag finger across your device’s screen/photo to move the “blue circle” over the color you would like to use. Once you find the color, tap “Set” and the luminaire will immediately change to that color.
Save A Preset Color:
18. Adjust the luminaire to a color you would like to save for future use. Tap on the “Heart” symbol located on the middle-right of the navigation bar running along the bottom of your device’s screen.
19. To save your color, swipe to the left over one of the default presets and tap the “check mark” symbol.
20. Your color is now saved in preset slot.
21. To “Rename” a preset color, tap the “pencil” symbol adjacent to the color it represents, delete the default preset name (i.e. Preset 01, Preset 02, etc.), and name your new preset color whatever you would like.
16. Select a color.
23. Adjust intensity. 18. Save preset.
17. Select color from a camera or a photo.
25. Arrows control aiming.
ANDROID OS (Cont. from previous page)
Adjust Intensity/Dim:22. Tap on the “Starburst” symbol located
on the middle-left of the navigation bar running along the bottom of your device’s screen.
23. Rotate your finger around the perimeter of the “Intensity Wheel” to achieve your desired dim/intensity setting.
Aiming and Dimming:24. Tap on the “Home/House” symbol
located on the left side of the navigation bar that runs along the bottom of your devices screen.
25. Touch and hold down each of the directional arrows in the middle of the color circle, to tilt/aim the luminaire.
26. Dimming/adjusting the intensity can also be achieved by sliding the bar between the plus and minus symbols back and forth.
© 2017 KIM LIGHTING • 17760 ROWLAND STREET, CITY OF INDUSTRY, CA 91748 • TEL: 626/968-5666 PAGE 7
© 2017 KIM LIGHTING • 17760 ROWLAND STREET, CITY OF INDUSTRY, CA 91748 • TEL: 626/968-5666 PAGE 8
Lightvault® RGBW LTV81/LTV82 RGBW Installation Instructions
The Bluetooth® word mark and logos are registered trademarks owned by Bluetooth SIG, Inc. and any use of such marks by Kim Lighting is under license. Other trademarks and trade names are those of their respective owners.
Apple, the Apple logo, iPad, iPhone, and iPod Touch are trademarks of Apple Inc., registered in the U.S. and other countries. App Store is a service mark of Apple Inc. Google Play is a trademark of Google Inc.
Trouble pairing device and KIM REMOTE with fixture.
1. When pairing initially, stand as close as possible to the fixture.
2. Power down fixture for 15 seconds and power back on.
3. Pair one device at a time.
4. Close app. To do this on an Android device go to Settings > Applications (or Aplications Manager) > Downloaded > KIM REMOTE > Force Stop. To do this on an Apple device (iOS 7): Push home button twice, find KIM REMOTE app, hold the app icon and swipe up. To do this on an Apple device (iOS 6): Push home button twice, find KIM REMOTE app, tap the X to close.
5. We recommend using one type of bluetooth device (apple or android) when pairing. When pairing multiple types of devices with the same fixture, power down the fixture for 15 seconds before switching devices.
6. A phone case/cover may interfere with the Bluetooth signal. Removing your case can significantly improve connectivity.
Why won't it work on my iPhone 4 or iPad 2?
The Kim Remote app for Apple devices requires an Apple device that support Bluetooth low energy (BLE). This includes iPhone 4S and above, iPad 3 and above and iPad mini.
Why did my dimming settings change?
The advanced electronics inside the LTV8 are designed to retain your settings for both dimming and aiming. Note: Each time you connect to the fixture with the KIM REMOTE app, dimming settings are automatically reset to 100%. Please follow the following steps.
1. Power on fixture.
2. Pair and Connect device.
3. Aim and set dimming.
4. Disconnect the device. (This will store your settings in memory)
5. Once settings are stored the fixture does not require power to retain settings.
For warranty see http://www.hubbelllighting.com/resources/warranty