1
LIGHTNING ARRESTOR Installation Guide For questions or help contact RAMM Horse Fencing and Stalls at 800-853-1611 The easiest and best way to install your lightning arrestor is by installing a cut-out switch on the hot lead-out wire close to the sight where you will be installing the arrestor. This will make adjustment of the arrestor much easier. THINGS TO CONSIDER BEFORE MOUNTING: • Mount outside the building at a location where, should it react to a lightning strike, the heat generated will be safely dissipated. • The arrestor ground bed and charger ground bed should be separated by at least 50ft. • Mount arrestor between the charger and any fence connections. INSTALLATION INSTRUCTIONS: 1. Turn off charger and/or unplug. 2. Mount outside and away from the building, but as close as practical to the charger. 3. Attach lead out from charger to the end of the metal coil opposite the spark gap. 4. Install ground bed at least 50ft away from charger ground bed. Use one more ground rod than used for the charger ground bed. Install rods a minimum of 10ft apart. Connect wire from the ground bed to the mounting from of the arrestor. 5. To be most effective, the gap on the 2 pointed upright metal pieces of the arrestor shoul be 1/8" greater than the distance the charger spark will jump. 6. After adjusting the gap, disconnect power to the charger and attach hot lead going out to the rest of the fence on the spark gap end of the choke coil. ITEM #MWLA TO POSITION THE GAP: • With power off, make the gap 1/8" by loosening the screws that hold the coil in place. • Turn the power on and check to see if spark from charger bridges the gap. • If it does, turn the power off (if cut-out switch is installed, throw switch) and increase the gap by 1/8". • Continue the above steps until the spark no longer bridges the gap, then in- crease an additional 1/8". • Retighten screws.

LIGHTNING ARRESTOR - Ramm Fence Arrestor Installation.pdf · LIGHTNING ARRESTOR Installation Guide For questions or help contact RAMM Horse Fencing and Stalls at 800-853-1611 The

  • Upload
    buiphuc

  • View
    231

  • Download
    2

Embed Size (px)

Citation preview

LIGHTNINGARRESTORInstallationGuide

For questions or help contact RAMM Horse Fencing and Stalls at 800-853-1611

The easiest and best way to install your lightning arrestor is byinstalling a cut-out switch on the hot lead-out wire close to thesight where you will be installing the arrestor. This will makeadjustment of the arrestor much easier.

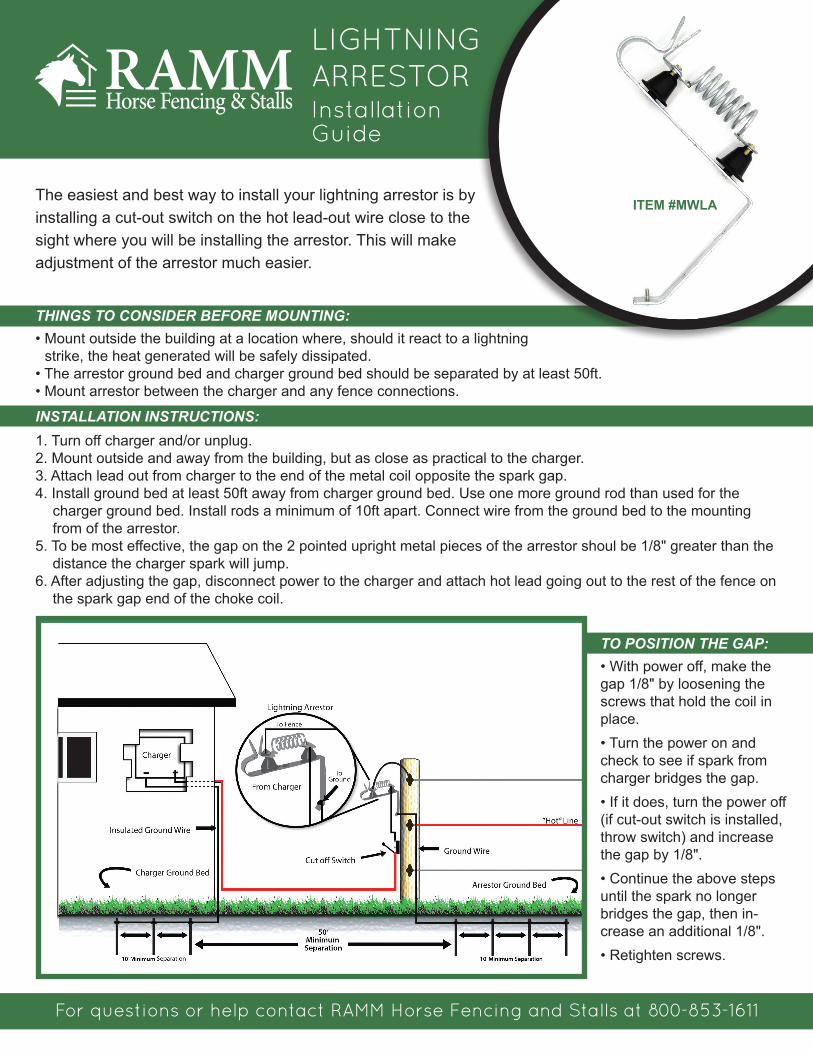
THINGS TO CONSIDER BEFORE MOUNTING:• Mount outside the building at a location where, should it react to a lightning strike, the heat generated will be safely dissipated.• The arrestor ground bed and charger ground bed should be separated by at least 50ft.• Mount arrestor between the charger and any fence connections.

INSTALLATION INSTRUCTIONS:1. Turn off charger and/or unplug.2. Mount outside and away from the building, but as close as practical to the charger.3. Attach lead out from charger to the end of the metal coil opposite the spark gap.4. Install ground bed at least 50ft away from charger ground bed. Use one more ground rod than used for the charger ground bed. Install rods a minimum of 10ft apart. Connect wire from the ground bed to the mounting from of the arrestor.5. To be most effective, the gap on the 2 pointed upright metal pieces of the arrestor shoul be 1/8" greater than the distance the charger spark will jump.6. After adjusting the gap, disconnect power to the charger and attach hot lead going out to the rest of the fence on the spark gap end of the choke coil.

ITEM #MWLA

Prices subject to change. Visit RammFence.com for up to date items and pricing.

Catalog NEW 2015 Fencing Section.indd 16 10/13/15 1:27 PM

TO POSITION THE GAP:• With power off, make the gap 1/8" by loosening the screws that hold the coil in place.• Turn the power on and check to see if spark from charger bridges the gap.• If it does, turn the power off (if cut-out switch is installed, throw switch) and increase the gap by 1/8".• Continue the above steps until the spark no longer bridges the gap, then in-crease an additional 1/8".• Retighten screws.