Embed Size (px)
Citation preview
SECOND EDITION
How to Get The Most
From Your New ARRI Kit
LIGHTING HANDBOOK
by B i l l Ho l s h e v n i k o f f

I m a g e s a n d T e x t © 2 0 1 0
b y B i l l H o l s h e v n i k o f f
For more detailed information about the
lighting techniques described in this booklet,
please go to www.poweroflighting.com
ARRI INC.617 Route 303, Blauvelt, NY 10913
Ph: 845-353-1400 Fx: 845-425-1250
600 North Victory Blvd., Burbank, CA 91502Ph: 818-841-7070 Fx: 818-848-4028
e-mail: [email protected]
1ARRI LIGHTING HANDBOOK
LIGHTING THEORIES AND TECHNIQUES:There have been dozens of books throughout the past decades that have discussed “standard” lighting setups for interviews, talk shows, dramas and countless other productions. This handbook is designed to help you create the best possible images with your new Arri Lighting Kit and help you to use these tools when lighting location or studio productions. CHOOSING A LIGHT SOURCE:
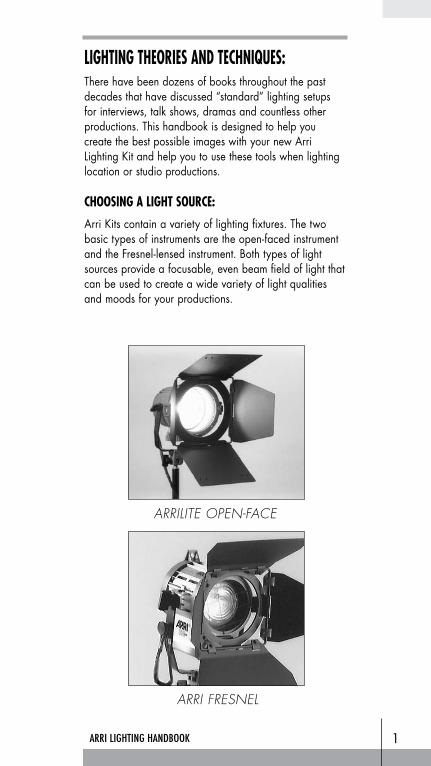
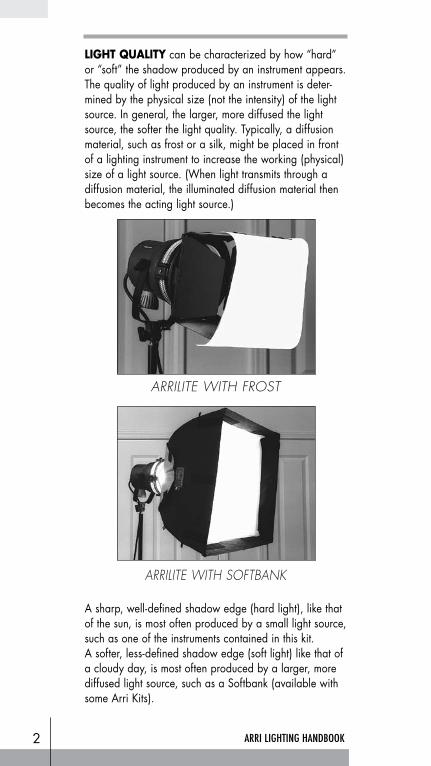
Arri Kits contain a variety of lighting fixtures. The two basic types of instruments are the open-faced instrument and the Fresnel-lensed instrument. Both types of light sources provide a focusable, even beam field of light that can be used to create a wide variety of light qualities and moods for your productions.
Arrilite OPeN-FACe
Arri FreSNel
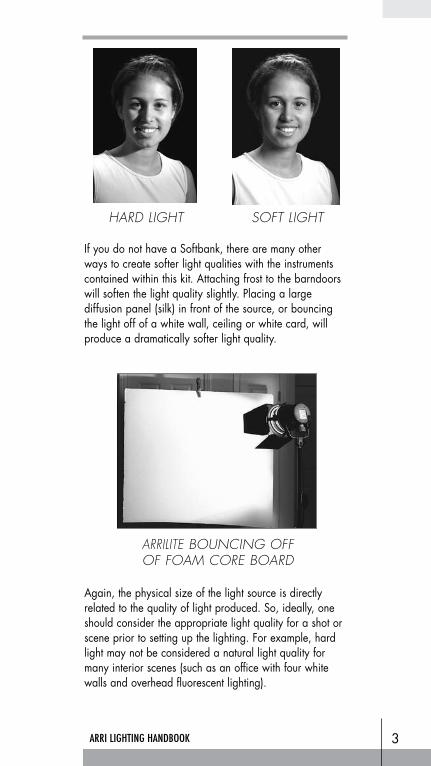
LIGHT QUALITY can be characterized by how “hard” or “soft” the shadow produced by an instrument appears. The quality of light produced by an instrument is deter-mined by the physical size (not the intensity) of the light source. In general, the larger, more diffused the light source, the softer the light quality. Typically, a diffusion material, such as frost or a silk, might be placed in front of a lighting instrument to increase the working (physical) size of a light source. (When light transmits through a diffusion material, the illuminated diffusion material then becomes the acting light source.)
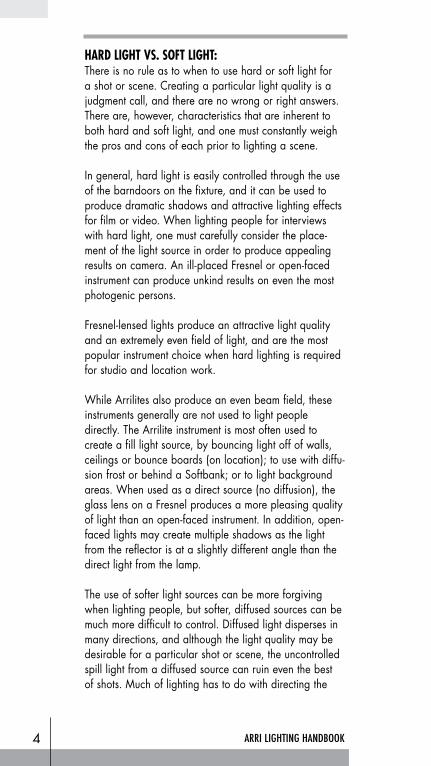
A sharp, well-defined shadow edge (hard light), like that of the sun, is most often produced by a small light source, such as one of the instruments contained in this kit. A softer, less-defined shadow edge (soft light) like that of a cloudy day, is most often produced by a larger, more diffused light source, such as a Softbank (available with some Arri Kits).
2 ARRI LIGHTING HANDBOOK
Arrilite WitH FrOSt
Arrilite WitH SOFtbANk
If you do not have a Softbank, there are many other ways to create softer light qualities with the instruments contained within this kit. Attaching frost to the barndoors will soften the light quality slightly. Placing a large diffusion panel (silk) in front of the source, or bouncing the light off of a white wall, ceiling or white card, will produce a dramatically softer light quality.
Again, the physical size of the light source is directly related to the quality of light produced. So, ideally, one should consider the appropriate light quality for a shot or scene prior to setting up the lighting. For example, hard light may not be considered a natural light quality for many interior scenes (such as an office with four white walls and overhead fluorescent lighting).
3ARRI LIGHTING HANDBOOK
HArD liGHt SOFt liGHt
Arrilite bOUNCiNG OFF OF FOAM COre bOArD
HARD LIGHT VS. SOFT LIGHT:There is no rule as to when to use hard or soft light for a shot or scene. Creating a particular light quality is a judgment call, and there are no wrong or right answers. There are, however, characteristics that are inherent to both hard and soft light, and one must constantly weigh the pros and cons of each prior to lighting a scene.
In general, hard light is easily controlled through the use of the barndoors on the fixture, and it can be used to produce dramatic shadows and attractive lighting effects for film or video. When lighting people for interviews with hard light, one must carefully consider the place-ment of the light source in order to produce appealing results on camera. An ill-placed Fresnel or open-faced instrument can produce unkind results on even the most photogenic persons.
Fresnel-lensed lights produce an attractive light quality and an extremely even field of light, and are the most popular instrument choice when hard lighting is required for studio and location work.
While Arrilites also produce an even beam field, these instruments generally are not used to light people directly. The Arrilite instrument is most often used to create a fill light source, by bouncing light off of walls, ceilings or bounce boards (on location); to use with diffu-sion frost or behind a Softbank; or to light background areas. When used as a direct source (no diffusion), the glass lens on a Fresnel produces a more pleasing quality of light than an open-faced instrument. In addition, open-faced lights may create multiple shadows as the light from the reflector is at a slightly different angle than the direct light from the lamp.
The use of softer light sources can be more forgiving when lighting people, but softer, diffused sources can be much more difficult to control. Diffused light disperses in many directions, and although the light quality may be desirable for a particular shot or scene, the uncontrolled spill light from a diffused source can ruin even the best of shots. Much of lighting has to do with directing the
4 ARRI LIGHTING HANDBOOK
viewer’s eye around the screen, and when spill light from your main light sources contaminates the background of your shot, the lighting can appear haphazard and lose visual impact. Once again, careful consideration of your light placement will dramatically improve the result.
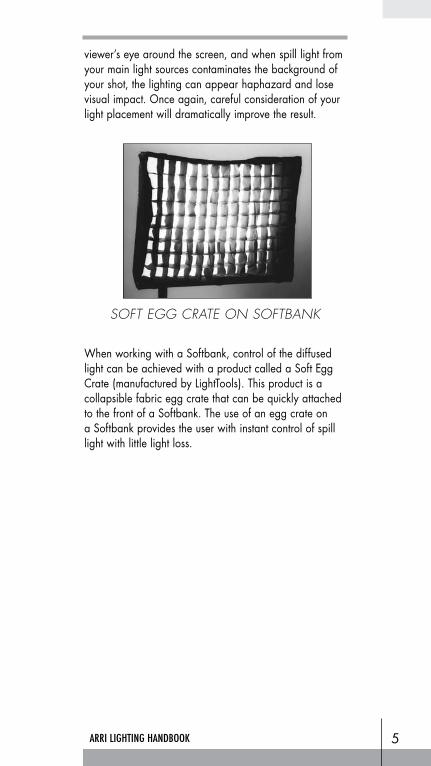
When working with a Softbank, control of the diffused light can be achieved with a product called a Soft Egg Crate (manufactured by LightTools). This product is a collapsible fabric egg crate that can be quickly attached to the front of a Softbank. The use of an egg crate on a Softbank provides the user with instant control of spill light with little light loss.
5ARRI LIGHTING HANDBOOK
SOFt eGG CrAte ON SOFtbANk
6 ARRI LIGHTING HANDBOOK
LIGHT SOURCE INTENSITy: The intensity of the light source you choose for a shot is an important decision. Brighter is not necessarily better. Depth-of-Field (f-stop = depth of focus) and f-stop selection with your camera should be a conscious decision each time you begin lighting a shot.
Many of the newest video cameras are extremely light sensitive. Lighting a scene with too much light forces you to close down the iris to a deeper f-stop (f-8 – f-11) to properly expose the scene. This creates a very deep focus range (depth of field) in your shot. Selective focus is not an option unless you are shooting at the very longest telephoto lens setting on your digital video camera.
Selective focus is a simple method of focusing the viewer’s attention on a particular subject or area in the frame. Using smaller lighting instruments and less light allows you to expose your scene at an iris setting of perhaps f-2.0 or f-2.8. Shooting with an open iris (aperture) creates a shallower depth-of-field and allows you to utilize selective focus as a creative tool in image-making.
Additionally, you can down-lamp your Arri instruments to use lower wattage bulbs. For example, the Arri 650 Fresnel also can use a 500 or 300W lamp. This provides you with the wider beam-field of the larger Fresnel while still working with lower light output. Many videographers now choose the more compact ARRI D Softbank kits, which use smaller, lower wattage fixtures. Shooting at lower light levels with the newer cameras allows the use of instruments as small as a 150W Arri Fresnel. Used in conjunction with proper lighting techniques, shooting with a shallow depth-of-field can enable you to create more of a film-look when shooting with your video camera.
A NOTE ON COLOR: The color of the tungsten lighting fixtures in your Arri Kit is rated at 3,200 degrees on the Kelvin temperature scale. Although the light from these instruments may appear as white light on video or film, it is actually a very warm-colored light relative to the color of daylight. Choosing a tungsten film stock or setting your video camera for tungsten (3,200K) will give you proper color rendering when lighting with these fixtures. Be careful when white balancing your camera that you are
7ARRI LIGHTING HANDBOOK
balancing your camera for the light in your subject area. Proper white balance will ensure accurate skin tones in your video productions.
Sometimes, you may be shooting in an area with existing ambient light and the color of that ambient light may differ dramatically from the color of light generated by the instruments in your Arri Kit. The color of fluorescent light in office areas, commercial light in retail or industrial settings and ambient daylight all differ greatly from the color of light created by your tungsten lights. In these cases, it may be necessary to color correct your lighting instruments to match the color of the ambient light in your scene.
Your Arri lights can be color corrected through the use of color correction gels which can be attached directly to the barndoors of your instruments. Just be aware of the fact that using gels on your lights can greatly reduce the output of light (i.e. full CTB (daylight) correction gel can reduce output by as much as 85%). Also, gels can burn when set too close to the lamp or lens on your lights. Careful use of correction gels can help you to manipulate and match the color of the existing light in your scene.
There is a great deal of information available on the subject of color correction gels (see Power of Lighting videos at the back of this booklet) and you should gain an understanding of this subject if you wish to better your lighting practices.
Additionally, you might consider supplementing your lighting package with additional Arri lighting instruments designed specifically for production use in daylight settings. Arri HMI (daylight balanced) instruments are used daily in motion picture and video production work around the world. See your local Arri equipment dealer or visit the Arri website for more information. www.arri.com
8 ARRI LIGHTING HANDBOOK8 ARRI LIGHTING HANDBOOK
SOME BASIC DEFINITIONS:
THE FOUR PRIMARY LIGHT SOURCES: KEY, FILL, SEPARATION & BACKGROUND
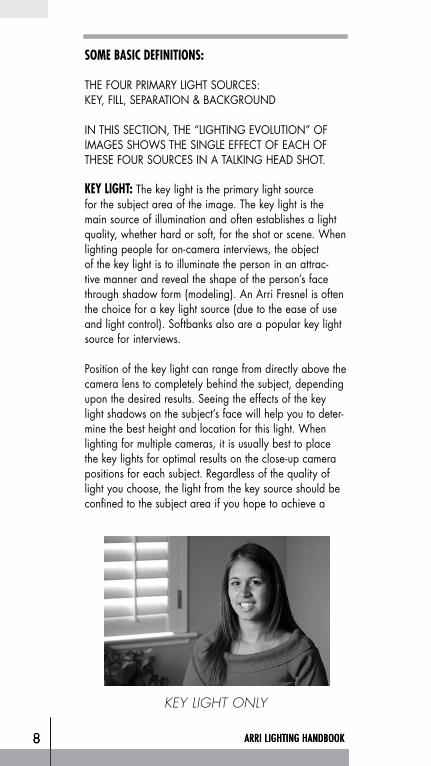
IN THIS SECTION, THE “LIGHTING EVOLUTION” OF IMAGES SHOWS THE SINGLE EFFECT OF EACH OF THESE FOUR SOURCES IN A TALKING HEAD SHOT.
KEy LIGHT: The key light is the primary light source for the subject area of the image. The key light is the main source of illumination and often establishes a light quality, whether hard or soft, for the shot or scene. When lighting people for on-camera interviews, the object of the key light is to illuminate the person in an attrac-tive manner and reveal the shape of the person’s face through shadow form (modeling). An Arri Fresnel is often the choice for a key light source (due to the ease of use and light control). Softbanks also are a popular key light source for interviews.
Position of the key light can range from directly above the camera lens to completely behind the subject, depending upon the desired results. Seeing the effects of the key light shadows on the subject’s face will help you to deter-mine the best height and location for this light. When lighting for multiple cameras, it is usually best to place the key lights for optimal results on the close-up camera positions for each subject. Regardless of the quality of light you choose, the light from the key source should be confined to the subject area if you hope to achieve a
key liGHt ONly
key & Fill liGHtS
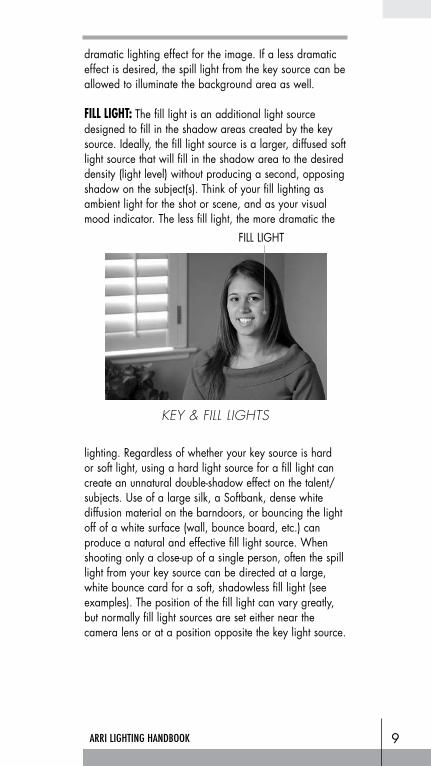
dramatic lighting effect for the image. If a less dramatic effect is desired, the spill light from the key source can be allowed to illuminate the background area as well.
FILL LIGHT: The fill light is an additional light source designed to fill in the shadow areas created by the key source. Ideally, the fill light source is a larger, diffused soft light source that will fill in the shadow area to the desired density (light level) without producing a second, opposing shadow on the subject(s). Think of your fill lighting as ambient light for the shot or scene, and as your visual mood indicator. The less fill light, the more dramatic the
lighting. Regardless of whether your key source is hard or soft light, using a hard light source for a fill light can create an unnatural double-shadow effect on the talent/subjects. Use of a large silk, a Softbank, dense white diffusion material on the barndoors, or bouncing the light off of a white surface (wall, bounce board, etc.) can produce a natural and effective fill light source. When shooting only a close-up of a single person, often the spill light from your key source can be directed at a large, white bounce card for a soft, shadowless fill light (see examples). The position of the fill light can vary greatly, but normally fill light sources are set either near the camera lens or at a position opposite the key light source.
9ARRI LIGHTING HANDBOOK
FILL LIGHT
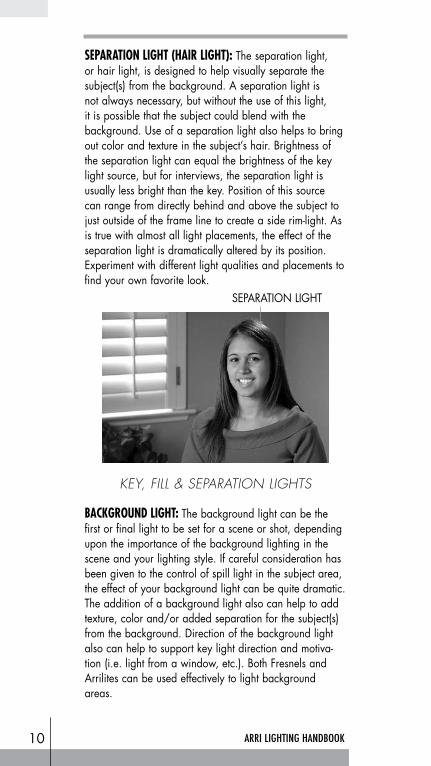
SEPARATION LIGHT (HAIR LIGHT): The separation light, or hair light, is designed to help visually separate the subject(s) from the background. A separation light is not always necessary, but without the use of this light, it is possible that the subject could blend with the background. Use of a separation light also helps to bring out color and texture in the subject’s hair. Brightness of the separation light can equal the brightness of the key light source, but for interviews, the separation light is usually less bright than the key. Position of this source can range from directly behind and above the subject to just outside of the frame line to create a side rim-light. As is true with almost all light placements, the effect of the separation light is dramatically altered by its position. Experiment with different light qualities and placements to find your own favorite look.
BACKGROUND LIGHT: The background light can be the first or final light to be set for a scene or shot, depending upon the importance of the background lighting in the scene and your lighting style. If careful consideration has been given to the control of spill light in the subject area, the effect of your background light can be quite dramatic. The addition of a background light also can help to add texture, color and/or added separation for the subject(s) from the background. Direction of the background light also can help to support key light direction and motiva-tion (i.e. light from a window, etc.). Both Fresnels and Arrilites can be used effectively to light background areas.
10 ARRI LIGHTING HANDBOOK
key, Fill & SePArAtiON liGHtS
SEPARATION LIGHT
11ARRI LIGHTING HANDBOOK
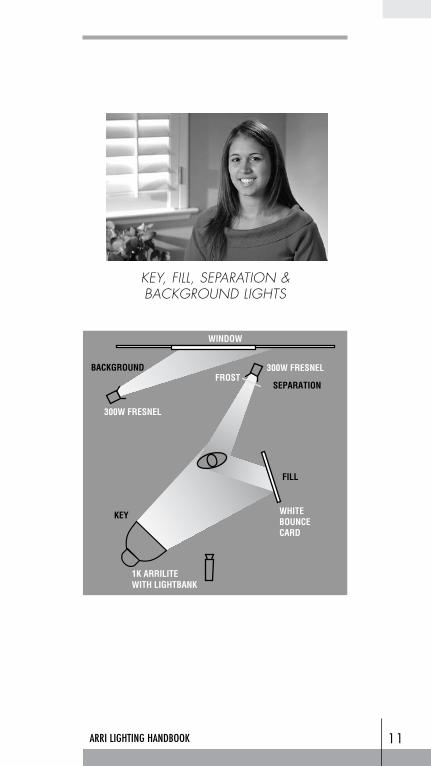
key, Fill, SePArAtiON & bACkGrOUND liGHtS
1K ARRILITEWITH LIGHTBANK
300W FRESNEL
WHITEBOUNCECARD
FROSTBACKGROUND
SEPARATION
KEY
FILL
WINDOW
300W FRESNEL
Artists of all types are constantly working to create a 3-dimensional image on a 2-dimensional plane (motion picture screen, television screen, paper, etc.). The following information will help you better identify and manipulate the separate components of reflected light.
THEORy OF 3-DIMENSIONAL CONTRASTThe Theory States: A single light source directed at a single object of a single density normally will produce three separate densities: the diffused value, the specular highlight and the shadow. The presence of these three densities can reveal shape, form, texture, density and depth.
DIFFUSED VALUE The true tone or natural brightness of an object. Accurate reproduction of the diffused value often determines a proper exposure. The diffused is a constant, objective value, while the shadow and specular are variable and subjective.
SPECULAR HIGHLIGHT The mirrored image of a light source on an object. The specular highlight is always brighter than the true tone of the object. A properly placed specular highlight will reveal shape and texture on an object.
SHADOW The area on a 3-D object that receives no illumination from the primary light source. The shadow is always lower in brightness than the true tone of the object. A properly placed shadow will reveal shape and form on an object.
SHADOW EDGE TRANSFER The area of transition between the diffused value and the shadow. It is the primary indicator to determine the quality of light produced, i.e. hard or soft light.
SPECULAR EDGE TRANSFER The area of transition between the diffused value and the specular highlight. The specular edge transfer usually defines the surface texture of an object. The smoother the surface, the harder the edge transfer.
RULE OF THUMB The larger the light source, the softer the light quality.
12 ARRI LIGHTING HANDBOOK

13ARRI LIGHTING HANDBOOK
ELEMENTS OF3-DIMENSIONAL CONTRAST
tHe FOllOWiNG PAGeS SHOW iMAGeS AND DiAGrAMS tHAt Will PrOviDe yOU WitH bASiC liGHtiNG SetUPS tHAt yOU CAN ACHieve WitH yOUr Arri kit FOr A vAriety OF StUDiO AND lOCAtiON PrODUCtiONS.
SPECULARHIGHLIGHT
SHADOWEDGETRANSFERSHADOW
DIFFUSEDVALUE
SPECULAREDGETRANSFER
14 ARRI LIGHTING HANDBOOK
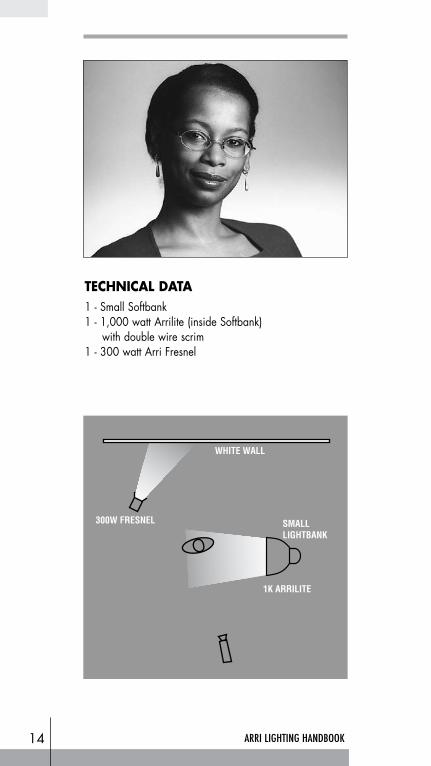
TecHnIcAL DATA1 - Small Softbank1 - 1,000 watt Arrilite (inside Softbank) with double wire scrim1 - 300 watt Arri Fresnel
1K ARRILITE
SMALL LIGHTBANK
300W FRESNEL
WHITE WALL
15ARRI LIGHTING HANDBOOK
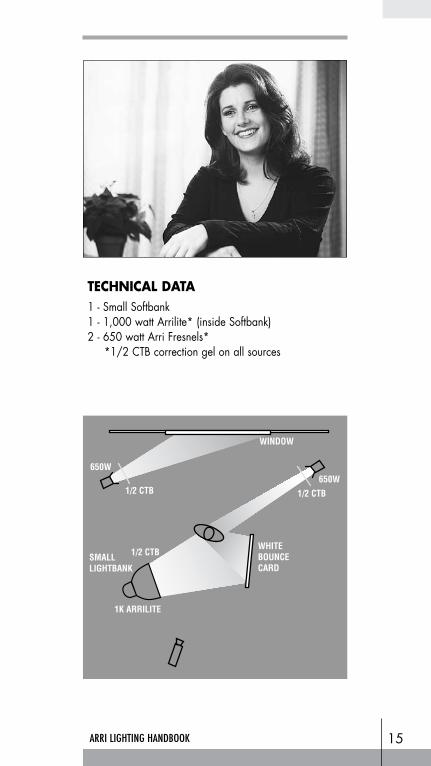
TecHnIcAL DATA1 - Small Softbank1 - 1,000 watt Arrilite* (inside Softbank)2 - 650 watt Arri Fresnels* *1/2 CTB correction gel on all sources
650W650W
SMALL LIGHTBANK
1K ARRILITE
1/2 CTB 1/2 CTB
1/2 CTB
WINDOW
WHITEBOUNCECARD
16 ARRI LIGHTING HANDBOOK
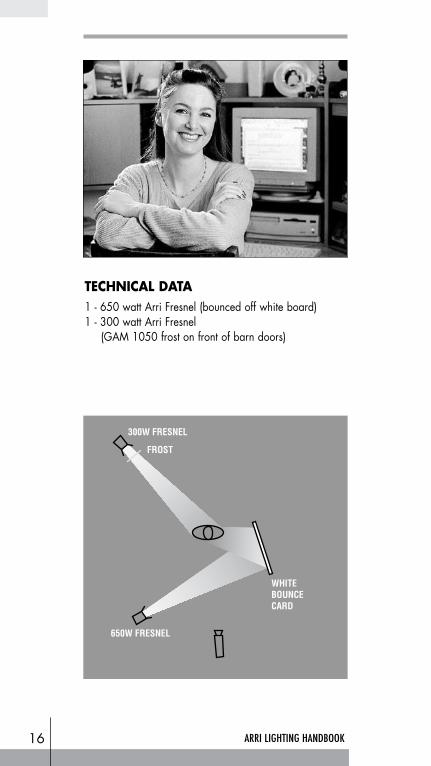
TecHnIcAL DATA1 - 650 watt Arri Fresnel (bounced off white board)1 - 300 watt Arri Fresnel (GAM 1050 frost on front of barn doors)
650W FRESNEL
300W FRESNEL
FROST
WHITEBOUNCECARD
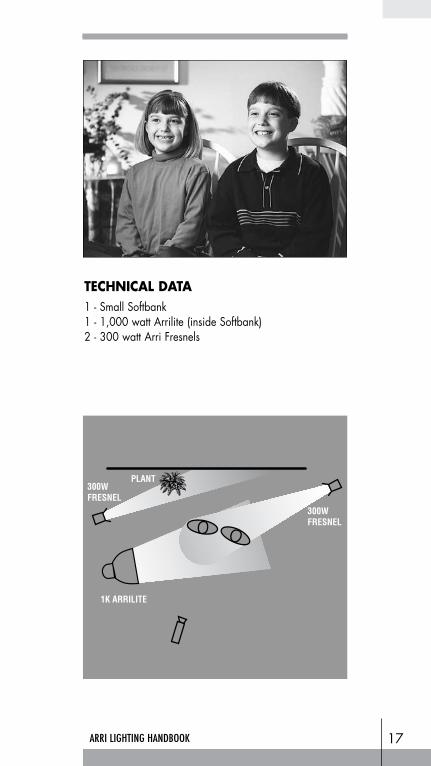
TecHnIcAL DATA1 - Small Softbank1 - 1,000 watt Arrilite (inside Softbank)2 - 300 watt Arri Fresnels
17ARRI LIGHTING HANDBOOK
300W FRESNEL
300W FRESNEL
PLANT
1K ARRILITE
18 ARRI LIGHTING HANDBOOK
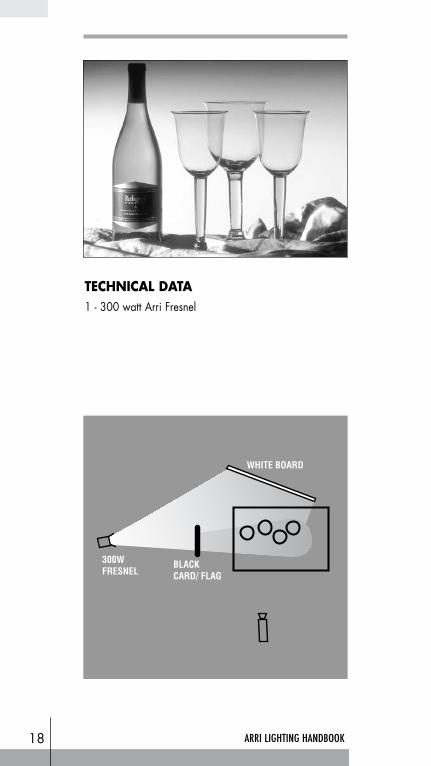
TecHnIcAL DATA1 - 300 watt Arri Fresnel
300W FRESNEL
WHITE BOARD
BLACKCARD/ FLAG
19ARRI LIGHTING HANDBOOK
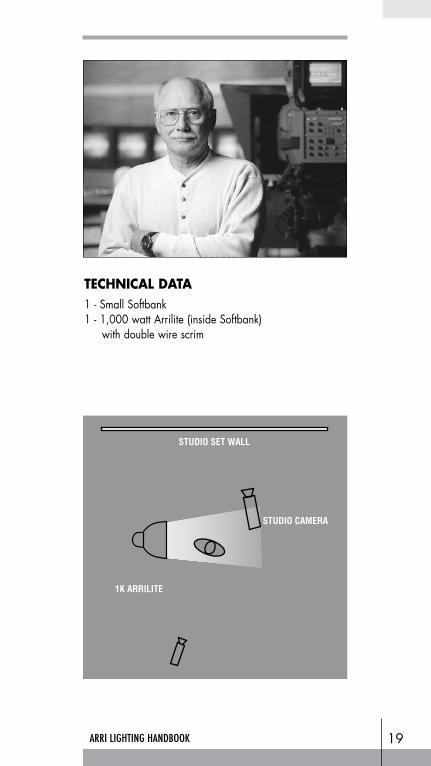
TecHnIcAL DATA1 - Small Softbank1 - 1,000 watt Arrilite (inside Softbank) with double wire scrim
1K ARRILITE
STUDIO SET WALL
STUDIO CAMERA
20 ARRI LIGHTING HANDBOOK
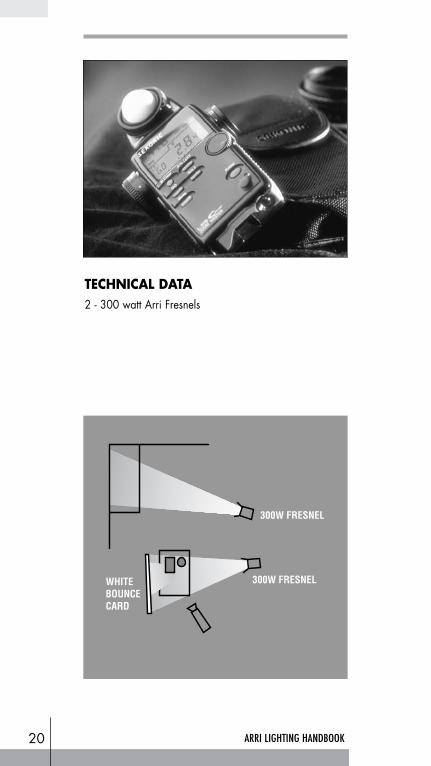
TecHnIcAL DATA2 - 300 watt Arri Fresnels
300W FRESNEL
300W FRESNEL
WHITEBOUNCECARD
21ARRI LIGHTING HANDBOOK
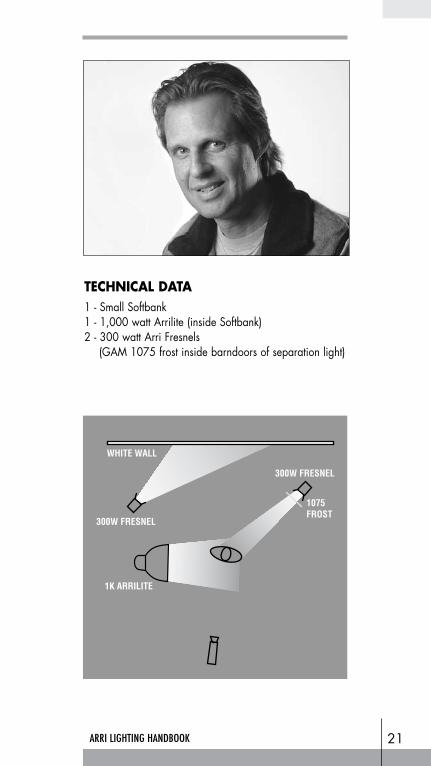
TecHnIcAL DATA1 - Small Softbank1 - 1,000 watt Arrilite (inside Softbank)2 - 300 watt Arri Fresnels (GAM 1075 frost inside barndoors of separation light)
1K ARRILITE
300W FRESNEL
300W FRESNEL
WHITE WALL
1075FROST
22 ARRI LIGHTING HANDBOOK
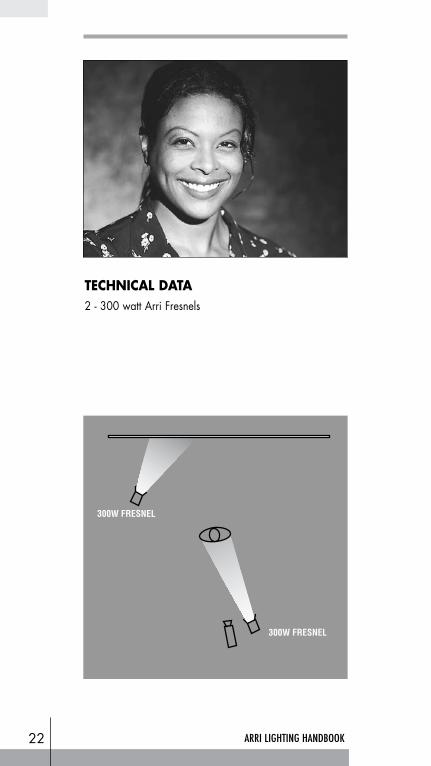
TecHnIcAL DATA2 - 300 watt Arri Fresnels
300W FRESNEL
300W FRESNEL
23ARRI LIGHTING HANDBOOK
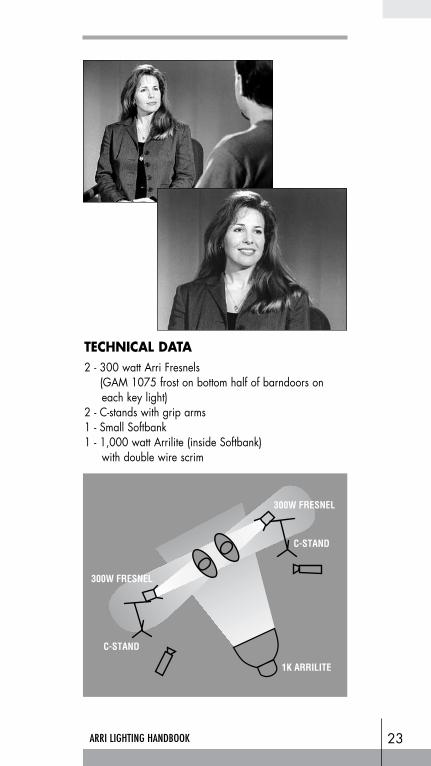
TecHnIcAL DATA2 - 300 watt Arri Fresnels (GAM 1075 frost on bottom half of barndoors on each key light)2 - C-stands with grip arms1 - Small Softbank1 - 1,000 watt Arrilite (inside Softbank) with double wire scrim
300W FRESNEL
300W FRESNEL
1K ARRILITE
C-STAND
C-STAND
24 ARRI LIGHTING HANDBOOK
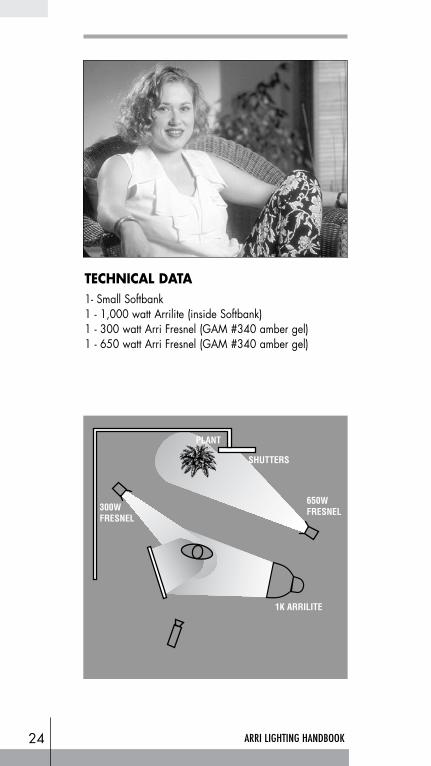
TecHnIcAL DATA1- Small Softbank1 - 1,000 watt Arrilite (inside Softbank)1 - 300 watt Arri Fresnel (GAM #340 amber gel)1 - 650 watt Arri Fresnel (GAM #340 amber gel)
300W FRESNEL
650W FRESNEL
PLANT
SHUTTERS
1K ARRILITE
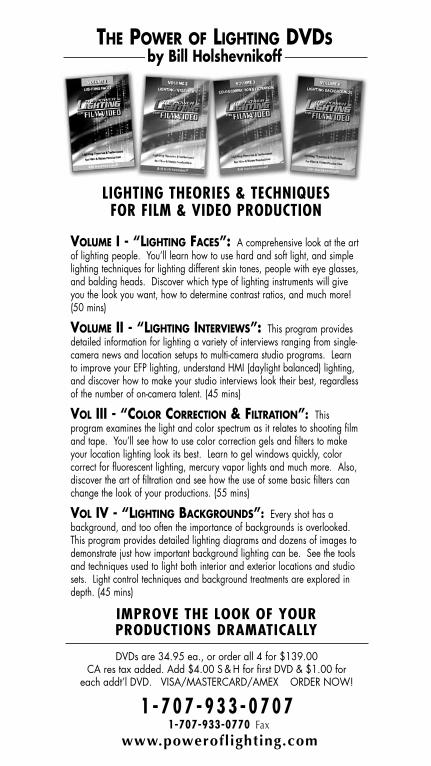
Volume I - “lIghtIng Faces”: A comprehensive look at the art of lighting people. You’ll learn how to use hard and soft light, and simple lighting techniques for lighting different skin tones, people with eye glasses, and balding heads. Discover which type of lighting instruments will give you the look you want, how to determine contrast ratios, and much more! (50 mins)
Volume II - “lIghtIng InterVIews”: This program provides detailed information for lighting a variety of interviews ranging from single-camera news and location setups to multi-camera studio programs. Learn to improve your EFP lighting, understand HMI (daylight balanced) lighting, and discover how to make your studio interviews look their best, regardless of the number of on-camera talent. (45 mins)
Vol III - “color correctIon & FIltratIon”: This program examines the light and color spectrum as it relates to shooting film and tape. You’ll see how to use color correction gels and filters to make your location lighting look its best. Learn to gel windows quickly, color correct for fluorescent lighting, mercury vapor lights and much more. Also, discover the art of filtration and see how the use of some basic filters can change the look of your productions. (55 mins)
Vol IV - “lIghtIng Backgrounds”: Every shot has a background, and too often the importance of backgrounds is overlooked. This program provides detailed lighting diagrams and dozens of images to demonstrate just how important background lighting can be. See the tools and techniques used to light both interior and exterior locations and studio sets. Light control techniques and background treatments are explored in depth. (45 mins)
IMPROVE THE LOOK OF yOUR PRODUCTIONS DRAMATICALLy
LIGHTING THEORIES & TECHNIQUES FOR FILM & VIDEO PRODUCTION
DVDs are 34.95 ea., or order all 4 for $139.00 CA res tax added. Add $4.00 S & H for first DVD & $1.00 for
each addt’l DVD. VISA/MASTERCARD/AMEX ORDER NOW!
1 - 7 0 7 - 9 3 3 - 0 7 0 7 1-707-933-0770 Fax
www.poweroflighting.com
the Power oF lIghtIng dVds by Bill Holshevnikoff
©2010 B i l l Ho l shevn iko f f