Embed Size (px)
Citation preview

1
LIGHTING & DECORATING PLASTERBOARDDESIGN & APPLICATION GUIDE

This Guide is intended for use by Building and Interior Designers, Builders, Contractors and Property Owners. It highlights some of the key factors affecting the appearance of flat plasterboard surfaces, and provides guidance on eliminating or reducing the undesirable effects due to unfavourable lighting conditions or inappropriate decoration.
Developed and published by USG Boral, this Guide has been endorsed by the following industry organisations:
This Guide contains the following information:• An overview of various types of light sources – both natural and artificial – used to illuminate building
interiors• Explanations of the possible problems that may arise when flat plasterboard surfaces are illuminated by
various light sources• Suggestions of what to do – and what to avoid – in order to mitigate the problems if
they arise• The effect of illumination on decorative finishes such as gloss or sheen paints
For additional information on finishing and decoration of plasterboard refer to the following publications:• AS/NZS 2589 ‘Gypsum linings – Application and finishing’• AS/NZS 2311 ‘Guide to the painting of buildings’• ‘Illumination & Decoration of Flat Surfaces’, CSIRO - 2009
TABLE OF CONTENTS
OVERVIEW ..................................................................................................................................... 3EXAMPLES OF UNFAVOURABLE LIGHTING...................................................................... 4DESIGN INFLUENCES..................................................................................................................5NATURAL LIGHTING INFLUENCES........................................................................................ 6GLANCING LIGHT .........................................................................................................................8DIFFERENT LIGHTING CONDITIONS ...................................................................................10 LIGHTING ....................................................................................................................................... 12GLOSS/SHEEN PAINT FINISHES ............................................................................................16PAINTING PREPARATION AND APPLICATION ................................................................. 17LEVELS OF FINISH ..................................................................................................................... 18JOINT INSPECTION AND TOLERANCES ............................................................................19POINTS TO REMEMBER ............................................................................................................19

3
OVERVIEW
There is little doubt that most customers have an expectation of a perfectly flat, blemish- free plasterboard surface finish. In practice, however, such finish is impossible to achieve and all that can be realistically expected is the perception of flatness.
Experience shows that satisfaction with plasterboard surfaces improves considerably when the following requirements have been met:
• Accurate installation of wall/ceiling framing and roof trusses• Use of ceiling battens• Plasterboard installation to Australian Standard AS/NZS 2589 ‘Gypsum linings – Application
and finishing’• Good painting practice to Australian Standard AS/NZS 2311 ‘Guide to the painting of buildings’• A planned approach to lighting design and installation.
It should be emphasised that even if plasterboard installation has been carried out strictly in accordance with AS/NZS 2589, surface finish expectations may not be met unless the other requirements listed above have also been satisfied.
A major cause of dissatisfaction with plasterboard surfaces is, in fact, unfavourable lighting from internal or external sources.

EXAMPLES OF UNFAVOURABLE LIGHTING
Large uncurtained windows allow external light reflections (especially from water) to emphasise surface irregularities on adjacent walls and ceilings.
Outdoor highly reflective surfaces Incorrectly positioned spotlights Energy saving downlights protruding from ceiling
Ceiling fluorescent lightsAn unshaded batten holder light globeIndiscriminate use of gloss paints

5
There are many factors in modern building design that influence the overall appearance of walls and ceilings.
Many of today’s homes have large open living areas with unbroken ceilings across adjoining rooms and, importantly, large windows and skylights. While providing the desired modern and spacious look, these features often create lighting conditions detrimental to the appearance of wall and ceiling surfaces.
It is important that surface finish expectations are based on what can be realistically achieved given the design features of the project, particularly when some design features are likely to magnify any minor surface irregularities.
When considering the effects of building orientation and window size and positioning on appearance of wall and ceiling surfaces, one should be aware of the effects of external light at different times of the day.
DESIGN INFLUENCES
Compare a modern house with large windows to the small windows of heritage design homes.

EARLY MORNING SUNLIGHTCasts deep elongated shadows and emphasises both decorative detail and variations in surface texture on walls and ceilings.
BUILDING REFLECTIONSLight reflected from neighbouring buildings from glazing and wall surfaces.
NATURAL LIGHTING INFLUENCES

7
DIRECT SUNLIGHTStrong overhead light. Intense shadows directly beneath objects. Washes out decorative detail and minimises variations in surface texture. Emphasised by bulkheads, skylights and atriums.
LATE AFTERNOON SUNLIGHTSimilar to early morning conditions but the sunlight and shadow directions are reversed. Effects may be more intense than early morning and of longer duration on walls and ceilings.
REFLECTED SUNLIGHTWaterfront properties and those with outdoor swimming pools may have harsh sunlight reflected back into building. The effect can be worse than direct light in that it strikes the surface from many angles.

GLANCING LIGHT
When architects, builders and home owners are considering what standard of finish is desired for plasterboard walls and ceilings, it is important to understand how the overall appearance is likely to be affected by glancing light.
Glancing light is the light that shines directly across the surface of a wall or ceiling.
Glancing light magnifies surface irregularities and can spoil the look of the highest quality surface finish.
As plasterboard linings are constructed on site using materials of two different surface textures and porosity (paper faced plasterboard and jointing compound), they cannot be expected to have a perfect, blemish-free surface. Because glancing light creates shadows from even minute undulations, it will highlight surface irregularities that would not normally be visible under a more diffuse light.
A wall or ceiling surface may be subjected to many different lighting conditions.
Lighting direction and intensity changes constantly throughout the day and at night, depending on the position of windows and lighting – as well as reflections from adjacent buildings, water surfaces, etc.
The same plasterboard joint under glancing light
Glancing light throws deep shadows emphasising surface irregularities
Frontal light reduces or eliminates shadows to give a perception of perfectly flat surface
Plasterboard joint under diffused frontal light

9
Critical instances of glancing light can occur when a single unshaded light source is fixed directly to the ceiling or wall, but also in rooms with windows up to ceiling height or adjacent to walls.
A particularly severe glancing light problem occurs when a surface-mounted fluorescent batten light fitting is placed parallel with the plastering joints. Resultant high intensity white light falling at a shallow angle will magnify any surface irregularities (right).
Incorrectly positioning a spotlight to highlight an object can also create a glancing light effect emphasising surface irregularities on walls and ceilings. Feature or spot lights should only light the featured object (below).
Glancing light due to large window abutting wall and ceiling
Correctly positioned spotlights
Glancing light can reflect upwards from pool water onto interior walls and ceilings
Incorrectly positioned spotlights

DIFFERENT LIGHTING CONDITIONS
A plasterboard ceiling under glancing light conditions
The same ceiling under different lighting conditions when viewed from another angle

11
A number of measures can help reduce or eliminate the effect of glancing light on interior surfaces:
• Diffuse and soften the light entering the room through windows by using mesh curtains or other diffusers.• Use a number of lower-wattage light bulbs (rather than one or two bright ones) to illuminate the room, thus reducing
the shadowing effect.• Use suspended or recessed ceiling lights.• Select shades that direct light downwards or directly at the feature to be highlighted.
The same wall surface under indirect light
Wall surface under glancing light conditions caused by direct sunlight
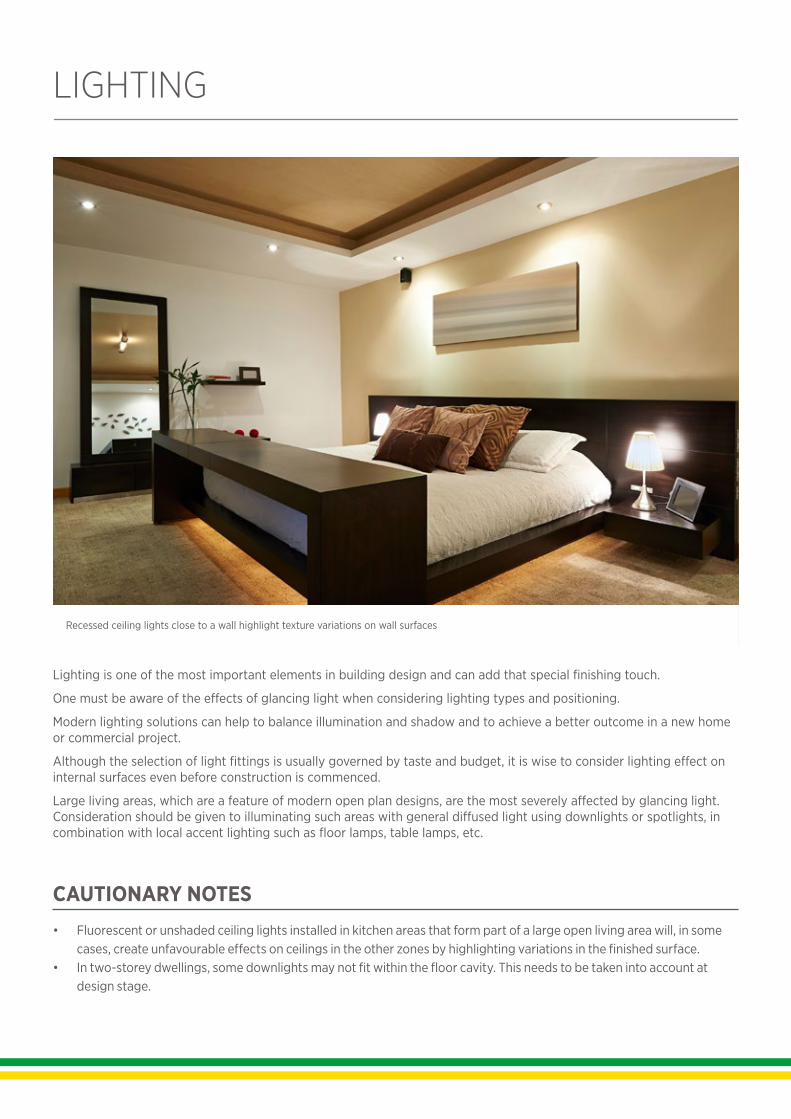
LIGHTING
Lighting is one of the most important elements in building design and can add that special finishing touch.
One must be aware of the effects of glancing light when considering lighting types and positioning.
Modern lighting solutions can help to balance illumination and shadow and to achieve a better outcome in a new home or commercial project.
Although the selection of light fittings is usually governed by taste and budget, it is wise to consider lighting effect on internal surfaces even before construction is commenced.
Large living areas, which are a feature of modern open plan designs, are the most severely affected by glancing light. Consideration should be given to illuminating such areas with general diffused light using downlights or spotlights, in combination with local accent lighting such as floor lamps, table lamps, etc.
CAUTIONARY NOTES• Fluorescent or unshaded ceiling lights installed in kitchen areas that form part of a large open living area will, in some
cases, create unfavourable effects on ceilings in the other zones by highlighting variations in the finished surface.• In two-storey dwellings, some downlights may not fit within the floor cavity. This needs to be taken into account at
design stage.
Recessed ceiling lights close to a wall highlight texture variations on wall surfaces

13

FAVOURABLE LIGHTING UNFAVOURABLE LIGHTING
Recessed downlights and spotlights avoid glancing light by providing an even downward illumination
Ceiling mounted circular fluorescent lights provide very strong glancing light and accentuate surface variations
Unguarded fluorescent lights close to the ceiling highlight surface variations and cast unsightly shadows
A recessed fluorescent light avoids ceiling shadows and does not highlight surface variations
An opaque shade directs the light downwards to illuminate the room not the ceiling
A batten holder without lampshade casts harsh light on the ceiling and highlights surface variations

15
FAVOURABLE LIGHTING UNFAVOURABLE LIGHTING
The same area at night when lit by ceiling mounted round fluorescent light
An area of ceiling in daylight. No surface variations are visible when ceiling light is off
In some circumstances, fluorescent lights installed directly over butt joints may help to conceal the joints
Fluorescent light tubes should not be run parallel to the long edges of plasterboard sheets

GLOSS/SHEEN PAINT FINISHES
Gloss and even semi-gloss paints will accentuate surface variations regardless of the direction of lighting or the viewing angle. Flat paints however, reflect light in a diffused form and thus mask surface variations.
As plasterboard’s paper surface has a different surface texture from hand applied jointing materials, this difference in texture can be accentuated by gloss paints.
Where gloss or impervious sheen paint finishes are desirable or mandatory for functional reasons (eg in kitchens, bathrooms and commercial food preparation areas), some loss of appearance can be expected, even when the work has been carried out to the highest level of workmanship.
For the reasons outlined, a full gloss paint finish is not recommended on plasterboard walls or ceilings.
Where gloss or semi-gloss paints are to be used, the highest level of plasterboard finish as stipulated by AS/NZS 2589 ‘Gypsum linings – Application and finishing’ is recommended (Level 5 finish; see Levels of Finish page 19).
Careful consideration must also be given to:
• The placement of windows• The type of lighting• The standard of paint finish• The positioning of plasterboard joints (both butt and recess)• Building aspect – Northerly? Westerly?
Surface finished with gloss paintSurface finished with matt paint
A gloss paint finish subjected to external glancing light

17
PAINTING PREPARATION AND APPLICATION
PREPARATION APPLICATION (LEVEL 4 FINISH)
The quality of a painted finish can be improved if adequate steps have been taken to prepare plasterboard surfaces prior to painting:
• All surfaces should be clean and dust free prior to painting.
• Any major defects visible after the first (sealer undercoat) coat of paint should be referred to the plasterboard contractor before proceeding with the second and final coats. Minor blemishes are normally attended to by the painter.
For the best results, USG Boral recommends roller paint application and the use of a suitable sealer undercoat over the entire plasterboard surface in order to equalise porosity and texture of the jointing material and plasterboard paper face.
Sealer undercoat should be lightly sanded before applying the second paint coat.
As spray painting does not impart a textured surface and does not equalise the porosity of what is essentially two different materials, it tends to emphasise the paper nap and accentuate joint locations.
If the spray painting method is to be used, it is recommended that all paint coats are backrolled and allowed to dry thoroughly prior to application of subsequent coats.
Backrolling must be carried out over wet paint to create a textured background for subsequent paint coats.
Choice of colours is also important, as some darker colours tend to highlight surface variations. Light colours give better results, and white is recommended for ceilings (refer to AS/NZS 2311 ‘Guide to the painting of buildings’).

LEVELS OF FINISH
LEVEL 3
LEVEL 4
LEVEL 5
DEFINITION
This level of finish is used in areas that do not require decoration or where finish is not important (for example, above ceilings or inside service shafts and the like).
All joints and interior angles must have tape embedded in the joint compound and one separate coat of joint compound applied over all joints and fastener heads.
This is the default and generally accepted level of plasterboard finish.
All joints and interior angles must have tape embedded in the jointing compound and a minimum of two separate coats of joint compound applied over all joints, angles fastener heads and accessories.
If Level 4 surface is to be exposed to critical lighting (see Glancing Light above), it should be covered with textured finishes or wall coverings. Smooth textured finishes and flat/matt or low sheen paints can be used when Level 4 finish is illuminated by non-critical lighting. Flat paints in this situation tend to conceal joints.
Weight, texture and sheen level of wall coverings/finishes should be carefully evaluated and joints should be adequately concealed if wall-covering material is lightweight, glossy or lightly patterned.
Note:
• In critical lighting conditions, surface variations may still be apparent in a Level 4 surface finish.
• Gloss, semi-gloss or deep tone paints are not recommended for Level 4 finish, as they accentuate surface variations.
Level 5 finish should be used where gloss or semi-gloss paints are specified or where flat or low sheen paints will be exposed to critical lighting conditions. Level 5 finish is characterised by a parity of surface texture and porosity.
All joints and interior angles must have tape embedded in the jointing compound and a minimum of two separate coats of jointing compound applied over all joints, angles, fastener heads and accessories.
The work is finished with proprietary surface preparations or skim coating to remove differential surface textures and porosity. A suitable paint or plaster material is sprayed, rolled or trowelled over the defined area. The surface texture must be random and monolithic, concealing joints and fixing points.
Note:
• If Level 5 finish is desired for a decorated plasterboard surface, this must be specified at the design stage.
• Level 5 finish does not mean the surface is without texture variation.
• Level 5 finish is difficult to achieve and always requires the cooperation of the framer, plasterer and painter in establishing suitable work practices that deliver the agreed painted finish for the given project.
• Some minor surface variations may still be visible in Level 5 finish. However, these will be minimised.
• The surface of the defined area may require sanding to be suitable for decoration.
The term ‘level of finish’ applies to plasterboard linings prior to decoration.
AS/NZS 2589 ‘Gypsum linings – Application and finishing’ defines three levels of finish: Levels 3, 4 and 5. Level 4 is the default level of finish for plasterboard surfaces, unless otherwise specified.
It is essential that the level of finish is determined at the design stage since each level of finish has specific requirements for substrate tolerances and plasterboard installation, jointing and finishing. The desired level of finish may not be achieved unless all of these requirements are met through various stages of construction.
For a full description of levels of finish refer to AS/NZS 2589. A summary of various levels of finish is provided below:

19
JOINT INSPECTION AND TOLERANCES
As outlined in AS/NZS 2589:2017 ‘Gypsum linings – Application and finishing’, a visual inspection of wall and ceiling surfaces should be carried out from a distance of 1.5m or greater, under normal lighting conditions.
Plasterboard surfaces should not be inspected under high intensity lighting or under glancing light conditions.
Allowable tolerances for plasterboard joint build-up are outlined in AS/NZS 2589:2017 ‘Gypsum linings – Application and finishing’.
Refer AS/NZS 2589 and the relevant industry publications for guidance on conducting plasterboard joint inspections.
500 luxCeiling
Wall 1500mm
1500mm
POINTS TO REMEMBER
Plasterboard surfaces are never perfectly flat. Even with the most careful professional finish, every surface will contain variations.
Surface variations invisible under normal lighting conditions will almost certainly be emphasised by a combination of glancing light and sheen or gloss paint finishes.
Glancing light can be caused by natural lighting conditions or by certain types of artificial lighting. Unfavourable factors include:
• Large uncurtained windows• Unshaded light bulbs• Ceiling-mounted fluorescent lights• Incorrectly-positioned spotlights• Gloss or sheen paint finishes• Outdoor reflective surfaces (eg pools, canals, adjoining
steel roofing and painted walls)• Plasterboard joints parallel to a glancing
light source.

UB1119-SYS 08/17
© 2017 USG BORAL. All rights reserved.Manufactured, sold or distributed by USG Boral Building Products or one or more of its affiliates. The trademarks USG BORAL, INNOVATION INSPIRED BY YOU and TecASSIST are trademarks of USG Boral Building Products or one or more of its affiliates. USG Boral Building Products Pty Limited – ABN 84 004 231 976 – 251 Salmon Street, Port Melbourne, VIC. 3207
PRODUCT INFORMATIONSee USGBoral.com for the most up-to-date product information.
SALES ENQUIRIES1800 003 377
TECHNICAL ASSISTANCETecASSIST™ 1800 811 222
NOTEThis Technical Information Guide is intended to provide general information and should not be used as a substitute for professional advice. There are many variables that can influence construction projects which affect whether a particular construction technique is appropriate. Before proceeding with any project we recommend you obtain professional advice to ascertain the appropriate construction techniques to suit the particular circumstances of your project having regard to the contents of this catalogue.We recommend you use qualified tradespersons to install this system. The technical information contained in this catalogue was correct at the time of printing. Building systems, details and product availability are, however, subject to change. To ensure the information you are using is current, USG Boral recommends you review the latest building information available on the USG Boral website. For further information contact TecASSIST™ or your nearest USG Boral Sales Office.