Embed Size (px)
Citation preview
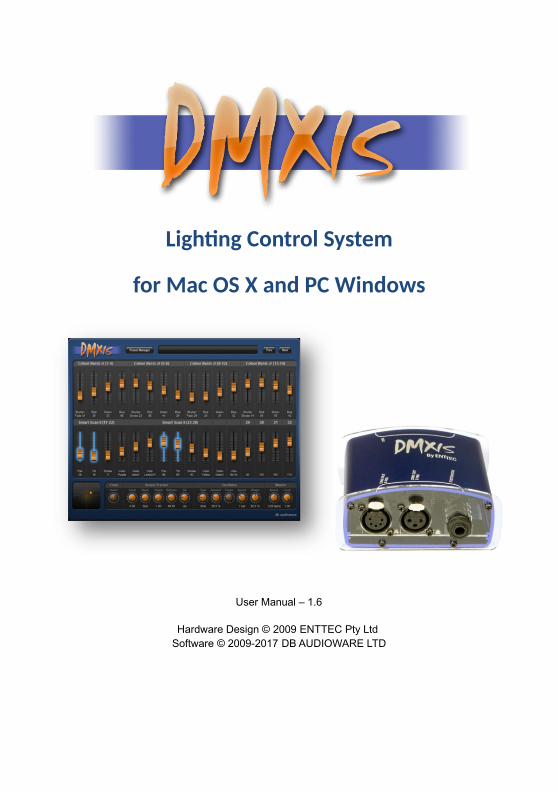
Lighting Control System
for Mac OS X and PC Windows
User Manual – 1.6
Hardware Design © 2009 ENTTEC Pty Ltd Software © 2009-2017 DB AUDIOWARE LTD

Page 2
CONTENTS
Contents.......................................................................................................................... 2
DMXIS Software License Agreement.............................................................................. 8
Acknowledgements..................................................................................................... 9
Welcome!...................................................................................................................... 10
About this manual......................................................................................................10
Installing the DMXIS software....................................................................................... 11
Mac OS X.................................................................................................................. 11
PC Windows.............................................................................................................. 11
Unlocking the Product............................................................................................... 11
Need help with DMXIS?................................................................................................ 12
Software Updates...................................................................................................... 12
Support...................................................................................................................... 12
User Forum............................................................................................................... 12
Missing a Fixture?..................................................................................................... 12
DMX Primer................................................................................................................... 13
What is DMX?........................................................................................................... 13
Are my lights DMX capable?..................................................................................... 13
Will my “XYZ-DMX1300ti LaserRite” work with DMXIS?...........................................13
How do I connect everything up?.............................................................................. 14
How do I set up the “DMX addressing”?................................................................... 15
DMXIS Hardware Interface........................................................................................... 16
Firmware Upgrades................................................................................................... 16
USB Power requirements.......................................................................................... 16
DMX Output Connections..........................................................................................17
LED States................................................................................................................ 17
Supported Footswitches............................................................................................ 18
Page 3
DMXIS Software Reference.......................................................................................... 19
Show Management................................................................................................... 19
The Faders................................................................................................................ 20
Selecting faders.........................................................................................................20
A note about context sensitive controls..................................................................... 20
XY Controller............................................................................................................. 21
Channel Invert........................................................................................................... 21
Sound Tracker........................................................................................................... 21
Oscillator................................................................................................................... 22
Master controls.......................................................................................................... 22
Loading fixtures......................................................................................................... 22
MIDI Learn.................................................................................................................23
A note on MIDI resolution 23
PRESET Manager..................................................................................................... 24
Switching between banks & presets 24
Managing banks 24
Managing presets 24
Sorting the banks & presets 25
Smooth cross fading between presets 25
Setting the bank master tempo 26
Auto-run a bank of presets 26
Macros....................................................................................................................... 26
Macros – a technical note 27
Footswitch preferences............................................................................................. 28
Switch type 28
Single click 28
Double click 28
Click & hold 28
Preferences............................................................................................................... 30
General tab 30
Page 4
Audio/MIDI Settings tab 31
MIDI Hardware 31
VST and Audio Units plug-in support........................................................................ 32
Advanced Features....................................................................................................... 33
Channel masking.......................................................................................................33
Channel Patching...................................................................................................... 35
Typical applications 35
Patching a single fader 35
Patching a range of faders 36
Additional notes 36
OSC Reference............................................................................................................. 37
General...................................................................................................................... 37
Tap Tempo................................................................................................................. 37
Direct Control............................................................................................................ 38
Banks & Presets........................................................................................................ 38
Revision History............................................................................................................ 40
Release 1.6............................................................................................................... 40
Release 1.5............................................................................................................... 40
Release 1.4.3............................................................................................................ 41
Release 1.4.2............................................................................................................ 41
Release 1.4.0............................................................................................................ 41
Release 1.3.0............................................................................................................ 42
Release 1.2.0............................................................................................................ 42
Release 1.1.2............................................................................................................ 42
Release 1.1.1............................................................................................................ 42
Release 1.1.0............................................................................................................ 43
Release 1.0.4............................................................................................................ 43
Release 1.0.3............................................................................................................ 44
Release 1.0.2............................................................................................................ 44
Page 5
DMXIS SOFTWARE LICENSE AGREEMENT
Before installing the DXMIS software, please carefully read and agree to the following legal agreement. From here on the "Software" refers to the DMXIS Lighting Control Software product in whole or in part, including all files, data and documentation. By installing the Software, you are consenting to be bound by and become a party to this agreement. If you do not agree to all of theterms of this agreement do not install the Software.
DMXIS Lighting Control SoftwareEND USER LICENSE AGREEMENT
1. Copyright Notice
The Software is © Copyright 2009-2016 DB AUDIOWARE LIMITED, all rights reserved, and is protected by United Kingdom copyright laws, international treaties and all other applicable nationalor international laws. The sole owner of this software product is DB AUDIOWARE LIMITED.
2. License Agreement
GRANT. With respect to each DMXIS hardware interface owned by you, DB AUDIOWARE LIMITED grants you a non-exclusive right to install and use the Software on multiple computers for use with said DMXIS hardware interface. You may copy the Software for personal archival purposes only.
TITLE. Title, ownership rights, and intellectual property rights in and to the Software shall remain in DB AUDIOWARE LIMITED. This agreement does not include the right to copy or sublicense the Software and is personal to you.
DISCLAIMER OF WARRANTY. The Software is provided on an "AS IS" basis, without warranty ofany kind, including without limitation the warranties of merchantability, fitness for a particular purpose and non-infringement. The entire risk as to the quality and performance of the Software is borne by you. Should the Software prove defective in any respect, you and not DB AUDIOWARE LIMITED assume the entire cost of any service and repair.
HIGH RISK ACTIVITIES. The Software is not fault-tolerant and is not designed or intended for use in environments requiring fail-safe performance. DB AUDIOWARE LIMITED expressly disclaims any express or implied warranty of fitness where the Software is used in any such environments.
LIMITATION OF LIABILITY. UNDER NO CIRCUMSTANCES AND UNDER NO LEGAL THEORY, TORT, CONTRACT, OR OTHERWISE, SHALL DB AUDIOWARE LIMITED OR ITS SUPPLIERS OR RESELLERS BE LIABLE TO YOU OR ANY OTHER PERSON FOR ANY INDIRECT, SPECIAL, INCIDENTAL, OR CONSEQUENTIAL DAMAGES OF ANY CHARACTER INCLUDING,WITHOUT LIMITATION, DAMAGES FOR LOSS OF GOODWILL, WORK STOPPAGE, COMPUTER FAILURE OR MALFUNCTION, OR ANY AND ALL OTHER COMMERCIAL DAMAGES OR LOSSES. IN NO EVENT WILL DB AUDIOWARE LIMITED BE LIABLE FOR ANY DAMAGES IN EXCESS OF THE PURCHASE PRICE OF THE PRODUCT, EVEN IF DB AUDIOWARE LIMITED OR ANY IF ITS AUTHORIZED RESELLERS SHALL HAVE BEEN INFORMED OF THE POSSIBILITY OF SUCH DAMAGES, OR FOR ANY CLAIM BY ANY OTHERPARTY.
Page 6
LIMITATIONS ON USE. You may not use, copy, modify, translate, sell, or transfer the Software or any copy except as expressly defined in this agreement. You may not attempt to unlock or bypassany copy-protection or authentication algorithm utilized by the Software. You may not modify, translate, reverse engineer, decompile or disassemble the software (except and solely to the extent an applicable statute expressly and specifically prohibits such restrictions), or create derivative works based on the Software. You may not redistribute the Software without the prior consent of DB AUDIOWARE LIMITED.
TERMINATION. Either party may terminate this agreement immediately in the event of default by the other party. Upon any termination of this agreement, you shall immediately discontinue the use of the Software and shall uninstall the Software and Documentation and all copies thereof.
GOVERNING LAW. The laws of Scotland govern this Agreement, and shall govern any dispute relating to this Agreement. The application of the United Nations Convention on Contracts for the International Sale of Goods is expressly excluded.
MISCELLANEOUS. This agreement represents the complete and exclusive statement of the agreements concerning this license between the parties and supersedes all prior agreements and representations between them. It may be amended only by a writing executed by both parties. If any provision of this agreement is held to be unenforceable for any reason, such provision shall be reformed only to the extent necessary to make it enforceable, and such decision shall not affect the enforceability (i) of such provision under other circumstances or (ii) of the remaining provisions hereof under all circumstances. Headings shall not be considered in interpreting this agreement.
DMXIS EULA Rev.080114
ACKNOWLEDGEMENTS
• DMXIS hardware design is copyright © 2009 Enttec Pty Ltd.
• DMXIS software (including all component programs, plug-ins, graphics and this documentation) is copyright © 2009-2016 DB AUDIOWARE LTD.
• db audioware and DMXIS are trademarks of DB AUDIOWARE LTD.
• VST is a trademark of Steinberg Media Technologies GmbH
• Apple, the Apple logo and Mac are trademarks of Apple Computer, Inc., registered in the U.S. and other countries.
• The Audio Units logo and the Audio Units symbol are trademarks of Apple Computer, Inc.
• Windows is a registered trademark of Microsoft Corporation in the United States and other countries.
• All other product and company names are trademarks or registered trademarks of their respective holders.
Page 7

WELCOME!
DMXIS is a flexible, easy to uselighting control package, specifically designed for live performers.
Most lighting controllers assume that an operator is available to manually control the show. They are often packed with features thatare of little use to the live performer who just wants a nice looking light show with a minimum of fuss.
DMXIS was designed specifically for live performers who want to run an automated light show while performing on stage. The hardware is incredibly easy to connect up, and the software extremely simple to learn and operate, while beingflexible enough to control modern intelligent light fixtures.
With DMXIS, you pre-program your entire light show in advance, letting you concentrate on your live performance. You can then manually step through the light show using a simple footswitch plugged into the DMXIS hardware interface. Or, if you use audio software such as Logic, Ableton Live, Cubase or Mixmeister in your live show, you can use the DMXIS plug-in (VST or Audio Unit) to run your lights directly from your audio software! This is incredibly effective, as your light show automatically synchronizes to the performance, even if you change tempo live.
ABOUT THIS MANUAL
This manual is a quick introduction and reference guide for DMXIS. For a more comprehensive introduction to DMXIS and its features, please watch the tutorial videos located on your original software CD. They are much more fun than reading a manual!
Page 8
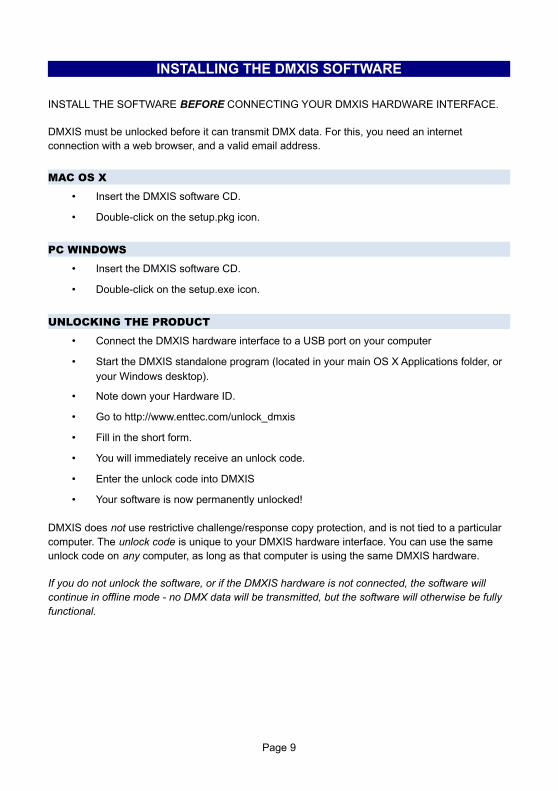
INSTALLING THE DMXIS SOFTWARE
INSTALL THE SOFTWARE BEFORE CONNECTING YOUR DMXIS HARDWARE INTERFACE.
DMXIS must be unlocked before it can transmit DMX data. For this, you need an internet connection with a web browser, and a valid email address.
MAC OS X
• Insert the DMXIS software CD.
• Double-click on the setup.pkg icon.
PC WINDOWS
• Insert the DMXIS software CD.
• Double-click on the setup.exe icon.
UNLOCKING THE PRODUCT
• Connect the DMXIS hardware interface to a USB port on your computer
• Start the DMXIS standalone program (located in your main OS X Applications folder, or your Windows desktop).
• Note down your Hardware ID.
• Go to http://www.enttec.com/unlock_dmxis
• Fill in the short form.
• You will immediately receive an unlock code.
• Enter the unlock code into DMXIS
• Your software is now permanently unlocked!
DMXIS does not use restrictive challenge/response copy protection, and is not tied to a particular computer. The unlock code is unique to your DMXIS hardware interface. You can use the same unlock code on any computer, as long as that computer is using the same DMXIS hardware.
If you do not unlock the software, or if the DMXIS hardware is not connected, the software will continue in offline mode - no DMX data will be transmitted, but the software will otherwise be fully functional.
Page 9
NEED HELP WITH DMXIS?
SOFTWARE UPDATES
Before getting stuck into the DMXIS software, please visit the DMXIS support site to check if any new software updates are available:
www.dmxis.com/downloads
The latest version of the DMXIS software will always be available for download from this location.
SUPPORT
If you have any questions about DMXIS, check out our dedicated support site:
www.dmxis.com
If you can’t find the answer to your question, just ask in the forums (below) or send an email to [email protected] and we’ll get back to you promptly.
USER FORUM
An active user forum is maintained at forums.dmxis.com.
MISSING A FIXTURE?
DMXIS ships with support for a limited selection of popular lighting fixtures. Further fixture definitions are available at fixtures.dmxis.com. This online fixture database allows you to easily create your own DMXIS fixture files, using the information contained in your fixture manual.
Page 10
DMX PRIMER
First, let’s look at what DMX actually is. Rather than getting too technical, we will just cover the basics of setting up a simple lighting rig for a band or DJ.
For more stuff like this, watch the training videos on your original DMXIS CD.
WHAT IS DMX?
DMX is a standard for connecting up stage lighting. It has been the standard in professional lighting for many years, and nowadays most affordable light fixtures support DMX. (For the musically inclined, think of DMX as the “MIDI of the lighting world”)
ARE MY LIGHTS DMX CAPABLE?
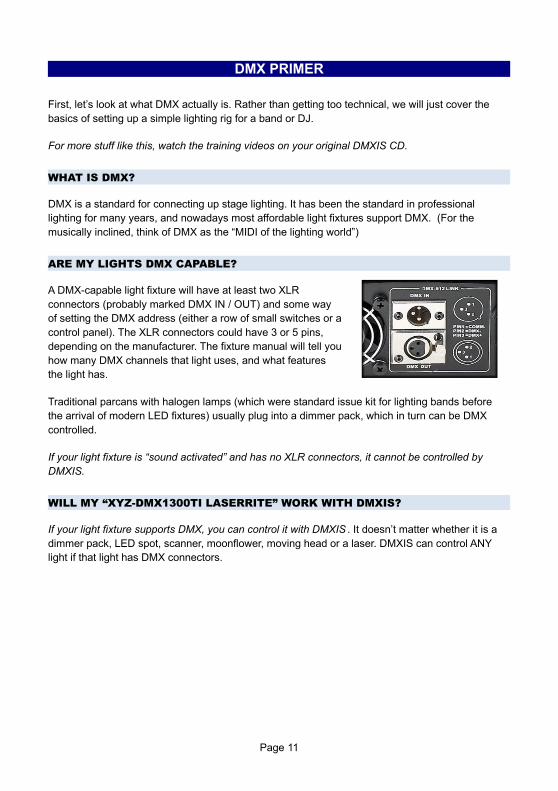
A DMX-capable light fixture will have at least two XLRconnectors (probably marked DMX IN / OUT) and some wayof setting the DMX address (either a row of small switches or acontrol panel). The XLR connectors could have 3 or 5 pins,depending on the manufacturer. The fixture manual will tell youhow many DMX channels that light uses, and what featuresthe light has.
Traditional parcans with halogen lamps (which were standard issue kit for lighting bands before the arrival of modern LED fixtures) usually plug into a dimmer pack, which in turn can be DMX controlled.
If your light fixture is “sound activated” and has no XLR connectors, it cannot be controlled by DMXIS.
WILL MY “XYZ-DMX1300TI LASERRITE” WORK WITH DMXIS?
If your light fixture supports DMX, you can control it with DMXIS . It doesn’t matter whether it is a dimmer pack, LED spot, scanner, moonflower, moving head or a laser. DMXIS can control ANY light if that light has DMX connectors.
Page 11

HOW DO I CONNECT EVERYTHING UP?
A: Connect the DMXIS hardware interface box to your computer with a USB cable.
B: Connect the DMX output (either 3 pin or 5 pin) of the interface box to the “DMX IN” XLR socketon your first light fixture (Light A in the diagram).
C: Connect “DMX OUT” of the first fixture to “DMX IN” of the next fixture. Continue connecting all remaining light fixtures together in a daisy-chain fashion.
D: Connect a DMX terminator plug to the DMX OUT of the last fixture.
E: Optionally connect a footswitch to the ¼” jack input on the DMXIS interface.
For reliable operation, use data-grade DMX cables to connect your lighting rig, not microphone cable. Mic cable is not designed to carry digital signals, and if you run very long cables around a stage, you could find that mic cables cause random problems with your lights.
Always use a DMX terminator plug in the last fixture of the DMX chain. The terminator prevents “ghost echoes” of the DMX signal from bouncing up & down the chain. Again, this is more of an issue if you run very long DMX cables.
Page 12
HOW DO I SET UP THE “DMX ADDRESSING”?
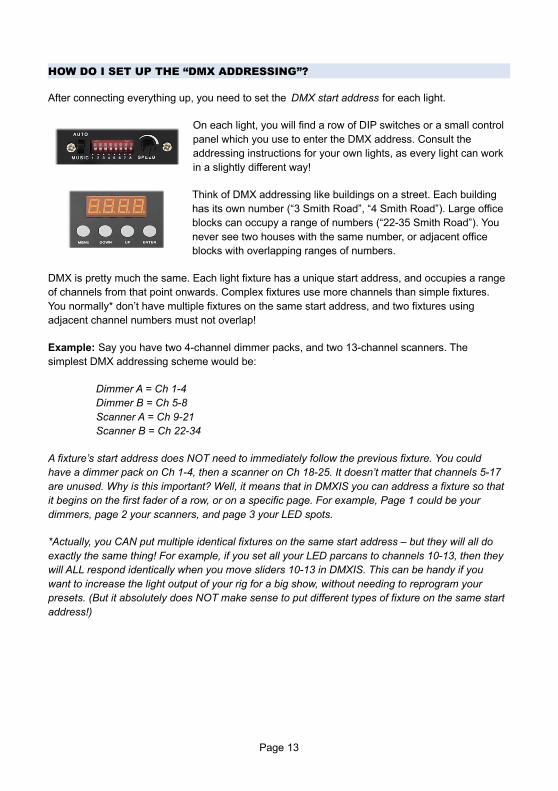
After connecting everything up, you need to set the DMX start address for each light.
On each light, you will find a row of DIP switches or a small control panel which you use to enter the DMX address. Consult the addressing instructions for your own lights, as every light can work in a slightly different way!
Think of DMX addressing like buildings on a street. Each building has its own number (“3 Smith Road”, “4 Smith Road”). Large office blocks can occupy a range of numbers (“22-35 Smith Road”). You never see two houses with the same number, or adjacent office blocks with overlapping ranges of numbers.
DMX is pretty much the same. Each light fixture has a unique start address, and occupies a rangeof channels from that point onwards. Complex fixtures use more channels than simple fixtures. You normally* don’t have multiple fixtures on the same start address, and two fixtures using adjacent channel numbers must not overlap!
Example: Say you have two 4-channel dimmer packs, and two 13-channel scanners. The simplest DMX addressing scheme would be:
Dimmer A = Ch 1-4Dimmer B = Ch 5-8Scanner A = Ch 9-21Scanner B = Ch 22-34
A fixture’s start address does NOT need to immediately follow the previous fixture. You could have a dimmer pack on Ch 1-4, then a scanner on Ch 18-25. It doesn’t matter that channels 5-17 are unused. Why is this important? Well, it means that in DMXIS you can address a fixture so thatit begins on the first fader of a row, or on a specific page. For example, Page 1 could be your dimmers, page 2 your scanners, and page 3 your LED spots.
*Actually, you CAN put multiple identical fixtures on the same start address – but they will all do exactly the same thing! For example, if you set all your LED parcans to channels 10-13, then theywill ALL respond identically when you move sliders 10-13 in DMXIS. This can be handy if you want to increase the light output of your rig for a big show, without needing to reprogram your presets. (But it absolutely does NOT make sense to put different types of fixture on the same startaddress!)
Page 13
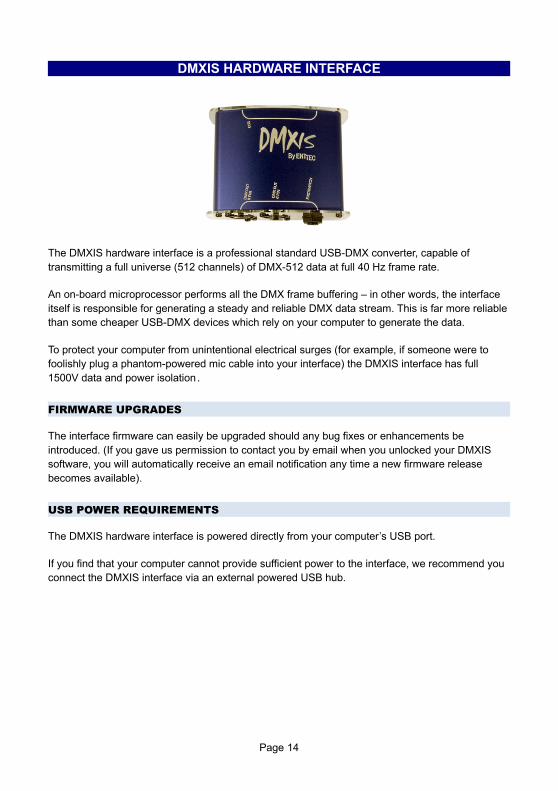
DMXIS HARDWARE INTERFACE
The DMXIS hardware interface is a professional standard USB-DMX converter, capable of transmitting a full universe (512 channels) of DMX-512 data at full 40 Hz frame rate.
An on-board microprocessor performs all the DMX frame buffering – in other words, the interface itself is responsible for generating a steady and reliable DMX data stream. This is far more reliablethan some cheaper USB-DMX devices which rely on your computer to generate the data.
To protect your computer from unintentional electrical surges (for example, if someone were to foolishly plug a phantom-powered mic cable into your interface) the DMXIS interface has full 1500V data and power isolation.
FIRMWARE UPGRADES
The interface firmware can easily be upgraded should any bug fixes or enhancements be introduced. (If you gave us permission to contact you by email when you unlocked your DMXIS software, you will automatically receive an email notification any time a new firmware release becomes available).
USB POWER REQUIREMENTS
The DMXIS hardware interface is powered directly from your computer’s USB port.
If you find that your computer cannot provide sufficient power to the interface, we recommend youconnect the DMXIS interface via an external powered USB hub.
Page 14
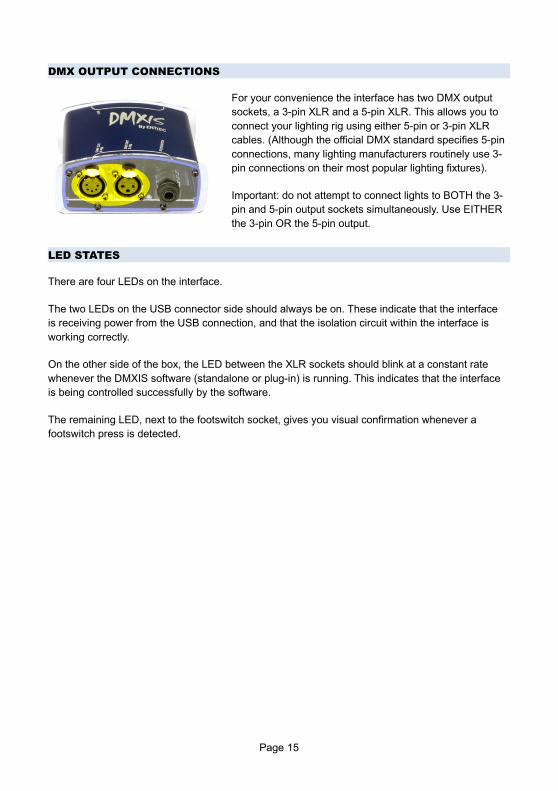
DMX OUTPUT CONNECTIONS
For your convenience the interface has two DMX output sockets, a 3-pin XLR and a 5-pin XLR. This allows you to connect your lighting rig using either 5-pin or 3-pin XLR cables. (Although the official DMX standard specifies 5-pin connections, many lighting manufacturers routinely use 3-pin connections on their most popular lighting fixtures).
Important: do not attempt to connect lights to BOTH the 3-pin and 5-pin output sockets simultaneously. Use EITHER the 3-pin OR the 5-pin output.
LED STATES
There are four LEDs on the interface.
The two LEDs on the USB connector side should always be on. These indicate that the interface is receiving power from the USB connection, and that the isolation circuit within the interface is working correctly.
On the other side of the box, the LED between the XLR sockets should blink at a constant rate whenever the DMXIS software (standalone or plug-in) is running. This indicates that the interface is being controlled successfully by the software.
The remaining LED, next to the footswitch socket, gives you visual confirmation whenever a footswitch press is detected.
Page 15
SUPPORTED FOOTSWITCHES
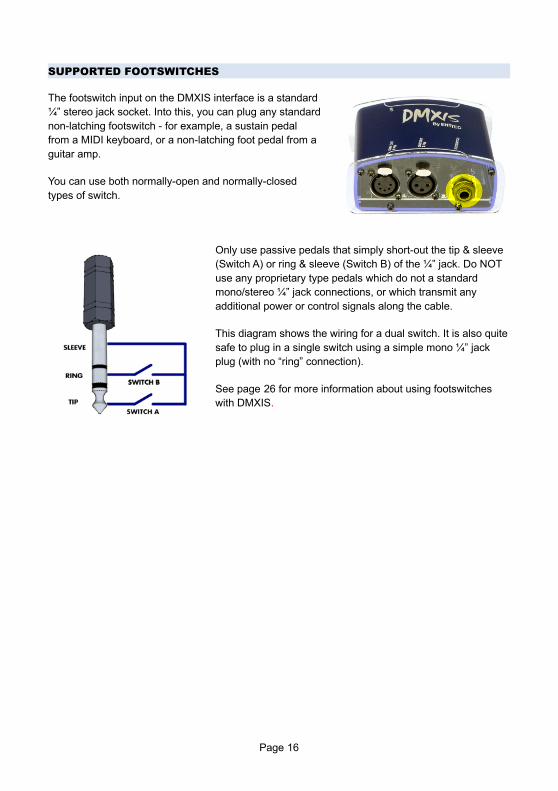
The footswitch input on the DMXIS interface is a standard¼” stereo jack socket. Into this, you can plug any standardnon-latching footswitch - for example, a sustain pedalfrom a MIDI keyboard, or a non-latching foot pedal from aguitar amp.
You can use both normally-open and normally-closedtypes of switch.
Only use passive pedals that simply short-out the tip & sleeve (Switch A) or ring & sleeve (Switch B) of the ¼” jack. Do NOT use any proprietary type pedals which do not a standard mono/stereo ¼” jack connections, or which transmit any additional power or control signals along the cable.
This diagram shows the wiring for a dual switch. It is also quitesafe to plug in a single switch using a simple mono ¼” jack plug (with no “ring” connection).
See page 26 for more information about using footswitches with DMXIS.
Page 16

DMXIS SOFTWARE REFERENCE
We will now describe every feature of the DMXIS software in detail. Let’s start with the main screen...
SHOW MANAGEMENT
DMXIS supports multiple shows. Each show has its own banks & presets, fixtures, footswitch settings and MIDI Learn associations.
When you start DMXIS, the Default Show is automatically loaded. You can if you wish use the default show on its own - this is pretty much how DMXIS 1.0.4 and older versions worked. However, we highly recommend you familiarise yourself with the new Manage Shows window. Even if you do not NEED multiple shows, it is a very useful way to create backups & temporary working copies of your show.
The Manage Shows window (shown above) is accessed from the Shows menu in the DMXIS standalone application. The currently loaded show is shown in bold (and in the DMXIS window title).
• Load Show... will switch to the highlighted show in the list
• Rename... allows you to edit the show name.
• Duplicate... lets you create an exact copy of the highlighted show. This is useful for creating a temporary show for a specific gig (to tweak light positions etc for a particular stage) or for backing up your show data.
• New... will create a completely blank show with no banks/presets, no fixtures and no MIDI assignments.
• Delete... will PERMANENTLY DELETE the highlighted show – after warning you twice! For obvious reasons, use this one with caution, as there is no way to recover a show once it has been deleted!
Page 17
Note that the Manage Shows window is only available in the DMXIS standalone application. The DMXIS plug-ins will automatically use the last show that was loaded in the standalone app.
THE FADERS
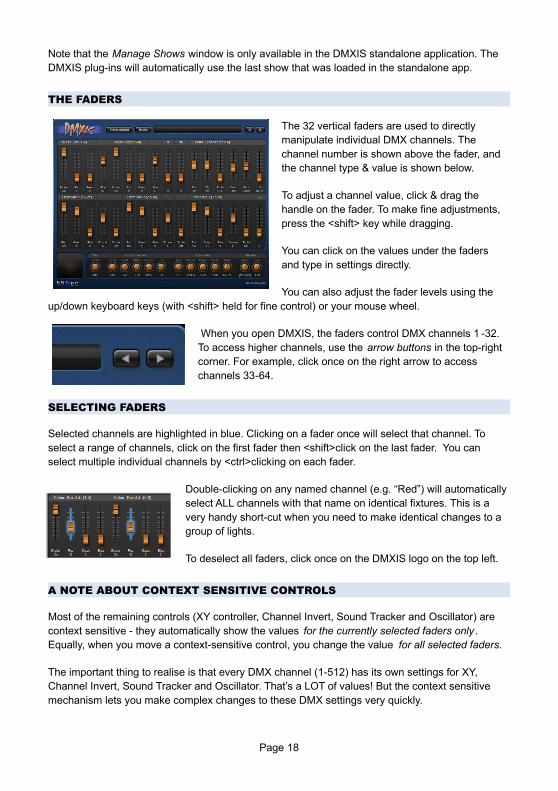
The 32 vertical faders are used to directly manipulate individual DMX channels. The channel number is shown above the fader, and the channel type & value is shown below.
To adjust a channel value, click & drag the handle on the fader. To make fine adjustments, press the <shift> key while dragging.
You can click on the values under the faders and type in settings directly.
You can also adjust the fader levels using the up/down keyboard keys (with <shift> held for fine control) or your mouse wheel.
When you open DMXIS, the faders control DMX channels 1 -32. To access higher channels, use the arrow buttons in the top-right corner. For example, click once on the right arrow to access channels 33-64.
SELECTING FADERS
Selected channels are highlighted in blue. Clicking on a fader once will select that channel. To select a range of channels, click on the first fader then <shift>click on the last fader. You can select multiple individual channels by <ctrl>clicking on each fader.
Double-clicking on any named channel (e.g. “Red”) will automaticallyselect ALL channels with that name on identical fixtures. This is a very handy short-cut when you need to make identical changes to a group of lights.
To deselect all faders, click once on the DMXIS logo on the top left.
A NOTE ABOUT CONTEXT SENSITIVE CONTROLS
Most of the remaining controls (XY controller, Channel Invert, Sound Tracker and Oscillator) are context sensitive - they automatically show the values for the currently selected faders only . Equally, when you move a context-sensitive control, you change the value for all selected faders.
The important thing to realise is that every DMX channel (1-512) has its own settings for XY, Channel Invert, Sound Tracker and Oscillator. That’s a LOT of values! But the context sensitive mechanism lets you make complex changes to these DMX settings very quickly.
Page 18
Context-sensitive controls are greyed-out if no faders are selected, or when the multiple selected faders have different values for that control. For example, if Ch1 Band=Sub and Ch2 Band=Mid...
• Select Ch1: the Band control shows Sub.
• Select Ch2: the Band control shows Mid.
• Select BOTH channels: Band greys out, indicating that the selected channels have different values.
• Change Band to Hi while both channels are selected. This will change the value of BOTH Ch1 AND Ch2 to Hi.
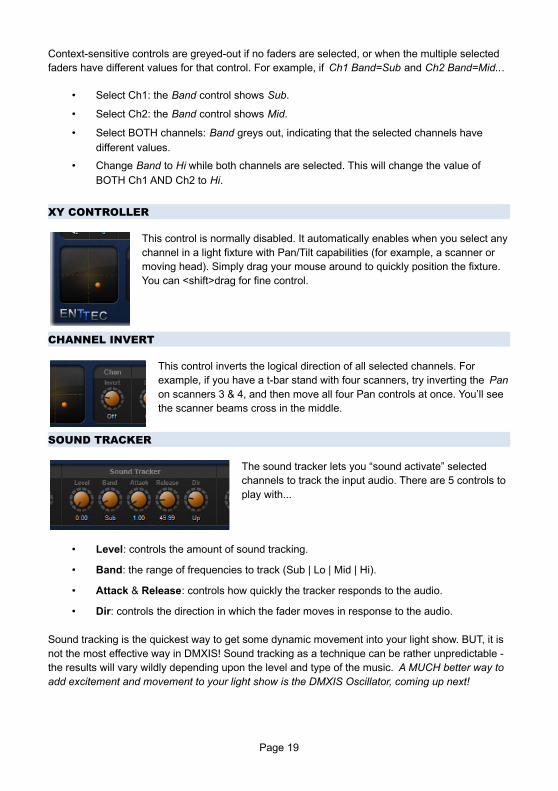
XY CONTROLLER
This control is normally disabled. It automatically enables when you select anychannel in a light fixture with Pan/Tilt capabilities (for example, a scanner or moving head). Simply drag your mouse around to quickly position the fixture. You can <shift>drag for fine control.
CHANNEL INVERT
This control inverts the logical direction of all selected channels. For example, if you have a t-bar stand with four scanners, try inverting the Panon scanners 3 & 4, and then move all four Pan controls at once. You’ll see the scanner beams cross in the middle.
SOUND TRACKER
The sound tracker lets you “sound activate” selected channels to track the input audio. There are 5 controls toplay with...
• Level: controls the amount of sound tracking.
• Band: the range of frequencies to track (Sub | Lo | Mid | Hi).
• Attack & Release: controls how quickly the tracker responds to the audio.
• Dir: controls the direction in which the fader moves in response to the audio.
Sound tracking is the quickest way to get some dynamic movement into your light show. BUT, it is not the most effective way in DMXIS! Sound tracking as a technique can be rather unpredictable - the results will vary wildly depending upon the level and type of the music. A MUCH better way to add excitement and movement to your light show is the DMXIS Oscillator, coming up next!
Page 19
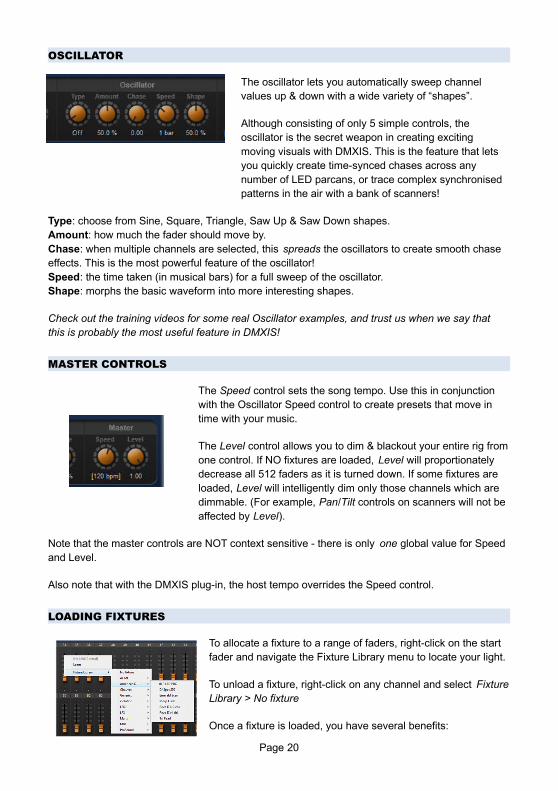
OSCILLATOR
The oscillator lets you automatically sweep channel values up & down with a wide variety of “shapes”.
Although consisting of only 5 simple controls, the oscillator is the secret weapon in creating exciting moving visuals with DMXIS. This is the feature that lets you quickly create time-synced chases across any number of LED parcans, or trace complex synchronised patterns in the air with a bank of scanners!
Type: choose from Sine, Square, Triangle, Saw Up & Saw Down shapes.Amount: how much the fader should move by. Chase: when multiple channels are selected, this spreads the oscillators to create smooth chase effects. This is the most powerful feature of the oscillator!Speed: the time taken (in musical bars) for a full sweep of the oscillator.Shape: morphs the basic waveform into more interesting shapes.
Check out the training videos for some real Oscillator examples, and trust us when we say that this is probably the most useful feature in DMXIS!
MASTER CONTROLS
The Speed control sets the song tempo. Use this in conjunction with the Oscillator Speed control to create presets that move in time with your music.
The Level control allows you to dim & blackout your entire rig fromone control. If NO fixtures are loaded, Level will proportionately decrease all 512 faders as it is turned down. If some fixtures are loaded, Level will intelligently dim only those channels which are dimmable. (For example, Pan/Tilt controls on scanners will not be affected by Level).
Note that the master controls are NOT context sensitive - there is only one global value for Speed and Level.
Also note that with the DMXIS plug-in, the host tempo overrides the Speed control.
LOADING FIXTURES
To allocate a fixture to a range of faders, right-click on the start fader and navigate the Fixture Library menu to locate your light.
To unload a fixture, right-click on any channel and select FixtureLibrary > No fixture
Once a fixture is loaded, you have several benefits:
Page 20
• You see sensible names & values under each fader, rather than basic numbers.
• The DMXIS Master Level control now works properly for that fixture (i.e. control channels are not dimmed).
• The XY controller will enable for that fixture (if it has Pan/Tilt parameters)
• You can double-click on faders, and any similarly named faders will be automatically selected. (Handy for making quick changes to a group of lights)
To give a fixture a friendlier name (e.g. “Left Flood” instead of “PAR64”) right-click on any channel in the fixture and select Rename Fixture.
You can unload all existing fixtures with the Show > Clear fixtures... menu option.
You can use DMXIS without loading any fixtures, but you will find it a much more pleasant experience if you do use them!
MIDI LEARN
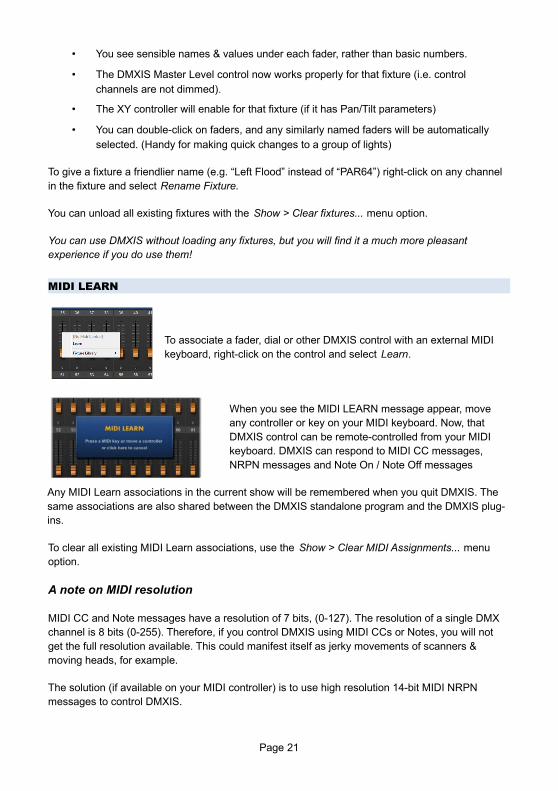
To associate a fader, dial or other DMXIS control with an external MIDI keyboard, right-click on the control and select Learn.
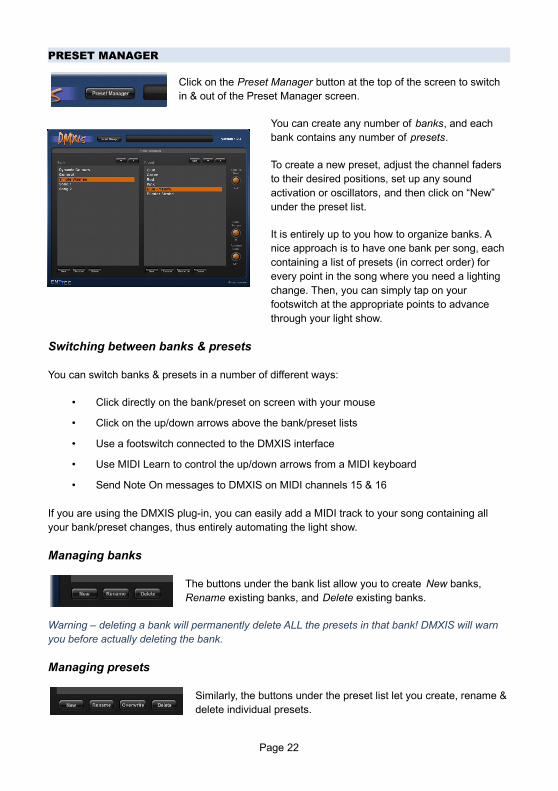
When you see the MIDI LEARN message appear, move any controller or key on your MIDI keyboard. Now, that DMXIS control can be remote-controlled from your MIDI keyboard. DMXIS can respond to MIDI CC messages, NRPN messages and Note On / Note Off messages
Any MIDI Learn associations in the current show will be remembered when you quit DMXIS. The same associations are also shared between the DMXIS standalone program and the DMXIS plug-ins.
To clear all existing MIDI Learn associations, use the Show > Clear MIDI Assignments... menu option.
A note on MIDI resolution
MIDI CC and Note messages have a resolution of 7 bits, (0-127). The resolution of a single DMX channel is 8 bits (0-255). Therefore, if you control DMXIS using MIDI CCs or Notes, you will not get the full resolution available. This could manifest itself as jerky movements of scanners & moving heads, for example.
The solution (if available on your MIDI controller) is to use high resolution 14-bit MIDI NRPN messages to control DMXIS.
Page 21
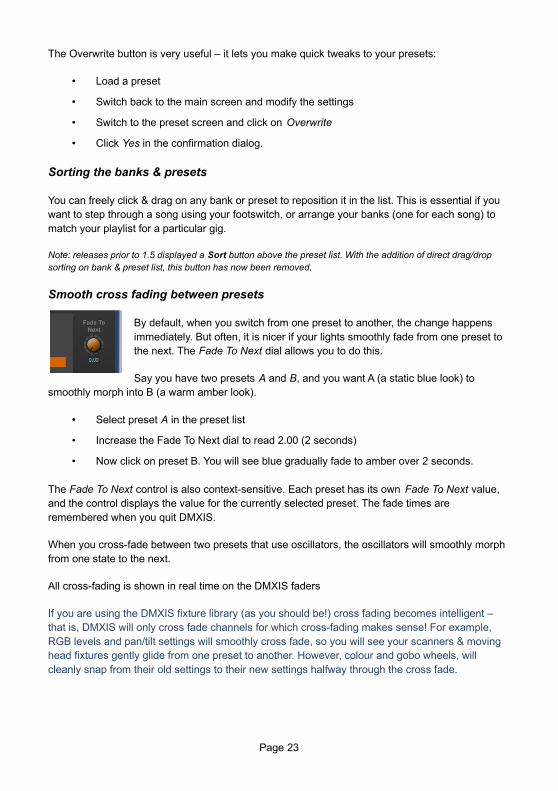
PRESET MANAGER
Click on the Preset Manager button at the top of the screen to switch in & out of the Preset Manager screen.
You can create any number of banks, and each bank contains any number of presets.
To create a new preset, adjust the channel faders to their desired positions, set up any sound activation or oscillators, and then click on “New” under the preset list.
It is entirely up to you how to organize banks. A nice approach is to have one bank per song, each containing a list of presets (in correct order) for every point in the song where you need a lighting change. Then, you can simply tap on your footswitch at the appropriate points to advance through your light show.
Switching between banks & presets
You can switch banks & presets in a number of different ways:
• Click directly on the bank/preset on screen with your mouse
• Click on the up/down arrows above the bank/preset lists
• Use a footswitch connected to the DMXIS interface
• Use MIDI Learn to control the up/down arrows from a MIDI keyboard
• Send Note On messages to DMXIS on MIDI channels 15 & 16
If you are using the DMXIS plug-in, you can easily add a MIDI track to your song containing all your bank/preset changes, thus entirely automating the light show.
Managing banks
The buttons under the bank list allow you to create New banks, Rename existing banks, and Delete existing banks.
Warning – deleting a bank will permanently delete ALL the presets in that bank! DMXIS will warn you before actually deleting the bank.
Managing presets
Similarly, the buttons under the preset list let you create, rename &delete individual presets.
Page 22
The Overwrite button is very useful – it lets you make quick tweaks to your presets:
• Load a preset
• Switch back to the main screen and modify the settings
• Switch to the preset screen and click on Overwrite
• Click Yes in the confirmation dialog.
Sorting the banks & presets
You can freely click & drag on any bank or preset to reposition it in the list. This is essential if you want to step through a song using your footswitch, or arrange your banks (one for each song) to match your playlist for a particular gig.
Note: releases prior to 1.5 displayed a Sort button above the preset list. With the addition of direct drag/drop sorting on bank & preset list, this button has now been removed.
Smooth cross fading between presets
By default, when you switch from one preset to another, the change happens immediately. But often, it is nicer if your lights smoothly fade from one preset to the next. The Fade To Next dial allows you to do this.
Say you have two presets A and B, and you want A (a static blue look) to smoothly morph into B (a warm amber look).
• Select preset A in the preset list
• Increase the Fade To Next dial to read 2.00 (2 seconds)
• Now click on preset B. You will see blue gradually fade to amber over 2 seconds.
The Fade To Next control is also context-sensitive. Each preset has its own Fade To Next value, and the control displays the value for the currently selected preset. The fade times are remembered when you quit DMXIS.
When you cross-fade between two presets that use oscillators, the oscillators will smoothly morphfrom one state to the next.
All cross-fading is shown in real time on the DMXIS faders
If you are using the DMXIS fixture library (as you should be!) cross fading becomes intelligent – that is, DMXIS will only cross fade channels for which cross-fading makes sense! For example, RGB levels and pan/tilt settings will smoothly cross fade, so you will see your scanners & moving head fixtures gently glide from one preset to another. However, colour and gobo wheels, will cleanly snap from their old settings to their new settings halfway through the cross fade.
Page 23
Setting the bank master tempo
Each bank can be assigned a different tempo, and every preset in a bank will run at the bank tempo. (The tempo sets the DMXIS oscillators to run in sync with your song)
Assuming you store each song in a separate bank, this basically lets you define the song tempos for your live set. You can still tweak the overall tempo (to match the actual tempo your band is playing at!) from Master Speed on the main page.
If you have a MIDI foot pedal, a good solution is to control Master Speed from an expression pedal (using MIDI Learn). Then, each bank will switch to the correct tempo for that song (via Bank Tempo) but you can tweak the tempo up & down using the expression pedal.
This feature is only useful with the DMXIS standalone program. In the VST/Audio Unit plug-in, bank tempo is always overridden by the current host tempo.
Auto-run a bank of presets
This is a neat feature for running a hands-off show in a loop, for example, to keepyour audience amused before the start of your show.
The Autorun Bank dial (right of the preset list) automatically advances through thepresets in the currently selected bank, at a predetermined rate. Once the end of the bank is reached, it will loop back to the start of the bank.
This is really only useful in the DMXIS standalone program. If you are using the DMXIS plug-in, you have much more scope and control when creating interesting automatic shows. More later...
MACROS
Macros can perform a range of useful tasks in DMXIS. Think of them as shortcuts to help you perform manually intensive or repetitive tasks more efficiently.
Macros are accessed by clicking on the Macros button at thetop of the DMXIS screen. This displays a cascading menu with a variety of macro categories. Example macro categories are:
• Colours – in here, you will find a number of macros to set RGB channels to named colours, and to manipulate existing RGB values. Simply select some RGB channels in your rig before running the macro.
• Fan – these macros allow you to create fan effects on the selected channels.
• Select – these macros speed up some common selection tasks (e.g. automatically selecting all Pan/Tilt channels)
Page 24

• Shapes – these macros manipulate the oscillators on any selected Pan/Tilt channels, to automatically create moving circles, Figure-8s and other shapes.
• Global Edits – these macros should be used with caution, as they make permanent changes to every preset in the current show. An example use would be to fix a musician’s front lighting to a fixed level for the entire show. You would simply set the channel to the appropriate value, and then run the Copy selected levels to all banks+presets macro.
• Fixture Setup – these help speed up the task of setting up multiple fixtures in your rig. For example, if you have 8 identical parcans, simply load the first one manually, and then run the Repeat last new fixture macro 7 times.
Note: the last run macro is always available at the top of the macro menu, and pressing the F4 key also re-runs the most recent macro.
Macros – a technical note
Macros are written in the industry standard Python language, and are stored as simple files in the DMXIS installation folder:
• Windows - C:/Program Files/ENTTEC/DMXIS/Macros
• OS X - /Library/Application Support/ENTTEC/DMXIS/Macros
New macros can easily be added by creating new folders and .py files under this location. A separate programming guide will be made available on the ENTTEC website to explain how to develop your own macros. This will obviously require at least a basic knowledge of the Python language.
Page 25
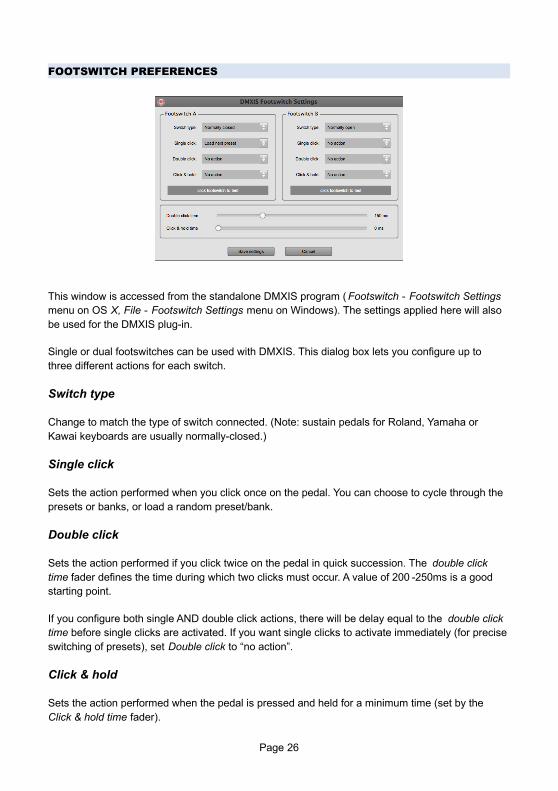
FOOTSWITCH PREFERENCES
This window is accessed from the standalone DMXIS program ( Footswitch - Footswitch Settings menu on OS X, File - Footswitch Settings menu on Windows). The settings applied here will also be used for the DMXIS plug-in.
Single or dual footswitches can be used with DMXIS. This dialog box lets you configure up to three different actions for each switch.
Switch type
Change to match the type of switch connected. (Note: sustain pedals for Roland, Yamaha or Kawai keyboards are usually normally-closed.)
Single click
Sets the action performed when you click once on the pedal. You can choose to cycle through the presets or banks, or load a random preset/bank.
Double click
Sets the action performed if you click twice on the pedal in quick succession. The double click time fader defines the time during which two clicks must occur. A value of 200 -250ms is a good starting point.
If you configure both single AND double click actions, there will be delay equal to the double click time before single clicks are activated. If you want single clicks to activate immediately (for preciseswitching of presets), set Double click to “no action”.
Click & hold
Sets the action performed when the pedal is pressed and held for a minimum time (set by the Click & hold time fader).
Page 26
Click & hold also has a unique action called Last preset (while held). This temporarily loads the last preset in the current bank while the pedal is held down. When the pedal is released, the original preset is then loaded back in. You can use this to trigger a special effect (such as a crowd blinder or a fast strobe) on demand at multiple points in a song.
Page 27
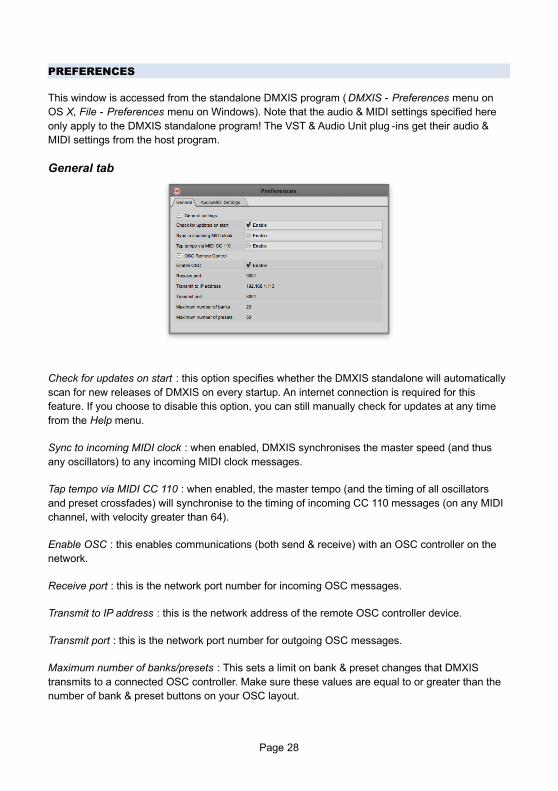
PREFERENCES
This window is accessed from the standalone DMXIS program ( DMXIS - Preferences menu on OS X, File - Preferences menu on Windows). Note that the audio & MIDI settings specified here only apply to the DMXIS standalone program! The VST & Audio Unit plug -ins get their audio & MIDI settings from the host program.
General tab
Check for updates on start : this option specifies whether the DMXIS standalone will automaticallyscan for new releases of DMXIS on every startup. An internet connection is required for this feature. If you choose to disable this option, you can still manually check for updates at any time from the Help menu.
Sync to incoming MIDI clock : when enabled, DMXIS synchronises the master speed (and thus any oscillators) to any incoming MIDI clock messages.
Tap tempo via MIDI CC 110 : when enabled, the master tempo (and the timing of all oscillators and preset crossfades) will synchronise to the timing of incoming CC 110 messages (on any MIDI channel, with velocity greater than 64).
Enable OSC : this enables communications (both send & receive) with an OSC controller on the network.
Receive port : this is the network port number for incoming OSC messages.
Transmit to IP address : this is the network address of the remote OSC controller device.
Transmit port : this is the network port number for outgoing OSC messages.
Maximum number of banks/presets : This sets a limit on bank & preset changes that DMXIS transmits to a connected OSC controller. Make sure these values are equal to or greater than the number of bank & preset buttons on your OSC layout.
Page 28
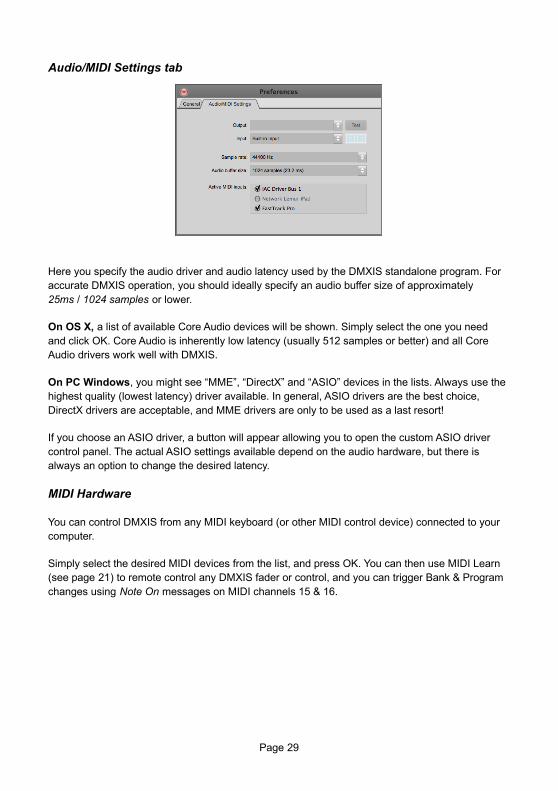
Audio/MIDI Settings tab
Here you specify the audio driver and audio latency used by the DMXIS standalone program. For accurate DMXIS operation, you should ideally specify an audio buffer size of approximately 25ms / 1024 samples or lower.
On OS X, a list of available Core Audio devices will be shown. Simply select the one you need and click OK. Core Audio is inherently low latency (usually 512 samples or better) and all Core Audio drivers work well with DMXIS.
On PC Windows, you might see “MME”, “DirectX” and “ASIO” devices in the lists. Always use thehighest quality (lowest latency) driver available. In general, ASIO drivers are the best choice, DirectX drivers are acceptable, and MME drivers are only to be used as a last resort!
If you choose an ASIO driver, a button will appear allowing you to open the custom ASIO driver control panel. The actual ASIO settings available depend on the audio hardware, but there is always an option to change the desired latency.
MIDI Hardware
You can control DMXIS from any MIDI keyboard (or other MIDI control device) connected to your computer.
Simply select the desired MIDI devices from the list, and press OK. You can then use MIDI Learn (see page 21) to remote control any DMXIS fader or control, and you can trigger Bank & Program changes using Note On messages on MIDI channels 15 & 16.
Page 29
VST AND AUDIO UNITS PLUG-IN SUPPORT
OK, we have saved the best feature until last! You can run DMXIS inside any audio host which supports VST or Audio Unit plug-ins or instruments (either 32 bit or 64 bit)
This has simply huge possibilities if you are interested in creating a tightly synchronised, automated light show. It is no longer necessary to mess about with MTC (MIDI time code), SMPTE, or other arcane techniques for syncing light shows to audio. You can now run your whole light show directly inside your favourite sequencer!
Operation of the VST/AU plug-in is pretty much identical to the standalone DMXIS program, with the exception that the main menus are missing. You can access all of your banks & presets – so you can use the standalone to create the lighting looks you need, and then quickly stitch together the final show in your audio sequencer.
In the plug-in, the oscillators automatically track your host tempo and song position. Thus, any moving chases or scanner movements will automatically track your music, with sample accuracy, and no additional work on your part. If you change the tempo of the song, the lighting automatically changes to match. This is incredibly powerful if you are performing live mixes using a program like Ableton Live or Logic Audio.
The easiest way to create a fully automated light show with the plug-in is as follows:
• Create a number of banks & presets for all the looks you want in the show.
• Adjust Fade To Next for those presets where you need smooth cross fades.
• Create an empty MIDI track in your host (to contain all your lighting cues)
• Add MIDI Notes to the MIDI track to trigger bank changes (on MIDI Ch 15) and preset changes (on MIDI Ch 16) exactly where you need them. You can create these events manually in your host, or record them manually from a MIDI keyboard.
The plug-in also gives you very fine-grained control over your light show if you need it. Every single control and fader in DMXIS can be automated using standard VST & audio Unit plug-in automation. For example, in Cubase you could draw automation curves to control the Pan & Tilt ofyour scanners. This approach is arguably a lot more work than the simple technique outlined above, but it gives you full control over the whole lighting rig, and you are not limited by the shapes that the DMXIS oscillator can produce.
As before, we recommend you watch the training videos for more information. Have fun using DMXIS, and please let us know if you have any comments of requests for new features!
Page 30
ADVANCED FEATURES
CHANNEL MASKING
Channel masking lets you “mask off” or disable channels in each preset. Masked channels are NOT transmitted when the preset is loaded. This allows you to modify aspects of the look on stage(e.g. colours) while leaving other aspects (e.g. mover positions & gobos) untouched.
Normally DMXIS is a preset console, to use industry standard terminology. A regular DMXIS preset contains 512 values, one for every DMX channel. When the preset is loaded the current value of every DMX channel is overwritten. This simple mechanism is very straightforward and manageable, and works great for most DMXIS owners.
However, this simple approach has limitations. It can become time consuming to maintain complex shows. A simple linear flow of presets can limit your creativity, especially if you use DMXIS in a hands-on manner (rather than driving it from a host program or from a simple footswitch)
Channel masking gives DMXIS some of the benefits of a tracking console (again to use industry standard terminology). Tracking consoles are more flexible, but have a higher learning curve.
So what can I use channel masking for?
• Splitting your show into preset categories which you then mix together to create looks on stage. For example, you could have banks wash colours, scanners moves, and gobo patterns. If each bank contained only 10 presets, you could instantly create 1000different looks on stage – much easier than manually creating 1000 presets.
• Creating special FX presets that you can switch on/off without affecting the current look on stage – for example a Crowd Blinder preset that masks off all channels except yourblinder dimmer channels.
Page 31
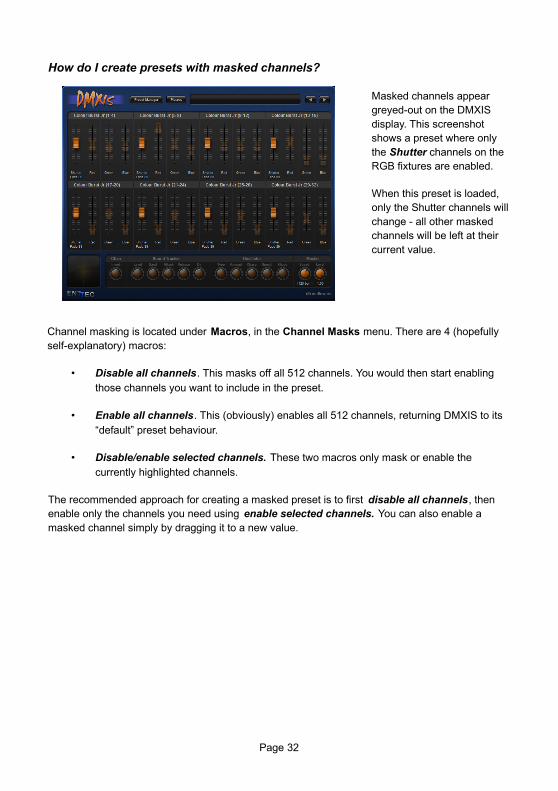
How do I create presets with masked channels?
Masked channels appear greyed-out on the DMXIS display. This screenshot shows a preset where only the Shutter channels on the RGB fixtures are enabled.
When this preset is loaded, only the Shutter channels willchange - all other masked channels will be left at their current value.
Channel masking is located under Macros, in the Channel Masks menu. There are 4 (hopefully self-explanatory) macros:
• Disable all channels. This masks off all 512 channels. You would then start enabling those channels you want to include in the preset.
• Enable all channels. This (obviously) enables all 512 channels, returning DMXIS to its “default” preset behaviour.
• Disable/enable selected channels. These two macros only mask or enable the currently highlighted channels.
The recommended approach for creating a masked preset is to first disable all channels, then enable only the channels you need using enable selected channels. You can also enable a masked channel simply by dragging it to a new value.
Page 32
CHANNEL PATCHING
Typical applications
DMXIS uses basic 1:1 channel patching (where fader 1 = DMX channel 1, fader 2 = DMX channel2, and so on). In many cases, it can be useful to modify this default patching scheme, for example:
• You arrive at a gig to find some fixtures owned by the club are not addressed as you were told. You need to quickly edit your DMXIS show so the mover @ fader 16 controls the fixture @ DMX channel 250.
• You want DMXIS fader 1 to control your house lights (which are on multiple DMX channels 10,11 and 14)
• You want to quickly extend your rig with extra lights (e.g. make some fixed theatre spots@ channels 300-306 mirror the spot @ channel 50 in your DMXIS show)
• You want to program a really simple generic show, without even knowing what lights you will have access to at each gig!
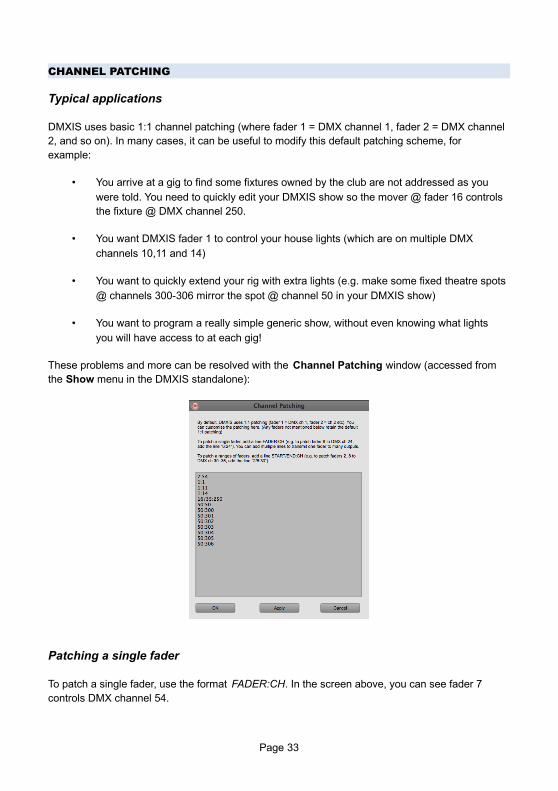
These problems and more can be resolved with the Channel Patching window (accessed from the Show menu in the DMXIS standalone):
Patching a single fader
To patch a single fader, use the format FADER:CH. In the screen above, you can see fader 7 controls DMX channel 54.
Page 33

To patch a fader to control multiple channels, simply include multiple lines in the patch window as required. In the screenshot above, you can see fader 50 is controlling DMX channels 50 and 300-306.
Patching a range of faders
If you want to move an entire fixture (covering a range of channels), use the format START/END:CH. In the screenshot above, you can see the fixture occupying faders 16-35 is controlling the device at DMX address 250.
As with single faders, you can adding multiple lines as required. For example, if we added the line “16/35:300” to the screen above, then faders 16-35 would be controlling TWO fixtures located at DMX addresses 250 and 300.
Additional notes
The contents of the Channel Patching window are stored with each DMXIS show. Thus, if you need to create multiple custom patch tables for a show, simply duplicate your “master” show in theManage Shows window, and edit the patching in each show copy as required.
When you patch a fader, the default 1:1 patching is disabled. For example, after adding the patch “23:45”, no data will be transmitted to channel 23 (because the default 23:23 patch is deleted). If you need the original patching to be retained, add the line “23:23” to the patch window as well.
Changes made in the patch window affect the DMX output immediately – there is no need to restart DMXIS or reload the show.
When using the DMXIS VST or AU plugin, the patching table for the DMXIS show most recently edited in the DMXIS standalone will be active.
Page 34
OSC REFERENCE
An OSC controller (such as TouchOSC or Lemur on iOS) can be used to remotely control the DMXIS standalone app. This offers some significant advantages over MIDI, including higher resolution control and visual feedback of current DMXIS settings.
OSC communications are configured from the General tab of the Preferences window, see earlier section.
The following tables list all OSC messages that can be sent or received by DMXIS.
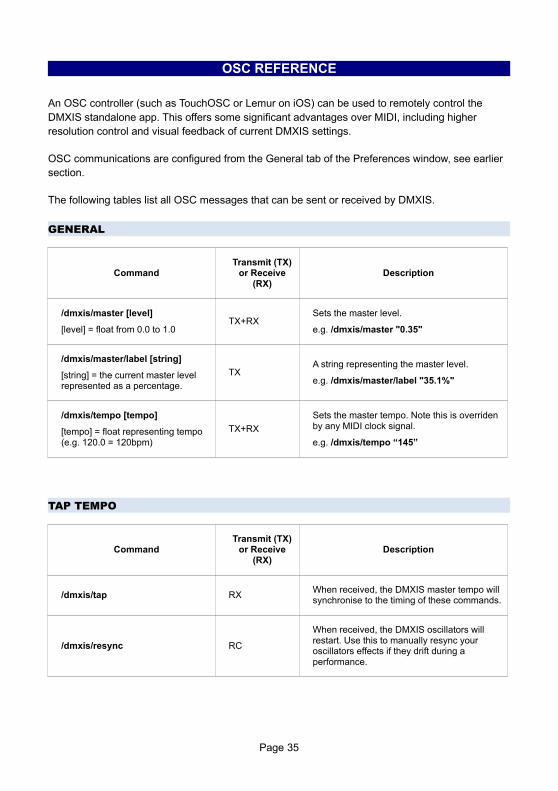
GENERAL
CommandTransmit (TX)
or Receive(RX)
Description
/dmxis/master [level]
[level] = float from 0.0 to 1.0TX+RX
Sets the master level.
e.g. /dmxis/master "0.35"
/dmxis/master/label [string]
[string] = the current master level represented as a percentage.
TXA string representing the master level.
e.g. /dmxis/master/label "35.1%"
/dmxis/tempo [tempo]
[tempo] = float representing tempo (e.g. 120.0 = 120bpm)
TX+RX
Sets the master tempo. Note this is overriden by any MIDI clock signal.
e.g. /dmxis/tempo “145”
TAP TEMPO
CommandTransmit (TX)
or Receive(RX)
Description
/dmxis/tap RXWhen received, the DMXIS master tempo will synchronise to the timing of these commands.
/dmxis/resync RC
When received, the DMXIS oscillators will restart. Use this to manually resync your oscillators effects if they drift during a performance.
Page 35

DIRECT CONTROL
CommandTransmit (TX)
or Receive(RX)
Description
/dmxis/ch/x [level]
x = DMXIS channel number (1-512)
[level] = float representing the channel level (0.0-1.0)
TX+RXSets a single DMX channel fader to the specified level.
/dmxis/ch/list [level]
list = a list of DMXIS channel number (1-512) separated by forward slashes
[level] = float representing the channel level (0.0-1.0)
RX
Sets a list of channels to a single value. Allows you to control many DMXIS faders withone OSC slider.
e.g. /dmxis/ch/1/3/12/24 0.3 (set DMXIS channels 1, 3, 12 and 14 to 0.3)
/dmxis/ch/list [levels]
list = a list of DMXIS channel number (1-512) separated by forward slashes
[levels] = a list of floats (0.0-1.0) representing the level of each channel defined in list.
RX
Sets a list of channels to individual values. This is useful for OSC controls which transmit multiple values (e.g. XY Pads in TouchOSC)
e.g. /dmxis/ch/10/20 0.2 0.4 (set channel 10 to 0.3 and channel 20 to 0.4)
/dmxis/ch/val/x [string]
x = DMXIS channel number (1-512)
[string] = a string representing the current channel value.
TX
Sends a readable string representing the current DMX channel value. This will be identical to the value displayed on the DMXIS fader (i.e. if a fixture definition is loaded, sensible labels like “Red”, “Gobo 3”, Dim 50%”etc will be sent).
/dmxis/ch/name/x [string]
x = DMXIS channel number (1-512)
[string] = a string representing the current channel name
TXSends the name of the specified channel, as specified in the fixture definition (e.g. “Dimmer”, “Gobo”)
BANKS & PRESETS
CommandTransmit (TX) or
Receive (RX)Description
/dmxis/xfade [time]
[time] = crossfade time to the next preset in seconds
TX+RXSets the crossfade time for the next loaded preset. This overrides any crossfade time already specified on the Preset Manager page.
Page 36
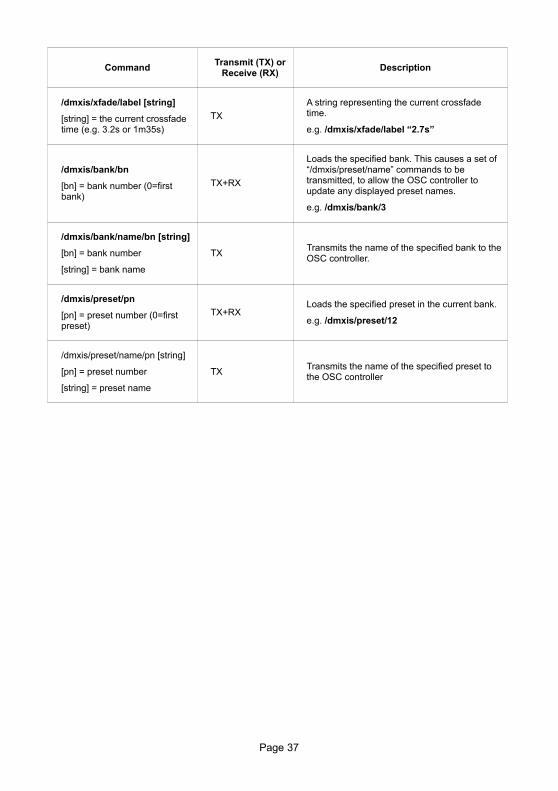
CommandTransmit (TX) or
Receive (RX)Description
/dmxis/xfade/label [string]
[string] = the current crossfade time (e.g. 3.2s or 1m35s)
TX
A string representing the current crossfade time.
e.g. /dmxis/xfade/label “2.7s”
/dmxis/bank/bn
[bn] = bank number (0=first bank)
TX+RX
Loads the specified bank. This causes a set of “/dmxis/preset/name” commands to be transmitted, to allow the OSC controller to update any displayed preset names.
e.g. /dmxis/bank/3
/dmxis/bank/name/bn [string]
[bn] = bank number
[string] = bank name
TXTransmits the name of the specified bank to theOSC controller.
/dmxis/preset/pn
[pn] = preset number (0=first preset)
TX+RXLoads the specified preset in the current bank.
e.g. /dmxis/preset/12
/dmxis/preset/name/pn [string]
[pn] = preset number
[string] = preset name
TXTransmits the name of the specified preset to the OSC controller
Page 37
REVISION HISTORY
RELEASE 1.6
Enhancements
• Added OSC support, allowing wireless remote control with full visual feedback (via appssuch as TouchOSC & Lemur).
• Added MIDI clock support. The master tempo will automatically sync to any MIDI clock messages received from any enabled MIDI device.
• Added tap tempo support (via OSC message, MIDI CC 110, or via a connected footswitch)
Bug fixes
• Fixed crash in Cubase when loading the DMXIS VST Instrument.
• DMXIS hardware is now correctly detected when multiple FTDI USB devices are connected.
RELEASE 1.5
Enhancements
• Added support for standard OS X serial FTDI driver.
• Added bank sorting. Banks & presets can be dragged & dropped to reorder as necessary. (Now-redundant “SORT” button above preset list has been removed)
• Added channel patching (see p31)
• Added automatic upgrade mechanism to DMXIS standalone.
• Massive reduction in DMXIS memory requirements. For a typical show with 500 presets, memory consumed by DMXIS is now reduced by 650MB.
• Multiple bank/preset changes (invoked via MIDI ch 15/16 notes) can now be sent simultaneously. This allows you to “stack up” multiple notes in a host sequencer to load up a full look using several masked presets. (Previously, the notes had to be staggered apart by a few milliseconds for reliable loading)
• When a channel slider is moved, the raw DMX 0-255 value is displayed in the status display.
• Faster startup & initial scanning of VST & AU plugin from host programs.
• A warning is displayed on startup (standalone only) if no input audio device is configured. (A valid audio input must be active, in order to synchronise DMXIS oscillators & crossfades)
Bug fixes
Page 38
• Preferences window is now larger, and can be resized further as required (to accommodate soundcards with multiple inputs, or systems with many MIDI devices).
• Bank/preset loads (via MIDI ch 15/16) only respond to Note On messages (Previously, Note OFF would also load the preset, which could produce confusing results if notes are overlapped)
• Improved reliability & behaviour of preset management. Specifically:
◦ Unexpected “Please select a preset first” messages no longer appear;
◦ When a preset is deleted, the first preset in the bank is no longer automatically loaded (giving the option of re-saving the deleted preset if desired).
• Standard OS X trackpad & mouse “secondary button” now properly supported.
• The “dimmable state” of each channel (i.e. whether it responds to the Master Level control) is now loaded correctly. (A bug in 1.4.3 led to all channels responding to level changes. Only dimmer & colour channels should respond!)
• Restored 32-bit OS X compatibility for the DMXIS standalone application.
• Improved reliability of DMXIS hardware detection.
• Fixed intermittent crash when DMXIS hardware initially connected.
RELEASE 1.4.3
• Added support for Show Buddy 1.4 release.
• Minor bugfixes.
RELEASE 1.4.2
• Bugfix : MIDI control of presets (via MIDI Notes on channel 16) broken when DMXIS plug-in window is closed in the host program.
• Up/down keyboard keys and mouse wheel can now be used to adjust any selected channel faders
• Added latest hardware drivers for Windows.
RELEASE 1.4.0
Enhancements
• Added 64 bit VST plugins & Audio Unit support
• Added VST and AU instrument variants (32 and 64 bit) of the DMXIS plugin. Allows better routing possibilities with certain host programs.
• Added support for Windows 8.1 and OS X Mavericks (10.9)
• Added hardware connectivity LED to DMXIS window.
• Decreased startup time for DMXIS standalone and plugin.
Page 39
• Added standalone support for multiple connected MIDI controllers.
• Hardware status is now continually monitored and displayed in the DMXIS status panel.
• Improved layout of fixture labels.
• Simpler layout of fixture popup menus.
RELEASE 1.3.0
Enhancements
• (Standalone) Oscillators now restart when a preset is loaded. This improves the timing of tempo-based visuals when switching presets from a foot switch.
• Added support for Show Buddy (a DMXIS show control program from www.db-audioware.com)
Bug fixes
• Improved accuracy of oscillator timing in DMXIS plug-in. (With extremely long songs, the oscillator timing was drifting)
• Fixed initial channel glitches when presets containing oscillators are loaded.
• Add warning on start-up if no sound card is available. (This was causing a crash).
• Prevent crash when loading corrupted bank configuration files.
RELEASE 1.2.0
Enhancements
• Upgraded for compatibility with OS X Lion
• Added channel masking, to allow greater programming flexibility for advanced users (see page 31)
RELEASE 1.1.2
Bug fixes
• Fixed global edit macros. (If preset ‘Fade To Next’ times were non-zero, global edit macros could incorrectly modify non-selected channels)
• Improved footswitch response time. (In previous release, there could occasionally be a noticeable delay between the footswitch press and the resulting preset change).
RELEASE 1.1.1
Bug fixes
• Added compatibility with OS X 10.6.5
Page 40
• Fix to Python macros API (inaccuracies when querying channel values). This was causing problems with the “Global Edit” macros.
Enhancements
• Added hardware monitoring. If the connection between the DMXIS hardware & softwareis lost, reconnecting the hardware will automatically re-establish the connection).
• Standalone does not “black out all channels to zero” when started. Allows you to restart DMXIS if necessary during a live show without plunging your audience into darkness).
• Improved loading times when switching presets (resulting in greater accuracy of automated shows).
RELEASE 1.1.0
Bug fixes
• Fixed preset sorting. (In certain circumstances, the sort order was being lost)
• Fixed support for MOTU soundcards in standalone.
• Fixed double-click bug. (Double-clicking on a channel fader would not select identical channels, when fixtures had been renamed)
• Fixed crash when using MIDI Learn in Cubase 5 on OS X systems.
Enhancements
• Added support for multiple shows (see Show Management on page 17).
• Added options to reset all MIDI assignments and fixtures across all channels.
• Added macros feature (see page 24).
• Oscillators morph smoothly between presets (when Fade To Next is in use).
• Cross-fades are now visible on the DMXIS faders.
• Improved behaviour of Sound Tracker “Attack” control. (Now acts as a “threshold” control, to prevent false triggering with very low volume audio)
RELEASE 1.0.4
Bug fixes
• Improved reliability of the footswitch input. (Some footswitch presses were not being registered on slower host computers)
• Fixed Bank Tempo feature. (Tempo was not restored reliably on all banks)
• Improved reliability of preset selection (If you selected Bank1/Preset3, then Bank 5/Preset 3, the second preset would not always load)
• Fixed Footswitch Settings window (settings were not stored correctly).
Enhancements
Page 41
• New Rename Fixture feature (See page 20)
• Autorun Bank now plays from the first preset when a new bank is selected.
• Improved start-up time of DMXIS standalone program on Windows.
RELEASE 1.0.3
Bug fixes
• Increased reliability of transmitted DMX data when used with certain low cost fixtures.
• MIDI assignments cleared with the “Forget” were not being stored on exit.
Enhancements
• Added “Bank Tempo” control to the Preset Manager page. (See page 24)
• MIDI Learn now supports 7 & 14 bit NRPN messages. (See page 21)
• DMXIS now displays all 16 MIDI input channels in Ableton Live. (In the previous release, only MIDI Ch 1 was available). You can switch DMXIS banks/presets by routingAbleton clips containing Notes to Ch 15/16 (as described 22)
• When the VST/Audio Unit plug-in is loaded or deleted, it does not clear the DMX channel values. The most recent DMX values will be held by the DMXIS hardware until a new preset is explicitly loaded into DMXIS. This allows you to change between songs in your audio host without plunging the audience into darkness!
• On the Footswitch Settings window, the “Click & hold time” range can now be set to 0mS. Useful if you are using a footswitch for the “Last Preset (while held)” feature, and want immediate response to the switch being pressed.
• Fixtures pop-up menu now uses subcategories within each manufacturer if necessary (i.e. if there are too many fixtures to fit on the screen).
RELEASE 1.0.2
• Initial public release
- end of document -
Page 42