Embed Size (px)
Citation preview
User Guide Web Sites for Ministry
"LifeWayLINK's tools are intuitive and very user friendly."
Norm Jones
Riviera Baptist Church Eugene, Oregon
2
Table of Contents
Topic Page LifeWayLINK Network 3 Products & Services 4 Frequently Answered Questions 5 Getting Started 7 Accessing the Control Panel 9 Using the Managers 10 Common Features 12 Profile Manager 13 Design Manager 14 Site Manager 15 Event Manager 18 Group Manager 20 People Manager 23 Request Manager 29 Poll Manager 33 Store Manager 35 Resource Manager 40 Communications Manager 44 The Page Editor 45
Adding a Page 46 Adding A Table 47 Changing the Order of Pages 47 Changing the Page Name 48 Creating Hyperlinks 48 Deleting a Page 49 Editing Page Contents 49 Editing Tips 49 Removing Images 50 Repositioning Images 50 Scrolling Marquee 50 Using the Gallery 50
Internet Explorer 6.0 Users 53 Glossary 54 Email Setup Instructions 56 Multimedia 65 Search Engine Placement 67 Technical Support 68
3
LifeWayLINK Network What is it about LifeWayLINK that makes it the obvious choice for so many in developing their Web site?
It’s easy. The tools put control for your site in your hands. Set up your site in a few simple steps in a matter of minutes. And the online and personal help give you assistance, should you need it.
It’s convenient. You make changes when you want to, 24/7.
It’s functional. Our managers allow you to receive and post prayer requests online, conduct polls, organize groups, schedule events, and sell products.
It’s affordable. We’ve kept the cost within your budget while providing a high quality product so that you can focus on ministry.
It’s trustworthy. You've trusted LifeWay to give you products and services designed to help you carry out your mission. LifeWayLINK is no exception.
It’s resource filled. The resources of LifeWay are at your disposal and can be incorporated into your site. Provide your congregation with quick access to daily devotions, teaching helps, articles living the Christian life, plus much, much more.
Our partners tell us that they can’t believe how simple LifeWayLINK is to use. Their past experience investigating Web sites and trying to develop their own have left them frustrated. Not so with LifeWayLINK.
"I want to thank you for providing this fantastic service. I have wanted to do something like this for a long time but lacked the tools or training. Yet, with your user-friendly system it has been remarkably easy to generate a wonderful Web site. I also appreciate your quick customer service." Dennis Murphy, Pastor, Northern Oaks Community Church
"In just 3 weeks this Web site has become an important contact between our church and the community. We have a "community" page for the locals to go to, but first they go through us. We've already had over 1000 hits, and we are a small church (160 in Sunday School). Thanks for this great ministry!" Mark Mangrum, Pastor, First Baptist Church Parsons
4
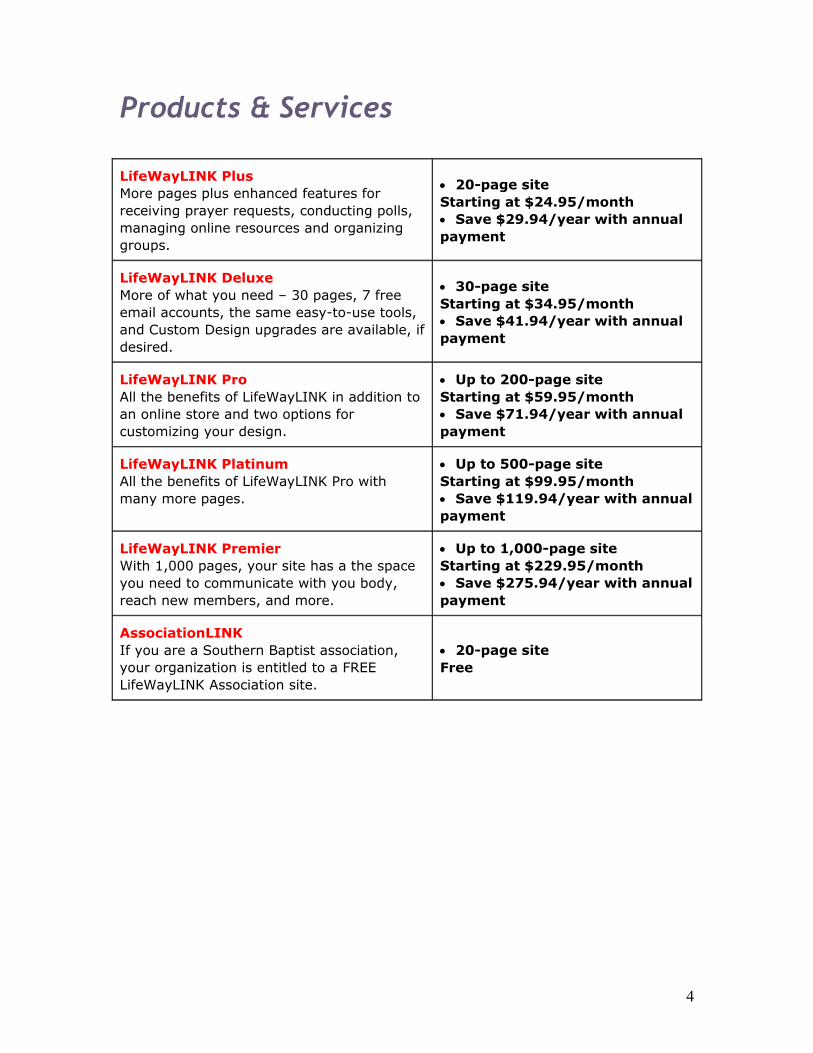
Products & Services LifeWayLINK Plus More pages plus enhanced features for receiving prayer requests, conducting polls, managing online resources and organizing groups.
• 20-page site Starting at $24.95/month • Save $29.94/year with annual payment
LifeWayLINK Deluxe More of what you need – 30 pages, 7 free email accounts, the same easy-to-use tools, and Custom Design upgrades are available, if desired.
• 30-page site Starting at $34.95/month • Save $41.94/year with annual payment
LifeWayLINK Pro All the benefits of LifeWayLINK in addition to an online store and two options for customizing your design.
• Up to 200-page site Starting at $59.95/month • Save $71.94/year with annual payment
LifeWayLINK Platinum All the benefits of LifeWayLINK Pro with many more pages.
• Up to 500-page site Starting at $99.95/month • Save $119.94/year with annual payment
LifeWayLINK Premier With 1,000 pages, your site has a the space you need to communicate with you body, reach new members, and more.
• Up to 1,000-page site Starting at $229.95/month • Save $275.94/year with annual payment
AssociationLINK If you are a Southern Baptist association, your organization is entitled to a FREE LifeWayLINK Association site.
• 20-page site Free
5
Frequently Answered Questions Is LifeWayLINK only for LifeWay-associated churches? No. Although it is a service for Southern Baptist churches, ministries of other denominations may use the LifeWayLINK Plus or LifeWayLINK Pro options. LifeWay reserves the right to decline enrollment to any ministry.
Can we purchase extra pages or disk space? LifeWayLINK is as flexible as you need it to be to meet your specific needs. You may add pages ($5/page per month), disk space ($10/10MB per month) or technical support phone packages. You also may consider other site levels for advanced capabilities.
What free resources are available from LifeWay? LifeWay wants your site to add as much value as possible to its users. We will continually change information and resources listed to the right of your site pages to keep it fresh. You can depend on high-quality and relevant insights for parents, church staff, teens, shopping, research, Bible study and overall Christian living. If you have ideas for information listed there, please email us at [email protected].
Do I get a percentage of sales from the link to LifeWayStores.com? We offer a store search box as a convenience to your site users. A search will provide a user with requested products and services available at the LifeWay Web store, but a percentage of sales from that search is not presented to the church. We currently are evaluating a program that will offer you a customized “virtual bookstore” right on your site, and we anticipate a revenue sharing capability. If you have ideas on this service, we’d love to hear from you. Email us at [email protected].
Our church site design really needs to have the full page for our information. Can we omit the LifeWay content on the right column? Yes, you may omit the LifeWay information in the right column.
How frequently may we update our site? How quickly are these changes applied? You may update your site as frequently as you desire. Changes are applied immediately.
How secure is my LifeWayLINK site? Can anyone make unauthorized changes to our site? Your LifeWayLINK account is secure. One must have a user name and password to access your account maintenance page. Please be sure to guard this important information to guarantee the security you desire.
Do the sites support audio and video? Yes, LifeWayLINK Plus and LifeWayLINK Pro options support audio and video. Discover a new tool for streaming audio and video at http://www.lifeway.com/emedialink.
6
What if I have a technical question regarding my site? We take very seriously your questions and concerns. To best serve you, we request these inquiries to be submitted to [email protected]. We track each submission easily this way. If your question is urgent, feel free to call us at 1-800-221-5167 during the hours of 8:00 a.m. to 5:00 p.m. CST.
What will our email address be? How do I check my email? Your address will be [email protected]. We will provide you with instructions for checking your email account.
Can I keep my current email address if I switch to LifeWayLINK? Yes, all you have to do is provide us with your email address and password, and we will provide you with instructions on how to check it.
How do I find out how many visitors or page views are occurring on our site? We currently are exploring the best software to meet your needs. We anticipate having the ability to show you a broad range of statistics for your site traffic.
What can I do to promote my site? We have some ideas for you. Please see our article on “Site Promotion.”
7
Getting Started Preparing your computer This advanced technology provides for very little setup of your computer. Unlike other Web technologies, you do not need expensive software packages that need to be loaded onto your computer. The only two items required are a connection to the Internet and Microsoft® Internet Explorer version 5.5 (IE 5.5).
Connecting to the Internet Your connection to the Internet is established through the Internet Service Provider (ISP). They will provide you with the connection and details on how to connect to the Internet. Check the your local phone book or contact your local phone company for a listing of ISPs in your area.
Internet Explorer (IE) While your Web site can be viewed in most any Web browser (e.g. Internet Explorer, Netscape, etc.), you need Internet Explorer 5.5 to take advantage of the advanced editing features. This gives the site administrator of your Web ministry the tools needed to produce a professional quality site in a more time efficient manner. If you are running Microsoft® Windows 95 or later, you most likely have some version of IE already installed on your computer.
Checking your version of IE Internet Explorer may be accessed in more than one method. Use one of the following methods to find Internet Explorer on your computer: Desktop Double-click on the Internet Explorer icon Start menu
1. Click on the Start menu 2. Click on Programs 3. Click on Internet Explorer
My Computer
1. Click My Computer on your Desktop 2. Open your Hard Drive (this is usually drive C) 3. Open the Program Files folder 4. Look for Internet Explorer folder and open it if it is present 5. Double-click on the Internet Explorer icon 6. Once the IE browser window opens, click on the Help menu on the top of the
screen. In the drop-down menu that appears, click on About Internet Explorer. On the screen that opens, look at the numbers that follow the word version. The first two numbers, starting at the left, should be 5.5. It is okay for there to be more numbers to the right.
8
Where to get IE 5.5
Go to www.microsoft.com/ie where you can download the latest version. CAUTION: IF YOU ARE NOT USING A HIGH-SPEED CONNECTION TO THE INTERNET, THIS DOWNLOAD WILL TAKE SEVERAL HOURS AND REQUIRE YOU TO BE ONLINE THE ENTIRE TIME. However, if you do have a high-speed connection, this will only take about 15-20 minutes to download and install.
Purchase it where you buy computer software.
AOL Users If you use America Online (AOL) as your ISP, you will still need Internet Explorer. When editing your Web site, you will connect to AOL as you normally do. After the connection to the Internet has been established, open IE and use it to edit your site. Please note that you will need to stay connected to AOL even while you are in the IE browser window.
9
Accessing the Control Panel When both the Internet connection and IE 5.5 are in place on your computer, you are ready to connect to your site managers. An added benefit of our technology is the ‘management team’ you now have, as outlined in the following section.
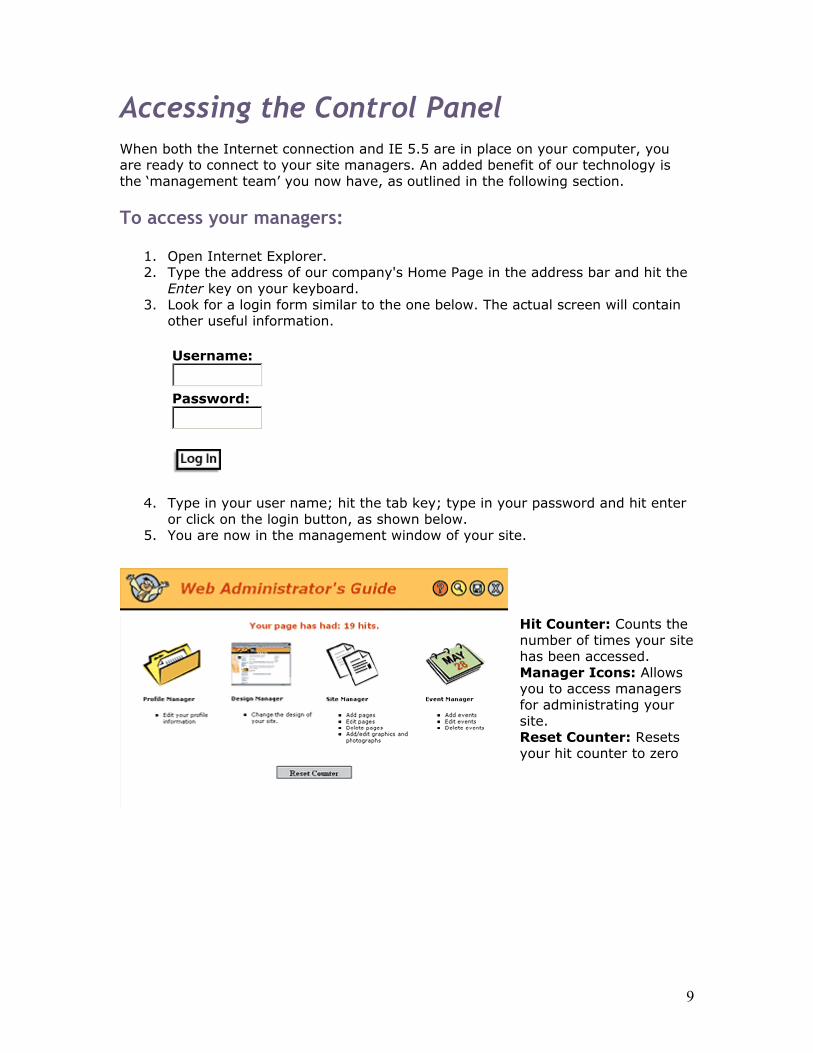
To access your managers:
1. Open Internet Explorer. 2. Type the address of our company's Home Page in the address bar and hit the
Enter key on your keyboard. 3. Look for a login form similar to the one below. The actual screen will contain
other useful information.
Username:
Password:
4. Type in your user name; hit the tab key; type in your password and hit enter or click on the login button, as shown below.
5. You are now in the management window of your site.
Hit Counter: Counts the number of times your site has been accessed. Manager Icons: Allows you to access managers for administrating your site. Reset Counter: Resets your hit counter to zero
10
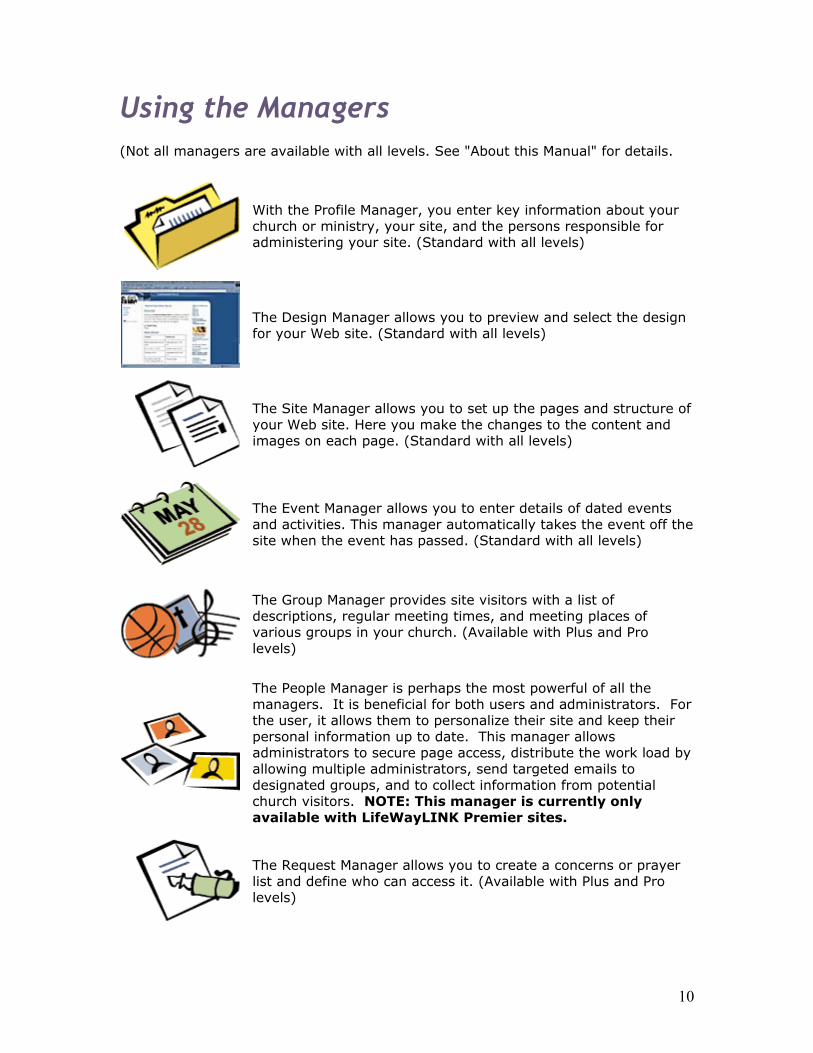
Using the Managers (Not all managers are available with all levels. See "About this Manual" for details.
With the Profile Manager, you enter key information about your church or ministry, your site, and the persons responsible for administering your site. (Standard with all levels)
The Design Manager allows you to preview and select the design for your Web site. (Standard with all levels)
The Site Manager allows you to set up the pages and structure of your Web site. Here you make the changes to the content and images on each page. (Standard with all levels)
The Event Manager allows you to enter details of dated events and activities. This manager automatically takes the event off the site when the event has passed. (Standard with all levels)
The Group Manager provides site visitors with a list of descriptions, regular meeting times, and meeting places of various groups in your church. (Available with Plus and Pro levels)
The People Manager is perhaps the most powerful of all the managers. It is beneficial for both users and administrators. For the user, it allows them to personalize their site and keep their personal information up to date. This manager allows administrators to secure page access, distribute the work load by allowing multiple administrators, send targeted emails to designated groups, and to collect information from potential church visitors. NOTE: This manager is currently only available with LifeWayLINK Premier sites.
The Request Manager allows you to create a concerns or prayer list and define who can access it. (Available with Plus and Pro levels)
11
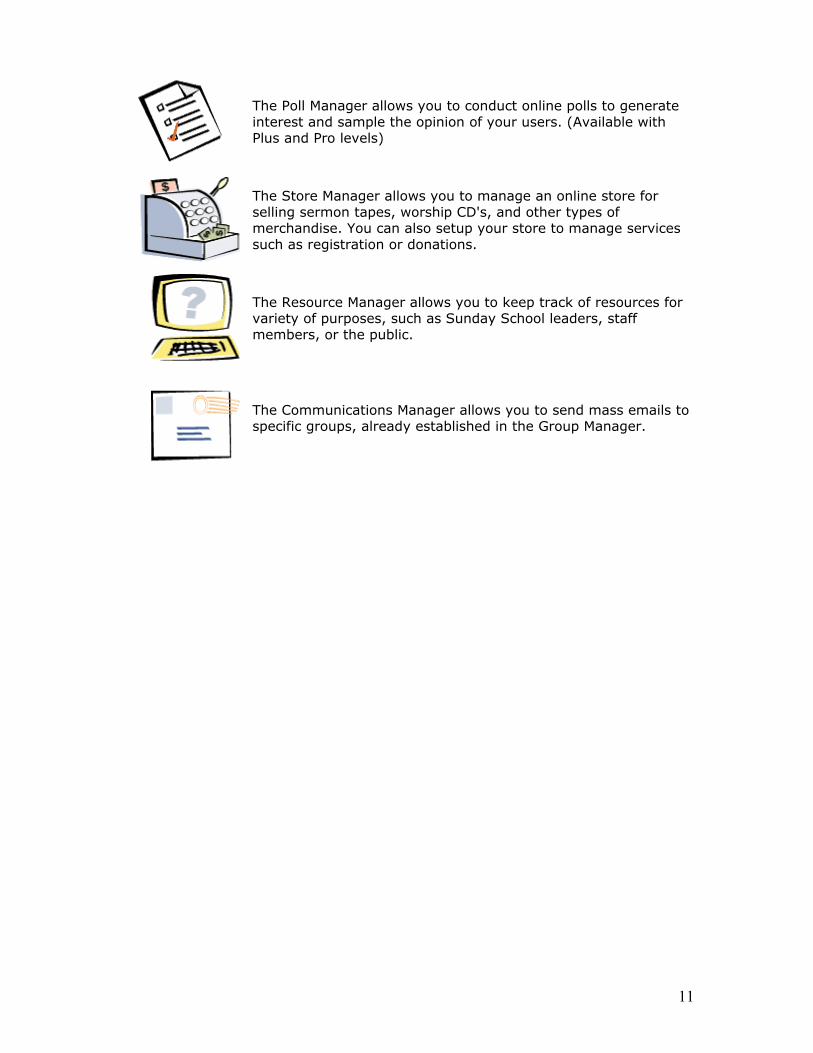
The Poll Manager allows you to conduct online polls to generate interest and sample the opinion of your users. (Available with Plus and Pro levels)
The Store Manager allows you to manage an online store for selling sermon tapes, worship CD's, and other types of merchandise. You can also setup your store to manage services such as registration or donations.
The Resource Manager allows you to keep track of resources for variety of purposes, such as Sunday School leaders, staff members, or the public.
The Communications Manager allows you to send mass emails to specific groups, already established in the Group Manager.
12
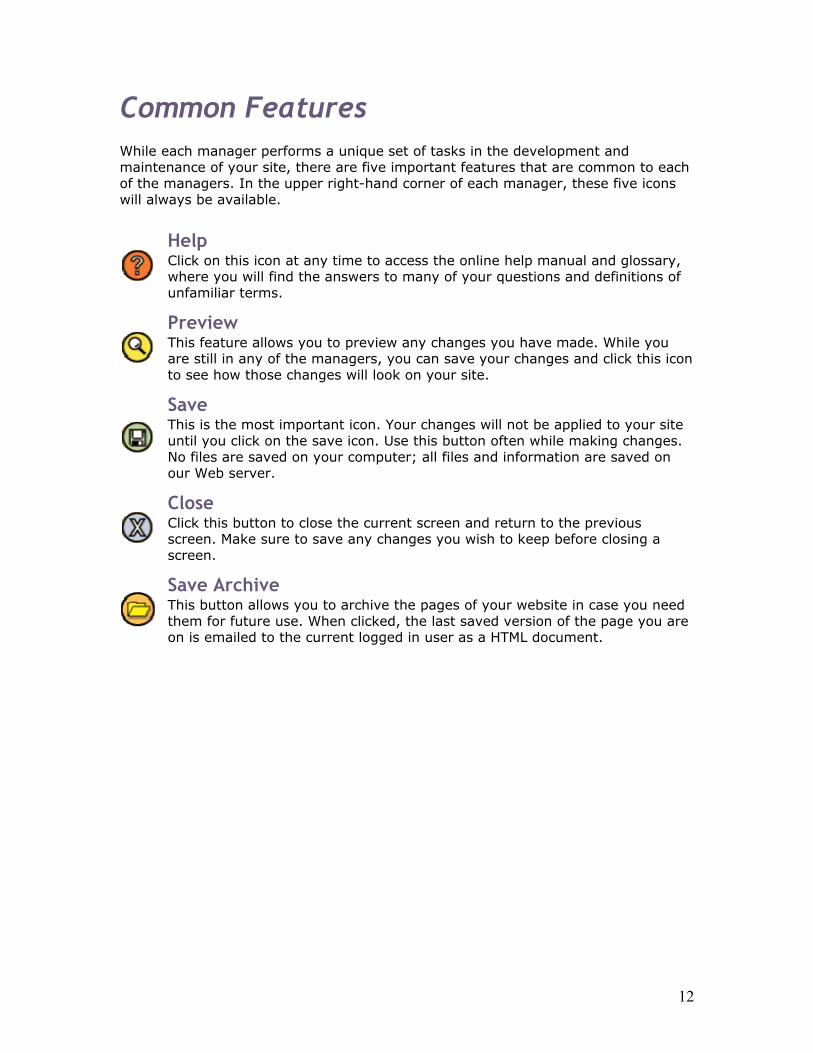
Common Features While each manager performs a unique set of tasks in the development and maintenance of your site, there are five important features that are common to each of the managers. In the upper right-hand corner of each manager, these five icons will always be available.
Help Click on this icon at any time to access the online help manual and glossary, where you will find the answers to many of your questions and definitions of unfamiliar terms.
Preview This feature allows you to preview any changes you have made. While you are still in any of the managers, you can save your changes and click this icon to see how those changes will look on your site.
Save This is the most important icon. Your changes will not be applied to your site until you click on the save icon. Use this button often while making changes. No files are saved on your computer; all files and information are saved on our Web server.
Close Click this button to close the current screen and return to the previous screen. Make sure to save any changes you wish to keep before closing a screen.
Save Archive This button allows you to archive the pages of your website in case you need them for future use. When clicked, the last saved version of the page you are on is emailed to the current logged in user as a HTML document.
13
Profile Manager
Features The Profile Manager keeps track of the information in your profile in one convenient place. If any of this information changes, you can go to the Profile Manager and change it once. These changes will reflect throughout the entire Web site, alleviating the need to change that information page by page.
Information Much of the information is already filled in through the setup/order process for your site. However, please keep this information current. ● Organization Name: This is the name of your church or individual ministry. The information typed in this field will appear at the top of your main page. ● Address: Make sure to input the street address (not a post office box) for your church or ministry. This information is displayed on the Contact Page. ● City: The city where your church or ministry is located. ● State/Province: The state or province where your church or ministry is located. ● Country: The country where your church or ministry is located. ● Zip Code: The zip code where you church or ministry is located. ● Phone: The contact phone number for your church or ministry. NOTE: Enter your 10-digit phone number without any spaces, hyphens, or symbols. ● Fax: The Fax number for your church or ministry. NOTE: Enter your 10-digit Fax number without any spaces, hyphens, or symbols. ● Motto/Slogan: If your church or ministry has a motto or slogan, enter it here. This will appear on the home page of your site. ● Contact Email Address: Your site has a Contact page where individuals can send email to the church or ministry. Enter the email address here of the person who needs to receive those emails. ● Administrator Email Address: Enter the email address of the site administrator here. This address is used to send important, helpful information to all administrators. It does not appear on your site. ● Billing Email Address: Enter the address of the person responsible for receiving and paying bills. This information does not appear on your site. ● Domain Name: The address or your Web site. (Note: all that will show up in this box is everything that follows the "www.") ● Description: This is a 25 words or less paragraph describing you organization, which are used for Search Engine purposes. To register your site with a Search Engine, see the “Search Engine Placement” section of the Help Manual.
14
Design Manager
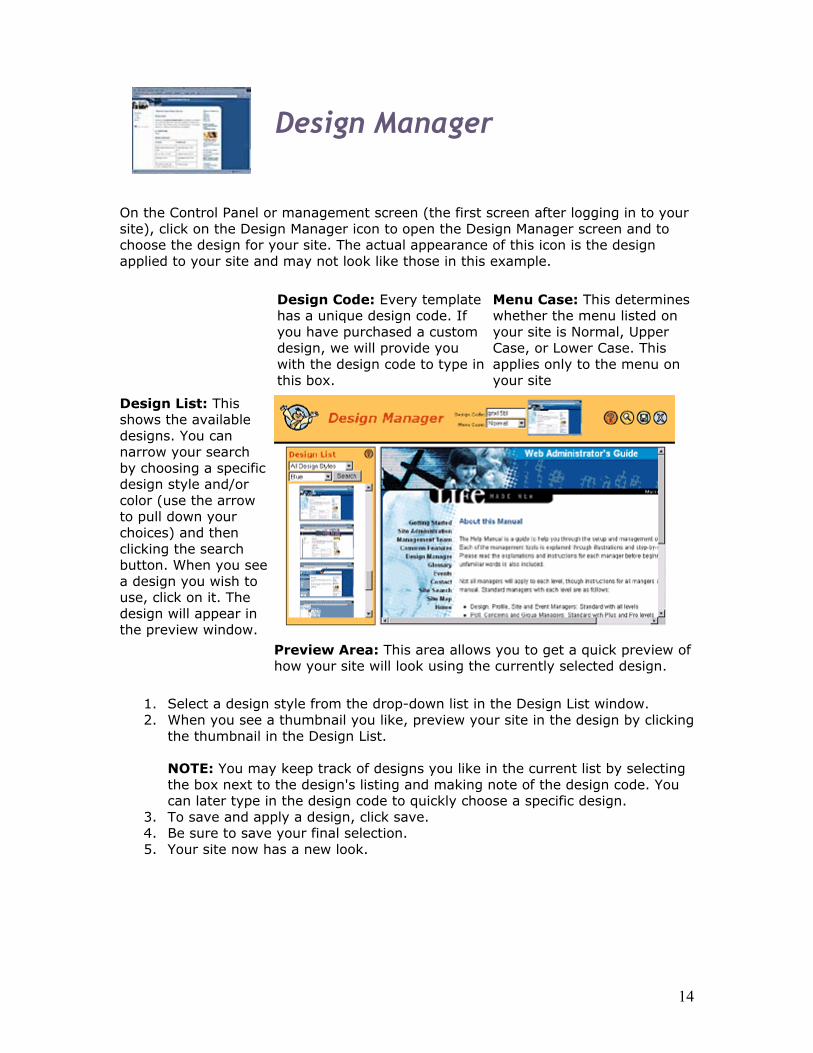
On the Control Panel or management screen (the first screen after logging in to your site), click on the Design Manager icon to open the Design Manager screen and to choose the design for your site. The actual appearance of this icon is the design applied to your site and may not look like those in this example.
Design Code: Every template has a unique design code. If you have purchased a custom design, we will provide you with the design code to type in this box.
Menu Case: This determines whether the menu listed on your site is Normal, Upper Case, or Lower Case. This applies only to the menu on your site
Design List: This shows the available designs. You can narrow your search by choosing a specific design style and/or color (use the arrow to pull down your choices) and then clicking the search button. When you see a design you wish to use, click on it. The design will appear in the preview window.
Preview Area: This area allows you to get a quick preview of how your site will look using the currently selected design.
1. Select a design style from the drop-down list in the Design List window. 2. When you see a thumbnail you like, preview your site in the design by clicking
the thumbnail in the Design List. NOTE: You may keep track of designs you like in the current list by selecting the box next to the design's listing and making note of the design code. You can later type in the design code to quickly choose a specific design.
3. To save and apply a design, click save. 4. Be sure to save your final selection. 5. Your site now has a new look.

15
Site Manager
Features The Site Manager allows you to enter the content into your site by using familiar tools. If you have used a word processor such as MS Word, you will recognize that most of the formatting buttons are the same. You do not a need to know HTML code. However, if you are familiar with HTML and wish to directly edit the code on your site, you can easily access it from this manager. From the novice to the expert, Site Manager allows site administrators of all experience levels to manage the site with ease.
Setting Up Your Site Structure Pages that come standard with your package level will automatically appear in your site structure. As you add, delete, or change the names of pages, the changes will appear in your site structure. See below for directions on adding, deleting, and editing pages.
16
Editing Page Contents
1. Click on the page which you wish to work on from the list of pages by clicking on the name of the page.
2. Edit your page contents and add graphics by following the directions in the Page Editor.
Changing a Page Name
1. Click on the page which you wish to work on from the list of pages by clicking on the name of the page.
2. In the Page Editor, click in the page title box at the top of the screen. 3. Type a new name in the box. 4. Click the save button in the upper right corner of your screen.
Deleting a Page
1. Click on the page you wish to delete from list of pages. 2. In the Page Editor, click the Delete Page button in the bottom right corner. 3. Click "OK" in the Page Delete Confirmation dialog box.
WARNING: Deleting a page cannot be undone. It totally removes the page (design, text, images) from your Web site. Make sure you want to delete the page before clicking “ok”.
Adding Pages to a Section
1. From the list of pages, choose the page under which you want to add additional pages.
2. Choose the "Add Page" button in the bottom right corner of the Page Editor.
3. If applicable, click the "OK" button in Add Page dialog box to agree to the terms.
4. This will display a new Page Editor screen. Type the title for the new page in the “Page Title” box located at the top.
5. Enter the page contents. 6. Click the save button in the upper right corner of the screen. 7. Click preview to view page. 8. If changes are needed, close the preview page. Make changes and save.
NOTE: It is always a good idea to save often. If your computer loses power before you have saved any changes, your work will be lost.
Once you click on a page to edit, you will notice three boxes on the left side of the screen. They are Relations, Related Polls, and Panels.

17
Parent Pages This allows you to "relate" one page to another or to multiple pages. In other words, if you relate one page to another, it will appear underneath the "parent" page of that relationship.
1. Select the appropriate page from the drop down menu.
2. Click the save icon within the dialogue box. This will relate the page you select to the page you are currently working on.
3. If you wish to delete a relationship, click the to the left of the relation you want to delete.
Related Polls This allows you to publish created polls onto your Website so you can get feedback from your site visitors. (To see how to create a poll, visit the Poll Manager section of the Help Manual.)
1. In the "Related Polls" box that appears on the left side of your screen, select the poll you created in the Poll Manager from the drop down menu.
2. Click the save icon within the dialogue box. 3. Repeat this process if you have more than one
poll. 4. Click the page save icon in the upper right
corner of the screen. 5. If you wish to delete a poll, click the to the left
of the poll title.
Panels This feature allows you to add content panel information to your Website. This information contains articles and links that your site visitors may be interested in viewing.
1. Select the content panel you wish to display from the drop down menu.
2. Click the save icon within the dialogue box. 3. Repeat this process if you wish to add multiple
content panels. 4. Click the page save icon in the upper right
corner of the screen. 5. If you wish to delete a panel, click the to the
left of the panel title.

18
Event Manager
Features The Event Manager keeps track of your events and automatically removes them from your site when they have past. No longer do you need to worry about outdated events appearing on your site. However, the Events Manager does not delete the event from the manager screen when it expires, but it does delete it from the Web site. If you have an event that occurs several times a year, you can simply go to the Event Manager and change the date on the event from the last time it took place to the next date.
Options Link Text: Changing the name for the link
1. To change the name from "Events" to something else, choose the Link Text option in the dialogue box on the left side of the page.
2. Type in the new title (i.e. Calendar). 3. Choose the save icon within the dialogue
box.
Provider: Changing the provider for the Events Manager
1. LifeWayLINK is the default, so you will not need to make any changes if you are not a Service U customer.
2. Click the Add Event button to begin adding an event (see “Adding An Event” below for further instructions).
Importing ServiceU Events
1. If you are a Service U customer, select Service U from the drop down menu. 2. A script prompt box will appear asking you to enter your EventU OrgID. Enter
the number and click OK. 3. A second script prompt box will appear asking you to enter the EventU
CategoryID you wish to use to indicate featured events. Enter the number and click OK.
4. A third script prompt box will appear asking you if you want to use the Registration Date as the start date for promoting this event on the Web. Enter Y for Yes or N for No and click OK.
19
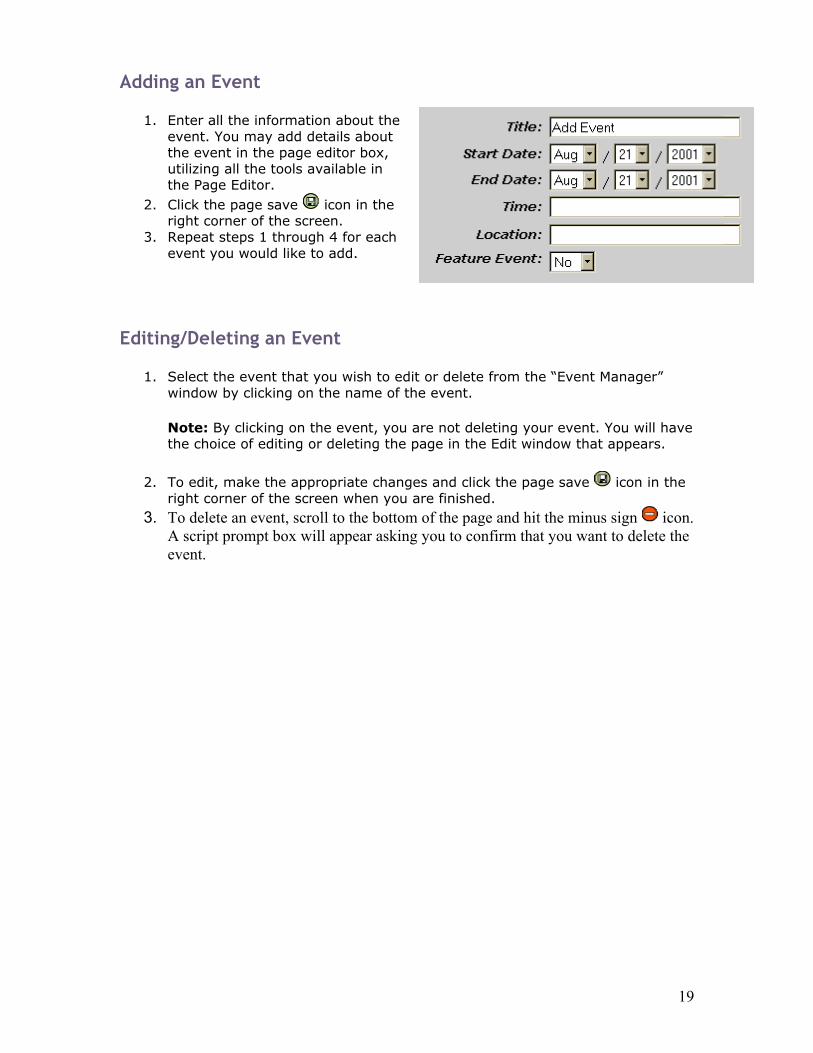
Adding an Event
1. Enter all the information about the event. You may add details about the event in the page editor box, utilizing all the tools available in the Page Editor.
2. Click the page save icon in the right corner of the screen.
3. Repeat steps 1 through 4 for each event you would like to add.
Editing/Deleting an Event
1. Select the event that you wish to edit or delete from the “Event Manager” window by clicking on the name of the event.
Note: By clicking on the event, you are not deleting your event. You will have the choice of editing or deleting the page in the Edit window that appears.
2. To edit, make the appropriate changes and click the page save icon in the right corner of the screen when you are finished.
3. To delete an event, scroll to the bottom of the page and hit the minus sign icon. A script prompt box will appear asking you to confirm that you want to delete the event.
20
Group Manager
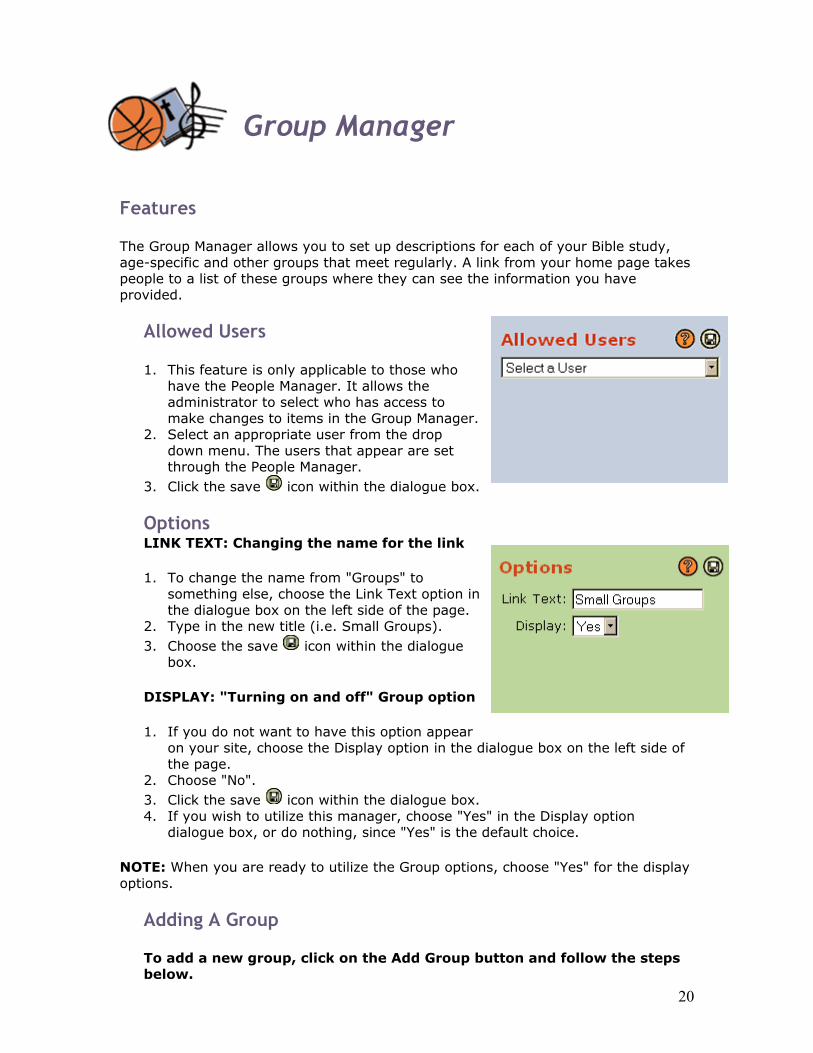
Features The Group Manager allows you to set up descriptions for each of your Bible study, age-specific and other groups that meet regularly. A link from your home page takes people to a list of these groups where they can see the information you have provided.
Allowed Users
1. This feature is only applicable to those who have the People Manager. It allows the administrator to select who has access to make changes to items in the Group Manager.
2. Select an appropriate user from the drop down menu. The users that appear are set through the People Manager.
3. Click the save icon within the dialogue box.
Options LINK TEXT: Changing the name for the link
1. To change the name from "Groups" to something else, choose the Link Text option in the dialogue box on the left side of the page.
2. Type in the new title (i.e. Small Groups). 3. Choose the save icon within the dialogue
box.
DISPLAY: "Turning on and off" Group option
1. If you do not want to have this option appear on your site, choose the Display option in the dialogue box on the left side of the page.
2. Choose "No". 3. Click the save icon within the dialogue box. 4. If you wish to utilize this manager, choose "Yes" in the Display option
dialogue box, or do nothing, since "Yes" is the default choice.
NOTE: When you are ready to utilize the Group options, choose "Yes" for the display options.
Adding A Group
To add a new group, click on the Add Group button and follow the steps below.
21
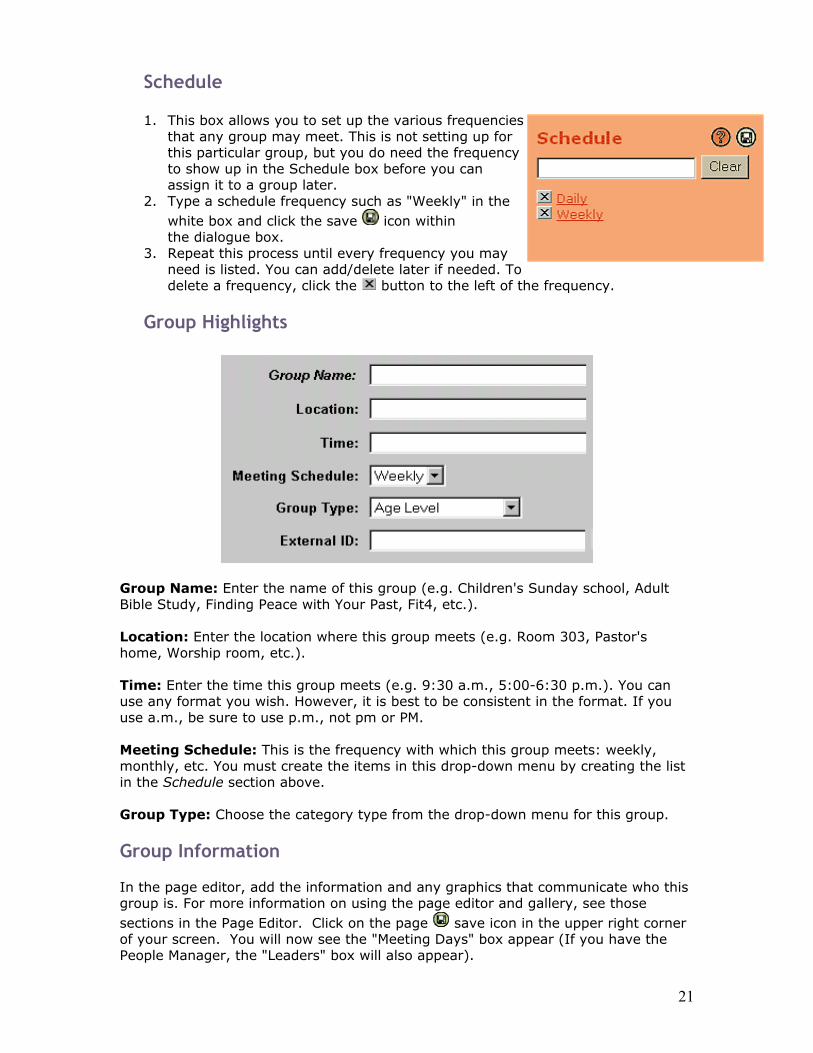
Schedule
1. This box allows you to set up the various frequencies that any group may meet. This is not setting up for this particular group, but you do need the frequency to show up in the Schedule box before you can assign it to a group later.
2. Type a schedule frequency such as "Weekly" in the white box and click the save icon within the dialogue box.
3. Repeat this process until every frequency you may need is listed. You can add/delete later if needed. To delete a frequency, click the button to the left of the frequency.
Group Highlights
Group Name: Enter the name of this group (e.g. Children's Sunday school, Adult Bible Study, Finding Peace with Your Past, Fit4, etc.). Location: Enter the location where this group meets (e.g. Room 303, Pastor's home, Worship room, etc.). Time: Enter the time this group meets (e.g. 9:30 a.m., 5:00-6:30 p.m.). You can use any format you wish. However, it is best to be consistent in the format. If you use a.m., be sure to use p.m., not pm or PM. Meeting Schedule: This is the frequency with which this group meets: weekly, monthly, etc. You must create the items in this drop-down menu by creating the list in the Schedule section above. Group Type: Choose the category type from the drop-down menu for this group.
Group Information In the page editor, add the information and any graphics that communicate who this group is. For more information on using the page editor and gallery, see those sections in the Page Editor. Click on the page save icon in the upper right corner of your screen. You will now see the "Meeting Days" box appear (If you have the People Manager, the "Leaders" box will also appear).
22
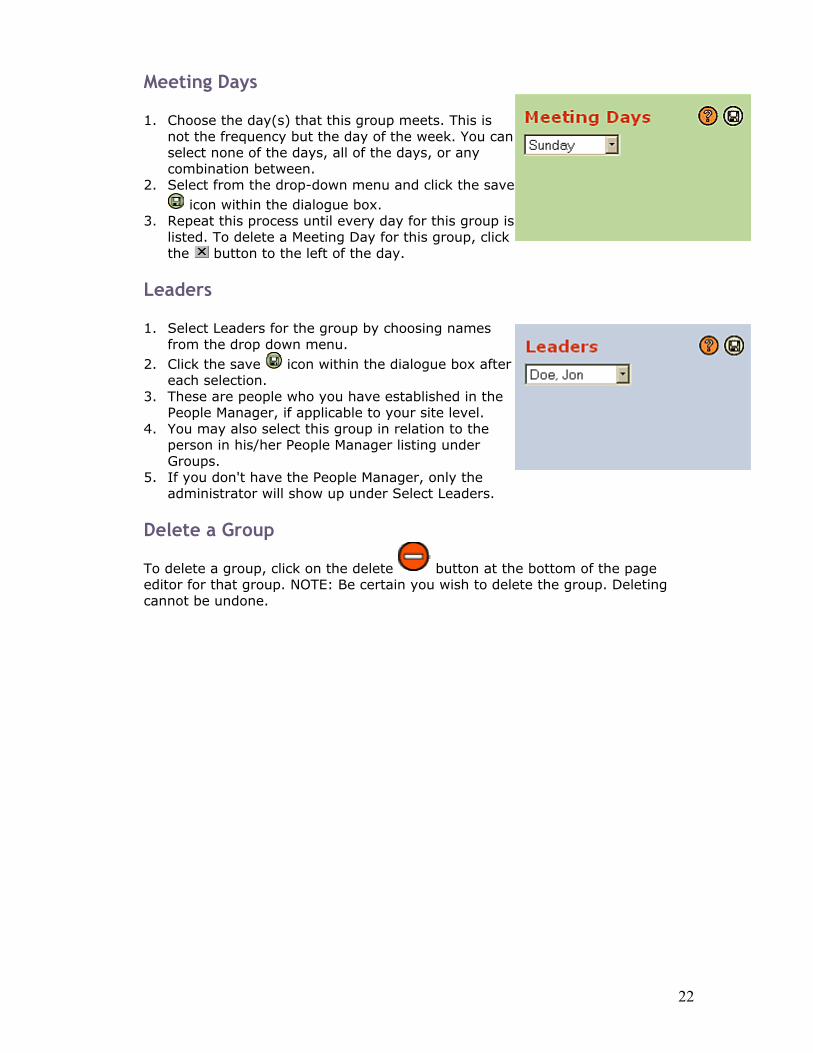
Meeting Days
1. Choose the day(s) that this group meets. This is not the frequency but the day of the week. You can select none of the days, all of the days, or any combination between.
2. Select from the drop-down menu and click the save icon within the dialogue box.
3. Repeat this process until every day for this group is listed. To delete a Meeting Day for this group, click the button to the left of the day.
Leaders
1. Select Leaders for the group by choosing names from the drop down menu.
2. Click the save icon within the dialogue box after each selection.
3. These are people who you have established in the People Manager, if applicable to your site level.
4. You may also select this group in relation to the person in his/her People Manager listing under Groups.
5. If you don't have the People Manager, only the administrator will show up under Select Leaders.
Delete a Group
To delete a group, click on the delete button at the bottom of the page editor for that group. NOTE: Be certain you wish to delete the group. Deleting cannot be undone.
23
People Manager
Features The People Manager is perhaps the most powerful of all the managers. It is beneficial for both users and administrators. For the user, it allows them to personalize their site and keep their personal information up to date. This manager allows administrators to secure page access, distribute the work load by allowing multiple administrators, send targeted emails to designated groups, and to collect information from potential church visitors. NOTE: This manager is currently only available with LifeWayLINK Premier sites.
Entering Individuals into the People Manager There are two ways for entering individuals into the People Manager. One is for the user to register directly through the Web site. The other is entering them directly into the People Manager located on your control panel.
Through Registration This method is popular as it allows the individual to enter his or her own information. This will not only save the site administrator time, but it will also allow the user to select his/her preferred content. This preferred content is how you can direct specific pages, group information, resources, and store items to an individual's home page. To enter this information, the user goes to your Web site and chooses to register as a new user. A series of screens prompts the user for the information. This information is automatically stored in the People Manager database. You may view it by logging in to the editor for your site and then going to the People Manager.
24
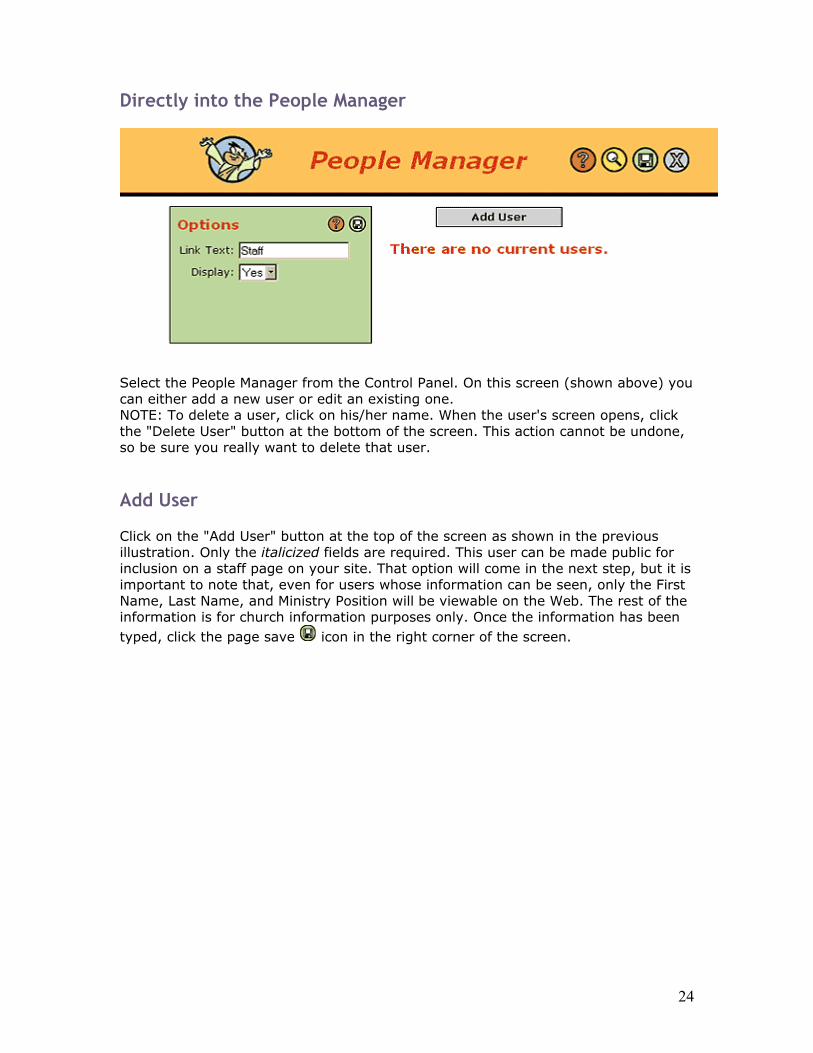
Directly into the People Manager
Select the People Manager from the Control Panel. On this screen (shown above) you can either add a new user or edit an existing one. NOTE: To delete a user, click on his/her name. When the user's screen opens, click the "Delete User" button at the bottom of the screen. This action cannot be undone, so be sure you really want to delete that user.
Add User Click on the "Add User" button at the top of the screen as shown in the previous illustration. Only the italicized fields are required. This user can be made public for inclusion on a staff page on your site. That option will come in the next step, but it is important to note that, even for users whose information can be seen, only the First Name, Last Name, and Ministry Position will be viewable on the Web. The rest of the information is for church information purposes only. Once the information has been typed, click the page save icon in the right corner of the screen.
25
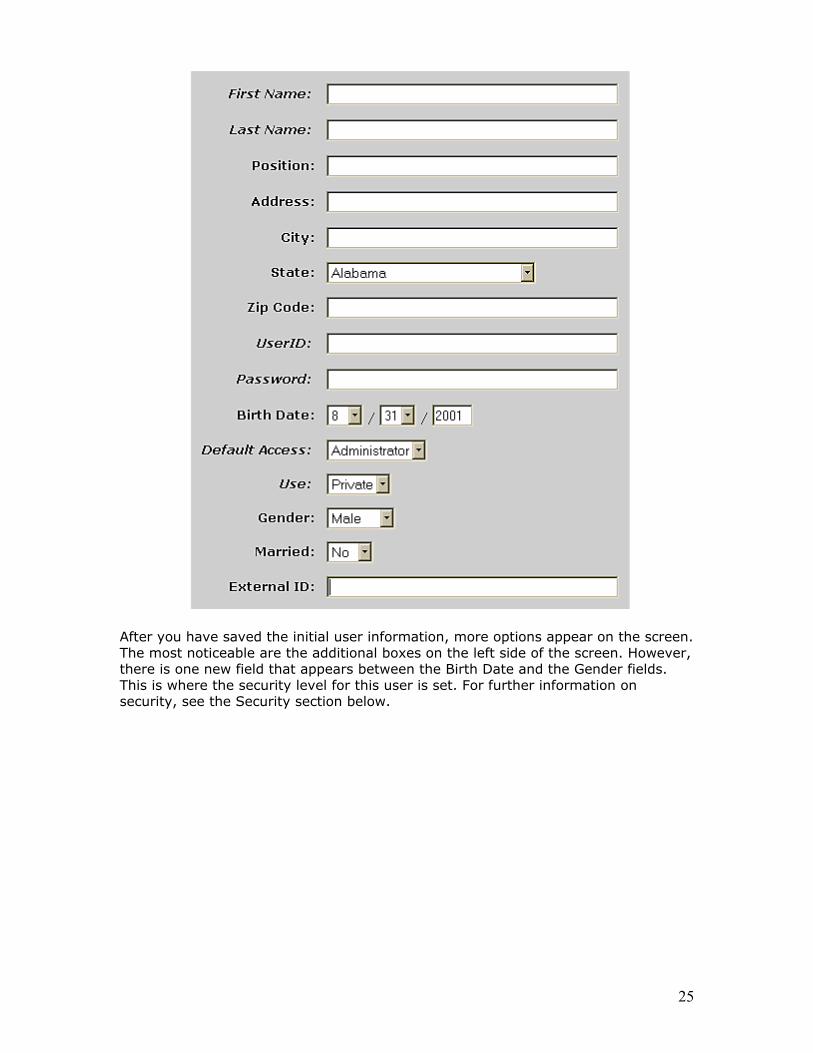
After you have saved the initial user information, more options appear on the screen. The most noticeable are the additional boxes on the left side of the screen. However, there is one new field that appears between the Birth Date and the Gender fields. This is where the security level for this user is set. For further information on security, see the Security section below.
26
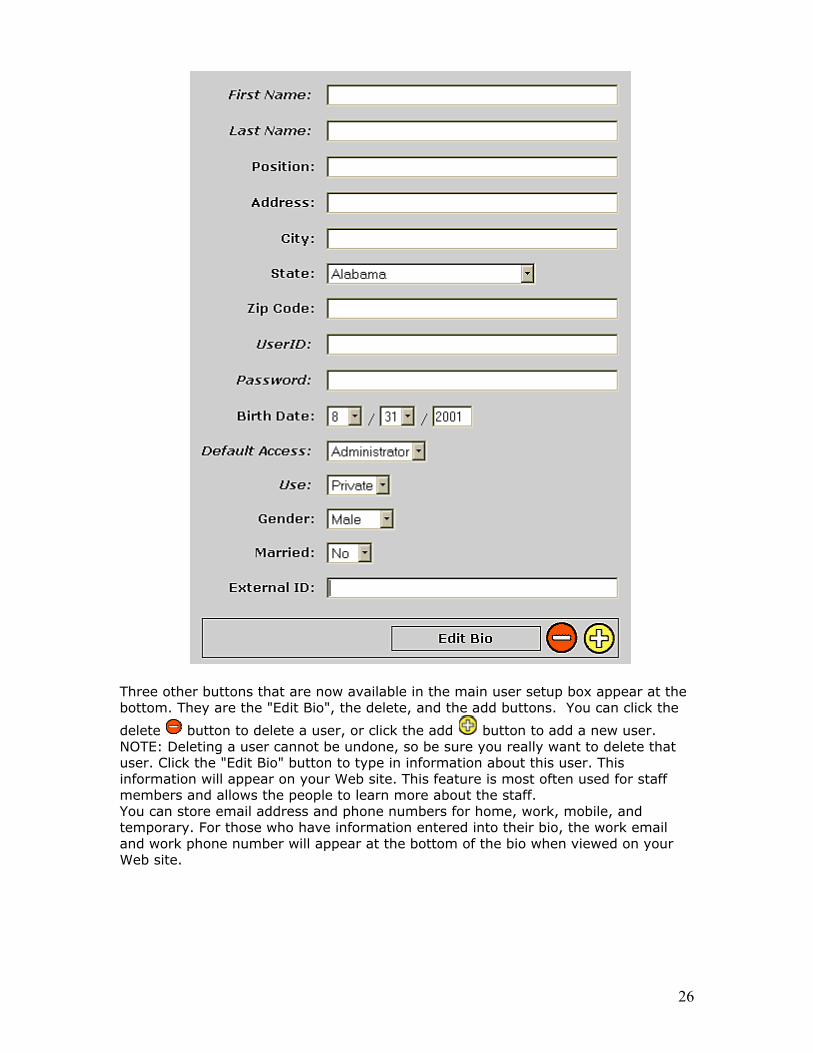
Three other buttons that are now available in the main user setup box appear at the bottom. They are the "Edit Bio", the delete, and the add buttons. You can click the
delete button to delete a user, or click the add button to add a new user. NOTE: Deleting a user cannot be undone, so be sure you really want to delete that user. Click the "Edit Bio" button to type in information about this user. This information will appear on your Web site. This feature is most often used for staff members and allows the people to learn more about the staff. You can store email address and phone numbers for home, work, mobile, and temporary. For those who have information entered into their bio, the work email and work phone number will appear at the bottom of the bio when viewed on your Web site.
27
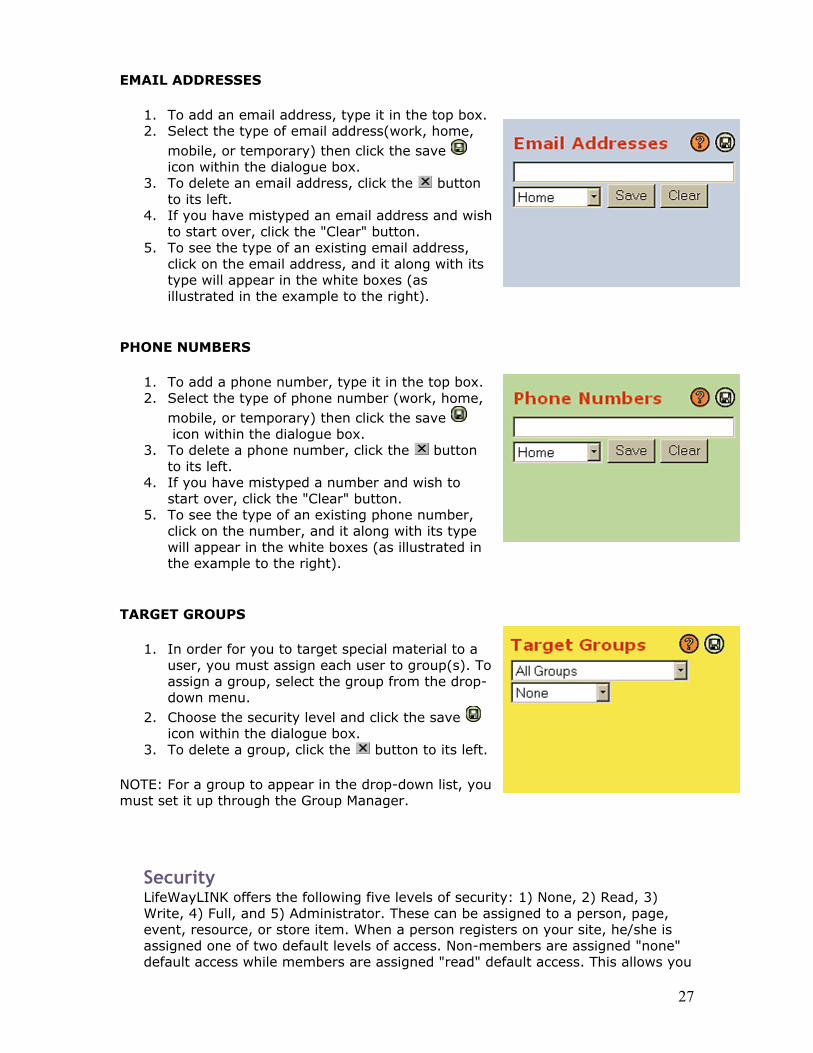
EMAIL ADDRESSES
1. To add an email address, type it in the top box. 2. Select the type of email address(work, home,
mobile, or temporary) then click the save icon within the dialogue box.
3. To delete an email address, click the button to its left.
4. If you have mistyped an email address and wish to start over, click the "Clear" button.
5. To see the type of an existing email address, click on the email address, and it along with its type will appear in the white boxes (as illustrated in the example to the right).
PHONE NUMBERS
1. To add a phone number, type it in the top box. 2. Select the type of phone number (work, home,
mobile, or temporary) then click the save icon within the dialogue box.
3. To delete a phone number, click the button to its left.
4. If you have mistyped a number and wish to start over, click the "Clear" button.
5. To see the type of an existing phone number, click on the number, and it along with its type will appear in the white boxes (as illustrated in the example to the right).
TARGET GROUPS
1. In order for you to target special material to a user, you must assign each user to group(s). To assign a group, select the group from the drop-down menu.
2. Choose the security level and click the save icon within the dialogue box.
3. To delete a group, click the button to its left.
NOTE: For a group to appear in the drop-down list, you must set it up through the Group Manager.
Security LifeWayLINK offers the following five levels of security: 1) None, 2) Read, 3) Write, 4) Full, and 5) Administrator. These can be assigned to a person, page, event, resource, or store item. When a person registers on your site, he/she is assigned one of two default levels of access. Non-members are assigned "none" default access while members are assigned "read" default access. This allows you
28
to control access to certain pages, events, etc. that you wish only members to view. The security feature allows for much more creativity than this. Groups, which have been set up through the Group Manager, provide you with the flexibility and options to target a page, event, resource, or store item to members of that group.
Targeting a Group
1. Set up the Group (See Group Manager). 2. Assign a person to the group. This can't be done by the individual through
setting his/her preferences at log in or by changing those preferences from your Web site's home page. You can also do this manually through the People Manager.
3. Go to the page, event, resource, or store item you wish to target this group. In the "Target Groups" box, choose the group you wish to target and the level of security required to access this item, and then hit the save button. To delete a group, click the button to its left.
29
Request Manager
Features This tool allows you to input and post prayer requests and receive those online. The tool can further be utilized to update staff members on conditions, progress, or other vital information related to those in need. You can choose what, if any, of the information to post to the site at large.
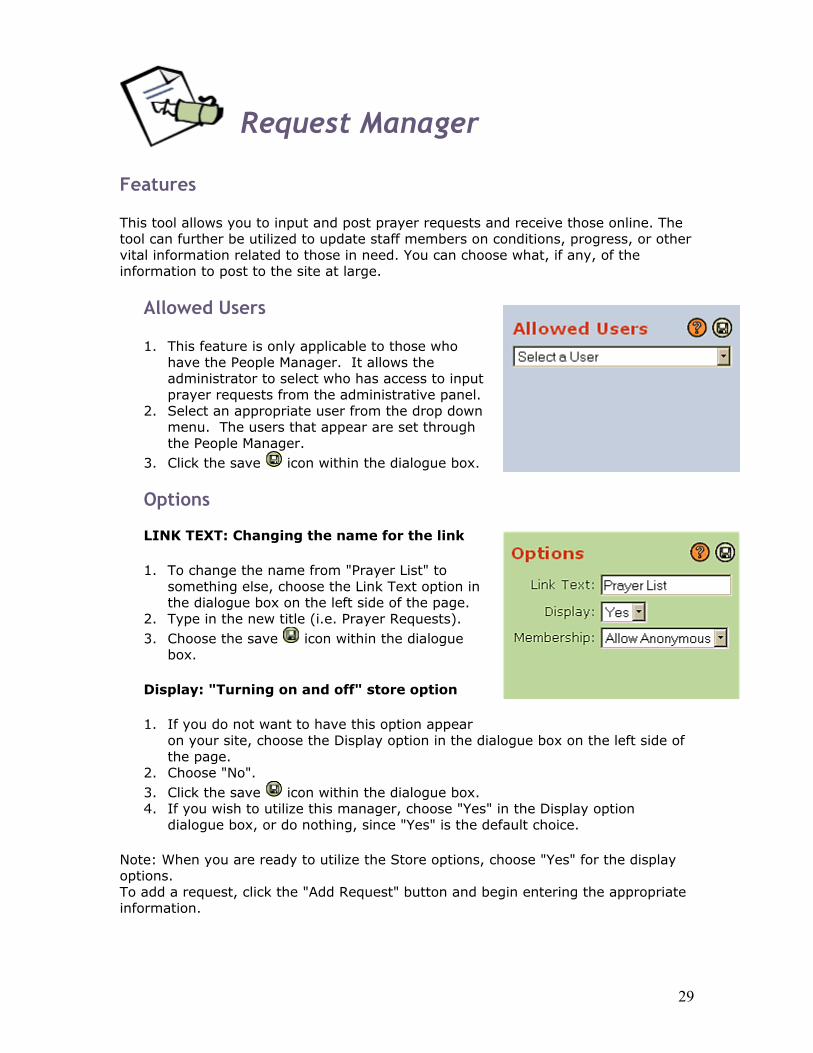
Allowed Users
1. This feature is only applicable to those who have the People Manager. It allows the administrator to select who has access to input prayer requests from the administrative panel.
2. Select an appropriate user from the drop down menu. The users that appear are set through the People Manager.
3. Click the save icon within the dialogue box.
Options LINK TEXT: Changing the name for the link
1. To change the name from "Prayer List" to something else, choose the Link Text option in the dialogue box on the left side of the page.
2. Type in the new title (i.e. Prayer Requests). 3. Choose the save icon within the dialogue
box.
Display: "Turning on and off" store option
1. If you do not want to have this option appear on your site, choose the Display option in the dialogue box on the left side of the page.
2. Choose "No". 3. Click the save icon within the dialogue box. 4. If you wish to utilize this manager, choose "Yes" in the Display option
dialogue box, or do nothing, since "Yes" is the default choice.
Note: When you are ready to utilize the Store options, choose "Yes" for the display options. To add a request, click the "Add Request" button and begin entering the appropriate information.
30
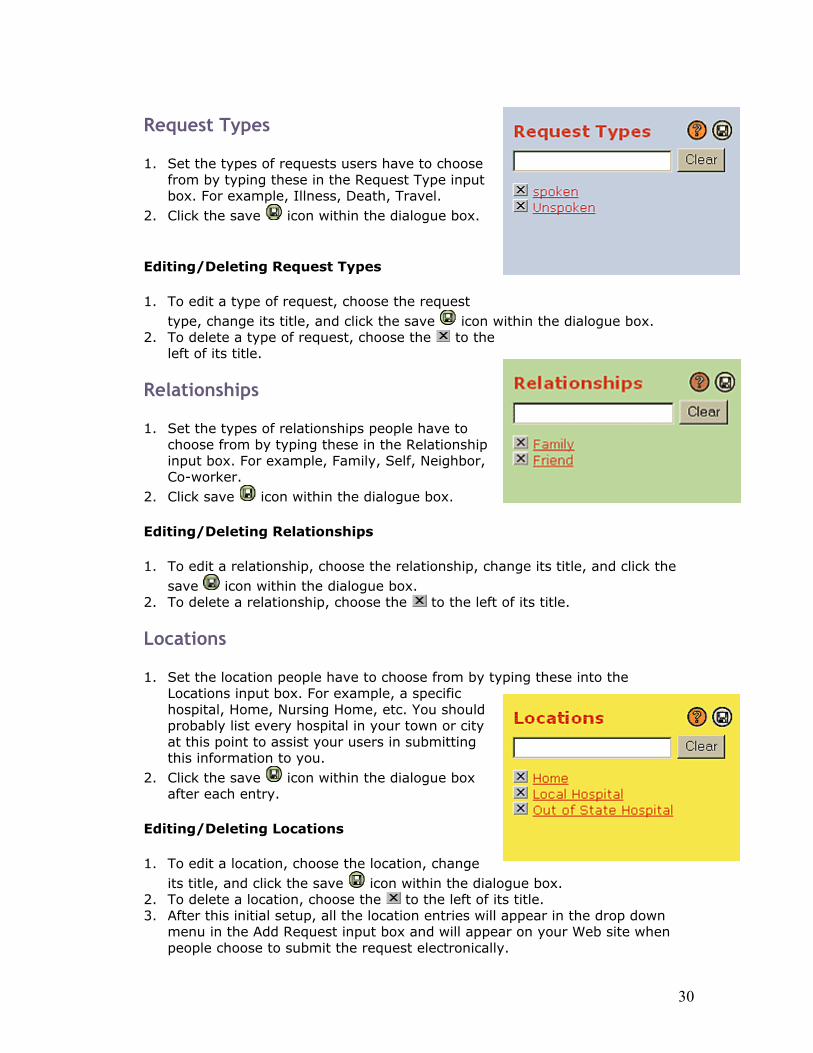
Request Types
1. Set the types of requests users have to choose from by typing these in the Request Type input box. For example, Illness, Death, Travel.
2. Click the save icon within the dialogue box.
Editing/Deleting Request Types
1. To edit a type of request, choose the request type, change its title, and click the save icon within the dialogue box.
2. To delete a type of request, choose the to the left of its title.
Relationships
1. Set the types of relationships people have to choose from by typing these in the Relationship input box. For example, Family, Self, Neighbor, Co-worker.
2. Click save icon within the dialogue box.
Editing/Deleting Relationships
1. To edit a relationship, choose the relationship, change its title, and click the save icon within the dialogue box.
2. To delete a relationship, choose the to the left of its title.
Locations
1. Set the location people have to choose from by typing these into the Locations input box. For example, a specific hospital, Home, Nursing Home, etc. You should probably list every hospital in your town or city at this point to assist your users in submitting this information to you.
2. Click the save icon within the dialogue box after each entry.
Editing/Deleting Locations
1. To edit a location, choose the location, change its title, and click the save icon within the dialogue box.
2. To delete a location, choose the to the left of its title. 3. After this initial setup, all the location entries will appear in the drop down
menu in the Add Request input box and will appear on your Web site when people choose to submit the request electronically.
31
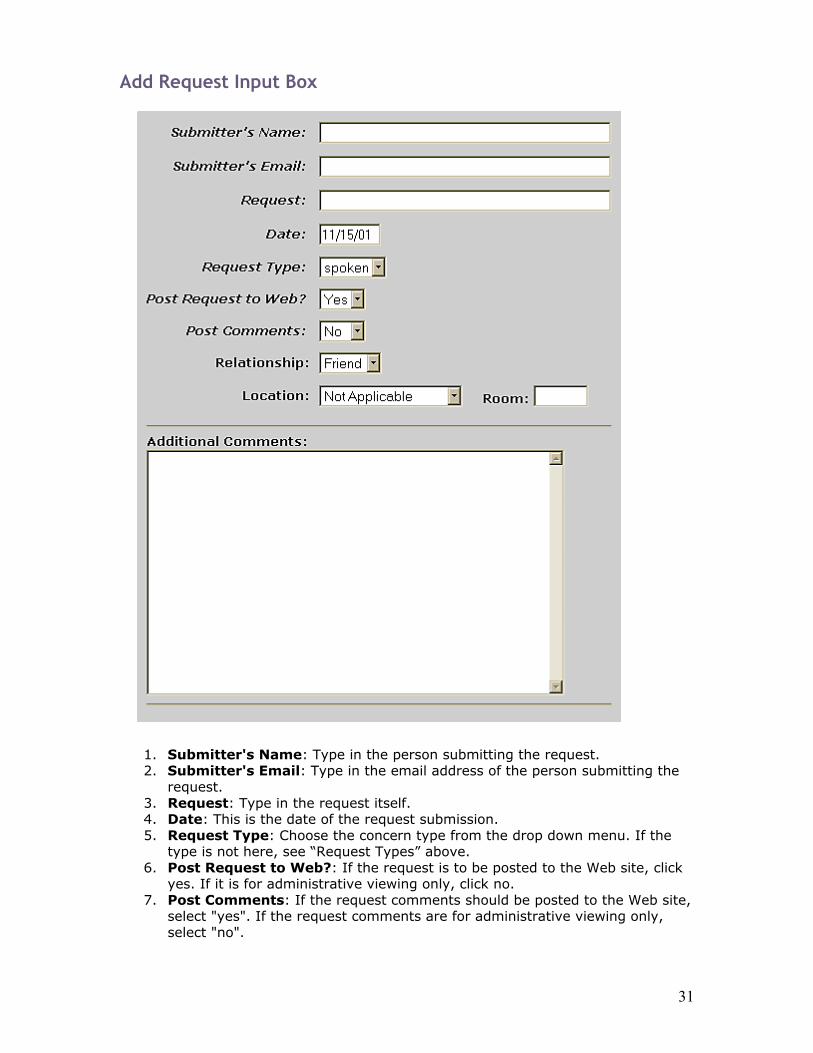
Add Request Input Box
1. Submitter's Name: Type in the person submitting the request. 2. Submitter's Email: Type in the email address of the person submitting the
request. 3. Request: Type in the request itself. 4. Date: This is the date of the request submission. 5. Request Type: Choose the concern type from the drop down menu. If the
type is not here, see “Request Types” above. 6. Post Request to Web?: If the request is to be posted to the Web site, click
yes. If it is for administrative viewing only, click no. 7. Post Comments: If the request comments should be posted to the Web site,
select "yes". If the request comments are for administrative viewing only, select "no".
32
8. Relationship: Choose the type of relationship to the person making the request from the drop down menu (optional). If the relationship is not listed, see “Relationships” above.
9. Location: Choose the location from the drop down menu (optional). If the location is not listed, see “Locations” above.
10. Room: Input room number, if applicable. 11. For security purposes, the location information related to the requests will not
appear on the Web site for the public at large. 12. Click the page save icon in the right corner of the screen when finished. 13. To delete a request, select the "Delete Request" button at the bottom of the
request input box.
Posting Requests
1. Whenever a request is submitted, an e-mail is sent to the administrator saying a request has been made. It is the administrator's responsibility to check the e-mail and see if the request needs can be posted or not.
2. If the request is to be posted, then the administrator must change the post drop down box to Yes. It is automatically set to No.
3. Click the page save icon in the right corner of the screen. 4. The person's name and request type will then be posted to your Web Site.
33
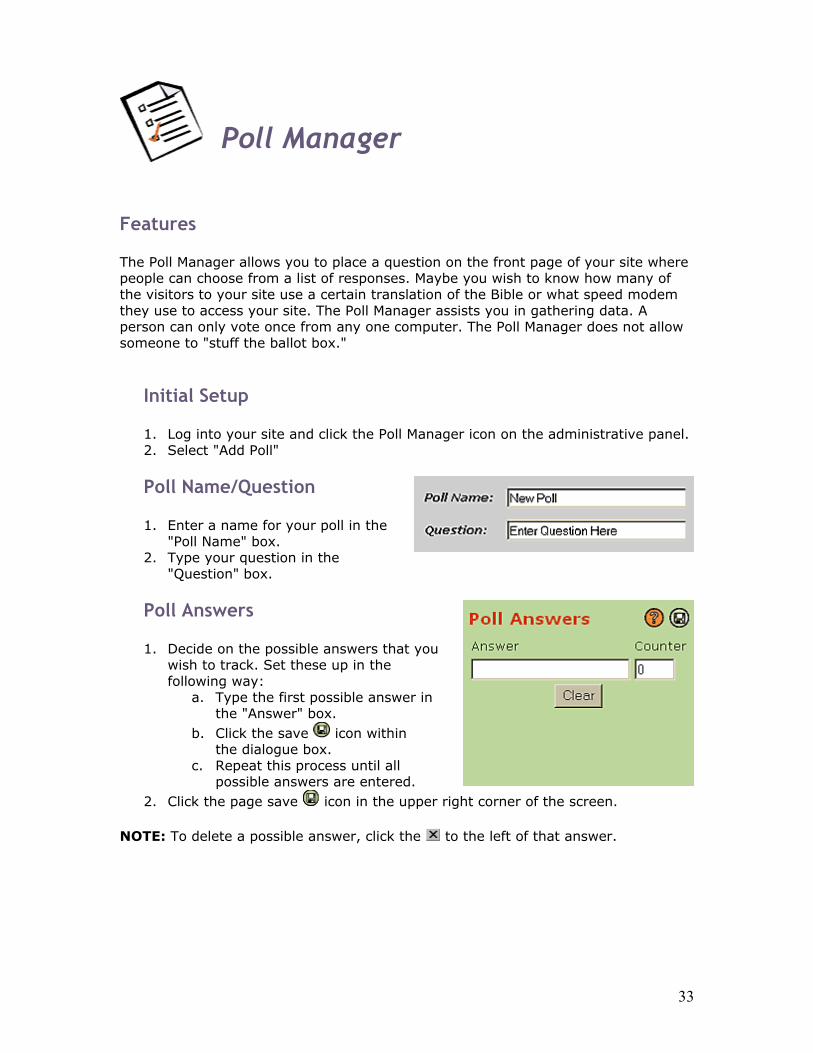
Poll Manager
Features The Poll Manager allows you to place a question on the front page of your site where people can choose from a list of responses. Maybe you wish to know how many of the visitors to your site use a certain translation of the Bible or what speed modem they use to access your site. The Poll Manager assists you in gathering data. A person can only vote once from any one computer. The Poll Manager does not allow someone to "stuff the ballot box."
Initial Setup
1. Log into your site and click the Poll Manager icon on the administrative panel. 2. Select "Add Poll"
Poll Name/Question
1. Enter a name for your poll in the "Poll Name" box.
2. Type your question in the "Question" box.
Poll Answers
1. Decide on the possible answers that you wish to track. Set these up in the following way:
a. Type the first possible answer in the "Answer" box.
b. Click the save icon within the dialogue box.
c. Repeat this process until all possible answers are entered.
2. Click the page save icon in the upper right corner of the screen.
NOTE: To delete a possible answer, click the to the left of that answer.
34
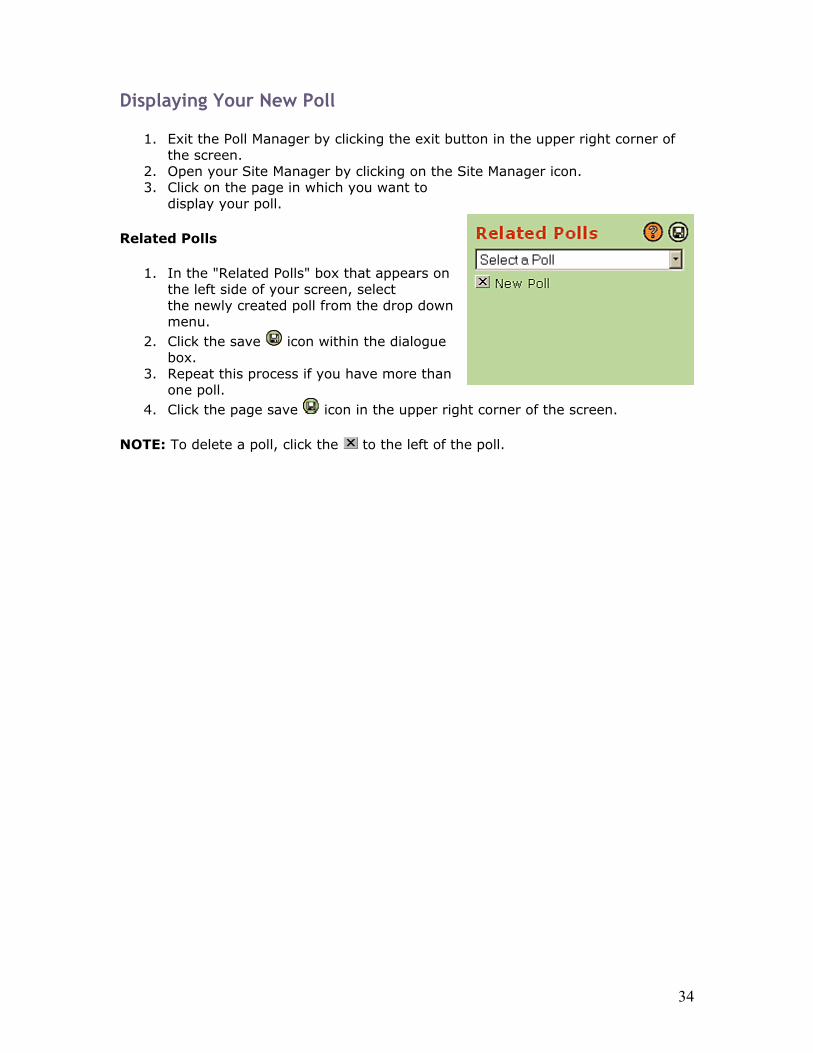
Displaying Your New Poll
1. Exit the Poll Manager by clicking the exit button in the upper right corner of the screen.
2. Open your Site Manager by clicking on the Site Manager icon. 3. Click on the page in which you want to
display your poll.
Related Polls
1. In the "Related Polls" box that appears on the left side of your screen, select the newly created poll from the drop down menu.
2. Click the save icon within the dialogue box.
3. Repeat this process if you have more than one poll.
4. Click the page save icon in the upper right corner of the screen.
NOTE: To delete a poll, click the to the left of the poll.
35
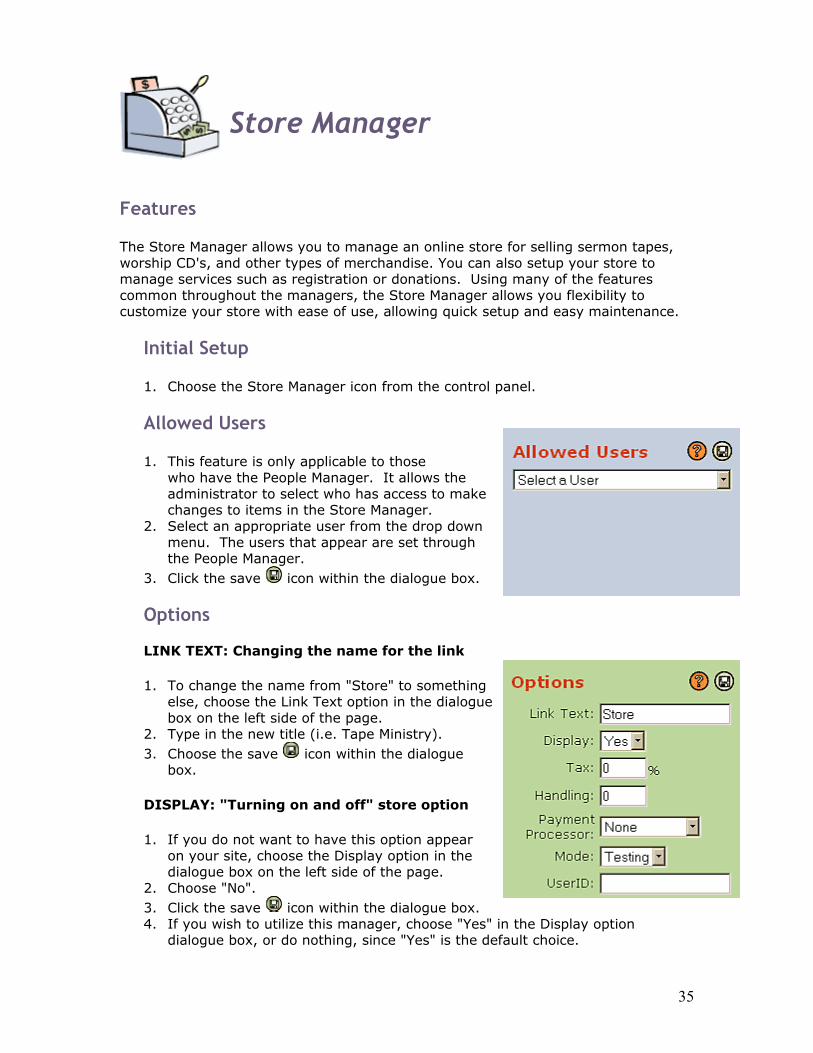
Store Manager
Features The Store Manager allows you to manage an online store for selling sermon tapes, worship CD's, and other types of merchandise. You can also setup your store to manage services such as registration or donations. Using many of the features common throughout the managers, the Store Manager allows you flexibility to customize your store with ease of use, allowing quick setup and easy maintenance.
Initial Setup
1. Choose the Store Manager icon from the control panel.
Allowed Users
1. This feature is only applicable to those who have the People Manager. It allows the administrator to select who has access to make changes to items in the Store Manager.
2. Select an appropriate user from the drop down menu. The users that appear are set through the People Manager.
3. Click the save icon within the dialogue box.
Options LINK TEXT: Changing the name for the link
1. To change the name from "Store" to something else, choose the Link Text option in the dialogue box on the left side of the page.
2. Type in the new title (i.e. Tape Ministry). 3. Choose the save icon within the dialogue
box.
DISPLAY: "Turning on and off" store option
1. If you do not want to have this option appear on your site, choose the Display option in the dialogue box on the left side of the page.
2. Choose "No". 3. Click the save icon within the dialogue box. 4. If you wish to utilize this manager, choose "Yes" in the Display option
dialogue box, or do nothing, since "Yes" is the default choice.
36
TAX
1. Enter the percentage of state tax for each order. 2. Choose the save icon within the dialogue box.
NOTE: Tax charges may not apply to everyone. Check with your church/organization accountant for tax information. HANDLING
1. Enter the amount you plan to add for handling to each order, if any. 2. Choose the save icon within the dialogue box.
PAYMENT PROCESSOR
1. Select your Payment Processor from the drop down menu. 2. If your processor does not appear, or you do not currently have a payment processor, please contact us at [email protected]. 3. Choose the save icon within the dialogue box.
MODE
1. Choose the mode for which you want to process payments. 2. "Testing" mode allows you to send and collect data without actually processing the information. 3. "Live" mode allows you to actually process the data. 4. Choose the save icon within the dialogue box.
USERID
1. Enter your Payment Processor UserID. 2. Choose the save icon within the dialogue box.
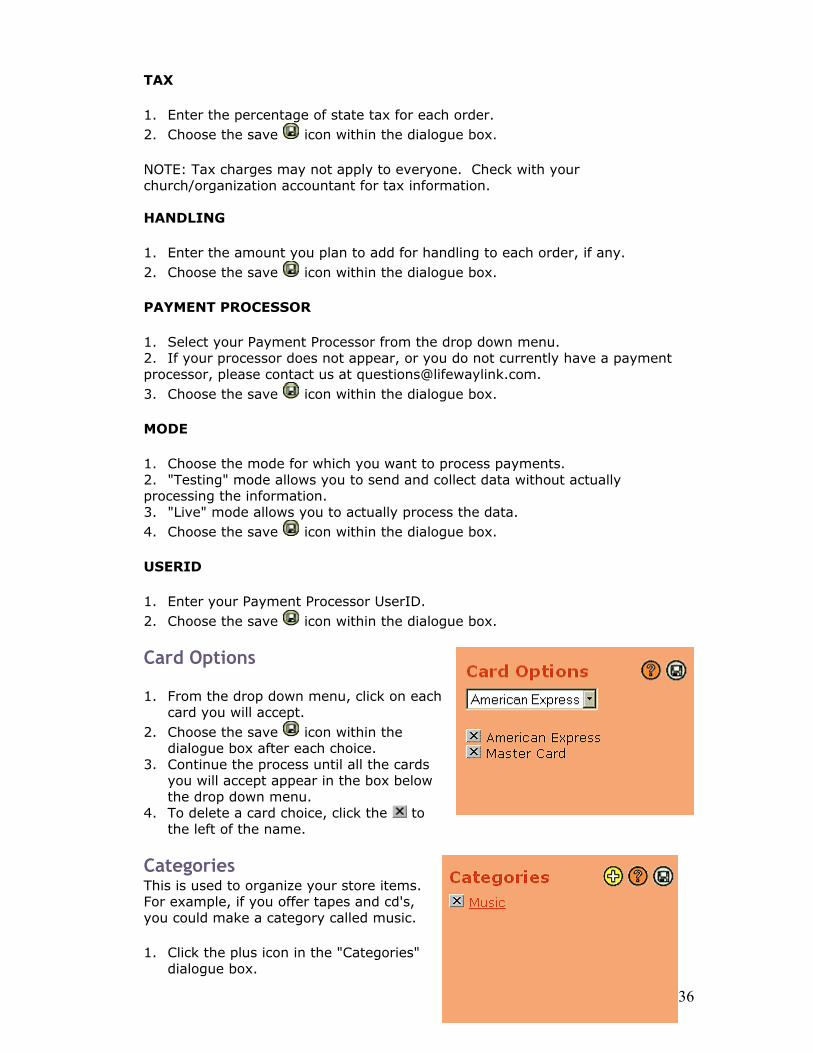
Card Options
1. From the drop down menu, click on each card you will accept.
2. Choose the save icon within the dialogue box after each choice.
3. Continue the process until all the cards you will accept appear in the box below the drop down menu.
4. To delete a card choice, click the to the left of the name.
Categories This is used to organize your store items. For example, if you offer tapes and cd's, you could make a category called music.
1. Click the plus icon in the "Categories" dialogue box.
37
2. In the script prompt that appears, type the name of the category you want to create.
3. Click the save icon within the dialogue box. 4. Continue this until all your categories are created.
When the initial setup is complete, click the page save icon in the right corner of the screen.
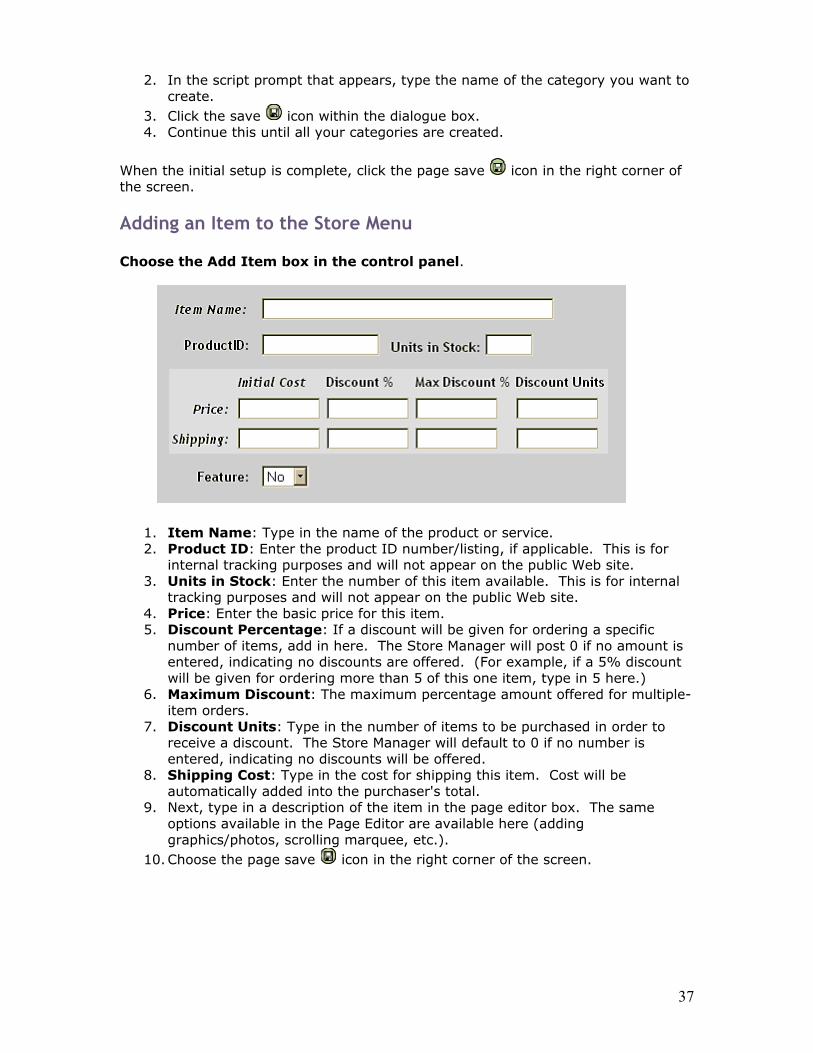
Adding an Item to the Store Menu Choose the Add Item box in the control panel.
1. Item Name: Type in the name of the product or service. 2. Product ID: Enter the product ID number/listing, if applicable. This is for
internal tracking purposes and will not appear on the public Web site. 3. Units in Stock: Enter the number of this item available. This is for internal
tracking purposes and will not appear on the public Web site. 4. Price: Enter the basic price for this item. 5. Discount Percentage: If a discount will be given for ordering a specific
number of items, add in here. The Store Manager will post 0 if no amount is entered, indicating no discounts are offered. (For example, if a 5% discount will be given for ordering more than 5 of this one item, type in 5 here.)
6. Maximum Discount: The maximum percentage amount offered for multiple-item orders.
7. Discount Units: Type in the number of items to be purchased in order to receive a discount. The Store Manager will default to 0 if no number is entered, indicating no discounts will be offered.
8. Shipping Cost: Type in the cost for shipping this item. Cost will be automatically added into the purchaser's total.
9. Next, type in a description of the item in the page editor box. The same options available in the Page Editor are available here (adding graphics/photos, scrolling marquee, etc.).
10. Choose the page save icon in the right corner of the screen.
38
To Delete an Item
To delete and item from the Store Manager, choose the minus icon at the bottom of the page, then save the page.
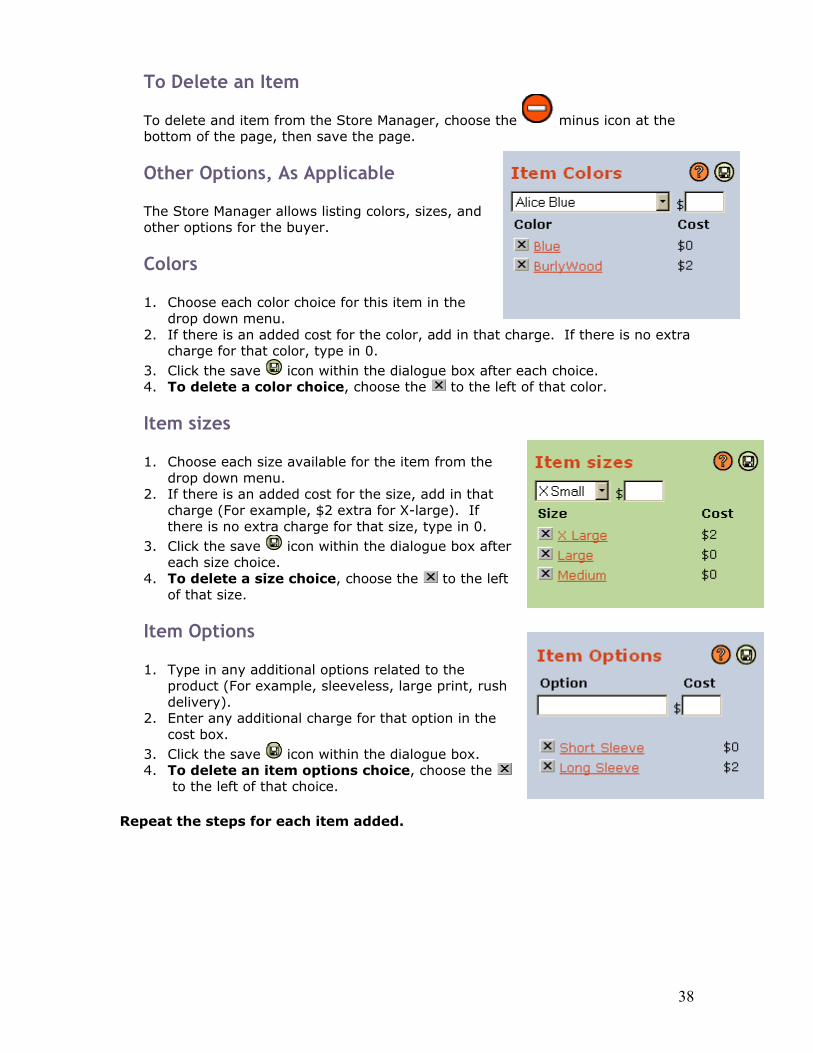
Other Options, As Applicable
The Store Manager allows listing colors, sizes, and other options for the buyer.
Colors
1. Choose each color choice for this item in the drop down menu.
2. If there is an added cost for the color, add in that charge. If there is no extra charge for that color, type in 0.
3. Click the save icon within the dialogue box after each choice. 4. To delete a color choice, choose the to the left of that color.
Item sizes
1. Choose each size available for the item from the drop down menu.
2. If there is an added cost for the size, add in that charge (For example, $2 extra for X-large). If there is no extra charge for that size, type in 0.
3. Click the save icon within the dialogue box after each size choice.
4. To delete a size choice, choose the to the left of that size.
Item Options
1. Type in any additional options related to the product (For example, sleeveless, large print, rush delivery).
2. Enter any additional charge for that option in the cost box.
3. Click the save icon within the dialogue box. 4. To delete an item options choice, choose the
to the left of that choice.
Repeat the steps for each item added.
39
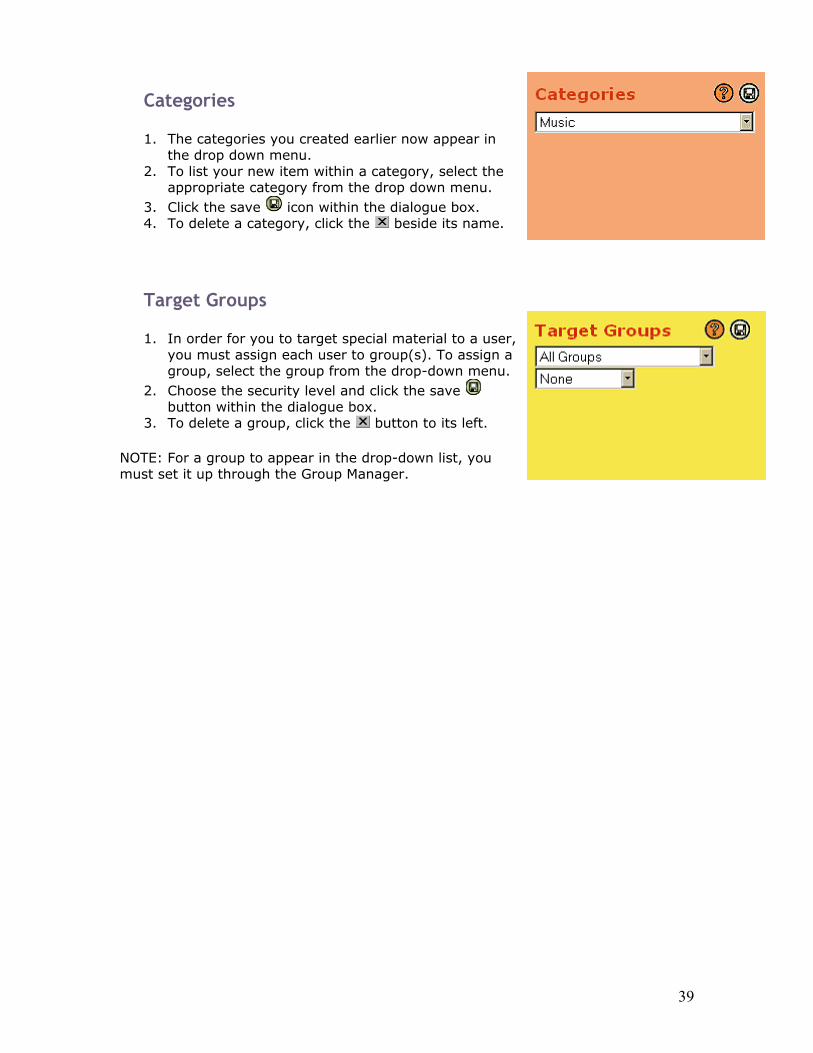
Categories
1. The categories you created earlier now appear in the drop down menu.
2. To list your new item within a category, select the appropriate category from the drop down menu.
3. Click the save icon within the dialogue box. 4. To delete a category, click the beside its name.
Target Groups
1. In order for you to target special material to a user, you must assign each user to group(s). To assign a group, select the group from the drop-down menu.
2. Choose the security level and click the save button within the dialogue box.
3. To delete a group, click the button to its left.
NOTE: For a group to appear in the drop-down list, you must set it up through the Group Manager.
40
Resource Manager
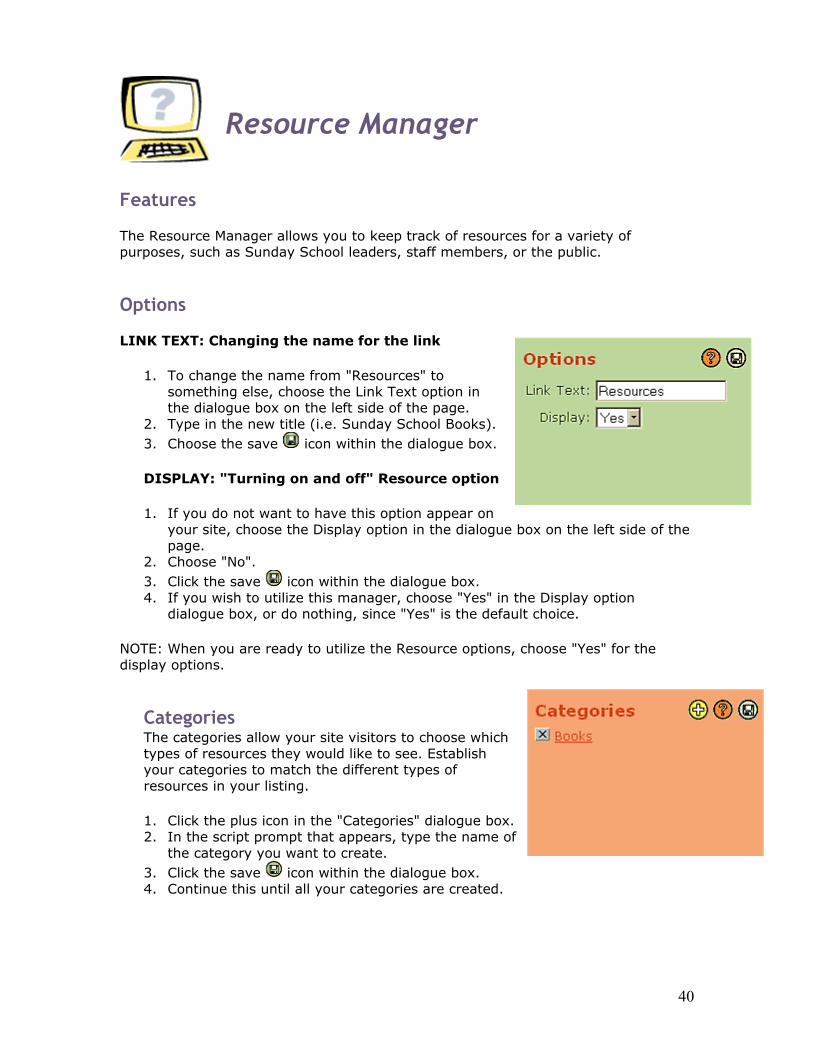
Features The Resource Manager allows you to keep track of resources for a variety of purposes, such as Sunday School leaders, staff members, or the public.
Options LINK TEXT: Changing the name for the link
1. To change the name from "Resources" to something else, choose the Link Text option in the dialogue box on the left side of the page.
2. Type in the new title (i.e. Sunday School Books). 3. Choose the save icon within the dialogue box.
DISPLAY: "Turning on and off" Resource option
1. If you do not want to have this option appear on your site, choose the Display option in the dialogue box on the left side of the page.
2. Choose "No". 3. Click the save icon within the dialogue box. 4. If you wish to utilize this manager, choose "Yes" in the Display option
dialogue box, or do nothing, since "Yes" is the default choice.
NOTE: When you are ready to utilize the Resource options, choose "Yes" for the display options.
Categories The categories allow your site visitors to choose which types of resources they would like to see. Establish your categories to match the different types of resources in your listing.
1. Click the plus icon in the "Categories" dialogue box. 2. In the script prompt that appears, type the name of
the category you want to create. 3. Click the save icon within the dialogue box. 4. Continue this until all your categories are created.
41
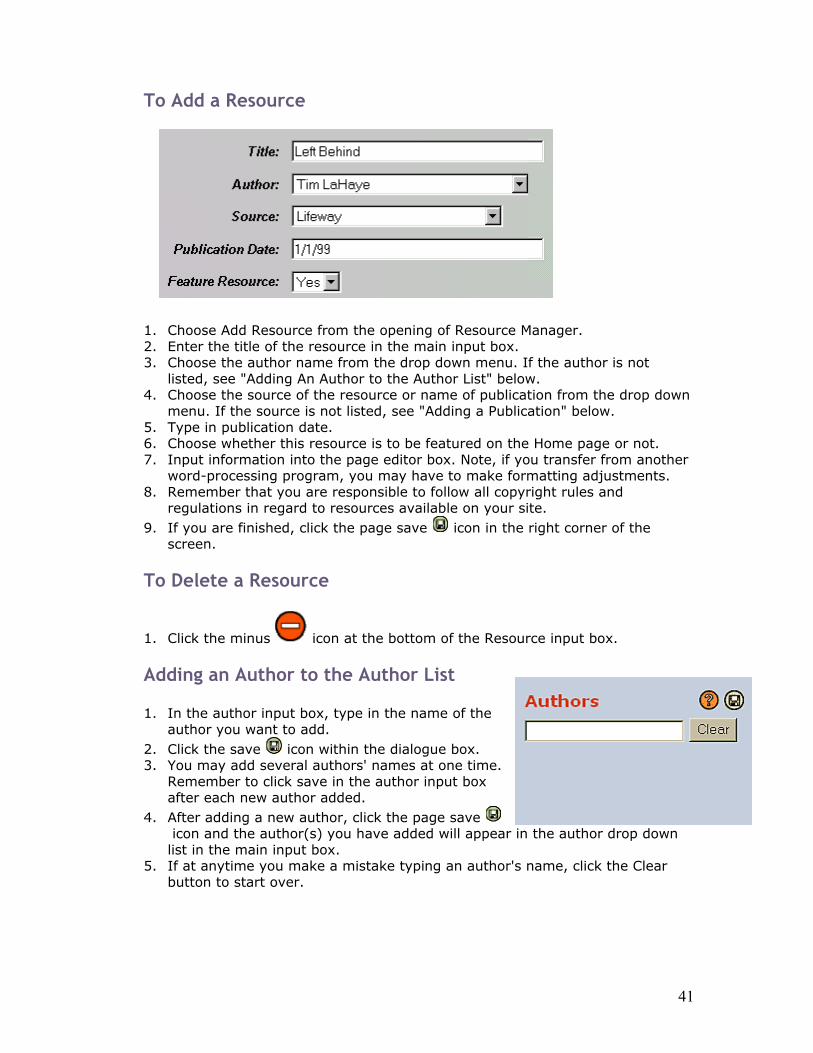
To Add a Resource
1. Choose Add Resource from the opening of Resource Manager. 2. Enter the title of the resource in the main input box. 3. Choose the author name from the drop down menu. If the author is not
listed, see "Adding An Author to the Author List" below. 4. Choose the source of the resource or name of publication from the drop down
menu. If the source is not listed, see "Adding a Publication" below. 5. Type in publication date. 6. Choose whether this resource is to be featured on the Home page or not. 7. Input information into the page editor box. Note, if you transfer from another
word-processing program, you may have to make formatting adjustments. 8. Remember that you are responsible to follow all copyright rules and
regulations in regard to resources available on your site. 9. If you are finished, click the page save icon in the right corner of the
screen.
To Delete a Resource
1. Click the minus icon at the bottom of the Resource input box.
Adding an Author to the Author List
1. In the author input box, type in the name of the author you want to add.
2. Click the save icon within the dialogue box. 3. You may add several authors' names at one time.
Remember to click save in the author input box after each new author added.
4. After adding a new author, click the page save icon and the author(s) you have added will appear in the author drop down list in the main input box.
5. If at anytime you make a mistake typing an author's name, click the Clear button to start over.

42
Editing/Deleting an Author
1. To edit, choose the author's name from the author input box. 2. Edit the name. 3. Click the save icon within the dialogue box. 4. To delete an author, click the beside his or her name. Warning, this cannot
be undone. 5. You may delete only those authors' who appear under the author input box,
not those built into the Resource Manager.
Adding a Publication to the Publication List
1. Type in the publication name in the publication input box.
2. Click the save icon within the dialogue box. 3. You may add several publications at one time.
Remember to click save in the publication input box after each new publication is added.
4. After adding a new publication, click the page save icon and the publications you have added will appear in the publications drop down list in the main input box.
5. If at anytime you make a mistake typing a publication, click the Clear button to start over.
Editing/Deleting a Publication
1. To edit, choose the publication name from the publication input box. 2. Edit the name. 3. Click the save icon within the dialogue box. 4. To delete a publication, click the beside its name. 5. You may delete only those publications which appear under the publications
input box, not those built into the Resource Manager.
After you have saved the initial resource information, two new dialogue boxes will appear on the screen. They are the Categories and Target Groups boxes.
Categories
1. The categories you created earlier now appear in the drop down menu.
2. To list your new resource within a category, select the appropriate category from the drop down menu.
3. Click the save icon within the dialogue box. 4. To delete a category, click the beside its name.
43
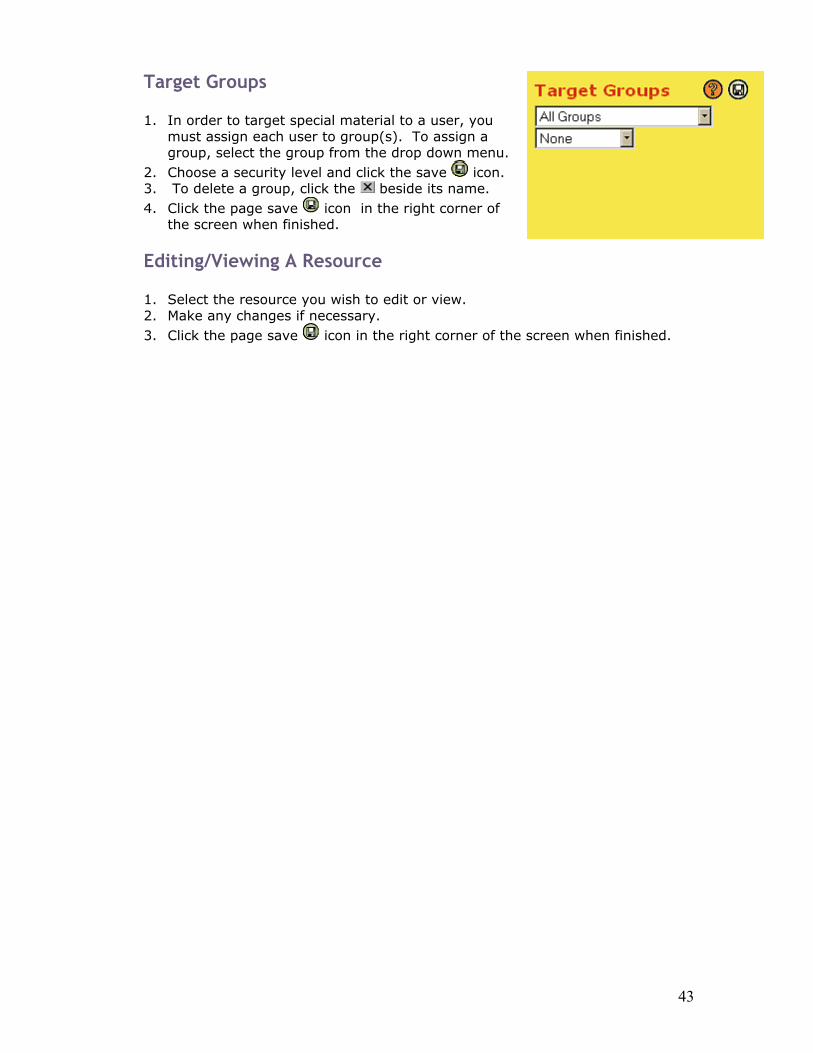
Target Groups
1. In order to target special material to a user, you must assign each user to group(s). To assign a group, select the group from the drop down menu.
2. Choose a security level and click the save icon. 3. To delete a group, click the beside its name. 4. Click the page save icon in the right corner of
the screen when finished.
Editing/Viewing A Resource
1. Select the resource you wish to edit or view. 2. Make any changes if necessary. 3. Click the page save icon in the right corner of the screen when finished.

44
Communications Manager
Features The Communications Manager allows you to send emails to specific groups, already established in the Group Manager.
Setup
1. From: Type the email address of who the message is from. 2. To: Type the email address of the person receiving the message. 3. Copy: Click on the groups you want to receive the message. 4. Subject: Type in the subject of the email. 5. Input the email message into the editor box. 6. Select "Send Mail" to send the email or "Cancel" to cancel it.
45
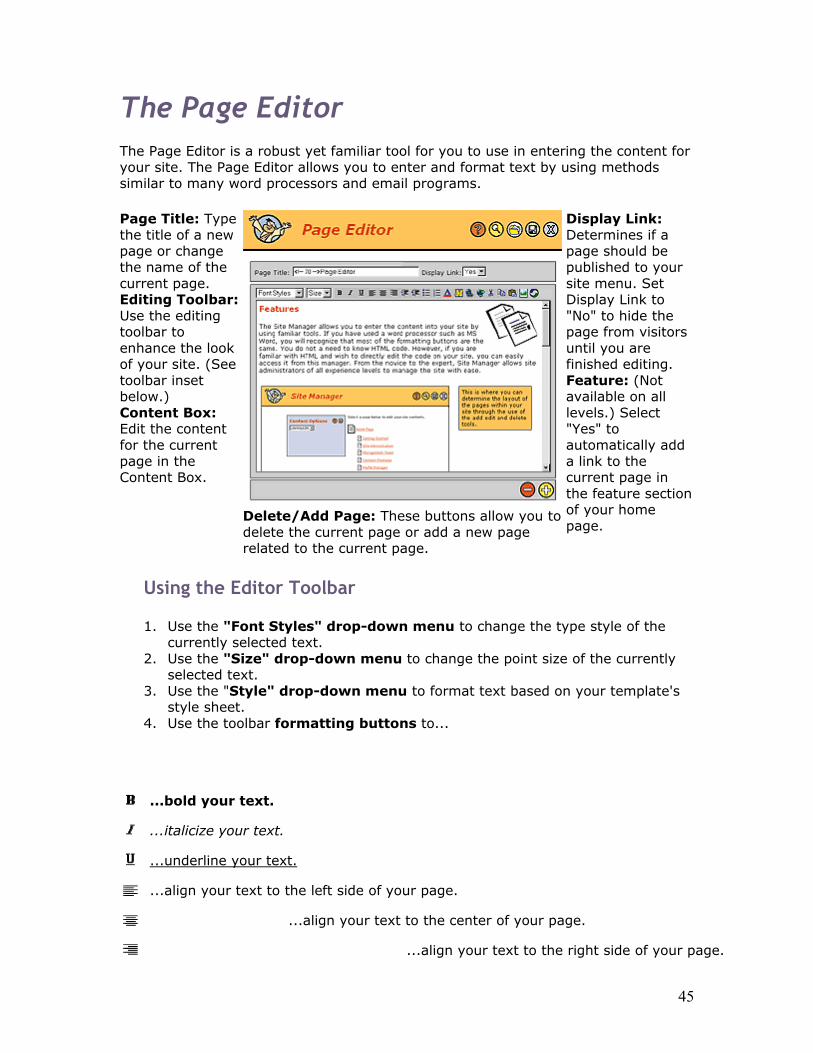
The Page Editor The Page Editor is a robust yet familiar tool for you to use in entering the content for your site. The Page Editor allows you to enter and format text by using methods similar to many word processors and email programs. Page Title: Type the title of a new page or change the name of the current page. Editing Toolbar: Use the editing toolbar to enhance the look of your site. (See toolbar inset below.) Content Box: Edit the content for the current page in the Content Box.
Delete/Add Page: These buttons allow you to delete the current page or add a new page related to the current page.
Display Link: Determines if a page should be published to your site menu. Set Display Link to "No" to hide the page from visitors until you are finished editing. Feature: (Not available on all levels.) Select "Yes" to automatically add a link to the current page in the feature section of your home page.
Using the Editor Toolbar
1. Use the "Font Styles" drop-down menu to change the type style of the currently selected text.
2. Use the "Size" drop-down menu to change the point size of the currently selected text.
3. Use the "Style" drop-down menu to format text based on your template's style sheet.
4. Use the toolbar formatting buttons to...
...bold your text.
...italicize your text.
...underline your text.
...align your text to the left side of your page.
...align your text to the center of your page.
...align your text to the right side of your page.
46
...insert a bulleted list.
1. ...insert 2. an ordered 3. list.
...add color to your text.
...insert a table
insert a scrolling marquee
...create a hyperlink to another Web site.
...create a link to another page in your site.
...cut a text selection.
...copy a text selection.
...paste text from the clipboard.
...add files to and select files from your online gallery.
...toggle between HTML view and design view.
The following standard keyboard shortcuts are also available in the editor.
Cut (Ctrl + X) Undo (Ctrl + Z)
Copy (Ctrl + C) Redo (Ctrl + Y)
Paste (Ctrl + V) Hyperlink (Ctrl + K)
Bold (Ctrl + B) Find (Ctrl + F)
Italic (Ctrl + I) Select all (Ctrl + A)
Underline (Ctrl + U) Select block (Ctrl + Left-click)
Adding a Page
1. From the list of pages, choose the page under which you want to add additional pages.
Note: For instance, to create a new page available from the home page, select the Home Page by clicking on the words “Home Page” in the Site Manager; then select the "Add Page" button in the Page Editor. To create a new page under the Ministries page, first select the Ministries page in the Site Manager; then select the "Add Page" button in the Page Editor. These new
47
pages will appear in your site structure under Home and Ministries, much like an outline.
2. Choose the "Add Page" button in the bottom right corner of the Page Editor.
3. Depending on the package you purchased, you may be presented with an additional page agreement notifying you of an additional monthly cost for adding the new page. Click the "OK" button in Add Page dialog box to agree to the terms and additional page cost or click the "Cancel" button to abort creating the new page without incurring any additional cost.
4. This will display a new Page Editor screen. Type the title for the new page in the “Page Title” box located at the top.
5. Enter the page contents. 6. Click save . 7. Click preview to view page. 8. If changes are needed, close the preview page. Make changes and save.
NOTE: It is always a good idea to save often. If your computer loses power before you have saved any changes, your work will be lost.
Adding A Table This tool allows you to set up tables on your page or to better align graphics and text.
Adding A Table
1. Create an insertion point for the table by holding down the "SHIFT" key and pressing the "6" key or holding down the "Ctrl" key and clicking your left mouse button. The "^" symbol should appear where you intend to insert the table.
2. Choose the table icon . 3. Choose the number of columns desired. 4. Choose whether you wish to have a border. 5. Column number headings will appear in the page editor. Type in text or place
graphics in the columns. Use the space bar to move from one column to the other.
6. Click the save icon in the right corner of the screen.
Wrapping Text
If you want your text to wrap around a picture, create a two column table with one row and no border. You can place the picture in one column and the text in the other. This will produce the wrapping effect.
Changing the Order of Pages By adding some basic HTML code to the page name, you can place the pages in any order you choose. The format is this: <!--1--> page name.
48
1. In the Page Title textbox, place your cursor at the beginning of your page title and type the following: <!--1-->
2. Change the 1 to the number of the order for that page. Example: if you want the About Us page to be listed third make the page name <!--3-->About Us. The code does not appear on the web site.
3. The order only affects pages on the same hierarchical level. So you can do this with subpages as well and it not affect the main pages.
Changing the Page Name
1. Click on the page which you wish to work on from the list of pages by clicking on the name of the page.
2. In the Page Editor, click in the page title box at the top of the screen. 3. Type a new name in the box. 4. Click the save button.
Creating Hyperlinks
Creating Links to Pages on Other Web Sites This tool gives you the ability to direct a user on your Web site to information at another site. For example, if your content includes information about your community and you would like to provide the option for the user to know more, you could add a link to the Web site of your community's Chamber of Commerce or Visitor's Information Center.
1. Use your mouse to highlight the text or image you would like to use as a link. In the above example, you might highlight “area attractions” or “for more information.”
2. Select the Web Link button from the Tool Bar. 3. Select the type of link. 4. Type the URL address of the Web link (i.e. http://www.LifeWayLINK.com). 5. Click "OK".
Creating Links to Pages Within Your Site The Site Link tool allows you to direct your user from the page they are currently viewing to another related page within your site with a simple click of their mouse.
1. Select the Site Link button from the Tool Bar. 2. In the Site Link window that appears, choose the type of link you wish to
create from the drop-down menu. Page: Allows you to select from a list of all the pages on your site. Event: Allows you to select from a list of all the current events on your site. Small Group: Allows you to select from a list of all the groups on your site. Resource: Allows you to select from a list of the resources on your site. Store Item: Allows you to select from a list of all the items in your bookstore. Person: Allows you to select from a list of everyone listed in the People Manager.
49
3. Highlight the text you want to convert to a link in the text editor window. 4. Select a link option from the "Links" drop-down menu.
5. Click the save icon in the upper right corner of the screen.
Deleting a Page
1. Click on the page you wish to delete from list of pages. 2. In the Page Editor, click the Delete Page button in the bottom right corner. 3. Click "OK" in the Page Delete Confirmation dialog box.
WARNING: Deleting a page cannot be undone. It totally removes the page (design, text, images) from your Web site. Make sure you want to delete the page before clicking “OK”.
Editing Page Contents
1. Choose the page which you wish to work on from the Site Manager pages list. 2. Edit your page contents by making the necessary changes in the Content Box. 3. Click save .
Note: Click the preview button in the upper-right corner of the Page Editor or Site Manager to view changes on the Web page. If additional changes are needed, close preview window, make changes, save, and preview again. WARNING: Be sure you save each page when changes have been made. Unsaved changes will be lost when you exit the Page Editor.
Editing Tips
1. The Style drop down list is an easy way to make sure your headings and other type-related graphics are consistent throughout your site. It also relieves you from changing type size and color each time you want to create a headline, subheading or other type of graphic element. Make a note of which style you use (ex. Heading 3 for all main headings on a page; Heading 2 for subheads).
2. The page editor is programmed to automatically double space. To single space, hold down the Shift and Return keys at the same time where you want to add one line between text. To edit material that shows up double spaced, such as a list, backspace the second line to the first. Place the cursor where you desire the line break to occur. Hit shift/enter and the text will be single-spaced. Continue the process until your text is complete.
3. Tabs are not recognized by the Page Editor. However, you can achieve the same purposes by utilizing the space bar or by setting up a Table.
4. We do not provide technical support for adding Flash to your site. However, if you know HTML, you can place Flash on your page by choosing the Change View Icon on the Page Editor. Then, you can input the correct HTML code. Don't forget to save!
50
Removing Images
1. Select the image by clicking on it with the mouse. 2. Hit the "delete" key on your keyboard.
WARNING: Deleting the image cannot be undone. Make sure you want to delete the image before saving.
Repositioning Images
1. Click and drag to the desired location on page manager. 2. Click save. 3. Click preview and view the page. If no further changes are needed, close the
window. If further changes are needed, close the window and reposition the image.
4. Be sure to save before each preview.
Scrolling Marquee You can add a scrolling marquee to any page. This could be used to draw attention to a new feature on your site or important news.
1. Place the cursor where you wish the marquee to scroll.
2. Select the Create Marquee button from the Tool Bar. 3. You will see the handles of a clear box where your cursor was. 4. Click inside this clear box. 5. Type the text and/or insert an image from the Gallery that you wish to scroll
across your screen. 6. When you are finished, simply click outside this box. 7. Click save.
Note: Click the preview button in the upper-right corner of the Page Editor or Site Manager to view the marquee on the Web page. If additional changes are needed, close preview window, make changes, save, and preview again.
Using the Gallery The Gallery allows you to organize and store images and files on the server for use in
your web site. To open the Gallery, click the Gallery icon on the editor's menu.
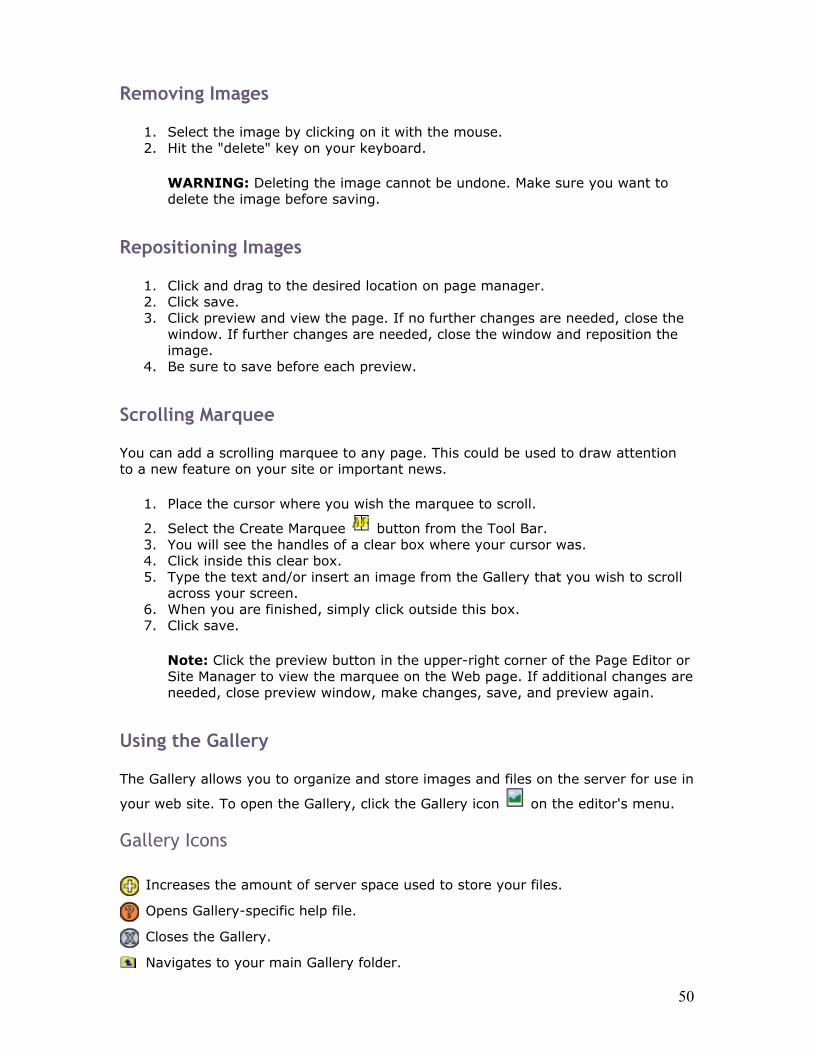
Gallery Icons
Increases the amount of server space used to store your files.
Opens Gallery-specific help file.
Closes the Gallery.
Navigates to your main Gallery folder.
51
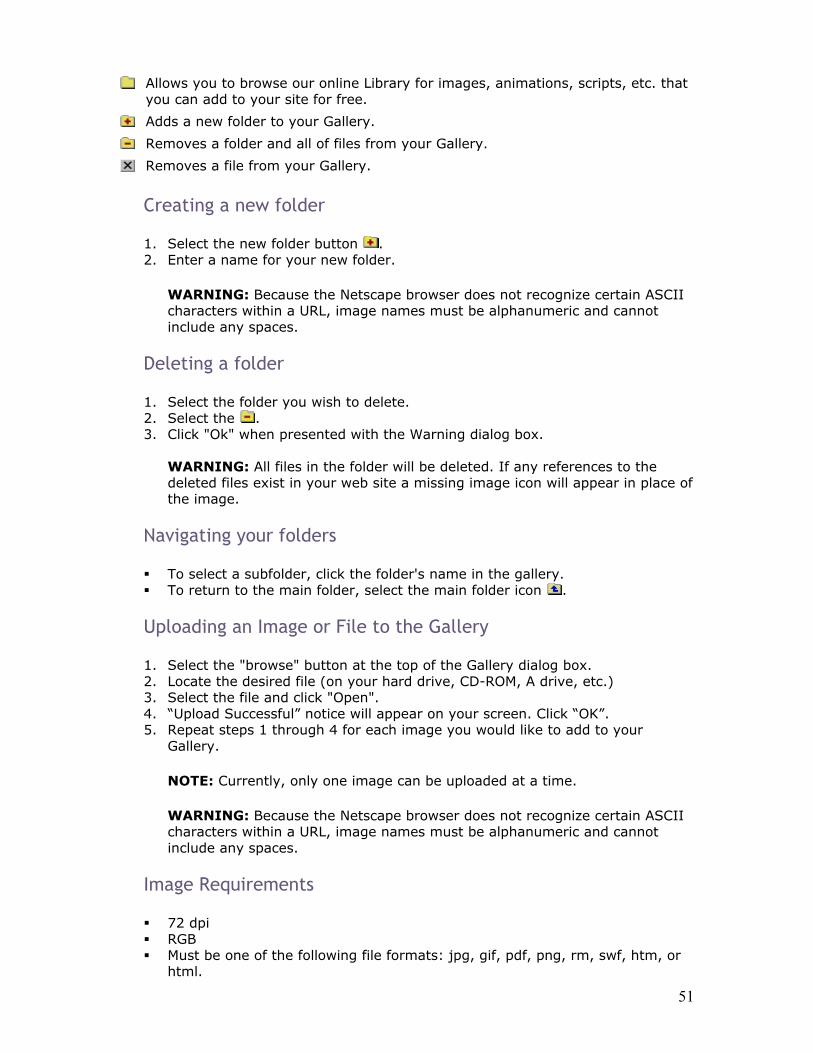
Allows you to browse our online Library for images, animations, scripts, etc. that you can add to your site for free.
Adds a new folder to your Gallery.
Removes a folder and all of files from your Gallery.
Removes a file from your Gallery.
Creating a new folder
1. Select the new folder button . 2. Enter a name for your new folder.
WARNING: Because the Netscape browser does not recognize certain ASCII characters within a URL, image names must be alphanumeric and cannot include any spaces.
Deleting a folder
1. Select the folder you wish to delete. 2. Select the . 3. Click "Ok" when presented with the Warning dialog box.
WARNING: All files in the folder will be deleted. If any references to the deleted files exist in your web site a missing image icon will appear in place of the image.
Navigating your folders
To select a subfolder, click the folder's name in the gallery. To return to the main folder, select the main folder icon .
Uploading an Image or File to the Gallery
1. Select the "browse" button at the top of the Gallery dialog box. 2. Locate the desired file (on your hard drive, CD-ROM, A drive, etc.) 3. Select the file and click "Open". 4. “Upload Successful” notice will appear on your screen. Click “OK”. 5. Repeat steps 1 through 4 for each image you would like to add to your
Gallery.
NOTE: Currently, only one image can be uploaded at a time.
WARNING: Because the Netscape browser does not recognize certain ASCII characters within a URL, image names must be alphanumeric and cannot include any spaces.
Image Requirements
72 dpi RGB Must be one of the following file formats: jpg, gif, pdf, png, rm, swf, htm, or
html.
52
Using the Library
1. Select the "Library folder icon (next to the "Main Folder" icon). 2. Browse the Library folders for images, scripts, audio/video files, etc. you wish
to add to your web page.
Adding an Image to Your Web Page
1. Select an image link from the list of images in the Gallery. The selected image will appear in the image preview pane at the bottom of the Gallery window.
2. Drag the image from the preview pane onto the Page Editor to the location you desire.
3. Click save in the Page Editor.
Adding a File Link to Your Web Page
You can add a file to the Gallery which you wish to make available to people who visit your site. See "Uploading an Image or File to the Gallery" above. Follow these steps to create a link to the file on your site so people can access the file from your page:
1. Create an insertion point by typing "Shift" + "6" or holding down the "Shift" key and clicking. You should see the ^ symbol where the file link or code will be inserted. If you decide to move your insertion point, simply delete the ^ symbol and create a new one.
2. Open the Gallery by selecting the icon and select the file link from the list of files in your Gallery.
3. In the Script Prompt window that appears, you can type the link text that you want to appear on the page (e.g. If the file is a camp registration form, you may wish to type “Registration Form”.) or accept the file name.
4. The text appears in the Content box as a link to the file. When people access your site, they can click on the link to gain access.
Removing an item from the Gallery
1. Select the next to the item's listing in the Gallery. 2. Select "OK" in the warning dialog box.
WARNING: Deleting a file completely removes the image from the server. Any references to the deleted image in your Web pages will appear as broken links.
To restore a deleted image, you will need to re-upload the image from your hard drive.
Note: Please follow all copyright laws. You are responsible for the images on your site.
53
Internet Explorer 6.0 Users If you are using the new Internet Explorer 6.0, you may experience problems logging into your site. This is due to a cookie issue in the privacy settings of I.E. 6.0. You can do one of the following to resolve the problem. Option One: Allow only LifeWayLINK cookies.
1. Right click on the Internet Explorer icon on your desktop 2. Select Properties 3. Click on the Privacy Tab 4. Select the "Edit" button. 5. Enter http://63.241.144.187 in the "Add" box. 6. Select the "Allow" button. 7. Click the "OK" button. 8. Select the "OK" button to close the Internet Options dialog box.
Option Two: Allow all cookies (Default In IE 5.5).
1. Right click on the Internet Explorer icon on your desktop 2. Select Properties 3. Click on the Privacy Tab 4. Select the "Advanced" button. 5. Select the "Override automatic cookie handling" checkbox. 6. Select the "OK" button. 7. Select the "OK" button to close the Internet Options dialog box.
54
Glossary Address Bar: The portion of the tool bar in the browser window where you type the address of the location you wish to view. Most of the time this is a URL address for a Web site. Once you have arrived to a particular site, the URL of that site appears in the Address Bar. Alphanumeric: This is any combination of letters and numbers. This excludes spaces and symbols. ASP (Application Service Provider): This is the abbreviation for Application Service Provider. An ASP is a company that offers access to various applications, software packages, and services through the Internet. Broken Link: (See also "Links") A link to a Web page or file that has been moved or deleted. Browser Window: The window on any Internet browser (such as Internet Explorer and Netscape) where the contents of Web sites can be viewed. Concerns Manager: Manager where you manage the prayer concerns for your church or ministry. Content box: This is the box within the Page Editor where all content for the page is entered. Control Panel: Main screen where the site administrator accesses the Managers. Dialog box: Window or box that appears on the screen prompting the user for a response. E.g. When you delete a page, you will be prompted you via a dialog box to make sure you really wish to delete that page. Design Manager: Manager that allows you to choose the design for your site. Event Manager: Manager where you enter and edit the events calendar that appears on your site. HTML: Abbreviation for Hypertext Markup Language. This is the computer language used to program each Web site on the Internet. Hyperlink: See "Link" Internet Explorer (IE): Microsoft® Corporation's Web browser. ISP (Internet Service Provider): This is a company with which you contract to provide your connection to the Internet. Link: (See also "Site Link" and "Broken Link") A link is a picture, image, or colored text that takes you to another section within the current Web site, takes you to another Web site, or opens a file. You can see whether an item on a page is a link by moving your mouse pointer over it. If the mouse pointer changes to a hand, the item is a link. Management Team: Managers which are available to assist the site administrator (e.g. Design Manager, Profile Manager, Site Manager, Events Manager, etc.).
55
Management Screen: See "Control Panel" Page Editor: Powerful tool that allows you to enter, edit, and delete text and images from your site without the need to know HTML code. Password: (See also "User Name") Your password used in conjunction with your User Name to gain access to the administrative section of your site. Profile Manager: Manager where you define the profile for your church or ministry (e.g. name, address, contact information). Script prompt window: Window that opens in the Web browser asking you to type a reply to a particular prompt. Scrolling marquee: This can be text and/or images that scroll across the screen. You can find this feature in the Page Editor. Server: See "Web Server" Site Administrator: Person responsible for entering, editing, and maintaining the content of a Web site (also known as Webmaster). Site Link: (See also "Link" and "Broken Link") Link to a page within the same Web site. Site Manager: Manager where you enter and edit content and images as well as define the layout of the pages within the site. Site Structure: The relationship of the pages within a site; outline structure of the site. URL: This is the abbreviation for Uniform Resource Locator. URLs are simply addresses for Web sites (e.g. www.fbcjackson.com is the URL for the FBC Jackson site) User Name: (See also "Password") Personal login name when used with your password allows you to access the administrative section of your site. Web server: A computer on the Internet where Web pages are stored. Web pages are stored on secure, high-speed servers.
56
Email Setup Instructions If you have decided to utilize the email accounts that come with your Web Site package, you can click on the appropriate link below to get instructions on setting the accounts up in Outlook or Outlook Express. NOTE: If you have not emailed us the account usernames and passwords, then you will not be able to set your accounts up. If you are a LifeWayLINK customer, email the usernames and passwords to [email protected]. The passwords must be 5 characters or more.
Outlook These are instructions for Microsoft Outlook 2000. The setup may vary for other versions, but not a whole lot. NOTE: If you are transferring a domain name, the accounts will not work until the transfer has been completed.
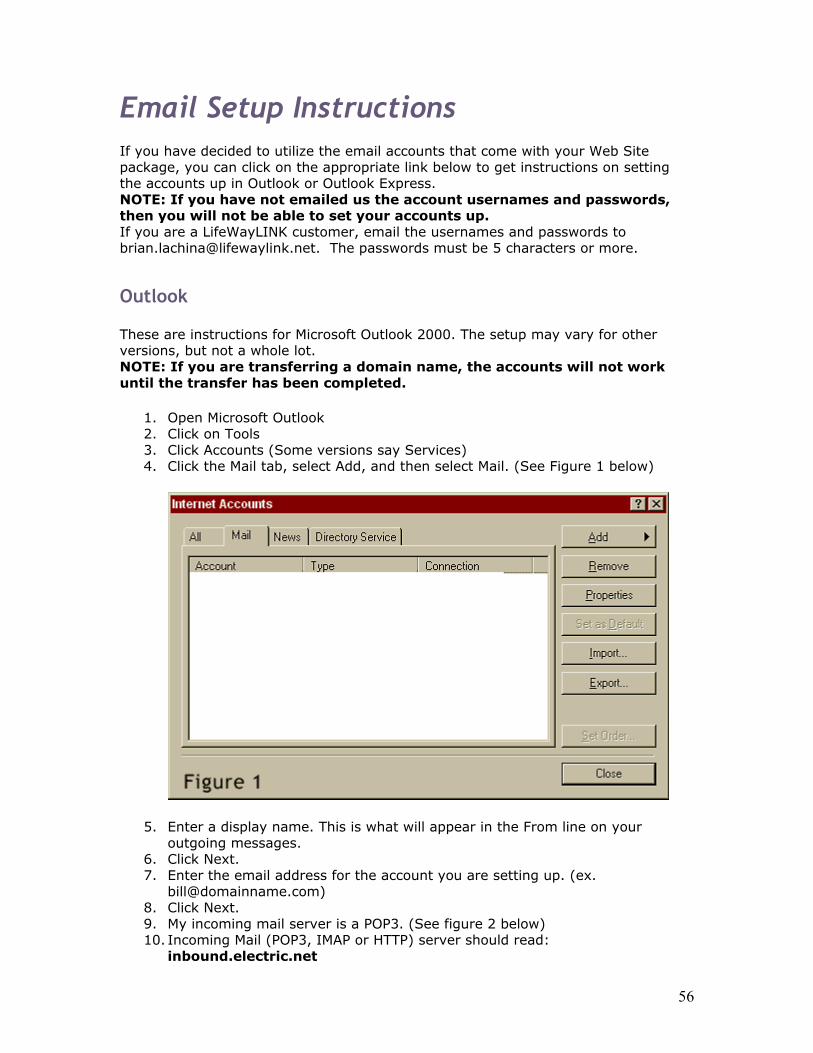
1. Open Microsoft Outlook 2. Click on Tools 3. Click Accounts (Some versions say Services) 4. Click the Mail tab, select Add, and then select Mail. (See Figure 1 below)
5. Enter a display name. This is what will appear in the From line on your outgoing messages.
6. Click Next. 7. Enter the email address for the account you are setting up. (ex.
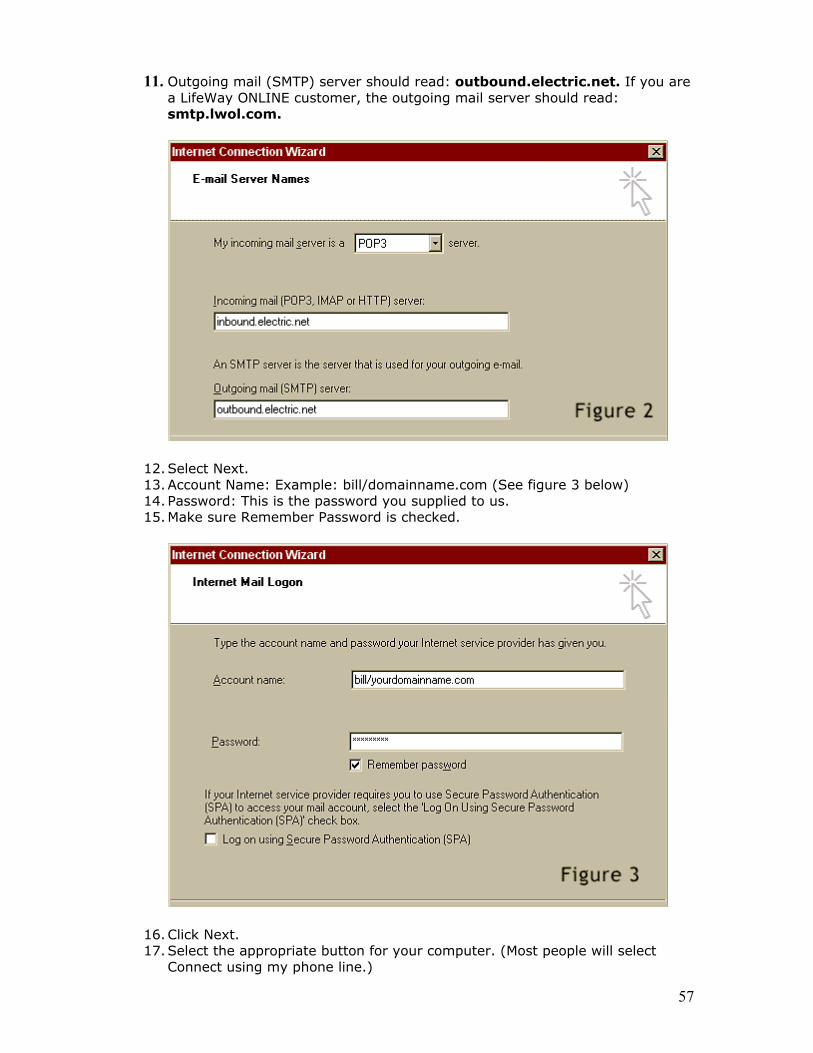
[email protected]) 8. Click Next. 9. My incoming mail server is a POP3. (See figure 2 below) 10. Incoming Mail (POP3, IMAP or HTTP) server should read:
inbound.electric.net
57
11. Outgoing mail (SMTP) server should read: outbound.electric.net. If you are a LifeWay ONLINE customer, the outgoing mail server should read: smtp.lwol.com.
12. Select Next. 13. Account Name: Example: bill/domainname.com (See figure 3 below) 14. Password: This is the password you supplied to us. 15. Make sure Remember Password is checked.
16. Click Next. 17. Select the appropriate button for your computer. (Most people will select
Connect using my phone line.)
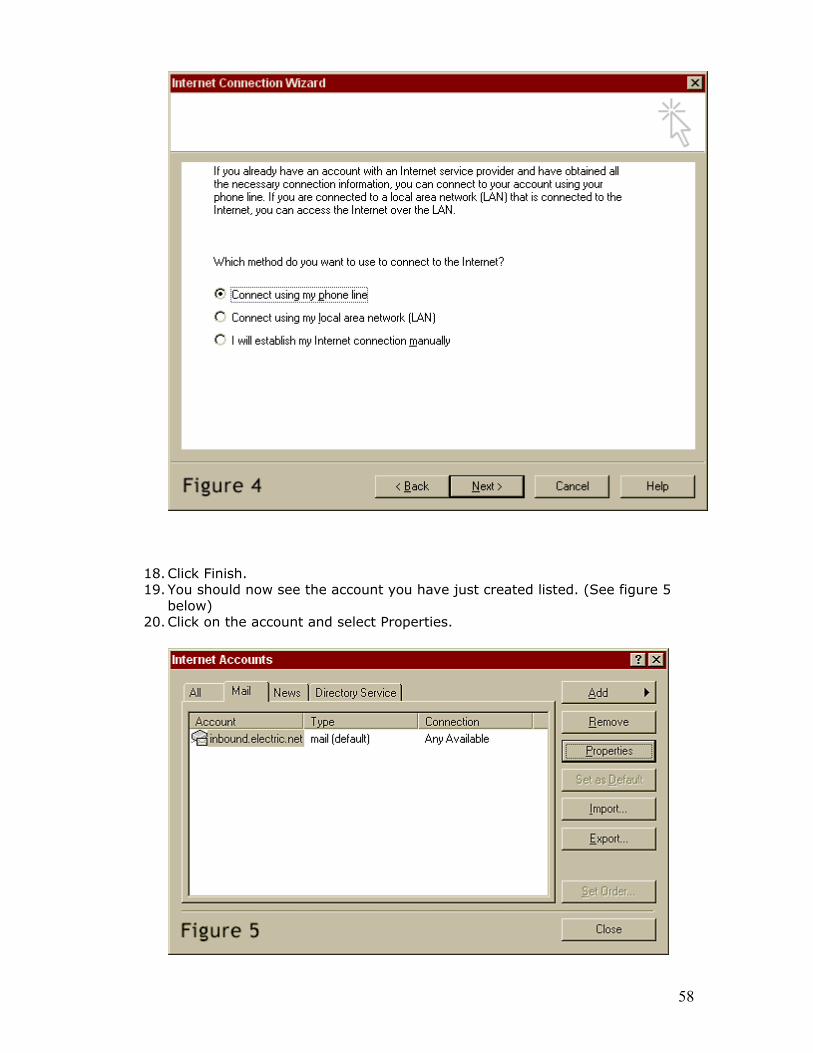
58
18. Click Finish. 19. You should now see the account you have just created listed. (See figure 5
below) 20. Click on the account and select Properties.
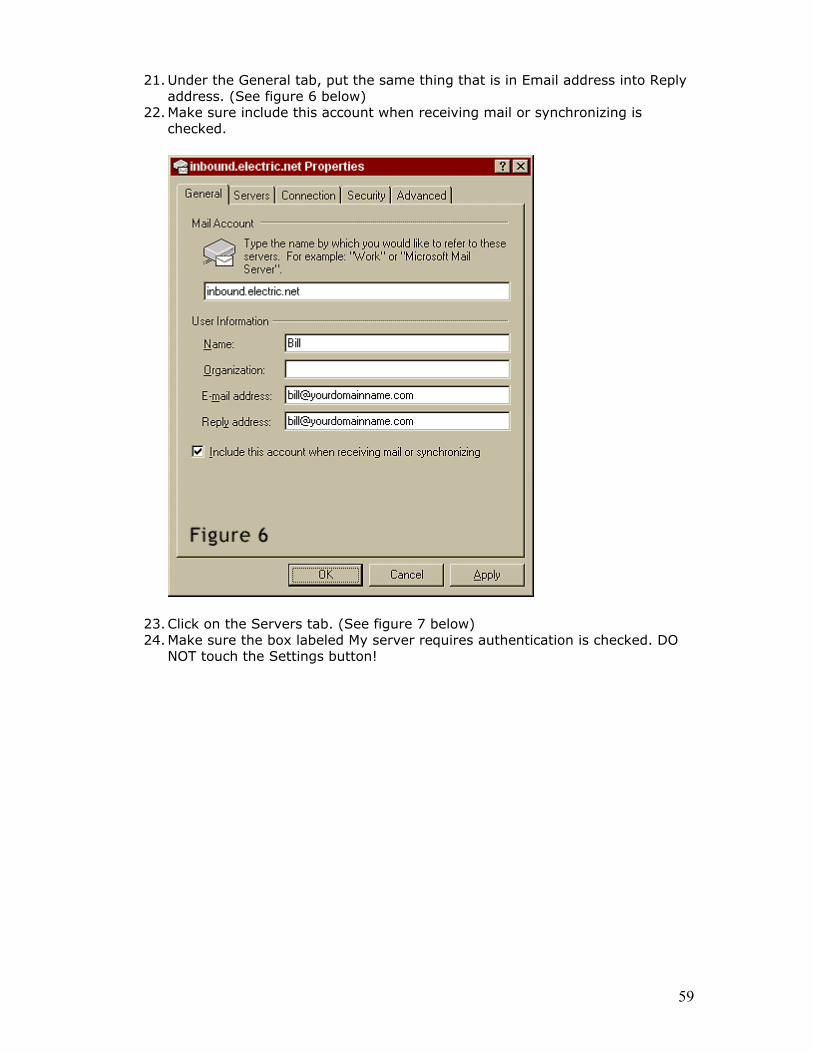
59
21. Under the General tab, put the same thing that is in Email address into Reply address. (See figure 6 below)
22. Make sure include this account when receiving mail or synchronizing is checked.
23. Click on the Servers tab. (See figure 7 below) 24. Make sure the box labeled My server requires authentication is checked. DO
NOT touch the Settings button!
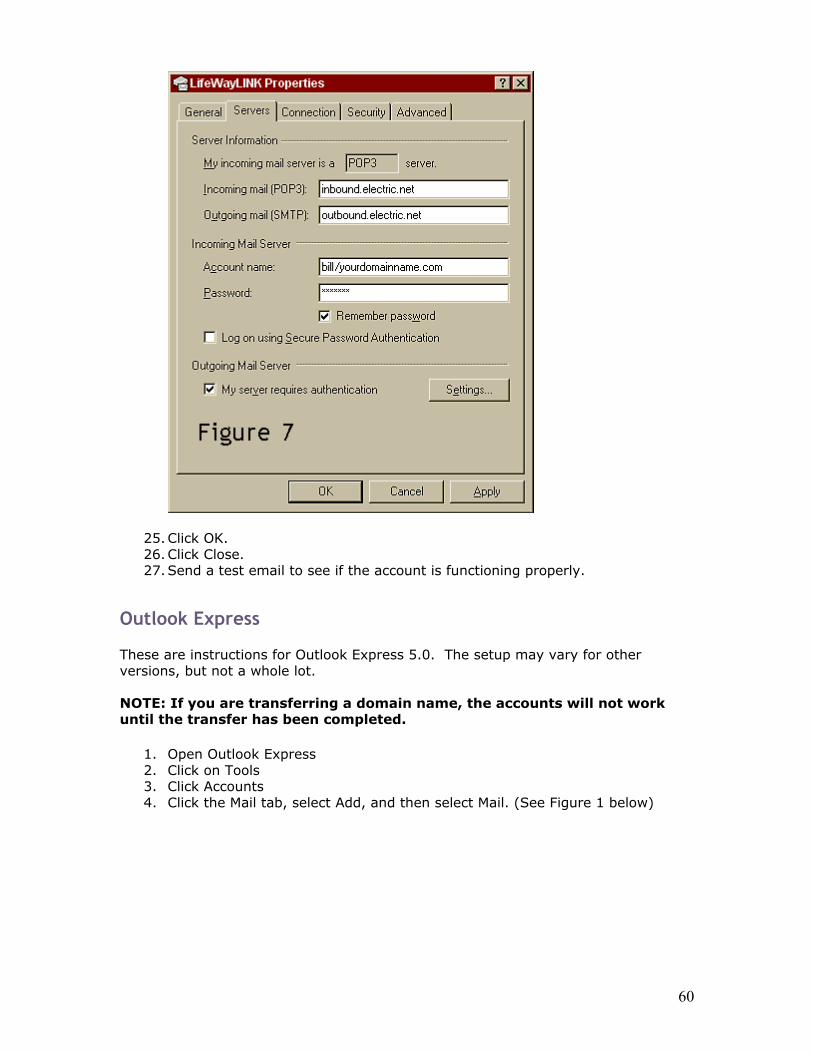
60
25. Click OK. 26. Click Close. 27. Send a test email to see if the account is functioning properly.
Outlook Express These are instructions for Outlook Express 5.0. The setup may vary for other versions, but not a whole lot. NOTE: If you are transferring a domain name, the accounts will not work until the transfer has been completed.
1. Open Outlook Express 2. Click on Tools 3. Click Accounts 4. Click the Mail tab, select Add, and then select Mail. (See Figure 1 below)
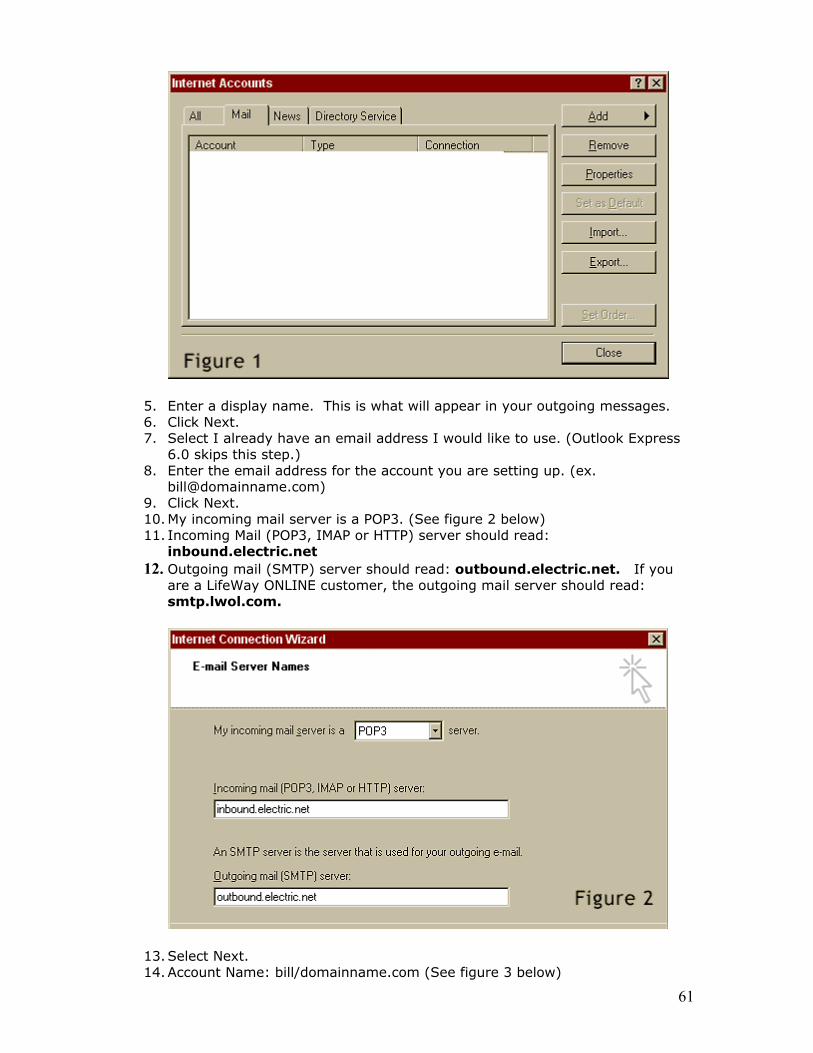
61
5. Enter a display name. This is what will appear in your outgoing messages. 6. Click Next. 7. Select I already have an email address I would like to use. (Outlook Express
6.0 skips this step.) 8. Enter the email address for the account you are setting up. (ex.
[email protected]) 9. Click Next. 10. My incoming mail server is a POP3. (See figure 2 below) 11. Incoming Mail (POP3, IMAP or HTTP) server should read:
inbound.electric.net 12. Outgoing mail (SMTP) server should read: outbound.electric.net. If you
are a LifeWay ONLINE customer, the outgoing mail server should read: smtp.lwol.com.
13. Select Next. 14. Account Name: bill/domainname.com (See figure 3 below)
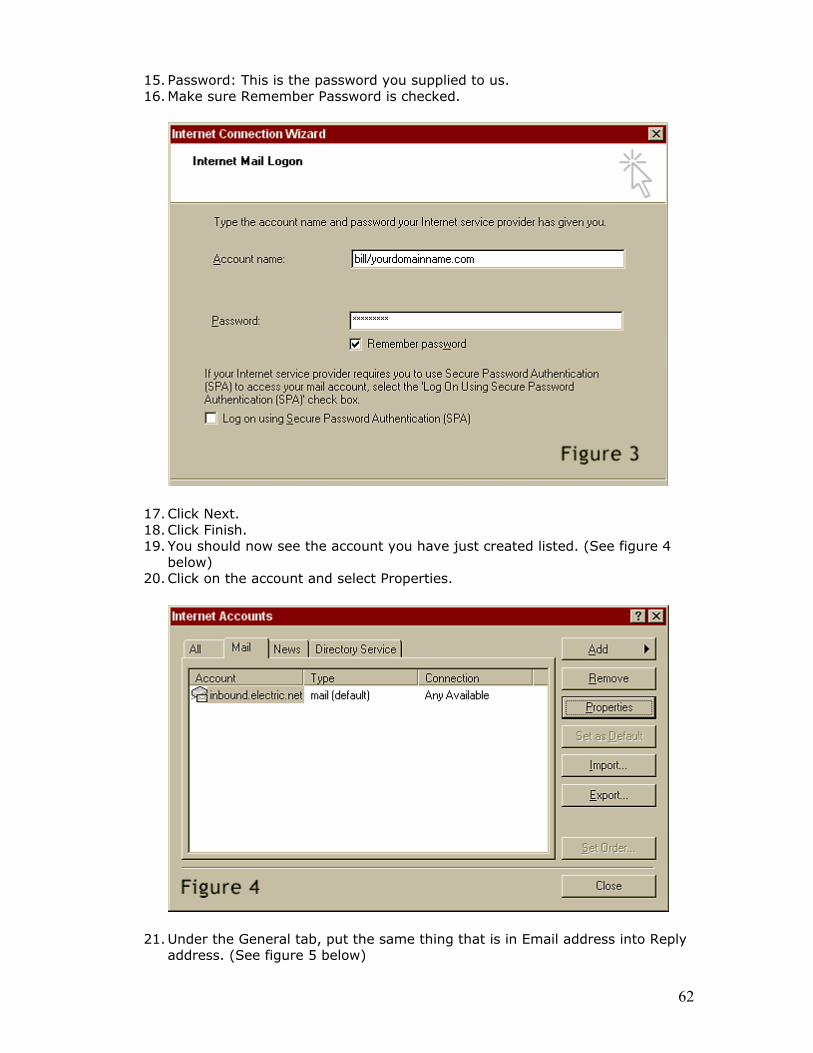
62
15. Password: This is the password you supplied to us. 16. Make sure Remember Password is checked.
17. Click Next. 18. Click Finish. 19. You should now see the account you have just created listed. (See figure 4
below) 20. Click on the account and select Properties.
21. Under the General tab, put the same thing that is in Email address into Reply address. (See figure 5 below)
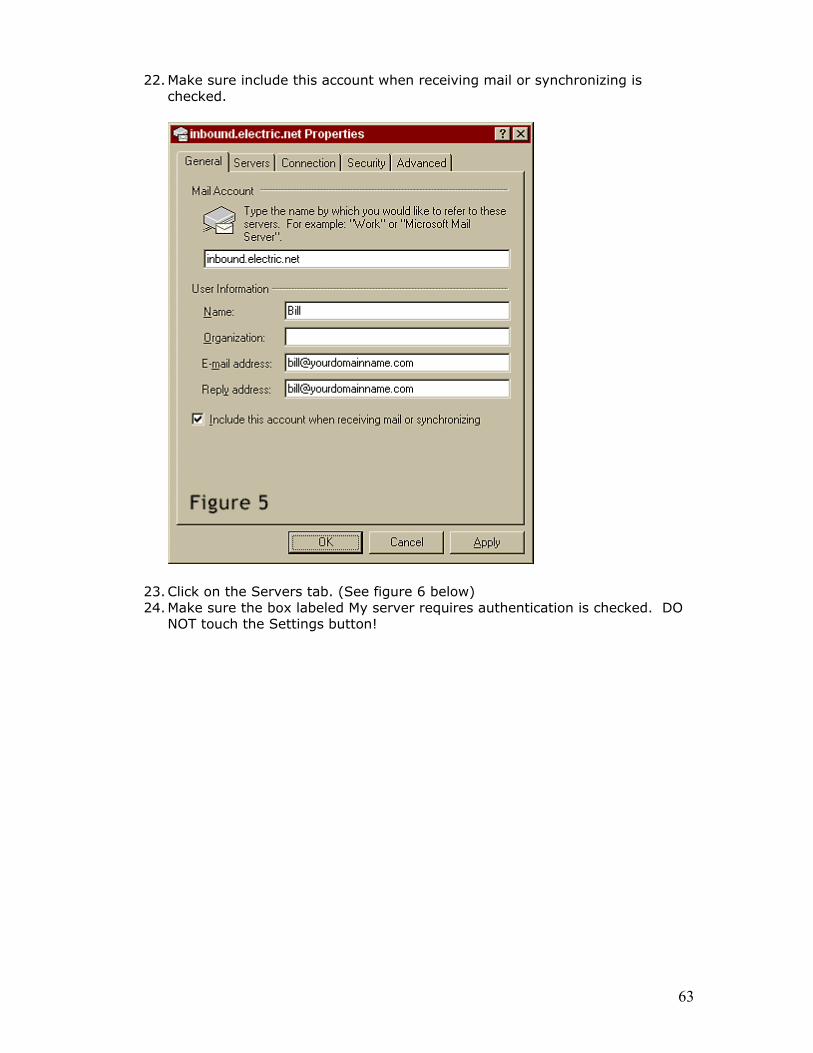
63
22. Make sure include this account when receiving mail or synchronizing is checked.
23. Click on the Servers tab. (See figure 6 below) 24. Make sure the box labeled My server requires authentication is checked. DO
NOT touch the Settings button!
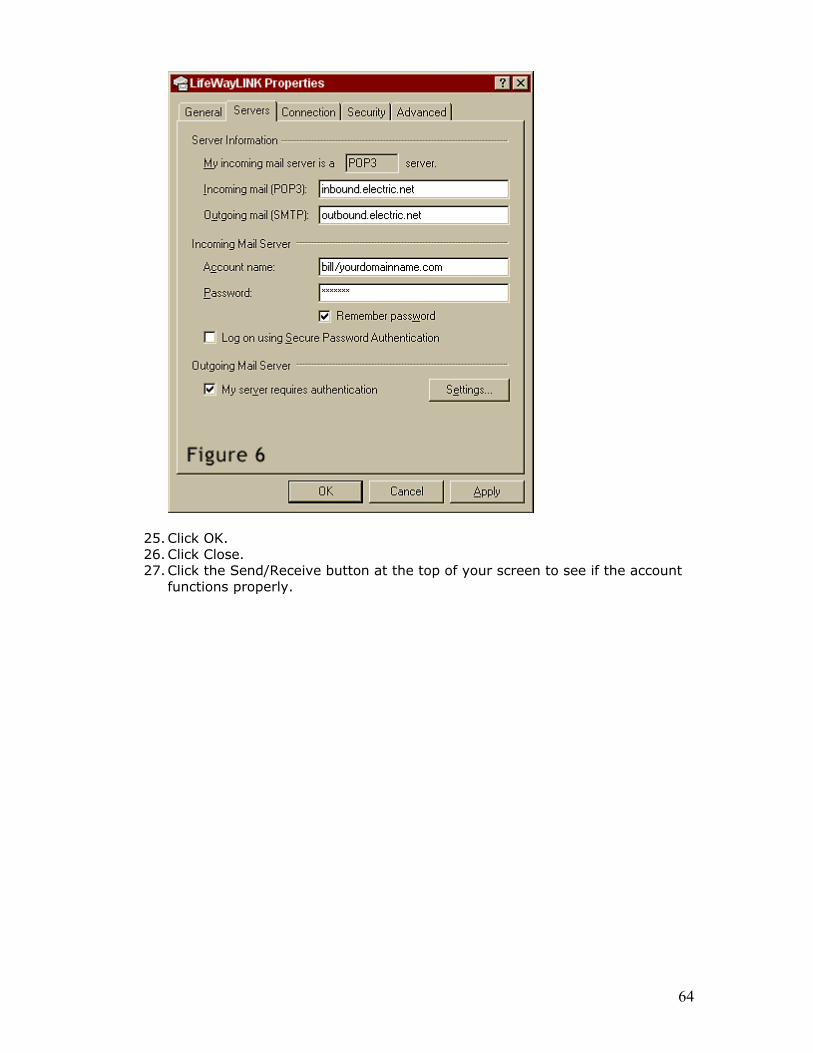
64
25. Click OK. 26. Click Close. 27. Click the Send/Receive button at the top of your screen to see if the account
functions properly.
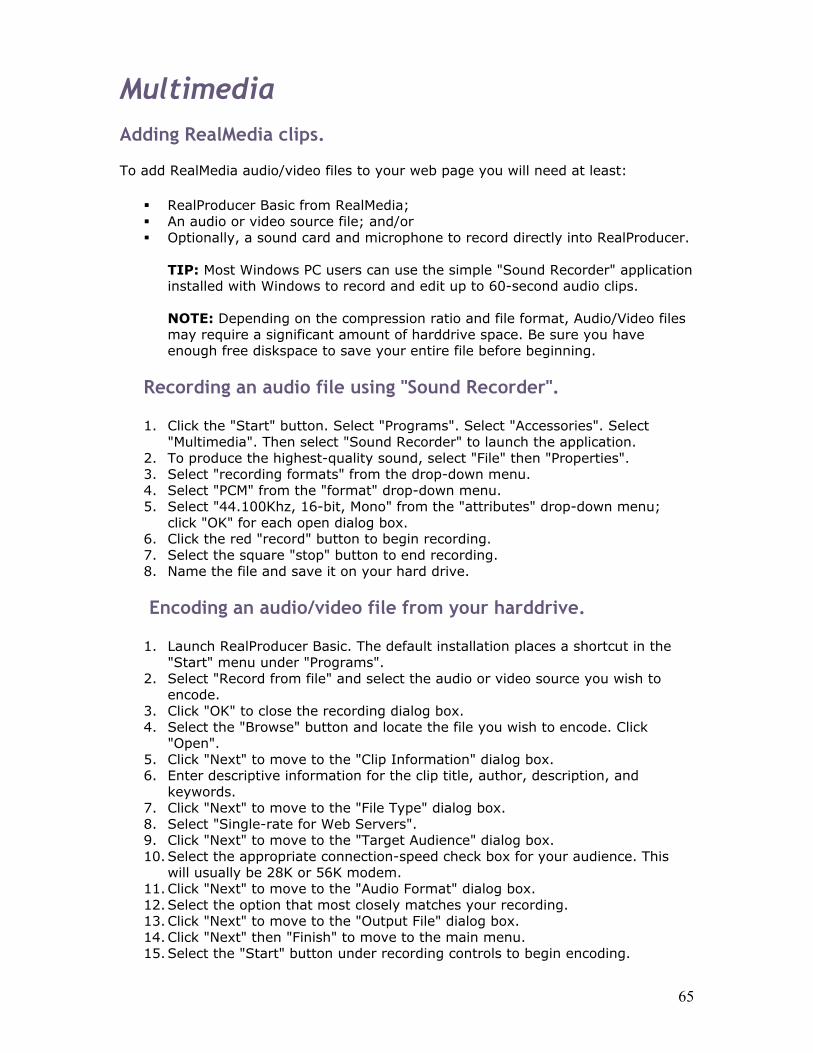
65
Multimedia Adding RealMedia clips. To add RealMedia audio/video files to your web page you will need at least:
RealProducer Basic from RealMedia; An audio or video source file; and/or Optionally, a sound card and microphone to record directly into RealProducer.
TIP: Most Windows PC users can use the simple "Sound Recorder" application installed with Windows to record and edit up to 60-second audio clips. NOTE: Depending on the compression ratio and file format, Audio/Video files may require a significant amount of harddrive space. Be sure you have enough free diskspace to save your entire file before beginning.
Recording an audio file using "Sound Recorder".
1. Click the "Start" button. Select "Programs". Select "Accessories". Select "Multimedia". Then select "Sound Recorder" to launch the application.
2. To produce the highest-quality sound, select "File" then "Properties". 3. Select "recording formats" from the drop-down menu. 4. Select "PCM" from the "format" drop-down menu. 5. Select "44.100Khz, 16-bit, Mono" from the "attributes" drop-down menu;
click "OK" for each open dialog box. 6. Click the red "record" button to begin recording. 7. Select the square "stop" button to end recording. 8. Name the file and save it on your hard drive.
Encoding an audio/video file from your harddrive.
1. Launch RealProducer Basic. The default installation places a shortcut in the "Start" menu under "Programs".
2. Select "Record from file" and select the audio or video source you wish to encode.
3. Click "OK" to close the recording dialog box. 4. Select the "Browse" button and locate the file you wish to encode. Click
"Open". 5. Click "Next" to move to the "Clip Information" dialog box. 6. Enter descriptive information for the clip title, author, description, and
keywords. 7. Click "Next" to move to the "File Type" dialog box. 8. Select "Single-rate for Web Servers". 9. Click "Next" to move to the "Target Audience" dialog box. 10. Select the appropriate connection-speed check box for your audience. This
will usually be 28K or 56K modem. 11. Click "Next" to move to the "Audio Format" dialog box. 12. Select the option that most closely matches your recording. 13. Click "Next" to move to the "Output File" dialog box. 14. Click "Next" then "Finish" to move to the main menu. 15. Select the "Start" button under recording controls to begin encoding.
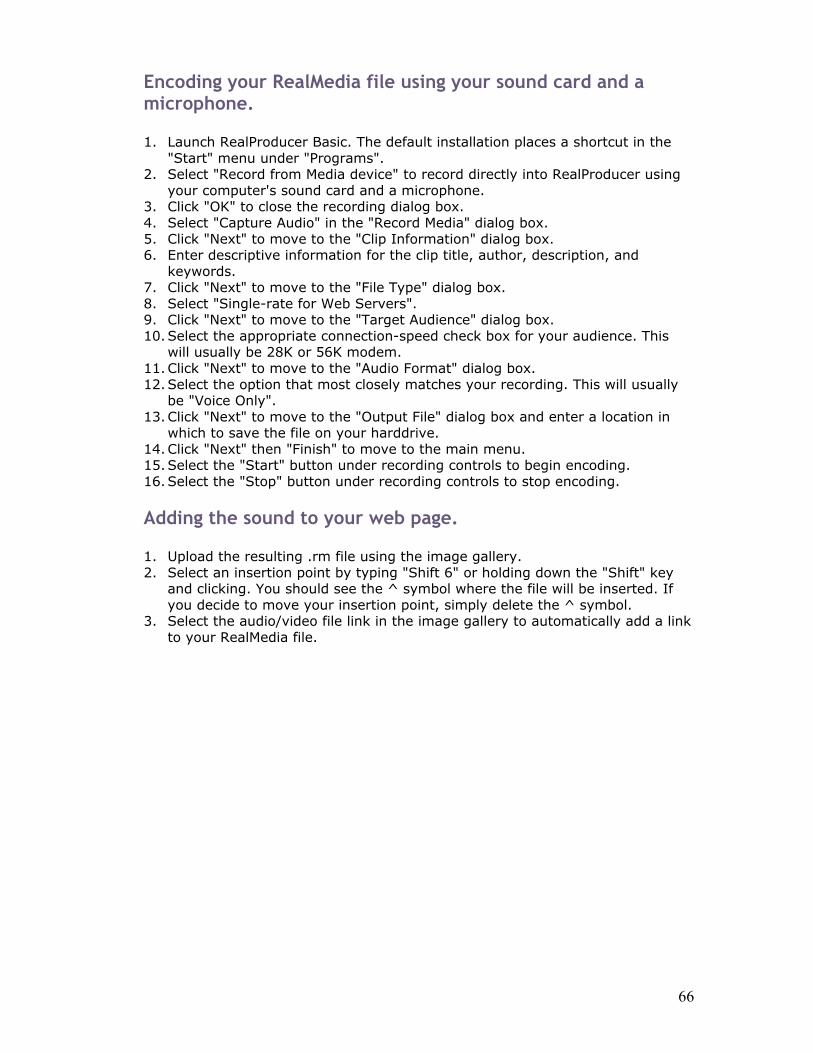
66
Encoding your RealMedia file using your sound card and a microphone.
1. Launch RealProducer Basic. The default installation places a shortcut in the "Start" menu under "Programs".
2. Select "Record from Media device" to record directly into RealProducer using your computer's sound card and a microphone.
3. Click "OK" to close the recording dialog box. 4. Select "Capture Audio" in the "Record Media" dialog box. 5. Click "Next" to move to the "Clip Information" dialog box. 6. Enter descriptive information for the clip title, author, description, and
keywords. 7. Click "Next" to move to the "File Type" dialog box. 8. Select "Single-rate for Web Servers". 9. Click "Next" to move to the "Target Audience" dialog box. 10. Select the appropriate connection-speed check box for your audience. This
will usually be 28K or 56K modem. 11. Click "Next" to move to the "Audio Format" dialog box. 12. Select the option that most closely matches your recording. This will usually
be "Voice Only". 13. Click "Next" to move to the "Output File" dialog box and enter a location in
which to save the file on your harddrive. 14. Click "Next" then "Finish" to move to the main menu. 15. Select the "Start" button under recording controls to begin encoding. 16. Select the "Stop" button under recording controls to stop encoding.
Adding the sound to your web page.
1. Upload the resulting .rm file using the image gallery. 2. Select an insertion point by typing "Shift 6" or holding down the "Shift" key
and clicking. You should see the ^ symbol where the file will be inserted. If you decide to move your insertion point, simply delete the ^ symbol.
3. Select the audio/video file link in the image gallery to automatically add a link to your RealMedia file.

67
Search Engine Placement Registering with one or all of the major search engines is one of the most effective ways to promote your web site. The keywords and description fields you completed when ordering your site are used to help describe your site to the search engine robots. To complete your site registration with the popular search engines below, select the link for the search engine in the "Add Site Link" column on the right and follow the instructions in the pop-up window. To search for your site on a particular search engine or to learn more about submitting your site to a specific search engine, select the search engine's name on the left.
Search Engine
Listing Activation Time
Register Your Site
Yahoo - http://docs.yahoo.com/info/suggest/
AltaVista 1-2 days http://www.altavista.com/cgi-bin/query?pg=addurl
Excite 2 weeks or more
http://www.excite.com/info/add_url
HotBot 60 days http://www.hotbot.com/addurl.asp
Infoseek 1 week or more
http://www.go.com/AddUrl?&pg=SubmitUrl.html
Lycos 2-3 weeks http://www.lycos.com/addasite.html
Webcrawler 2 weeks http://www.webcrawler.com/info/add_url/
Northernlight - http://www.northernlight.com/docs/regurl_help.html
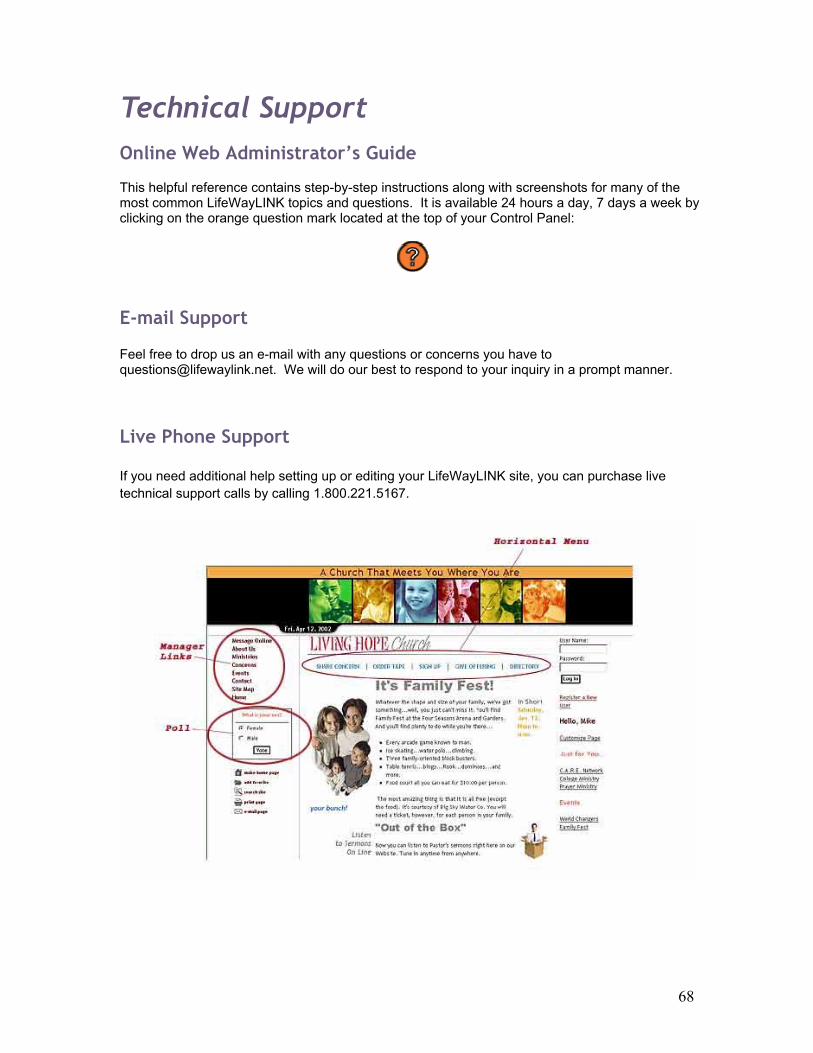
68
Technical Support Online Web Administrator’s Guide This helpful reference contains step-by-step instructions along with screenshots for many of the most common LifeWayLINK topics and questions. It is available 24 hours a day, 7 days a week by clicking on the orange question mark located at the top of your Control Panel:
E-mail Support
Feel free to drop us an e-mail with any questions or concerns you have to [email protected]. We will do our best to respond to your inquiry in a prompt manner.
Live Phone Support If you need additional help setting up or editing your LifeWayLINK site, you can purchase live technical support calls by calling 1.800.221.5167.
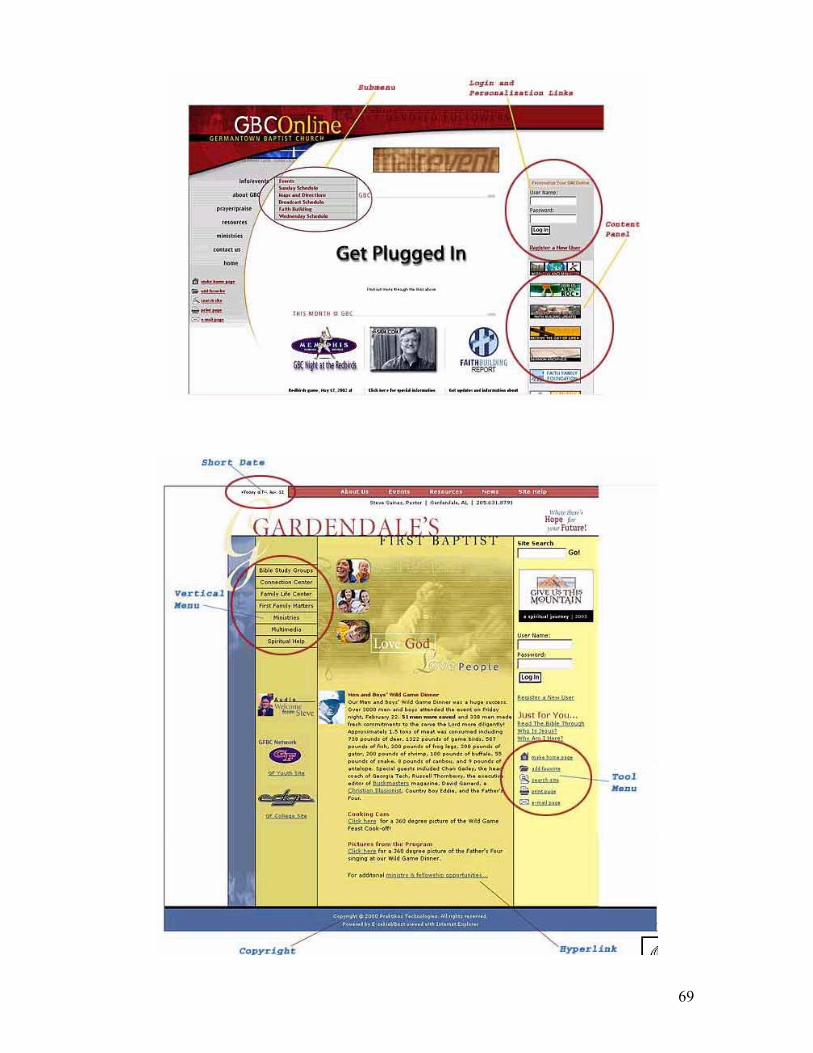
69