Embed Size (px)
Citation preview

8/10/2019 LIFESAVER Bottle Instruction Manual
http://slidepdf.com/reader/full/lifesaver-bottle-instruction-manual 1/20
INSTRUCTION MANUAL 4000UF & 6000UF
INvEnTeD, DEsIgNeDaNd MAnUfAcTuReD
iN GReAt BRiTaInPAtEnTeD WOrLdWiDe
bottle

8/10/2019 LIFESAVER Bottle Instruction Manual
http://slidepdf.com/reader/full/lifesaver-bottle-instruction-manual 2/20
2
LIFESAVER® bottle uses a highly advanced ultra ltration system, originallydeveloped for industrial applications.
LIFESAVER® bottle will remove all bacteria, all viruses, all cysts, all parasites,all fungi and all other microbiological waterborne pathogens.
LIFESAVER® bottle uses FAILSAFE™ technology, this means that when thecartridge has expired it shuts off, preventing the user from drinking
contaminated water.
** IMPORTANT **Please read this manual before using the LIFESAVER ® bottle.
CAUTION· DO NOT operate pump unless bottle contains water.· After rst use, bottle should not be stored dry at all.· Activated carbon is optional – water is thoroughly cleaned even without Activated carbon.
1 Fill with water. 2 Leave to stand– 5 minutes.
4 Empty bottlethrough teat –do not drink
5 Repeat steps3 & 4, repeattwice with teat
open.
6 Fill, pump, anddrink™.
3 Pump 4 times.
FIRST USE:
8/10/2019 LIFESAVER Bottle Instruction Manual
http://slidepdf.com/reader/full/lifesaver-bottle-instruction-manual 3/20
Uk
3
Contents 4 Using your LIFESAVER ® bottle 5 Technical Information 6 Priming the cartridge 6 Drinking from the bottle 7 Before undertaking any trip
8 Instructions for routine use 8 Choosing your water source
9 Maintenance and Care of your LIFESAVER ® bottle 9 Front-side washing at home & in the eld 11 Installing / changing the UF cartridge 13 Using the pre-lter 14 Replacing the activated carbon lter 15 Replacing the teat 15 Long term storage 16 Maintaining the pump 17 FAILSAFE™ Technology 17 Membrane integrity check
18 Frequently Asked Questions
19 Warranty
8/10/2019 LIFESAVER Bottle Instruction Manual
http://slidepdf.com/reader/full/lifesaver-bottle-instruction-manual 4/20
4
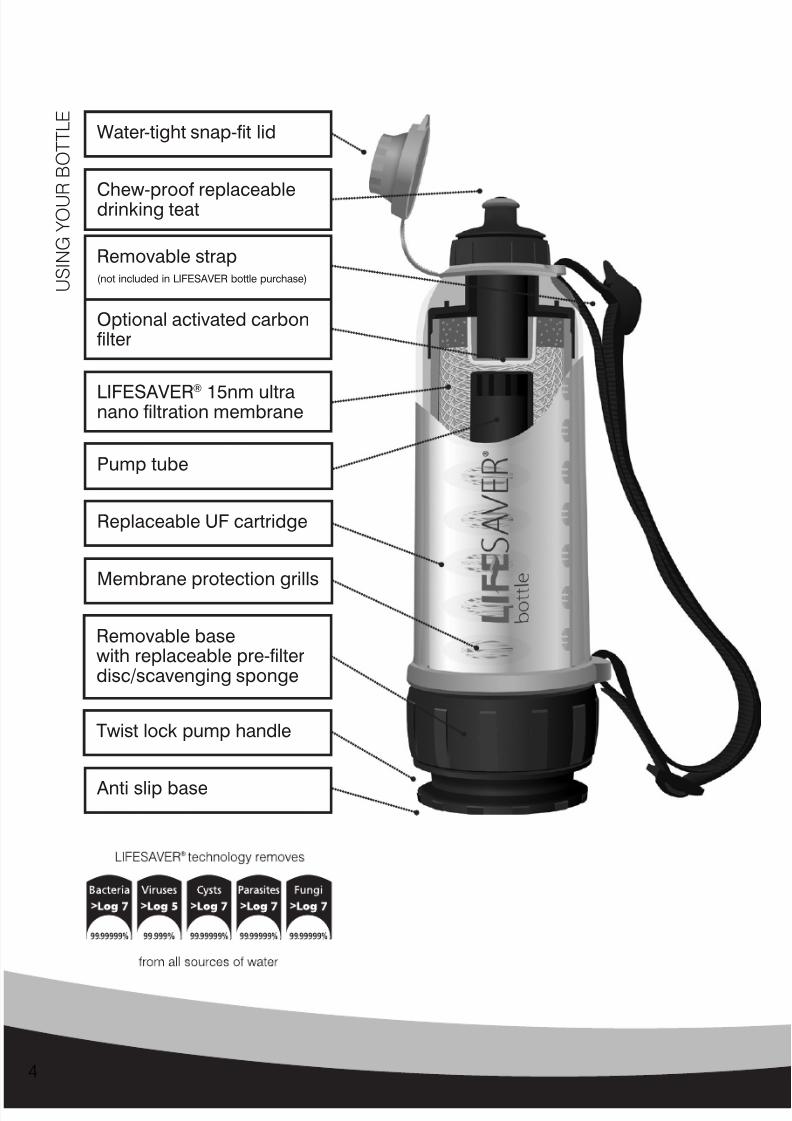
Water-tight snap-t lid
Membrane protection grills
Pump tube
Replaceable UF cartridge
Removable strap(not included in LIFESAVER bottle purchase)
Twist lock pump handle
Anti slip base
LIFESAVER ® 15nm ultranano ltration membrane
Chew-proof replaceabledrinking teat
Removable basewith replaceable pre-lterdisc/scavenging sponge
Optional activated carbonlter
U S I N G Y O U R B O T T L E
8/10/2019 LIFESAVER Bottle Instruction Manual
http://slidepdf.com/reader/full/lifesaver-bottle-instruction-manual 5/20
Uk
5
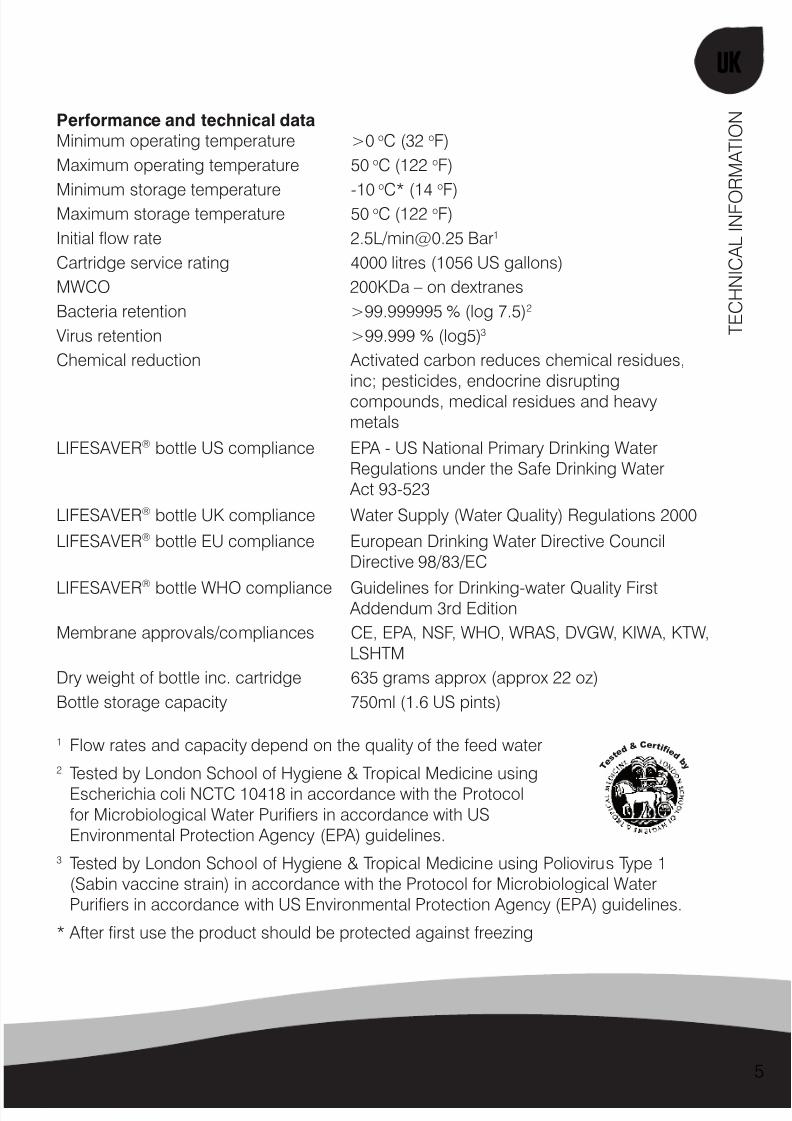
Performance and technical data Minimum operating temperature >0 oC (32 oF)Maximum operating temperature 50 oC (122 oF)
Minimum storage temperature -10o
C* (14o
F)Maximum storage temperature 50 oC (122 oF)Initial ow rate 2.5L/[email protected] Bar 1
Cartridge service rating 4000 litres (1056 US gallons)MWCO 200KDa – on dextranesBacteria retention >99.999995 % (log 7.5) 2
Virus retention >99.999 % (log5) 3
Chemical reduction Activated carbon reduces chemical residues,inc; pesticides, endocrine disruptingcompounds, medical residues and heavymetals
LIFESAVER® bottle US compliance EPA - US National Primary Drinking WaterRegulations under the Safe Drinking Water
Act 93-523LIFESAVER® bottle UK compliance Water Supply (Water Quality) Regulations 2000LIFESAVER® bottle EU compliance European Drinking Water Directive Council
Directive 98/83/EC
LIFESAVER® bottle WHO compliance Guidelines for Drinking-water Quality First Addendum 3rd Edition
Membrane approvals/compliances CE, EPA, NSF, WHO, WRAS, DVGW, KIWA, KTW,LSHTM
Dry weight of bottle inc. cartridge 635 grams approx (approx 22 oz)Bottle storage capacity 750ml (1.6 US pints)
1 Flow rates and capacity depend on the quality of the feed water2 Tested by London School of Hygiene & Tropical Medicine using
Escherichia coli NCTC 10418 in accordance with the Protocolfor Microbiological Water Puriers in accordance with USEnvironmental Protection Agency (EPA) guidelines.
3 Tested by London School of Hygiene & Tropical Medicine using Poliovirus Type 1(Sabin vaccine strain) in accordance with the Protocol for Microbiological WaterPuriers in accordance with US Environmental Protection Agency (EPA) guidelines.
* After rst use the product should be protected against freezing
T E C H N I C A L I N F O R M A T I O N
T e s
t e d & C e r t i f i e
d b y

8/10/2019 LIFESAVER Bottle Instruction Manual
http://slidepdf.com/reader/full/lifesaver-bottle-instruction-manual 6/20
6
FIRST TIME USE:
Priming the cartridgeIn order to use LIFESAVER ® bottle youmust rst prime the UF cartridge.
To prime the UF cartridge:• Ensure the cap is rmly tightened.• Ensure that the snap- t lid is on.• Unscrew the base, ll with water and screw to close.• Twist handle and pump a few times.*• Twist pump handle to lock.• Allow to stand for 5 minutes.• Unscrew the base and discarded the water and rell again.• Open the teat, pump the LIFESAVER® bottle. Water will begin
to ow. This water should bediscarded and should not be drunk.**
• Re ll and repeat the previous step 2 more times.• Your LIFESAVER ® bottle is now
ready to use. You may notice the water takes a while tocome through. This is normal and part ofthe priming process. After a 2-3 rells thewater will ow freely.
Drinking from the LIFESAVER ® bottleHaving primed the cartridge, rell yourLIFESAVER® bottle and familiarise yourself
with it. Practice drinking from the teat. This maysound a strange thing to say but because thewater is under pressure it will ow from the teatwithout you having to suck. If you over pumpthe bottle and are not used to the ow youmay get rather wet. Whilst drinking keep yourlips closed around the teat.
Pushing the teat ¾ closed with your teeth willhalt the ow. You can continue to close it fully
with your teeth or just push it fully closed withclean hands.
CAUTION*DO NOT over pump your
LIFESAVER®
bottle. It is effectively a pressurised vessel and should be handled with caution. You willdiscover in a very short time thatonly a few pumps are needed to
induce water ow. If you continueto over pump the bottle, teat willopen. This is a safety feature.
ACTIVATED CARBON PRIMINGYou may notice on priming thecartridge that the water contains
grey/black particles. This is simply harmless carbon dust from the activated carbon lter and oncethe cartridge has been ushedthrough a couple of times, this willdisappear.
GLYCERINE** In order to maintain thequality of the membranes after
manufacture a small amount of glycerine is used to coat their surface. Priming the cartridge removes the glycerine. This is available in the LIFESAVERConsumables Pack.
U S I N G Y O U R B O T T L E
8/10/2019 LIFESAVER Bottle Instruction Manual
http://slidepdf.com/reader/full/lifesaver-bottle-instruction-manual 7/20
Uk
7
Any position operation LIFESAVER® bottle has been
designed to work at any angle andon any axis. This means that ineffect it will work in any position.Not only are you able to drinkstraight from the teat but you canalso ll mugs, water bottles, pansand other water storage vessels.
Before you undertake any trip... It is important that you follow these fewsimple steps.
• Ensure that the cartridge is correctly and rmly in place. (‘How to installor replace a LIFESAVER ® bottle UFcartridge’ - page 11)
• Flush the bottle through a couple oftimes with clean water in order to checkthe ow rates.
• Check the pump is working smoothly
and add a small amount of siliconegrease* to the piston head asrequired. (‘Maintenance and care’ -page 16) Failure to do this will result inthe premature wearing of the o-ring.
• Ensure that you have installed a new activated carbon lter.
• Perform a membrane integrity check.(page 17)
*silicone grease can be purchased in theLIFESAVER consumables pack
CAUTION After rst use you must keep the membranes wet. Failure to do sowill cause the nano-meter poresto close up and the system will
shut down. This is not coveredunder your warranty and you
will need to purchase anothercartridge. Always leave the bottlefull of water after rst use.
CAUTION Always keep bottle cap rmly screwed on when in the eld.DO NOT remove bottle capunless changing the carbon lteror the LIFESAVER® cartridge
and then only after following instructions (see instructions below).
U S I N G Y O U R B O T T L E

8/10/2019 LIFESAVER Bottle Instruction Manual
http://slidepdf.com/reader/full/lifesaver-bottle-instruction-manual 8/20
8
Instructions for routine use Once you are familiar with yourLIFESAVER® bottle, the instructions aresimple. FILL•PUMP•DRINK™
Ensure that the drinking teat isclosed and that the snap-t lidis on securely.
Unscrew the bottle base.
Fill your LIFESAVER® bottle withthe desired amount of water.
Screw the base back on.
Twist to unlock the pump handleand pump a few times.
Twist the pump handle to lockclosed.
Open the snap-t lid, pull teatwith teeth or clean hands anddrink.
Close teat and ensure snap tlid is rmly closed by applyingpressure.
Choosing your water source Always choose the cleanest water sourceavailable. LIFESAVER ® bottle will work withhigh turbidity water though the dirtier thewater, the quicker the cartridge will expire.Using the pre-lter disc will prolong the lifeof your LIFESAVER ® bottle.
CAUTIONDO NOT allow grit, sand or other
abrasive matter to enter the bottle. If this happens it should be removed. Abrasive matter remaining in the bottle will causethe base seals to prematurelywear. This may cause yourLIFESAVER® bottle to leak and
may void your warranty.
• If the seal at the base beginsto wear, applying a thin layerof silicone grease (supplied)to the inside base of the bottlewill help seal the bottle and
prevent leakage.
• For situations where grit andother abrasive matter isdifcult to avoid a separate
o-ring seal may be purchased.• LIFESAVER® bottles purchased
after December 2007 includethis o-ring as standard.
U S I N G Y O U R B O T T L E
8/10/2019 LIFESAVER Bottle Instruction Manual
http://slidepdf.com/reader/full/lifesaver-bottle-instruction-manual 9/20
Uk
9
MAINTENANCE AND CARE
The unique ultra ltration membranesused in the LIFESAVER ® bottle havebeen developed to deliver a high volumethroughput at very low pressures. Thecapacity of your LIFESAVER ® cartridge willdepend on the water quality.
LIFESAVER® bottle is designedto lter water only. It is not designedfor ltering sugared or carbonateddrinks, alcohol or any other liquids.
LIFESAVER® bottle will not lterout salts.
LIFESAVER® bottle has a long shelflife. It can be stored unused for upto 3 years. Once the bottle hasbeen used, the cartridge will lastup to a further 2 years dependentupon usage conditions. Pleasecheck the end of shelf life date onyour product.
Front-side washing LIFESAVER ® bottle Over the life of the membranes particulatematter will build up on its surface. Thelter cartridge’s unique design inducesparticulate matter to form a caking layeron its external surfaces. To reduce thisbuild-up you should perform a front-side
wash on a regular basis.Damage If you suspect the cartridge has beendamaged in some way always replace thecartridge immediately and wash the bottlethoroughly in a mild disinfectant. In anyevent perform a Membrane Integrity. Check(page 17)
CAUTIONDO NOT subject the LIFESAVER ®
bottle/cartridge to shock or other misuse such as inserting objects into the cartridge.
CAUTIONDO NOT ll the cartridge upwith any liquids other than water
as this may cause irreparabledamage and in any event will
void your warranty. CAUTION
DO NOT use detergents or othercleaning agents to clean yourLIFESAVER® bottle / cartridgeexcept where specied.
M A I N T E N A N C E A N D C A R E
8/10/2019 LIFESAVER Bottle Instruction Manual
http://slidepdf.com/reader/full/lifesaver-bottle-instruction-manual 10/20
10
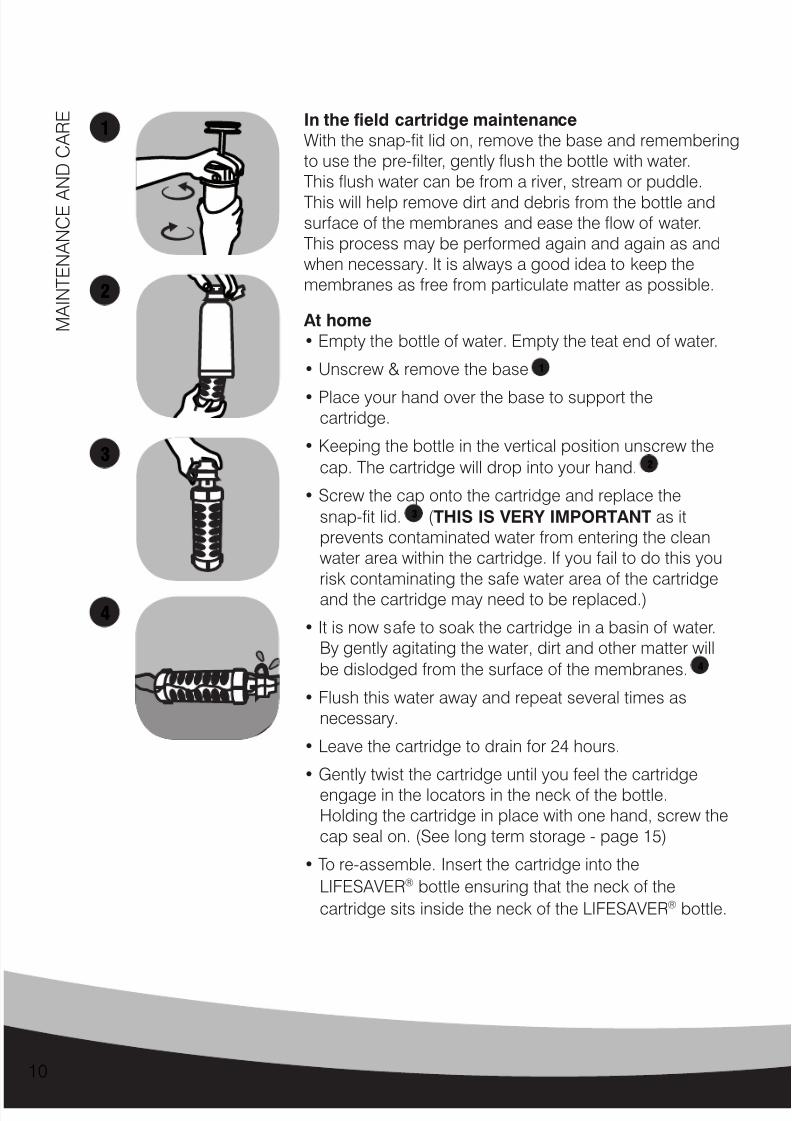
In the eld cartridge maintenance With the snap-t lid on, remove the base and rememberingto use the pre-lter, gently ush the bottle with water.This ush water can be from a river, stream or puddle.This will help remove dirt and debris from the bottle andsurface of the membranes and ease the ow of water.This process may be performed again and again as andwhen necessary. It is always a good idea to keep themembranes as free from particulate matter as possible.
At home • Empty the bottle of water. Empty the teat end of water.
• Unscrew & remove the base 1
• Place your hand over the base to support thecartridge.
• Keeping the bottle in the vertical position unscrew thecap. The cartridge will drop into your hand. 2
• Screw the cap onto the cartridge and replace thesnap-t lid. 3 (THIS IS VERY IMPORTANT as itprevents contaminated water from entering the cleanwater area within the cartridge. If you fail to do this yourisk contaminating the safe water area of the cartridgeand the cartridge may need to be replaced.)
• It is now safe to soak the cartridge in a basin of water.By gently agitating the water, dirt and other matter willbe dislodged from the surface of the membranes. 4
• Flush this water away and repeat several times asnecessary.
• Leave the cartridge to drain for 24 hours.
• Gently twist the cartridge until you feel the cartridgeengage in the locators in the neck of the bottle.Holding the cartridge in place with one hand, screw thecap seal on. (See long term storage - page 15)
• To re-assemble. Insert the cartridge into theLIFESAVER® bottle ensuring that the neck of thecartridge sits inside the neck of the LIFESAVER ® bottle.
1
2
3
4
M A I N T E N A N C E A N D C A R E
8/10/2019 LIFESAVER Bottle Instruction Manual
http://slidepdf.com/reader/full/lifesaver-bottle-instruction-manual 11/20
Uk
11
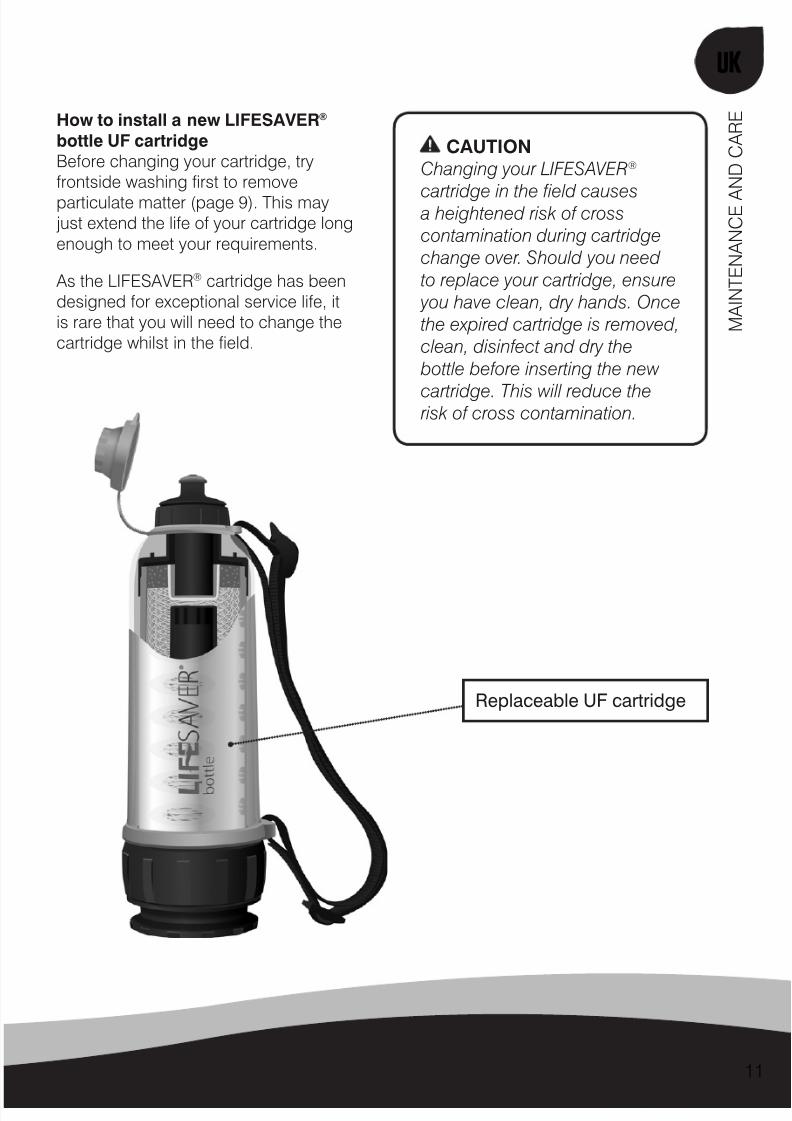
How to install a new LIFESAVER ® bottle UF cartridge Before changing your cartridge, tryfrontside washing rst to removeparticulate matter (page 9). This mayjust extend the life of your cartridge longenough to meet your requirements.
As the LIFESAVER ® cartridge has beendesigned for exceptional service life, itis rare that you will need to change thecartridge whilst in the eld.
CAUTIONChanging your LIFESAVER ®
cartridge in the eld causes a heightened risk of crosscontamination during cartridgechange over. Should you needto replace your cartridge, ensure
you have clean, dry hands. Oncethe expired cartridge is removed,clean, disinfect and dry the
bottle before inserting the new
cartridge. This will reduce the risk of cross contamination.
Replaceable UF cartridge
M A I N T E N A N C E A N D C A R E
8/10/2019 LIFESAVER Bottle Instruction Manual
http://slidepdf.com/reader/full/lifesaver-bottle-instruction-manual 12/20
12
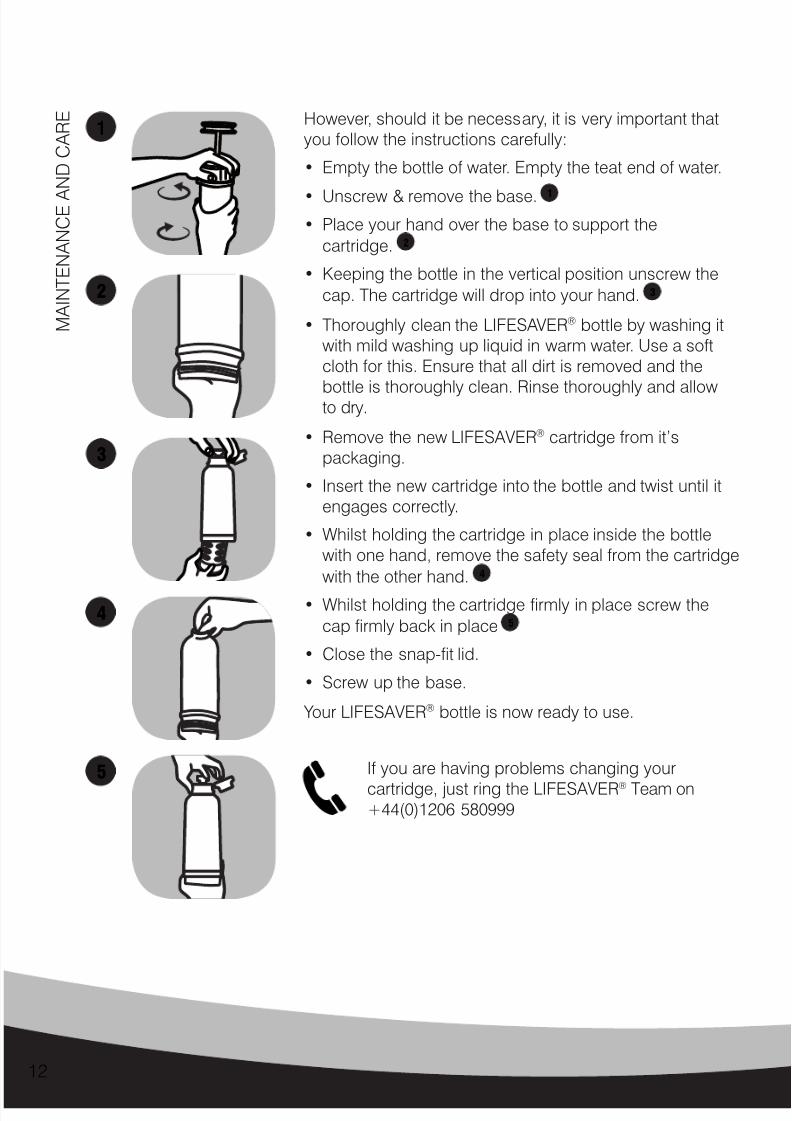
However, should it be necessary, it is very important thatyou follow the instructions carefully:
• Empty the bottle of water. Empty the teat end of water.
• Unscrew & remove the base. 1
• Place your hand over the base to support thecartridge. 2
• Keeping the bottle in the vertical position unscrew thecap. The cartridge will drop into your hand. 3
• Thoroughly clean the LIFESAVER ® bottle by washing itwith mild washing up liquid in warm water. Use a softcloth for this. Ensure that all dirt is removed and the
bottle is thoroughly clean. Rinse thoroughly and allowto dry.
• Remove the new LIFESAVER ® cartridge from it’spackaging.
• Insert the new cartridge into the bottle and twist until itengages correctly.
• Whilst holding the cartridge in place inside the bottlewith one hand, remove the safety seal from the cartridgewith the other hand. 4
• Whilst holding the cartridge rmly in place screw thecap rmly back in place 5
• Close the snap- t lid.
• Screw up the base.
Your LIFESAVER® bottle is now ready to use.
If you are having problems changing yourcartridge, just ring the LIFESAVER ® Team on+44(0)1206 580999
1
2
3
4
5
M A I N T E N A N C E A N D C A R E
8/10/2019 LIFESAVER Bottle Instruction Manual
http://slidepdf.com/reader/full/lifesaver-bottle-instruction-manual 13/20
Uk
13
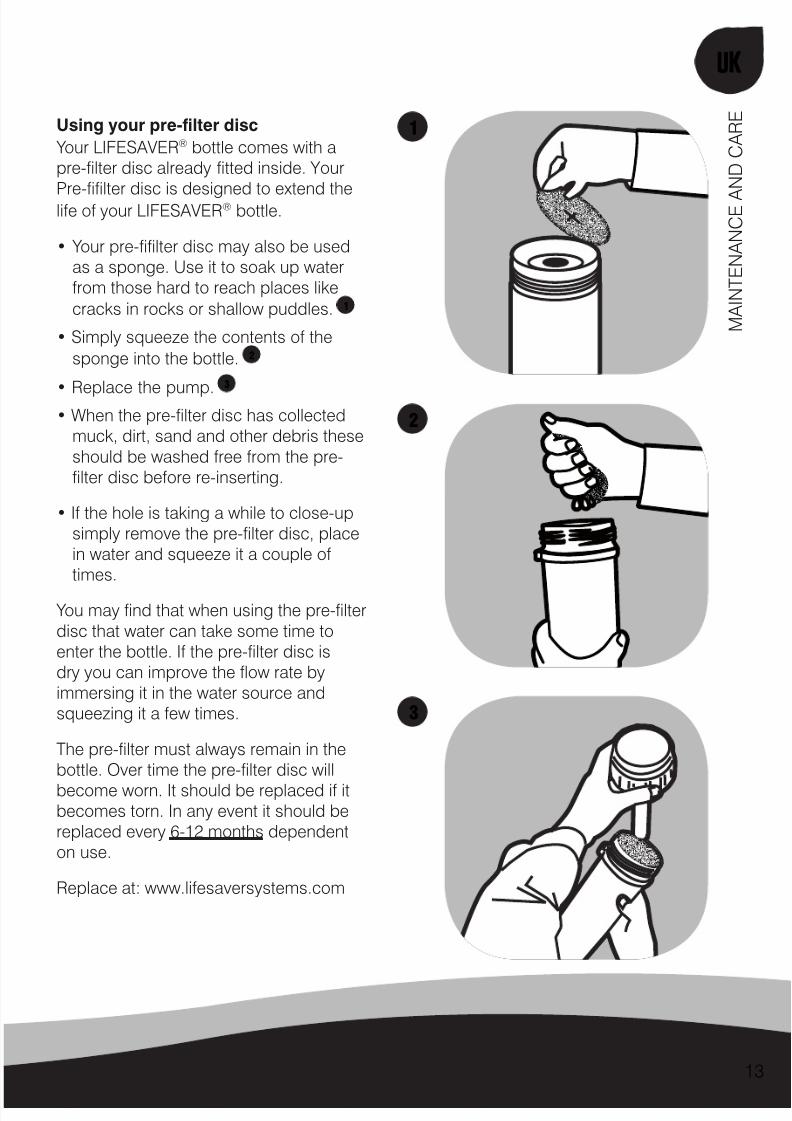
Using your pre-lter disc Your LIFESAVER® bottle comes with apre-lter disc already tted inside. Your
Pre-lter disc is designed to extend thelife of your LIFESAVER ® bottle.
• Your pre- lter disc may also be usedas a sponge. Use it to soak up waterfrom those hard to reach places likecracks in rocks or shallow puddles. 1
• Simply squeeze the contents of thesponge into the bottle. 2
• Replace the pump.3
• When the pre- lter disc has collectedmuck, dirt, sand and other debris theseshould be washed free from the pre-lter disc before re-inserting.
• If the hole is taking a while to close-upsimply remove the pre-lter disc, placein water and squeeze it a couple oftimes.
You may nd that when using the pre-lterdisc that water can take some time toenter the bottle. If the pre-lter disc isdry you can improve the ow rate byimmersing it in the water source andsqueezing it a few times.
The pre-lter must always remain in thebottle. Over time the pre-lter disc willbecome worn. It should be replaced if itbecomes torn. In any event it should bereplaced every 6-12 months dependenton use.
Replace at: www.lifesaversystems.com
1
2
3
M A I N T E N A N C E A N D C A R E
8/10/2019 LIFESAVER Bottle Instruction Manual
http://slidepdf.com/reader/full/lifesaver-bottle-instruction-manual 14/20
14
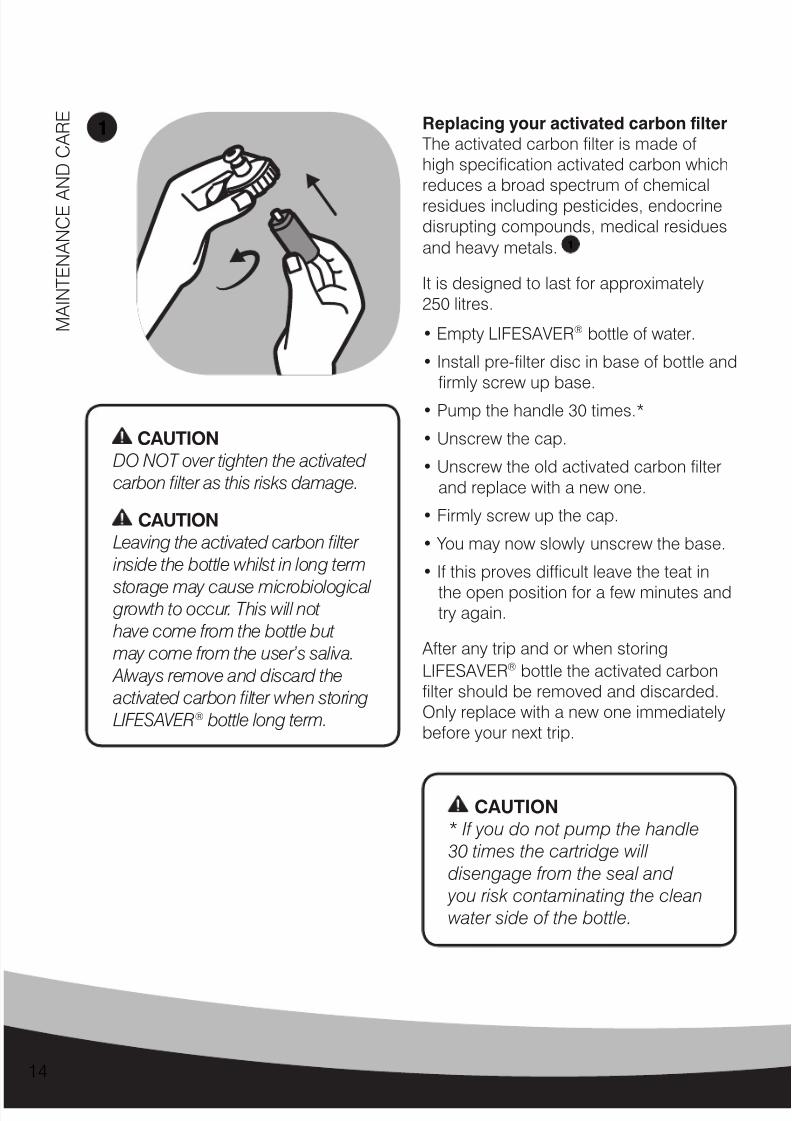
Replacing your activated carbon lter The activated carbon lter is made ofhigh specication activated carbon whichreduces a broad spectrum of chemicalresidues including pesticides, endocrinedisrupting compounds, medical residuesand heavy metals. 1
It is designed to last for approximately250 litres.
• Empty LIFESAVER ® bottle of water.
• Install pre- lter disc in base of bottle andrmly screw up base.
• Pump the handle 30 times.*
• Unscrew the cap.
• Unscrew the old activated carbon lterand replace with a new one.
• Firmly screw up the cap.
• You may now slowly unscrew the base.
• If this proves dif cult leave the teat inthe open position for a few minutes andtry again.
After any trip and or when storingLIFESAVER® bottle the activated carbonlter should be removed and discarded.Only replace with a new one immediatelybefore your next trip.
CAUTIONDO NOT over tighten the activatedcarbon lter as this risks damage.
CAUTIONLeaving the activated carbon lter
inside the bottle whilst in long term
storage may cause microbiological growth to occur. This will not have come from the bottle but may come from the user’s saliva. Always remove and discard the activated carbon lter when storingLIFESAVER® bottle long term.
1
CAUTION* If you do not pump the handle30 times the cartridge willdisengage from the seal and
you risk contaminating the cleanwater side of the bottle.
M A I N T E N A N C E A N D C A R E

8/10/2019 LIFESAVER Bottle Instruction Manual
http://slidepdf.com/reader/full/lifesaver-bottle-instruction-manual 15/20
Uk
15
Replacing the teat LIFESAVER® bottle’s teat hasbeen designed to be non-tasting,replaceable and chew-proof.Unlike many other systemsLIFESAVER® bottle has beendesigned so that its teat can beeasily changed. 2
Over time the teat will wear. When itbecomes necessary to replace followthese instructions.
• Open the snap- t lid.
• Pull out the teat.
• Remove your new teat from itspackaging.
• Wet the teat.
• Align the position dot on the teat withthe seam on the cap and rmly insert.
Long term storage
If storing your LIFESAVER ® bottle for aprolonged period of time (i.e. betweentrips) you should always perform a front-side wash. Ensure that no water remainsin the teat end of the cartridge. You willneed to discard the activated carbon lterand the pre-lter disc. Also see ‘Keep themembranes wet’ on (page 7).
Before rst use LIFESAVER ® bottle shouldbe kept in a dry place. After rst use theproduct should be protected againstfreezing. 3
2
3
M A I N T E N A N C E A N D C A R E
8/10/2019 LIFESAVER Bottle Instruction Manual
http://slidepdf.com/reader/full/lifesaver-bottle-instruction-manual 16/20
16
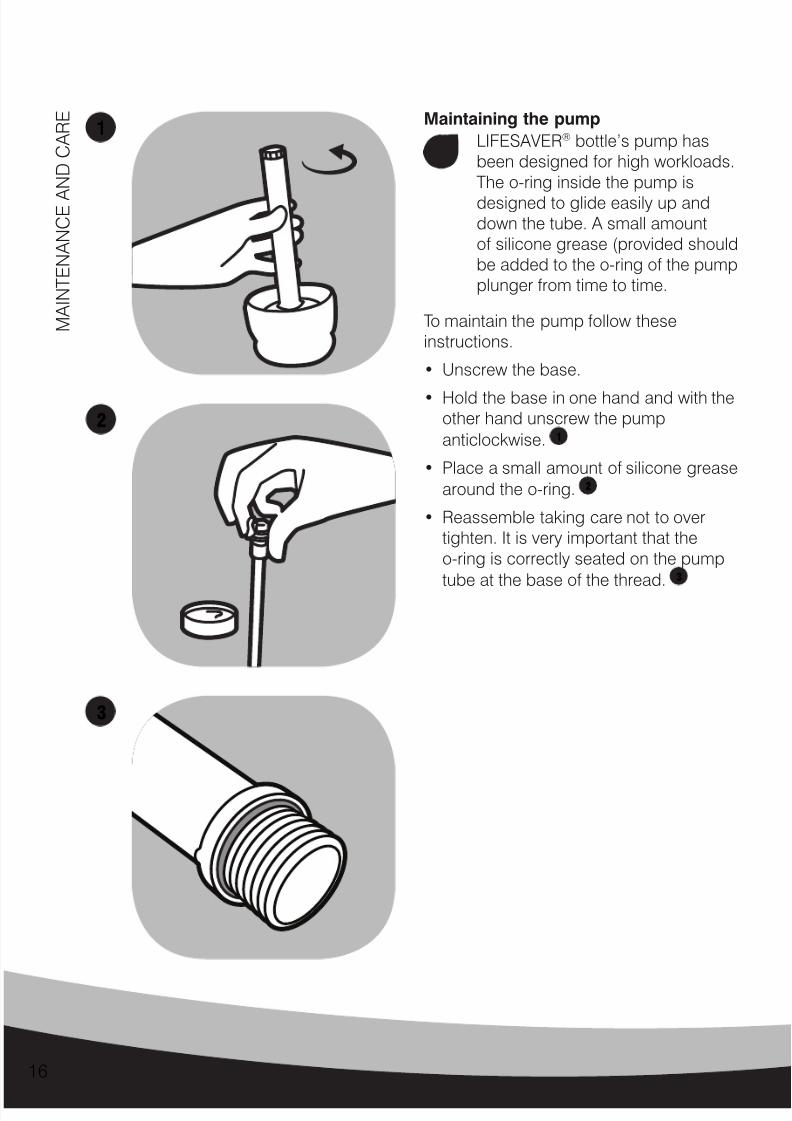
Maintaining the pump LIFESAVER® bottle’s pump hasbeen designed for high workloads.The o-ring inside the pump isdesigned to glide easily up anddown the tube. A small amountof silicone grease (provided shouldbe added to the o-ring of the pumpplunger from time to time.
To maintain the pump follow theseinstructions.
• Unscrew the base.
• Hold the base in one hand and with theother hand unscrew the pumpanticlockwise. 1
• Place a small amount of silicone greasearound the o-ring. 2
• Reassemble taking care not to overtighten. It is very important that theo-ring is correctly seated on the pump
tube at the base of the thread.3
M A I N T E N A N C E A N D C A R E
1
2
3
8/10/2019 LIFESAVER Bottle Instruction Manual
http://slidepdf.com/reader/full/lifesaver-bottle-instruction-manual 17/20
Uk
17
ALL ABOUT THE TECHNOLOGY
FAILSAFE™ technology There are several aspects of this technology that increase the safety and reliability ofyour LIFESAVER ® bottle.
Auto Shut Off As the LIFESAVER ® cartridge nears the end of its service life a greater and greaternumber of pumps are required to induce water to ow. There will come a point at whichdespite continuous pumping water does not ow. This is the auto shut off feature ofFAILSAFE™ working. Your cartridge has now expired and you must now change it.Before changing however, perform a front side wash as the membranes may just becovered with particulate matter.
Membrane Integrity The ultra ltration membranes used in your LIFESAVER ® bottle have been precisionengineered. They have been integrated into a robust cartridge format and have beendesigned for long service life. If treated incorrectly they are liable to break. There areseveral reasons why a membrane might break.
Membrane Integrity check Your LIFESAVER® bottle has been designed to work at any angle and on any axis. Ifwater does not ow at all angles and axes then you have damaged the membranes in
some way and you must replace the cartridge immediately.
M A I N T E N A N C E A N D C A R E
NOTICEThis integrity check should be
performed on a regular basis and every time the jerrycan has been subjected to shock or
you suspect damage may have occurred for any reasonto the jerrycan or cartridge
membranes.
8/10/2019 LIFESAVER Bottle Instruction Manual
http://slidepdf.com/reader/full/lifesaver-bottle-instruction-manual 18/20
18
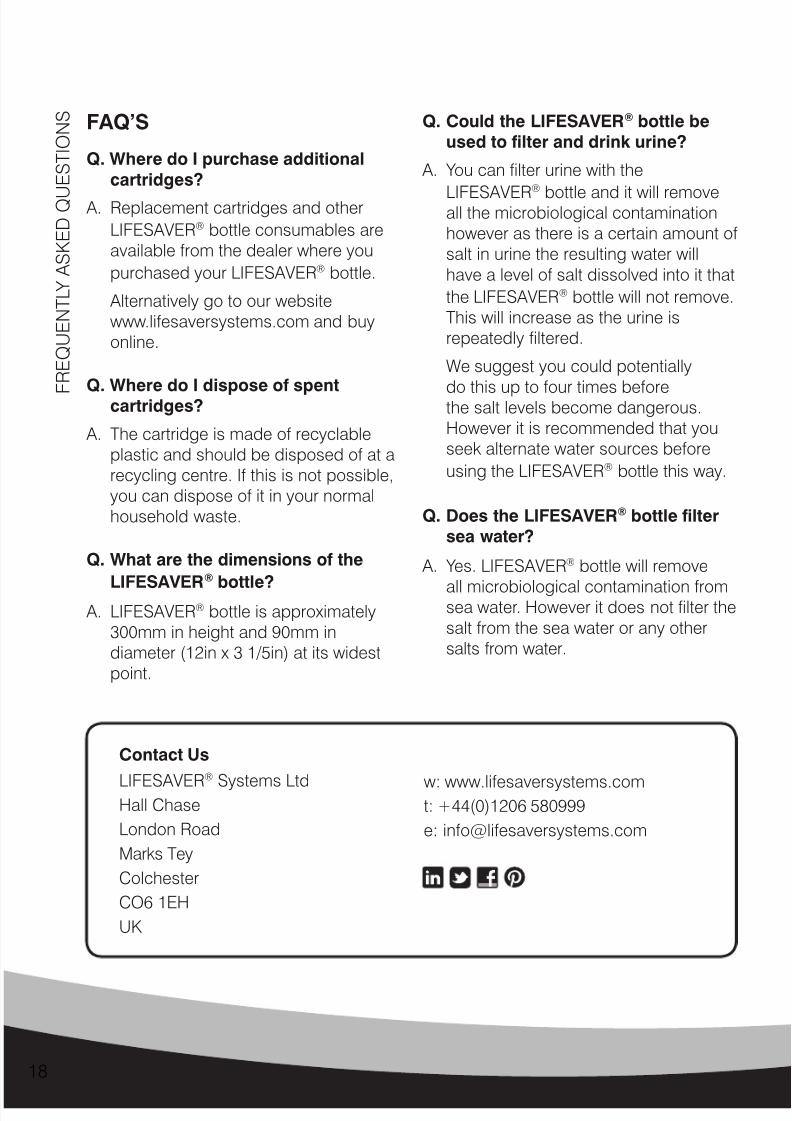
Contact Us
LIFESAVER®
Systems LtdHall ChaseLondon RoadMarks TeyColchesterCO6 1EHUK
w: www.lifesaversystems.comt: +44(0)1206 580999e: [email protected]
Q. Could the LIFESAVER ® bottle beused to lter and drink urine?
A. You can lter urine with the
LIFESAVER®
bottle and it will removeall the microbiological contaminationhowever as there is a certain amount ofsalt in urine the resulting water willhave a level of salt dissolved into it thatthe LIFESAVER ® bottle will not remove.This will increase as the urine isrepeatedly ltered.
We suggest you could potentially
do this up to four times beforethe salt levels become dangerous.However it is recommended that youseek alternate water sources beforeusing the LIFESAVER ® bottle this way.
Q. Does the LIFESAVER ® bottle ltersea water?
A. Yes. LIFESAVER ® bottle will remove
all microbiological contamination fromsea water. However it does not lter thesalt from the sea water or any othersalts from water.
F R E Q U E N T L Y A S K E D Q U
E S T I O N S FAQ’S
Q. Where do I purchase additionalcartridges?
A. Replacement cartridges and otherLIFESAVER® bottle consumables areavailable from the dealer where youpurchased your LIFESAVER ® bottle.
Alternatively go to our websitewww.lifesaversystems.com and buyonline.
Q. Where do I dispose of spentcartridges?
A. The cartridge is made of recyclableplastic and should be disposed of at arecycling centre. If this is not possible,you can dispose of it in your normalhousehold waste.
Q. What are the dimensions of the
LIFESAVER®
bottle? A. LIFESAVER® bottle is approximately
300mm in height and 90mm indiameter (12in x 3 1/5in) at its widestpoint.

8/10/2019 LIFESAVER Bottle Instruction Manual
http://slidepdf.com/reader/full/lifesaver-bottle-instruction-manual 19/20
Uk
19
I N T E
R N A T I O N A L L I M I T E D W A R R A N T YQ. Where can I get replacement parts?
A. LIFESAVER® bottle has beenengineered so that all parts are
replaceable. Please go to the dealerwhere you purchased yourLIFESAVER® bottle.
Alternatively go to our websitewwwlifesaversystems.com and buyonline.
Q. The pumping action has becomestiff
A. The most likely reason for this is a lackof silicone grease in the pump tube(maintaining the pump - page 16).
For a list of these and other frequentlyasked questions please visit our websitewww.lifesaversystems.com.
Q. I am nding it difcult to unscrewthe base
A. If you nd it difcult to remove the
base, this could be due to an overpressurisation. To solve this, leave theteat in the open position for a while andtry again. Alternatively you may haveover tightened the base. This willrequire either access to hot waterwhich will help loosen the base orgood old fashioned elbow grease.
You may also try pumping the bottle8-10 times and try again. Sometimesthis will loosen the base.
Q. I am pumping but no water iscoming out
A. Your cartridge may have expired or mayrequire a front-side wash (page 9).
International Limited Warranty Thanks again for purchasing LIFESAVER ® bottle. If you have any questions relatingto this or any other product in our range please contact us via our website wherewe will be more than happy to help.
LIFESAVER® bottle comes with a 2 year international warranty from the date ofpurchase against defects in materials and workmanship. Should your LIFESAVER ® bottle prove defective within 2 years from the date of purchase you should return itto the retailer that you originally purchased it from. LIFESAVER ® systems will, at itssole discretion, repair or replace the damaged item(s).
You should ensure that you retain your proof of purchase showing the date onwhich you purchased your LIFESAVER ® bottle. Without it we are unable to offerwarranty assistance. This International Limited Warranty does not affect yourstatutory legal rights.
8/10/2019 LIFESAVER Bottle Instruction Manual
http://slidepdf.com/reader/full/lifesaver-bottle-instruction-manual 20/20
DISCLAIMER:The information and data contained in this document are based on our generalexperience and are believed to be correct. They are given in good faith and areintended to provide a guideline for the selection and use of our products. Sincethe conditions under which our product may be used are beyond our control, thisinformation does not imply any guarantee of nal product performance and we cannot
accept any liability with respect to the use of our products. The quality of our productsis guaranteed under our conditions of sale. Existing industrial property rights must beobserved.
© 2007-2013 LIFESAVER ® systems. All Rights Reserved. Patents registered designsPending and granted. LIFESAVER ® is a registered trade mark. The following aretrademarks of the LIFESAVER ® group of companies :- FOR A HOSTILE WORLD™,FILL•PUMP•DRINK™ and FAILSAFE™.
All details given on and in this manual are believed to be correct at the time of goingto press. We reserve the right to make improvements and/or modications to theequipment herein.
v1.7