Embed Size (px)
Citation preview
Liferay Portal Enterprise Intranets
A practical guide to building a complete corporate intranet with Liferay
Jonas X. Yuan
BIRMINGHAM - MUMBAI
Liferay Portal Enterprise Intranets
Copyright © 2008 Packt Publishing
All rights reserved. No part of this book may be reproduced, stored in a retrieval system, or transmitted in any form or by any means, without the prior written permission of the publisher, except in the case of brief quotations embedded in critical articles or reviews.
Every effort has been made in the preparation of this book to ensure the accuracy of the information presented. However, the information contained in this book is sold without warranty, either express or implied. Neither the author, Packt Publishing, nor its dealers or distributors will be held liable for any damages caused or alleged to be caused directly or indirectly by this book.
Packt Publishing has endeavored to provide trademark information about all the companies and products mentioned in this book by the appropriate use of capitals. However, Packt Publishing cannot guarantee the accuracy of this information.
First published: April 2008
Production Reference: 1220408
Published by Packt Publishing Ltd. 32 Lincoln Road Olton Birmingham, B27 6PA, UK.
ISBN 978-1-847192-72-1
www.packtpub.com
Cover Image by Vinayak Chittar ([email protected])
Credits
Author
Jonas Yuan
Reviewer
C.J.S Hayward
Senior Acquisition Editor
David Barnes
Development Editor
Ved Jha
Technical Editor
Usha Iyer
Copy Editor
Sumathi Sridhar
Editorial Team Leader
Mithil Kulkarni
Project Manager
Abhijeet Deobhakta
Project Coordinator
Abhijeet Deobhakta
Indexer
Hemangini Bari
Proofreader
Nina Hasso
Production Coordinator
Shantanu Zagade
Cover Work
Shantanu Zagade
About the Author
Jonas X. Yuan is a senior technical analyst at CIGNEX. Jonas holds a Ph. D in Computer Science from the University of Zurich, where he focused on Integrity Control in Federated Database Systems. He earned his M.S and B.S. degrees from China, where he conducted research on expert systems for predicting landslides. Jonas is experienced in Systems Development Lifecycle (SDLC). Previously, he has worked as a Project Manager and a Technical Architect in Web GIS (Geographic Information System). He has extensive, hands on skills in J2EE technologies. Specifically, he had developed a BPEL (Business Process Execution Language) Engine called BPELPower from scratch at NASA data center. He also has experiences on content management related to the medical-legal area. Furthermore, he is an expert in Content Management Systems (CMS) such as Alfresco, Portals such as Liferay and full integration of Liferay, Alfresco, LDAP and SSO.
I would like to thank team members at Liferay, especially thank Bryan Cheung, Jorge Ferrer, Michael Young, Raymond Auge, Brian Chan, Jerry Niu, Ed Shin, Craig Kaneko and Brian Kim of Liferay for providing me with valuable information and all the support. My special thanks to all my team members at CIGNEX for making this book a reality. I would like to thank Navin Nagiah, CEO of CIGNEX for his encouragement and great support; without him, this book would not have been written. Furthermore thanks to Munwar Shariff and Mike W. Walker for introducing me to the publishers. Amit Babaria, Harish Ramachandran, Jarred Parris, and our sales and presales team at CIGNEX helped me understand what the customers' demands are. Our consulting team at CIGNEX, Srini Sridhar, Zakir Laliwala, Harshad Bakshi and Zankar Shah presented me with the various flavors of Liferay implementations with real-life examples. I am thankful to them. I sincerely thank and appreciate David Barnes and Ved Prakash Jha, Senior Acquisition Editor and Development Editor respectively at Packt Publishing for criticizing and fixing my writing style. Thanks to Abhijeet Deobhakta, and Usha Iyer and entire team at Packt Publishing and it was really joyful working with them. Last but not least, I would like to thank my parents and my wife, Linda, for their love, understanding and encouragement. A special thanks to my wonderful and understanding kid Josua.
About the Reviewer
C.J.S. Hayward is an author and IT professional who loves to create. He holds a master's degrees in math (UIUC) and theology (Cambridge). His main site, JonathansCorner.com, showcases different creations: short stories and Socratic dialogue, science fiction and fantasy, CGI and OSS, musing and mystic spark, a role playing world and a four dimensional maze, novellas, artwork, poetry, philosophy and theology, dreamlike vision and energetic endeavors, plus a game review for meatspace. (His works are available in print from CJSHayward.com.) He has lived in the U.S., Malaysia, England, and France and is a parishioner of St. Innocent of Moscow Russian Orthodox Church.
Table of ContentsPreface 1Chapter 1: Introducing Liferay for Your Intranet 9
What Are We Going to Build? 9Hosted Discussions 9Collaborative Documents Using Wikis 10Team And Individual Blogs 10Shared Calendars 11Document Stores 11And More...! 11Everything in One Place 12
Introducing Palm Tree Publications 12Why Use Liferay To Build An Intranet? 14
It's Got The Features We Need 14It's Easy To Set up and Use 14It's Free And Open Source 15It Will Grow with You 15It Works with Other Tools 15It Is Based on "Standards" 16
What Else Can Liferay Do? 16Corporate Extranets 16Collaborative Websites 17Content Management & Web Publishing 17Infrastructure Portals 18
Finding More Information 18Summary 19
Table of Contents
[ ii ]
Chapter 2: Set-up The Home PageAnd Navigation Structure for The Intranet 21
Experiencing Liferay Portal 22Quick Liferay Portal Installation 22What's Happening Behind? 23
Understanding Portlets 23Using Portlet Container 24How Does A Portal Work? 24
How Does A Portlet Work? 24Applying Portlet Life-cycle 26
Setting up Liferay Portal 27Using Liferay Portal Bundled with Tomcat 5.5 in Windows 28Using Liferay Portal Bundled with Tomcat 6.x in Linux 29Using More Options for Liferay Portal Installation 30Flexible Deployment Matrix 30
Customizing Personal Area 32Add Pages 33Remove Pages 34Add Portlets 35Remove Portlets 35Changing Layout Templates 36
Setting up Portal Pages 37Managing Pages 37
Add A Child Page 37Change Display Order 38Merge Pages 38Change The Logo 39
Edit A Page 39Delete A Page 40Changing Themes 41
How Do You Customize Portlets ? 42How Do You Navigate The Structure of Intranet Site? 43How to Configure Liferay Portal? 44
Customizing Mail Servers 45Configuring Portal Paths 46Customizing Configuration 46
Setting up Extension Environment 47Summary 49
Chapter 3: Bringing In Users 51Managing My Account 51
Accessing The Portal 52Logging into The Portal 52
Table of Contents
[ iii ]
Updating Your Profile 53Adding and Managing Users 54
Working with Organizations 55Adding A Top-level Organization 55Managing Organizations 56Using Organizations Effectively 59
Working with Locations 60Adding A Location for The Enterprise 60Managing Locations 60Using Locations Effectively 64
Bringing in Users 64Adding Users 64Managing Users 67
User Groups And Communities 71Adding A User Group 72Managing User Groups 73
Adding More Administrators 74Enterprise Admin 76Organization Admin 76
Authentication Methods 76Working with LDAP Server 76
What Happens Next? 78Use LDAP Effectively 79
General Configurations 79Working with SSO CAS 80
What Happens Next? 81Working with OpenID 81
Working with Roles 82Adding a Role 82Managing Roles 83
View Roles 83Search Roles 83Edit A Role 83Delete Roles 83Assign Enterprise Permissions to A Role 84Assign Roles 84
Using Roles Effectively 85Working with Permissions 86
Assign Individual Portlet Permissions 87Assign Default Permissions 88Assign Individual Permissions 88Delegate Permissions 89Using Permissions Effectively 91
Applying Full Access Control Security Model 92Summary 94
Table of Contents
[ iv ]
Chapter 4: Discussion Forums And Tags 95Working with Message Boards 95
Adding And Managing Categories 96Adding Categories 96Managing Categories 98
Adding And Managing Threads 99Adding Threads 100Managing Threads 101
Adding And Managing Posts 102Adding Posts 102Managing Posts 104
Subscribing Categories And Threads 107Unsubscribe Categories And Threads 108What Happens Next? 108
Setting up Message Boards 109Using Permissions 111
Working with Portlet Permissions 111Working with Permissions on Category 111Working with Permissions on Thread 113
Using Message Boards Effectively 114Working with Tags 114
Tagging Contents 114Managing Tags 115
Tags Admin 116Display Tagged Contents 118
What Makes Tags Important? 120Using Tags Effectively 121
Summary 122Chapter 5: Wikis, Web Form And Polls 123
Working with Wikis 123Adding And Managing Nodes 124
Adding Nodes 124Managing Nodes 125
Adding Pages 126Managing Pages 129
Add Comments 130Using Permissions 132
Update Portlet Permissions 133Set up Permissions on Nodes 133Update Permissions on Pages 134
Using Wikis Effectively 135Characteristics 135Design Principles 136Wiki Text 136Pros And Cons 137
Table of Contents
[ v ]
Publishing Wiki Articles 140Working with Web Form 142
Using View Mode 142Using Edit Mode 143
Working with Polls 145Using Polls Portlet 145
Managing Questions 147Set Up Permissions 147View Votes 148
Using Polls Display Portlet 149Using Polls Effectively 150
Summary 150Chapter 6: Internal Bloggings And RSS 151
Working with Blogs 151Adding Entries 152Managing Entries 154
Edit Entries 154Delete Entries 154Search Entries 154Giving Your Rating 155Employing RSS Feeds 156
Adding Comments 156Using Permissions 159
Update Portlet Permissions 159Set up Permissions on Entries 160
Using Blogs Effectively 162Blog Types 162Liferay Blogs Portlet 163
Publishing Blogs 164Using Recent Bloggers Portlet 164Using Blogs Aggregator Portlet 165
Building Blogs 166Inserting Image 167Inserting Links 168
Link to A Document 169Link to A Page 170Link to An Image 170
Insert Flashes, Tables, Smiley And Special Characters 170Editing Source 172
Working with RSS 173Using News Portlet 174Using Weather Portlet 176Using RSS Effectively 177
Table of Contents
[ vi ]
RSS Specification 178How It Works 179
Summary 180Chapter 7: Shared Calendars, WSRP And Workflow 181
Working with Calendar 181Adding Events 182Managing Events 183
View Events 183Edit An Event 185Delete An Event 185Export/Import Events 186
Setting up Email 186Sharing Calendar 187
Use Portlet Permissions 187Permissions On Events 188
Using iCalendar Effectively 189Use Core Object 190Exchange Data 192
Working with Workflow 192Deploying Workflow 192
Managing Definitions 194Managing Instances 194Managing Tasks 196Using Permissions 198
Portlet Permissions 198Permissions on Definitions 199Permissions on Instances 199Permissions on Tasks 200
Using Workflow Effectively 200Define Business Process 201Integrate with Users, Groups And Roles 202
Working with WSRP 204Using WSRP Effectively 205
Why Use WSRP? 206How Does It Work? 206
Using Web Proxy Portlet 207Using IFrame Portlet 208
What Are The Differences Between IFrame And Web Proxy? 209Using Flash Portlet 210
Summary 211Chapter 8: Content Management and Publishing 213
Working with Image Gallery 214Adding A Folder 214
Adding A Sub Folder 215
Table of Contents
[ vii ]
Adding An Image 215Managing Folders 217Managing Images 217
View Images as a Slideshow 218Search Images 218Edit An Image 219Delete An Image 220
Set up Permissions 220Use Permissions on Portlet 220Use Permissions on Folders 221Use Permissions on Images 221
Using Images Effectively 221Working with Document Library 222
Adding A Folder 222Adding A Subfolder 223
Adding A Document 224Add A Shortcut 224
Managing Folders And Documents 225View Documents 225Search Documents 226Edit A Document 226Delete a Document 227View Version History 227Give Your Rating 227Add Comments 228
Setup Permissions 228Use Permissions on Folders 228Use Permissions on Document 229
Publishing Documents 229Using Documents Effectively 229
Adding And Managing Articles 231Adding A Structure 232Managing Structures 233
View Structures 234Edit A Structure 235Delete a Structure 235
Adding A Template 235Managing Templates 237
View Templates 237Edit A Template 238Delete A Template 238
Adding An Article 238Managing Articles 240
View Articles 240Edit An Article 241Delete An Article 242
Table of Contents
[ viii ]
Setting up Journal 242Updating Permissions 243
Using Permissions on Articles 244Using Permissions on Structures And Templates 244
Using Articles Effectively 245Build A Structure 245Create A Template 246Construct An Article 247
Publishing Articles 248Using Journal Content 248Using Journal Articles 249
Using Other CMS Tools 250Summary 251
Chapter 9: Chat and Instant Messaging 253Working with Chat Portlet 253
Adding a Participant 254Managing Participants 255Starting Chatting 256How Does It Work? 257
Use Instant Messaging 258Employ AJAX 259
Using Chat Portlet Effectively 260Set up XMPP Server 261Configure Liferay 261
Working with Mail Portlet 262Experiencing Mail Management 262How to Set up Mail Server? 265How to Set up Mail Portlet? 266Using Permissions 267Using Mail Portlet effectively 268
Working with SMS Text Messenger 269Using SMS Text Messenger 270How to Set up SMTP? 271Using SMS Effectively 272
Summary 273Chapter 10: Help Desk/Customer Support 275
Working with Financial Portlets 276Using Calculator And Load Calculator 276Using Currency Converter 277Employing Stocks Portlet 279
Using Stocks Portlet Effectively 280Working with Google Portlets 281
Table of Contents
[ ix ]
Using Google Gadgets 282Employing Google AdSense 284
Working with Religion Portlets 285Using Religion Portlets Effectively 287
Playing with Additional Tools 288Experiencing Shopping Tools 291Enjoying Entertainment Tools 294Working with Multiple Languages 295
Removing an Unwanted Language 296Priority of Language Files 296
Using WebDAV 297Developing Portlets 298Summary 299
Chapter 11: Roll Out To Other Teams 301Working with Communities 301
Adding A Community 302Managing Communities 303
View Communities 303Search Communities 304Edit A Community 304Delete A Community 305
Managing Pages 306View Pages 306Import And Export Pages 307Monitor Pages 307
Assigning Users to A Community 308Joining An Open Community 310Leaving An Open Community 310Updating Permissions 310Working with Community Virtual Hosting 312
Using Virtual Hosting Effectively 313Working with Community Staging & Publishing 313
Using Community Staging 314Publishing Pages 314Manage Staging with Workflow 316
Employing Community Tools 318Using Announcements 318Working with Bookmarks Portlet 319Using Directory Portlet 321Working with Invitation Portlet 321Using Page Comments Portlet 322Working with Page Rating Portlet 323
Summary 324
Table of Contents
[ x ]
Chapter 12: Search 325Working with Federated Search 326
Using Search Portlet 326Query Alfresco Content via OpenSearch 328
Using CSZ Search 329Using Maps Search 330Employing Google Search 332Enjoying Google Maps 334Using OpenSearch Effectively 336
Design Principles 336OpenSearch Specification 336
Working with Journal Content Search 338Setting up Search 338Using Journal Content Search Effectively 339
Adding Sitemap for Search Engines 340Using The Sitemap 340Customizing The Sitemap for Pages 341Using Sitemap Effectively 342
XML Sitemap Format 343Deploying And Managing Search Portlets 344
Using Plugin Installer for Hot Deploy 344Using Update Manager 345Using Auto Deployment 346Managing Search Portlets via Software Catalogue 347
Summary 348Chapter 13: Ongoing Admin Tasks 349
Working with Admin Portlet 349Managing Server 350Managing Instances 352Managing Plugins 354
Working with Enterprise Admin Portlet 355Using Password Policies 355Updating Settings 358
Set up Default User Associations 359Update Reserved Screen Names 359Update Mail Host Names 360Update Email Notifications 360
Monitoring Users' Activities 361Integrating with Alfresco 362
Using Alfresco Web Client 363Using Alfresco Content 364
Enjoy Web Services 364
Table of Contents
[ xi ]
Employ Web Scripts 365Use Alfresco as Liferay Direct Repository 366Migrating Contents 368Integrating Liferay with LDAP, SSO And Alfresco 369
Integrating with Other Systems 371Working with Ad Server—OpenX 371Working with Orbeon Forms 373Working with Other Integrations 374
Summary 375Index 377

PrefaceWhen you plan to build an amazing website based on a portal, you may commonly consider a lot of questions. Some of them would look like the following:
Are you planning to build a website with an open source enterprise portal solution using SOA framework, ESB and Web 2.0 technologies? Do you want to add collaborative tools, such as Wikis, Blogs, Discussion Forums, Shared Calendar, RSS, mail, Tagging, and instant messaging in the same website?Do you want to manage, publish and maintain web contents and documents in the same website? Are you eager to integrate with LDAP, SSO and third-party systems like JBoss jBPM, Alfresco, Orbeon Forms, and Pentaho BI/Reporting in the same website?
Obviously Liferay would be the best choice in terms of answering the above questions. Liferay Portal is one of the most mature portal frameworks in the market and offers the above basic benefits. Liferay is backed by a comprehensive professional services network and it offers custom development, training, and support across the world.
As the world's leading open source portal platform, Liferay provides a unified web interface to data and tools scattered across many sources. Within Liferay portal, a portal interface is composed of a number of portlets—self contained interactive elements that are written to a particular standard. Since portlets are developed independently of the portal itself, and loosely coupled with the portal, they are apparently SOA (Service-Oriented Architecture).
•
•
•
•

Preface
[ 2 ]
Liferay has a wide range of portlets freely available for things like: Blogs, Calendar, Document Library, Image Gallery, Mail, Message Boards, Polls, RSS feeds, Wiki, and many others. Liferay Portal also ships with Liferay Journal CMS (Content Management Systems), which provides basic ECMS (Enterprise Content Management Systems) features. If you need robust enterprise content management system then you can integrate it with Alfresco. Liferay is good portal on top for small team collaboration. The data for events can be specific to a small group within a company. In any organization, some data will be relevant at a team level—and other data, across the whole business. Liferay has very good support for such things.
As the world's leading open source enterprise portal solution, Liferay portal uses the latest in Java, J2EE, and Web 2.0 technologies in order to deliver solutions to enterprises across both public and private sectors. Meanwhile, Journal CMS publishes, manages, and maintains web content and document libraries. In addition, Collaboration Suite takes advantage of the benefits of virtualized work environment for collaboration.
This book is your complete guide to build an intranet with Liferay —assess your needs, install the software, start using it, deploy portlets, customize as per your requirements and train users. The book focuses on leveraging the Liferay framework by configuring the XML files without changing the underlying java code.
What This Book CoversChapter 1 introduces Liferay.
Chapter 2 discusses how to set up the home page and navigate the structure of the intranet.
Chapter 3 investigates security and access model. It describes how to bring to users in the portal: application of full access control security model; administration of users, user groups, organizations and locations; authentication of Liferay portals, and moreover, usage of security permissions and roles.
Chapter 4 describes discussion Forums. Message Board (discussion Forum) provides support for sticky posts, statistics, recent posts, RSS, email-based subscriptions, avatars, threads management, and full fine-grained permissions. Tagging system provides support to tag web content, documents, Message Board threads and more, and dynamically publish content by tags.
Preface
[ 3 ]
Chapter 5 describes Wikis. Liferay Wiki is a straightforward Wiki solution with categories; classic Wiki, HTML, or plain text modes; WYSIWYG editing; page history and versioning; and permissions. Moreover, the Web Form portlet allows a web administrator to define a form to be published in the website; the Polls portlet allows users or administrators to create multiple choice polls that keep track of votes and display results on the page.
Chapter 6 describes Internal Bloggings. Blogs provide features including RSS support, user and guest comments, brows-able categories, tags and labels, and an entry rating system; RSS portlet has subscription ability to frequently read RSS feeds from within the portal framework. Furthermore, WYSIWGs (What You See Is What You Get editors) edit web content, including Blogs' content.
Chapter 7 introduces Shared Calendars. A calendar portlet provides the ability to display calendar information and to allow users to create, manage, and search for events. Workflow portlet provides the ability to manage instances and tasks, and furthermore, integrate with users, groups and roles. In addition, WSRP proxy portlet, IFrame portlet and Flash portlet are also included as well.
Chapter 8 investigates documents repositories. It does not only introduce document library, images gallery and content management including articles, templates and structure, but it also discusses content publication.
Chapter 9 presents chat and instant messaging. It first introduces chat portlet and its related features, such as AJAX and XMPP servers. Then it introduces mail portlet and its related features, such as IMAP. Finally, it briefly introduces SMS and the usage of SMS text messenger—sending SMS text messages.
Chapter 10 discusses others tools which would be useful to build a personalized web site.
Chapter 11 presents how to roll out to other teams. It principally introduces community administration, community virtual hosting, portal publishing and staging and a set of community tools.
Chapter 12 introduces search functionalities: OpenSearch, Journal content search, sitemaps protocol, Google search and Google maps.
Chapter 13 concludes the book. It mainly describes ongoing admin tasks, including admin portlet, enterprise admin portlet, managing password policies, updating the system–level settings, and monitoring users' activities,, and full integration approach to Liferay, Alfresco, LDAP and SSO.
Preface
[ 4 ]
What You Need for This Book This book uses Liferay portal version 4.4 and 5.0. with the following settings:
MySQL database 5.0Java SE 6.0Liferay portal bundled with Tomcat 6.0
Optionally, you can also work in both Windows and Linux with the following settings:
Java SE 5.0Liferay portal bundled with Tomcat 5.5 MySQL database 5.0
You can use one of the following options for Servlet containers and full Java EE application servers to install Liferay Portal:
Geronimo + TomcatGlassfish for AIXGlassfish for LinuxGlassfish for OSXGlassfish for SolarisGlassfish for Solaris (x86)Glassfish for WindowsJBoss + Jetty 4.0JBoss + Tomcat 4.0JBoss + Tomcat 4.2JettyJOnAS + JettyJOnAS + TomcatPramatiResinTomcat 5.5 for JDK 1.4Tomcat 5.5 for JDK 5.0Tomcat 6.0
•
•
•
•
•
•
•
•
•
•
•
•
•
•
•
•
•
•
•
•
•
•
•
•
Preface
[ 5 ]
The applications servers (or Servlet containers) that Liferay Portal can run on include:
Borland ES 6.5Apache Geronimo 2.xSun GlassFish 2 UR1JBoss 4.0.x, 4.2.xJOnAS 4.8.xJRun 4 Updater 3OracleAS 10.1.3.xOrion 2.0.7Pramati 5.0RexIP 2.5SUN JSAS 9.1WebLogic 8.1 SP4, 9.2, 10WebSphere 5.1, 6.0.x, 6.1.xJetty 5.1.10Resin 3.0.19Tomcat 5.0.x/5.5.x/6.0.x
Databases that Liferay portal can run on include:
Apache DerbyIBM DB2FirebirdHypersonicInformixInterBaseJDataStoreMySQLOraclePostgresSQLSAPSQL ServerSybase
•
•
•
•
•
•
•
•
•
•
•
•
•
•
•
•
•
•
•
•
•
•
•
•
•
•
•
•
•
Preface
[ 6 ]
Operating systems that Liferay portal can run on include:
LINUX (Debian, RedHat, SUSE, Ubuntu, and so on)UNIX (AIX, FreeBSD, HP-UX, OS X, Solaris, and so)WINDOWSMAC OS X
Who is This Book for This book is for beginners to Liferay and "Do-It-Yourselfers" who want to develop a simple but powerful corporate Intranet. The book assumes technical confidence but does not require specialist administrator or developer skills.
ConventionsIn this book, you will find a number of styles of text that distinguish between different kinds of information. Here are some examples of these styles, and an explanation of their meaning.
Code words in text are shown as follows: "We can include other contexts through the use of the include directive."
A block of code will be set as follows:
<swimlane name="user_admin"> <assignment class="com.liferay.jbpm.handler.IdentityAssignmentHandler" config-type="field"> <type>role</type> <companyId>liferay.com</companyId> <id>1001</id>
New terms and important words are introduced in a bold-type font. Words that you see on the screen, in menus or dialog boxes for example, appear in our text like this: "clicking the Next button moves you to the next screen".
Important notes appear in a box like this.
Tips and tricks appear like this.
••••
Preface
[ 7 ]
Reader FeedbackFeedback from our readers is always welcome. Let us know what you think about this book, what you liked or may have disliked. Reader feedback is important for us to develop titles that you really get the most out of.
To send us general feedback, simply drop an email to [email protected], making sure to mention the book title in the subject of your message.
If there is a book that you need and would like to see us publish, please send us a note in the SUGGEST A TITLE form on www.packtpub.com or email [email protected].
If there is a topic that you have expertise in and you are interested in either writing or contributing to a book, see our author guide on www.packtpub.com/authors.
Customer SupportNow that you are the proud owner of a PACKT book, we have a number of things to help you to get the most from your purchase.
Downloading the Example Code for the BookVisit http://www.packtpub.com/files/code/2721_Code.zip to directly download the example code.
The downloadable files contain instructions on how to use them.
ErrataAlthough we have taken every care to ensure the accuracy of our contents, mistakes do happen. If you find a mistake in one of our books—maybe a mistake in text or code—we would be grateful if you would report this to us. By doing this you can save other readers from frustration, and help to improve subsequent versions of this book. If you find any errata, report them by visiting http://www.packtpub.com/support, selecting your book, clicking on the Submit Errata link, and entering the details of your errata. Once your errata are verified, your submission will be accepted and the errata are added to the list of existing errata. The existing errata can be viewed by selecting your title from http://www.packtpub.com/support.

Preface
[ 8 ]
QuestionsYou can contact us at [email protected] if you are having a problem with some aspect of the book, and we will do our best to address it.
Introducing Liferay for Your Intranet
This book will show you how to create a company Intranet with Liferay. In this chapter, we will look at:
The features your Intranet will have by the time you reach the end of the book.Why Liferay is an excellent choice for building your Intranet.Some of the other things people are using Liferay for, besides Intranets.How to find more technical information about what Liferay is, and how it works.
So let's begin by looking at exactly which site we're going to build in the book.
What Are We Going to Build?Over the course of this book, we're going to build a complete corporate Intranet using Liferay. Let's discuss some of the features your Intranet will have.
Hosted DiscussionsAre you still using email for group discussions? Then it's time you found a better way. Running group discussions over email clogs up the team's inbox. Also, you have to choose your distribution list in advance, and it is hard for team members to 'opt in and out' of the discussion.
Using Liferay, we will build a range of discussion boards for discussion within and between teams. The discussions are archived in one place. So it's always possible to go back and refer to them later.
•
•
•
•
Introducing Liferay for Your Intranet
[ 10 ]
Furthermore, it's just more convenient to move an email discussion to a discussion forum designed for the purpose. Once the forum is in place, you will find that a more productive group discussion takes place than it ever did over email.
Collaborative Documents Using WikisYour company probably has guideline documents that should be updated regularly. But, they swiftly lose their relevance as practices and procedures change. Worse, each of your staff will know useful, productive tricks and techniques—but there's probably no easy way to record that knowledge in a way that is easy for others to find and use.
We will see how to host 'wikis' within Liferay. A wiki enables anybody to create and edit web pages, and link all of those web pages together. You can put your 'guideline' documents into a wiki, and as practices change, your frontline staff can quickly and effortlessly update the guideline documentation.
Wikis can also act as a shared notebook, enabling team members to collaborate and share both ideas and findings, and also work together on documents.
Team And Individual BlogsYour company probably needs frequent, chronological publications of personal thoughts and Web links in the Intranet. In more detail, your company probably has teams and individual works on specific projects in order to share files and Blogs about project processes, and furthermore use HTML text editor to create or update files and Blogs, and provide RSS feeds.
We will see how teams and individuals share files and Blogs within Liferay. Blogs provide a straightforward Blogging solution with a lot of features such as RSS support, comments, categories, tags, labels, rating, and so on. Liferay RSS with subscription provides the ability to frequently read RSS feeds from within the portal framework.
At the same time, WYSIWGs (What You See Is What You Get editors) provides the ability to edit web content, including Blog content. Less technical persons can use WYSIWGs without sifting through complex code.
Chapter 1
[ 11 ]
Shared CalendarsYour company may be required to provide and share calendar information among users from different departments. At the same time, it may be required to provide workflow ability so that normal users can submit requests, and the manager can take decisions on these requests. Moreover, it may also be required to publish third party contents in the intranet website.
We will see how to share a calendar within Liferay. Shared Calendar can satisfy basic business requirements incorporated in a featured business intranet such as scheduling meetings, sending meeting invitations, checking for attendees' availability and so on. Thus, you can provide an environment for users to manage events and share calendars.
In addition, you can also use workflows to manage workflow definitions, instances, and tasks. Furthermore, you can also employ WSRP proxy effectively, and other portlets such as web proxy, IFrame and flash smoothly. These portlets provide ability to publish third party contents in the intranet website.
Document StoresYou company may have a lot of images and documents, and you may need to manage all images and documents as well. Thus, you require the ability to manage a lot of web content and also publish web contents in the intranet.
We will see how to manage and publish web contents within Liferay. Liferay Journal does not only provide high availability to publish, manage, and maintain web content and documents, but it also separates content from layout.
In addition, within Image Gallery, you can add folders and sub folders for images, can manage folders and sub folders, add images in folders and manage images, can set up permission on folders and images. Within Document Library, you can add folders and sub folders for documents, and manage documents, and also publish documents.
And More...!The Intranet will also arrange staff members into teams and communities, provide a way for real-time IM and chat, and give each user an appropriate level of 'access'—implying that they get access to all the information they need, edit and add content as necessary, but can't meddle with sensitive information that they have no reason to see.
Introducing Liferay for Your Intranet
[ 12 ]
Everything in One PlaceAll these features are useful on their own. But it gets better when you consider that all these features will combine in one, easy-to-use, searchable portal.
A user of the Intranet, for example, can search for a topic— say 'financial report'—and can find in one go:
Any group discussions about financial reportsBlog entries within the intranet concerning financial reportsDocuments and files—the financial reports themselves, perhapsWiki entries with guidelines on preparing financial reportsCalendar entries for meetings to discuss the financial report
Of course, users can also restrict their search to just one area, if they already know exactly what they are looking for.
Liferay provides other features, such as tagging, to make it easier to organize information across the whole Intranet. We will do all of this and more over the course of the book.
Introducing Palm Tree PublicationsIn this book we are going to build an example Intranet for a fictions company. By applying the instructions to your own business, you will be able to build an Intranet to meet your own company's needs.
Palm Tree Publications needs an Intranet of its own, which we will call book.com.
The enterprise's global headquarters is in the United States. It has several departments: editorial, website, engineering, marketing, executive and human resources.
Each department has staff either in the United States, or in Germany, or both.
The intranet site provides a community called "Book Lovers",consisting of users who have an interest in reading books. The enterprise needs to integrate collaboration tools such as Wikis, Blogs, discussion forms, instant messaging, mail, RSS, shared calendars, tagging, and so on.
Palm Tree Publications has some more advanced needs too: a workflow to edit, approve and publish books. Furthermore, the enterprise has a lot of contents such as books stored and managed in Alfresco, currently. Now, it wants to publish the contents of Alfresco in the Intranet website.
•
•
•
•
•
Chapter 1
[ 13 ]
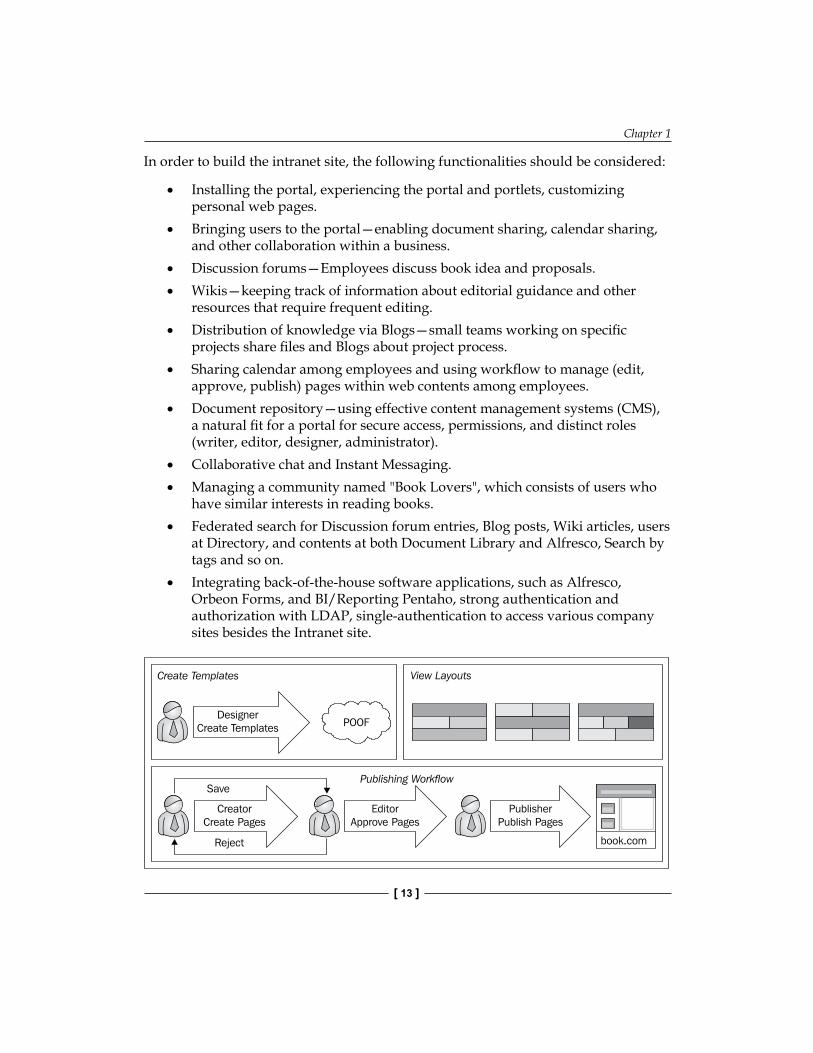
In order to build the intranet site, the following functionalities should be considered:
Installing the portal, experiencing the portal and portlets, customizing personal web pages.Bringing users to the portal—enabling document sharing, calendar sharing, and other collaboration within a business.Discussion forums—Employees discuss book idea and proposals.Wikis—keeping track of information about editorial guidance and other resources that require frequent editing.Distribution of knowledge via Blogs—small teams working on specific projects share files and Blogs about project process.Sharing calendar among employees and using workflow to manage (edit, approve, publish) pages within web contents among employees.Document repository—using effective content management systems (CMS), a natural fit for a portal for secure access, permissions, and distinct roles (writer, editor, designer, administrator).Collaborative chat and Instant Messaging.Managing a community named "Book Lovers", which consists of users who have similar interests in reading books. Federated search for Discussion forum entries, Blog posts, Wiki articles, users at Directory, and contents at both Document Library and Alfresco, Search by tags and so on.Integrating back-of-the-house software applications, such as Alfresco, Orbeon Forms, and BI/Reporting Pentaho, strong authentication and authorization with LDAP, single-authentication to access various company sites besides the Intranet site.
•
•
•
•
•
•
•
•
•
•
•
Introducing Liferay for Your Intranet
[ 14 ]
The enterprise may have the following groups of people:
Admin: Installs Systems, Manages Membership, Users, User Groups, Organizations, Roles and Permissions, Security on resources, Workflow, servers and instances, and Integrates with third-party systems.Executives: Executive Management handles approvals.Marketing: Handles Web Site, Company Brochures, Marketing Campaign, Projects, and Digital Assets. Sales: Presentations, Contracts, Documents and Reports.Website Editors: Manage pages of the intranet; Write articles, Review articles, Design layout of articles, Publish articles.Book Editors: Write books, Review books, and Publish books.Human Resources: Manages Corporate Policy Documents.Finance: Manages Account Documents, Scanned Invoices and Checks, Notifications.Corporate Communications: Manages External Public Relations, Internal News Releases, and Syndication.Engineering: Sets up development environment, collaborates on Engineering Projects and Presentation Templates.
Why Use Liferay To Build An Intranet?Of course, there are lots of ways to build a company Intranet. What makes Liferay such a good choice?
It's Got The Features We NeedAll the features we have outlined for our Intranet come built into Liferay; discussions, wikis, calendars, blogs and so on, are part of what Liferay is designed to do.
It is also designed to tie all these features together into one searchable 'portal'. So, we won't be dealing with lots of separate components when we build and use our Intranet. All parts will work together.
It's Easy To Set up and UseLiferay has an intuitive interface that uses icons, clear labels, drag and drop to make it easy to configure and use for the Intranet.
Setting up the Intranet will require a bit more work than using it, of course. But you will be pleasantly surprised by how simple it is—no programming is required to get your Intranet up and running.
•
••
••
•••
•
•
Chapter 1
[ 15 ]
It's Free And Open SourceHow much does Liferay cost? Nothing! It's a free, open source tool.
This means that you can go to Liferay's web site, and download it without paying anything. You can then go ahead, install it, and use it.
The Liferay company makes its money by providing additional services, including training. But the standard use of Liferay is completely free. Now that you've bought this book, you probably won't have to pay another penny to get your Intranet working.
Being open source means that the program code that makes Liferay work is available for anybody to look at and change. Even if you're not a programmer, this is still good for you:
If you need Liferay to do something new, then you can hire a programmer to modify Liferay so that it does this new thing.There are a lot of developers studying the source code, looking for ways to make it better. A lot of improvements get incorporated into Liferay's main code.Developers are always working to create 'plugins'—programs that work together with Liferay to add new features.
Probably for now, the big deal here is that it costs zero dollars. But as you use Liferay more, you will come to understand the other benefits of Open Source for you.
It Will Grow with YouLiferay is designed in a way so that it can work with thousands and thousands of users at once. No matter how big your business is, or how much it grows, Liferay will still work and handle all of the information you throw at it.
It also has features especially suited for large international businesses. Opening offices up in non-English speaking countries? No problem! Liferay has internationalization features tailored to suit many of the world's popular languages.
It Works with Other ToolsLiferay is designed to work with other software tools, ones that you're already using, and ones that you might use in the future. For example:
You can hook Liferay up to your LDAP directory server so that users' details and login credentials are added to Liferay automatically.Liferay can work with Alfresco, a popular and powerful Enterprise CMS system (used to provide extremely advance document management capabilities—far beyond what Liferay does on its own).
•
•
•
•
•
Introducing Liferay for Your Intranet
[ 16 ]
It Is Based on "Standards"This is a more technical benefit, but a very useful one, if you ever want to use Liferay in a more specialized way.
Liferay is based on standard technologies that are popular with developers and other IT experts. These include:
Built using Java—a very popular programming language that can run on just about any computer. There are millions of Java programmers in the world. So it won't be too hard to find developers who can customize Liferay.Based on tried and tested components. With any tool, there's a danger of bugs. Liferay uses lots of well known, widely tested components to minimize the likelihood of bugs creeping in. If you are interested, here are some of the well known components and technologies Liferay uses: Apache ServiceMix, Mule, Ehcache, Hibernate, ICEfaces, Java J2EE/JEE, jBPM, Intalio|BPMS, JGroups, jQuery, Lucene, PHP, Ruby, Seam, Spring and AOP, Struts and Tiles, Tapestry, Velocity, and FreeMarker.Uses standard ways to communicate with other software. There are various standards established for sharing data between pieces of software. Liferay uses these so that you can easily put information from Liferay into other systems. The standards implemented by Liferay include: AJAX, iCalendar and Micro-format, JSR-168, JSR-127, JSR-170, JSR-286 (Portlet 2.0) and JSF-314 (JSF 2.0) in the future roadmap, OpenSearch, Open platform with support for web services (including: JSON, Hessian, Burlap, REST, RMI, WSRP), and WebDAV.
Many of these standards are things that you will never need to know much about. So don't worry if you've never heard of them. Liferay is better for using them, but mostly you won't even know that they are there.
What Else Can Liferay Do?Liferay isn't just for Intranets! Users and developers are building all kinds of different web sites and systems based on Liferay.
Corporate ExtranetsAn Intranet is great for collaboration and information sharing within a company. An Extranet extends this facility to suppliers and customers, who usually log in over the Internet.
•
•
•
Chapter 1
[ 17 ]
In many ways, this is similar to an Intranet—there are few technical differences. The main difference is that you create user accounts for people who are not part of your company.
Collaborative WebsitesCollaborative websites not only provide a secure and administrated framework, but also empower users with collaborative tools such as Blogs, instant email, message boards, instant messaging, shared calendar, and so on. Moreover, it encourages users to use other tools such as tags administration, fine-grained permissions, delegable administrator privileges, enterprise taxonomy, and ad-hoc user groups. By these tools, as an administrator, you can ultimately control what people can do and cannot do in Liferay.
In many ways, this is similar to an Intranet—there are few technical differences. The main difference is that you use collaborative tools such as Blogs, instant email,Blogs, instant email, message boards, instant messaging, shared calendar, and so on..
Content Management & Web PublishingYou can also use Liferay to run your public company web site with content management and web publishing.
Content management and web publishing are useful in websites. It is a fact that the volume of digital content for any organization is increasing on a daily basis. Thus, an effective content management system (CMS) is a vital part of any organization. Meanwhile, document management is also useful and more effective when repositories have to be assigned to different departments and groups within the organization.
Content management and document management are effective in Liferay. Moreover, while managing and publishing contents, we may have to answer many questions, such as "who should be able to update and delete a document from the system". Fortunately, Liferay security and permission model can satisfy the needs for secure access and permissions, and distinct roles (for example, writer, editor, designer, and administrator). Furthermore, Liferay integrates with the workflow engine. Thus, users can follow a flow to edit, approve and publish contents in the website.
Content Management and Web Publishing are also similar to an Intranet—there are few technical differences. The main difference is that you can manage content and publish web contents smoothly.

Introducing Liferay for Your Intranet
[ 18 ]
Infrastructure PortalsInfrastructure portals integrate all possible functions stated above. It covers collaboration and information sharing within a company, collaborative tools, content management and web publishing. In the infrastructure portals, users can create a unified interface to work with contents, regardless of source via Content Interaction API. Furthermore, using the same API and the same interface as well as that of built-in content management system (CMS), users can also manage content and publish web contents from third-party systems such as Alfresco, Vignette, Magnolia, or Microsoft Share-Point, and so on.
Infrastructure portals are similar to an Intranet —there are a few technical differences. The main difference is that you can use collaborative tools, manage content, publish web contents and integrate other systems in one place.
Why do you need a portal? The main reason is that a portal can be served as a framework to aggregate content and applications. A portal normally provides a secure and manageable framework, where users can easily make new and existing enterprise applications available. In order to build an infrastructure portal smoothly, Liferay portal provides SOA-based framework to integrate third party systems.
Finding More InformationIn this chapter, we have looked at what Liferay can do for your corporate Intranet, and briefly seen why it's a good choice.
If you want more background information on Liferay, the best place to start is the Liferay corporate web site (http://www.liferay.com ) itself. You can find the latest news and events, various training programs offered world wide, presentations, demonstrations and hosted trails. More interestingly, Liferay corporate web site plus Forums and Blogs is built by the Liferay Portal itself. It is a real demo of the Liferay Portal.
The Liferay site uses MediaWiki for its wiki and Atlassian JIRA for its issue tracking. That is, the Liferay site does not use its own Wiki system.
Liferay is 100% open source and all downloads are available from sourceforge.net website at http://sourceforge.net/project/showfiles.php?group_id=49260 .
Liferay site Wiki (http://wiki.liferay.com) contains documentation such as tutorial, user guide, developer guide, administrator guide, roadmap and so on.
Chapter 1
[ 19 ]
Liferay discussion forums (http://www.liferay.com/web/guest/community/forums ), Blogs (http://www.liferay.com/web/guest/community/blog ), Road Map (http://www.liferay.com/web/guest/community/road_map ) and Community Plugins (http://www.liferay.com/web/guest/community/community_plugins ) are the best places to share your thoughts, to get tips and tricks about Liferay implementation, to know road map, and to use and contribute community plugins.
If you would like to file a bug or know more details about the fixes in a specific release, you must visit the bug tracking system at http://support.liferay.com .
SummaryIn this chapter, we have looked at what Liferay can offer your Intranet. In particular, we saw:
That our final intranet will provide shared documents, discussions, collaborative wikis and more in a single, searchable portal.That Liferay makes a great choice for the Intranet, because it provides so many features; it's easy to use, it's free and open source, is extensible and is well integrated with other tools and standards.Other kinds of site that Liferay is good for: extranets, collaborative web sites, content management and web publishing, and infrastructure portals.The various pages on Liferay.com that can provide us with more background information.
In the next chapter, we're going to install Liferay and start the hands-on task of building the Intranet.
•
•
•
•

Set-up The Home Page And Navigation Structure for
The IntranetThis chapter will assist administrators and normal users in the enterprise "Palm-Tree Publications" to experience the implementation of a portal page with portlets first. Then it will provide guidance to administrators to set up the portal, and direct administrators and normal users to build pages and customize their personal area. Finally, it will guide both administrators and normal users to navigate the structure of their intranet web site. In addition, it will provide guidance to administrators to configure the portals and moreover, set the extension environment in order to extend the functionality provided by Liferay.
By the end of this chapter you will have learned how to:
Experience implementing a portal page with portlets.Set up the portal.Configure the home page and the intranet web site.Customize the personal area.Build the portal pages.Navigate the structure of the Intranet.Configure the portal.And set up extension environment.
•
•
•
•
•
•
•
•
Set-up The Home Page And Navigation Structure for The Intranet
[ 22 ]
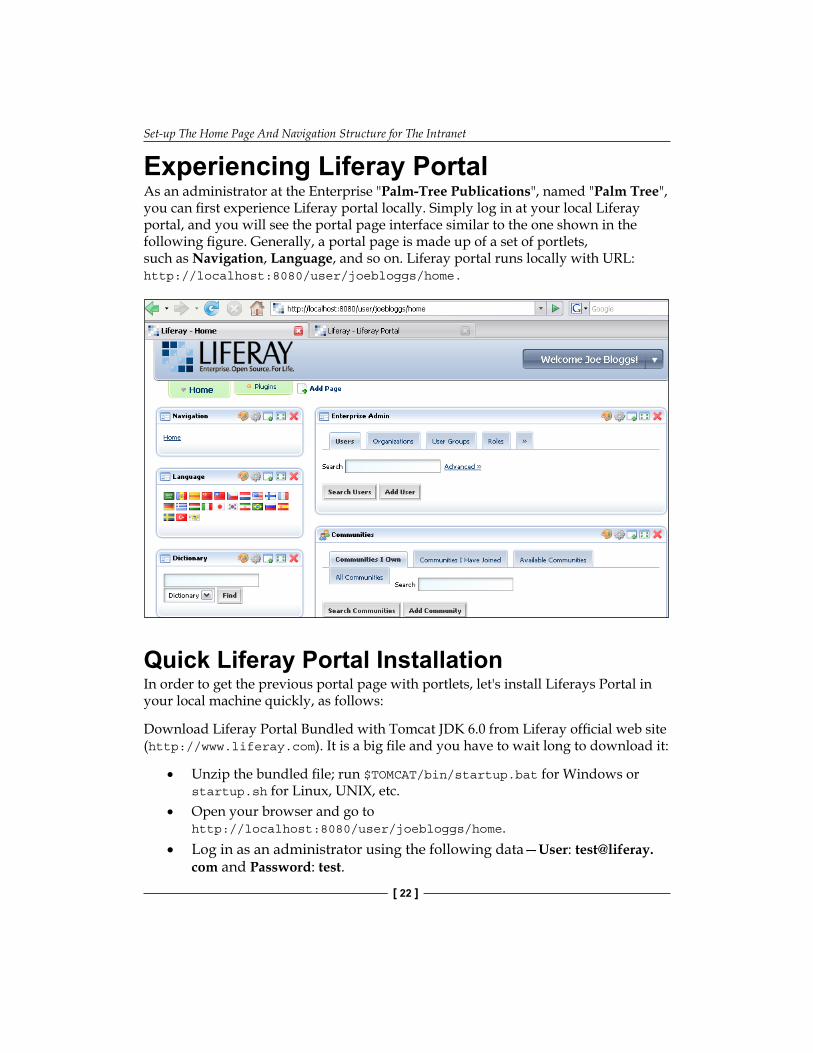
Experiencing Liferay PortalAs an administrator at the Enterprise "Palm-Tree Publications", named "Palm Tree", you can first experience Liferay portal locally. Simply log in at your local Liferay portal, and you will see the portal page interface similar to the one shown in the following figure. Generally, a portal page is made up of a set of portlets, such as Navigation, Language, and so on. Liferay portal runs locally with URL: http://localhost:8080/user/joebloggs/home.
Quick Liferay Portal InstallationIn order to get the previous portal page with portlets, let's install Liferays Portal in your local machine quickly, as follows:
Download Liferay Portal Bundled with Tomcat JDK 6.0 from Liferay official web site (http://www.liferay.com). It is a big file and you have to wait long to download it:
Unzip the bundled file; run $TOMCAT/bin/startup.bat for Windows or startup.sh for Linux, UNIX, etc. Open your browser and go to http://localhost:8080/user/joebloggs/home.Log in as an administrator using the following data—User: [email protected] and Password: test.
•
•
•
Chapter 2
[ 23 ]
Congratulations! You now have a running copy of Liferay. The remainder of this section will explain what a portal is, what a portlet is, and how to implement a portal page with a set of portlets, in general.
Does it work well? Make sure that you have installed JDK 6.0 or above in your local machine and set JAVA_HOME as well. This is the only one you need in order to install Liferay portal properly.
What's Happening Behind?What you have seen previously is a portal page with the name, Welcome. The portal page Welcome has a logo, menu, header (that is, a list of page names), a set of portlets, and a footer. When you logged in, the portal generated this page. If you select another page name such as Plugins, the portal will generate another page.
An intranet website is made up of a set of pages, such as Welcome and Plugins. Liferay portals can be used to build and manage these pages flexibly.
To summarise, portals provide a lot of essential benefits: reduction in site running costs, greater customer satisfaction, and more efficient business processes.
Understanding PortletsA portal page is made of a set of portlets. For example, the portal page such as Welcome contains portlets such as Navigation, Language, and so on And the portlet Language has icons (such as Look and Feel, Configuration, Minimize, Maximize, and Remove), title icon and title (such as Language), and a window which may contain contents (such as a set of language icons and links).
In a normal way, a portlet is an application that provides some content (such as information or service) that forms part of a portal page. A portlet container handles the portlets. A portlet container also processes requests and generates dynamic content. Actually, portals use portlets as pluggable user interface to provide a presentation layer information.
Loosely speaking, portlets are fragments of an HTML page, that is pieces of markup such as HTML, XHTML, WML, and so on (refer to JSR 286 specification). The content of a portlet is normally aggregated with the content of other portlets to form the portal page. The lifecycle of a portlet is managed by the portlet container. The content generated by a portlet may vary from one user to another, depending on the user configuration for the portlet.
Set-up The Home Page And Navigation Structure for The Intranet
[ 24 ]
Liferay Portal comes with several useful bundled portlets, and also supports the JSR-168 standard (and furthermore, JSR-286 standard) 100%, which allows the portal administrators to deploy any third party portlet developed according to this standard.
Where can you find more details about JSR-168 and JSR-286? JSR-168 means Portlet Specification 1.0/1.1 and JSR-286 means Portlet Specification 2.0. You can find more details at http://jcp.org/en/jsr/detail?id=168, http://jcp.org/en/jsr/detail?id=286.
Using Portlet ContainerThe portlet Language runs in the portal page. It requires runtime environment, that is, a portlet container.
Generally, a portlet container provides portlets with persistent storage for preferences and required runtime environment (refer to JSR 286 specification). A portlet container manages portlet lifecycles and receives requests from the portal to execute requests on the portlets. A portlet container is the responsibility of the portal to handle the aggregation.
How Does A Portal Work?The following is a typical sequence of events, initiated when you access the portal page such as Welcome (refer to JSR 286 specification):
A client (e.g. the administrator "Palm Tree") after being authenticated makes an HTTP request to the portal.The request is received by the portal (for example, Liferay portal).The portal determines if the request contains an action targeted at the portlets such as Language associated with the portal page, Welcome.If there is an action targeted at a portlet such as Language, the portal requests the portlet container to invoke the portlet to process the action.A portal invokes portlets such as Language, Navigation, and so on through the portlet container.The portal aggregates the output of the portlets in the portal page to the client (for example the administrator "Palm Tree").
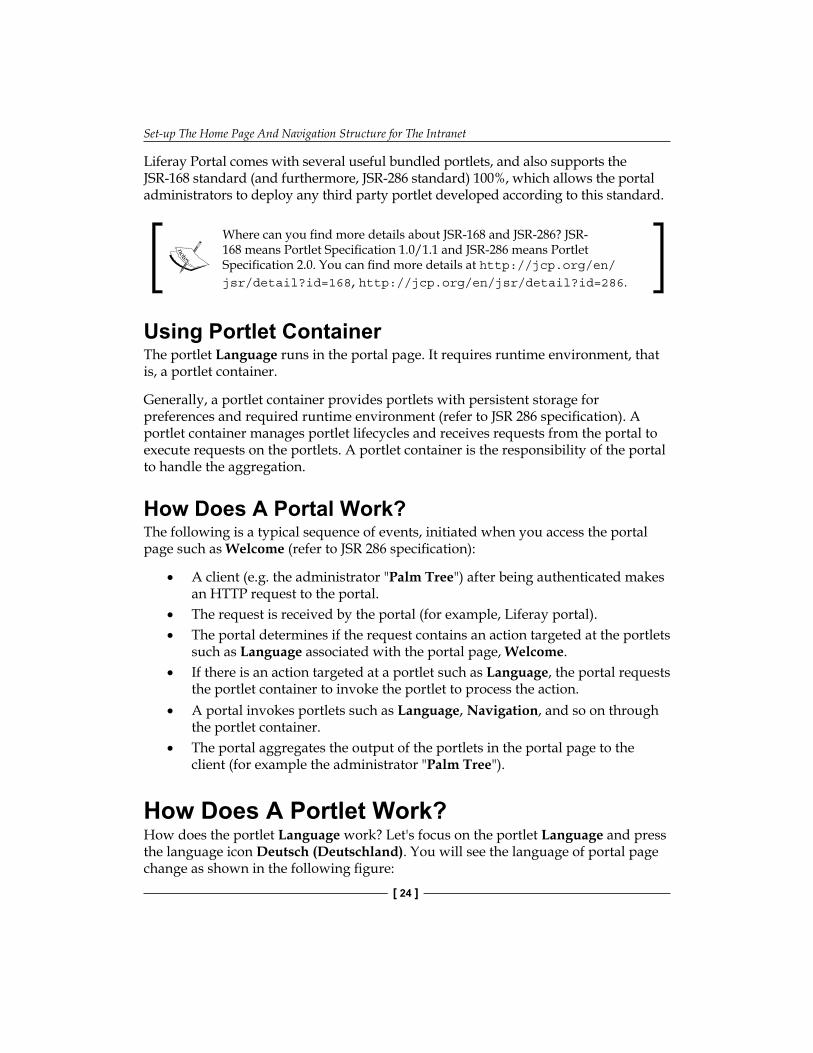
How Does A Portlet Work?How does the portlet Language work? Let's focus on the portlet Language and press the language icon Deutsch (Deutschland). You will see the language of portal page change as shown in the following figure:
•
••
•
•
•
Chapter 2
[ 25 ]
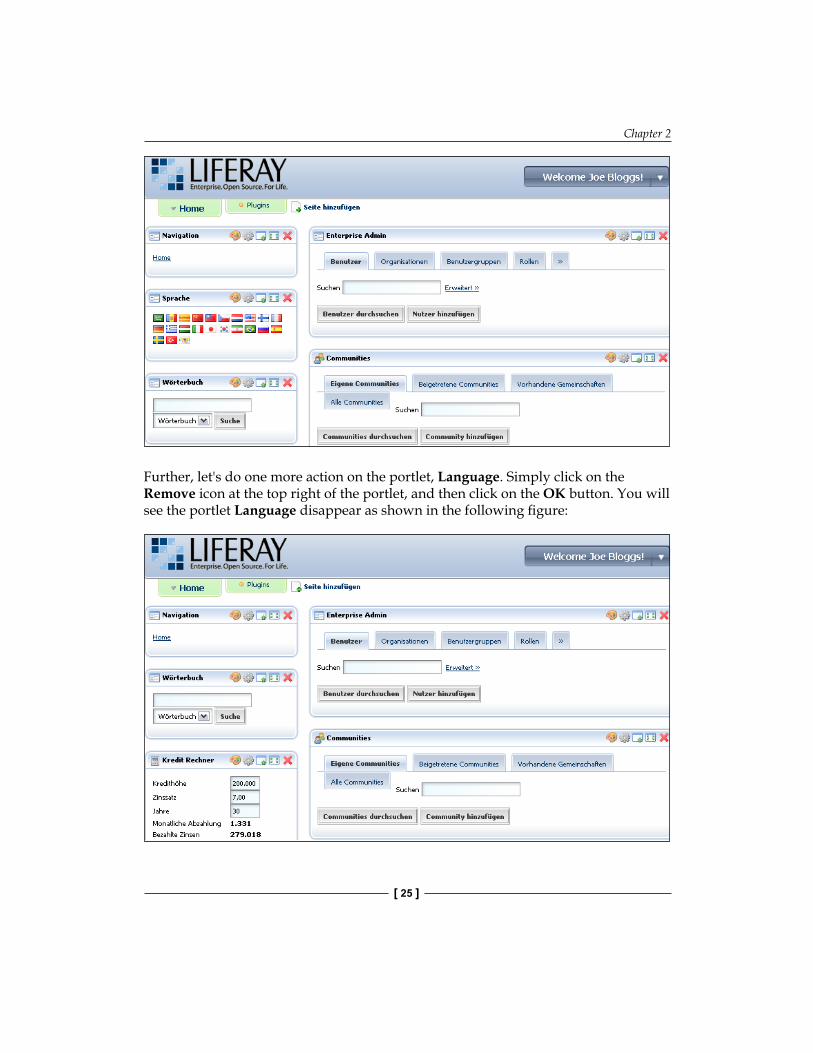
Further, let's do one more action on the portlet, Language. Simply click on the Remove icon at the top right of the portlet, and then click on the OK button. You will see the portlet Language disappear as shown in the following figure:
Set-up The Home Page And Navigation Structure for The Intranet
[ 26 ]
What the portal has done as stated before is related to portlet life cycle. You may need to read the following part (according to JSR-286 specification) if you are interested in the portlet life cycle. Otherwise, you can leave it for your future needs.
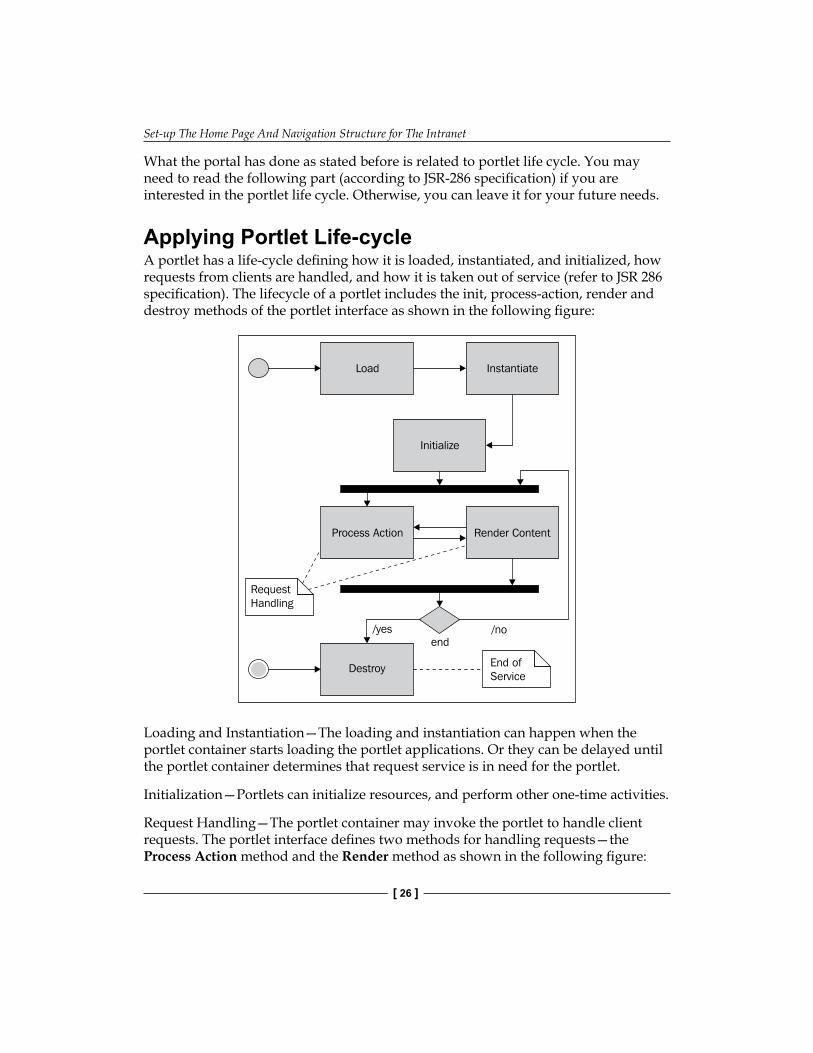
Applying Portlet Life-cycleA portlet has a life-cycle defining how it is loaded, instantiated, and initialized, how requests from clients are handled, and how it is taken out of service (refer to JSR 286 specification). The lifecycle of a portlet includes the init, process-action, render and destroy methods of the portlet interface as shown in the following figure:
Loading and Instantiation—The loading and instantiation can happen when the portlet container starts loading the portlet applications. Or they can be delayed until the portlet container determines that request service is in need for the portlet.
Initialization—Portlets can initialize resources, and perform other one-time activities.
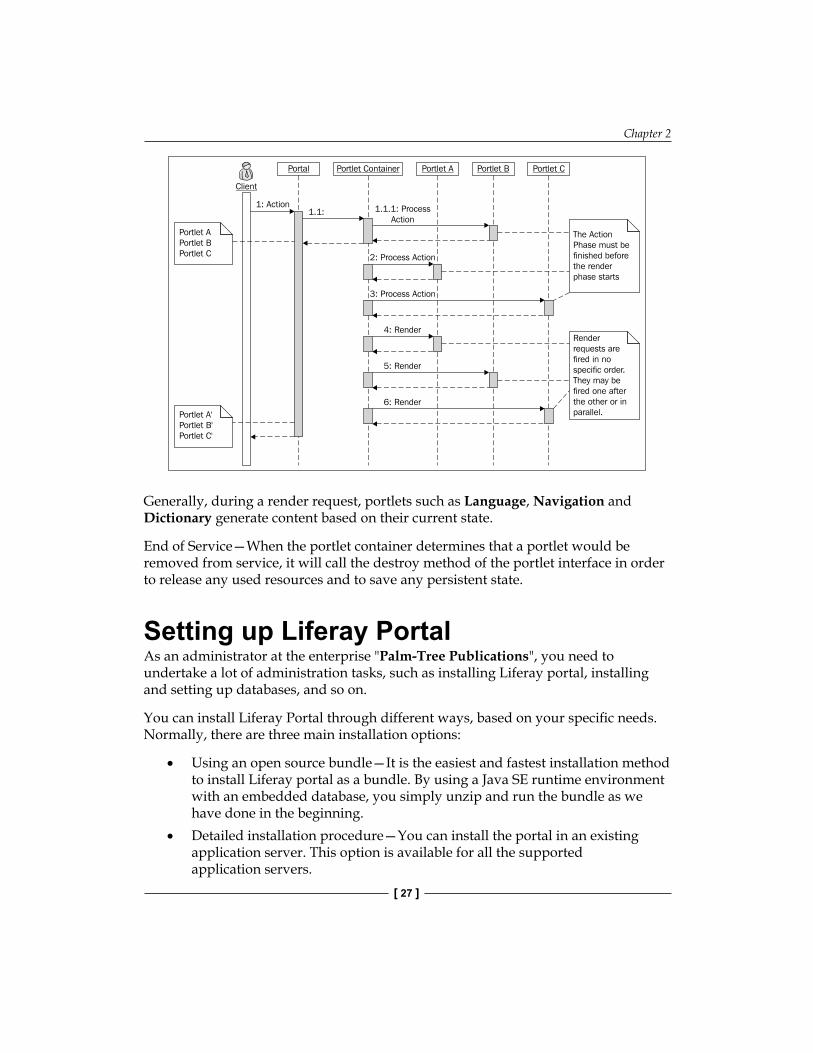
Request Handling—The portlet container may invoke the portlet to handle client requests. The portlet interface defines two methods for handling requests—the Process Action method and the Render method as shown in the following figure:
Chapter 2
[ 27 ]
Generally, during a render request, portlets such as Language, Navigation and Dictionary generate content based on their current state.
End of Service—When the portlet container determines that a portlet would be removed from service, it will call the destroy method of the portlet interface in order to release any used resources and to save any persistent state.
Setting up Liferay Portal As an administrator at the enterprise "Palm-Tree Publications", you need to undertake a lot of administration tasks, such as installing Liferay portal, installing and setting up databases, and so on.
You can install Liferay Portal through different ways, based on your specific needs. Normally, there are three main installation options:
Using an open source bundle—It is the easiest and fastest installation method to install Liferay portal as a bundle. By using a Java SE runtime environment with an embedded database, you simply unzip and run the bundle as we have done in the beginning.Detailed installation procedure—You can install the portal in an existing application server. This option is available for all the supported application servers.
•
•
Set-up The Home Page And Navigation Structure for The Intranet
[ 28 ]
Using the extension environment—You can use a full development environment to extend the functionality.
We will consider, partially, the second installation option "Detailed installation procedure" later (refer to Chapter 13 instructions). Meanwhile we will take up the third installation option "Using the extension environment" in the coming section.
In the previous section, we had used the first installation option "Using an open source bundle". Let's experience more details as follows:
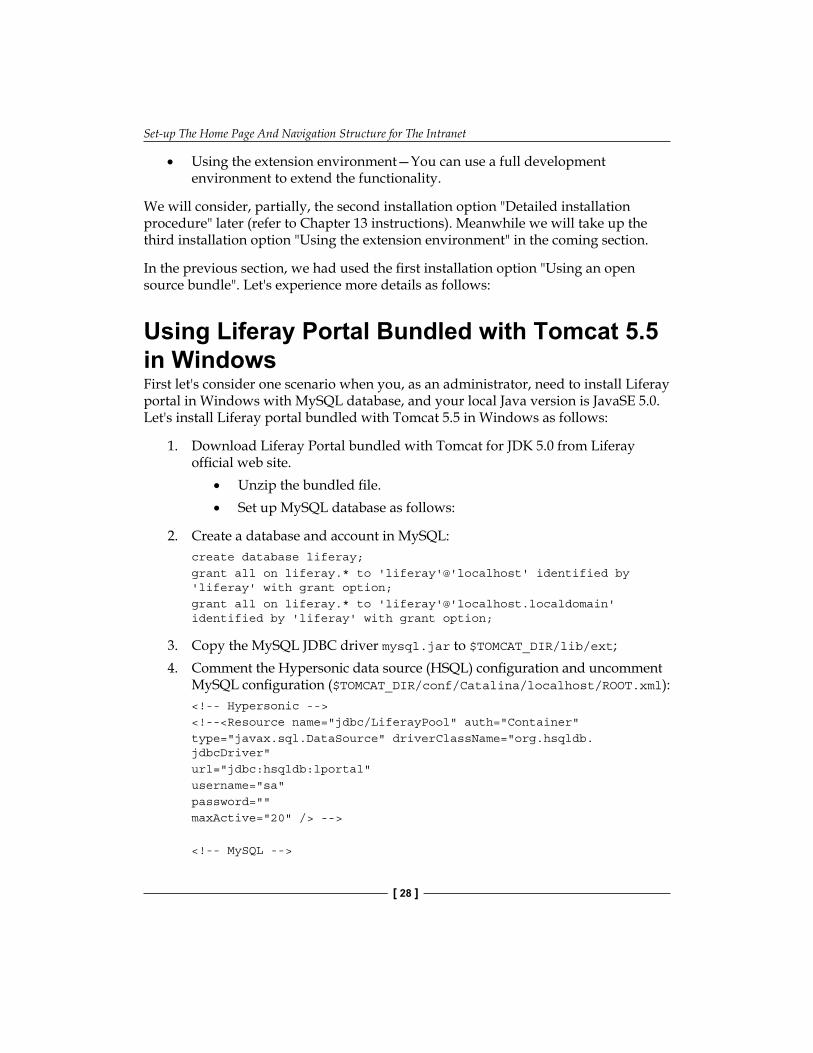
Using Liferay Portal Bundled with Tomcat 5.5 in WindowsFirst let's consider one scenario when you, as an administrator, need to install Liferay portal in Windows with MySQL database, and your local Java version is JavaSE 5.0. Let's install Liferay portal bundled with Tomcat 5.5 in Windows as follows:
1. Download Liferay Portal bundled with Tomcat for JDK 5.0 from Liferay official web site.
Unzip the bundled file.Set up MySQL database as follows:
2. Create a database and account in MySQL: create database liferay; grant all on liferay.* to 'liferay'@'localhost' identified by 'liferay' with grant option; grant all on liferay.* to 'liferay'@'localhost.localdomain' identified by 'liferay' with grant option;
3. Copy the MySQL JDBC driver mysql.jar to $TOMCAT_DIR/lib/ext;4. Comment the Hypersonic data source (HSQL) configuration and uncomment
MySQL configuration ($TOMCAT_DIR/conf/Catalina/localhost/ROOT.xml): <!-- Hypersonic --> <!--<Resource name="jdbc/LiferayPool" auth="Container" type="javax.sql.DataSource" driverClassName="org.hsqldb. jdbcDriver" url="jdbc:hsqldb:lportal" username="sa" password="" maxActive="20" /> -->
<!-- MySQL -->
•
•
•
Chapter 2
[ 29 ]
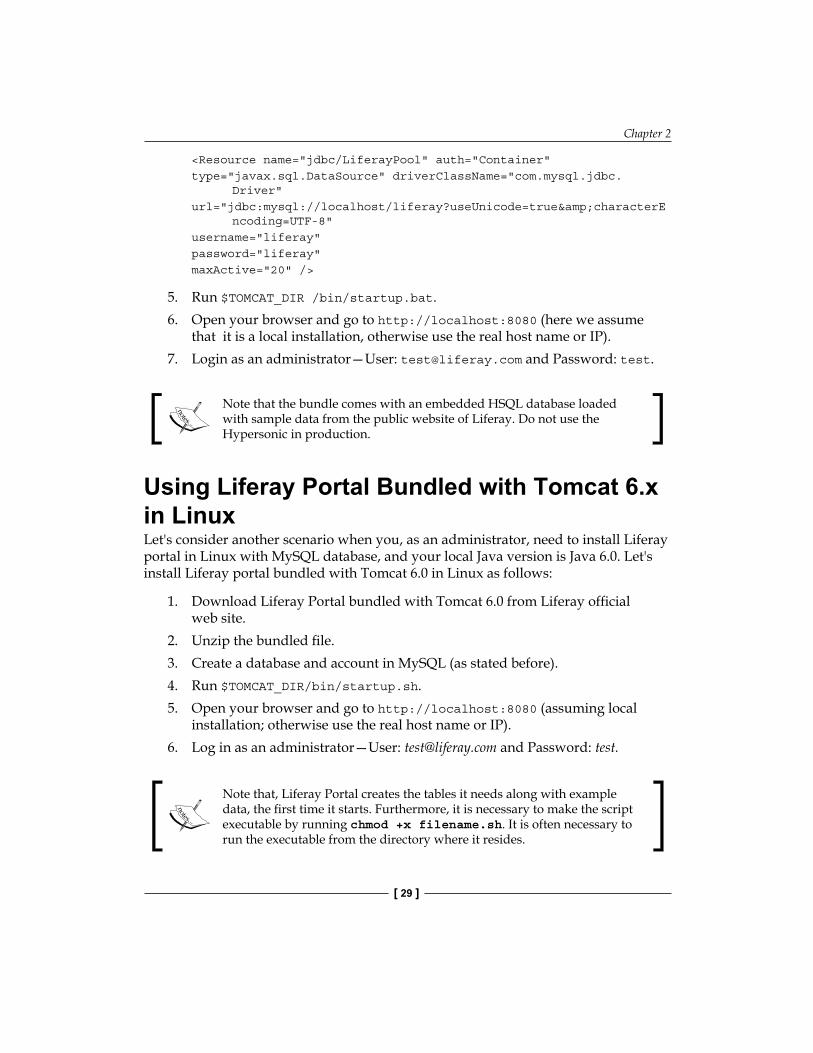
<Resource name="jdbc/LiferayPool" auth="Container" type="javax.sql.DataSource" driverClassName="com.mysql.jdbc. Driver" url="jdbc:mysql://localhost/liferay?useUnicode=true&characterE ncoding=UTF-8" username="liferay" password="liferay" maxActive="20" />
5. Run $TOMCAT_DIR /bin/startup.bat.6. Open your browser and go to http://localhost:8080 (here we assume
that it is a local installation, otherwise use the real host name or IP).7. Login as an administrator—User: [email protected] and Password: test.
Note that the bundle comes with an embedded HSQL database loaded with sample data from the public website of Liferay. Do not use the Hypersonic in production.
Using Liferay Portal Bundled with Tomcat 6.x in LinuxLet's consider another scenario when you, as an administrator, need to install Liferay portal in Linux with MySQL database, and your local Java version is Java 6.0. Let's install Liferay portal bundled with Tomcat 6.0 in Linux as follows:
1. Download Liferay Portal bundled with Tomcat 6.0 from Liferay official web site.
2. Unzip the bundled file.3. Create a database and account in MySQL (as stated before).4. Run $TOMCAT_DIR/bin/startup.sh.5. Open your browser and go to http://localhost:8080 (assuming local
installation; otherwise use the real host name or IP).6. Log in as an administrator—User: [email protected] and Password: test.
Note that, Liferay Portal creates the tables it needs along with example data, the first time it starts. Furthermore, it is necessary to make the script executable by running chmod +x filename.sh. It is often necessary to run the executable from the directory where it resides.
Set-up The Home Page And Navigation Structure for The Intranet
[ 30 ]
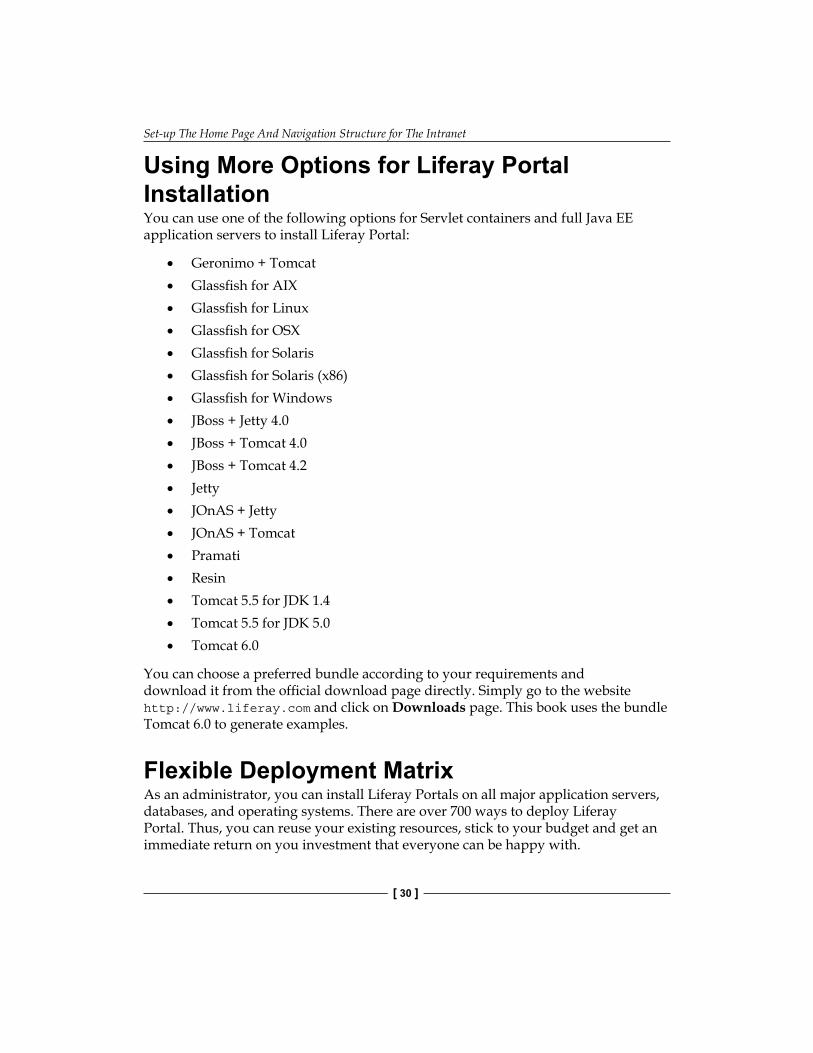
Using More Options for Liferay Portal InstallationYou can use one of the following options for Servlet containers and full Java EE application servers to install Liferay Portal:
Geronimo + TomcatGlassfish for AIXGlassfish for LinuxGlassfish for OSXGlassfish for SolarisGlassfish for Solaris (x86)Glassfish for WindowsJBoss + Jetty 4.0JBoss + Tomcat 4.0JBoss + Tomcat 4.2JettyJOnAS + JettyJOnAS + TomcatPramatiResinTomcat 5.5 for JDK 1.4Tomcat 5.5 for JDK 5.0Tomcat 6.0
You can choose a preferred bundle according to your requirements and download it from the official download page directly. Simply go to the website http://www.liferay.com and click on Downloads page. This book uses the bundle Tomcat 6.0 to generate examples.
Flexible Deployment MatrixAs an administrator, you can install Liferay Portals on all major application servers, databases, and operating systems. There are over 700 ways to deploy Liferay Portal. Thus, you can reuse your existing resources, stick to your budget and get an immediate return on you investment that everyone can be happy with.
•
•
•
•
•
•
•
•
•
•
•
•
•
•
•
•
•
•
Chapter 2
[ 31 ]
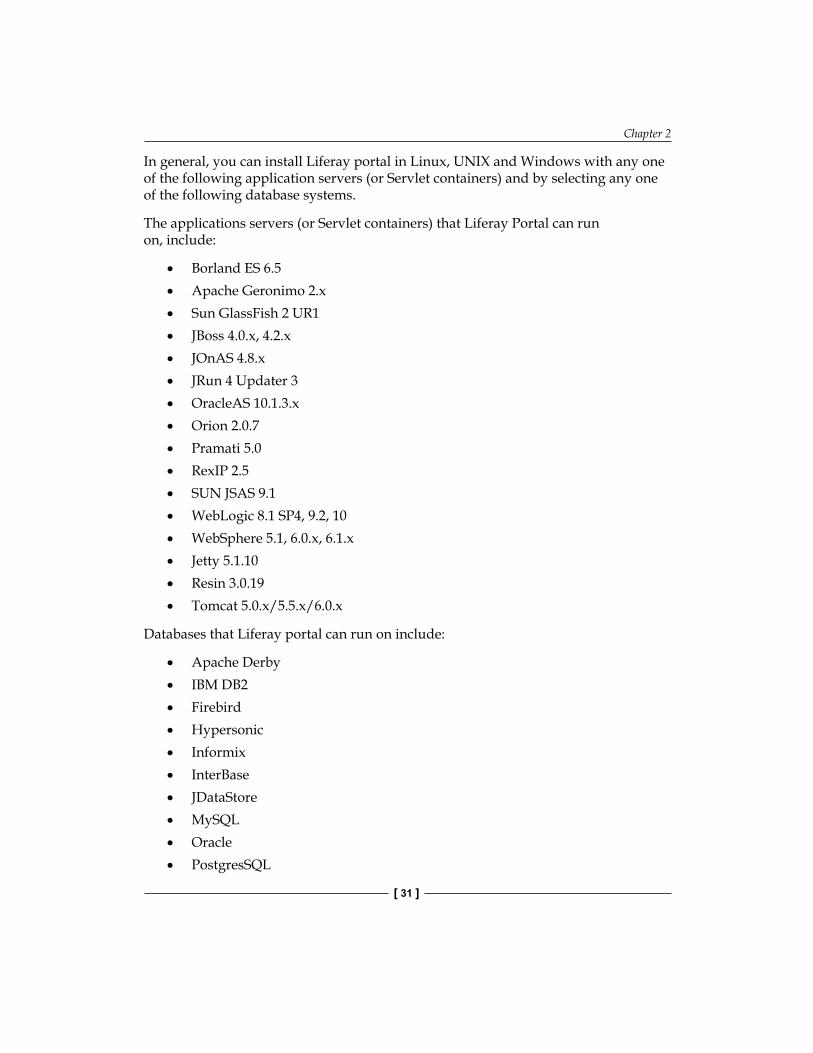
In general, you can install Liferay portal in Linux, UNIX and Windows with any one of the following application servers (or Servlet containers) and by selecting any one of the following database systems.
The applications servers (or Servlet containers) that Liferay Portal can run on, include:
Borland ES 6.5Apache Geronimo 2.xSun GlassFish 2 UR1JBoss 4.0.x, 4.2.xJOnAS 4.8.xJRun 4 Updater 3OracleAS 10.1.3.xOrion 2.0.7Pramati 5.0RexIP 2.5SUN JSAS 9.1WebLogic 8.1 SP4, 9.2, 10WebSphere 5.1, 6.0.x, 6.1.xJetty 5.1.10Resin 3.0.19Tomcat 5.0.x/5.5.x/6.0.x
Databases that Liferay portal can run on include:
Apache DerbyIBM DB2FirebirdHypersonicInformixInterBaseJDataStoreMySQLOraclePostgresSQL
•
•
•
•
•
•
•
•
•
•
•
•
•
•
•
•
•
•
•
•
•
•
•
•
•
•
Set-up The Home Page And Navigation Structure for The Intranet
[ 32 ]
SAPSQL ServerSybase
Operating systems that Liferay portal can run on include:
LINUX (Debian, RedHat, SUSE, Ubuntu, and so on.)UNIX (AIX, FreeBSD, HP-UX, OS X, Solaris, and so on.)WINDOWSMAC OS X
Customizing Personal AreaAs an administrator such as "Palm Tree", at the enterprise of "Palm Tree Publications", you may expect to customize your personal area (that is, the default home page that you see when you sign in) in your own Community anytime. Normally, the personal area refers to both public pages and Private Pages at My Community. You can find it by clicking on the Welcome, Palm Tree first, then moving the mouse on My Place and furthermore, by clicking on Private Pages or Public Pages, under My Community.
Note that if there were no pages in Private Pages, under My Community, My Account would be used to add pages with Page tab selected. The page management at My Account is the same as that in Manage Page (refer to the next section). The difference is that My Account manages pages only in My Community, while Manage Page manages pages for any Community. For more details about My Account, refer to Chapter 3. For a change of logo , refer to the forthcoming section.
What's a Private Page? A Private Page is a page in a Community that can be accessed only by logged in users, who are part of the Community. If a user is not logged in (that is, the user is a guest), or if a user does not belong to your Community, then the user cannot access the Private Page.What's a Public Page? A Public Page is a page in a Community that can be accessed by guests. As long as the guest has the appropriate URL, the guest can access any Public Page.
•
•
•
•
•
•
•
Chapter 2
[ 33 ]
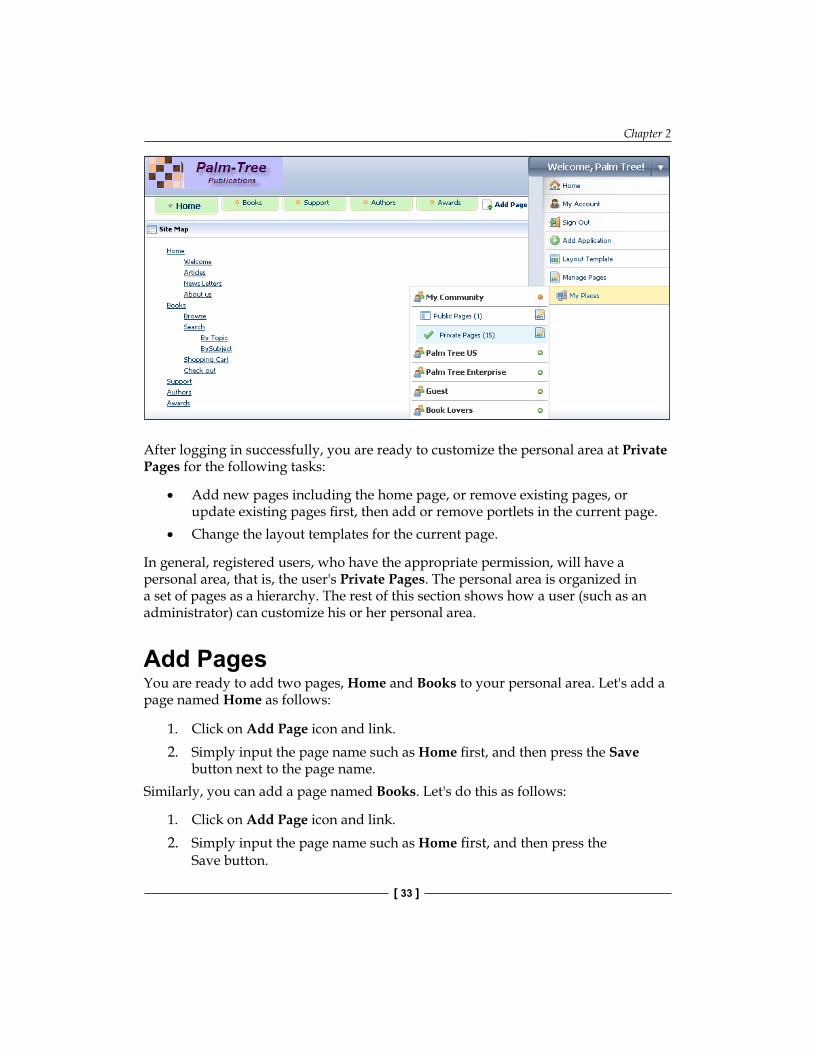
After logging in successfully, you are ready to customize the personal area at Private Pages for the following tasks:
Add new pages including the home page, or remove existing pages, or update existing pages first, then add or remove portlets in the current page.Change the layout templates for the current page.
In general, registered users, who have the appropriate permission, will have a personal area, that is, the user's Private Pages. The personal area is organized in a set of pages as a hierarchy. The rest of this section shows how a user (such as an administrator) can customize his or her personal area.
Add PagesYou are ready to add two pages, Home and Books to your personal area. Let's add a page named Home as follows:
1. Click on Add Page icon and link.2. Simply input the page name such as Home first, and then press the Save
button next to the page name.Similarly, you can add a page named Books. Let's do this as follows:
1. Click on Add Page icon and link.2. Simply input the page name such as Home first, and then press the
Save button.
•
•
Set-up The Home Page And Navigation Structure for The Intranet
[ 34 ]
Note that the possibility of adding pages, depends on the theme, by default. With the theme, Classic, you can add page in the Navigation bar, but not with the theme, Brochure. In the theme Classic, you'll find in navigation.vm: class="sort-pages modify-pages".
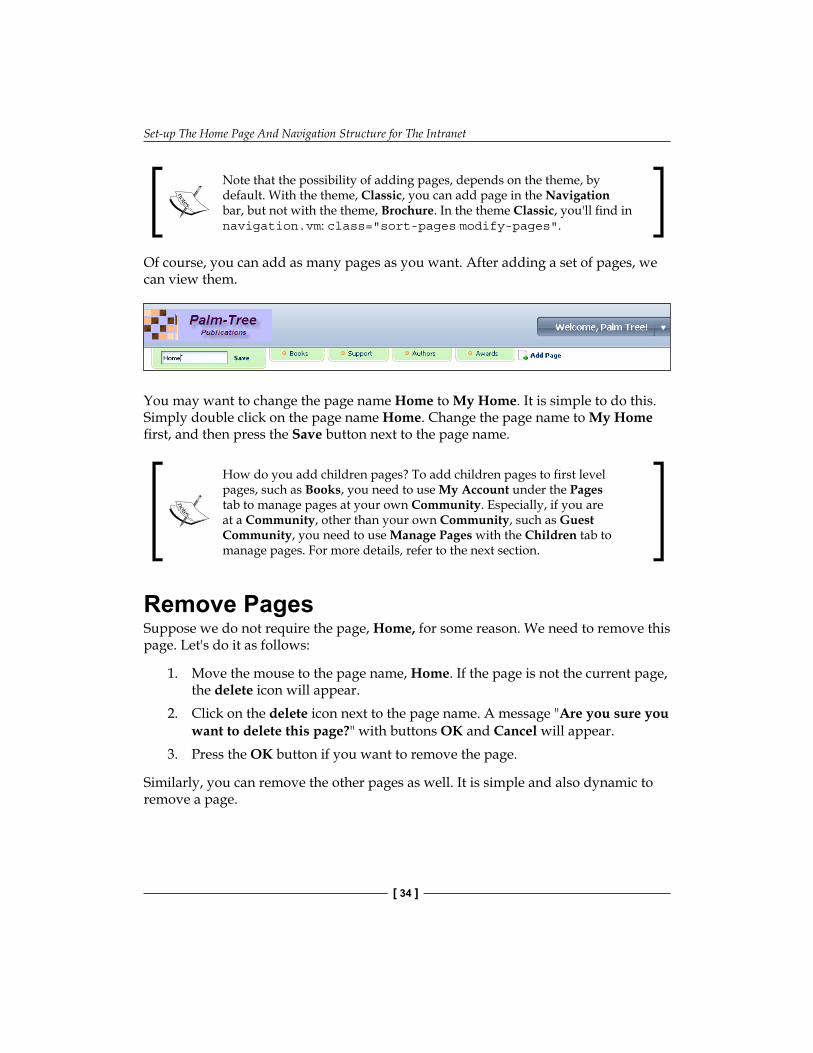
Of course, you can add as many pages as you want. After adding a set of pages, we can view them.
You may want to change the page name Home to My Home. It is simple to do this. Simply double click on the page name Home. Change the page name to My Home first, and then press the Save button next to the page name.
How do you add children pages? To add children pages to first level pages, such as Books, you need to use My Account under the Pages tab to manage pages at your own Community. Especially, if you are at a Community, other than your own Community, such as Guest Community, you need to use Manage Pages with the Children tab to manage pages. For more details, refer to the next section.
Remove PagesSuppose we do not require the page, Home, for some reason. We need to remove this page. Let's do it as follows:
1. Move the mouse to the page name, Home. If the page is not the current page, the delete icon will appear.
2. Click on the delete icon next to the page name. A message "Are you sure you want to delete this page?" with buttons OK and Cancel will appear.
3. Press the OK button if you want to remove the page.
Similarly, you can remove the other pages as well. It is simple and also dynamic to remove a page.
Chapter 2
[ 35 ]
Note that there is no delete icon for the current page. If you want to delete the current page, you need to click other pages and make the current page a normal page first. Then you can delete it as stated before. Furthermore, any instances of portlets of the page would be removed, if the page is removed.
Add PortletsIt is time now to add portlets to your page. For example, we need to add portlet Site Map to the Books page. Let's do it as follows:
1. Click on the Add Application link. This will bring up Add Application panel on your screen.
2. Input portlet name Site Map; find the portlet "Site Map" from the menu.3. Click on the Add button next to the right of the portlet name Site Map.4. Click on the Close icon of the Add Application panel to close it.
You will see that the portlet has been added to the bottom of your page. Now you are ready to change the portlet placement. To do so, click on the title bar of the portlet and drag it to where you like. You can add as many portlets as you want in your pages.
Remove PortletsMaybe you do not want the Books page to contain the portlet Site Map anymore. Therefore, we need to remove the portlet from the page. Let's do it as follows:
1. Locate the Site Map portlet.2. Click on the remove icon at the upper right of the portlet.3. A message "Are you sure you want to remove this component?" with
buttons OK and Cancel will appear.4. Click on the OK button.
Of course, you can remove any portlet from any page.
Note that everything related to the portlet in the page would be removed if the portlet is removed from the page. You cannot recover it after deletion.
Set-up The Home Page And Navigation Structure for The Intranet
[ 36 ]
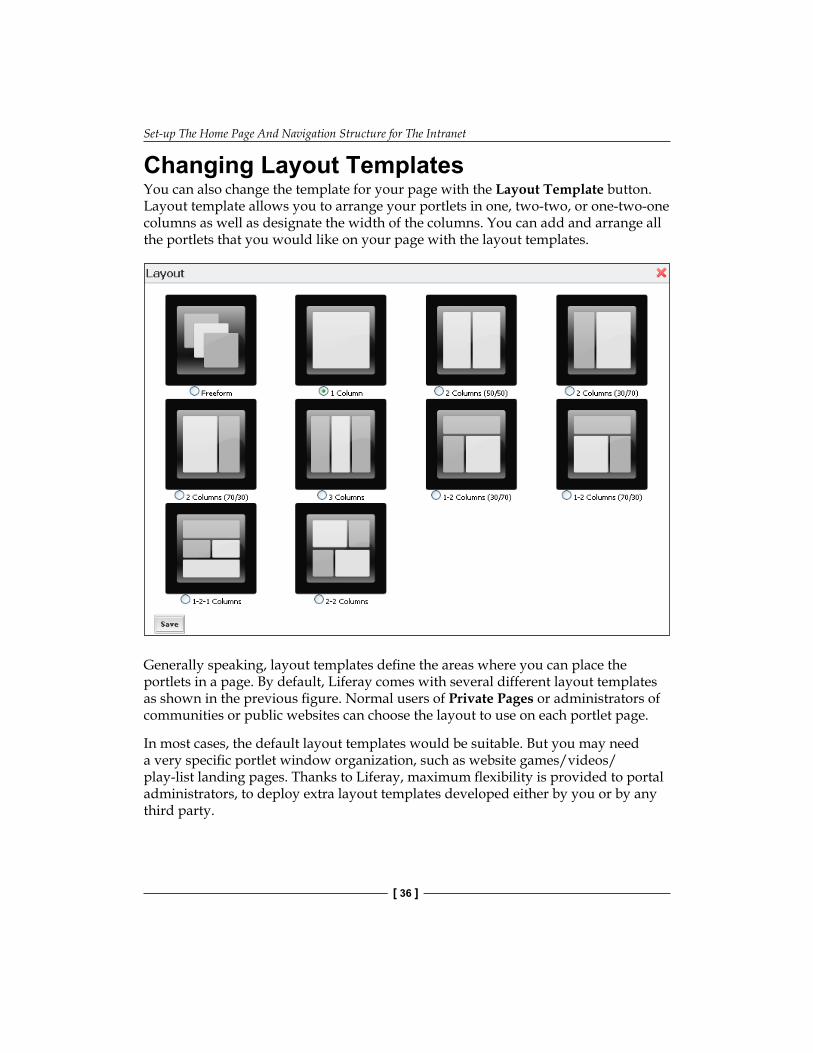
Changing Layout TemplatesYou can also change the template for your page with the Layout Template button. Layout template allows you to arrange your portlets in one, two-two, or one-two-one columns as well as designate the width of the columns. You can add and arrange all the portlets that you would like on your page with the layout templates.
Generally speaking, layout templates define the areas where you can place the portlets in a page. By default, Liferay comes with several different layout templates as shown in the previous figure. Normal users of Private Pages or administrators of communities or public websites can choose the layout to use on each portlet page.
In most cases, the default layout templates would be suitable. But you may need a very specific portlet window organization, such as website games/videos/ play-list landing pages. Thanks to Liferay, maximum flexibility is provided to portal administrators, to deploy extra layout templates developed either by you or by any third party.
Chapter 2
[ 37 ]
Note that if the preloaded templates are insufficient for your needs, you can create your own deployable layouts, using a sample layout template, or using a Community-submitted one.
Setting up Portal PagesWe have discussed how to build the home page, that is, personal area. Now let's see how to set up normal pages. As an administrator or website editor, you are required to set up the pages of any Community. Suppose you want to set up both Private Pages and Public Pages of My Community "Palm Tree" with the following tasks:
1. Edit pages and add child pages to the current page such as "Palm Tree" Private Page. You can use the Page tab and the Children tab of Manage Page.
2. Change the logo and themes for "Palm Tree" Private Page. You can use the Logo tab and Look and Feel tab of Manage Page.
With Manage Pages, you can change the look and feel with one click, manage portal pages, insert JavaScript, sitemap protocol, and meta-data, and set friendly URLs.
Managing PagesYou can manage top pages by clicking the top page name on the left-hand side, such as Palm Tree. Under managing the top page, you can add child pages, change the logo for all Private Pages, and change the look and feel of public or Private Pages.
Add A Child PageSuppose you need to add a child page, Awards under Palm Tree. You can add this page as follows:
1. Click the Manage Pages from your current page (Private Pages).2. Click on the root Palm Tree.3. Select the tab, New Page, after the tab, Children, is selected.4. Input child page name, such as Awards.5. Select a type, such as Portlet.6. Check the Hidden box, if you want to hide the page.7. Press the Add Page button when you are ready.
Set-up The Home Page And Navigation Structure for The Intranet
[ 38 ]
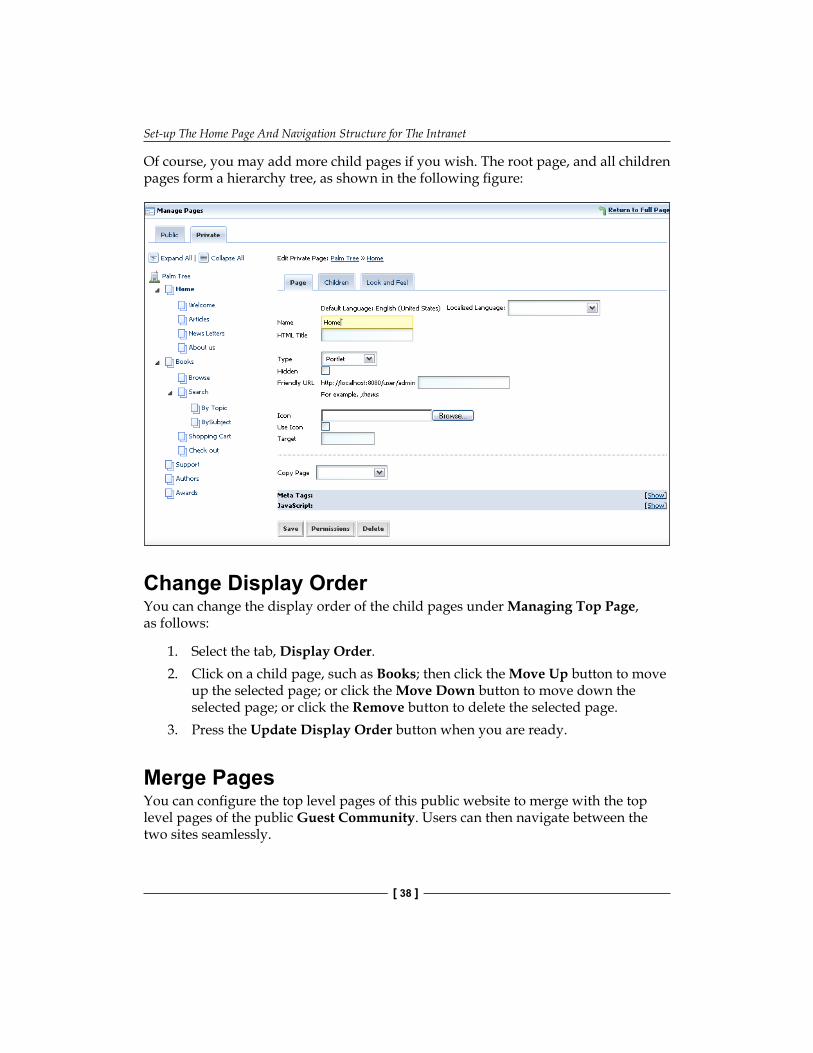
Of course, you may add more child pages if you wish. The root page, and all children pages form a hierarchy tree, as shown in the following figure:
Change Display OrderYou can change the display order of the child pages under Managing Top Page, as follows:
1. Select the tab, Display Order.2. Click on a child page, such as Books; then click the Move Up button to move
up the selected page; or click the Move Down button to move down the selected page; or click the Remove button to delete the selected page.
3. Press the Update Display Order button when you are ready.
Merge PagesYou can configure the top level pages of this public website to merge with the top level pages of the public Guest Community. Users can then navigate between the two sites seamlessly.
Chapter 2
[ 39 ]
First, you can select a Community other than Guest Community. Then click on the Manage Page link and select the top of Public or Private Pages. By default, the Children tab is selected.
To enable merging the Guest Public Pages, simply select the tab, Merge Pages, and check the box, Merge Guest Public Pages. To disable merging pages, simply uncheck the Merge Guest Public Pages box. Press the Save button when you are ready.
Change The LogoYou can change the logo from the default enterprise logo. For example, you have seen the logo of "Palm Tree Publications" in the previous figures. How do we get it? Let's do it as follows:
1. Select My Places link and also select a Community (such as My Community, and, Public pages or Private pages).
2. Select Manage Page and further, select the top of the public or Private Pages, such as Palm Tree.
3. Press the Logo tab and upload a logo say, "palmtree_logo.png".
In general, you can upload a logo for the public or Private Pages that will be used instead of the default enterprise logo.
Edit A PageYou can edit the pages such as Awards under Manage Pages. For example, if you want to replace the page title Awards with "Our Awards":
1. Find the page you want to edit in the left-hand tree structure.2. Click on the Awards page.3. Click on the Page tab.4. Input the HTML Title of the page with the value "Our Awards".5. Click on the Save button when you are ready.
You also have the option to rename the current page, change the display language of the current page, again change the HTML title, change the type of the current page, and change the option whether the current page should be hidden or not.
You can also provide a Friendly URL for this page. For example, you can create a URL for the page "Awards" as "http://localhost:8080/user/admin/awards".
Set-up The Home Page And Navigation Structure for The Intranet
[ 40 ]
If many parameters are passed in, through the URL, the portal URL becomes very long and difficult to read. However, you can give your page a Friendly URL to make it easier to read and access.
Liferay portal also provides a Friendly URL for each Community. Thus you could just put in a Friendly URL for your page (it must also start with "/") such as "/awards". If there is no duplication, you can now access your page using the following URL pattern:
http://server-name/community-friendly-url/page-friendly-url
You can also upload an icon for the current page and decide whether the icon is used or not. For instance, you can upload "reference.gif" as the icon for the Awards page.
You already have the Awards page in your Community, and further, you could set up another page, Others exactly like the Awards page. For this, you can use the Copy Page function. Just select the Awards page that you want to copy from the drop-down next to the Copy Page and click the Save button while editing the Others page. Your current page, Others, will be an exact copy of the Awards page you have selected except for the page's name.
Furthermore, you can insert the Meta Tags, Java Scripts, and Sitemap protocol for this page.
Delete A PageIf you do not want the page Awards for some reason, you can delete it. You can delete the pages under Manage Pages:
1. Locate the page you want to delete in the left-hand tree structure.2. Click the Awards page.3. Click the Page tab.4. Click the Delete button.5. A screen will appear asking if you want to delete the selected page. Click the
OK button to confirm.
Note that if a page such as the root page, Palm Tree is the only one page in the My Community, you cannot delete it under Manage Pages. Moreover, deleting a page will delete all child pages related to this page and remove all portlet instances that this page owns.
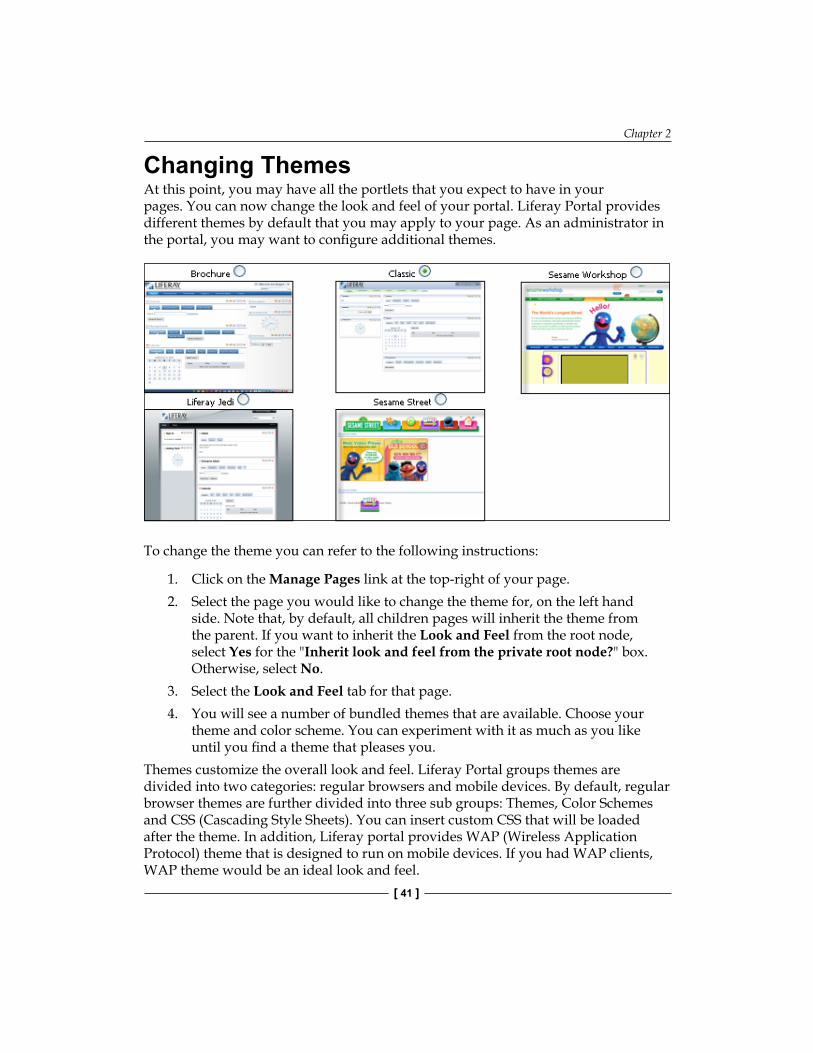
Chapter 2
[ 41 ]
Changing ThemesAt this point, you may have all the portlets that you expect to have in your pages. You can now change the look and feel of your portal. Liferay Portal provides different themes by default that you may apply to your page. As an administrator in the portal, you may want to configure additional themes.
To change the theme you can refer to the following instructions:
1. Click on the Manage Pages link at the top-right of your page.2. Select the page you would like to change the theme for, on the left hand
side. Note that, by default, all children pages will inherit the theme from the parent. If you want to inherit the Look and Feel from the root node, select Yes for the "Inherit look and feel from the private root node?" box. Otherwise, select No.
3. Select the Look and Feel tab for that page.4. You will see a number of bundled themes that are available. Choose your
theme and color scheme. You can experiment with it as much as you like until you find a theme that pleases you.
Themes customize the overall look and feel. Liferay Portal groups themes are divided into two categories: regular browsers and mobile devices. By default, regular browser themes are further divided into three sub groups: Themes, Color Schemes and CSS (Cascading Style Sheets). You can insert custom CSS that will be loaded after the theme. In addition, Liferay portal provides WAP (Wireless Application Protocol) theme that is designed to run on mobile devices. If you had WAP clients, WAP theme would be an ideal look and feel.
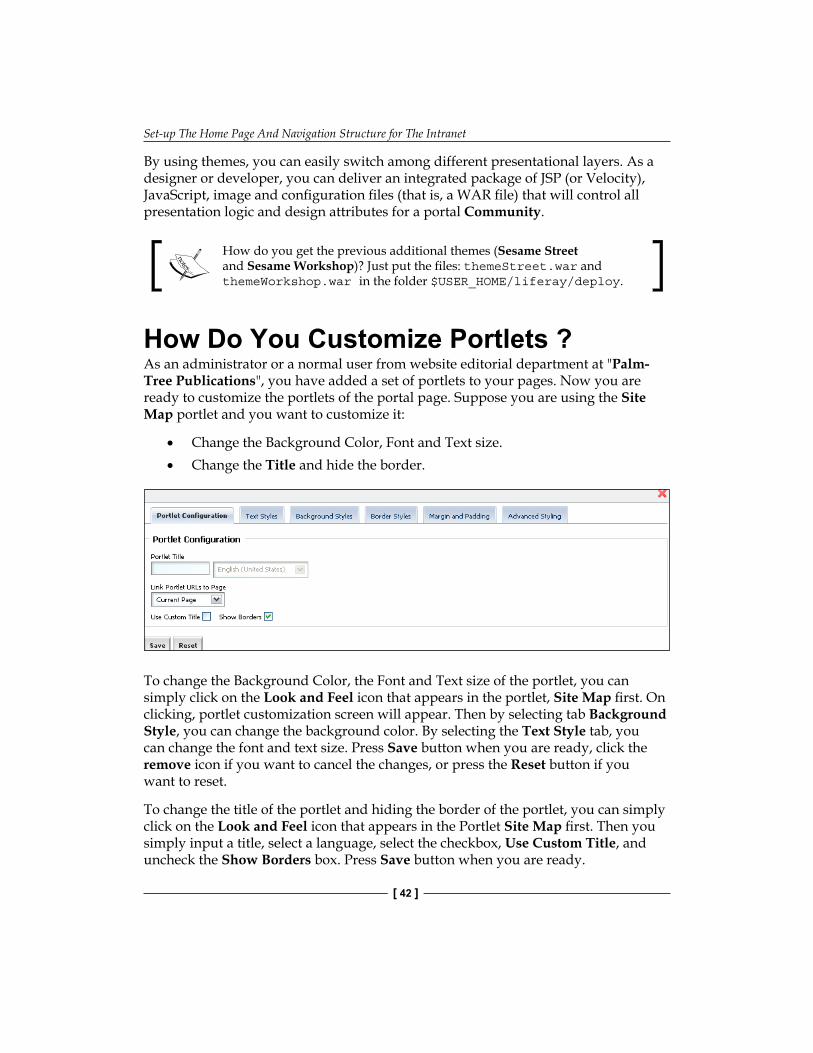
Set-up The Home Page And Navigation Structure for The Intranet
[ 42 ]
By using themes, you can easily switch among different presentational layers. As a designer or developer, you can deliver an integrated package of JSP (or Velocity), JavaScript, image and configuration files (that is, a WAR file) that will control all presentation logic and design attributes for a portal Community.
How do you get the previous additional themes (Sesame Street and Sesame Workshop)? Just put the files: themeStreet.war and themeWorkshop.war in the folder $USER_HOME/liferay/deploy.
How Do You Customize Portlets ?As an administrator or a normal user from website editorial department at "Palm-Tree Publications", you have added a set of portlets to your pages. Now you are ready to customize the portlets of the portal page. Suppose you are using the Site Map portlet and you want to customize it:
Change the Background Color, Font and Text size.Change the Title and hide the border.
To change the Background Color, the Font and Text size of the portlet, you can simply click on the Look and Feel icon that appears in the portlet, Site Map first. On clicking, portlet customization screen will appear. Then by selecting tab Background Style, you can change the background color. By selecting the Text Style tab, you can change the font and text size. Press Save button when you are ready, click the remove icon if you want to cancel the changes, or press the Reset button if you want to reset.
To change the title of the portlet and hiding the border of the portlet, you can simply click on the Look and Feel icon that appears in the Portlet Site Map first. Then you simply input a title, select a language, select the checkbox, Use Custom Title, and uncheck the Show Borders box. Press Save button when you are ready.
•
•
Chapter 2
[ 43 ]
Liferay portal provides the ability to change the look and feel of portlets dynamically with the following possibilities:
Portlet configuration: for using custom title, showing borders, selecting languages for title, and so on.Text Style: for font, size, color, alignment, text decoration, word spacing, line height, letter spacing, and so on.Background Style: for background color, and so on.Border Style: for border width, border style, border color etc.Margin and Padding: for padding, margin, and so on.Advanced Styling: for entering in your custom CSS.
How Do You Navigate The Structure of Intranet Site?As an administrator or a normal user from the website editorial department at the "Palm-Tree Publications" enterprise, you have customized the pages in the portal. Now it is ready for you to navigate the structure of the website. Suppose, your current page is Search and you want to provide the following tasks:
1. Show the structured directory of links to all pages in the portal. You simply add the Site Map portlet in the page if the portlet is not there.
2. Display a directory of links reflecting the portal's page structure, with drill down into the current page. You can add the Navigation portlet in the page.
3. Displays a trail of parent pages for the current page. You just add the Breadcrumb portlet in the page.
The Breadcrumb portlet provides ability to show a trail of parent pages for the current page. It can be placed on public portal pages as a navigational aid to publish websites. It helps the user visualize the structure of the site and quickly move from a page to a broader grouping of information.
•
•
•
•
•
•
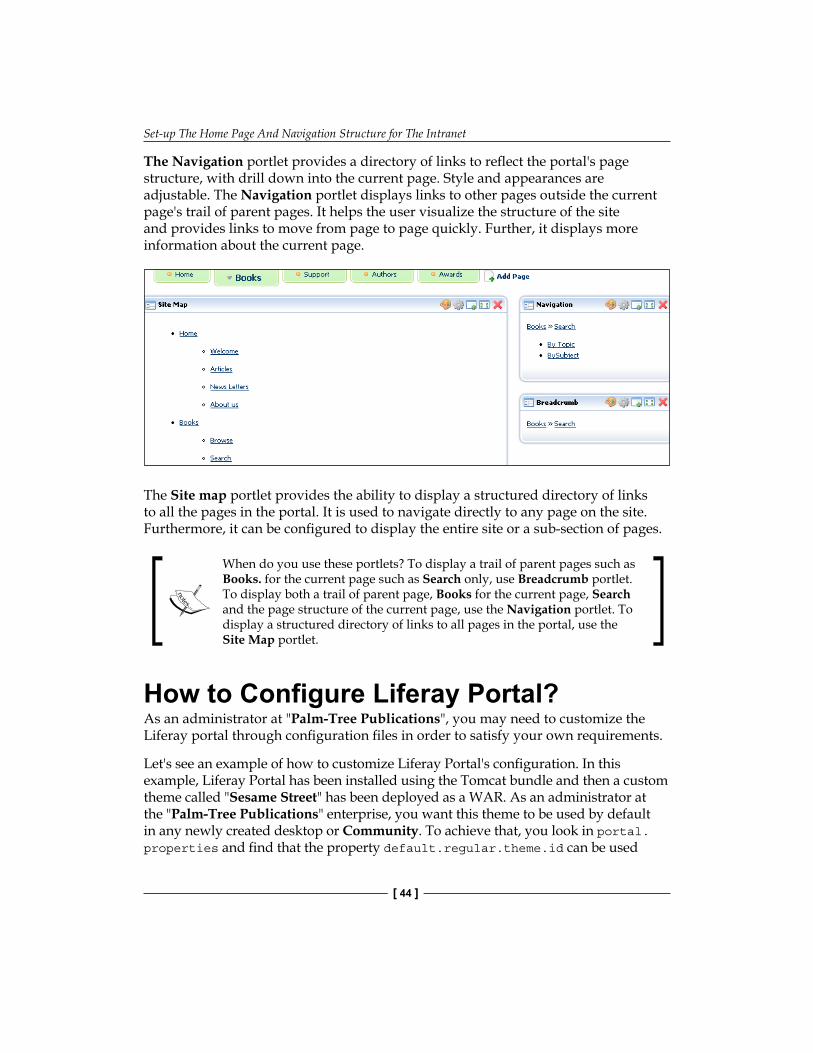
Set-up The Home Page And Navigation Structure for The Intranet
[ 44 ]
The Navigation portlet provides a directory of links to reflect the portal's page structure, with drill down into the current page. Style and appearances are adjustable. The Navigation portlet displays links to other pages outside the current page's trail of parent pages. It helps the user visualize the structure of the site and provides links to move from page to page quickly. Further, it displays more information about the current page.
The Site map portlet provides the ability to display a structured directory of links to all the pages in the portal. It is used to navigate directly to any page on the site. Furthermore, it can be configured to display the entire site or a sub-section of pages.
When do you use these portlets? To display a trail of parent pages such as Books. for the current page such as Search only, use Breadcrumb portlet. To display both a trail of parent page, Books for the current page, Search and the page structure of the current page, use the Navigation portlet. To display a structured directory of links to all pages in the portal, use the Site Map portlet.
How to Configure Liferay Portal?As an administrator at "Palm-Tree Publications", you may need to customize the Liferay portal through configuration files in order to satisfy your own requirements.
Let's see an example of how to customize Liferay Portal's configuration. In this example, Liferay Portal has been installed using the Tomcat bundle and then a custom theme called "Sesame Street" has been deployed as a WAR. As an administrator at the "Palm-Tree Publications" enterprise, you want this theme to be used by default in any newly created desktop or Community. To achieve that, you look in portal.properties and find that the property default.regular.theme.id can be used
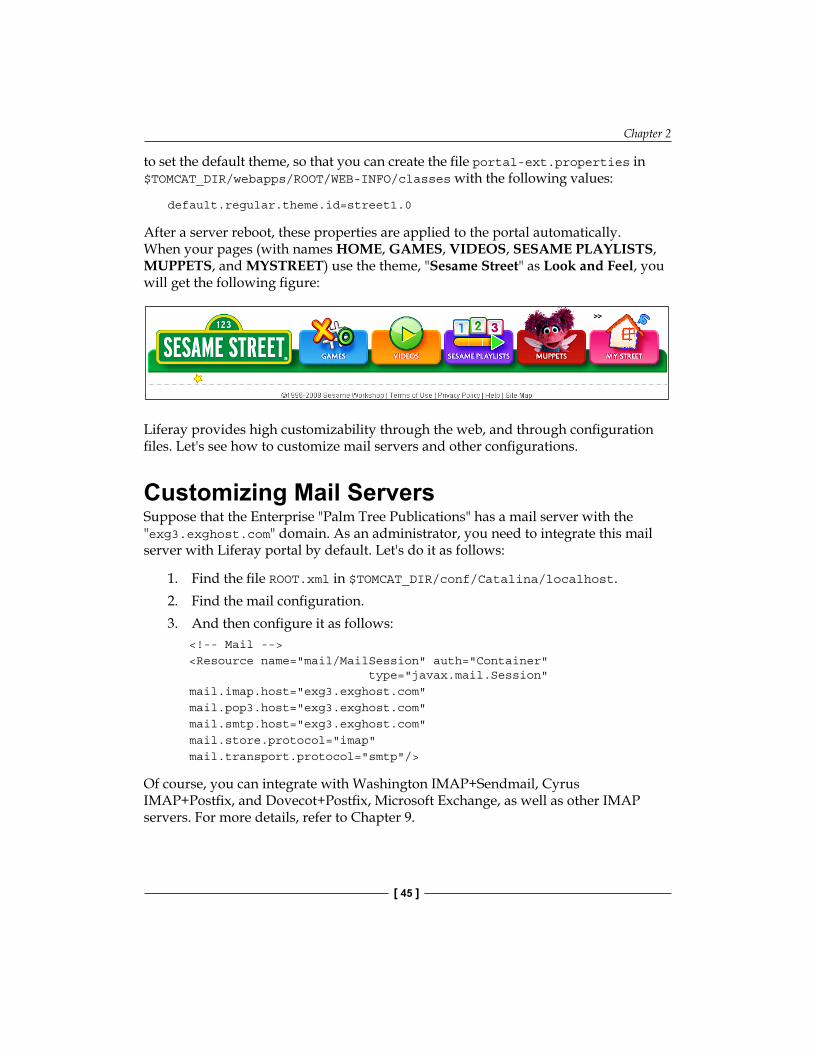
Chapter 2
[ 45 ]
to set the default theme, so that you can create the file portal-ext.properties in $TOMCAT_DIR/webapps/ROOT/WEB-INFO/classes with the following values:
default.regular.theme.id=street1.0
After a server reboot, these properties are applied to the portal automatically. When your pages (with names HOME, GAMES, VIDEOS, SESAME PLAYLISTS, MUPPETS, and MYSTREET) use the theme, "Sesame Street" as Look and Feel, you will get the following figure:
Liferay provides high customizability through the web, and through configuration files. Let's see how to customize mail servers and other configurations.
Customizing Mail ServersSuppose that the Enterprise "Palm Tree Publications" has a mail server with the "exg3.exghost.com" domain. As an administrator, you need to integrate this mail server with Liferay portal by default. Let's do it as follows:
1. Find the file ROOT.xml in $TOMCAT_DIR/conf/Catalina/localhost.2. Find the mail configuration.3. And then configure it as follows: <!-- Mail --> <Resource name="mail/MailSession" auth="Container" type="javax.mail.Session" mail.imap.host="exg3.exghost.com" mail.pop3.host="exg3.exghost.com" mail.smtp.host="exg3.exghost.com" mail.store.protocol="imap" mail.transport.protocol="smtp"/>
Of course, you can integrate with Washington IMAP+Sendmail, Cyrus IMAP+Postfix, and Dovecot+Postfix, Microsoft Exchange, as well as other IMAP servers. For more details, refer to Chapter 9.
Set-up The Home Page And Navigation Structure for The Intranet
[ 46 ]
Configuring Portal PathsThere are two files which are used to configure portal paths: portal.properties and system.properties. You should not modify portal.properties and system.properties directly. You should just create two files named portal-ext.properties and system-ext.properties, and write in only the properties whose values you want to override. These two files can be placed with the original one, or in the global classpath of the application server. These two extended files are located at $TOMCAT_DIR/webapps/ROOT/WEB-INFO/classes.
Before customizing the configuration, it is better to review and update the values of the following properties;
auto.deploy.deploy.dir=${user.home}/liferay/deploy: enable auto-deploy.lucene.dir=${user.home}/liferay/lucene/: for search to work.jcr.jackrabbit.repository.root=${user.home}/liferay/jackrabbit: for the document library.
Customizing ConfigurationWe can override the properties of configuration files. Let's configure the portal through the portal-ext.properties and system-ext.properties files that can be created and stored in any place in the class-path. When the extension development environment is used, you will find that these files are already present in the directory ext/ext-impl/WEB-INF/classes. Otherwise, they are stored in the global class-path of the application server. For example:
Tomcat: Place them in $TOMCAT_DIR/webapps/ROOT/WEB-INFO/classes.JBoss: Place them in $JBOSS_DIR/server/default/conf.Other application servers: Read the documentation provided with them.
Liferay uses EasyConf to read portal.properties, so that all functionalities provided by this library are also available.
The main configuration file is portal.properties, which contains a detailed explanation of the properties that it defines. To change the value of any of its properties, do it through a file called portal-ext.properties.
The system.properties file is provided as a convenient way to set all properties for the JVM machine and related system settings. Start your application server with the system property system.properties.load set to true to load it. When the server starts, the portal will load the system.properties file and then the system-ext.properties file.
•
•
•
•••
Chapter 2
[ 47 ]
What's EasyConf? EasyConf is a library to access the configuration of software components and applications. It defines simple conventions to make it easier to use.
Setting up Extension EnvironmentAs an administrator or a developer from engineering department at the enterprise, "Palm-Tree Publications", you may want to develop an engineering project (for example, collaborating on alfresco contents by Web services) on top of the Liferay portal, like a platform, without having to worry about upgrading in future. You can follow these instructions to set it up:
Requirements: Java 1.4 or Java 5.0 or Java 6.0 or a later version; Ant 1.7 or a later version; Liferay Portal source code; Web Server (Tomcat, Resin, and so on).Set JAVA_HOME to your Java directory. Set ANT_HOME to your Ant directory. Add JAVA_HOME/bin and ANT_HOME/bin to System Path.Configuring your compiler (build.${user.name}.properties):
## javac.compiler ## classic (the standard compiler of JDK 1.1/1.2). ## modern (the standard compiler of JDK 1.3/1.4/1.5/1.6). ## jikes (the Jikes compiler). ## jvc (Microsoft's SDK for Java/Visual J++ ). ## kjc (the kopi compiler). ## gcj (the gcj compiler from gcc). ## sj (Symantec java compiler). ## extJavac (run either modern or classic in a JVM of its own). javac.compiler=mordern javac.debug=on javac.deprecation=off javac.fork=true javac.memoryMaximumSize=256m javac.nowarn=on jsp.precompile=off
Configuring your release properties.Ant clean start build-ext.Configuring your application server properties.Ant build.Developing your new portlets.
•
•
•
•
•
•
•
•
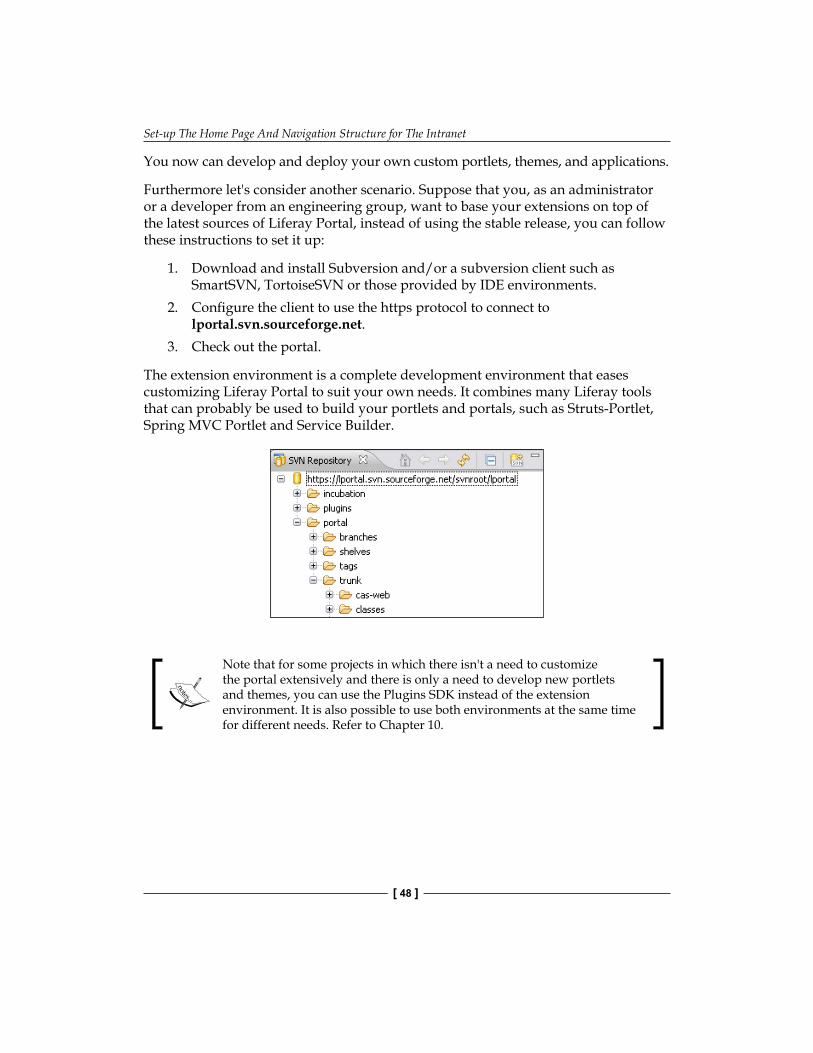
Set-up The Home Page And Navigation Structure for The Intranet
[ 48 ]
You now can develop and deploy your own custom portlets, themes, and applications.
Furthermore let's consider another scenario. Suppose that you, as an administrator or a developer from an engineering group, want to base your extensions on top of the latest sources of Liferay Portal, instead of using the stable release, you can follow these instructions to set it up:
1. Download and install Subversion and/or a subversion client such as SmartSVN, TortoiseSVN or those provided by IDE environments.
2. Configure the client to use the https protocol to connect to lportal.svn.sourceforge.net.
3. Check out the portal.
The extension environment is a complete development environment that eases customizing Liferay Portal to suit your own needs. It combines many Liferay tools that can probably be used to build your portlets and portals, such as Struts-Portlet, Spring MVC Portlet and Service Builder.
Note that for some projects in which there isn't a need to customize the portal extensively and there is only a need to develop new portlets and themes, you can use the Plugins SDK instead of the extension environment. It is also possible to use both environments at the same time for different needs. Refer to Chapter 10.
Chapter 2
[ 49 ]
SummaryThis chapter discussed how to experience implementing a portal page with portlets, understand portals, portlet containers, and portlets according to the JSR-286 specification. This chapter also discussed how to set up the portal, including installation options and deployment matrix, how to configure the home page and all other pages of the intranet web site. Then it introduced the concepts of how to customize the personal area, build the portal pages, and to navigate the structure of the Intranet via portlets such as Site Map, Breadcrumb, and Navigation. Finally, it provided guidance to configure the portal based on the system-ext.properties and portal-ext.properties files, and set up extension environment in order to extend functionality briefly.

Bringing In UsersLiferay Portal provides a powerful and yet highly configurable full security model for controlling Users, resources, workflow, search and policies. The full security model incorporates a fine-grained permission system to give administrators full control over access and privileges to portlets and objects within the portal. By this model, Users can assign Permissions to other Users, Communities, Organizations, Locations, and User Groups on a per portlet basis, and also, control Permissions all the way down to the object level.
This chapter begins with my account management, discusses bringing in Users, and all the ways to assign Permissions to Users. Finally, it gives a high-level overview of all the entities involved in the security model. In addition, this chapter introduces configurable authentications related to out-of-the-box managed accounts, LDAP (Lightweight Directory Access Protocol), SSO (Single Sign-On) CAS and OpenID.
By the end of this chapter, you would have learnt how to:
Update the profile in My Account.Administrate Users, User Groups, Organizations, and Locations.Integrate with LDAP and SSO.Manage Roles and Permissions.Apply full access control security model.
Managing My AccountAs an administrator at the enterprise "Palm-Tree Publications", you need to access the portal first, and then log into the portal. More interestingly, you can update your profile using your real personal information, such as name, password, language, time zone, icon, etc. The following sections show how to access the portal, log into the portal, and change the profile.
•
•
•
•
•

Bringing In Users
[ 52 ]
Accessing The PortalBy default, there are two ways to access Liferay portal: a regular connection (HTTP), and a secured connection (HTTPS). A default bundle installation supports HTTP only. The URL is http://book.com:8080. You can change the port number such as 80, and use a security connection by un-commenting the port number 433 at Tomcat.
For more details about HTTP and HTTPS, refer to the Chapter 13.
Logging into The PortalYou can get the login page by clicking on a link "Sign in," in the upper right corner that takes you to the login page. If it is not available in the default installation, you can go directly to the login page, by using the URL: http://book.com/c/portal/login.
In the login page, you are asked for the following information:
Login name (as an e-mail address) [email protected] test
Updating Your ProfileAs an administrator, you are running Liferay portal now, and you'll see a set of portlets in the default page. It is ready for you to update your profile anytime, such as Screen Name, Email Address, First Name, Last Name, Icon, Language, Greeting Message, and so on.
•
•
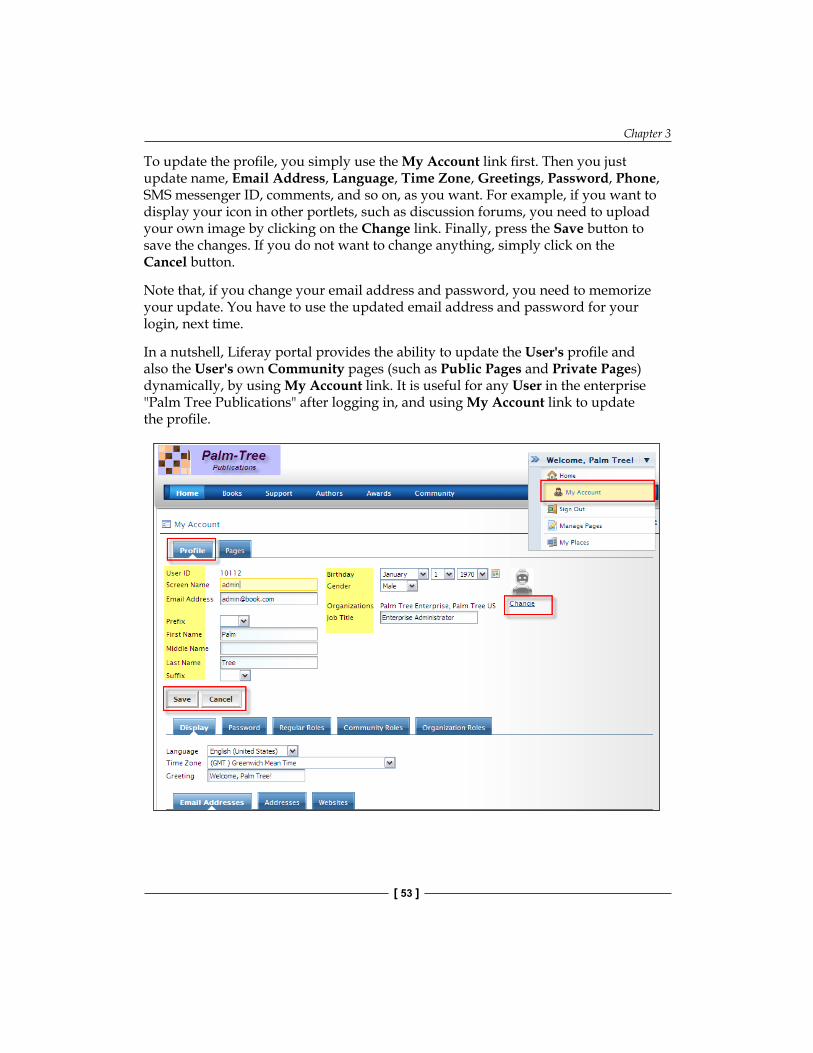
Chapter 3
[ 53 ]
To update the profile, you simply use the My Account link first. Then you just update name, Email Address, Language, Time Zone, Greetings, Password, Phone, SMS messenger ID, comments, and so on, as you want. For example, if you want to display your icon in other portlets, such as discussion forums, you need to upload your own image by clicking on the Change link. Finally, press the Save button to save the changes. If you do not want to change anything, simply click on the Cancel button.
Note that, if you change your email address and password, you need to memorize your update. You have to use the updated email address and password for your login, next time.
In a nutshell, Liferay portal provides the ability to update the User's profile and also the User's own Community pages (such as Public Pages and Private Pages) dynamically, by using My Account link. It is useful for any User in the enterprise "Palm Tree Publications" after logging in, and using My Account link to update the profile.
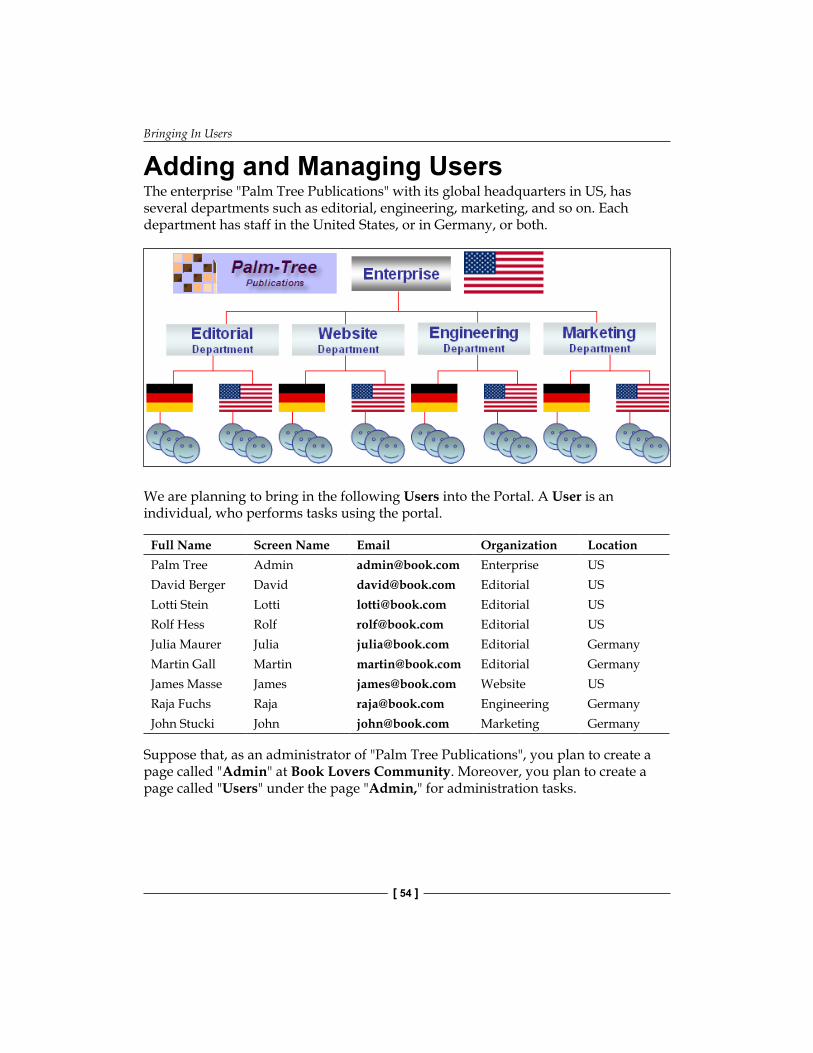
Bringing In Users
[ 54 ]
Adding and Managing UsersThe enterprise "Palm Tree Publications" with its global headquarters in US, has several departments such as editorial, engineering, marketing, and so on. Each department has staff in the United States, or in Germany, or both.
We are planning to bring in the following Users into the Portal. A User is an individual, who performs tasks using the portal.
Full Name Screen Name Email Organization LocationPalm Tree Admin [email protected] Enterprise USDavid Berger David [email protected] Editorial USLotti Stein Lotti [email protected] Editorial USRolf Hess Rolf [email protected] Editorial USJulia Maurer Julia [email protected] Editorial GermanyMartin Gall Martin [email protected] Editorial GermanyJames Masse James [email protected] Website USRaja Fuchs Raja [email protected] Engineering GermanyJohn Stucki John [email protected] Marketing Germany
Suppose that, as an administrator of "Palm Tree Publications", you plan to create a page called "Admin" at Book Lovers Community. Moreover, you plan to create a page called "Users" under the page "Admin," for administration tasks.
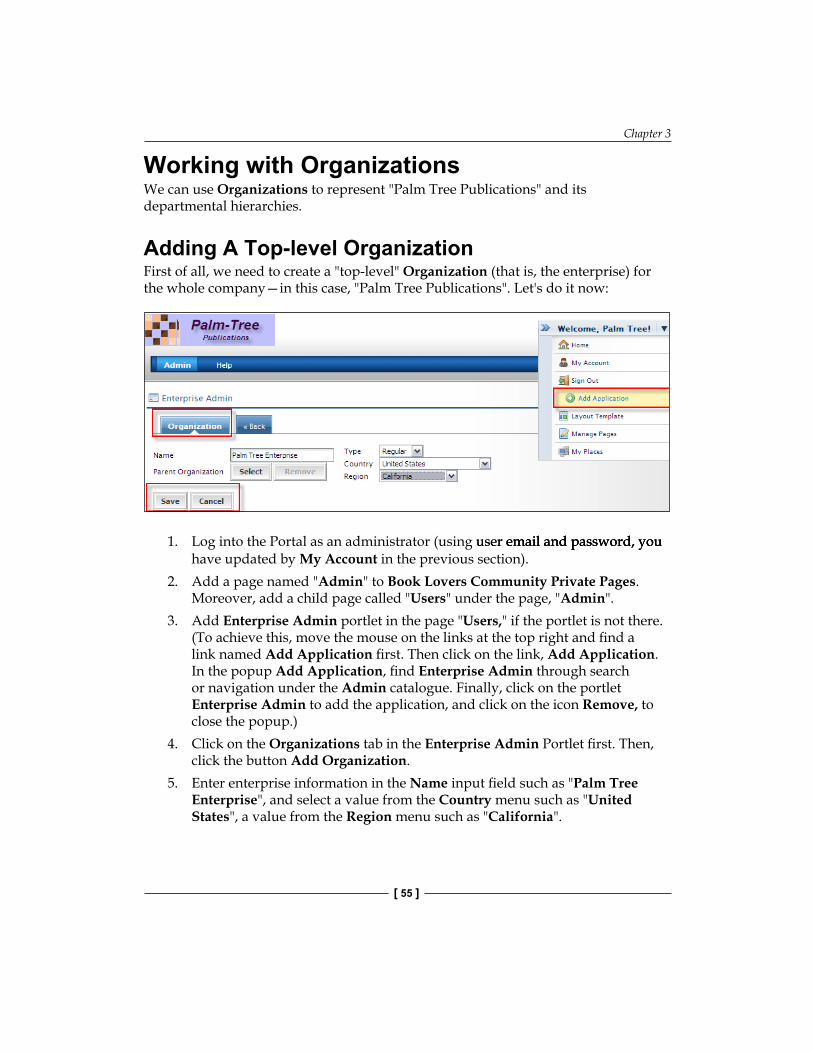
Chapter 3
[ 55 ]
Working with OrganizationsWe can use Organizations to represent "Palm Tree Publications" and its departmental hierarchies.
Adding A Top-level OrganizationFirst of all, we need to create a "top-level" Organization (that is, the enterprise) for the whole company—in this case, "Palm Tree Publications". Let's do it now:
1. Log into the Portal as an administrator (using user email and password, youuser email and password, you email and password, you have updated by My Account in the previous section).
2. Add a page named "Admin" to Book Lovers Community Private Pages. Moreover, add a child page called "Users" under the page, "Admin".
3. Add Enterprise Admin portlet in the page "Users," if the portlet is not there. (To achieve this, move the mouse on the links at the top right and find a link named Add Application first. Then click on the link, Add Application. In the popup Add Application, find Enterprise Admin through search or navigation under the Admin catalogue. Finally, click on the portlet Enterprise Admin to add the application, and click on the icon Remove, to close the popup.)
4. Click on the Organizations tab in the Enterprise Admin Portlet first. Then, click the button Add Organization.
5. Enter enterprise information in the Name input field such as "Palm Tree Enterprise", and select a value from the Country menu such as "United States", a value from the Region menu such as "California".
Bringing In Users
[ 56 ]
6. Select or Remove Parent Organization; here we maintain the default value.
7. Select Type with value, "Regular".
Note that the Enterprise is the top level Organization. It has no parent Organization. At the same time, it is an Organization, which will have a set of sub Organizations. Thus, it is a regular Organization with type value "Regular".
8. Click the Save button to save the inputs.
So we've created a top-level Organization. Now we need to create Organizations for the main departments in the company.
Managing OrganizationsOrganizations can contain other Organizations such as sub Organizations. This is useful in large companies where each department might almost be a separate company, with little interaction among them.
Add Child OrganizationsLet's create two departments within "Palm Tree Publications", Editorial and Marketing as follows:
1. Click on the Organizations tab in the Enterprise Admin portlet first, then click the button, Add Organization.
2. Enter enterprise information in the Name input field such as "Editorial Department" and select an option from the Country menu such as "United States", an option from the Region menu such as "California".
3. Click on the Select button to select the Parent Organization. In the Organization selection page, choose "Palm Tree Enterprise".
4. Select Type with value, "Regular".5. Click the Save button to save the inputs.
Similarly, let's add a child Organization called "Marketing department" as follows:
1. Click on the Organizations tab in the Enterprise Admin Portlet first; then click the button Add Organization.
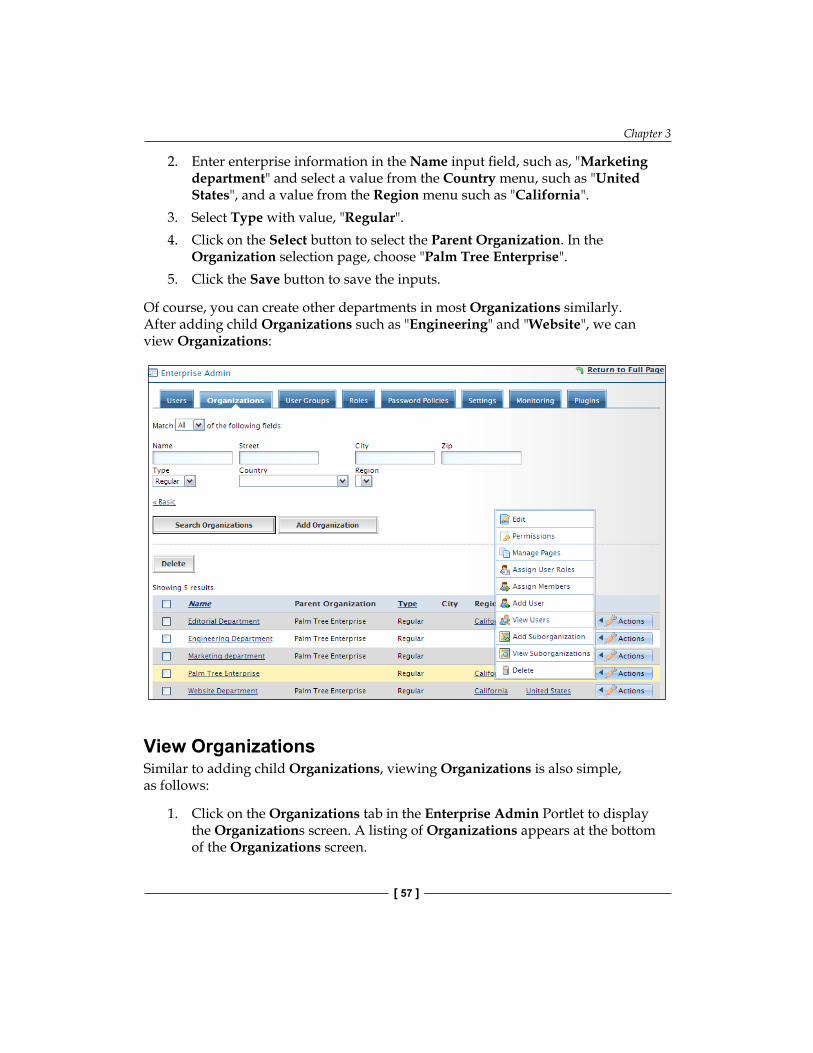
Chapter 3
[ 57 ]
2. Enter enterprise information in the Name input field, such as, "Marketing department" and select a value from the Country menu, such as "United States", and a value from the Region menu such as "California".
3. Select Type with value, "Regular".4. Click on the Select button to select the Parent Organization. In the
Organization selection page, choose "Palm Tree Enterprise".5. Click the Save button to save the inputs.
Of course, you can create other departments in most Organizations similarly. After adding child Organizations such as "Engineering" and "Website", we can view Organizations:
View OrganizationsSimilar to adding child Organizations, viewing Organizations is also simple, as follows:
1. Click on the Organizations tab in the Enterprise Admin Portlet to display the Organizations screen. A listing of Organizations appears at the bottom of the Organizations screen.
Bringing In Users
[ 58 ]
2. Locate an Organization such as "Editorial Department" that you want to view first, and then click on the Organization link such as "Editorial Department".
3. Or click the View Sub-organizations icon from Actions (next to Organization), if you want to view sub Organizations of a given Organization "Palm Tree Enterprise".
Search Organizations You can find Organizations by doing a basic search or an advanced search. To search Organizations, click on the Organizations tab in the Enterprise Admin portlet first. Then input search criterion for basic search, or input Organization information in the input fields and select Type value "Regular" for advanced search, and click the button, Search Organizations. A listing of Organizations based on search appears at the bottom of the Organizations screen.
Basic search will search both Organizations and Locations. Using advanced search, you may search Organizations (with type value "Regular") or Locations (with type value "Locations") or both (with type value "Any").
Edit An OrganizationAfter adding Organizations, we are ready to manage Organizations now. For example, we want to update the Organization's information of "Website department", such as changing name and parent Organizations, and adding email addresses and comments. Let's do it as follows:
1. Click on the Organizations tab in the Enterprise Admin portlet. Locate Organization such as "Website department" with type value "Regular", which you want to edit.
2. Click the Edit icon from Actions next to the right of Organization, or click on any links of the Organization, say "Website department".
3. Type changes in the Name input field and select value from the Country and Region, or add Email Addresses, Addresses, Website and Phone Numbers, and furthermore, add Services and Comments.
4. Click Save to save the changes.
Chapter 3
[ 59 ]
Delete An OrganizationFor some reasons, a department such as "Website", may not be wanted anymore. We need to delete this Organization from the Portal. Let's delete the Organization "Website" as follows:
1. Click on the Organizations tab in the Enterprise Admin Portlet.2. Locate an Organization such as "Website department" that you want
to delete.3. Click the Delete icon from the Actions next to the right of the Organization,
or select checkbox to the left of the Organization, and press the Delete button.
4. A screen will appear asking if you want to delete the selected Organizations. Click the OK button to confirm, or the Cancel button to cancel.
Note that you cannot delete an Organization which has child Organizations or Locations or Users. In order to delete this Organization, you need to remove sub Organizations or Locations or Users from this Organization first.
Using Organizations EffectivelyOrganizations represent the enterprise's departments hierarchy. Each Organization has a set of basic properties, such as name, parent Organization (not for top-level Organizations), status, country, and so on. It may also have a set of optional properties, such as email addresses, addresses, websites, phone numbers, services, comments, and so on.
An Organization can represent a parent corporation. An example would be the enterprise, "Palm Tree Publications".
An Organization that is a child Organization of top-level Organization can also represent departments of a parent corporation. Examples would be "Editorial department", "Marketing department", and so on.
Logically, Users can be members of more than one Organization. As a best practice, it is better to make a User belong to only one Organization. So make sure your Organizations don't overlap. For example, if you have a department called "marketing" and another called "engineering", then the marketing manager can be in one department or the other but not both.
Bringing In Users
[ 60 ]
This might seem limiting, but there is an answer to this in User Groups. A User can be a member of any number of User Groups, and "managers" is a common User Group. We'll see how to work with them later.
Working with LocationsJust like many departments, a company might have several Locations. "Palm Tree Publications" has one Location in San Jose, United States, and one in Berlin, Germany. Let's go ahead and create them.
Adding A Location for The EnterpriseFirst of all, we need to add a Location for the enterprise "Palm Tree Publications", that is the Organization "Palm Tree US". Let's do that now:
1. Click on the Organizations tab in the Enterprise Admin Portlet first, then click the button Add Organization.
2. Enter enterprise information, "Palm Tree US", in the Name input field and select a value such as "United States" from the Country menu, a value such as "California"from thefrom the the Region menu..
3. Click on the Select button to select the Parent Organization. In the Organization selection page, choose "Palm Tree Enterprise".
4. Select Type with value "Location".5. Click the Save button to save the inputs.
So we've added a Location for a top-level Organization. Now we need to create Locations for the department "Editorial".
Managing LocationsGenerally speaking, a Location is a special Organization, which associates with a parent Organization. More importantly, Locations cannot have any associated child Organizations. Location is mostly distinguished by its geographic position. An Organization may have any number of sub organizations and Locations. Obviously, Locations are leaves of organizations.
Chapter 3
[ 61 ]
Add Locations for Main Organizations Let's create a Location called "Editorial US" for the department "Editorial", as follows:
1. Click on the Organizations tab in the Enterprise Admin portlet first, then click the button Add Organization.
2. Enter enterprise information in the Name input field, "Editorial US" and select a value from the Country menu, "United States", a value from the Region menu, "California".
3. Click on the Select button to select the Parent Organization. In the Organization selection page, choose "Editorial department".
4. Select Type with the value "Location".5. Click the Save button to save the inputs.
Similarly, we can add another Location called "Editorial Germany" for the department, "Editorial". Optionally, we can add the Location "Editorial Germany" from the Organization "Editorial department" directly:
1. Click on the Organizations tab in the Enterprise Admin portlet. Locate the Organization, "Editorial department".
2. Click the Add Sub Organization icon from Actions, to the right of the Organization.
3. Enter enterprise information in the Name input field, "Editorial Germany" and select a value from the Country menu, "Germany". Keep the default value for the Region menu.
4. Select Type with value, "Location".5. Keep default value for the Parent Organization.6. Click the Save button to save the inputs.
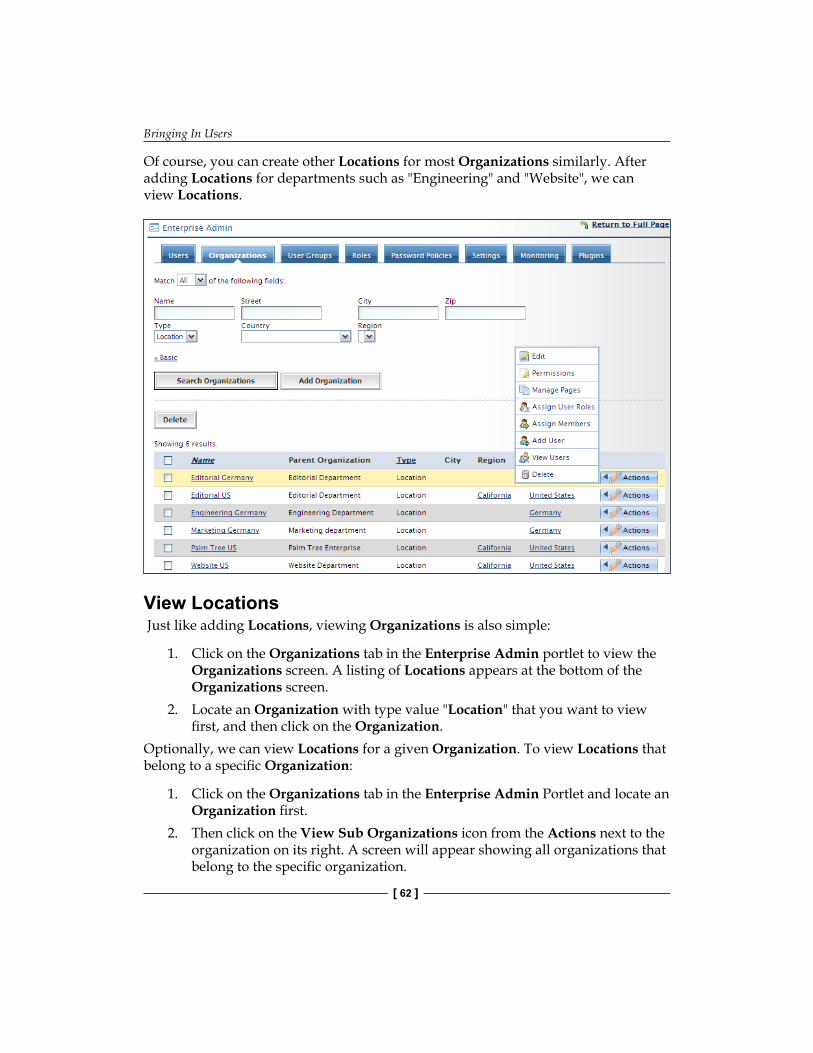
Bringing In Users
[ 62 ]
Of course, you can create other Locations for most Organizations similarly. After adding Locations for departments such as "Engineering" and "Website", we can view Locations.
View Locations Just like adding Locations, viewing Organizations is also simple:
1. Click on the Organizations tab in the Enterprise Admin portlet to view the Organizations screen. A listing of Locations appears at the bottom of the Organizations screen.
2. Locate an Organization with type value "Location" that you want to view first, and then click on the Organization.
Optionally, we can view Locations for a given Organization. To view Locations that belong to a specific Organization:
1. Click on the Organizations tab in the Enterprise Admin Portlet and locate an Organization first.
2. Then click on the View Sub Organizations icon from the Actions next to the organization on its right. A screen will appear showing all organizations that belong to the specific organization.
Chapter 3
[ 63 ]
3. Locate an Organization with type value "Location" that you want to view first, and then click on the Organization name link.
Search Locations Locations are searchable only by advanced search. To search Locations, simply click on the Organizations tab in the Enterprise Admin first. Then input Organization information in the input fields, and select Type value "Location" in advanced search, and click the button Search Organizations.
Edit A LocationAfter adding Locations, we are ready to manage Locations now. For example, we want to update the Location information of "Website US", such as name and parent Organizations, and add email addresses and comments. Let's do it as follows:
1. Click on the Organizations tab in the Enterprise Admin portlet. Locate the Location, "Website US" with type value "Location", which you want to edit.
2. Click the Edit icon from the Actions to the right of the Location, or click on any of the links under Location such as the name, "Website US".
3. Then in the edit page, type changes in the Name input field and select values from the Country and Region menus to make changes. Or add Email Addresses, Addresses, Website and Phone Numbers, and also Services and Comments.
4. Click Save button to save the changes.
Delete A LocationIn some instances a Location, say "Website US" may not be wanted anymore. We need to delete this Location in the Portal. Let's delete the Location "Website US" as follows:
1. Click on the Organizations tab in the Enterprise Admin Portlet.2. Locate the Location you want to delete such as "Website US".3. Click the Delete icon from the Actions to the right of the Location, or select
the checkbox to the left of the Location and press the Delete button.4. A screen appears asking if you want to delete the selected Locations. Click
the OK button to confirm.
Note that you can not delete a Location which has Users. In order to delete this Location, you need to remove Users from this Location first.
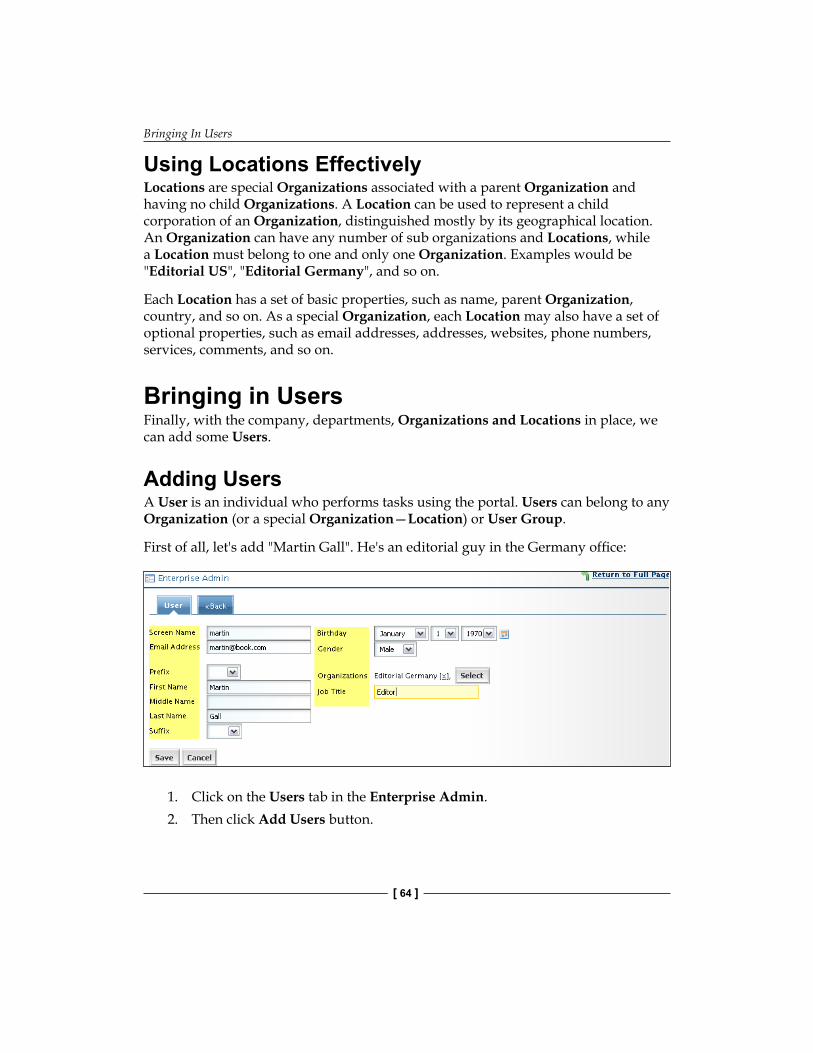
Bringing In Users
[ 64 ]
Using Locations EffectivelyLocations are special Organizations associated with a parent Organization and having no child Organizations. A Location can be used to represent a child corporation of an Organization, distinguished mostly by its geographical location. An Organization can have any number of sub organizations and Locations, while a Location must belong to one and only one Organization. Examples would be "Editorial US", "Editorial Germany", and so on.
Each Location has a set of basic properties, such as name, parent Organization, country, and so on. As a special Organization, each Location may also have a set of optional properties, such as email addresses, addresses, websites, phone numbers, services, comments, and so on.
Bringing in UsersFinally, with the company, departments, Organizations and Locations in place, we can add some Users.
Adding UsersA User is an individual who performs tasks using the portal. Users can belong to any Organization (or a special Organization—Location) or User Group.
First of all, let's add "Martin Gall". He's an editorial guy in the Germany office:
1. Click on the Users tab in the Enterprise Admin.2. Then click Add Users button.
Chapter 3
[ 65 ]
3. Enter Users information in the input field and select values from the pull down menus. Normally, you can select an Organization (with type value "Location") such as "Editorial Germany" that the new User belongs to. More importantly, Screen Name, such as "martin", and Email Address, such as "[email protected]" are required, since both act as a unique identifier for this User. When this User logs in, the screen name or email address or user ID will be used as login ID.
4. Click Save button to save the inputs.
What Just Happened?We added our first User to Liferay. When we created the new account, Liferay sent an email to the specified email address, notifying the User that they could log in and start using the portal.
The email will send successfully, only if you have specified an SMTP server for Liferay to use. Refer to Chapter 2 for detailed instructions.
Here's the example email Martin will receive:
Dear Martin,
Welcome! You recently created an account at http://book.com/. Your password is your password. Enjoy!
Sincerely,
Palm Tree
http://book.com
When "Martin Gall" clicks the link, he'll be taken to a page that displays a regular account for signing in. After inputting his email address and password and clicking the Sign in button, he'll be taken to a page that displays terms and conditions.
To change the email notification, such as account created notification and password changed notification, refer to Chapter 13 instructions.
Bringing In Users
[ 66 ]
Add More UsersNow go ahead and add a few more Users. We can add two more Users, "David Berger" and "Lotti Stein" in the same way as mentioned earlier. Both are editorial guys in the US offices.
Fortunately, there are two more options to add Users: to add a User for a given Organization, and to add a User from scratch as stated earlier.
Let's add the User "David Berger" from scratch as follows:
1. Click on the Users tab in the Enterprise Admin.2. Click Add Users button.3. Enter User's information in the input fields and select values from the pull
down menus, and select an Organization (with type value "Location") such as, "Editorial US".
4. Click the Save button to save.
Let's add the User "Lotti Stein" through a given Organization as follows:
1. Click on the Organizations tab in the Enterprise Admin.2. Locate an Organization say "Editorial US", to which you want to add a
new User.3. Click on the Add User icon from Actions located to the right of the
Organization you want to add a User to. You will see that the given Organization has been selected by default.
4. Enter Users information in the input fields and select values from the pull down menus.
5. Click the Save button to save.
Add Users in BulkIt won't take long before you're bored of manually adding Users. Fortunately, you don't need to type them all in one at a time. There are several options for adding Users in bulk:
LDAP—Lightweight Directory Access Protocol.Single Sign-On (SSO)—a method of access control that enables a User to authenticate once and gain access to the resources of multiple software systems.OpenID—a decentralized single sign-on system.
•
•
•
Chapter 3
[ 67 ]
Create Account on FlyAs an administrator at "Palm Tree Publications", you can set up the portal and allow Users to create accounts on fly. For example, "Rolf Hess" accesses the portal login page and clicks on the tab Create Account. He inputs User's information and text verification, and furthermore, presses the Save button.
The portal system will create an account for the User "Rolf Hess", and send an email to him with a new password.
Note that there is no Organization or no Location selected for the new account created on fly. In order to set proper Organization and Location for the new account, administrators have to update this account in the portal.
When The Password Is ForgottenIf a User such as "Rolf Hess" forgot his password, he can access the portal login page, and click on the tab, Forgot Password. He can input email address and text verification, and furthermore, press the Send New Password button.
The portal system will create a new password for the User "Rolf Hess", and send an email to him with this new password.
Managing UsersOf course, you can similarly add Users of other departments in most Organizations. After adding more Users, we can view Users.
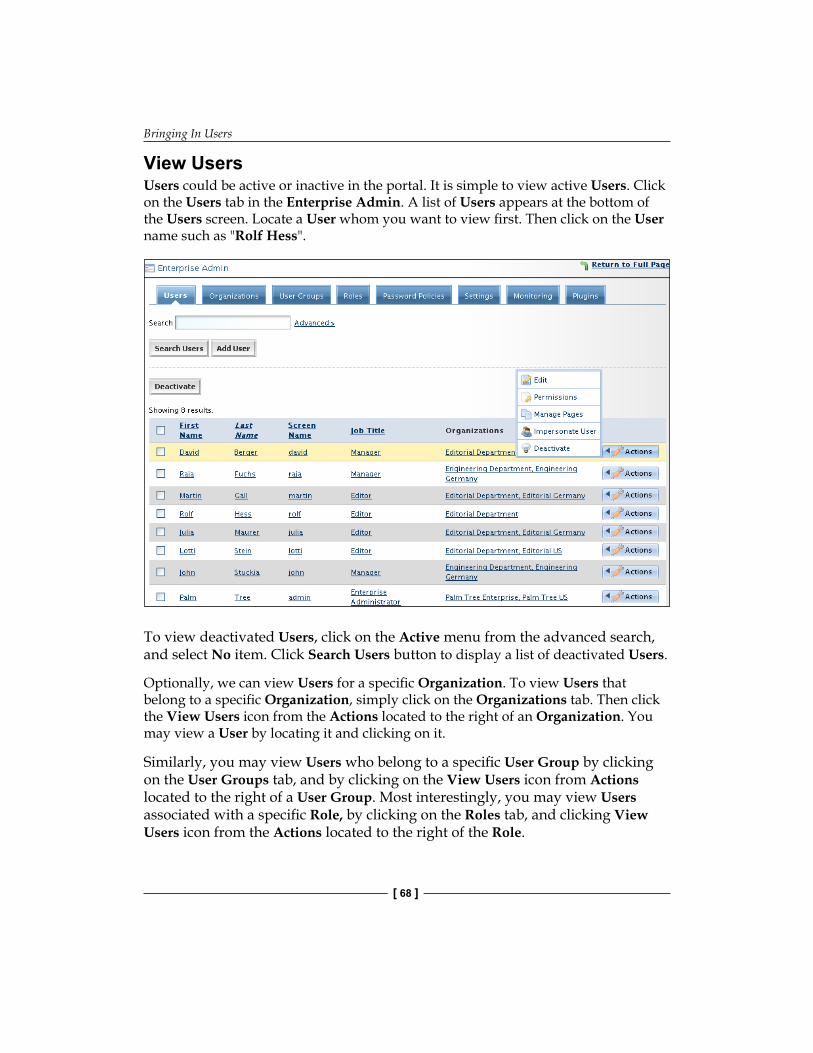
Bringing In Users
[ 68 ]
View UsersUsers could be active or inactive in the portal. It is simple to view active Users. Click on the Users tab in the Enterprise Admin. A list of Users appears at the bottom of the Users screen. Locate a User whom you want to view first. Then click on the User name such as "Rolf Hess".
To view deactivated Users, click on the Active menu from the advanced search, and select No item. Click Search Users button to display a list of deactivated Users.
Optionally, we can view Users for a specific Organization. To view Users that belong to a specific Organization, simply click on the Organizations tab. Then click the View Users icon from the Actions located to the right of an Organization. You may view a User by locating it and clicking on it.
Similarly, you may view Users who belong to a specific User Group by clicking on the User Groups tab, and by clicking on the View Users icon from Actions located to the right of a User Group. Most interestingly, you may view Users associated with a specific Role, by clicking on the Roles tab, and clicking View Users icon from the Actions located to the right of the Role.
Chapter 3
[ 69 ]
Search UsersUsers are searchable. First you can search Users by clicking on the Users tab in the Enterprise Admin. Then, input search criterion for basic search, or input User's information in the input fields and select a value ("Yes" or "No") from the Active menu options for advanced search, and finally click on the Search Users button. A listing of Users based on the required search appears at the bottom of the Users screen.
Note that basic search is only useful for active Users. You cannot find inactive Users through basic search. To find inactive Users, you have to use advanced search, and select the value "No" from the Active menu options.
Edit A UserAfter adding Users, we are ready to manage Users now. For example, we want to update the Users information of "Lotti Stein", by changing name and parent Organizations, and adding email addresses and comments. Let's do it as follows:
1. Click on the Users tab in the Enterprise Admin.2. Locate a User such as "Lotti Stein" whose information you want to update,
and click on the User.3. Click the Edit icon from Actions next to the right of the User or click any of
the User links, or select the check box to the left of the User.4. A screen appears displaying the Users information. Type changes in the First
Name, Middle Name, Last Name, Email, and Job Title input fields, and select from the Prefix, Suffix, Birthday, Gender and Organization menus to make changes.
5. Optionally, you can change the icon, display language, time zone and greeting, password, Roles, and also update email addresses, addresses, comments, and so on.
6. Click the Save button to save changes.
The functions of editing a User are the same as that of updating the profile in My Account. Using My Account, you can only update your own information. By editing a User, you can update any Users information, if you have the Permissions to do so.
Bringing In Users
[ 70 ]
Deactivate A UserSuppose a User such as "Lotti Stein" has to be made inactive in the portal, we need to deactivate it. To deactivate a User, do the following:
1. Click on the Users tab in the Enterprise Admin first.2. Locate the User, say "Lotti Stein", which you want to deactivate.3. Then click on the box located next to the User you want to deactivate and
click the Deactivate button. You can also deactivate a User, by clicking the Deactivate icon from Actions next to a User.
To deactivate all Users listed on a page, click the box located next to the Name column, and click the Deactivate button. A screen will appear asking if you want to deactivate the selected Users. Click OK to deactivate them. Click Cancel if you do not want to deactivate the selected Users.
Activate A UserIn case we want to make an inactive User, "Lotti Stein" here, become active in the portal, we need to restore or activate it. To restore a User you can do the following:
1. Click on the Users tab in the Enterprise Admin.2. Click on the Active menu in advanced search, and select No. Then click the
Search Users button to display a listing of deactivated Users.3. Click on the box located next to the User you want to reactivate and further
click the Restore button.4. You can also reactivate a User by clicking the Activate icon from Actions, to
the right of the User.
To restore all Users listed in a page, click in the box located next to the Name column. Click Restore button.
Delete A UserIn case a User such as "Lotti Stein" is not wanted any more, we need to delete it from the portal as follows:
1. To delete a User such as "Lotti Stein", you need to first deactivate the User.2. Then click on the Users tab in the Enterprise Admin.3. Click on the Active menu in advanced search, and select the item, No. Click
Search Users to display a list of deactivated Users.4. Click on the box located next to the User you want to delete, and click the
Delete button. You can also delete a User by clicking the Delete icon from Actions, to the right of the User.
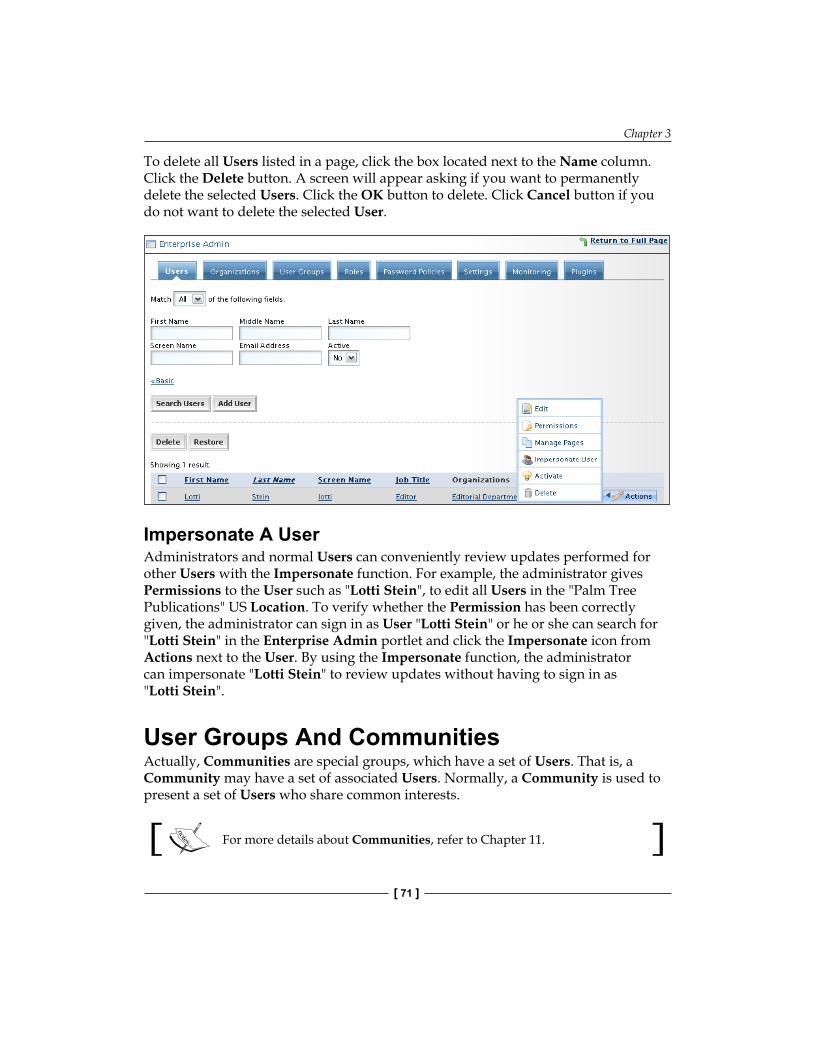
Chapter 3
[ 71 ]
To delete all Users listed in a page, click the box located next to the Name column. Click the Delete button. A screen will appear asking if you want to permanently delete the selected Users. Click the OK button to delete. Click Cancel button if you do not want to delete the selected User.
Impersonate A UserAdministrators and normal Users can conveniently review updates performed for other Users with the Impersonate function. For example, the administrator gives Permissions to the User such as "Lotti Stein", to edit all Users in the "Palm Tree Publications" US Location. To verify whether the Permission has been correctly given, the administrator can sign in as User "Lotti Stein" or he or she can search for "Lotti Stein" in the Enterprise Admin portlet and click the Impersonate icon from Actions next to the User. By using the Impersonate function, the administrator can impersonate "Lotti Stein" to review updates without having to sign in as "Lotti Stein".
User Groups And CommunitiesActually, Communities are special groups, which have a set of Users. That is, a Community may have a set of associated Users. Normally, a Community is used to present a set of Users who share common interests.
For more details about Communities, refer to Chapter 11.
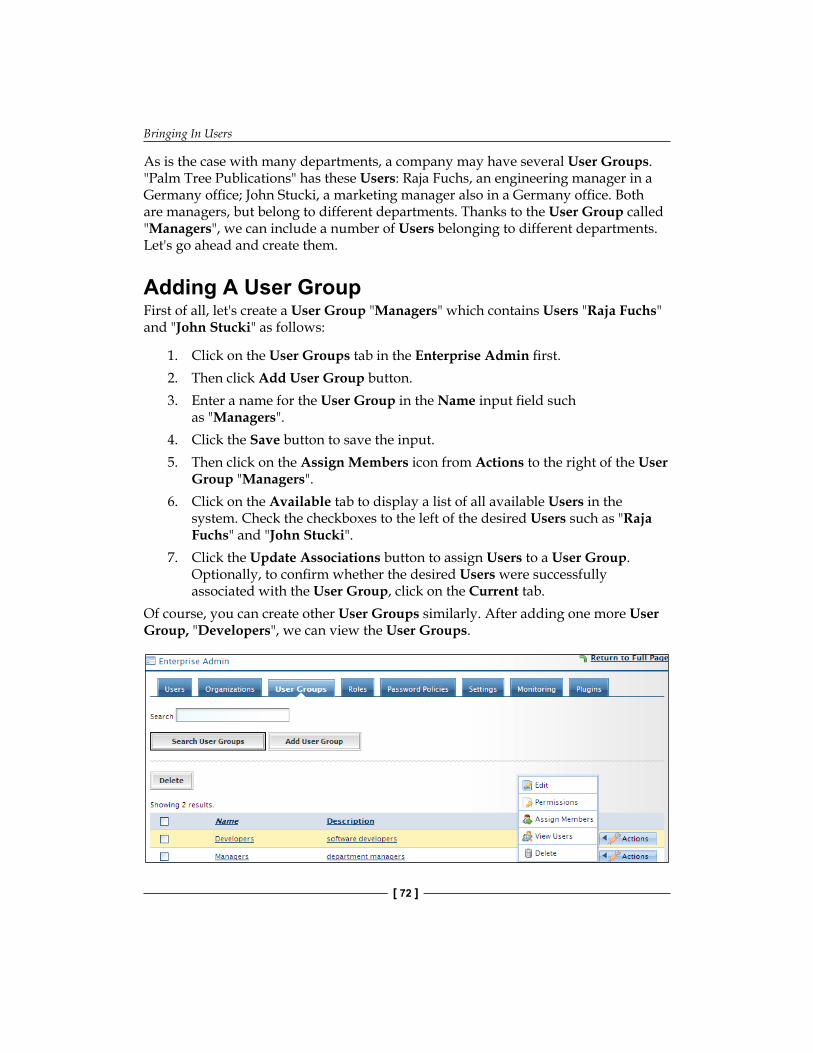
Bringing In Users
[ 72 ]
As is the case with many departments, a company may have several User Groups. "Palm Tree Publications" has these Users: Raja Fuchs, an engineering manager in a Germany office; John Stucki, a marketing manager also in a Germany office. Both are managers, but belong to different departments. Thanks to the User Group called "Managers", we can include a number of Users belonging to different departments. Let's go ahead and create them.
Adding A User GroupFirst of all, let's create a User Group "Managers" which contains Users "Raja Fuchs" and "John Stucki" as follows:
1. Click on the User Groups tab in the Enterprise Admin first.2. Then click Add User Group button.3. Enter a name for the User Group in the Name input field such
as "Managers".4. Click the Save button to save the input.5. Then click on the Assign Members icon from Actions to the right of the User
Group "Managers".6. Click on the Available tab to display a list of all available Users in the
system. Check the checkboxes to the left of the desired Users such as "Raja Fuchs" and "John Stucki".
7. Click the Update Associations button to assign Users to a User Group. Optionally, to confirm whether the desired Users were successfully associated with the User Group, click on the Current tab.
Of course, you can create other User Groups similarly. After adding one more User Group, "Developers", we can view the User Groups.
Chapter 3
[ 73 ]
Managing User GroupsA User Group can hold a number of Users. In fact, a User Group is also a special group which may have a set of associated Users. User Groups are different from both Organizations and Communities, since they have no context associated with them.
View User GroupsTo view User Groups, click on the User Groups tab in the Enterprise Admin first. A list of User Groups appears at the bottom of the screen. Click on a User Group, say "Managers", that you want to view. Normally, clicking on a User Group will only display the name of the User Group. To actually view the Users associated with the User Group, click on the View Users icon from Actions to the right of the User Group.
Search User GroupsUser Groups are also searchable. To search User Groups, click on the User Groups tab in the Enterprise Admin first. Then type a User Group name as search keywords, and click Search User Groups button.
Edit A User GroupYou may need to change the User Group, "Managers". Click on the User Groups tab in the Enterprise Admin first. Then locate the User Group you want to edit. Click the Edit icon from the Actions to the right of the User Group, or click any of the links in User Group. In the edit page, type changes in the New Name input field and the Description input field. Then click the Save button to save the changes.
Delete User GroupsFor some particular reasons, a User Group, say "Developers", may not be wanted anymore. We need to delete this User Group in the Portal. Let's delete the User Group "Developers" as follows:
Click on the User Groups tab in the Enterprise Admin first.Locate a User Group, "Developers", which you want to delete.Then click on the Delete icon from Actions to the right of the User Group, or check the box on the left of the User Group and click the Delete button.A screen will appear asking if you want to permanently delete the selected User Groups. Click OK button to delete the User Group.
•
•
•
•
Bringing In Users
[ 74 ]
Similarly, you can delete multiple User Groups by checking the boxes located to the left of the User Groups you want to delete, and then clicking the Delete button. Verily, you can delete all User Groups listed on a page, by checking the box located next to the Name column, and then clicking the Delete button. A screen will appear asking if you want to permanently delete the selected User Groups. Click the OK button to delete or the Cancel button if you do not want to delete the selected User Groups.
Assign A User GroupYou can assign Users to a User Group. First, click on the User Groups tab in the Enterprise Admin. Then click on the Assign Members icon from Actions to the right of the User Group. Click on the Available tab to display a list of all available Users in the system. Search for the desired Users using the search form (through basic search or advanced search). Check the boxes to the left of the desired Users. If you would like to select all the Users on the page, check the box next to the Name column. Finally, click the Update Associations button to assign Users to a User Group. Optionally, to confirm whether the desired Users were successfully associated with the User Group, click on the Current tab.
Adding More AdministratorsAs mentioned before, "Palm Tree" is an administrator at the enterprise. We need to add more administrators at the department level and Location level. "David Berger" acts as an administrator in the "Editorial" department. Let's add it as follows:
1. Click on the Organizations tab in the Enterprise Admin portlet.2. Locate an Organization such as "Editorial department" to which you want to
add an admin.3. Click on the Permissions icon from the Actions next to the Organization. By
default, the User tab and Current sub-tab are selected.4. Click on the Available tab if the User, "David Berger" is not there.5. Locate the User "David Berger". Check the User "David Berger" checkbox,
and click on the Update Permissions button.6. Select all permissions from the Available select box, and click on the right
arrow to add them to the Current select box.7. Click on the Finished button if you are ready.
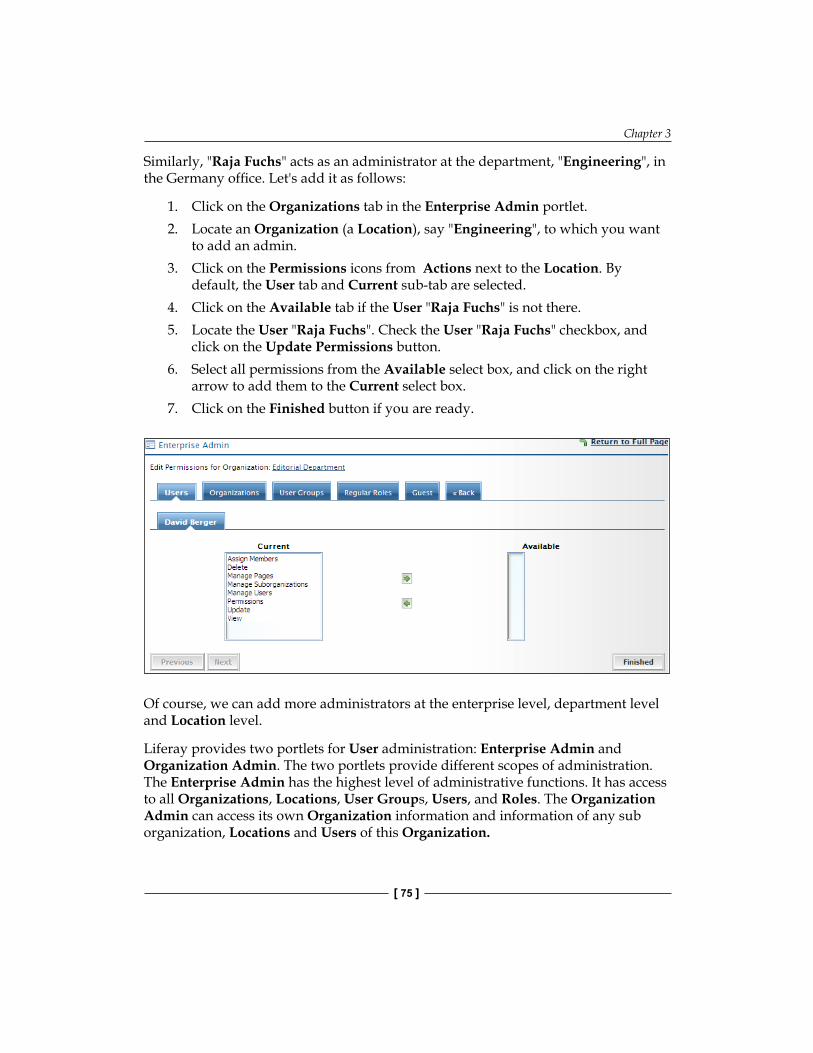
Chapter 3
[ 75 ]
Similarly, "Raja Fuchs" acts as an administrator at the department, "Engineering", in the Germany office. Let's add it as follows:
1. Click on the Organizations tab in the Enterprise Admin portlet.2. Locate an Organization (a Location), say "Engineering", to which you want
to add an admin.3. Click on the Permissions icons from Actions next to the Location. By
default, the User tab and Current sub-tab are selected.4. Click on the Available tab if the User "Raja Fuchs" is not there.5. Locate the User "Raja Fuchs". Check the User "Raja Fuchs" checkbox, and
click on the Update Permissions button.6. Select all permissions from the Available select box, and click on the right
arrow to add them to the Current select box.7. Click on the Finished button if you are ready.
Of course, we can add more administrators at the enterprise level, department level and Location level.
Liferay provides two portlets for User administration: Enterprise Admin and Organization Admin. The two portlets provide different scopes of administration. The Enterprise Admin has the highest level of administrative functions. It has access to all Organizations, Locations, User Groups, Users, and Roles. The Organization Admin can access its own Organization information and information of any sub organization, Locations and Users of this Organization.
Bringing In Users
[ 76 ]
Enterprise AdminAs we have mentioned earlier, Enterprise Admin has access to all Organizations (sub Organizations and Locations), User Groups, Users and Roles, with the highest level of administrative functions. Additionally, Enterprise Admin provides the management of password policies, settings, monitoring, plug-ins, and so on.
Organization AdminVarious functions can be performed to your Organization, especially to Location and Users that belong to your Organization via Organization Admin. You can:
View and edit an Organization.View, search, add, and edit Locations or sub organizations that belong to an Organization.View, search, add, edit, and deactivate Users that belong to an Organization.View, search, edit, delete, and assign User Groups.
Authentication MethodsAs mentioned before, you don't need to type in Users all in one at a time. You can add Users in bulk by using LDAP server.
Working with LDAP ServerThe enterprise "Palm Tree Publications" has Users in LDAP server. Suppose the LDAP server has the following information.
Base Provider URL: ldap://docs.cignex.com:10389 Base DN: ou=book, ou=systemPrincipal: uid=admin,ou=systemCredentials: secretEncryption algorithm: SHAServer Type: Apache Directory Server
•
•
•
•
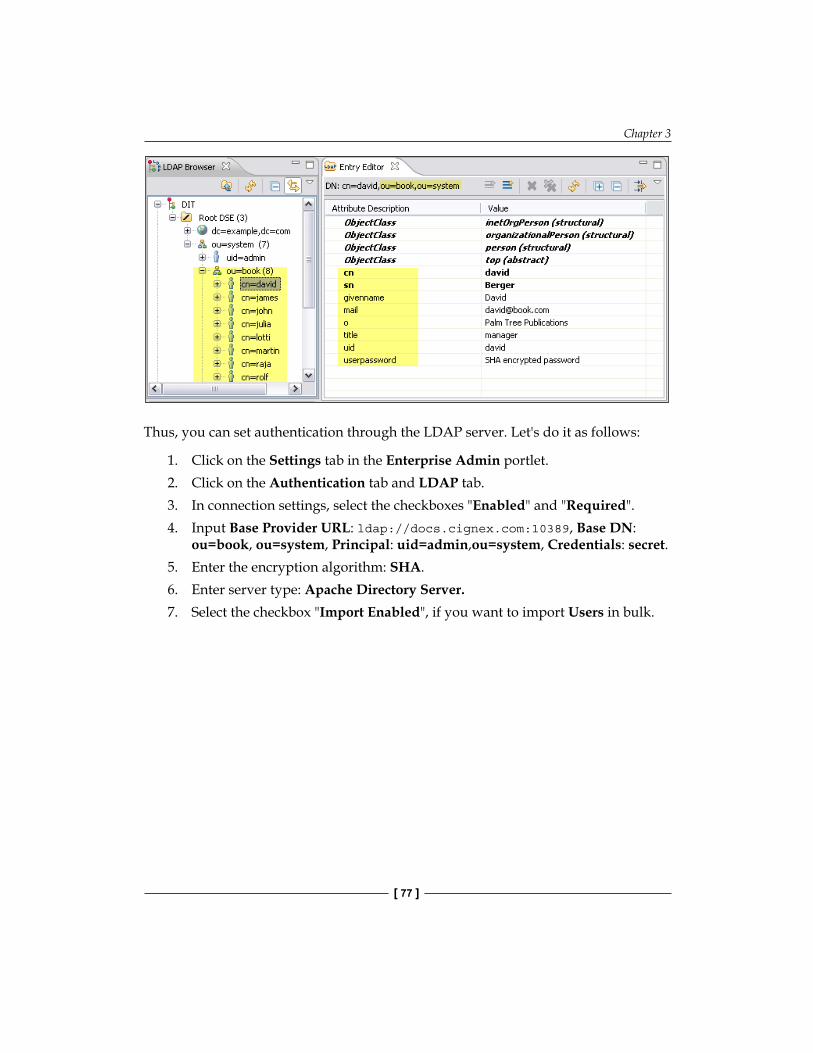
Chapter 3
[ 77 ]
Thus, you can set authentication through the LDAP server. Let's do it as follows:
1. Click on the Settings tab in the Enterprise Admin portlet.2. Click on the Authentication tab and LDAP tab.3. In connection settings, select the checkboxes "Enabled" and "Required".4. Input Base Provider URL: ldap://docs.cignex.com:10389, Base DN:
ou=book, ou=system, Principal: uid=admin,ou=system, Credentials: secret.5. Enter the encryption algorithm: SHA.6. Enter server type: Apache Directory Server.7. Select the checkbox "Import Enabled", if you want to import Users in bulk.
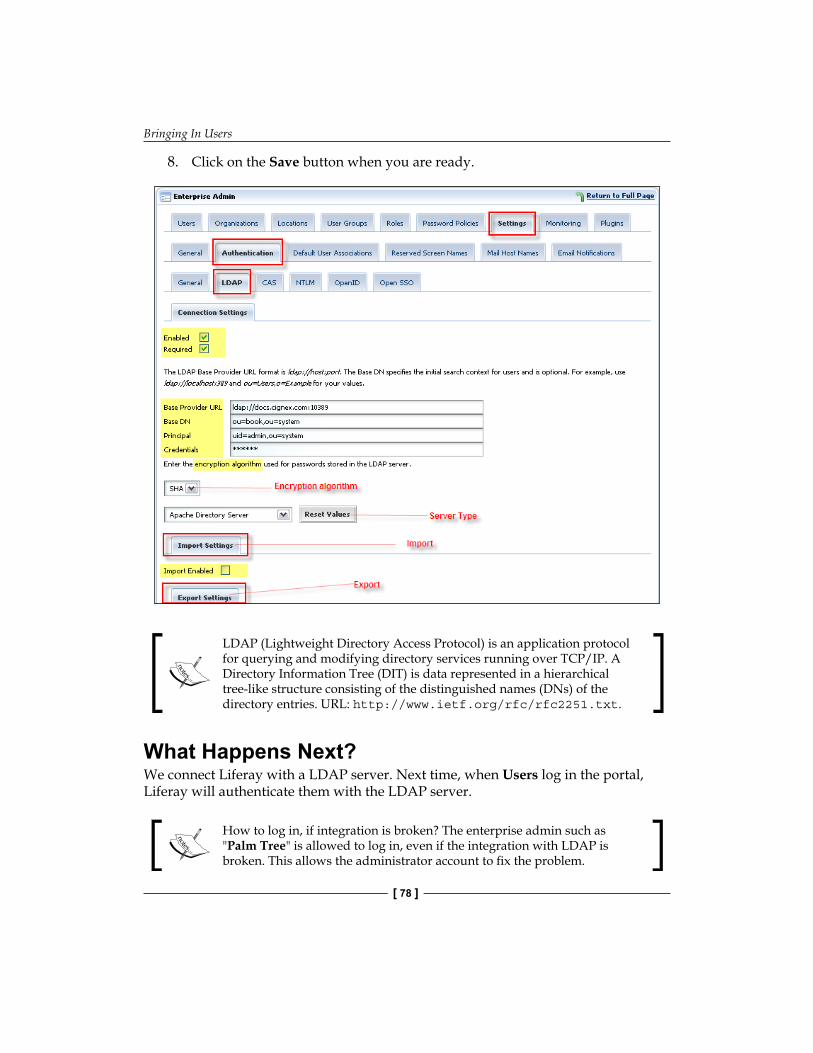
Bringing In Users
[ 78 ]
8. Click on the Save button when you are ready.
LDAP (Lightweight Directory Access Protocol) is an application protocol for querying and modifying directory services running over TCP/IP. A Directory Information Tree (DIT) is data represented in a hierarchical tree-like structure consisting of the distinguished names (DNs) of the directory entries. URL: http://www.ietf.org/rfc/rfc2251.txt.
What Happens Next?We connect Liferay with a LDAP server. Next time, when Users log in the portal, Liferay will authenticate them with the LDAP server.
How to log in, if integration is broken? The enterprise admin such as "Palm Tree" is allowed to log in, even if the integration with LDAP is broken. This allows the administrator account to fix the problem.
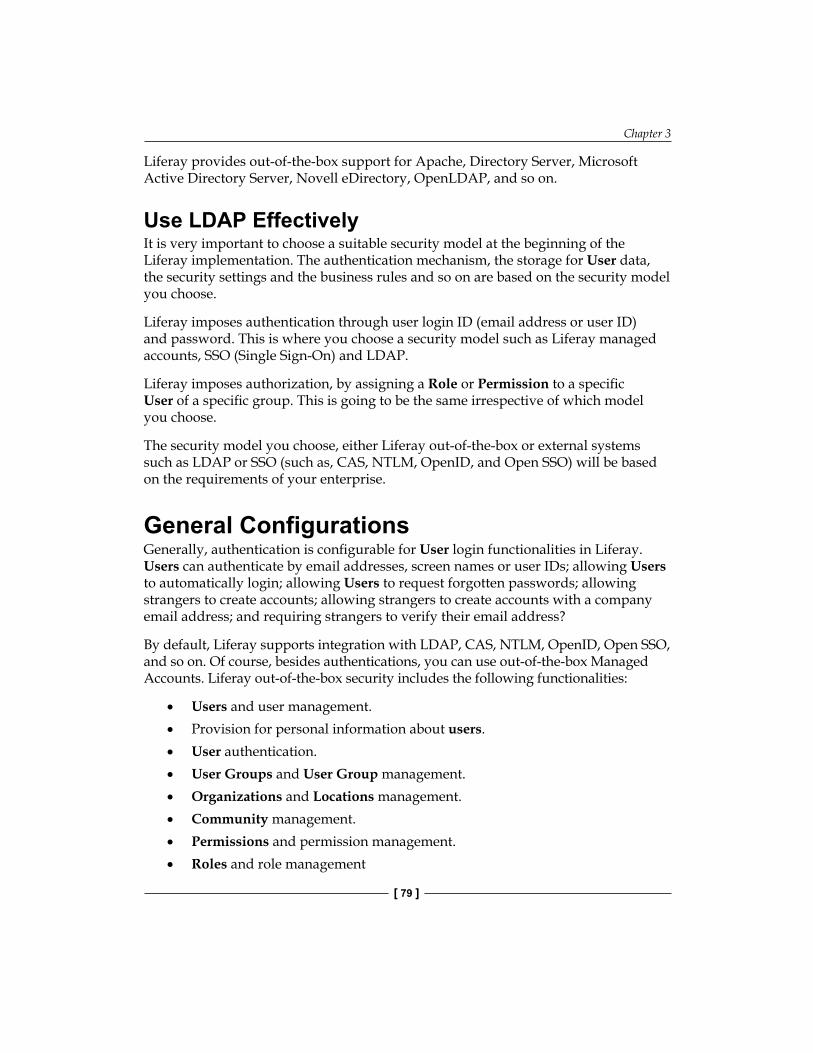
Chapter 3
[ 79 ]
Liferay provides out-of-the-box support for Apache, Directory Server, Microsoft Active Directory Server, Novell eDirectory, OpenLDAP, and so on.
Use LDAP EffectivelyIt is very important to choose a suitable security model at the beginning of the Liferay implementation. The authentication mechanism, the storage for User data, the security settings and the business rules and so on are based on the security model you choose.
Liferay imposes authentication through user login ID (email address or user ID) and password. This is where you choose a security model such as Liferay managed accounts, SSO (Single Sign-On) and LDAP.
Liferay imposes authorization, by assigning a Role or Permission to a specific User of a specific group. This is going to be the same irrespective of which model you choose.
The security model you choose, either Liferay out-of-the-box or external systems such as LDAP or SSO (such as, CAS, NTLM, OpenID, and Open SSO) will be based on the requirements of your enterprise.
General ConfigurationsGenerally, authentication is configurable for User login functionalities in Liferay. Users can authenticate by email addresses, screen names or user IDs; allowing Users to automatically login; allowing Users to request forgotten passwords; allowing strangers to create accounts; allowing strangers to create accounts with a company email address; and requiring strangers to verify their email address?
By default, Liferay supports integration with LDAP, CAS, NTLM, OpenID, Open SSO, and so on. Of course, besides authentications, you can use out-of-the-box Managed Accounts. Liferay out-of-the-box security includes the following functionalities:
Users and user management.Provision for personal information about users.User authentication.User Groups and User Group management.Organizations and Locations management.Community management.Permissions and permission management.Roles and role management
•
•
•
•
•
•
•
•
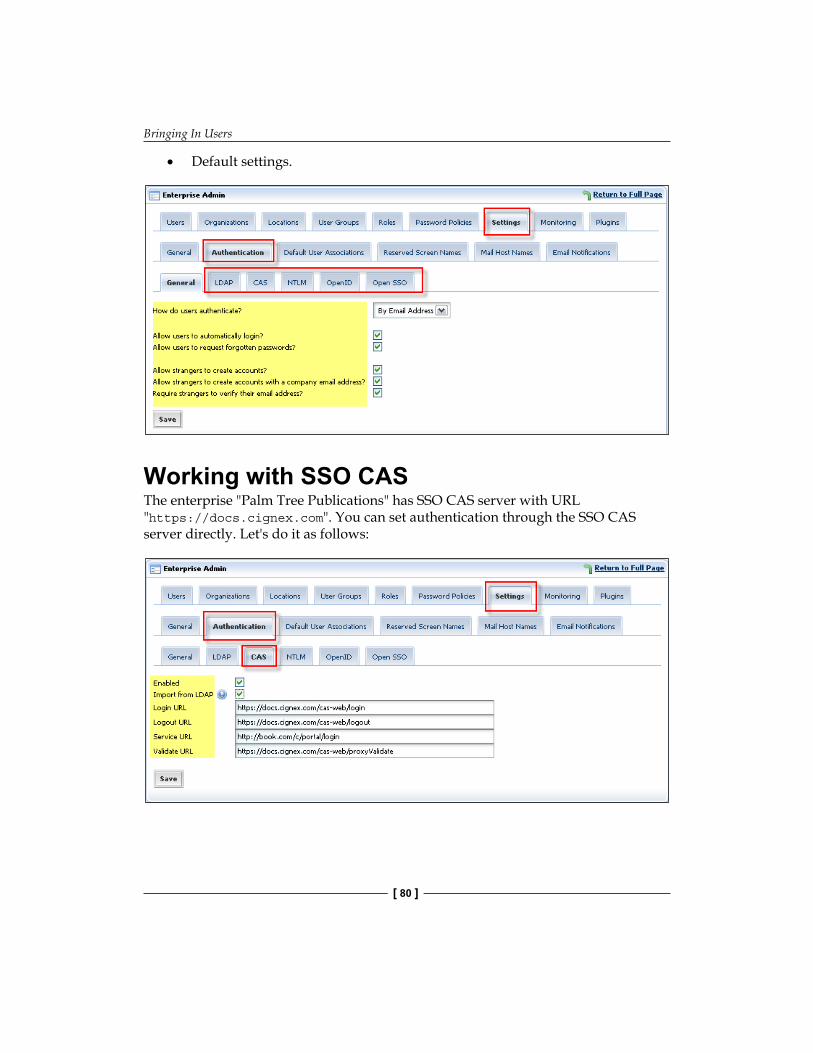
Bringing In Users
[ 80 ]
Default settings.
Working with SSO CASThe enterprise "Palm Tree Publications" has SSO CAS server with URL "https://docs.cignex.com". You can set authentication through the SSO CAS server directly. Let's do it as follows:
•
Chapter 3
[ 81 ]
1. Click on the Settings tab in the Enterprise Admin portlet.2. Click on the Authentication tab and CAS tab further.3. Select the checkbox, "Enabled"; Select checkbox "Import from LDAP".4. Input Login URL: https://docs.cignex.com/cas-web/login, Logout
URL: https://docs.cignex.com/cas-web/logout, Validate URL: https://docs.cignex.com/cas-web/proxyValidate, Service URL: http://book.com/c/portal/login.
5. Click on the Save button when you are ready.6. Now you are ready to use SSO CAS. Similarly, you can use NTLM and
Open SSO.
What Happens Next?The next time the Users log in to the portal, they will be redirected to the CAS server's login screen, if everything is set up correctly.
Liferay Portal integrates CAS Server to set up single sign on (SSO) between Liferay and an existing web application.
The JA-SIG Central Authentication Service (CAS) is an open single sign-on service that provides web applications the ability to defer all authentications to a trusted central server or servers. Refer to URL: http://www.ja-sig.org/.
Working with OpenIDWe can also use OpenID as authentication. Let's first enable OpenID authentication as follows:
1. Click on the Settings tab in the Enterprise Admin portlet.2. Click on the Authentication tab and OpenID tab further.3. Select check box to enable OpenID.4. Click Save to save the changes.
Now it is ready for Users to log in through OpenID.
OpenID is a decentralized single sign-on system. URL: http://openid.net/.
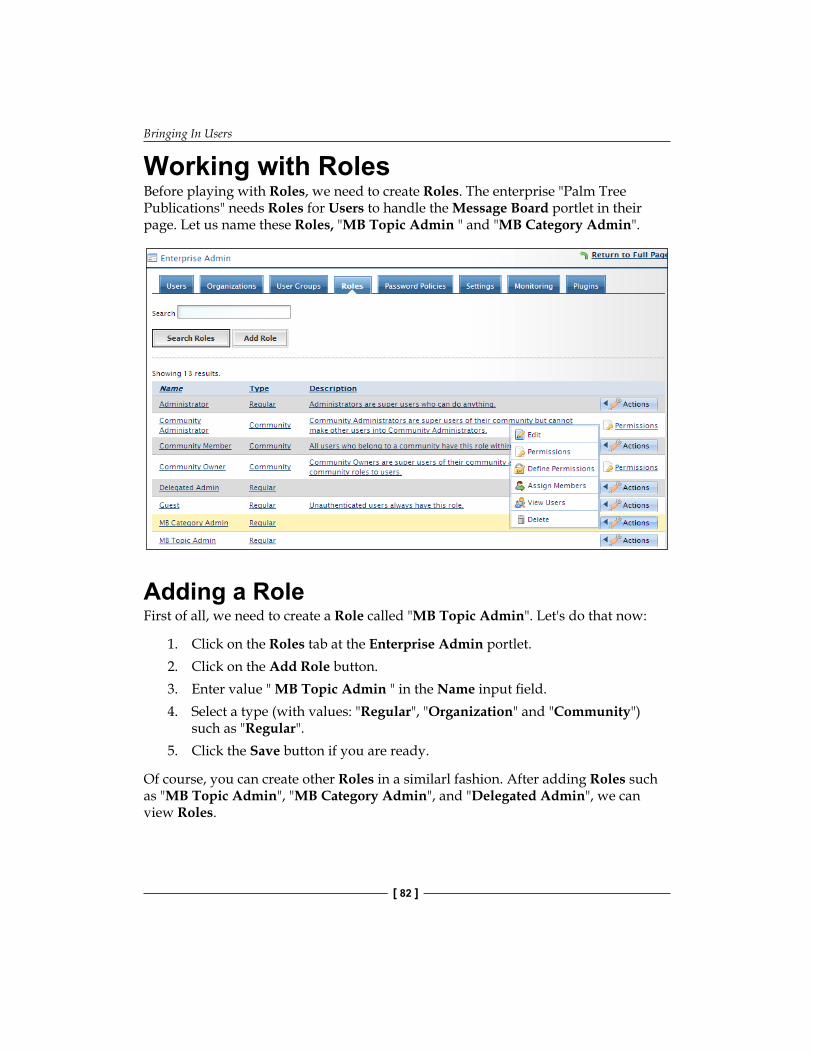
Bringing In Users
[ 82 ]
Working with RolesBefore playing with Roles, we need to create Roles. The enterprise "Palm Tree Publications" needs Roles for Users to handle the Message Board portlet in their page. Let us name these Roles, "MB Topic Admin " and "MB Category Admin".
Adding a RoleFirst of all, we need to create a Role called "MB Topic Admin". Let's do that now:
1. Click on the Roles tab at the Enterprise Admin portlet.2. Click on the Add Role button.3. Enter value " MB Topic Admin " in the Name input field.4. Select a type (with values: "Regular", "Organization" and "Community")
such as "Regular".5. Click the Save button if you are ready.
Of course, you can create other Roles in a similarl fashion. After adding Roles such as "MB Topic Admin", "MB Category Admin", and "Delegated Admin", we can view Roles.
Chapter 3
[ 83 ]
Managing RolesA Role is a collection of Permissions. There are system Roles and customized Roles.
System Roles are specified by default, and the required Roles are Administrator, Guest, Power User, and User. You cannot edit them or delete them at the UI level. Optionally, system Roles could be renamed at the system level. Customized Roles are built by Users, which can be edited and deleted.
View RolesBesides creating Roles, you can view also them by :
1. Click on the Roles tab in the Enterprise Admin portlet to display the Role screen. A listing of Roles appears at the bottom of the Roles screen.
2. Locate a Role that you want to view, and then click on the Role link.
Search RolesRoles are searchable. Click on the Roles tab in the Enterprise Admin first. Then type a Role name in the search keywords field. Click the Search Roles button.
Edit A RoleTo edit a Role, click on the Roles tab in the Enterprise Admin first. Then locate the Role that you want to edit. Click the Edit icon from Actions to the right of the Role, or click any of the Role links. In the edit page, type changes in the Name input field and Description input field. Click the Save button to save the changes.
Note that you can update customized Roles only. You cannot edit or delete system Roles.
Delete RolesIt may happen that, a Role such as "MB Category Admin" is not wanted anymore. We need to delete this Role in the Portal. Let's delete the Role "MB Category Admin" as follows:
1. Click on the Roles tab in the Enterprise Admin.2. Locate a Role such as "MB Category Admin" which you want to delete.3. Then click on the Delete icon from Actions to the right of the Role.
Bringing In Users
[ 84 ]
4. A screen will appear asking if you want to permanently delete the selected Roles.
5. Click the OK button when you are ready.
Assign Enterprise Permissions to A RoleWe need to assign Permissions to the "MB Topic Admin" Role that allows Users to view any Message Board Category in "Palm Tree Publications" (that is, action: View, resource: Message Board Category, scope: Enterprise). Let's do it as follows:
1. Select the Roles tab in the Enterprise Admin.2. Click on the Define Permissions icon from Actions next to the "MB Topic
Admin" Role.3. Click on the Message Boards link. There are two options: Add portlet
permissions and Add portal permissions. Every object in the portal is contained within a portlet. Therefore, the administrator must find the parent portlet of the object in question. Since the Message Boards Category resource is to be acted upon, the administrator must first find the Message Board portlet.
4. Then click on the Message Boards Category link. There are two lists for Message Boards: One presents a list of the actions that can be performed on the portlet itself while the other represents a list of the "Resources" (that is, objects) that are contained within the portlet.
5. Slick on the Scope drop-down menu next to the View action, and select "Enterprise".
6. Click on the Next button to return to the Role list under the Roles tab.
Similarly, we can assign Community Permissions to a Role.
Assign RolesIn some cases, we may need to assign the "MB Topic Admin" Role to the User "Lotti Stein". Let do it as follows:
1. Select the Roles tab in the Enterprise Admin portlet.2. Click on the Assign Members icon from the Actions next to the "MB Topic
Admin" Role.3. Since the Current tab is selected by default, there are no Users associated
with this Role. Therefore, click on the Available tab in order to search for the User "Lotti Stein".
Chapter 3
[ 85 ]
4. Check the checkbox next to the User, "Lotti Stein".5. Click the Update Associations button. If needed, click on the Current tab to
confirm whether the association was successful.6. It is clear that the association was successfully created. If you want to discard
this association, you can uncheck the checkbox next to the User's name first and then click the Update Associations button.
Similarly, we can assign Roles to other entities, such as Community, Organization, Location, or User Group, by just repeating the previous steps. In fact, the same results could have been achieved by associating the "MB Topic Admin" Role with the appropriate Community, Organization, Location, or User Group, instead of associating directly to the User, "Lotti Stein".
Using Roles EffectivelyThere are three types of Roles: regular, Organization and Community as shown in the following table. Community Roles allow administration of Roles scoped to a specific Community. The objective is to create a new type of Role that is associated with a Community, when it is assigned to a User:
Community Owner: This Role is automatically given to the creator of a Community and gives him total control over the Community management including website configuration and content management.Community Administrator: Users with this Role can administer the Community but cannot assign new Users or edit existing ones. They can create new content in the Community portlets, but cannot manage the content created by others.Community Member: It's a Role that is automatically given to Users when they are assigned to a Community. It does not give any special right by default, but can be edited by the portal administrator to add privileges that might be desirable in certain situations.
•
•
•
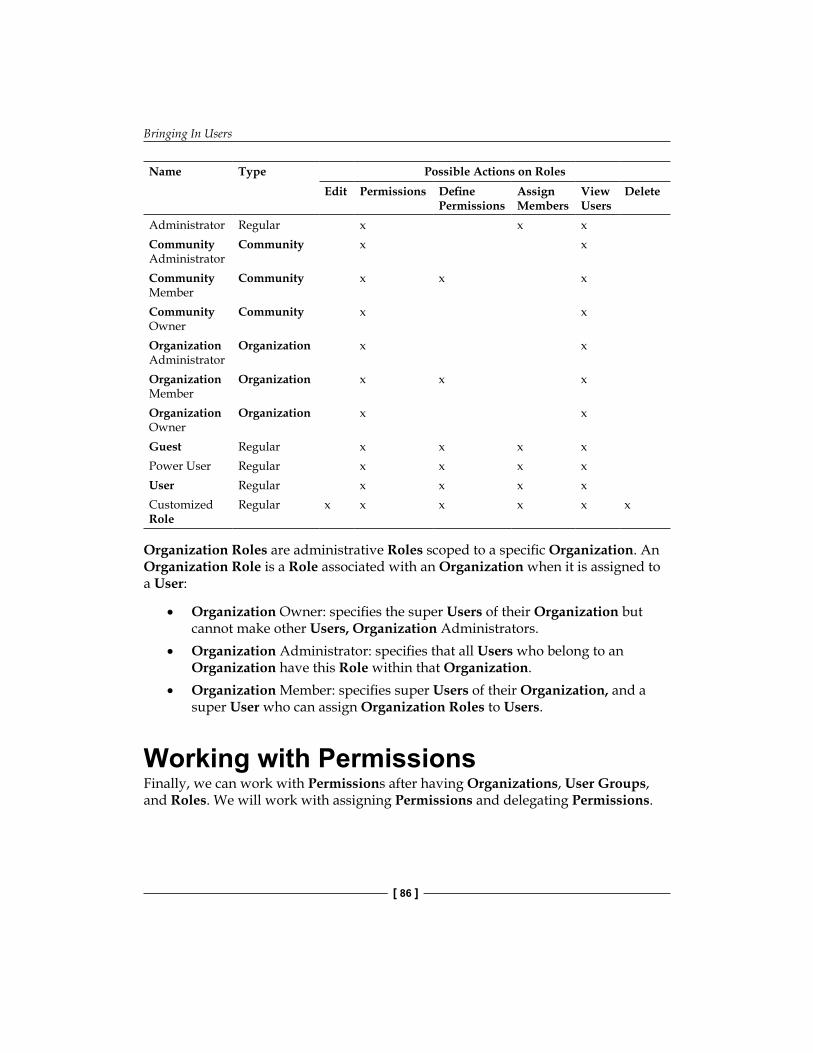
Bringing In Users
[ 86 ]
Name Type Possible Actions on RolesEdit Permissions Define
PermissionsAssign Members
View Users
Delete
Administrator Regular x x xCommunity Administrator
Community x x
Community Member
Community x x x
Community Owner
Community x x
Organization Administrator
Organization x x
Organization Member
Organization x x x
Organization Owner
Organization x x
Guest Regular x x x xPower User Regular x x x xUser Regular x x x xCustomized Role
Regular x x x x x x
Organization Roles are administrative Roles scoped to a specific Organization. An Organization Role is a Role associated with an Organization when it is assigned to a User:
Organization Owner: specifies the super Users of their Organization but cannot make other Users, Organization Administrators.Organization Administrator: specifies that all Users who belong to an Organization have this Role within that Organization.Organization Member: specifies super Users of their Organization, and a super User who can assign Organization Roles to Users.
Working with PermissionsFinally, we can work with Permissions after having Organizations, User Groups, and Roles. We will work with assigning Permissions and delegating Permissions.
•
•
•
Chapter 3
[ 87 ]
In order to work with Permissions, we have the following assumptions. Assume we have added a Message Board portlet in the page "Admin", at the Book Lovers Community Private Pages. A category called "Book Category" has been created and this category contains three categories—"Book Category A," "Book Category B," and "Book Category C". By default, all categories are viewable by Users in the Book Lovers Community. The Permission to view "Book Category C" has been removed for the Users of Book Lovers Community. Also assume that "Book Category C" contains a single thread.
For comparison purposes, assume the User "Lotti Stein" who belongs to the Book Lovers Community also logs in and views the Message Board portlet. When compared with the Administrator's view, it is clear that Lotti Stein's view is much more limited in functionality. Lotti Stein is missing several buttons and icons that the administrator has.
How to create a Community "Book Lovers"? Refer to Chapter 11 for instructions.
Assign Individual Portlet PermissionsAssume that the User, "Lotti Stein", does not have Permission to add a root category to the Message Boards portlet in the Book Lovers Community.
As an administrator, "Palm Tree", you may need to assign the "Add Category" portlet Permission to the User "Lotti Stein". Let's do it as follows:
1. Log in to the portal as an Administrator, "Palm Tree", and go to the Book Lovers Community located in the My Places menu. Click on the Configuration icon in the upper-right corner of the Message Boards portlet.
2. Click on the Permissions tab.3. The User tab and Current sub-tab are selected. This means that the current
Users who have portlet Permissions assigned to them are being displayed. Obviously, there are no Users who have portlet Permissions for this particular portlet.
4. Click on the Available tab.5. Locate the User, "Lotti Stein".6. Check the User, "Lotti Stein" checkbox, and click on the Update
Permissions button.7. Select Add Category from the Available select box and click on the right
arrow to add it to the Current select box.8. Click the Finished button.
Bringing In Users
[ 88 ]
Alternatively, you can assign individual portlet Permissions for the Organizations, User Groups, Community, Regular Roles, Community roles or use Guest tab for assigning portlet Permissions to each of these entities.
Portlet Permissions are only applicable to the portlet instance for which they were configured. For example, "Lotti Stein" can only add root categories to the Message Board in the Book Lovers Community. "Lotti Stein" would not be able to add root categories to the message boards in other Communities unless they were specifically configured as such.
Assign Default Permissions As an administrator, "Palm Tree", you may need to create a new Message Board Category in the Book Lovers Community's message board and assign default Permissions to it. Let's do it as follows:
1. Log in to the portal as an administrator, and go to the Book Lovers Community. Click on the "Book Category" link in the Message Boards portlet, and then click on the Add Category button.
2. To set Permissions for the category, click Configure.3. All actions under Community are checked and the Guest View option is
checked. By default, a new Message Board Category allows Community members (in this case, Book Lovers Community members) to view it, subscribe to it, and add messages to it, and also allows guests to view it.
4. Keep the default Permissions checkboxes checked. Enter "Book Category D" into the Name field, input the text verification code.
5. Click the Save button if you are ready.
If the User Lotti Stein were to click on the "Book Category" link now, the User would see the new "Book Category D" topic and would be able to view the contents of the topic and post a new thread (that is, message) to the category because of the Community default Permissions.
Assign Individual Permissions As an administrator "Palm Tree", you may need to assign a Permission to User "Lotti Stein" to delete the "Book Category D" topic in the Book Lovers community's Message Boards portlet. Let's do it as follows:
1. Go to the page "Admin" at Book Lovers Community Private Pages, click on the "Book Category" link in the Message Boards portlet, and then click on the Permissions icon from the Actions next to the "Book Category D".
Chapter 3
[ 89 ]
2. The Users tab and the Current sub-tab are selected. This means that the current Users who have Permissions for the "Book Category D" topic are being displayed. Currently, only the Administrator has Permissions for this category. Go to the Available tab, find the User "Lotti Stein", check the User's checkbox, and click on the Update Permissions button.
3. Select the Delete action from the Available select box and click on the left arrow to add it to the Current select box.
4. Click the Finished button when you are ready.
The User "Lotti Stein" has been updated with the "Delete" Permission. To see this Permission in effect, log in to the portal as "Lotti Stein", go to the Book Lovers Community Private Pages, and click on the "Book Category" link in the Message Boards portlet. The "Book Category D" topic now has a Delete icon from Actions next to it.
Alternatively, you can assign Permissions to the Organizations, User Groups, Community, or use Guest tab for assigning individual Permissions to each of these entities.
Note that there is a special case for assigning individual Permissions to Locations that requires a slightly different use case. Refer to the following part.
It should also be noted that very fine-grained Permission allotments can be obtained through using individual Permissions. As this use case showed, administrators have the power to control objects within a portlet at a very micro level. For example, take the four topics in "Book Category." An administrator could easily decide that all Users in the department "Editorial" can post messages to "Book Category A," but only members of the Book Lovers Community can view the messages in "Book Category B". In addition, only "Lotti Stein" can update "Book Category C," while anyone in the "Editorial Germany" Location can update "Book Category D." The possibilities are endless.
Delegate PermissionsAssume the administrator has created a Role called "Delegated Admin" and assigned it to the User "Lotti Stein", and the Communities portlet have been added in the page "Admin" at the Book Lovers Community. Moreover, assume the User "Lotti Stein" has Permissions (view in fact) on the Enterprise Admin portlet.
Bringing In Users
[ 90 ]
As an Administrator, "Palm Tree", you may need to delegate Permissions to Users which allow them to have certain administrative rights as well. For example, you may assign the User "Lotti Stein" Permissions to add Communities to the system as follows:
Log in to the portal as "Lotti Stein" and go to the Book Lovers Community. Click on the Current tab in the Communities portlet. The User "Lotti Stein" can't add new Community to the system.Log in to the portal as an Administrator "Palm Tree". Go to the Book Lovers Community and click on the Roles tab in the Enterprise Admin portlet. Click on the Define Permissions icon from the Actions next to the "Delegated Admin" Role.Select the Add Portal Permissions button.Choose "Enterprise" from the Scope drop-down next to the Add Community action. Click the Next button.The result of these steps is that any User with the "Delegated Admin" Role can now add Communities to the system. To confirm this, go back to "Lotti Stein" and refresh the Current tab in the Communities portlet. Notice that there is an Add Community button now.
Similarly, we can enable any User with the "Delegated Admin" Role to have Permission to add Organizations, Roles, Users, and User Groups to the system. Just go back to the Administrator and perform the mentioned steps. But this time, choose "Enterprise" from the Scope drop-down next to the "Add Organization" ("Add Role" or "Add User" or "Add User Group") action.
Logically, you can delegate Permissions which includes portals Permissions, Community Permissions, page Permissions, portlet Permissions, and Role Permissions. Besides the above mentioned portal Permissions delegation, you can do the following:
Delegate Permissions to Users so that they will be able to manage Roles.Delegate Permissions to Users so that they will be able to manage portlets within pages.Delegate Permissions to Users so that they will be able to manage pages within their Communities.Delegate Permissions to the members of the Community.
•
•
•
•
•
•
•
•
•
Chapter 3
[ 91 ]
Using Permissions EffectivelyPermission is an action on a resource. Liferay provides exclusive Permissions mechanism.
Assume the delete Permission for "Book Category A" is added to the "Editorial Germany" Location. As expected, the User "Lotti Stein" receives the delete Permission. Then, the delete Permission for "Book Category A" is added to the "Editorial US" Location. Though an explicit check is not made, it is assumed that this allows all members of the "Editorial US" Location to also have delete Permission. In other words, any member of either "Editorial US" or "Editorial Germany" has delete Permission for "Book Category A".
However, when the value of the "Permission exclusive to members of current location and community?" was changed from "No" to "Yes" for "Editorial Germany", suddenly "Lotti Stein" lost the delete Permission.
In other words, in order to have the delete Permission on "Book Category A," a User had to be a member of both the "Editorial US" Location and the Book Lovers Community. Since "Lotti Stein" was only a member of the Book Lovers Community, and not a member of the "Editorial Germany" Location, "Lotti Stein" did not meet the criteria and was excluded from receiving the delete Permission.
Exclusive Permissions take precedence over all other Permissions except Permissions assigned directly to a User. Therefore, even if the delete Permission had been assigned to the "Editorial US" Location and the Book Lovers Community, or if the delete Permission had enterprise scope and had been assigned to a Role that was assigned to "Lotti Stein", it wouldn't have mattered. The exclusive Permission would still have taken precedence, and "Lotti Stein" would not have received the delete Permission. However, if the delete Permission had been assigned directly to the User "Lotti Stein", "Lotti Stein" would have received the Permission.
Although exclusive Permissions are not additive with other Permissions, they are additive among themselves. In other words, if the "Permission exclusive to members of current location and community?" was changed from "No" to "Yes" for "Editorial US" as well, "Lotti Stein" would receive the delete Permission once again. However, it should be noted that only "Editorial US" and "Editorial Germany" Users would receive the Permission, even if the delete Permission was assigned to other Users through other entities (such as, Organization, Community, Role, and so on).
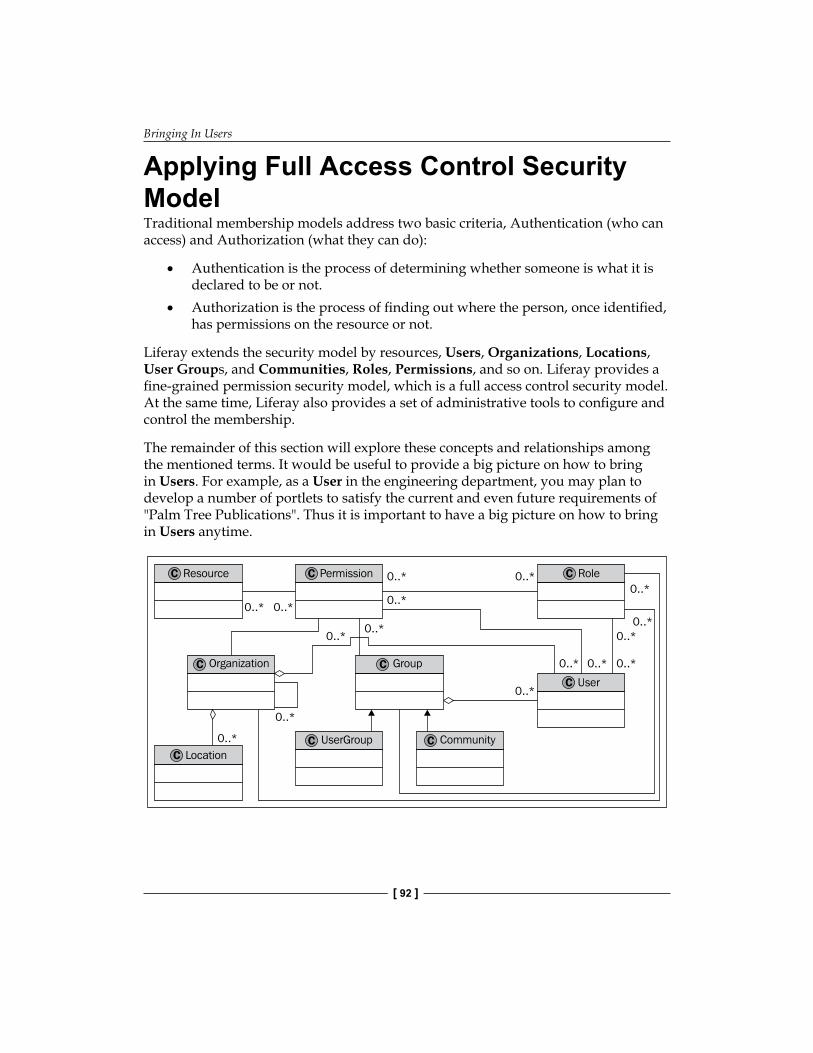
Bringing In Users
[ 92 ]
Applying Full Access Control Security ModelTraditional membership models address two basic criteria, Authentication (who can access) and Authorization (what they can do):
Authentication is the process of determining whether someone is what it is declared to be or not.Authorization is the process of finding out where the person, once identified, has permissions on the resource or not.
Liferay extends the security model by resources, Users, Organizations, Locations, User Groups, and Communities, Roles, Permissions, and so on. Liferay provides a fine-grained permission security model, which is a full access control security model. At the same time, Liferay also provides a set of administrative tools to configure and control the membership.
The remainder of this section will explore these concepts and relationships among the mentioned terms. It would be useful to provide a big picture on how to bring in Users. For example, as a User in the engineering department, you may plan to develop a number of portlets to satisfy the current and even future requirements of "Palm Tree Publications". Thus it is important to have a big picture on how to bring in Users anytime.
•
•
Chapter 3
[ 93 ]
As shown in the previous figure, a Resource is a base object. It can be a portlet (such as, Message Boards, Calendar, Document Library, and so on), a Java class (for example, Message Board Topics, Calendar Event, Document Library Folder, and so on), or a file (such as, documents, images, applications, and so on). Resources are scoped into enterprise, Community and individual.
Then Permission is an action on a resource. Enterprise and Community scoped Permissions can only be assigned to entities (for example, Users, Communities and Organizations) via Roles. Individual scoped Permissions can be assigned to a User, Community, Organization, or Guest.
A Role is a collection of Permissions. Roles can be assigned to a User, Community, or Organization. If a Role is assigned to a Community, Organization, or Location, then all the users who are members of that entity receive the Role.
A User is an individual. Depending on what Permissions and Roles have been assigned, the User either has Permission or does not have Permission to perform certain tasks.
Organizations represent the enterprise and departments hierarchy. Organizations can contain other Organizations. Moreover, an Organization acting as a child Organization of a top-level Organization can also represent departments of a parent corporation.
A Location is a special Organization with one and only one associated parent Organization, and without any associated child Organization. Organizations can have any number of Locations and sub organizations. Both Roles and individual Permissions can be assigned to Organizations (Locations or sub Organizations). By default, Locations and sub organizations inherit Permissions from their parent Organization.
A Community is a special group. It may hold a number of Users who share common interests. Both Roles and individual Permissions can be assigned to Communities.
Finally, a User Group is a special group with no context, which may hold a number of Users. Both Roles and individual Permissions can be assigned to User Groups, and every User that belongs to that User Group will receive the Role or Permission.
Bringing In Users
[ 94 ]
SummaryThis chapter introduced how to update the profile with My Account; how to create Organization and Locations; how to add Users and manage (such as view, search, update, deactivate, restore, delete and impersonate) Users; how to add User Groups and manage (such as view, search, update, delete and assign) User Groups; and how to add more administrators at the enterprise level, department level and Location level. Then it discussed how to integrate with different authentication servers: LDAP, CAS, NTLM, OpenID, Open SSO, and so on. Furthermore, it also discussed how to manage Permissions, and how to add Roles and manage (for example, view, search, update, delete and assign) Roles. Finally, it provided a big picture about fine-grained permission security model via a conceptual diagram.
Discussion Forums And TagsIn the intranet website "book.com" of "Palm Tree Publications", it is required that an environment for employees is provided to discuss book ideas and proposals, and to share important and interesting contents with other users inside or outside of the intranet website. Liferay Message Boards provides a full-featured discussion forums solution, while Liferay Meta Tags provide a way of organizing and aggregating contents. This chapter will introduce both Liferay Message Boards and Liferay Meta Tags.
By the end of this chapter, you will have learned how to:
Add categories and sub-categories for Message Boards.Add Threads and Posts for a given category.Manage (view, add, update, delete, and feed) Categories, Threads and Posts.Use Permissions for Message Boards, Categories and Threads.Add a Tag, manage (add, delete, and change category) Tags.Tag contents.Display tagged contents.
Working with Message BoardsIn order to provide an environment for employees to discuss book ideas and proposals, we should use Message Boards portlet at the Book Lovers Community (Public Pages). In the previous chapter, we assumed we have added a Message Board portlet to the Book Lovers Community. A Category called "Book Category" has been created, and the Category contains four Categories—"Book Category A," "Book Category B," "Book Category C" and "Book Category D".
•
•
•
•
•
•
•
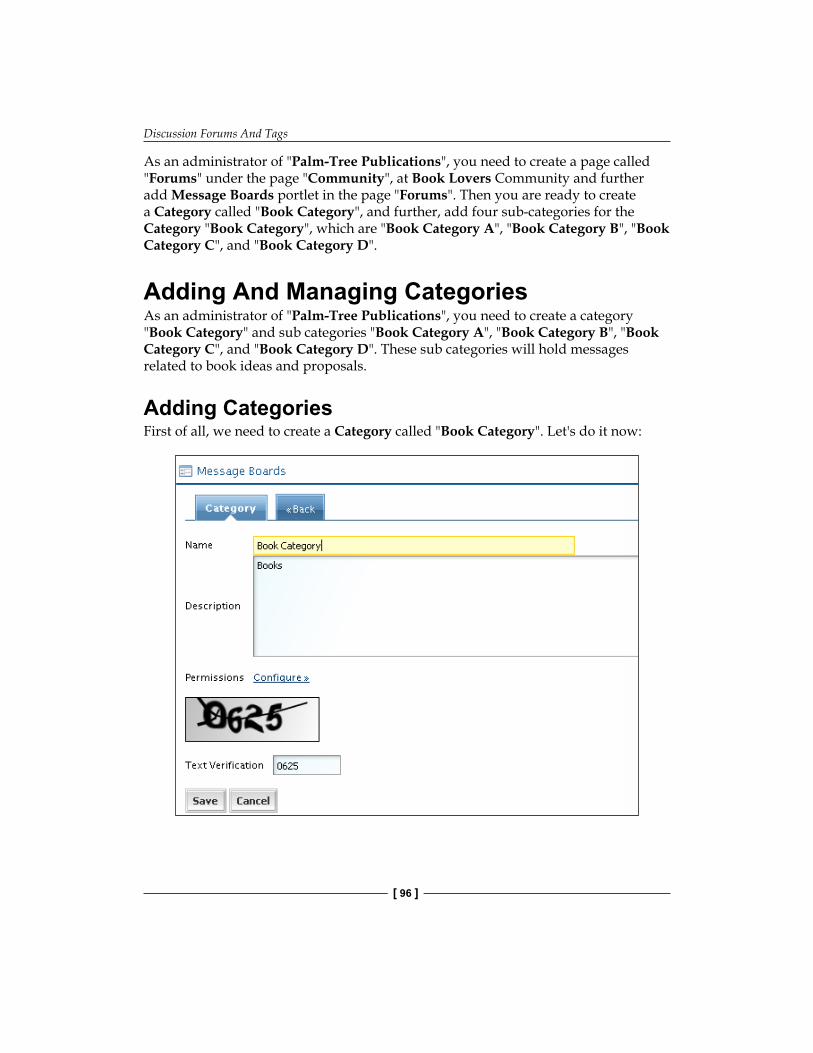
Discussion Forums And Tags
[ 96 ]
As an administrator of "Palm-Tree Publications", you need to create a page called "Forums" under the page "Community", at Book Lovers Community and further add Message Boards portlet in the page "Forums". Then you are ready to create a Category called "Book Category", and further, add four sub-categories for the Category "Book Category", which are "Book Category A", "Book Category B", "Book Category C", and "Book Category D".
Adding And Managing CategoriesAs an administrator of "Palm-Tree Publications", you need to create a category "Book Category" and sub categories "Book Category A", "Book Category B", "Book Category C", and "Book Category D". These sub categories will hold messages related to book ideas and proposals.
Adding CategoriesFirst of all, we need to create a Category called "Book Category". Let's do it now:
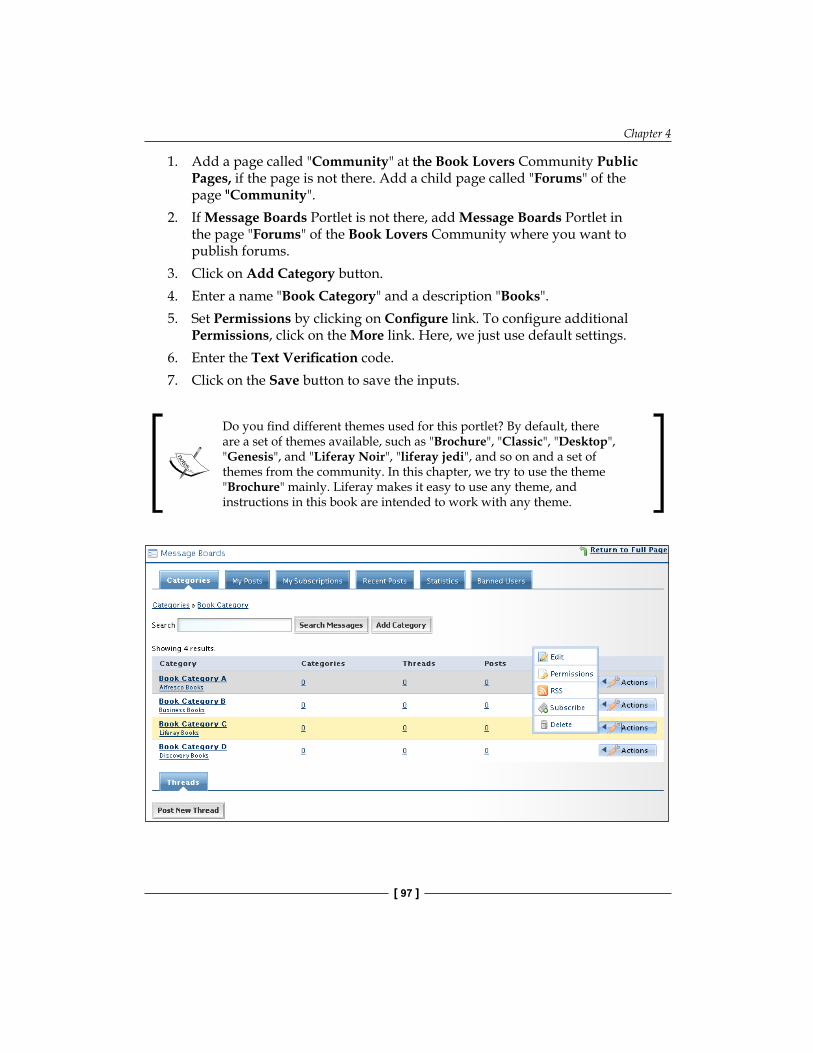
Chapter 4
[ 97 ]
1. Add a page called "Community" at the the Book Lovers Community Public Pages, if the page is not there. Add a child page called "Forums" of the page " ""Community".
2. If Message Boards Portlet is not there, add Message Boards Portlet in the page "Forums" of the Book Lovers Community where you want to publish forums.
3. Click on Add Category button.4. Enter a name "Book Category" and a description "Books".5. Set Permissions by clicking on Configure link. To configure additional
Permissions, click on the More link. Here, we just use default settings.6. Enter the Text Verification code.7. Click on the Save button to save the inputs.
Do you find different themes used for this portlet? By default, there are a set of themes available, such as "Brochure", "Classic", "Desktop", "Genesis", and "Liferay Noir", "liferay jedi", and so on and a set of themes from the community. In this chapter, we try to use the theme "Brochure" mainly. Liferay makes it easy to use any theme, and instructions in this book are intended to work with any theme.
Discussion Forums And Tags
[ 98 ]
You can also definitely add other Categories. Normally, a forum may have many Categories, and each Category may have many Categories called sub-categories. For example, the Category "Book Category" contains four Categories: "Book Category A", "Book Category B", "Book Category C", and "Book Category D". Let's create the category "Book Category A" as follows:
1. Click on the newly created category "Book Category".2. Click the Add Category button.3. Enter a name "Book Category A" and a description "Alfresco Books".4. Set permissions by clicking on the Configure link. To configure additional
permissions, click on the More link. Here again, we just use the default settings.
5. Enter the Text Verification code.6. Click on the Save button to save the inputs.
Of course, you can add as many Categories or sub-categories as you want. After creating the sub categories "Book Category B", "Book Category C", and "Book Category D", we can view the Category and its sub-categories. Categories "Book Category B" and "Book Category D" used the default permission setting, while Category "Book Category C" uses only "View" permission in the Community column.
Managing CategoriesCategories or sub-categories are editable. For example, you may need to change the description of the Category "Book Category" from "Books" to "Books discussion category". Let's do is as follows:
1. Locate the category, "Book Category", which you want to edit.2. Click on the Edit icon from the Actions located next to the category.3. Maintain the value of name, and update the description of the selected
Category "Book Category" with the value "Books discussion category".4. Click on the Save button to save the changes.
You can update the name as well. For example, we can update the name "Book Category" with the value "Books". Similarly, we can edit sub-category such as "Book Category C" by updating the name with value "Liferay Books".
Chapter 4
[ 99 ]
Alternatively, you can change the parent Category by selecting a Category as the parent Category of the Category or sub-category, or merging Categories with the parent Category, or removing the parent Category. If you remove the parent Category, the current Category will become a Category at the root level.
Categories or sub-categories are removable. For example, the sub-category "Book Category B" is not wanted anymore; you can remove it. Let's do it as follows:
1. Click on the category, "Books", in order to list its sub-categories.2. Locate the sub-category, "Book Category B", which you want to delete.3. Then click on the Delete icon from the Actions located next to the category.4. A screen will appear asking if you want to delete this. Click OK to
confirm deletion.
Note that deleting the Category will delete all related sub-categories, Threads and Posts which belong to this category.
View RSS FeedsYou can view RSS feeds of Categories or sub-categories. Suppose that you need to view the RSS feeds of the Category "Books". Let's do it as follows:
1. Locate the category "Books".2. Click on the RSS icon from the Actions located next to the category.3. Follow the browser's instructions to subscribe if you want to subscribe
RSS Feeds.
What's RSS? Refer to Chapter 6 for instructions.
Adding And Managing ThreadsNow, we are ready to post new Threads. Normally, a forum may have many Categories, and each Category may have many sub-categories and Threads.
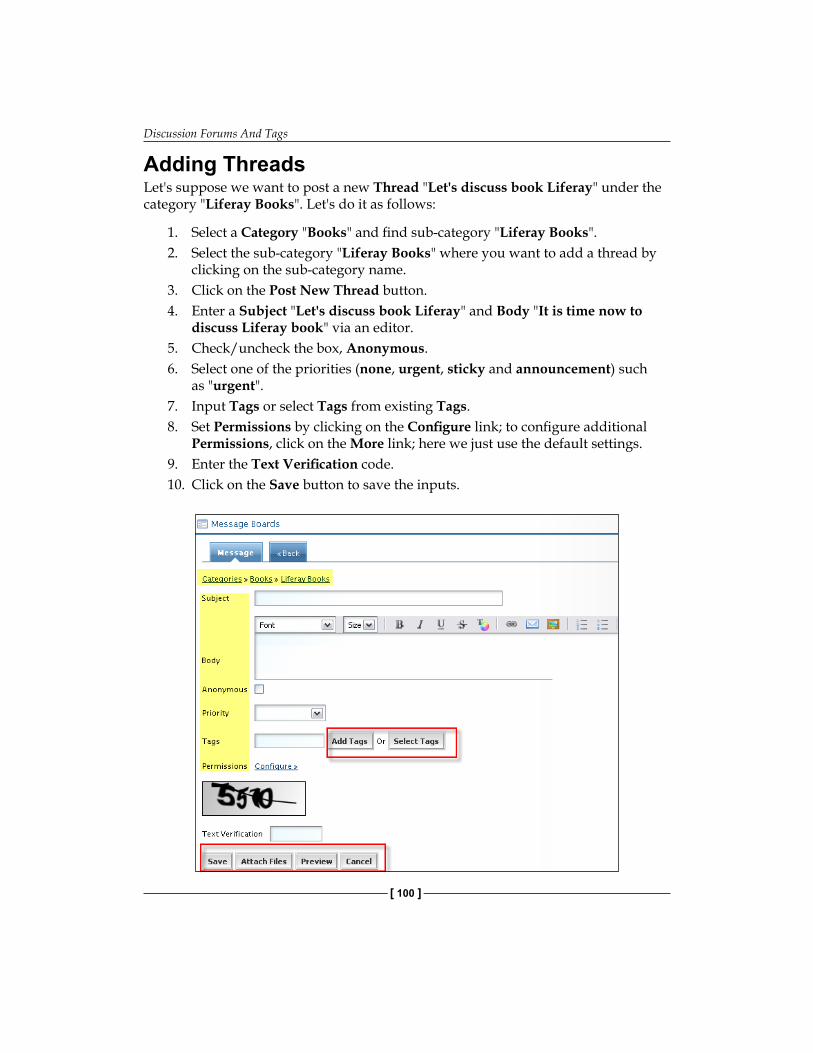
Discussion Forums And Tags
[ 100 ]
Adding ThreadsLet's suppose we want to post a new Thread "Let's discuss book Liferay" under the category "Liferay Books". Let's do it as follows:
1. Select a Category "Books" and find sub-category "Liferay Books".2. Select the sub-category "Liferay Books" where you want to add a thread by
clicking on the sub-category name.3. Click on the Post New Thread button.4. Enter a Subject "Let's discuss book Liferay" and Body "It is time now to
discuss Liferay book" via an editor.5. Check/uncheck the box, Anonymous.6. Select one of the priorities (none, urgent, sticky and announcement) such
as "urgent".7. Input Tags or select Tags from existing Tags.8. Set Permissions by clicking on the Configure link; to configure additional
Permissions, click on the More link; here we just use the default settings.9. Enter the Text Verification code.10. Click on the Save button to save the inputs.
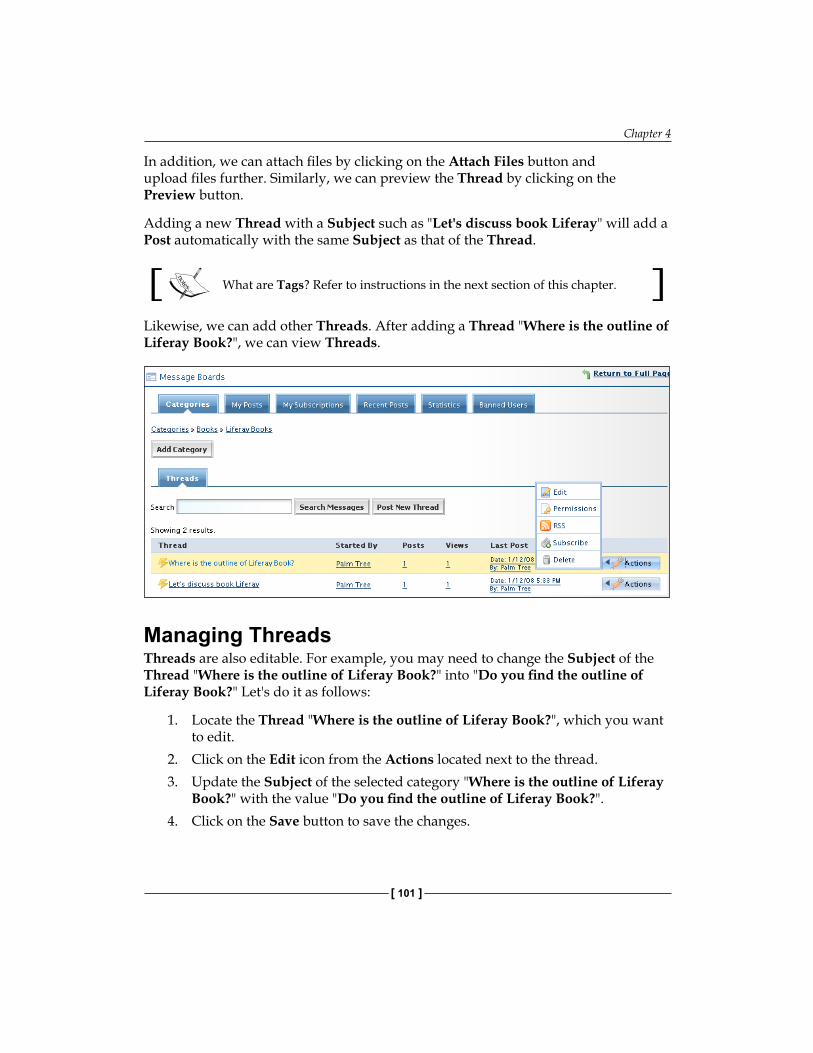
Chapter 4
[ 101 ]
In addition, we can attach files by clicking on the Attach Files button and upload files further. Similarly, we can preview the Thread by clicking on the Preview button.
Adding a new Thread with a Subject such as "Let's discuss book Liferay" will add a Post automatically with the same Subject as that of the Thread.
What are Tags? Refer to instructions in the next section of this chapter.
Likewise, we can add other Threads. After adding a Thread "Where is the outline of Liferay Book?", we can view Threads.
Managing ThreadsThreads are also editable. For example, you may need to change the Subject of the Thread "Where is the outline of Liferay Book?" into "Do you find the outline of Liferay Book?" Let's do it as follows:
1. Locate the Thread "Where is the outline of Liferay Book?", which you want to edit.
2. Click on the Edit icon from the Actions located next to the thread.3. Update the Subject of the selected category "Where is the outline of Liferay
Book?" with the value "Do you find the outline of Liferay Book?".4. Click on the Save button to save the changes.
Discussion Forums And Tags
[ 102 ]
You can update the Body and Priority as well. Alternatively, you can change the Category by selecting another Category as the Category of the Thread.
Updating the Subject of the Thread, such as "Let's discuss book Liferay?", will automatically update the Subject of the top-level Post with the same Subject as that of the Thread.
Threads are also removable. For example, if the Thread "Where is the outline of Liferay Book?" is not wanted anymore, you can remove it. Let's do it as follows:
1. Locate the Thread "Where is the outline of Liferay Book?", which you want to delete.
2. Then click on the Delete icon from the Actions located next to the thread.3. A screen will appear asking if you want to delete this. Click OK to
confirm deletion.
Note that deleting a Thread will delete all related Posts that belong to this thread.
View RSS FeedsYou can view the the RSS feeds of Threads as well as that of Categories. Suppose that you need to view the the RSS feeds of the Thread "Let's discuss book Liferay". Let's do it as follows:
1. Navigate to the category "Books" and the sub-category "Liferay Books".2. Locate the Thread "Let's discuss book Liferay".3. Click on the RSS icon from the Actions located next to the thread.4. Follow the browser's instructions to subscribe if you want to subscribe
RSS Feeds.
Adding And Managing PostsFinally, we are ready to add more Posts. Normally, a forum may have many Categories, and each Category may have many sub-categories and Threads, and each Thread may have a lot of Posts.
Adding PostsWe can reply to the Thread "Let's discuss book Liferay" with the message "OK". Let's do it as follows:
1. Select category "Books" and sub-category "Liferay Books".
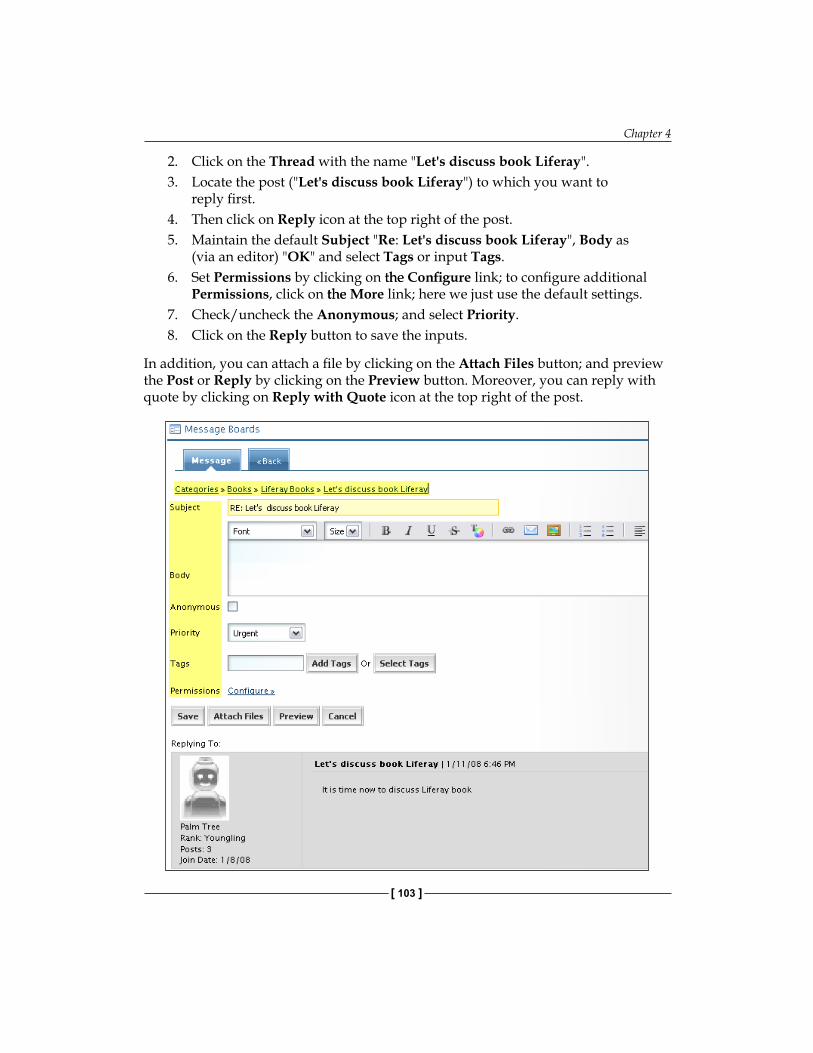
Chapter 4
[ 103 ]
2. Click on the Thread with the name "Let's discuss book Liferay".3. Locate the post ("Let's discuss book Liferay") to which you want to
reply first.4. Then click on Reply icon at the top right of the post.5. Maintain the default Subject "Re: Let's discuss book Liferay", Body as
(via an editor) "OK" and select Tags or input Tags.6. Set Permissions by clicking on the the Configure link; to configure additional
Permissions, click on the the More link; here we just use the default settings.7. Check/uncheck the Anonymous; and select Priority.8. Click on the Reply button to save the inputs.
In addition, you can attach a file by clicking on the Attach Files button; and preview the Post or Reply by clicking on the Preview button. Moreover, you can reply with quote by clicking on Reply with Quote icon at the top right of the post.
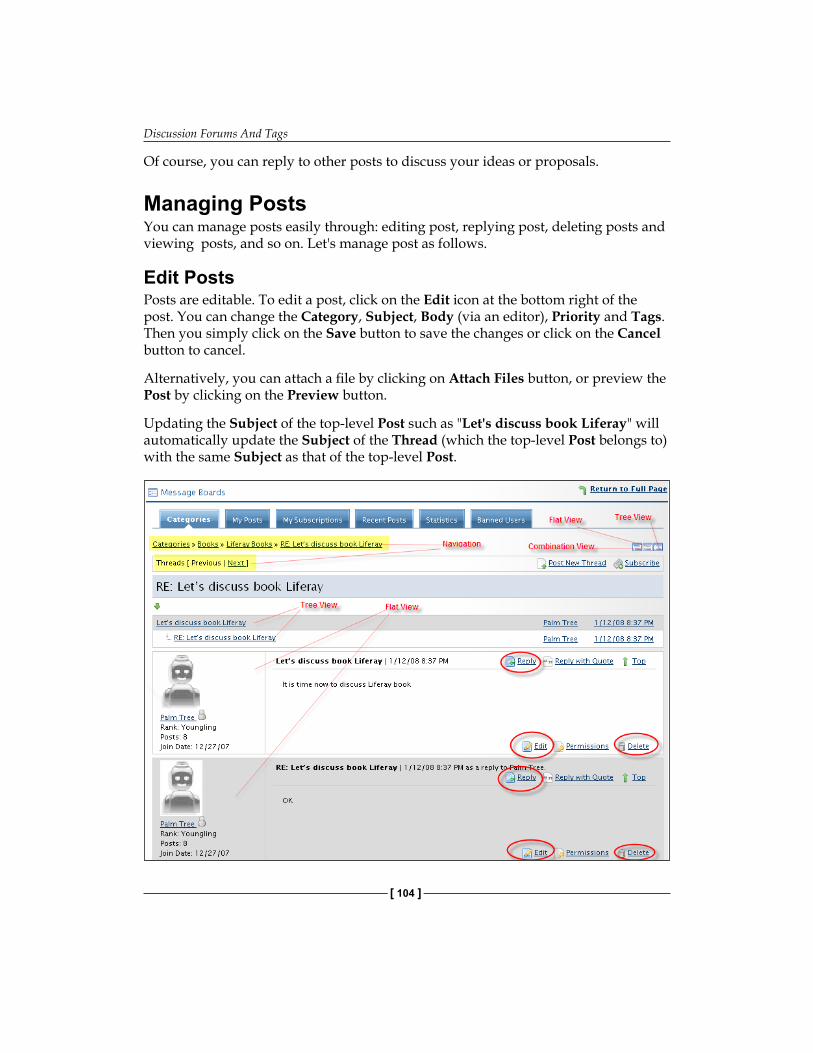
Discussion Forums And Tags
[ 104 ]
Of course, you can reply to other posts to discuss your ideas or proposals.
Managing PostsYou can manage posts easily through: editing post, replying post, deleting posts and viewing posts, and so on. Let's manage post as follows.
Edit PostsPosts are editable. To edit a post, click on the Edit icon at the bottom right of the post. You can change the Category, Subject, Body (via an editor), Priority and Tags. Then you simply click on the Save button to save the changes or click on the Cancel button to cancel.
Alternatively, you can attach a file by clicking on Attach Files button, or preview the Post by clicking on the Preview button.
Updating the Subject of the top-level Post such as "Let's discuss book Liferay" will automatically update the Subject of the Thread (which the top-level Post belongs to) with the same Subject as that of the top-level Post.
Chapter 4
[ 105 ]
Ban UsersIn addition, you can ban a user if you have proper Permissions. Let's suppose that "Lotti Stein" has a post "Alfresco Books - discussion" under the category "Book Category A". As an administrator, you will see the icon (Ban this User), under the user "Lotti Stein" image. If you need to ban this user, simply click on the icon (Ban this User). Then you will see that the Ban this User icon becomes the Un-ban this User icon.
When the user "Lotti Stein" logs in, she will see a message at the Message Board: "You have been banned by the moderator".
As an administrator, you can un-ban the user "Lotti Stein", by simply clicking on the icon, Un-ban this User. Then you will see that the icon,Un-ban this User becomes the icon, Ban this User.
Delete PostsPosts are also removable. For example, if the Post "Re: Let's discuss book Liferay" is not required anymore, you can remove it. Let's do it as follows:
1. Locate the post "Re: Let's discuss book Liferay", which you want to delete.2. Click on the Delete icon at the bottom right of the post.3. A screen will appear asking if you want to delete this. Click OK to confirm
deletion or Cancel to cancel deletion.
More interestingly, if the top-level Post, "Let's discuss book Liferay" was deleted, the Thread which the top-level Post belongs to will link to the low-level Post, "Re: Let's discuss book Liferay". If the top-level Post , "Let's discuss book Liferay", was the only Post in the Thread, and it was deleted, then the Thread which the top-level Post belongs to will also be deleted.
Note that only the current Post has been deleted. The low level Posts related to the current Post will have a link to the top-level Post of the current Post.
View PostsAll Posts of a given Thread may have different views: Combination View, Flat View or Tree View. For example, the default view mode is Combination View. To change current view mode to Flat View, simply click on the Flat View button next to the navigation. Of course, you can use Tree View model.
Discussion Forums And Tags
[ 106 ]
You can also change the Thread by clicking on the "Previous" or "Next" buttons next to Threads. Moreover, you can change the Categories by clicking on the Category name on the navigation line.
Search MessagesWe can easily find messages by search. For instance, in order to search messages which contain "book" in Message Boards, simply input the message keyword, "book", and then click on the Search Messages button. A list of Categories which contain the keywords in messages appears with columns: Categories, Messages (thread subject), Thread Posts, Thread Vies and Score.
Search is scoped by Category. For example, if you just need to search messages which contain "book" in the Category "Categories->Books->Liferay Books", simply navigate to the Category "Liferay Books" first, and then input message keyword such as "book", and, click on the Search Messages button.
What are messages in search? Messages here refer to the contents of Threads andand Posts. They contain the Subject and Body ofof Threads and Posts.
View My PostsYou can view your own Posts by clicking the My Posts tab of the Message Boards. A list of your Posts will appear with Thread, Started By, Posts, Views, Last Post and Actions with a set of icons (Edit, Permissions, RSS, Subscribe/Unsubscribe, Delete, and so forth).
View Recent PostsSimilarly, you can view recent posts, by clicking the Recent Posts tab of the Message Boards. A list of recent postings will appear with Thread, Started By, Posts, Views, Last Post and Actions with a set of icons (Edit, Permissions, RSS, Subscribe/Unsubscribe and Delete).
View StatisticsFurthermore, you can view general statistics by clicking the Statistics tab of the Message Boards. By this, statistics data such as Number of Categories, Number of Posts and Participants will appear. In addition, click the Top Posters sub tab to see a list of most active users.
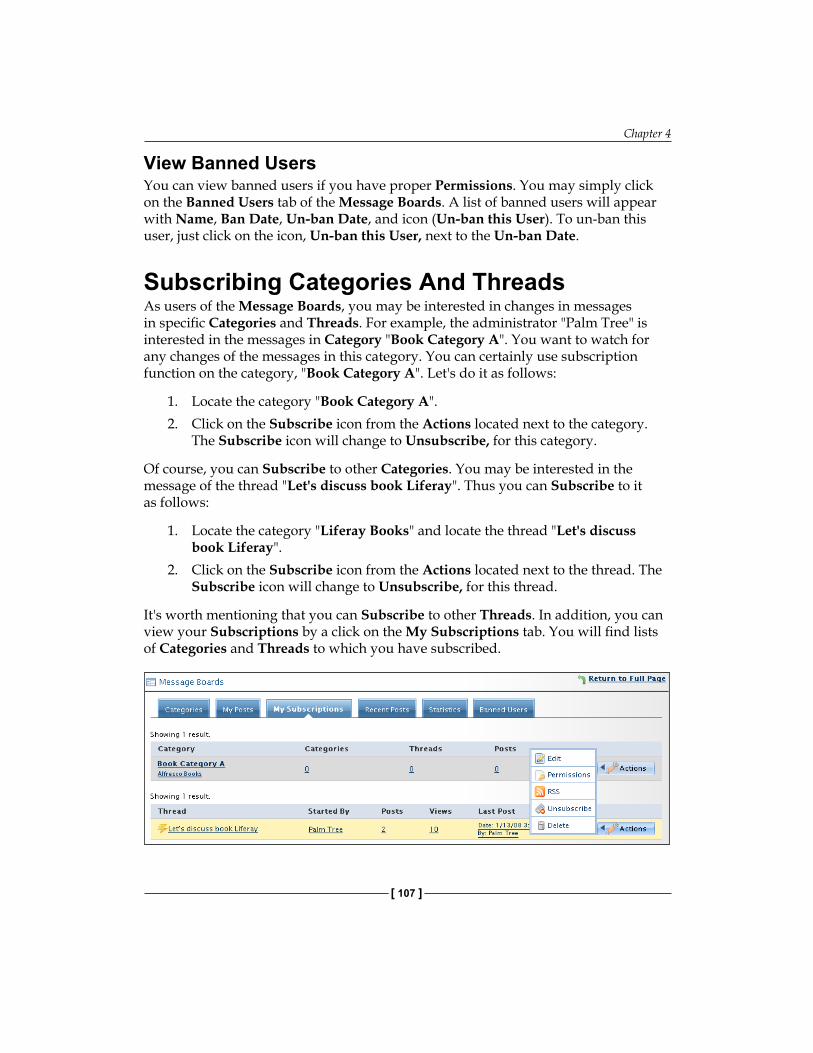
Chapter 4
[ 107 ]
View Banned UsersYou can view banned users if you have proper Permissions. You may simply click on the Banned Users tab of the Message Boards. A list of banned users will appear with Name, Ban Date, Un-ban Date, and icon (Un-ban this User). To un-ban this user, just click on the icon, Un-ban this User, next to the Un-ban Date.
Subscribing Categories And ThreadsAs users of the Message Boards, you may be interested in changes in messages in specific Categories and Threads. For example, the administrator "Palm Tree" is interested in the messages in Category "Book Category A". You want to watch for any changes of the messages in this category. You can certainly use subscription function on the category, "Book Category A". Let's do it as follows:
1. Locate the category "Book Category A".2. Click on the Subscribe icon from the Actions located next to the category.
The Subscribe icon will change to Unsubscribe, for this category.
Of course, you can Subscribe to other Categories. You may be interested in the message of the thread "Let's discuss book Liferay". Thus you can Subscribe to it as follows:
1. Locate the category "Liferay Books" and locate the thread "Let's discuss book Liferay".
2. Click on the Subscribe icon from the Actions located next to the thread. The Subscribe icon will change to Unsubscribe, for this thread.
It's worth mentioning that you can Subscribe to other Threads. In addition, you can view your Subscriptions by a click on the My Subscriptions tab. You will find lists of Categories and Threads to which you have subscribed.
Discussion Forums And Tags
[ 108 ]
Unsubscribe Categories And ThreadsIn addition, you can Unsubscribe to Categories, or sub-categories, or Threads, if they have been subscribed to already. For example, you may need to Unsubscribe to the Thread, "Let's discuss book Liferay". Let's do it as follows:
1. Click on the My Subscriptions tab in the Message Boards.2. Locate the thread "Let's discuss book Liferay".3. Click on the Unsubscribe icon from the Actions located next to the thread.
The thread "Let's discuss book Liferay" will disappear from the view of My Subscriptions.
Or you can Unsubscribe to the Thread "Let's discuss book Liferay" from the view of Categories as follows:
1. Locate the Category "Liferay Books" and locate the Thread, "Let's discuss book Liferay".
2. Click on the Unsubscribe icon from the Actions located next to the thread. The Unsubscribe icon will change to Subscribe, for this Thread.
What Happens Next?If you have some Categories or Threads to which you have subscribed, and the messages of the subscribed to Categories or Threads have changed, you will receive notifications for these changes.
Subscription is, generally speaking, an agreement to receive electronic texts or services, especially over the Internet. The Thread subscription provides a useful function, that of notifying through email, when a new message has been posted or updated. On the one hand, you can subscribe to a Thread for a given Category or sub-category. Whenever a new message has been posted or updated, you will be notified through email. On the other hand, you can also unsubscribe to a Thread for a given Category or sub-category if it has been subscribed to already. Henceforth, you will not be notified through email; even if a message has been posted or updated.
Moreover, Category subscription provides a useful function, that is, to to notify through email, when a Category has been updated. Similar to the Thread subscription, you can subscribe to a Category or sub-category. Whenever Category or sub-category is updated, you will be notified through email.
How to set up mail notifications? Just refer to the following section.
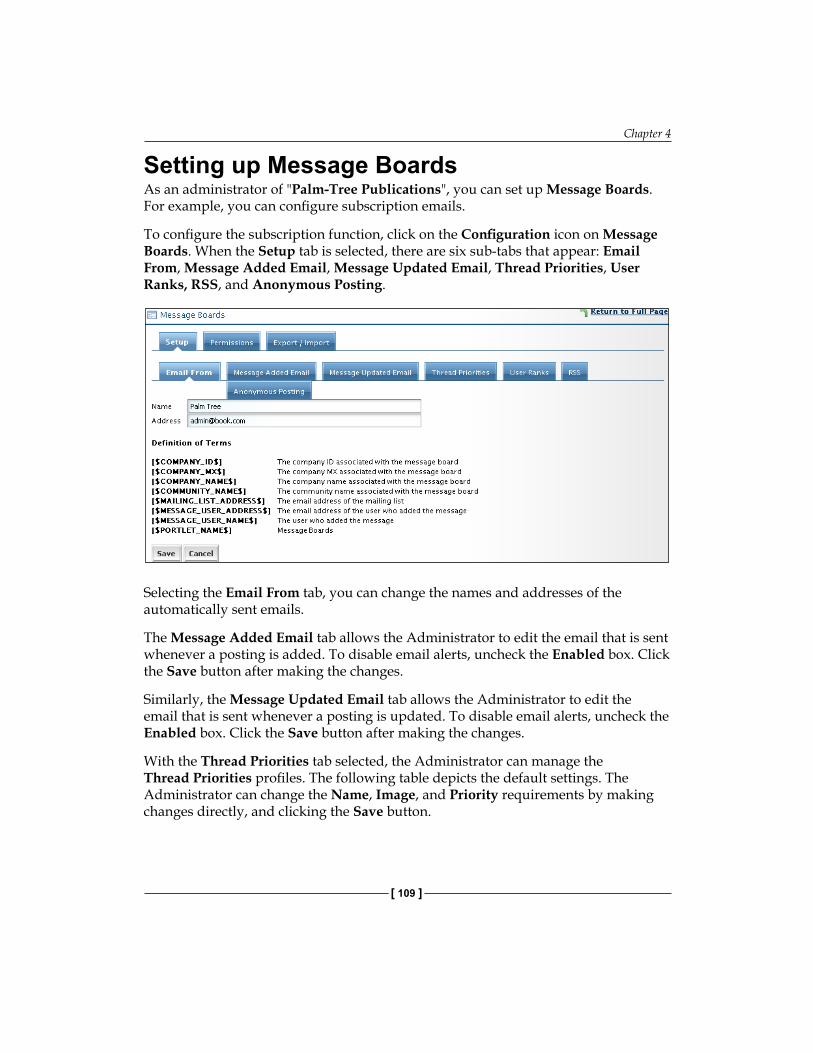
Chapter 4
[ 109 ]
Setting up Message BoardsAs an administrator of "Palm-Tree Publications", you can set up Message Boards. For example, you can configure subscription emails.
To configure the subscription function, click on the Configuration icon on Message Boards. When the Setup tab is selected, there are six sub-tabs that appear: Email From, Message Added Email, Message Updated Email, Thread Priorities, User Ranks, RSS, and Anonymous Posting.
Selecting the Email From tab, you can change the names and addresses of the automatically sent emails.
The Message Added Email tab allows the Administrator to edit the email that is sent whenever a posting is added. To disable email alerts, uncheck the Enabled box. Click the Save button after making the changes.
Similarly, the Message Updated Email tab allows the Administrator to edit the email that is sent whenever a posting is updated. To disable email alerts, uncheck the Enabled box. Click the Save button after making the changes.
With the Thread Priorities tab selected, the Administrator can manage the Thread Priorities profiles. The following table depicts the default settings. The Administrator can change the Name, Image, and Priority requirements by making changes directly, and clicking the Save button.
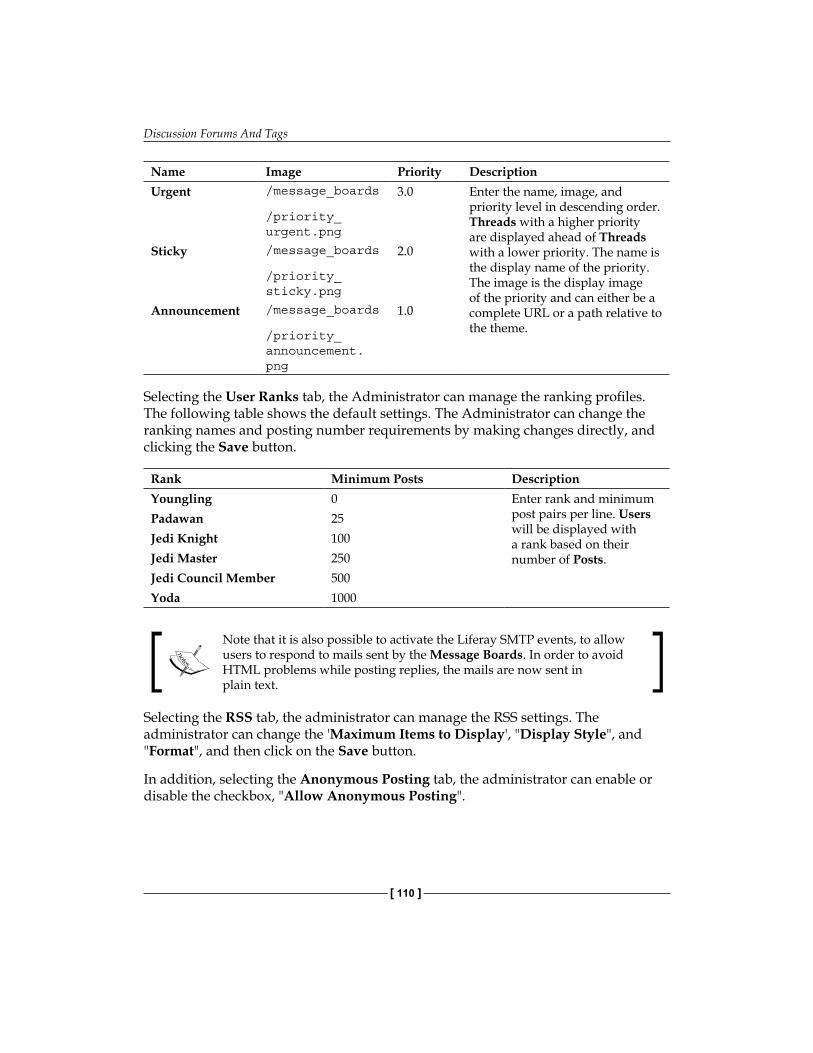
Discussion Forums And Tags
[ 110 ]
Name Image Priority DescriptionUrgent /message_boards
/priority_urgent.png
3.0 Enter the name, image, and priority level in descending order. Threads with a higher priority are displayed ahead of Threads with a lower priority. The name is the display name of the priority. The image is the display image of the priority and can either be a complete URL or a path relative to the theme.
Sticky /message_boards
/priority_sticky.png
2.0
Announcement /message_boards
/priority_announcement.png
1.0
Selecting the User Ranks tab, the Administrator can manage the ranking profiles. The following table shows the default settings. The Administrator can change the ranking names and posting number requirements by making changes directly, and clicking the Save button.
Rank Minimum Posts DescriptionYoungling 0 Enter rank and minimum
post pairs per line. Users will be displayed with a rank based on their number of Posts.
Padawan 25Jedi Knight 100Jedi Master 250Jedi Council Member 500Yoda 1000
Note that it is also possible to activate the Liferay SMTP events, to allow users to respond to mails sent by the Message Boards. In order to avoid HTML problems while posting replies, the mails are now sent in plain text.
Selecting the RSS tab, the administrator can manage the RSS settings. The administrator can change the 'Maximum Items to Display', "Display Style", and "Format", and then click on the Save button.
In addition, selecting the Anonymous Posting tab, the administrator can enable or disable the checkbox, "Allow Anonymous Posting".
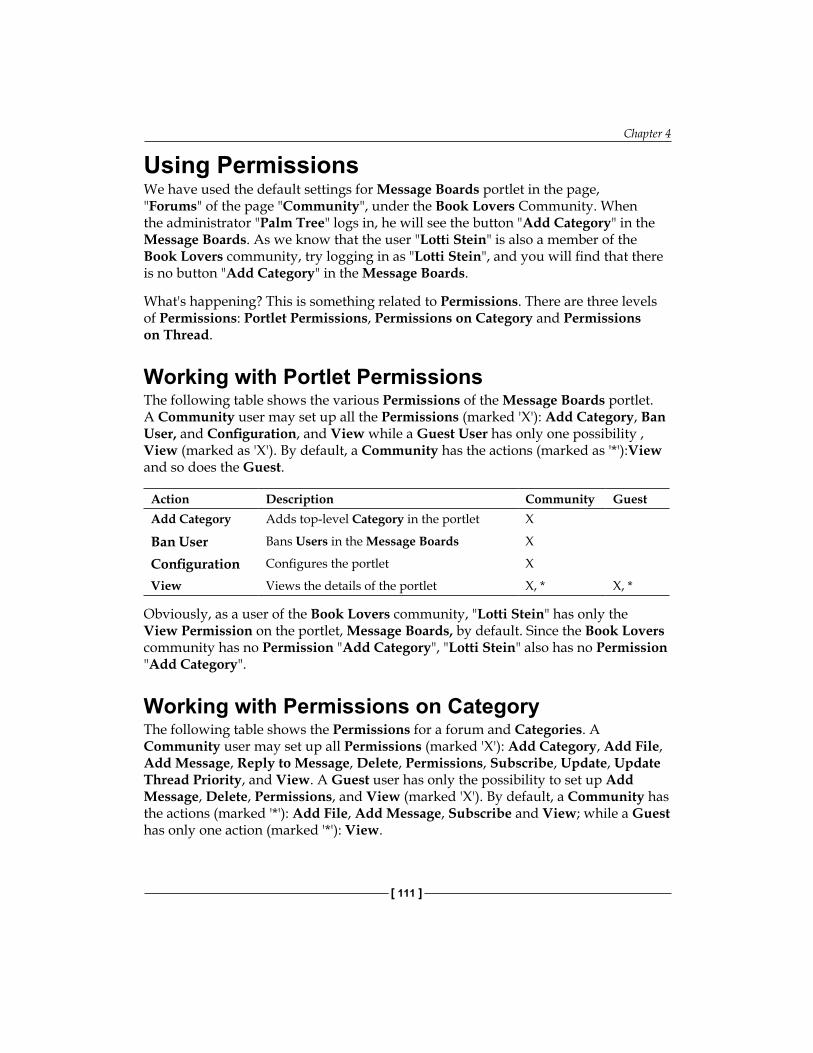
Chapter 4
[ 111 ]
Using PermissionsWe have used the default settings for Message Boards portlet in the page, "Forums" of the page "Community", under the Book Lovers Community. When the administrator "Palm Tree" logs in, he will see the button "Add Category" in the Message Boards. As we know that the user "Lotti Stein" is also a member of the Book Lovers community, try logging in as "Lotti Stein", and you will find that there is no button "Add Category" in the Message Boards.
What's happening? This is something related to Permissions. There are three levels of Permissions: Portlet Permissions, Permissions on Category and Permissions on Thread.
Working with Portlet PermissionsThe following table shows the various Permissions of the Message Boards portlet. A Community user may set up all the Permissions (marked 'X'): Add Category, Ban User, and Configuration, and View while a Guest User has only one possibility , View (marked as 'X'). By default, a Community has the actions (marked as '*'):View and so does the Guest.
Action Description Community GuestAdd Category Adds top-level Category in the portlet X
Ban User Bans Users in the Message Boards X
Configuration Configures the portlet X
View Views the details of the portlet X, * X, *
Obviously, as a user of the Book Lovers community, "Lotti Stein" has only the View Permission on the portlet, Message Boards, by default. Since the Book Lovers community has no Permission "Add Category", "Lotti Stein" also has no Permission "Add Category".
Working with Permissions on CategoryThe following table shows the Permissions for a forum and Categories. A Community user may set up all Permissions (marked 'X'): Add Category, Add File, Add Message, Reply to Message, Delete, Permissions, Subscribe, Update, Update Thread Priority, and View. A Guest user has only the possibility to set up Add Message, Delete, Permissions, and View (marked 'X'). By default, a Community has the actions (marked '*'): Add File, Add Message, Subscribe and View; while a Guest has only one action (marked '*'): View.
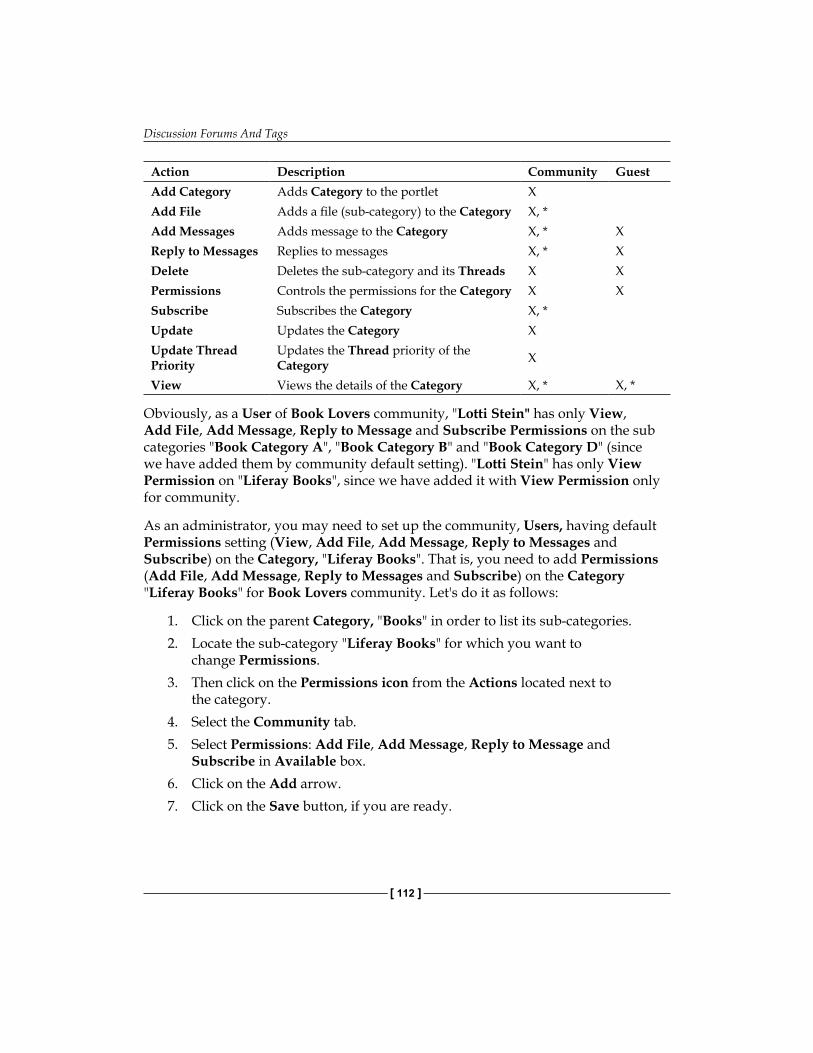
Discussion Forums And Tags
[ 112 ]
Action Description Community GuestAdd Category Adds Category to the portlet XAdd File Adds a file (sub-category) to the Category X, *Add Messages Adds message to the Category X, * XReply to Messages Replies to messages X, * XDelete Deletes the sub-category and its Threads X XPermissions Controls the permissions for the Category X XSubscribe Subscribes the Category X, *Update Updates the Category XUpdate Thread Priority
Updates the Thread priority of the Category X
View Views the details of the Category X, * X, *
Obviously, as a User of Book Lovers community, "Lotti Stein" has only View, Add File, Add Message, Reply to Message and Subscribe Permissions on the sub categories "Book Category A", "Book Category B" and "Book Category D" (since we have added them by community default setting). "Lotti Stein" has only View Permission on "Liferay Books", since we have added it with View Permission only for community.
As an administrator, you may need to set up the community, Users, having default Permissions setting (View, Add File, Add Message, Reply to Messages and Subscribe) on the Category, "Liferay Books". That is, you need to add Permissions (Add File, Add Message, Reply to Messages and Subscribe) on the Category "Liferay Books" for Book Lovers community. Let's do it as follows:
1. Click on the parent Category, "Books" in order to list its sub-categories. 2. Locate the sub-category "Liferay Books" for which you want to
change Permissions.3. Then click on the Permissions icon from the Actions located next to
the category.4. Select the Community tab.5. Select Permissions: Add File, Add Message, Reply to Message and
Subscribe in Available box.6. Click on the Add arrow.7. Click on the Save button, if you are ready.
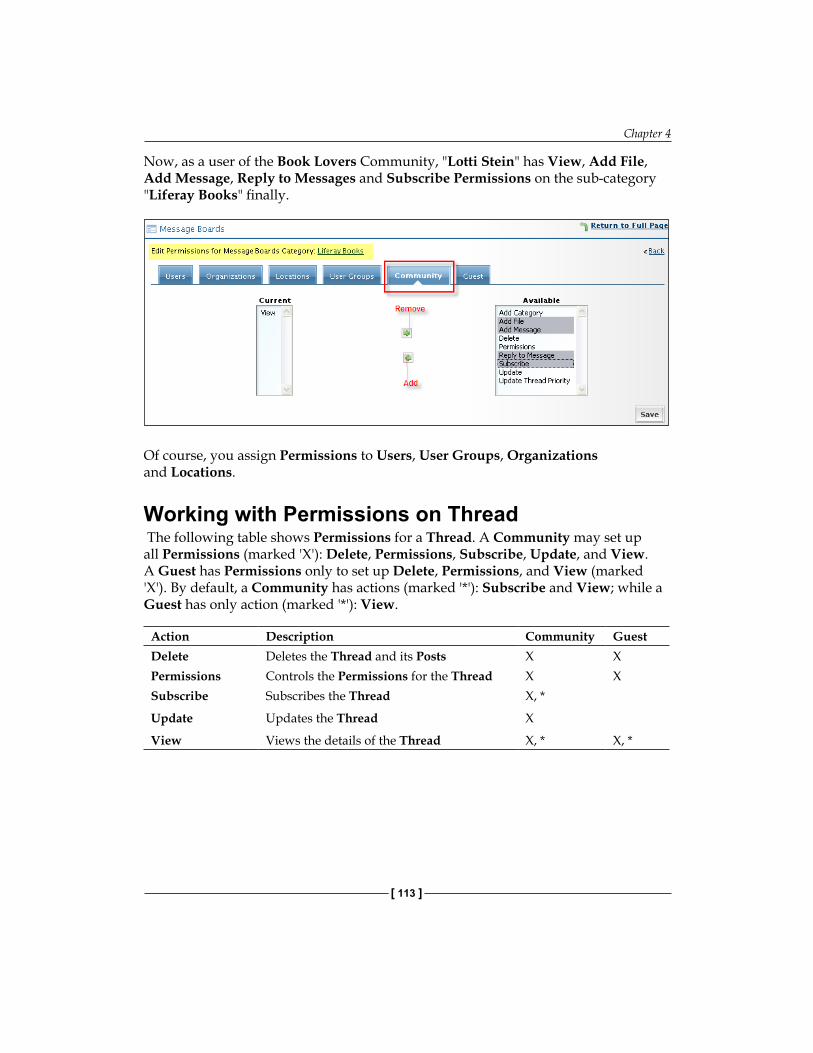
Chapter 4
[ 113 ]
Now, as a user of the Book Lovers Community, "Lotti Stein" has View, Add File, Add Message, Reply to Messages and Subscribe Permissions on the sub-category "Liferay Books" finally.
Of course, you assign Permissions to Users, User Groups, Organizations and Locations.
Working with Permissions on Thread The following table shows Permissions for a Thread. A Community may set up all Permissions (marked 'X'): Delete, Permissions, Subscribe, Update, and View. A Guest has Permissions only to set up Delete, Permissions, and View (marked 'X'). By default, a Community has actions (marked '*'): Subscribe and View; while a Guest has only action (marked '*'): View.
Action Description Community GuestDelete Deletes the Thread and its Posts X XPermissions Controls the Permissions for the Thread X XSubscribe Subscribes the Thread X, *
Update Updates the Thread X
View Views the details of the Thread X, * X, *
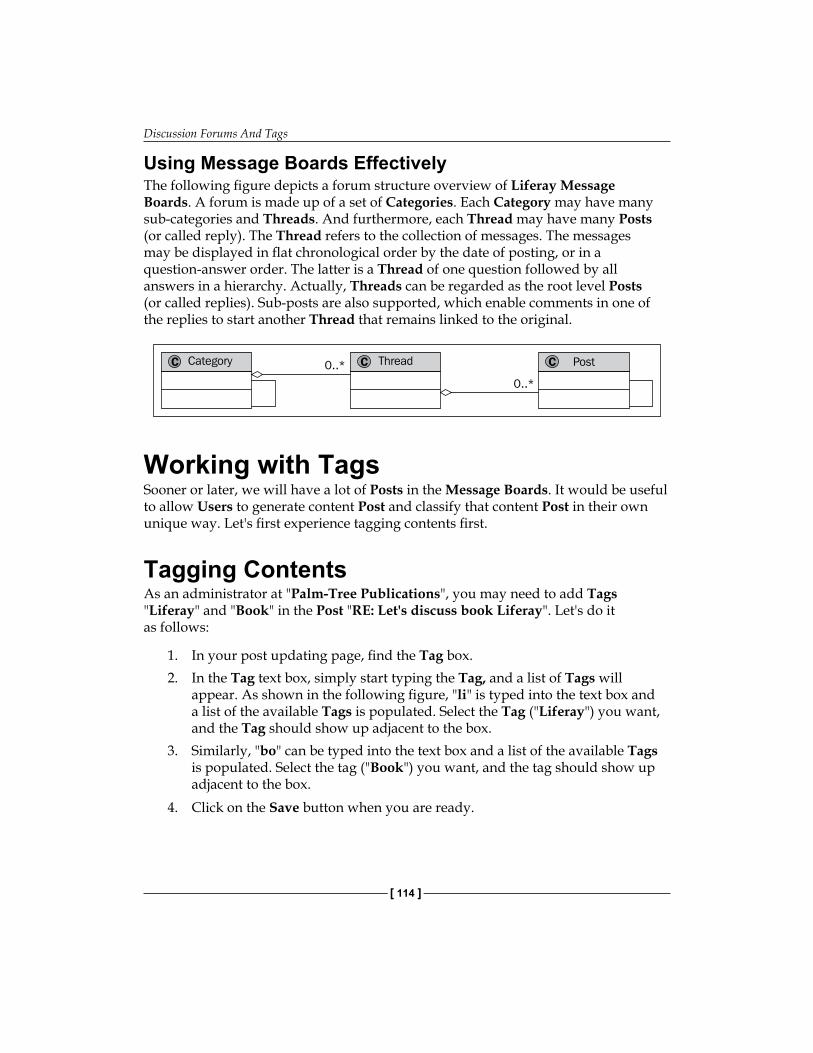
Discussion Forums And Tags
[ 114 ]
Using Message Boards Effectively The following figure depicts a forum structure overview of Liferay Message Boards. A forum is made up of a set of Categories. Each Category may have many sub-categories and Threads. And furthermore, each Thread may have many Posts (or called reply). The Thread refers to the collection of messages. The messages may be displayed in flat chronological order by the date of posting, or in a question-answer order. The latter is a Thread of one question followed by all answers in a hierarchy. Actually, Threads can be regarded as the root level Posts (or called replies). Sub-posts are also supported, which enable comments in one of the replies to start another Thread that remains linked to the original.
Working with TagsSooner or later, we will have a lot of Posts in the Message Boards. It would be useful to allow Users to generate content Post and classify that content Post in their own unique way. Let's first experience tagging contents first.
Tagging ContentsAs an administrator at "Palm-Tree Publications", you may need to add Tags "Liferay" and "Book" in the Post "RE: Let's discuss book Liferay". Let's do it as follows:
1. In your post updating page, find the Tag box.2. In the Tag text box, simply start typing the Tag, and a list of Tags will
appear. As shown in the following figure, "li" is typed into the text box and a list of the available Tags is populated. Select the Tag ("Liferay") you want, and the Tag should show up adjacent to the box.
3. Similarly, "bo" can be typed into the text box and a list of the available Tags is populated. Select the tag ("Book") you want, and the tag should show up adjacent to the box.
4. Click on the Save button when you are ready.
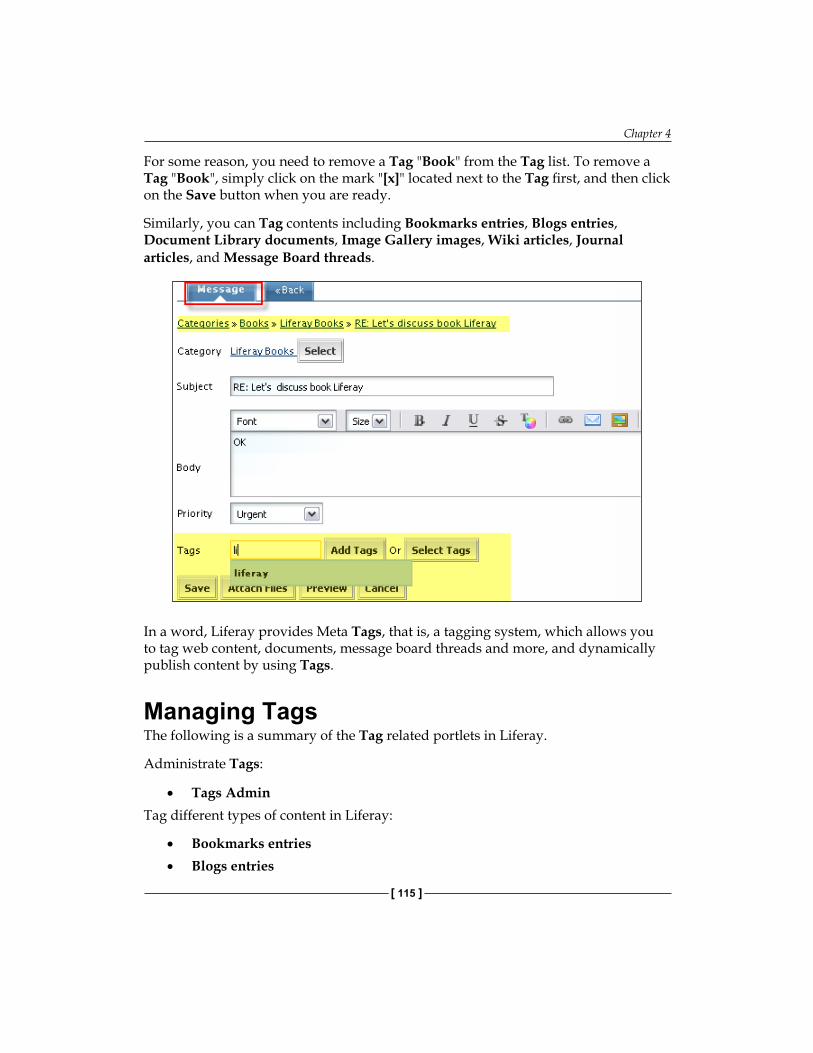
Chapter 4
[ 115 ]
For some reason, you need to remove a Tag "Book" from the Tag list. To remove a Tag "Book", simply click on the mark "[x]" located next to the Tag first, and then click on the Save button when you are ready.
Similarly, you can Tag contents including Bookmarks entries, Blogs entries, Document Library documents, Image Gallery images, Wiki articles, Journal articles, and Message Board threads.
In a word, Liferay provides Meta Tags, that is, a tagging system, which allows you to tag web content, documents, message board threads and more, and dynamically publish content by using Tags.
Managing TagsThe following is a summary of the Tag related portlets in Liferay.
Administrate Tags:
Tags AdminTag different types of content in Liferay:
Bookmarks entriesBlogs entries
•
•
•
Discussion Forums And Tags
[ 116 ]
Wiki articlesDocument Library documentsImage Gallery imagesJournal articles and Message Board threads
Aggregate Content:
Asset Publisher
Users can choose Tags from a dictionary list at the Tags Admin portlet, while tagging content.
Tags AdminBy Tags Admin portlet, you can add Tags and organize them into Categories. As shown in the following figure, Tags Admin portlet provides three groups of functionalities to manage tags: Search Tag, Edit Tag and Add Tag.
To search for a Tag in Search Tag group, select a Category: "all" or "no category" or a specific one. Once you input a search criterion, search results will appear dynamically.
To edit a tag, click the Tag by edit links. In Edit Tag group, Tag Value and Properties are displayed. To delete a property of a given Tag, click on the property first, and then click on the Delete button. Or click on the Delete button at the right of the property, for all properties other than the "category" property. Deleting 'category' property will delete the Tag to which the property belongs. Deleting a property other than the 'category' property will delete only that property. To add a property of a given tag, just click on the Add Property button first. Then simply input Name and Value. Click the Save button to save the inputs or Cancel to cancel the inputs.
To delete a Tag, click on the mark "[x]" located next to the tag.
To add a tag, simply input tag name in Add Tag group, and select a Category. Then click the Save button to save the inputs. If the Tag doesn't exist in the current Category, the Tag will be added to the current Category.
•
•
•
•
•
•
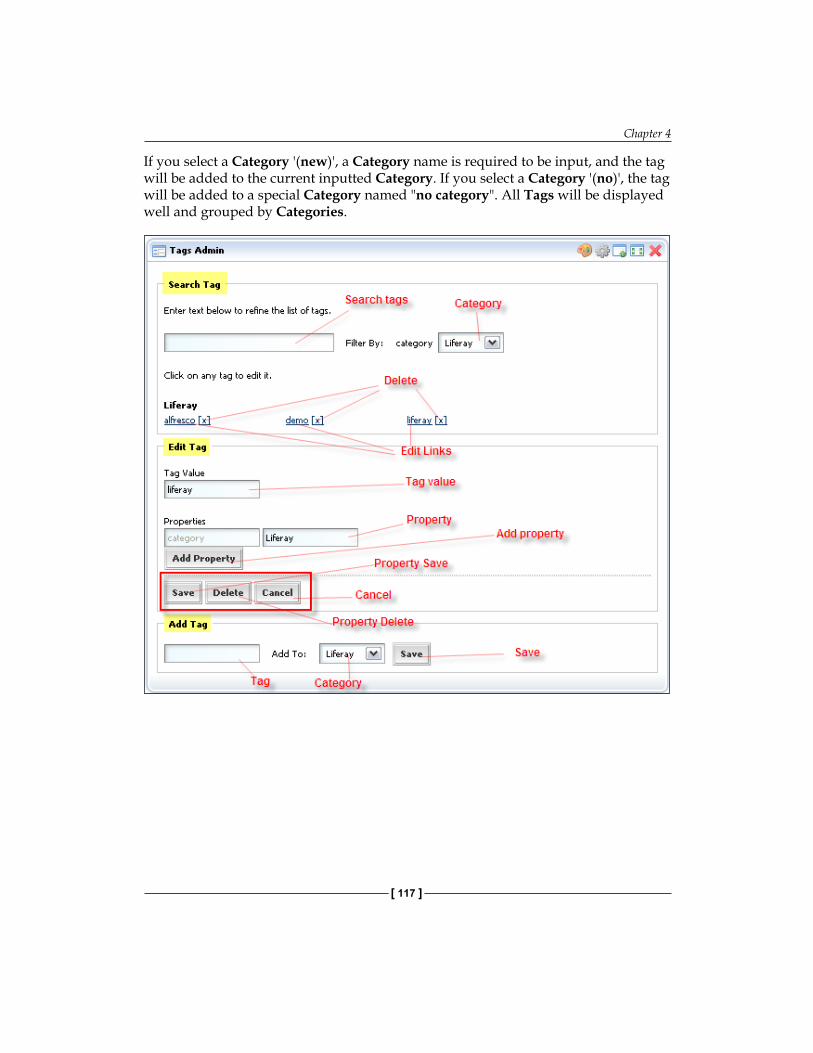
Chapter 4
[ 117 ]
If you select a Category '(new)', a Category name is required to be input, and the tag will be added to the current inputted Category. If you select a Category '(no)', the tag will be added to a special Category named "no category". All Tags will be displayed well and grouped by Categories.
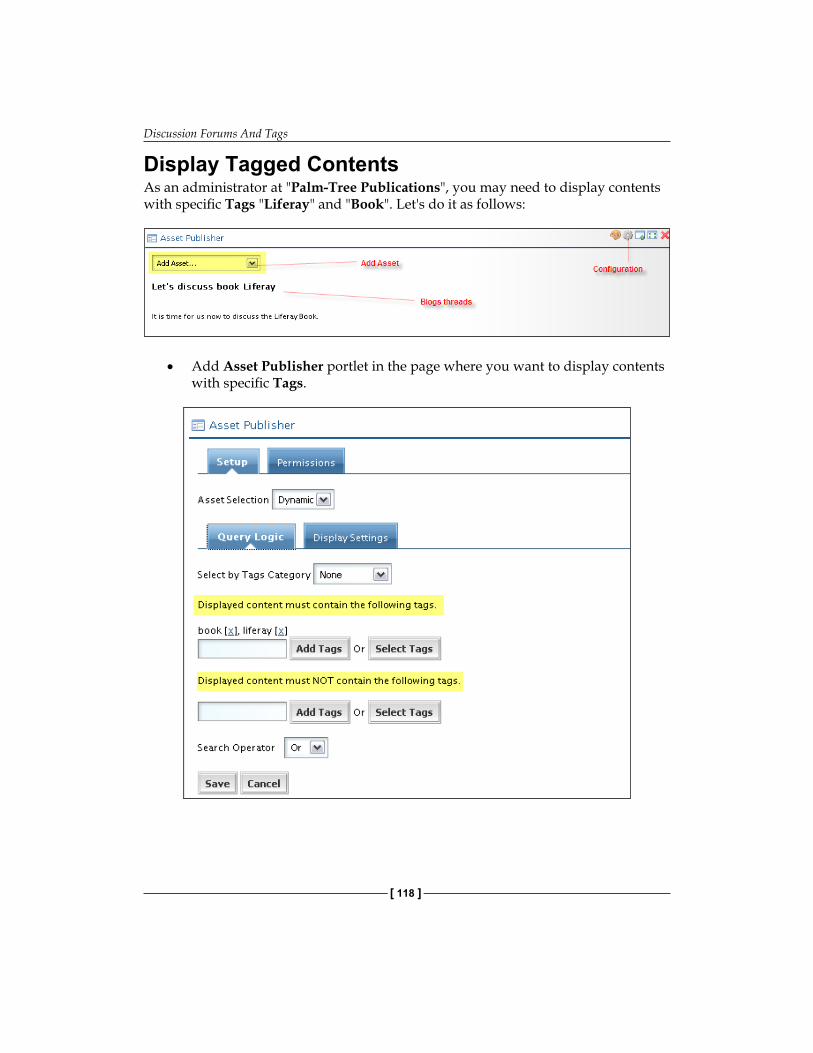
Discussion Forums And Tags
[ 118 ]
Display Tagged ContentsAs an administrator at "Palm-Tree Publications", you may need to display contents with specific Tags "Liferay" and "Book". Let's do it as follows:
Add Asset Publisher portlet in the page where you want to display contents with specific Tags.
•
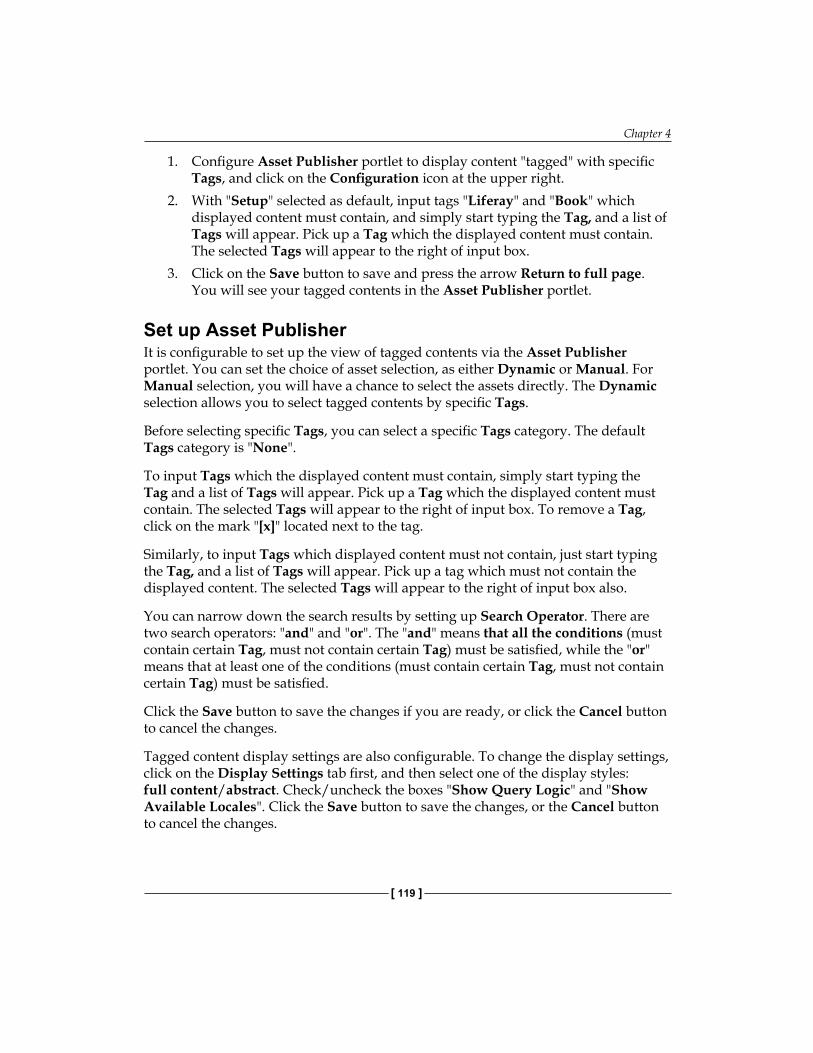
Chapter 4
[ 119 ]
1. Configure Asset Publisher portlet to display content "tagged" with specific Tags, and click on the Configuration icon at the upper right.
2. With "Setup" selected as default, input tags "Liferay" and "Book" which displayed content must contain, and simply start typing the Tag, and a list of Tags will appear. Pick up a Tag which the displayed content must contain. The selected Tags will appear to the right of input box.
3. Click on the Save button to save and press the arrow Return to full page. You will see your tagged contents in the Asset Publisher portlet.
Set up Asset PublisherIt is configurable to set up the view of tagged contents via the Asset Publisher portlet. You can set the choice of asset selection, as either Dynamic or Manual. For Manual selection, you will have a chance to select the assets directly. The Dynamic selection allows you to select tagged contents by specific Tags.
Before selecting specific Tags, you can select a specific Tags category. The default Tags category is "None".
To input Tags which the displayed content must contain, simply start typing the Tag and a list of Tags will appear. Pick up a Tag which the displayed content must contain. The selected Tags will appear to the right of input box. To remove a Tag, click on the mark "[x]" located next to the tag.
Similarly, to input Tags which displayed content must not contain, just start typing the Tag, and a list of Tags will appear. Pick up a tag which must not contain the displayed content. The selected Tags will appear to the right of input box also.
You can narrow down the search results by setting up Search Operator. There are two search operators: "and" and "or". The "and" means that all the conditions (must contain certain Tag, must not contain certain Tag) must be satisfied, while the "or" means that at least one of the conditions (must contain certain Tag, must not contain certain Tag) must be satisfied.
Click the Save button to save the changes if you are ready, or click the Cancel button to cancel the changes.
Tagged content display settings are also configurable. To change the display settings, click on the Display Settings tab first, and then select one of the display styles: full content/abstract. Check/uncheck the boxes "Show Query Logic" and "Show Available Locales". Click the Save button to save the changes, or the Cancel button to cancel the changes.
Discussion Forums And Tags
[ 120 ]
The Asset Publisher portlet provides a way to display tagged contents: Bookmarks entries, Blogs entries, Document Library documents, Image Gallery images, Wiki articles, Journal articles, and Message Board threads. Given a set of Tags, the contents "tagged" with specific Tags will be shown in this portlet.
In addition, you can easily add assets (such as Bookmarks entries, Blogs entries, Document Library documents, Image Gallery images, and Journal articles) via this portlet.
For Bookmarks entries, Blogs entries, Document Library documents, Image Gallery images, Wiki articles, and Journal articles, refer to the forthcoming chapters.
What Makes Tags Important?Tags are so important that users can generate content and classify that content in their own unique way.
For example (refer to Folksonomies at http://www.uie.com/articles/folksonomies/), suppose that you have a photo-sharing site, where users can Tag their humorous pictures from a vacation. Some pictures, they may tag "hawaii" only, others they may tag "funny" only. A number of pictures they may tag both "funny" and "hawaii". Later, when they want to view their pictures from Hawaii, they simply select "hawaii". If they want to view all their funny pictures, they would select "funny". If they want to view only their funny pictures from Hawaii, they would simply select both "hawaii" and "funny".
Let's consider another example (refer to Tags & Folksonomies at http://www.threadwatch.org/node/1206). Suppose that you have a website on hobbies and you have lots of users who like fishing. Thus when users input data, photos, reviews or anything you might dream up, they will invariably tag their posts with "Fishing". Some of the users will tag their posts with "Angling", and others may use two or more tags such as "Fishing Vacation" or "Holiday Fishing".
Then you can generate a web site with the following data:
Fishing—100 postsAngling—200 postsFishing Vacation—300 postsHoliday Fishing—400 posts
Imagine creating menus and pages based on these categories.
•
•
•
•
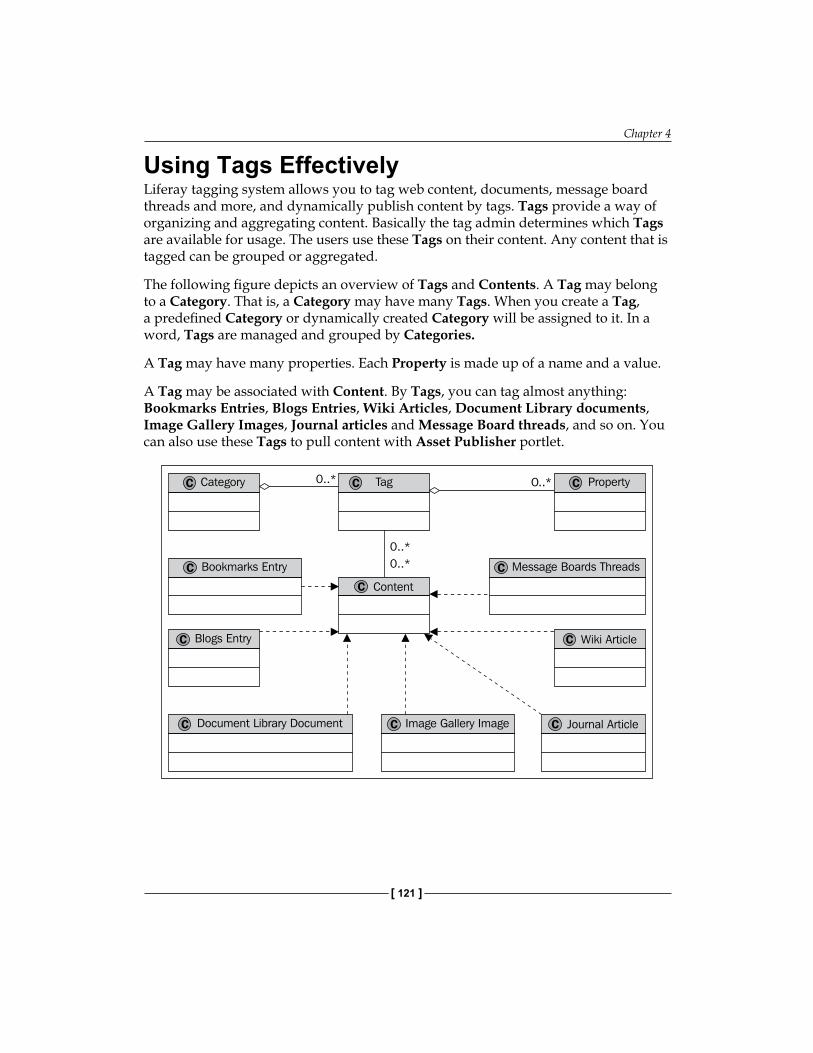
Chapter 4
[ 121 ]
Using Tags EffectivelyLiferay tagging system allows you to tag web content, documents, message board threads and more, and dynamically publish content by tags. Tags provide a way of organizing and aggregating content. Basically the tag admin determines which Tags are available for usage. The users use these Tags on their content. Any content that is tagged can be grouped or aggregated.
The following figure depicts an overview of Tags and Contents. A Tag may belong to a Category. That is, a Category may have many Tags. When you create a Tag, a predefined Category or dynamically created Category will be assigned to it. In a word, Tags are managed and grouped by Categories.
A Tag may have many properties. Each Property is made up of a name and a value.
A Tag may be associated with Content. By Tags, you can tag almost anything: Bookmarks Entries, Blogs Entries, Wiki Articles, Document Library documents, Image Gallery Images, Journal articles and Message Board threads, and so on. You can also use these Tags to pull content with Asset Publisher portlet.
Discussion Forums And Tags
[ 122 ]
Do Meta Tags work for educatinal purposes? The answer is clearly no. Meta Tags allow users to generate Content and classify that Content in their own unique way. If educating Tags was in need, you could add these Tags' properties of Contents in your content model.
SummaryThis chapter discussed how to add Categories and sub-categories for Message Boards; how to add Threads and Posts for a given Category; how to manage (view, add, update, delete, and feed) Categories, Threads and Posts; and how to set Permissions of Message Boards, Categories and Threads. Then it discussed how to add a Tag and manage (add, delete, and change category) Tags; and how to Tag contents and display tagged contents.
Wikis, Web Form And PollsIn the intranet website "book.com" of "Palm Tree Publications", it is required that a track of information is kept about editorial guidance and other resources that require frequent editing, It is also required that a track of Votes is kept on the topic, "Is Liferay Book a proper book", and moreover, collect suggestions on the subjects such as "Liferay Book" and "Alfresco Book". Liferay Wiki provides a straightforward Wiki solution. Liferay. Liferay Web Form provides a way to collect Users' suggestions and Polls, and provides survey to assess public opinions. This chapter will introduce you to Liferay Wikis, Web Form and Polls.
By the end of this chapter, you will have learned how to:
Add Node and manage (view, update and delete) Nodes of Wikis.Add Pages at the nodes in Wikis.Manage (view, update, delete and search) Pages of a given Node in Wikis.Use Permissions on Wikis nodes.Publish Wiki articles.Set up Web Form portlet.Configure Polls portlet.Display Polls.
Working with WikisIn order to provide an environment for employees at "Palm Tree Publications" to keep track of information about editorial guidance and other resources that require frequent editing, we can use Liferay Wikis portlet at the Book Lovers Community (Public Pages).
As an administrator of "Palm Tree Publications", you need to create a page called "Wikis" under the Page "Community" at the Book Lovers Community and further, add the Wikis portlet in the page "Wikis". Then you are ready to create Nodes called "Liferay" and "Alfresco".
••••••••
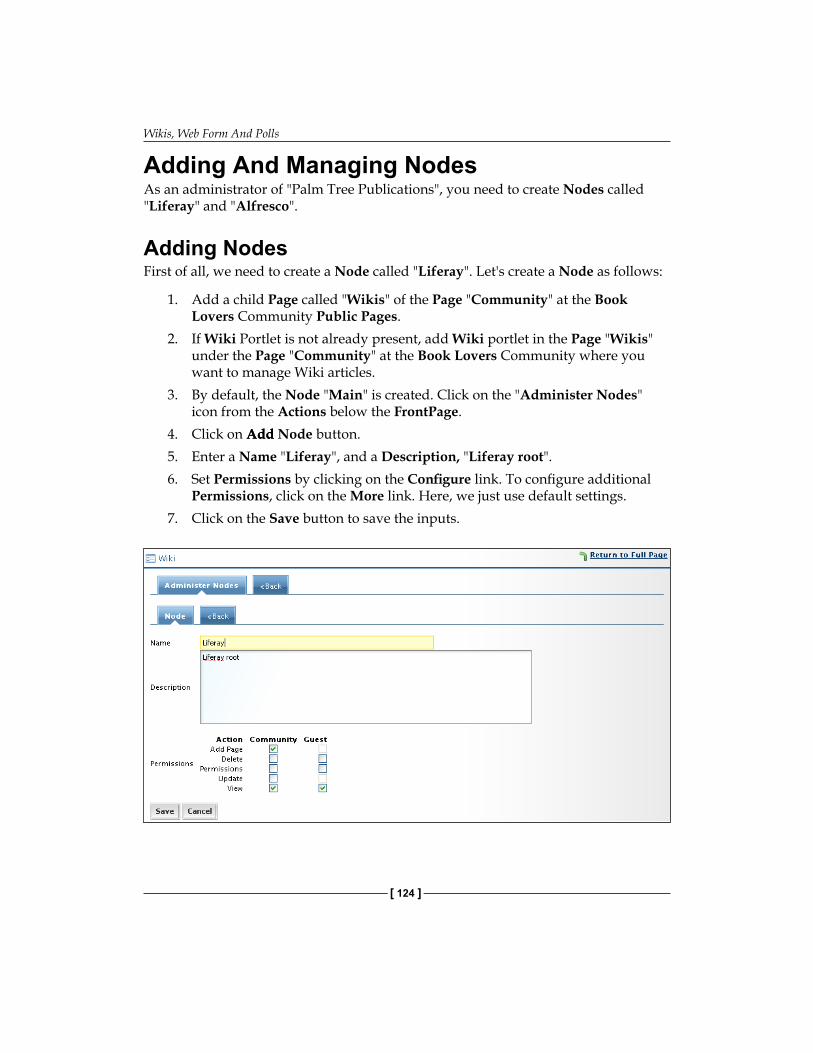
Wikis, Web Form And Polls
[ 124 ]
Adding And Managing NodesAs an administrator of "Palm Tree Publications", you need to create Nodes called "Liferay" and "Alfresco".
Adding NodesFirst of all, we need to create a Node called "Liferay". Let's create a Node as follows:
1. Add a child Page called "Wikis" of the Page "Community" at the Book Lovers Community Public Pages.
2. If Wiki Portlet is not already present, add Wiki portlet in the Page "Wikis" under the Page "Community" at the Book Lovers Community where you want to manage Wiki articles.
3. By default, the Node "Main" is created. Click on the "Administer Nodes" icon from the Actions below the FrontPage.
4. Click on AddAdd Node button.5. Enter a Name "Liferay", and a Description, "Liferay root".6. Set Permissions by clicking on the Configure link. To configure additional
Permissions, click on the More link. Here, we just use default settings.7. Click on the Save button to save the inputs.
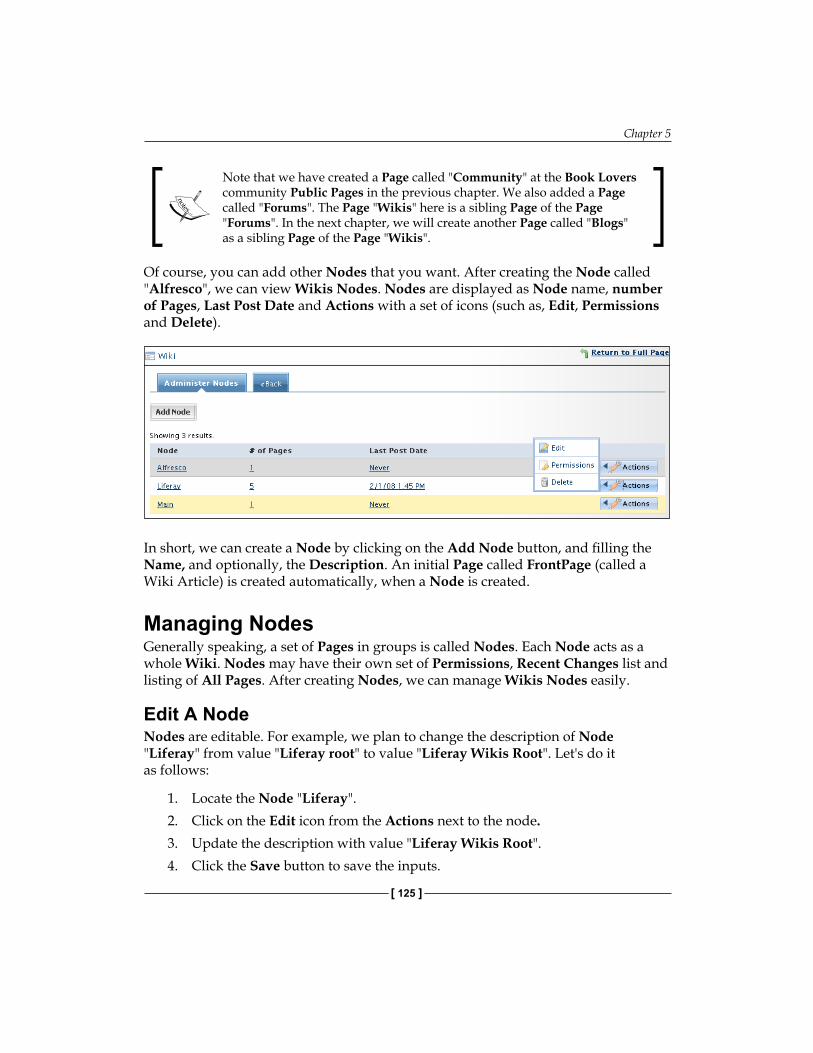
Chapter 5
[ 125 ]
Note that we have created a Page called "Community" at the Book Lovers community Public Pages in the previous chapter. We also added a Page called "Forums". The Page "Wikis" here is a sibling Page of the Page "Forums". In the next chapter, we will create another Page called "Blogs" as a sibling Page of the Page "Wikis".
Of course, you can add other Nodes that you want. After creating the Node called "Alfresco", we can view Wikis Nodes. Nodes are displayed as Node name, number of Pages, Last Post Date and Actions with a set of icons (such as, Edit, Permissions and Delete).
In short, we can create a Node by clicking on the Add Node button, and filling the Name, and optionally, the Description. An initial Page called FrontPage (called a Wiki Article) is created automatically, when a Node is created.
Managing NodesGenerally speaking, a set of Pages in groups is called Nodes. Each Node acts as a whole Wiki. Nodes may have their own set of Permissions, Recent Changes list and listing of All Pages. After creating Nodes, we can manage Wikis Nodes easily.
Edit A NodeNodes are editable. For example, we plan to change the description of Node "Liferay" from value "Liferay root" to value "Liferay Wikis Root". Let's do it as follows:
1. Locate the Node "Liferay".2. Click on the Edit icon from the Actions next to the node.3. Update the description with value "Liferay Wikis Root".4. Click the Save button to save the inputs.
Wikis, Web Form And Polls
[ 126 ]
Delete A NodeNodes are removable. For instance, the Node "Alfresco" is not wanted anymore. We have to remove this from the Wiki portlet. Let's delete it as follows:
1. Locate the Node "Alfresco", which you want to delete.2. Click on the Delete icon from the Actions located next to the node.3. A screen will appear asking if you want to delete this. Click OK to
confirm deletion.
Note that deleting a Node will delete all related Pages which belong to this Node. Moreover, any Comments related to the Pages of the Node will be deleted too.
Adding PagesAs an administrator of "Palm Tree Publications", you may need to add more Pages, such as "LiferayAlfrescoIntegration" and "AlfrescoBook", under the node "Liferay". Let's do it as follows:
1. Locate the Node "Liferay" tab.2. Click on the name of the Node "Liferay".3. Click on the icon Edit from the Actions below the Page "FrontPage".3. Select a Format such as "Classic Wiki".4. In the editing Page, input "LiferayAlfrescoIntegration" and "AlfrescoBook".5. If you need to add Tags, press the button Select Tags, or input tag and press
the button, Add Tags,.6. Click on the Save button when you are ready.
Of course, you can add a Page directly. Let's suppose you want to add a Page "MyPage" under the Node "Liferay". Let's do it as follows:
1. Locate the Node "Liferay" tab.2. Click on the name of the Node, "Liferay".3. Click on the icon, Add Page, from the Actions below the Page "FrontPage".4. Input the Page name as "MyPage".5. Click on the OK button to save.
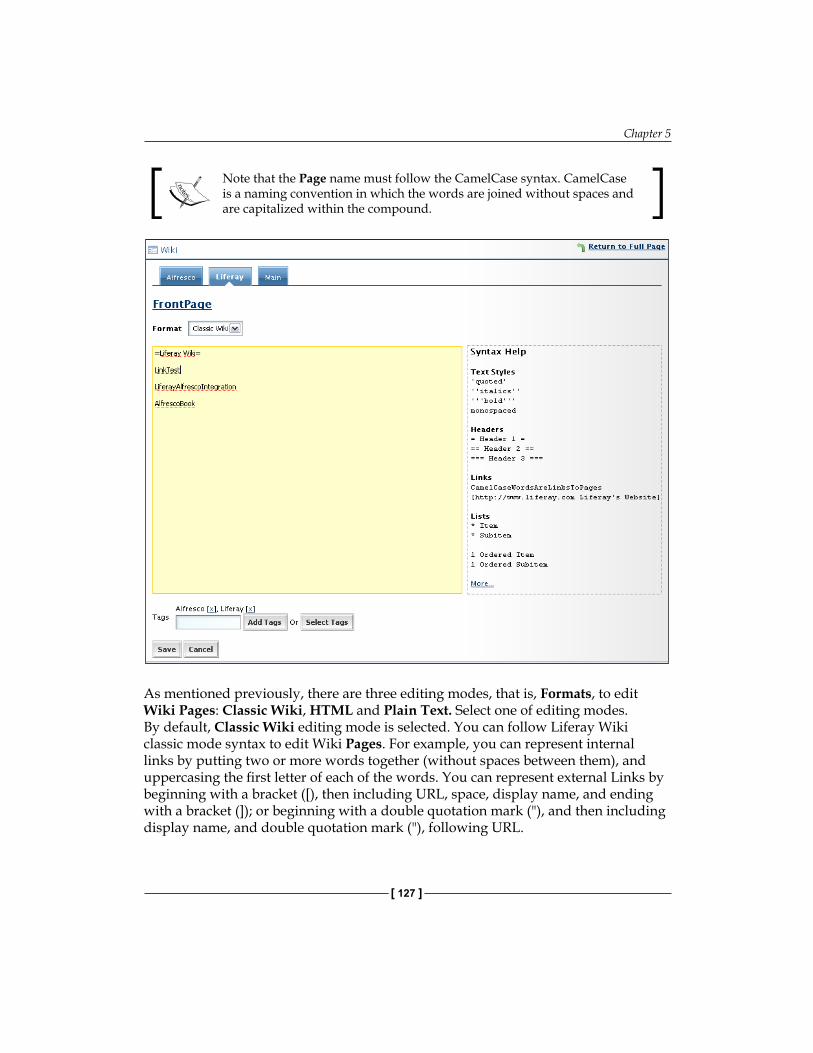
Chapter 5
[ 127 ]
Note that the Page name must follow the CamelCase syntax. CamelCase is a naming convention in which the words are joined without spaces and are capitalized within the compound.
As mentioned previously, there are three editing modes, that is, Formats, to edit Wiki Pages: Classic Wiki, HTML and Plain Text. Select one of editing modes. By default, Classic Wiki editing mode is selected. You can follow Liferay Wiki classic mode syntax to edit Wiki Pages. For example, you can represent internal links by putting two or more words together (without spaces between them), and uppercasing the first letter of each of the words. You can represent external Links by beginning with a bracket ([), then including URL, space, display name, and ending with a bracket (]); or beginning with a double quotation mark ("), and then including display name, and double quotation mark ("), following URL.
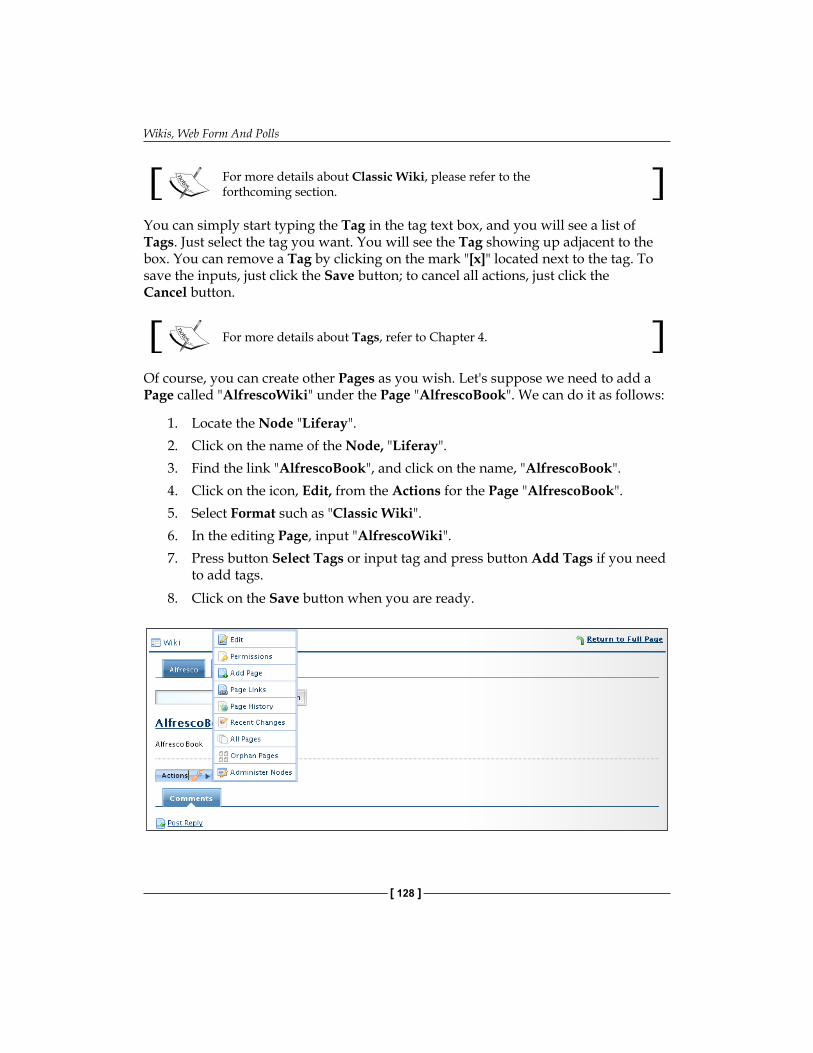
Wikis, Web Form And Polls
[ 128 ]
For more details about Classic Wiki, please refer to the forthcoming section.
You can simply start typing the Tag in the tag text box, and you will see a list of Tags. Just select the tag you want. You will see the Tag showing up adjacent to the box. You can remove a Tag by clicking on the mark "[x]" located next to the tag. To save the inputs, just click the Save button; to cancel all actions, just click the Cancel button.
For more details about Tags, refer to Chapter 4.
Of course, you can create other Pages as you wish. Let's suppose we need to add a Page called "AlfrescoWiki" under the Page "AlfrescoBook". We can do it as follows:
1. Locate the Node "Liferay".2. Click on the name of the Node, "Liferay".3. Find the link "AlfrescoBook", and click on the name, "AlfrescoBook".4. Click on the icon, Edit, from the Actions for the Page "AlfrescoBook".5. Select Format such as "Classic Wiki".6. In the editing Page, input "AlfrescoWiki".7. Press button Select Tags or input tag and press button Add Tags if you need
to add tags.8. Click on the Save button when you are ready.
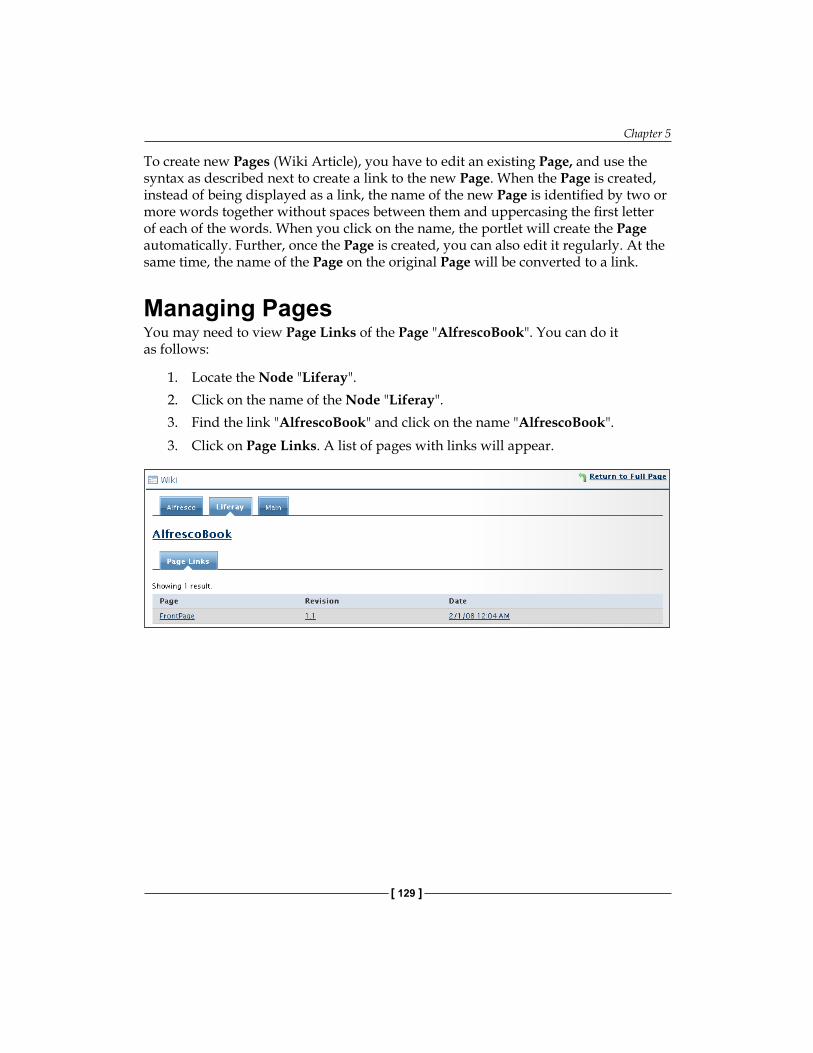
Chapter 5
[ 129 ]
To create new Pages (Wiki Article), you have to edit an existing Page, and use the syntax as described next to create a link to the new Page. When the Page is created, instead of being displayed as a link, the name of the new Page is identified by two or more words together without spaces between them and uppercasing the first letter of each of the words. When you click on the name, the portlet will create the Page automatically. Further, once the Page is created, you can also edit it regularly. At the same time, the name of the Page on the original Page will be converted to a link.
Managing PagesYou may need to view Page Links of the Page "AlfrescoBook". You can do it as follows:
1. Locate the Node "Liferay".2. Click on the name of the Node "Liferay".3. Find the link "AlfrescoBook" and click on the name "AlfrescoBook".3. Click on Page Links. A list of pages with links will appear.
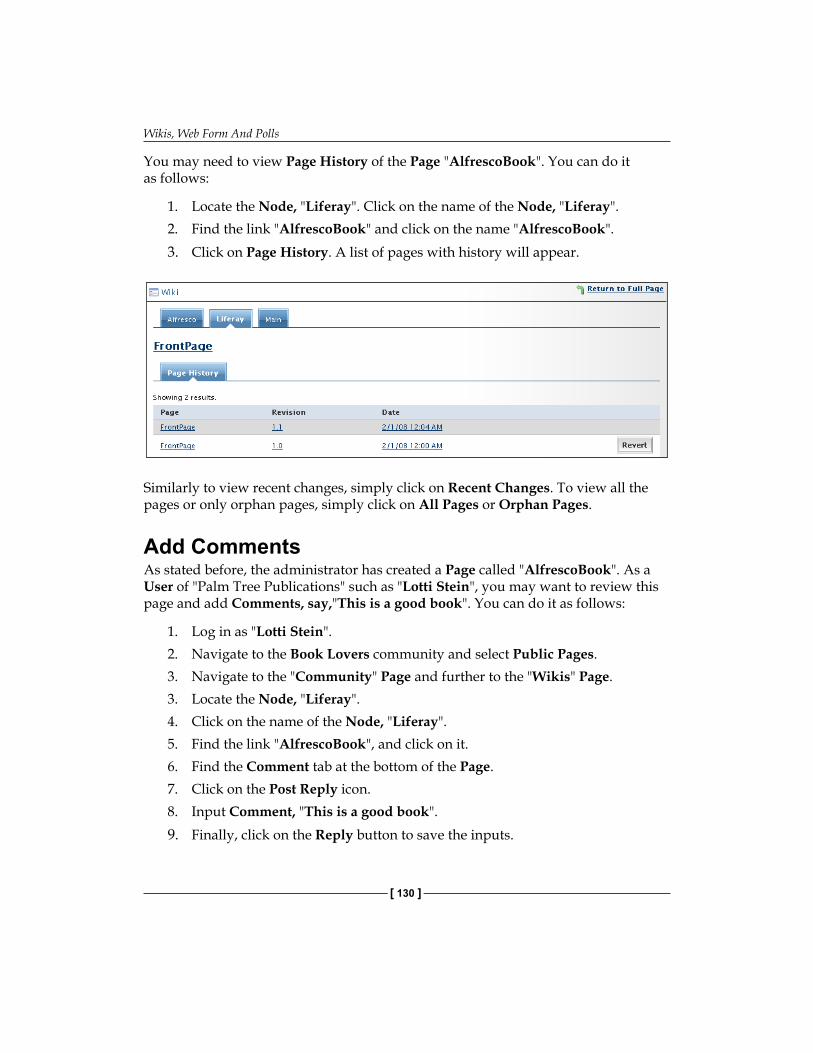
Wikis, Web Form And Polls
[ 130 ]
You may need to view Page History of the Page "AlfrescoBook". You can do it as follows:
1. Locate the Node, "Liferay". Click on the name of the Node, "Liferay".2. Find the link "AlfrescoBook" and click on the name "AlfrescoBook".3. Click on Page History. A list of pages with history will appear.
Similarly to view recent changes, simply click on Recent Changes. To view all the pages or only orphan pages, simply click on All Pages or Orphan Pages.
Add CommentsAs stated before, the administrator has created a Page called "AlfrescoBook". As a User of "Palm Tree Publications" such as "Lotti Stein", you may want to review this page and add Comments, say,"This is a good book". You can do it as follows:
1. Log in as "Lotti Stein".2. Navigate to the Book Lovers community and select Public Pages.3. Navigate to the "Community" Page and further to the "Wikis" Page.3. Locate the Node, "Liferay".4. Click on the name of the Node, "Liferay".5. Find the link "AlfrescoBook", and click on it.6. Find the Comment tab at the bottom of the Page.7. Click on the Post Reply icon.8. Input Comment, "This is a good book".9. Finally, click on the Reply button to save the inputs.
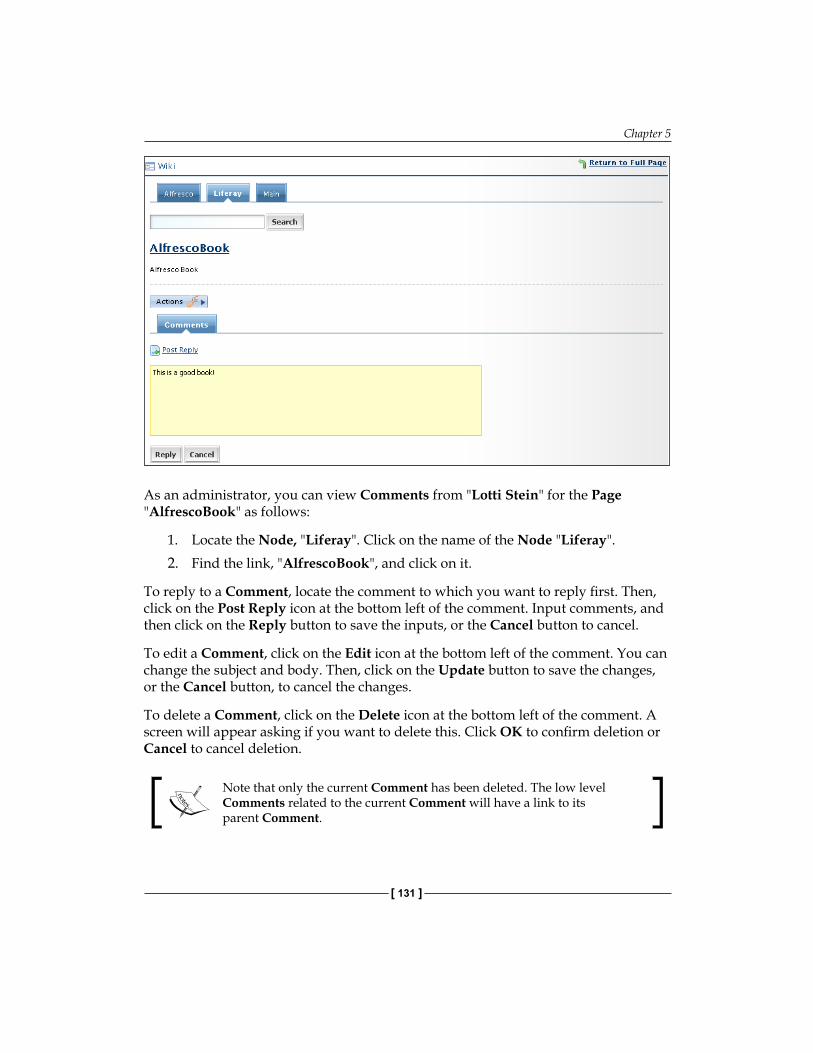
Chapter 5
[ 131 ]
As an administrator, you can view Comments from "Lotti Stein" for the Page "AlfrescoBook" as follows:
1. Locate the Node, "Liferay". Click on the name of the Node "Liferay".2. Find the link, "AlfrescoBook", and click on it.
To reply to a Comment, locate the comment to which you want to reply first. Then, click on the Post Reply icon at the bottom left of the comment. Input comments, and then click on the Reply button to save the inputs, or the Cancel button to cancel.
To edit a Comment, click on the Edit icon at the bottom left of the comment. You can change the subject and body. Then, click on the Update button to save the changes, or the Cancel button, to cancel the changes.
To delete a Comment, click on the Delete icon at the bottom left of the comment. A screen will appear asking if you want to delete this. Click OK to confirm deletion or Cancel to cancel deletion.
Note that only the current Comment has been deleted. The low level Comments related to the current Comment will have a link to its parent Comment.
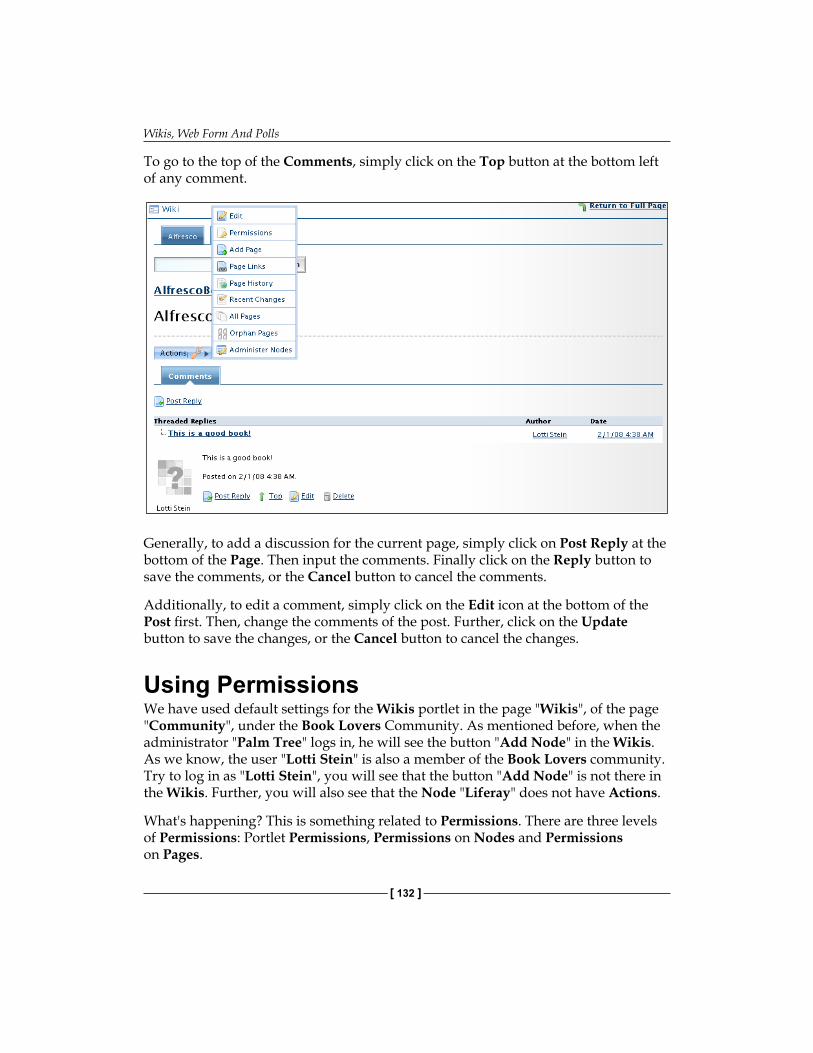
Wikis, Web Form And Polls
[ 132 ]
To go to the top of the Comments, simply click on the Top button at the bottom left of any comment.
Generally, to add a discussion for the current page, simply click on Post Reply at the bottom of the Page. Then input the comments. Finally click on the Reply button to save the comments, or the Cancel button to cancel the comments.
Additionally, to edit a comment, simply click on the Edit icon at the bottom of the Post first. Then, change the comments of the post. Further, click on the Update button to save the changes, or the Cancel button to cancel the changes.
Using PermissionsWe have used default settings for the Wikis portlet in the page "Wikis", of the page "Community", under the Book Lovers Community. As mentioned before, when the administrator "Palm Tree" logs in, he will see the button "Add Node" in the Wikis. As we know, the user "Lotti Stein" is also a member of the Book Lovers community. Try to log in as "Lotti Stein", you will see that the button "Add Node" is not there in the Wikis. Further, you will also see that the Node "Liferay" does not have Actions.
What's happening? This is something related to Permissions. There are three levels of Permissions: Portlet Permissions, Permissions on Nodes and Permissions on Pages.
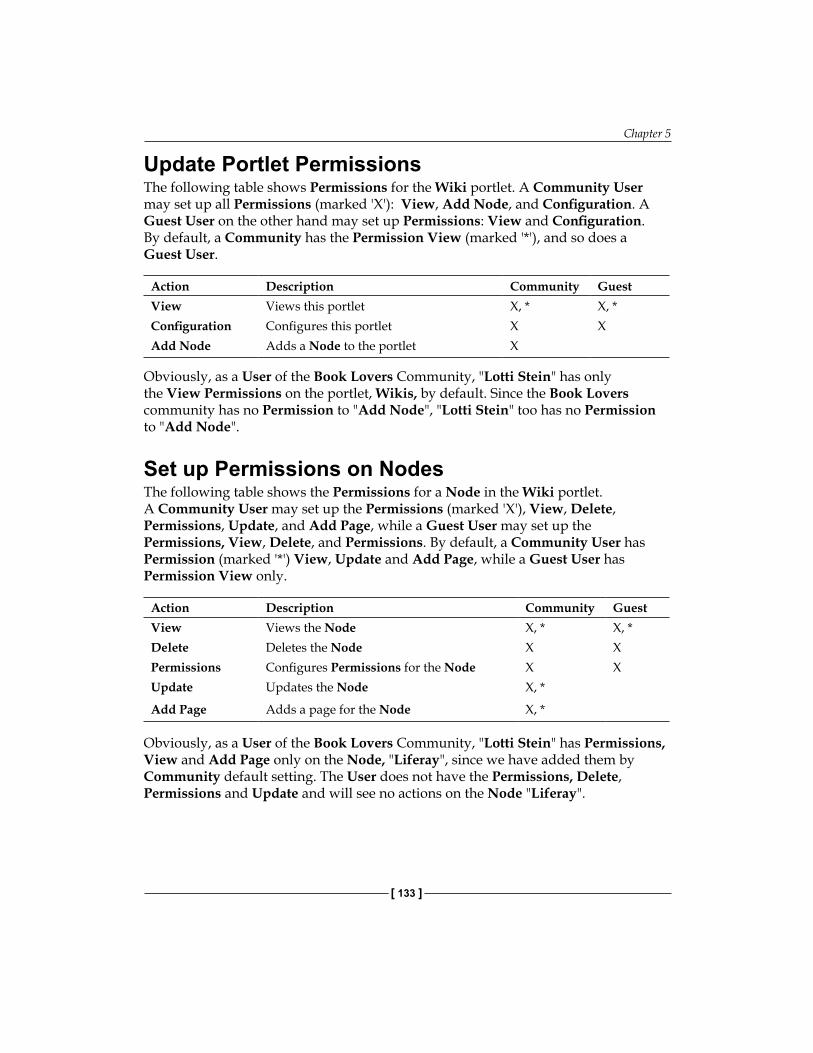
Chapter 5
[ 133 ]
Update Portlet PermissionsThe following table shows Permissions for the Wiki portlet. A Community User may set up all Permissions (marked 'X'): View, Add Node, and Configuration. A Guest User on the other hand may set up Permissions: View and Configuration. By default, a Community has the Permission View (marked '*'), and so does a Guest User.
Action Description Community GuestView Views this portlet X, * X, *Configuration Configures this portlet X XAdd Node Adds a Node to the portlet X
Obviously, as a User of the Book Lovers Community, "Lotti Stein" has only the View Permissions on the portlet, Wikis, by default. Since the Book Lovers community has no Permission to "Add Node", "Lotti Stein" too has no Permission to "Add Node".
Set up Permissions on NodesThe following table shows the Permissions for a Node in the Wiki portlet. A Community User may set up the Permissions (marked 'X'), View, Delete, Permissions, Update, and Add Page, while a Guest User may set up the Permissions, View, Delete, and Permissions. By default, a Community User has Permission (marked '*') View, Update and Add Page, while a Guest User has Permission View only.
Action Description Community GuestView Views the Node X, * X, *Delete Deletes the Node X XPermissions Configures Permissions for the Node X XUpdate Updates the Node X, *
Add Page Adds a page for the Node X, *
Obviously, as a User of the Book Lovers Community, "Lotti Stein" has Permissions, View and Add Page only on the Node, "Liferay", since we have added them by Community default setting. The User does not have the Permissions, Delete, Permissions and Update and will see no actions on the Node "Liferay".
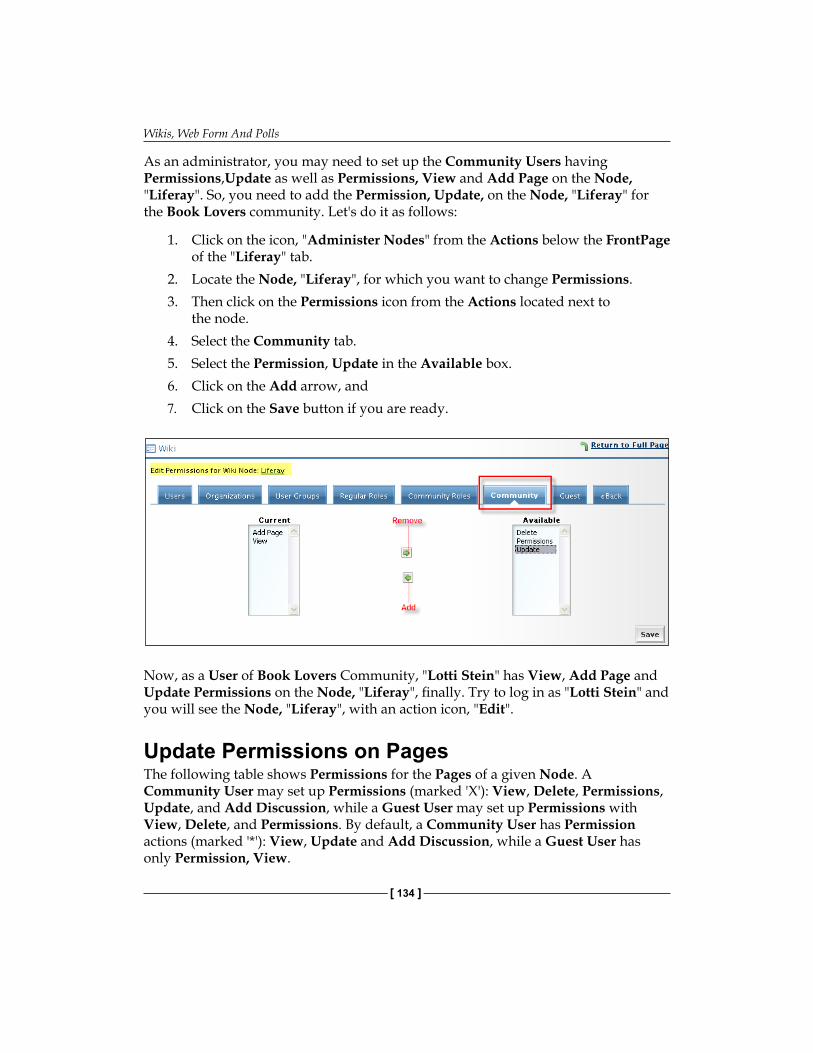
Wikis, Web Form And Polls
[ 134 ]
As an administrator, you may need to set up the Community Users having Permissions,Update as well as Permissions, View and Add Page on the Node, "Liferay". So, you need to add the Permission, Update, on the Node, "Liferay" for the Book Lovers community. Let's do it as follows:
1. Click on the icon, "Administer Nodes" from the Actions below the FrontPage of the "Liferay" tab.
2. Locate the Node, "Liferay", for which you want to change Permissions.3. Then click on the Permissions icon from the Actions located next to
the node.4. Select the Community tab.5. Select the Permission, Update in the Available box.6. Click on the Add arrow, and7. Click on the Save button if you are ready.
Now, as a User of Book Lovers Community, "Lotti Stein" has View, Add Page and Update Permissions on the Node, "Liferay", finally. Try to log in as "Lotti Stein" and you will see the Node, "Liferay", with an action icon, "Edit".
Update Permissions on PagesThe following table shows Permissions for the Pages of a given Node. A Community User may set up Permissions (marked 'X'): View, Delete, Permissions, Update, and Add Discussion, while a Guest User may set up Permissions with View, Delete, and Permissions. By default, a Community User has Permission actions (marked '*'): View, Update and Add Discussion, while a Guest User has only Permission, View.
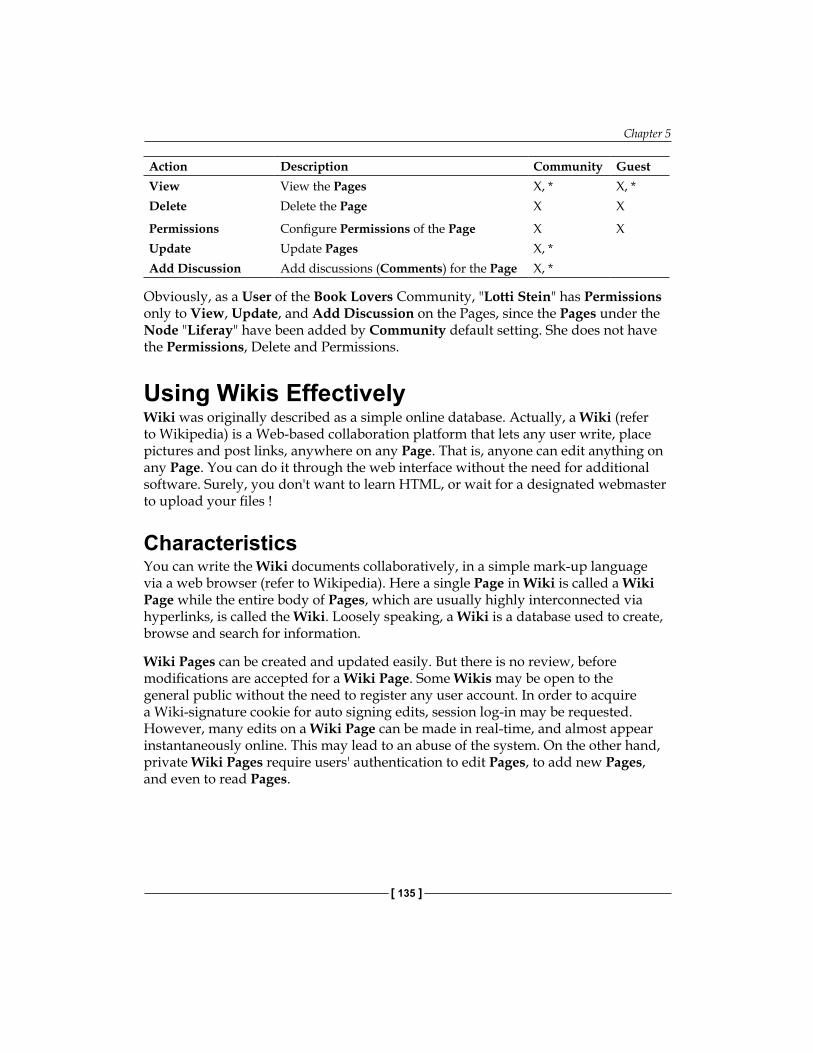
Chapter 5
[ 135 ]
Action Description Community GuestView View the Pages X, * X, *Delete Delete the Page X X
Permissions Configure Permissions of the Page X XUpdate Update Pages X, *Add Discussion Add discussions (Comments) for the Page X, *
Obviously, as a User of the Book Lovers Community, "Lotti Stein" has Permissions only to View, Update, and Add Discussion on the Pages, since the Pages under the Node "Liferay" have been added by Community default setting. She does not have the Permissions, Delete and Permissions.
Using Wikis EffectivelyWiki was originally described as a simple online database. Actually, a Wiki (refer to Wikipedia) is a Web-based collaboration platform that lets any user write, place pictures and post links, anywhere on any Page. That is, anyone can edit anything on any Page. You can do it through the web interface without the need for additional software. Surely, you don't want to learn HTML, or wait for a designated webmaster to upload your files !
CharacteristicsYou can write the Wiki documents collaboratively, in a simple mark-up language via a web browser (refer to Wikipedia). Here a single Page in Wiki is called a Wiki Page while the entire body of Pages, which are usually highly interconnected via hyperlinks, is called the Wiki. Loosely speaking, a Wiki is a database used to create, browse and search for information.
Wiki Pages can be created and updated easily. But there is no review, before modifications are accepted for a Wiki Page. Some Wikis may be open to the general public without the need to register any user account. In order to acquire a Wiki-signature cookie for auto signing edits, session log-in may be requested. However, many edits on a Wiki Page can be made in real-time, and almost appear instantaneously online. This may lead to an abuse of the system. On the other hand, private Wiki Pages require users' authentication to edit Pages, to add new Pages, and even to read Pages.
Wikis, Web Form And Polls
[ 136 ]
Design PrinciplesWiki design principles involve the following items (refer to Wiki Design Principles at http://c2.com/cgi/wiki?WikiDesignPrinciples):
1. Open—a Page should be incomplete or poorly organized, any reader can edit it as he wants.
2. Cross-referencing—Pages can cite other Pages that may have not been written yet.
3. Organic—it is open to edit and evolve the structure and text content of the web site.
4. Secular—a small number of text conventions provide access to the most useful page markup.
5. Universal—any writer is automatically an editor and an organizer. Editing and organizing Wiki Pages is the same as writing a Wikis Page.
6. Manifest— the formatted output will suggest the input required to reproduce Wikis Pages.
7. Unified—no additional context is required to interpret Pages, since Page names are drawn from a flat space.
8. Precise—in order to avoid most name clashes, Pages are titled with sufficient precision, typically, by forming noun phrases.
9. Tolerant—interpretable behavior is preferred to error messages.10. Observable—any other visitor can watch and review activity within the site.11. Convergent—remove duplication by finding and citing similar or
related content.
Wiki TextWiki-Text language is a mark-up language, alternative to HTML, to write Wikis pages (refer to Wikipedia). Unfortunately, there is no commonly accepted standard Wiki-text language, since the grammar, structure, features and keywords of the Wiki-text language are dependent on the particular Wiki software used on the particular website.
The following figure depicts an overview of the Wiki article search and creation. Initially, you enter the search criterion. If you do not find the articles, you can think of another term, and search again. If you find the articles, then you just display them. Further, if you find related terms, you can create a redirection; otherwise you just create a new article. Wiki text are used as tools to create new article and redirection.
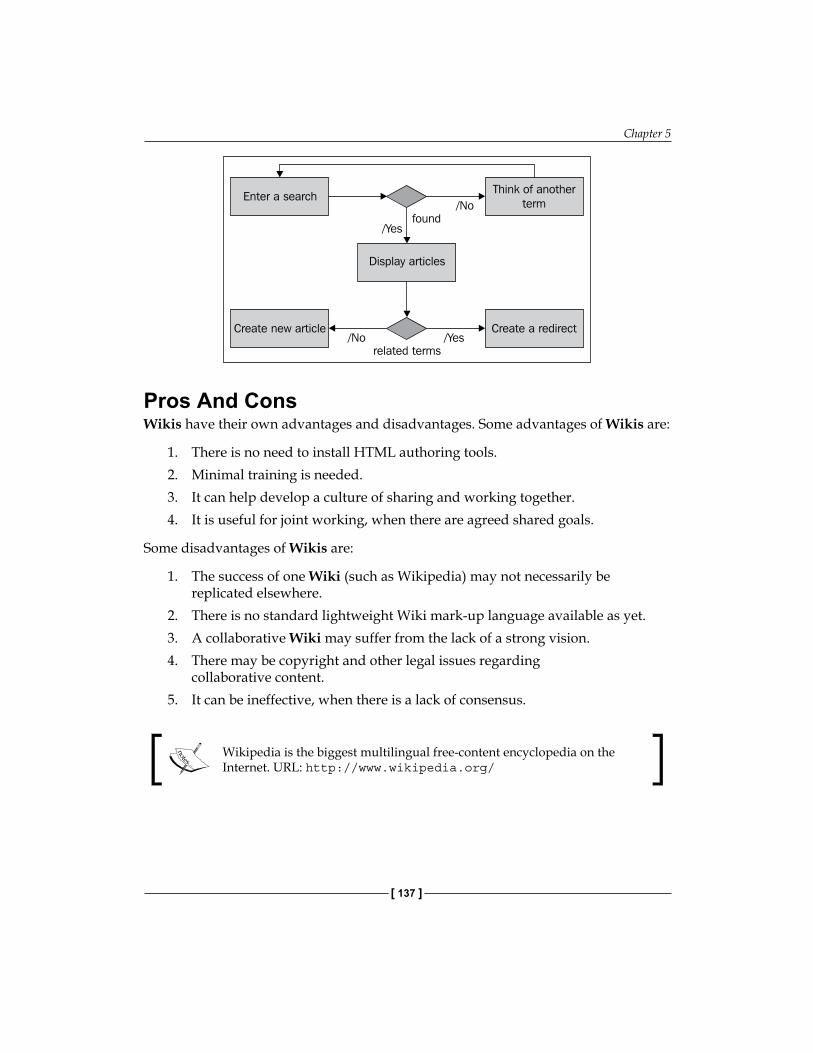
Chapter 5
[ 137 ]
Pros And ConsWikis have their own advantages and disadvantages. Some advantages of Wikis are:
1. There is no need to install HTML authoring tools.2. Minimal training is needed.3. It can help develop a culture of sharing and working together.4. It is useful for joint working, when there are agreed shared goals.
Some disadvantages of Wikis are:
1. The success of one Wiki (such as Wikipedia) may not necessarily be replicated elsewhere.
2. There is no standard lightweight Wiki mark-up language available as yet.3. A collaborative Wiki may suffer from the lack of a strong vision.4. There may be copyright and other legal issues regarding
collaborative content.5. It can be ineffective, when there is a lack of consensus.
Wikipedia is the biggest multilingual free-content encyclopedia on the Internet. URL: http://www.wikipedia.org/
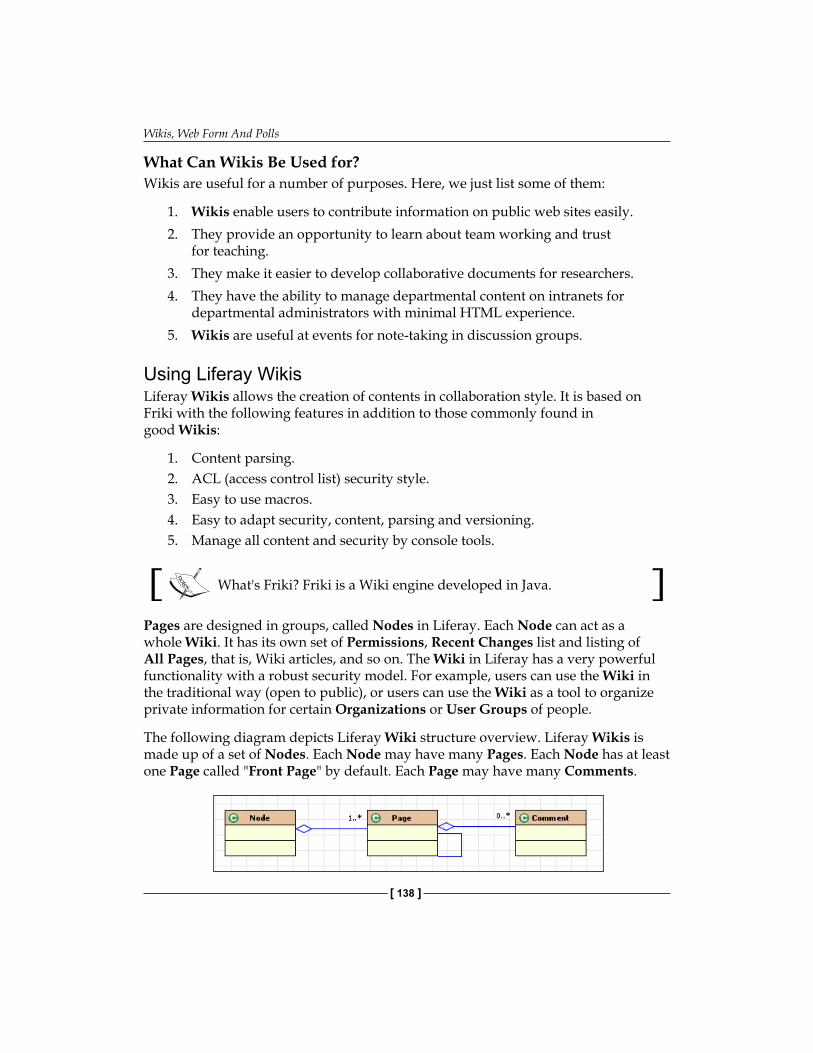
Wikis, Web Form And Polls
[ 138 ]
What Can Wikis Be Used for?Wikis are useful for a number of purposes. Here, we just list some of them:
1. Wikis enable users to contribute information on public web sites easily.2. They provide an opportunity to learn about team working and trust
for teaching.3. They make it easier to develop collaborative documents for researchers.4. They have the ability to manage departmental content on intranets for
departmental administrators with minimal HTML experience.5. Wikis are useful at events for note-taking in discussion groups.
Using Liferay WikisLiferay Wikis allows the creation of contents in collaboration style. It is based on Friki with the following features in addition to those commonly found in good Wikis:
1. Content parsing.2. ACL (access control list) security style.3. Easy to use macros.4. Easy to adapt security, content, parsing and versioning.5. Manage all content and security by console tools.
What's Friki? Friki is a Wiki engine developed in Java.
Pages are designed in groups, called Nodes in Liferay. Each Node can act as a whole Wiki. It has its own set of Permissions, Recent Changes list and listing of All Pages, that is, Wiki articles, and so on. The Wiki in Liferay has a very powerful functionality with a robust security model. For example, users can use the Wiki in the traditional way (open to public), or users can use the Wiki as a tool to organize private information for certain Organizations or User Groups of people.
The following diagram depicts Liferay Wiki structure overview. Liferay Wikis is made up of a set of Nodes. Each Node may have many Pages. Each Node has at least one Page called "Front Page" by default. Each Page may have many Comments.

Chapter 5
[ 139 ]
Liferay Wiki comes with three editing modes: Classic, HTML and Plain Text.
Classic ModeThe classic editing mode uses text conventions to format the text. The text is later converted to HTML which will be presented by the Friki engine.
Liferay Wiki uses the forthcoming syntax (refer to Liferay Wiki):
Text styles: at the beginning and at the end of the text:Sole single-quote (') for quote.Double single-quotes ('') for emphasis, usually italics.Triple single-quotes (''') for strong emphasis, usually bold.Quadruple single-quotes ('''') for strong emphasis, usually bold and italics.
Lists:Tab * (or 8 spaces and *), for first level; tab-tab * for second level, and so forth.* for bullet lists, '1.'. For numbered lists (mix at will)—always use '1.'; it will be renumbered automatically.
Headers:Single equal-sign (=) for header 1.Double equal-sign (==) for header 2.Triple equal-sign (===) for header 3, and so on.
Embedded and formatted RAW HTML: also HTML table tags.Horizontal rule: four or more hyphens (----) at the beginning of a line make a horizontal rule.Mono spaced indent: a blank or more spaces (not 8 spaces) at the beginning of the line.Internal Links: two or more words together, without spaces between them, and uppercasing the first letter of each of the words.External Links:
Beginning with a bracket ([), then including URL, space, display name, and ending with a bracket (]).Beginning with a double quotation mark ("), then including display name, and double quotation mark ("), followed by the URL.
•
°
°
°
°
•
°
°
•
°
°
°
•
•
•
•
•
°
°
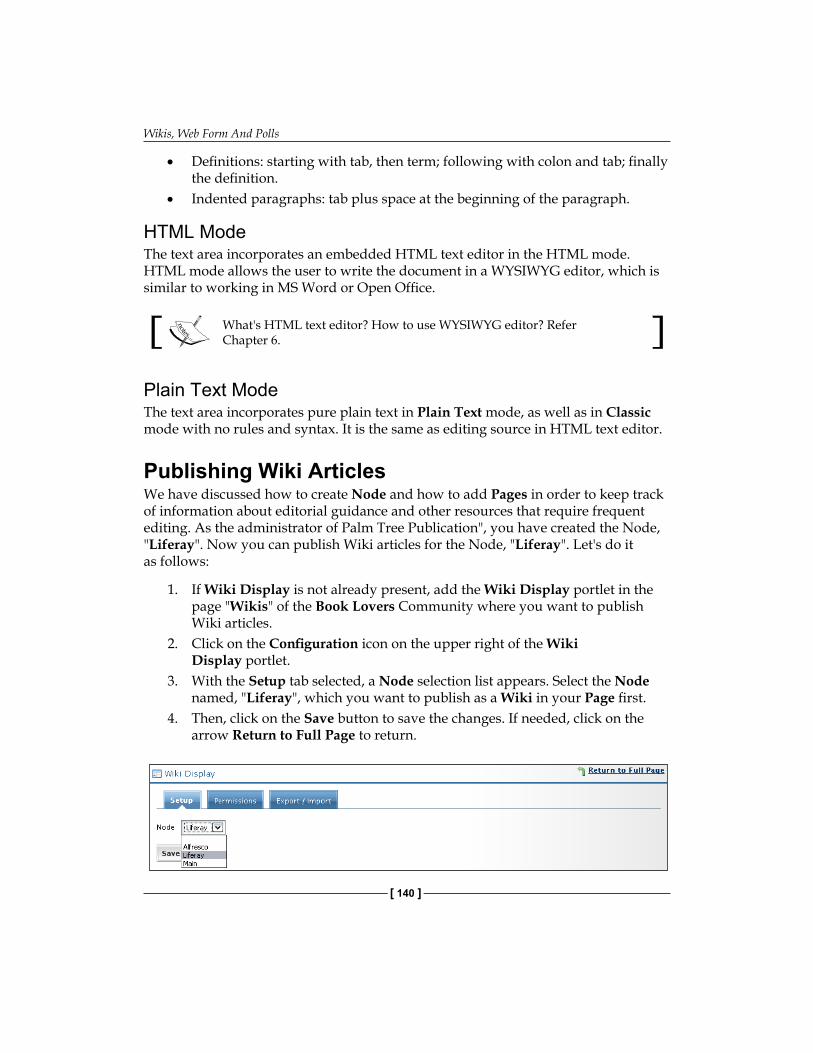
Wikis, Web Form And Polls
[ 140 ]
Definitions: starting with tab, then term; following with colon and tab; finally the definition.Indented paragraphs: tab plus space at the beginning of the paragraph.
HTML ModeThe text area incorporates an embedded HTML text editor in the HTML mode. HTML mode allows the user to write the document in a WYSIWYG editor, which is similar to working in MS Word or Open Office.
What's HTML text editor? How to use WYSIWYG editor? Refer Chapter 6.
Plain Text ModeThe text area incorporates pure plain text in Plain Text mode, as well as in Classic mode with no rules and syntax. It is the same as editing source in HTML text editor.
Publishing Wiki ArticlesWe have discussed how to create Node and how to add Pages in order to keep track of information about editorial guidance and other resources that require frequent editing. As the administrator of Palm Tree Publication", you have created the Node, "Liferay". Now you can publish Wiki articles for the Node, "Liferay". Let's do it as follows:
1. If Wiki Display is not already present, add the Wiki Display portlet in the page "Wikis" of the Book Lovers Community where you want to publish Wiki articles.
2. Click on the Configuration icon on the upper right of the Wiki Display portlet.
3. With the Setup tab selected, a Node selection list appears. Select the Node named, "Liferay", which you want to publish as a Wiki in your Page first.
4. Then, click on the Save button to save the changes. If needed, click on the arrow Return to Full Page to return.
•
•
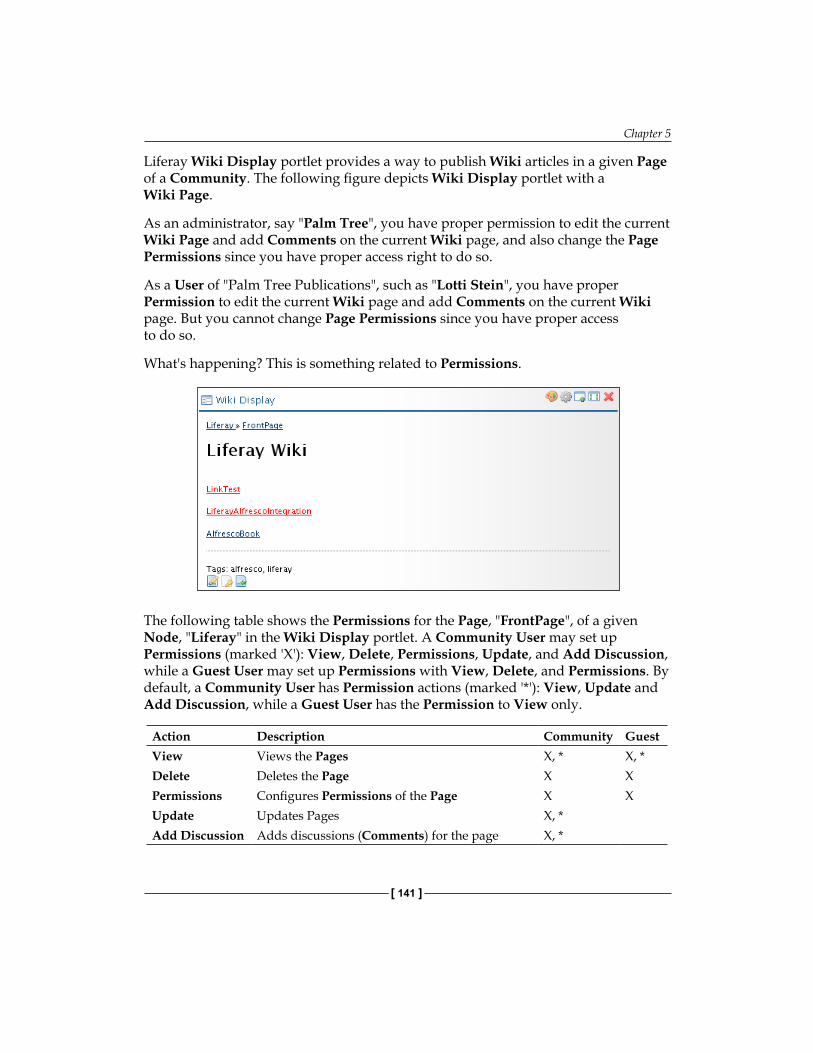
Chapter 5
[ 141 ]
Liferay Wiki Display portlet provides a way to publish Wiki articles in a given Page of a Community. The following figure depicts Wiki Display portlet with a Wiki Page.
As an administrator, say "Palm Tree", you have proper permission to edit the current Wiki Page and add Comments on the current Wiki page, and also change the Page Permissions since you have proper access right to do so.
As a User of "Palm Tree Publications", such as "Lotti Stein", you have proper Permission to edit the current Wiki page and add Comments on the current Wiki page. But you cannot change Page Permissions since you have proper access to do so.
What's happening? This is something related to Permissions.
The following table shows the Permissions for the Page, "FrontPage", of a given Node, "Liferay" in the Wiki Display portlet. A Community User may set up Permissions (marked 'X'): View, Delete, Permissions, Update, and Add Discussion, while a Guest User may set up Permissions with View, Delete, and Permissions. By default, a Community User has Permission actions (marked '*'): View, Update and Add Discussion, while a Guest User has the Permission to View only.
Action Description Community GuestView Views the Pages X, * X, *Delete Deletes the Page X XPermissions Configures Permissions of the Page X XUpdate Updates Pages X, *Add Discussion Adds discussions (Comments) for the page X, *
Wikis, Web Form And Polls
[ 142 ]
Obviously, as a User of the Book Lovers Community, "Lotti Stein" has only the Permissions to View, Update, Add Discussion on the Pages, since the Pages under "Liferay" was added by Community default setting. She does not have the Permissions, Delete and Permissions.
As an administrator, you may need to set up the Community Users having Permissions to View and Update on the Page, "FrontPage", of the Node, "Liferay". That is, you have to remove the Permissions, Add Discussion on the Page, "FrontPage", of the Node, "Liferay", for the Book Lovers community. Let's do it as follows:
1. Click on the Permissions icon at the bottom of the Page, "FrontPage".2. Select the Community tab.3. Select Permission, Add Discussion, in the Current box.4. Click on the Remove arrow. 5. Click on the Save button, if you are ready.
Now, as a User of the Book Lovers Community, "Lotti Stein" has the View and Update Permissions on the Page, "FrontPage", of the Node, "Liferay", finally. Try to log in as "Lotti Stein" and you will see the Page "FrontPage" of the Node, "Liferay" without an action icon, "Comments".
Working with Web FormDo you want to collect suggestions on the "Liferay Book" and "Alfresco Book"? Do you want to collect Comments on other topics? The Web Form portlet would be a useful tool.
The Web Form portlet allows a web administrator to define a form to be published in the website. Users who visit the website can then fill the form, which is then sent to a configured email address.
There are two modes for the Web Form portlet: view mode and edit mode.
Using View ModeThe following figure depicts the view mode of the Web Form portlet. As an administrator, you may need to add the Web Form portlet in the page, "Web Form", of the page "Community. Let's do it as follows:
1. Add a child page called "Web Form" of the page "Community", at the Book Lovers Community Public Pages.
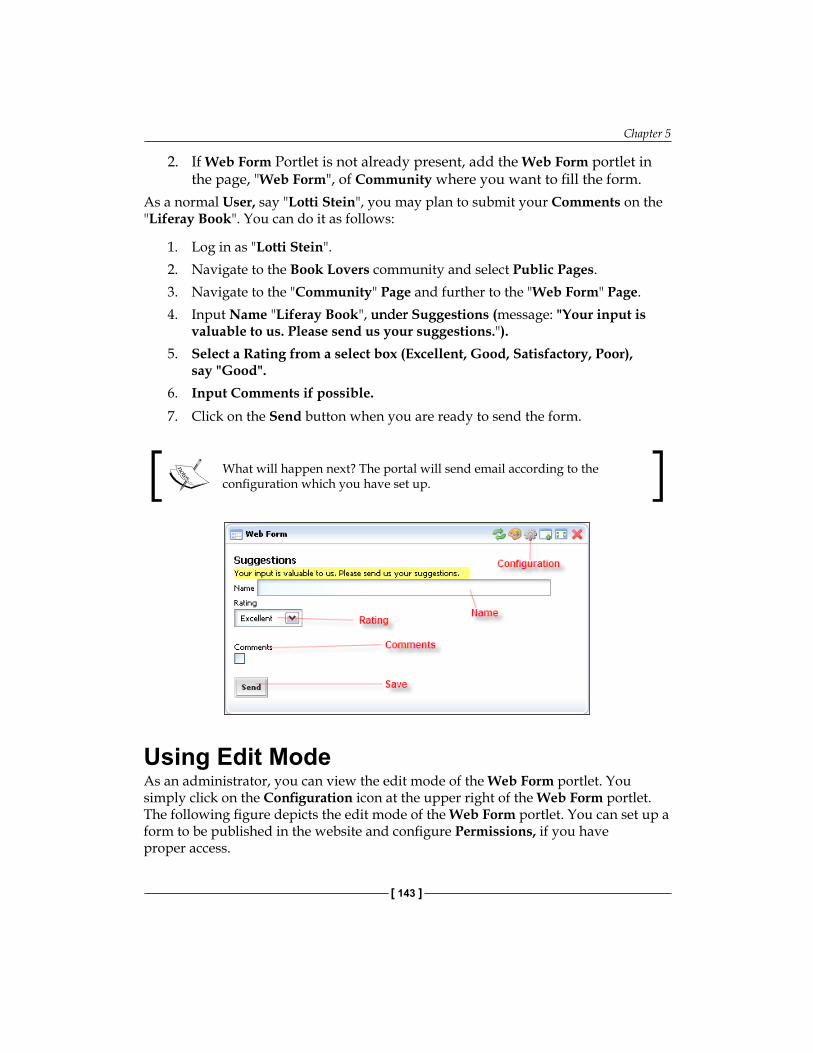
Chapter 5
[ 143 ]
2. If Web Form Portlet is not already present, add the Web Form portlet in the page, "Web Form", of Community where you want to fill the form.
As a normal User, say "Lotti Stein", you may plan to submit your Comments on the "Liferay Book". You can do it as follows:
1. Log in as "Lotti Stein".2. Navigate to the Book Lovers community and select Public Pages.3. Navigate to the "Community" Page and further to the "Web Form" Page.4. Input Name "Liferay Book", underunder Suggestions (message: "Your input is
valuable to us. Please send us your suggestions.").5. Select a Rating from a select box (Excellent, Good, Satisfactory, Poor),
say "Good".6. Input Comments if possible.7. Click on the Send button when you are ready to send the form.
What will happen next? The portal will send email according to the configuration which you have set up.
Using Edit ModeAs an administrator, you can view the edit mode of the Web Form portlet. You simply click on the Configuration icon at the upper right of the Web Form portlet. The following figure depicts the edit mode of the Web Form portlet. You can set up a form to be published in the website and configure Permissions, if you have proper access.
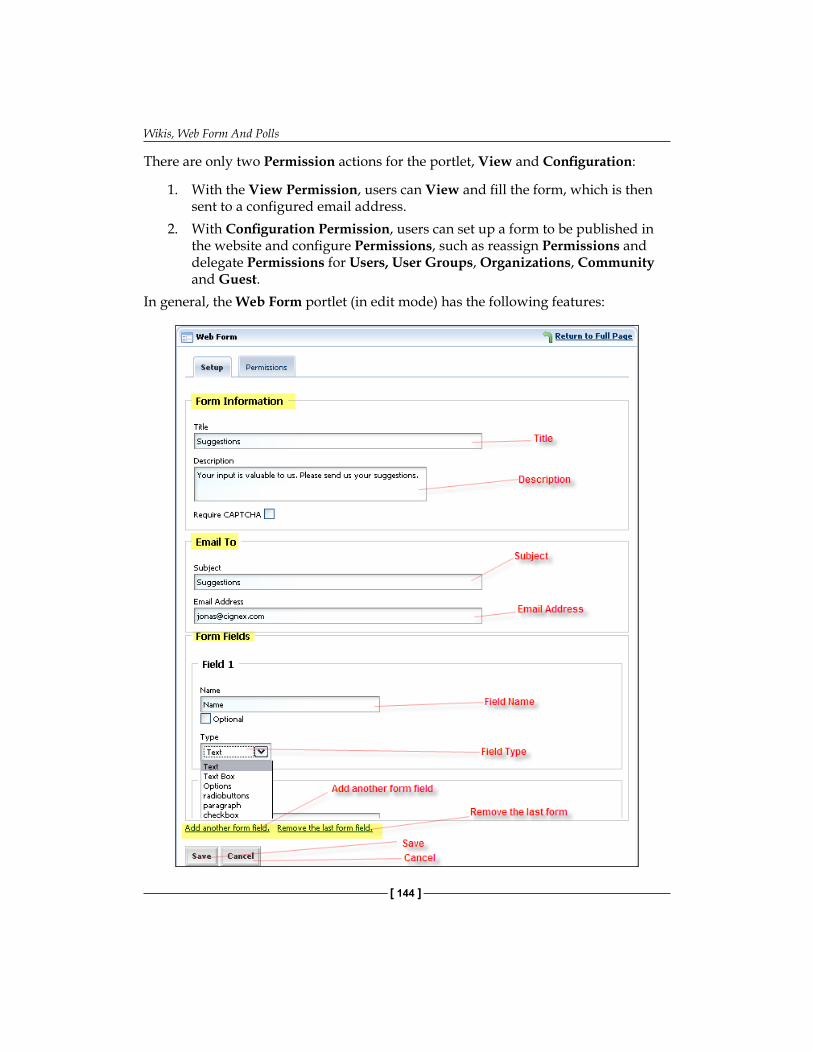
Wikis, Web Form And Polls
[ 144 ]
There are only two Permission actions for the portlet, View and Configuration:
1. With the View Permission, users can View and fill the form, which is then sent to a configured email address.
2. With Configuration Permission, users can set up a form to be published in the website and configure Permissions, such as reassign Permissions and delegate Permissions for Users, User Groups, Organizations, Community and Guest.
In general, the Web Form portlet (in edit mode) has the following features:
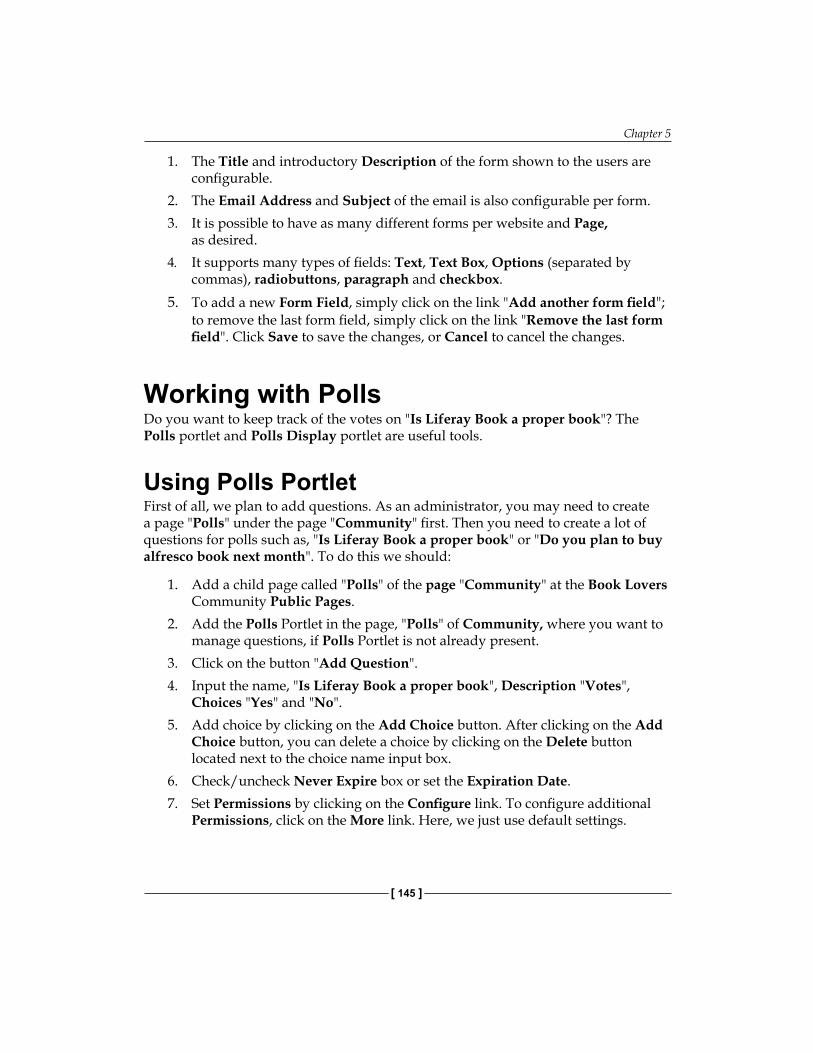
Chapter 5
[ 145 ]
1. The Title and introductory Description of the form shown to the users are configurable.
2. The Email Address and Subject of the email is also configurable per form.3. It is possible to have as many different forms per website and Page,
as desired.4. It supports many types of fields: Text, Text Box, Options (separated by
commas), radiobuttons, paragraph and checkbox.5. To add a new Form Field, simply click on the link "Add another form field";
to remove the last form field, simply click on the link "Remove the last form field". Click Save to save the changes, or Cancel to cancel the changes.
Working with PollsDo you want to keep track of the votes on "Is Liferay Book a proper book"? The Polls portlet and Polls Display portlet are useful tools.
Using Polls PortletFirst of all, we plan to add questions. As an administrator, you may need to create a page "Polls" under the page "Community" first. Then you need to create a lot of questions for polls such as, "Is Liferay Book a proper book" or "Do you plan to buy alfresco book next month". To do this we should:
1. Add a child page called "Polls" of the page "Community" at the Book Lovers Community Public Pages.
2. Add the Polls Portlet in the page, "Polls" of Community, where you want to manage questions, if Polls Portlet is not already present.
3. Click on the button "Add Question".4. Input the name, "Is Liferay Book a proper book", Description "Votes",
Choices "Yes" and "No".5. Add choice by clicking on the Add Choice button. After clicking on the Add
Choice button, you can delete a choice by clicking on the Delete button located next to the choice name input box.
6. Check/uncheck Never Expire box or set the Expiration Date.7. Set Permissions by clicking on the Configure link. To configure additional
Permissions, click on the More link. Here, we just use default settings.
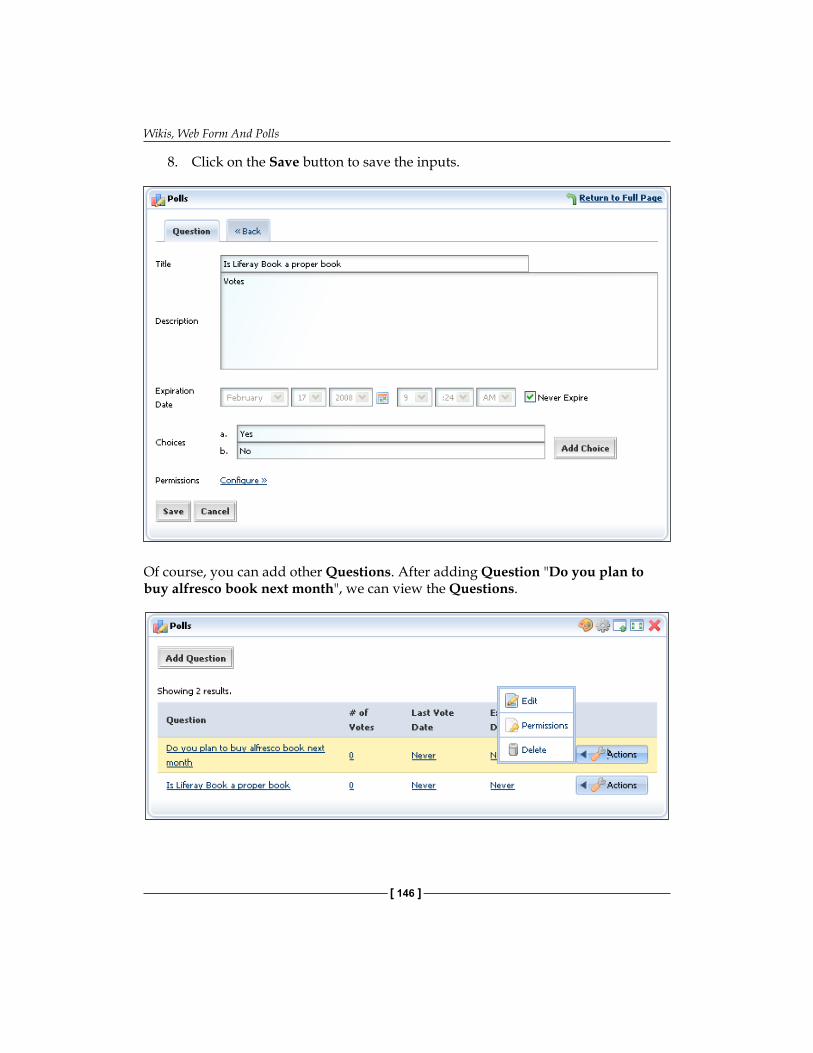
Wikis, Web Form And Polls
[ 146 ]
8. Click on the Save button to save the inputs.
Of course, you can add other Questions. After adding Question "Do you plan to buy alfresco book next month", we can view the Questions.
Chapter 5
[ 147 ]
Managing QuestionsPolls questions are displayed as question name, number of Votes, Last Vote Date, Expiration Date, and Actions, with the set of icons: Edit, Permissions, and Delete. By default, this portlet will display all Questions for the current User who has proper Permissions.
Edit a QuestionLet's suppose that we want to change the Description of the question, "Do you plan to buy alfresco book next month" from "alfresco book" to "vote for alfresco book". We need to edit and update it. Let's do it as follows:
1. Locate the question "Do you plan to buy alfresco book next month" in the Polls portlet, and click on the Edit icon from the Actions next to the question.
2. Update the Description with the value "vote for alfresco book".3. Click Save button to save the inputs.
Delete a QuestionSuppose that the Question "Do you plan to buy alfresco book next month" is not wanted anymore, we need to delete it. Let's delete it as follows:
1. Locate a Question ("Do you plan to buy alfresco book next month") that you want to delete.
2. Click on the Delete icon from the Actions located next to the question.3. A screen will appear asking if you want to delete this.4. Click OK button to confirm deletion.
Note that deleting a Question will delete all related votes which belong to this Question.
Set Up PermissionsAs a User at "Palm Tree Publications", such as "Lotti Stein", you have proper Permissions to View and Add Vote on the Question, "Is Liferay Book a proper book". But you do not have Permissions to Update and Delete.
Wikis, Web Form And Polls
[ 148 ]
What's happening? The following table shows the Permissions for the Polls Questions. A Community User may have Permissions (marked 'X'): View, Delete, Permissions, Update, and Add Vote, while a Guest User may have the Permissions, View, Add Vote, Delete, and Permissions. By default, a Community User has the Permission actions (marked '*'), View and Add Vote, while a guest user only has Permission to View.
Action Description Community GuestView Views Polls Questions X, * X, *Delete Deletes Polls Questions X XPermissions Configures Permissions of Polls Questions X XUpdate Updates Polls Questions X
Add Vote Adds vote for the Question X, * X
Obviously, as a User of the Book Lovers Community, "Lotti Stein" has only Permissions to View and Add Vote on the Question.
As an administrator, you may need to set up the Community Users having Permissions to View, Add Vote, Delete and Update on the Question, "Is Liferay Book a proper book". Let's do it as follows:
1. Click on the Permissions icon from the Actions next to the Question, "Is Liferay Book a proper book".
2. Select the Community tab.3. Select Permissions, Delete and Update in the Available box.4. Click on the Add arrow. 5. Click on the Save button if you are ready.
Now, as a User of the Book Lovers Community, "Lotti Stein" has Permissions to View, Add Vote, Update and Delete on the Question, "Is Liferay Book a proper book" finally. Try to log in as "Lotti Stein" and you will see the Actions with icons Edit and Delete next to the Question, "Is Liferay Book a proper book".
View VotesSuppose that you want to view Votes for the Question, "Do you plan to buy alfresco book next month" in different ways. You can simply click on the name of the Question. You will see the Votes in percentage, or other Charts (such as Area, Horizontal Bar, Line, Pie and Vertical Bar). Further, you can also view the actual voters if you have proper Permissions.
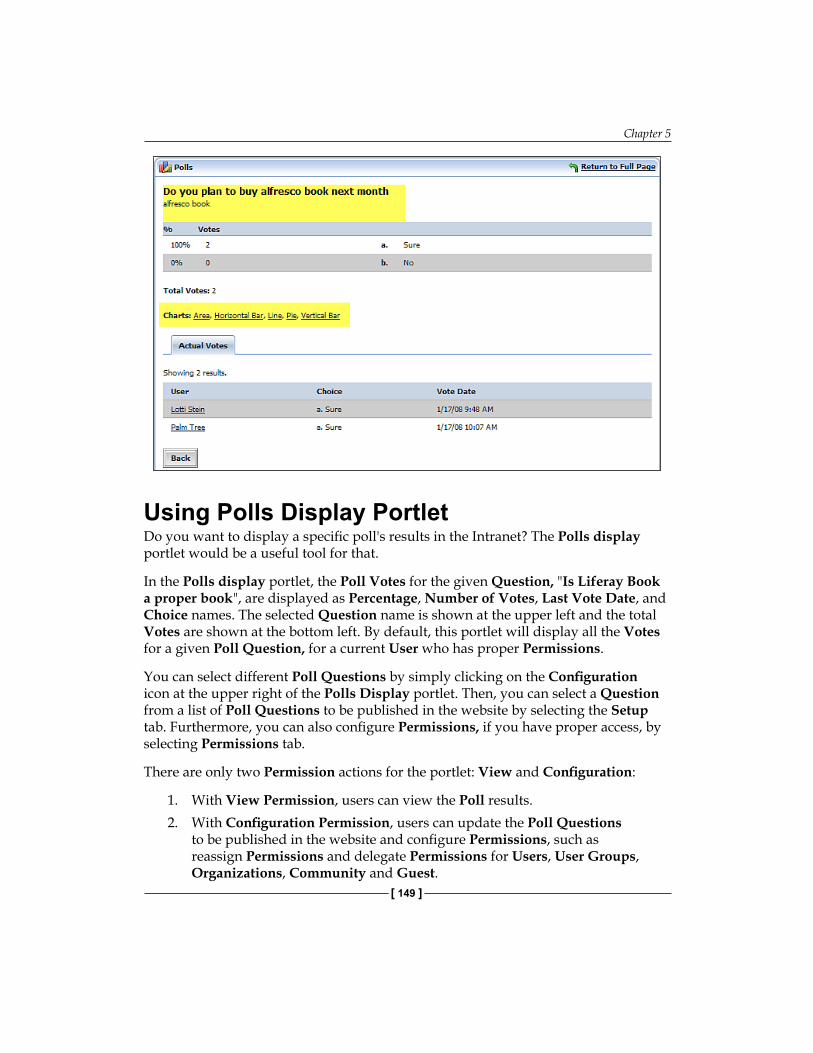
Chapter 5
[ 149 ]
Using Polls Display PortletDo you want to display a specific poll's results in the Intranet? The Polls display portlet would be a useful tool for that.
In the Polls display portlet, the Poll Votes for the given Question, "Is Liferay Book a proper book", are displayed as Percentage, Number of Votes, Last Vote Date, and Choice names. The selected Question name is shown at the upper left and the total Votes are shown at the bottom left. By default, this portlet will display all the Votes for a given Poll Question, for a current User who has proper Permissions.
You can select different Poll Questions by simply clicking on the Configuration icon at the upper right of the Polls Display portlet. Then, you can select a Question from a list of Poll Questions to be published in the website by selecting the Setup tab. Furthermore, you can also configure Permissions, if you have proper access, by selecting Permissions tab.
There are only two Permission actions for the portlet: View and Configuration:
1. With View Permission, users can view the Poll results.2. With Configuration Permission, users can update the Poll Questions
to be published in the website and configure Permissions, such as reassign Permissions and delegate Permissions for Users, User Groups, Organizations, Community and Guest.
Wikis, Web Form And Polls
[ 150 ]
Using Polls EffectivelyGenerally speaking, Users (who have proper Permissions) or administrators can create multiple choice Polls that keep track of Votes and display results on the Page in the Polls portlet. On the one hand, the Polls portlet can manage several separate Polls. On the other hand, a separate portlet such as the Polls Display portlet can be configured to display a specific poll's results.
Actually, the Polls portlet acts as a voting application in order to take the public opinions. It provides users with scientifically sampled survey to assess public opinions. Meanwhile, it effectively uses the portal's customization and personalization features, and furthermore, allows an end user to customize the results shown.
As Poll administrators, you can easily add and delete the Poll topics. You can customize the portlet through actions such as changing the result title, reordering the Poll options and specifying whether the user can select multiple options.
In theory, Polls are scheduled to open and close at given times. As Poll administrator, you may view previous Poll results if you want to make use of this information for your statistical analysis. At the same time, you may configure portlet instance to determine which Poll is to be shown in the portlet.
However, there are some differences between survey and Poll. A survey is a multiple pages survey questionnaire, while a Poll is a one page questionnaire and is replaced by Poll results after voting., Polls consists of straightforward lists relating to questions and potential responses, either in the form of multiple choices or text. When information gathering requirements are simple, and you do not require the identification of the respondents, you can use Polls. Otherwise, you have to use survey.
SummaryThis chapter instructed us, how to add and manage (view, update and delete)add and manage (view, update and delete) Nodes of Wikis, add Pages at the Nodes in Wikis, manage (view, update, delete and search) Pages for a given node in Wikis, use permissions for Wikis portlet and Permissions on Nodes, and publish Wiki articles in the intranet first. Then it discussed how to set up Web Form in order to collectto collect Users' suggestions, to, to configure Polls and to display a survey in order to assess public opinion.survey in order to assess public opinion.
Internal Bloggings And RSSIn the intranet website "book.com", of "Palm Tree Publications", it is required to let small teams work on specific projects, share files and Blogs about project process, use, use HTML text editor to create or update files and Blogs, and employ RSS feeds. Liferayfiles and Blogs, and employ RSS feeds. Liferay. Liferay Blogs provide a straightforward Blog solution with features such as RSS support, with features such as RSS support, User and Guest Comments, browseable categories, Tags and labels, and an entry rating system. Liferay RSS with subscription provides the ability to frequently read RSS feeds from within the portal framework. At the same time, Liferay WYSIWGs (What You See Is What You Get editors) provides ability to edit web content, including Blogs' content. Less technical persons can use WYSIWGs without sifting through complex code. This chapter will introduce us to working with Blogs, publishing them, building Blog content and working with RSS.
By the end of this chapter, you would have learnt how to:
Add entries of Blogs.Manage (view, update and delete) entries of Blogs.Add comments for a given entry of Blogs.Use Permission on the Blogs portlet and entries of Blogs.Publish Blogs by Recent Bloggers portlet and Blogs Aggregator portlet.Build Blogs with WYSIWGs editor.WYSIWGs editor.. Use RSS including RSS portlet, News Portlets and Weather portlet.
Working with BlogsIn order to let small teams working on specific projects share files and Blogssmall teams working on specific projects share files and Blogs about project process, we should use Liferay Blogs at, we should use Liferay Blogs at Book Lovers Community Public Pages.
•
•
•
•
•
•
•
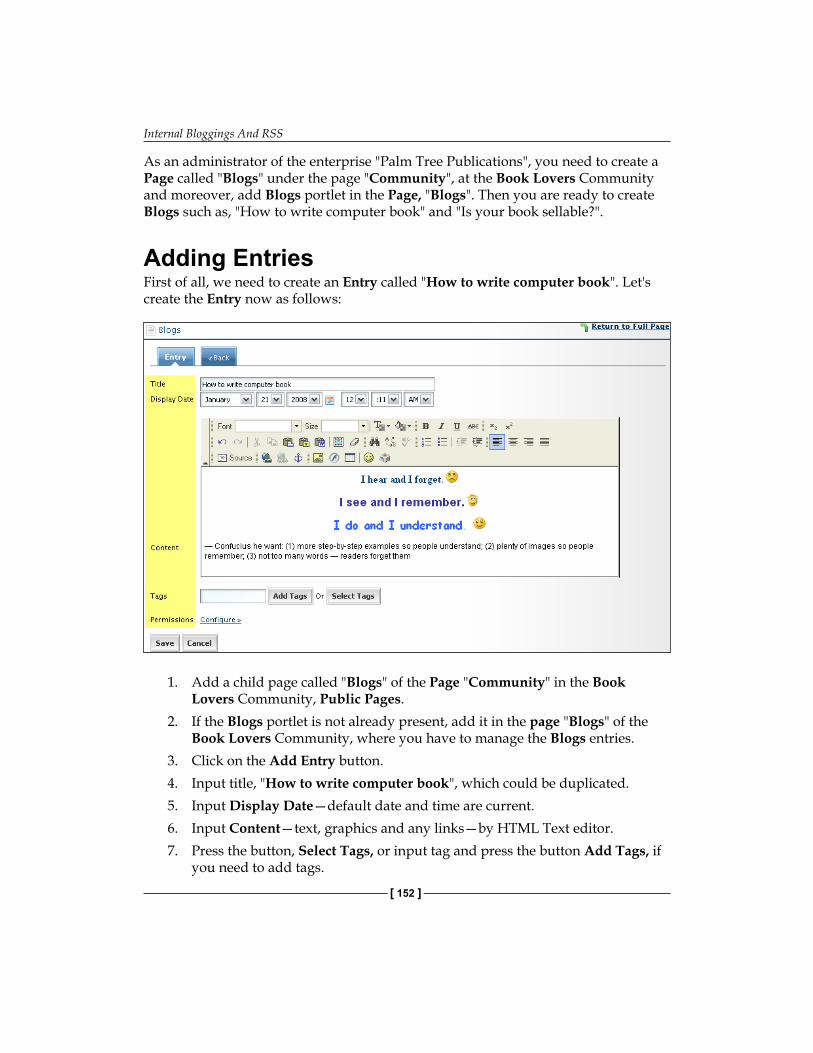
Internal Bloggings And RSS
[ 152 ]
As an administrator of the enterprise "Palm Tree Publications", you need to create a Page called "Blogs" under the page "Community", at the Book Lovers Community and moreover, add Blogs portlet in the Page, "Blogs". Then you are ready to create Blogs such as, "How to write computer book" and "Is your book sellable?".
Adding EntriesFirst of all, we need to create an Entry called "How to write computer book". Let's create the Entry now as follows:
1. Add a child page called "Blogs" of the Page "Community" in the Book Lovers Community, Public Pages.
2. If the Blogs portlet is not already present, add it in the page "Blogs" of the Book Lovers Community, where you have to manage the Blogs entries.
3. Click on the Add Entry button.4. Input title, "How to write computer book", which could be duplicated.5. Input Display Date—default date and time are current.6. Input Content—text, graphics and any links—by HTML Text editor.7. Press the button, Select Tags, or input tag and press the button Add Tags, if
you need to add tags.
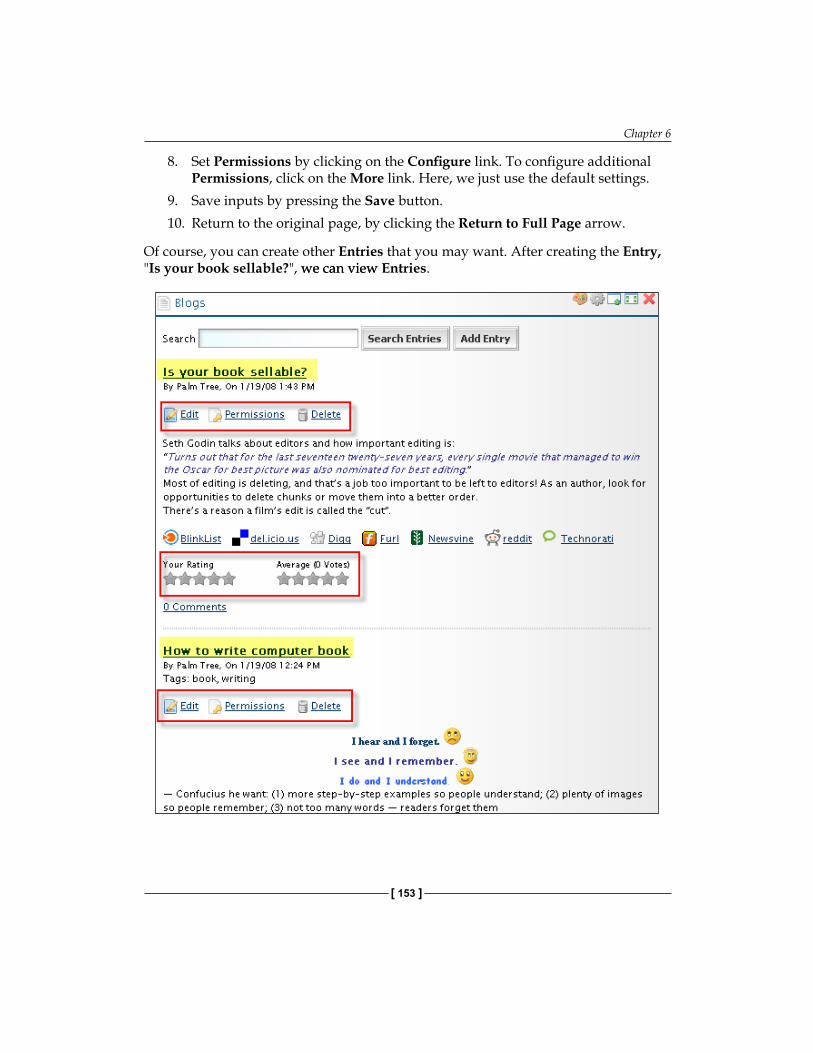
Chapter 6
[ 153 ]
8. Set Permissions by clicking on the Configure link. To configure additional Permissions, click on the More link. Here, we just use the default settings.
9. Save inputs by pressing the Save button.10. Return to the original page, by clicking the Return to Full Page arrow.
Of course, you can create other Entries that you may want. After creating the Entry, "Is your book sellable?", we can viewwe can view Entries.

Internal Bloggings And RSS
[ 154 ]
Managing EntriesAfter creating Entries, we can manage them easily.
Edit EntriesEntries are editable. For example, we need to change the title of the Entry, "Is your book sellable?" from value "Is your book sellable?", to the value "How to write sellable book". Let's do it as follows:
1. Locate the Entry "Is your book sellable?" that you want to edit..2. Click on thethe Edit icon below the title, "Is your book sellable?".3. Update the title, "Is your book sellable?", with new value, "How to write
sellable book?".4. Retain the values of Display Date, Content, and Tags.5. Save inputs by pressing the Save button.
Delete EntriesEntries are removable. For instance, the Entry, "How to write sellable book?", is not wanted anymore. We have to remove this from the Blogs portlet. Let's delete it as follows:
1. Locate the Entry, "How to write sellable book?", that you want to delete.2. Click on the Delete icon below the title, "How to write sellable book?".3. A screen will appear asking if you want to delete this.4. Click the OK button to confirm deletion.
Note that deleting an Entry will delete all related Comments which belong to this Entry.
Search EntriesThe Contents of Entries are searchable. Suppose that as an administrator, you want to search Entries by the keyword "them". Let's search it as follows:
1. Find the button, Search Entries in the Blogs portlet.2. Input the search criterion (that is keyword), "them".3. Click on the Search Entries button.
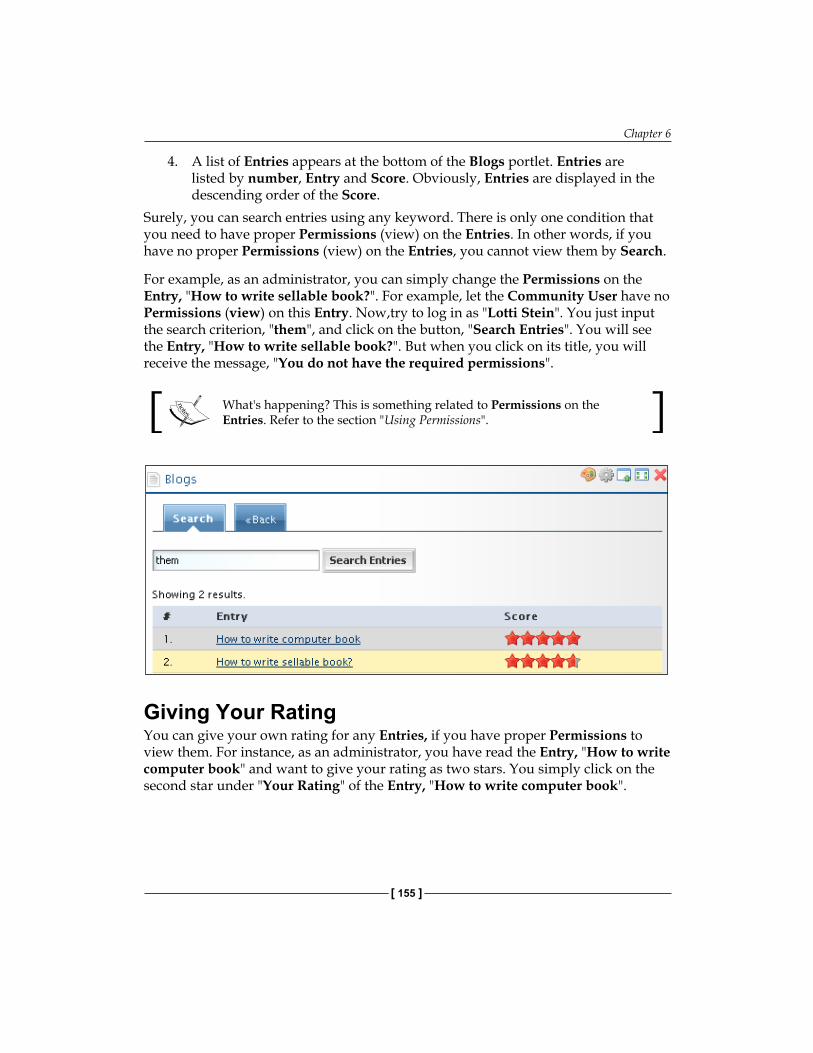
Chapter 6
[ 155 ]
4. A list of Entries appears at the bottom of the Blogs portlet. Entries are listed by number, Entry and Score. Obviously, Entries are displayed in the descending order of the Score.
Surely, you can search entries using any keyword. There is only one condition that you need to have proper Permissions (view) on the Entries. In other words, if you have no proper Permissions (view) on the Entries, you cannot view them by Search.
For example, as an administrator, you can simply change the Permissions on the Entry, "How to write sellable book?". For example, let the Community User have no Permissions (view) on this Entry. Now,try to log in as "Lotti Stein". You just input the search criterion, "them", and click on the button, "Search Entries". You will see the Entry, "How to write sellable book?". But when you click on its title, you will receive the message, "You do not have the required permissions".
What's happening? This is something related to Permissions on the Entries. Refer to the section "Using Permissions".
Giving Your RatingYou can give your own rating for any Entries, if you have proper Permissions to view them. For instance, as an administrator, you have read the Entry, "How to write computer book" and want to give your rating as two stars. You simply click on the second star under "Your Rating" of the Entry, "How to write computer book".
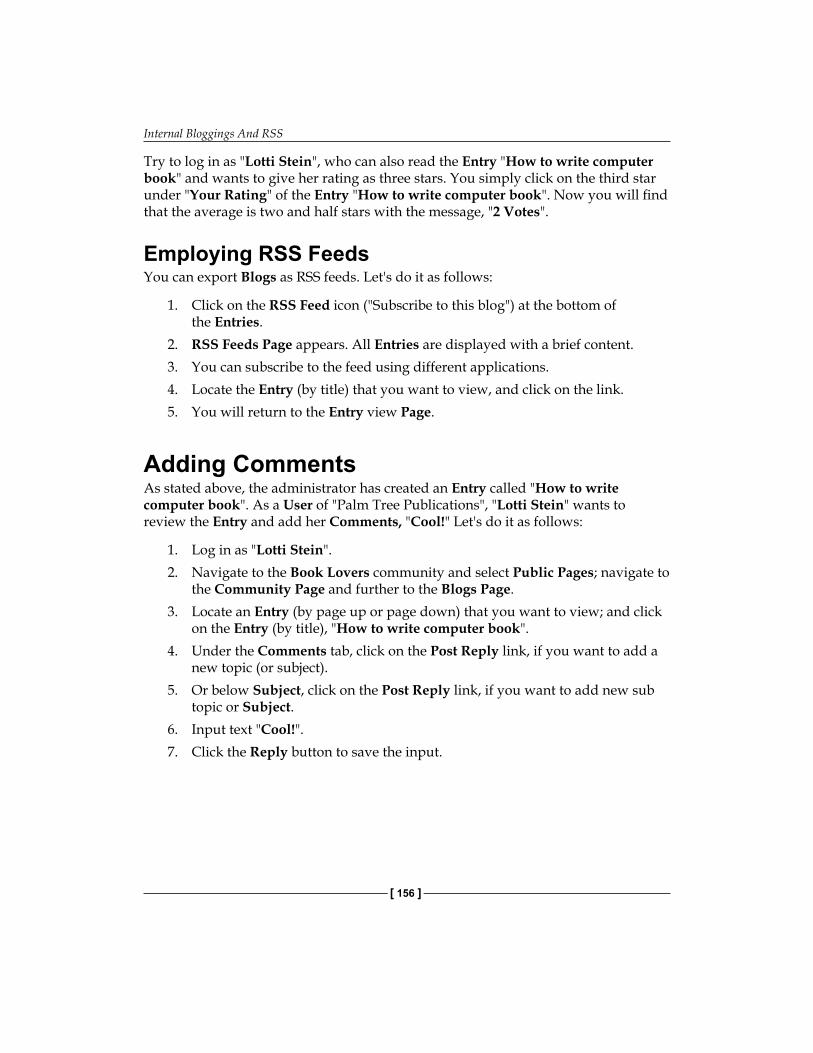
Internal Bloggings And RSS
[ 156 ]
Try to log in as "Lotti Stein", who can also read the Entry "How to write computer book" and wants to give her rating as three stars. You simply click on the third star under "Your Rating" of the Entry "How to write computer book". Now you will find that the average is two and half stars with the message, "2 Votes".
Employing RSS FeedsYou can export Blogs as RSS feeds. Let's do it as follows:
1. Click on the RSS Feed icon ("Subscribe to this blog") at the bottom of the Entries.
2. RSS Feeds Page appears. All Entries are displayed with a brief content.3. You can subscribe to the feed using different applications.4. Locate the Entry (by title) that you want to view, and click on the link.5. You will return to the Entry view Page.
Adding CommentsAs stated above, the administrator has created an Entry called "How to write computer book". As a User of "Palm Tree Publications", "Lotti Stein" wants to review the Entry and add her Comments, "Cool!" Let's do it as follows:
1. Log in as "Lotti Stein".2. Navigate to the Book Lovers community and select Public Pages; navigate to
the Community Page and further to the Blogs Page.3. Locate an Entry (by page up or page down) that you want to view; and click
on the Entry (by title), "How to write computer book".4. Under the Comments tab, click on the Post Reply link, if you want to add a
new topic (or subject). 5. Or below Subject, click on the Post Reply link, if you want to add new sub
topic or Subject.6. Input text "Cool!".7. Click the Reply button to save the input.
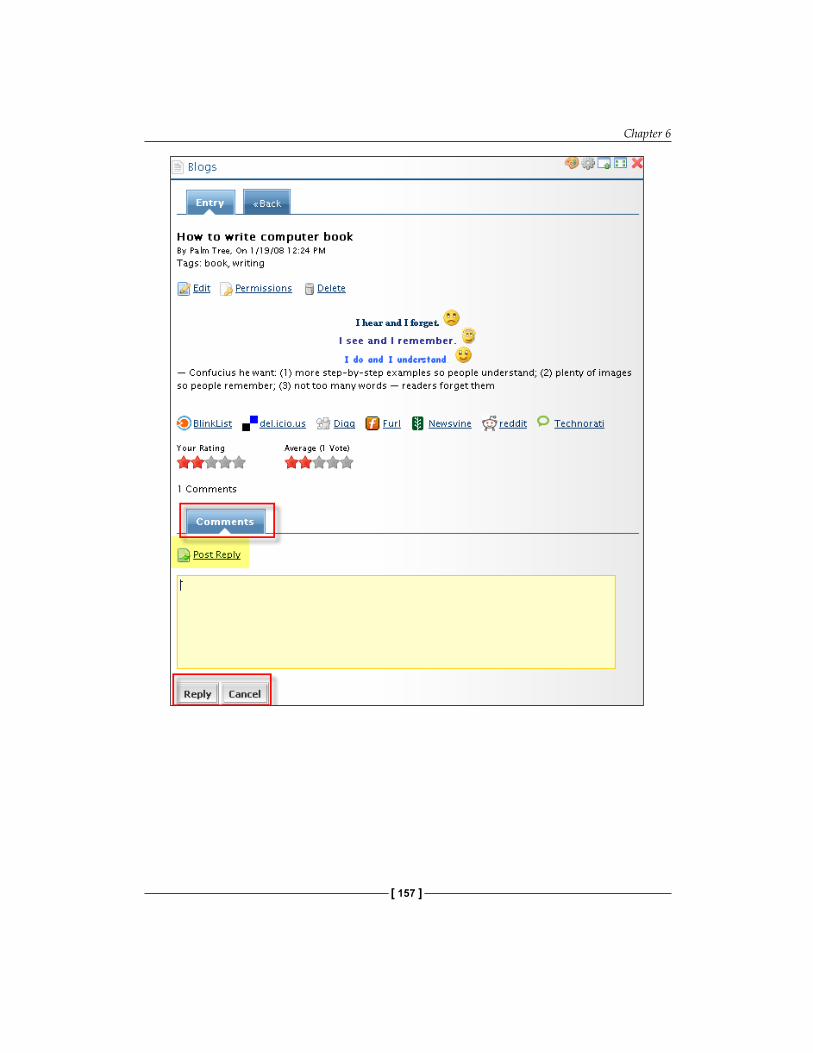
Chapter 6
[ 157 ]
Internal Bloggings And RSS
[ 158 ]
As an administrator, you can view Comments from "Lotti Stein", for the Entry, "How to write computer book" as follows:
1. Locate the Entry, "How to write computer book".2. Click on the title of the Entry, "How to write computer book".
Moreover, you can also reply to a Comment. You locate the Comment to which you want to reply first. Then, click on the Post Reply icon at the bottom left of the Comment. Input Comments, and then click on the Reply button to save the inputs, or the Cancel button to cancel.
Chapter 6
[ 159 ]
Furthermore, you can also edit a Comment. You click on the Edit icon at the bottom left of the Comment. You can change the Subject and the Body. Then, click on the Update button to save the changes, or the Cancel button to cancel the changes.
You can also delete a Comment. You click on the Delete icon at the bottom left of the Comment. A screen will appear asking if you want to delete this. Click OK to confirm deletion or Cancel to cancel deletion.
Note that only the current Comment has been deleted on action. The low level Comments related to the current Comment will have a link to its parent Comment.
Finally, in order to go to the top of the Comments, simply click on the Top button at the bottom left of any Comment.
Using PermissionsWe have used default settings for the Blogs portlet in the Page, "Blogs" of the Page "Community" under the Book Lovers Community. As mentioned earlier, when the administrator "Palm Tree" logs in, he/she will see the button, "Add Entry" in the Blogs. As we know, the User "Lotti Stein" is also a member of the Book Lovers community. Try to log in as "Lotti Stein", and you will see that there is no "Add Entry" button in the Blogs. Furthermore, you see the entry, "How to write computer book", without the Action icons (Edit, Permissions and Delete).
What's happening? This is something related to Permissions. There are two levels of Permissions: Portlet Permissions and Permissions on Entries.
Update Portlet PermissionsThe following table shows Permissions related to the Blogs portlet. A Community User may set up all Permissions (marked 'X'), View, Add Entry, and Configuration, while a Guest User may set up Permissions, View and Configuration. By default, a Community has the Permission action View (marked '*'), and so does a guest user.
Action Description Community GuestView Views this portlet X, * X, *Configuration Configures this portlet X XAdd Entry Adds an Entry to the portlet X
Obviously, as a User of the Book Lovers Community, "Lotti Stein" has only View Permission on the portlet, Blogs, by default. Since the Book Lovers community has no "Add Entry" Permission, "Lotti Stein" also has no "Add Entry" Permission.
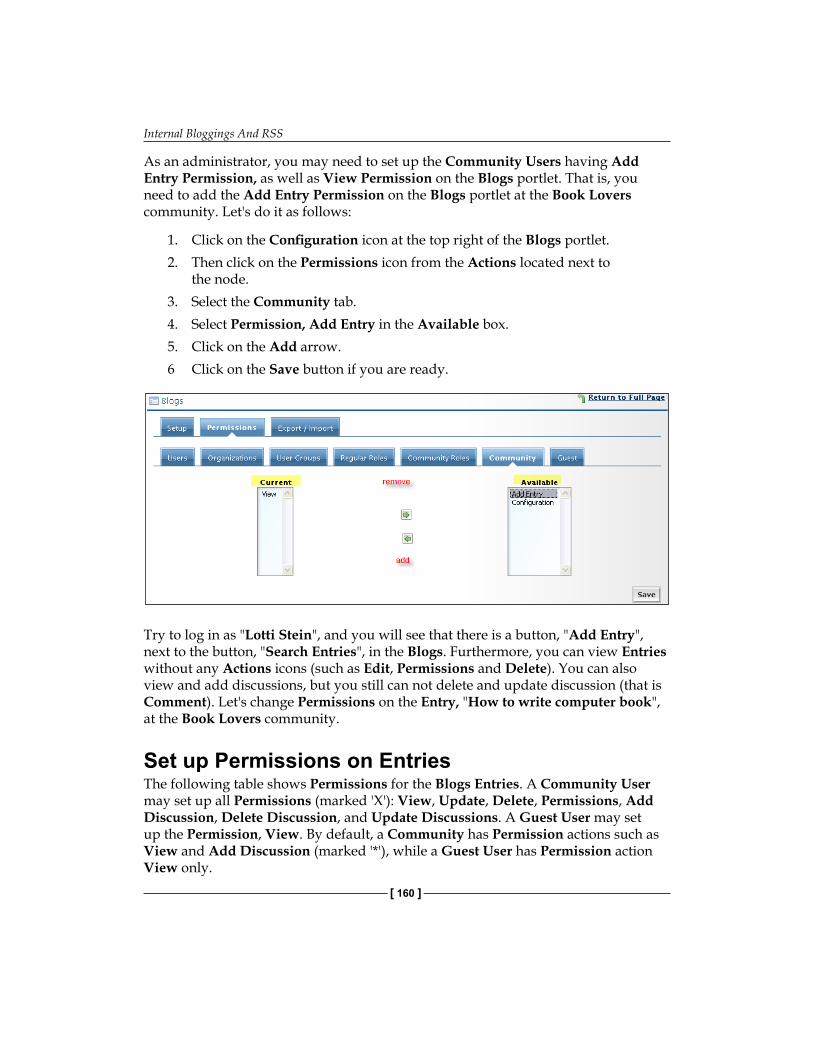
Internal Bloggings And RSS
[ 160 ]
As an administrator, you may need to set up the Community Users having Add Entry Permission, as well as View Permission on the Blogs portlet. That is, you need to add the Add Entry Permission on the Blogs portlet at the Book Lovers community. Let's do it as follows:
1. Click on the Configuration icon at the top right of the Blogs portlet.2. Then click on the Permissions icon from the Actions located next to
the node.3. Select the Community tab.4. Select Permission, Add Entry in the Available box.5. Click on the Add arrow.6 Click on the Save button if you are ready.
Try to log in as "Lotti Stein", and you will see that there is a button, "Add Entry", next to the button, "Search Entries", in the Blogs. Furthermore, you can view Entries without any Actions icons (such as Edit, Permissions and Delete). You can also view and add discussions, but you still can not delete and update discussion (that is Comment). Let's change Permissions on the Entry, "How to write computer book", at the Book Lovers community.
Set up Permissions on EntriesThe following table shows Permissions for the Blogs Entries. A Community User may set up all Permissions (marked 'X'): View, Update, Delete, Permissions, Add Discussion, Delete Discussion, and Update Discussions. A Guest User may set up the Permission, View. By default, a Community has Permission actions such as View and Add Discussion (marked '*'), while a Guest User has Permission action View only.
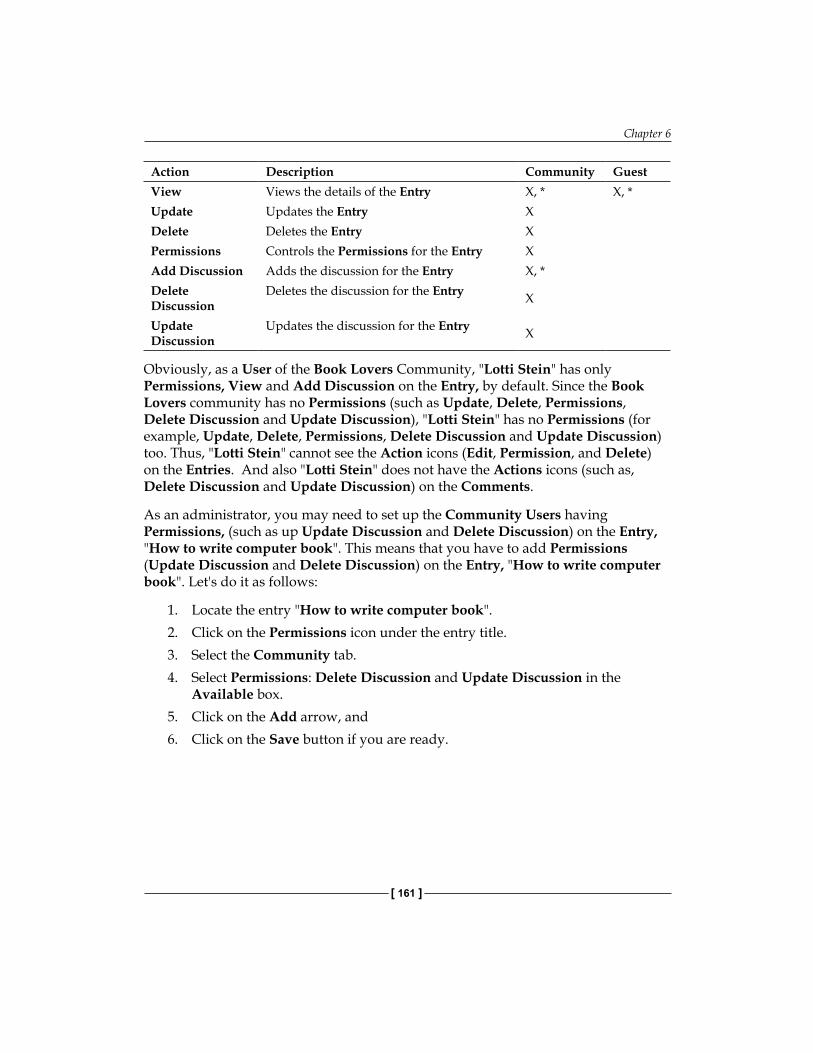
Chapter 6
[ 161 ]
Action Description Community GuestView Views the details of the Entry X, * X, *Update Updates the Entry XDelete Deletes the Entry XPermissions Controls the Permissions for the Entry XAdd Discussion Adds the discussion for the Entry X, *Delete Discussion
Deletes the discussion for the Entry X
Update Discussion
Updates the discussion for the Entry X
Obviously, as a User of the Book Lovers Community, "Lotti Stein" has only Permissions, View and Add Discussion on the Entry, by default. Since the Book Lovers community has no Permissions (such as Update, Delete, Permissions, Delete Discussion and Update Discussion), "Lotti Stein" has no Permissions (for example, Update, Delete, Permissions, Delete Discussion and Update Discussion) too. Thus, "Lotti Stein" cannot see the Action icons (Edit, Permission, and Delete) on the Entries. And also "Lotti Stein" does not have the Actions icons (such as, Delete Discussion and Update Discussion) on the Comments.
As an administrator, you may need to set up the Community Users having Permissions, (such as up Update Discussion and Delete Discussion) on the Entry, "How to write computer book". This means that you have to add Permissions (Update Discussion and Delete Discussion) on the Entry, "How to write computer book". Let's do it as follows:
1. Locate the entry "How to write computer book".2. Click on the Permissions icon under the entry title.3. Select the Community tab.4. Select Permissions: Delete Discussion and Update Discussion in the
Available box.5. Click on the Add arrow, and 6. Click on the Save button if you are ready.
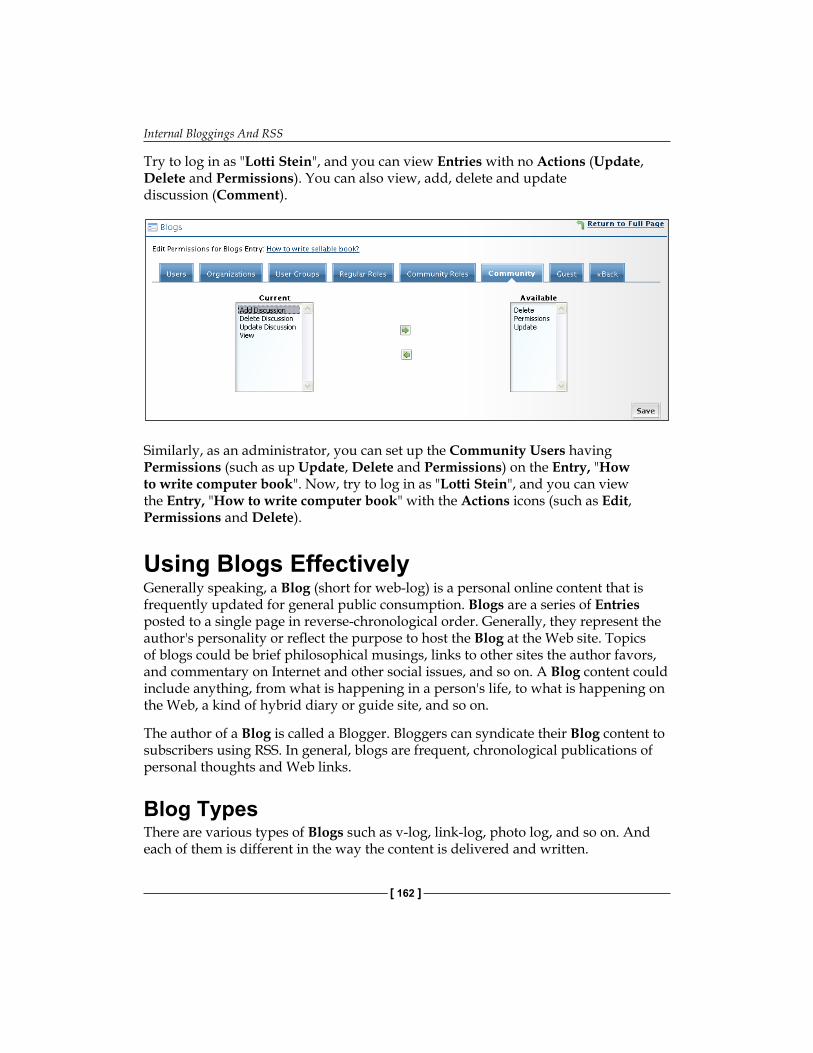
Internal Bloggings And RSS
[ 162 ]
Try to log in as "Lotti Stein", and you can view Entries with no Actions (Update, Delete and Permissions). You can also view, add, delete and update discussion (Comment).
Similarly, as an administrator, you can set up the Community Users having Permissions (such as up Update, Delete and Permissions) on the Entry, "How to write computer book". Now, try to log in as "Lotti Stein", and you can view the Entry, "How to write computer book" with the Actions icons (such as Edit, Permissions and Delete).
Using Blogs EffectivelyGenerally speaking, a Blog (short for web-log) is a personal online content that is frequently updated for general public consumption. Blogs are a series of Entries posted to a single page in reverse-chronological order. Generally, they represent the author's personality or reflect the purpose to host the Blog at the Web site. Topics of blogs could be brief philosophical musings, links to other sites the author favors, and commentary on Internet and other social issues, and so on. A Blog content could include anything, from what is happening in a person's life, to what is happening on the Web, a kind of hybrid diary or guide site, and so on.
The author of a Blog is called a Blogger. Bloggers can syndicate their Blog content to subscribers using RSS. In general, blogs are frequent, chronological publications of personal thoughts and Web links.
Blog TypesThere are various types of Blogs such as v-log, link-log, photo log, and so on. And each of them is different in the way the content is delivered and written.
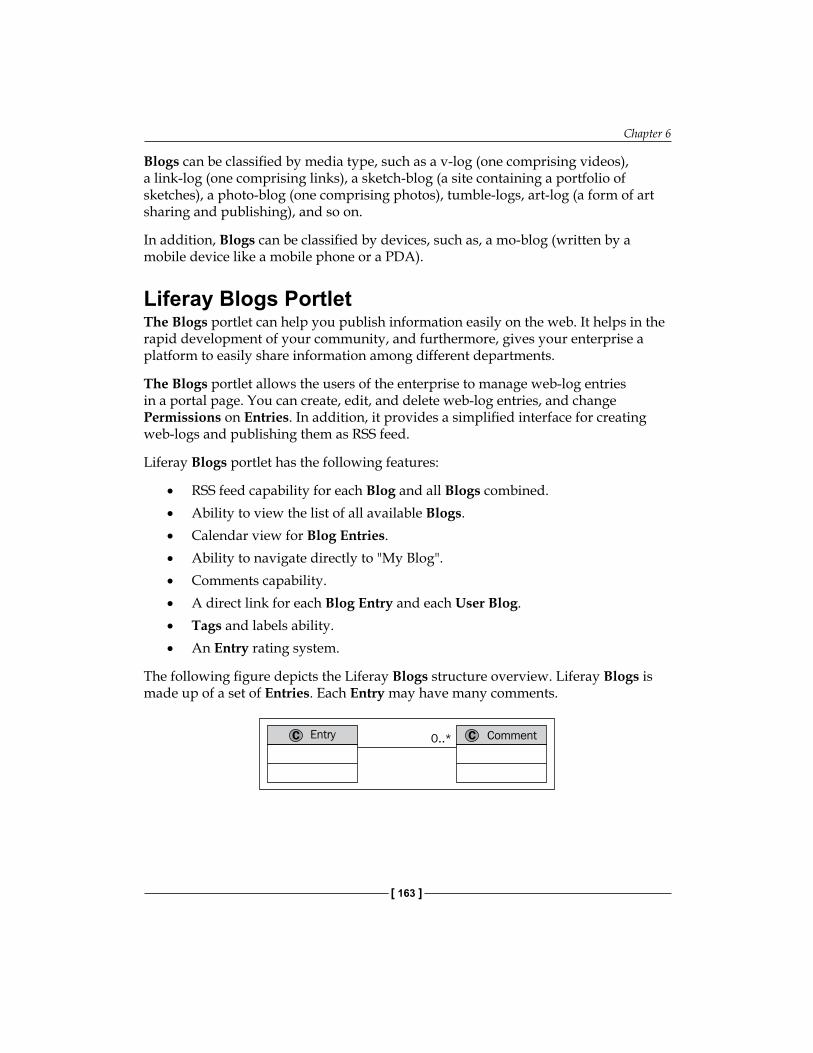
Chapter 6
[ 163 ]
Blogs can be classified by media type, such as a v-log (one comprising videos), a link-log (one comprising links), a sketch-blog (a site containing a portfolio of sketches), a photo-blog (one comprising photos), tumble-logs, art-log (a form of art sharing and publishing), and so on.
In addition, Blogs can be classified by devices, such as, a mo-blog (written by a mobile device like a mobile phone or a PDA).
Liferay Blogs PortletThe Blogs portlet can help you publish information easily on the web. It helps in the rapid development of your community, and furthermore, gives your enterprise a platform to easily share information among different departments.
The Blogs portlet allows the users of the enterprise to manage web-log entries in a portal page. You can create, edit, and delete web-log entries, and change Permissions on Entries. In addition, it provides a simplified interface for creating web-logs and publishing them as RSS feed.
Liferay Blogs portlet has the following features:
RSS feed capability for each Blog and all Blogs combined.Ability to view the list of all available Blogs.Calendar view for Blog Entries.Ability to navigate directly to "My Blog".Comments capability.A direct link for each Blog Entry and each User Blog.Tags and labels ability.An Entry rating system.
The following figure depicts the Liferay Blogs structure overview. Liferay Blogs is made up of a set of Entries. Each Entry may have many comments.
•
•
•
•
•
•
•
•
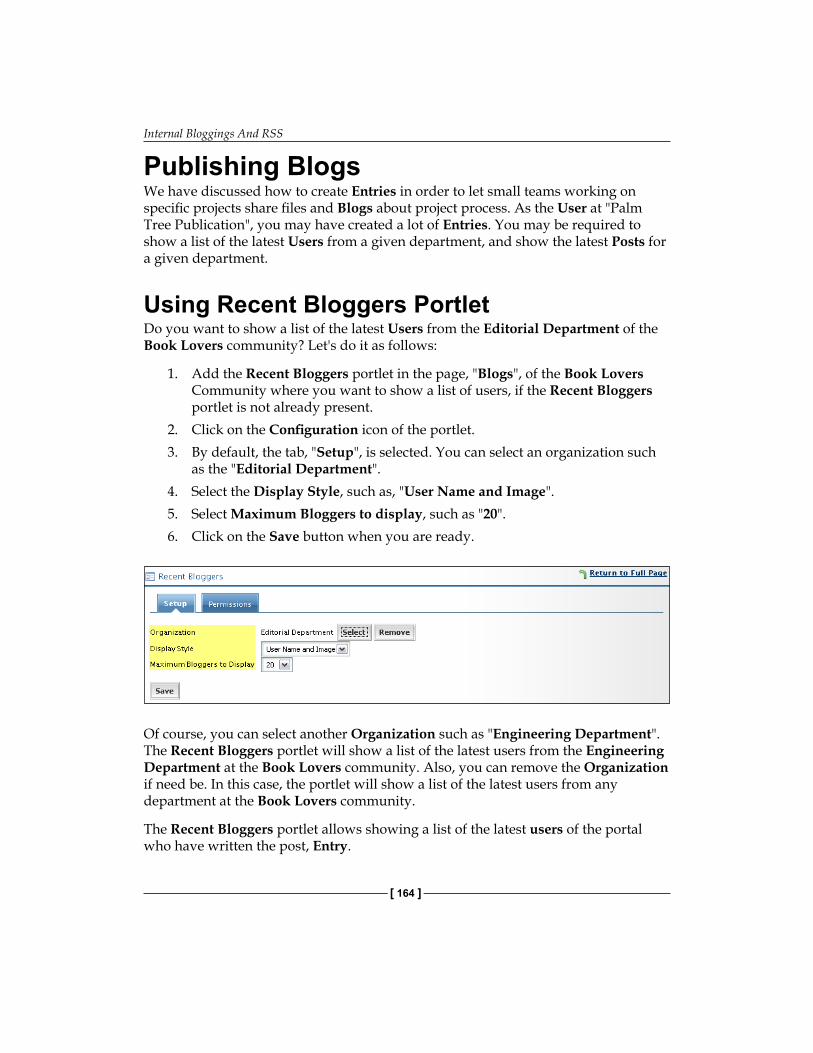
Internal Bloggings And RSS
[ 164 ]
Publishing BlogsWe have discussed how to create Entries in order to let small teams working on specific projects share files and Blogs about project process. As the User at "Palm Tree Publication", you may have created a lot of Entries. You may be required to show a list of the latest Users from a given department, and show the latest Posts for a given department.
Using Recent Bloggers PortletDo you want to show a list of the latest Users from the Editorial Department of the Book Lovers community? Let's do it as follows:
1. Add the Recent Bloggers portlet in the page, "Blogs", of the Book Lovers Community where you want to show a list of users, if the Recent Bloggers portlet is not already present.
2. Click on the Configuration icon of the portlet.3. By default, the tab, "Setup", is selected. You can select an organization such
as the "Editorial Department".4. Select the Display Style, such as, "User Name and Image".5. Select Maximum Bloggers to display, such as "20".6. Click on the Save button when you are ready.
Of course, you can select another Organization such as "Engineering Department". The Recent Bloggers portlet will show a list of the latest users from the Engineering Department at the Book Lovers community. Also, you can remove the Organization if need be. In this case, the portlet will show a list of the latest users from any department at the Book Lovers community.
The Recent Bloggers portlet allows showing a list of the latest users of the portal who have written the post, Entry.
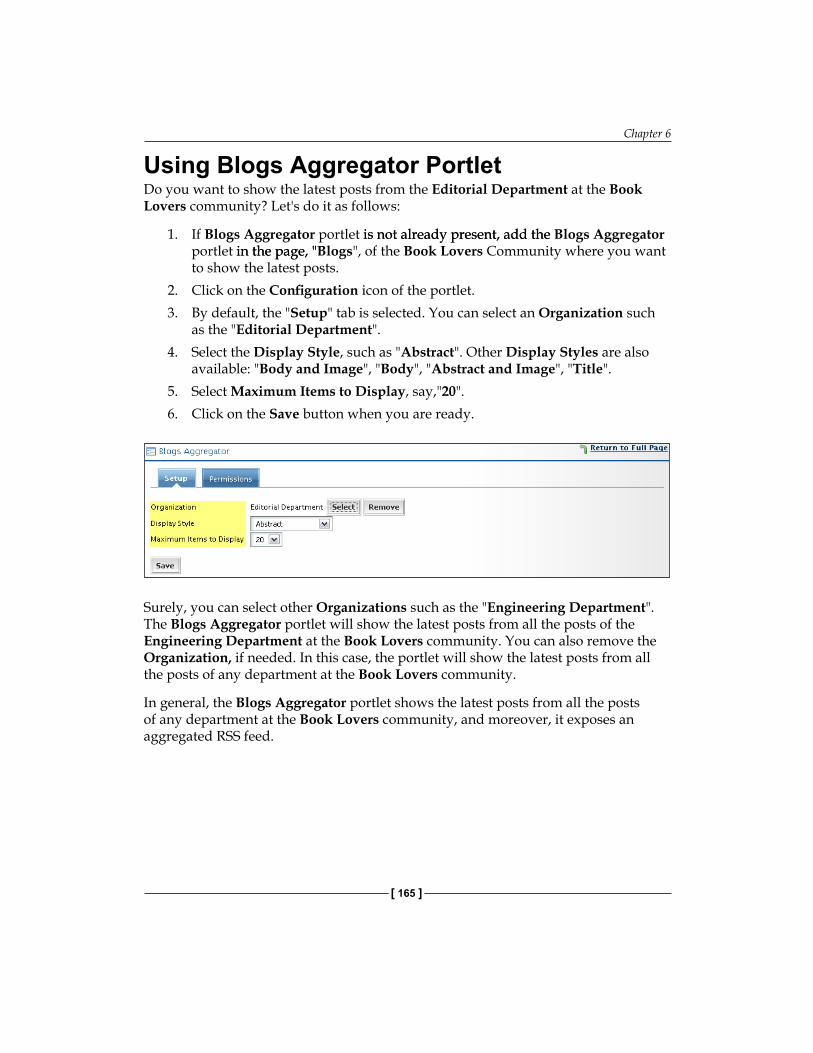
Chapter 6
[ 165 ]
Using Blogs Aggregator Portlet Do you want to show the latest posts from the Editorial Department at the Book Lovers community? Let's do it as follows:
1. If Blogs Aggregator portlet is not already present, add the is not already present, add the Blogs Aggregator portlet in the page, " in the page, "Blogs", of the Book Lovers Community where you want to show the latest posts.
2. Click on the Configuration icon of the portlet.3. By default, the "Setup" tab is selected. You can select an Organization such
as the "Editorial Department". 4. Select the Display Style, such as "Abstract". Other Display Styles are also
available: "Body and Image", "Body", "Abstract and Image", "Title".5. Select Maximum Items to Display, say,"20".6. Click on the Save button when you are ready.
Surely, you can select other Organizations such as the "Engineering Department". The Blogs Aggregator portlet will show the latest posts from all the posts of the Engineering Department at the Book Lovers community. You can also remove the Organization, if needed. In this case, the portlet will show the latest posts from all the posts of any department at the Book Lovers community.
In general, the Blogs Aggregator portlet shows the latest posts from all the posts of any department at the Book Lovers community, and moreover, it exposes an aggregated RSS feed.
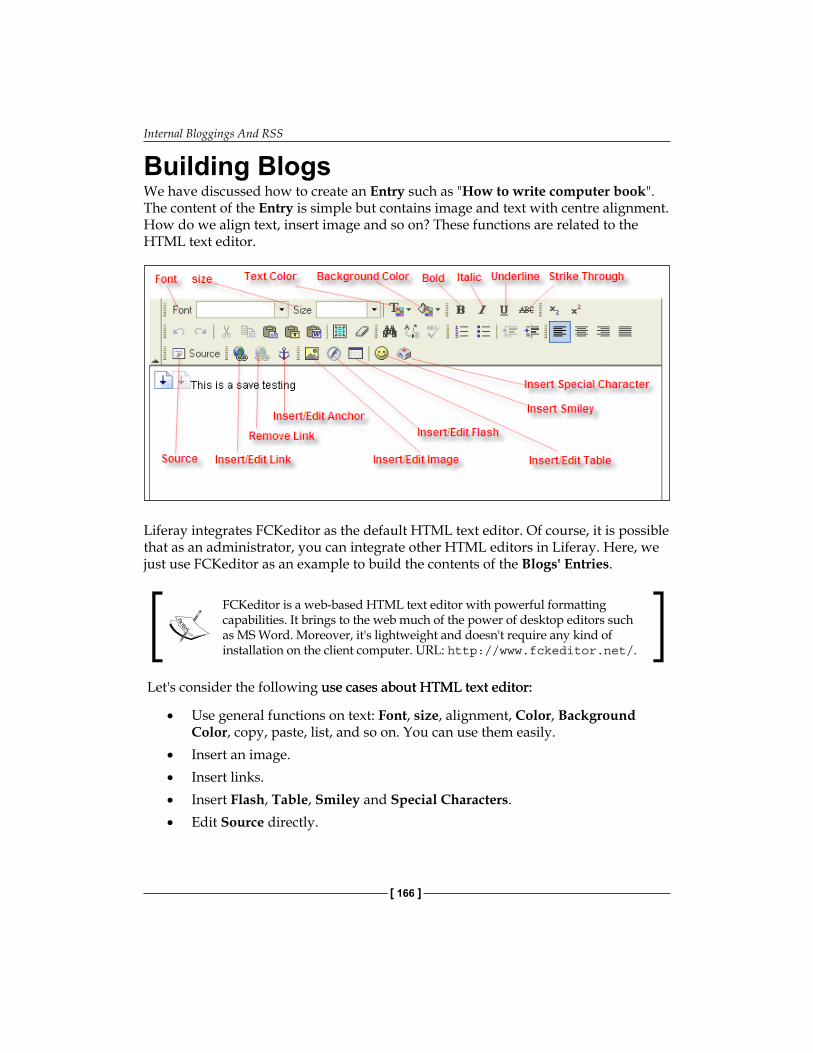
Internal Bloggings And RSS
[ 166 ]
Building BlogsWe have discussed how to create an Entry such as "How to write computer book". The content of the Entry is simple but contains image and text with centre alignment. How do we align text, insert image and so on? These functions are related to the HTML text editor.
Liferay integrates FCKeditor as the default HTML text editor. Of course, it is possible that as an administrator, you can integrate other HTML editors in Liferay. Here, we just use FCKeditor as an example to build the contents of the Blogs' Entries.
FCKeditor is a web-based HTML text editor with powerful formatting capabilities. It brings to the web much of the power of desktop editors such as MS Word. Moreover, it's lightweight and doesn't require any kind of installation on the client computer. URL: http://www.fckeditor.net/.
Let's consider the following use cases about HTML text editor:use cases about HTML text editor:
Use general functions on text: Font, size, alignment, Color, Background Color, copy, paste, list, and so on. You can use them easily.Insert an image.Insert links.Insert Flash, Table, Smiley and Special Characters. Edit Source directly.
•
•
•
•
•
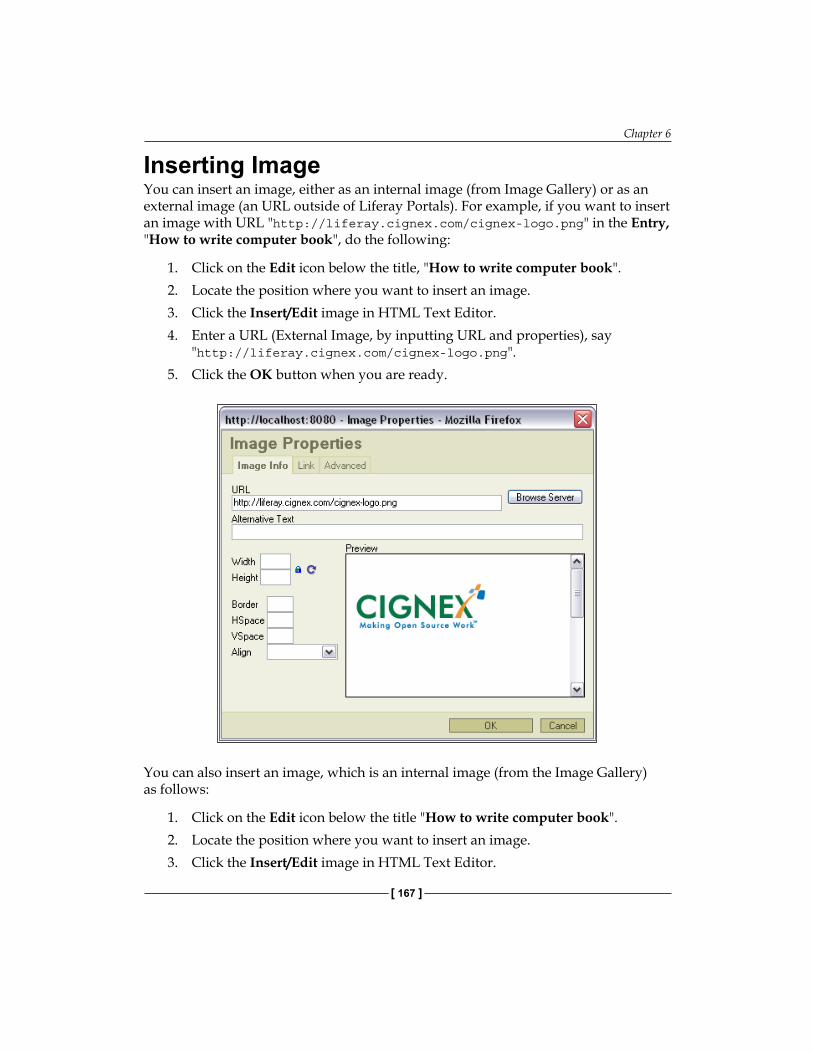
Chapter 6
[ 167 ]
Inserting ImageYou can insert an image, either as an internal image (from Image Gallery) or as an external image (an URL outside of Liferay Portals). For example, if you want to insert an image with URL "http://liferay.cignex.com/cignex-logo.png" in the Entry, "How to write computer book", do the following:
1. Click on the Edit icon below the title, "How to write computer book".2. Locate the position where you want to insert an image.3. Click the Insert/Edit image in HTML Text Editor.4. Enter a URL (External Image, by inputting URL and properties), say
"http://liferay.cignex.com/cignex-logo.png".5. Click the OK button when you are ready.
You can also insert an image, which is an internal image (from the Image Gallery) as follows:
1. Click on the Edit icon below the title "How to write computer book".2. Locate the position where you want to insert an image.3. Click the Insert/Edit image in HTML Text Editor.
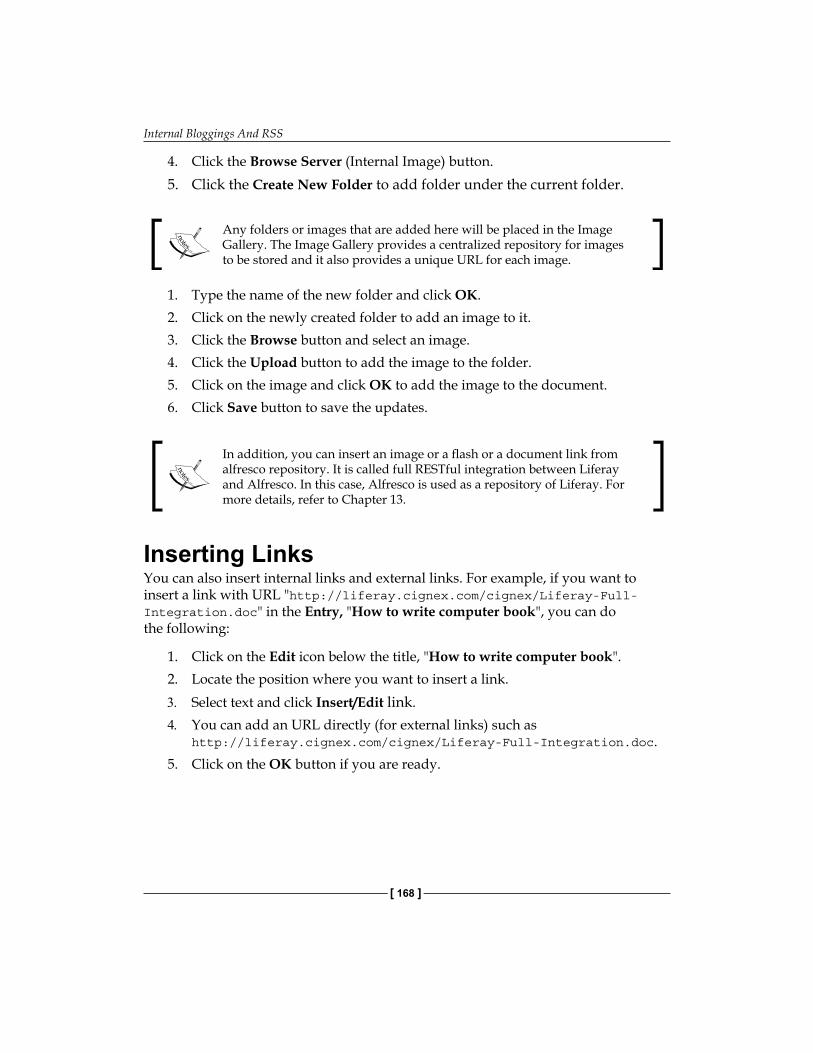
Internal Bloggings And RSS
[ 168 ]
4. Click the Browse Server (Internal Image) button.5. Click the Create New Folder to add folder under the current folder.
Any folders or images that are added here will be placed in the Image Gallery. The Image Gallery provides a centralized repository for images to be stored and it also provides a unique URL for each image.
1. Type the name of the new folder and click OK.2. Click on the newly created folder to add an image to it.3. Click the Browse button and select an image.4. Click the Upload button to add the image to the folder.5. Click on the image and click OK to add the image to the document.6. Click Save button to save the updates.
In addition, you can insert an image or a flash or a document link from alfresco repository. It is called full RESTful integration between Liferay and Alfresco. In this case, Alfresco is used as a repository of Liferay. For more details, refer to Chapter 13.
Inserting LinksYou can also insert internal links and external links. For example, if you want to insert a link with URL "http://liferay.cignex.com/cignex/Liferay-Full-Integration.doc" in the Entry, "How to write computer book", you can do the following:
1. Click on the Edit icon below the title, "How to write computer book".2. Locate the position where you want to insert a link.3. Select text and click Insert/Edit link.4. You can add an URL directly (for external links) such as
http://liferay.cignex.com/cignex/Liferay-Full-Integration.doc.5. Click on the OK button if you are ready.
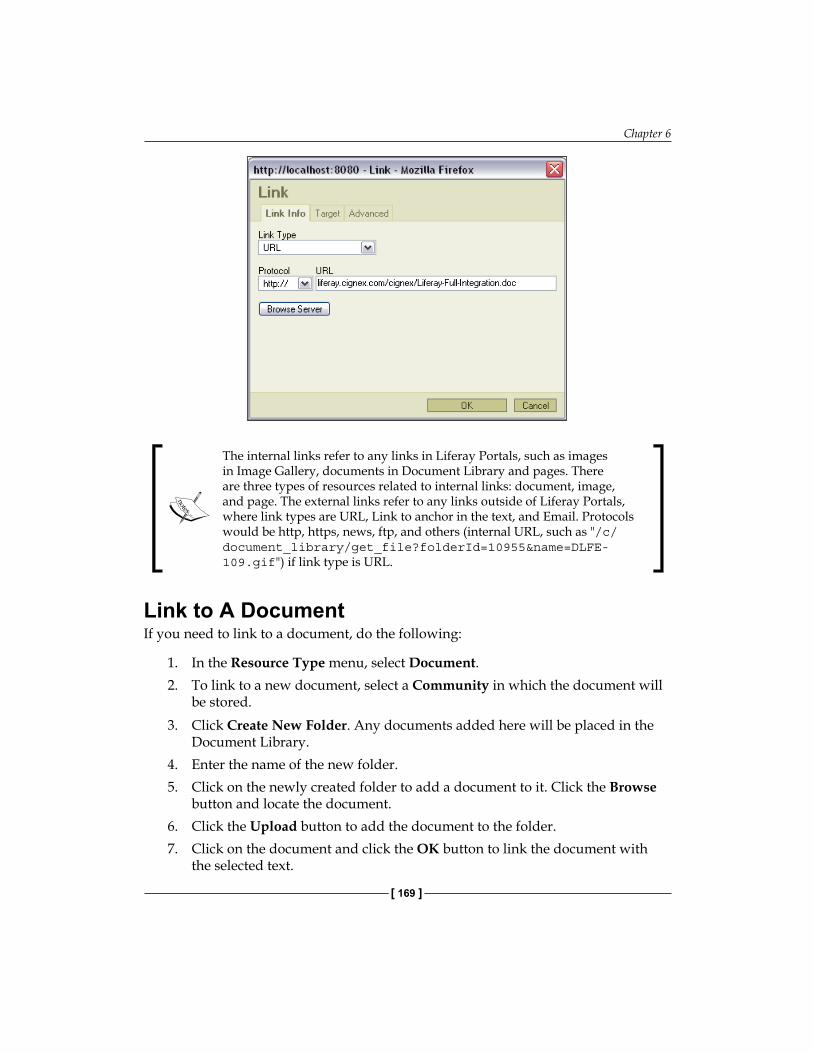
Chapter 6
[ 169 ]
The internal links refer to any links in Liferay Portals, such as images in Image Gallery, documents in Document Library and pages. There are three types of resources related to internal links: document, image, and page. The external links refer to any links outside of Liferay Portals, where link types are URL, Link to anchor in the text, and Email. Protocols would be http, https, news, ftp, and others (internal URL, such as "/c/document_library/get_file?folderId=10955&name=DLFE-109.gif") if link type is URL.
Link to A DocumentIf you need to link to a document, do the following:
1. In the Resource Type menu, select Document.2. To link to a new document, select a Community in which the document will
be stored.3. Click Create New Folder. Any documents added here will be placed in the
Document Library.4. Enter the name of the new folder.5. Click on the newly created folder to add a document to it. Click the Browse
button and locate the document.6. Click the Upload button to add the document to the folder.7. Click on the document and click the OK button to link the document with
the selected text.
Internal Bloggings And RSS
[ 170 ]
Link to A PageYou may need to link to a page, say "web/guest/home". You can do it as follows:
1. In the Resource Type menu, select Page.2. Select the Community where the page is located.3. Click on the page that you want to link the selected text to, such as "web/
guest/home".4. Click OK to link the page with the selected text.
Link to An ImageYou may need to link to an image. You can do it as follows:
1. In the Resource Type menu, select Image.2. Select the Community either where the image is located, or where it will be
stored.3. If the image is stored in the system, click on the image to link with the
selected text and click OK.4. To link to a new image, select a folder to upload the image to, or click Create
New Folder to add a new folder to place the image in. Any images added here will be placed in the Document Library.
5. If you are using an existing folder, skip to step Upload.6. Enter the name of the new folder.7. Click on the newly created folder to add an image to it.8. Click Browse and locate the image.9. Click Upload to add the image to the folder.10. Click on the image and click OK to link the image with the selected text.
Insert Flashes, Tables, Smiley And Special CharactersYou can insert/edit a flash as follows:
1. Locate the position where the flash will be inserted.2. Click Insert/Edit Flash in HTML Text Editor.3. Enter a URL (of flash, by inputting URL and properties) at the Info tab;
optionally, enter details at the Advanced tab. The HTML Text Editor will transfer data from the related URL.
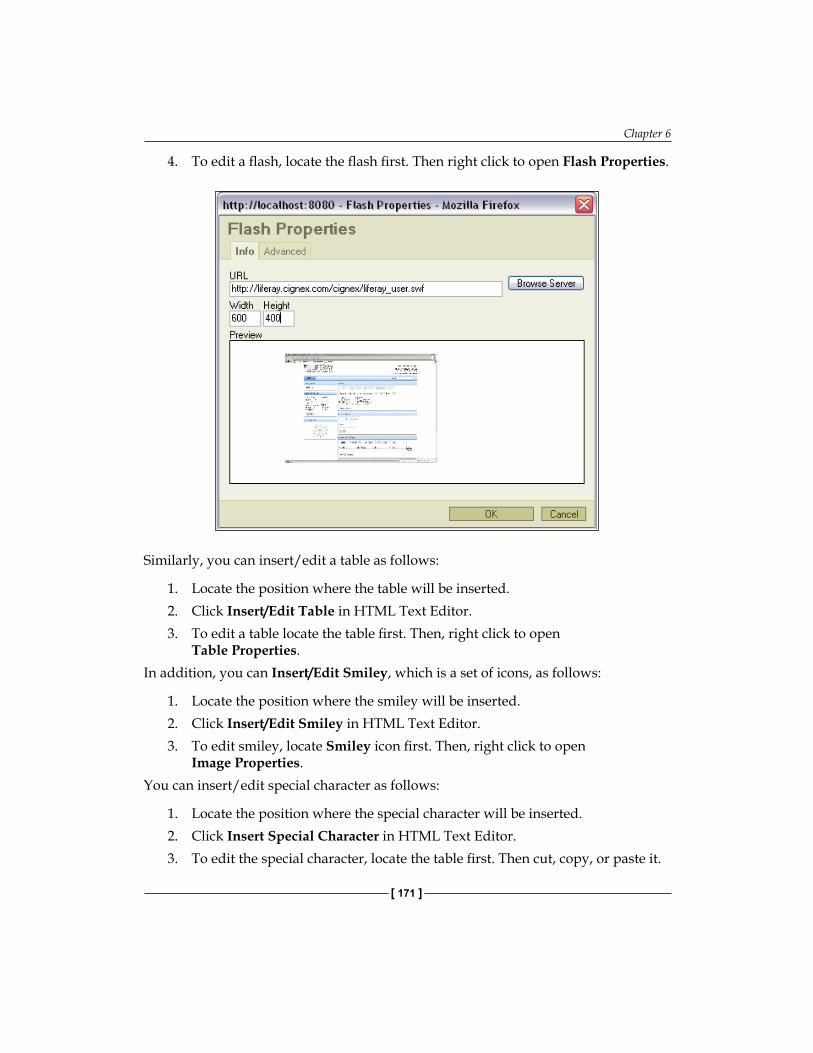
Chapter 6
[ 171 ]
4. To edit a flash, locate the flash first. Then right click to open Flash Properties.
Similarly, you can insert/edit a table as follows:
1. Locate the position where the table will be inserted.2. Click Insert/Edit Table in HTML Text Editor.3. To edit a table locate the table first. Then, right click to open
Table Properties.In addition, you can Insert/Edit Smiley, which is a set of icons, as follows:
1. Locate the position where the smiley will be inserted.2. Click Insert/Edit Smiley in HTML Text Editor.3. To edit smiley, locate Smiley icon first. Then, right click to open
Image Properties.You can insert/edit special character as follows:
1. Locate the position where the special character will be inserted.2. Click Insert Special Character in HTML Text Editor.3. To edit the special character, locate the table first. Then cut, copy, or paste it.
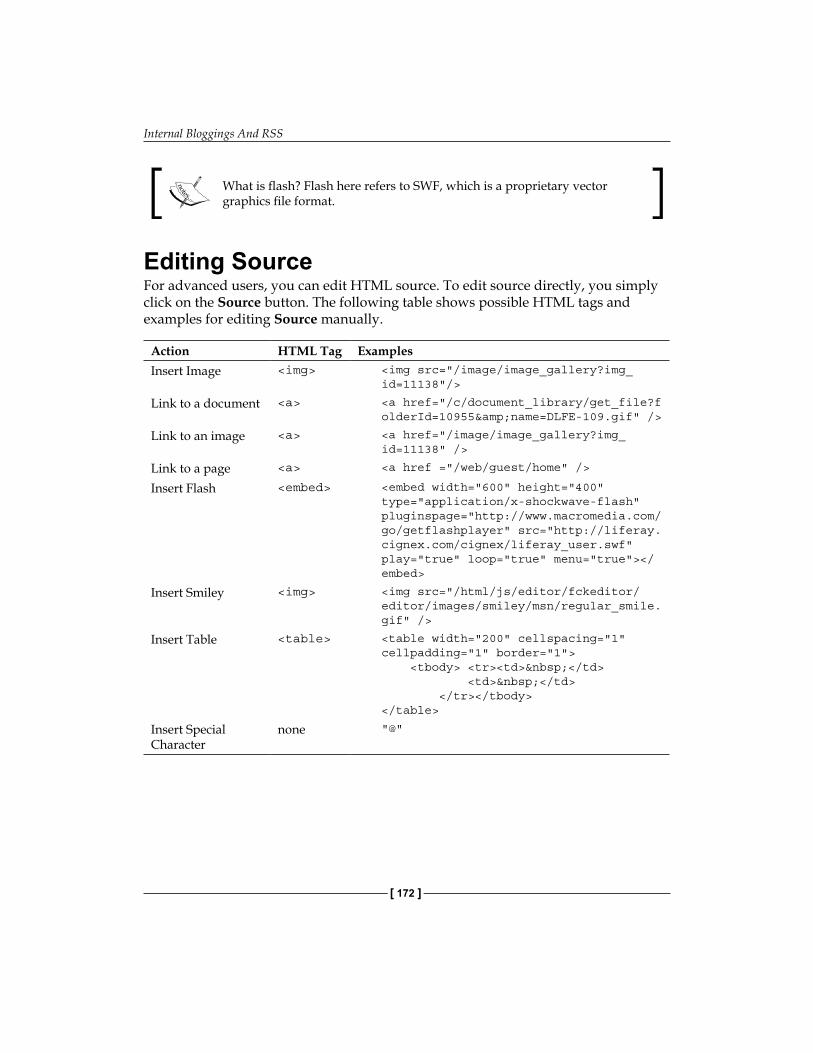
Internal Bloggings And RSS
[ 172 ]
What is flash? Flash here refers to SWF, which is a proprietary vector graphics file format.
Editing Source For advanced users, you can edit HTML source. To edit source directly, you simply click on the Source button. The following table shows possible HTML tags and examples for editing Source manually.
Action HTML Tag Examples Insert Image <img> <img src="/image/image_gallery?img_
id=11138"/>
Link to a document <a> <a href="/c/document_library/get_file?folderId=10955&name=DLFE-109.gif" />
Link to an image <a> <a href="/image/image_gallery?img_id=11138" />
Link to a page <a> <a href ="/web/guest/home" />
Insert Flash <embed> <embed width="600" height="400" type="application/x-shockwave-flash" pluginspage="http://www.macromedia.com/go/getflashplayer" src="http://liferay.cignex.com/cignex/liferay_user.swf" play="true" loop="true" menu="true"></embed>
Insert Smiley <img> <img src="/html/js/editor/fckeditor/editor/images/smiley/msn/regular_smile.gif" />
Insert Table <table> <table width="200" cellspacing="1" cellpadding="1" border="1"> <tbody> <tr><td> </td> <td> </td> </tr></tbody></table>
Insert Special Character
none "@"
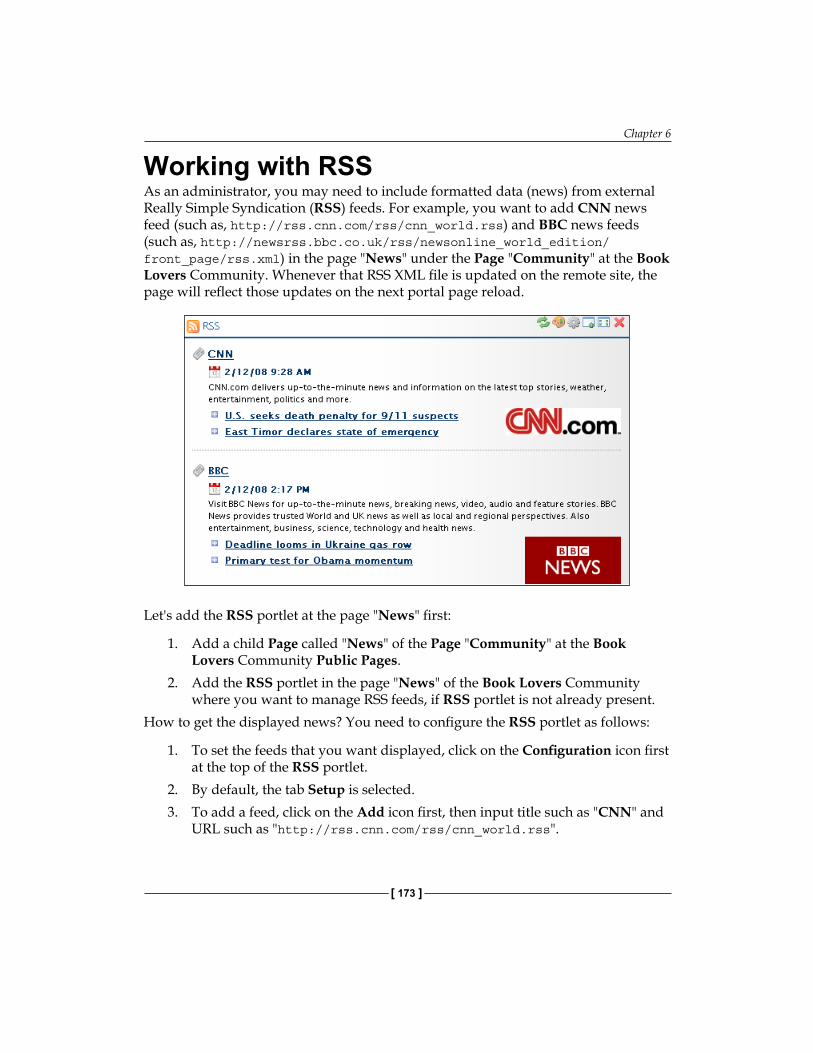
Chapter 6
[ 173 ]
Working with RSSAs an administrator, you may need to include formatted data (news) from external Really Simple Syndication (RSS) feeds. For example, you want to add CNN news feed (such as, http://rss.cnn.com/rss/cnn_world.rss) and BBC news feeds (such as, http://newsrss.bbc.co.uk/rss/newsonline_world_edition/ front_page/rss.xml) in the page "News" under the Page "Community" at the Book Lovers Community. Whenever that RSS XML file is updated on the remote site, the page will reflect those updates on the next portal page reload.
Let's add the RSS portlet at the page "News" first:
1. Add a child Page called "News" of the Page "Community" at the Book Lovers Community Public Pages.
2. Add the RSS portlet in the page "News" of the Book Lovers Community where you want to manage RSS feeds, if RSS portlet is not already present.
How to get the displayed news? You need to configure the RSS portlet as follows:
1. To set the feeds that you want displayed, click on the Configuration icon first at the top of the RSS portlet.
2. By default, the tab Setup is selected.3. To add a feed, click on the Add icon first, then input title such as "CNN" and
URL such as "http://rss.cnn.com/rss/cnn_world.rss".
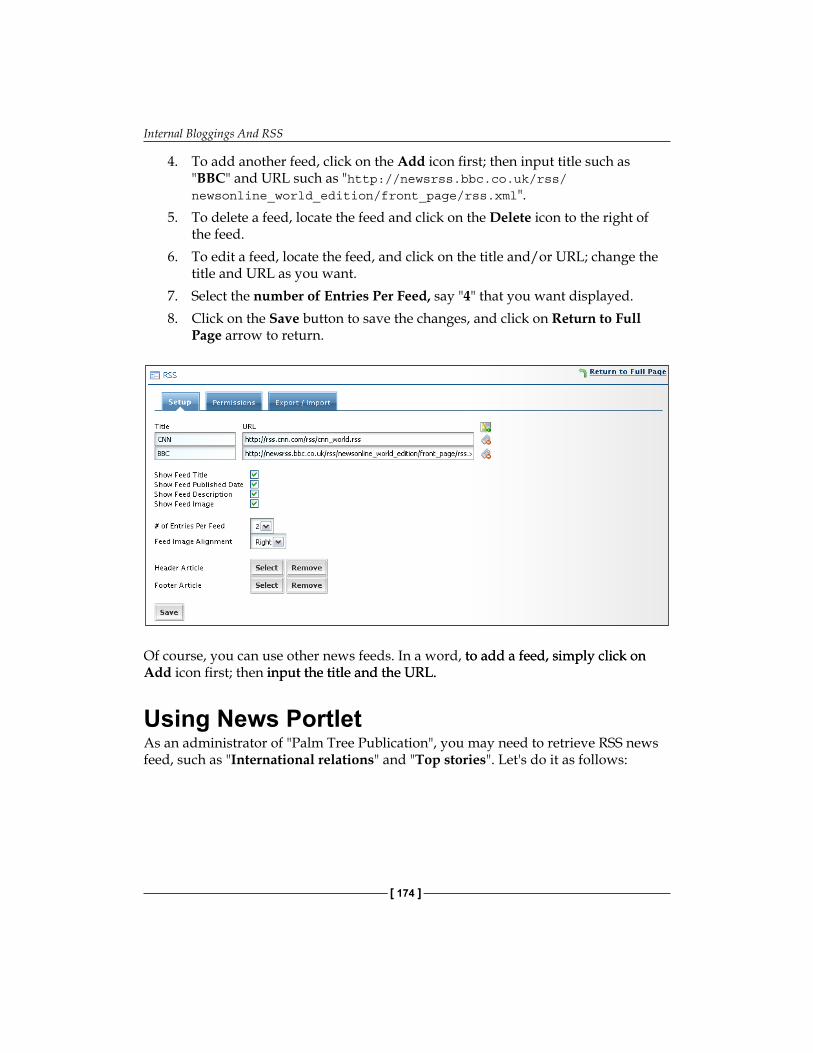
Internal Bloggings And RSS
[ 174 ]
4. To add another feed, click on the Add icon first; then input title such as "BBC" and URL such as "http://newsrss.bbc.co.uk/rss/ newsonline_world_edition/front_page/rss.xml".
5. To delete a feed, locate the feed and click on the Delete icon to the right of the feed.
6. To edit a feed, locate the feed, and click on the title and/or URL; change the title and URL as you want.
7. Select the number of Entries Per Feed, say "4" that you want displayed.8. Click on the Save button to save the changes, and click on Return to Full
Page arrow to return.
Of course, you can use other news feeds. In a word, to add a feed, simply click onto add a feed, simply click on Add icon first; then input the title and the URL.input the title and the URL.
Using News PortletAs an administrator of "Palm Tree Publication", you may need to retrieve RSS news feed, such as "International relations" and "Top stories". Let's do it as follows:
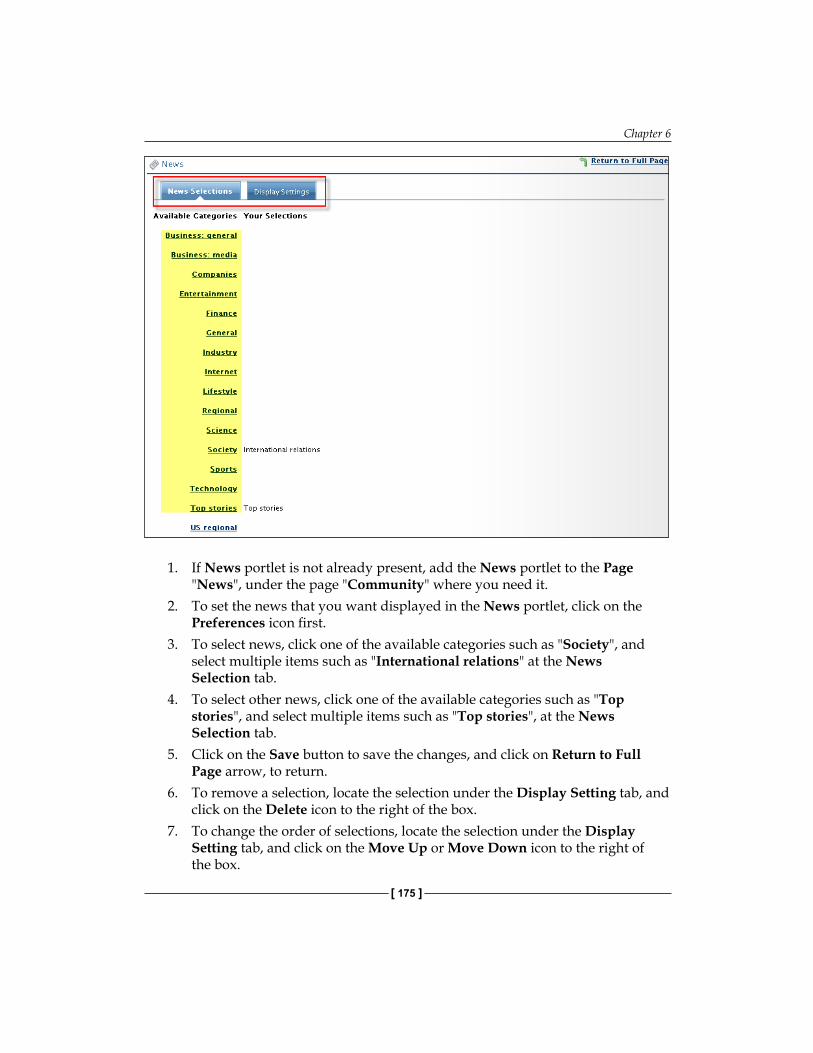
Chapter 6
[ 175 ]
1. If News portlet is not already present, add the News portlet to the Page "News", under the page "Community" where you need it.
2. To set the news that you want displayed in the News portlet, click on the Preferences icon first.
3. To select news, click one of the available categories such as "Society", and select multiple items such as "International relations" at the News Selection tab.
4. To select other news, click one of the available categories such as "Top stories", and select multiple items such as "Top stories", at the News Selection tab.
5. Click on the Save button to save the changes, and click on Return to Full Page arrow, to return.
6. To remove a selection, locate the selection under the Display Setting tab, and click on the Delete icon to the right of the box.
7. To change the order of selections, locate the selection under the Display Setting tab, and click on the Move Up or Move Down icon to the right of the box.
Internal Bloggings And RSS
[ 176 ]
8. Select the number of Entries Per Feed under the Display Setting tab.9. Click on the Save button to save the changes, and click on Back arrow
to return.
The News Portlet retrieves a RSS news feed, based on a URL, and displays it as HTML to the user. By default, Moreover Technologies is used as the news provider.
Moreover Technologies is the premier provider of real-time news, current awareness and business information—pioneering the way online news is gathered, refined, categorized and delivered. URL: http://w.moreover.com/categories/category_list.tsv2.
Using Weather PortletAs an administrator at "Palm Tree Publication", you may need to show the latest weather message in the page, "News" under the page, "Community". Since the enterprise has two locations: US (San Jose city) and Germany (Frankfurt/main city), the latest weather message about both US (San Jose city) and Germany (Frankfurt/main city) is required in the page, "News". At same time, we want to know the latest weather message about other cities, such as Rome (Italy), Zurich (Switzerland) and Beijing (China). Let's do it as follows:
1. If the Weather portlet is not already present, add the Weather portlet to the page, "News" under the page, "Community" where you need it.
2. To set the city or zip code that you want displayed in the portlet, click on the Preferences icon.
3. Enter one city or zip code per line. For example, 94043; Frankfurt/mainFrankfurt/main Germany; Rome, Italy; Zurich, Switzerland; and Beijing, China.Zurich, Switzerland; and Beijing, China.Beijing, China..
4. Select temperature format, such as Fahrenheit and Celsius. Here, we select Fahrenheit which is default.
5. Click on the Save button to save the changes and finally, click on Return to Full Page arrow to return.
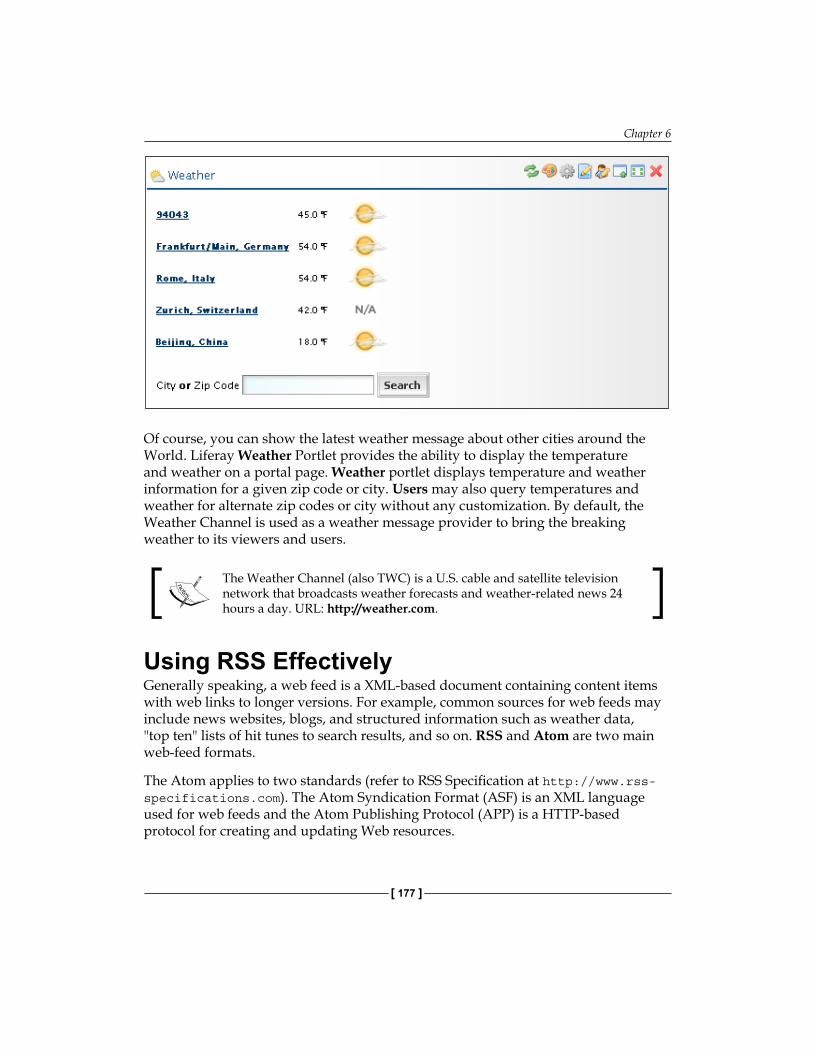
Chapter 6
[ 177 ]
Of course, you can show the latest weather message about other cities around the World. Liferay Weather Portlet provides the ability to display the temperature and weather on a portal page. Weather portlet displays temperature and weather information for a given zip code or city. Users may also query temperatures and weather for alternate zip codes or city without any customization. By default, the Weather Channel is used as a weather message provider to bring the breaking weather to its viewers and users.
The Weather Channel (also TWC) is a U.S. cable and satellite television network that broadcasts weather forecasts and weather-related news 24 hours a day. URL: http://weather.com.
Using RSS EffectivelyGenerally speaking, a web feed is a XML-based document containing content items with web links to longer versions. For example, common sources for web feeds may include news websites, blogs, and structured information such as weather data, "top ten" lists of hit tunes to search results, and so on. RSS and Atom are two main web-feed formats.
The Atom applies to two standards (refer to RSS Specification at http://www.rss-specifications.com). The Atom Syndication Format (ASF) is an XML language used for web feeds and the Atom Publishing Protocol (APP) is a HTTP-based protocol for creating and updating Web resources.
Internal Bloggings And RSS
[ 178 ]
In general, RSS is used to refer to the following formats:
Really Simple Syndication (RSS 2.0)RDF Site Summary (RSS 1.0 and RSS 0.90)Rich Site Summary (RSS 0.91)
There are three formats of syndication that have emerged: RSS 2.0, RSS 1.0, and Atom. Which feed format do we choose? In general, the three formats are for three different goals:
RSS 2.0—This is the simplest format (although extensible) available, to display links on articles of a site.RSS 1.0—to get information on the feed.Atom—requires special software to process, and has more requirements about format of data.
In short, RSS is a XML-based web content syndication format, compliant to the XML 1.0 specification.
RSS SpecificationRSS, not a perfect format, is very popular and widely supported. Here, we briefly introduce RSS 2.0 specification.
For more details related RSS specification, refer to the URL http://www.rss-specifications.com/rss-specifications.htm.
A RSS document has an element <rss> with an attribute version at the top level. The attribute version specifies the version of RSS that the document conforms to. Subordinate to the <rss> element is a single element <channel>, which contains information about the channel and its contents.
The following table depicts a list of the required channel elements, each with a brief description (refer to RSS Specification at http://www.rss-specifications.com/):
Element DescriptionTitle The name of the channel.Link The URL link to the website corresponding to the channel.Description Phrase or sentence describing the channel.Item One item tag at least, for the content.
•
•
•
•
•
•

Chapter 6
[ 179 ]
For example,
<rss version="2.0"><channel> <title>Integration</title> <link>http://liferay.cignex.com/</link> <description>LDAP, SSO, Liferay and Alfresco Full integration </description> <item> </item> </channel></rss>
A channel may contain any number of items. An item represents content. The description is a synopsis of the content, while the link points to the full content.
For example:
<item> <title>Liferay and Alfresco – RESTFul Integration</title> <link>http://liferay.cignex.com/sesame</link> <description>Integration based on REST</description> </item>
How It WorksSuppose there are web pages, which we want other websites to display. The set of pages is the RSS feed. The RSS system, which publishes articles and news, over the web, works as follows:
An XML file defines the RSS feed, which holds URL, title and summary of each page to display.A User, who wants to read the feed on his computer, uses an RSS reader or its browser, and just adds the feed with the proper command of its software.Or a User displays the feed in a website—loading the RSS file from the provider, by extracting the URL of pages, and displaying titles and summaries.On visiting the website of the receiver, the script is launched first; it recalls the RSS file from the provider's website and displays a list of news from the extracted data.Visitors display a page from the provider by clicking on the title of the list.
•
•
•
•
•
Internal Bloggings And RSS
[ 180 ]
SummaryThis chapter has introduced to us how Entries in Blogs, are added, how they are managed (for example, view, update and delete), and how Comments are added on a given Entry of Blogs. Then it discussed how to use Permission on the Blogs portlet and Entries in Blogs. It also introduced ways to publish Blogs by Recent Bloggers and using Blogs Aggregator portlets, and to build Blogs with WYSIWGs editor. Finally, it discussed RSS and related portlets such as RSS, News and Weather portlets.
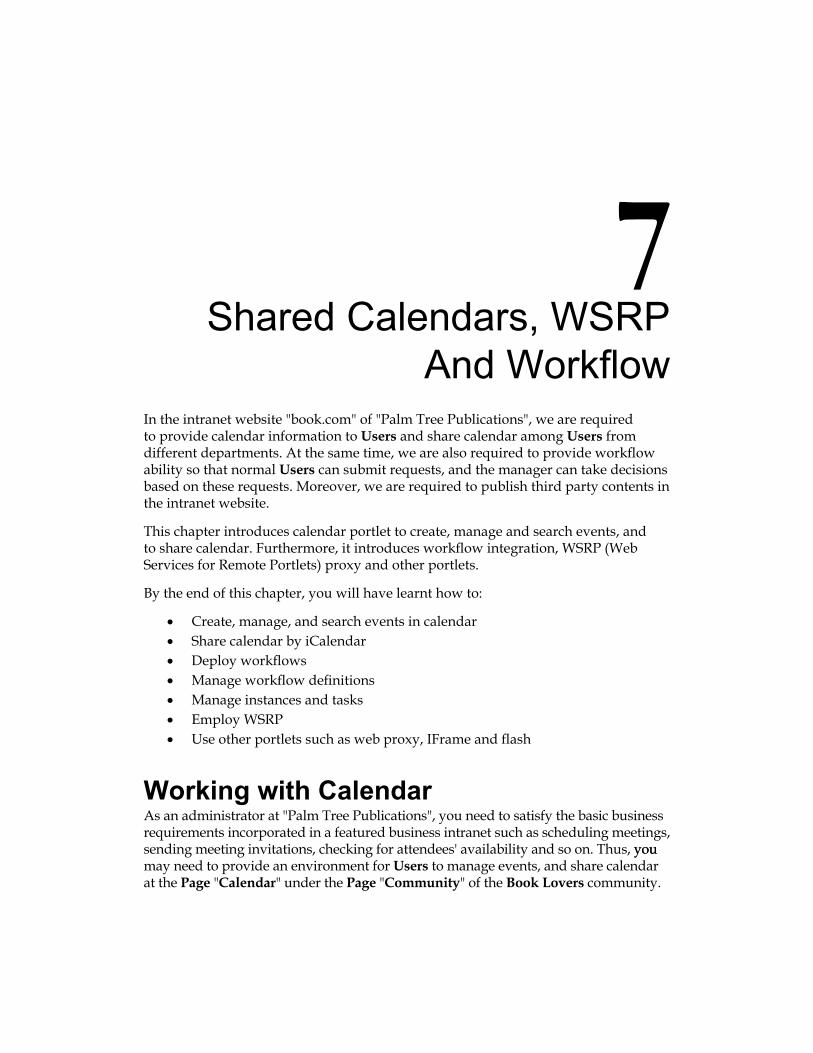
Shared Calendars, WSRP And Workflow
In the intranet website "book.com" of "Palm Tree Publications", we are required to provide calendar information to Users and share calendar among Users from different departments. At the same time, we are also required to provide workflow ability so that normal Users can submit requests, and the manager can take decisions based on these requests. Moreover, we are required to publish third party contents in the intranet website.
This chapter introduces calendar portlet to create, manage and search events, and to share calendar. Furthermore, it introduces workflow integration, WSRP (Web Services for Remote Portlets) proxy and other portlets.
By the end of this chapter, you will have learnt how to:
Create, manage, and search events in calendarShare calendar by iCalendarDeploy workflowsManage workflow definitionsManage instances and tasks Employ WSRPUse other portlets such as web proxy, IFrame and flash
Working with CalendarAs an administrator at "Palm Tree Publications", you need to satisfy the basic business requirements incorporated in a featured business intranet such as scheduling meetings, sending meeting invitations, checking for attendees' availability and so on. Thus, youyou may need to provide an environment for Users to manage events, and share calendar at the Page "Calendar" under the Page "Community" of the Book Lovers community.
•••••••
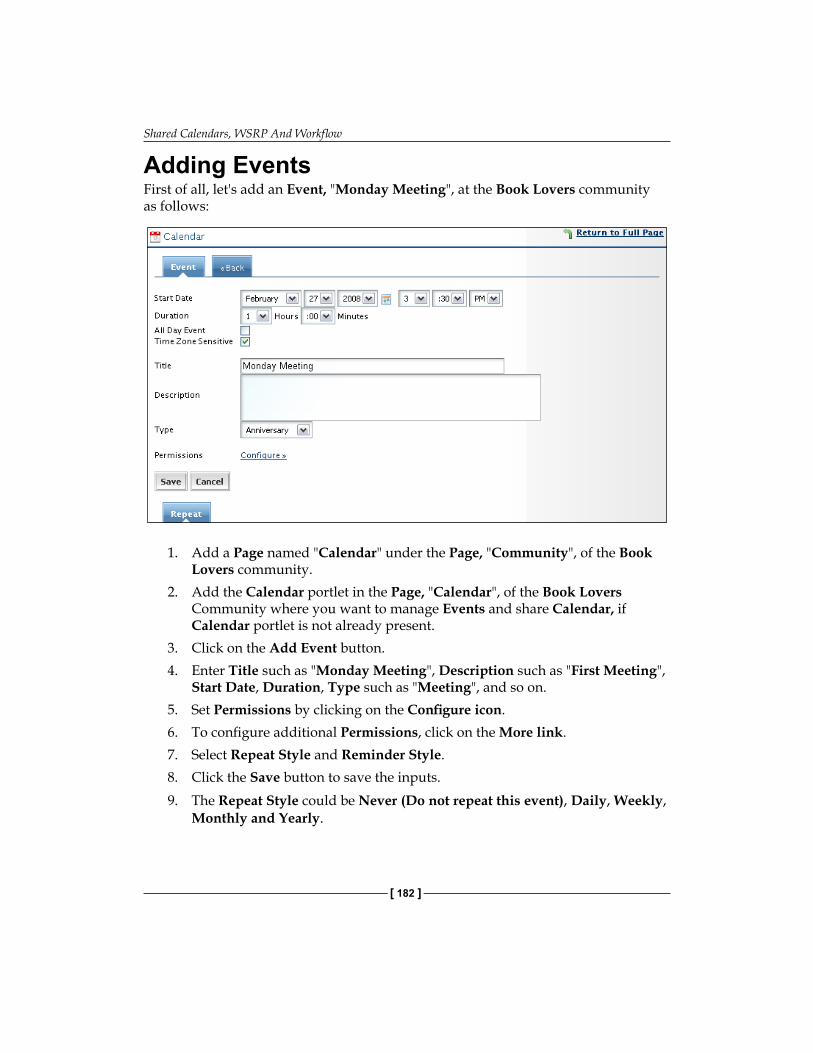
Shared Calendars, WSRP And Workflow
[ 182 ]
Adding EventsFirst of all, let's add an Event, "Monday Meeting", at the Book Lovers community as follows:
1. Add a Page named "Calendar" under the Page, "Community", of the Book Lovers community.
2. Add the Calendar portlet in the Page, "Calendar", of the Book Lovers Community where you want to manage Events and share Calendar, if Calendar portlet is not already present.
3. Click on the Add Event button.4. Enter Title such as "Monday Meeting", Description such as "First Meeting",
Start Date, Duration, Type such as "Meeting", and so on. 5. Set Permissions by clicking on the Configure icon.6. To configure additional Permissions, click on the More link.7. Select Repeat Style and Reminder Style.8. Click the Save button to save the inputs.9. The Repeat Style could be Never (Do not repeat this event), Daily, Weekly,
Monthly and Yearly.
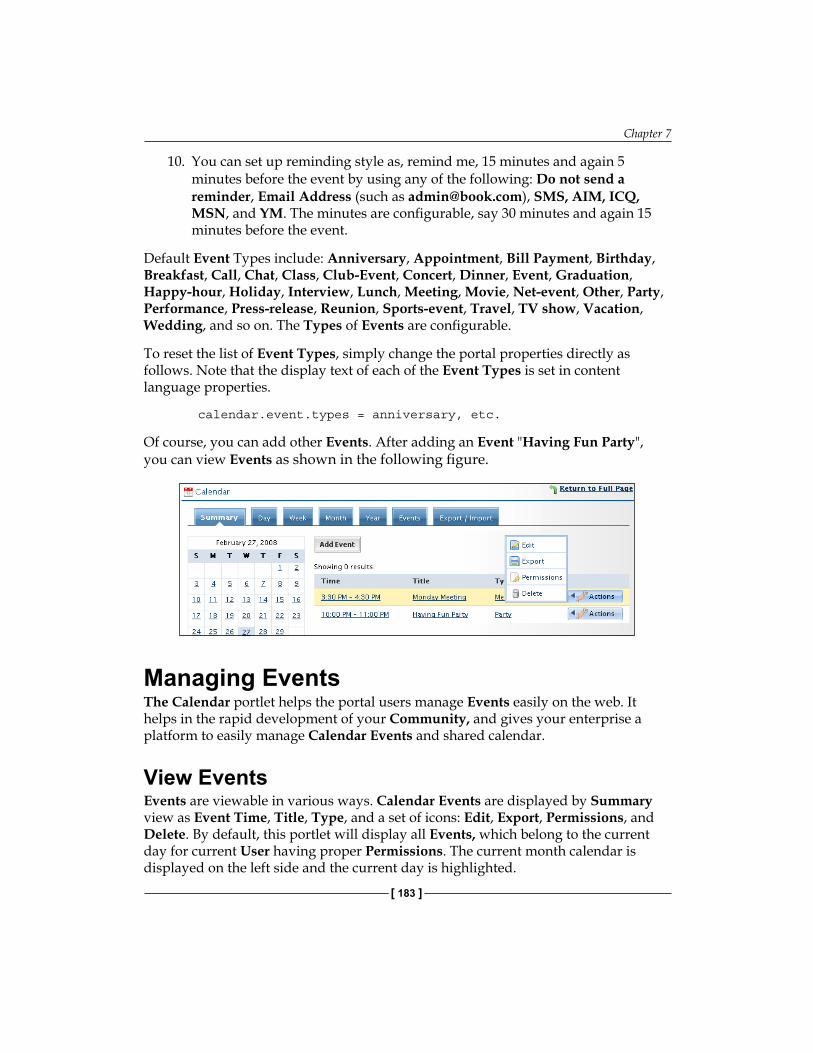
Chapter 7
[ 183 ]
10. You can set up reminding style as, remind me, 15 minutes and again 5 minutes before the event by using any of the following: Do not send a reminder, Email Address (such as [email protected]), SMS, AIM, ICQ, MSN, and YM. The minutes are configurable, say 30 minutes and again 15 minutes before the event.
Default Event Types include: Anniversary, Appointment, Bill Payment, Birthday, Breakfast, Call, Chat, Class, Club-Event, Concert, Dinner, Event, Graduation, Happy-hour, Holiday, Interview, Lunch, Meeting, Movie, Net-event, Other, Party, Performance, Press-release, Reunion, Sports-event, Travel, TV show, Vacation, Wedding, and so on. The Types of Events are configurable.
To reset the list of Event Types, simply change the portal properties directly as follows. Note that the display text of each of the Event Types is set in content language properties.
calendar.event.types = anniversary, etc.
Of course, you can add other Events. After adding an Event "Having Fun Party", you can view Events as shown in the following figure.
Managing EventsThe Calendar portlet helps the portal users manage Events easily on the web. It helps in the rapid development of your Community, and gives your enterprise a platform to easily manage Calendar Events and shared calendar.
View EventsEvents are viewable in various ways. Calendar Events are displayed by Summary view as Event Time, Title, Type, and a set of icons: Edit, Export, Permissions, and Delete. By default, this portlet will display all Events, which belong to the current day for current User having proper Permissions. The current month calendar is displayed on the left side and the current day is highlighted.
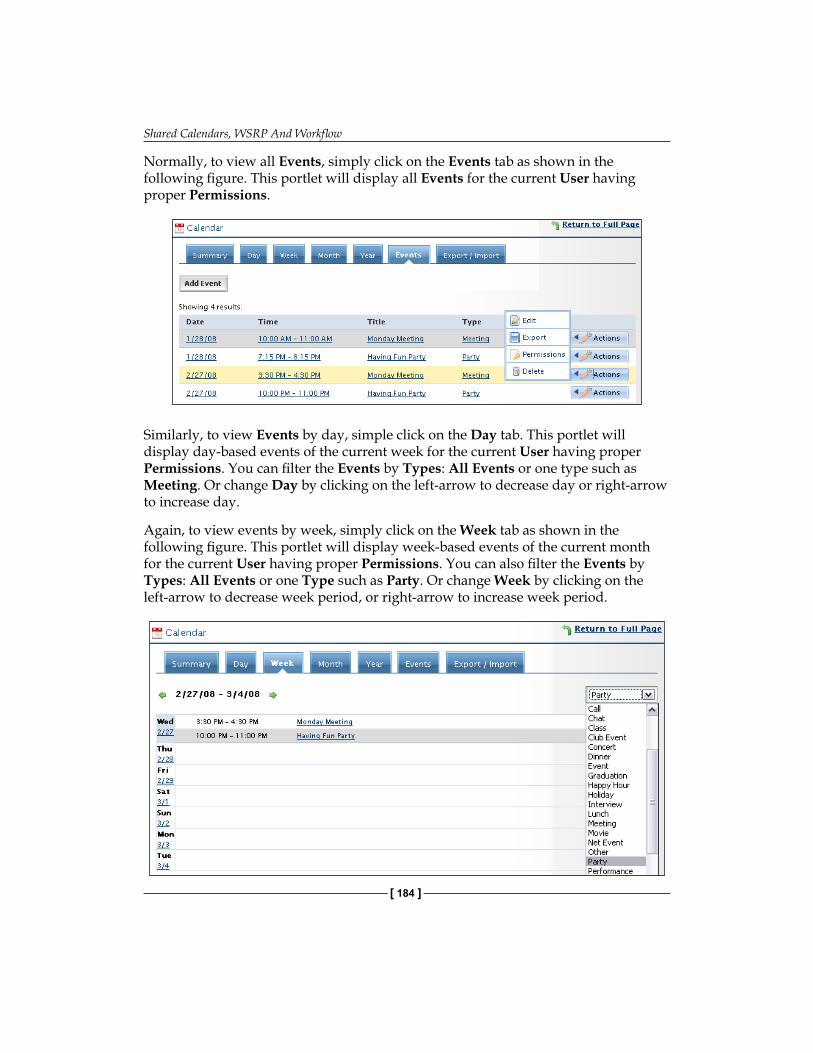
Shared Calendars, WSRP And Workflow
[ 184 ]
Normally, to view all Events, simply click on the Events tab as shown in the following figure. This portlet will display all Events for the current User having proper Permissions.
Similarly, to view Events by day, simple click on the Day tab. This portlet will display day-based events of the current week for the current User having proper Permissions. You can filter the Events by Types: All Events or one type such as Meeting. Or change Day by clicking on the left-arrow to decrease day or right-arrow to increase day.
Again, to view events by week, simply click on the Week tab as shown in the following figure. This portlet will display week-based events of the current month for the current User having proper Permissions. You can also filter the Events by Types: All Events or one Type such as Party. Or change Week by clicking on the left-arrow to decrease week period, or right-arrow to increase week period.
Chapter 7
[ 185 ]
Once more, to view events by month, simply click on the Month tab. This portlet will display month-based events of the current year for the current User having proper Permissions. To change the Month, click on the left-arrow to decrease month number, or the right-arrow to increase month number.
To view events by the year, simply click on the Year tab. This portlet will display year-based events for the current User having proper Permissions. To change Year, click on the left-arrow to decrease year number, or the right-arrow to increase year number.
Edit An EventEvents are updatable. We have an Event called "Having Fun Party" currently. But now, we want to change the Description from "a party" to "This is a special party for Lotti Stein". Let's do it as follows:
1. Select the Events tab in the Calendar portlet.2. Locate an Event such as "Having Fun Party" in the Calendar portlet, and
click on the Edit icon from the Actions next to the event.3. Update Description with value "This is a special party for Lotti Stein".4. Maintain other values.5. Click Save button to save the inputs.
Delete An EventEvents are removable. We have an Event called "Having Fun Party" currently. But for some reason, this Event is not wanted anymore. We have to delete this Event. Let's delete this Event as follows:
1. Locate an Event such as "Having Fun Party" that you want to delete.2. Click the Delete icon from the Actions located next to the event.3. A screen will appear asking if you want to delete this.4. Click the OK button to confirm delete action.
Note that deleting an Event will delete all related information that belongs to this Event.
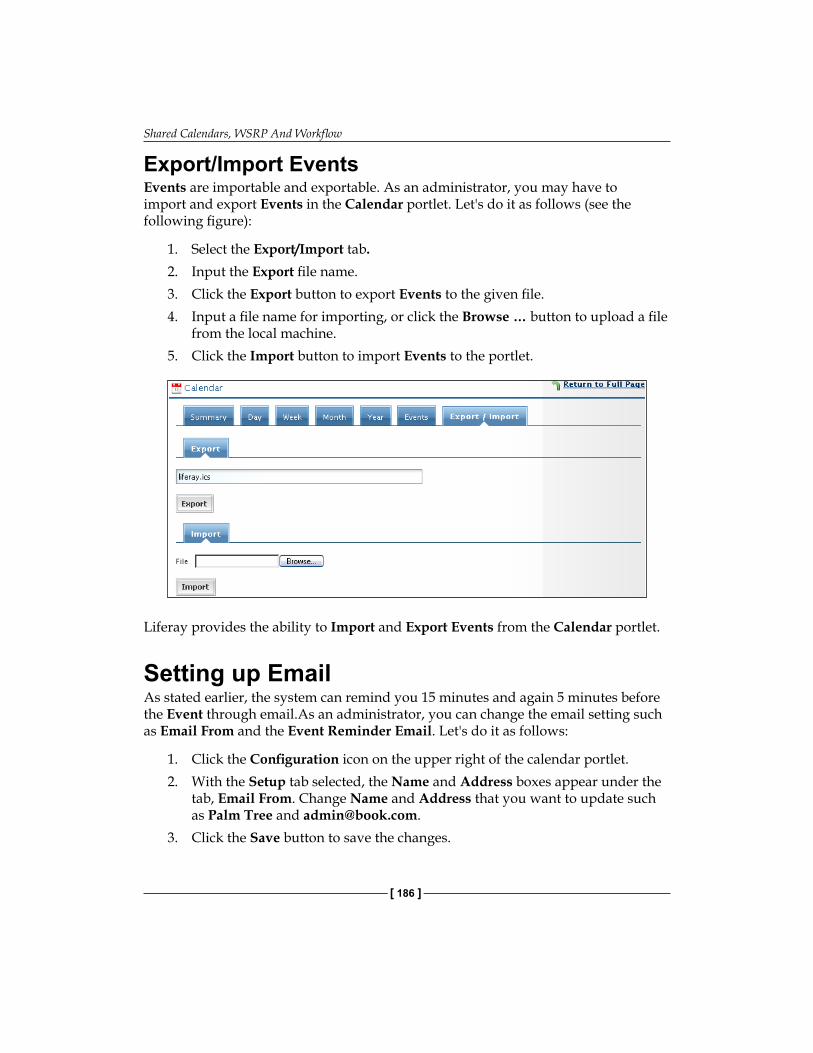
Shared Calendars, WSRP And Workflow
[ 186 ]
Export/Import EventsEvents are importable and exportable. As an administrator, you may have to import and export Events in the Calendar portlet. Let's do it as follows (see the following figure):
1. Select the Export/Import tab.2. Input the Export file name.3. Click the Export button to export Events to the given file.4. Input a file name for importing, or click the Browse … button to upload a file
from the local machine.5. Click the Import button to import Events to the portlet.
Liferay provides the ability to Import and Export Events from the Calendar portlet.
Setting up Email As stated earlier, the system can remind you 15 minutes and again 5 minutes before the Event through email.As an administrator, you can change the email setting such as Email From and the Event Reminder Email. Let's do it as follows:
1. Click the Configuration icon on the upper right of the calendar portlet. 2. With the Setup tab selected, the Name and Address boxes appear under the
tab, Email From. Change Name and Address that you want to update such as Palm Tree and [email protected].
3. Click the Save button to save the changes.
Chapter 7
[ 187 ]
4. Select the Event Reminder Email tab to change the Event reminder email. 5. Click the Save button to save the changes. 6. If in need, click on the arrow, Return to Full Page, to return.
Your Event Reminder Email may have the following format:
Dear [$TO_NAME$],
This is an autogenerated email for the [$PORTLET_NAME$] portlet.
Your event with the title [$EVENT_TITLE$] will start at [$EVENT_START_DATE$].
Sincerely,
[$FROM_NAME$]
[$FROM_ADDRESS$]
http://[$PORTAL_URL$]
Sharing CalendarWe have used default setting for the Calendar portlet in the Page, "Calendar", under the Page "Community" at the Book Lovers Community. When the administrator,"Palm Tree", logs in, he/she will see the button, Add Event, as mentioned earlier. As we know, the User "Lotti Stein" is also a member of the Book Lovers community. Try to log in as "Lotti Stein", and you will see that there is no button, Add Event. Furthermore, you see the Events with one action icon, Export.
What's happening? This is something related to Permissions. In order to share Calendar, we have to consider two levels of Permissions, Permissions portlet and Permissions on Events.
Use Portlet PermissionsThe following table shows Permissions for the Calendar portlet. A Community User may set up all Permissions (marked 'X'), View, Configuration, Add Event and Export All Events, whereas a Guest User may have Permissions, View, Configuration and Export All Events. By default, a Community has View action (marked '*'), and so does a Guest User.
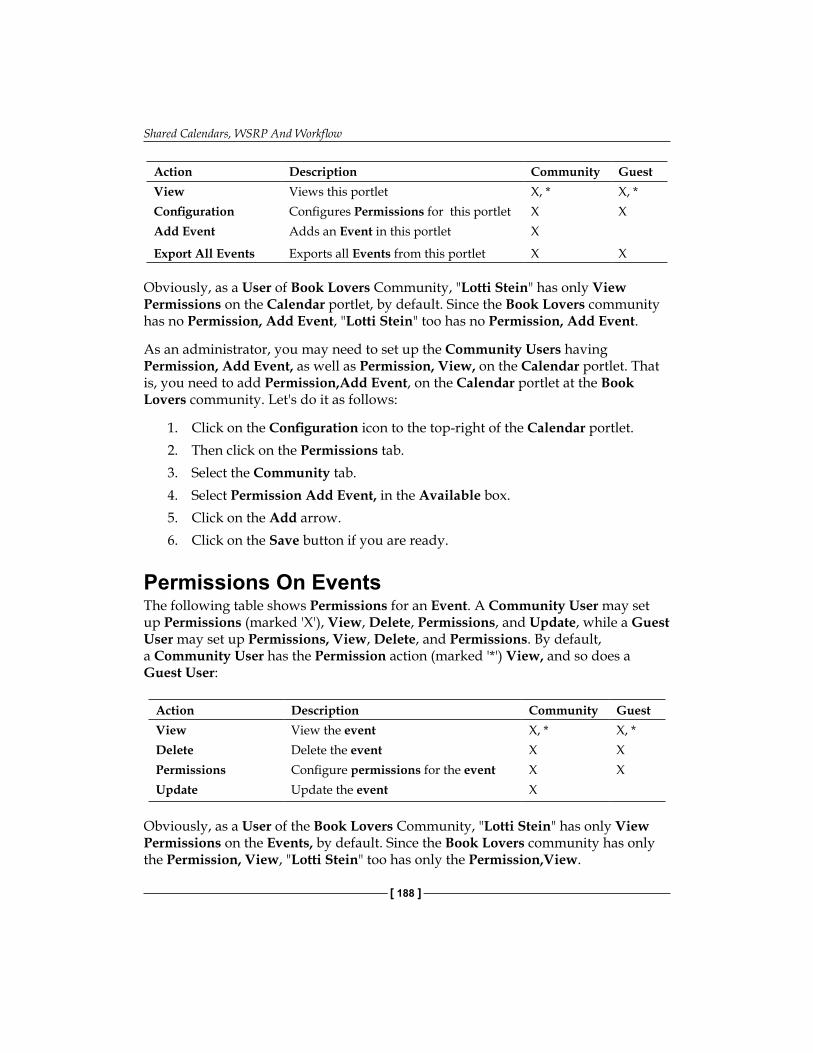
Shared Calendars, WSRP And Workflow
[ 188 ]
Action Description Community GuestView Views this portlet X, * X, *Configuration Configures Permissions for this portlet X XAdd Event Adds an Event in this portlet X
Export All Events Exports all Events from this portlet X X
Obviously, as a User of Book Lovers Community, "Lotti Stein" has only View Permissions on the Calendar portlet, by default. Since the Book Lovers community has no Permission, Add Event, "Lotti Stein" too has no Permission, Add Event.
As an administrator, you may need to set up the Community Users having Permission, Add Event, as well as Permission, View, on the Calendar portlet. That is, you need to add Permission,Add Event, on the Calendar portlet at the Book Lovers community. Let's do it as follows:
1. Click on the Configuration icon to the top-right of the Calendar portlet.2. Then click on the Permissions tab.3. Select the Community tab.4. Select Permission Add Event, in the Available box.5. Click on the Add arrow. 6. Click on the Save button if you are ready.
Permissions On EventsThe following table shows Permissions for an Event. A Community User may set up Permissions (marked 'X'), View, Delete, Permissions, and Update, while a Guest User may set up Permissions, View, Delete, and Permissions. By default, a Community User has the Permission action (marked '*') View, and so does a Guest User:
Action Description Community GuestView View the event X, * X, *Delete Delete the event X XPermissions Configure permissions for the event X XUpdate Update the event X
Obviously, as a User of the Book Lovers Community, "Lotti Stein" has only View Permissions on the Events, by default. Since the Book Lovers community has only the Permission, View, "Lotti Stein" too has only the Permission,View.
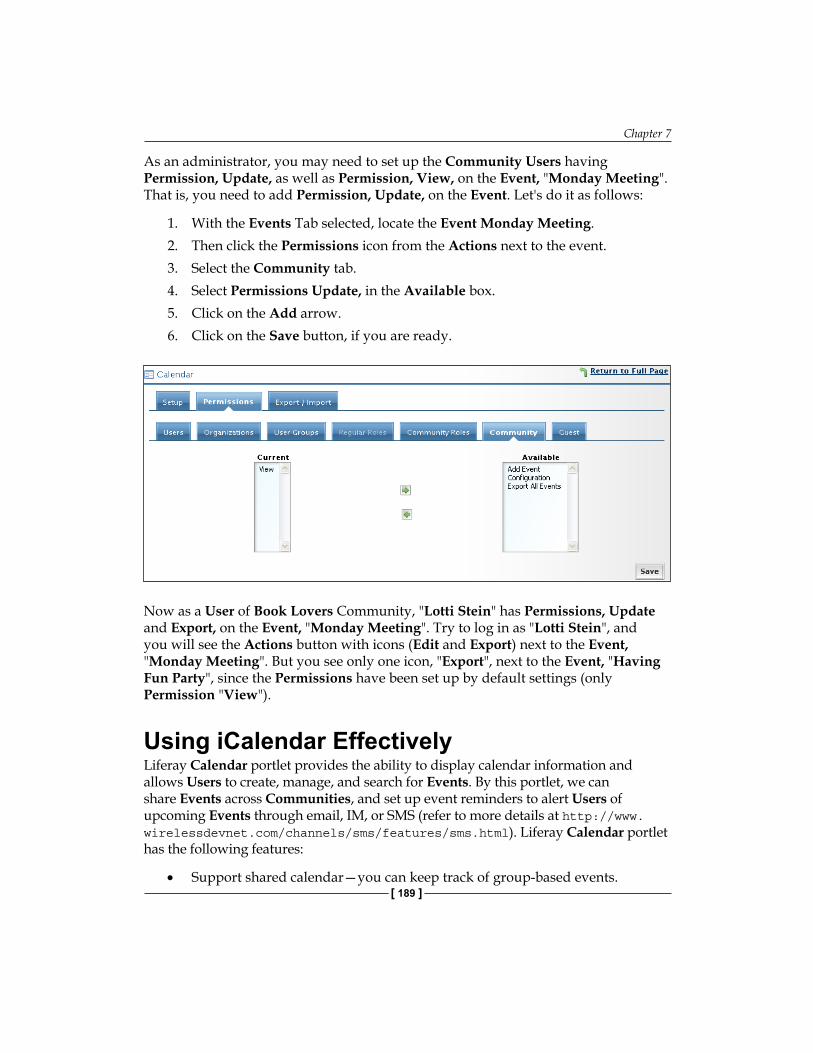
Chapter 7
[ 189 ]
As an administrator, you may need to set up the Community Users having Permission, Update, as well as Permission, View, on the Event, "Monday Meeting". That is, you need to add Permission, Update, on the Event. Let's do it as follows:
1. With the Events Tab selected, locate the Event Monday Meeting.2. Then click the Permissions icon from the Actions next to the event.3. Select the Community tab.4. Select Permissions Update, in the Available box.5. Click on the Add arrow. 6. Click on the Save button, if you are ready.
Now as a User of Book Lovers Community, "Lotti Stein" has Permissions, Update and Export, on the Event, "Monday Meeting". Try to log in as "Lotti Stein", and you will see the Actions button with icons (Edit and Export) next to the Event, "Monday Meeting". But you see only one icon, "Export", next to the Event, "Having Fun Party", since the Permissions have been set up by default settings (only Permission "View").
Using iCalendar EffectivelyLiferay Calendar portlet provides the ability to display calendar information and allows Users to create, manage, and search for Events. By this portlet, we can share Events across Communities, and set up event reminders to alert Users of upcoming Events through email, IM, or SMS (refer to more details at http://www.wirelessdevnet.com/channels/sms/features/sms.html). Liferay Calendar portlet has the following features:
Support shared calendar—you can keep track of group-based events.•
Shared Calendars, WSRP And Workflow
[ 190 ]
Support Micro-format—you can transfer your calendar and User information via Web 2.0 standards. Data in micro-formats (hCard, hCalendar, and so on) could be easily used by and integrated with third-party applications.Support Calendaring—both iCal and Exchange, providing flexible import and export of Events.
hCalendar is a simple, open, distributed calendaring and Events format, based on the iCalendar standard (RFC2445), suitable for embedding in XHTML, Atom, RSS, and arbitrary XML; while hCard is a simple, open, distributed format for representing people, companies, organizations, and places, using a 1:1 representation of vCard (RFC2426) properties and values in semantic XHTML, also suitable for embedding in XHTML, Atom, RSS, and arbitrary XML.
Liferay Calendar portlet supports iCalendar Standards. iCalendar is a standard (Requests for Comments—RFC 2445) for calendar data exchange. By this, Users can send event-based requests and tasks to other Users through email, while recipients of the iCalendar email can respond to the sender easily.
With a common data format, we can use iCalendar standard to store information about calendar-specific data such as to-do lists, appointments, events, and so on. Most of the popular calendaring tools, such as Lotus Notes, Outlook, Google Calendar, Zimbra and Apple's iCal also support the iCalendar standard.
Request for Comments (RFC) documents are a series of memoranda encompassing new research, innovations, and methodologies applicable to Internet technologies. Refer to URL http://www.rfc-editor.org/
Use Core ObjectIn iCalendar, the core object (or called top-level object) is a collection of calendaring and scheduling information (refer to RFC2445 at http://www.ietf.org/rfc/rfc2445.txt. Normally, this information consists of a single iCalendar object. But it is possible to group multiple iCalendar objects together.
It must start with "BEGIN: VCALENDAR", and end with "END: VCALENDAR". The contents are called the "i-cal-body", consisting of a sequence of calendar properties, and one or more calendar components. The calendar properties (that is, attributes) apply to the calendar as a whole. The calendar components refer to collections of properties expressing a particular calendar semantic. For instance, a calendar component may specify an event, or free/busy time information, or an alarm, or a to-do list, and so on.
•
•
Chapter 7
[ 191 ]
Here is a simple example:
BEGIN:VCALENDARVERSION:2.0PRODID:-//PALM TREE PUBLICATIONS//ENBEGIN:VEVENTDTSTART:20081014T170000ZDTEND:20081015T035959ZSUMMARY: Day Editorial Party END:VEVENTEND:VCALENDAR
There are many different types of components defined in the standard as described in the following table (refer to RFC2445 at http://www.ietf.org/rfc/rfc2445.txt).
Object Names DescriptionVEVENT Events Describes an event that represents a scheduled
amount of time on a calendar. VTODO To-do Describes a to-do item, that is, an action-item
or assignment.VJOURNAL Journal entry Describes a journal entry. VFREEBUSY Free/busy
timeDescribes either a request for free/busy time, a response to a request, or describes a published set of busy time.
VTIMEZONE Time zone Defines time zones.VALARM Alarms Defines alarms.
Note that some components may include other components (VALARM is often included in other components), and some components are often defined to support other components defined after them (VTIMEZONE is often used this way).
Especially, under the VTODO, the UID field facilitates distribution of updates, that is, a scheduled event change. A type of globally unique identifier (UID) is generated when the event is generated first. If a later event is distributed with the same UID, it means the original one is replaced. An example UID might be "[email protected]", for the 4th meeting of class 121 in semester 3 at "Palm Tree Publications".
Shared Calendars, WSRP And Workflow
[ 192 ]
Exchange DataThe iCalendar format describes calendar-based data such as Events. But it does not describe what to do with that data. Thus, other protocols are in need to implement actions to be done with this data. In general, the iCalendar format supports interoperability of calendar data, while the features are widely supported by iCalendar implementations.
iCalendar Transport-Independent Interoperability (I-TIP) (RFC 2446) defines a protocol to exchange iCalendar objects for the purposes of group calendaring, and scheduling between "Calendar Users" (CUs). It defines a set of methods such as PUBLISH, REQUEST, REPLY, ADD, CANCEL, REFRESH, COUNTER and DECLINE-COUNTER (negotiate/decline the counter-proposal).
iCalendar Message-based Interoperability Protocol—IMIP (RFC 2447) defines a method to implement I-TIP on standard Internet email-based transports.
Working with WorkflowAs an administrator, you may need to provide an environment for Users to manage workflows at the Page, "Workflow", under the Page, "Community", of the Book Lovers community. For example, the User, "Lotti Stein", at the Editorial department submits a request, "request-holiday", and the manager, "David Berger", at the Editorial department reviews/approves/rejects the request via a workflow. First, let's set up workflow as follows:
1. Add a Page named "Workflow" under the Page, "Community", of the Book Lovers community.
2. If the Workflow portlet is not already present, add it in the Page, "Workflow", of the Book Lovers Community, where you want to let Users manage workflows by other portals.
Now, you are ready to deploy a workflow.
Deploying WorkflowSuppose that a workflow, "holiday", was used for the above example. Let's deploy this workflow as follows:
1. Navigate to the Page, "Workflow", under the Page, "Community", at the Book Lovers community.
2. Locate the Workflow portlet.
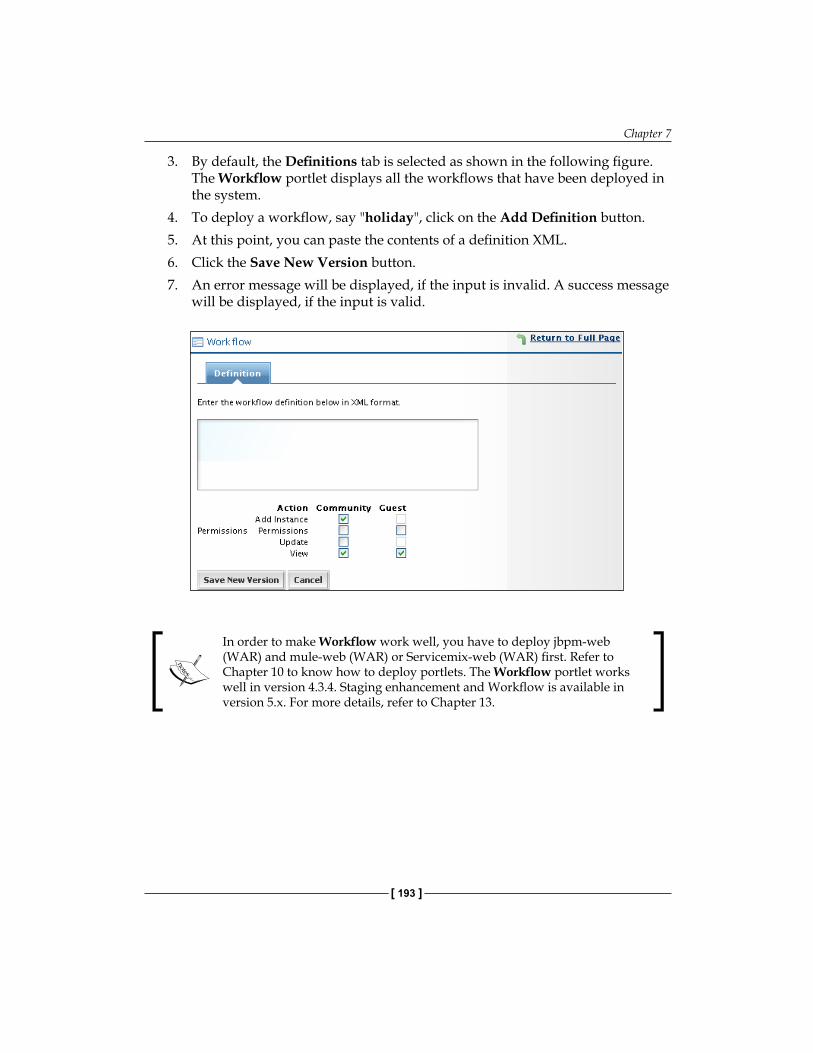
Chapter 7
[ 193 ]
3. By default, the Definitions tab is selected as shown in the following figure. The Workflow portlet displays all the workflows that have been deployed in the system.
4. To deploy a workflow, say "holiday", click on the Add Definition button.5. At this point, you can paste the contents of a definition XML. 6. Click the Save New Version button. 7. An error message will be displayed, if the input is invalid. A success message
will be displayed, if the input is valid.
In order to make Workflow work well, you have to deploy jbpm-web (WAR) and mule-web (WAR) or Servicemix-web (WAR) first. Refer to Chapter 10 to know how to deploy portlets. The Workflow portlet works well in version 4.3.4. Staging enhancement and Workflow is available in version 5.x. For more details, refer to Chapter 13.
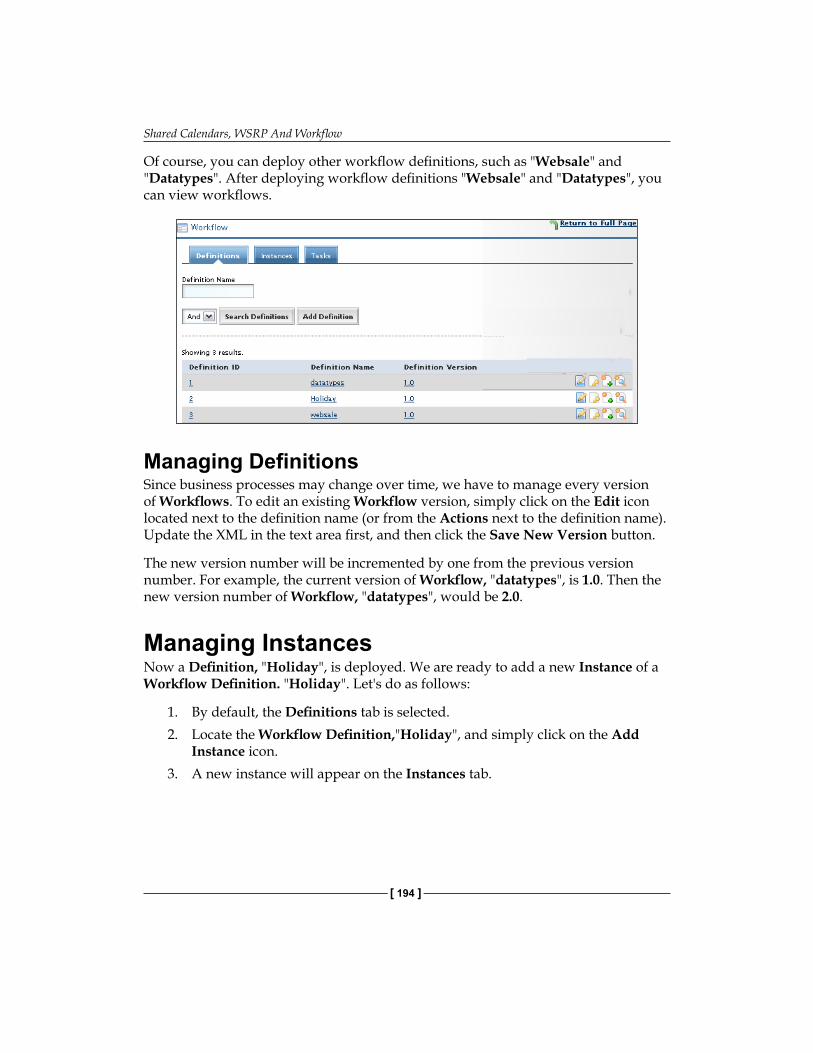
Shared Calendars, WSRP And Workflow
[ 194 ]
Of course, you can deploy other workflow definitions, such as "Websale" and "Datatypes". After deploying workflow definitions "Websale" and "Datatypes", you can view workflows.
Managing DefinitionsSince business processes may change over time, we have to manage every version of Workflows. To edit an existing Workflow version, simply click on the Edit icon located next to the definition name (or from the Actions next to the definition name). Update the XML in the text area first, and then click the Save New Version button.
The new version number will be incremented by one from the previous version number. For example, the current version of Workflow, "datatypes", is 1.0. Then the new version number of Workflow, "datatypes", would be 2.0.
Managing InstancesNow a Definition, "Holiday", is deployed. We are ready to add a new Instance of a Workflow Definition. "Holiday". Let's do as follows:
1. By default, the Definitions tab is selected. 2. Locate the Workflow Definition,"Holiday", and simply click on the Add
Instance icon. 3. A new instance will appear on the Instances tab.
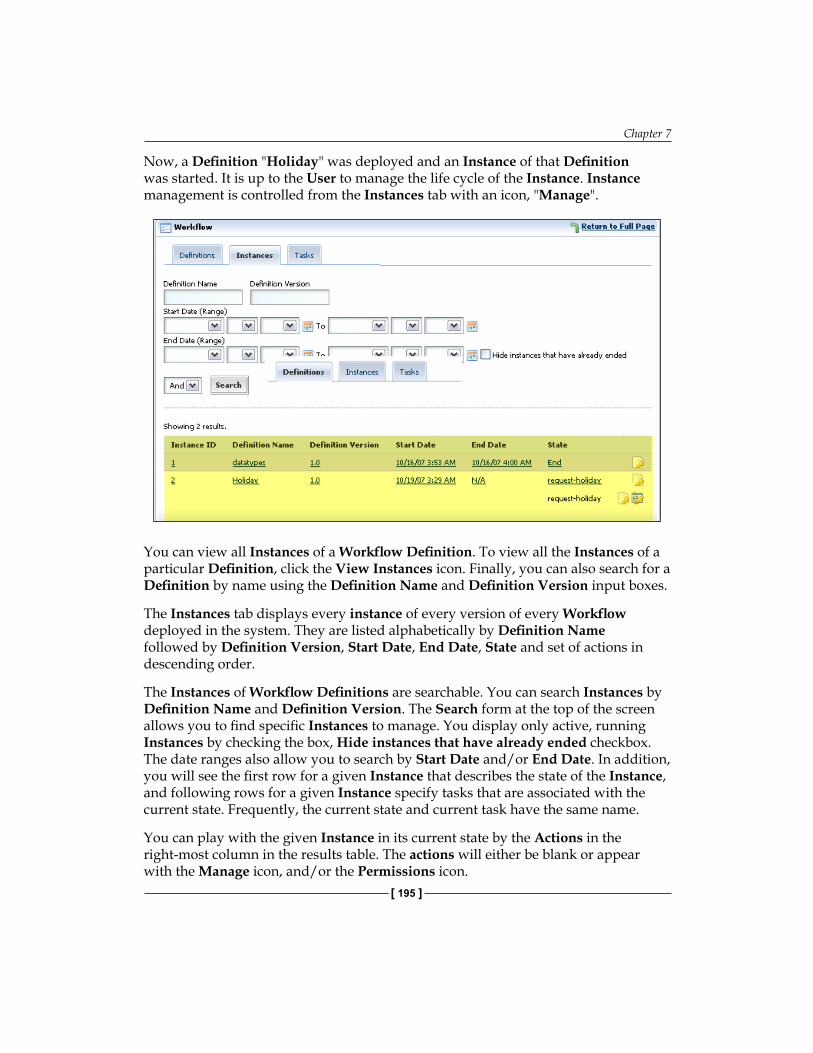
Chapter 7
[ 195 ]
Now, a Definition "Holiday" was deployed and an Instance of that Definition was started. It is up to the User to manage the life cycle of the Instance. Instance management is controlled from the Instances tab with an icon, "Manage".
You can view all Instances of a Workflow Definition. To view all the Instances of a particular Definition, click the View Instances icon. Finally, you can also search for a Definition by name using the Definition Name and Definition Version input boxes.
The Instances tab displays every instance of every version of every Workflow deployed in the system. They are listed alphabetically by Definition Name followed by Definition Version, Start Date, End Date, State and set of actions in descending order.
The Instances of Workflow Definitions are searchable. You can search Instances by Definition Name and Definition Version. The Search form at the top of the screen allows you to find specific Instances to manage. You display only active, running Instances by checking the box, Hide instances that have already ended checkbox. The date ranges also allow you to search by Start Date and/or End Date. In addition, you will see the first row for a given Instance that describes the state of the Instance, and following rows for a given Instance specify tasks that are associated with the current state. Frequently, the current state and current task have the same name.
You can play with the given Instance in its current state by the Actions in the right-most column in the results table. The actions will either be blank or appear with the Manage icon, and/or the Permissions icon.
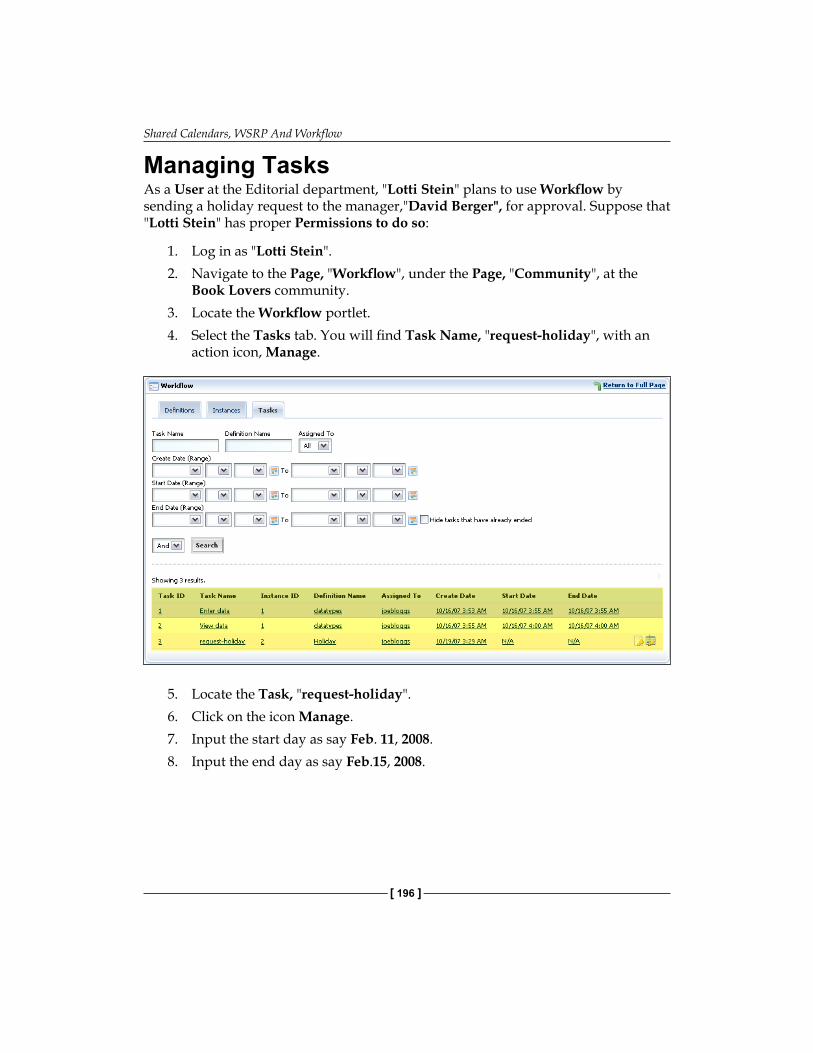
Shared Calendars, WSRP And Workflow
[ 196 ]
Managing TasksAs a User at the Editorial department, "Lotti Stein" plans to use Workflow by sending a holiday request to the manager,"David Berger", for approval. Suppose that "Lotti Stein" has proper Permissions to do so:
1. Log in as "Lotti Stein".2. Navigate to the Page, "Workflow", under the Page, "Community", at the
Book Lovers community. 3. Locate the Workflow portlet.4. Select the Tasks tab. You will find Task Name, "request-holiday", with an
action icon, Manage.
5. Locate the Task, "request-holiday".6. Click on the icon Manage.7. Input the start day as say Feb. 11, 2008.8. Input the end day as say Feb.15, 2008.
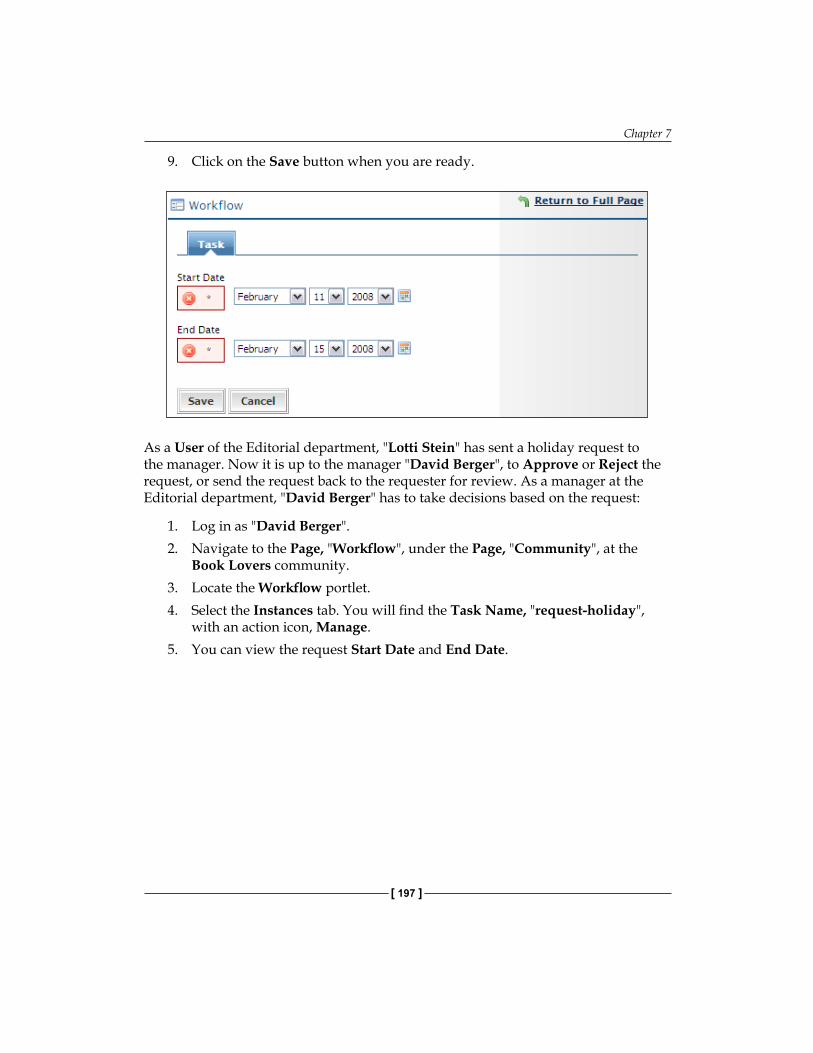
Chapter 7
[ 197 ]
9. Click on the Save button when you are ready.
As a User of the Editorial department, "Lotti Stein" has sent a holiday request to the manager. Now it is up to the manager "David Berger", to Approve or Reject the request, or send the request back to the requester for review. As a manager at the Editorial department, "David Berger" has to take decisions based on the request:
1. Log in as "David Berger".2. Navigate to the Page, "Workflow", under the Page, "Community", at the
Book Lovers community. 3. Locate the Workflow portlet.4. Select the Instances tab. You will find the Task Name, "request-holiday",
with an action icon, Manage. 5. You can view the request Start Date and End Date.
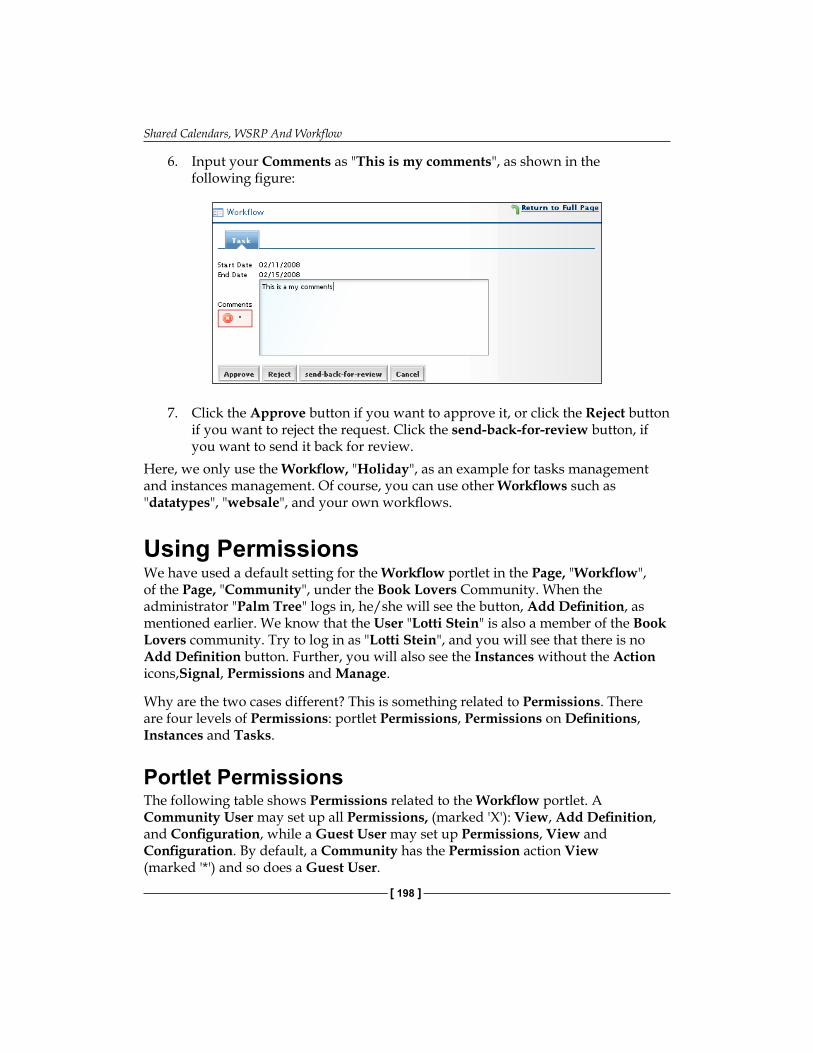
Shared Calendars, WSRP And Workflow
[ 198 ]
6. Input your Comments as "This is my comments", as shown in the following figure:
7. Click the Approve button if you want to approve it, or click the Reject button if you want to reject the request. Click the send-back-for-review button, if you want to send it back for review.
Here, we only use the Workflow, "Holiday", as an example for tasks management and instances management. Of course, you can use other Workflows such as "datatypes", "websale", and your own workflows.
Using PermissionsWe have used a default setting for the Workflow portlet in the Page, "Workflow", of the Page, "Community", under the Book Lovers Community. When the administrator "Palm Tree" logs in, he/she will see the button, Add Definition, as mentioned earlier. We know that the User "Lotti Stein" is also a member of the Book Lovers community. Try to log in as "Lotti Stein", and you will see that there is no Add Definition button. Further, you will also see the Instances without the Action icons,Signal, Permissions and Manage.
Why are the two cases different? This is something related to Permissions. There are four levels of Permissions: portlet Permissions, Permissions on Definitions, Instances and Tasks.
Portlet PermissionsThe following table shows Permissions related to the Workflow portlet. A Community User may set up all Permissions, (marked 'X'): View, Add Definition, and Configuration, while a Guest User may set up Permissions, View and Configuration. By default, a Community has the Permission action View (marked '*') and so does a Guest User.
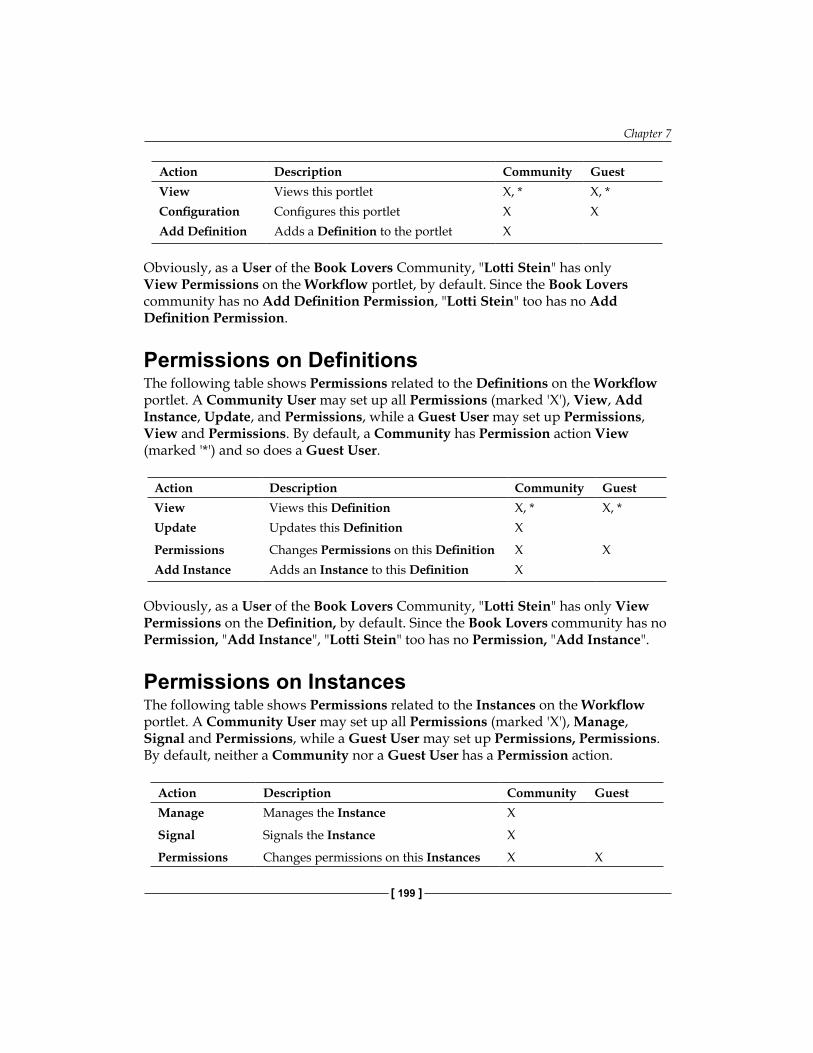
Chapter 7
[ 199 ]
Action Description Community GuestView Views this portlet X, * X, *Configuration Configures this portlet X XAdd Definition Adds a Definition to the portlet X
Obviously, as a User of the Book Lovers Community, "Lotti Stein" has only View Permissions on the Workflow portlet, by default. Since the Book Lovers community has no Add Definition Permission, "Lotti Stein" too has no Add Definition Permission.
Permissions on DefinitionsThe following table shows Permissions related to the Definitions on the Workflow portlet. A Community User may set up all Permissions (marked 'X'), View, Add Instance, Update, and Permissions, while a Guest User may set up Permissions, View and Permissions. By default, a Community has Permission action View (marked '*') and so does a Guest User.
Action Description Community GuestView Views this Definition X, * X, *Update Updates this Definition X
Permissions Changes Permissions on this Definition X XAdd Instance Adds an Instance to this Definition X
Obviously, as a User of the Book Lovers Community, "Lotti Stein" has only View Permissions on the Definition, by default. Since the Book Lovers community has no Permission, "Add Instance", "Lotti Stein" too has no Permission, "Add Instance".
Permissions on InstancesThe following table shows Permissions related to the Instances on the Workflow portlet. A Community User may set up all Permissions (marked 'X'), Manage, Signal and Permissions, while a Guest User may set up Permissions, Permissions. By default, neither a Community nor a Guest User has a Permission action.
Action Description Community GuestManage Manages the Instance X
Signal Signals the Instance X
Permissions Changes permissions on this Instances X X
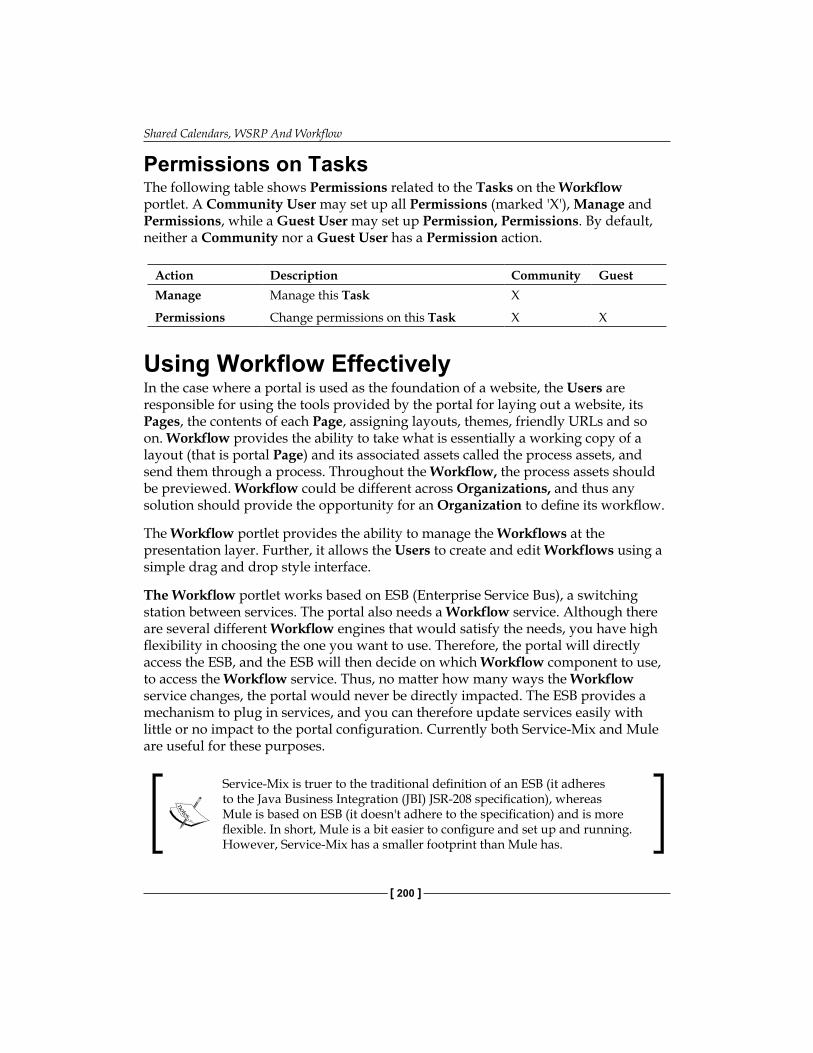
Shared Calendars, WSRP And Workflow
[ 200 ]
Permissions on TasksThe following table shows Permissions related to the Tasks on the Workflow portlet. A Community User may set up all Permissions (marked 'X'), Manage and Permissions, while a Guest User may set up Permission, Permissions. By default, neither a Community nor a Guest User has a Permission action.
Action Description Community GuestManage Manage this Task X
Permissions Change permissions on this Task X X
Using Workflow EffectivelyIn the case where a portal is used as the foundation of a website, the Users are responsible for using the tools provided by the portal for laying out a website, its Pages, the contents of each Page, assigning layouts, themes, friendly URLs and so on. Workflow provides the ability to take what is essentially a working copy of a layout (that is portal Page) and its associated assets called the process assets, and send them through a process. Throughout the Workflow, the process assets should be previewed. Workflow could be different across Organizations, and thus any solution should provide the opportunity for an Organization to define its workflow.
The Workflow portlet provides the ability to manage the Workflows at the presentation layer. Further, it allows the Users to create and edit Workflows using a simple drag and drop style interface.
The Workflow portlet works based on ESB (Enterprise Service Bus), a switching station between services. The portal also needs a Workflow service. Although there are several different Workflow engines that would satisfy the needs, you have high flexibility in choosing the one you want to use. Therefore, the portal will directly access the ESB, and the ESB will then decide on which Workflow component to use, to access the Workflow service. Thus, no matter how many ways the Workflow service changes, the portal would never be directly impacted. The ESB provides a mechanism to plug in services, and you can therefore update services easily with little or no impact to the portal configuration. Currently both Service-Mix and Mule are useful for these purposes.
Service-Mix is truer to the traditional definition of an ESB (it adheres to the Java Business Integration (JBI) JSR-208 specification), whereas Mule is based on ESB (it doesn't adhere to the specification) and is more flexible. In short, Mule is a bit easier to configure and set up and running. However, Service-Mix has a smaller footprint than Mule has.
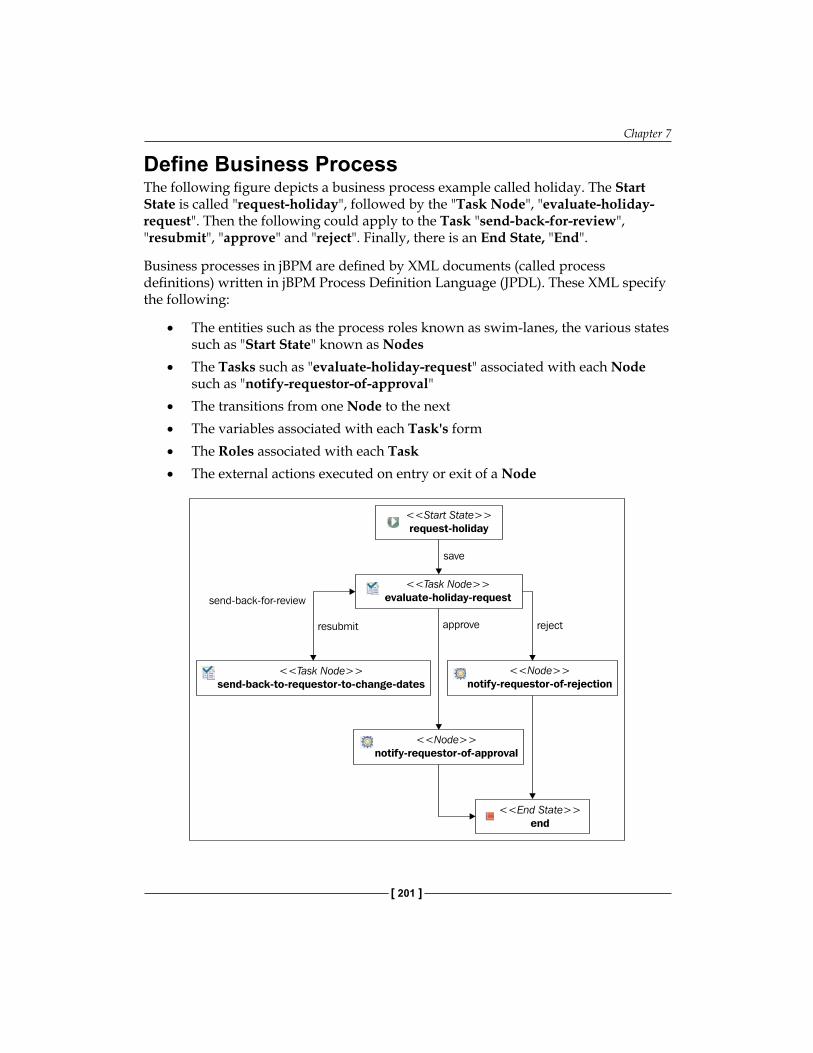
Chapter 7
[ 201 ]
Define Business ProcessThe following figure depicts a business process example called holiday. The Start State is called "request-holiday", followed by the "Task Node", "evaluate-holiday-request". Then the following could apply to the Task "send-back-for-review", "resubmit", "approve" and "reject". Finally, there is an End State, "End".
Business processes in jBPM are defined by XML documents (called process definitions) written in jBPM Process Definition Language (JPDL). These XML specify the following:
The entities such as the process roles known as swim-lanes, the various states such as "Start State" known as Nodes The Tasks such as "evaluate-holiday-request" associated with each Node such as "notify-requestor-of-approval" The transitions from one Node to the next The variables associated with each Task's form The Roles associated with each Task The external actions executed on entry or exit of a Node
•
•
•
•
•
•

Shared Calendars, WSRP And Workflow
[ 202 ]
JBoss jBPM is a workflow and BPM (Business Process Management) engine that enables the creation of business processes that coordinate between people, applications and services. With its modular architecture, jBPM combines easy development of workflow applications with a flexible and scalable process engine. The jBPM process designer graphically represents the business process steps in order to facilitate a strong link between the business analyst and the technical developer.
Integrate with Users, Groups And RolesWorkflow can be integrated with Users, groups, and Roles. You can use process roles named swim-lanes associated with Users, groups, and Roles In JPDL.
<swimlane name="approver"> <assignment class="*" config-type="field"> <type>user</type> <companyId>book.com</companyId> <id>10838</id> </assignment> </swimlane>
As shown, the "approver" swimlane is associated with the user, "David Berger" who has a User ID "10838", and belongs to a Company ID,"book.com". That is, "David Berger" is acting as an approver.
Similar to associating a user with User ID, you can also associate a user such as "David Berger" with a swimlane by email address, such as "[email protected]", as shown in the following XML snippet.
<swimlane name="approver"> <assignment class="*" config-type="field"> <type>user</type> <companyId>book.com</companyId> <name>[email protected]</name> </assignment> </swimlane>
As shown in the previous XML, the "approver" swimlane is associated with the user, "David Berger", who has an email address, "[email protected]", and belongs to a Company ID, "book.com."
<swimlane name="approver"> <assignment class="*" config-type="field"> <type>group</type> <companyId>book.com</companyId>
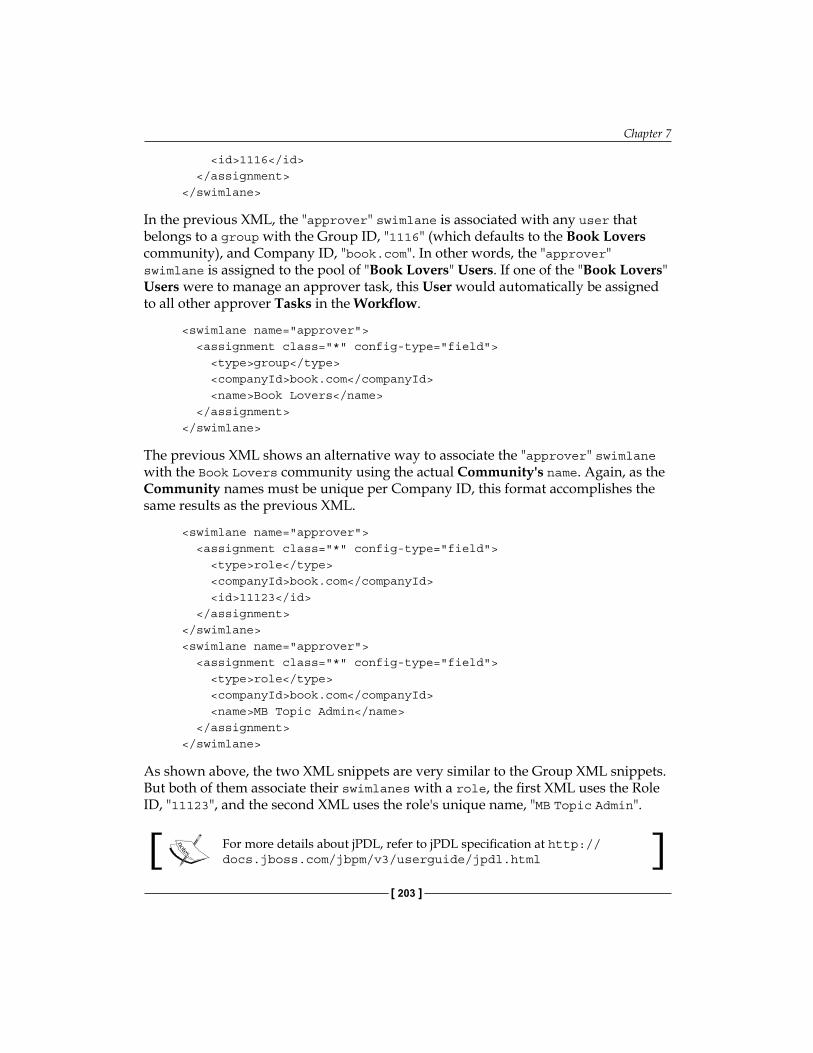
Chapter 7
[ 203 ]
<id>1116</id> </assignment> </swimlane>
In the previous XML, the "approver" swimlane is associated with any user that belongs to a group with the Group ID, "1116" (which defaults to the Book Lovers community), and Company ID, "book.com". In other words, the "approver" swimlane is assigned to the pool of "Book Lovers" Users. If one of the "Book Lovers" Users were to manage an approver task, this User would automatically be assigned to all other approver Tasks in the Workflow.
<swimlane name="approver"> <assignment class="*" config-type="field"> <type>group</type> <companyId>book.com</companyId> <name>Book Lovers</name> </assignment> </swimlane>
The previous XML shows an alternative way to associate the "approver" swimlane with the Book Lovers community using the actual Community's name. Again, as the Community names must be unique per Company ID, this format accomplishes the same results as the previous XML.
<swimlane name="approver"> <assignment class="*" config-type="field"> <type>role</type> <companyId>book.com</companyId> <id>11123</id> </assignment> </swimlane> <swimlane name="approver"> <assignment class="*" config-type="field"> <type>role</type> <companyId>book.com</companyId> <name>MB Topic Admin</name> </assignment> </swimlane>
As shown above, the two XML snippets are very similar to the Group XML snippets. But both of them associate their swimlanes with a role, the first XML uses the Role ID, "11123", and the second XML uses the role's unique name, "MB Topic Admin".
For more details about jPDL, refer to jPDL specification at http://docs.jboss.com/jbpm/v3/userguide/jpdl.html
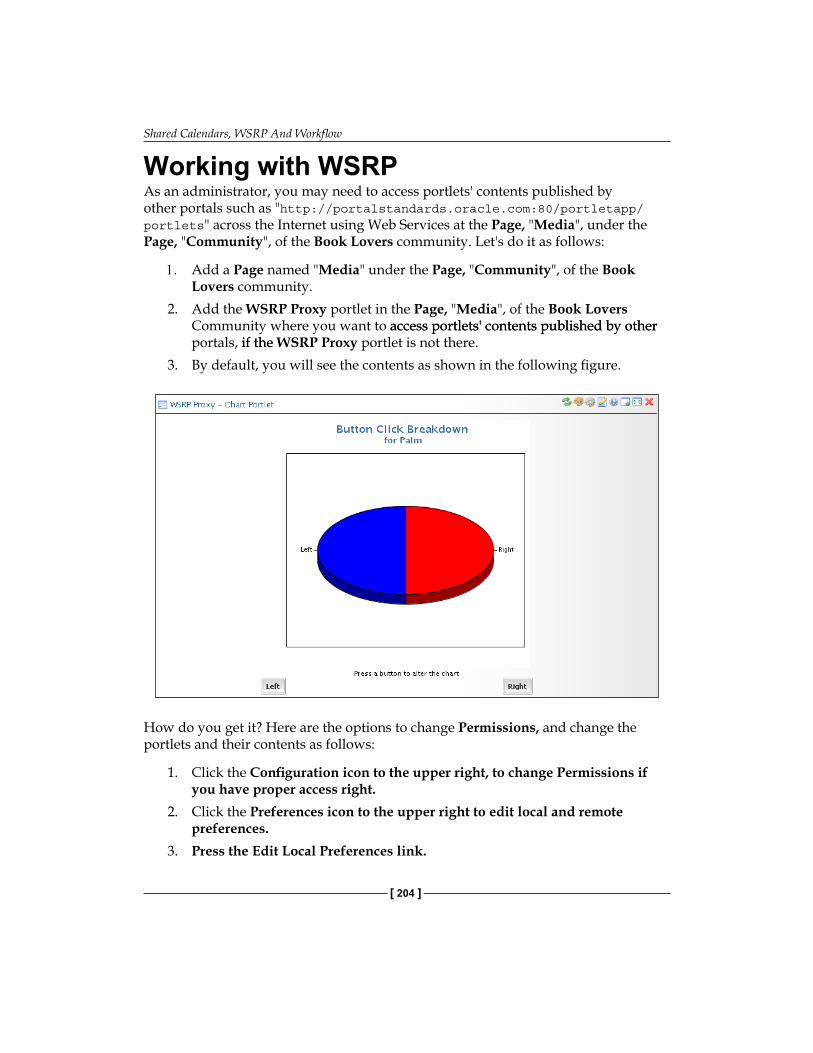
Shared Calendars, WSRP And Workflow
[ 204 ]
Working with WSRPAs an administrator, you may need to access portlets' contents published by other portals such as "http://portalstandards.oracle.com:80/portletapp/portlets" across the Internet using Web Services at the Page, "Media", under the Page, "Community", of the Book Lovers community. Let's do it as follows:
1. Add a Page named "Media" under the Page, "Community", of the Book Lovers community.
2. Add the WSRP Proxy portlet in the Page, "Media", of the Book Lovers Community where you want to access portlets' contents published by otheraccess portlets' contents published by other portals, if the if the WSRP Proxy portlet is not there.
3. By default, you will see the contents as shown in the following figure.
How do you get it? Here are the options to change Permissions, and change the portlets and their contents as follows:
1. Click the Configuration icon to the upper right, to change Permissions if you have proper access right.
2. Click the Preferences icon to the upper right to edit local and remote preferences.
3. Press the Edit Local Preferences link.
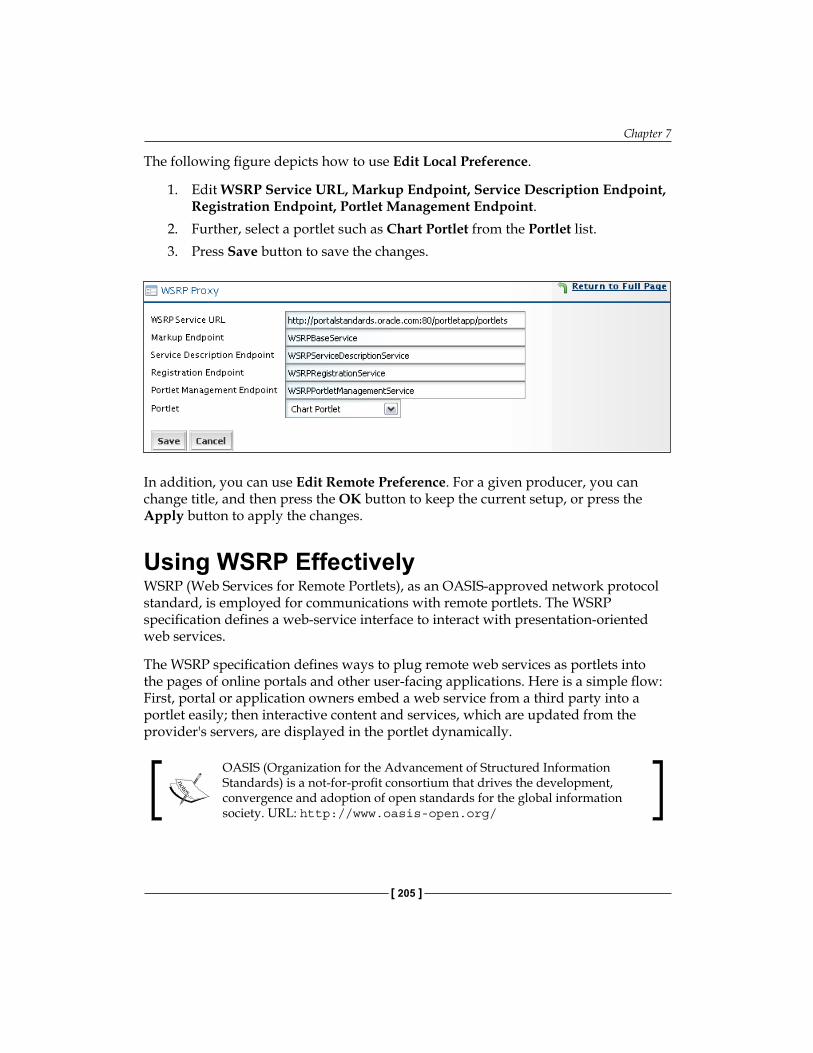
Chapter 7
[ 205 ]
The following figure depicts how to use Edit Local Preference.
1. Edit WSRP Service URL, Markup Endpoint, Service Description Endpoint, Registration Endpoint, Portlet Management Endpoint.
2. Further, select a portlet such as Chart Portlet from the Portlet list. 3. Press Save button to save the changes.
In addition, you can use Edit Remote Preference. For a given producer, you can change title, and then press the OK button to keep the current setup, or press the Apply button to apply the changes.
Using WSRP EffectivelyWSRP (Web Services for Remote Portlets), as an OASIS-approved network protocol standard, is employed for communications with remote portlets. The WSRP specification defines a web-service interface to interact with presentation-oriented web services.
The WSRP specification defines ways to plug remote web services as portlets into the pages of online portals and other user-facing applications. Here is a simple flow: First, portal or application owners embed a web service from a third party into a portlet easily; then interactive content and services, which are updated from the provider's servers, are displayed in the portlet dynamically.
OASIS (Organization for the Advancement of Structured Information Standards) is a not-for-profit consortium that drives the development, convergence and adoption of open standards for the global information society. URL: http://www.oasis-open.org/
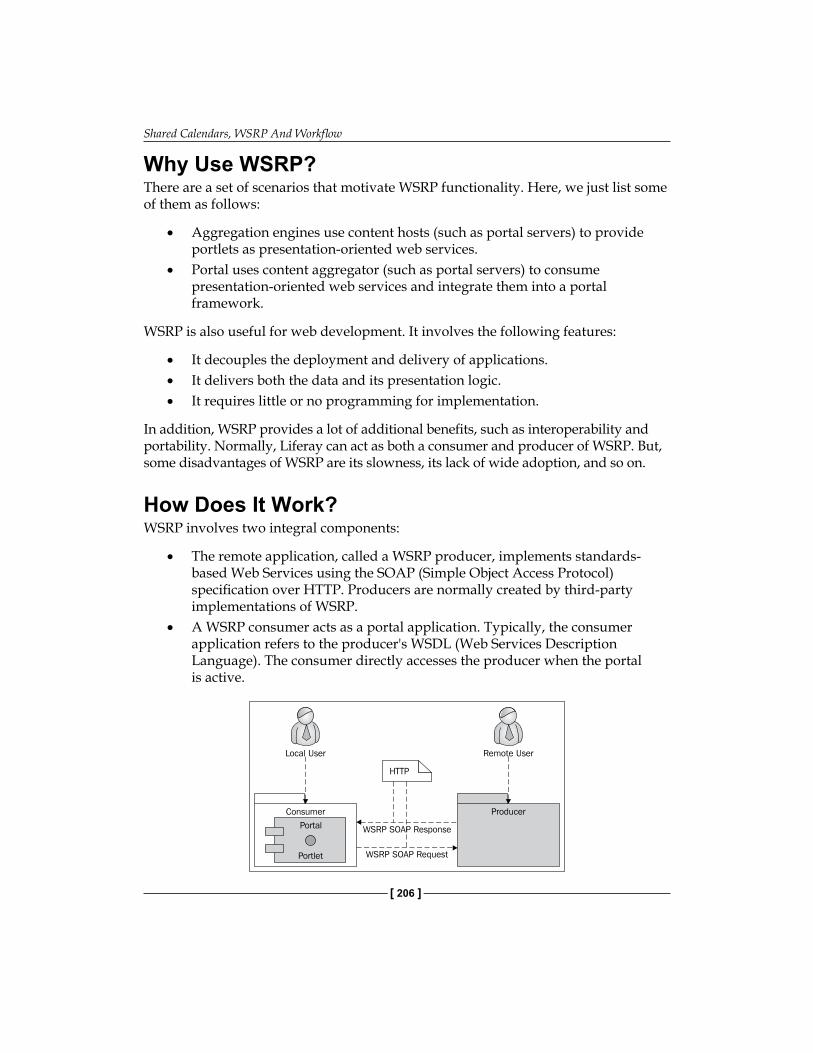
Shared Calendars, WSRP And Workflow
[ 206 ]
Why Use WSRP?There are a set of scenarios that motivate WSRP functionality. Here, we just list some of them as follows:
Aggregation engines use content hosts (such as portal servers) to provide portlets as presentation-oriented web services.Portal uses content aggregator (such as portal servers) to consume presentation-oriented web services and integrate them into a portal framework.
WSRP is also useful for web development. It involves the following features:
It decouples the deployment and delivery of applications.It delivers both the data and its presentation logic.It requires little or no programming for implementation.
In addition, WSRP provides a lot of additional benefits, such as interoperability and portability. Normally, Liferay can act as both a consumer and producer of WSRP. But, some disadvantages of WSRP are its slowness, its lack of wide adoption, and so on.
How Does It Work? WSRP involves two integral components:
The remote application, called a WSRP producer, implements standards-based Web Services using the SOAP (Simple Object Access Protocol) specification over HTTP. Producers are normally created by third-party implementations of WSRP.A WSRP consumer acts as a portal application. Typically, the consumer application refers to the producer's WSDL (Web Services Description Language). The consumer directly accesses the producer when the portal is active.
•
•
•••
•
•
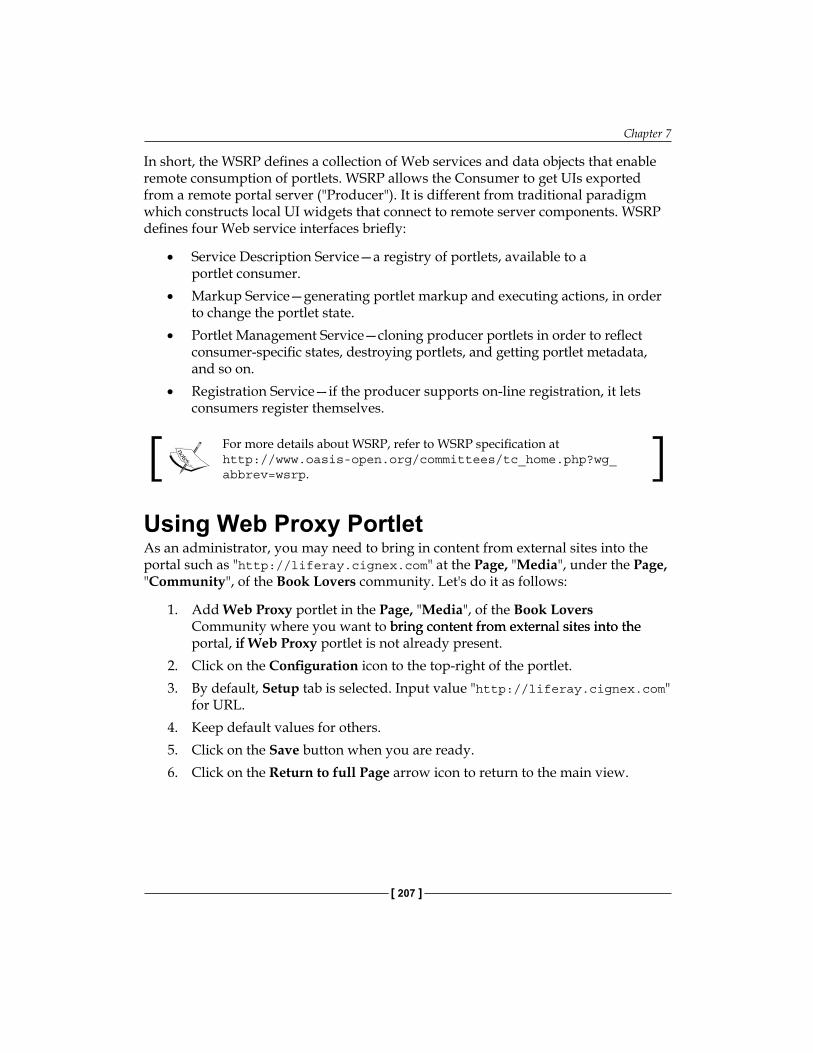
Chapter 7
[ 207 ]
In short, the WSRP defines a collection of Web services and data objects that enable remote consumption of portlets. WSRP allows the Consumer to get UIs exported from a remote portal server ("Producer"). It is different from traditional paradigm which constructs local UI widgets that connect to remote server components. WSRP defines four Web service interfaces briefly:
Service Description Service—a registry of portlets, available to a portlet consumer.Markup Service—generating portlet markup and executing actions, in order to change the portlet state.Portlet Management Service—cloning producer portlets in order to reflect consumer-specific states, destroying portlets, and getting portlet metadata, and so on.Registration Service—if the producer supports on-line registration, it lets consumers register themselves.
For more details about WSRP, refer to WSRP specification at http://www.oasis-open.org/committees/tc_home.php?wg_abbrev=wsrp.
Using Web Proxy PortletAs an administrator, you may need to bring in content from external sites into the portal such as "http://liferay.cignex.com" at the Page, "Media", under the Page, "Community", of the Book Lovers community. Let's do it as follows:
1. Add Web Proxy portlet in the Page, "Media", of the Book Lovers Community where you want to bring content from external sites into thebring content from external sites into the portal, if if Web Proxy portlet is not already present.
2. Click on the Configuration icon to the top-right of the portlet.3. By default, Setup tab is selected. Input value "http://liferay.cignex.com"
for URL. 4. Keep default values for others.5. Click on the Save button when you are ready.6. Click on the Return to full Page arrow icon to return to the main view.
•
•
•
•
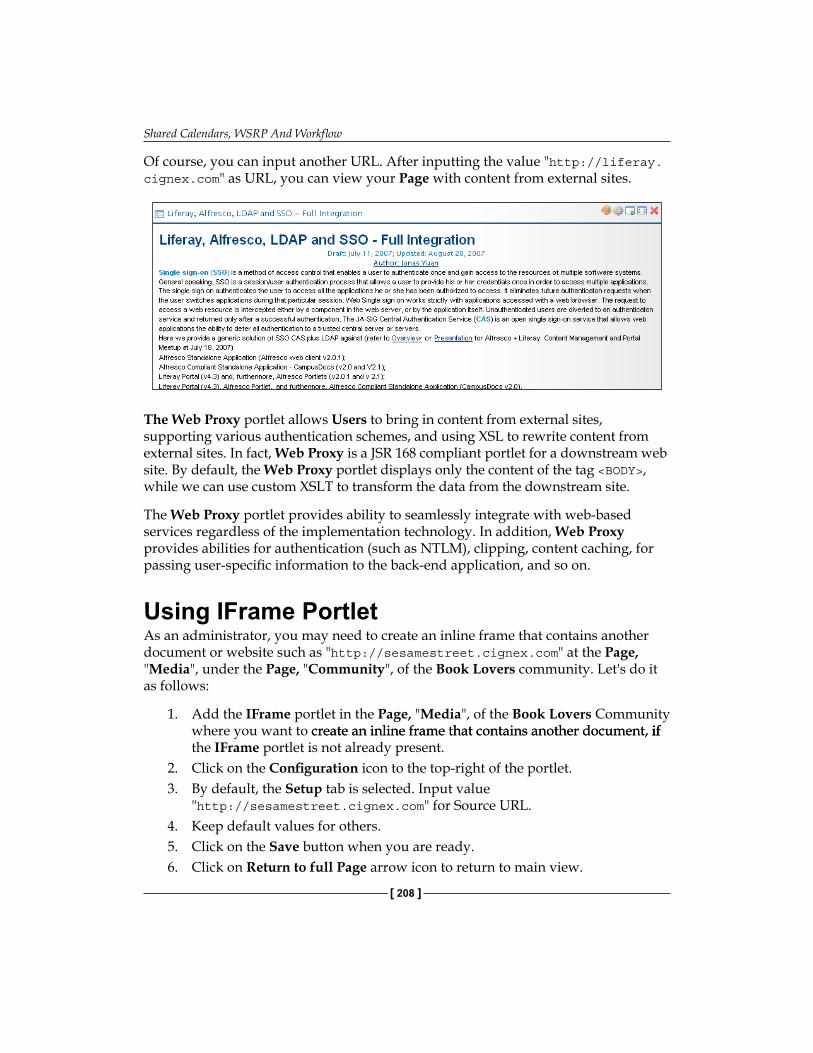
Shared Calendars, WSRP And Workflow
[ 208 ]
Of course, you can input another URL. After inputting the value "http://liferay.cignex.com" as URL, you can view your Page with content from external sites.
The Web Proxy portlet allows Users to bring in content from external sites, supporting various authentication schemes, and using XSL to rewrite content from external sites. In fact, Web Proxy is a JSR 168 compliant portlet for a downstream web site. By default, the Web Proxy portlet displays only the content of the tag <BODY>, while we can use custom XSLT to transform the data from the downstream site.
The Web Proxy portlet provides ability to seamlessly integrate with web-based services regardless of the implementation technology. In addition, Web Proxy provides abilities for authentication (such as NTLM), clipping, content caching, for passing user-specific information to the back-end application, and so on.
Using IFrame PortletAs an administrator, you may need to create an inline frame that contains another document or website such as "http://sesamestreet.cignex.com" at the Page, "Media", under the Page, "Community", of the Book Lovers community. Let's do it as follows:
1. Add the IFrame portlet in the Page, "Media", of the Book Lovers Community where you want to create an inline frame that contains another document, ifcreate an inline frame that contains another document, if if the IFrame portlet is not already present.
2. Click on the Configuration icon to the top-right of the portlet.3. By default, the Setup tab is selected. Input value
"http://sesamestreet.cignex.com" for Source URL. 4. Keep default values for others.5. Click on the Save button when you are ready.6. Click on Return to full Page arrow icon to return to main view.
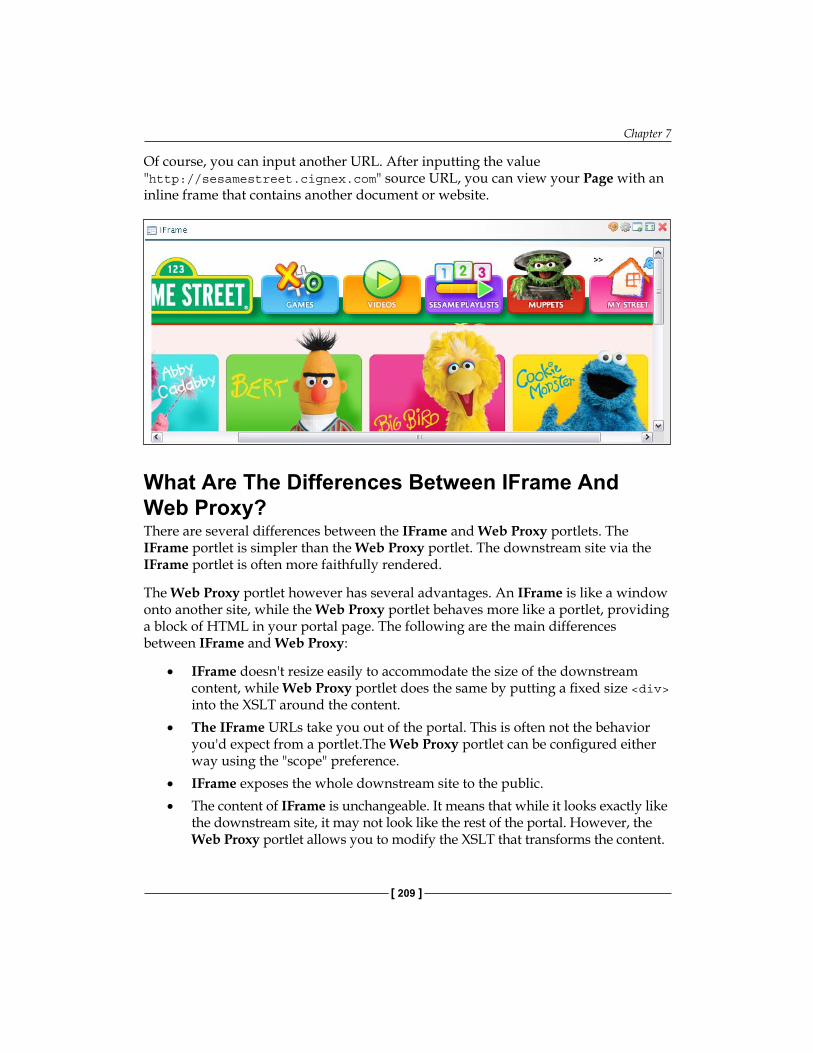
Chapter 7
[ 209 ]
Of course, you can input another URL. After inputting the value "http://sesamestreet.cignex.com" source URL, you can view your Page with an inline frame that contains another document or website.
What Are The Differences Between IFrame And Web Proxy? There are several differences between the IFrame and Web Proxy portlets. The IFrame portlet is simpler than the Web Proxy portlet. The downstream site via the IFrame portlet is often more faithfully rendered.
The Web Proxy portlet however has several advantages. An IFrame is like a window onto another site, while the Web Proxy portlet behaves more like a portlet, providing a block of HTML in your portal page. The following are the main differences between IFrame and Web Proxy:
IFrame doesn't resize easily to accommodate the size of the downstream content, while Web Proxy portlet does the same by putting a fixed size <div> into the XSLT around the content.The IFrame URLs take you out of the portal. This is often not the behavior you'd expect from a portlet.The Web Proxy portlet can be configured either way using the "scope" preference.IFrame exposes the whole downstream site to the public.The content of IFrame is unchangeable. It means that while it looks exactly like the downstream site, it may not look like the rest of the portal. However, the Web Proxy portlet allows you to modify the XSLT that transforms the content.
•
•
•
•
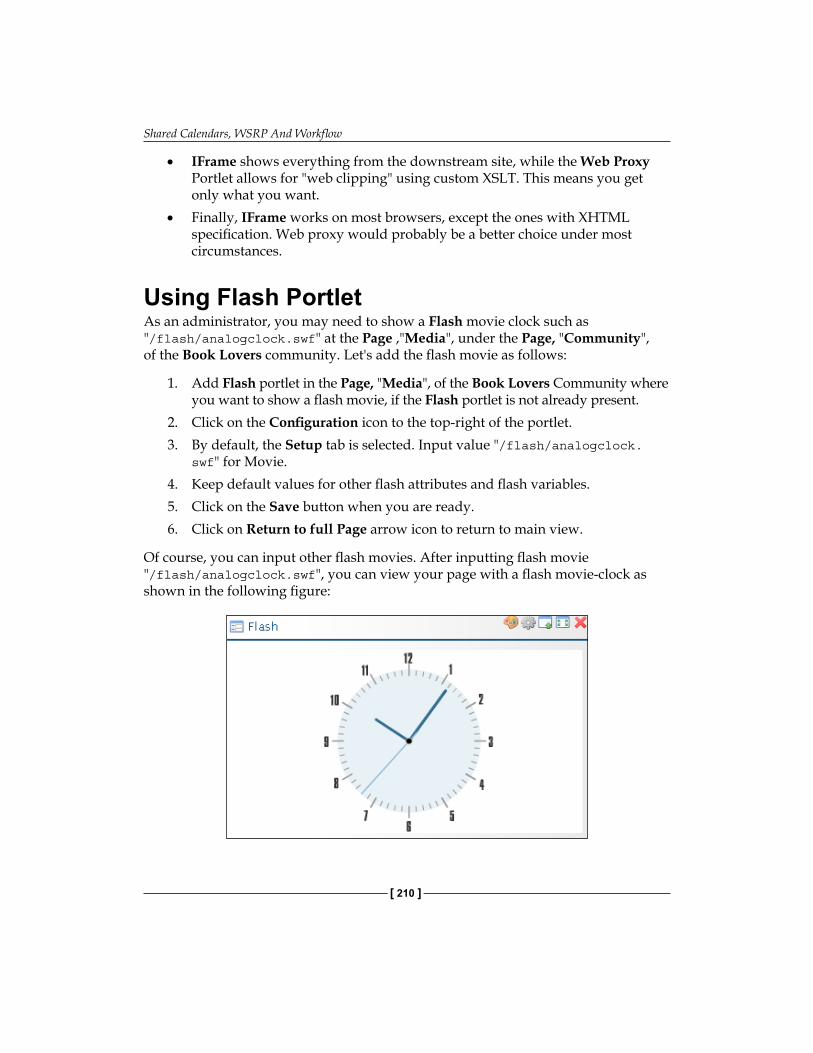
Shared Calendars, WSRP And Workflow
[ 210 ]
IFrame shows everything from the downstream site, while the Web Proxy Portlet allows for "web clipping" using custom XSLT. This means you get only what you want.Finally, IFrame works on most browsers, except the ones with XHTML specification. Web proxy would probably be a better choice under most circumstances.
Using Flash PortletAs an administrator, you may need to show a Flash movie clock such as "/flash/analogclock.swf" at the Page ,"Media", under the Page, "Community", of the Book Lovers community. Let's add the flash movie as follows:
1. Add Flash portlet in the Page, "Media", of the Book Lovers Community where you want to show a flash movie, if the Flash portlet is not already present.
2. Click on the Configuration icon to the top-right of the portlet.3. By default, the Setup tab is selected. Input value "/flash/analogclock.
swf" for Movie. 4. Keep default values for other flash attributes and flash variables.5. Click on the Save button when you are ready.6. Click on Return to full Page arrow icon to return to main view.
Of course, you can input other flash movies. After inputting flash movie "/flash/analogclock.swf", you can view your page with a flash movie-clock as shown in the following figure:
•
•
Chapter 7
[ 211 ]
In general, Liferay provides a set of portlets to incorporate other technologies with it at the presentation layer. Besides the portlets such as Flash, IFrame and Web Proxy, Liferay also provides support for Laszlo, Velocity, JSP, Struts, PHP, Perl, Spring MVC, and so on.
SummaryFirst, this chapter discussed how to create, manage (edit, delete, add, view), and search Events in a Calendar, and how to share calendar using iCalendar. Then,it discussed how to deploy Workflows and how to manage Workflow Definitions, Instances and Tasks. Finally it showed us how to employ WSRP proxy effectively, and other portlets such as Web Proxy, IFrame and Flash, smoothly.

Content Management and Publishing
In the intranet website "book.com" of "Palm Tree Publications", a lot of web contents are required to be managed and published. Liferay Journal not only provides high availability to publish, manage, and maintain web content and documents, but also separates content from layout. This chapter will introduce us to managing and publishing images first. Then, it will discuss how to manage and publish documents. Finally, it will focus on the articles' creation, management and publishing.
By the end of this chapter, you will have learned how to:
Add folders and sub folders for images.Manage (view, search, edit, delete) folders and sub folders.Add images in folders and manage (view, search, edit, delete) images. Set up permissions on folders and images.Add folders and sub folders for documents.Manage (view, search, edit, delete) documents, add Comments, give your rating, view version history.Set up Permissions on folders and documents.Publish documents.Manage (view, search, edit, delete) structures.Manage (view, search, edit, delete) template.Manage (view, search, edit, delete, approve, preview) articles.Set up Permissions on Journal, articles, templates and structures.Publish articles.Employ other CMS tools.
•
•
•
•
•
•
•
•
•
•
•
•
•
•
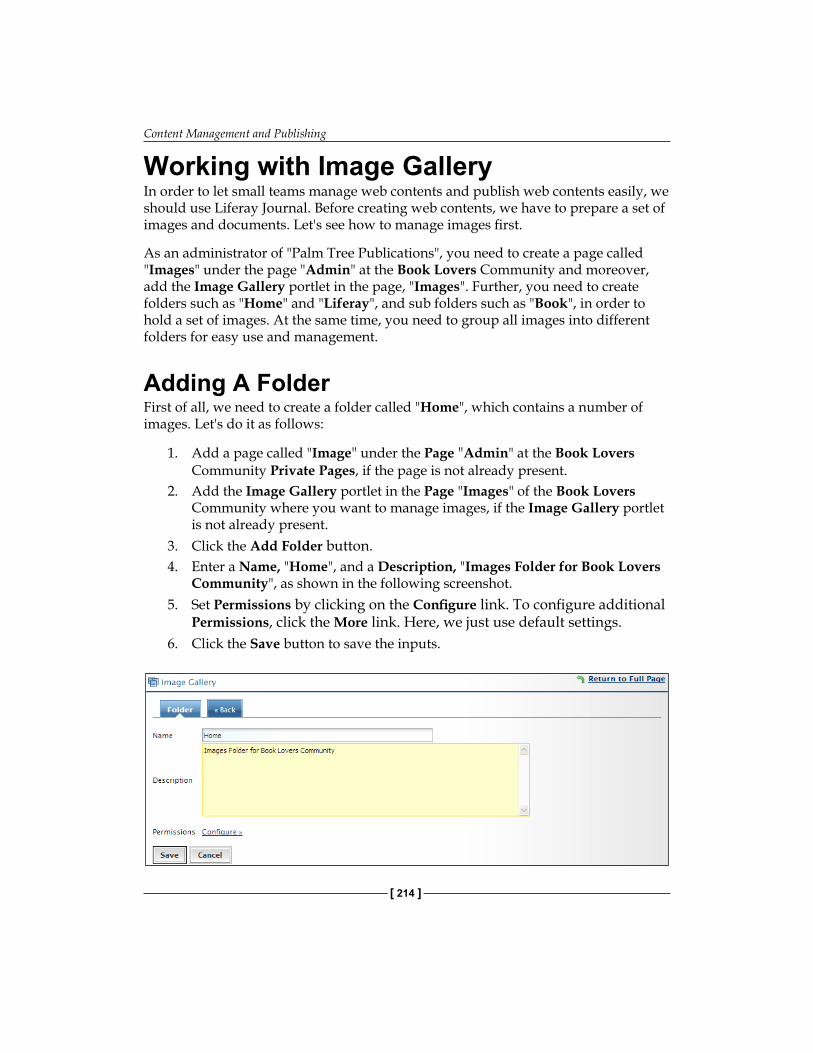
Content Management and Publishing
[ 214 ]
Working with Image GalleryIn order to let small teams manage web contents and publish web contents easily, we should use Liferay Journal. Before creating web contents, we have to prepare a set of images and documents. Let's see how to manage images first.
As an administrator of "Palm Tree Publications", you need to create a page called "Images" under the page "Admin" at the Book Lovers Community and moreover, add the Image Gallery portlet in the page, "Images". Further, you need to create folders such as "Home" and "Liferay", and sub folders such as "Book", in order to hold a set of images. At the same time, you need to group all images into different folders for easy use and management.
Adding A FolderFirst of all, we need to create a folder called "Home", which contains a number of images. Let's do it as follows:
1. Add a page called "Image" under the Page "Admin" at the Book Lovers Community Private Pages, if the page is not already present.
2. Add the Image Gallery portlet in the Page "Images" of the Book Lovers Community where you want to manage images, if the Image Gallery portlet is not already present.
3. Click the Add Folder button.4. Enter a Name, "Home", and a Description, "Images Folder for Book Lovers
Community", as shown in the following screenshot.5. Set Permissions by clicking on the Configure link. To configure additional
Permissions, click the More link. Here, we just use default settings.6. Click the Save button to save the inputs.

Chapter 8
[ 215 ]
Adding A Sub FolderSuppose that we need to create a Subfolder named "Book" under the folder, "Home", which will contain a set of images for "Liferay Book". Let's do it as follows:
1. Locate the Folder, "Home"; click the link of the Folder, "Home".2. Click the Add Subfolder button.3. Enter a Name such as "Book" and a Description such as "Images folder
for book".4. Set Permissions by clicking the Configure link. To configure additional
Permissions, click the More link. Here, we just use default settings.5. Click the Save button to save the inputs.
Of course, you can create other Folders as siblings of the Folder, "Home". After adding a Folder, "Liferay", we can view Folders as shown in the following figure.
Obviously, all Folders or Subfolders names form a folder tree. The names of Folders or Subfolders must be unique at the same level in the folder tree. The names could be the same at different levels.
Adding An ImageFinally, we can add an image in a given Folder. Suppose that we need to add a logo of "Palm Tree Publications" in the folder "Home". Let's do it as follows:
1. Locate the folder "Home"; click on the link of the Folder "Home".2. Click the Add Image button.3. Click the Browse icon to find an Image, "PalmTree_logo.png", in the local
machine. Should you wish, you can browse multiple files, such as "United_States.png" and "Germany.png" as shown in the following figure.
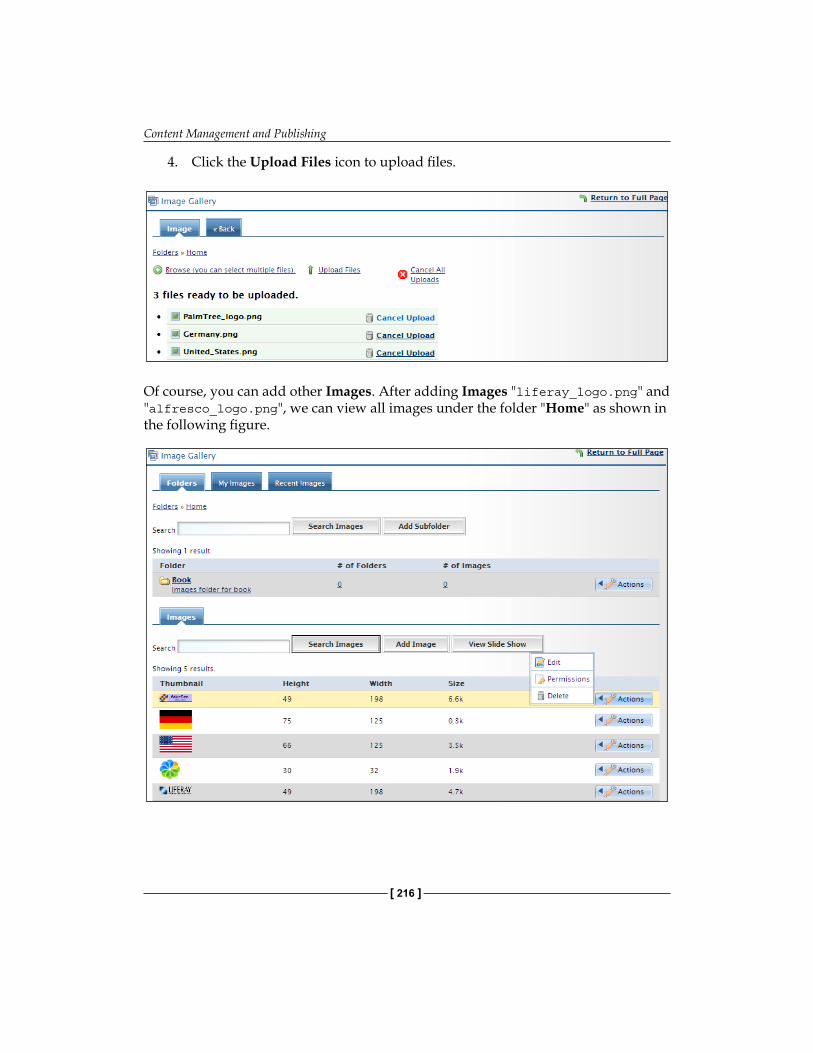
Content Management and Publishing
[ 216 ]
4. Click the Upload Files icon to upload files.
Of course, you can add other Images. After adding Images "liferay_logo.png" and "alfresco_logo.png", we can view all images under the folder "Home" as shown in the following figure.
Chapter 8
[ 217 ]
Managing FoldersFolders and Subfolders are editable. For example, you may need to change the description of the Folder, "Liferay", from "Images Folder for Liferay and Alfresco integration" to "Images Folder for Integration". Let's do is as follows:
1. Locate the folder "Liferay" that you want to edit.2. Click the Edit icon from the Actions located next to the folder. 3. Maintain the value of Name and update the Description of the selected
Folder "Images Folder for Liferay and Alfresco integration" with the value "Images Folder for Integration".
4. Click the Save button to save the changes.
You can update the Name as well. For example, we can update the Name "Liferay" with the value "Liferay-Alfresco".
Optionally, you can change the parent Folder by selecting a Folder as the parent Folder of the Folder or Subfolder, or merging the Folder with the parent Folder, or removing the parent Folder. If you remove the parent Folder, the current Folder will become a Folder at the root level.
Folders or Subfolders are removable. For example, if the Folder "Liferay-Alfresco" is not wanted anymore, you can remove it. Let's do it as follows:
1. Locate the Folder "Liferay-Alfresco" that you want to delete.2. Click the Delete icon from the Actions located next to the folder.3. A screen will appear asking if you want to delete this. Click OK to
confirm deletion.
Note that deleting a Folder will delete all related Subfolders and Images which belong to this folder.
Managing ImagesAfter adding Folders and Images, you can manage Images easily. You can view Images as a slideshow, search images, edit images and delete images.
Content Management and Publishing
[ 218 ]
View Images as a SlideshowImages are viewable. To view an Image, simply click on the link of an Image. For example, you want to view the Image, "PalmTree_logo.png" under the Folder, "Home". You can just click the link of the Folder "Home" first, and then locate the Image, "PalmTree_logo.png. Finally, click the link of the Image. A new window will appear showing a full-size image of "PalmTree_logo.png".
Optionally, you can view your own Images, by clicking the tab My Images in the Image Gallery portlet and you can also view the recent Images by clicking the tab Recent Images, in the Image Gallery portlet.
All Images from a folder can be viewed as a slideshow. For example, if you want to view all Images under the Folder, "Home" as a slideshow, click the Folder "Home" first, and then click the View Slide Show button. A new window will appear showing a full-size Image and a set of commands such as previous, play, pause, next, and speed selection, and so forth.
Search ImagesImages are searchable. There are three options to search Images. You can search Images from the root, search Images from the current folder only, or search Images both in the current Folder and its Subfolders.
Suppose that there is an Image, "Sesame Street Logo", under the Folder, "Book", which is Subfolder of the Folder, "Home", and there is also an Image, "Sesame Workshop Logo" under the Folder, "Liferay-Alfresco".
First, let's search Images from the root. In Image Gallery, simply input the keyword such as "logo", and click the Search Images button. A list of Images will appear including the above two Images.
Then, let's search Image from the Folder, "Home" and its Subfolders. In Image Gallery, locate the Folder, "Home", and click on the link of the Folder "Home". Simply input the keyword, "logo", and click the Search Images button below the Folder navigation Folders » Home. A list of Images will appear, except the Image, "Sesame Workshop Logo".
Finally, let's search Image from the Folder, "Home", only. Simply input the keyword, "logo", and click the Search Images button under the tab Images. A list of Images will appear, except the Images, "Sesame Workshop Logo" and "Sesame Street Logo".

Chapter 8
[ 219 ]
Edit An ImageImages are editable. For example, you may need to change the Description of the Image, "PalmTree_logo.png", under the Folder, "Home", from "PalmTree_logo.png" to "Palm Tree Publications Logo". Let's do is as follows:
1. Click the folder "Home".2. Locate the "PalmTree_logo.png" Image that you want to edit. 3. Click on the Edit icon from the Actions located next to the Image. 4. Update the Description of the selected Image, "PalmTree_logo.png", with
value, "Palm Tree Publications Logo".5. Click the Save button to save the changes.
Optionally, you can change the Folder by selecting a Folder as shown in the following figure. At the same time, you can change the content of the Image by uploading another Image file. Furthermore, you can find a URL for the Image and reference the Image by this URL. For instance, you can refer an Image in an article. We'll see how to work with URLs, later.
Content Management and Publishing
[ 220 ]
Delete An ImageImages are removable. For example, the Image, "alfresco-logo.png", is not wanted anymore, and can be removed. Let's do it as follows:
1. Locate the Image, "alfresco-logo.png" that you want to delete.2. Then click the Delete icon from the Actions located next to the image.3. A screen will appear asking if you want to delete this. Click OK to
confirm deletion.
Set up PermissionsWe have used default settings for the Image Gallery portlet in the Page, "Images", of the Page "Admin" under the Book Lovers Community. As mentioned earlier, when the administrator "Palm Tree" logs in, he will see the button, Add Folder. As we know, the User "Lotti Stein" is also a member of the Book Lovers community. Try to log in as "Lotti Stein", and you will see that the Add Folder button is not there. Furthermore, you will also see that the Folders, "Home" and "Liferay-Alfresco" have no Actions icons.
Why? Different Users have different actions in the Image Gallery because of Permissions. Normally, there are three levels of Permissions: Permissions on portlet, Permissions on folders and Permissions on Images.
Use Permissions on Portlet The following table shows Permissions on the Image Gallery portlet. A Community User may set up all Permissions (marked 'X'), View, Add Folder, and Configuration, while a Guest User may set up Permissions, View and Configuration. By default, a Community has Permission action View (marked '*'), and so does a Guest User.
Action Description Community GuestView Views this portlet X, * X, *Configuration Configures this portlet X XAdd Folder Adds a Folder to the portlet X
Obviously, as a User of the Book Lovers Community, "Lotti Stein" has only the View Permissions on the portlet Image Gallery, by default. Since the Users of the Book Lovers community have no Add Folder Permission, "Lotti Stein" also has no Add Folder Permission.
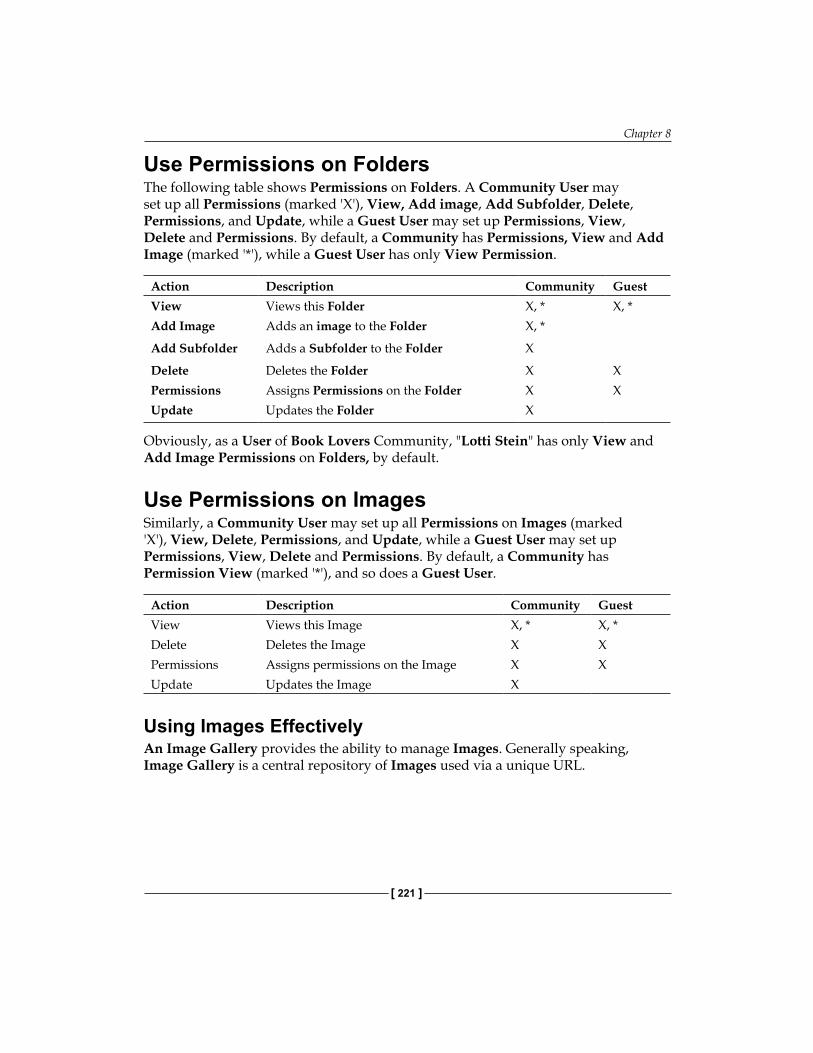
Chapter 8
[ 221 ]
Use Permissions on FoldersThe following table shows Permissions on Folders. A Community User may set up all Permissions (marked 'X'), View, Add image, Add Subfolder, Delete, Permissions, and Update, while a Guest User may set up Permissions, View, Delete and Permissions. By default, a Community has Permissions, View and Add Image (marked '*'), while a Guest User has only View Permission.
Action Description Community GuestView Views this Folder X, * X, *Add Image Adds an image to the Folder X, *
Add Subfolder Adds a Subfolder to the Folder X
Delete Deletes the Folder X XPermissions Assigns Permissions on the Folder X XUpdate Updates the Folder X
Obviously, as a User of Book Lovers Community, "Lotti Stein" has only View and Add Image Permissions on Folders, by default.
Use Permissions on ImagesSimilarly, a Community User may set up all Permissions on Images (marked 'X'), View, Delete, Permissions, and Update, while a Guest User may set up Permissions, View, Delete and Permissions. By default, a Community has Permission View (marked '*'), and so does a Guest User.
Action Description Community GuestView Views this Image X, * X, *Delete Deletes the Image X XPermissions Assigns permissions on the Image X XUpdate Updates the Image X
Using Images EffectivelyAn Image Gallery provides the ability to manage Images. Generally speaking, Image Gallery is a central repository of Images used via a unique URL.

Content Management and Publishing
[ 222 ]
The following diagram depicts an overview of an Image Gallery, conceptually. Image Gallery has a set of Folders associated with it. Each Folder may have many Subfolders associated with it. Each Folder (or Subfolder) may have a set of Images. And each Image has a unique URL to be referred.
Working with Document LibraryIn order to let small teams manage web contents and publish web contents, we needsmall teams manage web contents and publish web contents, we need, we need not only a set of images, but also a set of documents.
Thus, as an administrator of "Palm Tree Publications", you need to create a page called "Documents" under the page, "Admin" at the Book Lovers Community and moreover, add the Document Library portlet in the Page, "Documents". Furthermore, you need to create Folders such as "Books" and "Integration", and Subfolders such as "Chapters", in order to hold a set of documents. As with the Image Gallery, you can group all documents into different folders for easy use and management.
Adding A FolderBefore adding a document, we need to create a Folder called "Books", which contains a lot of documents. Let's do it as follows:
1. Add a page called "Documents" under the page "Admin" at the Book Lovers Community private pages, if the page is not already present.
2. If the Document Library portlet is not already present, add it in the page "Documents", of the Book Lovers Community where you want to manage documents.
3. Click the Add Folder button.
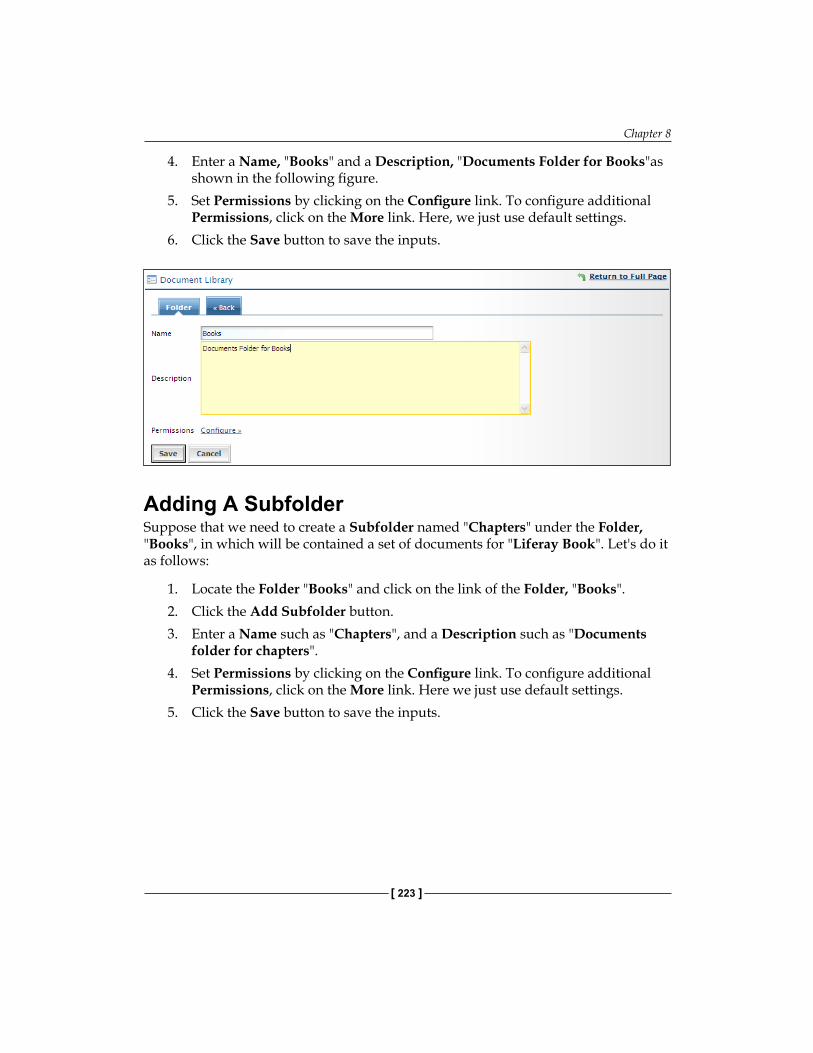
Chapter 8
[ 223 ]
4. Enter a Name, "Books" and a Description, "Documents Folder for Books"as shown in the following figure.
5. Set Permissions by clicking on the Configure link. To configure additional Permissions, click on the More link. Here, we just use default settings.
6. Click the Save button to save the inputs.
Adding A SubfolderSuppose that we need to create a Subfolder named "Chapters" under the Folder, "Books", in which will be contained a set of documents for "Liferay Book". Let's do it as follows:
1. Locate the Folder "Books" and click on the link of the Folder, "Books".2. Click the Add Subfolder button.3. Enter a Name such as "Chapters", and a Description such as "Documents
folder for chapters".4. Set Permissions by clicking on the Configure link. To configure additional
Permissions, click on the More link. Here we just use default settings.5. Click the Save button to save the inputs.
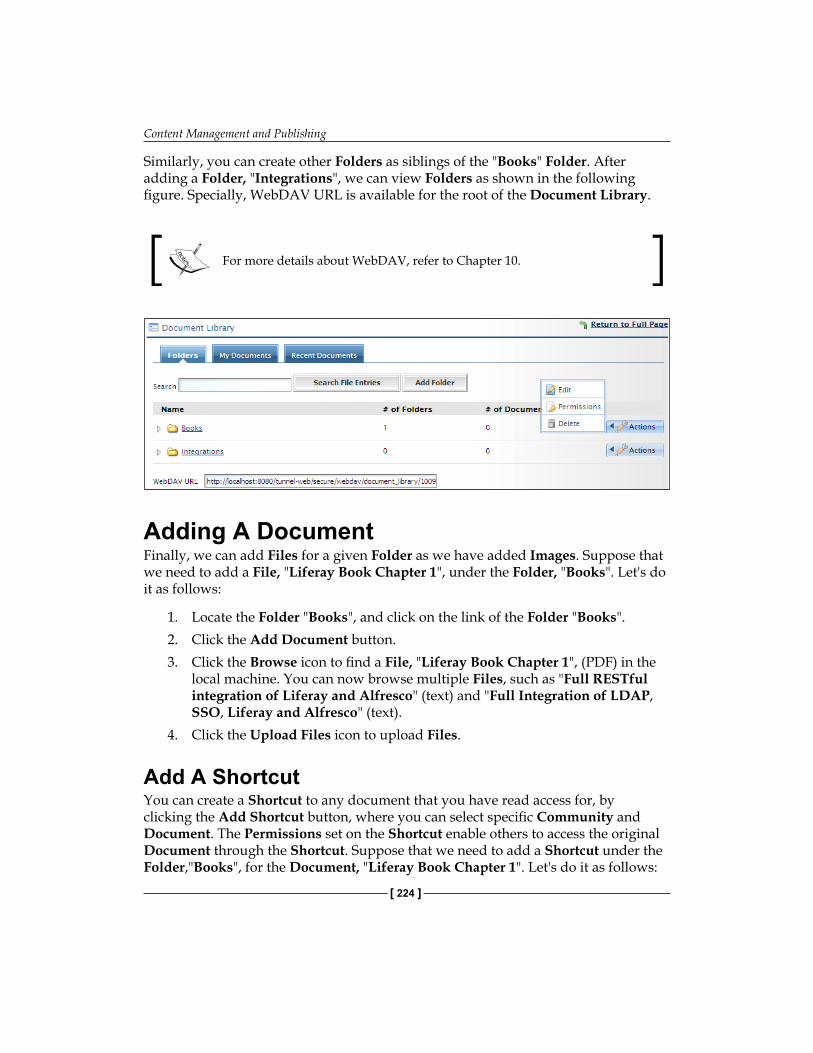
Content Management and Publishing
[ 224 ]
Similarly, you can create other Folders as siblings of the "Books" Folder. After adding a Folder, "Integrations", we can view Folders as shown in the following figure. Specially, WebDAV URL is available for the root of the Document Library.
For more details about WebDAV, refer to Chapter 10.
Adding A DocumentFinally, we can add Files for a given Folder as we have added Images. Suppose that we need to add a File, "Liferay Book Chapter 1", under the Folder, "Books". Let's do it as follows:
1. Locate the Folder "Books", and click on the link of the Folder "Books".2. Click the Add Document button.3. Click the Browse icon to find a File, "Liferay Book Chapter 1", (PDF) in the
local machine. You can now browse multiple Files, such as "Full RESTful integration of Liferay and Alfresco" (text) and "Full Integration of LDAP, SSO, Liferay and Alfresco" (text).
4. Click the Upload Files icon to upload Files.
Add A ShortcutYou can create a Shortcut to any document that you have read access for, by clicking the Add Shortcut button, where you can select specific Community and Document. The Permissions set on the Shortcut enable others to access the original Document through the Shortcut. Suppose that we need to add a Shortcut under the Folder,"Books", for the Document, "Liferay Book Chapter 1". Let's do it as follows:
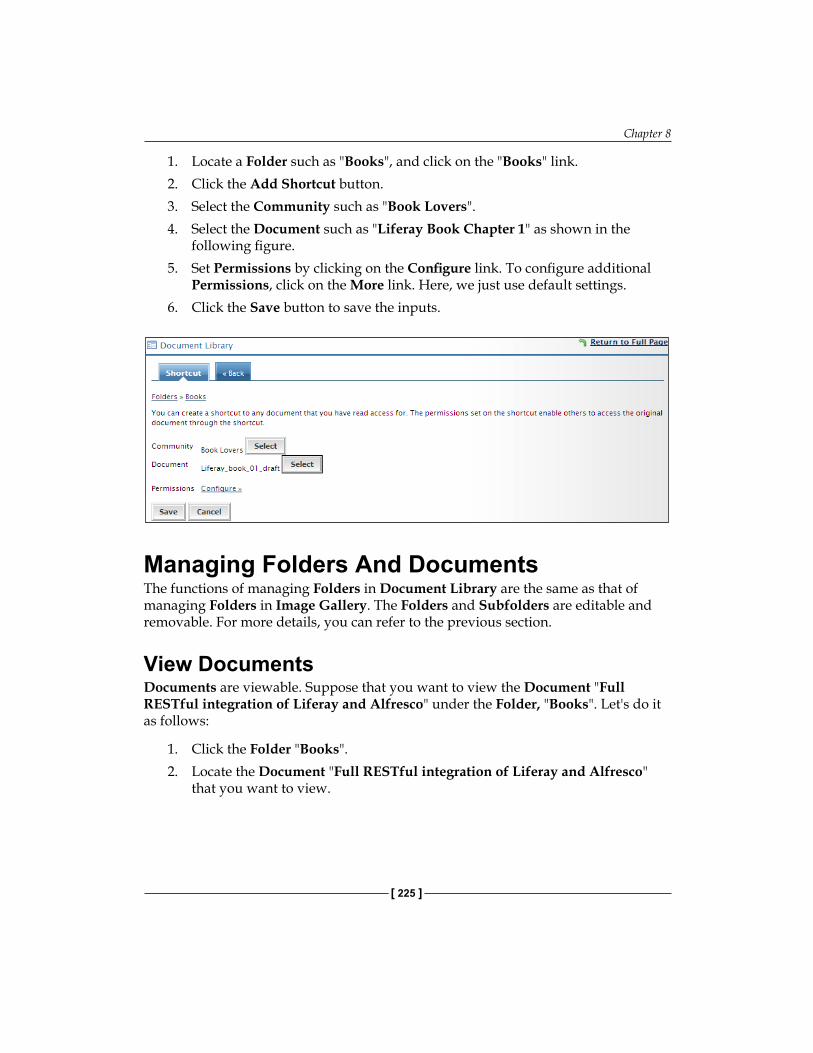
Chapter 8
[ 225 ]
1. Locate a Folder such as "Books", and click on the "Books" link.2. Click the Add Shortcut button.3. Select the Community such as "Book Lovers".4. Select the Document such as "Liferay Book Chapter 1" as shown in the
following figure.5. Set Permissions by clicking on the Configure link. To configure additional
Permissions, click on the More link. Here, we just use default settings.6. Click the Save button to save the inputs.
Managing Folders And DocumentsThe functions of managing Folders in Document Library are the same as that of managing Folders in Image Gallery. The Folders and Subfolders are editable and removable. For more details, you can refer to the previous section.
View DocumentsDocuments are viewable. Suppose that you want to view the Document "Full RESTful integration of Liferay and Alfresco" under the Folder, "Books". Let's do it as follows:
1. Click the Folder "Books".2. Locate the Document "Full RESTful integration of Liferay and Alfresco"
that you want to view.
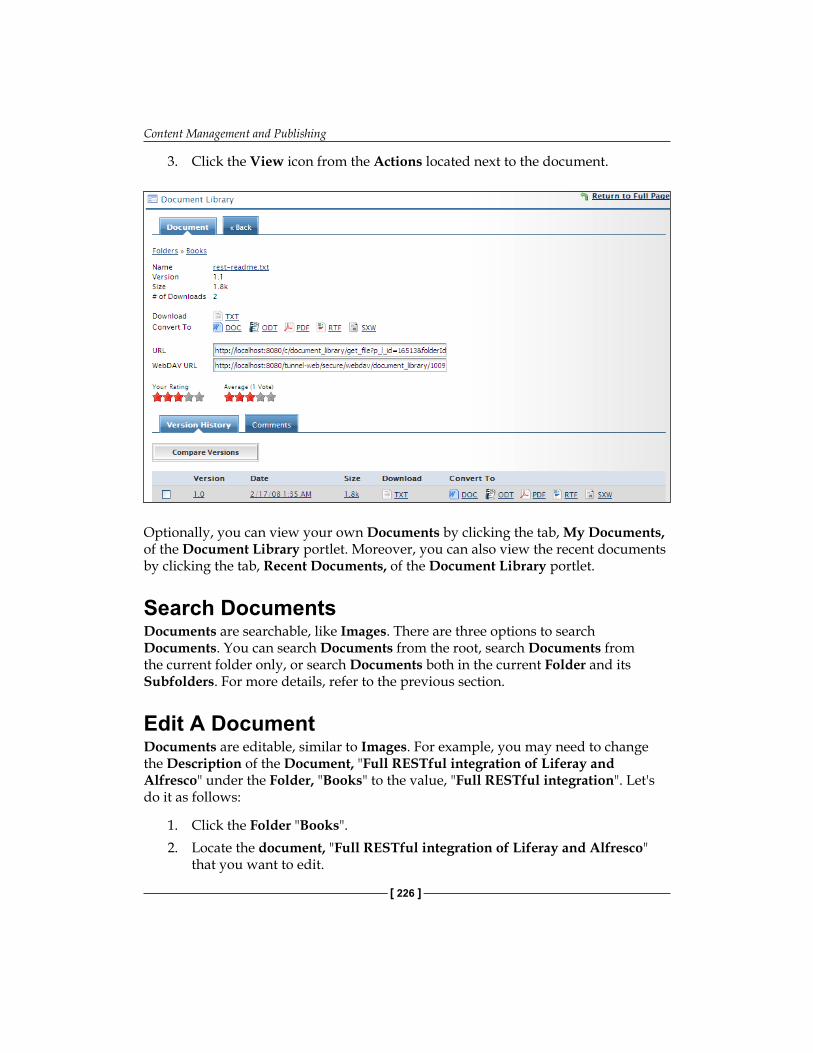
Content Management and Publishing
[ 226 ]
3. Click the View icon from the Actions located next to the document.
Optionally, you can view your own Documents by clicking the tab, My Documents, of the Document Library portlet. Moreover, you can also view the recent documents by clicking the tab, Recent Documents, of the Document Library portlet.
Search DocumentsDocuments are searchable, like Images. There are three options to search Documents. You can search Documents from the root, search Documents from the current folder only, or search Documents both in the current Folder and its Subfolders. For more details, refer to the previous section.
Edit A DocumentDocuments are editable, similar to Images. For example, you may need to change the Description of the Document, "Full RESTful integration of Liferay and Alfresco" under the Folder, "Books" to the value, "Full RESTful integration". Let's do it as follows:
1. Click the Folder "Books".2. Locate the document, "Full RESTful integration of Liferay and Alfresco"
that you want to edit.
Chapter 8
[ 227 ]
3. Click the Edit icon from the Actions located next to the document. 4. Update the description of the selected document, "Full RESTful integration
of Liferay and Alfresco", with the value "Full RESTful integration".5. Click the Save button when you are ready.
Optionally, you can change the Folder by selecting a Folder. At the same time, you can change the contents of the Document by uploading another File. As shown in the previous figure, updating the content of the Document will create a new Version of the Document. Furthermore, you can find a URL for the Document. You can reference the Document by this URL in an article.
Delete a DocumentDocuments are removable, just like Images. For example, the Document, "Full RESTful Integration", is not wanted anymore. So, you can remove it as follows:
1. Locate the Document, "Full RESTful integration" that you want to delete.2. Then click the Delete icon from the Actions located next to the document.3. A screen will appear asking if you want to delete this. Click OK to
confirm deletion.
View Version HistoryWhenever the contents of the Document changes, a new Version of the Document is generated. To view Versions, first view the Document and then click on the Version History tab. For example, we want to view Version History of the document, "Full RESTful integration". Let's do it as follows:
1. Locate the Document "Full RESTful integration" that you want to view.2. Then click the View icon from the Actions located next to the document.3. By default, thethe Version History tab is selected, and all and all Versions of the
document will appear below the button, Compare Versions. 4. Check the checkbox to the right of the Version, say "1.0", and then click on
the Compare Versions button. A comparative result appears, such as, "There are no differences between 1.0 and 1.1".
Give Your RatingAs for an Entry of Blogs, you can give your own rating for any Document. For example, as an administrator, you can read the document "Full Integration of LDAP, SSO, Liferay and Alfresco" and give your rating, say two stars. You simply click the second star under "Your Rating" of the Document.
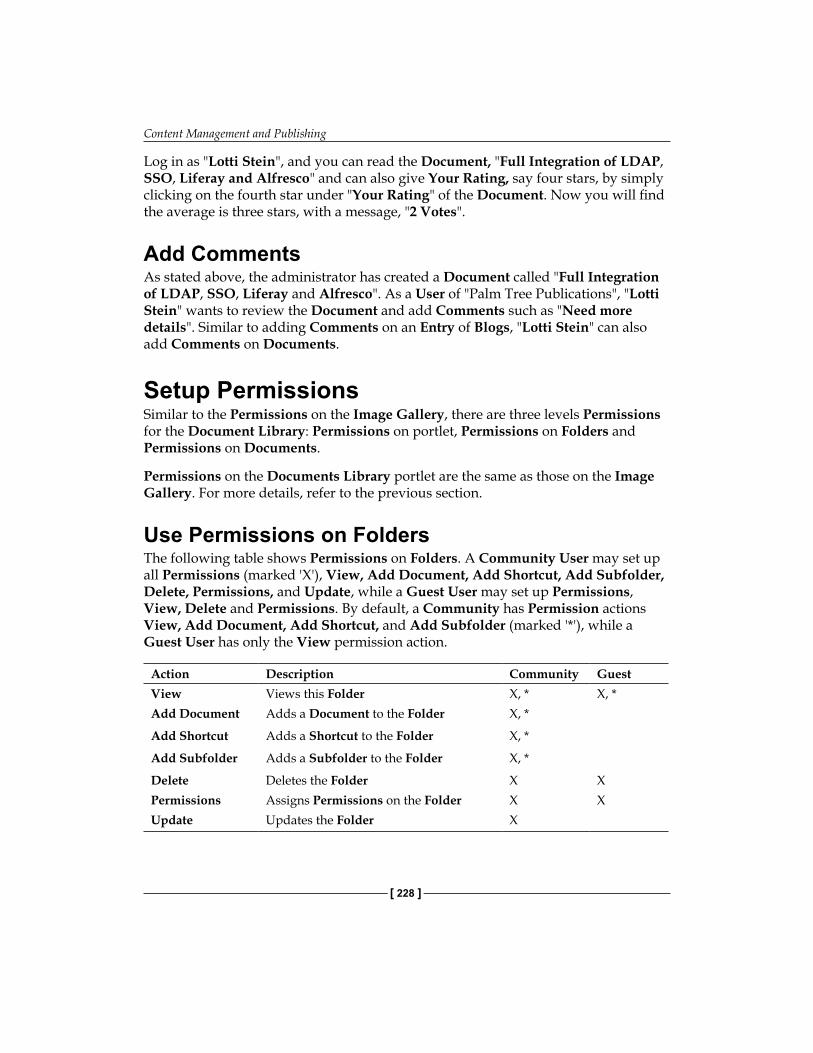
Content Management and Publishing
[ 228 ]
Log in as "Lotti Stein", and you can read the Document, "Full Integration of LDAP, SSO, Liferay and Alfresco" and can also give Your Rating, say four stars, by simply clicking on the fourth star under "Your Rating" of the Document. Now you will find the average is three stars, with a message, "2 Votes".
Add CommentsAs stated above, the administrator has created a Document called "Full Integration of LDAP, SSO, Liferay and Alfresco". As a User of "Palm Tree Publications", "Lotti Stein" wants to review the Document and add Comments such as "Need more details". Similar to adding Comments on an Entry of Blogs, "Lotti Stein" can also add Comments on Documents.
Setup PermissionsSimilar to the Permissions on the Image Gallery, there are three levels Permissions for the Document Library: Permissions on portlet, Permissions on Folders and Permissions on Documents.
Permissions on the Documents Library portlet are the same as those on the Image Gallery. For more details, refer to the previous section.
Use Permissions on FoldersThe following table shows Permissions on Folders. A Community User may set up all Permissions (marked 'X'), View, Add Document, Add Shortcut, Add Subfolder, Delete, Permissions, and Update, while a Guest User may set up Permissions, View, Delete and Permissions. By default, a Community has Permission actions View, Add Document, Add Shortcut, and Add Subfolder (marked '*'), while a Guest User has only the View permission action.
Action Description Community GuestView Views this Folder X, * X, *Add Document Adds a Document to the Folder X, *
Add Shortcut Adds a Shortcut to the Folder X, *
Add Subfolder Adds a Subfolder to the Folder X, *
Delete Deletes the Folder X XPermissions Assigns Permissions on the Folder X XUpdate Updates the Folder X
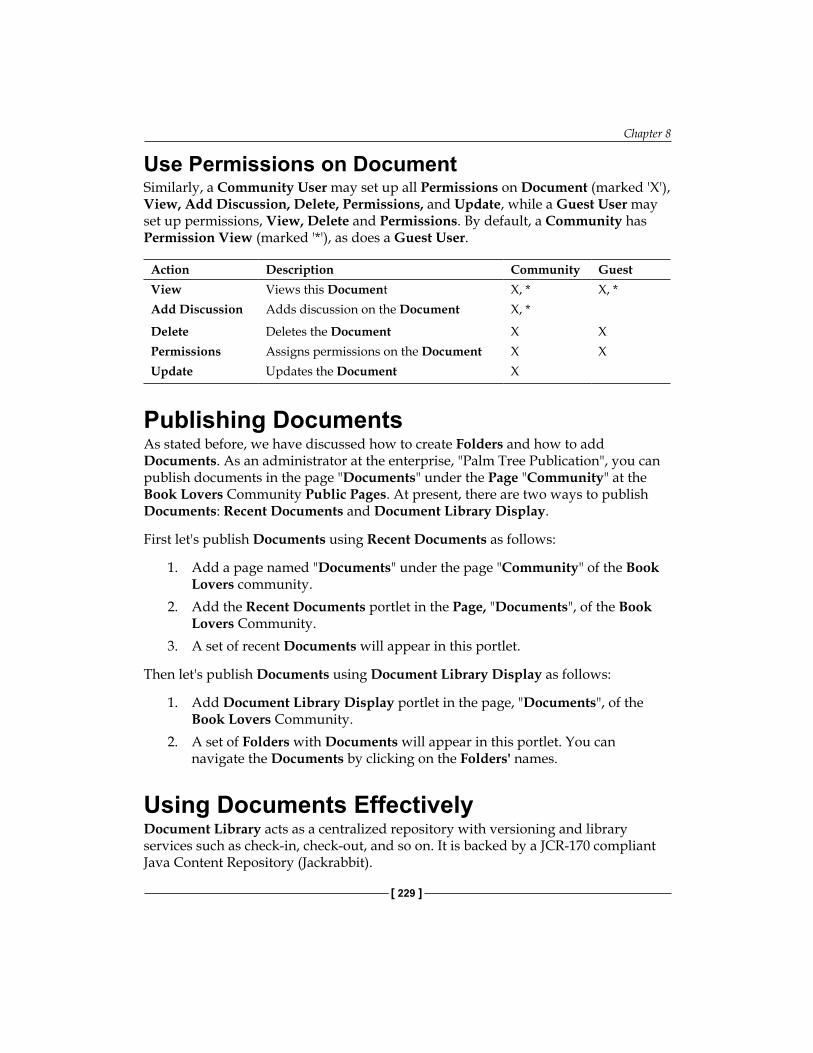
Chapter 8
[ 229 ]
Use Permissions on DocumentSimilarly, a Community User may set up all Permissions on Document (marked 'X'), View, Add Discussion, Delete, Permissions, and Update, while a Guest User may set up permissions, View, Delete and Permissions. By default, a Community has Permission View (marked '*'), as does a Guest User.
Action Description Community GuestView Views this Document X, * X, *Add Discussion Adds discussion on the Document X, *
Delete Deletes the Document X XPermissions Assigns permissions on the Document X XUpdate Updates the Document X
Publishing DocumentsAs stated before, we have discussed how to create Folders and how to add Documents. As an administrator at the enterprise, "Palm Tree Publication", you can publish documents in the page "Documents" under the Page "Community" at the Book Lovers Community Public Pages. At present, there are two ways to publish Documents: Recent Documents and Document Library Display.
First let's publish Documents using Recent Documents as follows:
1. Add a page named "Documents" under the page "Community" of the Book Lovers community.
2. Add the Recent Documents portlet in the Page, "Documents", of the Book Lovers Community.
3. A set of recent Documents will appear in this portlet.
Then let's publish Documents using Document Library Display as follows:
1. Add Document Library Display portlet in the page, "Documents", of the Book Lovers Community.
2. A set of Folders with Documents will appear in this portlet. You can navigate the Documents by clicking on the Folders' names.
Using Documents EffectivelyDocument Library acts as a centralized repository with versioning and library services such as check-in, check-out, and so on. It is backed by a JCR-170 compliant Java Content Repository (Jackrabbit).
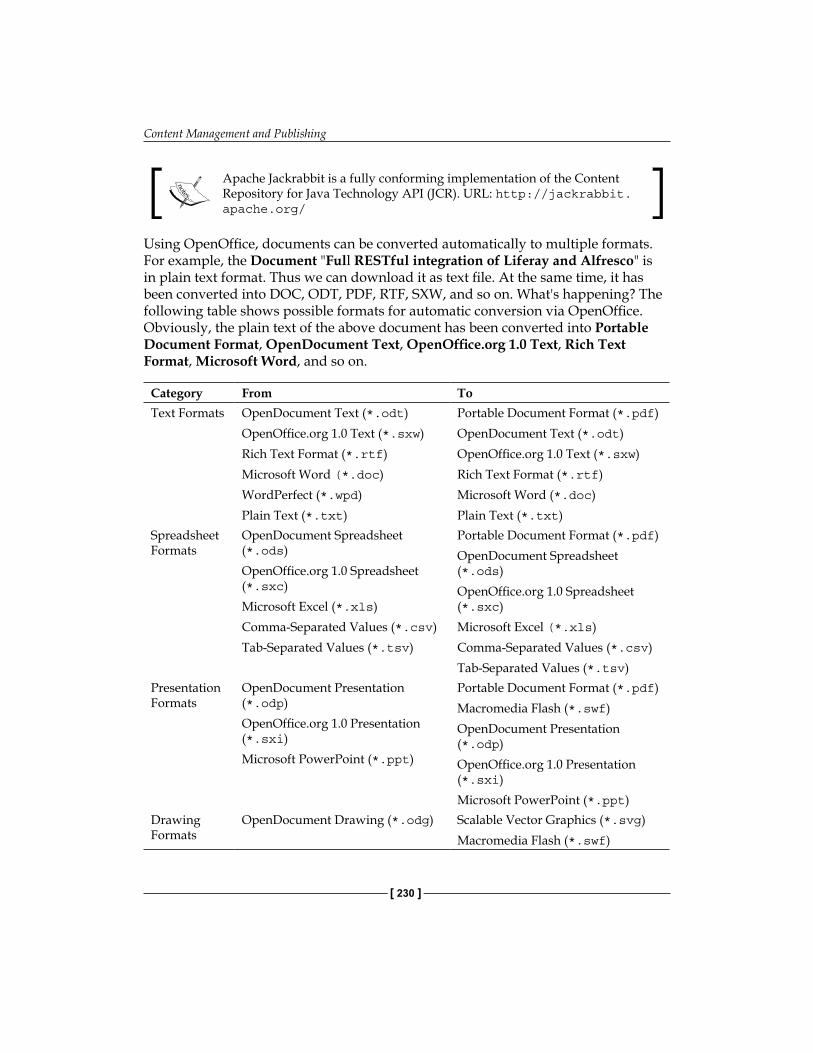
Content Management and Publishing
[ 230 ]
Apache Jackrabbit is a fully conforming implementation of the Content Repository for Java Technology API (JCR). URL: http://jackrabbit.apache.org/
Using OpenOffice, documents can be converted automatically to multiple formats. For example, the Document "Full RESTful integration of Liferay and Alfresco" is in plain text format. Thus we can download it as text file. At the same time, it has been converted into DOC, ODT, PDF, RTF, SXW, and so on. What's happening? The following table shows possible formats for automatic conversion via OpenOffice. Obviously, the plain text of the above document has been converted into Portable Document Format, OpenDocument Text, OpenOffice.org 1.0 Text, Rich Text Format, Microsoft Word, and so on.
Category From ToText Formats OpenDocument Text (*.odt)
OpenOffice.org 1.0 Text (*.sxw)Rich Text Format (*.rtf)Microsoft Word (*.doc)WordPerfect (*.wpd)Plain Text (*.txt)
Portable Document Format (*.pdf)OpenDocument Text (*.odt)OpenOffice.org 1.0 Text (*.sxw)Rich Text Format (*.rtf)Microsoft Word (*.doc)Plain Text (*.txt)
Spreadsheet Formats
OpenDocument Spreadsheet (*.ods)OpenOffice.org 1.0 Spreadsheet (*.sxc)Microsoft Excel (*.xls)Comma-Separated Values (*.csv)Tab-Separated Values (*.tsv)
Portable Document Format (*.pdf)OpenDocument Spreadsheet (*.ods)OpenOffice.org 1.0 Spreadsheet (*.sxc)Microsoft Excel (*.xls)Comma-Separated Values (*.csv)Tab-Separated Values (*.tsv)
Presentation Formats
OpenDocument Presentation (*.odp)OpenOffice.org 1.0 Presentation (*.sxi)Microsoft PowerPoint (*.ppt)
Portable Document Format (*.pdf)Macromedia Flash (*.swf)OpenDocument Presentation (*.odp)OpenOffice.org 1.0 Presentation (*.sxi)Microsoft PowerPoint (*.ppt)
Drawing Formats
OpenDocument Drawing (*.odg) Scalable Vector Graphics (*.svg)Macromedia Flash (*.swf)
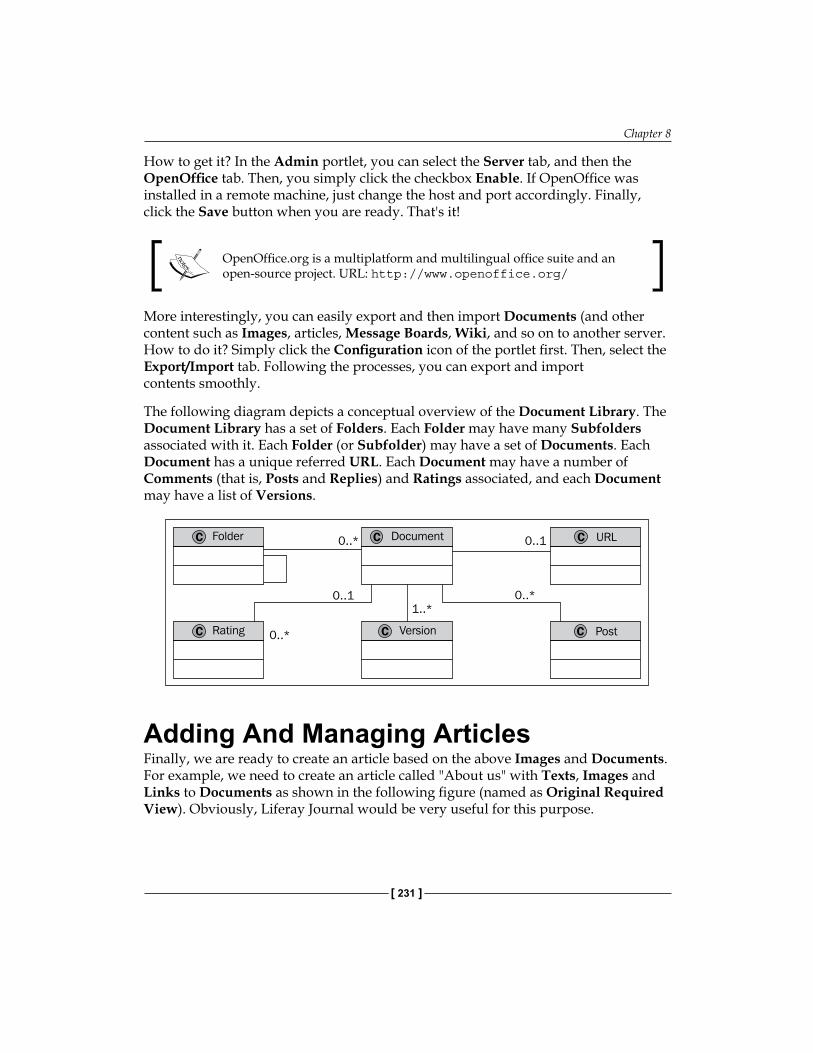
Chapter 8
[ 231 ]
How to get it? In the Admin portlet, you can select the Server tab, and then the OpenOffice tab. Then, you simply click the checkbox Enable. If OpenOffice was installed in a remote machine, just change the host and port accordingly. Finally, click the Save button when you are ready. That's it!
OpenOffice.org is a multiplatform and multilingual office suite and an open-source project. URL: http://www.openoffice.org/
More interestingly, you can easily export and then import Documents (and other content such as Images, articles, Message Boards, Wiki, and so on to another server. How to do it? Simply click the Configuration icon of the portlet first. Then, select the Export/Import tab. Following the processes, you can export and import contents smoothly.
The following diagram depicts a conceptual overview of the Document Library. The Document Library has a set of Folders. Each Folder may have many Subfolders associated with it. Each Folder (or Subfolder) may have a set of Documents. Each Document has a unique referred URL. Each Document may have a number of Comments (that is, Posts and Replies) and Ratings associated, and each Document may have a list of Versions.
Adding And Managing ArticlesFinally, we are ready to create an article based on the above Images and Documents. For example, we need to create an article called "About us" with Texts, Images and Links to Documents as shown in the following figure (named as Original Required View). Obviously, Liferay Journal would be very useful for this purpose.
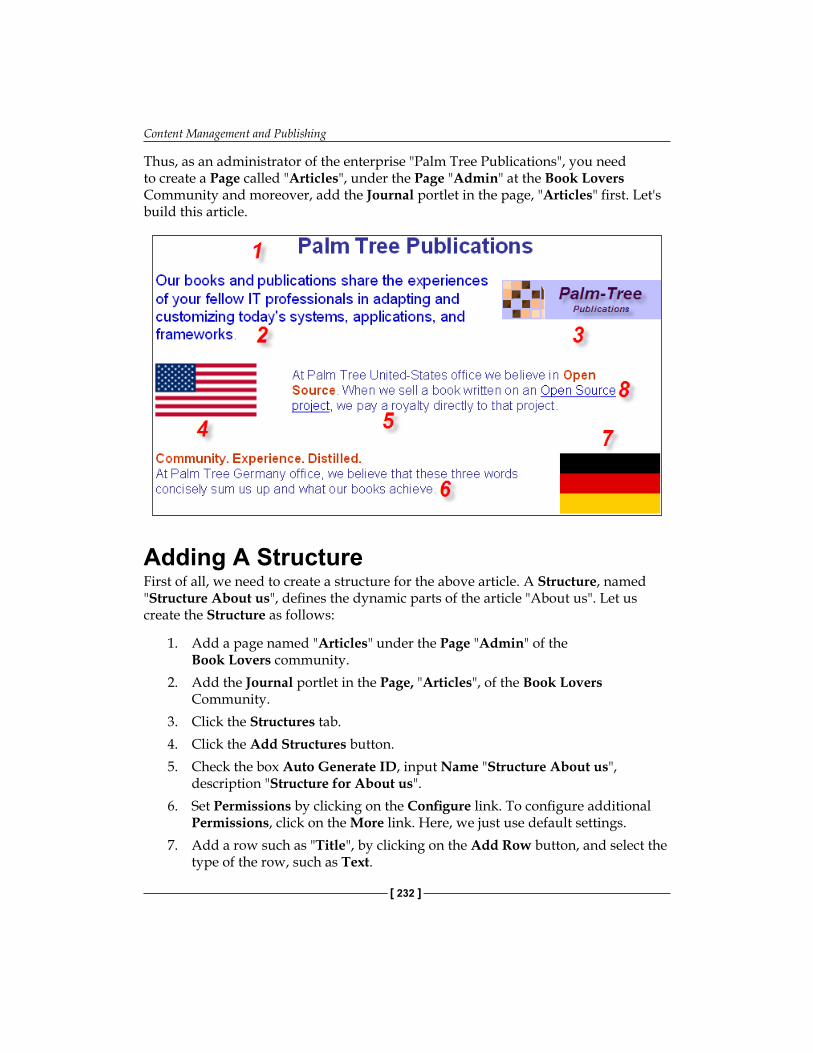
Content Management and Publishing
[ 232 ]
Thus, as an administrator of the enterprise "Palm Tree Publications", you need to create a Page called "Articles", under the Page "Admin" at the Book Lovers Community and moreover, add the Journal portlet in the page, "Articles" first. Let's build this article.
Adding A StructureFirst of all, we need to create a structure for the above article. A Structure, named "Structure About us", defines the dynamic parts of the article "About us". Let us create the Structure as follows:
1. Add a page named "Articles" under the Page "Admin" of the Book Lovers community.
2. Add the Journal portlet in the Page, "Articles", of the Book Lovers Community.
3. Click the Structures tab.4. Click the Add Structures button.5. Check the box Auto Generate ID, input Name "Structure About us",
description "Structure for About us".6. Set Permissions by clicking on the Configure link. To configure additional
Permissions, click on the More link. Here, we just use default settings.7. Add a row such as "Title", by clicking on the Add Row button, and select the
type of the row, such as Text.
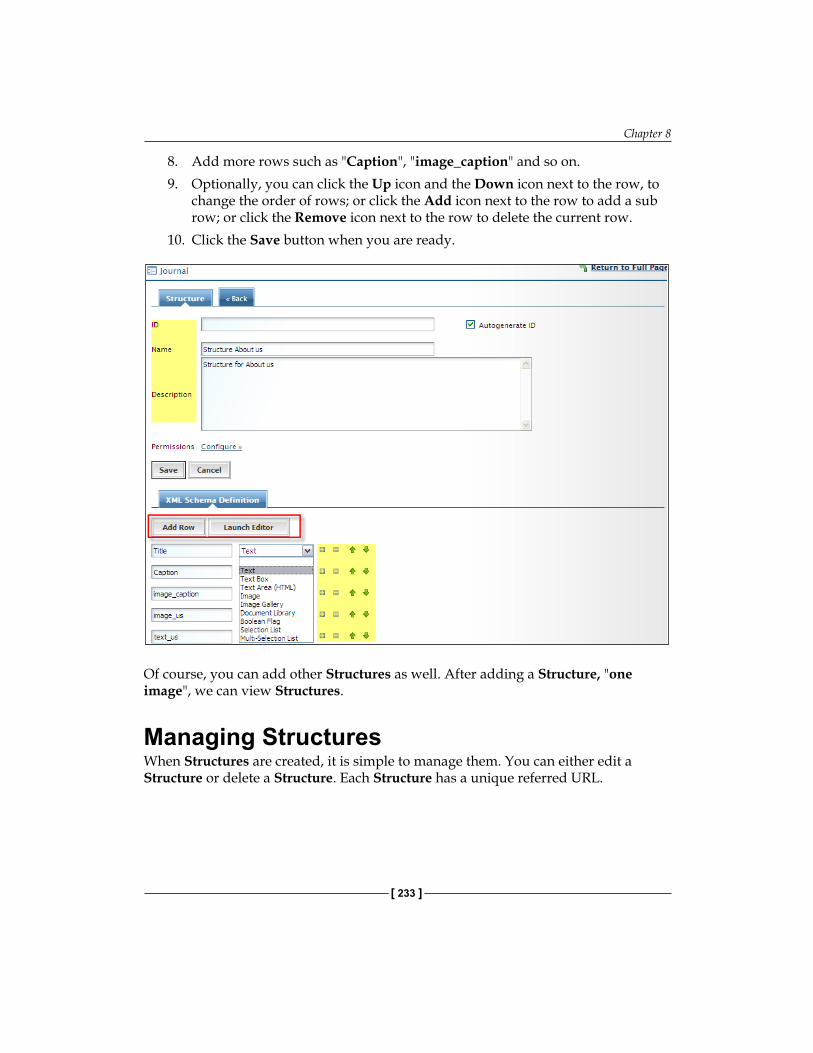
Chapter 8
[ 233 ]
8. Add more rows such as "Caption", "image_caption" and so on.9. Optionally, you can click the Up icon and the Down icon next to the row, to
change the order of rows; or click the Add icon next to the row to add a sub row; or click the Remove icon next to the row to delete the current row.
10. Click the Save button when you are ready.
Of course, you can add other Structures as well. After adding a Structure, "one image", we can view Structures.
Managing StructuresWhen Structures are created, it is simple to manage them. You can either edit a Structure or delete a Structure. Each Structure has a unique referred URL.
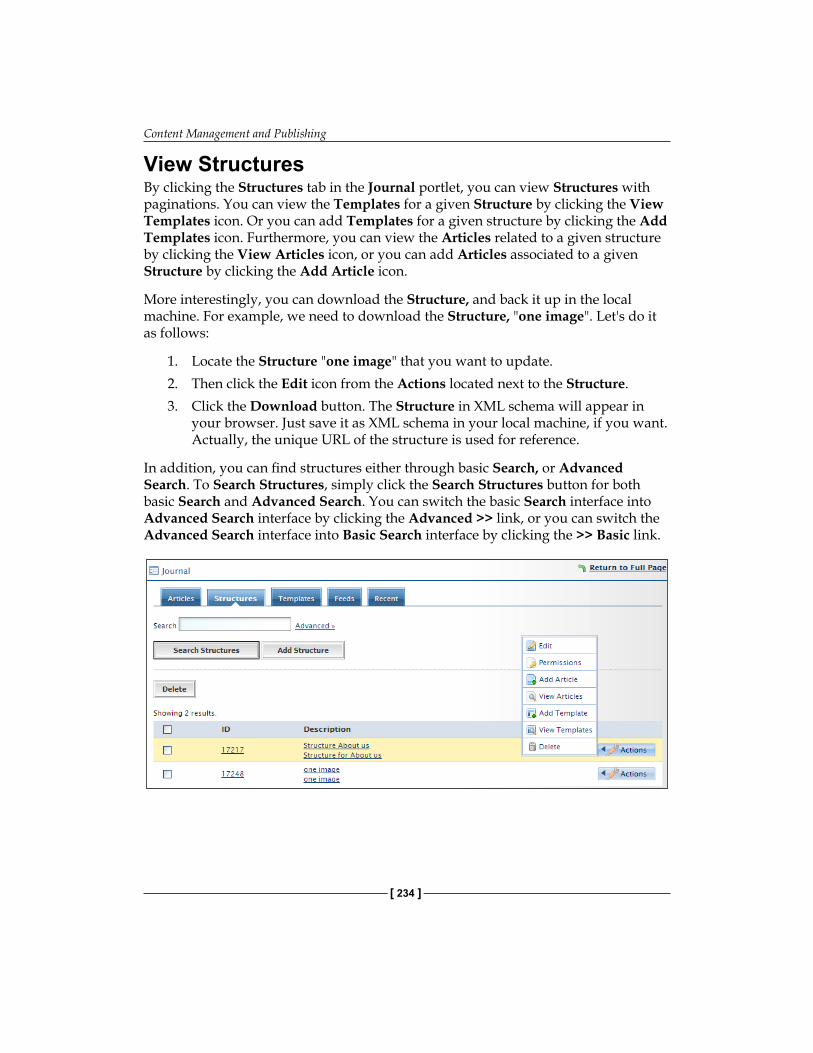
Content Management and Publishing
[ 234 ]
View StructuresBy clicking the Structures tab in the Journal portlet, you can view Structures with paginations. You can view the Templates for a given Structure by clicking the View Templates icon. Or you can add Templates for a given structure by clicking the Add Templates icon. Furthermore, you can view the Articles related to a given structure by clicking the View Articles icon, or you can add Articles associated to a given Structure by clicking the Add Article icon.
More interestingly, you can download the Structure, and back it up in the local machine. For example, we need to download the Structure, "one image". Let's do it as follows:
1. Locate the Structure "one image" that you want to update.2. Then click the Edit icon from the Actions located next to the Structure.3. Click the Download button. The Structure in XML schema will appear in
your browser. Just save it as XML schema in your local machine, if you want. Actually, the unique URL of the structure is used for reference.
In addition, you can find structures either through basic Search, or Advanced Search. To Search Structures, simply click the Search Structures button for both basic Search and Advanced Search. You can switch the basic Search interface into Advanced Search interface by clicking the Advanced >> link, or you can switch the Advanced Search interface into Basic Search interface by clicking the >> Basic link.
Chapter 8
[ 235 ]
Edit A StructureStructures are editable just like documents and images. For example, you may need to add a row of the structure, "one image", with the name, "Title". Let's do is as follows:
1. Locate the Structure "one image" that you want to update.2. Then click the Edit icon from the Actions located next to the structure.3. Add a row such as "Title", by clicking on the Add Row button; and select the
type of the row such as Text. 4. Optionally, you can launch an editor to update the rows directly, if you know
XML schema, by clicking the Launch Editor button first. Then you can use either Plain or Rich editor types, to update the XML schema. Finally, click the Update button.
5. Click the Save button when you are ready.
Delete a StructureStructures are removable just like Documents and Images. Suppose that the Structure "one image" is not wanted anymore, you can delete it as follows:
1. Locate the Structure "one image" that you want to delete.2. Then click on the Delete icon from the Actions located next to the structure.3. A screen will appear asking if you want to delete this. Click OK to
confirm deletion.
Note that you cannot delete a Structure which is used by Templates. In order to delete this Structure, you need to edit the Templates and remove the Structure association first. Then, you can delete the Structure.
Adding A TemplateNext, we need to create a Template for the above Article. A Template, named "Template About us", is a pattern to rapidly generate theis a pattern to rapidly generate the Article "About us". Let's create the Template as follows:
1. Click the Templates tab.2. Click the Add Templates button.3. Check the box, Auto Generate ID, input Name, "Template About us",
description "Template for About us".

Content Management and Publishing
[ 236 ]
4. Select Structure such as "Structure About us", by clicking the Select button next to the Structure.
5. Select the Language Type, such as "VM" (that is, Velocity Macro).6. Upload a Template script file, such as "template.vm" from the local machine,
by clicking the Browse… button next to the Script.7. Upload a small image such as "template.png", from the local machine by
clicking the Browse… button, next to the Small Image.8. Check the checkbox, Use Small Image.9. Set Permissions by clicking on the Configure link. To configure additional
Permissions, click on the More link. Here, we just use default settings.10. Click on the Save button when you are ready.
Surely, you can add other Templates that you want. After adding a Template, "Template one image", associated with the Structure, "one image", we can view Templates.
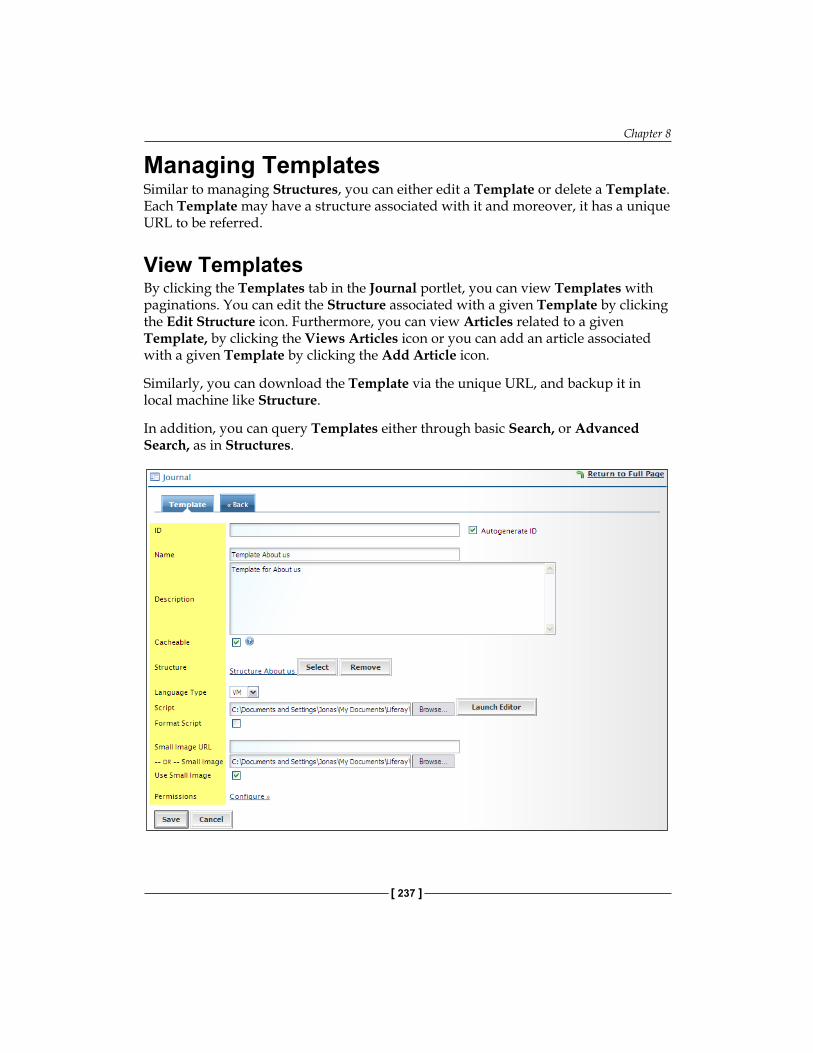
Chapter 8
[ 237 ]
Managing TemplatesSimilar to managing Structures, you can either edit a Template or delete a Template. Each Template may have a structure associated with it and moreover, it has a unique URL to be referred.
View TemplatesBy clicking the Templates tab in the Journal portlet, you can view Templates with paginations. You can edit the Structure associated with a given Template by clicking the Edit Structure icon. Furthermore, you can view Articles related to a given Template, by clicking the Views Articles icon or you can add an article associated with a given Template by clicking the Add Article icon.
Similarly, you can download the Template via the unique URL, and backup it in local machine like Structure.
In addition, you can query Templates either through basic Search, or Advanced Search, as in Structures.
Content Management and Publishing
[ 238 ]
Edit A TemplateSimilar to Structures, Templates are also editable. For example, you may need to change the expression of the Template, "Template one image", with a new item, "Title", according to the structure, "one image". Let's do it as follows:
1. Locate the Template, "Template one image" that you want to update.2. Then click the Edit icon from the Actions located next to the Template.3. Launch an editor to update the content of the Template, by clicking the
Launch Editor button first. Then you can use either Plain or Rich editor types to update the content such as, adding the new item according to theaccording to the Structure "one image". Finally, click the. Finally, click the Update button.
4. Click the Save button when you are ready.
Delete A TemplateSimilar to Structures, Templates are also removable. Suppose the Template, "Template one image", is not wanted anymore ,we can delete it as follows:
1. Locate the Template, "Template one image" that you want to delete.2. Then click on the Delete icon from the Actions located next to the template.3. A screen will appear asking if you want to delete this. Click OK to
confirm deletion.
Note that you cannot delete a Template which is used by Articles. In order to delete this Template, you need to edit Articles and remove the Template association first. Then, you can delete the Template.
Adding An ArticleWhen Structures and Templates are ready, we can create the Article, "About us", now. An Article is the actual content of the web Page, which may be associated with a Template and a Structure. Let's create the Article as follows:
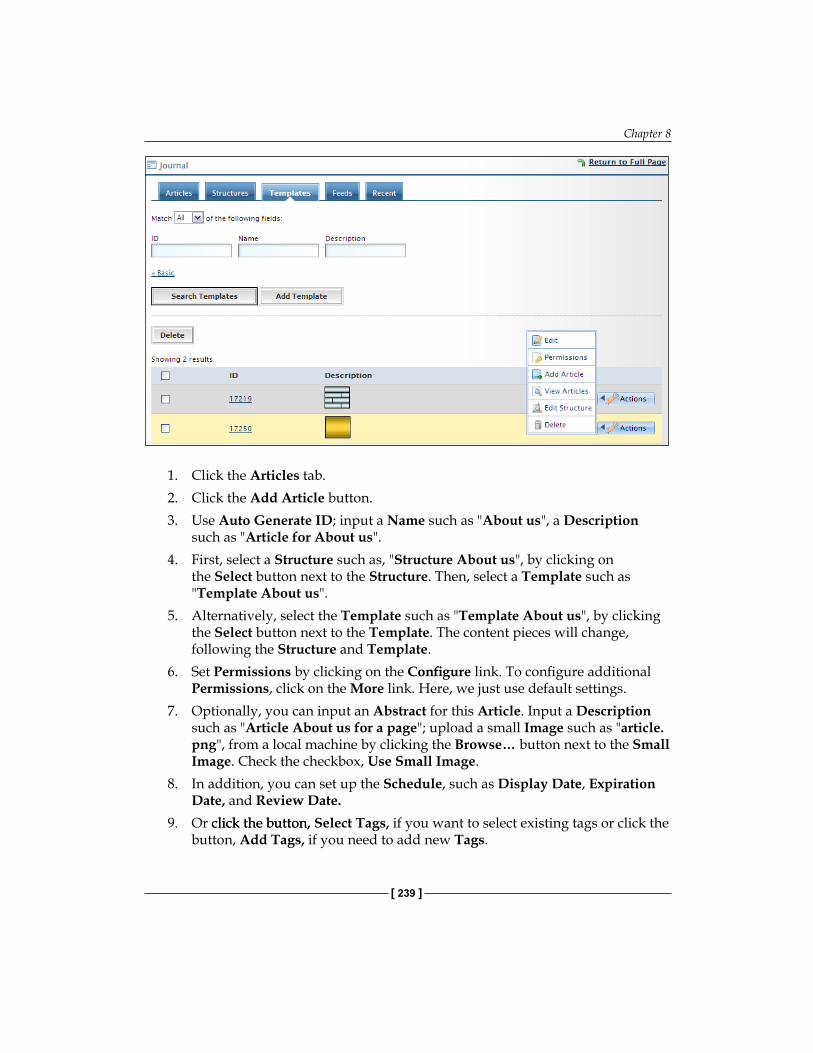
Chapter 8
[ 239 ]
1. Click the Articles tab.2. Click the Add Article button.3. Use Auto Generate ID; input a Name such as "About us", a Description
such as "Article for About us".4. First, select a Structure such as, "Structure About us", by clicking on
the Select button next to the Structure. Then, select a Template such as "Template About us".
5. Alternatively, select the Template such as "Template About us", by clicking the Select button next to the Template. The content pieces will change, following the Structure and Template.
6. Set Permissions by clicking on the Configure link. To configure additional Permissions, click on the More link. Here, we just use default settings.
7. Optionally, you can input an Abstract for this Article. Input a Description such as "Article About us for a page"; upload a small Image such as "article.png", from a local machine by clicking the Browse… button next to the Small Image. Check the checkbox, Use Small Image.
8. In addition, you can set up the Schedule, such as Display Date, Expiration Date, and Review Date.
9. Or click the button,click the button, Select Tags, if you want to select existing tags or click the button, Add Tags, if you need to add new Tags.
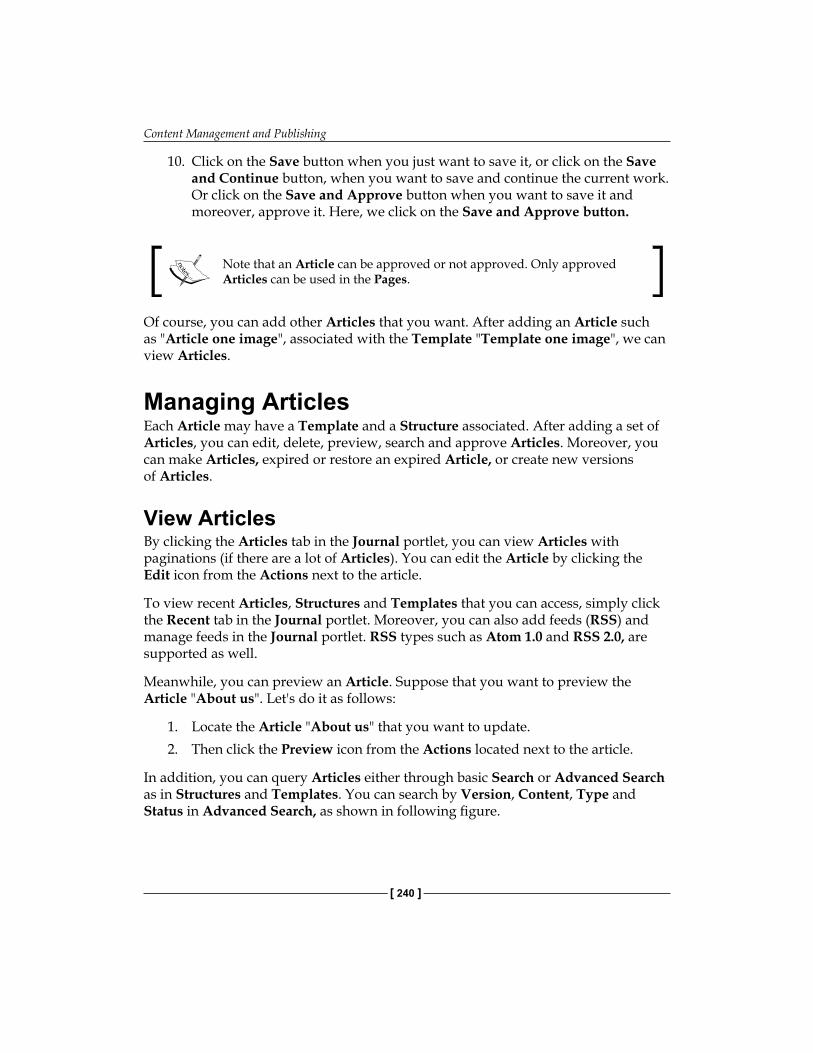
Content Management and Publishing
[ 240 ]
10. Click on the Save button when you just want to save it, or click on the Save and Continue button, when you want to save and continue the current work. Or click on the Save and Approve button when you want to save it and moreover, approve it. Here, we click on the Save and Approve button.
Note that an Article can be approved or not approved. Only approved Articles can be used in the Pages.
Of course, you can add other Articles that you want. After adding an Article such as "Article one image", associated with the Template "Template one image", we can view Articles.
Managing ArticlesEach Article may have a Template and a Structure associated. After adding a set of Articles, you can edit, delete, preview, search and approve Articles. Moreover, you can make Articles, expired or restore an expired Article, or create new versions of Articles.
View ArticlesBy clicking the Articles tab in the Journal portlet, you can view Articles with paginations (if there are a lot of Articles). You can edit the Article by clicking the Edit icon from the Actions next to the article.
To view recent Articles, Structures and Templates that you can access, simply click the Recent tab in the Journal portlet. Moreover, you can also add feeds (RSS) and manage feeds in the Journal portlet. RSS types such as Atom 1.0 and RSS 2.0, are supported as well.
Meanwhile, you can preview an Article. Suppose that you want to preview the Article "About us". Let's do it as follows:
1. Locate the Article "About us" that you want to update.2. Then click the Preview icon from the Actions located next to the article.
In addition, you can query Articles either through basic Search or Advanced Search as in Structures and Templates. You can search by Version, Content, Type and Status in Advanced Search, as shown in following figure.
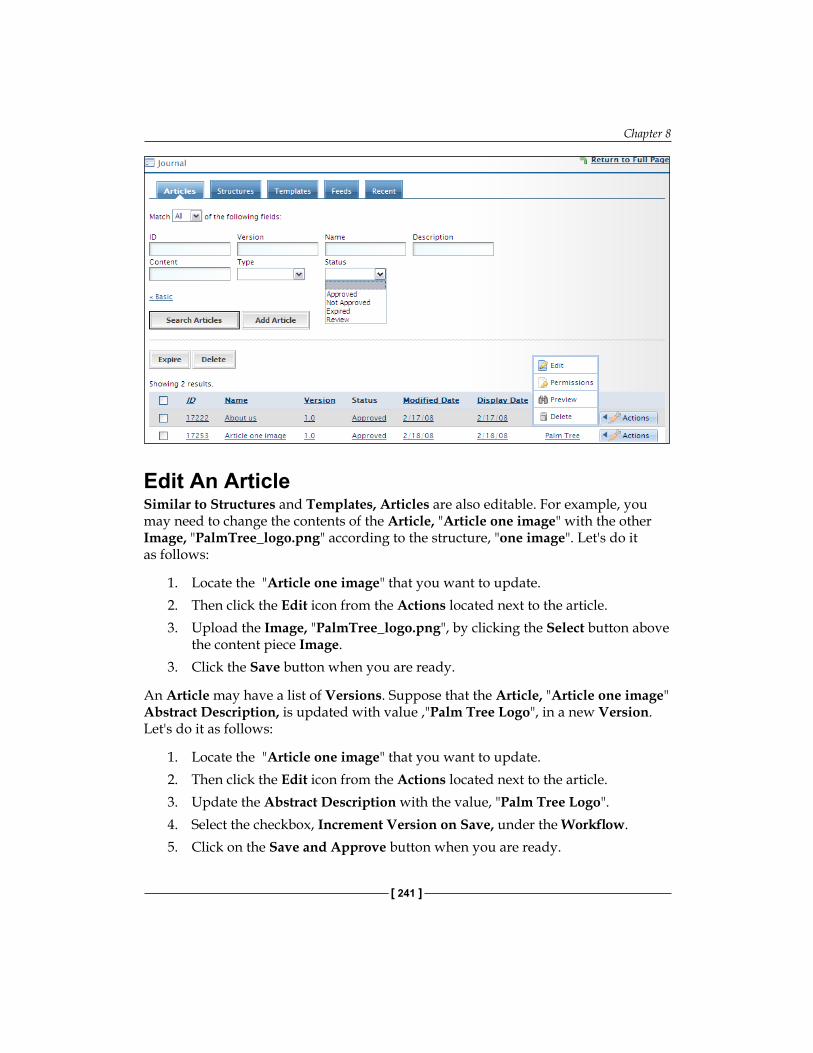
Chapter 8
[ 241 ]
Edit An Article Similar to Structures and Templates, Articles are also editable. For example, you may need to change the contents of the Article, "Article one image" with the other Image, "PalmTree_logo.png" according to the structure, "one image". Let's do it as follows:
1. Locate the "Article one image" that you want to update.2. Then click the Edit icon from the Actions located next to the article.3. Upload the Image, "PalmTree_logo.png", by clicking the Select button above
the content piece Image.3. Click the Save button when you are ready.
An Article may have a list of Versions. Suppose that the Article, "Article one image" Abstract Description, is updated with value ,"Palm Tree Logo", in a new Version. Let's do it as follows:
1. Locate the "Article one image" that you want to update.2. Then click the Edit icon from the Actions located next to the article.3. Update the Abstract Description with the value, "Palm Tree Logo".4. Select the checkbox, Increment Version on Save, under the Workflow.5. Click on the Save and Approve button when you are ready.
Content Management and Publishing
[ 242 ]
In addition, you can expire an Article, or restore an expired Article. Suppose that the Article "Article one image" has to be made expired. Let's do it as follows:
1. Locate the "Article one image" that you want to update.2. Then click the Edit icon from the Actions located next to the article.3. Click the Expire button under the Workflow.
Later, we may want to restore the Article, "Article one image", and also update it for other purposes. Let's restore it as follows:
1. Select the checkbox, Never Auto Expire.2. Click the Save and Approve button.
Delete An ArticleArticles are also removable just like Structures and Templates. Suppose that the Article, "Article one image", is not wanted anymore. Let's delete it as follows:
1. Locate the Article "Article one image" that you want to delete.2. Then click on the Delete icon from the Actions located next to the article.3. A screen will appear asking if you want to delete this. Click OK to
confirm deletion.
Note that after an Article has been deleted, you cannot restore it. If you do not want to delete it actually, you can just make it expired. Sooner or later, when you want to reuse this Article, you can restore it easily.
Setting up JournalAs an administrator of the enterprise, "Palm Tree Publications", you can set up Journal. You can configure Email From.
To configure the Email From, click the Configuration icon on Journal. On selecting the Setup tab, the following five sub-tabs appear: Email From, Article Denied Email, Article Granted Email, Article Requested Email, and Article Review Email.
With the Email From tab selected, you can change the name and address of the automatically sent emails.
The Article Denied Email tab allows the Administrator to edit the email that is sent whenever an article is denied. To disable email notification, uncheck the Enabled box. Click the Save button after making any changes.
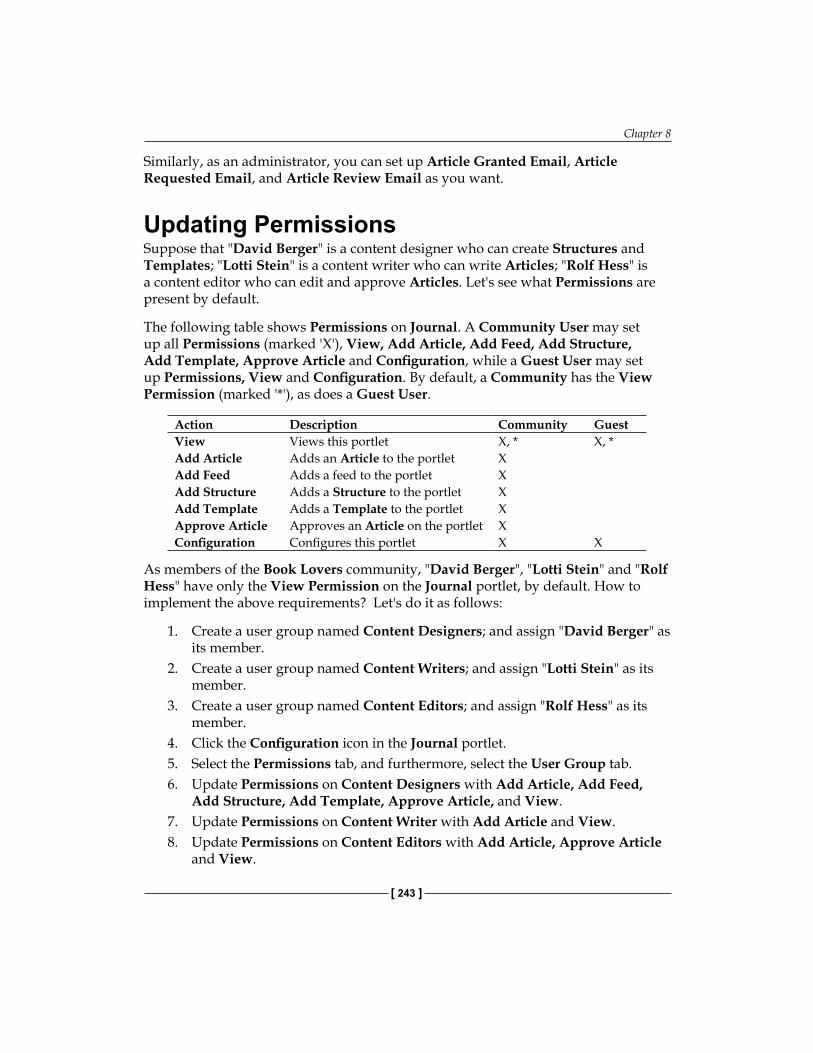
Chapter 8
[ 243 ]
Similarly, as an administrator, you can set up Article Granted Email, Article Requested Email, and Article Review Email as you want.
Updating PermissionsSuppose that "David Berger" is a content designer who can create Structures and Templates; "Lotti Stein" is a content writer who can write Articles; "Rolf Hess" is a content editor who can edit and approve Articles. Let's see what Permissions are present by default.
The following table shows Permissions on Journal. A Community User may set up all Permissions (marked 'X'), View, Add Article, Add Feed, Add Structure, Add Template, Approve Article and Configuration, while a Guest User may set up Permissions, View and Configuration. By default, a Community has the View Permission (marked '*'), as does a Guest User.
Action Description Community GuestView Views this portlet X, * X, *Add Article Adds an Article to the portlet XAdd Feed Adds a feed to the portlet XAdd Structure Adds a Structure to the portlet XAdd Template Adds a Template to the portlet XApprove Article Approves an Article on the portlet XConfiguration Configures this portlet X X
As members of the Book Lovers community, "David Berger", "Lotti Stein" and "Rolf Hess" have only the View Permission on the Journal portlet, by default. How to implement the above requirements? Let's do it as follows:
1. Create a user group named Content Designers; and assign "David Berger" as its member.
2. Create a user group named Content Writers; and assign "Lotti Stein" as its member.
3. Create a user group named Content Editors; and assign "Rolf Hess" as its member.
4. Click the Configuration icon in the Journal portlet.5. Select the Permissions tab, and furthermore, select the User Group tab.6. Update Permissions on Content Designers with Add Article, Add Feed,
Add Structure, Add Template, Approve Article, and View.7. Update Permissions on Content Writer with Add Article and View.8. Update Permissions on Content Editors with Add Article, Approve Article
and View.
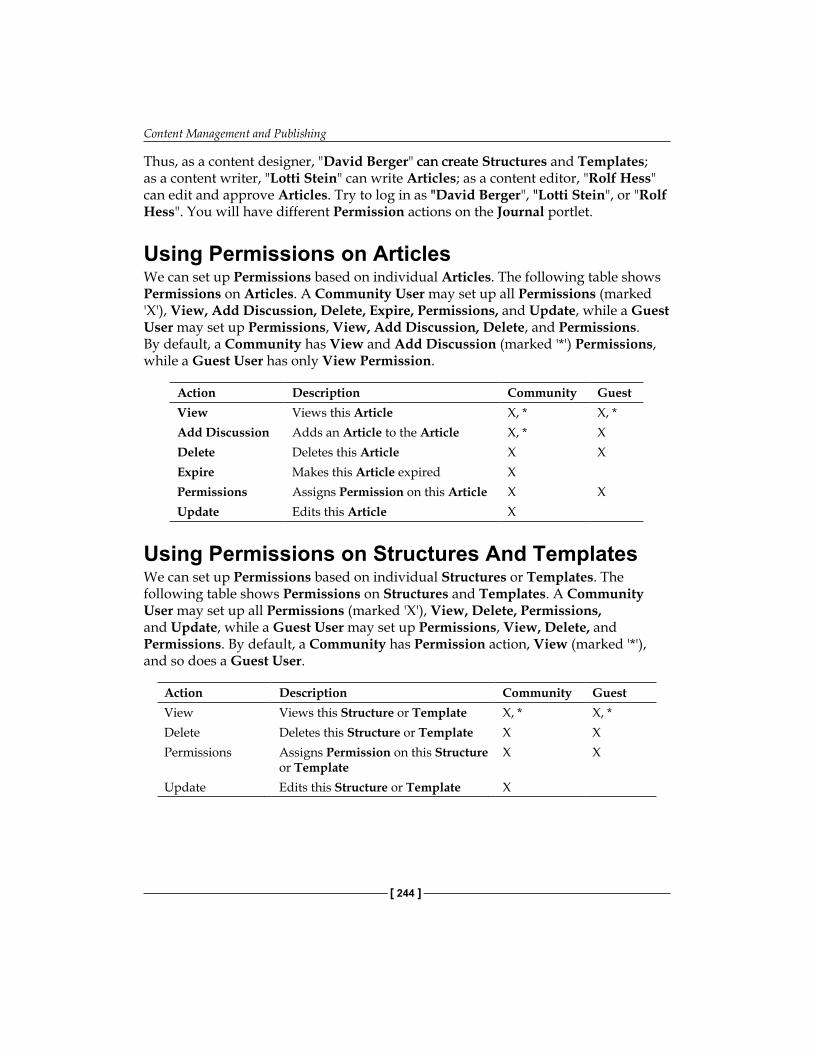
Content Management and Publishing
[ 244 ]
Thus, as a content designer, "David Berger" can createcan create Structures and Templates; as a content writer, "Lotti Stein" can write Articles; as a content editor, "Rolf Hess" can edit and approve Articles. Try to log in as ""David Berger", ""Lotti Stein", or "Rolf Hess". You will have different Permission actions on the Journal portlet.
Using Permissions on ArticlesWe can set up Permissions based on individual Articles. The following table shows Permissions on Articles. A Community User may set up all Permissions (marked 'X'), View, Add Discussion, Delete, Expire, Permissions, and Update, while a Guest User may set up Permissions, View, Add Discussion, Delete, and Permissions. By default, a Community has View and Add Discussion (marked '*') Permissions, while a Guest User has only View Permission.
Action Description Community GuestView Views this Article X, * X, *Add Discussion Adds an Article to the Article X, * XDelete Deletes this Article X XExpire Makes this Article expired XPermissions Assigns Permission on this Article X XUpdate Edits this Article X
Using Permissions on Structures And TemplatesWe can set up Permissions based on individual Structures or Templates. The following table shows Permissions on Structures and Templates. A Community User may set up all Permissions (marked 'X'), View, Delete, Permissions, and Update, while a Guest User may set up Permissions, View, Delete, and Permissions. By default, a Community has Permission action, View (marked '*'), and so does a Guest User.
Action Description Community GuestView Views this Structure or Template X, * X, *Delete Deletes this Structure or Template X XPermissions Assigns Permission on this Structure
or TemplateX X
Update Edits this Structure or Template X
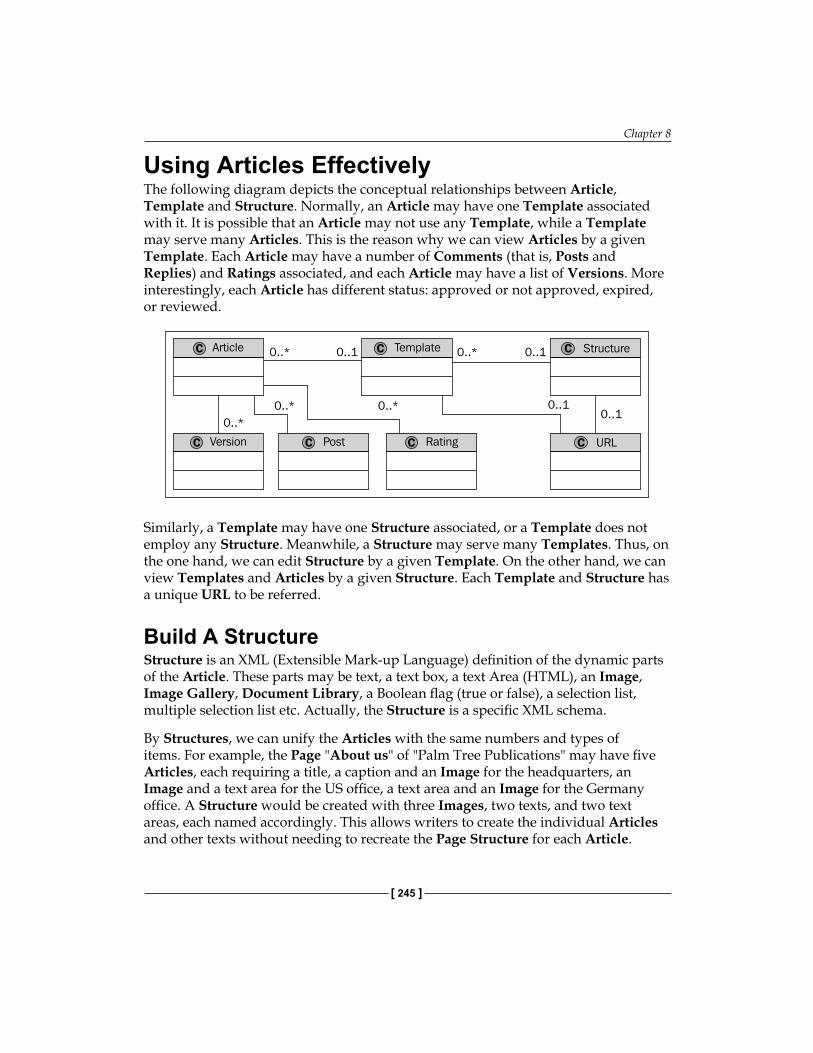
Chapter 8
[ 245 ]
Using Articles EffectivelyThe following diagram depicts the conceptual relationships between Article, Template and Structure. Normally, an Article may have one Template associated with it. It is possible that an Article may not use any Template, while a Template may serve many Articles. This is the reason why we can view Articles by a given Template. Each Article may have a number of Comments (that is, Posts and Replies) and Ratings associated, and each Article may have a list of Versions. More interestingly, each Article has different status: approved or not approved, expired, or reviewed.
Similarly, a Template may have one Structure associated, or a Template does not employ any Structure. Meanwhile, a Structure may serve many Templates. Thus, on the one hand, we can edit Structure by a given Template. On the other hand, we can view Templates and Articles by a given Structure. Each Template and Structure has a unique URL to be referred.
Build A StructureStructure is an XML (Extensible Mark-up Language) definition of the dynamic parts of the Article. These parts may be text, a text box, a text Area (HTML), an Image, Image Gallery, Document Library, a Boolean flag (true or false), a selection list, multiple selection list etc. Actually, the Structure is a specific XML schema.
By Structures, we can unify the Articles with the same numbers and types of items. For example, the Page "About us" of "Palm Tree Publications" may have five Articles, each requiring a title, a caption and an Image for the headquarters, an Image and a text area for the US office, a text area and an Image for the Germany office. A Structure would be created with three Images, two texts, and two text areas, each named accordingly. This allows writers to create the individual Articles and other texts without needing to recreate the Page Structure for each Article.
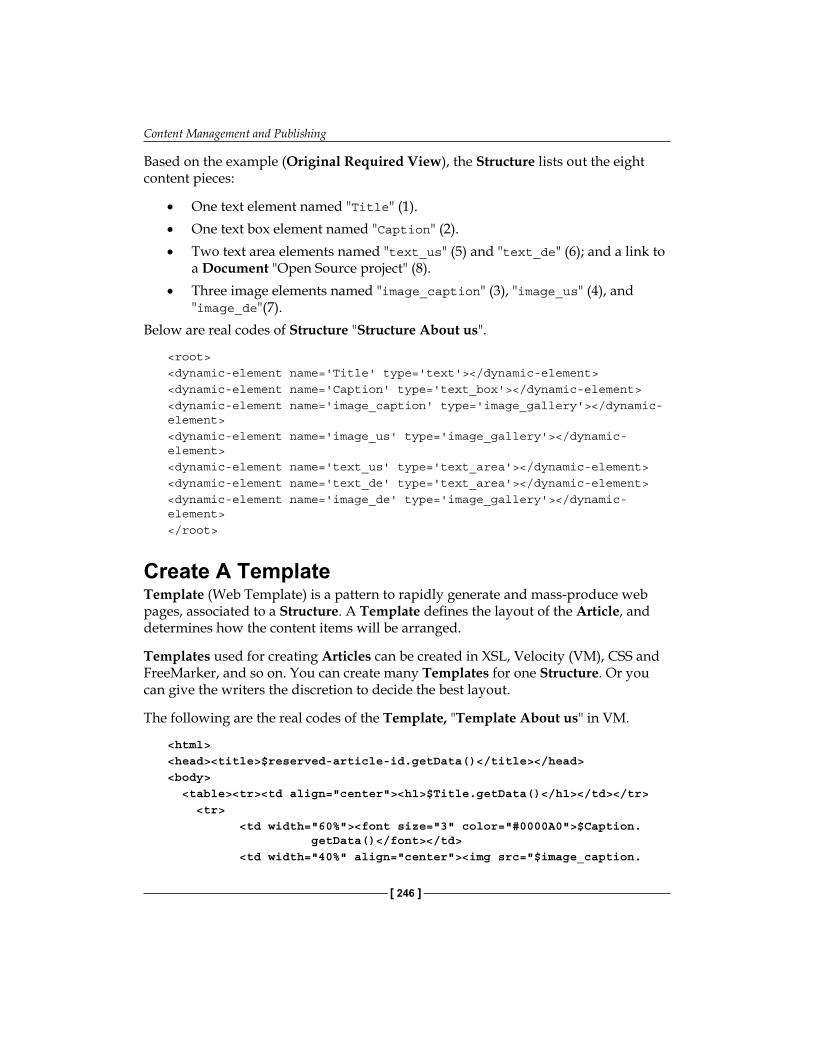
Content Management and Publishing
[ 246 ]
Based on the example (Original Required View), the Structure lists out the eight content pieces:
• One text element named "Title" (1).• One text box element named "Caption" (2).• Two text area elements named "text_us" (5) and "text_de" (6); and a link to
a Document "Open Source project" (8). • Three image elements named "image_caption" (3), "image_us" (4), and
"image_de"(7).Below are real codes of Structure "Structure About us".
<root><dynamic-element name='Title' type='text'></dynamic-element><dynamic-element name='Caption' type='text_box'></dynamic-element><dynamic-element name='image_caption' type='image_gallery'></dynamic-element><dynamic-element name='image_us' type='image_gallery'></dynamic-element><dynamic-element name='text_us' type='text_area'></dynamic-element><dynamic-element name='text_de' type='text_area'></dynamic-element><dynamic-element name='image_de' type='image_gallery'></dynamic-element></root>
Create A TemplateTemplate (Web Template) is a pattern to rapidly generate and mass-produce web pages, associated to a Structure. A Template defines the layout of the Article, and determines how the content items will be arranged.
Templates used for creating Articles can be created in XSL, Velocity (VM), CSS and FreeMarker, and so on. You can create many Templates for one Structure. Or you can give the writers the discretion to decide the best layout.
The following are the real codes of the Template, "Template About us" in VM.
<html><head><title>$reserved-article-id.getData()</title></head><body> <table><tr><td align="center"><h1>$Title.getData()</h1></td></tr> <tr> <td width="60%"><font size="3" color="#0000A0">$Caption. getData()</font></td> <td width="40%" align="center"><img src="$image_caption.
Chapter 8
[ 247 ]
getData()"/></td> </tr> </table><table> <tr> <td width="30%" align="center"><img src="$image_ us.getData()"/></td> <td width="70%">$text_us.getData()</td> </tr></table><table> <tr> <td width="70%">$text_de.getData()</td> <td width="30%" align="center"><img src="$image_ de.getData()"/></td> </tr> </table></body></html>
Construct An ArticleArticle is the actual content of the web page, associated with a Structure and a Template. Each content piece is populated with actual texts and Images. Each Article is integrated with two status of Workflow, either approved or not approved. Meanwhile, each Article may have a set of dates associated, such as display date, expiration date, and review date, and so on.
There are three kinds of Users involved in Article lifecycle: designers, writers and editors. Typically, designers create Structures and Templates first. Then, Articles are written normally by writers, and editors edit and approve the Articles. Finally, Articles are displayed or expired by designers.
By default, Article types include Announcements, Blogs, News, General, Press release and Test.
Type Name DescriptionAnnouncements Publications for making known publicly.Blogs Frequent and chronological publications of personal thoughts and
Web links.News Information about recent events or happenings.General General publications / information.Press release News that is sent out or released by the company making the news.Test Testing information.
Content Management and Publishing
[ 248 ]
It should be noted that these Article types are configurable. For example, you can configure Articles types in portal-ext.properties by removing Test as follows:
journal.article.types=announcements,blogs,general,news,press-release
Publishing ArticlesWe have used the Journal portlet to create contents (Articles) stored in CMS. Now, we are ready to publish contents to portal Users and Guests.
Suppose that there are two Pages, "Articles" and "About us", under the Page, "Home" at the Book Lovers Community Public Pages. The Page, "Articles", will display all Articles, and Users can navigate these Articles, while the Page, "About us", will display the Article, "About us" only. Thanks to Journal Content and Journal Articles, these are very useful for these two scenarios.
Using Journal ContentAs an administrator of "Palm Tree Publications", you need to create a Page called "About us" under the Page "Home" at the Book Lovers Community, and also add the Journal Content portlet in the Page, "About us". Finally, publish the Article, "About us", in the Page, "About us". Let's publish the Article as follows:
1. Add a Page called "About us" under the Page, "Home", at the Book Lovers Community Public Pages, if the Page is not already present.
2. Change the layout with the value "1-Column" by clicking the link Layout Templates.
3. If the Journal Content portlet is not present, add it in the page, "About us", of the Book Lovers Community where you want to publish the Article.
4. Select an Article by clicking the Select Article icon in the Journal Content portlet.
5. Locate the Article "About us", and select the Article by clicking the link Name.
6. Optionally, check the checkbox, Enable Ratings, if you want to enable Ratings; check the checkbox, Enable Comments, if you want to enable Comments. Here, we just use default settings.
7. Click the Return to Full Page arrow when you are ready.8. Optionally, remove the border of the portlet by clicking the Look and Feel
icon and unselecting the checkbox, Show Border. Click the Save button and click the Remove icon to return.
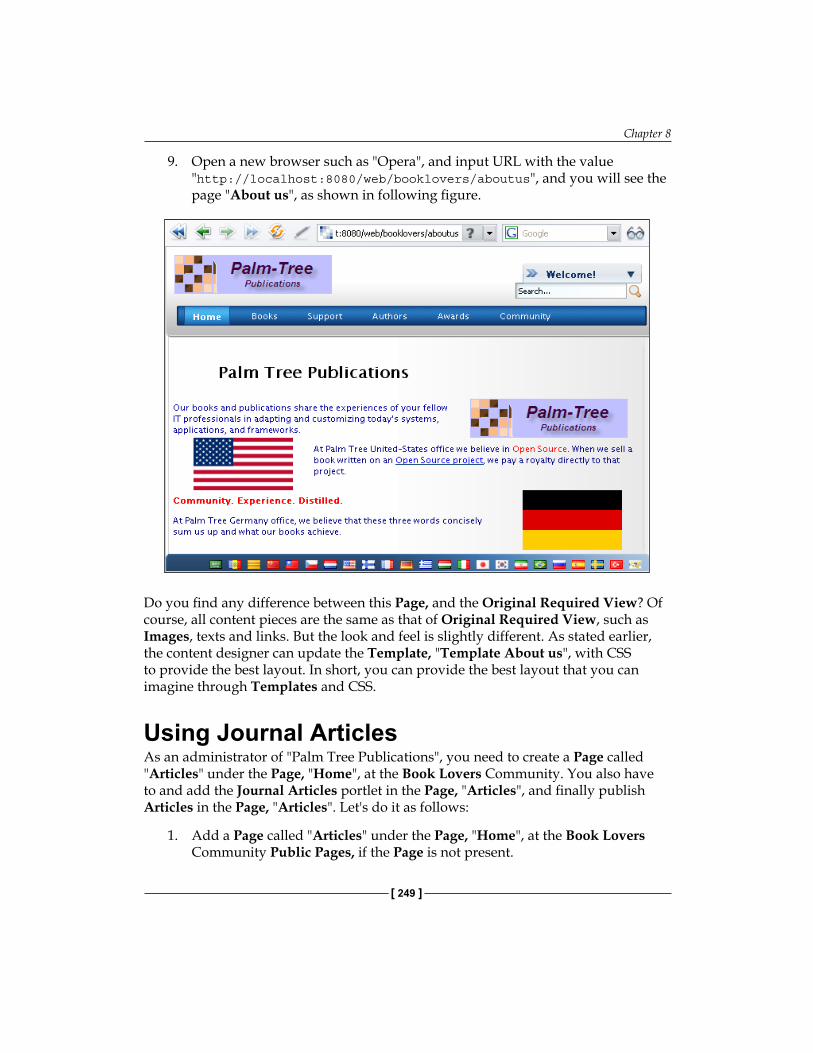
Chapter 8
[ 249 ]
9. Open a new browser such as "Opera", and input URL with the value "http://localhost:8080/web/booklovers/aboutus", and you will see the page "About us", as shown in following figure.
Do you find any difference between this Page, and the Original Required View? Of course, all content pieces are the same as that of Original Required View, such as Images, texts and links. But the look and feel is slightly different. As stated earlier, the content designer can update the Template, "Template About us", with CSS to provide the best layout. In short, you can provide the best layout that you can imagine through Templates and CSS.
Using Journal ArticlesAs an administrator of "Palm Tree Publications", you need to create a Page called "Articles" under the Page, "Home", at the Book Lovers Community. You also have to and add the Journal Articles portlet in the Page, "Articles", and finally publish Articles in the Page, "Articles". Let's do it as follows:
1. Add a Page called "Articles" under the Page, "Home", at the Book Lovers Community Public Pages, if the Page is not present.
Content Management and Publishing
[ 250 ]
2. Change the layout with value "1-Column" by clicking on the link Layout Templates.
3. Add the Journal Articles portlet in the page, "Articles", of the Book Lovers Community where you want to publish Articles, if Journal Articles portlet is not present.
4. Click the Configuration link to modify the properties of the portlet.5. Choose the Community such as "Book Lovers", Article Type such as
"General", Display URL, Display per Page, Order by Column, and Order by Type as well.
6. Click the Save button.7. Click on the Return to Full Page arrow when you are ready.
Do you find a list of Articles in the Page "Articles"? One of them is the Article "About us".
Note that only approved Articles will appear in the Journal Articles portlet. You cannot see the Articles which are not approved or the ones which have expired.
Using Other CMS ToolsThere are some other CMS tools, which are useful for web content publishing. Here, we just list some of them as follows:
XML content: provides ability to publish XML-based content.Asset publisher: a generic front end to several content types and sources such as Blogs Entry, Bookmarks Entry, Document Library Document, Image Gallery Image, Journal Article, and last but not the least, Tagged Content. Nested portlets: holds one or more portlets inside. It provides nested portlets layout, that is, portlets within portlets.
•
•
•
Chapter 8
[ 251 ]
SummaryThis chapter covered how to addadd Folders and Subfolders for Images; how to manage Folders and Subfolders; how to add Images in Folders and manage Images; and how to set up Permission on Folders and Images. It also discussed how to add Folders and Subfolders for Documents; how to manage Documents, how to add Comments, how to give your Rating and view Versions; how to set up Permission on Folders and Documents and how to publish Documents. Further, it also introduced us to Structure management, Template management and Article management. It emphasised on how to build Articles based on Structures and Templates, and how to set up Permissions on Journal, Articles, Templates and Structures. Finally, it discussed how to publish Articles and to employ other CMS tools. In short, Liferay Journal does not only provides high availability to publish,Liferay Journal does not only provides high availability to publish, manage, and maintain web contents and documents, but also separates contents from the layout.

Chat and Instant MessagingIn the intranet website book.com of "Palm Tree Publications", as an administrator, you are required to provide an environment for employees to enjoy chatting, instant messaging, mailing, and SMS text messaging with others. This chapter will introduce to us, how to enjoy instant messaging. Then, it will discuss how to manage emails. Finally, it will focus on SMS text messenger.
By the end of this chapter, you will have learnt how to:
Add a participant for chatting.Manage (view and delete) participants in the chat portlet.Start chatting. Set up chat portlet.Manage (check, delete, forward, reply, search) mails.Set up mail portlet.Manage SMS text messenger portlet.
Working with Chat PortletIn order to let employees enjoy chatting and instant messaging with others, we should use the Liferay Chat portlet. Let's experience how to enjoy chatting and instant messaging first.
As an administrator of "Palm Tree Publications", you need to create a Page called "Instant Messaging" under the Page, "Community", at the Book Lovers Community and also add the Chat portlet in the Page, "Instant Messaging".
•
•
•
•
•
•
•
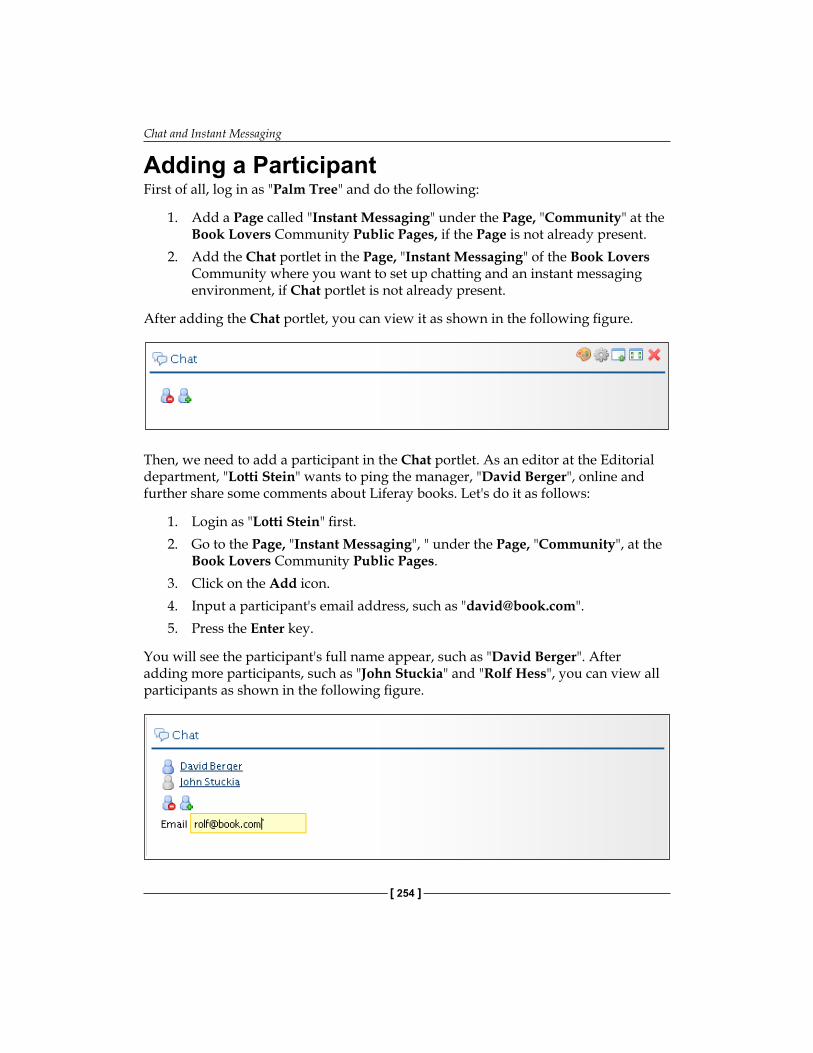
Chat and Instant Messaging
[ 254 ]
Adding a ParticipantFirst of all, log in as "Palm Tree" and do the following:
1. Add a Page called "Instant Messaging" under the Page, "Community" at the Book Lovers Community Public Pages, if the Page is not already present.
2. Add the Chat portlet in the Page, "Instant Messaging" of the Book Lovers Community where you want to set up chatting and an instant messaging environment, if Chat portlet is not already present.
After adding the Chat portlet, you can view it as shown in the following figure.
Then, we need to add a participant in the Chat portlet. As an editor at the Editorial department, "Lotti Stein" wants to ping the manager, "David Berger", online and further share some comments about Liferay books. Let's do it as follows:
1. Login as "Lotti Stein" first.2. Go to the Page, "Instant Messaging", " under the Page, "Community", at the
Book Lovers Community Public Pages.3. Click on the Add icon.4. Input a participant's email address, such as "[email protected]".5. Press the Enter key.
You will see the participant's full name appear, such as "David Berger". After adding more participants, such as "John Stuckia" and "Rolf Hess", you can view all participants as shown in the following figure.
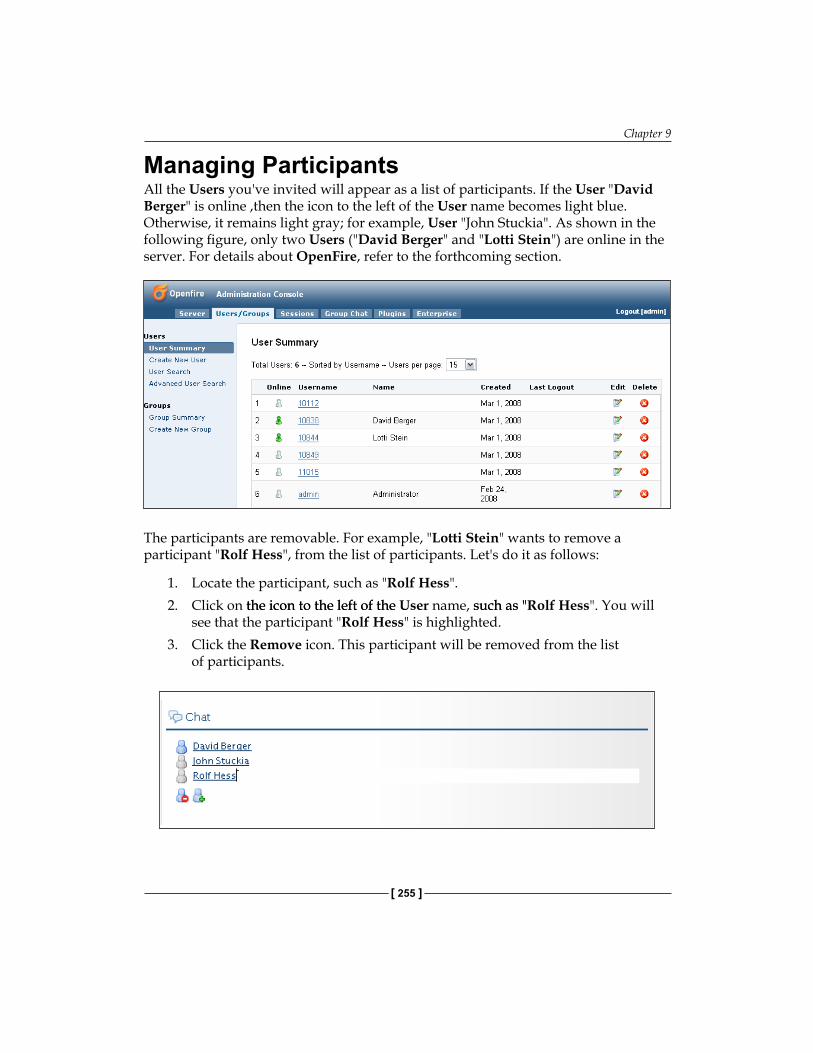
Chapter 9
[ 255 ]
Managing ParticipantsAll the Users you've invited will appear as a list of participants. If the User "David Berger" is online ,then the icon to the left of the User name becomes light blue. Otherwise, it remains light gray; for example, User "John Stuckia". As shown in the following figure, only two Users ("David Berger" and "Lotti Stein") are online in the server. For details about OpenFire, refer to the forthcoming section.
The participants are removable. For example, "Lotti Stein" wants to remove a participant "Rolf Hess", from the list of participants. Let's do it as follows:
1. Locate the participant, such as "Rolf Hess".2. Click on the icon to the left of thethe icon to the left of the User name, such as " such as "Rolf Hess". You will
see that the participant "Rolf Hess" is highlighted.3. Click the Remove icon. This participant will be removed from the list
of participants.
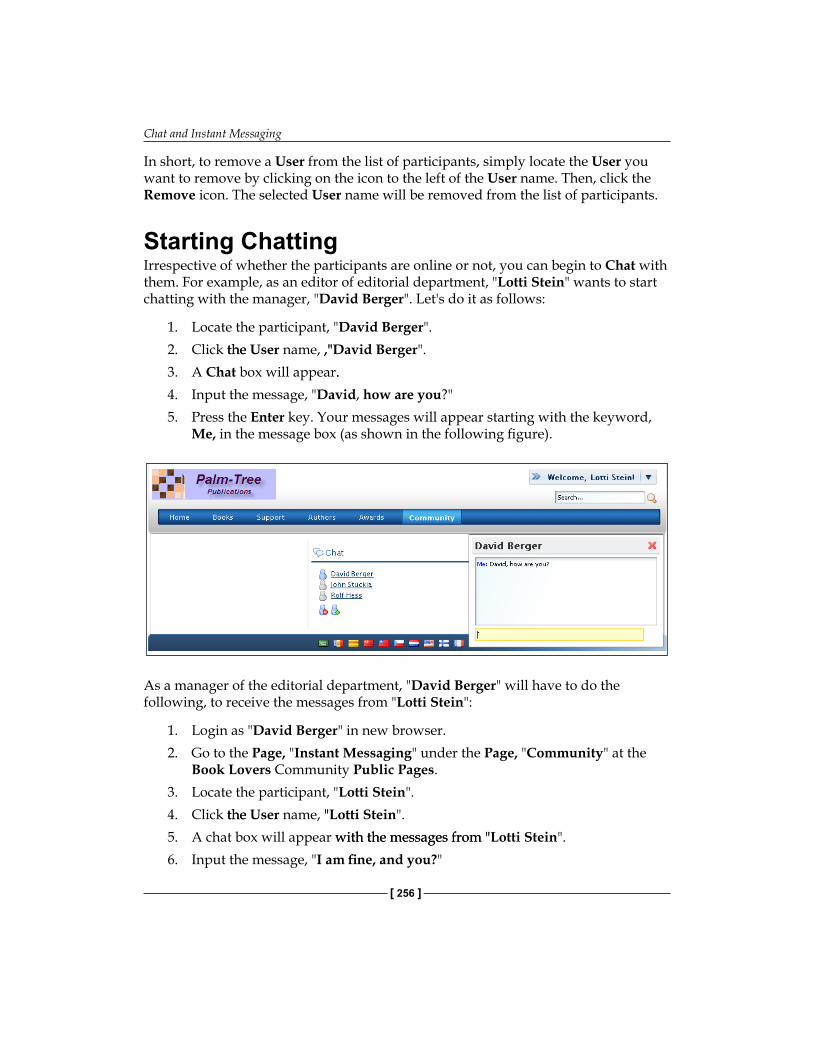
Chat and Instant Messaging
[ 256 ]
In short, to remove a User from the list of participants, simply locate the User you want to remove by clicking on the icon to the left of the User name. Then, click the Remove icon. The selected User name will be removed from the list of participants.
Starting ChattingIrrespective of whether the participants are online or not, you can begin to Chat with them. For example, as an editor of editorial department, "Lotti Stein" wants to start chatting with the manager, "David Berger". Let's do it as follows:
1. Locate the participant, "David Berger".2. Click thethe User name, ," ,"David Berger". 3. A Chat box will appear..4. Input the message, "David, how are you?"5. Press the Enter key. Your messages will appear starting with the keyword,
Me, in the message box (as shown in the following figure).
As a manager of the editorial department, "David Berger" will have to do the following, to receive the messages from "Lotti Stein":
1. Login as "David Berger" in new browser.2. Go to the Page, "Instant Messaging" under the Page, "Community" at the
Book Lovers Community Public Pages. 3. Locate the participant, "Lotti Stein".4. Click thethe User name, " "Lotti Stein". 5. A chat box will appear with the messages from " with the messages from "Lotti Stein".6. Input the message, "I am fine, and you?"
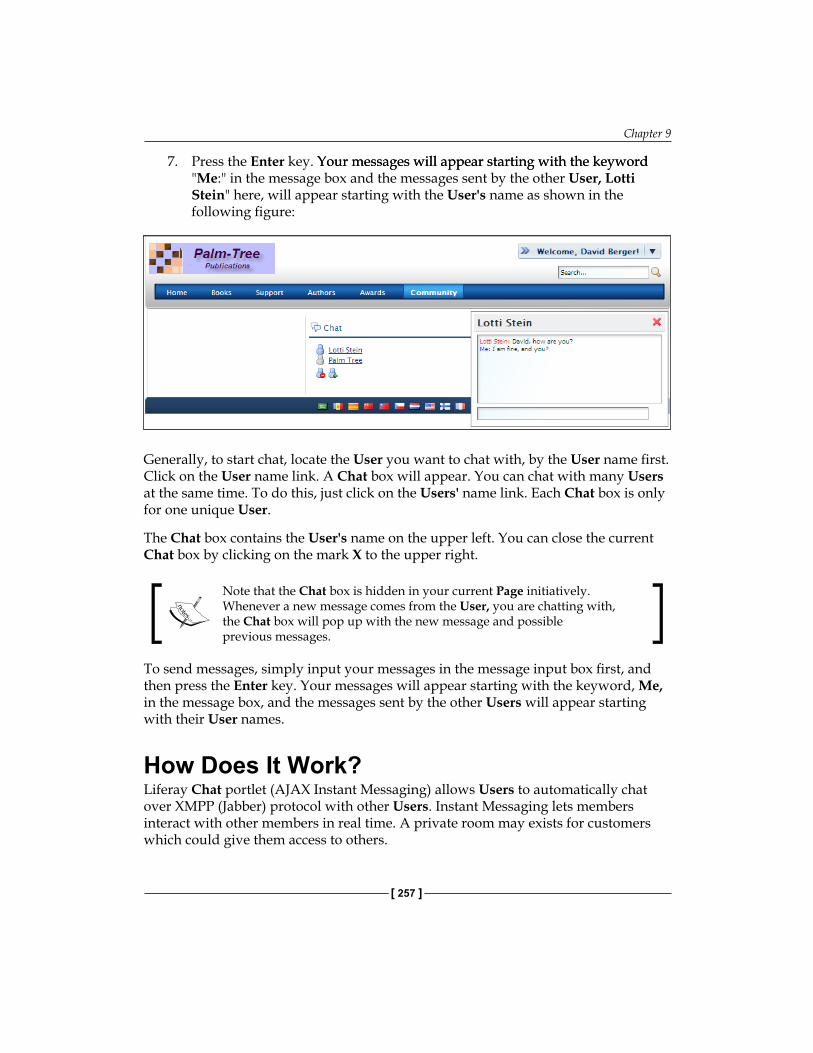
Chapter 9
[ 257 ]
7. Press the Enter key. Your messages will appear starting with the keywordYour messages will appear starting with the keyword "Me:" in the message box and the messages sent by the other User, Lotti Stein" here, will appear starting with the User's name as shown in the following figure:
Generally, to start chat, locate the User you want to chat with, by the User name first. Click on the User name link. A Chat box will appear. You can chat with many Users at the same time. To do this, just click on the Users' name link. Each Chat box is only for one unique User.
The Chat box contains the User's name on the upper left. You can close the current Chat box by clicking on the mark X to the upper right.
Note that the Chat box is hidden in your current Page initiatively. Whenever a new message comes from the User, you are chatting with, the Chat box will pop up with the new message and possible previous messages.
To send messages, simply input your messages in the message input box first, and then press the Enter key. Your messages will appear starting with the keyword, Me, in the message box, and the messages sent by the other Users will appear starting with their User names.
How Does It Work?Liferay Chat portlet (AJAX Instant Messaging) allows Users to automatically chat over XMPP (Jabber) protocol with other Users. Instant Messaging lets members interact with other members in real time. A private room may exists for customers which could give them access to others.
Chat and Instant Messaging
[ 258 ]
Liferay Chat portlet integrates with a Jabber server, that is, OpenFire. This session will introduce Instant Messaging, AJAX, and Jabber (OpenFire).
OpenFire (previously known as Wildfire Server) is a real-time collaboration (RTC) server, adopted open protocol for instant messaging, XMPP (also called Jabber). URL: http://www.jivesoftware.com/products/openfire/.
Use Instant MessagingInstant messaging (IM) acts as a form of real-time communication among Users, based on typed text. It allows easy collaboration. In contrast to email, the participants know whether the peer is available. Conversations by instant messaging can be saved for later reference.
One of the Instant Messaging protocols is Extensible Messaging and Presence Protocol (XMPP).
XMPP is an open, XML-inspired protocol for near-real-time, extensible instant messaging (IM) and presence information. It is the core protocol of the Jabber Instant Messaging and Presence technology. URL: http://www.xmpp.org/.
On the one hand, XMPP is based on open standards, different from other instant messaging protocols. Similar to email, XMPP is an open system where a User having a domain name and a suitable Internet connection can run a Jabber server, and talk to others on other servers.
On the other hand, another useful feature of the XMPP system is, transports, also called gateways. Through this, Users can access networks using other protocols. These protocols can be other instant messaging protocols, such as SMS or Email. The case is different from multi-protocol clients, as Users can access XMPP server at the server level. That is, it communicates with other servers through gateway services, which are running on a remote server.
Another interesting feature of XMPP is the HTTP binding behind restricted firewalls.
For instance, Community A User wants to chat with Community B User. Community A User and Community B User have accounts on the Jabber Server and the Third Part Server respectively. When Community A User types in and sends his/her message, a sequence of events is set in action, as shown in the following figure:
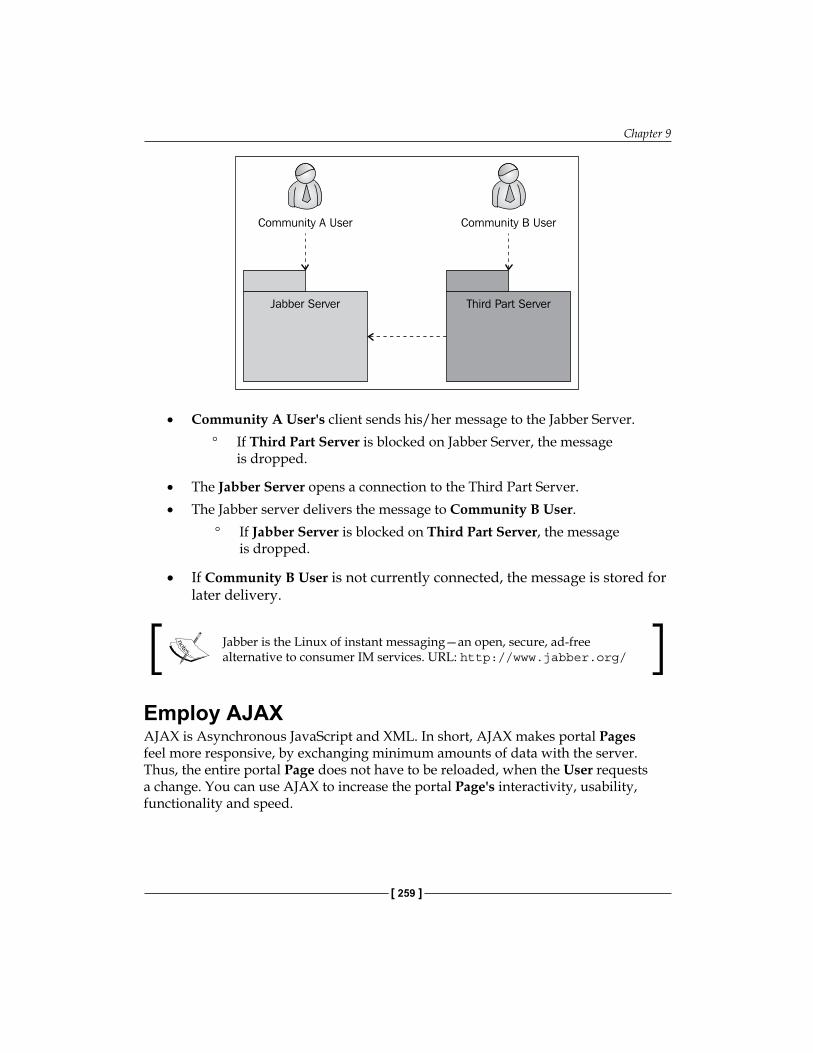
Chapter 9
[ 259 ]
Community A User's client sends his/her message to the Jabber Server. If Third Part Server is blocked on Jabber Server, the message is dropped.
The Jabber Server opens a connection to the Third Part Server.The Jabber server delivers the message to Community B User.
If Jabber Server is blocked on Third Part Server, the message is dropped.
If Community B User is not currently connected, the message is stored for later delivery.
Jabber is the Linux of instant messaging—an open, secure, ad-free alternative to consumer IM services. URL: http://www.jabber.org/
Employ AJAXAJAX is Asynchronous JavaScript and XML. In short, AJAX makes portal Pages feel more responsive, by exchanging minimum amounts of data with the server. Thus, the entire portal Page does not have to be reloaded, when the User requests a change. You can use AJAX to increase the portal Page's interactivity, usability, functionality and speed.
•
°
•
•
°
•
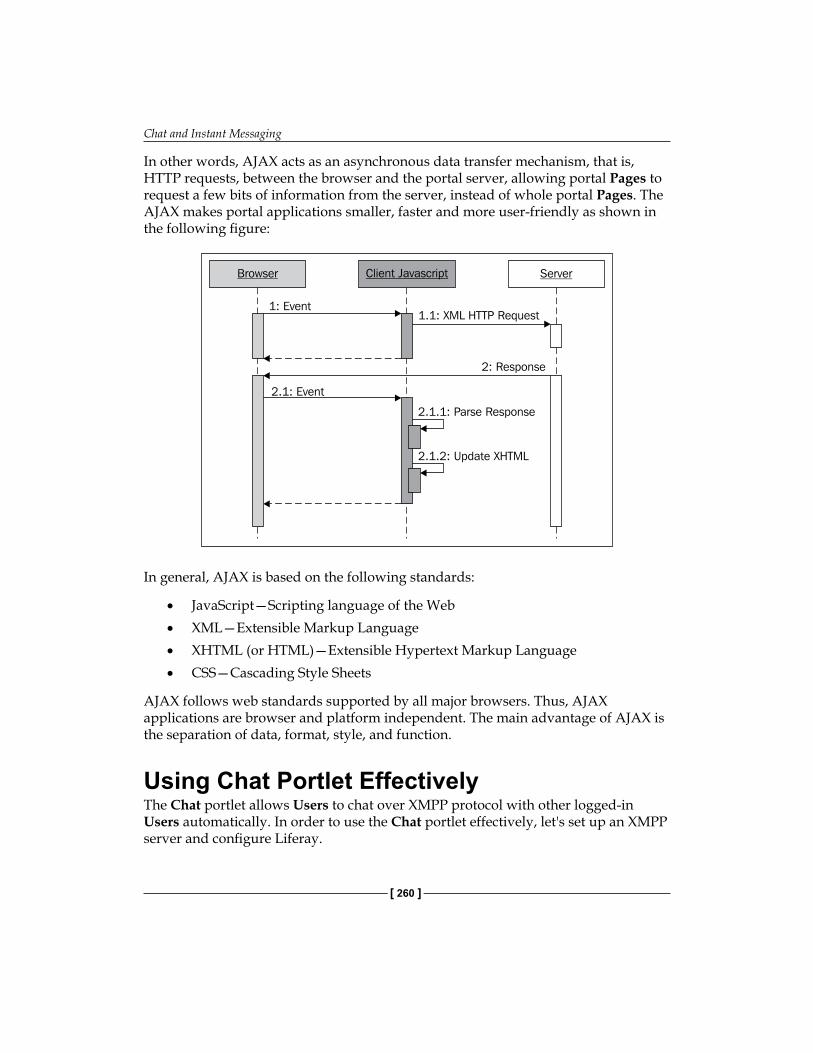
Chat and Instant Messaging
[ 260 ]
In other words, AJAX acts as an asynchronous data transfer mechanism, that is, HTTP requests, between the browser and the portal server, allowing portal Pages to request a few bits of information from the server, instead of whole portal Pages. The AJAX makes portal applications smaller, faster and more user-friendly as shown in the following figure:
In general, AJAX is based on the following standards:
JavaScript—Scripting language of the Web XML—Extensible Markup LanguageXHTML (or HTML)—Extensible Hypertext Markup LanguageCSS—Cascading Style Sheets
AJAX follows web standards supported by all major browsers. Thus, AJAX applications are browser and platform independent. The main advantage of AJAX is the separation of data, format, style, and function.
Using Chat Portlet EffectivelyThe Chat portlet allows Users to chat over XMPP protocol with other logged-in Users automatically. In order to use the Chat portlet effectively, let's set up an XMPP server and configure Liferay.
•
•
•
•

Chapter 9
[ 261 ]
Set up XMPP ServerFirst, we have to set up a XMPP (Jabber) server. Suppose that we use OpenFire as an XMPP (Jabber) server. Here are the steps to set up OpenFire as follows:
1. Create a folder, and name it OpenFire.2. Download the OpenFire.3. Extract the file to the OpenFire folder.4. Open the OpenFire folder and furthermore, bin.5. Click on openfire_x_x_x.exe or unzip openfire_x_x_x.tar.gz.6. Click Launch Admin.7. Proceed with configuring OpenFire based on your requirements, as shown in
the following figure.
Configure LiferayThen, you need to configure the XMPP server (such as OpenFire) with Liferay. You can simply open portal-ext.properties at $LIFERAY_ROOT/webapps/Root/WEB-INF/classes.
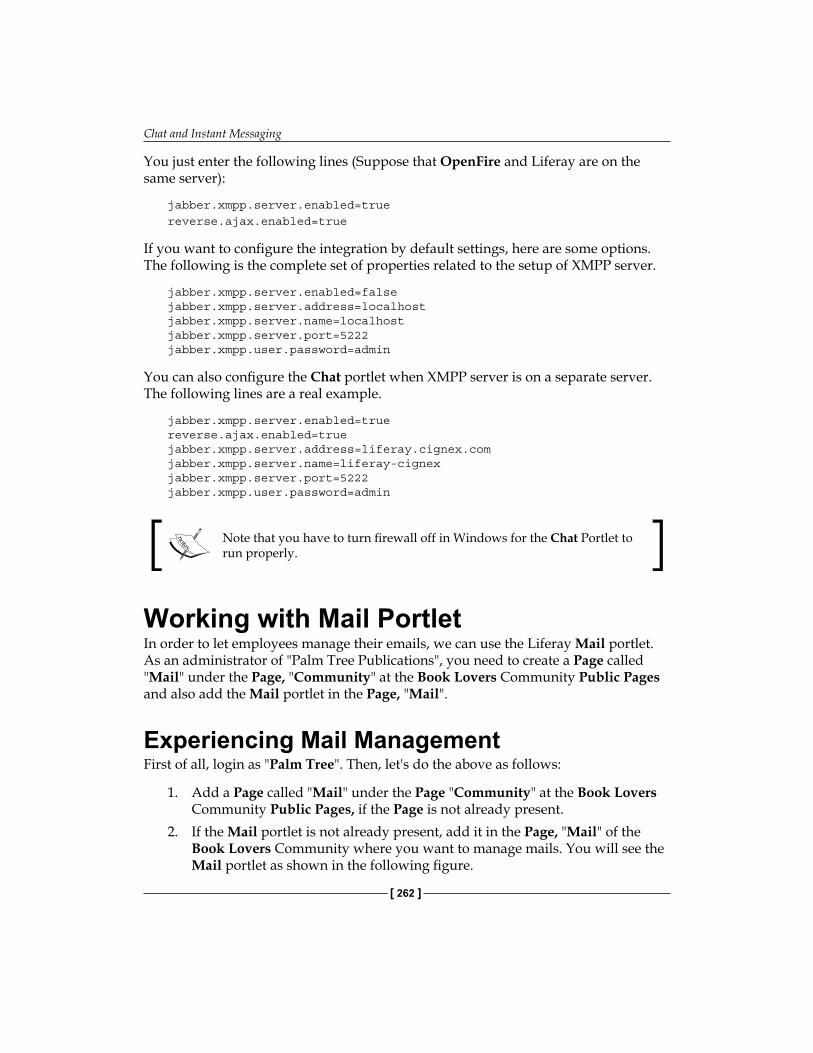
Chat and Instant Messaging
[ 262 ]
You just enter the following lines (Suppose that OpenFire and Liferay are on the same server):
jabber.xmpp.server.enabled=truereverse.ajax.enabled=true
If you want to configure the integration by default settings, here are some options. The following is the complete set of properties related to the setup of XMPP server.
jabber.xmpp.server.enabled=falsejabber.xmpp.server.address=localhostjabber.xmpp.server.name=localhostjabber.xmpp.server.port=5222jabber.xmpp.user.password=admin
You can also configure the Chat portlet when XMPP server is on a separate server. The following lines are a real example.
jabber.xmpp.server.enabled=truereverse.ajax.enabled=truejabber.xmpp.server.address=liferay.cignex.comjabber.xmpp.server.name=liferay-cignexjabber.xmpp.server.port=5222jabber.xmpp.user.password=admin
Note that you have to turn firewall off in Windows for the Chat Portlet to run properly.
Working with Mail PortletIn order to let employees manage their emails, we can use the Liferay Mail portlet. As an administrator of "Palm Tree Publications", you need to create a Page called "Mail" under the Page, "Community" at the Book Lovers Community Public Pages and also add the Mail portlet in the Page, "Mail".
Experiencing Mail ManagementFirst of all, login as "Palm Tree". Then, let's do the above as follows:
1. Add a Page called "Mail" under the Page "Community" at the Book Lovers Community Public Pages, if the Page is not already present.
2. If the Mail portlet is not already present, add it in the Page, "Mail" of the Book Lovers Community where you want to manage mails. You will see the Mail portlet as shown in the following figure.
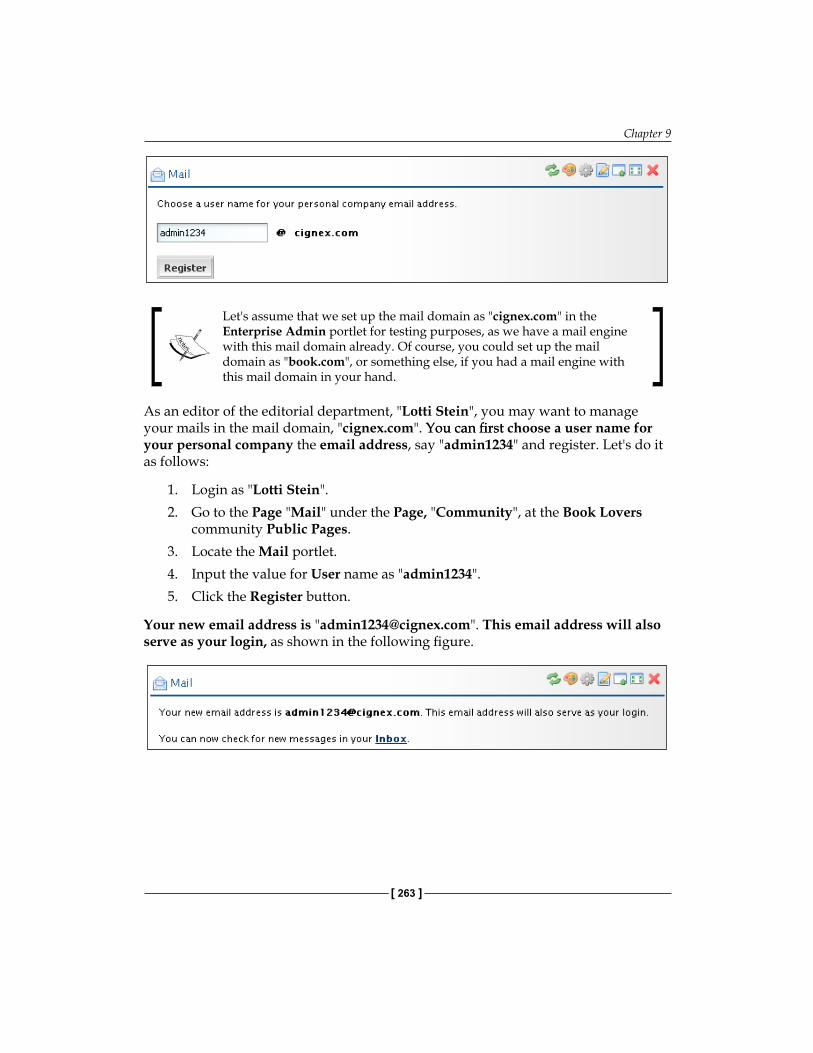
Chapter 9
[ 263 ]
Let's assume that we set up the mail domain as "cignex.com" in the Enterprise Admin portlet for testing purposes, as we have a mail engine with this mail domain already. Of course, you could set up the mail domain as "book.com", or something else, if you had a mail engine with this mail domain in your hand.
As an editor of the editorial department, "Lotti Stein", you may want to manage your mails in the mail domain, "cignex.com". You can firstYou can first choose a user name for your personal company the email address, say "admin1234" and register. Let's do it as follows:
1. Login as "Lotti Stein".2. Go to the Page "Mail" under the Page, "Community", at the Book Lovers
community Public Pages.3. Locate the Mail portlet.4. Input the value for User name as "admin1234". 5. Click the Register button.
Your new email address is "[email protected]". This email address will also serve as your login, as shown in the following figure.
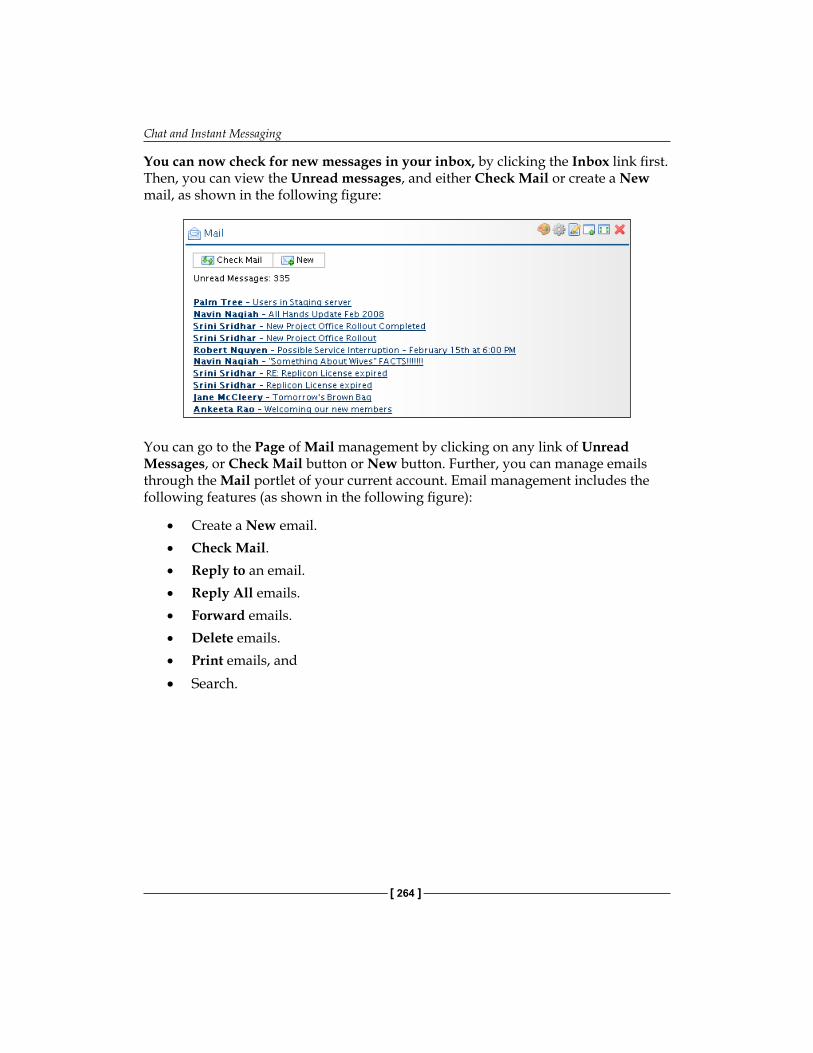
Chat and Instant Messaging
[ 264 ]
You can now check for new messages in your inbox, by clicking the Inbox link first. Then, you can view the Unread messages, and either Check Mail or create a New mail, as shown in the following figure:
You can go to the Page of Mail management by clicking on any link of Unread Messages, or Check Mail button or New button. Further, you can manage emails through the Mail portlet of your current account. Email management includes the following features (as shown in the following figure):
Create a New email.Check Mail. Reply to an email.Reply All emails.Forward emails.Delete emails.Print emails, and Search.
•
•
•
•
•
•
•
•
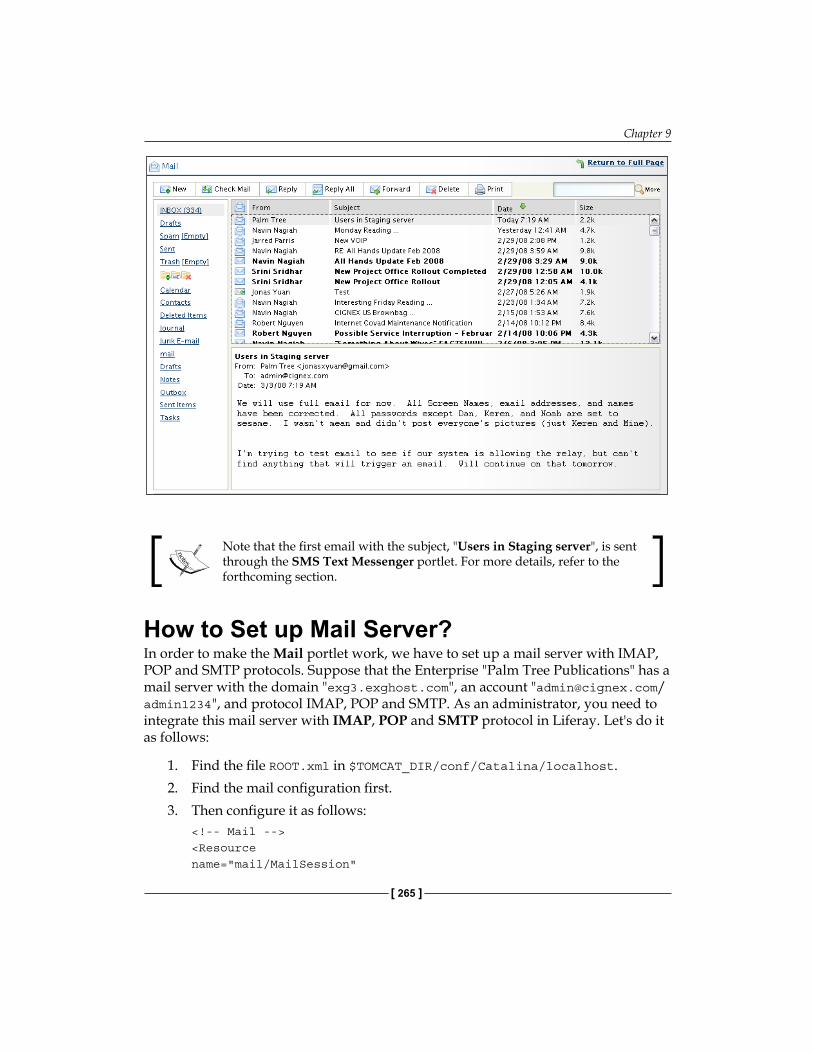
Chapter 9
[ 265 ]
Note that the first email with the subject, "Users in Staging server", is sent through the SMS Text Messenger portlet. For more details, refer to the forthcoming section.
How to Set up Mail Server?In order to make the Mail portlet work, we have to set up a mail server with IMAP, POP and SMTP protocols. Suppose that the Enterprise "Palm Tree Publications" has a mail server with the domain "exg3.exghost.com", an account "[email protected]/admin1234", and protocol IMAP, POP and SMTP. As an administrator, you need to integrate this mail server with IMAP, POP and SMTP protocol in Liferay. Let's do it as follows:
1. Find the file ROOT.xml in $TOMCAT_DIR/conf/Catalina/localhost.2. Find the mail configuration first. 3. Then configure it as follows: <!-- Mail --> <Resource name="mail/MailSession"
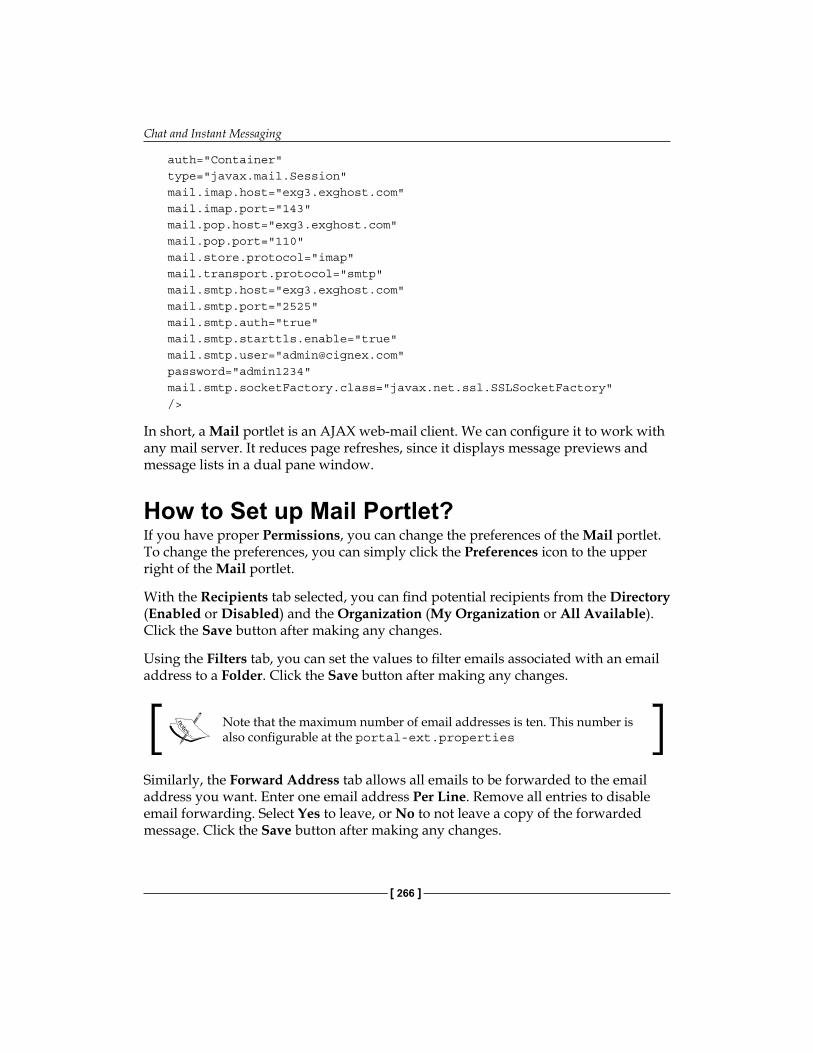
Chat and Instant Messaging
[ 266 ]
auth="Container"type="javax.mail.Session"mail.imap.host="exg3.exghost.com"mail.imap.port="143"mail.pop.host="exg3.exghost.com"mail.pop.port="110"mail.store.protocol="imap"mail.transport.protocol="smtp"mail.smtp.host="exg3.exghost.com"mail.smtp.port="2525"mail.smtp.auth="true"mail.smtp.starttls.enable="true"mail.smtp.user="[email protected]"password="admin1234"mail.smtp.socketFactory.class="javax.net.ssl.SSLSocketFactory"/>
In short, a Mail portlet is an AJAX web-mail client. We can configure it to work with any mail server. It reduces page refreshes, since it displays message previews and message lists in a dual pane window.
How to Set up Mail Portlet?If you have proper Permissions, you can change the preferences of the Mail portlet. To change the preferences, you can simply click the Preferences icon to the upper right of the Mail portlet.
With the Recipients tab selected, you can find potential recipients from the Directory (Enabled or Disabled) and the Organization (My Organization or All Available). Click the Save button after making any changes.
Using the Filters tab, you can set the values to filter emails associated with an email address to a Folder. Click the Save button after making any changes.
Note that the maximum number of email addresses is ten. This number is also configurable at the portal-ext.properties
Similarly, the Forward Address tab allows all emails to be forwarded to the email address you want. Enter one email address Per Line. Remove all entries to disable email forwarding. Select Yes to leave, or No to not leave a copy of the forwarded message. Click the Save button after making any changes.
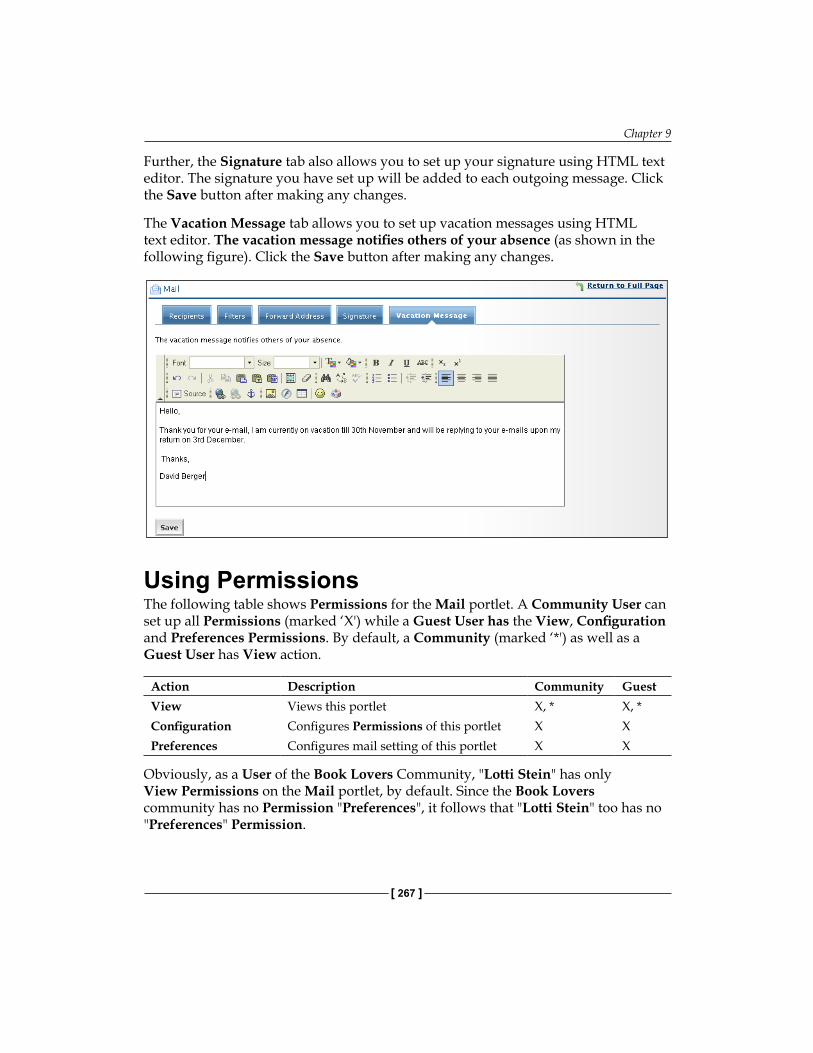
Chapter 9
[ 267 ]
Further, the Signature tab also allows you to set up your signature using HTML text editor. The signature you have set up will be added to each outgoing message. Click the Save button after making any changes.
The Vacation Message tab allows you to set up vacation messages using HTML text editor. The vacation message notifies others of your absence (as shown in the following figure). Click the Save button after making any changes.
Using PermissionsThe following table shows Permissions for the Mail portlet. A Community User can set up all Permissions (marked ‘X') while a Guest User has the View, Configuration and Preferences Permissions. By default, a Community (marked ‘*') as well as a Guest User has View action.
Action Description Community GuestView Views this portlet X, * X, *Configuration Configures Permissions of this portlet X XPreferences Configures mail setting of this portlet X X
Obviously, as a User of the Book Lovers Community, "Lotti Stein" has only View Permissions on the Mail portlet, by default. Since the Book Lovers community has no Permission "Preferences", it follows that "Lotti Stein" too has no "Preferences" Permission.
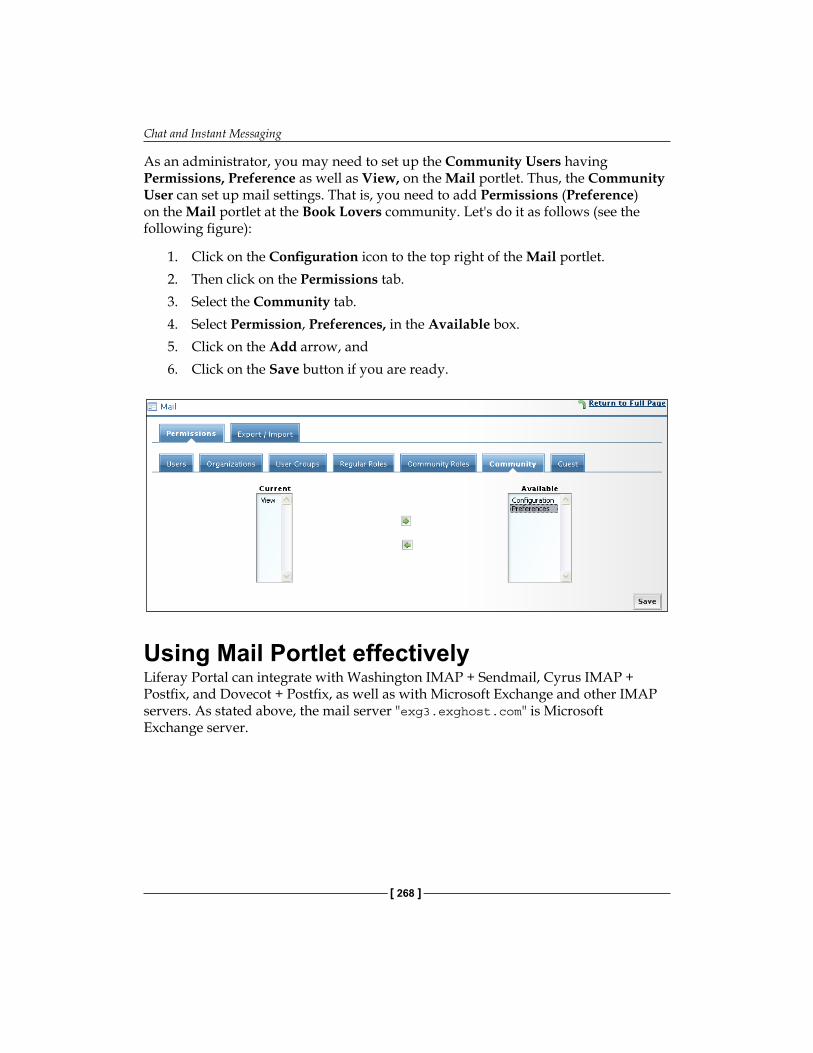
Chat and Instant Messaging
[ 268 ]
As an administrator, you may need to set up the Community Users having Permissions, Preference as well as View, on the Mail portlet. Thus, the Community User can set up mail settings. That is, you need to add Permissions (Preference) on the Mail portlet at the Book Lovers community. Let's do it as follows (see the following figure):
1. Click on the Configuration icon to the top right of the Mail portlet.2. Then click on the Permissions tab.3. Select the Community tab.4. Select Permission, Preferences, in the Available box.5. Click on the Add arrow, and 6. Click on the Save button if you are ready.
Using Mail Portlet effectivelyLiferay Portal can integrate with Washington IMAP + Sendmail, Cyrus IMAP + Postfix, and Dovecot + Postfix, as well as with Microsoft Exchange and other IMAP servers. As stated above, the mail server "exg3.exghost.com" is Microsoft Exchange server.
Chapter 9
[ 269 ]
You can access your email through an IMAP server. If access is on IMAP, the portal does not have to know where to persist the mail.
IMAP stands for Internet Message Access Protocol. URL: http://www.imap.org/.
One of the popular protocols used for email is IMAP, an application layer Internet protocol. IMAP operates on port 143 that allows a local client to access email on a remote server.
IMAP supports both connected and disconnected modes of operation. Until the User explicitly deletes them, email IMAP clients generally leave messages on the server. Moreover, IMAP offers access to the mail store.
IMAP has a lot of advantages. Here, we have listed just some of them:
Use connected and disconnected modes of operation.Users can connect to the same mailbox simultaneously.Users have access to MIME message parts and partial fetch.Has message state information.Supports multiple mailboxes on the server.Provides ability for search on the server-side.Has a built-in extension mechanism.
Working with SMS Text MessengerIn order to let employees send text message to others, anytime, we can usesend text message to others, anytime, we can use, we can use the Liferay SMS Text Messenger portlet. As an administrator of "Palm Tree Publications", you need to create a Page called "SMS" under the Page "Community" at the Book Lovers Community and add the SMS Text Messenger portlet in the Page, "SMS"..
•
•
•
•
•
•
•
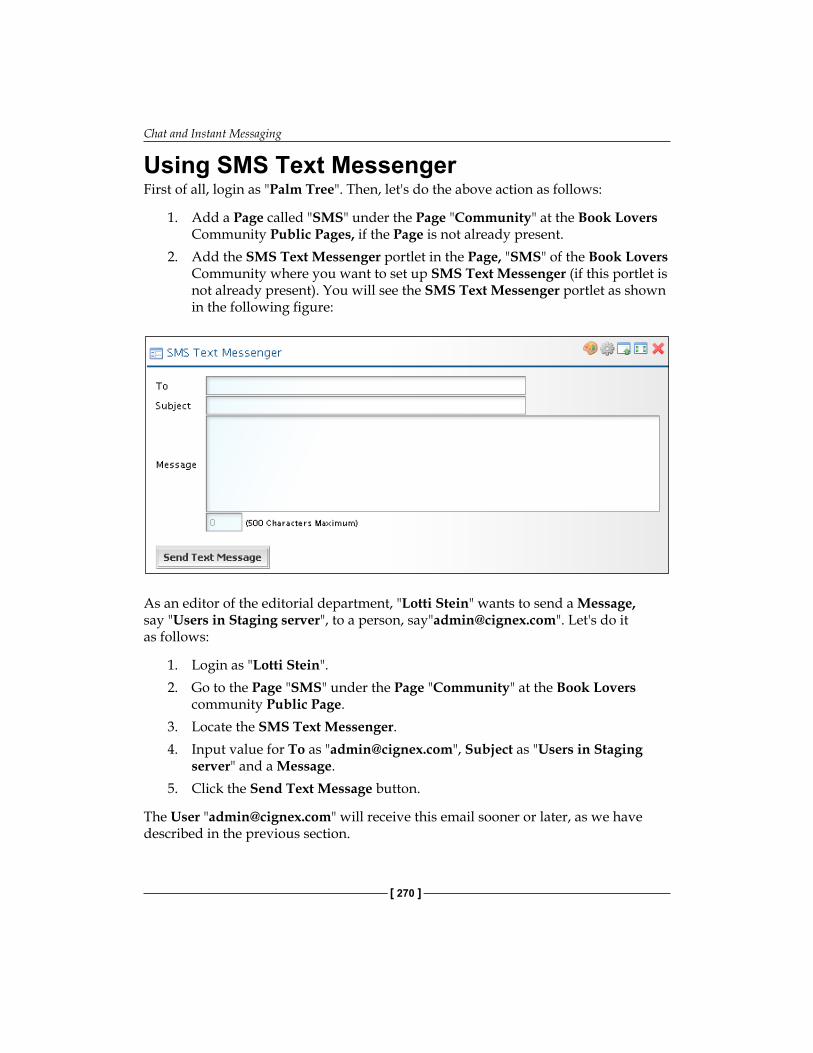
Chat and Instant Messaging
[ 270 ]
Using SMS Text MessengerFirst of all, login as "Palm Tree". Then, let's do the above action as follows:
1. Add a Page called "SMS" under the Page "Community" at the Book Lovers Community Public Pages, if the Page is not already present.
2. Add the SMS Text Messenger portlet in the Page, "SMS" of the Book Lovers Community where you want to set up SMS Text Messenger (if this portlet is not already present). You will see the SMS Text Messenger portlet as shown in the following figure:
As an editor of the editorial department, "Lotti Stein" wants to send a Message, say "Users in Staging server", to a person, say"[email protected]". Let's do it as follows:
1. Login as "Lotti Stein".2. Go to the Page "SMS" under the Page "Community" at the Book Lovers
community Public Page.3. Locate the SMS Text Messenger.4. Input value for To as "[email protected]", Subject as "Users in Staging
server" and a Message. 5. Click the Send Text Message button.
The User "[email protected]" will receive this email sooner or later, as we have described in the previous section.
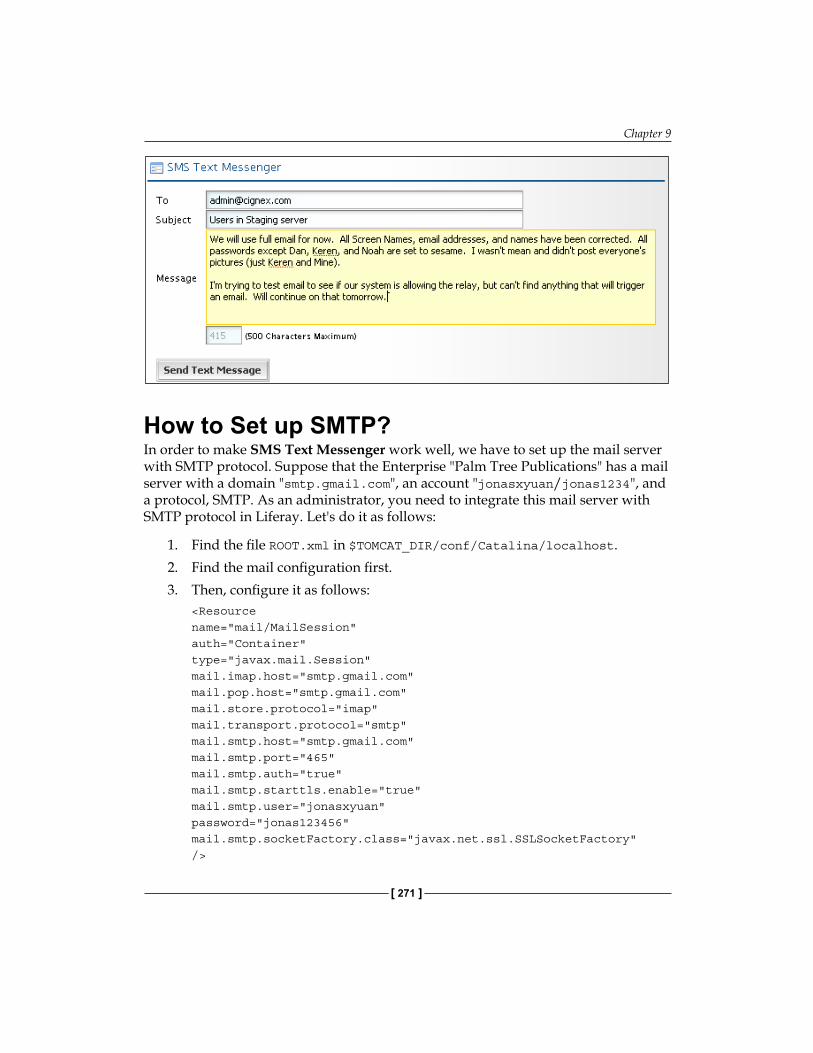
Chapter 9
[ 271 ]
How to Set up SMTP?In order to make SMS Text Messenger work well, we have to set up the mail server with SMTP protocol. Suppose that the Enterprise "Palm Tree Publications" has a mail server with a domain "smtp.gmail.com", an account "jonasxyuan/jonas1234", and a protocol, SMTP. As an administrator, you need to integrate this mail server with SMTP protocol in Liferay. Let's do it as follows:
1. Find the file ROOT.xml in $TOMCAT_DIR/conf/Catalina/localhost.2. Find the mail configuration first. 3. Then, configure it as follows: <Resource name="mail/MailSession" auth="Container" type="javax.mail.Session" mail.imap.host="smtp.gmail.com" mail.pop.host="smtp.gmail.com" mail.store.protocol="imap" mail.transport.protocol="smtp" mail.smtp.host="smtp.gmail.com" mail.smtp.port="465" mail.smtp.auth="true" mail.smtp.starttls.enable="true" mail.smtp.user="jonasxyuan" password="jonas123456" mail.smtp.socketFactory.class="javax.net.ssl.SSLSocketFactory" />

Chat and Instant Messaging
[ 272 ]
In short, the SMS Text Messenger portlet allows you to send SMS text messages from your portal page anytime.
Using SMS EffectivelyThe Short Message Service (SMS), called text messaging, is used to send short messages to and from mobile phones. It provides a mechanism for the delivery of short text messages over mobile networks, in order to transmit messages to and from mobiles. The text message from the sender can be stored in a central short message center, which then forwards it to the recipient. If the recipient is not available, the short message is stored temporally and will be sent later. SMS provides return receipts. Thus, the sender gets a brief message notification if the short message is delivered to the recipient.
You may need to read the following part, if you are interested in the organization of network elements for supporting SMS. Otherwise, you can leave it for your future needs. The following figure shows a typical organization of network elements in a network supporting SMS (refer to more details at http://www.wirelessdevnet.com/channels/sms/features/sms.html).
The SMC (Short Message Center) stores and forwards messages, to and from the message station. The SME (Short Message Entity) receives and sends short messages.
The SMS GWMS (SMS gateway MSC), a gateway MSC, can receive short messages. After receiving the short message from the message center, GMSC employs the SS7 (Signaling System #7) network to interrogate the current position of the mobile station from the HLR (home location register).
Chapter 9
[ 273 ]
HLR, as a main database, holds information about the subscription profile of the mobile. It also maintains the routing information for the subscriber where the mobile is currently situated. The GMSC thus passes on the short message to the correct MSC.
MSC (Mobile Switching Center) switches connections between mobile stations.
A VLR (Visitor Location Register) communicates with each MSC and contains temporary information about the mobile. MSC switches the short message to the corresponding BSS (Base Station System), which transmits the short message to the mobile. The BSS is made up of transceivers, which send and receive information over the air interface, to and from the mobile station. The short message is passed over signaling channels, so that the recipient (for example, mobile) can receive this short piece of information, even if a data call or a voice call is going on.
SummaryThis chapter discussed how to add a participant for chatting, how to manage (view and delete) participants in the Chat portlet, how to start chatting, and how to set up the Chat portlet first. Then it discussed how to manage (check, delete, add, reply, forward, search) emails and also to set up the Mail portlet properly. Finally, it discussed how to manage the SMS Text Messenger portlet and send SMS text messages.

Help Desk/Customer SupportThe enterprise "Palm Tree Publications" may often provide help desk support to its customers via a toll-free number, website and/or e-mail. But in the intranetin the intranet website "book.com", of "Palm Tree Publications", it is required to provide help desk and customer support—an information and assistance resource that troubleshoots—an information and assistance resource that troubleshoots problems related to websites. Liferay packages facilities that will help "Palm Tree Publications" design, develop, deploy, and support the websites. It offers unbeatable out-of-the-box functionality with over 60 JSR-168 / JSR-286 compliant portlets. With these portlets, we can easily build help desk assistances and customer support information on the web site of "Palm Tree Publications".
This chapter mainly discusses how to use a set of portlets in order to provide an information and assistance resource that troubleshoots specific requirements. Furthermore, it also introduces us to multilingual support and the usage of WebDAV. Finally, it provides brief guidance on how to develop new portlets to deal with specific requirements, in order to provide help desk assistances and customer support information efficiently.
By the end of this chapter you will have learnt how to:
Use financial tools.Work with Google portlets.Employ religion tools.Use additional tools.Employ shopping portlets in the portal.Play with entertainment portlets in the website.Play with multiple languages.Use WebDAV. Develop your own portlets.
•
•
•
•
•
•
•
•
•
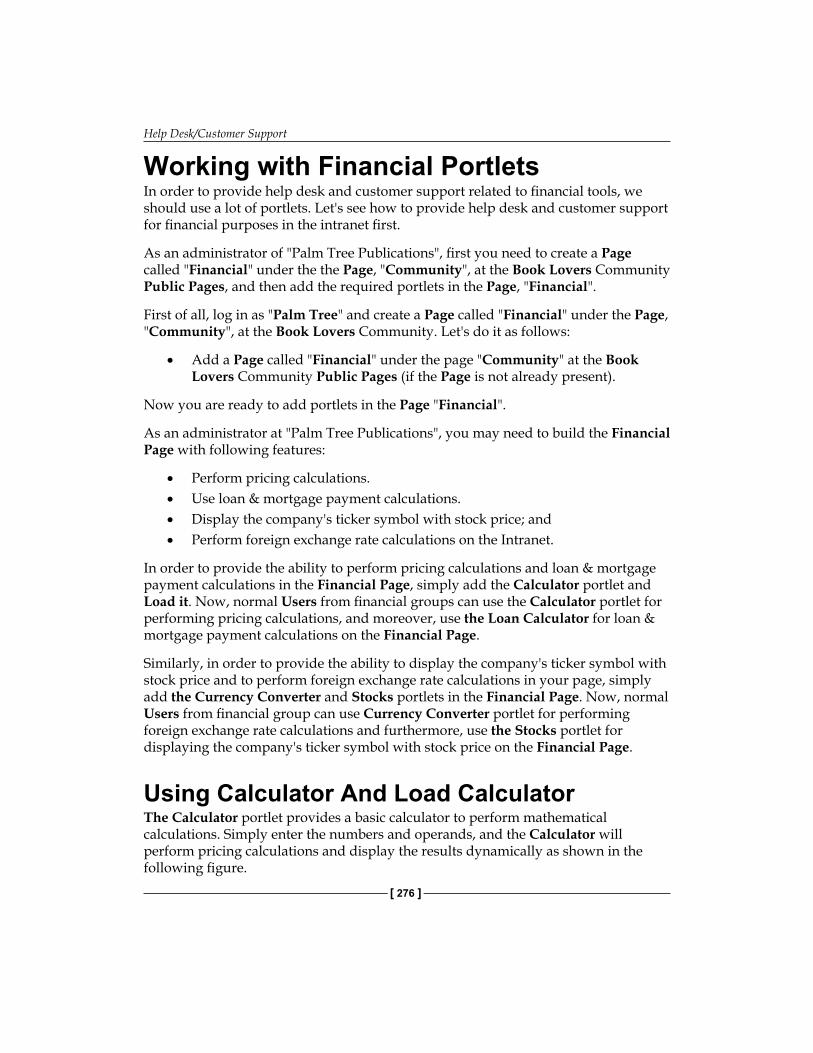
Help Desk/Customer Support
[ 276 ]
Working with Financial PortletsIn order to provide help desk and customer support related to financial tools, we should use a lot of portlets. Let's see how to provide help desk and customer support for financial purposes in the intranet first.
As an administrator of "Palm Tree Publications", first you need to create a Page called "Financial" under the the Page, "Community", at the Book Lovers Community Public Pages, and then add the required portlets in the Page, "Financial".
First of all, log in as "Palm Tree" and create a Page called "Financial" under the Page, "Community", at the Book Lovers Community. Let's do it as follows:
Add a Page called "Financial" under the page "Community" at the Book Lovers Community Public Pages (if the Page is not already present).
Now you are ready to add portlets in the Page "Financial".
As an administrator at "Palm Tree Publications", you may need to build the Financial Page with following features:
Perform pricing calculations.Use loan & mortgage payment calculations.Display the company's ticker symbol with stock price; and Perform foreign exchange rate calculations on the Intranet.
In order to provide the ability to perform pricing calculations and loan & mortgage payment calculations in the Financial Page, simply add the Calculator portlet and Load it. Now, normal Users from financial groups can use the Calculator portlet for performing pricing calculations, and moreover, use the Loan Calculator for loan & mortgage payment calculations on the Financial Page.
Similarly, in order to provide the ability to display the company's ticker symbol with stock price and to perform foreign exchange rate calculations in your page, simply add the Currency Converter and Stocks portlets in the Financial Page. Now, normal Users from financial group can use Currency Converter portlet for performing foreign exchange rate calculations and furthermore, use the Stocks portlet for displaying the company's ticker symbol with stock price on the Financial Page.
Using Calculator And Load CalculatorThe Calculator portlet provides a basic calculator to perform mathematical calculations. Simply enter the numbers and operands, and the Calculator will perform pricing calculations and display the results dynamically as shown in the following figure.
•
••••
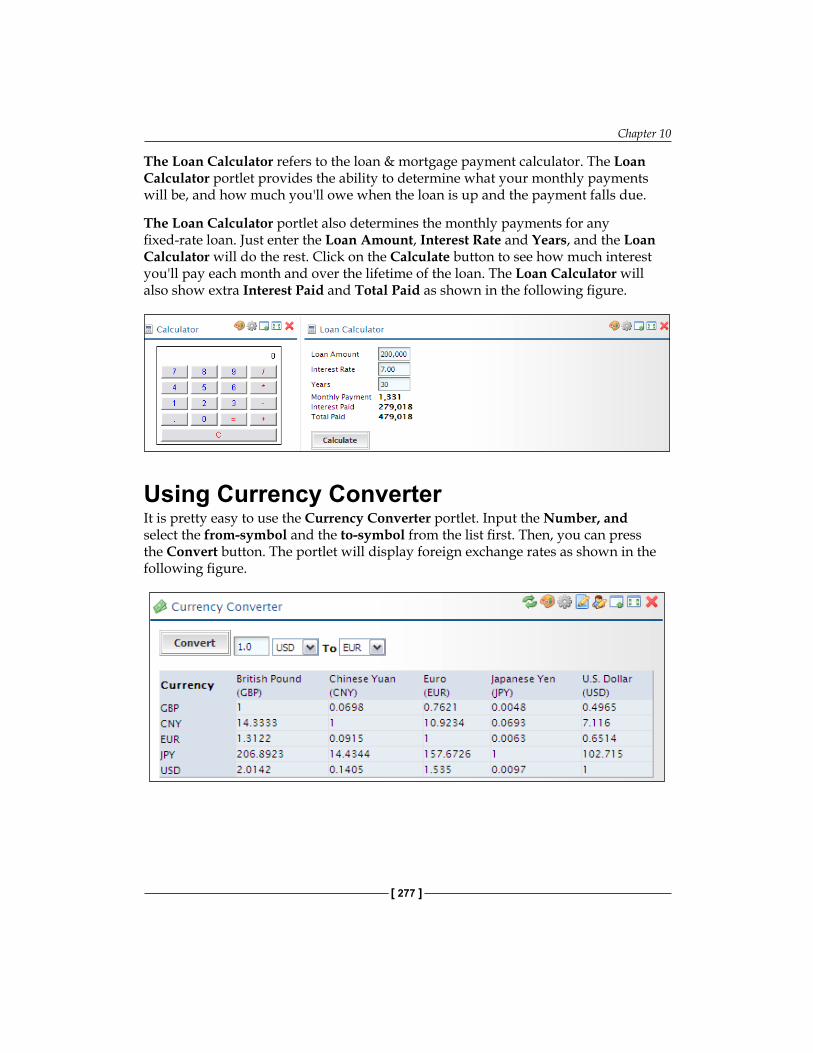
Chapter 10
[ 277 ]
The Loan Calculator refers to the loan & mortgage payment calculator. The Loan Calculator portlet provides the ability to determine what your monthly payments will be, and how much you'll owe when the loan is up and the payment falls due.
The Loan Calculator portlet also determines the monthly payments for any fixed-rate loan. Just enter the Loan Amount, Interest Rate and Years, and the Loan Calculator will do the rest. Click on the Calculate button to see how much interest you'll pay each month and over the lifetime of the loan. The Loan Calculator will also show extra Interest Paid and Total Paid as shown in the following figure.
Using Currency ConverterIt is pretty easy to use the Currency Converter portlet. Input the Number, and select the from-symbol and the to-symbol from the list first. Then, you can press the Convert button. The portlet will display foreign exchange rates as shown in the following figure.

Help Desk/Customer Support
[ 278 ]
You can also change current Currency by updating preferences, such as GBP, CNY, EUR, JPY and USD. Let's do it as follows:
1. Click the Preferences icon. There are two boxes for currencies. The Current box contains current currencies and the Available box contains available currencies which you may use.
2. You can change the order of currencies by selecting a currency such as "Euro" first, and then press the Move Up button to move up or press the Move Down button to move down.
3. You can remove a currency from the Current box. You simply select the currency such as "Japanese Yen" in the Current box, and then press the Remove button to the right.
4. Similarly, you can add a currency from the Available box to the Current box. You simply select the currency such as "Chinese Yuan" in the Available box, and then press the Add button to the left.
5. Click the Save button when you are ready as shown in the following figure.
The Currency Converter portlet allows you to perform foreign exchange rate calculations on the Intranet, using up-to-the-minute currency rates. More than 147 currencies are supported at present.
By default, Yahoo Financial is used as Service provider with the following URL access.
http://finance.yahoo.com/d/quotes.csv?s=symbols=X&f=sl1d1t1c1ohgv&e=.csv
An example of the symbol would be USD, GBP, EUR, JPY, CNY, and so on.
Chapter 10
[ 279 ]
Employing Stocks PortletThe Stocks portlet provides personalized stock quotes in the portal. It allows access to global market indices. You can select the companies and indices to monitor and their order of appearance in the portlet. You can also view price and volume charts.
For example, you can allow normal users to customize their Stock portlets with their own portfolio of Stocks as shown in the following figure:
You can also change default ticker symbols. Let's do it as follows:
1. Click the Preferences icon of the Stocks portlet. 2. Input all ticker symbols, separated by spaces as in "GOOG, YHOO". 3. Click the Save button when you are ready.
By default, Yahoo Financial is used as Service provider with the following URL access:
http://finance.yahoo.com/d/quotes.csv?s=symbol&f=sl1d1t1c1ohgv&e=.csv
An example of the symbol could be YHOO, GOOG, and so on.
You can view Stock information such as "GOOG". Let's do it as follows:
1. Input the Stock symbol such as "GOOG" first. 2. Then, click the Get Quote button.
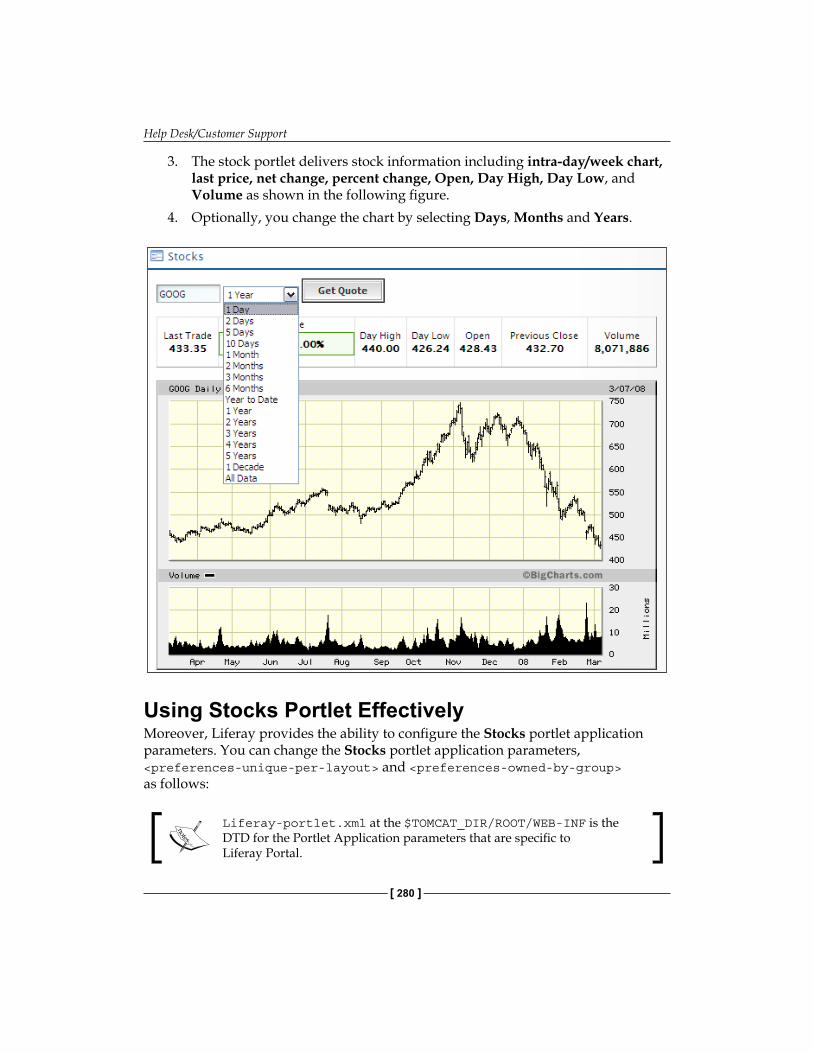
Help Desk/Customer Support
[ 280 ]
3. The stock portlet delivers stock information including intra-day/week chart, last price, net change, percent change, Open, Day High, Day Low, and Volume as shown in the following figure.
4. Optionally, you change the chart by selecting Days, Months and Years.
Using Stocks Portlet EffectivelyMoreover, Liferay provides the ability to configure the Stocks portlet application parameters. You can change the Stocks portlet application parameters, <preferences-unique-per-layout> and <preferences-owned-by-group> as follows:
Liferay-portlet.xml at the $TOMCAT_DIR/ROOT/WEB-INF is the DTD for the Portlet Application parameters that are specific to Liferay Portal.
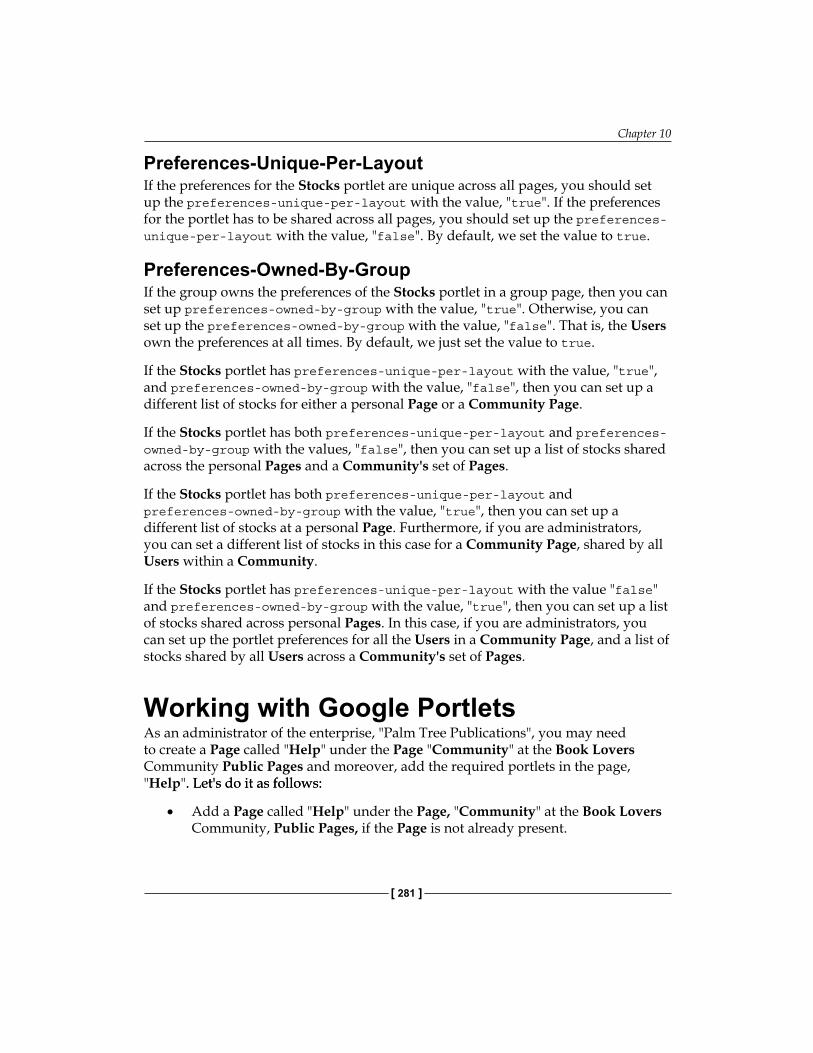
Chapter 10
[ 281 ]
Preferences-Unique-Per-LayoutIf the preferences for the Stocks portlet are unique across all pages, you should set up the preferences-unique-per-layout with the value, "true". If the preferences for the portlet has to be shared across all pages, you should set up the preferences-unique-per-layout with the value, "false". By default, we set the value to true.
Preferences-Owned-By-GroupIf the group owns the preferences of the Stocks portlet in a group page, then you can set up preferences-owned-by-group with the value, "true". Otherwise, you can set up the preferences-owned-by-group with the value, "false". That is, the Users own the preferences at all times. By default, we just set the value to true.
If the Stocks portlet has preferences-unique-per-layout with the value, "true", and preferences-owned-by-group with the value, "false", then you can set up a different list of stocks for either a personal Page or a Community Page.
If the Stocks portlet has both preferences-unique-per-layout and preferences-owned-by-group with the values, "false", then you can set up a list of stocks shared across the personal Pages and a Community's set of Pages.
If the Stocks portlet has both preferences-unique-per-layout and preferences-owned-by-group with the value, "true", then you can set up a different list of stocks at a personal Page. Furthermore, if you are administrators, you can set a different list of stocks in this case for a Community Page, shared by all Users within a Community.
If the Stocks portlet has preferences-unique-per-layout with the value "false" and preferences-owned-by-group with the value, "true", then you can set up a list of stocks shared across personal Pages. In this case, if you are administrators, you can set up the portlet preferences for all the Users in a Community Page, and a list of stocks shared by all Users across a Community's set of Pages.
Working with Google PortletsAs an administrator of the enterprise, "Palm Tree Publications", you may need to create a Page called "Help" under the Page "Community" at the Book Lovers Community Public Pages and moreover, add the required portlets in the page, "Help". Let's do it as follows:. Let's do it as follows:
Add a Page called "Help" under the Page, "Community" at the Book Lovers Community, Public Pages, if the Page is not already present.
•
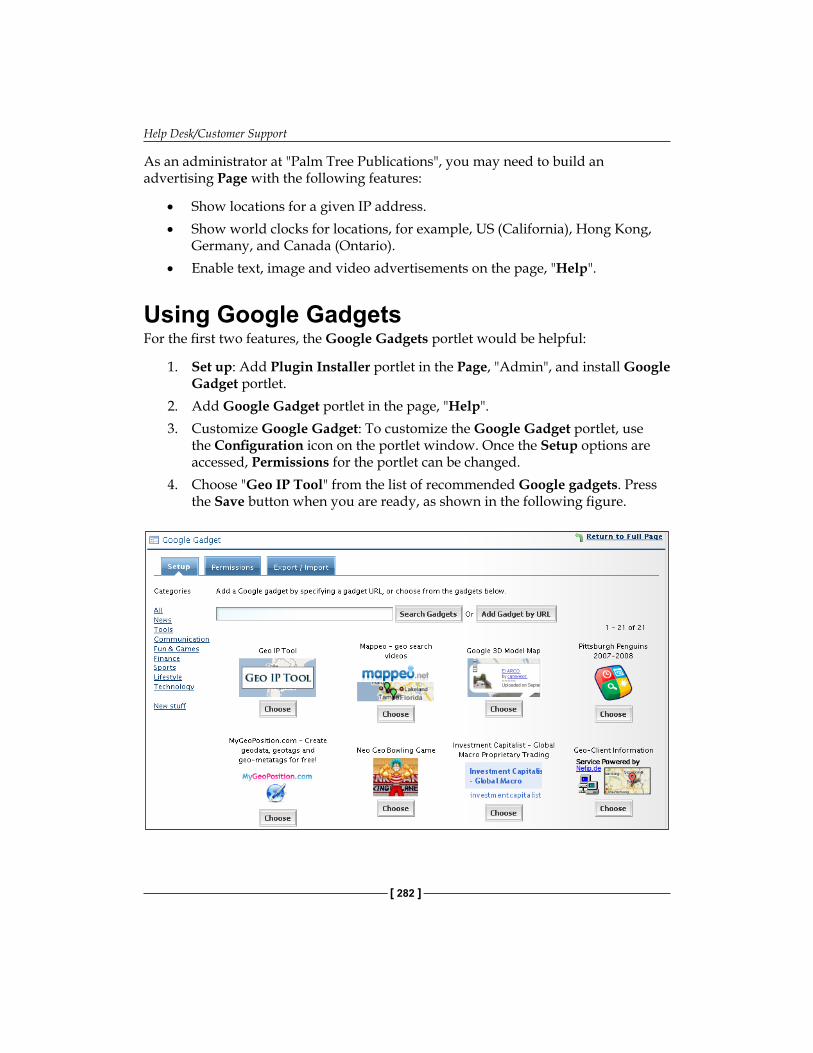
Help Desk/Customer Support
[ 282 ]
As an administrator at "Palm Tree Publications", you may need to build an advertising Page with the following features:
Show locations for a given IP address. Show world clocks for locations, for example, US (California), Hong Kong, Germany, and Canada (Ontario).Enable text, image and video advertisements on the page, "Help".
Using Google GadgetsFor the first two features, the Google Gadgets portlet would be helpful:
1. Set up: Add Plugin Installer portlet in the Page, "Admin", and install Google Gadget portlet.
2. Add Google Gadget portlet in the page, "Help".3. Customize Google Gadget: To customize the Google Gadget portlet, use
the Configuration icon on the portlet window. Once the Setup options are accessed, Permissions for the portlet can be changed.
4. Choose "Geo IP Tool" from the list of recommended Google gadgets. Press the Save button when you are ready, as shown in the following figure.
•
•
•
Chapter 10
[ 283 ]
5. To create world clocks for the locations, US California, Hong Kong, Germany, and CA Ontario in the website, "Google Gadgets for Your Webpage", generate the code and copy it.
6. Choose "obtain the Google Gadget code directly and paste it below" and paste the code into the box as instructed.
7. Press the Save button when you are ready.
That's it! You got your custom Google gadget! Google Gadget portlet allows easy integration with Google Gadgets as shown in the following figure.
Gadget World Clock could be used for the intranet that displays multiple analog or digital clocks at the times in the selected time zones, or countries, or cities. You can synchronize the world clocks with the server to always display the correct time.
Google Gadgets act as mini-applications built using HTML, with JavaScript, Flash, or Silver-light for dynamic behaviors. URL: http://www.google.com/ig/directory?synd=open
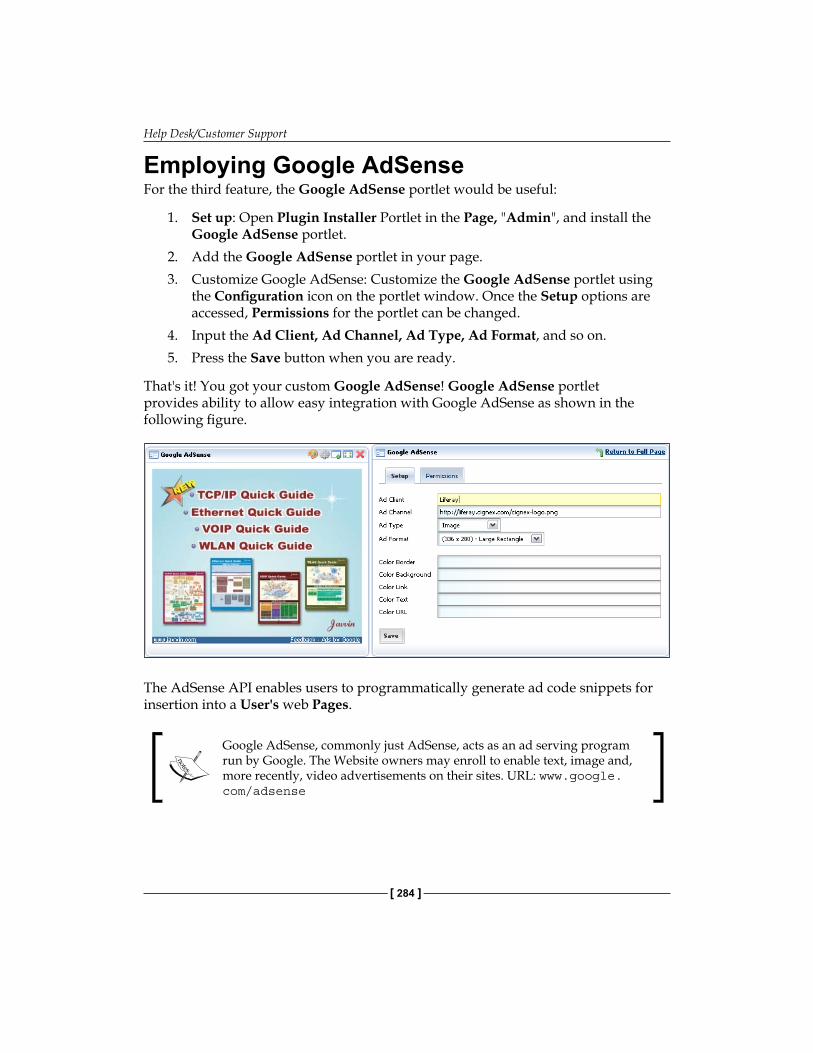
Help Desk/Customer Support
[ 284 ]
Employing Google AdSenseFor the third feature, the Google AdSense portlet would be useful:
1. Set up: Open Plugin Installer Portlet in the Page, "Admin", and install the Google AdSense portlet.
2. Add the Google AdSense portlet in your page.3. Customize Google AdSense: Customize the Google AdSense portlet using
the Configuration icon on the portlet window. Once the Setup options are accessed, Permissions for the portlet can be changed.
4. Input the Ad Client, Ad Channel, Ad Type, Ad Format, and so on. 5. Press the Save button when you are ready.
That's it! You got your custom Google AdSense! Google AdSense portlet provides ability to allow easy integration with Google AdSense as shown in the following figure.
The AdSense API enables users to programmatically generate ad code snippets for insertion into a User's web Pages.
Google AdSense, commonly just AdSense, acts as an ad serving program run by Google. The Website owners may enroll to enable text, image and, more recently, video advertisements on their sites. URL: www.google.com/adsense
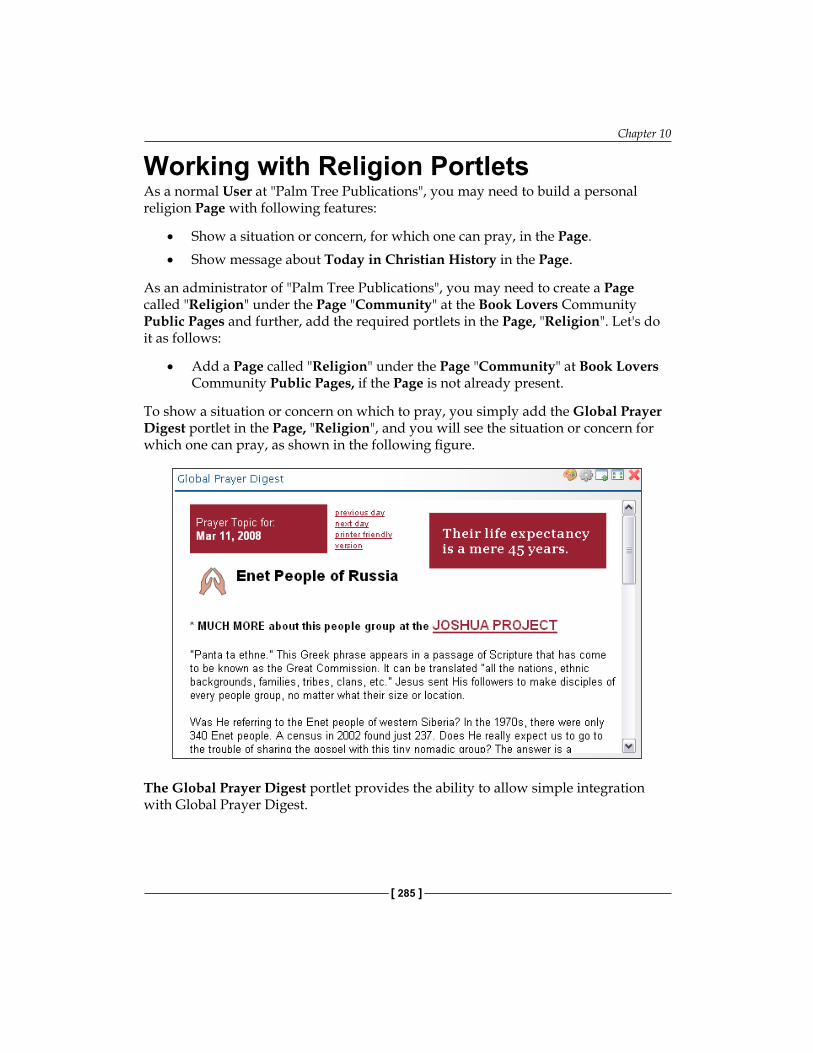
Chapter 10
[ 285 ]
Working with Religion PortletsAs a normal User at "Palm Tree Publications", you may need to build a personal religion Page with following features:
Show a situation or concern, for which one can pray, in the Page.Show message about Today in Christian History in the Page.
As an administrator of "Palm Tree Publications", you may need to create a Page called "Religion" under the Page "Community" at the Book Lovers Community Public Pages and further, add the required portlets in the Page, "Religion". Let's do it as follows:
Add a Page called "Religion" under the Page "Community" at Book Lovers Community Public Pages, if the Page is not already present.
To show a situation or concern on which to pray, you simply add the Global Prayer Digest portlet in the Page, "Religion", and you will see the situation or concern for which one can pray, as shown in the following figure.
The Global Prayer Digest portlet provides the ability to allow simple integration with Global Prayer Digest.
•
•
•
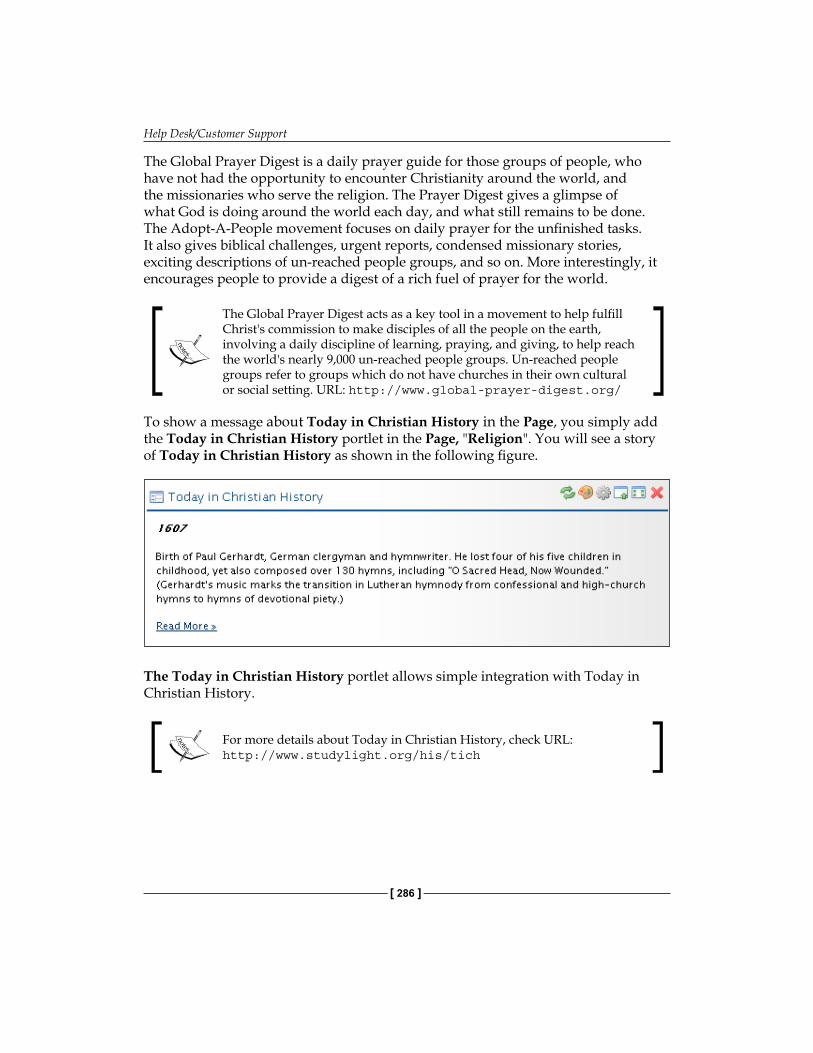
Help Desk/Customer Support
[ 286 ]
The Global Prayer Digest is a daily prayer guide for those groups of people, who have not had the opportunity to encounter Christianity around the world, and the missionaries who serve the religion. The Prayer Digest gives a glimpse of what God is doing around the world each day, and what still remains to be done. The Adopt-A-People movement focuses on daily prayer for the unfinished tasks. It also gives biblical challenges, urgent reports, condensed missionary stories, exciting descriptions of un-reached people groups, and so on. More interestingly, it encourages people to provide a digest of a rich fuel of prayer for the world.
The Global Prayer Digest acts as a key tool in a movement to help fulfill Christ's commission to make disciples of all the people on the earth, involving a daily discipline of learning, praying, and giving, to help reach the world's nearly 9,000 un-reached people groups. Un-reached people groups refer to groups which do not have churches in their own cultural or social setting. URL: http://www.global-prayer-digest.org/
To show a message about Today in Christian History in the Page, you simply add the Today in Christian History portlet in the Page, "Religion". You will see a story of Today in Christian History as shown in the following figure.
The Today in Christian History portlet allows simple integration with Today in Christian History.
For more details about Today in Christian History, check URL: http://www.studylight.org/his/tich
Chapter 10
[ 287 ]
Christians have been making history for over 2,000 years, founding a country or burning it for the sake of their beliefs. Until this day in Christian History, you can wow the visitors with interesting tidbits of history, every day of the year. To add this resource, you just cut and paste the following codes to the desired page:
<script language="Javascript" src="http://www.studylight.org/jscripts/tichcode.cgi"></script>
Using Religion Portlets EffectivelySeveral portlets dealing with religious or spiritual topics are available. You can use them as prototypes for other similar portlets, including a scripture reference tool, a guide to prayer for the current world events, a daily historical events portlet, and so on.
Besides the above portlets, Liferay also provides other portlets dealing with religious or spiritual topics as follows:
The Bible Gateway portlet allows linked integration with Bible Gateway.
The Bible Gateway acts as a tool for reading and researching scripture online. It supports most Bible versions in the language or translation. Moreover, it provides advanced search capabilities, which allow readers to find and compare particular passages in scriptures, based on keywords, phrases, or scripture reference. URL: http://www.biblegateway.com/
The Gospel for Asia portlet allows easy integration with Gospel for Asia.
Gospel for Asia (GFA), a Christian missionary organization, spreads the Gospel to India and the surrounding countries, through native missionaries. It sets up churches among the world's most un-reached people groups - those who have never heard the Good News of Jesus Christ. URL: http://www.gfa.org/
The Random Bible Verse portlet picks a verse number at random from a pre-selected list of verses.
The pre-selected list of verse numbers was statically specified in the file: random-bible-verse.xml. Flexibly the language of the random Bible verse is configurable by clicking on the Preferences icon. Once a verse number (and furthermore, the language) is selected, this portlet uses the service of Bible Gateway to reach the verse as follows.
http://www.biblegateway.com/passage/?search=*&version=*
•
•
•
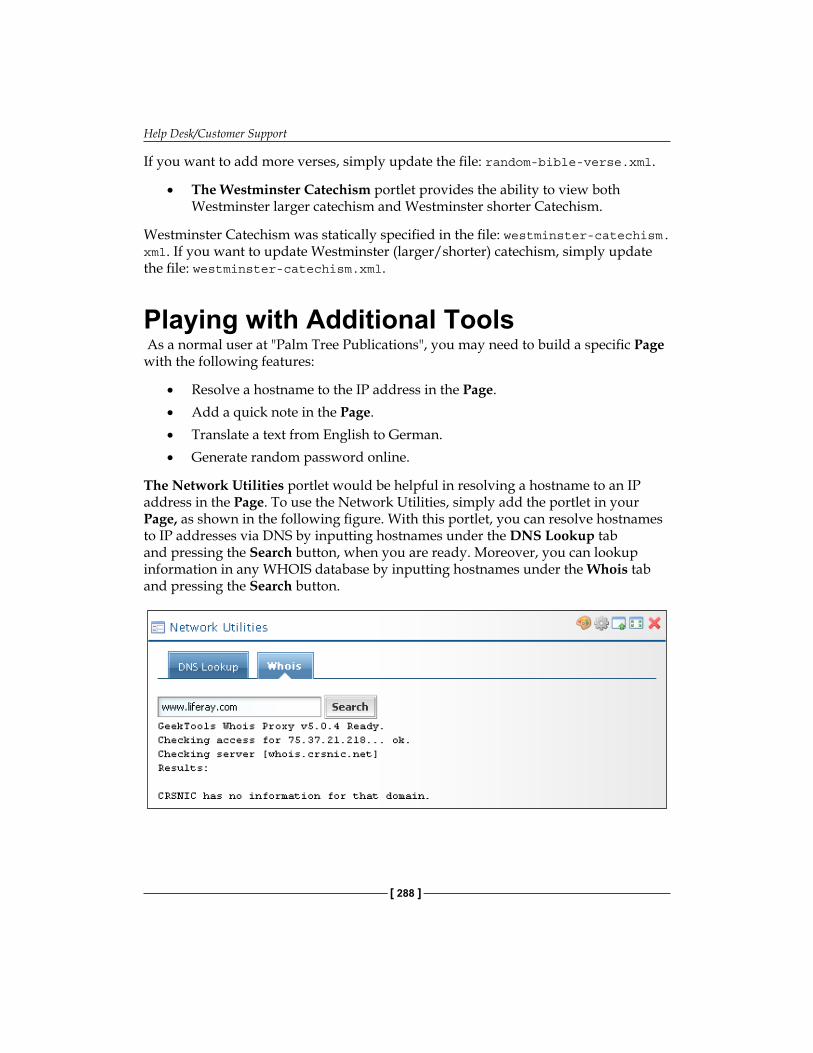
Help Desk/Customer Support
[ 288 ]
If you want to add more verses, simply update the file: random-bible-verse.xml.
The Westminster Catechism portlet provides the ability to view both Westminster larger catechism and Westminster shorter Catechism.
Westminster Catechism was statically specified in the file: westminster-catechism.xml. If you want to update Westminster (larger/shorter) catechism, simply update the file: westminster-catechism.xml.
Playing with Additional Tools As a normal user at "Palm Tree Publications", you may need to build a specific Page with the following features:
Resolve a hostname to the IP address in the Page.Add a quick note in the Page.Translate a text from English to German.Generate random password online.
The Network Utilities portlet would be helpful in resolving a hostname to an IP address in the Page. To use the Network Utilities, simply add the portlet in your Page, as shown in the following figure. With this portlet, you can resolve hostnames to IP addresses via DNS by inputting hostnames under the DNS Lookup tab and pressing the Search button, when you are ready. Moreover, you can lookup information in any WHOIS database by inputting hostnames under the Whois tab and pressing the Search button.
•
•
•
•
•
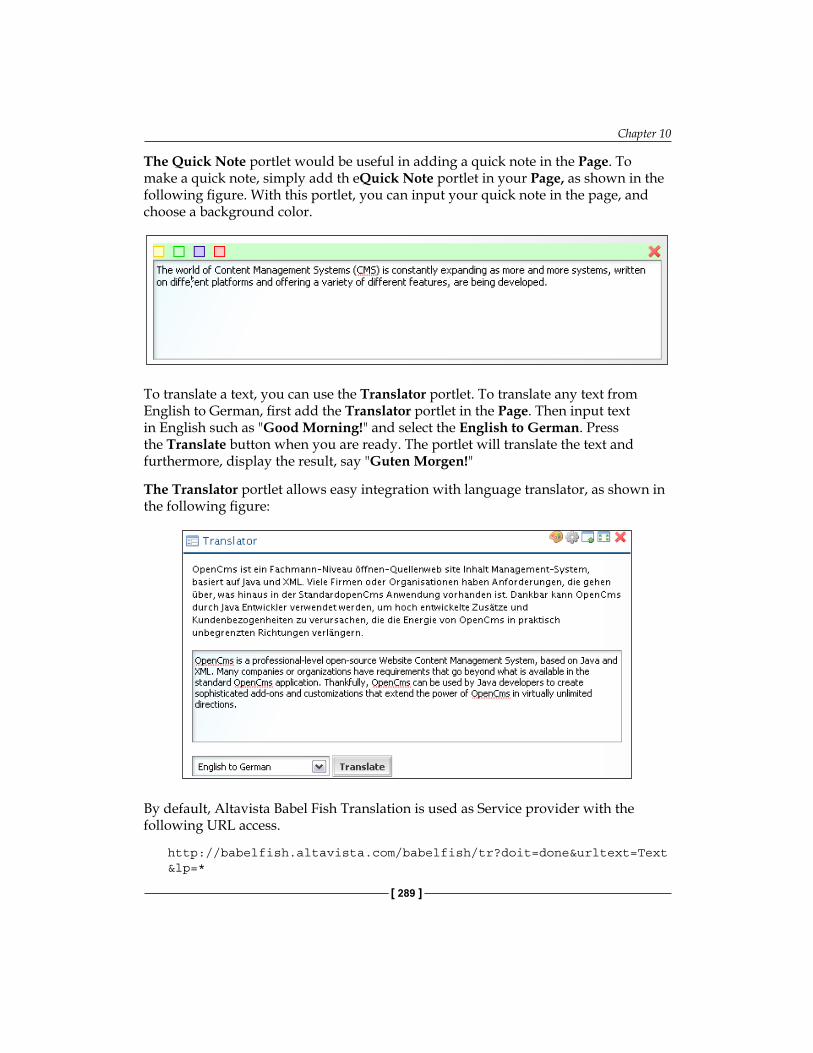
Chapter 10
[ 289 ]
The Quick Note portlet would be useful in adding a quick note in the Page. To make a quick note, simply add th eQuick Note portlet in your Page, as shown in the following figure. With this portlet, you can input your quick note in the page, and choose a background color.
To translate a text, you can use the Translator portlet. To translate any text from English to German, first add the Translator portlet in the Page. Then input text in English such as "Good Morning!" and select the English to German. Press the Translate button when you are ready. The portlet will translate the text and furthermore, display the result, say "Guten Morgen!"
The Translator portlet allows easy integration with language translator, as shown in the following figure:
By default, Altavista Babel Fish Translation is used as Service provider with the following URL access.
http://babelfish.altavista.com/babelfish/tr?doit=done&urltext=Text&lp=*
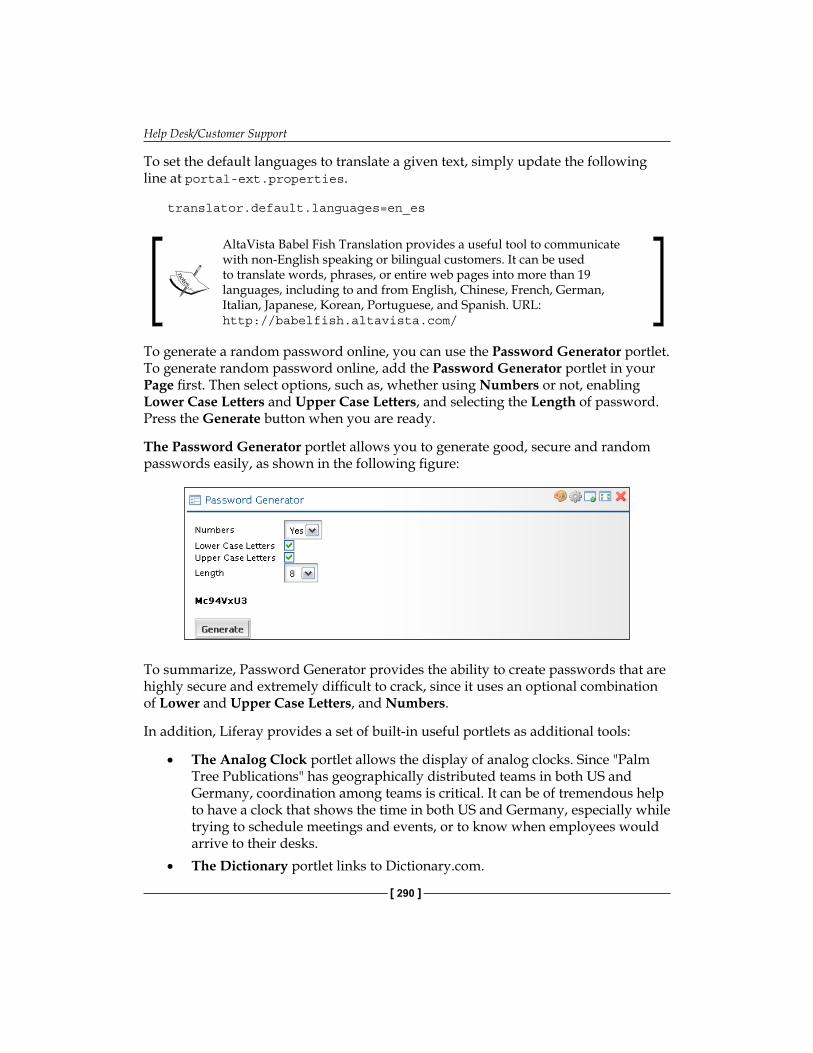
Help Desk/Customer Support
[ 290 ]
To set the default languages to translate a given text, simply update the following line at portal-ext.properties.
translator.default.languages=en_es
AltaVista Babel Fish Translation provides a useful tool to communicate with non-English speaking or bilingual customers. It can be used to translate words, phrases, or entire web pages into more than 19 languages, including to and from English, Chinese, French, German, Italian, Japanese, Korean, Portuguese, and Spanish. URL: http://babelfish.altavista.com/
To generate a random password online, you can use the Password Generator portlet. To generate random password online, add the Password Generator portlet in your Page first. Then select options, such as, whether using Numbers or not, enabling Lower Case Letters and Upper Case Letters, and selecting the Length of password. Press the Generate button when you are ready.
The Password Generator portlet allows you to generate good, secure and random passwords easily, as shown in the following figure:
To summarize, Password Generator provides the ability to create passwords that are highly secure and extremely difficult to crack, since it uses an optional combination of Lower and Upper Case Letters, and Numbers.
In addition, Liferay provides a set of built-in useful portlets as additional tools:
The Analog Clock portlet allows the display of analog clocks. Since "Palm Tree Publications" has geographically distributed teams in both US and Germany, coordination among teams is critical. It can be of tremendous help to have a clock that shows the time in both US and Germany, especially while trying to schedule meetings and events, or to know when employees would arrive to their desks. The Dictionary portlet links to Dictionary.com.
•
•
Chapter 10
[ 291 ]
Dictionary.com provides online dictionary search, translator, word of the day, crossword puzzles and word games, and vocabulary learning resources for many languages. URL: http://dictionary.reference.com/.
The Unit Converter portlet provides the ability to convert area, length, mass, temperature and volume online.The Sign In portlet provides the ability to sign in, if you registered already, to deal with forgotten password issue, and to create new accounts. The OpenID Sign In portlet provides the ability to sign in via OpenID, if you have an OpenID already.
Experiencing Shopping ToolsLet's consider a scenario. As an administrator at "Palm-Tree publications", you may need to build a specific Page called "Shopping" for online shopping with the following functions:
Ability to find rankings about a book, before buying it.Ability to manage online shopping—manage SKU (Stock Keeping Unit), pricing, descriptions, stock quantities, shipping and tax calculation, a shopping cart, order management, coupon management, checkout with credit card payments.
As an administrator of "Palm Tree Publications", you may need to create a Page called "Shopping" under the Page "Community" at the Book Lovers Community Public Pages, and add the required portlets in the Page, "Shopping". Let's do it. Let's do it as follows:
Add a Page called "Shopping" under the Page "Community" at the Book Lovers Community Public Pages, if the Page is not already present.
To find rankings about a given book, the Amazon Rankings portlet would be useful:
1. First, add the following line into the file portal-ext.properties: amazon.license.0=0F8PF7VK38NX3T19QE02
2. Shutdown Liferay portal, if it is running.3. Restart Liferay system, and login as an administrator, say "Palm Tree".4. Add the Amazon Rankings portlet in the page where you want to show
online shopping.
•
•
•
•
•
•

Help Desk/Customer Support
[ 292 ]
5. Configure the portlet by clicking the Configuration icon, and add all ISBN numbers separated by spaces as in "1847190979 184719270X 1904811175".
6. You will see the rankings of books as shown in the following figure.
Note that you can enter a list of valid Amazon license keys. You can configure additional keys by incrementing the last number. The keys are used following a Round-Robin algorithm.
The Amazon Rankings portlet provides the ability to display Amazon sales information on any number of items. You can use it as a prototype to collect Amazon data with other proprietary data or web services.
For shopping online, the Shopping portlet shown in the following figure, would be useful:
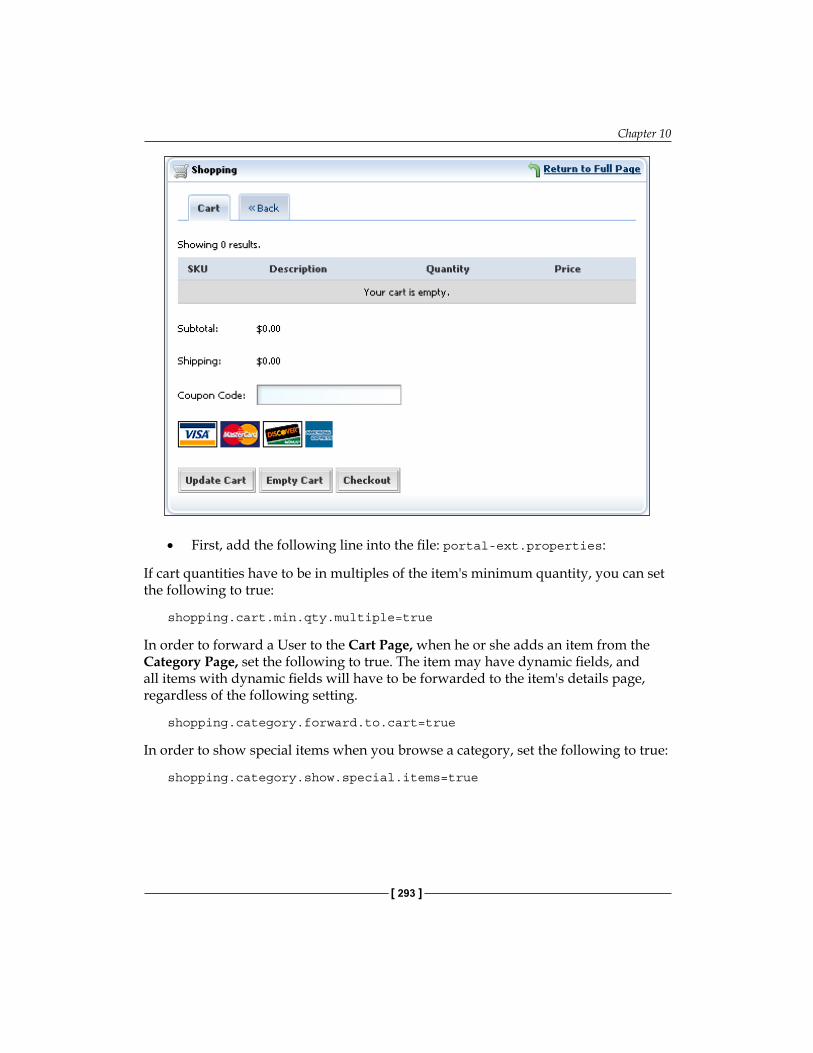
Chapter 10
[ 293 ]
First, add the following line into the file: portal-ext.properties:
If cart quantities have to be in multiples of the item's minimum quantity, you can set the following to true:
shopping.cart.min.qty.multiple=true
In order to forward a User to the Cart Page, when he or she adds an item from the Category Page, set the following to true. The item may have dynamic fields, and all items with dynamic fields will have to be forwarded to the item's details page, regardless of the following setting.
shopping.category.forward.to.cart=true
In order to show special items when you browse a category, set the following to true:
shopping.category.show.special.items=true
•
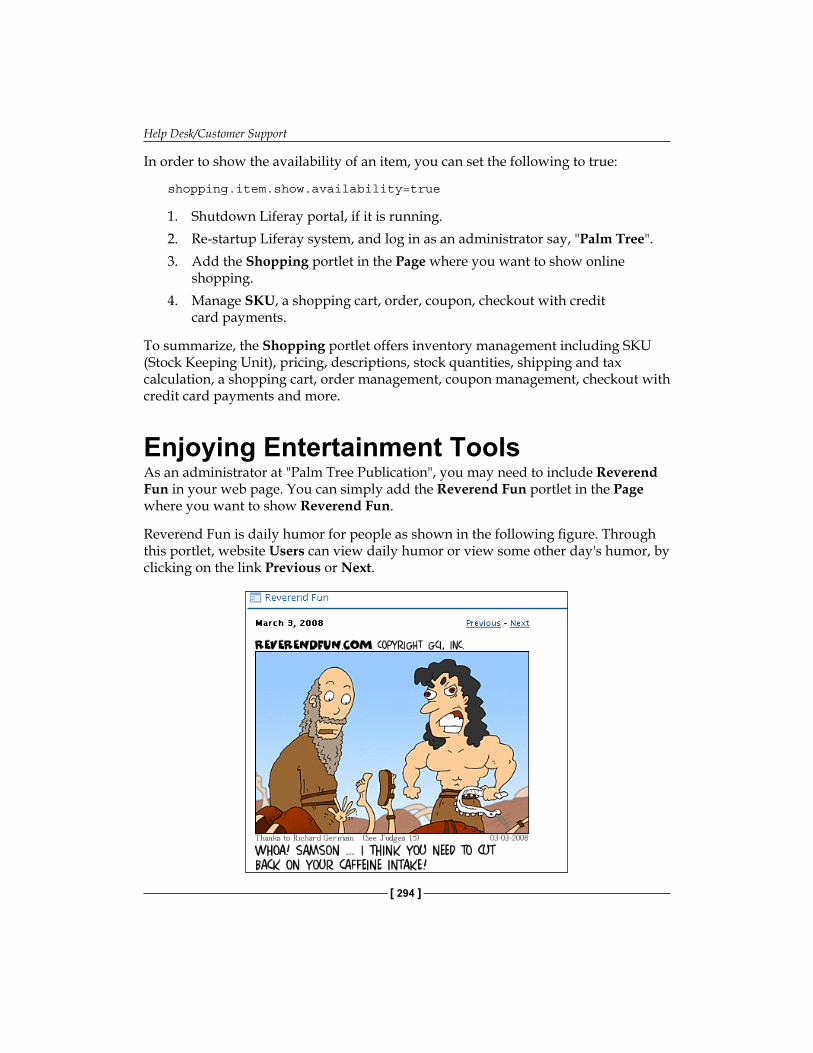
Help Desk/Customer Support
[ 294 ]
In order to show the availability of an item, you can set the following to true:
shopping.item.show.availability=true
1. Shutdown Liferay portal, if it is running.2. Re-startup Liferay system, and log in as an administrator say, "Palm Tree".3. Add the Shopping portlet in the Page where you want to show online
shopping. 4. Manage SKU, a shopping cart, order, coupon, checkout with credit
card payments.
To summarize, the Shopping portlet offers inventory management including SKU (Stock Keeping Unit), pricing, descriptions, stock quantities, shipping and tax calculation, a shopping cart, order management, coupon management, checkout with credit card payments and more.
Enjoying Entertainment ToolsAs an administrator at "Palm Tree Publication", you may need to include Reverend Fun in your web page. You can simply add the Reverend Fun portlet in the Page where you want to show Reverend Fun.
Reverend Fun is daily humor for people as shown in the following figure. Through this portlet, website Users can view daily humor or view some other day's humor, by clicking on the link Previous or Next.
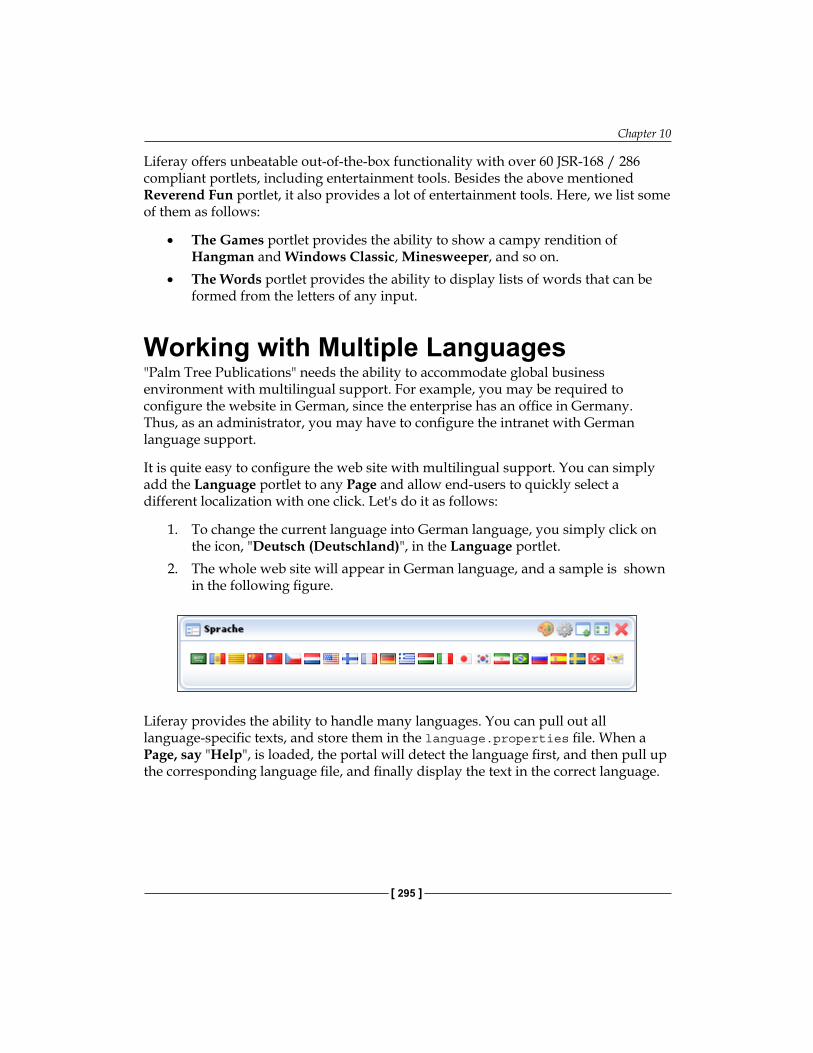
Chapter 10
[ 295 ]
Liferay offers unbeatable out-of-the-box functionality with over 60 JSR-168 / 286 compliant portlets, including entertainment tools. Besides the above mentioned Reverend Fun portlet, it also provides a lot of entertainment tools. Here, we list some of them as follows:
The Games portlet provides the ability to show a campy rendition of Hangman and Windows Classic, Minesweeper, and so on.The Words portlet provides the ability to display lists of words that can be formed from the letters of any input.
Working with Multiple Languages"Palm Tree Publications" needs the ability to accommodate global business environment with multilingual support. For example, you may be required to configure the website in German, since the enterprise has an office in Germany. Thus, as an administrator, you may have to configure the intranet with German language support.
It is quite easy to configure the web site with multilingual support. You can simply add the Language portlet to any Page and allow end-users to quickly select a different localization with one click. Let's do it as follows:
1. To change the current language into German language, you simply click on the icon, "Deutsch (Deutschland)", in the Language portlet.
2. The whole web site will appear in German language, and a sample is shown in the following figure.
Liferay provides the ability to handle many languages. You can pull out all language-specific texts, and store them in the language.properties file. When a Page, say "Help", is loaded, the portal will detect the language first, and then pull up the corresponding language file, and finally display the text in the correct language.
•
•
Help Desk/Customer Support
[ 296 ]
With this, you can do a lot of work as follows:
Easily support as many languages as you can imagine.Have a central location for multiple languages.Change the way a certain word is translated. If you want, you could effectively rename the portlet, such as Message Boards, as Forums. Then the title will be translated according to the language you choose.
In short, there are many properties, including languages, which you can configure in order to customize the portal.
Removing an Unwanted LanguageBy default, Liferay supports all the following languages.
locales=ar_SA,ca_AD,ca_ES,zh_CN,zh_TW,cs_CZ,nl_NL,en_US,fi_FI,fr_FR,de_DE,el_GR,hu_HU,it_IT,ja_JP,ko_KR,fa_IR,pt_BR,ru_RU,es_ES,sv_SE,tr_TR,vi_VN
If you want to support English, German and Chinese only, you can simply remove the unwanted locales, and your locales value looks like this:
locales=en_US,de_DE,zh_CN
Priority of Language Files Liferay provides many language files and every language file overwrites another language file. What is the priority of these language files?
There are three simple rules:
-ext versions such as language-ext_ de_DE.properties, language-ext_de.properties and language-ext.properties take precedence over the non -ext versions.language-specific versions, such as Language_ de_DE.properties take precedence over the non-language-specific versions, such as Language-ext_de.properties.location-specific versions, such as language_de.properties take precedence over the non-location-specific versions, such as Language-ext.properties.
•
•
•
•
•
•
Chapter 10
[ 297 ]
For German, here is a ranking:
Language-ext_ de_DE.properties
Language_ de_DE.properties
Language-ext_de.properties
Language_de.properties
Language-ext.properties
Language.properties
Note that, you may find the entry in "Language.properties". So you may think that you just need to override the value by editing "Language-ext.properties". However, this will not change anything, since all values in "Language.properties" are also in "Language_de.properties" and locale-specific definitions take precedence. Therefore, "Language_de.properties" will override any changes you have made in "Language-ext.properties". That is why, you edited the "Language-ext_en.properties" file.
You can edit the same files to change Language Settings, Portlet Titles, Category Titles, Action Names, Messages and any other text that is language dependant.
Using WebDAVAs an employee of "Palm Tree Publications", you may want to view articles from Journal and contents in the Document Library using WebDAV. Thus, as an administrator, you need to configure WebDAV.
For example, in the Document Library portlet, navigate to the specific Folder, such as "Books", and edit it by clicking the Edit button to the right of the Folder, "Books". There, you will see the direct WebDAV URL for that location. In the Journal portlet, navigate to the specific Journal Template and edit it. You should see the direct WebDAV URL for that Template.
Each WebDAV accessible resource has an associated URL. Let's use the WebDAV as follows:
1. Copy the WebDAV URL of the folder "Books"—http://localhost:8080/tunnel-web/secure/webdav/document_library/10095/11116/Books.
2. Paste the URL in the address of the browser. 3. You will be asked to authenticate with your user ID and password.
•
•
•
•
•
•
Help Desk/Customer Support
[ 298 ]
WebDAV, Web-based Distributed Authoring and Versioning, refers to the set of extensions to the Hypertext Transfer Protocol (HTTP). It allows the Users to collaboratively edit and manage files on remote World Wide Web servers, and offers functionality to create, change and move documents on a remote server.
WebDAV Support in Liferay Portal includes:
Users can productively manage portal content with familiar operating system conventions for Folders and Documents.Full support for OS such as Windows and Linux.
Both Document Library and Journal portlets support the WebDAV protocol. Thus, Users can upload and organize resources from both a web interface and the file explorer of their desktop operating system.
To summarize, Liferay Portal allows WebDAV URL connections from any server using HTTP or HTTPS by default. You can also have a more secure configuration through the properties in portal-ext.properties as follows:
webdav.servlet.hosts.allowed=webdav.servlet.https.required=false
Developing PortletsLiferay built-in portlets and community plugins (portlets) may not satisfy your specific requirements related to your website building. Fortunately, you can develop new portlets to reach your own specific needs. The remaining section will describe the portlet development briefly.
Developing a Java Portlet is similar to developing a Servlet based web application. Existing web application development frameworks such as Struts, JSF, Webwork, and so on. can be used through the use of bridges. Existing frameworks may be adapted directly, without the need of a bridge, such as the Spring Portlet MVC (Model-View-Controller) framework.
Here is an example of Spring MVC Portlets for Liferay Plugin-SDK:
1. Download plugins-SDK with Spring MVC portlets from http://liferay.cignex.com/sesame/plugins-sdk.zip.
2. Unzip plugins-sdk.zip; find build.Jonas.properties.3. Rename build.Jonas.properties as build.${username}.properties.
•
•

Chapter 10
[ 299 ]
4. Update entry (app.server.dir) in build.${username}.properties. Let it point to the Liferay Tomcat directory. For instance: app.server.dir=C:/training/tomcat.
5. Drop "build.xml" at /portlets to Ant view.6. Develop and run Deploy at Ant view if you are ready.7. Test portlets at Liferay runtime.…
In short, it is possible to use Liferay Service Builder or Plugin-SDK to develop your portlets, using the same service oriented architecture that Liferay Portal is based on.
SummaryThis chapter discussed how to use a set of portlets to provide an information and assistance resource that troubleshoots specific requirements. Further, it also discussed multilingual support, and the usage of WebDAV. Finally, it provided guidance on how to develop new portlets to deal with specific requirements, in order to provide help desk assistances and customer support information efficiently.

Roll Out To Other TeamsThe intranet website "book.com" of "Palm Tree Publications" is required to have the ability to build aa Community, such as Book Lovers, where employees can share interests, and roll out to other teams. Liferay Communities provide the ability to create and manage Communities and their Users. A Community in Liferay has its own set of Pages, content management systems and Permissions management.
This chapter will provide a reference for administering Communities. It will include a discussion on how to create and manage Communities, as well as how to create and manage the Pages and Users within a Community. Moreover, it will introduce portal staging and publishing, manage staging workflow, community virtual hosting, and, in addition, a set of community tools - portlets.
By the end of this chapter, you will have learnt how to:
Add a Community.Manage (edit, delete, search, join, leave) Communities.Add and manage the Pages and Users within a Community.Employ Community virtual hosting.Stage, preview and publish a web site.Manage staging workflow. Use Community tools, such as bookmarks, page comments, and so on.
Working with CommunitiesAs an administrator at "Palm Tree Publications", you would need to provide an environment to roll out to other teams. Thus, you may need to provide an environment for Users to manage Communities at the page, "Home", of My Community Private Pages.
•
•
•
•
•
•
•
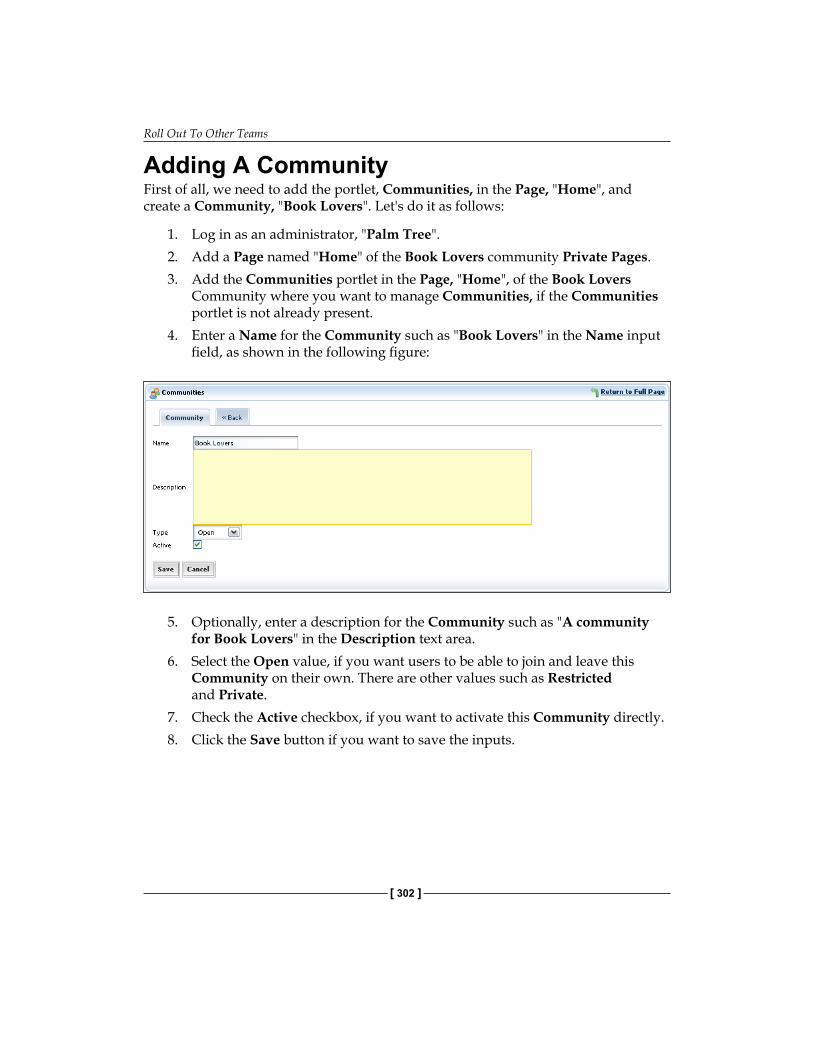
Roll Out To Other Teams
[ 302 ]
Adding A CommunityFirst of all, we need to add the portlet, Communities, in the Page, "Home", and create a Community, "Book Lovers". Let's do it as follows:
1. Log in as an administrator, "Palm Tree".2. Add a Page named "Home" of the Book Lovers community Private Pages.3. Add the Communities portlet in the Page, "Home", of the Book Lovers
Community where you want to manage Communities, if the Communities portlet is not already present.
4. Enter a Name for the Community such as "Book Lovers" in the Name input field, as shown in the following figure:
5. Optionally, enter a description for the Community such as "A community for Book Lovers" in the Description text area.
6. Select the Open value, if you want users to be able to join and leave this Community on their own. There are other values such as Restricted and Private.
7. Check the Active checkbox, if you want to activate this Community directly. 8. Click the Save button if you want to save the inputs.
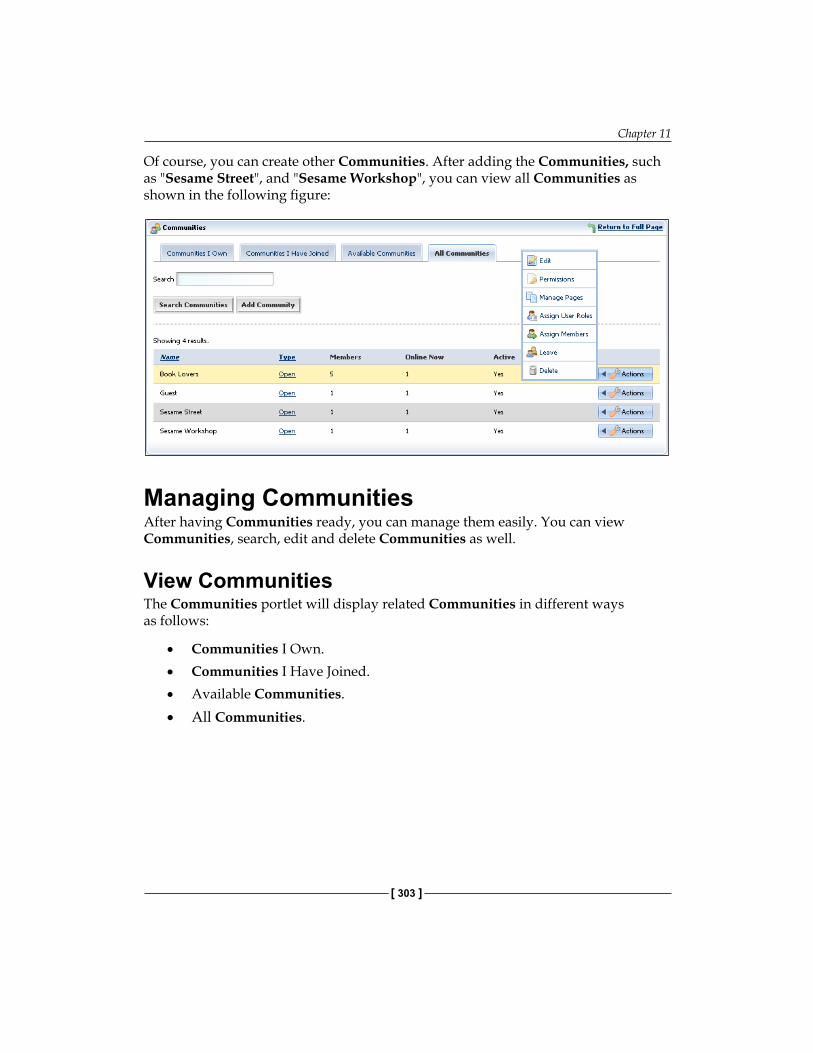
Chapter 11
[ 303 ]
Of course, you can create other Communities. After adding the Communities, such as "Sesame Street", and "Sesame Workshop", you can view all Communities as shown in the following figure:
Managing CommunitiesAfter having Communities ready, you can manage them easily. You can view Communities, search, edit and delete Communities as well.
View CommunitiesThe Communities portlet will display related Communities in different ways as follows:
Communities I Own.Communities I Have Joined.Available Communities.All Communities.
•
•
•
•
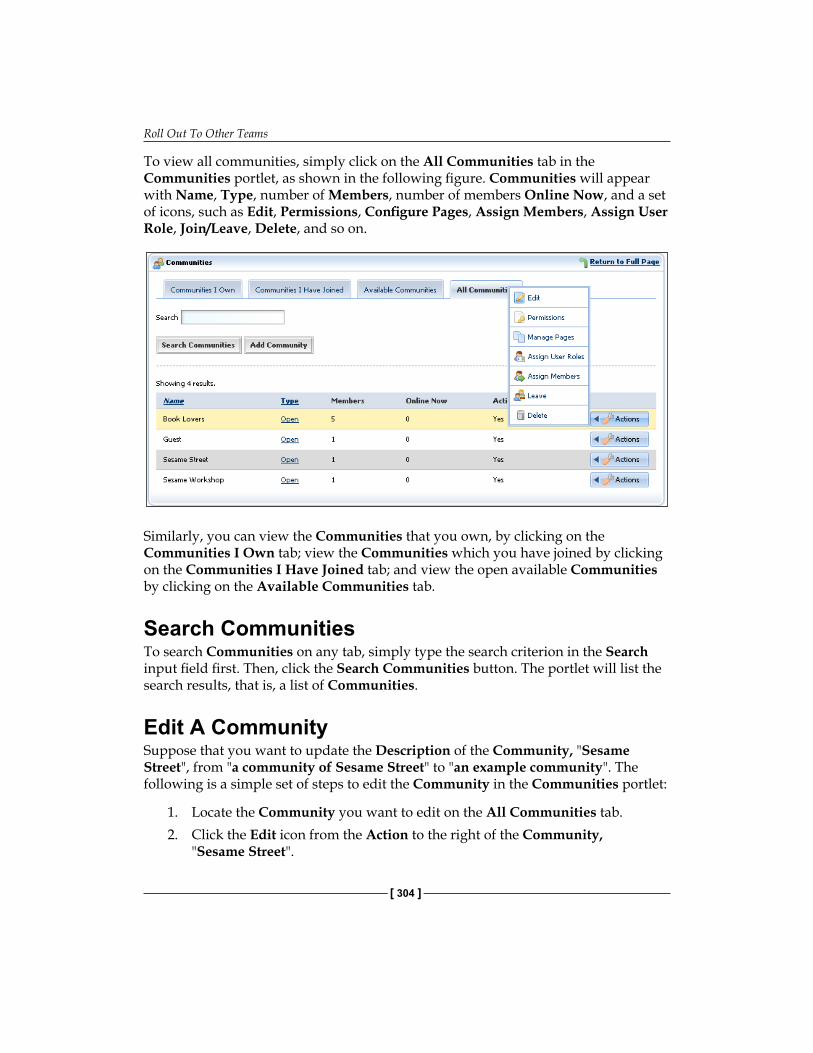
Roll Out To Other Teams
[ 304 ]
To view all communities, simply click on the All Communities tab in the Communities portlet, as shown in the following figure. Communities will appear with Name, Type, number of Members, number of members Online Now, and a set of icons, such as Edit, Permissions, Configure Pages, Assign Members, Assign User Role, Join/Leave, Delete, and so on.
Similarly, you can view the Communities that you own, by clicking on the Communities I Own tab; view the Communities which you have joined by clicking on the Communities I Have Joined tab; and view the open available Communities by clicking on the Available Communities tab.
Search CommunitiesTo search Communities on any tab, simply type the search criterion in the Search input field first. Then, click the Search Communities button. The portlet will list the search results, that is, a list of Communities.
Edit A CommunitySuppose that you want to update the Description of the Community, "Sesame Street", from "a community of Sesame Street" to "an example community". The following is a simple set of steps to edit the Community in the Communities portlet:
1. Locate the Community you want to edit on the All Communities tab.2. Click the Edit icon from the Action to the right of the Community,
"Sesame Street".
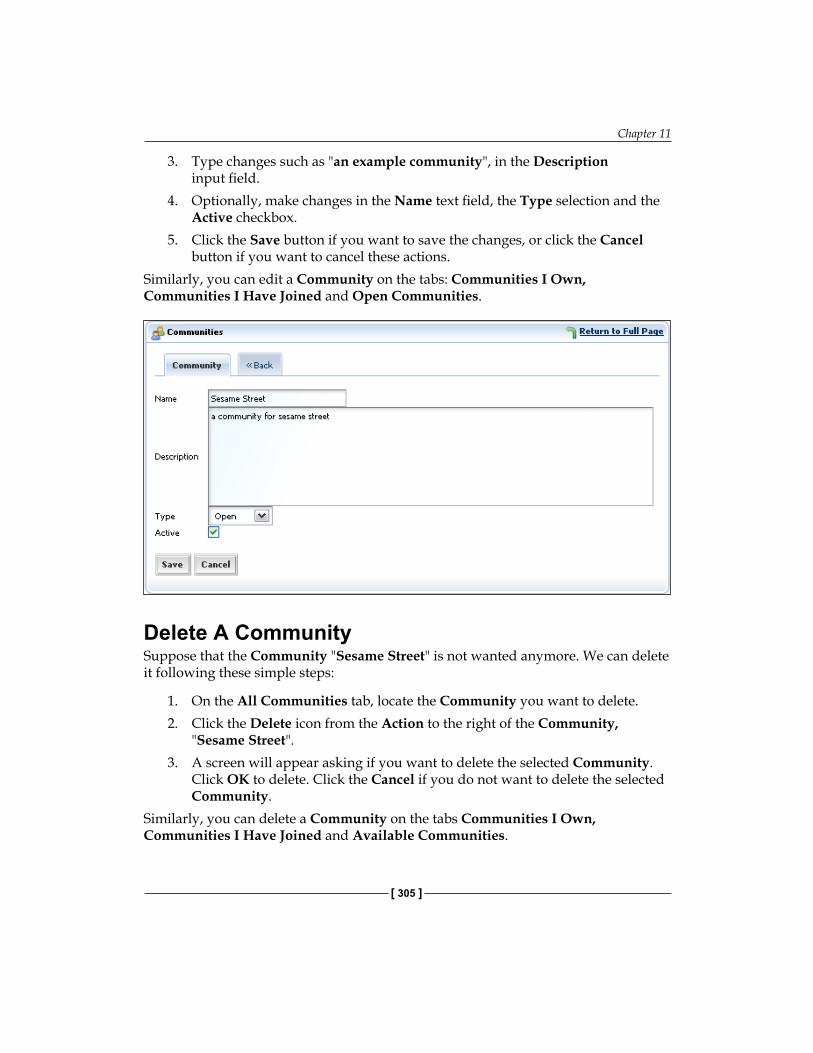
Chapter 11
[ 305 ]
3. Type changes such as "an example community", in the Description input field.
4. Optionally, make changes in the Name text field, the Type selection and the Active checkbox.
5. Click the Save button if you want to save the changes, or click the Cancel button if you want to cancel these actions.
Similarly, you can edit a Community on the tabs: Communities I Own, Communities I Have Joined and Open Communities.
Delete A CommunitySuppose that the Community "Sesame Street" is not wanted anymore. We can delete it following these simple steps:
1. On the All Communities tab, locate the Community you want to delete. 2. Click the Delete icon from the Action to the right of the Community,
"Sesame Street".3. A screen will appear asking if you want to delete the selected Community.
Click OK to delete. Click the Cancel if you do not want to delete the selected Community.
Similarly, you can delete a Community on the tabs Communities I Own, Communities I Have Joined and Available Communities.
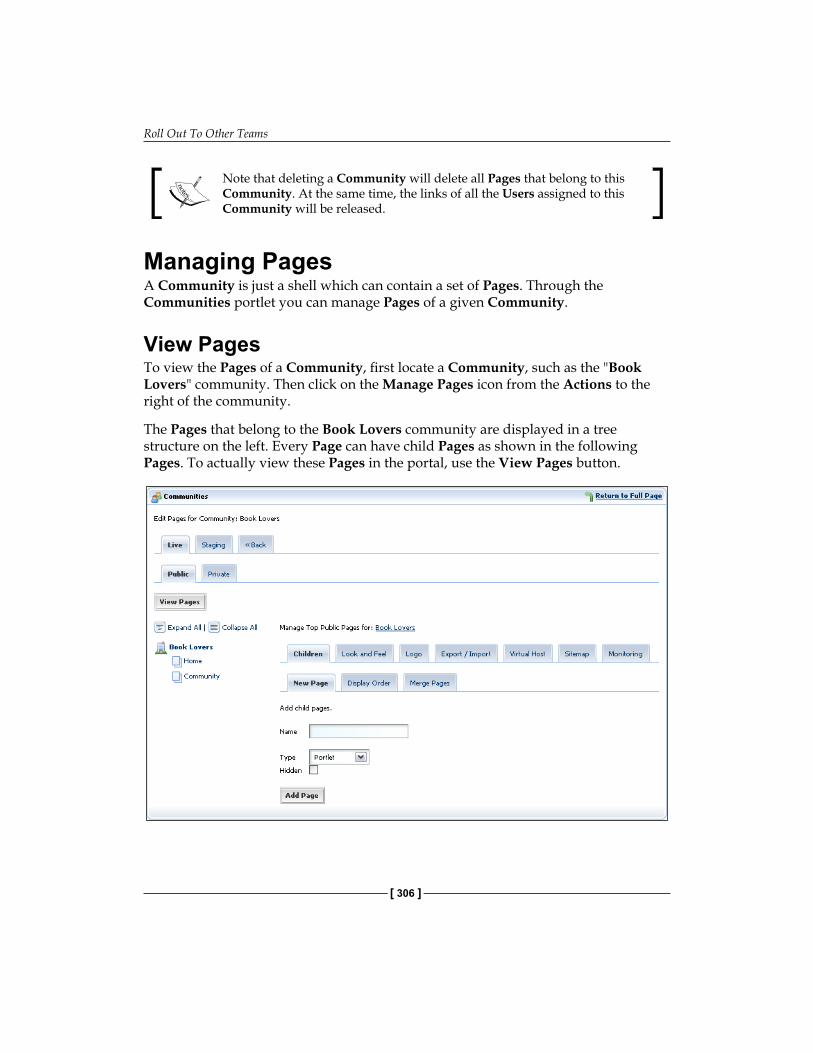
Roll Out To Other Teams
[ 306 ]
Note that deleting a Community will delete all Pages that belong to this Community. At the same time, the links of all the Users assigned to this Community will be released.
Managing PagesA Community is just a shell which can contain a set of Pages. Through the Communities portlet you can manage Pages of a given Community.
View PagesTo view the Pages of a Community, first locate a Community, such as the "Book Lovers" community. Then click on the Manage Pages icon from the Actions to the right of the community.
The Pages that belong to the Book Lovers community are displayed in a tree structure on the left. Every Page can have child Pages as shown in the following Pages. To actually view these Pages in the portal, use the View Pages button.
Chapter 11
[ 307 ]
To view all Pages in the tree structure, simply click on the Expand All button. To view only the top level Pages, and the root node, that is, Community name, in the tree structure, simply click on the Collapse All button.
To view all Pages in the Public, simply click on the Public tab; or click on the Private tab to view all Pages in the Private.
Further, you can also add, edit, delete the pages, as stated in Chapter 2.
Import And Export PagesYou can also import and export Pages in a given Community, such as "Book Lovers", as follows:
1. In the Communities portlet, click on the Configure Pages icon to the right of the community for which you want to import/export Pages.
2. Click on the Import / Export tab.3. If you click on the Export button, it will export all the Pages, their layouts,
their configurations, their look and feel, and their Permissions to a LAR file (Liferay Archive). After you click the Export button, you will be prompted with a dialog window asking where to save the file.
4. You can also import a LAR file into your current Community. 5. To import a LAR file, click on the Browse button, find the LAR file on your
hard drive, and click the Import button.
LAR file is a Liferay Archive. It includes all the Pages, their layouts, their configurations, their look and feel, and their Permissions.Note that importing an LAR file will overwrite any existing Pages with the Pages configured in the LAR file.
Monitor PagesSuppose that you want to use Google Analytics (GA) to generate detailed statistics about the visitors to a website. Let's do it as follows:
1. In the Communities portlet, click on the Manage Pages icon to the right of the community for which you want to monitor Pages.
2. Click on the Monitoring tab.3. Set the Google Analytics ID that will be used for this set of pages.4. Click on the Save button to save the inputs.

Roll Out To Other Teams
[ 308 ]
Assigning Users to A CommunityYou can assign Users to a Community directly. You can assign Users "David Berger" and "Lotti Stein" to the Community, "Book Lovers" as follows:
1. Go to the Communities portlet. 2. Click on the Assign Members icon from the Action to the right of the
Community, such as "Book Lovers", for which you want to assign Users.3. When a Community is first created by "Palm Tree", only the User "Palm
Tree" is assigned to it. 4. Click on the Available tab.5. Use the Search form to search for the Users, such as "David Berger" and
"Lotti Stein", whom you want to assign to this Community, directly.6. Check the boxes to the left of the Users, "David Berger" and "Lotti Stein",
whom you want to assign to this Community, directly.7. Click the Update Associations button as shown in the following figure.8. Alternatively, Users can assign themselves directly to the available
Communities by joining them.
Chapter 11
[ 309 ]
You can also assign Users to a Community indirectly through Organizations and User Groups. Suppose that you need to assign Users to the Community, "Book Lovers", by the User Group, "Managers". Let's do as follows:
1. Go to the Communities portlet.2. Click on the Assign Members icon from the Actions to the right of the
Community for which you want to assign Users. 3. Click on the Available tab.4. Click on the Organizations or User Groups tabs.5. In short, you can use the Search form to search for the User Groups that you
want to assign to this Community. All the members of your selected User Groups will be assigned indirectly to this Community, via a link. However, for all intents and purposes, the Users will function as members of the Community.
6. Check the boxes to the left of the User Groups that you want to assign to this community.
7. Click the Update Associations button.
Similarly, you can assign Users to a Community indirectly, through User Group.
You can also assign Users indirectly to a Community by assigning User Roles. You can assign User Role, "Content Creator" to a Community through the following steps:
1. Go to the Communities portlet. 2. Click on the Assign User Roles icon from the Actions to the right of the
community for which you want to assign users. 3. Click on the Available tab.4. Use the Search form to search for the Users such as "David Berger" and
"Lotti Stein", whom you want to directly assign to this Community.5. Check the boxes to the left of the User Group "Content Creator" that you
want to directly assign to this Community.6. Click the Update Associations button.
Roll Out To Other Teams
[ 310 ]
Joining An Open CommunityAs User "Lotti Stein" of "Palm Tree Publications", suppose that you want to join the Community, "Sesame Street":
1. Go to the Communities portlet, and select the Available Communities tab. Locate a Community, such as "Sesame Street", which you want to join.
2. Click on the Join icon to the right of the community.3. Assuming that Community already has Pages configured for it, the My
Places menu will now have an entry for the Community you have just joined. Click on that Community's name, and you will be able to navigate to it.
Leaving An Open CommunityAs User "Lotti Stein" of "Palm Tree Publications", suppose that you want to leave the Community, "Sesame Street":
1. Go to the Communities portlet, and select the Available Communities tab.2. Locate the Community such as "Sesame Street" which you want to leave.3. Click on the Leave icon to the right of the community.4. The Community you just left will no longer appear in the My Places menu,
and you will no longer have access to it.
Updating PermissionsSuppose that as an administrator, "Palm Tree", of "Palm Tree Publications", you want to give the User, "Lotti Stein", Permission to manage the Pages in the Community, "Book Lovers". Let's do it as follows:
1. Go to the Communities portlet. 2. Locate the community "Book Lovers", where you want to change
Permissions.3. Then click on the Permissions icon from the Actions located next to the
community.4. Select the Users tab.5. Find User "Lotti Stein"in the Available box.6. Click on the Update Permissions button. 7. Select Permissions: Manage Pages in the Available box.
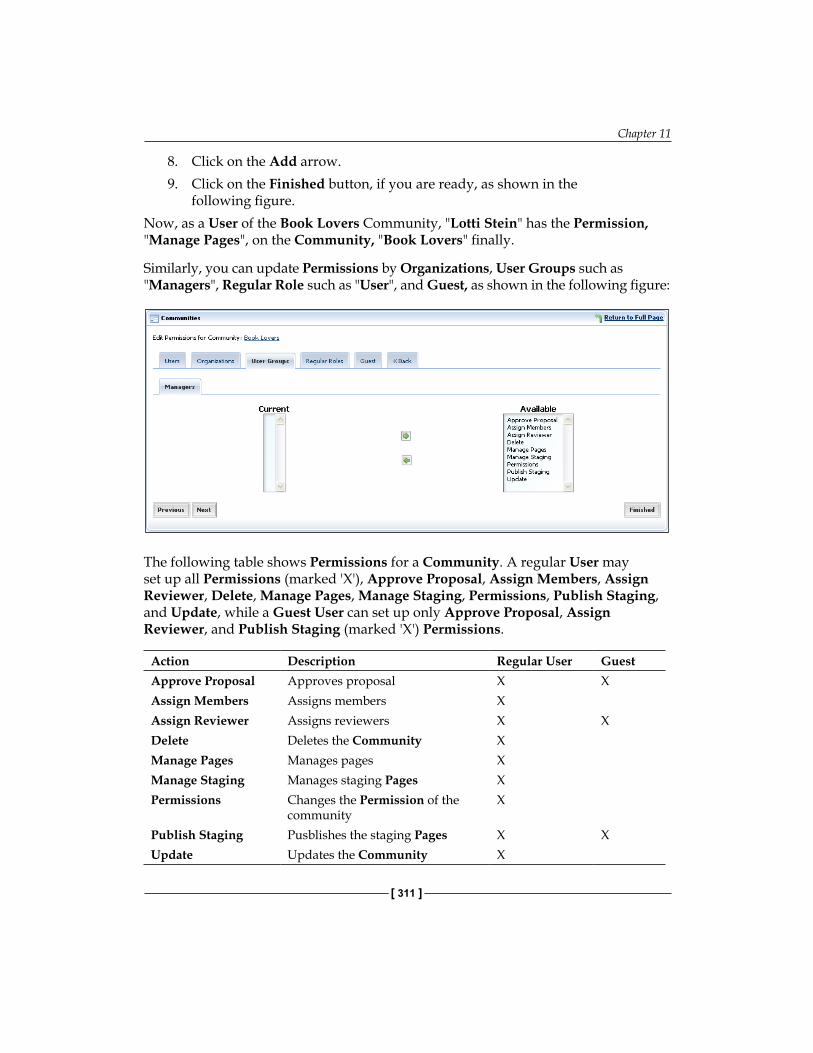
Chapter 11
[ 311 ]
8. Click on the Add arrow.9. Click on the Finished button, if you are ready, as shown in the
following figure.Now, as a User of the Book Lovers Community, "Lotti Stein" has the Permission, "Manage Pages", on the Community, "Book Lovers" finally.
Similarly, you can update Permissions by Organizations, User Groups such as "Managers", Regular Role such as "User", and Guest, as shown in the following figure:
The following table shows Permissions for a Community. A regular User may set up all Permissions (marked 'X'), Approve Proposal, Assign Members, Assign Reviewer, Delete, Manage Pages, Manage Staging, Permissions, Publish Staging, and Update, while a Guest User can set up only Approve Proposal, Assign Reviewer, and Publish Staging (marked 'X') Permissions.
Action Description Regular User GuestApprove Proposal Approves proposal X XAssign Members Assigns members XAssign Reviewer Assigns reviewers X XDelete Deletes the Community XManage Pages Manages pages XManage Staging Manages staging Pages XPermissions Changes the Permission of the
community X
Publish Staging Pusblishes the staging Pages X XUpdate Updates the Community X
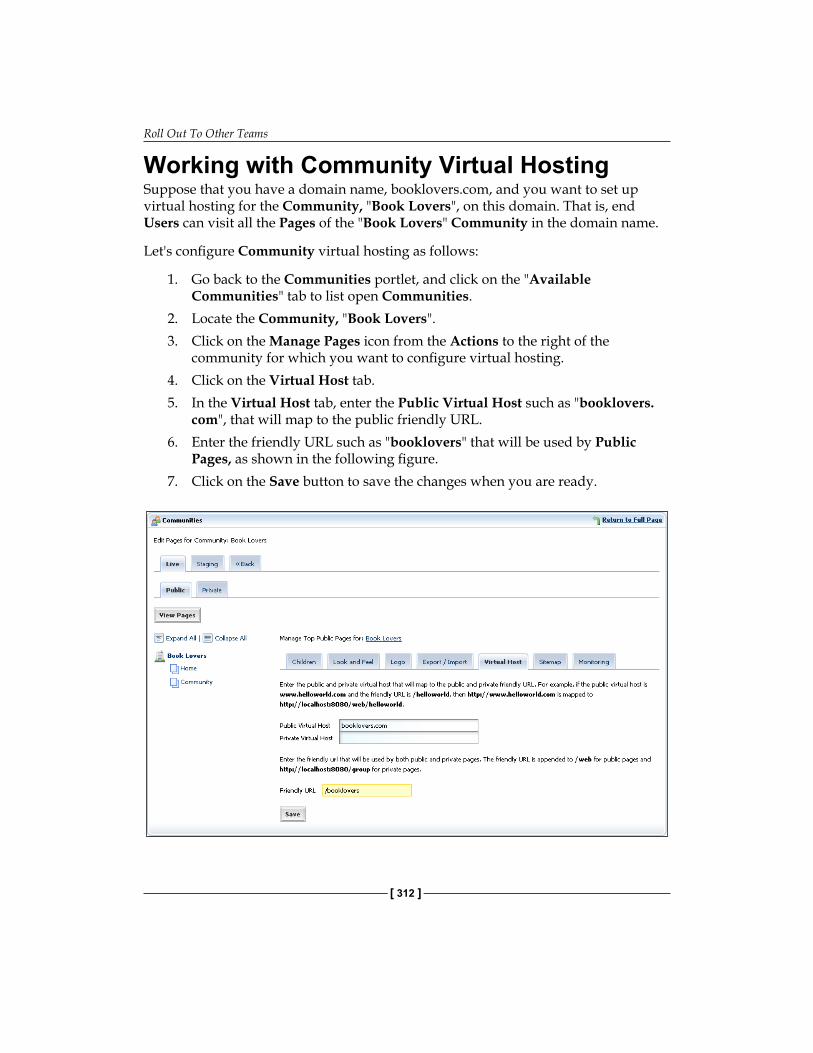
Roll Out To Other Teams
[ 312 ]
Working with Community Virtual HostingSuppose that you have a domain name, booklovers.com, and you want to set up virtual hosting for the Community, "Book Lovers", on this domain. That is, end Users can visit all the Pages of the "Book Lovers" Community in the domain name.
Let's configure Community virtual hosting as follows:
1. Go back to the Communities portlet, and click on the "Available Communities" tab to list open Communities.
2. Locate the Community, "Book Lovers".3. Click on the Manage Pages icon from the Actions to the right of the
community for which you want to configure virtual hosting.4. Click on the Virtual Host tab.5. In the Virtual Host tab, enter the Public Virtual Host such as "booklovers.
com", that will map to the public friendly URL.6. Enter the friendly URL such as "booklovers" that will be used by Public
Pages, as shown in the following figure.7. Click on the Save button to save the changes when you are ready.
Chapter 11
[ 313 ]
Using Virtual Hosting EffectivelyVirtual hosting means to host more than one domain name on the same computer, mostly on the same IP address. There are two basic methods to fulfill virtual hosting: name-based, and IP address based or IP-based. Name-based virtual hosts are used with multiple host names in order to share the same web server IP address, while in IP-based virtual hosting, each site will point to a unique IP address. You can configure the web server with multiple physical network interfaces, virtual network interfaces on the same physical interface, or multiple IP addresses on one interface.
Liferay Community Virtual Hosting is an extension of the friendly URL functionality. It allows one or more Communities in a single portal instance, identified by separate and unique host names. End users only input the name of the host they expect to visit, into the address bar in the browser. Although, it appears to the users that they are visiting different web sites, they are in fact being directed to a single web server. In fact, based on the host name, the server determines the Community to be presented to the User.
Setup Virtual HostingThere are two steps to set up virtual hosting. The first step is to ensure that a Domain Name Server (DNS) entry exists for each virtual host you want, and that every one of them points to the IP address of the server.
Next, set up a virtual host filter at system.properties as follows.
com.liferay.portal.servlet.filters.virtualhost.VirtualHostFilter=true
Note that, the virtual host filter maps hosts to both the Public and Private pages.
Working with Community Staging & PublishingIt is a basic requirement for the Users to have the capability to stage their work. That is, they need the ability to work on a working copy of the website first. At the same time, they need to manipulate this working copy and preview it, as if it were the web site. Moreover, they need the capability to have many "working copies" in progress at any point in time. More interestingly, Users should be able to preview a working copy at any time, without disrupting the live Pages.
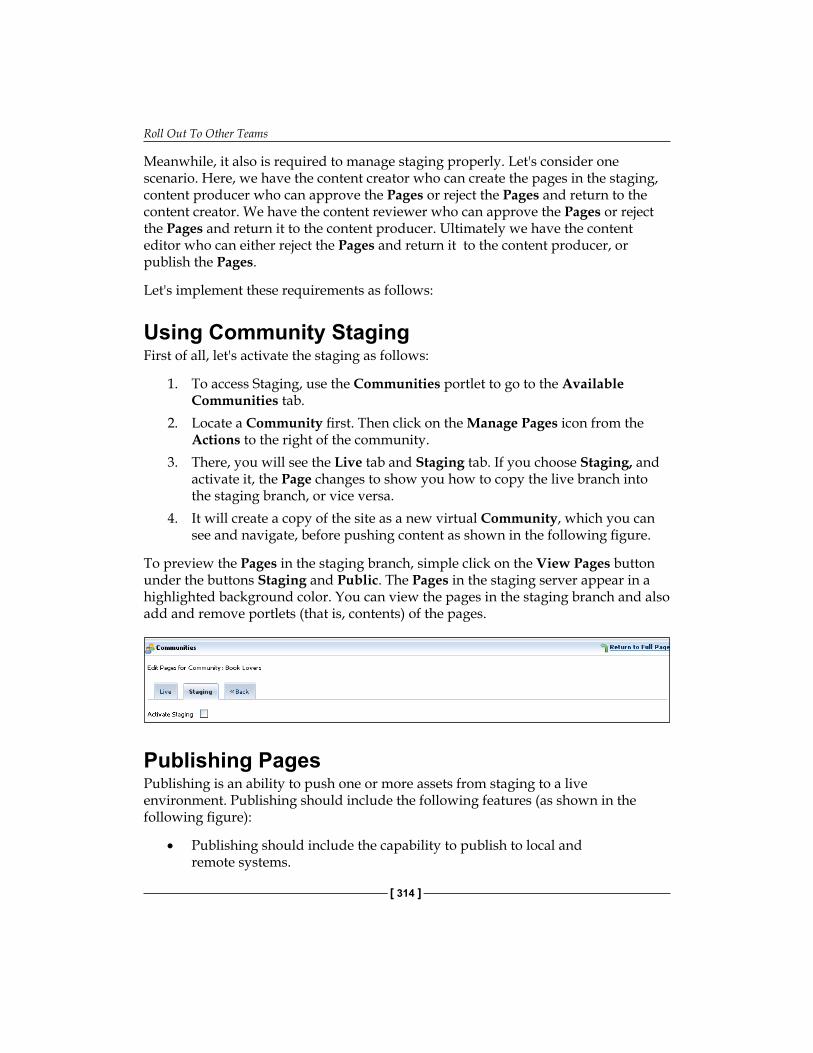
Roll Out To Other Teams
[ 314 ]
Meanwhile, it also is required to manage staging properly. Let's consider one scenario. Here, we have the content creator who can create the pages in the staging, content producer who can approve the Pages or reject the Pages and return to the content creator. We have the content reviewer who can approve the Pages or reject the Pages and return it to the content producer. Ultimately we have the content editor who can either reject the Pages and return it to the content producer, or publish the Pages.
Let's implement these requirements as follows:
Using Community StagingFirst of all, let's activate the staging as follows:
1. To access Staging, use the Communities portlet to go to the Available Communities tab.
2. Locate a Community first. Then click on the Manage Pages icon from the Actions to the right of the community.
3. There, you will see the Live tab and Staging tab. If you choose Staging, and activate it, the Page changes to show you how to copy the live branch into the staging branch, or vice versa.
4. It will create a copy of the site as a new virtual Community, which you can see and navigate, before pushing content as shown in the following figure.
To preview the Pages in the staging branch, simple click on the View Pages button under the buttons Staging and Public. The Pages in the staging server appear in a highlighted background color. You can view the pages in the staging branch and also add and remove portlets (that is, contents) of the pages.
Publishing PagesPublishing is an ability to push one or more assets from staging to a live environment. Publishing should include the following features (as shown in the following figure):
Publishing should include the capability to publish to local and remote systems.
•
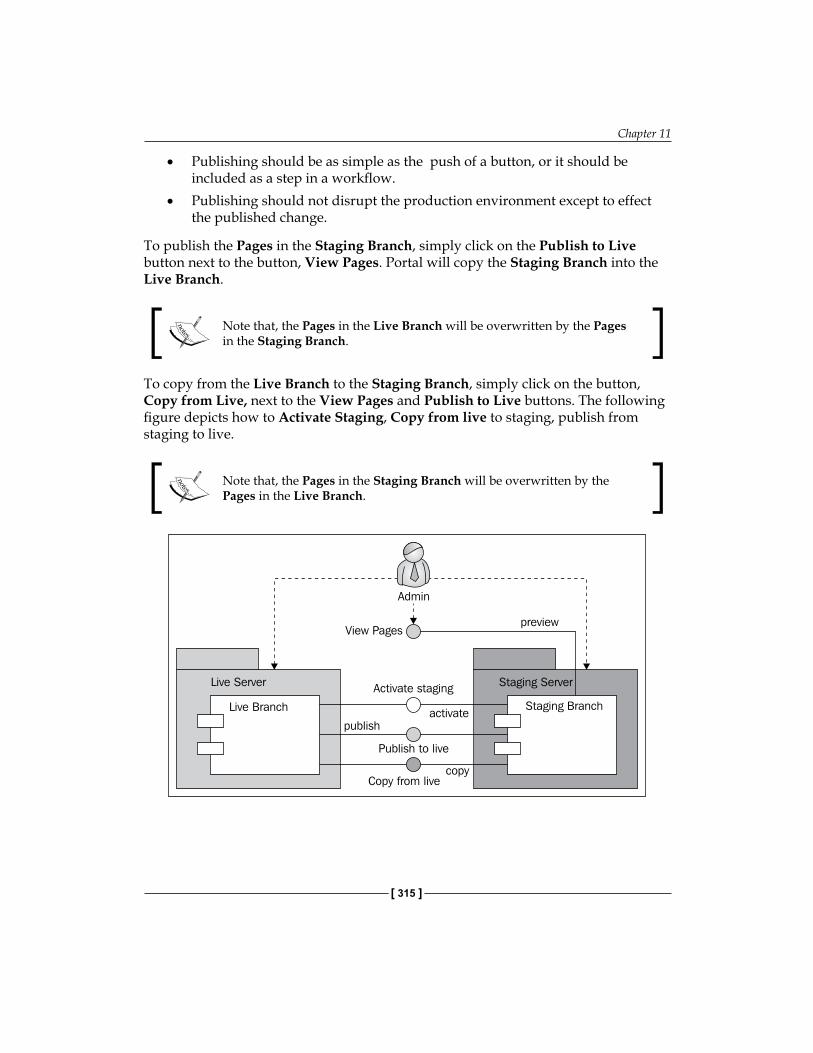
Chapter 11
[ 315 ]
Publishing should be as simple as the push of a button, or it should be included as a step in a workflow. Publishing should not disrupt the production environment except to effect the published change.
To publish the Pages in the Staging Branch, simply click on the Publish to Live button next to the button, View Pages. Portal will copy the Staging Branch into the Live Branch.
Note that, the Pages in the Live Branch will be overwritten by the Pages in the Staging Branch.
To copy from the Live Branch to the Staging Branch, simply click on the button, Copy from Live, next to the View Pages and Publish to Live buttons. The following figure depicts how to Activate Staging, Copy from live to staging, publish from staging to live.
Note that, the Pages in the Staging Branch will be overwritten by the Pages in the Live Branch.
•
•
Roll Out To Other Teams
[ 316 ]
Manage Staging with WorkflowLet's implement the previously mentioned scenario. First of all, let's create a set of Roles as follows:
1. Create a Role, "Content Creator", in the Enterprise Admin portlet.2. Add a User, "Lotti Stein" with the Permissions, View, Update and Delete in
the "Content Creator". 3. At the same time, define Permission, "Manage Pages", for the Role, "Content
Creator", with the Communities portlet.4. Create a Role, "Content Producer" in the Enterprise Admin portlet.5. Add a User, "Rolf Hans", with the Permissions, View, Update and Delete in
the "Content Producer".6. At the same time, define the Permissions, "Manage Pages", "Assign
Reviewer" and "Approve Proposal" for the Role, "Content Producer" with the Communities portlet.
7. Create a Role, "Content Reviewer" in the Enterprise Admin portlet.8. Add a User, "Julia Maurer", with the Permissions, View, Update and Delete
in the "Content Reviewer".9. At the same time, define Permission, "Approve Proposal", for the Role,
"Content Reviewer" with the Communities portlet.10. Create a Role "Content Editor" in the Enterprise Admin portlet.11. Add a User, "David Berger", with the Permissions, View, Update and
Delete in the "Content Editor".12. At the same time, define the Permissions, "Approve Proposal", "Manage
Pages", "Manage Staging" and "Publish Staging" for the Role, "Content Reviewer" with the Communities portlet.
When User Roles are ready, we can configure managed staging workflow. Let's do it as follows:
To access Staging, use the Communities' portlet and go to the Available Communities tab.
Now, we are ready to Activate Managed Staging. Let's use the Community Roles and set up staging and publishing workflow, as shown in the following figure:
1. Activate managed stages by checking on the checkbox.2. Select the Number of Approval Stages, such as "4".3. Select value of "Content Creator" for Stage "1".
•

Chapter 11
[ 317 ]
4. Select value of "Content Producer" for Stage "2".5. Select value of "Content Reviewer" for Stage "3".6. Select value of "Content Editor" for Stage "4".7. Click on the Save button when you are ready.
Now we have Staging and publishing workflow ready. Let's do it as follows:
1. Log in as a Content Creator, say "Lotti Stein". 2. Create a Page, such as "Test", with contents such as Bookmarks.3. Input Proposal publication and assign Reviewer, such as "Rolf Hans".4. Click the Save button when you are ready.5. Log in as a Content Producer, such as "Rolf Hans". 6. You can view Proposals to either approve or reject.7. You can also assign Reviewer, such as "Julia Maurer".8. Log in as a Content Producer, say "Julia Maurer". 9. You can view Proposals to either approve or reject.10. You can also assign Reviewer, such as "David Berger".11. Then Log in as a Content Producer, such as "David Berger". 12. You can view Proposals and reject it.13. Or you can publish it to Live.
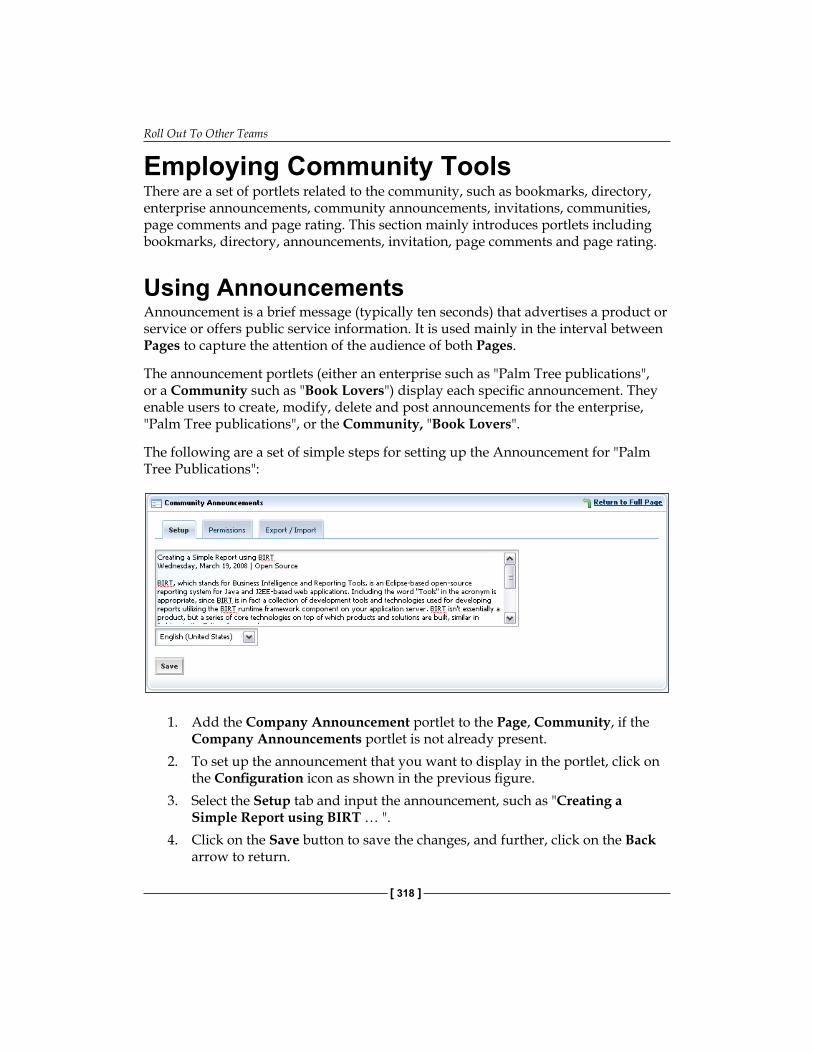
Roll Out To Other Teams
[ 318 ]
Employing Community ToolsThere are a set of portlets related to the community, such as bookmarks, directory, enterprise announcements, community announcements, invitations, communities, page comments and page rating. This section mainly introduces portlets including bookmarks, directory, announcements, invitation, page comments and page rating.
Using AnnouncementsAnnouncement is a brief message (typically ten seconds) that advertises a product or service or offers public service information. It is used mainly in the interval between Pages to capture the attention of the audience of both Pages.
The announcement portlets (either an enterprise such as "Palm Tree publications", or a Community such as "Book Lovers") display each specific announcement. They enable users to create, modify, delete and post announcements for the enterprise, "Palm Tree publications", or the Community, "Book Lovers".
The following are a set of simple steps for setting up the Announcement for "Palm Tree Publications":
1. Add the Company Announcement portlet to the Page, Community, if the Company Announcements portlet is not already present.
2. To set up the announcement that you want to display in the portlet, click on the Configuration icon as shown in the previous figure.
3. Select the Setup tab and input the announcement, such as "Creating a Simple Report using BIRT … ".
4. Click on the Save button to save the changes, and further, click on the Back arrow to return.
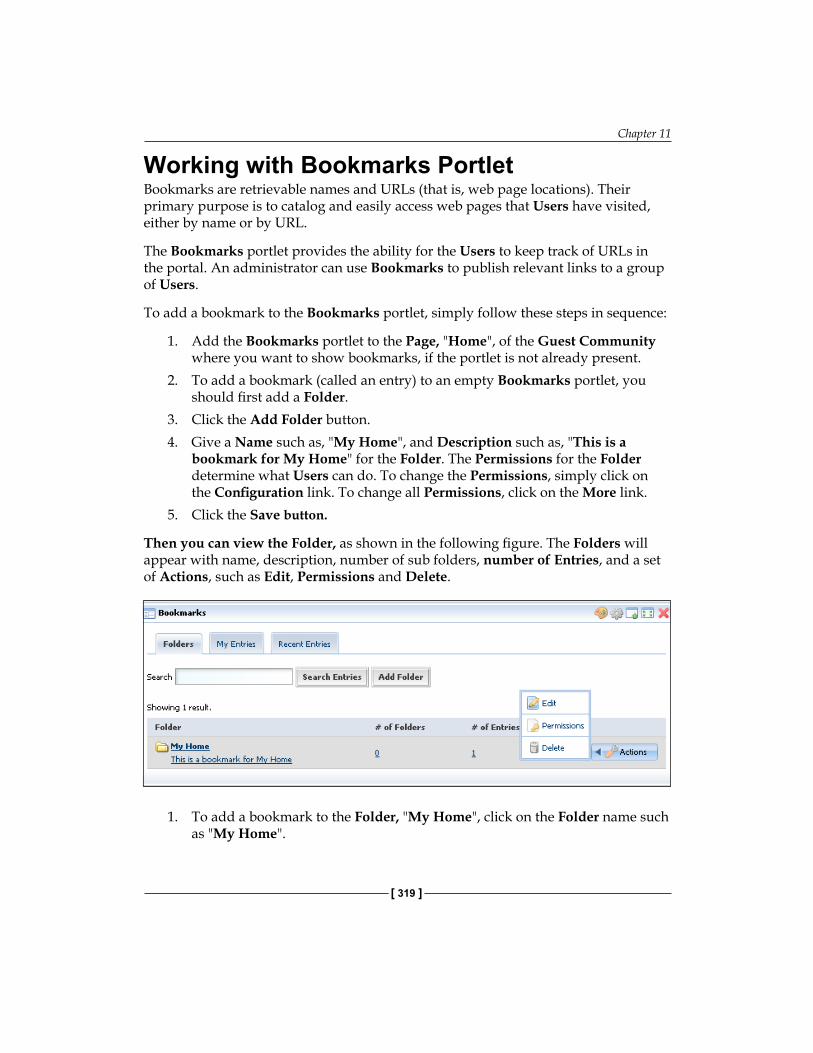
Chapter 11
[ 319 ]
Working with Bookmarks PortletBookmarks are retrievable names and URLs (that is, web page locations). Their primary purpose is to catalog and easily access web pages that Users have visited, either by name or by URL.
The Bookmarks portlet provides the ability for the Users to keep track of URLs in the portal. An administrator can use Bookmarks to publish relevant links to a group of Users.
To add a bookmark to the Bookmarks portlet, simply follow these steps in sequence:
1. Add the Bookmarks portlet to the Page, "Home", of the Guest Community where you want to show bookmarks, if the portlet is not already present.
2. To add a bookmark (called an entry) to an empty Bookmarks portlet, you should first add a Folder.
3. Click the Add Folder button.4. Give a Name such as, "My Home", and Description such as, "This is a
bookmark for My Home" for the Folder. The Permissions for the Folder determine what Users can do. To change the Permissions, simply click on the Configuration link. To change all Permissions, click on the More link.
5. Click the Save button.
Then you can view the Folder, as shown in the following figure. The Folders will appear with name, description, number of sub folders, number of Entries, and a set of Actions, such as Edit, Permissions and Delete.
1. To add a bookmark to the Folder, "My Home", click on the Folder name such as "My Home".
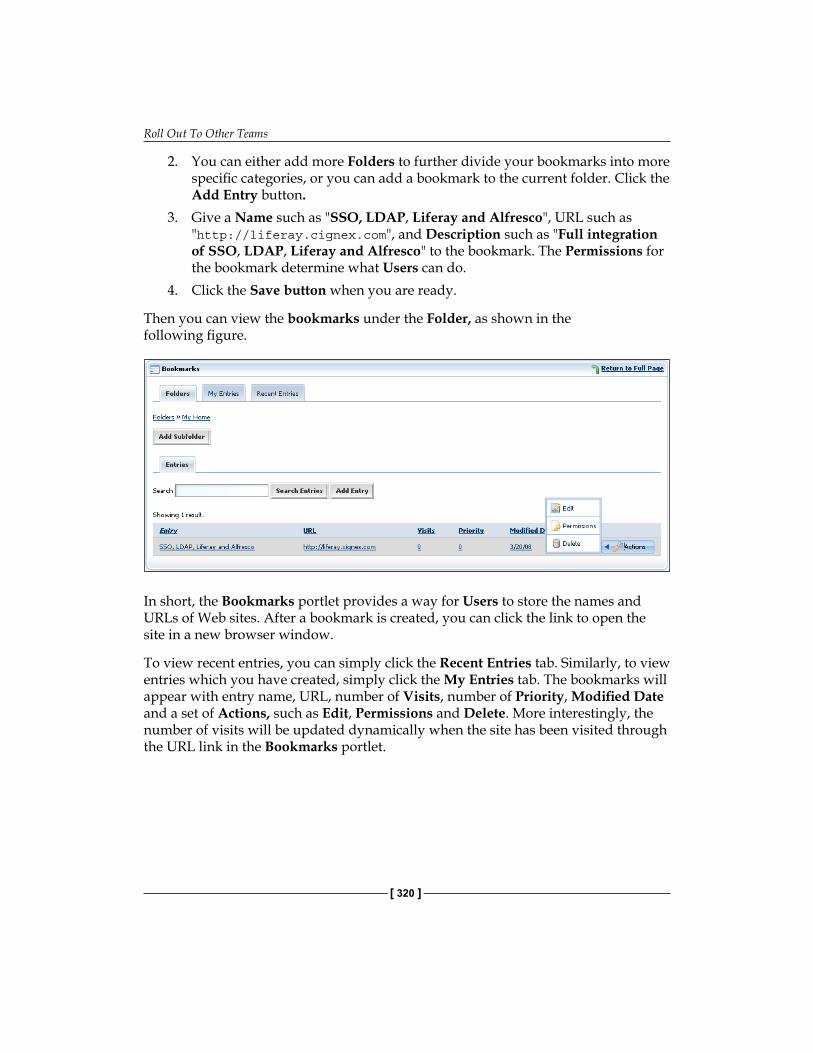
Roll Out To Other Teams
[ 320 ]
2. You can either add more Folders to further divide your bookmarks into more specific categories, or you can add a bookmark to the current folder. Click the Add Entry button.
3. Give a Name such as "SSO, LDAP, Liferay and Alfresco", URL such as "http://liferay.cignex.com", and Description such as "Full integration of SSO, LDAP, Liferay and Alfresco" to the bookmark. The Permissions for the bookmark determine what Users can do.
4. Click the Save button when you are ready.
Then you can view the bookmarks under the Folder, as shown in the following figure.
In short, the Bookmarks portlet provides a way for Users to store the names and URLs of Web sites. After a bookmark is created, you can click the link to open the site in a new browser window.
To view recent entries, you can simply click the Recent Entries tab. Similarly, to view entries which you have created, simply click the My Entries tab. The bookmarks will appear with entry name, URL, number of Visits, number of Priority, Modified Date and a set of Actions, such as Edit, Permissions and Delete. More interestingly, the number of visits will be updated dynamically when the site has been visited through the URL link in the Bookmarks portlet.

Chapter 11
[ 321 ]
Using Directory PortletThe Directory portlet provides the ability to display a list of Users registered on the portal. The Directory portlet displays personal information for individual Users and also gives listings of available Organizations and User Groups.
You can find Users through basic Search, as shown in the following figure. You just input the search criterion and click the Search Users button. Similarly, you can find Users through Advanced Search. You just click on the Advanced link first, and then input Search criterions for advanced search, and then click on the Search Users button. Moreover, you can find Users, by available Organizations as well as User Groups.
Working with Invitation PortletThe Invitation portlet allows you to invite friends to come and see your web sites, or portal pages. The following are a simple set of steps to invite friends using the Invitation Portlet (as shown in the following figure):
1. Add the Invitation portlet in the page, "Home", of the Guest Community where you want to invite friends, if the portlet is not already present.
2. Click on the Invite Friends link.

Roll Out To Other Teams
[ 322 ]
3. Enter up to 20 email addresses of friends whom you would like to invite. Enter one email address per line as shown in the following figure.
4. Click on the Invite Friends button when you are ready.5. To change the email setup and Permissions for Users, simply click on the
Configuration icon at the top right of the portlet. The number of email addresses of friends you would like to invite is configurable. You can change the number of recipients (at system-ext.properties) as follows:
invitation.email.max.recipients=20
Using Page Comments PortletThe Page Comments portlet allows you to add page comments easily in your portal page. Using this portlet, you can easily add, or edit, or delete Page Comments. Let's do is as follows:
1. Add the Page Comments portlet in the Page, "Home", of the Guest community where you want to add Page Comments, if the portlet is not already present.
2. Click the Post Reply link, if you want to add Page Comments.3. Input your Page Comments. Click the Reply button to save the inputs, or the
Cancel button to cancel the inputs.
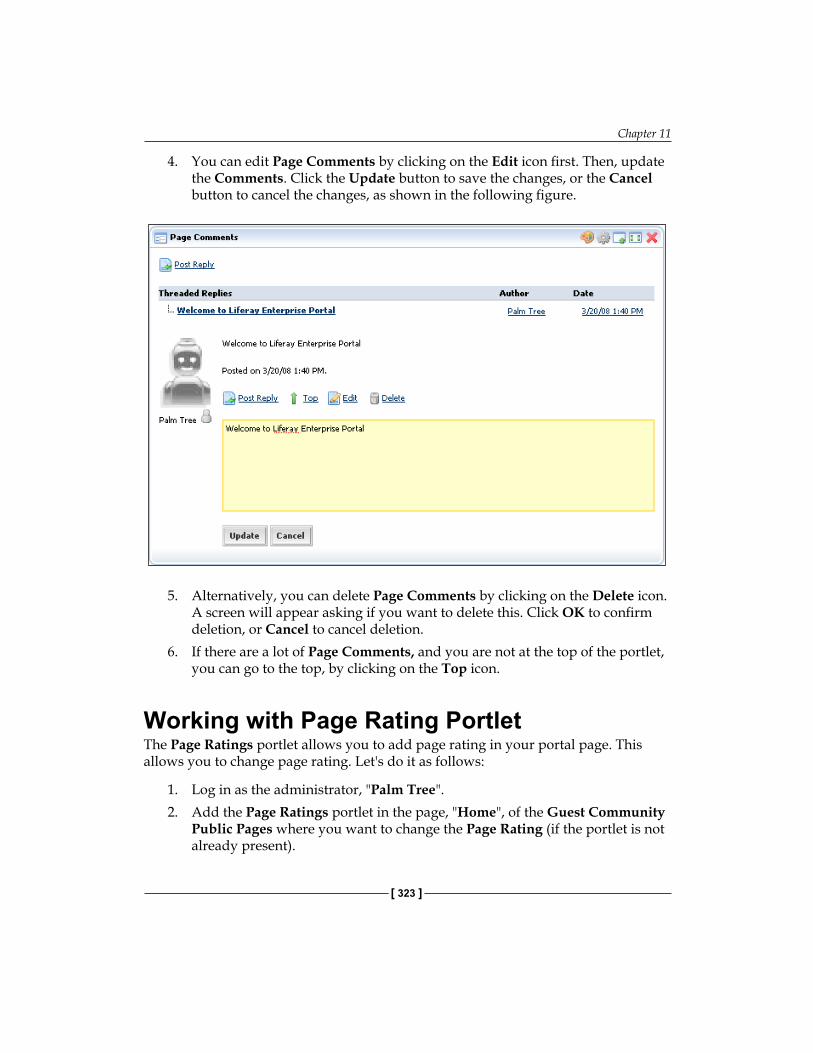
Chapter 11
[ 323 ]
4. You can edit Page Comments by clicking on the Edit icon first. Then, update the Comments. Click the Update button to save the changes, or the Cancel button to cancel the changes, as shown in the following figure.
5. Alternatively, you can delete Page Comments by clicking on the Delete icon. A screen will appear asking if you want to delete this. Click OK to confirm deletion, or Cancel to cancel deletion.
6. If there are a lot of Page Comments, and you are not at the top of the portlet, you can go to the top, by clicking on the Top icon.
Working with Page Rating PortletThe Page Ratings portlet allows you to add page rating in your portal page. This allows you to change page rating. Let's do it as follows:
1. Log in as the administrator, "Palm Tree".2. Add the Page Ratings portlet in the page, "Home", of the Guest Community
Public Pages where you want to change the Page Rating (if the portlet is not already present).
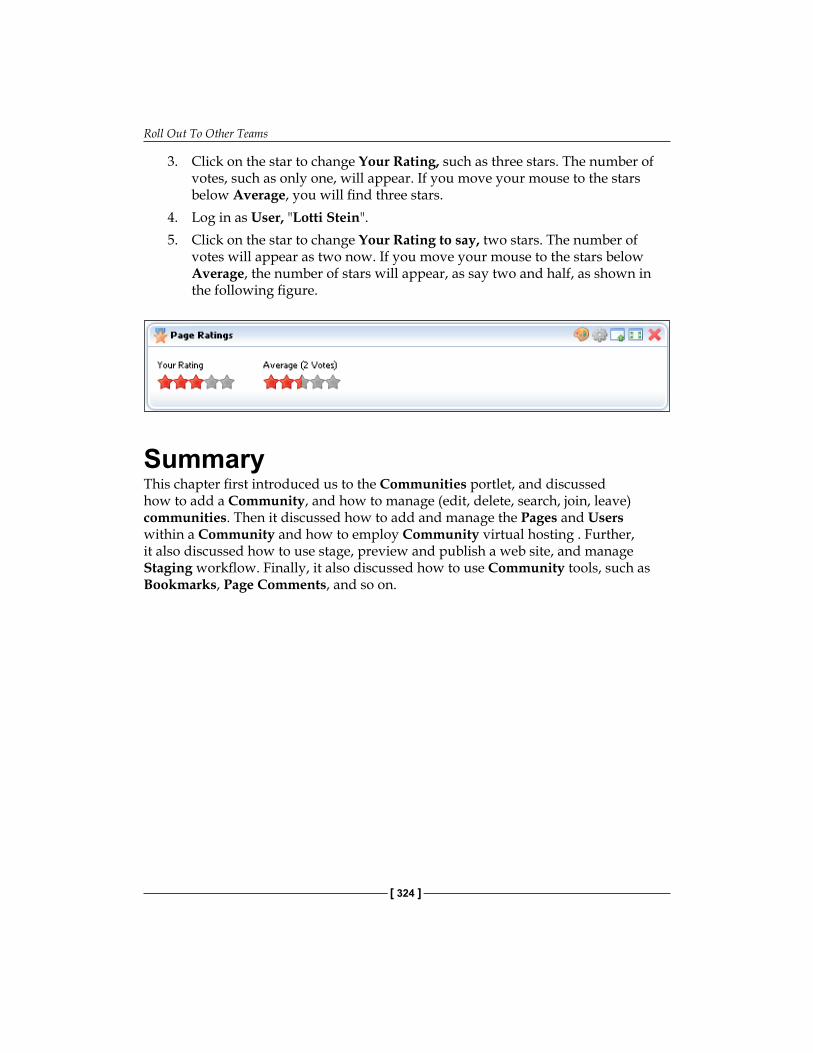
Roll Out To Other Teams
[ 324 ]
3. Click on the star to change Your Rating, such as three stars. The number of votes, such as only one, will appear. If you move your mouse to the stars below Average, you will find three stars.
4. Log in as User, "Lotti Stein".5. Click on the star to change Your Rating to say, two stars. The number of
votes will appear as two now. If you move your mouse to the stars below Average, the number of stars will appear, as say two and half, as shown in the following figure.
SummaryThis chapter first introduced us to the Communities portlet, and discussed how to add a Community, and how to manage (edit, delete, search, join, leave) communities. Then it discussed how to add and manage the Pages and Users within a Community and how to employ Community virtual hosting . Further, it also discussed how to use stage, preview and publish a web site, and manage Staging workflow. Finally, it also discussed how to use Community tools, such as Bookmarks, Page Comments, and so on.
SearchIn the intranet website "book.com" of "Palm Tree Publications", we are required to query Message Boards entries, Blogs posts, Wikis Articles, Users at Directory and contents at Document Library, bookmarks entries, Images at Image Gallery, and so on. Furthermore, a lot of contents are stored and managed in the alfresco server. Thus, it is also required to search alfresco contents in the intranet websites. Meanwhile, it would be very helpful to provide maps search and CSZ (City, State, and Zip code) search in the intranet websites as well as Google Maps and Google Search.
This chapter first will introduce a federated search for Message Boards entries, Blogs posts, Wikis Articles, users of Directory and the contents at Document Library, Bookmarks entries, and alfresco contents. Then, it will describe a CSZ search, maps search, Google Maps and Google search portlets. Further, it will also discuss the OpenSearch concept and the Journal content search portlet, in detail. Finally, this chapter will discuss how to use the sitemap for search engines, and how to deploy and manage search portlets.
By the end of this chapter, you will have learnt how to:
Employ federated search.Integrate search against alfresco contents.Use CSZ search and map search.Employ Google search and Google maps.Understand OpenSearch within alfresco content portlet.Use Journal Content search.Configure sitemap for search engines.Deploy search portlets Manage search portlets.
•
•
•
•
•
•
•
•
•
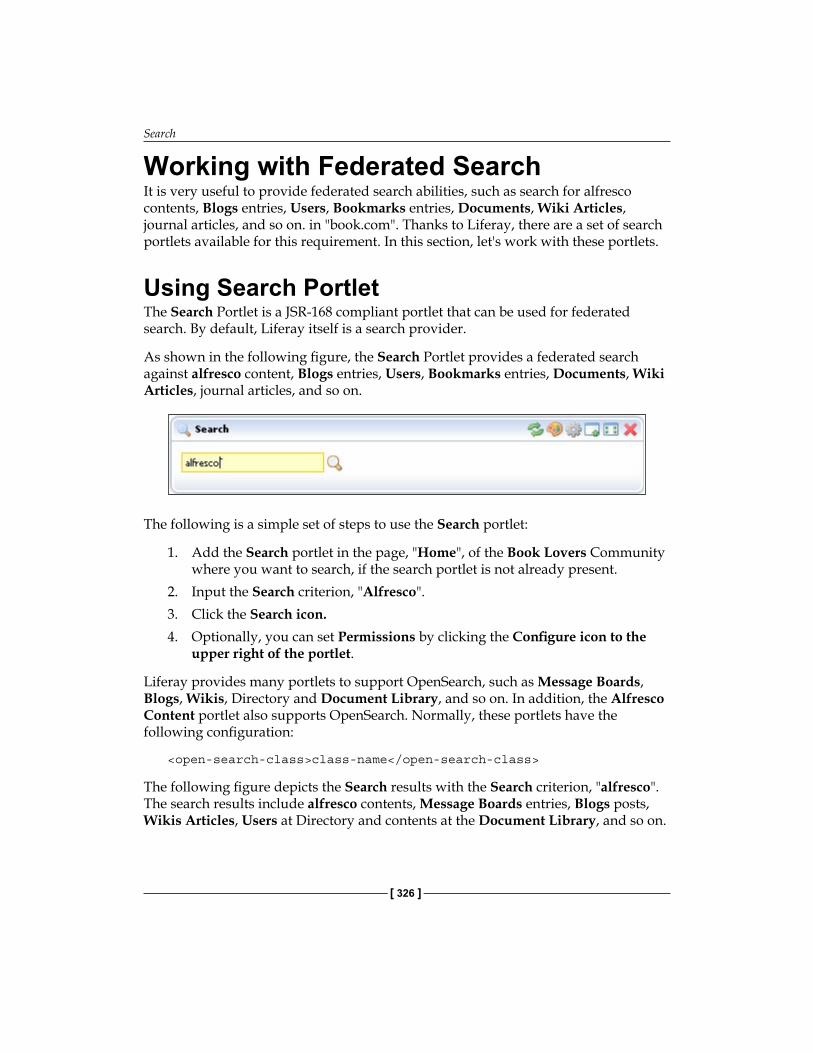
Search
[ 326 ]
Working with Federated SearchIt is very useful to provide federated search abilities, such as search for alfresco contents, Blogs entries, Users, Bookmarks entries, Documents, Wiki Articles, journal articles, and so on. in "book.com". Thanks to Liferay, there are a set of search portlets available for this requirement. In this section, let's work with these portlets.
Using Search PortletThe Search Portlet is a JSR-168 compliant portlet that can be used for federated search. By default, Liferay itself is a search provider.
As shown in the following figure, the Search Portlet provides a federated search against alfresco content, Blogs entries, Users, Bookmarks entries, Documents, Wiki Articles, journal articles, and so on.
The following is a simple set of steps to use the Search portlet:
1. Add the Search portlet in the page, "Home", of the Book Lovers Community where you want to search, if the search portlet is not already present.
2. Input the Search criterion, "Alfresco".3. Click the Search icon. 4. Optionally, you can set Permissions by clicking the Configure icon to the
upper right of the portlet.
Liferay provides many portlets to support OpenSearch, such as Message Boards, Blogs, Wikis, Directory and Document Library, and so on. In addition, the Alfresco Content portlet also supports OpenSearch. Normally, these portlets have the following configuration:
<open-search-class>class-name</open-search-class>
The following figure depicts the Search results with the Search criterion, "alfresco". The search results include alfresco contents, Message Boards entries, Blogs posts, Wikis Articles, Users at Directory and contents at the Document Library, and so on.
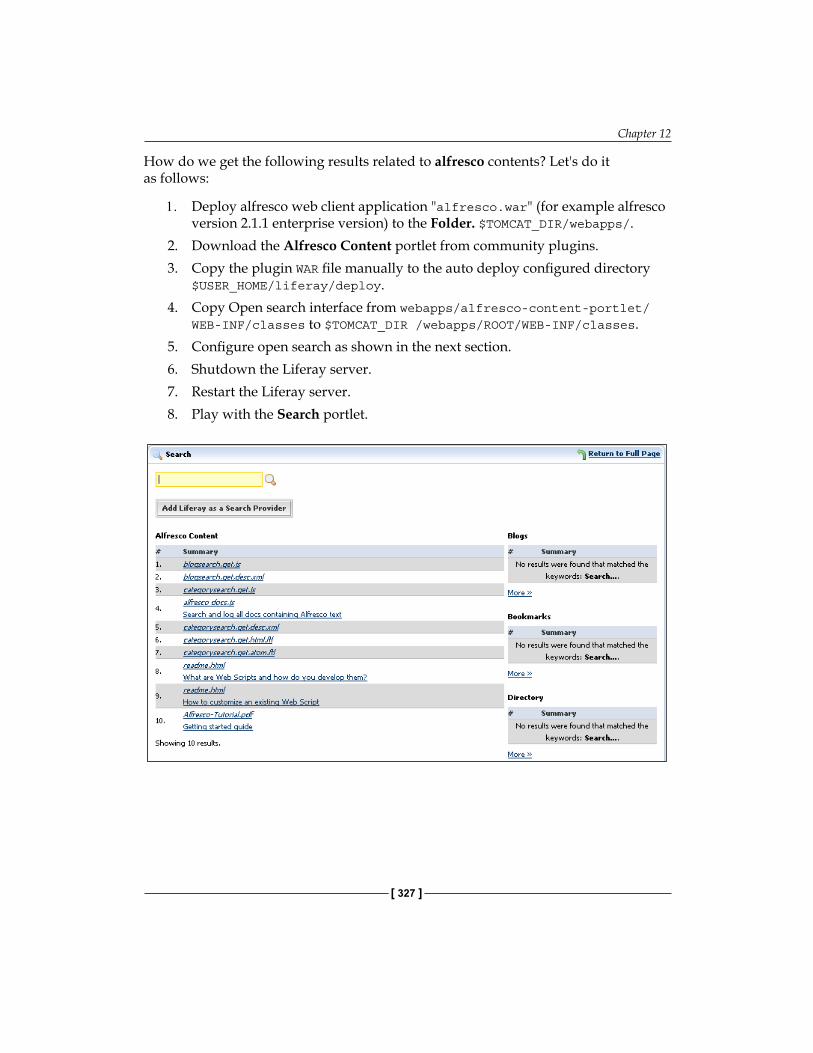
Chapter 12
[ 327 ]
How do we get the following results related to alfresco contents? Let's do it as follows:
1. Deploy alfresco web client application "alfresco.war" (for example alfresco version 2.1.1 enterprise version) to the Folder. $TOMCAT_DIR/webapps/.
2. Download the Alfresco Content portlet from community plugins.3. Copy the plugin WAR file manually to the auto deploy configured directory
$USER_HOME/liferay/deploy.4. Copy Open search interface from webapps/alfresco-content-portlet/
WEB-INF/classes to $TOMCAT_DIR /webapps/ROOT/WEB-INF/classes.5. Configure open search as shown in the next section.6. Shutdown the Liferay server.7. Restart the Liferay server.8. Play with the Search portlet.
Search
[ 328 ]
Query Alfresco Content via OpenSearchAlfresco does not ony provide the ability to expose its search engines via OpenSearch, but it also provides an aggregate OpenSearch feature in the Alfresco Web Client. Moreover, alfresco keyword search mimics the keyword search of the Alfresco Web Client.
First, let's view the search URL template as follows:
http://<host>:<port>/alfresco/service/api/search/keyword?q={searchTerms}&p={startPage?}&c={count?}&l={language?}
where:
searchTerms = keyword or keywords to search.startPage (optional) = the page number of search results desired by the client.count (optional) = the number of search results per page (default: 10).language (optional) = the locale to search with (XML 1.0 Language ID for example en-GB).
Then in order to let the Alfresco Content portlet support OpenSearch, we need to simply set the open-search-class value (at liferay-portlet.xml) as follows:
<open-search-class>com.liferay.portlet.alfrescocontent.util.AlfrescoOpenSearchImpl</open-search-class>
Finally, in Liferay portal, we need to let the Search Portlet know that the Alfresco Content portlet supports OpenSearch, and sets the values used to query Alfresco via OpenSearch as follows:
open.search.enabled=trueopen.search.protocol=httpopen.search.host=localhostopen.search.port=8080open.search.realm=Alfrescoopen.search.username=adminopen.search.password=adminopen.search.path=/alfresco/service/search/keyword
If the domain for alfresco server was sesame.cignex.com, and port number was 80, we can set the values used to query Alfresco via OpenSearch as follows:
open.search.enabled=trueopen.search.protocol=httpopen.search.host=sesame.cignex.comopen.search.port=80
•
•
•
•
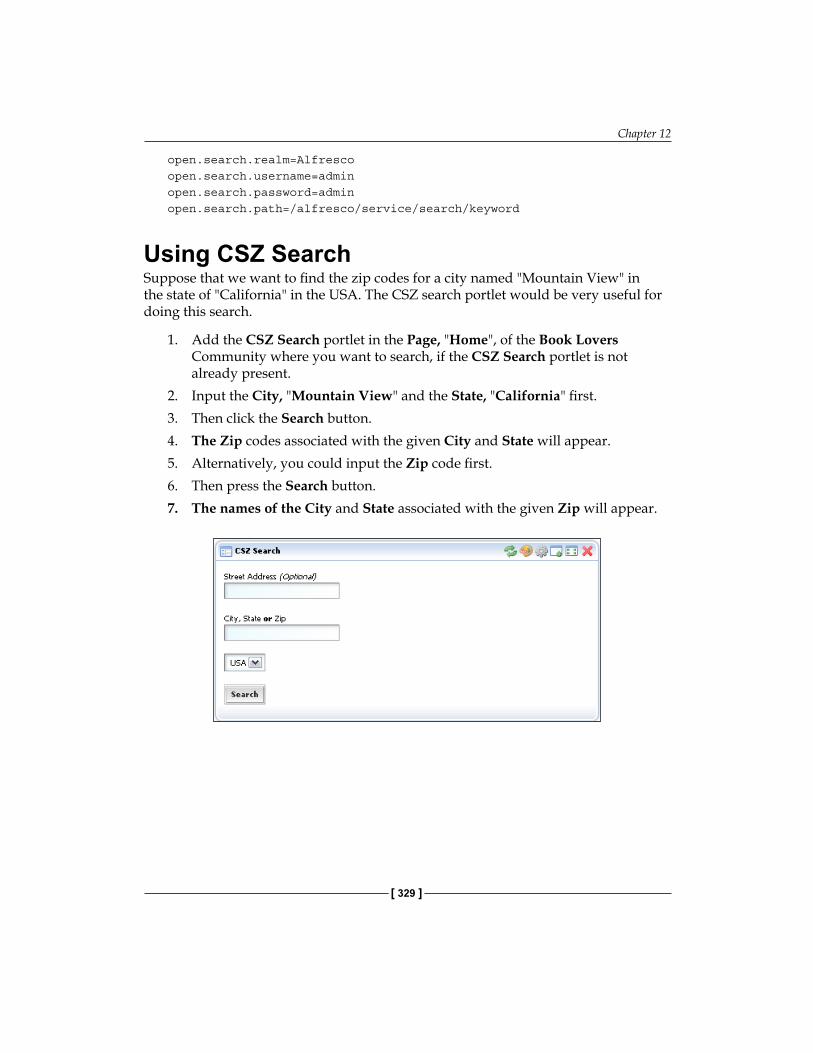
Chapter 12
[ 329 ]
open.search.realm=Alfrescoopen.search.username=adminopen.search.password=adminopen.search.path=/alfresco/service/search/keyword
Using CSZ SearchSuppose that we want to find the zip codes for a city named "Mountain View" in the state of "California" in the USA. The CSZ search portlet would be very useful for doing this search.
1. Add the CSZ Search portlet in the Page, "Home", of the Book Lovers Community where you want to search, if the CSZ Search portlet is not already present.
2. Input the City, "Mountain View" and the State, "California" first. 3. Then click the Search button.4. The Zip codes associated with the given City and State will appear.5. Alternatively, you could input the Zip code first. 6. Then press the Search button. 7. The names of the City and State associated with the given Zip will appear.

Search
[ 330 ]
The following figure depicts the CSZ Search example and search results. It shows all the related zip codes for the City, "Mountain View" and State, "California" in the USA.
In general, the CSZ (City, State and Zip) search portlet provides a way to Search Zip codes by address, City and State, or to Search City and State by Zip code. USPS ZIP code lookup is used as a web service provider.
USPS (U.S. Postal Service) provides services for ZIP code lookup, URL: http://www.usps.com/zip4/.
Using Maps SearchSuppose that we know the City name, say "Mountain View", and the State name, say such "California", in the USA and we want to find the related maps. The Maps portlet would be useful for this purpose.
1. Add the Maps portlet in the Page, "Home", of the Book Lovers Community where you want to search for maps, if the Maps portlet is not already present.
2. Input the Address, City as "Mountain View", State as "California", the related Zip code and the country as "USA" first.
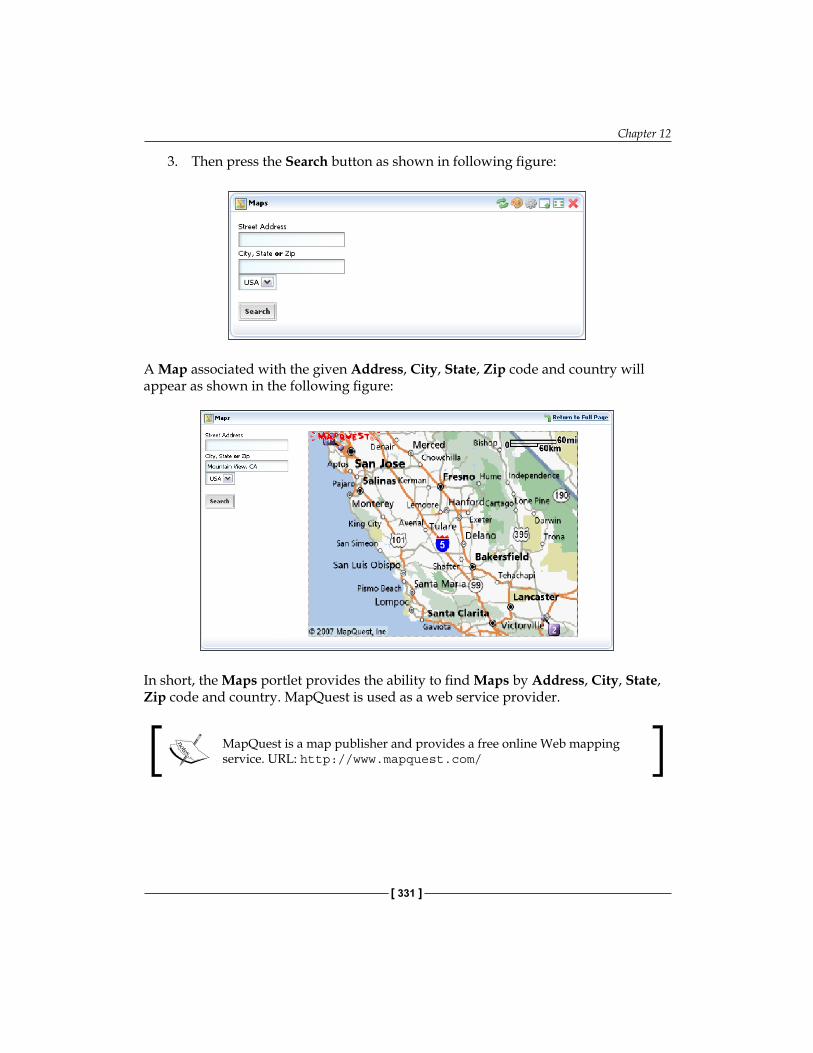
Chapter 12
[ 331 ]
3. Then press the Search button as shown in following figure:
A Map associated with the given Address, City, State, Zip code and country will appear as shown in the following figure:
In short, the Maps portlet provides the ability to find Maps by Address, City, State, Zip code and country. MapQuest is used as a web service provider.
MapQuest is a map publisher and provides a free online Web mapping service. URL: http://www.mapquest.com/
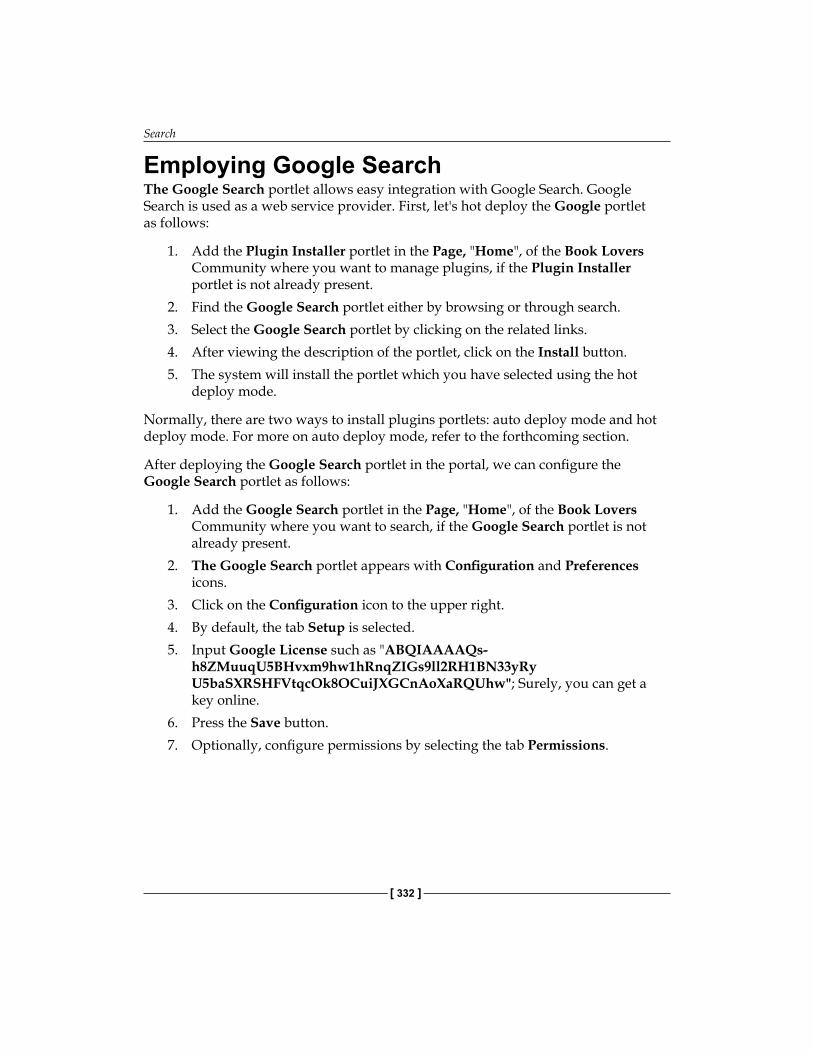
Search
[ 332 ]
Employing Google SearchThe Google Search portlet allows easy integration with Google Search. Google Search is used as a web service provider. First, let's hot deploy the Google portlet as follows:
1. Add the Plugin Installer portlet in the Page, "Home", of the Book Lovers Community where you want to manage plugins, if the Plugin Installer portlet is not already present.
2. Find the Google Search portlet either by browsing or through search.3. Select the Google Search portlet by clicking on the related links.4. After viewing the description of the portlet, click on the Install button.5. The system will install the portlet which you have selected using the hot
deploy mode.
Normally, there are two ways to install plugins portlets: auto deploy mode and hot deploy mode. For more on auto deploy mode, refer to the forthcoming section.
After deploying the Google Search portlet in the portal, we can configure the Google Search portlet as follows:
1. Add the Google Search portlet in the Page, "Home", of the Book Lovers Community where you want to search, if the Google Search portlet is not already present.
2. The Google Search portlet appears with Configuration and Preferences icons.
3. Click on the Configuration icon to the upper right. 4. By default, the tab Setup is selected.5. Input Google License such as "ABQIAAAAQs-
h8ZMuuqU5BHvxm9hw1hRnqZIGs9ll2RH1BN33yRy U5baSXRSHFVtqcOk8OCuiJXGCnAoXaRQUhw"; Surely, you can get a key online.
6. Press the Save button. 7. Optionally, configure permissions by selecting the tab Permissions.
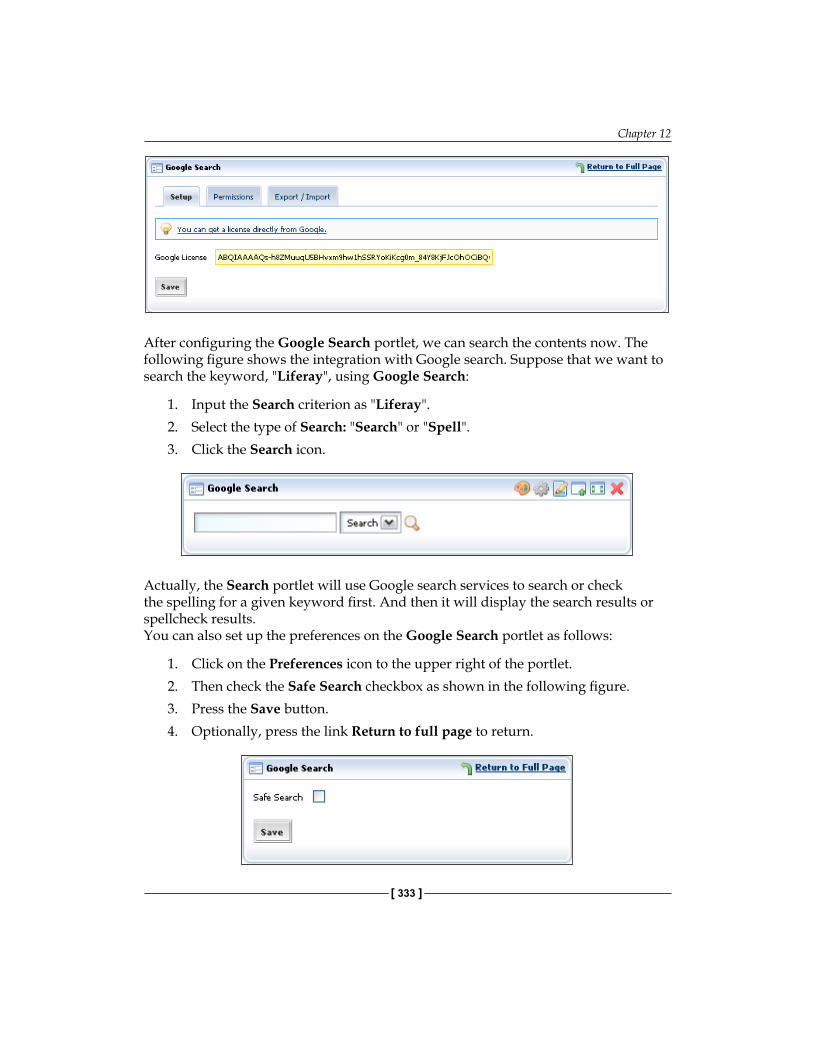
Chapter 12
[ 333 ]
After configuring the Google Search portlet, we can search the contents now. The following figure shows the integration with Google search. Suppose that we want to search the keyword, "Liferay", using Google Search:
1. Input the Search criterion as "Liferay".2. Select the type of Search: "Search" or "Spell".3. Click the Search icon.
Actually, the Search portlet will use Google search services to search or check the spelling for a given keyword first. And then it will display the search results or spellcheck results.You can also set up the preferences on the Google Search portlet as follows:
1. Click on the Preferences icon to the upper right of the portlet. 2. Then check the Safe Search checkbox as shown in the following figure. 3. Press the Save button. 4. Optionally, press the link Return to full page to return.
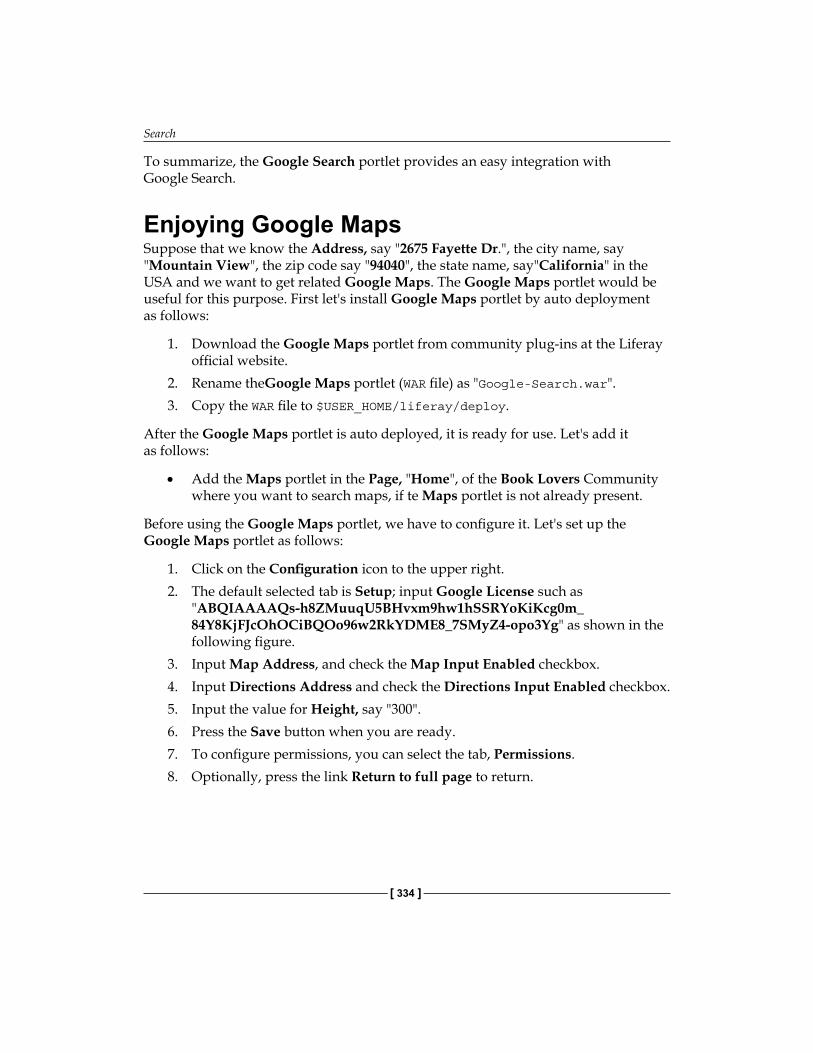
Search
[ 334 ]
To summarize, the Google Search portlet provides an easy integration with Google Search.
Enjoying Google MapsSuppose that we know the Address, say "2675 Fayette Dr.", the city name, say "Mountain View", the zip code say "94040", the state name, say"California" in the USA and we want to get related Google Maps. The Google Maps portlet would be useful for this purpose. First let's install Google Maps portlet by auto deployment as follows:
1. Download the Google Maps portlet from community plug-ins at the Liferay official website.
2. Rename theGoogle Maps portlet (WAR file) as "Google-Search.war".3. Copy the WAR file to $USER_HOME/liferay/deploy.
After the Google Maps portlet is auto deployed, it is ready for use. Let's add it as follows:
Add the Maps portlet in the Page, "Home", of the Book Lovers Community where you want to search maps, if te Maps portlet is not already present.
Before using the Google Maps portlet, we have to configure it. Let's set up the Google Maps portlet as follows:
1. Click on the Configuration icon to the upper right. 2. The default selected tab is Setup; input Google License such as
"ABQIAAAAQs-h8ZMuuqU5BHvxm9hw1hSSRYoKiKcg0m_84Y8KjFJcOhOCiBQOo96w2RkYDME8_7SMyZ4-opo3Yg" as shown in the following figure.
3. Input Map Address, and check the Map Input Enabled checkbox. 4. Input Directions Address and check the Directions Input Enabled checkbox.5. Input the value for Height, say "300".6. Press the Save button when you are ready.7. To configure permissions, you can select the tab, Permissions. 8. Optionally, press the link Return to full page to return.
•
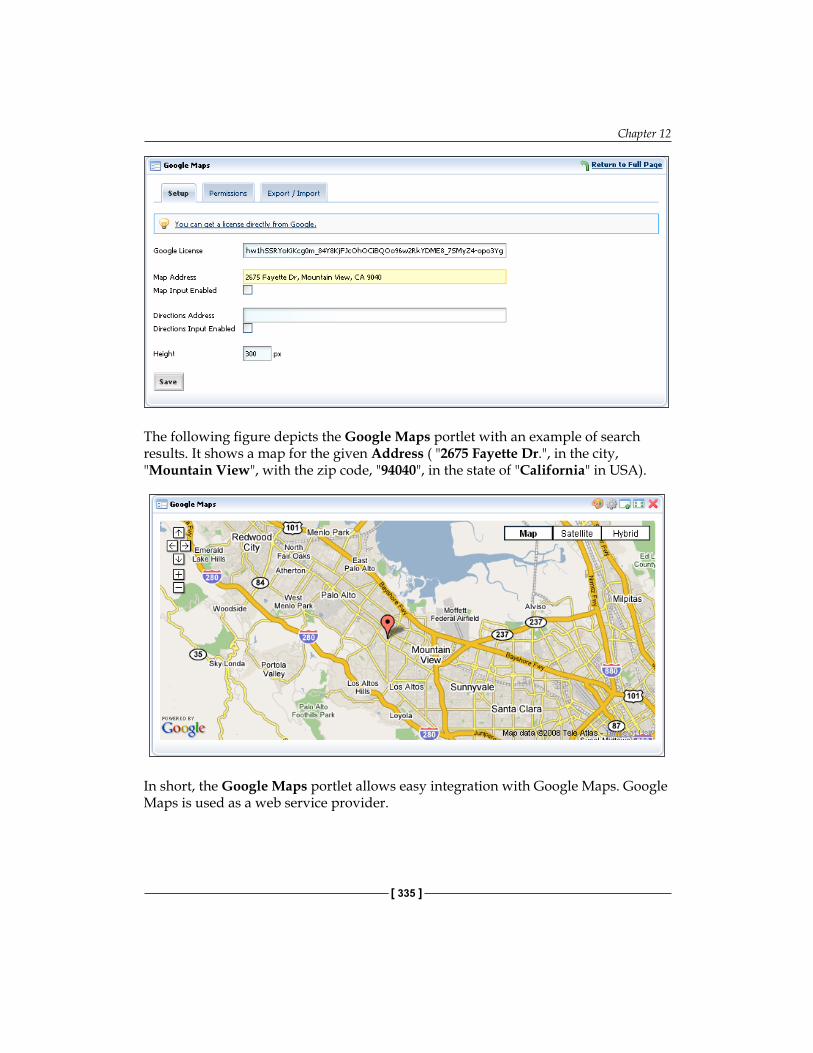
Chapter 12
[ 335 ]
The following figure depicts the Google Maps portlet with an example of search results. It shows a map for the given Address ( "2675 Fayette Dr.", in the city, "Mountain View", with the zip code, "94040", in the state of "California" in USA).
In short, the Google Maps portlet allows easy integration with Google Maps. Google Maps is used as a web service provider.
Search
[ 336 ]
Google Maps provide directions, interactive maps, and satellite/aerial imagery of the United States. URL: http:// maps.google.com.
Using OpenSearch EffectivelyAs stated before, we use OpenSearch to integrate alfresco contents in the Alfresco Content portlet. So, what's OpenSearch? Why is OpenSearch useful?
OpenSearch is a collection of simple formats, which enable the sharing of search results (refer to OpenSearch at http://www.opensearch.org). Generally speaking, OpenSearch allows the publishing of search results in a format for syndication and aggregation. It is a useful way for both websites and search engines to publish search results in a standard and accessible format.
Design PrinciplesOpenSearch consists of the following elements (refer to OpenSearch at http://www.opensearch.org):
Description: XML files that identify and describe a search engine. Query Syntax: describes where to retrieve the search results.RSS or Response: format for providing open search results.Aggregators: Sites that can display OpenSearch results.Auto-discovery: signals the presence of a search plug-in link to the User, and the link embedded in the header of HTML pages.
OpenSearch Description lists search result or responses for the given website. It provides support for multiple responses in any format. Generally speaking, RSS and Atom are the only ones formally supported by OpenSearch aggregators. However, other types, such as HTML are perfectly acceptable.
OpenSearch Specification OpenSearch description document defines three kinds of elements in general: the OpenSearch Query element, the OpenSearch URL template syntax, and the OpenSearch Response elements.
OpenSearch description documents are referred to, via the following type:
application/opensearchdescription+xml
•
•
•
•
•
Chapter 12
[ 337 ]
The XML Namespaces URI for the XML data formats described in this specification by default is:
http://a9.com/-/spec/opensearch/1.1/
Example of a simple OpenSearch description document:
<?xml version="1.0" encoding="UTF-8"?> <OpenSearchDescription xmlns="http://a9.com/-/spec/opensearch/1.1/"> <ShortName>Web Search</ShortName> <Description>Use Book.com to search the Web.</Description> <Tags>Book website</Tags> <Contact>[email protected]</Contact> <Url type="application/rss+xml" template="http://book.com/?q={searchTerms}&pw={startPage?}&format=rss"/> </OpenSearchDescription>
As shown in the following table, the root node of the OpenSearch description document is OpenSearchDescription. We can use this table as a reference for OpenSearch specification (refer to OpenSearch at http://www.opensearch.org).
Element Name DescriptionOpenSearchDescription Is the root node of the OpenSearch description document.ShortName Contains a brief human-readable title that identifies this search. Description Contains a human-readable text description of the search
engine. URL Describes an interface by which a search client can make search
requests of the search engine.Contact Contains an email address at which the maintainer of the
description document can be reached.Tags Contains a set of words that are used as keywords to identify
and categorize this search contentLongName Contains an extended human-readable title that identifies this
search engine.Image Contains an image that identifies this search engine.Query Defines a search query that can be performed by search clients.Developer Contains the human-readable name or identifier of the creator
or maintainer of the description document.Attribution Contains a list of all sources or entities that should be credited
for the content contained in the search feed.SyndicationRight Contains a value that indicates the degree to which the
search results provided by this search engine can be queried, displayed, and redistributed.
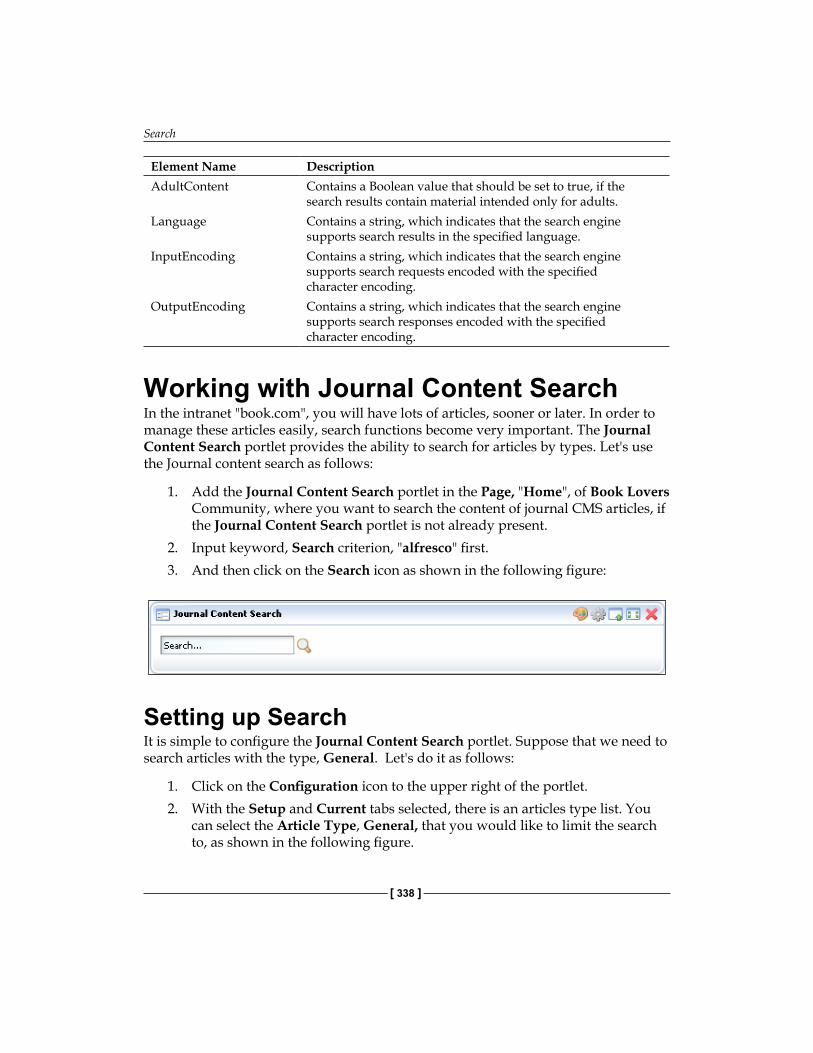
Search
[ 338 ]
Element Name DescriptionAdultContent Contains a Boolean value that should be set to true, if the
search results contain material intended only for adults.Language Contains a string, which indicates that the search engine
supports search results in the specified language.InputEncoding Contains a string, which indicates that the search engine
supports search requests encoded with the specified character encoding.
OutputEncoding Contains a string, which indicates that the search engine supports search responses encoded with the specified character encoding.
Working with Journal Content SearchIn the intranet "book.com", you will have lots of articles, sooner or later. In order to manage these articles easily, search functions become very important. The Journal Content Search portlet provides the ability to search for articles by types. Let's use the Journal content search as follows:
1. Add the Journal Content Search portlet in the Page, "Home", of Book Lovers Community, where you want to search the content of journal CMS articles, if the Journal Content Search portlet is not already present.
2. Input keyword, Search criterion, "alfresco" first. 3. And then click on the Search icon as shown in the following figure:
Setting up SearchIt is simple to configure the Journal Content Search portlet. Suppose that we need to search articles with the type, General. Let's do it as follows:
1. Click on the Configuration icon to the upper right of the portlet. 2. With the Setup and Current tabs selected, there is an articles type list. You
can select the Article Type, General, that you would like to limit the search to, as shown in the following figure.
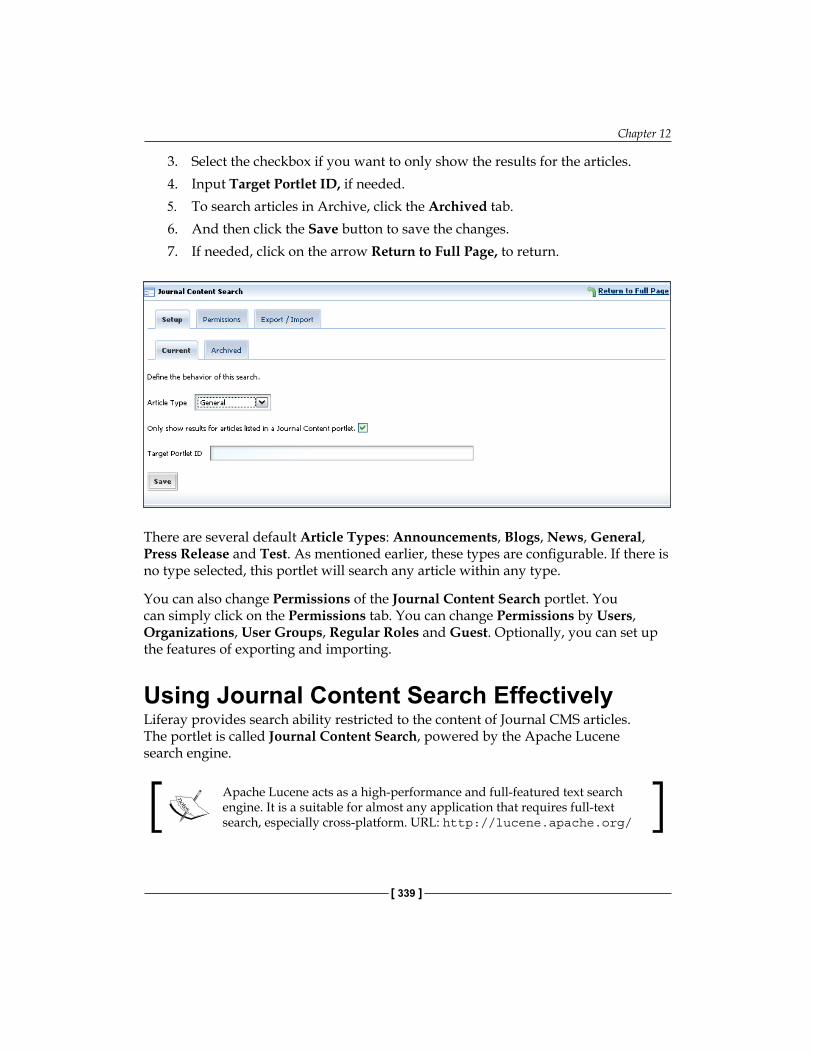
Chapter 12
[ 339 ]
3. Select the checkbox if you want to only show the results for the articles.4. Input Target Portlet ID, if needed.5. To search articles in Archive, click the Archived tab.6. And then click the Save button to save the changes. 7. If needed, click on the arrow Return to Full Page, to return.
There are several default Article Types: Announcements, Blogs, News, General, Press Release and Test. As mentioned earlier, these types are configurable. If there is no type selected, this portlet will search any article within any type.
You can also change Permissions of the Journal Content Search portlet. You can simply click on the Permissions tab. You can change Permissions by Users, Organizations, User Groups, Regular Roles and Guest. Optionally, you can set up the features of exporting and importing.
Using Journal Content Search EffectivelyLiferay provides search ability restricted to the content of Journal CMS articles. The portlet is called Journal Content Search, powered by the Apache Lucene search engine.
Apache Lucene acts as a high-performance and full-featured text search engine. It is a suitable for almost any application that requires full-text search, especially cross-platform. URL: http://lucene.apache.org/
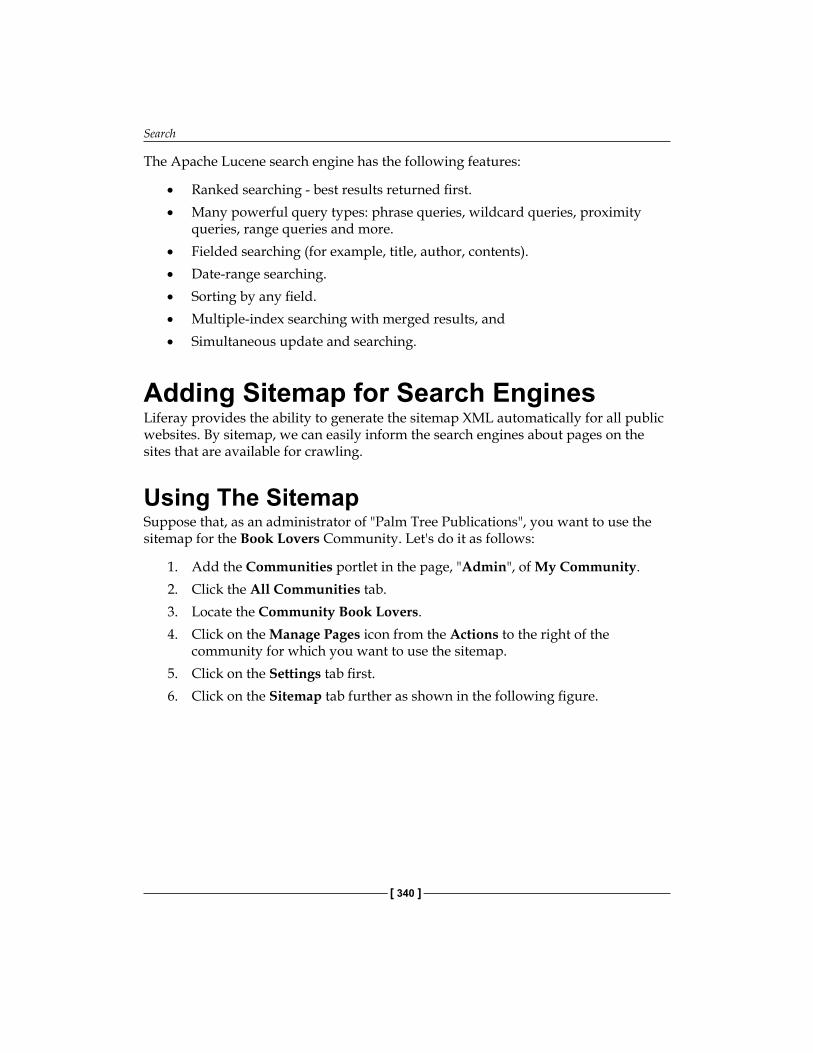
Search
[ 340 ]
The Apache Lucene search engine has the following features:
Ranked searching - best results returned first.Many powerful query types: phrase queries, wildcard queries, proximity queries, range queries and more.Fielded searching (for example, title, author, contents).Date-range searching.Sorting by any field.Multiple-index searching with merged results, and Simultaneous update and searching.
Adding Sitemap for Search EnginesLiferay provides the ability to generate the sitemap XML automatically for all public websites. By sitemap, we can easily inform the search engines about pages on the sites that are available for crawling.
Using The SitemapSuppose that, as an administrator of "Palm Tree Publications", you want to use the sitemap for the Book Lovers Community. Let's do it as follows:
1. Add the Communities portlet in the page, "Admin", of My Community.2. Click the All Communities tab.3. Locate the Community Book Lovers.4. Click on the Manage Pages icon from the Actions to the right of the
community for which you want to use the sitemap. 5. Click on the Settings tab first.6. Click on the Sitemap tab further as shown in the following figure.
•
•
•
•
•
•
•
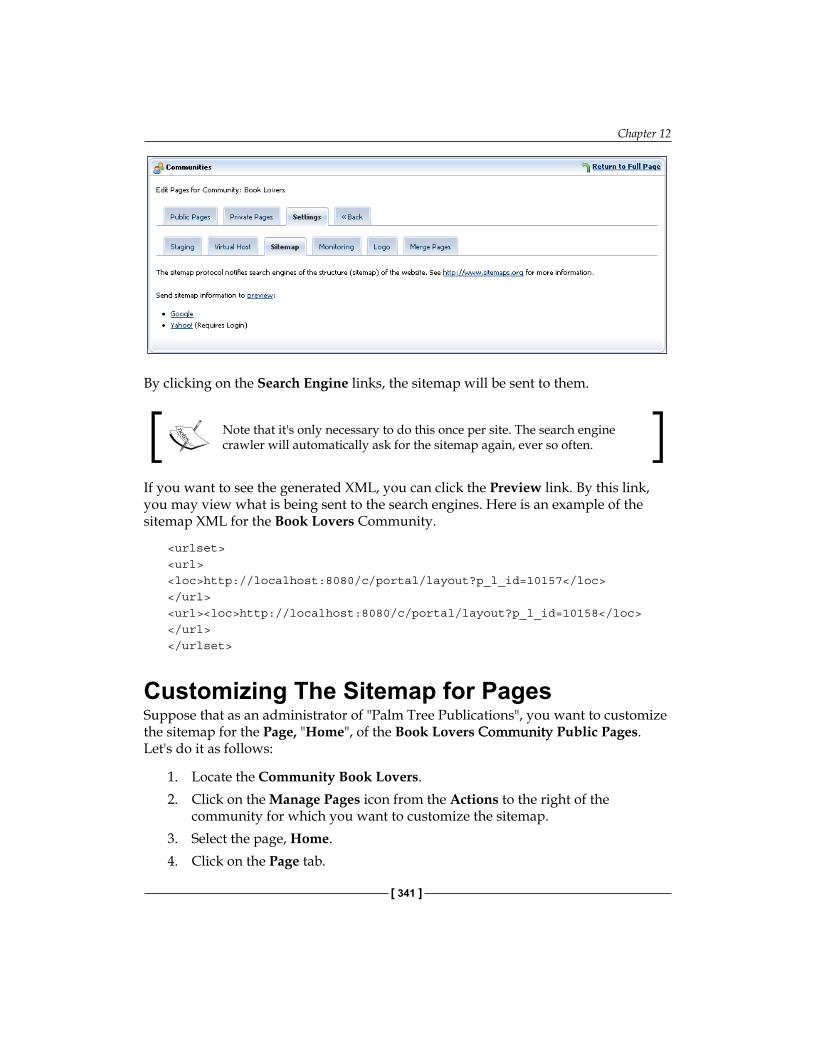
Chapter 12
[ 341 ]
By clicking on the Search Engine links, the sitemap will be sent to them.
Note that it's only necessary to do this once per site. The search engine crawler will automatically ask for the sitemap again, ever so often.
If you want to see the generated XML, you can click the Preview link. By this link, you may view what is being sent to the search engines. Here is an example of the sitemap XML for the Book Lovers Community.
<urlset><url><loc>http://localhost:8080/c/portal/layout?p_l_id=10157</loc></url><url><loc>http://localhost:8080/c/portal/layout?p_l_id=10158</loc></url></urlset>
Customizing The Sitemap for PagesSuppose that as an administrator of "Palm Tree Publications", you want to customize the sitemap for the Page, "Home", of the Book Lovers CommunityCommunity Public Pages. Let's do it as follows:
1. Locate the Community Book Lovers.2. Click on the Manage Pages icon from the Actions to the right of the
community for which you want to customize the sitemap.3. Select the page, Home.4. Click on the Page tab.
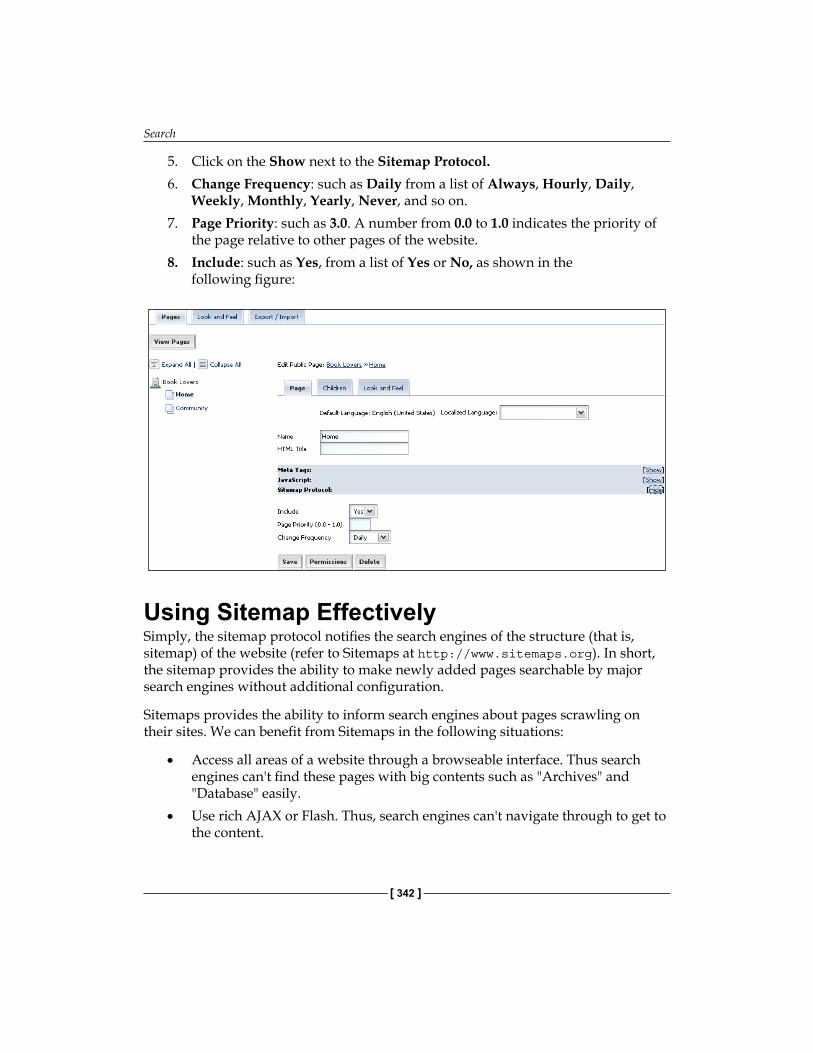
Search
[ 342 ]
5. Click on the Show next to the Sitemap Protocol.6. Change Frequency: such as Daily from a list of Always, Hourly, Daily,
Weekly, Monthly, Yearly, Never, and so on.7. Page Priority: such as 3.0. A number from 0.0 to 1.0 indicates the priority of
the page relative to other pages of the website.8. Include: such as Yes, from a list of Yes or No, as shown in the
following figure:
Using Sitemap EffectivelySimply, the sitemap protocol notifies the search engines of the structure (that is, sitemap) of the website (refer to Sitemaps at http://www.sitemaps.org). In short, the sitemap provides the ability to make newly added pages searchable by major search engines without additional configuration.
Sitemaps provides the ability to inform search engines about pages scrawling on their sites. We can benefit from Sitemaps in the following situations:
Access all areas of a website through a browseable interface. Thus search engines can't find these pages with big contents such as "Archives" and "Database" easily.Use rich AJAX or Flash. Thus, search engines can't navigate through to get to the content.
•
•
Chapter 12
[ 343 ]
We can generate a sitemap containing all accessible URLs on the site first. And then we can submit it to the search engines. Since search engines, such as Google, MSN, and Yahoo, support the same protocol, through a sitemap we could make the search engines having the updated Pages information.
Liferay sitemaps protocol makes any new Pages searchable by the major search engines, supporting automatically updating sitemap information, which is available for web-crawling.
XML Sitemap FormatYou may be interested on the XML sitemap format. Here, we list some of the XML sitemap formats for reference. Otherwise, you can leave it for your future requirements.
The Sitemap protocol format consists of XML tags. All data values in a Sitemap must be entity-escaped. The file itself must be UTF-8 encoded.
The Sitemap must:
Begin with an opening <urlset> tag, and end with a closing </urlset> tag.Specify the namespace (protocol standard) within the <urlset> tag.Include a <url> entry for each URL, as a parent XML tag.Include a <loc> child entry for each <url> parent tag.
As shown in the following table, other tags are optional. It is true that support for these optional tags may vary across search engines (refer to Sitemaps at http://www.sitemaps.org).
Attribute Required Descriptionurlset Yes Encapsulates the file and references the current protocol
standard.url Yes Parent tag for each URL entry. The remaining tags are
children of this tag.loc Yes URL of the page.lastmod No The date of last modification of the file. This date should be
in W3C Date-Time format. This format allows you to omit the time portion, if desired, and use YYYY-MM-DD.
changefreq No How frequently the page is likely to change. This value provides general information to search engines and may not correlate exactly to how often the page was crawled.
priority No The priority of this URL relative to other URLs on your site. Valid values range from 0.0 to 1.0.
•
•
•
•
Search
[ 344 ]
Here is an example sitemap that contains just one URL and uses all optional tags, as shown here.
<urlset xmlns:xsi="http://www.w3.org/2001/XMLSchema-instance"xsi:schemaLocation="http://www.sitemaps.org/schemas/sitemap/0.9 http://www.sitemaps.org/schemas/sitemap/0.9/sitemap.xsd"> <url> <loc>http://www.book.com</loc> <lastmod>2008-03-26</lastmod> <changefreq>daily</changefreq> <priority>0.8</priority> </url></urlset>
Deploying And Managing Search PortletsAs stated, we have used a lot of Search portlets. Before using these portlets, we need to deploy them in the portal first. There are several ways in which you can deploy Search portlets as follows:
Hot deploy by Plugin Installer portlet.Update by Update Manager portlet.Manage by Software Catalogue portlet.
Using Plugin Installer for Hot Deploy We can hot deploy the Google Maps portlet or other portlets via Plugin Installer portlet. Plugin Installer portlet allows portal administrators to administer and install plugins in the portal and pages. There are two ways to access the Plugin Installer:
By adding the Plugin Installer portlet directly to a portal Page, say Page "Admin" of Book Lovers Community.By clicking the Add more portlets from the Admin or Update Manager portlets.
We have auto deployed Google Maps earlier. Here, let's hot deploy Google Maps portlet as follows:
1. Add the Plugin Installer portlet to a portal Page, say the Page "Admin", of Book Lovers Community.
2. Click on the Browse Repository tab. 3. Input search criterion say, "Google".
•
•
•
•
•
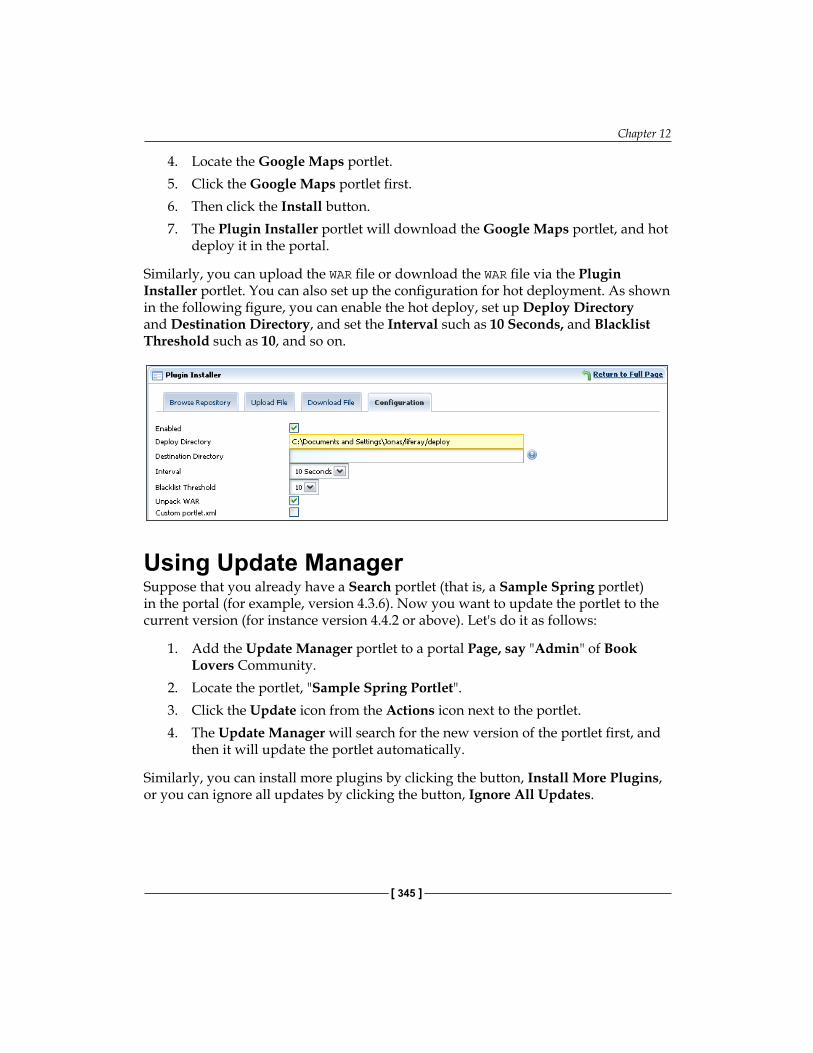
Chapter 12
[ 345 ]
4. Locate the Google Maps portlet.5. Click the Google Maps portlet first.6. Then click the Install button. 7. The Plugin Installer portlet will download the Google Maps portlet, and hot
deploy it in the portal.
Similarly, you can upload the WAR file or download the WAR file via the Plugin Installer portlet. You can also set up the configuration for hot deployment. As shown in the following figure, you can enable the hot deploy, set up Deploy Directory and Destination Directory, and set the Interval such as 10 Seconds, and Blacklist Threshold such as 10, and so on.
Using Update ManagerSuppose that you already have a Search portlet (that is, a Sample Spring portlet) in the portal (for example, version 4.3.6). Now you want to update the portlet to the current version (for instance version 4.4.2 or above). Let's do it as follows:
1. Add the Update Manager portlet to a portal Page, say "Admin" of Book Lovers Community.
2. Locate the portlet, "Sample Spring Portlet".3. Click the Update icon from the Actions icon next to the portlet. 4. The Update Manager will search for the new version of the portlet first, and
then it will update the portlet automatically.
Similarly, you can install more plugins by clicking the button, Install More Plugins, or you can ignore all updates by clicking the button, Ignore All Updates.
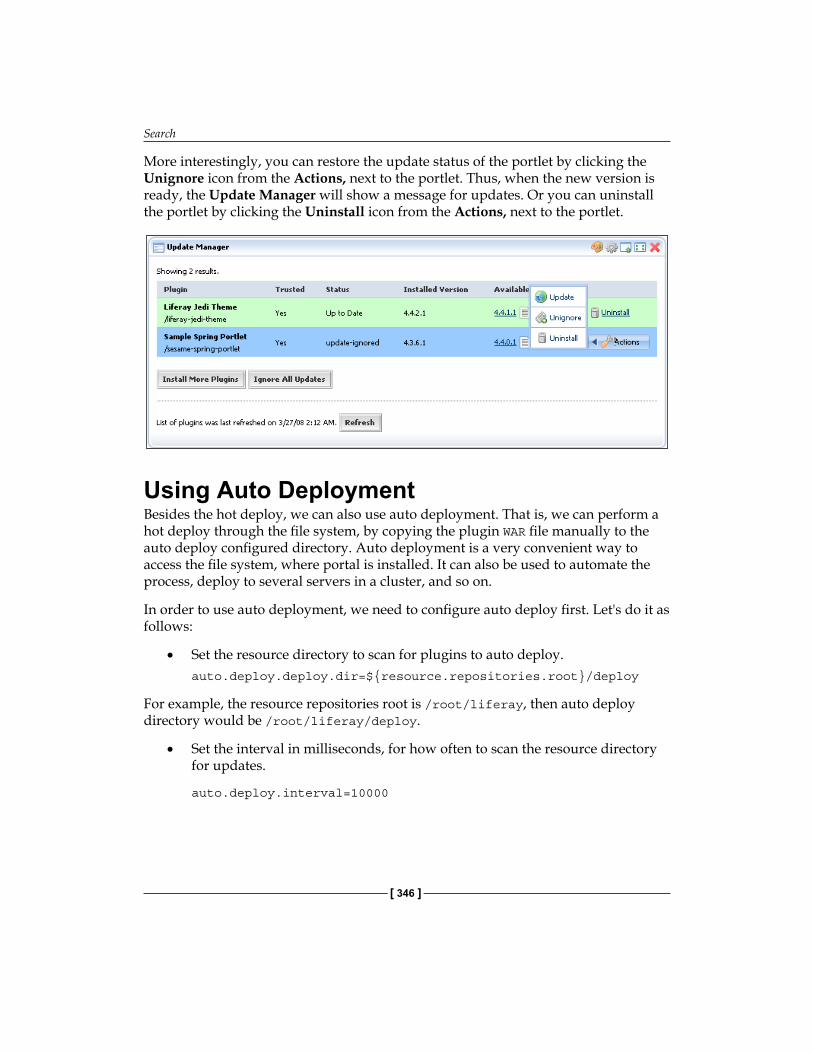
Search
[ 346 ]
More interestingly, you can restore the update status of the portlet by clicking the Unignore icon from the Actions, next to the portlet. Thus, when the new version is ready, the Update Manager will show a message for updates. Or you can uninstall the portlet by clicking the Uninstall icon from the Actions, next to the portlet.
Using Auto DeploymentBesides the hot deploy, we can also use auto deployment. That is, we can perform a hot deploy through the file system, by copying the plugin WAR file manually to the auto deploy configured directory. Auto deployment is a very convenient way to access the file system, where portal is installed. It can also be used to automate the process, deploy to several servers in a cluster, and so on.
In order to use auto deployment, we need to configure auto deploy first. Let's do it as follows:
Set the resource directory to scan for plugins to auto deploy. auto.deploy.deploy.dir=${resource.repositories.root}/deploy
For example, the resource repositories root is /root/liferay, then auto deploy directory would be /root/liferay/deploy.
Set the interval in milliseconds, for how often to scan the resource directory for updates.
auto.deploy.interval=10000
•
•
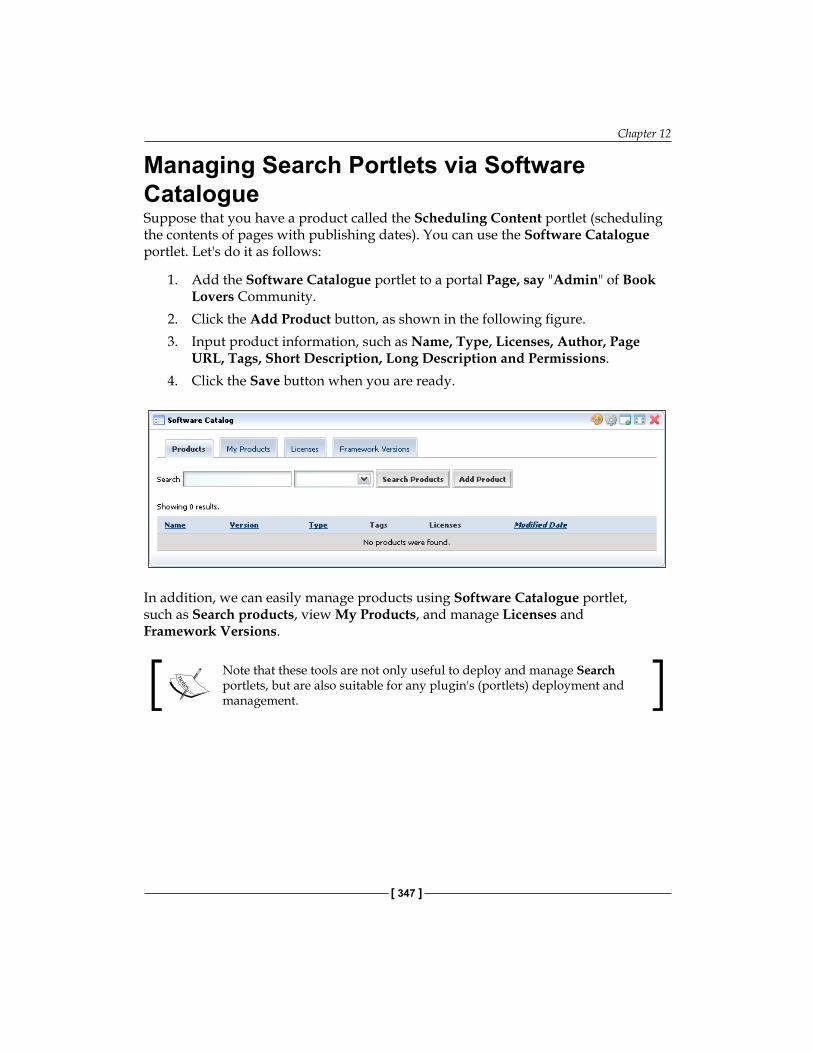
Chapter 12
[ 347 ]
Managing Search Portlets via Software CatalogueSuppose that you have a product called the Scheduling Content portlet (scheduling the contents of pages with publishing dates). You can use the Software Catalogue portlet. Let's do it as follows:
1. Add the Software Catalogue portlet to a portal Page, say "Admin" of Book Lovers Community.
2. Click the Add Product button, as shown in the following figure.3. Input product information, such as Name, Type, Licenses, Author, Page
URL, Tags, Short Description, Long Description and Permissions.4. Click the Save button when you are ready.
In addition, we can easily manage products using Software Catalogue portlet, such as Search products, view My Products, and manage Licenses and Framework Versions.
Note that these tools are not only useful to deploy and manage Search portlets, but are also suitable for any plugin's (portlets) deployment and management.
Search
[ 348 ]
SummaryThis chapter discussed how to employ federated search, and how to integrate search against alfresco contents first. Then it discussed how to use the CSZ Search and Map Search portlets. More interestingly, it depicted how to integrate Google search and Google maps in the portal pages.Then, it discussed the OpenSearch concept. It also discussed Journal Content Search and how to configure sitemap for search engines. Finally, it discussed how to deploy Search portlets, and how to manage Search portlets in the portal pages.
Ongoing Admin TasksIn the intranet website "book.com" of "Palm Tree Publications", we are required to manage servers, instances, and plugins. Further, we are also required to use password policies, to update the website settings, and to monitor Users' activities. Moreover, we also have to publish contents, which are stored in Alfresco. Liferay provides Admin portlet to manage servers, instances and plugins, and Enterprise Admin portlet to manage password policies and enterprise information settings, and to monitor Users' activities.
This chapter will introduce how to manage a server, instances and plugins via Admin portlet first. Then it will discuss how to use password policies, how to update the system –level settings, and how to monitor Users' activities in Enterprise Admin portlet. More interestingly, it will explain how to integrate Liferay with Alfresco. Finally, it will introduce how to integrate other systems in Liferay such as Ad Sever (such as OpenX) and Orbeon Forms.
By the end of this chapter, you will have learnt how to:Manage servers and instances Manage plugins in Admin PortletUse password policies and update settingsMonitor Users' activities in Enterprise Admin portletIntegrate Liferay with Alfresco by web service and web scripts Integrate Liferay with Other Systems such as Ad Server and Orbeon Forms
Working with Admin Portlet As an administrator "Palm Tree", at the enterprise "Palm-Tree Publications", you can handle a lot of administration tasks on the portal. The first admin tool you can use is the Admin portlet. Admin portlet provides the ability to view server information, to create and manage instances, to update and install available portlets, Themes and layout Templates, and so on. This section will mainly introduce server management, instances management and plugins management.
••••••
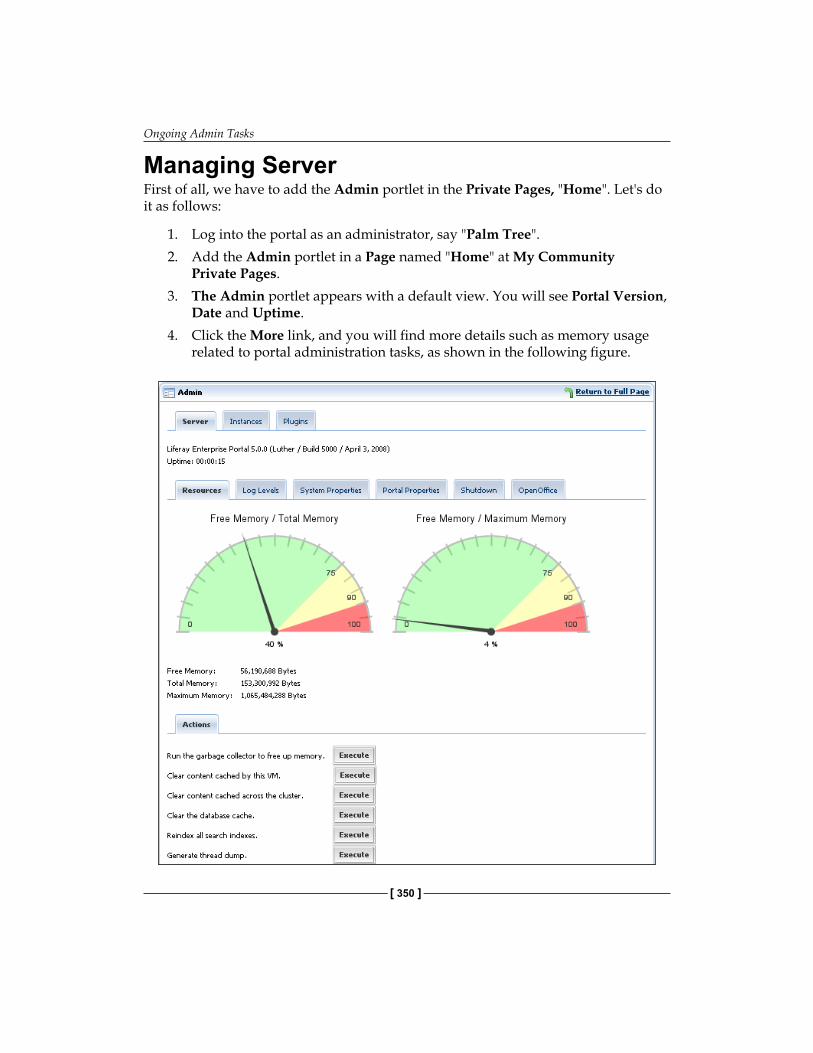
Ongoing Admin Tasks
[ 350 ]
Managing ServerFirst of all, we have to add the Admin portlet in the Private Pages, "Home". Let's do it as follows:
1. Log into the portal as an administrator, say "Palm Tree".2. Add the Admin portlet in a Page named "Home" at My Community
Private Pages.3. The Admin portlet appears with a default view. You will see Portal Version,
Date and Uptime. 4. Click the More link, and you will find more details such as memory usage
related to portal administration tasks, as shown in the following figure.
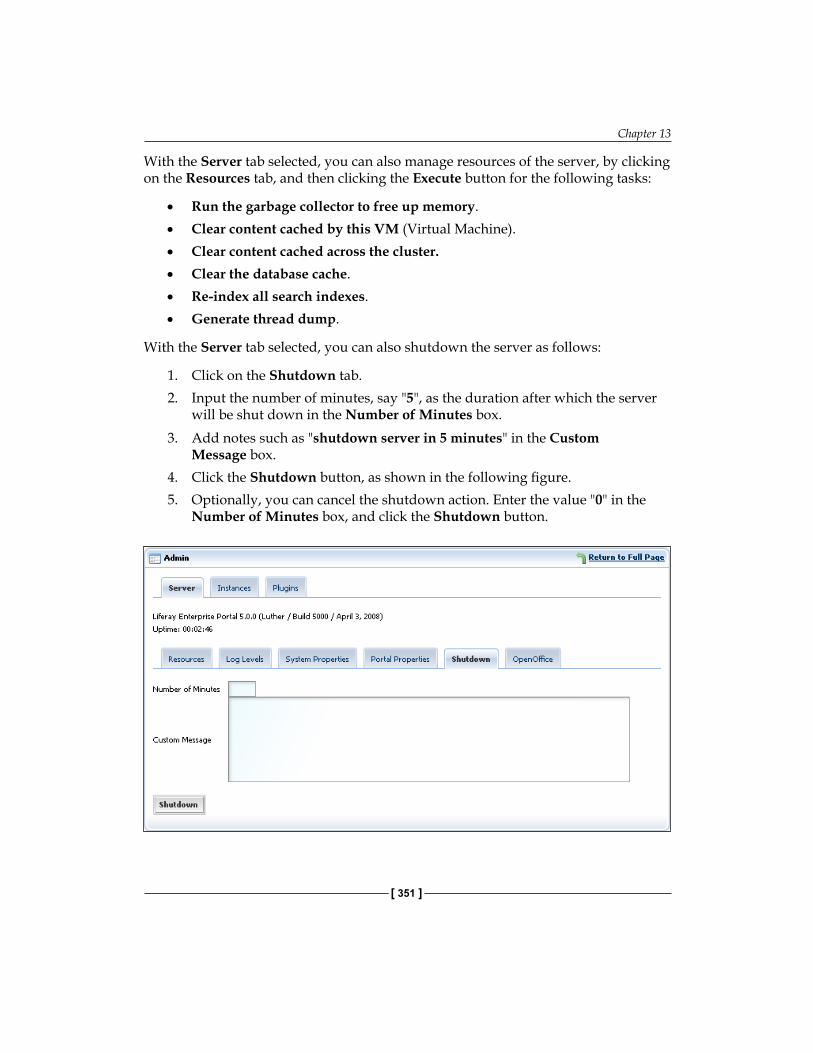
Chapter 13
[ 351 ]
With the Server tab selected, you can also manage resources of the server, by clicking on the Resources tab, and then clicking the Execute button for the following tasks:
Run the garbage collector to free up memory. Clear content cached by this VM (Virtual Machine). Clear content cached across the cluster.Clear the database cache.Re-index all search indexes.Generate thread dump.
With the Server tab selected, you can also shutdown the server as follows:
1. Click on the Shutdown tab.2. Input the number of minutes, say "5", as the duration after which the server
will be shut down in the Number of Minutes box.3. Add notes such as "shutdown server in 5 minutes" in the Custom
Message box.4. Click the Shutdown button, as shown in the following figure.5. Optionally, you can cancel the shutdown action. Enter the value "0" in the
Number of Minutes box, and click the Shutdown button.
•
•
•
•
•
•
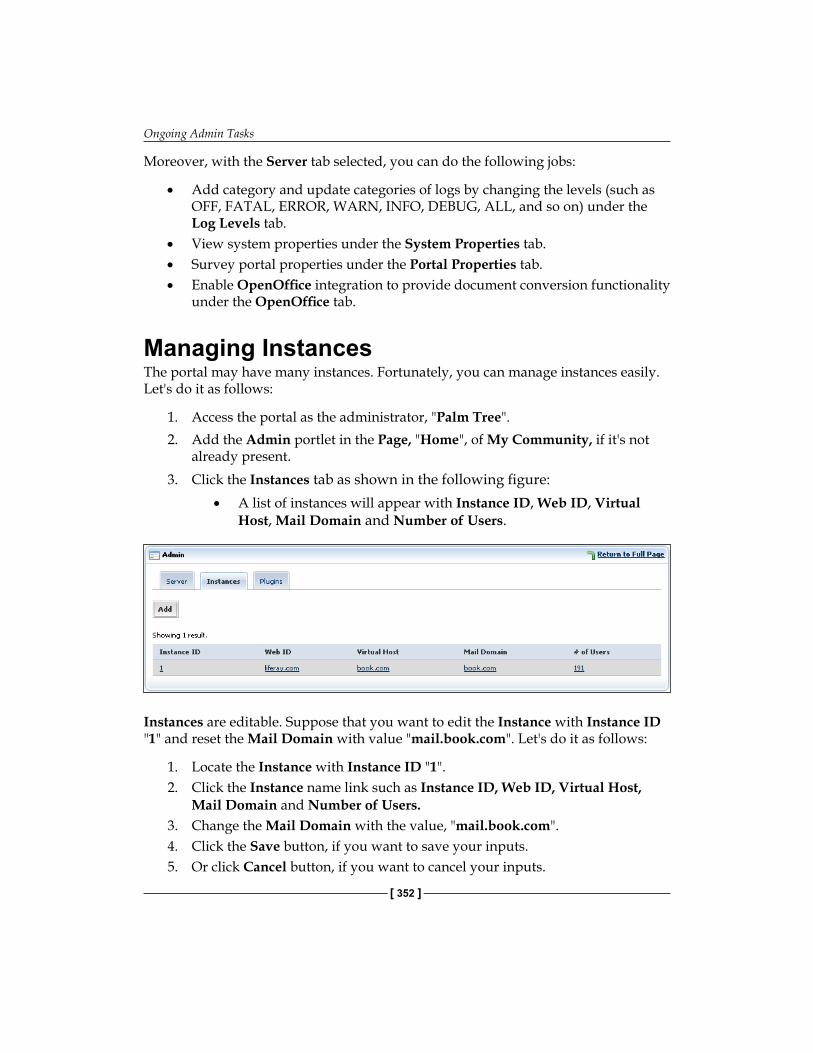
Ongoing Admin Tasks
[ 352 ]
Moreover, with the Server tab selected, you can do the following jobs:
Add category and update categories of logs by changing the levels (such as OFF, FATAL, ERROR, WARN, INFO, DEBUG, ALL, and so on) under the Log Levels tab.View system properties under the System Properties tab.Survey portal properties under the Portal Properties tab.Enable OpenOffice integration to provide document conversion functionality under the OpenOffice tab.
Managing InstancesThe portal may have many instances. Fortunately, you can manage instances easily. Let's do it as follows:
1. Access the portal as the administrator, "Palm Tree".2. Add the Admin portlet in the Page, "Home", of My Community, if it's not
already present.3. Click the Instances tab as shown in the following figure:
A list of instances will appear with Instance ID, Web ID, Virtual Host, Mail Domain and Number of Users.
Instances are editable. Suppose that you want to edit the Instance with Instance ID "1" and reset the Mail Domain with value "mail.book.com". Let's do it as follows:
1. Locate the Instance with Instance ID "1".2. Click the Instance name link such as Instance ID, Web ID, Virtual Host,
Mail Domain and Number of Users. 3. Change the Mail Domain with the value, "mail.book.com".4. Click the Save button, if you want to save your inputs. 5. Or click Cancel button, if you want to cancel your inputs.
•
•••
•
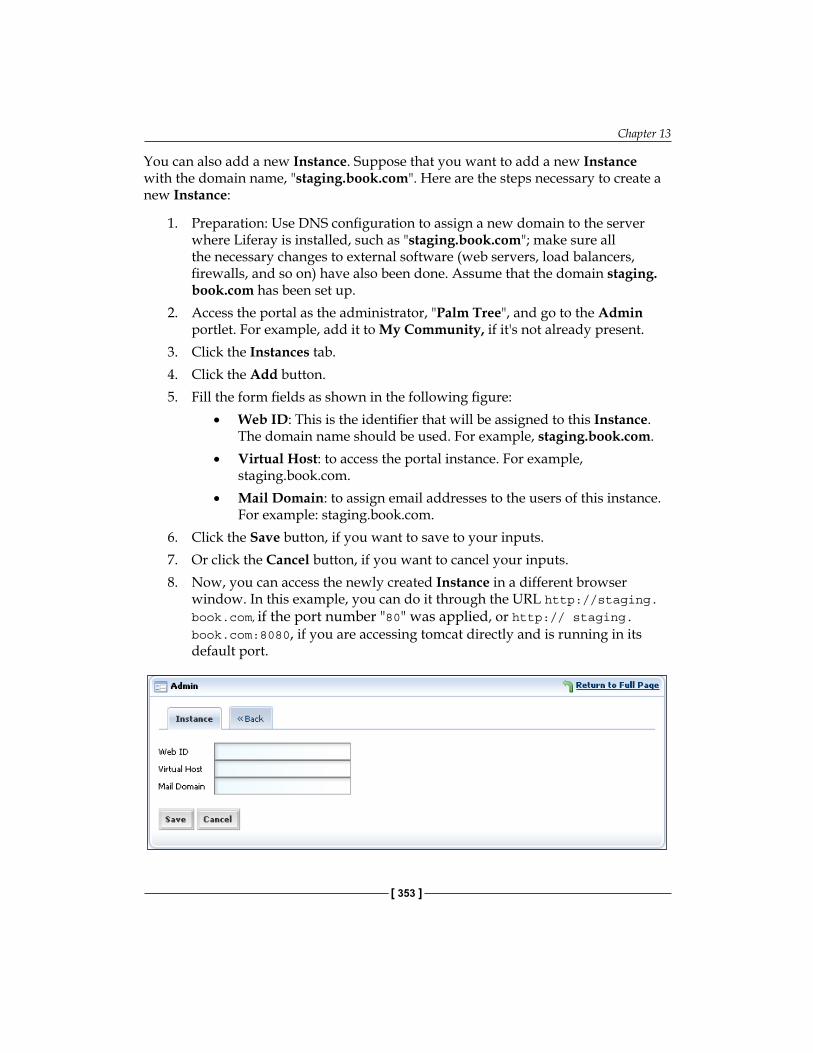
Chapter 13
[ 353 ]
You can also add a new Instance. Suppose that you want to add a new Instance with the domain name, "staging.book.com". Here are the steps necessary to create a new Instance:
1. Preparation: Use DNS configuration to assign a new domain to the server where Liferay is installed, such as "staging.book.com"; make sure all the necessary changes to external software (web servers, load balancers, firewalls, and so on) have also been done. Assume that the domain staging.book.com has been set up.
2. Access the portal as the administrator, "Palm Tree", and go to the Admin portlet. For example, add it to My Community, if it's not already present.
3. Click the Instances tab.4. Click the Add button.5. Fill the form fields as shown in the following figure:
Web ID: This is the identifier that will be assigned to this Instance. The domain name should be used. For example, staging.book.com.Virtual Host: to access the portal instance. For example, staging.book.com.Mail Domain: to assign email addresses to the users of this instance. For example: staging.book.com.
6. Click the Save button, if you want to save to your inputs. 7. Or click the Cancel button, if you want to cancel your inputs.8. Now, you can access the newly created Instance in a different browser
window. In this example, you can do it through the URL http://staging.book.com, if the port number "80" was applied, or http:// staging.book.com:8080, if you are accessing tomcat directly and is running in its default port.
•
•
•
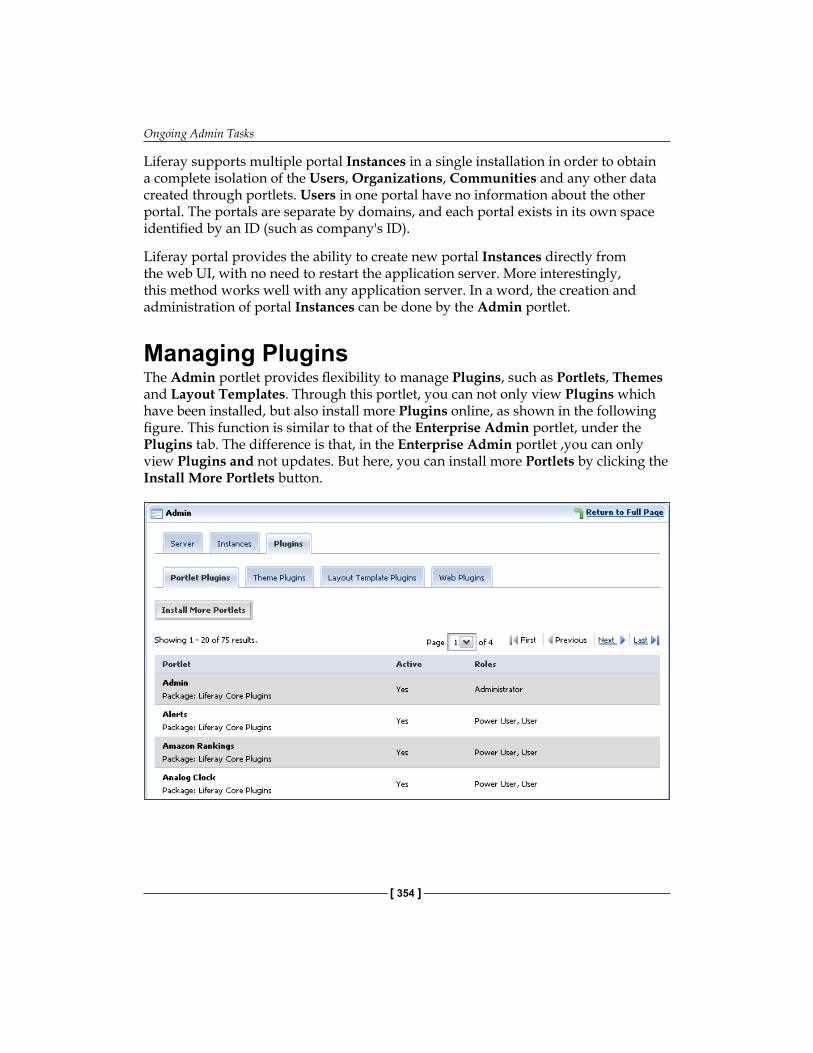
Ongoing Admin Tasks
[ 354 ]
Liferay supports multiple portal Instances in a single installation in order to obtain a complete isolation of the Users, Organizations, Communities and any other data created through portlets. Users in one portal have no information about the other portal. The portals are separate by domains, and each portal exists in its own space identified by an ID (such as company's ID).
Liferay portal provides the ability to create new portal Instances directly from the web UI, with no need to restart the application server. More interestingly, this method works well with any application server. In a word, the creation and administration of portal Instances can be done by the Admin portlet.
Managing PluginsThe Admin portlet provides flexibility to manage Plugins, such as Portlets, Themes and Layout Templates. Through this portlet, you can not only view Plugins which have been installed, but also install more Plugins online, as shown in the following figure. This function is similar to that of the Enterprise Admin portlet, under the Plugins tab. The difference is that, in the Enterprise Admin portlet ,you can only view Plugins and not updates. But here, you can install more Portlets by clicking the Install More Portlets button.
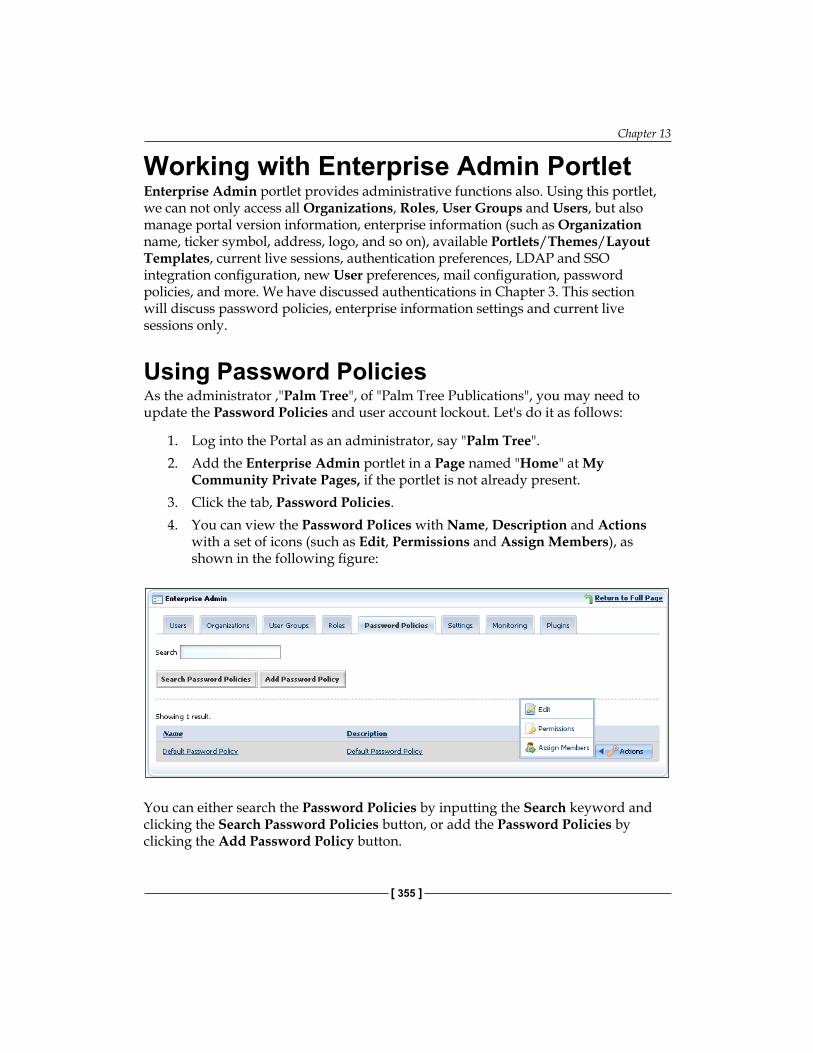
Chapter 13
[ 355 ]
Working with Enterprise Admin Portlet Enterprise Admin portlet provides administrative functions also. Using this portlet, we can not only access all Organizations, Roles, User Groups and Users, but also manage portal version information, enterprise information (such as Organization name, ticker symbol, address, logo, and so on), available Portlets/Themes/Layout Templates, current live sessions, authentication preferences, LDAP and SSO integration configuration, new User preferences, mail configuration, password policies, and more. We have discussed authentications in Chapter 3. This section will discuss password policies, enterprise information settings and current live sessions only.
Using Password PoliciesAs the administrator ,"Palm Tree", of "Palm Tree Publications", you may need to update the Password Policies and user account lockout. Let's do it as follows:
1. Log into the Portal as an administrator, say "Palm Tree".2. Add the Enterprise Admin portlet in a Page named "Home" at My
Community Private Pages, if the portlet is not already present.3. Click the tab, Password Policies. 4. You can view the Password Polices with Name, Description and Actions
with a set of icons (such as Edit, Permissions and Assign Members), as shown in the following figure:
You can either search the Password Policies by inputting the Search keyword and clicking the Search Password Policies button, or add the Password Policies by clicking the Add Password Policy button.
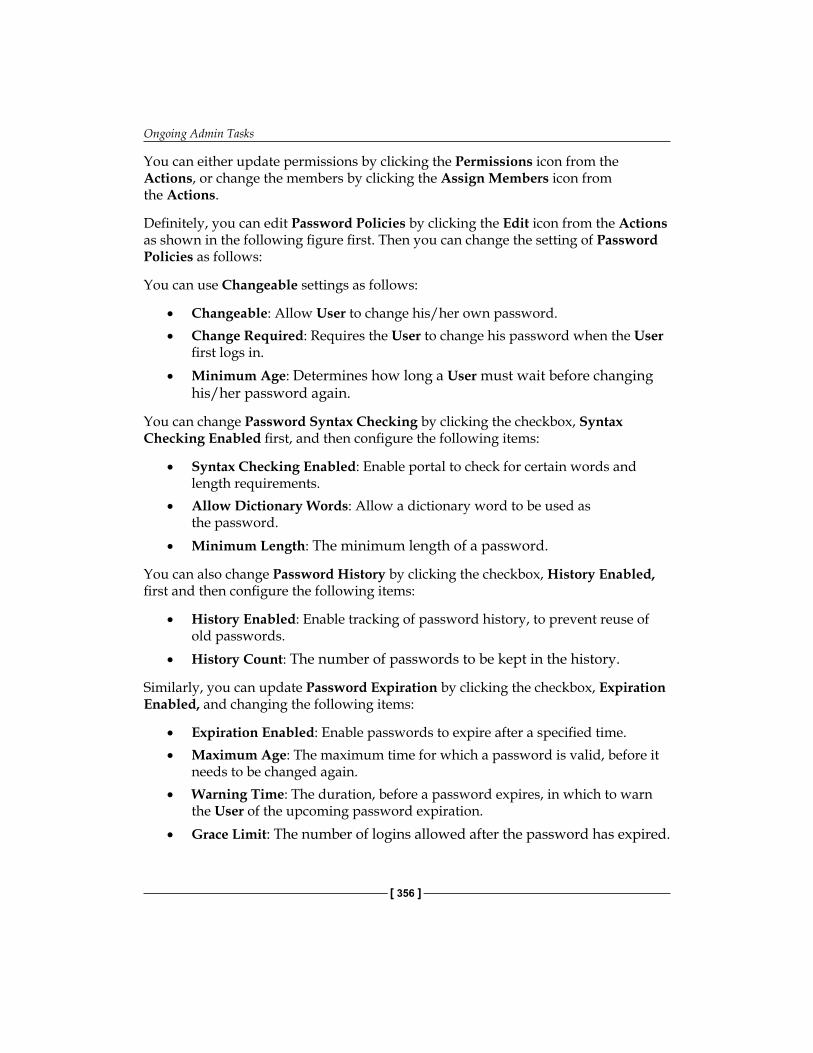
Ongoing Admin Tasks
[ 356 ]
You can either update permissions by clicking the Permissions icon from the Actions, or change the members by clicking the Assign Members icon from the Actions.
Definitely, you can edit Password Policies by clicking the Edit icon from the Actions as shown in the following figure first. Then you can change the setting of Password Policies as follows:
You can use Changeable settings as follows:
Changeable: Allow User to change his/her own password.Change Required: Requires the User to change his password when the User first logs in.Minimum Age: Determines how long a User must wait before changing his/her password again.
You can change Password Syntax Checking by clicking the checkbox, Syntax Checking Enabled first, and then configure the following items:
Syntax Checking Enabled: Enable portal to check for certain words and length requirements.Allow Dictionary Words: Allow a dictionary word to be used as the password.Minimum Length: The minimum length of a password.
You can also change Password History by clicking the checkbox, History Enabled, first and then configure the following items:
History Enabled: Enable tracking of password history, to prevent reuse of old passwords.History Count: The number of passwords to be kept in the history.
Similarly, you can update Password Expiration by clicking the checkbox, Expiration Enabled, and changing the following items:
Expiration Enabled: Enable passwords to expire after a specified time.Maximum Age: The maximum time for which a password is valid, before it needs to be changed again.Warning Time: The duration, before a password expires, in which to warn the User of the upcoming password expiration.Grace Limit: The number of logins allowed after the password has expired.
•
•
•
•
•
•
•
•
•
•
•
•
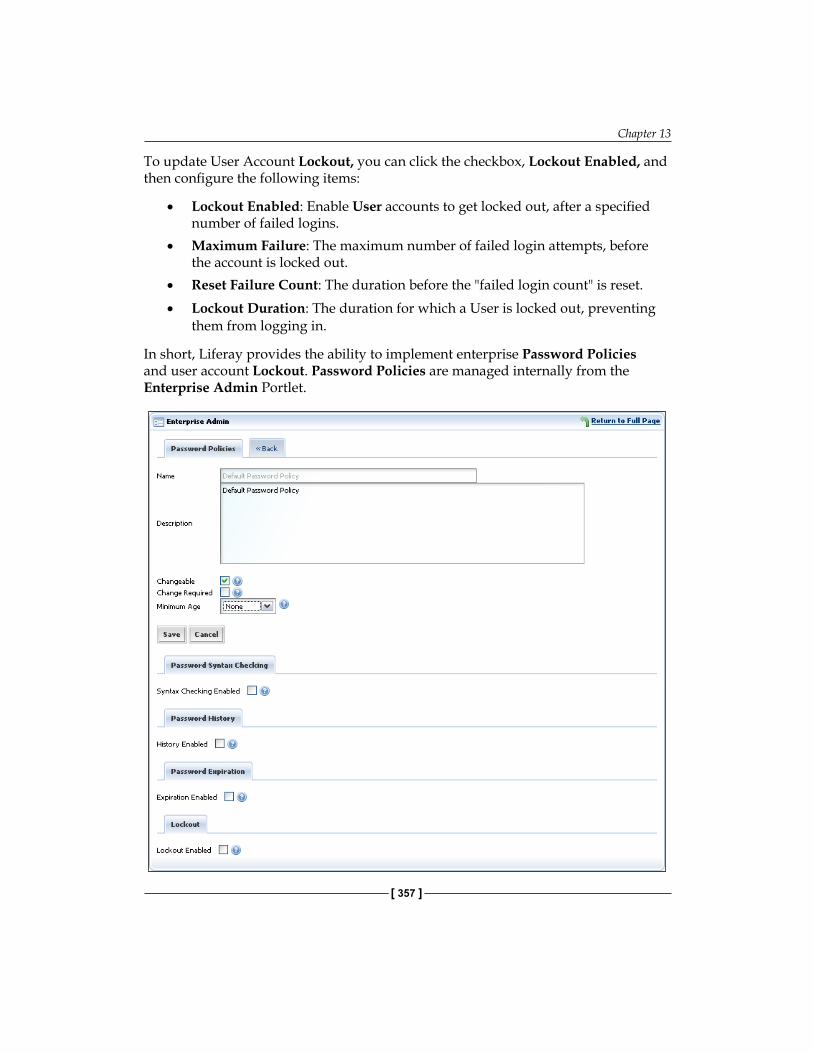
Chapter 13
[ 357 ]
To update User Account Lockout, you can click the checkbox, Lockout Enabled, and then configure the following items:
Lockout Enabled: Enable User accounts to get locked out, after a specified number of failed logins.Maximum Failure: The maximum number of failed login attempts, before the account is locked out.Reset Failure Count: The duration before the "failed login count" is reset.Lockout Duration: The duration for which a User is locked out, preventing them from logging in.
In short, Liferay provides the ability to implement enterprise Password Policies and user account Lockout. Password Policies are managed internally from the Enterprise Admin Portlet.
•
•
•
•

Ongoing Admin Tasks
[ 358 ]
Updating SettingsYou can update enterprise information under the Settings tab, such as general configuration, authentication, default User associations, reversed screen names, mail host names and email notifications. The following figure depicts the main tabs which can be used to change the enterprise information in detail:
With the General tab selected, you can change the enterprise's information via the following steps:
1. An enterprise's information can be viewed or edited from the General tab. For example, the Mail Domain box contains the domain names that the server will recognize.
2. Click the Save button after making any changes.3. The default Language, Time Zone, and logo image can also be changed in
the Display section.4. Check the box if you allow community administrators to use their own logo.
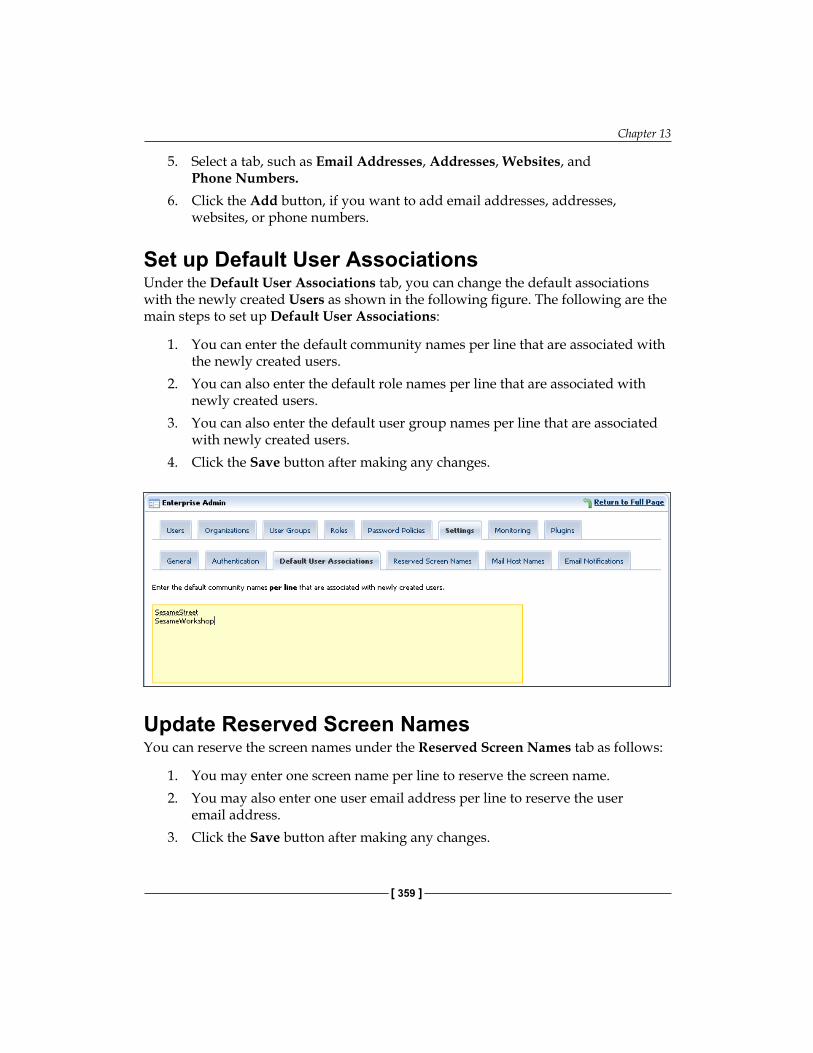
Chapter 13
[ 359 ]
5. Select a tab, such as Email Addresses, Addresses, Websites, and Phone Numbers.
6. Click the Add button, if you want to add email addresses, addresses, websites, or phone numbers.
Set up Default User AssociationsUnder the Default User Associations tab, you can change the default associations with the newly created Users as shown in the following figure. The following are the main steps to set up Default User Associations:
1. You can enter the default community names per line that are associated with the newly created users.
2. You can also enter the default role names per line that are associated with newly created users.
3. You can also enter the default user group names per line that are associated with newly created users.
4. Click the Save button after making any changes.
Update Reserved Screen NamesYou can reserve the screen names under the Reserved Screen Names tab as follows:
1. You may enter one screen name per line to reserve the screen name.2. You may also enter one user email address per line to reserve the user
email address.3. Click the Save button after making any changes.
Ongoing Admin Tasks
[ 360 ]
Update Mail Host NamesUnder the Mail Host Names tab, you can change all additional mail host names as follows:
1. Enter one mail host name per line for all additional mail host names such as "mail.book.com".
2. Click the Save button after making any changes.
Update Email NotificationsUnder the Email Notifications tab, you can change the configuration of email notifications, as shown in the following figure. The following are the main steps to update email notifications:
1. From the General tab, you can enter the Name, say "Palm Tree", and email Address, say "[email protected]".
2. With the Account Created Notification tab selected, you can make changes to the default message that is automatically sent when accounts are created.
3. To disable new account emails, uncheck the Enabled box.4. With the Account Created Notification tab selected, you can make changes
to the default message that is automatically sent when a new password is created.
5. To disable new account emails, uncheck the Enabled box.6. Click the Save button after making any changes.
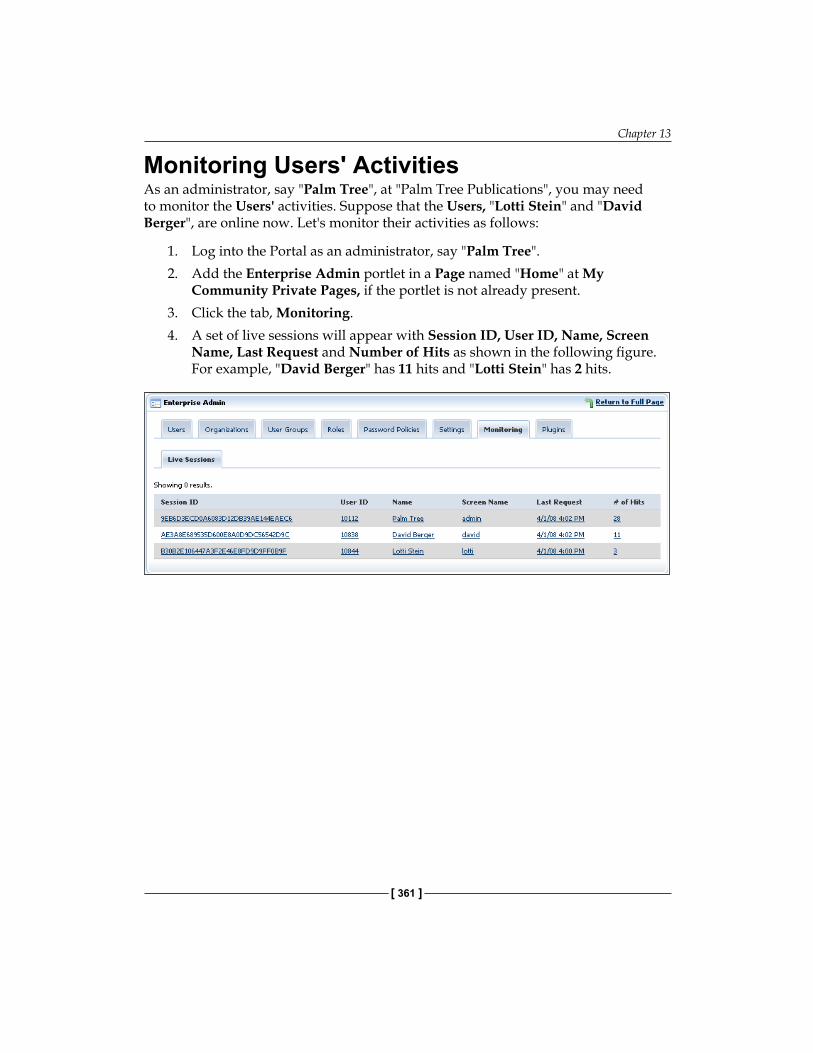
Chapter 13
[ 361 ]
Monitoring Users' ActivitiesAs an administrator, say "Palm Tree", at "Palm Tree Publications", you may need to monitor the Users' activities. Suppose that the Users, "Lotti Stein" and "David Berger", are online now. Let's monitor their activities as follows:
1. Log into the Portal as an administrator, say "Palm Tree".2. Add the Enterprise Admin portlet in a Page named "Home" at My
Community Private Pages, if the portlet is not already present.3. Click the tab, Monitoring.4. A set of live sessions will appear with Session ID, User ID, Name, Screen
Name, Last Request and Number of Hits as shown in the following figure. For example, "David Berger" has 11 hits and "Lotti Stein" has 2 hits.
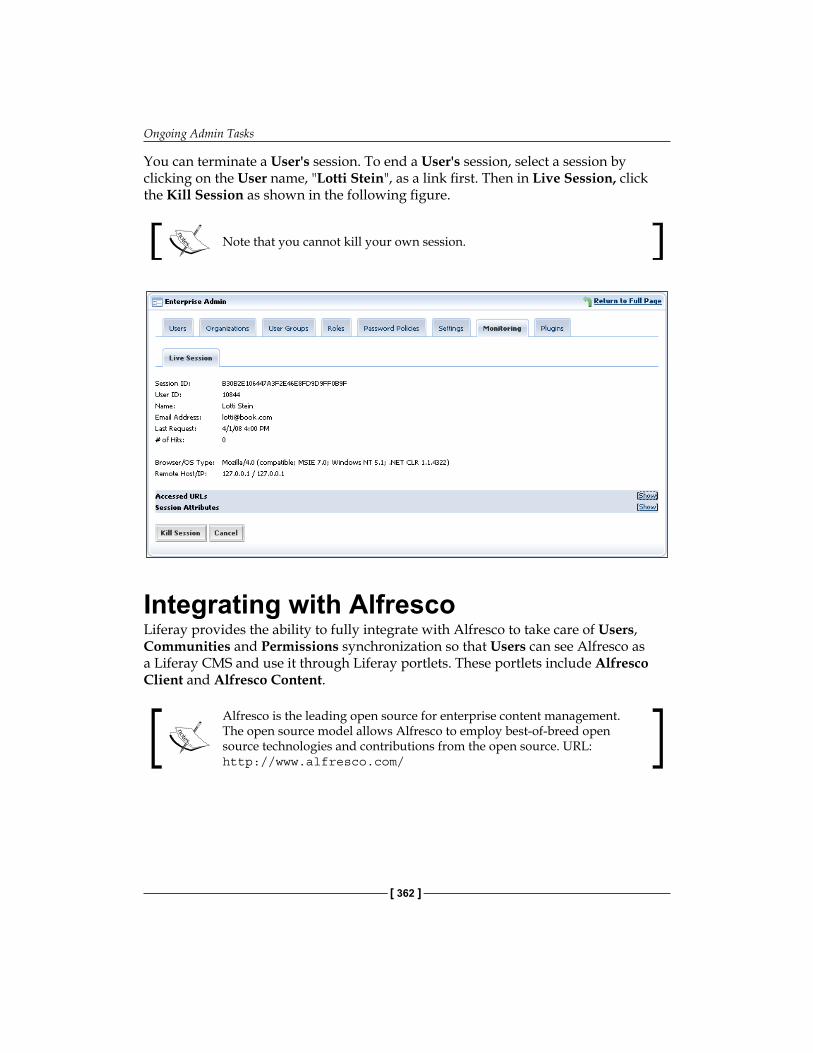
Ongoing Admin Tasks
[ 362 ]
You can terminate a User's session. To end a User's session, select a session by clicking on the User name, "Lotti Stein", as a link first. Then in Live Session, click the Kill Session as shown in the following figure.
Note that you cannot kill your own session.
Integrating with AlfrescoLiferay provides the ability to fully integrate with Alfresco to take care of Users, Communities and Permissions synchronization so that Users can see Alfresco as a Liferay CMS and use it through Liferay portlets. These portlets include Alfresco Client and Alfresco Content.
Alfresco is the leading open source for enterprise content management. The open source model allows Alfresco to employ best-of-breed open source technologies and contributions from the open source. URL: http://www.alfresco.com/
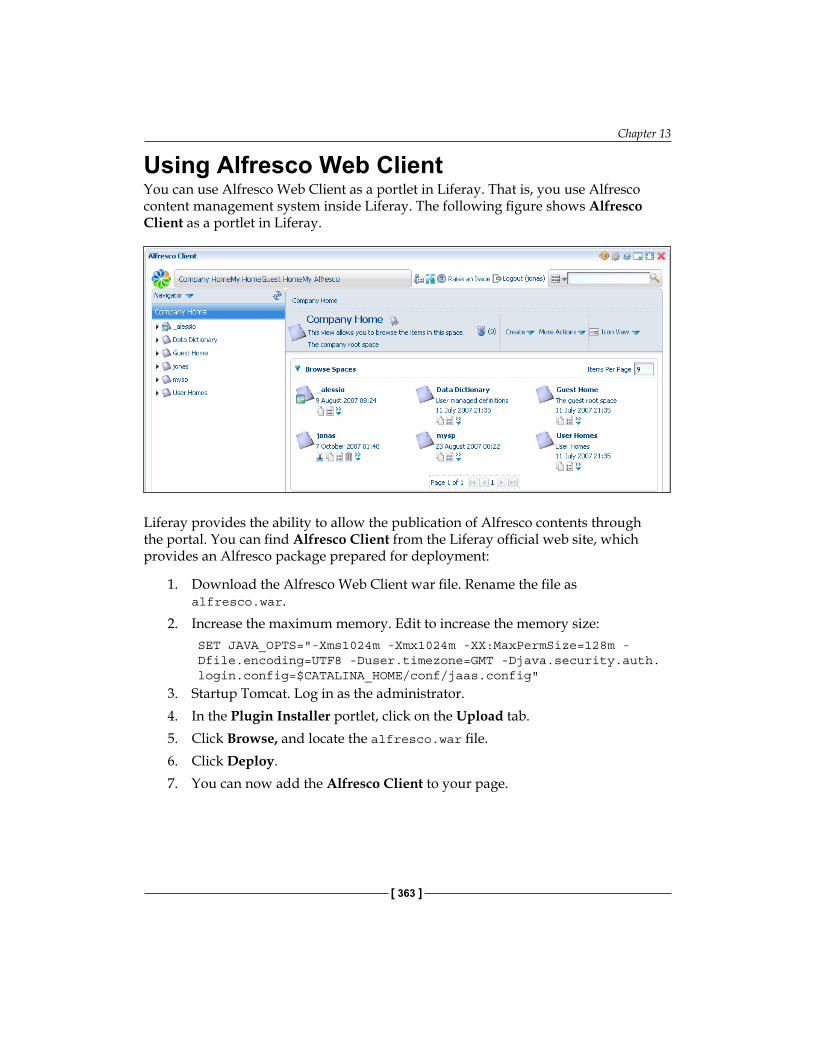
Chapter 13
[ 363 ]
Using Alfresco Web ClientYou can use Alfresco Web Client as a portlet in Liferay. That is, you use Alfresco content management system inside Liferay. The following figure shows Alfresco Client as a portlet in Liferay.
Liferay provides the ability to allow the publication of Alfresco contents through the portal. You can find Alfresco Client from the Liferay official web site, which provides an Alfresco package prepared for deployment:
1. Download the Alfresco Web Client war file. Rename the file as alfresco.war.
2. Increase the maximum memory. Edit to increase the memory size: SET JAVA_OPTS="-Xms1024m -Xmx1024m -XX:MaxPermSize=128m - Dfile.encoding=UTF8 -Duser.timezone=GMT -Djava.security.auth. login.config=$CATALINA_HOME/conf/jaas.config"
3. Startup Tomcat. Log in as the administrator.4. In the Plugin Installer portlet, click on the Upload tab.5. Click Browse, and locate the alfresco.war file. 6. Click Deploy.7. You can now add the Alfresco Client to your page.
Ongoing Admin Tasks
[ 364 ]
Using Alfresco ContentAlfresco web services support remote access and bindings to any client environment. Web Services—SOA is recognized as a way forward for integrating disparate systems including Content Management and building new enterprise-wide solutions. Furthermore, Alfresco Web Scripts are ideal for building data access and updating APIs, simple UI components such as portlets, and integration adaptors. Alfresco OpenSearch has been hosted as a series of Web Scripts. Within Liferay SOA framework, we can export Alfresco content in portlets via Web Services or Web Scripts.
Enjoy Web ServicesWeb services are applications designed to support interoperable interaction over a network. In fact, web services are just Web APIs accessed over a network, such as the Internet, and executed on a remote system that hosts the requested services.
Alfresco Web Services is provided by Alfresco Repository. It supports remote access and bindings to any client environment. For example, alfresco community is already using PHP, Ruby and Microsoft .NET. Numerous standards and integration efforts are focused around Web Services—SOA is recognized as a way forward for integrating disparate systems including Content Management and building new enterprise-wide solutions. BPEL (Business Process Execution Language) plays an important role in orchestrating all these services.
Alfresco web services API include the following core Services:
AuthenticationRepository—query and model manipulationContent—content manipulationAuthoring—collaborative content creationAccess Control—Users, groups, Roles and PermissionsAdministration—environment, configuration, export and importDictionary—model descriptionsContent Rules—automate content management behaviorClassification—apply classifications and categories
The following figure depicts an example for Alfresco Content—web services portlet. You can navigate contents, search contents by OpenSearch, and set up default access account. After selecting the content, the portlet will display the content directly in the Portal.
•
•
•
•
•
•
•
•
•
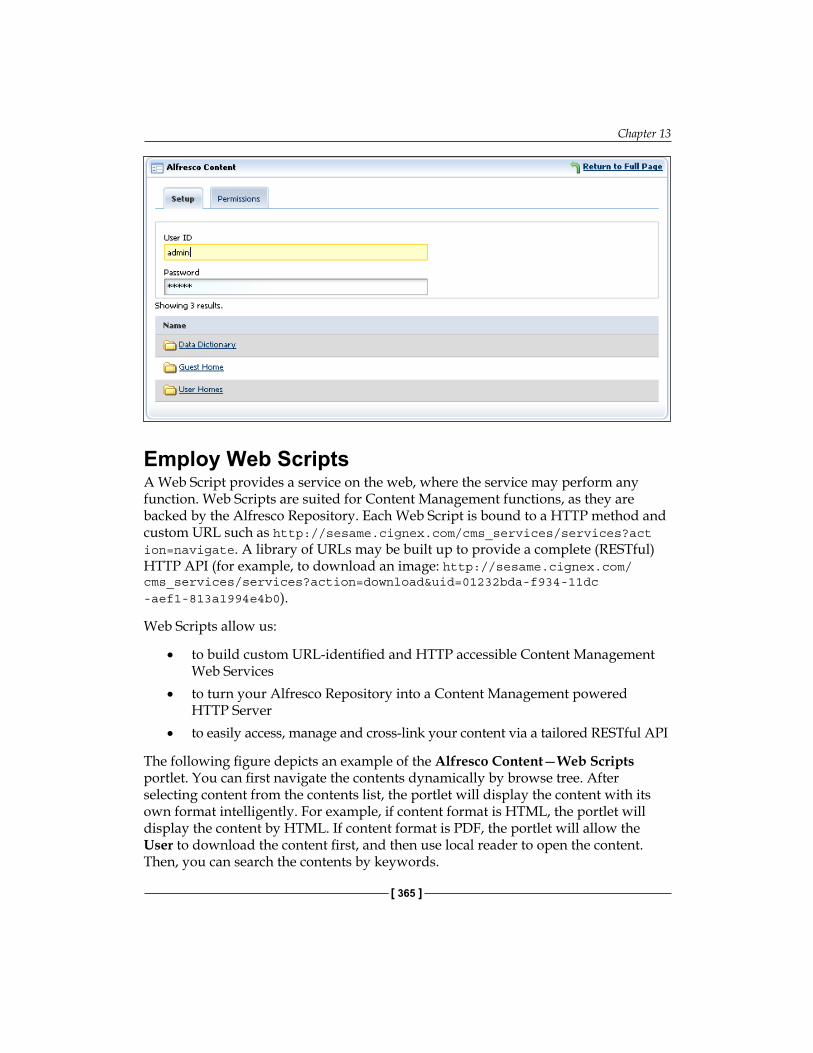
Chapter 13
[ 365 ]
Employ Web ScriptsA Web Script provides a service on the web, where the service may perform any function. Web Scripts are suited for Content Management functions, as they are backed by the Alfresco Repository. Each Web Script is bound to a HTTP method and custom URL such as http://sesame.cignex.com/cms_services/services?action=navigate. A library of URLs may be built up to provide a complete (RESTful) HTTP API (for example, to download an image: http://sesame.cignex.com/ cms_services/services?action=download&uid=01232bda-f934-11dc -aef1-813a1994e4b0).
Web Scripts allow us:
to build custom URL-identified and HTTP accessible Content Management Web Servicesto turn your Alfresco Repository into a Content Management powered HTTP Serverto easily access, manage and cross-link your content via a tailored RESTful API
The following figure depicts an example of the Alfresco Content—Web Scripts portlet. You can first navigate the contents dynamically by browse tree. After selecting content from the contents list, the portlet will display the content with its own format intelligently. For example, if content format is HTML, the portlet will display the content by HTML. If content format is PDF, the portlet will allow the User to download the content first, and then use local reader to open the content. Then, you can search the contents by keywords.
•
•
•
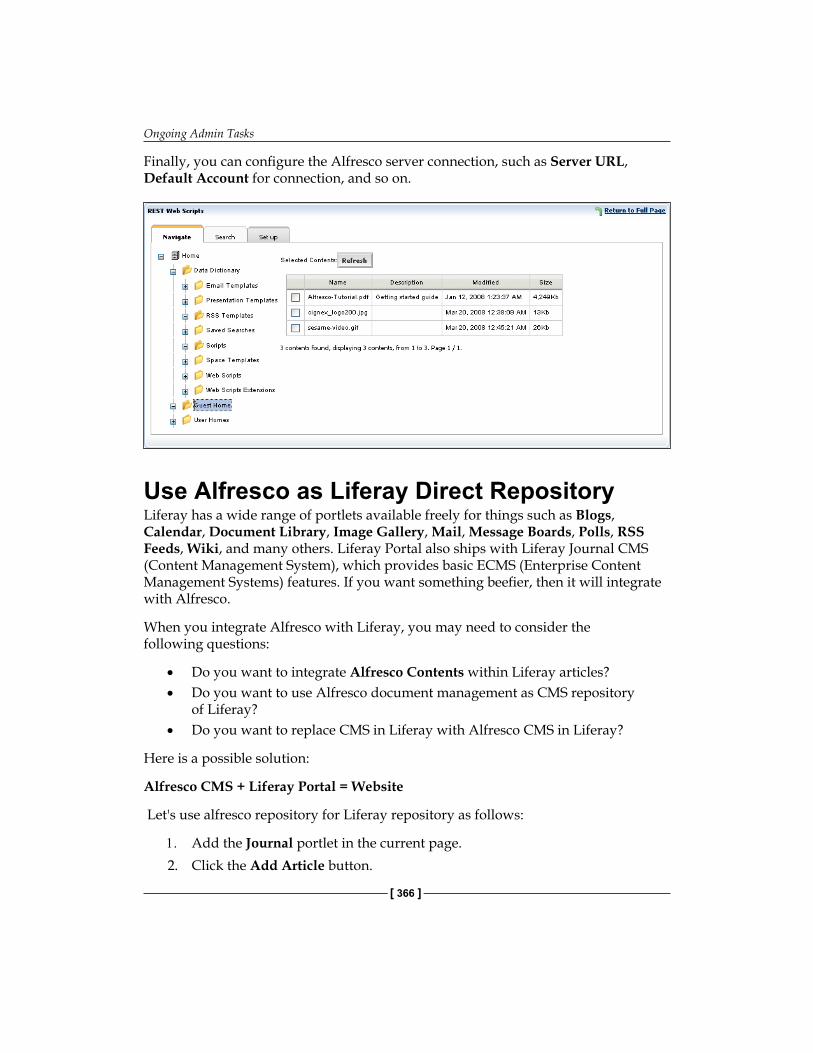
Ongoing Admin Tasks
[ 366 ]
Finally, you can configure the Alfresco server connection, such as Server URL, Default Account for connection, and so on.
Use Alfresco as Liferay Direct RepositoryLiferay has a wide range of portlets available freely for things such as Blogs, Calendar, Document Library, Image Gallery, Mail, Message Boards, Polls, RSS Feeds, Wiki, and many others. Liferay Portal also ships with Liferay Journal CMS (Content Management System), which provides basic ECMS (Enterprise Content Management Systems) features. If you want something beefier, then it will integrate with Alfresco.
When you integrate Alfresco with Liferay, you may need to consider the following questions:
Do you want to integrate Alfresco Contents within Liferay articles? Do you want to use Alfresco document management as CMS repository of Liferay? Do you want to replace CMS in Liferay with Alfresco CMS in Liferay?
Here is a possible solution:
Alfresco CMS + Liferay Portal = Website
Let's use alfresco repository for Liferay repository as follows:
1. Add the Journal portlet in the current page.2. Click the Add Article button.
••
•
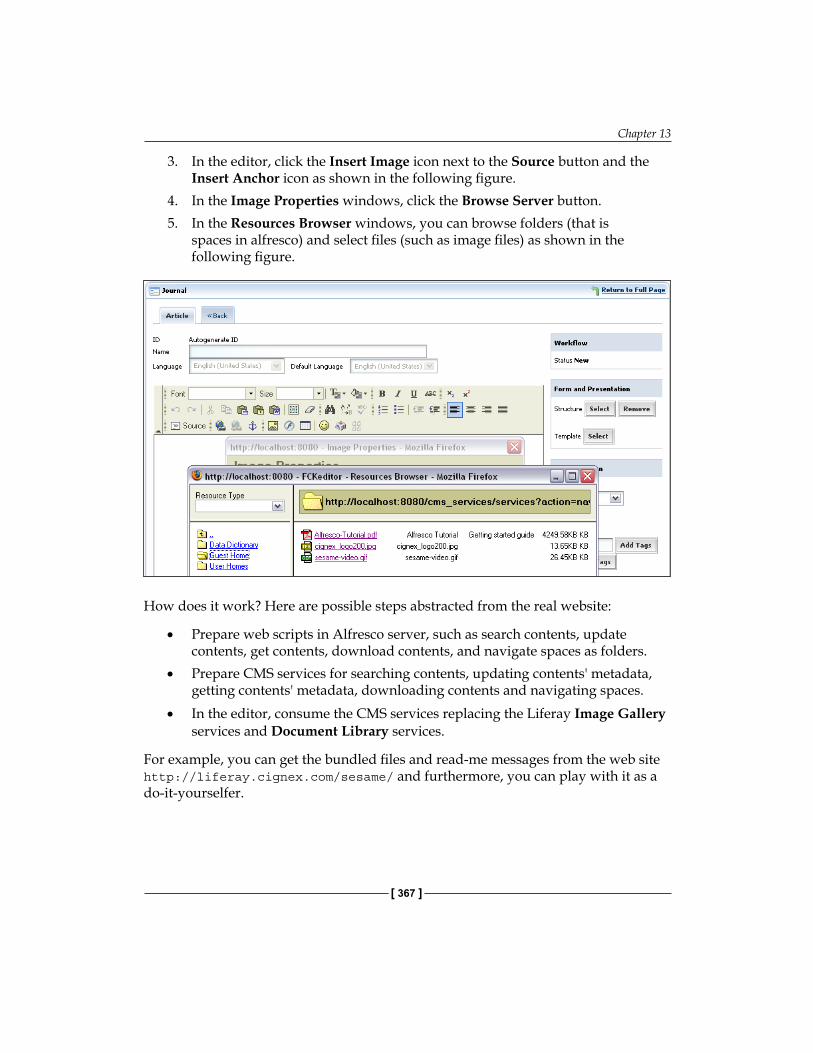
Chapter 13
[ 367 ]
3. In the editor, click the Insert Image icon next to the Source button and the Insert Anchor icon as shown in the following figure.
4. In the Image Properties windows, click the Browse Server button.5. In the Resources Browser windows, you can browse folders (that is
spaces in alfresco) and select files (such as image files) as shown in the following figure.
How does it work? Here are possible steps abstracted from the real website:
Prepare web scripts in Alfresco server, such as search contents, update contents, get contents, download contents, and navigate spaces as folders.Prepare CMS services for searching contents, updating contents' metadata, getting contents' metadata, downloading contents and navigating spaces. In the editor, consume the CMS services replacing the Liferay Image Gallery services and Document Library services.
For example, you can get the bundled files and read-me messages from the web site http://liferay.cignex.com/sesame/ and furthermore, you can play with it as a do-it-yourselfer.
•
•
•
Ongoing Admin Tasks
[ 368 ]
Migrating ContentsSuppose that you already have contents stored in Liferay such as Image Gallery and Document Library. Now, you want to transfer these contents stored in Liferay into Alfresco. Let's do it as follows.
A portlet called Alfresco Importer provides services of content migration from Liferay Content Management repositories to alfresco repositories. Through Liferay services, the portlet gets all CMS contents with all communities; again by web services, the portlet writes all CMS contents into Alfresco repository, where the space names are created automatically by community's names. The following figure depicts the look and feel of the Alfresco Importer portlet.
You need to fill the following fields in the Alfresco Importer portlet:
1. Alfresco username and password: these fields will be used to connect to Alfresco through web services.
2. Destination path: this is the path of the Alfresco space in which the folders will be created, and the files imported. "Company Home" is the default root space.
3. You need to specify the folders' name that will be created for each CMS portlet. Then, three folders ("spaces" in alfresco terminology) will be created in Alfresco repository: one each for Document Library, Journal Articles and Image Gallery.
After you click on the Import button, the portlet will do the following steps:
For each community in the current company, create a space in the root space (described in the second bullet step above). Each space's name will be the same as the community's name.Inside each community's space, create three folders with the names chosen (in third bullet step above).Import the files from Document Library and Image Gallery, keeping the same folder structure they have in these portlets. Journal Articles are imported to the same Folder, their content is merged with their Templates and the result is imported to Alfresco as HTML files.
Note that when importing contents from CMS in Liferay to Alfresco repository, links, images, CSS, and JavaScript references in HTML generated article may not resolve correctly.
•
•
•
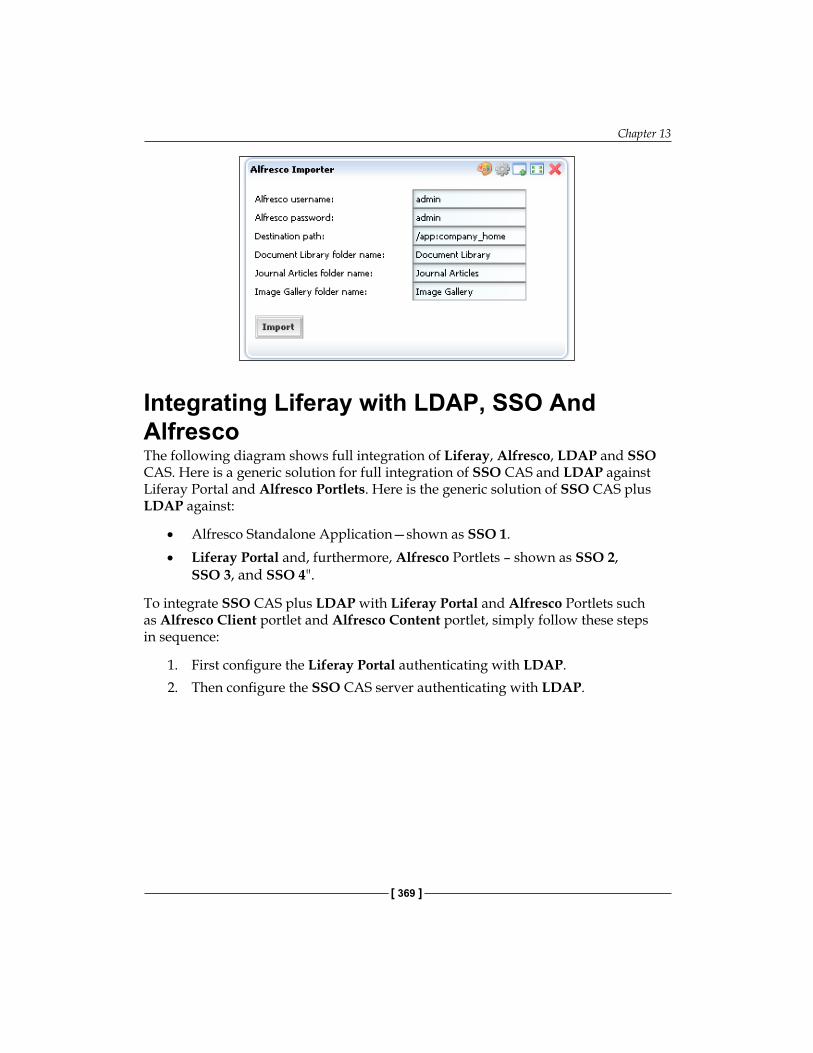
Chapter 13
[ 369 ]
Integrating Liferay with LDAP, SSO And AlfrescoThe following diagram shows full integration of Liferay, Alfresco, LDAP and SSO CAS. Here is a generic solution for full integration of SSO CAS and LDAP against Liferay Portal and Alfresco Portlets. Here is the generic solution of SSO CAS plus LDAP against:
Alfresco Standalone Application—shown as SSO 1.Liferay Portal and, furthermore, Alfresco Portlets – shown as SSO 2, SSO 3, and SSO 4".
To integrate SSO CAS plus LDAP with Liferay Portal and Alfresco Portlets such as Alfresco Client portlet and Alfresco Content portlet, simply follow these steps in sequence:
1. First configure the Liferay Portal authenticating with LDAP. 2. Then configure the SSO CAS server authenticating with LDAP.
•
•
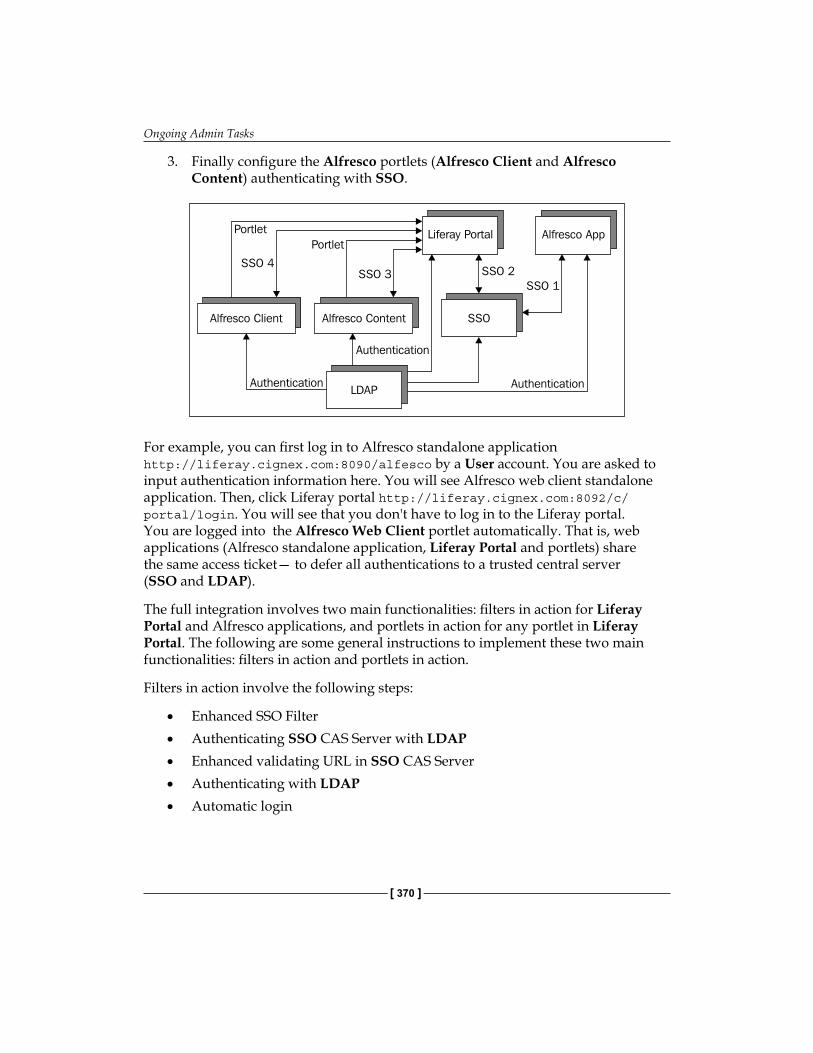
Ongoing Admin Tasks
[ 370 ]
3. Finally configure the Alfresco portlets (Alfresco Client and Alfresco Content) authenticating with SSO.
For example, you can first log in to Alfresco standalone application http://liferay.cignex.com:8090/alfesco by a User account. You are asked to input authentication information here. You will see Alfresco web client standalone application. Then, click Liferay portal http://liferay.cignex.com:8092/c/portal/login. You will see that you don't have to log in to the Liferay portal. You are logged into the Alfresco Web Client portlet automatically. That is, web applications (Alfresco standalone application, Liferay Portal and portlets) share the same access ticket— to defer all authentications to a trusted central server (SSO and LDAP).
The full integration involves two main functionalities: filters in action for Liferay Portal and Alfresco applications, and portlets in action for any portlet in Liferay Portal. The following are some general instructions to implement these two main functionalities: filters in action and portlets in action.
Filters in action involve the following steps:
Enhanced SSO FilterAuthenticating SSO CAS Server with LDAPEnhanced validating URL in SSO CAS Server Authenticating with LDAPAutomatic login
•
•
•
•
•
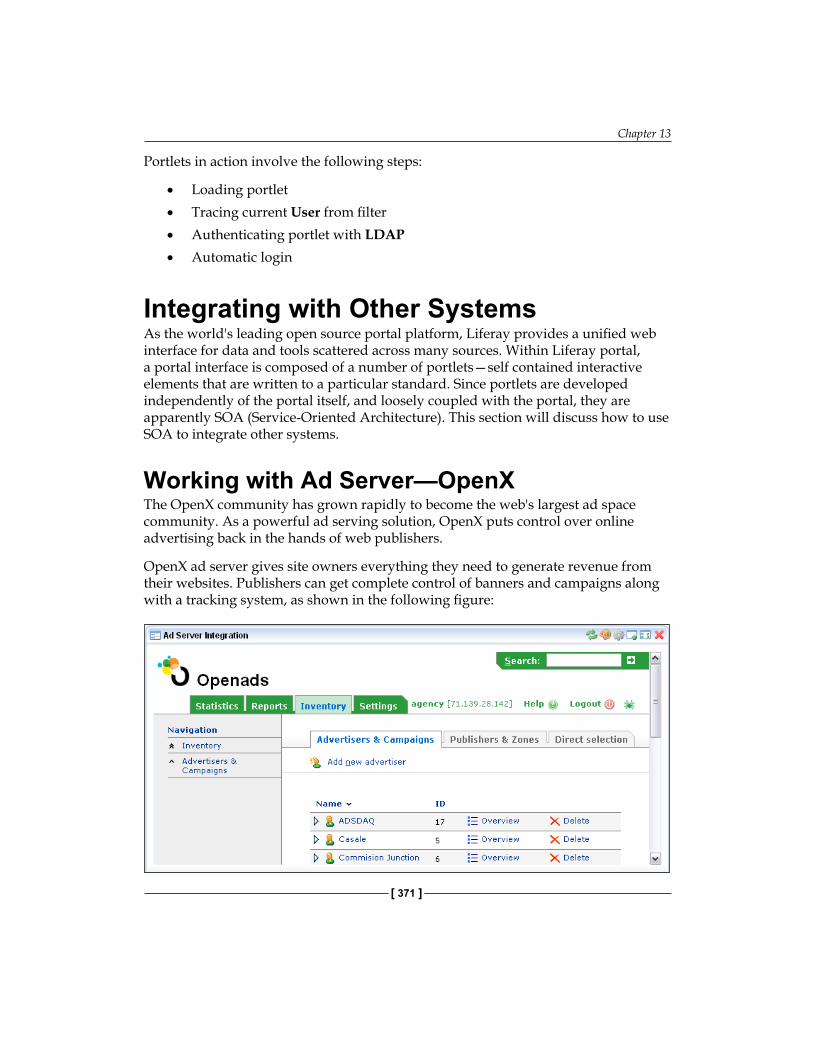
Chapter 13
[ 371 ]
Portlets in action involve the following steps:
Loading portletTracing current User from filterAuthenticating portlet with LDAPAutomatic login
Integrating with Other SystemsAs the world's leading open source portal platform, Liferay provides a unified web interface for data and tools scattered across many sources. Within Liferay portal, a portal interface is composed of a number of portlets—self contained interactive elements that are written to a particular standard. Since portlets are developed independently of the portal itself, and loosely coupled with the portal, they are apparently SOA (Service-Oriented Architecture). This section will discuss how to use SOA to integrate other systems.
Working with Ad Server—OpenXThe OpenX community has grown rapidly to become the web's largest ad space community. As a powerful ad serving solution, OpenX puts control over online advertising back in the hands of web publishers.
OpenX ad server gives site owners everything they need to generate revenue from their websites. Publishers can get complete control of banners and campaigns along with a tracking system, as shown in the following figure:
•
•
•
•
Ongoing Admin Tasks
[ 372 ]
How do we integrate OpenX in Liferay? Here are some possible steps to do this:
Consume web services from Ad Server in OpenX. Prepare Ad portlet to manage ads in Liferay.Prepare Ad Display portlet to publish Ad Banners. Deploy these two portlets (Ad portlet and Ad Display portlet) in Liferay.
The features are necessary in setting up the banners of the content of Ads portlet should include:
Displaying ads (that is, banners) based on a specific day; for example, at Christmas, showing GUND's banner.Displaying ads based on a general day; for example, on Monday, display a Fisher-Price ad; on Tuesday, display a GUND ad.Displaying ads on percentage basis for the duration of a given day; for example, on Tuesday, display GUND 40%, and Fisher-Price 60%.
We can use ads server OpenX to manage information on companies including banners (called Ads repository), as well as the alfresco server for content repository. At the same time, we can get complete control of banners and campaigns along with a tracking system. Further, we can do more tasks such as these:
Provide version feature for Ads in Liferay. Thus, we can see which ad version it was in the past. Separate Ad Display from Ad management in Liferay. In ads, admin will manage all possible ads with the above mentioned rules (similar to Journal portlet). Ad Display provides a way to display ads (similar to that of display articles in Journal Content) in any page. Schedule ads (that is, banners) in Ad Display, which is the same as that of articles in Journal Content. We can preview Pages on a specific date, say July 14th, including all updated Pages, home Page, and all scheduled articles and ads.
OpenX is a hugely popular, free ad server for web publishers. It takes control, manages your advertising and makes more money from online advertising. URL: http://www.openx.org/
•
•
•
•
•
•
•
•
•
•
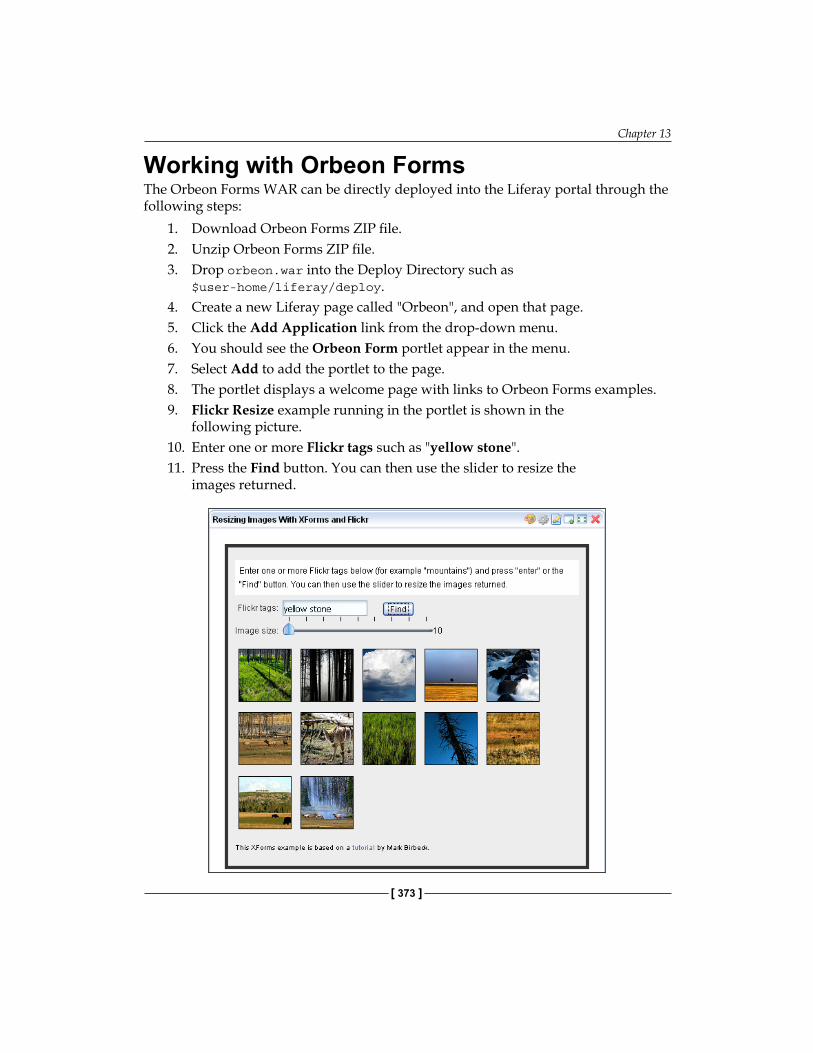
Chapter 13
[ 373 ]
Working with Orbeon FormsThe Orbeon Forms WAR can be directly deployed into the Liferay portal through the following steps:
1. Download Orbeon Forms ZIP file.2. Unzip Orbeon Forms ZIP file.3. Drop orbeon.war into the Deploy Directory such as
$user-home/liferay/deploy.4. Create a new Liferay page called "Orbeon", and open that page.5. Click the Add Application link from the drop-down menu.6. You should see the Orbeon Form portlet appear in the menu. 7. Select Add to add the portlet to the page.8. The portlet displays a welcome page with links to Orbeon Forms examples.9. Flickr Resize example running in the portlet is shown in the
following picture.10. Enter one or more Flickr tags such as "yellow stone".11. Press the Find button. You can then use the slider to resize the
images returned.
Ongoing Admin Tasks
[ 374 ]
Orbeon Forms is an open source forms solution that handles the complexity of forms. URL:: http://www.orbeon.com/
Working with Other IntegrationsWe can also integrate other applications such as Jasper Reports, Pentaho, Intalio, and so on. Here, we just discuss some of them.
Using Jasper Reports, we can easily integrate reporting tool in Liferay portal.
Jasper Reports is an open source reporting tool that can write to screen, to a printer or into PDF, HTML, Microsoft Excel, RTF, ODT, Comma-separated values and XML files. URL: http://www.jasperforge.org/jaspersoft/opensource/business_intelligence/jasperreports/
Using Pentaho, we can add ETL capabilities for Business Intelligence (BI) inside the Liferay portal.
Pentaho is an Open Source application software for reporting, analysis, dashboard, data mining, and workflow and Business Intelligence. URL: http://www.pentaho.com
Using Intalio|BPMS, we can integrate the BPMN and BELP inside the Liferay portal.
Intalio|BPMS is the BPMS to natively support the BPMN and BPEL industry standards. URL: http://www.intalio.com/.
Chapter 13
[ 375 ]
SummaryThis chapter first introduced us to the Admin portlet, which provides the ability to view server information, to create Instances, and to view available Portlets, Themes and Layout Templates. Then it discussed the Enterprise Admin portlet which not only allows Users with Permissions to manage Users, Organizations, User Groups, and Roles, but also shows portal settings information, Password Policies besides monitoring Users' activities. In addition, it discusses full integration with Alfresco through web services and web scripts. Further, it also discussed full integration of LDAP, SSO CAS, Liferay and Alfresco to take care of Users, Communities and Permissions synchronization so that Users can see Alfresco as a CMS in Liferay and use it through Liferay portlets. Finally, it discussed other forms of integration such as Ad Server, which includes OpenX, Orbeon Forms, and so on.
In general, we have introduced Liferay, including Portal, Journal CMS, Collaboration suite and various integrations with other systems such as Alfresco, SSO and LDAP. We tried to explain why Liferay is a better solution for building dynamic and interactive web sites with web content management and web content publishing. Moreover, we also tried to expound how Liferay satisfies the current and future requirements of your website.

IndexAaccount management
about 51portal, accessing 52portal, logging in 52profile, updating 52, 53
additonal toolsanalog clock portlet 290dictionary portlet 291network utilities portlet 288OpenID sign in portlet 291password generator portlet 290quick note portlet 289sign in portlet 291translator portlet 289unit converter portlet 291
administrators, user managementadding 74, 75enterprise admin 76organization admin 76
admin portletabout 349instances, managing 352, 353plugins, managing 354server, managing 350, 351
AJAXabout 259web standards 260
Alfresco/Liferay integrationabout 362Alfresco, used as Liferay direct repository
366contents, migrating 368
Apache Lucene 339
Apache Lucene search enginefeatures 340journal content search 339
application serversApache Geronimo 2.x 31Borland ES 6.5 31JBoss 4.0.x, 4.2.x 31Jetty 5.1.10 31JOnAS 4.8.x 31JRun 4 Updater 3 31OracleAS 10.1.3.x 31Orion 2.0.7 31Pramati 2.5 31Resin 3.0.19 31RexIP 2.5 31Sun GlassFish 2 UR1 31SUN JSAS 9.1 31Tomcat 5.0.x/5.5.x/6.0.x 31WebLogic 8.1 SP4, 9.2, 10 31WebSphere 5.1, 6.0.x, 6.1.x 31
articlesadding 238-240constructor 247creating 231deleting 242editing 241, 242features 245journal, setting up 242managing 240permissions, updating 243permissions on articles 244permissions on journal 244permissions on structures 244permissions on templates 244publishing 248
[ 378 ]
publishing, journal articles used 249, 250publishing, journal content used 248, 249publishing, other CMS tools used 250structure, adding 232, 233structure, building 245, 246structures, deleting 235structures, editing 235structures, managing 233structures, viewing 234template, adding 235template, creating 246, 247template, deleting 238template, editing 238template, managing 237template, viewing 237types 247viewing 240
Atomabout 177APP format 177ASF format 177
authentication methodsgeneral configurations 79, 80LDAP server, working with 76OpenID, working with 81SSO CAS server, working with 80
Bblogs
building 166comments, adding 156, 159entries, adding 152, 153entries, deleting 154entries, editing 154entries, managing 154entries, rating 155entries, searching 154, 155link-log, types 162permissions 159photo-log, types 162publishing 164RSS feeds, employing 156types 162using effectively 162v-log, types 162working with 151
blogs, buildingflash, inserting 170image, inserting 167, 168links, inserting 168link to document 169link to image 170link to page 170smiley, inserting 171source, editing 172special character, inserting 171table, inserting 171
blogs, publishingblogs aggregator portlet, used 165recent bloggers portlet, used 164
Ccalendar
components 191email, setting up 186events, adding 182, 183events, deleting 185events, editing 185events, exporting 186events, importing 186events, managing 183events, viewing 183, 184features 189permissions on events 188, 189portlet permissions 187sharing 187working with 181
categories, message boardsadding 96-98managing 98RSS feeds, viewing 99subcategories, adding 98
chat portletAJAX, employing 259chatting, starting 256, 257features 260Liferay, configuring 261participant, adding 254participants, managing 255, 256working 257working, instant messaging used 258working with 253
[ 379 ]
XMPP, instant messaging protocol 258XMPP server, setting up 261
communitiesadding 302community publishing 313community staging 313community staging, activating 314community staging, managing with
Workflow 316, 317community virtual hosting 313community virtual hosting, configuring 312deleting 305editing 304, 305managing 303open community, joining 310open community, leaving 310pages, exporting 307pages, importing 307pages, managing 306pages, monitoring 307pages, publishing 314, 315pages, viewing 306, 307permissions, updating 310, 311searching 304users, adding 308, 309viewing 303, 304virtual hosting, setting up 312, 313
community 93community tools
announcements, using 318, 320directory portlet, using 321employing 318invitation portlet, working with 321, 322page comments portlet, using 322, 323page rating porlet, working with 323, 324
Ddocument library
comments, adding in document 228document, adding 224document, rating 227documents, deleting 227documents, editing 226documents, managing 225documents, publishing 229documents, searching 226
documents, viewing 225document shortcut, adding 224document version history, viewing 227features 229folder, adding 222formats, for automatic conversion 230, 231overview 231permissions, setting up 228permissions on document 229permissions on folders 228subfolder, adding 223, 224working with 222
Eenterprise admin portlet
about 355password policies 355, 357settings, updating 358user activities, monitoring 361, 362
entertainment toolsgames portlet 295words portlet 295
Ffederated search
about 326alfresco cotent query, via Opensearch 328CSZ search 329Google maps 334Google maps, configuring 334Google maps, deploying 334Google search portlet 332Google search portlet, configuring 332Google search portlet, deploying 332Google search portlet, integrating 333maps search 330, 331Opensearch 326, 336Opensearch, design principles 336Opensearch description document 336Opensearch description document, root
nodes 337, 338Opensearch specification 336, 337search portlet 326search portlet, alfresco content 327search portlet, steps for using 326
[ 380 ]
financial portletsabout 276calculator portlet 276currency converter portlet 277, 278loan calculator portlet 277preferences-owned-by-group, stocks portlet
281preferences-unique-per-layout, stocks
portlet 281stocks portlet 279stocks portlet, using 280working with 276
GGoogle portlets
about 281Google AdSense portlet 284Google gadgets portlet 282, 283working with 281
Hhome page, Liferay portal
customizing 32layout template, changing 36logging in 33pages, adding 33pages, removing 34portlets, adding 35portlets, removing 35private page 32public page 32
II-TIP 192iCalendar
about 190core object 190data, exchanging 192I-TIP 192IMIP 192
iCalendar Message-based Interoperability Protocol. See IMIP
iCalendar Transport-Independent Interoperability Protocol. See I-TIP
image gallery
features 221folder, adding 214folders, deleting 217folders, editing 217folders, managing 217image, adding 215, 216images, deleting 220images, editing 219images, managing 217images, searching 218images, viewing as slideshow 218overview 222permissions, setting up 220permissions on folders 221permissions on images 221permissions on portlet 220subfolder, adding 215working with 214
IMIP 192installing, Liferay portal
bundled with Tomcat 5.5 in Windows 28, 29
bundled with Tomcat 6.x in Linux 29Geronimo + Tomcat, options 30Glassfish for AIX, options 30Glassfish for Linux, options 30Glassfish for OSX, options 30Glassfish for Solaris(x86), options 30Glassfish for Solaris, options 30Glassfish for Windows, options 30JBoss + Jetty 4.0, options 30JBoss + Tomcat 4.0, options 30JBoss + Tomcat 4.2, options 30Jetty, options 30JOnAS + Jetty, options 30JOnAS + Tomcat, options 30options 30Pramati, options 30Resin, options 30Tomcat 5.5 for JDK 1.4, options 30Tomcat 5.5 for JDK 5.0, options 30Tomcat 6.0, options 30
internet site structure,navigating 43
intranetbuilding 9building, for Palm Tree Publications 12
[ 381 ]
considerations 13features 9
intranet featuresblogs 10collaborative documents, Wikis using 10document stores 11hosted discussions 9shared calendars 11
Jjournal content search
about 338configuring 338, 339
LLDAP server
authentication, setting 77using effectively 79working with 76
Liferayfeatures 14, 15, 16information 18uses 16
Liferay, LDAP, SSO, Alfresco integration 369
functionalities 370functionalities, implementing 370
Liferay blogs 151Liferay blogs portlet 163Liferay calendar
features 189Liferay chat portlet 253Liferay communities 301Liferay Journal 213Liferay mail portlet 262Liferay message board 95Liferay meta tags 115Liferay polls 145Liferay portal
account management 51additional tools 288admin portlet 349Alfresco, integrating with 362Alfresco content 364Alfresco web client, used as portlet 363
Alfresco web services API, code services 364
application servers 31articles, creating 231authentication methods 76blogs 151calendar, working with 181chat portlet 253Color Schemes, regular browser themes 41communities 301community tools, employing 318configuring 44CSS, regular browser themes 41deployment matrix 30detailed installation procedure 27document library 222enterprise admin 75, 76enterprise admin portlet 355entertainment tools 294experiencing 22extension environment, setting up 47, 48federated search 326financial portlets 276full access control security model,
applying 92Google portlets 281home page, customizing 32image gallery 214installing 22installing, using extension environment 28installing, using open source bundle 27installing ways 27Intalio, integrating 374integrating with, LDAP, SSO, Alfresco 369internet site structure, navigating 43, 44Jasper Reports, integrating 374Java Portlet, developing 298journal content search 338mail portlet 262message boards 95mobile devices themes 41multiple languages 295OpenX server, integrating 372OpenX server, working with 371Orbeon forms, deploying 373Orbeon forms, working with 373
[ 382 ]
organization admin 75, 76Palm-Tree Publications, example 22Pentaho, integrating 374permissions 86polls 145portal pages, setting up 37portlets, customizing 42portlets, developing 298regular browser themes 41Religion portlets 285roles 82RSS, working with 173setting up 27shopping tools 291sitemap, adding for search engines 340SMS text messenger portlet 269spring MVC portlet 298tags 114themes 41Themes, regular browser themes 41user management 54WAP 41WebDAV support 297, 298web form 142web script, Alfresco content 365web service, Alfresco content 364Wikis 123Workflow, working with 192WSRP, working with 204
Liferay portal, configuringconfiguration, customizing 46mail servers, customizing 45portal plans, configuring 46
Liferay portal, databasesApache Derby 31Firebird 31Hypersonic 31IBM DB2 31Informix 31InterBase 31JDataStore 31MySQL 31Oracle 31PostgresSQL 32SAP 32SQL Server 32Sybase 32
Liferay portal, operating systemsLINUX 32MAC OS X 32UNIX 32WINDOWS 32
Liferay RSS 151, 173Liferay SMS text messenger portlet 269Liferay web form 142Liferay Wikis 123locations, user management
about 93adding, for main organizations 61location, adding for enterprise 60location, deleting 63location, editing 63managing 60searching 63using effectively 64viewing 62working with 60
Mmail portlet
features 268IMAP server 268IMAP server, advantages 269mail management 262, 263, 264mail server, setting up 265, 266permissions 267, 268setting up 266, 267working with 262
message boardscategories, adding 96categories, managing 98categories, subscribing 107categories, unsubscribing 108permissions 111posts, adding 102, 103posts, managing 104ranking profiles, default settings 110setting up 109thread profiles, default settings 109threads, adding 100threads, managing 101threads, subscribing 107threads, unsubscribing 108
[ 383 ]
using effectively 114working with 95
multiple languagesabout 295language files, rules 296language files priority 296unwanted languages, removing 296
Nnodes, Wikis
adding 124, 125Liferay node, creating 124managing 125node, deleting 126node, editing 125
OOpenID
working with 81organizations, user management
about 93child organizations, adding 56, 57managing 56organization, deleting 59organization, editing 58searching 58top-level organiztions, adding 55, 56using effectively 59viewing 57working with 55
Ppages, Wikis
adding 126, 127comments, adding 130-132creating 128managing 129, 130
Palm Tree Publications example 12permissions
about 93default permissions, assigning 88delegating 89, 90individual permissions, assigning 88individual portlet permissions, assigning
87, 88
using effectively 91working with 86
permissions, blogspermissions on entries, setting up 160, 162portlet permissions, updating 159, 160
permissions, message boardslevels 111permissions, for categories 111permissions, for forum 111permissions on category 111, 112permissions on thread 113portlet permissions 111
permissions, Wikisabout 132permissions on nodes, setting up 133, 134permissions on pages, updating 134portlet permissions, updating 133
pollspolls display portlet 149polls portlet 145using effectively 150
polls portletabout 145permissions, setting up 147, 148question, deleting 147question, editing 147questions, managing 147votes, viewing 148
portalbenefits 23working 24
portal pages, Liferay portalabout 23child page, adding 37child page display order, changing 38logo, changing 39page, deleting 40page, editing 39pages, managing 37pages, merging 38setting up 37themes, changing 41
portletabout 23customizing 42life cycle 26life cycle, applying 26
[ 384 ]
life cycle, end of service 27life cycle, initialization 26life cycle, instantiation 26life cycle, loading 26life cycle, request handling 26working 24, 25
portlet containerabout 23uses 24
posts, message boardsadding 102banned users, viewing 107deleting 105editing 104managing 104my posts, viewing 106permissions 105recent posts, viewing 106search message 106statistics, viewing 106user, banning 105viewing 105
Rreligion portlets
about 285Bible Gateway portlet 287Gospel for Asia portlet 287Random Bible Verse portlet 287using 287working with 285, 287
rolesabout 83, 93assigning 84deleting 83enterprise permissions, assigning to role 84managing 83role, adding 82role, editing 83searching 83using effectively 85viewing 83working with 82
RSSabout 99formats 178
news portlet 174-176RDF Site Summary (RSS 1.0 and RSS 0.90),
formats 178Really Simple Syndication (RSS 2.0),
formats 178Rich Site Summary (RSS 0.91), formats 178RSS portlet 173RSS specification 178, 179RSS system, working 179using effectively 177wearther portlet 176, 177working with 173
Ssearch portlets
auto deployment 346deploying, update manager used 345deploying ways 344hot deploying, plugin installer used 344managing, via software catalogue 345-347
settings, enterprise admin portletdefault user association, setting up 359email notifications, updating 360mail host names, updating 360reserved screen name, updating 359
shopping toolsAmazon rankings portlet 291-293shopping portlet 294
sitemapadding, for search engines 340customizing, for pages 341, 342features 342using 340XML sitemap format 343XML tags 343
SMS text messengerfeatures 272HLR 273MSC 273organization of network elements 272SMC 272SME 272SMS GWMS 272SMTP, setting up 271uses 272using 270
[ 385 ]
VLR 273working with 269
SSO CAS serverworking with 80, 81
Ttags
about 101, 114adding 116Asset Publisher set up, for displaying
tagged contents 119deleting 116editing 116importance 120managing 115overview 121searching 116tagged contents, displaying 118, 119tagging contents 114, 115tags admin portlet 116using effectively 121
threads, message boardsadding 99, 100, 101managing 101, 102RSS feeds, viewing 102
Uuser groups, user management
about 71, 93deleting 73managing 73searching 73user group, adding 72user group, assigning 74user group, editing 73viewing 73
user managementadministrator, adding 74communities 71locations, working with 60organizations, working with 55user groups 71users, bringing in 64
users, user managementabout 64, 93account, creating on fly 67
adding 64managing 67more users, adding 66new password, creating 67searching 69user, activating 70user, deactivating 70user, deleting 70user, editing 69user, impersonating 71users, adding in bulk 66viewing 68
uses, Liferaycollaborative websites, building 17content management and web publishing
website, building 17corporate extranets, building 16infrastructure portal, building 18
Vvirtual hosting 313
WWebDAV 297web forms
edit mode 143edit mode, features 144, 145view mode 142working with 142
Wikisabout 123advantages 137characteristics 135design principles 136disadvantages 137nodes, adding 124nodes, managing 125pages, adding 126pages, managing 129permissions 132using effectively 135Wiki articles, publishing 142Wiki test 136working with 123
Workfowbusiness process, defining 201

[ 386 ]
definitions, managing 194deploying 192, 193features 200groups, integrating with 202instances, managing 194, 195permissions 198permissions on definitions 199permissions on instances 199permissions on tasks 200portlet permissions 198roles, integrating with 202tasks, managing 196, 197users, integrating with 202working with 192
WSRPabout 205features 205
flash portlet 210, 211functionalities 206functions 206iframe portlet 208iframe portlet, advantages 209iframe portlet and web proxy, differences
209need for 206web proxy portlet 207, 208working 206, 207working with 204, 205WSRP consumer 206WSRP producer 206
XXMPP 258