Embed Size (px)
Citation preview

1
Technical Data . . . . . . . . . . . . . . . . . . . . . .
Installation InstructionsInstallation Requirements . . . . . . . . . . . . . . . . .Installation/Removal . . . . . . . . . . . . . . . . . . . .
Introduction . . . . . . . . . . . . . . . . . . . . . . . .
Getting StartedAbout Your Washer-Dryer . . . . . . . . . . . . . . . . .Understanding the Control Panel . . . . . . . . . . . . . .Guide to the Wash Programs . . . . . . . . . . . . . . . .Preparing Laundry / About Laundry Aids . . . . . . . . . . . .Fabric Care Labels / Stain Removal Chart . . . . . . . . . . .
Operation InstructionsChoosing a Load . . . . . . . . . . . . . . . . . . . . .About the Dispenser Drawer . . . . . . . . . . . . . . . .How to Wash . . . . . . . . . . . . . . . . . . . . . . .How to Dry . . . . . . . . . . . . . . . . . . . . . . . .
Easy Care and MaintenanceRegular Maintenance. . . . . . . . . . . . . . . . . . . .Monthly/Yearly Maintenance . . . . . . . . . . . . . . . . .
TroubleshootingAvoid Service Checklist . . . . . . . . . . . . . . . . . .If You Need Service. . . . . . . . . . . . . . . . . . . . .
Quick Reference Guide
���������
Read All Instructions Before Using
2
34
6
7891011
12131415
1617
1819
Washer-DryerInstallation Instructions and Use & Care Guide
Lave-linge séchantMode d’installation et d’emploi
Instrucciones para la instalación y el uso
Lavasecadora
WD2100WD2000S
Splendide 2100Splendide 2000 S

To winterize your washer-dryer:1. With the machine power OFF, pour ½ quart of RV-
type antifreeze into the washer drum
2. Close the door. Advance the Program Selector knob to a SPIN position
3. Press ON/OFF Button (IN). Wait 1-2 minutes
4. Press ON/OFF Button (OUT). Unplug the washer-dryer from the electrical outlet (or disconnect power)
5. Turn the water supply faucets OFF. Disconnect the inlet hoses from the faucets. Drain any remaining water from the hoses. Finished!
Optional RV Winterization - If you’re currently pumping antifreeze through the fresh water
system, follow these steps to winterize:1. With the machine power OFF, turn the WASH TEMP
knob to HOT
2. Advance the Program Selector knob to REGULAR in Cotton Heavy Duty
3. Press the ON/OFF button (IN) and let the machine fi ll until antifreeze is in the drum
4. Advance Program Selector to a RESET. Wait 5 seconds (Status/Door Lock LED will blink)
5. Advance Program Selector to a SPIN position. Let the antifreeze drain from the drum
6. Advance Program Selector to RESET. Wait 5 seconds (Status/Door Lock LED will blink)
7. Turn the WASH TEMP knob to COLD
8. Advance the Program Selector knob to REGULAR in Cotton Heavy Duty
9. Let the machine fi ll until you see antifreeze in the drum
10. Advance the Program Selector knob to RESET. Wait 5 seconds (Status/Door Lock LED will blink)
11. Advance the Program Selector knob to SPIN. Let the antifreeze drain from the drum
12. Press the ON/OFF button (OUT). Finished!
To use again, fl ush the water pipes, then:1. Reconnect the water inlet hoses to the correspond-
ing HOT/COLD faucets. Turn the faucets ON. (NOTE: Check the water inlet hoses and pump periodically. Refer to the “Use & Care Guide” that came with the machine)
2. Plug the washer-dryer into an appropriate electrical outlet (or reconnect power supply)
3. With the ON/OFF button in the off (OUT) position, pour 1/2 TBSP. of powder detergent (or liquid equiv.) into the ‘Detergent’ compartment inside the Dispenser Drawer
4. Advance the Program Selector knob to an EXPRESS cycle
5. Press the ON/OFF button (IN) and allow the machine to run through the complete cycle to clean out any remaining antifreeze. Finished!
M O D E L SWD2000S (Splendide 2000S)WD2100 (Splendide 2100)WDC6200 CEE (Comb-o-matic 6200)WDC5200 (Comb-o-matic 5200)
Front-Loading Washer-Dryer
Addendum to Owners Manual
Splendide®
W A S H E R D R Y E R
© C
op
yrig
ht
20
04
, W
est
lan
d S
ale
s, C
lack
am
as,
OR
97
01
5
Q U E S T I O N S ? Splendide Service HQ:Westland Sales15650 SE 102nd Ave. (PO BOX 427)Clackamas, OR 97015
Telephone: Toll Free: 800-356-0766 (Local: 503-655-2563)Service Fax: (503) 722-9202E-mail: [email protected]: www.splendide.com
W I N T E R I Z A T I O N S U P P L E M E N T
To Open the Door During a Wash Cycle:1. Advance the Program Selector to ‘Reset’ and wait 5
seconds.
2. Advance the Program Selector to ‘Drain’ (8 o’clock) and allow the machine to drain completely.
3. Advance the Program Selector to ‘Reset’ (The ‘Status/Door Lock’ LED will blink quickly to indicate that the cycle has stopped, but the door is STILL LOCKED)
4. When the ‘Status/Door Lock’ LED blinks SLOWLY (takes 1-2 minutes), you can open the door
To Open the Door During a Dry Cycle:1. Advance the Program Selector to ‘Reset’ (The ‘Status/
Door Lock’ LED will blink quickly to indicate the cycle has stopped, but the door is STILL LOCKED)
2. When the ‘Status/Door Lock’ LED blinks SLOWLY (takes 1-2 minutes), you can open the door
D O O R L O C K S U P P L E M E N T!DO NOT DISCARD!
THIS INFORMATION SUPERSEDES THE
INFORMATION FOUND IN YOUR OWNERS MANUAL
KEEP THIS PAGE WITH YOUR
OWNERS MANUAL FOR FUTURE REFERENCE
Once a wash or dry cycle is underway, the washer-dryer door will LOCK for the duration of the cycle and will STAY LOCKED for up to 2 minutes after the cycle ends. DO NOT attempt to open the door unless
the ‘STATUS/DOOR LOCK’ LED is BLINKING SLOWLY!
IMPORTANT! !
Follow theses steps if you need to winterized your washer-dryer that’s installed in a boat or RV
Follow these steps if you need to open the door to your washer-dryer after a cycle has already begun

2
* Additional clearances for wall, door/floor moldings may be required.
This appliance was tested by UL andconforms with both Canadian and U.S. ULsafety requirements and displays their mark.
As an Energy Star Partner, Splendide DivisionWestland Sales has determined that Energy Starlabeled models meet the Energy Star guidelines forenergy efficiency.
Technical Data
Technical Data
Dimensions
Capacity
Electrical Conn.
Water Conn.
Spin Speed
NOTE: The manufacturer reserves the right to make any improvements to its appliances without giving prior notice.
Models Splendide 2100by Splendide (WD 2100)
Width: 23.4" (59.5 cm)Height: 33.25"-33.75" (84.5-85.7 cm)Depth: 23.4" (59.4 cm)
Drum Size: 1.92 CFWashing: 2-12 lbs.Drying: 2- 8 lbs.
Voltage: 120 Volts, 13 Amp, 60 HzMax. Absorbed Power: 1300 Watts
Max. Pressure: .69 MPa (6.9 bar), 100 PSIMin. Pressure: 0.05 MPa (0.5 bar), 7.5 PSI
Up to 1200 RPM
Splendide 2000 Sby Splendide (WD 2000 S)
Width: 23.4" (59.5 cm)Height: 33.25"-33.75" (84.5-85.7 cm)Depth: 22.2" (56.4 cm)
Drum Size: 1.6 CFWashing: 2-10 lbs.Drying: 2- 6 lbs.
Voltage: 120 Volts, 13 Amp, 60 HzMax. Absorbed Power: 1300 Watts
Max. Pressure: .69 MPa (6.9 bar), 100 PSIMin. Pressure: 0.05 MPa (0.5 bar), 7.5 PSI
Up to 1200 RPM
�Minimum Installation SpacingThis appliance may be installed in a recessed area, closet or alcove. The installation spacing is in inches and is the minimum acceptable. Additionalspacing should be considered for easy installation, servicing and compliance with local codes and ordinances. Installations must conform with theminimum dimensions indicated.
� WARNING: To reduce the risk of fire this appliance MUST BE EXHAUSTED OUTDOOR
!
1" **1"
Side View
0" * 0" *
Recessed Front View
C UL US LISTED®

3
�LocationThis machine may be installed free standing as well as in a recessedarea, closet, or alcove.
• Minimum Installation Spacing - 0" on sides and 1" in front and back.NOTE: Additional installation spacing needs to be considered for easyinstallation, servicing, and compliance with state and federal codes.
• Floor - Must support at least 280 lbs. and be a solid, level surface. DONOT install on carpet.
• RV/Marine Applications - When locating the appliance in a towabletrailer or watercraft, position the machine over the axles or mid-shipwhere movement is at a minimum. Block the machine to preventextreme movement.
• Exhaust Requirements - Ducting installing. Rigid or flexiblemetallic duct required. Ducting must slope downwards and away fromthe machine. DO NOT exhaust dryer into a chimney, furnace,cold air duct, attic crawl space, or another duct used for venting. Ifcabinet door is installed, a min. of 8 sq. in. should be provided for makeup air. Louvered doors with equiv. air openings are acceptable. Allowclearances behind door(s) to avoid rubbing between back of cabinetdoor(s) and front of unit control panel. Additional clearances for wall,door and floor molding may be required.
�Drainage• Standpipe Diameter/Capacity - Needs a 1 ¼” minimum diameter
standpipe with a minimum carry-away capacity of 7 gallons perminute.
• Top of Standpipe - Must be between 25" - 34" high from the bottom ofthe machine.
• Outlet End of Drain Hose (provided with the unit) - Must be atleast 20" above the bottom of the washer-dryer. An air break must beavailable at the standpipe to avoid siphoning. No more than 6" of thedrain hose should be inserted into the drain pipe to prevent siphoning.
�Splendide Accessories (Available Separately)• Faucet Adapter Kit allows for a direct faucet connection.• Optional Drain-A-Way Pans designed to be drain plumbed.
Installation Instructions
WARNING: Splendide denies all liability if these instructions are not followed correctly.
Installation Requirements
Attention!For your own protection and to prevent accidents, injury, and fire,please read the following carefully before installing the washer-dryer.
• Installation and grounding must be done in accordance with localcodes and by a qualified installer. Installation Instructions providedin this booklet are for the installers’ reference.
• Washer-dryer MUST be installed on a strong, level floor and in aprotected dry and well-ventilated area close to a power supply anddrain outlet of sufficient capacity. DO NOT install on carpet.
IMPORTANT: Installation on carpet floors will cause themachine to vibrate and may result in excessive machinevibration during the spin cycles and loss of performance.
• The washer-dryer should be plugged into a properly grounded (3)prong electrical outlet capable of 120 Volt, 60 Hz, 1300 W, and 13Amp. It shouldn’t be controlled by a wall switch or pull cord whichcould be turned off accidentally. For your safety, the third or roundgrounding prong must never be removed. DO NOT USE ANEXTENSION CORD.
• DO NOT install or store this appliance where it will be exposed toweather or in an area where gasoline or other flammables arestored.
!
!
GROUNDING INSTRUCTIONSThis appliance must be grounded. In the event of malfunction, orbreakdown, grounding will reduce the risk of electric shock byproviding a path of least resistance for electric current. Thisappliance is equipped with a cord having an equipment groundingconductor and grounding plug. The plug must be plugged into anappropriate outlet that is properly installed and grounded inaccordance with all local codes and ordinances. DO NOT modifythe plug provided with the appliance. If it will not fit the outlet,have a proper outlet installed by a qualified electrician.
WARNING: Improper connection of the equipment-grounding conductor can result in a risk of electricshock. Check with a qualified electrician or servicemanif you are in doubt as to whether the appliance isproperly grounded.
• Rigid or flex metal/metallic ductingshould be used.
• Exhaust ducts should be as short andstraight as possible and slopedownwards and away from themachine. NOTE: Long exhaust ductingcan extend drying time, collect lint andmay affect drying performance.
• The exhaust duct must end with anapproved exhaust vent hood withswing out damper(s) or tailpiece withlouvers.
• Check that all ducting is clean and lint free. Use duct tape or screw clampst o secure all joints.
• Use duct tape or screw clamps to secure the duct to the round flange ventlocated on the back of the machine (Fig. 8).
�Electrical• Machine Voltage/Amperage - 120V, 60 Hz, 1300 W, 13 Amp.• Connection - 3-prong plug with 6' cord is provided with the machine.• Circuit/Protector - 3-wire single phase, 120V, 60 Hz, AC, on a
separate 15 Amp circuit.

4
!
�3. Connecting Water Inlet• If the water pipes you will be connecting to are new or unused, run the
water until clear to remove any debris that could clog the water valvescreens or valves before connecting the machine. NOTE: Supplyshut-off valves should be easily accessible.
• Included in the accessories supplied with your machine are 2 inlet hoseswith 4 rubber washers preinstalled. Check that the rubber washers areinstalled in the ends of the inlethoses to make a water tight sealat each connection point.
• Connect the straight ends of thewater inlet hoses to the supplytaps that have ¾” BSP thread(standard hose bib).
• Connect the 90º angled ends (20mm thread) of these hoses to theinlet valves on the back of themachine (Fig. 2). NOTE: WaterInlet valves are color coded:Red (Hot) & White (Cold).
IMPORTANT: Do not use excessive force. Damage to thecouplings can result. The couplings should be tightened byhand; a tool should only be used if a leak occurs.
Optional Single Faucet Hook-UpIt is possible to run the machine oncold water only, but a water supplymust be connected to each inletvalve. To do this, we suggest you usea “Y” connector (contact Splendide).Connect the “Y” connector to a tap.After checking that the 4 rubberwashers (provided) are installed in theends of the inlet hoses, connect thestraight ends of the hoses to the “Y”connector (Fig. 3). Then connect the
90º angled ends of these hoses to the inlet valves on the back of themachine (Fig. 2). NOTE: When the machine is connected to a singlefaucet, the water temp. for the wash/rinse settings is regulated by thetemperature YOU set at the faucet.
�1. Unpacking Your Washer-Dryer• Carefully remove the packing materials with care not to damage the drain
hose and power cord that are shipped installed on the machine. Checkthat the machine is intact. Report any damage immediately.
• Position the washer-dryer near the desired installation position.
WARNING: Plastic bags, Styrofoam, nails and other packagingparts are not children’s toys and can be potentially dangerous.Destroy the carton and plastic bags after the washer-dryer hasbeen unpacked.
�2. Remove the Transit Screws/Spacers• For transportation, the inside of the machine is supported by screws,
rubber grommets and spacers on the back panel. Before using thewasher-dryer, these items MUST be removed.
IMPORTANT: Transit screws and spacers must be removedbefore operating the machine to allow proper operation of themachine and to prevent damage to the appliance.
• After positioning the washer-dryernear the installation location,remove the four screws (Fig.1), withthe rubber grommets and plasticspacers that are attached to them.
• Use the plastic plugs (provided inthe accessories bag) to fill in theholes.
IMPORTANT: Retain the transit screws, spacers and rubbertubes. These items should be reinstalled to prevent damage ifor when you transport the machine in the future.
!
Installation Instructions
WARNING: Splendide denies all liability if these instructions are not followed correctly.
!
!
Fig. 2
Fig. 3
Continued on next page
�4. Water Drainage• It is possible for the water to be discharged into a sink, standpipe or
drainpipe, but an air break must be available at a min. 20" height toprevent the machine from siphoning (Fig. 6).
Standpipe Drain System - Installations require a minimum 1 ¼” (3.2 cm)diameter standpipe with a minimum carry away capacity of 7 gallons (26liters) per minute.
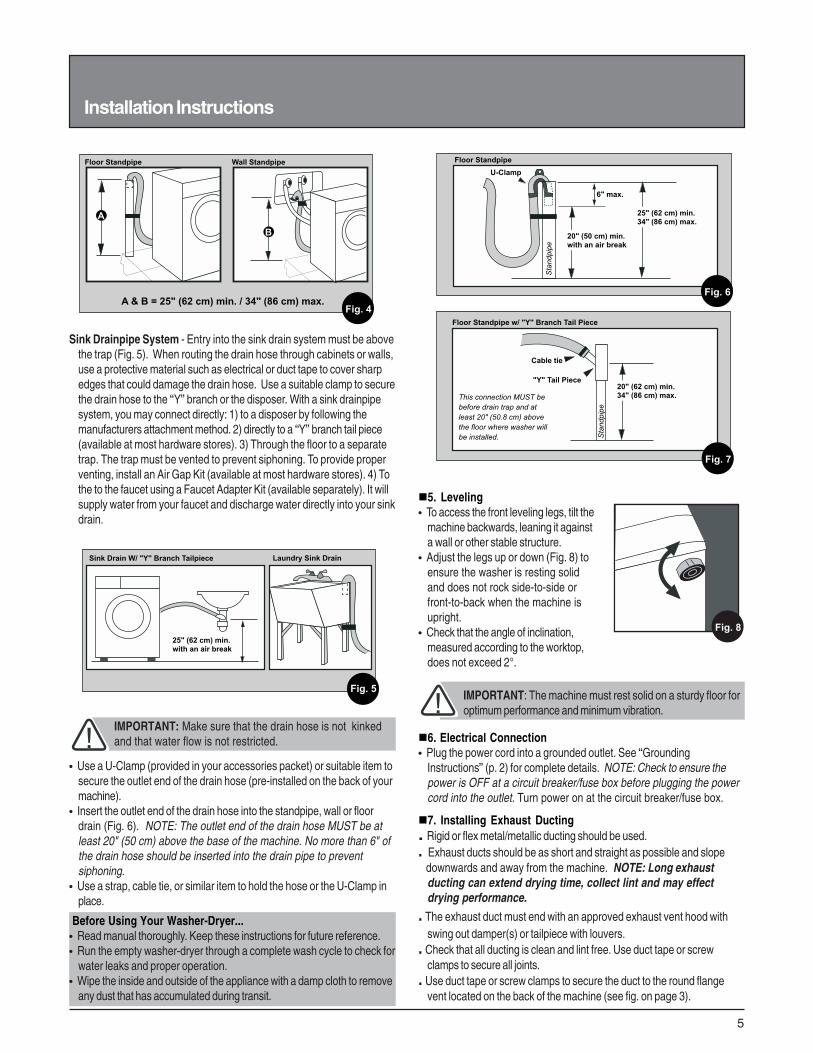
Wall or Floor Standpipe Drain System - The top of the standpipemust be between 25" (62 cm) - 34" (86 cm) from the bottom of thewasher (Fig. 4).
Fig. 1
Installation / Removal
!IMPORTANT: Water pressure MUST range within the valuesindicated on the “Technical Data” chart (p. 1).
5
• Use a U-Clamp (provided in your accessories packet) or suitable item tosecure the outlet end of the drain hose (pre-installed on the back of yourmachine).
• Insert the outlet end of the drain hose into the standpipe, wall or floordrain (Fig. 6). NOTE: The outlet end of the drain hose MUST be atleast 20" (50 cm) above the base of the machine. No more than 6" ofthe drain hose should be inserted into the drain pipe to preventsiphoning.
• Use a strap, cable tie, or similar item to hold the hose or the U-Clamp inplace.
�5. Leveling• To access the front leveling legs, tilt the
machine backwards, leaning it againsta wall or other stable structure.
• Adjust the legs up or down (Fig. 8) toensure the washer is resting solidand does not rock side-to-side orfront-to-back when the machine isupright.
• Check that the angle of inclination,measured according to the worktop,does not exceed 2°.
IMPORTANT: The machine must rest solid on a sturdy floor foroptimum performance and minimum vibration.
Installation Instructions
A & B = 25" (62 cm) min. / 34" (86 cm) max.
Floor Standpipe Wall Standpipe
A
B
Fig. 4
Sink Drainpipe System - Entry into the sink drain system must be abovethe trap (Fig. 5). When routing the drain hose through cabinets or walls,use a protective material such as electrical or duct tape to cover sharpedges that could damage the drain hose. Use a suitable clamp to securethe drain hose to the “Y” branch or the disposer. With a sink drainpipesystem, you may connect directly: 1) to a disposer by following themanufacturers attachment method. 2) directly to a “Y” branch tail piece(available at most hardware stores). 3) Through the floor to a separatetrap. The trap must be vented to prevent siphoning. To provide properventing, install an Air Gap Kit (available at most hardware stores). 4) Tothe to the faucet using a Faucet Adapter Kit (available separately). It willsupply water from your faucet and discharge water directly into your sinkdrain.
25" (62 cm) min.with an air break
Laundry Sink Drain
Fig. 5
Sink Drain W/ "Y" Branch Tailpiece
20" (50 cm) min.with an air break
25" (62 cm) min. 34" (86 cm) max.
6" max.
Sta
ndpip
e
Floor Standpipe
Fig. 6
U-Clamp
20" (62 cm) min. 34" (86 cm) max.
Sta
ndpip
e
"Y" Tail Piece
This connection MUST be
before drain trap and at
least 20" (50.8 cm) above
the floor where washer will
be installed.
Cable tie
Floor Standpipe w/ "Y" Branch Tail Piece
Fig. 7
!
Fig. 8
�6. Electrical Connection• Plug the power cord into a grounded outlet. See “Grounding
Instructions” (p. 2) for complete details. NOTE: Check to ensure thepower is OFF at a circuit breaker/fuse box before plugging the powercord into the outlet. Turn power on at the circuit breaker/fuse box.
Before Using Your Washer-Dryer...• Read manual thoroughly. Keep these instructions for future reference.• Run the empty washer-dryer through a complete wash cycle to check for
water leaks and proper operation.• Wipe the inside and outside of the appliance with a damp cloth to remove
any dust that has accumulated during transit.
�7. Installing Exhaust Ducting. Rigid or flex metal/metallic ducting should be used.. Exhaust ducts should be as short and straight as possible and slope downwards and away from the machine. NOTE: Long exhaust
ducting can extend drying time, collect lint and may effectdrying performance.
. The exhaust duct must end with an approved exhaust vent hood withswing out damper(s) or tailpiece with louvers.
. Check that all ducting is clean and lint free. Use duct tape or screwclamps to secure all joints.
. Use duct tape or screw clamps to secure the duct to the round flangevent located on the back of the machine (see fig. on page 3).
IMPORTANT: Make sure that the drain hose is not kinkedand that water flow is not restricted.!

6
For Your SafetyYour washer-dryer has been built in compliance with the strictestinternational safety regulations. However, for your safety, theinformation in this manual must be followed to minimize the risk of fireor explosion, electric shock, or to prevent property damage, personalinjury, or loss of life.• Read all instructions before using any appliance.• Do not wash or dry articles that have been previously cleaned in,
washed in, or spotted in gasoline, dry cleaning solvents, otherflammable/explosive substances as they emit vapors that couldignite or explode.
• Before the appliance is removed from service or discarded, removethe door to the washing/drying compartment.
• Do not repair or replace any part of the appliance or attempt anyservicing unless specifically recommended in the user-maintenanceinstructions or in published user-repair instructions that youunderstand and have the skills to carry out.
• Do not allow children to play on or in the appliance.• Do not add gasoline, dry cleaning solvents, items contaminated with
cooking oil or other flammable or explosive substances to the washwater. These substances give off vapors that could ignite orexplode.
• Do not place flammable substances around your washer-dryer duringoperation.
• Under certain conditions, Hydrogen gas may be produced in a hotwater system that has not been used for 2 weeks or more.HYDROGEN GAS IS EXPLOSIVE. If the hot water system has notbeen used for such a period, before using the appliance, turn on allhot water faucets and let the water flow from each for several min.This will release any accumulated hydrogen.
• Do not use heat to dry articles containing foam rubber or similartextured rubber-like materials.
• Turn off water faucets to relieve pressure on hoses and valves and tominimize leakage if a break or rupture occurs.
• Do not reach into the appliance if the drum is moving.• Do not tamper with controls.• Repair or replacement of a part should be made only by a qualified
service technician to prevent personal injury or damage to themachine. Contact Splendide to locate an authorized repair servicecompany near you.
• Qualified service personnel should clean the interior of the machineperiodically.
• Disconnect power to the washer at the circuit breaker or fuse box, orunplug the machine in an emergency or when servicing is required.Have the installer show you and label the proper switch or fuse atthe electrical disconnect box.
• Good, safe practices and caution MUST be applied when installing,operating, and maintaining any appliance. Follow basic precaution.
• Save these instructions.
Introduction
Congratulations!
Thank you for choosing Splendide - North America’s #1 sellingcombination laundry center since 1984. Your new Splendide washer-dryer is designed to give you maximum washing and dryingperformance while using less energy/resources and taking up lessspace. The performance levels, safety features, sturdiness and all itsfunctions are the result of ongoing technological innovation. Theultimate purpose? To offer you the best performance with the utmostsimplicity.
�Read This ManualInside this book you will find many helpful hints on how to install, useand maintain your new washer-dryer properly. Please read thismanual carefully. Just a little preventative care on your part can saveyou a great deal of time and money over the life of your washer-dryer.If you need further assistance, please contact Splendide LaundryCenters at 1-800-356-0766.
�For Your RecordsWrite model and serial numbers here. You can find them on the frontof the machine and inside of the door opening.
Model #:
Serial #:
Save these instructions
• Before loading - Before loading the washer, make sure the drum isempty.
CAUTIONRISK OF ELECTRIC SHOCK
DO NOT OPEN
CAUTION: To reduce the risk of electric shock, DO NOT removecover (or back)/No user servicable parts inside. Refer servicing toqualified services personnel.
The lightning flash with arrowhead symbol, with-in anequilateral triangle, is intended to alert the user to thepresence of uninsulated “dangerous voltage” within theproduct’s enclosure that may be of sufficient magnitude toconstitute a risk of electric shock to persons.
The exclamation point within an equilateral triangle isintended to alert the user to the presence of importantoperating and maintenance (servicing) instructions in theliterature accompanying the appliance.
!
!

7
Getting Started
About Your Washer-Dryer
�Your New ApplianceYour new appliance is an automatic washer and vented tumble dryer bySplendide. Front-loading with a stainless steel drum and an extra-largedoor opening for easy loading and unloading, it features 9 washprograms, 6 water temp. settings, 3 dry programs, a delay start optionand a 1200 RPM max. spin speed.
�Features• Automatic Dispenser Drawer - Your washer-dryer has a convenient
dispenser drawer that dispenses laundry aids (detergent, bleach,softener) automatically.
• Delay Start Option - Your washer-dryer offers a delay start option,allowing you to run your washer at a later time (or during off-peakhours).
• Auto Water/Energy Control - Your washer-dryer doesn’t need high,medium, or low water level settings for different wash load sizes. Itautomatically adjusts the amount of water and energy to use for eachload.
• Safety Door Lock - Your washer-dryer has an automatic door lockfeature that engages for the duration of the wash and dry cycles andprotects you from opening the door when there is water or high heatand steam within the drum.
• Express Wash - Your washer-dryer features Express wash cycles towash your lightly soiled Cotton Heavy Duty or Permanent Pressfabrics in less time.
• More Rinse Cycles/Extra Rinse - Most washers have only 1 rinsefollowing each wash while your Splendide washer-dryer has up to 4. Itrinses 3 times after every wash (except Express Wash) and features anExtra Rinse button that adds yet another rinse to remove even more dirt/detergent from fabrics (recommended for those with detergent contactallergies).
• Foam Removal System - Your machine automatically measures theamount of foam in circulation and adds water to the drum to removeexcess foam for the highest rinsing performance.
• Recirculating Wash Feature - With your Splendide washer-dryer, nodetergent is wasted. Water recirculates and redistributes detergentthroughout the drum in a way that assures all detergent is dissolved formax. resource efficiency.
• Automatic Balance System - Every Splendide washer-dryerincorporates the latest motor technology Automatic Balance System(ABS). When it detects an out-of-balance load the motor will adjust speed(or come to a complete stop) and reposition the load automatically.
• Impulse Spin Technology - Your machine features Splendide’sexclusive IST processor that varies pulse in low spin for less wrinkling,less wear on clothing, less noise, less vibration, and improved energyefficiency.
• Dry Spin - During Cotton Heavy Duty drying, there is an additional spinfor improved drying performance.

8
�Program Selector (Turn clockwise only) (A) - Use this knob toselect one of 9 wash programs (see “Guide to the Wash Programs,”p. 10).
• Delay Start Option: You can also use this knob to delay the start of anywash program by 1, 3, 9, or 12 hours (see “How to Wash,” p. 14).
IMPORTANT: Should you wish to interrupt a program inprogress or set a new one, advance the Program Selectorknob (A) to a “Reset” position and wait 5 seconds.
�Dry Time Knob (B) - Use this knob to set the drying time up to 120minutes. Once set, this knob will not move. NOTE: The last 12minutes of the dry cycle is a cool down period (See “Dryer CoolDown,” p. 7).
�Water Temperature Knob (C) - Use this knob to set your washwater temperature. Choose between HOT, WARM, COLD, orvariations between. NOTE: Rinse water temperatures are alwaysCOLD.
�Dispenser Drawer (D) - This is where you add your detergent andother laundry aids (See “How to Use the Dispenser Drawer,” p. 13).
�Pre-wash Button (E) - For heavily soiled loads, push this button toadd an extra wash to any wash program (except the Wool programor when another Special Program (F, G, H) is selected).
�Easy Iron Button (Rinse Hold) (F) - Pressing this button preventsfabric creasing, making items easier to iron. (Only available onPermanent Press cycles and the Silk cycle). If pressed, the wash cyclewill come to a complete stop (Rinse Hold) at the “Anti-crease” part of thedial-allowing you to leave items in the machine without spinning toprevent wrinkling. You complete it by pressing the Easy Iron buttonagain. NOTE: If a dry cycle is preset, machine will not perform the anti-crease (rinse hold) function.
Understanding the Control Panel
!
�Low Spin Button (G) - Press this button to reduce the spinning speedto 600 RPM during anyCotton Heavy Duty or Permanent Presscycle-perfect for washing more delicate fabrics in these cycles.
�Extra Rinse Button (H) - Press this button to add an extra rinse cycleto any Cotton Heavy Duty or Permanent Press cycle to improverinsing results while washing full loads (when more detergent isused). NOTE: Recommended for those who have detergentcontact allergies.
�On/Off Button (I) - Press this button to turn your washer-dryer ON orOFF. “In” position, machine is ON. “Out” position, machine is OFF.NOTE: Turning the appliance OFF does not cancel selected washprogram.
�Status/Door Lock Lamp (L)• Flashes Slowly: Door can be opened. The appliance is on and
awaiting instruction or the cycle has ended.• Steady Light: Door lock is engaged / Program accepted.• Flashes quickly: Program has ended and door lock is engaged.
NOTE: Door may remain locked for up to 1-2 min. after end of cycle.
�Auto Dry Lamp (M) - Lights when the dry timer has been set andfollowing the wash cycle, the appliance will automatically run theselected tumble drying cycle.
NOTE: Auto dry not available when Silk or Wool cycle isselected.
Getting Started
TTTTThe Knob he Knob he Knob he Knob he Knob ���� with your with your with your with your with your
washer-dryer programswasher-dryer programswasher-dryer programswasher-dryer programswasher-dryer programs
� � � � � �
�
��

9
Guide to the Wash Programs
Type of Fabric and Degree of Soil
Cotton Heavy Duty Exceptionally soiled whites/colorfast fabrics (Sheets, tablecloths, etc.)
Heavily soiled whites/colorfast fabrics
Slightly soiled whites and light colors(T-Shirts, sweatshirts, etc.)
Rinse cycles
Spin cycle (1200 RPM high spin)
Drying cycle for cotton fabrics
Reset
Permanent PressHeavily soiled colorfast synthetics(Baby linen, etc.)
Delicate color synthetics(All types of slightly soiled garments)
Delicate color synthetics(All types of slightly soiled garments)
Rinse cycles
Spin cycle (850 RPM spin)
Drying cycle for synthetic fabrics
Reset
Delicates
Delicates
Silk and particularly delicate garments(Curtains, silk, viscose, etc.)
Wool, hand wash
Rinse cycles
Spin cycle (600 RPM spin)
Draining
Drying cycle for synthetic fabrics
Reset
Delay Start12 - 9 - 3 - 1 hour delay
Stop/Reset
Super
Regular
Express
Regular
Gentle
Express
Regular
Silk
Wool
Detergent
For Wash
Program
Knob
Fabric
Softener BleachDescription of Wash Cycle
35 min. wash cycle, 3 rinse cycles, intermediate and final spin cycles
27 min. wash cycle, 2 rinse cycles, intermediate and final spin cycles
14 min. wash cycle, 2 rinse cycles, intermediate and final spin cycles
Rinse cycles, intermediate and final spin cycles
Draining and final spin cycle
Cotton Heavy Duty Dry Program
Interrupts/cancels program
26 min. wash cycle, 3 rinse cycles, anti-crease or spin cycle
19 min. wash cycle, 3 rinse cycles, anti-crease or spin cycle
13 min. wash cycle, 2 rinse cycles, anti-crease or spin cycle
Rinse cycles, anti-crease or spin cycle
Draining and spin cycle
Permanent Press Dry Program
Interrupts/cancels program
16 min. wash cycle, 3 rinse cycles, anti-crease or spin cycle
17 min. wash cycle, 3 rinse cycles and draining (no spin cycle)
27 min. wash cycle, 2 rinse cycles, anti-crease or spin cycle Rinse cycles, anti-crease or draining or spin cycle
Draining and spin cycle
Draining Only (Silk program)
Delicates Dry Program
Interrupts/cancels program
Program start is delayed
Interrupts/Cancels program
Softener is automatically dispensed during the last rinse
Total
Length
of cycle
80min.
70min.
40min.
75min.
65min.
40min.
65min.
60min.
45min.
Special
Programs
Available*
P, L, R
P, L, R
P, L, R
P, E, L, R
P, E, L, R
P, E, L, R
P
P, E
(Always protect delicate items such as underwear, tights and stockings by placing them in a mesh laundry pouch)
*Special Programs:
Softener is automatically dispensed during the last rinse
Softener is automatically dispensed during the last rinse
**Easy Iron Description:
Wash Only: Reduced agitation, rinse, spin speed and Anti-crease (Rinse Hold).
Wash to Dry: Reduced agitation, rinse, and dry temp. (No Anti-crease function).
P = Prewash
E = Easy Iron**
L = Low Spin
R = Extra Rinse
Note: Above cycle times vary according to water pressure, load size and fabric type.
Getting Started

1 0
!
!
�DetergentYour Splendide requires smaller amounts of laundry aids to get fabricscleaner. If your previous washer was a top loader, you may not needto add as much (or any) detergent to initial wash loads. Old detergenttrapped in fabrics will release during the tumble action wash cycle.
• Amount: 1-2 tablespoons of any powder laundry detergent (or liquidequiv.) per wash load. However, if you have access to them, low-sudsing, high efficiency (HE) detergents are designed for use in front-loading machines and are recommended.
• Adjust the amount for heavily or lightly soiled loads. Use more if water isextremely hard - use less in soft water. If garments have beenpretreated, you won’t need as much (or any) detergent at all.
• Your machine features an internal foam removal system, however, if thesuds level rises too high, set the Program Selector knob (A) to “Rinse”and allow the machine to rinse out.
IMPORTANT: The suds level should never rise more thanhalf way up to the porthole. Too much foam will rise throughthe detergent dispenser and make a mess on your floor!
�Liquid Fabric SoftenerUsing fabric softener causes items to release from the drumimmediately after your washer-dryer’s high-speed spin, helping clothesto dry faster while minimizing wrinkling and softening fabrics.
• Amount: 1-2 tablespoons of a bio-friendly, or similar brand per washload. These softeners tend to appear light in color and dissolve morequickly in less water, minimizing build-up within your machine.
• Adjust the amount for heavily or lightly soiled loads. Use more if water isextremely hard - use less in soft water.
IMPORTANT: Never use softener sheets or exceed therecommended amount of liquid fabric softener. Doing socould impair wash results and cause damage to the internalparts of your machine!
�Bleach (Cotton Heavy Duty Cycles Only)Use bleach to whiten, remove certain problem stains, deodorize andeven sanitize fabrics.
WARNING: Always dilute bleach before using. Never overfillbleach dispenser. Excess bleach could damage clothes.Bleach should never be added to rinse water.
!
"Don't forget to empty all
pockets before you load
items in your washer-
dryer: small objects can
cause serious damage to
your machine."
"Using fabric softener is
very important for
optimum performance
with automatic wash
through dry loads."
Preparing Laundry
�Sort & PrepareBefore washing, you can do a great deal to ensure better wash resultsby preparing your laundry correctly. Always read the fabric labels andfollow their guidelines. Separate items according to color, fabric type,and degree of soil. Separate items that shed lint from those thatattract lint.
• Pre-treat heavily soiled areas.• Empty Pockets. Fasten all hooks, zippers and buttons. Tie strings, apron
sashes, etc. Remove non-washable buckles, trims and belts.• Turn knit garments inside out.• Place delicate items such as bras, shoulder pads, underwear, tights and
stockings in a mesh laundry pouch to prevent tangling.• Mend garments that are ripped or torn so that further damage is not
done.
�About Pre-washingUse your washer-dryers Pre-wash feature when washing excessivelysoiled clothes that contain deeply embedded dirt such as men’s workclothes or children’s play clothes.
�About Pre-treatingPre-treat heavily soiled areas of clothing with a pre-wash spray, liquidlaundry detergent, or a laundry detergent/water paste mixture overthe stains before washing (see “Stain Removal Chart,” p. 11) fortreatment of specific stains.
About Laundry Aids
Getting Started
11
Getting Started
Permt Press/wrinkle resistant
Delicate/Gentle
Normal/Cotton Heavy Duty
Stain
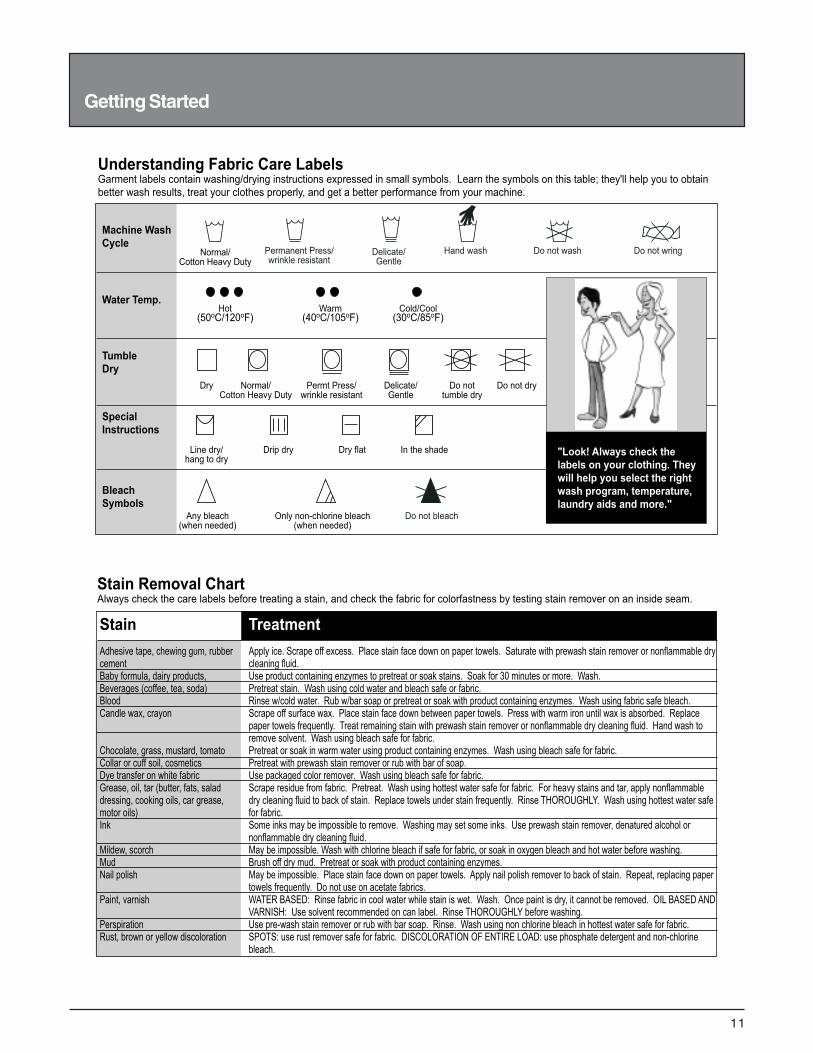
Adhesive tape, chewing gum, rubber cementBaby formula, dairy products,Beverages (coffee, tea, soda)BloodCandle wax, crayon
Chocolate, grass, mustard, tomatoCollar or cuff soil, cosmeticsDye transfer on white fabricGrease, oil, tar (butter, fats, salad dressing, cooking oils, car grease, motor oils)Ink
Mildew, scorchMudNail polish
Paint, varnish
PerspirationRust, brown or yellow discoloration
Treatment
Apply ice. Scrape off excess. Place stain face down on paper towels. Saturate with prewash stain remover or nonflammable dry cleaning fluid.Use product containing enzymes to pretreat or soak stains. Soak for 30 minutes or more. Wash.Pretreat stain. Wash using cold water and bleach safe or fabric.Rinse w/cold water. Rub w/bar soap or pretreat or soak with product containing enzymes. Wash using fabric safe bleach.Scrape off surface wax. Place stain face down between paper towels. Press with warm iron until wax is absorbed. Replace paper towels frequently. Treat remaining stain with prewash stain remover or nonflammable dry cleaning fluid. Hand wash to remove solvent. Wash using bleach safe for fabric.Pretreat or soak in warm water using product containing enzymes. Wash using bleach safe for fabric.Pretreat with prewash stain remover or rub with bar of soap.Use packaged color remover. Wash using bleach safe for fabric.Scrape residue from fabric. Pretreat. Wash using hottest water safe for fabric. For heavy stains and tar, apply nonflammable dry cleaning fluid to back of stain. Replace towels under stain frequently. Rinse THOROUGHLY. Wash using hottest water safe for fabric.Some inks may be impossible to remove. Washing may set some inks. Use prewash stain remover, denatured alcohol or nonflammable dry cleaning fluid.May be impossible. Wash with chlorine bleach if safe for fabric, or soak in oxygen bleach and hot water before washing. Brush off dry mud. Pretreat or soak with product containing enzymes.May be impossible. Place stain face down on paper towels. Apply nail polish remover to back of stain. Repeat, replacing paper towels frequently. Do not use on acetate fabrics. WATER BASED: Rinse fabric in cool water while stain is wet. Wash. Once paint is dry, it cannot be removed. OIL BASED AND VARNISH: Use solvent recommended on can label. Rinse THOROUGHLY before washing.Use pre-wash stain remover or rub with bar soap. Rinse. Wash using non chlorine bleach in hottest water safe for fabric.SPOTS: use rust remover safe for fabric. DISCOLORATION OF ENTIRE LOAD: use phosphate detergent and non-chlorine bleach.
Stain Removal ChartAlways check the care labels before treating a stain, and check the fabric for colorfastness by testing stain remover on an inside seam.
Understanding Fabric Care LabelsGarment labels contain washing/drying instructions expressed in small symbols. Learn the symbols on this table; they'll help you to obtain
better wash results, treat your clothes properly, and get a better performance from your machine.
Water Temp.
Machine Wash
Cycle
Tumble
Dry
Special
Instructions
Bleach
Symbols
Normal/Cotton Heavy Duty
Permanent Press/wrinkle resistant
Do not washHand wash Do not wring
Hot(50oC/120oF)
Warm(40oC/105oF)
Cold/Cool(30oC/85oF)
Dry Do not tumble dry
Do not dry
Line dry/ hang to dry
Drip dry Dry flat In the shade
Any bleach(when needed)
Only non-chlorine bleach(when needed)
Do not bleach
Delicate/Gentle
"Look! Always check the
labels on your clothing. They
will help you select the right
wash program, temperature,
laundry aids and more."
1 2
Helpful Hints
Combine large and small items in one full load. When washingsingle items such as a sweater, towel or jeans, add 1 or 2 similaritems to help balance the load. Single, heavy items such as abathrobe can be washed separately.
Never use your washing machine to wash torn, fraying or non-hemmed linen. If it’s absolutely necessary, place these items in a meshbag for protection.
Do not wash colored linens with whites. Do not wash rugs thatcould come apart and clog your pump.
Colored T-shirts, printed ones and sweatshirts last longer if turnedinside out before washing. Printed T-shirts and sweatshirts shouldalways be ironed inside out.
For more delicate garments protect underwear, tights, stockingsand delicate items by placing them in a mesh laundry pouch whilewashing and drying.
Dungaree alert! Overalls have straps with hooks that can damagethe drum of your washing machine or other garments during wash.To minimize the risk, place hooks in the pockets and fasten withsafety pins.
When using the “Wool” cycle for best results, we recommend thatyou use a detergent that is for wool garments, taking care not to washmore than 2.2 lbs.
Choosing a Load
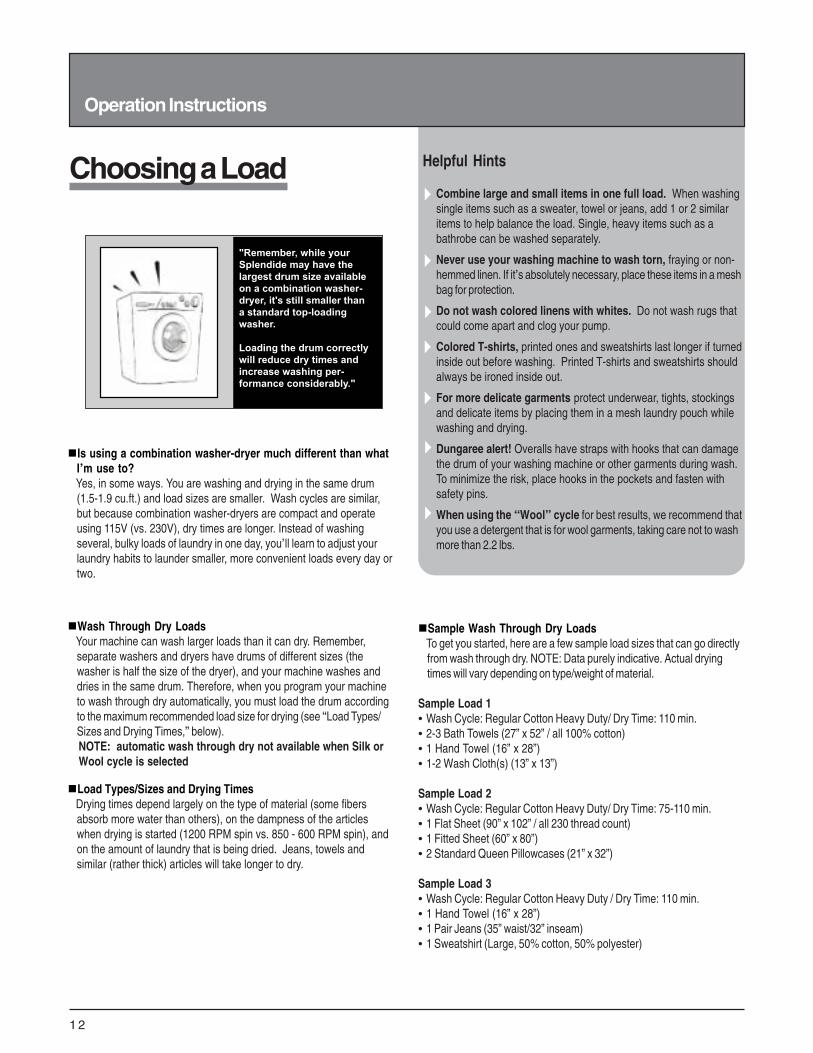
"Remember, while your
Splendide may have the
largest drum size available
on a combination washer-
dryer, it's still smaller than
a standard top-loading
washer.
Loading the drum correctly
will reduce dry times and
increase washing per-
formance considerably."
Operation Instructions
�Is using a combination washer-dryer much different than whatI’m use to?Yes, in some ways. You are washing and drying in the same drum(1.5-1.9 cu.ft.) and load sizes are smaller. Wash cycles are similar,but because combination washer-dryers are compact and operateusing 115V (vs. 230V), dry times are longer. Instead of washingseveral, bulky loads of laundry in one day, you’ll learn to adjust yourlaundry habits to launder smaller, more convenient loads every day ortwo.
�Load Types/Sizes and Drying TimesDrying times depend largely on the type of material (some fibersabsorb more water than others), on the dampness of the articleswhen drying is started (1200 RPM spin vs. 850 - 600 RPM spin), andon the amount of laundry that is being dried. Jeans, towels andsimilar (rather thick) articles will take longer to dry.
�Wash Through Dry LoadsYour machine can wash larger loads than it can dry. Remember,separate washers and dryers have drums of different sizes (thewasher is half the size of the dryer), and your machine washes anddries in the same drum. Therefore, when you program your machineto wash through dry automatically, you must load the drum accordingto the maximum recommended load size for drying (see “Load Types/Sizes and Drying Times,” below).NOTE: automatic wash through dry not available when Silk orWool cycle is selected
�Sample Wash Through Dry LoadsTo get you started, here are a few sample load sizes that can go directlyfrom wash through dry. NOTE: Data purely indicative. Actual dryingtimes will vary depending on type/weight of material.
Sample Load 1• Wash Cycle: Regular Cotton Heavy Duty/ Dry Time: 110 min.• 2-3 Bath Towels (27” x 52” / all 100% cotton)• 1 Hand Towel (16” x 28”)• 1-2 Wash Cloth(s) (13” x 13”)
Sample Load 2• Wash Cycle: Regular Cotton Heavy Duty/ Dry Time: 75-110 min.• 1 Flat Sheet (90” x 102” / all 230 thread count)• 1 Fitted Sheet (60” x 80”)• 2 Standard Queen Pillowcases (21” x 32”)
Sample Load 3• Wash Cycle: Regular Cotton Heavy Duty / Dry Time: 110 min.• 1 Hand Towel (16” x 28”)• 1 Pair Jeans (35” waist/32” inseam)• 1 Sweatshirt (Large, 50% cotton, 50% polyester)

13
�How to Use the Dispenser DrawerPull out the dispenser drawer to reveal the four compartments. Thedrawer is divided into 3+1 compartments: one for pre-wash detergent,one for wash detergent, one for fabric softener, and one for bleach(see Fig. 10, for a description of each).
• Add the correct type/amount of detergent, fabric softener, and bleach (ifneeded) to the corresponding compartments (see “About Laundry Aids,”p. 10).
• When finished, simply close the door. Laundry aids will automatically beflushed into the machine during the wash cycle. NOTE: From time totime you may see water in the dispenser compartments. This is a resultof the siphoning action and is part of the normal operation of thewasher.
IMPORTANT: Do not exceed the recommended amounts (p.10). Using too much detergent and softener causes over-sudsing and poor rinsing and will harm the efficiency of yourmachine. Only use detergents that are suitable for washingmachines.
!
About theDispenser Drawer
"The dispenser drawer is where you add your detergent
and other laundry aids."
In compartment 1:
Detergent for pre-wash
(powder only)
In compartment 2:
Detergent for washing
(powder or liquid)
In compartment 3:
Fabric softener (liquid)
In compartment 4:
BleachFig. 10
12
3
4
Helpful Hints
Before adding detergent for pre-washing in the Pre-washcompartment (1), make sure that the extra compartment for bleachhas not been inserted. Do not use liquid detergent in the pre-washcompartment. The pre-wash compartment only accepts powderdetergent.
When you use fabric softener, the washing machine automaticallydispenses the softener to the last rinse of your selected washprogram.
When using liquid detergent, pour the detergent into compart-ment 2 just a few seconds before starting the wash cycle.
Never use hand-washing detergent, because it may form toomuch foam and could damage your machine.
When washing with cold water, reduce the amount of detergentyou use: it dissolves less easily in cold water than in hot water, sopart of it would be wasted.
�Using BleachIf bleaching is necessary, the extra compartment (4) must be insertedinto the Pre-wash compartment (1) ( Fig. 10).
• Be careful not to exceed the “max” levelindicated on the central pivot (Fig. 11).
• Always dilute the bleach with waterbefore using.
• Traditional bleach should only be usedon sturdy white fabrics; therefore, thebleach option is only available whenusing a Cotton Heavy Duty cycle.NOTES: the use of the additional bleachcompartment excludes the possibility ofusing the Pre-wash button.When using Bleach it isrecommended that you press the Extra-rinse button.
�Detergent Dispenser CleansingOccasionally, detergent build up mayaccumulate in and/or around yourdispenser drawer. The detergentdispenser can easily be removed andcleaned:
• Pull it outwards (Fig. 11b).• Leave it under running water a few
minutes to remove the build up.• Inspect and wipe out dispenser alcove if necessary. Replace the
dispenser drawer.
Fig. 11
Fig.
11b
Operation Instructions
1 4
Helpful Hints
To eliminate worry about selecting the right water level, yourwasher has a sensor water level control system that is designed toensure the correct amount of water is pumped into the machine forany load size.
Use one of the “Express” wash cycles to wash smaller loads ofyour lightly soiled Cotton Heavy Duty or Permanent Press fabrics inless time.
About the Easy Iron button: This special program uses specifi-cally studied wash motions to respect fabrics in the best possibleway. During the rinse phase, it introduces more water and the spincycle is shorter with a reduced spin speed, thus producing moreoutstreched fabrics for easier ironing (see “Understanding the ControlPanel,” pg. 9, for complete instructions).
How to Wash
Operation Instructions
�Starting Your Washer-DryerStarting your washer-dryer in the right way effects the quality of yourwash results, will help prevent future problems, and will enhance thelife expectancy of your machine. Once you have loaded your washer-dryer correctly (see “Choosing a Load,” p. 12) and added detergentand fabric softener (see “About Laundry Aids” on p. 10), always checkthat:
• The door is closed correctly;• The plug is secured in the socket;• The water supply is turned on;• The Program Selector Knob (A) is positioned on one of the “Reset”
positions;• The On/Off button (I) is in the OFF position.
�How to Wash OnlySelect the program according to the type of garments you arewashing. Refer to the “Guide to the Wash Programs” chart on p. 7 then:
• Turn the Program Selector knob (A) clockwise until the selected programis aligned with the mark on the knob.
• Turn the Wash Temp. knob (C) to the desired wash temperature for yourload.
• If necessary, use buttons E, F, G, or H to run a Special Program. If youdo not wish to use these buttons, leave them in their OFF (OUT)position.
• Lastly, press the On/Off button (I) in. The Status/Door Lock lamp (L) willflash slowly for 5 seconds, then will light steady to indicate that theprogram has been accepted. NOTE: Should you wish to interrupt aprogram in progress or set a new one, advance the Program Selectorknob (A) to a “Reset” position and wait 5 seconds. Pilot lamp (L) willflash slowly, then turn the appliance off.
At the end of the wash cycle:• The Status/Door Lock lamp (L) will flash quickly for up to 1-2 min. to
indicate that the cycle is finished, but the door is still locked. The lightwill flash slowly when the door can safely be opened.
• When the Status/Door Lock lamp (L) light flashes slowly, turn the washer-dryer OFF by pressing the On/Off button (I) again.
• Open the washer-dryer door and remove your freshly cleaned laundry.• After removing your laundry, leave the door open to allow for air
circulation inside the drum to avoid the formation of bad odors.
�Setting Delay StartUse the Delay Start option on your washer-dryer to delay the start ofany wash program by 12, 9, 3, or 1 hour(s).
• With the machine power OFF, turn the Program Selector Knob (A)clockwise to one of the 4 delay start positions (12, 9, 3, or 1 hr.).
• Press the On/Off button (I). The Status/Door Lock lamp (L) will flashslowly for 5 seconds and then stays lit to indicate that the delay timehas been accepted. Now you can turn the knob clockwise to theprogram you desire.
• The Status/Door Lock lamp (L) has a particular flashing motion (2seconds on and 4 seconds off) to indicate that a delayed start hasbeen set. During this phase, you can open the appliance door andchange the washing load, should you wish to do so. NOTE: After thewash cycle has been set and accepted by the washer-dryer, turningthe knob will have no effect (except when it’s on the “Reset” position).
"The dispenser drawer is where you add your detergent
and other laundry aids."
"But where did all the water go?"
"Simple, Splendide washer-dryers use the newest
technology and need less than half the water to get wash
results that are twice as good! This is why you cannot see
the water through the door."

15
!
!
�How to Wash & Dry AutomaticallyIf you want your load to go automatically from wash to dry:
• Load the drum according to the recommended maximum load sizes fordrying. (See “Wash Through Dry Loads,” p. 12).
To protect your delicate fabrics, this machine will notallow a dry program to be set when the Silk or Woolprogram is selected.
IMPORTANT: To optimize the performance of your machinewhen going from wash to dry automatically, always use fabricsoftener during the wash cycle (“About Laundry Aids,” p. 10).
• Simply follow the instructions for wash only (see “How to Wash,” p. 15)and set the Dry Time knob (C) before pressing the On/Off button (I).Refer to the “How to Dry Only,” section on this page.
• The Auto Dry lamp (M) will light to indicate that the dry timer has been setand at the end of the wash cycle, the appliance will run the selectedtumble drying cycle.
If the laundry load to be washed and dried is too large to dry,then follow the instructions for wash only (see “How to Wash,” p. 14).When the wash cycle has finished,you’ll need to remove some items (upto 50%) after the wash cycle to give the remaining ones room to tumblefreely while drying. Now follow the instructions for dry only (see “How toDry Only,” this page). Repeat this procedure for the remainder of theload.
Opening the door during the dry cycle: For your safety, the doorlock stays engaged for the duration of the dry cycle (see “Features,” p.7). However, should you wish to open the door during the drying cycle,you have two options:
• You can cancel the program by advancing the Program Selector knob(A) to a “Reset” position and waiting 5 seconds. Pilot lamp (L) will flashquickly, then slowly when the door lock is released. Now, turn theappliance off and open the door. When finished, close the door andfollow instructions for dry only (“How to Dry Only,” this page).
• Or, press the On/Off button (I) to turn the appliance off. Wait 1-2 min. forthe door lock to release, then open the door. When finished, close thedoor and press the On/Off button again. The dryer will automaticallyresume the selected program where it left off.
How to Dry
Operation Instructions
!
�How to Dry OnlyOnce you have loaded the drum with the laundry that needs drying,(see “Load Types/Sizes and Dry Times,” p. 12) make sure that:
• The door is closed correctly; The plug is secured in the socket; Thewater supply is turned on; The On/Off button (I) is in the OFF (OUT)position.
• Depending on the type of fabric being dried, turn the Program Selectorknob (A) clockwise until one of the three “Dry” programs is aligned withthe mark on the knob.
A spin cycle is carried out during drying if you select theCotton Heavy Duty dry program. For cotton loads of lessthan 2.2 lbs., use the drying program for Permanent Pressfabrics.
• Set the Dry Time knob (C) to the desired dry time.• Press the On/Off button (I) to turn the machine ON. The Status/Door
Lock lamp (L) will flash slowly for 5 seconds, then will light steady toindicate that the program has been accepted.
At the end of the drying cycle:• The Status/Door Lock lamp (L) will flash quickly for up to 90 seconds to
indicate that the cycle is finished, but the door is still locked.• When the Status/Door Lock lamp (L) light flashes slowly, turn the washer-
dryer OFF by pressing the On/Off button (I).• Open the door and remove your laundry (See “A Special Note About
Condenser Drying,” above on this page).• After removing your laundry, leave the door open to allow for air
circulation inside the drum to avoid the formation of bad odors.
Warning:-During the drying phase, the door tends to get quite hot. Do not
attempt to open the door when the door lock is engaged.-Do not use the appliance to dry clothes that have been washed with
flammable or chemical solvents (e.g. trichlorethylene).-This appliance can only be used to dry clothes that have been pre-
washed in water.-Do not use the appliance to dry foam rubber or similar materials.

1 6
Easy Care and Maintenance
�Cleaning the exterior:The exterior of your machine should be cleaned with a rag dipped inlukewarm water and soap. Do not use polish of any kind on theplastic trim. Some polishes contain agents, which may damageplastics.
�Cleaning the Interior:If you live in an area where phosphate detergents are banned, it maybe necessary to recondition the washer periodically. If a non-phosphate detergent must be used, body oils and detergent mayaccumulate in the washer tub. This is particularly evident in hardwater areas or homes where heavily soiled garments are regularlylaundered. To remove this buildup, run the washer through acomplete cycle using HOT water and 2 cups of a non-precipitatingwater conditioner. Do not add any clothes, laundry detergent, orother laundry aids. Once all the accumulation has been removed,your laundry should be satisfactory if you follow the preventativesuggestions in this book.
"It's Easy! With just a bit of care, your washer-dryer
will repay you with loyalty and devotion. With the
necessary upkeep, it will give you excellent washing
and drying results for years to come."
�General Maintenance:Your washer-dryer is designed to provide reliable service over manyyears. A few simple steps will help to prolong its life and avoidproblems:
• After washing is complete, the water faucets should be turned off torelieve water pressure on the hoses.
• Before moving you washer-dryer to a new location, you must reattachthe transit screws/spacers you removed during installation (p. 5).
• Wipe the inside of the washer-dryer door with a soft cloth to remove anyremaining moisture after washing. Periodically, a thin coat of paste waxshould be applied to the inner door of the washer, especially to the areathat is immediately next to the porthole window. This will protect the doorfinish from laundry aid spills and any discoloration that could result fromthese spills.
• Clear the pump pre-chamber if it gets clogged. See “When Needed,Check the Pump,” p. 17).
• The use of a de-liming product is recommended every wash ONLY if thewater is particularly hard or rich in lime content. Normal detergentsalready contain de-liming agents. A periodical wash cycle with a dose ofa de-liming product (without detergents or laundry) may prove useful.
• Never use too much detergent or additives, because this could cause anexcessive amount of foam, increasing the potential for damage to thecomponent parts of your washer-dryer. See “About Laundry Aids, (p.10).
• It is important to wash the detergent dispenser drawer regularly. If driedlaundry aids accumulate, place the dispenser under running water for afew minutes until clean. See “Detergent Dispenser Cleansing,” (p. 13).
Helpful Hints
Clean the exterior and rubber parts of the appliance gently with asoft cloth dipped in warm, soapy water. Never use solvents orabrasives to clean the external or rubber parts of the washer-dryer.
Vacations, or anytime the machine is not in use, it is recom-mended that you unplug the machine from the socket and turn offthe water supply to limit wear to the machines’ water circuit and toeliminate the risk of leakage. Also, leave the door ajar to allow forair circulation within the drum and door gasket area. This willprevent unpleasant odors.
Don’t neglect the detergent dispenser. The detergent dispenseris removable and can easily be cleaned under running water (see“Detergent Dispenser Cleansing,” p. 13).
Never leave the washer-dryer plugged in while cleaning. Duringcleaning and maintenance the appliance should always beunplugged.
Regular Maintenance
Easy Care and Maintenance
Continued on next page
17
!
�Winterizing Your MachineIf needed, follow these steps to winterize your machine:
• With the machine power OFF, put 1/2 quart of R.V.-typeantifreeze in the drum. Close the door.
• Turn the Program Selector knob to Spin. Turn the power On.Let the machine spin for 1-2 min.
• Turn the power OFF. Unplug the washer or disconnect power.• Shut off both water faucets. Disconnect water inlet hoses
from faucets and drain. DONE!
To Use Again:• Flush water pipes.• Reconnect water inlet hoses to the corresponding HOT and
COLD faucets. Turn on both water faucets.• Plug in washer or reconnect power.• Run the washer through the Express cycle with 1/2
tablespoon of powder detergent (or liquid equiv.) to clean outantifreeze. DONE!
�Optional RV Winterization:If currently pumping antifreeze through the fresh watersystem, follow these steps to winterize your machine:
• With the machine power OFF, turn the Wash Temp. knob toWARM.
• Turn the Program Selector knob to Regular wash (located inthe Cotton Heavy Duty section of the dial.) Turn the powerON.
• When you see antifreeze in the drum, turn the power OFF.Now advance the Program Selector knob to Spin.
• Turn the power ON. Allow the drum to spin for 30 seconds.• Turn the power OFF. DONE!
Monthly/Yearly Maint.
Easy Care and Maintenance
�Check the Water Inlet HosesPeriodically inspect and replace hoses if bulges, kinks, cuts,wear, or leaks are found. Remove and clean the filters andthe water valves (Fig. 12). Replace inlet hoses as neededto reduce the risk of hose failure.
IMPORTANT: Replace inlet hoses at least every fiveyears of use to reduce the risk of hose failure. Inspectand replace inlet hoses if bulges, kinks, cuts or leaksare found. NOTE: When replacing your inlet hoses, markthe date of replacement on the label with a permanentmarker.
!
�When Needed, Check the PumpYour washer-dryer comes equipped with a self-cleaning pumpthat does not require regular cleaning and maintenance.However, small objects may accidentally fall into the pump:coins, hair clips, loose buttons and other small items. Toavoid possible damage, they are withheld in an accessiblepre-chamber at the lower end of the pump.
IMPORTANT: Before attempting to examine this pre-chamber, first ensure that the machine has finished itsprogram and is empty. As with any maintenance,unplug the machine.
• To gain access, gently ease down the top of the toe-kickpanel (at the base of the front of the machine) with ascrewdriver or similar item to release it. Then ease the topedge forward to allow it to be lifted clear (Fig.13).
• Place a shallow dish or tray below the cover of the pre-chamber to catch the small amount of water present.Release the cover by turning counter-clockwise (Fig 14).Remove any items or debris.
• Securely replace the cover by turning clockwise. Refit thetoe-kick panel by inserting the hooks on its lower edge intothe slots and ease the top edge back into position.
1 8
Operation
The washer does not start
The machine
continuously
fills and drains
water
Water does
not enter
the washer
The program selector knob
keeps turning
The washer-
dryer doesn't
drain or spinKinked Hose
Possible Cause
There is no power.
Door is open.
The Delay Start has been programmed (p. 14).
Controls not set properly (p.14).
Water supply is turned off or the supply hoses are kinked.
Wall drainage system doesn't have a breather pipe.
Drain hose is positioned too low causing siphoning (Fig. 6, p. 5).
Hose is not connected correctly to the tap (p. 4).
Water supply is not adequate (p. 2).
Water inlet hoses are kinked or clogged.
The machine needs to be Reset.
The selected program incorporates a manual draining command (p. 8).
The drain pump is clogged (p. 17).
The drain hose is kinked or clogged.
The detergent used is not suitable for washing machines.
Too much detergent or softener is being used (p. 10).
The transit screws and spacers are still installed (p. 4).
The washer-dryer is not leveled correctly (p. 5).
Overloading (p. 12).
The inlet hose is not properly attached (p. 4).
The machine is not level (p. 5).
The detergent dispenser is obstructed (p. 13).
The drain hose is not positioned properly (p. 4).
The drain pump is obstructed (p. 17).
What to do
Check that the plug has been correctly inserted into the socket and that there is electricity to the plug. Check house circuit breakers/fuses. Replace fuses or reset breaker. Washer should have separate outlet.
Close the door.
Move the program selector knob (A) to one of the Reset positions to cancel the program. Then reset the controls without setting the delay start.
Refer to the "How to Wash" section (p. 14) to make sure your controls are set correctly.
Turn both hot and cold faucets fully ON. Make sure hoses are not kinked or pinched.
Make sure that the wall drainage system has a breather pipe. If you live on an upper floor of your building, there may be a problem with your drain trap. To solve this problem, a special valve must be installed.
Check that the standpipe is at least 25" high and not more than 34" high. Make sure that no more than 6" of drain hose is inserted into the standpipe. If the problem still persists after these checks, turn the water supply OFF and call for assistance.
Review the installation instructions and make sure the hoses are connected properly to the tap.
Check water pressure. The water heater may be malfunctioning. Water may be being used elsewhere in your home. Make sure that the hot and cold water inlet faucets are turned fully ON.
Free the inlet hoses of any kinks and clear them of any clogs. If the water is very calcareous, or if work has recently been carried out on the water piping, the tap filter could be clogged with particles and debris.
Wait a few minutes for the drain pump to empty the tub, switch the washer-dryer OFF. Select one of the Reset positions on the knob, then switch it back ON. If the knob continues to turn, call for assistance.
When using the Easy Iron function without presetting a drying program, the machine will stop and wait for your command to drain. Simply press the Easy Iron button again and the machine will drain.
Turn the water supply OFF, unplug the washer-dryer and follow the "When Needed, Check the Pump" instructions (p. 17) to unclog the pump.
Make sure that the drain hose is not squashed or kinked. The drain hose should be as straight as possible. Check that nothing is blocking the water flow.
Check that the detergent you are using is labeled "For Machine Wash" or "Hand and Machine Wash" or any similar wording.
Make sure that you are using only 1-2 tablespoons of low-sudsing powdered detergent (or liquid equiv.) and 1-2 tbsp. of softener per wash load.
Make sure that the transit screws and spacers are removed.
The level of the washer-dryer should be checked periodically. Adjust the feet and check the machine with a level.
Make sure the drum is not overloaded.
Turn off the water supply, unplug the appliance and refer to the "Connecting the Water Inlet" section (p. 4) to tighten the attachment.
Make sure the machine is resting level on a level surface.
Remove the dispenser drawer and wash it under tap water to remove any detergent residue that has built up.
Turn off the water supply, unplug the appliance, and position the drain hose correctly. Refer to the "Water Drainage" section (p. 4).
Follow the "When Needed, Check the Pump" directions (p. 18) to remove any debris from the pumps pre-chamber.
The washer
produces too
much foam
Excessive
vibration during
the spin cycle
The washer-dryer
leaks
In most cases, when your washer-dryer fails to work, the problems arising can be easily solved without having to call for a technician. Before callingfor assistance, always check these points:
Avoid Service Checklist
Troubleshooting
Continued on next page
The washer-dryerleaks

19
Troubleshooting
Every Splendide washer-dryer comes with a Limited Warranty. Pleaseread the Limited Warranty Statement that came separately with yourmachine for complete details. You’ll find many answers to commonproblems in the “Avoid Service Checklist” section of this manual. If youreview this section first, you may not need to call for service at all. NOTE:You will be charged for a service call while the appliance is underwarranty if the problems are not caused by defective workmanship ormaterials.• If you do need service, you can relax knowing that help is only a phone
call away. Call our Splendide Technical Service/Assistance Departmenttoll-free at 1-800-356-0766 Monday-Friday 8:00AM-5:00PM PacificTime.
• Please have the model number and serial number of your washer-dryerready when you call.
If You Need Service
"Knowledgeable Splendide
Service Technicians are
just a phone call away!"
Operation Possible Cause
There is no power.
The door is open.
The Delay Start has been programmed (p. 14).
Water supply turned off, kinked.
The controls are not set properly (p. 15).
End of drain hose under water.
The drain pump is obstructed. (p. 17)
The drum has been overloaded (p. 12).
Washing is too long.
Detergent not dissolving.
Overloading (p. 12).
A fabric softener dispensing ball was used.
Powdered detergent in low spin.
Large load in Express wash.
Incorrect sorting (p. 10).
Overloading (p. 12).
Incorrect wash cycle (p. 9).
Clothes matted to drum after Spin (p. 10).
What to Do
Check that the plug has been correctly inserted into the socket and that there is electricity to the plug. Check house circuit breakers/fuses. Replace fuses or reset breaker. Washer should have separate outlet.
Close the door.
Move the program selector knob (A) to one of the Reset positions to cancel the program. Then reset the controls without setting the delay start.
Turn both hot and cold faucets fully ON. Make sure hoses are not kinked or pinched.
Make sure that the program selector knob (A) is set to a Dry position and that the Dry Time knob (C) is set to your desired dry time.
Make sure that the drain hose is positioned properly (p. 5).
Follow the "When Needed, Check the Pump" directions (p. 17) to remove any debris from the pumps pre-chamber.
Follow the "Choosing A Load" (p. 12) instructions in this manual for recommended load sizes for drying.
Excess wash time may create lint. Select a shorter wash cycle (p. 9).
Try a liquid detergent and/or use a warmer temperature setting.
Make sure the drum is not overloaded. For wash loads, you should be able to close the door easily; items should not be tightly packed.
Dispensing balls will not operate correctly in this machine. Add liquid fabric softener to the fabric softener compartment.
Consider using liquid detergent in wash cycles with low spin.
For best results, use Express wash for small, lightly soiled loads.
Avoid mixing heavy fabrics with light fabrics.
Load your dryer so clothes have enough room to move freely in the drum while drying.
Match cycle selection to type of fabric you are using. Repeated washing in water that is too hot may cause wrinkling.
Use the recommended amount of fabric softener during the wash cycle.
The dryer does not dry
properly
Stains on the load
Wrinkling
Lint or residue on clothing
The dryer does not start

���������Splendide Division Westland Sales
15650 SE 102nd Ave (PO Box 427)Clackamas, OR 97015 - USA
Phone: 1-800-356-0766Email: [email protected]
Fax: 503-656-8829Web: www.splendide.com
© Splendide Division Westland Sales, 2002
WD
2100 & 2000 S
: 9-2003-195 034 757 03 - Xerox B
usiness Service D
ocutech