Embed Size (px)
Citation preview
Lesson 60 Using OneNote 214
Lesson 60 Using OneNote Objectives In Lesson 60, you will:C Create and name OneNote folders, sections, and page headers.C Enter notes into OneNote containers.
OneNote Basics
OneNote is a program that allows you to take notes and organize them in away that is easy to use. You can key data into OneNote using your computerkeyboard. You can handtype data into OneNote using Writing Pad or anon-screen keyboard. You can dictate data into OneNote using speechrecognition tools (covered in Chapter 8). You can also use a type of digitalink that leaves your notes in handwritten form. With OneNote, you canhandwrite your notes just like you would write on a piece of paper.
Lesson 60 Using OneNote 215
OneNote takes note-taking to an exciting, new level. OneNote can changethe way you learn, study, and work. OneNote also provides an opportunityto practice your penmanship and handtyping skills.
60A LEARN: Open OneNote
1. Start OneNote by choosing Start, All Programs, Microsoft Office,Microsoft Office OneNote.
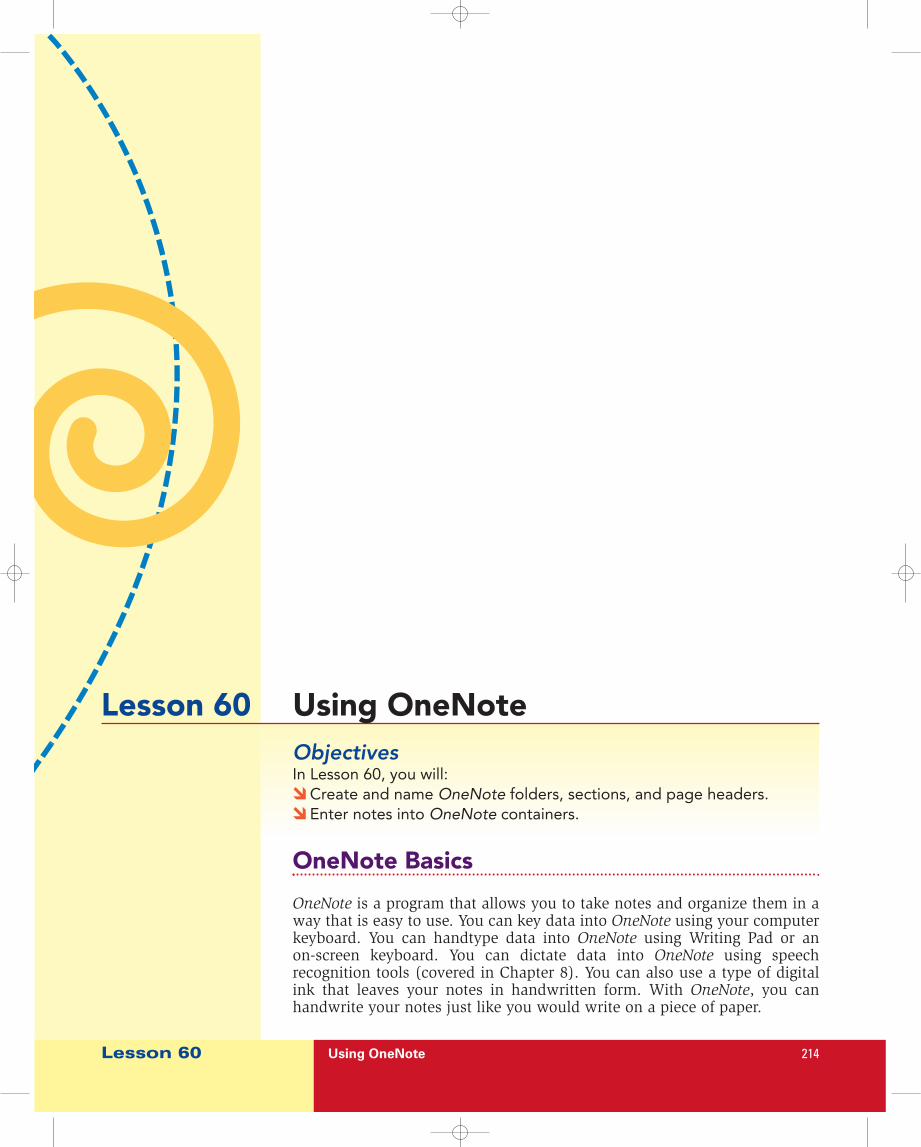
2. Look at the parts of a OneNote screen in Figure 6.28. Find each of theseparts on your screen.
3. If the Standard and Formatting toolbars appear on one line, change thesetting. Click the down arrow at the end of either toolbar. Choose ShowButtons on Two Rows as shown in Figure 6.29.
Figure 6.28 OneNote Window
Figure 6.29 Display Toolbars on Two Separate Rows
Type/Selection Tool
Type/Selection Tool
Menu bar
StandardandFormattingtoolbars
MyNotebooklist
Note-Taking area
Folder and Section tabs
Page Header
PageSelectiontab
If you can’t see yourStandard and Formattingtoolbars, choose View,Toolbars from the menubar. Place a check markby each toolbar.
Lesson 60 Using OneNote 216
4. Close OneNote by clicking Close button on the OneNote window or bychoosing File, Exit from the menu bar.
OneNote Folders, Sections, and Headers
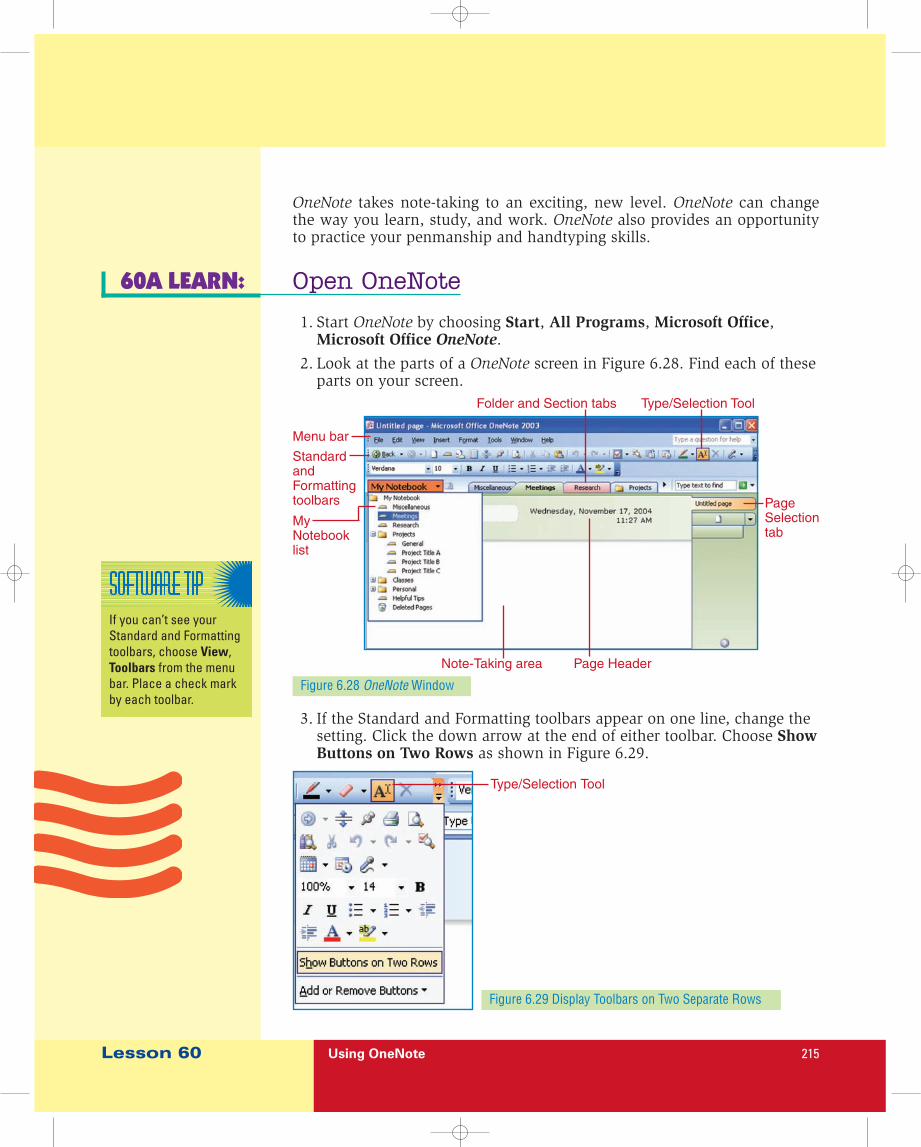
Information in OneNote is organized in folders. All OneNote folders arestored in the My Notebook folder. You can tell which tabs are for a folder bythe folder icon as shown in Figure 6.30. Inside folders you’ll find sections. Asection is a computer file like any other computer file. It can have as manypages as you care to create. To say it another way:
• You will write your notes on pages.
• Pages are organized in sections (files).
• Sections are stored in folders.
Pages, sections, and folders can be opened by choosing tabs. Several tabsare shown in Figure 6.30. In the next activity, you’ll create a new folder andadd several new sections.
Figure 6.30 Folders and Sections in the My Notebook Folder
Name and Rename Folders, Sections, and60B LEARN: Headers
1. Start OneNote. Open the Writing Pad. Tap or click the Text/SelectionTool on the Standard toolbar.
2. To create a new folder, choose Insert on the menu bar. Choose NewFolder. A new tab will appear on the screen. It will be named NewFolder. The name should be highlighted. (If it is not, right-click thename and choose Rename from the menu.)
3. Key History for the folder name and tap Enter. The new folder namewill appear on the tab as shown in Figure 6.31.
Sections Folders
Figure 6.31 New Folder in OneNote
New Folder Folder renamed as History
Lesson 60 Using OneNote 217
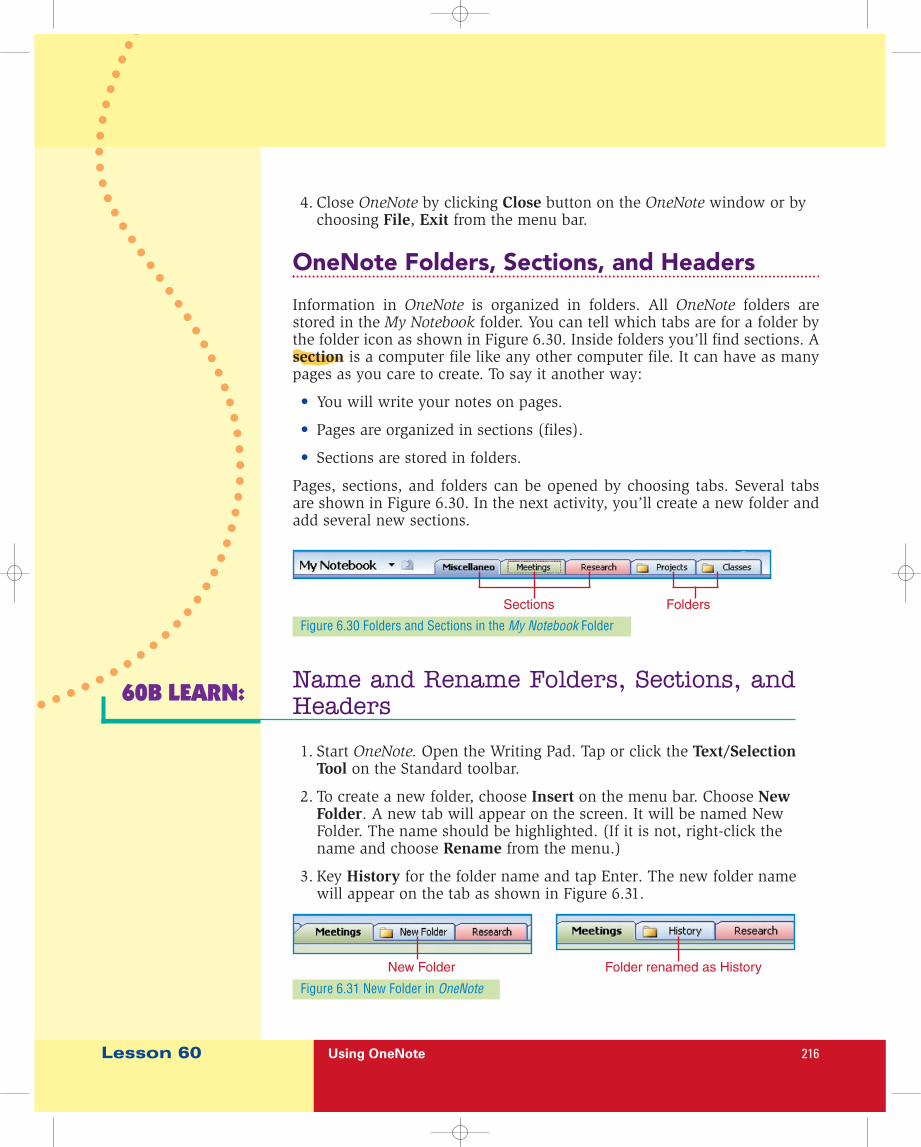
4. Practice renaming a folder. Right-click on the folder tab to open a pop-upmenu. Choose Rename. Key Presidents and tap Enter.
5. Click or tap the new Presidents folder tab. You will see the messagetelling you that there are no sections open in this folder. Click or tap inthe middle of the message and a new section will be created. The tabwill read New Section 1.
6. To change the name of the section, double-click on the tab to select thename if it is not already selected. Enter the new name Washington. TapEnter to record the name.
7. Practice renaming a section. Right-click on the section tab to open apop-up menu. Choose Rename. Key or handtype George Washingtonas shown in Figure 6.32. Tap Enter.
Tablet PC users can restthe tip of the pen directlyon the tab name. Afterthe mouse appears, liftthe pen off the screenand the pop-up menuwill appear.
Figure 6.32 Rename a section in OneNote.
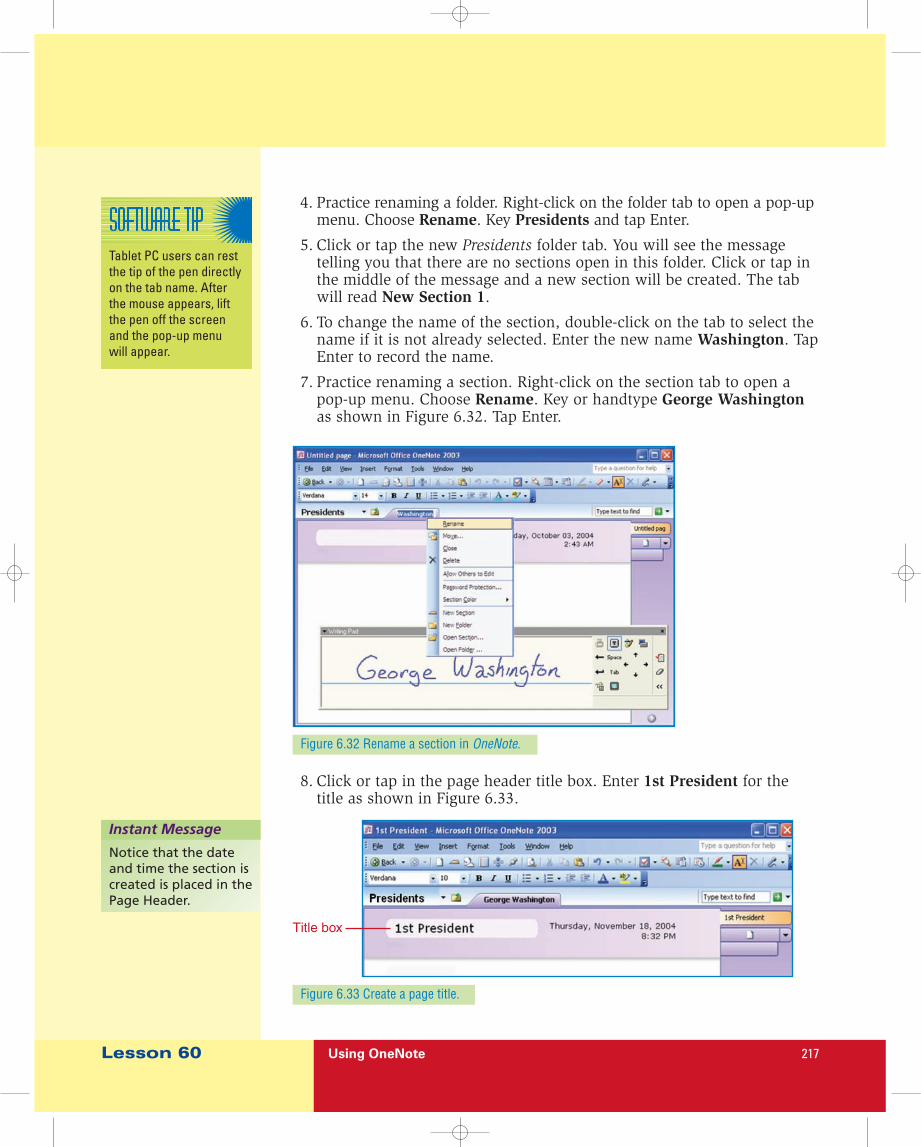
8. Click or tap in the page header title box. Enter 1st President for thetitle as shown in Figure 6.33.
Figure 6.33 Create a page title.
Title box
Instant Message
Notice that the dateand time the section iscreated is placed in thePage Header.
Lesson 60 Using OneNote 218
9. When you have made several changes, you would normally plan tosave those changes. With OneNote, all changes are saved automaticallyevery 30 seconds and each time you exit. You don’t have to give a Savecommand. Now that’s comforting! Close OneNote.
60C PRACTICE: Open and Navigate Around OneNote
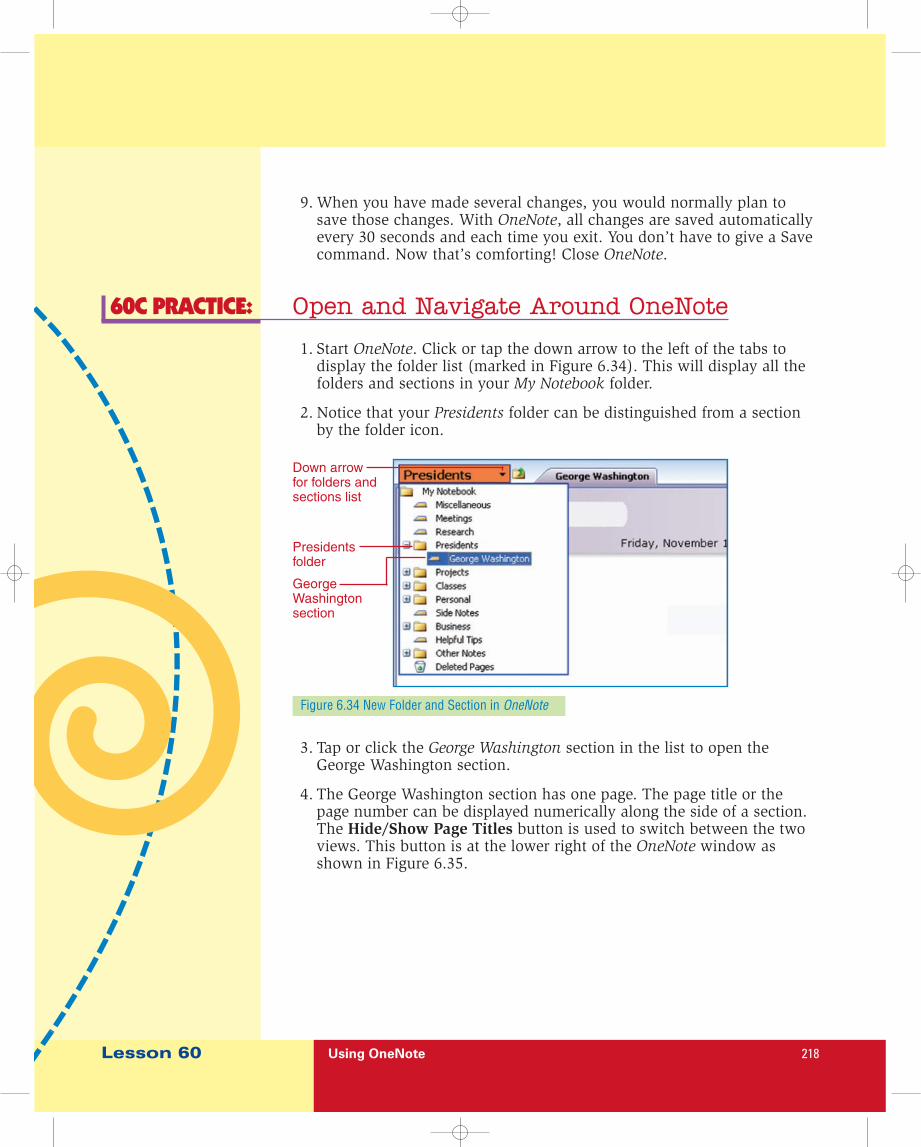
1. Start OneNote. Click or tap the down arrow to the left of the tabs todisplay the folder list (marked in Figure 6.34). This will display all thefolders and sections in your My Notebook folder.
2. Notice that your Presidents folder can be distinguished from a sectionby the folder icon.
Figure 6.34 New Folder and Section in OneNote
3. Tap or click the George Washington section in the list to open theGeorge Washington section.
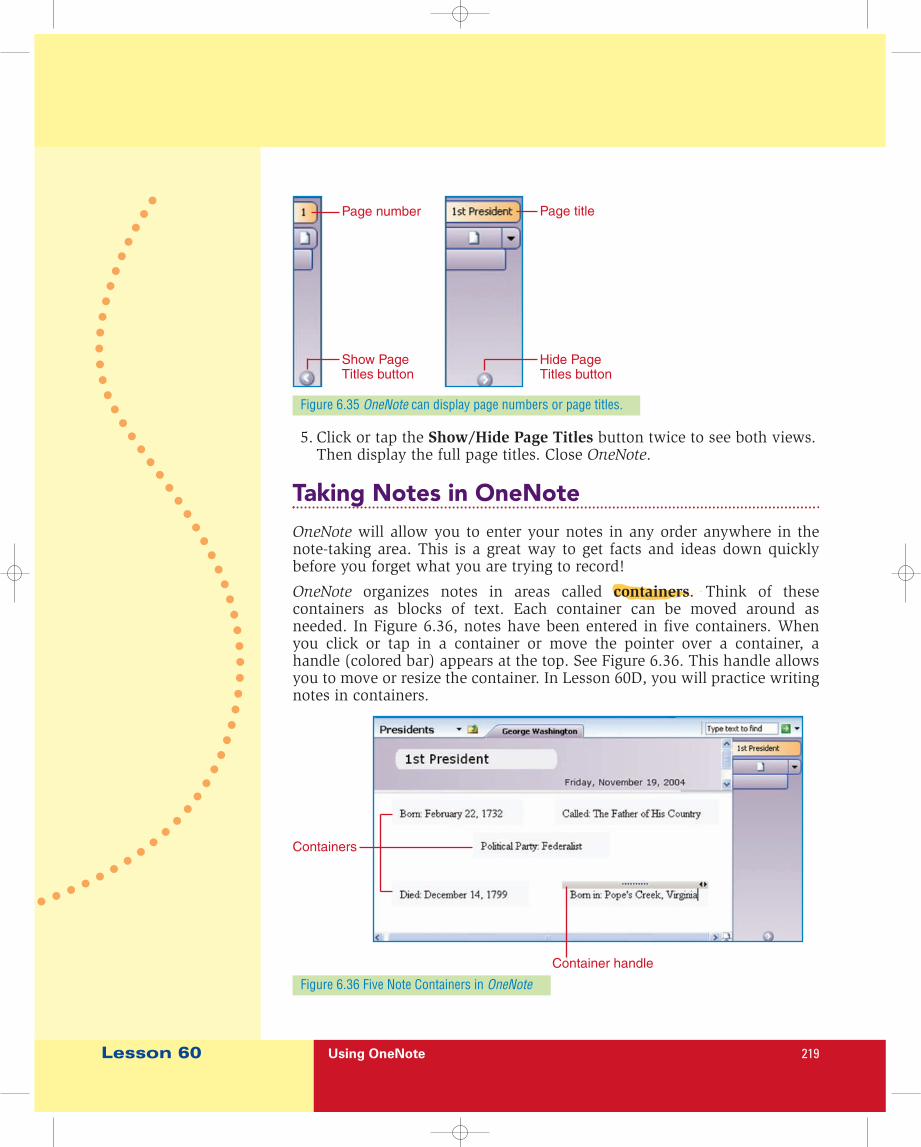
4. The George Washington section has one page. The page title or thepage number can be displayed numerically along the side of a section.The Hide/Show Page Titles button is used to switch between the twoviews. This button is at the lower right of the OneNote window asshown in Figure 6.35.
GeorgeWashingtonsection
Presidentsfolder
Down arrowfor folders andsections list
Lesson 60 Using OneNote 219
5. Click or tap the Show/Hide Page Titles button twice to see both views.Then display the full page titles. Close OneNote.
Taking Notes in OneNote
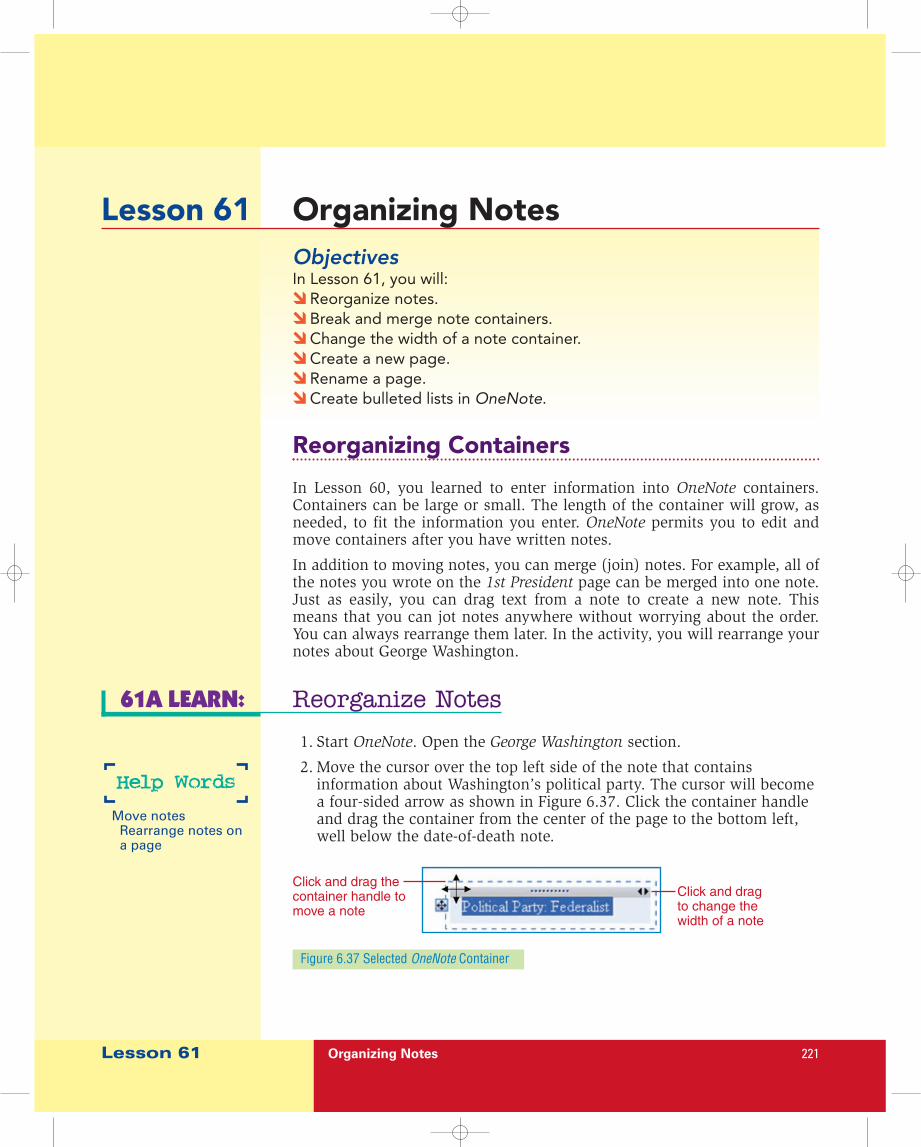
OneNote will allow you to enter your notes in any order anywhere in thenote-taking area. This is a great way to get facts and ideas down quicklybefore you forget what you are trying to record!
OneNote organizes notes in areas called containers. Think of thesecontainers as blocks of text. Each container can be moved around asneeded. In Figure 6.36, notes have been entered in five containers. Whenyou click or tap in a container or move the pointer over a container, ahandle (colored bar) appears at the top. See Figure 6.36. This handle allowsyou to move or resize the container. In Lesson 60D, you will practice writingnotes in containers.
Figure 6.36 Five Note Containers in OneNote
Figure 6.35 OneNote can display page numbers or page titles.
Page number
Show PageTitles button
Page title
Hide PageTitles button
Containers
Container handle

Lesson 60 Using OneNote 220
60D LEARN: Enter Notes
1. Start OneNote. Open the George Washington section. The 1st Presidentpage will be displayed. Click or tap in the top-left corner of the note-taking area and enter Born: February 22, 1732. See Figure 6.36.
2. Notice that the text is entered into a small container. Click or tap in thetop-right corner of the note-taking area to create a new container. EnterCalled: The Father of His Country.
3. Click or tap in the bottom-left corner of the note-taking area and enterDied: December 14, 1799.
4. Click or tap in the bottom-right corner of the note-taking area and enterBorn in: Pope’s Creek, Virginia.
5. Click or tap in the center of the note-taking area and enter PoliticalParty: Federalist.
6. Complete the Check Point below. Then close OneNote or continue tothe next activity.
Compare your 1st President page with the one shownin Figure 6.36. Do you have notes in five containers?
60E PRACTICE: Create Sections and Notes
1. Work with a classmate to research information about the second U.S.President. Use the Internet or your local library to find the followinginformation:• Name of the second U.S. President• His date of birth• His date of death• Where he was born (city and state)• Years served in the office of President
2. Work alone to finish this activity. Start OneNote. Open the Presidentsfolder. Create a section with the second U.S. President’s name.
3. Enter 2nd President for the page title. Enter each item of informationyou found in a separate note in the note-taking area.
4. Create a new section in the Presidents folder. Name the section ThomasJefferson. Enter 3rd President for the page title. You will add notes tothis page later.
5. Create another new section in the Presidents folder. Name the sectionJames Madison. Enter 4th President for the page title. You will addnotes to this page later. Close OneNote.
CHECK POINTCHECK POINT
TEAMWORK
Lesson 61 Organizing Notes 221
Lesson 61 Organizing Notes Objectives In Lesson 61, you will:C Reorganize notes.C Break and merge note containers.C Change the width of a note container.C Create a new page.C Rename a page.C Create bulleted lists in OneNote.
Reorganizing Containers
In Lesson 60, you learned to enter information into OneNote containers.Containers can be large or small. The length of the container will grow, asneeded, to fit the information you enter. OneNote permits you to edit andmove containers after you have written notes.
In addition to moving notes, you can merge (join) notes. For example, all ofthe notes you wrote on the 1st President page can be merged into one note.Just as easily, you can drag text from a note to create a new note. Thismeans that you can jot notes anywhere without worrying about the order.You can always rearrange them later. In the activity, you will rearrange yournotes about George Washington.
61A LEARN: Reorganize Notes
1. Start OneNote. Open the George Washington section.
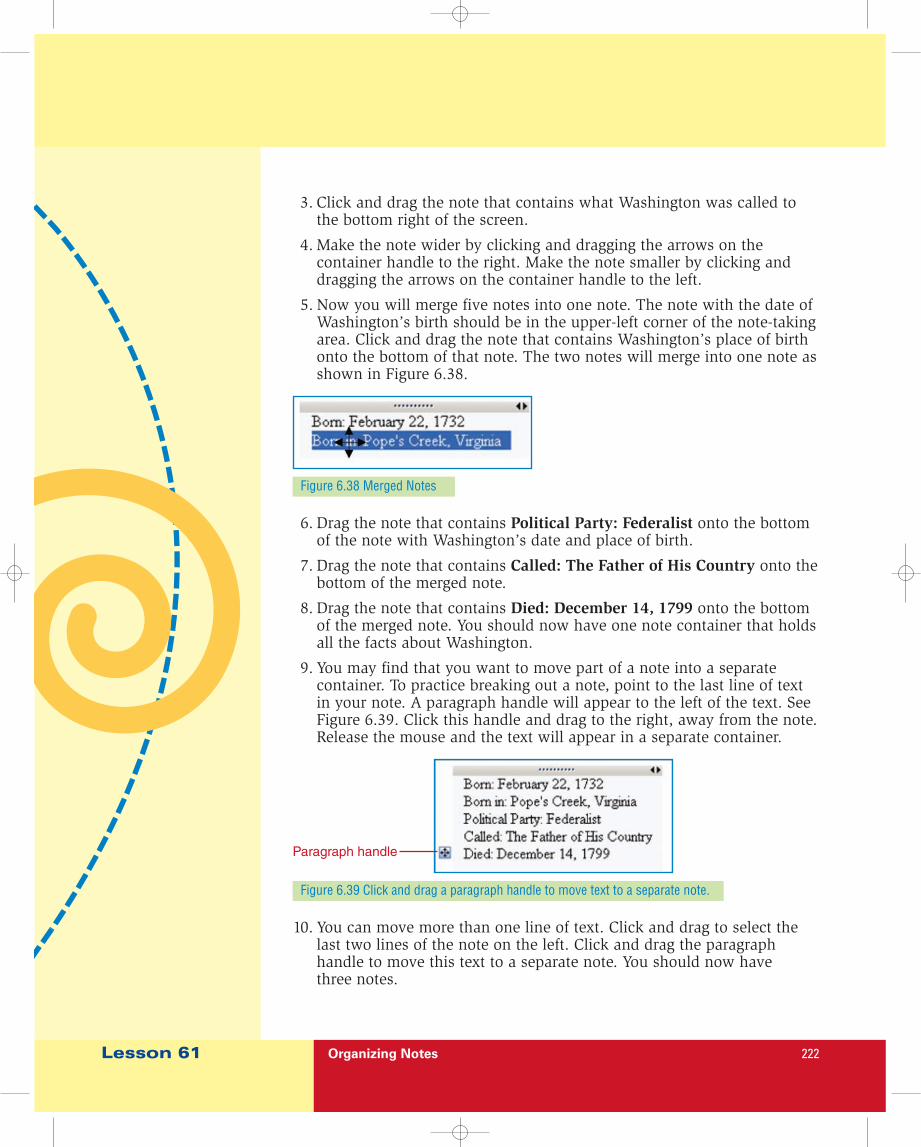
2. Move the cursor over the top left side of the note that containsinformation about Washington’s political party. The cursor will becomea four-sided arrow as shown in Figure 6.37. Click the container handleand drag the container from the center of the page to the bottom left,well below the date-of-death note.
Figure 6.37 Selected OneNote Container
Click and drag thecontainer handle tomove a note
Click and dragto change thewidth of a note
Move notesRearrange notes ona page
Help Words
Lesson 61 Organizing Notes 222
3. Click and drag the note that contains what Washington was called tothe bottom right of the screen.
4. Make the note wider by clicking and dragging the arrows on thecontainer handle to the right. Make the note smaller by clicking anddragging the arrows on the container handle to the left.
5. Now you will merge five notes into one note. The note with the date ofWashington’s birth should be in the upper-left corner of the note-takingarea. Click and drag the note that contains Washington’s place of birthonto the bottom of that note. The two notes will merge into one note asshown in Figure 6.38.
Figure 6.38 Merged Notes
6. Drag the note that contains Political Party: Federalist onto the bottomof the note with Washington’s date and place of birth.
7. Drag the note that contains Called: The Father of His Country onto thebottom of the merged note.
8. Drag the note that contains Died: December 14, 1799 onto the bottomof the merged note. You should now have one note container that holdsall the facts about Washington.
9. You may find that you want to move part of a note into a separatecontainer. To practice breaking out a note, point to the last line of textin your note. A paragraph handle will appear to the left of the text. SeeFigure 6.39. Click this handle and drag to the right, away from the note.Release the mouse and the text will appear in a separate container.
Figure 6.39 Click and drag a paragraph handle to move text to a separate note.
10. You can move more than one line of text. Click and drag to select thelast two lines of the note on the left. Click and drag the paragraphhandle to move this text to a separate note. You should now havethree notes.
Paragraph handle
Lesson 61 Organizing Notes 223
11. Click and drag to merge the notes back into one note. Place theinformation in the order shown in Figure 6.39. Close OneNote orcontinue to the next activity.
61B PRACTICE: Merge Notes
1. Start OneNote. Open the Presidents folder. Open the John Adamssection.
2. Click and drag notes to create one merged note with all the informationabout this president. Place the information in this order:
• His date of birth
• Where he was born (city and state)
• Years served in the office of President
• His date of death
3. Complete the Check Point below. Then close OneNote or continue tothe next activity.
Ask a classmate to check your merged note. Does itcontain all the information in the correct order? If not,make corrections.
61C LEARN: Create a New Page
OneNote will allow you to add as many pages as you need. You will learn toadd a page in this activity.
1. Start OneNote. Open the George Washington section.
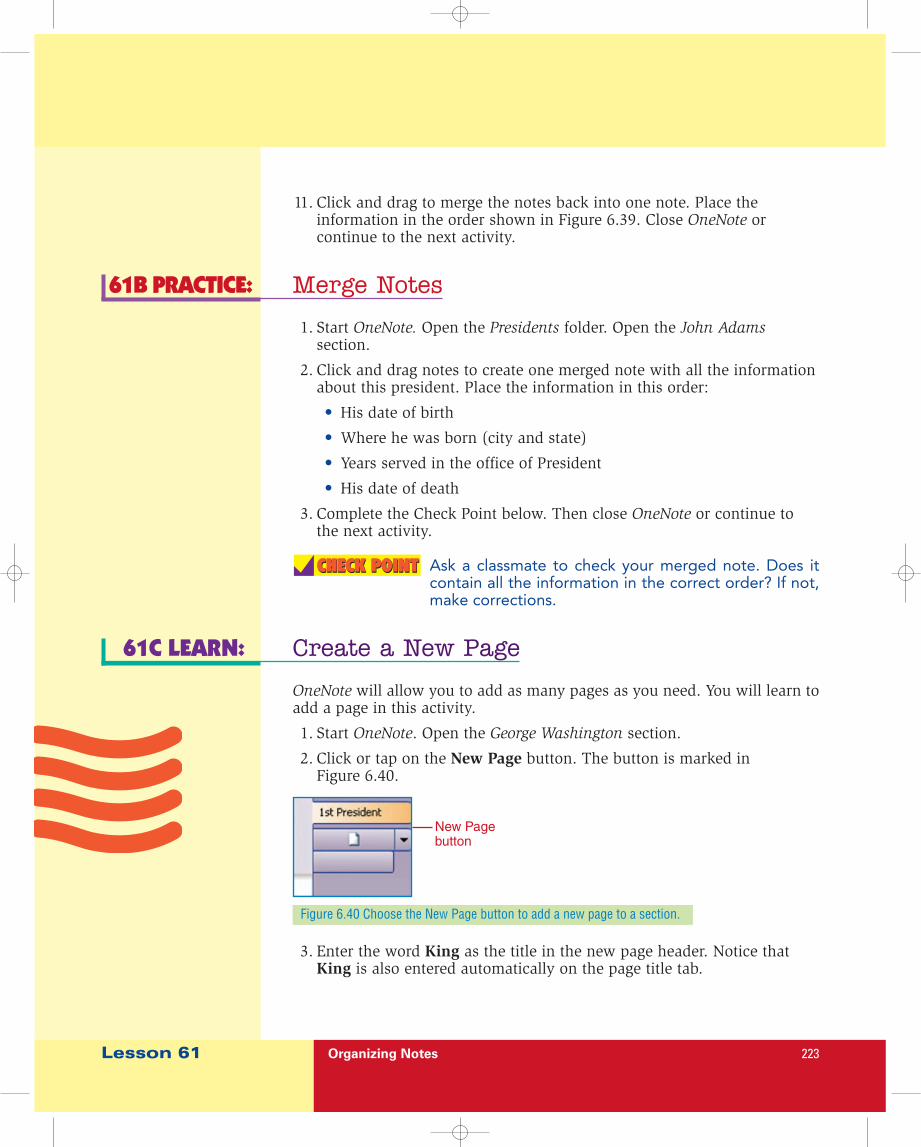
2. Click or tap on the New Page button. The button is marked inFigure 6.40.
CHECK POINTCHECK POINT
Figure 6.40 Choose the New Page button to add a new page to a section.
New Pagebutton
3. Enter the word King as the title in the new page header. Notice thatKing is also entered automatically on the page title tab.
Lesson 61 Organizing Notes 224
4. Tap in the top left-hand corner of the note-taking area and enter thefollowing paragraph:
George Washington was so popular after theRevolutionary War that many people wanted him tobecome their king. However, Washington was quitecontent to live a peaceful life on his plantation inbeautiful Mount Vernon, Virginia. This was not tobe. He was soon elected as the first President ofthe United States.
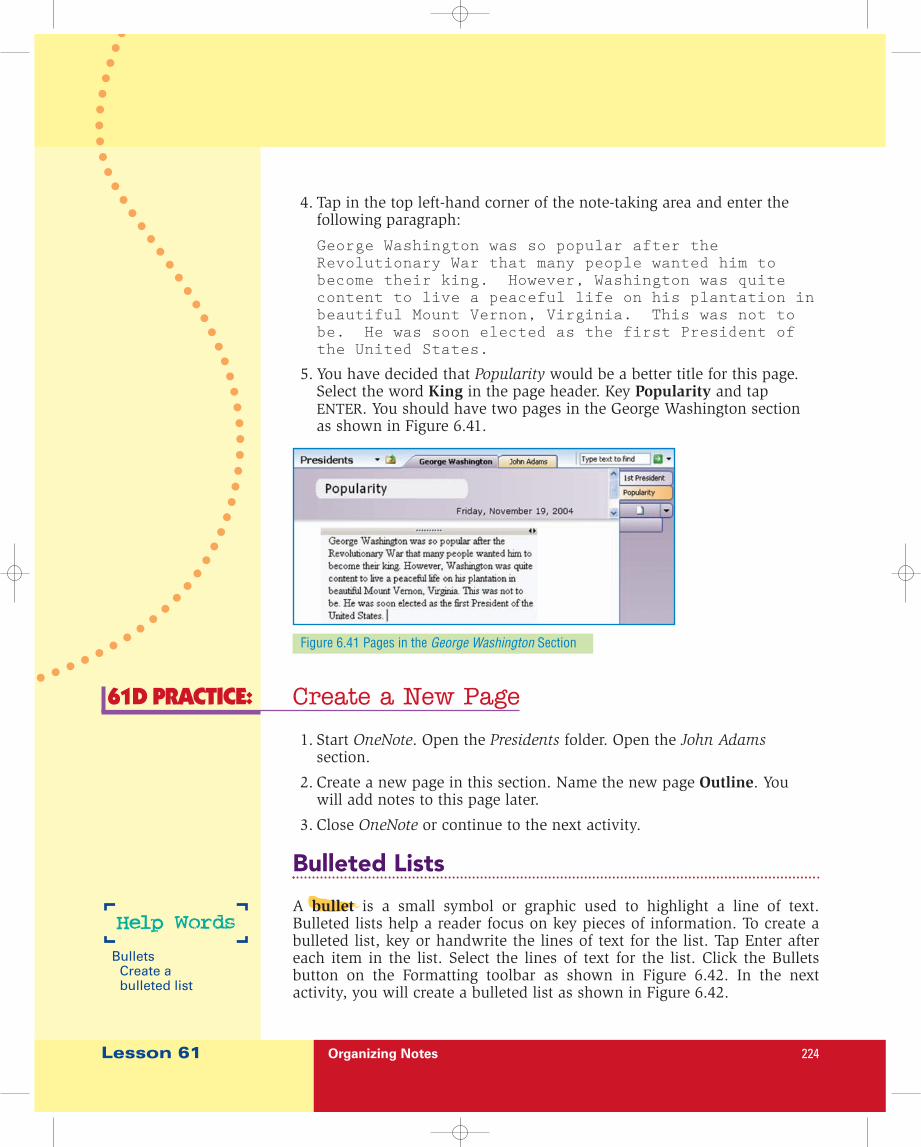
5. You have decided that Popularity would be a better title for this page.Select the word King in the page header. Key Popularity and tapENTER. You should have two pages in the George Washington sectionas shown in Figure 6.41.
61D PRACTICE: Create a New Page
1. Start OneNote. Open the Presidents folder. Open the John Adamssection.
2. Create a new page in this section. Name the new page Outline. Youwill add notes to this page later.
3. Close OneNote or continue to the next activity.
Bulleted Lists
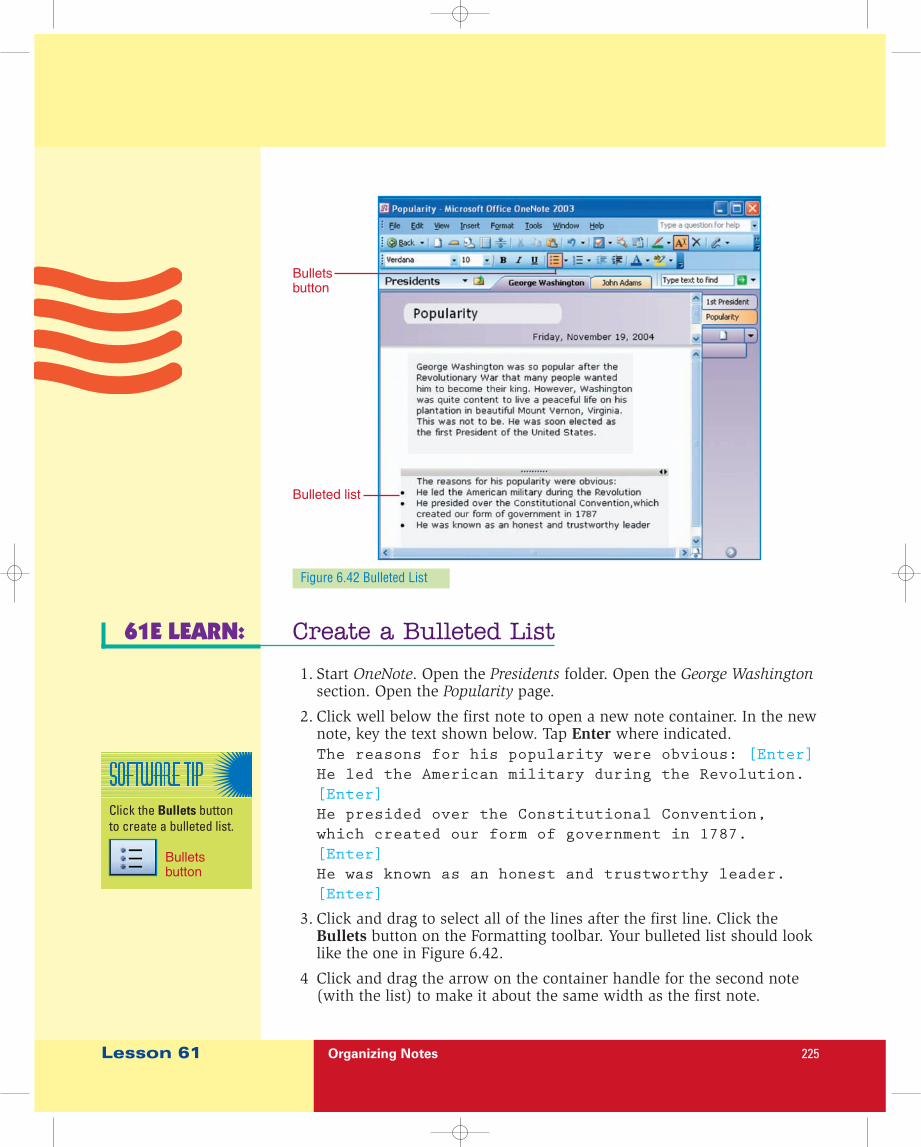
A bullet is a small symbol or graphic used to highlight a line of text.Bulleted lists help a reader focus on key pieces of information. To create abulleted list, key or handwrite the lines of text for the list. Tap Enter aftereach item in the list. Select the lines of text for the list. Click the Bulletsbutton on the Formatting toolbar as shown in Figure 6.42. In the nextactivity, you will create a bulleted list as shown in Figure 6.42.
Figure 6.41 Pages in the George Washington Section
BulletsCreate abulleted list
Help Words
Lesson 61 Organizing Notes 225
61E LEARN: Create a Bulleted List
1. Start OneNote. Open the Presidents folder. Open the George Washingtonsection. Open the Popularity page.
2. Click well below the first note to open a new note container. In the newnote, key the text shown below. Tap Enter where indicated.The reasons for his popularity were obvious: [Enter]He led the American military during the Revolution. [Enter]He presided over the Constitutional Convention, which created our form of government in 1787. [Enter]He was known as an honest and trustworthy leader. [Enter]
3. Click and drag to select all of the lines after the first line. Click theBullets button on the Formatting toolbar. Your bulleted list should looklike the one in Figure 6.42.
4 Click and drag the arrow on the container handle for the second note(with the list) to make it about the same width as the first note.
Figure 6.42 Bulleted List
Bulletsbutton
Bulleted list
Click the Bullets buttonto create a bulleted list.
Bulletsbutton
Lesson 61 Organizing Notes 226
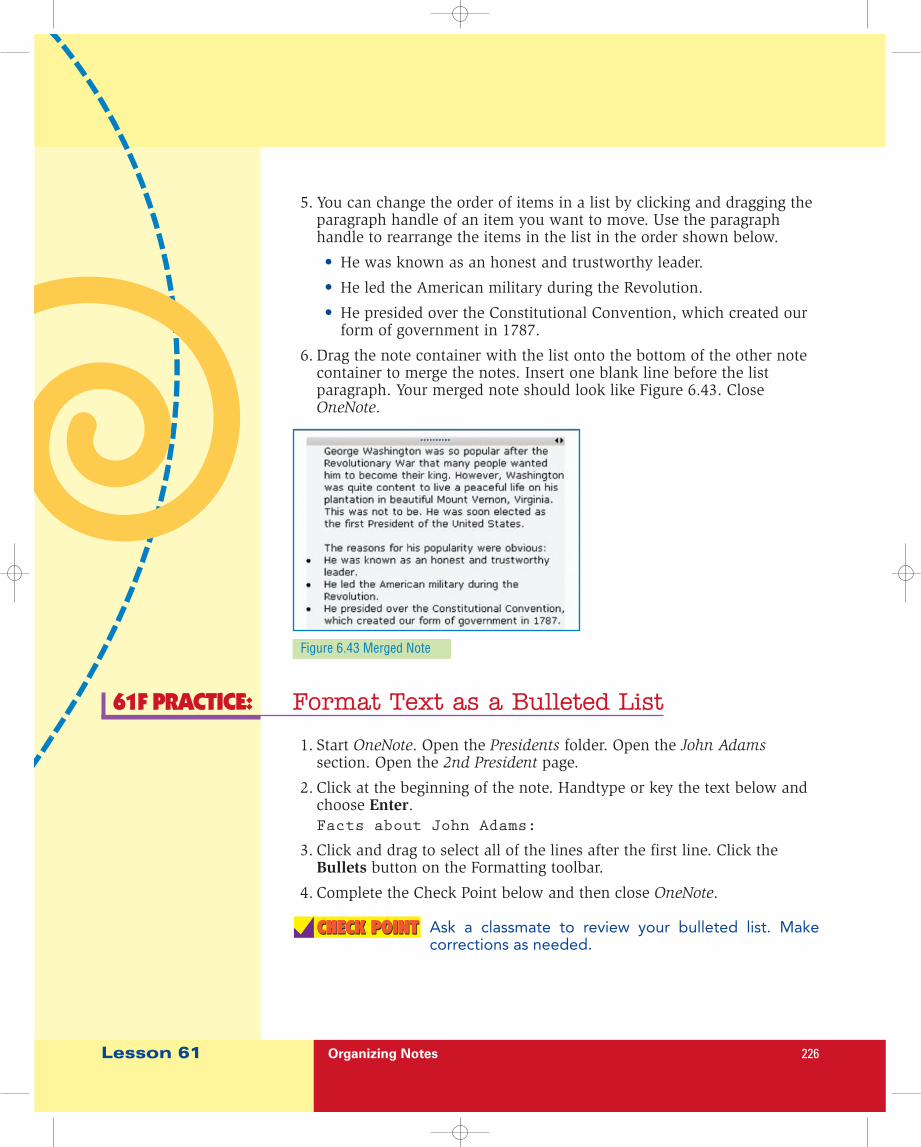
5. You can change the order of items in a list by clicking and dragging theparagraph handle of an item you want to move. Use the paragraphhandle to rearrange the items in the list in the order shown below.
• He was known as an honest and trustworthy leader.
• He led the American military during the Revolution.
• He presided over the Constitutional Convention, which created ourform of government in 1787.
6. Drag the note container with the list onto the bottom of the other notecontainer to merge the notes. Insert one blank line before the listparagraph. Your merged note should look like Figure 6.43. CloseOneNote.
Figure 6.43 Merged Note
61F PRACTICE: Format Text as a Bulleted List
1. Start OneNote. Open the Presidents folder. Open the John Adamssection. Open the 2nd President page.
2. Click at the beginning of the note. Handtype or key the text below andchoose Enter.Facts about John Adams:
3. Click and drag to select all of the lines after the first line. Click theBullets button on the Formatting toolbar.
4. Complete the Check Point below and then close OneNote.
Ask a classmate to review your bulleted list. Makecorrections as needed.
CHECK POINTCHECK POINT
Lesson 62 Outlines and Formatting 227
Lesson 62 Outlines and Formatting Objectives In Lesson 62, you will:C Create an outline in OneNote.C Print a page from OneNote.C Add extra writing space in a note.C Copy from OneNote to a Word document.C Change fonts and use color and formatting to accent notes.
Outlines
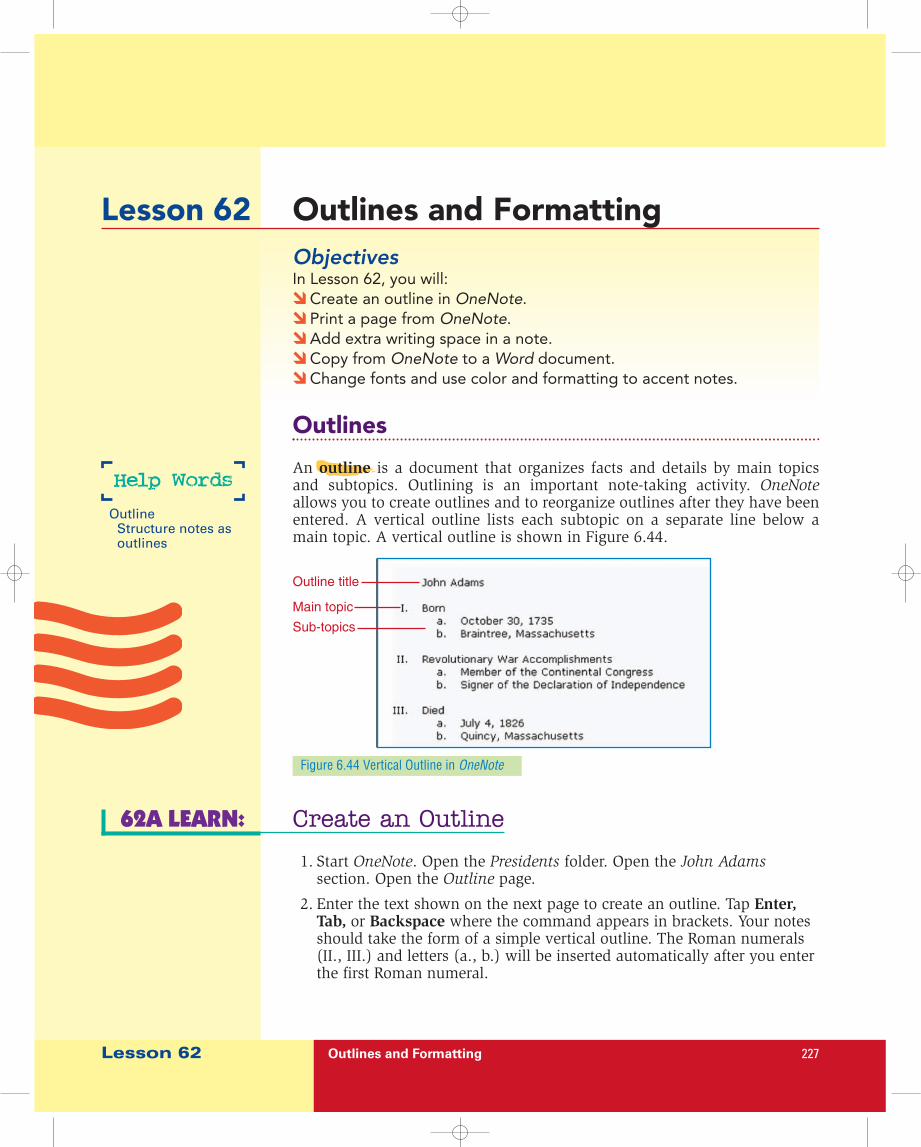
An outline is a document that organizes facts and details by main topicsand subtopics. Outlining is an important note-taking activity. OneNoteallows you to create outlines and to reorganize outlines after they have beenentered. A vertical outline lists each subtopic on a separate line below amain topic. A vertical outline is shown in Figure 6.44.
OutlineStructure notes asoutlines
Help Words
62A LEARN: Create an Outline
1. Start OneNote. Open the Presidents folder. Open the John Adamssection. Open the Outline page.
2. Enter the text shown on the next page to create an outline. Tap Enter,Tab, or Backspace where the command appears in brackets. Your notesshould take the form of a simple vertical outline. The Roman numerals(II., III.) and letters (a., b.) will be inserted automatically after you enterthe first Roman numeral.
Figure 6.44 Vertical Outline in OneNote
Outline title
Main topic
Sub-topics
Lesson 62 Outlines and Formatting 228
John Adams [Enter][Enter]I. [Tab] Born [Enter][Tab]October 30, 1735 [Enter]
Braintree, Massachusetts [Enter][Enter][Backspace]Revolutionary War Accomplishments [Enter][Tab]Member of the Continental Congress [Enter]
Signer of the Declaration of Independence [Enter][Enter][Backspace]Died [Enter][Tab]July 4, 1826 [Enter]Quincy, Massachusetts [Enter]
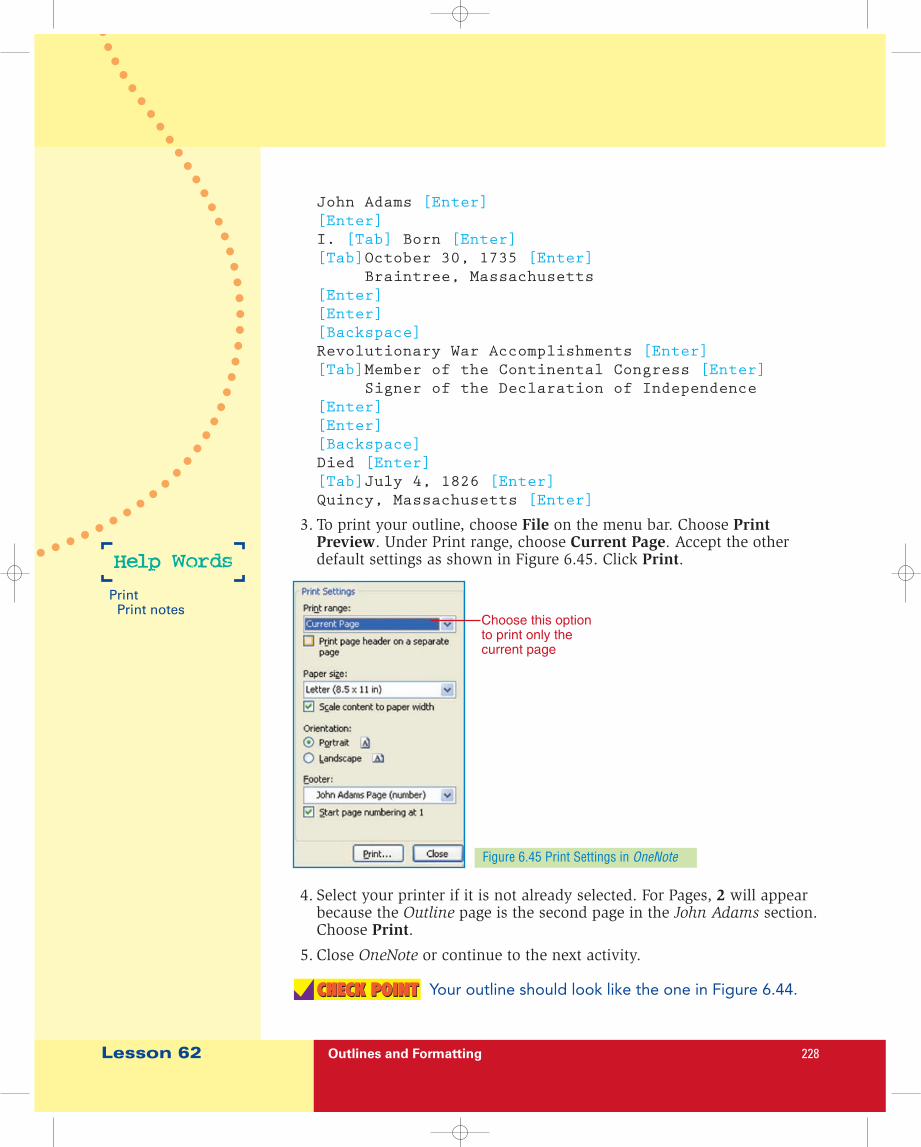
3. To print your outline, choose File on the menu bar. Choose PrintPreview. Under Print range, choose Current Page. Accept the otherdefault settings as shown in Figure 6.45. Click Print.
PrintPrint notes
Help Words
Figure 6.45 Print Settings in OneNote
4. Select your printer if it is not already selected. For Pages, 2 will appearbecause the Outline page is the second page in the John Adams section.Choose Print.
5. Close OneNote or continue to the next activity.
Your outline should look like the one in Figure 6.44.CHECK POINTCHECK POINT
Choose this optionto print only thecurrent page
Lesson 62 Outlines and Formatting 229
62B PRACTICE: Create Abigail Adams Outline
1. Start OneNote. Open the Presidents folder. Create a new section. Namethe section First Ladies.
2. Name the new page in this section Abigail Adams. Enter the text belowto create an outline.Abigail Adams [Enter][Enter]I. [Tab] Born [Enter][Tab]November 11, 1744 [Enter]
Weymouth, Massachusetts [Enter][Enter][Backspace]Family [Enter][Tab]Parents: Elizabeth Quincy Smith and ReverendWilliam Smith [Enter]
Siblings: Mary, Betsy, and Billy [Enter][Enter][Backspace]Marriage [Enter][Tab]Date: October 25, 1764[Enter]
Husband: John Adams, second U.S. President [Enter][Enter][Backspace]Died [Enter][Tab] October 28, 1818[Enter]Cause of death: Typhoid fever [Enter]
3. Proofread your outline and make corrections if needed. Print youroutline page. Close OneNote.
Editing and Formatting
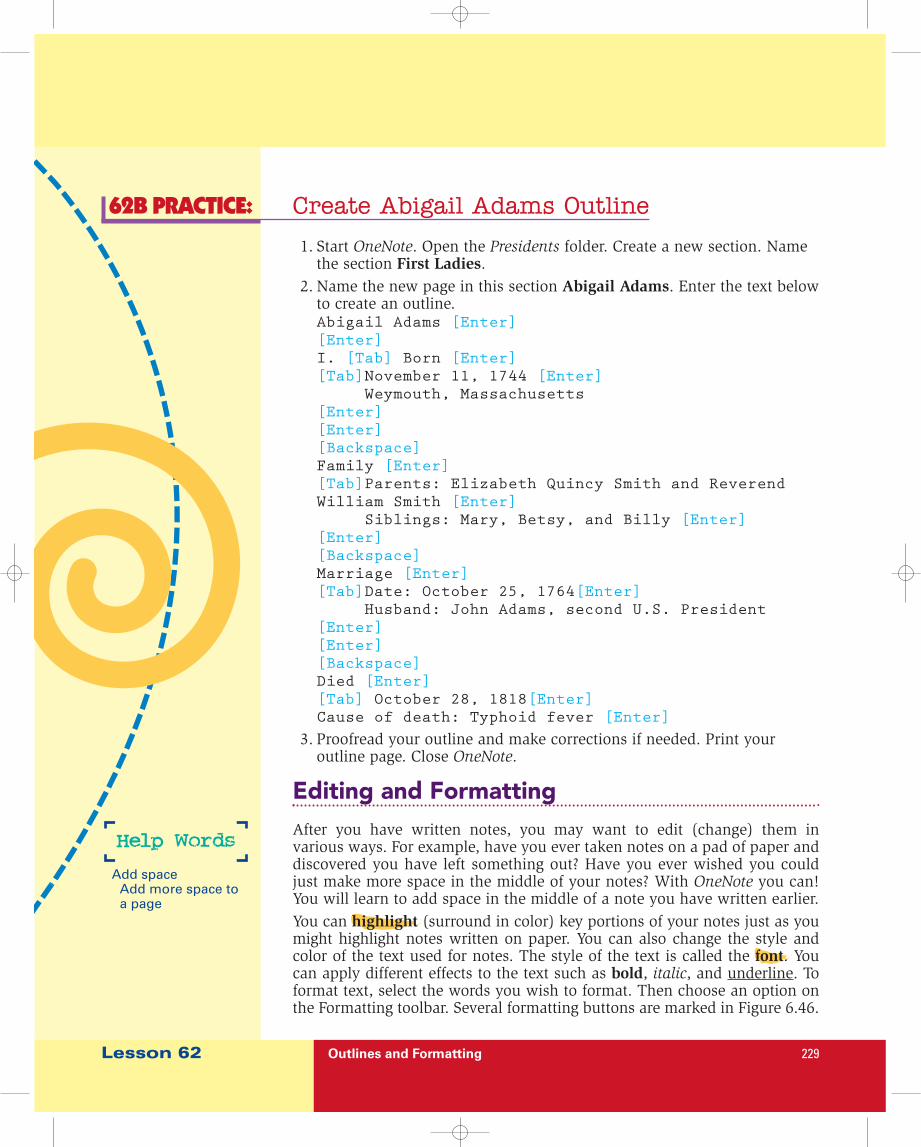
After you have written notes, you may want to edit (change) them invarious ways. For example, have you ever taken notes on a pad of paper anddiscovered you have left something out? Have you ever wished you couldjust make more space in the middle of your notes? With OneNote you can!You will learn to add space in the middle of a note you have written earlier. You can highlight (surround in color) key portions of your notes just as youmight highlight notes written on paper. You can also change the style andcolor of the text used for notes. The style of the text is called the font. Youcan apply different effects to the text such as bold, italic, and underline. Toformat text, select the words you wish to format. Then choose an option onthe Formatting toolbar. Several formatting buttons are marked in Figure 6.46.
Add spaceAdd more space toa page
Help Words
Lesson 62 Outlines and Formatting 230
62C LEARN: Add Space and Edit an Outline
1. Start OneNote. Open the Presidents folder. Open the John Adamssection and the Outline page.
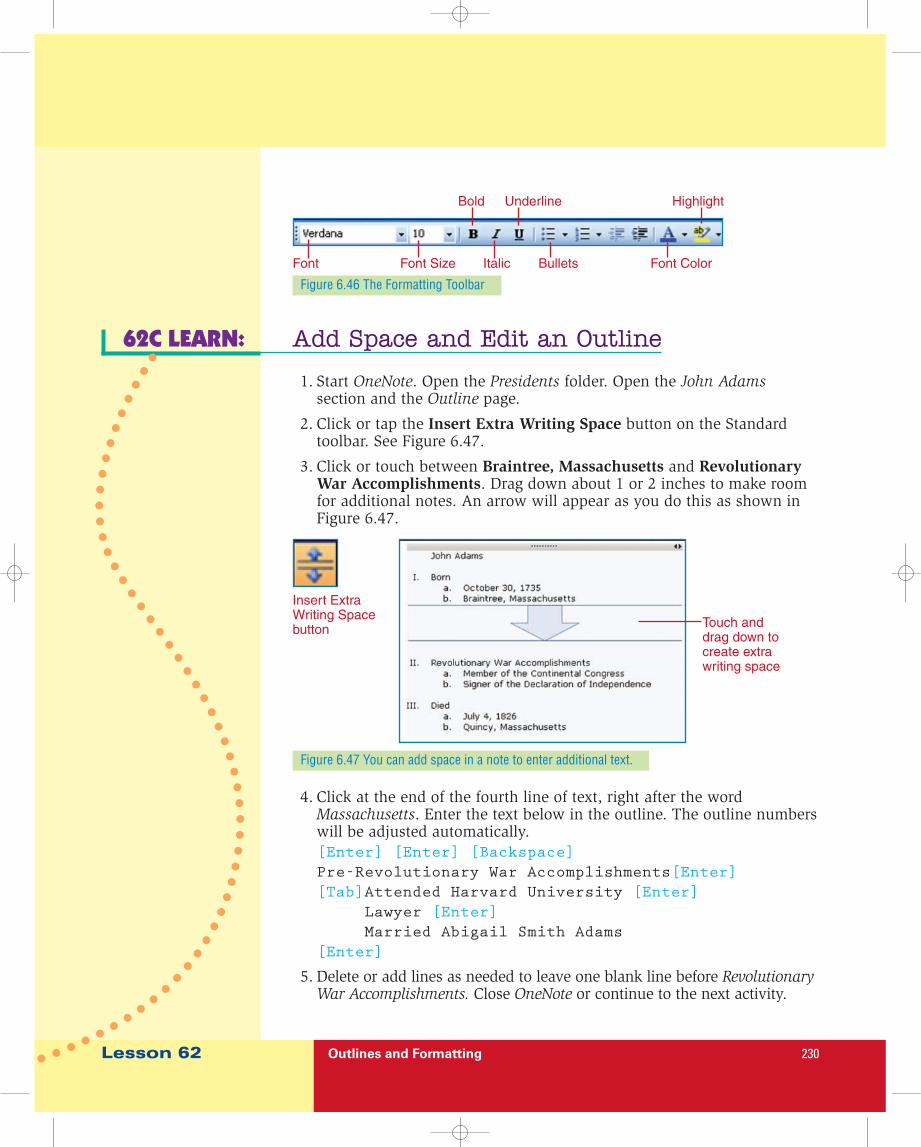
2. Click or tap the Insert Extra Writing Space button on the Standardtoolbar. See Figure 6.47.
3. Click or touch between Braintree, Massachusetts and RevolutionaryWar Accomplishments. Drag down about 1 or 2 inches to make roomfor additional notes. An arrow will appear as you do this as shown inFigure 6.47.
Figure 6.46 The Formatting Toolbar
Bold Underline Highlight
Font Font Size Italic Bullets Font Color
4. Click at the end of the fourth line of text, right after the wordMassachusetts. Enter the text below in the outline. The outline numberswill be adjusted automatically.[Enter] [Enter] [Backspace]Pre-Revolutionary War Accomplishments[Enter][Tab]Attended Harvard University [Enter]
Lawyer [Enter]Married Abigail Smith Adams
[Enter]
5. Delete or add lines as needed to leave one blank line before RevolutionaryWar Accomplishments. Close OneNote or continue to the next activity.
Figure 6.47 You can add space in a note to enter additional text.
Insert ExtraWriting Spacebutton Touch and
drag down tocreate extrawriting space
Lesson 62 Outlines and Formatting 231
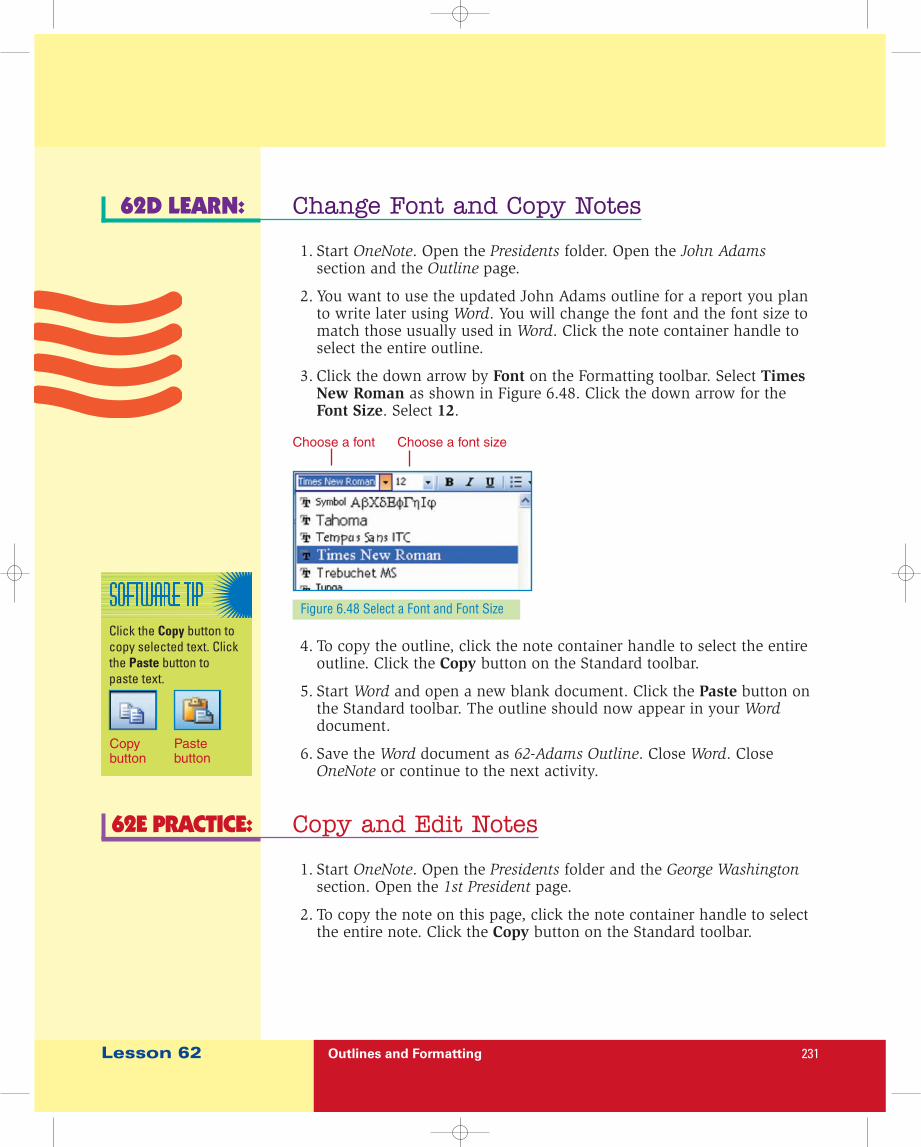
62D LEARN: Change Font and Copy Notes
1. Start OneNote. Open the Presidents folder. Open the John Adamssection and the Outline page.
2. You want to use the updated John Adams outline for a report you planto write later using Word. You will change the font and the font size tomatch those usually used in Word. Click the note container handle toselect the entire outline.
3. Click the down arrow by Font on the Formatting toolbar. Select TimesNew Roman as shown in Figure 6.48. Click the down arrow for theFont Size. Select 12.
Figure 6.48 Select a Font and Font Size
Choose a font Choose a font size
4. To copy the outline, click the note container handle to select the entireoutline. Click the Copy button on the Standard toolbar.
5. Start Word and open a new blank document. Click the Paste button onthe Standard toolbar. The outline should now appear in your Worddocument.
6. Save the Word document as 62-Adams Outline. Close Word. CloseOneNote or continue to the next activity.
62E PRACTICE: Copy and Edit Notes
1. Start OneNote. Open the Presidents folder and the George Washingtonsection. Open the 1st President page.
2. To copy the note on this page, click the note container handle to selectthe entire note. Click the Copy button on the Standard toolbar.
Click the Copy button tocopy selected text. Clickthe Paste button topaste text.
Copybutton
Pastebutton
Lesson 62 Outlines and Formatting 232
3. Open the Thomas Jefferson section and the 3rd President page. Click thePaste button on the Standard toolbar. The note should now appear onthe 3rd President page.
4. Edit the note to contain the facts for Thomas Jefferson as shown below.Start by selecting the text to be changed. Then key or handtype thenew text.
Born: April 13, 1743 Born in: Shadwell, VirginiaPolitical Party: Democratic-Republican Called: A Renaissance ManDied: July 4, 1826
5. Close OneNote or continue to the next activity.
62F LEARN: Format Notes
In this activity, you will format and add color to notes to make headings andimportant facts stand out.
1. Start OneNote. Open the Presidents folder and the George Washingtonsection. Open the 1st President page.
2. Select Born: in the first line. Click the Bold button on the Formattingtoolbar. Select and apply bold to:
Born in:Political Party:Called: Died:
3. Select the text The Father of His Country. Click the Italic button onthe Formatting toolbar.
4. Select the text Federalist. Click the Underline button on the Formattingtoolbar.
5. You want to memorize the date of birth for each president. You willhighlight this information to make it stand out when you study yournotes. Select the text Born: February 22, 1732. Click the down arrowfor Highlight on the Formatting toolbar. Choose the yellow square asshown in Figure 6.49.
Instant Message
What is a RenaissanceMan? A Renaissanceman is someone whohas a wide variety ofinterests. Jefferson’sinterests includedarchitecture, invention,science, literature,and politics. He was awell-rounded man.
Use the Bold, Italic, andUnderline buttons toemphasize text.
Boldbutton
Italicbutton
Underlinebutton
Lesson 62 Outlines and Formatting 233
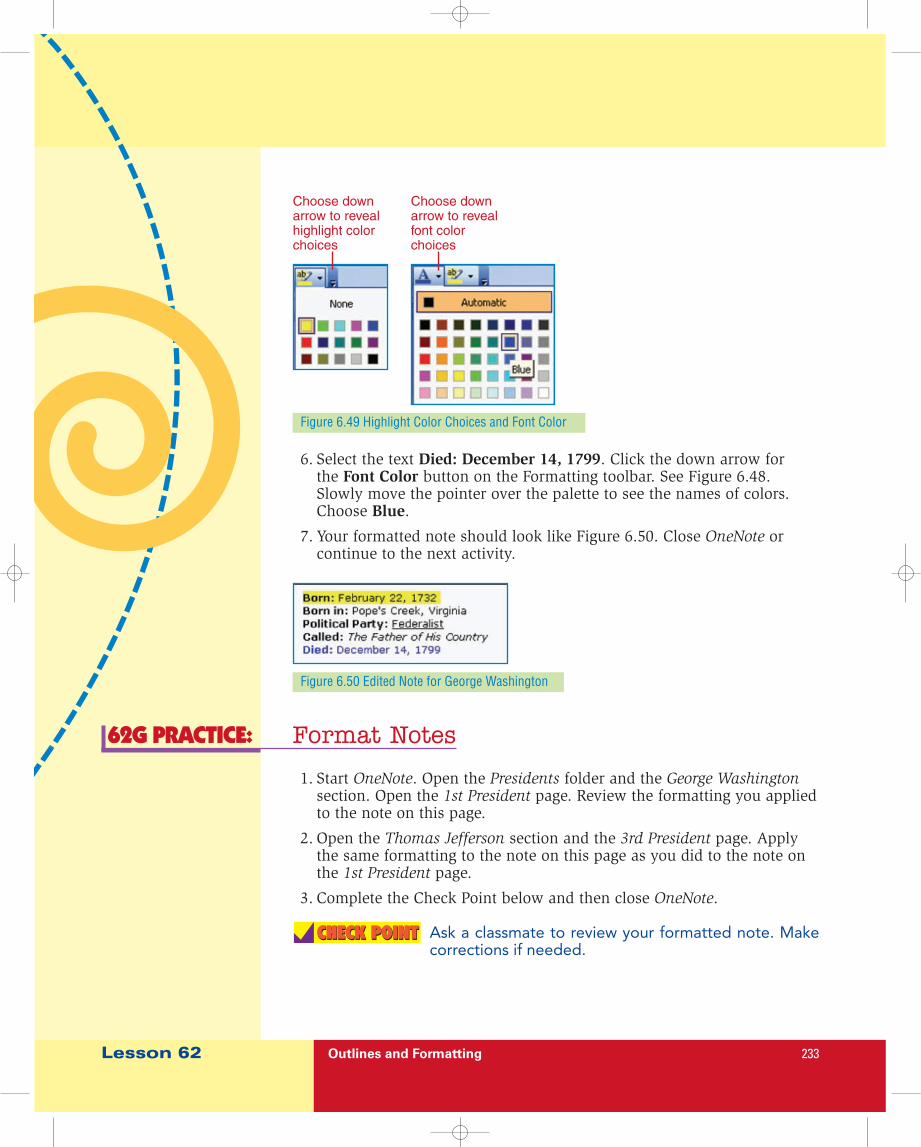
6. Select the text Died: December 14, 1799. Click the down arrow forthe Font Color button on the Formatting toolbar. See Figure 6.48.Slowly move the pointer over the palette to see the names of colors.Choose Blue.
7. Your formatted note should look like Figure 6.50. Close OneNote orcontinue to the next activity.
Figure 6.49 Highlight Color Choices and Font Color
Choose downarrow to revealhighlight colorchoices
Choose downarrow to revealfont colorchoices
Figure 6.50 Edited Note for George Washington
62G PRACTICE: Format Notes
1. Start OneNote. Open the Presidents folder and the George Washingtonsection. Open the 1st President page. Review the formatting you appliedto the note on this page.
2. Open the Thomas Jefferson section and the 3rd President page. Applythe same formatting to the note on this page as you did to the note onthe 1st President page.
3. Complete the Check Point below and then close OneNote.
Ask a classmate to review your formatted note. Makecorrections if needed.
CHECK POINTCHECK POINT
Lesson 63 Web Content and Pictures 234
Lesson 63 Web Content and Pictures Objectives In Lesson 63, you will:C Copy text from Web files.C Search your notes. C Insert pictures and sketch pictures.C Write notes using digital ink.
Data files: CD-63-Louisiana, CD-63-Indiana
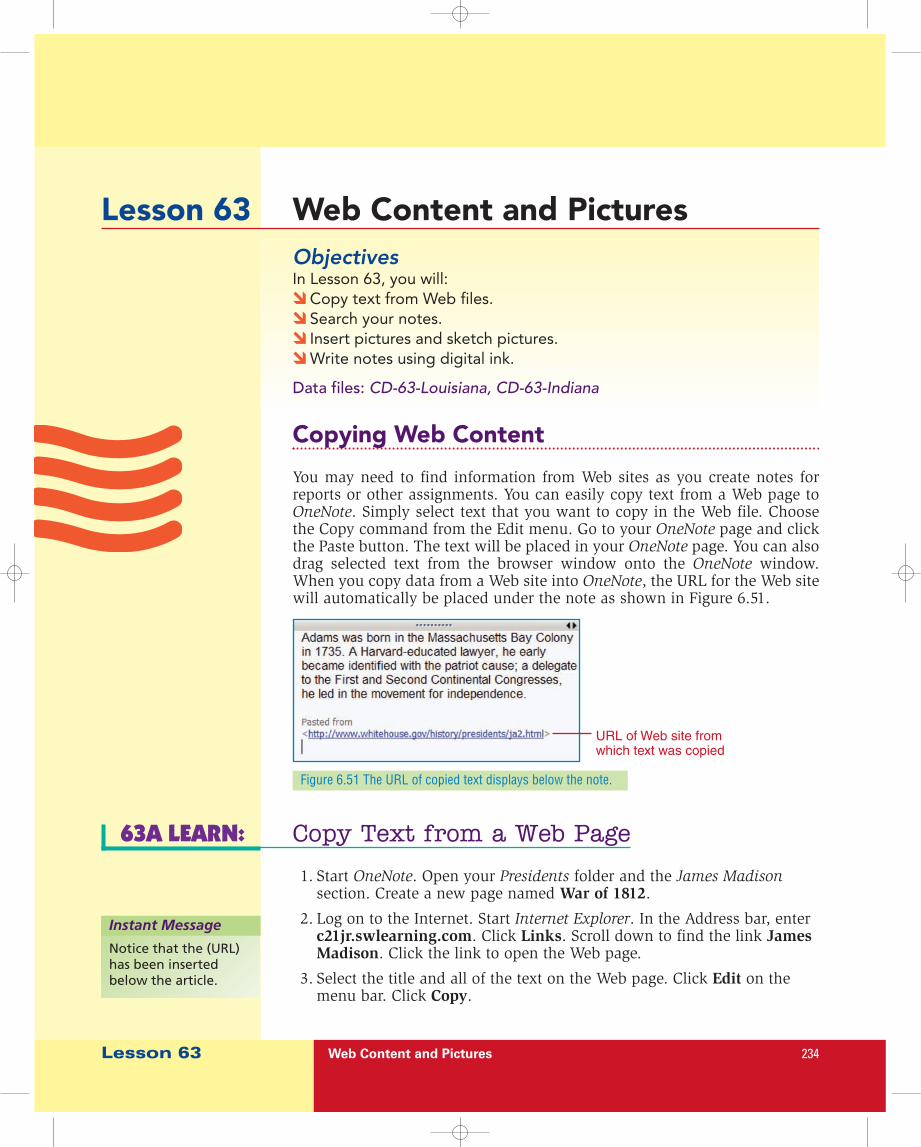
Copying Web Content
You may need to find information from Web sites as you create notes forreports or other assignments. You can easily copy text from a Web page toOneNote. Simply select text that you want to copy in the Web file. Choosethe Copy command from the Edit menu. Go to your OneNote page and clickthe Paste button. The text will be placed in your OneNote page. You can alsodrag selected text from the browser window onto the OneNote window.When you copy data from a Web site into OneNote, the URL for the Web sitewill automatically be placed under the note as shown in Figure 6.51.
Figure 6.51 The URL of copied text displays below the note.
URL of Web site fromwhich text was copied
63A LEARN: Copy Text from a Web Page
1. Start OneNote. Open your Presidents folder and the James Madisonsection. Create a new page named War of 1812.
2. Log on to the Internet. Start Internet Explorer. In the Address bar, enterc21jr.swlearning.com. Click Links. Scroll down to find the link JamesMadison. Click the link to open the Web page.
3. Select the title and all of the text on the Web page. Click Edit on themenu bar. Click Copy.
Instant Message
Notice that the (URL)has been insertedbelow the article.

Lesson 63 Web Content and Pictures 235
4. In OneNote, click in the upper-left corner of the War of 1812 page. Clickthe Paste button. The article should now appear in your OneNote page.Read the article and insert blank lines between the paragraphs if needed.
5. Close OneNote or continue to the next activity.
63B PRACTICE: Download Information on James Madison
1. Start OneNote. Open your Presidents folder and the James Madisonsection. Open the 4th President page.
2. Start Internet Explorer. Use a search engine to find articles on JamesMadison. Enter search terms such as U.S. Presidents or President JamesMadison.
3. Find three or four important facts about James Madison from thearticles you read. Copy each fact and paste it into OneNote on the4th President page.
4. Close Internet Explorer and close OneNote.
Searching Notes
You can use the Find feature to look for text you have entered in your notes.This can be helpful when you forget which page contains the informationyou want. It also helps you locate information on a page that contains a lotof text. The Find feature will search both typed and handwritten notes,provided you have written them clearly.
To search for text, choose Find from the Edit menu. Enter a word or term inthe box that appears at the right of the tabs. Choose a search area. Click theFind arrow to begin the search. See Figure 6.52.
FindFind notes
Help Words
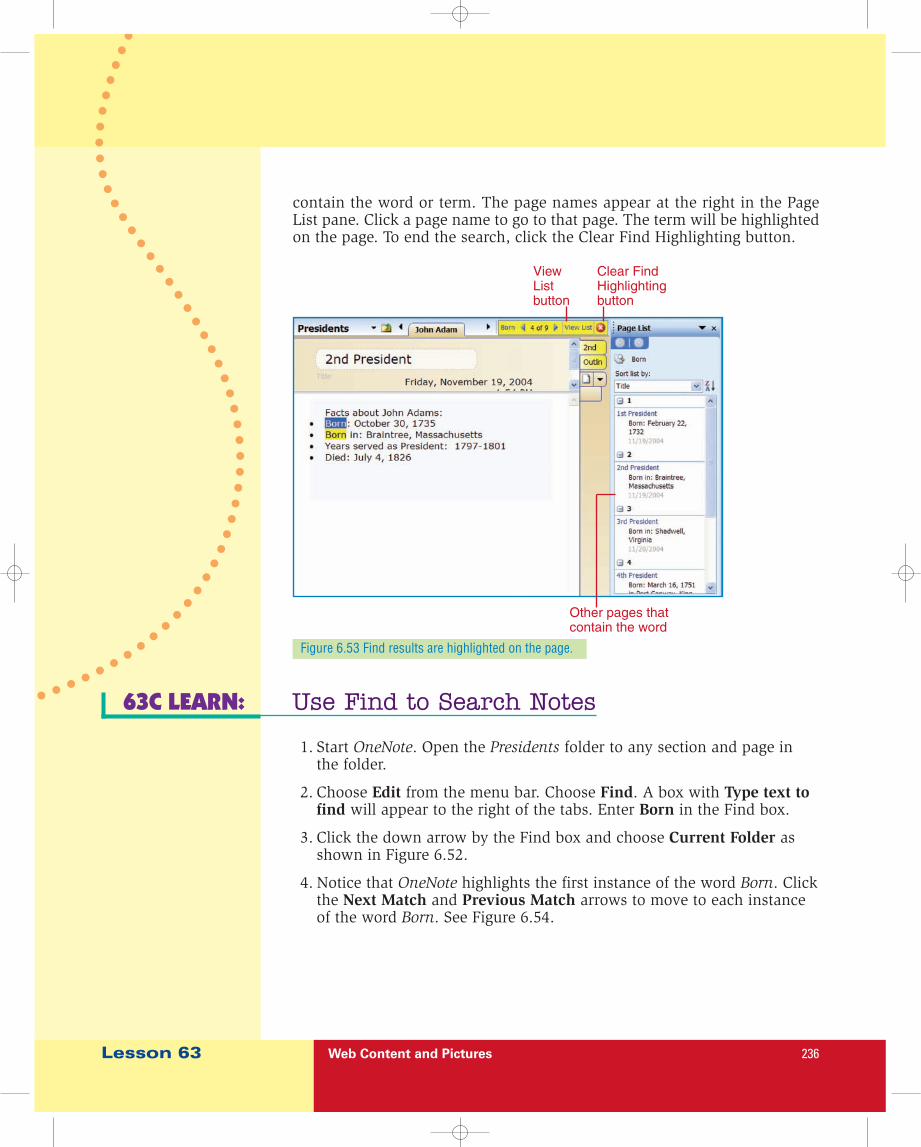
The word or term will be highlighted on the current page as shown inFigure 6.53. You can click the View List button to see a list of pages that
Figure 6.52 Use Find to search for words or terms.
Type text tofind here
Click to showsearch options
Click Find arrowto start search
Lesson 63 Web Content and Pictures 236
contain the word or term. The page names appear at the right in the PageList pane. Click a page name to go to that page. The term will be highlightedon the page. To end the search, click the Clear Find Highlighting button.
ViewListbutton
Clear FindHighlightingbutton
Other pages thatcontain the word
63C LEARN: Use Find to Search Notes
1. Start OneNote. Open the Presidents folder to any section and page inthe folder.
2. Choose Edit from the menu bar. Choose Find. A box with Type text tofind will appear to the right of the tabs. Enter Born in the Find box.
3. Click the down arrow by the Find box and choose Current Folder asshown in Figure 6.52.
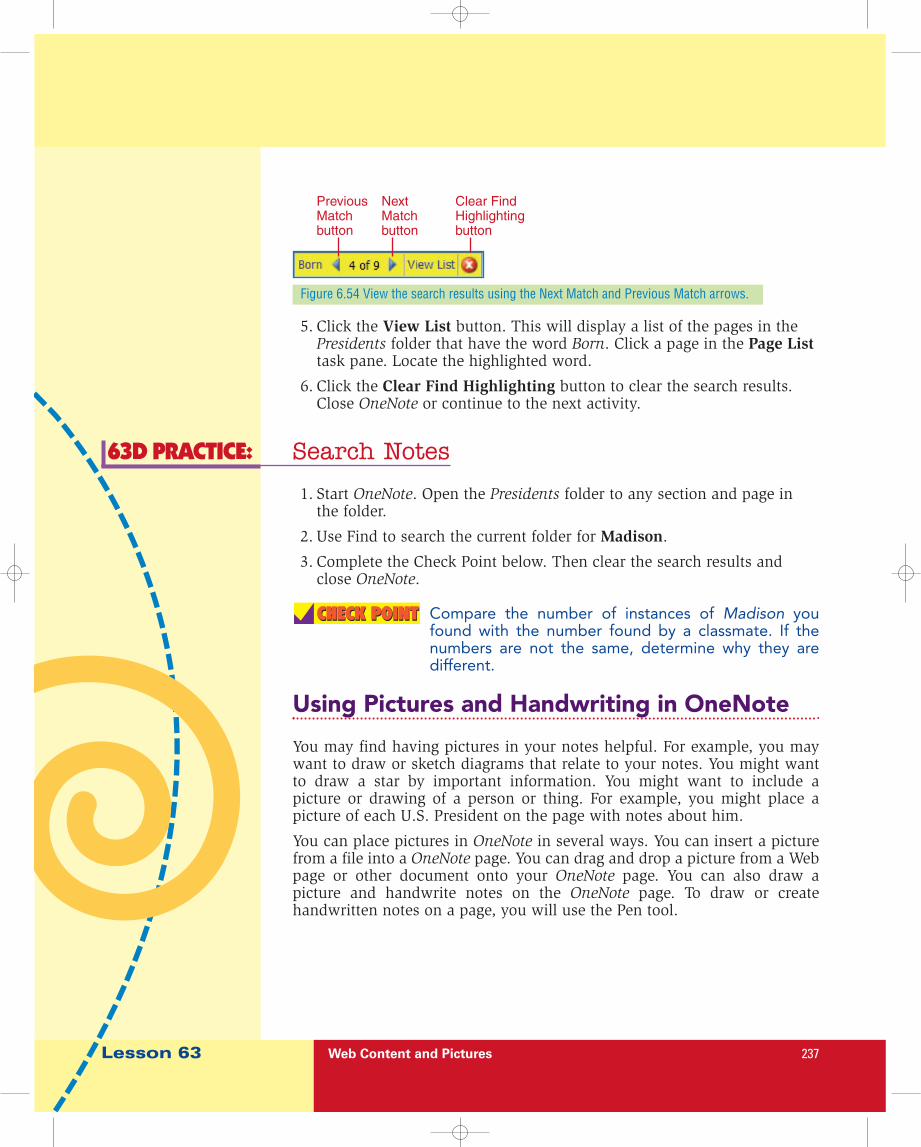
4. Notice that OneNote highlights the first instance of the word Born. Clickthe Next Match and Previous Match arrows to move to each instanceof the word Born. See Figure 6.54.
Figure 6.53 Find results are highlighted on the page.
Lesson 63 Web Content and Pictures 237
5. Click the View List button. This will display a list of the pages in thePresidents folder that have the word Born. Click a page in the Page Listtask pane. Locate the highlighted word.
6. Click the Clear Find Highlighting button to clear the search results.Close OneNote or continue to the next activity.
63D PRACTICE: Search Notes
1. Start OneNote. Open the Presidents folder to any section and page inthe folder.
2. Use Find to search the current folder for Madison.
3. Complete the Check Point below. Then clear the search results andclose OneNote.
Compare the number of instances of Madison youfound with the number found by a classmate. If thenumbers are not the same, determine why they aredifferent.
Using Pictures and Handwriting in OneNote
You may find having pictures in your notes helpful. For example, you maywant to draw or sketch diagrams that relate to your notes. You might wantto draw a star by important information. You might want to include apicture or drawing of a person or thing. For example, you might place apicture of each U.S. President on the page with notes about him.
You can place pictures in OneNote in several ways. You can insert a picturefrom a file into a OneNote page. You can drag and drop a picture from a Webpage or other document onto your OneNote page. You can also draw apicture and handwrite notes on the OneNote page. To draw or createhandwritten notes on a page, you will use the Pen tool.
CHECK POINTCHECK POINT
Figure 6.54 View the search results using the Next Match and Previous Match arrows.
PreviousMatchbutton
NextMatchbutton
Clear FindHighlightingbutton
Lesson 63 Web Content and Pictures 238
63E LEARN: Insert Pictures in OneNote
1. Start OneNote. Open the Presidents folder. Open the James Madisonsection. Create a new page named New States.
2. Indiana and Louisiana became states during the administration ofJames Madison. You will place pictures that represent these states onthe New States pages.
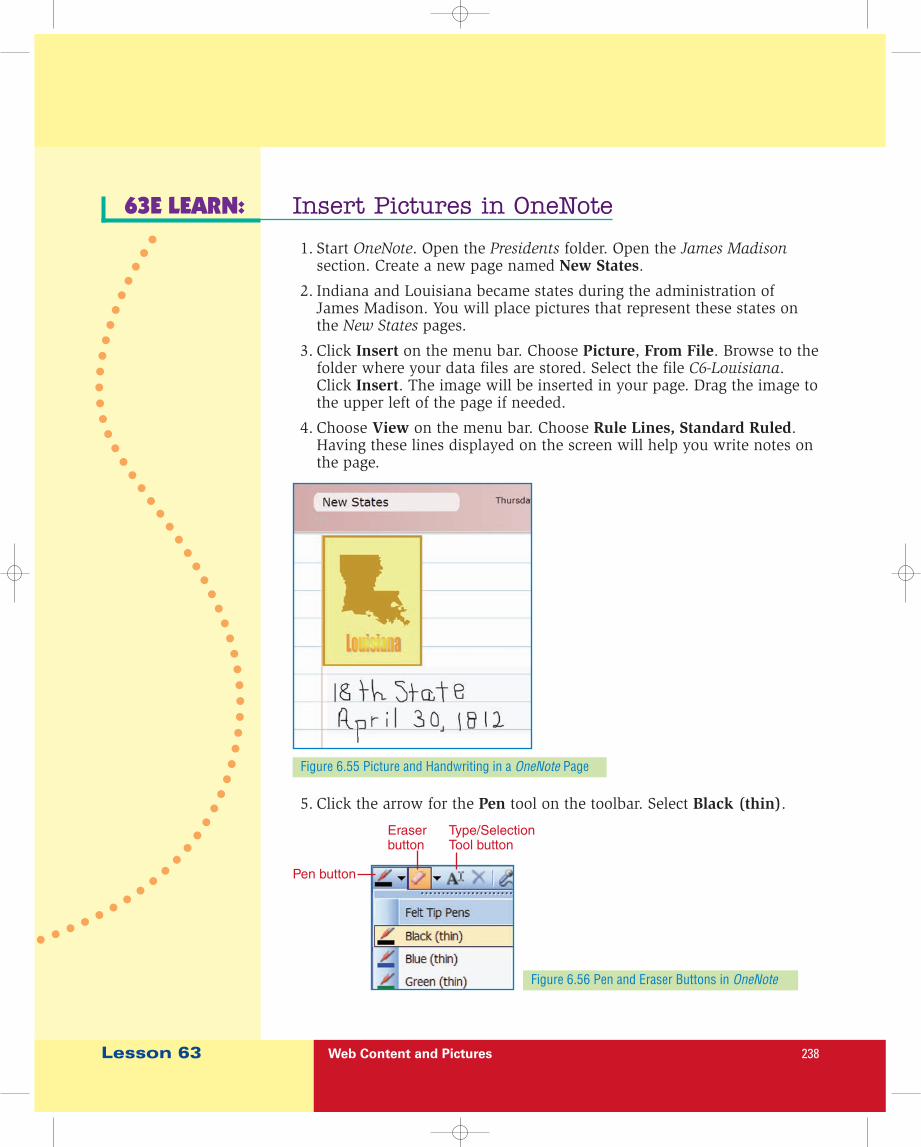
3. Click Insert on the menu bar. Choose Picture, From File. Browse to thefolder where your data files are stored. Select the file C6-Louisiana.Click Insert. The image will be inserted in your page. Drag the image tothe upper left of the page if needed.
4. Choose View on the menu bar. Choose Rule Lines, Standard Ruled.Having these lines displayed on the screen will help you write notes onthe page.
Figure 6.55 Picture and Handwriting in a OneNote Page
5. Click the arrow for the Pen tool on the toolbar. Select Black (thin).
Figure 6.56 Pen and Eraser Buttons in OneNote
Pen button
Eraserbutton
Type/SelectionTool button
Lesson 63 Web Content and Pictures 239
6. Using a digital pen or mouse, click below the state image. Write thisnote below the image:
18th StateApril 30, 1812
7. If you make a mistake or want to write more clearly, click the Eraserbutton. Move the cursor over the handwritten note to delete a word.Select the Pen button and try writing the word again.
8. Your page should look similar to Figure 6.55. Close OneNote orcontinue to the next activity.
63F PRACTICE: Insert Picture and Handwrite Note
1. Start OneNote. Open the Presidents folder. Open the James Madisonsection. Open the New States page.
2. Insert the picture C6-Indiana from your data files into the New Statespage. Drag the image to the upper right of the page beside theLouisiana image.
3. Use the Pen tool to write the note below under the Indiana image:
19th StateDecember 11, 1816
4. Close OneNote or continue to the next activity.
63G PRACTICE: Sketch Pictures
1. Start OneNote. Open the Presidents folder. Open the James Madisonsection. Open the War of 1812 page.
2. Read the article about the War of 1812. Look for sentences that mentionNative Americans or Indian tribes.
3. Click the arrow for the Pen button on the toolbar. Choose Red (thin).Use a digital pen or mouse to underline each use of Native Americansor Indian tribes. Draw a star in the margin to the right of the paragraphthat contains these words.
4. Complete the Check Point below and then close OneNote.
Compare your War of 1812 page with that of anotherstudent. Did you both find all the words? Do you havethe same number of stars?
CHECK POINTCHECK POINT


![[MS-ONE]: OneNote File FormatMS-ONE... · MS-ONE] — OneNote File Format](https://img.pdfslide.us/doc/110x75/5f939c6491986f2b0015ccc3/ms-one-onenote-file-format-ms-one-ms-one-a-onenote-file-format.jpg)