Embed Size (px)
Citation preview

Lesson 2 – General Techniques of Measurement1
Copy Right. ES. 2015.
Lesson 2 – General Techniques of Measurement
OUTLINE
Method of Taking-off
2 methods
Common units used in taking-off
Descriptions requirements
Adjustment of Openings & Extra Over – exercise
Centre Line Technique / Girth – exercise
2
Copy Right. ES. 2015.

Lesson 2 – General Techniques of Measurement
Method of Taking-off (2 common methods available)
“ Trade ” Method
Typical Works for a Building Project:
Foundation
Excavation (site clearance, excavation, disposal & back-filling)
RC Works (lean concrete, concrete, rebar, formwork, waterproofing)
Architectural Works – Wet Trade (brickwall, plastering, screeding, tile & finishing)
Architectural Works – Dry Trade (door, window, glazing, paiting, etc)
M&E Works – ACMV, P&S, Fire, Lift & Electrical
External Works & Landscape Works
3
Copy Right. ES. 2015.

Lesson 2 – General Techniques of Measurement
Method of Taking-off (2 common methods available) – Cont’d “ Elemental ” Method
Typical Items for a Building Project:
Sub-Structure: Works below ground floor level
Superstructure: Above ground
External Walls including windows and external doors
Internal Walls and Partitions
Roof finishes, drainage and lights
Internal finishes
Fittings and Furnishings
M&E Services, Sub-Station
Ancillary Buildings & External Works
4
Copy Right. ES. 2015.
Lesson 2 – General Techniques of Measurement5
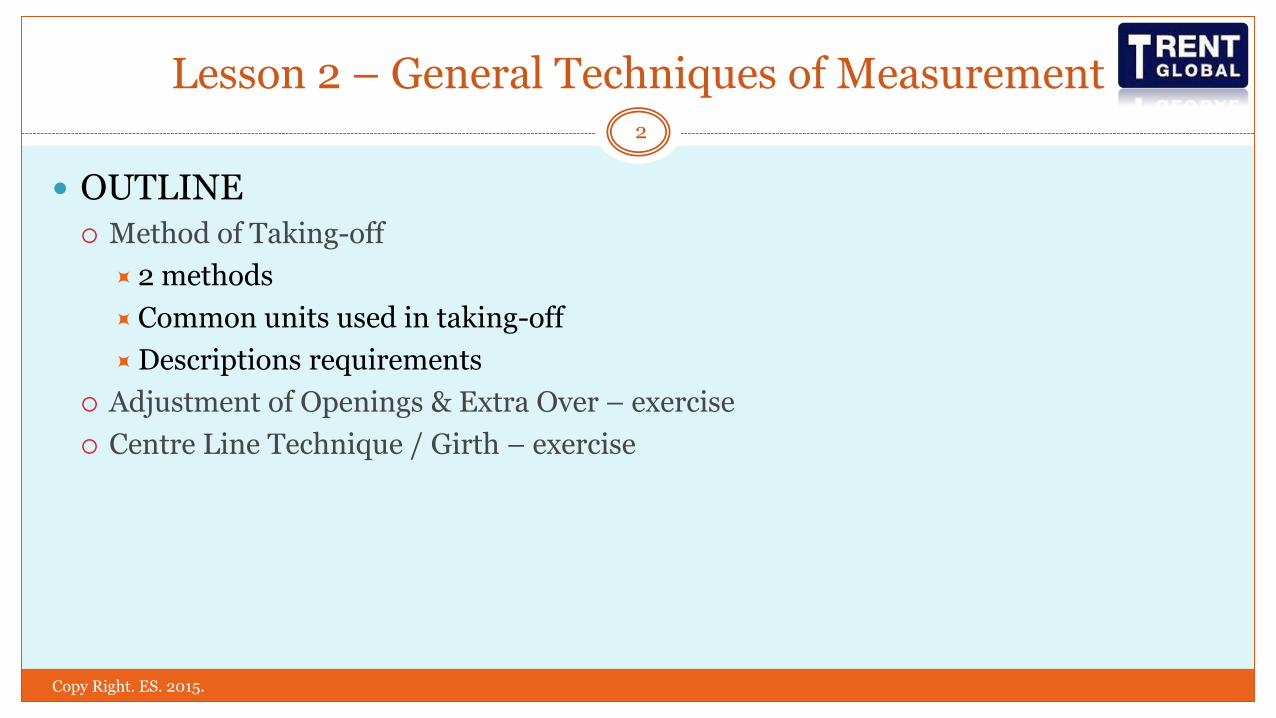
Trade Method
Advantages (+ve): Disadvantages (-ve):
1. QS to follow fundamental of measurement and repeatable using the same method of taking-off.
1. Items could be easily missed out as the QS progressed thru the measurement (e.g. block 123)
2. It is preferred by Contractors for the purpose of pricing as all similar items and components are grouped together.
Copy Right. ES. 2015.
Elemental Method
Advantages (+ve): Disadvantages (-ve):
1. Grouping items into identifiable operations or tasks. 1. QS tends to create more error during taking-off if not familiar with various type of measurement skills.
2. This type of method makes it easier for QS to analyse a contractor’s price and collects real-time cost data for future use.
Lesson 2 – General Techniques of Measurement
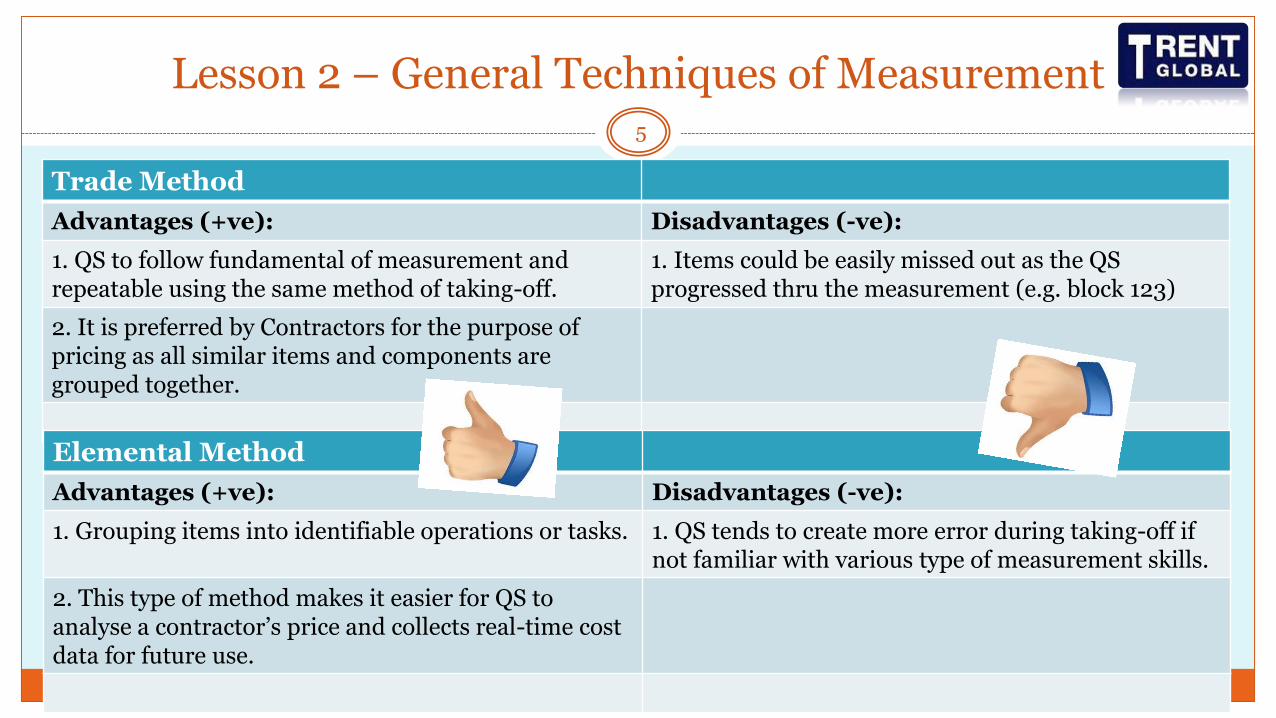
Common Units Used in Taking-Off
Firstly an accurate description of the work in place must be written and the correct unit of measurement added.
Linear – m
Area – m2
Volume - m3
Item - sum / nos.
6
Copy Right. ES. 2015.

Lesson 2 – General Rules of Measurement
Description Requirements Contents:-
Generally works descriptions, e.g. “… … to carry out concreting works”
Overall scope to be covered, e.g. “design, supply, fabricate and install of … …”
Specific dimension of materials, e.g. “12mm thick tempered and laminated glazing… …”
Specific materials used, e.g. “to apply with Laticrete mortar, or equivalent… ….”
Method of apply, e.g. “1 coats of base paint, and 2 coats of finishing coat… …”
Background, e.g. “apply hardener on screed surface” & Finishing, e.g. “wooden trowel finish”
Associated works to be completed as a whole / same process, e.g. “complete with necessary supports and welding works”
7
Copy Right. ES. 2015.
Lesson 2 – General Techniques of Measurement
Description Requirements (Cont’d)
to have comprehensive and meaningful descriptions and to express in simple and understand manner.
1H & 4W (What, Who, Why, Whom, How)
to cover as much as information required for assisting in building up a realistic price easier; thus, less dispute and argument later on.
to begin with: making reference of existing BQ descriptions and to learn from there.
8
Copy Right. ES. 2015.

Lesson 2 – General Techniques of Measurement
“Extra Over” an item
It is usually used when measuring a certain special type of work or finishing over the previously measured work. It will come together with the additional cost over previous priced work.
E.g. to lay cement & sand (1:3) screed to floor – m2
ditto; extra over for floor hardener to M&E rooms only – m2
9
Copy Right. ES. 2015.

Lesson 2 – General Techniques of Measurement
Technique 1: Adjustment of Openings / Voids and Awantings
It would be best to measure the overall area first, and then to make adjustment to the openings (void, door & windows). E.g. the adjustments for the window & doors opening shall be made at the same time when these are measured.
Voids & Awantings
10
Copy Right. ES. 2015.

Lesson 2 – General Techniques of Measurement
Technique 1: Adjustment of Openings / Voids and Awantings (Cont’d)
SMM7 rules that awantings are always deducted and voids are generally deducted unless there is a modification of the rules of measurement to the effect that voids below certain minimum are NOT deducted.
Let’s try the simple exercise… …
11
Copy Right. ES. 2015.
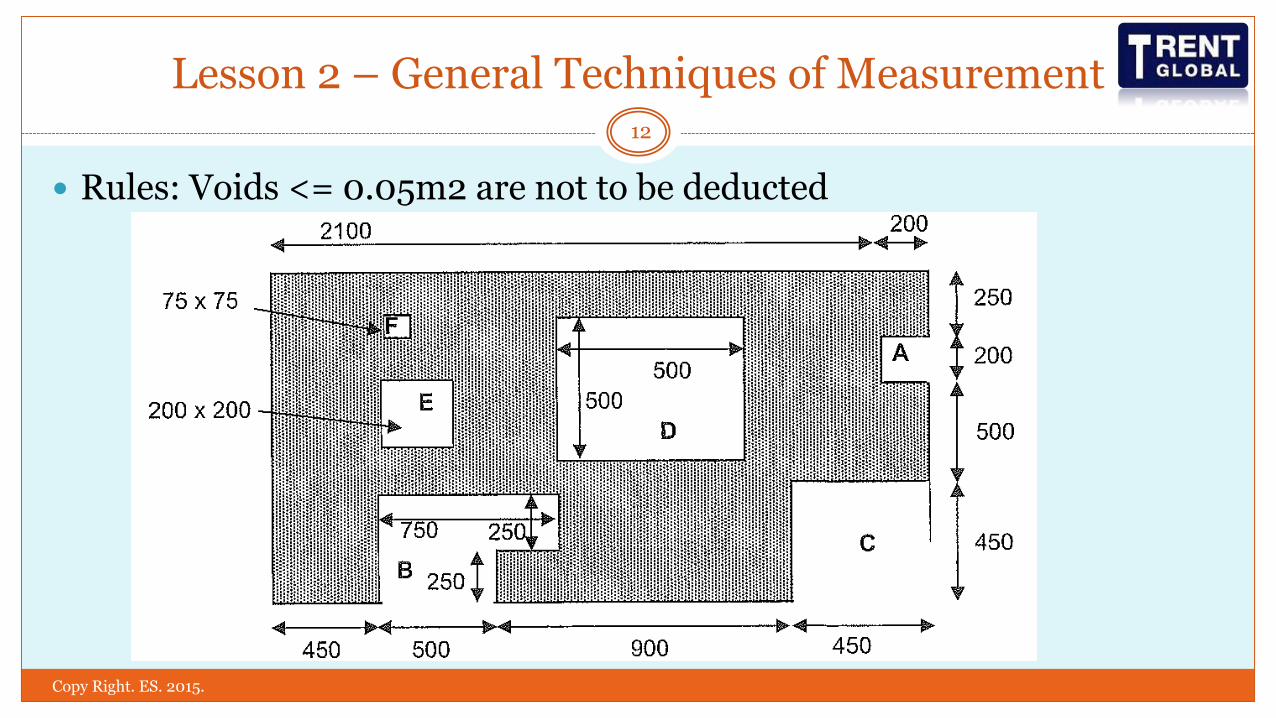
Lesson 2 – General Techniques of Measurement
Rules: Voids <= 0.05m2 are not to be deducted
12
Copy Right. ES. 2015.
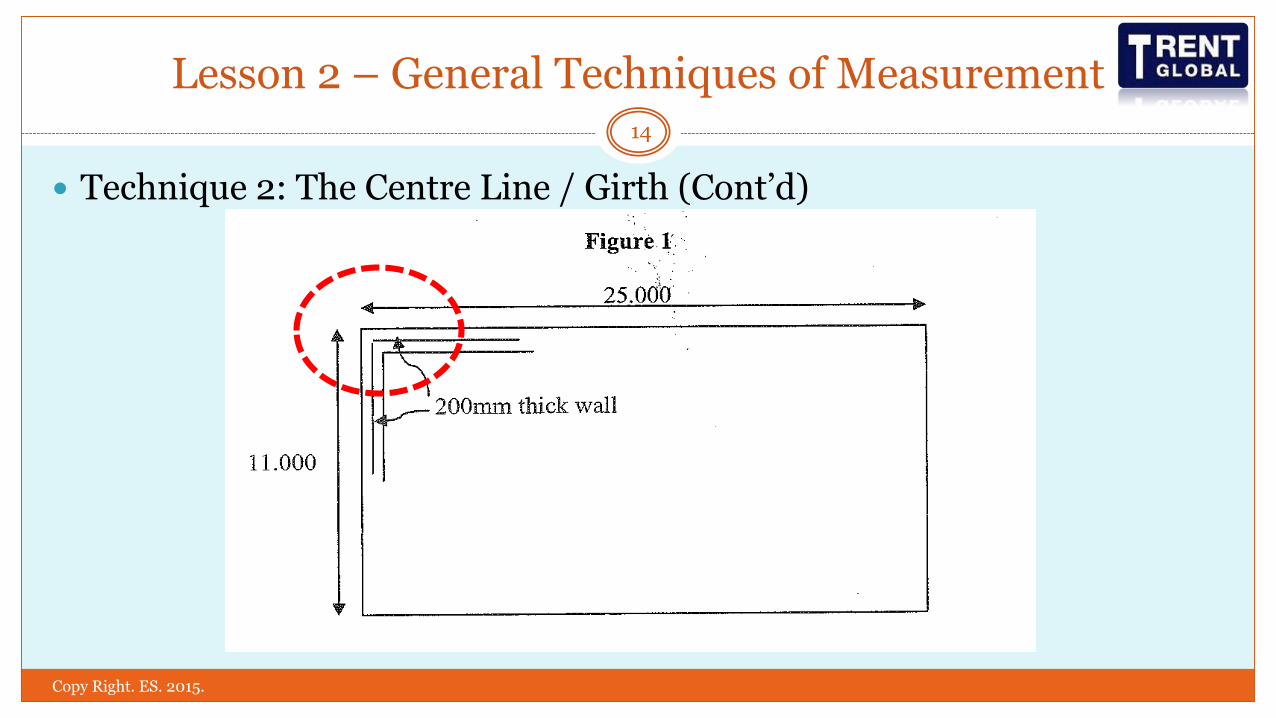
Lesson 2 – General Techniques of Measurement
Technique 2: The Centre Line / Girth
When measuring brickwork or trench excavation it is necessary to book dimension based on average or mean lengths. This is achieved by an adaptation of girthing, known as a centre line technique.
the measurement of the perimeter on the centre line or mid-point of the exterior wall of a building. The length may be calculated on a rectangular building by determining the total exterior length of walling and making a deduction for each exterior angle equivalent to the thickness of the wall.
13
Copy Right. ES. 2015.
Lesson 2 – General Techniques of Measurement
Technique 2: The Centre Line / Girth (Cont’d)
14
Copy Right. ES. 2015.
Lesson 2 – General Techniques of Measurement
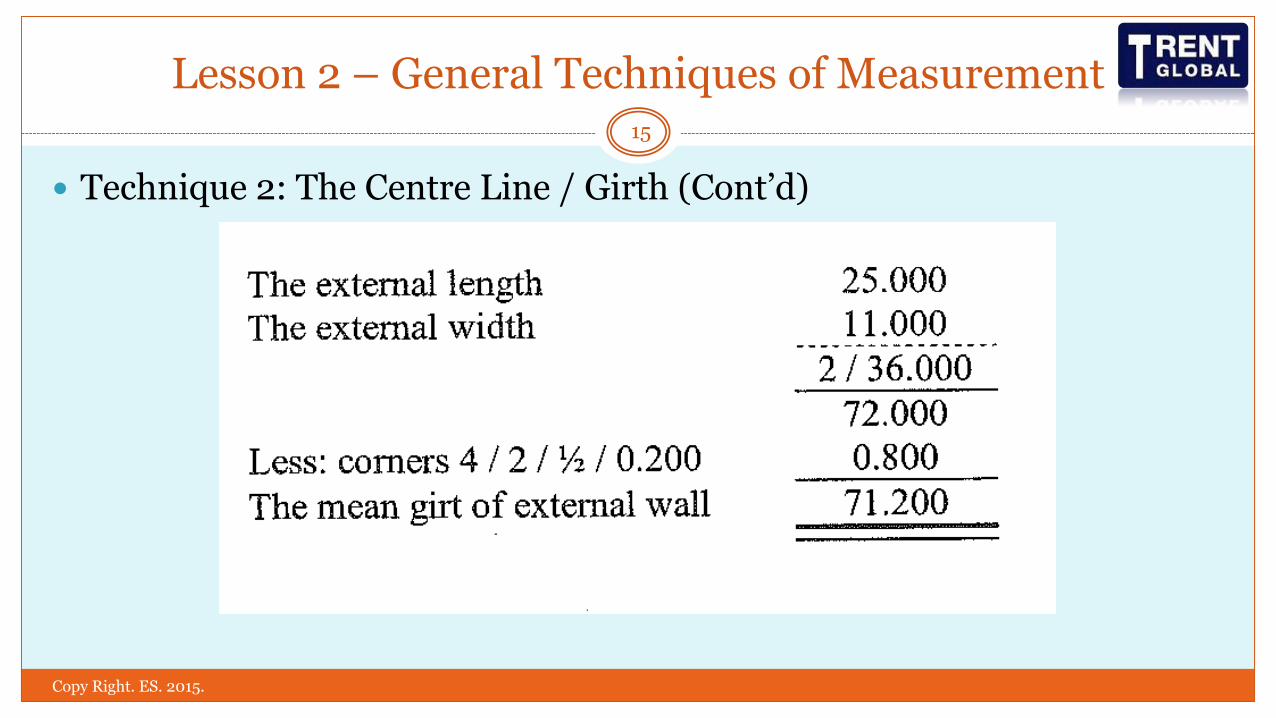
Technique 2: The Centre Line / Girth (Cont’d)
15
Copy Right. ES. 2015.
Lesson 2 – General Techniques of Measurement
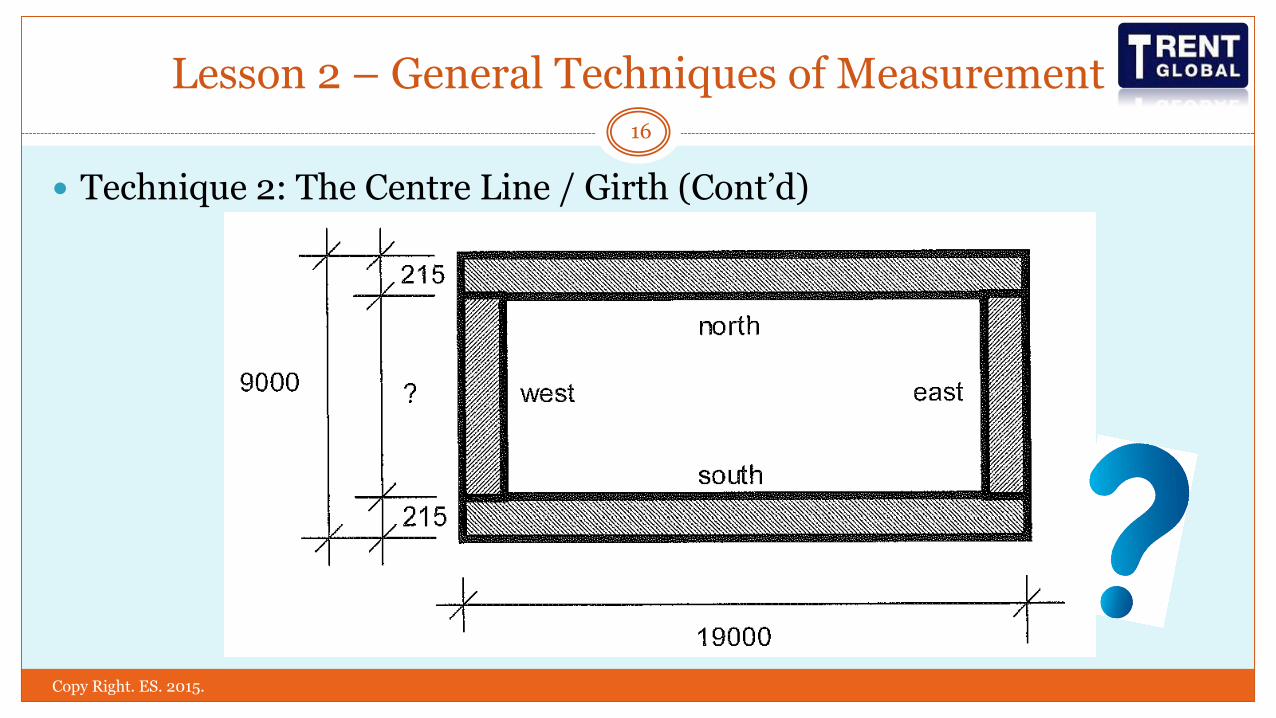
Technique 2: The Centre Line / Girth (Cont’d)
16
Copy Right. ES. 2015.
Lesson 2 – General Techniques of Measurement
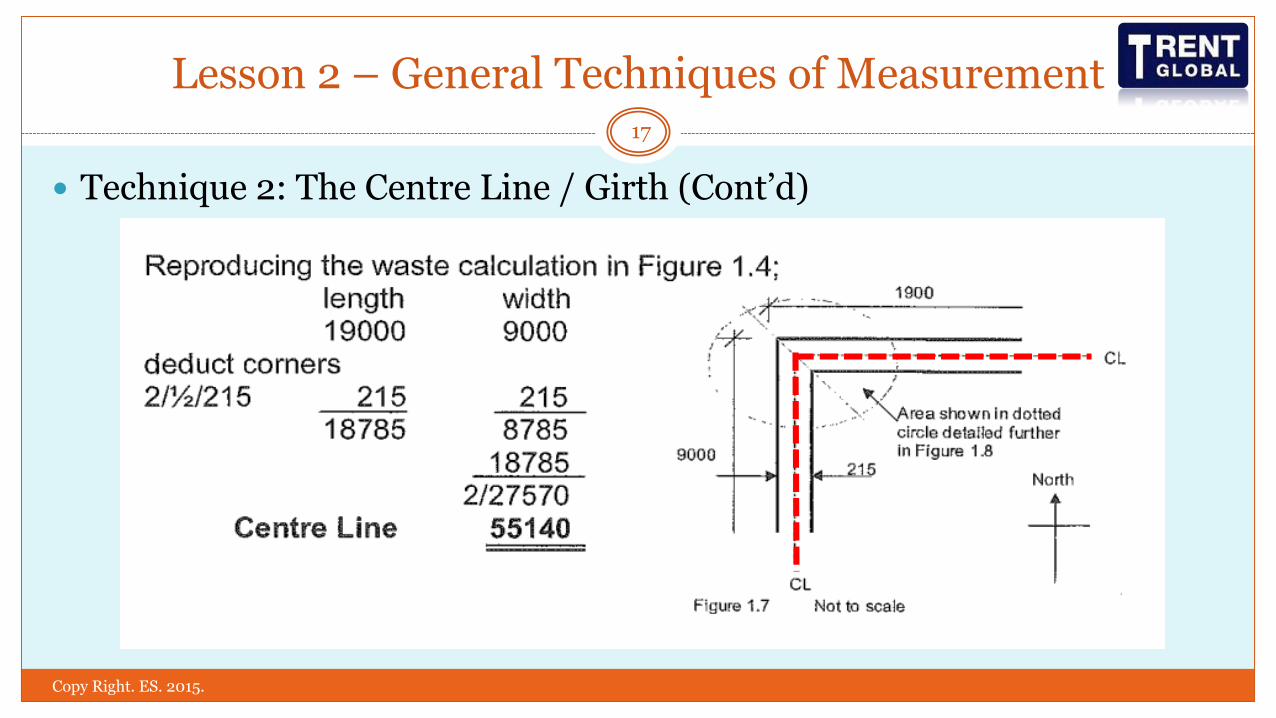
Technique 2: The Centre Line / Girth (Cont’d)
17
Copy Right. ES. 2015.

Lesson 2 – General Techniques of Measurement
Technique 2: The Centre Line / Girth (Cont’d)
It can be seen that there is a series of 5 items from different trades measured linearly, superficially and by volume. All the taker-off has to do is calculate the CLM and apply the correct combination of height, width, thickness and /or depth as appropriate.
18
Copy Right. ES. 2015.
Lesson 2 – General Techniques of Measurement
Technique 2: The Centre Line / Girth (Cont’d)
Modify Centre Line: Modifying of CLM is simple but must be carried out methodically.
Example 1:
19
Copy Right. ES. 2015.
Lesson 2 – General Techniques of Measurement
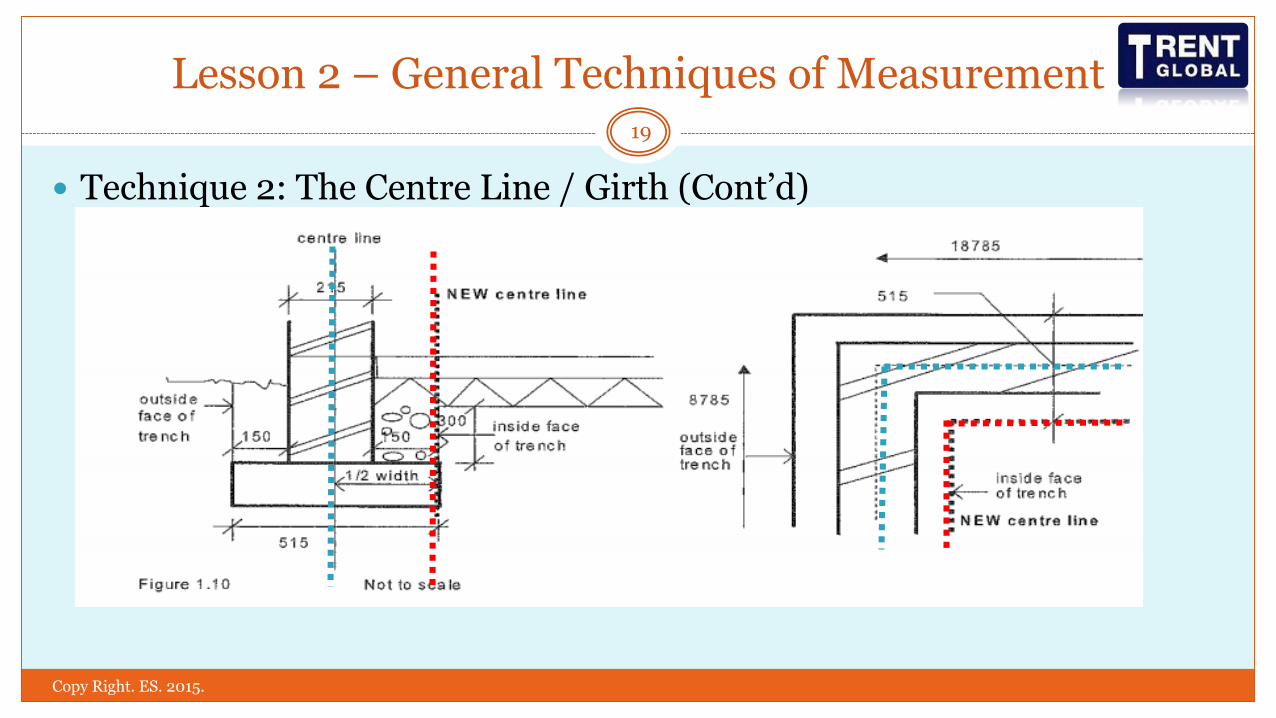
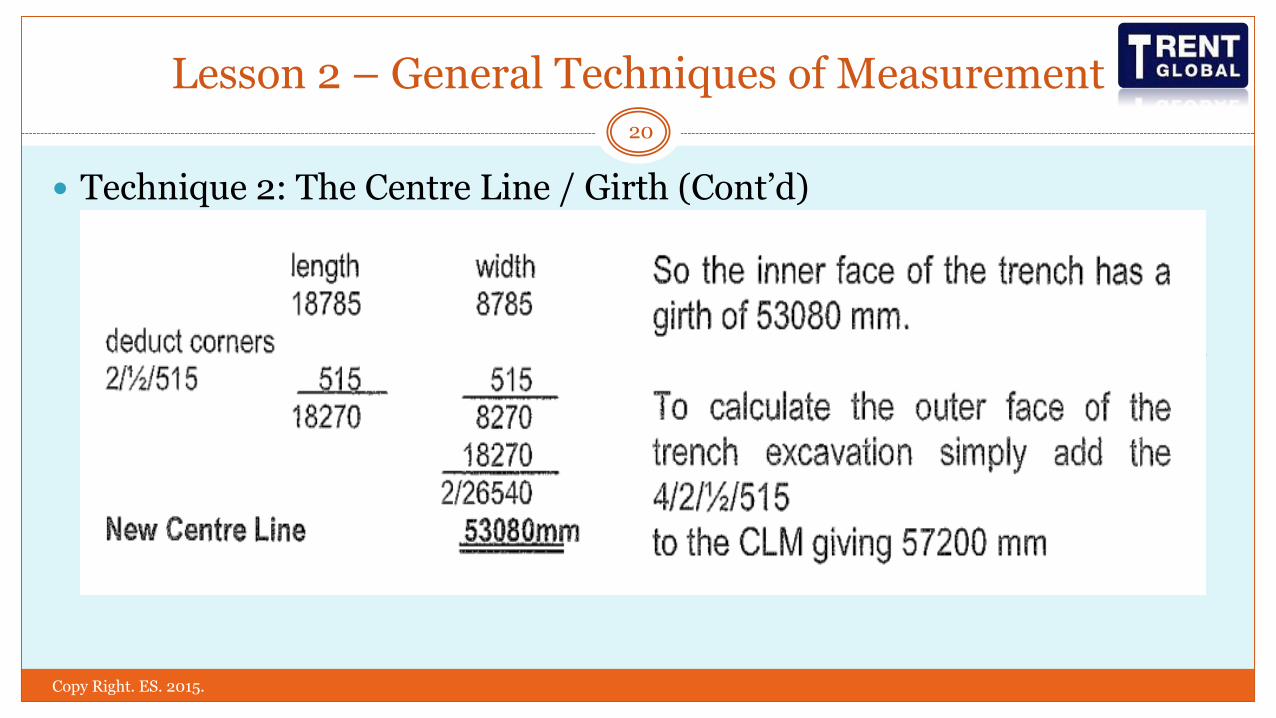
Technique 2: The Centre Line / Girth (Cont’d)
Earthwork support on the inside face of the trench. It can be seen that the inside face of the trench will be 300mm high and that the face is half the width of the concrete in from the centre line of the wall/trench/concrete.
Applying the same logic to this calculation as the previous, the new centre line would be calculated as follow:
20
Copy Right. ES. 2015.

Lesson 2 – General Techniques of Measurement
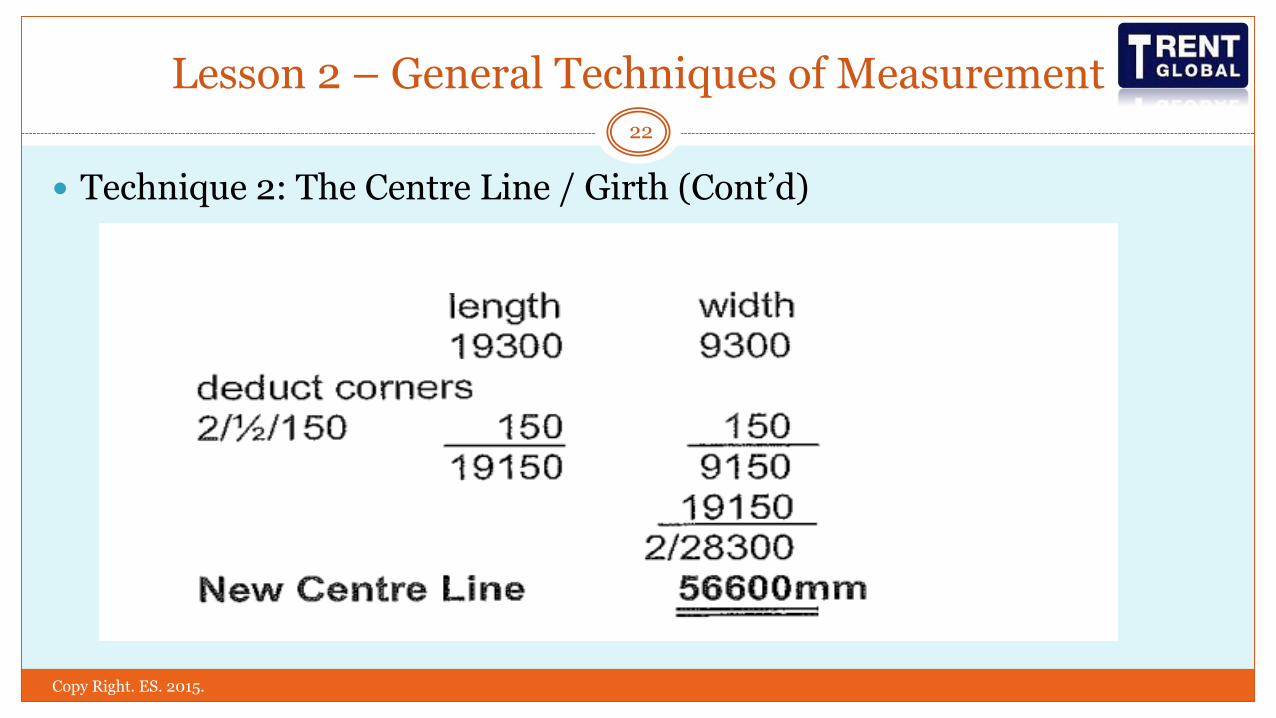
Technique 2: The Centre Line / Girth (Cont’d)
Example 2: Backfilling to the outer face of the wall at the perimeter level, just above the hardcore bed. Then centre line of this portion of work is best calculated from the full excavation length of trench.
21
Copy Right. ES. 2015.
Lesson 2 – General Techniques of Measurement
Technique 2: The Centre Line / Girth (Cont’d)
22
Copy Right. ES. 2015.

Lesson 2 – General Techniques of Measurement
Technique 2: The Centre Line / Girth (Cont’d)
Self Analysis Examples x 2
Centre Line Example 1 ,
Centre Line Example 2 , 3
23
Copy Right. ES. 2015.

Lesson 2 – General Techniques of Measurement
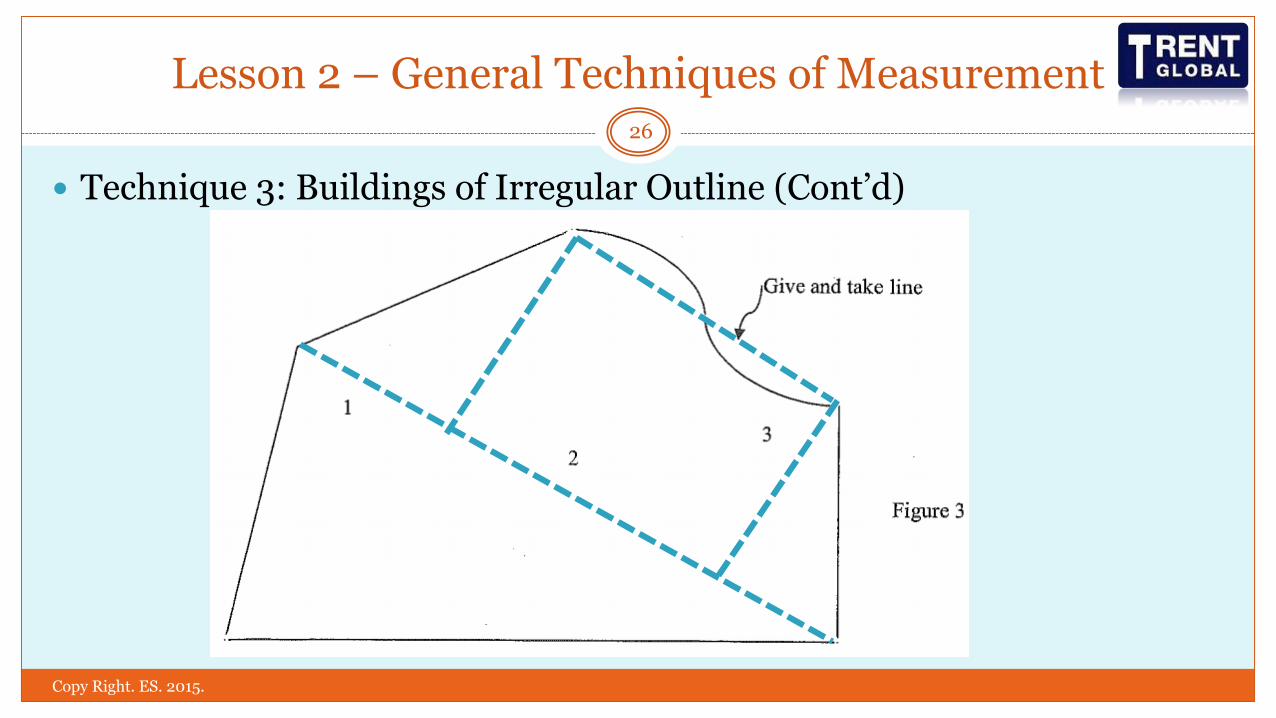
Technique 3: Buildings of Irregular Outline
Method 1: To make it a complete square/rectangular box first, then apply the same
method as previous.
Method 2: For irregular shape of a building as shown below, after deducting the total
numbers of internal angles from the total of external angles, the result
must have four external angles in balance.
Method 3: To simplify it by turn the irregular shape of building into the nearest
form of triangle or rectangular shape.
24
Copy Right. ES. 2015.

Lesson 2 – General Techniques of Measurement
Technique 3: Buildings of Irregular Outline (Cont’d)
25
Copy Right. ES. 2015.
Lesson 2 – General Techniques of Measurement
Technique 3: Buildings of Irregular Outline (Cont’d)
26
Copy Right. ES. 2015.
Lesson 2 – General Techniques of Measurement
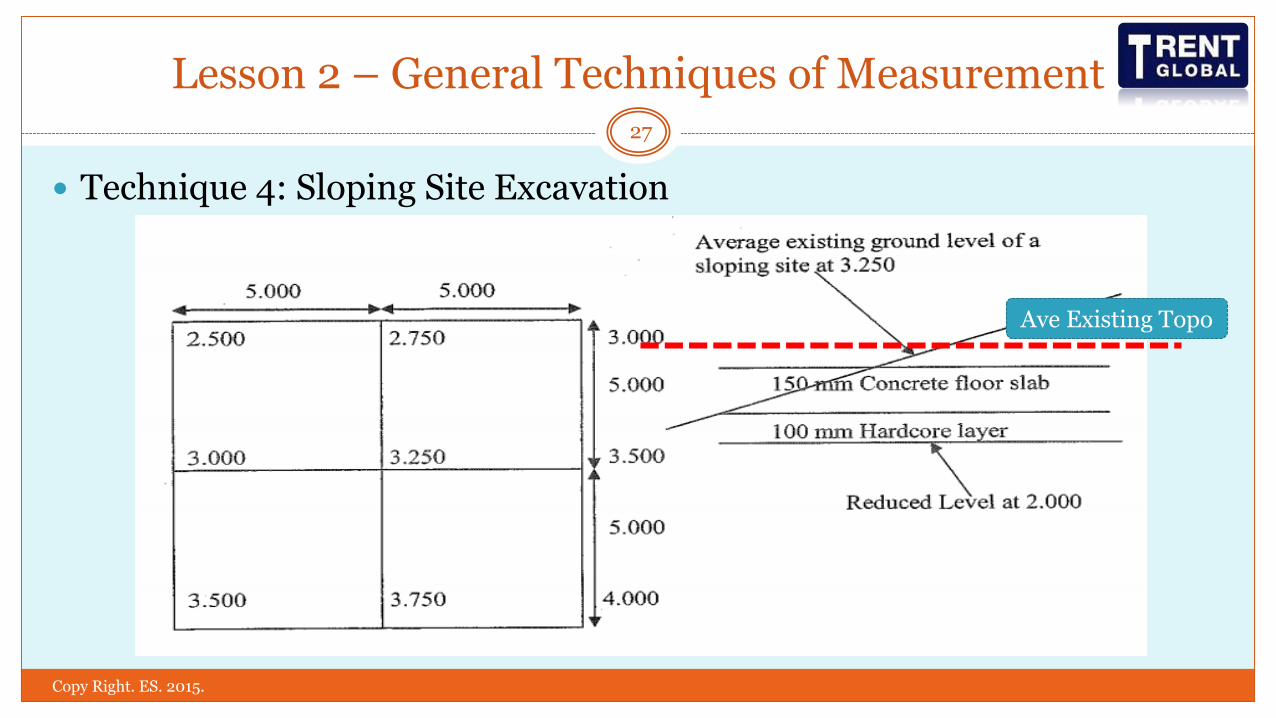
Technique 4: Sloping Site Excavation
27
Copy Right. ES. 2015.
Ave Existing Topo
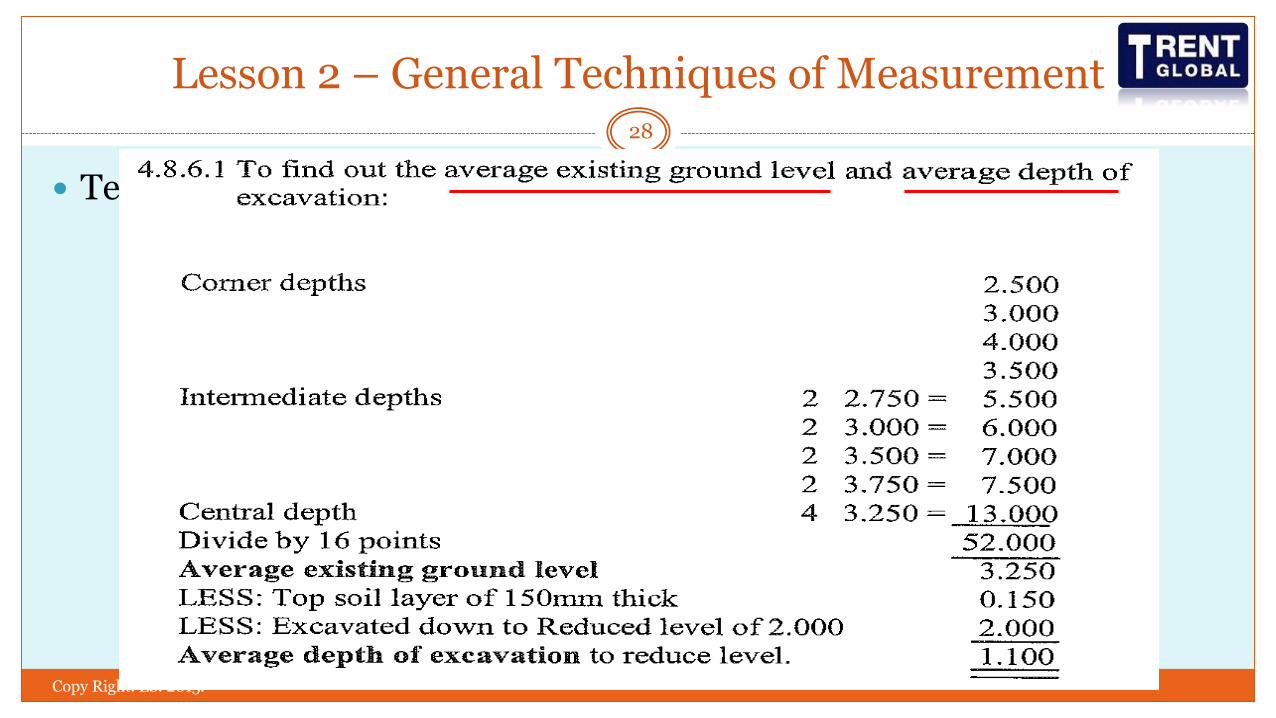
Lesson 2 – General Techniques of Measurement
Technique 4: Sloping Site Excavation (Cont’d)
28
Copy Right. ES. 2015.
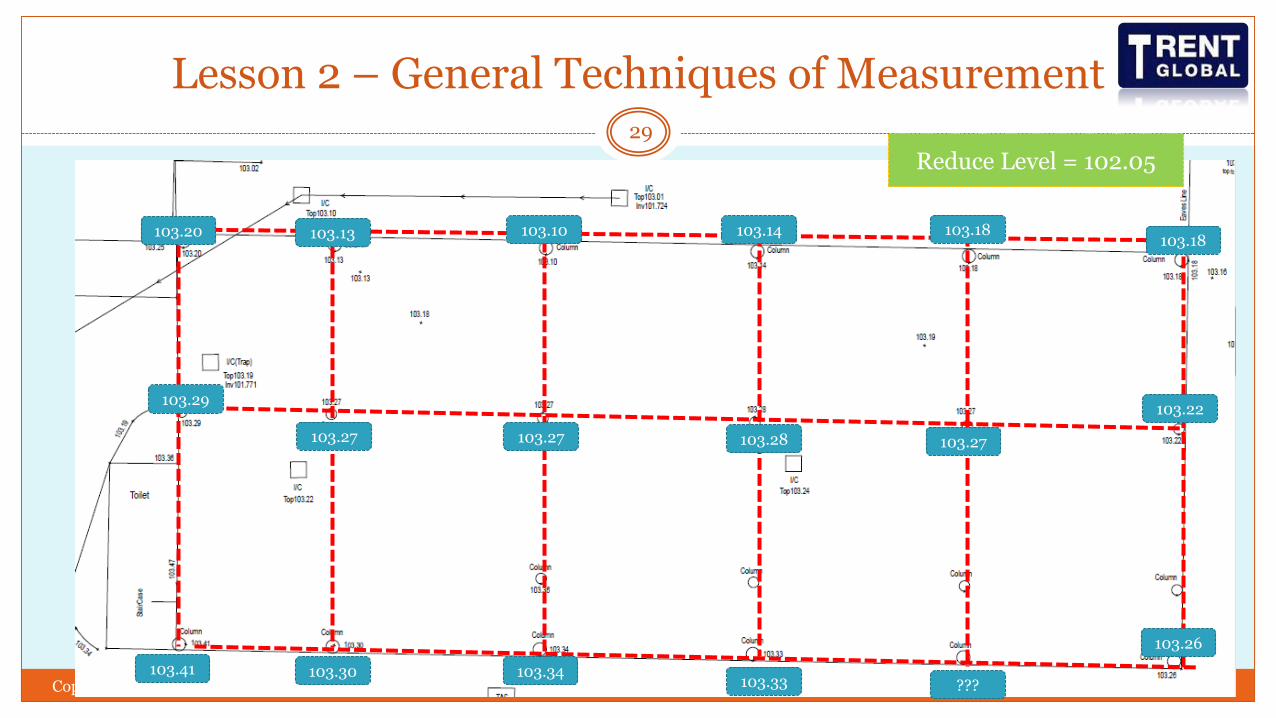
Lesson 2 – General Techniques of Measurement29
Copy Right. ES. 2015.
103.20 103.13
103.28
103.14
103.34
103.27
103.10
103.27
103.30103.41
103.29
103.33 ???
103.26
103.18
103.27
103.22
103.18
Reduce Level = 102.05

Lesson 2 – General Techniques of Measurement
What is the average existing ground level and average depth of excavation, if reduce level to be 102.05? Step 1: to make sure all intersection point have the level figure, if not, to find out the
figure first. E.g. take average of nearest two points, (103.33 + 103.26)/2 = 103.295 roundup to 2 decimals point, so is 103.30.
Step 2: Corner Depth x 1
Intermediate Depth x 2
Centre Depth x 4
Step 3: the sum of the step 2 divided by total depth points taken (Answer Part1)
Step 4: take the answer found in Step 3, then deduct the RL 102.05, then will get the
average depth of excavation (Answer Part2)
30
Copy Right. ES. 2015.
Lesson 2 – General Techniques of Measurement31
Copy Right. ES. 2015.
![[XLS] · Web viewSummary DAYWORK 1 BQ-10 BQ-9 BQ-8 BQ-7 BQ-6 BQ-5 BQ-4 BQ-3 BQ-2 BQ-1 Preamble Contents Example Notes Multiple post sign support assemblies (each type and size) Multiple](https://img.pdfslide.us/doc/110x75/5aff741f7f8b9aa34d906f7c/xls-viewsummary-daywork-1-bq-10-bq-9-bq-8-bq-7-bq-6-bq-5-bq-4-bq-3-bq-2-bq-1-preamble.jpg)