Embed Size (px)
Citation preview
Lesson 10: Adding Flash, Video, and Sound
ContentIntroduction to Adobe Dreamweaver CS6
Adobe Certified Associate:Web Communication using Adobe Dreamweaver CS6
© 2013 John Wiley & Sons, Inc. 2
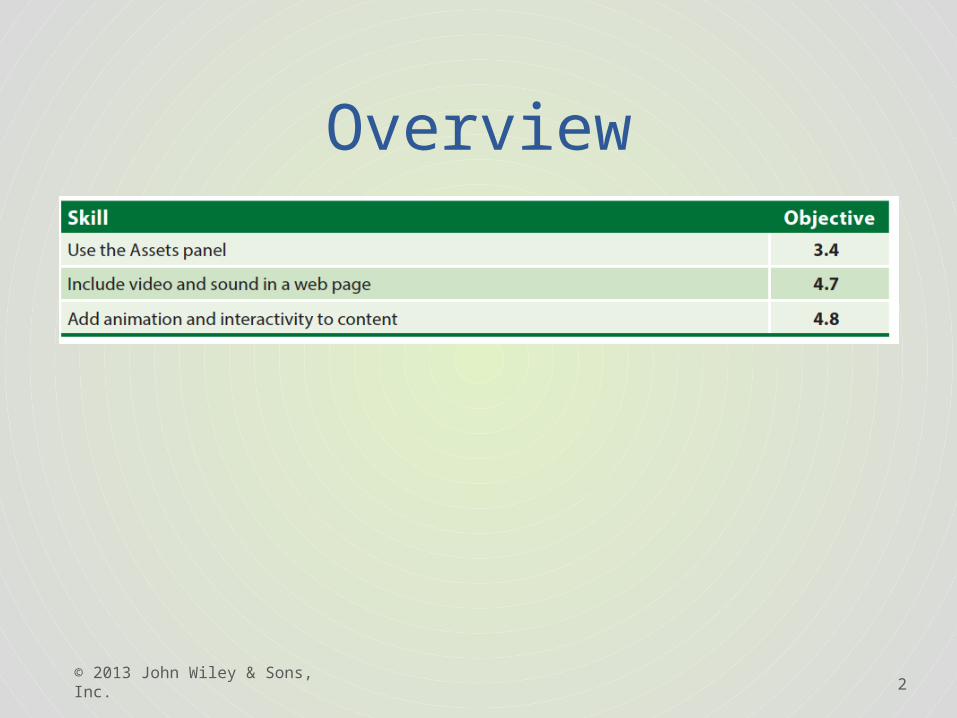
Overview
3
4.8 Adding Animation and Interactivity
Animation can be a great addition to your pages, but keep these things in mind:• Animations should not be distracting. Users might
enjoy your animation the first time, but it may not be so enjoyable after 40 times.
• Gratuitous animation can actually remove value from your site.
• Your users may not have patience for long animations that translate to longer download times.
• Manage file size and be aware of technical limitations.
© 2013 John Wiley & Sons, Inc.
4
4.8 Adding Animation and Interactivity
Follow these steps to insert a Flash movie:1. In the Files panel, navigate to the dw10lessons
folder, and double-click the banner.html file.2. If the page opens in Split view, click on the
Design view button.
© 2013 John Wiley & Sons, Inc.

5
4.8 Adding Animation and Interactivity
3. Click in the empty div element at the top of the sidebar on the right.
© 2013 John Wiley & Sons, Inc.
6
4.8 Adding Animation and Interactivity
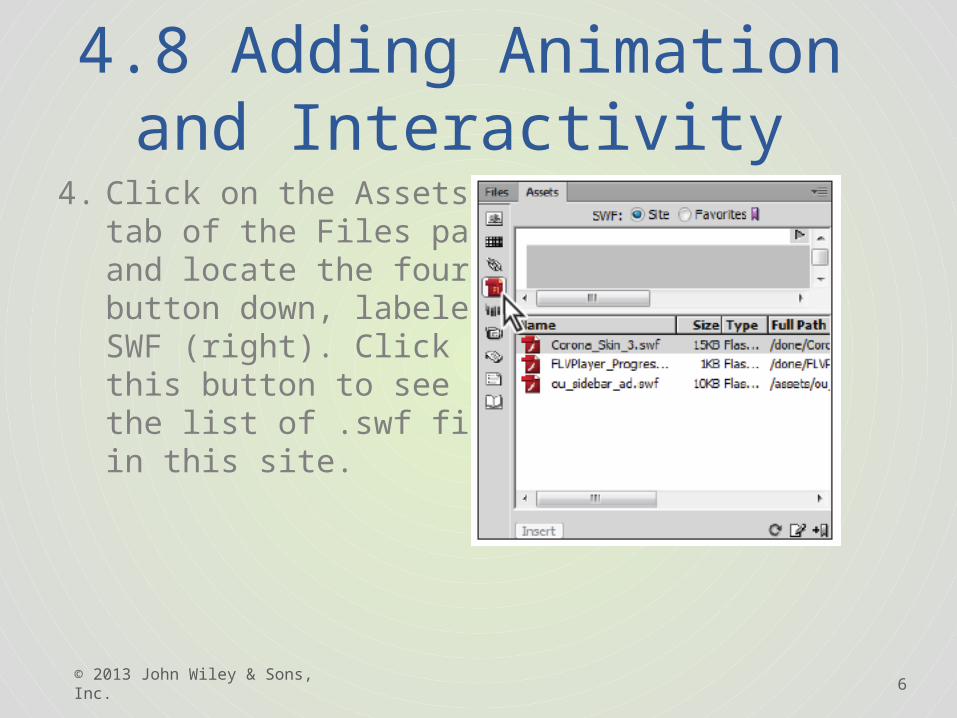
4. Click on the Assets tab of the Files panel, and locate the fourth button down, labeled SWF (right). Click on this button to see the list of .swf files in this site.
© 2013 John Wiley & Sons, Inc.
7
3.4 Use the Assets panel• The Assets panel lists all assets within a site. But
imagine a site with hundreds of SWF files. Locating a particular file could take a while.
• Dreamweaver has a Favorites list to which you can add frequently used assets and group related assets. You can also give them nicknames to remind yourself what they’re for, and find them easily in the Assets panel.
© 2013 John Wiley & Sons, Inc.
8
3.4 Use the Assets panel• Select one or more assets in the Site list of the
Assets panel, then click the Add To Favorites button.
• To view Favorites click on the Favorites radio button at the top of the Assets panel.
• To place Favorite assets into a group click the New Favorites folder in the Assets panel, label the folder and then drag one or more Favorites into the folder.
© 2013 John Wiley & Sons, Inc.
9
4.8 Adding Animation and Interactivity
5. Click on the ou_sidebar_ad.swf file in the Assets panel and drag it to the sidebar_ad div.
6. When the Object Tag Accessibility Attributes dialog box appears, type Organic Utopia sidebar ad in the Title text field, then press OK.
© 2013 John Wiley & Sons, Inc.
10
4.8 Adding Animation and Interactivity
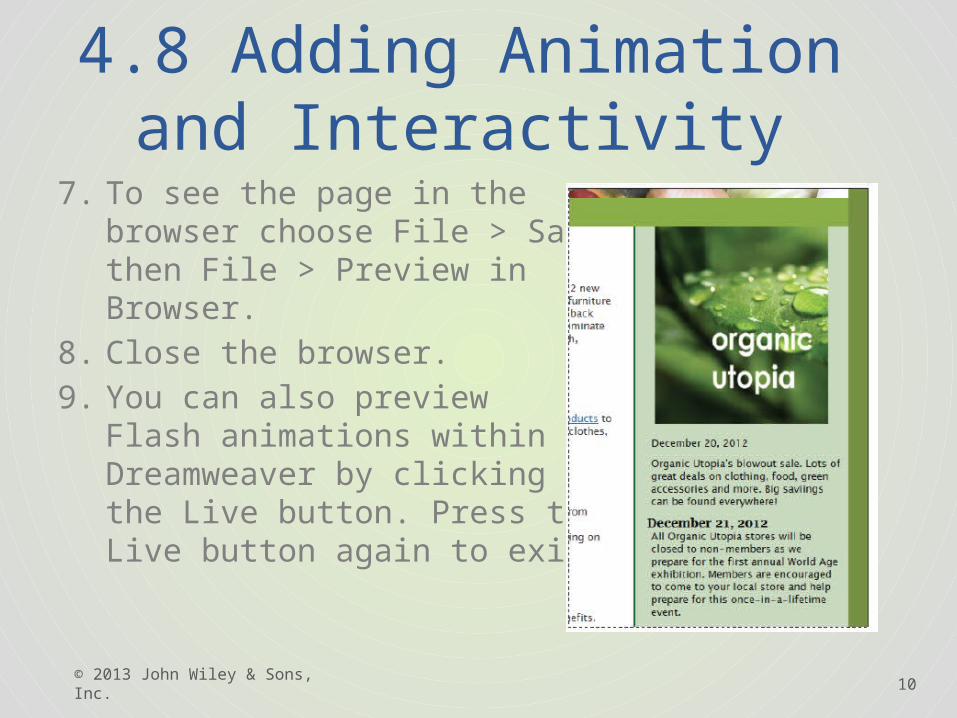
7. To see the page in the browser choose File > Save, then File > Preview in Browser.
8. Close the browser.9. You can also preview
Flash animations within Dreamweaver by clicking the Live button. Press the Live button again to exit.
© 2013 John Wiley & Sons, Inc.
11
4.7 Adding Video and Sound to a Web Page
• HTML5 video is a relatively new alternative to Flash video (and other plug-in based video such as Quicktime or Windows Media Video).
• It has become particularly popular for iOS devices such as the iPhone and iPod, which do not support Flash.
• HTML5 video supports certain video types in their native formats such as .MP4, .OGV and .WEBM and does not require a browser plug-in.
• To add video to a page you can add the <video> tag and any browser that supports this tag (as well as the code for the type of video used) will play the video.
© 2013 John Wiley & Sons, Inc.
12
4.7 Adding Video and Sound to a Web Page
There are additional benefits to using HTML5 video:• There are a set of native video controls (such as
play, pause and volume) that can be added with a simple line of code and are keyboard accessible.
• Because of the architecture and specification of the <video> tag, additional features such as text transcripts and/or captions can be added.
• HTML5 video is generally more searchable and discoverable by search engines because the code is exposed as an element with attributes.
© 2013 John Wiley & Sons, Inc.

13
4.7 Adding Video and Sound to a Web Page
Dreamweaver CS6 does not have a specific command or object in the Insert menu allowing you to add HTML5 video. You must type the <video> element and any attributes in the Code view.1. Choose File > New and in the New Document
window set to HTML and then click on the DocType menu and choose HTML5. Click Create.
2. Choose File > Save and save this file into the same folder as the your video.
3. Enter code view and locate the opening <body> tag. Press return/enter to add space between the two <body> tags.
© 2013 John Wiley & Sons, Inc.
14
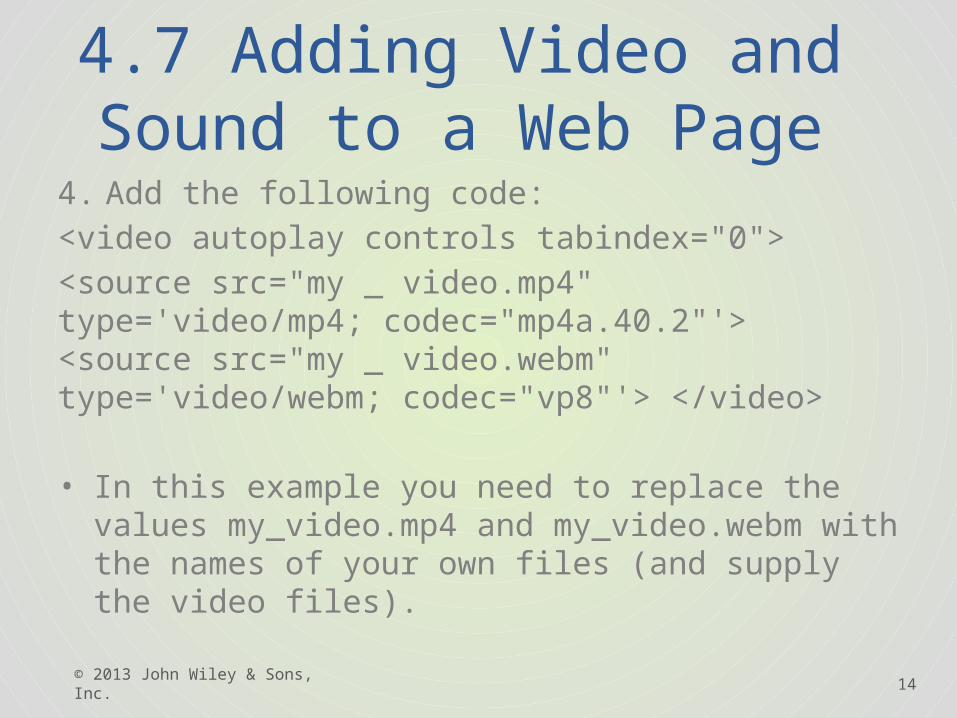
4.7 Adding Video and Sound to a Web Page
4. Add the following code:<video autoplay controls tabindex="0"><source src="my _ video.mp4" type='video/mp4; codec="mp4a.40.2"'> <source src="my _ video.webm" type='video/webm; codec="vp8"'> </video>
• In this example you need to replace the values my_video.mp4 and my_video.webm with the names of your own files (and supply the video files).
© 2013 John Wiley & Sons, Inc.
15
4.7 Adding Video and Sound to a Web Page
• Like video, sound can slow downloads and it requires a plug-in, such as QuickTime or Windows Media Player.
• You can incorporate types of sound files into a web page. Three formats are common: .aif, .wav, and .mp3.
• The main difference between .aif and .wav files is where they originate. Windows is generally linked to the .wav format, and Mac OS is associated with the .aif format.
• You can also play .mp3 files on both the Windows and Mac OS platforms. Depending on compression settings, the .mp3 format may not sound CD quality sound, but it downloads faster and uses less hard drive space.
© 2013 John Wiley & Sons, Inc.
16
4.7 Adding Video and Sound to a Web Page
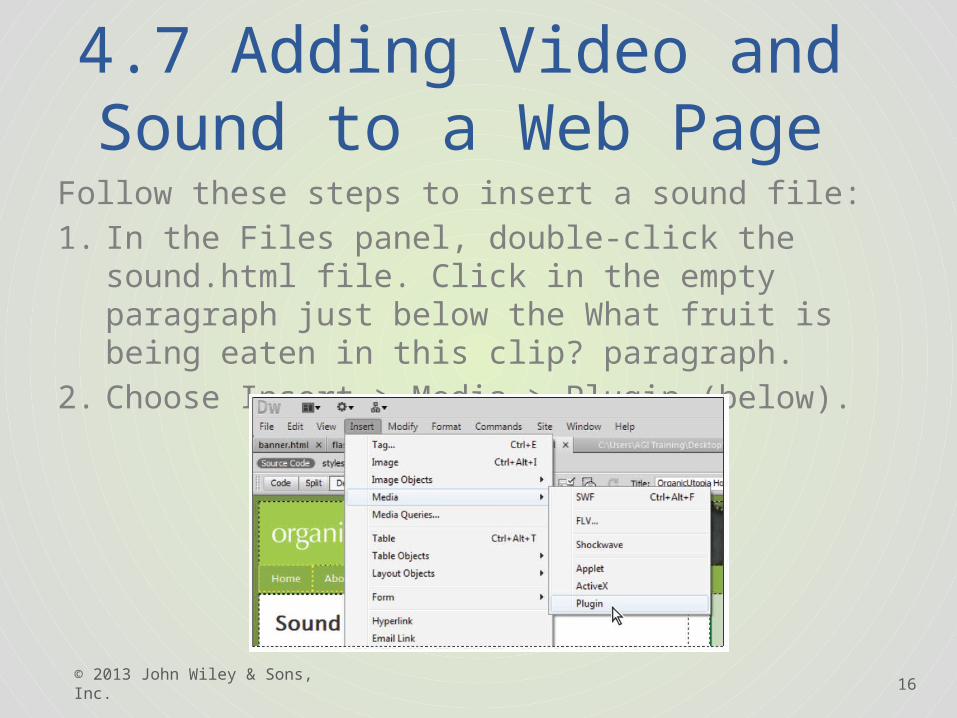
Follow these steps to insert a sound file:1. In the Files panel, double-click the sound.html
file. Click in the empty paragraph just below the What fruit is being eaten in this clip? paragraph.
2. Choose Insert > Media > Plugin (below).
© 2013 John Wiley & Sons, Inc.

17
4.7 Adding Video and Sound to a Web Page
3. In the Select File dialog box, go to the assets folder located in the dw10lessons root folder. Choose the crunch.mp3 file and click OK (Windows) or Open (Mac OS).
4. Click the edge of the plug-in icon and drag it to the right to extend it to 150 pixels wide.
© 2013 John Wiley & Sons, Inc.
18
4.7 Adding Video and Sound to a Web Page
5. Choose File > Save, then preview the page in a browser. In most browsers, the sound will play automatically. To give users the ability to control the playback of the sound file you will need to change a parameter back in Dreamweaver.
6. Close the browser.
© 2013 John Wiley & Sons, Inc.
19
4.7 Adding Video and Sound to a Web Page
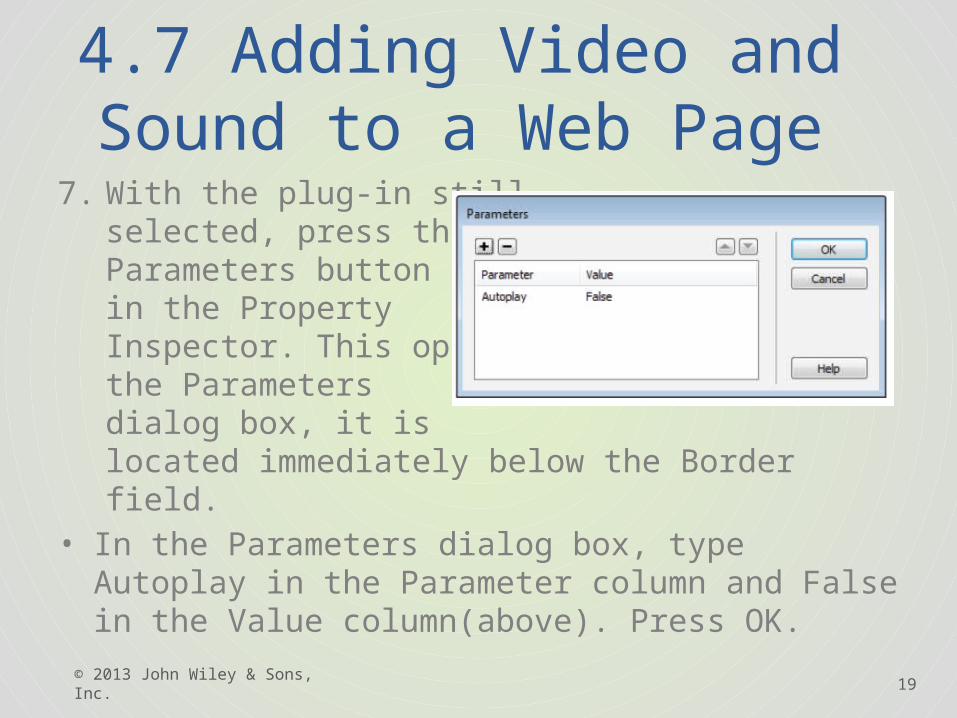
7. With the plug-in still selected, press the Parameters button in the Property Inspector. This opens the Parameters dialog box, it is located immediately below the Border field.
• In the Parameters dialog box, type Autoplay in the Parameter column and False in the Value column(above). Press OK.
© 2013 John Wiley & Sons, Inc.
20
4.7 Adding Video and Sound to a Web Page
8. Choose File > Save, then preview the page in a browser again. This time you need to press the Play button in the plug-in application to hear the sound.
9. Close your browser.
© 2013 John Wiley & Sons, Inc.

© 2013 John Wiley & Sons, Inc. 21
Lesson Summary
Copyright 2013 John Wiley & Sons, Inc.. All rights reserved. Reproduction or translation of this work beyond that named in Section 117 of the 1976 United States Copyright Act without the express written consent of the copyright owner is unlawful. Requests for further information should be addressed to the Permissions Department, John Wiley & Sons, Inc.. The purchaser may make back-up copies for his/her own use only and not for distribution or resale. The Publisher assumes no responsibility for errors, omissions, or damages, caused by the use of these programs or from the use of the information contained herein.