Embed Size (px)
Citation preview
Lesson 1: Weather Stories Big Ideas of the Lesson • Weather has an affect on the things we do outside. • Temperature is how hot or cold it is outside. Abstract In this lesson children identify their preconceptions about weather by drawing pictures of memorable weather events they have experienced and writing narratives. The teacher uses a graphic organizer to record important descriptors of these events (i.e., temperature, wind, moisture, and other). Grade Level Context Expectation(s) Children will: • compare daily changes in weather related to temperature (e.g., cold, hot, warm,
cool); cloud cover (e.g., cloudy, partly cloudy, foggy); precipitation (e.g., rain, snow, hail, freezing rain); wind (e.g., breezy, windy, calm) (E.ES.01.21).
• describe and compare weather related to the four seasons in terms of temperature, cloud cover, precipitation, and wind (E.ES.01.22).
• demonstrate scientific concepts through various illustrations, performances, models, exhibits, and activities (S.RS.01.11).
Key Concept(s) precipitation temperature Instructional Resources Equipment/Manipulative Student Resource Kahan, Janet, and Juliana Texley. Supplemental Materials (SC01040101.doc). Teacher-made
material. Waterford, MI: Oakland Schools, 2009. National Weather Service Playtime for Kids. U.S. Department of Commerce. 24
February 2009 <http://www.nws.noaa.gov/om/reachout/kidspage.shtml>. Web Weather for Kids. University Corporation for Atmospheric Research. 24 February
2009 <http://www.ucar.edu/40th/webweather/>. Teaching Resource Bundey, Nikki. Ice and the Earth. Minneapolis, MN: Lerner, 2001. ---. Ice and People. Minneapolis, MN: Lerner, 2001. ---. Rain and the Earth. Minneapolis, MN: Lerner, 2000.

---. Rain and People. Minneapolis, MN: Lerner, 2000. ---. Snow and People. Minneapolis, MN: Lerner, 2000. ---. Storms and the Earth. Minneapolis, MN: Lerner, 2000. Galiano, Dean. Clouds, Rain and Snow. New York: The Rosen Group, 2000. GEMS. The Real Reason for the Seasons. Berkeley, CA: Lawrence Hall of Science, 2000. Kahan, Janet, and Juliana Texley. Grade 1 Unit 4 Teacher Background (SC010400TB.doc). Teacher-
made material. Waterford, MI: Oakland Schools, 2009. Keats, Ezra Jack. The Snowy Day. New York: Puffin Books, 1972. Kwiller, Karen, and Steven Souza. Hands On Science Series: Atmosphere and Weather. Portland,
ME: J. Weston Walch, 1998. National Climatic Data Center. National Oceanic and Atmospheric Administration. 24
February 2009 <http://lwf.ncdc.noaa.gov/oa/ncdc.html>. National Weather Service Education Page. U.S. Department of Commerce. 24
February 2009 <http://www.nws.noaa.gov/education.html>. Nelson, Robin. A Cloudy Day. Minneapolis, MN: Lerner, 2000. ---. A Rainy Day. Minneapolis, MN: Lerner, 2000. ---. A Sunny Day. Minneapolis, MN: Lerner, 2000. ---. A Windy Day. Minneapolis, MN: Lerner, 2000. Weather Channel Education Department. The Weather Channel Enterprises, Inc.
2002. 24 February 2009 <http://www.weather.com/education>. Williams, Jack. The Weather Book. New York: Random House, 1997. Sequence of Activities Advance Preparation: Make a “Weather Words” (flipchart available- http://flintsciencesource.weebly.com/1st--2nd-mk-periods-weather.html) class chart as shown in Teacher Background. Plan to save the weather pictures and stories for future lessons. 1. Read aloud a book such as The Snowy Day by Ezra Jack Keats
https://www.youtube.com/watch?v=92zPv-TsBkk , or one of the other literature connections listed above. This should be used to help spark children’s memories.
2. Ask children to think about a day when the weather was important to what they did. Have several children briefly share their stories.
3. Mention that you liked the way the pictures in the story you read helped to show the weather, and
helped the story. Explain that you would like the children to illustrate the weather in the stories they are thinking of, and to write down the stories.
4. Distribute the writing and drawing materials. Have the children illustrate and write weather stories. 5. After the children have illustrated their weather stories, ask one child to show the picture and tell
the class the story. Say that you heard several weather words in the story, and that you would like to capture those words for the class “Weather Words” chart. Put the weather words chart on the overhead. Fill in one or two appropriate words from the story. Repeat for several more stories.
6. Explain that for the next few weeks the class will be studying about weather and the ideas in the
chart. Explain that the homework is for the children to ask someone to tell them about a day when the temperature was extremely hot or cold.
Assessment The illustrations are a form of pretest. Look for visual evidence of weather phenomena such as sky conditions (clouds, sun, precipitation). The writing also may include weather conditions such as temperature, wind, or precipitation. Application Beyond School As homework the children can ask a family member or neighbor to relate a story of a special weather day. Connections Social Studies Children can describe the weather of places they study and its effects on culture.

Lesson 1: Weather Stories
Do you remember a windy day? A snowy day? A hot day? Draw what the weather looked like below. Write a weather story. _____________________________________________________________________ _____________________________________________________________________ _____________________________________________________________________ _____________________________________________________________________ _____________________________________________________________________
Lesson 2: What’s The Temperature? Big Ideas of the Lesson • The temperature is how hot or cold something is. • The temperature can be hot, warm, cool, or cold. • A thermometer is a tool that displays what the temperature is. Abstract This lesson introduces how to measure the temperature and how a thermometer works. Children observe a thermometer daily and record the temperature. As they record the temperature throughout the year, they make a connection to the season. Children also observe a thermometer in hot, warm, cool, and cold water. They use a thermometer made from paper and yarn to reinforce how a thermometer works. Grade Level Context Expectation(s) Children will: • compare daily changes in weather related to temperature (e.g., cold, hot, warm,
cool); cloud cover (e.g., cloudy, partly cloudy, foggy); precipitation (e.g., rain, snow, hail, freezing rain); wind (e.g., breezy, windy, calm) (E.ES.01.21).
• describe and compare weather related to the four seasons in terms of temperature, cloud cover, precipitation, and wind (E.ES.01.22).
• identify the tools that might be used to measure temperature, precipitation, cloud cover, and wind (E.ES.01.31).
• observe and collect data of weather conditions over a period of time (E.ES.01.32). • demonstrate scientific concepts through various illustrations, performances, models,
exhibits, and activities (S.RS.01.11). Key Concept(s) measure season temperature thermometer Instructional Resources Equipment/Manipulative Demonstration thermometer (with manual moveable alcohol line) Glue Hole punch Ice cubes (1 tray) Outdoor thermometer near classroom Picture cards (4cards, 1 for each type of day: hot, warm, cool, cold) Red and white yarn (1 spool of each) Scissors
Small cups (4 per child at center) Tag board (1 per each thermometer made) Temperature graph Water Student Resource Kahan, Janet, and Juliana Texley. Supplemental Materials (SC01040201.doc). Teacher-made
material. Waterford, MI: Oakland Schools, 2009. National Weather Service Playtime for Kids. U.S. Department of Commerce. 24
February 2009 <http://www.nws.noaa.gov/om/reachout/kidspage.shtml>. Web Weather for Kids. University Corporation for Atmospheric Research. 24 February
2009 <http://www.ucar.edu/40th/webweather/>. Teaching Resource General Weather Glossary. National Weather Service Weather Forecast Office –
Detroit, MI. 24 February 2009 <http://www.crh.noaa.gov/dtx/glossary.php>. Kahan, Janet, and Juliana Texley. Grade 1 Unit 4 Teacher Background (SC010400TB.doc). Teacher-
made material. Waterford, MI: Oakland Schools, 2009. National Climatic Data Center. National Oceanic and Atmospheric Administration. 24
February 2009 <http://lwf.ncdc.noaa.gov/oa/ncdc.html>. National Weather Service Education Page. U.S. Department of Commerce. 24
February 2009 <http://www.nws.noaa.gov/education.html>. Weather Channel Education Department. The Weather Channel Enterprises, Inc.
2002. 24 February 2009 <http://www.weather.com/education>. Sequence of Activities Advance Preparation: There is quite a bit of work to be done prior to this lesson. Make the children’s thermometers found in the Student Page ahead of time. They are time consuming to make so sending them home with a parent volunteer is suggested. Also, the picture cards representing a hot, warm, cool, and cold day will need to be made prior to this lesson. They could be a picture of what one would wear on that type of day, what kinds of things one may do on that kind of day, or what the weather might look like on that kind of day. Samples can be found in Teacher Background. Copy the class temperature graph shown in the Teacher Resource onto butcher paper or poster board, or if you want to keep the graphs for the entire school year in a notebook, just copy it as found in the Teacher Background. Safety Precautions: Never use glass thermometers or thermometers with mercury in primary school.
1. To introduce this lesson, children need to become of aware that the temperature is a weather feature and that it gives us another way to describe the weather. Tell the children: “Temperature is something that we can use to describe the weather. We can describe the temperature as hot, warm, cool, or cold.” Note: The official definitions for these terms are: hot = warmer than 90oF, warm = 90oF to 65oF, cool = 65oF to 45oF, and cold = below than 45oF. Use the picture cards to give children a visual of what each word means. Ask the children to describe the classroom temperature as hot, warm, cool, or cold. Next, take them outside and ask them to describe what the temperature feels like outside using the terms hot, warm, cool, or cold. This activity needs to be repeated several times throughout the year to help the children develop a sense of what hot, warm, cool, and cold feels like and how a person dresses for each temperature. Since many children will not be able to read the numbers on the thermometer nor understand the Celsius and Fahrenheit sides of the thermometer, allow the children to describe the fluid in the thermometer as high, in the middle, or low.
2. Introduce the children to the thermometer. Explain to them that a thermometer
measures the temperature of the air. Describe to the children how the thermometer works. Using a demonstration thermometer, move the red fluid/yarn/paper up and explain to the children that on hot days the temperature of the air causes the fluid in the thermometer to be higher. Move the red fluid/yarn/paper down on the thermometer and explain to children that on colder days the temperature of the air causes the red fluid to move lower on the thermometer. Note: Distinguishing between a warm and cool day on a thermometer may be difficult in the beginning so wait to discuss the difference between them until they occur naturally. Ask the children to use their thumbs to indicate the direction the thermometer fluid will move on a hot day (thumbs up) and on a cold day (thumbs down). Repeat this activity several times throughout the year as the temperature outdoors changes.
3. Take the children to a location where an outdoor thermometer is visible. Allow them
to observe it and ask them to describe where the fluid is (high or low). Describe this thermometer reading and decide as a class if it is a hot or cold day. Ask the children how they dressed for this temperature.
4. Show the children the class temperature graph. Explain that: “First we will look at
the thermometer and decide if it is hot, warm, cool, or cold outside. Then we will color in the rectangle above that temperature in the square next to the date. A different student will do this each day.” Ask the children: “Will it matter what time of day we record the temperature?” [No, just so long as it is the same time everyday.] Summarize the findings for each month by asking: “Did we have more hot, warm, cool, or cold days this month?” Then compare the temperature trends for different months. Ask: "Did we have more hot days this month or the month when you started school?” [Answers will vary.] Use the comparisons to help the children make a
connection to the season and develop a sense of common temperatures for that season.
5. Put cups with hot, warm, cool, and cold water at a center with some thermometers.
Give the children an opportunity to explore the thermometers in the different temperature water. This gives them a chance to watch the fluid rise and fall in the different temperature water. Note: Use the faucet to get hot, warm, and cool water temperatures and add ice cubes to cool water to make colder water. Do not heat water to make hot water for the children.
6. Give each child a pretend thermometer similar to that in the Student Page. Using
the demonstration thermometer, model for the children how to move the red yarn representing the thermometer fluid up and down. Then ask the children to have their thermometer show the temperature on a hot day, cold day, warm day, or cool day. Have them move their yarn to simulate the thermometer fluid rising and falling on these types of days. Repeat this activity numerous times.
7. Ask children to draw pictures or find them to fill the boxes adjacent to the
thermometer on the Student Page. Assessment Using the picture cards, ask the children individually to describe the weather in the picture as a hot, warm, cool, or cold day. Application Beyond School When the children are finished using their pretend thermometers at school, they can share their knowledge with their family. Children can use their outdoor thermometers at home to decide what to do or what to wear. They can move the yarn in their pretend thermometer to match that of the outdoor thermometer at their home. Mathematics Connections While learning about the thermometer, the children can practice counting by fives. Children can make a picture graph of temperature.
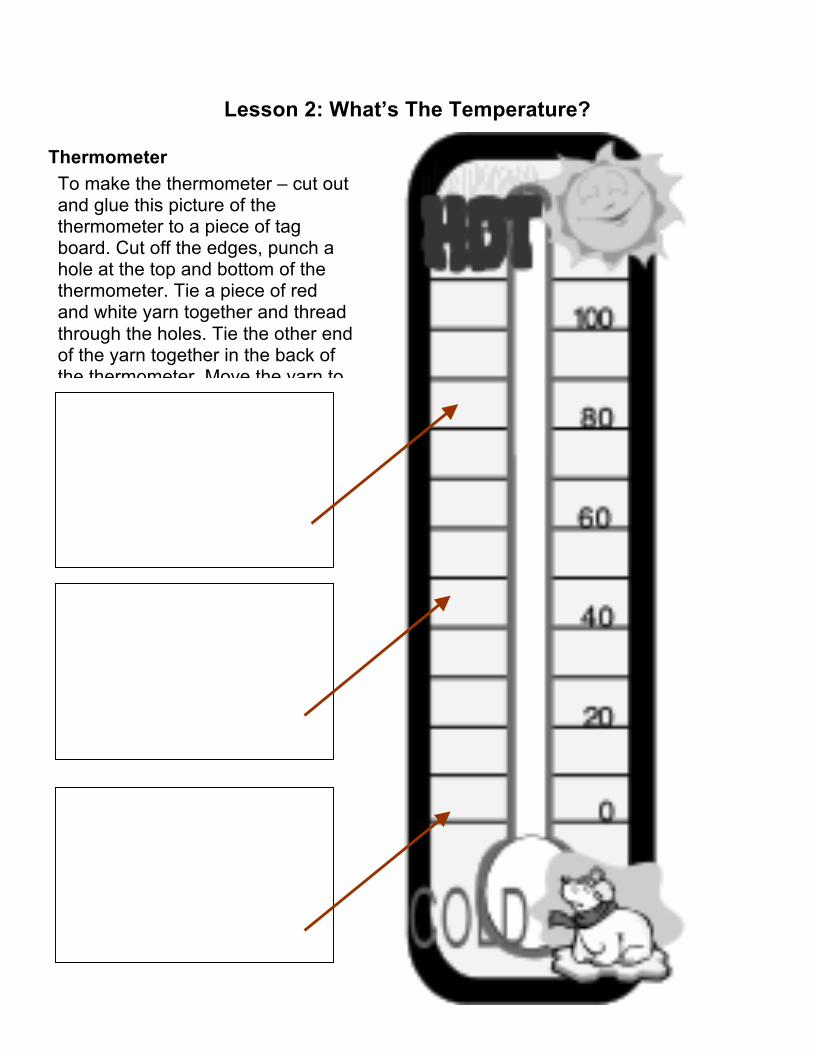
Lesson 2: What’s The Temperature?
Thermometer
To make the thermometer – cut out and glue this picture of the thermometer to a piece of tag board. Cut off the edges, punch a hole at the top and bottom of the thermometer. Tie a piece of red and white yarn together and thread through the holes. Tie the other end of the yarn together in the back of the thermometer. Move the yarn to simulate the red fluid going up and down with changes in air temperature.
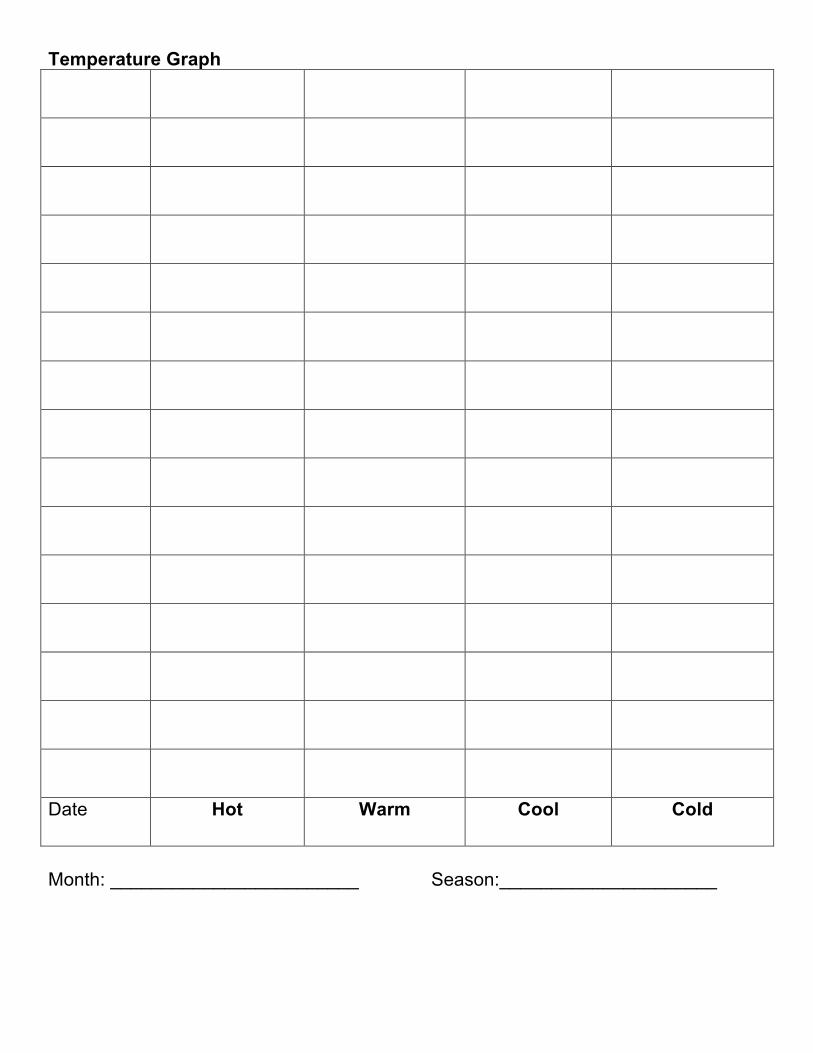
Temperature Graph
Date Hot Warm Cool Cold
Month: ________________________ Season:_____________________
Lesson 3: Reading Outdoor Temperatures Big Ideas of the Lesson • The source of heat for our weather is the sun. • A season is one of the four parts of the year. • A weather report tells the predicted high temperature for the following day. Abstract In this lesson children use thermometers to read indoor and outdoor temperatures and characterize those temperatures using weather words. The class begins to a class weather chart by recording their measured outdoor temperature. Grade Level Context Expectation(s) Children will: • compare daily changes in weather related to temperature (e.g., cold, hot, warm,
cool); cloud cover (e.g., cloudy, partly cloudy, foggy); precipitation (e.g., rain, snow, hail, freezing rain); wind (e.g., breezy, windy, calm) (E.ES.01.21).
• describe and compare weather related to the four seasons in terms of temperature, cloud cover, precipitation, and wind (E.ES.01.22).
• identify the sun as the most important source of heat, which warms the land, air, and water of the earth (E.ES.01.11).
• identify the tools that might be used to measure temperature, precipitation, cloud cover, and wind (E.ES.01.31).
• observe and collect data of weather conditions over a period of time (E.ES.01.32). • demonstrate scientific concepts through various illustrations, performances, models,
exhibits, and activities (S.RS.01.11). Key Concept(s) measure temperature thermometer Instructional Resources Equipment/Manipulative Alcohol thermometers (1 per group) Class chart “Weather Chart” Transparency master “Thermometer” Student Resource Kahan, Janet, and Juliana Texley. Supplemental Materials (SC01040301.doc). Teacher-made
material. Waterford, MI: Oakland Schools, 2009. National Weather Service Playtime for Kids. U.S. Department of Commerce. 24
February 2009 <http://www.nws.noaa.gov/om/reachout/kidspage.shtml>.
Web Weather for Kids. University Corporation for Atmospheric Research. 24 February
2009 <http://www.ucar.edu/40th/webweather/>. Teaching Resource General Weather Glossary. National Weather Service Weather Forecast Office –
Detroit, MI. 24 February 2009 <http://www.crh.noaa.gov/dtx/glossary.php>. Kahan, Janet, and Juliana Texley. Grade 1 Unit 4 Teacher Background (SC010400TB.doc). Teacher-
made material. Waterford, MI: Oakland Schools, 2009. National Climatic Data Center. National Oceanic and Atmospheric Administration. 24
February 2009 <http://lwf.ncdc.noaa.gov/oa/ncdc.html>. National Weather Service Education Page. U.S. Department of Commerce. 24
February 2009 <http://www.nws.noaa.gov/education.html>. Weather Channel Education Department. The Weather Channel Enterprises, Inc.
2002. 24 February 2009 <http://www.weather.com/education>. Sequence of Activities Advance Preparation: Prepare a flipchart or chart paper of a class weather chart that includes space for the date, temperature, sky conditions, wind, and precipitation. Obtain a report that predicts the weather for the next day. 1. Ask children to think about their homework: “What was the predicted high temperature for today?
The low? What temperature is it outside right now? How would we find out?” 2. Explain that the class will review using thermometers indoors and then the class will go outdoors
to find out the outside temperature. Remind the children not to hold the thermometers by the alcohol bulb or tube.
3. Distribute thermometers and have children read indoor temperature. It should be recorded on the
Student Pages and then on the board or on a transparency. 4. Go outside. Take one minute to let the thermometers adjust to the new temperature. Ask children
to observe the sky: “Is it clear, cloudy? Is any water falling out of the sky?” Read outdoor temperatures and record them on the Student Pages.
5. Once you have returned to the classroom use the class weather chart to record temperature and
any other observations. Ask children if the outdoor temperature was as high as the predicted high? Was the low temperature the same as the predicted low?
6. Display a blank thermometer on the Promethean Board. (This flipchart with an interactive
thermometer can be downloaded from Promethean Planet: http://www.prometheanplanet.com/en-us/Resources/Item/58755/recording-temperature#.U7rmMZRdUuU) Mark where the current temperature is. Ask the children: “Is this is hot or cold? How does it compare to the water temperatures they measured yesterday? Is this coat weather or shorts weather?”
7. Ask the children to think about what makes the weather warm or hot. “What is the source of heat for our weather?” [The heat from the sun warms the Earth and warms the atmosphere, the blanket of air around the earth.]
8. Ask the children what season it is. “What kinds of weather do they think matches with this
season?” Ask the children to make predictions for the following day’s range of temperatures. Ask: “Do your predictions match the season you are in? Do they go with to today’s temperatures?”
9. Show the children a weather report for the next day. Read the predicted high. Ask them what they
should wear to school the next day. Then ask them to make their own predictions. Put their predictions on the board to compare the next day.
Assessment Assess children using thermometers for proper use. Application Beyond School After experimenting with thermometers and temperature, children can plan what to wear for the following day and choose clothing based upon scientific prediction. Connections Mathematics While measuring temperature, children can compare predicted and actual numbers.
Lesson 4: Clouds! Clouds! Clouds! Big Ideas of the Lesson • Clouds are white or gray shapes in the sky. • Cloud cover means how cloudy it is. • Clouds can be described by their color, shape, size, and thickness. Abstract In this lesson children go outdoors and watch the clouds. They describe the clouds including the color, shape, size, and thickness based on their observations. Children learn the three types of cloud cover: no clouds (sunny), partly cloudy, and cloudy. They listen to a story about clouds and make a booklet using cotton balls showing the three basic types of cloud cover. A classroom cloud cover bar graph is recorded daily for each month throughout the year and the children interpret the results comparing them month after month and season after season. Grade Level Context Expectation(s) Children will: • compare daily changes in weather related to temperature (e.g., cold, hot, warm,
cool); cloud cover (e.g., cloudy, partly cloudy, foggy); precipitation (e.g., rain, snow, hail, freezing rain); wind (e.g., breezy, windy, calm) (E.ES.01.21).
• describe and compare weather related to the four seasons in terms of temperature, cloud cover, precipitation, and wind (E.ES.01.22).
• identify the tools that might be used to measure temperature, precipitation, cloud cover, and wind (E.ES.01.31).
• observe and collect data of weather conditions over a period of time (E.ES.01.32). • demonstrate scientific concepts through various illustrations, performances, models,
exhibits, and activities (S.RS.01.11). Key Concept(s) measure season Instructional Resources Equipment/Manipulative Blue construction paper (2 (9 X 12) pieces per child) Cotton balls (7 per child) Crayons Glue Student Resource Kahan, Janet, and Juliana Texley. Supplemental Materials (SC01040401.doc). Teacher-made
material. Waterford, MI: Oakland Schools, 2009.
National Weather Service Playtime for Kids. U.S. Department of Commerce. 24 February 2009 <http://www.nws.noaa.gov/om/reachout/kidspage.shtml>.
Nelson, Robin. A Cloudy Day. Minneapolis, MN: Lerner, 2001. Web Weather for Kids. University Corporation for Atmospheric Research. 24 February
2009 <http://www.ucar.edu/40th/webweather/>. Teaching Resource Dan’s Wild Weather Page. Ed. Dan Satterfield. 24 February 2009
<http://www.wildwildweather.com>. dePaola, Tomie. The Cloud Book. New York: Scholastic, Inc., 1985. Doudna, Kelly. It Is Cloudy. Edina, MN: Abdo Publishers, 2002. ---. It Is Sunny. Edina, MN: Abdo Publishers, 2002. General Weather Glossary. National Weather Service Weather Forecast Office –
Detroit, MI. 24 February 2009 <http://www.crh.noaa.gov/dtx/glossary.php>. How The Weather Works. Ed. Mike Mogil. 24 February 2009
<http://www.weatherworks.com>. Kahan, Janet, and Juliana Texley. Grade 1 Unit 4 Teacher Background (SC010400TB.doc). Teacher-
made material. Waterford, MI: Oakland Schools, 2009. National Climatic Data Center. National Oceanic and Atmospheric Administration. 24
February 2009 <http://lwf.ncdc.noaa.gov/oa/ncdc.html>. National Weather Service Education Page. U.S. Department of Commerce. 24
February 2009 <http://www.nws.noaa.gov/education.html>. Observing, Tracking, and Charting the Weather. Ed. Kathee Terry. 24 February 2009
<http://www.k12.wa.us/EdTech/Athena/curric/weather/pricloud/index.html>. Weather Channel Education Department. The Weather Channel Enterprises, Inc.
2002. 24 February 2009 <http://www.weather.com/education>. Sequence of Activities Advance Preparation: To make cloud cover books, fold two blue sheets of paper and staple together making a four-page booklet. Write on the cover “My Cloud Book” with a crayon, if the children have the ability, encourage them to do the writing. Enlarge the classroom cloud cover bar graph found on the Student Page and in Teacher Background for chart board or bulletin board.
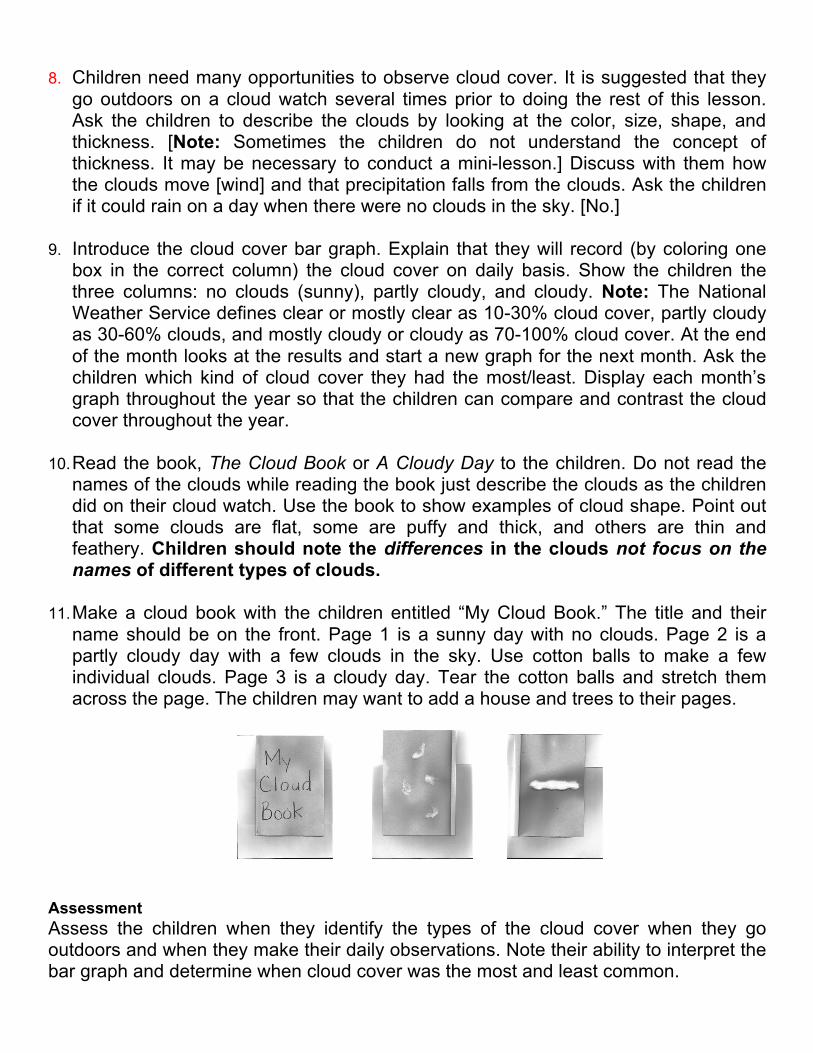
8. Children need many opportunities to observe cloud cover. It is suggested that they
go outdoors on a cloud watch several times prior to doing the rest of this lesson. Ask the children to describe the clouds by looking at the color, size, shape, and thickness. [Note: Sometimes the children do not understand the concept of thickness. It may be necessary to conduct a mini-lesson.] Discuss with them how the clouds move [wind] and that precipitation falls from the clouds. Ask the children if it could rain on a day when there were no clouds in the sky. [No.]
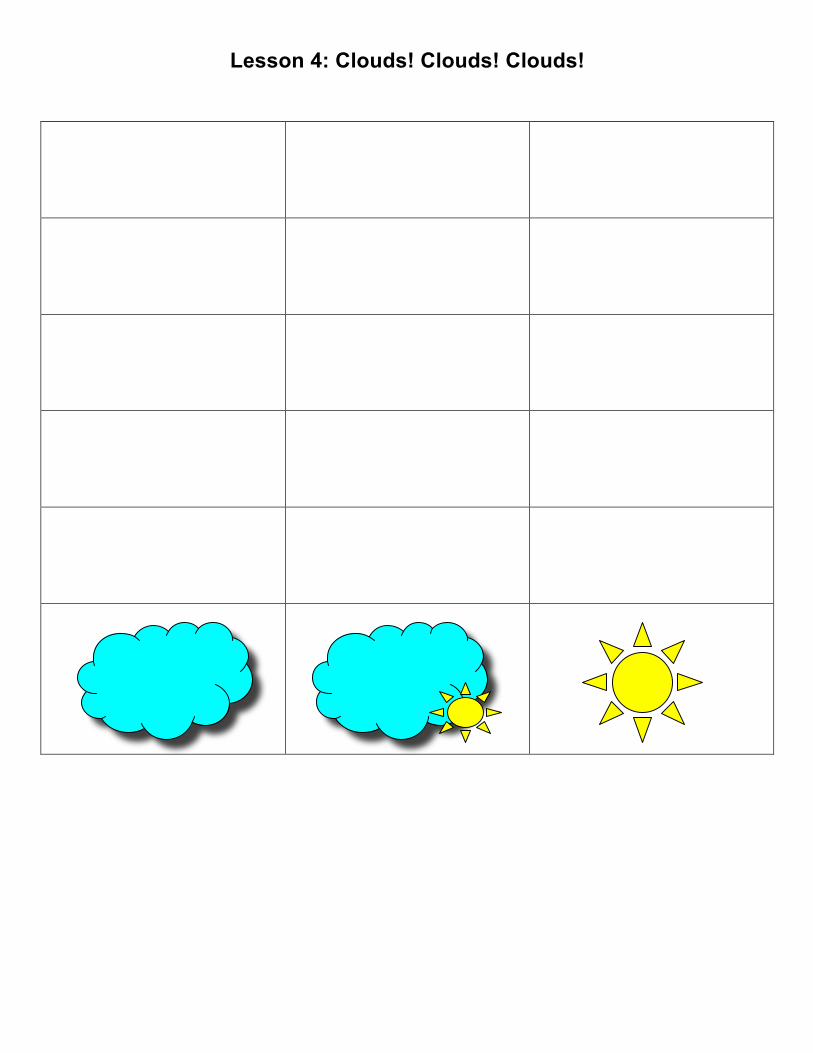
9. Introduce the cloud cover bar graph. Explain that they will record (by coloring one
box in the correct column) the cloud cover on daily basis. Show the children the three columns: no clouds (sunny), partly cloudy, and cloudy. Note: The National Weather Service defines clear or mostly clear as 10-30% cloud cover, partly cloudy as 30-60% clouds, and mostly cloudy or cloudy as 70-100% cloud cover. At the end of the month looks at the results and start a new graph for the next month. Ask the children which kind of cloud cover they had the most/least. Display each month’s graph throughout the year so that the children can compare and contrast the cloud cover throughout the year.
10. Read the book, The Cloud Book or A Cloudy Day to the children. Do not read the
names of the clouds while reading the book just describe the clouds as the children did on their cloud watch. Use the book to show examples of cloud shape. Point out that some clouds are flat, some are puffy and thick, and others are thin and feathery. Children should note the differences in the clouds not focus on the names of different types of clouds.
11. Make a cloud book with the children entitled “My Cloud Book.” The title and their
name should be on the front. Page 1 is a sunny day with no clouds. Page 2 is a partly cloudy day with a few clouds in the sky. Use cotton balls to make a few individual clouds. Page 3 is a cloudy day. Tear the cotton balls and stretch them across the page. The children may want to add a house and trees to their pages.
Assessment Assess the children when they identify the types of the cloud cover when they go outdoors and when they make their daily observations. Note their ability to interpret the bar graph and determine when cloud cover was the most and least common.
Application Beyond School When children take their cloud book home, they could describe the type of cloud cover to their family. Each morning they could observe the cloud cover and discuss the weather. Connections English Language Arts Children could compare and contrast a variety of narrative and expository texts about weather. Mathematics Children could summarize the information on the classroom weather graph. They could count the days with each type of cloud cover and then determine which is most/least.
Lesson 4: Clouds! Clouds! Clouds!
Lesson 5: What Makes the Wind Blow? Big Ideas of the Lesson • Wind is moving air. • An anemometer is an instrument that measures the speed of the wind. • A weather vane is an instrument that measures the direction of the wind. • Precipitation is water that falls to the Earth in some form. • When air gets warm, it moves up. • When air starts to cool, it moves down. Abstract In this lesson children explore the cause of wind, by experimenting with warm air. They continue to compare predictions to actual readings in weather forecasting. Grade Level Context Expectation(s) Children will: • compare daily changes in weather related to temperature (e.g., cold, hot, warm,
cool); cloud cover (e.g., cloudy, partly cloudy, foggy); precipitation (e.g., rain, snow, hail, freezing rain); wind (e.g., breezy, windy, calm) (E.ES.01.21).
• describe and compare weather related to the four seasons in terms of temperature, cloud cover, precipitation, and wind (E.ES.01.22).
• identify the sun as the most important source of heat, which warms the land, air, and water of the earth (E.ES.01.11).
• identify the tools that might be used to measure temperature, precipitation, cloud cover, and wind (E.ES.01.31).
• observe and collect data of weather conditions over a period of time (E.ES.01.32). • demonstrate scientific concepts through various illustrations, performances, models,
exhibits, and activities (S.RS.01.11). Key Concept(s) measure season Instructional Resources Equipment/Manipulative Anemometers Globe Incandescent light bulbs in lamps (several, placed in secure places) Pin (1 per group) Pinwheel pattern on tag board Scissors (1 per group) Soda straws or wood dowels (12 cm, per group)
Student Resource Kahan, Janet, and Juliana Texley. Supplemental Materials (SC01040501.doc). Teacher-made
material. Waterford, MI: Oakland Schools, 2009. National Weather Service Playtime for Kids. U.S. Department of Commerce. 24
February 2009 <http://www.nws.noaa.gov/om/reachout/kidspage.shtml>. Web Weather for Kids. University Corporation for Atmospheric Research. 24 February
2009 <http://www.ucar.edu/40th/webweather/>. Teaching Resource Dan’s Wild Weather Page. Ed. Dan Satterfield. 24 February 2009
<http://www.wildwildweather.com>. General Weather Glossary. National Weather Service Weather Forecast Office –
Detroit, MI. 24 February 2009 <http://www.crh.noaa.gov/dtx/glossary.php>. How The Weather Works. Ed. Mike Mogil. 24 February 2009
<http://www.weatherworks.com>. Kahan, Janet, and Juliana Texley. Grade 1 Unit 4 Teacher Background (SC010400TB.doc). Teacher-
made material. Waterford, MI: Oakland Schools, 2009. National Climatic Data Center. National Oceanic and Atmospheric Administration. 24
February 2009 <http://lwf.ncdc.noaa.gov/oa/ncdc.html>. National Weather Service Education Page. U.S. Department of Commerce. 24
February 2009 <http://www.nws.noaa.gov/education.html>. Nelson, Robin. A Windy Day. Minneapolis, MN: Lerner, 2000. Weather Channel Education Department. The Weather Channel Enterprises, Inc.
2002. 24 February 2009 <http://www.weather.com/education>. Sequence of Activities Advance Preparation: Obtain or make a pinwheel prior to the start of this lesson. Safety Precautions: Supervise use of pins. Place lamps in secure places, where they cannot be overturned and where you can watch that the children do not burn themselves. Warn children that light bulbs will become quite hot. 1. Ask children to think about yesterday’s weather: “Was it windy?” Ask: “Is today windy?” Compare
the predictions that the children made the previous day with today’s weather. 2. Explain that the class will go outside to check on the wind and also to measure today’s
temperature. Have the children look at trees, bushes, signs, flags, and clouds. Ask: “Is anything moving? Is it really windy, a little windy, or not windy at all?” (If you can allocate the time, bring out the anemometers.)
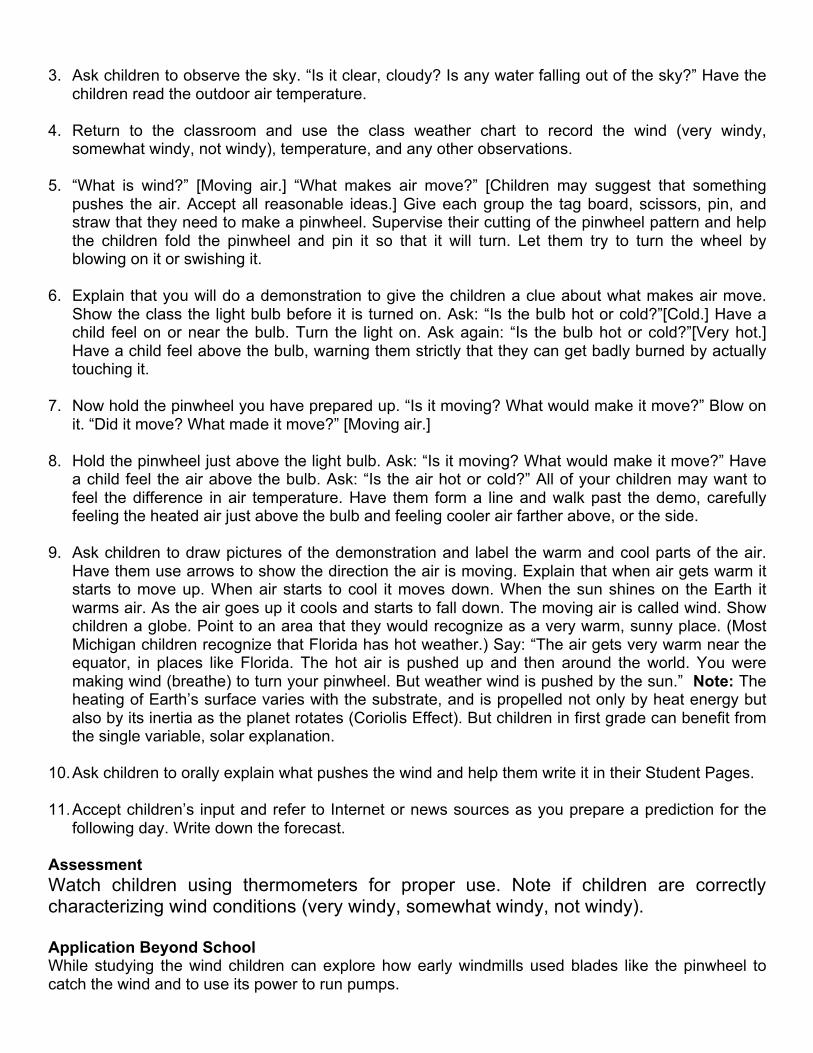
3. Ask children to observe the sky. “Is it clear, cloudy? Is any water falling out of the sky?” Have the
children read the outdoor air temperature. 4. Return to the classroom and use the class weather chart to record the wind (very windy,
somewhat windy, not windy), temperature, and any other observations. 5. “What is wind?” [Moving air.] “What makes air move?” [Children may suggest that something
pushes the air. Accept all reasonable ideas.] Give each group the tag board, scissors, pin, and straw that they need to make a pinwheel. Supervise their cutting of the pinwheel pattern and help the children fold the pinwheel and pin it so that it will turn. Let them try to turn the wheel by blowing on it or swishing it.
6. Explain that you will do a demonstration to give the children a clue about what makes air move.
Show the class the light bulb before it is turned on. Ask: “Is the bulb hot or cold?”[Cold.] Have a child feel on or near the bulb. Turn the light on. Ask again: “Is the bulb hot or cold?”[Very hot.] Have a child feel above the bulb, warning them strictly that they can get badly burned by actually touching it.
7. Now hold the pinwheel you have prepared up. “Is it moving? What would make it move?” Blow on
it. “Did it move? What made it move?” [Moving air.] 8. Hold the pinwheel just above the light bulb. Ask: “Is it moving? What would make it move?” Have
a child feel the air above the bulb. Ask: “Is the air hot or cold?” All of your children may want to feel the difference in air temperature. Have them form a line and walk past the demo, carefully feeling the heated air just above the bulb and feeling cooler air farther above, or the side.
9. Ask children to draw pictures of the demonstration and label the warm and cool parts of the air.
Have them use arrows to show the direction the air is moving. Explain that when air gets warm it starts to move up. When air starts to cool it moves down. When the sun shines on the Earth it warms air. As the air goes up it cools and starts to fall down. The moving air is called wind. Show children a globe. Point to an area that they would recognize as a very warm, sunny place. (Most Michigan children recognize that Florida has hot weather.) Say: “The air gets very warm near the equator, in places like Florida. The hot air is pushed up and then around the world. You were making wind (breathe) to turn your pinwheel. But weather wind is pushed by the sun.” Note: The heating of Earth’s surface varies with the substrate, and is propelled not only by heat energy but also by its inertia as the planet rotates (Coriolis Effect). But children in first grade can benefit from the single variable, solar explanation.
10. Ask children to orally explain what pushes the wind and help them write it in their Student Pages. 11. Accept children’s input and refer to Internet or news sources as you prepare a prediction for the
following day. Write down the forecast. Assessment Watch children using thermometers for proper use. Note if children are correctly characterizing wind conditions (very windy, somewhat windy, not windy). Application Beyond School While studying the wind children can explore how early windmills used blades like the pinwheel to catch the wind and to use its power to run pumps.

Connections Social Studies While studying the wind, children can explore how wind patterns create climate conditions that have influenced settlement, agriculture, and the development of civilizations. Prevailing winds influenced the voyages of discovery.
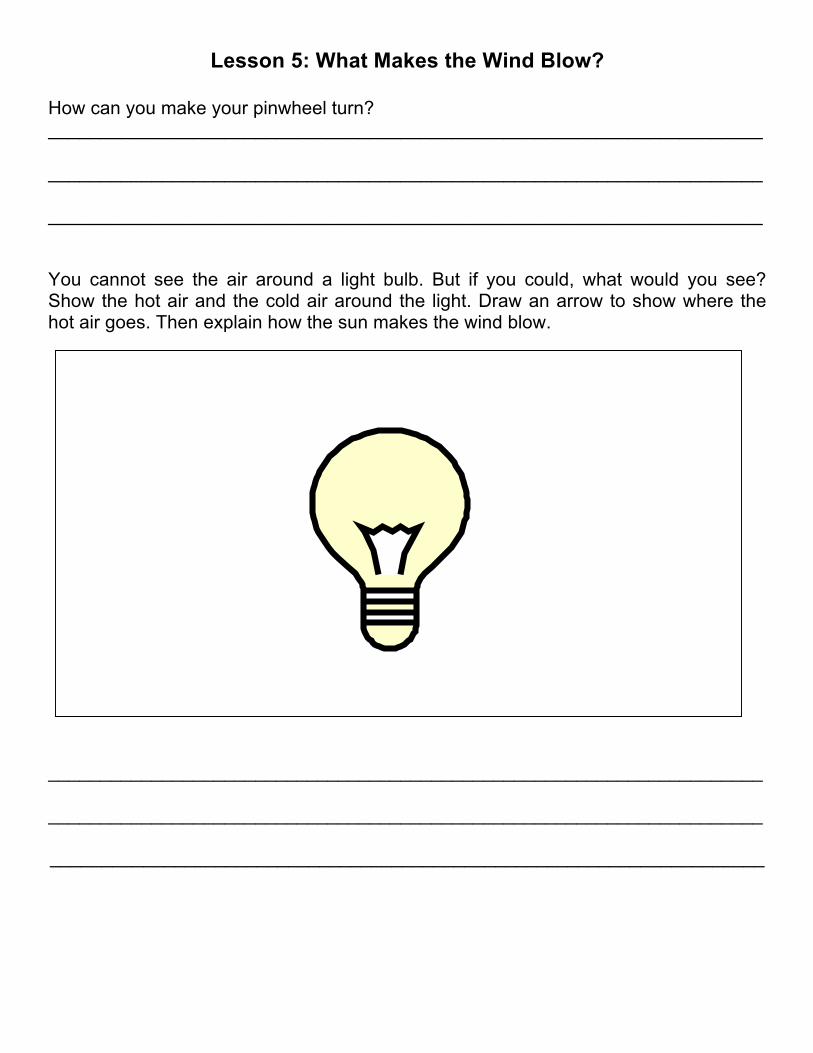
Lesson 5: What Makes the Wind Blow?
How can you make your pinwheel turn? _____________________________________________________________________ _____________________________________________________________________ _____________________________________________________________________ You cannot see the air around a light bulb. But if you could, what would you see? Show the hot air and the cold air around the light. Draw an arrow to show where the hot air goes. Then explain how the sun makes the wind blow. _____________________________________________________________________ _____________________________________________________________________ _____________________________________________________________________
Lesson 6: What’s That Falling From The Sky? Big Ideas of the Lesson • Precipitation is liquid or solid water falling form the sky. • Rain, snow, hail, and sleet are four types of precipitation. • Severe weather can be very dangerous. • Thunderstorms, blizzards, floods, and tornados are all severe weather conditions. • It is important to find a safe place when there is a severe weather warning. Abstract This lesson is the first of three lessons about precipitation. In this lesson, children learn about the different forms of precipitation and precautions for severe weather. This lesson is intended to help the children be prepared for severe weather, not to frighten them. They read a fictional story about food falling from the sky that introduces a discussion of what precipitation really falls from the sky and how we learn about severe weather. Children learn what to do during severe weather at school and at home. Grade Level Context Expectation(s) Children will: • compare daily changes in weather related to temperature (e.g., cold, hot, warm,
cool); cloud cover (e.g., cloudy, partly cloudy, foggy); precipitation (e.g., rain, snow, hail, freezing rain); wind (e.g., breezy, windy, calm) (E.ES.01.21).
• describe and compare weather related to the four seasons in terms of temperature, cloud cover, precipitation, and wind (E.ES.01.22).
• describe severe weather characteristics (E.ES.01.23). • describe precautions that should be taken for human safety during severe weather
conditions (e.g., thunder and lightning, tornadoes, strong winds, heavy precipitation) (E.ES.01.24).
• identify the tools that might be used to measure temperature, precipitation, cloud cover, and wind (E.ES.01.31).
• observe and collect data of weather conditions over a period of time (E.ES.01.32). • demonstrate scientific concepts through various illustrations, performances, models,
exhibits, and activities (S.RS.01.11). Key Concept(s) measure precipitation season severe weather Instructional Resources
Equipment/Manipulative Map of school with shelter area for severe weather Student Resource Disaster Preparedness Coloring Book. American Red Cross. 11 June 2002
<http://www.redcross.org/services/disaster/eduinfo/colorbk.pdf>. Kahan, Janet, and Juliana Texley. Supplemental Materials (SC01040601.doc). Teacher-made
material. Waterford, MI: Oakland Schools, 2009. National Weather Service Playtime for Kids. U.S. Department of Commerce. 24
February 2009 <http://www.nws.noaa.gov/om/reachout/kidspage.shtml>. Nelson, Robin. A Stormy Day. Minneapolis, MN: Lerner, 2000. Web Weather for Kids. University Corporation for Atmospheric Research. 24 February
2009 <http://www.ucar.edu/40th/webweather/>. Teaching Resource Barrett, Judy, and Ron. Cloudy With a Chance of Meatballs. New York: Atheneum
Books for Young Readers, 2002. Branley, Franklyn M. Flash, Crash, Rumble, and Roll. New York: HarperCollins
Children’s Book Group, 1999. Dan’s Wild Weather Page. Ed. Dan Satterfield. 24 February 2009
<http://www.wildwildweather.com>. General Weather Glossary. National Weather Service Weather Forecast Office –
Detroit, MI. 24 February 2009 <http://www.crh.noaa.gov/dtx/glossary.php>. How The Weather Works. Ed. Mike Mogil. 24 February 2009
<http://www.weatherworks.com>. Kahan, Janet, and Juliana Texley. Grade 1 Unit 4 Teacher Background (SC010400TB.doc). Teacher-
made material. Waterford, MI: Oakland Schools, 2009. National Climatic Data Center. National Oceanic and Atmospheric Administration. 24
February 2009 <http://lwf.ncdc.noaa.gov/oa/ncdc.html>. National Weather Service Education Page. U.S. Department of Commerce. 24
February 2009 <http://www.nws.noaa.gov/education.html>. Weather Channel Education Department. The Weather Channel Enterprises, Inc.
2002. 24 February 2009 <http://www.weather.com/education>. Sequence of Activities
Advance Preparation: Get a map of the school with the shelter areas from your principal. You might also contact your city offices and ask if they have any information on the warnings for severe weather and precautions they recommend. The National Weather Service web site has sections devoted to severe weather, weather forecast terminology, and weather safety. Visit this site to review terminology and to gather current examples of different weather. Although the section for students will be beyond the understanding of first graders, the information may provide the teacher with useful examples and explanations. By law, all Michigan schools must have 10 drills a year, two of which are tornado drills. See if your principal will arrange one during this lesson. 12. Begin this lesson by introducing the term precipitation (liquid or solid water falling
from the sky and reaching the ground). Ask the children to name and describe different types of precipitation. [Rain, snow, hail, sleet, etc.] Ask the children: “When does it rain and when does it snow? [It rains when the temperatures are warm, greater than freezing, and it snows when the temperatures are below freezing.] Follow up with: “What time of year is it most likely to snow?” [Winter.] “What time of year might we see a thunderstorm?” [Spring, summer, and fall.] Make the connection between the season and the temperature to the type of precipitation.
13. Discuss with children that sometimes weather conditions become dangerous. This
is called severe weather and might include hail, freezing rain, flash floods, dangerous thunderstorms with wind and lightning, blizzards, etc. In these cases the National Weather Service might issue a weather warning or watch. These statements come over the television and radio and they are intended to protect us. A weather watch means that severe weather might come to where we live and that you and your family should be on the look out and be ready to take precautions. Many times the severe weather never materializes. A weather warning means that there has been severe weather you and those you are with should take the necessary action to be safe. These severe weather situations only last a short time.
14. Introduce the story Cloudy With A Chance of Meatballs or you can show this video:
https://www.youtube.com/watch?v=hUp5R_D6Ir8 (or A Stormy Day) to the children and tell them it is a story where the weather goes crazy. As the story is read, use the text to make a connection to the real world.
15. After reading the story, ask the children how the characters in the story found out
about the severe weather. [Television, radio, sirens.] Ask the children how they or their parents find out about severe weather and what they do during severe weather at home. [Come in the house, listen to the radio or television, go in the basement, for example.] Discuss options for finding safety depending on their type of housing. [Seeking shelter in a basement, crawlspace, bathroom, center hallway, closet floor, or reinforced doorway.]
16. Ask the children to think about how the school finds out about severe weather.
[Radio stations, telephone calls from administrators, or weather spotters.] “How do the classrooms find out?” [Notification from the principal or announcement over the PA system, a special alarm that is different than the fire alarm.] Note: The NOAA (National Oceanic and Atmospheric Administration) Weather Radio broadcasts the National Weather Service warnings, watches, forecasts and other hazard information 24 hours a day. During an emergency, National Weather Service forecasters will interrupt routine weather radio programming and send out the special tone that activates weather radios in the listening area. The hearing and visually impaired also can get these warnings by connecting weather radios with alarm tones to other kinds of attention-getting devices like strobe lights, pagers, bed-shakers, personal computers, and text printers.
17. Show children a map of the building with the route to their place of shelter. Talk with
children about why that place is a safer place to be than inside their classroom. [Safe places are away from windows and in structurally strong parts of the building, sometimes underground. In many schools the tornado drill position is seated in the hall.]
18. Have children complete the Student Page: “When You Hear the Tornado Drill.” Assessment Informally assess students by asking them individually what is a type of severe weather, where should they go while at school, and where could they go while at home. Application Beyond School Children can share with their parents where they go during severe weather at school and discuss with their parents a good plan for where they could go while at home. Children can create a map of their home with their shelter area marked on it. (A Disaster Preparedness Coloring Book developed by The American Red Cross is available on the web site listed under Student Resources. Families could complete the coloring book together.) Connections Social Studies When learning about weather safety children learn about public warning systems for severe weather.
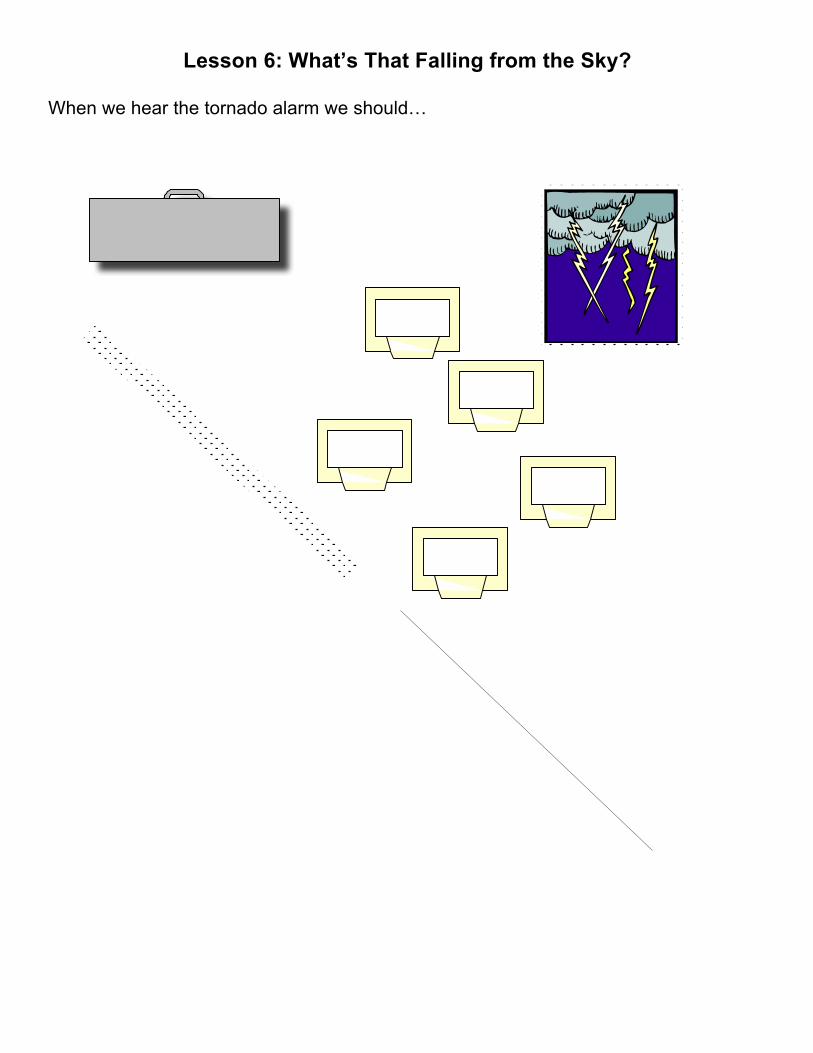
Lesson 6: What’s That Falling from the Sky?
When we hear the tornado alarm we should…
Lesson 7: It’s Raining! It’s Pouring! Big Ideas of the Lesson • Rain can fall as a light rain or a downpour. • A rain gauge measures the amount of rain outside. • A rainbow is a curved light of many colors in the sky. Abstract This is the second of three lessons on precipitation. This lesson focuses on rain. Children listen to a story about rain and to a CD with rain falling at varying speeds. They simulate light rain and heavy rain by stomping their feet. Children learn how to measure rainfall using a rain gauge. They are introduced to a prism and how to make a rainbow using one. Grade Level Context Expectation(s) Children will: • compare daily changes in weather related to temperature (e.g., cold, hot, warm,
cool); cloud cover (e.g., cloudy, partly cloudy, foggy); precipitation (e.g., rain, snow, hail, freezing rain); wind (e.g., breezy, windy, calm) (E.ES.01.21).
• describe and compare weather related to the four seasons in terms of temperature, cloud cover, precipitation, and wind (E.ES.01.22).
• identify the tools that might be used to measure temperature, precipitation, cloud cover, and wind (E.ES.01.31).
• observe and collect data of weather conditions over a period of time (E.ES.01.32). • demonstrate scientific concepts through various illustrations, performances, models,
exhibits, and activities (S.RS.01.11). Key Concept(s) measure precipitation season Instructional Resources Equipment/Manipulative CD of rain falling at varying speeds CD player Flour Glass (drinking) Mesh sieve Overhead projector Prism Rain gauge Shallow pan (1” deep)
Student Resource Kahan, Janet, and Juliana Texley. Supplemental Materials (SC01040701.doc). Teacher-made
material. Waterford, MI: Oakland Schools, 2009. National Weather Service Playtime for Kids. U.S. Department of Commerce. 24
February 2009 <http://www.nws.noaa.gov/om/reachout/kidspage.shtml>. Web Weather for Kids. University Corporation for Atmospheric Research. 24 February
2009 <http://www.ucar.edu/40th/webweather/>. Teaching Resource Chambers, Catherine. Thunderstorm. Chicago, IL: Heinemann Library, 2002. Dan’s Wild Weather Page. Ed. Dan Satterfield. 24 February 2009
<http://www.wildwildweather.com>. Doudna, Kelly. It Is Raining. Edina, MN: Abdo Publishers, 2002. ---. It Is Stormy. Edina, MN: Abdo Publishers, 2002. General Weather Glossary. National Weather Service Weather Forecast Office –
Detroit, MI. 24 February 2009 <http://www.crh.noaa.gov/dtx/glossary.php>. Hale, James G., and Franklyn M. Branley. Down Comes The Rain. New York:
HarperCollins Children’s Book Group, 1997. How The Weather Works. Ed. Mike Mogil. 24 February 2009
<http://www.weatherworks.com>. How To Make Your Own Rainbow. Digital Bits Science Lab. 24 February 2009
<http://www.andybrain.com/sciencelab/2007/12/30/how-to-make-your-own-rainbow-and-meet-roy-g-biv/>.
Kahan, Janet, and Juliana Texley. Grade 1 Unit 4 Teacher Background (SC010400TB.doc). Teacher-
made material. Waterford, MI: Oakland Schools, 2009. National Climatic Data Center. National Oceanic and Atmospheric Administration. 24
February 2009 <http://lwf.ncdc.noaa.gov/oa/ncdc.html>. National Weather Service Education Page. U.S. Department of Commerce. 24
February 2009 <http://www.nws.noaa.gov/education.html>. Weather Channel Education Department. The Weather Channel Enterprises, Inc.
2002. 24 February 2009 <http://www.weather.com/education>. Sequence of Activities Advance Preparation: Purchase or borrow from the school or public library a CD of rainfall sounds. It is best if the rainfall is of varying speeds so that it sounds like a light
shower at times and like a hard rain at other times. Decide how to display the monthly precipitation graph. You might want to put each month across a bulletin board or in a notebook for easy comparison. 19. Begin this lesson with a review of precipitation as presented in the last lesson. Ask
the children: “Where does rain come from?” [The sky.] Read the book Down Comes The Rain.
20. Shut off the lights and listen to this video
(https://www.youtube.com/watch?v=DWVG8T6Vozk) with the sound of rain. Encourage the children close their eyes and listen closely. Ask the children if they can imagine the rain falling. After a few minutes, ask them to raise one hand if the rain is falling gently and two hands if it is falling hard. Ask the children how they could tell if the rain was a gentle shower or a downpour. [A harder rainfall is usually louder.] Next, ask the children how they could simulate the sound of a rainstorm using their feet. [Tapping their feet softly to represent a light rain and stomping them loudly to represent a heavy rain.] Lead the children in a simulated rainstorm.
21. Show the children a rain gauge and then leave it out so that they can observe it
closely. Pour water into the rain gauge and show the children how to read rain in inches. Do this several times asking two or three students to read the amount of “rain.” Put the rain gauge outside in a secure spot. As a class, check the rain gauge weekly and have children assist with recording the amount of rainfall on the rainfall graph. Note: Remember that snow must be melted and then measured as a liquid. Begin a new graph for each month.
22. Use the graph to compare rainfall week-to-week and month-to-month. This activity
will lend itself to discussing which months received the most rainfall and accordingly which seasons.
23. When a light rainstorm is about to begin at school, set a pan of flour (one inch deep)
outside to catch some raindrops. Bring it inside after several drops have fallen onto the flour. Carefully pour the flour through a mesh sieve. Ask the children: “What do you notice?” [There are clumps of flour caught in the sieve.] Repeat this activity during several different rains to compare the size of the raindrops (larger raindrops make larger flour balls).
24. Ask the children if they have seen a rainbow. After several children have
commented on their experiences, ask: “Does a rainbow always follow a shower?” [No.] “When might a rainbow appear?” [Rainbows occur when the light shines through the rain. When the sun shines following or during a rain, there is a rainbow. Stand with your back to the sun to search for the rainbow.]

25. On a sunny day, put a glass of water on the very edge of a windowsill. As the sun shines through the water the white light from the sun is bent and appears as the rainbow of colors on a white sheet of paper on the floor. Allow several children to participate in the demonstration. Ask the children to explain what they see. Note: You can also make a rainbow using a prism and bright, white light such as that from a slide or overhead projector. Have children describe what they see. Explain to children how the prism is acting like a raindrop.
Assessment Assess the children individually as they add data to their own graphs and to the class graph. Ask them to explain what the graph means. As the end of the year approaches, ask them to describe any seasonal changes. Application Beyond School The children could share their discoveries from the rainfall graph from month to month and throughout the seasons with their family. They might also try to make a rainbow using their garden hose at home by spraying a fine mist of water as they stand with their back to the sun. Connections English Language Arts Children could generate words to describe the rain as they listen to and observe rain falling. Mathematics Children could measure water puddles after it rains. Children can discover and describe the seasonal changes in their rainfall graphs.
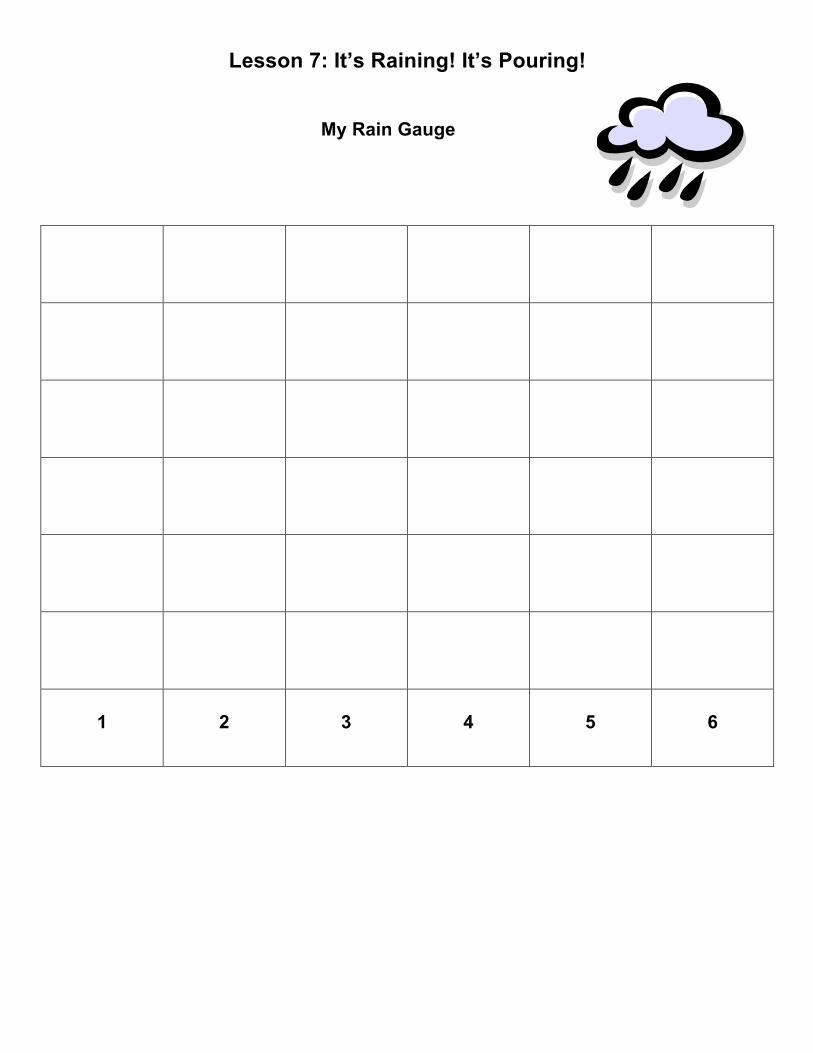
Lesson 7: It’s Raining! It’s Pouring!
My Rain Gauge
1
2
3
4
5
6
Lesson 8: Let It Snow! Big Ideas of the Lesson • Snow is a type of precipitation. • Snow melts when it gets warm. Abstract This is the third of three lessons on precipitation. This lesson focuses on snow. Children listen to a story about a snowy day. They discuss the season and the effects of temperature on the weather. The class keeps a graph of the number of snowy days for each month throughout the school year. Grade Level Context Expectation(s) Children will: • compare daily changes in weather related to temperature (e.g., cold, hot, warm,
cool); cloud cover (e.g., cloudy, partly cloudy, foggy); precipitation (e.g., rain, snow, hail, freezing rain); wind (e.g., breezy, windy, calm) (E.ES.01.21).
• describe and compare weather related to the four seasons in terms of temperature, cloud cover, precipitation, and wind (E.ES.01.22).
• identify the tools that might be used to measure temperature, precipitation, cloud cover, and wind (E.ES.01.31).
• observe and collect data of weather conditions over a period of time (E.ES.01.32). • demonstrate scientific concepts through various illustrations, performances, models,
exhibits, and activities (S.RS.01.11). Key Concept(s) measure precipitation season Instructional Resources Student Resource Kahan, Janet, and Juliana Texley. Supplemental Materials (SC01040801.doc). Teacher-made
material. Waterford, MI: Oakland Schools, 2009. National Weather Service Playtime for Kids. U.S. Department of Commerce. 24
February 2009 <http://www.nws.noaa.gov/om/reachout/kidspage.shtml>. Web Weather for Kids. University Corporation for Atmospheric Research. 24 February
2009 <http://www.ucar.edu/40th/webweather/>. Teaching Resource Dan’s Wild Weather Page. Ed. Dan Satterfield. 24 February 2009 <http://www.wildwildweather.com>.
Doudna, Kelly. It Is Snowing. Edina, MN: Abdo Publishers, 2002. General Weather Glossary. National Weather Service Weather Forecast Office –
Detroit, MI. 24 February 2009 <http://www.crh.noaa.gov/dtx/glossary.php>. How The Weather Works. Ed. Mike Mogil. 24 February 2009
<http://www.weatherworks.com>. Kahan, Janet, and Juliana Texley. Grade 1 Unit 4 Teacher Background (SC010400TB.doc). Teacher-
made material. Waterford, MI: Oakland Schools, 2009. Kalz, Jill. Snow. Mankato, MN: Smart Apple Media, 2002. Keats, Jack Ezra. The Snowy Day. New York: Penguin Putnam Books for Young Readers, 1976. National Climatic Data Center. National Oceanic and Atmospheric Administration. 24
February 2009 <http://lwf.ncdc.noaa.gov/oa/ncdc.html>. National Weather Service Education Page. U.S. Department of Commerce. 24
February 2009 <http://www.nws.noaa.gov/education.html>. Nelson, Robin. A Snowy Day. Minneapolis, MN: Lerner, 2000. U.S. Snow Monitoring. 12 March 2008. NOAA Satellite and Information Service. 24
February 2009 <http://lwf.ncdc.noaa.gov/oa/climate/research/snow/>. Weather Channel Education Department. The Weather Channel Enterprises, Inc.
2002. 24 February 2009 <http://www.weather.com/education>. Sequence of Activities Advance Preparation: Since this activity is about snow, it is best done in the winter. If this is not possible, you can scrape “snow” from the inside of an older freezer to produce something for students to handle, or buy some from a convenience store that sells “Sno Cones.” Enlarge the precipitation graph from Teacher Background for class observation. 1. Access the children’s prior knowledge by asking them what they know about snow.
Ask the children some of the following questions: “What does snow look like?” “What does it feel like?” “Does it make any sounds?” “Does it have a taste?” “Where does snow come from?” “What is snow made of?” Note: Clouds contain snow, not rain. Students may speculate that the clouds have snow because they are fluffy. They are right.
2. Finally, make the connection between the temperature and snow by asking: “Why do we have snow instead of rain?” [It snows when the temperature is near or below the freezing point of water.] Ask the children: “What time of the year do we get the most snow? Is it near Thanksgiving? Before New Year’s Day? After New Year’s Day?” [The most snowfall for Michigan usually occurs November through February, but in the record-setting year of 2002, greatest snowfall occurred in February and March.]
3. Read the story The Snowy Day to students or
(https://www.youtube.com/watch?v=AEmBTYc7Ivo). (A Snowy Day by Nelson is an alternate.) Use the illustrations to support the type of weather and the season. Stop reading the story when the little boy goes inside to look for his snowball in his pocket. Explain to the children that they are going to do the same thing as the boy in the story. Take the children outside and have them make a snowball and to keep it in their coat pocket. The children hang up their coat and sit down to listen to the rest of the story.
4. Discuss what happened to the little boy’s snowball. Ask them: “Why do you think the
snowball melted?” Discuss the effect of temperature on snow. Have the children go and get their snowball out of their pocket and describe what happened. [The snow began to melt because the school temperature was above freezing.]
5. Show the children the Winter Precipitation Graph on a chart or on the Student Page.
Refer to the precipitation terms along the bottom of the graph (rain, snow, freezing rain, and hail) and ask the children to describe each term. Note: These terms are defined on several of the Internet sites. They all deal with precipitation. Rain drops are liquid and larger than a drizzle; freezing rain is rain that freezes on impact and coats the roads and sidewalks; hail is precipitation in the form of lumps of ice; and snow is frozen rain.
6. Explain that the class will keep track of the type of precipitation daily for each month
throughout the rest of the school year. If it is raining then the student volunteer should color in one box above the word rain. The next day that month that it rains, the child should color in the next box, and so on. If there is no precipitation, then do not color any boxes. Keep the graphs in a binder as a Weather Journal or post them across the bulletin board for comparison.
7. At the beginning of each season, review the graphs in the Weather Journal. Count
the days of rain, snow, freezing rain, and hail. Ask the children: “What is the most common precipitation for fall (…winter or spring)?” Ask the children to predict what might be the most common form of precipitation for the coming months.
Assessment Assess the children individually by asking them to describe what kind of precipitation do we usually have in the winter (fall, spring, summer). Application Beyond School Send home an activity for the children to do using two ice cubes. Their task is to find a way to make one melt faster than the other. Connections English Language Arts When learning about seasons children can keep a weather journal.
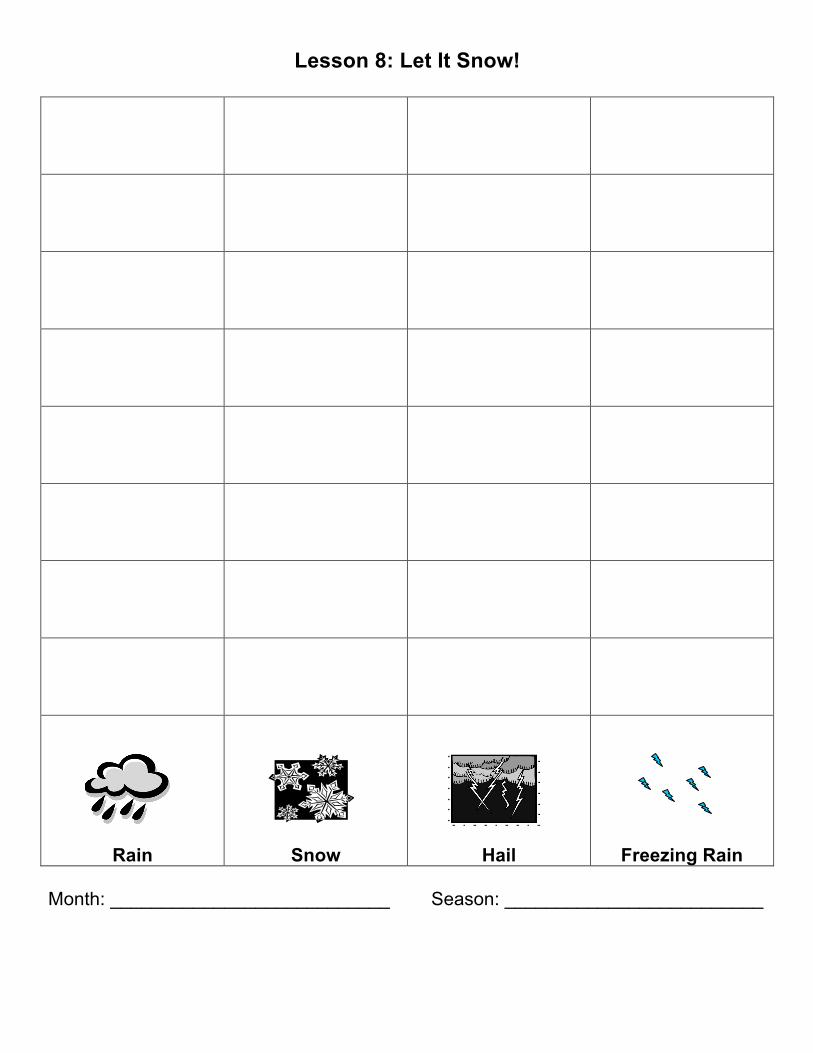
Lesson 8: Let It Snow!
Rain
Snow
Hail
Freezing Rain Month: ___________________________ Season: _________________________
Lesson 9: Seasonal Weather Big Ideas of the Lesson • Certain weather conditions can be expected in certain seasons. • The four seasons are spring, summer, fall/autumn, and winter. • The temperature changes with the seasons. Abstract In this lesson children use graphic organizers to classify typical weather for the seasons: winter, spring, summer, and fall. They expand their understanding to include violent weather conditions such as tornadoes and blizzards. Grade Level Context Expectation(s) Children will: • compare daily changes in weather related to temperature (e.g., cold, hot, warm,
cool); cloud cover (e.g., cloudy, partly cloudy, foggy); precipitation (e.g., rain, snow, hail, freezing rain); wind (e.g., breezy, windy, calm) (E.ES.01.21).
• describe and compare weather related to the four seasons in terms of temperature, cloud cover, precipitation, and wind (E.ES.01.22).
• describe severe weather characteristics (E.ES.01.23). • describe precautions that should be taken for human safety during sever weather
conditions (e.g., thunder and lightning, tornadoes, strong winds, heavy precipitation) (E.ES.01.24).
• identify the tools that might be used to measure temperature, precipitation, cloud cover, and wind (E.ES.01.31).
• observe and collect data of weather conditions over a period of time (E.ES.01.32). • demonstrate scientific concepts through various illustrations, performances, models,
exhibits, and activities (S.RS.01.11). Key Concept(s) measure precipitation season severe weather temperature Instructional Resources Equipment/Manipulative Weather Word Graphic Organizer Student Resource Kahan, Janet, and Juliana Texley. Supplemental Materials (SC01040901.doc). Teacher-made
material. Waterford, MI: Oakland Schools, 2009.
National Weather Service Playtime for Kids. U.S. Department of Commerce. 24 February 2009 <http://www.nws.noaa.gov/om/reachout/kidspage.shtml>.
Spring: Seasons under the Sun. Videocassette. Evanston, IL: United Learning, 2001. Web Weather for Kids. University Corporation for Atmospheric Research. 24 February
2009 <http://www.ucar.edu/40th/webweather/>. Teaching Resource Dan’s Wild Weather Page. Ed. Dan Satterfield. 24 February 2009 <http://www.wildwildweather.com>. General Weather Glossary. National Weather Service Weather Forecast Office –
Detroit, MI. 24 February 2009 <http://www.crh.noaa.gov/dtx/glossary.php>. How The Weather Works. Ed. Mike Mogil. 24 February 2009
<http://www.weatherworks.com>. Kahan, Janet, and Juliana Texley. Grade 1 Unit 4 Teacher Background (SC010400TB.doc). Teacher-
made material. Waterford, MI: Oakland Schools, 2009. National Climatic Data Center. National Oceanic and Atmospheric Administration. 24
February 2009 <http://lwf.ncdc.noaa.gov/oa/ncdc.html>. National Weather Service Education Page. U.S. Department of Commerce. 24
February 2009 <http://www.nws.noaa.gov/education.html>. Weather Channel Education Department. The Weather Channel Enterprises, Inc.
2002. 24 February 2009 <http://www.weather.com/education>. Sequence of Activities Advance Preparation: Make four copies of the blank graphic organizer transparency. Run the outline for one of the seasonal safety drawings on tag board, so that each child can make a poster of the current season. 1. Begin again by comparing yesterday’s weather predictions with today’s weather. Say: “That is
funny I thought it would be (“a blizzard” if it is spring, “warm and sunny” if it is winter).” Ask children why that would probably be wrong. [Seasonal weather is usually fairly typical.] Put the “Weather Words” graphic organizer on the Promethean Board. Label it with the current season. Then together begin labeling it with words typical of that season. (For example, winter temperatures are cold, often below freezing. The wind can vary from still to very windy. The precipitation can be rain, sleet, snow; the water on the ground can be water, ice, and snow.) Here are some examples:
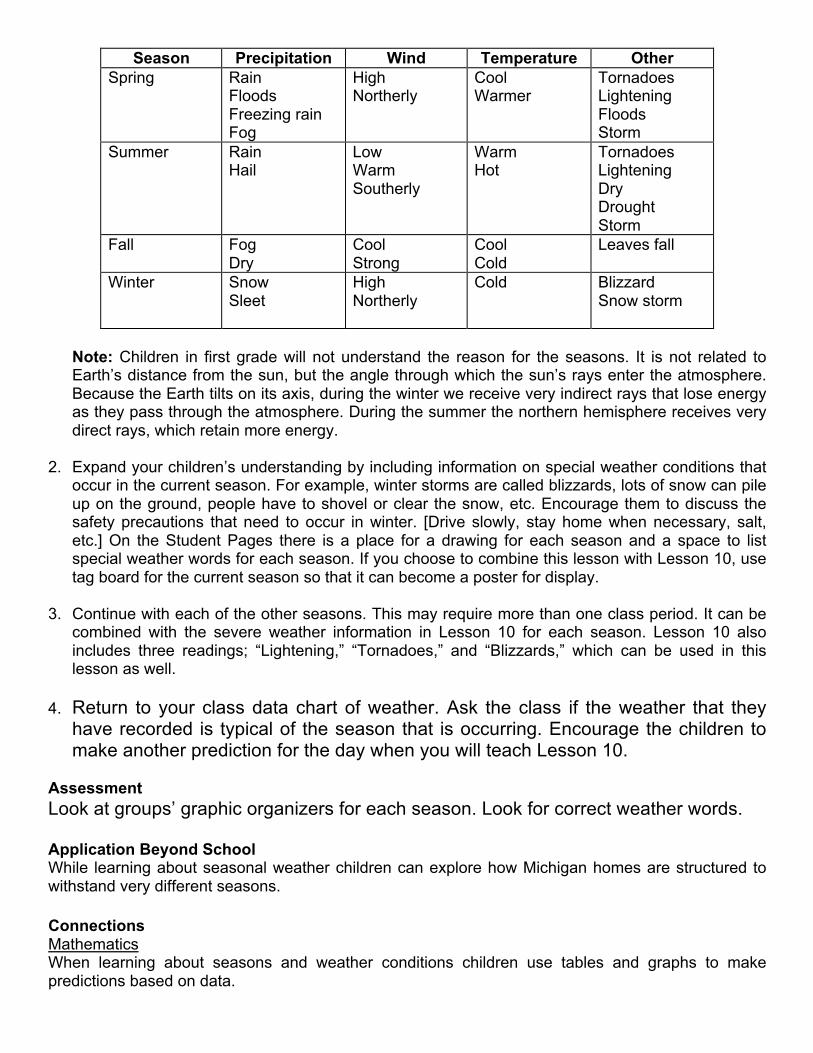
Season Precipitation Wind Temperature Other Spring Rain
Floods Freezing rain Fog
High Northerly
Cool Warmer
Tornadoes Lightening Floods Storm
Summer Rain Hail
Low Warm Southerly
Warm Hot
Tornadoes Lightening Dry Drought Storm
Fall Fog Dry
Cool Strong
Cool Cold
Leaves fall
Winter Snow Sleet
High Northerly
Cold Blizzard Snow storm
Note: Children in first grade will not understand the reason for the seasons. It is not related to Earth’s distance from the sun, but the angle through which the sun’s rays enter the atmosphere. Because the Earth tilts on its axis, during the winter we receive very indirect rays that lose energy as they pass through the atmosphere. During the summer the northern hemisphere receives very direct rays, which retain more energy.
2. Expand your children’s understanding by including information on special weather conditions that
occur in the current season. For example, winter storms are called blizzards, lots of snow can pile up on the ground, people have to shovel or clear the snow, etc. Encourage them to discuss the safety precautions that need to occur in winter. [Drive slowly, stay home when necessary, salt, etc.] On the Student Pages there is a place for a drawing for each season and a space to list special weather words for each season. If you choose to combine this lesson with Lesson 10, use tag board for the current season so that it can become a poster for display.
3. Continue with each of the other seasons. This may require more than one class period. It can be
combined with the severe weather information in Lesson 10 for each season. Lesson 10 also includes three readings; “Lightening,” “Tornadoes,” and “Blizzards,” which can be used in this lesson as well.
4. Return to your class data chart of weather. Ask the class if the weather that they
have recorded is typical of the season that is occurring. Encourage the children to make another prediction for the day when you will teach Lesson 10.
Assessment Look at groups’ graphic organizers for each season. Look for correct weather words. Application Beyond School While learning about seasonal weather children can explore how Michigan homes are structured to withstand very different seasons. Connections Mathematics When learning about seasons and weather conditions children use tables and graphs to make predictions based on data.
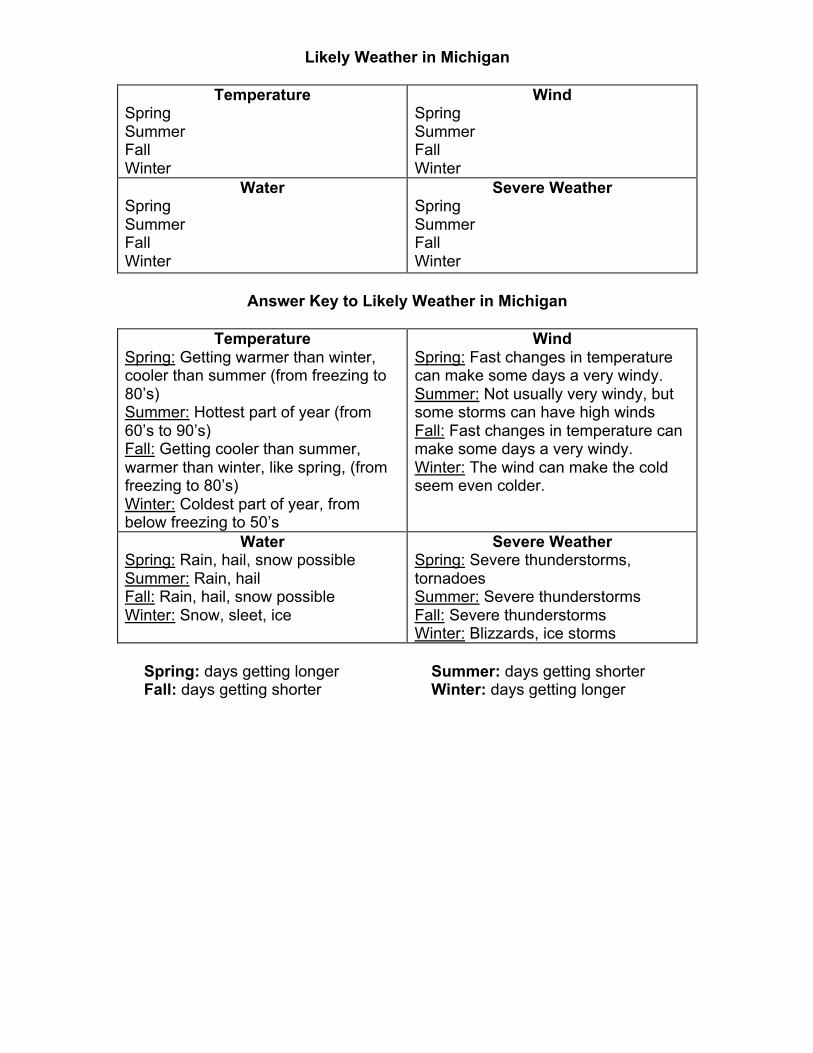
Likely Weather in Michigan
Temperature Spring Summer Fall Winter
Wind Spring Summer Fall Winter
Water Spring Summer Fall Winter
Severe Weather Spring Summer Fall Winter
Answer Key to Likely Weather in Michigan
Temperature
Spring: Getting warmer than winter, cooler than summer (from freezing to 80’s) Summer: Hottest part of year (from 60’s to 90’s) Fall: Getting cooler than summer, warmer than winter, like spring, (from freezing to 80’s) Winter: Coldest part of year, from below freezing to 50’s
Wind Spring: Fast changes in temperature can make some days a very windy. Summer: Not usually very windy, but some storms can have high winds Fall: Fast changes in temperature can make some days a very windy. Winter: The wind can make the cold seem even colder.
Water Spring: Rain, hail, snow possible Summer: Rain, hail Fall: Rain, hail, snow possible Winter: Snow, sleet, ice
Severe Weather Spring: Severe thunderstorms, tornadoes Summer: Severe thunderstorms Fall: Severe thunderstorms Winter: Blizzards, ice storms
Spring: days getting longer Summer: days getting shorter Fall: days getting shorter Winter: days getting longer
Lesson 9: Seasonal Weather Season: ______________________________ Here is a typical day! Normal weather _____________________________________________________ ___________________________________________________________________ ___________________________________________________________________ ___________________________________________________________________
Lesson 10: Seasonal Safety Big Ideas of the Lesson • A tornado is a strong wind in the shape of a funnel that can cause a lot of damage. • A lightening storm is a storm that has lightening. • A flood is an overflow of water. • A blizzard is a heavy snowstorm that can last for days. Abstract In this lesson children explore violent weather conditions, beginning with a demonstration and information on tornadoes. They prepare posters of safety precautions for violent weather conditions. Grade Level Context Expectation(s) Children will: • compare daily changes in weather related to temperature (e.g., cold, hot, warm,
cool); cloud cover (e.g., cloudy, partly cloudy, foggy); precipitation (e.g., rain, snow, hail, freezing rain); wind (e.g., breezy, windy, calm) (E.ES.01.21).
• describe and compare weather related to the four seasons in terms of temperature, cloud cover, precipitation, and wind (E.ES.01.22).
• describe severe weather characteristics (E.ES.01.23). • describe precautions that should be taken for human safety during sever weather
conditions (e.g., thunder and lightning, tornadoes, strong winds, heavy precipitation) (E.ES.01.24).
• identify the tools that might be used to measure temperature, precipitation, cloud cover, and wind (E.ES.01.31).
• observe and collect data of weather conditions over a period of time (E.ES.01.32). • demonstrate scientific concepts through various illustrations, performances, models,
exhibits, and activities (S.RS.01.11). Key Concept(s) measure precipitation season severe weather temperature Instructional Resources Equipment/Manipulative Computer access (projection is optimal) Crayons, markers or other art supplies Food coloring Poster or tag board

Soda bottles (2 clean 2 liter) Tornado tube link (or duct tape) Water Student Resource FEMA for Kids. 24 February 2009 <http://www.fema.gov/kids/>. Kahan, Janet, and Juliana Texley. Supplemental Materials (SC01041001.doc). Teacher-made
material. Waterford, MI: Oakland Schools, 2009. National Weather Service Playtime for Kids. U.S. Department of Commerce. 24
February 2009 <http://www.nws.noaa.gov/om/reachout/kidspage.shtml>. Web Weather for Kids. University Corporation for Atmospheric Research. 24 February
2009 <http://www.ucar.edu/40th/webweather/>. Teaching Resource Dan’s Wild Weather Page. Ed. Dan Satterfield. 24 February 2009 <http://www.wildwildweather.com>. General Weather Glossary. National Weather Service Weather Forecast Office –
Detroit, MI. 24 February 2009 <http://www.crh.noaa.gov/dtx/glossary.php>. How The Weather Works. Ed. Mike Mogil. 24 February 2009
<http://www.weatherworks.com>. Kahan, Janet, and Juliana Texley. Grade 1 Unit 4 Teacher Background (SC010400TB.doc). Teacher-
made material. Waterford, MI: Oakland Schools, 2009. Meteorological Monsters: Tornadoes. 16 October 2006. NOAA. 24 February 2009
<http://www.photolib.noaa.gov/nws/torn1.html>. Mogil, H. Michael. Tornadoes. Minneapolis, MN: Voyageur Press, 2001. National Climatic Data Center. National Oceanic and Atmospheric Administration. 24
February 2009 <http://lwf.ncdc.noaa.gov/oa/ncdc.html>. National Weather Service Education Page. U.S. Department of Commerce. 24
February 2009 <http://www.nws.noaa.gov/education.html>. Simons, Seymour. Tornadoes. New York: HarperCollins, 2001. Spring from Seasons Under the Sun. Videocassette. Evanston, IL: United Learning, 2001. Tornado Tube. Steve Spangler Science. 24 February 2009
<http://www.stevespanglerscience.com/product/1400>.
Weather Channel Education Department. The Weather Channel Enterprises, Inc. 2002. 24 February 2009 <http://www.weather.com/education>.
Williams, Jack. The Weather Book. New York: Random House, 1997. Sequence of Activities Advance Preparation: Prior to the lesson you will need to make a tornado demo. You will need two 2 liter pop bottles. One pop bottle should have colored water in it, filled 1/2 to 2/3 full. Use a “tornado tube” available from science suppliers or use duct tape to attach the two 2 liter pop bottles. Practice the demonstration in advance: give the set a twirl, stand it up so that one pop bottle has its bottom on the table. You should see a tornado shape in the swirling water. If you cannot project computer images, download a few from the NOAA website above for your bulletin board or flipchart. If the season is appropriate, this is a good time to make arrangements with your principal to have a tornado drill. By Michigan law, a school must have at least 10 emergency drills a year, of which at least one must be a tornado drill. 1. Have children share their drawings of the seasons from Lesson 9. “Did any of the scenes show
violent storms or other dangerous seasonal weather events?” 2. Introduce the children to the idea of Michigan’s most dangerous type of weather, the tornado. Say:
“Can you think of a storm that would be so dangerous that we would have to seek shelter right away?” (By law the children should have practiced a tornado drill every year, so it would be likely that they would have this knowledge.) “Let us look at some tornadoes.” Share the NOAA images with the children.
3. “Tornadoes can crush houses and blow cars right off the road. Let us look at how a tornado can
form.” Using the tornado tube apparatus show the swirl of water. “A tornado is swirling air, at hundreds of miles an hour. The funnel travels along the ground at 35 to 60 miles per hour…” Add as many details as you can. You can find resources at the NOAA website above. (If you have the Russell Wright teaching module you can also show a short video clip of the devastation of a tornado.)
4. “Tornadoes usually occur in the spring and summer. What kind of warning do we get?” [Radio and
television warnings and watches.] If your community has a siren system, mention that. Then explain your school’s warning system. “What do we do if we hear a tornado warning?” [Review specific procedures for your school. They should include going to an inside place of shelter far from windows and doors.] Distinguish between fire drills and tornado drills. If possible, use this time to play the two signals and distinguish between the two. Have the children read the section on tornadoes in their Student Pages.
5. “Tornadoes are most common in spring and summer. What other dangerous conditions are
common in the summer?” [Lightening storms.] Review lightening safety with children, using the reading on the Student Pages. If children also mention floods, expand your discussion to include those dangerous conditions and how to stay safe.
6. “How about winter?” [Ice storms, blizzards, extreme cold spells.] Review how to stay safe with
children in winter by reading the Student Pages and discussing safety precautions.
7. If you have computer access, lead children to the site FEMA for Kids (http://www.ready.gov/kids) to help them think about safety. There is a search engine at the site into which children can enter weather words like tornado and blizzard.
8. Divide children into groups. Depending upon the size of your class and the size of your paper or
board, you may want groups of two or more. Ask each group to choose a season and create a safety poster. The poster should have a scene of the season, with weather conditions clearly shown. It should also have safety precautions labeled. (Provide children the graphic organizers from Lesson 9 to help them spell the words for their posters.)
9. Share the posters with the school and/or parents. Assessment The posters created by the children should have appropriate weather conditions for the season. Application Beyond School Children should be able to identify the safest structures in their neighborhoods. Connections Social Studies While learning about weather safety children can investigate the communities storm warning system.
Lesson 10: Seasonal Safety Plan Your Poster
Each season we must take special care to keep safe. Here are some tips.
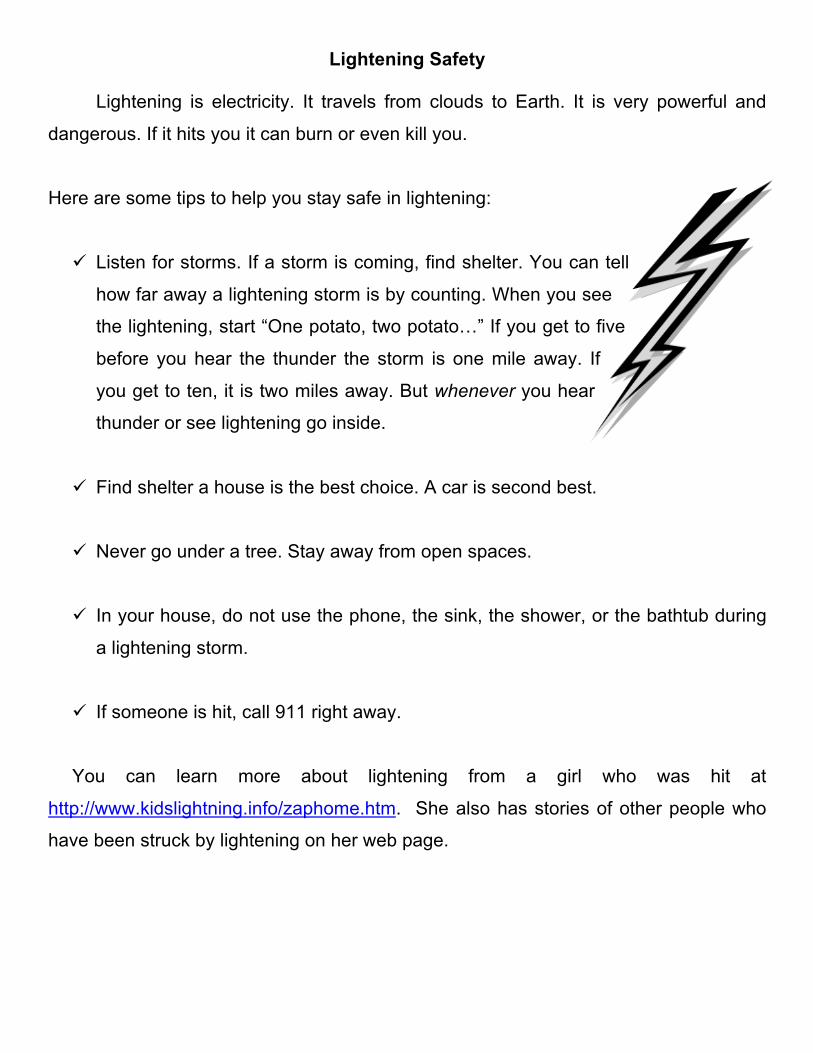
Lightening Safety
Lightening is electricity. It travels from clouds to Earth. It is very powerful and
dangerous. If it hits you it can burn or even kill you.
Here are some tips to help you stay safe in lightening:
! Listen for storms. If a storm is coming, find shelter. You can tell
how far away a lightening storm is by counting. When you see
the lightening, start “One potato, two potato…” If you get to five
before you hear the thunder the storm is one mile away. If
you get to ten, it is two miles away. But whenever you hear
thunder or see lightening go inside.
! Find shelter a house is the best choice. A car is second best.
! Never go under a tree. Stay away from open spaces.
! In your house, do not use the phone, the sink, the shower, or the bathtub during
a lightening storm.
! If someone is hit, call 911 right away.
You can learn more about lightening from a girl who was hit at
http://www.kidslightning.info/zaphome.htm. She also has stories of other people who
have been struck by lightening on her web page.
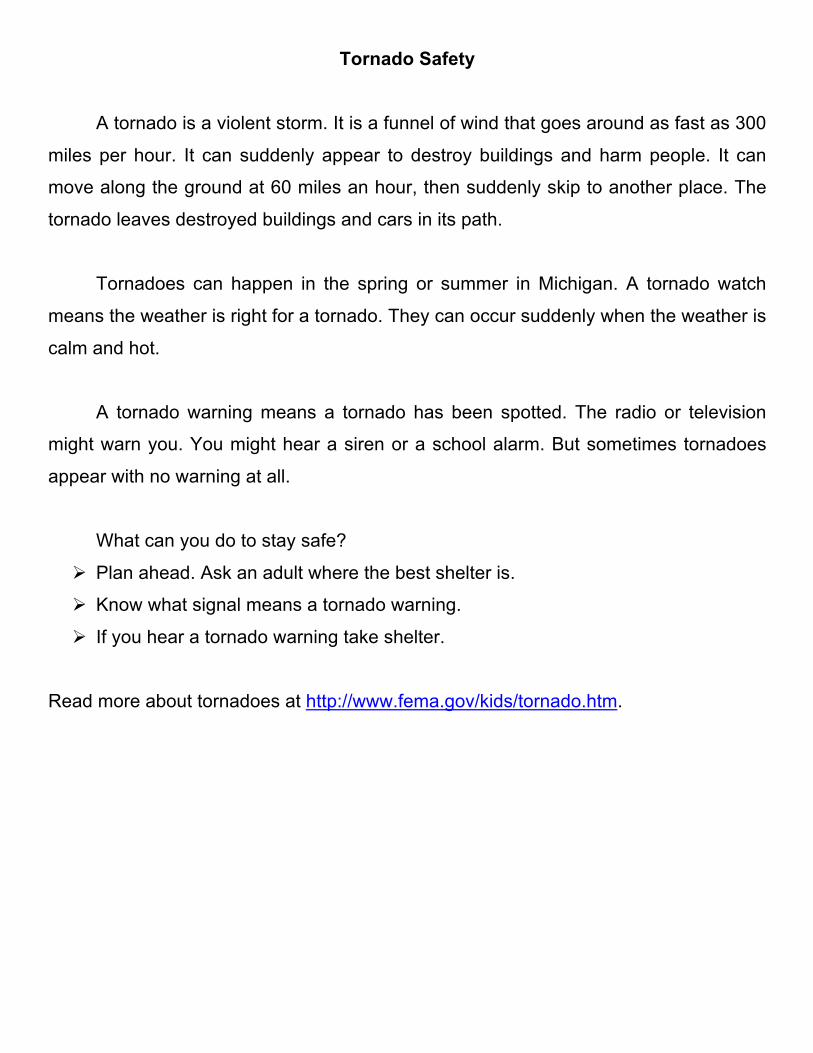
Tornado Safety
A tornado is a violent storm. It is a funnel of wind that goes around as fast as 300
miles per hour. It can suddenly appear to destroy buildings and harm people. It can
move along the ground at 60 miles an hour, then suddenly skip to another place. The
tornado leaves destroyed buildings and cars in its path.
Tornadoes can happen in the spring or summer in Michigan. A tornado watch
means the weather is right for a tornado. They can occur suddenly when the weather is
calm and hot.
A tornado warning means a tornado has been spotted. The radio or television
might warn you. You might hear a siren or a school alarm. But sometimes tornadoes
appear with no warning at all.
What can you do to stay safe?
" Plan ahead. Ask an adult where the best shelter is.
" Know what signal means a tornado warning.
" If you hear a tornado warning take shelter.
Read more about tornadoes at http://www.fema.gov/kids/tornado.htm.

Ice and Snow
In the winter Michigan is very cold. Many people enjoy winter sports. They ski and
skate and they make snowmen. But ice, snow, and wind can make it dangerous to be
outside. Here are some dangerous winter weather events:
! Freezing rain: When warm rain falls on cold ground it makes the streets and
sidewalks very slick.
! Sleet: Rain freezes before it hits the ground. It is very slippery too!
! Blizzard: Heavy snow and strong winds will produce a blinding snow, near zero
visibility, deep drifts, and life-threatening wind chill.
! Wind chill: When it is cold and the wind is blowing, it is even more dangerous.
Your skin can freeze. That is called frostbite. You can even die.
A winter storm warning means that very bad weather is coming and it is best to stay at
home. Adults should not drive. If school is closed, that means it is dangerous outside.
Stay in until the weather gets better.
Read more about winter storms at http://www.fema.gov/kids/wntstrm.htm.
Lesson 11: My Weather Book Big Ideas of the Lesson • Weather features often have an opposite feature (sunny is opposite of cloudy). Abstract This lesson is the cumulative lesson for the weather unit. Children make a weather book written in simplistic language using weather terms. They demonstrate an understanding of the weather concepts through their illustrations. Grade Level Context Expectation(s) Children will: • compare daily changes in weather related to temperature (e.g., cold, hot, warm,
cool); cloud cover (e.g., cloudy, partly cloudy, foggy); precipitation (e.g., rain, snow, hail, freezing rain); wind (e.g., breezy, windy, calm) (E.ES.01.21).
• describe and compare weather related to the four seasons in terms of temperature, cloud cover, precipitation, and wind (E.ES.01.22).
• describe severe weather characteristics (E.ES.01.23). • describe precautions that should be taken for human safety during sever weather
conditions (e.g., thunder and lightning, tornadoes, strong winds, heavy precipitation) (E.ES.01.24).
• identify the tools that might be used to measure temperature, precipitation, cloud cover, and wind (E.ES.01.31).
• observe and collect data of weather conditions over a period of time (E.ES.01.32). • demonstrate scientific concepts through various illustrations, performances, models,
exhibits, and activities (S.RS.01.11). Key Concept(s) measure precipitation season severe weather temperature Instructional Resources Equipment/Manipulative Crayons Pencils Student Resource FEMA for Kids. 24 February 2009 <http://www.fema.gov/kids/>. Kahan, Janet, and Juliana Texley. Supplemental Materials (SC01041101.doc). Teacher-made
material. Waterford, MI: Oakland Schools, 2009.
National Weather Service Playtime for Kids. U.S. Department of Commerce. 24 February 2009 <http://www.nws.noaa.gov/om/reachout/kidspage.shtml>.
Web Weather for Kids. University Corporation for Atmospheric Research. 24 February
2009 <http://www.ucar.edu/40th/webweather/>. Teaching Resource Dan’s Wild Weather Page. Ed. Dan Satterfield. 24 February 2009 <http://www.wildwildweather.com>. General Weather Glossary. National Weather Service Weather Forecast Office –
Detroit, MI. 24 February 2009 <http://www.crh.noaa.gov/dtx/glossary.php>. How The Weather Works. Ed. Mike Mogil. 24 February 2009
<http://www.weatherworks.com>. Kahan, Janet, and Juliana Texley. Grade 1 Unit 4 Teacher Background (SC010400TB.doc). Teacher-
made material. Waterford, MI: Oakland Schools, 2009. National Climatic Data Center. National Oceanic and Atmospheric Administration. 24
February 2009 <http://lwf.ncdc.noaa.gov/oa/ncdc.html>. National Weather Service Education Page. U.S. Department of Commerce. 24
February 2009 <http://www.nws.noaa.gov/education.html>. Weather Channel Education Department. The Weather Channel Enterprises, Inc.
2002. 24 February 2009 <http://www.weather.com/education>. Williams, Jack. The Weather Book. New York: Random House, 1997. Sequence of Activities Advance Preparation: The weather booklets need to be made prior to this lesson. It is suggested that this lesson be spread out over several days to ensure the quality of the illustrations. A completed example of the weather book can be found in the Teacher Background. Note: The children need to have the basic concept of word opposites before doing this lesson. 26. Review weather terms and features covered throughout this unit. Now ask the
children if they can think of any other weather concepts that they have learned and add those features to the map. Ask the children to identify the pictures on the concept web as a temperature, cloud cover, precipitation, or severe weather characteristic.
27. As the children to look at the concept web, ask them to identify features that would
be opposite, for example, ask: “What would be opposite of cold?” Not all of the
pictures lend themselves to having an opposite but include the opposites covered in the children’s booklets.
28. Show the children the booklet: My Weather Book. Have the children read and
reread the title pointing to the words as they are read. Point to the word by and show the children where they write their name. Model this by writing your name. Tell children they are going to draw pictures on the front cover of their booklet just like they did on their weather web. Encourage them to share ideas and model for them by drawing the pictures on the cover.
29. Open the booklet to the first page and encourage the children to read along. “It is
sunny. It is ______.” Have them predict what kind of weather would be the opposite of sunny. Go back and reread both sentences and tell the children to draw two pictures, one to go with each sentence. Ask them to describe what kind of picture would go with the opposite words. Model for them by drawing a picture that goes with each sentence.
30. Repeat step four for each page in the booklet, encouraging the children to make
predictions for the opposite weather term and then describe what kinds of pictures would be appropriate for each sentence. Model for the children how to draw the pictures on each page but keep the activity open-ended and discuss other possible types of illustrations.
Assessment An informal assessment can be done by looking at each child’s booklet and checking for an appropriate picture and asking them to describe the weather features on each page. Application Beyond School Children can take their booklets home to share with their family. Connections English Language Arts When learning about seasons and weather features, children can explore expository picture books to further their knowledge.
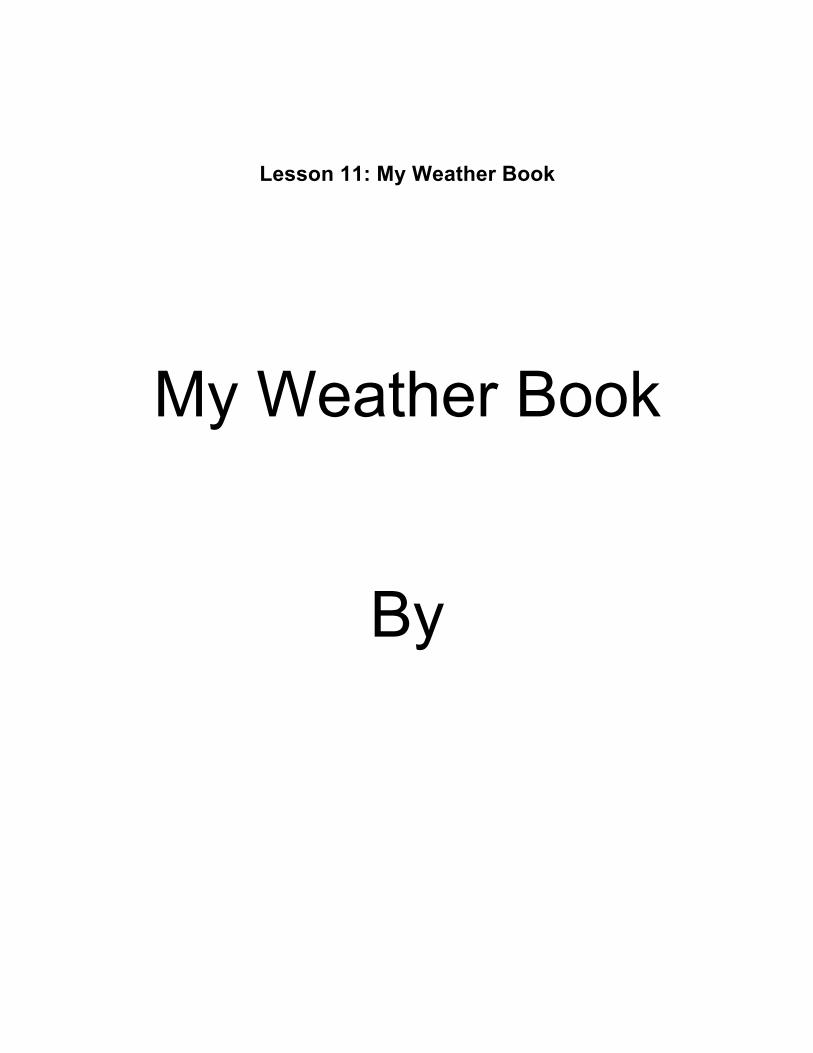
Lesson 11: My Weather Book
My Weather Book
By

It is sunny.

It is cloudy.

It is hot.

It is cold.

It is calm.

It is windy.

It is snowy.

It is rainy.
Lesson 12: Keeping it Cool 1-3 days Big Ideas of the Lesson The goal of this activity is to develop the young learner from a creative thinker to a problem solver. Grade Level Context Expectation(s) (ENGINEERING) Children will: • K-PS3-2. Use tools and materials to design and build a structure that will reduce the
warming effect of sunlight on an area.* [Clarification Statement: Examples of structures could include umbrellas, canopies, and tents that minimize the warming effect of the sun.]).
Key Concept(s) Design Build The sun produces heat. Shading an object from the sun can keep it cooler. Instructional Resources Equipment/Manipulatives -Desk lamp (optional) -Ice cold water -Styrofoam cups -Thermometers or temperature strips -Assorted fabrics -Tape -Scissors -Foam -Aluminum foil -Dowels -Popsicle sticks or tongue depressors Sequence of Activities Advance Preparation: Gather a variety of materials for Provide students with a wide variety of materials. Tell them that they will need to work in teams to design & create something that can be used to keep a glass of water cold. Feel free to be creative with how you present the engineering challenge (i.e. Shark Tank, Invent a product, fictional situation, etc…)
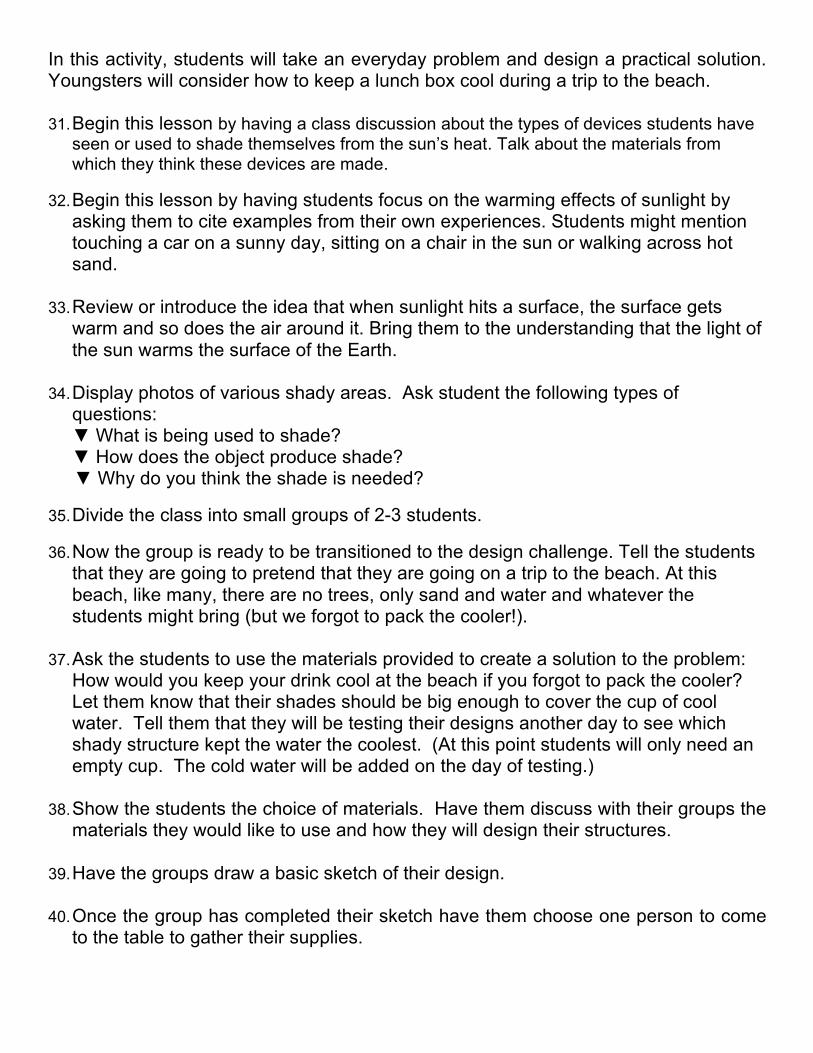
In this activity, students will take an everyday problem and design a practical solution. Youngsters will consider how to keep a lunch box cool during a trip to the beach. 31. Begin this lesson by having a class discussion about the types of devices students have
seen or used to shade themselves from the sun’s heat. Talk about the materials from which they think these devices are made.
32. Begin this lesson by having students focus on the warming effects of sunlight by
asking them to cite examples from their own experiences. Students might mention touching a car on a sunny day, sitting on a chair in the sun or walking across hot sand.
33. Review or introduce the idea that when sunlight hits a surface, the surface gets warm and so does the air around it. Bring them to the understanding that the light of the sun warms the surface of the Earth.
34. Display photos of various shady areas. Ask student the following types of questions: ▼ What is being used to shade? ▼ How does the object produce shade?
▼ Why do you think the shade is needed? 35. Divide the class into small groups of 2-3 students. 36. Now the group is ready to be transitioned to the design challenge. Tell the students
that they are going to pretend that they are going on a trip to the beach. At this beach, like many, there are no trees, only sand and water and whatever the students might bring (but we forgot to pack the cooler!).
37. Ask the students to use the materials provided to create a solution to the problem: How would you keep your drink cool at the beach if you forgot to pack the cooler? Let them know that their shades should be big enough to cover the cup of cool water. Tell them that they will be testing their designs another day to see which shady structure kept the water the coolest. (At this point students will only need an empty cup. The cold water will be added on the day of testing.)
38. Show the students the choice of materials. Have them discuss with their groups the
materials they would like to use and how they will design their structures.
39. Have the groups draw a basic sketch of their design.
40. Once the group has completed their sketch have them choose one person to come to the table to gather their supplies.
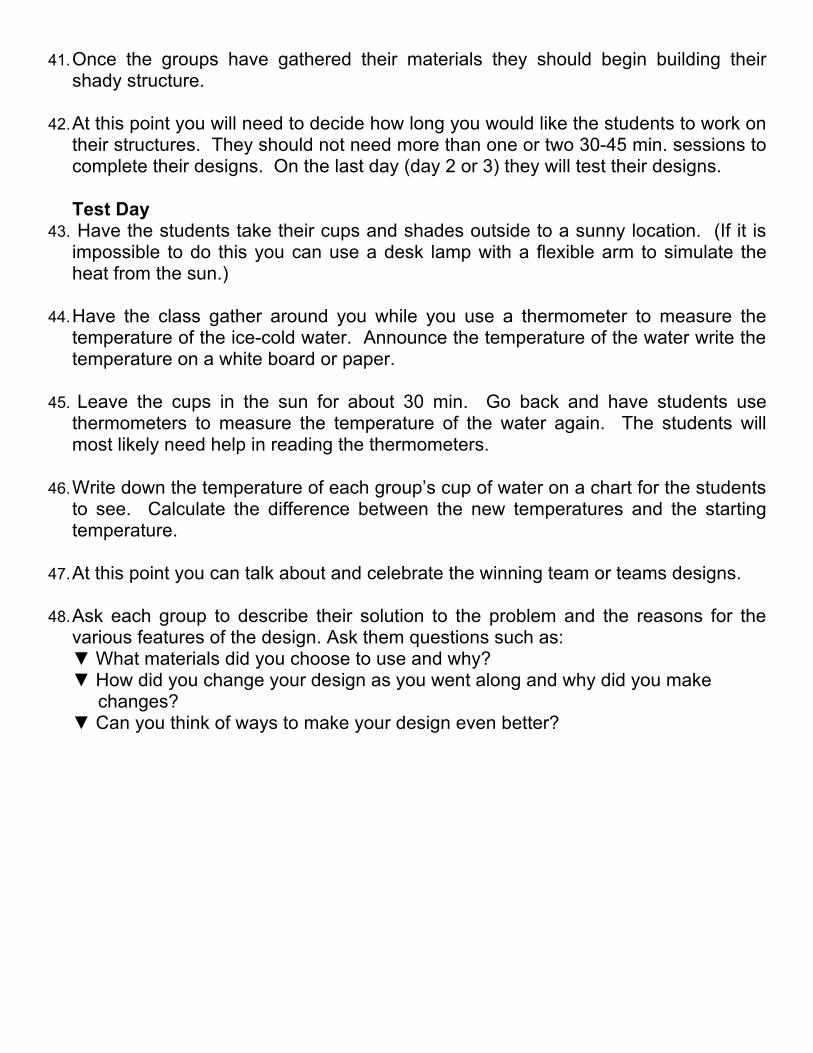
41. Once the groups have gathered their materials they should begin building their shady structure.
42. At this point you will need to decide how long you would like the students to work on their structures. They should not need more than one or two 30-45 min. sessions to complete their designs. On the last day (day 2 or 3) they will test their designs. Test Day
43. Have the students take their cups and shades outside to a sunny location. (If it is impossible to do this you can use a desk lamp with a flexible arm to simulate the heat from the sun.)
44. Have the class gather around you while you use a thermometer to measure the temperature of the ice-cold water. Announce the temperature of the water write the temperature on a white board or paper.
45. Leave the cups in the sun for about 30 min. Go back and have students use thermometers to measure the temperature of the water again. The students will most likely need help in reading the thermometers.
46. Write down the temperature of each group’s cup of water on a chart for the students to see. Calculate the difference between the new temperatures and the starting temperature.
47. At this point you can talk about and celebrate the winning team or teams designs.
48. Ask each group to describe their solution to the problem and the reasons for the various features of the design. Ask them questions such as: ▼ What materials did you choose to use and why? ▼ How did you change your design as you went along and why did you make changes? ▼ Can you think of ways to make your design even better?