Embed Size (px)
Citation preview
NRP Study Guide
Bethanie Christopher, RN
(626) 441-3406
fax (626) 441-2791
www.LifesaverEd.com Revised 1/2012

Page 2
NRP 6th Edition Need-to-Know Information
1. A baby who is breathing or crying, has good muscle tone, and a heart rate over 100 bpm should go to the mother (with mother’s permission) for skin-to-skin contact (preferred), routine care, and continued evaluation.
2. After delivery, a baby who is breathing, has no secretions impeding
respirations, and does not require resuscitation does not require
suctioning of his/her mouth and nose with a bulb syringe.
3. Do not administer free-flow oxygen in the first few minutes after
delivery to “pink-up” infants who appear dusky. We now know this practice can result in oxygenation that is too high and may, in some cases, be harmful.
4. Use pulse oximetry to guide the use and concentration of supplemental
oxygen, including free-flow oxygen. Use the Targeted Preductal Oxygen table and stay within the target range according to the newborn’s age in minutes.
5. Begin resuscitation of the term infant with room air.
6. A source of blended air/oxygen and pulse oximetry should be present
at every high-risk birth and immediately available in the event of an unexpected resuscitation.
7. During chest compressions, increase oxygen concentration to 100%.
Intubation is recommended. Minimize interruption of coordinated chest
compressions and ventilation and check the heart rate every 45-60
seconds. When the heart rate is more than 60 bpm, discontinue chest
compressions and go back to checking the heart rate every 30 seconds.
Page 3
Lesson 1 – Overview and Principles of Resuscitation
All newborns require initial assessment to determine whether resuscitation is required. Most
newly born babies are vigorous, but approximately 10% of newborns require some assistance to
begin breathing at birth. One percent needs extensive resuscitative measures (intubation, chest
compressions, and/or medications) to survive. Every birth should be attended by someone who
has been trained in initiating a neonatal resuscitation. Additional trained personnel will be
necessary if a full resuscitation is anticipated or required. Many, but not all, babies who will
require neonatal resuscitation can be anticipated by identifying the presence of antepartum and
intrapartum risk factors associated with the need for neonatal resuscitation.
The most important and effective action in neonatal resuscitation is to ventilate the baby’s
lungs.
Before birth, a baby receives oxygen from the mother through the placenta. At birth, the
following things must happen in seconds for the baby to complete a normal transition to breathing
on its own and getting oxygen into the blood stream from the lungs:
Lung fluid must be absorbed from the alveoli and replaced by air that contains oxygen
The umbilical arteries and vein constrict and are then clamped. This increases systemic blood
pressure.
Blood vessels in the lungs must relax to increase blood flow to the alveoli so that oxygen can
be absorbed and carried to the rest of the body.
As blood oxygen levels increase, the pulmonary blood vessels relax and the ductus arteriosus
begins to constrict. This causes additional increase in systemic blood pressure and results in
closure of the foramen ovale.
Blood should then fully flow through the lungs, picking up more oxygen and causing the
baby to turn pink.
Complete newborn transition may take hours or even several days. It may take 10 minutes
for a newborn to achieve an oxygen saturation of 90% or greater.
If a newborn’s lungs are not ventilated, the pulmonary arterioles will remain constricted,
preventing blood from becoming oxygenated. This can lead to brain damage, damage to other
organs, or death.
When a fetus/newborn first becomes compromised, an initial period of attempted rapid breathing
is followed by primary apnea. Oxygen deprivation from primary apnea causes the heart rate to
drop. Normally stimulation will help a baby transition. If a baby does not begin breathing
immediately after being stimulated, he or she is likely in secondary apnea and will require
positive-pressure ventilation (PPV). Continued stimulation will not help.
Primary apnea = responds to stimulation
Secondary apnea = does NOT respond to stimulation
Positive-pressure ventilation must be provided to reverse the process triggered by oxygen
deprivation. This will usually result in a rapid improvement in heart rate.
Initial Assessment:
1. Gestational age
2. Muscle Tone
3. Breathing or Crying
Page 4
Key factors of the newborn resuscitation:
Resuscitation should proceed rapidly.
You have approximately 30 seconds to achieve a response from one step before deciding
whether you need to go on to the next.
Once chest compressions begin, evaluate heart rate every 45 – 60 seconds.
Evaluation and decision making are based primarily upon: respirations, heart rate, and
oxygenation.
Behavioral skills such as teamwork, leadership, and effective communication are critical to
successful resuscitation of the newborn.
A. Initial Steps
1. Provide warmth
2. Position & clear airway as necessary*
3. Dry stimulate, reposition
4. Evaluate respirations, heart rate, and oxygenation
B. Provide positive pressure ventilation (PPV) with a resuscitation bag and apply pulse
oximeter*
If apneic, gasping, or heart rate is < 100 bpm, provide PPV.
C. Provide chest compressions as you continue assisted ventilation and insert emergency
umbilical venous catheter.*
If the heart rate is < 60 bpm, begin chest compressions as you continue to ventilate.
If heart rate is > 60 bpm and < 100 bpm, continue PPV.
Once chest compressions are in progress, re-evaluate the HR every 45 – 60 seconds.
D. Administer epinephrine as you continue assisted ventilation and chest compressions.*
If heart rate is < 60 bpm despite 30 seconds of effective assisted ventilation and
another 45 - 60 seconds of coordinated chest compressions and ventilation,
administer epinephrine as you continue assisted ventilation and chest compressions.*
* May consider intubation of the trachea at these points.
Determine a newborn’s heart rate by counting how many beats are in 6 seconds, then
multiply by 10. For example, if you count 8 beats in 6 seconds, announce the baby’s heart
rate as 80 bpm.
Apgar scores are not useful for determining the need for resuscitation. They are only useful for
providing information about overall status and response to resuscitation.
Perform Apgar scores at 1 minute and 5 minutes of age.
When 5 minute score is less than 7, continue additional scores every 5 minutes for up
to 20 minutes.
Post-Resuscitation care encompasses 3 levels:
1. Routine Care – when the baby is vigorous and may stay with mother. Provide warmth, clear
airway, dry and assess baby’s color.
2. Observational Care – when the baby requires initial steps under the radiant warmer due to
depressed breathing or activity, meconium-stained amniotic fluid or cyanosis. Manage with
frequent evaluation and perhaps admission to a transitional nursery.
3. Post-resuscitation care – when the baby received PPV or more extensive resuscitation and is
at high risk for recurrent deterioration or subsequent complications. Manage where ongoing
evaluation and monitoring are available. Neonatal intensive care may be necessary.
Page 5
Lesson 2 – Initial Steps in Resuscitation
If meconium is present and the newborn is NOT vigorous, suction the baby’s trachea before
proceeding with any other steps. If the newborn is vigorous, suction the mouth and nose only,
and proceed with resuscitation as required.
Vigorous = Strong respiratory effort
Good muscle tone
Heart rate > 100 bpm
Initial Steps of resuscitation, except for a non-vigorous baby with meconium:
1. Provide a warm and dry environment.
2. Open the airway by positioning the newborn in a “sniffing” position.
3. Dry Stimulate, reposition
4. Evaluate respirations, heart rate, and oxygenation.
Appropriate forms of tactile stimulation are:
Dry with a warm towel
Slapping or flicking the soles of the feet
Gently rubbing the back
Continued use of tactile stimulation in an apneic newborn wastes valuable time. For persistent
apnea, begin PPV promptly.
Oxygen should be treated as a drug—either too little or too much can cause injury.
Use pulse oximetry when:
When resuscitation is anticipated
When positive-pressure ventilation is required for more than a few breaths
When central cyanosis is persistent
When supplemental oxygen is administered
To confirm your perception of cyanosis
A fetus has an oxygen saturation of approximately 60%, and it may take up to 10 minutes for a
healthy newborn to increase saturation to the normal range of over 90%.
Free-flow oxygen is indicated for central cyanosis. Acceptable methods for administering
free-flow oxygen are:
A simple oxygen mask held firmly over the baby’s face
Mask from the flow-inflating bag or T-piece resuscitator held closely to the baby’s mouth and
nose
Oxygen tubing cupped closely over the baby’s mouth and nose
Free-flow oxygen cannot be given reliably by a mask attached to a self-inflating bag.
Decisions and actions during newborn resuscitation are based on the newborn’s respirations, heart
rate, and oxygenation.

Page 6
Lesson 3 – Use of Resuscitation Devices for Positive-Pressure
Ventilation
Ventilation of the lungs is the single most important and most effective step in
cardiopulmonary resuscitation of the compromised infant.
Indications for PPV are
Apnea/gasping
Heart rate less than 100 bpm even if breathing
Persistent central cyanosis and low SPO2 despite 100% free-flow supplemental oxygen
increased to 100%
Resuscitation of term newborns may begin with 21% oxygen (room air); resuscitation of preterm
newborns may begin with a somewhat higher oxygen concentration. Pulse oximetry is used to
help adjust the amount of supplemental oxygen to avoid giving too much or too little oxygen.
Self-inflating bags
Fill spontaneously after they are squeezed, pulling oxygen or air into the bag
Remain inflated at all times
Must have a tight face-mask seal to inflate the lungs
Can deliver PPV without a compressed gas source; user must be certain the bag is connected
to an oxygen source for the purpose of neonatal resuscitation
Require attachment of an oxygen reservoir to deliver high oxygen concentration. Without the
reservoir, the bag delivers a maximum of only about 40% oxygen, which may be insufficient
for neonatal resuscitation.
Cannot be used to administer free-flow oxygen through the mask and cannot be used to
deliver continuous positive airway pressure (CPAP)
Should have an integral pressure gauge, or, if there is a site for attaching a pressure gauge
(manometer), it should be attached
Flow-inflating bags
Fill only when gas from a compressed source flows into them
Depend on a compressed gas source
Must have a tight face-mask seal to inflate
Use a flow-control valve to regulate pressure/inflation
Should have a pressure gauge
Look like a deflated balloon when not in use
Can be used to administer free-flow oxygen and CPAP
Flow-inflating bags will NOT work if
The mask is not properly sealed over the newborn’s nose and mouth
There is a hole in the bag
The flow-control valve is open too far
The pressure gauge is missing or the port is not occluded
Page 7
T-piece resuscitators
Depend on a compressed gas source
Must have a tight face-mask seal to inflate the lungs
Require selection of a maximum pressure, peak inspiratory pressure, and positive end-
expiratory pressure (PEEP)
May require adjustment of peak inspiratory during resuscitation to achieve physiologic
improvement, audible breath sounds, and perceptible chest movements
Positive pressure is provided by alternately occluding and releasing the hole in the PEEP cap
Can be used to deliver free-flow oxygen
The PPV device should be assembled and connected to a blender so that any concentration of
oxygen from 21% (room air), up to 100% oxygen, can be provided.
If an oxygen blender and pulse oximeter are not immediately available, start PPV
with 21% oxygen (room air) while you obtain an air-oxygen source and an oximeter.
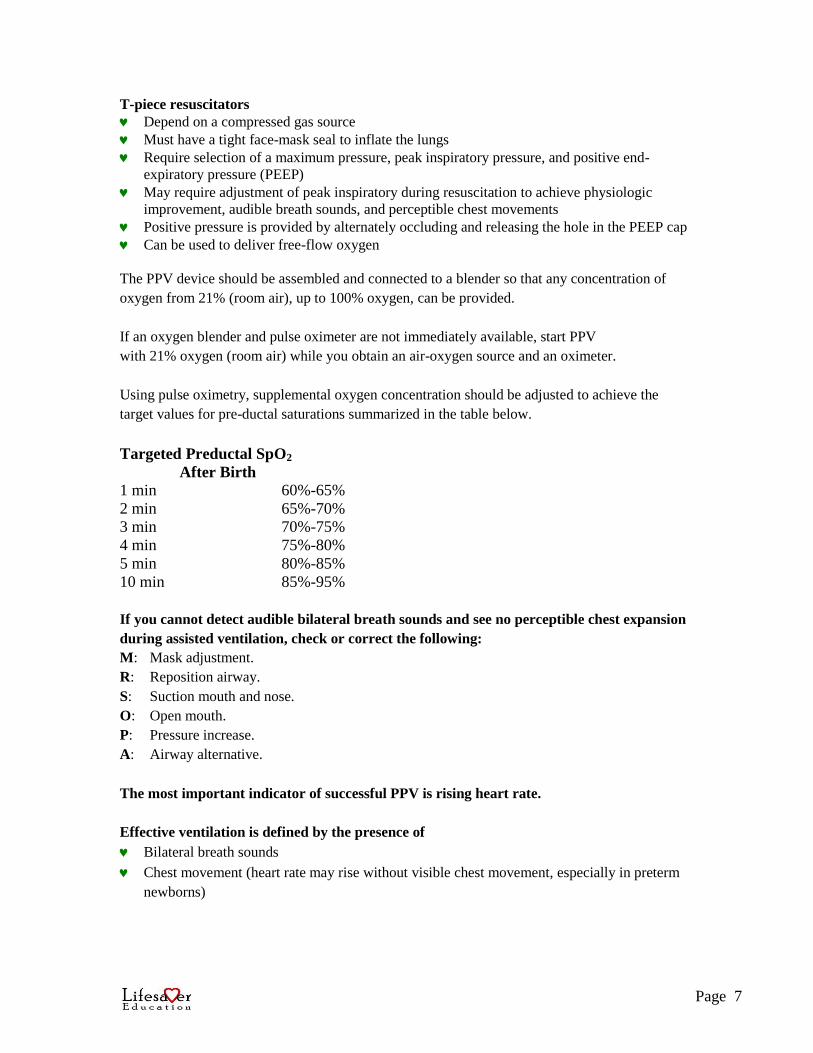
Using pulse oximetry, supplemental oxygen concentration should be adjusted to achieve the
target values for pre-ductal saturations summarized in the table below.
Targeted Preductal SpO2
After Birth
1 min 60%-65%
2 min 65%-70%
3 min 70%-75%
4 min 75%-80%
5 min 80%-85%
10 min 85%-95%
If you cannot detect audible bilateral breath sounds and see no perceptible chest expansion
during assisted ventilation, check or correct the following:
M: Mask adjustment.
R: Reposition airway.
S: Suction mouth and nose.
O: Open mouth.
P: Pressure increase.
A: Airway alternative.
The most important indicator of successful PPV is rising heart rate.
Effective ventilation is defined by the presence of
Bilateral breath sounds
Chest movement (heart rate may rise without visible chest movement, especially in preterm
newborns)

Page 8
Signs that PPV has been effective, and indications that PPV may be discontinued, are
Heart rate rises to over 100 breaths per minute
Improvement in oxygen saturation
Onset of spontaneous respirations
If there is not physiologic improvement and no perceptible chest expansion during assisted
ventilation
Reapply mask to face using light downward pressure and lifting the mandible up toward the
mask (Make sure that you are using the right size mask – the rim should cover the tip of the
chin, the mouth, and the nose, but not the eyes.)
Reposition the head
Check for secretions; suction mouth and nose
Ventilate with the baby’s mouth slightly open
Increase pressure of ventilations
Recheck or replace the resuscitation bag
After reasonable attempts fail, intubate the baby
If PPV will be continuing for several minutes, insert an orogastric tube
To prevent upward pressure on the diaphragm, preventing full expansion of the lungs, that
may be caused by a stomach distended with gas
To prevent regurgitation of gastric contents that may be aspirated during PPV
By measuring the distance from the bridge of the nose to the earlobe and from the earlobe to
a point halfway between the xyphoid process and the umbilicus to determine how much tube
to insert
Through the mouth rather than the nose
Page 9
Lesson 4 – Chest Compressions
Chest compressions are indicated when the heart rate remains less than 60 bpm despite 30
seconds of effective PPV.
Once the heart rate is below 60 beats per minute, the oximeter may stop working. You should
increase the oxygen to 100% until return of the oximeter reading to guide you in the appropriate
adjustment of delivered oxygen.
Chest compressions
Compress the heart against the spine
Increase intrathoracic pressure
Circulate blood to the vital organs, including the brain
There are 2 acceptable techniques for chest compressions – the thumb technique and the 2-finger
technique – but the thumb technique is preferred
Locate the correct area for compressions by running your fingers along the lower edge of the rib
cage until you locate the xyphoid. Then place your thumbs or fingers on the sternum, above the
xyphoid and on a line connecting the nipples.
To ensure proper rate of chest compressions and ventilation, the compressor repeats “One-and-
Two-and-Three-and Breathe-and….”
During chest compressions, the breathing rate is 30 breaths per minute and the compression rate
is 90 compressions per minute. This equals 120 “events” per minute. One cycle of 3
compressions and 1 breath takes 2 seconds.
If you anticipate that the baby will need medication by the umbilical route, you can continue
chest compressions by moving to the head of the bed to continue giving compressions using the
thumb technique. Performing chest compressions from the head of the bed is most easily
accomplished if the trachea has been intubated.
During chest compressions, ensure that
Chest movement is adequate during ventilation.
Supplemental oxygen is being used.
Compression depth is one third the diameter of the chest.
Pressure is released fully to permit chest recoil during relaxation phase of chest compression.
Thumbs or fingers remain in contact with the chest at all times
Duration of the downward stroke of the compression is shorter than duration of the release.
Chest compressions and ventilation are well coordinated.
After 45 to 60 seconds of chest compressions and ventilation, check the heart rate. If the
heart rate is
Greater than 60 beats per minute, discontinue compressions and continue ventilation at 40 to
60 breaths per minute.
Greater than 100 beats per minute, discontinue compressions, and gradually discontinue
ventilation if the newborn is breathing spontaneously.
Less than 60 bpm, intubate the newborn, if not already done, and give epinephrine, preferably
intravenously. Intubation provides a more reliable method of continuing ventilation.
Page 10
Lesson 5 – Endotracheal Intubation
A person experienced in endotracheal intubation should be immediately available to assist at
every delivery.
Indications for endotracheal intubation include the following:
To suction trachea in presence of meconium when the newborn is not vigorous
To improve efficacy of ventilation if mask ventilation is ineffective or required for more than
a few minutes
To facilitate coordination of chest compressions and ventilation and to maximize the
efficiency of each ventilation
To improve ventilation in special conditions, such as extreme prematurity, surfactant
administration, or suspected diaphragmatic hernia (see Lessons 7 and 8)
The laryngoscope is always held in the operator’s left hand
The correct-sized laryngoscope blade for a term newborn is No.1. The correct-sized blade for a
preterm newborn is No. 0 or, in extremely preterm infants, No. 00.
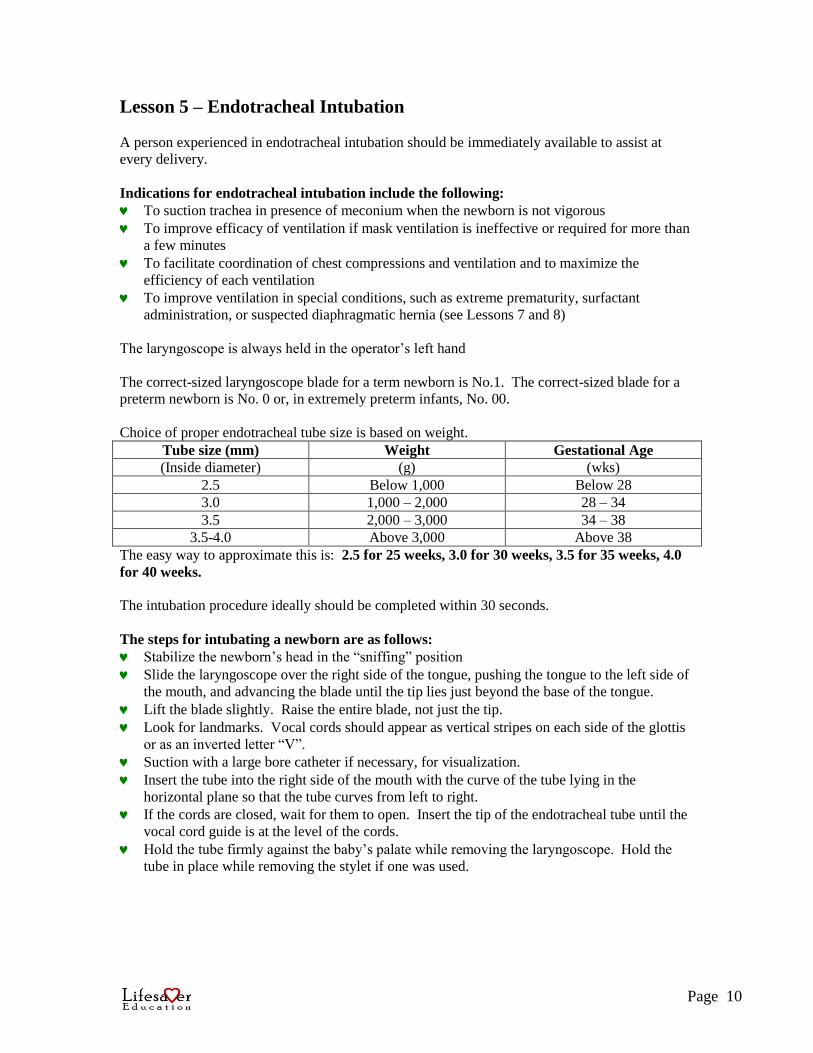
Choice of proper endotracheal tube size is based on weight.
Tube size (mm) Weight Gestational Age
(Inside diameter) (g) (wks)
2.5 Below 1,000 Below 28
3.0 1,000 – 2,000 28 – 34
3.5 2,000 – 3,000 34 – 38
3.5-4.0 Above 3,000 Above 38
The easy way to approximate this is: 2.5 for 25 weeks, 3.0 for 30 weeks, 3.5 for 35 weeks, 4.0
for 40 weeks.
The intubation procedure ideally should be completed within 30 seconds.
The steps for intubating a newborn are as follows:
Stabilize the newborn’s head in the “sniffing” position
Slide the laryngoscope over the right side of the tongue, pushing the tongue to the left side of
the mouth, and advancing the blade until the tip lies just beyond the base of the tongue.
Lift the blade slightly. Raise the entire blade, not just the tip.
Look for landmarks. Vocal cords should appear as vertical stripes on each side of the glottis
or as an inverted letter “V”.
Suction with a large bore catheter if necessary, for visualization.
Insert the tube into the right side of the mouth with the curve of the tube lying in the
horizontal plane so that the tube curves from left to right.
If the cords are closed, wait for them to open. Insert the tip of the endotracheal tube until the
vocal cord guide is at the level of the cords.
Hold the tube firmly against the baby’s palate while removing the laryngoscope. Hold the
tube in place while removing the stylet if one was used.
Page 11
Correct placement of the endotracheal tube is indicated by
Direct visualization of the tube passing between the vocal cords
Improved vital signs (heart rate, color/oximetry, activity)
Presence of exhaled CO2 as determined by a CO2 detector
Breath sounds over both lung fields but decreased or absent over the stomach
No gastric distention with ventilation
Vapor in the tube during exhalation
Chest movement with each breath
Tip-to-lip measurement: add 6 to newborn’s weight in kilograms
Chest x-ray confirmation if the tube is to remain in place past initial resuscitation
Placement of a laryngeal mask airway may be useful in the following situations:
When facial or upper airway malformations render ventilation by mask ineffective
When positive-pressure ventilation with a face mask fails to achieve effective ventilation and
intubation is not possible
The limitations of a laryngeal mask airway are
Currently available devices are too large for small preterm babies (or babies less than
approximately 32 weeks’ gestational age).
The device cannot be used to suction meconium from the airway.
An air leak at the mask-larynx interface may result in delivery of insufficient pressure to the
lungs.
It may not be as effective as an endotracheal tube for delivering medications to the lungs.
There is insufficient evidence to recommend the laryngeal mask airway for prolonged
assisted ventilation in newborns.
Page 12
Lesson 6 – Medications
Epinephrine is a cardiac stimulant that also increases blood pressure. Preferably, it should be
given by umbilical venous catheter. Epinephrine administration is indicated when the heart rate
remains below 60 beats per minute despite 30 seconds of effective assisted ventilation, followed
by another 45 to 60 seconds of coordinated chest compressions and ventilations.
Recommended epinephrine
Concentration: 1:10,000 (0.1mg/mL)
Route: IV, endotracheal (ET) administration may be considered while IV access is being
established.
Dose: 0.1 to 0.3 mL/kg (consider higher dose, 0.5 to 1 mL/kg for ET route only)
Rate: Rapidly – as quickly as possible
Epinephrine should be given by umbilical vein. The ET route is often faster and more accessible
than placing an umbilical catheter, but is associated with unreliable absorption and is very likely
not to be effective.
Indications for volume expansion during resuscitation include
Baby is not responding to resuscitation
AND
Baby appears in shock (pale color, weak pulses, persistently low heart rate, no improvement
in circulatory status despite resuscitation efforts)
AND
There is a history of condition associated with fetal blood loss (e.g., extensive vaginal
bleeding, abruption placentae, placenta previa, twin-to-twin transfusion, etc.).
Recommended volume expander
Normal saline, Ringer’s lactate, or O Rh-negative blood
Dose: 10 mL/kg
Route: Umbilical vein
Preparation: Correct volume drawn into large syringe
Rate: Over 5 to 10 minutes
Lesson 7 – Special Considerations
The appropriate action for a baby who fails to respond to resuscitation will depend on the
presentation – failure to ventilate, persistent oxygen desaturation or bradycardia, or failure to
initiate spontaneous breathing.
Respiratory distress due to choanal atresia can be helped by placing an oral airway.
Airway obstruction from Robin syndrome can be helped by inserting a nasopharyngeal tube and
placing the baby prone.

Page 13
In an emergency, a pneumothorax can be detected by transillumination and treated by aspirating
air with a syringe attached to a needle inserted into the chest.
If diaphragmeatic hernia is suspected, avoid PPV by mask. Immediately intubate the trachea in
the delivery room and insert an orogastric tube to decompress the stomach and intestines..
Persistent cyanosis and bradycardia are rarely caused by congenital heart disease in a newborn.
More commonly, the persistent desaturation and bradycardia are caused by inadequate
ventilation.
A baby who has required resuscitation must have close monitoring and management of
oxygenation, blood pressure, fluid status, respiratory effort, blood glucose, nutritional issues, and
temperature.
Be careful not to overheat the baby during or following resuscitation.
If a mother has recently received narcotics and her baby fails to breathe, first assist ventilation
with PPV to maintain a heart rate above 100 bpm, then consider giving naloxone to the baby.
Indications for naloxone (all of the following must be present)
Continued respiratory depression
PPV has restored a normal heart rate and oxygen saturation (after discontinuing PPV, the
baby deteriorates).
A history of maternal narcotic administration within the previous 4 hours
Restoring adequate ventilation remains the priority when resuscitating babies at birth in the
delivery room or later in the nursery or other location.
Management steps for babies requiring resuscitation outside of the delivery room include
the following:
Maintain temperature by placing the baby skin-to-skin with the mother and raising the
environmental temperature.
Clear airway with a bulb syringe or cloth on your finger.
Consider mouth-to-mouth-and-nose for administering positive pressure.
Obtaining vascular access by cannulating a peripheral vein or placing an intraosseous needle
in the tibia.
Therapeutic hypothermia following perinatal asphyxia should be
Used for babies ≥ 36 weeks’ gestation who meet previously defined criteria for this therapy
Initiated before 6 hours after birth
Used only according to specific protocols coordinated by centers with specialized programs
equipped to provide the therapy
Page 14
Lesson 8 – Resuscitation of Babies Born Preterm
Preterm babies are at additional risk for requiring resuscitation because of their
Rapid heat loss
Vulnerability to hyperoxic injury
Immature lungs and diminished respiratory drive
Immature brains that are prone to bleeding
Vulnerability to infection
Small blood volume, increasing the implications of blood loss
Additional resources needed to prepare for an anticipated preterm birth include
Additional trained personnel, including intubation and emergency umbilical venous
catheterization expertise
Additional strategies for maintaining temperature
Compressed air source
Oxygen blender
Pulse oximetry
Premature babies are more vulnerable to hyperoxia; use an oximeter and blender to gradually
achieve oxyhemoglobin saturations in the 85% to 95% range during and immediately following
resuscitation.
Babies born very preterm are more susceptible to heat loss.
Increase temperature of room.
Preheat radiant warmer.
Consider using a chemically activated warming pad.
Use polyethylene wrap for babies less than approximately 29 weeks’ gestation.
Use warmed transport incubator to transfer baby to nursery.
When assisting ventilation in preterm babies,
Follow the same criteria for initiating positive-pressure ventilation as with term babies.
Consider using continuous positive airway pressure (CPAP) if the baby is breathing
spontaneously and has a heart rate above 100 bpm, but is having difficulty such as labored
respirations or low oxygen saturation. Use positive end-expiratory pressure (PEEP) if the
baby has been intubated.
If PPV is required, use the lowest inflation pressure to achieve an adequate response.
Consider giving prophylactic surfactant.
Decrease the risk of brain injury by
Handling the baby gently
Avoiding the Trendelenburg position
Avoiding high airway pressures when possible
Adjusting ventilation gradually, based on physical examination, oximetry, and blood gases
Avoiding rapid intravenous fluid boluses and hypertonic solutions
Page 15
After resuscitation of a preterm baby,
Monitor and control blood sugar.
Monitor for apnea, bradycardia, or oxygen desaturations and intervene promptly.
Monitor and control oxygenation and ventilation.
Consider delaying feeding if perinatal compromise was significant.
Have a high level of suspicion for infection.
Lesson 9 – Ethics and Care at the End of Life
The ethical principles regarding the resuscitation of a newborn should be no different from those
followed in resuscitating an older child or adult.
Ethical and current national legal principles do not mandate attempted resuscitation in all
circumstances. Withdrawal of critical care interventions and institution of comfort care are
considered acceptable if there is agreement by health professionals and the parents that further
resuscitation efforts would be futile, would merely prolong dying, or would not offer sufficient
benefit to justify the burdens imposed.
Parents are considered to be the appropriate surrogate decision makers for their own infants. For
parents to fulfill this role responsibly, they must be given relevant and accurate information about
the risks and benefits of each treatment option.
Where gestation, birth weight, and/or congenital anomalies are associated with almost certain
early death, or unacceptably high morbidity is likely among the rare survivors, resuscitation is not
indicated, although exceptions may be reasonable to comply with parental wishes.
In conditions associated with uncertain prognosis, where there is borderline survival and a high
rate of morbidity, and where the burden to the child is high, parental desires regarding initiation
of resuscitation should be supported.
Unless conception occurred via in vitro fertilization, techniques used for obstetrical dating are
accurate to 3 to 5 days if applied in the first trimester and only ± 1 to 2 weeks subsequently.
Estimates of fetal weight are accurate only to ±15% to 20%. When counseling parents about the
birth of an extremely premature baby, advise them that decisions made about neonatal
management before birth may need to be modified in the delivery room, depending on the
condition of the baby at birth and the postnatal gestational age assessment.
Discontinuation of resuscitation efforts may be appropriate after 10 minutes of absent heart rate
following complete and adequate resuscitation efforts. The decision to continue resuscitation
efforts beyond this point should take into consideration factors such as the presumed etiology of
the arrest, the gestational age of the baby, the presence or absence of complications, the potential
role of therapeutic hypothermia, and the parents’ previously expressed feelings about acceptable
risk of morbidity.
Chapter Key Points Summaries taken from Neonatal Resuscitation Instructor Manual © 2011.
Page 16
What to expect at your NRP Course
Once you have completed the NRP online test, print out your completion certificate.
MAKE SURE THAT YOU BRING IT WITH YOU TO THE NRP COURSE. YOU
WILL NOT BE ALLOWED TO ATTEND WITHOUT PROOF OF COMPLETING
THE TEST. The course, itself, is designed to give you hands-on practice time. While
you will need to be competent in the skills before you receive your card, it is not a
pass/fail skills test. You will learn/review individual skills, put them all together by
playing the role of a team leader, and then the group will perform a resuscitation followed
by reviewing the code and debriefing as part of the learning experience. It will be helpful
for you to review the following steps in a resuscitation so that you are prepared to learn,
ask questions, and participate in the course.
Steps for Resuscitation (All or some may be required based upon scenario):
o Obtains relevant perinatal history – Gestational age, fluid (clear, meconium,
bloody), expected number of babies, additional risk factors?
o Performs Equipment Check – Warm, Clear airway, Auscultate, Oxygenate,
Ventilate, Intubate, Medicate, Thermoregulate
o Discusses plan and assigns team member roles – Uses behavioral skills such as
teamwork, leadership, and effective communication
o Completes initial assessment – Term, tone, crying or breathing
o (Optional) Meconium management – If NOT vigorous, assist with/performs
tracheal suction.
o Performs initial steps – Warm, clear airway if necessary, dry, remove wet linen,
stimulate.
o Evaluates respirations and heart rate (HR) – Auscultate apical pulse or palpate
umbilicus. If heart rate less than 60 beats per minute (BPM), apneic or gasping,
go to next step.
o Initiates positive-pressure ventilation (PPV) with 21% oxygen – Apply mask
correctly, rate 40 – 60/minute.
o Calls for additional help, if needed – A minimum of 2 resuscitators necessary if
PPV required.
o Requests pulse oximetry – Place probe on right hand before plugging into
monitor.
o Assesses for rising HR and oxygen saturation within first 5 – 10 breaths –
HR remains below 60 bpm. If HR not rising, pulse oximetry might not be
functioning.
o Assesses chest movement and bilateral breath sounds – If bilateral breath
sounds are absent and chest is NOT moving with PPV, go to next step.
o Takes ventilation corrective steps (MR SOPA) – Mask adjustment and
Reposition head. Suction mouth and nose and Open mouth. Increase Pressure
(do not exceed 40 cm H2O). Use Alternative airway (endotracheal [ET] tube or
laryngeal mask airway).
Page 17
o Requests assessment of bilateral breath sound and chest movement – If
bilateral breath sounds and chest movement are present, Perform 30 seconds of
effective PPV
o Evaluates HR, breathing, and oxygen saturation – If HR remains below 60
bpm and the baby is apneic, pulse oximetry might not be functioning.
o Intubates or direct intubation and assesses ET tube placement – Intubation is
recommended prior to beginning chest compressions.
o Increases oxygen to 100% in preparation for chest compressions (CC)
o Initiates CC coordinated with PPV – 2 thumbs (preferred) on lower third of
sternum., 3 compressions:1 ventilation. Compress one-third of the anterior-
posterior diameter of the chest.
o Calls for additional help
o After at least 45-60 seconds of CC, evaluates HR, breathing and oxygen
saturation - If HR remains below 60, apneic, pulse oximetry might not be
functioning.
o May consider intratracheal epinephrine while umbilical venous catheter
(UVC) is being placed. – Epinephrine 1:10,000 (0.1 mg/kg). Intratracheal dose:
0.5 to 1 mL/kg. No response expected from intratracheal epinephrine for at least
1 minute and perhaps longer.
o Places or directs placement of UVC – CC may be performed from head of
infant after intubation. Insert UVC 2-4 cm. Hold or tape catheter to avoid
dislodgement.
o After at least 45-60 seconds of chest compressions, evaluates HR, breathing,
and oxygen saturation - If HR remains below 60, apneic, pulse oximetry might
not be functioning.
o Administers or directs administration of IV epinephrine - Epinephrine
1:10,000 (0.1 mg/kg). IV dose: 0.1 to 0.3 mL/kg. Flush UVC with 0.5-1mL
normal saline.
o After at least 45-60 seconds of CC, evaluates HR, breathing and oxygen
saturation - If HR rises above 60 bpm, you observe occasional gasps, pulse
oximetry is now functioning.
o Discontinues compressions, continues ventilation at 40-60 breaths/minute –
discontinue compressions if HR above 60 bpm. Reassess every 30 seconds.
o (Option) Based on scenario, identifies need for volume replacement (states
solution, dose, route, rate) – Risk factors: Placenta previa, abruption, blood loss
from umbilical cord. Solutions: Normal saline, Ringer’s lactate or O Rh-negative
packed cells. Dose: 10 mL/kg over 5-10 minutes. Route: Umbilical vein. Rate:
Over 5-10 minutes.
o Continues to monitor HR, breathing, and oxygen saturation every 30 seconds
during resuscitation – Adjust oxygen based on oximetry and newborn’s age.
Continue PPV until HR above 100 bpm with adequate respiratory effort (newborn
may remain intubated).
o Directs post-resuscitation care – Ongoing evaluation and monitoring.
Communicate effectively with parent(s).