Embed Size (px)
Citation preview
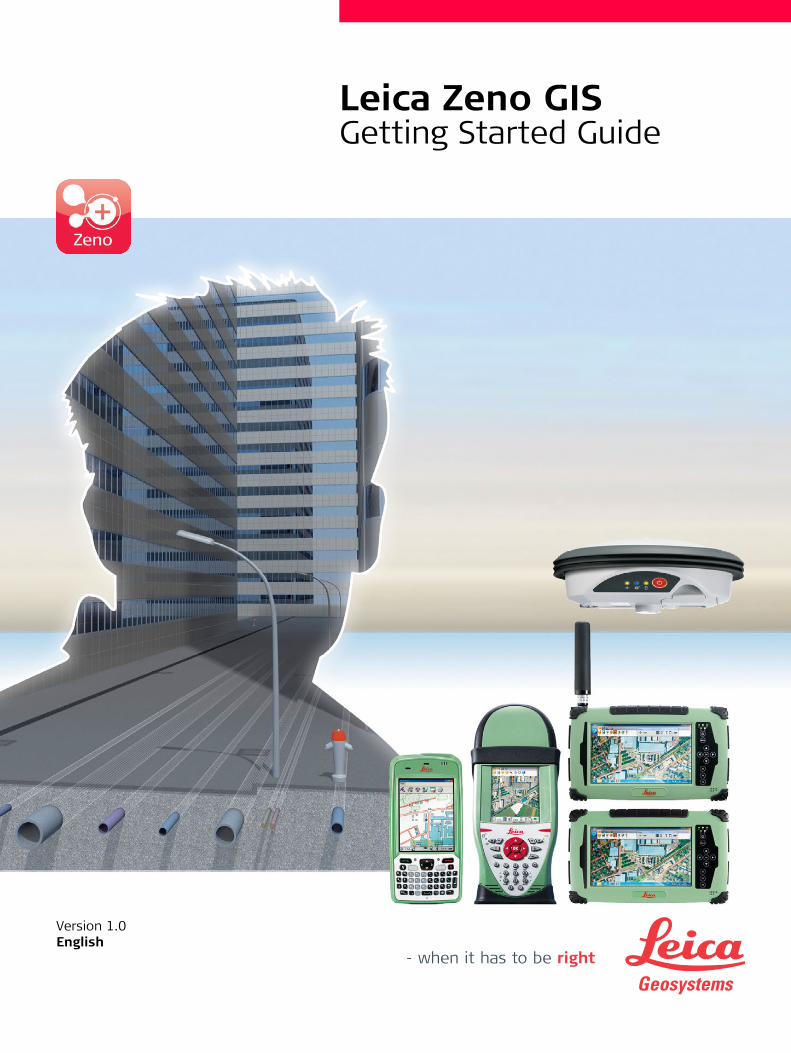
Leica Zeno GISGetting Started Guide
Version 1.0English
Zeno GIS, Table of Contents 2
Table of ContentsIn this manual Chapter Page
1 Installation and Licencing of Zeno Field and Zeno Connect 41.1 Installation on CS10/CS15 4
1.1.1 Zeno Field 41.1.2 Zeno Connect 41.1.3 Licence Activation for CS10/CS15 41.1.4 Language Packs 51.1.5 Installation of WinCE6 Operating System 6
1.2 Installation on CS25 71.2.1 Licence Activation for Zeno Field/Zeno Connect
on CS25 71.2.2 Manage Licences 101.2.3 Transferring Licences to Another PC (Rehosting) 121.2.4 Language Packs 13
1.3 Installation and Licencing on Zeno 5 131.3.1 Installation for Windows Mobile Embedded
Professionsal 6.5 131.3.2 Zeno Field/Zeno Connect 141.3.3 Licence Activation for Zeno Field/Zeno Connect
on Zeno 5 14
2 Project Creation 162.1 Zeno Office 16
2.1.1 Wizard 162.1.2 Image Settings 212.1.3 Transferring a Project between Zeno Office and
Zeno Field using EasyOut 222.2 Zeno Field 24
2.2.1 Existing Map 242.2.2 New Map 252.2.3 Applying a Transformation to the Zeno 29
3 Working with Zeno Field 323.1 Editing in Zeno Field 32
3.1.1 Keys on Zeno 10/Zeno 15 323.1.2 Keys on Zeno 5 333.1.3 Keys on CS25 343.1.4 Creating Features 35
3.2 GNSS Settings 373.2.1 GPS Preferences 373.2.2 Connecting to a GG03/GG02 plus 383.2.3 Configuring a Real-Time Source 39
3.3 Collecting Features with GNSS 443.4 Support of ArcGIS Online Layers 463.5 Working with the Camera 473.6 Working with the Rangefinder 493.7 Working with the Digicat Cable Detection Tool 55
4 Transfering Data Back to Zeno Office with EasyIn 57
Zeno GIS, Table of Contents 3
5 Working with Zeno Office 595.1 Opening a Map Document 595.2 Adding a Dataset 595.3 Toolbar 605.4 Table of Contents 615.5 Data Frame Properties 615.6 Toolbox 625.7 Survey Data 63
5.7.1 Overview 635.7.2 Query Information 645.7.3 Post-Processing Computation 695.7.4 COGO 70
6 Feature Service Sync in Zeno Field 75
7 Zeno Tools 817.1 Introduction 817.2 Zeno Tools on Zeno 10/Zeno 15 81
7.2.1 Using the System Settings Manager 817.2.2 Using the GS05/GS06 Firmware Loader 827.2.3 Using the Licence Manager 827.2.4 Using the Bluetooth App 83
7.3 Zeno Tools on CS25 877.4 Zeno Tools on Zeno 5 88
Zeno GIS, Installation and Licencing of Zeno Field and Zeno Connect 4
1 Installation and Licencing of Zeno Field and Zeno Connect
1.1 Installation on CS10/CS151.1.1 Zeno Field
Installing Zeno Field on CS10/CS15
1.1.2 Zeno Connect
Installing Zeno Connect on CS10/CS15
1.1.3 Licence Activation for CS10/CS15
Licencing Zeno Field/Zeno Connect
For using Zeno Field and Zeno Connect, a valid licence is required.In the Licence Manager, you can register licences for:
• Zeno Field: Zeno Field licence, Zeno GIS key, CCP keys• Zeno Connect: Zeno Connect licence, Zeno GIS key, CCP keys• GS05/GS06: Add GPS and GLONASS licences to GS05/GS06• GG02 plus: GLONASS option
All Zeno devices are shipped with pre-installed licence keys. Additionally, you receive the keys in printed form. In some cases it is necessary to register new licence keys, for example if the key for a CCP licence has expired.
How to register a licence for Zeno Field
Step Description1. Download the latest Zeno Field installer from myWorld@Leica Geosystems
(https://myworld.leica-geosystems.com). You can find it in this location: myDownloadsSoftware > Zeno Field
2. Copy the Leica ZenoField.ARM.CAB onto the CS10/CS15 in the Program Files folder and double click the file.
3. The Leica ZenoField.ARM.CAB gets installed.4. To start Zeno Field, double click the shortcut icon on the desktop.
Step Description1. Download the latest Zeno Connect on CS10/CS15 installer from
myWorld@Leica Geosystems (https://myworld.leica-geosystems.com). You can find it in this location: myDownloadsSoftware > Zeno Connect
2. Copy the Leica ZenoConnect.ARM.CAB onto the CS10/CS15 in the Program Files folder and double click the file.
3. The Leica ZenoConnect.ARM.CAB gets installed.4. To start Zeno Connect, double click the shortcut icon on the desktop.
Step Description1. Start Licence Manager on your CS10/CS15 by taping Start\Programs\Zeno
Tools\Licence Manager.2. Enter your licence keys in the according fields in the Zeno Field tab.
Or tap Browse and browse for you licence file. This will fill in all included keys automatically. These are:
• Zeno GIS Key: Enables the CS10/CS15 for Zeno Field• Zeno Field Key: Licence for Zeno Field• CCP Key: Maintenance key for Zeno Field
Zeno GIS, Installation and Licencing of Zeno Field and Zeno Connect 5
How to register a licence for Zeno Connect
Licences for the Zeno Field GNSS cap GS05/GS06
There are two types of licences for the GNSS cap, which the user can request when purchasing the product:
a) GPS onlyb) GPS and GLONASS
GLONASS Option for GG02 plus SmartAntenna
In the Licence Manager you also can add a GLONASS option for GG02 plus.
1.1.4 Language Packs
Installing language packs The language pack is based on a specific Zeno Field/Zeno Connect version and
can only be installed on the corresponding version.
Step Description1. Start Licence Manager on your CS10/CS15 by taping Start\Programs\Zeno
Tools\Licence Manager.2. Enter your licence keys in the according fields in the Zeno Connect tab.
Or tap Browse and browse for you licence file. This will fill in all included keys automatically. These are:
• Zeno GIS Key: Enables the CS10/CS15 for Zeno Connect• Zeno Connect Key: Licence for Zeno Connect• CCP Key: Maintenance key for Zeno Connect
Step Description1. Start Licence Manager on your Zeno 10/Zeno 15 by taping
Start\Programs\Zeno Tools\Licence Manager.2. Enter you licence keys in the according fields in the GS05/06 tab.
Or tap Browse and browse for you licence file. This will fill in all included keys automatically.
Step Description1. Start Licence Manager on your CS10/CS15 by taping Start\Programs\Zeno
Tools\Licence Manager.2. Enter you licence keys in the according fields in the GG02 plus tab and enter
your GLONASS licence in the according field.Or tap Browse and browse for you licence file. This will fill in all included keys automatically.
Step Description1. Download the Zeno Field/Zeno Connect language pack from myWorld@Leica
Geosystems (https://myworld.leica-geosystems.com). You can find it in this location: myDownloadsSoftware > Zeno Field/Zeno Connect.
2. Copy the file onto the Zeno 10/Zeno 15.3. Double click the file. The Zeno Field/Zeno Connect language pack will be
installed.
Zeno GIS, Installation and Licencing of Zeno Field and Zeno Connect 6
1.1.5 Installation of WinCE6 Operating System
After installing a new WinCE 6 version, other installed applications like Zeno Field/Zeno Connect must be reinstalled.
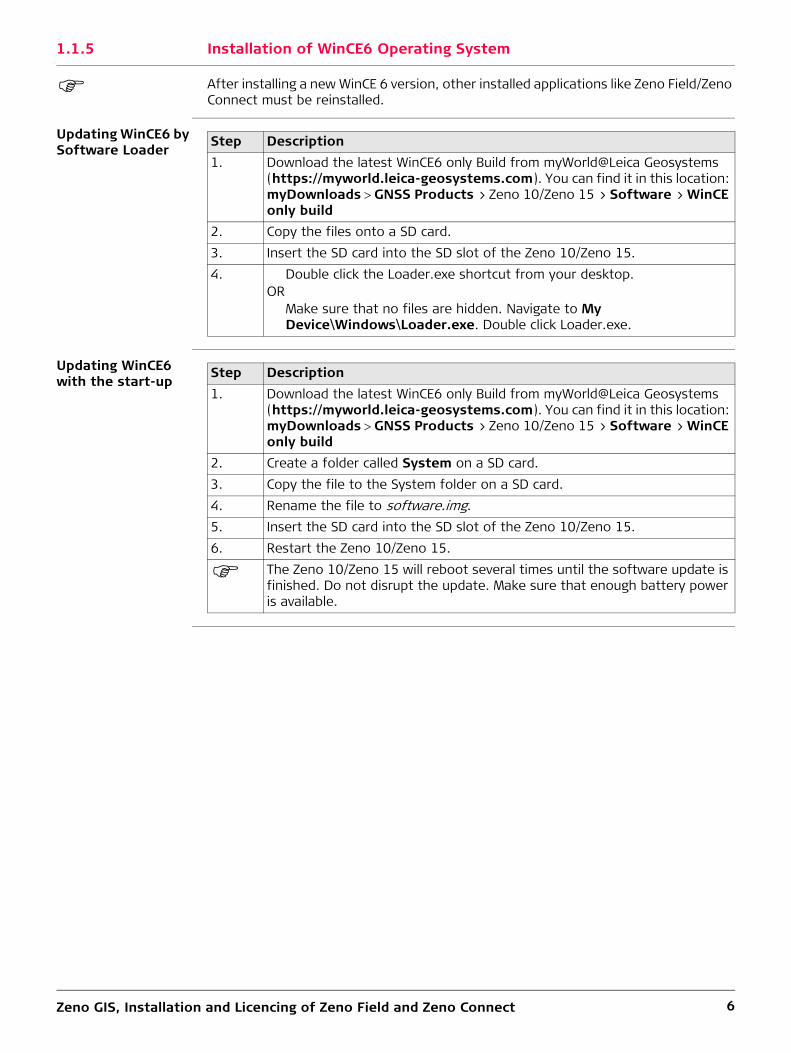
Updating WinCE6 by Software Loader
Updating WinCE6 with the start-up
Step Description1. Download the latest WinCE6 only Build from myWorld@Leica Geosystems
(https://myworld.leica-geosystems.com). You can find it in this location: myDownloadsGNSS Products > Zeno 10/Zeno 15 > Software > WinCE only build
2. Copy the files onto a SD card.3. Insert the SD card into the SD slot of the Zeno 10/Zeno 15.4. Double click the Loader.exe shortcut from your desktop.
ORMake sure that no files are hidden. Navigate to My Device\Windows\Loader.exe. Double click Loader.exe.
Step Description1. Download the latest WinCE6 only Build from myWorld@Leica Geosystems
(https://myworld.leica-geosystems.com). You can find it in this location: myDownloadsGNSS Products > Zeno 10/Zeno 15 > Software > WinCE only build
2. Create a folder called System on a SD card.3. Copy the file to the System folder on a SD card.4. Rename the file to software.img.5. Insert the SD card into the SD slot of the Zeno 10/Zeno 15.6. Restart the Zeno 10/Zeno 15.
The Zeno 10/Zeno 15 will reboot several times until the software update is finished. Do not disrupt the update. Make sure that enough battery power is available.
Zeno GIS, Installation and Licencing of Zeno Field and Zeno Connect 7
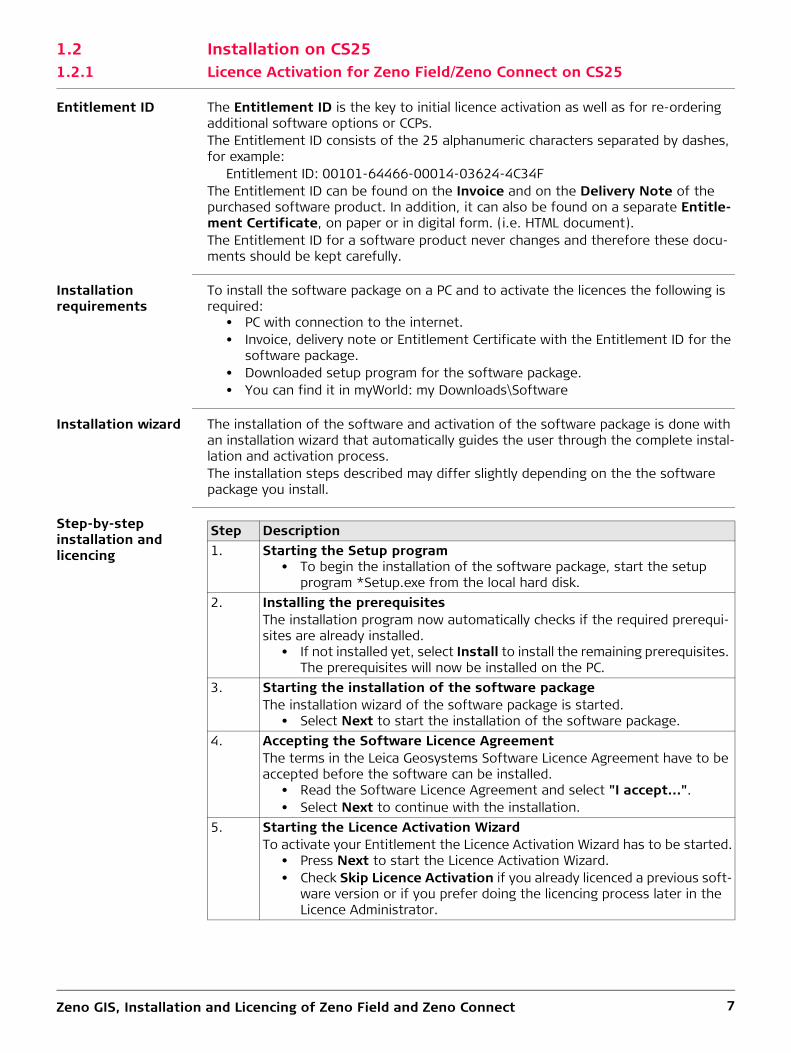
1.2 Installation on CS251.2.1 Licence Activation for Zeno Field/Zeno Connect on CS25
Entitlement ID The Entitlement ID is the key to initial licence activation as well as for re-ordering additional software options or CCPs.The Entitlement ID consists of the 25 alphanumeric characters separated by dashes, for example:
Entitlement ID: 00101-64466-00014-03624-4C34FThe Entitlement ID can be found on the Invoice and on the Delivery Note of the purchased software product. In addition, it can also be found on a separate Entitle-ment Certificate, on paper or in digital form. (i.e. HTML document).The Entitlement ID for a software product never changes and therefore these docu-ments should be kept carefully.
Installation requirements
To install the software package on a PC and to activate the licences the following is required:
• PC with connection to the internet.• Invoice, delivery note or Entitlement Certificate with the Entitlement ID for the
software package.• Downloaded setup program for the software package.• You can find it in myWorld: my Downloads\Software
Installation wizard The installation of the software and activation of the software package is done with an installation wizard that automatically guides the user through the complete instal-lation and activation process.The installation steps described may differ slightly depending on the the software package you install.
Step-by-step installation and licencing
Step Description1. Starting the Setup program
• To begin the installation of the software package, start the setup program *Setup.exe from the local hard disk.
2. Installing the prerequisitesThe installation program now automatically checks if the required prerequi-sites are already installed.
• If not installed yet, select Install to install the remaining prerequisites. The prerequisites will now be installed on the PC.
3. Starting the installation of the software packageThe installation wizard of the software package is started.
• Select Next to start the installation of the software package.4. Accepting the Software Licence Agreement
The terms in the Leica Geosystems Software Licence Agreement have to be accepted before the software can be installed.
• Read the Software Licence Agreement and select "I accept...".• Select Next to continue with the installation.
5. Starting the Licence Activation WizardTo activate your Entitlement the Licence Activation Wizard has to be started.
• Press Next to start the Licence Activation Wizard.• Check Skip Licence Activation if you already licenced a previous soft-
ware version or if you prefer doing the licencing process later in the Licence Administrator.
Zeno GIS, Installation and Licencing of Zeno Field and Zeno Connect 8
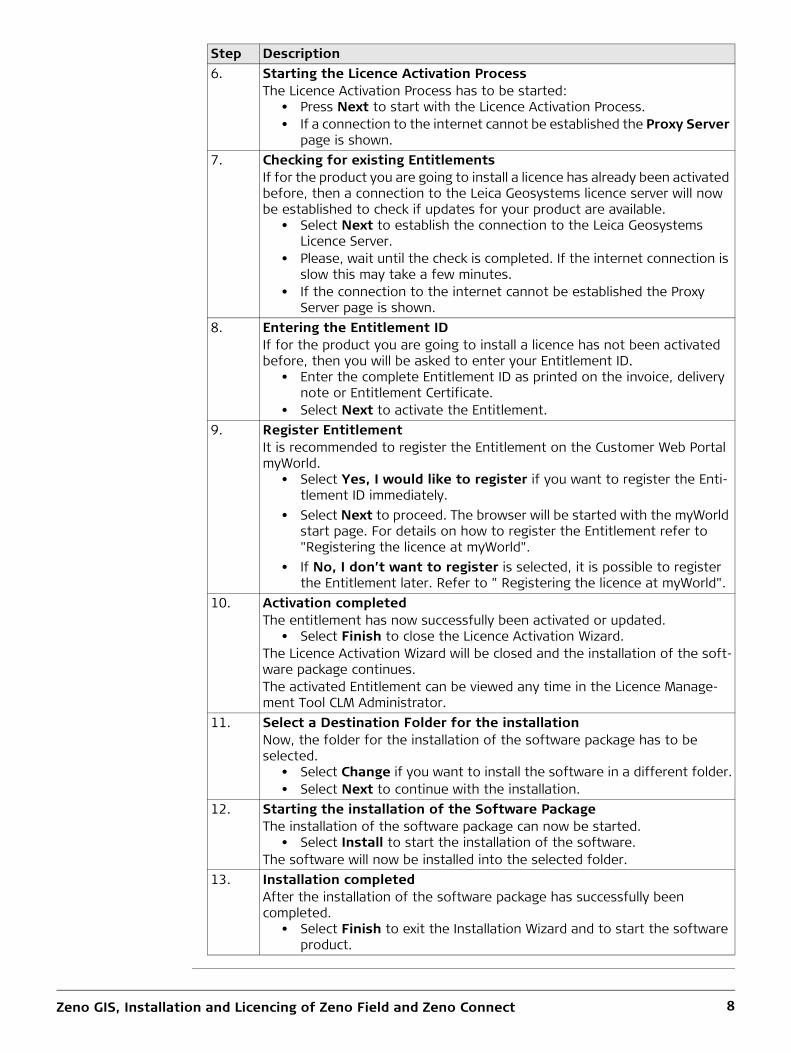
6. Starting the Licence Activation ProcessThe Licence Activation Process has to be started:
• Press Next to start with the Licence Activation Process.• If a connection to the internet cannot be established the Proxy Server
page is shown.7. Checking for existing Entitlements
If for the product you are going to install a licence has already been activated before, then a connection to the Leica Geosystems licence server will now be established to check if updates for your product are available.
• Select Next to establish the connection to the Leica Geosystems Licence Server.
• Please, wait until the check is completed. If the internet connection is slow this may take a few minutes.
• If the connection to the internet cannot be established the Proxy Server page is shown.
8. Entering the Entitlement IDIf for the product you are going to install a licence has not been activated before, then you will be asked to enter your Entitlement ID.
• Enter the complete Entitlement ID as printed on the invoice, delivery note or Entitlement Certificate.
• Select Next to activate the Entitlement.9. Register Entitlement
It is recommended to register the Entitlement on the Customer Web Portal myWorld.
• Select Yes, I would like to register if you want to register the Enti-tlement ID immediately.
• Select Next to proceed. The browser will be started with the myWorld start page. For details on how to register the Entitlement refer to "Registering the licence at myWorld".
• If No, I don’t want to register is selected, it is possible to register the Entitlement later. Refer to " Registering the licence at myWorld".
10. Activation completedThe entitlement has now successfully been activated or updated.
• Select Finish to close the Licence Activation Wizard.The Licence Activation Wizard will be closed and the installation of the soft-ware package continues.The activated Entitlement can be viewed any time in the Licence Manage-ment Tool CLM Administrator.
11. Select a Destination Folder for the installationNow, the folder for the installation of the software package has to be selected.
• Select Change if you want to install the software in a different folder.• Select Next to continue with the installation.
12. Starting the installation of the Software PackageThe installation of the software package can now be started.
• Select Install to start the installation of the software.The software will now be installed into the selected folder.
13. Installation completedAfter the installation of the software package has successfully been completed.
• Select Finish to exit the Installation Wizard and to start the software product.
Step Description
Zeno GIS, Installation and Licencing of Zeno Field and Zeno Connect 9
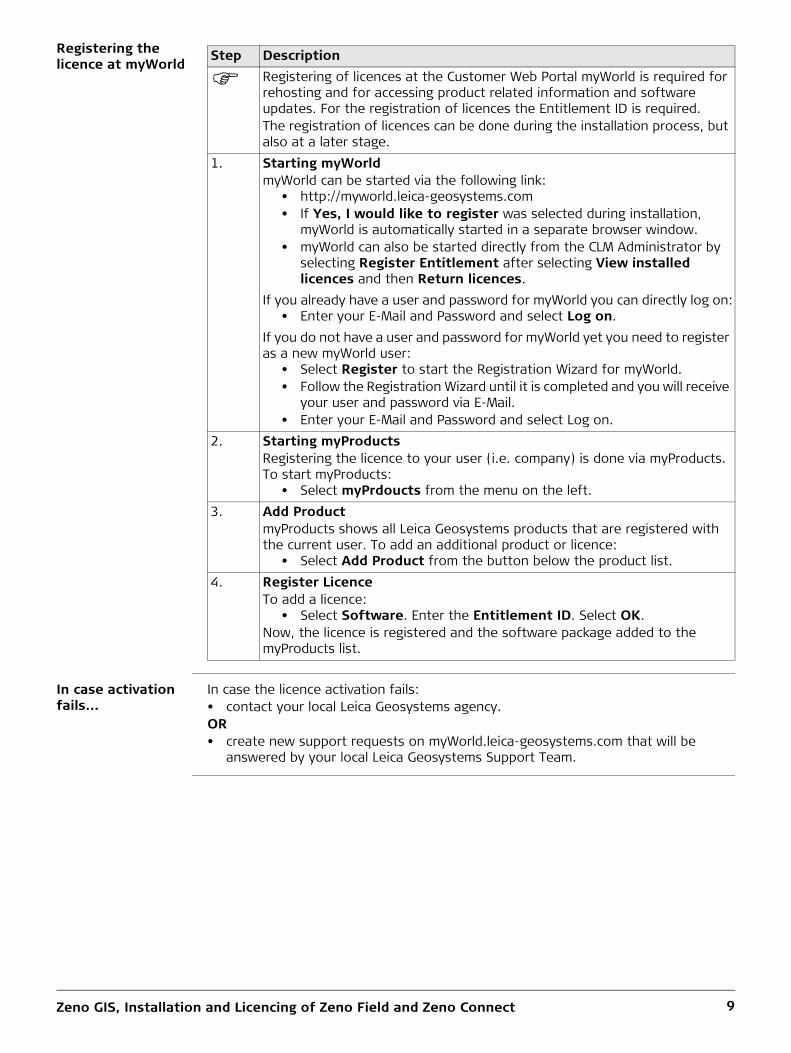
Registering the licence at myWorld
In case activation fails...
In case the licence activation fails: • contact your local Leica Geosystems agency.OR• create new support requests on myWorld.leica-geosystems.com that will be
answered by your local Leica Geosystems Support Team.
Step Description
Registering of licences at the Customer Web Portal myWorld is required for rehosting and for accessing product related information and software updates. For the registration of licences the Entitlement ID is required.The registration of licences can be done during the installation process, but also at a later stage.
1. Starting myWorldmyWorld can be started via the following link:
• http://myworld.leica-geosystems.com• If Yes, I would like to register was selected during installation,
myWorld is automatically started in a separate browser window.• myWorld can also be started directly from the CLM Administrator by
selecting Register Entitlement after selecting View installed licences and then Return licences.
If you already have a user and password for myWorld you can directly log on:• Enter your E-Mail and Password and select Log on.
If you do not have a user and password for myWorld yet you need to register as a new myWorld user:
• Select Register to start the Registration Wizard for myWorld.• Follow the Registration Wizard until it is completed and you will receive
your user and password via E-Mail.• Enter your E-Mail and Password and select Log on.
2. Starting myProductsRegistering the licence to your user (i.e. company) is done via myProducts. To start myProducts:
• Select myPrdoucts from the menu on the left.3. Add Product
myProducts shows all Leica Geosystems products that are registered with the current user. To add an additional product or licence:
• Select Add Product from the button below the product list.4. Register Licence
To add a licence:• Select Software. Enter the Entitlement ID. Select OK.
Now, the licence is registered and the software package added to the myProducts list.
Zeno GIS, Installation and Licencing of Zeno Field and Zeno Connect 10
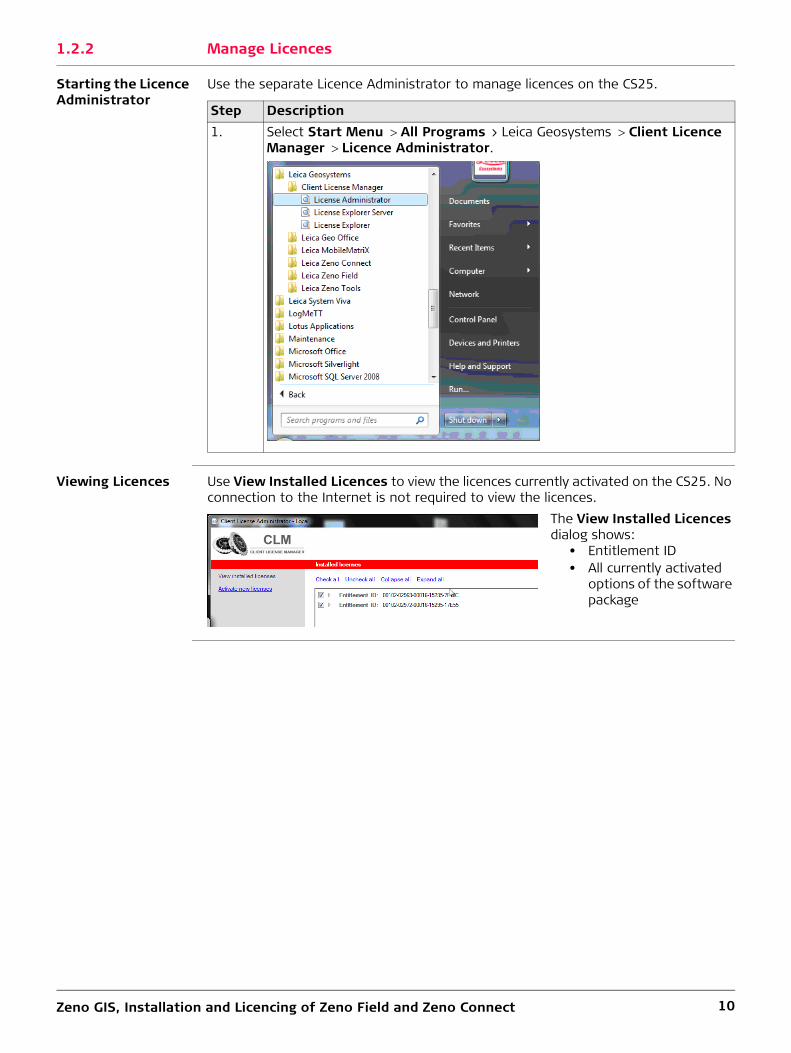
1.2.2 Manage Licences
Starting the Licence Administrator
Use the separate Licence Administrator to manage licences on the CS25.
Viewing Licences Use View Installed Licences to view the licences currently activated on the CS25. No connection to the Internet is not required to view the licences.
Step Description1. Select Start MenuAll Programs > Leica GeosystemsClient Licence
ManagerLicence Administrator.
The View Installed Licences dialog shows:
• Entitlement ID• All currently activated
options of the software package
Zeno GIS, Installation and Licencing of Zeno Field and Zeno Connect 11
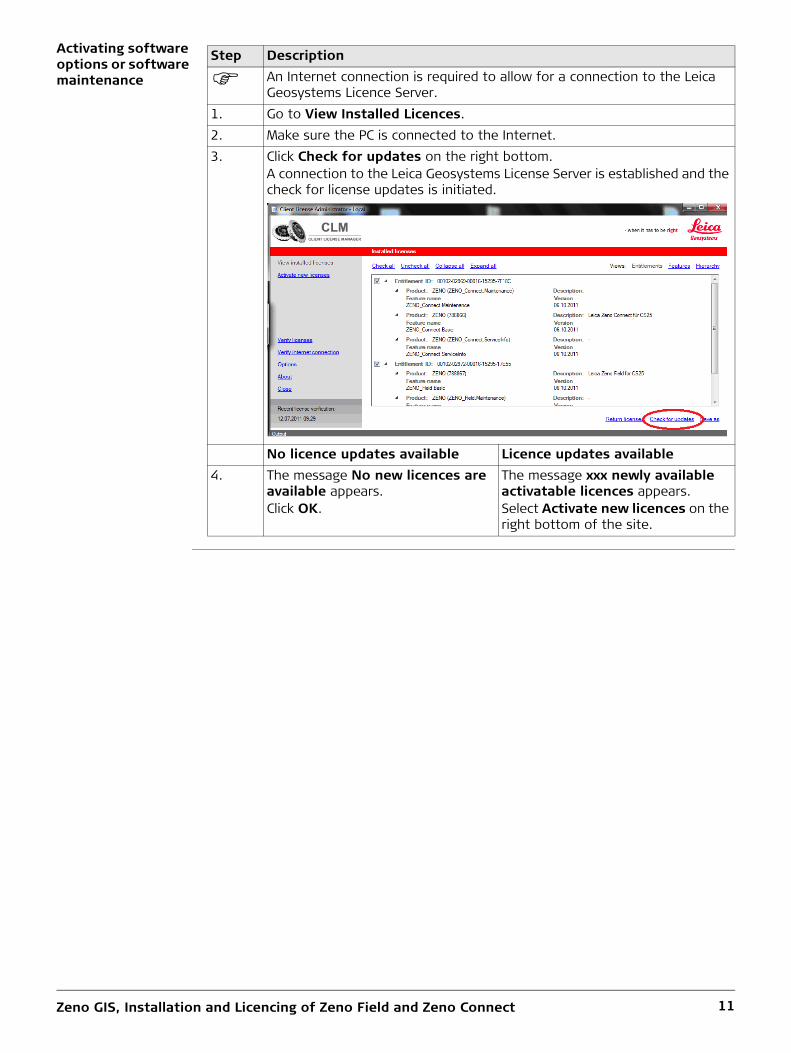
Activating software options or software maintenance
Step Description
An Internet connection is required to allow for a connection to the Leica Geosystems Licence Server.
1. Go to View Installed Licences.2. Make sure the PC is connected to the Internet.3. Click Check for updates on the right bottom.
A connection to the Leica Geosystems License Server is established and the check for license updates is initiated.
No licence updates available Licence updates available4. The message No new licences are
available appears.Click OK.
The message xxx newly available activatable licences appears.Select Activate new licences on the right bottom of the site.
Zeno GIS, Installation and Licencing of Zeno Field and Zeno Connect 12
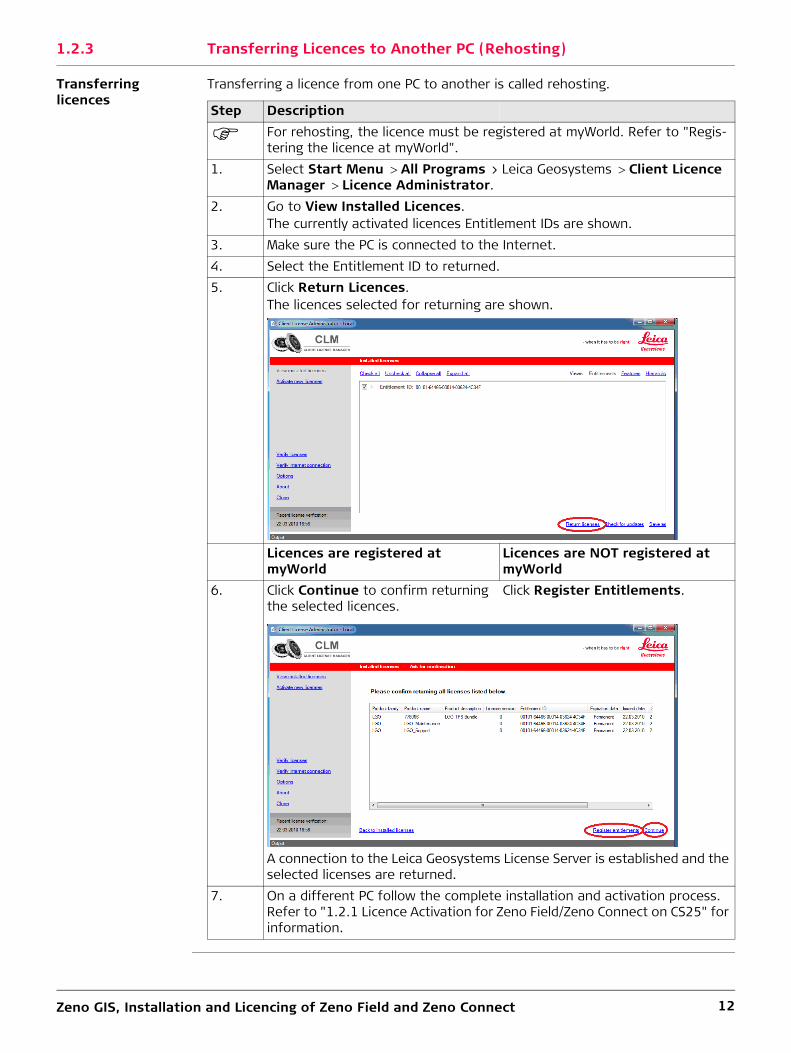
1.2.3 Transferring Licences to Another PC (Rehosting)
Transferring licences
Transferring a licence from one PC to another is called rehosting.
Step Description
For rehosting, the licence must be registered at myWorld. Refer to "Regis-tering the licence at myWorld".
1. Select Start MenuAll Programs > Leica GeosystemsClient Licence ManagerLicence Administrator.
2. Go to View Installed Licences.The currently activated licences Entitlement IDs are shown.
3. Make sure the PC is connected to the Internet.4. Select the Entitlement ID to returned.5. Click Return Licences.
The licences selected for returning are shown.
Licences are registered at myWorld
Licences are NOT registered at myWorld
6. Click Continue to confirm returning the selected licences.
Click Register Entitlements.
A connection to the Leica Geosystems License Server is established and the selected licenses are returned.
7. On a different PC follow the complete installation and activation process. Refer to "1.2.1 Licence Activation for Zeno Field/Zeno Connect on CS25" for information.
Zeno GIS, Installation and Licencing of Zeno Field and Zeno Connect 13
1.2.4 Language Packs
Installing language packs The language pack is based on a specific Zeno Field/Zeno Connect version and
can only be installed on the corresponding version.
1.3 Installation and Licencing on Zeno 51.3.1 Installation for Windows Mobile Embedded Professionsal 6.5
Installation
Step Description1. Download the Zeno Field/Zeno Connect language pack from myWorld@Leica
Geosystems (https://myworld.leica-geosystems.com). You can find it in this location: myDownloadsSoftware > Zeno Field/Zeno Connect.
2. Copy the file onto the CS25.3. Double click the file. Follow the instructions in the installation wizard.
Step Description
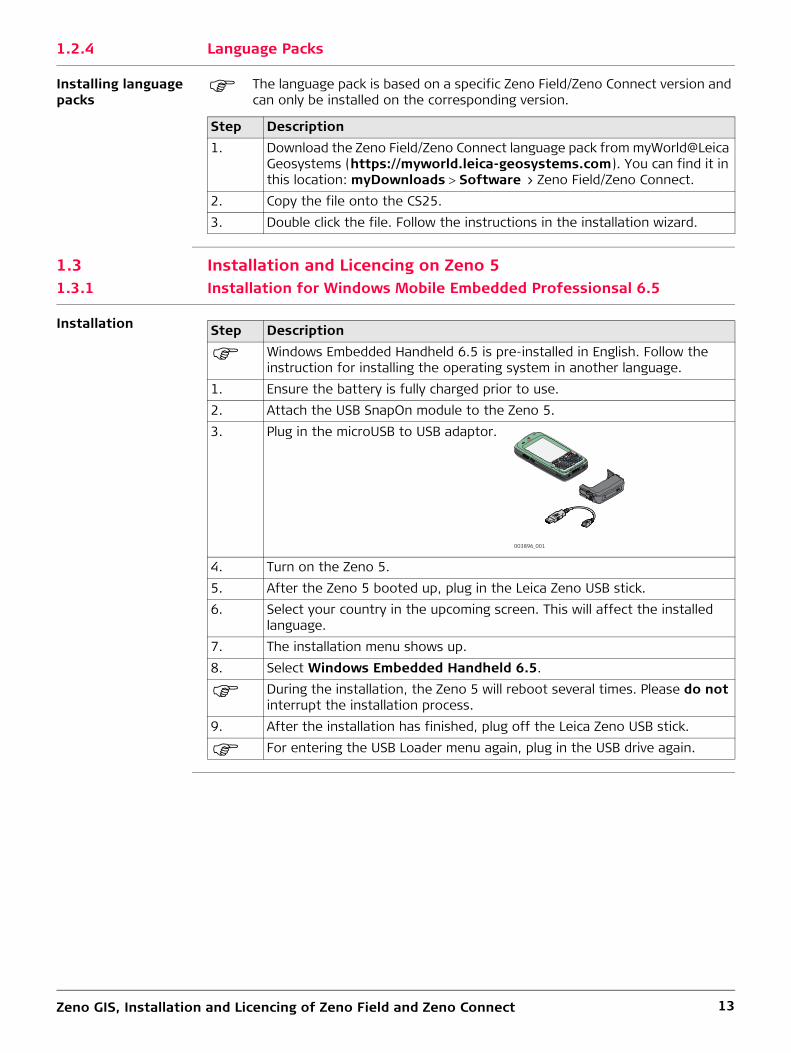
Windows Embedded Handheld 6.5 is pre-installed in English. Follow the instruction for installing the operating system in another language.
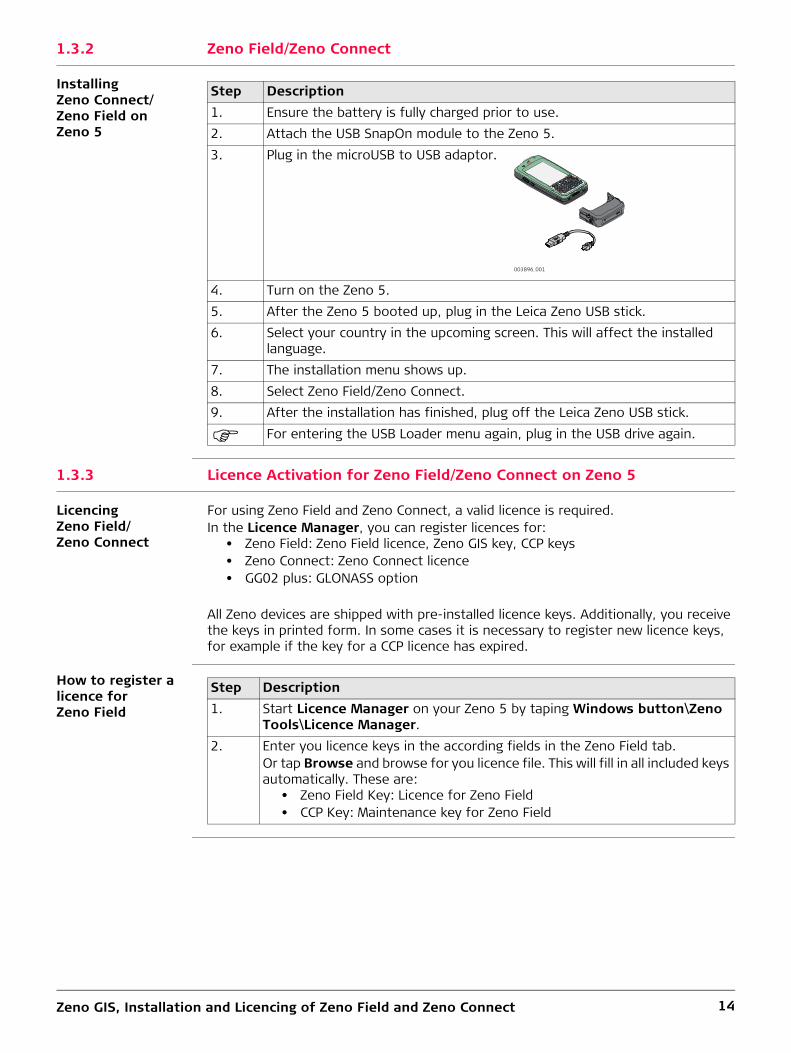
1. Ensure the battery is fully charged prior to use.2. Attach the USB SnapOn module to the Zeno 5.3. Plug in the microUSB to USB adaptor.
4. Turn on the Zeno 5.5. After the Zeno 5 booted up, plug in the Leica Zeno USB stick.6. Select your country in the upcoming screen. This will affect the installed
language.7. The installation menu shows up.8. Select Windows Embedded Handheld 6.5.
During the installation, the Zeno 5 will reboot several times. Please do not interrupt the installation process.
9. After the installation has finished, plug off the Leica Zeno USB stick.
For entering the USB Loader menu again, plug in the USB drive again.
Y U
I O
P
L K
J H
G F
D S
A Z X
C V
B N
M
.Q
W E
R T
ESC
,
SYM
TAB <
<
<
<
2 3
1 54
6
8 9
7 0
F1
F2 F7
F8
F9
F10
F3
F4
F5
F6
CTRL
#
ALT
àü
?
DEL
OK
:
=+
_@ /
003896_001
Zeno GIS, Installation and Licencing of Zeno Field and Zeno Connect 14
1.3.2 Zeno Field/Zeno Connect
Installing Zeno Connect/Zeno Field on Zeno 5
1.3.3 Licence Activation for Zeno Field/Zeno Connect on Zeno 5
Licencing Zeno Field/Zeno Connect
For using Zeno Field and Zeno Connect, a valid licence is required.In the Licence Manager, you can register licences for:
• Zeno Field: Zeno Field licence, Zeno GIS key, CCP keys• Zeno Connect: Zeno Connect licence• GG02 plus: GLONASS option
All Zeno devices are shipped with pre-installed licence keys. Additionally, you receive the keys in printed form. In some cases it is necessary to register new licence keys, for example if the key for a CCP licence has expired.
How to register a licence for Zeno Field
Step Description1. Ensure the battery is fully charged prior to use.2. Attach the USB SnapOn module to the Zeno 5.3. Plug in the microUSB to USB adaptor.
4. Turn on the Zeno 5.5. After the Zeno 5 booted up, plug in the Leica Zeno USB stick.6. Select your country in the upcoming screen. This will affect the installed
language.7. The installation menu shows up.8. Select Zeno Field/Zeno Connect.9. After the installation has finished, plug off the Leica Zeno USB stick.
For entering the USB Loader menu again, plug in the USB drive again.
Y U
I O
P
L K
J H
G F
D S
A Z X
C V
B N
M
.Q
W E
R T
ESC
,
SYM
TAB <
<
<
<
2 3
1 54
6
8 9
7 0
F1
F2 F7
F8
F9
F10
F3
F4
F5
F6
CTRL
#
ALT
àü
?
DEL
OK
:
=+
_@ /
003896_001
Step Description1. Start Licence Manager on your Zeno 5 by taping Windows button\Zeno
Tools\Licence Manager.2. Enter you licence keys in the according fields in the Zeno Field tab.
Or tap Browse and browse for you licence file. This will fill in all included keys automatically. These are:
• Zeno Field Key: Licence for Zeno Field• CCP Key: Maintenance key for Zeno Field
Zeno GIS, Installation and Licencing of Zeno Field and Zeno Connect 15
How to register a licence for Zeno Connect
GLONASS Option for GG02 plus SmartAntenna
In the Licence Manager you also can add a GLONASS option for GG02 plus.
Step Description1. Start Licence Manager on your Zeno 5 by taping Windows button\Zeno
Tools\Licence Manager.2. Enter you licence keys in the according fields in the Zeno Connect tab.
Or tap Browse and browse for you licence file. This will fill in all included keys automatically. These are:
• Zeno Connect Key: Licence for Zeno Connect
Step Description1. Start Licence Manager on your Zeno 5 by taping Windows button\Zeno
Tools\Licence Manager.2. Enter you licence keys in the according fields in the GG02 plus tab and enter
your GLONASS licence in the according field.Or tap Browse and browse for you licence file. This will fill in all included keys automatically.
Zeno GIS, Project Creation 16
2 Project Creation2.1 Zeno Office
Functionality of Zeno Office
Zeno Office and Zeno Office on ArcGISTM are software packages to maintain, manage and post-process GIS, GNSS and surveying data.
Tools of Zeno Office and Zeno Office on ArcGISTM:• Automated field-office workflows: EasyIn and EasyOut• Store detailed GNSS quality information in a GIS database• Integration of surveying measurements in a GIS database
2.1.1 Wizard
Creating a project Use the Project Wizard to define:• Coordinate systems• Transformations• Data models
Step Description1. Start Zeno Office or Zeno Office on ArcGISTM.2. Click File > New Project and enter a project name. If New Project is
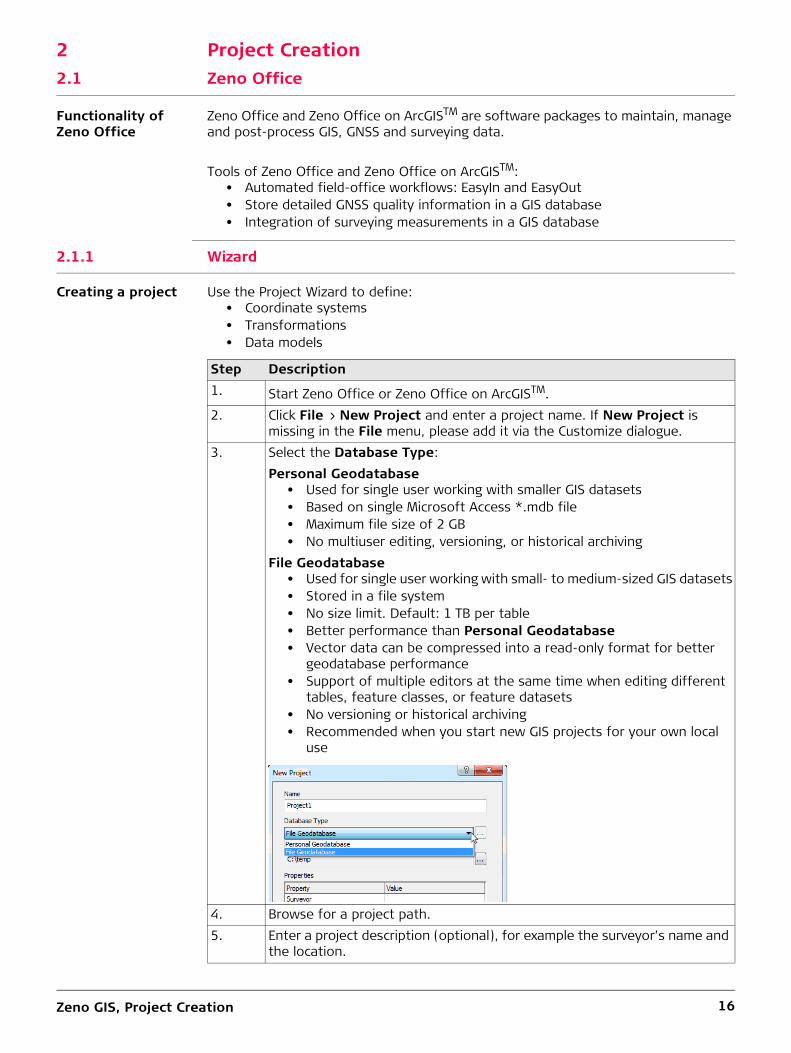
missing in the File menu, please add it via the Customize dialogue.3. Select the Database Type:
Personal Geodatabase• Used for single user working with smaller GIS datasets• Based on single Microsoft Access *.mdb file• Maximum file size of 2 GB• No multiuser editing, versioning, or historical archiving
File Geodatabase• Used for single user working with small- to medium-sized GIS datasets• Stored in a file system• No size limit. Default: 1 TB per table• Better performance than Personal Geodatabase• Vector data can be compressed into a read-only format for better
geodatabase performance• Support of multiple editors at the same time when editing different
tables, feature classes, or feature datasets• No versioning or historical archiving• Recommended when you start new GIS projects for your own local
use
4. Browse for a project path.5. Enter a project description (optional), for example the surveyor’s name and
the location.
Zeno GIS, Project Creation 17
If you want to re-use the settings for another project, define a map template.
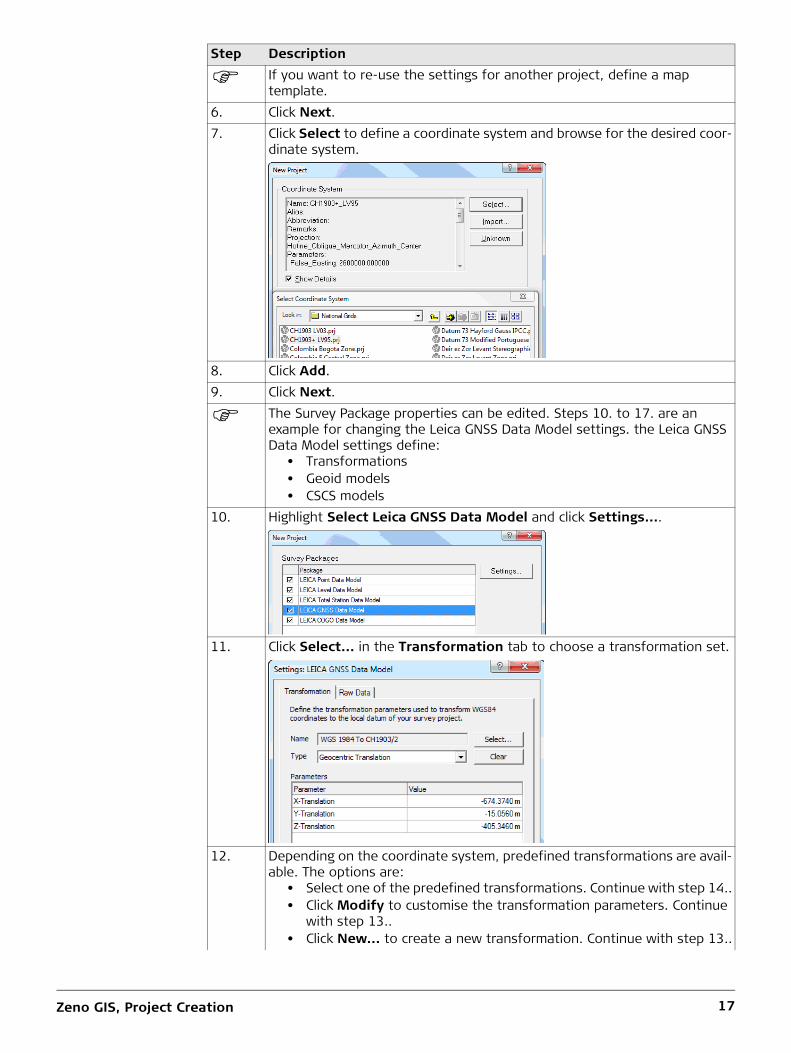
6. Click Next.7. Click Select to define a coordinate system and browse for the desired coor-
dinate system.
8. Click Add. 9. Click Next.
The Survey Package properties can be edited. Steps 10. to 17. are an example for changing the Leica GNSS Data Model settings. the Leica GNSS Data Model settings define:
• Transformations• Geoid models• CSCS models
10. Highlight Select Leica GNSS Data Model and click Settings....
11. Click Select... in the Transformation tab to choose a transformation set.
12. Depending on the coordinate system, predefined transformations are avail-able. The options are:
• Select one of the predefined transformations. Continue with step 14..• Click Modify to customise the transformation parameters. Continue
with step 13..• Click New... to create a new transformation. Continue with step 13..
Step Description
Zeno GIS, Project Creation 18
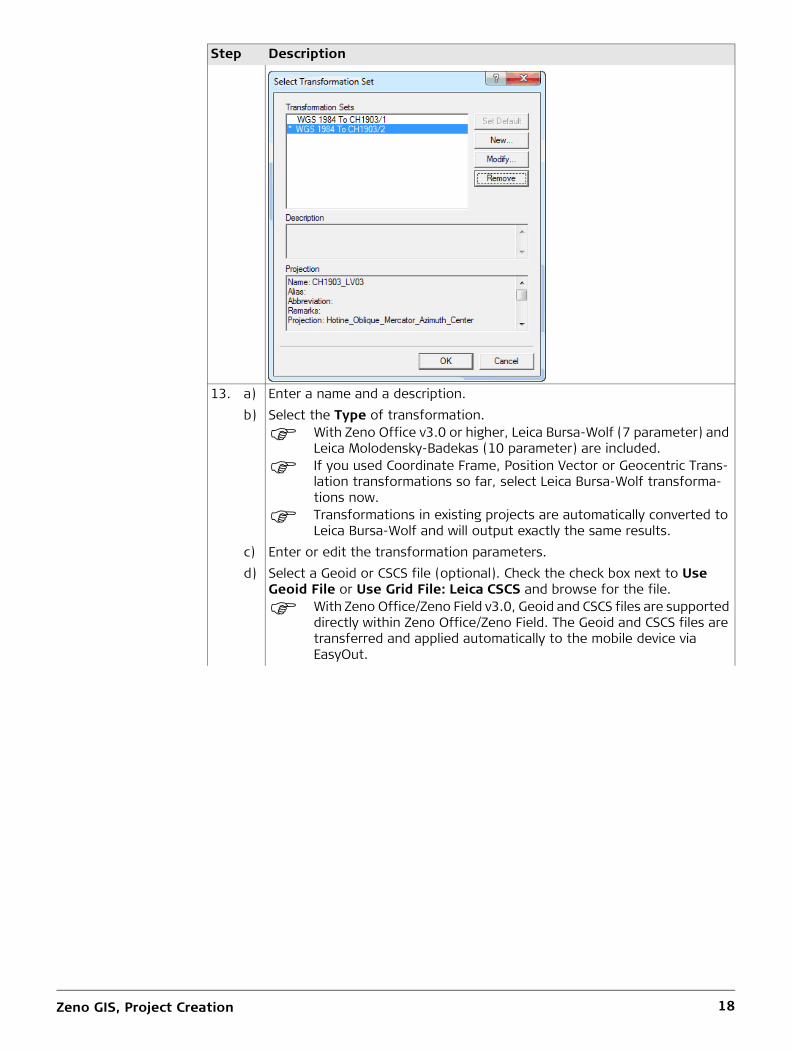
13. a) Enter a name and a description.b) Select the Type of transformation.
With Zeno Office v3.0 or higher, Leica Bursa-Wolf (7 parameter) and Leica Molodensky-Badekas (10 parameter) are included.
If you used Coordinate Frame, Position Vector or Geocentric Trans-lation transformations so far, select Leica Bursa-Wolf transforma-tions now.
Transformations in existing projects are automatically converted to Leica Bursa-Wolf and will output exactly the same results.
c) Enter or edit the transformation parameters.d) Select a Geoid or CSCS file (optional). Check the check box next to Use
Geoid File or Use Grid File: Leica CSCS and browse for the file.
With Zeno Office/Zeno Field v3.0, Geoid and CSCS files are supported directly within Zeno Office/Zeno Field. The Geoid and CSCS files are transferred and applied automatically to the mobile device via EasyOut.
Step Description
Zeno GIS, Project Creation 19
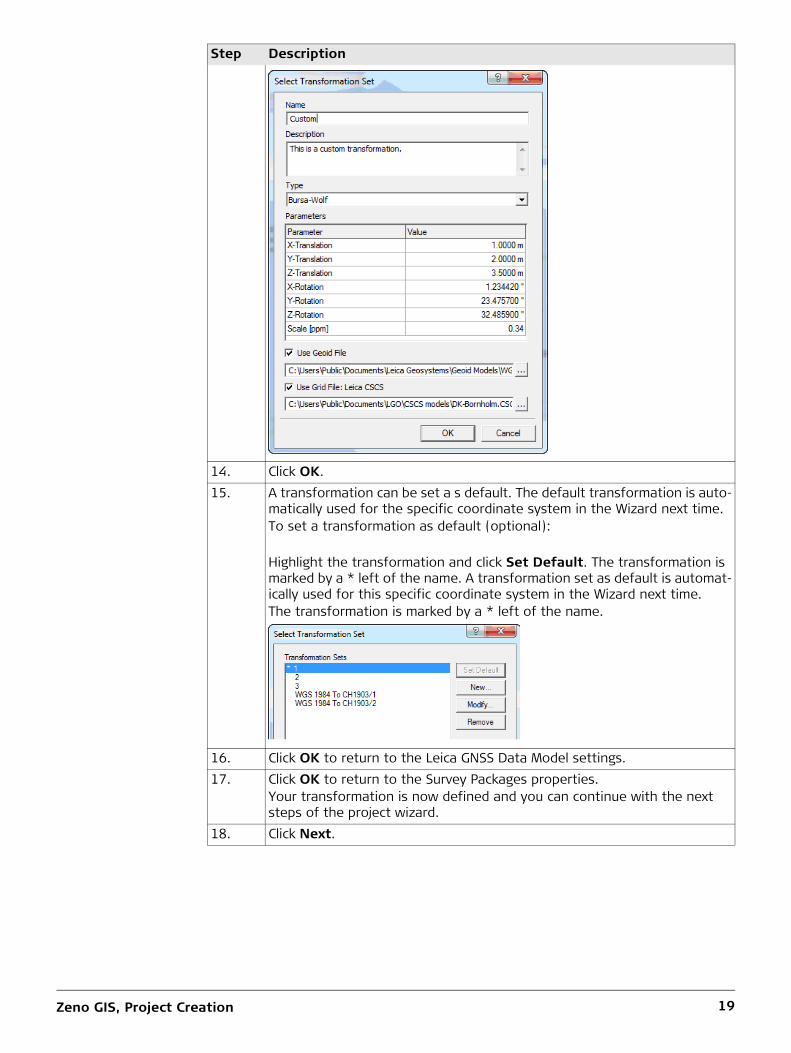
14. Click OK.15. A transformation can be set a s default. The default transformation is auto-
matically used for the specific coordinate system in the Wizard next time.To set a transformation as default (optional):
Highlight the transformation and click Set Default. The transformation is marked by a * left of the name. A transformation set as default is automat-ically used for this specific coordinate system in the Wizard next time.The transformation is marked by a * left of the name.
16. Click OK to return to the Leica GNSS Data Model settings.17. Click OK to return to the Survey Packages properties.
Your transformation is now defined and you can continue with the next steps of the project wizard.
18. Click Next.
Step Description
Zeno GIS, Project Creation 20
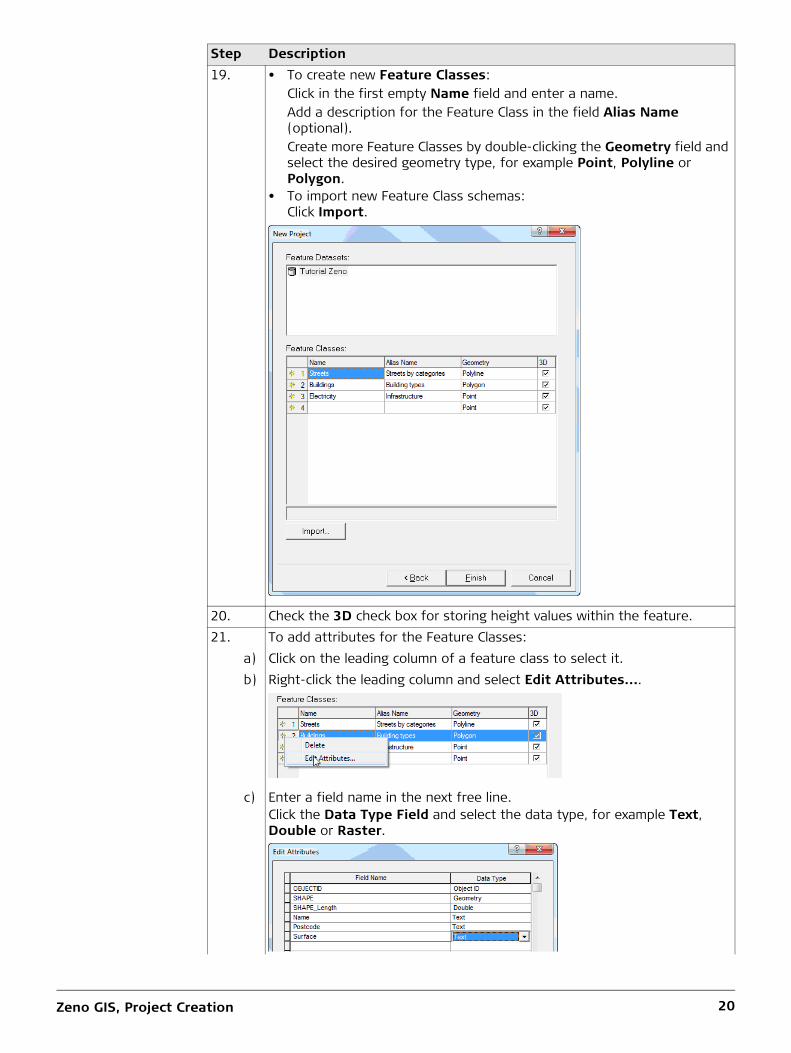
19. • To create new Feature Classes:Click in the first empty Name field and enter a name.Add a description for the Feature Class in the field Alias Name (optional).Create more Feature Classes by double-clicking the Geometry field and select the desired geometry type, for example Point, Polyline or Polygon.
• To import new Feature Class schemas:Click Import.
20. Check the 3D check box for storing height values within the feature.21. To add attributes for the Feature Classes:
a) Click on the leading column of a feature class to select it.b) Right-click the leading column and select Edit Attributes....
c) Enter a field name in the next free line.Click the Data Type Field and select the data type, for example Text, Double or Raster.
Step Description
Zeno GIS, Project Creation 21
2.1.2 Image Settings
Hyperlink base EasyIn will automatically transfer collected images to your office PC. The images are stored in the defined location of the Hyperlink base.
Layer hyperlink settings
Images linked to a feature can be shown in Zeno Office by clicking on the Tools
toolbar. The hyperlink support must be defined for each layer which should show images.
To store pictures as an attribute in the data, create a text field. Name the text field photo, image or picture. Assign the minimum length of 20 characters. This text field is used for storing the picture link within Zeno Field.
22. Repeat step 20. for all feature classes23. Click OK.24. Click Finish after all Feature Classes and attribute fields were defined.
The project is created.
The project can be used as a template.
Step Description
Step Description1. Click FileDocument Properties....2. Enter the path into the Hyperlink base field, for example c:\images.
Ensure that the defined path exists on your system. If the path does not exist during EasyIn, the images will be copied to the location of the map document.
If the images should be stored in a different location, you can define it in the Hyperlink base setting of the map.
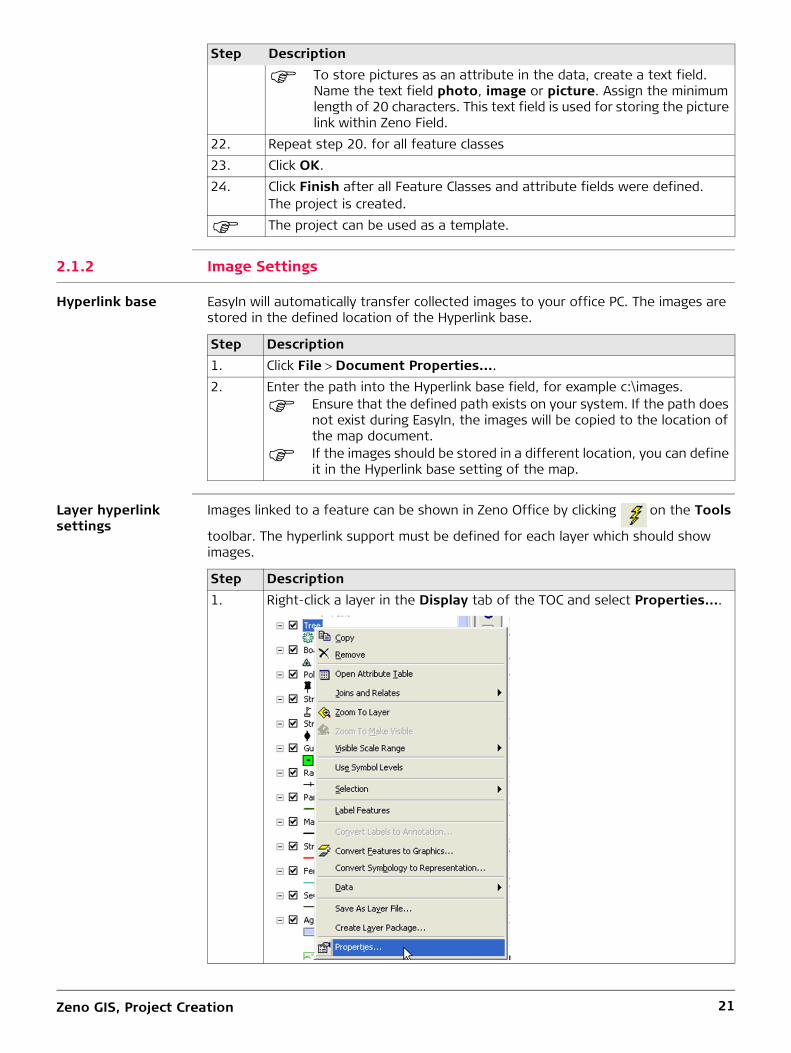
Step Description1. Right-click a layer in the Display tab of the TOC and select Properties....
Zeno GIS, Project Creation 22
2.1.3 Transferring a Project between Zeno Office and Zeno Field using EasyOut
Transfer project from Zeno Office to Zeno Field
With the EasyOut process you can transfer a Zeno Office project to Zeno Office.
For exporting a database that was not created by the Project Wizard you have to create a Survey Data Set manually. Refer to Zeno Office Office help.
the EasyOut process works only from one single geodatabase.Make sure that all your data has the same spatial reference.If your project includes data from different geodatabases or your feature classes have different coordinate systems, a message will be displayed.
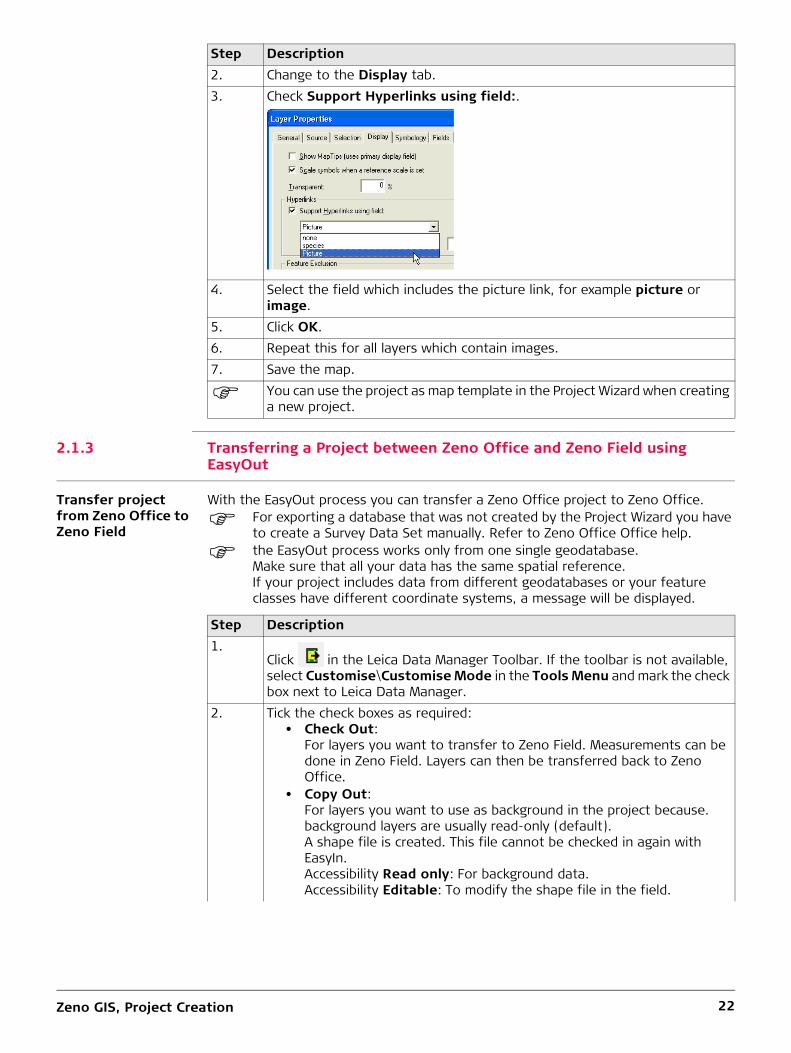
2. Change to the Display tab.3. Check Support Hyperlinks using field:.
4. Select the field which includes the picture link, for example picture or image.
5. Click OK.6. Repeat this for all layers which contain images.7. Save the map.
You can use the project as map template in the Project Wizard when creating a new project.
Step Description
Step Description1.
Click in the Leica Data Manager Toolbar. If the toolbar is not available, select Customise\Customise Mode in the Tools Menu and mark the check box next to Leica Data Manager.
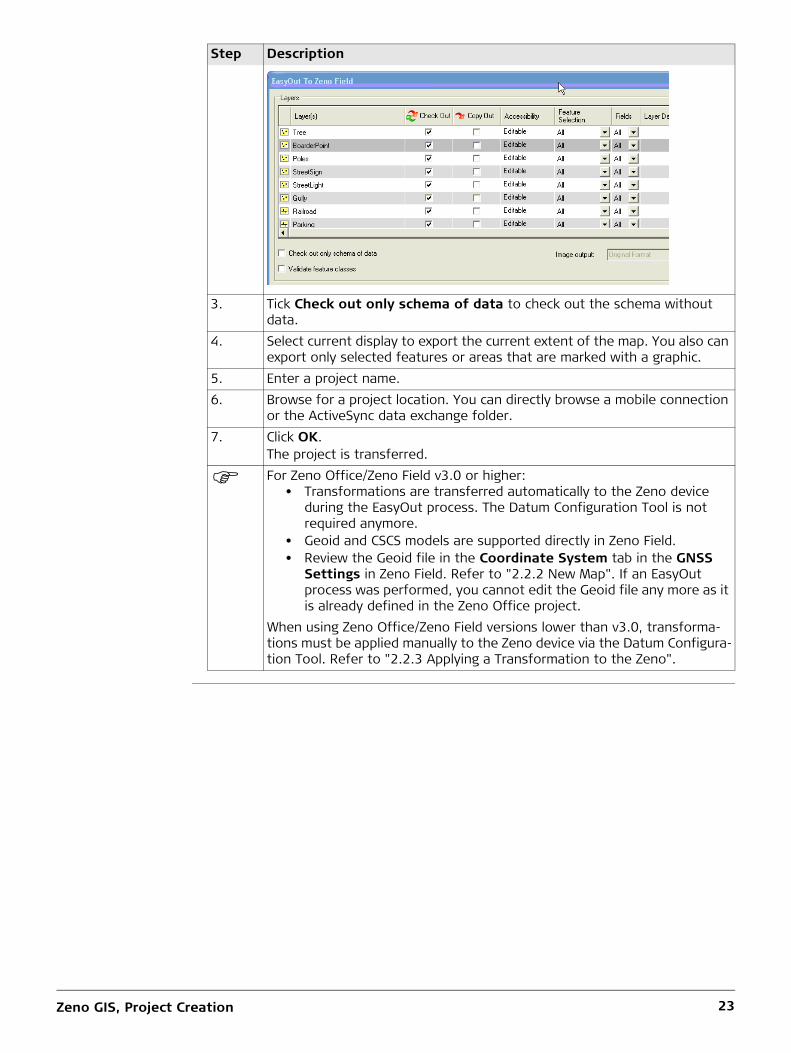
2. Tick the check boxes as required:• Check Out:
For layers you want to transfer to Zeno Field. Measurements can be done in Zeno Field. Layers can then be transferred back to Zeno Office.
• Copy Out:For layers you want to use as background in the project because. background layers are usually read-only (default).A shape file is created. This file cannot be checked in again with EasyIn.Accessibility Read only: For background data.Accessibility Editable: To modify the shape file in the field.
Zeno GIS, Project Creation 23
3. Tick Check out only schema of data to check out the schema without data.
4. Select current display to export the current extent of the map. You also can export only selected features or areas that are marked with a graphic.
5. Enter a project name.6. Browse for a project location. You can directly browse a mobile connection
or the ActiveSync data exchange folder.7. Click OK.
The project is transferred.
For Zeno Office/Zeno Field v3.0 or higher:• Transformations are transferred automatically to the Zeno device
during the EasyOut process. The Datum Configuration Tool is not required anymore.
• Geoid and CSCS models are supported directly in Zeno Field.• Review the Geoid file in the Coordinate System tab in the GNSS
Settings in Zeno Field. Refer to "2.2.2 New Map". If an EasyOut process was performed, you cannot edit the Geoid file any more as it is already defined in the Zeno Office project.
When using Zeno Office/Zeno Field versions lower than v3.0, transforma-tions must be applied manually to the Zeno device via the Datum Configura-tion Tool. Refer to "2.2.3 Applying a Transformation to the Zeno".
Step Description
Zeno GIS, Project Creation 24
2.2 Zeno Field
Functionality of Zeno Field
Leica Zeno Field is a version of ArcPad10. Zeno Field provides, additionally to the ArcPadTM functionality,:
• GNSS raw data logging• Easy handling of GNSS configurations, for example DGPS settings• Feature accuracy management• Automated workflow between the field and office
Use Zeno Office to manage feature quality over time and benefit from automated import and export functions to a wide range of different formats such as ArcGIS geodatabase, shapefile, dxf, dgn, and dwg.
Leica Zeno Field can be used for:• Field Mapping• Asset Inventories• Asset Maintenance• Inspections• Incident Reporting• GIS Analysis and Decision Making
2.2.1 Existing Map
Opening an existing map
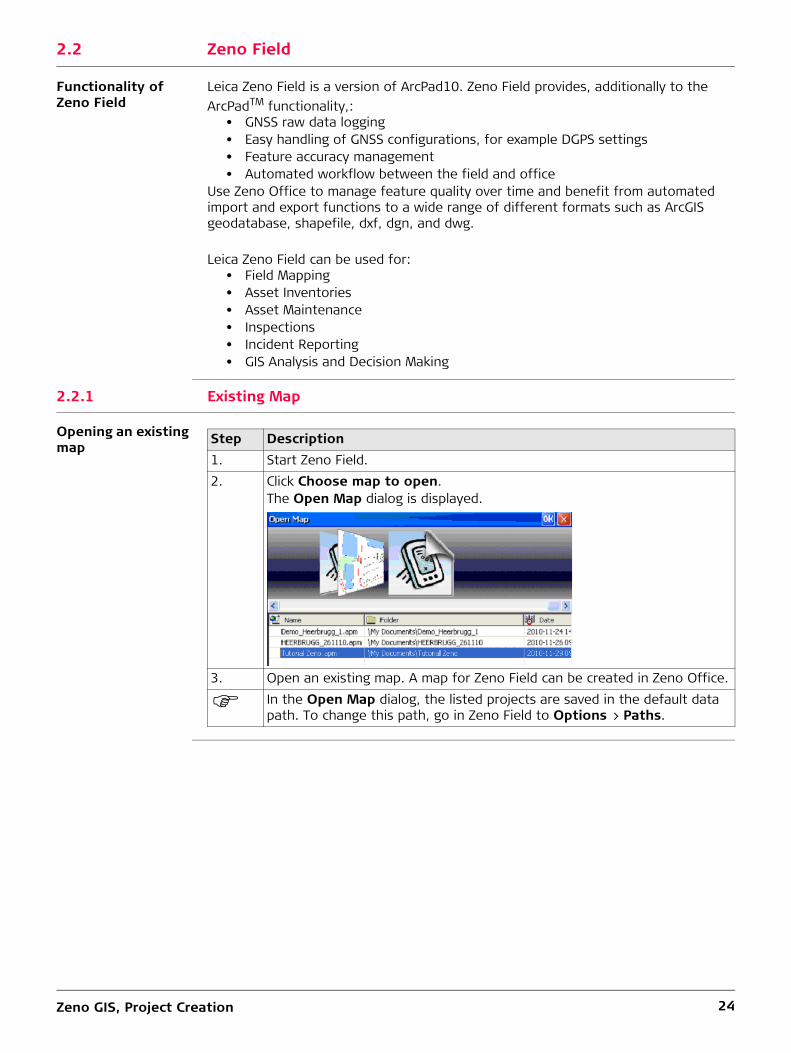
Step Description1. Start Zeno Field.2. Click Choose map to open.
The Open Map dialog is displayed.
3. Open an existing map. A map for Zeno Field can be created in Zeno Office.
In the Open Map dialog, the listed projects are saved in the default data path. To change this path, go in Zeno Field to Options > Paths.
Zeno GIS, Project Creation 25
2.2.2 New Map
Creating a new map Step Description1. Start Zeno Field.2. Close the Open Map dialogue or select new map.3. Select a coordinate system:
In Zeno Field you need a *.prj file where the information of the coordinate system is stored.Location of the *.prj file on your PC: In the folder Coordinate Systems in the installation directory of Zeno Office.Copy the desired *.prj file to the Zeno device.
4.Tap to open the Table of Contents.
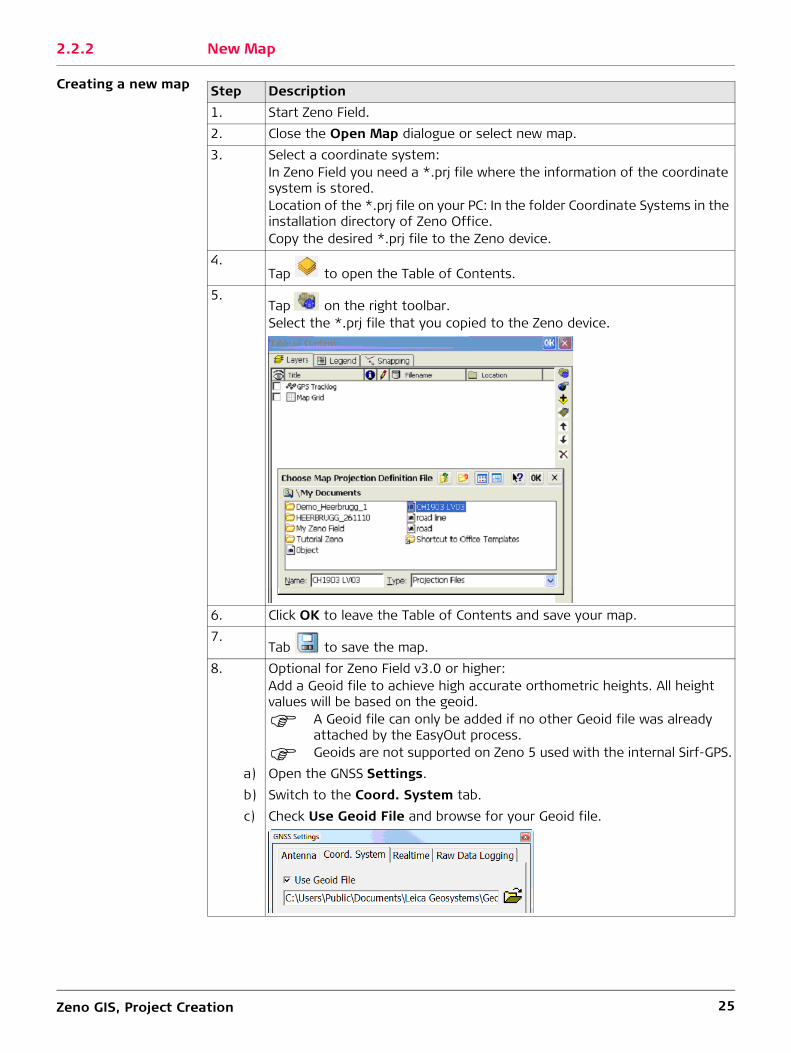
5.Tap on the right toolbar.Select the *.prj file that you copied to the Zeno device.
6. Click OK to leave the Table of Contents and save your map. 7.
Tab to save the map.8. Optional for Zeno Field v3.0 or higher:
Add a Geoid file to achieve high accurate orthometric heights. All height values will be based on the geoid.
A Geoid file can only be added if no other Geoid file was already attached by the EasyOut process.
Geoids are not supported on Zeno 5 used with the internal Sirf-GPS.a) Open the GNSS Settings.b) Switch to the Coord. System tab.c) Check Use Geoid File and browse for your Geoid file.
Zeno GIS, Project Creation 26
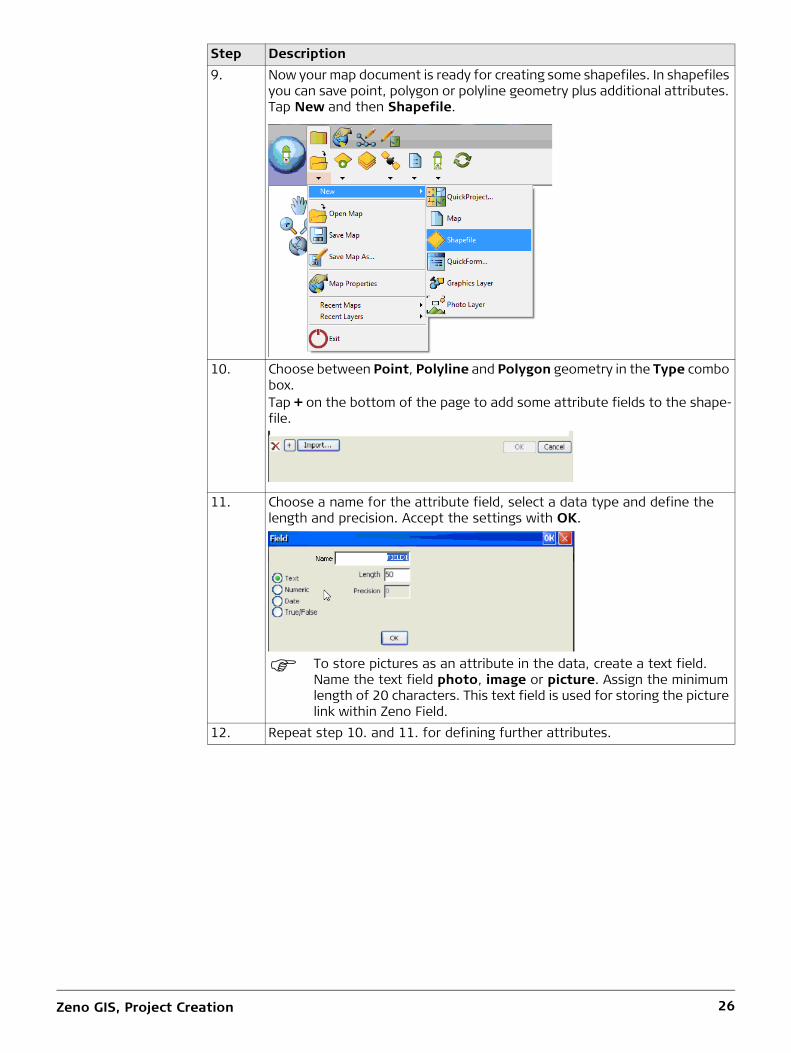
9. Now your map document is ready for creating some shapefiles. In shapefiles you can save point, polygon or polyline geometry plus additional attributes. Tap New and then Shapefile.
10. Choose between Point, Polyline and Polygon geometry in the Type combo box.Tap + on the bottom of the page to add some attribute fields to the shape-file.
11. Choose a name for the attribute field, select a data type and define the length and precision. Accept the settings with OK.
To store pictures as an attribute in the data, create a text field. Name the text field photo, image or picture. Assign the minimum length of 20 characters. This text field is used for storing the picture link within Zeno Field.
12. Repeat step 10. and 11. for defining further attributes.
Step Description
Zeno GIS, Project Creation 27
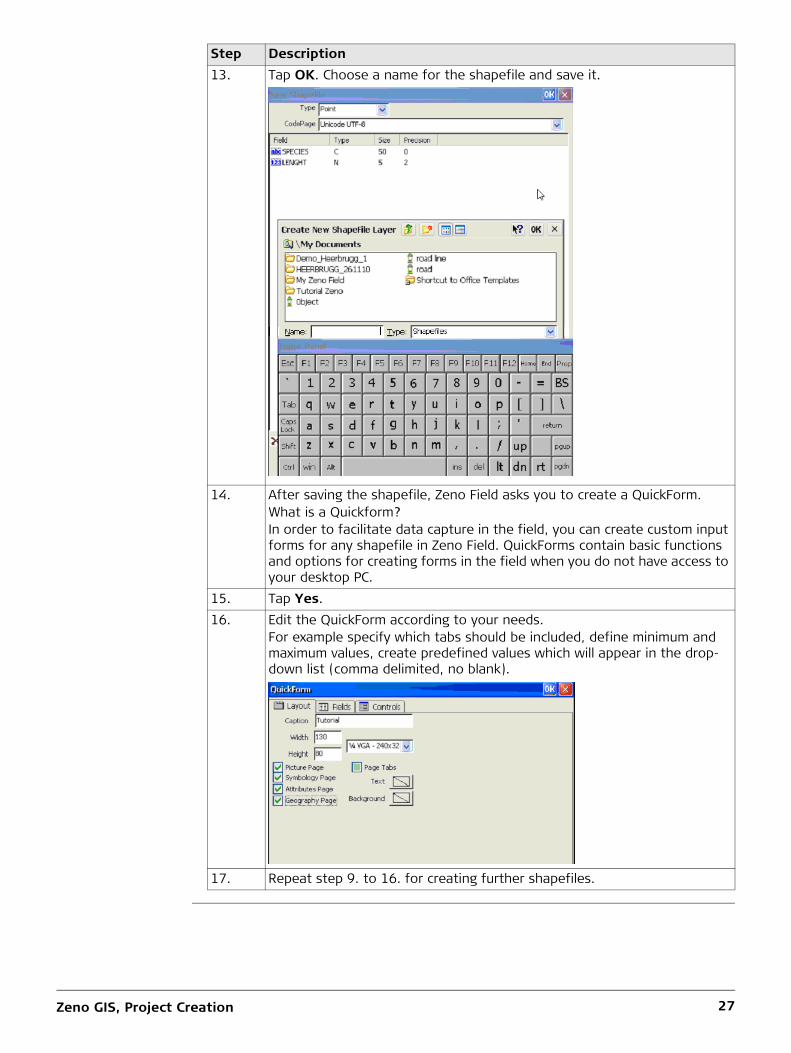
13. Tap OK. Choose a name for the shapefile and save it.
14. After saving the shapefile, Zeno Field asks you to create a QuickForm.What is a Quickform?In order to facilitate data capture in the field, you can create custom input forms for any shapefile in Zeno Field. QuickForms contain basic functions and options for creating forms in the field when you do not have access to your desktop PC.
15. Tap Yes.16. Edit the QuickForm according to your needs.
For example specify which tabs should be included, define minimum and maximum values, create predefined values which will appear in the drop-down list (comma delimited, no blank).
17. Repeat step 9. to 16. for creating further shapefiles.
Step Description
Zeno GIS, Project Creation 28
Creating a QuickProject
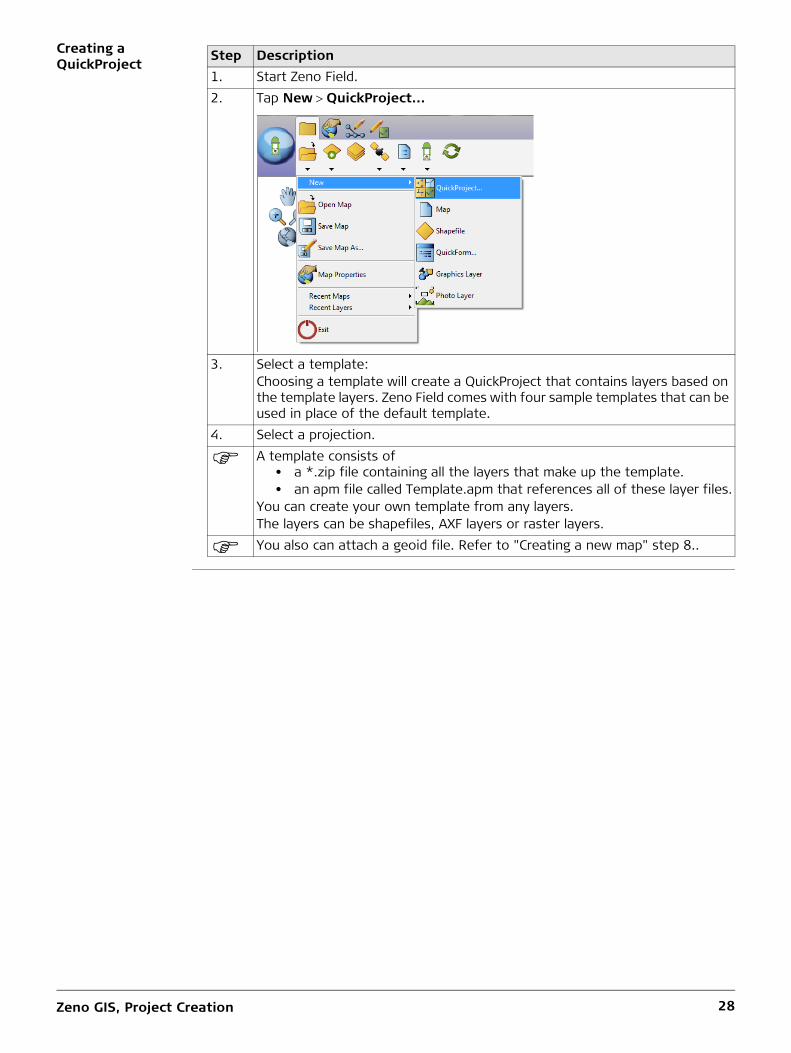
Step Description1. Start Zeno Field.2. Tap NewQuickProject...
3. Select a template:Choosing a template will create a QuickProject that contains layers based on the template layers. Zeno Field comes with four sample templates that can be used in place of the default template.
4. Select a projection.
A template consists of• a *.zip file containing all the layers that make up the template.• an apm file called Template.apm that references all of these layer files.
You can create your own template from any layers.The layers can be shapefiles, AXF layers or raster layers.
You also can attach a geoid file. Refer to "Creating a new map" step 8..
Zeno GIS, Project Creation 29
2.2.3 Applying a Transformation to the Zeno
You must use the Datum Configuration Tool and transfer the transformation to your Zeno device if
• a Zeno Office version is lower than v3.0.• a Zeno Field version is lower than v3.0.• no EasyOut from Zeno Office was made.
Functionality of the Datum Configuration Tool
The Datum Configuration Tool is installed with Zeno Field on the Desktop PC and CS25. You can:
• Define new transformation sets between two datums• Select default transformations• Copy transformation files to the Zeno
The Datum Configuration Tool writes editings to two *.dbf files. Both files must be copied manually to your Zeno device.
Applying a transformation to the Zeno using the Datum Configuration Tool
Step Description
The process needs to be done only once.The correct transformation will be used automatically for every map which uses the associated datum!
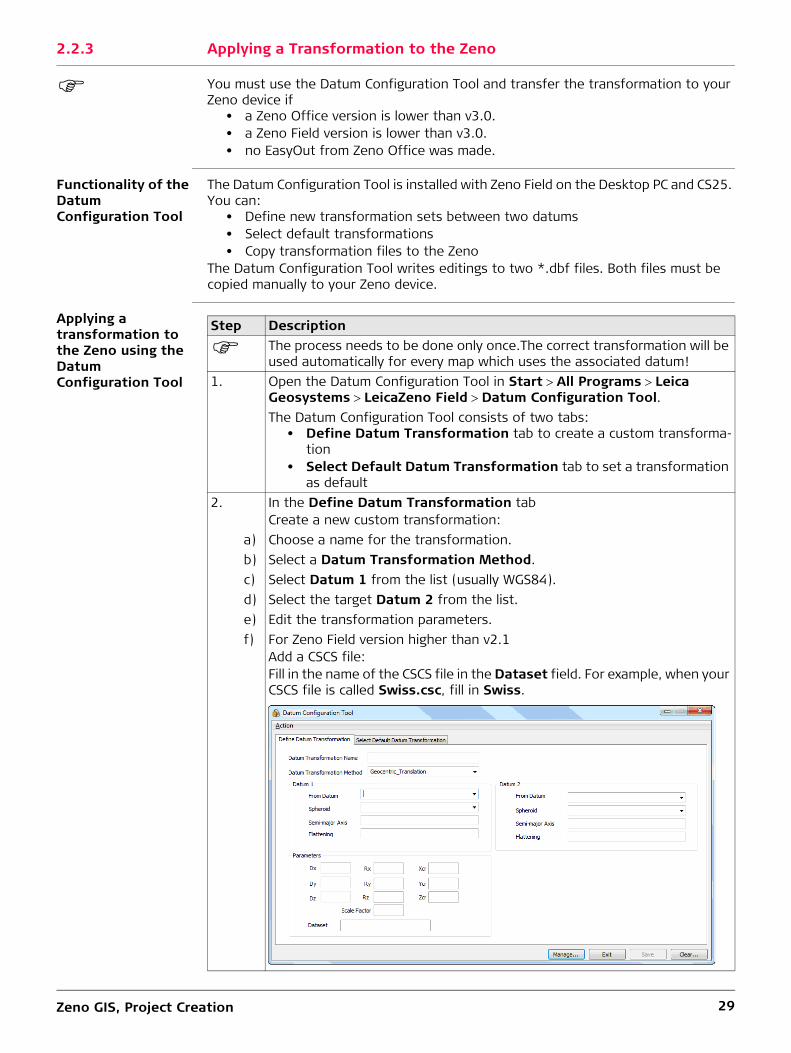
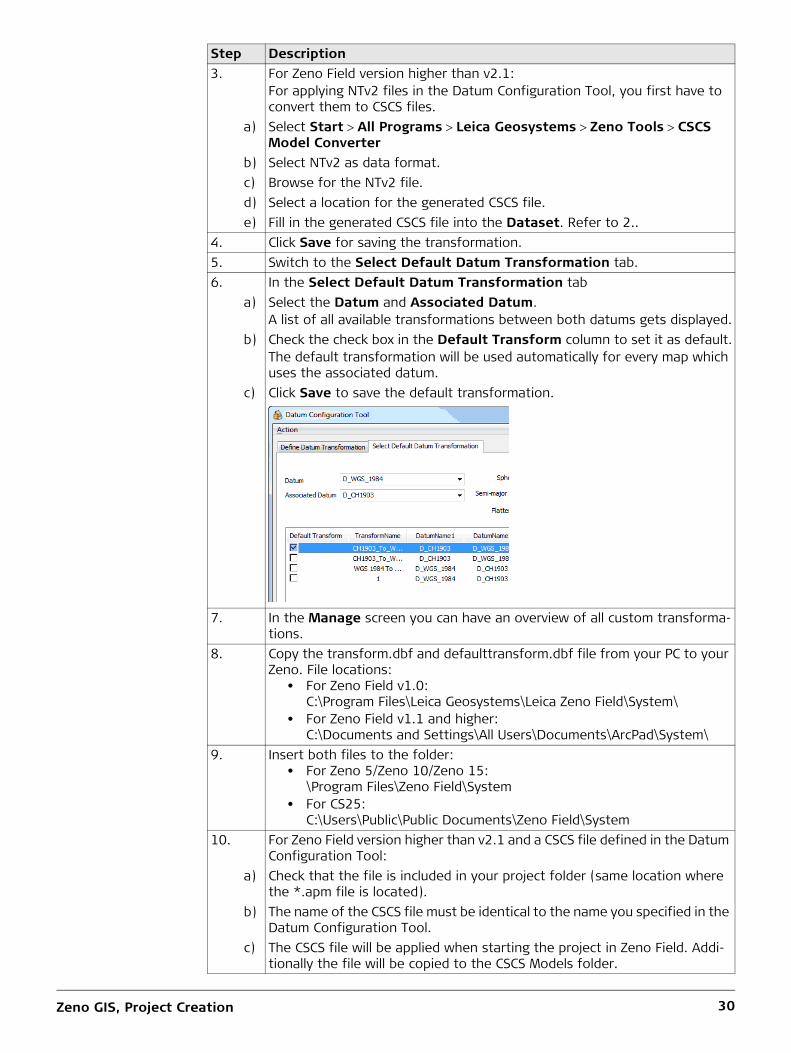
1. Open the Datum Configuration Tool in StartAll ProgramsLeica GeosystemsLeicaZeno FieldDatum Configuration Tool.The Datum Configuration Tool consists of two tabs:
• Define Datum Transformation tab to create a custom transforma-tion
• Select Default Datum Transformation tab to set a transformation as default
2. In the Define Datum Transformation tabCreate a new custom transformation:
a) Choose a name for the transformation.b) Select a Datum Transformation Method.c) Select Datum 1 from the list (usually WGS84).d) Select the target Datum 2 from the list.e) Edit the transformation parameters.f) For Zeno Field version higher than v2.1
Add a CSCS file:Fill in the name of the CSCS file in the Dataset field. For example, when your CSCS file is called Swiss.csc, fill in Swiss.
Zeno GIS, Project Creation 30
3. For Zeno Field version higher than v2.1:For applying NTv2 files in the Datum Configuration Tool, you first have to convert them to CSCS files.
a) Select StartAll ProgramsLeica GeosystemsZeno ToolsCSCS Model Converter
b) Select NTv2 as data format.c) Browse for the NTv2 file.d) Select a location for the generated CSCS file.e) Fill in the generated CSCS file into the Dataset. Refer to 2..
4. Click Save for saving the transformation.5. Switch to the Select Default Datum Transformation tab.6. In the Select Default Datum Transformation tab
a) Select the Datum and Associated Datum.A list of all available transformations between both datums gets displayed.
b) Check the check box in the Default Transform column to set it as default.The default transformation will be used automatically for every map which uses the associated datum.
c) Click Save to save the default transformation.
7. In the Manage screen you can have an overview of all custom transforma-tions.
8. Copy the transform.dbf and defaulttransform.dbf file from your PC to your Zeno. File locations:
• For Zeno Field v1.0:C:\Program Files\Leica Geosystems\Leica Zeno Field\System\
• For Zeno Field v1.1 and higher:C:\Documents and Settings\All Users\Documents\ArcPad\System\
9. Insert both files to the folder:• For Zeno 5/Zeno 10/Zeno 15:
\Program Files\Zeno Field\System• For CS25:
C:\Users\Public\Public Documents\Zeno Field\System10. For Zeno Field version higher than v2.1 and a CSCS file defined in the Datum
Configuration Tool:a) Check that the file is included in your project folder (same location where
the *.apm file is located).b) The name of the CSCS file must be identical to the name you specified in the
Datum Configuration Tool.c) The CSCS file will be applied when starting the project in Zeno Field. Addi-
tionally the file will be copied to the CSCS Models folder.
Step Description
Zeno GIS, Project Creation 31
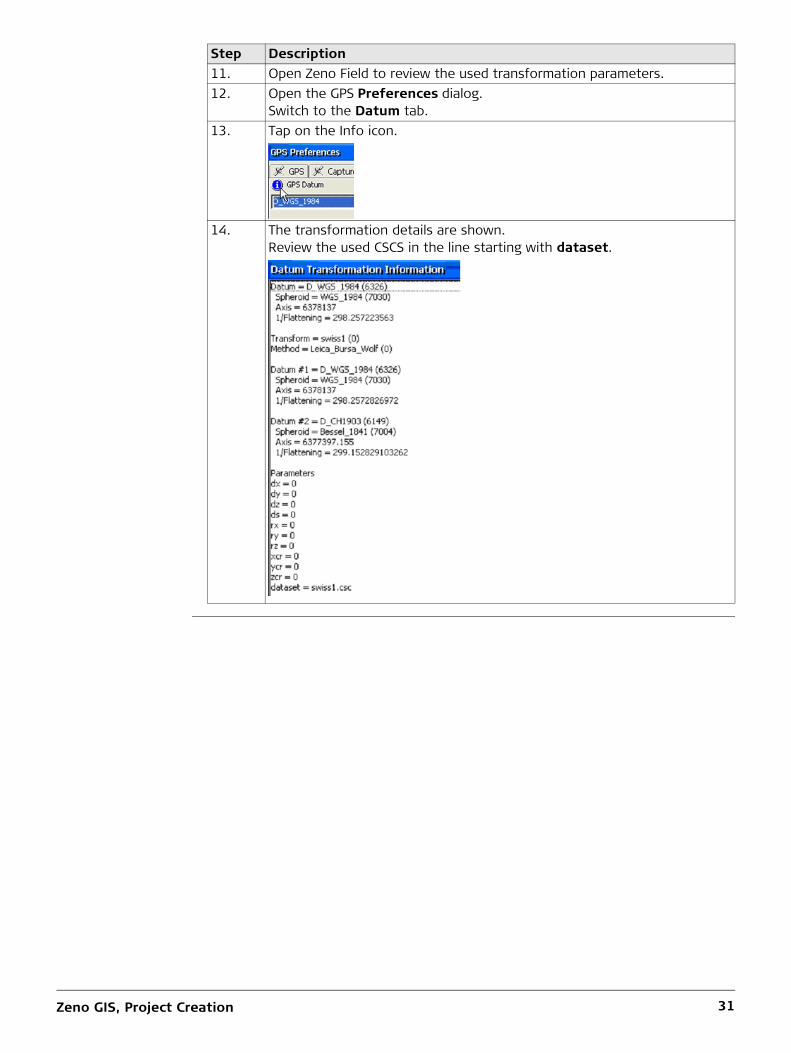
11. Open Zeno Field to review the used transformation parameters.12. Open the GPS Preferences dialog.
Switch to the Datum tab.13. Tap on the Info icon.
14. The transformation details are shown.Review the used CSCS in the line starting with dataset.
Step Description
Zeno GIS, Working with Zeno Field 32
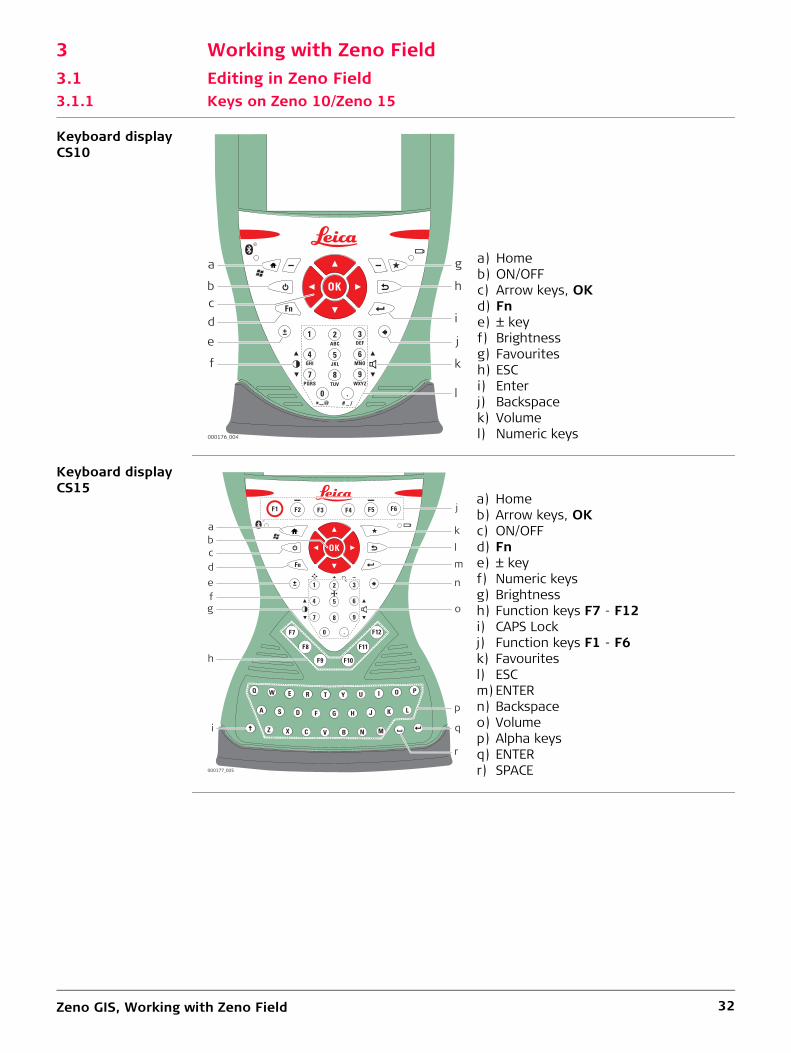
3 Working with Zeno Field3.1 Editing in Zeno Field3.1.1 Keys on Zeno 10/Zeno 15
Keyboard display CS10
Keyboard display CS15
a) Homeb) ON/OFFc) Arrow keys, OKd) Fne) ± keyf) Brightnessg) Favouritesh) ESCi) Enterj) Backspacek) Volumel) Numeric keys
2 31
.
5 64
8 97
0
Fn
ABC DEF
GHI JKL MNO
PQRS TUV WXYZ
OK
000176_004
e
f
g
d
a
bc
h
i
j
k
l
a) Homeb) Arrow keys, OKc) ON/OFFd) Fne) ± keyf) Numeric keysg) Brightnessh) Function keys F7 - F12i) CAPS Lockj) Function keys F1 - F6k) Favouritesl) ESCm) ENTERn) Backspaceo) Volumep) Alpha keysq) ENTERr) SPACE
F1 F2
F7
F8
F9 F10
F11
F12
F3 F4 F5 F6
.
2 31
54
Fn
6
8 97
0
Q W E R T Y U I O P
L K J H G F D S A
Z X C V B N M
OK
000177_005
e
g
h
c
ab
d
f
i
j
k
lm
n
o
p
q
r
Zeno GIS, Working with Zeno Field 33
Keys
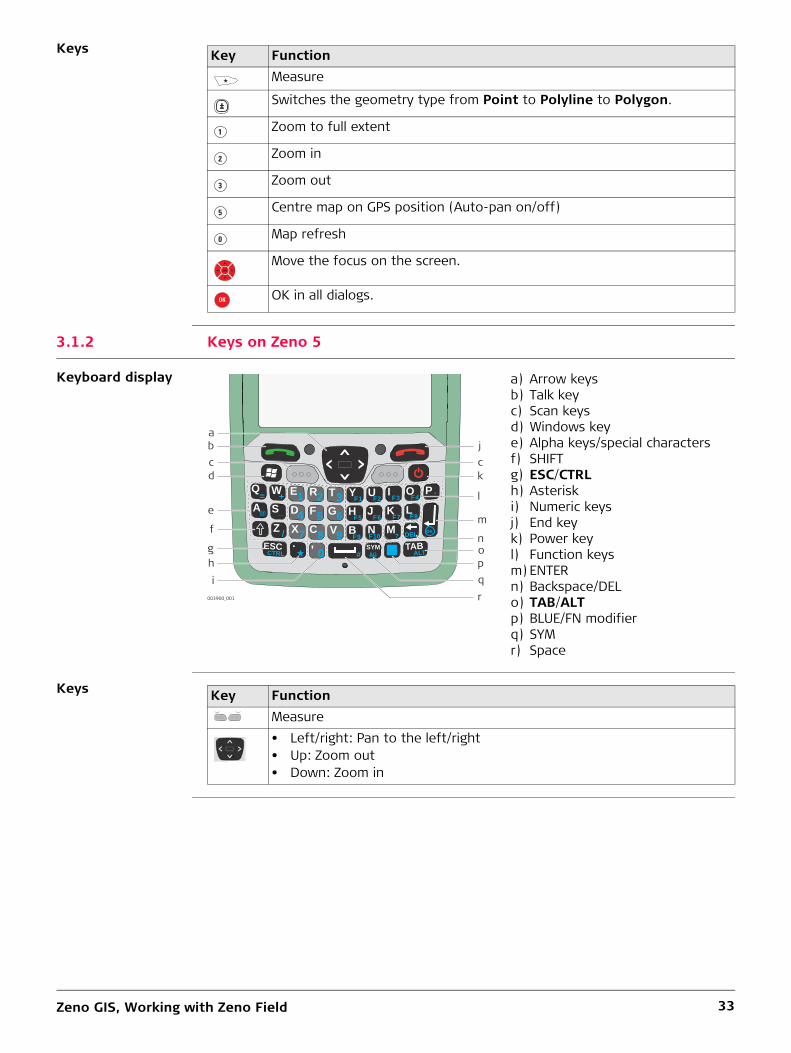
3.1.2 Keys on Zeno 5
Keyboard display
Keys
Key FunctionMeasure
Switches the geometry type from Point to Polyline to Polygon.
Zoom to full extent
Zoom in
Zoom out
Centre map on GPS position (Auto-pan on/off)
Map refresh
Move the focus on the screen.
OK in all dialogs.
1
2
3
5
0
OK
OK
a) Arrow keysb) Talk keyc) Scan keysd) Windows keye) Alpha keys/special charactersf) SHIFTg) ESC/CTRLh) Asteriski) Numeric keysj) End keyk) Power keyl) Function keysm) ENTERn) Backspace/DELo) TAB/ALTp) BLUE/FN modifierq) SYMr) Space
Y U I O P
L K J H G F D S A
Z X C V B N M .
Q W E R T
ESC , SYM TAB
<<
<<
2 31
54 68 970
F1 F2
F7 F8
F9 F10
F3 F4
F5 F6
CTRL # ALT àü
? DEL OK
:= +_@
/
003900_001
abc cd
e
f
ghi
j
k
l
m
nopqr
Key FunctionMeasure• Left/right: Pan to the left/right• Up: Zoom out• Down: Zoom in
Zeno GIS, Working with Zeno Field 34
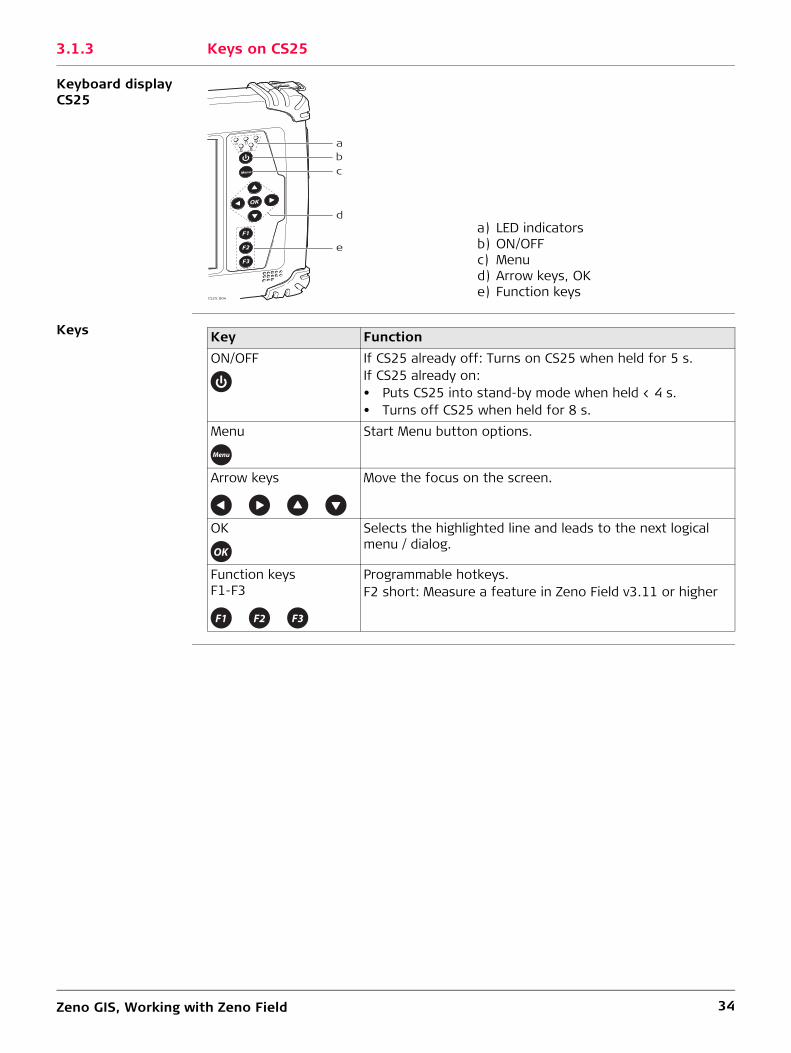
3.1.3 Keys on CS25
Keyboard display CS25
Keys
a) LED indicatorsb) ON/OFFc) Menud) Arrow keys, OKe) Function keys
CS25_004
abc
e
d
Key FunctionON/OFF If CS25 already off: Turns on CS25 when held for 5 s.
If CS25 already on:• Puts CS25 into stand-by mode when held < 4 s.• Turns off CS25 when held for 8 s.
Menu Start Menu button options.
Arrow keys Move the focus on the screen.
OK Selects the highlighted line and leads to the next logical menu / dialog.
Function keysF1-F3
Programmable hotkeys.F2 short: Measure a feature in Zeno Field v3.11 or higher
Zeno GIS, Working with Zeno Field 35
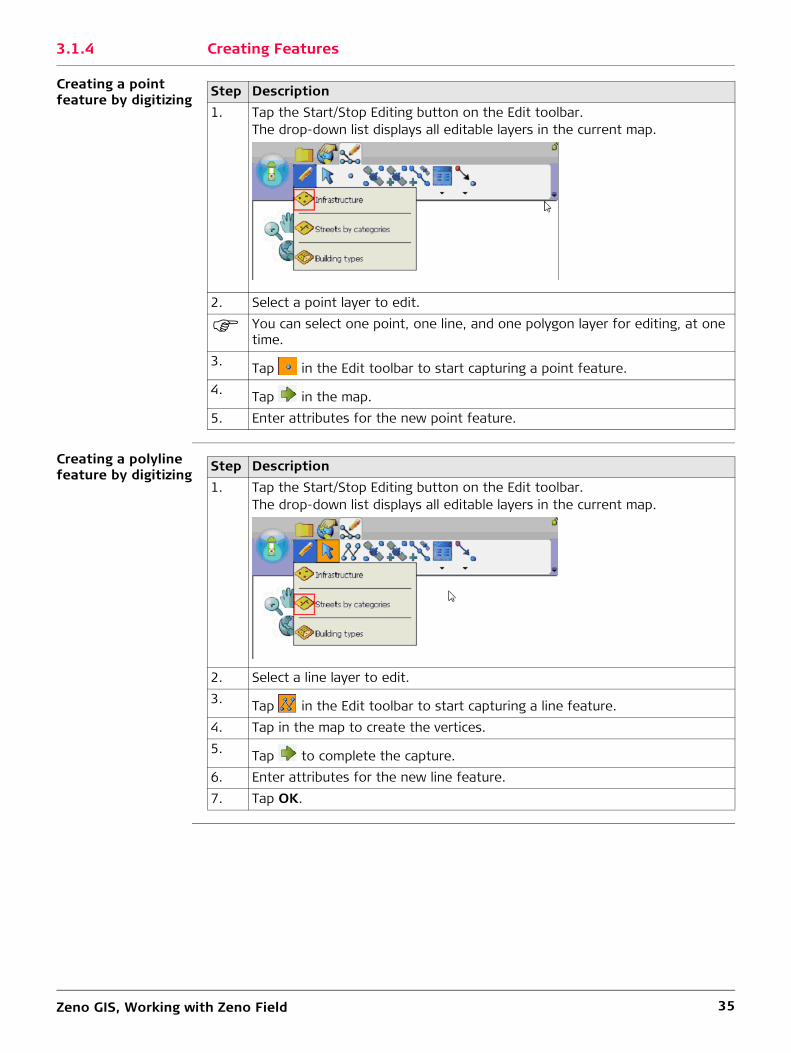
3.1.4 Creating Features
Creating a point feature by digitizing
Creating a polyline feature by digitizing
Step Description1. Tap the Start/Stop Editing button on the Edit toolbar.
The drop-down list displays all editable layers in the current map.
2. Select a point layer to edit.
You can select one point, one line, and one polygon layer for editing, at one time.
3. Tap in the Edit toolbar to start capturing a point feature.4. Tap in the map.5. Enter attributes for the new point feature.
Step Description1. Tap the Start/Stop Editing button on the Edit toolbar.
The drop-down list displays all editable layers in the current map.
2. Select a line layer to edit.3. Tap in the Edit toolbar to start capturing a line feature.4. Tap in the map to create the vertices.5. Tap to complete the capture.6. Enter attributes for the new line feature.7. Tap OK.
Zeno GIS, Working with Zeno Field 36
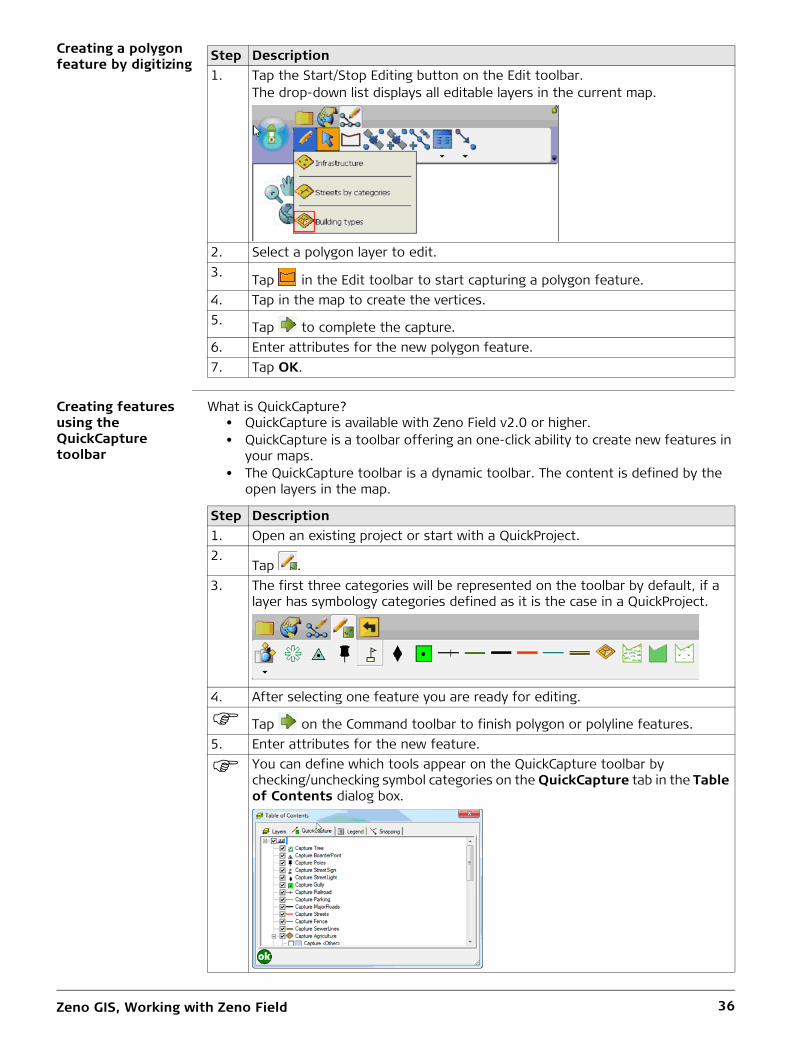
Creating a polygon feature by digitizing
Creating features using the QuickCapture toolbar
What is QuickCapture?• QuickCapture is available with Zeno Field v2.0 or higher. • QuickCapture is a toolbar offering an one-click ability to create new features in
your maps. • The QuickCapture toolbar is a dynamic toolbar. The content is defined by the
open layers in the map.
Step Description1. Tap the Start/Stop Editing button on the Edit toolbar.
The drop-down list displays all editable layers in the current map.
2. Select a polygon layer to edit.3. Tap in the Edit toolbar to start capturing a polygon feature.4. Tap in the map to create the vertices.5. Tap to complete the capture.6. Enter attributes for the new polygon feature.7. Tap OK.
Step Description1. Open an existing project or start with a QuickProject.2.
Tap .3. The first three categories will be represented on the toolbar by default, if a
layer has symbology categories defined as it is the case in a QuickProject.
4. After selecting one feature you are ready for editing.
Tap on the Command toolbar to finish polygon or polyline features.5. Enter attributes for the new feature.
You can define which tools appear on the QuickCapture toolbar by checking/unchecking symbol categories on the QuickCapture tab in the Table of Contents dialog box.
Zeno GIS, Working with Zeno Field 37
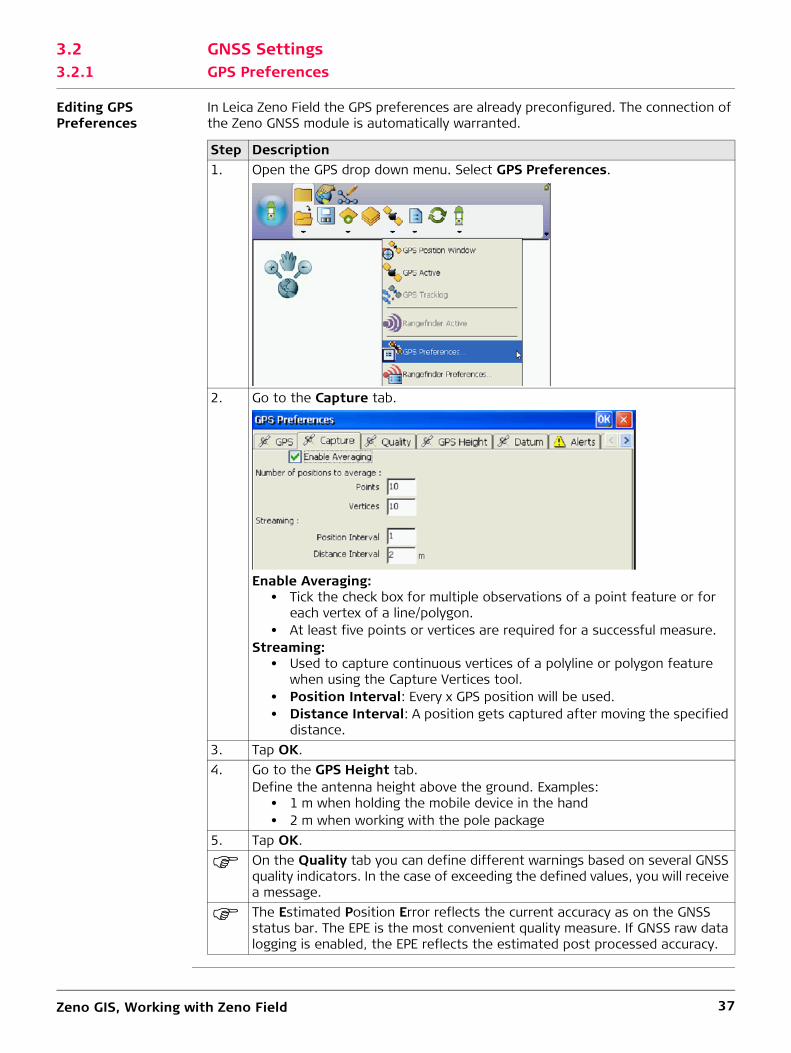
3.2 GNSS Settings3.2.1 GPS Preferences
Editing GPS Preferences
In Leica Zeno Field the GPS preferences are already preconfigured. The connection of the Zeno GNSS module is automatically warranted.
Step Description1. Open the GPS drop down menu. Select GPS Preferences.
2. Go to the Capture tab.
Enable Averaging:• Tick the check box for multiple observations of a point feature or for
each vertex of a line/polygon.• At least five points or vertices are required for a successful measure.
Streaming:• Used to capture continuous vertices of a polyline or polygon feature
when using the Capture Vertices tool. • Position Interval: Every x GPS position will be used.• Distance Interval: A position gets captured after moving the specified
distance.3. Tap OK.4. Go to the GPS Height tab.
Define the antenna height above the ground. Examples:• 1 m when holding the mobile device in the hand• 2 m when working with the pole package
5. Tap OK.
On the Quality tab you can define different warnings based on several GNSS quality indicators. In the case of exceeding the defined values, you will receive a message.
The Estimated Position Error reflects the current accuracy as on the GNSS status bar. The EPE is the most convenient quality measure. If GNSS raw data logging is enabled, the EPE reflects the estimated post processed accuracy.
Zeno GIS, Working with Zeno Field 38
3.2.2 Connecting to a GG03/GG02 plus
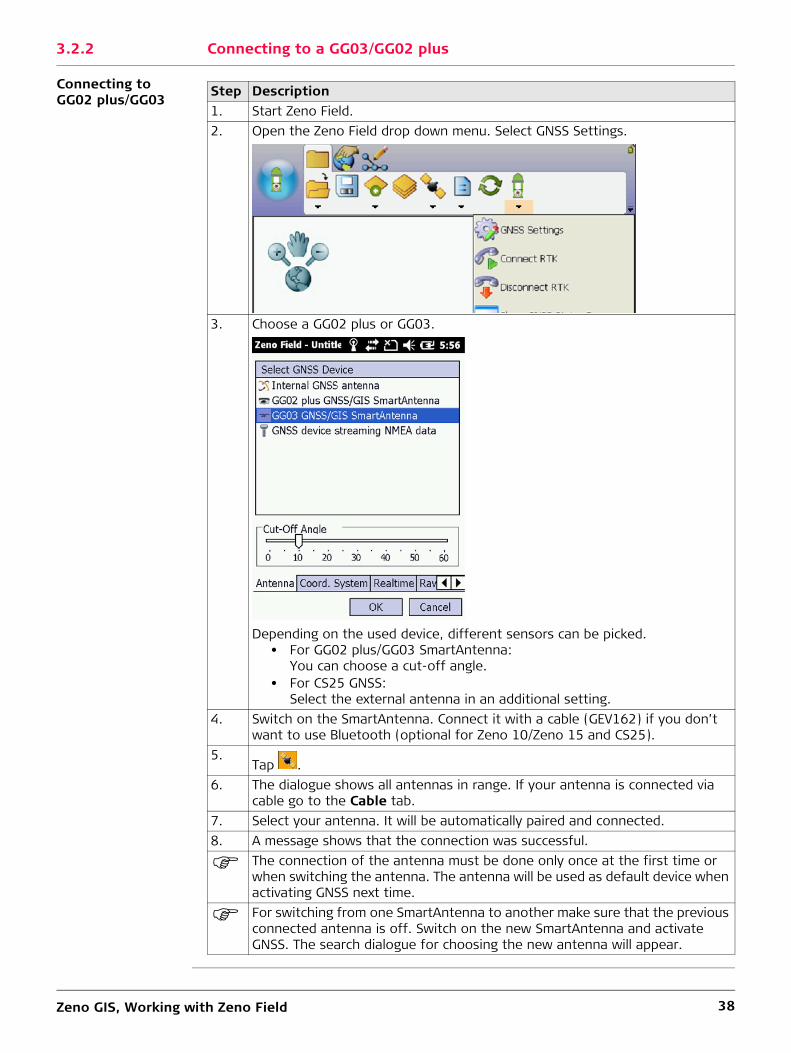
Connecting to GG02 plus/GG03
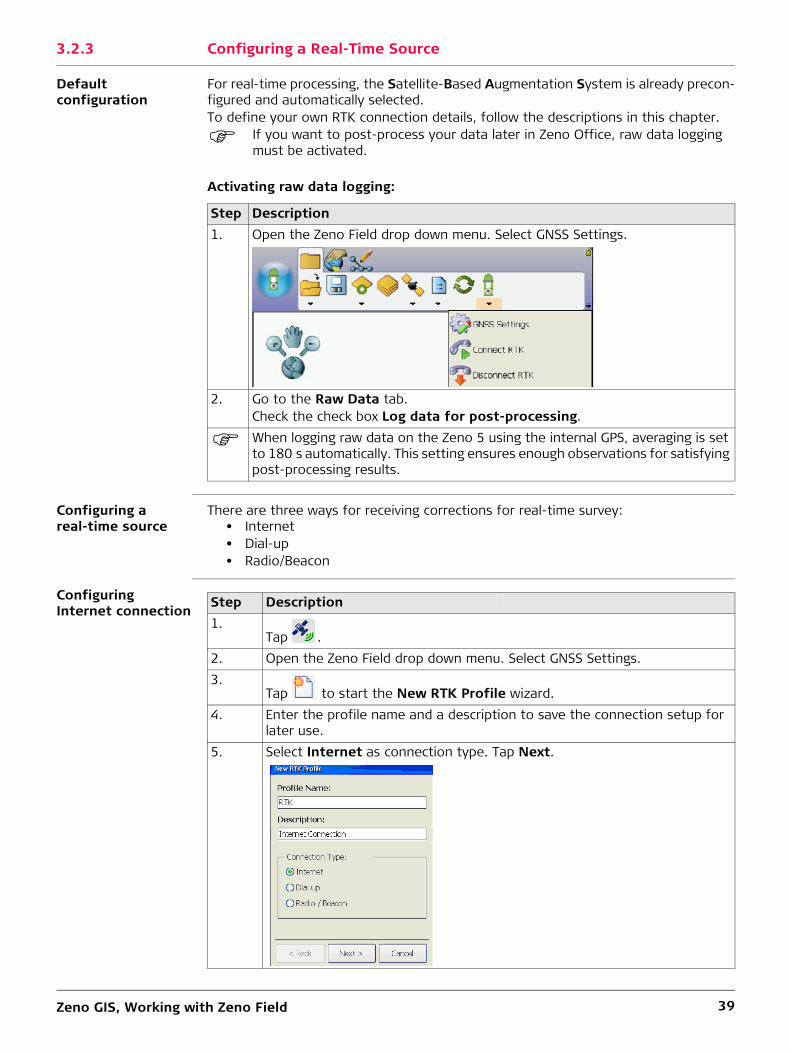
Step Description1. Start Zeno Field.2. Open the Zeno Field drop down menu. Select GNSS Settings.
3. Choose a GG02 plus or GG03.
Depending on the used device, different sensors can be picked.• For GG02 plus/GG03 SmartAntenna:
You can choose a cut-off angle.• For CS25 GNSS:
Select the external antenna in an additional setting.4. Switch on the SmartAntenna. Connect it with a cable (GEV162) if you don’t
want to use Bluetooth (optional for Zeno 10/Zeno 15 and CS25).5.
Tap .6. The dialogue shows all antennas in range. If your antenna is connected via
cable go to the Cable tab.7. Select your antenna. It will be automatically paired and connected.8. A message shows that the connection was successful.
The connection of the antenna must be done only once at the first time or when switching the antenna. The antenna will be used as default device when activating GNSS next time.
For switching from one SmartAntenna to another make sure that the previous connected antenna is off. Switch on the new SmartAntenna and activate GNSS. The search dialogue for choosing the new antenna will appear.
Zeno GIS, Working with Zeno Field 39
3.2.3 Configuring a Real-Time Source
Default configuration
For real-time processing, the Satellite-Based Augmentation System is already precon-figured and automatically selected.To define your own RTK connection details, follow the descriptions in this chapter.
If you want to post-process your data later in Zeno Office, raw data logging must be activated.
Activating raw data logging:
Configuring a real-time source
There are three ways for receiving corrections for real-time survey:• Internet• Dial-up• Radio/Beacon
Configuring Internet connection
Step Description1. Open the Zeno Field drop down menu. Select GNSS Settings.
2. Go to the Raw Data tab.Check the check box Log data for post-processing.
When logging raw data on the Zeno 5 using the internal GPS, averaging is set to 180 s automatically. This setting ensures enough observations for satisfying post-processing results.
Step Description1.
Tap .2. Open the Zeno Field drop down menu. Select GNSS Settings.3.
Tap to start the New RTK Profile wizard.4. Enter the profile name and a description to save the connection setup for
later use.5. Select Internet as connection type. Tap Next.
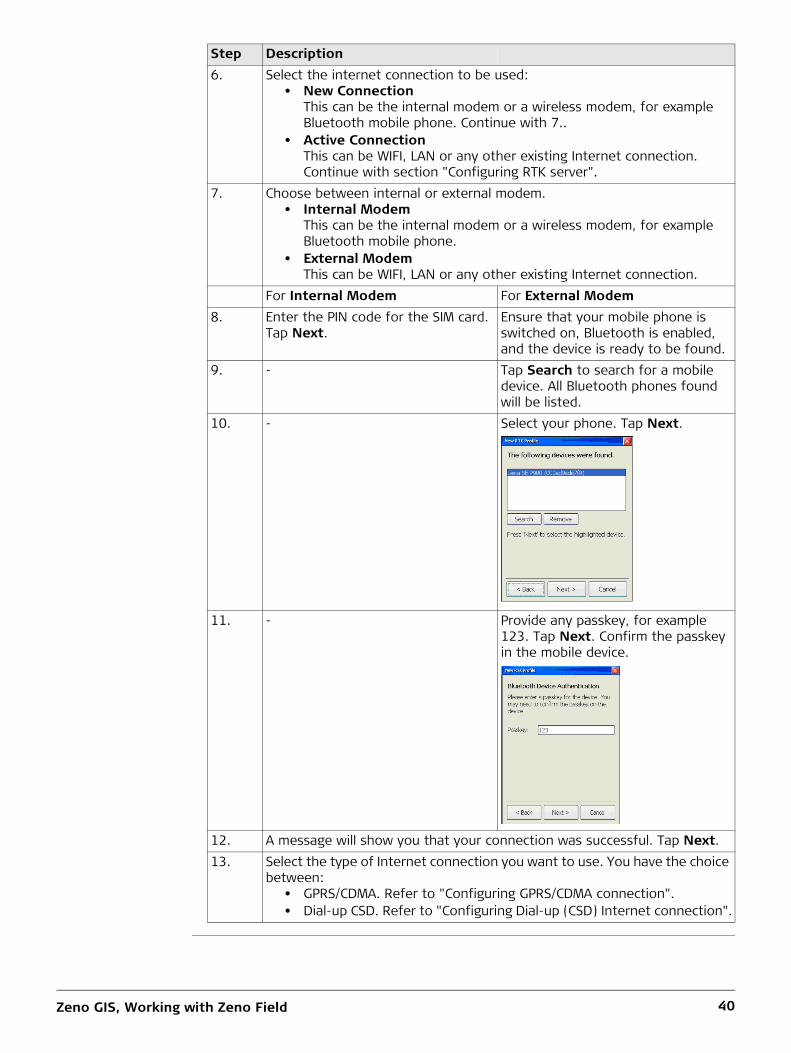
Zeno GIS, Working with Zeno Field 40
6. Select the internet connection to be used:• New Connection
This can be the internal modem or a wireless modem, for example Bluetooth mobile phone. Continue with 7..
• Active ConnectionThis can be WIFI, LAN or any other existing Internet connection. Continue with section "Configuring RTK server".
7. Choose between internal or external modem.• Internal Modem
This can be the internal modem or a wireless modem, for example Bluetooth mobile phone.
• External ModemThis can be WIFI, LAN or any other existing Internet connection.
For Internal Modem For External Modem8. Enter the PIN code for the SIM card.
Tap Next.Ensure that your mobile phone is switched on, Bluetooth is enabled, and the device is ready to be found.
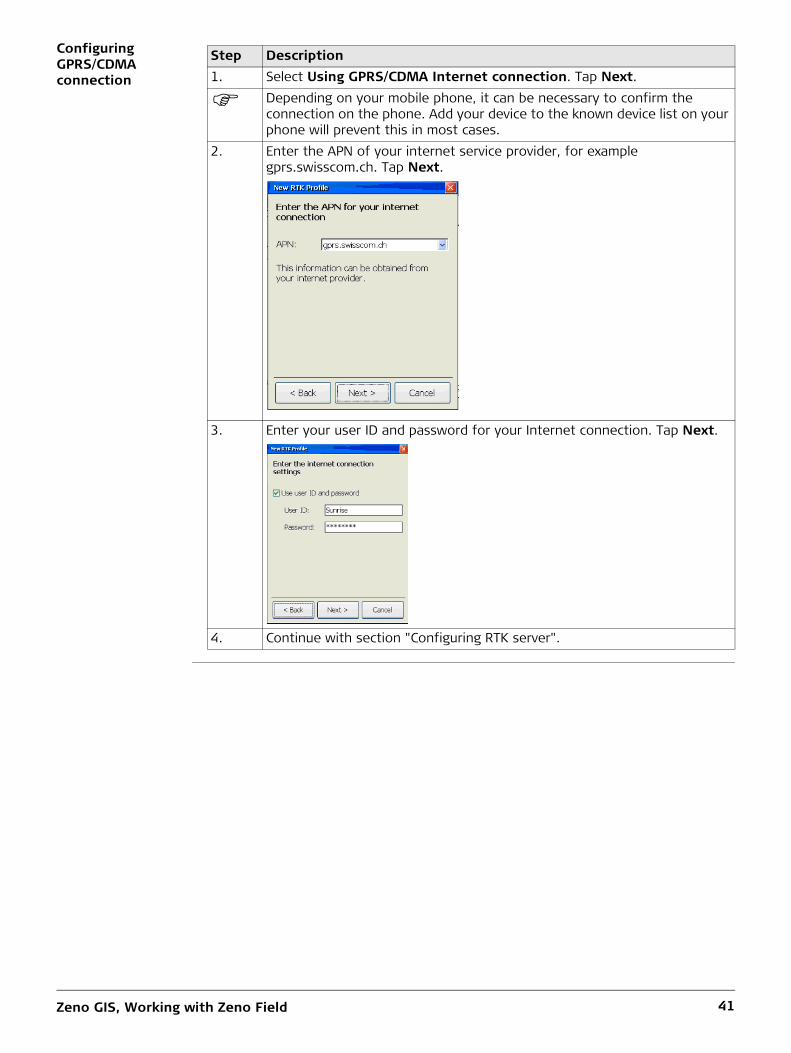
9. - Tap Search to search for a mobile device. All Bluetooth phones found will be listed.
10. - Select your phone. Tap Next.
11. - Provide any passkey, for example 123. Tap Next. Confirm the passkey in the mobile device.
12. A message will show you that your connection was successful. Tap Next.13. Select the type of Internet connection you want to use. You have the choice
between:• GPRS/CDMA. Refer to "Configuring GPRS/CDMA connection".• Dial-up CSD. Refer to "Configuring Dial-up (CSD) Internet connection".
Step Description
Zeno GIS, Working with Zeno Field 41
Configuring GPRS/CDMA connection
Step Description1. Select Using GPRS/CDMA Internet connection. Tap Next.
Depending on your mobile phone, it can be necessary to confirm the connection on the phone. Add your device to the known device list on your phone will prevent this in most cases.
2. Enter the APN of your internet service provider, for example gprs.swisscom.ch. Tap Next.
3. Enter your user ID and password for your Internet connection. Tap Next.
4. Continue with section "Configuring RTK server".
Zeno GIS, Working with Zeno Field 42
Configuring Dial-up (CSD) Internet connection
Configuring RTK server
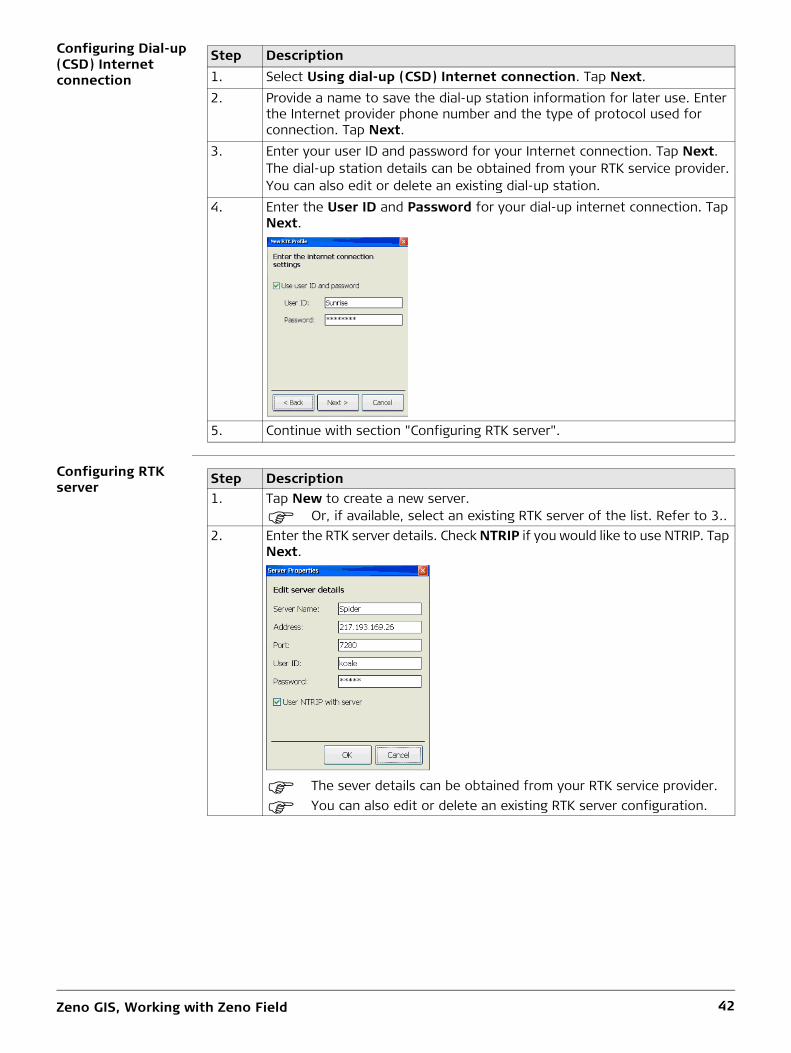
Step Description1. Select Using dial-up (CSD) Internet connection. Tap Next.2. Provide a name to save the dial-up station information for later use. Enter
the Internet provider phone number and the type of protocol used for connection. Tap Next.
3. Enter your user ID and password for your Internet connection. Tap Next.The dial-up station details can be obtained from your RTK service provider.You can also edit or delete an existing dial-up station.
4. Enter the User ID and Password for your dial-up internet connection. Tap Next.
5. Continue with section "Configuring RTK server".
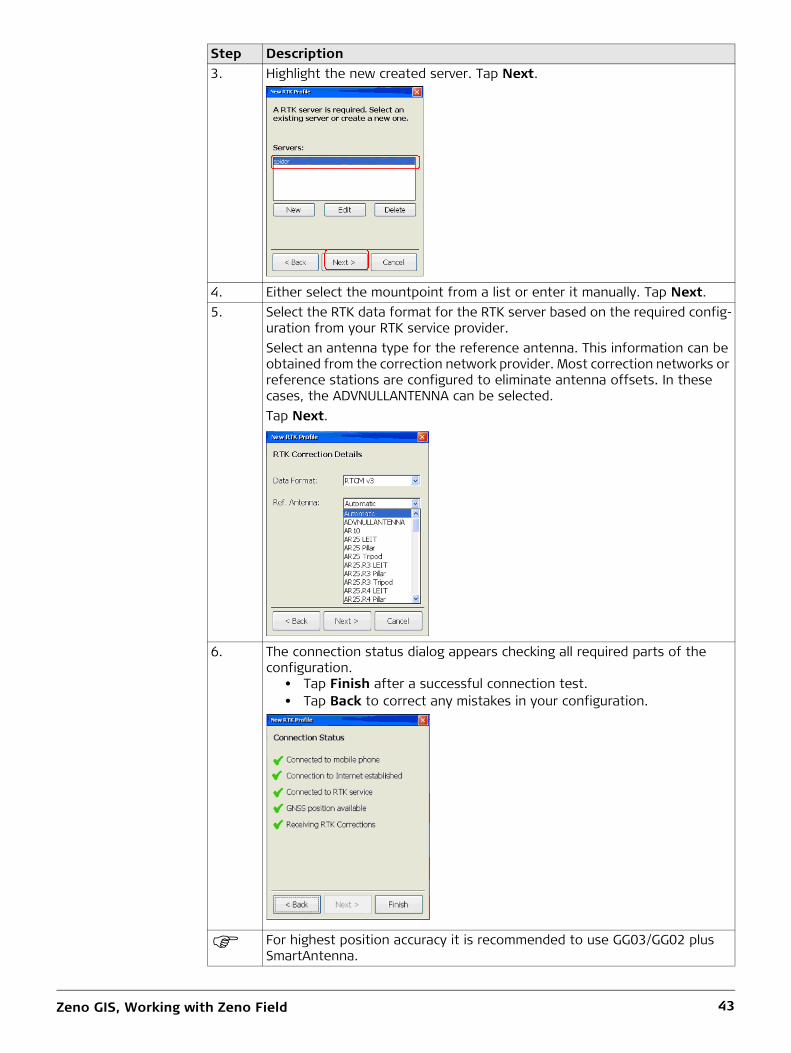
Step Description1. Tap New to create a new server.
Or, if available, select an existing RTK server of the list. Refer to 3..2. Enter the RTK server details. Check NTRIP if you would like to use NTRIP. Tap
Next.
The sever details can be obtained from your RTK service provider.
You can also edit or delete an existing RTK server configuration.
Zeno GIS, Working with Zeno Field 43
3. Highlight the new created server. Tap Next.
4. Either select the mountpoint from a list or enter it manually. Tap Next.5. Select the RTK data format for the RTK server based on the required config-
uration from your RTK service provider.Select an antenna type for the reference antenna. This information can be obtained from the correction network provider. Most correction networks or reference stations are configured to eliminate antenna offsets. In these cases, the ADVNULLANTENNA can be selected.Tap Next.
6. The connection status dialog appears checking all required parts of the configuration.
• Tap Finish after a successful connection test.• Tap Back to correct any mistakes in your configuration.
For highest position accuracy it is recommended to use GG03/GG02 plus SmartAntenna.
Step Description
Zeno GIS, Working with Zeno Field 44
3.3 Collecting Features with GNSS
Preparing feature collection with GNSS
Measuring a point using GPS
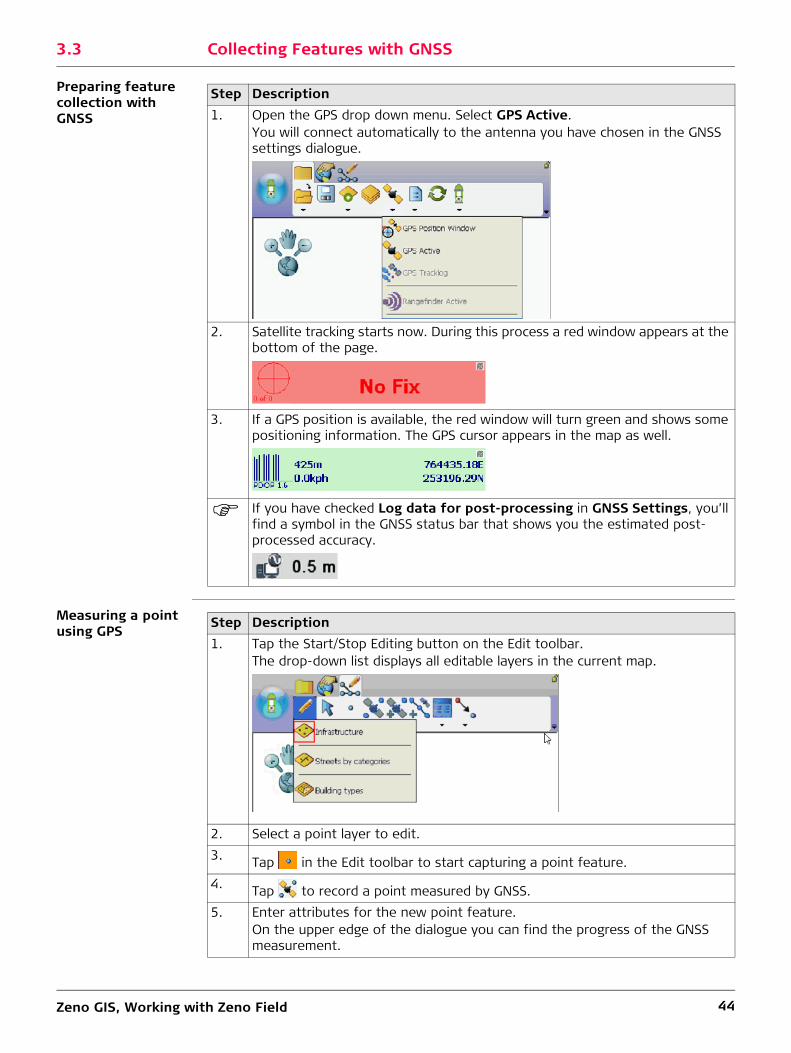
Step Description1. Open the GPS drop down menu. Select GPS Active.
You will connect automatically to the antenna you have chosen in the GNSS settings dialogue.
2. Satellite tracking starts now. During this process a red window appears at the bottom of the page.
3. If a GPS position is available, the red window will turn green and shows some positioning information. The GPS cursor appears in the map as well.
If you have checked Log data for post-processing in GNSS Settings, you’ll find a symbol in the GNSS status bar that shows you the estimated post-processed accuracy.
Step Description1. Tap the Start/Stop Editing button on the Edit toolbar.
The drop-down list displays all editable layers in the current map.
2. Select a point layer to edit.3. Tap in the Edit toolbar to start capturing a point feature.4. Tap to record a point measured by GNSS.5. Enter attributes for the new point feature.
On the upper edge of the dialogue you can find the progress of the GNSS measurement.
Zeno GIS, Working with Zeno Field 45
Measuring a line using GPS
Measuring a polygon using GPS
6. Tap OK. The point was saved in the layer.
Use the QuickCapture Toolbar to collect a point using GNSS.
Step Description
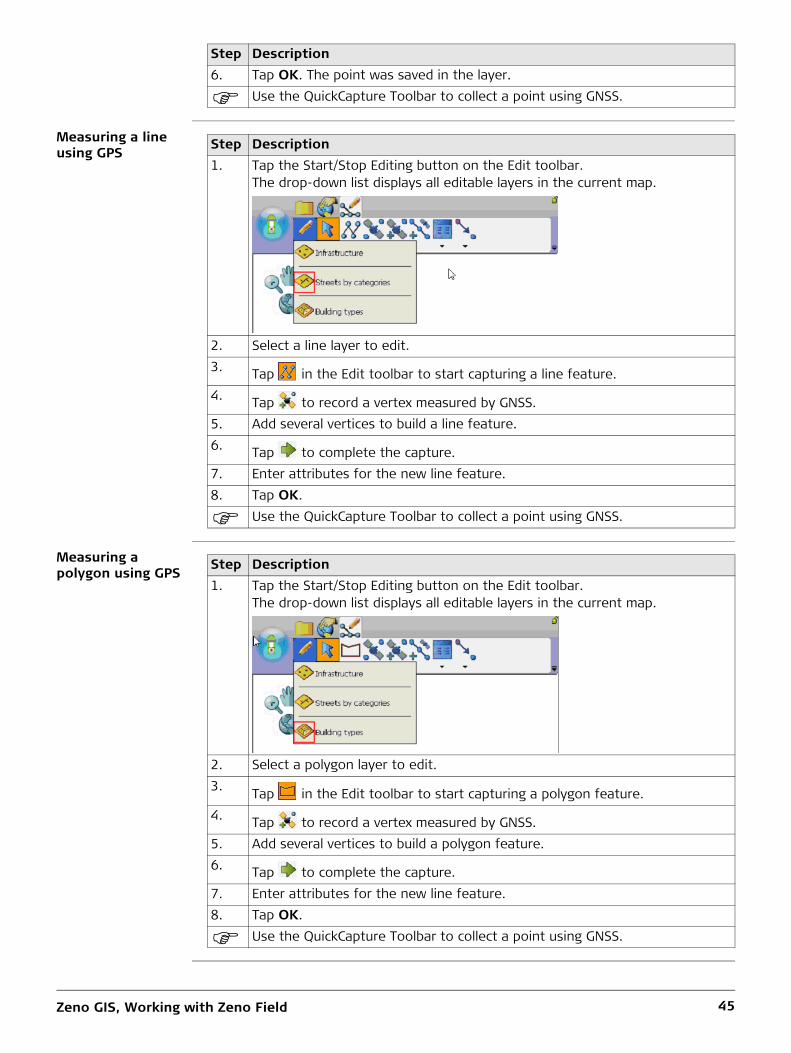
Step Description1. Tap the Start/Stop Editing button on the Edit toolbar.
The drop-down list displays all editable layers in the current map.
2. Select a line layer to edit.3. Tap in the Edit toolbar to start capturing a line feature.4. Tap to record a vertex measured by GNSS.5. Add several vertices to build a line feature.6. Tap to complete the capture.7. Enter attributes for the new line feature.8. Tap OK.
Use the QuickCapture Toolbar to collect a point using GNSS.
Step Description1. Tap the Start/Stop Editing button on the Edit toolbar.
The drop-down list displays all editable layers in the current map.
2. Select a polygon layer to edit.3. Tap in the Edit toolbar to start capturing a polygon feature.4. Tap to record a vertex measured by GNSS.5. Add several vertices to build a polygon feature.6. Tap to complete the capture.7. Enter attributes for the new line feature.8. Tap OK.
Use the QuickCapture Toolbar to collect a point using GNSS.
Zeno GIS, Working with Zeno Field 46
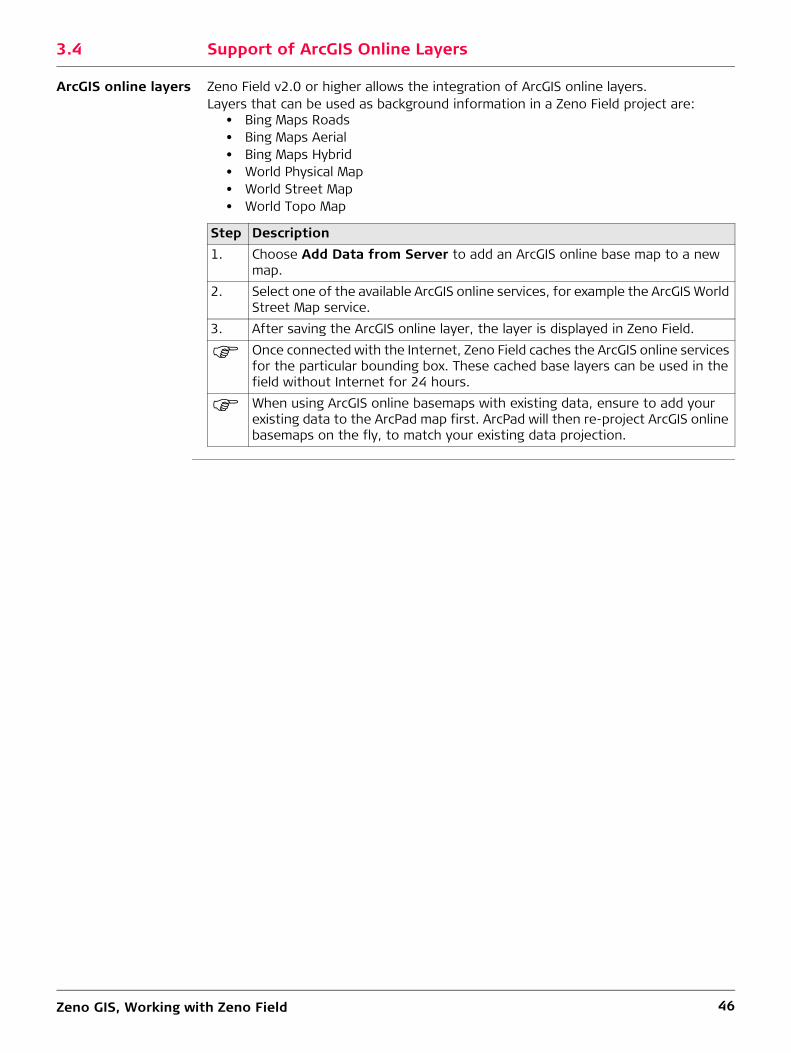
3.4 Support of ArcGIS Online Layers
ArcGIS online layers Zeno Field v2.0 or higher allows the integration of ArcGIS online layers.Layers that can be used as background information in a Zeno Field project are:
• Bing Maps Roads• Bing Maps Aerial• Bing Maps Hybrid• World Physical Map• World Street Map• World Topo Map
Step Description1. Choose Add Data from Server to add an ArcGIS online base map to a new
map.2. Select one of the available ArcGIS online services, for example the ArcGIS World
Street Map service.3. After saving the ArcGIS online layer, the layer is displayed in Zeno Field.
Once connected with the Internet, Zeno Field caches the ArcGIS online services for the particular bounding box. These cached base layers can be used in the field without Internet for 24 hours.
When using ArcGIS online basemaps with existing data, ensure to add your existing data to the ArcPad map first. ArcPad will then re-project ArcGIS online basemaps on the fly, to match your existing data projection.
Zeno GIS, Working with Zeno Field 47
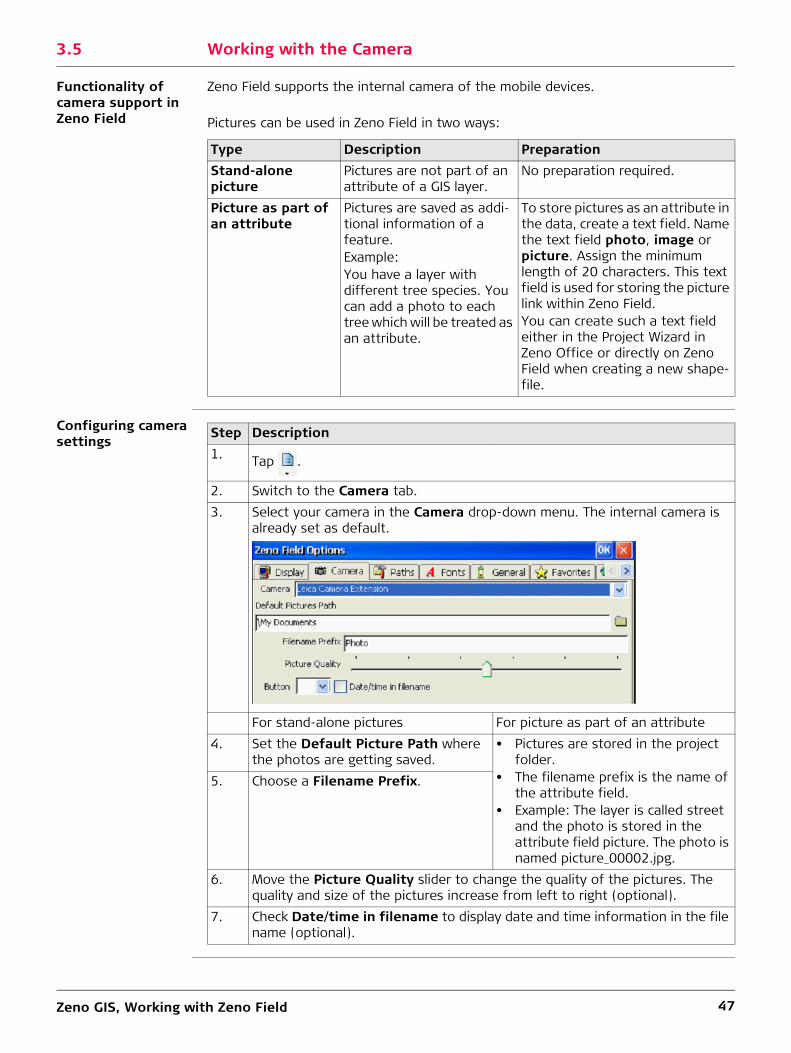
3.5 Working with the Camera
Functionality of camera support in Zeno Field
Zeno Field supports the internal camera of the mobile devices.
Pictures can be used in Zeno Field in two ways:
Configuring camera settings
Type Description PreparationStand-alone picture
Pictures are not part of an attribute of a GIS layer.
No preparation required.
Picture as part of an attribute
Pictures are saved as addi-tional information of a feature.Example:You have a layer with different tree species. You can add a photo to each tree which will be treated as an attribute.
To store pictures as an attribute in the data, create a text field. Name the text field photo, image or picture. Assign the minimum length of 20 characters. This text field is used for storing the picture link within Zeno Field.You can create such a text field either in the Project Wizard in Zeno Office or directly on Zeno Field when creating a new shape-file.
Step Description1. Tap .
2. Switch to the Camera tab.3. Select your camera in the Camera drop-down menu. The internal camera is
already set as default.
For stand-alone pictures For picture as part of an attribute4. Set the Default Picture Path where
the photos are getting saved.• Pictures are stored in the project
folder. • The filename prefix is the name of
the attribute field. • Example: The layer is called street
and the photo is stored in the attribute field picture. The photo is named picture_00002.jpg.
5. Choose a Filename Prefix.
6. Move the Picture Quality slider to change the quality of the pictures. The quality and size of the pictures increase from left to right (optional).
7. Check Date/time in filename to display date and time information in the file name (optional).

Zeno GIS, Working with Zeno Field 48
Taking a stand-alone picture
Taking a picture as attribute
Step Description1. Start the QuickCapture toolbar.2. Tap .
3. Tap Capture to take the photo.4. Save: To save the picture.
Discard: To take a new photo.5. After saving the picture, a message shows the path of the picture.6. Tap OK.
The current GPS position is automatically added to the EXIF header of the *.jpg file.
Step Description1. Create a point-, line- or polygon-feature.2. In the attribute table of the feature:
Change to the Picture tab.
3. Tap the Field drop-down list.Select the attribute where you want to store the picture.For the attribute filed names photo, image and picture, the field is pre-selected.The path of the photo is stored into the selected field.
4. Tap on the bottom of the page. 5. Tap Capture to take the photo.6. Save: To save the picture.
Discard: To take a new photo.7. Rotate the picture using .
8. Tap OK to save the image as an attribute.
You also can browse a picture as an attribute from disk.
The current GPS position is automatically added to the EXIF header of the *.jpg file.
Zeno GIS, Working with Zeno Field 49
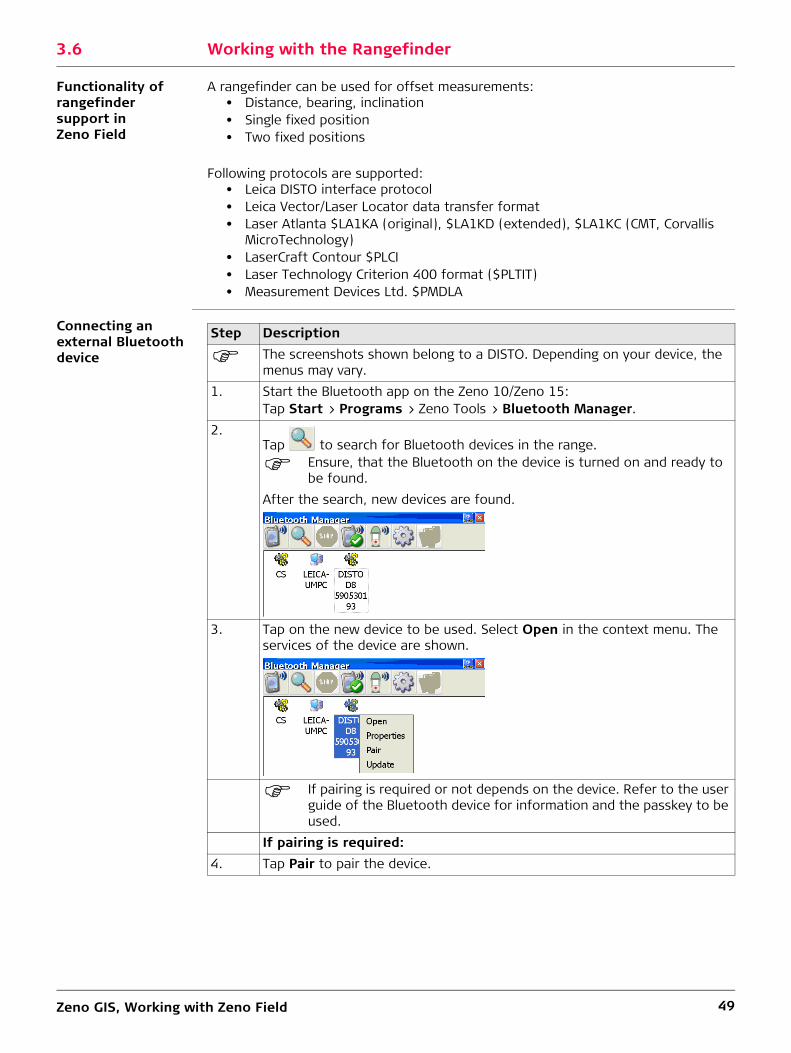
3.6 Working with the Rangefinder
Functionality of rangefinder support in Zeno Field
A rangefinder can be used for offset measurements:• Distance, bearing, inclination• Single fixed position• Two fixed positions
Following protocols are supported:• Leica DISTO interface protocol • Leica Vector/Laser Locator data transfer format • Laser Atlanta $LA1KA (original), $LA1KD (extended), $LA1KC (CMT, Corvallis
MicroTechnology) • LaserCraft Contour $PLCI• Laser Technology Criterion 400 format ($PLTIT)• Measurement Devices Ltd. $PMDLA
Connecting an external Bluetooth device
Step Description
The screenshots shown belong to a DISTO. Depending on your device, the menus may vary.
1. Start the Bluetooth app on the Zeno 10/Zeno 15:Tap Start > Programs > Zeno Tools > Bluetooth Manager.
2.Tap to search for Bluetooth devices in the range.
Ensure, that the Bluetooth on the device is turned on and ready to be found.
After the search, new devices are found.
3. Tap on the new device to be used. Select Open in the context menu. The services of the device are shown.
If pairing is required or not depends on the device. Refer to the user guide of the Bluetooth device for information and the passkey to be used.
If pairing is required:4. Tap Pair to pair the device.
Zeno GIS, Working with Zeno Field 50
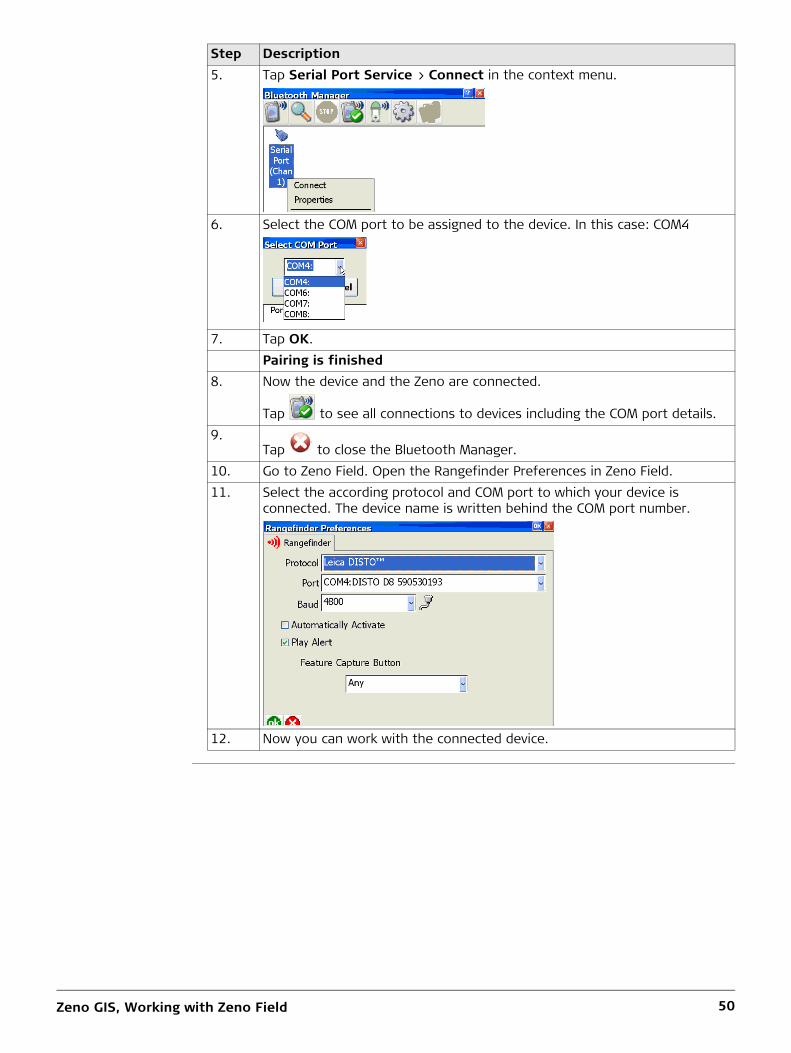
5. Tap Serial Port Service > Connect in the context menu.
6. Select the COM port to be assigned to the device. In this case: COM4
7. Tap OK.Pairing is finished
8. Now the device and the Zeno are connected.
Tap to see all connections to devices including the COM port details.9.
Tap to close the Bluetooth Manager.10. Go to Zeno Field. Open the Rangefinder Preferences in Zeno Field.11. Select the according protocol and COM port to which your device is
connected. The device name is written behind the COM port number.
12. Now you can work with the connected device.
Step Description
Zeno GIS, Working with Zeno Field 51
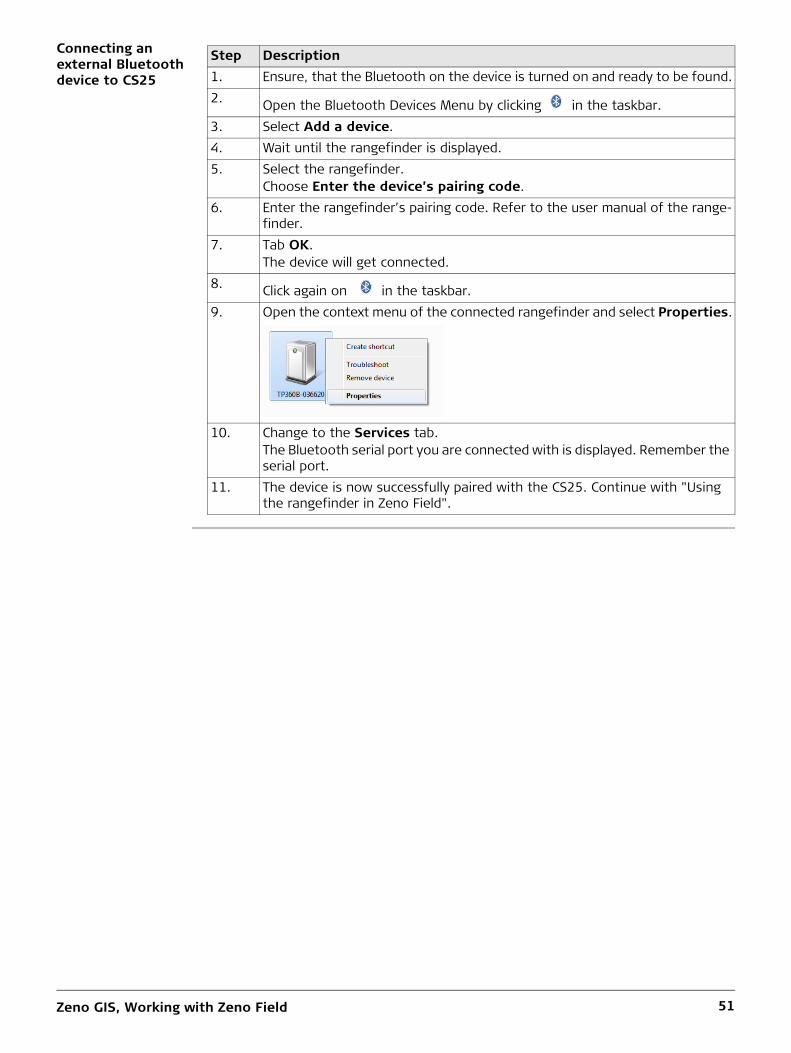
Connecting an external Bluetooth device to CS25
Step Description1. Ensure, that the Bluetooth on the device is turned on and ready to be found.2. Open the Bluetooth Devices Menu by clicking in the taskbar.3. Select Add a device.4. Wait until the rangefinder is displayed.5. Select the rangefinder.
Choose Enter the device’s pairing code.6. Enter the rangefinder’s pairing code. Refer to the user manual of the range-
finder.7. Tab OK.
The device will get connected.8. Click again on in the taskbar.9. Open the context menu of the connected rangefinder and select Properties.
10. Change to the Services tab.The Bluetooth serial port you are connected with is displayed. Remember the serial port.
11. The device is now successfully paired with the CS25. Continue with "Using the rangefinder in Zeno Field".
Zeno GIS, Working with Zeno Field 52
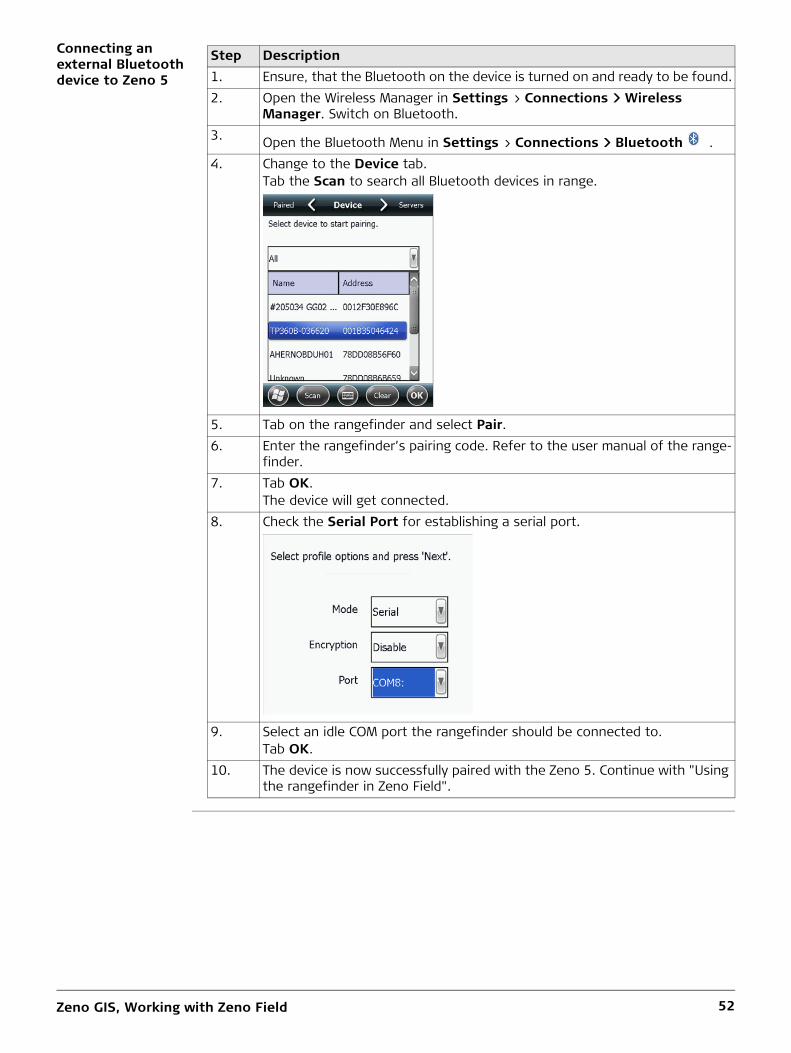
Connecting an external Bluetooth device to Zeno 5
Step Description1. Ensure, that the Bluetooth on the device is turned on and ready to be found.2. Open the Wireless Manager in Settings > Connections > Wireless
Manager. Switch on Bluetooth.3. Open the Bluetooth Menu in Settings > Connections > Bluetooth .4. Change to the Device tab.
Tab the Scan to search all Bluetooth devices in range.
5. Tab on the rangefinder and select Pair.6. Enter the rangefinder’s pairing code. Refer to the user manual of the range-
finder.7. Tab OK.
The device will get connected.8. Check the Serial Port for establishing a serial port.
9. Select an idle COM port the rangefinder should be connected to.Tab OK.
10. The device is now successfully paired with the Zeno 5. Continue with "Using the rangefinder in Zeno Field".
Zeno GIS, Working with Zeno Field 53
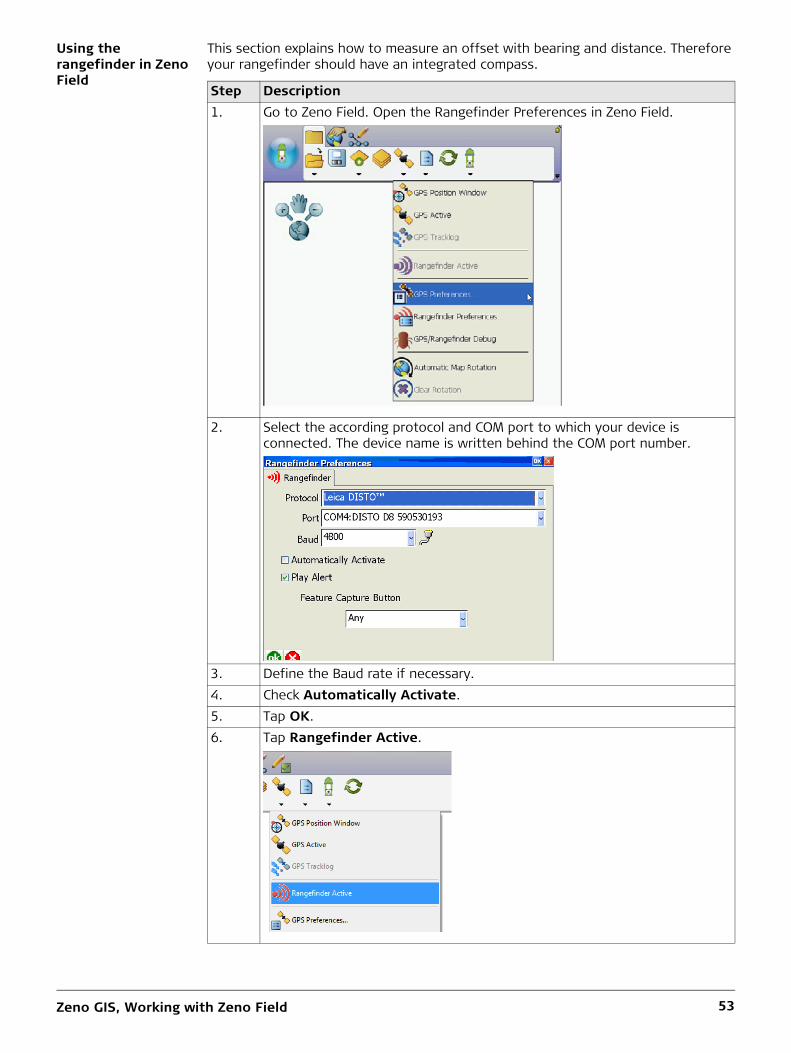
Using the rangefinder in Zeno Field
This section explains how to measure an offset with bearing and distance. Therefore your rangefinder should have an integrated compass.
Step Description1. Go to Zeno Field. Open the Rangefinder Preferences in Zeno Field.
2. Select the according protocol and COM port to which your device is connected. The device name is written behind the COM port number.
3. Define the Baud rate if necessary.4. Check Automatically Activate.5. Tap OK.6. Tap Rangefinder Active.
Zeno GIS, Working with Zeno Field 54
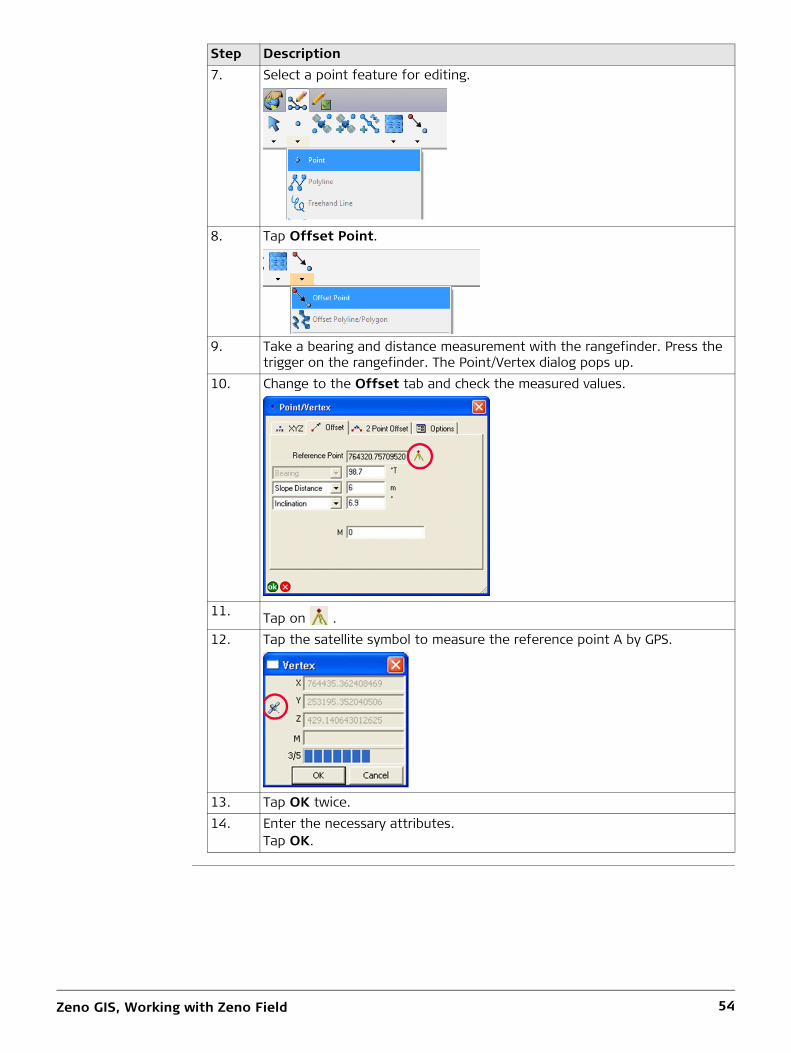
7. Select a point feature for editing.
8. Tap Offset Point.
9. Take a bearing and distance measurement with the rangefinder. Press the trigger on the rangefinder. The Point/Vertex dialog pops up.
10. Change to the Offset tab and check the measured values.
11. Tap on .12. Tap the satellite symbol to measure the reference point A by GPS.
13. Tap OK twice.14. Enter the necessary attributes.
Tap OK.
Step Description

Zeno GIS, Working with Zeno Field 55
3.7 Working with the Digicat Cable Detection Tool
Working with a Digicat
This section provides step-by-step instructions for storing depth values measured with a Digicat (or an Ezicat) Cable Detection Tool in Zeno Field.
A Digicat Cable Locator with Bluetooth connectivity and service depth indica-tion is mandatory.
Step Description1. Connect the Zeno with your computer via cable.2. Download and install the Digicat PPC software on your PC. You can find it on
myWorld. Follow the guidance to deploy the Digicat PPC software on your mobile device.
3. Start the Digicat transfer tool in Start > Programs > Digicat Transfer.4. The Digicat transfer window opens up. No Digicat is detected yet.
5. Press and hold the trigger on your Digicat to activate the locator. Be sure that the Bluetooth connectivity is activated on the device. Please read the Digicat manual for further information.
6. The Digicat transfer tool detects the Digicat device automatically. There is no need of any pairing before.In the Digicat transfer window you will find information on the used device as well as a green dashed indicator. It indicates the response of the locator to a signal. The information is identical to the Signal Strength Indicator on the Digicat device.
7. Press and hold down the i Button for 2 s until the dashed lines have scrolled through once.
8. The display readout will indicate the depth of the cable that has to be indi-cated.
9. When a depth reading has been taken, the locator will display LOG. To transfer the information to the data logger press the i Button whilst LOG is displayed.
10. The depth value will be displayed in the transfer window.11. Open a project in Zeno Field.12. Generate a feature by taping or measuring until the attribute dialogue opens
up.13. Tap into the appropriate field.
Measure the depth following 7. to 9..The value is transferred into the attribute field in Zeno Field.
Zeno GIS, Working with Zeno Field 56
14. Save the feature.
The Digicat transfer tool transmits the measured value always to the position of the cursor. This works within different programs like Excel or Notepad.
Step Description
Zeno GIS, Transfering Data Back to Zeno Office with EasyIn 57
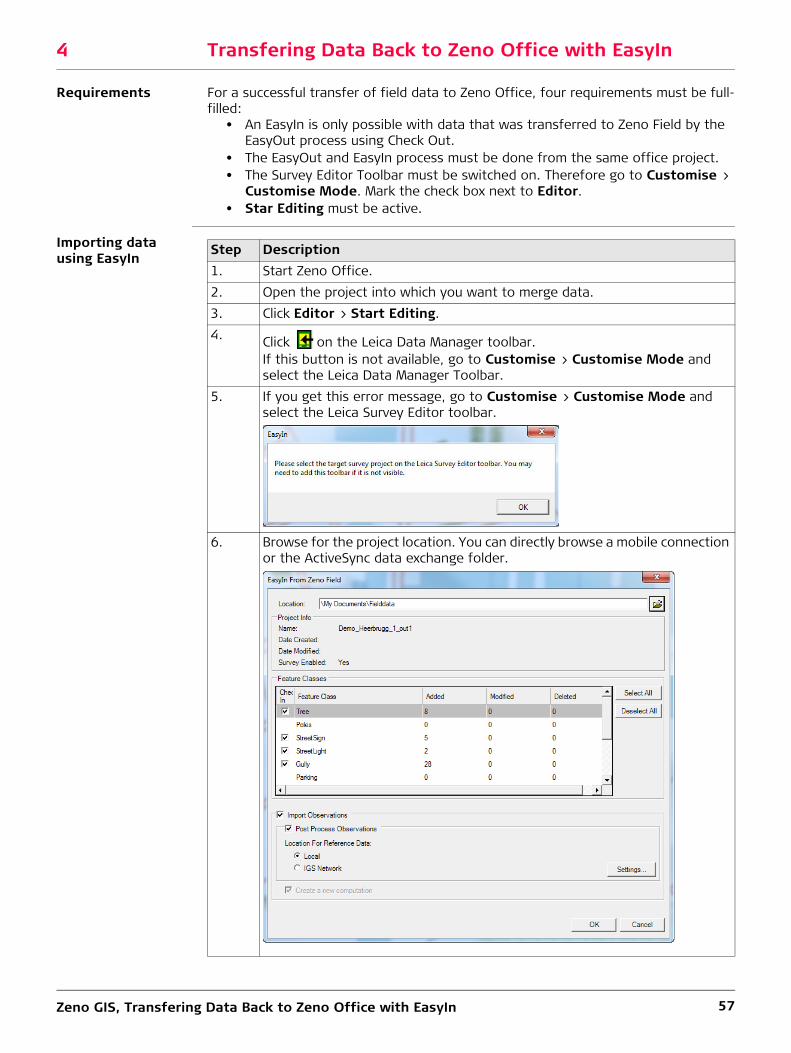
4 Transfering Data Back to Zeno Office with EasyIn
Requirements For a successful transfer of field data to Zeno Office, four requirements must be full-filled:
• An EasyIn is only possible with data that was transferred to Zeno Field by the EasyOut process using Check Out.
• The EasyOut and EasyIn process must be done from the same office project.• The Survey Editor Toolbar must be switched on. Therefore go to Customise >
Customise Mode. Mark the check box next to Editor.• Star Editing must be active.
Importing data using EasyIn
Step Description1. Start Zeno Office.2. Open the project into which you want to merge data.3. Click Editor > Start Editing.4. Click on the Leica Data Manager toolbar.
If this button is not available, go to Customise > Customise Mode and select the Leica Data Manager Toolbar.
5. If you get this error message, go to Customise > Customise Mode and select the Leica Survey Editor toolbar.
6. Browse for the project location. You can directly browse a mobile connection or the ActiveSync data exchange folder.
Zeno GIS, Transfering Data Back to Zeno Office with EasyIn 58
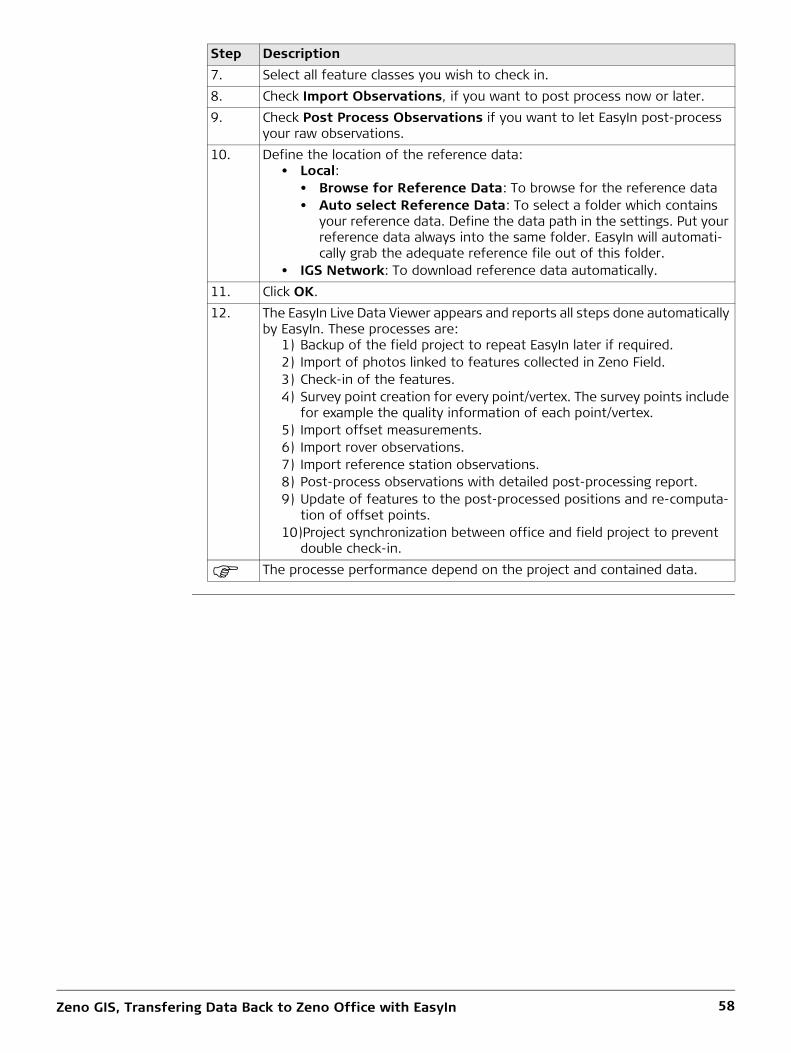
7. Select all feature classes you wish to check in.8. Check Import Observations, if you want to post process now or later.9. Check Post Process Observations if you want to let EasyIn post-process
your raw observations.10. Define the location of the reference data:
• Local:• Browse for Reference Data: To browse for the reference data• Auto select Reference Data: To select a folder which contains
your reference data. Define the data path in the settings. Put your reference data always into the same folder. EasyIn will automati-cally grab the adequate reference file out of this folder.
• IGS Network: To download reference data automatically.11. Click OK.12. The EasyIn Live Data Viewer appears and reports all steps done automatically
by EasyIn. These processes are:1) Backup of the field project to repeat EasyIn later if required.2) Import of photos linked to features collected in Zeno Field.3) Check-in of the features.4) Survey point creation for every point/vertex. The survey points include
for example the quality information of each point/vertex.5) Import offset measurements.6) Import rover observations.7) Import reference station observations.8) Post-process observations with detailed post-processing report.9) Update of features to the post-processed positions and re-computa-
tion of offset points.10)Project synchronization between office and field project to prevent
double check-in.
The processe performance depend on the project and contained data.
Step Description
Zeno GIS, Working with Zeno Office 59
5 Working with Zeno Office5.1 Opening a Map Document
Opening a map document
A map document is a *.mxd file.To open a map document in Zeno Office, use one of the listed methods.
Double-click
Select a map in the Zeno Office Getting Started dialog box
Opening another map from an Zeno Office sessionIf you are already working in Zeno Office, you can choose to open another map docu-ment. This will close your existing map and open the new map instead.
5.2 Adding a Dataset
Adding a dataset Dataset is a generic term for:• Feature class• Shape file• CAD file (dxf, dgn, dwg)
To add a dataset in Zeno Office, use one of the listed methods.Using a button
Copying or dragging
Step Description1. In Windows Explorer, navigate to the location of the map document.2. Double-click the *.mxd file.
Step Description1. Start Zeno Office from the Windows Start menu.
The Zeno Office Getting Started dialog box is displayed.2. Select an existing map.3. OK to open the map in Zeno Office.
Step Description1. Click on the Standard toolbar.
ORClick File > Open.
Step Description1. Click .2. Navigate to the desired dataset.3. Select the dataset and click Add.
Step Description
To move datasets between data frames or maps:• Copy and past the datasets• Drag the layer from one data frame to another
Zeno GIS, Working with Zeno Office 60
5.3 Toolbar
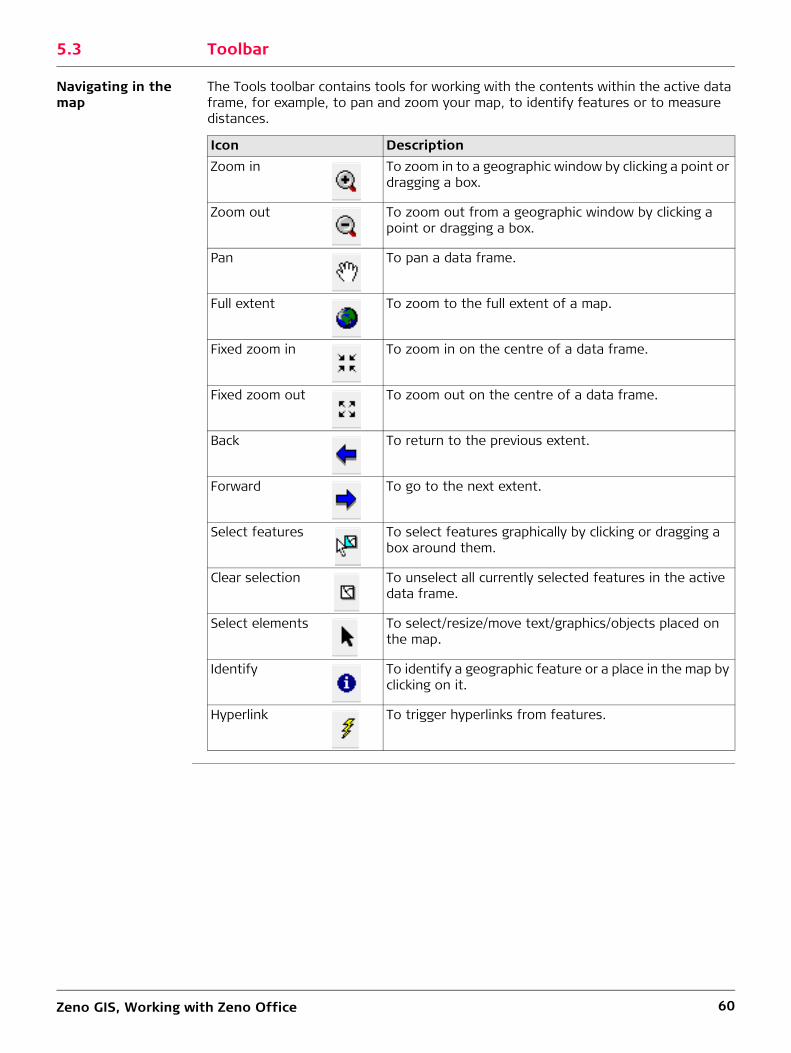
Navigating in the map
The Tools toolbar contains tools for working with the contents within the active data frame, for example, to pan and zoom your map, to identify features or to measure distances.
Icon DescriptionZoom in To zoom in to a geographic window by clicking a point or
dragging a box.
Zoom out To zoom out from a geographic window by clicking a point or dragging a box.
Pan To pan a data frame.
Full extent To zoom to the full extent of a map.
Fixed zoom in To zoom in on the centre of a data frame.
Fixed zoom out To zoom out on the centre of a data frame.
Back To return to the previous extent.
Forward To go to the next extent.
Select features To select features graphically by clicking or dragging a box around them.
Clear selection To unselect all currently selected features in the active data frame.
Select elements To select/resize/move text/graphics/objects placed on the map.
Identify To identify a geographic feature or a place in the map by clicking on it.
Hyperlink To trigger hyperlinks from features.
Zeno GIS, Working with Zeno Office 61
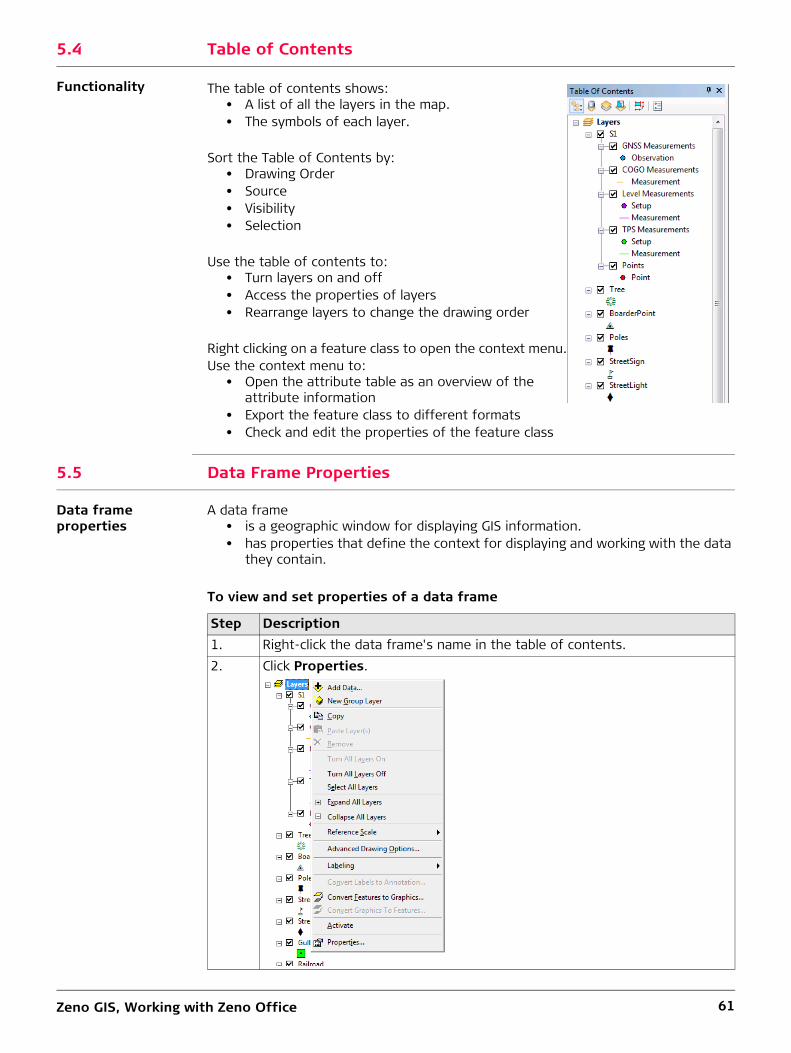
5.4 Table of Contents
Functionality
5.5 Data Frame Properties
Data frame properties
A data frame• is a geographic window for displaying GIS information.• has properties that define the context for displaying and working with the data
they contain.
To view and set properties of a data frame
The table of contents shows:• A list of all the layers in the map.• The symbols of each layer.
Sort the Table of Contents by:• Drawing Order• Source• Visibility• Selection
Use the table of contents to:• Turn layers on and off• Access the properties of layers• Rearrange layers to change the drawing order
Right clicking on a feature class to open the context menu.Use the context menu to:
• Open the attribute table as an overview of the attribute information
• Export the feature class to different formats• Check and edit the properties of the feature class
Step Description1. Right-click the data frame's name in the table of contents.2. Click Properties.
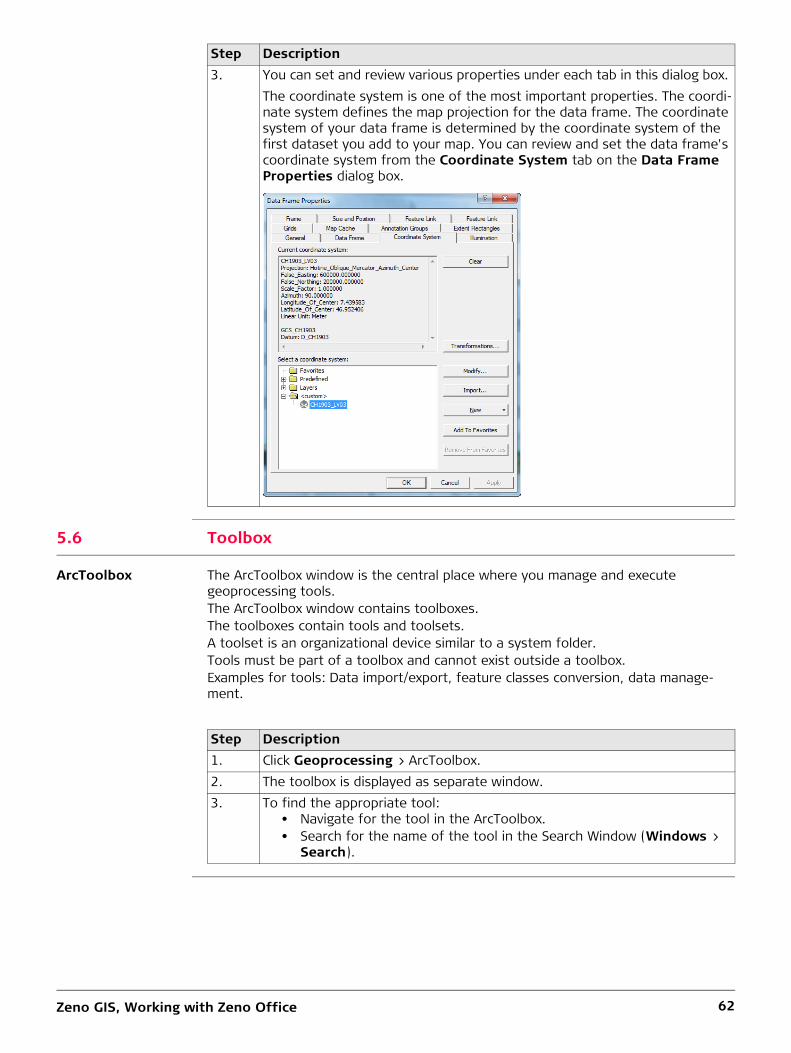
Zeno GIS, Working with Zeno Office 62
5.6 Toolbox
ArcToolbox The ArcToolbox window is the central place where you manage and execute geoprocessing tools.The ArcToolbox window contains toolboxes.The toolboxes contain tools and toolsets.A toolset is an organizational device similar to a system folder.Tools must be part of a toolbox and cannot exist outside a toolbox.Examples for tools: Data import/export, feature classes conversion, data manage-ment.
3. You can set and review various properties under each tab in this dialog box. The coordinate system is one of the most important properties. The coordi-nate system defines the map projection for the data frame. The coordinate system of your data frame is determined by the coordinate system of the first dataset you add to your map. You can review and set the data frame's coordinate system from the Coordinate System tab on the Data Frame Properties dialog box.
Step Description
Step Description1. Click Geoprocessing > ArcToolbox.2. The toolbox is displayed as separate window.3. To find the appropriate tool:
• Navigate for the tool in the ArcToolbox.• Search for the name of the tool in the Search Window (Windows >
Search).
Zeno GIS, Working with Zeno Office 63
5.7 Survey Data5.7.1 Overview
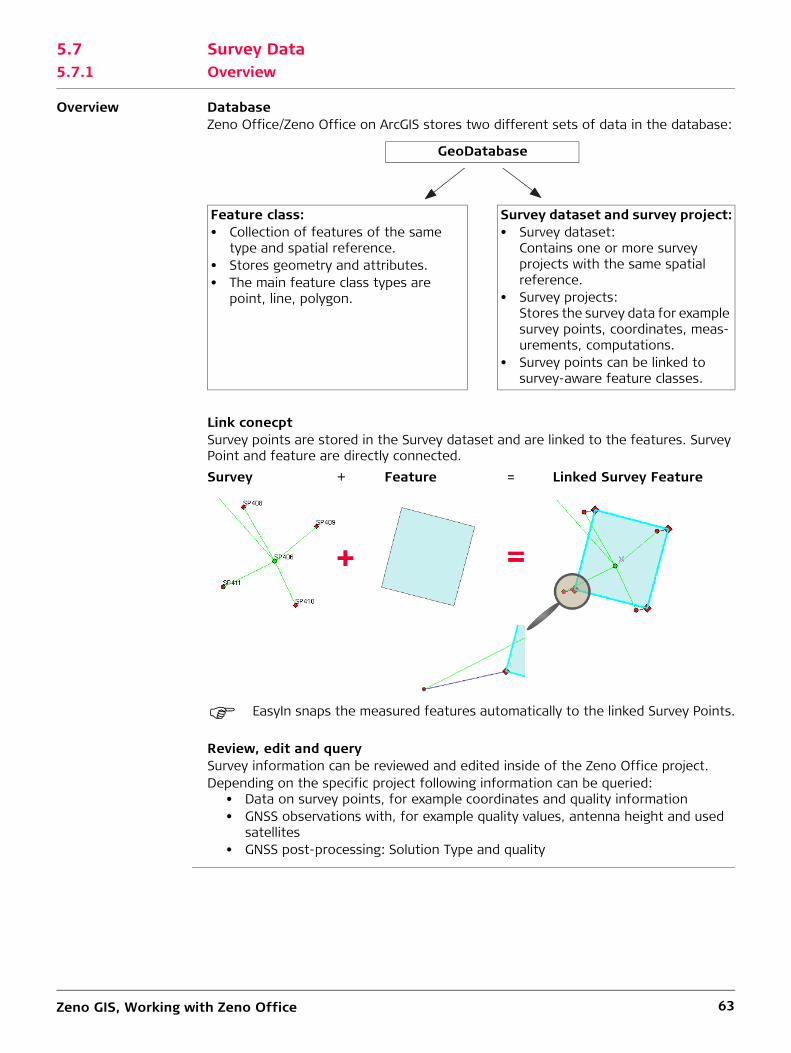
Overview DatabaseZeno Office/Zeno Office on ArcGIS stores two different sets of data in the database:
Link conecptSurvey points are stored in the Survey dataset and are linked to the features. Survey Point and feature are directly connected.
EasyIn snaps the measured features automatically to the linked Survey Points.
Review, edit and querySurvey information can be reviewed and edited inside of the Zeno Office project.Depending on the specific project following information can be queried:
• Data on survey points, for example coordinates and quality information• GNSS observations with, for example quality values, antenna height and used
satellites• GNSS post-processing: Solution Type and quality
GeoDatabase
Feature class:• Collection of features of the same
type and spatial reference.• Stores geometry and attributes.• The main feature class types are
point, line, polygon.
Survey dataset and survey project:• Survey dataset:
Contains one or more survey projects with the same spatial reference.
• Survey projects:Stores the survey data for example survey points, coordinates, meas-urements, computations.
• Survey points can be linked to survey-aware feature classes.
Survey + Feature = Linked Survey Feature
Zeno GIS, Working with Zeno Office 64
5.7.2 Query Information
Functionality Explore and edit survey objects in the Survey Explorer.The Survey Explorer is a container for pages of survey information. You create these pages as you work.Survey information can be displayed in two ways:
• List survey objects tool:Lists multiple survey objects by queryTo select survey information directly out of the map
• List survey objects by query:Displays a detailed view of individual survey objects
List survey objects tool
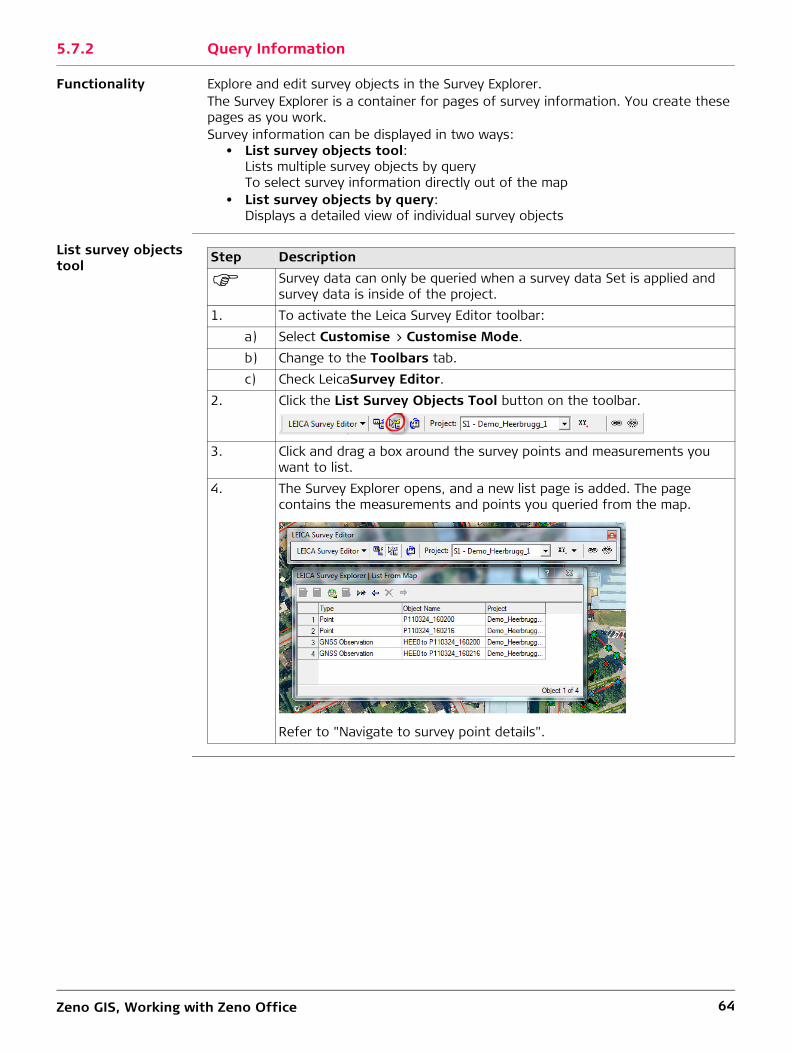
Step Description
Survey data can only be queried when a survey data Set is applied and survey data is inside of the project.
1. To activate the Leica Survey Editor toolbar:a) Select Customise > Customise Mode.b) Change to the Toolbars tab.c) Check LeicaSurvey Editor.
2. Click the List Survey Objects Tool button on the toolbar.
3. Click and drag a box around the survey points and measurements you want to list.
4. The Survey Explorer opens, and a new list page is added. The page contains the measurements and points you queried from the map.
Refer to "Navigate to survey point details".
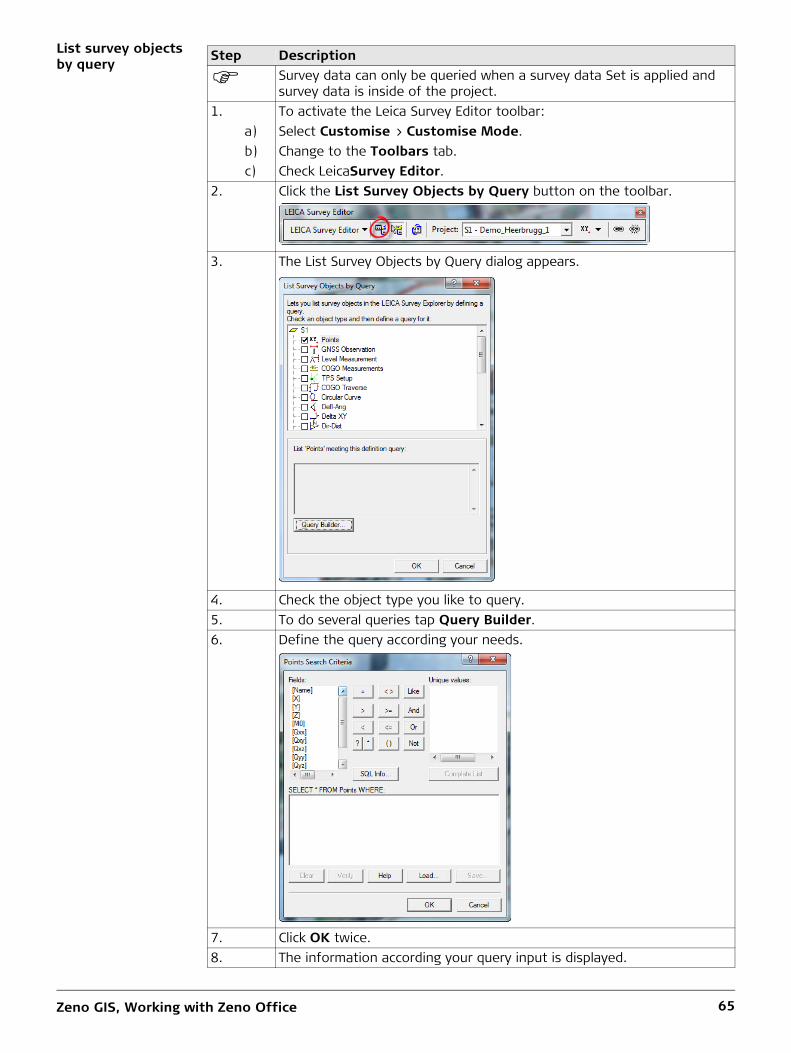
Zeno GIS, Working with Zeno Office 65
List survey objects by query
Step Description
Survey data can only be queried when a survey data Set is applied and survey data is inside of the project.
1. To activate the Leica Survey Editor toolbar:a) Select Customise > Customise Mode.b) Change to the Toolbars tab.c) Check LeicaSurvey Editor.
2. Click the List Survey Objects by Query button on the toolbar.
3. The List Survey Objects by Query dialog appears.
4. Check the object type you like to query.5. To do several queries tap Query Builder.6. Define the query according your needs.
7. Click OK twice.8. The information according your query input is displayed.
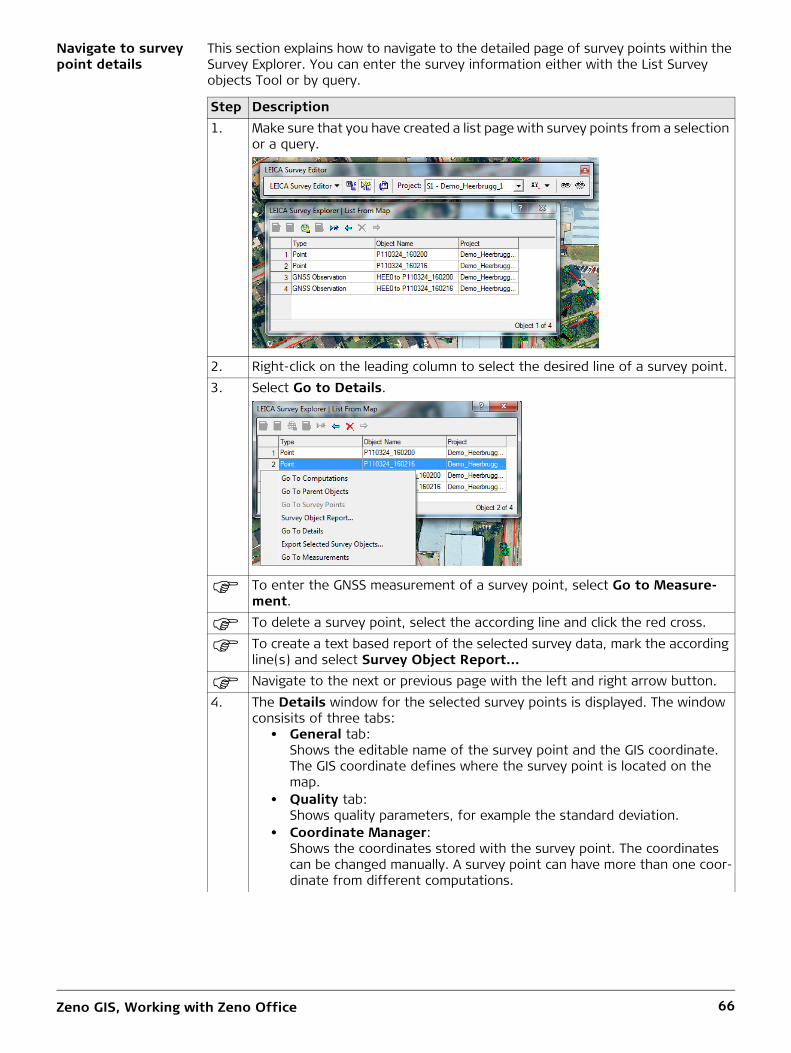
Zeno GIS, Working with Zeno Office 66
Navigate to survey point details
This section explains how to navigate to the detailed page of survey points within the Survey Explorer. You can enter the survey information either with the List Survey objects Tool or by query.
Step Description1. Make sure that you have created a list page with survey points from a selection
or a query.
2. Right-click on the leading column to select the desired line of a survey point.3. Select Go to Details.
To enter the GNSS measurement of a survey point, select Go to Measure-ment.
To delete a survey point, select the according line and click the red cross.
To create a text based report of the selected survey data, mark the according line(s) and select Survey Object Report...
Navigate to the next or previous page with the left and right arrow button.4. The Details window for the selected survey points is displayed. The window
consisits of three tabs:• General tab:
Shows the editable name of the survey point and the GIS coordinate. The GIS coordinate defines where the survey point is located on the map.
• Quality tab:Shows quality parameters, for example the standard deviation.
• Coordinate Manager:Shows the coordinates stored with the survey point. The coordinates can be changed manually. A survey point can have more than one coor-dinate from different computations.

Zeno GIS, Working with Zeno Office 67
Navigate to GNSS observation details
This section explains how to navigate to the detailed page of GNSS observations within the Survey Explorer. You can enter the survey information either with the List Survey objects Tool or by query.
Step Description
Step Description1. Make sure that you have created a list page with GNSS observations from a
selection or a query.
2. Right-click on the leading column to select the desired line of a GNSS observa-tion.
3. Select Go to Details.
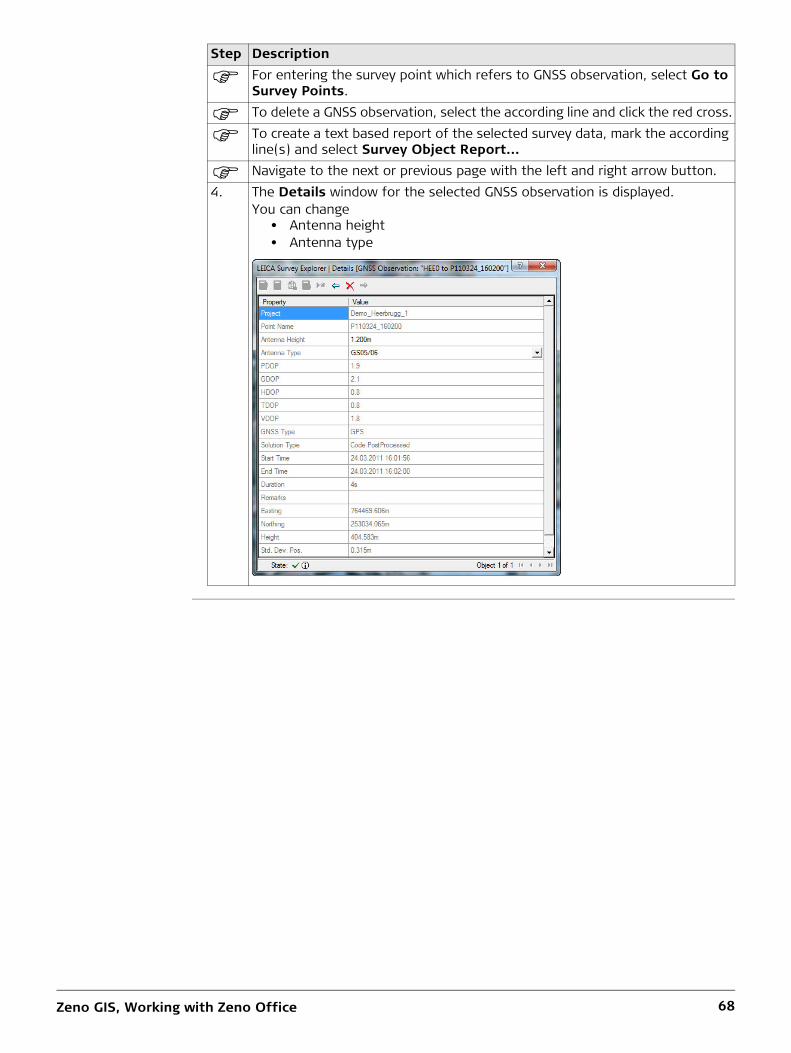
Zeno GIS, Working with Zeno Office 68
For entering the survey point which refers to GNSS observation, select Go to Survey Points.
To delete a GNSS observation, select the according line and click the red cross.
To create a text based report of the selected survey data, mark the according line(s) and select Survey Object Report...
Navigate to the next or previous page with the left and right arrow button.4. The Details window for the selected GNSS observation is displayed.
You can change• Antenna height• Antenna type
Step Description
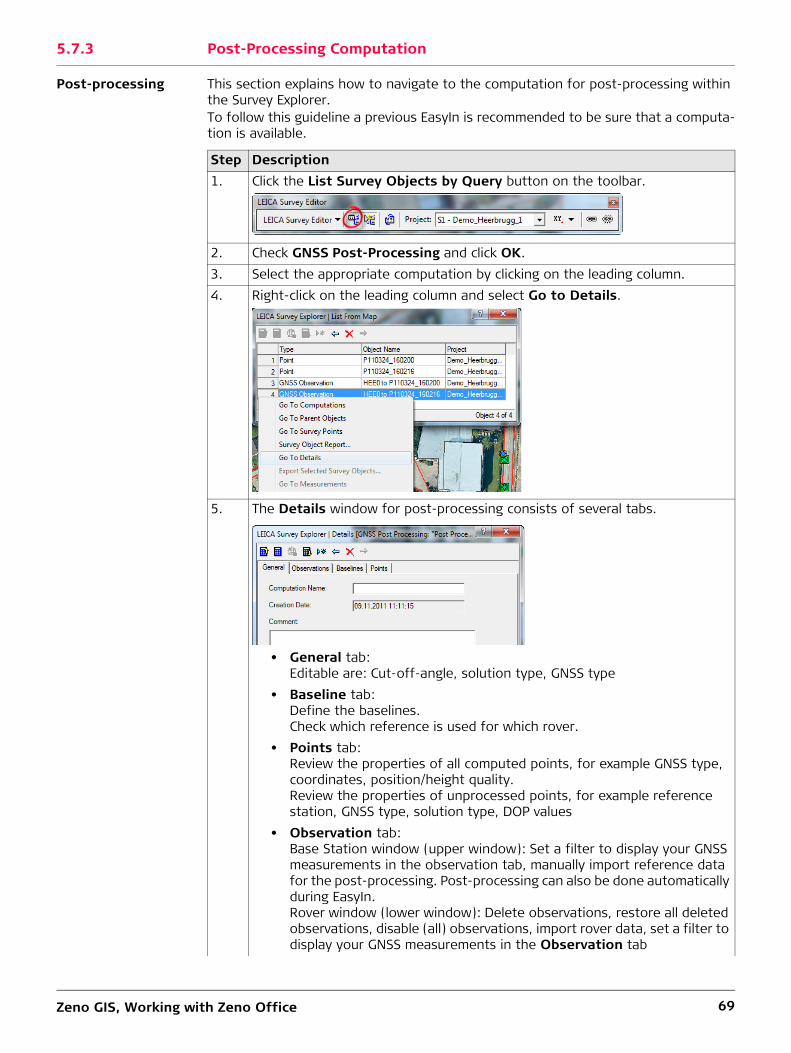
Zeno GIS, Working with Zeno Office 69
5.7.3 Post-Processing Computation
Post-processing This section explains how to navigate to the computation for post-processing within the Survey Explorer.To follow this guideline a previous EasyIn is recommended to be sure that a computa-tion is available.
Step Description1. Click the List Survey Objects by Query button on the toolbar.
2. Check GNSS Post-Processing and click OK.3. Select the appropriate computation by clicking on the leading column.4. Right-click on the leading column and select Go to Details.
5. The Details window for post-processing consists of several tabs.
• General tab:Editable are: Cut-off-angle, solution type, GNSS type
• Baseline tab:Define the baselines.Check which reference is used for which rover.
• Points tab:Review the properties of all computed points, for example GNSS type, coordinates, position/height quality.Review the properties of unprocessed points, for example reference station, GNSS type, solution type, DOP values
• Observation tab:Base Station window (upper window): Set a filter to display your GNSS measurements in the observation tab, manually import reference data for the post-processing. Post-processing can also be done automatically during EasyIn.Rover window (lower window): Delete observations, restore all deleted observations, disable (all) observations, import rover data, set a filter to display your GNSS measurements in the Observation tab
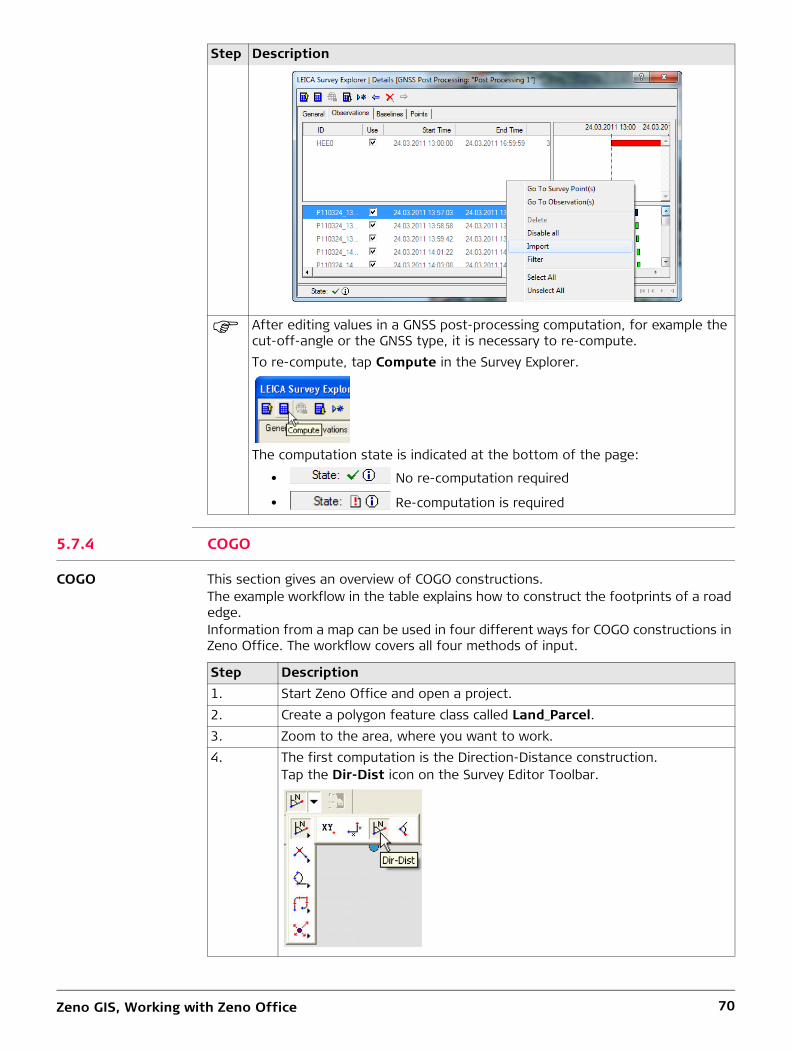
Zeno GIS, Working with Zeno Office 70
5.7.4 COGO
COGO This section gives an overview of COGO constructions.The example workflow in the table explains how to construct the footprints of a road edge.Information from a map can be used in four different ways for COGO constructions in Zeno Office. The workflow covers all four methods of input.
After editing values in a GNSS post-processing computation, for example the cut-off-angle or the GNSS type, it is necessary to re-compute.To re-compute, tap Compute in the Survey Explorer.
The computation state is indicated at the bottom of the page:
• No re-computation required
• Re-computation is required
Step Description
Step Description1. Start Zeno Office and open a project.2. Create a polygon feature class called Land_Parcel.3. Zoom to the area, where you want to work.4. The first computation is the Direction-Distance construction.
Tap the Dir-Dist icon on the Survey Editor Toolbar.
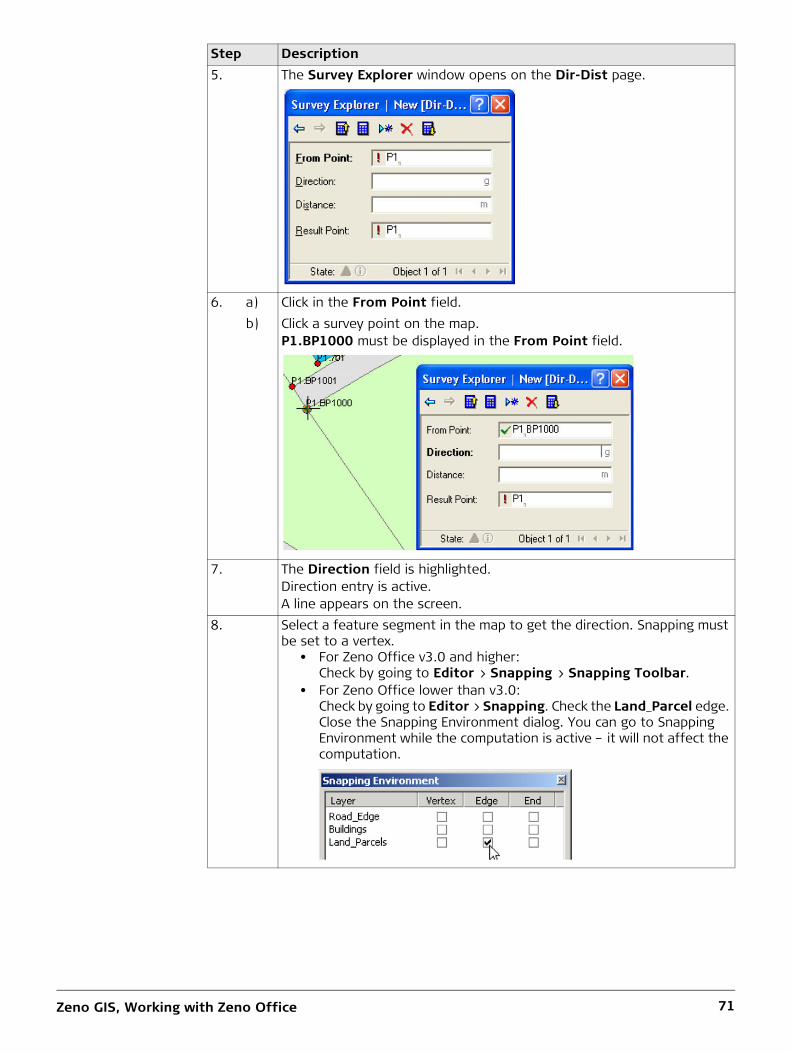
Zeno GIS, Working with Zeno Office 71
5. The Survey Explorer window opens on the Dir-Dist page.
6. a) Click in the From Point field.b) Click a survey point on the map.
P1.BP1000 must be displayed in the From Point field.
7. The Direction field is highlighted.Direction entry is active.A line appears on the screen.
8. Select a feature segment in the map to get the direction. Snapping must be set to a vertex.
• For Zeno Office v3.0 and higher:Check by going to Editor > Snapping > Snapping Toolbar.
• For Zeno Office lower than v3.0:Check by going to Editor > Snapping. Check the Land_Parcel edge. Close the Snapping Environment dialog. You can go to Snapping Environment while the computation is active – it will not affect the computation.
Step Description
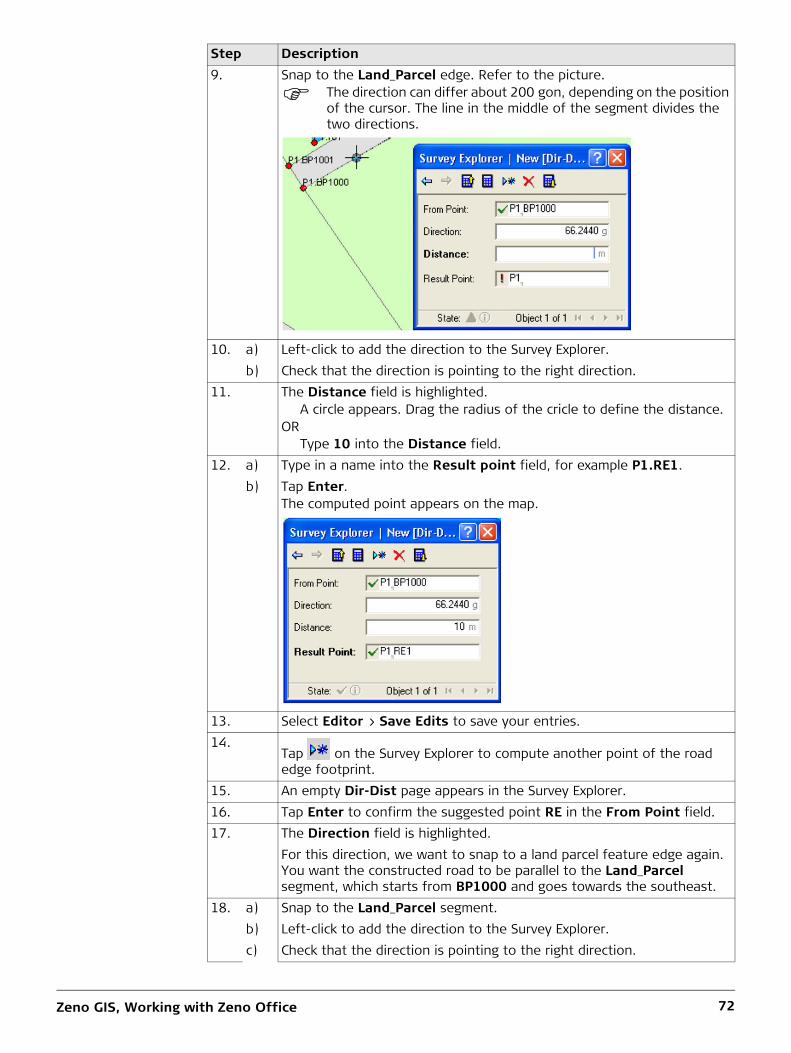
Zeno GIS, Working with Zeno Office 72
9. Snap to the Land_Parcel edge. Refer to the picture.
The direction can differ about 200 gon, depending on the position of the cursor. The line in the middle of the segment divides the two directions.
10. a) Left-click to add the direction to the Survey Explorer.b) Check that the direction is pointing to the right direction.
11. The Distance field is highlighted.A circle appears. Drag the radius of the cricle to define the distance.
ORType 10 into the Distance field.
12. a) Type in a name into the Result point field, for example P1.RE1.b) Tap Enter.
The computed point appears on the map.
13. Select Editor > Save Edits to save your entries.14.
Tap on the Survey Explorer to compute another point of the road edge footprint.
15. An empty Dir-Dist page appears in the Survey Explorer.16. Tap Enter to confirm the suggested point RE in the From Point field.17. The Direction field is highlighted.
For this direction, we want to snap to a land parcel feature edge again. You want the constructed road to be parallel to the Land_Parcel segment, which starts from BP1000 and goes towards the southeast.
18. a) Snap to the Land_Parcel segment.b) Left-click to add the direction to the Survey Explorer.c) Check that the direction is pointing to the right direction.
Step Description
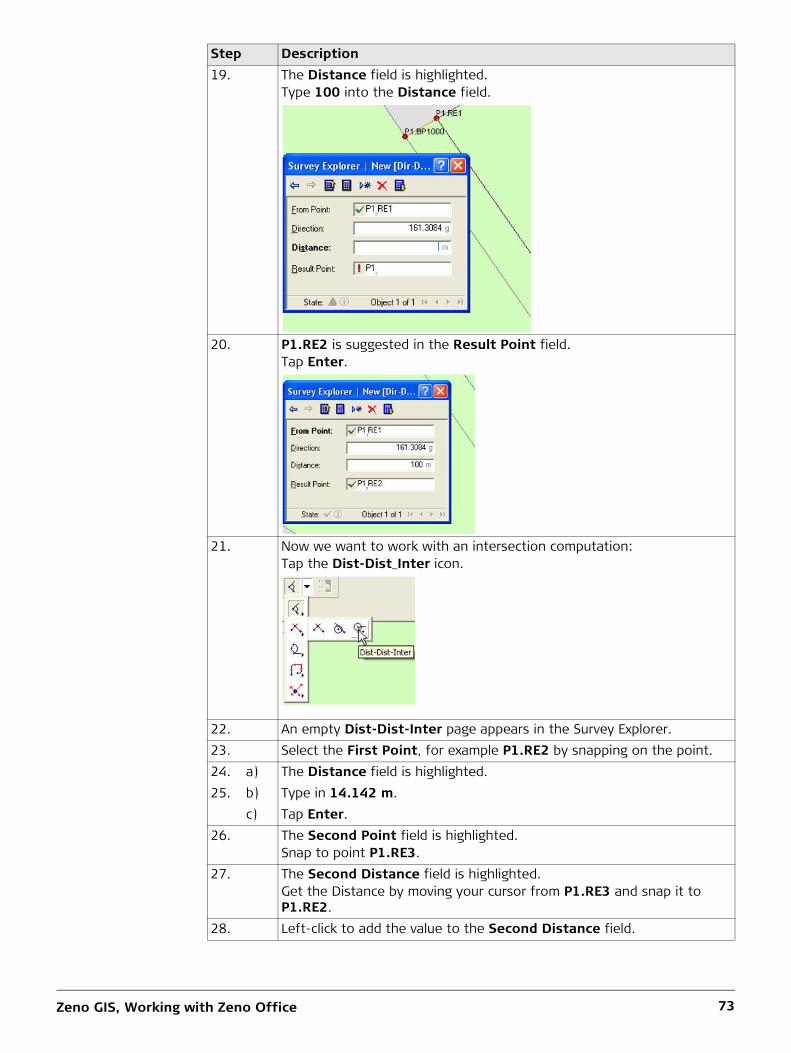
Zeno GIS, Working with Zeno Office 73
19. The Distance field is highlighted.Type 100 into the Distance field.
20. P1.RE2 is suggested in the Result Point field.Tap Enter.
21. Now we want to work with an intersection computation:Tap the Dist-Dist_Inter icon.
22. An empty Dist-Dist-Inter page appears in the Survey Explorer.23. Select the First Point, for example P1.RE2 by snapping on the point.24. a) The Distance field is highlighted.25. b) Type in 14.142 m.
c) Tap Enter.26. The Second Point field is highlighted.
Snap to point P1.RE3.27. The Second Distance field is highlighted.
Get the Distance by moving your cursor from P1.RE3 and snap it to P1.RE2.
28. Left-click to add the value to the Second Distance field.
Step Description
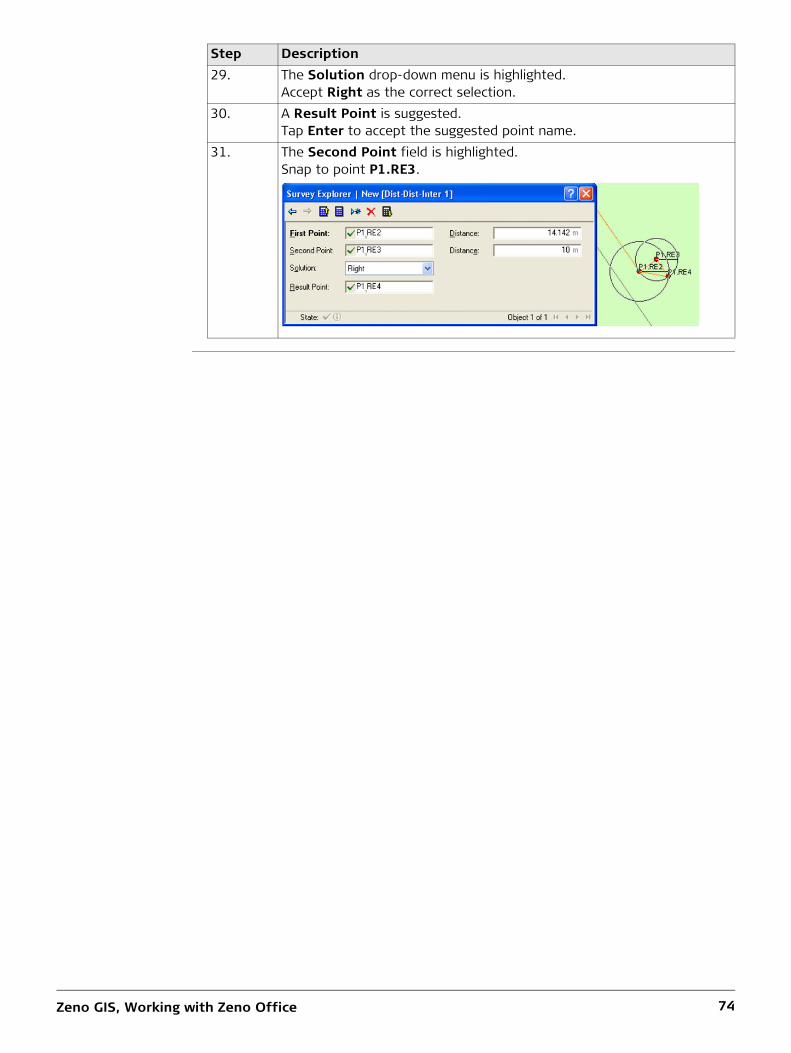
Zeno GIS, Working with Zeno Office 74
29. The Solution drop-down menu is highlighted.Accept Right as the correct selection.
30. A Result Point is suggested.Tap Enter to accept the suggested point name.
31. The Second Point field is highlighted.Snap to point P1.RE3.
Step Description
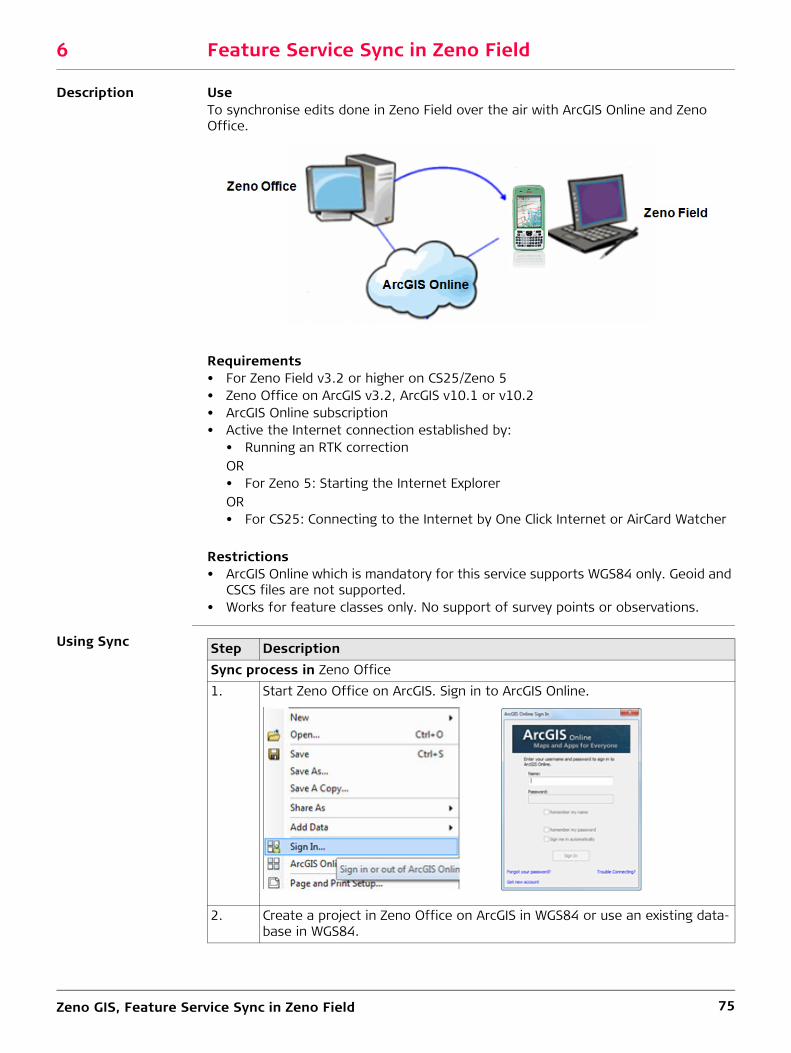
Zeno GIS, Feature Service Sync in Zeno Field 75
6 Feature Service Sync in Zeno Field
Description UseTo synchronise edits done in Zeno Field over the air with ArcGIS Online and Zeno Office.
Requirements• For Zeno Field v3.2 or higher on CS25/Zeno 5• Zeno Office on ArcGIS v3.2, ArcGIS v10.1 or v10.2• ArcGIS Online subscription• Active the Internet connection established by:
• Running an RTK correctionOR• For Zeno 5: Starting the Internet ExplorerOR• For CS25: Connecting to the Internet by One Click Internet or AirCard Watcher
Restrictions• ArcGIS Online which is mandatory for this service supports WGS84 only. Geoid and
CSCS files are not supported.• Works for feature classes only. No support of survey points or observations.
Using Sync Step DescriptionSync process in Zeno Office1. Start Zeno Office on ArcGIS. Sign in to ArcGIS Online.
2. Create a project in Zeno Office on ArcGIS in WGS84 or use an existing data-base in WGS84.
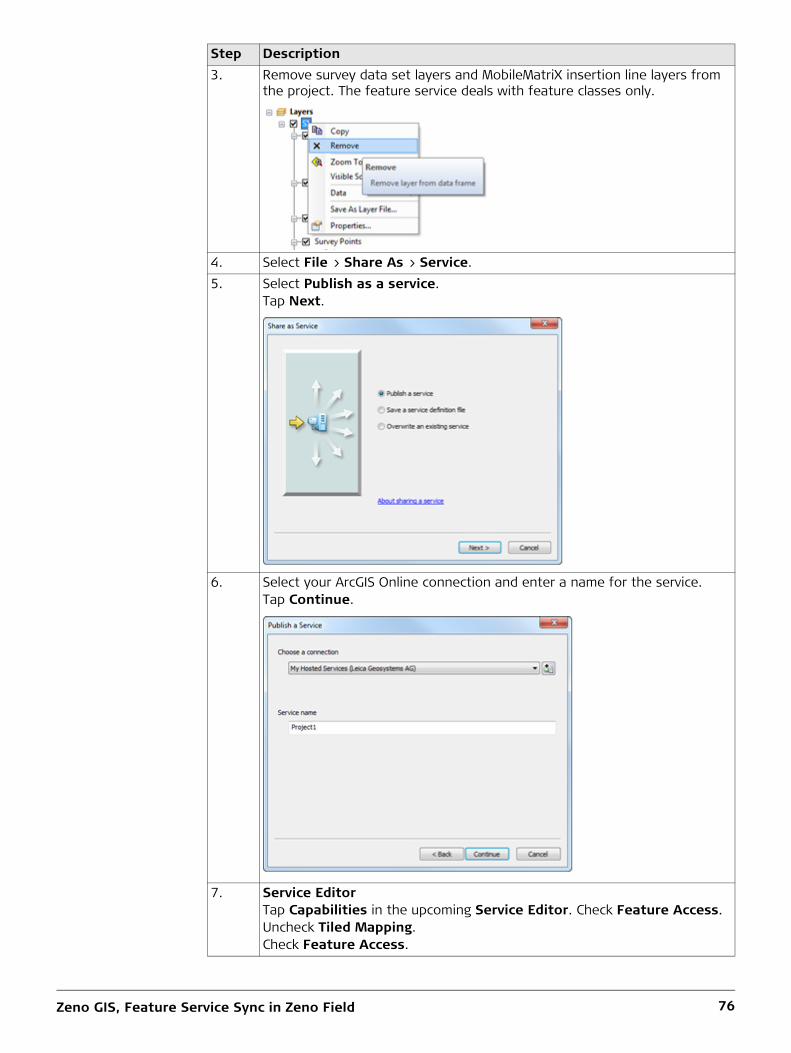
Zeno GIS, Feature Service Sync in Zeno Field 76
3. Remove survey data set layers and MobileMatriX insertion line layers from the project. The feature service deals with feature classes only.
4. Select File > Share As > Service.5. Select Publish as a service.
Tap Next.
6. Select your ArcGIS Online connection and enter a name for the service.Tap Continue.
7. Service EditorTap Capabilities in the upcoming Service Editor. Check Feature Access.Uncheck Tiled Mapping.Check Feature Access.
Step Description
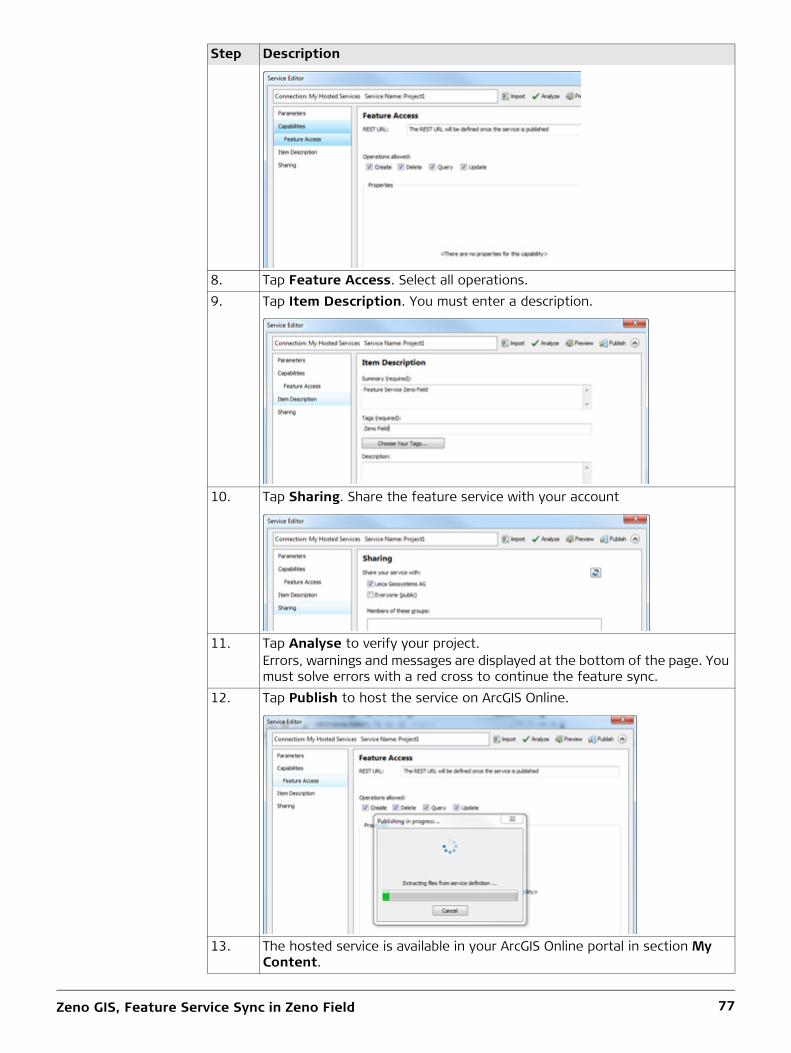
Zeno GIS, Feature Service Sync in Zeno Field 77
8. Tap Feature Access. Select all operations.9. Tap Item Description. You must enter a description.
10. Tap Sharing. Share the feature service with your account
11. Tap Analyse to verify your project.Errors, warnings and messages are displayed at the bottom of the page. You must solve errors with a red cross to continue the feature sync.
12. Tap Publish to host the service on ArcGIS Online.
13. The hosted service is available in your ArcGIS Online portal in section My Content.
Step Description
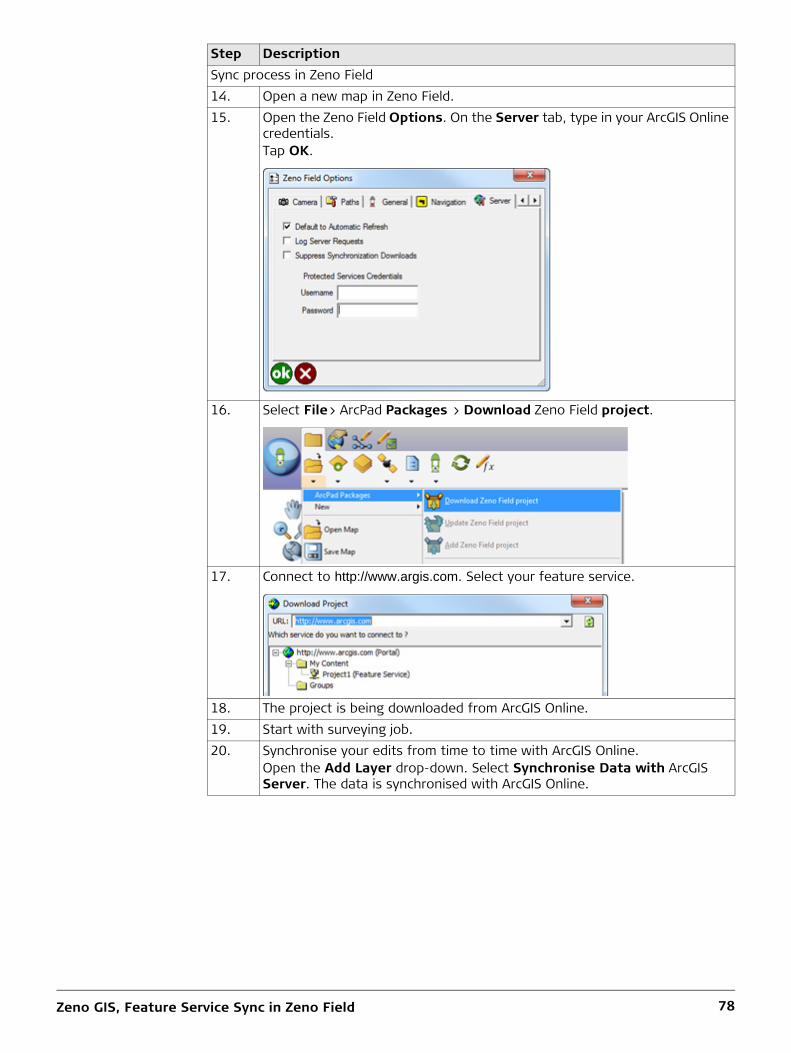
Zeno GIS, Feature Service Sync in Zeno Field 78
Sync process in Zeno Field14. Open a new map in Zeno Field.15. Open the Zeno Field Options. On the Server tab, type in your ArcGIS Online
credentials.Tap OK.
16. Select File> ArcPad Packages > Download Zeno Field project.
17. Connect to http://www.argis.com. Select your feature service.
18. The project is being downloaded from ArcGIS Online.19. Start with surveying job.20. Synchronise your edits from time to time with ArcGIS Online.
Open the Add Layer drop-down. Select Synchronise Data with ArcGIS Server. The data is synchronised with ArcGIS Online.
Step Description
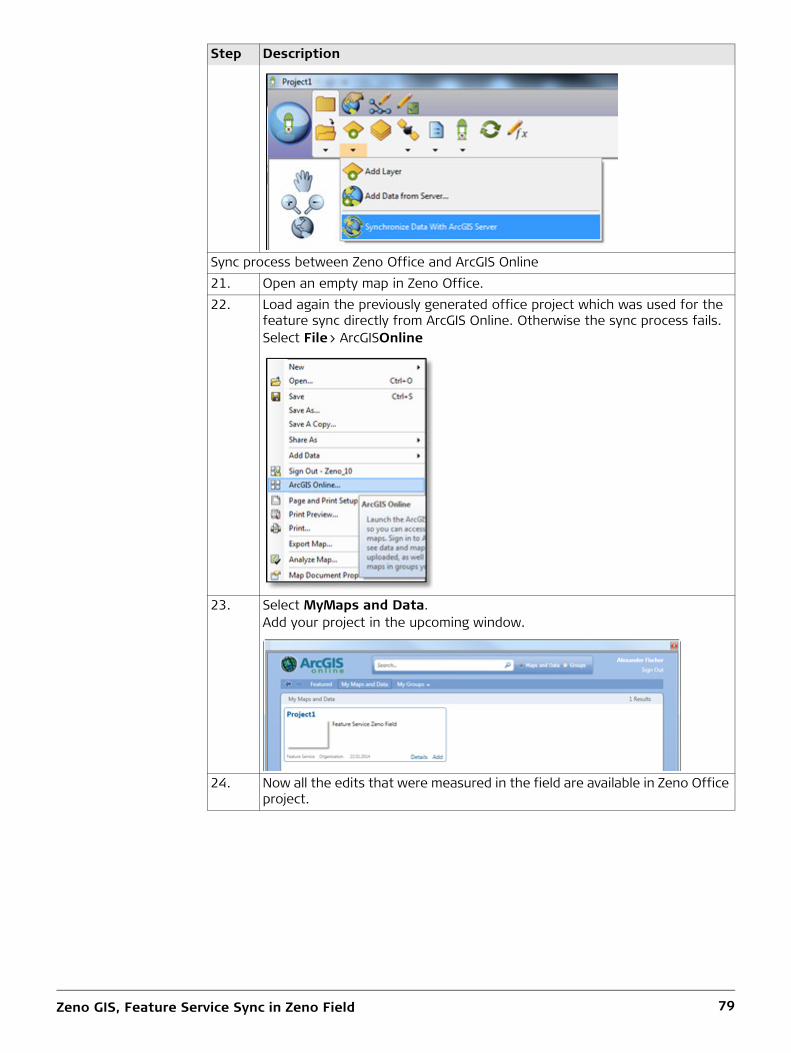
Zeno GIS, Feature Service Sync in Zeno Field 79
Sync process between Zeno Office and ArcGIS Online21. Open an empty map in Zeno Office.22. Load again the previously generated office project which was used for the
feature sync directly from ArcGIS Online. Otherwise the sync process fails.Select File> ArcGISOnline
23. Select MyMaps and Data.Add your project in the upcoming window.
24. Now all the edits that were measured in the field are available in Zeno Office project.
Step Description
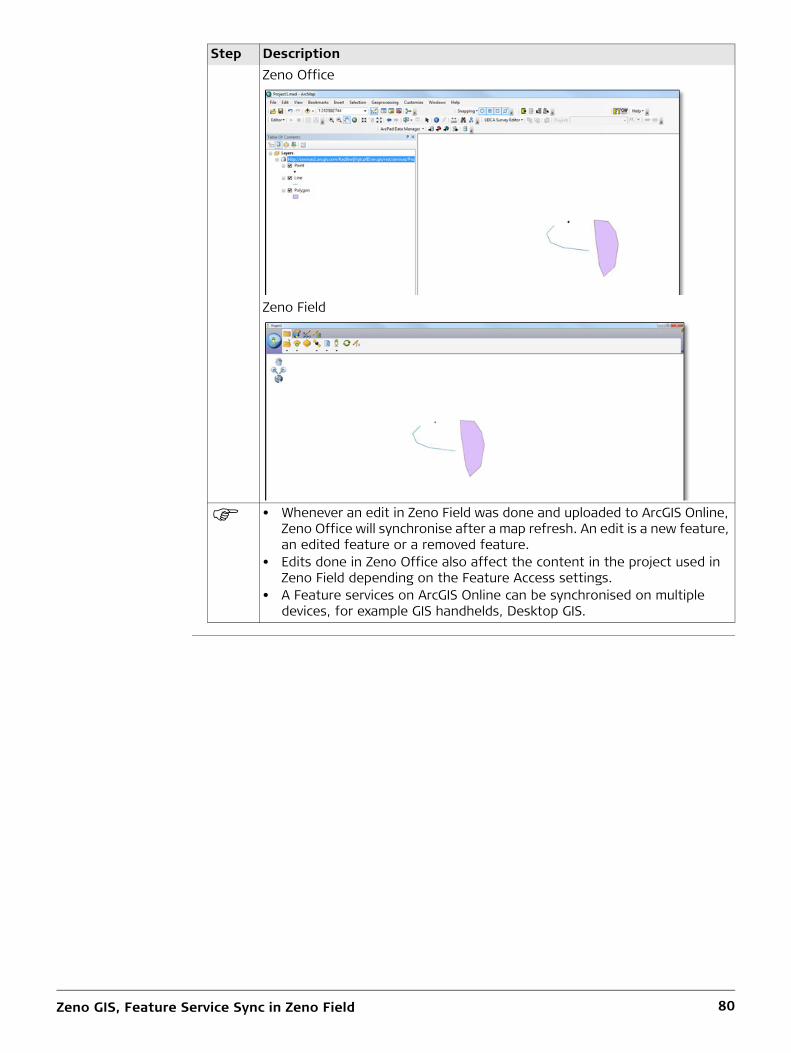
Zeno GIS, Feature Service Sync in Zeno Field 80
Zeno Office
Zeno Field
• Whenever an edit in Zeno Field was done and uploaded to ArcGIS Online, Zeno Office will synchronise after a map refresh. An edit is a new feature, an edited feature or a removed feature.
• Edits done in Zeno Office also affect the content in the project used in Zeno Field depending on the Feature Access settings.
• A Feature services on ArcGIS Online can be synchronised on multiple devices, for example GIS handhelds, Desktop GIS.
Step Description
Zeno GIS, Zeno Tools 81
7 Zeno Tools7.1 Introduction
Functionality of Zeno Tools
Zeno Tools consists of apps to configure: • Zeno 5• Zeno 10/Zeno 15• CS25• CS25 GNSS• GG02 plus• GG03
Depending on the hardware on which Zeno Tools is installed, the following apps can be used:
7.2 Zeno Tools on Zeno 10/Zeno 157.2.1 Using the System Settings Manager
Functionality In the System Settings Manager, you can• Change the font sizes• Reset the GS05/GS06 cap to factory defaults. The reset deletes the almanac and
re-initializes the cap.• Define the USB speed
Changing the system font size
Use this tool to set the system font size for the Zeno handheld device. The available font sizes are small, medium, large, and Zeno optimized fonts.
Using larger font sizes will also resize dialog boxes. Some dialogs will not be fully visible anymore.
Changing USB settings
The USB speed can be changed from USB Full Speed to the faster USB High Speed setting. The setting is required, because some computers do not support USB High Speed.
Installation onZeno 5 • Licence ManagerZeno 10/Zeno 15 • Bluetooth Manager to connect external Bluetooth devices
such as laser rangefinder• Change the System Settings
Example: Font size• Add new licence keys
Example: New maintenance key or a Glonass key for the GS05/GS06
• Uploading a new firmware for the GS05/GS06 capsCS25 • Upload a new firmware on a GG03/GG02 plus
• Upload upgrade keys on a GG03/GG02 plus or CS25 GNSS
Step Description1. Start System Settings Manager on your Zeno 10/Zeno 10:
Tap Start > Programs > Zeno Tools > System Settings Manager.2. Select the preferred text size.3. Tap OK. A dialog box will ask you to restart the system. Tap Yes and the
system will restart with the new text size settings.
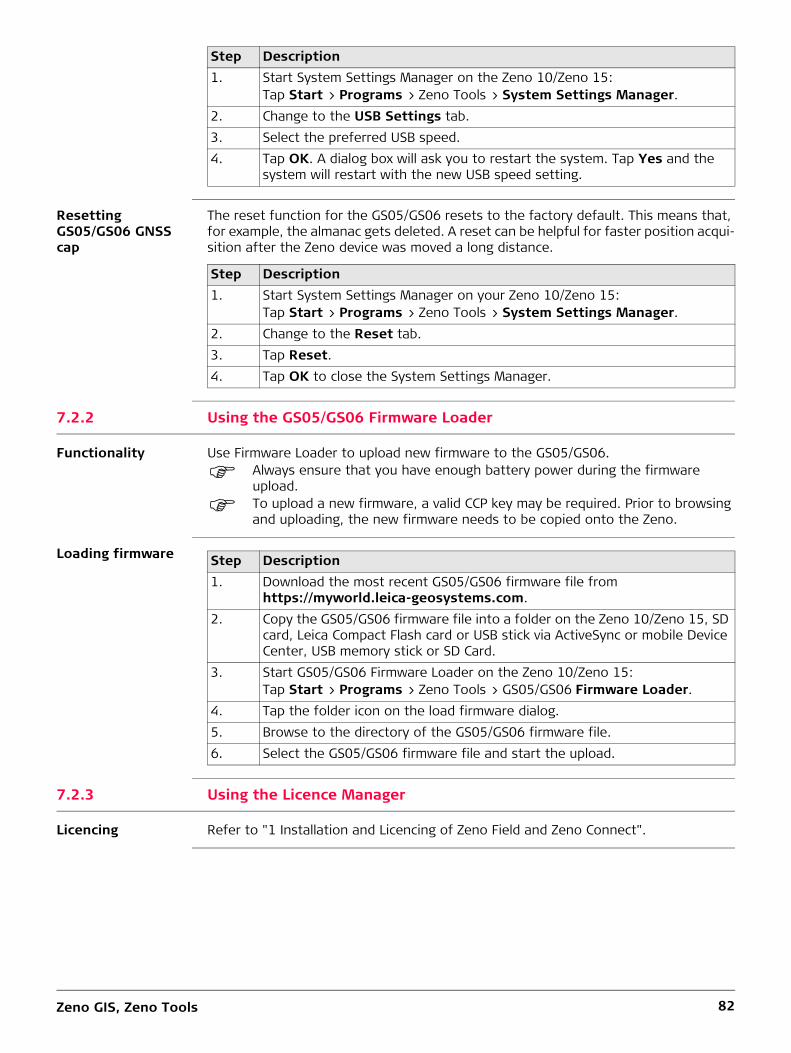
Zeno GIS, Zeno Tools 82
Resetting GS05/GS06 GNSS cap
The reset function for the GS05/GS06 resets to the factory default. This means that, for example, the almanac gets deleted. A reset can be helpful for faster position acqui-sition after the Zeno device was moved a long distance.
7.2.2 Using the GS05/GS06 Firmware Loader
Functionality Use Firmware Loader to upload new firmware to the GS05/GS06.
Always ensure that you have enough battery power during the firmware upload.
To upload a new firmware, a valid CCP key may be required. Prior to browsing and uploading, the new firmware needs to be copied onto the Zeno.
Loading firmware
7.2.3 Using the Licence Manager
Licencing Refer to "1 Installation and Licencing of Zeno Field and Zeno Connect".
Step Description1. Start System Settings Manager on the Zeno 10/Zeno 15:
Tap Start > Programs > Zeno Tools > System Settings Manager.2. Change to the USB Settings tab.3. Select the preferred USB speed.4. Tap OK. A dialog box will ask you to restart the system. Tap Yes and the
system will restart with the new USB speed setting.
Step Description1. Start System Settings Manager on your Zeno 10/Zeno 15:
Tap Start > Programs > Zeno Tools > System Settings Manager.2. Change to the Reset tab.3. Tap Reset.4. Tap OK to close the System Settings Manager.
Step Description1. Download the most recent GS05/GS06 firmware file from
https://myworld.leica-geosystems.com.2. Copy the GS05/GS06 firmware file into a folder on the Zeno 10/Zeno 15, SD
card, Leica Compact Flash card or USB stick via ActiveSync or mobile Device Center, USB memory stick or SD Card.
3. Start GS05/GS06 Firmware Loader on the Zeno 10/Zeno 15:Tap Start > Programs > Zeno Tools > GS05/GS06 Firmware Loader.
4. Tap the folder icon on the load firmware dialog.5. Browse to the directory of the GS05/GS06 firmware file.6. Select the GS05/GS06 firmware file and start the upload.
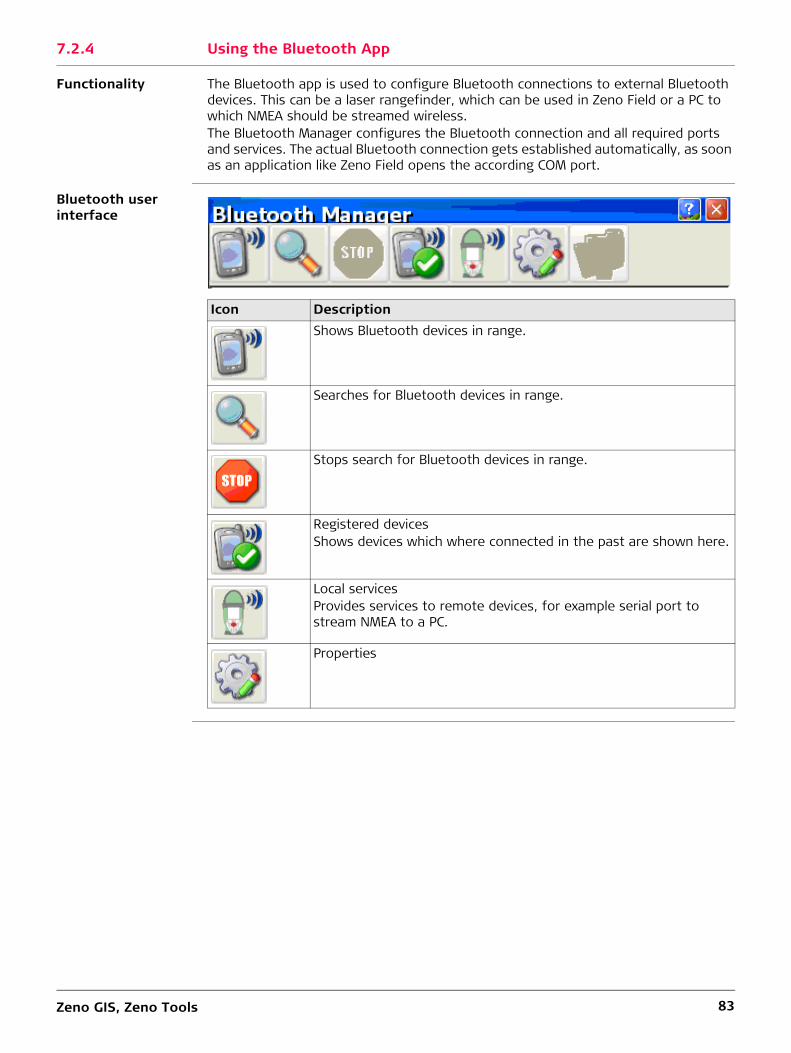
Zeno GIS, Zeno Tools 83
7.2.4 Using the Bluetooth App
Functionality The Bluetooth app is used to configure Bluetooth connections to external Bluetooth devices. This can be a laser rangefinder, which can be used in Zeno Field or a PC to which NMEA should be streamed wireless.The Bluetooth Manager configures the Bluetooth connection and all required ports and services. The actual Bluetooth connection gets established automatically, as soon as an application like Zeno Field opens the according COM port.
Bluetooth user interface
Icon DescriptionShows Bluetooth devices in range.
Searches for Bluetooth devices in range.
Stops search for Bluetooth devices in range.
Registered devicesShows devices which where connected in the past are shown here.
Local servicesProvides services to remote devices, for example serial port to stream NMEA to a PC.
Properties
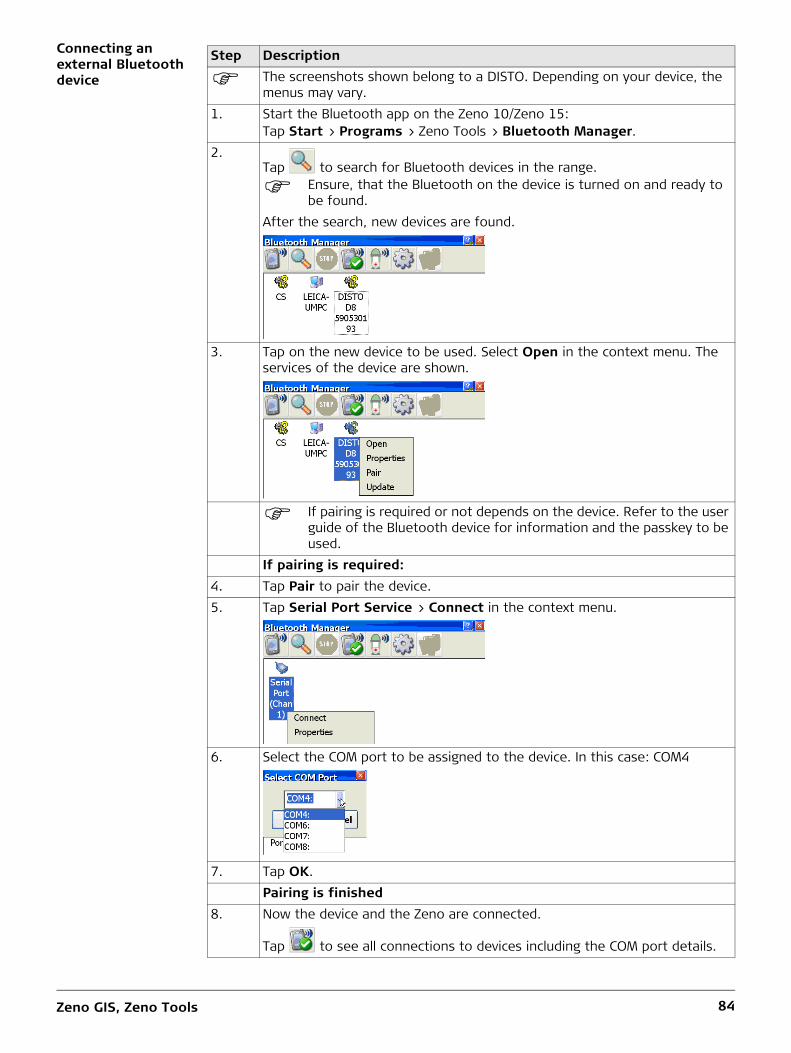
Zeno GIS, Zeno Tools 84
Connecting an external Bluetooth device
Step Description
The screenshots shown belong to a DISTO. Depending on your device, the menus may vary.
1. Start the Bluetooth app on the Zeno 10/Zeno 15:Tap Start > Programs > Zeno Tools > Bluetooth Manager.
2.Tap to search for Bluetooth devices in the range.
Ensure, that the Bluetooth on the device is turned on and ready to be found.
After the search, new devices are found.
3. Tap on the new device to be used. Select Open in the context menu. The services of the device are shown.
If pairing is required or not depends on the device. Refer to the user guide of the Bluetooth device for information and the passkey to be used.
If pairing is required:4. Tap Pair to pair the device.5. Tap Serial Port Service > Connect in the context menu.
6. Select the COM port to be assigned to the device. In this case: COM4
7. Tap OK.Pairing is finished
8. Now the device and the Zeno are connected.
Tap to see all connections to devices including the COM port details.
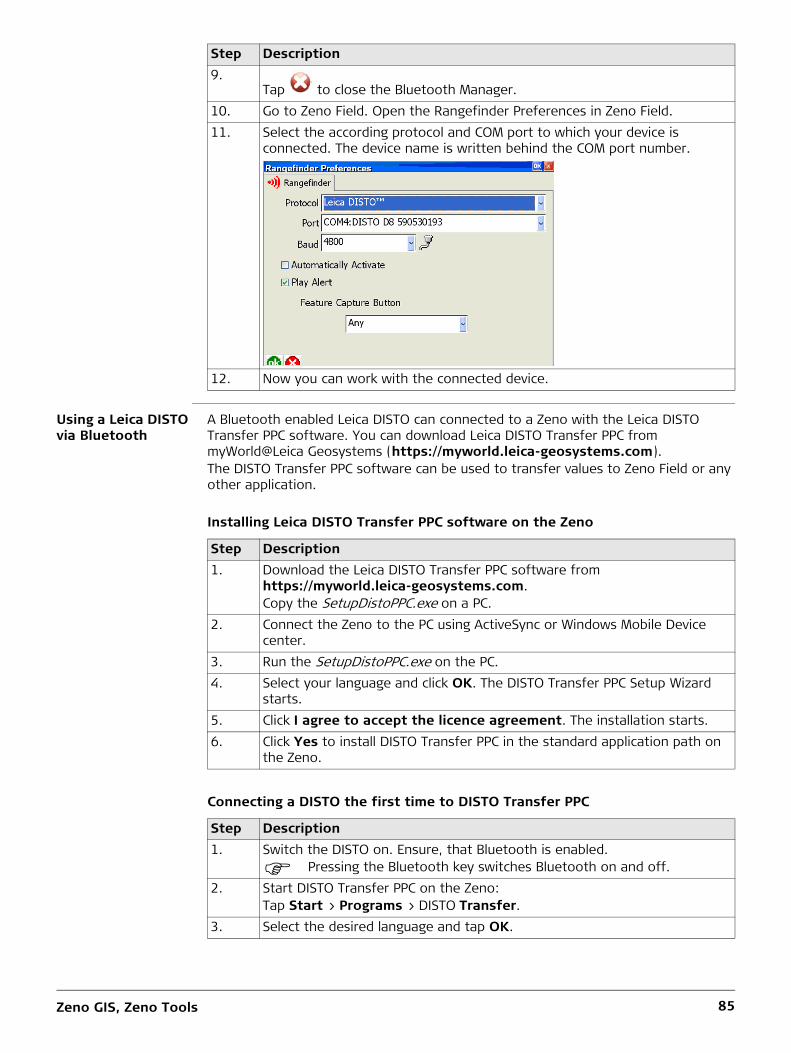
Zeno GIS, Zeno Tools 85
Using a Leica DISTO via Bluetooth
A Bluetooth enabled Leica DISTO can connected to a Zeno with the Leica DISTO Transfer PPC software. You can download Leica DISTO Transfer PPC from myWorld@Leica Geosystems (https://myworld.leica-geosystems.com).The DISTO Transfer PPC software can be used to transfer values to Zeno Field or any other application.
Installing Leica DISTO Transfer PPC software on the Zeno
Connecting a DISTO the first time to DISTO Transfer PPC
9.Tap to close the Bluetooth Manager.
10. Go to Zeno Field. Open the Rangefinder Preferences in Zeno Field.11. Select the according protocol and COM port to which your device is
connected. The device name is written behind the COM port number.
12. Now you can work with the connected device.
Step Description
Step Description1. Download the Leica DISTO Transfer PPC software from
https://myworld.leica-geosystems.com.Copy the SetupDistoPPC.exe on a PC.
2. Connect the Zeno to the PC using ActiveSync or Windows Mobile Device center.
3. Run the SetupDistoPPC.exe on the PC.4. Select your language and click OK. The DISTO Transfer PPC Setup Wizard
starts.5. Click I agree to accept the licence agreement. The installation starts.6. Click Yes to install DISTO Transfer PPC in the standard application path on
the Zeno.
Step Description1. Switch the DISTO on. Ensure, that Bluetooth is enabled.
Pressing the Bluetooth key switches Bluetooth on and off.2. Start DISTO Transfer PPC on the Zeno:
Tap Start > Programs > DISTO Transfer.3. Select the desired language and tap OK.
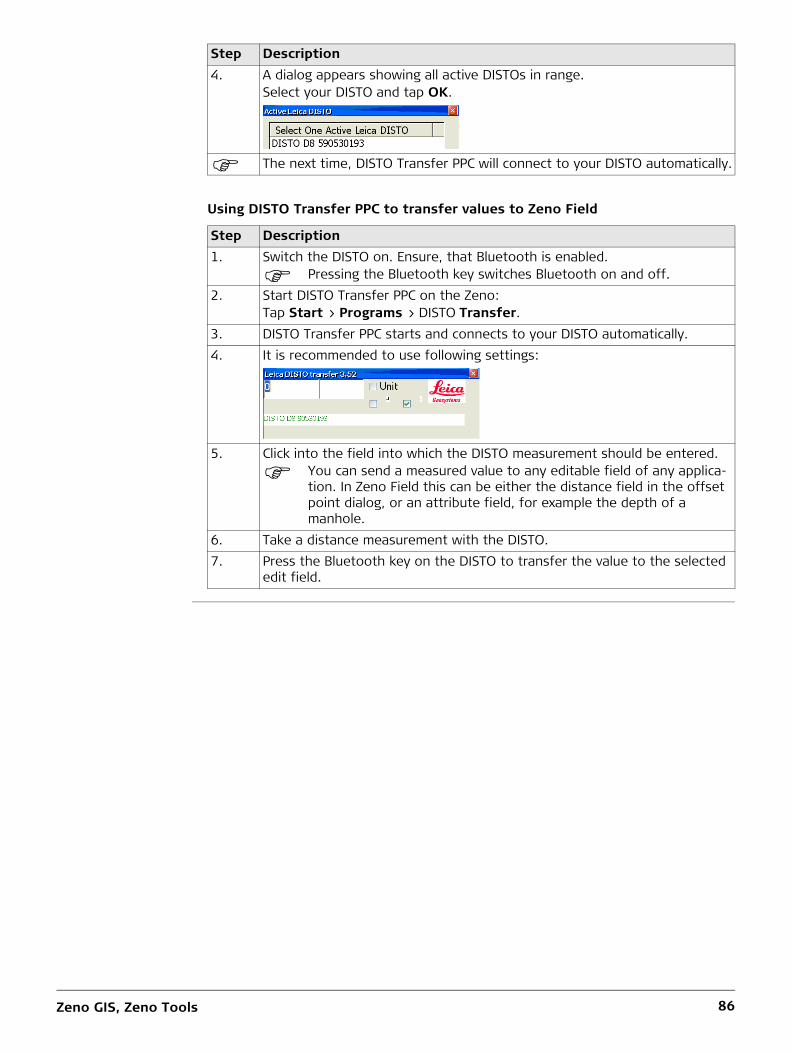
Zeno GIS, Zeno Tools 86
Using DISTO Transfer PPC to transfer values to Zeno Field
4. A dialog appears showing all active DISTOs in range.Select your DISTO and tap OK.
The next time, DISTO Transfer PPC will connect to your DISTO automatically.
Step Description1. Switch the DISTO on. Ensure, that Bluetooth is enabled.
Pressing the Bluetooth key switches Bluetooth on and off.2. Start DISTO Transfer PPC on the Zeno:
Tap Start > Programs > DISTO Transfer.3. DISTO Transfer PPC starts and connects to your DISTO automatically.4. It is recommended to use following settings:
5. Click into the field into which the DISTO measurement should be entered.
You can send a measured value to any editable field of any applica-tion. In Zeno Field this can be either the distance field in the offset point dialog, or an attribute field, for example the depth of a manhole.
6. Take a distance measurement with the DISTO.7. Press the Bluetooth key on the DISTO to transfer the value to the selected
edit field.
Step Description
Zeno GIS, Zeno Tools 87
7.3 Zeno Tools on CS25
Uploading firmware for GG03/GG02 plus
With Zeno Tools installed on the CS25 you are able to upload new firmware to the GG03/GG02 plus.
Uploading firmware for CS25 GNSS
With Zeno Tools installed on the CS25 you are able to upload new firmware to the CS25 GNSS.
Uploading GNSS upgrade keys on GG03
With Zeno Tools installed on the CS25 you are able to upload new firmware to the GG03.
Step Description1. Connect GG03/GG02 plus to your PC by using Bluetooth or the GEV162 cable.2. Start the Firmware Loader Tool on your CS25 by taping Start > All Programs
> Leica Geosystems > Leica Zeno Tools > Firmware Loader GG0X.3. Switch on the GG03/GG02 plus.4. Click the COM Port drop-down arrow to select the serial port on the CS25
which is connected with the GG03/GG02 plus. The Bluetooth COM port number can be found on the Hardware tab of the Bluetooth Device Prop-erties.
5. Browse for the new firmware. 6. Check that the version number of the new firmware is higher than the
current version.7. Click Upload to start the firmware update.8. Click Close when the upload is done.
Step Description1. Start the Firmware Loader Tool on your CS25 by taping Start > All Programs
> Leica Geosystems > Leica Zeno Tools > Firmware Loader GG0X.2. Click the COM Port drop-down arrow to select the COM port with the descrip-
tion CS25 GNSS device.3. Browse for the new firmware.4. Check that the version number of the new firmware is higher than the
current version.5. Uploading additional options to a GG03/CS25 GNSS is possible with the GNSS
Upgrade Key Tool.Click Upload to start the firmware update.
6. Click Close when the upload is done.
Step Description1. Connect GG03 to your PC by using Bluetooth or the GEV162 cable.2. Start the Leica Zeno GNSS Upgrade Key Tool on your CS25 by taping Start >
All Programs > Leica Geosystems > Leica Zeno Tools > GNSS Upgrade Key.3. Switch on the GG03.4. Click the COM Port drop-down arrow to select the serial port on the CS25
which is connected with the GG03. The Bluetooth COM port number can be found on the Hardware tab of the Bluetooth Device Properties.
5. Enter the Authorization Code. The code is printed on your invoice and can also be downloaded from the device details in myWorld@Leica Geosystems (https://myworld.leica-geosystems.com).
6. Click OK.
Zeno GIS, Zeno Tools 88
Uploading GNSS upgrade keys on CS25 GNSS
With Zeno Tools installed on the CS25 you are able to upload new firmware to the CS25 GNSS.
7.4 Zeno Tools on Zeno 5
Functionality With Zeno Tools installed on a Zeno 5, you can licence your software through Licence Manager.
Step Description1. Start the Leica Zeno GNSS Upgrade Key Tool on your CS25 GNSS by taping
Start > All Programs > Leica Geosystems > Leica Zeno Tools > GNSS Upgrade Key.
2. Click the COM Port drop-down arrow to select the COM port with the descrip-tion CS25 GNSS device.
3. Enter the Authorization Code. The code is printed on your invoice and can also be downloaded from the device details in myWorld@Leica Geosystems (https://myworld.leica-geosystems.com).
4. Click OK.

Zeno GIS, Zeno Tools 89
Leica Geosystems AGHeinrich-Wild-StrasseCH-9435 HeerbruggSwitzerlandPhone +41 71 727 31 31www.leica-geosystems.com
812978-1.0.0enOriginal text Printed in Switzerland© 2014 Leica Geosystems AG, Heerbrugg, Switzerland