Embed Size (px)
Citation preview
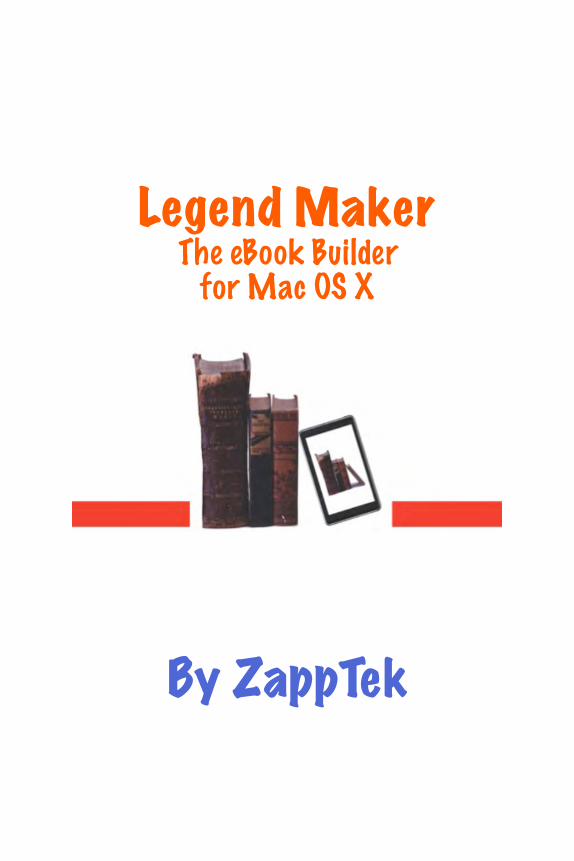
Legend Maker The eBook Builder
for Mac OS X
�
By ZappTek

Legend Maker: The eBook Builder for Mac OS X - Copyright © 2016 by ZappTek
All rights reserved. No part of this book may be used or reproduced by any means without the written permis-sion of the publisher except in the case of brief quotation embodied in critical articles and reviews.
ISBN-13: 978-1-935585-28-2
BISAC Subject Headings: COM065000 COMPUTERS / Electronic Publishing COM074000 COMPUTERS / Hardware / Handheld Devices COM063000 COMPUTERS / Document Management
!
Updated May 8, 2014
Legend Maker: The eBook Builder for Mac OS X was created by ZappTek.
To purchase, go to: www.zapptek.com
For Support, e.Mail: [email protected]
Welcome to Legend Maker 1
Preparing Your Manuscript 2
Step One: Initial Formatting 2
Step Two: Tagging Your Book 5
Step Three: Inserting Audio and Video Files 16
Step Four: Building Your Manuscript Folder 19
Running Legend Maker 21
Step Zero - Decide if you want to make a Kindle (.mobi) file 21
Step One: Open Legend Maker 22
Step Two: Select Publication Options 23
Step Three: Generate Your eBook or Document 25
Verifying Your ePub File 29
About ZappTek 30
Appendix A 31
Contents

Legend MakerWelcome to Legend Maker
The eBook Builder for Mac OS X
Legend Maker takes all the hassle, confusion, and mys-tery out of creating perfectly formed electronic document and ebook files. It does this via a simple two step process. First, you prepare your manuscript to be read by the software. This is a matter of taking a word processor file of your document, and adding special phrases, called “tags,” to tell the Legend Maker where you want page breaks, pictures, and so forth, to go. Second, you run the software, and the files are automati-cally created. Legend Maker...
✓ Uses a standard word processor file ✓ Honors boldface, italics and underlining ✓ Inserts pictures where you want them ✓ Inserts page breaks where you want them ✓ Automatically inserts the cover picture ✓ Automatically creates a Table of Contents ✓ Automatically inserts and positions your tables ✓ Automatically inserts audio and video files ✓ Automatically honors hypertext urls ✓ Automatically creates endnotes from footnotes ✓ Automatically inserts book metadata
and more This version of Legend Maker will convert your man-uscript into either an ePub file, a mobi file, or both. Between these two files, your manuscript will be able to run on most of the major ebook readers (Apple iPad, Amazon Kindle, Sony Reader, Barnes & Noble Nook, and so forth). So, let’s get started.
!1

ZappTek
Preparing Your Manuscript
Step One: Initial Formatting The first thing you need to do is to set up the basic man-uscript. You can use any word processor to do this, as long as it has the ability to save the file as an .rtf file. Saving a file as an .rtf document is inherent in every word processor we know of—Apple Pages, Microsoft Word, TextEdit (as a Rich Text document) and so forth. Just look for it as an option when you do a “Save As…” or perhaps as an “Export” or “Share” option.
!2
Legend Maker can process .doc files, but for best results we strongly recommend you work with your manuscript as an .rtf file. The reason for this is because Microsoft Word does strange things with their “Styles” feature. Things get even more complicated when you save things as a .doc file from word processors other than Mi-crosoft Word. The results can be, shall we say, something less than uniform. docx is even worse than .doc.
The good news is that any program (that we know of) that can save as a .doc file, can also save as an .rtf. And rtf is rtf no matter which word processor you use.

Legend Maker So, start by loading your manuscript into your friendly neighborhood word processor and saving it under a different file name. After all, we don’t want you to accidentally save the file you are about to create on top of your original docu-ment. Then do the following:
1) Remove all header and footer data from your doc-ument. eBook devices don’t use either.
2) Delete your Table of Contents if you have one. Legend Maker will be creating a new one for you. Besides, your page numbers will mean nothing to an ebook reading device anyway.
3) Select all of your text (i.e. do a “select all”) and convert everything into the Times New Roman font. Don’t worry, your italics, boldface, and so on will be maintained, all you’re changing is the font.
4) While you have everything still selected, covert it all to an 18 point font size. Again, don’t panic! You can use other font sizes, but first you have to estab-lish the font size baseline.
Legend Maker assumes that 18 point Times New Roman will be the default baseline font and font size for the main body of your text. “Font size baseline?” I hear you cry. Okay, let me ex-plain all this folderol. I know you’re aghast at losing all those fancy exotic fonts you might have used in your printed version; but remember an ebook is a whole different beaste. You no longer control the font selection; the ebook reader device does. Complicating things, most ebook devices have only a small selection of fonts from which the user can choose; and
!3
ZappTekyou don’t know what they are, as they vary from device to device. The only thing that’s safe to assume, is that Times New Roman will be one of them. That’s why you have to convert everything to that font. It’s the only way we can ensure that things will look good, no matter where your manuscript is running—at least until the user changes it. Welcome to ebook document publishing. 18 points is assumed to be the default baseline (100%) size for the main body of your text. You can use other font sizes for headings, etc., but they will be rendered relative to that baseline (e.g. 14 points is 80% of 18 points, 24 points is 135% and so on). The reason for all this is that, with ebooks, the font size is no longer controlled by you; it’s controlled by the user. When the user selects a new font size (small, medium, large), the device adjusts the size relative to the baseline. To get every-one on the same page (no pun intended), Legend Maker as-sumes your baseline is an 18 point font size. If you want to use a different size for chapter titles or whatever, just go ahead and make those specific text items bigger or smaller—Legend Maker can handle it. But I think you’ll find that 18 point, especially if it’s capitalized, looks pretty good.
5) Remove tabs and use hanging indents instead. Tab characters will cause formatting errors with the
latest Adobe ePub reader software (found in readers such as the Nook). Legend Maker will replace tab characters with spaces, but this will result in misaligned text (since letters are of differing widths). Instead, using a hanging indent at the beginning of a paragraph.
6) Next convert everything to single line space. In addition to losing control over font selection and, to an extent, font size, you also lose control over line spacing.
!4

Legend Maker Line spacing, again, is defined by the reader device, so anything you set will be ignored. All other formatting (blank lines, indenting, tabs, etc), however, is respected, so your document will otherwise look exactly as you format it.
7) Finally, create a new file folder for your Legend Maker manuscript document—we’ll refer to it as the “Manuscript Folder”—and save the file you just cre-ated into it. Have a separate folder for each ebook you create. As you will see below, more stuff will soon be going into that folder.
Step Two: Tagging Your Book
The next step in the process is to use your word processor to insert text-based tags into your document. When Legend Maker reads your document and sees these tags, it will insert the right commands into the ePub or Kindle file it is build-ing. This really isn’t as onerous as you might think, as there are only a few tags you need to worry about: Page breaks (self-explanatory), Bookmarks (which automatically create a
!5
If you are using Microsoft Word as your word proces-sor, stick to using the “normal style.” Custom styles won't convert properly.
Legend Maker uses the folder's name to name the ePub and Kindle files that it creates, so you should use a folder name that is identifiable, but reasonably short.

ZappTektable of contents for you), Images (so Legend knows where to place pictures and graphics), Audio and Video (so Legend knows where to embed audio and video files), and TOC (to force Legend to put the table of contents where you want it). If your book has footnotes, you’ll need to reformat them slightly; but Legend Maker will handle them very nicely. Everything else is honored automatically. In other words, if your word processor manuscript has italics, bold-face, indentation, and hyperlinks—so will your ePub and Kindle files. If it has tables, don’t worry about it. Legend Maker will automatically process them as well. Now, there is nothing that says you have to use any of these tags. Your ebook file will compile just fine without them. But they are so easy to do, and they will make your document look so much more professional, that we highly recommend it. Here’s how you use those special tags.
Page breaks: To force a page break, include the text ####### (seven pound signs) on it's own line anywhere in your document, followed by a blank line. (NOTE: If you’re using Microsoft Word, when you hit return it might do an auto-correct and convert the seven pound signs into some-thing else. If Word does this, simply do an undo to get rid of the auto-correct.) So, a page break might look like this:
!6
Lorem ipsum dolor sit amet, consetetur sadipscing elitr, sed diam nonumy eirmod tempor invidunt ut labore et dolore magna aliquyam erat, sed diam voluptua.
#######
Duis autem vel eum iriure dolor in hendrerit in vulputate velit esse molestie consequat, vel illum dolore eu feugiat nulla facilisis at vero eros et accumsan et iusto odio dignissim qui blandit prae-sent luptatum zzril delenit.

Legend MakerBookmarks: Bookmarks will generate a table of contents for your document. In addition, on the Kindle, it will construct the table so that it shows up as an option when the user presses the “Menu” button. You can add a bookmark to any page by placing the fol-lowing text on it's own line: (the bookmark: tag does not re-quire a blank line following it).
bookmark:Chapter 1
The text you add following the tag "bookmark:" (e.g. Chapter 1) will appear as a line item in the table of contents, and if the user clicks on it, it will take him to that location. The bookmark tag also serves as a page break, so you do not need to include the “#######” tag in addition to the bookmark. Legend will automatically add one for you. As a result, make sure that any text (such as the chapter title) comes after the bookmark, since Legend Maker will use the bookmark location to indicate where a new page should start. If you put the tag after the chapter title, and the user clicked on it in the table of contents, he would shoot right past the chapter heading.
There’s another bookmark tag that you can use once: the "srh:" tag (start-right-here tag). In every aspect this has the same effect as a bookmark (adds the line to the table of con-tents, adds a page break), but it comes with one added bene-fit. It tells ebook readers that this bookmark also defines the first page to open to when loading the ebook for the first time. And finally, don't use a bookmark for the end of a book/section since ePub files need that to define a new section, which you likely don't want. After all that, a bookmark might look like this: TOC: For compatibility with older Kindles, in the mobi file Legend Maker generates an inline table of contents as a page of hyperlinks and places it at the end of the mobi file. By de-fault Legend Maker does not generate an inline table of con-tents for the ePub file, but you can have one if you want to.
!7

ZappTek
Just put a “bookmark:contents” tag where you want the table of contents to appear:
bookmark:contents
By default Legend Maker generates the title for the table of contents, but if you prefer another title, in a non-English language for instance, enter the tag like this:
toc:My ToC title
Footnotes: Legend Maker cannot put “footnotes” in an ePub or Kindle book because ebook readers have no concept of a fixed page. If there are no fixed pages, putting a note at the bottom of one is therefore… well you get the idea. Legend Maker does, however, support endnotes that link citation marks in your document to their respective citations. It’s just the citations appear at the end of the book, not at the bottom of the page.
!8
Lorem ipsum dolor sit amet, consetetur sadipscing elitr, sed diam nonumy eirmod tempor invidunt ut labore et dolore magna aliquyam erat, sed diam voluptua. At vero eos et accusam et justo duo dolores et ea rebum. Stet clita kasd gubergren, no sea takimata sanctus est Lorem ipsum dolor sit amet. Lorem ipsum dolor sit amet. bookmark:Chapter 2 - Lost in the Woods
Chapter 2 Lost in the Woods
Duis autem vel eum iriure dolor in hendrerit in vulputate velit esse molestie consequat, vel illum dolore eu feugiat nulla facilisis at vero eros et accumsan et iusto odio dignissim qui blandit prae-sent luptatum zzril delenit augue duis dolore te feugait.
Legend Maker
Here’s what you need to do to process your footnotes.
1. Go through your manuscript and locate a footnote. Let’s say it looks like this:
It was a dark and stormy night. 1 A dog barked as rain slapped the window.
And let’s say that citation mark (1) leads to a foot-note that reads: 1. Yes, I know this is trite.
2. Okay, all you need to do is copy and paste the actual footnote text where that citation mark (1) is located, enclose it with two “broken brackets” (<< and >>) then delete the citation mark. (If you delete the cita-tion mark first, it will delete the footnote and you will have nothing to copy.)
So, now, that line of text will look like this:
It was a dark and stormy night.<< Yes, I know this is trite. >> A dog barked as rain slapped the window.
Legend Maker will read the text, see those broken brack-ets, and say: Ah-ha! A footnote! It will then grab everything between those brackets, place it in the endnotes, number it, delete the bracketed material, insert a clickable citation number in it’s place, and insert a character (↩︎) after the endnote citation that will allow the user to return to where they left off reading. In short, Legend Maker will convert the original sentence back to:
It was a dark and stormy night. 1 A dog barked as rain slapped the window.
And create an endnote that looks like: !9

ZappTek
1. Yes, I know this is trite. ↩︎
This allows you to deal with footnotes without worrying about numbering, linking, etc. Legend Maker will take care of everything for you. By default, Legend Maker will put the endnotes section at the very end of your manuscript file. If you want to place it somewhere else (say before your "About the Author" section, or before your advertising, or whatever), insert the text "bookmark:endnotes" on its own line to indicate where you want the endnotes to go. Legend Maker generates the title for the endnotes, but if you prefer another title, in a non-English language for instance, enter the "pnh:" tag (which stands for "put notes here" – clever, eh?) like this: pnh:My Endnotes title
Note that you cannot have any footnotes on the other side of wherever you place “bookmark:endnotes" (or "pnh:"). Finally, Legend Maker will always automatically include “Endnotes" (or your own title if you’ve used "pnh:") as an en-try in your table of contents. That’s so people can easily pop to the endnotes and read them whenever they want.
Tables: There really isn’t much to say about tables, because Legend Maker automatically handles them. You don’t have to worry about it, EXCEPT for two things.
1) We mentioned above that one of the first things you need to do when creating your Legend Maker file was to convert it to 18 point - Times New Roman font. But after you’ve done that, be sure to check out your tables to make sure they were changed as well. Some word processors will do that automatically, some will not. 2) When you’re creating your document, make sure
that the tables are tables, and not pictures of tables.
!10
Legend Maker(Yeah, it happened to us.) If you want to have a pic-ture of a table instead of the real thing, you’ll have to handle it like any other image.
3) Of Readers and Tables. See the special note on the next page.
How do you handle photos? Glad you asked, because it leads us to the next topic.
!11

ZappTek
!12
Of Readers and Tables: To put it charitably, the Kindleʼs ability to handle tables is... shall
we say... primitive. The Kindle 1 will not display them at all. The Kindle 2 handles them, but it can't adjust the cell sizes, borders, etc. Thus, if your table exceeds the width of the Kindle 2ʼs screen, it will appear all scrunched together, and some of the data might actual-ly be missing. The Kindle 2DX gives a slightly better performance, but thatʼs because the screen is so much larger. It too will convert your data into a train wreck if the width of your table exceeds the width of the DX screen.
• So, whatʼs the answer? If you have a large table thatʼs important to your document, convert it to a picture and save it as a png file. Then stick the table in your docu-ment as an image. The Kindle knows how to re- size that.
• And how do you do all this image business? Well thatʼs the subject of the next section.
• The point is, Legend Maker uses standards- compliant formatting techniques for tables. On some readers it will render perfectly (e.g. iPad, ibis), on others the exact same file might or might not (e.g. Sony Reader, Kindle). But, any problem with rendering a table on any given device or reader software is going to be because of the inherent limitations of that reader—not because of Leg-end Maker.

Legend MakerImages and Graphics: Again we go back to the ebook read-er as a strange beaste. It’s a computer, in that it uses computer-like chips to work. But it is not a computer when it comes to the kind of usage latitude you have on your Mac or PC. This is especially true when it involves images. As with font size and type, you only have limited control over the size of a picture or a graphic; but you can control its placement. So, let’s start with that, and we’ll cover the gener-ation of images next. To place an image anywhere in your ebook, use the fol-lowing tag.
image:picturename.jpg
By default, Legend Maker will center the image on the page. But you also have the option of left or right alignment using a "limage:" (left-image) or "rimage:" (right-image) tag. You can even make sure an image take a full page using a "fimage:" (full-image) tag – perfect for automatically scaling images that may be larger than a full page. So, for example, if you wanted to make sure your image appeared on the right side of the screen you would use:
rimage:picturename.jpg
The text immediately following one of these images will flow around it. This makes it perfect for drop caps at the be-ginning of a chapter and magazine style pictures at the be-ginning of an article. The Kindle doesn't support left and right aligned images so you won't be able to use drop caps. If you really want those caps, and need a Kindle version, we suggest doing two manuscripts, an ePub version with the drop caps, and a Kin-dle version without.
!13

ZappTek Yes, you will have slightly different versions for Kindle and ePub; but a lot of people might feel there is no use hav-ing a less than ideal book for ePub just because of Kindle's limitations. Legend Maker allows you to generate both. Obviously, you'll need to run each manuscript version through Legend Maker separately; but that’s no big deal, and you’ll end up with the best book for each platform.
Generating Images: You might be tempted to skip over this section, because your book doesn’t have any pictures. You’d be wrong. All ebooks have to have at least one image—the cover. Without that, your book becomes invisible on any website that carries it—if you can even get someone to carry it. So, let’s talk about how that image, and others, are done. You’ll need to get a program that allows you to resize your image. This program could be as simple as Apple’s iPhoto (via it’s export function), to the more comprehensive Graph-icConverter, to the very expensive but very powerful, Adobe Photoshop. Fortunately, there is also a graphics program that is in-cluded with Mac OSX. It’s called Preview. Just fire it up, select your image, Choose Tools —> Adjust Size, and you’re done. You can also use it to spruce up your pictures a bit. It has some amazing and easy to use capabilities in that regard. But no matter what software you use, it has to be able to save your picture as a .png file or a .jpg file (which almost all graphics programs can do). .jpg is better for images (photos), while .png is better for graphics (drawings).
The Cover: If you want a picture to cover an entire screen (like a cover), it needs to be 560 pixels wide by 740 pixels tall. That’s the magic number for use in eInk devices. You can have images that are smaller than that, but it can’t be larger for eInk devices. Devices like the iPad will automati-cally resize larger images. Once you have created the image, name it cover.jpg or cover.png, and save it in the same folder that you had previ-
!14

Legend Makerously put the manuscript. (Remember? Step One, Number 7, above?) Legend Maker will always use a cover.jpg file if it is present. It has to have exactly that name because that’s what Leg-end Maker will be looking for. It will automatically grab it, and attach it as the first thing in the ebook file it is creating. It will also shown on the Legend Maker screen as a way to verify that you’ve grabbed the right manuscript.
Other Images: From here on you can add whatever images you’d like, wherever you like. You want to have an “About the Author” section at the end of the book, with the author’s picture? Fine.
1) Bring the author’s photo into your photo program. 2) Size it to whatever dimensions you want, but re-
member, it can’t be larger than 560 pixels wide by 740 pixels tall. If it is larger, make sure you use "fimage:".
3) Save it in your manuscript folder as a .jpg file. (In this case we’re calling it: authorpic.jpg)
4) Go to the place in your manuscript where you want to place the picture, and type:
image:authorpic.jpg
You want to do other pictures and graphics? No problem. Just repeat the above process, save the photos in your man-uscript file, and put a tag in your manuscript showing where you want it to go by using: image:picturename.jpg Legend Maker will do the rest.
!15

ZappTek
Step Three: Inserting Audio and Video FilesOne of Legend Maker’s most powerful features is it’s abil-
ity to add audio and video files to your books and docu-ments. You can include a video or audio trailer at the begin- ning of a book, for example, or an informational segment be- fore each chapter. You can even include an audiobook ver- sion1 of your entire document, which is great for the visually impaired, or include background music to set the mood while reading a chapter, and so on. But where Legend Maker really shines is if you are creating instruction or training manuals. You are not stuck with static pictures any more; you can show them and tell them how it’s done with simple clips.
The extent to which you can use audio or video files in your document is, of course, dependent on the kind of ebook reader your enduser has. If they are using the iPhone or the iPad—you’re golden. eReaders, such as the Kindle, that do not support either audio or video within the text, will simply skip over the embedded files. With other eReaders, your mi- lage might vary. You will need to check. ! 1 To easily covert any document to computer-read audio, you should
check out another software product from ZappTek called iSpeak It. (www.zapptek.com/ispeak-it) It’s inexpensive, easy to use, and it works like a charm.
!16
Hyperlinks: Legend Maker automatically sup-ports hyperlinks that you embed in your .doc or .rtf document with your word processor (no HTML coding is required). Include links to any websites you wish (e.g. author/artist information, extra resources, information about the book, etc.) using a standard word processor hyperlink. The ebook device will display those links and jump to a web browser, if the reading device supports web access.

Legend MakerAudio and Video Formats: Legend Maker supports most of the widely used audio and video formats in use today:
Audio: .mp3, .aac, .m4a and .m4b Video: .mov, .mp4, .m4v and .3gp If your current file is not on this list, there are a host of
file converters available on the internet, many of which are free, that will convert whatever you have to one of these for-mats.
With audio files you should have no problem. As long as it’s in one of the above mentioned file types, it should simply play. With video, however, things get a bit more finicky.
As we’ve mentioned so often in this manual—not all files are created equal. To play on the iPhone and iPad, you have to make sure that your video files are formatted properly for those devices. Now, many files are; but if yours isn’t, or you’re not sure, here’s how you can be sure that it will work.
1. Open up iTunes, and drag and drop your video file into your iTunes Library.
Note: I find it better to create a new iTunes playlist and drop it in there. That way I can find it a lot easier
2. Click once on the file to highlight it.
3. With the file highlighted, look up to the very top of your screen. You’ll see an option called “Advanced.” Slide that down and pick “Create iPod or iPhone Version.” It will then start converting your file into a version that is considered righteous to those devices. Don’t worry about whether it will run on an iPad. If it runs on the iPhone, it will run on the iPad.
Now that you have your audio and/or video file all prepped and ready to go, it’s time to tell Legend Maker where you want it to go in your document.
!17

ZappTekEmbedding Audio and Video Files:
To include an audio file, place the following on its own line where you want the audio to show up (let’s assume your file is named chapter1.mp3) audio:chapter1.mp3
Note! Audio file names should not include any spaces be-cause on some platforms file names with spaces will prevent the audio from playing.
To include a video file, place the following on its own line where you want the video to show up (assuming your file is named chapter1.m4v):
video:chapter1.m4v
Video Poster Art: To fully comply with Apple's book re- quirements, poster art is required as a placeholder image when a video is not playing. The image should be 300 pixels wide. Legend Maker assumes that the poster art will be a PNG file with the same name as the video. Thus, if you have embedded a video called chapter1.m4v, (and you want to keep the folks at Apple happy) you will have to create a poster art file called: chapter1.png. Simply place the PNG file in the same folder as your video and all your other ebook construction files (see manuscript folder below), and Legend Maker will automatically include it in your final ebook.
That’s it. Your plain old text document is now a sparkling new multimedia star.
!18
Please note that audio and video are not part of the ePub 2 standard and, as such, many ePub validators will flag "audio" and "video" as un-known elements. While these ePubs will still load correctly, be sure to select ePub 3 to ensure 100% validation.

Legend MakerStep Four: Building Your Manuscript Folder
You’ve no doubt noticed that we’re making increasing reference to the manuscript folder. That is because that’s the place the Legend Maker will go to find everything it needs to create your ebook or document. So far, your manuscript folder looks like this:
!
Author/Book Information: We have one more possible item to add, and that is the bookinfo.txt file; but this is an optional thing. If you are only doing one book, you might want to en-ter the metadata (i.e. the book’s information) by hand at the main screen (see below). If you have a large number of ebooks to process, however, you might find this method easi-er. It’s really quite simple to do. Open any word processor, or even a utility program like TextEdit, and type in the following information in this order, with each item on its own line: Book Title Author Name Publisher Copyright Notice
!19

ZappTekDate Published (in the format: YYYY-MM-DD) ISBN Genre
If you don't have (or don’t want to provide) a particular piece of information, just leave the line blank. But you should pro-vide at least the Book Title and Author Name. If you don't do that here (or manually type it in later) the ebook device will display a default name (your manuscript's raw file name) and no name for the author. So, your bookinfo.txt file will look something like this:
The Temple Tom Grundner Fireship Press The Temple - Copyright © 2009 by Tom Grundner 2010-04-09 978-1-934757-79-6 Historical Fiction, War and Military
Then save the file as bookinfo.txt in the manuscript fold-er.
!20
On that last information item, “Genre,” we suggest you use one of the standardized systems for cat-egorizing books. The one that is used most often was devised by the Book Industry Study Group (BISG). It’s called the BISAC Subject Headings List, and can be found at: https://www.bisg.org/bisac-subject-codes

Legend MakerRunning Legend Maker
Step Zero - Decide if you want to make a Kindle (.mobi) file
Before you run Legend Maker, you need to decide if you want to generate a Kindle file or not. If you don’t, you can proceed to Step One. If you do, read on.
Kindle uses a type of a file format called “mobi.” To get your manuscript into that format just the way the Kindle wants it, requires a rather complex program called “Kin- dleGen.”
The good news is that KindleGen is a FREE program. It is available to anyone—or at least anyone who understands how to use it. The bad news is that their user agreement does not allow us to incorporate KindleGen into Legend Maker. So, you will have to do that yourself.
But don’t panic—it’s easy. 1) If the option to “Make a Kindle Book” is already se- lected before you launch Legend Maker (or if you select it after you launch), you will see a message asking if you want to add KindleGen. 2) Click on the Get KindleGen button and download it from Amazon. Remember, it's FREE. 3) Unzip the downloaded file and, in the folder, find the file titled "kindlegen." 4) Drag and drop "kindlegen" onto Legend Maker. That’s all there is to it. Once you've done this, go ahead and make your ebook
just like you normally would, and you'll find a perfect Kindle .mobi file alongside your .epub.
If you decide to market your Kindle version through Amazon you should make sure that you have added the latest version of KindleGen to Legend Maker before you create your .mobi ebook.
!21
ZappTek
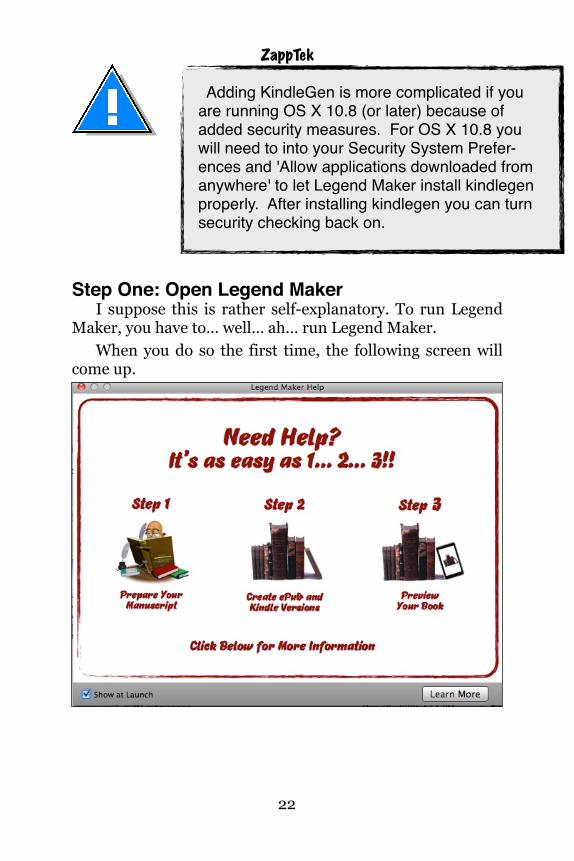
Step One: Open Legend Maker I suppose this is rather self-explanatory. To run Legend Maker, you have to… well… ah… run Legend Maker. When you do so the first time, the following screen will come up.
!
!22
Adding KindleGen is more complicated if you are running OS X 10.8 (or later) because of added security measures. For OS X 10.8 you will need to into your Security System Prefer-ences and 'Allow applications downloaded from anywhere' to let Legend Maker install kindlegen properly. After installing kindlegen you can turn security checking back on.
Legend Maker This comes up automatically and is designed to be a ben-efit to all those for whom reading an instruction manual seems like cheating. If you click on the “Learn More” button in the lower right corner, you will get essentially this document in a straight text form. If you uncheck the box marked “Show at Launch,” the help splash will darken your screen no more. Assuming you have had the good sense and uncommon good taste to have read this manual, and have prepared your manuscript file and folder accordingly, you can proceed to using the Legend Maker program. Click on the red dot in the upper left corner of the help screen. It will go away, leaving Legend Maker in all its radi-ant glory.
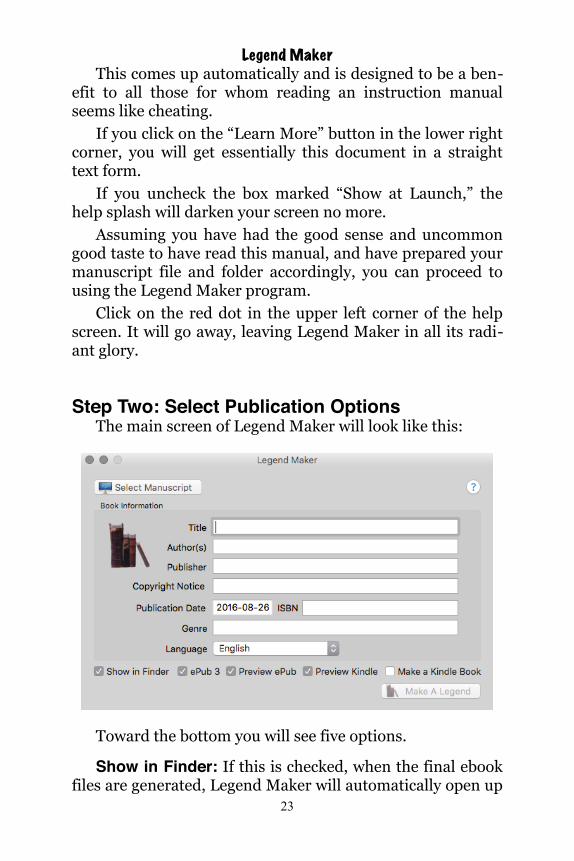
Step Two: Select Publication Options The main screen of Legend Maker will look like this:
Toward the bottom you will see five options.
Show in Finder: If this is checked, when the final ebook files are generated, Legend Maker will automatically open up
!23

ZappTekthe folder in which they are located. I know that’s no big deal, but it’s kind’a handy. ePub 3: If you select this option, Legend Maker will pro-duce an ebook adhering to the ePub 3 standard. This is great for embedding audio/video and support advanced features such as pop-up footnotes. But, Legend Maker can't produce an ePub 3 and Kindle book at the same time since it needs an ePub 2 version to make the Kindle book. This and the Make a Kindle Book options can't be selected at the same time – Legend Maker won't let you. Preview ePub: If you select this option, when Legend Maker has finished making your file, it will automatically call up whatever ePub reader you use so you can see how it looks. But see the note below concerning not all ePub readers being equal.
Preview Kindle: If you select this option, when Legend Maker has finished, it will automatically call up whatever Kindle or mobi file reader you use. If you don’t have one, it will direct you to a website where you can get a copy of the Kindle Reader for Macintosh. In fact, if you don’t already have it currently on your Mac—you should get it on general principles. Make a Kindle Book: Legend Maker is geared to auto-matically create an ePub file. The Kindle files are optional; but—what the heck—you might as well generate them. It’s not like it costs extra. If you want Kindle files generated, check this box. In the upper right corner you will see a question mark. That does not mean we were at a loss for something to put there. It means you can get help by clicking on it. One more thing... You may have noticed the Language book information. This won't translate your book into the language selected (sorry). But it will tell the eReader the lan-guage of your book's contents, which can be useful for pulling up the correct dictionary, etc.
!24
Legend Maker
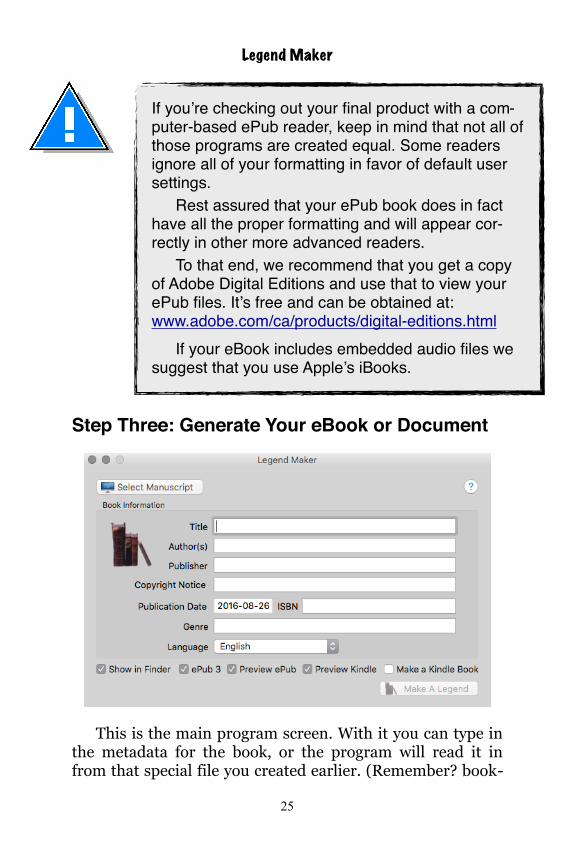
Step Three: Generate Your eBook or Document
This is the main program screen. With it you can type in the metadata for the book, or the program will read it in from that special file you created earlier. (Remember? book-
!25
If you’re checking out your final product with a com-puter-based ePub reader, keep in mind that not all of those programs are created equal. Some readers ignore all of your formatting in favor of default user settings.
Rest assured that your ePub book does in fact have all the proper formatting and will appear cor-rectly in other more advanced readers.
To that end, we recommend that you get a copy of Adobe Digital Editions and use that to view your ePub files. It’s free and can be obtained at: www.adobe.com/ca/products/digital-editions.html
If your eBook includes embedded audio files we suggest that you use Apple’s iBooks.

ZappTekinfo.txt?) Legend Maker will default to today’s date for the publication date, but you can type in any date you want. When you’re ready to go, click on Select Manuscript. If you followed the priceless directions given in the “Pre-paring Your Manuscript” section above, your Manuscript Folder will now look like something like this:
Any and all pictures, plus the body of the book, must be in the same folder. The bookinfo.txt file, as mentioned above, is the metadata for the book. If this is present, the program will read it in and fill-out the first user screen. The folder must contain, at a minimum, a picture of the book’s cover. Whatever additional pictures you want to use are up to you.
!26
REMEMBER: You can have as many pictures as you want, but they all must be tagged in the man-uscript, and saved as .png or .jpg files in the same folder with everything else. That’s where Legend Maker will look for them when it sees your “image:” tags.

Legend Maker So, okay, you select the manuscript. In this case it is called My e.Book.rtf. The main screen of Legend Maker will now look like this:
If you’re satisfied with what you see, click on the Make a Legend button in the lower right corner, and the program will go to work, like this:
!27

ZappTekLiterally, within a few seconds, the manuscript folder will have two new files. If you look into that folder, you’ll see them. In this case, one is called My e.Book.ePub, and the other is My e.Book.mobi
There are your ePub and mobi files, all ready to go. No- tice that if you put an ISBN number into Legend Maker, it will use that number to name those files. If you don’t have an ISBN it will use the name of the rtf file.
At this point, you can close Legend Maker and upload your ebook to your retailer or send your document to whom- ever, or do another book.
It’s like magic, huh?
!28

Legend Maker
Verifying Your ePub FileIf you are at all concerned with the validity of your ePub
file (or even if you’re not, and you just want to be thorough), here’s a quick and easy way of checking it out.
Fire-up Legend Maker and look at the top bar of your screen. You will see an option called “Help.” Pull down on that, and you will see an option called “Visit the <idpf> ePub Validator.” Click on that, and it will take you to a special website operated by the International Digital Publishing Fo-rum. The Validator will only accept ePub files that are 10 MB or less!!
Follow the directions for uploading your file, click on the “Validate” button and, in a few seconds, it will give you a complete report on the validity of your file.
It’s really worth the minute or two it takes to access this service.
!29
ZappTek
About ZappTek
ZappTek has been developing applications for the iPod since 2002. Beginning with tools to bring calendar and note information into the Contact entries of the original iPod (EntourageEvents and EntourageNotes, the precursors to iPDA), ZappTek now provides a suite of applications to meet all of your iPod and iPhone needs. These include iPresent It for giving presentations with your iPod, and iSpeak It to convert documents into MP3/AAC audio tracks.
With the advent of the iPhone and App Store, ZappTek introduced Legends, the first line of original fiction books available for the iPhone.
Legends includes over 50 titles from such authors as Michael Stackpole, Robert Vardeman, Fred Saberhagen, Aaron Allston, Dana Stabenow and David Farland. ZappTek also distributes iPhone books for Fireship Press and the EngLits line of English literature educational guides.
ZappTek was founded by Michael Zapp in 2002 and is based in Winnipeg, Canada.
!30
Legend Maker
Appendix A
A Sample File
Here is a printout of a file that is all ready to go into Leg-end Maker. You will also find it as a sample file, that came in the practice folder, with your Legend Maker software. All of the tags discussed above are shown in this file. The footnote/endnote citation is highlighted in bold so you can see it.
————————————————————
MY GREAT NOVEL
by
Hieronymus Periwinkle
Fireship Press www.FireshipPress.com
!31

ZappTek
#######
My Great Novel - Copyright © 2010 by Hi-eronymus Periwinkle
All rights reserved. No part of this book may be used or reproduced by any means without the written permission of the publisher ex-cept in the case of brief quotation embodied in critical articles and reviews.
ISBN-13: 978-1-934757-xx-x
BISAC Subject Headings: FIC014000 FICTION / Historical FIC032000 FICTION / War & Military
!32
Legend MakerAddress all correspondence to:
Fireship Press, LLC P.O. Box 68412
Tucson, AZ 85737 Or visit our website at: www.FireshipPress.com
1.0e #######
To Admiral Lorem Ipsum of the Vulputate Navy bookmark:Chapter One
CHAPTER ONE
Lorem ipsum dolor sit amet, consetetur sadipscing elitr, sed diam nonumy eirmod tempor invidunt ut labore et dolore magna
!33

ZappTekaliquyam erat, sed diam voluptua. At vero eos et accusam et justo duo dolores et ea re-bum. Stet clita kasd gubergren, no sea taki-mata sanctus est Lorem ipsum dolor sit amet. Lorem ipsum dolor sit amet, consete-tur sadipscing elitr, sed diam nonumy eir-mod tempor invidunt ut labore et dolore m a g n a a l i q u y a m e r a t , s e d d i a m voluptua.<<Letter from Douglas to P. Durell, quoted in N.A.M. Rodger, The Wooden World, pp. 56-57.>> At vero eos et accusam et justo duo dolores et ea rebum. Stet clita kasd gubergren, no sea takimata sanctus est Lorem ipsum dolor sit amet. Lorem ipsum dolor sit amet, consetetur sadipscing elitr, sed diam nonumy eirmod tempor invidunt ut labore et dolore magna aliquyam erat, sed diam voluptua. At vero eos et accusam et justo duo dolores et ea re-bum. Stet clita kasd gubergren, no sea taki-mata sanctus est Lorem ipsum dolor sit amet.
1 2 34 5 6
!34

Legend Maker
Nam liber tempor cum soluta nobis eleifend option congue nihil imperdiet dom-ing id quod mazim placerat facer possim as-sum. Lorem ipsum dolor sit amet, con-sectetuer adipiscing elit, sed diam nonummy nibh euismod tincidunt ut laoreet dolore magna aliquam erat volutpat. Ut wisi enim ad minim veniam, quis nostrud exerci tation ullamcorper suscipit lobortis nisl ut aliquip ex ea commodo consequat. bookmark:endnotes bookmark:About the Author
ABOUT THE AUTHOR
image:authorpic.png
#######
7 8 910 11 1213 14 1516 17 1819 20 2122 23 24
!35
ZappTek
Hieronymus Periwinkle was born Hi-eronymus (or Jeroen, respectively the Latin and Middle Dutch form of the name "Jerome") van Aken (meaning "from Aachen"). He signed a number of his paint-ings as Bosch (pronounced Boss in Middle Dutch). The name derives from his birth-place, 's-Hertogenbosch, which is commonly called "Den Bosch". Little is known of Periwinkle’s life or training. He left behind no letters or diaries, and what has been identified has been taken from brief references to him in the munici-pal records of 's-Hertogenbosch, and in the account books of the local order of the Brotherhood of Our Lady. Nothing is known of his personality or his thoughts on the meaning of his art. Bosch’s date of birth has not been determined with certainty. It is estimated at c. 1450 on the basis of a hand drawn portrait (which may be a self-portrait) made shortly before his death in 1516. The drawing shows the artist at an advanced age, probably in his late six-ties.
!36

Legend Makerbookmark:Other Related Books
If You Enjoyed This Book, You’ll Love Everything
That Has Ever Been Printed, Or Ever Will Be Printed,
by
FIRESHIP PRESS www.FireshipPress.com
All Fireship Press books are available direct-ly through our website, amazon.com, via leading bookstores from coast-to-coast, and from all major wholesalers in the U.S., Canada, the UK, and Europe
!37