Embed Size (px)
Citation preview

Legal Disclaimer
Warning: All the information presented in The Bigger Arms Blueprint is for educational and resource
purposes only. It is not a substitute for or in addition to any advice given to you by your physician or
health care provider.
Consult your physician before making any changes to your lifestyle, diet, or exercise habits. You are
solely responsible for the way information in The Bigger Arms Blueprint is perceived and utilized and so,
you do so at your own risk.
In no way will Alain Gonzalez, Human Evolution LLC, or any persons associated with The Bigger Arms
Blueprint be held responsible for any injuries or problems that may occur due to the use of this book or
the advice contained within.
Personal Disclaimer
We are not doctors, nor do we possess a degree in nutrition. The advice we give is based on years of
practical application, dealing with the needs of our own health and physiques as well as the needs of
others. Any recommendations we may make to you regarding diet, including supplements and herbal or
nutritional treatments must be discussed between you and your doctor/s.
Muscle-Building Disclaimer
Required Legal Disclaimer: Due to recent laws from the FTC, it is required that all companies identify
what a “typical” result is. The truth is that most people never do anything when it comes to trying
building muscle. They might buy a million products, including this one, but never do anything with the
information they have in hand. The testimonials that you saw were of people who took action, followed
a healthy lifestyle, exercised, and ate a balanced nutritional diet. If you want results like them, you
should do this too.

Copyright Notice
Published by: Human Evolution LLC
Copyright © 2016 All material in this guide is, unless otherwise stated, the property of Alain Gonzalez
and Human Evolution LLC. Copyright and other intellectual property laws protect these materials. Reproduction or retransmission of the materials, in whole or in part, in any manner, without the prior
written consent of the copyright holder, is a violation of copyright law.

Introduction Building bigger arms is probably the most common goal of the average gym goer—next to washboard
abs, of course. Ask anyone—male or female—to show you their muscles, and 10 times out of 10, they’re
going to flex their biceps. And let’s face it, we all dream of someday putting on our own gun show.
For some people, that gun show is a long ways away; for most, however, that show will be less than
spectacular. Not because you’ve been doomed with poor genetics—although that may play a role—but
because you’re operating on hope; hope that the training practices that got you your initial results will,
eventually, produce those same muscle gains again.
Let me ask you a question, though. How much have your arms grown in the last 3-6 months?
If you’re finding it hard to answer that question because the number is practically insignificant, then I
implore you to read every single word of this book.
Do that, and I can almost guarantee that you’ll see more progress in the next 28 days than you have in
the last 6 months. Unless, of course, you’ve recently made some serious arm gains—in that case, you
probably have no business reading this book.
Unfortunately for most of us, however, sleeve huggin’ guns don’t come that easily. Especially not after
that initial growth spurt we experienced in the beginning of our bodybuilding journey. But fear not, my
friend, as I am going to bring the noise—and by “noise” I mean game-changing information that’ll allow
you to pack slabs of muscle onto your scrawny arms in the shortest time possible.
Just imagine that in a few short weeks, your shirt sleeves will become tighter around your arms; random
women will be asking to touch your biceps; and your friends and family will be amazed by how much
bigger you look.
Have you ever seen a dude with arms that practically rip through his shirt sleeves and think, “damn, that
guy is jacked!”?
Well in just 28 days, you’ll be one giant leap closer to getting that same reaction from your peers.
This guide is going to help you break through that arm growth plateau, in as little as one month, with a
few unconventional methods that you haven’t seen elsewhere.
These methods—or as I’ll refer to them, growth factors—will be the difference between whether it
takes you 4 months to see any changes in your arm development, or 4 weeks. And yes, I am fully aware
of the hyperbole in that sentence, but the fact remains: you can do it the long and hard way, or you can
do it the fast not so long and easy hard way.
There is, however, one caveat. That being, for the next 28 days, you’ve got to forget about increasing
your bench press, developing bigger traps, or improving your squat. If you’re going to take full
advantage of the mechanisms by which this program works (more on that later), then your sole purpose,
for the next 4 weeks, must be to build bigger arms.
The way we are going to achieve rapid arm growth—and the only way it’s even possible to improve a
specific muscle-group in such a short period of time—is through the one-body-part-at-a-time approach;
otherwise known as specialization training.

What is specialization training, you ask? Great question. In the next chapter, we’ll go over exactly what
specialization training is, how it works, who it’s for, and why top level bodybuilders utilize it regularly
when they need to improve specific muscle-groups.
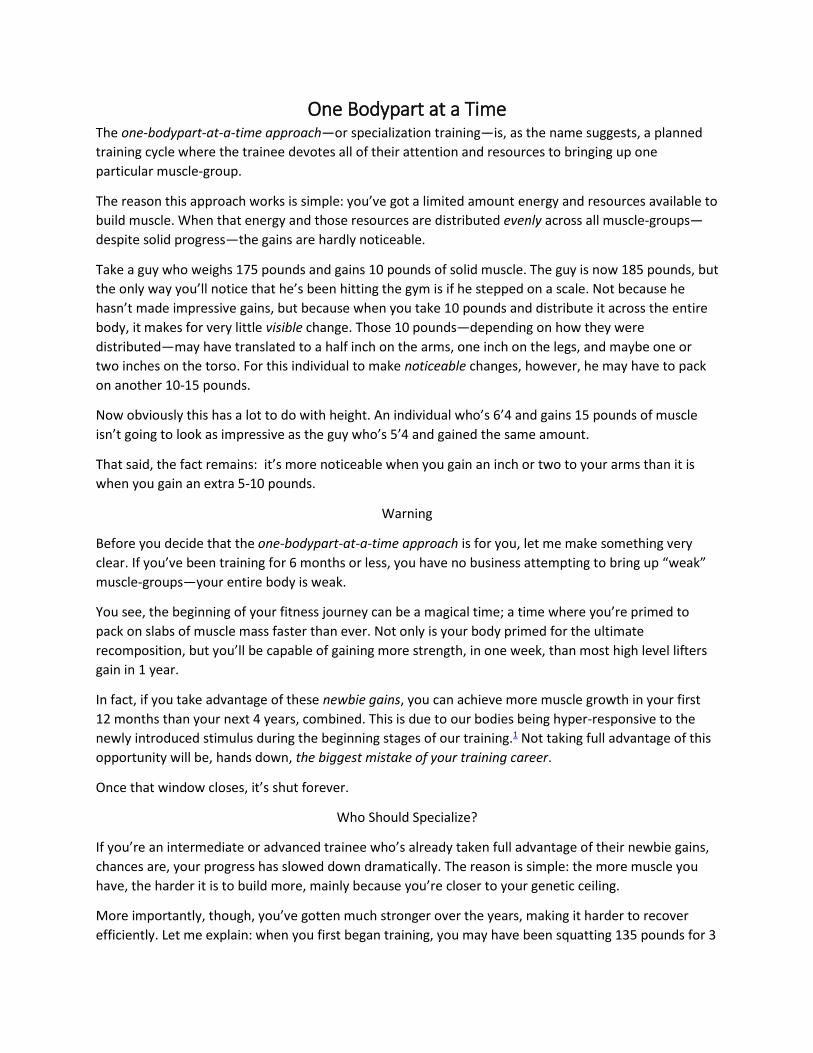
One Bodypart at a Time The one-bodypart-at-a-time approach—or specialization training—is, as the name suggests, a planned
training cycle where the trainee devotes all of their attention and resources to bringing up one
particular muscle-group.
The reason this approach works is simple: you’ve got a limited amount energy and resources available to
build muscle. When that energy and those resources are distributed evenly across all muscle-groups—
despite solid progress—the gains are hardly noticeable.
Take a guy who weighs 175 pounds and gains 10 pounds of solid muscle. The guy is now 185 pounds, but
the only way you’ll notice that he’s been hitting the gym is if he stepped on a scale. Not because he
hasn’t made impressive gains, but because when you take 10 pounds and distribute it across the entire
body, it makes for very little visible change. Those 10 pounds—depending on how they were
distributed—may have translated to a half inch on the arms, one inch on the legs, and maybe one or
two inches on the torso. For this individual to make noticeable changes, however, he may have to pack
on another 10-15 pounds.
Now obviously this has a lot to do with height. An individual who’s 6’4 and gains 15 pounds of muscle
isn’t going to look as impressive as the guy who’s 5’4 and gained the same amount.
That said, the fact remains: it’s more noticeable when you gain an inch or two to your arms than it is
when you gain an extra 5-10 pounds.
Warning
Before you decide that the one-bodypart-at-a-time approach is for you, let me make something very
clear. If you’ve been training for 6 months or less, you have no business attempting to bring up “weak”
muscle-groups—your entire body is weak.
You see, the beginning of your fitness journey can be a magical time; a time where you’re primed to
pack on slabs of muscle mass faster than ever. Not only is your body primed for the ultimate
recomposition, but you’ll be capable of gaining more strength, in one week, than most high level lifters
gain in 1 year.
In fact, if you take advantage of these newbie gains, you can achieve more muscle growth in your first
12 months than your next 4 years, combined. This is due to our bodies being hyper-responsive to the
newly introduced stimulus during the beginning stages of our training.1 Not taking full advantage of this
opportunity will be, hands down, the biggest mistake of your training career.
Once that window closes, it’s shut forever.
Who Should Specialize?
If you’re an intermediate or advanced trainee who’s already taken full advantage of their newbie gains,
chances are, your progress has slowed down dramatically. The reason is simple: the more muscle you
have, the harder it is to build more, mainly because you’re closer to your genetic ceiling.
More importantly, though, you’ve gotten much stronger over the years, making it harder to recover
efficiently. Let me explain: when you first began training, you may have been squatting 135 pounds for 3

sets of 8—impressive for a novice lifter, but not very taxing on the nervous system. Some years later,
however, you’re squatting 405 pounds for the same 8 reps—a much more strenuous load.
To put it simply: the longer you train—and the stronger you get—the more difficult it becomes to
recover from training for full-body growth.
Not to mention, because our already-developed body can only gain a fraction of the muscle that we
once did—and it’s distributed among the entire body—the results are even less noticeable. Look at it
this way: would you rather distribute the newly added muscle throughout your entire body, or direct it
all to your lagging biceps and triceps?
Bottom line: if you’ve been training for 1 year or more and your arms seem to be lagging behind—or
you’d just rather focus on further arm growth—then specialization training is for you.
Specialization Training
The main—and most important—benefit of specialization training is visibility. If your goal is just to get
big and strong, then you probably have no business following a specialized arm training program. If your
goal, however, is symmetry and aesthetics—because you have a certain look you’re aiming for—then
specialized training is needed.
The one-bodypart-at-a-time approach is, by far, the fastest and most effective method for sculpting your
physique to your liking. And if your goals are strictly cosmetic, I believe in single-focus cycles of training
for a short period of time. Not only is it the fastest way to make noticeable changes in your physique,
but it’s the closest you’ll get to carving out your perfect body.
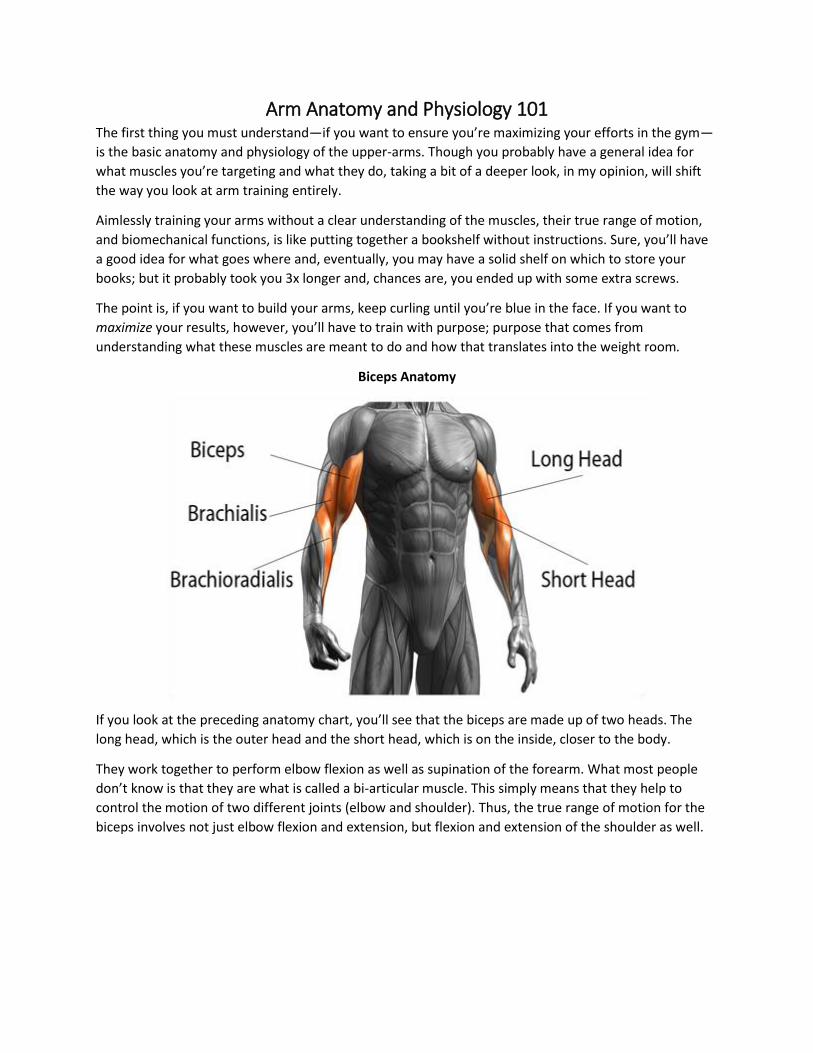
Arm Anatomy and Physiology 101 The first thing you must understand—if you want to ensure you’re maximizing your efforts in the gym—
is the basic anatomy and physiology of the upper-arms. Though you probably have a general idea for
what muscles you’re targeting and what they do, taking a bit of a deeper look, in my opinion, will shift
the way you look at arm training entirely.
Aimlessly training your arms without a clear understanding of the muscles, their true range of motion,
and biomechanical functions, is like putting together a bookshelf without instructions. Sure, you’ll have
a good idea for what goes where and, eventually, you may have a solid shelf on which to store your
books; but it probably took you 3x longer and, chances are, you ended up with some extra screws.
The point is, if you want to build your arms, keep curling until you’re blue in the face. If you want to
maximize your results, however, you’ll have to train with purpose; purpose that comes from
understanding what these muscles are meant to do and how that translates into the weight room.
Biceps Anatomy
If you look at the preceding anatomy chart, you’ll see that the biceps are made up of two heads. The
long head, which is the outer head and the short head, which is on the inside, closer to the body.
They work together to perform elbow flexion as well as supination of the forearm. What most people
don’t know is that they are what is called a bi-articular muscle. This simply means that they help to
control the motion of two different joints (elbow and shoulder). Thus, the true range of motion for the
biceps involves not just elbow flexion and extension, but flexion and extension of the shoulder as well.

There is another muscle involved that not only adds to the cosmetics of your arms, but aids the biceps in
flexion. It’s primary function, however, is to flex the forearm muscles at the elbow. This is the brachialis
and it is responsible for biceps thickness.
Although the brachialis is involved any time we perform a curling motion, because it’s primary function
is the flex the forearms, it’s emphasized when using a neutral or pronated grip.
Now that you have a basic understanding of the anatomy and physiology of the biceps, let’s get into the
different planes of motion and how they distribute force to the biceps and brachialis.
Supinated Grip: As we mentioned in the anatomy section, the main function of the biceps are elbow
flexion and supination.
Focus: Biceps Brachii – Short + Long Head
Neutral Grip: Due to the grip, the forearm is a bit more engaged. The brachialis is more targeted when
elbow flexion is performed while the forearm is activated.
Focus: Brachialis + Long Head
Pronated Grip: With this grip, the forearms are even more engaged and thus targeting the brachialis to
a larger degree when performing elbow flexion.
Focus: Brachialis + Brachioradialis
Elbows In Front of Torso: The long head is not stretched in this position. This allows the short head to
bare most of the load.

Focus: Short Head
Elbows Behind the Torso: This position allows for a greater stretch of the long head.
Focus: Long Head
Overhead (Shoulders Flexed): The biceps are fully shortened when (and only when) the shoulders are
flexed. This variation allows for truly shortened biceps brachii.
Focus: Biceps Brachii – Short + Long Head
This is not to say that in order to build bigger biceps we must train them through all of these planes of
motion. In fact, most people can expect to maximize their biceps growth by limiting their training to just
2 or 3 of these movements. The point, however, is to give you a better understanding of what’s actually
happening with each type of movement, allowing you to make better decisions in the future as to what
exercises you’ll want to include in your program.
Triceps Anatomy
Triceps, believe it or not, make up around 2/3 of your upper arm mass. That said, neglecting this
important muscle group is ludicrous and flat-out stupid if you’re trying to build big arms—especially
since it’s made up of three individual heads; hence the “tri” in the name.
You have the long head, lateral head, and medial head. The long head is typically the one most trainees
struggle to develop, mainly because most programs don’t prescribe an exercise that emphasizes this
head a great deal. Not to say that this head can be isolated—it can’t—but similar to the biceps, certain
planes of motion can shift the focus from one head to the other.
Not only is the long head of your triceps the largest of the three, but it’s the only triceps head connected
from your shoulder, all the way down to your elbow. This is really important because certain exercises
where an extreme stretch is placed on the shoulder joint, and elbow joint, will hit this particular head
the best.

A perfect example would be overhead triceps extensions with a dumbbell or cable.
Next up is the lateral head which originates on the greater tubercle of the humerus. I’m so smart, right?
This sucker gets hit primarily with any type of elbow extension—mainly when done so using a pronated
grip.
Rope pushdowns where you’re starting off with a neutral grip and pronating as you push downward
would be a good example.
Last, but not least, we have the medial head. This guy originates below the radial groove and sweeps
around the back of your humerus.
This is the smaller of all three heads, but still responsible for overall arm thickness. A great exercise to
focus on this particular head of the triceps is reverse grip triceps extensions, but what I’ve found is that
it really comes into play with heavy pressing exercises.
All variations of the bench press will do the trick.
Like the long and short heads of the biceps, the individual triceps heads cannot be isolated, only
emphasized. Anytime we extend the arm, the triceps fire as a unit. That said, though, knowing where
you’re visibly weaker, and training to accommodate that, is going to allow you to get extremely specific
with your exercise selection in the future.
Getting Down to Brass Tacks
Now that you have a firm understanding of what muscles make up your target—the upper arms—and
how they function, you’ll be more mindful of not only what exercises you choose to perform, but how
you execute them. Performing the appropriate exercises—something you’ve probably already been
doing—with proper form, however, is only one small piece to a much larger puzzle.
If you want to add more size to your arms in the next 28 days than you have in the last 6 months, then
doing the right exercises, correctly, isn’t going to be enough. You see, there are certain principles—or
growth factors—that must be in place if you wish to dominate your training and take your arms to the

next level. In subsequent sections, we’re going to go over what these growth factors are and how to
implement them into the program.

Growth Factor #1
Progressive Tension Overload When it comes to building muscle—biceps or otherwise—there is one thing for certain: it’s not going to
happen unless you get progressively stronger. I don’t care how dialed in your nutrition is or how
consistently you’re hitting the weight room, if you’re not stimulating growth through new stress, you’re
not going to build muscle tissue.
You see, the main mechanism by which we build muscle is known as progressive overload2; the gradual
increase of stress placed upon the body during exercise training.
Here’s how it works: we go in the weight room and bench press 135 pounds for 3 sets of 8 reps. Our
body then adapts to that newly added stress by building new muscle tissue in order to handle the stress
again later. If we come back to the gym and perform the same 3 sets of 8 with 135 pounds, our body has
no reason to adapt and grow; however, if we manage to increase the stress by adding 5 pounds to the
bar—or squeezing out a couple more reps with the same weight—then, again, our body is forced to
adapt and grow.
In the beginning of your bodybuilding journey, adding 5-10 pounds to a lift, per session, is not
uncommon. These rapid strength gains are, partially, the reason you’re able to build so much muscle,
quickly, in the beginning. Unfortunately, all good things must to come to an end. What’s worse,
however, is that your ability to progress with small isolation lifts (i.e. biceps curls, triceps pushdowns,
etc.) comes to a halt much faster than it does for bigger compound lifts like squats and deadlifts.
Think about it: how long have you been curling the same 30 pound dumbbells? Or, more importantly,
when was the last time you saw someone strict curling the 75s?
Let me explain.
Adding 100 pounds to your bench press, over the course of a year, as a beginner, isn’t easy but it’s
certainly possible. Adding 100 pounds to your biceps curls, however, is not likely. This is true for a
couple of reasons. For starters, your chest, triceps, and shoulders, working together are far stronger
than your biceps alone. Secondly, the rate of progression would simply be too fast for anyone to
achieve, naturally.
Here’s what I mean: If you bench pressed 100 lbs at the beginning of your training career, and managed
to increase it to 200 lbs over the course of 1 year, that would make for a 100% increase in your bench. If
you, on the other hand, began with 10 pound dumbbells (20 lbs total) and ended the year using 60
pound dumbbells (120 lbs total), that would make for a 500% increase.
Make sense?
How to Progress with The Big Arm Blueprint
Progression on the program should be linear. This means that every week, when you perform the same
workout of its kind, you’ll aim to get better by (1) adding weight to the bar or (2) squeezing out a few
more reps than you did previously.

The way you’ll progress with heavy compound exercises will differ from the progression technique you’ll
use for isolation exercises—for obvious reasons.
Progressing with Compound Lifts
For your heavy compound lifts, the goal is simply to add 5 pounds per session.
For example, if day 1 prescribes a weighted chin up for 3 sets of 5 reps, and you’re able to pull 95
pounds for the prescribed volume, then next time you perform the same workout, you’ll aim to pull 100
pounds, and so on.
Example: Progression with Compound Lifts
Week 1 Week 2
Weighted Chin Ups Weighted Chin Ups
95 lbs. x 5 95 lbs. x 5 95 lbs. x 5
100 lbs. x 5 100 lbs. x 5 100 lbs. x 5
Total Workload: 1,425 lbs. Total Workload: 1,500 lbs.
Progressing with Small Lifts
The smaller lifts will prescribe not a rep number, but a rep range. For example, on a specific day, biceps
curls may call for 3 sets of 8-12 reps. In this case, choose a weight you can perform for the prescribed
number of sets, for 8 reps. Once you are able to complete every set for the minimum prescribed reps
(8), aim to hit 10 reps—with the same weight—the next time around.
Once you are able to complete every set for 10 reps, use the same weight the next time and aim for 12.
Once you are able to complete every set for the maximum prescribed reps, increase the weight by 2.5 -
5 lbs.
Perform 3 sets for 8 reps using the new, heavier weight, and repeat.
Example: Progression with Isolation Lifts
Week 1 Week 2 Week 3
Barbell Curls Barbell Curls Barbell Curls
70 lbs. x 8 70 lbs. x 8 70 lbs. x 8
70 lbs. x 10 70 lbs. x 10 70 lbs. x 9
70 lbs. x 12 70 lbs. x 12 70 lbs. x 10
Total Workload: 1,680 lbs. Total Workload: 2,030 lbs. Total Workload: 2,380 lbs.
If you want to get bigger, you’ve got to get better, period.
Though this may be the least sexy of the growth factors, it’s the foundation from which they all stem.
Without progressive overload in place, none of the following principles will matter at all. I’d also

mention that, if you ignored the rest of the growth factors and focused only on progressive overload,
you’d still make significant gains.

Growth Factor #2
Strengthening The Weakest Link There’s a reason it’s tough to squat 405 pounds during a powerlifting meet, yet any Joe Schmo at your
local health club makes it look like light work. No, it’s not because the average gym goer is massively
stronger than guys who train specifically for strength; it’s because while the powerlifter is forced to
squat all the way down to parallel—or below—the meathead is squatting down only a quarter of the
way.
The reason partial reps make it easier to load up the bar is simple: First—and more obvious—with a
partial repetition, the bar travels through a shorter range of motion. Second—and less commonly
discussed—you’re training the muscle from its strongest position.
Take a look at the following illustration:
It’s going to be much easier to take a 50 pound dumbbell from 100 degrees to 130 than it would be to
take the same weight up from 0 degrees—that’s pretty obvious though, right?
The point I am trying to make, however, has little to do with training a muscle through a full range of
motion—although that is what we’re, technically, discussing here. But rather, it has to do with
strengthening the muscle from its weakest position—the point where the target muscle is fully
lengthened.
To illustrate the point, take a look at the previous image: it’s going to be much easier to take a 50 pound
dumbbell from 50 to 100 degrees than it would to take the same weight from 0 to 50—because your
biceps are at their weakest point at 0 degrees.
The benefits of training the arms through a full range of motion are twofold: (1) training a muscle
through a full range activates muscles along their entire length and (2) stretching a muscle under tension
is a strong stimulus for muscle growth; creating a longer and thicker muscle.
Now that we understand the importance of training a muscle from its weakest position, let’s talk about
how you can ensure you’re, in fact, at the weakest point of the lift.
The simple answer is this: a muscle is fully lengthened—or in its weakest position—when the antagonist
muscle is flexed.

Biceps
Training the biceps through a full range of motion is done is by fully contracting (flexing) your biceps at
the peak of the concentric movement, and then flexing its antagonistic muscle—the triceps—at the end
of the eccentric movement. This will allow you to train the biceps at their weakest point and ensure
you’re getting a nice stretch before initiating the lift again.
Triceps
The trick to training the triceps is very similar—if not practically identical—to training the biceps. Use
the same idea of fully lengthening and fully shortening the muscle. The triceps are fully shortened when
they are flexed at the peak of the concentric movement and fully lengthened when the forearm touches
the biceps at the end of the eccentric movement. To ensure you’re initiating the lift from the absolute
weakest point, flex the biceps before starting the rep.
Leave Your Ego at the Door

I must warn you, as much as you want to lift heavier in the gym, this strategy will require you to leave
your ego at the door. When I began to implement this technique, I was forced to use less than half of
the weight I was used to lifting.
Though quite simple, this small tweak to your training will make a huge impact. Ignore it, and you’ll be
leaving a ton of growth on the table. Implement it, however, and your arms will grow like never before.

Growth Factor #3
Negative Reps for Positive Results There is one fundamental part of the repetition that is just as important—if not more so—than the
lifting portion itself. For some reason, however, it’s often times minimized, or worse, completely
ignored; diluting the effect of every exercise, rep by rep.
Before we jump in and discuss the, potentially, most important part of every repetition, let’s first layout
the anatomy of a rep.
The Anatomy of a Rep
There are three components to a repetition in each exercise:
Concentric: The concentric contraction refers to the portion of the lift where we’re pushing (or pulling)
against resistance; shortening the muscle under load.
During a biceps curl, for example, the concentric portion of the lift occurs when you’re curling the
weight up. In a triceps pushdown, it refers to the portion of the lift where you’re pushing the weight
down against resistance.
Eccentric: The eccentric contraction—or negative—refers to the portion of the lift where we’re lowering
the weight; lengthening the muscle under load.
During a biceps curl, the negative refers to the part of the lift where you’re lowering the weight back
down. In a triceps pushdown, it refers to the portion of the lift where you’re bringing the weight back up
to the starting point.
Isometric: The isometric contraction happens at both the starting and ending point of a lift when the
weight is motionless
Sticking to the biceps curl example, the isometric contraction occurs at the top of the curl when your
biceps are flexed, and at the bottom of the lift when your arm is fully extended. For the triceps
pushdown, the isometric takes place at the end of the lift when the triceps are fully flexed, and at the
beginning of the exercise when the triceps are fully lengthened.
In a race to becoming the most critical important part of a rep, the isometric contraction is far behind
while the eccentric and concentric battle it out for 1st place.
I won’t go as far as to say that one is, in fact, more important than the other, but I will say this: if you’re
not taking advantage of the negative, you’re not going to maximize muscle growth.
This isn’t to state the obvious: we should control the weight through the entire rep; that should go
without saying.
I’d like to introduce something less intuitive: negative training.
A Case for Heavy Negatives

It’s no secret that we are much stronger on the eccentric portion of the lift than we are on the
concentric—we can handle more weight on the way down than we can actually lift up. The reason is
simple: we're going with the resistance (and not against it), so it requires less energy.
Now let’s talk about how, in practice, negative training could make for bigger gains. Say, for example,
you’re stuck bench pressing 225 pounds for 5 reps—for one reason or another, you can’t squeeze out
the 6th. Sure, maybe you can’t lift the weight up for another repetition, but could you lower it back
down? Absolutely. So who’s making greater gains—the guy who stops at 5 reps, or the one who has his
buddy assisting with every rep after the 5th and then letting him handle the negative on his own? I think
the answer is obvious.
Here’s the problem, though: this style of training isn’t practical because it requires not just a consistent
gym partner, but a competent one. That said, however, I have a solution.
Enter Cheat Reps
Using body English or momentum to aid with a lift is, in most bodybuilding circles, frowned upon; and
with good reason. Often referred to as Ego Lifting, cheat reps have been demonized by form Nazis all
across the interwebz who claim they’re a one way ticket to Snap City. I disagree.
Here’s the thing: not all cheat reps are created equal. For example, you can’t compare the meathead
who’s bench pressing with his ass 6 inches off the bench, with the advanced lifter who’s swaying slightly
to get the barbell back up to the starting position on a biceps curl. One is extremely dangerous and can
cause serious injury, while the other is purposeful and far from threatening.
Take a look at the following images: Example A. depicts a potentially dangerous cheat curl (no offence to
Arnold); Example B. demonstrates the use of purposeful—and non-hazardous—body English.
Example A.
Example B.

I think it’s safe to say that not all cheat reps are created equal. That said, properly—and safely—
executed cheap reps can very well make the biggest impact on your arm growth.
In the Growth Factor #1: Progressive Tension Overload section, we discussed the importance of
increasing workload or stress in order to stimulate new growth. We also talked about why, with isolation
exercises, it’s not as simple as adding more weight to the bar. So we need to handle more load, but
we’re at a point where we just can’t add any more weight to the bar; what do we do? We cheat!
Not only is using momentum going to increase the workload by aiding with additional reps, but despite
how little work the target muscle is doing on the concentric, it’s still doing all of the work on the
negative.
A Case for Cheating
Cheat reps don’t have to be something you implement at the end of an exercise in order to get a bit
more out of the set, however. In fact, I’d argue that, with some exercises, cheating throughout the
entire set is going to put massive amounts of size on your arms.
Let’s take a barbell curl for example. Say, for the sake of argument, your max barbell curl with strict
form is 135 pounds—if you used a bit of body English, you could squeeze out 5 reps, safely. Although
you wouldn’t be maximizing the amount of stress placed on the biceps during the concentric portion of
the lift, you’re still handling an insane amount of weight during the negative; more weight than you
could ever dream of with a strict curl.
This is not to say that cheating is better; that we should use momentum for all of our lifts in order to
emphasize the negative. It’s simply a useful tool that, if implemented correctly, can take your arm
development to another level.

Growth Factor #4
Undulating Rep Ranges There are plenty of theories out there about how to properly train arms. Some say you’ve got to use
light weight and go for high-reps to feel the burn, while others will tell you that training your arms
directly is a waste of time, and instead, you should be focusing on heavy compound lifts.
Truth is, the best way to build bigger arms requires a combination of high and low reps, and heavy and
light weight.
In fact, a 2002 study published in the Journal of Strength and Conditioning Research, where they
compared linear periodization and daily undulating periodization, concluded that training in a
combination of rep ranges throughout the week was more effective in eliciting strength gains.3
Now before you claim that you’re not interested in strength, and rather, you want to focus on size—
shall I remind you of Growth Factor #1: Progressive Tension Overload?
It’s easy for me to say that training in different rep ranges is superior to focusing on high-reps or training
strictly with heavy weights--especially when I include a scientific study that validates the claim—but it’s
important that we discuss the mechanisms for why varying rep ranges is so effective.
3 Mechanisms of Muscle Growth
There are three primary mechanisms that drive muscle growth: mechanical tension, muscle damage,
and to a lesser degree, metabolic stress.4 There are two main variables that determine which one of
these responses we elicit: for one, the amount of load we use, and second, how long the muscle is
placed under tension.
Mechanical tension is—as the name implies—a mechanically induced tension produced both by force
generation and stretch. This stress is typically formed when lifting a heavier load for a sufficient amount
of time. Mechanical stress has been shown to produce the greatest increases in strength and is a
primary driver of muscle growth.5
Muscle damage is a localized damage to muscle tissue which generates a hypertrophic response. The
tension necessary to produce this result is typically found in a moderate rep range—where the load is
still relatively heavy, but due to the higher number of reps, the muscle is placed under tension for a
prolonged period of time.
Metabolic stress has to do with a metabolite build up that is a byproduct of training with a lighter load
using higher repetitions. When you’re curling those 20 pound dumbbells to the point your biceps feel
like they’ve caught fire, that’s metabolic stress.
Rep Range Intensity Mechanical Tension Muscle Damage Metabolic Stress
1-6 Heavy xxxxx xxx
6-12 Moderate xx xxxxx xx
12-15 Light xx xxxxx

The previous chart depicts the relationship between volume and intensity, and the stress it produces.
It’s important to understand that these stresses aren’t confined to specific rep ranges or intensities—
instead, it’s a continuum. For example, an individual who is using a relatively heavy weight and
performing 7 repetitions is producing a good deal of mechanical tension and a great deal of muscle
damage. On the other hand, the person using a lighter weight and lifting it for 15 reps may not get any
mechanical tension, but, the intensity is still sufficient enough to cause some muscle damage while
eliciting metabolic stress.
The Cycle of Growth
Now that we see what each rep range can provide, let’s talk a little about how they can work together to
aid in hypertrophy.
Increases in the lactate threshold—caused by metabolic stress (15-20)—will allow the trainee to work
with a heavier weight for a longer period of time. Increases in strength (1-5) will spill over by allowing
the trainee to work with a heavier load when training for higher reps. Creating muscle damage (6-12)
will induce adaptive responses that will aid in both mechanical stress training and metabolic stress
training.
It’s not hard to see that, if you undulate these rep ranges effectively, your training becomes a vicious
cycle of growth. The question then becomes: how exactly should I implement the various rep ranges
into my training on a weekly basis?
This brings me to my next point: training frequency.

Growth Factor #5
Training Frequency When we talk about training frequency in the context of this program, we’re referring to the number of
times we’re training our arms per week.
Why Is Frequency Important?
Here’s what we know: When we equate for volume, training 3 days per week produces greater muscle
growth than training once per week.6 That’s enough to solidify the importance of frequency when the
goal is to maximize muscle hypertrophy.
I’d be willing to bet that these results were due to two primary mechanisms:
The Repeated Bout Effect: the adaptation whereby a single bout of eccentric exercise protects
against muscle damage from subsequent eccentric bouts.
It’s been shown that, when training a muscle-group more frequently (to a degree), we increase our
ability to recover and adapt.7 That said, the notion that training a muscle-group more than once per
week would impede recovery is, to put it blatantly, hogwash. To the contrary, training your arms 2-3
times per week would actually increase your ability to recover between bouts. The more we can train a
specific muscle-group in a week, while being able to recover from the stress, the more time we will
spend synthesizing protein for that particular muscle. Which bring me to mechanism number two:
muscle protein synthesis.
Muscle Protein Synthesis: the driving force behind adaptive responses to exercise and represents
a widely adopted proxy for gauging chronic efficacy of acute interventions, (i.e.
exercise/nutrition).
Studies suggest that MPS is more than doubled at about 24 hours following a workout.8 By the 36 hour
mark, however, it has dropped back to baseline. It’s not hard to see that, despite volume being equal,
the person spending more time in this anabolic state will produce greater muscle growth.
Now before you decide to start hitting your biceps 7x per week, consider this: A recent meta-analysis
concluded that frequencies of training twice per week promoted more muscle growth than once per
week, on a volume-equated basis9; however, they also added, “whether training a muscle group three
times per week is superior to a twice-per-week protocol remains to be determined.”
Now before you ditch the idea of training a muscle-group 3x per week because you’re unsure of
whether or not there is any added benefit, consider the fact that this meta-analysis only accounted for
higher frequency with volume being equal. That said, training at a higher frequency can be a great way
to accumulate volume once you’ve reached a certain threshold in your training.
For example:
An individual who trains his triceps, directly, once per week, might perform the following:
Triceps Pushdowns: 1x per week
Day 1: 4 sets x 8 reps x 80 lbs = 2,560 lbs of total volume.

The individual who trains his triceps twice per week—with equal volume—might perform the following:
Triceps Pushdowns: 2x per week
Day 1: 2 sets x 8 reps x 80 lbs = 1,280 lbs of total volume
Day 2: 2 sets x 8 reps x 80 lbs = 1,280 lbs of total volume
Total: 4 sets x 8 reps x 80 lbs = 2,560 lbs of total volume
The evidence is clear that, despite equating for volume, the individual who trained his triceps twice per
week would have achieved greater muscle gains.
What we don’t know is whether or not distributing that same volume between 3 days (instead of 2)
would have any additional benefit in terms of muscle-hypertrophy.
What we do know, however, is that if we added an additional triceps training session and increased the
total volume that way, we’d elicit greater muscle growth.
Let’s go back to the example of the individual who trained his triceps, directly, twice per week. If he
simply added one more triceps training session to his week, not only will he have more MPS uptime, but
the total volume for the week will have increased.
Triceps Pushdowns: 3x per week
Day 1: 2 sets x 8 reps x 80 lbs = 1,280 lbs of total volume
Day 2: 2 sets x 8 reps x 80 lbs = 1,280 lbs of total volume
Day 3: 2 sets x 8 reps x 80 lbs = 1,280 lbs of total volume
Total: 6 sets x 8 reps x 80 lbs = 3,840 lbs of total volume
Bottom line: when you’re trying to train your back, legs, chest, arms, and shoulders, equally, maximizing
training frequency—without inhibiting recovery—becomes unlikely. If, however, you make one body
part your main focus, it can be done easily and effectively.

Growth Factor #6
Antagonist Paired Sets The biceps and triceps both control the elbow joint—moving the forearm up or down. When the triceps
contract, the biceps relax, and the forearm moves down. When the biceps contract, the triceps relax,
and the forearm moves up. They—the biceps and triceps—are an antagonistic pair.
Antagonist Paired Sets
Antagonist Paired Sets: These are essentially just back to back exercises that target the opposing muscle
groups (i.e. biceps/triceps, hamstring/quads, etc.). The antagonist paired set—or APS—is executed by
performing one set of a given exercise, and then immediately following it up with an exercise that
targets the antagonist muscle of the first set.
For example, instead of performing your set of triceps pushdowns and then resting for your next set of
the same exercise, you would immediately follow the triceps pushdowns with a biceps curl.
Now, I’m sure you’re familiar with this type of training as it’s been highly popularized in the
bodybuilding world as “supersets”; however, there is a difference. For instance, supersets—although
performed in the same manner—typically alternate between exercises that target the same muscle-
group. APS, on the other hand, target the opposite muscle-group on the second exercise—an important
distinction.
You see, when you pair your sets with the same muscle-group, you inhibit your ability to increase
performance. Have you ever done 50 pushups on your first set and then couldn’t get more than 10 on
the second? This is due to the fatigue that sets in to the muscle from the high amount of repetitions.
When you pair the opposite muscle-groups, however, not only does it not negatively impact your
performance, it increases it.
Think about it: let’s imagine you’re pairing triceps pushdowns with dumbbell curls. When you’re
performing your pushdowns you’re using the triceps, then you follow them up with curls. When you’re
curling, you’re essentially resting the triceps while you’re working the biceps. But because you’re still
moving the triceps through their full range of motion, despite them not actively contracting against
resistance, it produces a sort of active recovery effect that can improve performance when performing
your pushdowns again. In fact, this was shown in a 2010 study published in the Journal of Strength and
Conditioning Research, where they compared paired sets to traditional sets and concluded that PS may
be more effective than TS in terms of volume load.10
Antagonist Paired Sets for Improved Performance
Because the goal with APS is not to fatigue a specific muscle, but rather, to increase performance, it’s
important that we execute them with that intention. A 2014 study on rest intervals between paired sets
concluded that more repetitions are performed when the rest period is approximately 60 seconds
between sets on opposing muscles.11 This, however, was based on isolation movements where there is
less total body fatigue. Pairing compound exercises may require longer rest periods.
Example: Triceps Pushdowns/ Dumbbell Curls (Isolation Lifts)

Triceps Pushdowns
60 Second Rest
Dumbbell Curls
60 Second Rest
Repeat
Example: Close Grip Bench Press/ Pull Ups (Compound Lifts)
CGBP
120 Second Rest
Pull Ups
120 Second Rest
Repeat
I am not suggesting that you keep a stopwatch or timer in order to ensure you’re resting enough;
however, I do recommend that you’re mindful of your rest intervals. As long as you’re resting just
enough to ensure you’re recovered and ready for your next set—without resting so long that you end up
spending your entire day at the gym, or so little that it impedes performance—you’ll be all set.

Growth Factor #7
Proper Nutrition Last, but certainly not least—in fact, I’d argue that this point should have been first—is nutrition: the
most important growth factor of them all. I don’t care how much stronger you get or how often you’re
training, if you’re not eating enough to support growth, you’ll never maximize the amount of muscle you
build.
Think of this short specialization phase as doing renovations on your home. The heavy workouts,
eccentric training, high frequency, and antagonist paired sets are all part of the demolition—we’re
tearing the house apart with these methods. Nutrition, however, would act as the tools necessary for
the repair work: putting up the new walls, painting them, installing the cabinets, and so on.
I don’t care how much damage you do, if you don’t have the tools available for repair, the job will never
get done.
For the next 28 days, your nutrition requirements are as follows:
1. Be in a slight, positive energy balance.
2. Ensure you’re getting enough protein.
Simple enough, right?
If you know what you’re maintenance calories are, add another 100-250kcal to that and you’re set—just
make sure you’re getting enough protein in there.
If you’re not sure, however, then use the formula I’ve outlined here to determine how much you’ll be
eating for the next 28 days.
Finding Your Maintenance
If you are a male with a, presumably, healthy metabolism who exercises regularly, then the number 16 is
a great place to start and will be fairly accurate for most.
Calculating your maintenance calories
Bodyweight (in lbs) x 16 = Estimated Maintenance
Example: 125 lbs x 16 = 2,000kcal
Where does this number (16) come from?
Resting Metabolic Rate: an estimate of how many calories you'd burn if you were to do nothing but rest
for 24 hours. For men, we typically use about 11 calories (10 for women) per pound of bodyweight.
Thermic Effect of Activity: the number of calories burned through physical activity. This accounts for
about 30-50% of the energy your body uses, all depending on how active you are.
Thermic Effect of Food: the amount of energy required to eat, digest, absorb, and store food. This makes
up for another 10% of the energy our bodies use.
Creating a Positive Energy Balance

For some, the estimated maintenance may actually be enough to put you in a positive energy balance.
For most, however, you’ll need to increase your intake, slightly—by 100-250kcal per day. To be safe,
because it’s only a 4 week program, I’d recommend going with the higher end of the suggested intake.
Estimated Maintenance + 250kcal = Total Calories
Example: 2,000kcal + 250kcal = 2,250 daily calories
You don’t need to be a mathematician to figure that out—so please, put the calculator away for this
one.
Now that you know exactly how many calories you’ll aim for, daily, while you’re on the program, it’s
time to figure out how many of those calories will come from protein.
Protein Intake
When you consume protein, your body breaks the protein molecules in the food down into amino acids,
and then uses them to build new muscle. If you don’t consume enough protein, however, your body
may not get enough of these amino acids, thus impairing your ability to build and repair muscle tissue.
The average sedentary person can survive with very little protein due to a survival mechanism we
inherited from our ancestors. This mechanism allows us to recycle broken down protein. So although
you will die if you don’t consume protein, you can easily survive with very little amounts.
But you’re not average and sedentary, right?
Since you’ll be lifting weights, regularly, your body will require more protein. In fact, research has shown
that athletes need to eat a high protein diet to maximize performance.12
How Much Protein?
One study suggests that 0.6-0.8g per pound of bodyweight is enough to maximize protein synthesis;
however, they note that “more protein should be consumed during periods of high frequency/intensity
training.”13 Another study found a similar conclusion, but suggested that a higher intake may be
beneficial depending on a number of factors.14
“Numerous interacting factors including energy intake, carbohydrate availability, exercise intensity,
duration and type, dietary protein quality, training history, gender, age, timing of nutrient intake and the
like make this topic extremely complex.” 14
With all of that in mind, the overall consensus among experts in the field is somewhere around 0.8-1g of
protein per pound of bodyweight.
Bodyweight (in lbs) x 0.8-1 = Protein Intake (in grams)
Example: 125 lbs x 1 = 125 grams of protein per day
125 grams of protein x 4 calories per gram = 500 calories from protein
Now that you’ve got your total calories calculated and a daily protein goal, you’re ready to make some
serious gains.

That was the simple part; the hard part is actually hitting those numbers on a daily basis. You see,
knowing how much you’ll need to eat is only half the battle; the other half is fitting it all in your
stomach.
To make your life—while you’re on this program—a bit easier, I’ll give you a few options to help ensure
you’re eating enough.
1. Track Calories/Macros: Download an app like My Fitness Pal, weigh your food out, and plug it
into the app. My Fitness Pal will auto-populate your numbers as you go, so you’ll always know
how many calories (and protein) you’ve got left for the day.
2. Meal Plans: Download my book The Lean Mass Diet and use the meal plans provided there. If
you’re in the United Kingdom, grab it here.
3. Do It In Your Head: Keep track of the total calories you consume at each meal and subtract as
you go. Once you’ve reached zero, you’ve reached your suggested calorie intake for the day.*
*If you choose to take the do-it-in-your-head approach, there are a couple of guidelines you should
follow. First, make sure that you’re getting 80-90% of your calories from whole, minimally processed
foods like grains, dairy, meat, nuts, fruits, and vegetables. Second, include a solid protein source at every
sitting (this will ensure you’re reaching your protein requirements without having to track every gram).
Now that you know exactly how many calories you need, how much protein to consume, and have a
strategy for actually hitting these numbers, it’s time for the fun stuff.
In the following section of this book, we’re going to go over the principles—that is, rest periods,
progression methods, and so on—that you’ll adhere to during the program.
The Bigger Arms Blueprint
The Rules By now you understand how to train the arms for maximum growth, why the growth factors are
effective, and how to ensure you’re eating enough to support rapid muscle gain. Now it’s time to put all
of this theory into practice.
In this section we are going to go over all of the rules you must follow if you want to maximize your
efforts with the Bigger Arms Blueprint.
1. Warming Up
The role of the warm up is simple: to prepare the body to be primed and ready for the working sets.
If you warm up just enough, you’re going to feel primed and excited, and you’re going to dominate your
working sets. If, however, you overdo it, it’s going to have a negative impact on your lifts. Any physical
activity we perform requires energy; energy that could be better used for a strenuous workout—so why
waste it by performing excessive warm ups? If you want to ensure you’re maximizing your performance,
you’ve got to make sure you’re using your energy wisely.
Warming up before an intense training session is critical, but not complicated. In the case of this
program, the warm up should fit the workout. Because we are weight training, then we must utilize a
warm up method that will prepare the body for this specific activity. For example, if you’re going to
perform a close grip bench press, then the warm up should consist of a few lighter sets of close grip
bench pressing.
2. Aim for Progression
If you want to get bigger, get better. This is not to say that you should aim to curl 135 pounds within the
(short) span of this program, but getting better from week to week is critical—as I explained in Growth
Factor #1: Progressive Tension Overload.
That said, let me quickly recap how you’ll progress with the program.
Progression with Compound Lifts
Progression with compound lifts is quite simple: if the program prescribes a close grip bench press for 3
sets of 5 reps on Workout 1, and you’re able do so with 95 pounds, then next week, during the same
workout (Workout 1), you’ll add 5 pounds to that.
For example:
Week 1 – Workout 1
Close Grip Bench Press: 95 x 5
Close Grip Bench Press: 95 x 5
Close Grip Bench Press: 95 x 5
Week 2 – Workout 1

Close Grip Bench Press: 100 x 5
Close Grip Bench Press: 100 x 5
Close Grip Bench Press: 100 x 5
Pretty straight forward, right?
Progression with Isolation Lifts
Adding 5 pounds to your dumbbell curls each week isn’t realistic, as we discussed previously. That said,
instead of trying to add weight to the lift, the goal will be to increase the volume—particularly via
additional repetitions.
If the program prescribes, for example, 3 sets of 8-12 reps on biceps curls, then choose a weight where
you can complete each set for the lower end of the reps (8 or 9). Next week, during the same workout,
aim to push the same weight for a few more reps. The only time you’ll increase the weight on small
isolation lifts is once you’re able to complete each set for the maximum amount of reps (12).
One last thing I’d like to mention about progression with isolation movements is this: if you’re
progressing in your compound lifts, but are unable to increase volume on your isolation workouts, that’s
still progress—as long as you’re not regressing.
You see, if you’re able to perform 3 sets of 8 reps on triceps extensions, right after you completed a 5x5
with 95 pounds on the close grip bench press, being able to hit those same numbers after close grip
bench pressing 100 pounds (for the same 5x5) is still an increase in performance.
Progression with Bodyweight Movements
This program will include bodyweight movements like chin ups and pullups. If you’re unable to perform
these for the prescribed volume, then substitute them with a lat-pulldown variation. A traditional grip
lat-pulldown can substitute the pullups, while an underhand grip would be a better alternative to chin
ups.
If you’re willing and able to go the pull up—or chin up—route, progression is quite simple. Use a dip belt
and gradually add weight or simply hold a dumbbell in between your feet or thighs for added resistance.
3. Rest Periods
The point of rest periods is twofold: (1) to ensure you’re primed and ready for your next set and (2) to
mitigate the amount of time you spend in the weight room. As long as you’re resting just enough to
ensure you’re recovered and ready for your next set—without resting so long that you end up spending
your entire day at the gym—you’ll be all set.
Although there isn’t an exact timeframe you should aim for, there are some basic guidelines I’d
recommend. But let me be very clear: I do not expect you to sit around with a stopwatch and time your
rest periods. Instead, pay attention to your body and use your best judgment when deciding whether or
not you’re ready for your next set.
Rest Interval Guidelines
Rep Range Rest Period
1-6 3-7 Minutes

6-12 60-90 Seconds
12-15 45-60 econds
4. Rep Tempo
Rep tempo refers to the speed at which you’re performing a repetition. As we discussed in the Growth
Factor #3: Negative Reps for Positive Results section, each rep is made up of 3 types of contractions:
concentric, isometric, and eccentric. The speed at which each of these are performed makes up the rep
tempo.
For the lifts on this program, we’ll keep a standard rep tempo. That is, ensure that you’re controlling the
weight on the negative—perhaps count 2 seconds to ensure gravity isn’t taking over—no pauses at the
top or bottom of the lift, and a fast and explosive concentric.
Your rep tempo should look something like this: 1:0:2:0
As for the concentric, lifting as fast and explosive as possible—without sacrificing control—is the goal.
Too often, people associate “explosive reps” with “sloppy form”—that’s just not the case.
Simply put, if you want to maximize each rep, lifting speed matters. Make sure you’re controlling the
weight throughout the entirety of the set—without overthinking it—and focus on getting stronger from
there.
5. Adherence
There is no physiological difference between working out on Monday and working out on Tuesday.
What matters is not what day of the week it is, but the total work done in a given period of time. On top
of that, everyone’s schedule is different, and since adherence is key, it’s less about what you should do
and more about what you can do.
The workout won’t be broken down into specific days (e.g. Monday, Wednesday, Friday), instead, it’ll be
broken down into a given number of workouts (e.g. Workout 1, Workout 2, Workout 3). So whether
you’re taking a rest day after every session or performing them all back to back—what’s really important
is that (1) you perform them in order—so Workout 2 will never be done before Workout 1 in the week—
and (2) that all of the workouts are completed within the training week.
Although it may be ideal to throw in a rest day following every workout or every other training session—
and if that’s an option, it’s what I’d recommend—doing 3 or even all 4 workouts back to back—even if
you’re feeling a little banged up—will always be better than missing a session that week. Remember, it’s
not about a specific schedule, but rather, a specific amount of work that must be performed in a given
timeframe.
Let’s Recap
To summarize, make sure you’re warming up properly—don’t overdo it, though, or you’ll end up
hindering your performance. Strive to get stronger from week to week, as it’s the only way you’ll
stimulate new growth. Rest as long as you need to in between sets—but don’t take so long that you cool
down or end up in the gym for 2 hours. Control the weight on each rep—explosive on the concentric,

nice and controlled on the eccentric. And create your training schedule based on what you’ll be able to
stick to.

The Bigger Arms Blueprint
The Workout It’s time for the fun stuff. In this section, I am going to lay out the Bigger Arms Blueprint workout routine:
a program strategically designed to put as much muscle mass on your upper-arms as possible in 28 days.
I’m not going to explain how or why the routine works—I’ve already done that. I will, however, include
some instructions to help clarify the execution of the workouts, while also answering questions you may
have.
Week 1
Workout #1 – Arms: Heavy
Exercise Sets Reps
Close Grip Bench Press 5 5
Weighted Pull Ups 5 5
Weighted Dips 4 6
Cheat Barbell Curls 4 6
Overhead Rope Extensions 2 8
Incline Dumbbell Curls 2 8
Workout #2 – Arms: Medium
Exercise Sets Reps
A1. Chin Ups* 4 8-10 B1. Dips 4 8-10
A2. Barbell Curls* 4 8-10 B2. Rope Pushdowns 4 8-10
Dumbbell Hammer Curls 2 8
V-Bar Pushdowns 2 8
*Letters denote an antagonist paired set.
For example: perform A1) for the prescribed reps; rest 1 minute; perform A2) for the prescribed reps;
rest 1 minute; and repeat until you’ve completed the exercises for 4 sets.
Workout #3 – Full-Body: Maintenance
Exercise Sets Reps
Squat 3 5
Bench Press 3 6
Bent Over Barbell Rows 3 6
Overhead Press 2 8
Lateral Raises 2 8-12
Hamstring Curls 2 8-12
Barbell Shrugs 4 8-12

The purpose of the maintenance work is exactly that, to maintain overall muscle mass. For the next few
weeks, your goal is not to increase the load, but rather, to maintain strength—this will ensure that you
hang on to your hard earned muscle tissue during this arms specialization cycle.
Workout #4 – Arms: Light
Exercise Sets Reps
Preacher Curls 3 12-15
Overhead Rope Extensions 3 12-15
Reverse EZ Bar Curls 2 15-20
Bench Dips 2 20-30
Cable Rope Curls 2 15-20
Close-Grip Pushups 2 20-30
Week 2
Workout #1
Exercise Sets Reps
Close Grip Bench Press* 5 5
Weighted Pull Ups* 5 5
Weighted Dips* 4 6
Cheat Barbell Curls* 4 6
Overhead Rope Extensions 2 8-10
Incline Dumbbell Curls 2 8-10
*Aim to increase the load by 5 pounds without sacrificing volume.
For the overhead rope extensions and incline dumbbell curls, use the same weight as last week and aim
to increase volume.
Workout #2
Exercise Sets Reps
A1. Chin Ups* 4 10-12 B1. Dips 4 10-12
A2. Barbell Curls* 4 10-12 B2. Rope Pushdowns 4 10-12
Dumbbell Hammer Curls 2 10
V-Bar Pushdowns 2 10
*Letters denote an antagonist paired set.
For example: perform A1) for the prescribed reps; rest 1 minute; perform A2) for the prescribed reps;
rest 1 minute; and repeat until you’ve completed the exercises for 4 sets.
Working weight should be the same as last week, with an emphasis on increasing total volume via
additional repetitions.

Workout #3 – Full-Body: Maintenance
Exercise Sets Reps
Deadlift 2 5
Squat 3 5
Bench Press 3 6
Bent Over Barbell Rows 3 6
Overhead Press 4 8
Hamstring Curls 2 8-12
Barbell Shrugs 4 8-12
The purpose of the maintenance work is exactly that, to maintain overall muscle mass. For the next few
weeks, your goal is not to increase the load, but rather, to maintain strength—this will ensure that you
hang on to your hard earned muscle tissue during this arms specialization cycle.
Workout #4
Exercise Sets Reps
Preacher Curls 3 12-15
Overhead Rope Extensions 3 12-15
Reverse EZ Bar Curls 2 15-20
Bench Dips 2 20-30
Cable Rope Curls 2 15-20
Close-Grip Pushups 2 20-30
Similar to Workout #2, working weight should be the same as the previous week—aim to progress
through increased volume.
Week 3
Workout #1
Exercise Sets Reps
Close Grip Bench Press* 5 5
Weighted Pull Ups* 5 5
Weighted Dips* 4 6
Cheat Barbell Curls* 4 6
Overhead Rope Extensions 2 10-12
Incline Dumbbell Curls 2 10-12
*Aim to increase load by 5 pounds without sacrificing volume.
For the overhead rope extensions and incline dumbbell curls, use the same weight as last week and aim
to increase volume.
Workout #2

Exercise Sets Reps
A1. Chin Ups* 4 12 B1. Dips 4 12
A2. Barbell Curls* 4 10-12 B2. Rope Pushdowns 4 10-12
Dumbbell Hammer Curls 2 12
V-Bar Pushdowns 2 12
*Letters denote an antagonist paired set.
For example: perform A1) for the prescribed reps; rest 1 minute; perform A2) for the prescribed reps;
rest 1 minute; and repeat until you’ve completed the exercises for 4 sets.
Working weight should be the same as last week, with an emphasis on increasing total volume via
additional repetitions.
Workout #3 – Full-Body: Maintenance
Exercise Sets Reps
Deadlift 2 5
Squat 3 5
Bench Press 3 6
Bent Over Barbell Rows 3 6
Overhead Press 4 8
Hamstring Curls 2 8-12
Barbell Shrugs 4 8-12
The purpose of the maintenance work is exactly that, to maintain overall muscle mass. For the next few
weeks, your goal is not to increase the load, but rather, to maintain strength—this will ensure that you
hang on to your hard earned muscle tissue during this arms specialization cycle.
Workout #4
Exercise Sets Reps
Preacher Curls 3 12-15
Overhead Rope Extensions 3 12-15
Reverse EZ Bar Curls 2 15-20
Bench Dips 2 20-30
Cable Rope Curls 2 15-20
Close-Grip Pushups 2 20-30
Similar to Workout #2, working weight should be the same as the previous week—aim to progress
through increased volume.
Workout Schedule Example:
Monday: Workout #1
Tuesday: Rest
Wednesday: Workout #2
Thursday: Workout #3
Friday: Workout #4
Saturday: Rest
Sunday: Rest
The aforementioned schedule is simply an example. Use it as a guidelines for creating your own personal
training schedule based on availability.
Week 4
Week 4 is where the magic happens. You see, your body deals with physical stress in 3 simple steps:
first, you provide the stimulus through exercise, next you remove the stimulus through rest and
recovery, and lastly, you adapt in order to handle the stimulus better. This adaptation is known as
supercompensation and is what allows us to gain muscle and strength.
For the last few weeks you’ve been hammering your arms into the ground—almost to a point of
(purposely) overtraining. This week we’ll pull back on the arm training and allow the adaptations to take
place.
Workout #1
Exercise Sets Reps
Squat 3 5
Bench Press 3 6
Bent Over Barbell Rows 3 6
Overhead Press 4 8
Barbell Shrugs 2 8-12
Workout #2
Exercise Sets Reps
Deadlift 2 6
Leg Extensions 3 8
Incline Dumbbell Press 3 8
Bent Over Barbell Rows 3 8
Dumbbell Shoulder Press 3 10
Barbell Shrugs 2 8-12
Workout #3
Exercise Sets Reps
Squat 3 8
Bench Press 3 8
Lat-Pulldowns 3 8-10
Lateral Raises 4 10-12

Hamstring Curls 3 4 10-12
What’s next?
Once you’ve completed your 28 days of arm specialization training, it’s back to business as usual. Take
your new, bigger arms and get back to focusing on overall muscle-growth. Or, perhaps, dedicate another
28 days to another muscle-group that’s been lagging behind.

ABOUT THE AUTHOR
Alain Gonzalez is a former skinny guy turned jacked fitness professional. He’s a personal trainer,
consultant, and has written for some of the most prestigious online fitness magazines.
His transformation has been featured in articles on websites all over the internet and has given hope to
countless “hardgainers” all over the world.
He is the founder of www.MuscleMonsters.com, a free fitness website dedicated to helping guys (and
gals) to build muscle, get lean, and achieve a physique they never thought possible.
Over the years, Alain has helped thousands of naturally skinny guys to finally move the scale and pack
on pounds of rock hard muscle mass, regardless of their genetics, and he hopes to do the same for you.
Stay In Touch!

BOOKS BY ALAIN GONZALEZ
The Lean Mass Diet: Build Muscle, Stay Lean, And Never Give
Up Your Favorite Foods
If you want to build muscle, stay lean, and never give up your favorite foods, then you must read this
book. The Lean Mass Diet is strategically designed, using hard scientific evidence, to put pounds of
muscle onto your frame without burying your abs in the process.
Click here to grab a copy on Amazon.com!
Click here to grab a copy on Amazon.co.uk!

The Shredded Diet: The Ultimate Guide to Getting Ripped,
Staying Strong, and Eating Delicious Food
If you want to get ripped, stay strong, and never give up your favorite foods, then you must read this
book. The Shredded Diet is strategically designed, using hard scientific evidence, to get you absolutely
ripped without losing your hard earned muscle mass in the process.
Click here to grab a copy on Amazon.com!
Click here to grab a copy on Amazon.co.uk!

References
1. Wallace MB, Mills BD, Browning CL. Effects of cross-training on markers of insulin
resistance/hyperinsulinemia. Med Sci Sports Exerc. 1997 Sep;29(9):1170-5.
2. Goldberg AL, Etlinger JD, Goldspink DF, Jablecki C. Mechanism of work-induced hypertrophy of
skeletal muscle. Med Sci Sports. 1975 Fall;7(3):185-98.
3. Rhea MR, Ball SD, Phillips WT, Burkett LN. A comparison of linear and daily undulating
periodized programs with equated volume and intensity for strength. J Strength Cond Res. 2002
May;16(2):250-5.
4. Schoenfeld BJ. The mechanisms of muscle hypertrophy and their application to resistance
training. J Strength Cond Res. 2010 Oct;24(10):2857-72.
5. Schoenfeld BJ, Ratamess NA, Peterson MD, Contreras B, Sonmez GT, Alvar BA. Effects of
different volume-equated resistance training loading strategies on muscular adaptations in well-
trained men. J Strength Cond Res. 2014 Oct;28(10):2909-18.
6. McLester, John R. JR.; Bishop, E; Guilliams, M. E. Comparison of 1 Day and 3 Days Per Week of
Equal-Volume Resistance Training in Experienced Subjects. J Strength Cond Res. 200 August.
7. McHugh MP, Connolly DA, Eston RG, Gleim GW. Exercise-induced muscle damage and potential
mechanisms for the repeated bout effect. Sports Med. 1999 Mar;27(3):157-70.
8. MacDougall JD, Gibala MJ, Tarnopolsky MA, MacDonald JR, Interisano SA, Yarasheski KE. The
time course for elevated muscle protein synthesis following heavy resistance exercise. Can J
Appl Physiol. 1995 Dec;20(4):480-6.
9. Schoenfeld BJ, Ogborn D, Krieger JW. Effects of Resistance Training Frequency on Measures of
Muscle Hypertrophy: A Systematic Review and Meta-Analysis. Sports Med. 2016
Nov;46(11):1689-1697.
10. Robbins DW, Young WB, Behm DG. The effect of an upper-body agonist-antagonist resistance
training protocol on volume load and efficiency. J Strength Cond Res. 2010 Oct;24(10):2632-40.
11. de Freitas Maia M, Willardson JM, Paz GA, Miranda H. EFFECTS OF DIFFERENT REST INTERVALS
BETWEEN ANTAGONIST PAIRED SETS ON REPETITION PERFOMANCE AND MUSCLE ACTIVATION.
J Strength Cond Res. 2014 Mar 11.
12. Tipton KD, Wolfe RR. Protein and amino acids for athletes. J Sports Sci. 2004 Jan;22(1):65-79.
13. Phillips SM, Van Loon LJ. Dietary protein for athletes: from requirements to optimum
adaptation. J Sports Sci. 2011;29 Suppl 1:S29-38.
14. Lemon PW. Beyond the zone: protein needs of active individuals. J Am Coll Nutr. 2000 Oct;19(5
Suppl):513S-521S.


![[THE 5 PART BLUEPRINT] HOW I ATTRACTED bigger & better clientsthelastrebrand.com/wp-content/uploads/2017/02/tggc.ebook_how-i... · in your own rebrand. Whether you use me as your](https://img.pdfslide.us/doc/110x75/5f7013f96afe732a524c75fa/the-5-part-blueprint-how-i-attracted-bigger-better-c-in-your-own-rebrand.jpg)