Embed Size (px)
Citation preview
LEGACY FAMILY TREE –
UNLOCKED!
TECHNIQUES, TIPS AND STEP-BY-STEPS FOR USING
LEGACY FAMILY TREE TO RECORD YOUR GENEALOGY
BASED ON THE POPULAR WATCH GEOFF LIVE!
WEBINAR SERIES
Geoffrey D. Rasmussen
2013
Middleton, Idaho
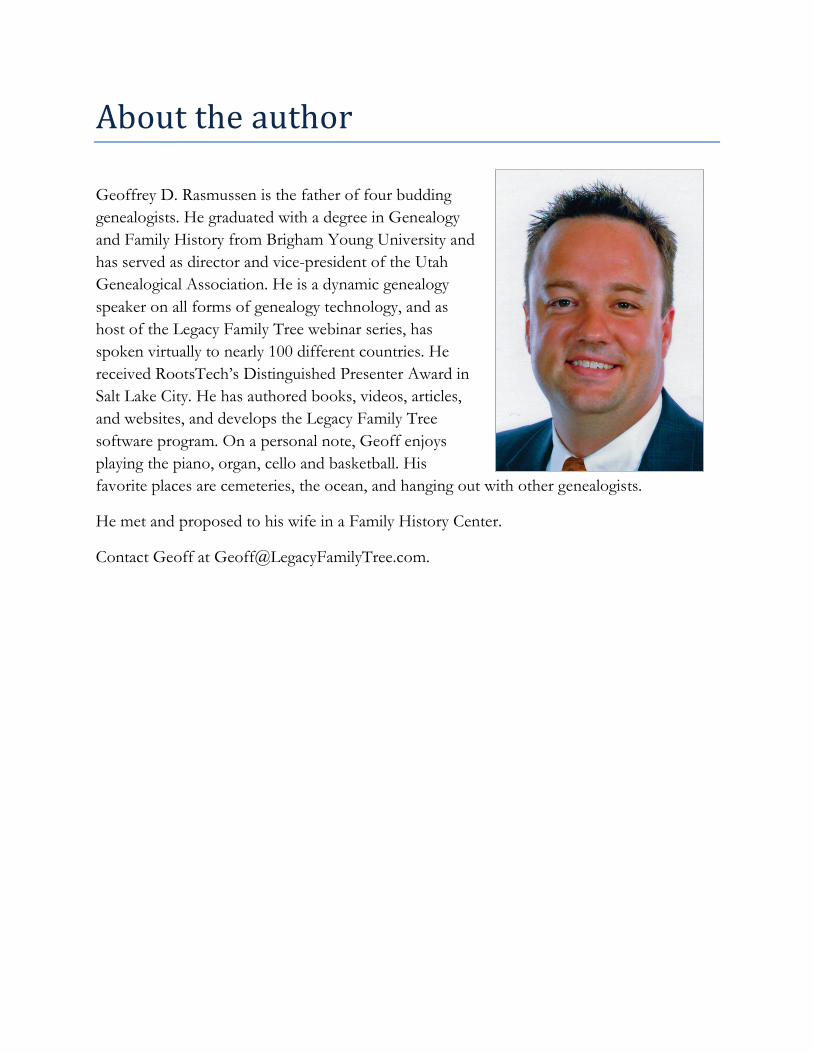
About the author Geoffrey D. Rasmussen is the father of four budding genealogists. He graduated with a degree in Genealogy and Family History from Brigham Young University and has served as director and vice-president of the Utah Genealogical Association. He is a dynamic genealogy speaker on all forms of genealogy technology, and as host of the Legacy Family Tree webinar series, has spoken virtually to nearly 100 different countries. He received RootsTech’s Distinguished Presenter Award in Salt Lake City. He has authored books, videos, articles, and websites, and develops the Legacy Family Tree software program. On a personal note, Geoff enjoys playing the piano, organ, cello and basketball. His favorite places are cemeteries, the ocean, and hanging out with other genealogists.
He met and proposed to his wife in a Family History Center.
Contact Geoff at [email protected].
Contents
Preface .......................................................................................................................................................... 9
Chapter 1 - Adding a Death Certificate ....................................................................................................... 15
Step 1 – Create the To Do item and perform the research ........................................................................ 16
Step 2 – Set up the source clipboard ......................................................................................................... 23
Step 3 – Analyze and add the new data, sourcing as you go ...................................................................... 31
Step 4 - Add the digital image to the death event ...................................................................................... 52
Step 5 – Close/complete the To Do item ................................................................................................. 57
Step 6 – Plan for future research .............................................................................................................. 58
Step 7 – File the paper document, if applicable......................................................................................... 61
Chapter 2 - Adding Cemetery Records ........................................................................................................ 63
Step 1 – Create the To Do item and perform the research ........................................................................ 63
Step 2 – Set up the source clipboard ......................................................................................................... 69
Step 3 – Analyze and add the new data, sourcing as you go ...................................................................... 75
Step 4 – Add the digital image to the burial event ..................................................................................... 80
Step 5 – Close/complete the To Do item ................................................................................................. 84
Step 6 – Plan for future research .............................................................................................................. 86
Step 7 – File the paper document, if applicable......................................................................................... 86
Chapter 3 - Adding an Obituary .................................................................................................................. 87
Step 1 – Create the To Do item and perform the research ........................................................................ 87
Step 2 – Set up the source clipboard ......................................................................................................... 92
Step 3 – Analyze and add the new data, creating the custom “obituary” event, and sourcing as you go ... 100
Step 4 – Close/complete the To Do item ............................................................................................... 119
Step 5 – Plan for future research ............................................................................................................ 119
Step 6 – File the paper document, if applicable....................................................................................... 119
Chapter 4 - Adding a Marriage Record ..................................................................................................... 121
Step 1 – Create the To Do item and perform the research ...................................................................... 121
Step 2 – Set up the source clipboard ....................................................................................................... 129
Step 3 – Analyze and add the new data, sourcing as you go .................................................................... 139
Step 4 – Add the digital image to the marriage event .............................................................................. 149
Step 5 – Close/complete the To Do item ............................................................................................... 152
Step 6 – Plan for future research ............................................................................................................ 153
Step 7 – File the paper document, if applicable....................................................................................... 154
Chapter 5 - Adding a Census Record ......................................................................................................... 155
Step 1 – Create the To Do item and perform the research ...................................................................... 155
Step 2 – Set up the source clipboard ....................................................................................................... 164
Step 3 – Analyze and add the new data, including the census event, share the event with the other individuals, and source as you go ............................................................................................................ 174
Step 4 – Close/complete the To Do item ............................................................................................... 187
Step 5 – Plan for future research ............................................................................................................ 188
Step 6 – File the paper document, if applicable....................................................................................... 188
Chapter 6 - Adding Land Records PLUS a Visit to the Cemetery ............................................................... 189
Step 1 – Create the To Do item and perform the research ...................................................................... 198
Step 2 – Set up the source clipboard ....................................................................................................... 198
Step 3 – Analyze and add the new Deed event, sourcing as you go ......................................................... 210
Step 4 – Close/complete the To Do item ............................................................................................... 219
Step 5 – Plan for future research ............................................................................................................ 220
Step 6 – File the paper document, if applicable....................................................................................... 221
Chapter 7 - Conclusion .............................................................................................................................. 223
Appendix: SourceWriter Conversion ........................................................................................................ 225
Step 1 - Open the Assigned Sources list for an individual by clicking on the Sources icon. .................... 226
Step 2 - Copy/paste the existing citation and other data into a word processing document. .................... 227
Step 3 - Set up the Source Clipboard with the new SourceWriter style source and add the source where necessary. ............................................................................................................................................... 228
Step 4 - Remove the now-unnecessary Basic Style sources. ..................................................................... 235
9
Preface I had no idea the ending of this book was going to be so good! The beginning and middle ended up pretty good too. Without the beginning and middle, I guess the end would be the beginning. And that wouldn’t be so bad either.
This book was actually years in the making. Twenty years to be exact. From the time I first turned the reel of a microfilm reader to my recent experience at the cemetery, my genealogical knowledge, skills, and techniques have expanded enormously. It is only with this experience that I was able to write this book.
If I could return to the beginning of my genealogy career I would do it with the understanding of the methods and principles that I have written in this book. I would do it with the strategies I have developed over the years with my use of the Legacy Family Tree software.
Anyone can use Legacy Family Tree. It is simple enough for the beginner and powerful enough for the experienced. Without this book, you will probably discover some of the more powerful Legacy tools on your own…eventually…but why wait? In Legacy Family Tree – Unlocked! you will learn how to better utilize some of Legacy’s best features:
• Shared Events • Source Clipboard • To Do List • Custom Internet searches • Mapping • Chronology View • Soundex Calculator • Digital pictures and other media • Much more…
Not only will you learn how to use Legacy, but you will learn how to use it in the context of real genealogical research situations. This book is based on the style of the more-popular-than-I-ever-dreamed-of “Watch Geoff Live” webinar series, meaning, it was written live and unscripted! As I researched my ancestor, George Fieldsted, I wrote down every thought, decision and step-by-step procedure as I went. There were no planning sessions or detailed outlines prepared. All I knew was I wanted to learn more about George
10 Legacy Family Tree – Unlocked!
and that by writing about it, it would provide you a guide that you can adopt, adapt, and follow. I will never tell you that my methods are the only right way, but if you learn a thing or two that you can use for your own research and use of Legacy then I have succeeded.
As a result of your reading this book, I hope to save you time – lots of it! As you contemplate, adapt, and apply the research and data entry procedures from this book, you will have more time to find your ancestors. With the new skills you gain about how to better use Legacy Family Tree, you will be more prepared, organized and better equipped to find those challenging ancestors.
Along the way, you will learn lots of little tips and tricks that you can add to your genealogy toolbox:
• The Inflation Calculator • Steve Morse’s one-step website • Using FindAGrave.com • FamilySearch Catalog • Lots of other websites plus so much more
Each record below has its own chapter dedicated to learning how to locate, analyze, and add the information to your Legacy family file from the record:
• Death certificate • Cemetery records • Obituaries • Marriage records • Census records • Land records
At the beginning of each chapter I have included a summary of the necessary steps and procedures for each type of record.
This book is for genealogists and Legacy Family Tree users of all expertise. All levels of genealogists benefit from learning about how others do research. Long time Legacy users will enjoy the insights into the advanced features (especially the Shared Events!) and the little tips and tricks along the way. Beginning Legacy users will not only begin to grasp what is possible in Legacy but they will learn to “do it right the first time.”

Preface 11
In this day of the spell-checker and grammar verifier, I hope you will not notice anything too out of order, but if you do, please let me know and I will get it updated for future revisions. I already know I am not going to win any awards for my use of passive voice and mixing up the I/we/you pronouns throughout this book. Remember, I wrote it as I researched it. The written words were my thoughts as I thought them. If I edited the resulting copy too much it would lose a little of the unscriptedness (wow, spell-checker didn’t even have a suggestion for ‘unscriptedness’). So, send me an email to [email protected]. I promise to read every email, but cannot promise to respond to every one.
A wise person once said, “life is short – do genealogy first!” Maybe even wiser though – do genealogy first after a little guidance from those with experience.
How to read this book
Although the end is really good, start from the beginning – especially since each chapter builds on the instruction from the previous chapter. You might also want to create a new Legacy family file and duplicate my steps and procedures. This will better prepare you to work with your personal family file.
George Fjeldsted
Why did I choose to research my 2nd cousin five times removed and to base an entire book on him? I didn’t know in the beginning. Something just quietly told me that he was important. My cemetery experience in the end answers this question. You never know what you are going to find until you begin searching!
Before we continue, take a look at what I knew about George before I began. From Legacy’s Family View I knew his name, his approximate birth year and place, his exact death date, an approximate place, his cause of death, and the names of his parents and wife.

12 Legacy Family Tree – Unlocked!
Preface 13
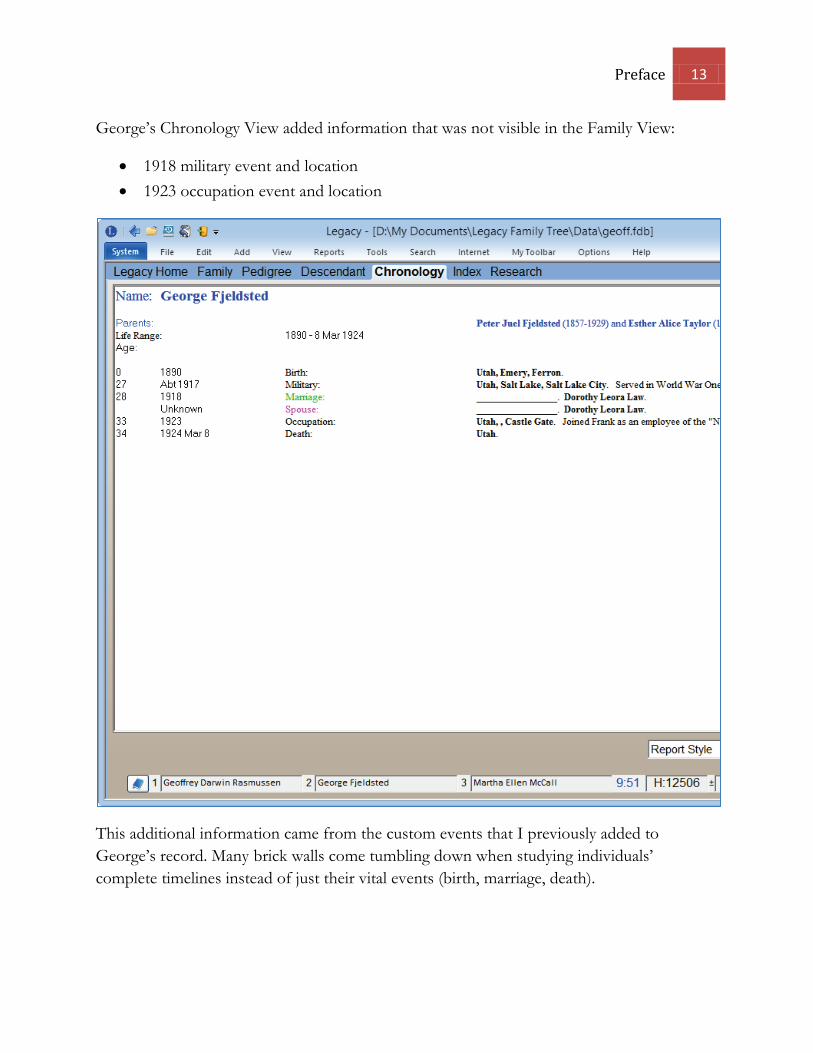
George’s Chronology View added information that was not visible in the Family View:
• 1918 military event and location • 1923 occupation event and location
This additional information came from the custom events that I previously added to George’s record. Many brick walls come tumbling down when studying individuals’ complete timelines instead of just their vital events (birth, marriage, death).
14 Legacy Family Tree – Unlocked!
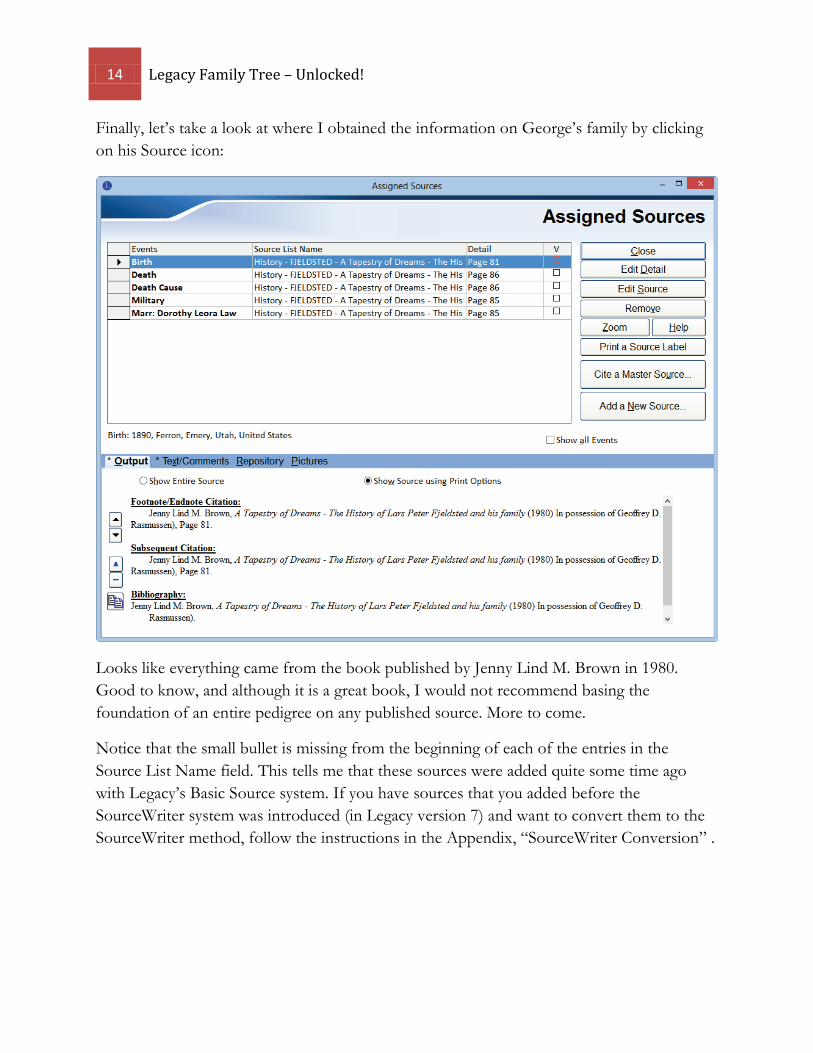
Finally, let’s take a look at where I obtained the information on George’s family by clicking on his Source icon:
Looks like everything came from the book published by Jenny Lind M. Brown in 1980. Good to know, and although it is a great book, I would not recommend basing the foundation of an entire pedigree on any published source. More to come.
Notice that the small bullet is missing from the beginning of each of the entries in the Source List Name field. This tells me that these sources were added quite some time ago with Legacy’s Basic Source system. If you have sources that you added before the SourceWriter system was introduced (in Legacy version 7) and want to convert them to the SourceWriter method, follow the instructions in the Appendix, “SourceWriter Conversion” .
Chapter 5 155
Adding a Census Record Census records are where we flesh out the missing pieces of the family. Specifically, in the 1920 census, I am hoping to learn:
• Where George’s wife was born • The identity of at least one of their children • Whether George rented or owned his home. If he owned it, then the natural next
step would be to search the deeds.
Summary of Steps
1. Create the To Do item and perform the research 2. Set up the source clipboard 3. Analyze and add the new data, including the census event, share the event with the
other individuals, and source as you go 4. Close/complete the To Do item 5. Plan for future research 6. File the paper document, if applicable
Step 1 – Create the To Do item and perform the research Since we created the To Do item in step 6 of the previous chapter, we are ready to begin the research. Census research takes me back to the first days of my genealogical journeys. While attending Ricks College in Rexburg, Idaho, the 1920 census had just been released. Apparently this was big news to the genealogy community. I had never heard of a census record. I quickly learned how valuable they are.
The process took several weeks. Here’s why:
1. First, we had to learn what state the ancestor lived in during the census year. You might have to use a variety of records to learn this.
2. Second, we had to learn what the ancestor’s Soundex Code was. Here are the instructions:
o The Soundex code consists of a letter and three numbers, such as W-252. o The letter is always the first letter of the surname. o The numbers are assigned to the remaining letters of the surname code
according to the Soundex instructions: 1 = B, F, P and V
156 Legacy Family Tree – Unlocked!
2 = C, G J, K, Q, S, X and Z 3 = D and T 4 = L 5 = M and N 6 = R
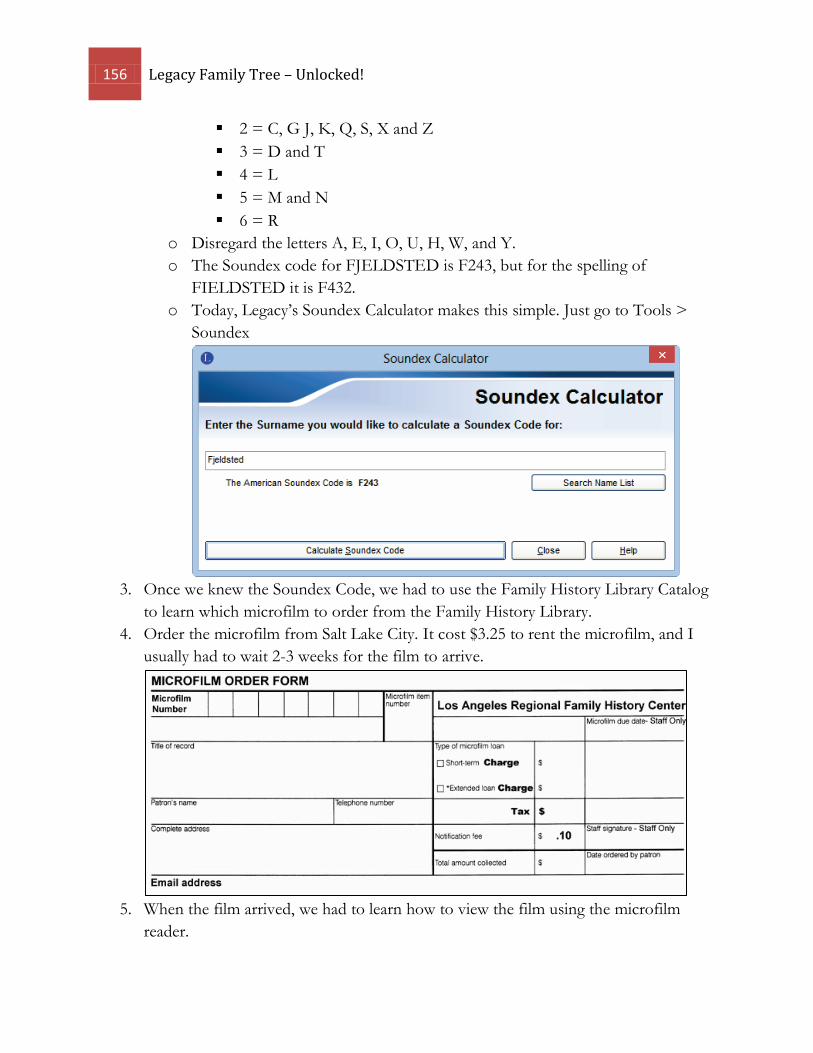
o Disregard the letters A, E, I, O, U, H, W, and Y. o The Soundex code for FJELDSTED is F243, but for the spelling of
FIELDSTED it is F432. o Today, Legacy’s Soundex Calculator makes this simple. Just go to Tools >
Soundex
3. Once we knew the Soundex Code, we had to use the Family History Library Catalog
to learn which microfilm to order from the Family History Library. 4. Order the microfilm from Salt Lake City. It cost $3.25 to rent the microfilm, and I
usually had to wait 2-3 weeks for the film to arrive.
5. When the film arrived, we had to learn how to view the film using the microfilm
reader.
Chapter 5 ⟡ Adding a Census Record 157
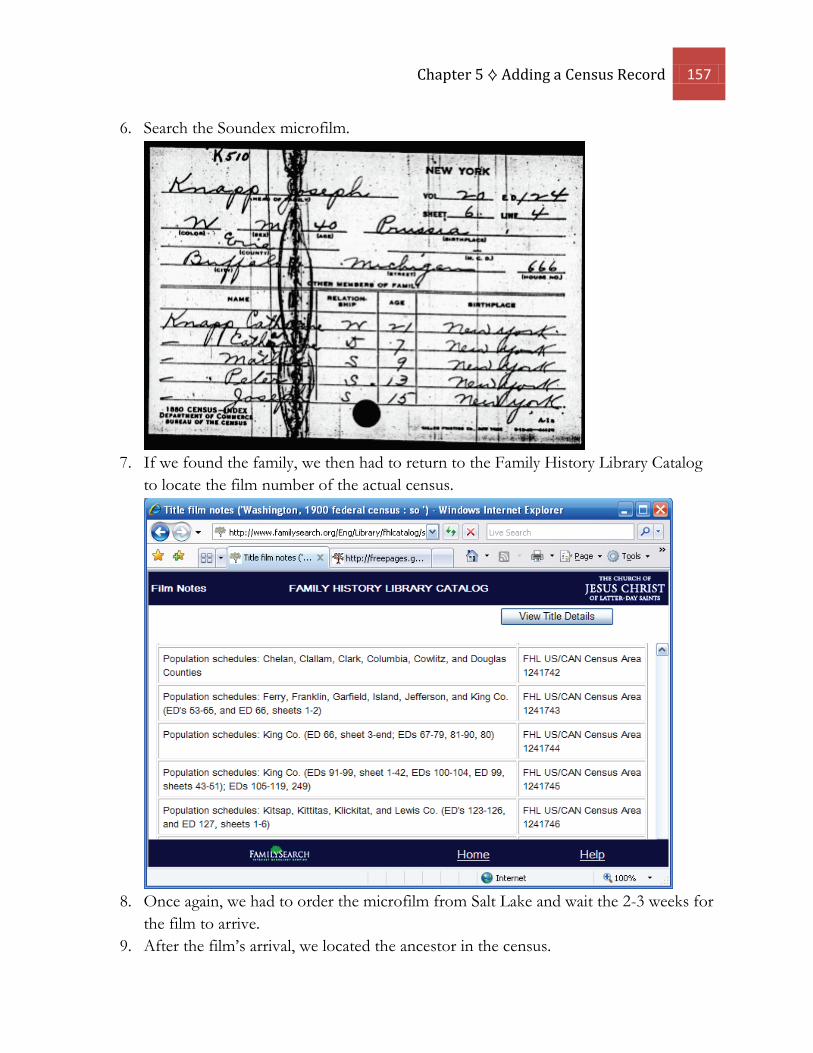
6. Search the Soundex microfilm.
7. If we found the family, we then had to return to the Family History Library Catalog
to locate the film number of the actual census.
8. Once again, we had to order the microfilm from Salt Lake and wait the 2-3 weeks for
the film to arrive. 9. After the film’s arrival, we located the ancestor in the census.
158 Legacy Family Tree – Unlocked!
10. If we wanted a printed copy of the record, we had to transfer the microfilm to a
microfilm printer machine.
Wow, that was a trip down genealogy memory lane. I am glad I learned to research census records using these old methods. It really makes me appreciate what we have today.
The hardest part today is deciding which of the many websites to use. One that I often turn to is Census Finder at www.censusfinder.com. It is a directory of free census records and is not restricted to U.S. records. I use this mostly when I am seeking for census records other than the federal census like state and territorial census records. For the federal census records, I turn first to FamilySearch.
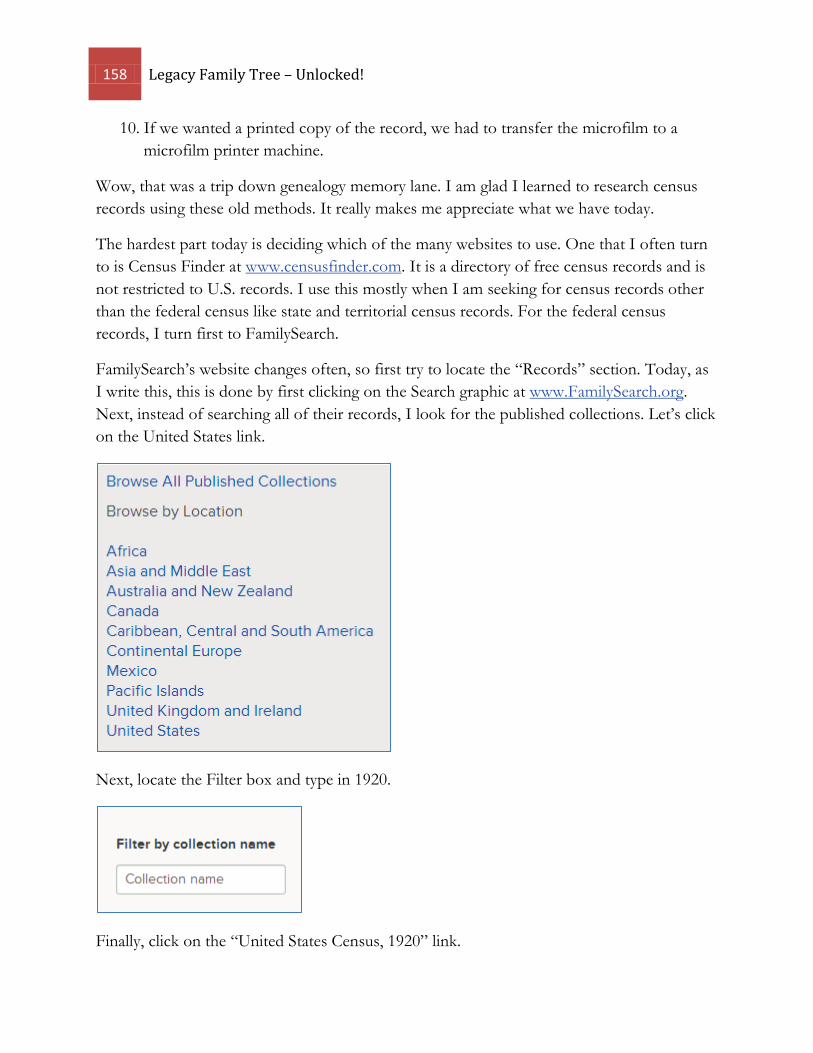
FamilySearch’s website changes often, so first try to locate the “Records” section. Today, as I write this, this is done by first clicking on the Search graphic at www.FamilySearch.org. Next, instead of searching all of their records, I look for the published collections. Let’s click on the United States link.
Next, locate the Filter box and type in 1920.
Finally, click on the “United States Census, 1920” link.
Chapter 5 ⟡ Adding a Census Record 159
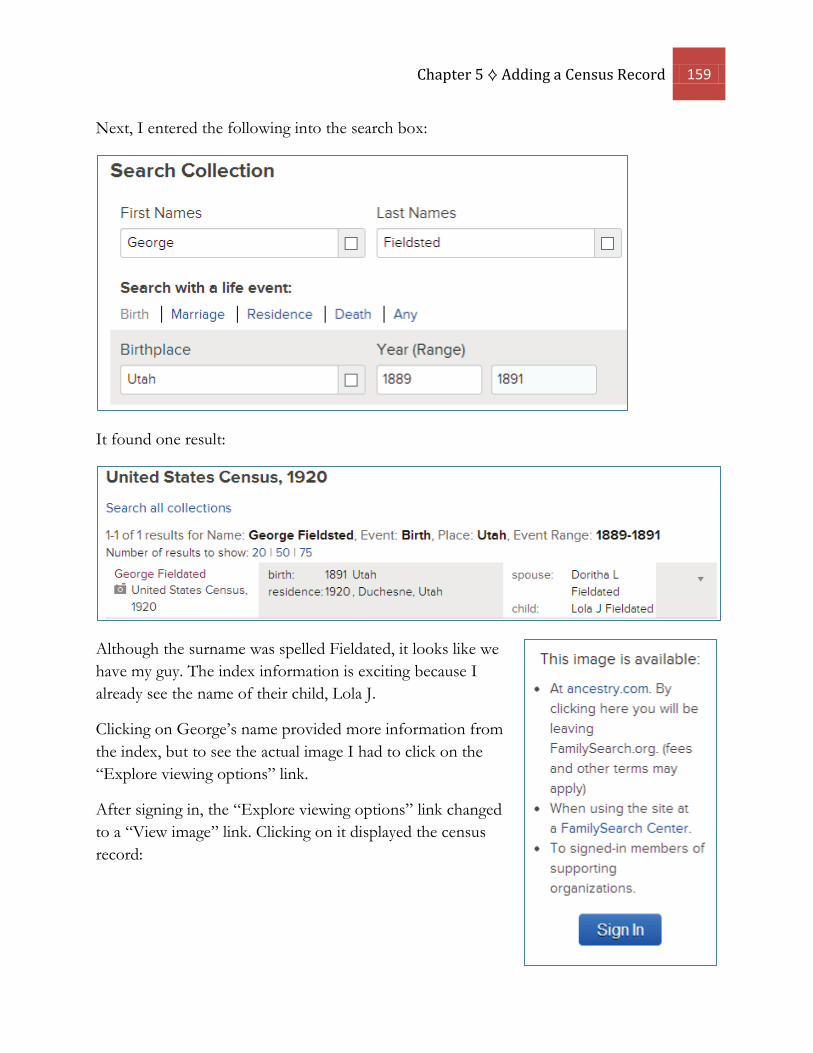
Next, I entered the following into the search box:
It found one result:
Although the surname was spelled Fieldated, it looks like we have my guy. The index information is exciting because I already see the name of their child, Lola J.
Clicking on George’s name provided more information from the index, but to see the actual image I had to click on the “Explore viewing options” link.
After signing in, the “Explore viewing options” link changed to a “View image” link. Clicking on it displayed the census record:
160 Legacy Family Tree – Unlocked!
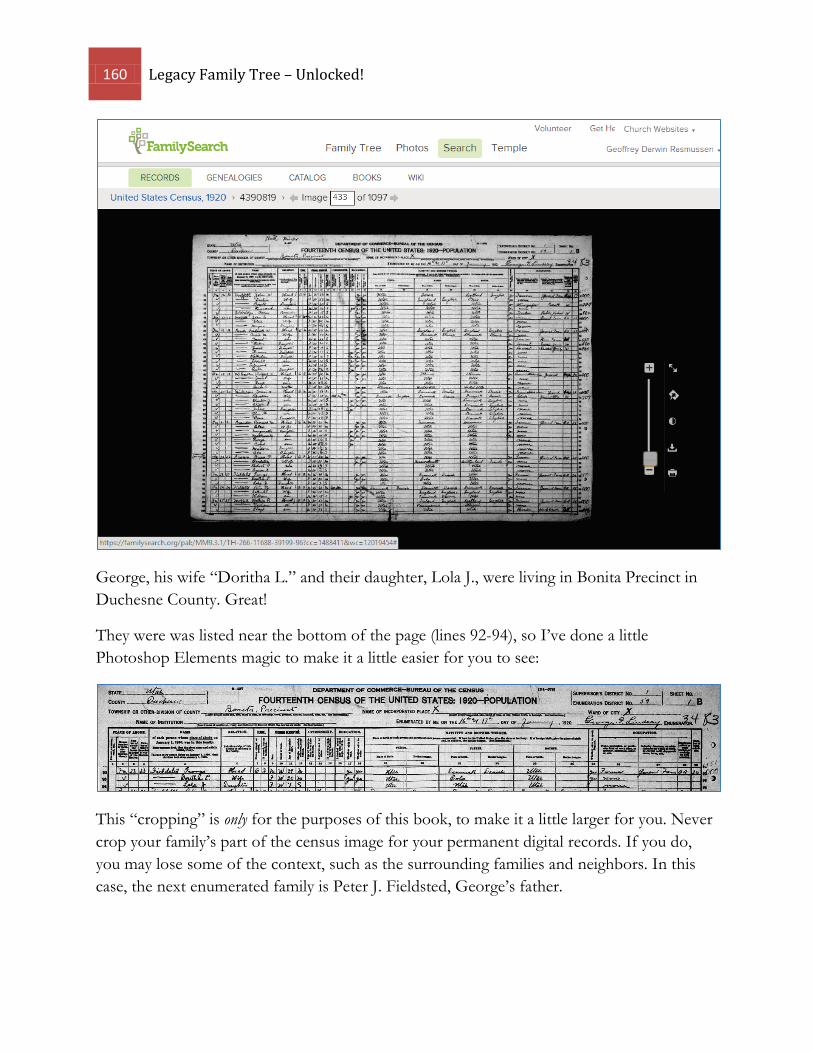
George, his wife “Doritha L.” and their daughter, Lola J., were living in Bonita Precinct in Duchesne County. Great!
They were was listed near the bottom of the page (lines 92-94), so I’ve done a little Photoshop Elements magic to make it a little easier for you to see:
This “cropping” is only for the purposes of this book, to make it a little larger for you. Never crop your family’s part of the census image for your permanent digital records. If you do, you may lose some of the context, such as the surrounding families and neighbors. In this case, the next enumerated family is Peter J. Fieldsted, George’s father.

Chapter 5 ⟡ Adding a Census Record 161
And to make it even easier, I’ve blown up and cropped the image into two sections:
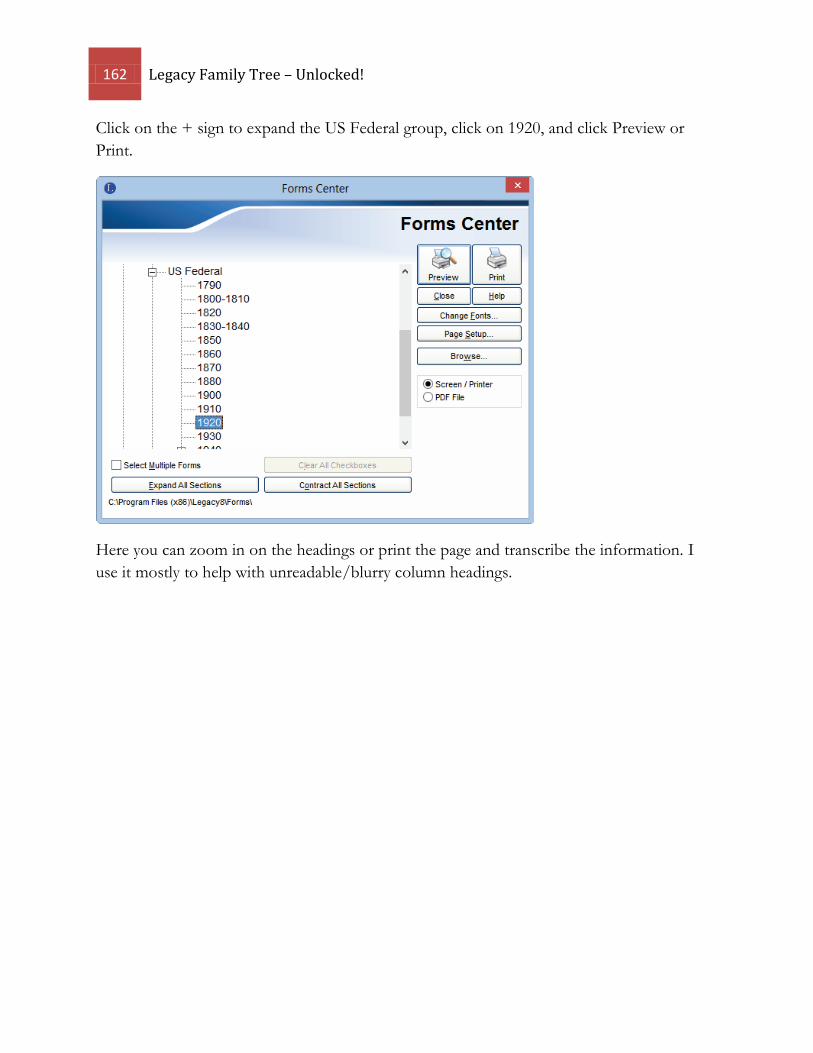
To make the column headings easier to decipher, use Legacy’s blank census forms. These are found at Reports > Blank Charts > Forms Center.
162 Legacy Family Tree – Unlocked!
Click on the + sign to expand the US Federal group, click on 1920, and click Preview or Print.
Here you can zoom in on the headings or print the page and transcribe the information. I use it mostly to help with unreadable/blurry column headings.
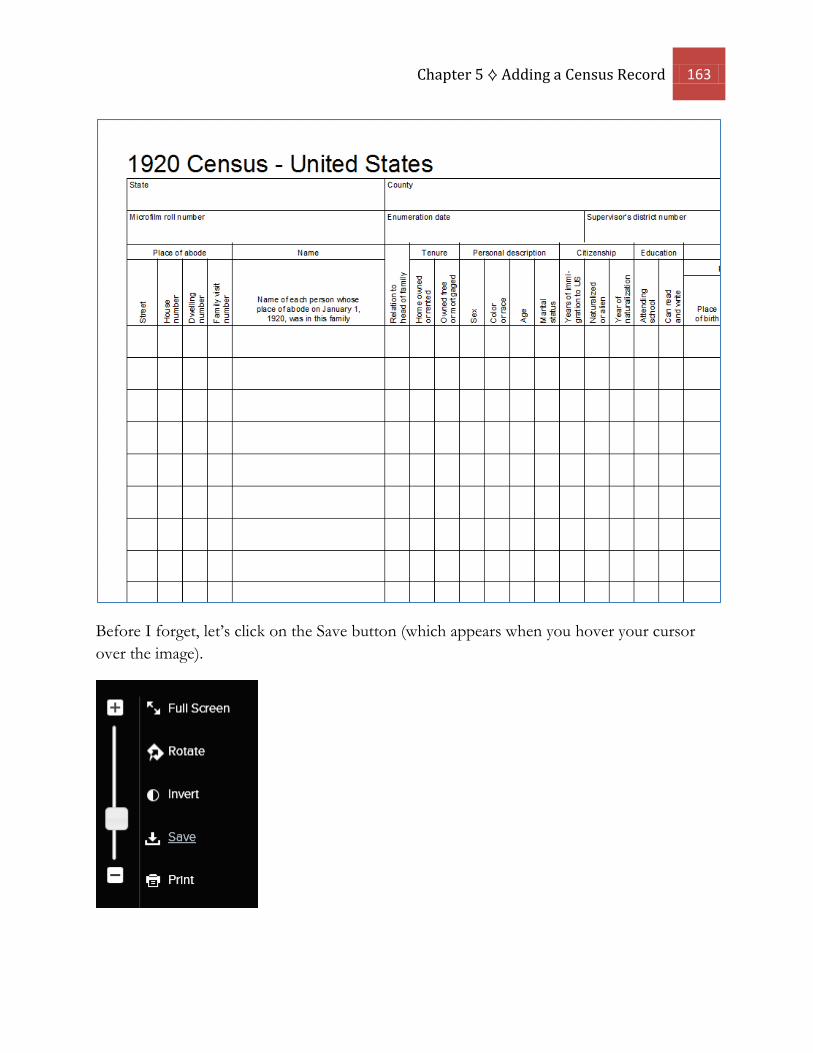
Chapter 5 ⟡ Adding a Census Record 163
Before I forget, let’s click on the Save button (which appears when you hover your cursor over the image).
164 Legacy Family Tree – Unlocked!
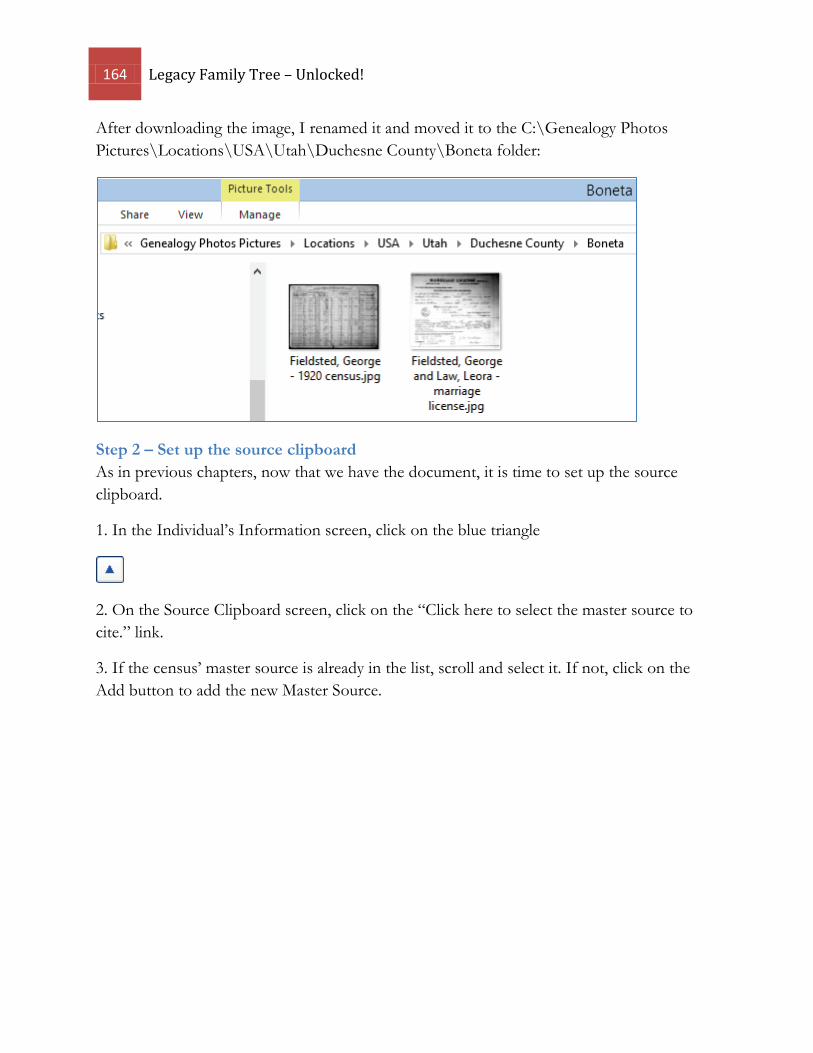
After downloading the image, I renamed it and moved it to the C:\Genealogy Photos Pictures\Locations\USA\Utah\Duchesne County\Boneta folder:
Step 2 – Set up the source clipboard As in previous chapters, now that we have the document, it is time to set up the source clipboard.
1. In the Individual’s Information screen, click on the blue triangle
2. On the Source Clipboard screen, click on the “Click here to select the master source to cite.” link.
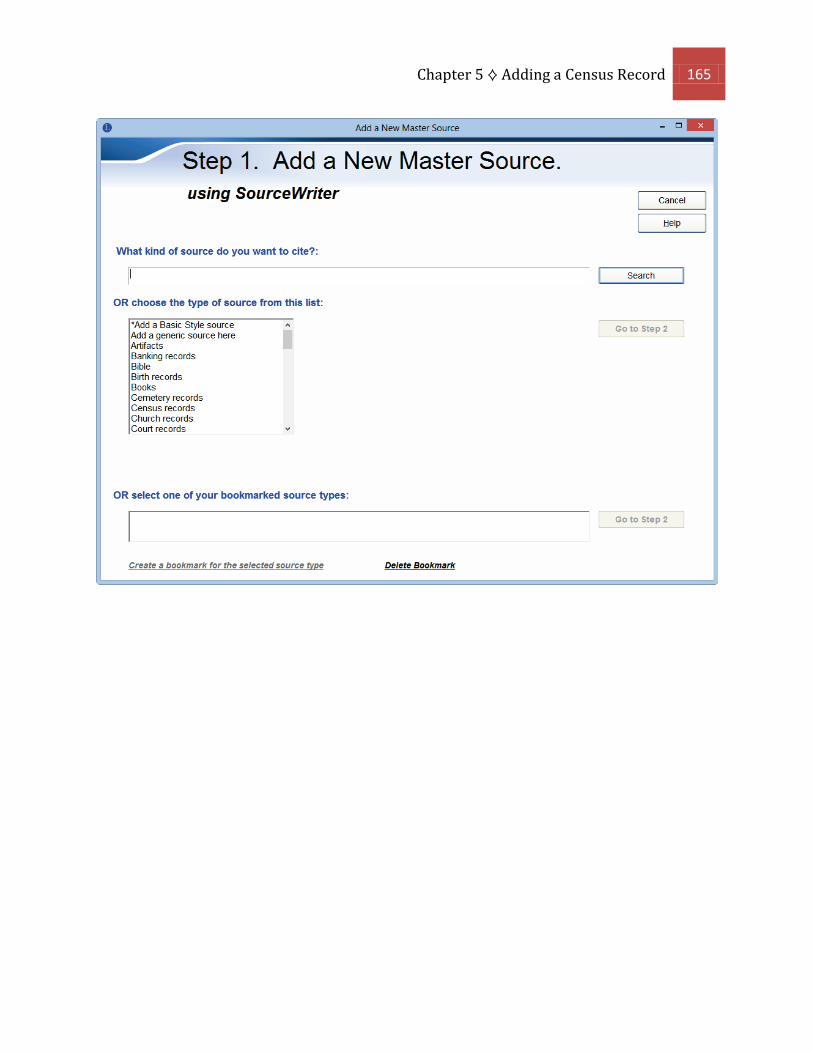
3. If the census’ master source is already in the list, scroll and select it. If not, click on the Add button to add the new Master Source.
Chapter 5 ⟡ Adding a Census Record 165
166 Legacy Family Tree – Unlocked!
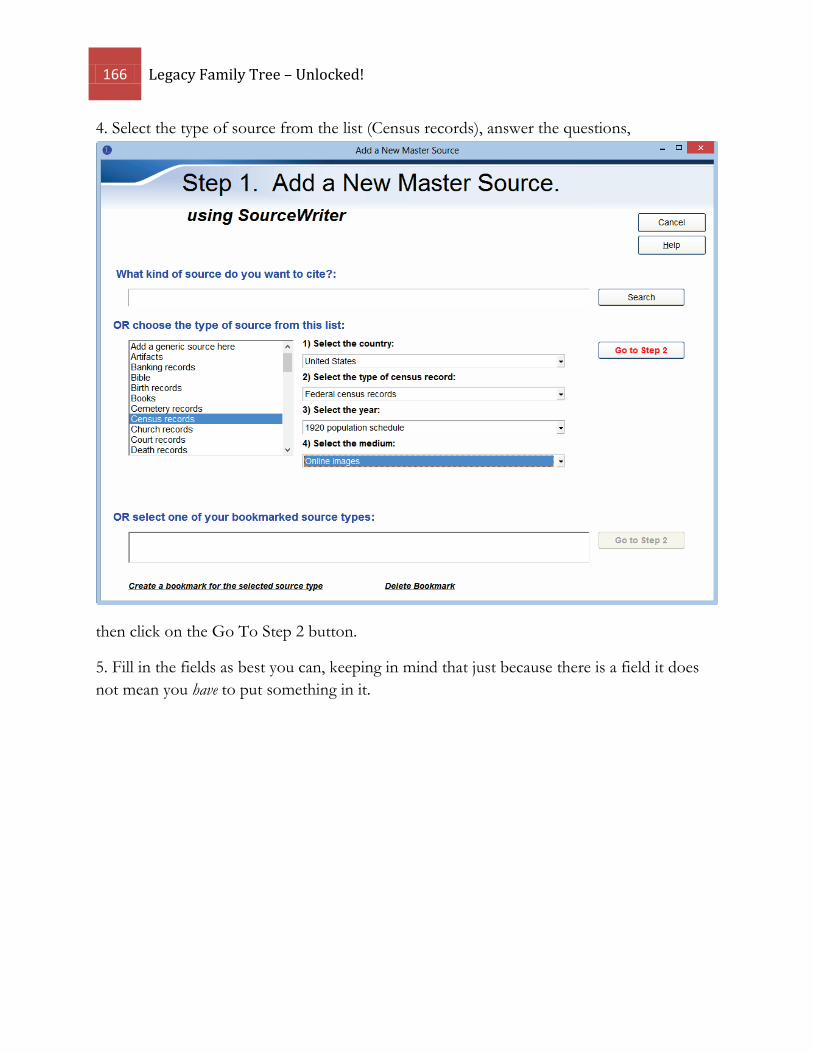
4. Select the type of source from the list (Census records), answer the questions,
then click on the Go To Step 2 button.
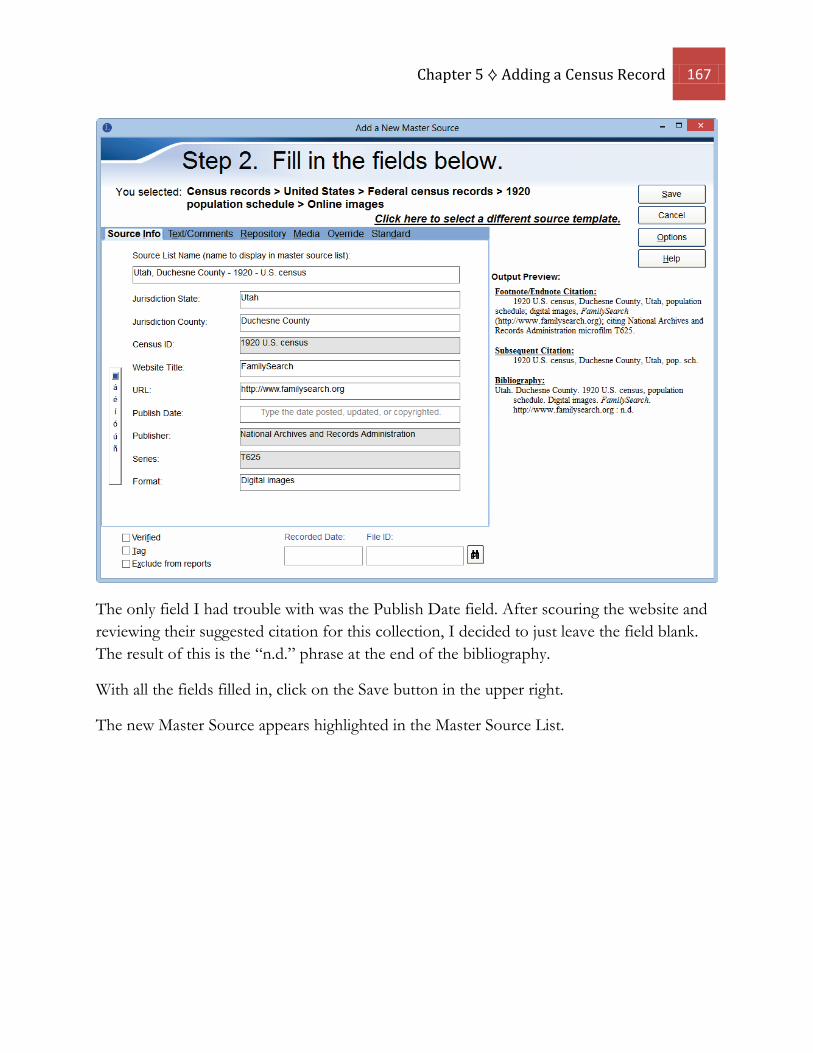
5. Fill in the fields as best you can, keeping in mind that just because there is a field it does not mean you have to put something in it.
Chapter 5 ⟡ Adding a Census Record 167
The only field I had trouble with was the Publish Date field. After scouring the website and reviewing their suggested citation for this collection, I decided to just leave the field blank. The result of this is the “n.d.” phrase at the end of the bibliography.
With all the fields filled in, click on the Save button in the upper right.
The new Master Source appears highlighted in the Master Source List.
168 Legacy Family Tree – Unlocked!
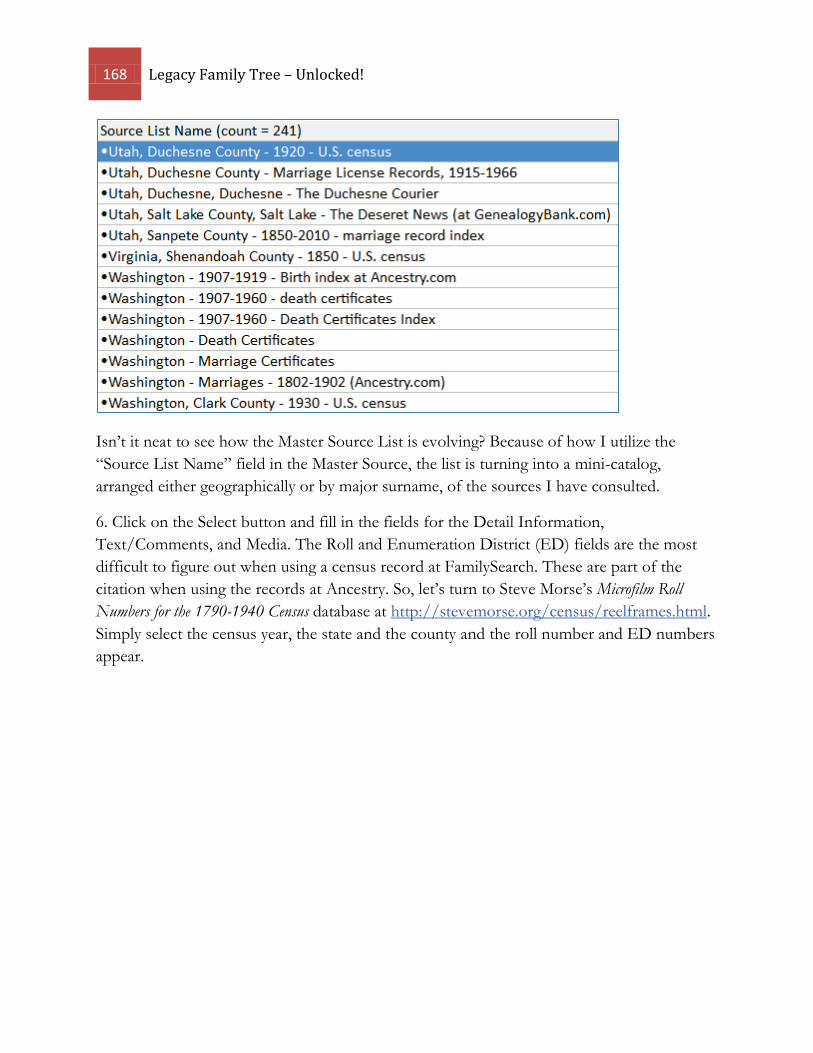
Isn’t it neat to see how the Master Source List is evolving? Because of how I utilize the “Source List Name” field in the Master Source, the list is turning into a mini-catalog, arranged either geographically or by major surname, of the sources I have consulted.
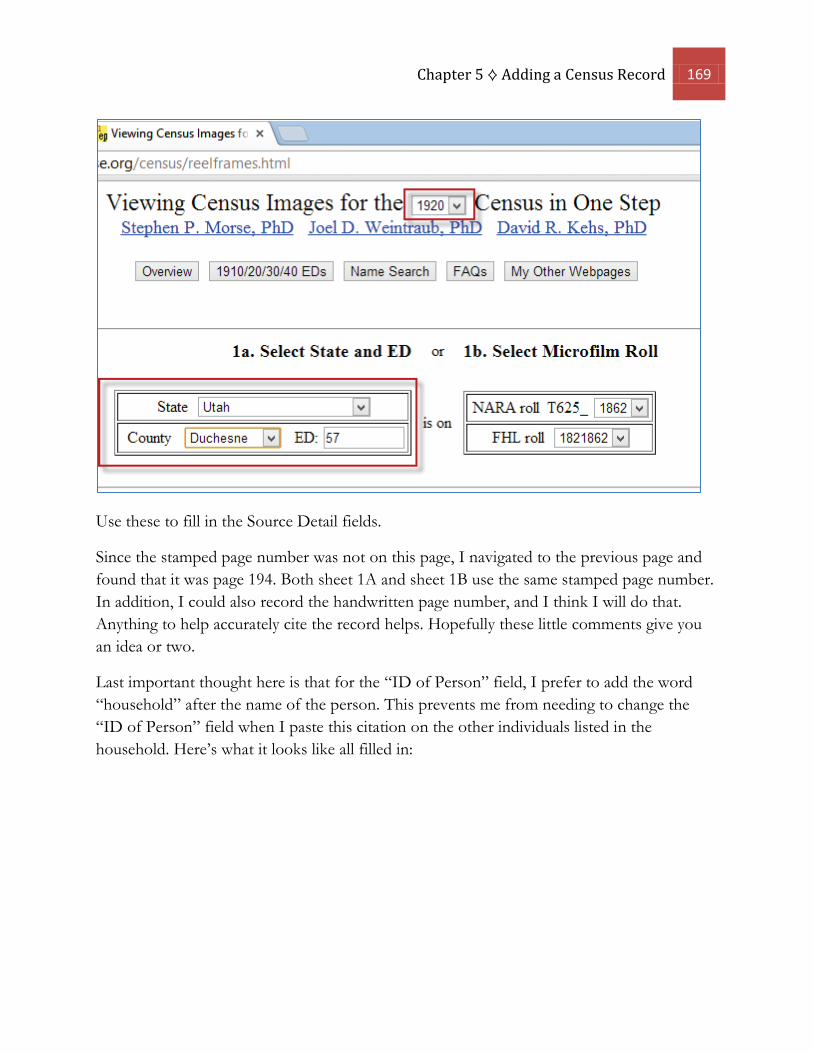
6. Click on the Select button and fill in the fields for the Detail Information, Text/Comments, and Media. The Roll and Enumeration District (ED) fields are the most difficult to figure out when using a census record at FamilySearch. These are part of the citation when using the records at Ancestry. So, let’s turn to Steve Morse’s Microfilm Roll Numbers for the 1790-1940 Census database at http://stevemorse.org/census/reelframes.html. Simply select the census year, the state and the county and the roll number and ED numbers appear.
Chapter 5 ⟡ Adding a Census Record 169
Use these to fill in the Source Detail fields.
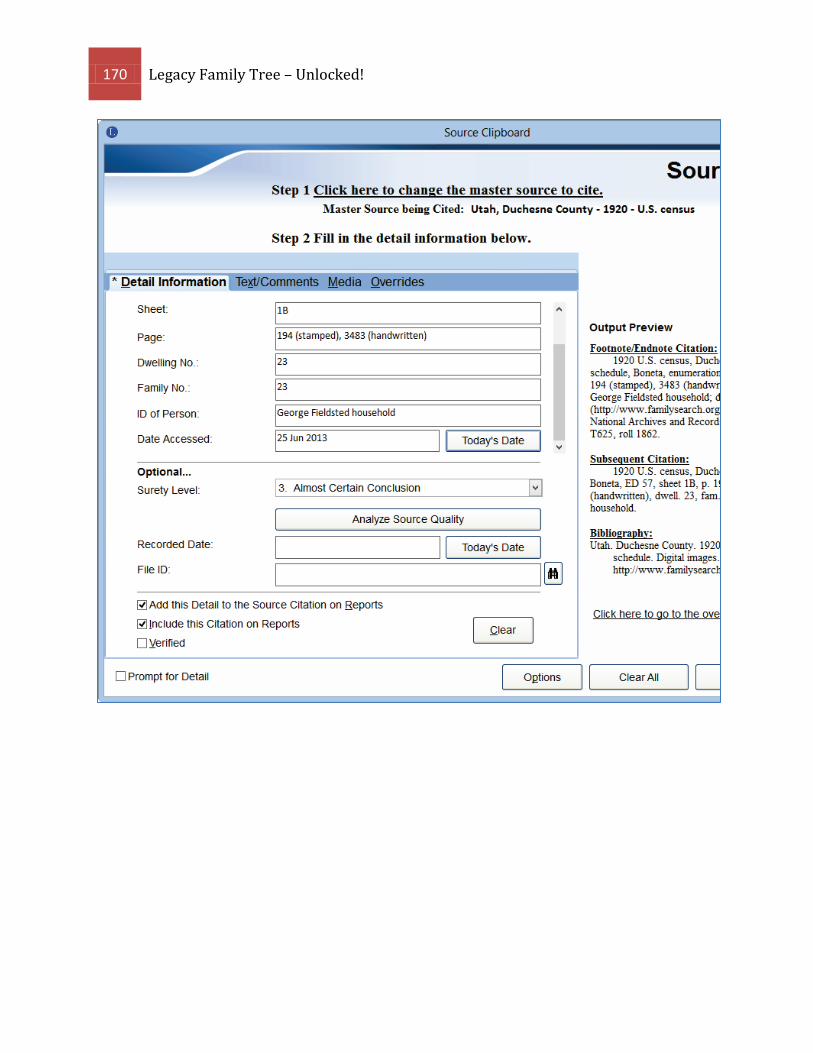
Since the stamped page number was not on this page, I navigated to the previous page and found that it was page 194. Both sheet 1A and sheet 1B use the same stamped page number. In addition, I could also record the handwritten page number, and I think I will do that. Anything to help accurately cite the record helps. Hopefully these little comments give you an idea or two.
Last important thought here is that for the “ID of Person” field, I prefer to add the word “household” after the name of the person. This prevents me from needing to change the “ID of Person” field when I paste this citation on the other individuals listed in the household. Here’s what it looks like all filled in:
170 Legacy Family Tree – Unlocked!
Chapter 5 ⟡ Adding a Census Record 171
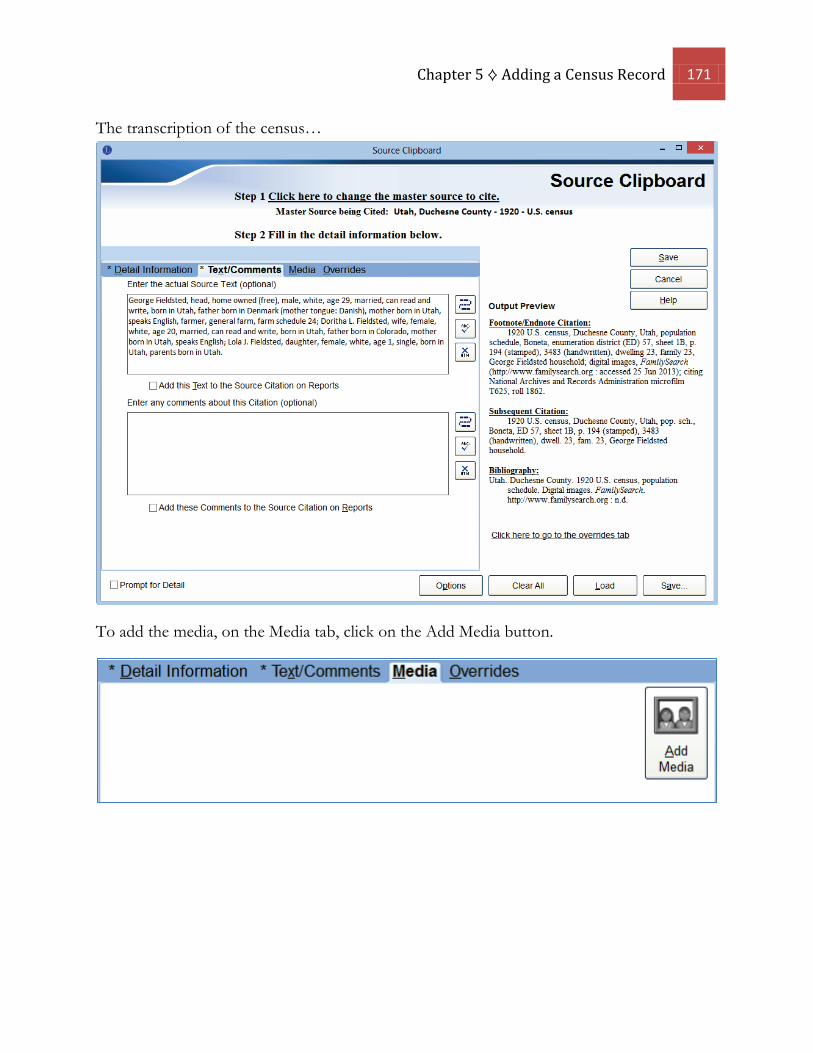
The transcription of the census…
To add the media, on the Media tab, click on the Add Media button.
172 Legacy Family Tree – Unlocked!
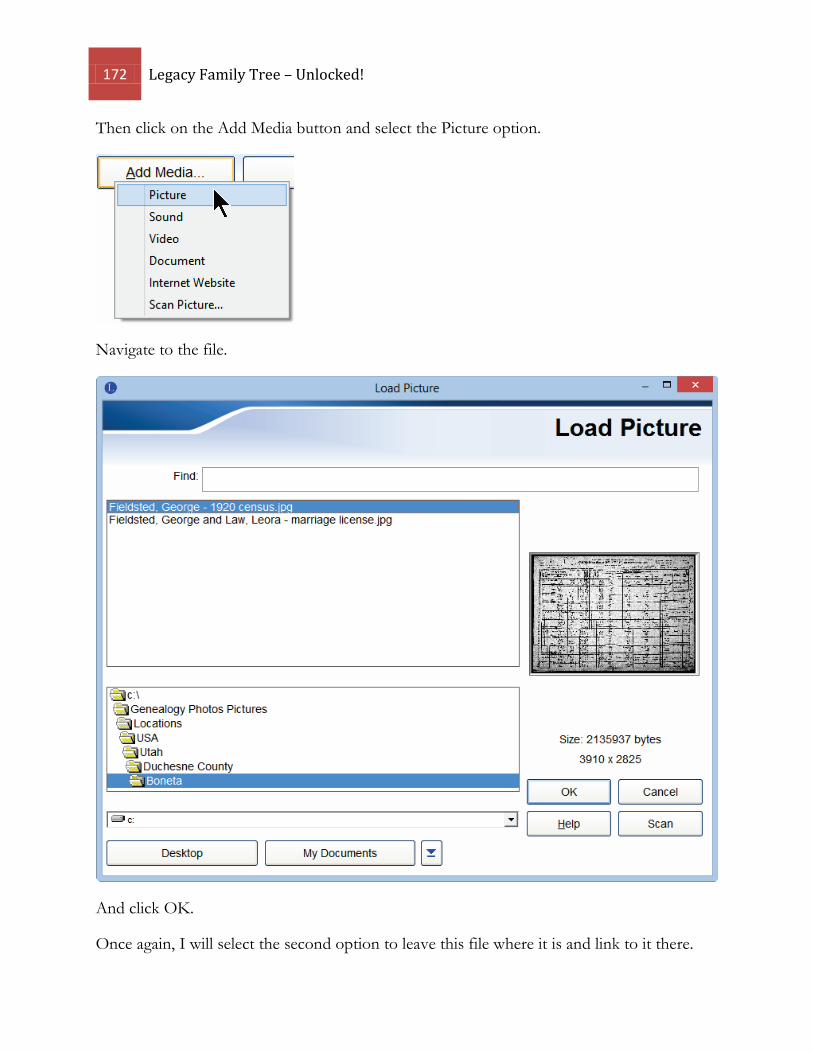
Then click on the Add Media button and select the Picture option.
Navigate to the file.
And click OK.
Once again, I will select the second option to leave this file where it is and link to it there.

Chapter 5 ⟡ Adding a Census Record 173
Click OK.
Type any caption, date, and description (I usually just leave the description blank) and click OK.
174 Legacy Family Tree – Unlocked!
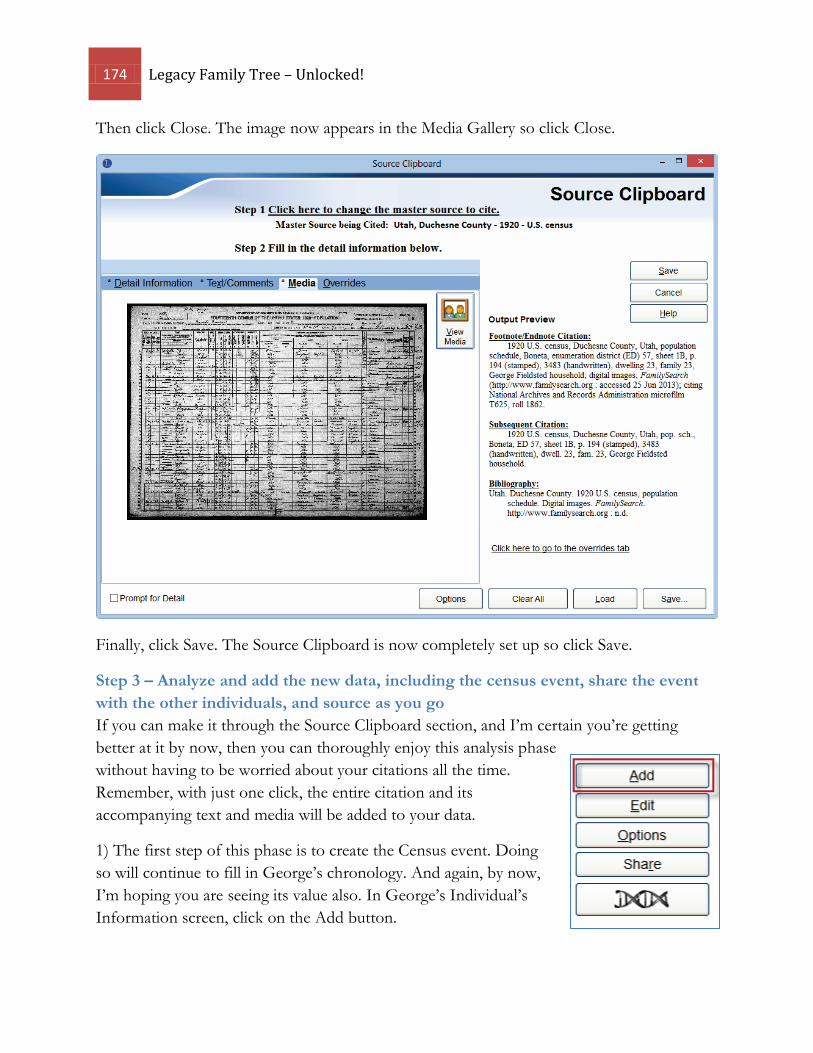
Then click Close. The image now appears in the Media Gallery so click Close.
Finally, click Save. The Source Clipboard is now completely set up so click Save.
Step 3 – Analyze and add the new data, including the census event, share the event with the other individuals, and source as you go If you can make it through the Source Clipboard section, and I’m certain you’re getting better at it by now, then you can thoroughly enjoy this analysis phase without having to be worried about your citations all the time. Remember, with just one click, the entire citation and its accompanying text and media will be added to your data.
1) The first step of this phase is to create the Census event. Doing so will continue to fill in George’s chronology. And again, by now, I’m hoping you are seeing its value also. In George’s Individual’s Information screen, click on the Add button.
Chapter 5 ⟡ Adding a Census Record 175
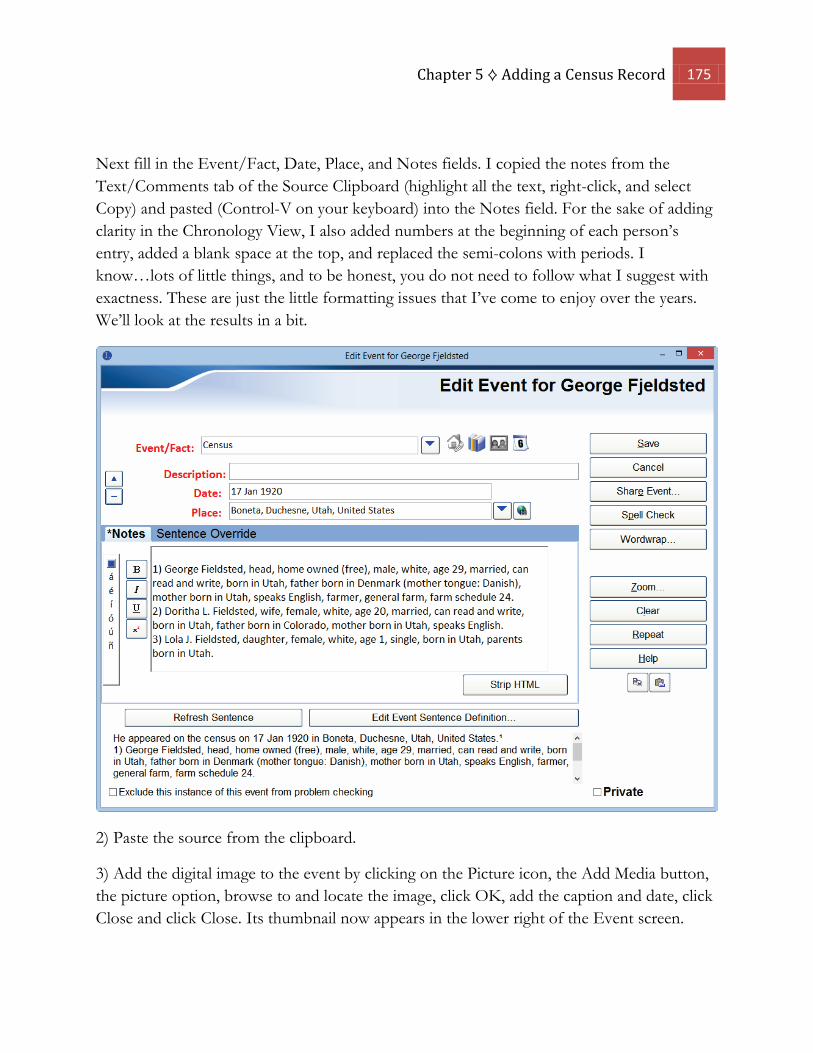
Next fill in the Event/Fact, Date, Place, and Notes fields. I copied the notes from the Text/Comments tab of the Source Clipboard (highlight all the text, right-click, and select Copy) and pasted (Control-V on your keyboard) into the Notes field. For the sake of adding clarity in the Chronology View, I also added numbers at the beginning of each person’s entry, added a blank space at the top, and replaced the semi-colons with periods. I know…lots of little things, and to be honest, you do not need to follow what I suggest with exactness. These are just the little formatting issues that I’ve come to enjoy over the years. We’ll look at the results in a bit.
2) Paste the source from the clipboard.
3) Add the digital image to the event by clicking on the Picture icon, the Add Media button, the picture option, browse to and locate the image, click OK, add the caption and date, click Close and click Close. Its thumbnail now appears in the lower right of the Event screen.
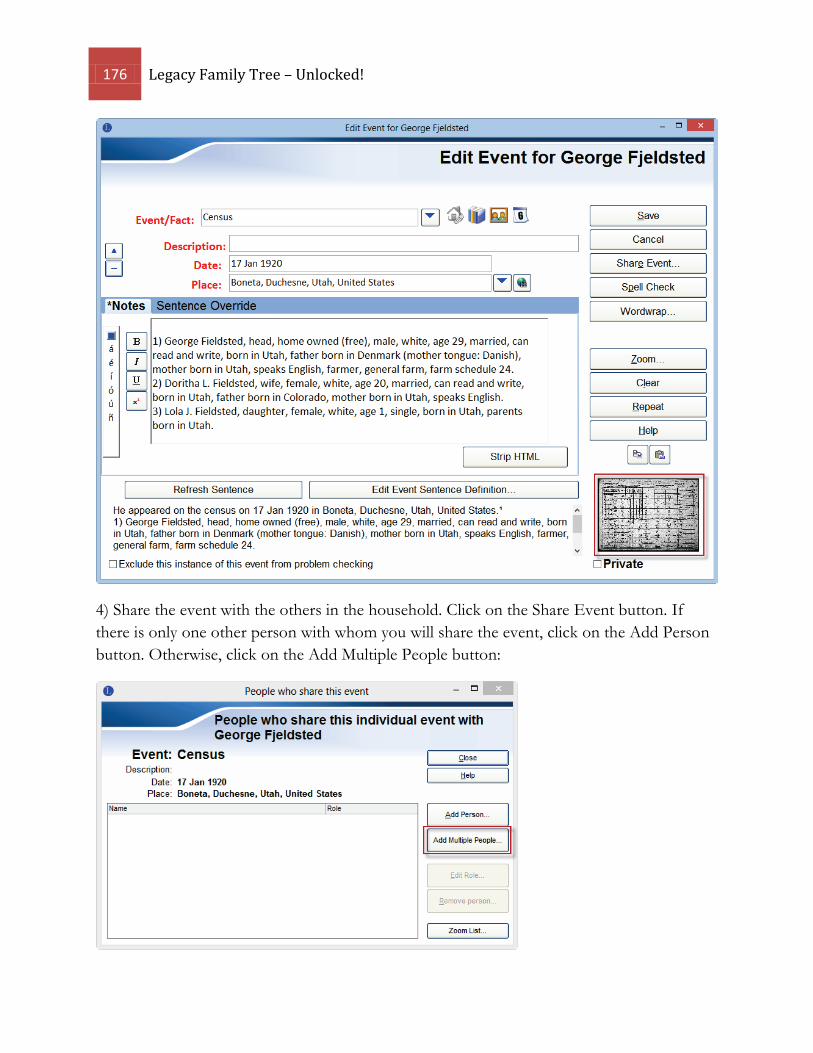
176 Legacy Family Tree – Unlocked!
4) Share the event with the others in the household. Click on the Share Event button. If there is only one other person with whom you will share the event, click on the Add Person button. Otherwise, click on the Add Multiple People button:
Chapter 5 ⟡ Adding a Census Record 177
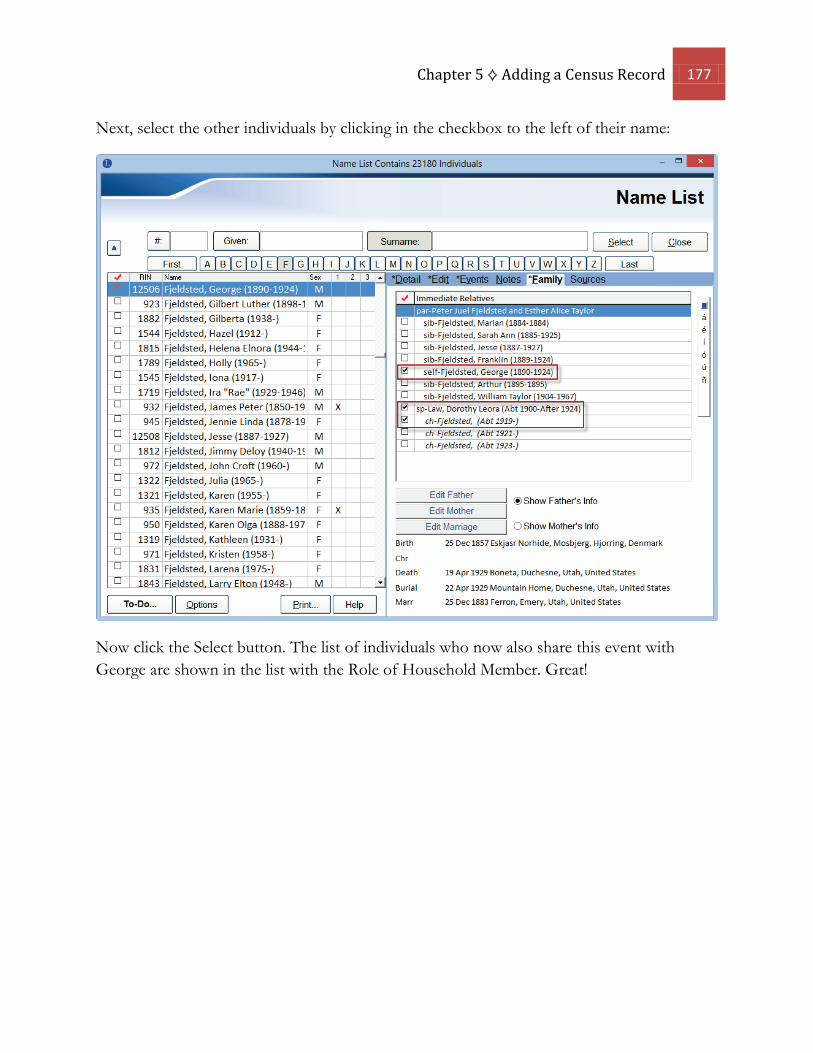
Next, select the other individuals by clicking in the checkbox to the left of their name:
Now click the Select button. The list of individuals who now also share this event with George are shown in the list with the Role of Household Member. Great!
178 Legacy Family Tree – Unlocked!
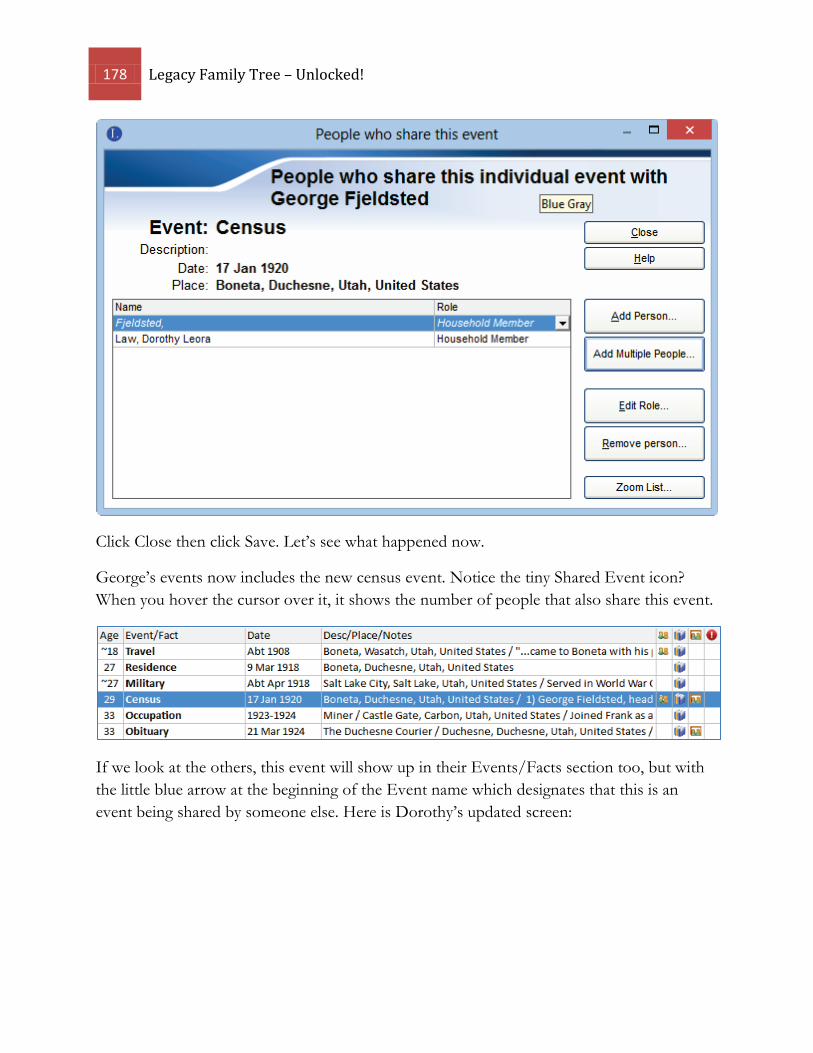
Click Close then click Save. Let’s see what happened now.
George’s events now includes the new census event. Notice the tiny Shared Event icon? When you hover the cursor over it, it shows the number of people that also share this event.
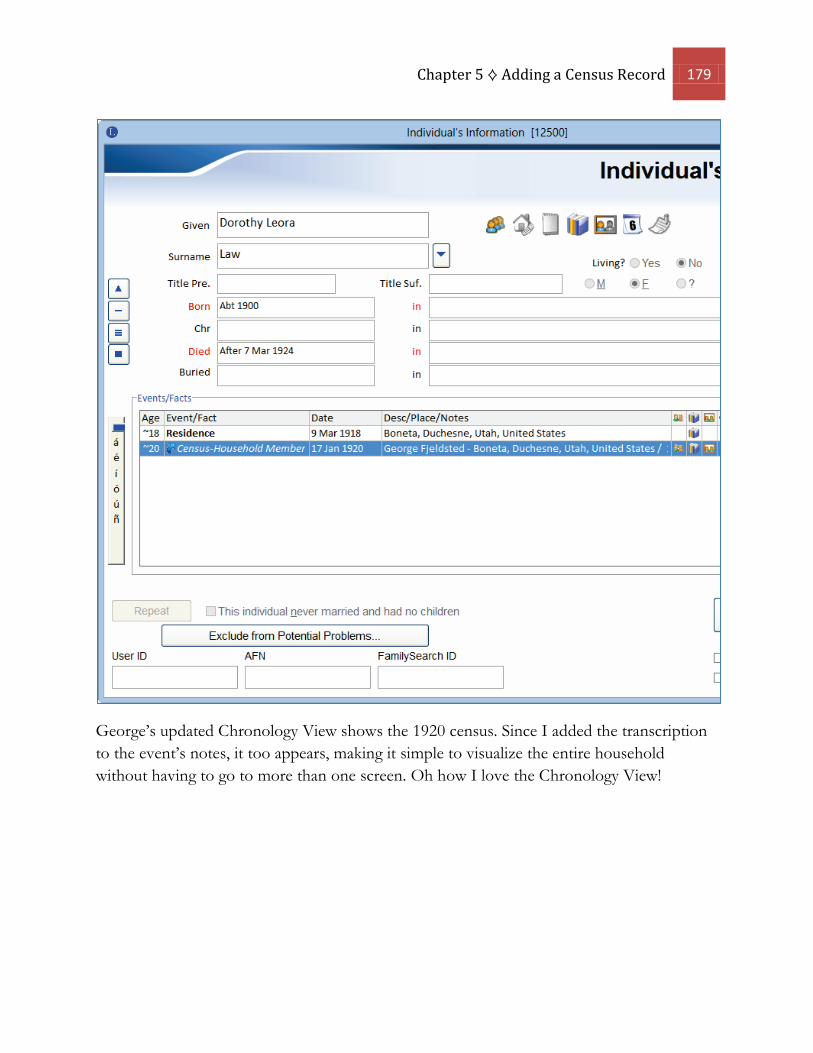
If we look at the others, this event will show up in their Events/Facts section too, but with the little blue arrow at the beginning of the Event name which designates that this is an event being shared by someone else. Here is Dorothy’s updated screen:
Chapter 5 ⟡ Adding a Census Record 179
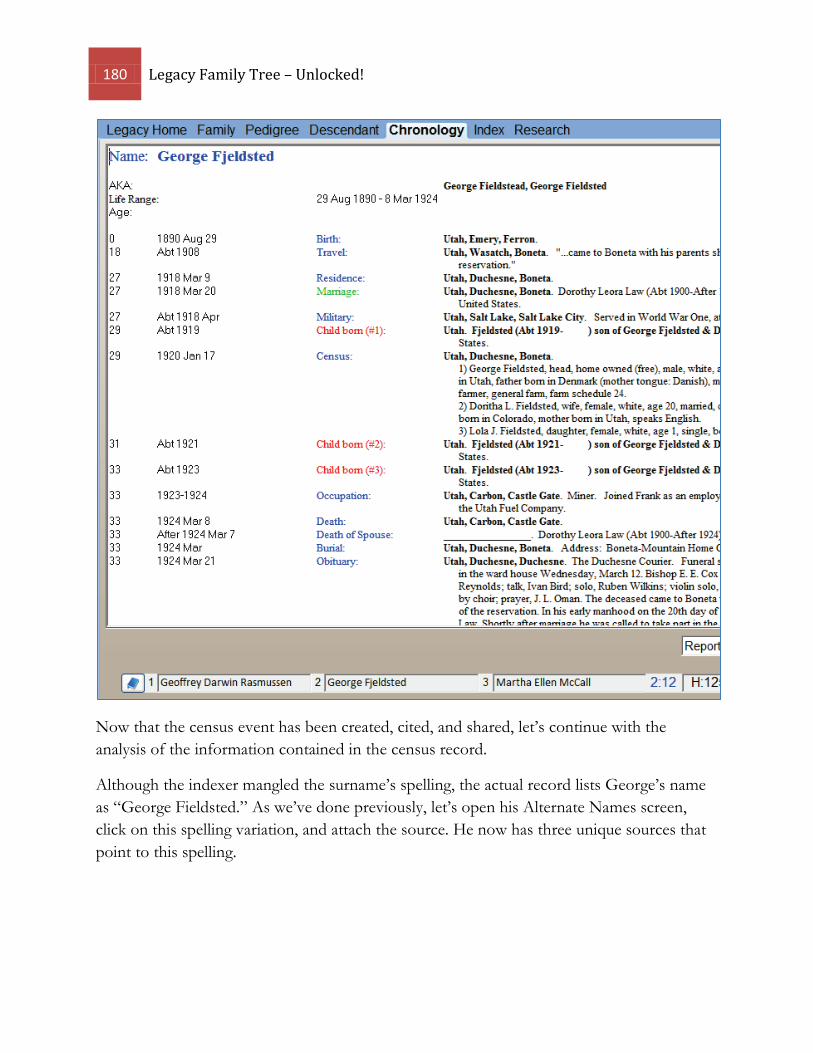
George’s updated Chronology View shows the 1920 census. Since I added the transcription to the event’s notes, it too appears, making it simple to visualize the entire household without having to go to more than one screen. Oh how I love the Chronology View!
180 Legacy Family Tree – Unlocked!
Now that the census event has been created, cited, and shared, let’s continue with the analysis of the information contained in the census record.
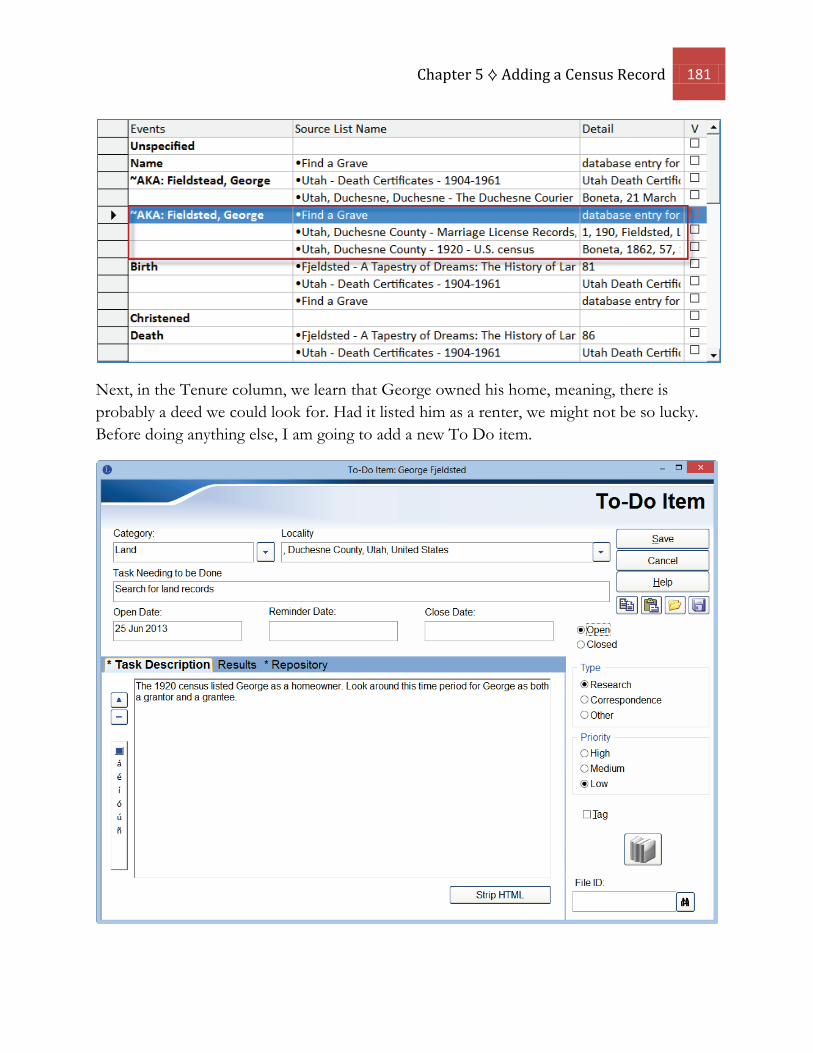
Although the indexer mangled the surname’s spelling, the actual record lists George’s name as “George Fieldsted.” As we’ve done previously, let’s open his Alternate Names screen, click on this spelling variation, and attach the source. He now has three unique sources that point to this spelling.
Chapter 5 ⟡ Adding a Census Record 181
Next, in the Tenure column, we learn that George owned his home, meaning, there is probably a deed we could look for. Had it listed him as a renter, we might not be so lucky. Before doing anything else, I am going to add a new To Do item.
182 Legacy Family Tree – Unlocked!
Whew! Now I do not have to remember to do that later on. Oh how I love the To Do List!
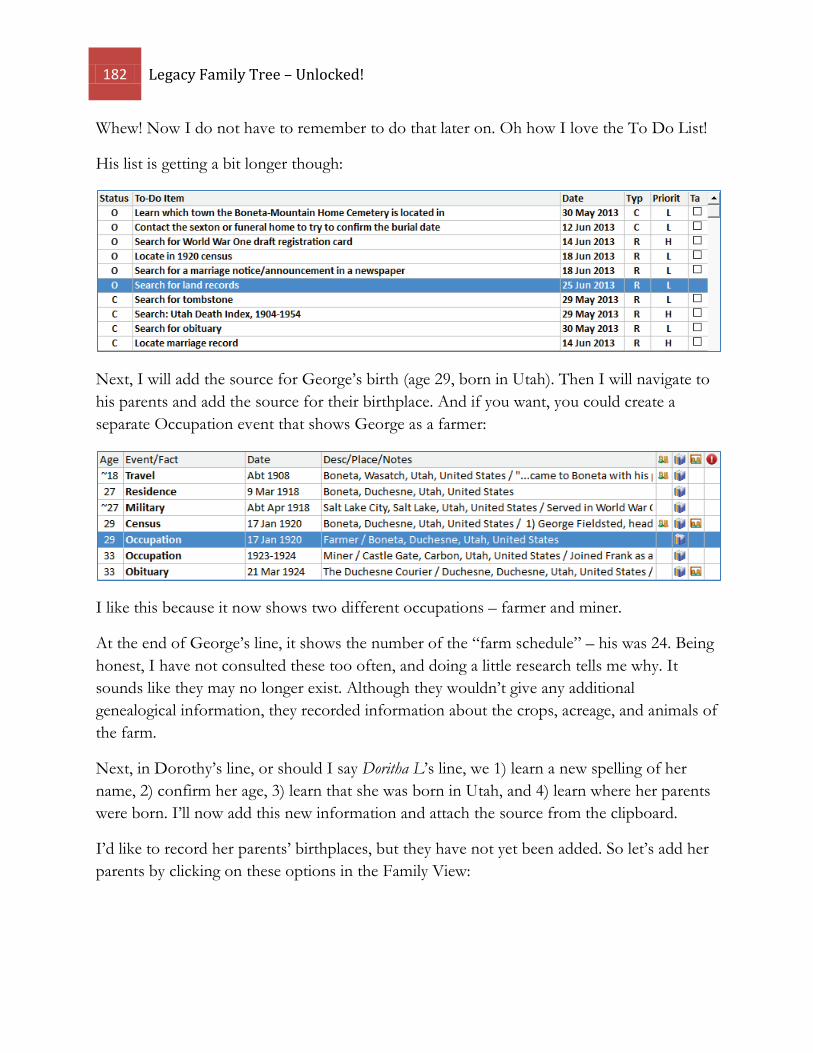
His list is getting a bit longer though:
Next, I will add the source for George’s birth (age 29, born in Utah). Then I will navigate to his parents and add the source for their birthplace. And if you want, you could create a separate Occupation event that shows George as a farmer:
I like this because it now shows two different occupations – farmer and miner.
At the end of George’s line, it shows the number of the “farm schedule” – his was 24. Being honest, I have not consulted these too often, and doing a little research tells me why. It sounds like they may no longer exist. Although they wouldn’t give any additional genealogical information, they recorded information about the crops, acreage, and animals of the farm.
Next, in Dorothy’s line, or should I say Doritha L’s line, we 1) learn a new spelling of her name, 2) confirm her age, 3) learn that she was born in Utah, and 4) learn where her parents were born. I’ll now add this new information and attach the source from the clipboard.
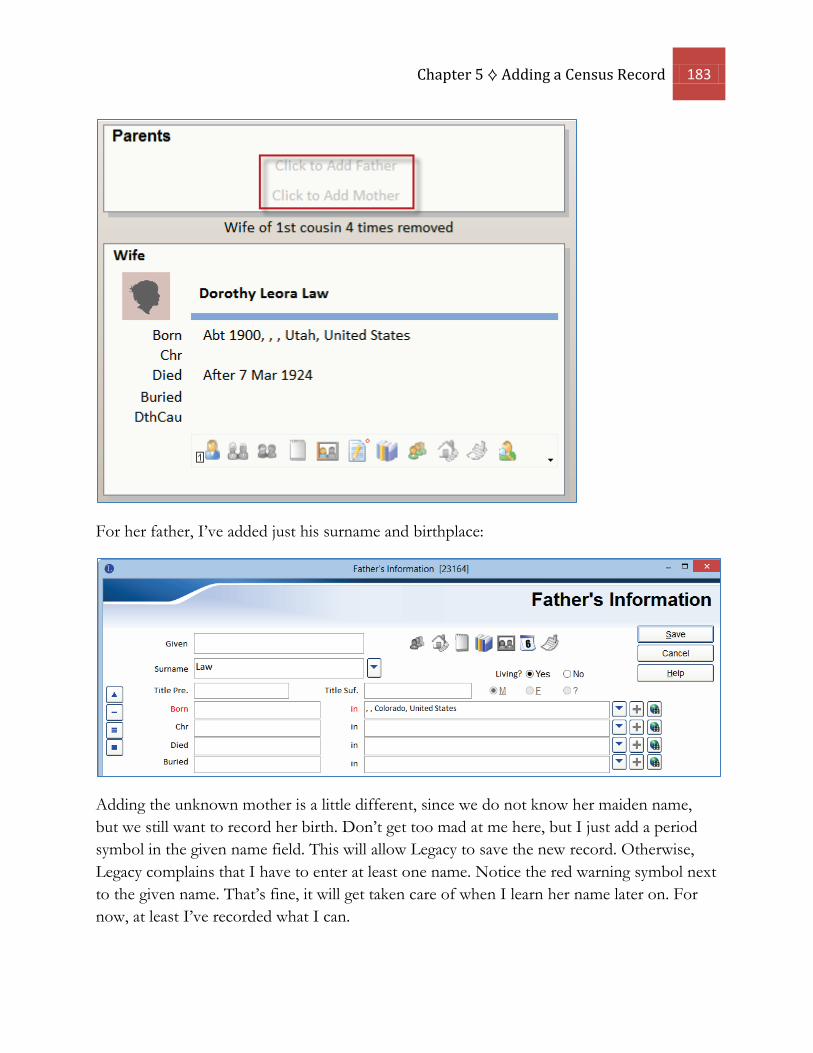
I’d like to record her parents’ birthplaces, but they have not yet been added. So let’s add her parents by clicking on these options in the Family View:
Chapter 5 ⟡ Adding a Census Record 183
For her father, I’ve added just his surname and birthplace:
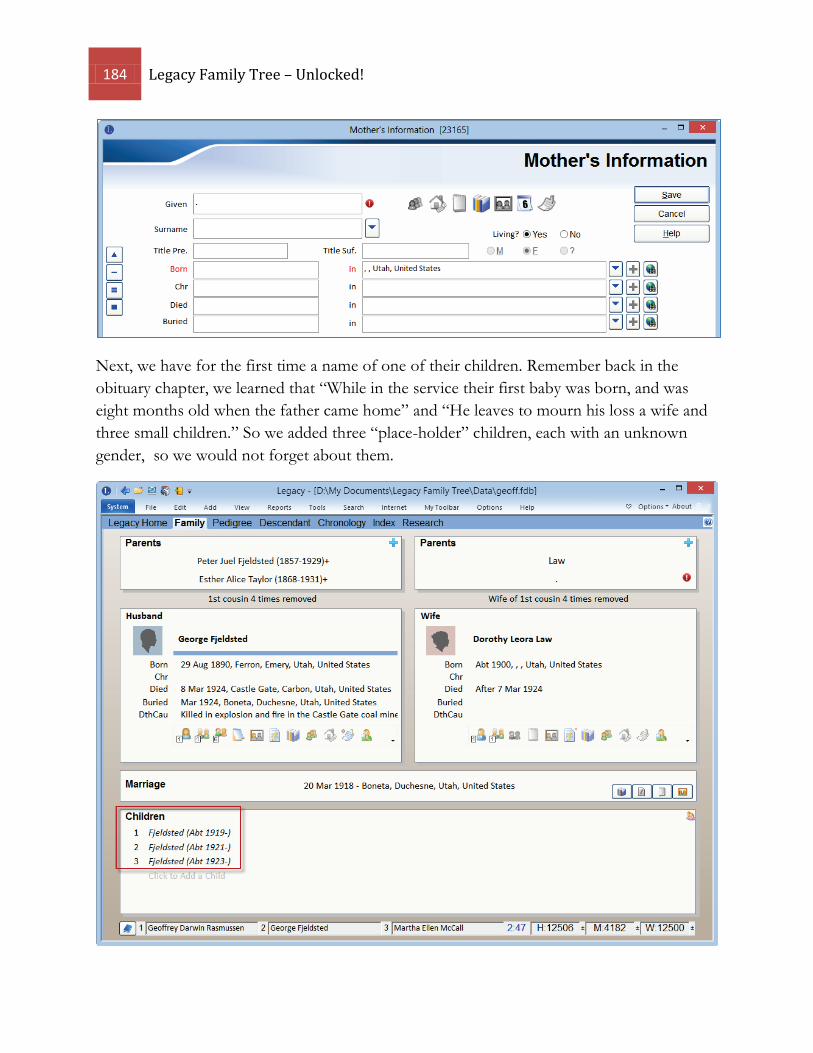
Adding the unknown mother is a little different, since we do not know her maiden name, but we still want to record her birth. Don’t get too mad at me here, but I just add a period symbol in the given name field. This will allow Legacy to save the new record. Otherwise, Legacy complains that I have to enter at least one name. Notice the red warning symbol next to the given name. That’s fine, it will get taken care of when I learn her name later on. For now, at least I’ve recorded what I can.
184 Legacy Family Tree – Unlocked!
Next, we have for the first time a name of one of their children. Remember back in the obituary chapter, we learned that “While in the service their first baby was born, and was eight months old when the father came home” and “He leaves to mourn his loss a wife and three small children.” So we added three “place-holder” children, each with an unknown gender, so we would not forget about them.
Chapter 5 ⟡ Adding a Census Record 185
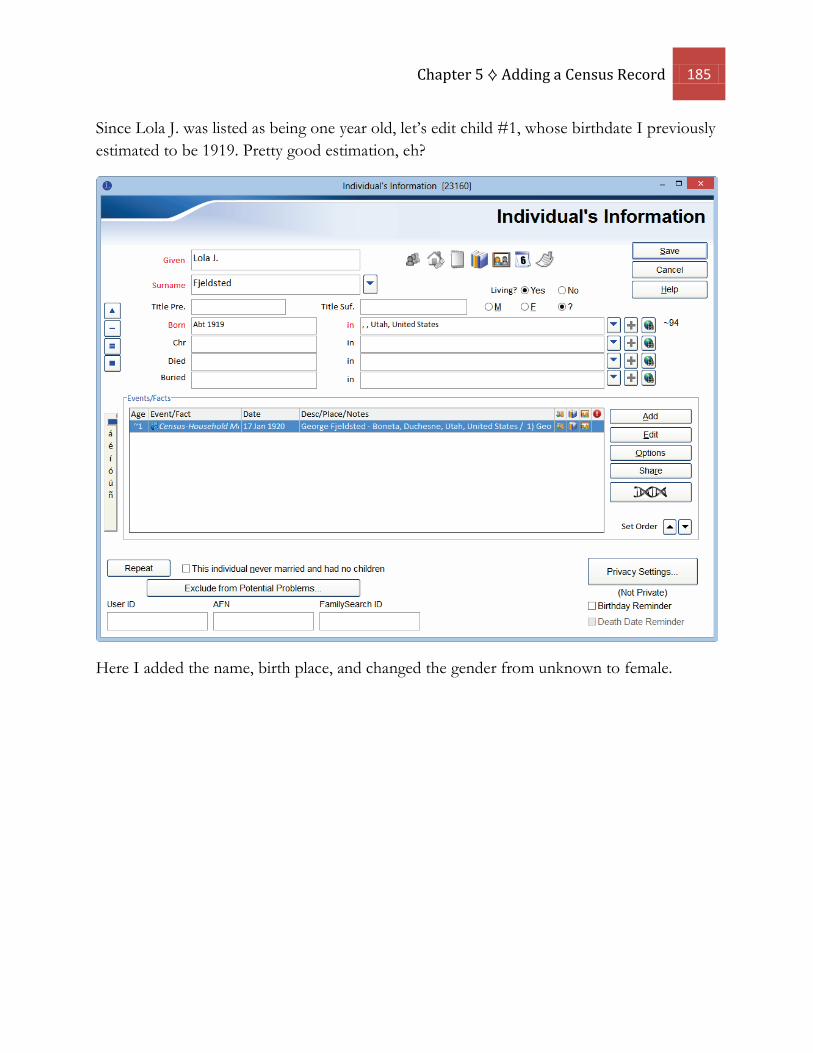
Since Lola J. was listed as being one year old, let’s edit child #1, whose birthdate I previously estimated to be 1919. Pretty good estimation, eh?
Here I added the name, birth place, and changed the gender from unknown to female.
186 Legacy Family Tree – Unlocked!
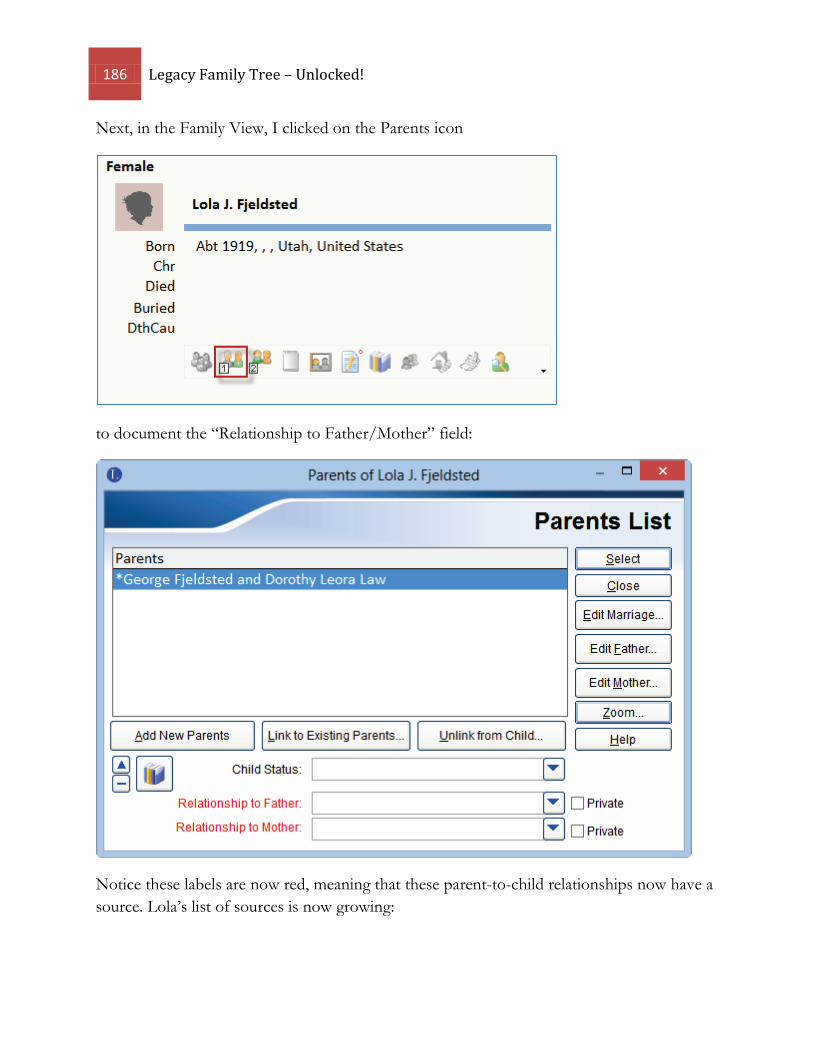
Next, in the Family View, I clicked on the Parents icon
to document the “Relationship to Father/Mother” field:
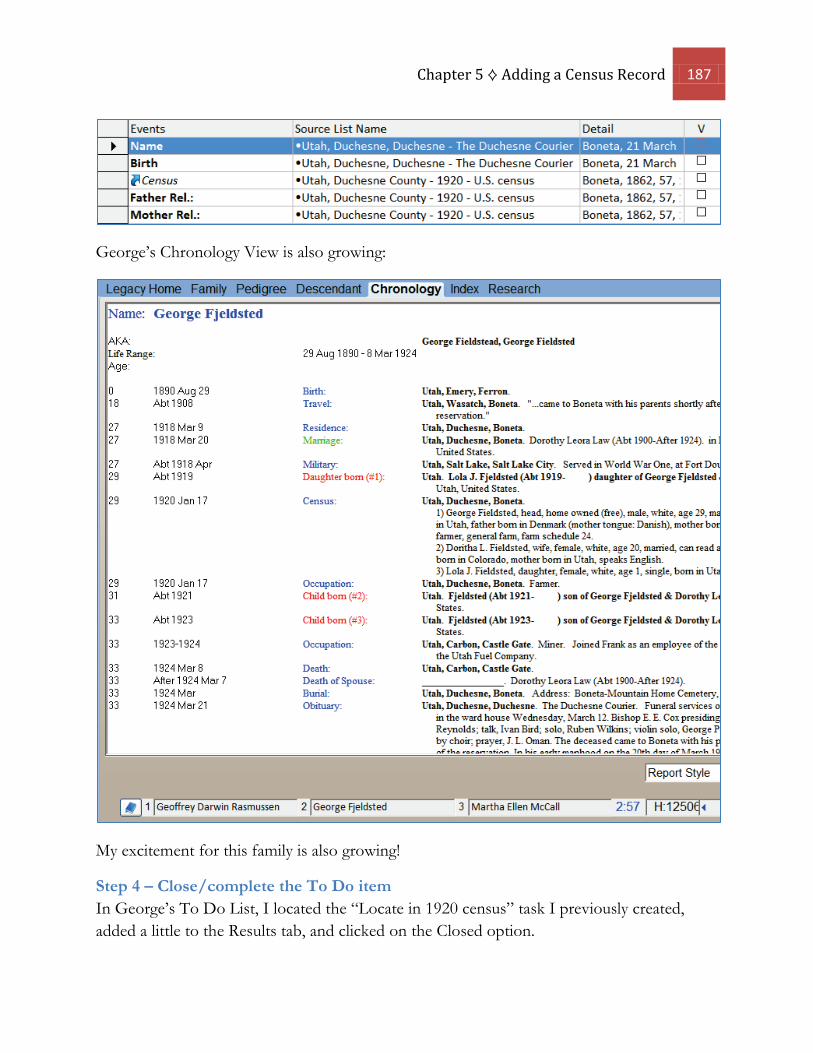
Notice these labels are now red, meaning that these parent-to-child relationships now have a source. Lola’s list of sources is now growing:
Chapter 5 ⟡ Adding a Census Record 187
George’s Chronology View is also growing:
My excitement for this family is also growing!
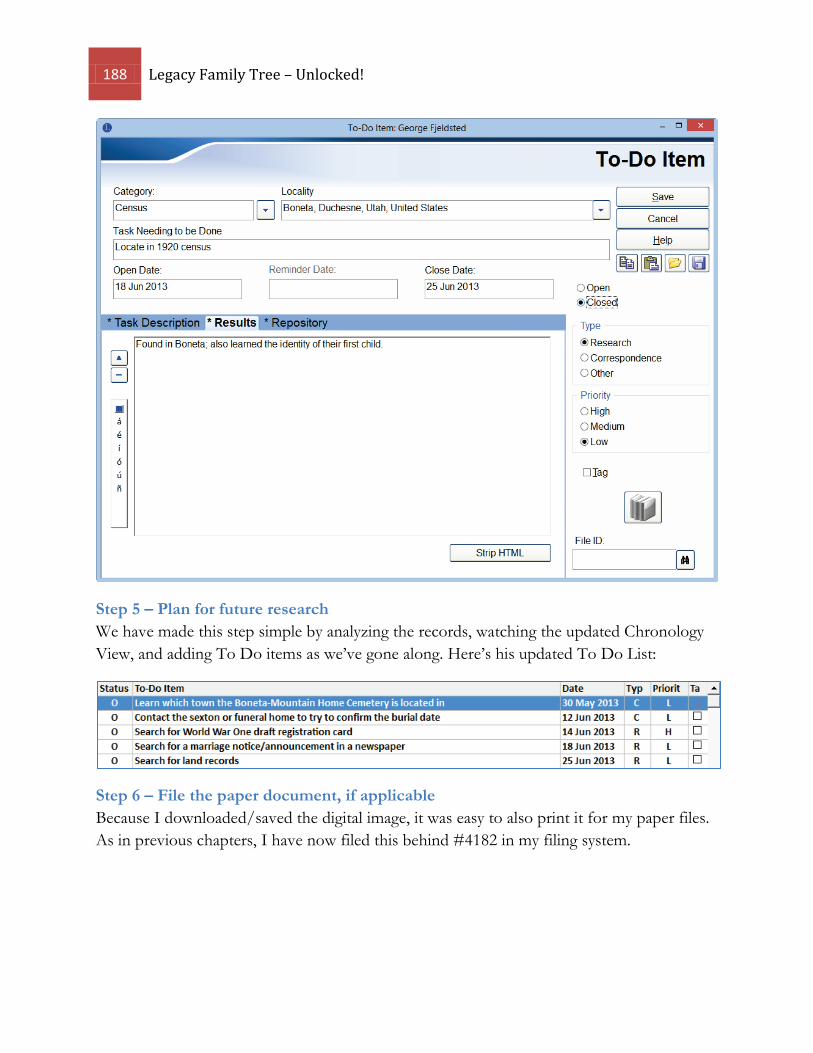
Step 4 – Close/complete the To Do item In George’s To Do List, I located the “Locate in 1920 census” task I previously created, added a little to the Results tab, and clicked on the Closed option.
188 Legacy Family Tree – Unlocked!
Step 5 – Plan for future research We have made this step simple by analyzing the records, watching the updated Chronology View, and adding To Do items as we’ve gone along. Here’s his updated To Do List:
Step 6 – File the paper document, if applicable Because I downloaded/saved the digital image, it was easy to also print it for my paper files. As in previous chapters, I have now filed this behind #4182 in my filing system.

Thank you for reading the preview.
Click here to purchase Legacy Family Tree – Unlocked! Techniques, Tips and Step-by-Steps for Using Legacy Family Tree To Record Your
Genealogy