Embed Size (px)
Citation preview

Vulture News 78a A guide for attaching devices to vultures and condors August 2020
44
Leg loop Harness. Design and Method 5
Sonja Krüger http://dx.doi.org/10.4314/vulnew.v78ai1.9
This method has been used successfully on Bearded Vultures Gypaetus barbatus in South Africa and
Europe and on Cape Vultures in South Africa. Daniel Hegglin is acknowledged his role in the leg loop
harness design and method.
Figure 5.0: Adult Bearded Vulture with satellite GPS transmitter
Materials and Equipment needed:
Tubular Teflon ribbon: 6.4 mm wide
(0.25”) and 8.4 mm wide (0.33”) (use one
or both)
Silicone cord – 2 mm thick, or clothing
elastic – 5 mm wide
Heat shrink tubing
Two-ear clamps #5 / #7 (can also use cable
ties)
Elastic thread (white)
Medical tape & cellotape
Powder
Superglue
Transmitter (have used Microwave,
NorthStar)
Neoprene pad and glue (if not supplied by
manufacturer of transmitter)
Thin sewing needle and cotton thread
Surgical clamps
Long thin piece of metal/copper wire
Scissors
Pliers
Attachment must be prepared in advance.
Vulture News 78a A guide for attaching devices to vultures and condors August 2020
45
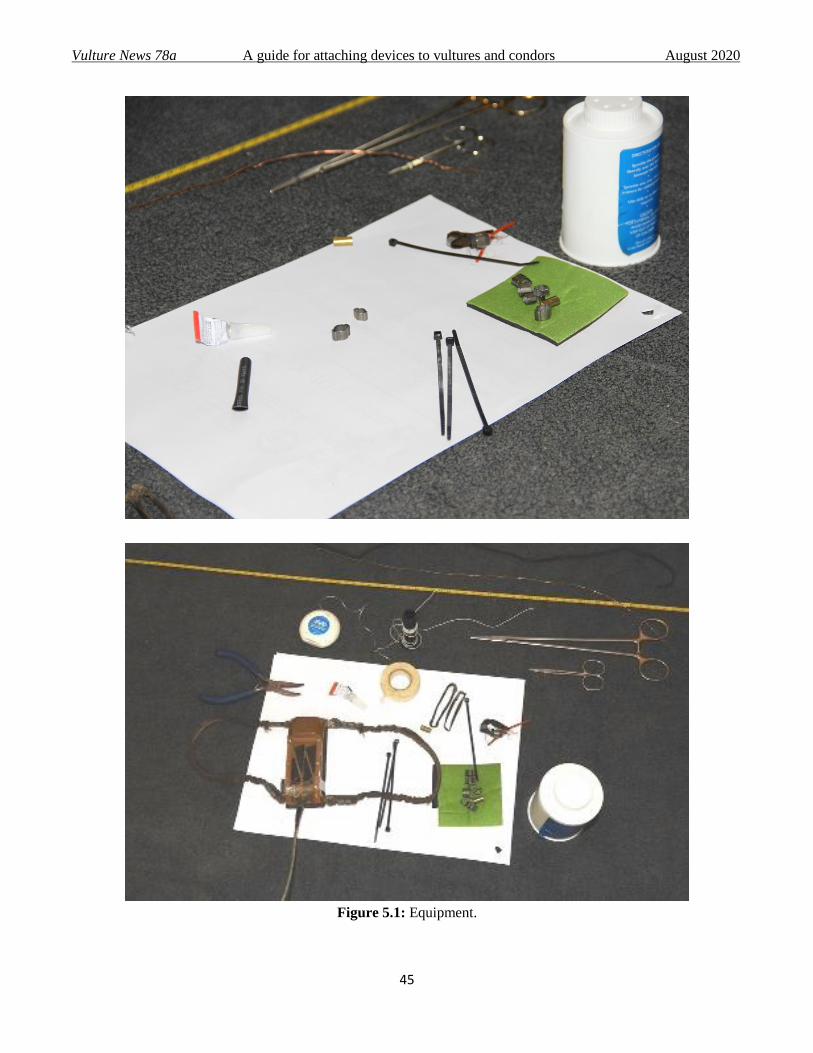
Figure 5.1: Equipment.
Vulture News 78a A guide for attaching devices to vultures and condors August 2020
46
Measurements and preparations: Key
stages/steps
The leg loop harnesses can be made “expandable”.
These harnesses have been used successfully on
numerous Bearded Vultures, some even lasting
more than 10 years on the bird. The expandable
version provides additional elasticity (the Teflon
provides some elasticity) for comfort and to date no
evidence of chaffing, as a result of the additional
bunched up material, has been found.
For the expandable version; use silicone cord (2
mm diameter) which is highly durable, or clothing
elastic (5 mm wide) that is easily obtainable and
easy to work with. For the non-expandable version
(used successfully on Cape Vultures), leave out the
step that involves the cord or elastic.
The measurements below are for Bearded Vultures
(4–6 kg)- for a larger bird use approximately 10 cm
more and for a smaller bird use 10 cm less.
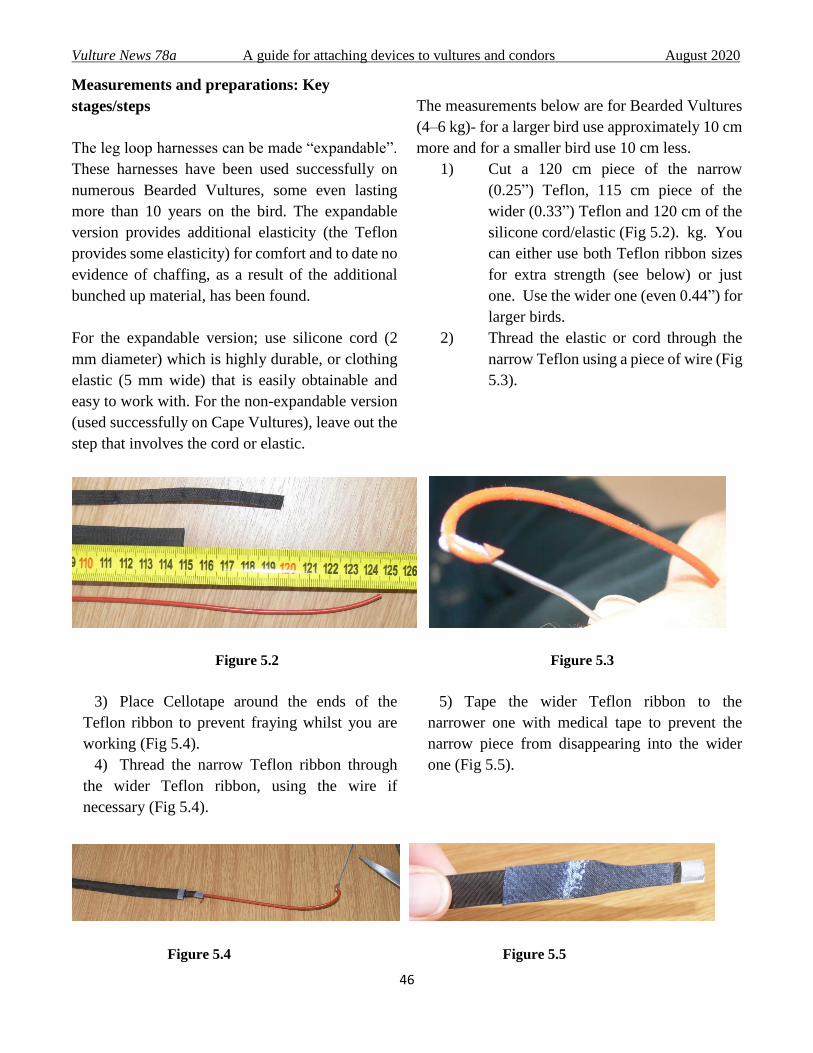
1) Cut a 120 cm piece of the narrow
(0.25”) Teflon, 115 cm piece of the
wider (0.33”) Teflon and 120 cm of the
silicone cord/elastic (Fig 5.2). kg. You
can either use both Teflon ribbon sizes
for extra strength (see below) or just
one. Use the wider one (even 0.44”) for
larger birds.
2) Thread the elastic or cord through the
narrow Teflon using a piece of wire (Fig
5.3).
Figure 5.2 Figure 5.3
3) Place Cellotape around the ends of the
Teflon ribbon to prevent fraying whilst you are
working (Fig 5.4).
4) Thread the narrow Teflon ribbon through
the wider Teflon ribbon, using the wire if
necessary (Fig 5.4).
5) Tape the wider Teflon ribbon to the
narrower one with medical tape to prevent the
narrow piece from disappearing into the wider
one (Fig 5.5).
Figure 5.4 Figure 5.5

Vulture News 78a A guide for attaching devices to vultures and condors August 2020
47
6) Using the elastic thread (white is easier to
see than black), tie off a 1 cm section to secure the
elastic and Teflon ribbon and ensure that none of
the individual pieces move when you thread them
into the lugs of the transmitter. Knots can be made
on alternating sides of the ribbon for 1 cm (Fig
5.6). Cut off the ends (Fig 5.7). From now on the
elastic cord in the narrower Teflon both of which
are in the wider Teflon will be referred to as
harness material.
Figure 5.6 Figure 5.7
7) Your harness material should now be approximately 80 cm long (Fig 5.8) and 100 cm long at full
stretch (Fig 5.9).
Figure 5.8 Figure 5.9.
8) Thread the harness through the lugs at the back of the transmitter (Fig 5.10). Use the ends of the
elastic thread for this or the surgical clamps (Fig 5.11).
Figure 5.10 Figure 5.11
9) Create a weak link to thread through the
front attachment points of the transmitter. The
weak link is to ensure that the harness will drop
off after some time. Create a weak link by cutting
a piece of narrow Teflon ribbon, that when sewn
together as a loop (Fig 5.12), will fit through the
front lug and extend on either side by about 5–8
mm (Fig 5.13; enough to thread the harness
material through). The “strength” of the weak link
will depend on the number and position of stiches.
Use cotton for sewing the weak link- dental floss
is too durable and will last >10 years. Even cotton
will last >8 years. Adding Superglue to the stiches
will increase durability of the thread.

Vulture News 78a A guide for attaching devices to vultures and condors August 2020
48
Figure 5.12 Figure 5.13
10) To secure the harness on the back end of the
transmitter, cut a piece of heat shrink tubing
(black plastic) just longer then the length of a two-
ear clamp (or two clamps to make it more secure).
Thread the heat shrink tubing on the harness
material and thread the clamp over this. Use pliers
to flatten/tighten the clamp (Fig 5.14). Ringing
pliers will allow you to crimp the ears of the two-
ear clamp. Note, plastic cable ties (easily
obtainable and as durable?) may be used instead
of clamps, but be sure to have no sharp edges that
can injure the bird- hence flat metal clamps are
preferable (Fig 5.15).
Figure 5.14 Figure 5.15
11) Place another piece of heat shrink tubing on
each end of the harness material and insert one or
two clamps on this. The heat shrink tubing
protects the Teflon from being cut by the clamp.
Thread the ends of the harness material through
the weak link loops prepared in 9) and then back
onto itself and insert the end into the heat shrink
tubing and clamp (Fig 5.16). Do not close these
clamps- this is the end that will be adjusted once
on the bird, and the clamps will be tightened after
final adjustments have been made (see below).
Once the harness has been adjusted on the bird
and the clamps tightened, the end that has been
threaded through can be cut off. Superglue can
be placed on the cut end to stop fraying; care must
be taken not to get glue on the feathers of the bird.
Place a piece of paper underneath when gluing.
Powder can be placed on the glue to dry it
quicker.
Depending on the type of attachment the
transmitter has, it may not be possible to thread
the harness material through the lugs on the

Vulture News 78a A guide for attaching devices to vultures and condors August 2020
49
transmitter. In this instance, you may need two
weak links (front and back) and two pieces of the
harness material to thread through the lugs of the
transmitter, one at the front of the transmitter and
one at the back. Ideally and if the attachments are
wide enough, you should be able to thread the
entire length through both ends (see 12).
12) The harness is now ready for fitting. Ensure
that it has been tested before fitting to a bird.
Make sure solar panels are fully charged before
fitting. Keep the magnet on (if the transmitter is
activated by removing a magnet) until the bird is
ready to be released.
Figure 5.16
13) If elastic was used, then the elasticity of the harness is as depicted in Figs 5.17-20.

Vulture News 78a A guide for attaching devices to vultures and condors August 2020
50
Figures 5.17-20

Vulture News 78a A guide for attaching devices to vultures and condors August 2020
51
14) Make sure your contact details are on the
transmitter (Fig 5.21).
15) Make sure a neoprene pad has been glued to
the bottom of the transmitter (with a bit of
overlap) if the transmitter did not come complete
with a pad.
Figure 5.21
Restraint and hooding
At this stage an additional person is needed to hold
the bird whilst the tag is being attached. It is
recommended that the bird is held breast
downwards with legs retracted (Fig 5.22). When
fitment is completed and the clamps have not yet
been tightened, both legs should be stretched
backward (or the bird made to stand) before final
adjustments are made. The bird can be held on the
ground or on someone’s lap to make it easier to
manoeuvre the harness on.
In order to keep the bird calm while
restrained, a loose material tube (or a sock with the
toes cut off - Fig 5.22) can be used to cover the head.
A hole in the end is needed so that the bird will not
choke if it regurgitates food whilst hooded.

Vulture News 78a A guide for attaching devices to vultures and condors August 2020
52
Figure 5.22
Fitting to the bird
1) The two leg loops can be stretched over the
leg one at a time (Fig 5.24) until the material
settles nicely in the leg joint on either side (Fig
5.25). The device should be positioned on the
lower back in the approximate position where it
will lie. Run a finger along the harness material to
ensure that it lies smoothly in the leg joint and that
no feathers are obstructed.
Figure 5.23

Vulture News 78a A guide for attaching devices to vultures and condors August 2020
53
Figure 5.24
2) The two loose ends of harness material
should then be pulled evenly to tighten the
harness. Assess the fit of the harness by putting
two fingers (side by side) between the tag and the
bird’s back (Fig 5.26). It should be possible to
move the fingers but without there being a gap. It
is helpful to stand the bird on its feet (though still
restrained) whilst assessing the fitting. As a guide
you can compare the lengths of the two ends of
the harness material (Fig 5.27).
Figure 5.25

Vulture News 78a A guide for attaching devices to vultures and condors August 2020
54
Figure 5.26
3) Once the harness has been adjusted on the
bird, close/tighten the two-ear clamps using pliers
(Fig 5.28). The end that has been threaded through
can be cut off (Fig 5.29). Superglue can be placed
on the cut end to stop fraying, but care must be
take not to get glue on the feathers of the bird (Fig
5.30). Place a piece of paper or your finger
underneath when gluing. Powder can be placed on
the glue to dry it quicker.
Figure 5.27

Vulture News 78a A guide for attaching devices to vultures and condors August 2020
55
Figure 5.28
Figure 5.29

Vulture News 78a A guide for attaching devices to vultures and condors August 2020
56
4) Remove the magnet (if the transmitter has one) to activate the transmitter before releasing the bird.
Figure 5.30
******


![Vigil Reserve Closing Loop Instructions[1] · NOTE: Silicon should be applied to the Vigil reserve closing loop according to the Harness and Container Manufacturers Instruction. If](https://img.pdfslide.us/doc/110x75/5eda85ebfebf237c0c3b7078/vigil-reserve-closing-loop-instructions1-note-silicon-should-be-applied-to-the.jpg)


![INDEX [] COVER ENG.pdf3 2.1- LEG COVER Firstly, hook the two trapezoid Maillons to the loops at the harness seat edges. These Maillons are attached to the two lower straps of the LEG](https://img.pdfslide.us/doc/110x75/5f9ca1f4f0d5082e3b756dbc/index-cover-engpdf-3-21-leg-cover-firstly-hook-the-two-trapezoid-maillons.jpg)