Embed Size (px)
Citation preview

Learning to SailSmall Boat Sailing at theUCLA Marina Aquatic CenterSection 2: Introduction to Single-Handed Sailing
By Vladislav J. Mikulich
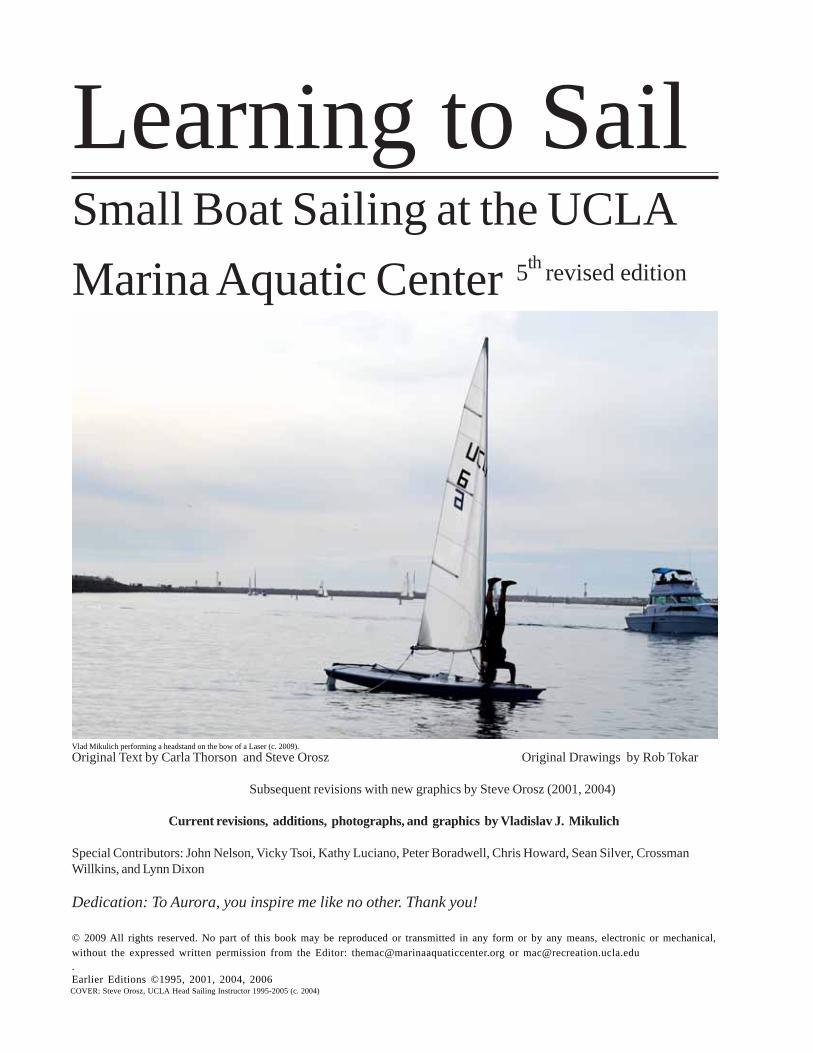
Learning to SailSmall Boat Sailing at the UCLAMarina Aquatic Center
Original Text by Carla Thorson and Steve Orosz Original Drawings by Rob Tokar
Subsequent revisions with new graphics by Steve Orosz (2001, 2004)
Current revisions, additions, photographs, and graphics by Vladislav J. Mikulich
Special Contributors: John Nelson, Vicky Tsoi, Kathy Luciano, Peter Boradwell, Chris Howard, Sean Silver, CrossmanWillkins, and Lynn Dixon
Dedication: To Aurora, you inspire me like no other. Thank you!
© 2009 All rights reserved. No part of this book may be reproduced or transmitted in any form or by any means, electronic or mechanical,without the expressed written permission from the Editor: [email protected] or [email protected] Editions ©1995, 2001, 2004, 2006
Vlad Mikulich performing a headstand on the bow of a Laser (c. 2009).
5 revised edition
COVER: Steve Orosz, UCLA Head Sailing Instructor 1995-2005 (c. 2004)
th

I. BASIC SAILING SKILLSIntroduction to sailing at UCLA 4Safety and Preparation 5-6Sailing Area 7Parts of the Boat: Capri 14.2 8-10Wind Sensing 11How Sailboats Work: Beginner 12Sailing Directions: Points of Sail 13-15Starting the Boat 16Stopping and Slowing the Boat 17Steering the Boat: Use of the Tiller 18Tacking 19Sailing Upwind: Beating 20Gybing 21Navigational Rules of the Road 22-24Capsize Recovery 25-26Person Overboard Recovery 27Knots Beginner: Belaying & Figure-Eight 28Rigging: Capri 14.2 29-33Launching 34-35Docking 36-37Derigging: Capri 14.2 38-42_________________________________
II. INTRODUCTION TO SINGLE-HANDED SAILING
Parts of the Boat: Laser 43-44Displacement Sailing vs Planing 45Boat Trim 46-48Hiking Properly 49-50Sail Controls: Laser 51-53Knots Intermediate: Bowline, Hitches
Sheet Bend, & Coiling a line 54-55Tacking: Use of a Tiller Extension 56-57Gybing: 58-59Dry Capsize Recovery: Walkover 60Rigging: Laser 61-67Derigging: Laser 68-71
_________________________________III. INTRODUCTION TO DOUBLE HANDED PERFORMANCE SAILING:
Parts of the Boat: V-15 72-73Points of Sail: Speed Differentials 74Sail Setup 75-76
Upwind Sailing: Planning 77
Vlad Mikulich, UCLA Head Sailing Instructor 2005 to present, mid-tack during reach on breezyday (c.2004).
Table of ContentsDownwind Sailing: Zig-Zag 78Tacking 79-80Gybing 81-82Rigging: V-15 83-86Derigging: V-15 87-90
_________________________________IV. INTRODUCTION TO CATAMARAN SAILING Parts of the boat: Hobie 16 91-92
Tacking: Body Placement 93-95Gybing 96-98Trapezing/ Flying a hull 99-101Rigging: Hobie 16 102-106Derigging: Hobie 16 107-111
_________________________________VI. INTERMEDIATE TO ADVANCED SAILING TOPICS
Roll Tacking 112-113Roll Gybing 114-115How Sails Work: Circulation Theory 116Upwind Sailing in Gusts 117-118Wave Sailing Upwind 119-120Wave Sailing Downwind 121-122Foward and Aft Torquing: Laser 123-124Mast Rake 125Ocean Safety 126-128Three Basic Wind Shifts 129-130Current 131-132Local Weather: MDR 133-134Sailing by the Lee 135Introduction to Racing 136-140
_________________________________VII. GLOSSARY 140-147
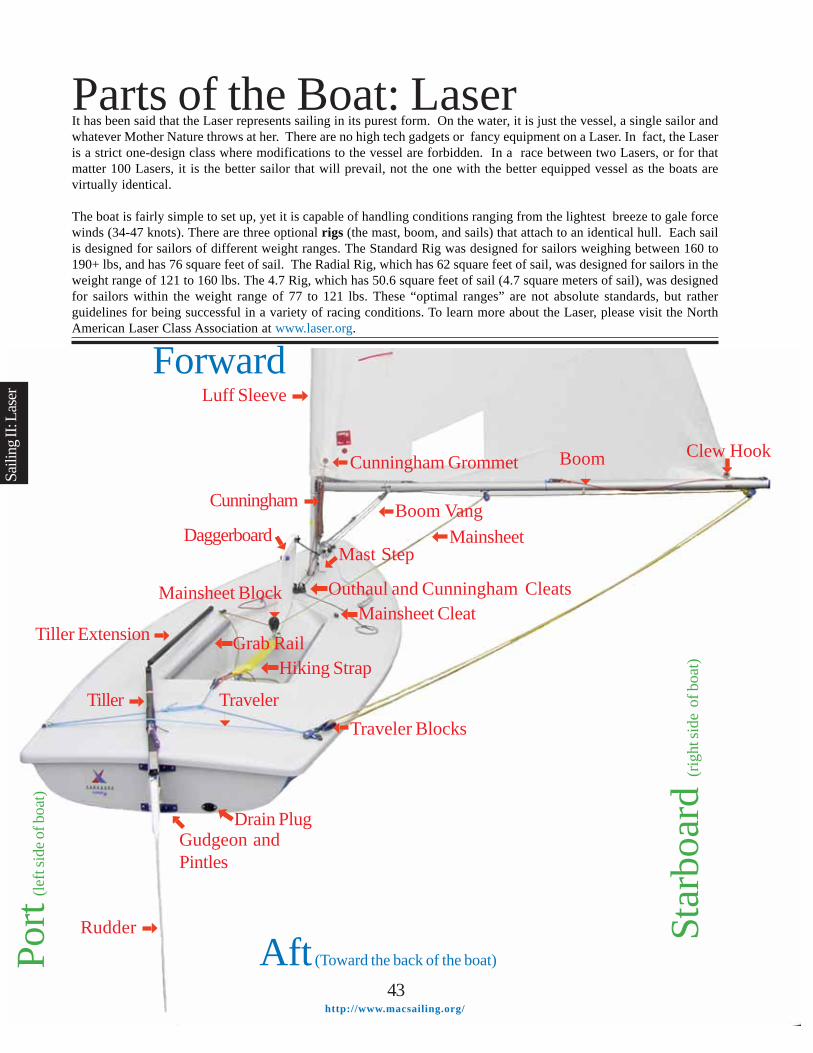
Parts of the Boat: Laser
Saili
ng II
: Las
er
It has been said that the Laser represents sailing in its purest form. On the water, it is just the vessel, a single sailor andwhatever Mother Nature throws at her. There are no high tech gadgets or fancy equipment on a Laser. In fact, the Laseris a strict one-design class where modifications to the vessel are forbidden. In a race between two Lasers, or for thatmatter 100 Lasers, it is the better sailor that will prevail, not the one with the better equipped vessel as the boats arevirtually identical.
The boat is fairly simple to set up, yet it is capable of handling conditions ranging from the lightest breeze to gale forcewinds (34-47 knots). There are three optional rigs (the mast, boom, and sails) that attach to an identical hull. Each sailis designed for sailors of different weight ranges. The Standard Rig was designed for sailors weighing between 160 to190+ lbs, and has 76 square feet of sail. The Radial Rig, which has 62 square feet of sail, was designed for sailors in theweight range of 121 to 160 lbs. The 4.7 Rig, which has 50.6 square feet of sail (4.7 square meters of sail), was designedfor sailors within the weight range of 77 to 121 lbs. These “optimal ranges” are not absolute standards, but ratherguidelines for being successful in a variety of racing conditions. To learn more about the Laser, please visit the NorthAmerican Laser Class Association at www.laser.org.
Luff Sleeve
Star
boar
d (r
ight
side
of b
oat)
Port
(left
side o
f boa
t)
Rudder
Tiller Extension
Cunningham
Mainsheet Block
Hiking Strap
Boom VangMainsheet
Boom
Drain Plug
Traveler
Gudgeon andPintles
Outhaul and Cunningham Cleats
Aft (Toward the back of the boat)
Forward
43http://www.macsailing.org/
Tiller
Grab Rail
Clew Hook
Mainsheet Cleat
Traveler Blocks
Mast StepDaggerboard
Cunningham Grommet

LASER: The Laser is the Men’s and Women’s OlympicClass single-handed dinghy, and it is arguably the mostpopular racing vessel in the world with over 200,000 boatsbuilt-to-date. It is cat rigged: it has a single mast withtriangular mainsail and no headsail (jib).
Sailing II: Laser
44http://www.macsailing.org/
Boom Vang
Tiller Extension
Head (corner of the sail)
Luff(side of the sail)
Leech(side of the sail)
Bow Eye
Daggerboard
Rudder
Batten Pocket
Tack (corner of the sail)
CunninghamMainsheet
Cockpit
Clew(corner of the sail) Cunningham Grommet
Hull
Foot(side of the sail)
Telltale
Outhaul
“Any fool can carry on, but a wiseman knows how to shorten sail intime.” — Joseph Conrad
Boom

Displacement vs PlaningThere are two modes of sailing for monohull vessels: displacement and planing. Most large monohulls and all slowmoving small ones operate via displacement sailing. Certain smaller vessels are capable of operating via planing whenenough power is applied.
Displacement hull plowsthrough the water slowly
Archimedes’ Principle of Buoyancy states that an objectfully or partially immersed in a liquid will displace a volumeof water equal in weight to the weight of the object. Sailboatsthat operate via this principle are sailing in displacementmode.
to skim along the surface of the water using the flatterportion of the aft hull. This occurs any time the boat hasenough power applied to the sails to break free from thewave it created. The heavier the vessel, the more powerthat must be applied to the sails for the hull to break freefrom the wave; therefore very few large sailboats can plane.
Although Catamarans and certain modern keelboats are ableto operate above hull speed by using unique design featuresthat are explained in other parts of the manual, they still arelimited by the resistance created by displacement sailing,and thus the above topic applies to all vessels in the water.
Planing in a Laser can be achieved on the following pointsof sail: Beam Reach, Broad Reach, and a Run. Beginnerswho wish to learn to plane should first start on a Beam Reachin flat water as it is the fastest point of sail for a Laser. If theskipper is the optimal weight for the vessel she will mostlikely need a fresh breeze (16-20 knots) to initiate planing.
In these conditions it is essential that the skipper keep theboat flat on the reach, as a boat with heel has an asymmetricalhull in the water that impedes planing. The sailor shouldmove her weight aft as the vessel begins to pick up speed.By doing so, the bow of the boat will be lifted, therebyreducing drag as there will be less area exposed to the water.
Furthermore the lifted bow area which has a pronouncedcurve is not suited for planning, whereas the flat aft sectionof the Laser is.
Lastly, by lifting the bow up, it makes it easier for the boat tobreak out of the wave it created.
A boat operating via displacement mode has a limited speedpotential because it must perpetually displace a patch ofwater equal to its own weight. Displacement boats createwaves as they move. As a boat begins to speed up, fewerand fewer waves are generated until only one wave, which isthe length of the boat, is produced. This single trough wavehas a crest at the bow and stern of the boat. The generatedwave cannot get much longer than the hull of the boat.Surface waves are dispersive, which means their speed isdependent upon the length of the wave. The longer the wave,the faster it can travel. Therefore each wave of a particularlength has a theoretical maximum speed. All boats have atheoretical “hull speed” that is dependent on the length ofthe vessel.
The theoretical hull speed of a boat in knots is equal to 1.34multiplied by the square root of the Length Water Line(LWL). The LWL is the length of the vessel that is actuallysitting in the water. For example a Laser is 13.78 feet long andapproximately 13 feet of the hull sits in the water at anygiven time. This means a Laser’s theoretical maximum speedis 1.34 X 3.61 = 4.83 knots.
Yet a Laser’s maximum speed is definitely above 4.83 knots.Lasers and other light weight small dinghies can operate asplaning vessels quite easily. In planing mode, the hull risesout of the water and escapes the single trough wave itproduced while moving. Thus as a boat begins to plane, thehull skips over the crest of the wave at the bow and begins
Bow lifts and boat planeson aft portion of the hull
http://www.macsailing.org/45
Saili
ng II
: Las
er

HighPressure
Boat Trim
http://www.macsailing.org/
Boat trim is the hull’s angle relative to the water. All vessels can rotate about their center of mass in three dimensions:pitching (fore and aft rotation), rolling (side to side rotation, commonly called heel) and yawing (clockwise tocounterclockwise rotation when viewed from above). The Laser has a very light hull. At approximately 130 lbs, the hull’sweight relative to the sailor’s weight makes the boat ideal to be responsive to the sailor’s position in regards to control-ling both pitching and rolling. The right body placement in the boat is extremely important to sailing fast and efficientlyin a Laser!
Essential KnowledgeOn most points of sail the Laser is most efficient when sailedflat!
Why sail flat?A flat boat allows the mast to stay vertical which means lift isnear the horizontal plane
Sailing UpwindUpwind sailing is one of the biggest challenges in learningto sail a Laser, as it can be quite physical when the breeze isstrong. It requires a combination of proper sail trim, boattrim, and pointing angle to be effective.
All upwind sailing regardless of the wind conditions is basedon generating lift via Bernoulli’s Principle.
Bernoulli’s PrincipleBernoulli’s Principle states that a fast moving fluidexerts less pressure than a slow moving fluid. Sails have anasymmetrical shape that allows airflow along each side tohave a different overall speed. The overall speed of the airon the leeward side is always faster than on the windwardside. This means there is a low pressure system on the leewardside of the sail, and thus lift is created perpendicular to thechord of the sail.
Sailor keeps his boat flat through the useof his body position
No Roll (Heel)
If the boat is sailed with a heel, a downward force is generatedthat depresses the hull into the water and reduces speed.
Lift is generated perpendicular to the sail
Lift
O Captain! My Captain!Our fearful trip is done,The ship has weathered every rack,the prize we sought is won,the Port is near,the bells I hearthe people all exulting.
— Walt Whitman
LiftDownward Force
A heeled boat causes a downward forcethat impedes forward motion
Near VerticalMast
Heeled Mast
Low Pressure
Airflow onthe leewardside is faster
Airflow on thewindwardside is slower
46Lift is perpendicularto the chord of thesail
Sailing II: Laser

On its own, this force causes the boat to slide sideways aswell as heel (rotational force). To go to windward a boatneeds more than just lift on the sails. The vessel must havelateral resistance to the sliding force as well as lift fromthe submerged portion of the vessel. This is provided bythe foils (daggerboard and rudder).
A Laser has a thin wing-shaped daggerboard, which not onlyprovides lateral resistance, but also generates lift whichaids the vessel in pointing to windward.
As stated above, when sailing to windward there is a largeforce on the sail that translates to sideways slippage andheel. This force is counteracted by the foils. Although thefoils on a Laser are symmetrical, because the boat slidessideways the water does not strike the foil head-on, butinstead hits it at an angle a few degrees to leeward. Thereforethe foil can generate a lifting force that pulls the boat towindward. Combining the forces generated from the sailand the foils produces the forward movement of a sailboat.
When sailing to windward in a Laser it is important to keepthe boat flat in almost all conditions. This allows the foils toproduce the most efficient lift to windward. To do this onemust often hike as the wind increases (see page 49-50).
Two-BlockAlong with keeping the boat flat, the sailor must trim thesail appropriately. In all but the lightest and heaviest breezethe mainsail is two-blocked when going to windward.
Two-blocking a sail is an essential skill all Laser sailorsneed to master in order to sail upwind effectively. Whenthe sail is sheeted in fully and the traveler block touchesthe boom block the sail has effectively been two-blocked.
47http://www.macsailing.org/
Sail catches windwhich causes the boatto slide sideways
A two-blocked sail bends the mast aft and tightens theleech. This in effect depowers the sail, but allows the boatto point closer to windward. The loss of speed is offset bysailing a shorter distance. The concept of having an optimalbalance between speed and pointing angle is known asVelocity Made Good (see page 52 for more details).
Steerage via the HullWhen the hull heels to either side it becomes asymmetricalin regards to its shape in the water. This means that as theboat tracks through the water it has a different amount offorce on each side. This force causes the boat to turn.
A vessel with heel to the leeward side is said to haveWeatherhelm as the boat will naturally want to turn toweather (windward).
Vessel turns to windward due to leewardheel
Saili
ng II
: Las
er
Lift From Daggerboard
LH
L= Low PressureH= High Pressure = Flow of water
Foils resistsideways slippagethrough the water(Lateral Resistance)
Two-Blocked
Heel

http://www.macsailing.org/48
A vessel with heel to the windward side is said to haveLeehelm as the boat will want to turn to leeward.
Limited Helm UsageA Laser sailor is rewarded with more speed if she is subtlewith her tiller. Each time the tiller is used, water is deflectedby the rudder, and thus acts as a brake. Therefore, to bemost efficient, the sailor should attempt to use the leastamount of rudder necessary to steer the vessel.
As mentioned above the vessel can be steered via boat trim.A Laser sailor can make small course changes by inducingheel in the vessel, and thus will steer via Weatherhelm andLeehelm. This steerage is subtle, and when used inconjunction with the rudder makes the boat more efficient.
Steerage MistakesOne of the most common mistakes a beginning Laser sailorwill make is attempting to turn her vessel in one directionwhen the boat has a heel which counteracts the rudder. Ifthe boat has leeward heel and the skipper wants to fall offthe force on the rudder will be fighting the boat’s naturalinclination to turn to windward. Therefore it is vital to keepthe boat flat or induce the proper heel to help with the turn!
Furthermore many sailors when going to windward will nothike hard enough to keep the boat flat in a moderate breeze,and this means the boat will want to turn to windward, whichis known as rounding up. The skipper will either find herselfconstantly pulling the tiller toward herself to track a straightcourse or will end up in irons.
One should keep the boat flat when sailing a close-hauledcourse. The only exception to this is in very light air when aleeward heel will induce curvature in the sail and help generatelift. The slight loss in lift on the blades due to the heel will beoffset by the fact that the sail will generate more lift withproper shape.
When not to be flat?As mentioned above, a boat can have a slight heel whenbeating to windward in a light breeze. But are there othertimes the boat should be heeled for optimal speed?
When sailing on a close reach, beam reach or broad reach itis essential to keep the boat flat in all conditions. Aside frombeing able to initiate planning if there is enough wind, a flatboat provides the most efficient use of force for forwarddrive.
But on a run a Laser can be sailed with a slight heel towindward. This aligns the Center of Effort with the Centerof Buoyancy. The Center of Effort is the theoretical point onthe sail that is the balance point for all the aerodynamicforces on the sail. The Center of Buoyancy is the theoreticalpoint on the hull that is the balance point for all of thehydrodynamic forces on the vessel. By placing these forcesdirectly over each other, the boat will have neutral helm on arun and will be most stable. Sailing II: Laser
X
X
Center of Effort (CE) is aligned overthe Center of Buoyancy (CB) which
provides neutral helm
CE
CB
“I find the great thing in this world is not so much where we stand asin what direction we are moving: To reach the port of heaven, we mustsail sometimes with the wind and sometimes against it— but we mustsail and not drift nor lie at anchor.”
— Oliver Wendell Holmes
Vessel turns to Leeward dueto windward heel
Heel

Hiking ProperlyHiking is the leaning of one’s body over the windward side of the boat to counter the heeling forces on the sails. On aLaser there is a hiking strap that the sailor puts her feet under to secure her body when leaning out of the boat. Learning toproperly hike will make your boat more efficient and thus faster in a moderate to strong breeze.
http://www.macsailing.org/49
Why Hike?The deck of a Laser was not designed for ergonomicconsideration. It was made for car topping (placing the deckonto the roof rack of a car for transportation).
It actually hurts to hike due to the shape of the vessel. So ifhiking hurts why do it? The simple answer is that a flat boatis a fast boat! Leeward heel causes the lift on the sail toacquire a downward vector which slows the boat (see page46 for a more detailed explanation.)
Types of HikingThere are three established forms of hiking: Drooped-LeggedHiking, Bent-Legged Hiking and Straight-Legged Hiking.
Drooped-Legged Hiking is found on vessels such as a StarKeelboat and is inappropriate for a Laser as the deck is tooclose to the water to allow a sailor to bend one’s knees to 90degrees and droop over the side of the hull with the bodybelow the deck. On a Laser this would cause the sailor to becompletely under the water! Lasers sailors will either hikein a Straight-Legged fashion or Bent-Legged one.
Straight-Legged Hiking is characterized by having arelatively tight hiking strap. The sailor literally places justthe toes of her feet under the hiking strap, and locks outher knees. She then leans out of the boat to windward tomaximize her righting leverage.
The benefit of this technique is that the sailor is really “lockedinto the cockpit,” and thus her body movements efficientlytranslate into movements of the boat. The tighter strap alsokeeps the sailor’s backside out of the water and the upperbody achieves an angle that results in the greatest amountof leverage possible.
Saili
ng II
: Las
er
The disadvantage of this style is that it is extremelyphysical, and often very difficult to maintain for longperiods of time. The style can take a long time to develop,and sailors often bruise or strain their ankles, thighs, andcalves in the process.
Bent-Legged Hiking is characterized by having a looserhiking strap that allows the sailor to have a slight bend inher knees. A gap between the knees and the deck of the boatis easily discernable.
Bent-Legged Hiking is more comfortable, and therefore asailor is likely to maintain the position for a longer period oftime which often offsets the loss of leverage from notStraight- Legged Hiking.
Car topped Laser
Flat deck of Laser facilitates car topping
Straight-Legged Hiking: Maximum Leverage
Bent-Legged Hiking
GAP

While hiking in either fashion the upper body should beflat. The sailor should not allow her back to curl as thisputs unneeded stress on the lower portion of the back andmakes your hiking position much less efficient. It would befar better to slide in and keep your back straight than tohike from your toes but curl the upper body into the boat.
Your goal is to keep the boat flat. If the breeze is lighterand you do not need that much weight out, the sailor shouldslide her legs and buttocks in and keep a straight back.
Poor hiking technique
You should sit 0-10 inches aft of the daggerboard.
When hiking you should feel an equal amount of pressureon your thighs and calves. If you feel too much pressure onyour thighs it means your body is not out far enough whichcould be due to a hiking strap that is too tight or the fact thatyou are not allowing yourself to slide out as far as you arecapable of. Conversely if you feel too much on your calvesyour hiking strap is too lose.
Regardless of which style is used, you should try to lockyour legs into the cockpit so that the motions of your bodytranslate into motions of the boat. A Laser was meant to besteered kinetically: through body movement and placement.
You should keep your toes pointed up or outwards. Neverinwards! By allowing your feet to point inwards you will beplacing a greater amount of force on the outside quadricepsmuscles relative to the inside quadriceps muscles. Thisuneven distribution will cause the kneecaps to pull outwardsand a condition called patellofemoral pain will developafter time.
Toes while hiking!
Static Muscle ContractionHiking involves a “static muscle contraction” that isdifferent than the explosive muscle contraction of anOlympic Weight lifter or the repetitive musclecontractions of a Marathon runner. While hiking a sailorlocks out her muscles and attempts to stay in the sameposition for a long period of time. The constant contractionof the muscles constricts blood flow to the legs andtherefore after a long period the thighs are deprived ofoxygen. To counteract this, a sailor must transiently relaxthe muscles in one leg at a time. This will allow bloodflow to reenter each leg while the other leg is used tocompletely support the body.
Overhand GripYou should always have an overhand grip on the tiller whenhiking! There are times when you will not hold your tiller inan overhand grip, but never while hiking!
Do NOT do the following while hiking:Do NOT cleat the mainsheet and forget about it as you willneed to use it to constantly adjust the sail while hiking. Ifyou are hit with a gust when fully hiked and you are notholding the mainsheet you will likely capsize. Furthermore itwill help you pull yourself into the vessel in a lull.Do NOT wrap the mainsheet around your hand as a largegust will likely pull you off balance and injure your hand.Do NOT put the mainsheet in your teeth as it appalls mydentist.Do NOT hold the tiller in a underhand “frying pan” grip.Do NOT heel the boat to windward as this will cause theboat to slide sideways by reducing lift from the blades.Do NOT curl your back. Keep it straight.Do NOT be afraid to hike. The straps will hold you. Water issoft and this is what Laser sailing is all about!
Sailing II: Laser
Poor hiking technique: curled back, overflattened, dragging in the water, etc.
Good hiking: feet together, toes pointingupward while hiking from the middle ofthe feet. Sailor is locked into the cockpit!
Breeze too light to fully hike. Sailor keepsbody inboard to flatten boat.
50http://www.macsailing.org/

Sail Controls: LaserModern sails are not flat pieces of cloth with only a two dimensional shape. All sails have a built in curve that is formedwhen the sailmaker sews the panels of the sail together. This curved shape aids in generating lift. This built in curve on aLaser sail can be increased or decreased by adjusting the six available sail controls: Mainsheet, Outhaul, Cunningham,Boom Vang, Clew Tie Down, and Traveler.
Sail TypesThere are three established sailing rigs for the Laser, anddue to the unique shape and cut of the sail, each is trimmeddifferently. The text below was written for the Standard Rig,although many of the same principles can be applied to theRadial Rig. When differences are sufficient, a separate entryfor the Radial Rig will appear.
The Standard Sail is composed of eight panels of resin-impregnated Dacron cloth sewn together horizontally. Thesail’s curvature is induced by sewing the curved seams ofthe horizontal panels together as well as from the curve ofthe luff.
Basic Sail Theory Expanded:On all points of sail but the run, the curvature of the sailinduces lift via Bernoulli’s Principle. The amount of liftgenerated depends on how well the air adheres to the sail asit travels along both the leeward and windward sides. Afuller (rounded sail) has more power than a flatter sail, butless ability to point to windward when beating upwind. Whensetting up a sail, the sailor’s goal is to “power up the sail as
much as she can handle” (as defined by her ability to controlthe boat and keep the hull flat) given the wind conditionsand waves. The caveat to this mantra is that the sail cannotbe made so full that it hinders the lift that is generated.
Airflow tends to separate (detach) on the leeward side ofthe sail, generating turbulence. The place where airflowseparates and produces turbulence is defined as the breakpoint of the sail. As the sail becomes fuller the break pointmoves forward (towards the luff). If the sail is too full thebreakpoint will appear closer to the center of the sail insteadof near the leech, and thus the sail will stall.
Mainsheet:The mainsheet is the sail control the skipper uses most oftenwhile sailing on all points of sail. Proper sheeting angle isvital for the boat to sail efficiently. An under-trimmed sailluffs because lift is not generated. An over-trimmed sailcauses early separation (moves the break point forward onthe sail) and thus stalls the sail.
Over-trimming is worse than under-trimming. To correctan under-trimmed sail all one must do is trim in until thesail stops luffing. The wind will quickly re-attach to aproperly trimmed sail, and the boat will reach full speedquickly. To correct an over-trimmed sail one must trimout the sail to the proper angle of attack. The new air flowmust then push through the turbulence that was generatedat the early break point, which is too far forward. Thereforeit takes much longer to correct.
http://www.macsailing.org/51
Excessively fullsail leads toearly separation
MinimalSeparation
Sailing II: Laser
Standard Sail: Panels Are Horizontal
Radial Sail: Panels “Radiate from Clew”
The Radial Sail is composed of the same cloth as the StandardSail, but the panels are laid in a radial cut from the clew. Thismakes the sail more sensitive to the various sail controls andis capable of handling gusts more readily.

Lift is approximately generated perpendicular to the boom.Sideways slippage occurs perpendicular to the length of thehull. These two forces combine to create forward momentum.When the sail is over-trimmed the sideways slippage forceincreases while decreasing the forward force. This causesthe force on the sail to shift aft and the boat begins to slowand slide sideways more. When under-trimmed, both thesideway slippage and lift decrease, which results in lessforward momentum.
When sailing upwind, your mainsheet is initially used tochange the angle of attack (the angle between the sail andthe apparent wind) of the sail to produce optimal lift. On aLaser the mainsheet can bring the boom to the aft corner ofthe stern but no further if the traveler is tight. At this pointthere is still 15-18 inches of mainsheet that can be sheeted-in. These last 18 inches will bend the mast to aft, but doesnot change the angle of attack because it cannot bring theboom any further inboard. This action flattens the sail andthus decreases power, but allows the vessel to point closerto the wind.
Both the Standard and Radial sails should not be two-blockedif the wind is very light (less than 5 knots) or exceptionallyheavy wind (over 20 knots) when traveling to windward.But in all other conditions, VMG (Velocity Made Good) isusually achieved by two-blocking the sail during the beat towindward. VMG is the concept that there is an optimalbalance between speed and angle sailed. When beating towindward a vessel increases speed as it falls off from aclose-hauled course, but also increases the distancenecessary to travel to windward. Therefore a vessel thatpoints higher to the wind will lose speed, but decrease thedistance traveled. For a Laser the loss of speed from two-blocking the sail is negligible compared to the amount ofdistance cut from the overall trip. When beating towindward in most conditions the skipper should two-blockthe mainsheet and then steer the boat to the edge of thewind using the tell-tales.
When sailing on all points of sail other than close-hauledthe mainsheet is only used to control the angle of attack andnot the curvature of the mast. Therefore the sail should betrimmed to the tell-tales whenever possible.
Cunningham:The Cunningham, or downhaul as it is commonly called,affects the entire shape of the sail by placing tension on theluff. When Cunningham tension is increased the draft of thesail moves forward. The draft is the deepest part of the sail.The entire sail flattens as Cunningham tension is increasedand the top third of the sail twists off. Twist is the amountthe leech sags off relative to an imaginary straight linebetween the clew and head of the sail. This added twist tothe sail allows wind to spill off the top, thereby depoweringthe sail.
Therefore placing more Cunningham tension depowers thesail. Since it has the greatest effect on the top third of thesail, where the most rotational heeling force is found, it isa best to begin depowering the sail using the Cunninghamfirst.
http://www.macsailing.org/52
Win
dUnder Trimmed: Luffing
Perfect Trim
Over Trimmed: Stalled
F=Forward DriveS=Sideways ForceL=Lift
FL
S
F
F
L
L
S
S
Saili
ng II
: Las
er
Cunningham off Cunningham on
Depth
Twist
“Waves are not measured in feet or inches, they are measured inincrements of fear.” —Buzzy Trent

Outhaul:The outhaul controls the depth of the foot of the sail. Whensailing upwind the maximum depth in the foot of the sailshould be roughly the distance from your wrist to the tip ofyour extended middle finger. The sail can become deeper thefarther off wind you are sailing. The sail should be no deeperthan 15 inches when on a run.
Traveler:The traveler is the least adjusted sail control line while onthe water. The traveler should be kept tight in almost allconditions and only adjusted if it loosens while sailing. Atight traveler allows the skipper to gain maximum tension onthe luff when she two-blocks the mainsheet during a beat towindward. A tight traveler has virtually no effect whentraveling off wind. In very light air, when the traveler blockhas difficulty going over the tiller, it is acceptable to loosenthe traveler slightly to make your tacks and gybes easier.
Clew Tie Down:The clew tie down is not adjustable while on the water. Itallows the mainsheet to put maximum tension on the leech ofthe sail when two-blocked. The clew tie down should be tiedas close to the boom as possible before you set sail; but itshould not bind to the boom so that the outhaul isineffective.
http://www.macsailing.org/53
Boom Vang:The boom vang, or “kicker” is a unique sail control that canbe used to add power or depower the sail.
When sailing upwind in a moderate breeze the sail is generallytwo-blocked. If a large gust occurs the natural reaction of asailor who wishes to keep the boat flat and avoid a capsize isto ease the mainsheet. If the boom vang is “on” when two-blocked (the slack is taken out of the line), then when themainsheet is eased the boom will not rise, but instead will gooutwards. This will change the angle of attack and thusdepowers the sail by spilling air.
Conversely if the boom vang is not “on” when two-blocked(there is slack), then when the mainsheet is eased the boomwill rise first before moving to leeward. This means the sailbecomes rounder and fuller. Thus in a gust, easing the sailwhen the vang is “off” causes the boat to heel farther! Thisin effect powers the boat up!
This concept of powering the boat up is useful when sailingin light air. If the vang is off, then when the vessel enters alull (less air), it is beneficial to ease the mainsheet as this willgive the vessel power to the sail through the light spot andremain flat.
The boom vang is also very important for sailing offwind.The boom vang controls the height of the boom on all pointsof sail other than close-hauled.
On a reach the boom vang is generally set to match the topbatten with the angle of the boom in light and medium winds.The vang is loosened as the wind increases to keep theboom from dragging in the water.
Traveler
Clew Tie Down
Vang controlsheight of boomon downwindcourse
Maximum depthof sail forclose-hauledcourse
Sailing II: LaserVang

Knots: IntermediateBowline
The bowline is a knot most commonly used to form a fixed loop in the end of a line. It is reliable, strong, stable, does not slipor loosen while under tension and can be easily untied when tension is removed. The bowline was once the knot used onsquare rigged boats to attach a line from the bow of a ship to the weather leech of a square sail, but has since expanded itsuse to a variety of tasks where a temporary loop is needed. The bowline has literally dozens of variations; each for a specifictask. Once you have learned the most simple version the others will be easy to pick up.
http://www.macsailing.org/54
1. Form a loop with the Working End
Loop withWorkingEnd ontop ofStandingEnd
2. Pass Working End through loop
Standing End
Working End
Working End
StandingEnd
3. Pass Working End around Standing End
Working End
4. Pass Working End through loop
Working End
5. Pull Working End taut
Working End
6. Completed bowline
Sheet BendThe sheet bend originally was used to attach the sheets to the clew on a sail. Now it is used to join two lines of differentthicknesses and should be used when securing your vessel to the dock.
1. Form a loop withone line.
2. Bring the end of theother line through theloop
3. Pass the workingend of the second linearound the standingend of the first line.
4. Pull the workingend of the second linethrough the loop.
5. Pull the standingparts of both ropessideways to tightenknot.
Working End
Working End
Saili
ng II
: Las
er

Double Overhand knotThe double overhand knot is a variation of the simple over hand knot which is the most elementary of stopper knots. It isused at the end of a line to stop it from running through a block, in this case your mainsheet. On the Laser this knot is moresecure than a figure eight stopper knot because of the material the mainsheet is made out of: polilite.
HitchesA hitch is a knot used for tying a rope to another object. There are a variety of hitches used in sailing and it is most oftenseen while setting up a temporary mooring. For the Laser, a series of hitches are used to secure the bow of the boat to thedolly and is finished with a half hitch.
55http://www.macsailing.org/
Coiling a LineLine should be cared for to ensure extended use. All the lines on a Laser should be coiled (wound loosely) in order toprotect them from unnecessary wear as well as to make it easier for the next sailor to use. A simple coil is demonstratedbelow for the mainsheet.
1. Pass the WorkingEnd around yourhand.
2. Take the WorkingEnd from the back ofyour hand and pass itaround a second time.
3. Bring the WorkingEnd to the inside ofyour hand.
4. Pass the WorkingEnd through the twoloops you haveformed.
5. Pull the WorkingEnd taut.
Working EndWorking End
Working End
Working End Working End
1. Begin bymakingcounterclockwiseloops
2. Leaveabout twofeet of lineuncoiled
3. Pinch thecenter of thecoil and wrapthe WorkingEnd aroundthe center
4. Make at least3 loops aroundthe center mov-ing towards theWorking End
5. Make abite with theWorking End
6. Pass thebite throughthe top ofthe coil
7. Pass aloop overthe back ofthe coil
8. Pull theWorking Endtaut.
Sailing II: Laser
Pass painter around dollyhandles
Pass painter throughbowline on the bow Make a series of figure
eight hitches
Make a loop with theWorking End
Pull taut
Bite

Tacking: Use of TillerTacking is the first fundamental boat handling skill one should learn in a Laser. Because the boat is light, it carries very littlemomentum; so it is important to have speed before initiating your tack! The long tiller extension generally is the greatestimpediment for new sailors to the class as it can be difficult to handle. Below is a basic tack with no roll induced. For a moreadvanced tack see the roll tack section (page 112-113)
Before tacking one should always check to windward andover your front shoulder to be sure it is clear. One mustalways be certain that she is turning into a space that is notalready occupied.
1. While on a close-hauled course, keep your boat flat andget some speed before initiating the tack.
56http://www.macsailing.org/
2. Gently push the tiller extension AWAY with the aft hand.
3.The boat will begin to turn into the wind. As it does socontinue pushing the tiller across the boat until you canplace your aft hand and the extension on the old leewardside of the boat. It is generally necessary to bend the tillerextension at the flexible joint so that the mainsheet doesnot stop you from pushing the tiller across the boat.
4. Wait for the boom to come centerline, and then crossthe boat with your aft foot first.
Saili
ng II
: Las
er
Flat boat on close-hauled course
Tiller is over toleeward side
Aft hand ondeck helpswith balance
Sailor pivots on aft foot whileALWAYS facing forward duringthe tack. Aft hand on deck helpswith balance
57http://www.macsailing.org/
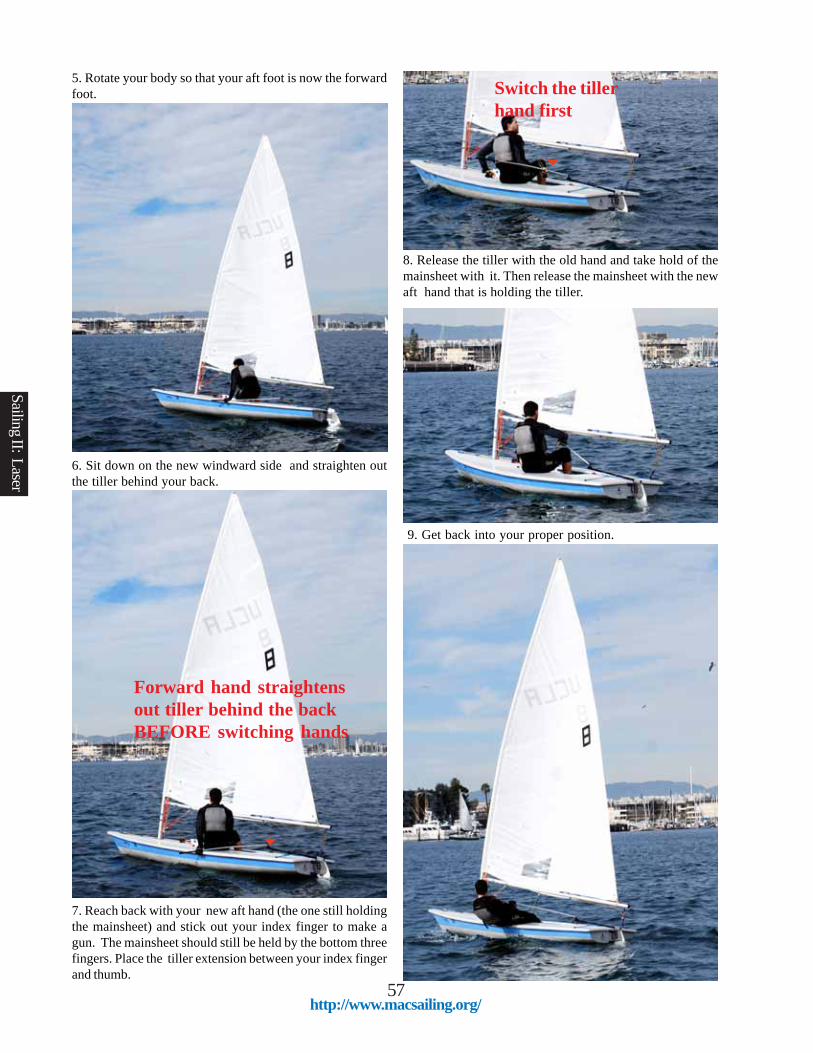
5. Rotate your body so that your aft foot is now the forwardfoot.
6. Sit down on the new windward side and straighten outthe tiller behind your back.
7. Reach back with your new aft hand (the one still holdingthe mainsheet) and stick out your index finger to make agun. The mainsheet should still be held by the bottom threefingers. Place the tiller extension between your index fingerand thumb.
8. Release the tiller with the old hand and take hold of themainsheet with it. Then release the mainsheet with the newaft hand that is holding the tiller.
9. Get back into your proper position.
Sailing II: Laser
Forward hand straightensout tiller behind the backBEFORE switching hands
Switch the tillerhand first

Gybing
58http://www.macsailing.org/
Gybing is often more feared than tacking due to the speed at which the boom can cross the boat in heavy air. Yet gybingis easier than tacking in light to moderate air because of the pressure felt on the sail during all but a fraction of themaneuver. The key to gybing is keeping speed before and after the turn. Below is a basic gybe with no roll induced.For a more advanced gybe see pages 114-115.
Before gybing one should always check to leeward to besure it is clear. A sailor must be certain that he is turning intoa space that is not already occupied! When learning to gybeit is easier to gybe from a broad reach to a broad reach sothis is how a novice sailor should first practice.
1. Bring the boat flat and sheet in slightly if you are on adeep broad reach or a run (sheet in 1-2 feet).
2. Start to bear away by pulling the tiller extensionTOWARD you. The boat will begin to roll on top of you asthe boat begins to turn if there is any breeze. Make sureyour aft foot is braced against the side of the cockpit incase the boat rolls excessively so that you can quickly climbto the high side if necessary.
3. Reach up with your forward hand and grab the mainsheetnear the block on the boom.
4. Give the mainsheet a yank once you feel the sail losepressure (right before the boom is ready to gybe). This willallow you to control when the boom crosses the boat.
I must go down to the seas again, to the lonely sea and the sky,And all I ask is a tall ship and a star to steer her by,And the wheel’s kick and the wind’s song and the white sail’s shaking,And a grey mist on the sea’s face and a grew dawn breaking.
I must go down to the seas again, for the call ofthe running tideIs a wild call and a clear call that may not be denied;And all I ask is a windy day with the white clouds flying,And the flung spray and the blown spume, and the sea-gulls crying.
— John Masefiled, Sea Fever
Saili
ng II
: Las
er
Pull the tillertowards you
Control thegybe with themainsheet
59http://www.macsailing.org/
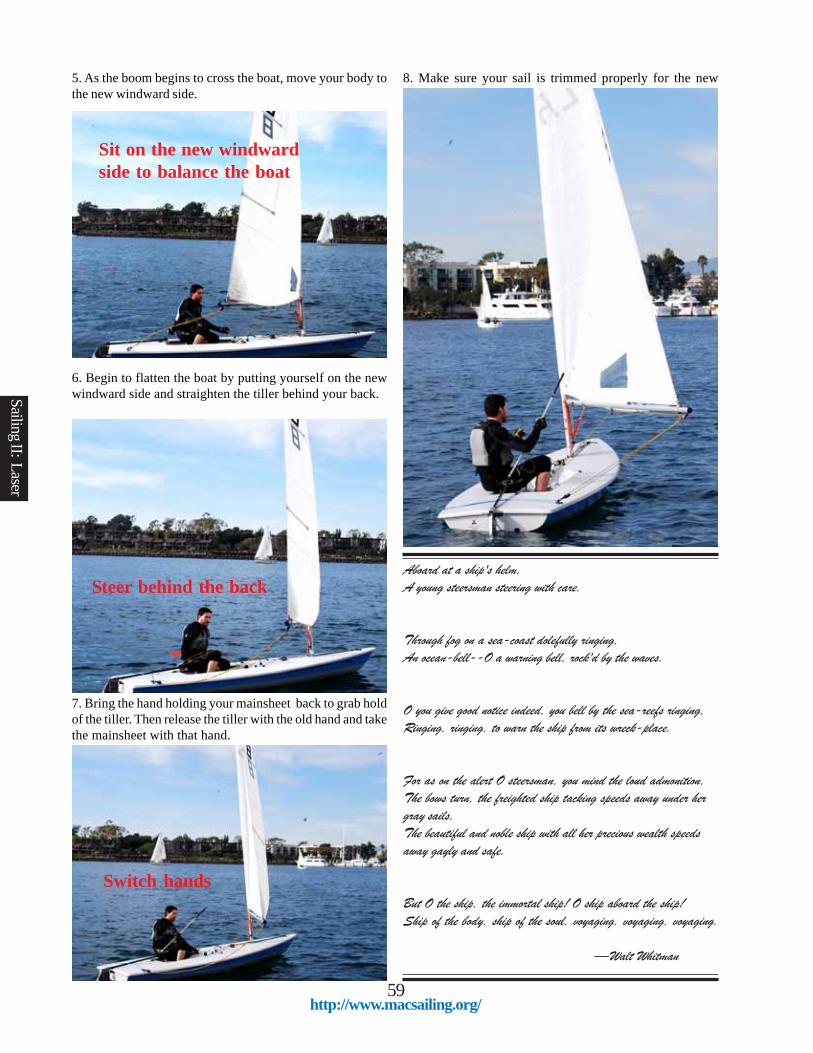
6. Begin to flatten the boat by putting yourself on the newwindward side and straighten the tiller behind your back.
7. Bring the hand holding your mainsheet back to grab holdof the tiller. Then release the tiller with the old hand and takethe mainsheet with that hand.
5. As the boom begins to cross the boat, move your body tothe new windward side.
8. Make sure your sail is trimmed properly for the newcourse.
Aboard at a ship's helm,A young steersman steering with care.
Through fog on a sea-coast dolefully ringing,An ocean-bell--O a warning bell, rock'd by the waves.
O you give good notice indeed, you bell by the sea-reefs ringing,Ringing, ringing, to warn the ship from its wreck-place.
For as on the alert O steersman, you mind the loud admonition,The bows turn, the freighted ship tacking speeds away under hergray sails,The beautiful and noble ship with all her precious wealth speedsaway gayly and safe.
But O the ship, the immortal ship! O ship aboard the ship!Ship of the body, ship of the soul, voyaging, voyaging, voyaging.
—Walt Whitman
Sailing II: Laser
Sit on the new windwardside to balance the boat
Steer behind the back
Switch hands

Dry Capsize Recovery: Walkover
60http://www.macsailing.org/
Due to the relatively small width of the boat a dry capsize recovery is easily executed in a windward capsize. The key toexecuting a dry capsize recovery is anticipating the capsize and correctly timing when to throw one’s leg over the gunwaleof the boat.
As the boat begins to heel to leeward due to excessivebreeze a sailor must decide when hiking further or releasingthe mainsheet will not be able to save the boat from a capsize.Generally speaking if the boat has heeled over to the pointthat the top of the mast is only three feet from the water acapsize will occur. Once the sailor has made the decision toexecute a dry capsize she must be decisive in regard tostaying dry.
1. The boat begins to heel beyond the point of no return,and the sailor climbs to the high side of the boat.
2. The sailor throws a leg over the gunwale of the boat andstraddles the hull.
3. The sailor steps onto the daggerboard and checks to seeif the mainsheet is free.
4. The sailor moves his weight out onto the daggerboard sothat the boat begins to right.
5. The sailor throws his aft leg over the gunwale to step intothe boat.
6. The sailor keeps his head low and ducks the boom whilestabilizing the boat with his weight. He immediately grabsthe tiller and takes control of the vessel.
Saili
ng II
: Las
er
Straddle the hull
Mast rises outof water
Take hold oftiller for control

Standard vs Radial RigThe principle difference between the Standard and Radialrig is the length of the bottom section. The Radial rig usesa shorter, bendier lower mast section. The Radial lower mastsections are marked with a thick red stripe and the letter “R”above the boom vang tang for easy identification. Both rigsuse the same top mast section and are rigged identically.
The Standard and Radial sails are on separate parts of thesail rack and are labeled accordingly.
Rigging in the YardMost of the rigging for the Laser is done in the yard andboat house. You should only move the boat onto the dockand into the water when you are ready to sail. With a littlepractice you should be able to rig and be off sailing in under15 minutes.
When rigging, thoroughly inspect your equipment to makesure everything is in good working order. You can use thelawn or the deck of your Laser or even the carpet inside theboathouse (if there is room) for rigging your sail.
1. Select a boat from the rack. Boats numbered 1-8 are foranyone who has completed Sailing II. Boats numbered 9-12have the “Pro-Rigging” and are reserved for those who havecompleted Sailing III.
Rigging: LaserSAIL SELECTION: The International Laser Class has three different official rigs. Each sail is designed for sailors ofdifferent weights. The Standard Rig was designed for sailors weighing more than 160 lbs and has 76 square feet of sail. TheRadial Rig, which has 62 square feet of sail, was designed for sailors in the weight range of 121 to 160 lbs. The 4.7 Rig, whichhas 50.6 square feet of sail (4.7 square meters of sail), was designed for sailors within the weight range of 77 to 121 lbs. Theweight ranges listed above are ‘optimal.’ This means that a sailor in the prescribed weight range is best suited to sail thematching rig in a variety of wind conditions (3 to 20 knots). A sailor outside of the listed range may sail a different rig in theappropriate conditions. At the UCLA MAC we have both the Standard and Radial Rigs available. The reduced sail area ofa Radial Rig allows a novice or lighter sailor the ability to sail without being overpowered in medium winds. TheInternational Laser Class strictly controls how sailboats are rigged during official races. For the convenience of learning tosail, the UCLA MAC Lasers are rigged in a non-class legal manner. To learn more about the Class Legal Racing please visitthe North American Laser Class Association at www.laser.org.
2. Retrieve a Laser Dolly. Place the dolly wheelsapproximately 3-4 feet to the left of the boat slot (in themiddle of the slot two numbers below the one you are taking.)
3. Lower the boat onto a dolly. Ask for help if you needit--- it is much better than dropping the boat on your head!It is best to keep your right hand on the gunwale of theboat and your left hand on the hull while pulling it out ofthe slot. Once the boat is out of the slot place both handscentered on the hull, and lock your arms out so that youcan walk the boat down onto the dolly. Walk backwards, butbe cautious of the dolly so that you do not trip.
Dolly wheels in slot#8 for Boat #10
61http://www.macsailing.org/
Sailing II: Laser

4. Gently lower the hull onto your shoulders and thensquat down to place the hull onto the dolly strap.
5. Place the bow of the boat onto the curved plastic bowretainer, and then secure the boat using the painter with aseries of half hitches. Please see intermediate knot sectionof the manual for instructions on how to tie a half hitch.
6. Remove the stern dolly (the wood piece with twoorange wheels). Place one hand on the stern dolly whilepressing your thigh against it when removing the dollypin. This will stop the dolly from dropping to the groundand breaking. Leave the stern dolly (the wood piece withtwo wheels) and its pin in the slot the boat came from.
7. Retrieve a boom, top mast section and appropriatebottom section. The spar numbers MUST match thenumber of the hull.
Arms locked out
Bow Retainer
Stern Dolly
62http://www.macsailing.org/
Saili
ng II
: Las
er

8. Insert the drain plug into the transom and seal the hullby turning it clockwise.
11. Take the top and bottom sections of the mast to theboat house. Insert the top section into the bottom section.Make sure to align the rivet with the gooseneck (failureto do this may cause the top mast section to break at therivet collar).
9. Gently place a daggerboard, tiller and rudder in thecockpit of the Laser. The numbers on the Blades(daggerboard and rudder) must match the hull of the vessel.
10. Attach the boom to the traveler via the brummelhooks (sister clips). Make sure that there is no twist in themainsheet.
12. Retrieve the appropriate sail from the sail rack. Checkout a set of battens from the dockmaster that matches yourhull number. The top batten is shorter than the middle andbottom battens which are identical in length. Insert thecurved end of the batten into the batten pocket andthen pinch the end of the non-curved batten until it slidesdown into the batten pocket.
Drain Plug
No Twist
BrummelHooks
Rivet
Gooseneck
Insert BattenPinch Batten Down
63http://www.macsailing.org/
Sailing II: Laser

14. Place the bow of the boat into the wind. Take the mastout of the boat bay and place it onto the deck of the boat.Carefully place the mast into the maststep. Be careful not toallow the mast to drop or swing as it will damage the gelcoatof the deck. If you are uncertain of your ability to controlthe mast ask for help. Other sailors and the dockmasterare always available to help.
16. Attach the clew hook to the sail. Always pass the hookfrom the starboard side first!
13. Slide the sail onto the mast using the luff sleeve.Ensure that the body of the sail is on the same side as thegooseneck.
15. Place the boom connector onto the gooseneck.
17. Attach the boom vang to the boom by placing the vangkey into the vang fitting on the boom.
18. Attach the cunningham. Pass the thinner spectra linethrough the cunningham grommet. Use the snap shackle onthe Vang to secure the Cunningham.
Luff Sleeve
Wind Direction
Gooseneck
CunninghamGrommet
Snap Shackle
Vang Key
Clew hook
64http://www.macsailing.org/
Saili
ng II
: Las
er

19. Pass the other end of the Cunningham to the blockat the base of the mast on the port side of the boat.
22.Then take the line and pass it through the outhaulblock at the base of the mast on the starboard side.
23. Secure the outhaul line through the starboard camcleat and create a handle via the daisy chain method asseen in the advanced knots section of the manual.20. Take the Cunningham line and pass it to the deck
cleat (first through the metal fairlead and then into the camcleat). Place a stopper knot at the end of the line. Pleasenote that rigging the Cunningham correctly is importantbecause it is used to keep your mast attached to the boatwhen the vessel capsizes!
21. Take the outhaul line and pass it through the blocksecured to the gooseneck fitting.
24. Attach the mast retention line that is secured to thegooseneck fitting to the deck fitting at the base of the mast.Please note that for boats 1-8, if the Cunningham is notsecured properly the mast will slide out of the mast step andsink when the boat is turtled. For boats 9-12 the Cunninghamline will ‘help’ secure the mast to the vessel, but due to thelower amount of friction achieved by the blocks used in thesystem an additional line is necessary to keep the mastsecure.
CunninghamDeck Block
Cunningham Deck Cleat
Outhaul Forward BlockMastRetentionHook
Outhaul Deck Cleat
Outhaul Deck Block
http://www.macsailing.org/65
Sailing II: Laser

25.Uncoil the mainsheet, but do not attach it to themainsheet block. Instead add a figure eight at the bitter endso that it will not come loose when walking your boat downthe ramp. Walk your vessel down the ramp stern first.The mast will begin to catch air and will rotate. As long asyour mainsheet is not attached the boat will not be pushedoff the dolly by the wind. It is best to hold the bitter end ofthe mainsheet in your right hand so that you can take theslack out of the mainsheet if the wheels of your dolly areclose to catching the dragging mainsheet.
26. Keep the front end of your dolly low as you approachthe bottom of the ramp. If you raise the front end of yourdolly high the stern of the boat will scrape against the dockas you reach the end of the ramp.
27. Angle your boat so that the stern is just at the edge ofthe dock, but not over the water.
28.Attach the rudder of your boat by inserting the pintlesinto the gudgeon. Make sure the rudder stop is securelyover the lower pintle section so that the rudder will not belost during a capsize/inversion.
29. Place the tiller under the aft traveler line but above theforward traveler line. Then put the tiller into the rudder headand tighten the rudder downhaul.
Rotated Mast
Wind Direction
Front End of Dolly is Low
Pintle
Gudgeon
Rudder Stop
UnderOver
66http://www.macsailing.org/
Saili
ng II
: Las
er
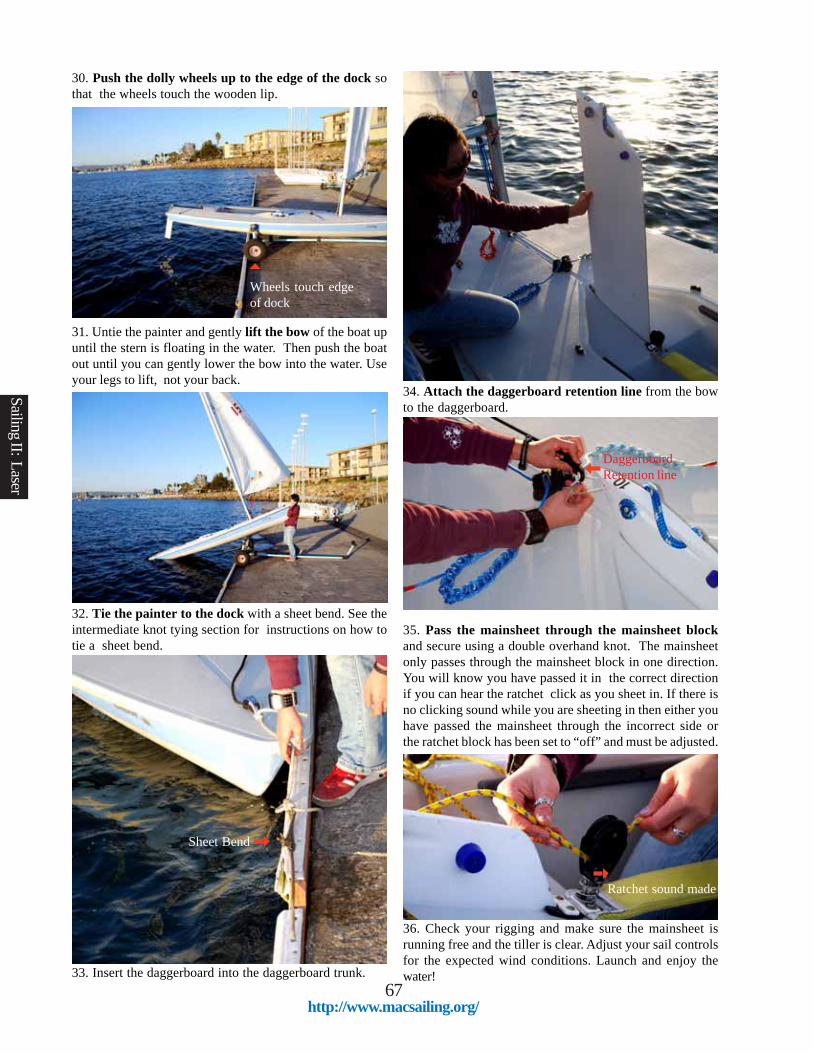
30. Push the dolly wheels up to the edge of the dock sothat the wheels touch the wooden lip.
31. Untie the painter and gently lift the bow of the boat upuntil the stern is floating in the water. Then push the boatout until you can gently lower the bow into the water. Useyour legs to lift, not your back.
32. Tie the painter to the dock with a sheet bend. See theintermediate knot tying section for instructions on how totie a sheet bend.
33. Insert the daggerboard into the daggerboard trunk.
34. Attach the daggerboard retention line from the bowto the daggerboard.
35. Pass the mainsheet through the mainsheet blockand secure using a double overhand knot. The mainsheetonly passes through the mainsheet block in one direction.You will know you have passed it in the correct directionif you can hear the ratchet click as you sheet in. If there isno clicking sound while you are sheeting in then either youhave passed the mainsheet through the incorrect side orthe ratchet block has been set to “off” and must be adjusted.
36. Check your rigging and make sure the mainsheet isrunning free and the tiller is clear. Adjust your sail controlsfor the expected wind conditions. Launch and enjoy thewater!
Sheet Bend
Wheels touch edgeof dock
Ratchet sound made
DaggerboardRetention line
http://www.macsailing.org/67
Sailing II: Laser

DERIGGING: LaserDERIGGING THE LASER: To protect the boat and equipment it is important that you get the sail down and the boat outof the water without delay. Once the sail is down and the boat out of the water you can then take your time with derigging.While derigging note any damage that may have occurred while sailing and report it to the Dockmaster.
1. Secure your vessel to the dock using a sheet bend (seepage 56).
2. Detach the boom. First release any tension that is onyour boom vang. Then remove the clew hook from the backof the sail while firmly holding the boom so that it doesnot drop onto the deck.
Clew hook
Sheet Bend
3. Walk your hands along the boom until you reach thegooseneck and remove the boom from the mast. Place theboom on the deck. Take the vang key out of the boom. Usean overhand knot to secure the vang lines. This will keep thelines from fouling.
4. Release the daggerboard retention line from thedaggerboard. Then remove the daggerboard from the trunkand place it gently in the cockpit.
5. Retrieve your dolly from the ramp and place it to leewardof your vessel.
6. Untie the painter and then grab the bow of the boat. Whileholding the bitter end of the painter begin to rotate the hulluntil it is near perpendicular to the dock. The bow shouldnow be closest to the dock.
68http://www.macsailing.org/
Saili
ng II
: Las
er
Wind

7. Squat down and place both your hands under the bow.Lift the bow up using your legs not your back. If you arestrong enough to press the bow over your head do so.
8. Begin walking the hull onto the dolly.
9. Place your leeward foot onto the dolly when you arehalf way. This will stop the dolly from moving when thehull contacts the dolly’s strap.
10. Pull down on the bow until the stern lifts out of thewater. If the bow is not far enough forward on the dolly youmust pull the boat towards you.
11. Place the bow of the boat onto the lip of the dolly andthen tie off using hitches (see page 56).
12. Gently pull the boat forward; be careful not to lift thebow or the rudder will strike the dock. Pull forward untilthe rudder is over the dock. Remove the tiller and rudderand lay them gently into the cockpit.
69http://www.macsailing.org/
Sailing II: Laser
Foot on dollyRudder overdock

13. Remove the drain plug from the stern.
14. Pull the boat up the ramp. If it is low tide you should goup at an angle to make it easier. Remove the Cunninghamfrom the deck cleat and lift the mast out of the mast step.
15. Take the mast and sail into the boat house. Then gentlypull the sail off the mast. Be careful not to pull too hard or thetop piece of the mast may get lodged in the luff sleeve.
16. Take the mast back to the hull of your boat. Rinse offthe boat, blades and spars while paying special attention toanywhere there is metal on the boat.
17. Coil all the lines: mainsheet and Cunningham.
18. Return the spars and blades to the appropriate racks.Spars are numbered 1-12.
70http://www.macsailing.org/
Saili
ng II
: Las
er
Drain Plug

19. Attach the stern dolly to the vessel.
20. Make sure the wheels of the stern dolly are in thecorrect slot to return the boat. Untie the painter and lift thebow up. The stern dolly should catch the ground and besecure. Gently lift the boat until it is almost vertical, andthen begin sliding it into the appropriately numbered slot.
21. Return the dolly to the dolly area.
22. Lay the sail flat.
http://www.macsailing.org/71
23. Fold the sail in half and align the leech.
24. Begin rolling the sail.
25. Place sail in the appropriate bag and back on the rack.Standard sail bags have a black tip while Radial sail bagshave a red tip.
Sailing II: LaserDolly Area