Embed Size (px)
Citation preview
Learning Java® with JBuilder™
V E R S I O N 4
Inprise Corporation100 Enterprise Way, Scotts Valley, CA 95066-3249
Borland®
JBuilder™

Refer to the file DEPLOY.TXT located in the JBuilder 4 redist directory of your JBuilder product for a complete list of files that you can distribute in accordance with the JBuilder License Statement and Limited Warranty.
Inprise may have patents and/or pending patent applications covering subject matter in this document. The furnishing of this document does not give you any license to these patents.
Apache Software Foundation conditions and disclaimer
Redistribution and use in source and binary forms, with or without modification, are permitted provided that the following conditions are met:
Redistributions of source code must retain the above copyright notice, this list of conditions and the following disclaimer.
Redistributions in binary form must reproduce the above copyright notice, this list of conditions and the following disclaimer in the documentation and/or other materials provided with the distribution.
The end-user documentation included with the redistribution, if any, must include the following acknowledgment: “This product includes software developed by the Apache Software Foundation (http://www.apache.org/).” Alternately, this acknowledgment may appear in the software itself, if and wherever such third-party acknowledgments normally appear.
The names “Apache” and “Apache Software Foundation” must not be used to endorse or promote products derived from this software without prior written permission. For written permission, please contact [email protected].
Products derived from this software may not be called “Apache”, nor may “Apache” appear in their name, without prior written permission of the Apache Software Foundation.
THIS SOFTWARE (Tomcat) IS PROVIDED “AS IS” AND ANY EXPRESSED OR IMPLIED WARRANTIES, INCLUDING, BUT NOT LIMITED TO, THE IMPLIED WARRANTIES OF MERCHANTABILITY AND FITNESS FOR A PARTICULAR PURPOSE ARE DISCLAIMED. IN NO EVENT SHALL THE APACHE SOFTWARE FOUNDATION OR ITS CONTRIBUTORS BE LIABLE FOR ANY DIRECT, INDIRECT, INCIDENTAL, SPECIAL, EXEMPLARY, OR CONSEQUENTIAL DAMAGES (INCLUDING, BUT NOT LIMITED TO, PROCUREMENT OF SUBSTITUTE GOODS OR SERVICES; LOSS OF USE, DATA, OR PROFITS; OR BUSINESS INTERRUPTION) HOWEVER CAUSED AND ON ANY THEORY OF LIABILITY, WHETHER IN CONTRACT, STRICT LIABILITY, OR TORT (INCLUDING NEGLIGENCE OR OTHERWISE) ARISING IN ANY WAY OUT OF THE USE OF THIS SOFTWARE, EVEN IF ADVISED OF THE POSSIBILITY OF SUCH DAMAGE.
COPYRIGHT © 1997, 2000 Inprise Corporation. All rights reserved. All Inprise and Borland brands and product names are trademarks or registered trademarks of Inprise Corporation. Other product names are trademarks or registered trademarks of their respective holders.
Printed in the U.S.A.
JBE0040WW21000 1E0R08000001020304-9 8 7 6 5 4 3 2 1D3

i
Chapter 1Introduction 1-1Contacting Borland developer support . . . . . 1-2Online resources . . . . . . . . . . . . . . . . . . 1-2
World Wide Web . . . . . . . . . . . . . . . . 1-2Borland newsgroups . . . . . . . . . . . . . . 1-3Usenet newsgroups . . . . . . . . . . . . . . 1-3
Documentation conventions . . . . . . . . . . . 1-3
Part IJBuilder Quick Start
Chapter 2What’s new in JBuilder 4 2-1Web Development . . . . . . . . . . . . . . . . . 2-1
JavaServer Pages and servlet support . . . . 2-2XML support . . . . . . . . . . . . . . . . . . 2-2InternetBeans Express . . . . . . . . . . . . . 2-2
Enterprise JavaBeans . . . . . . . . . . . . . . . 2-3Application server support . . . . . . . . . . . . 2-4Team development. . . . . . . . . . . . . . . . . 2-4
Version tracking and control . . . . . . . . . 2-4OpenTools API . . . . . . . . . . . . . . . . . . . 2-5User Interface changes . . . . . . . . . . . . . . 2-5
JBuilder IDE. . . . . . . . . . . . . . . . . . . 2-5Wizards . . . . . . . . . . . . . . . . . . . . . 2-6Editor . . . . . . . . . . . . . . . . . . . . . . 2-7
Keymaps . . . . . . . . . . . . . . . . . . . 2-7Search and Save . . . . . . . . . . . . . . . 2-8
Running and Debugging . . . . . . . . . . . . . 2-8Database tools . . . . . . . . . . . . . . . . . . . 2-9
JDataStore . . . . . . . . . . . . . . . . . . . . 2-9JDBC Explorer improvements . . . . . . . . 2-10
Using JBuilder’s online help . . . . . . . . . . . 2-10How to get Help . . . . . . . . . . . . . . . . 2-10
Chapter 3Introducing JBuilder 3-1What is JBuilder?. . . . . . . . . . . . . . . . . . 3-1Introducing the AppBrowser . . . . . . . . . . . 3-2
AppBrowser design view . . . . . . . . . . . 3-4AppBrowser message pane in
debugger view . . . . . . . . . . . . . . . . 3-5Navigating in the AppBrowser . . . . . . . . 3-5
Java language support . . . . . . . . . . . . . . . 3-6Learning more about JBuilder . . . . . . . . . . . 3-7
The JBuilder documentation set . . . . . . . . 3-7Learning more about Java . . . . . . . . . . . . . 3-8
Chapter 4Using the editor 4-1Completing code with CodeInsight. . . . . . . . 4-3Using code templates . . . . . . . . . . . . . . . . 4-4Keymaps for editor emulations . . . . . . . . . . 4-5
Cursor movement . . . . . . . . . . . . . . . . 4-5Selection . . . . . . . . . . . . . . . . . . . . . 4-7Editing text . . . . . . . . . . . . . . . . . . . . 4-8Clipboard. . . . . . . . . . . . . . . . . . . . 4-10Search and replace. . . . . . . . . . . . . . . 4-10Buffers and Files . . . . . . . . . . . . . . . . 4-11Compile and Debug . . . . . . . . . . . . . 4-11CodeInsight . . . . . . . . . . . . . . . . . . 4-12Code Templates . . . . . . . . . . . . . . . . 4-12View and Help . . . . . . . . . . . . . . . . . 4-12
Chapter 5Automating application development 5-1
Using wizards . . . . . . . . . . . . . . . . . . . . 5-1Using the object gallery . . . . . . . . . . . . . . 5-2Additional JBuilder tools. . . . . . . . . . . . . . 5-3Working with projects . . . . . . . . . . . . . . . 5-4
Saving projects. . . . . . . . . . . . . . . . . . 5-4Using the Project wizard . . . . . . . . . . . . 5-5
Project wizard: Step 1 . . . . . . . . . . . . 5-5Project Wizard: Step 2 . . . . . . . . . . . . 5-6Project Wizard: Step 3 . . . . . . . . . . . . 5-7
Displaying project files . . . . . . . . . . . . . 5-8Setting project properties . . . . . . . . . . . . 5-9Managing projects. . . . . . . . . . . . . . . 5-10
Opening projects . . . . . . . . . . . . . . 5-10Adding and removing files . . . . . . . . 5-10Saving and closing projects . . . . . . . . 5-11Renaming projects and files . . . . . . . 5-11Working with multiple projects . . . . . 5-12
Creating JavaBeans . . . . . . . . . . . . . . . . 5-13Working with applets. . . . . . . . . . . . . . . 5-14
Using the Applet wizard . . . . . . . . . . . 5-14
Contents
ii
Chapter 6Building a user interface 6-1Using the UI designer . . . . . . . . . . . . . . . 6-2
Viewing a file . . . . . . . . . . . . . . . . . . 6-3Adding and manipulating components . . . 6-3
Designing menus . . . . . . . . . . . . . . . . . 6-3Setting component properties and events . . . . 6-4
Opening the Inspector . . . . . . . . . . . . . 6-5Designing layouts with layout managers . . . . 6-5
Chapter 7Compiling and running Java programs 7-1
Compiling Java programs. . . . . . . . . . . . . 7-1Running Java programs . . . . . . . . . . . . . . 7-2Debugging Java programs . . . . . . . . . . . . 7-3
Debugging . . . . . . . . . . . . . . . . . . . 7-4Deploying Java programs . . . . . . . . . . . . . 7-5
Using the Archive Builder. . . . . . . . . . . 7-5Deploying CORBA applications . . . . . . . 7-6Deploying web-based applications. . . . . . 7-7Running deployed programs . . . . . . . . . 7-7
Using command line tools . . . . . . . . . . . . 7-8
Chapter 8Building distributed applications 8-1Team development. . . . . . . . . . . . . . . . . 8-1Java technologies. . . . . . . . . . . . . . . . . . 8-2Building database applications . . . . . . . . . . 8-4Developing international applications . . . . . 8-5
Internationalization features in JBuilder . . . 8-6
Part IIGetting Started with Java
Chapter 9Java language basics 9-1Java syntax . . . . . . . . . . . . . . . . . . . . . 9-1
Identifiers . . . . . . . . . . . . . . . . . . . . 9-2Literals. . . . . . . . . . . . . . . . . . . . . . 9-3
Integer literals . . . . . . . . . . . . . . . . 9-3Floating-point literals . . . . . . . . . . . 9-4Boolean literals . . . . . . . . . . . . . . . 9-4Character literals . . . . . . . . . . . . . . 9-4String literals . . . . . . . . . . . . . . . . 9-5
Keywords . . . . . . . . . . . . . . . . . . . . 9-5Statements . . . . . . . . . . . . . . . . . . . . 9-6Code blocks . . . . . . . . . . . . . . . . . . . 9-6Comments . . . . . . . . . . . . . . . . . . . . 9-7Expressions. . . . . . . . . . . . . . . . . . . . 9-8Operators. . . . . . . . . . . . . . . . . . . . . 9-8
Arithmetic operators . . . . . . . . . . . . 9-9Logical operators. . . . . . . . . . . . . . 9-10Comparison operators . . . . . . . . . . 9-10Assignment operators . . . . . . . . . . . 9-11Bitwise operators . . . . . . . . . . . . . 9-12A special operator: The ?: operator . . . 9-12
Java’s data types . . . . . . . . . . . . . . . . . 9-13Variables . . . . . . . . . . . . . . . . . . . . 9-13Built-in data types . . . . . . . . . . . . . . . 9-14
Numeric data types . . . . . . . . . . . . 9-14Boolean data types. . . . . . . . . . . . . 9-14Character data types. . . . . . . . . . . . 9-15
Composite data types . . . . . . . . . . . . . 9-15Arrays . . . . . . . . . . . . . . . . . . . . 9-15Strings. . . . . . . . . . . . . . . . . . . . 9-16
Type casting . . . . . . . . . . . . . . . . . . 9-17Implicit casting . . . . . . . . . . . . . . . 9-18
Scope rules . . . . . . . . . . . . . . . . . . . 9-18Flow control structures . . . . . . . . . . . . . . 9-19
Loops . . . . . . . . . . . . . . . . . . . . . . 9-19The while loop . . . . . . . . . . . . . . . 9-19The do loop . . . . . . . . . . . . . . . . . 9-20The for loop. . . . . . . . . . . . . . . . . 9-20
Loop control statements . . . . . . . . . . . 9-21The break statement . . . . . . . . . . . . 9-21The continue statement . . . . . . . . . . 9-22
Conditional statements . . . . . . . . . . . . 9-22The if-else statement. . . . . . . . . . . . 9-22The switch statement . . . . . . . . . . . 9-23
Summary. . . . . . . . . . . . . . . . . . . . . . 9-24
Chapter 10Object-oriented programming in Java 10-1
Introduction to OOP . . . . . . . . . . . . . . . 10-1Classes . . . . . . . . . . . . . . . . . . . . . . . 10-2
Declaring and instantiating classes . . . . . 10-2Data members . . . . . . . . . . . . . . . . . 10-3Class methods . . . . . . . . . . . . . . . . . 10-3Constructors and finalizers. . . . . . . . . . 10-4

iii
Case study: A simple OOP example . . . . . 10-4Class inheritance . . . . . . . . . . . . . . . . 10-6
Using this and super . . . . . . . . . . . . 10-8Access modifiers . . . . . . . . . . . . . . . . 10-9
Access from within class’s package . . . . 10-9Access outside of a class’s package . . . . 10-9
Accessor methods . . . . . . . . . . . . . . 10-10Abstract classes . . . . . . . . . . . . . . . . 10-11
Polymorphism . . . . . . . . . . . . . . . . . . 10-13Method overloading . . . . . . . . . . . . . 10-13Using interfaces. . . . . . . . . . . . . . . . 10-13
Java packages. . . . . . . . . . . . . . . . . . . 10-17The import statement . . . . . . . . . . . . 10-17Declaring packages. . . . . . . . . . . . . . 10-18Project options related to packages. . . . . 10-19
Summary . . . . . . . . . . . . . . . . . . . . . 10-19
Chapter 11The Java class libraries 11-1Introduction . . . . . . . . . . . . . . . . . . . . 11-1The Language package . . . . . . . . . . . . . . 11-2
The Object class . . . . . . . . . . . . . . . . 11-2Type wrapper classes . . . . . . . . . . . . . 11-2The Math class . . . . . . . . . . . . . . . . . 11-3The String class . . . . . . . . . . . . . . . . . 11-4The StringBuffer class . . . . . . . . . . . . . 11-5The System class . . . . . . . . . . . . . . . . 11-6
The Utilities package . . . . . . . . . . . . . . . 11-6The Enumeration interface . . . . . . . . . . 11-7The Vector class . . . . . . . . . . . . . . . . . 11-7
The I/O package . . . . . . . . . . . . . . . . . . 11-9Input stream classes . . . . . . . . . . . . . . 11-9Output Stream classes . . . . . . . . . . . . 11-11File classes. . . . . . . . . . . . . . . . . . . 11-12The StreamTokenizer class . . . . . . . . . 11-13
Summary . . . . . . . . . . . . . . . . . . . . . 11-13
Chapter 12Threading techniques 12-1Overview . . . . . . . . . . . . . . . . . . . . . . 12-1
Why are threads useful? . . . . . . . . . . . . 12-1Why haven’t I heard of threads before? . . . 12-2
Creating a thread. . . . . . . . . . . . . . . . . . 12-2Subclassing the Thread class . . . . . . . . . 12-2
Example: Implementing countingThread . . . . . . . . . . . . . . 12-3
Implementing the Runnable interface . . . . 12-4
The Thread API . . . . . . . . . . . . . . . . . . 12-5Constructors . . . . . . . . . . . . . . . . . . 12-5The start() method. . . . . . . . . . . . . . . 12-6The sleep() method . . . . . . . . . . . . . . 12-6The yield() method . . . . . . . . . . . . . . 12-6The join() method . . . . . . . . . . . . . . . 12-6
A thread’s lifecycle . . . . . . . . . . . . . . . . 12-7Making your code thread-safe. . . . . . . . . . 12-7
The synchronized keyword . . . . . . . . . 12-7Monitors . . . . . . . . . . . . . . . . . . . . 12-8
Summary. . . . . . . . . . . . . . . . . . . . . . 12-9
Chapter 13Serialization 13-1Overview . . . . . . . . . . . . . . . . . . . . . 13-1Why serialize? . . . . . . . . . . . . . . . . . . . 13-1Serialization in JDK 1.1 . . . . . . . . . . . . . . 13-2
The Serializable interface . . . . . . . . . . . 13-2Using output streams. . . . . . . . . . . . . . . 13-3
ObjectOutputStream methods . . . . . . . . 13-4Using input streams . . . . . . . . . . . . . . . 13-4
ObjectInputStream methods . . . . . . . . . 13-6Writing and reading object streams . . . . . . . 13-6Summary. . . . . . . . . . . . . . . . . . . . . . 13-6
Chapter 14Java Virtual Machine security 14-1Overview . . . . . . . . . . . . . . . . . . . . . 14-1
Why is the Java VM necessary? . . . . . . . 14-2What are the main roles of the JVM? . . . . 14-2
Java VM security . . . . . . . . . . . . . . . . . 14-3The security model . . . . . . . . . . . . . . 14-3
The Java verifier . . . . . . . . . . . . . . 14-3The Security Manager . . . . . . . . . . . 14-4The class loader . . . . . . . . . . . . . . 14-5Java’s safety as a language . . . . . . . . 14-6
What about Just-In-Time compilers? . . . . 14-6Summary. . . . . . . . . . . . . . . . . . . . . . 14-7
Chapter 15Working with the native codeinterface 15-1
Overview . . . . . . . . . . . . . . . . . . . . . 15-1Using the JNI. . . . . . . . . . . . . . . . . . 15-1Using the native keyword . . . . . . . . . . 15-2Using the javah tool . . . . . . . . . . . . . . 15-3
Summary . . . . . . . . . . . . . . . . . . . . . 15-3

iv
Part IIITutorials
Chapter 16Building an application 16-1Step 1: Creating the project . . . . . . . . . . . . 16-1Step 2: Generating your source files . . . . . . . 16-4
Changing the project properties . . . . . . . 16-6Step 3: Compiling and running your
application . . . . . . . . . . . . . . . . . . . . 16-7Step 4: Customizing your application’s
user interface . . . . . . . . . . . . . . . . . . . 16-7Step 5: Adding a component to your
application . . . . . . . . . . . . . . . . . . . 16-10Step 6: Editing your source code . . . . . . . . 16-11Step 7: Compiling and running your
application . . . . . . . . . . . . . . . . . . . 16-12Step 8: Running your application from the
command line . . . . . . . . . . . . . . . . . 16-13Step 9: Adding more components to your
application . . . . . . . . . . . . . . . . . . . 16-14Step 10: Preparing your application for
deployment . . . . . . . . . . . . . . . . . . . 16-16Step 11: Running your deployed
application from the command line . . . . . 16-17HelloWorld source code. . . . . . . . . . . . . 16-18
Source code for HelloWorldFrame.java . . 16-18Source code for HelloWorldClass.java . . . 16-21
Chapter 17Building an applet 17-1Overview . . . . . . . . . . . . . . . . . . . . . . 17-2Step 1: Creating the project . . . . . . . . . . . . 17-3
Changing the project properties . . . . . . . 17-5Step 2: Generating your source files . . . . . . . 17-6Step 3: Compiling and running your applet . 17-10Step 4: Customizing your applet’s
user interface . . . . . . . . . . . . . . . . . . 17-11Step 5: Adding AWT components to
your applet . . . . . . . . . . . . . . . . . . . 17-15Step 6: Editing your source code . . . . . . . . 17-18Step 7: Deploying your applet . . . . . . . . . 17-22
Deploying your applet with the jar tool . . 17-23Deploying your applet with the
Archive Builder . . . . . . . . . . . . . . . 17-24Step 8: Modifying the HTML file. . . . . . . . 17-26
Step 9: Running your deployed applet from the command line. . . . . . . . 17-28
Step 10: Testing your deployed applet on the Web . . . . . . . . . . . . . . . . . . . 17-29
Applet source code . . . . . . . . . . . . . . . 17-29Applet HTML source code . . . . . . . . . 17-29Applet class source code . . . . . . . . . . 17-30
Chapter 18Compiling, running, and debugging 18-1About this tutorial . . . . . . . . . . . . . . . . 18-1Step 1: Opening the sample project . . . . . . . 18-2Step 2: Fixing syntax errors . . . . . . . . . . . 18-3
Saving files and running the program . . . 18-4Step 3: Fixing compiler errors . . . . . . . . . . 18-4
Saving files and running the program . . . 18-8Step 4: Fixing the subtractValues() method . . 18-8
Saving files and running the program . . 18-13Step 5: Fixing the divideValues() method . . 18-14
Saving files and running the program . . 18-17Step 6: Fixing the oddEven() method . . . . . 18-18Step 7: Finding runtime exceptions . . . . . . 18-21
Chapter 19Building a Java text editor 19-1About this tutorial . . . . . . . . . . . . . . . . 19-1
Overview . . . . . . . . . . . . . . . . . . . . 19-1What this tutorial demonstrates . . . . . . . 19-2
Step 1: Creating the project . . . . . . . . . . . 19-2Using the Project wizard . . . . . . . . . . . 19-2Changing the project properties . . . . . . . 19-4Selecting the project’s code style options . . 19-4
Choosing the event handler type . . . . 19-5Choosing how to instantiate objects . . . 19-5
Using the Application wizard . . . . . . . . 19-5Suppressing automatic hiding of JFrame . . 19-6Setting the look and feel . . . . . . . . . . . 19-7
Design time look and feel . . . . . . . . . 19-7Runtime look and feel . . . . . . . . . . . 19-7
Step 2: Adding a text area . . . . . . . . . . . . 19-8Step 3: Creating the menus. . . . . . . . . . . .19-11Step 4: Adding a FontChooser dialog. . . . . 19-13
Setting the dialog’s frame and title properties . . . . . . . . . . . . . . . . . . 19-13
Creating an event to launch the FontChooser . . . . . . . . . . . . . . . . 19-14

v
Step 5: Attaching a menu item event to the FontChooser . . . . . . . . . . . . . . . . 19-15
Step 6: Attaching menu item events to JColorChooser . . . . . . . . . . . . . . . . . 19-18
Step 7: Adding a menu event handler to clear the text area . . . . . . . . . . . . . . 19-19
Step 8: Adding a file chooser dialog . . . . . . 19-20Internationalizing Swing
components . . . . . . . . . . . . . . . . . 19-20Step 9: Adding code to read text from
a file . . . . . . . . . . . . . . . . . . . . . . . 19-21Step 10: Adding code to menu items
for saving a file . . . . . . . . . . . . . . . . . 19-23Step 11: Adding code to test if a file has
been modified . . . . . . . . . . . . . . . . . 19-25
Step 12: Activating the toolbar buttons . . . . 19-27Specifying button tool tip text . . . . . . . 19-27Creating the button events . . . . . . . . . 19-28Creating a fileOpen() method . . . . . . . 19-28Creating a helpAbout() method . . . . . . 19-29
Step 13: Hooking up event handling to the text area . . . . . . . . . . . . . . . . . . 19-30
Step 14: Adding a right-click menu to the text area . . . . . . . . . . . . . . . . . . 19-32
Step 15: Showing filename and state in the window title bar . . . . . . . . . . . . . 19-33
Step 16: Deploying the “Text Editor” application to a JAR file . . . . . . . . . . . 19-36
Overview . . . . . . . . . . . . . . . . . . . 19-37Running the Archive Builder . . . . . . . 19-37Running the application from the
command line . . . . . . . . . . . . . . . 19-42
Index I-1

vi
1.1 Typeface and symbol conventions . . . . . 1-31.2 Platform conventions and directories . . . 1-43.1 Navigation keyboard shortcuts . . . . . . 3-54.1 Editor features . . . . . . . . . . . . . . . . 4-1
Keymaps for editor emulations . . . . . . . 4-55.1 JBuilder tools . . . . . . . . . . . . . . . . . 5-36.1 JBuilder’s visual design tools . . . . . . . . 6-2
Tables
6.1 The AppBrowser and the UI designer. . . . . . . . . . . . . . . . . . . . 6-1
10.1 OOP1 form showing two instantiated objects . . . . . . . . . . . . . 10-5
10.2 New version of the sample application with Speed and Speak buttons added . . . . . . . . . . . . . . . 10-16
11.1 Vector and Enumeration example . . . . 11-913.1 Saving a user name and password . . . . 13-213.2 The serialized object . . . . . . . . . . . . 13-413.3 The object restored . . . . . . . . . . . . . 13-516.1 AppBrowser elements . . . . . . . . . . . 16-616.2 UI designer elements . . . . . . . . . . . . 16-819.1 JBuilder in design view . . . . . . . . . . 19-6
Figures

I n t r o d u c t i o n 1-1
C h a p t e r
1Chapter1Introduction
Learning Java with JBuilder provides introductory material to JBuilder and the Java programming language. This book contains the following three parts:
• Part I, “JBuilder Quick Start”
Provides information about the development environment, explains how to create and manage projects, design your user interface, and compile and debug Java programs. Also provides general information about JBuilder and its documentation.
• Part II, “Getting Started with Java”
Explores basics of programming in Java, including threading techniques, serialization, and using the Native Code Interface.
• Part III, “Tutorials”
Provides several step-by-step tutorials designed to get you up, running, and productive using the JBuilder integrated development environment (IDE).
• “Building an application”
Creates a simple "Hello World" application.
• “Building an applet”
Takes you through the process of creating an AWT applet.
• “Compiling, running, and debugging”
Shows you how to find and fix syntax errors, compiler errors, and runtime errors using JBuilder.
• “Building a Java text editor”
Build a simple text editor capable of reading, writing, and editing text files.

1-2 L e a r n i n g J a v a w i t h J B u i l d e r
C o n t a c t i n g B o r l a n d d e v e l o p e r s u p p o r t
Contacting Borland developer supportBorland offers a variety of support options. These include free services on the Internet, where you can search our extensive information base and connect with other users of Borland products. In addition, you can choose from several categories of support, ranging from support on installation of the Borland product to fee-based consultant-level support and detailed assistance.
For more information about Borland's developer support services, see our web site at http://www.borland.com/devsupport/, call Borland Assist at (800) 523-7070, or contact our Sales Department at (831) 431-1064.
When contacting support, be prepared to provide complete information about your environment, the version of the product you are using, and a detailed description of the problem.
For support on third-party tools, contact the vendor.
Online resourcesYou can get information from any of these online sources:
World Wide Web
Check www.borland.com regularly. The JBuilder Product Team will post white papers, competitive analyses, answers to frequently asked questions, sample applications, updated software, updated documentation, and information about new and existing products.
You may want to check these URLs in particular:
• http://www.borland.com/jbuilder/ (updated software and other files)
• http://www.borland.com/techpubs/jbuilder/ (updated documentation and other files)
World Wide Web http://www.borland.com/
FTP ftp.borland.com Technical documents available by anonymous ftp.
Listserv To subscribe to electronic newsletters, use the online form at: http://www.borland.com/contact/listserv.htmlor, for Borland's international listserver, http://www.borland.com/contact/intlist.html
TECHFAX 1-800-822-4269 (North America) Technical documents available by fax.
I n t r o d u c t i o n 1-3
D o c u m e n t a t i o n c o n v e n t i o n s
Borland newsgroupsYou can register JBuilder and participate in many threaded discussion groups devoted to JBuilder.
You can find user-supported newsgroups for JBuilder and other Borland products at http://www.borland.com/newsgroups/
Usenet newsgroupsThe following Usenet groups are devoted to Java and related programming issues:
• news:comp.lang.java.advocacy• news:comp.lang.java.announce• news:comp.lang.java.beans• news:comp.lang.java.databases• news:comp.lang.java.gui• news:comp.lang.java.help• news:comp.lang.java.machine• news:comp.lang.java.programmer• news:comp.lang.java.security• news:comp.lang.java.softwaretools
These newsgroups are maintained by users and are not official Borland sites.
Documentation conventionsThe Borland printed documentation for JBuilder uses the typefaces and symbols described in the table below to indicate special text.
Table 1.1 Typeface and symbol conventions
Typeface Meaning
Monospace type Monospaced type represents the following:• text as it appears onscreen• anything you must type, such as “Enter Hello World in the Title
field of the Application wizard.”• file names• path names• directory and folder names• commands, such as SET PATH, CLASSPATH• Java code• Java identifiers, such as names of variables, classes, interfaces,
components, properties, methods, and events• package names• argument names• field names• Java keywords, such as void and static

1-4 L e a r n i n g J a v a w i t h J B u i l d e r
D o c u m e n t a t i o n c o n v e n t i o n s
JBuilder is available on multiple platforms. See the table below for a description of platform and directory conventions used in the documentation.
Bold Bold is used for java tools, bmj (Borland Make for Java), bcj (Borland Compiler for Java), and compiler options. For example: javac, bmj, -classpath.
Italics Italicized words are used for new terms being defined and for book titles.
Keycaps This typeface indicates a key on your keyboard. For example, “Press Esc to exit a menu.”
[ ] Square brackets in text or syntax listings enclose optional or variable items. Do not type the brackets.
< > Angle brackets in text or syntax listings indicate a variable string; type in a string appropriate for your code. Do not type the angle brackets. Angle brackets are also used for HTML tags.
... An ellipsis in syntax listing indicates code that is missing from the example.
Table 1.2 Platform conventions and directories
Item Meaning
Paths All paths in the documentation are indicated with a forward slash (/). For the Windows platform, use a backslash (\).
Home directory The location of the home directory varies by platform.• For UNIX and Linux, the home directory can vary. For
example, it could be /user/[username] or /home/[username]• For Windows 95/98, the home directory is C:\Windows• For Windows NT, the home directory is C:\Winnt\
Profiles\[username]
• For Windows 2000, the home directory is C:\Documents and Settings\[username]
.jbuilder4 directory The .jbuilder4 directory, where JBuilder settings are stored, is located in the home directory.
jbproject directory The jbproject directory, which contains project, class, and source files, is located in the home directory. JBuilder saves files to this default path.
Screen shots Screen shots reflect JBuilder’s Metal Look & Feel on various platforms.
Table 1.1 Typeface and symbol conventions (continued)
Typeface Meaning
J B u i l d e r Q u i c k S t a r t
P a r t
IPart IJBuilder Quick Start


W h a t ’ s n e w i n J B u i l d e r 4 2-1
C h a p t e r
2Chapter2What’s new in JBuilder 4
JBuilder 4 has several suites of new features and customer-requested enhancements of existing features.
• Web Development, Enterprise JavaBeans, and Team development are the focus of new features in this release.
• The OpenTools API has been extended and is easier to work with.
• Application server support has expanded.
• The User Interface is redesigned, notably the File|Open dialogs and many of the wizards, including the Archive Builder.
• The debugger feature set is expanded.
• Database handling is easier with improvements to JDataStore and JDBC Explorer.
JBuilder 4 is tested on Solaris, Linux, and Windows 98, NT, and 2000. JBuilder 4 is hosted on JDK version 1.3 in order to take advantage of its debugging capabilities and enhanced client-side performance. You can still build applications for any prior version of the JDK.
Web DevelopmentJBuilder 4 supports the development of web applications in a number of ways. It provides expanded XML support. It provides better servlet and JSP support. InternetBeans Express, a suite of components, allows you to transfer data between Java and HTML seamlessly. Web Debug and Web Run let you test your web applications right from the AppBrowser. Right-click in the project pane to access these two features.

2-2 L e a r n i n g J a v a w i t h J B u i l d e r
W e b D e v e l o p m e n t
JavaServer Pages and servlet support
JBuilder 4 lets you run and debug servlets and JSPs on Tomcat™ 3.1, the reference implementation of Servlet 2.2/JSP 1.1. For more information on Tomcat, refer to Apache Software Foundation’s Jakarta web site at http://jakarta.apache.org
Each servlet may have an alias (servlet-name) and init() parameters, and can be executed directly without an SHTML file. The web server can also have context parameters and a context path to make the development configuration match the deployment configuration more closely.
JBuilder 4 provides extended JSP support. Debugging your JSP is easy, as you can debug your source code directly. CodeInsight, ErrorInsight, and syntax highlighting are supported in JSP files.
For more information on JSPs, see “Developing JavaServer Pages” in Part III, “Distributed Application Developer’s Guide” of the Enterprise Application Developer’s Guide. For more information on servlets, see “Developing Servlets” in Part III, “Distributed Application Developer’s Guide” of the Enterprise Application Developer’s Guide.
This product includes software developed by the Apache Software Foundation (http://www.apache.org/) which is released with the following copyright:
Copyright (c) 2000 The Apache Software Foundation. All rights reserved.
This software from the Apache Software Foundation is being distributed according to the conditions and disclaimer on the copyright page.
XML supportThis version of JBuilder provides features that speed and simplify the development of XML files. These features include syntax highlighting to review your XML code and a structure pane for XML files so you can navigate within your tree more easily. JBuilder includes a new Help viewer that supports XML, providing a natural browser view of your XML files.
InternetBeans ExpressInternetBeans Express is a set of components that enables dynamic content generation in web pages through both servlets and JSPs. In addition to generic content, InternetBeans Express leverages DataExpress to make it easy to display, navigate, update and append data sets.
To access InternetBeans Express, click the Design tab at the bottom of your content pane. InternetBeans Express is on a tab of the component palette. If necessary, scroll the tabs left to reveal the InternetBeans Express tab.

W h a t ’ s n e w i n J B u i l d e r 4 2-3
E n t e r p r i s e J a v a B e a n s
For more information, see “Using InternetBeans Express” in Part III, “Distributed Application Developer’s Guide” of the Enterprise Application Developer’s Guide.
Enterprise JavaBeansJBuilder 4 makes it easier to create and deploy both session and entity bean components. A number of wizards (including EJB Group) streamline the creation, handling, and deployment of Enterprise JavaBeans. JBuilder 4 provides tools that simplify modeling and server configuration. It has Inprise Application Server’s Deployment Descriptor Editor built into the JBuilder IDE. JBuilder supports BEA’s WebLogic™ Server 5.1.
One new aspect of JBuilder 4 is the EJB Group functionality. Each EJB Group represents a single deployable JAR that is created automatically by Make or Rebuild. Using the EJB Group wizard, you can also migrate existing EJBs. You can have multiple EJB groups per project.
The Entity Bean Modeler lets you create entity beans that map to existing tables. The modeler will both create all the necessary Java code and update the deployment descriptor stored in the EJB Group. Select an EJB Group to bring up the Entity Bean Modeler dialog.
With JBuilder 4, you can:
• Create entity and session beans using EJB wizards.
• Map entity beans to existing tables with the Entity Bean Modeler.
• Create EJB groups with the EJB Group wizard, so you can have any number of EJBs in a given application.
• Migrate existing EJBs into a new group or create an empty group from the EJB Group wizard.
• Use multiple EJB groups in a project.
• Create deployable JARs automatically using Make or Rebuild.
• View JAR contents in the node viewer.
• Test your applications in a local container or on your EJB 1.1-compliant application server with the Test Client wizard.
• Run EJBs from the EJB Run dialog in a local container or application server selected for the project.
• Deploy EJBs automatically when you run or debug them.
• View and edit your application server deployment descriptor using the Deployment Descriptor Editor.
To select any of the wizards or modelers mentioned above, choose File|New, select the Enterprise tab, and choose from the icons available.

2-4 L e a r n i n g J a v a w i t h J B u i l d e r
A p p l i c a t i o n s e r v e r s u p p o r t
Part IV, “Enterprise JavaBeans Developer’s Guide” of the Enterprise Application Developer’s Guide provides a comprehensive overview of what these features do and how to use them.
Application server supportJBuilder 4 allows you to choose which application server to run on, allowing you to maintain different configurations for each one. To do so, select Project|Project Properties, select the Run tab and then the EJB tab. Default parameters are for the Inprise Application Server, but BEA’s WebLogic™ Server 5.1 can also be used directly from the JBuilder IDE: choose Tools|Enterprise Setup, select the Application Server tab, select the WebLogic tab, then set the directory path.
You may plug in other application servers through the OpenTools API.
JDBC connections are verified by JBuilder 4. Column data is available on the Persistence tab of the Deployment Descriptor Editor (DDE) view in the content pane.
The Deployment Descriptor Editor is compliant with JDK 1.3 and can read and write to EJB groups. The Deployment Descriptor Editor is integrated into the JBuilder interface. When used with WebLogic™, it creates WebLogic deployment descriptors, so you can target your beans for the WebLogic server from within JBuilder.
Team developmentJBuilder 4 provides features that make team development faster, smoother, and easier.
Project files (.jpr and .jpx) are in two parts: private and shared. Windows, watches, and breakpoints are stored in the private side, while libraries and compiler options are stored in the shared side. This simplifies the process of sharing projects.
Version tracking and control
JBuilder 4 provides revision support in every edition. To see version information for a file, click on the History tab at the bottom of the content pane. Tabs on the History page provide different views of revision information. Availability of views depends on your JBuilder edition. For more information on the History page, put your cursor in the History page and press F1.
JBuilder automatically keeps backup copies of your file. You can store backup files outside your source directory, so it’s easier to share your
W h a t ’ s n e w i n J B u i l d e r 4 2-5
O p e n T o o l s A P I
source. You can set how many backups to keep. The History page can use these multiple backup copies as a rudimentary version management system: you can access prior versions, and, in JBuilder Professional and Enterprise, you can apply the Diff engine to different versions of the same file.
The following features areavailable in JBuilder
Enterprise edition
JBuilder 4 provides seamless intergration with CVS (Concurrent Versions System), a popular Open Source version control system. CVS is included in the Companion Tools CD that comes with the Enterprise edition of JBuilder 4. Other version control systems can be incorporated using the OpenTools API.
For more information on version control in JBuilder, see “Version control” in Building Applications with JBuilder.
OpenTools APIThe OpenTools API has been expanded and made easier to use and understand. You can alter something as specific as a default path or design something as complex as your own wizard. The OpenTools features show you how.
Concept documents discuss the structure and nature of the elements of JBuilder that are included in the API. Expanded JavaDoc provides more specific and detailed technical information from within the source code. Samples show how to use OpenTools in real-life settings. For example, you can:
• Add root directories and define your favorite locations on the File|Open dialogs.
• Add keymaps.
• Plug in the servlet engine of your choice.
• Incorporate version control systems in addition to CVS.
• Customize the look and feel of the JBuilder interface.
The Concept Documents and JavaDoc are available from the Help viewer. Choose Help|Help Topics. The samples are in the samples directory of your JBuilder installation.
User Interface changes
JBuilder IDE
Most dialogs support multiple selection. When you start up, JBuilder remembers your last cursor position in open source files. You can choose

2-6 L e a r n i n g J a v a w i t h J B u i l d e r
U s e r I n t e r f a c e c h a n g e s
URLs in pathnames. JBuilder can search for source packages automatically. The Package Migration tool tunes packages created in previous versions of JBuilder to be compatible with the new JDK and expanded feature set.
The AppBrowser lets you open multiple instances of it. If you have the same file open in different instances, changes you make to one are reflected in the others. In the content pane, file tabs are displayed only for the project that is displayed in the project pane. If you select a different project, the file tabs change accordingly.
For more information on the AppBrowser, see “Introducing the AppBrowser” on page 3-2.
JBuilder 4 allows you to:
• Browse hierarchies and drill down into subclasses with a click.
• Set your own pathnames and filenames for the files you create, change, and move.
• Delete files from your drive as well as from your project by right-clicking in the project pane.
File|Open dialogs appear in a split window that simplifies navigation and selection. The left pane shows nodes; it can be expanded as needed. The right pane shows the contents of what is selected in the left pane. There is a navigation bar on the left edge that lets you select frequently-used locations with a single click. From this window, you can choose a root directory and select single or multiple files.
The File|Open dialogs let you:
• Expand directory trees with a click.
• Search tree variants by typing inside the tree.
• Drill into .zip and .jar files by clicking on them in the tree.
• Add root directories using the OpenTools API.
• Navigate to frequently-used locations with a single click on the left-hand icon bar.
• Select multiple files.
• Create folders by clicking on the New Folder icon at the top of the window.
WizardsMany new wizards have been added and many existing wizards have been redesigned or expanded to make them easier to use and more powerful and effective. Wizards yield JavaDoc commentary. There is a new category of EJB wizards. Wizards that create components, such as

W h a t ’ s n e w i n J B u i l d e r 4 2-7
U s e r I n t e r f a c e c h a n g e s
panels and dialogs, are more accessible. The utility wizards are more sophisticated, including EJB, CORBA, and data module utilities.
• The Archive Builder supersedes the Deployment wizard. It builds a comprehensive archive of deployment preferences, based on the kind of application you’re deploying. It’s available from the Wizards menu. To learn more about the Archive Builder, see “Deploying Java programs” on page 7-5, or “Deploying Java programs” in Building Applications with JBuilder.
• The Project wizard is extended. It lets you select an existing project as a template for a new project, change source and output directories, add required libraries, and edit root, project, source, backup, and output paths. To learn more about the new Project wizard, see “Working with projects” on page 5-4 or “Creating and managing projects” in Building Applications with JBuilder.
• New Library and New JDK wizards automatically search the directory you choose for the files you need. They are available from the Tools menu. Select Configure Libraries or Configure JDKs then click the New button.
• EJB wizards let you create, group, test, debug, and deploy Enterprise JavaBeans. The new EJB wizard matrix includes EJB Group, EJB Group From Descriptors, Enterprise JavaBean, EJB Entity Bean Modeler, and EJB Test Client from the Enterprise page of the object gallery, plus EJB Interfaces and Use EJB Test Client from the Wizards menu. These are covered in “Enterprise JavaBeans” on page 2-3.
To use wizards, select File|New or select Wizards from the main menu. Some wizards are in both places.
EditorTo see the Editor menu, right-click in the Source pane. This menu is adjusted dynamically and has a Select All option.
• The editor supports tags, such as @todo tags.
• It places curly braces according to your Code Style settings.
• It aligns closing curly braces. If you are using this in a JSP file make sure Java and JSP code are not on the same line.
• In CodeInsight, MemberInsight provides autocompletion as you type.
The editor has expanded in other key aspects: keymaps and keybinding customization, and Search and Save options.
KeymapsKeyboard Mappings include emulations of four editors: CUA, Emacs, Brief, and Visual Studio. Visual Studio is keystroke compatible with VisualStudio™.

2-8 L e a r n i n g J a v a w i t h J B u i l d e r
R u n n i n g a n d D e b u g g i n g
You can check or customize individual keybindings, including CodeInsight keybindings, in any editor emulation. To do so, select Tools|Editor Options, choose the Editor tab, and click the Customize button.
A grid of the keymaps is available from Help|Keyboard Mappings.
Search and SaveThe editor includes expanded Search and Save options. To view or change Save options, click on Tools|Editor Options and select the Editor tab. Expand Save Options to view the list of options. They are:
• Strip Trailing Whitespace• Change Leading Tabs To Spaces• Change Leading Spaces To Tabs
Global search options are: Show Dialog When Search Fails (as opposed to showing a status bar message) and Search Word At Cursor. To access these, choose Tools|Editor Options, select the Editor tab, and expand Search Options.
Other search options are on the Find/Replace Text dialog. To access it, choose Search|Find. These options allow you to refine the textual parameters of your search.
Still more options are available in the Search|Find In Path dialog. You can define the paths as well as the textual parameters of your search.
CodeInsight’s MemberInsight can automatically complete your code as you type.
For more information on the Editor, see Chapter 4, “Using the editor.” You can also use F1 Help in the dialog boxes.
Running and DebuggingYou can create new runtime configurations based on existing ones by choosing Run|Configurations and clicking Copy.
The debugger feature set has been expanded considerably. All debugger lists support multiple selection. Data and threads can be seen in a split view. You can toggle floating windows for debugger views: threads, breakpoints, and so on.
The list of enhancements include:
• Tool tip variable inspection.
• Evaluator method call evaluation.
• Evaluator variable inline assignment.
• Show/hide null value for any array type.

W h a t ’ s n e w i n J B u i l d e r 4 2-9
D a t a b a s e t o o l s
• Type in your own log message in the Breakpoint Properties dialog (select Run|Add Breakpoint and choose the kind of breakpoint).
• Cross-process breakpoint for client/server applications.
• Keep thread suspended option.
• Debug tab in the Runtime Properties dialog (select Run|Configurations) to set debugging preferences.
• Improved sourceless debugging.
For more information on the debugger, see “Debugging Java programs” in Building Applications with JBuilder. For more information on debugging distributed applications, see “Debugging distributed applications” in Part III, “Distributed Application Developer’s Guide” of the Enterprise Application Developer’s Guide.
Database toolsThe usability and functionality of the database tools is improved. There is a new UI for setting up database authentication.
JDataStore
JDataStore is faster and more flexible. The underlying connection pool provides significant performance gains. JBuilder 4’s support for JTA allows JDataStore connections to participate in distributed transactions using standard XA interfaces.
JDataStore Explorer allows you to create and manipulate tables graphically. It can create indexes for its tables.
JDataStore now supports cross joins, inner joins, and left, right, and full outer joins. (In this release, specify join columns by using the “natural” or “using” keywords.) JDataStore supports the SQL-92 join sequence and the JDBC “oj” escape sequence. It supports scalar subqueries.
JDataStore Server options are under the Options tab. The new UI shows more information about the server, including:
• Users connected.• Open databases.• History of events.
Database authentication allows you to password protect your JDataStore. There are two stages to the process: password protecting it, and opening it for different levels of access.
For more information on JDataStore, see the JDataStore Developer’s Guide.
2-10 L e a r n i n g J a v a w i t h J B u i l d e r
U s i n g J B u i l d e r ’ s o n l i n e h e l p
JDBC Explorer improvements
The JDBC feature set has expanded:
• You can create tables graphically. To do so, select File|Create Table.
• Drivers not in the classpath are now displayed in red when defining a new URL.
• The Options dialog gives you more ways to control the JDBC Explorer.
• You can visually manipulate jdbcexplorer.properties.
For more information about the JDBC Explorer, see “JDBC Explorer: Overview” in the Database Application Developer’s Guide.
Using JBuilder’s online helpJBuilder displays online help topics in the Help Viewer. Topics can also be displayed in the AppBrowser or in a web browser.
How to get Help
You can get help on a topic when you are using JBuilder in the following ways:
• From the IDE:
• Choose Help|Help Topics from the JBuilder main menu to open the Help Viewer.
• Click the Help button displayed on a dialog box, or press F1.
• Choose Search|Browse Symbol and enter a class name. Click the Doc tab.
W h a t ’ s n e w i n J B u i l d e r 4 2-11
U s i n g J B u i l d e r ’ s o n l i n e h e l p
• From the AppBrowser:
• Double-click a class name in the structure pane and click the Doc tab to see the reference documentation for the class if a JavaDoc is available for that class.
• Click a class name in the structure pane and press Enter; then click the Doc tab. (same as double-clicking)
• Right-click a class name in the source pane and choose Browse Symbol. Click the Doc tab.
• From the Inspector, choose a property or event and press F1.
For more information, see “Using JBuilder’s online help” in the “Learning more about JBuilder” chapter of the online Quick Start.

2-12 L e a r n i n g J a v a w i t h J B u i l d e r
I n t r o d u c i n g J B u i l d e r 3-1
C h a p t e r
3Chapter3Introducing JBuilder
Welcome to JBuilder! This Quick Start provides an overview of the JBuilder integrated development environment (IDE). It helps you start using the product immediately, and it shows you where to find more detailed information about Java programming in JBuilder.
What is JBuilder?JBuilder is a comprehensive group of highly productive tools for creating scalable, high-performance, platform-independent applications using the Java programming language.
Scalable and component-based, JBuilder is designed for all levels of development projects, ranging from applets to applications that require networked database connectivity to enterprise-wide, distributed, multi-tier solutions.
The JBuilder environment is 100% Pure Java. Any program written in Java can be run, debugged, and worked on from within JBuilder. JBuilder provides tools for developing programs using a variety of Java technologies, including:
• JavaBeans
• Java 2
• Java Development Kit (JDK); based on version 1.3, it can compile for any previous version
• JFC/Swing
• OpenTools development

3-2 L e a r n i n g J a v a w i t h J B u i l d e r
I n t r o d u c i n g t h e A p p B r o w s e r
JBuilder Professional provides tools for these additional technologies:
• Servlets and servlet engines
• Remote Method Invocation (RMI)
• Java Database Connectivity (JDBC)
• Open Database Connectivity (ODBC)
• Structured Query Language (SQL)
• All major corporate database servers
JBuilder Enterprise provides tools for these additional technologies:
• Enterprise JavaBeans (EJB)
• Version control systems
• Extensible Markup Language (XML)
• JavaServer Pages (JSP)
• Common Object Request Broker Architecture (CORBA)
JBuilder also provides developers with a flexible, open architecture that makes it easy to incorporate new JDKs, third-party tools, add-ins, and JavaBean components. OpenTools resources such as expanded JavaDoc commentary and Concept Documents make this easier.
For more information on what JBuilder can do, visit the Borland JBuilder web site at http://www.borland.com/jbuilder
Introducing the AppBrowserThe JBuilder integrated development environment provides a single window that is equipped to handle the large majority of development functions. This window is called the AppBrowser. From the AppBrowser you can create, edit, and manage files and projects, visually design visual features, and compile, debug, and run your applications.
For more information on the AppBrowser, see the “Welcome Project” and the “AppBrowser” topic in the “JBuilder environment” topic available from Help|JBuilder Environment.
The AppBrowser has several panes and panels designed for performing its functions. These elements are shown below.
I n t r o d u c i n g J B u i l d e r 3-3
I n t r o d u c i n g t h e A p p B r o w s e r
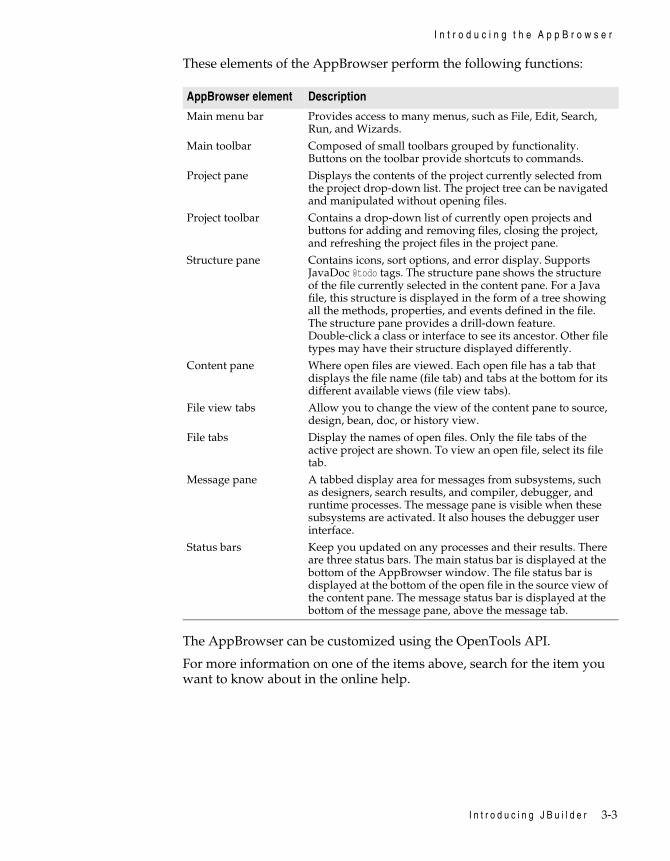
These elements of the AppBrowser perform the following functions:
The AppBrowser can be customized using the OpenTools API.
For more information on one of the items above, search for the item you want to know about in the online help.
AppBrowser element Description
Main menu bar Provides access to many menus, such as File, Edit, Search, Run, and Wizards.
Main toolbar Composed of small toolbars grouped by functionality. Buttons on the toolbar provide shortcuts to commands.
Project pane Displays the contents of the project currently selected from the project drop-down list. The project tree can be navigated and manipulated without opening files.
Project toolbar Contains a drop-down list of currently open projects and buttons for adding and removing files, closing the project, and refreshing the project files in the project pane.
Structure pane Contains icons, sort options, and error display. Supports JavaDoc @todo tags. The structure pane shows the structure of the file currently selected in the content pane. For a Java file, this structure is displayed in the form of a tree showing all the methods, properties, and events defined in the file. The structure pane provides a drill-down feature. Double-click a class or interface to see its ancestor. Other file types may have their structure displayed differently.
Content pane Where open files are viewed. Each open file has a tab that displays the file name (file tab) and tabs at the bottom for its different available views (file view tabs).
File view tabs Allow you to change the view of the content pane to source, design, bean, doc, or history view.
File tabs Display the names of open files. Only the file tabs of the active project are shown. To view an open file, select its file tab.
Message pane A tabbed display area for messages from subsystems, such as designers, search results, and compiler, debugger, and runtime processes. The message pane is visible when these subsystems are activated. It also houses the debugger user interface.
Status bars Keep you updated on any processes and their results. There are three status bars. The main status bar is displayed at the bottom of the AppBrowser window. The file status bar is displayed at the bottom of the open file in the source view of the content pane. The message status bar is displayed at the bottom of the message pane, above the message tab.

3-4 L e a r n i n g J a v a w i t h J B u i l d e r
I n t r o d u c i n g t h e A p p B r o w s e r
AppBrowser design view
You can use the UI designer to design your application visually.
To view a file in the UI designer, select the Design tab at the bottom of the content pane. The design view for the file is displayed and the component palette, available only in the design view, appears at the top of the content pane.
To create a UI, drag and drop components from the component palette in the content pane or in the structure pane on the appropriate node. The resulting code is automatically generated and inserted into your file. Use the Inspector to adjust the properties of the components you choose.
For more information, see “Designing a user interface” in Building Applications with JBuilder.

I n t r o d u c i n g J B u i l d e r 3-5
I n t r o d u c i n g t h e A p p B r o w s e r
AppBrowser message pane in debugger view
When you run the debugger, it appears in the message pane. Multiple debugging sessions are displayed as tabs along the bottom of the AppBrowser.
To use the debugger, select Run|Debug Project.
For more information, see “Debugging Java programs” in Building Applications with JBuilder.
Navigating in the AppBrowser
Use the following keyboard shortcuts to move the cursor around within the AppBrowser.
Table 3.1 Navigation keyboard shortcuts
Keyboard shortcut Action
Ctrl+Tab Moves forward in rotation order to the next AppBrowser pane. The rotation order is project pane, structure pane, content pane, message pane tab, and message pane text area.
Shift+Ctrl+Tab Moves backwards in rotation order to the previous AppBrowser pane.
Up / Down arrows Moves the selection cursor up and down in a tree.

3-6 L e a r n i n g J a v a w i t h J B u i l d e r
J a v a l a n g u a g e s u p p o r t
For more information, see the “Navigating and searching in the AppBrowser” topic in “The JBuilder environment” chapter of Building Applications with JBuilder.
Java language supportMore than any other Java development environment, JBuilder gives you easy access to the programming power of the Java language. When you’re developing cutting-edge applications, you need the most efficient tools available to simplify your programming. JBuilder provides the tools and language support you need for developing your applications.
JBuilder includes the following language support:
• JavaBeans for reusable components• JFC/Swing components for Java user interface development
JBuilder Professional includes language support for
• JDBC
• Servlets
• Multiple Java Development Kits (JDKs)
JBuilder starts RMI registry and can compile using RMIC.
JBuilder allows you to build applications and applets for different versions of the JDK from JDK 1.1x on up. Any existing 100% Java 2 compliant program can be added to, worked on, and run from the JBuilder environment. Select Project|Project Properties and the Paths tab to change the JDK version to compile against.
For more information, see http://www.javasoft.com.
JBuilder Enterprise includes language support for
• Enterprise JavaBeans (EJB) for server-side component architecture and EJBExpress for visually creating Enterprise JavaBeans
• CORBA
• JavaServer Pages (JSP) for web-based applications
Enter or Left / Right arrows
Project and structure pane - expands and collapses top level tree node branches.
Enter Project pane - opens a selected source file and places cursor in Source view. This is equivalent to a double-click.Structure pane - drills down into the superclass or interface of the selected class. This is equivalent to a double-click.
Table 3.1 Navigation keyboard shortcuts (continued)
Keyboard shortcut Action

I n t r o d u c i n g J B u i l d e r 3-7
L e a r n i n g m o r e a b o u t J B u i l d e r
For more information on JavaBeans, see “Creating JavaBeans with BeansExpress” in Building Applications with JBuilder. For more information on Enterprise JavaBeans, see the Enterprise Application Developer’s Guide.
Learning more about JBuilder
The JBuilder documentation setThe following JBuilder titles are available:
JBuilder also includes the following online documents about Java:
• API reference documentation for the Sun Java Development Kit (JDK)
You can access this documentation several formats:
• Choose Java Reference on the Help menu.• Choose the Doc tab in the content pane when viewing a JDK file.
• Java Language Specification
• Getting Started with Java
• Additional third-party documentation
Quick Start Explains what’s new in this version of JBuilder, introduces the development environment, and provides several step-by-step tutorial for creating your first application and applet with JBuilder.
Building Applications with JBuilder
Explains how to create and manage projects, design user interfaces, use layout managers, compile and debug Java programs, create applets, deploy programs, and internationalize programs. The online version includes information on version control, CVS, and using command line tools.
Database Application Developer’s Guide
Information on using JBuilder’s DataExpress database architecture. Explains the relationships between the main DataExpress data components and classes, and how to use them to create your database applications.
Enterprise Application Developer’s Guide
Information on developing and debugging distributed Java and Web applications using CORBA and RMI and developing Enterprise JavaBeans. The printed version includes information on version control and CVS.
JDataStore Programmer’s Guide
Explains how to make effective use of JDataStore functionality. JDataStore is a high-performance, small-footprint, 100% Pure Java database.
DataExpress Component Library Reference
Detailed information on all the borland.com value-added, data-aware components, classes, properties, methods, and events (online only).
Context-sensitive online help
Information related specifically to the JBuilder user interface from which you called Help.

3-8 L e a r n i n g J a v a w i t h J B u i l d e r
L e a r n i n g m o r e a b o u t J a v a
Documentation is available in the following ways:
* This documentation is also available from the JavaSoft web site at http://developer.java.sun.com/developer/infodocs/index.shtml.
The JBuilder web site at http://www.borland.com/jbuilder/ and the Borland Community web site at http://community.borland.com/ have additional information about JBuilder and Java.
Learning more about JavaThese are Sun Microsystem’s online Java glossaries:
• Sun Microsystem’s Java glossary in HTML: http://java.sun.com/docs/glossary.nonjava.html#top
• Sun Microsystem’s Java glossary in Java: http://java.sun.com/docs/glossary.html
Books that tell you more about Java programming are listed below. The first half of the list is in ascending order of difficulty. The second half covers special topics such as network programming and JavaBeans.
Document Print PDF Help HTML
All editionsQuick Start X X X XGetting Started with Java X X X XBuilding Applications with JBuilder X X XTutorials printed in various books X X XDeveloping OpenTools for JBuilder X XOpenTools API Reference X XJDK 1.3 documentation X *Java language specification X *
Professional and Enterprise editionsDatabase Application Developer’s Guide X X X XJDataStore Programmer’s Guide X X X XDataExpress Component Library Reference X X
Enterprise editionEnterprise Application Developer’s Guide X X X X
Books Authors Audience
Java for the World Wide Web: Visual Quickstart Guide(Peachpit Press)
Dori Smith no programming background
A Little Java, A Few Patterns(MIT Press)
Mattias Felleisen and Daniel P. Friedmens
novice to advanced *

I n t r o d u c i n g J B u i l d e r 3-9
L e a r n i n g m o r e a b o u t J a v a
* Philosophical in tone. Good for understanding concepts: not good for “how-to”.
For books on JBuilder, visit http://www.borland.com/jbuilder/books/.
Beginning Java 2(Wrox Press)
Ivor Horton novice
Java: How to Program(Prentice Hall)
Harvey M. Deitel and Paul J. Deitel
novice
Core Java 2, Volume 1: Fundamentals(Prentice Hall)
Cay S. Horstmann and Gary Cornell
intermediate to advanced
Java in a Nutshell(O’Reilly and Assoc.)
Mike Loukides, ed. intermediate to advanced
Just Java 2(Prentice Hall)
Peter van der Linden intermediate to advanced
Thinking in Java(Prentice Hall)
Bruce Eckel intermediate to advanced
The Complete Java 2 Certification Study Guide(Sybex, Inc.)
Simon Roberts, et al. advanced
Data Structures and Algorithms in Java(Waite Group Press)
Mitchell Waite and Robert Lafore
advanced
Books Authors Topic
Graphic Java 2: Mastering the JFC, Volume 2: Swing(Prentice Hall)
David M. Geary Swing
Developing JavaBeans(O’Reilly and Assoc.)
Robert Englander JavaBeans
Enterprise JavaBeans(O’Reilly and Assoc.)
Richard Monson-Haefel
network JavaBeans
Java 2 Networking(McGraw Hill)
Justin Couch network programming
The Java Virtual Machine Specifications(Addison Wesley)
Tim Lindholm and Frank Yellin
network programming
Java Programming with CORBA(John Wiley and Sons, Inc.)
Andreas Vogel and Keith Duddy
network programming
JDBC Database Access with Java: a Tutorial and Annotated Reference(Addison Wesley)
Graham Hamilton, Maydene Fisher, Rick Cattell
JDBC
Inside Servlets: Server-Side Programming for the Java Platform(Addison Wesley Pub. Co.)
Dustin R. Callaway servlets
Java: Servlet Programming(O’Reilly and Assoc.)
Jason Hunter and William Crawford
servlets
Books Authors Audience

3-10 L e a r n i n g J a v a w i t h J B u i l d e r
U s i n g t h e e d i t o r 4-1
C h a p t e r
4Chapter4Using the editor
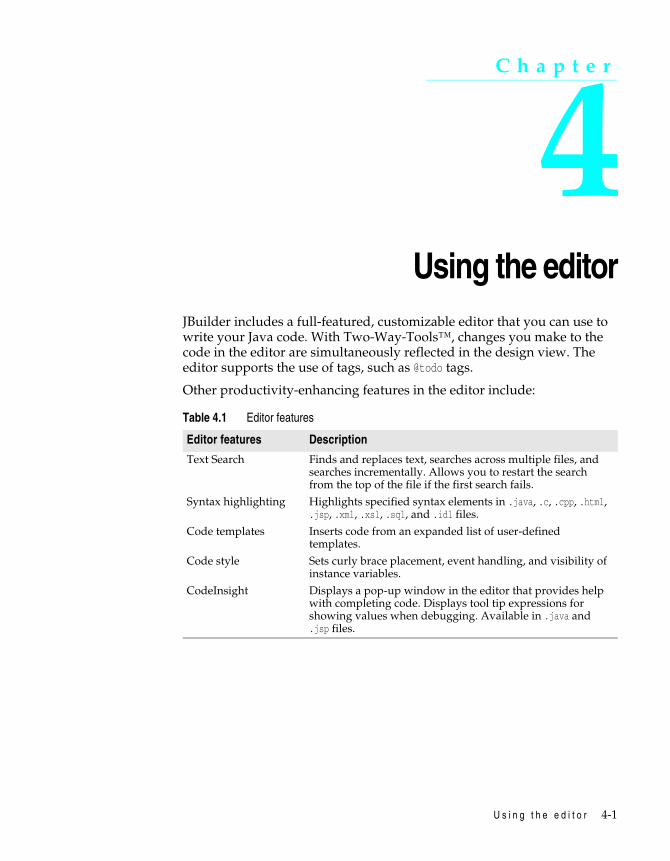
JBuilder includes a full-featured, customizable editor that you can use to write your Java code. With Two-Way-Tools™, changes you make to the code in the editor are simultaneously reflected in the design view. The editor supports the use of tags, such as @todo tags.
Other productivity-enhancing features in the editor include:
Table 4.1 Editor features
Editor features Description
Text Search Finds and replaces text, searches across multiple files, and searches incrementally. Allows you to restart the search from the top of the file if the first search fails.
Syntax highlighting Highlights specified syntax elements in .java, .c, .cpp, .html, .jsp, .xml, .xsl, .sql, and .idl files.
Code templates Inserts code from an expanded list of user-defined templates.
Code style Sets curly brace placement, event handling, and visibility of instance variables.
CodeInsight Displays a pop-up window in the editor that provides help with completing code. Displays tool tip expressions for showing values when debugging. Available in .java and .jsp files.
4-2 L e a r n i n g J a v a w i t h J B u i l d e r
U s i n g t h e e d i t o r
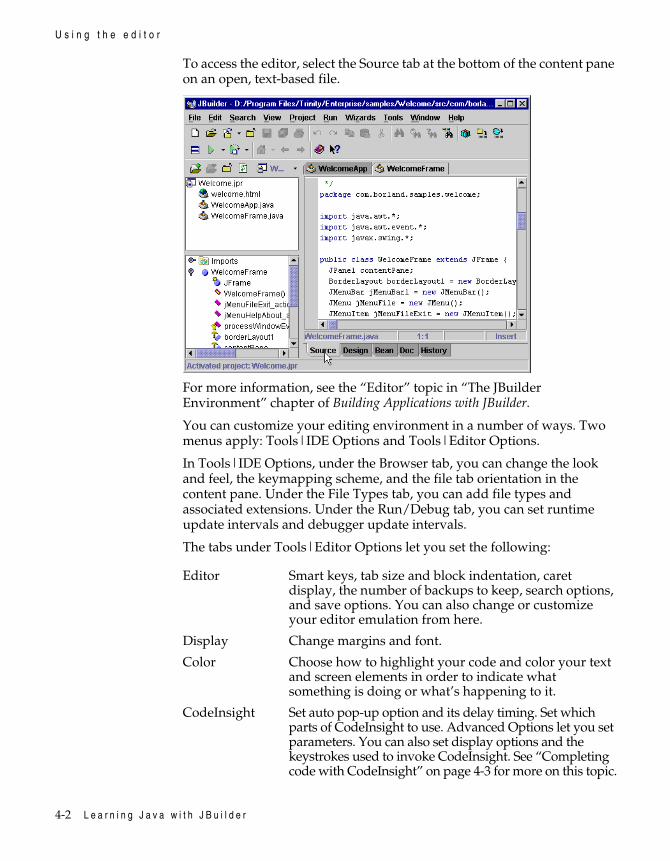
To access the editor, select the Source tab at the bottom of the content pane on an open, text-based file.
For more information, see the “Editor” topic in “The JBuilder Environment” chapter of Building Applications with JBuilder.
You can customize your editing environment in a number of ways. Two menus apply: Tools|IDE Options and Tools|Editor Options.
In Tools|IDE Options, under the Browser tab, you can change the look and feel, the keymapping scheme, and the file tab orientation in the content pane. Under the File Types tab, you can add file types and associated extensions. Under the Run/Debug tab, you can set runtime update intervals and debugger update intervals.
The tabs under Tools|Editor Options let you set the following:
Editor Smart keys, tab size and block indentation, caret display, the number of backups to keep, search options, and save options. You can also change or customize your editor emulation from here.
Display Change margins and font.
Color Choose how to highlight your code and color your text and screen elements in order to indicate what something is doing or what’s happening to it.
CodeInsight Set auto pop-up option and its delay timing. Set which parts of CodeInsight to use. Advanced Options let you set parameters. You can also set display options and the keystrokes used to invoke CodeInsight. See “Completing code with CodeInsight” on page 4-3 for more on this topic.
U s i n g t h e e d i t o r 4-3
C o m p l e t i n g c o d e w i t h C o d e I n s i g h t
For more information, click the Help button on the Editor Options or IDE Options dialog pages (Tools|Editor Options, Tools|IDE Options). For more information on keymaps, choose Help|Keyboard Mappings.
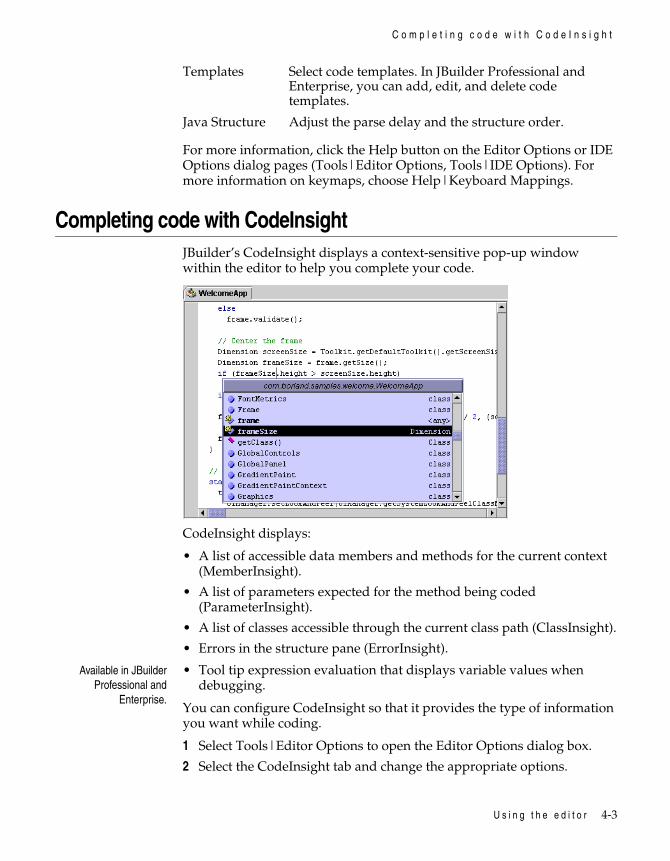
Completing code with CodeInsightJBuilder’s CodeInsight displays a context-sensitive pop-up window within the editor to help you complete your code.
CodeInsight displays:
• A list of accessible data members and methods for the current context (MemberInsight).
• A list of parameters expected for the method being coded (ParameterInsight).
• A list of classes accessible through the current class path (ClassInsight).
• Errors in the structure pane (ErrorInsight).
Available in JBuilderProfessional and
Enterprise.
• Tool tip expression evaluation that displays variable values when debugging.
You can configure CodeInsight so that it provides the type of information you want while coding.
1 Select Tools|Editor Options to open the Editor Options dialog box.
2 Select the CodeInsight tab and change the appropriate options.
Templates Select code templates. In JBuilder Professional and Enterprise, you can add, edit, and delete code templates.
Java Structure Adjust the parse delay and the structure order.
4-4 L e a r n i n g J a v a w i t h J B u i l d e r
U s i n g c o d e t e m p l a t e s
3 Select the Display Options button to customize displayed code in the pop-up windows.
Configure CodeInsight keys by selecting the Keystrokes button on the CodeInsight page. A listing of the default keyboard shortcuts is in Help|Keyboard Mappings.
For more information, see the “CodeInsight” topic in “The JBuilder environment” chapter of Building Applications with JBuilder.
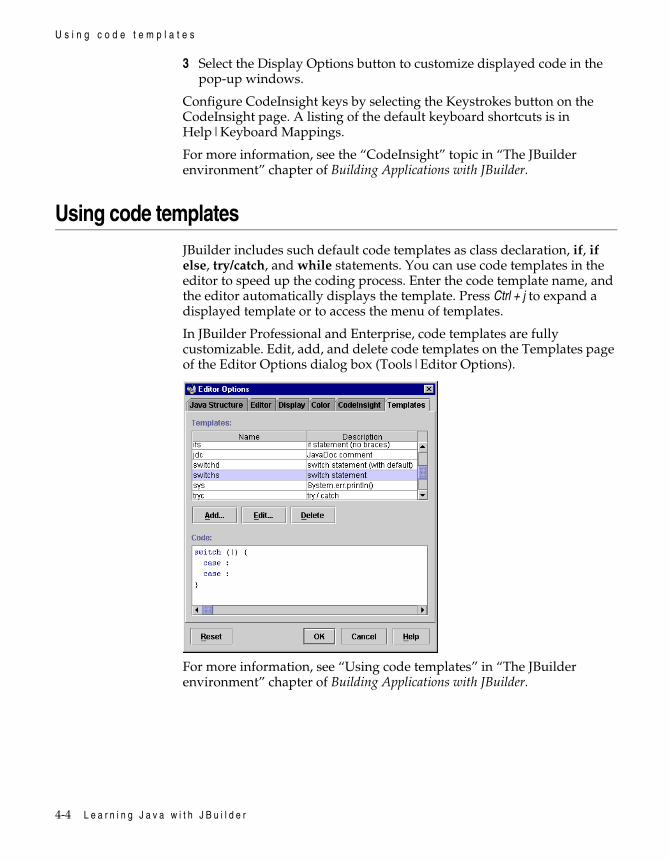
Using code templatesJBuilder includes such default code templates as class declaration, if, if else, try/catch, and while statements. You can use code templates in the editor to speed up the coding process. Enter the code template name, and the editor automatically displays the template. Press Ctrl + j to expand a displayed template or to access the menu of templates.
In JBuilder Professional and Enterprise, code templates are fully customizable. Edit, add, and delete code templates on the Templates page of the Editor Options dialog box (Tools|Editor Options).
For more information, see “Using code templates” in “The JBuilder environment” chapter of Building Applications with JBuilder.
U s i n g t h e e d i t o r 4-5
K e y m a p s f o r e d i t o r e m u l a t i o n s
Keymaps for editor emulationsYou can customize the JBuilder environment to emulate your favorite editor. JBuilder provides the following editor emulation keymaps:
• Default/CUA• Emacs• Brief• Visual Studio®
Most of these keymaps are also available as samples, which you can use as general models for creating new keymaps. You can easily customize any editor emulation. To learn how to use the Keymap Editor, click the Help button in the Keymap Editor dialog.
To change or customize JBuilder’s editor emulation,
• Choose Tools|IDE Options. Select the Browser tab. Or,• Choose Tools|Editor Options. Select the Editor tab.
To view standard keyboard shortcuts in these emulations, choose one of the topics below. In these tables, all keystrokes are in regular type.
Solaris users, note that both sets of arrow keys have been mapped to the same actions.
Cursor movementNote In the Brief emulation, if you use Alt + l, Alt + c, Alt + m, or Alt + a commands,
any cursor movement will select what the cursor traverses.
Some keys are not available on all platforms.
• Cursor movement• Selection• Editing text• Clipboard• Search and replace• Buffers and Files• Compile and Debug• CodeInsight• Code Templates• View and Help
page 4-5page 4-7page 4-8page 4-10page 4-10page 4-11page 4-11page 4-12page 4-12page 4-12
Keymaps for editor emulations
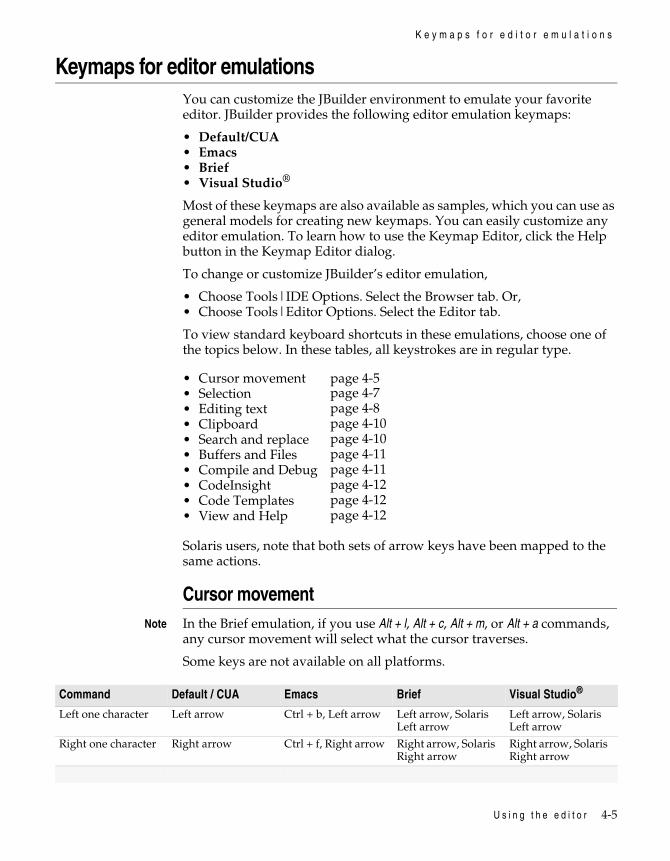
Command Default / CUA Emacs Brief Visual Studio®
Left one character Left arrow Ctrl + b, Left arrow Left arrow, Solaris Left arrow
Left arrow, Solaris Left arrow
Right one character Right arrow Ctrl + f, Right arrow Right arrow, Solaris Right arrow
Right arrow, Solaris Right arrow

4-6 L e a r n i n g J a v a w i t h J B u i l d e r
K e y m a p s f o r e d i t o r e m u l a t i o n s
Left one word Ctrl + Left arrow Alt + b, Ctrl + Left arrow
Ctrl + Left arrow, Ctrl + Solaris Left arrow
Ctrl + Left arrow, Ctrl + Solaris Left arrow
Right one word Ctrl + Right arrow Alt + f, Ctrl + Right arrow
Ctrl + Right arrow, Ctrl + Solaris Right arrow
Ctrl + Right arrow, Ctrl + Solaris Right arrow
Up one line Up arrow Ctrl + p, Up arrow Up arrow Up arrow
Down one line Down arrow Ctrl + n, Down arrow
Down arrow Down arrow
Beginning of line Home Ctrl + a Home
Beginning of line/top of window/start of file
Home, Shift + Home
End of line End Ctrl + e End
End of line/bottom of window/end of file
End, Shift + End
Top of window Ctrl + Page Up Ctrl + Home Ctrl + Page Up
Bottom of window Ctrl + Page Down Ctrl + End Ctrl + Page Down
Up one screen Page Up Alt + v, Page Up Page Up Page Up
Down one screen Page Down Ctrl + v, Page Down
Page Down Page Down
Top of file Ctrl + Home Home, Alt + < Ctrl + Page Up Ctrl + Home
Bottom of file Ctrl + End End, Alt + > Ctrl + Page Down Ctrl + End
Next tab stop Tab Tab Tab Tab
Previous tab stop Shift + Tab Shift + Tab Shift + Tab Shift + Tab
Scroll window up one line
Ctrl + Up arrow Ctrl + u, Ctrl + e, Ctrl + Up, Ctrl + Solaris Up arrow
Ctrl + Up Arrow, Ctrl + Solaris Up arrow
Scroll window down one line
Ctrl + Down arrow Ctrl + d, Ctrl + Down, Ctrl + Solaris Down arrow
Ctrl + Down Arrow, Ctrl + Solaris Down arrow
Recenter Ctrl + l Ctrl + c
Go to line Ctrl + g Ctrl + x g Alt + g Ctrl + g
Find matching brace, bracket or parenthesis
Alt + [ , Alt + ] , Ctrl + [ , Ctrl + ]
Ctrl + Alt + b,Ctrl + Alt + f
Ctrl + ] Alt + ]
Command Default / CUA Emacs Brief Visual Studio®
U s i n g t h e e d i t o r 4-7
K e y m a p s f o r e d i t o r e m u l a t i o n s
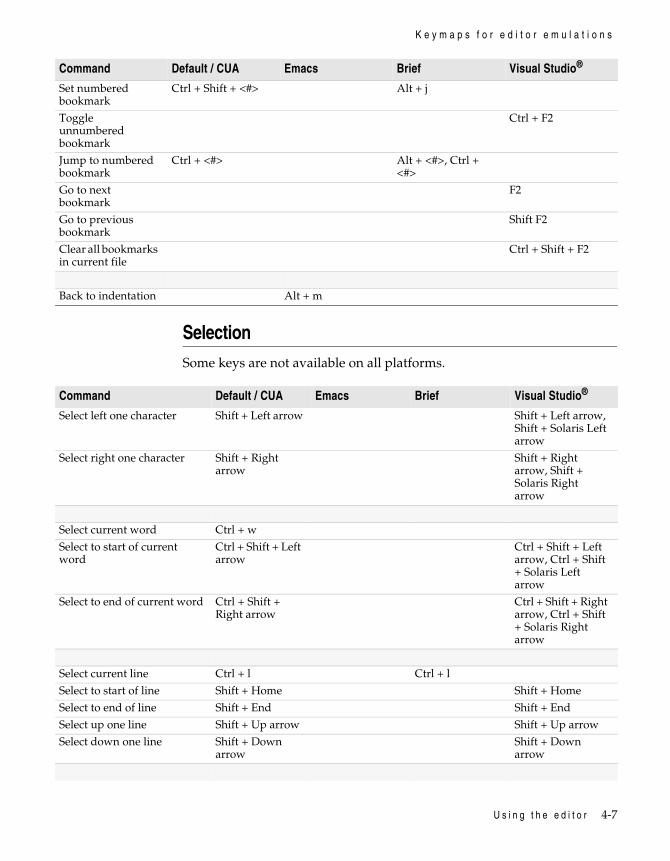
SelectionSome keys are not available on all platforms.
Set numbered bookmark
Ctrl + Shift + <#> Alt + j
Toggle unnumbered bookmark
Ctrl + F2
Jump to numbered bookmark
Ctrl + <#> Alt + <#>, Ctrl + <#>
Go to next bookmark
F2
Go to previous bookmark
Shift F2
Clear all bookmarks in current file
Ctrl + Shift + F2
Back to indentation Alt + m
Command Default / CUA Emacs Brief Visual Studio®
Command Default / CUA Emacs Brief Visual Studio®
Select left one character Shift + Left arrow Shift + Left arrow, Shift + Solaris Left arrow
Select right one character Shift + Right arrow
Shift + Right arrow, Shift + Solaris Right arrow
Select current word Ctrl + w
Select to start of current word
Ctrl + Shift + Left arrow
Ctrl + Shift + Left arrow, Ctrl + Shift + Solaris Left arrow
Select to end of current word Ctrl + Shift + Right arrow
Ctrl + Shift + Right arrow, Ctrl + Shift + Solaris Right arrow
Select current line Ctrl + l Ctrl + l
Select to start of line Shift + Home Shift + Home
Select to end of line Shift + End Shift + End
Select up one line Shift + Up arrow Shift + Up arrow
Select down one line Shift + Down arrow
Shift + Down arrow
4-8 L e a r n i n g J a v a w i t h J B u i l d e r
K e y m a p s f o r e d i t o r e m u l a t i o n s
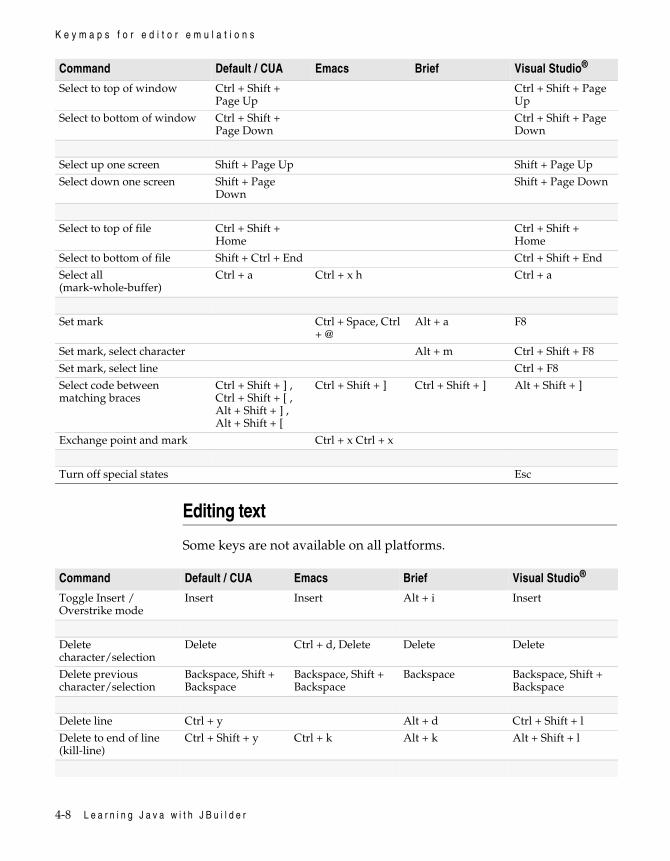
Editing text
Some keys are not available on all platforms.
Select to top of window Ctrl + Shift + Page Up
Ctrl + Shift + Page Up
Select to bottom of window Ctrl + Shift + Page Down
Ctrl + Shift + Page Down
Select up one screen Shift + Page Up Shift + Page Up
Select down one screen Shift + Page Down
Shift + Page Down
Select to top of file Ctrl + Shift + Home
Ctrl + Shift + Home
Select to bottom of file Shift + Ctrl + End Ctrl + Shift + End
Select all (mark-whole-buffer)
Ctrl + a Ctrl + x h Ctrl + a
Set mark Ctrl + Space, Ctrl + @
Alt + a F8
Set mark, select character Alt + m Ctrl + Shift + F8
Set mark, select line Ctrl + F8
Select code between matching braces
Ctrl + Shift + ] , Ctrl + Shift + [ , Alt + Shift + ] , Alt + Shift + [
Ctrl + Shift + ] Ctrl + Shift + ] Alt + Shift + ]
Exchange point and mark Ctrl + x Ctrl + x
Turn off special states Esc
Command Default / CUA Emacs Brief Visual Studio®
Command Default / CUA Emacs Brief Visual Studio®
Toggle Insert / Overstrike mode
Insert Insert Alt + i Insert
Delete character/selection
Delete Ctrl + d, Delete Delete Delete
Delete previous character/selection
Backspace, Shift + Backspace
Backspace, Shift + Backspace
Backspace Backspace, Shift + Backspace
Delete line Ctrl + y Alt + d Ctrl + Shift + l
Delete to end of line (kill-line)
Ctrl + Shift + y Ctrl + k Alt + k Alt + Shift + l

U s i n g t h e e d i t o r 4-9
K e y m a p s f o r e d i t o r e m u l a t i o n s
Delete to end of word (kill-word)
Ctrl + t Alt + d Alt + Backspace Ctrl + Delete
Delete to start of word (backward-kill-word)
Ctrl + Backspace Ctrl + Delete, Alt + Backspace, Alt + Delete
Ctrl + Backspace Ctrl + Backspace
Indent block Ctrl + Shift + i, Tab Ctrl + x Tab
Unindent block Ctrl + Shift + u, Shift + Tab
Insert return Enter, Shift + Enter Enter,Shift + Enter,Ctrl + m
Enter, Ctrl + Shift + Enter (differs from original Brief)
Enter, Shift + Enter
Open line Ctrl + n Ctrl + o
Comment / uncomment lines
Ctrl + / (to uncomment, // must be in first column)
Ctrl + /
Delete horizontal space
Alt + \
Delete blank lines Ctrl + x Ctrl + o
Lowercase word Alt + l
Uppercase word Alt + u
Capitalize word Alt + c
Lowercase selection Ctrl + x Ctrl + l (if no selection, lowercases to cursor
Ctrl + u
Uppercase selection Ctrl + x Ctrl + u (if no selection, uppercases to cursor
Ctrl + Shift + u
Transpose characters Ctrl + t
Transpose words Alt + t
Transpose lines Ctrl + x Ctrl + t Alt + Shift + t
Undo Ctrl + z, Alt + Backspace, Undo
Ctrl + /, Ctrl + Underscore, Ctrl + x u, Undo, F9
Alt + u, Numeric + *, Undo
Ctrl + z, Solaris Undo
Redo Ctrl + Shift + z, Alt + Shift + Backspace, Again
Again, Shift + F9 Alt + y, Again Ctrl + y, Solaris Redo
Command Default / CUA Emacs Brief Visual Studio®

4-10 L e a r n i n g J a v a w i t h J B u i l d e r
K e y m a p s f o r e d i t o r e m u l a t i o n s
Clipboard
Some keys are not available on all platforms.
Search and replace
Some keys are not available on all platforms.
Command Default / CUA Emacs Brief Visual Studio®
Cut selection Ctrl + x, Shift + Delete, Cut
Shift + Delete Ctrl + x, Shift + Delete, Solaris Cut
Cut selection/current line Numeric + - (minus sign), Solaris Cut
Ctrl + l
Copy selection Ctrl + c, Ctrl + Insert, Copy
Ctrl + Insert Ctrl + c, Ctrl + Insert, Solaris Copy
Copy selection/current line Numeric + + (plus sign), Solaris Copy
Paste from clipboard Ctrl + v, Shift + Insert, Paste
Insert, Ctrl + y, Shift + Insert, Solaris Paste
Ctrl + v, Shift + Insert, Solaris Paste
Kill-region Ctrl + w
Kill-ring-save Alt + w
Clipboard-kill-region F20, Cut
Clipboard-kill-ring-save F16, Copy
Clipboard-yank F18, Paste
Yank Ctrl + y
Yank-pop Alt + y
Command Default / CUA Emacs Brief Visual Studio®
Find text Ctrl + f Find F5, Alt + s, Solaris Find
Find again F3 Shift + F5
Find again, backwards Shift + F3
Search and replace Ctrl + r Alt + % F6, Alt + t Ctrl + h
Search in path Ctrl + p Ctrl + p Ctrl + d
Incremental search forward Ctrl + e Ctrl + s Ctrl + s Ctrl + i
Incremental search backward Ctrl + r Ctrl + r Ctrl + Shift + i
Search for selected text Ctrl + F3
Search backward for selected text
Ctrl + Shift + F3
Turn off special states Esc
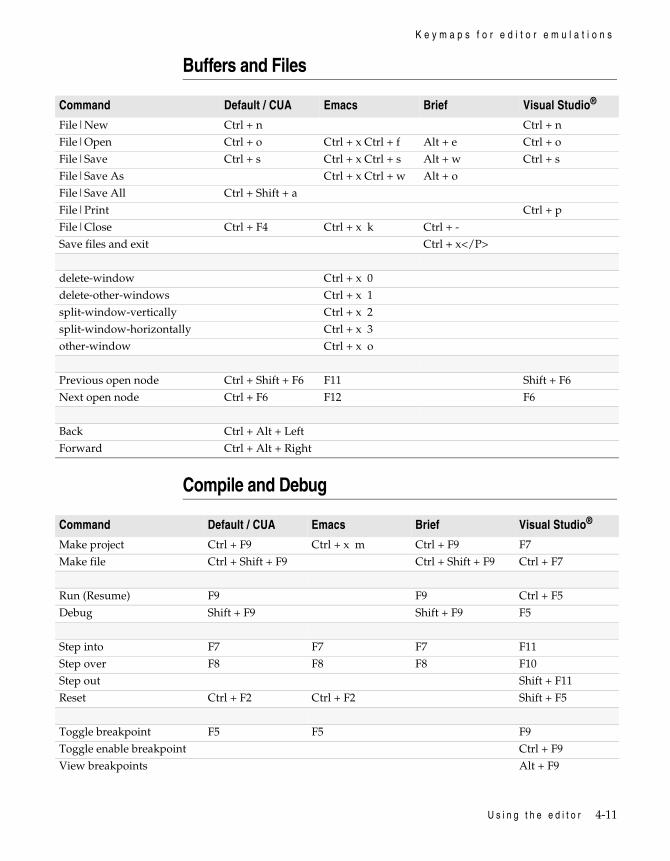
U s i n g t h e e d i t o r 4-11
K e y m a p s f o r e d i t o r e m u l a t i o n s
Buffers and Files
Compile and Debug
Command Default / CUA Emacs Brief Visual Studio®
File|New Ctrl + n Ctrl + n
File|Open Ctrl + o Ctrl + x Ctrl + f Alt + e Ctrl + o
File|Save Ctrl + s Ctrl + x Ctrl + s Alt + w Ctrl + s
File|Save As Ctrl + x Ctrl + w Alt + o
File|Save All Ctrl + Shift + a
File|Print Ctrl + p
File|Close Ctrl + F4 Ctrl + x k Ctrl + -
Save files and exit Ctrl + x</P>
delete-window Ctrl + x 0
delete-other-windows Ctrl + x 1
split-window-vertically Ctrl + x 2
split-window-horizontally Ctrl + x 3
other-window Ctrl + x o
Previous open node Ctrl + Shift + F6 F11 Shift + F6
Next open node Ctrl + F6 F12 F6
Back Ctrl + Alt + Left
Forward Ctrl + Alt + Right
Command Default / CUA Emacs Brief Visual Studio®
Make project Ctrl + F9 Ctrl + x m Ctrl + F9 F7
Make file Ctrl + Shift + F9 Ctrl + Shift + F9 Ctrl + F7
Run (Resume) F9 F9 Ctrl + F5
Debug Shift + F9 Shift + F9 F5
Step into F7 F7 F7 F11
Step over F8 F8 F8 F10
Step out Shift + F11
Reset Ctrl + F2 Ctrl + F2 Shift + F5
Toggle breakpoint F5 F5 F9
Toggle enable breakpoint Ctrl + F9
View breakpoints Alt + F9
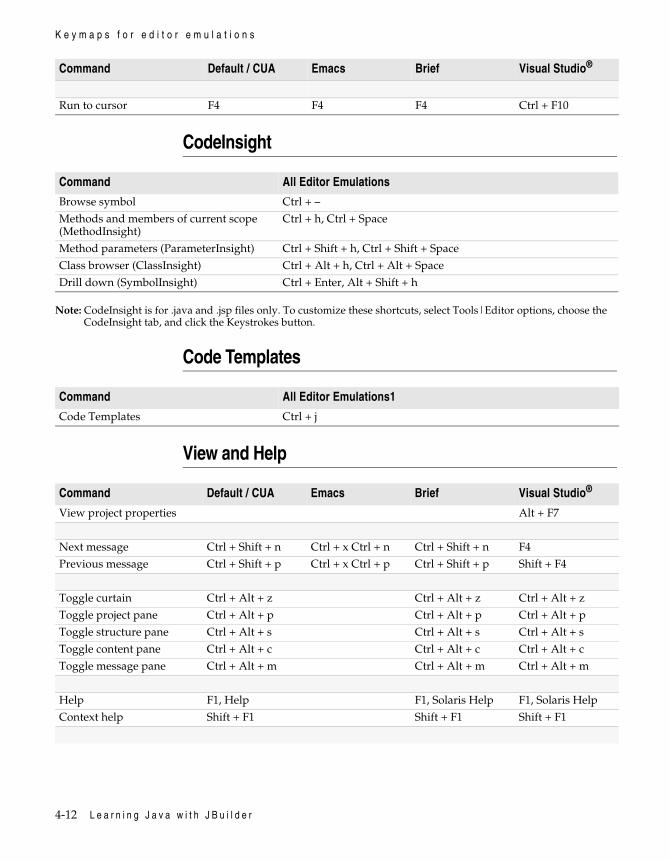
4-12 L e a r n i n g J a v a w i t h J B u i l d e r
K e y m a p s f o r e d i t o r e m u l a t i o n s
CodeInsight
Note: CodeInsight is for .java and .jsp files only. To customize these shortcuts, select Tools|Editor options, choose the CodeInsight tab, and click the Keystrokes button.
Code Templates
View and Help
Run to cursor F4 F4 F4 Ctrl + F10
Command Default / CUA Emacs Brief Visual Studio®
Command All Editor Emulations
Browse symbol Ctrl + –
Methods and members of current scope (MethodInsight)
Ctrl + h, Ctrl + Space
Method parameters (ParameterInsight) Ctrl + Shift + h, Ctrl + Shift + Space
Class browser (ClassInsight) Ctrl + Alt + h, Ctrl + Alt + Space
Drill down (SymbolInsight) Ctrl + Enter, Alt + Shift + h
Command All Editor Emulations1
Code Templates Ctrl + j
Command Default / CUA Emacs Brief Visual Studio®
View project properties Alt + F7
Next message Ctrl + Shift + n Ctrl + x Ctrl + n Ctrl + Shift + n F4
Previous message Ctrl + Shift + p Ctrl + x Ctrl + p Ctrl + Shift + p Shift + F4
Toggle curtain Ctrl + Alt + z Ctrl + Alt + z Ctrl + Alt + z
Toggle project pane Ctrl + Alt + p Ctrl + Alt + p Ctrl + Alt + p
Toggle structure pane Ctrl + Alt + s Ctrl + Alt + s Ctrl + Alt + s
Toggle content pane Ctrl + Alt + c Ctrl + Alt + c Ctrl + Alt + c
Toggle message pane Ctrl + Alt + m Ctrl + Alt + m Ctrl + Alt + m
Help F1, Help F1, Solaris Help F1, Solaris Help
Context help Shift + F1 Shift + F1 Shift + F1

U s i n g t h e e d i t o r 4-13
K e y m a p s f o r e d i t o r e m u l a t i o n s
Split window horizontally Ctrl + t
Split window vertically Ctrl + Shift + t
Zoom window (close other splits)
Ctrl + z
Close split window Ctrl + Shift + z
Next split window Ctrl + w
Command Default / CUA Emacs Brief Visual Studio®

4-14 L e a r n i n g J a v a w i t h J B u i l d e r

A u t o m a t i n g a p p l i c a t i o n d e v e l o p m e n t 5-1
C h a p t e r
5Chapter5Automating application
developmentJBuilder provides many time-saving wizards for application development. With these wizards you can quickly create or modify files, settings, and preferences. The wizards create the framework of your file or application, allowing you to focus on development.
Using wizardsJBuilder has three types of wizards: wizards that create new files, wizards that create elements of an application, and utility wizards.
The wizards available inJBuilder vary by edition
Examples of wizards are:
• Wizards that create new sets of files. Select File|New to access such wizards as:
• Project• Application• Applet• JavaBean
• Wizards that create elements of an application. Select File|New to access such wizards as:
• Dialog• Frame• Panel
• Utility wizards. Some of these are accessible from the object gallery, some from the Wizards menu.

5-2 L e a r n i n g J a v a w i t h J B u i l d e r
U s i n g t h e o b j e c t g a l l e r y
From the New page of the object gallery, you can choose the following utility wizards:
• Archive Builder (available in JBuilder Professional and Enterprise)• Class• Interface• Data Module
You can access these additional wizards from the Tools menu:
• New Library• New JDK
The following are featuresof JBuilder Professional
and Enterprise
• Select the Wizards menu to access utility wizards such as:
• Implement Interface
• Override Method
• Archive Builder (also available from the object gallery)
• Use DataModule
• Two EJB utility wizards: Interfaces and Test Client
The following are featuresof JBuilder Enterprise
• Wizards available on the Enterprise tab of the object gallery include:
• EJB wizards for creating, grouping, modeling, and testing Enterprise JavaBeans
• CORBA wizards for creating and setting up both client and server sides of an application
• Sample IDL wizard
• JavaServer Page wizard
For more information on wizards, search for “wizard” in the online help index. For more information on a specific wizard, open the wizard and click the Help button in the dialog box.
Using the object galleryThe object gallery contains many wizards you can use to create objects quickly. These wizards vary by JBuilder edition.

A u t o m a t i n g a p p l i c a t i o n d e v e l o p m e n t 5-3
A d d i t i o n a l J B u i l d e r t o o l s
To open the object gallery, choose File|New.
The object gallery has two pages:
• New: wizards that use Java 2 Standard Edition technologies
The following is a featureof JBuilder Enterprise
• Enterprise: wizards that use Java 2 Enterprise Edition technologies
For more information, see “Using the object gallery” in “The JBuilder environment” chapter of Building Applications with JBuilder.
Additional JBuilder toolsThese are features of
JBuilder Professional andEnterprise.
JBuilder offers additional tools from the Tools menu.
For more information, see the Database Application Developer’s Guide, Distributed Application Developer’s Guide, and JDataStore Programmer’s Guide.
Table 5.1 JBuilder tools
Tools Description
BeanInsight Checks the validity of JavaBeans and displays information on properties, property editors, and customizers.
Package Migration Tunes files created with previous versions of JBuilder so they are compatible with the updated JDK and JBuilder functionality.
JDBC Monitor Monitors SQL applications.
JDBC Explorer Allows you to edit data and view JDBC-based meta-database information, tables, views, and stored procedures.
JDataStore Explorer Examines the contents of a JDataStore, performs many JDataStore operations without writing code, and manages queries.
JDataStore Server Provides remote access to JDataStore files.
Configure Tools Allows you to create and customize macros for command-line tools.
RMI Registry Allows remote clients to get a reference to a remote object.

5-4 L e a r n i n g J a v a w i t h J B u i l d e r
W o r k i n g w i t h p r o j e c t s
Working with projectsTo develop programs in the JBuilder environment, you must first create a project. A project organizes the files and maintains the settings that make a JBuilder application or applet. You can view and manage your project in the project pane.
A JBuilder project is an organizational tool. When you put a file into a JBuilder project, it doesn’t change that file’s location in your directory structure. This means you can use the same file in any number of JBuilder projects without ever moving the file. You can view and manage your directory structure using your favorite file management tool.
The information about a JBuilder project is stored in a project file. The project file includes the list of files and packages that are in the project and the project properties that define the project. JBuilder uses this information when you load, save, build, or deploy a project. You don’t edit the project file directly; it is modified whenever you use the JBuilder development environment to add or remove files or to set project properties such as paths or connection settings.
The project file is shown as a node in the project pane. Listed below it are all the files in the project:
Saving projects
While you are working on a project, you can save it to the default location or to a directory of your choice. By default, JBuilder saves projects to the jbproject directory of your home directory.
Each project is saved to its own directory. Each project directory includes a project file (.jpr or .jpx), an optional file for project notes (.html), a classes directory for class files, a src directory for source files, and a bak directory for backup copies of your files.
By default, the project directory (with its children) is saved to jbproject. All paths can be changed in the Project wizard and in the Project|Project Properties dialog.
For more information on the location of the jbproject and home directories, see Table 1.2, “Platform conventions and directories,” on page 1-4.

A u t o m a t i n g a p p l i c a t i o n d e v e l o p m e n t 5-5
W o r k i n g w i t h p r o j e c t s
Using the Project wizard
JBuilder includes a Project wizard that simplifies project creation. When you use the Project wizard to create a new project, the wizard automatically sets up the directory framework for the project and develops and saves information on project properties, such as applicable paths and JDK version. You may also create a project notes file. The information in this file can go into the commentary of the source files the project contains, and from there into any JavaDoc-generated documentation you create from that project.
If you use the Application or Applet wizard without any projects open, the Project wizard is launched first so you can create a new project to hold the new application or applet.
For more information on the Project wizard, click the Help button in the wizard’s dialog box. For more information about the Application or Applet wizards, select File|New, choose the Application or Applet icon from the object gallery, and click Help in the wizard’s dialog box.
Project wizard: Step 1Step 1 sets the names of the files associated with the project. It also sets the root path and the project template.
To create a new project with the Project wizard, Choose File|New Project to open the Project wizard. This will bring up Step 1 of 3:
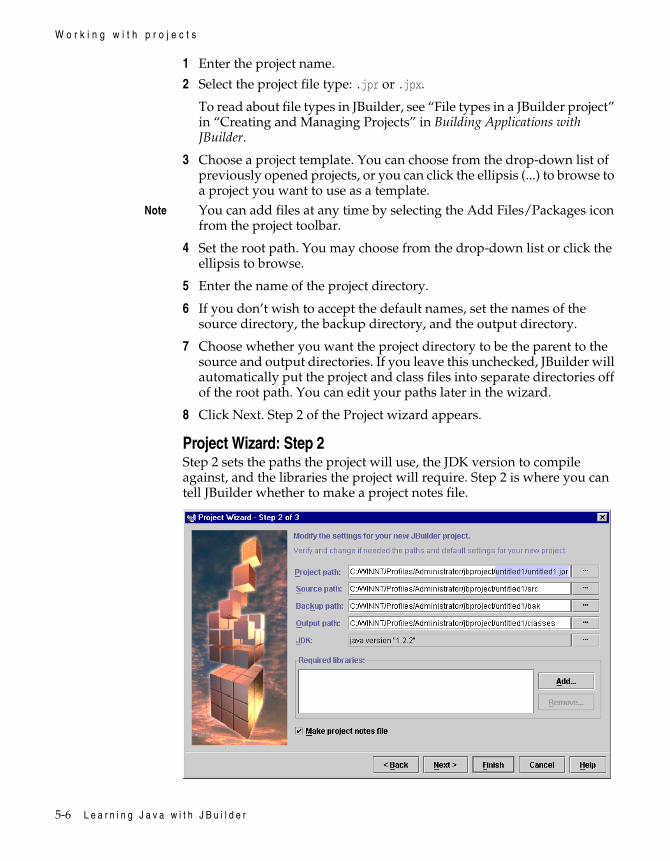
5-6 L e a r n i n g J a v a w i t h J B u i l d e r
W o r k i n g w i t h p r o j e c t s
1 Enter the project name.
2 Select the project file type: .jpr or .jpx.
To read about file types in JBuilder, see “File types in a JBuilder project” in “Creating and Managing Projects” in Building Applications with JBuilder.
3 Choose a project template. You can choose from the drop-down list of previously opened projects, or you can click the ellipsis (...) to browse to a project you want to use as a template.
Note You can add files at any time by selecting the Add Files/Packages icon from the project toolbar.
4 Set the root path. You may choose from the drop-down list or click the ellipsis to browse.
5 Enter the name of the project directory.
6 If you don’t wish to accept the default names, set the names of the source directory, the backup directory, and the output directory.
7 Choose whether you want the project directory to be the parent to the source and output directories. If you leave this unchecked, JBuilder will automatically put the project and class files into separate directories off of the root path. You can edit your paths later in the wizard.
8 Click Next. Step 2 of the Project wizard appears.
Project Wizard: Step 2Step 2 sets the paths the project will use, the JDK version to compile against, and the libraries the project will require. Step 2 is where you can tell JBuilder whether to make a project notes file.

A u t o m a t i n g a p p l i c a t i o n d e v e l o p m e n t 5-7
W o r k i n g w i t h p r o j e c t s
1 Notice the project, source, backup, and output paths. The information that you set in Step 1 shows up here.
JBuilder defaults all of these paths to the jbproject directory, but you can change them here to suit your development needs.
2 Set the version of the JDK that you will compile against. Click on the ellipsis (...) to bring up the Select A JDK dialog.
3 Choose the libraries the project will require. Click Add to bring up the Select One Or More Libraries dialog. This dialog allows you to sort the library list, select single or multiple libraries, create new libraries, and edit or delete existing libraries.
4 Decide whether you want a project notes file.
If not, uncheck this box and click Finish. You’re done!
If so, leave the box checked and click Next in order to create this file. Step 3 of the Project wizard appears.
Project Wizard: Step 3Step 3 develops the project notes file. These project notes are the basis of the About box of the application you create.
1 Enter the project’s title, author or authors, and company name. Write a project description in the pane below.
2 Click Finish. You’re done!
The newly created project node appears at the top of the project pane with the HTML notes file below it. To view your paths, JDK, and libraries, right-click on the project node, select Properties, and select the Paths tab.

5-8 L e a r n i n g J a v a w i t h J B u i l d e r
W o r k i n g w i t h p r o j e c t s
To view your project notes information as JavaDoc class fields, select the General tab in the same dialog.
For more information on projects and the Project wizard, see “Creating and managing projects” in Building Applications with JBuilder. For a tutorial on creating a project and an application, see Chapter 16, “Building an application.”
Displaying project files
JBuilder displays the project file in the project pane of the AppBrowser. The files that make up the project are listed below it. To open a file in the content pane, double-click its name in the project pane.
Note You can only view one file at a time in the content pane. To view multiple files simultaneously, open multiple instances of the AppBrowser. To do so, select Window|New Browser for each instance desired.
A tab with the file name appears at the top of the content pane. If several files are open, there will be a file tab for each one. You can look at a different open file by selecting its file tab or by selecting the file from the Window menu. You can customize the labeling and positioning of the file tabs. To learn about customizing your file tabs, see the “File Tabs” topic in “The JBuilder Environment” in Building Applications with JBuilder.
The following figure shows a project file, hello.jpr, in the project pane with the source and image files listed below it. The project notes file, hello.html, is selected in the content pane. The project notes are created from the information entered in Step 3 of the Project wizard.
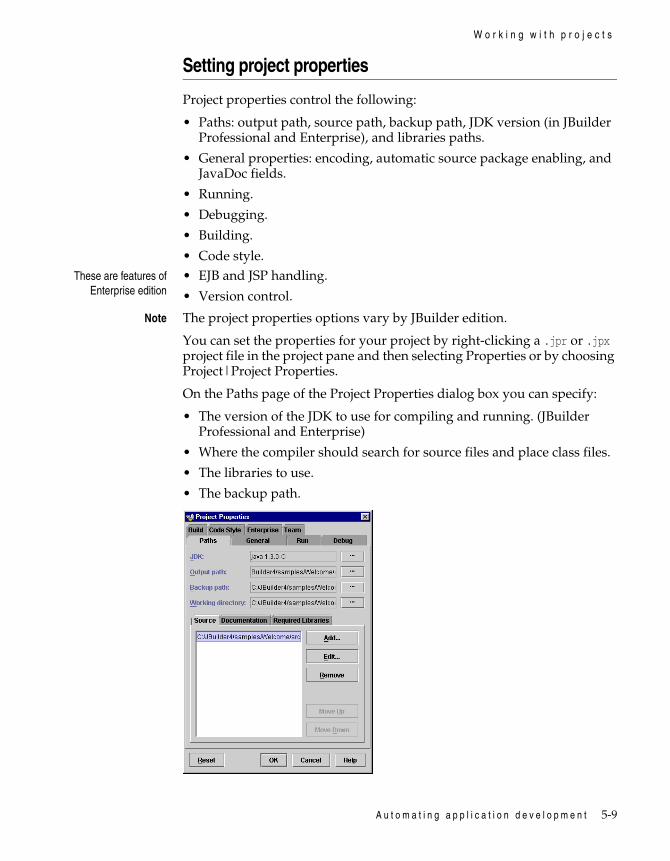
A u t o m a t i n g a p p l i c a t i o n d e v e l o p m e n t 5-9
W o r k i n g w i t h p r o j e c t s
Setting project properties
Project properties control the following:
• Paths: output path, source path, backup path, JDK version (in JBuilder Professional and Enterprise), and libraries paths.
• General properties: encoding, automatic source package enabling, and JavaDoc fields.
• Running.
• Debugging.
• Building.
• Code style.These are features of
Enterprise edition• EJB and JSP handling.
• Version control.
Note The project properties options vary by JBuilder edition.
You can set the properties for your project by right-clicking a .jpr or .jpx project file in the project pane and then selecting Properties or by choosing Project|Project Properties.
On the Paths page of the Project Properties dialog box you can specify:
• The version of the JDK to use for compiling and running. (JBuilder Professional and Enterprise)
• Where the compiler should search for source files and place class files.
• The libraries to use.
• The backup path.

5-10 L e a r n i n g J a v a w i t h J B u i l d e r
W o r k i n g w i t h p r o j e c t s
You can also globally set the default properties for all new projects in the Default Project Properties dialog box (Project|Default Project Properties).
For more information, see the “Setting project properties” topic in “Creating and managing projects” in Building Applications with JBuilder.
Managing projects
From the AppBrowser, you can:
• View project files.• Open and edit multiple files and projects, including paths and names.• Add source files and packages to a project.• Add project folders.• Navigate through packages.• Browse HTML files and web graphics.• Drill down into the structure of classes, methods, and code elements.
Opening projectsTo open a project, select File|Open Project and browse to find the project file you want. To open a previously opened project, select File|Reopen and select the project file from the drop-down list. Or click the Open or Reopen buttons on the main toolbar.
Adding and removing filesYou can add and remove files and packages from a project or folder by using the Add Files/Packages or the Remove From Project buttons on the project toolbar, or by right-clicking on a file in the project pane and selecting Add Files/Packages or Remove From Project from the right-click menu.

A u t o m a t i n g a p p l i c a t i o n d e v e l o p m e n t 5-11
W o r k i n g w i t h p r o j e c t s
The Add Files/Packages dialog has two tabs: Packages, which shows a list of available packages, and Explorer, which allows you to browse your directories and files.
Tip You can create a new file from the Explorer page by entering a new file name and clicking OK. You will get a message asking if you want to create that file; click OK.
Saving and closing projectsTo save a project, select File|Save All, File|Save Current Project, or click the Save All button on the main toolbar.
To close a project, select File|Close Project, File|Close Files, or click the Close Project button on the project toolbar.
Renaming projects and filesTo rename a project,
1 Select the project in the project pane.2 Select Project|Rename.3 Enter the new name in the File Name field of the Rename dialog box.4 Click OK.
To rename an open file,
1 Select File|Rename or right-click on the file tab at the top of the content pane and select Rename.
2 Enter the new name in the File Name field of the Rename dialog box.
3 Click Save.
Caution Renaming projects and files does not change the references to the relevant package and file names inside the code. You must make those changes separately.
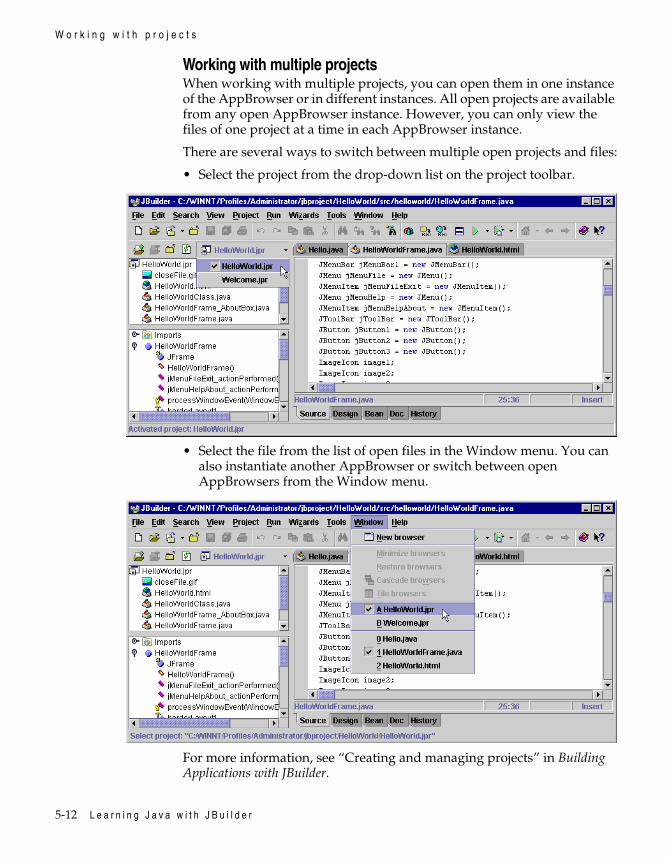
5-12 L e a r n i n g J a v a w i t h J B u i l d e r
W o r k i n g w i t h p r o j e c t s
Working with multiple projectsWhen working with multiple projects, you can open them in one instance of the AppBrowser or in different instances. All open projects are available from any open AppBrowser instance. However, you can only view the files of one project at a time in each AppBrowser instance.
There are several ways to switch between multiple open projects and files:
• Select the project from the drop-down list on the project toolbar.
• Select the file from the list of open files in the Window menu. You can also instantiate another AppBrowser or switch between open AppBrowsers from the Window menu.
For more information, see “Creating and managing projects” in Building Applications with JBuilder.
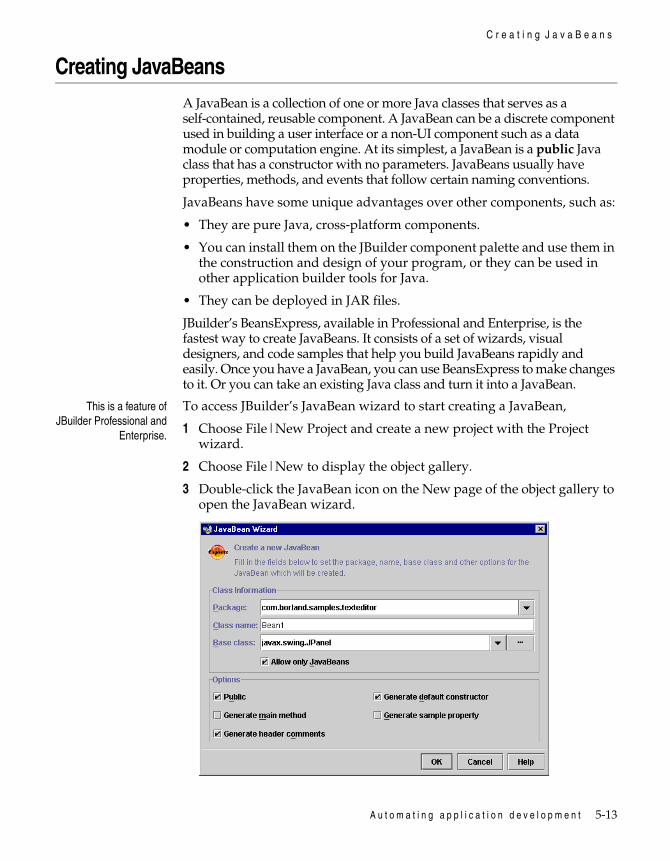
A u t o m a t i n g a p p l i c a t i o n d e v e l o p m e n t 5-13
C r e a t i n g J a v a B e a n s
Creating JavaBeansA JavaBean is a collection of one or more Java classes that serves as a self-contained, reusable component. A JavaBean can be a discrete component used in building a user interface or a non-UI component such as a data module or computation engine. At its simplest, a JavaBean is a public Java class that has a constructor with no parameters. JavaBeans usually have properties, methods, and events that follow certain naming conventions.
JavaBeans have some unique advantages over other components, such as:
• They are pure Java, cross-platform components.
• You can install them on the JBuilder component palette and use them in the construction and design of your program, or they can be used in other application builder tools for Java.
• They can be deployed in JAR files.
JBuilder’s BeansExpress, available in Professional and Enterprise, is the fastest way to create JavaBeans. It consists of a set of wizards, visual designers, and code samples that help you build JavaBeans rapidly and easily. Once you have a JavaBean, you can use BeansExpress to make changes to it. Or you can take an existing Java class and turn it into a JavaBean.
This is a feature ofJBuilder Professional and
Enterprise.
To access JBuilder’s JavaBean wizard to start creating a JavaBean,
1 Choose File|New Project and create a new project with the Project wizard.
2 Choose File|New to display the object gallery.
3 Double-click the JavaBean icon on the New page of the object gallery to open the JavaBean wizard.
5-14 L e a r n i n g J a v a w i t h J B u i l d e r
W o r k i n g w i t h a p p l e t s
For more information, see “Creating JavaBeans with BeansExpress” in Building Applications with JBuilder.
Working with appletsApplets are Java programs that are stored on Internet/intranet web servers. Unlike applications, applets are not stand-alone programs but require a viewer to run, such as a web browser. Applets must be launched from an HTML web page that includes an APPLET tag.
Before developing applets, it’s important to fully understand browser and JDK compatibility issues. See “Working with applets” in Building Applications with JBuilder and Chapter 17, “Building an applet” for information on these issues.
Using the Applet wizard
JBuilder provides an Applet wizard to assist you in creating applets. The Applet wizard creates an applet consisting of two files and adds them to the existing project:
• An HTML file containing an APPLET tag referencing your applet class. This is the file you should select to run or debug your applet.
• A Java class that extends JApplet or Applet. This is your main UI container to which you’ll add UI components using the UI designer.
To open the Applet wizard,
1 Close all open projects.
2 Choose File|New. Double-click the Applet icon in the object gallery. The Project wizard opens first. You must create a project before creating an applet.
3 Complete the three steps of the Project wizard. The Applet wizard opens.

A u t o m a t i n g a p p l i c a t i o n d e v e l o p m e n t 5-15
W o r k i n g w i t h a p p l e t s
4 Complete the three-step wizard to create the applet. The applet is added to the project.
For more information on deploying applets, see “Deploying Java programs” in Building Applications with JBuilder.

5-16 L e a r n i n g J a v a w i t h J B u i l d e r

B u i l d i n g a u s e r i n t e r f a c e 6-1
C h a p t e r
6Chapter6Building a user interface
Using JBuilder’s visual design tools, you can quickly and easily create a user interface (UI) for a Java application or applet. You construct the UI using a palette that contains components such as buttons, text areas, lists, dialogs, and menus. Then you set the values of the component properties and attach event-handler code to the component events, telling the program how to respond to UI events.
Figure 6.1 The AppBrowser and the UI designer

6-2 L e a r n i n g J a v a w i t h J B u i l d e r
U s i n g t h e U I d e s i g n e r
For more information, see Chapter 16, “Building an application” and Chapter 19, “Building a Java text editor.” You can also see the online tutorial “Creating a UI with nested layouts.”
For more information, see “Designing a user interface” in Building Applications with JBuilder.
Using the UI designerJBuilder provides tools for visually designing and programming Java classes, allowing you to produce new compound or complex components.
To use the visual design tools, a file must meet the following requirements:
• It must be a Java file (excluding Inner and Anonymous classes).• It must be free from syntax errors.• It must contain a class whose name matches the file name.
Note The class cannot be an Inner class or an Anonymous class. The UI designer is used to manipulate JavaBeans that extend java.awt.Container. For example, the JavaBean can extend any of the following classes:
• JFrame • JPanel • JDialog • JApplet
Note These requirements are all met when you create files with the Application wizard or the Applet wizard.
Table 6.1 JBuilder’s visual design tools
Design tools Description
UI designer Provides a surface for placing and editing panels and other UI components. To access the UI designer for an open file, select the Design tab at the bottom of the content pane.
Component palette Contains visual and nonvisual Java components. Components on the palette vary by JBuilder edition.
Component tree Displays a structured view of all the components in your source file and their relationships. This is shown in the structure pane at the lower left of the AppBrowser.
Inspector Used to inspect and set the values of component properties and to attach methods to component events. Changes made in the Inspector are reflected visually in your design.
Menu designer Used to design menus on the design surface. To invoke it while in the UI designer, double-click a JMenuBar or JPopupMenu component in the component tree, or select the component and press Enter.
Column designer Allows you to work visually with data set components. To invoke it, double-click a data set.
Available in JBuilderProfessional and Enterprise

B u i l d i n g a u s e r i n t e r f a c e 6-3
D e s i g n i n g m e n u s
Viewing a file
1 Double-click a Java file in the project pane. The file opens in the source editor in the content pane.
2 Select the Design tab at the bottom of the content pane. The file changes to the design view, or the designer. The component palette and the Inspector become available.
Adding and manipulating components
• Click a component in the component palette to select it.
• Click either in the designer or on the component’s parent in the structure pane to drop the chosen component into the designer.
• Use the component tree in the structure pane to keep track of where your UI components are in relation to each other. Cut and paste components in the component tree to stack and nest them the way you want them.
• Select the container you want to apply a layout manager to, then select layout in the Inspector to choose and apply the desired layout manager.
• Double-click the right column fields of the Inspector to view available values or activate text fields.
Note JBuilder keeps the designer and the Java source code synchronized. When you change the design in the UI designer, JBuilder automatically updates the source code, and when you change the source code, the change is reflected in the UI designer.
For more information, see “JBuilder’s visual design tools” in “Designing a user interface” in Building Applications with JBuilder.
Designing menusJBuilder includes a menu designer that makes it easy to create menus. You can visually design both drop-down and pop-up menus.
To access JBuilder’s menu designer,
1 Double-click a Java file in the project pane to open it.
2 Select the Design tab at the bottom of the content pane to change to the designer.
3 Add a menu component by clicking a menu component from the component palette then clicking in your design.
4 Double-click the new menu component in the component tree to activate the menu designer.

6-4 L e a r n i n g J a v a w i t h J B u i l d e r
S e t t i n g c o m p o n e n t p r o p e r t i e s a n d e v e n t s
To return to the UI designer, double-click any component in the UI folder of the component tree. For more information, see “Designing menus” in Building Applications with JBuilder.
Setting component properties and eventsThe Inspector in the UI designer allows you to visually edit component properties and attach code to component events. You can make changes to the properties and events in the Inspector and the appropriate code is automatically inserted into your source code.

B u i l d i n g a u s e r i n t e r f a c e 6-5
D e s i g n i n g l a y o u t s w i t h l a y o u t m a n a g e r s
For more information, see “Designing a user interface” in Building Applications with JBuilder.
Using the Inspector, you can:
• Set the initial property values for components in a container and for the container and its layout manager (initialization code).
• Create, name, and delete event listeners in a container that will receive events from the component in the container (event handling code).
• Save text property String values to a ResourceBundle, or revert a resourced String back to a String constant.
• Change the level of properties exposed in the Inspector.
• Expose a property as a class level variable so you can change it in the Inspector.
Any changes you make in the Inspector are reflected immediately in the source code and in the UI designer.
For more information, see “Handling events” in Building Applications with JBuilder.
Opening the Inspector
To display the Inspector,
1 Select a Java file in the project pane and press Enter to open the file in the content pane.
2 Select the Design tab at the bottom of the AppBrowser to access the designer. The Inspector is displayed at the right of the content pane.
3 Adjust the width of the Inspector by dragging its left border.
For more information, see “Using the Inspector” in Building Applications with JBuilder.
Designing layouts with layout managersA program written in Java might be deployed on more than one platform. If you were to use classic UI design techniques that specify absolute positions and sizes for your UI components, the UI might not look as you intended on all platforms. What looks fine on your development system might be unusable on another platform. To solve this problem, Java provides a system of portable layout managers.

6-6 L e a r n i n g J a v a w i t h J B u i l d e r
D e s i g n i n g l a y o u t s w i t h l a y o u t m a n a g e r s
Layout managers give you the following advantages:
• Correctly positioned components that are independent of fonts, screen resolutions, and platform differences.
• Intelligent component placement for containers that are dynamically resized at runtime.
• Ease of translation with different sized strings. If a string increases in size, the components stay properly aligned.
JBuilder provides the following layout managers from Java AWT and Swing:
• BorderLayout • FlowLayout • GridLayout • CardLayout • GridBagLayout • Null
JBuilder Professional and Enterprise also provide these custom layouts:
• XYLayout, which keeps components you put in a container at their original size and location (x,y coordinates)
• PaneLayout, used to divide a container into multiple panes
• VerticalFlowLayout, which is very similar to FlowLayout except that it arranges the components vertically instead of horizontally
• BoxLayout2, a bean wrapper class for Swing’s BoxLayout, which allows it to be selected as a layout in the Inpsector
• OverlayLayout2, a bean wrapper class for Swing’s OverlayLayout, which allows it to be selected as a layout in the Inspector
You can create custom layouts of your own, or experiment with other layouts such as those in the java.awt classes, new or third-party layout managers. Many of these are public domain on the Web or accessible to members of the Open Source community. If you want to use a custom layout in the UI designer, you may have to provide a Java helper class file to help the UI designer use the layout.
Most UI designs use a combination of layouts, nesting different layout panels within each other.
For more information, see “Using layout managers” in Building Applications with JBuilder.
C o m p i l i n g a n d r u n n i n g J a v a p r o g r a m s 7-1
C h a p t e r
7Chapter7Compiling and running
Java programsThe JBuilder compiler has full support for the Java language, including inner classes and Java Archive (JAR) files. You can compile (or “make”) from within the IDE. With JBuilder Professional and Enterprise, you can also compile from the command line using bmj (Borland Maker for Java) or bcj (Borland Compiler for Java).
For more information on the command line tools, see “Using the command line tools” in Building Applications with JBuilder.
The Run command compiles and runs projects, individual .java files (such as JSPs), or HTML applets.
JBuilder’s integrated debugger allows you to run a project or file with or without debugging it. In JBuilder Professional and Enterprise, you can set runtime configurations that are appropriate for the kind of file or program that you want to run, whether it’s an application, an applet, a JSP, a servlet, or an EJB.
Compiling Java programsA Java compiler reads Java source files, determines which additional files need to be compiled, and produces the Java program in the form of .class files containing bytecodes that are the machine code for the Java Virtual Machine (VM).
Compiling produces a separate .class file for each class declaration and interface declaration in a source file. When you run the resulting Java program on a particular platform, the Java interpreter for that platform runs the bytecode contained in the .class files.

7-2 L e a r n i n g J a v a w i t h J B u i l d e r
R u n n i n g J a v a p r o g r a m s
To compile the source files for an application or applet, follow these steps:
1 Open a project.
2 Do one of the following in the project pane:
• To compile an application, select the project node (.jpr or .jpx extension).
• To compile an applet, select the HTML file that calls the applet.
3 Then, do one of the following:
• Choose Project|Make Project.
• Right-click a node and choose Make.
Note If you haven’t already set the runnable class, the Run page of the Project Properties dialog box appears. Browse to the runnable class and select it to continue compiling.
Compiler error messages are displayed in the message pane below the AppBrowser content pane. Select an error message to display the relevant source code. To get help on an error message, select the error message in the message pane and press F1. To learn about error messages in JBuilder, see “Error and warning messages” in Building Applications with JBuilder.
For more information, see “Compiling Java programs” in Building Applications with JBuilder.
Running Java programsRunning a project runs the main class of that project file. If a main class has not yet been selected, then when you try to run it, a dialog box appears so you can make the selection. If you created your file using the Application wizard or the Applet wizard, the main class is automatically

C o m p i l i n g a n d r u n n i n g J a v a p r o g r a m s 7-3
D e b u g g i n g J a v a p r o g r a m s
selected. You can select or change the main class by selecting Project|Project Properties and choosing the Run tab.
If you want to run a .java file such as a JSP, it must contain a main method.
To run an applet, select the HTML file that contains the <APPLET> tag. The HTML file calls the class found in the CODE attribute of the <APPLET> tag. This applet class must contain an init() method.
To run in JBuilder:
1 Save the program or file that you want to run.
2 Select it in the project pane.
3 Compile it (Project|Make Project) if it’s a program.
4 Run it by choosing Project|Run Project, or right-click it in the project pane and choose Run from the drop-down menu.
Once your program has been compiled, you can run it without compiling.
Runtime error messages are displayed in the message pane below the AppBrowser content pane. Select an error message to display the relevant source code. To get help on an error message, select the error message in the message pane and press F1. To learn about error messages in JBuilder, see “Error and warning messages” in Building Applications with JBuilder.
For more information on running programs, see “Running Java programs” in Building Applications with JBuilder.
For more information on running applets, see “Working with applets” in Building Applications with JBuilder.
For more information on running JSPs and servlets, see “Developing JavaServer Pages (JSP)” and “Developing servlets” in the Distributed Applications Developer’s Guide.
Debugging Java programsDebugging is the process of locating and fixing errors in your programs. JBuilder’s integrated debugger lets you debug applications and applets within the JBuilder environment. JBuilder Professional also supports servlet debugging and JBuilder Enterprise supports JSP debugging. Many debugger features are accessed through the Run menu. Others are available from the Search, View, and Tools menus.
CodeInsight and syntax highlighting make it easier to debug your source code. JBuilder Enterprise edition also provides cross-process debugging and remote debugging.
For more information on debugging, see “Debugging Java programs” in Building Applications with JBuilder or “Debugging distributed applications”

7-4 L e a r n i n g J a v a w i t h J B u i l d e r
D e b u g g i n g J a v a p r o g r a m s
in the Distributed Application Developer’s Guide. For more information on CodeInsight and syntax highlighting, see “The JBuilder environment” in Building Applications with JBuilder.
Debugging
You may debug a file or a whole project. You may compile before debugging or not.
To choose whether to compile before debugging, choose Project|Project Properties and select the Run tab. Use the Compile Before Debugging check box at the bottom of the dialog. In JBuilder Professional, you can choose whether and how to use Smart Step. In JBuilder Enterprise, you can choose to enable remote debugging and to make appropriate settings. To do either of these, choose Project|Project Properties and select the Debug tab.
To debug a file, right-click on it in the project pane and choose Debug from the context menu. To set a breakpoint in the source code, either choose Run|Add Breakpoint, click in the gray margin to the left of an executable line of code in the source file, or use the keystroke sequence for your chosen editor emulation.
To debug a project, follow these steps:
1 Open your project.
2 Select Project|Project Properties. Choose the Run tab and decide whether JBuilder should compile before debugging.
3 To set a breakpoint in the source code, either choose Run|Add Breakpoint, click in the gray margin to the left of an executable line of code in the source file, or use the keystroke sequence for your chosen editor emulation.
4 Choose Run|Debug Project or click the Debug icon in the toolbar.
The compiler and debugger work the same way on both files and projects:
• If you have set JBuilder to compile before debugging, then any compiler errors will show on the compiler page in the message pane at the bottom of the AppBrowser. You may click the error message to go to the relevant line of code.
• If you have disabled the compiler, or if there are no errors, the debugger will show in the message pane. Use your tool tip on the left-hand tabs to see the kinds of information the debugger provides:

C o m p i l i n g a n d r u n n i n g J a v a p r o g r a m s 7-5
D e p l o y i n g J a v a p r o g r a m s
For more information on the debugger, see “Debugging Java programs” in Building Applications with JBuilder.
Deploying Java programsDeploying a Java program consists of bundling the various Java class files, image files, and other files needed by the project and copying them to a location on a server or client computer where users can access them. You can deliver them in compressed or uncompressed archive files.
Using the Archive Builder
This is a feature ofJBuilder Professional and
Enterprise.
The JBuilder Archive Builder automatically gathers together the classes and files your program needs. It then bundles files into a compressed or uncompressed archive file, usually a JAR file. It can also create the archive’s manifest file, which you can modify in JBuilder.
The Archive Builder also creates an archive node in your project, allowing easy access to the archive file. At any time during development, you can make the archive file, rebuild it, or reset its properties. You can also view the contents of the archive, as well as the contents of the manifest file.

7-6 L e a r n i n g J a v a w i t h J B u i l d e r
D e p l o y i n g J a v a p r o g r a m s
To deploy a program,
1 Create and compile your code in JBuilder.
2 Run the Archive Builder to create the archive file.
3 Create an install procedure.
4 Deliver your JAR file, all necessary redistributable JAR files, and the installation files.
For more information, see “Deploying Java programs” in Building Applications with JBuilder.
For a tutorial on deploying to and running programs from JAR files, visit http://java.sun.com/docs/books/tutorial/jar/basics/index.html.
Deploying CORBA applications
This is a feature ofJBuilder Enterprise.
When deploying CORBA applications with JBuilder Enterprise, the Archive Builder collects your stubs and skeletons into a JAR file. You must install your ORB on each machine that runs a client, middle-tier, or server CORBA program.

C o m p i l i n g a n d r u n n i n g J a v a p r o g r a m s 7-7
D e p l o y i n g J a v a p r o g r a m s
For more information, see “Deploying Applications with VisiBroker” in the VisiBroker for Java Programmer’s Guide if you are using VisiBroker, or see your Application Server’s User’s Guide.
Deploying web-based applications
Web-based, multi-tier applications are deployed onto web servers. Consult the documentation for your web server for information on deploying web applications.
Running deployed programs
You can run a deployed program from the command line with the JDK command line tools.
To run a program at the command line, use the -jar option with the java command.
For more information, see “Running a program from a JAR file,” “Using the command line tools,” and “Deploying Java programs” in Building Applications with JBuilder.
For a tutorial on running programs from JAR files, visit http://java.sun.com/docs/books/tutorial/jar/basics/index.html.

7-8 L e a r n i n g J a v a w i t h J B u i l d e r
U s i n g c o m m a n d l i n e t o o l s
Using command line toolsCommand line tools allow you to execute global commands from your command line window. Using standard command line tools, you can compile and launch applications, manage your JAR files, view applets outside of a web browser, and extract comments embedded in the code. JBuilder provides additional command line tools that provide extended or improved functionality.
The JDK includes the following command line tools:
• javac - the compiler for the Java programming language.
• java - the launcher for the Java applications.
• jar - manages the Java Archive (.jar) files.
• javadoc - an API documentation comments extraction utility.
• appletviewer - allows you to run applets outside of the context of a web browser.
• native2ascii - converts a file of native encoded characters to one with Unicode escape sequences.
JBuilder includes the following command line tools:
• JBuilder command line arguments
And, in JBuilder Professional and Enterprise:
• The bmj command line make
• The bcj command line compiler
JBuilder’s command line interface includes such options as:
• Building projects
• Displaying configuration information
• Displaying the license manager
• Disabling the splash screen
• Enabling verbose debugging mode for OpenTools authors
Note These options vary by edition.
To access the list of options available in your edition of JBuilder, open a command-line window, navigate to the JBuilder bin directory and type jbuilder -help.
JBuilder runs on its own launcher, which is a shell script, a batch file, or an executable, depending on the platform you run it on. Each of these launchers can pass arguments to JBuilder.

C o m p i l i n g a n d r u n n i n g J a v a p r o g r a m s 7-9
U s i n g c o m m a n d l i n e t o o l s
For more information on using command line tools in JBuilder, see “Using the command line tools” in Building Applications with JBuilder.
For more information on command line arguments, see “JBuilder command line arguments” in Building Applications with JBuilder.
For more general information on command line tools, see http://java.sun.com/j2se/1.3/docs/tooldocs/tools.html#basic.

7-10 L e a r n i n g J a v a w i t h J B u i l d e r

B u i l d i n g d i s t r i b u t e d a p p l i c a t i o n s 8-1
C h a p t e r
8Chapter8Building distributed applicationsThe JBuilder development environment greatly simplifies the creation of distributed applications, generating many of the files, structure, settings and paths necessary to create multi-tier, distributed applications. JBuilder provides excellent support for distributed application development using either Java Remote Method Invocation (RMI), or the Common Object Request Broker Architecture (CORBA).
Once the application is generated, you can add the business logic you need to the generated code. With JBuilder’s development environment, distributed application development becomes rapid application development (RAD).
JBuilder simplifies distributed application development in two ways. It provides wizards and other interfaces for Java technologies, and it provides tools for other aspects of distributed application development in a team environment.
Team developmentJBuilder provides the following team development features and features that simplify the process of distributed application development:
• Version control support is built into the JBuilder IDE. A simple backup queue provides access to prior versions of a file.
These are features ofJBuilder Enterprise
Seamless integration with Concurrent Versions System (CVS) and an expanded API for adding your own version control system make this feature as powerful as you want it to be.
• Project files (.jpr and .jpx) are logically divided into two parts: private and shared. Windows, watches and breakpoints are stored in the
RMI is available in JBuilderProfessional and Enterprise
CORBA is available inJBuilder Enterprise

8-2 L e a r n i n g J a v a w i t h J B u i l d e r
J a v a t e c h n o l o g i e s
private side, while libraries and compiler options are stored in the shared side.
• InternetBeans Express converts data presentations between HTML and Java. It can extract data from one and turn it into an appropriate format in the other.
Java technologiesThese are features of
JBuilder Professional andEnterprise
JBuilder provides features that simplify distributed application development using the following technologies:
• Remote Method Invocation (RMI)
With RMI you can create distributed Java-to-Java applications.
For more information, see the tutorial “Exploring Java RMI-based distributed applications in JBuilder” in the Distributed Application Developer’s Guide.
• Servlets
Use JBuilder’s Servlet wizard to quickly create servlets. These programs are written in the Java programming language, run on a server, and extend server functionality with such advanced features as security, easy database access, and easier integration with Java applets.
For more information, see the tutorial “Developing servlets” in the Distributed Application Developer’s Guide.

B u i l d i n g d i s t r i b u t e d a p p l i c a t i o n s 8-3
J a v a t e c h n o l o g i e s
These are features ofJBuilder Enterprise
You can also use JBuilder Enterprise to develop both web-based and enterprise applications based on Java 2 Enterprise Edition (J2EE) and these technologies:
• Common Object Request Broker Architecture (CORBA)
CORBA is an open standards-based solution for distributed application development that allows clients and servers to be written in any language that CORBA supports on any platform.
For more information, see the tutorial “Exploring CORBA-based distributed applications in JBuilder” in the Distributed Application Developer’s Guide.
• CORBA interfaces with Java (Caffeine)
VisiBroker (included with JBuilder Enterprise edition) incorporates features, collectively known as Caffeine, which enable you to define CORBA interfaces with Java.
For more information, see “Caffeine: defining CORBA interfaces with Java” in the Distributed Application Developer’s Guide.
• Enterprise JavaBeans (EJB) and EJB wizards
With JBuilder’s suite of EJB wizards, you can visually create Enterprise JavaBeans™, the server-side component architecture for the Java™ platform. EJB wizards also simplify the grouping, testing, and deployment of EJBs by providing visual tools for creating EJB groups, a test client, and 1.1 XML Deployment Descriptors.
For more information, see “Developing Enterprise JavaBeans (EJB)” in the Distributed Application Developer’s Guide.
• JavaServer Pages
Use JBuilder’s JavaServer Pages wizard to create JavaServer Pages (JSP) quickly, making it easier and faster for you to build web-based applications using your choice of platforms and servers.
For more information, see “Developing JavaServer Pages” in the Distributed Application Developer’s Guide.
• HTML Clients
HTML client applications are HTML forms connected to CORBA objects.
For more information, see the tutorial “Creating an HTML CORBA client application” in the Distributed Application Developer’s Guide.
For more information on using JavaServer Pages, Remote Method Invocation, Enterprise JavaBeans, or CORBA on the Java platform, go to Sun’s Java API web site at http://www.sun.com/products-n-solutions/software/api/java.html.

8-4 L e a r n i n g J a v a w i t h J B u i l d e r
B u i l d i n g d a t a b a s e a p p l i c a t i o n s
Building database applicationsThese are features of
JBuilder Professional andEnterprise.
You can use JBuilder’s DataExpress components to build all-Java client-server applications, applets, and servlets for the Internet or intranet. With JBuilder Enterprise you can also build JavaServer Pages™ (JSP). Applications you build in JBuilder are all-Java at runtime and cross-platform.
JBuilder allows you to access data and manipulate it using properties, methods, and events defined in the com.borland.dx packages of the DataExpress Component Library in conjunction with the com.borland.dbswing package. By using dbSwing components, you can extend the functionality of Swing components and provide your applications with data-aware capabilities.
For more information, see the DataExpress Reference and dbSwing Reference available from the Help menu.
JBuilder’s modular DataExpress architecture has many benefits, including support for:
• Network computing• Mobile computing• Embedded applications• Rapid development of user interfaces
Using the designer, you can quickly create database applications by dragging and dropping components from the component palette onto your design.

B u i l d i n g d i s t r i b u t e d a p p l i c a t i o n s 8-5
D e v e l o p i n g i n t e r n a t i o n a l a p p l i c a t i o n s
JBuilder applications communicate with database servers through the Java Database Connectivity™ (JDBC) API, the JavaSoft database connectivity specification. JDBC is the all-Java industry standard API for accessing and manipulating database data. JBuilder database applications can connect to any database using its JDBC driver.
JBuilder offers additional tools for developing database applications:
• JDataStore for data caching and compact persistence
• Transaction and crash recovery support
• Advanced concurrency control for increased application performance
• JDBC 2.0 Type-4 drivers (local and remote)
• JDataStore Explorer for visually managing DataStores
• JDBC database tools
• SQL Builder for visually creating and editing SQL queries to JDBC data sources
• JDBC Explorer for viewing database data, schema, and creating connections to URLs
• JDBC Monitor for monitoring SQL applications
• Data Modules
• Data Module designer
• Data Modeler
• Connection URL Builder
For more information, see the Database Application Developer’s Guide, the JDataStore Reference available from the Help menu, and the JDataStore Programmer’s Guide.
For technical questions, visit the database newsgroup on the Borland web page at http://www.borland.com/newsgroups/.
Developing international applicationsAs businesses continue to expand into the global marketplace, it is critical to develop applications for the international market. Special features in JBuilder make it easy to take advantage of Java’s internationalization capabilities, allowing your applications to be customized for different countries or languages without requiring cumbersome changes to the code.

8-6 L e a r n i n g J a v a w i t h J B u i l d e r
D e v e l o p i n g i n t e r n a t i o n a l a p p l i c a t i o n s
Internationalization features in JBuilder
These are features ofJBuilder Professional and
Enterprise.
JBuilder includes the following features designed to help you easily create your Java applets and applications for the international marketplace.
• Multilingual sample application (The “IntlDemo.jpr” project is located in the samples/jbcl/multilingual directory of your JBuilder installation.)
• Resource Strings wizard to eliminate hard-coded strings
• dbSwing internationalization architecture and features
• UI designer internationalization support
• Full debugger support for Unicode
• IDE and compiler support for all JDK native encodings
For more information, see “Internationalizing programs with JBuilder” in Building Applications with JBuilder and the Java documentation at http://java.sun.com/j2se/1.3/docs/guide/intl/index.html.
G e t t i n g S t a r t e d w i t h J a v a
P a r t
IIPart IIGetting Started with Java


J a v a l a n g u a g e b a s i c s 9-1
C h a p t e r
9Chapter9Java language basics
This chapter will answer the following questions:
• What are identifiers, and what are the restrictions on their declaration?
• What is a literal?
• What is an escape sequence?
• What are Java’s keywords?
• What is a code block?
• What is an expression?
• What are Java’s operators?
• What data types does Java support? How do Java’s data types differ from those of C/C++?
• What are the looping constructs in Java?
• What are the conditional statements in Java?
Java syntaxBefore you can effectively read or write programs in any language, you need to know about the language’s syntax rules and restrictions. A language’s syntax defines the way programs are written in that language; more specifically, the syntax of the language defines the language elements, the way these elements are used, and the way they are used
9-2 L e a r n i n g J a v a w i t h J B u i l d e r
J a v a s y n t a x
together. The following lists the typical language elements and shows how the language syntax is concerned with these elements:
• Identifiers: How are variable names composed? What are the naming restrictions and conventions?
• Literals: How are constant names composed? How are their values assigned?
• Keywords: What are the language’s predefined words? How are they used and how are they not used?
• Statements: What is a statement and how is one written?
• Code blocks: How are statements grouped together?
• Comments: How can the programmer add comments and notes to the program?
• Expressions: What is an expression and how is one written?
• Operators: What are the operators used in the language? How are they used in expressions? Can a programmer define his/her own operators?
Identifiers
An identifier is a name that uniquely identifies a variable, a method, or a class (we will discuss variables later in this chapter; methods and classes are discussed in Chapter 10, “Object-oriented programming in Java”). In most languages, there are restrictions on how identifiers are composed. The following lists Java’s restrictions on identifiers:
• All identifiers must begin with a letter, an underscore ( _ ), or a dollar sign ($)
• An identifier can include, but not begin with numbers
• An identifier cannot include a white space (tab, space, linefeed, or carriage return)
• Identifiers are case-sensitive
• Java keywords cannot be used as identifiers
Note Since some C library names begin with an underscore or a dollar sign, it is best to avoid beginning an identifier name with these characters. Importing a C library into a program that uses an underscore or a dollar sign to start an identifier name might cause name clashing and confusion.
In addition to these restrictions, certain conventions are used with identifiers to make them more readable. Although these conventions do not affect the compiler in any way, it is considered a good programming

J a v a l a n g u a g e b a s i c s 9-3
J a v a s y n t a x
practice to follow them. The following table lists some of these conventions based on the type of identifier:
Literals
A literal, or constant, represents a value that never changes. Think of an identifier as something that represents a value, whereas a literal is a value. For example, the number 35 is a literal; the identifier age represents a number which could be 35. In Java, a literal can be a number (integer or floating-point), a Boolean, a character, or a string.
Integer literalsInteger literals are written in three formats: decimal (base 10), hexadecimal (base 16), and octal (base 8). Decimal literals are written as ordinary numbers, hexadecimal literals always begin with 0X or 0x, and octal literals begin with 0. For example, the decimal number 10 is 0xA or 0XA in hexadecimal format, and 012 in octal format.
An integer literal can be stored in the data types byte, short, int, or long. By default, Java stores integer literals in the int data type, which is restricted to 32-bits.
To store an integer literal in the long data type, which can store 64-bit values, add the character l or L to the end of the literal. For example, the literal 9999L is stored as long. The following lines of code use integer literals:
int x = 12345; //12345 is a literalint y = x * 4; //4 is a literal
In the first line, the literal 12345 is stored directly in the int variable x. In the second line, the literal 4 is used to compute a value first, which in turn is stored in the int variable y.
Note that even though an integer literal represents a constant value, it can still be assigned to an integer variable. Think of the variable as a storage unit that at any one time can represent a single literal value. This also applies to the other literal types.
Type of Identifier Convention Examples
Class name The first letter of each word is capitalized
Mammal, SeaMammal
Function name The first letter of each, except the first, word is capitalized
getAge, setHeight
Variable name The first letter of each, except the first, word is capitalized
age, brainSize
Constant names Every letter is capitalized and underscores are used between words
MAX_HEIGHT, MAX_AGE

9-4 L e a r n i n g J a v a w i t h J B u i l d e r
J a v a s y n t a x
Floating-point literalsA floating-point literal is a number with a decimal point and/or exponent. A floating-point literal is written in either standard or scientific notation. For example, 123.456 is in standard notation, while 1.23456e+2 is in scientific notation.
Floating-point literals are stored in the 64-bit double type (the default type), or the 32-bit float type. To store a floating-point literal in the float type, append the letter f or F to the end of the number.
Boolean literalsA boolean literal represents two possible states: true or false. Boolean literals are stored in the data type boolean. Unlike C/C++ where the states of a Boolean value are represented by 0 (false) and 1 (true), Java represents these states using the keywords true and false.
Character literalsA character literal represents a single Unicode character. Character literals are always surrounded by single quotes; for example, ‘A’ and ‘9’ are character literals. Java uses the char type to store single characters.
Note The Unicode character set is a 16-bit set that supplants the 8-bit ASCII set. The Unicode set can define up to 65,536 values, which is enough to include symbols and characters from other languages. Check out the Unicode home page at www.unicode.org for more information.
Escape sequencesA special type of character literal is called an escape sequence. Like C/C++, Java uses escape sequences to represent special control characters and characters that cannot be printed. An escape sequence is represented by a backslash (\) followed by a character code. The following table summarizes these escape sequences:
Character Escape Sequence
Backslash \\
Backspace \b
Carriage return \r
Continuation \
Double quote \”
Form feed \f
Horizontal tab \t
Newline \n
Octal character \DDD
Single Quote \’
Unicode character \uHHHH

J a v a l a n g u a g e b a s i c s 9-5
J a v a s y n t a x
An octal character is represented by a sequence of three octal digits, and a Unicode character is represented by a sequence of four hexadecimal digits. For example, the decimal number 57 is represented by the octal code \071, and the Unicode sequence \u0039.
To illustrate the use of escape sequences, the string in the following statement prints out the words Name and ID separated by two tabs on one line, and prints out "Joe Smith" and "999", also separated by two tabs, on the second line:
String escapeDemo = new String ("Name\t\tID\n\"Joe\ Smith\"\t\t\"999\"");
Note that this statement is intentionally written on two lines; therefore, the continuation character (\) is used to prevent a compiler error.
String literalsA string literal represents a sequence of characters. Strings in Java are always enclosed in double quotes. Java handles strings differently than C/C++; the latter represents a string using an array of characters, while the former uses the classes String and StringBuffer. So, of all the literal types we’ve discussed, only string literals are stored as objects by default. Strings are covered in more detail in the section “Strings” on page 9-16.
KeywordsA keyword is a predefined identifier that has a special meaning to the Java compiler, and which cannot be redefined. The following is a list of Java’s keywords:
* Reserved but not being used.
abstract boolean break byte byvalue*
case cast* catch char class
const* continue default do double
else extends false final finally
float for future* generic* goto*
if implements import inner* instanceof
int interface long native new
null operator* outer* package private
protected public rest* return short
static super switch synchronized this
throw throws transient true try
var* void volatile while

9-6 L e a r n i n g J a v a w i t h J B u i l d e r
J a v a s y n t a x
As you may have noticed, many of Java’s keywords are borrowed from C/C++. Also, as in C/C++, keywords are always written in lowercase. Generally speaking, Java’s keywords can be categorized according to their function as follows (examples are in parenthesis):
• Data declaration keywords (boolean, float, int)• Loop keywords (continue, while, for)• Conditional keywords (if, else, switch)• Exception keywords (try, throw, catch)• Structure keywords (class, extends, implements)• Modifier and access keywords (private, public, transient)• Miscellaneous keywords (true, null, super)
StatementsA statement represents a single command, or line of code, for the compiler. This doesn’t mean, however, that each line of code is a statement; in other words, there is no one-to-one mapping between physical lines of codes and statements. As we will see later in this chapter, some statements, such as an if statement, can be composed of multiple lines of code.
So, if a statement can take up multiple physical lines, how does the compiler know where each statement ends and the next begins? By using semicolons to separate statements.
The Java compiler is not concerned with the length of each statement, as long as statements are always separated by semicolons. For example, the following two statements are equivalent:
x = (y + z) / q; //statement 1x =(y + z) / q; //statement 2
The second statement has whitespace characters embedded in it (whitespace characters are the space, horizontal and vertical tabs, form-feed, and new-line). Although the Java compiler ignores all whitespace characters embedded in statements, it is obviously bad practice to do that since it makes the code difficult to read.
Note Recall that in the case of string values, the continuation character ( \ ) must be used at the end of each line to allow strings to take up multiple lines.
Code blocks
A code block is a grouping of statements that behave as a unit. Java delimits code blocks with braces ({ and }). Examples of code blocks are class definitions, loop statements, condition statements, exception statements, and function bodies. In the following section of code, there are three code blocks: the function frmResolver(), the try block, and the catch block.

J a v a l a n g u a g e b a s i c s 9-7
J a v a s y n t a x
public frmResolver() {
try { jbInit(); }
catch (Exception e) { e.printStackTrace(); }
}
The above code also illustrates the concept of nested blocks: the try and catch blocks are nested inside the main frmResolver() block.
Comments
Comments are natural-language statements written by the programmer to make notes about the code. There are three styles of comments in Java. The first one begins with /* and ends with */, and allows you to write comments that span multiple lines. This style is the same as in the C language.
The following code demonstrates the use of this style:
x = y + z; /* This is a comment.*/z = q / p; /*This commentextends over two lines*/
When the Java compiler encounters /*, it ignores every character that follows it until it encounters */.
The second comment style is similar to the first one, only it begins with /** and ends with */. The difference is that this style is used with the JDK tool javadoc to automatically generate documentation from the source code (Java documentation is beyond the scope of this course).
The third comment style is borrowed from C++. It begins with // and can be written on just one line. Here’s an example:
x = y + z; //This comment cannot extend over multiple lines
Nesting comments is valid only when comments of the third style are embedded in one of the other two styles. Nesting comments of the first two styles is illegal.
Here is an invalid nested comment:
/*This is the beginning of the comment /* The comment ends here */ this is outside the comment and will generate a compiler error*/

9-8 L e a r n i n g J a v a w i t h J B u i l d e r
J a v a s y n t a x
As we mentioned earlier, the compiler ignores everything between /* and */; so when it encounters the first */ it thinks that the comment ended. The last line in the code is therefore not contained in the comment.
The following is an example of a valid nested comment:
/*This is the beginning of the comment //This is OK //so is this this is the end of the comment.*/
Expressions
An expression is a meaningful combination of identifiers, keywords, symbols, and operators that has a value of some sort. Generally speaking, everything that can be used on the right side of an assignment sign is an expression.
Here are some examples of expressions:
s = "Hello World";x = 123.4;y = (x * 5) / 2;value = getValue();Mammal m = new Mammal();
From the previous examples, we can categorize expressions into the following:
• Variable assignments: The first two expressions assign values to the variables s and x.
• Operator expressions: The third expression is an example of this. Operator expressions use combinations of variables, literals, method calls, operators, and symbols. We will examine this kind in the next section.
• Method calls: The fourth expression is a call to the method getValue(), which returns a value that is assigned to value.
• Object allocation: The last expression allocates memory for the Mammal object m. Think of object allocation expressions as special method call expressions. We will cover both types of expressions in more detail in Chapter 10, “Object-oriented programming in Java.”
Operators
Operators are special symbols that perform a particular function on operands. There are five general types of operators: arithmetic operators, logical operators, comparison operators, assignment operators, and bitwise operators. Each of these can be further categorized into unary and
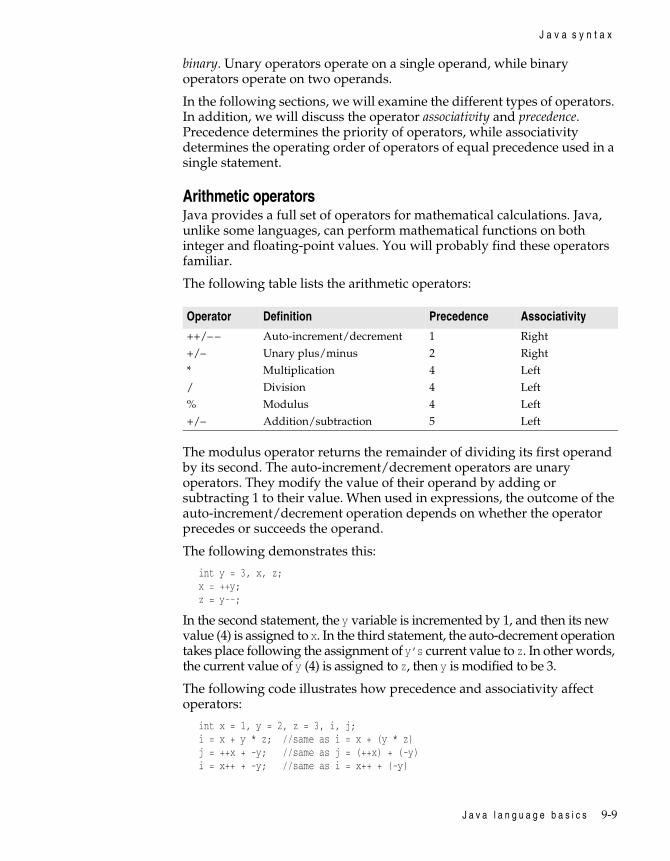
J a v a l a n g u a g e b a s i c s 9-9
J a v a s y n t a x
binary. Unary operators operate on a single operand, while binary operators operate on two operands.
In the following sections, we will examine the different types of operators. In addition, we will discuss the operator associativity and precedence. Precedence determines the priority of operators, while associativity determines the operating order of operators of equal precedence used in a single statement.
Arithmetic operatorsJava provides a full set of operators for mathematical calculations. Java, unlike some languages, can perform mathematical functions on both integer and floating-point values. You will probably find these operators familiar.
The following table lists the arithmetic operators:
The modulus operator returns the remainder of dividing its first operand by its second. The auto-increment/decrement operators are unary operators. They modify the value of their operand by adding or subtracting 1 to their value. When used in expressions, the outcome of the auto-increment/decrement operation depends on whether the operator precedes or succeeds the operand.
The following demonstrates this:
int y = 3, x, z;x = ++y;z = y--;
In the second statement, the y variable is incremented by 1, and then its new value (4) is assigned to x. In the third statement, the auto-decrement operation takes place following the assignment of y’s current value to z. In other words, the current value of y (4) is assigned to z, then y is modified to be 3.
The following code illustrates how precedence and associativity affect operators:
int x = 1, y = 2, z = 3, i, j;i = x + y * z; //same as i = x + (y * z)j = ++x + -y; //same as j = (++x) + (-y)i = x++ + -y; //same as i = x++ + (-y)
Operator Definition Precedence Associativity
++/– – Auto-increment/decrement 1 Right
+/– Unary plus/minus 2 Right
* Multiplication 4 Left
/ Division 4 Left
% Modulus 4 Left
+/– Addition/subtraction 5 Left

9-10 L e a r n i n g J a v a w i t h J B u i l d e r
J a v a s y n t a x
Logical operatorsLogical (or Boolean) operators allow the programmer to group Boolean expressions to determine certain conditions. These operators perform the standard Boolean operations (AND, OR, NOT, and XOR).
The following table lists the logical operators:
The evaluation operators always evaluate both operands. The short-circuit operators, on the other hand, always evaluate the first operand, and if that determines the value of the whole expression, they don’t evaluate the second operand. For better understanding, consider the following code:
if ( !isHighPressure && (temperature1 > temperature2)) {}boolean1 = (x < y) || ( a > b);boolean2 = (10 > 5) & (5 > 1);
The first statement evaluates !isHighPressure first, if it is false, it does not evaluate the second operand (temperature1 > temperature2) since the first operand being false means the whole expression is false. The same is true for the second statement—the value of boolean1 will be true only if x is less than y (the value of the second operand is never determined). In the third statement, however, the compiler will compute the values of both operands before making the assignment to boolean2.
Note The XOR operator produces a true value only if the operands are of different values (true and false, or false and true).
Comparison operators Programmers need the ability to compare values. Comparison operators, unlike logical operators, will only evaluate a singe expression.
The following table lists the comparison operators:
Operator Definition Precedence Associativity
! Unary logical complement (NOT) 2 Right
& Evaluation AND 9 Left
^ XOR 10 Left
| Evaluation OR 11 Left&& Short-circuit AND 12 Left
|| Short-circuit OR 13 Left
Operator Definition Precedence Associativity
< Less than 7 Left
> Greater than 7 Left
<= Less than or equal 7 Left
>= Greater than or equal 7 Left
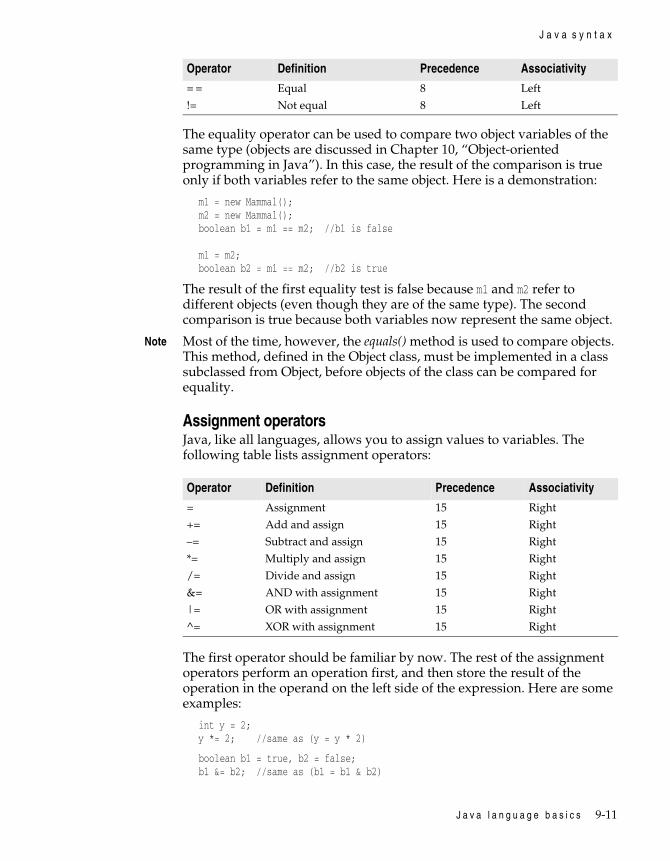
J a v a l a n g u a g e b a s i c s 9-11
J a v a s y n t a x
The equality operator can be used to compare two object variables of the same type (objects are discussed in Chapter 10, “Object-oriented programming in Java”). In this case, the result of the comparison is true only if both variables refer to the same object. Here is a demonstration:
m1 = new Mammal();m2 = new Mammal();boolean b1 = m1 == m2; //b1 is false
m1 = m2;boolean b2 = m1 == m2; //b2 is true
The result of the first equality test is false because m1 and m2 refer to different objects (even though they are of the same type). The second comparison is true because both variables now represent the same object.
Note Most of the time, however, the equals() method is used to compare objects. This method, defined in the Object class, must be implemented in a class subclassed from Object, before objects of the class can be compared for equality.
Assignment operatorsJava, like all languages, allows you to assign values to variables. The following table lists assignment operators:
The first operator should be familiar by now. The rest of the assignment operators perform an operation first, and then store the result of the operation in the operand on the left side of the expression. Here are some examples:
int y = 2;y *= 2; //same as (y = y * 2)
boolean b1 = true, b2 = false; b1 &= b2; //same as (b1 = b1 & b2)
= = Equal 8 Left
!= Not equal 8 Left
Operator Definition Precedence Associativity
Operator Definition Precedence Associativity
= Assignment 15 Right
+= Add and assign 15 Right
–= Subtract and assign 15 Right
*= Multiply and assign 15 Right
/= Divide and assign 15 Right
&= AND with assignment 15 Right
|= OR with assignment 15 Right
^= XOR with assignment 15 Right

9-12 L e a r n i n g J a v a w i t h J B u i l d e r
J a v a s y n t a x
Bitwise operatorsBitwise operators are of two types: shift operators and boolean operators. The shift operators are used to shift the binary digits of an integer number to the right or the left. Consider the following example (the short integer type is used instead of int for conciseness):
short i = 13; //i is 0000000000001101i = i << 2; //i is 0000000000110100i >>= 3; //i is 0000000000000110
In the second line, the bitwise left shift operator shifted all the bits of i two positions to the left. The bitwise right shift operator then shifted the bits three positions to the right.
Note The shifting operation is different in Java than in C/C++ –mainly in how it is used with signed integers. A signed integer is one whose left-most bit is used to indicate the integer’s sign (the bit is 1 if the integer is negative). In Java, integers are always signed, whereas in C/C++ they are signed by default. In most implementations of C/CC, a bitwise shift operation does not preserve the integer’s sign (since the sign bit would be shifted out). In Java, however, the shift operators preserve the sign bit (unless you use the >>> to perform an unsigned shift). This means that the sign bit is duplicated, then shifted (right shifting 10010011 by 1 is 11001001).
The following is a complete list of Java’s bitwise operators:
A special operator: The ?: operatorWe said earlier that there are two types of operators: unary and binary. That’s not exactly true. There is also a ternary operator that Java borrows from C, the ?: operator. Here’s the general syntax for this operator:
expression1? expression2: expression3;
expression1 is first evaluated. If its value is true, expression2 is computed, otherwise expression3 is. Here is a demonstration:
int x = 3, y = 4, max;max = (x > y)? x: y; //this is basically the same as max=x;
Operator Definition Precedence Associativity
~ Bitwise complement 2 Right
<< Signed left shift 6 Left
>> Signed right shift 6 Left
>>> Zero-fill right shift (as if unsigned) 6 Left
& Bitwise AND 9 Left
| Bitwise OR 10 Left
^ Bitwise XOR 11 Left
<<= Left-shift with assignment 15 Left
>>= Right-shift with assignment 15 Left
>>>= Zero-fill right shift with assignment 15 Left

J a v a l a n g u a g e b a s i c s 9-13
J a v a ’ s d a t a t y p e s
In this code, max is assigned the value of x or y, based on whether x is greater than y.
Note Some people mislabel this operator as being a conditional statement. It is not a statement. The following invalid code illustrates why it is not a statement:
(x > y)? max = x: max = y; //can't use it as if it’s a statement
Java’s data typesData types are entities, which represent specific types of values that can be stored in memory, and are interpreted in a specific way by the compiler. We already introduced data types in our discussion about literals in a previous section. We mentioned that a literal is stored in a certain data type depending on the literal’s value; the literal 9, for example, can be stored in the int data type, and the literal ‘c’ can be stored in the char data type.
There are two categories of data types in Java: built-in and composite data types. Built-in (or primitive) data types can be further categorized into three kinds: numeric, boolean, and character data types. Built-in data types are understood by the compiler and don’t require special libraries. (A special library basically refers to any collection of code that is not part of the actual language definition). Composite types are of two kinds: arrays and strings. Composite types usually require the use of special libraries.
Before explaining the different Java data types, we need to discuss variables.
Variables
We defined a data type as something representing a specific value that can be stored in memory. So, how do you allocate memory for that value, and how do you access it and assign values to it? To allocate a portion of memory for the storage of data types, you must first declare a variable of that data type, then give the variable a name (identifier) that references it. Here’s the general syntax of a variable declaration:
datatype identifier [ = defaultValue ];
The declaration begins with the type of variable, followed by the variable’s identifier, then followed by an optional default value assignment.
The following are examples of different types of variable declarations:
int p; //declares the variable p to store int data typesfloat x, y = 4.1, z = 2.2;boolean endOfFile = false;char char1 = ‘T’;

9-14 L e a r n i n g J a v a w i t h J B u i l d e r
J a v a ’ s d a t a t y p e s
Notice that the second line declared three variables at the same time. You can declare multiple variables of the same type at once, as long as you separate the variable identifiers with commas.
A variable can be declared anywhere in a program, as long as its declaration precedes any reference to it. Java is a strongly typed language, which means that all variables must be declared before they are used.
If we attempt to reference the variable x, without declaring it first, we would get a compiler error:
int y = 4, z = 2;x = y / z; //What is x? Is it a float, char, int, or what?
In the code example above, the second line generates an error because the compiler does not know the type of x; moreover, it does not know where in memory it is stored.
Note To avoid any problems, such as referencing a variable that does not yet exist, it is best to declare all variables at the beginning of the code blocks where they are used. That makes it easier for you to keep track of all your variables.
Now that we understand what variables are, we can go on to discuss data types.
Built-in data types
Numeric data typesThe numeric data types are summarized in the following table:
If a numeric variable is not initialized by the programmer, the Java VM will automatically initialize it to 0. Most Java compilers will also detect uninitialized variables. This is different than C/C++, where uninitialized variables contain random values and are not detected by the compiler.
Boolean data typesA boolean data type has two values: true and false. Unlike C/C++, which stores Boolean data types numerically (0 for false and 1 for true), Java uses the built-in data type boolean. Uninitialized boolean variables are
Type Size Description (smallest and largest positive values)
byte 8 bits very small signed integer (–128 ⇒127)short 16 bits short signed integer (–32768 ⇒ 32767)int 32 bits signed integer (–2.14e+9 ⇒ 2.14e+9)long 64 bits long signed integer (–9.22e+18 ⇒ 9.22e+18)float 32 bits floating-point number (1.402e–45 ⇒ 3.402e+38)double 64 bits double precision floating-point (4.94e–324 ⇒ 1.79e+308)
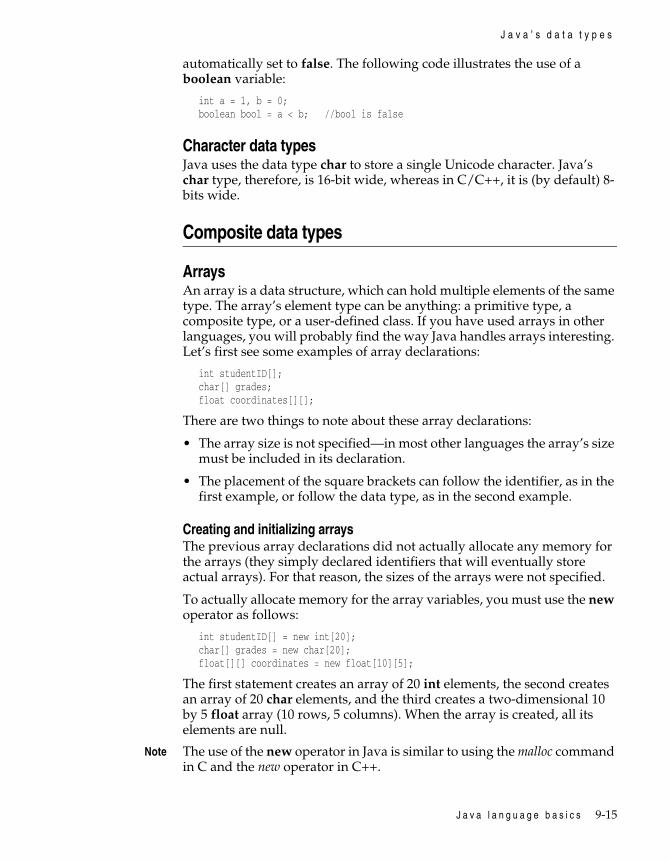
J a v a l a n g u a g e b a s i c s 9-15
J a v a ’ s d a t a t y p e s
automatically set to false. The following code illustrates the use of a boolean variable:
int a = 1, b = 0;boolean bool = a < b; //bool is false
Character data typesJava uses the data type char to store a single Unicode character. Java’s char type, therefore, is 16-bit wide, whereas in C/C++, it is (by default) 8-bits wide.
Composite data types
ArraysAn array is a data structure, which can hold multiple elements of the same type. The array’s element type can be anything: a primitive type, a composite type, or a user-defined class. If you have used arrays in other languages, you will probably find the way Java handles arrays interesting. Let’s first see some examples of array declarations:
int studentID[];char[] grades;float coordinates[][];
There are two things to note about these array declarations:
• The array size is not specified—in most other languages the array’s size must be included in its declaration.
• The placement of the square brackets can follow the identifier, as in the first example, or follow the data type, as in the second example.
Creating and initializing arraysThe previous array declarations did not actually allocate any memory for the arrays (they simply declared identifiers that will eventually store actual arrays). For that reason, the sizes of the arrays were not specified.
To actually allocate memory for the array variables, you must use the new operator as follows:
int studentID[] = new int[20];char[] grades = new char[20];float[][] coordinates = new float[10][5];
The first statement creates an array of 20 int elements, the second creates an array of 20 char elements, and the third creates a two-dimensional 10 by 5 float array (10 rows, 5 columns). When the array is created, all its elements are null.
Note The use of the new operator in Java is similar to using the malloc command in C and the new operator in C++.

9-16 L e a r n i n g J a v a w i t h J B u i l d e r
J a v a ’ s d a t a t y p e s
To initialize an array, the values of the array elements are enumerated inside a set of curly braces. For multi-dimensional arrays, nested curly braces are used.
The following statements illustrate this:
char[] grades = {‘A’, ‘B’, ‘C’, ‘D’, ‘F’);float[][] coordinates = {{0.0, 0.1}, {0.2, 0.3}};
The first statement creates a char array called grades. It initializes the array’s elements with the values ‘A’ through ‘F’. Notice that we did not have to use the new operator to create this array; by initializing the array, enough memory is automatically allocated for the array to hold all the initialized values. Therefore, the first statement creates a char array of 5 elements.
The second statement creates a two-dimensional float array called coordinates, whose size is 2 by 2. The array’s first row is initialized to 0.0 and 0.1, and the second row to 0.2 and 0.3. Conceptually, coordinates is an array of two array elements.
Accessing array elementsArray elements are accessed by subscripting (or indexing) the array variable. Indexing an array variable involves following the array variable’s name with the element’s number (index) surrounded by square brackets. Arrays are always indexed starting from 0. In the case of multi-dimensional arrays, you must use an index for each dimension to access an element.
Here are a couple of examples:
firstElement = grades[0]; //firstElement = ‘A’fifthElement = grades[4]; //fifthElement = ‘F’row2Col1 = coordinates[1][0]; //row2Col1 = 0.2
The following snippet of code demonstrates the use of arrays. It creates an array of 5 int elements called intArray, then uses a for loop to store the integers 0 through 4 in the elements of the array:
int[] intArray = new int [5];int index;for (index = 0; index < 5; index++) intArray [index] = index;
We will discuss for loops in a later section. Basically this code uses the loop to increment the index variable from 0 to 4, and at every pass, it stores its value in the element of intArray indexed by index.
StringsA string is a sequence of characters. Java uses the String data type to store strings. This data type is a member of the java.lang package, which we will study in Chapter 11, “The Java class libraries.” That means that it is not a built-in type; if you want to declare a variable of type String, you

J a v a l a n g u a g e b a s i c s 9-17
J a v a ’ s d a t a t y p e s
must use the java.lang package. We will learn more about packages in Chapter 10, “Object-oriented programming in Java.”
A String variable, once initialized, cannot be changed. How can it be a variable and yet cannot be changed? Recall that a variable is just a reference to a place in memory; you use it to access and change the memory in which it points. In the case of a String variable, the memory that a String variable points to cannot be changed; however, the variable itself can be made to point somewhere else in memory. The following code illustrates this:
String s = new String ("Hello");s = "Hello World"; //s now points to a new place in memory
We first created a String variable called s that pointed to a particular place in memory, which contains the string “Hello”. The second line made s point to a new place in memory, which now contains “Hello World”. This is valid because we changed the variable itself, not the memory it points to. This point illustrates the difference between a variable and the memory it points to.
If you want more control over your strings, use the StringBuffer class. This class, also part of the java.lang package, provides methods that allow you to modify the contents of strings. Here’s an example of something you cannot do using the String class:
StringBuffer s = new StringBuffer ("Hello");s.setCharAt (1, 'o'); //s is now "Hello"
StringBuffer’s setCharAt() method modifies the character, at the index specified in the first parameter, to the new value specified in the second parameter.
We will cover both string classes in more detail in Chapter 11, “The Java class libraries.”
Type casting
In some cases, you need to convert a variable’s type to another type. You might, for example, need to pass an int variable to a method that accepts only float variables. Converting the type of a variable is called casting. To cast a variable’s type, place the type you want it to cast to, in parentheses, immediately before the variable’s identifier. The following example shows how a method’s return variable, which is of type int, can be cast to float:
float f = (float) returnInt();
You must be careful when casting types, as some loss of information might result. Casting a 64-bit long variable to a 32-bit int variable, for instance, causes the compiler to discard the upper 32-bits of the long variable. If the value of the long variable at the time of the cast were bigger than 32-bits, the cast would assign an incorrect value to the int variable.

9-18 L e a r n i n g J a v a w i t h J B u i l d e r
J a v a ’ s d a t a t y p e s
The general rule is that the cast type must be at least equal in size to the original type. The following table shows the casts that do not result in information loss:
Implicit castingThere are times when a cast is performed implicitly by the compiler. The following is an example:
if (3 > 'a') {}
In this case, the value of ‘a’ is converted to an integer value (the ASCII value of the letter, a) before it is compared with the number 3.
Scope rules
Scope rules determine where in a program a variable is recognized. Variables fall into two main scope categorizes:
• Global variables: Variables that are recognized throughout the entire program.
• Local variables: Variables that are recognized only in the code block they were declared.
Scope rules are tightly related to code blocks. The one general scope rule is as follows: a variable declared in a code block is visible only in that block and any blocks nested inside it. The following code illustrates this:
class scopeDemo { int x = 0; void method1() { int y; y = x; //legal } void method2() { int z = 1; z = y; //illegal! }}
Original Type Cast Type
byte short, char, int, long, float, doubleshort int, long, float, doublechar int, long, float, doubleint long, float, doublelong float, doublefloat double
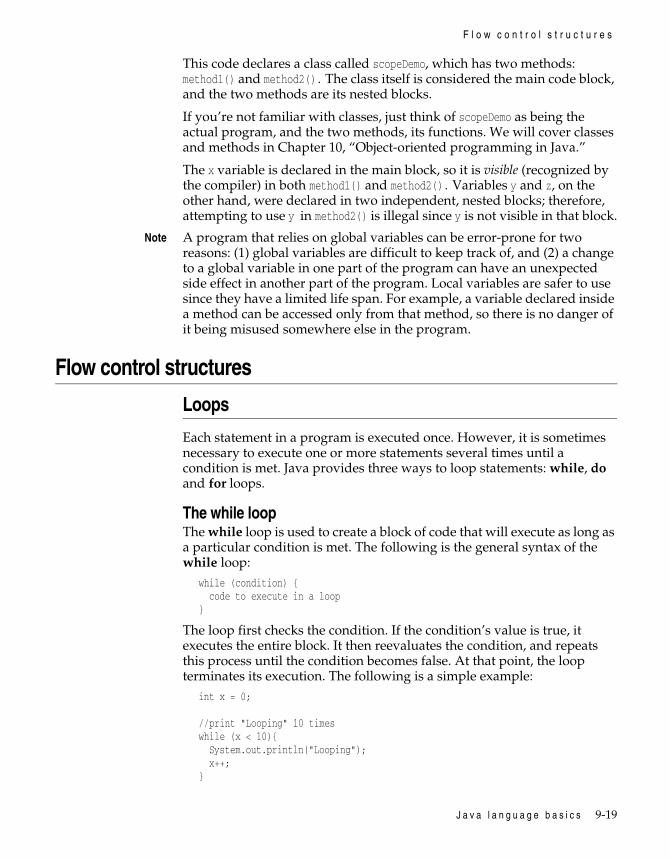
J a v a l a n g u a g e b a s i c s 9-19
F l o w c o n t r o l s t r u c t u r e s
This code declares a class called scopeDemo, which has two methods: method1() and method2(). The class itself is considered the main code block, and the two methods are its nested blocks.
If you’re not familiar with classes, just think of scopeDemo as being the actual program, and the two methods, its functions. We will cover classes and methods in Chapter 10, “Object-oriented programming in Java.”
The x variable is declared in the main block, so it is visible (recognized by the compiler) in both method1() and method2(). Variables y and z, on the other hand, were declared in two independent, nested blocks; therefore, attempting to use y in method2() is illegal since y is not visible in that block.
Note A program that relies on global variables can be error-prone for two reasons: (1) global variables are difficult to keep track of, and (2) a change to a global variable in one part of the program can have an unexpected side effect in another part of the program. Local variables are safer to use since they have a limited life span. For example, a variable declared inside a method can be accessed only from that method, so there is no danger of it being misused somewhere else in the program.
Flow control structures
Loops
Each statement in a program is executed once. However, it is sometimes necessary to execute one or more statements several times until a condition is met. Java provides three ways to loop statements: while, do and for loops.
The while loopThe while loop is used to create a block of code that will execute as long as a particular condition is met. The following is the general syntax of the while loop:
while (condition) { code to execute in a loop}
The loop first checks the condition. If the condition’s value is true, it executes the entire block. It then reevaluates the condition, and repeats this process until the condition becomes false. At that point, the loop terminates its execution. The following is a simple example:
int x = 0;
//print "Looping" 10 timeswhile (x < 10){ System.out.println("Looping"); x++;}

9-20 L e a r n i n g J a v a w i t h J B u i l d e r
F l o w c o n t r o l s t r u c t u r e s
When the loop first starts executing, it checks whether the value of x(0) is less than 10. Since it is, the body of the loop is executed. In this case, the word “Looping” is printed on the screen, and then the value of x is incremented. This loop continues until the value of x is equal to, or greater than, 10. At that point, the loop terminates.
Make sure there is some point in the loop where the condition’s value becomes false, and the loop terminates; otherwise, your loop would execute forever.
Note You can also terminate loop execution by using the return, continue, or break statements. The return statement is illustrated in Chapter 10, “Object-oriented programming in Java”; the break and continue statements are discussed in the next section.
The do loopThe do loop is similar to the while loop, except it evaluates the condition after the statements—not before. The following code shows the previous while loop converted to a do loop:
int x = 0;do{ System.out.println("Looping"); x++;}while (x < 10);
The main difference between the two loop constructs is that unlike the while loop, the do loop is always guaranteed to execute at least once.
The for loopThe for loop is the most powerful loop construct. Here is the general syntax of a for loop:
for (init expr; condition expr; operation expr) {}
The for loop initialization consists of three parts: an initialization expression, a condition expression, and an “operation” expression. The third expression usually updates the loop variable initialized in the first expression. Here is the for loop equivalent of our initial while loop:
for (int x = 0; x < 10; x++){ System.out.println("Looping");}
This loop and its equivalent while loop are practically the same. In fact, for (almost) every for loop, there is an equivalent while loop. The way the for loop executes is different, however. The first expression is executed first (in this case, x is initialized). The condition is then checked, and if it is true, the body of the loop is executed. Once the loop finishes executing, the third loop expression is computed (x is incremented). The cycle then

J a v a l a n g u a g e b a s i c s 9-21
F l o w c o n t r o l s t r u c t u r e s
returns to the first expression. It is critical that you understand how this works; otherwise, you would get some unexpected results.
The for loop is far more versatile than the other loop constructs; it can be constructed in unique ways that lessen the number of lines of code and improve the loop’s efficiency. To demonstrate the versatility of the for loop, consider the following code:
int x = 1, z = 0;while (x <= 20) { z += x; x++;}
This loop simply adds the numbers from 1 to 20 (inclusive). The equivalent for loop is as follows:
int z = 0;for (int x=1; x <= 20; x++) { z+= x;}
To cut down the number of times the loop executes in half, we can use the following loop:
for (int x=1,y=20, z=0; x<=10 && y>10; x++, y--) { z+= x+y;}
To better understand how this loop works, we will break it up into its four main sections:
1 The initialization expression: int x =1, y=20, z=02 The loop condition: x<=10 && y>103 The “operation” expression: x++, y--4 The main body: z+= x + y
Mathematically speaking, the second for loop is not more efficient than the first (they both have the same order of magnitude). The purpose of this example, was simply to demonstrate the flexibility of the for loop.
How does the outcome of the next loop differ from the previous one?
for (int x=1,y=20, z=0; x<=10 && y>10; x++, y--, z+=x+y) {}
Loop control statements
The break statementThe break statement will allow you to exit a loop structure before the test condition is met. Once a break statement is encountered, the loop

9-22 L e a r n i n g J a v a w i t h J B u i l d e r
F l o w c o n t r o l s t r u c t u r e s
immediately terminates, skipping any remaining code. Here is an example:
int x = 0;while (x < 10){ System.out.println("Looping"); x++; if (x == 5) break; else //do something else}
In this example, the loop will stop executing when x equals 5.
The continue statementThe continue statement is used to skip the rest of the loop and continue execution at the next loop iteration.
for ( int x = 0 ; x < 10 ; x++){ if(x == 5) continue; //go back to beginning of loop with x=6 System.out.println("Looping");}
This example will not print “Looping” if x is 5.
Conditional statements
Conditional statements are used to provide your code with decision-making capabilities. There are two conditional structures in Java: the if-else statement, and the switch statement.
The if-else statementThe syntax of an the if-else statement is as follows:
if (condition1) { //codeBlock 1}else if (condition2) { //codeBlock 2}else { //codeBlock 3}
The if-else statement is typically made up of multiple blocks. Only one of the blocks will execute when the if-else statement executes (based on which of the conditions is true, of course). The if-else blocks and the else block are optional. Also, the if-else statement is not restricted to three blocks—it can contain as many of the if-else block as needed.
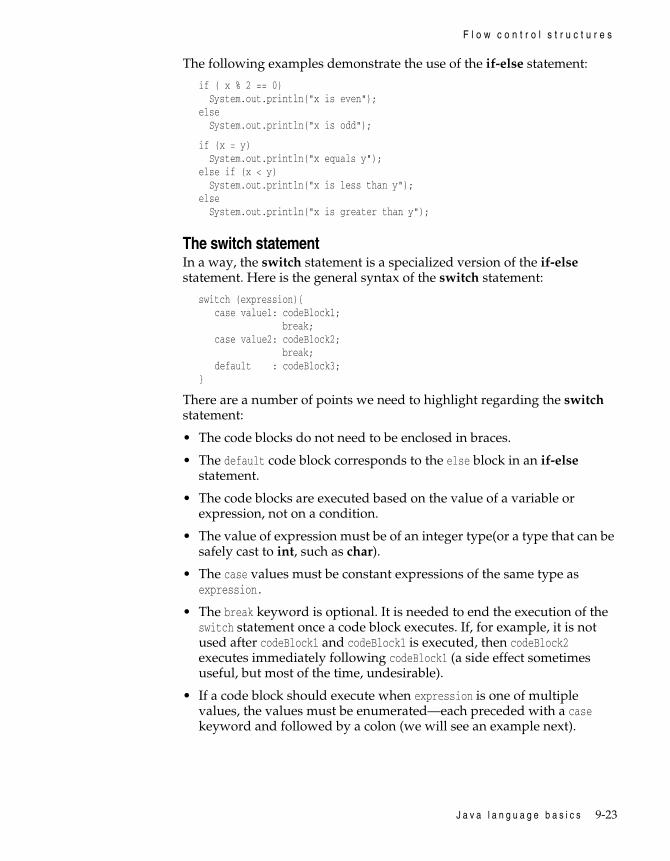
J a v a l a n g u a g e b a s i c s 9-23
F l o w c o n t r o l s t r u c t u r e s
The following examples demonstrate the use of the if-else statement:
if ( x % 2 == 0) System.out.println("x is even");else System.out.println("x is odd");
if (x = y) System.out.println("x equals y");else if (x < y) System.out.println("x is less than y");else System.out.println("x is greater than y");
The switch statement In a way, the switch statement is a specialized version of the if-else statement. Here is the general syntax of the switch statement:
switch (expression){case value1: codeBlock1;
break;case value2: codeBlock2;
break;default : codeBlock3;
}
There are a number of points we need to highlight regarding the switch statement:
• The code blocks do not need to be enclosed in braces.
• The default code block corresponds to the else block in an if-else statement.
• The code blocks are executed based on the value of a variable or expression, not on a condition.
• The value of expression must be of an integer type(or a type that can be safely cast to int, such as char).
• The case values must be constant expressions of the same type as expression.
• The break keyword is optional. It is needed to end the execution of the switch statement once a code block executes. If, for example, it is not used after codeBlock1 and codeBlock1 is executed, then codeBlock2 executes immediately following codeBlock1 (a side effect sometimes useful, but most of the time, undesirable).
• If a code block should execute when expression is one of multiple values, the values must be enumerated—each preceded with a case keyword and followed by a colon (we will see an example next).

9-24 L e a r n i n g J a v a w i t h J B u i l d e r
S u m m a r y
Here is an example (assuming c is of type char):
switch (c){case '1': case '3': case '5': case '7': case '9':
System.out.println("c is an odd number");break;
case '0': case '2': case '4': case '6': case '8':System.out.println("c is an even number");break;
case ' ':System.out.println("c is a space");break;
default :System.out.println("c is not a number or a space");
}
The switch will evaluate c and jump to the case statement whose value is equal to c. If none of the case values equal c, the default section will be executed. Notice how multiple values can be used for each block.
SummaryWhat was covered in this chapter:
• Identifiers are used to uniquely identify variables, methods and classes. Identifiers must begin with an underscore, dollar sign, or letter. They can include numbers and are case–sensitive.
• Literals represent constant values. They can be used in expressions and variable assignments.
• Escape sequences represent special control characters and characters that cannot be printed.
• Code blocks are used to group related statements together.
• An expression is something that has a certain value. Expressions can combine identifiers, keywords, operators, and symbols.
• Java’s operators are of the following types: arithmetic, logical, comparison, assignment, and bitwise. Some operators are unary and others are binary. Also, Java borrows the ternary operator (?:) from C/C++.
• Java supports primitive data types (numerical, Boolean, and character data types), as well as composite data types (arrays and strings). Java’s data types differ from C/C++’s in that Java does not use arrays of characters to represent strings, and it does not represent Boolean values

J a v a l a n g u a g e b a s i c s 9-25
S u m m a r y
using 0’s and 1’s. Also, Java’s integer types are always signed; in C/C++ they are signed by default.
• There are three looping constructs in Java: the while construct, the do construct, and the for loop. The for loop is the most flexible looping construct in Java.
• In Java, there are two conditional statements: the if statement and the switch statement.

9-26 L e a r n i n g J a v a w i t h J B u i l d e r

O b j e c t - o r i e n t e d p r o g r a m m i n g i n J a v a 10-1
C h a p t e r
10Chapter10Object-oriented programming
in JavaThis chapter will answer the following questions:
• How long has object-oriented programming existed?• How do I declare an object and instantiate a class?• What types can appear in a class?• What are constructors and finalizers?• How do I implement inheritance from a parent class to a child class?• What are the keywords, this and super used for?• What are accessor methods?• What is an abstract class?• What is polymorphism?• What is an interface?• What is the import statement used for?
Introduction to OOPObject-oriented programming has been around since the introduction of the language, Simula ’67, in 1967. However, it really came to the forefront of programming paradigms in the mid 1980’s.
Object-oriented programming mainly differs from traditional structured programming because it places the data and the operations that pertain to the data within a single data structure. In structured programming, the data and the operations on the data are separate, and this methodology requires sending data structures to procedures and functions to operate on them. Object-oriented programming solves many of the problems inherent in this design because the attributes and operations are part of
10-2 L e a r n i n g J a v a w i t h J B u i l d e r
C l a s s e s
the same entity. This more closely models the real world, in which all objects have both attributes and activities associated with them.
Java is a pure object-oriented language, meaning that the outermost level of data structure in Java is the object. There are no stand-alone constants, variables, or functions in Java—everything is accessed through classes and objects. This is one of the nicest features of Java as compared to other hybrid object-oriented languages, which have aspects of structured languages in addition to object extensions. For example, C++ and Object Pascal are object-oriented languages, but you can still write structured programming constructs, which dilutes the effectiveness of the object-oriented extensions. Such an option in Java is not available!
ClassesFirst, a distinction must be made between classes and objects. A class is a type definition, whereas an object is a variable declaration. Once you create a class, you can create as many objects based on that class as you want. The same relationship exists between classes and objects as cherry pie recipes and cherry pies—you can make as many cherry pies as you want from a single recipe.
The process of creating an object from a class is referred to as instantiating an object, or creating an instance of a class.
Declaring and instantiating classes
A class in Java can be very simple. Here is a class definition for an empty class:
class MyClass {}
Obviously, this class is not yet useful, but it is legal in Java. A slightly better class would contain some data members and methods, which will be added shortly. First, however, the syntax for instantiating a class must be covered. To create an instance of this class, the new operator is used in conjunction with the class name. An instance variable must be declared for the object.
MyClass myObject;
This, however, does not allocate memory and other resources for the object. This creates a reference called, myObject, but does not instantiate the object. The new operator performs this task.
myObject = new MyClass();
Notice that the name of the class is used as if it were a method. This is not coincidental (as you will see in an upcoming section). Once this line of

O b j e c t - o r i e n t e d p r o g r a m m i n g i n J a v a 10-3
C l a s s e s
code has executed, the member variables and methods of the class (which do not yet exist) can be accessed using the “.” operator.
Once you have created the object, you never have to worry about destroying it. Objects in Java are automatically garbage collected. As soon as the object reference (i.e., the variable) goes out of scope, the virtual machine will automatically deallocate any resources allocated by the new operator.
Data members
As stated above, a class in Java can contain both data members and methods. Here is a class that contains just data members:
public class DogClass { String name,eyeColor; int age; boolean hasTail;}
In this example, we have created a class called, DogClass, which contains member variables for name, eyeColor, age, and a flag called hasTail. You can include any data type as the member variable of a class (primitive, composite, and object types). To access a data member, you must first create an instance of the class, then access the data using the “.” operator.
Class methods
You can also include methods in classes. In fact, there are no standalone functions or procedures in Java—all subroutines are defined as methods of classes. Here is an example of the DogClass above with a speak() method added:
public class DogClass { String name,eyeColor; int age; boolean hasTail;
public void speak() { Message msgSpeak = new Message(); msgSpeak.setMessage( "arf, arf" ); msgSpeak.setFrame( new Frame() ); msgSpeak.show(); }}
Notice that when you define methods, the implementation for the method appears directly below the declaration. This is unlike some other object-oriented languages where the class is defined in one location and the
10-4 L e a r n i n g J a v a w i t h J B u i l d e r
C l a s s e s
implementation code appears somewhere else. Also notice that you must specify a return type and any parameters received by the method.
To call the method, you would access it just like you would access the member variables. For example,
DogClass dog = new DogClass();dog.age = 4;dog.speak();
Constructors and finalizers
Every class has a special purpose method called a constructor. The constructor always has the same name as the class and cannot specify a return value. The constructor takes care of allocating all the resources needed by the object and returning an instance of the object. When you use the new operator, you are actually calling the constructor. The reason that you do not need to specify a return type for the constructor is that the instance of the object is always the return type!
Most object-oriented languages have a corresponding method called a destructor, which is called to deallocate all the resources that the constructor allocated. However, as stated above, Java takes care of deallocating all the resources for you, thus, there is no destructor mechanism in Java.
However, there are situations that require you to perform some special cleanup that the garbage collector cannot handle, as the class goes away. For example, you may have opened some files in the life of the object and you want to make sure the files are closed properly when the object is destroyed. There is another special purpose method that can be defined for a class called a finalizer. This method (if present) is called by the garbage collector immediately before the object is destroyed. Thus, if there is any special cleanup that needs to be performed, the finalizer can handle it for you. However, the garbage collector runs as a low priority thread in the virtual machine, so you can never predict when it will actually destroy your object. So, you should not put any time-sensitive code in the finalizer because you cannot predict when it will be called.
Case study: A simple OOP example
In this section, we will see a simple example of defining classes and instantiating objects. We will develop an application that creates two objects (a dog and a man) and show their attributes on a form.

O b j e c t - o r i e n t e d p r o g r a m m i n g i n J a v a 10-5
C l a s s e s
Here is a screenshot of the running application.
Figure 10.1 OOP1 form showing two instantiated objects
Here is a listing of the file DogClass.java:
package Oop1;
public class DogClass { String name,eyeColor; int age; boolean hasTail;
public DogClass() { name = "Snoopy"; eyeColor = "Black"; age = 2; hasTail = true; }}
As you can see, we are defining DogClass and supplying some member variables. There is also a constructor to handle instantiating DogClass objects.
Here is the source for the ManClass (found in ManClass.java):
package Oop1;
public class ManClass { String name,eyeColor; int age; boolean isMarried;
public ManClass() { name = "Bob"; eyeColor = "Blue"; age = 1; isMarried = true; }}
There are obviously some distinct similarities (which we will take advantage of in an upcoming section).
10-6 L e a r n i n g J a v a w i t h J B u i l d e r
C l a s s e s
Within the Frame class, we declare two instance variables as references to our objects. Here is the source listing of the Frame1 variable declarations:
public class Frame1 extends DecoratedFrame { // Create a reference for the objects DogClass dog; ManClass man;
XYLayout xYLayout2 = new XYLayout(); BevelPanel bevelPanel1 = new BevelPanel(); . . .
Here is the event handler code for the Create Dog button where we instantiate the object and fill in some form text fields:
void button1_actionPerformed(ActionEvent e) { dog = new DogClass(); txtfldDogName.setText( dog.name ); txtfldDogEyeColor.setText( dog.eyeColor ); txtfldDogAge.setText( Integer.toString( dog.age ) ); chkbxDog.setState( dog.hasTail); }
As shown, we call the constructor for the dog object and then access its member variables.
Here is the similar source code for the Create Man button’s event handler:
void button2_actionPerformed(ActionEvent e) { man = new ManClass(); txtfldManName.setText( man.name ); txtfldManEyeColor.setText( man.eyeColor ); txtfldManAge.setText( Integer.toString( man.age ) ); chkbxMan.setState( man.isMarried ); }
Class inheritance
The dog and man classes we created have a lot of similarities. One of the benefits of object-oriented programming is the ability to handle similarities like this within a hierarchy. This ability is referred to as inheritance. When a class inherits from another class, the child class automatically inherits all the characteristics (member variables) and behavior (methods) from the parent class. Notice that inheritance is always additive – there is no way to inherit from a class and get less than what the parent class has.
Inheritance in Java is handled through the keyword, extends. When one class inherits from another class, the child class extends the parent class.
public class DogClass extends MammalClass {. . . }
O b j e c t - o r i e n t e d p r o g r a m m i n g i n J a v a 10-7
C l a s s e s
The items that men and dogs have in common could be said to be common to all mammals, thus we can create a MammalClass to handle these similarities. We can then remove the declarations of the common items from DogClass and ManClass, declare them in MammalClass instead, and then subclass DogClass and ManClass from MammalClass. The following is the declaration of MammalClass:
package Oop2;
public class MammalClass { String name,eyeColor; int age;
public MammalClass() { name = "The Name"; eyeColor = "Black"; age = 0; }}
Notice that the MammalClass has the common characteristics from both the DogClass and the ManClass. Now, we can rewrite the DogClass and ManClass to take advantage of inheritance.
package Oop2;
public class DogClass extends MammalClass {
boolean hasTail;
public DogClass() { // implied Super() name = "Snoopy"; age = 2; hasTail = true; }}
package Oop2;
public class ManClass extends MammalClass{
boolean isMarried;
public ManClass() { name = "Bob"; eyeColor = "Blue"; age = 1; isMarried = true; }}
Notice that as soon as DogClass extends MammalClass, DogClass has all the member variables and methods that the MammalClass has. In fact, even MammalClass is inherited from another class. All classes in Java ultimately extend the Object class; so if a class is declared that does not extend another class, it implicitly extends the Object class.
10-8 L e a r n i n g J a v a w i t h J B u i l d e r
C l a s s e s
Classes in Java can only inherit from one class at a time (single inheritance). Some languages (such as C++) allow a class to inherit from several classes at once (multiple inheritance) but this is not the case in Java. A class can only extend one class at a time. Although, there is no restriction on how many times you can use inheritance to extend the hierarchy, you must do so one extension at a time. Multiple inheritance is a nice feature, but it leads to very complex object hierarchies. Java has a mechanism that provides many of the same benefits without so much complexity, called interfaces (covered in an upcoming section).
The MammalClass has a constructor, which sets very practical and convenient default values, and it would be very beneficial if the sub-classes could access this constructor.
In fact, they can. There are two ways to go about this in Java. If you do not explicitly call the parent’s constructor, Java automatically calls it for you as the first line of the child constructor. The only way to prevent this behavior is to call one of the parent’s constructors, yourself, as the first line of the child class’ constructor. The constructor calls are always chained like this, and this mechanism cannot be defeated. This is a very nice feature of the Java language, because in other object-oriented languages it is a common bug not to call the parent’s constructor. Java will always do this for you if you do not. That is the meaning of the comment in the first line of the DogClass constructor (implied Super()). The MammalClass constructor is called at that point, automatically. This mechanism relies on the existence of a super class constructor, which takes no parameters. If the constructor does not exist and you do not call one of the other constructors as the first line of the child constructor, the class will not compile.
Using this and superBecause you frequently want to call the super class constructor explicitly, there is a keyword in Java that makes this easy. Super() will call the parent’s constructor which has the appropriate supplied parameters. It is also possible to have more than one constructor for a class (which will be discussed in the “Overloading” section). If you are creating more than one constructor, you typically do not want to duplicate the common code. So, you can call a same class constructor using the this() keyword, sending it any required parameters.
For the example application, the change in the hierarchy is the only difference between the first two versions of the sample. The instantiation of the objects and the main form have not changed at all. However, the design of the application is more effective, because now if we have to modify any of the mammal characteristics, we can do so in the MammalClass and just recompile the child classes. Those changes will automatically flow to the child classes.

O b j e c t - o r i e n t e d p r o g r a m m i n g i n J a v a 10-9
C l a s s e s
Access modifiers
Another aspect of classes in Java is the accessibility of the members (both variables and methods) in the class. There are several options in Java to allow you to closely tailor how accessible you want these members to be.
As a general rule of thumb, you want to limit the scope of program elements (and this includes class members) as much as possible—the fewer places something is accessible, the fewer places it can be accessed incorrectly.
There are four different access modifiers for class members in Java: private, protected, public, and default (or the absence of any modifier). This is slightly complicated by the fact that classes within the same package have different access than classes outside the package. Thus, here are two charts which show both the accessibility and inheritability of classes and member variables from within the same package and from outside the package (packages are discussed in a later section).
Access from within class’s package
This table shows how class members are accessed and inherited from, with respect to other members in the same package. For example, a member that is declared to be private cannot be accessed by, or inherited from, other members of the same package. On the other hand, members declared using the other modifiers, could be accessed by and inherited from all other members of that package.
Access outside of a class’s package
For example, this table shows that a protected member could be inherited from, but not accessed, by classes outside its package.
Access Modifier Inherited Accessible
default (no modifier) Yes YesPublic Yes YesProtected Yes YesPrivate No No
Access Modifier Inherited Accessible
default (no modifier) No NoPublic Yes YesProtected Yes NoPrivate No No
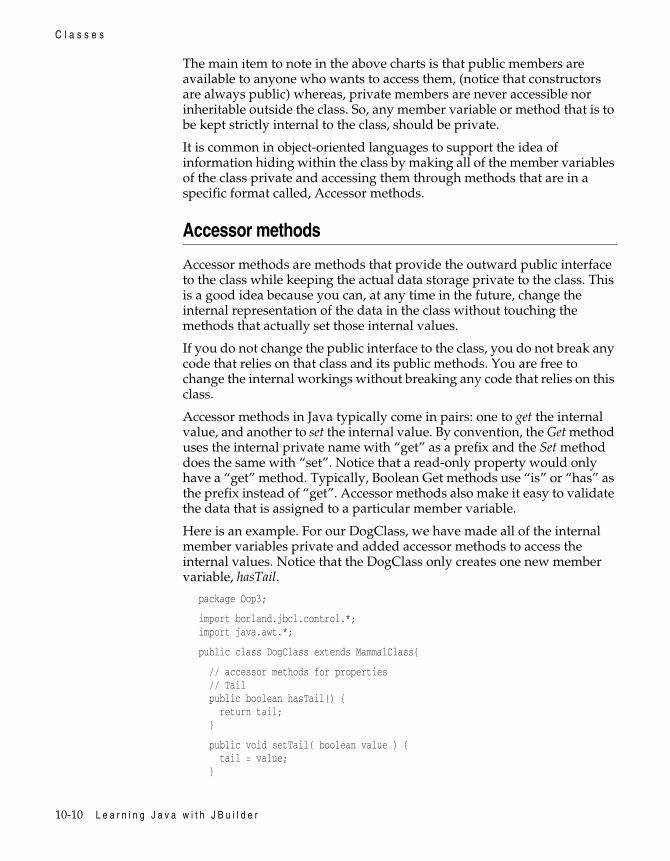
10-10 L e a r n i n g J a v a w i t h J B u i l d e r
C l a s s e s
The main item to note in the above charts is that public members are available to anyone who wants to access them, (notice that constructors are always public) whereas, private members are never accessible nor inheritable outside the class. So, any member variable or method that is to be kept strictly internal to the class, should be private.
It is common in object-oriented languages to support the idea of information hiding within the class by making all of the member variables of the class private and accessing them through methods that are in a specific format called, Accessor methods.
Accessor methods
Accessor methods are methods that provide the outward public interface to the class while keeping the actual data storage private to the class. This is a good idea because you can, at any time in the future, change the internal representation of the data in the class without touching the methods that actually set those internal values.
If you do not change the public interface to the class, you do not break any code that relies on that class and its public methods. You are free to change the internal workings without breaking any code that relies on this class.
Accessor methods in Java typically come in pairs: one to get the internal value, and another to set the internal value. By convention, the Get method uses the internal private name with “get” as a prefix and the Set method does the same with “set”. Notice that a read-only property would only have a “get” method. Typically, Boolean Get methods use “is” or “has” as the prefix instead of “get”. Accessor methods also make it easy to validate the data that is assigned to a particular member variable.
Here is an example. For our DogClass, we have made all of the internal member variables private and added accessor methods to access the internal values. Notice that the DogClass only creates one new member variable, hasTail.
package Oop3;
import borland.jbcl.control.*;import java.awt.*;
public class DogClass extends MammalClass{
// accessor methods for properties // Tail public boolean hasTail() { return tail; }
public void setTail( boolean value ) { tail = value; }
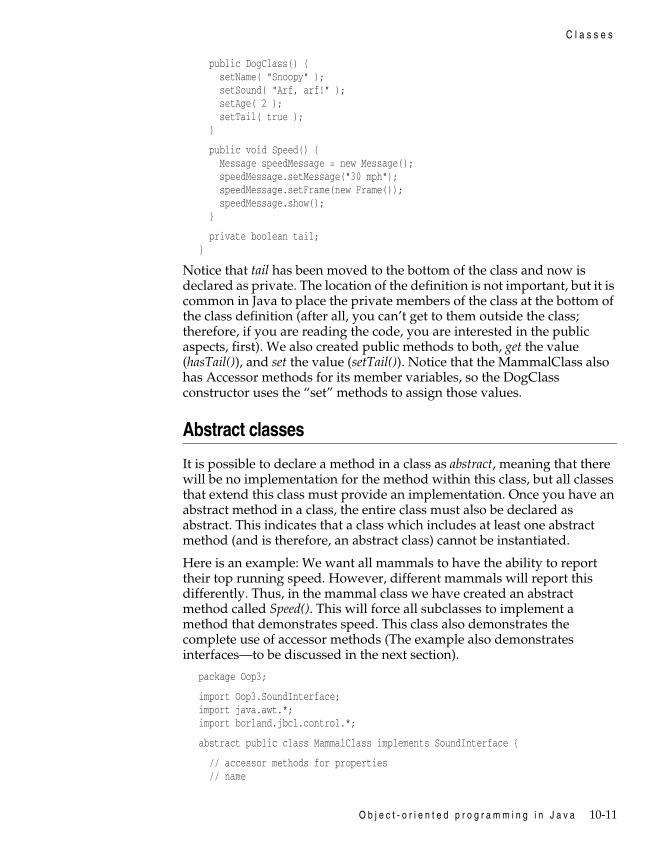
O b j e c t - o r i e n t e d p r o g r a m m i n g i n J a v a 10-11
C l a s s e s
public DogClass() { setName( "Snoopy" ); setSound( "Arf, arf!" ); setAge( 2 ); setTail( true ); }
public void Speed() { Message speedMessage = new Message(); speedMessage.setMessage("30 mph"); speedMessage.setFrame(new Frame()); speedMessage.show(); }
private boolean tail;}
Notice that tail has been moved to the bottom of the class and now is declared as private. The location of the definition is not important, but it is common in Java to place the private members of the class at the bottom of the class definition (after all, you can’t get to them outside the class; therefore, if you are reading the code, you are interested in the public aspects, first). We also created public methods to both, get the value (hasTail()), and set the value (setTail()). Notice that the MammalClass also has Accessor methods for its member variables, so the DogClass constructor uses the “set” methods to assign those values.
Abstract classes
It is possible to declare a method in a class as abstract, meaning that there will be no implementation for the method within this class, but all classes that extend this class must provide an implementation. Once you have an abstract method in a class, the entire class must also be declared as abstract. This indicates that a class which includes at least one abstract method (and is therefore, an abstract class) cannot be instantiated.
Here is an example: We want all mammals to have the ability to report their top running speed. However, different mammals will report this differently. Thus, in the mammal class we have created an abstract method called Speed(). This will force all subclasses to implement a method that demonstrates speed. This class also demonstrates the complete use of accessor methods (The example also demonstrates interfaces—to be discussed in the next section).
package Oop3;
import Oop3.SoundInterface;import java.awt.*;import borland.jbcl.control.*;
abstract public class MammalClass implements SoundInterface {
// accessor methods for properties // name

10-12 L e a r n i n g J a v a w i t h J B u i l d e r
C l a s s e s
public String getName() { return name; }
public void setName( String value ) { name = value; }
// eyecolor public String getEyeColor() { return eyeColor; }
public void setEyeColor( String value ) { eyeColor = value; }
// sound public String getSound() { return sound; }
public void setSound( String value ) { sound = value; }
// age public int getAge() { return age; }
public void setAge( int value ) { if ( value > 0 ) { age = value; } else age = 0; }
public MammalClass() { name = "The Name"; eyeColor = "Black"; age = 0; }
public void Speak() { Message soundMessage = new Message(); soundMessage.setMessage( this.sound ); soundMessage.setFrame( new Frame() ); soundMessage.show(); }
abstract public void Speed();
private String name, eyeColor, sound; private int age;}

O b j e c t - o r i e n t e d p r o g r a m m i n g i n J a v a 10-13
P o l y m o r p h i s m
Notice the declaration of the abstract method Speed() and also the declaration of the class as abstract.
PolymorphismPolymorphism is the ability for two separate, yet related, classes to receive the same message but act on it in their own way. In other words, two different (but related) classes can have the same method name but implement it in different ways.
Thus, you can have a method in a class, which is also implemented in a child class, and access the code from the parent’s class (similar to the automatic constructor chaining discussed earlier). Just as in the constructor example, you can use the keyword super to access any of the superclass’ methods or member variables.
Here is a simple example. We have two classes (Parent and Child).
class Parent { int x = 1; int someMethod(){ return x; }}
class Child extends Parent { int x; // this x is part of this class int someMethod() { // this overrides parent's method x = super.x + 1; // access parent's x with super return super.someMethod() + x; }}
Method overloading
It is possible in Java to create several methods of a class which have the same name but have different parameters and/or return value. This is referred to as method overloading. Java takes care of deciding which method to call by looking at the return value and the parameters.
Using interfaces
An interface is functionally like an abstract class but with one important difference: an interface cannot include any code. The interface mechanism in Java is meant to replace multiple inheritance.
An interface is a specialized class declaration that can declare constants and method declarations, but not implementation—code can never be placed in an interface.
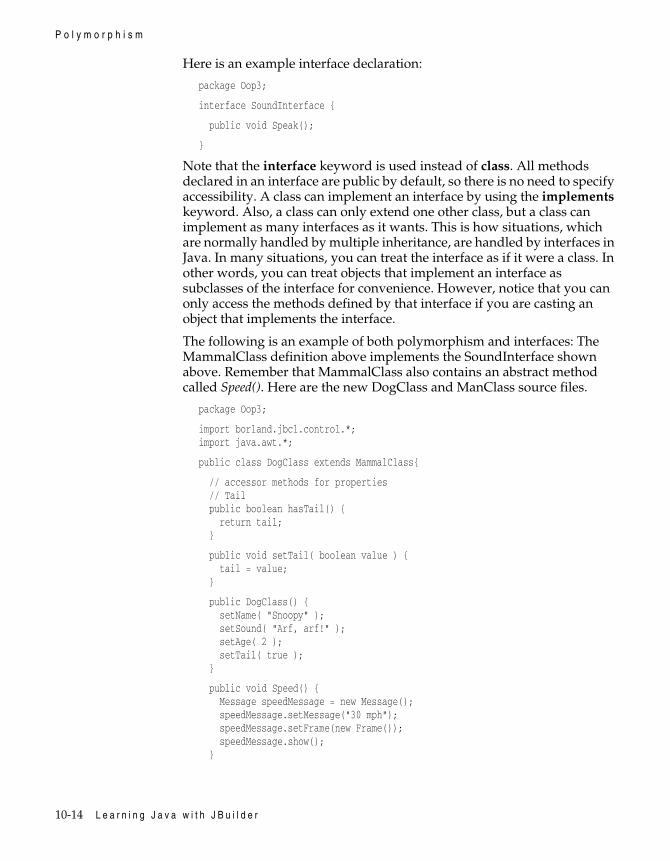
10-14 L e a r n i n g J a v a w i t h J B u i l d e r
P o l y m o r p h i s m
Here is an example interface declaration:
package Oop3;
interface SoundInterface {
public void Speak();
}
Note that the interface keyword is used instead of class. All methods declared in an interface are public by default, so there is no need to specify accessibility. A class can implement an interface by using the implements keyword. Also, a class can only extend one other class, but a class can implement as many interfaces as it wants. This is how situations, which are normally handled by multiple inheritance, are handled by interfaces in Java. In many situations, you can treat the interface as if it were a class. In other words, you can treat objects that implement an interface as subclasses of the interface for convenience. However, notice that you can only access the methods defined by that interface if you are casting an object that implements the interface.
The following is an example of both polymorphism and interfaces: The MammalClass definition above implements the SoundInterface shown above. Remember that MammalClass also contains an abstract method called Speed(). Here are the new DogClass and ManClass source files.
package Oop3;
import borland.jbcl.control.*;import java.awt.*;
public class DogClass extends MammalClass{
// accessor methods for properties // Tail public boolean hasTail() { return tail; }
public void setTail( boolean value ) { tail = value; }
public DogClass() { setName( "Snoopy" ); setSound( "Arf, arf!" ); setAge( 2 ); setTail( true ); }
public void Speed() { Message speedMessage = new Message(); speedMessage.setMessage("30 mph"); speedMessage.setFrame(new Frame()); speedMessage.show(); }

O b j e c t - o r i e n t e d p r o g r a m m i n g i n J a v a 10-15
P o l y m o r p h i s m
private boolean tail;
}
package Oop3;import borland.jbcl.control.*;import java.awt.*;
public class ManClass extends MammalClass {
// accessor methods for properties // married public boolean isMarried() { return married; }
public void setMarried( boolean value ) { married = value; }
public ManClass() { setName( "Bob" ); setEyeColor( "Blue" ); setSound( "Hello there!" ); setAge( 1 ); setMarried( true ); }
public void Speed() { Message speedMessage = new Message(); speedMessage.setMessage( "22 mph" ); speedMessage.setFrame( new Frame() ); speedMessage.show(); }
private boolean married;}
Because both these classes extend MammalClass, they must both provide an implementation of the Speed() method. Notice, too, that they also implement the SoundInterface interface because it is implemented by the MammalClass. In fact, the Speak() method is defined in MammalClass, but the sound that each mammal will make is specified in the constructor.
There has also been some changes to the main form of the application. We have added two buttons, Speed and Speak.
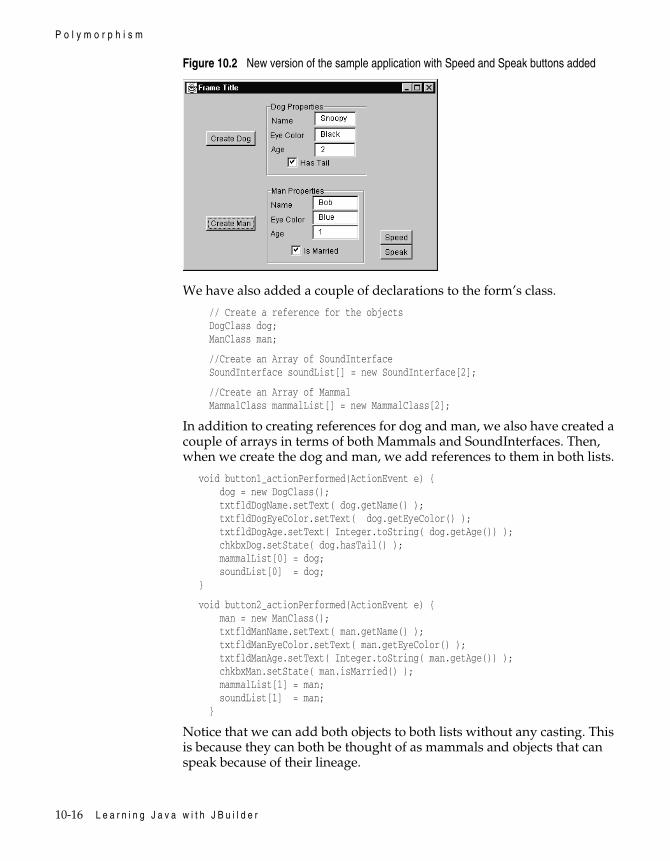
10-16 L e a r n i n g J a v a w i t h J B u i l d e r
P o l y m o r p h i s m
Figure 10.2 New version of the sample application with Speed and Speak buttons added
We have also added a couple of declarations to the form’s class.
// Create a reference for the objects DogClass dog; ManClass man;
//Create an Array of SoundInterface SoundInterface soundList[] = new SoundInterface[2];
//Create an Array of Mammal MammalClass mammalList[] = new MammalClass[2];
In addition to creating references for dog and man, we also have created a couple of arrays in terms of both Mammals and SoundInterfaces. Then, when we create the dog and man, we add references to them in both lists.
void button1_actionPerformed(ActionEvent e) { dog = new DogClass(); txtfldDogName.setText( dog.getName() ); txtfldDogEyeColor.setText( dog.getEyeColor() ); txtfldDogAge.setText( Integer.toString( dog.getAge()) ); chkbxDog.setState( dog.hasTail() ); mammalList[0] = dog; soundList[0] = dog;}
void button2_actionPerformed(ActionEvent e) { man = new ManClass(); txtfldManName.setText( man.getName() ); txtfldManEyeColor.setText( man.getEyeColor() ); txtfldManAge.setText( Integer.toString( man.getAge()) ); chkbxMan.setState( man.isMarried() ); mammalList[1] = man; soundList[1] = man; }
Notice that we can add both objects to both lists without any casting. This is because they can both be thought of as mammals and objects that can speak because of their lineage.

O b j e c t - o r i e n t e d p r o g r a m m i n g i n J a v a 10-17
J a v a p a c k a g e s
The code under the Speed button loops through the list and tells each object to display its speed.
void button4_actionPerformed(ActionEvent e) { for (int i = 0; i <= 1; i++) { mammalList[i].Speed(); }}
Notice again that we do not have to cast either object to access the Speed() method. The first time through the list, the dog displays speed, the second time through the list, the man displays speed. This is polymorphism in action – two separate but related objects receiving the same message and reacting to it in their own way.
The code under the Speak button is similar.
void button3_actionPerformed(ActionEvent e) { for (int i = 0; i <= 1; i++) { soundList[i].Speak(); } }
You’ll see that we can treat the SoundInterface as a class when it is convenient. Again, we do not have to do any casting to execute this method against these objects. However, because this is an interface, we cannot access the Speed() method from this reference without type casting. But notice that the interface gives us some of the benefits of multiple inheritance without the added complexity.
Java packagesIn order to facilitate code reuse, Java allows you to group several class definitions together in a logical grouping called a package. If, for instance, you create a group of business rules that model the work processes of your organization, you might want to place them together in a package. This makes it easier to reuse code that you have previously created.
The import statement
The Java language comes with many predefined packages. For instance, the java.applet package contains classes for working with Java applets. In the previous example, we were declaring an applet subclass with the following line of code:
public class Hello extends java.applet.Applet {
In this code, we were really referring to the class called Applet in the Java package java.applet. You can imagine that it might get quite tedious to have to repeat the entire full class name java.applet.Applet every time we
10-18 L e a r n i n g J a v a w i t h J B u i l d e r
J a v a p a c k a g e s
referred to this class. Instead, Java offers an alternative. You can choose to import a package you will use frequently:
import java.applet.*;
This tells the compiler “if you see a class name you do not recognize, look in the java.applet package for it.” Now, when we declare our new class, we can say,
public class Hello extends Applet {
which is a little less verbose. However, this does present a problem if you have two classes by the same name defined in two different packages that are imported. In this case, you must use the fully qualified name.
Declaring packages
Creating your own packages is almost as easy as using them. For instance, if you want to create a package called, mypackage, you would simply use a package statement at the beginning of your file:
package mypackage;
public class Hello extends java.applet.Applet {
public void init() { add(new java.awt.Label("Hello World Wide Web!")); }
} // end class
Now, any other program can access the classes declared in mypackage with the statement:
import mypackage.*;
Remember, this file should be in a subdirectory called mypackage. This allows your Java compiler to easily locate your package. JBuilder’s Project Wizard will automatically set the directory to match the project name. Also, keep in mind that the base directory of any package you import must be listed in the Source Path of the JBuilder IDE or the Source Path of your project. This is good to remember if you decide to relocate a package to a different base directory.
“The Java Language Specification” (provided in the online documentation) has more information about packages, including recommended naming conventions.

O b j e c t - o r i e n t e d p r o g r a m m i n g i n J a v a 10-19
S u m m a r y
Project options related to packages
In the Paths section of the Project Properties dialog, you can set the following package-related properties:
• Browser Source Path: this specifies the path that JBuilder’s IDE will use to look for source files. If it does not find the files, it uses the compiler source path.
• Compiler Source Path: JBuilder uses this path to compare .class files from the class path with their corresponding .java files to determine whether the .java files need to be recompiled.
• Class Path: the class path is where JBuilder looks for .class files. When you reference a class from another package, JBuilder looks for its package in the class path.
• Out Path: where compiled files are stored. When a Java compiler compiles a Java class, it places the resulting bytecode in a file with the same name as the class, but with a .class extension. The Out Path will mirror the path in which you have created your project. So, in our case, we created a class called, DogClass by creating a file called, DogClass.java. This file is in a subdirectory called Oop1; therefore, the result of compiling this file is a file called, DogClass.class, which is stored in a subdirectory of the Out Path called Oop1.
When a piece of Java code references an external package (e.g. you use one of the components in the java.awt package), the Java environment and compiler will look through the Source and Class paths to find a subdirectory with the same name as the package.
SummaryWhat was covered in this chapter:
• Object-oriented programming started with the language Simula ’67 in 1967 but became popular in the 80’s.
• An object is declared just like any other variable and it is instantiated using the new keyword.
• Any type (both primitive and object) can appear in a class.

10-20 L e a r n i n g J a v a w i t h J B u i l d e r
S u m m a r y
• A constructor is a special method that allocates all resources for the class. A finalizer is a method that is automatically called by the garbage collector just before the object is destroyed.
• Inheritance is implemented using the extends keyword.
• The keyword, this, refers to the current class and can be used as a method call to call another constructor of the class. The keyword, super, can be used to refer to a member variable in a parent class or to invoke the constructor for a parent class.
• Accessor methods are “get” and “set” methods used to encapsulate internal data representation in the form of private member variables.
• An abstract class is a class with at least one abstract method, which cannot be instantiated.
• Polymorphism is the ability for two separate, but related objects, to receive the same message but react to it differently.
• An interface is like an abstract class but cannot contain any code or non-constant member variables.
• The import statement is used to avoid having to full qualify class names.

T h e J a v a c l a s s l i b r a r i e s 11-1
C h a p t e r
11Chapter11The Java class libraries
This chapter will answer the following questions:
• What does the standard class libraries provide for Java development?• What purpose does type wrapper classes serve?• Why does Java support primitive data types?
IntroductionMost programming languages rely on pre-built libraries to support certain functionality. For example, C has no built-in support for I/O functions. JDK 1.1 comes with a very impressive library that includes support for database connectivity, GUI design, I/O, and network programming. Although JDK 1.1 contains numerous support packages, there are ten standard packages that warrant further discussion. The following table briefly describes these packages.
Package Description
Language The main core of the Java language
Utilities Support for utility data structures
I/O Supports various types of input/output
Networking TCP/IP support and socket programming
AWT GUI design and event-handling
Text Support for internationalization
Security Support for cryptographic security
RMI Support for distributed programming
Reflection Used to obtain runtime class information
SQL Support for querying databases using SQL

11-2 L e a r n i n g J a v a w i t h J B u i l d e r
T h e L a n g u a g e p a c k a g e
This chapter will primarily focus on the Language, Utilities and I/O packages. Aspects of the security package will be discussed in Chapter 14, “Java Virtual Machine security.”
The Language packageOne of the most important packages in the Java class library is the java.lang package. This Language package contains the language’s main support classes. It is virtually impossible to write a Java program without using the Language package. The following sections discuss some of the more important classes contained in the Language package.
The Object class
The Object class is the parent class of all Java classes. This simply means that all Java classes are derived from the Object class. The Object class itself contains several methods of importance. These methods include clone, equals, and toString.
An object that uses the clone method simply makes a copy of itself. To accomplish this, new memory is allocated for the clone, then contents of the original object is copied into the clone object. For example, a copy of the Document class that contains a text and author property needs to be created. To create a new instance of the Document class that contains both properties and the values associated with the object, the clone method should be used. The following code demonstrates how this would be accomplished.
Document document1 = new Document ("docText.txt", "Joe Smith");Document document2 = document1.clone();
The equals method compares two objects of the same type for equality by comparing the properties of both objects. It simply returns a Boolean value depending on the results of the object that calls it and the object that is passed to it. For instance, if equals is called by an object that passes it an object that is completely identical, the equals method would return a true value.
The toString method returns a String representing the value of the object. For this method to return proper information about different types of objects, the object’s class must override it.
Type wrapper classes
Primitive data types are not used as objects in Java. These primitive data types include numbers, booleans, and characters. The reasoning behind not including these data types as objects, lies in performance.
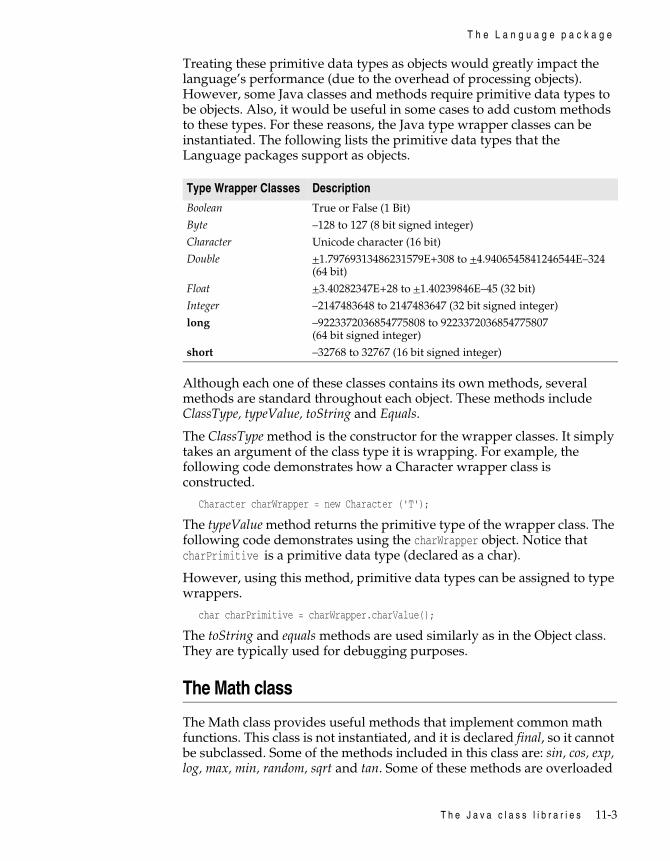
T h e J a v a c l a s s l i b r a r i e s 11-3
T h e L a n g u a g e p a c k a g e
Treating these primitive data types as objects would greatly impact the language’s performance (due to the overhead of processing objects). However, some Java classes and methods require primitive data types to be objects. Also, it would be useful in some cases to add custom methods to these types. For these reasons, the Java type wrapper classes can be instantiated. The following lists the primitive data types that the Language packages support as objects.
Although each one of these classes contains its own methods, several methods are standard throughout each object. These methods include ClassType, typeValue, toString and Equals.
The ClassType method is the constructor for the wrapper classes. It simply takes an argument of the class type it is wrapping. For example, the following code demonstrates how a Character wrapper class is constructed.
Character charWrapper = new Character ('T');
The typeValue method returns the primitive type of the wrapper class. The following code demonstrates using the charWrapper object. Notice that charPrimitive is a primitive data type (declared as a char).
However, using this method, primitive data types can be assigned to type wrappers.
char charPrimitive = charWrapper.charValue();
The toString and equals methods are used similarly as in the Object class. They are typically used for debugging purposes.
The Math class
The Math class provides useful methods that implement common math functions. This class is not instantiated, and it is declared final, so it cannot be subclassed. Some of the methods included in this class are: sin, cos, exp, log, max, min, random, sqrt and tan. Some of these methods are overloaded
Type Wrapper Classes Description
Boolean True or False (1 Bit)Byte –128 to 127 (8 bit signed integer)Character Unicode character (16 bit)Double +1.79769313486231579E+308 to +4.9406545841246544E–324
(64 bit)Float +3.40282347E+28 to +1.40239846E–45 (32 bit)Integer –2147483648 to 2147483647 (32 bit signed integer)long –9223372036854775808 to 9223372036854775807
(64 bit signed integer)short –32768 to 32767 (16 bit signed integer)
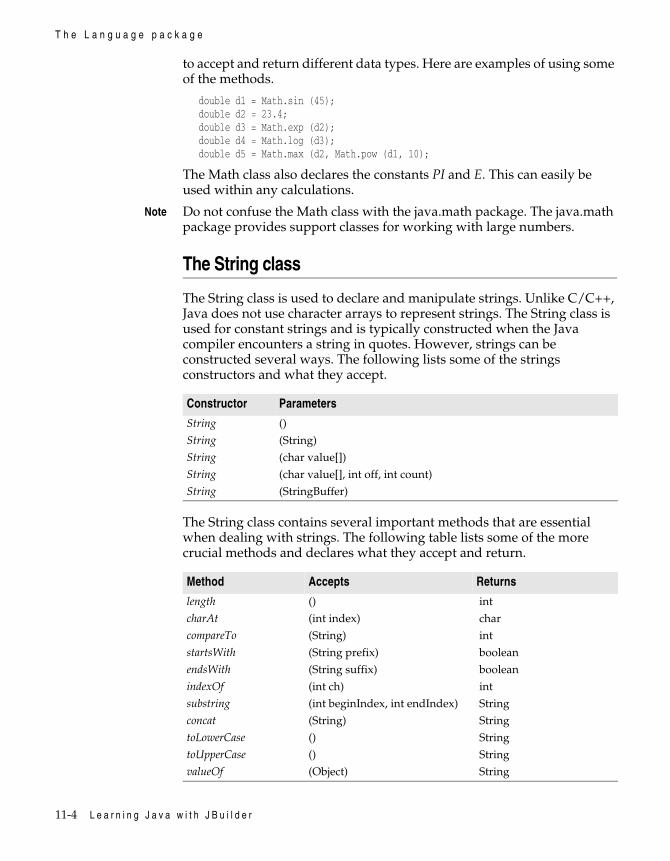
11-4 L e a r n i n g J a v a w i t h J B u i l d e r
T h e L a n g u a g e p a c k a g e
to accept and return different data types. Here are examples of using some of the methods.
double d1 = Math.sin (45);double d2 = 23.4;double d3 = Math.exp (d2);double d4 = Math.log (d3);double d5 = Math.max (d2, Math.pow (d1, 10);
The Math class also declares the constants PI and E. This can easily be used within any calculations.
Note Do not confuse the Math class with the java.math package. The java.math package provides support classes for working with large numbers.
The String class
The String class is used to declare and manipulate strings. Unlike C/C++, Java does not use character arrays to represent strings. The String class is used for constant strings and is typically constructed when the Java compiler encounters a string in quotes. However, strings can be constructed several ways. The following lists some of the strings constructors and what they accept.
The String class contains several important methods that are essential when dealing with strings. The following table lists some of the more crucial methods and declares what they accept and return.
Constructor Parameters
String ()String (String)String (char value[])String (char value[], int off, int count)String (StringBuffer)
Method Accepts Returns
length () intcharAt (int index) charcompareTo (String) intstartsWith (String prefix) booleanendsWith (String suffix) booleanindexOf (int ch) intsubstring (int beginIndex, int endIndex) Stringconcat (String) StringtoLowerCase () StringtoUpperCase () StringvalueOf (Object) String

T h e J a v a c l a s s l i b r a r i e s 11-5
T h e L a n g u a g e p a c k a g e
A very efficient and feature associated with many of these methods is that they are overloaded for different data types. The following demonstrates how the String class and some of its methods can be used.
String s1 = new String ("Hello World.");
char cArray[] = {'J', 'B', 'u', 'i', 'l', 'd', 'e', 'r'};String s2 = new String (cArray); //s2 = "JBuilder"
int i = s1.length(); //i = 12char c = s1.charAt(4); //c = 'o'i = s1.indexOf('l'); //i = 2 (the first 'l')
String s3 = "abcdef".substring (2, 5) //s3 = "cde"String s4 = s3.concat ("f");//s4 = "cdef"String s5 = valueOf (i); //s5 = "2" (valueOf()is static)
The StringBuffer class
The StringBuffer class differs from the String class in that StringBuffer objects can be modified. Like the String class, the StringBuffer class has several constructors. The following table lists these constructors for the StringBuffer class.
There are several important methods that separate the StringBuffer class from the String class. These methods include: Length, Capacity, setLength, charAt, setCharAt, Append, Insert and toString.
One method that is used quite often when dealing with StringBuffers’ is the Append method. The Append method is used to add text to the StringBuffer. Fortunately, the Append method is heavily overloaded.
Another important method that is commonly used with the StringBuffer is the Capacity method. This method returns the amount of memory allocated for the StringBuffer. This value can be greater than the value returned by the Length method. This is due to the fact that memory allocated for a StringBuffer can be controlled with the StringBuffer (int length) constructor. The following code demonstrates some of the methods associated with the StringBuffer class.
StringBuffer s1 = new StringBuffer(10);
int c = s1.capacity(); //c = 10int l = s1.length(); //l = 0
s1.append("Bor"); //s1 = "Bor"s1.append("land"); //s1 = "land"
Constructor Accepts
StringBuffer ()StringBuffer (int length)StringBuffer (String)
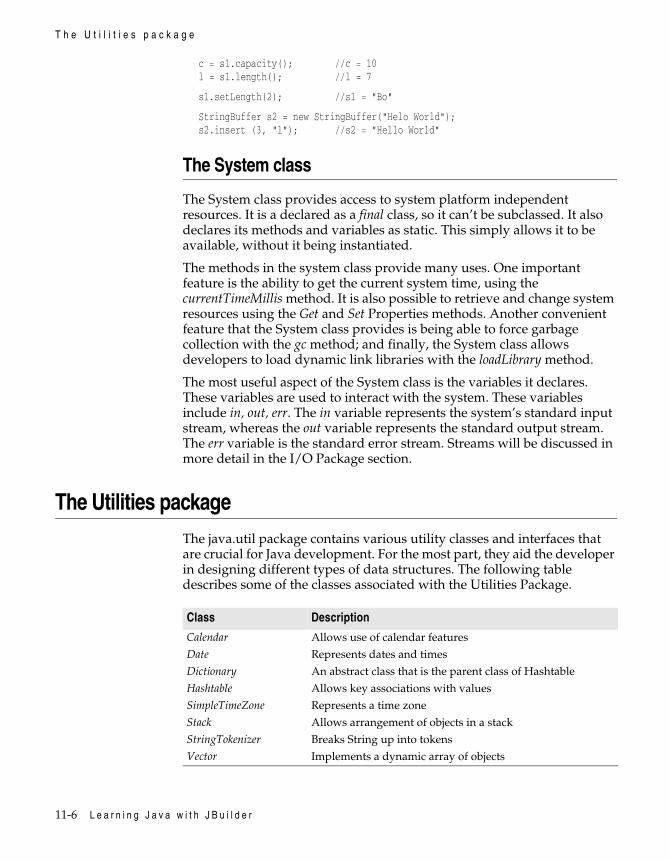
11-6 L e a r n i n g J a v a w i t h J B u i l d e r
T h e U t i l i t i e s p a c k a g e
c = s1.capacity(); //c = 10l = s1.length(); //l = 7
s1.setLength(2); //s1 = "Bo"
StringBuffer s2 = new StringBuffer("Helo World");s2.insert (3, "l"); //s2 = "Hello World"
The System class
The System class provides access to system platform independent resources. It is a declared as a final class, so it can’t be subclassed. It also declares its methods and variables as static. This simply allows it to be available, without it being instantiated.
The methods in the system class provide many uses. One important feature is the ability to get the current system time, using the currentTimeMillis method. It is also possible to retrieve and change system resources using the Get and Set Properties methods. Another convenient feature that the System class provides is being able to force garbage collection with the gc method; and finally, the System class allows developers to load dynamic link libraries with the loadLibrary method.
The most useful aspect of the System class is the variables it declares. These variables are used to interact with the system. These variables include in, out, err. The in variable represents the system’s standard input stream, whereas the out variable represents the standard output stream. The err variable is the standard error stream. Streams will be discussed in more detail in the I/O Package section.
The Utilities packageThe java.util package contains various utility classes and interfaces that are crucial for Java development. For the most part, they aid the developer in designing different types of data structures. The following table describes some of the classes associated with the Utilities Package.
Class Description
Calendar Allows use of calendar featuresDate Represents dates and timesDictionary An abstract class that is the parent class of HashtableHashtable Allows key associations with valuesSimpleTimeZone Represents a time zoneStack Allows arrangement of objects in a stackStringTokenizer Breaks String up into tokensVector Implements a dynamic array of objects
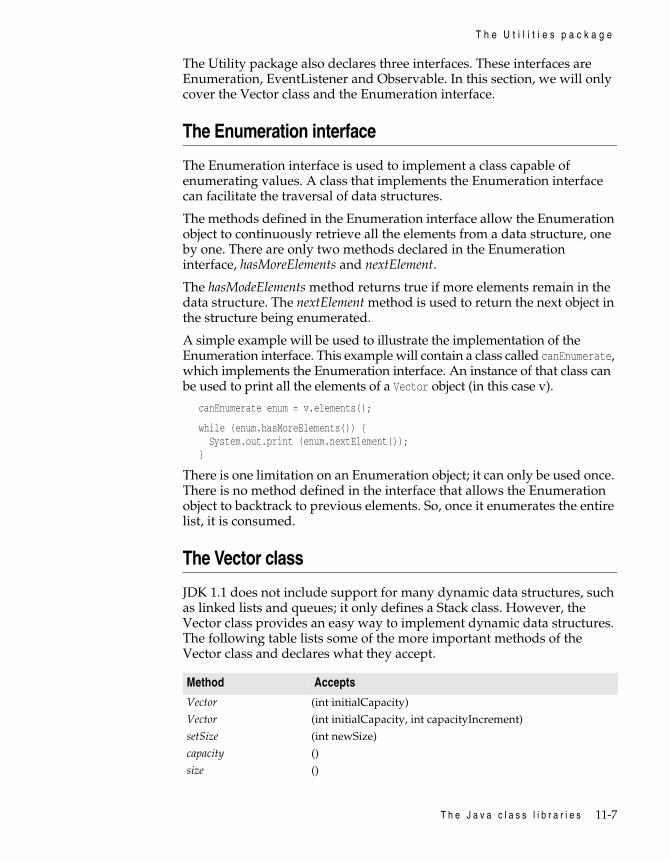
T h e J a v a c l a s s l i b r a r i e s 11-7
T h e U t i l i t i e s p a c k a g e
The Utility package also declares three interfaces. These interfaces are Enumeration, EventListener and Observable. In this section, we will only cover the Vector class and the Enumeration interface.
The Enumeration interface
The Enumeration interface is used to implement a class capable of enumerating values. A class that implements the Enumeration interface can facilitate the traversal of data structures.
The methods defined in the Enumeration interface allow the Enumeration object to continuously retrieve all the elements from a data structure, one by one. There are only two methods declared in the Enumeration interface, hasMoreElements and nextElement.
The hasModeElements method returns true if more elements remain in the data structure. The nextElement method is used to return the next object in the structure being enumerated.
A simple example will be used to illustrate the implementation of the Enumeration interface. This example will contain a class called canEnumerate, which implements the Enumeration interface. An instance of that class can be used to print all the elements of a Vector object (in this case v).
canEnumerate enum = v.elements();
while (enum.hasMoreElements()) { System.out.print (enum.nextElement());}
There is one limitation on an Enumeration object; it can only be used once. There is no method defined in the interface that allows the Enumeration object to backtrack to previous elements. So, once it enumerates the entire list, it is consumed.
The Vector class
JDK 1.1 does not include support for many dynamic data structures, such as linked lists and queues; it only defines a Stack class. However, the Vector class provides an easy way to implement dynamic data structures. The following table lists some of the more important methods of the Vector class and declares what they accept.
Method Accepts
Vector (int initialCapacity)Vector (int initialCapacity, int capacityIncrement)setSize (int newSize)capacity ()size ()

11-8 L e a r n i n g J a v a w i t h J B u i l d e r
T h e U t i l i t i e s p a c k a g e
The Vector class is efficient because it allocates more memory than needed when adding new elements. A Vector’s capacity, therefore, is usually greater than its actual size. The capacityIncrement parameter in the second constructor indicates a Vector’s capacity increase whenever an element is added to it.
The following code demonstrates the use of the Vector class. In the code, a Vector object is created called vector1, and enumerates its elements in three ways: using Enumeration’s nextElement method, using Vector’s elementAt method, and using Vector’s toString method. To display the output, an AWT component is created called textArea, and the text property is set using the setText method. Here is the code added to the end of the VectorTest1 constructor.
Vector vector1 = new Vector (10, 2); //initial size is 10, //capacityIncrement is 2for (int i=0; i<10;i++) vector1.addElement(new Integer(i)); //addElement doesn't //accept //int types //enumerate vector1Enumeration e = vector1.elements();
frame.textArea1.setText ("The elements using Enumeration's nextElement():\n");
while (e.hasMoreElements()) frame.textArea1.setText (frame.textArea1.getText()+ e.nextElement()+ " | ");
frame.textArea1.setText (frame.textArea1.getText()+ "\n\n");
//enumerate using the elementAt() methodframe.textArea1.setText (frame.textArea1.getText()+ "The elements using Vector's elementAt():\n");
for (int i=0; i< vector1.size();i++) frame.textArea1.setText (frame.textArea1.getText()+ vector1.elementAt(i) + " | ");
frame.textArea1.setText (frame.textArea1.getText()+ "\n\n");
//enumerate using the toString() methodframe.textArea1.setText (frame.textArea1.getText()+ "Here's the vector as a String:\n");
frame.textArea1.setText (frame.textArea1.getText()+ vector1.toString());
elements ()elementAt (int)firstElement ()lastElement ()removeElementAt (int index)addElement (Object)toString ()
Method Accepts

T h e J a v a c l a s s l i b r a r i e s 11-9
T h e I / O p a c k a g e
The following figure demonstrates what this code would accomplish if it was used within an application.
Figure 11.1 Vector and Enumeration example
The I/O packageThe java.io package provides support for reading and writing data to and from different devices. The classes in this package can be divided into the following packages: Input stream classes, Output stream classes, File classes, and the StreamTokenizer class.
Input stream classes
An input stream is used to read data from an input source (e.g., a file, a string, memory, etc.). There are several classes encapsulated in this definition. These input stream classes include: InputStream, BufferedInputStream, DataInputStream, FileInputStream, and StringBufferInputStream.
The basic method of reading data using an Input stream class is always the same: (1) create an instance of an input stream class, then (2) tell it where to read the data. Input stream classes read data as a continuous stream of bytes. If no data is currently available, the Input stream class blocks (waits until some data becomes available).
In addition to the Input stream classes, the I/O package provides reader classes that correspond to all the Input stream classes (except for DataInputStream). These reader classes are as follows: Reader, BufferedReader, FileReader and StringReader. Reader classes are identical to Input stream classes, except that they read Unicode characters instead of bytes.
The InputStream class is an abstract class from which all other Input stream classes are derived. It provides the basic interface for reading a

11-10 L e a r n i n g J a v a w i t h J B u i l d e r
T h e I / O p a c k a g e
stream of bytes. The following table lists some of the InputStream methods and what they except. Each of these methods returns an int value, except for the close method.
The first method, abstract int read, reads a byte from the input stream and returns it as an integer (you can cast the return type to char). It returns –1 when it reaches the end of the stream. The second method, int read(byte b[]), reads multiple bytes and stores them in its array parameter. It returns the number of bytes read, or –1 when the end of the stream is reached. The last read method, int read(byte b[], int off, int len), allows the developer to set the maximum number of bytes to read and directs where in the array to store them.
The int available method, returns the number of input bytes that can be read without blocking. The skip method skips a specified number of bytes from the stream. Finally, the close method is used to close the input stream. This method is normally called automatically, but it is safer to call it, manually.
The FileInputStream class is very similar to the InputStream class, only it is designed for reading from files. It contains two constructors. These constructors are FileInputStream(String name) and FileInputStream(File file). The first constructor takes the file’s name as a parameter. The second simply takes a file object. The file class will be discussed later. The following example demonstrates the use of the FileInputStream class.
import java.io.*;
class fileReader {
public static void main (string args[]) {
byte buff[] = new byte [80]; try {
InputStream fileIn = new FileInputStream("Readme.txt"); int i = fileIn.read(buff);
} catch(FileNotFoundException e) { } catch(IOException e) { }
Method Accepts
read ()read (byte b[])read (byte b[], int off, int len)available ()skip (long)close ()

T h e J a v a c l a s s l i b r a r i e s 11-11
T h e I / O p a c k a g e
String s = new String(buff); System.out.println(s); }}
In this example, a character array was created that will store the input data. Then a FileInputStream object was instantiated and passed the input file’s name to its constructor. Next, the FileInputStreams’ read() method was used to read a stream of characters and store them in the buff array. The first 80 bytes are read from the Readme.txt file and stored in the buff array. The FilerReader class could be used in place of the FileInputStream method. The only changes needed would be a char array used in place of the byte array, and the reader object would be instantiated as follows.
Reader fileIn = new FileReader("Readme.txt");
Finally, in order to see the result of the read call, a string object is created using the buff array, and then it is passed to the System.out.println method.
As mentioned earlier, the class System is defined in java.lang and provides access to system resources. System.out is a static member of System and represents the standard output device. The println method was called to send the output to the standard output device. The System.out object is of type PrintStream, which will be discussed in the Output Stream Classes section.
Another static member of the System class is the System.in object, which is of type InputStream. Naturally, this object represents the standard input device.
Output Stream classes
The Output stream classes are the counterparts to the Input stream classes. They are used to output streams of data to the various output sources. The main output stream classes in Java are: OutputStream, PrintStream, BufferedOutputStream, DataOutputStream and FileOutputStream.
To output a stream of data, an output stream object is created and is directed to output the data to a particular output source. As expected, there are also writer classes. There is a corresponding writer class for all, except the DataOutputStream class. Since the OutputStream class is the counterpart to the InputStream class, it defines the following methods.
Method Accepts
write (int)write (byte b[])write (byte b[], int off, int len)flush ()close ()

11-12 L e a r n i n g J a v a w i t h J B u i l d e r
T h e I / O p a c k a g e
The flush method is used to flush the output stream (i.e. it forces the output of any buffered data). The PrintStream class is primarily designed to output data as text. It has two constructors. These constructors are PrintStream(OutputStream) and PrintStream(OutputStram, boolean autoflush).
There is one difference between the two constructors. The first causes the PrintStream object to flush the buffered data based on specified conditions, while the second flushes the data when it encounters a new line character (if autoflush is set to true).
Here are some of the methods PrintStream defines.
The print and println methods are overloaded for different data types. The checkerror method flushes the stream and returns a false value if an error was encountered.
File classes
The FileInputStream and FileOutputStream classes only provide basic functions for handling file input and output. The java.io package provides the File class and RandomAccessFile class for more advanced file support. The File class provides easy access to file attributes and functions. The RandomAccessFile class provides various methods for reading and writing to and from a file. The File class has three constructors: File(String path), File(String path, String name) and File(File dir, String name). The File class also implements many important methods. The following table lists these methods and declares what they return.
Method Accepts
checkError ()print (Object obj)print (String s)println ()println (Object obj)
Method Returns
delete booleancanRead booleancanWrite booleanexists booleanisDirectory booleanrenameTo booleanlong lastModified longlong length long
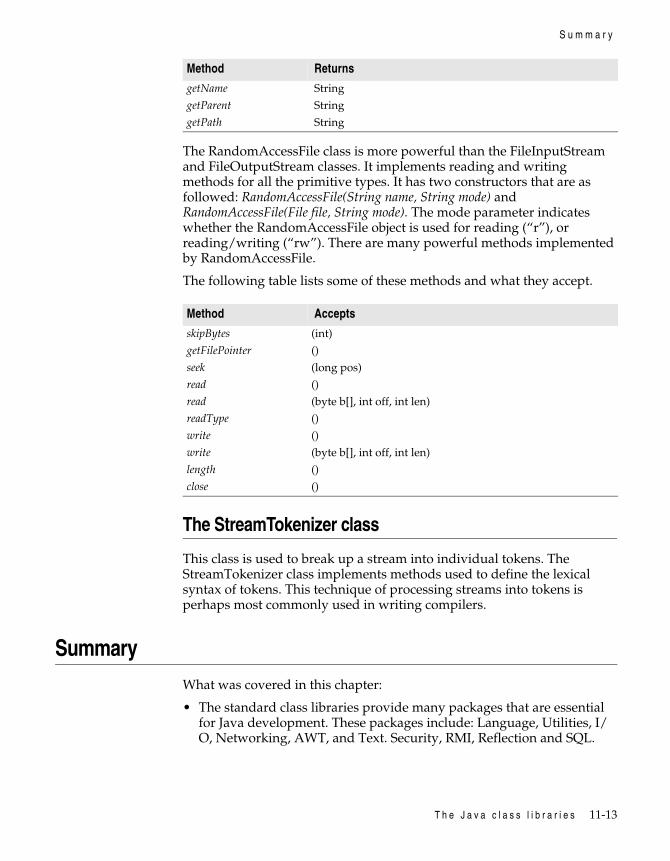
T h e J a v a c l a s s l i b r a r i e s 11-13
S u m m a r y
The RandomAccessFile class is more powerful than the FileInputStream and FileOutputStream classes. It implements reading and writing methods for all the primitive types. It has two constructors that are as followed: RandomAccessFile(String name, String mode) and RandomAccessFile(File file, String mode). The mode parameter indicates whether the RandomAccessFile object is used for reading (“r”), or reading/writing (“rw”). There are many powerful methods implemented by RandomAccessFile.
The following table lists some of these methods and what they accept.
The StreamTokenizer class
This class is used to break up a stream into individual tokens. The StreamTokenizer class implements methods used to define the lexical syntax of tokens. This technique of processing streams into tokens is perhaps most commonly used in writing compilers.
SummaryWhat was covered in this chapter:
• The standard class libraries provide many packages that are essential for Java development. These packages include: Language, Utilities, I/O, Networking, AWT, and Text. Security, RMI, Reflection and SQL.
getName StringgetParent StringgetPath String
Method Accepts
skipBytes (int)getFilePointer ()seek (long pos)read ()read (byte b[], int off, int len)readType ()write ()write (byte b[], int off, int len)length ()close ()
Method Returns

11-14 L e a r n i n g J a v a w i t h J B u i l d e r
S u m m a r y
• Primitive data types are essential for performance related issues. Without these primitive data types, complex calculations could severely reduce the performance of the application.
• Type wrapper classes enable developers to treat primitive data types as if they were objects.
• The Java Beans Component Library (JBCL) package provides developers with several UI components. Some of these components include: ButtonBar, ButtonControl, CheckBoxControl, CheckBoxPanel, ListControl, ChoiceControl, GridControl and StatusBar.
• MultiCaster classes provide Java Beans an efficient means of managing events. It uses an array, instead of a vector to keep a list of Event Listener objects.

T h r e a d i n g t e c h n i q u e s 12-1
C h a p t e r
12Chapter12Threading techniques
This chapter will answer the following questions:
• What is a thread?• Why are threads useful?• How are threads created and used?• What are the different states of a thread?• What is the purpose of the synchronized keyword?
OverviewWhether you are aware of it or not, threads are a part of every Java program; when you run a Java application, the Java VM runs its main() method inside its own thread—applets are also run in their own threads. This fact proves how integral the concept of threads is to Java. To become a powerful Java programmer, you need to know how threads work and how they can be used in the development of Java programs.
Why are threads useful?
First of all, a thread is a single sequence of execution that can run independently within an application. A multi-threaded application is one, which supports the concurrent execution of multiple threads. To understand why threads are useful, we’ll consider an example of how using threads in an application can be very productive, while not using them can be counter-productive. Consider the case where you want to use a web browser to download a file from one site and access another site at the same time. If your browser does not allow you to do these two things, simultaneously, you are forced to wait for the file to finish downloading before you can do anything else—and if that file is relatively large, you

12-2 L e a r n i n g J a v a w i t h J B u i l d e r
C r e a t i n g a t h r e a d
can imagine how annoying that can be. It certainly would be much more productive to take advantage of the time the browser is spending downloading the file to do other things. Luckily, most web browsers are multi-threaded.
Why haven’t I heard of threads before?
The concept of threads has actually been around for a long time. Threads were not as popular as they are now because, prior to Java, no API managed to standardize the use of threads across different platforms. Java came along with a threading API that is supported by all JVMs running on all platforms.
Creating a threadIt’s now time to show you how a thread is created in Java. The java.lang package defines a Thread class, which is used to create threads. So to create a thread in your application you could have a declaration similar to the following:
Thread myFirstThread = new Thread();
This declaration creates an instance of Thread called myFirstThread; however, it is not a particularly useful declaration. The reason is that there is no way you can tell myFirstThread to do what you want it to do. Thread defines methods that define the general behavior of all threads; it has no methods or properties that can perform the particular tasks you might have intended for it. Does this mean that the Thread class is useless? No, it simply means that we have not yet seen how to make good use of it. Be patient and read on.
There are two ways used to create threads: the first involves subclassing the Thread class, and the second involves implementing the Runnable interface. We will look at both ways next.
Subclassing the Thread class
It was stated in the previous section that an object of type Thread cannot be directly programmed by the user to perform a particular task. If that’s the case, how can any thread be programmed? The answer lies in one of the methods that the Thread class defines:
public void run() {}
This method is where the thread’s main execution logic lies; the run() method is to a thread what the main() method is to an application. Just as,

T h r e a d i n g t e c h n i q u e s 12-3
C r e a t i n g a t h r e a d
main() is the starting point of execution for an application, run() is the first thing that executes when a thread is started.
The default run() method basically does nothing; directly instantiating the Thread class, therefore, results in a thread that has a useless run() method. The obvious solution to this is to subclass Thread and override its run() method.
Here’s an example of how this is done:
public class myUsefulThread extends Thread { //constructors public void run() { //do something useful }}
Now, when you instantiate myUsefulThread, its object will get its functionality from the overridden run() method.
Lastly, you need to know how to start your thread. To start a thread, simply call its start() method, as in the following:
myUsefulThread t = new myUsefulThread();t.start();
Example: Implementing countingThreadcountingThread is a simple thread class that counts from one number to another. While this is a simplified example, it nevertheless illustrates how separate threads are created and how they can co-exist in the same environment. countingThread is shown next:
public class countingThread extends Thread { private int start; private int finish;
public countingThread(int from, int to) { this.start = from; this.finish = to; }
public void run() { System.out.println(this.getName()+ " started executing..."); for (int i = start; i <= finish; i++) { System.out.print (i + " "); } //for System.out.println(this.getName() + " finished executing."); } //run}
countingThread’s constructor takes two int parameters and uses them to initialize its properties start and finish. The run() method first identifies the current thread object by printing its name to the screen. It then uses a for loop to count from start to finish, and print each number to the screen.

12-4 L e a r n i n g J a v a w i t h J B u i l d e r
C r e a t i n g a t h r e a d
Before it is done, it prints a string stating that the current thread has finished executing.
We can use countingThread in an application as follows:
public class threadTester { static public void main(String[] args) { countingThread thread1 = new countingThread (1, 10); countingThread thread2 = new countingThread (20, 30); thread1.start(); thread2.start(); }}
The above main() method creates two countingThread objects: thread1 will count from 1 to 10, and thread2 will count from 20 to 30. It then starts both threads by calling their start() methods. When this main() method is run in an application, the output could be similar to the following:
Thread-1 started executing…Thread-2 started executing…20 21 22 23 24 25 26 27 28 29 30 Thread-2 finished executing.1 2 3 4 5 6 7 8 9 10 Thread-1 finished executing.
First, notice that the output does not show the threads’ names as thread1 and thread2, as you might have expected. Unless you specifically assign a name to a thread, Java will automatically give it a name of the form Thread-n, where n is a unique number. In this case, the first thread to start was given the name Thread-1, and the second the name Thread-2. If you prefer your own, more descriptive names, use Thread’s setName(String) method.
Next, notice that while Thread-1 started executing first, it finished last. What’s going on here? The answer is that threads in Java are not guaranteed to execute in any particular sequence. In fact, each time you execute threadTester, you may get a different output. Here’s another output generated by threadTester:
Thread-1 started executing…1 2 3 4 5 6 7 8 Thread-2 started executing…20 21 22 23 9 10 Thread-1 finished executing.24 25 26 27 28 29 30 Thread-2 finished executing.
Notice how in this output, Thread-2 started executing before Thread-1 was even finished. Basically, the process of scheduling threads is controlled by the Java thread scheduler, and not the programmer.
Implementing the Runnable interface
As we saw in the previous section, subclassing the Thread class is one way of creating thread objects. That’s fine if you are designing a new class whose objects you want to execute in separate threads. But what if you wanted objects of a preexisting class to execute in their own threads? You would just implement the Runnable interface.

T h r e a d i n g t e c h n i q u e s 12-5
T h e T h r e a d A P I
The Runnable interface is used to add threading support to classes that do not inherit from the Thread class. It declares only one method:
public void run() {}
So, in order to have objects of a preexisting class execute in their own threads, you have to do the following:
1 Make the class implement the Runnable interface2 Implement the run() method for that class
To make countingThread2, use the Runnable interface instead of subclassing the Thread class, we only need to change its declaration to the following:
public class countingThread2 implements Runnable { //the rest is not changed}
While the implementation of the countingThread2 class did not have to change to make it implement Runnable, the way its objects are created does have to change. Instead of instantiating countingThread, as we did previously, we now must create a Runnable object from countingThread2 and pass it to one of Thread’s constructors. Here’s how the thread1 object is now created:
Runnable rThread = new countingThread2(1, 10);Thread thread1 = new Thread(rThread);
Let’s think about why we had to do this. countingThread was subclassed from the Thread class, so it inherited all the behavior of a Java thread. That means that you can perform all the functionality that Thread supports on an object of countingThread, such as calling start(). countingThread2, however, did not inherit anything from Thread, so it did not support any of Thread’s behavior. countingThread2 only defined the run() method, which would be called when a countingThread2 object is run in a thread.
The Thread API
Constructors
The Thread class defines the following constructors:
public Thread()public Thread(Runnable target)public Thread(Runnable target, String name)public Thread(String name)public Thread(ThreadGroup group, Runnable target)public Thread(ThreadGroup group, String name)public Thread(ThreadGroup group, Runnable target, String name)
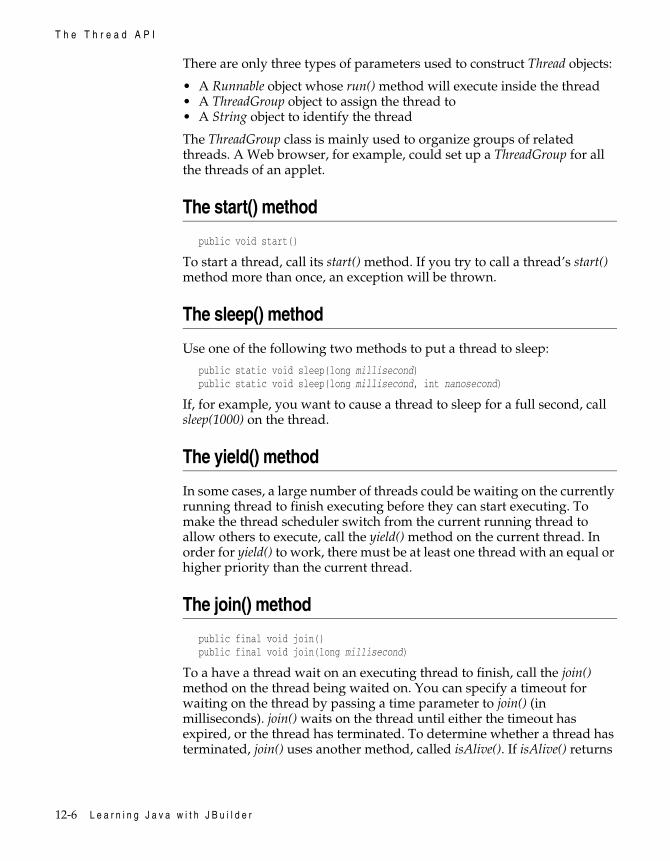
12-6 L e a r n i n g J a v a w i t h J B u i l d e r
T h e T h r e a d A P I
There are only three types of parameters used to construct Thread objects:
• A Runnable object whose run() method will execute inside the thread• A ThreadGroup object to assign the thread to • A String object to identify the thread
The ThreadGroup class is mainly used to organize groups of related threads. A Web browser, for example, could set up a ThreadGroup for all the threads of an applet.
The start() method
public void start()
To start a thread, call its start() method. If you try to call a thread’s start() method more than once, an exception will be thrown.
The sleep() method
Use one of the following two methods to put a thread to sleep:
public static void sleep(long millisecond)public static void sleep(long millisecond, int nanosecond)
If, for example, you want to cause a thread to sleep for a full second, call sleep(1000) on the thread.
The yield() method
In some cases, a large number of threads could be waiting on the currently running thread to finish executing before they can start executing. To make the thread scheduler switch from the current running thread to allow others to execute, call the yield() method on the current thread. In order for yield() to work, there must be at least one thread with an equal or higher priority than the current thread.
The join() method
public final void join()public final void join(long millisecond)
To a have a thread wait on an executing thread to finish, call the join() method on the thread being waited on. You can specify a timeout for waiting on the thread by passing a time parameter to join() (in milliseconds). join() waits on the thread until either the timeout has expired, or the thread has terminated. To determine whether a thread has terminated, join() uses another method, called isAlive(). If isAlive() returns

T h r e a d i n g t e c h n i q u e s 12-7
A t h r e a d ’ s l i f e c y c l e
true, join() does not return and keeps waiting on the thread. If isAlive() returns false, join() returns and the waiting thread can start executing.
A thread’s lifecycleA thread goes through several states from the point it starts to the point it ends. When you first create a thread object, it is in the NEW state. When you call the thread’s start() method, it becomes Runnable. Remember that a thread does not necessarily start executing immediately after its start() method is called–as we saw in the threadTester application. When in its Runnable state, the thread can become Not Runnable or Dead. Calling sleep(), suspend(), or wait() makes a thread Not Runnable, while calling destroy() or stop() makes it Dead (a thread also becomes Dead when its run() method ends). A thread can be made Runnable again by calling its resume() method, or when sleep() runs out; but a Dead thread can never be revived. There are other conditions that affect a thread’s lifecycle; for example, a Runnable thread becomes Not Runnable if it has to wait for a particular operation to end before it can execute.
Making your code thread-safeIn this section, we will examine why it is important to protect certain code against being executed by multiple threads at the same time, and how you can protect it. At the end of the section, we will discuss Java monitors and their role in multi-threaded programs.
The synchronized keyword
In some cases, it is necessary to have a method or block of code executed by only one thread at a time. The synchronized keyword is used to achieve that. Before we discuss how synchronized is used, we need to discuss when it needs to be used.
To better understand why using the synchronized keyword is necessary in some cases, consider the following code:
public class Swapper { int from; int to; public void swap() { int temp = from; from = to; to = temp; }}

12-8 L e a r n i n g J a v a w i t h J B u i l d e r
M a k i n g y o u r c o d e t h r e a d - s a f e
This class declares a swap() method which swaps the values of its two properties, from and to. The method takes the from property, stores it in a temp variable, then it stores the value of to in from and the value of temp in to. Consider the case in which two different methods start their own threads to execute swap() at the same time –we’ll call these threads thread1 and thread2. Now assume that thread1 executed the method first, and at the time it began the execution, the values of from and to where 5 and 6, respectively. thread1 executes the first line of code and assigns 5 to temp. At the end of the second line, from is assigned the value 6. At this point, thread2 starts executing the method. To thread2, the value of from is 6 (as assigned by thread1) and to is also 6. thread2 executes the entire method, swapping the values 6 and 6. Once thread2 is done, thread1 resumes its execution at the third line and assigns the value of temp (now 6) to to. When thread1 is done, both from and to have the value 6, and the intended swapping operation (from 5 to 6) never took place!
To prevent the above scenario from ever taking place, we simply add the synchronized keyword to the signature of swap(), as follows:
public synchronized void swap()
Now, only one thread can execute swap() at a time. In this case, thread1 executes the entire method, properly swapping the values of from and to. Once thread1 is finished its execution, thread2 executes swap(), and swaps the values back again.
Note As a rule of thumb, any method that modifies an object’s properties should be declared synchronized.
Monitors
An environment that supports multiple threads must implement some type of concurrency-control technique. There are several such techniques, including semaphores, critical sections, and database record locking. Java implements a concurrency-control mechanism known as a monitor.
Traditionally, a monitor is an object, which monitors something, such as a procedure. The monitor’s job is to make sure that only one thread at a time can execute the procedure it is monitoring. In Java, every object has a monitor object associated with it. The monitor makes sure that only one thread at a time is executing any synchronized methods belonging to the object it is monitoring. The monitor blocks any other threads from executing the same synchronized method, until the currently executing thread is done. If no threads are executing the target synchronized method, a thread can enter the monitor (or lock the monitor for itself). At that point, no other thread can execute the method until the current thread leaves the monitor.
Note Java monitors are not true objects, in the sense that they do not have methods and properties. They are built into Java’s implementation of

T h r e a d i n g t e c h n i q u e s 12-9
S u m m a r y
multithreading and are not visible to the programmer. For that reason, our discussion of monitors has been purely conceptual.
SummaryWhat was covered in this chapter:
• A thread represents a single sequence of execution that runs separately in a program.
• Threads are mainly useful in cases where a program has to perform multiple functions at the same time, without making one function takeover entirely.
• A thread can be created in one of two ways: by subclassing the Thread class, or by having a class implement the Runnable interface.
• During its lifetime, a thread goes through the following states: NEW, RUNNABLE, NOT RUNNABLE, and DEAD.
• To safeguard a method against having multiple threads execute it at the same time, add to its signature the synchronized prefix.

12-10 L e a r n i n g J a v a w i t h J B u i l d e r

S e r i a l i z a t i o n 13-1
C h a p t e r
13Chapter13Serialization
This chapter will answer the following question:
• How can I save an object to a file and read it back again?
OverviewObject serialization is the process of storing a complete object to disk or other storage system, ready to be restored at any time. The process of restoring the object, in contrast, is known as deserialization. In this section, you’ll learn why serialization is useful and how Java implements serialization and deserialization.
An object that has been serialized is said to be persistent. Most objects in memory, in contrast, are transient, meaning that they go away when their references drop out of scope or the computer loses power. Persistent objects, on the other hand, exist as long as there is a copy of them stored somewhere on a disk, tape, or in ROM.
Why serialize?Traditionally, saving data to a disk or other storage device required that you define a special data format, write a set of functions to write and read that format, and create a mapping between the file format and the format of your data. The functions to read and write data were either simple and lacked extensibility or were complex and difficult to create and maintain.
As you should be aware by now, Java is completely based around objects and object-oriented programming. To this end, Java provides a storage mechanism for objects in the form of serialization. With the Java way of doing things, you no longer have to worry about details of file formats and I/O. Instead, you are free to concentrate on solving your real-world
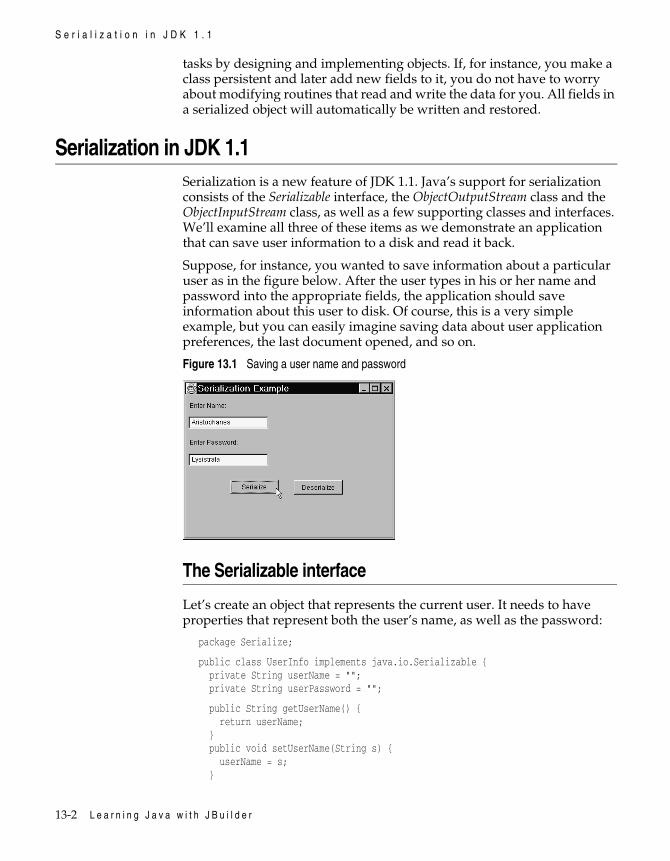
13-2 L e a r n i n g J a v a w i t h J B u i l d e r
S e r i a l i z a t i o n i n J D K 1 . 1
tasks by designing and implementing objects. If, for instance, you make a class persistent and later add new fields to it, you do not have to worry about modifying routines that read and write the data for you. All fields in a serialized object will automatically be written and restored.
Serialization in JDK 1.1 Serialization is a new feature of JDK 1.1. Java’s support for serialization consists of the Serializable interface, the ObjectOutputStream class and the ObjectInputStream class, as well as a few supporting classes and interfaces. We’ll examine all three of these items as we demonstrate an application that can save user information to a disk and read it back.
Suppose, for instance, you wanted to save information about a particular user as in the figure below. After the user types in his or her name and password into the appropriate fields, the application should save information about this user to disk. Of course, this is a very simple example, but you can easily imagine saving data about user application preferences, the last document opened, and so on.
Figure 13.1 Saving a user name and password
The Serializable interface
Let’s create an object that represents the current user. It needs to have properties that represent both the user’s name, as well as the password:
package Serialize;
public class UserInfo implements java.io.Serializable { private String userName = ""; private String userPassword = "";
public String getUserName() { return userName; } public void setUserName(String s) { userName = s; }

S e r i a l i z a t i o n 13-3
U s i n g o u t p u t s t r e a m s
public String getUserPassword() { return userPassword; } public void setUserPassword(String s) { userPassword = s; }}
You’ll note that the above class implements the java.io.Serializable interface. Serializable is known as a “tagging interface” because it specifies no methods to be implemented, but merely “tags” its objects as being of a particular type.
Any object that you expect to serialize should implement this interface. This is critical because the techniques used later in this chapter won’t work otherwise. If, for instance, you try to serialize an object that does not implement this interface, a NotSerializableException will be raised.
Using output streamsBefore you serialize the UserInfo object, you should set it up with the values that the user entered into the text fields. This is done when the user clicks the Serialize button:
void button1_mouseClicked(MouseEvent e) { u.setUserName (textFieldName.getText()); u.setUserPassword (textFieldPassword.getText());
Next, you will need to open a FileOutputStream to the file that will contain the serialized data. In this example, the file will be called C:\userInfo.txt:
try { FileOutputStream file = new FileOutputStream ("c:\\userInfo.txt");
Then, you need to create an ObjectOutputStream that will serialize the object and send it to the FileOutputStream.
ObjectOutputStream out = new ObjectOutputStream(file);
Now, you’re ready to send the UserInfo object to the file. This is accomplished by calling the ObjectOutputStream’s writeObject() method. Calling the flush() method will flush the output buffer to ensure that the object is actually written to the file.
out.writeObject(u); out.flush();
Finally, you need to close the output stream to free up any resources, such as file descriptors, used by the stream.
out.close(); }
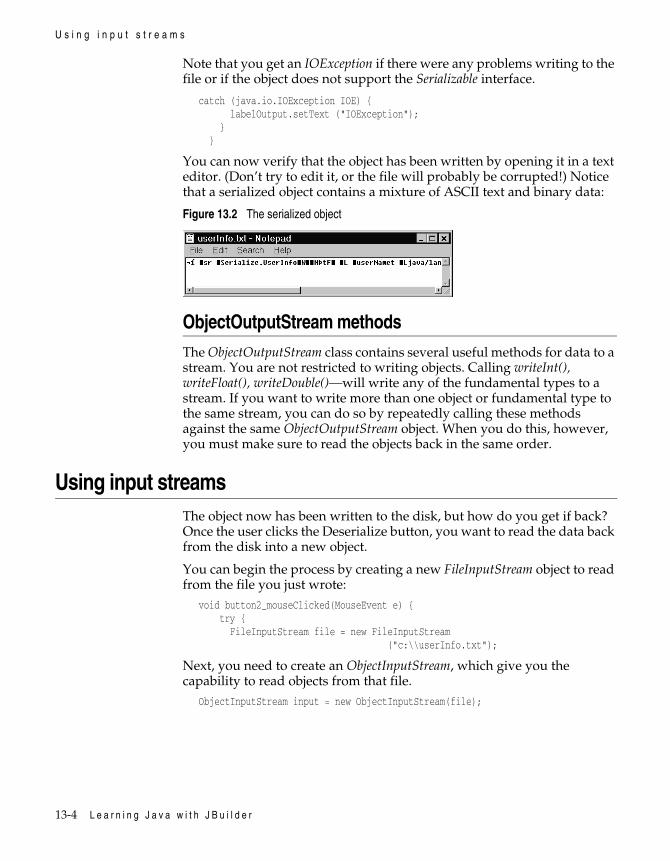
13-4 L e a r n i n g J a v a w i t h J B u i l d e r
U s i n g i n p u t s t r e a m s
Note that you get an IOException if there were any problems writing to the file or if the object does not support the Serializable interface.
catch (java.io.IOException IOE) { labelOutput.setText ("IOException"); } }
You can now verify that the object has been written by opening it in a text editor. (Don’t try to edit it, or the file will probably be corrupted!) Notice that a serialized object contains a mixture of ASCII text and binary data:
Figure 13.2 The serialized object
ObjectOutputStream methodsThe ObjectOutputStream class contains several useful methods for data to a stream. You are not restricted to writing objects. Calling writeInt(), writeFloat(), writeDouble()—will write any of the fundamental types to a stream. If you want to write more than one object or fundamental type to the same stream, you can do so by repeatedly calling these methods against the same ObjectOutputStream object. When you do this, however, you must make sure to read the objects back in the same order.
Using input streamsThe object now has been written to the disk, but how do you get if back? Once the user clicks the Deserialize button, you want to read the data back from the disk into a new object.
You can begin the process by creating a new FileInputStream object to read from the file you just wrote:
void button2_mouseClicked(MouseEvent e) { try { FileInputStream file = new FileInputStream ("c:\\userInfo.txt");
Next, you need to create an ObjectInputStream, which give you the capability to read objects from that file.
ObjectInputStream input = new ObjectInputStream(file);

S e r i a l i z a t i o n 13-5
U s i n g i n p u t s t r e a m s
After this, call the ObjectInputStream’s readObject() method to read the first object from the file. readObject() returns type Object, so you’ll want to cast it to the appropriate type (UserInfo).
UserInfo u = (UserInfo) input.readObject();
When you’re done reading, remember to close the ObjectInputStream, so you free up any resources associated with it, such as file descriptors.
input.close();
Finally, you can use the u object as you would any other object of the UserInfo class:
labelOutput.setText ("Name is: "+u.getUserName()+",password is: "+u.getUserPassword());
}
Reading from a file could cause an IOException, so you should handle this exception. You may also get a StreamCorruptedException (a subclass of IOException) if the file has been corrupted in any way:
catch (java.io.IOException IOE) { labelOutput.setText ("IOException"); }
There’s another exception you need to deal with. The readObject() method can throw a ClassNotFoundException. This exception can occur if you attempt to read an object for which you have no implementation. For instance, if this object was written by another program, or you have renamed the UserInfo class since the file was written, you’ll get a ClassNotFoundException.
catch (ClassNotFoundException cnfe) { labelOutput.setText ("ClassNotFoundException"); }
}
Figure 13.3 The object restored

13-6 L e a r n i n g J a v a w i t h J B u i l d e r
W r i t i n g a n d r e a d i n g o b j e c t s t r e a m s
ObjectInputStream methods
ObjectInputStream also has methods such as readDouble(), readFloat(), etc., which are the counterparts to the writeDouble(), writeFloat(), etc. methods. You need to call each method in sequence, the same way the objects were written to the stream.
Writing and reading object streamsYou may be wondering what happens when an object you are serializing contains a field that refers to another object, rather than a primitive type. In this case, both the base object and the secondary object will be written to the stream. You should realize, however, that both objects written to the stream need to implement the Serializable interface. If they don’t, a NotSerializableException will be thrown when the writeObject() method is called.
Recall that object serialization can create potential security problems. In the example above, we wrote a password to a serialized object. While it can be acceptable in many circumstances, keep this in mind when you choose to serialize an object.
Finally, if you want to create a persistent object, but do not want to use the default serialization mechanism, the Serializable interface documents two methods, writeObject() and readObject(), which you can implement to perform custom serialization. The Externalizable interface also provides a similar mechanism. Consult the JDK documentation for information about these techniques.
SummaryWhat was covered in this chapter:
• The Java serialization mechanism is used to store and restore an object to and from a file.

J a v a V i r t u a l M a c h i n e s e c u r i t y 14-1
C h a p t e r
14Chapter14Java Virtual Machine security
This chapter will answer the following questions:
• What is the Java Virtual Machine?• What are Java bytecodes?• What does Java really stand for?• Why is the Java Virtual Machine necessary?• What are the main roles of the Java Virtual Machine?• What are the elements that make up Java’s security model?• What is the role of the Java verifier?• What is the role of the security manager?• What is the role of the class loader?• How does Java’s language specification contribute to its security?• Do Just-In-Time compilers affect Java’s security?• Are there any weaknesses with Java’s security model?
OverviewBefore exploring the Java Virtual Machine, we will explain some of the terminology used in this chapter. First, the Java Virtual Machine (JVM) is the environment in which Java programs execute. It essentially defines an abstract computer, and specifies the instructions that this computer can execute. These instructions are called bytecodes. Generally speaking, Java bytecodes are to the JVM what an instruction set is to a CPU. A bytecode is a byte-long instruction that the Java compiler generates, and the Java interpreter executes. When the compiler compiles a .java file, it produces a series of bytecodes and stores them in a .class file. The Java interpreter can then execute the bytecodes stored in the .class file.
Other terminology used in this chapter involves Java applications and applets. It is sometimes appropriate to distinguish between a Java
14-2 L e a r n i n g J a v a w i t h J B u i l d e r
O v e r v i e w
application and a Java applet. In some sections of this chapter, however, that distinction is inappropriate. In such cases, we will use the word app to refer to both Java applications and Java applets.
Finally, it is important to clarify what the word Java really stands for. Java is more than just a computer language; it is a computer environment. This is because Java stands for two inseparable things: the design-time Java (the language itself) and the runtime Java (the JVM). This interpretation of the word Java is a more technical one. Interestingly enough, the practical interpretation of Java is that it stands for the runtime environment—not the language. When you say something like “this machine can run Java,” what you really mean is that the machine supports the Java runtime environment—more precisely, it implements a Java Virtual Machine.
Why is the Java VM necessary?
It might seem strange that a truly portable language should need a specific “machine” to run anywhere; in other words, how can Java run on any machine, and yet not be able to run without the JVM? The answer is quite simple: for a language to be truly portable, it must meet the following requirements:
• Its language specification must be precise and unchangeable.• Its runtime environment must also be precise.
As for the first requirement, Java’s language specification is well defined—as it stands, there is only one flavor of Java, and there exists a standard library for it (Sun’s JDK). As for the runtime environment requirement that is taken care of by the JVM: the JVM is the runtime environment. That means that having Java programs run under the JVM guarantees a common runtime environment. Even though there are different implementations of the JVM, they all must meet certain requirements to guarantee portability; in other words, whatever differs among the various implementations does not affect portability.
What are the main roles of the JVM?
The JVM is responsible for performing the following functions:
• Allocating memory for created objects• Performing garbage collection• Handling register and stack operations• Calling on the host system for certain functions, such as device access• Monitoring the security of Java apps
Throughout the remaining chapter, we will focus on the last function: Security.

J a v a V i r t u a l M a c h i n e s e c u r i t y 14-3
J a v a V M s e c u r i t y
Java VM securityOne of the JVM’s most important roles is monitoring the security of Java apps. The JVM uses a specific mechanism to force certain security restrictions on Java apps. This mechanism (or security model) has the following roles:
• Verify that any downloaded files are downloaded from a trusted source
• Assure that bytecodes do not perform illegal operations• Verify that every bytecode is generated correctly
In the following sections, we will see how these security roles are taken care of in Java.
The security model
In this section, we will look at some of the different elements in Java’s security model. In particular, we will examine the roles of the Java Verifier, the Security Manager, and the class loader. These are the components that make Java apps secure. In addition, we will see how the Java language specification is an important factor in making Java a secure environment.
The Java verifierEvery time a class is loaded, it must first go through a verification process. The main role of this verification process is to ensure that each bytecode in the class does not violate the specifications of the Java VM. Examples of bytecode violations are syntactic errors, and overflowed or underflowed arithmetic operations. The verification process is handled by the Java verifier, and it consists of the following four stages:
1 Verifying the structure of class files.2 Performing system-level verifications.3 Validation bytecodes.4 Performing runtime type and access checks.
The first stage of the verifier is concerned with verifying the structure of the class file. All class files share a common structure; for example, they must always begin with what is called the magic number, whose value is 0xCAFEBABE. Following the magic number, are four bytes representing the minor and major versions of the compiler. At this stage, the verifier also checks that the constant pool is not corrupted (the constant pool is where the class file’s strings and numbers are stored). In addition, the verifier makes sure that there are no added bytes at the end of the class file.

14-4 L e a r n i n g J a v a w i t h J B u i l d e r
J a v a V M s e c u r i t y
The second stage performs system-level verifications. This involves verifying the validity of all references to the constant pool, and ensuring that classes are subclassed properly.
The third stage involves validating the bytecodes. This is the most significant and complex stage in the entire verification process. Validating a bytecode means checking that its type is valid, and that its arguments have the appropriate number and type. The verifier also checks that method calls are passed the correct type and number of arguments, and that each external function returns the proper type.
Finally, the verifier ensures that all variables are initialized correctly.
The final stage is where runtime checks take place. At this stage, externally referenced classes are loaded, and their methods are checked. The method check involves checking that the method calls match the signature of the methods in the external classes. The verifier also monitors access attempts by the currently loaded class to make sure that the class does not violate access restrictions. Another access check is done on variables to ensure that private and protected variables are not accessed illegally. Also, some runtime optimizations are performed at this stage, such as replacing direct references for indirect ones.
From this exhaustive verification process, we can see how important the Java verifier is to the security model. It is also important to note that the verification process must be done at the verifier level, and not at the compiler’s, since any compiler can be programmed to generate Java bytecodes. Clearly then, relying on the compiler to perform the verification process is dangerous, since the compiler can be programmed to bypass it. This point illustrates why the JVM is necessary.
The Security ManagerOne of the classes defined in the java.lang package is the SecurityManager class. This class is used to define the security policy that specifies certain security restrictions on Java apps. The security policy’s main role is to determine access rights. Here’s an overview of how this works: every Java app loaded into the JVM exists in its own namespace. An app’s namespace defines its access boundary. This means that the app cannot access any resources beyond its namespace. Before an app can access a system resource, such as a local or networked file, the SecurityManager object verifies that the resource is inside the app’s namespace. If it is, the SecurityManager object grants the access right; otherwise, it prevents it.
The SecurityManager class contains many methods used to check whether a particular operation is permitted. The checkRead() and checkWrite() methods, for example, check whether the method caller has the right to perform a read or write operation, respectively, to a specified file. The default implementation of all of SecurityManager’s methods, assume that the operation is not permitted, and they prevent the operation from taking

J a v a V i r t u a l M a c h i n e s e c u r i t y 14-5
J a v a V M s e c u r i t y
place by throwing a SecurityException. Many of the methods in the JDK use the SecurityManager before performing dangerous operations.
In order to specify your own security policy, you need to subclass SecurityManager. Once you have your own SecurityManager class, you can use the static System.setSecurityManager() method to load it into the environment. Now, whenever a Java app needs to perform a dangerous operation, it can consult with the SecurityManager object that is loaded into the environment.
The way Java apps use the SecurityManager class is generally the same. An instance of SecurityManager is first created in the following way:
SecurityManager security = System.getSecurityManager();
The System.getSecurityManager() method returns an instance of the currently loaded SecurityManager. If no SecurityManager has been set using the System.setSecurityManager() method, System.getSecurityManager() returns null; otherwise, it returns an instance of the SecurityManager that was loaded into the environment. Now, let’s assume that the app wants to check whether it can read a file. It does so as follows:
if (security != null) { security.checkRead (fileName);}
The if statement first checks whether a SecurityManager object exists, then it makes the call to the checkRead() method. If checkRead() does not permit the operation, a SecurityException is thrown and the operation never takes place; otherwise, all goes well.
Note Keep in mind that although by default all of SecurityManager’s methods automatically throw a SecurityException, unless you use System.setSecurityManager() to specify a SecurityManager, attempting to instantiate SecurityManager will always return null that means that the SecurityException will never be thrown and all access operations will be permitted.
The class loaderThe class loader works alongside the security manager to monitor the security of Java apps. The main roles of the class loader are summarized below:
• Loads class files into the Virtual Machine
• Identifies the package to which a loaded class belongs
• Locates and loads any classes referenced by the currently loaded class
• Verifies attempts by the loaded class to access classes outside its package
14-6 L e a r n i n g J a v a w i t h J B u i l d e r
J a v a V M s e c u r i t y
• Keeps track of the sources loaded classes, and makes sure that classes are loaded from valid sources
• Provides certain information about loaded classes to the security manager
Each class is associated with a class loader object. Before a class can be loaded into a certain package, its class loader must check which package the class belongs to. The class loader achieves this by calling SecurityManager.checkPackageDefinition(). Once loaded, the class loader resolves the class, which means that it loads every other class that the class references. Resolving a class involves: verifying that the class has the right to access the classes it references, and ensuring that referenced classes are not loaded from invalid sources.
Java’s safety as a languageSo far, we’ve seen how the Java verifier, the SecurityManager, and the class loader work to ensure the security of Java apps. In addition to these, there are other mechanisms not described in this chapter, such as the encryption and signed classes, which add to the security of Java apps. All of these mechanisms end up overshadowing the security of the Java language itself.
There are a number of things that make Java’s language specification secure, including:
• Array references are always checked at runtime.
• There is no way of directly manipulating pointers.
• Memory leaks are prevented by having the JVM perform automatic memory management.
• Casts are not allowed to violate any casting rules.
What about Just-In-Time compilers?
It is appropriate to include a brief discussion of Just-In-Time (JIT) compilers in this chapter. JIT compilers translate Java bytecodes into native machine instructions to be directly executed by the CPU. This obviously boosts the performance of Java apps. But if native instructions are executed instead of bytecodes, what happens to the verification process mentioned earlier? Actually, the verification process does not change because the Java verifier still verifies the bytecodes before they are translated.
J a v a V i r t u a l M a c h i n e s e c u r i t y 14-7
S u m m a r y
SummaryWhat was covered in this chapter:
• The Java Virtual Machine (JVM) is the environment in which Java programs execute. This environment is essentially an abstract computer, which runs on a special set of instructions.
• Java bytecodes are the instructions that the compiler translates from a Java program, and the interpreter executes.
• The word Java stands for both the Java language and the Java runtime environment (or the JVM).
• The JVM serves to guarantee the portability of Java apps.
• The main roles of the JVM are to: allocate memory for created objects, perform garbage collection, handle register and stack operations, call on the host system for certain functions, and monitor the security of Java apps.
• The following elements make up Java’s security model: the Java verifier, the SecurityManager, the class loader, and the language specification.
• The verifier performs a four-step verification process that mainly serves to check the validity of bytecodes.
• The SecurityManager is mainly responsible for granting access rights to system resources.
• The class loader performs many functions, including loading class into the JVM, and providing information about loaded class to the SecurityManager.
• Java’s language specification is secure because it does not allow pointer manipulation, illegal casting operations, illegal array indexing, or memory leaks.
• JIT compilers do not affect the security of Java apps since the bytecodes they translate are always verified first.

14-8 L e a r n i n g J a v a w i t h J B u i l d e r
W o r k i n g w i t h t h e n a t i v e c o d e i n t e r f a c e 15-1
C h a p t e r
15Chapter15Working with the
native code interfaceThis chapter will answer the following questions:
• What is the Native Method Interface, and how does it work?• How can I make a Java method native?• How can I generate C header files for Java classes?
OverviewIn this chapter, we will explain how you can invoke native methods in Java applications using the Java Native Method Interface (JNI). We will begin by discussing how the JNI works in the JDK 1.1. We will then discuss the native keyword and how any Java method can become a native method. Finally, we will examine the JDK’s javah tool, which is used to generate C header files for Java classes.
Using the JNI
In order to achieve Java’s main goal of platform independence, Sun did not standardize its implementation of the Java Virtual Machine; in other words, Sun did not want to rigidly specify the internal architecture of the JVM, but allowed vendors to have their own implementations of the JVM. This does not preclude Java from being platform-independent, because every JVM implementation must still comply with certain standards needed to achieve platform independence (such as the standard structure of a .class file). The only problem with this scenario is that accessing native libraries from Java apps becomes difficult, since the runtime system
15-2 L e a r n i n g J a v a w i t h J B u i l d e r
O v e r v i e w
differs across the various JVM implementations. For that reason, Sun came up with the JNI as a standard way for accessing native libraries from Java apps.
The way native methods are accessed from Java apps changed in the JDK 1.1. The old way allowed a Java class to directly access methods in a native library. The new implementation uses the JNI as an intermediate layer between a Java class and a native library. Instead of having the JVM make direct calls to native methods, the JVM uses a pointer to the JNI to make the actual calls. This way, even if the JVM implementations are different, the layer they use to access the native methods (the JNI) is always the same.
Using the native keyword
There could not have been an easier way to make Java methods native. Here is a summary of the required steps:
1 Delete the main body of the method.2 Add a semicolon at the end of the method’s signature.3 Add the native keyword at the beginning of the method’s signature.4 Include the method’s body in a native library to be loaded at runtime.
For example, assume the following method exists in a Java class:
public void nativeMethod () { //the method’s body}
This is how the method becomes native:
public native void nativeMethod ();
Now that you’ve declared the method to be native, where is its actual implementation? The method’s implementation will be included in a native library. It is the duty of the class in which this method is a member of, to invoke the library, so that its implementation becomes available to whoever needs it. The easiest way to have the class invoke the library is to add the following to the class:
static{ System.loadLibrary (nameOfLibrary);}
A static code block is always executed once when the class is first loaded. You can include virtually anything in a static code block; however, loading libraries is the most common use for it. If, for some reason, the library fails to load, an UnsatisfiedLineError exception will be thrown once a method from that library is called. If the library loads fine, the JVM will add the correct extension to its name (.dll in Windows, and .so in UNIX).

W o r k i n g w i t h t h e n a t i v e c o d e i n t e r f a c e 15-3
S u m m a r y
Using the javah tool
The JDK supplies a tool called javah, which is used to generate C header files for Java classes. The following is the general syntax for using javah:
javah [options] className
className represents the name of the class (without the .class extension) you want to generate a C header file for. You can specify more than one class at the command line. For each class, javah adds a .h file to the classes’ directory, by default. If you want the .h files placed elsewhere, use the -o option. If a class is in a package, you must specify the package along with the class name.
If, for example, you want to generate a header file for the class myClass in the package myPackage, do the following:
javah myPackage.myClass
The generated header file will include the package name, (myPackage_myClass.h).
Here’s a list of some of the options used with javah:
The contents of the .h file generated by javah include all the function prototypes for the native methods in the class. The prototypes are modified to allow the Java runtime system to find and invoke the native methods. This modification basically involves changing the name of the method according to a naming convention established for native method invocation. The modified name includes the prefix Java_ to the class and method names. So, if you have a native method called nativeMethod in a class called, myClass, the name that appears in the myClass.h file is Java_myClass_nativeMethod.
SummaryWhat was covered in this chapter:
• The JNI is an intermediate interface used between the JVM and native libraries. Using this interface makes it possible for different JVM implementations to have a common way of using native libraries. If the
Option Description
-jni Creates a JNI header file-verbose Displays progress information-version Displays the version of javah
-o directoryName Outputs the .h file in specified directory -classpath path Overrides the default class path
15-4 L e a r n i n g J a v a w i t h J B u i l d e r
S u m m a r y
JVM needs to access a method in a native library, it passes a pointer to the JNI to the method.
• To make a Java method native, you simply remove the method’s implementation and place it in a library file, add a semicolon and a native prefix to the method’s signature, and them have the method’s class load the library file.
• The javah is used to generate .h header files for classes that include native methods.

T u t o r i a l s
P a r t
IIIPart IIITutorials


B u i l d i n g a n a p p l i c a t i o n 16-1
C h a p t e r
16Chapter16Building an application
This tutorial gets you up and running using the JBuilder integrated development environment (IDE). The tutorial shows how to:
• Create a simple “Hello World” application.• Modify the user interface of an application.• Automatically generate the skeleton code for an event method.• Edit the generated code.• Compile and run the application.• Run the application from the command line.
These are features ofJBuilder Professional and
Enterprise.
• Bundle the files for deployment.• Run the deployed application from the command line.
For information on documentation conventions used in this tutorial, see “Documentation conventions” on page 1-3.
For the complete source code, see the “HelloWorld source code” on page 16-18.
For additional suggestions on improving this tutorial, send email to [email protected].
Step 1: Creating the projectFirst, you need a project in which to store your application. The Project wizard creates one for you:
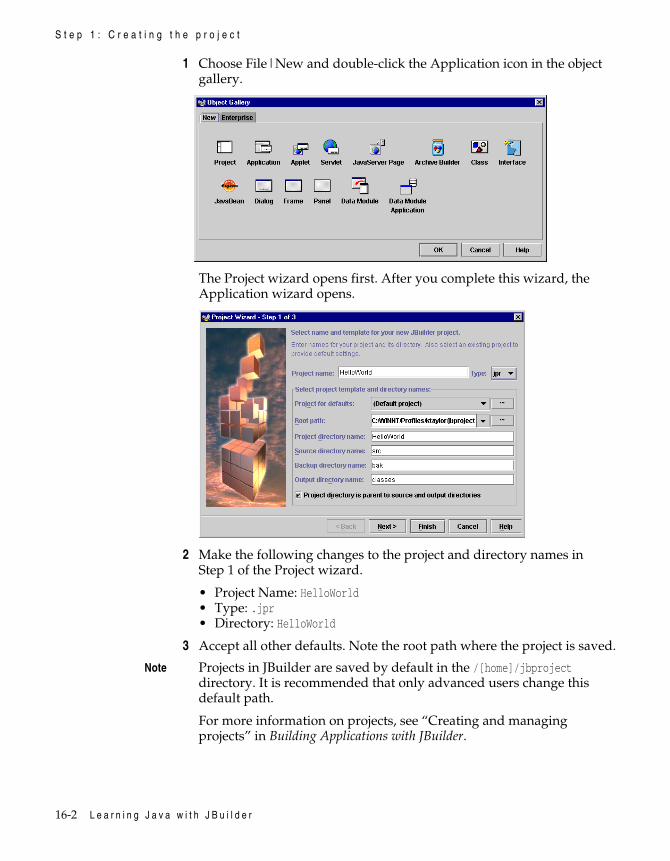
16-2 L e a r n i n g J a v a w i t h J B u i l d e r
S t e p 1 : C r e a t i n g t h e p r o j e c t
1 Choose File|New and double-click the Application icon in the object gallery.
The Project wizard opens first. After you complete this wizard, the Application wizard opens.
2 Make the following changes to the project and directory names in Step 1 of the Project wizard.
• Project Name: HelloWorld• Type: .jpr• Directory: HelloWorld
3 Accept all other defaults. Note the root path where the project is saved.
Note Projects in JBuilder are saved by default in the /[home]/jbproject directory. It is recommended that only advanced users change this default path.
For more information on projects, see “Creating and managing projects” in Building Applications with JBuilder.
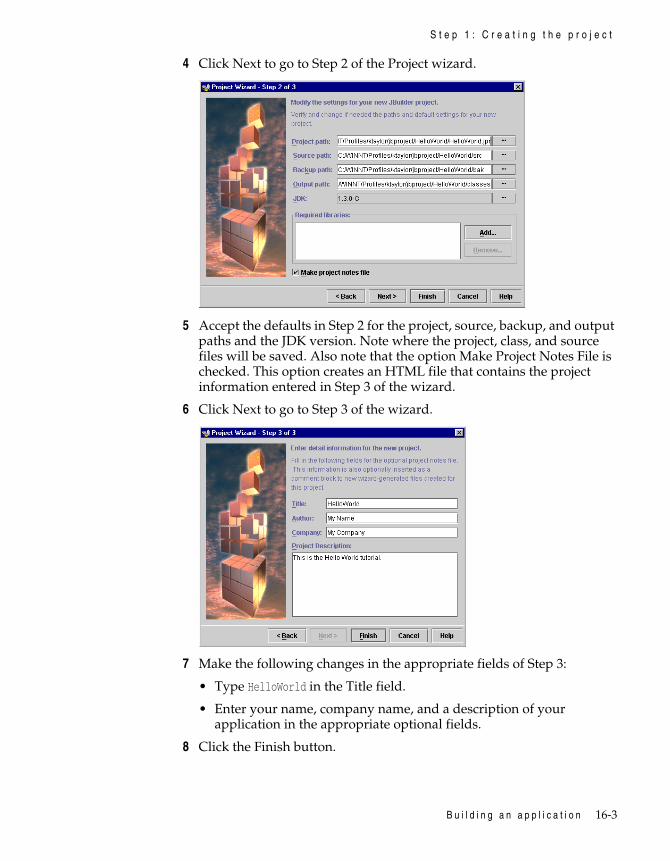
B u i l d i n g a n a p p l i c a t i o n 16-3
S t e p 1 : C r e a t i n g t h e p r o j e c t
4 Click Next to go to Step 2 of the Project wizard.
5 Accept the defaults in Step 2 for the project, source, backup, and output paths and the JDK version. Note where the project, class, and source files will be saved. Also note that the option Make Project Notes File is checked. This option creates an HTML file that contains the project information entered in Step 3 of the wizard.
6 Click Next to go to Step 3 of the wizard.
7 Make the following changes in the appropriate fields of Step 3:
• Type HelloWorld in the Title field.
• Enter your name, company name, and a description of your application in the appropriate optional fields.
8 Click the Finish button.

16-4 L e a r n i n g J a v a w i t h J B u i l d e r
S t e p 2 : G e n e r a t i n g y o u r s o u r c e f i l e s
Two files, HelloWorld.jpr and HelloWorld.html, appear in the project pane of the AppBrowser. The Application wizard is open on top of it.
See also “How JBuilder constructs paths” and “Where are my files?” in the “Creating and managing projects” chapter of Building Applications with JBuilder
Step 2: Generating your source filesThe Application wizard creates .java files that are added to the project you just created.
To generate source files for your application, follow these steps:
1 Accept the default package name, helloworld. By default, the wizard takes the package name from the project file name, HelloWorld.jpr.
2 Enter HelloWorldClass in the Class field. This is a case-sensitive Java class name.
3 Check Generate Header Comments. When you select this option, the information you entered in Step 3 of the Project wizard appears at the beginning of each source file that the Application wizard generates.

B u i l d i n g a n a p p l i c a t i o n 16-5
S t e p 2 : G e n e r a t i n g y o u r s o u r c e f i l e s
Step 1 of the Application wizard should look like this:
4 Click the Next button to go to Step 2 of the Application wizard.
5 Type HelloWorldFrame in the Class field to name the Frame class.
6 Type Hello World in the Title field. This text appears in the title bar of the frame in your application.
7 Check all of the options for additional application features: Generate Menu Bar, Generate Toolbar, Generate Status Bar, Generate About Dialog, and Center Frame On Screen. The wizard generates the basic code to support these features.
Step 2 of the Application wizard should look like this:
8 Click the Finish button.
The new .java class files and toolbar images are added to your project, and the source code for HelloWorldFrame.java is open in the content pane as shown in Figure 16.1.
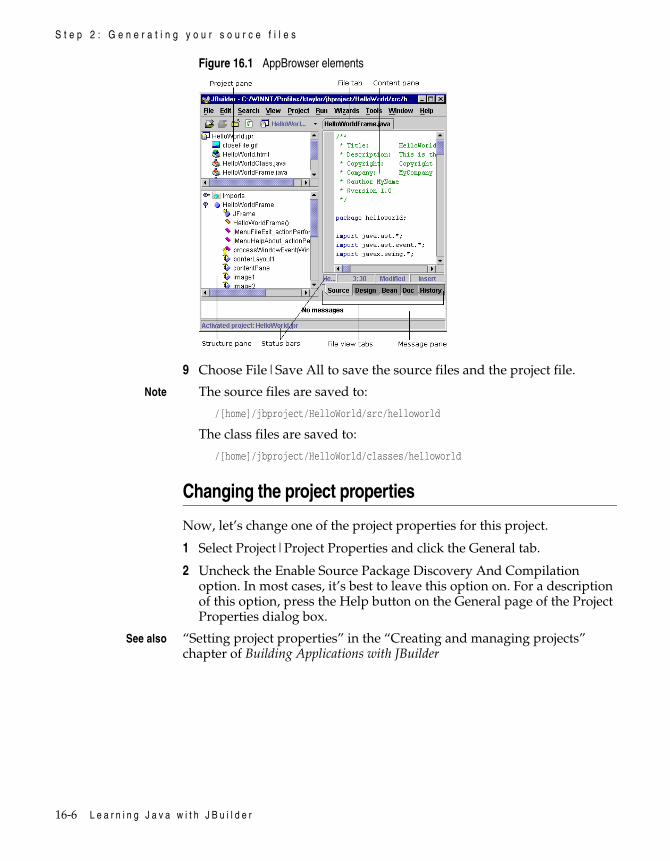
16-6 L e a r n i n g J a v a w i t h J B u i l d e r
S t e p 2 : G e n e r a t i n g y o u r s o u r c e f i l e s
Figure 16.1 AppBrowser elements
9 Choose File|Save All to save the source files and the project file.
Note The source files are saved to:
/[home]/jbproject/HelloWorld/src/helloworld
The class files are saved to:
/[home]/jbproject/HelloWorld/classes/helloworld
Changing the project properties
Now, let’s change one of the project properties for this project.
1 Select Project|Project Properties and click the General tab.
2 Uncheck the Enable Source Package Discovery And Compilation option. In most cases, it’s best to leave this option on. For a description of this option, press the Help button on the General page of the Project Properties dialog box.
See also “Setting project properties” in the “Creating and managing projects” chapter of Building Applications with JBuilder
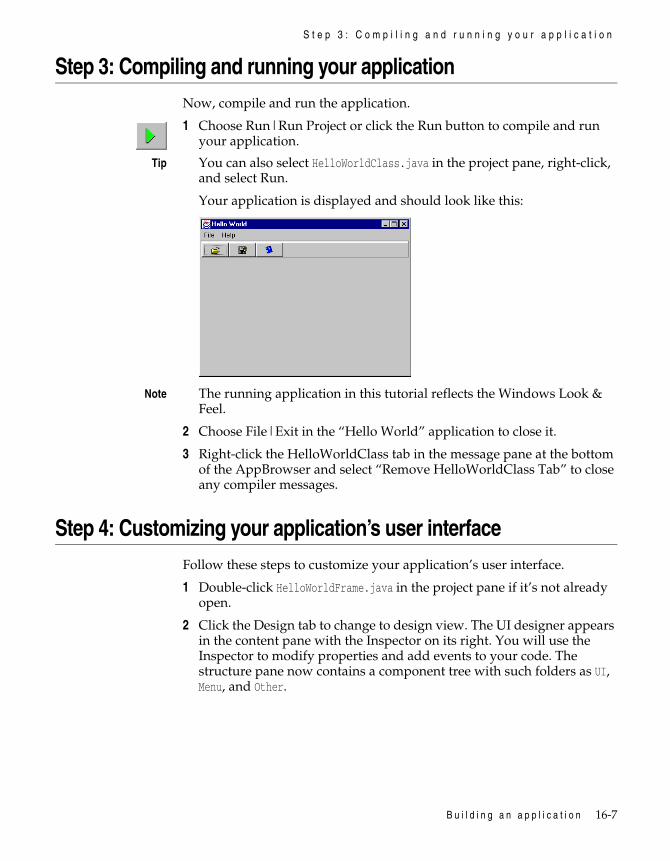
B u i l d i n g a n a p p l i c a t i o n 16-7
S t e p 3 : C o m p i l i n g a n d r u n n i n g y o u r a p p l i c a t i o n
Step 3: Compiling and running your applicationNow, compile and run the application.
1 Choose Run|Run Project or click the Run button to compile and run your application.
Tip You can also select HelloWorldClass.java in the project pane, right-click, and select Run.
Your application is displayed and should look like this:
Note The running application in this tutorial reflects the Windows Look & Feel.
2 Choose File|Exit in the “Hello World” application to close it.
3 Right-click the HelloWorldClass tab in the message pane at the bottom of the AppBrowser and select “Remove HelloWorldClass Tab” to close any compiler messages.
Step 4: Customizing your application’s user interfaceFollow these steps to customize your application’s user interface.
1 Double-click HelloWorldFrame.java in the project pane if it’s not already open.
2 Click the Design tab to change to design view. The UI designer appears in the content pane with the Inspector on its right. You will use the Inspector to modify properties and add events to your code. The structure pane now contains a component tree with such folders as UI, Menu, and Other.

16-8 L e a r n i n g J a v a w i t h J B u i l d e r
S t e p 4 : C u s t o m i z i n g y o u r a p p l i c a t i o n ’ s u s e r i n t e r f a c e
Figure 16.2 UI designer elements
3 Click the Swing Containers tab on the component palette above the UI designer and select the JPanel component to add a panel to your design.
4 Click the center of the frame to drop the component into the center of your design’s frame.
Note The constraints property in the Inspector should be Center. If not, click the column to the right of the constraints property, and choose Center from the drop-down list.
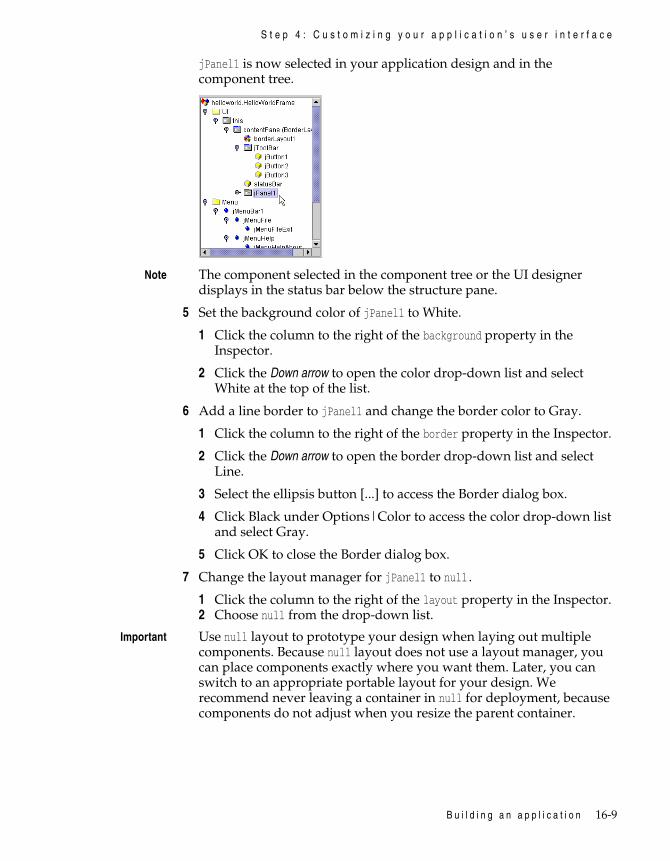
B u i l d i n g a n a p p l i c a t i o n 16-9
S t e p 4 : C u s t o m i z i n g y o u r a p p l i c a t i o n ’ s u s e r i n t e r f a c e
jPanel1 is now selected in your application design and in the component tree.
Note The component selected in the component tree or the UI designer displays in the status bar below the structure pane.
5 Set the background color of jPanel1 to White.
1 Click the column to the right of the background property in the Inspector.
2 Click the Down arrow to open the color drop-down list and select White at the top of the list.
6 Add a line border to jPanel1 and change the border color to Gray.
1 Click the column to the right of the border property in the Inspector.
2 Click the Down arrow to open the border drop-down list and select Line.
3 Select the ellipsis button [...] to access the Border dialog box.
4 Click Black under Options|Color to access the color drop-down list and select Gray.
5 Click OK to close the Border dialog box.
7 Change the layout manager for jPanel1 to null.
1 Click the column to the right of the layout property in the Inspector.2 Choose null from the drop-down list.
Important Use null layout to prototype your design when laying out multiple components. Because null layout does not use a layout manager, you can place components exactly where you want them. Later, you can switch to an appropriate portable layout for your design. We recommend never leaving a container in null for deployment, because components do not adjust when you resize the parent container.
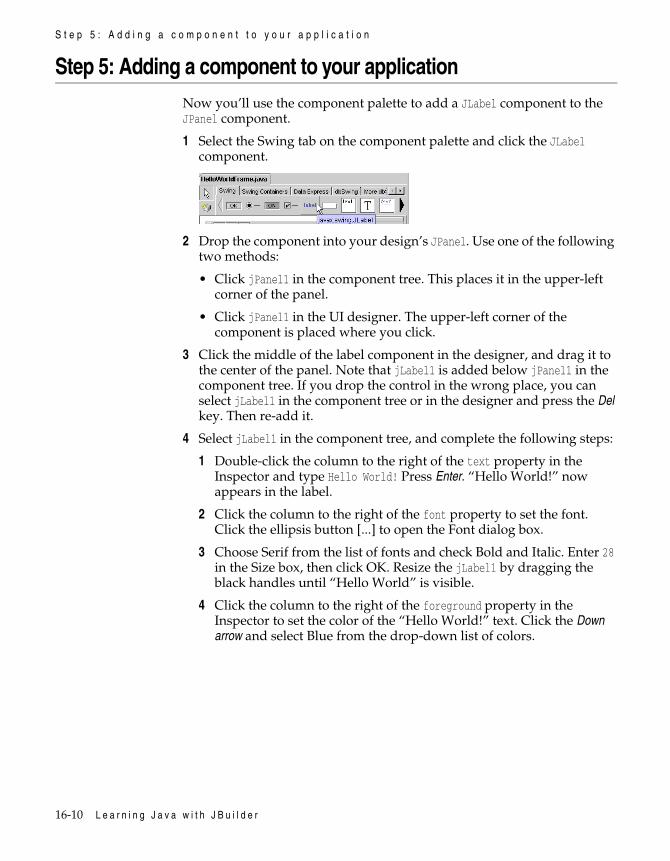
16-10 L e a r n i n g J a v a w i t h J B u i l d e r
S t e p 5 : A d d i n g a c o m p o n e n t t o y o u r a p p l i c a t i o n
Step 5: Adding a component to your applicationNow you’ll use the component palette to add a JLabel component to the JPanel component.
1 Select the Swing tab on the component palette and click the JLabel component.
2 Drop the component into your design’s JPanel. Use one of the following two methods:
• Click jPanel1 in the component tree. This places it in the upper-left corner of the panel.
• Click jPanel1 in the UI designer. The upper-left corner of the component is placed where you click.
3 Click the middle of the label component in the designer, and drag it to the center of the panel. Note that jLabel1 is added below jPanel1 in the component tree. If you drop the control in the wrong place, you can select jLabel1 in the component tree or in the designer and press the Del key. Then re-add it.
4 Select jLabel1 in the component tree, and complete the following steps:
1 Double-click the column to the right of the text property in the Inspector and type Hello World! Press Enter. “Hello World!” now appears in the label.
2 Click the column to the right of the font property to set the font. Click the ellipsis button [...] to open the Font dialog box.
3 Choose Serif from the list of fonts and check Bold and Italic. Enter 28 in the Size box, then click OK. Resize the jLabel1 by dragging the black handles until “Hello World” is visible.
4 Click the column to the right of the foreground property in the Inspector to set the color of the “Hello World!” text. Click the Down arrow and select Blue from the drop-down list of colors.

B u i l d i n g a n a p p l i c a t i o n 16-11
S t e p 6 : E d i t i n g y o u r s o u r c e c o d e
Your design now looks similar to this:
5 Choose File|Save All.
Step 6: Editing your source codeYou can change information in the About box by directly editing the code. The default application version created by the Application wizard is 1.0.
1 Double-click HelloWorldFrame_AboutBox.java in the project pane to open the file. The content pane changes to the source view where you can edit the code in the editor.
2 Choose Search|Find. Type the following line of code in the Find/Replace Text dialog box:
String version = "1.0";
3 Click Find.
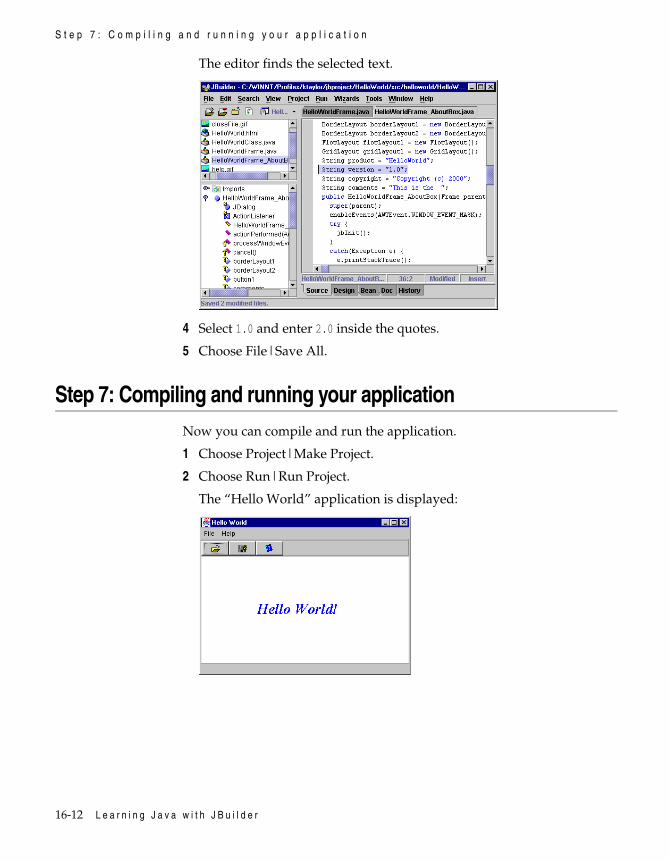
16-12 L e a r n i n g J a v a w i t h J B u i l d e r
S t e p 7 : C o m p i l i n g a n d r u n n i n g y o u r a p p l i c a t i o n
The editor finds the selected text.
4 Select 1.0 and enter 2.0 inside the quotes.
5 Choose File|Save All.
Step 7: Compiling and running your applicationNow you can compile and run the application.
1 Choose Project|Make Project.
2 Choose Run|Run Project.
The “Hello World” application is displayed:

B u i l d i n g a n a p p l i c a t i o n 16-13
S t e p 8 : R u n n i n g y o u r a p p l i c a t i o n f r o m t h e c o m m a n d l i n e
3 Choose Help|About. The version data you changed is now displayed in the About dialog box.
4 Click OK to close the dialog box.
5 Choose File|Exit in your “Hello World” application to close it.
Step 8: Running your application from the command lineYou can also run the application outside the JBuilder environment from the command line.
You can do this using any of these methods:
• Include the JDK/bin directory in your path.• Run the application from the JDK/bin directory.
To run the application,
1 Choose File|Close Project after compiling your project in JBuilder.
2 Open the command-line window.
3 Run the application with the following command on one line at the command prompt:
java -classpath /[home]/jbproject/HelloWorld/classes helloworld.HelloWorldClass
Note For Windows, use a backslash (\).
This command should be in the following form:
java -classpath package-name.main-class-name
In this example,
• classpath = /[home]/jbproject/HelloWorld/classes• package-name = helloworld• main-class-name = HelloWorldClass
See also “Setting the classpath” and “Basic tools” at http://java.sun.com/j2se/1.3/docs/tooldocs/tools.html

16-14 L e a r n i n g J a v a w i t h J B u i l d e r
S t e p 9 : A d d i n g m o r e c o m p o n e n t s t o y o u r a p p l i c a t i o n
Step 9: Adding more components to your applicationNext, you’ll add another Swing component to your application.
1 Reopen HelloWorld.jpr (File|Reopen). Open HelloWorldFrame.java and click the Design tab to switch to the UI designer.
2 Click the JButton component on the Swing tab of the component palette and drop it on either jPanel1 in the component tree or in the panel in your design. jButton4 is added below jPanel1 in the component tree.
3 Click jButton4 in the design and drag it to the top center of the design as shown in the image below.
4 Change the Text property in the Inspector from jButton4 to Push Me. Press Enter. Enlarge the button by dragging the black handles until “Push Me” shows completely.
The Inspector should look like this:
5 Click the Inspector’s Events tab to define what happens when jButton4 is pressed.
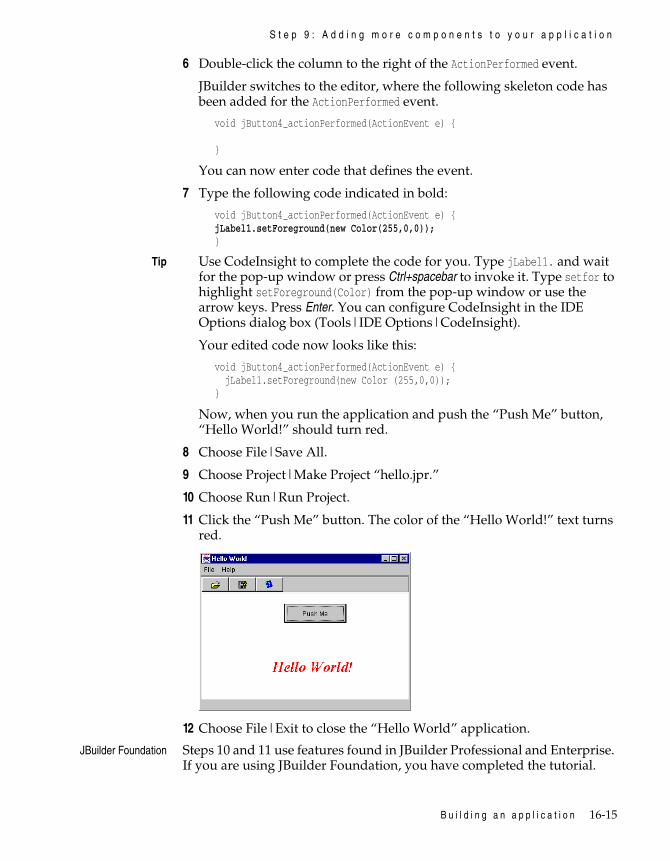
B u i l d i n g a n a p p l i c a t i o n 16-15
S t e p 9 : A d d i n g m o r e c o m p o n e n t s t o y o u r a p p l i c a t i o n
6 Double-click the column to the right of the ActionPerformed event.
JBuilder switches to the editor, where the following skeleton code has been added for the ActionPerformed event.
void jButton4_actionPerformed(ActionEvent e) {
}
You can now enter code that defines the event.
7 Type the following code indicated in bold:
void jButton4_actionPerformed(ActionEvent e) {jLabel1.setForeground(new Color(255,0,0));}
Tip Use CodeInsight to complete the code for you. Type jLabel1. and wait for the pop-up window or press Ctrl+spacebar to invoke it. Type setfor to highlight setForeground(Color) from the pop-up window or use the arrow keys. Press Enter. You can configure CodeInsight in the IDE Options dialog box (Tools|IDE Options|CodeInsight).
Your edited code now looks like this:
void jButton4_actionPerformed(ActionEvent e) { jLabel1.setForeground(new Color (255,0,0));}
Now, when you run the application and push the “Push Me” button, “Hello World!” should turn red.
8 Choose File|Save All.
9 Choose Project|Make Project “hello.jpr.”
10 Choose Run|Run Project.
11 Click the “Push Me” button. The color of the “Hello World!” text turns red.
12 Choose File|Exit to close the “Hello World” application.
JBuilder Foundation Steps 10 and 11 use features found in JBuilder Professional and Enterprise. If you are using JBuilder Foundation, you have completed the tutorial.

16-16 L e a r n i n g J a v a w i t h J B u i l d e r
S t e p 1 0 : P r e p a r i n g y o u r a p p l i c a t i o n f o r d e p l o y m e n t
Step 10: Preparing your application for deploymentJBuilder Professional or
Enterprise.Continue with the tutorial if you have JBuilder Professional or Enterprise.
The Archive Builder collects all the files needed to distribute your program, and if selected as the archive type, can archive them into a JAR file.
To deploy your application:
1 Choose Wizards|Archive Builder to open the Archive Builder.
2 Select Application from the Archive Type drop-down list.
3 Click Next to go to Step 2.
4 Accept the default name for the archive and default path for the JAR file. Note that HelloWorld.jar will be saved to the HelloWorld directory.
5 Accept the defaults in Steps 3 through 6.
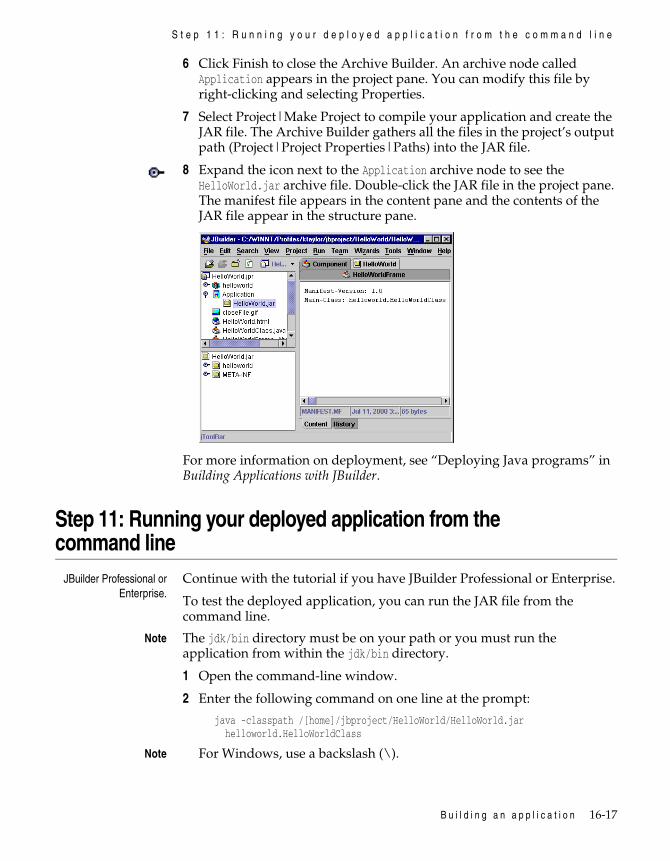
B u i l d i n g a n a p p l i c a t i o n 16-17
S t e p 1 1 : R u n n i n g y o u r d e p l o y e d a p p l i c a t i o n f r o m t h e c o m m a n d l i n e
6 Click Finish to close the Archive Builder. An archive node called Application appears in the project pane. You can modify this file by right-clicking and selecting Properties.
7 Select Project|Make Project to compile your application and create the JAR file. The Archive Builder gathers all the files in the project’s output path (Project|Project Properties|Paths) into the JAR file.
8 Expand the icon next to the Application archive node to see the HelloWorld.jar archive file. Double-click the JAR file in the project pane. The manifest file appears in the content pane and the contents of the JAR file appear in the structure pane.
For more information on deployment, see “Deploying Java programs” in Building Applications with JBuilder.
Step 11: Running your deployed application from the command line
JBuilder Professional orEnterprise.
Continue with the tutorial if you have JBuilder Professional or Enterprise.
To test the deployed application, you can run the JAR file from the command line.
Note The jdk/bin directory must be on your path or you must run the application from within the jdk/bin directory.
1 Open the command-line window.
2 Enter the following command on one line at the prompt:
java -classpath /[home]/jbproject/HelloWorld/HelloWorld.jar helloworld.HelloWorldClass
Note For Windows, use a backslash (\).

16-18 L e a r n i n g J a v a w i t h J B u i l d e r
H e l l o W o r l d s o u r c e c o d e
The command must have the following form:
java -classpath package-name.main-class-name
For information on JAR files, see the JAR tutorial at http://java.sun.com/docs/books/tutorial/jar/index.html.
3 The “Hello World” application loads and runs.
Congratulations, you’ve created your first application with JBuilder. Now that you’re familiar with JBuilder’s development environment, you’ll find its many time-saving features make your programming easier.
HelloWorld source codeSee the following sections to view the code:
• “Source code for HelloWorldFrame.java” on page 16-18• “Source code for HelloWorldClass.java” on page 16-21
Source code for HelloWorldFrame.java
/** * Title: HelloWorld * Description: This is the "Hello World" tutorial. * Copyright: Copyright (c) 2000 * Company: MyCompany * @author MyName * @version 1.0 */
package helloworld;
import java.awt.*;import java.awt.event.*;import javax.swing.*;import javax.swing.border.*;
public class HelloWorldFrame extends JFrame { JPanel contentPane; JMenuBar jMenuBar1 = new JMenuBar(); JMenu jMenuFile = new JMenu(); JMenuItem jMenuFileExit = new JMenuItem(); JMenu jMenuHelp = new JMenu(); JMenuItem jMenuHelpAbout = new JMenuItem(); JToolBar jToolBar = new JToolBar(); JButton jButton1 = new JButton(); JButton jButton2 = new JButton(); JButton jButton3 = new JButton(); ImageIcon image1; ImageIcon image2;

B u i l d i n g a n a p p l i c a t i o n 16-19
H e l l o W o r l d s o u r c e c o d e
ImageIcon image3; JLabel statusBar = new JLabel(); BorderLayout borderLayout1 = new BorderLayout(); JPanel jPanel1 = new JPanel(); Border border1; JLabel jLabel1 = new JLabel(); JButton jButton4 = new JButton(); /**Construct the frame*/ public HelloWorldFrame() { enableEvents(AWTEvent.WINDOW_EVENT_MASK); try { jbInit(); } catch(Exception e) { e.printStackTrace(); } }
/**Component initialization*/ private void jbInit() throws Exception { image1 = new ImageIcon(helloworld.HelloWorldFrame.class.getResource ("openFile.gif")); image2 = new ImageIcon(helloworld.HelloWorldFrame.class.getResource ("closeFile.gif")); image3 = new ImageIcon(helloworld.HelloWorldFrame.class.getResource ("help.gif")); //setIconImage(Toolkit.getDefaultToolkit().createImage (HelloWorldFrame.class.getResource("[Your Icon]"))); contentPane = (JPanel) this.getContentPane(); border1 = BorderFactory.createLineBorder(Color.gray,1); contentPane.setLayout(borderLayout1); this.setSize(new Dimension(400, 300)); this.setTitle("Hello World"); statusBar.setText(" "); jMenuFile.setText("File"); jMenuFileExit.setText("Exit"); jMenuFileExit.addActionListener(new ActionListener() {
public void actionPerformed(ActionEvent e) { jMenuFileExit_actionPerformed(e); } }); jMenuHelp.setText("Help"); jMenuHelpAbout.setText("About"); jMenuHelpAbout.addActionListener(new ActionListener() {
public void actionPerformed(ActionEvent e) { jMenuHelpAbout_actionPerformed(e); } }); jButton1.setIcon(image1); jButton1.setToolTipText("Open File"); jButton2.setIcon(image2); jButton2.setToolTipText("Close File");

16-20 L e a r n i n g J a v a w i t h J B u i l d e r
H e l l o W o r l d s o u r c e c o d e
jButton3.setIcon(image3); jButton3.setToolTipText("Help"); jPanel1.setBackground(Color.white); jPanel1.setBorder(border1); jPanel1.setLayout(null); jLabel1.setFont(new java.awt.Font("Serif", 3, 28)); jLabel1.setForeground(Color.blue); jLabel1.setText("Hello World!"); jLabel1.setBounds(new Rectangle(135, 111, 184, 56)); jButton4.setText("Push Me"); jButton4.setBounds(new Rectangle(157, 21, 117, 36)); jButton4.addActionListener(new java.awt.event.ActionListener() {
public void actionPerformed(ActionEvent e) { jButton4_actionPerformed(e); } }); jToolBar.add(jButton1); jToolBar.add(jButton2); jToolBar.add(jButton3); jMenuFile.add(jMenuFileExit); jMenuHelp.add(jMenuHelpAbout); jMenuBar1.add(jMenuFile); jMenuBar1.add(jMenuHelp); this.setJMenuBar(jMenuBar1); contentPane.add(jToolBar, BorderLayout.NORTH); contentPane.add(statusBar, BorderLayout.SOUTH); contentPane.add(jPanel1, BorderLayout.CENTER); jPanel1.add(jLabel1, null); jPanel1.add(jButton4, null); }
/**File | Exit action performed*/ public void jMenuFileExit_actionPerformed(ActionEvent e) { System.exit(0); }jLabel1.setf /**Help | About action performed*/ public void jMenuHelpAbout_actionPerformed(ActionEvent e) { HelloWorldFrame_AboutBox dlg = new HelloWorldFrame_AboutBox(this); Dimension dlgSize = dlg.getPreferredSize(); Dimension frmSize = getSize(); Point loc = getLocation(); dlg.setLocation((frmSize.width - dlgSize.width) / 2 + loc.x, (frmSize.height - dlgSize.height) / 2 + loc.y); dlg.setModal(true); dlg.show(); }
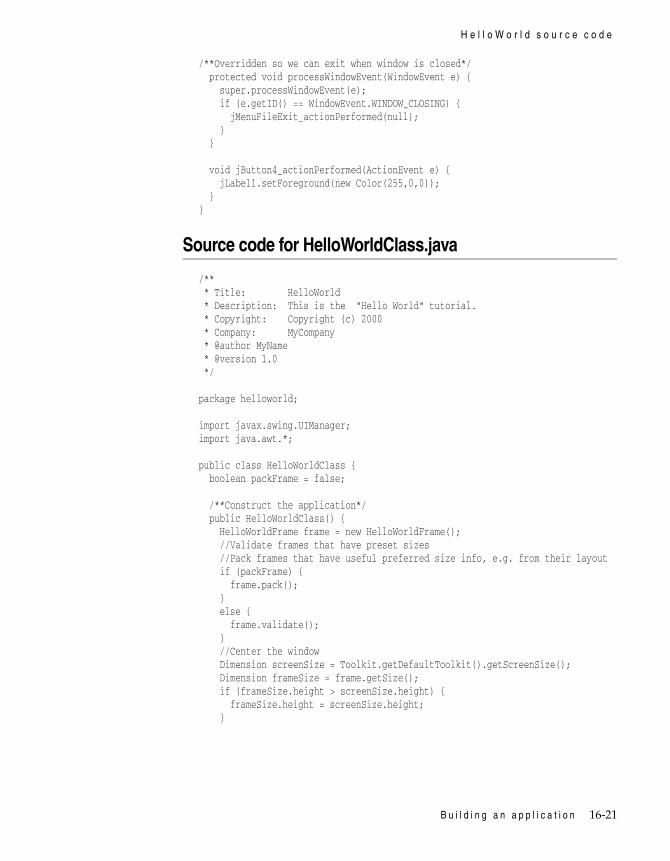
B u i l d i n g a n a p p l i c a t i o n 16-21
H e l l o W o r l d s o u r c e c o d e
/**Overridden so we can exit when window is closed*/ protected void processWindowEvent(WindowEvent e) { super.processWindowEvent(e); if (e.getID() == WindowEvent.WINDOW_CLOSING) { jMenuFileExit_actionPerformed(null); } }
void jButton4_actionPerformed(ActionEvent e) { jLabel1.setForeground(new Color(255,0,0)); }}
Source code for HelloWorldClass.java
/** * Title: HelloWorld * Description: This is the "Hello World" tutorial. * Copyright: Copyright (c) 2000 * Company: MyCompany * @author MyName * @version 1.0 */
package helloworld;
import javax.swing.UIManager;import java.awt.*;
public class HelloWorldClass { boolean packFrame = false;
/**Construct the application*/ public HelloWorldClass() { HelloWorldFrame frame = new HelloWorldFrame(); //Validate frames that have preset sizes //Pack frames that have useful preferred size info, e.g. from their layout if (packFrame) { frame.pack(); } else { frame.validate(); } //Center the window Dimension screenSize = Toolkit.getDefaultToolkit().getScreenSize(); Dimension frameSize = frame.getSize(); if (frameSize.height > screenSize.height) { frameSize.height = screenSize.height; }
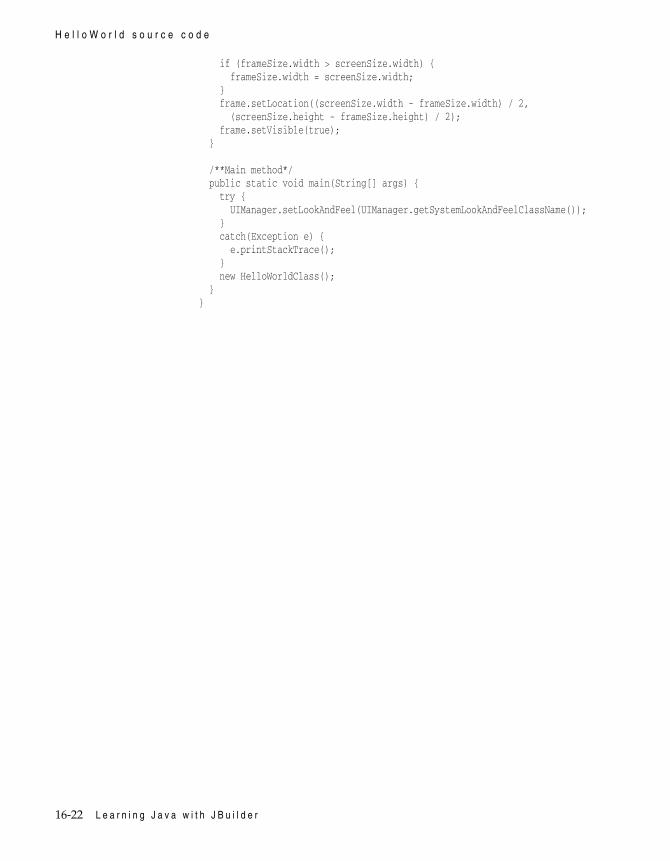
16-22 L e a r n i n g J a v a w i t h J B u i l d e r
H e l l o W o r l d s o u r c e c o d e
if (frameSize.width > screenSize.width) { frameSize.width = screenSize.width; } frame.setLocation((screenSize.width - frameSize.width) / 2, (screenSize.height - frameSize.height) / 2); frame.setVisible(true); }
/**Main method*/ public static void main(String[] args) { try { UIManager.setLookAndFeel(UIManager.getSystemLookAndFeelClassName()); } catch(Exception e) { e.printStackTrace(); } new HelloWorldClass(); }}
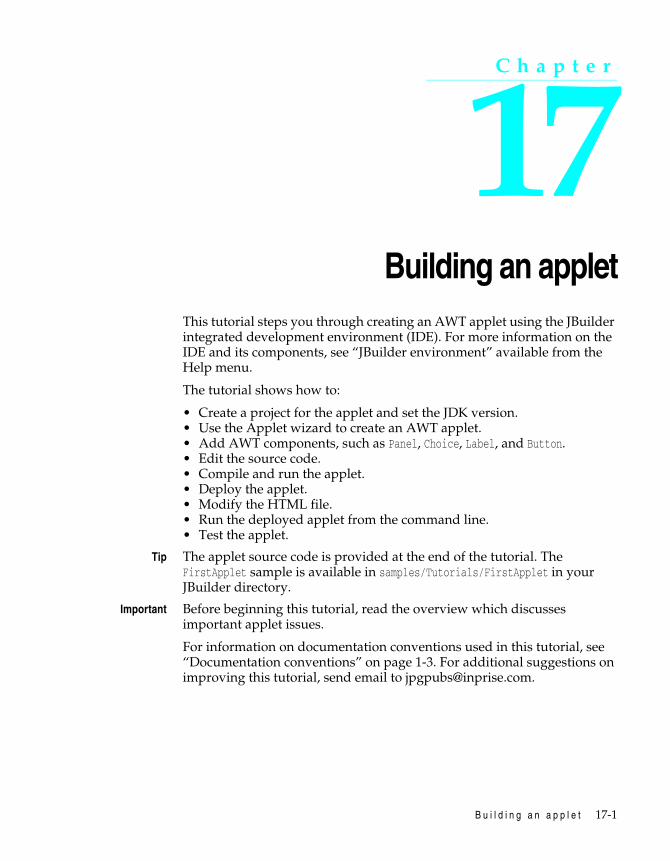
B u i l d i n g a n a p p l e t 17-1
C h a p t e r
17Chapter17Building an applet
This tutorial steps you through creating an AWT applet using the JBuilder integrated development environment (IDE). For more information on the IDE and its components, see “JBuilder environment” available from the Help menu.
The tutorial shows how to:
• Create a project for the applet and set the JDK version.• Use the Applet wizard to create an AWT applet.• Add AWT components, such as Panel, Choice, Label, and Button.• Edit the source code.• Compile and run the applet.• Deploy the applet.• Modify the HTML file.• Run the deployed applet from the command line.• Test the applet.
Tip The applet source code is provided at the end of the tutorial. The FirstApplet sample is available in samples/Tutorials/FirstApplet in your JBuilder directory.
Important Before beginning this tutorial, read the overview which discusses important applet issues.
For information on documentation conventions used in this tutorial, see “Documentation conventions” on page 1-3. For additional suggestions on improving this tutorial, send email to [email protected].

17-2 L e a r n i n g J a v a w i t h J B u i l d e r
O v e r v i e w
OverviewIt’s important to remember when designing applets that browser support for Java is limited. As of this writing, Internet Explorer and Netscape support JDK 1.1.5. The browsers do not presently support Swing components, introduced in JDK 1.1.7, although they may in the future. If you are creating your applets with a more recent version of the JDK, you must be very careful to use components that the browsers support. For example, if you develop your applets strictly with AWT components, in most cases your applets will run. There may be changes in the AWT components (for example, JDK 1.1.x may have slightly different features than JDK 1.3) and you may have to modify your applet code accordingly. You can troubleshoot your applet in the browser by checking the Java Console error messages. The safest way to design your applet is by using AWT components and the JDK that the browser supports.
Note Browsers that support JDK 1.1 include Netscape 4.06 and later and Internet Explorer 4.01 and later. JDK version support may vary by platform.
Another option is to design your applets using the current JDK and Swing components and provide your users with the Java Plug-in. This is usually only possible within a controlled environment, such as a company intranet. Browsers supported by the Java Plug-in, which provides the browser with the Java 2 SDK 1.3 Runtime Environment (JRE), can run JDK 1.3-based applets. There are several additional steps involved in developing applets that run with the Java Plug-in. Visit the Java Plug-in Home Page at http://www.javasoft.com/products/plugin/index.html for more information.
Although browsers support only JDK 1.1.5, in this tutorial we will use JDK 1.3. The applet will still run, however, because we are carefully selecting the components that we use. We are designing only with AWT components and avoiding any new JDK 1.3 features.
Important For information on running JDK 1.1.x and 1.2 applets in JBuilder, see the “Runtime” topic in “Release Notes” (Help|Release Notes).
The “Good Evening” applet you create in this tutorial contains a drop-down list of language choices. When you select a language, such as German, the panel below the selection changes to the German translation of “Good Evening”: “Guten Abend.”
For the complete applet code, see the “Applet source code” on page 17-29.
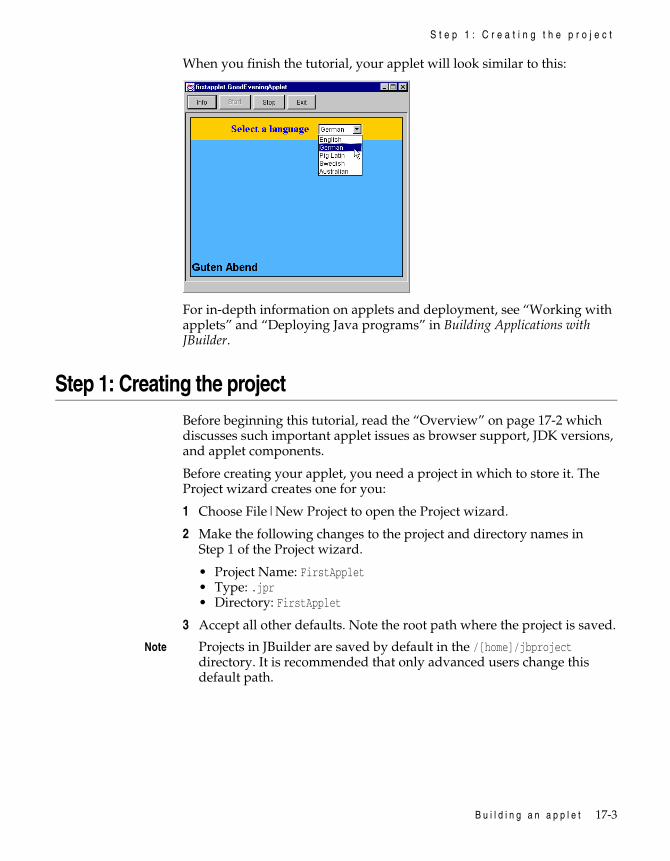
B u i l d i n g a n a p p l e t 17-3
S t e p 1 : C r e a t i n g t h e p r o j e c t
When you finish the tutorial, your applet will look similar to this:
For in-depth information on applets and deployment, see “Working with applets” and “Deploying Java programs” in Building Applications with JBuilder.
Step 1: Creating the projectBefore beginning this tutorial, read the “Overview” on page 17-2 which discusses such important applet issues as browser support, JDK versions, and applet components.
Before creating your applet, you need a project in which to store it. The Project wizard creates one for you:
1 Choose File|New Project to open the Project wizard.
2 Make the following changes to the project and directory names in Step 1 of the Project wizard.
• Project Name: FirstApplet• Type: .jpr• Directory: FirstApplet
3 Accept all other defaults. Note the root path where the project is saved.
Note Projects in JBuilder are saved by default in the /[home]/jbproject directory. It is recommended that only advanced users change this default path.
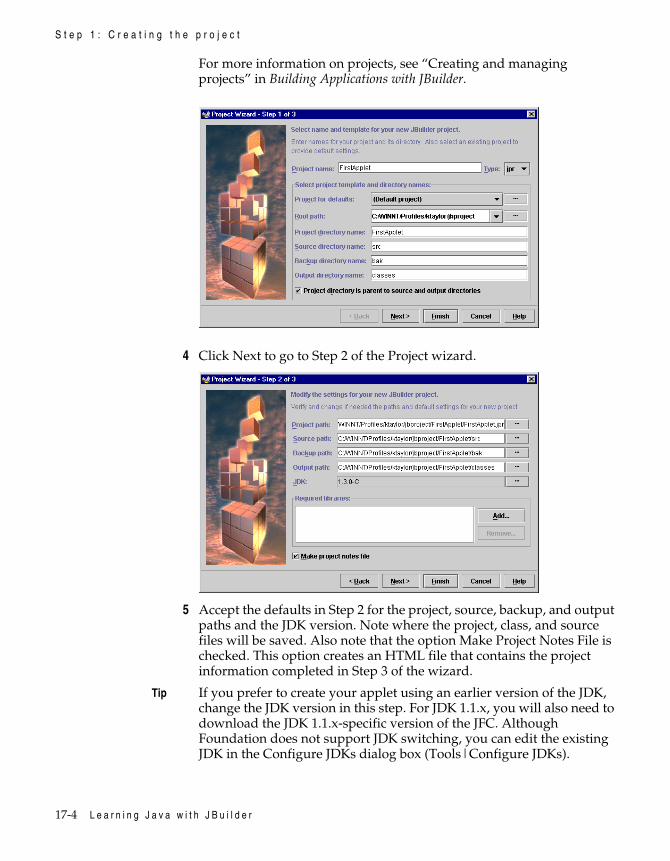
17-4 L e a r n i n g J a v a w i t h J B u i l d e r
S t e p 1 : C r e a t i n g t h e p r o j e c t
For more information on projects, see “Creating and managing projects” in Building Applications with JBuilder.
4 Click Next to go to Step 2 of the Project wizard.
5 Accept the defaults in Step 2 for the project, source, backup, and output paths and the JDK version. Note where the project, class, and source files will be saved. Also note that the option Make Project Notes File is checked. This option creates an HTML file that contains the project information completed in Step 3 of the wizard.
Tip If you prefer to create your applet using an earlier version of the JDK, change the JDK version in this step. For JDK 1.1.x, you will also need to download the JDK 1.1.x-specific version of the JFC. Although Foundation does not support JDK switching, you can edit the existing JDK in the Configure JDKs dialog box (Tools|Configure JDKs).

B u i l d i n g a n a p p l e t 17-5
S t e p 1 : C r e a t i n g t h e p r o j e c t
See also • “Setting project properties” in the “Creating and managing projects” chapter of Building Applications with JBuilder for information on switching or editing the JDK
• “Runtime” topic in the “Release Notes” (Help|Release Notes) for information on running JDK 1.1.x and 1.2 applets in JBuilder
• “How JBuilder constructs paths” and “Where are my files?” in the “Creating and managing projects” chapter of Building Applications with JBuilder
6 Click Next to go to Step 3 of the wizard.
7 Make the following changes in the appropriate fields of Step 3:
• Type GoodEvening in the Title field.
• Enter your name, company name, and a description of your application in the appropriate optional fields.
8 Click the Finish button.
The wizard creates a project file and a project notes file, FirstApplet.jpr and FirstApplet.html, that appear in the project pane of the AppBrowser. Double-click the HTML file to see the project notes in the content pane.
Changing the project propertiesNow, let’s change one of the project properties for this project.
1 Select Project|Project Properties and click the General tab.

17-6 L e a r n i n g J a v a w i t h J B u i l d e r
S t e p 2 : G e n e r a t i n g y o u r s o u r c e f i l e s
2 Uncheck the Enable Source Package Discovery And Compilation option. In most cases, it’s best to leave this option on. For a description of this option, press the Help button on the General page.
See also “Setting project properties” topic in the “Creating and managing projects” chapter of Building Applications with JBuilder
Step 2: Generating your source filesThe Applet wizard creates a .java file and an applet HTML file and places them in the project you just created with the Project wizard.
To generate these source files for your applet, follow these steps:
1 Select File|New and double-click the Applet icon in the object gallery to open the Applet wizard.
2 Accept the default package name, firstapplet, in Step 1. By default, the wizard takes the package name from the project file name, FirstApplet.jpr.
3 Enter GoodEveningApplet in the Class field. This is a case-sensitive Java class name.
Note The fully qualified class name (package name + class name) is firstapplet.GoodEveningApplet.class. The class file is saved in the following Java package structure: firstapplet/GoodEveningApplet.class.
4 Change the Base Class to java.applet.Applet.
Caution If you create your applet using the default base class, javax.swing.JApplet, your applet won’t run in the browsers. Swing is not yet supported by the browsers.

B u i l d i n g a n a p p l e t 17-7
S t e p 2 : G e n e r a t i n g y o u r s o u r c e f i l e s
5 Check Generate Standard Methods.
Step 1 of the Applet wizard should look like this:
6 Click Next to go to Step 2. In this step, you can add parameters to your applet. The wizard adds the PARAM tags inside the APPLET tags in the applet’s HTML file and also inserts code for handling parameters in the source code. Applet parameters, the equivalent of command-line arguments for applications, allow you to customize your applet. Do not add any parameters.
See also “Defining and using parameters” at http://www.java.sun.com/docs/books/tutorial/applet/appletsonly/param.html
7 Click Next to go to Step 3 of the wizard.
8 Make the following changes in Step 3:
1 Accept the default option Check Generate HTML Page. When you select this option, the HTML file that calls the applet is created.
2 Uncheck the option Place In Output Directory. When you uncheck this option, the HTML file is saved to the project’s source directory specified on the Paths page of the Project Properties dialog box (Project|Project Properties|Paths). When you select this option, the HTML file is saved to the project’s output directory.
3 Title: Good Evening HTML page
The title displays in the browser window when the applet is running.
4 Accept the default values for all other attributes.

17-8 L e a r n i n g J a v a w i t h J B u i l d e r
S t e p 2 : G e n e r a t i n g y o u r s o u r c e f i l e s
Step 3 of the Applet wizard should look like this:
Some of the following attributes are found in the APPLET tag of the HTML file:
Important The values for CODEBASE, CODE, ARCHIVE, and NAME must be in quotation marks and are case-sensitive.
CODEBASE This optional attribute specifies the path relative to the HTML file that the browser searches to find any necessary class files. A value of "." specifies the same directory as the HTML file running the applet. The CODEBASE attribute is required when the class files are in a different directory than the HTML file.
CODE This required attribute, which is automatically inserted by JBuilder’s Applet wizard, is the fully qualified class name (package name + class name) of the applet class that contains the init() method. You’ll see it in the HTML file when it is generated.
ARCHIVE This optional attribute, which is not listed in the Applet wizard, is required when the applet is deployed in a JAR, ZIP, or CAB file. Archive files must be in the directory specified by CODEBASE.
NAME This optional attribute names the applet.
WIDTH/HEIGHT These required attributes determine the width and height of the applet display area in pixels.
HSPACE/VSPACE These optional attributes determine the horizontal padding (left and right margins) and vertical padding (top and bottom margins) around the applet in pixels.
ALIGN This optional attribute determines the alignment of the applet on the HTML page.

B u i l d i n g a n a p p l e t 17-9
S t e p 2 : G e n e r a t i n g y o u r s o u r c e f i l e s
See also “APPLET tag attributes” topic in “Working with applets” in Building Applications with JBuilder
9 Select Finish to close the Applet wizard.
Note that two files are created and added to the project, GoodEveningApplet.java and GoodEveningApplet.html. Double-click each file and select the Source tab in the content pane to view the generated code.
Look at the .java file and note the following:
• It contains the init() method. The applet HTML file must call the class that contains the init() method for the applet to run.
• The package name firstapplet is the first line of code. The class file will be saved in a firstapplet directory according to Java conventions.
• The import statements import AWT packages, not Swing:
import java.awt.*;import java.awt.event.*;import java.applet.*;
Look at the HTML file and notice that the wizard inserted the CODE value, firstapplet.GoodEveningApplet.class.

17-10 L e a r n i n g J a v a w i t h J B u i l d e r
S t e p 3 : C o m p i l i n g a n d r u n n i n g y o u r a p p l e t
10 Choose File|Save All to save the source files and the project file.
Note By default, JBuilder saves the source files to:
/[home]/jbproject/FirstApplet/src/firstapplet
In this tutorial, the applet HTML file is also saved to the src directory.
The class files, after compiling, are saved to:
/[home]/jbproject/FirstApplet/classes/firstapplet
Java always follows the package hierarchy when saving files. In this example, the source and class files are saved within a firstapplet directory on the source and output paths to reflect the firstapplet package structure. These paths are set for the project in the Project Properties dialog box. In this example, we accepted the default JBuilder paths.
Step 3: Compiling and running your appletNow, compile and run the applet.
Important For information on running JDK 1.1.x and 1.2 applets in JBuilder, see the “Runtime” topic in “Release Notes” (Help|Release Notes).
1 Choose Run|Run Project, or click the Run button to compile and run your applet. By default, the Applet wizard automatically selects the runnable main class and runs the applet in JBuilder’s applet viewer (AppletTestbed).
Tip You can also right-click GoodEveningApplet.html in the project pane and select Run. This runs your applet in Sun’s appletviewer.
You can change the applet’s run settings on the Run page of the Project Properties dialog box. To access this dialog box, select Project|Project Properties or right-click FirstApplet.jpr and select Properties.
Important Applets run from the HTML file, which calls the class containing the init() method, not from the .java file. Any attempt to run the .java file results in an error message (unless the Can Run Standalone option was selected in Step 1 of the Applet wizard):
java.lang.NoSuchMethodError: main Exception in thread "main"

B u i l d i n g a n a p p l e t 17-11
S t e p 4 : C u s t o m i z i n g y o u r a p p l e t ’ s u s e r i n t e r f a c e
If there are any compile-time errors when you run your applet, the message pane appears at the bottom of the AppBrowser. Correct these errors and run the applet again.
Your applet is displayed and should look like this:
2 Choose Exit in the “Good Evening” applet to close it.
3 Right-click the GoodEveningApplet tab in the message pane and select “Remove GoodEveningApplet Tab” to close any runtime messages.
Step 4: Customizing your applet’s user interfaceNow that the Applet wizard has generated the applet shell, let’s customize it with various components in the following steps.
1 Click the Design tab at the bottom of the content pane to change GoodEveningApplet.java to design view. The UI designer appears in the content pane with the Inspector on its right. You will use the Inspector to modify properties and add events to your code. The structure pane now contains a component tree with such folders as UI, Menu, and Other.

17-12 L e a r n i n g J a v a w i t h J B u i l d e r
S t e p 4 : C u s t o m i z i n g y o u r a p p l e t ’ s u s e r i n t e r f a c e
2 Change the this layout to BorderLayout in the Inspector.
To do this,
1 Select this in the component tree in the structure pane.
2 Click to the right of the layout property on the Properties page of the Inspector. Select BorderLayout from the drop-down list of layouts.
BorderLayout arranges a container’s components in areas named North, South, East, West, and Center. Use BorderLayout when you want to force components to one or more edges of a container and fill the center of the container with a component. It is also the layout you want to use to cause a single component to completely fill its container.
Note JBuilder’s UI designer uses a default layout manager for each container, usually the layout of the AWT parent container. In the Java AWT, all panels use FlowLayout by default. To see the layout for each component, click the icon in the component tree of the structure pane to expand the
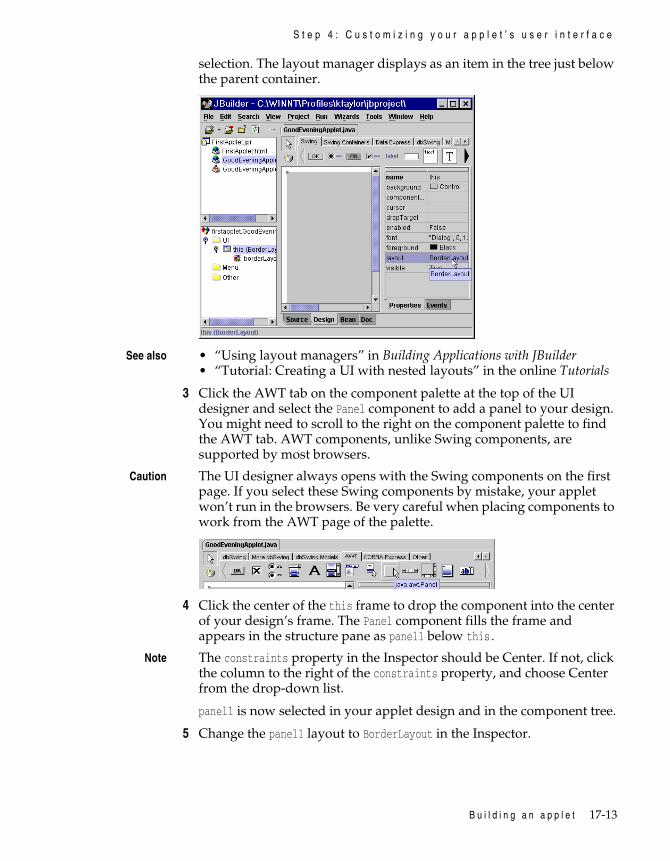
B u i l d i n g a n a p p l e t 17-13
S t e p 4 : C u s t o m i z i n g y o u r a p p l e t ’ s u s e r i n t e r f a c e
selection. The layout manager displays as an item in the tree just below the parent container.
See also • “Using layout managers” in Building Applications with JBuilder• “Tutorial: Creating a UI with nested layouts” in the online Tutorials
3 Click the AWT tab on the component palette at the top of the UI designer and select the Panel component to add a panel to your design. You might need to scroll to the right on the component palette to find the AWT tab. AWT components, unlike Swing components, are supported by most browsers.
Caution The UI designer always opens with the Swing components on the first page. If you select these Swing components by mistake, your applet won’t run in the browsers. Be very careful when placing components to work from the AWT page of the palette.
4 Click the center of the this frame to drop the component into the center of your design’s frame. The Panel component fills the frame and appears in the structure pane as panel1 below this.
Note The constraints property in the Inspector should be Center. If not, click the column to the right of the constraints property, and choose Center from the drop-down list.
panel1 is now selected in your applet design and in the component tree.
5 Change the panel1 layout to BorderLayout in the Inspector.

17-14 L e a r n i n g J a v a w i t h J B u i l d e r
S t e p 4 : C u s t o m i z i n g y o u r a p p l e t ’ s u s e r i n t e r f a c e
6 Add two panels to panel1. The top panel will contain a drop-down list of languages to select from and a label to identify the list. The bottom panel will contain “Good Evening” in various languages.
1 Shift+Click the Panel component on the component palette. Now you can add multiple panels to panel1.
2 Click twice on panel1 in the structure pane.
panel2 and panel3 are added below panel1 in the structure pane. You can also drop the components on panel1 in the designer.
3 Click the Selection Arrow on the left side of the component palette to disable the component selection.
Note If you drop the component in the wrong location, select it in the component tree and press Delete. Then add it again.
4 Check the constraints for the panels. The top panel in your design should be North and the bottom panel should be Center.
5 Rename the top panel to upper. Select the component in the component tree and double-click the column to the right of the name property in the Inspector and enter upper.
6 Rename the bottom panel to lower.
7 Change the background color of upper to Orange in the Inspector:
1 Click the column to the right of the background property in the Inspector.
2 Click the Down arrow to open the color drop-down list, and select Orange from the list.
8 Change the background color of lower to Magenta.

B u i l d i n g a n a p p l e t 17-15
S t e p 5 : A d d i n g A W T c o m p o n e n t s t o y o u r a p p l e t
9 Change lower’s layout to CardLayout. The CardLayout panel will contain 5 panels, each with “Good Evening” in a different language.
Note CardLayout places components (usually panels) on top of each other in a stack like a deck of cards. You see only one at a time, and you can flip through the panels by using another control to select which panel comes to the top. CardLayout is usually associated with a controlling component, such as a check box or a list. The state of the controlling component determines which component the CardLayout displays. The user makes the choice by selecting something on the UI.
10 Add 5 panels (panels 2 through 6) to the lower panel. Each of these panels will have “Good Evening” in a different language.
11 Change the layout for panels 2 through 6 to BorderLayout.
• Use Ctrl+Click to select panels 2 through 6 in the component tree.
• Change the layout property to BorderLayout in the Inspector. All 5 panels now have BorderLayout layout.
• Select another component in the component tree or the UI designer to deselect all the panels.
12 Change each of these 5 panels to a different color.
Tip Click the ellipsis button [...] to the right of the background property in the Inspector and use the color sliders to create a color.
13 Save the file and the project.
14 Right-click GoodEveningApplet.html and select Run. When the applet runs, you will only see upper and the top panel on the CardLayout. The other language panels will display later after we add the drop-down list and add the events to the list selections.
15 Exit the applet.
16 Close the message pane by right-clicking the GoodEveningApplet tab and selecting Remove “GoodEveningApplet” tab.
Step 5: Adding AWT components to your appletNow you’ll use the component palette to add a Label and a Choice component to the top panel in your design, upper.
1 Select the AWT tab on the component palette and click the Choice component.
2 Drop the component into your design’s top orange panel, upper. Use one of the following two methods:
• Click upper in the component tree.• Click upper in the UI designer.

17-16 L e a r n i n g J a v a w i t h J B u i l d e r
S t e p 5 : A d d i n g A W T c o m p o n e n t s t o y o u r a p p l e t
3 Select the Label component on the palette and place it on upper to the left of the Choice component. Note that label1 is added to upper in the component tree.
4 Select label1 in the component tree and complete the following steps:
1 Double-click the column to the right of the text property in the Inspector to highlight the existing text. Enter Select a language and press Enter.
2 Click the column to the right of the font property to set the font. Click the ellipsis button [...] to open the Font dialog box.
3 Choose Serif from the list of fonts and check Bold. Enter 20 in the Size box, then click OK. “Select a language” now appears in the label next to the Choice component.
4 Click the column to the right of the foreground property in the Inspector to set the text color. Click the Down arrow and select Blue from the drop-down list of colors.
Your design should look similar to this:
5 Add a label to each panel (panels 2 through 6) on the CardLayout panel. Each of these labels will have “Good Evening” in a different language.
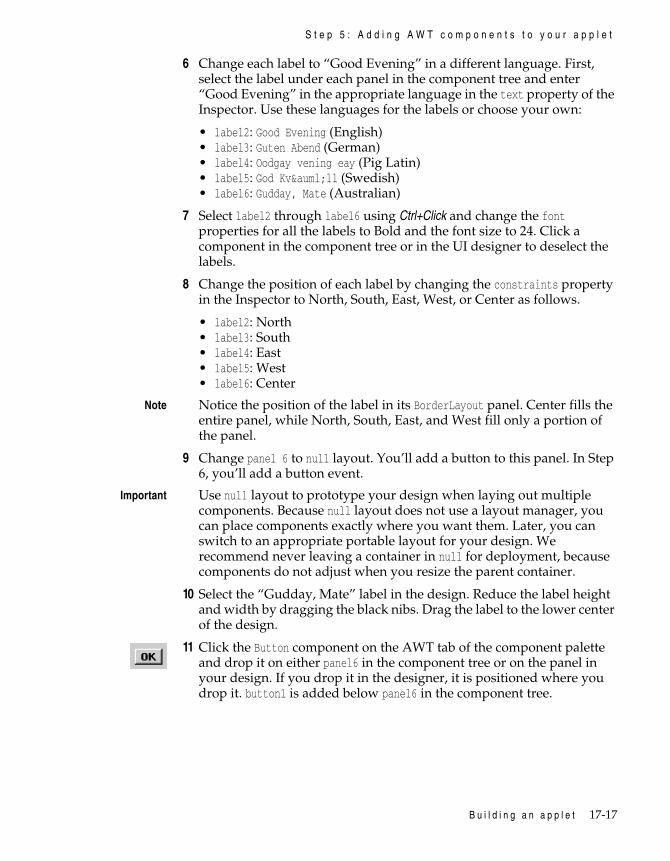
B u i l d i n g a n a p p l e t 17-17
S t e p 5 : A d d i n g A W T c o m p o n e n t s t o y o u r a p p l e t
6 Change each label to “Good Evening” in a different language. First, select the label under each panel in the component tree and enter “Good Evening” in the appropriate language in the text property of the Inspector. Use these languages for the labels or choose your own:
• label2: Good Evening (English)• label3: Guten Abend (German)• label4: Oodgay vening eay (Pig Latin)• label5: God Kväll (Swedish)• label6: Gudday, Mate (Australian)
7 Select label2 through label6 using Ctrl+Click and change the font properties for all the labels to Bold and the font size to 24. Click a component in the component tree or in the UI designer to deselect the labels.
8 Change the position of each label by changing the constraints property in the Inspector to North, South, East, West, or Center as follows.
• label2: North• label3: South• label4: East• label5: West• label6: Center
Note Notice the position of the label in its BorderLayout panel. Center fills the entire panel, while North, South, East, and West fill only a portion of the panel.
9 Change panel 6 to null layout. You’ll add a button to this panel. In Step 6, you’ll add a button event.
Important Use null layout to prototype your design when laying out multiple components. Because null layout does not use a layout manager, you can place components exactly where you want them. Later, you can switch to an appropriate portable layout for your design. We recommend never leaving a container in null for deployment, because components do not adjust when you resize the parent container.
10 Select the “Gudday, Mate” label in the design. Reduce the label height and width by dragging the black nibs. Drag the label to the lower center of the design.
11 Click the Button component on the AWT tab of the component palette and drop it on either panel6 in the component tree or on the panel in your design. If you drop it in the designer, it is positioned where you drop it. button1 is added below panel6 in the component tree.

17-18 L e a r n i n g J a v a w i t h J B u i l d e r
S t e p 6 : E d i t i n g y o u r s o u r c e c o d e
12 Select button1 in the design and drag it to the top center of the design as shown in the image below.
13 Choose File|Save All to save the project.
Step 6: Editing your source codeIn this step, we’ll be adding the languages in the drop-down list. Then we’ll add events to hook up each language panel to the Choice component.
1 Add the languages for the drop-down list to the init() method as follows:
1 Click the Source tab in the content pane to change to the source code in the editor.
2 Select the init() method in the structure pane. The init() method code is highlighted in the editor.
Tip Search for a method in the structure pane by clicking in the pane and typing the method name.
3 Position the cursor after the opening curly brace and before the try/catch statement and press Enter to create an extra blank line.
Tip To expand the editor and hide the project and structure pane, select View|Toggle Curtain.
4 Add the following code block indicated in bold:
//initialize the applet public void init() {
choice1.addItem("English"); choice1.addItem("German"); choice1.addItem("Pig Latin"); choice1.addItem("Swedish"); choice1.addItem("Australian");

B u i l d i n g a n a p p l e t 17-19
S t e p 6 : E d i t i n g y o u r s o u r c e c o d e
try { jbinit(); } catch(Exception e) { e.printStackTrace(); } }
Tip Use CodeInsight to complete the code for you. Enter choice1. and wait for the pop-up window or press Ctrl+spacebar to invoke it. Be sure to include the dot (.) after choice. Use the arrow keys to select addItem(String) from the pop-up window. Press Enter. You can configure CodeInsight in the IDE Options dialog box (Tools|IDE Options|CodeInsight).
If there are any syntax errors in your code, an Errors folder appears in the structure pane as you type in the editor. Open the folder and select the error message to highlight the error in the source code.
See also “About error and warning messages” in Building Applications with JBuilder
Next, you’ll hook up the event to the language choice. When you select a language from the drop-down list Choice component, “Good Evening” appears in the cardLayout panel in the selected language.
2 Hook up the Choice list events as follows:
1 Return to the UI designer.
2 Select choice1 located under upper in the component tree.
3 Select the Events tab in the Inspector.
4 Double-click to the right of the itemStateChanged event. JBuilder generates the method code and takes you to the source code with the cursor inserted in the method.
void choice1_itemStateChanged(ItemEvent e) { }
5 Add the following code indicated in bold to connect the correct language panel to the language choice:

17-20 L e a r n i n g J a v a w i t h J B u i l d e r
S t e p 6 : E d i t i n g y o u r s o u r c e c o d e
void choice1_itemStateChanged(ItemEvent e) {
if (choice1.getSelectedItem()== "English") { cardLayout1.show(lower, "panel2"); } else if (choice1.getSelectedItem()== "German") { cardLayout1.show(lower, "panel3"); } else if (choice1.getSelectedItem()== "Pig Latin") { cardLayout1.show(lower, "panel4"); } else if (choice1.getSelectedItem()== "Swedish") { cardLayout1.show(lower, "panel5"); } (choice1.getSelectedItem()== "Australian") { cardLayout1.show(lower, "panel6"); }
}
Tip You can use code templates to generate code. Type if and press Ctrl+J to access the code templates pop-up window. Use the arrow keys to navigate the selections. Select the if/else if template and press Enter. The code is generated:
if () { }else if { }
3 Choose File|Save All.
4 Run the applet by right-clicking GoodEveningApplet.html in the project pane and selecting Run.
If there are any errors, they appear in the message pane at the bottom of the AppBrowser. Select an error message and press F1 for Help. Select the error message to highlight the code in the editor. Sometimes the error may be before or after the highlighted line of code. Fix the errors, save the project, and run the applet again.
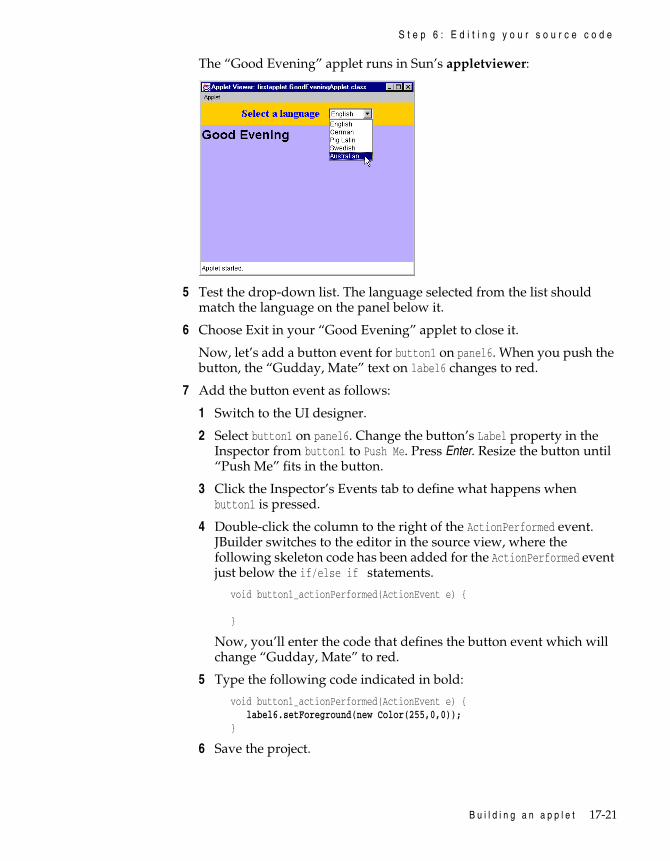
B u i l d i n g a n a p p l e t 17-21
S t e p 6 : E d i t i n g y o u r s o u r c e c o d e
The “Good Evening” applet runs in Sun’s appletviewer:
5 Test the drop-down list. The language selected from the list should match the language on the panel below it.
6 Choose Exit in your “Good Evening” applet to close it.
Now, let’s add a button event for button1 on panel6. When you push the button, the “Gudday, Mate” text on label6 changes to red.
7 Add the button event as follows:
1 Switch to the UI designer.
2 Select button1 on panel6. Change the button’s Label property in the Inspector from button1 to Push Me. Press Enter. Resize the button until “Push Me” fits in the button.
3 Click the Inspector’s Events tab to define what happens when button1 is pressed.
4 Double-click the column to the right of the ActionPerformed event. JBuilder switches to the editor in the source view, where the following skeleton code has been added for the ActionPerformed event just below the if/else if statements.
void button1_actionPerformed(ActionEvent e) {
}
Now, you’ll enter the code that defines the button event which will change “Gudday, Mate” to red.
5 Type the following code indicated in bold:
void button1_actionPerformed(ActionEvent e) {label6.setForeground(new Color(255,0,0));
}
6 Save the project.

17-22 L e a r n i n g J a v a w i t h J B u i l d e r
S t e p 7 : D e p l o y i n g y o u r a p p l e t
7 Run the applet and select “Australian” from the drop-down list. Click the “Push Me” button. “Gudday, Mate” should turn red.
Your applet should look similar to this:
8 Exit the applet.
Step 7: Deploying your appletDeploying a Java applet consists of bundling together the various Java class files, image files, and other files needed by your applet and copying them and the applet HTML file to a location on a server or client computer where they can be executed. You can deliver the files separately, or you can deliver them in compressed or uncompressed archive files. JAR files, Java archive files, are the most commonly used. JAR files provide the advantages of smaller file sizes and faster download times.
When deploying your applet, it’s important to remember the following:
• Maintain the existing directory structure. In this example, GoodEveningApplet.class must be in a firstapplet directory to reflect the package structure: firstapplet/GoodEveningApplet.class. If you’re deploying to a JAR file, check the directory structure in the file and make sure it matches.
• Deliver all the necessary classes. The class files must be in the correct location relative to the HTML file and matching the CODEBASE attribute.
• Deliver the applet HTML file.
See also • “Deploying Java programs” in Building Applications with JBuilder
• “Step 16: Deploying the “Text Editor” application to a JAR file” of the JBuilder tutorial “Building a Java text editor” (see page 19-36)
B u i l d i n g a n a p p l e t 17-23
S t e p 7 : D e p l o y i n g y o u r a p p l e t
Depending on the edition of JBuilder you have, there are several tools for deploying your applet:
• Java jar tool available with the JDK
• JBuilder’s Archive Builder available in Professional and Enterprise
Caution If you are creating your applets for older JDK 1.02-compliant browsers, keep in mind that JAR files are not supported by these older browsers. Create a ZIP archive file instead.
Important Before creating the JAR file, review this checklist:
• Save and compile your project before deploying.
• Check that the CODE attribute in GoodEveningApplet.html has the fully qualified class name, including the package name: firstapplet.GoodEveningApplet.
• Check that the CODEBASE attribute in GoodEveningApplet.html specifies the correct location of the class file relative to the HTML file. In this example, the CODEBASE is ".", because the JAR file containing the class file will be in the same directory as the HTML file. If the class files were located in a different directory, such as a class directory, the value for the CODEBASE directory would be as follows, CODEBASE = "classes".
Deploying your applet with the jar tool
JBuilder Foundation The JDK includes a jar tool in the bin directory for creating JAR files for deployment. The jar tool, an archiving and compression tool, combines multiple files into a single JAR archive.
The basic jar command is in the following form:
jar [ options ] [manifest] destination input-file [input-files]
For example,
jar cf myjarfile.jar *.class
This command creates a JAR file of all the classes in the current directory.
To include all files in the directory, use this command:
jar cf myjarfile.jar *
Note For help on additional JAR options, enter jar -help at the command line.
Create the JAR file in the following steps:
1 Save and compile your project.
2 Create an applets directory for your applet in your /[home]/jbproject directory. This will be the testing directory where you’ll put your applet HTML file and your JAR file.
3 Open the command-line shell or DOS window.

17-24 L e a r n i n g J a v a w i t h J B u i l d e r
S t e p 7 : D e p l o y i n g y o u r a p p l e t
4 Change to the classes directory in your FirstApplet project: /[home]/jbproject/FirstApplet/classes. The firstapplet directory should be in this directory.
5 Enter the JAR command.
jar cf GoodEvening.jar *
Important The JDK must be on your path. If it isn’t, use the following command. If JBuilder is on another drive, include the drive name.
/jbuilder/jdk1.3/bin/jar cf GoodEvening.jar *
Note For Windows, use backslashes (\).
6 The JAR file is created in the current classes directory. Open the JAR file and check that the directory structure is correct: firstapplet/GoodEveningApplet.class.
7 Copy GoodEvening.jar to the applets directory for testing.
After creating the JAR file, continue to “Step 8: Modifying the HTML file” on page 17-26.
See also • “Using JAR Files: The Basics” at http://java.sun.com/docs/books/tutorial/jar/basics/index.html
• “jar-The Java Archive Tool”
Deploying your applet with the Archive Builder
This is a feature ofJBuilder Professional and
Enterprise.
JBuilder’s Archive Builder collects all the files needed to distribute your applet and can archive them into a JAR file.
To deploy your applet with JBuilder Professional and Enterprise:
1 Save and compile your project.
2 Create an applets directory for your applet in your /[home]/jbproject directory. This will be the testing directory where you’ll put your applet HTML file and your JAR file.

B u i l d i n g a n a p p l e t 17-25
S t e p 7 : D e p l o y i n g y o u r a p p l e t
3 Choose Wizards|Archive Builder to open the Archive Builder.
4 Select Applet from the Archive Type drop-down list in Step 1. Click Next to continue to the Step 2.
5 Accept the default name of Applet in the Name field.
6 Click the ellipsis button next to the Path field and browse to the applets directory you created in the /[home]/jbproject directory. Change the JAR file name to GoodEvening.jar.
7 Accept the default settings in Steps 3, 4, and 5. Note that in Step 5 the option is set to create a manifest file for the archive.
Note For information on manifest files, see “About the manifest file” in “Deploying Java programs” in Building Applications with JBuilder.
8 Click Finish to exit the Archive Builder. An archive node called Applet appears in the project pane. You can modify this file by right-clicking and selecting Properties.

17-26 L e a r n i n g J a v a w i t h J B u i l d e r
S t e p 8 : M o d i f y i n g t h e H T M L f i l e
9 Compile your project by selecting Project|Make Project. The Archive Builder gathers all the files in the project’s output path (Project|Project Properties|Paths) into the JAR file.
10 Expand the icon next to the Applet archive node to see the GoodEvening.jar archive file. Double-click the JAR file in the project pane. The manifest file appears in the content pane and the contents of the JAR file appear in the structure pane. Select a file in the structure pane to view it in the content pane.
Note If you are delivering multiple programs to the same location, you can deliver the redistributable files separately, rather than include them in each of your JAR files.
Step 8: Modifying the HTML fileNow that your applet is deployed in a JAR file, you need to modify the HTML file with the ARCHIVE attribute and include the JAR file name. We’ll also add a message inside the APPLET tags that tells users without Java-enabled browsers that they won’t be able to see the applet unless they enable Java in their browser or upgrade their browser.
To modify the HTML file,
1 Open GoodEveningApplet.html in JBuilder and add the ARCHIVE attribute:
1 Select the Source tab to view the HTML source code.
2 Add the following HTML code inside the APPLET tag:
ARCHIVE = "GoodEvening.jar"
The APPLET tag should look like this:
<APPLET CODEBASE = "." CODE = "firstapplet.GoodEveningApplet.class" ARCHIVE = "GoodEvening.jar" NAME = "TestApplet" WIDTH = 400 HEIGHT = 300 HSPACE = 0 VSPACE = 0 ALIGN = middle></APPLET>
Tip If you have multiple JAR files for your applet, list them separated by a comma as shown here:
ARCHIVE="file1.jar, file2.jar"
Note Some older browsers do not support JAR files or multiple listings of archive files but do support a single ZIP file in the ARCHIVE tag.
B u i l d i n g a n a p p l e t 17-27
S t e p 8 : M o d i f y i n g t h e H T M L f i l e
2 Next, let’s add a message that tells users without Java-enabled browsers that their browsers do not support Java; therefore, they can’t see the applet. Enter the following message between the open and close APPLET tags:
You need a Java-enabled browser to view this applet.
The APPLET tag looks like this:
<APPLET CODEBASE = "." CODE = "firstapplet.GoodEveningApplet.class" ARCHIVE = "GoodEvening.jar" NAME = "TestApplet" WIDTH = 400 HEIGHT = 300 HSPACE = 0 VSPACE = 0 ALIGN = middle>You need a Java-enabled browser to view this applet.</APPLET>
Any browser that does not support Java ignores the APPLET tags and displays everything between the tags. Because a Java-enabled browser recognizes the APPLET tags, anyone with a Java-enabled browser will see the applet and not the message.
Important Before saving the HTML file, check the CODEBASE and CODE values again. If these values are incorrect, the applet won’t run. Remember that the CODEBASE value is the location of the applet code (class or JAR file) in relation to the HTML file. The value, ".", means the class file is in the same directory as the HTML file. The CODE value must be the fully qualified class name for the applet, including the package name.
3 Save and close the file.
4 Copy the modified GoodEveningApplet.html from the project’s src directory to the applets directory. The applets directory should contain two files, GoodEveningApplet.html and GoodEvening.jar.
Caution Remember, JBuilder creates two HTML files: the project notes HTML file located at the root of the project directory and the applet HTML file located in the project src directory. Do not copy FirstApplet.html to the applets directory or your applet will not run.

17-28 L e a r n i n g J a v a w i t h J B u i l d e r
S t e p 9 : R u n n i n g y o u r d e p l o y e d a p p l e t f r o m t h e c o m m a n d l i n e
Step 9: Running your deployed applet from the command lineIt’s a good idea to test the deployed applet locally before testing it on the Web. You can do this from the command line using Sun’s appletviewer. This will tell you if the browser has everything it needs to run the applet. If any files are missing or if there are any errors in the HTML file, the applet won’t run. You can then correct the errors before posting it on the Web.
To run the applet at the command line,
1 Be sure a copy of GoodEveningApplet.html and GoodEvening.jar are in the applets directory.
2 Open the command-line window.
3 Clear any CLASSPATH variables to remove any class path settings for this session as follows:
• Windows 95, 98, NT, 2000: set CLASSPATH=
• UNIX:
• in csh shell: unsetenv CLASSPATH• in sh shell: unset CLASSPATH
4 Change to the applets directory.
5 Run the appletviewer by entering the following command:
/jbuilder/jdk1.3/bin/appletviewer GoodEveningApplet.html
Important If JBuilder is on another drive, include the drive letter.
Note For Windows, use backslashes (\).
6 If the “Good Evening” applet loads and runs, the deployment was successful and all the classes were found and included. If the applet doesn’t run, check the error messages, correct them, recompile, deploy, and test again.
The “Good Evening” applet is available as a sample in the samples/Tutorials/FirstApplet directory of your JBuilder installation.
If you are having problems running your applet, check the “Applet source code” on page 17-29, and see these topics for common errors:
• “Solving common applet problems” at http://www.java.sun.com/docs/books/tutorial/applet/problems/index.html
• “Common mistakes in the APPLET tag” and “Additional tips for making applets work” in the “Working with applets” chapter of Building Applications with JBuilder.

B u i l d i n g a n a p p l e t 17-29
S t e p 1 0 : T e s t i n g y o u r d e p l o y e d a p p l e t o n t h e W e b
Step 10: Testing your deployed applet on the WebThe final step in testing your applet is to run it on the Web. This will tell you if it really has all the files it needs.
Complete these steps, then test your applet on the Web.
1 FTP (file transfer protocol) the applet’s HTML and JAR files to an Internet server or copy to a Windows NT server.
1 Use an FTP utility to transfer the files.
2 Transfer archives and class files as binary files.
3 Be sure the HTML and JAR file locations match the CODEBASE attribute in the HTML file and that the CODE attribute has the fully qualified class name (including the package name).
2 Test the applet in various browsers. If the applet fails to load, check that the browser is Java-enabled. Also check the browser’s Java Console for error messages.
To open the Java Console:
1 Select Communicator|Tools|Java Console in Netscape.2 Select View|Java Console in Internet Explorer.
Congratulations!! You’ve created your first applet with JBuilder. Now that you’re familiar with JBuilder’s development environment, you’ll find its many time-saving features make your programming easier.
For other applet tutorials, see:
• “The Java™ Tutorial” at http://java.sun.com/docs/books/tutorial/index.html
• Charlie Calvert’s Part II: Applets at http://homepages.borland.com/ccalvert/JavaCourse/index.htm
Applet source code
Applet HTML source codeSource code for GoodEveningApplet.html:
<HTML><HEAD><META HTTP-EQUIV="Content-Type" CONTENT="text/html; charset=windows-1252"><TITLE>Good Evening HTML Page</TITLE></HEAD><BODY>firstapplet.GoodEveningApplet will appear below in a Java enabled browser.

17-30 L e a r n i n g J a v a w i t h J B u i l d e r
A p p l e t s o u r c e c o d e
<APPLET CODEBASE = "." CODE = "firstapplet.GoodEveningApplet.class" ARCHIVE = "GoodEvening.jar" NAME = "TestApplet" WIDTH = 400 HEIGHT = 300 HSPACE = 0 VSPACE = 0 ALIGN = middle>You need a Java-enabled browser to view this applet.</APPLET></BODY></HTML>
Applet class source code
Source code for GoodEveningApplet.java:
package firstapplet;
import java.awt.*;import java.awt.event.*;import java.applet.*;
public class GoodEveningApplet extends Applet { boolean isStandalone = false; BorderLayout borderLayout1 = new BorderLayout(); Panel panel1 = new Panel(); BorderLayout borderLayout2 = new BorderLayout(); Panel lower = new Panel(); Panel upper = new Panel(); CardLayout cardLayout1 = new CardLayout(); BorderLayout borderLayout4 = new BorderLayout(); Panel panel2 = new Panel(); Panel panel3 = new Panel(); Panel panel4 = new Panel(); Panel panel5 = new Panel(); Panel panel6 = new Panel(); Choice choice1 = new Choice(); Label label1 = new Label(); Label label2 = new Label(); Label label3 = new Label(); Label label4 = new Label(); Label label5 = new Label(); Label label6 = new Label(); BorderLayout borderLayout3 = new BorderLayout(); BorderLayout borderLayout5 = new BorderLayout(); BorderLayout borderLayout6 = new BorderLayout(); BorderLayout borderLayout7 = new BorderLayout(); Button button1 = new Button();
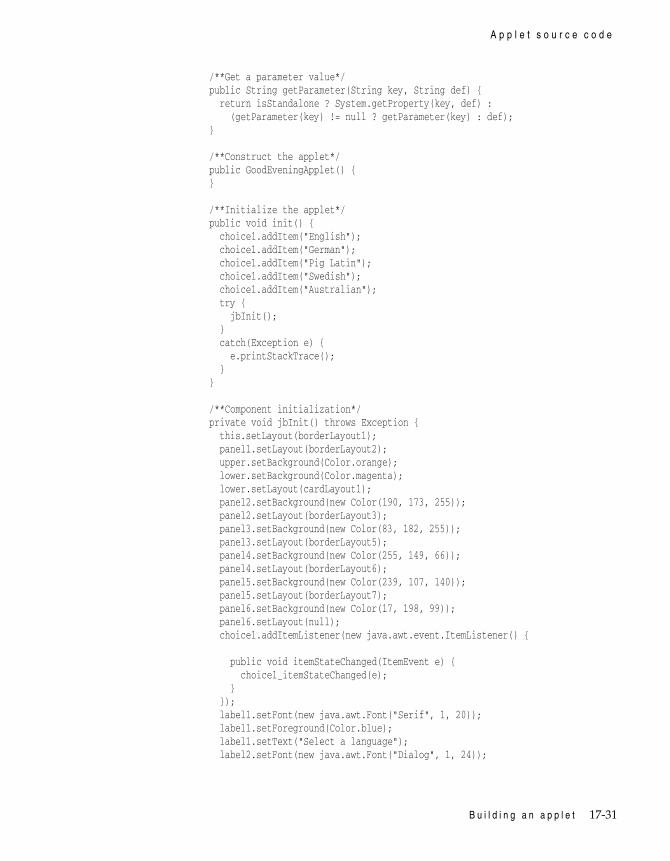
B u i l d i n g a n a p p l e t 17-31
A p p l e t s o u r c e c o d e
/**Get a parameter value*/ public String getParameter(String key, String def) { return isStandalone ? System.getProperty(key, def) : (getParameter(key) != null ? getParameter(key) : def); }
/**Construct the applet*/ public GoodEveningApplet() { }
/**Initialize the applet*/ public void init() { choice1.addItem("English"); choice1.addItem("German"); choice1.addItem("Pig Latin"); choice1.addItem("Swedish"); choice1.addItem("Australian"); try { jbInit(); } catch(Exception e) { e.printStackTrace(); } }
/**Component initialization*/ private void jbInit() throws Exception { this.setLayout(borderLayout1); panel1.setLayout(borderLayout2); upper.setBackground(Color.orange); lower.setBackground(Color.magenta); lower.setLayout(cardLayout1); panel2.setBackground(new Color(190, 173, 255)); panel2.setLayout(borderLayout3); panel3.setBackground(new Color(83, 182, 255)); panel3.setLayout(borderLayout5); panel4.setBackground(new Color(255, 149, 66)); panel4.setLayout(borderLayout6); panel5.setBackground(new Color(239, 107, 140)); panel5.setLayout(borderLayout7); panel6.setBackground(new Color(17, 198, 99)); panel6.setLayout(null); choice1.addItemListener(new java.awt.event.ItemListener() {
public void itemStateChanged(ItemEvent e) { choice1_itemStateChanged(e); } }); label1.setFont(new java.awt.Font("Serif", 1, 20)); label1.setForeground(Color.blue); label1.setText("Select a language"); label2.setFont(new java.awt.Font("Dialog", 1, 24));

17-32 L e a r n i n g J a v a w i t h J B u i l d e r
A p p l e t s o u r c e c o d e
label2.setForeground(Color.black); label2.setText("Good Evening"); label3.setFont(new java.awt.Font("Dialog", 1, 24)); label3.setForeground(Color.black); label3.setText("Guten Abend"); label4.setFont(new java.awt.Font("Dialog", 1, 24)); label4.setForeground(Color.black); label4.setText("Oodgay vening eay"); label5.setFont(new java.awt.Font("Dialog", 1, 24)); label5.setForeground(Color.black); label5.setText("God Kväll"); label6.setFont(new java.awt.Font("Dialog", 1, 24)); label6.setForeground(Color.black); label6.setText("Gudday, Mate"); label6.setBounds(new Rectangle(134, 121, 183, 58)); button1.setLabel("Push Me"); button1.setBounds(new Rectangle(160, 60, 107, 35)); button1.addActionListener(new java.awt.event.ActionListener() {
public void actionPerformed(ActionEvent e) { button1_actionPerformed(e); } }); this.add(panel1, BorderLayout.CENTER); panel1.add(lower, BorderLayout.CENTER); lower.add(panel2, "panel2"); panel2.add(label2, BorderLayout.NORTH); lower.add(panel3, "panel3"); panel3.add(label3, BorderLayout.SOUTH); lower.add(panel4, "panel4"); panel4.add(label4, BorderLayout.EAST); lower.add(panel5, "panel5"); panel5.add(label5, BorderLayout.WEST); lower.add(panel6, "panel6"); panel6.add(button1, null); panel6.add(label6, null); panel1.add(upper, BorderLayout.NORTH); upper.add(label1, null); upper.add(choice1, null); }
/**Start the applet*/ public void start() { }
/**Stop the applet*/ public void stop() { }
/**Destroy the applet*/ public void destroy() { }

B u i l d i n g a n a p p l e t 17-33
A p p l e t s o u r c e c o d e
/**Get Applet information*/ public String getAppletInfo() { return "Applet Information"; }
/**Get parameter info*/ public String[][] getParameterInfo() { return null; }
void choice1_itemStateChanged(ItemEvent e) { if (choice1.getSelectedItem()== "English") { cardLayout1.show(lower, "panel2"); } else if (choice1.getSelectedItem()== "German") { cardLayout1.show(lower, "panel3"); } else if (choice1.getSelectedItem()== "Pig Latin") { cardLayout1.show(lower, "panel4"); } else if (choice1.getSelectedItem()== "Swedish") { cardLayout1.show(lower, "panel5"); } else if (choice1.getSelectedItem()== "Australian") { cardLayout1.show(lower, "panel6"); } }
void button1_actionPerformed(ActionEvent e) { label6.setForeground(new Color(255,0,0)); }
}

17-34 L e a r n i n g J a v a w i t h J B u i l d e r

C o m p i l i n g , r u n n i n g , a n d d e b u g g i n g 18-1
C h a p t e r
18Chapter18Compiling, running, and
debugging
About this tutorialThis step-by-step tutorial shows you how to find and fix syntax errors, compiler errors, and runtime errors in a sample provided with JBuilder.
• Syntax errors are identified before you compile. Syntax errors occur in code that does not meet the syntactical requirements of the Java language.
• Compiler errors are errors generated by the compiler: the syntax may be correct, but the compiler cannot compile the code due to missing variables, missing classes, or incomplete statements. Note that the true cause of an error might occur one or more lines before or after the line number specified in the error message.
• If your program successfully compiles, but gives runtime exceptions or hangs when you run it, you’ve encountered a runtime error. Your program contains valid statements, but the statements cause errors when they’re executed.
The tutorial uses the sample project that is provided in the samples/Tutorials/DebugTutorial folder of your JBuilder installation. The sample is a simple mathematical calculator. The program contains introduced errors. Before running this tutorial, make sure that you have installed the samples folder. This sample will run under all JBuilder editions. Some steps of the tutorial use features that are available in JBuilder Professional and Enterprise. These steps are indicated as you work through the tutorial.

18-2 L e a r n i n g J a v a w i t h J B u i l d e r
S t e p 1 : O p e n i n g t h e s a m p l e p r o j e c t
Note The sample project in the samples/Tutorials/DebugTutorial folder will not run and compile as provided. You must work through this tutorial, finding and fixing the errors, in order for the program to run.
For suggestions on improving this tutorial, send email to [email protected].
Step 1: Opening the sample projectThis tutorial uses the sample project that is provided in the samples/Tutorials/DebugTutorial folder of your JBuilder installation. Before running this tutorial, make sure that you have installed the samples folder.
In this step, you will open the project file and open one of the files in the project. You’ll see that syntax errors exist in one of the files.
To open the sample project,
1 Choose File|Open Project. The Open Project dialog box is displayed.
2 Navigate to the samples/Tutorials/DebugTutorial folder of your JBuilder installation.
3 Double-click DebugTutorial.jpr. The project is opened in the project pane. The files in the project are listed in the project pane. This project consists of three files:
• Application1.java - The runnable file, containing the main() method.
• DebugTutorial.html - The HTML file that provides a descriptive overview of the project.
• Frame1.java - The file that contains the frame, the components, and the methods for the program.
4 Double-click Frame1.java. This opens the file in the editor and displays its structure in the structure pane.

C o m p i l i n g , r u n n i n g , a n d d e b u g g i n g 18-3
S t e p 2 : F i x i n g s y n t a x e r r o r s
Notice the Errors folder in the structure pane. You will be finding and fixing these errors in Step 2 of the tutorial.
Step 2: Fixing syntax errorsSyntax errors do not meet the syntactical requirements of the Java language. JBuilder identifies these errors before you compile. They are listed in the Errors folder of the structure pane. If you try to compile the program without fixing these syntax errors, JBuilder will display the errors in the message pane. The program cannot be compiled until these errors are fixed.
In this step, you will find the syntax errors in the sample program and fix them. For more information on JBuilder’s error messages, see the topic called “Error messages” in Building Applications with JBuilder.
To find and fix syntax errors,
1 Expand the Errors folder in the structure pane.
Three errors are listed. The first error:
';' expected at line 38
indicates that a semi-colon is missing from the end of line 38.
2 Click the error in the structure pane. JBuilder moves the cursor to line 38 in the editor. If you single-click the error message, JBuilder highlights the line of the code where the error occurred. A double-click places the cursor in the column where the error occurred.
Tip The content pane’s status bar displays the line and column number, as well as the insert mode.
3 Add a semi-colon to the end of the line. You’ve fixed the error, and it is removed from the structure pane.
4 Click the next error in the structure pane:
illegal start of type at line 222
JBuilder moves the cursor to line 222 in the editor. This error is a little trickier to decipher. The message means that a type identifier was expected at this point in the program, but was not found. Notice that line 222 starts with the keyword else, and that line 221 consists of a single closing brace. If you read the code before line 222, you’ll notice the beginning of an if statement on line 219. In Java, an if statement
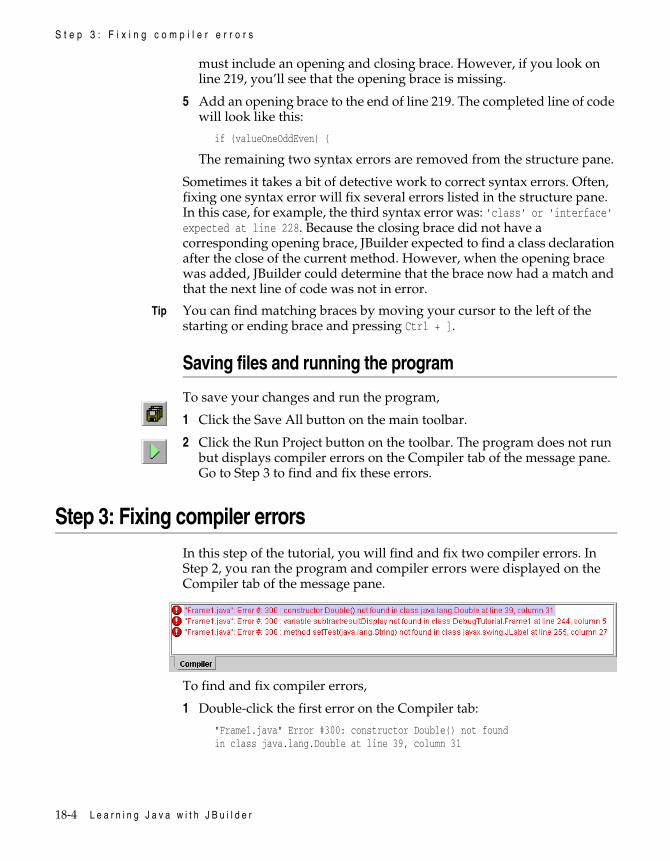
18-4 L e a r n i n g J a v a w i t h J B u i l d e r
S t e p 3 : F i x i n g c o m p i l e r e r r o r s
must include an opening and closing brace. However, if you look on line 219, you’ll see that the opening brace is missing.
5 Add an opening brace to the end of line 219. The completed line of code will look like this:
if (valueOneOddEven) {
The remaining two syntax errors are removed from the structure pane.
Sometimes it takes a bit of detective work to correct syntax errors. Often, fixing one syntax error will fix several errors listed in the structure pane. In this case, for example, the third syntax error was: 'class' or 'interface' expected at line 228. Because the closing brace did not have a corresponding opening brace, JBuilder expected to find a class declaration after the close of the current method. However, when the opening brace was added, JBuilder could determine that the brace now had a match and that the next line of code was not in error.
Tip You can find matching braces by moving your cursor to the left of the starting or ending brace and pressing Ctrl + ].
Saving files and running the program
To save your changes and run the program,
1 Click the Save All button on the main toolbar.
2 Click the Run Project button on the toolbar. The program does not run but displays compiler errors on the Compiler tab of the message pane. Go to Step 3 to find and fix these errors.
Step 3: Fixing compiler errorsIn this step of the tutorial, you will find and fix two compiler errors. In Step 2, you ran the program and compiler errors were displayed on the Compiler tab of the message pane.
To find and fix compiler errors,
1 Double-click the first error on the Compiler tab:
"Frame1.java" Error #300: constructor Double() not foundin class java.lang.Double at line 39, column 31

C o m p i l i n g , r u n n i n g , a n d d e b u g g i n g 18-5
S t e p 3 : F i x i n g c o m p i l e r e r r o r s
JBuilder positions the cursor on line 39, column 31 in the editor, the location of the error.
The error message indicates that the Java class java.lang.Double does not contain a parameterless constructor. The highlighted statement is attempting to create a new Double object that does not have a parameter. If you look at the constructors in the java.lang.Double class, you’ll see that all constructors require a parameter. Additionally, if you look a few lines further on in the program, you’ll see that the Double object, valueTwoDouble, is constructed with an initial value of 0.0.
Tip Position the cursor between the parenthesis and press Ctrl+Shift+Space to display ParameterInsight, JBuilder’s pop-up window that displays the required parameter type. You can also right-click the Double() method and choose Browse Symbol to open the source in the editor.
2 Insert 0.0 between the parenthesis on line 39. The statement will now read:
Double valueOneDouble = new Double(0.0)
Tip The content pane status bar now displays the word Modified, indicating that you’ve made changes to the file.
3 Click the Save All button on the toolbar.
4 Click the Run Project button on the toolbar. The program is recompiled. Because you fixed the first compiler error, it is no longer displayed on the Compiler tab.
5 Double-click the first error on the Compiler tab:
"Frame1.java" Error 300: variable subtractresultDisplay not foundin class DebugTutorial.Frame1 at line 244, column 5
This error indicates that the variable subtractresultDisplay in line 243 has not been defined.
6 Choose Search|Find to display the Find/Replace Text dialog box.
Tip If the Find command is dimmed, click the file you want to search in and then choose Search|Find.

18-6 L e a r n i n g J a v a w i t h J B u i l d e r
S t e p 3 : F i x i n g c o m p i l e r e r r o r s
7 Enter subtractresultDisplay in the Text To Find field. Make sure the Case Sensitive option is turned off. Click the Search From Start Of File option to start the search from the beginning of the file.
8 Click Find All. The results of the search are displayed on the Search Results tab of the message pane.
Notice that two of the three references to this label are subtractResultDisplay; there is an uppercase R in Result. Casing is critical in Java: subtractresultDisplay is not the same as subtractResultDisplay.
9 Double-click the incorrect word in the Search Results tab to move the cursor to the word in the editor. JBuilder highlights the word.
10 Change subtractresultDisplay to subtractResultDisplay.
11 Right-click the Search Results tab and choose Remove “Search Results” Tab to close the search results.
To use CodeInsight to fix a compiler error,
1 Double-click the next compiler error in the Compiler tab. This error indicates that there is no setTest() method in javax.swing.JLabel.
"Frame1.java" Error #300: method setTest(java.lang.String) notfound in class javax.swing.JLabel at line 255, column 27
JBuilder positions the cursor on line 255, column 27.

C o m p i l i n g , r u n n i n g , a n d d e b u g g i n g 18-7
S t e p 3 : F i x i n g c o m p i l e r e r r o r s
2 Press Ctrl+Space while the cursor is positioned after the dot (.). This will display the CodeInsight pop-up window that displays available member functions.
Note If the pop-up window is not displayed, choose the Keystrokes button on the CodeInsight page of the Editor Options dialog box (Tools|Editor Options). Use the keystrokes that are defined for your editor or customize them. For more information, see “Keymaps for editor emulations” on page 4-5.
3 Scroll through the window using the arrow keys. Those items that are bolded are in this class. The items with lines through them have been deprecated. The grayed-out items are inherited, but are available for use.
4 Search for setText by typing setText or scrolling. Once selected, double-click it or press Enter. The setText() method is inserted in the editor after the dot, replacing the incorrect setTest method name. A tool tip displays the expected method parameter type.

18-8 L e a r n i n g J a v a w i t h J B u i l d e r
S t e p 4 : F i x i n g t h e s u b t r a c t V a l u e s ( ) m e t h o d
Saving files and running the programTo save your changes and run the program,
1 Click the Save All button on the toolbar.
2 Click the Run Project button on the toolbar. The program runs and the UI is displayed.
3 Enter values into the program’s Value 1 and Value 2 input fields. Press the Compute Values button. The values are computed and displayed. However, if you look carefully at computed results, you’ll see that there are some runtime errors; the program compiles and runs but gives incorrect results. You will find and fix these errors in the next steps.
4 Choose File|Exit to exit the application.
5 Right-click the Application1 tab in the message pane, and choose Remove “Application1” Tab.
Step 4: Fixing the subtractValues() methodIn this step of the tutorial, you will find and fix one of three runtime errors. To find this error, you’ll use debugger features. You’ll learn how to start and stop the debugger; create a floating window for one of the debugger views; set a breakpoint; step into and step over a method; trace into a thread; set a this watch, an object watch, and a local variable watch; and use the Evaluate/Modify dialog box.
In Step 3, you ran the program. When you entered values into the Value 1 and Value 2 input fields, and pressed Compute Values to compute the added, subtracted, multiplied, and divided values, you may have noticed that the subtracted value was not correct.
For example, if you enter 4 in the Value 1 field and 3 in the Value 2 field, the subtracted result is 0.0 instead of 1.0.
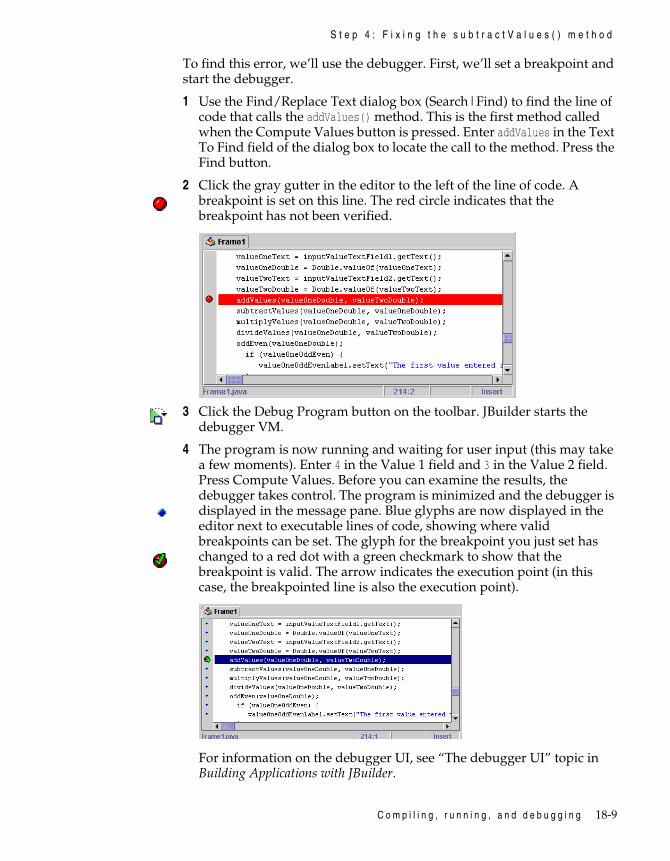
C o m p i l i n g , r u n n i n g , a n d d e b u g g i n g 18-9
S t e p 4 : F i x i n g t h e s u b t r a c t V a l u e s ( ) m e t h o d
To find this error, we’ll use the debugger. First, we’ll set a breakpoint and start the debugger.
1 Use the Find/Replace Text dialog box (Search|Find) to find the line of code that calls the addValues() method. This is the first method called when the Compute Values button is pressed. Enter addValues in the Text To Find field of the dialog box to locate the call to the method. Press the Find button.
2 Click the gray gutter in the editor to the left of the line of code. A breakpoint is set on this line. The red circle indicates that the breakpoint has not been verified.
3 Click the Debug Program button on the toolbar. JBuilder starts the debugger VM.
4 The program is now running and waiting for user input (this may take a few moments). Enter 4 in the Value 1 field and 3 in the Value 2 field. Press Compute Values. Before you can examine the results, the debugger takes control. The program is minimized and the debugger is displayed in the message pane. Blue glyphs are now displayed in the editor next to executable lines of code, showing where valid breakpoints can be set. The glyph for the breakpoint you just set has changed to a red dot with a green checkmark to show that the breakpoint is valid. The arrow indicates the execution point (in this case, the breakpointed line is also the execution point).
For information on the debugger UI, see “The debugger UI” topic in Building Applications with JBuilder.

18-10 L e a r n i n g J a v a w i t h J B u i l d e r
S t e p 4 : F i x i n g t h e s u b t r a c t V a l u e s ( ) m e t h o d
5 Click the Breakpoints tab on the left side of the debugger to go to the Data and code breakpoints view. The default breakpoint and the breakpoint you just set are displayed. The debugger status bar displays a message indicating that the program has stopped on the breakpoint you set in the editor.
The next step is to trace into the stepping thread. This allows you to see where methods are called and set watches on those methods.
1 Go to the Threads, call stacks, and data view. Notice how the view is split, allowing you to see the contents of the item selected on the left side on the right side. (The split view is a feature of JBuilder Professional and Enterprise.)
Step 2 is for JBuilderProfessional and
Enterprise users only.
2 Right-click an empty area of the left side of the view and choose Floating Window. The view now turns into a floating window and is initially displayed at the top left of the screen. You can resize the window or move it. Changing a view to a window allows you to look at more than one debugger view at a time. (Note that all views, except the Console, output, input and errors view, can be turned into floating windows.)
Step 3 is for JBuilderProfessional and
Enterprise users only.
3 Scroll in the editor so that you can see the breakpoint and the floating window at the same time.
4 You could have set the breakpoint on the call to the subtractValues() method instead of the addValues() method, allowing you to get closer to the actual area of the program you want to examine more closely.

C o m p i l i n g , r u n n i n g , a n d d e b u g g i n g 18-11
S t e p 4 : F i x i n g t h e s u b t r a c t V a l u e s ( ) m e t h o d
To do this, click the Step Over button on the debugger toolbar. This steps over the call to the addValues() method, positioning the execution point on the call to the subtractValues() method.
5 Click the Step Into button to step into the subtractValues() method. The subtractValues() method is now at the top of the right pane of the floating Threads, call stacks and data view.
Step 6 is for JBuilderProfessional and
Enterprise users only.
6 Right-click an empty area on the left side of the floating Threads, call stacks and data view and uncheck Floating Window to close it. The floating window is displayed again as a debugger view.
Tip If you want to reset the debugger tabs to their default order, right-click an empty area of the view and choose Restore Default View Order.
7 Go to the Threads, call stacks, and data view and expand the subtractValues() method.
Tip You can use the Show Current Frame button to display only data on the right side of the view.
The next step is to set watches on objects and variables. This allows you to examine data values.
1 Create a this object watch by right-clicking the this object in the expanded list:
this = {DebuggerTutorial.Frame1@3c6}
Choose the Create ‘this’ Watch command. A watch on the this object allows you to trace through the current instantiation of the class.

18-12 L e a r n i n g J a v a w i t h J B u i l d e r
S t e p 4 : F i x i n g t h e s u b t r a c t V a l u e s ( ) m e t h o d
2 The Add Watch dialog box is displayed, with the Enter A Watch Description field available. Click OK.
You do not need to enter a description for the watch. If you do enter a description, it is displayed on the same line as the watched expression in the Data watches view. A description may make individual watches easier to locate in the view.
3 Right-click the this object again:
this = {DebuggerTutorial.Frame1@3c6}.
This time, choose the Create Object Watch command to create an object watch. The Add Watch dialog box is displayed. Click OK.
4 Right-click the valueOneDouble object in the expanded list to create a watch on the first value being passed to the subtractValues()method:
valueOneDouble: java.lang.Double. = {java.lang.Double@3c7}.
Choose the Create Local Variable Watch command. The Add Watch dialog box is displayed. Click OK.
5 Right-click the valueTwoDouble object in the expanded list to create a watch on the second value being passed to the method:
valueTwoDouble: java.lang.Double. = {java.lang.Double@3c7}.
Choose the Create Local Variable Watch command. The Add Watch dialog box is displayed. Click OK.
6 Go to the Data watches view.
7 Expand the first two watches: the this watch and the <reference> watch. In this case, both the watches provide the same data, as the two watches are identical. Note that you can watch all object data in this view (except static data). The grayed-out items are inherited. Collapse these two watches. The remaining two watches, the local variable watches, watch the values of valueOneDouble and valueTwoDouble.
8 Click the Step Into button to step into the subtractValues() method.
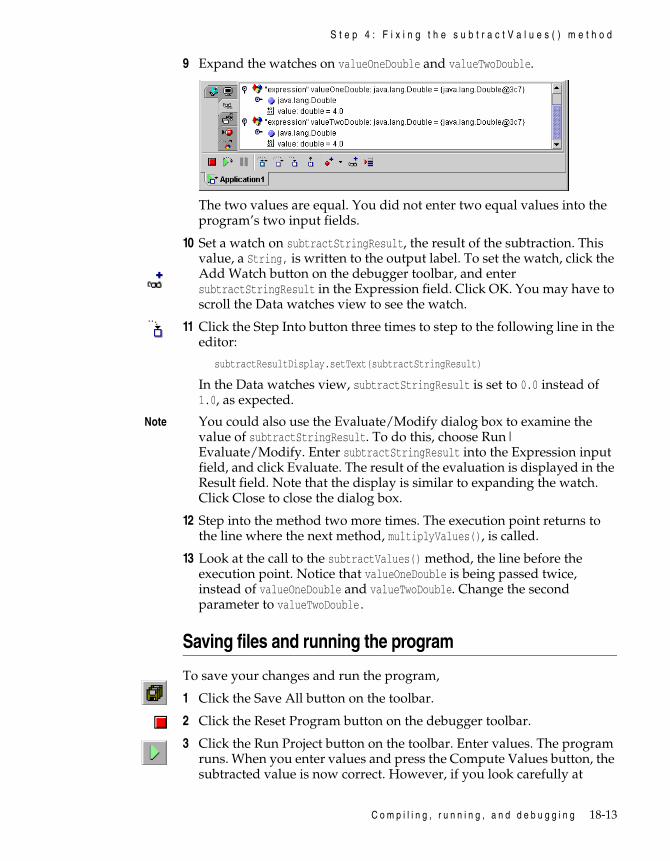
C o m p i l i n g , r u n n i n g , a n d d e b u g g i n g 18-13
S t e p 4 : F i x i n g t h e s u b t r a c t V a l u e s ( ) m e t h o d
9 Expand the watches on valueOneDouble and valueTwoDouble.
The two values are equal. You did not enter two equal values into the program’s two input fields.
10 Set a watch on subtractStringResult, the result of the subtraction. This value, a String, is written to the output label. To set the watch, click the Add Watch button on the debugger toolbar, and enter subtractStringResult in the Expression field. Click OK. You may have to scroll the Data watches view to see the watch.
11 Click the Step Into button three times to step to the following line in the editor:
subtractResultDisplay.setText(subtractStringResult)
In the Data watches view, subtractStringResult is set to 0.0 instead of 1.0, as expected.
Note You could also use the Evaluate/Modify dialog box to examine the value of subtractStringResult. To do this, choose Run|Evaluate/Modify. Enter subtractStringResult into the Expression input field, and click Evaluate. The result of the evaluation is displayed in the Result field. Note that the display is similar to expanding the watch. Click Close to close the dialog box.
12 Step into the method two more times. The execution point returns to the line where the next method, multiplyValues(), is called.
13 Look at the call to the subtractValues() method, the line before the execution point. Notice that valueOneDouble is being passed twice, instead of valueOneDouble and valueTwoDouble. Change the second parameter to valueTwoDouble.
Saving files and running the program
To save your changes and run the program,
1 Click the Save All button on the toolbar.
2 Click the Reset Program button on the debugger toolbar.
3 Click the Run Project button on the toolbar. Enter values. The program runs. When you enter values and press the Compute Values button, the subtracted value is now correct. However, if you look carefully at

18-14 L e a r n i n g J a v a w i t h J B u i l d e r
S t e p 5 : F i x i n g t h e d i v i d e V a l u e s ( ) m e t h o d
remaining results, you’ll see that the divided result is also incorrect. Go to Step 5 to find and fix the error.
4 Exit the program before you proceed to Step 5. Remove the message pane tabs by right-clicking the Application1 tab and choosing Remove “Application1” Tab.
Step 5: Fixing the divideValues() methodIn this step of the tutorial, you will find and fix another of three runtime errors. You will set a breakpoint, step into a method, and learn how to use tool tips and ExpressionInsight to locate errors.
In Step 4, you found and fixed an error with the call to the subtractValues() method. Now, when you run the program again, you may notice that the divided result is also incorrect. For example, if you enter 4 in the Value 1 field and and 2 in the Value 2 field, the divided result is 8.0 instead of 2.0.
To find this error, we’ll first set a breakpoint, step into the questionable method, and use ExpressionInsight and tool tips to find the error.
1 Choose Run|View Breakpoints to remove the breakpoint you set in Step 4. In the Breakpoints dialog box, right-click the following breakpoint:
class DebugTutorial.Frame1; line 214; (unverified)
Choose Remove Breakpoint and click the Close button to close the dialog box.
2 Use the Find/Replace Text dialog box to locate the call to the divideValues() method.
3 Set a breakpoint on this line.
This step is for JBuilderProfessional and
Enterprise users only.
4 Right-click the breakpointed line, and choose Breakpoint Properties to open the Breakpoint Properties dialog box.

C o m p i l i n g , r u n n i n g , a n d d e b u g g i n g 18-15
S t e p 5 : F i x i n g t h e d i v i d e V a l u e s ( ) m e t h o d
This step is for JBuilderProfessional and
Enterprise users only.
5 Click the Log Message option. In the Evaluate Expression input field, enter:
System.out.println("divideValues method reached")
The message will be written to the Console output, input and errors view when the specified breakpoint is reached. If the Stop Execution option is also selected the program will stop. The dialog box will look similar to this:
Click OK to close the dialog box.
6 Click the Debug button on the main toolbar.
7 Enter 4 in the Value 1 input box and 2 in the Value 2 input box when the program’s UI is displayed. Press Compute Values. Remember, before you can examine the results, the debugger takes control. The program is minimized and the debugger is displayed in the message pane.
This step is for JBuilderProfessional and
Enterprise users only.
8 Go to the Console output, input and errors view. You’ll see the message:
divideValues method reached
During the development cycle, you can use this feature instead of adding println statements to your code.
9 Go to the Data and code watches view. Notice that most of the watches are no longer in scope.
10 Right-click an empty area of the view and choose Remove All.

18-16 L e a r n i n g J a v a w i t h J B u i l d e r
S t e p 5 : F i x i n g t h e d i v i d e V a l u e s ( ) m e t h o d
11 Click the Step Into button to step into the divideValues() method.
12 Click the button three more times, so that you step past the line that reads:
divideResult = (valueOneDoubleResult * valueTwoDoubleResult)
This step is for JBuilderProfessional and
Enterprise users only.
13 Position the mouse over the variable divideResult in the editor. A tool tip displaying the value of divideResult pops up. Notice that the value is incorrect. Based on what you entered, the result should be 2.0. However, it is 8.0.
You can also press the Ctrl key plus right-click the mouse button to display ExpressionInsight. This pop-up window shows the expression name, its type, and its value. If the expression is an object, you can descend into the object members, as well as use a right-click menu to set watches, change values, and change base display values. For example, position the cursor over divideResultDisplay in line 265. Press the Ctrl key plus right-click the mouse button. You will see the

C o m p i l i n g , r u n n i n g , a n d d e b u g g i n g 18-17
S t e p 5 : F i x i n g t h e d i v i d e V a l u e s ( ) m e t h o d
members of the JLabel object. As you scroll down, notice the grayed-out items: these are inherited.
Click in the editor to close the ExpressionInsight window. The window will also automatically close if the cursor is repositioned.
14 Carefully read this line of source code (line 264):
divideResult = (valueOneDoubleResult * valueTwoDoubleResult)
Can you find the error? The divideResult() method is multiplying values instead of dividing them.
15 To fix the error, change the * operator to /.
Saving files and running the program
To save your changes and run the program,
1 Remove the breakpoint in the editor.
2 Click the Save All button on the toolbar.
3 Click the Reset Program button on the debugger toolbar.
4 Click the Run Project button on the toolbar. Enter values in the Value 1 and Value 2 input fields. The program runs and the divided value is now correct. However, if you look carefully at the remaining results, you may spot the last error. If you enter an odd number in the Value 1 field, the program incorrectly reports that the value is even. If you enter an even value, the program says it is odd.

18-18 L e a r n i n g J a v a w i t h J B u i l d e r
S t e p 6 : F i x i n g t h e o d d E v e n ( ) m e t h o d
5 Exit the application before you proceed to Step 6. Remove the Application1 tab from the message pane.
Step 6: Fixing the oddEven() methodIn this step of the tutorial, you will find the last of the three runtime errors. You will use the Evaluate/Modify dialog box to evaluate a method call, step into and over a method, set a watch, and change a boolean value on-the-fly to test a theory.
In Step 5, you fixed an error in the divideValues() method. Now, when you run the program again, you may notice the statement saying whether the first value is odd or even is incorrect.
For example, if you enter 4 into the Value 1 field, the program reports it is an odd number. However, if you enter 3, the program says that the value is even. In this last step, you will find and fix this error.
To find this error, we’ll use the Evaluate/Modify dialog box to evaluate the method that determines if the number is odd or even. Then we’ll set a watch on the result returned from the method to see if it’s printing to the screen correctly.
1 Use the Find/Replace Text dialog box to locate the call to the oddEven() method in Frame1.java. Notice that a variable name also includes the text OddEven. To find the method, you can turn the Case Sensitive option on in the dialog box or search for: oddEven(
2 Set a breakpoint on this line:
oddEven(valueOneDouble);
3 Click the Debug button.
4 Enter 3 in the Value 1 input box and 4 in the Value 2 input box when the program’s UI is displayed. Click the Compute Values button. The focus returns to the debugger.
This step is for JBuilderProfessional and
Enterprise users only.
5 Choose Run|Evaluate/Modify to open the Evaluate/Modify dialog box.
Tip: You can also right-click in the editor and choose Evaluate/Modify.

C o m p i l i n g , r u n n i n g , a n d d e b u g g i n g 18-19
S t e p 6 : F i x i n g t h e o d d E v e n ( ) m e t h o d
Enter oddEven(valueOneDouble) in the Expression input box. Click Evaluate. You’ll see that the method returns true.
Close the Evaluate/Modify dialog box.
Now, we’ll step into the method in order to evaluate what the true value means.
6 Go to the Data watches view. Set a watch on valueOneOddEven.
7 Click the Step Into button on the debugger toolbar. When you step into the oddEven()method, the value of valueOneOddEven is true, because the value was initialized to true. (To see the initialization, use the Search|Go To Line command to go to line 62 in Frame1.java. Then, use Run|Show Execution Point to return to the cursor location.)
8 Click Step Into three more times to step further into the method. This method determines if the value is odd or even. As you step, the value of valueOneOddEven remains true. Is this correct? Does the result of (3 modulus 2) equal zero? It actually does not equal zero, and the value of valueOneOddEven should be set to false.
This step is for JBuilderProfessional and
Enterprise users only.
9 Right-click valueOneOddEven in the Data watches view and choose Change Value to test this theory. The Change Value dialog box is displayed.
Enter false and click OK. The value of valueOneOddEven is set to false. You just changed the method’s returned value from true to false.
Click OK to close the dialog box.
10 Click Step Out to step out of the method and return to the calling location, then click Step Into to trace into the if statement in the next line of code.
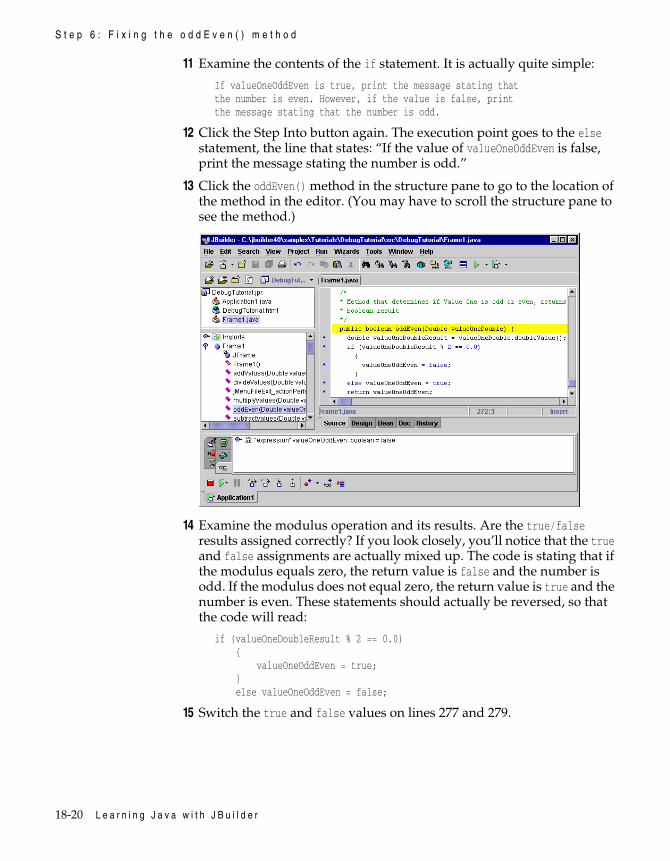
18-20 L e a r n i n g J a v a w i t h J B u i l d e r
S t e p 6 : F i x i n g t h e o d d E v e n ( ) m e t h o d
11 Examine the contents of the if statement. It is actually quite simple:
If valueOneOddEven is true, print the message stating thatthe number is even. However, if the value is false, print the message stating that the number is odd.
12 Click the Step Into button again. The execution point goes to the else statement, the line that states: “If the value of valueOneOddEven is false, print the message stating the number is odd.”
13 Click the oddEven() method in the structure pane to go to the location of the method in the editor. (You may have to scroll the structure pane to see the method.)
14 Examine the modulus operation and its results. Are the true/false results assigned correctly? If you look closely, you’ll notice that the true and false assignments are actually mixed up. The code is stating that if the modulus equals zero, the return value is false and the number is odd. If the modulus does not equal zero, the return value is true and the number is even. These statements should actually be reversed, so that the code will read:
if (valueOneDoubleResult % 2 == 0.0) { valueOneOddEven = true; } else valueOneOddEven = false;
15 Switch the true and false values on lines 277 and 279.

C o m p i l i n g , r u n n i n g , a n d d e b u g g i n g 18-21
S t e p 7 : F i n d i n g r u n t i m e e x c e p t i o n s
To save your changes and run the program,
1 Save your files.
2 Click the Reset Program button on the debugger toolbar.
3 Run the program again.
4 Enter 3 in the Value 1 input box and 4 in the Value 2 input box. Click the Compute Values button. The result is correct! The program now correctly informs you that Value 1 is an odd number.
5 Click File|Exit to exit the program. Remove the Application1 tab.
In the next step, you will see what happens when a runtime exception is generated.
Step 7: Finding runtime exceptionsIn this step of the tutorial, you’ll see what happens when a runtime exception is generated. The sample program does not do any error handling. For example, if you enter a character in the Value 1 or Value 2 fields instead of a number, the program will generate a runtime exception stack trace. It won’t gracefully tell you that the value was not the expected format or provide information about valid values.
To see what a runtime exception stack trace looks like,
1 Run the program.
2 Enter eeee in the Value 1 input field. Enter 3 in the Value 2 input field. Press Compute Values.

18-22 L e a r n i n g J a v a w i t h J B u i l d e r
S t e p 7 : F i n d i n g r u n t i m e e x c e p t i o n s
3 Minimize the program to view the message pane.
The Application1 tab now displays a NumberFormatException stack trace. This is a trace of how your program arrived at this exception. Scroll to the top of the pane.
This step is for JBuilderProfessional and
Enterprise users only.
4 Click the first class name in the stack trace to see where the exception is thrown. In this case, click java.lang.FloatingDecimal.
JBuilder opens the source code for java.lang.FloatingDecimal and highlights the line of code where the exception is thrown.
You can click other classes in the stack trace to trace through the steps that brought the program to this exception.
To handle this exception is beyond the scope of this tutorial. To run the program again without the exception, just close the program and run it again entering numeric values.

C o m p i l i n g , r u n n i n g , a n d d e b u g g i n g 18-23
S t e p 7 : F i n d i n g r u n t i m e e x c e p t i o n s
Congratulations, you have finished this tutorial. You found and fixed syntax errors, compiler errors, and runtime errors using JBuilder’s integrated debugger. You also saw an example of a runtime exception stack trace.
For more information on compiling, running, and debugging, read the following chapters in the online Help book, Building Applications with JBuilder:
• “Compiling Java programs”• “Running Java programs”• “Debugging Java programs”

18-24 L e a r n i n g J a v a w i t h J B u i l d e r
B u i l d i n g a J a v a t e x t e d i t o r 19-1
C h a p t e r
19Chapter19Building a Java text editor
About this tutorial
Overview
This step-by-step tutorial builds a Java application in JBuilder called “Text Editor,” which is a simple text editor capable of reading, writing, and editing text files.
This text editor will be able to set the text color, as well as the background color of the text editing region. In the JBuilder Professional and Enterprise versions of the tutorial, it will also be able to set the text font.
The tutorial takes approximately two hours to complete.

19-2 L e a r n i n g J a v a w i t h J B u i l d e r
S t e p 1 : C r e a t i n g t h e p r o j e c t
What this tutorial demonstrates
Some steps in this tutorialare specific to JBuilder
Professional andEnterprise editions. This is
noted at the top of thosesteps, or in the margin.
The Text Editor tutorial uses the Project and Application wizards to create the project. Then it shows you how to use the visual design tools, modify the UI design, hook up events, and edit source code. It steps you through handling events for commonly used components and tasks, such as menu items, a toolbar, a text area, and system events. It contains specific examples that show you how to do the following:
• Use the JFileChooser dialog box to allow the user to select a file.
• Read and write text from a text file and manipulate text with a JTextArea.
• Set foreground and background colors.
This step is for JBuilderProfessional andEnterprise only.
• Set the font using the dbSwing FontChooser dialog.
• Display information in a status bar and in the window caption.
• Add code manually to handle UI events.
• Have a menu item and a button execute the same code by putting the code in a new “helper” method that is called by both event handlers.
• Add a right-click menu to the JTextArea component.
• Keep track of the current filename and whether the file is dirty. Shows you how to handle the logic of this for File|New, File|Open, File|Save, File|SaveAs, editing, and exit.
This step is for JBuilderProfessional andEnterprise only.
• Deploy the “Text Editor” application to a JAR file.
To see the complete source for the Text Editor sample, open the project:
• Foundation:jbuilder/samples/swing/SimpleTextEditor/SimpleTextEditor.jpr
• Professional and Enterprise: jbuilder/samples/TextEditor/TextEditor.jpr
Step 1: Creating the projectTo start this tutorial, create a project that contains the necessary files for building your user interface.
Using the Project wizard
There are two wizards you can use to speed up this process: the Project wizard and the Application wizard.
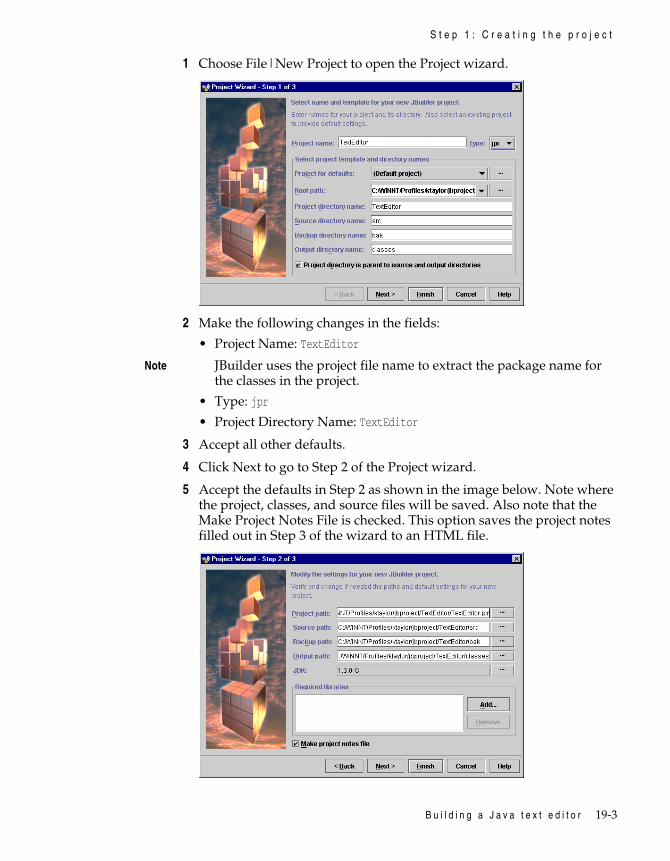
B u i l d i n g a J a v a t e x t e d i t o r 19-3
S t e p 1 : C r e a t i n g t h e p r o j e c t
1 Choose File|New Project to open the Project wizard.
2 Make the following changes in the fields:
• Project Name: TextEditor
Note JBuilder uses the project file name to extract the package name for the classes in the project.
• Type: jpr
• Project Directory Name: TextEditor
3 Accept all other defaults.
4 Click Next to go to Step 2 of the Project wizard.
5 Accept the defaults in Step 2 as shown in the image below. Note where the project, classes, and source files will be saved. Also note that the Make Project Notes File is checked. This option saves the project notes filled out in Step 3 of the wizard to an HTML file.

19-4 L e a r n i n g J a v a w i t h J B u i l d e r
S t e p 1 : C r e a t i n g t h e p r o j e c t
6 Click Next to continue to Step 3 of the Project wizard.
7 Fill out the optional title, author, company, and project description fields.
8 Press Finish to create the project.
See also “How JBuilder constructs paths” and “Where are my files?” in the “Creating and managing projects” chapter of Building Applications with JBuilder
Changing the project propertiesNow, let’s change one of the project properties for this project.
1 Select Project|Project Properties and click the General tab.
2 Uncheck the Enable Source Package Discovery And Compilation option. In most cases, it’s best to leave this option on. For a description of this option, press the Help button on the General page.
See also “Setting project properties” in the “Creating and managing projects” chapter of Building Applications with JBuilder
Selecting the project’s code style optionsBefore you go on, make sure you select the same code style options we used for the JBuilder-generated code in the sample. You do this in the Project Properties dialog box.
To change the code style options,
1 Right-click TextEditor.jpr in the project pane (upper left), and choose Properties.
2 Click the Code Style tab in the Project Properties dialog box.
B u i l d i n g a J a v a t e x t e d i t o r 19-5
S t e p 1 : C r e a t i n g t h e p r o j e c t
Choosing the event handler typeFirst, you need to choose which style event handler to generate. JBuilder can use either anonymous inner classes or separate adapter classes. In this tutorial, we use separate adapter classes.
On the Project Properties Code Style tab, check Standard Adapter for the Event Handling option.
Note Regardless of which style event handler method you use, the code you put inside the method will be the same.
For more information on the differences between event handler styles, see “Choosing which type of event handler to use” in the topic “Working with events” in Building Applications with JBuilder.
Choosing how to instantiate objectsChoose which method to use for instantiating objects. JBuilder gives you the option of instantiating objects using Beans.instantiate(), as well as using the keyword new. This tutorial uses new.
On the Code Style tab, make sure Use Beans.instantiate is unchecked, then press the OK button to close the Project Properties dialog box.
Using the Application wizard
Now add the application files to the project.
1 Choose File|New to open the object gallery.
2 Double-click the Application icon to open the Application wizard.
3 Change the application class name in Step 1 to:
Class: TextEditClass
4 Click Next to go to Step 2 of the Application wizard.
5 Change the name and title of the frame class on Step 2 to:
Class: TextEditFrameTitle: Text Editor
6 Check all the options on Step 2. The wizard automatically generates code for the selected options. (Notice what each option is as you check it off.)
7 Click the Finish button.
8 Save the project using File|Save Project.

19-6 L e a r n i n g J a v a w i t h J B u i l d e r
S t e p 1 : C r e a t i n g t h e p r o j e c t
Click the Design tab at the bottom of the AppBrowser window to open the UI designer.
• The UI designer appears in the content pane.• The component tree appears in the structure pane.• The Inspector appears to the right of the designer.
Figure 19.1 JBuilder in design view
Tip If the design area is too narrow to see the entire UI in the AppBrowser, you can maximize the JBuilder window and adjust the AppBrowser panes by dragging their borders.
Suppressing automatic hiding of JFrame
By default, a JFrame will hide when you click its close box. This is not the behavior we want for this tutorial, because the Application wizard added an event handler to call System.exit(0) when the close button is pressed. Later we will be adding code in this handler to ask the user about saving the file on exit, and we do not want the window to automatically hide if the user says no.

B u i l d i n g a J a v a t e x t e d i t o r 19-7
S t e p 1 : C r e a t i n g t h e p r o j e c t
To change the default behavior,
1 Select this in the component tree.
2 Click the Properties tab in the Inspector, and select the defaultCloseOperation property.
3 Choose DO_NOTHING_ON_CLOSE from the property’s drop-down list.
Setting the look and feel
Design time look and feelIf you have changed the JBuilder look and feel from its default, before you start using the UI designer, set up JBuilder so the designer will use the Metal Look & Feel. You can, of course, use others, but we’ll use Metal for this tutorial since it is a good choice when designing cross-platform applications.
There are two ways to change the design time look and feel:
• Right-click in the UI designer and choose Metal from the Look And Feel pop-up list. This only changes the look and feel in the UI designer and only for the current project. Using this method, you can design in one look and preview it in the runtime look, all without leaving the UI designer.
• Choose Tools|IDE Options, and select Metal from the Look And Feel drop-down list on the Browser page. This changes the look and feel for the JBuilder environment, but you can still use the first method to switch the look in the designer.
Runtime look and feelSetting the look and feel on the designer pop-up menu or in the JBuilder IDE Options dialog box does not have any effect on how your UI will look at runtime. To force a particular runtime look and feel, you have to explicitly set it in the main() method of the class that runs the application (in this case, TextEditClass.java).
By default, the Application wizard generates the following line of code in the main() method of the runnable class:
UIManager.setLookAndFeel(UIManager.getSystemLookAndFeelClassName());
This means the runtime look and feel will be whatever the hosting system is using.

19-8 L e a r n i n g J a v a w i t h J B u i l d e r
S t e p 2 : A d d i n g a t e x t a r e a
To specify Metal, do the following:
1 Double-click TextEditClass.java in the project pane to open the file in the editor.
2 Click main(String[] args) in the structure pane at the bottom left, or scroll down in the content pane until you find public static void main(String[] args){.
3 Highlight the setLookAndFeel() line of code and copy it to the line just below it.
4 Place two forward slashes in front of one of them to comment it out.
// UIManager.setLookAndFeel(UIManager.getSystemLookAndFeelClassName());
5 Change the parameter of the other one as follows:
UIManager.setLookAndFeel("javax.swing.plaf.metal.MetalLookAndFeel");
Note The following lines of code would be used if you wanted to specify CDE/Motif or Windows Look & Feel:
UIManager.setLookAndFeel("com.sun.java.swing.plaf.motif.MotifLookAndFeel");
orUIManager.setLookAndFeel("com.sun.java.swing.plaf.windows.WindowsLookAndFeel");
If you know you want your runtime to be a particular look and feel, in this case Metal, then be sure to use the same look and feel in the UI designer so you can see the end results. For example, Motif puts more space around components, like buttons, and you have no control over that.
Choose File|Save All to save the project and its files, then proceed to the next step. (It’s a good idea to save frequently during this tutorial, for example, at the end of each step.)
Step 2: Adding a text areaIn this step, you’ll make a text area completely fill the UI frame between the menu bar at the top and the status bar at the bottom. To accomplish this, the layout manager for the main UI container needs to use BorderLayout. As a result of using the Application wizard, the main container in this UI, referred to as this in the component tree, contains a JPanel called contentPane that has been already been changed to BorderLayout. All you need to do now is add the components for the text area to the contentPane.
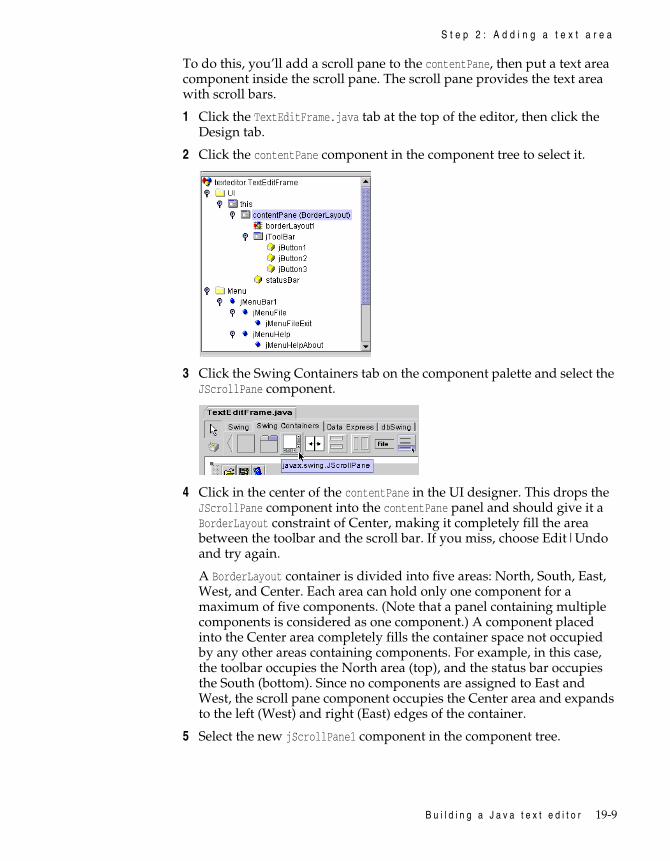
B u i l d i n g a J a v a t e x t e d i t o r 19-9
S t e p 2 : A d d i n g a t e x t a r e a
To do this, you’ll add a scroll pane to the contentPane, then put a text area component inside the scroll pane. The scroll pane provides the text area with scroll bars.
1 Click the TextEditFrame.java tab at the top of the editor, then click the Design tab.
2 Click the contentPane component in the component tree to select it.
3 Click the Swing Containers tab on the component palette and select the JScrollPane component.
4 Click in the center of the contentPane in the UI designer. This drops the JScrollPane component into the contentPane panel and should give it a BorderLayout constraint of Center, making it completely fill the area between the toolbar and the scroll bar. If you miss, choose Edit|Undo and try again.
A BorderLayout container is divided into five areas: North, South, East, West, and Center. Each area can hold only one component for a maximum of five components. (Note that a panel containing multiple components is considered as one component.) A component placed into the Center area completely fills the container space not occupied by any other areas containing components. For example, in this case, the toolbar occupies the North area (top), and the status bar occupies the South (bottom). Since no components are assigned to East and West, the scroll pane component occupies the Center area and expands to the left (West) and right (East) edges of the container.
5 Select the new jScrollPane1 component in the component tree.

19-10 L e a r n i n g J a v a w i t h J B u i l d e r
S t e p 2 : A d d i n g a t e x t a r e a
6 Look at its constraints property value in the Inspector and verify that it is set to Center. If not, select Center from the property’s drop-down list.
7 Click the Swing tab on the palette and select the JTextArea component.
8 Click the jScrollPane1 component in the component tree or the UI designer to put the JTextArea into the scroll pane.
9 Right-click the text property in the Inspector and choose Clear Property Setting to remove jTextArea1 from the text area.
10 Finally, you need to set some properties on jTextArea1 to make it wrap lines of text automatically and at word boundaries. In the Inspector, set the following:
lineWrap = truewrapStyleWord = truebackground = white

B u i l d i n g a J a v a t e x t e d i t o r 19-11
S t e p 3 : C r e a t i n g t h e m e n u s
Now, compile your program and run it to see how it looks.
1 Choose Project|Make Project from the menu.
This compiles all the files in the project and creates a TextEditClass.class file and a TextEditFrame.class in a classes folder in the project folder. It should compile without any errors.
2 Click the Run button on the JBuilder toolbar, or choose Run|Run Project from the menu.
Your UI should now look like this at runtime:
Notice that there are no scroll bars. This is because the horizontalScrollBarPolicy and verticalScrollBarPolicy properties for jScrollPane1 are set to AS_NEEDED by default. If you want scroll bars to be visible all the time, you would need to change these property values to ALWAYS.
Choose File|Exit in the “Text Editor” application to close the runtime window.
Next we’ll create the menus.
Step 3: Creating the menusIn this step, you are going to create the following menus:
JBuilder Foundationusers omit the Edit|Font
menu item.
1 Click the Design tab on TextEditFrame.java if it’s not already selected.
2 Double-click jMenuBar1 in the Menu folder of the component tree to switch to the menu designer.
(Alternatively, you can select a menu item in the component tree and press Enter.)

19-12 L e a r n i n g J a v a w i t h J B u i l d e r
S t e p 3 : C r e a t i n g t h e m e n u s
3 Select the File|Exit menu item in the menu designer or jMenuFileExit in the component tree. The menu designer will highlight the selected item.
4 Click the Insert button on the menu designer toolbar, or press Insert on the keyboard. A new, blank, highlighted menu item is inserted above Exit.
5 Type New in the highlighted area.
6 Press the Down arrow to accept the new entry and move down to the next item (in this case the Exit menu item).
7 Right-click Exit, and choose Insert Menu Item from the pop-up menu. Type Open.
Note All the toolbar actions are also available on the right-click pop-up menu.
8 Similarly, insert menu items for Save and Save As.
9 Select Exit and click the Separator toolbar button to insert a bar. The File menu is now complete.
10 Right-click the Help item on the main menu bar and choose Insert Menu. This creates a new menu between the File and Help menus. Type Edit as the name for this menu.
11 Press Enter to move down to the next blank entry. You don’t need to press Insert here because there are no menu items on this menu after the current entry.
Tip To delete an entry, select it and click the Delete toolbar button, or press the Delete key twice. (The first press of the Delete key clears the text in the entry. The second press removes the entry from the menu.)
12 Continue to build the Edit menu as shown in the image above, adding three items: Font (JBuilder Professional and Enterprise), Foreground Color, and Background Color. If an entry is too wide for the edit area, the text will automatically scroll as you type. When you press Enter, the menu designer will adjust the width of the menu to accommodate the longest item in the list.
13 Close the menu designer by double-clicking any component in the UI section of the component tree. This switches the view in the content pane back to the UI designer.
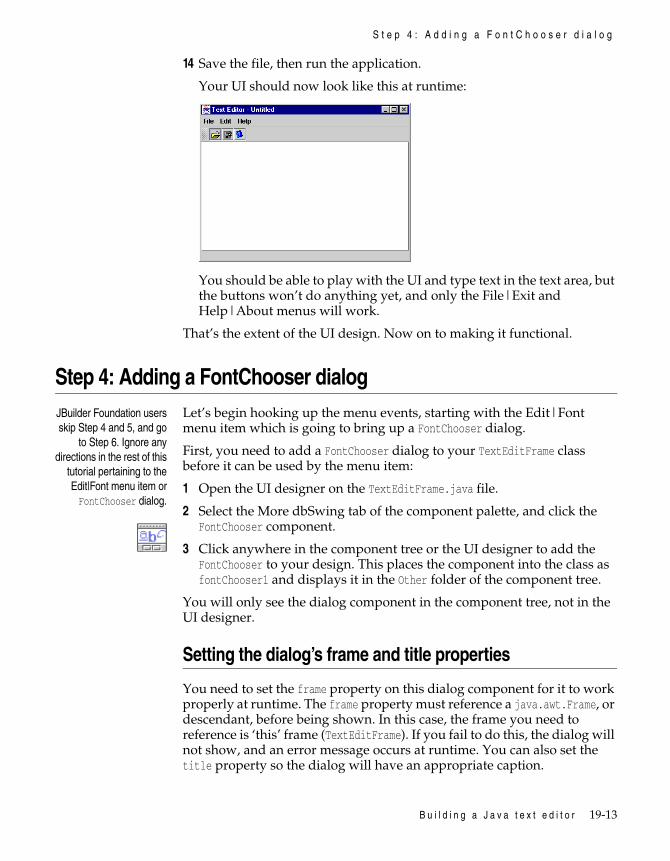
B u i l d i n g a J a v a t e x t e d i t o r 19-13
S t e p 4 : A d d i n g a F o n t C h o o s e r d i a l o g
14 Save the file, then run the application.
Your UI should now look like this at runtime:
You should be able to play with the UI and type text in the text area, but the buttons won’t do anything yet, and only the File|Exit and Help|About menus will work.
That’s the extent of the UI design. Now on to making it functional.
Step 4: Adding a FontChooser dialogJBuilder Foundation usersskip Step 4 and 5, and go
to Step 6. Ignore anydirections in the rest of this
tutorial pertaining to theEdit|Font menu item orFontChooser dialog.
Let’s begin hooking up the menu events, starting with the Edit|Font menu item which is going to bring up a FontChooser dialog.
First, you need to add a FontChooser dialog to your TextEditFrame class before it can be used by the menu item:
1 Open the UI designer on the TextEditFrame.java file.
2 Select the More dbSwing tab of the component palette, and click the FontChooser component.
3 Click anywhere in the component tree or the UI designer to add the FontChooser to your design. This places the component into the class as fontChooser1 and displays it in the Other folder of the component tree.
You will only see the dialog component in the component tree, not in the UI designer.
Setting the dialog’s frame and title properties
You need to set the frame property on this dialog component for it to work properly at runtime. The frame property must reference a java.awt.Frame, or descendant, before being shown. In this case, the frame you need to reference is ‘this’ frame (TextEditFrame). If you fail to do this, the dialog will not show, and an error message occurs at runtime. You can also set the title property so the dialog will have an appropriate caption.
19-14 L e a r n i n g J a v a w i t h J B u i l d e r
S t e p 4 : A d d i n g a F o n t C h o o s e r d i a l o g
To set the frame and title properties,
1 Select fontChooser1 in the Other folder of the component tree and click the frame property value in the Inspector.
2 Click the property’s Down arrow and select this from the list of values.
3 Next, click the title property value, and type the word Font as its value.
4 Press Enter to commit the changes to the generated code.
As a result, the following lines are added to the source code in the jbInit() method:
fontChooser1.setFrame(this);fontChooser1.setTitle("Font");
Placing the FontChooser into the component tree and setting these properties creates code in your class that instantiates a FontChooser dialog for your class, sets its title to “Font”, and sets its frame to this. But this code won’t display the dialog or make use of it in any way. That has to be done in the “event handler” for the Edit|Font menu item. Let’s create that code now.
Creating an event to launch the FontChooser
Create an event for the Edit|Font menu item that will launch the FontChooser:
1 Select the Edit|Font menu item in the component tree. It should be jMenuItem5 (under the second menu node called jMenu1.) Notice that the text property for this menu item in the Inspector says “Font”. (Don’t worry if your Font menu item is a different number than this. Just make sure you select the one for the Font menu.)
2 Click the Events tab in the Inspector, then click the value field (second column) for the actionPerformed event.
For menus, buttons, and many other Java UI components, actionPerformed is the main user event of interest, the one you should hook for responding to the user operating that menu or button.
The name of the event handling method appears in the value field. If the method doesn’t already exist, this will show the proposed default name for a new event handling method. For this new event handler, the suggested name is jMenuItem5_actionPerformed.
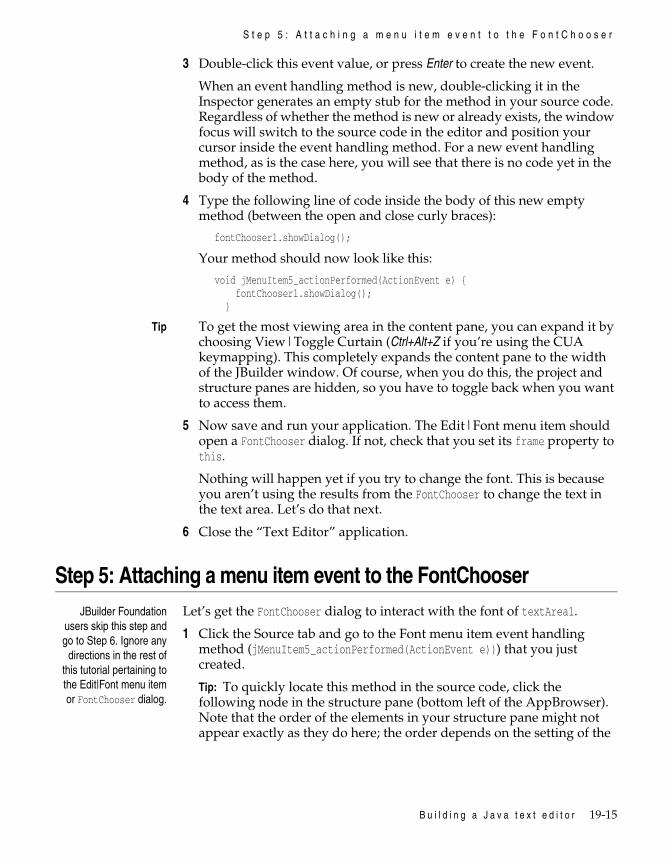
B u i l d i n g a J a v a t e x t e d i t o r 19-15
S t e p 5 : A t t a c h i n g a m e n u i t e m e v e n t t o t h e F o n t C h o o s e r
3 Double-click this event value, or press Enter to create the new event.
When an event handling method is new, double-clicking it in the Inspector generates an empty stub for the method in your source code. Regardless of whether the method is new or already exists, the window focus will switch to the source code in the editor and position your cursor inside the event handling method. For a new event handling method, as is the case here, you will see that there is no code yet in the body of the method.
4 Type the following line of code inside the body of this new empty method (between the open and close curly braces):
fontChooser1.showDialog();
Your method should now look like this:
void jMenuItem5_actionPerformed(ActionEvent e) { fontChooser1.showDialog(); }
Tip To get the most viewing area in the content pane, you can expand it by choosing View|Toggle Curtain (Ctrl+Alt+Z if you’re using the CUA keymapping). This completely expands the content pane to the width of the JBuilder window. Of course, when you do this, the project and structure panes are hidden, so you have to toggle back when you want to access them.
5 Now save and run your application. The Edit|Font menu item should open a FontChooser dialog. If not, check that you set its frame property to this.
Nothing will happen yet if you try to change the font. This is because you aren’t using the results from the FontChooser to change the text in the text area. Let’s do that next.
6 Close the “Text Editor” application.
Step 5: Attaching a menu item event to the FontChooserJBuilder Foundation
users skip this step andgo to Step 6. Ignore any
directions in the rest ofthis tutorial pertaining tothe Edit|Font menu itemor FontChooser dialog.
Let’s get the FontChooser dialog to interact with the font of textArea1.
1 Click the Source tab and go to the Font menu item event handling method (jMenuItem5_actionPerformed(ActionEvent e))) that you just created.
Tip: To quickly locate this method in the source code, click the following node in the structure pane (bottom left of the AppBrowser). Note that the order of the elements in your structure pane might not appear exactly as they do here; the order depends on the setting of the

19-16 L e a r n i n g J a v a w i t h J B u i l d e r
S t e p 5 : A t t a c h i n g a m e n u i t e m e v e n t t o t h e F o n t C h o o s e r
Structure Order options in the Java Structure page of the Structure View Properties dialog box.
2 Insert the following code into your Font menu item (jMenuItem5) event handling method between the opening and closing curly braces, being sure to replace the old fontChooser1.showDialog(); code:
// Handle the "Edit Font" menu item
// Pick up the existing font from the text area// and put it into the FontChooser before showing// the FontChooser, so that we are editing the// existing / previous font.fontChooser1.setSelectedFont(jTextArea1.getFont());
// Obtain the new Font from the FontChooser.// First test the return value of showDialog() to// see if the user pressed OK.if (fontChooser1.showDialog()) {
// Set the font of jTextArea1 to the font // the user selected before pressing the OK button jTextArea1.setFont(fontChooser1.getSelectedFont());}//repaints menu after item is selectedthis.repaint();//Repaints text properly if some text is highlighted when font is changed.jTextArea1.repaint();
The entire method should look like this:
void jMenuItem5_actionPerformed(ActionEvent e) { // Handle the "Edit Font" menu item
// Pick up the existing font from the text area // and put it into the FontChooser before showing // the FontChooser, so that we are editing the // existing / previous font. fontChooser1.setSelectedFont(jTextArea1.getFont());

B u i l d i n g a J a v a t e x t e d i t o r 19-17
S t e p 5 : A t t a c h i n g a m e n u i t e m e v e n t t o t h e F o n t C h o o s e r
// Obtain the new Font from the FontChooser. // First test the return value of showDialog() to // see if the user pressed OK. if (fontChooser1.showDialog()) { // Set the font of jTextArea1 to the font // the user selected before pressing the OK button jTextArea1.setFont(fontChooser1.getSelectedFont()); } //repaints menu after item is selected this.repaint(); //Repaints text properly if some text is highlighted when font is changed. jTextArea1.repaint();}
Tip To save typing, you can copy and paste the code example above from the Help Viewer to your source code by doing the following:
1 Use the mouse to select the code to copy in the Help Viewer. In this example, highlight the entire event handling method, including the last curly brace.
2 Choose Edit|Copy on the Help Viewer menu, or use the keystroke shortcut displayed by that menu item for your editor keymapping scheme.
3 Click the Source tab to switch to the editor in the AppBrowser.
4 Place your cursor where you want the code inserted, or, to replace existing code, highlight the code you want to replace. In this example, highlight the entire event handling method in your source code.
Warning Be careful where you paste. Don’t remove an important curly brace, such as the closing one for the class definition.
5 Choose Edit|Paste from the JBuilder main menu, or use the appropriate keyboard shortcut.
6 Check the indenting level of the inserted code and adjust to match your code if you wish.
3 Save the application.
4 Save and run the application and type some text in the text area.
5 Select the text and use the Edit|Font menu item to change the text’s font.
In this application, the font for the entire text area (not just the selected text) is changed. Don’t expect the font settings to persist. We aren’t going to enter code to enable that feature.
6 Close the “Text Editor” application.
19-18 L e a r n i n g J a v a w i t h J B u i l d e r
S t e p 6 : A t t a c h i n g m e n u i t e m e v e n t s t o J C o l o r C h o o s e r
Step 6: Attaching menu item events to JColorChooserNow let’s create Edit|Foreground and Edit|Background menu events, and connect them to a Swing JColorChooser dialog.
Since you don’t need to set any of the properties for JColorChooser in the designer, there’s no need to add it to the UI in the designer. You can just call it directly from a menu item’s actionPerformed() event handler as follows:
1 Switch back to the designer for TextEditFrame.java.
2 Select the second menu item in the component tree under Edit (jMenuItem6) which has “Foreground Color” in its actionCommand property.
3 Click the Events tab in the Inspector and triple-click the actionPerformed() event to create the following event handler:
void jMenuItem6_actionPerformed(ActionEvent e) {}
4 Insert the following code into the stub of the event handler (including comments if you wish):
//Handle the "Foreground Color" menu itemColor color = JColorChooser.showDialog(this,"Foreground Color",jTextArea1.getForeground());
if (color != null) {jTextArea1.setForeground(color);}//repaints menu after item is selectedthis.repaint();
5 Switch back to the designer.
6 Select the third menu item in the component tree under Edit (jMenuItem7), which should have “Background Color” in its actionCommand property. Create an actionPerformed() event for it as you did for jMenuItem6.
7 Insert the following code into the actionPerformed() event for jMenuItem7:
// Handle the "Background Color" menu itemColor color = JColorChooser.showDialog(this,"Background
Color",jTextArea1.getBackground());if (color != null) {jTextArea1.setBackground(color);}//repaints menu after item is selectedthis.repaint();
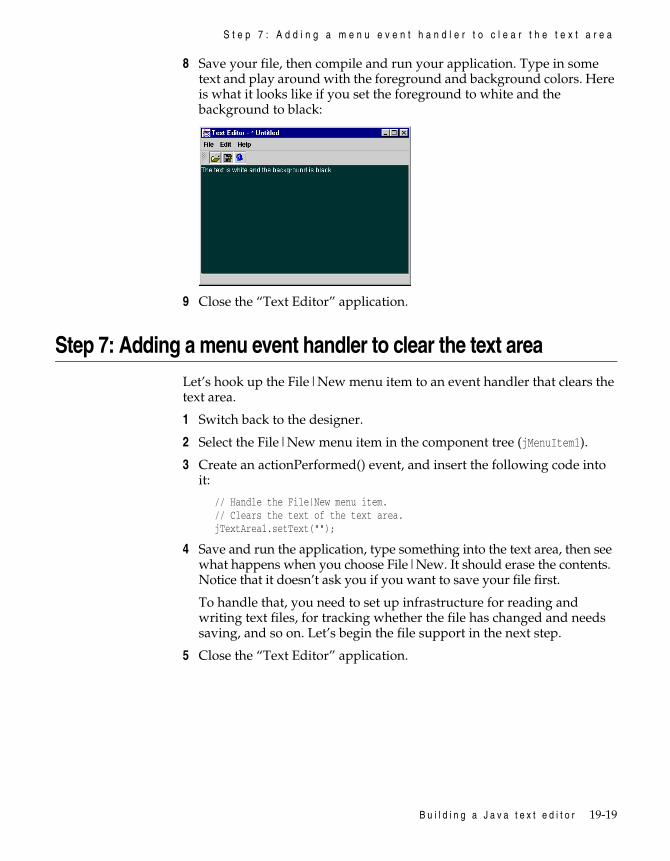
B u i l d i n g a J a v a t e x t e d i t o r 19-19
S t e p 7 : A d d i n g a m e n u e v e n t h a n d l e r t o c l e a r t h e t e x t a r e a
8 Save your file, then compile and run your application. Type in some text and play around with the foreground and background colors. Here is what it looks like if you set the foreground to white and the background to black:
9 Close the “Text Editor” application.
Step 7: Adding a menu event handler to clear the text areaLet’s hook up the File|New menu item to an event handler that clears the text area.
1 Switch back to the designer.
2 Select the File|New menu item in the component tree (jMenuItem1).
3 Create an actionPerformed() event, and insert the following code into it:
// Handle the File|New menu item.// Clears the text of the text area.jTextArea1.setText("");
4 Save and run the application, type something into the text area, then see what happens when you choose File|New. It should erase the contents. Notice that it doesn’t ask you if you want to save your file first.
To handle that, you need to set up infrastructure for reading and writing text files, for tracking whether the file has changed and needs saving, and so on. Let’s begin the file support in the next step.
5 Close the “Text Editor” application.

19-20 L e a r n i n g J a v a w i t h J B u i l d e r
S t e p 8 : A d d i n g a f i l e c h o o s e r d i a l o g
Step 8: Adding a file chooser dialogLet’s hook up the File|Open menu item to an event handler that presents the user with a JFileChooser (file open dialog) for text files. If the user selects a file and clicks the OK button, then the event handler opens that text file and puts the text into the JTextArea.
1 Switch back to the designer and select the JFileChooser component from the Swing Containers page of the palette.
2 Click the UI folder in the component tree to drop the component. (If you click in the UI designer, the component will be dropped into the wrong section of the tree.)
3 Select the File|Open menu item in the component tree (jMenuItem2).
4 Create an actionPerformed() event and insert the following code:
//Handle the File|Open menu item.// Use the OPEN version of the dialog, test return for Approve/Cancelif (JFileChooser.APPROVE_OPTION == jFileChooser1.showOpenDialog(this)) {
// Display the name of the opened directory+file in the statusBar. statusBar.setText("Opened "+jFileChooser1.getSelectedFile().getPath());
// Code will need to go here to actually load text // from file into TextArea.}
5 Save and run the application. Using the File|Open menu, select a file and click OK. You should see the complete directory and file name displayed in the status line at the bottom of the window. However, no text appears in the text area. We’ll take care of that in the next step.
6 Close the “Text Editor” application before continuing.
Internationalizing Swing components
JBuilder Foundationusers skip this step and
go to Step 9.
If you are localizing your application, you need to add a line of code so the Swing components, JFileChooser and JColorChooser, will appear in the language the application is running in. Add the following line of code to the TextEditFrame class in TextEditFrame.java:
IntlSwingSupport intlSwingSupport1 = new IntlSwingSupport();
Your code now looks like this:
public class TextEditFrame extends JFrame { IntlSwingSupport intlSwingSupport1 = new IntlSwingSupport(); JPanel contentPane; JMenuBar menuBar1 = new JMenuBar(); JMenu menuFile = new JMenu(); ...}

B u i l d i n g a J a v a t e x t e d i t o r 19-21
S t e p 9 : A d d i n g c o d e t o r e a d t e x t f r o m a f i l e
Note When adding this line of code, you must also add the import statement import com.borland.dbswing.*; and the dbSwing library. In this tutorial, this was taken care of automatically when you added the dbSwing FontChooser component.
Now, when you run your application in other languages, the JFileChooser and JColorChooser will appear in the appropriate language.
See also • “Internationalizing programs with JBuilder” in Building Applications with JBuilder
• “Adding and configuring libraries” in the “Creating and managing projects” chapter of Building Applications with JBuilder
Step 9: Adding code to read text from a fileNext let’s add the code that actually reads text from the user-selected file into the JTextArea.
First, you need to add a new method to your class to perform the actual open file operation. We’ll call this method openFile().
1 Switch to the editor in TextEditFrame.java and insert the following openFile() method. You can put this method anywhere in your class (outside of other methods). A good place for it is just after the code for the jbInit() method, just before the jMenuFileExit_actionPerformed() event.
// Open named file; read text from file into jTextArea1; report to// statusBar.void openFile(String fileName){ try { // Open a file of the given name. File file = new File(fileName);
// Get the size of the opened file. int size = (int)file.length();
// Set to zero a counter for counting the number of // characters that have been read from the file. int chars_read = 0;
// Create an input reader based on the file, so we can read its data. // FileReader handles international character encoding conversions. FileReader in = new FileReader(file);
// Create a character array of the size of the file, // to use as a data buffer, into which we will read // the text data. char[] data = new char[size];

19-22 L e a r n i n g J a v a w i t h J B u i l d e r
S t e p 9 : A d d i n g c o d e t o r e a d t e x t f r o m a f i l e
// Read all available characters into the buffer. while(in.ready()) { // Increment the count for each character read, // and accumulate them in the data buffer. chars_read += in.read(data, chars_read, size - chars_read); } in.close();
// Create a temporary string containing the data, // and set the string into the JTextArea. jTextArea1.setText(new String(data, 0, chars_read));
// Display the name of the opened directory+file in the statusBar. statusBar.setText("Opened "+fileName); } catch (IOException e) { statusBar.setText("Error opening "+fileName); }}
2 Add the following import to the list of imports at the top of the file:
import java.io.*;
3 Click the File|Open event handler (jMenuItem2_actionPerformed(ActionEvent)) in the structure pane to locate it in the source code.
4 Replace the code in the File|Open event handler if() statement that previously said:
// Display the name of the opened directory+file in the statusBar.statusBar.setText("Opened "+jFileChooser1.getSelectedFile().getPath());
// Code will need to go here to actually load text// from file into JTextArea.
with this new openFile() method instead, using the concatenated Directory and File name.
// Call openFile to attempt to load the text from file into JTextAreaopenFile(jFileChooser1.getSelectedFile().getPath());//repaints menu after item is selectedthis.repaint();
5 Now try it out and see if it works. Save and run your program and open a text file in your editor. You should have contents in the text editor.
6 Close the “Text Editor” application.
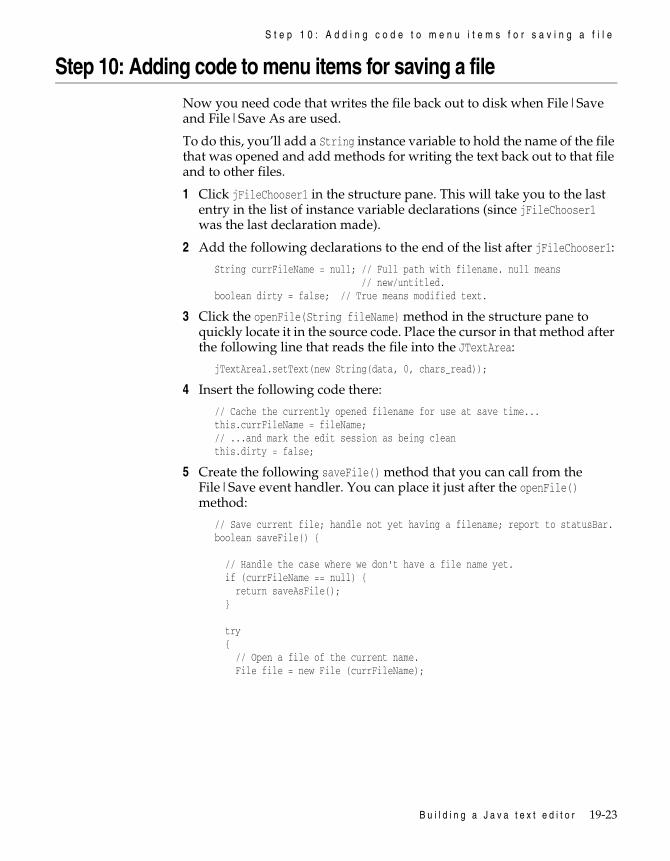
B u i l d i n g a J a v a t e x t e d i t o r 19-23
S t e p 1 0 : A d d i n g c o d e t o m e n u i t e m s f o r s a v i n g a f i l e
Step 10: Adding code to menu items for saving a fileNow you need code that writes the file back out to disk when File|Save and File|Save As are used.
To do this, you’ll add a String instance variable to hold the name of the file that was opened and add methods for writing the text back out to that file and to other files.
1 Click jFileChooser1 in the structure pane. This will take you to the last entry in the list of instance variable declarations (since jFileChooser1 was the last declaration made).
2 Add the following declarations to the end of the list after jFileChooser1:
String currFileName = null; // Full path with filename. null means // new/untitled.
boolean dirty = false; // True means modified text.
3 Click the openFile(String fileName) method in the structure pane to quickly locate it in the source code. Place the cursor in that method after the following line that reads the file into the JTextArea:
jTextArea1.setText(new String(data, 0, chars_read));
4 Insert the following code there:
// Cache the currently opened filename for use at save time...this.currFileName = fileName;// ...and mark the edit session as being cleanthis.dirty = false;
5 Create the following saveFile() method that you can call from the File|Save event handler. You can place it just after the openFile() method:
// Save current file; handle not yet having a filename; report to statusBar.boolean saveFile() { // Handle the case where we don't have a file name yet. if (currFileName == null) { return saveAsFile(); }
try { // Open a file of the current name. File file = new File (currFileName);

19-24 L e a r n i n g J a v a w i t h J B u i l d e r
S t e p 1 0 : A d d i n g c o d e t o m e n u i t e m s f o r s a v i n g a f i l e
// Create an output writer that will write to that file. // FileWriter handles international characters encoding conversions. FileWriter out = new FileWriter(file); String text = jTextArea1.getText(); out.write(text); out.close(); this.dirty = false; return true; } catch (IOException e) { statusBar.setText("Error saving "+currFileName); } return false;}
6 Create the following saveAsFile() method that is called from saveFile() if there is no current filename. It will also be used from the File|Save As menu later. Put the following code right after the saveFile() method:
// Save current file, asking user for new destination name.// Report to statuBar.boolean saveAsFile() { // Use the SAVE version of the dialog, test return for Approve/Cancel if (JFileChooser.APPROVE_OPTION == jFileChooser1.showSaveDialog(this)) { // Set the current file name to the user's selection, // then do a regular saveFile currFileName = jFileChooser1.getSelectedFile().getPath(); //repaints menu after item is selected this.repaint(); return saveFile(); } else { this.repaint(); return false; }}
7 Switch back to the designer and create an actionPerformed() event handler for the File|Save menu item (jMenuItem3). Insert the following code:
//Handle the File|Save menu item.saveFile();
8 Create an actionPerformed() event handler for the File|Save As menu item (jMenuItem4) and insert the following code:
//Handle the File|Save As menu item.saveAsFile();
9 Save and compile your file. Run it and try saving text to a file.
Warning This is now a functioning text editor. Don’t damage important source files while testing it.
10 Close the “Text Editor” application.
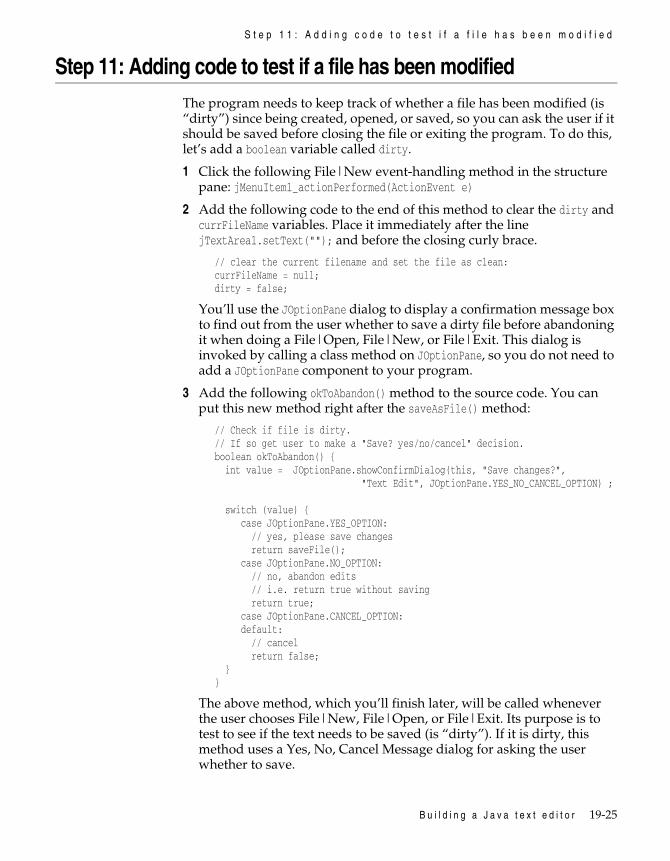
B u i l d i n g a J a v a t e x t e d i t o r 19-25
S t e p 1 1 : A d d i n g c o d e t o t e s t i f a f i l e h a s b e e n m o d i f i e d
Step 11: Adding code to test if a file has been modifiedThe program needs to keep track of whether a file has been modified (is “dirty”) since being created, opened, or saved, so you can ask the user if it should be saved before closing the file or exiting the program. To do this, let’s add a boolean variable called dirty.
1 Click the following File|New event-handling method in the structure pane: jMenuItem1_actionPerformed(ActionEvent e)
2 Add the following code to the end of this method to clear the dirty and currFileName variables. Place it immediately after the line jTextArea1.setText(""); and before the closing curly brace.
// clear the current filename and set the file as clean:currFileName = null;dirty = false;
You’ll use the JOptionPane dialog to display a confirmation message box to find out from the user whether to save a dirty file before abandoning it when doing a File|Open, File|New, or File|Exit. This dialog is invoked by calling a class method on JOptionPane, so you do not need to add a JOptionPane component to your program.
3 Add the following okToAbandon() method to the source code. You can put this new method right after the saveAsFile() method:
// Check if file is dirty.// If so get user to make a "Save? yes/no/cancel" decision.boolean okToAbandon() { int value = JOptionPane.showConfirmDialog(this, "Save changes?", "Text Edit", JOptionPane.YES_NO_CANCEL_OPTION) ;
switch (value) { case JOptionPane.YES_OPTION: // yes, please save changes return saveFile(); case JOptionPane.NO_OPTION: // no, abandon edits // i.e. return true without saving return true; case JOptionPane.CANCEL_OPTION: default: // cancel return false; }}
The above method, which you’ll finish later, will be called whenever the user chooses File|New, File|Open, or File|Exit. Its purpose is to test to see if the text needs to be saved (is “dirty”). If it is dirty, this method uses a Yes, No, Cancel Message dialog for asking the user whether to save.

19-26 L e a r n i n g J a v a w i t h J B u i l d e r
S t e p 1 1 : A d d i n g c o d e t o t e s t i f a f i l e h a s b e e n m o d i f i e d
This method also calls saveFile() if the user clicks the Yes button. When the method returns, the <CODE>boolean</CODE> return value, if true, indicates it is OK to abandon this file because it was clean or the user clicked the Yes or No button. If the return value is false, it means the user clicked Cancel. The code that will actually check to see if the file has changed will be added in a later step.
For now, this method always treats the file as dirty, even if no change has been made to the text. Later you will add a method to set the dirty variable to true when the user types in the text area, and you will add code to the top of okToAbandon() to test the dirty variable.
4 Place calls to this okToAbandon() method at the top of your File|New and File|Open event handlers, as well as in the wizard-generated File|Exit event handler. In each case, test the value returned by okToAbandon() and only perform the operation if the value returned is ‘true’.
Tip To find these event handlers quickly, click them in the structure pane. You can also search in the structure pane by moving focus to the pane and typing.
The following are the modified event handlers:
• For File|New, put a new if statement around the existing code in the method body, so that code will only be executed if okToAbandon() returns true. The modified method should now look like this:
void jMenuItem1_actionPerformed(ActionEvent e) { // Handle the File|New menu item. if (okToAbandon()) { // clears the text of the TextArea jTextArea1.setText(""); // clear the current filename and set the file as clean: currFileName = null; dirty = false; }}
• For File|Open, do the same, or more simply, return right away from the method if okToAbandon() returns false. The modified method should now look like this:
void jMenuItem2_actionPerformed(ActionEvent e) { //Handle the File|Open menu item. if (!okToAbandon()) { return; } // Use the OPEN version of the dialog, test return for Approve/Cancel if (JFileChooser.APPROVE_OPTION == jFileChooser1.showOpenDialog(this)){ // Call openFile to attempt to load the text from file into TextArea openFile(jFileChooser1.getSelectedFile().getPath()); } this.repaint();}

B u i l d i n g a J a v a t e x t e d i t o r 19-27
S t e p 1 2 : A c t i v a t i n g t h e t o o l b a r b u t t o n s
• For File|Exit, put a test for okToAbandon() around the line of code that exits the application. The modified method should now look like this:
//File | Exit action performedpublic void jMenuFileExit_actionPerformed(ActionEvent e) { if (okToAbandon()) { System.exit(0); }}
Each of these menu event handling methods now only does its task if okToAbandon() returns true.
5 Save and run the program and try opening, editing, and saving various files. Remember that okToAbandon() isn’t completed yet (it will be finished in a later step). Right now, it always acts like the file is dirty. The result is that for now the confirmation message box always comes up when you choose File|New, File|Open, or File|Exit, even if the text hasn’t been changed.
6 Close the “Text Editor” application.
Step 12: Activating the toolbar buttonsSince you checked the Generate Toolbar option in the Application wizard, JBuilder generated code for a JToolBar and populated it with three JButton components that already display icons. All you have left to do is specify the text for each button’s label and tool tip, and create an actionPerformed() event for each button from which you’ll call the appropriate event-handling method.
Specifying button tool tip text
To specify tool tips for the buttons,
1 Switch back to the UI designer.
2 Select jButton1 in the component tree, then click the Properties tab in the Inspector.
3 Click the toolTipText property to highlight its entry. Type Open File, if it doesn’t already say that, and press Enter.
4 Repeat this process for jButton2 and jButton3, using the following text:
• Type Save File for jButton2.• Type About for jButton3.
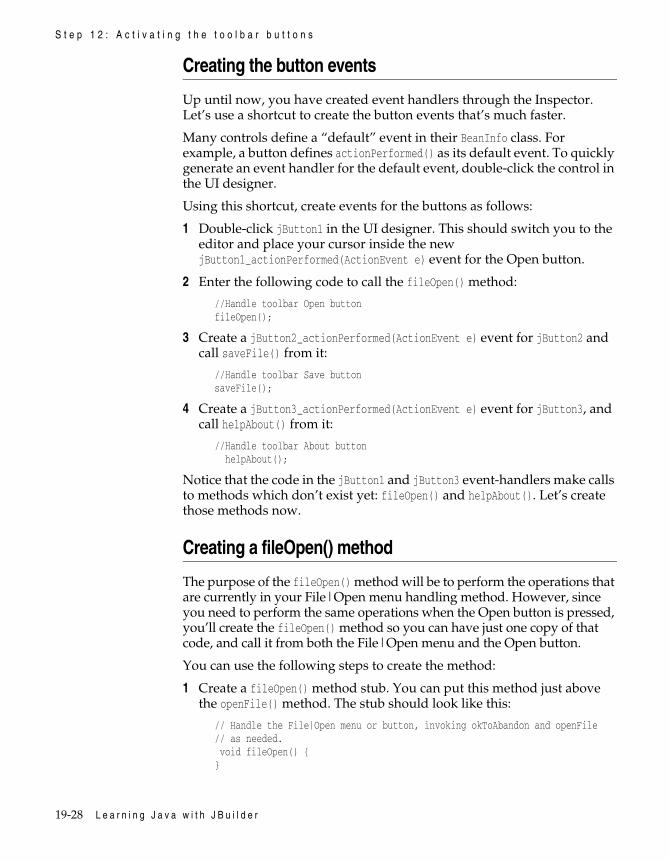
19-28 L e a r n i n g J a v a w i t h J B u i l d e r
S t e p 1 2 : A c t i v a t i n g t h e t o o l b a r b u t t o n s
Creating the button events
Up until now, you have created event handlers through the Inspector. Let’s use a shortcut to create the button events that’s much faster.
Many controls define a “default” event in their BeanInfo class. For example, a button defines actionPerformed() as its default event. To quickly generate an event handler for the default event, double-click the control in the UI designer.
Using this shortcut, create events for the buttons as follows:
1 Double-click jButton1 in the UI designer. This should switch you to the editor and place your cursor inside the new jButton1_actionPerformed(ActionEvent e) event for the Open button.
2 Enter the following code to call the fileOpen() method:
//Handle toolbar Open buttonfileOpen();
3 Create a jButton2_actionPerformed(ActionEvent e) event for jButton2 and call saveFile() from it:
//Handle toolbar Save buttonsaveFile();
4 Create a jButton3_actionPerformed(ActionEvent e) event for jButton3, and call helpAbout() from it:
//Handle toolbar About button helpAbout();
Notice that the code in the jButton1 and jButton3 event-handlers make calls to methods which don’t exist yet: fileOpen() and helpAbout(). Let’s create those methods now.
Creating a fileOpen() method
The purpose of the fileOpen() method will be to perform the operations that are currently in your File|Open menu handling method. However, since you need to perform the same operations when the Open button is pressed, you’ll create the fileOpen() method so you can have just one copy of that code, and call it from both the File|Open menu and the Open button.
You can use the following steps to create the method:
1 Create a fileOpen() method stub. You can put this method just above the openFile() method. The stub should look like this:
// Handle the File|Open menu or button, invoking okToAbandon and openFile// as needed. void fileOpen() {}

B u i l d i n g a J a v a t e x t e d i t o r 19-29
S t e p 1 2 : A c t i v a t i n g t h e t o o l b a r b u t t o n s
2 Select all the code (except the first comment line) inside your existing File|Open event handler, jMenuItem2_actionPerformed(). The code selected should be:
if (!okToAbandon()) { return;}// Use the OPEN version of the dialog, test return for Approve/Cancelif (JFileChooser.APPROVE_OPTION == jFileChooser1.showOpenDialog(this)) { // Call openFile to attempt to load the text from file into TextArea openFile(jFileChooser1.getSelectedFile().getPath());}this.repaint();
3 Cut this code from the source code to the clipboard, and paste it into the new fileOpen() method stub.
Tip Quickly search in the editor using Search|Find.
Here is what the completed fileOpen() method should look like:
// Handle the File|Open menu or button, invoking okToAbandon and openFile// as needed.void fileOpen() { if (!okToAbandon()) { return; } // Use the OPEN version of the dialog, test return for Approve/Cancel if (JFileChooser.APPROVE_OPTION == jFileChooser1.showOpenDialog(this)) { // Call openFile to attempt to load the text from file into TextArea openFile(jFileChooser1.getSelectedFile().getPath()); } this.repaint();}
4 Now, call fileOpen() from the File|Open event handler, which you should modify to look like this:
void jMenuItem2_actionPerformed(ActionEvent e) { // Handle the File|Open menu item. fileOpen();}
Creating a helpAbout() methodNow do a similar thing for the Help|About menu item and the About button. Gather the code that is currently in the Help|About event handler into a new helpAbout() method and call it from both the menu and button event handlers.

19-30 L e a r n i n g J a v a w i t h J B u i l d e r
S t e p 1 3 : H o o k i n g u p e v e n t h a n d l i n g t o t h e t e x t a r e a
Use the following steps to do this:
1 Place the following stub in your code for a new helpAbout() method just before the fileOpen() method:
// Display the About box.void helpAbout() {}
2 Cut the following code from jMenuHelpAbout_actionPerformed() into the new helpAbout() method stub:
TextEditFrame_AboutBox dlg = new TextEditFrame_AboutBox(this);Dimension dlgSize = dlg.getPreferredSize();Dimension frmSize = getSize();Point loc = getLocation();dlg.setLocation((frmSize.width - dlgSize.width) / 2 + loc.x,
(frmSize.height - dlgSize.height) / 2 + loc.y);dlg.setModal(true);dlg.show();
3 Insert the call helpAbout(); into jMenuHelpAbout_actionPerformed() so the method looks like this:
//Help | About action performedpublic void jMenuHelpAbout_actionPerformed(ActionEvent e) { helpAbout();}
4 Now, save and run the application. Try the Open, Save, and About buttons. Compare them with the File|Open, File|Save, and Help|About menu items.
5 Close the “Text Editor” application.
Step 13: Hooking up event handling to the text areaNow let’s hook up event handling to the JTextArea so your program will be setting the dirty flag whenever typing occurs. To do this, you need to add a Swing DocumentListener to the jTextArea’s document (model) and check for insert, remove, and changed events.
1 Switch to design mode and select jTextArea1.
2 Click the document property in the left column of the Inspector, then right-click and choose Expose As Class Level Variable.
A document1 object is placed in the Other folder of the component tree where you can now set its properties and events.
3 Select document1 in the tree, then switch to the Events tab in the Inspector and create a changedUpdate() event. Notice that the following DocumentListener was added to the jbInit():
document1.addDocumentListener(new TextEditFrame1_document1_documentAdapter(this));

B u i l d i n g a J a v a t e x t e d i t o r 19-31
S t e p 1 3 : H o o k i n g u p e v e n t h a n d l i n g t o t h e t e x t a r e a
4 Insert the following code into the new void document1_changedUpdate(DocumentEvent e) event:
dirty = true;
5 Return to the designer, select document1, and create two more events from the Inspector for document1: insertUpdate() and removeUpdate(). Insert the same line of code in these events that you used in the changedUpdate() event.
This will make sure that any character typed in the text area will force the dirty flag to true.
6 Add the following three lines to the top of the okToAbandon() method so that now it will really be testing the dirty flag:
if (!dirty) { return true;}
The okToAbandon() method should now look like this:
// Check if file is dirty.// If so get user to make a "Save? yes/no/cancel" decision.boolean okToAbandon() { if (!dirty) { return true; } int value = JOptionPane.showConfirmDialog(this, "Save changes?", "Text Edit", JOptionPane.YES_NO_CANCEL_OPTION) ; switch (value) { case JOptionPane.YES_OPTION: // yes, please save changes return saveFile(); case JOptionPane.NO_OPTION: // no, abandon edits // i.e. return true without saving return true; case JOptionPane.CANCEL_OPTION: default: // cancel return false; }}
7 At this point, you should save your work, run the program, and test to see that dirty and clean states of the file work properly:
• Typing text in the text area should “dirty” the file, so that the Save Changes prompt appears if you attempt a File|New, File|Open, or File|Exit.
• The message box should not appear on those operations when the file is clean.
• Close the “Text Editor” application.
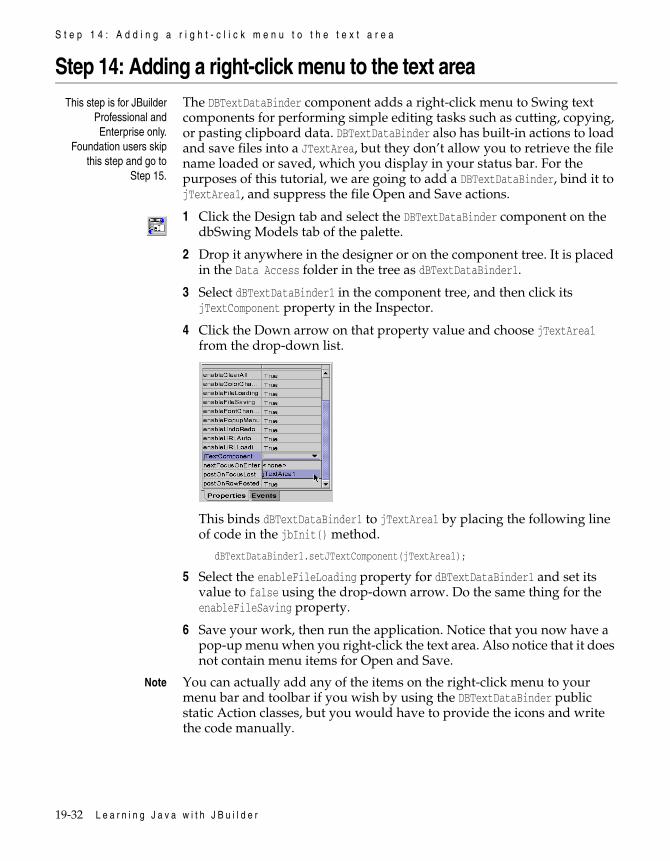
19-32 L e a r n i n g J a v a w i t h J B u i l d e r
S t e p 1 4 : A d d i n g a r i g h t - c l i c k m e n u t o t h e t e x t a r e a
Step 14: Adding a right-click menu to the text areaThis step is for JBuilder
Professional andEnterprise only.
Foundation users skipthis step and go to
Step 15.
The DBTextDataBinder component adds a right-click menu to Swing text components for performing simple editing tasks such as cutting, copying, or pasting clipboard data. DBTextDataBinder also has built-in actions to load and save files into a JTextArea, but they don’t allow you to retrieve the file name loaded or saved, which you display in your status bar. For the purposes of this tutorial, we are going to add a DBTextDataBinder, bind it to jTextArea1, and suppress the file Open and Save actions.
1 Click the Design tab and select the DBTextDataBinder component on the dbSwing Models tab of the palette.
2 Drop it anywhere in the designer or on the component tree. It is placed in the Data Access folder in the tree as dBTextDataBinder1.
3 Select dBTextDataBinder1 in the component tree, and then click its jTextComponent property in the Inspector.
4 Click the Down arrow on that property value and choose jTextArea1 from the drop-down list.
This binds dBTextDataBinder1 to jTextArea1 by placing the following line of code in the jbInit() method.
dBTextDataBinder1.setJTextComponent(jTextArea1);
5 Select the enableFileLoading property for dBTextDataBinder1 and set its value to false using the drop-down arrow. Do the same thing for the enableFileSaving property.
6 Save your work, then run the application. Notice that you now have a pop-up menu when you right-click the text area. Also notice that it does not contain menu items for Open and Save.
Note You can actually add any of the items on the right-click menu to your menu bar and toolbar if you wish by using the DBTextDataBinder public static Action classes, but you would have to provide the icons and write the code manually.

B u i l d i n g a J a v a t e x t e d i t o r 19-33
S t e p 1 5 : S h o w i n g f i l e n a m e a n d s t a t e i n t h e w i n d o w t i t l e b a r
button = productsToolBar.add(DBTextDataBinder.UNDO_ACTION);button.setText("");button.setPreferredSize(buttonSize);
For an example of how to do this, see the TextPane sample in the JBuilder samples folder: jbuilder/samples/dbswing/TextPane
For more information on the DBTextDataBinder component,
1 Drill down into the TextEditFrame component in the structure pane with TextEditFrame.java open in the editor.
2 Select the dBTextDataBinder1 component. The code is highlighted in the editor.
3 Right-click the highlighted code in the editor and select Browse Symbol. The DBTextDataBinder source code file opens in the editor. Click the Doc tab to view the documentation.
Close the “Text Editor” application before continuing to the next step.
Step 15: Showing filename and state in the window title barIn this final step, you will add code that uses the title bar of the application to display the current filename, and to display an asterisk if the file is “dirty”.
To do this, create a new method that will update the title bar, then call it from places where the code changes either the current file name or the dirty flag. Name this new method updateCaption().
1 Click the jMenuFileExit_actionPerformed(ActionEvent e) method in the structure pane. This moves the cursor to that event handling method and highlights it in the editor. Click in the editor to place the cursor just above this method and insert the following updateCaption() method:
// Update the title bar of the application to show the filename and its// dirty state.void updateCaption() { String caption;
if (currFileName == null) { // synthesize the "Untitled" name if no name yet. caption = "Untitled"; } else { caption = currFileName; }
// add a "*" in the caption if the file is dirty. if (dirty) { caption = "* " + caption; } caption = "Text Editor - " + caption; this.setTitle(caption);}

19-34 L e a r n i n g J a v a w i t h J B u i l d e r
S t e p 1 5 : S h o w i n g f i l e n a m e a n d s t a t e i n t h e w i n d o w t i t l e b a r
2 Now call updateCaption() from each of the places the dirty flag actually changes or whenever you change the currFileName.
Specifically, put the call updateCaption(); in the following places:
• Inside the try block of the TextEditFrame() constructor, as the next line immediately after the call to jbInit().
//Construct the framepublic TextEditFrame() { enableEvents(AWTEvent.WINDOW_EVENT_MASK); try { jbInit(); updateCaption(); } catch(Exception e) { e.printStackTrace(); }}
• As the last line in the try block of the openFile() method.
try{ // Open a file of the given name. File file = new File(fileName);
// Get the size of the opened file. int size = (int)file.length();
// Set to zero a counter for counting the number of // characters that have been read from the file. int chars_read = 0;
// Create an input reader based on the file, so we can read its data. // FileReader handles international character encoding conversions. FileReader in = new FileReader(file);
// Create a character array of the size of the file, // to use as a data buffer, into which we will read // the text data. char[] data = new char[size];
// Read all available characters into the buffer. while(in.ready()) { // Increment the count for each character read, // and accumulate them in the data buffer. chars_read += in.read(data, chars_read, size - chars_read); } in.close();
// Create a temporary string containing the data, // and set the string into the JTextArea. jTextArea1.setText(new String(data, 0, chars_read));

B u i l d i n g a J a v a t e x t e d i t o r 19-35
S t e p 1 5 : S h o w i n g f i l e n a m e a n d s t a t e i n t h e w i n d o w t i t l e b a r
// Cache the currently opened filename for use at save time... this.currFileName = fileName; // ...and mark the edit session as being clean this.dirty = false;
// Display the name of the opened directory+file in the statusBar. statusBar.setText("Opened "+fileName); updateCaption(); }catch (IOException e){ statusBar.setText("Error opening "+fileName);}
• Right after setting this.dirty=false in the try block of saveFile().
try{ // Open a file of the current name. File file = new File (currFileName);
// Create an output writer that will write to that file. // FileWriter handles international characters encoding conversions. FileWriter out = new FileWriter(file); String text = jTextArea1.getText(); out.write(text); out.close(); this.dirty = false; updateCaption(); return true;}catch (IOException e) { statusBar.setText("Error saving "+currFileName);}return false;
• As the last line of code in the if block of the File|New menu handler jMenuItem1_actionPerformed().
void jMenuItem1_actionPerformed(ActionEvent e) { // Handle the File|New menu item. if (okToAbandon()) { // clears the text of the TextArea jTextArea1.setText(""); // clear the current filename and set the file as clean: currFileName = null; dirty = false; updateCaption(); }}

19-36 L e a r n i n g J a v a w i t h J B u i l d e r
S t e p 1 6 : D e p l o y i n g t h e “ T e x t E d i t o r ” a p p l i c a t i o n t o a J A R f i l e
• When the dirty flag is first set in a clean file due to user typing. This is done in each of the document1 event handlers which should be changed to read:
void document1_changedUpdate(DocumentEvent e) { if (!dirty) { dirty = true; updateCaption(); }}
void document1_insertUpdate(DocumentEvent e) { if (!dirty) { dirty = true; updateCaption(); }}
void document1_removeUpdate(DocumentEvent e) { if (!dirty) { dirty = true; updateCaption(); }}
3 Run your application and watch the title bar as you perform the following operations:
• Change the file name using File|SaveAs.
• Type in the text area, making the file dirty. Notice the * appear in the title bar as soon as the file has been touched.
• Save the file, making it clean.
• If you have a right-click menu, try out the actions on it.
Congratulations! You now have a functional text editor written in JBuilder!
For suggestions on improving this tutorial, send email to [email protected].
JBuilder Professional andEnterprise
JBuilder Professional and Enterprise users: Proceed to Step 16 to deploy this application and run it from the command line.
Step 16: Deploying the “Text Editor” application to a JAR fileThis step is for JBuilder
Professional andEnterprise only.
Now that you’ve created the “Text Editor” application, you can deploy all the files to a Java Archive File (JAR) using JBuilder’s Archive Builder.
Note If you haven’t yet completed Steps 1 - 15 of this tutorial, you can still complete this step of the tutorial using the Text Editor sample project in

B u i l d i n g a J a v a t e x t e d i t o r 19-37
S t e p 1 6 : D e p l o y i n g t h e “ T e x t E d i t o r ” a p p l i c a t i o n t o a J A R f i l e
the samples/TextEditor directory of your JBuilder installation. To do this, you need to convert the paths specified in the tutorial to point to samples/TextEditor and its subdirectories.
OverviewDeployment is an advanced subject which takes some study and experience to understand. JBuilder’s Archive Builder reduces this complexity and helps you create an archive file that meets your deployment requirements.
This step of the tutorial will give you the explicit instructions for deploying the “Text Editor” application. It is not intended to be a comprehensive example of all the situations you will run across while deploying Java programs. Each application or applet you deploy has its own unique set of deployment issues, so it is difficult to generalize. Links are provided throughout this tutorial for further information on deployment, including Sun’s Java™ Tutorial.
The first step in deploying any program is to identify which project and library contents will be included in the archive. This will help you determine what classes and resources, as well as dependencies, to include. Including all classes, resources and dependencies in your archive creates a large archive file. However, the advantage is that you don’t need to provide your end-user with other files as the archive contains everything needed to run the program. If you exclude some or all classes, resources or dependencies, you’ll need to provide them to your end-user separately.
The Archive Builder will never include the JDK in your archive. It assumes that the JDK classes already exist on the target computer in the form of an installed JDK, Java runtime environment or Java Plug-in, or that you will be providing it in your installation.
JBuilder’s Archive Builder also creates an archive node in your project, allowing easy access to the archive file. At any time during development, you can make the archive file, rebuild it, or reset its properties. You can also view the contents of the archive, as well as the contents of the manifest file.
Running the Archive Builder
To run the Archive Builder wizard and create the archive node and file for the Text Editor tutorial,
1 Save all files in the project and compile it.
2 Choose Wizards|Archive Builder. Step 1 of the Archive Builder is displayed.

19-38 L e a r n i n g J a v a w i t h J B u i l d e r
S t e p 1 6 : D e p l o y i n g t h e “ T e x t E d i t o r ” a p p l i c a t i o n t o a J A R f i l e
3 Choose Application for the Archive Type. Step 1 of the wizard should look like this:
4 Click Next to go to Step 2 of the wizard.
5 Change the name of the archive to Text Editor Application JAR in the Name field. This is the name of the archive node that will be displayed in the project pane.
6 Accept the remaining defaults on this page. These options:
• Create an uncompressed JAR file in the project’s root directory.• Rebuild the archive each time the project is made or rebuilt.
When you’re done, Step 2 of the wizard should now look like this:
7 Click Next to go to Step 3 of the wizard, where you determine what project classes and resources are deployed. The project classes and resources are those on your outpath, defined on the Paths page of the Project Properties dialog box. Usually, this is set to the classes directory

B u i l d i n g a J a v a t e x t e d i t o r 19-39
S t e p 1 6 : D e p l o y i n g t h e “ T e x t E d i t o r ” a p p l i c a t i o n t o a J A R f i l e
of your project. For this tutorial, accept the default, so that the wizard includes all classes and resources on the outpath.
Step 3 of the wizard will look like this:
8 Click Next to go to Step 4 of the wizard. In this step, you choose how library contents are included in your archive file.
1 Select dbSwing and choose Include Required Classes And All Resources.
2 Select DataExpress and choose Include Required Classes And All Resources. (Even though you did not use the DataExpress library in this tutorial, some dbSwing classes depend on DataExpress classes, so that they need to be included in the archive file.)
Note This option is the safest and simplifies deployment. It will, however, make the archive file larger.
Step 4 of the wizard should look like this:

19-40 L e a r n i n g J a v a w i t h J B u i l d e r
S t e p 1 6 : D e p l o y i n g t h e “ T e x t E d i t o r ” a p p l i c a t i o n t o a J A R f i l e
9 Click Next to go to Step 5, where you create the manifest file. There can only be one manifest file in an archive, and it always has the path name META-INF/MANIFEST.MF. For more information on the manifest file, see “Understanding the Manifest” at http://java.sun.com/docs/books/tutorial/jar/basics/manifest.html.
Accept the default settings for Step 5 of the wizard. These options:
• Automatically include the manifest file in the archive file.
• Automatically create the manifest file for you.
Step 5 of the wizard will look like this:
10 Click Next to go to Step 6, where you choose how the Archive Builder finds the main class. For this tutorial, leave the default setting: Use The Main Class Specified In The Default Runtime. This option uses the main class specified on the Run page of the Project Properties dialog box.
Step 6 of the wizard will look like this:
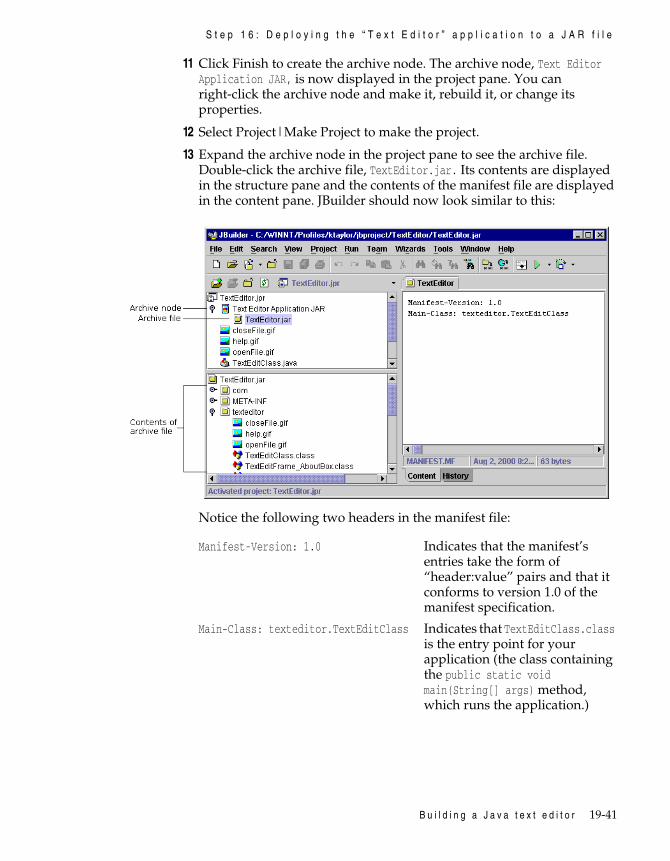
B u i l d i n g a J a v a t e x t e d i t o r 19-41
S t e p 1 6 : D e p l o y i n g t h e “ T e x t E d i t o r ” a p p l i c a t i o n t o a J A R f i l e
11 Click Finish to create the archive node. The archive node, Text Editor Application JAR, is now displayed in the project pane. You can right-click the archive node and make it, rebuild it, or change its properties.
12 Select Project|Make Project to make the project.
13 Expand the archive node in the project pane to see the archive file. Double-click the archive file, TextEditor.jar. Its contents are displayed in the structure pane and the contents of the manifest file are displayed in the content pane. JBuilder should now look similar to this:
Notice the following two headers in the manifest file:
Manifest-Version: 1.0 Indicates that the manifest’s entries take the form of “header:value” pairs and that it conforms to version 1.0 of the manifest specification.
Main-Class: texteditor.TextEditClass Indicates that TextEditClass.class is the entry point for your application (the class containing the public static void main(String[] args) method, which runs the application.)
19-42 L e a r n i n g J a v a w i t h J B u i l d e r
S t e p 1 6 : D e p l o y i n g t h e “ T e x t E d i t o r ” a p p l i c a t i o n t o a J A R f i l e
Running the application from the command line
Important Before you run the application from the command line, you need to make sure your operating system’s PATH environment variable points to the JDK jre/bin directory, the runtime environment. The JBuilder installation process guarantees that JBuilder knows where to find the JDK class files. However, once you leave the JBuilder environment, your system needs to know where the class files for the Java runtime are installed. How you set the PATH environment variable depends on which operating system you are using.
To run the Text Edit tutorial from the command line,
1 Switch to your command-line window and change to the TextEditor directory. This is where the JAR file is located.
2 Set the path to the JDK jre/bin folder.
3 Enter the following command at the command line:
java -jar TextEditor.jar
where,
• java - The Java tool that runs the jar file.• jar - The option that tells the Java VM that the file is an archive file.• TextEditor.jar - The name of the archive file.
Since the manifest file provides the information in the Main-Class header about which class to run, you don’t need to specify the class name at the end of this command. And, because all classes, resources, and dependencies are included in the archived JAR file, you don’t need to specify a classpath or copy JBuilder libraries to this directory.
Note When you use the -jar option, the Java runtime ignores any explicit classpath settings. If you try to run this JAR file when you’re not in the TextEditor directory, you need to use the following Java command:
java -jar -classpath <full_path> <main_class_name>
The Java runtime looks in the JAR file for the startup class, and the other classes used by the application. The Java VM uses three search paths to look for the files: the bootstrap class path, the installed extensions, and the user class path. To learn about these search paths, see “How Classes Are Found” at http://java.sun.com/j2se/1.3/docs/tooldocs/findingclasses.html.
That’s it! As you can see, there is a lot of information to assimilate related to deployment. Deployment goes far beyond just creating an archive file. Not only do you have to make sure you provide all the necessary classes and resources, as well as libraries, in your deployment set, you have be concerned with other issues, such as learning about the java tool and the

B u i l d i n g a J a v a t e x t e d i t o r 19-43
S t e p 1 6 : D e p l o y i n g t h e “ T e x t E d i t o r ” a p p l i c a t i o n t o a J A R f i l e
Jar tool. There are also differences between running JDK 1.1 and Java 2 applications.
Take the time to study the wealth of information available at the links to Sun’s web site provided here and in “Deploying Java programs” in Building Applications with JBuilder. You can also look at the Sun Tutorial trail on Jar files at http://java.sun.com/docs/books/tutorial/jar/index.html.
For suggestions on improving this tutorial, send email to [email protected].

19-44 L e a r n i n g J a v a w i t h J B u i l d e r

I n d e x I-1
Symbols. (dot) operator 10-3?: operator 9-12_ (underscore) as name prefix 9-2
Numerics8-bit ASCII set 9-4
Aabstract classes 10-11access boundaries 14-4access modifiers 10-9accessor methods 10-10adding components 16-10, 16-14addition 9-9, 9-11allocation 9-8, 9-13, 9-15
getting StringBuffer 11-5AND operator 9-10, 9-11, 9-12AppBrowser 3-2Append method 11-5applet 5-14, 10-17, 14-2
adding components 17-15ARCHIVE attribute 17-26command line 17-28deploying 17-22event handlers 17-21message for non-Java browsers 17-26running 17-10, 17-28, 17-29running at the command line 17-28testing 17-29tutorial 17-1
Applet wizard 5-14tutorial for 17-6
Application wizardtutorial 16-4
applications 14-2adding components 16-10, 16-14command line 16-17deploying 7-5, 16-16example for developing 10-4running 12-1, 16-7, 16-12, 16-13, 16-17running at the command line 16-13, 16-17running deployed 7-7tutorial 16-1
Archive Builder 7-5tutorial 16-16, 17-22
arithmetic operators 9-9, 9-11array types 9-15
arrays 9-15accessing elements 9-16representing strings 11-4
ASCII character sets 9-4assignment 9-8
operators 9-11auto-increment operator 9-9Automating application development
wizards 5-1
BBeansExpress 5-13binary digits 9-12bitwise operators 9-12blocks 9-6, 11-9
static code 15-2books in JBuilder doc set 3-7boolean data types 9-14boolean literals 9-4boolean operators 9-10, 9-12Borland
contacting 1-2Borland Online 1-2break statements 9-21building database applications 8-4building distributed applications
overview 8-1built-in data types 9-13, 9-14byte reads 11-10bytecode violations 14-3bytecodes 14-1
translating 14-6
CC header files 15-3calculations 9-8Calendar class 11-6Capacity method 11-5casting 9-17character arrays 11-4character data types 9-15character literals 9-4character strings 9-5charAt method 11-4checkerror method 11-12checkRead method 14-4checkWrite method 14-4child classes 10-6choosing layouts 6-5
Index

I-2 L e a r n i n g J a v a w i t h J B u i l d e r
class definitions 10-2grouping 10-17
class files 10-19, 14-1class libraries 11-1class loader 14-5class names 9-3class paths 10-19classes 10-2 to 10-13
accessing members 10-9implementing interfaces 10-14java-specific 11-1objects vs. 10-2
ClassNotFoundException exceptions 13-5ClassType method 11-3cleanup 10-4clone method 11-2code 4-3
Code templates 4-4conditional execution 9-19reusing 10-17tutorial for editing 16-11
code blocks 9-6static 15-2
code style options 19-4Code templates source code 4-4CodeInsight 4-3collapsing AppBrowser trees 3-5comments 9-7Common Object Request Broker Architecture
(CORBA) 8-3compareTo method 11-4comparison operators 9-10comparisons 11-2compilers 14-1, 14-6compiling 7-1, 16-7, 17-10
Java programs 7-1overview 7-1
Compiling, running, debugging tutorial 18-1complement 9-12component palette
selecting components 16-10, 16-14components 16-14composite data types 9-15composite types 9-13concat method 11-4concurrency-control techniques 12-8conditional statements 9-22constants 9-3constructors 10-4
calling 10-8super classes 10-8wrapper classes 11-3
contacting Borland 1-2World Wide Web 1-2
containerschoosing layouts 6-5
continuation character 9-5, 9-6continue statements 9-22control characters 9-4control statements 9-21control structures 9-19 to 9-24conversions 9-17copying objects 11-2CORBA 8-3CORBA applications
deploying 7-6creating a project
with Project wizard 5-5creating JavaBeans 5-13creating menus 6-3creating projects 16-1, 17-3creating threads 12-2 to 12-5cross-platform environments 12-2currentTimeMillis method 11-6custom UIs 16-7
Ddata members 10-3
accessing 10-9data structures 9-15, 11-6, 11-7data types 9-13, 9-14 to 9-17
casting 9-17getting 11-3reading 13-6writing to streams 13-4
database applications 8-4databases 8-4
developing 8-4new features 2-9
DataExpress architecture 8-4Date class 11-6deallocation 10-4debugger
new features 2-8debugging 7-3
overview 7-4decimal literals 9-3declarations
arrays 9-15classes 10-2interfaces 10-14packages 10-18threads 12-2variables 9-13
decrement operator 9-9default keyword 10-9defaultCloseOperation 19-6
I n d e x I-3
deployed applicationsrunning 7-7
deployingCORBA applications 7-6JAR tool 17-22Java programs 7-5web-based applications 7-7
deploymentapplets 17-22
deployment tutorial 16-16, 19-36deserialization 13-1
example 13-4designing
user interface 6-1destructors 10-4developer support 1-2developing applications 10-4devices 11-9Dictionary class 11-6displaying project files 5-8distributed applications
overview 8-1division 9-9, 9-11do loops 9-20DO_NOTHING_ON_CLOSE 19-6documentation conventions 1-3documents in JBuilder doc set 3-7dot operator 10-3dynamic link libraries 11-6
Eediting source code 16-11editor 4-1
CodeInsight 4-3keybindings 4-5new features 2-7SpeedSetting 4-5
editor emulations 4-5encryption 14-6endsWith method 11-4enhancements 2-1Enterprise JavaBeans 3-6
new features 2-3Enumeration interface 11-7equality 9-11equals method 11-2, 11-3error stream 11-6escape sequences 9-4evaluation operators 9-10event handlers 16-15
tutorial 19-19events
creating and modifying 6-4executing applications 16-7
expanding AppBrowser trees 3-5exponentation 9-4expressions 9-8extends keyword 10-6external packages 10-19
importing 10-18
Ffile classes 11-12file input/output 11-12FileInputStream class 11-10, 11-12, 13-4FileOutputStream class 11-12, 13-3files
adding to project 5-10compiling and building 7-1removing from project 5-10renaming 5-11
finalizers 10-4floating-point literals 9-4flow control structures 9-19 to 9-24flush method 11-12, 13-3FontChooser dialog tutorial 19-13, 19-15fonts 16-10for loops 9-20 to 9-21freeing resources 10-4, 13-3, 13-5function names 9-3
Ggarbage collection 10-3
forcing 11-6gc method 11-6generating source files 16-4, 17-6getters 10-10getting help 2-10global variables 9-18
caution for 9-19greater than operator 9-10greater than or equal operator 9-10grouping statements 9-6
HHashtable class 11-6hasModeElements method 11-7header files 15-3Hello World application
customizing 16-7running 16-12, 16-13
help 2-10about 2-10
hexadecimal literals 9-3HIDE_ON_CLOSE 19-6hierarchical views
navigating 3-5

I-4 L e a r n i n g J a v a w i t h J B u i l d e r
II/O package 11-9identifiers 9-2
predefined 9-5if-else statements 9-22IIOP 8-3implements keyword 10-14implicit type casting 9-18import statements 10-17indexOf method 11-4inequality 9-11inheritance 10-6
interface implementation and 10-13initializing arrays 9-15initializing variables 9-14input devices 11-11input stream classes 11-9input streams 11-6, 11-9, 11-12, 13-4Inspector 6-4
opening 6-5overview 6-4using 6-4
instance variables 10-2instantiation 10-2
abstract classes and 10-11defined 10-2
instructions 14-1, 14-6integers 9-3integrated debugger 7-3interface design 16-7
tutorial 17-11interface keyword 10-14interfaces 10-13, 13-2
native code 15-1pre-built utility 11-6
internationalization 8-5, 8-6internationalizing programs 8-5JBuilder features 8-6
Internet InterORB Protocol (IIOP) 8-3InternetBeans Express 2-2introduction 3-1
JJAR tool
deploying applets 17-22Java 14-2
keywords 9-5language basics 9-1language support 3-6
.java files 16-4, 17-6Java class libraries 11-1Java data types 9-13
Java interpreter 14-1Java Native Method Interface (JNI) 15-1Java RMI 8-2Java verifier 14-3Java virtual machine 14-1
advantages 14-2implementing 15-1
java.applet package 10-17java.io package 11-9, 11-12java.lang package 11-2java.math package 11-4java.util package 11-6JavaBeans 5-13
creating 5-13javah 15-3
options 15-3JBuilder 3-1
new features 2-1what it is 3-1
JBuilder tools 5-3JColorChooser dialog tutorial 19-18JDataStore
new features 2-9JDBC 8-4
new features 2-10JDK 1.1 pre-built packages 11-1JDK switching 3-6JFileChooser tutorial 19-20JFrame auto-hide suppression 19-6JINI 3-6JIT (just-in-time) compilers 14-6join method 12-6JSP
JavaServer Pages 3-6JSP support
new features 2-2JToolBar buttons tutorial 19-27just-in-time compilers 14-6JVM (Java virtual machine) 14-1
advantages 14-2implementing 15-1
Kkeybindings 4-5keyboard mappings 4-5keymappings 4-5
Brief 4-5CUA 4-5default 4-5Emacs 4-5
keymaps 4-5keywords 9-5

I n d e x I-5
Llanguage elements 9-1, 9-5, 9-19Language package 11-2layout managers 6-5layouts
choosing 6-5learning JBuilder 3-7left shift operator 9-12length method 11-4less than operator 9-10less than or equal operator 9-10libraries 9-13
accessing native 15-2Java class 11-1loading dynamic link 11-6static code blocks and 15-2
linked lists 11-7literals 9-3loaders 14-5loadLibrary method 11-6local variables 9-18localization 8-5logical operators 9-10look and feel
setting 19-7loops 9-19 to 9-21
controlling execution 9-21terminating 9-20
Mmain method 12-3main window 3-2managing projects 5-10Math class 11-3math functions 11-3math operators 9-9math package 11-4members 10-9memory allocation 9-13, 9-15
getting StringBuffer 11-5menu designer
accessing 6-3menus
creating 6-3tutorial 19-11
method calls 9-8, 10-4, 15-2methods 10-3, 10-10
accessing 15-2interfaces and 10-14overloading 10-13restricting implementation of 10-11
modulus 9-9
monitors 12-8multi-dimensional arrays 9-16multi-line comments 9-7multi-line strings 9-6multi-platform environments 12-2multiple inheritance 10-13multiple projects 5-12multiple views 3-2multiplication 9-9, 9-11multi-threaded applications 12-1, 12-8
Nnames 9-2
predefined 9-5namespace 14-4native code interface 15-1native keyword 15-2native machine instructions 14-6navigating
keyboard shortcuts 3-5nesting comments 9-7new operator 9-15, 10-2newsgroups 1-3nextElement method 11-7nonprinting characters 9-4NOT operator 9-10NotSerializableException exceptions 13-3numeric data types 9-14numeric literals 9-3
Oobject allocation 9-8Object class 11-2object gallery 5-2
wizards 5-2Object Request Broker (ORB) 8-3ObjectInputStream class 13-2, 13-4, 13-6object-oriented programming 10-1
example for 10-4ObjectOutputStream class 13-2, 13-4objects 13-1
classes vs. 10-2copying 11-2referencing 13-6
octal characters 9-5octal literals 9-3online resources 1-2opening projects 5-10OpenTools API
new features 2-5operands 9-8operator expressions 9-8

I-6 L e a r n i n g J a v a w i t h J B u i l d e r
operators 9-8 to 9-13OR operator 9-10, 9-11, 9-12ORB 8-3out paths 10-19output devices 11-11output stream classes 11-11output streams 11-6, 11-11, 11-12, 13-3overloading methods 10-13overview 7-1
Ppackage statements 10-18packages 10-17
accessing class members 10-9declaring 10-18importing 10-18project options 10-19table of JDK 1.1 11-1
parent class 10-6, 11-2persistent objects 13-1platform independence 15-1pointers 15-2polymorphism 10-13
example 10-14portability 14-2predefined identifiers 9-5primitive data types 9-13, 9-14print method 11-12println method 11-12PrintStream class 11-12private keyword 10-9programming editor 4-1programming language elements 9-1, 9-5, 9-19programs
deployed 7-7running 7-2
project filessaving 5-4search paths 10-19tutorial for creating 16-1, 17-3viewing 5-8
Project wizard 5-5creating new projects 5-5Step 1-choosing template 5-5Step 2-setting paths, libraries, JDK 5-6Step 3-project notes file 5-7tutorial 16-1, 17-3
projectsadding files 5-10closing 5-11compiling and building 7-1creating with Project wizard 5-5displaying in AppBrowser 5-8managing 5-4, 5-10multiple 5-12
opening 5-10options 10-19overview 5-4removing files 5-10renaming 5-11running 7-2saving 5-4, 5-11setting properties 5-9
propertiessetting and modifying 6-4
protected keyword 10-9prototypes 15-3public keyword 10-9
Qqueues 11-7
Rrandom values 9-14RandomAccessFile class 11-12reader classes 11-9readObject method 13-5reads 11-9, 11-12, 13-6references 9-14, 10-2
to other objects 13-6Remote Method Invocation (RMI) 8-2reserved words 9-5resources 10-4, 11-6
accessing 14-4freeing 13-3, 13-5
restrictions 14-4return values 10-4right shift operator 9-12right-click menu tutorial 19-32RMI 8-2run method 12-2Runnable interface 12-4running 7-1, 7-7
applets 17-10applications 12-1, 16-7deployed programs 7-7Java programs 7-2
runtime environment 14-2
Ssample application
customizing 16-7saving 13-1scientific notation 9-4scope 9-14, 9-18, 10-9search paths 10-19security 14-1, 14-3
monitoring 14-5

I n d e x I-7
serialization and 13-6Security Manager 14-4security models 14-3SecurityException exceptions 14-5SecurityManager class 14-4Serializable interface 13-2serialization 13-1
security and 13-6servlet support
new features 2-2setCharAt() method 9-17setSecurityManager method 14-5setters 10-10setting
properties and events 6-4setting project properties 5-9shift operators 9-12short-circuit AND/OR operations 9-10shortcuts keys
AppBrowser trees 3-5signed classes 14-6signed integers 9-12SimpleTimeZone class 11-6sleep method 12-6source code 4-3
conditional execution 9-19reusing 10-17tutorial for editing 16-11, 17-18
source files 10-19tutorial for generating 16-4, 17-6
source paths 10-19Stack class 11-6start method 12-6startsWith method 11-4statements 9-6, 9-21, 9-22
grouping 9-6static code blocks 15-2stop method 12-6streams 11-6, 11-9, 11-11, 11-12, 13-3, 13-4
partitioning as tokens 11-13read/writes 13-6
StreamTokenizer class 11-13String class 11-4string literals 9-5String type 9-16StringBuffer class 9-17, 11-5strings 9-5, 9-16, 11-2
constructing 11-4modifying contents 9-17multi-line 9-6
StringTokenizer class 11-6subclassing a thread 12-2subroutines 10-3substring method 11-4subtraction 9-9, 9-11
super classes 10-8super keyword 10-8support packages 11-1switch statements 9-23sychronized keyword 12-7syntax rules and restrictions 9-1System class 11-6system time 11-6
Tteam development
new features 2-4technical support 1-2ternary operator 9-12test conditions, aborting 9-21text area event handlers tutorial 19-30text area tutorial 19-8Text Editor tutorial 19-1, 19-33text strings See stringsthis keyword 10-8Thread API 12-5Thread class 12-2, 12-5ThreadGroup class 12-6threading API 12-2threads 12-1
creating 12-2 to 12-5defined 12-1example for creating 12-3lifecycle 12-7monitoring 12-8starting and stopping 12-6switching 12-6synchronizing 12-7
time 11-6timeouts 12-6tokens 11-13toLowerCase method 11-4toString method 11-2, 11-3toUpperCase method 11-4transient objects 13-1trees
navigating 3-5navigation shortcuts 3-5
tutorialsadding DBTextDataBinder 19-32adding right-click menus 19-32compiling, running, debugging 18-1creating a UI 19-1creating text editors 19-1, 19-33deploying 16-16deploying with Archive Builder 19-36event handler 19-19event handlers 19-30FontChooser dialog 19-13, 19-15Good Evening applet 17-1

I-8 L e a r n i n g J a v a w i t h J B u i l d e r
Hello World application 16-1JColorChooser dialog 19-18JFileChooser 19-20JToolBar buttons 19-27menus 19-11text area 19-8Text Editor application 19-1window title bar and file state 19-33
type casting 9-17type definitions 10-2type wrapper classes 11-2types 9-13, 9-14 to 9-17
getting 11-3reading 13-6writing to streams 13-4
typeValue method 11-3
UUI
new features 2-5UI designer 6-1
tutorial 16-7, 17-11unary logical complement 9-10unary operators 9-9underscore as name prefix 9-2unexpected side effects 9-19Unicode characters 9-4, 9-5
reading 11-9Unicode home page 9-4uninitialized variables 9-14UnsatisfiedLineError exceptions 15-2unsigned shifts 9-12Usenet newsgroups 1-3user interface
designing 6-1, 16-7new features 2-5tutorial 17-11
using help 2-10Utilities package 11-6utility classes and interfaces 11-6
VvalueOf method 11-4values 9-8, 9-13
assigning to variables 9-11, 9-13comparing 9-10
variable assignments 9-8variable names 9-3variables 9-11, 9-13
caution for global 9-19initializing 9-14objects as 10-2scope 9-18type conversions 9-17
Vector class 11-6, 11-7verification 14-3version control system
new features 2-4viewing project files 5-8virtual machine 14-1, 15-1Visual Studio 4-5
Wweb development
new features 2-1web-based applications
deploying 7-7while loops 9-19whitespace characters 9-6window (JBuilder main) 3-2wizards 5-1
Applet 5-14Archive Builder 7-5create files 5-1Deployment 7-5improvements 2-6modify files 5-1new features 2-6shortcuts 5-1source code 5-1
wrapper classes 11-2writeObject method 13-3writer classes 11-11writes 11-9, 11-12, 13-4, 13-6
XXOR operator 9-10, 9-11, 9-12
Yyield method 12-6