Embed Size (px)
Citation preview

Excel®
2010Microsoft®
Making Everything Easier!™
• Navigate the new interface
• Use the Ribbon and Quick Access toolbar
• Create formulas and functions
• Save, protect, and recover workbook files
Learn to:
Colin BanfieldJohn Walkenbach
Go to Dummies.com®
for videos, step-by-step photos, how-to articles, or to shop!
Open the book and find:
• A tour of the Excel 2010 window
• Keyboard shortcuts that save you time
• How to undo changes and correct mistakes
• All you need to know about naming constants and formulas
• Advice on formatting numbers and ranges
• How to adjust settings and print your worksheet
• The different types of charts and how to change them
• What to do with the slicer report filter
Want to spend more time on your projects and less time trying to figure out Excel? This handy, portable guide gives you the facts in an easy-to-use format. Two Excel gurus bring you quickly up to speed on the 2010 version and then lay out the stuff you need to know: how to compare workbooks, manage worksheets, enter dates, work with formulas and functions, and much more.
• New for 2010 — learn to use the slicer report filter for PivotTables, in-cell charts (called Sparklines), table and PivotTable search filters, interactive PivotChart filters, and PivotTable custom calculations
• More than one — share workbooks, protect them from unauthorized use, or compare two side-by-side
• It’s relative — use relative, absolute, and mixed references, and convert formulas to values
• Cell development — edit cell contents, copy cells and ranges, and enter dates, formulas, text, and values
• Chart your progress — choose a chart, modify its axis, create and add elements, and add context to numbers
• Tables and more — use tables, PivotTables, and PivotCharts effectively
Straightforward and up-to-date — the nitty-gritty on working with Excel
Desktop Applications/Spreadsheets
$18.99 US / $22.99 CN / £14.99 UK
ISBN 978-0-470-52755-9Colin Banfield is an Excel expert with more than 20 years in the telecommunications field. John Walkenbach, aka Mr. Spreadsheet, has written more than 50 books on Excel and spreadsheet use. Visit his popular Spreadsheet Page at spreadsheetpage.com.

ISBN 978-0-470-52755-9
Welcome to Excel 2010 For Dummies Quick Reference! Keep this book within arm’s reach of your computer to find quick answers.
As you use this book, you’ll come across the following icons:
This icon indicates a feature that is available only in Excel 2010.
This icon flags the quickest way to complete a task.
This icon shows a way of using a feature that may not be obvious to the average user.
This icon flags problem areas that can mess up your work if you’re not careful.
If you’re new to Excel, take a look at Part 1, which gives you an overview of Excel and introduces terms that are used throughout the book. Part 1 is also important if you already know Excel but are new to Excel 2010.
Remember: If you’re having trouble finding a particular topic, check out the table of contents or the index. For topics not covered, we encourage you to use Excel’s Help feature.

by Colin Banfield and John Walkenbach
Excel® 2010FOR
DUMmIES‰
Q U I C K R E F E R E N C E
01_527559-ffirs.indd i01_527559-ffirs.indd i 4/1/10 6:58 PM4/1/10 6:58 PM

Excel® 2010 For Dummies® Quick Reference
Published byWiley Publishing, Inc.111 River StreetHoboken, NJ 07030-5774
www.wiley.com
Copyright © 2010 by Wiley Publishing, Inc., Indianapolis, Indiana
Published by Wiley Publishing, Inc., Indianapolis, Indiana
Published simultaneously in Canada
No part of this publication may be reproduced, stored in a retrieval system or transmitted in any form or by any means, electronic, mechanical, photocopying, recording, scanning or otherwise, except as permitted under Sections 107 or 108 of the 1976 United States Copyright Act, without either the prior written permission of the Publisher, or authorization through payment of the appropriate per-copy fee to the Copyright Clearance Center, 222 Rosewood Drive, Danvers, MA 01923, (978) 750-8400, fax (978) 646-8600. Requests to the Publisher for permission should be addressed to the Permissions Department, John Wiley & Sons, Inc., 111 River Street, Hoboken, NJ 07030, (201) 748-6011, fax (201) 748-6008, or online at http://www.wiley.com/go/permissions.
Trademarks: Wiley, the Wiley Publishing logo, For Dummies, the Dummies Man logo, A Reference for the Rest of Us!, The Dummies Way, Dummies Daily, The Fun and Easy Way, Dummies.com, Making Everything Easier, and related trade dress are trademarks or registered trademarks of John Wiley & Sons, Inc. and/or its affiliates in the United States and other countries, and may not be used without written permission. Excel is a registered trademark of Microsoft Corporation in the United States and/or other countries. All other trademarks are the property of their respective owners. Wiley Publishing, Inc., is not associated with any product or vendor mentioned in this book.
LIMIT OF LIABILITY/DISCLAIMER OF WARRANTY: THE PUBLISHER AND THE AUTHOR MAKE NO REPRESENTATIONS OR WARRANTIES WITH RESPECT TO THE ACCURACY OR COMPLETENESS OF THE CONTENTS OF THIS WORK AND SPECIFICALLY DISCLAIM ALL WARRANTIES, INCLUDING WITHOUT LIMITATION WARRANTIES OF FITNESS FOR A PARTICULAR PURPOSE. NO WARRANTY MAY BE CREATED OR EXTENDED BY SALES OR PROMOTIONAL MATERI-ALS. THE ADVICE AND STRATEGIES CONTAINED HEREIN MAY NOT BE SUITABLE FOR EVERY SITUATION. THIS WORK IS SOLD WITH THE UNDERSTANDING THAT THE PUBLISHER IS NOT ENGAGED IN RENDERING LEGAL, ACCOUNTING, OR OTHER PROFESSIONAL SERVICES. IF PROFESSIONAL ASSISTANCE IS REQUIRED, THE SERVICES OF A COMPETENT PROFESSIONAL PERSON SHOULD BE SOUGHT. NEITHER THE PUBLISHER NOR THE AUTHOR SHALL BE LIABLE FOR DAMAGES ARISING HEREFROM. THE FACT THAT AN ORGANIZATION OR WEBSITE IS REFERRED TO IN THIS WORK AS A CITATION AND/OR A POTENTIAL SOURCE OF FURTHER INFORMATION DOES NOT MEAN THAT THE AUTHOR OR THE PUBLISHER ENDORSES THE INFORMATION THE ORGANIZATION OR WEBSITE MAY PROVIDE OR RECOMMENDATIONS IT MAY MAKE. FURTHER, READERS SHOULD BE AWARE THAT INTERNET WEBSITES LISTED IN THIS WORK MAY HAVE CHANGED OR DISAPPEARED BETWEEN WHEN THIS WORK WAS WRITTEN AND WHEN IT IS READ.
For general information on our other products and services, please contact our Customer Care Department within the U.S. at 877-762-2974, outside the U.S. at 317-572-3993, or fax 317-572-4002.
For technical support, please visit www.wiley.com/techsupport.
Wiley also publishes its books in a variety of electronic formats. Some content that appears in print may not be available in electronic books.
Library of Congress Control Number: 2010923562
ISBN: 978-0-470-52755-9
Manufactured in the United States of America
10 9 8 7 6 5 4 3 2 1
01_527559-ffirs.indd ii01_527559-ffirs.indd ii 4/1/10 6:58 PM4/1/10 6:58 PM

About the AuthorsColin Banfield has worked in the telecommunications field and has been using spreadsheet programs for more than two decades. Colin works with organizations to build business intelligence models, dashboards, and complex adjunct tools using a combination of Excel, Microsoft Access, and other related Microsoft software. In his spare time, Colin writes and reviews books for Wiley and enjoys photography, astronomy, and expanding his musical repertoire. Colin holds a BSc (Honors) in Electrical Engineering from the University of the West Indies and has received extensive training in many advanced technologies. You can reach Colin at www.biexcel.com.
John Walkenbach is a leading authority on spreadsheet software and is principal of JWalk and Associates Inc., a small San Diego–based consulting firm that specializes in spreadsheet application development. He is the author of approximately three dozen spreadsheet books and has written hundreds of articles and reviews for a variety of publications, including PC World, InfoWorld, Windows magazine, and PC/Computing. John graduated from the University of Missouri and earned a master’s and a PhD from the University of Montana. Visit his Web site at www.j-walk.com.
DedicationTo Dorothy, my most loving and patient better half, and one of the nicest people on the planet. —C. B.
Author’s AcknowledgmentsThanks to the folks at Wiley who helped with this book. In particular, my project editor, Susan Pink (Pinkie to me), did her usual wonderful editing and coordinating job and kept me on my toes (not to mention on time). Pinkie has a keen eye for even the smallest details. I’m indebted to Mike Talley, who provided a thorough technical review, spotted important errors, and made some useful suggestions. —C. B.
01_527559-ffirs.indd iii01_527559-ffirs.indd iii 4/1/10 6:58 PM4/1/10 6:58 PM

Publisher’s AcknowledgmentsWe’re proud of this book; please send us your comments through our online registration form located at http://dummies.custhelp.com. For other comments, please contact our Customer Care Department within the U.S. at 877-762-2974, outside the U.S. at 317-572-3993, or fax 317-572-4002.
Some of the people who helped bring this book to market include the following:
Acquisitions and Editorial
Project Editor: Susan Pink
Acquisitions Editor: Katie Mohr
Copy Editor: Susan Pink
Technical Editor: Mike Talley
Editorial Manager: Jodi Jensen
Editorial Assistant: Amanda Graham
Sr. Editorial Assistant: Cherie Case
Composition Services
Project Coordinator: Kristie Rees
Layout and Graphics: Christin Swinford, Christine Williams
Proofreaders: Leeann Harney
Indexer: Becky Hornyak
Publishing and Editorial for Technology Dummies
Richard Swadley, Vice President and Executive Group Publisher
Andy Cummings, Vice President and Publisher
Mary Bednarek, Executive Acquisitions Director
Mary C. Corder, Editorial Director
Publishing for Consumer Dummies
Diane Graves Steele, Vice President and Publisher
Composition Services
Debbie Stailey, Director of Composition Services
01_527559-ffirs.indd iv01_527559-ffirs.indd iv 4/1/10 6:58 PM4/1/10 6:58 PM

Table of Contents
Part 1: Getting to Know Excel 2010 .........................1Excel 2010 Basics .............................................................................................. 2
Formulas ....................................................................................................... 2Active cell and ranges ................................................................................. 3
Familiarizing Yourself with the Excel 2010 Window ..................................... 3Moving, resizing, and closing windows ..................................................... 3Exiting Excel ................................................................................................. 3
Navigating with the Mouse and Keyboard ..................................................... 5Mousing around ........................................................................................... 5Using the keyboard ...................................................................................... 6
Introducing the Ribbon .................................................................................... 8Dissecting the parts of the Ribbon ............................................................ 8Sizing up the Ribbon .................................................................................. 11Tipping off your keyboard ........................................................................ 12Hiding the Ribbon commands .................................................................. 12
Introducing the Quick Access Toolbar (QAT) ............................................. 13Going Backstage .............................................................................................. 14Previewing Your Formatting Live ................................................................. 15Formatting with Themes ................................................................................ 16Soliciting Help .................................................................................................. 17
Part 2: Managing Workbooks ................................21Activating a Workbook ................................................................................... 22Arranging Windows Automatically ............................................................... 22Changing the Default File Location ............................................................... 22Closing a Workbook ........................................................................................ 23Comparing Two Workbooks Side by Side .................................................... 23Creating a New (Empty) Workbook .............................................................. 24Creating Multiple Windows (Views) for a Workbook ................................. 24Opening Non-native Files ............................................................................... 25Opening a Workbook ...................................................................................... 26
Opening a workbook using the Open dialog box ................................... 26Opening recently used workbooks .......................................................... 28Modifying security settings in the Trust Center .................................... 29
Protecting and Unprotecting a Workbook ................................................... 29Safeguarding your workbook from unauthorized users ....................... 29Protecting and unprotecting a workbook structure or window .......... 30
Recovering an Unsaved File ........................................................................... 31Reviewing Workbook Properties................................................................... 32Saving Workbooks........................................................................................... 32
Saving a workbook ..................................................................................... 33Saving a workbook under a different name ............................................ 33Saving a workbook in a non-native file format ....................................... 34
02_527559-ftoc.indd v02_527559-ftoc.indd v 4/1/10 6:58 PM4/1/10 6:58 PM

vi Excel 2010 For Dummies Quick Reference
Sharing Workbooks ......................................................................................... 35Switching among Open Workbooks .............................................................. 35Working with Workbook Templates ............................................................. 36
Creating a workbook template ................................................................. 36Creating a workbook from a template ..................................................... 37
Part 3: Working with Worksheets ..........................39Activating a Worksheet .................................................................................. 40Adding a New Worksheet ............................................................................... 40Changing a Worksheet’s Name ...................................................................... 40Coloring a Worksheet Tab ............................................................................. 41Copying or Moving a Worksheet ................................................................... 41Deleting a Worksheet ...................................................................................... 42Freezing Row or Column Titles ..................................................................... 43Grouping and Ungrouping Worksheets ........................................................ 44
Grouping worksheets ................................................................................ 44Ungrouping worksheets ............................................................................ 44
Hiding and Unhiding a Worksheet ................................................................ 45Protecting a Worksheet .................................................................................. 45Splitting Panes ................................................................................................. 46Turning Off Gridlines ...................................................................................... 47Using Full-Screen View ................................................................................... 48Zooming a Worksheet ..................................................................................... 48
Part 4: Entering and Editing Worksheet Data .........49Copying Cells and Ranges .............................................................................. 50
Copying a cell to another cell or a range ................................................ 50Copying a range to another range ........................................................... 52Copying data to another worksheet or workbook ................................. 53Copying multiple cells or ranges to another range ............................... 53
Deleting Entire Rows and Columns ............................................................... 55Editing the Contents of a Cell ........................................................................ 55Entering Data into a Range............................................................................. 57
Entering data into a specific range .......................................................... 57Entering the same data into a range of cells .......................................... 57
Entering Dates and Times .............................................................................. 58Entering specific dates and times ............................................................ 58Entering the current date or time ............................................................ 59
Entering Formulas ........................................................................................... 59Entering formulas manually...................................................................... 60Entering formulas by pointing .................................................................. 61
Entering Text ................................................................................................... 62Entering text into cells .............................................................................. 62Completing text entries by using AutoComplete ................................... 63
Entering Values ............................................................................................... 64Entering values into cells .......................................................................... 64Entering fractions ...................................................................................... 64
02_527559-ftoc.indd vi02_527559-ftoc.indd vi 4/1/10 6:58 PM4/1/10 6:58 PM

Erasing Data in Cells and Ranges .................................................................. 65Filling a Series .................................................................................................. 65
Entering a series of incremental values or dates ................................... 66Entering a series of text ............................................................................ 67
Inserting or Deleting Entire Rows and Columns ......................................... 67Inserting entire rows and columns .......................................................... 67Deleting entire rows and columns ........................................................... 68
Moving Cells and Ranges ............................................................................... 68Moving data to a new location in the same worksheet ......................... 68Moving data to a different worksheet or workbook .............................. 69
Replacing the Contents of a Cell ................................................................... 70Searching for Data to Replace ....................................................................... 70Selecting Cells and Ranges ............................................................................. 72
Selecting a cell ............................................................................................ 72Selecting a range ........................................................................................ 72Selecting noncontiguous ranges .............................................................. 73Selecting entire rows and columns .......................................................... 73Selecting a multisheet (3-D) range ........................................................... 74
Transposing a Range ...................................................................................... 74Undoing Changes and Mistakes .................................................................... 75Validating Data Entry ...................................................................................... 76
Part 5: Using Formulas and Functions ....................79Absolute, Relative, and Mixed References ................................................... 80Basic Formula Essentials................................................................................ 80Changing When Formulas Are Calculated.................................................... 81Converting Formulas to Values ..................................................................... 82Editing Functions in Formulas ....................................................................... 82Entering Functions in Formulas .................................................................... 83
Entering functions manually ..................................................................... 84Using the AutoSum tool ............................................................................ 84Using the Function Library ....................................................................... 85
Modifying a Range Reference Used in a Function ....................................... 86Referencing Cells or Ranges in Other Workbooks ...................................... 87
Referencing cells in other workbooks ..................................................... 87Managing links ............................................................................................ 88
Referencing Cells or Ranges in Other Worksheets ..................................... 90
Part 6: Creating and Using Names .........................91Advantages to Naming Cells and Ranges ..................................................... 92Applying Names to Existing Cell References ............................................... 92Creating Names ............................................................................................... 93
Creating a name using the New Name dialog box.................................. 93Creating a name using the name box ...................................................... 94Creating names from row and column labels ......................................... 95Creating sheet-level names ....................................................................... 96Creating multisheet names ....................................................................... 97
Table of Contents vii
02_527559-ftoc.indd vii02_527559-ftoc.indd vii 4/1/10 6:58 PM4/1/10 6:58 PM
viii Excel 2010 For Dummies Quick Reference
Deleting Names ................................................................................................ 97Editing Names .................................................................................................. 98Managing Names ............................................................................................. 98Naming Constants and Formulas ................................................................ 100Pasting Names into a Formula ..................................................................... 100
Part 7: Auditing Your Work .................................101Checking for Specific Worksheet Errors .................................................... 102
Checking for errors in the background ................................................. 102Checking for errors manually ................................................................. 103
Checking Your Spelling ................................................................................ 104Creating a Table of Names ........................................................................... 104Displaying Formulas in a Worksheet .......................................................... 105Evaluating Parts of a Formula ...................................................................... 105Finding Specific Data .................................................................................... 106Handling Circular References ...................................................................... 108Locating Errors by Selecting Special Cells ................................................. 110Tracing Cell Relationships ........................................................................... 111
Tracing precedents and dependents..................................................... 111Tracing formula error values ................................................................. 112
Understanding Formula Error Values ......................................................... 112Using Cell Comments .................................................................................... 113
Adding a cell comment ............................................................................ 114Editing a cell comment ............................................................................ 114Viewing cell comments ........................................................................... 114
Using the Watch Window ............................................................................. 115Displaying and adding cells to the Watch window .............................. 115Removing cells from the Watch window .............................................. 116
Part 8: Formatting Your Data ..............................117Adding Borders to a Cell or a Range ........................................................... 118Aligning Cell Contents .................................................................................. 118Changing the Appearance of Cell Contents ............................................... 120Copying Formats ........................................................................................... 121Formatting Based on the Contents of a Cell or Range .............................. 121
Formatting based on individual cell values .......................................... 122Formatting based on values in a range ................................................. 123Applying multiple conditional formats to a cell or range ................... 125Editing or deleting a conditional format ............................................... 126
Formatting a Number.................................................................................... 127Using Excel’s built-in number formats .................................................. 127Creating custom number formats .......................................................... 128
Formatting a Range Using Comparative Visualizations ........................... 129Using a visualization to compare values in a range ............................ 129Modifying the visualization for a range ................................................. 130
Hiding Cell Contents ..................................................................................... 132Hiding and Unhiding Columns and Rows ................................................... 133
02_527559-ftoc.indd viii02_527559-ftoc.indd viii 4/1/10 6:58 PM4/1/10 6:58 PM

Hiding columns and rows ....................................................................... 133Unhiding columns and rows ................................................................... 133
Modifying Cell Size ........................................................................................ 134Changing column width .......................................................................... 134Changing row height ................................................................................ 135
Using Cell Styles ............................................................................................ 136Applying a predefined cell style ............................................................. 136Modifying an existing style ..................................................................... 137Creating a custom cell style ................................................................... 138Copying (merging) cell styles from another workbook ...................... 138
Part 9: Previewing and Printing Your Work ..........139Adjusting Page and Printer Settings ........................................................... 140
Setting page and printer options ........................................................... 140Previewing your pages ............................................................................ 141
Changing the Worksheet Display Mode ..................................................... 142Handling Page Breaks ................................................................................... 143
Inserting manual page breaks ................................................................ 143Removing manual page breaks .............................................................. 145Previewing and adjusting page breaks .................................................. 145
Inserting a Header or Footer........................................................................ 146Selecting a predefined header or footer ............................................... 147Creating a custom header or footer ...................................................... 148Using multiple headers and footers in your reports ........................... 149
Setting the Print Area ................................................................................... 150Specifying Sheet Printing Options .............................................................. 150
Printing gridlines or row and column headings ................................... 151Printing row or column data labels on each page ............................... 151Selecting miscellaneous sheet printing options .................................. 151
Part 10: Charting Your Data ................................153Anatomy of a Chart ....................................................................................... 154Activating a Chart ......................................................................................... 155Adding Context to Numbers with Sparklines ............................................ 156
Creating a sparkline ................................................................................. 156Grouping and ungrouping sparklines .................................................... 157Modifying a sparkline data range or location....................................... 158Including additional elements in your sparkline ................................. 158Formatting and changing the sparkline type........................................ 159Using sparkline axis options ................................................................... 159
Adding a New Data Series to a Chart .......................................................... 160Adding a Title to a Chart .............................................................................. 161Changing the Chart Type for an Existing Chart or Data Series ............... 162Creating a Chart ............................................................................................ 162Creating and Using a Chart Template......................................................... 164Displaying a Data Table in a Chart .............................................................. 165Displaying Data Labels in a Chart ............................................................... 165
Table of Contents ix
02_527559-ftoc.indd ix02_527559-ftoc.indd ix 4/1/10 6:58 PM4/1/10 6:58 PM

x Excel 2010 For Dummies Quick Reference
Formatting a Chart Element ......................................................................... 166Handling Missing Data or Charting Hidden Data ...................................... 167Inserting and Modifying Chart Legends ..................................................... 167
Adding a legend to a chart ...................................................................... 167Changing the names (titles) on a chart legend .................................... 168
Modifying a Chart Axis ................................................................................. 168Resizing, Moving, Copying, and Deleting an Embedded Chart ............... 169Resizing, Moving, and Deleting a Chart Element....................................... 170Selecting a Chart Element ............................................................................ 171Updating the Source Data Range for a Chart or a Data Series ................ 171
Part 11: Working with Tables ..............................173Anatomy of a Table ....................................................................................... 174Converting a Table to a Range .................................................................... 175Creating a Table ............................................................................................ 175Formatting a Table ........................................................................................ 176
Applying a new style to a table .............................................................. 176Formatting based on cell or column content ....................................... 176
Inserting a Totals Row in a Table ................................................................ 177Inserting and Deleting Table Rows and Columns ..................................... 177
Adding and deleting table rows ............................................................. 177Adding and deleting table columns ....................................................... 178
Referencing Table Data in a Formula.......................................................... 178Referencing table data outside the table .............................................. 179Referencing table data using a calculated column .............................. 180
Removing Duplicate Values from a Table .................................................. 181Selecting Table Areas ................................................................................... 182
Part 12: Analyzing Data with PivotTables ............183Anatomy of a PivotTable .............................................................................. 184Adding a Slicer Report Filter........................................................................ 185
Creating a new slicer ............................................................................... 185Copying, moving, deleting, and resizing a slicer.................................. 186Filtering a PivotTable with a slicer ........................................................ 187Formatting a slicer ................................................................................... 187Associating a slicer with other PivotTables ......................................... 188
Changing the Summarization of PivotTable Data ..................................... 189Copying a PivotTable .................................................................................... 190Creating and Using a PivotChart ................................................................. 190
Creating a PivotChart .............................................................................. 191Using a PivotChart ................................................................................... 191
Creating a PivotTable Report ...................................................................... 192Formatting a PivotTable Report .................................................................. 193
Applying a new style to a PivotTable .................................................... 194Formatting based on data values ........................................................... 194Changing the number format of a PivotTable field ............................. 195
02_527559-ftoc.indd x02_527559-ftoc.indd x 4/1/10 6:58 PM4/1/10 6:58 PM

Table of Contents xi
Grouping PivotTable Items .......................................................................... 196Creating a date group .............................................................................. 196Creating a number group ........................................................................ 197Creating a text group ............................................................................... 198
Modifying a PivotTable Report.................................................................... 198Modifying a report layout ....................................................................... 198Modifying a report structure .................................................................. 199Displaying and hiding subtotals and grand totals ............................... 200Expanding and collapsing field item levels........................................... 200
Refreshing a PivotTable Report .................................................................. 201Renaming a PivotTable ................................................................................. 201Using Custom Calculations .......................................................................... 201
Part 13: Sorting and Filtering Your Data ..............203Creating a Custom Sort List ......................................................................... 204Filtering a PivotTable Report....................................................................... 205
Filtering a PivotTable based on individual field items ........................ 205Filtering a PivotTable based on a field text search ............................. 206Filtering a PivotTable based on field data type ................................... 206Clearing PivotTable filters ...................................................................... 207
Filtering Data in a Table ............................................................................... 207Filtering a table based on individual column entries .......................... 208Filtering a table based on a column text search .................................. 209Filtering a table based on column data type ........................................ 210Filtering a table based on cell color ...................................................... 211Clearing table filters ................................................................................ 211
Sorting Data in a PivotTable ........................................................................ 212Sorting a row or column field using standard sort options ............... 212Sorting a value field ................................................................................. 213Sorting a row or column field manually ................................................ 213Sorting a row or column field using a custom sort order ................... 213
Sorting Data in a Table ................................................................................. 214Sorting a single column based on column values ................................ 214Sorting multiple columns based on column values ............................. 215Sorting based on a custom sort order .................................................. 216Sorting based on color or conditional formatting icons ..................... 217
Index ..................................................................219
02_527559-ftoc.indd xi02_527559-ftoc.indd xi 4/1/10 6:58 PM4/1/10 6:58 PM

xii Excel 2010 For Dummies Quick Reference
02_527559-ftoc.indd xii02_527559-ftoc.indd xii 4/1/10 6:58 PM4/1/10 6:58 PM

Getting to Know Excel 2010With Microsoft’s popular Excel spreadsheet program, you can enter, manipulate, and analyze data in ways that would be impossible, cumbersome, or error prone for you to do manually. This part gives you the basics you need to get up and running quickly in Excel.
In this part . . .✓ Familiarizing Yourself with the Excel 2010 Window
✓ Navigating with the Mouse and Keyboard
✓ Introducing the Ribbon, Quick Access Toolbar, and Backstage View
✓ Formatting with Themes and Previewing Your Formatting Live
Part 1
03_527559-ch01.indd 103_527559-ch01.indd 1 4/1/10 6:59 PM4/1/10 6:59 PM

2 Part 1: Getting to Know Excel 2010
Excel 2010 BasicsExcel documents are known as workbooks. A single workbook can store as many sheets as will fit into memory, and these sheets are stacked like the pages in a notebook. Sheets can be either worksheets (a normal spreadsheet-type sheet with rows and columns) or chart sheets (a special sheet that holds a single chart).
Most of the time, you perform tasks in worksheets. Each worksheet uses a grid with 1,048,576 rows and 16,384 columns. Excel numbers rows starting with 1 and assigns letters to columns starting with A. After Excel exhausts the letters of the alphabet, column lettering continues with AA, AB, and so on. So column 1 is A, column 26 is Z, column 27 is AA, column 52 is AZ, column 53 is BA, and so on. Rows are numbered from 1 to 1,048,576, and columns are labeled from A to XFD.
The intersection of a row and a column is called a cell. A quick calculation using Excel tells us that this works out to 17,179,869,184 cells — more than enough for just about any use. Cells have addresses, which are based on their row and column. The upper-left cell in a worksheet is called A1, and the cell down at the bottom right is called XFD1048576. Cell K9 (also known as the dog cell) is the intersection of the eleventh column and the ninth row.
You might be wondering about the amount of system memory (known as random access memory, or RAM) you need to accommodate all those rows and columns. The memory you need depends on the amount of data you store in the workbook and the number of open workbooks. In Excel 2010, the memory available is limited by the maximum amount of memory that your version of Windows (XP, Vista, or Windows 7) can use.
FormulasA cell in Excel can hold a number, some text, a formula, or nothing at all. You already know what numbers and text are, but you may be a bit fuzzy on the concept of a formula. A formula tells Excel to perform a calculation using information stored in other cells. For example, you can insert a formula that tells Excel to add the values in the first 10 cells in column A and to display the result in the cell that contains the formula.
Formulas can use normal arithmetic operators such as + (plus), – (minus), * (multiply), and / (divide). They can also use special built-in functions that let you do powerful things without much effort on your part. For example, Excel has functions that add a range of values, calculate square roots, compute loan payments, and even tell you the time of day. Excel has more than 300 built-in functions, which are categorized by type — Math, Financial, Statistical and so on. Part 5 covers the basics of using functions in Excel.
03_527559-ch01.indd 203_527559-ch01.indd 2 4/1/10 6:59 PM4/1/10 6:59 PM
Excel 2010 Basics — Familiarizing Yourself with the Excel 2010 Window 3
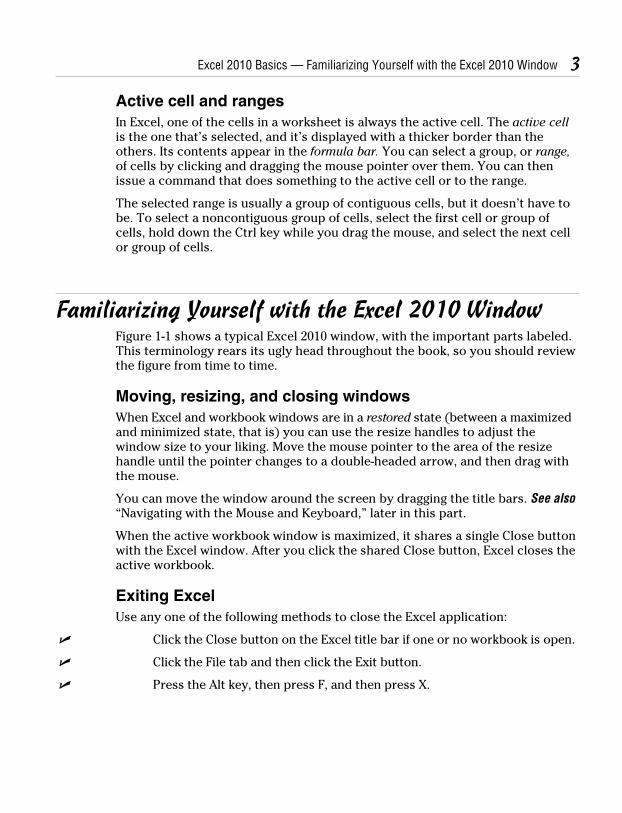
Active cell and rangesIn Excel, one of the cells in a worksheet is always the active cell. The active cell is the one that’s selected, and it’s displayed with a thicker border than the others. Its contents appear in the formula bar. You can select a group, or range, of cells by clicking and dragging the mouse pointer over them. You can then issue a command that does something to the active cell or to the range.
The selected range is usually a group of contiguous cells, but it doesn’t have to be. To select a noncontiguous group of cells, select the first cell or group of cells, hold down the Ctrl key while you drag the mouse, and select the next cell or group of cells.
Familiarizing Yourself with the Excel 2010 WindowFigure 1-1 shows a typical Excel 2010 window, with the important parts labeled. This terminology rears its ugly head throughout the book, so you should review the figure from time to time.
Moving, resizing, and closing windowsWhen Excel and workbook windows are in a restored state (between a maximized and minimized state, that is) you can use the resize handles to adjust the window size to your liking. Move the mouse pointer to the area of the resize handle until the pointer changes to a double-headed arrow, and then drag with the mouse.
You can move the window around the screen by dragging the title bars. See also “Navigating with the Mouse and Keyboard,” later in this part.
When the active workbook window is maximized, it shares a single Close button with the Excel window. After you click the shared Close button, Excel closes the active workbook.
Exiting ExcelUse any one of the following methods to close the Excel application:
✓ Click the Close button on the Excel title bar if one or no workbook is open.
✓ Click the File tab and then click the Exit button.
✓ Press the Alt key, then press F, and then press X.
03_527559-ch01.indd 303_527559-ch01.indd 3 4/1/10 6:59 PM4/1/10 6:59 PM

4 Part 1: Getting to Know Excel 2010
Figure 1-1
Select all button
Control button
Name box
Control button
Quick Access toolbar Excel title bar
Workbook title bar
Minimize
Maximize/Restore
Close
Help
Split box
Workbook window
Formula bar
Mouse pointer
Columnheader
Activecell
pointer
Tab scrolling controls
Ribbon
Sheet tabs
New sheet tab
Status bar Tab split
Normal view
Page layout view
Page break preview
Scroll bar
Zoom controls
Split box
Window resize handles
Row header
03_527559-ch01.indd 403_527559-ch01.indd 4 4/1/10 6:59 PM4/1/10 6:59 PM

Familiarizing Yourself with the Excel 2010 Window — Navigating with the Mouse and Keyboard 5
Navigating with the Mouse and KeyboardThe mouse is the primary tool that you use in Excel for executing commands, making selections, and navigating in the worksheet. Following are the mouse conventions that we use in this book:
✓ Click: Click the left mouse button once.
✓ Double-click: Click the left mouse button twice in quick succession.
✓ Right-click: Click the right mouse button once.
✓ Drag: Hold down the left mouse button and move the mouse. Release the mouse button to complete the drag operation.
✓ Hover: Place the mouse pointer over an element without clicking a mouse button.
✓ Select: Place the mouse pointer over an element and click the left mouse button.
Mousing aroundEvery mouse action is associated with some element in the Excel window. An element can be a slider, button, cell, chart object, and so on. You select or hover over the element using the mouse pointer.
Navigating through a worksheet with a mouse works just as you’d expect. Click a cell, and it becomes the active cell. If the cell that you want to activate isn’t visible in the workbook window, you can use the scroll bars to scroll the window in any direction, as follows:
✓ To scroll one cell, click one of the arrows on the scroll bar.
✓ To scroll by a complete screen, click either side of the scroll bar’s slider.
✓ To scroll faster, drag the slider.
✓ To scroll a long distance vertically, press and hold the Shift key while dragging the slider button.
Note that only the active workbook window displays scroll bars. If you activate a different window, its scroll bars appear.
After you right-click a cell, a range of cells, or another object in the worksheet area, Excel displays a contextual menu, so-called because the menu includes commands specific to working with the cell, range, or object.
For your convenience, Excel adds a minitoolbar above the contextual menu with useful commands drawn from the Ribbon, as shown in Figure 1-2. See also “Introducing the Ribbon,” later in this part.
03_527559-ch01.indd 503_527559-ch01.indd 5 4/1/10 6:59 PM4/1/10 6:59 PM

6 Part 1: Getting to Know Excel 2010
Figure 1-2
Using the keyboardMost users will be comfortable using the mouse to do all their work in Excel. For users who prefer to use the keyboard exclusively when working in Windows applications or for users who prefer to split the use of the mouse and keyboard among various tasks, Excel provides the following solutions:
✓ Keyboard shortcuts
✓ Keyboard navigation
✓ KeyTips
The first two functions are described next. For more on the last function, KeyTips, see “Tipping off your keyboard,” later in this part.
You can access commands in Excel using keyboard shortcuts, which are individual keystrokes or a combination of keys pressed simultaneously. To access the Print command using a shortcut, for example, you hold down the Ctrl key and press the P key, represented in this book as Ctrl+P. The following table lists some common keyboard shortcuts in Excel.
Shortcut ActionCtrl+A Select all
Ctrl+B Apply or remove bold formatting
Ctrl+C Copy selection
Ctrl+F Find
Ctrl+G or F5 Go to
03_527559-ch01.indd 603_527559-ch01.indd 6 4/1/10 6:59 PM4/1/10 6:59 PM

Navigating with the Mouse and Keyboard 7
Shortcut ActionCtrl+H Replace
Ctrl+I Apply or remove italic formatting
Ctrl+O or Ctrl+F12 Open a document
Ctrl+P Print
Ctrl+S or Shift+F12 Save
Ctrl+U Apply or remove underlining
Ctrl+V Paste
Ctrl+W or Ctrl+F4 Close the active workbook
Crtl+X Cut
Ctrl+Y or F4 Repeat the last action
Ctrl+Z Undo the last action
F1 Display the help viewer
Ctrl+F1 Hide or display the Ribbon commands
F2 Enable editing within the active cell
With more than 17 billion cells in a worksheet, you need ways to move to spe-cific cells. Fortunately, Excel provides you with many techniques to move around a worksheet. As always, you can use either your mouse or the keyboard on your navigational journeys. The following table lists the keystrokes that enable you to move through a worksheet.
Keys ActionUp arrow Moves the active cell one row up
Down arrow Moves the active cell one row down
Left arrow Moves the active cell one column to the left
Right arrow Moves the active cell one column to the right
PgUp Moves the active cell one screen up
PgDn Moves the active cell one screen down
Alt+PgDn Moves the active cell one screen right
Alt+PgUp Moves the active cell one screen left
Home Moves the active cell to the first column of the row that the active cell is currently in
Ctrl+Home Moves the active cell to the beginning of worksheet (A1)
F5 Displays the Go To dialog boxcont.
03_527559-ch01.indd 703_527559-ch01.indd 7 4/1/10 6:59 PM4/1/10 6:59 PM

8 Part 1: Getting to Know Excel 2010
Keys ActionCtrl+Backspace Scrolls the screen to display the active cell
Up arrow* Scrolls the screen one row up (active cell doesn’t change)
Down arrow* Scrolls the screen one row down (active cell doesn’t change)
Left arrow* Scrolls the screen one column left (active cell doesn’t change)
Right arrow* Scrolls the screen one column right (active cell doesn’t change)* With Scroll Lock on
Introducing the RibbonExcel comes with a user interface called the Ribbon, which consists of a series of horizontal tabs, each containing a variety of commands grouped according to function (see Figure 1-3). Most features in Excel 2010 are available through the commands on the Ribbon tabs.
Figure 1-3
Contextual tab headerHome tab
Dialog launcherSplit button Contextual tabs
Dissecting the parts of the RibbonThe commands on the Ribbon are accessed through a variety of controls. Here’s a list of the various types of controls and other parts that make up the Ribbon:
✓ Button: This is the most common type of control. Most buttons on the Ribbon (except the formatting ones) have descriptive text associated with them, so you don’t need to be a Mensa expert to figure out what a button represents. The most frequently used commands on each Ribbon tab have larger buttons.
Most buttons execute commands directly when you click them. However, some buttons have an embedded downward-pointing arrow, and others have an attached downward-pointing arrow. Clicking a button with an embedded arrow displays a menu or gallery. For a button with an attached
03_527559-ch01.indd 803_527559-ch01.indd 8 4/1/10 6:59 PM4/1/10 6:59 PM

Navigating with the Mouse and Keyboard — Introducing the Ribbon 9
arrow (known as a split button), the icon or text part of the button represents the most common command for the button. Clicking the arrow part displays a menu or gallery with additional commands or formatting choices. The two types of buttons with arrows look similar, but if you hover the mouse pointer over a button with an attached arrow, you see a clear delineation between the icon or text (command) part and the arrow (menu) part (refer to Figure 1-3).
✓ Check box: This is a square box that you click to turn an option on or off.
✓ Command group: Each Ribbon tab contains groups of related commands. For example, you find commands related to text fonts in the Font group of the Home tab.
✓ Dialog launcher: A dialog launcher is a command that launches a dialog box (a pop-up window) from a command group, menu, or gallery. The dialog launcher in a command group is a little button in the bottom right of the group frame. In addition, some menus and galleries contain options that launch dialog boxes. After you click a dialog launcher, a dialog box appears that presents additional choices. (However, the Ribbon displays the commands you are likely to use frequently, thus minimizing the need to launch dialog boxes.)
✓ Drop-down list: This list contains things you can choose from. Click the control’s downward-pointing arrow to display the list.
✓ Gallery: A gallery is a control that presents you with a set of graphic choices, such as a particular formatting style (patterns, colors, and effects) or a predefined layout. An example of a predefined layout is a chart choice with specific elements preselected for inclusion in the chart. Galleries enable Excel to be more results oriented; that is, they present the likely result you are looking for first and then expose advanced choices through a dialog box or Ribbon command.
Three types of galleries are available:
• Drop-down gallery: This is displayed after you click certain buttons with downward-pointing arrows. This type of gallery presents a single column of choices and includes both graphic and text elements.
• Drop-down grid: This is displayed after you click certain buttons with downward-pointing arrows. This type of gallery presents a two-dimensional grid of choices and does not include text.
• In-Ribbon gallery: This is like the drop-down grid, but this gallery exposes a single row of choices directly within a Ribbon control group. You can click up and down scroll arrows to reveal additional rows, or you can click a drop-down arrow to display the full set of choices in a two-dimensional grid.
03_527559-ch01.indd 903_527559-ch01.indd 9 4/1/10 6:59 PM4/1/10 6:59 PM

10 Part 1: Getting to Know Excel 2010
✓ Menu, rich: Rich menus have illustrative graphics, the command name, and in some cases a short description of what the command does.
Remember: Don’t confuse rich menus with drop-down galleries, although they look similar. Menus contain related commands. Galleries allow you to choose from among a set of formats or layouts.
✓ Menu, standard: Most users are already familiar with this form of menu — a drop-down list of choices with command names (such as Copy or Insert Cells). Some command names have small associated icons. If you click a command name that ends with an ellipsis (…), Excel displays a dialog box that presents further choices.
✓ Spinner: A spinner is a control with two arrows (one pointing up, the other pointing down) used with an input box to specify a number (height or width, for example.) Clicking an arrow increases or decreases the number in the input box. You can also enter a number in the box directly. The spinner control allows you to use only valid numbers.
✓ Tab, contextual: Contextual tabs give the Ribbon the power to expose most Excel features. One or more contextual tabs appear after you insert or select an object, such as a chart, shape, table, or picture. For example, after you insert a chart, three contextual tabs related to chart functionality appear on the Ribbon and a header labeled Chart Tools appears on the Excel title bar above the contextual tabs. Contextual tabs contain all the commands you need for working with the particular object. After you deselect an object, the contextual tabs (and the header) disappear.
The general rules that govern the display of contextual tabs follow:
• After you select an object (such as a chart, shape, or table), one or more contextual tabs for the object appear on the Ribbon. You must select a tab to display the associated commands.
• After you insert an object, Excel displays the commands for the first tab of the contextual tab set for that object.
• After you double-click an object, Excel displays the commands for the first tab of the contextual tab set for that object. Note that not all objects have this double-click capability.
• After you select, deselect, and then reselect the object without using any other commands in-between, Excel displays the commands for the first tab of the contextual tab set for that object.
✓ Tab, custom: In addition to the built-in standard and contextual Ribbon tabs that Excel includes, you can create custom Ribbon tabs.
03_527559-ch01.indd 1003_527559-ch01.indd 10 4/1/10 6:59 PM4/1/10 6:59 PM

Introducing the Ribbon 11
✓ Tab, standard: The Ribbon comes with a set of standard tabs, each organized according to the functions of the commands that it contains. For example, the Insert tab contains command groups to insert shapes, charts, tables, pictures, and so on. An exception is the Home tab, which is so-named because this is where you do most of your work in Excel.
If your mouse has a scroll wheel, you can navigate quickly among the Ribbon tabs by hovering the mouse pointer over the Ribbon area and scrolling the wheel back and forth.
✓ Text box: A box in which you enter a number or text. In general, the Ribbon associates a text box with another control, such as a spinner or a drop-down box.
Sizing up the RibbonThe layout of the Ribbon controls is not static. Depending on your screen resolution, or the Excel window size, or both, the Ribbon provides one of four layout options for command groups. If sufficient space is available, the Ribbon presents a layout that labels commands, displays more commands individually, and eliminates extra mouse clicks. As you resize the Ribbon downwards (by reducing the screen resolution or shrinking the size of the Excel window), the Ribbon rearranges the layout of some of the command groups by first resizing command buttons (larger buttons become smaller), then removing labels from commands, and finally reducing the groups to single large buttons (see Figure 1-4). To access the commands in a command group that the Ribbon resizes to a single button, you must first click the button to display a menu and then select the command.
Figure 1-4
03_527559-ch01.indd 1103_527559-ch01.indd 11 4/1/10 6:59 PM4/1/10 6:59 PM