Embed Size (px)
Citation preview
8/6/2019 Learn the Guitar Lessons Part 1
http://slidepdf.com/reader/full/learn-the-guitar-lessons-part-1 1/42
Learn The Guitar Lessons Part 1 – Tuning and Notes
Welcome to part 1 of our learn guitar lessons. We are excited to be kicking it all off today
with the first of many free guitar lessons. Over time this will develop into a 40 part seriesof Beginners Guitar Lessons, all for free!
If you are keen on mastering the fretboard and becoming a proficient guitarist, you’re
about to embark on a very exciting journey, joining millions of other guitar players from
all walks of life.
Learning the guitar is easier than you think, but like anything, it does take work, and
plenty of practice! It is very important that you understand the learning process, and
understand that the progress you make is directly relative to the action you take and the
effort you put forth.
You won’t learn guitar overnight, and learning will not be entirely incremental. You’ll
reach highs, lows, and mid-points in your learning, and all of a sudden, you’ll reach thenext level! Don’t give up, and know that you’re never too young, or too old, to learn theguitar. For the first in our series of Beginners Guitar Lessons, we’ll talk about guitar
tuning and basic notes.
Listen To Beginners Lesson 1 – Guitar Tuning by Matt McKay
Learn Guitar – Lesson 1 Guitar Tuning
Guitar Tuning is perhaps the single most frustrating element when you are beginning to
learn guitar, and of course, is also among the most important. Even electronic guitar tuners, which are quite helpful, will not be reliable if your guitar is drastically out of tune.
Since electronic tuners are only worthwhile if the guitar is semi in-tune – a pitch pipe, or
an electronic tuner with audible note tones, is the best starting point.
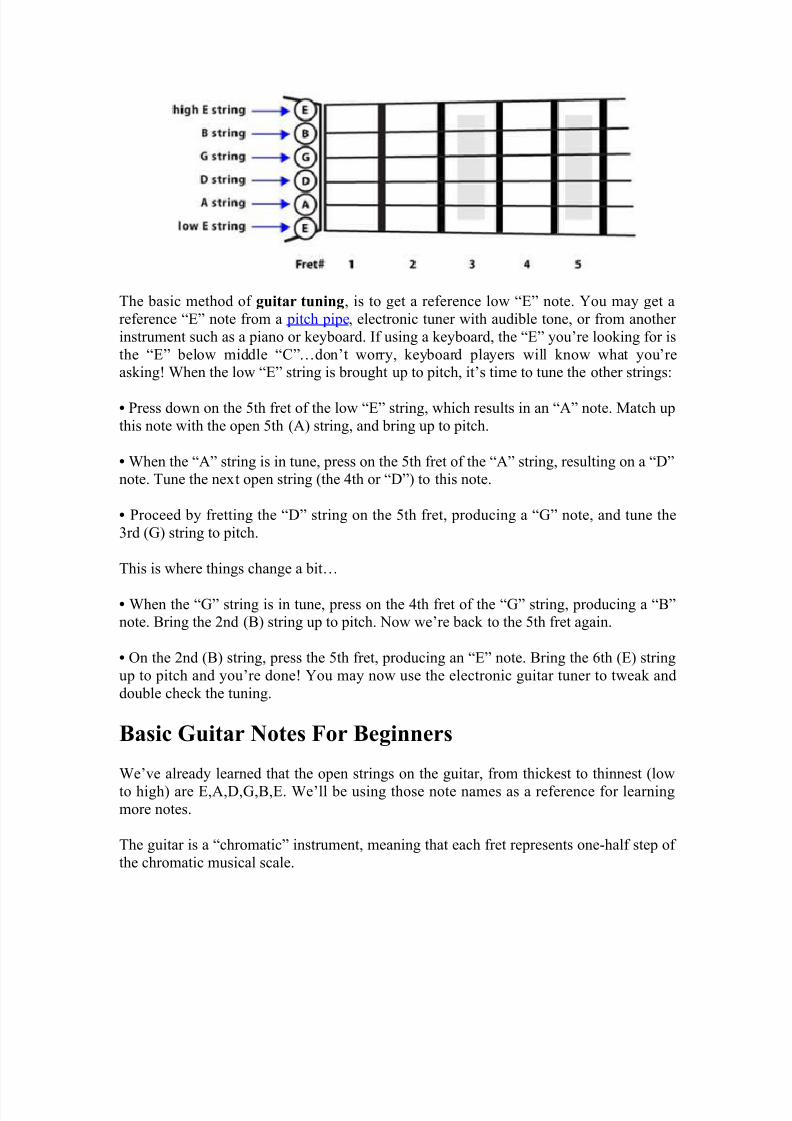
Starting from the thickest string, proceeding to the thinnest, are the string number andnote names as follows: 6E, 5A, 4D, 3G, 2B, 1E (as seen below). Remember EADGBE is
also a good start in learning the note names.
8/6/2019 Learn the Guitar Lessons Part 1
http://slidepdf.com/reader/full/learn-the-guitar-lessons-part-1 2/42
8/6/2019 Learn the Guitar Lessons Part 1
http://slidepdf.com/reader/full/learn-the-guitar-lessons-part-1 3/42
The basic musical scale includes seven notes, placed in alphabetical order:
A,B,C,D,E,F,G. Sharps (#) and flats (b) are added to each note except between B and C,
and between E and F, resulting in the 12 notes of the chromatic musical scale.
The chromatic scale contains every possible musical note, arranged in half-steps.
Incidentally, a whole-step equals two frets on the guitar, and jumps one note in the scale:
A, A# or Bb, B, C, C# or Db, D, D# or Db, E, F, F# or Gb, G, G# or Ab, and back to A
again.
The difference between sharps and flats can cause some confusion for beginners, but it’sreally not a mystery. For example, A# and Bb sound exactly the same – and they are!
They are written and called one name or the other depending on their use in other scales.
The primary reason is to keep the note names in alphabetical order. This concept will become a bit clearer as we move on to future learn guitar lessons, but for now, don’t
worry about it!
Since each fret on the guitar equals one half-step in the chromatic scale, any one fret
movement, up or down, results in the next note in the chromatic scale (also up or down).
For example, play the low “E” string on your guitar, and locate the note in the chromaticscale above. Press on the first fret. You’ve just produced an “F” note, which is the next
note in the scale. Press on the second fret, and you’ve produced an “F#/Gb” note. Third
fret will produce a “G”, fourth fret will produce a “G#/Ab note, fifth fret produces and“A” note, and so on. As we learned in our guitar tuning exercise, the fifth fret of every
string (with the exception of the 3rd (G) string, which is the fourth fret) produces the
same note as the next open string. The guitar is laid out this way, in order to offer a
certain dynamic range and ease of playability.
Exercise – Notes And Fingering
Learn the chromatic notes on the guitar up to the 5th fret on each string (except the third
string, which you will learn to the fourth fret). This grouping of notes is what is called the“first position” on the guitar, starting from the low “E” string. Use your first finger for
notes on the first fret, the second finger for the second fret, third finger for third fret, and
fourth finger for the fourth and fifth fret…easy enough?
Play and say each note on each string, moving along to the higher strings until you finally
come to the fifth fret of the high “E” string…that note will be “A”. This exercise will getyour fingers used to the fretboard, and learn all the notes, and proper fingering, in the first
position.
We hope you have enjoyed part 1 of our learn guitar beginners series and are excitedabout learning the guitar. So, what are you waiting for? Get into stuck into guitar tuning
and start learning a few of the basic notes as mentioned above. If you can stick to our
8/6/2019 Learn the Guitar Lessons Part 1
http://slidepdf.com/reader/full/learn-the-guitar-lessons-part-1 4/42
Beginners Learn The Guitar Lesson 2 – The Major Scale
Great to have you back for part two of our 40 part series of Beginners Guitar Lessons.We hope you have been implementing the tips from lesson one, where talked about guitar
tuning, learning first position notes, and the chromatic scale.
For beginners guitar lesson two, we are going to learn about major scales and how to play
one. Here is both the audio and written version of the lesson… Lets start rocking!
Beginners Guitar Lessons – Audio Lesson 2
Beginners Guitar Lessons Part 2 – The Major Scale
The major scale is a grouping of eight notes used in every form of modern music. Welearned in part 1 of Beginners Guitar Lessons, that the chromatic scale contains all the
possible notes in music, separated by half-steps.
The major scale is a taken from the chromatic scale, using a specific formula of steps. If
you recall, one fret equals one-half of a step, and two frets equal a whole-step. Using thefollowing formula, it is possible to create every major scale, no matter where you start on
any given point of the chromatic scale:
Major Scale Formula: Whole, Whole, Half, Whole, Whole, Whole, Half (WWHWWWH)
Chromatic Scale: A, A#/Bb, B, C, C#/Db, D, D#/Eb, E, F, F#/Gb, G, G#/Ab, back to Aand infinity.
Excersice – C Major Scale
We’ll use the “C Major” scale as an example. Note that C major contains no sharp (#) or
flat (b) notes. Using the formula, for this example, we’ll start at the “C’ which occurs onthe 5th (A) string, on the third fret.
• Fret the “C” note with your third finger. According to the formula, we’ll be going
up a whole-step, which would land you on “D”. We’ll use the open 4th (D) string
as our “D” note. The second step in the formula is also a whole-step, which will bring us to “E”. The “E” we’re looking for occurs when you press the 2nd fret on
the 4th string with your second finger.
• The next step in the formula is a half-step, or one fret. Place your third finger on
the 3rd fret of the 4th string to get our next note, which is an “F”. Cool! You’rehalfway there…so far, we’ve got C, D, E, and F. Take a few minutes and practice
those four notes.
8/6/2019 Learn the Guitar Lessons Part 1
http://slidepdf.com/reader/full/learn-the-guitar-lessons-part-1 5/42
• All set? The next note in “C” major, after CDEF, is the next whole-step in the
formula, which is “G” in this example. The “G” we’re looking for can be found
by playing the 3rd string open…easy enough! After “G”, we’ll need another whole-step, which is “A”. “A” is located on the 2nd fret of the 3rd string, using
your second finger.
• Next, we have another whole-step, which is “B”. Play “B” by picking the open
2nd string. The final note in the scale is another “C”, which is one half-step from“B”. Play “C” with your 1st finger, on the 1st fret of the 2nd string.
You’ve done it! Now play the scale in it’s entirety, saying the notes as you play them:
C,D,E,F,G,A,B, and C. Practice playing the C major scale forward and backward, saying
the notes while you’re playing them.
Beginners Learn The Guitar Lessons 3 – Chords
Welcome back to lesson 3 of our Beginners Guitar Lessons series. Now that we’ve
discussed guitar tuning, basic notes and basic scales, it’s time to learn about guitar chords.
Simply put, chords are combinations of three or more notes played together.
Just as we’ve learned to use the chromatic scale to create a major scale, the notes in a
chord are derived from the major scale. In music, everything builds upon something else.
Here is the Beginners Guitar Lessons part 3 audio by Matt McKay, which goes hand inhand with the written lesson below… Get stuck into it and you will be playing the guitar
like a pro in no time!
Beginners Guitar Lessons – Audio Lesson 3 By Matt McKay
Beginners Guitar Lessons – Part 3
As scales have formulas, so do chords. Let’s start by taking the notes in the C major
scale, and apply numbers to each note:
C=1, D=2, E=3, F=4, G=5, A=6, B=7, C=8
The first note in the scale is known as the “root” note, which in this case, is “C.”
8/6/2019 Learn the Guitar Lessons Part 1
http://slidepdf.com/reader/full/learn-the-guitar-lessons-part-1 6/42
To form a major chord, we’ll use the following formula:
1, 3, 5…that’s it! Simply take the number one note, C, the number three note, E, and the
number five note, G, and play them together. It doesn’t even matter if the notes are played in order or not, as those three notes played together, in any order, will always
form a C major chord.
Chord Charts
Chord charts are a helpful way to learn guitar chords, and are quite simple to read.Looking at the diagram, the vertical lines represent the strings, low to high E, from left to
right. The horizontal lines represent the frets. Unless designated by a number on the top
horizontal line, the line represents the “nut” of the guitar, meaning an open string. The
second horizontal line represents the first fret, and so on.
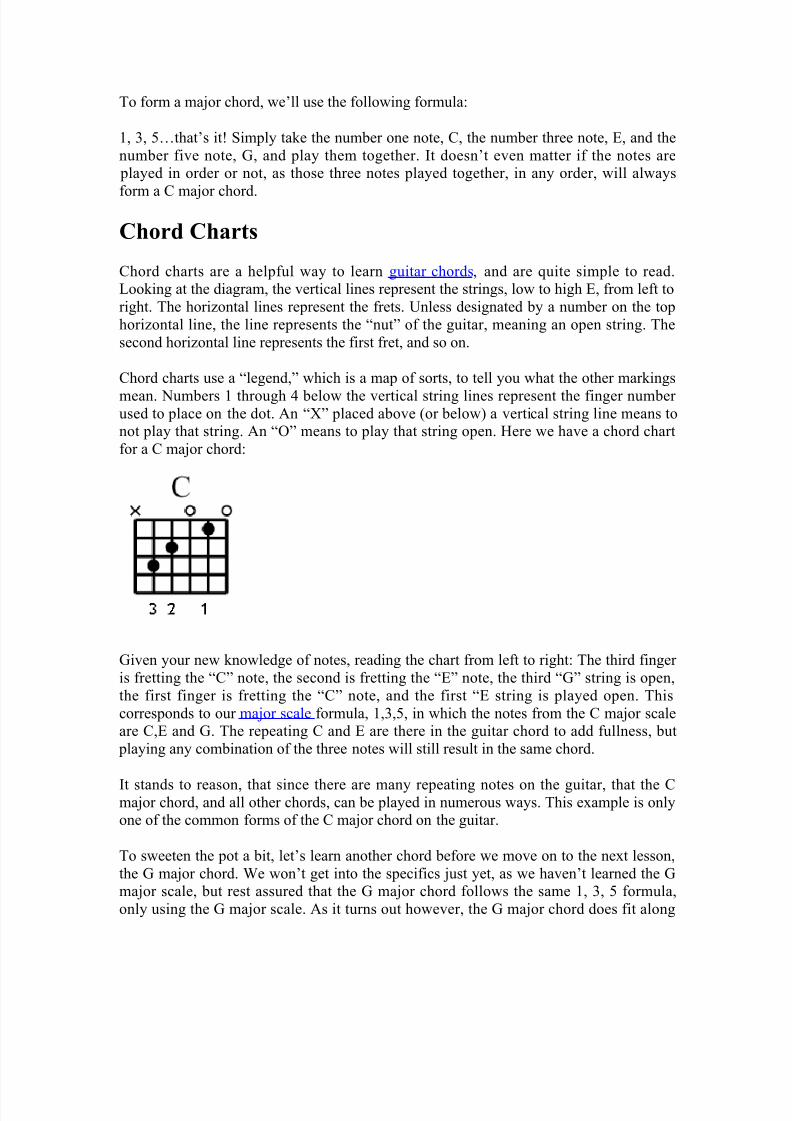
Chord charts use a “legend,” which is a map of sorts, to tell you what the other markings
mean. Numbers 1 through 4 below the vertical string lines represent the finger number used to place on the dot. An “X” placed above (or below) a vertical string line means tonot play that string. An “O” means to play that string open. Here we have a chord chart
for a C major chord:
Given your new knowledge of notes, reading the chart from left to right: The third finger
is fretting the “C” note, the second is fretting the “E” note, the third “G” string is open,
the first finger is fretting the “C” note, and the first “E string is played open. This
corresponds to our major scale formula, 1,3,5, in which the notes from the C major scaleare C,E and G. The repeating C and E are there in the guitar chord to add fullness, but
playing any combination of the three notes will still result in the same chord.
It stands to reason, that since there are many repeating notes on the guitar, that the Cmajor chord, and all other chords, can be played in numerous ways. This example is onlyone of the common forms of the C major chord on the guitar.
To sweeten the pot a bit, let’s learn another chord before we move on to the next lesson,
the G major chord. We won’t get into the specifics just yet, as we haven’t learned the Gmajor scale, but rest assured that the G major chord follows the same 1, 3, 5 formula,
only using the G major scale. As it turns out however, the G major chord does fit along
8/6/2019 Learn the Guitar Lessons Part 1
http://slidepdf.com/reader/full/learn-the-guitar-lessons-part-1 7/42
with the C major, because it has some of the same notes as the C major scale. This will be
an important fact to consider from here on, as every note and chord played within a song,
needs to relate to one another in order to sound good.
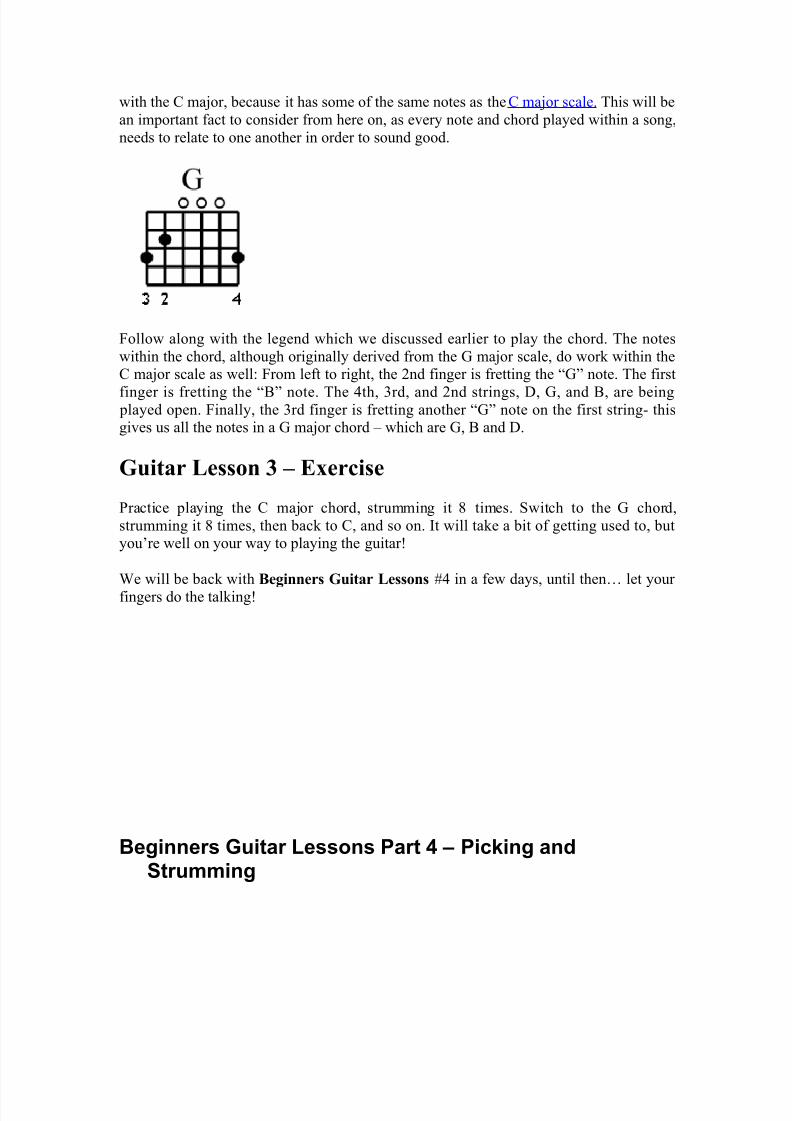
Follow along with the legend which we discussed earlier to play the chord. The notes
within the chord, although originally derived from the G major scale, do work within theC major scale as well: From left to right, the 2nd finger is fretting the “G” note. The first
finger is fretting the “B” note. The 4th, 3rd, and 2nd strings, D, G, and B, are being played open. Finally, the 3rd finger is fretting another “G” note on the first string- thisgives us all the notes in a G major chord – which are G, B and D.
Guitar Lesson 3 – Exercise
Practice playing the C major chord, strumming it 8 times. Switch to the G chord,
strumming it 8 times, then back to C, and so on. It will take a bit of getting used to, butyou’re well on your way to playing the guitar!
We will be back with Beginners Guitar Lessons #4 in a few days, until then… let your
fingers do the talking!
Beginners Guitar Lessons Part 4 – Picking andStrumming
8/6/2019 Learn the Guitar Lessons Part 1
http://slidepdf.com/reader/full/learn-the-guitar-lessons-part-1 8/42
Welcome back to part four of Beginners Guitar Lessons. Today, we’ll learn about picking
and strumming. Picking and strumming use varying patterns of up and down strokes,
noted in music to form some sort of arrow.
Using combinations of up and down strokes helps make a more efficient use of
movement, making the notes and chords easier to play faster, and provide for a morefluid sound. There is no right way or wrong way to pick or strum, only different ways to
achieve a certain result.
Using all down or up strokes results in a “choppier” sound with more attack, while
playing alternating up and down strokes will result in a smoother sound. Using
alternating up and down strokes, is also the method used to play extremely fast and fluid.
Different combinations of up and down strokes are also used to achieve a combination of soft or sharp attach sounds and effects.
Audio Track by Matt McKay – Beginners Guitar Lessons Part 4
Finger Picking
There are many playing who alternative with using a pick, and finger picking, while
others use their fingers exclusively. We’ll get into finger picking at another time, but
while both methods have merits, using a pick at this point is a good idea. As you progresswith these Beginners Guitar Lessons, you will soon decide which method, if not both, are
right for the style of music you will be playing.
Anatomy Of A Pick
Picks are made from many different materials, including stone, metal, heavy felt, or evenwood, those made of a plastic composite are most popular. Picks come in many sizes and
thicknesses also, and choosing the right one for you is a matter of personal preference.
Try a few different shapes and thicknesses and you will invariably find one that feelscomfortable.
Holding The Pick
There is no right or wrong way to hold a pick, but most guitarists hold the pick between
their thumb and index finger. This also frees up other fingers to perform finger picking if you so desire. When you’re starting out, the pick may feel as though it will fall out of
your hand at any given time…and it will at first! A firm, but not too tight of a grip, with
the hand relaxed, is right about where you want to be.
8/6/2019 Learn the Guitar Lessons Part 1
http://slidepdf.com/reader/full/learn-the-guitar-lessons-part-1 9/42
Guitar Practice – Picking With Scales
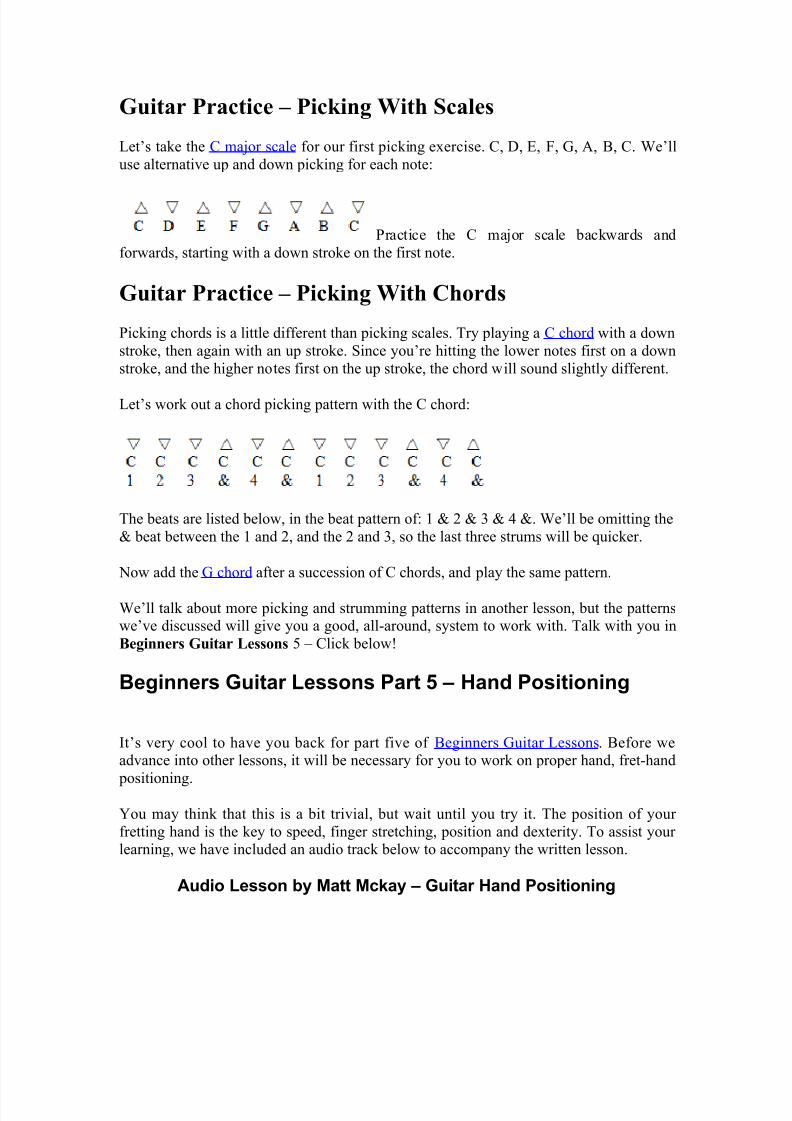
Let’s take the C major scale for our first picking exercise. C, D, E, F, G, A, B, C. We’ll
use alternative up and down picking for each note:
Practice the C major scale backwards and
forwards, starting with a down stroke on the first note.
Guitar Practice – Picking With Chords
Picking chords is a little different than picking scales. Try playing a C chord with a down
stroke, then again with an up stroke. Since you’re hitting the lower notes first on a down
stroke, and the higher notes first on the up stroke, the chord will sound slightly different.
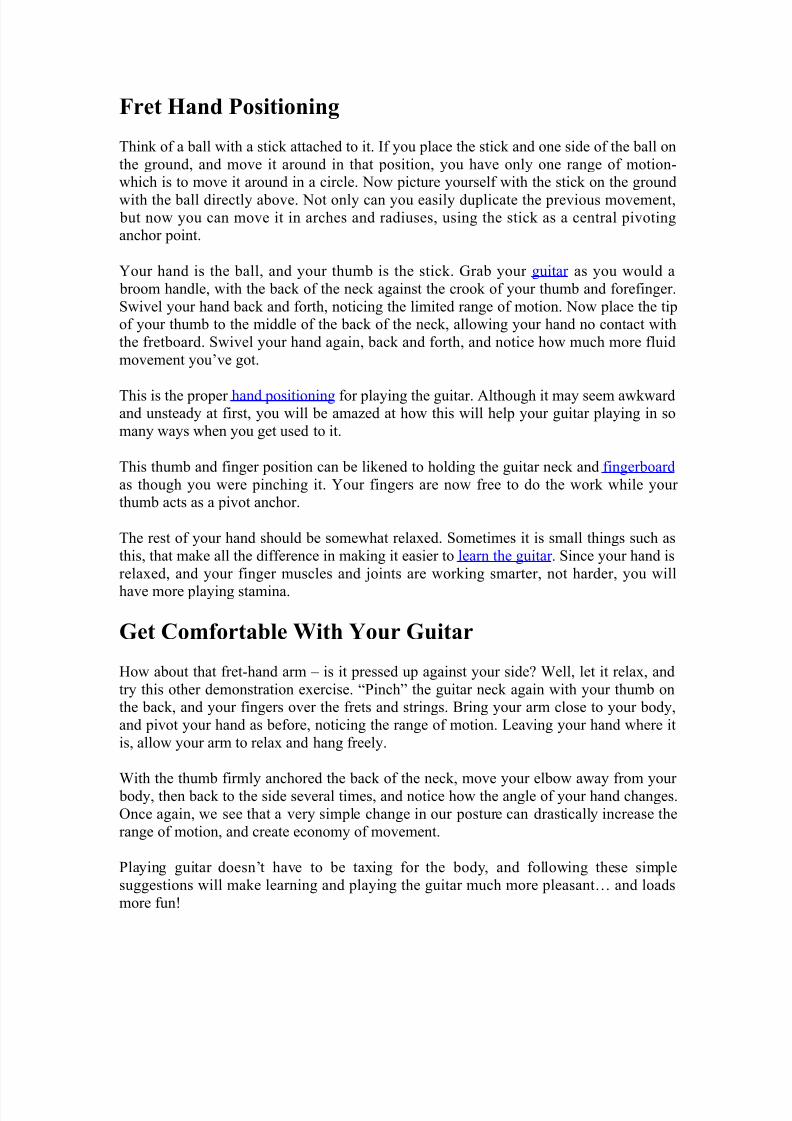
Let’s work out a chord picking pattern with the C chord:
The beats are listed below, in the beat pattern of: 1 & 2 & 3 & 4 &. We’ll be omitting the
& beat between the 1 and 2, and the 2 and 3, so the last three strums will be quicker.
Now add the G chord after a succession of C chords, and play the same pattern.
We’ll talk about more picking and strumming patterns in another lesson, but the patternswe’ve discussed will give you a good, all-around, system to work with. Talk with you in
Beginners Guitar Lessons 5 – Click below!
Beginners Guitar Lessons Part 5 – Hand Positioning
It’s very cool to have you back for part five of Beginners Guitar Lessons. Before weadvance into other lessons, it will be necessary for you to work on proper hand, fret-hand
positioning.
You may think that this is a bit trivial, but wait until you try it. The position of your
fretting hand is the key to speed, finger stretching, position and dexterity. To assist your learning, we have included an audio track below to accompany the written lesson.
Audio Lesson by Matt Mckay – Guitar Hand Positioning
8/6/2019 Learn the Guitar Lessons Part 1
http://slidepdf.com/reader/full/learn-the-guitar-lessons-part-1 10/42
Fret Hand Positioning
Think of a ball with a stick attached to it. If you place the stick and one side of the ball on
the ground, and move it around in that position, you have only one range of motion-which is to move it around in a circle. Now picture yourself with the stick on the ground
with the ball directly above. Not only can you easily duplicate the previous movement, but now you can move it in arches and radiuses, using the stick as a central pivotinganchor point.
Your hand is the ball, and your thumb is the stick. Grab your guitar as you would a
broom handle, with the back of the neck against the crook of your thumb and forefinger.
Swivel your hand back and forth, noticing the limited range of motion. Now place the tipof your thumb to the middle of the back of the neck, allowing your hand no contact with
the fretboard. Swivel your hand again, back and forth, and notice how much more fluid
movement you’ve got.
This is the proper hand positioning for playing the guitar. Although it may seem awkwardand unsteady at first, you will be amazed at how this will help your guitar playing in so
many ways when you get used to it.
This thumb and finger position can be likened to holding the guitar neck and fingerboard
as though you were pinching it. Your fingers are now free to do the work while your thumb acts as a pivot anchor.
The rest of your hand should be somewhat relaxed. Sometimes it is small things such as
this, that make all the difference in making it easier to learn the guitar . Since your hand is
relaxed, and your finger muscles and joints are working smarter, not harder, you will
have more playing stamina.
Get Comfortable With Your Guitar
How about that fret-hand arm – is it pressed up against your side? Well, let it relax, and
try this other demonstration exercise. “Pinch” the guitar neck again with your thumb onthe back, and your fingers over the frets and strings. Bring your arm close to your body,
and pivot your hand as before, noticing the range of motion. Leaving your hand where it
is, allow your arm to relax and hang freely.
With the thumb firmly anchored the back of the neck, move your elbow away from your body, then back to the side several times, and notice how the angle of your hand changes.
Once again, we see that a very simple change in our posture can drastically increase the
range of motion, and create economy of movement.
Playing guitar doesn’t have to be taxing for the body, and following these simple
suggestions will make learning and playing the guitar much more pleasant… and loads
more fun!
8/6/2019 Learn the Guitar Lessons Part 1
http://slidepdf.com/reader/full/learn-the-guitar-lessons-part-1 11/42
Talk with you next time in Beginners Guitar Lessons part 6, where we cover guitar
chords in more detail… Click below.
Beginners Guitar Lessons Part 6 – Guitar Chords Part 2
Great to see you back for lesson six! In lesson three of our beginners learn the guitar
series, we talked about the basics of Guitar Chords, and learned the C and G major chords. So let’s continue and get a few more chords mastered!
First up, to make learning the guitar easier, we have provided the lesson on audio which
goes hand in hand with the written lesson below.
Audio by Matt McKay – Guitar Chords Part 2
As we mentioned before, chords are taken from major scales. Since we love the C major
scale so much, we’ll work on the other chords that work within C major. Remember that
chords are simply groups of complimentary notes taken from a particular scale.
Therefore, all the notes contained in the chord must also appear in the scale. Music hasrules, which rely on other related rules. So learning the basics right from the start will
help you all along the way.
Let’s refresh our memories with the notes of the C major scale. It has no sharps (#) or
flats (b) so we start at C and move forward alphabetically:
C D E F G A B1 2 3 4 5 6 7
Since each key and corresponding chord has a number of sharps and flats (with the
exception of C), we’ll need to modify the chords slightly so they contain notes which
appear in the major scale we are working in. Our chords will be either major or minor,with the exception of the 7 chord, which in the case of C major is B, will be a diminished
chord. Diminished chords are marked with the abbreviation: dim
Just as we have formulas for scales and chords, we have a formula for the basic chordswithin a key. Note that this does not include every possible chord, but it is a starting pointfor the basic chords, with others built from them. The basic chord formula for any major
key (or major scale) is as follows. The numbers represent the notes within the scale as
they appear in order.
1=major chord, 2=minor chord, 3=minor chord, 4=major chord, 5=major chord, 6=minor chord, 7=diminished chord, and finally back to the 1, which is a major chord again.
8/6/2019 Learn the Guitar Lessons Part 1
http://slidepdf.com/reader/full/learn-the-guitar-lessons-part-1 12/42
In the case of C major, our Guitar Chords will be: C, Dm, Em, F, G, Am, Bdim, and C.
Notice that the name of major chords are not marked as major. So if you see chord
marked only by a note name, it will always be a major chord.
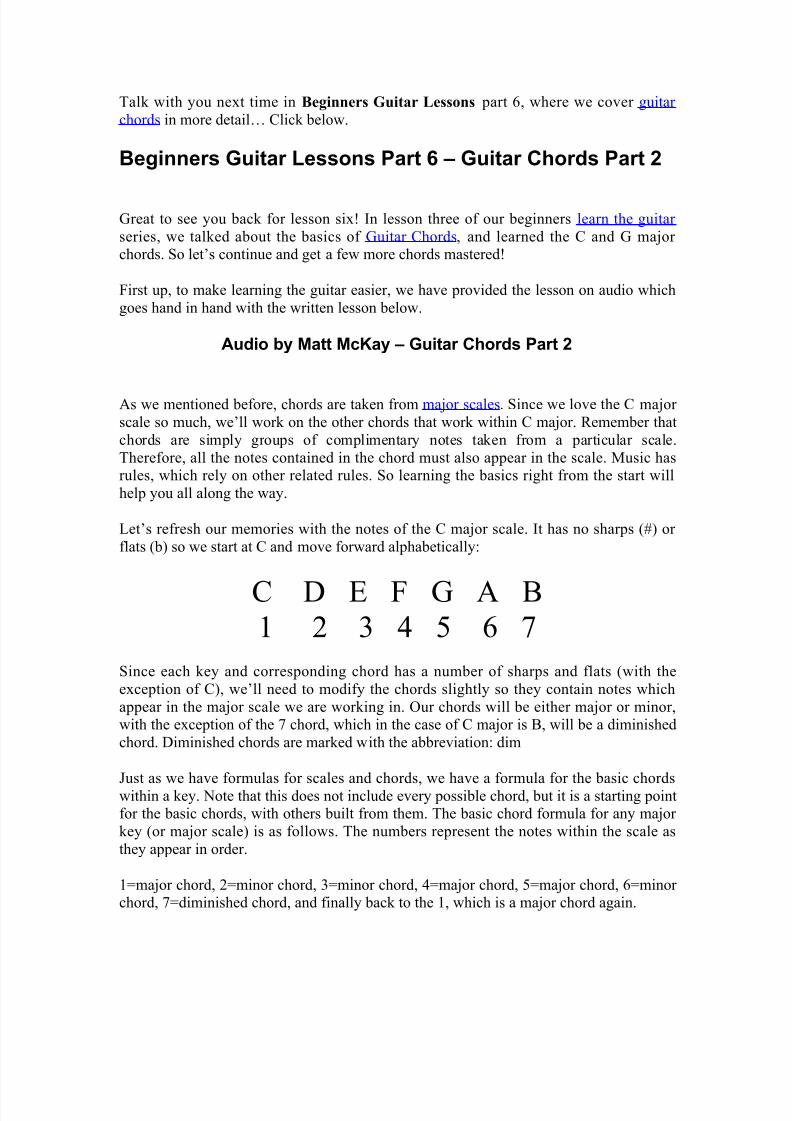
Our next chord to learn will be A minor (Am). As we’ll learn in a future lesson, all major scales have what is called a relative minor key. The relative minor key is always the sixth
note of any major scale, which in this case is A. The A minor chord contains the notes: A,
C and E, and is played like this:
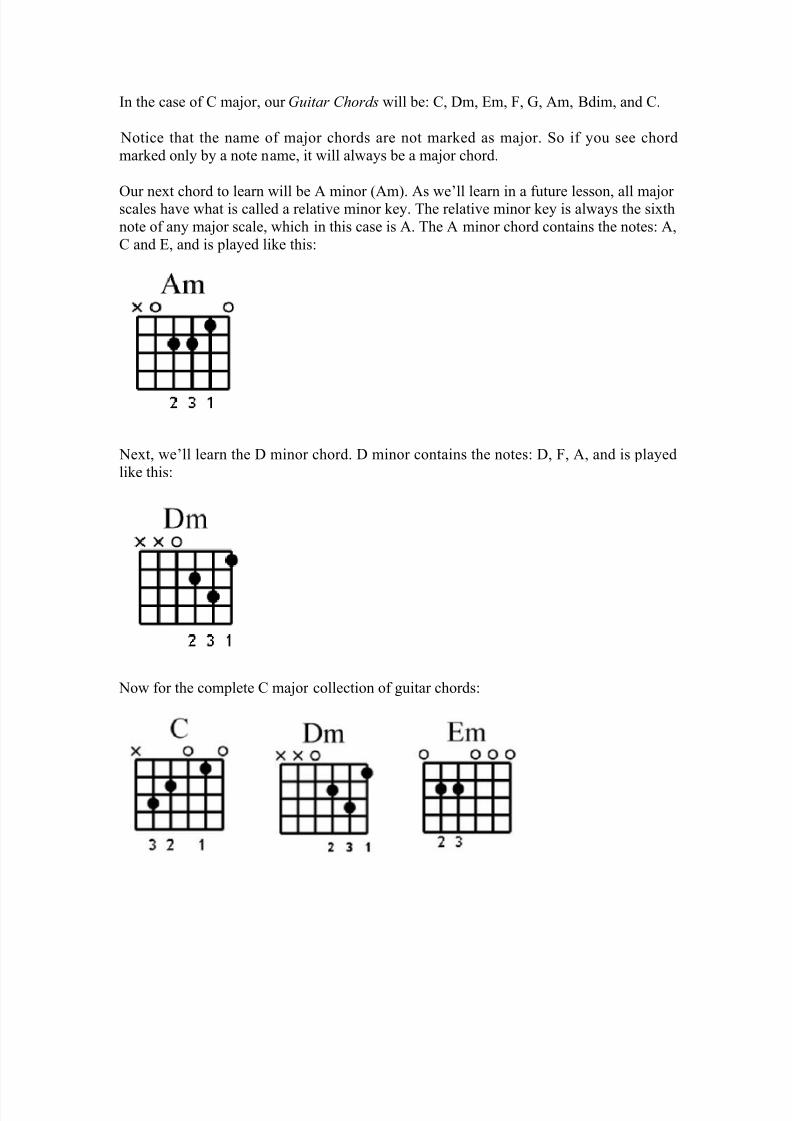
Next, we’ll learn the D minor chord. D minor contains the notes: D, F, A, and is played
like this:
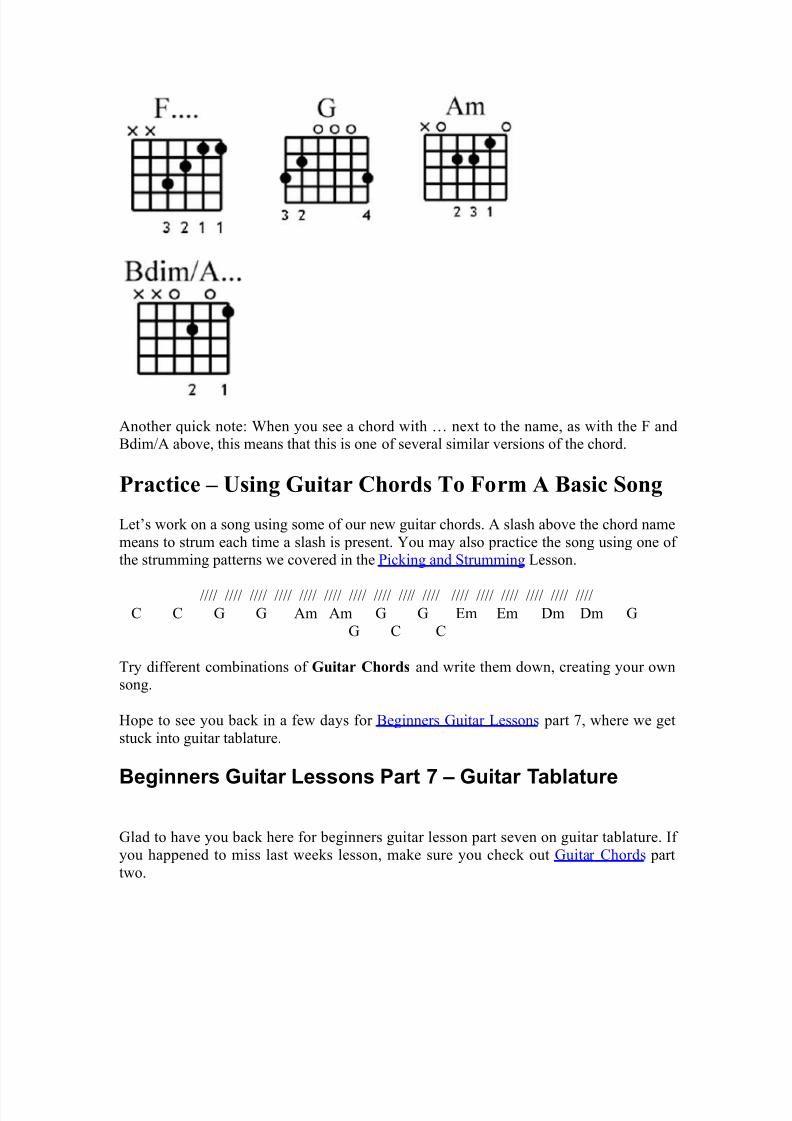
Now for the complete C major collection of guitar chords:
8/6/2019 Learn the Guitar Lessons Part 1
http://slidepdf.com/reader/full/learn-the-guitar-lessons-part-1 13/42
Another quick note: When you see a chord with … next to the name, as with the F andBdim/A above, this means that this is one of several similar versions of the chord.
Practice – Using Guitar Chords To Form A Basic Song
Let’s work on a song using some of our new guitar chords. A slash above the chord name
means to strum each time a slash is present. You may also practice the song using one of the strumming patterns we covered in the Picking and Strumming Lesson.
//// //// //// //// //// //// //// //// //// //// //// //// //// //// //// ////
C C G G Am Am G G Em Em Dm Dm G
G C C
Try different combinations of Guitar Chords and write them down, creating your ownsong.
Hope to see you back in a few days for Beginners Guitar Lessons part 7, where we get
stuck into guitar tablature.
Beginners Guitar Lessons Part 7 – Guitar Tablature
Glad to have you back here for beginners guitar lesson part seven on guitar tablature. If
you happened to miss last weeks lesson, make sure you check out Guitar Chords part
two.
8/6/2019 Learn the Guitar Lessons Part 1
http://slidepdf.com/reader/full/learn-the-guitar-lessons-part-1 14/42
Guitar Tablature (also called guitar tabs) is an old form of music notation, which made its
way back into modern guitar teaching in the 1980s. Since many guitarists are self-taught,
reading musical notation was out of the question.
As always, we have included an audio track of today’s lesson just to make it that little bit
easier for you to learn the guitar . It also helps those up and coming guitarists who don’tlike to read!
Audio Lesson by Matt McKay – Guitar Tablature
Although musical notation should eventually be learned by every serious guitar player,
Guitar Tablature makes it easy to learn the tunes of other musicians, and relay your own
musical creations in the meantime. Other instruments have their own set of tablature,including drums and other stringed instruments, but tablature has its own language,
unique to each instrument.
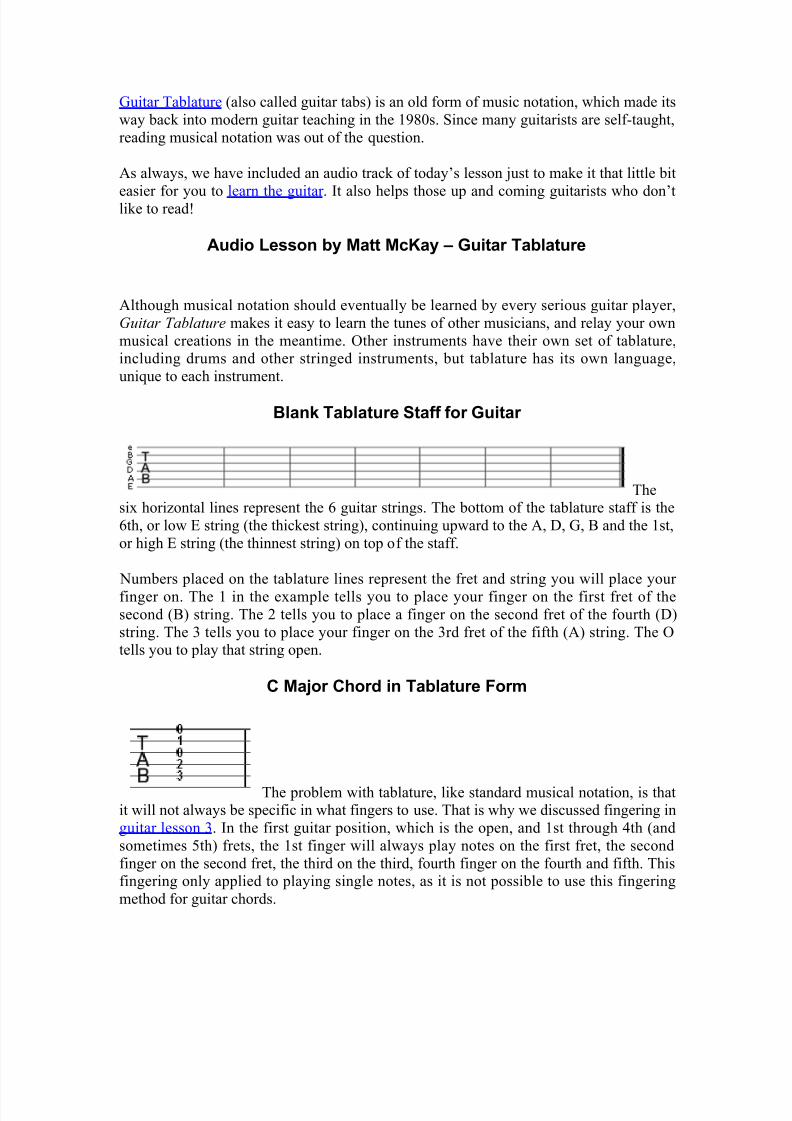
Blank Tablature Staff for Guitar
Thesix horizontal lines represent the 6 guitar strings. The bottom of the tablature staff is the
6th, or low E string (the thickest string), continuing upward to the A, D, G, B and the 1st,
or high E string (the thinnest string) on top of the staff.
Numbers placed on the tablature lines represent the fret and string you will place your
finger on. The 1 in the example tells you to place your finger on the first fret of the
second (B) string. The 2 tells you to place a finger on the second fret of the fourth (D)
string. The 3 tells you to place your finger on the 3rd fret of the fifth (A) string. The Otells you to play that string open.
C Major Chord in Tablature Form
The problem with tablature, like standard musical notation, is thatit will not always be specific in what fingers to use. That is why we discussed fingering in
guitar lesson 3. In the first guitar position, which is the open, and 1st through 4th (and
sometimes 5th) frets, the 1st finger will always play notes on the first fret, the second
finger on the second fret, the third on the third, fourth finger on the fourth and fifth. Thisfingering only applied to playing single notes, as it is not possible to use this fingering
method for guitar chords.
8/6/2019 Learn the Guitar Lessons Part 1
http://slidepdf.com/reader/full/learn-the-guitar-lessons-part-1 15/42
Also in the example, note that the numbers are stacked on top of one other. This number
array tells you that all notes are to be played at the same time, which normally denotes a
chord or other multiple note grouping.
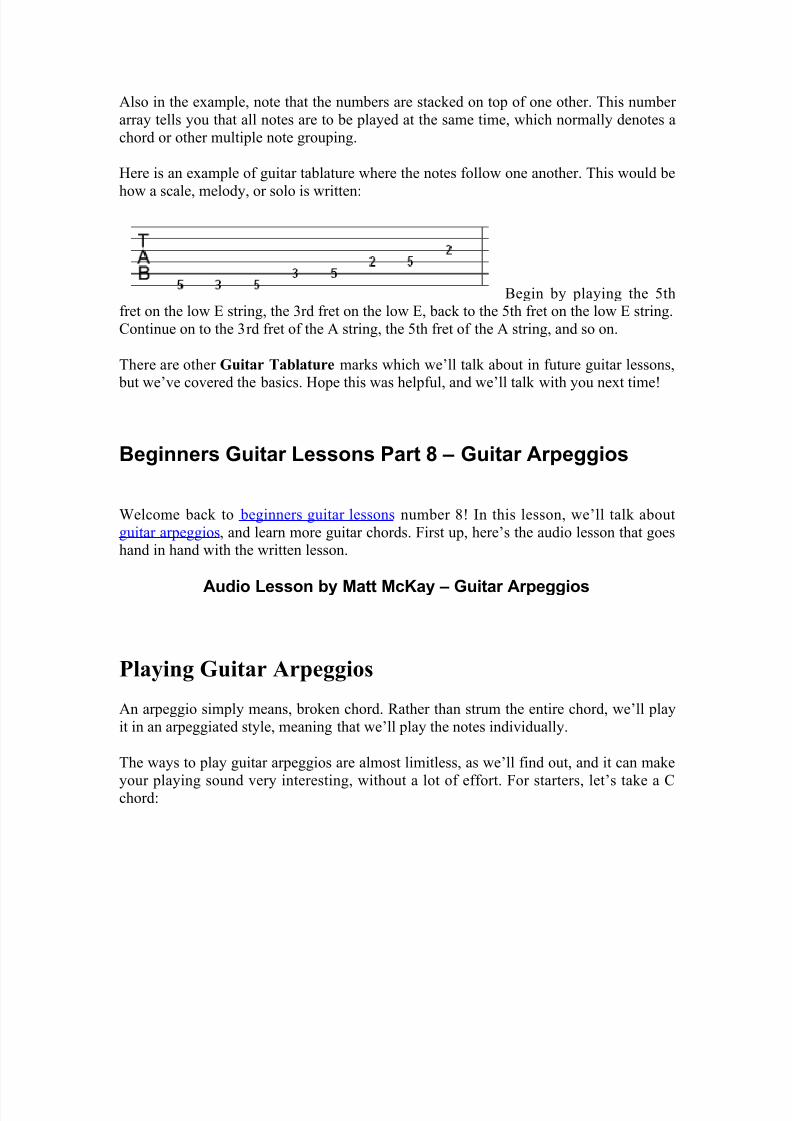
Here is an example of guitar tablature where the notes follow one another. This would be
how a scale, melody, or solo is written:
Begin by playing the 5thfret on the low E string, the 3rd fret on the low E, back to the 5th fret on the low E string.
Continue on to the 3rd fret of the A string, the 5th fret of the A string, and so on.
There are other Guitar Tablature marks which we’ll talk about in future guitar lessons, but we’ve covered the basics. Hope this was helpful, and we’ll talk with you next time!
Beginners Guitar Lessons Part 8 – Guitar Arpeggios
Welcome back to beginners guitar lessons number 8! In this lesson, we’ll talk about
guitar arpeggios, and learn more guitar chords. First up, here’s the audio lesson that goeshand in hand with the written lesson.
Audio Lesson by Matt McKay – Guitar Arpeggios
Playing Guitar Arpeggios
An arpeggio simply means, broken chord. Rather than strum the entire chord, we’ll play
it in an arpeggiated style, meaning that we’ll play the notes individually.
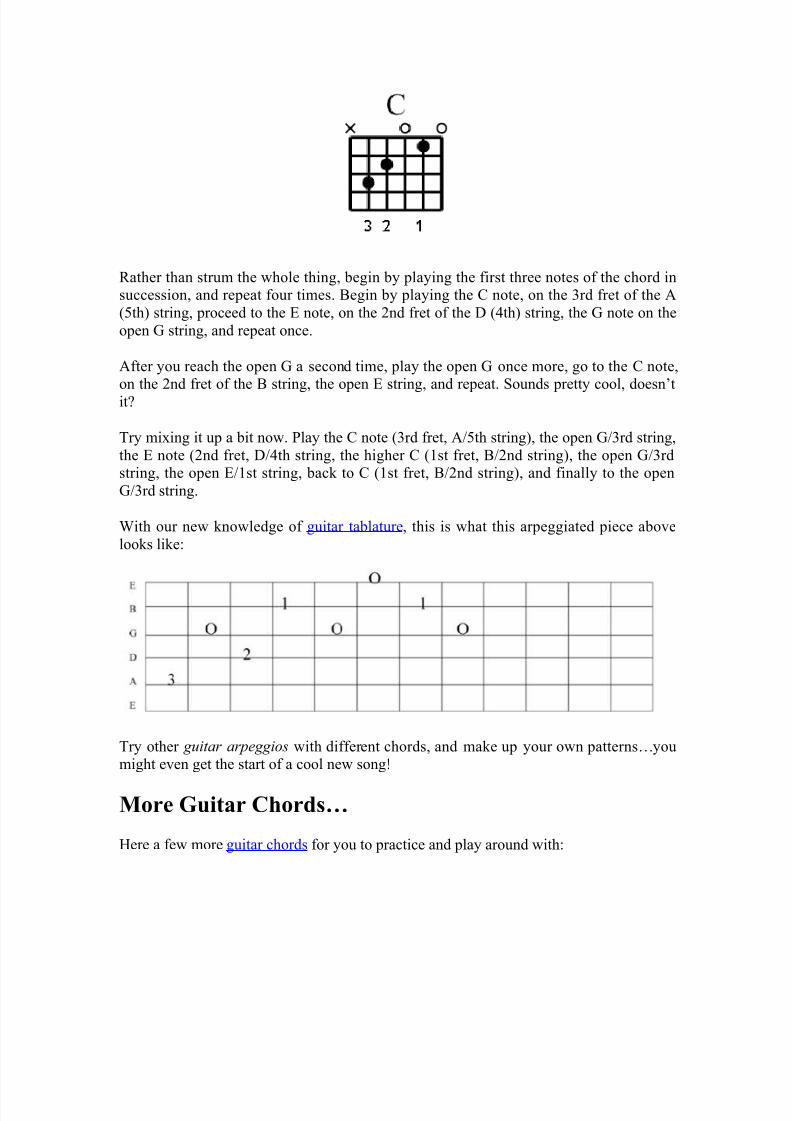
The ways to play guitar arpeggios are almost limitless, as we’ll find out, and it can make
your playing sound very interesting, without a lot of effort. For starters, let’s take a Cchord:
8/6/2019 Learn the Guitar Lessons Part 1
http://slidepdf.com/reader/full/learn-the-guitar-lessons-part-1 16/42
Rather than strum the whole thing, begin by playing the first three notes of the chord insuccession, and repeat four times. Begin by playing the C note, on the 3rd fret of the A
(5th) string, proceed to the E note, on the 2nd fret of the D (4th) string, the G note on the
open G string, and repeat once.
After you reach the open G a second time, play the open G once more, go to the C note,on the 2nd fret of the B string, the open E string, and repeat. Sounds pretty cool, doesn’t
it?
Try mixing it up a bit now. Play the C note (3rd fret, A/5th string), the open G/3rd string,
the E note (2nd fret, D/4th string, the higher C (1st fret, B/2nd string), the open G/3rdstring, the open E/1st string, back to C (1st fret, B/2nd string), and finally to the open
G/3rd string.
With our new knowledge of guitar tablature, this is what this arpeggiated piece above
looks like:
Try other guitar arpeggios with different chords, and make up your own patterns…youmight even get the start of a cool new song!
More Guitar Chords…
Here a few more guitar chords for you to practice and play around with:
8/6/2019 Learn the Guitar Lessons Part 1
http://slidepdf.com/reader/full/learn-the-guitar-lessons-part-1 17/42
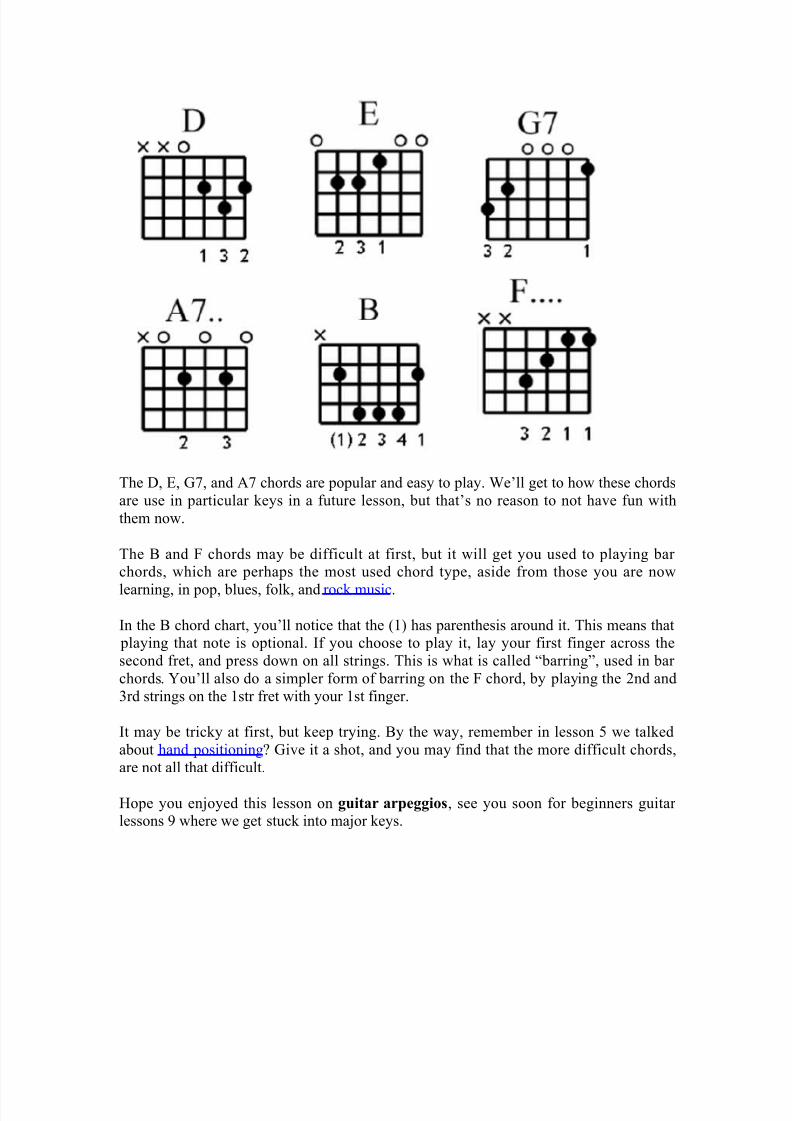
The D, E, G7, and A7 chords are popular and easy to play. We’ll get to how these chords
are use in particular keys in a future lesson, but that’s no reason to not have fun with
them now.
The B and F chords may be difficult at first, but it will get you used to playing bar chords, which are perhaps the most used chord type, aside from those you are now
learning, in pop, blues, folk, and rock music.
In the B chord chart, you’ll notice that the (1) has parenthesis around it. This means that playing that note is optional. If you choose to play it, lay your first finger across the
second fret, and press down on all strings. This is what is called “barring”, used in bar
chords. You’ll also do a simpler form of barring on the F chord, by playing the 2nd and
3rd strings on the 1str fret with your 1st finger.
It may be tricky at first, but keep trying. By the way, remember in lesson 5 we talked
about hand positioning? Give it a shot, and you may find that the more difficult chords,
are not all that difficult.
Hope you enjoyed this lesson on guitar arpeggios, see you soon for beginners guitar lessons 9 where we get stuck into major keys.
8/6/2019 Learn the Guitar Lessons Part 1
http://slidepdf.com/reader/full/learn-the-guitar-lessons-part-1 18/42
Beginners Guitar Lessons Part 9 – Major Keys
Hi and welcome back to the beginners guitar lessons series, where we will get stuck rightinto Major Keys. By now, we’ve had some discussion about the key of C major, so now
we’ll learn two more. In music, a key is like a road map. It contains all the informationneeded to produce scales, chords, melodies, harmonies, and solos, with notes that work together.
As per usual, we have included an audio lesson that goes with the written instruction
below. Enjoy!
Audio Guitar Lesson 9 – Major Keys
Major Keys
We’ve learned that C major is the only major key that contains no sharps (#) or flats (b) but what does that really mean? We covered the chromatic scale and the major scale
structure formula in lesson two, but here is a refresher view:
Chromatic Scale: A, A#/Bb, B, C, C#/Db, D, D#/Eb, E, F, F#/Gb, G, G#/Ab, back A and
infinity.
Major Scale Formula in Steps: Whole, Whole, Half, Whole, Whole, Whole, Half
(WWHWWWH)
If we apply the step formula to the chromatic scale, starting on C, it just so happens that
no sharp or flat notes are included. This isn’t the case with any other scale. But there’sanother pattern there as well. As we move on to later lessons, you’ll find that the scales
we’ll learn have an increasing number of sharps or flats, and the pattern will begin to
become apparent.
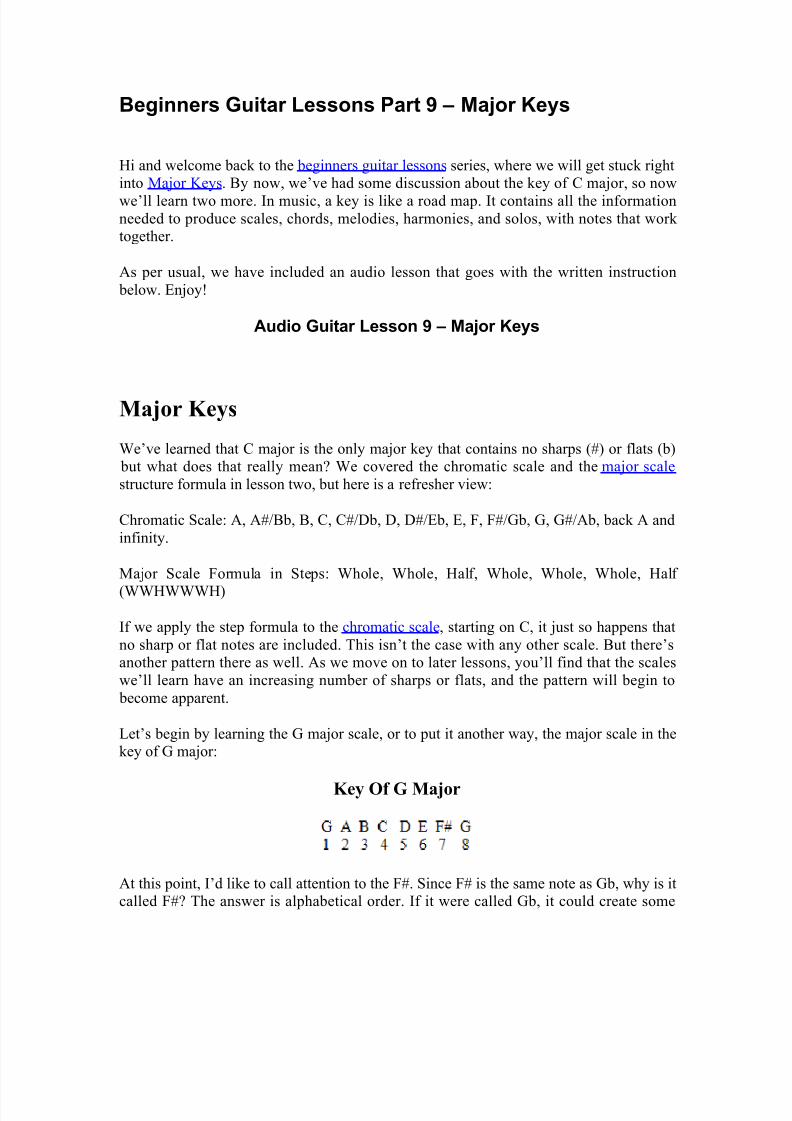
Let’s begin by learning the G major scale, or to put it another way, the major scale in thekey of G major:
Key Of G Major
At this point, I’d like to call attention to the F#. Since F# is the same note as Gb, why is itcalled F#? The answer is alphabetical order. If it were called Gb, it could create some
8/6/2019 Learn the Guitar Lessons Part 1
http://slidepdf.com/reader/full/learn-the-guitar-lessons-part-1 19/42
confusion, since we already have a G in the scale. Remember that music has rules, and
this one of many that makes perfect sense.
Relative Minor
Remember that the sixth note of any major scale is called the Relative Minor. In the caseof G major, the relative minor is E. You may have heard talk of songs being played in
minor keys, and this is where they come from. A minor key is really a sort of misnomer,
as minor keys are actually Major Keys played in a different order.
To demonstrate, let’s take E minor as an example. Now, there are a few different
modifications of minor scales, but for now, we’ll deal with the natural minor scale. The
natural minor scale begins with the sixth note of the major scale, and continues along for
eight notes: E, F#, G, A, B, C, D, E. We’ll talk more about minor keys in another lesson,as there are a few commonly used rules in the modern use of minor scales.
An Endless Repetition Of Notes
To make this scale extension concept a little easier, think of any scale as an endless
repetition of notes, as if it were written in a circle. If you start at any point and movearound the circle, you’ll end up going around as many times as you’d like. As a linear
example, think of a scale as a never ending line, starting at a given point:
GABCDEF#GABCDEF#GABCDEF#GABCDEF#GABCDEF#G…and so on.
The linear and circle example can also be applied to the chromatic scale, and applyingformulas to get other scales, which is the case in the major scale formula in steps:
WWHWWWH
We also talked about the basic chord formula for major scales: “M” stands for Major,
“m” stands for minor, and “d” stands for diminished. We’ll use G major for our chords:
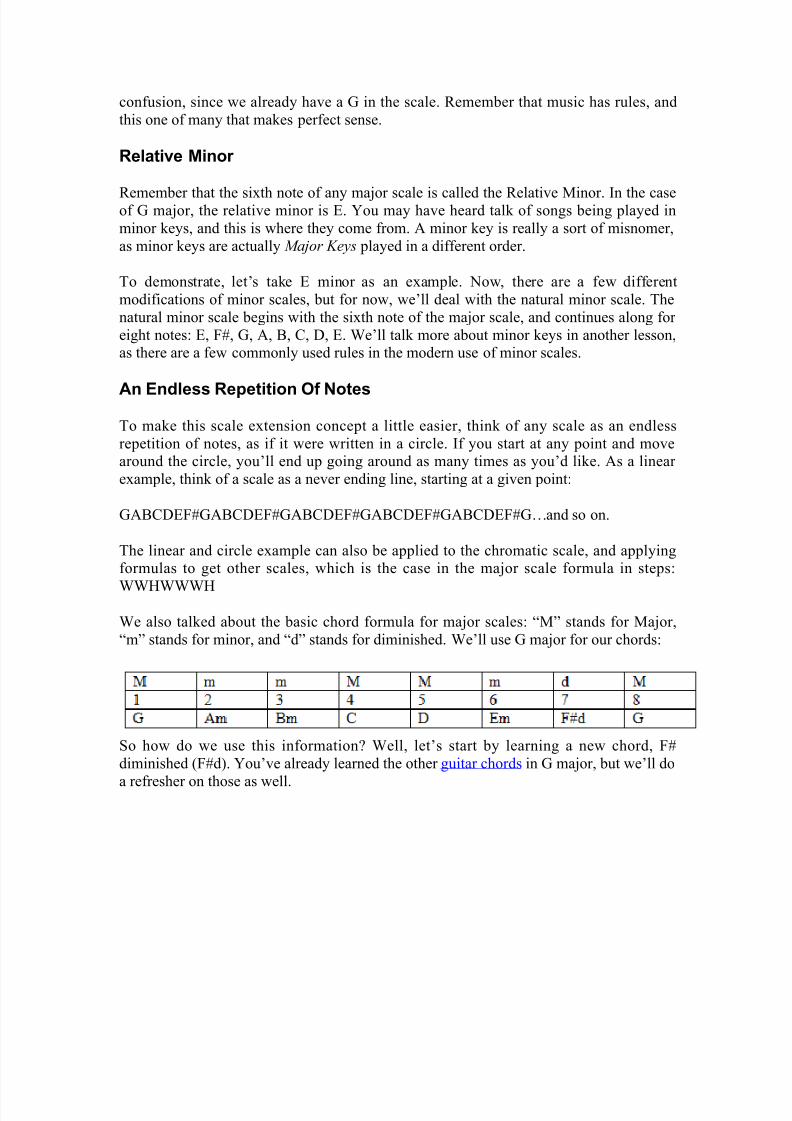
So how do we use this information? Well, let’s start by learning a new chord, F#
diminished (F#d). You’ve already learned the other guitar chords in G major, but we’ll do
a refresher on those as well.
8/6/2019 Learn the Guitar Lessons Part 1
http://slidepdf.com/reader/full/learn-the-guitar-lessons-part-1 20/42
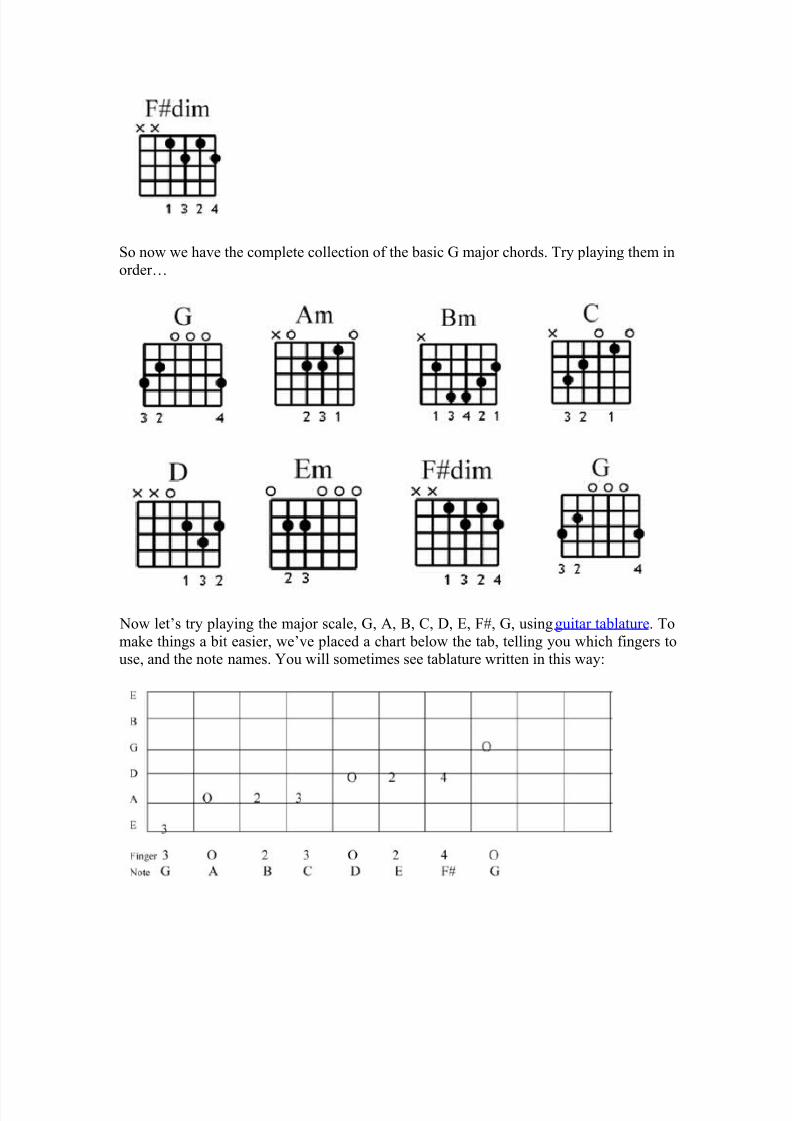
So now we have the complete collection of the basic G major chords. Try playing them in
order…
Now let’s try playing the major scale, G, A, B, C, D, E, F#, G, using guitar tablature. To
make things a bit easier, we’ve placed a chart below the tab, telling you which fingers touse, and the note names. You will sometimes see tablature written in this way:
8/6/2019 Learn the Guitar Lessons Part 1
http://slidepdf.com/reader/full/learn-the-guitar-lessons-part-1 21/42
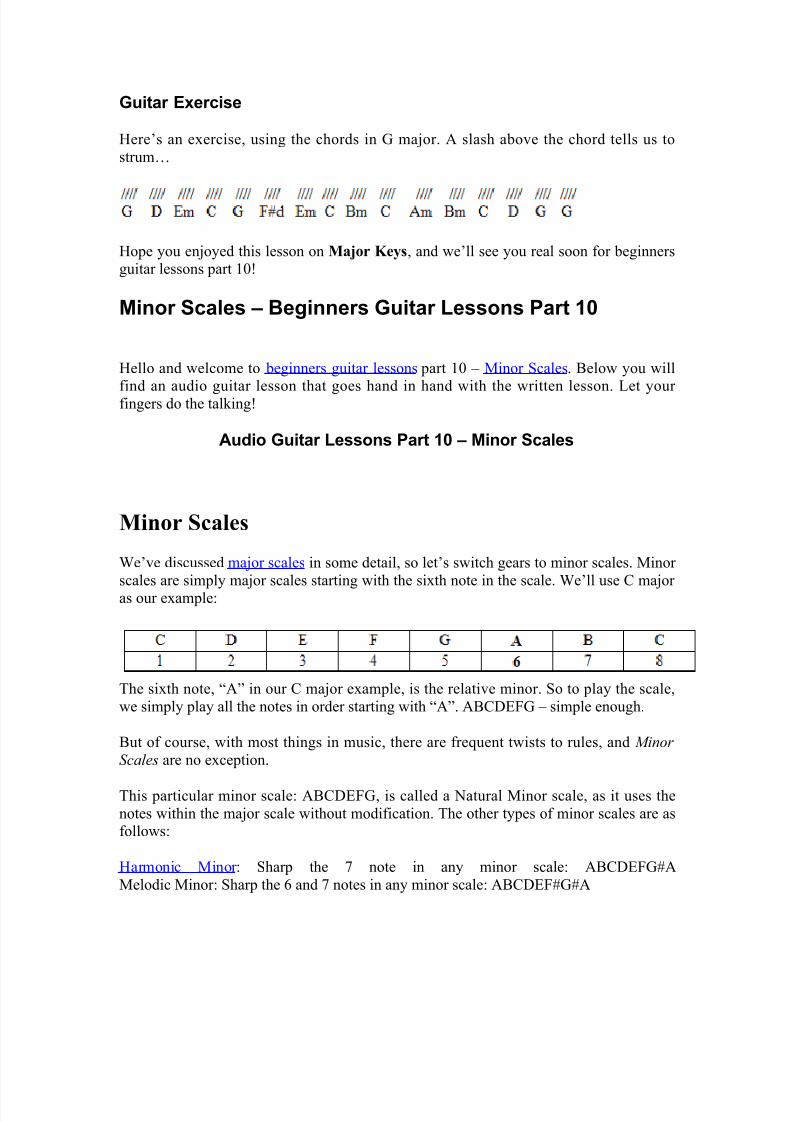
Guitar Exercise
Here’s an exercise, using the chords in G major. A slash above the chord tells us to
strum…
Hope you enjoyed this lesson on Major Keys, and we’ll see you real soon for beginnersguitar lessons part 10!
Minor Scales – Beginners Guitar Lessons Part 10
Hello and welcome to beginners guitar lessons part 10 – Minor Scales. Below you will
find an audio guitar lesson that goes hand in hand with the written lesson. Let your fingers do the talking!
Audio Guitar Lessons Part 10 – Minor Scales
Minor Scales
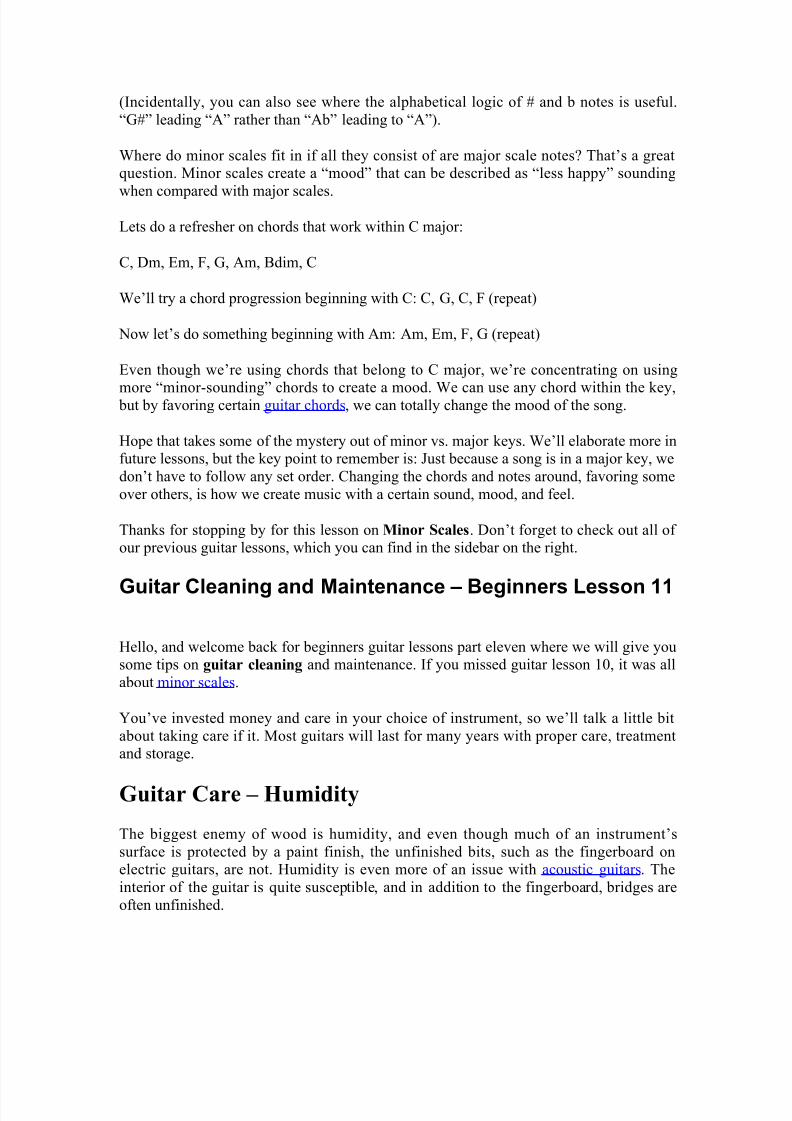
We’ve discussed major scales in some detail, so let’s switch gears to minor scales. Minor
scales are simply major scales starting with the sixth note in the scale. We’ll use C major as our example:
The sixth note, “A” in our C major example, is the relative minor. So to play the scale,
we simply play all the notes in order starting with “A”. ABCDEFG – simple enough.
But of course, with most things in music, there are frequent twists to rules, and Minor
Scales are no exception.
This particular minor scale: ABCDEFG, is called a Natural Minor scale, as it uses the
notes within the major scale without modification. The other types of minor scales are asfollows:
Harmonic Minor : Sharp the 7 note in any minor scale: ABCDEFG#A
Melodic Minor: Sharp the 6 and 7 notes in any minor scale: ABCDEF#G#A
8/6/2019 Learn the Guitar Lessons Part 1
http://slidepdf.com/reader/full/learn-the-guitar-lessons-part-1 22/42
(Incidentally, you can also see where the alphabetical logic of # and b notes is useful.
“G#” leading “A” rather than “Ab” leading to “A”).
Where do minor scales fit in if all they consist of are major scale notes? That’s a greatquestion. Minor scales create a “mood” that can be described as “less happy” sounding
when compared with major scales.
Lets do a refresher on chords that work within C major:
C, Dm, Em, F, G, Am, Bdim, C
We’ll try a chord progression beginning with C: C, G, C, F (repeat)
Now let’s do something beginning with Am: Am, Em, F, G (repeat)
Even though we’re using chords that belong to C major, we’re concentrating on using
more “minor-sounding” chords to create a mood. We can use any chord within the key, but by favoring certain guitar chords, we can totally change the mood of the song.
Hope that takes some of the mystery out of minor vs. major keys. We’ll elaborate more infuture lessons, but the key point to remember is: Just because a song is in a major key, we
don’t have to follow any set order. Changing the chords and notes around, favoring some
over others, is how we create music with a certain sound, mood, and feel.
Thanks for stopping by for this lesson on Minor Scales. Don’t forget to check out all of our previous guitar lessons, which you can find in the sidebar on the right.
Guitar Cleaning and Maintenance – Beginners Lesson 11
Hello, and welcome back for beginners guitar lessons part eleven where we will give yousome tips on guitar cleaning and maintenance. If you missed guitar lesson 10, it was all
about minor scales.
You’ve invested money and care in your choice of instrument, so we’ll talk a little bit
about taking care if it. Most guitars will last for many years with proper care, treatmentand storage.
Guitar Care – Humidity
The biggest enemy of wood is humidity, and even though much of an instrument’s
surface is protected by a paint finish, the unfinished bits, such as the fingerboard onelectric guitars, are not. Humidity is even more of an issue with acoustic guitars. The
interior of the guitar is quite susceptible, and in addition to the fingerboard, bridges are
often unfinished.
8/6/2019 Learn the Guitar Lessons Part 1
http://slidepdf.com/reader/full/learn-the-guitar-lessons-part-1 23/42
With too much humidity, wood swells, joints and glue becomes weak, and once the
process begins, it is difficult or impossible to correct. Dry conditions suck moisture out of
wood, and can cause wood, glue, and joints to split and crack, which also is difficult or impossible to correct when it reaches a certain point.
Commercial guitar humidifiers and dehumidifiers are inexpensive and reliable, andshould be used according to seasonal and atmospheric conditions. Always store guitars in
their case when not in use, and avoid basement or garage storage. As a general rule of thumb, if humidity levels are uncomfortable for you, your guitar probably feels the same
way. Proper humidity levels for guitars are between 45 and 55% relative humidity.
Guitar Cleaning
Guitar cleaning not only makes your axe look good, it also protects the finish. Guitar finishes are designed not to clog wood pores, they allow acoustic soundboards to vibrate
freely, and electric bodies to resonate properly. Guitar finishes are much different than
furniture polishes, so furniture polish should never be substituted.
Furniture polish can contain waxes and other substances which may clog finish pores,
and may actually damage the guitars finish eventually. Always use a commercial polish
or cleaner made especially for guitars, and use a dedicated clean, dry, cotton cloth… one
for polish application, and one for final buffing.
Generally, it is not advisable to apply cleaners to unfinished guitar parts, such as
fingerboards and bridges, but it is worth checking the manufacturer’s literature or web
site for specifics. For some instruments, these parts can be treated and cleaned with a
small amount of linseed or lemon oil. In all cases, a wipe with a cotton cloth very lightly
dampened with water, followed by immediate drying is using sufficient.
Clean metal parts with a damp cloth, and there are some commercially available guitar
hardware cleaners or combination finish/metal cleaners that will do a fine job. Another rule of thumb for guitar cleaning: Use the mildest possible cleaner, progressing to
stronger formulations only if necessary.
Tips On Guitar Strings
Guitar strings should be changed whenever you are unhappy with the sound. There is no
set rule when to change strings, and it is a matter of preference. It is best to always tune
your strings up to pitch so there is constant tension on the neck.
8/6/2019 Learn the Guitar Lessons Part 1
http://slidepdf.com/reader/full/learn-the-guitar-lessons-part-1 24/42
If the guitar is to be shipped, or will be stored for long periods of time, strings should be
loosened. Of course this may result in neck adjustment when the guitar is ready to be
played again, but the neck’s natural tendency to relax without strings is better than forcedtension with strings installed over long periods of time.
So, there you go! Every manufacturer has suggested methods of guitar care, so visitingthe website or reading the literature which came with your instrument is highly
recommended. Keep up with your guitar cleaning and maintenance and you will have aguitar you can depend upon for years to come. See you soon for beginners guitar lessons
part 12 where we will get stuck into guitar restringing.
Guitar Restringing – Beginners Guitar Lesson 12
Thanks for joining us back here for part 12 of our beginners guitar lessons series. After
covering guitar cleaning in the last lesson, today we will get stuck into Guitar
Restringing in depth.
Learning how to restring your guitar can be frustrating and mysterious, but with a bit of experience and a few tips, you’ll be restringing like a pro in no time. Restringing your
own instrument will save time and money, and will help you become familiar with your guitar.
Unless your guitar is fitted with special locking tuners or vibrato tailpieces, for which youshould consult the owner’s manual or website, restringing guitars is very similar no
matter what make you have. First up is an audio guitar lesson, followed by a written step
by step instruction on Guitar Restringing .
Guitar Restringing – Audio Guitar Lesson
Guitar Restringing – Step 1
Place the guitar on a flat, padded surface, such as a table covered with a blanket or towel.
8/6/2019 Learn the Guitar Lessons Part 1
http://slidepdf.com/reader/full/learn-the-guitar-lessons-part-1 25/42
Step 2
Elevate and secure the neck by placing a small cardboard box or foam block underneath
the neck below the nut.
Step 3
Notice how the previous strings were installed, and make mental or physical notes if
necessary. In particular, note the wraps around the tuning posts, and the direction in
which they are wound. Of course, this is assuming that the strings were installed correctlyin the first place. Plan to restring your guitar one string at a time to minimize neck tension
shock.
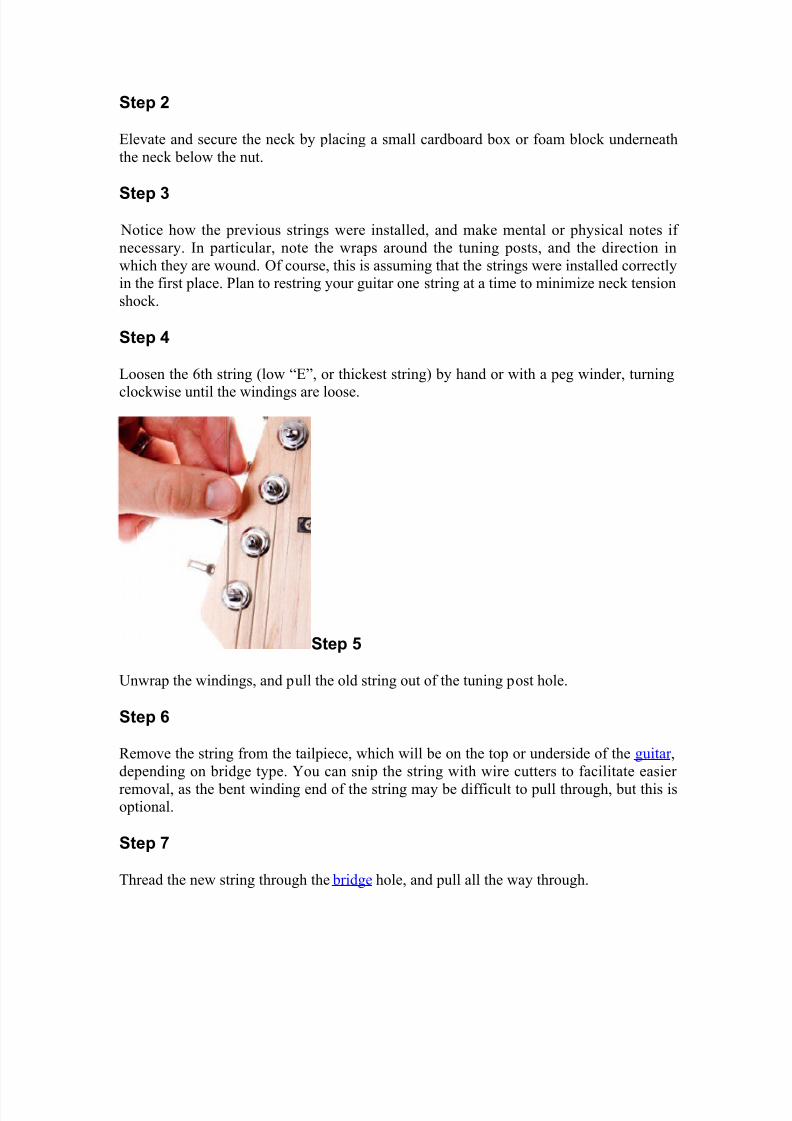
Step 4
Loosen the 6th string (low “E”, or thickest string) by hand or with a peg winder, turning
clockwise until the windings are loose.
Step 5
Unwrap the windings, and pull the old string out of the tuning post hole.
Step 6
Remove the string from the tailpiece, which will be on the top or underside of the guitar ,
depending on bridge type. You can snip the string with wire cutters to facilitate easier
removal, as the bent winding end of the string may be difficult to pull through, but this isoptional.
Step 7
Thread the new string through the bridge hole, and pull all the way through.
8/6/2019 Learn the Guitar Lessons Part 1
http://slidepdf.com/reader/full/learn-the-guitar-lessons-part-1 26/42
Step 8
Wrap the string around the machine head several times, and insert the tip into the tuning
post hole. Pre-wrapping takes the guesswork out if some other string slackening methods,and allows a suitable number of wraps to prevent string slippage.
Step 9
Secure the string by grasping the end near the tuning post hole with needle-nose pliers
and pulling snug. Bending it up at a 90 degree angle will lock the string into place.
Step 10
Bring up to pitch by turning counter-clockwise. Hold the string and pull up slightly as
you tune, which will help to pre-stretch the string, but don’t pull too hard! This may need
to be repeated several times until the string stabilizes.
Step 11
Repeat steps 3 through 10 for additional strings.
Guitar Restringing – Step 12
Guitar tuning after restringing – Stretch and tune all strings two to three additional timeswith a tuner, pitch pipe, or tuning fork , to further stabilize.
That’s about it! Guitar Restringing does require some practice, but is a vital part of the
learn the guitar puzzle. You may investigate other methods, but over many years of professional playing, this method has proven to be quick and reliable. See you next timefor part 13 of our beginners guitar lessons series. Until then, rock on!
Guitar Adjustments – Beginners Guitar Lessons Pt13
Nice to have you back for part 13 of the beginners guitar lessons series. Let’s talk a bitabout some guitar setup situations and terms that are often quite fuzzy when you’re
starting out. While this is not a tutorial for performing guitar adjustments, as most are
best left to repair pros, it does help to understand what the terms mean, and how theyaffect your guitar.
Audio Lesson – Guitar Adjustments
8/6/2019 Learn the Guitar Lessons Part 1
http://slidepdf.com/reader/full/learn-the-guitar-lessons-part-1 27/42
Intonation
Intonation is the pitch of all notes over the entire guitar neck. The basic idea of
intonation, is that a string’s length from the nut to its center (the 12th fret octave) must bemust the same distance to the bridge saddle. If its not, notes higher up on the fretboard
will sound out of tune.
Improper intonation can come about when changing string gauges, improper neck
adjustments, action set too high, or instrument damage. Since each string is of a differentthickness, slightly different lengths are required for the notes to sound true.
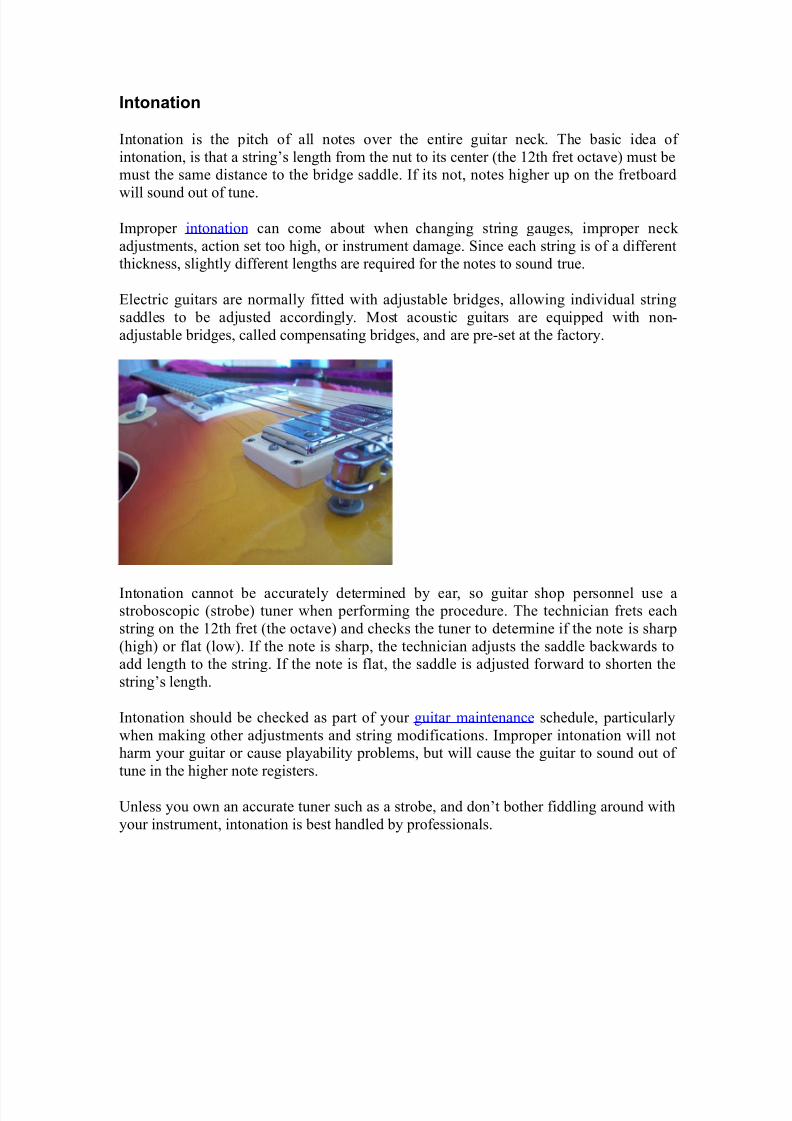
Electric guitars are normally fitted with adjustable bridges, allowing individual string
saddles to be adjusted accordingly. Most acoustic guitars are equipped with non-
adjustable bridges, called compensating bridges, and are pre-set at the factory.
Intonation cannot be accurately determined by ear, so guitar shop personnel use astroboscopic (strobe) tuner when performing the procedure. The technician frets each
string on the 12th fret (the octave) and checks the tuner to determine if the note is sharp
(high) or flat (low). If the note is sharp, the technician adjusts the saddle backwards toadd length to the string. If the note is flat, the saddle is adjusted forward to shorten the
string’s length.
Intonation should be checked as part of your guitar maintenance schedule, particularly
when making other adjustments and string modifications. Improper intonation will notharm your guitar or cause playability problems, but will cause the guitar to sound out of
tune in the higher note registers.
Unless you own an accurate tuner such as a strobe, and don’t bother fiddling around with
your instrument, intonation is best handled by professionals.

8/6/2019 Learn the Guitar Lessons Part 1
http://slidepdf.com/reader/full/learn-the-guitar-lessons-part-1 28/42
Guitar Adjustments – Action
Every guitar player searches for the guitar’s perfect
“action” or string height. While this is normally accomplished by adjusting the bridge up
and down on electric guitars, or shaving or shimming the saddle on acoustic guitars, it’snot always as simple as that. While lowering the bridge will bring the strings closer to the
fretboard, neck or fret misalignment can cause buzzing notes and flat spots.
As with intonation, unless you are prepared to fiddle about for a while, with no positive
results guaranteed, these type of guitar adjustments are best left to professionalsconsidering all the variables involved.
Guitar Adjustments – Neck
Neck adjustments are perhaps one of the most important guitar adjustments needed, and
should be taken care of before all else. A maladjusted neck will cause buzzing frets,intonation issues, and action problems. Performing string adjustments with a neck out of
whack will cause undesirable results, and may make problems worse.
Guitars are usually supplied with a neck adjustment
tool, typically a hex wrench, but attempting to adjust a neck on your own can cause
disastrous results if done improperly. Guitar necks contain an internal truss rod, whichexpands or contracts when adjusted, prompting the wood to follow suit. Truss rods can
break, sometimes causing wood damage and always causing the neck to adjust whichever way it likes, resulting in very expensive repairs or neck replacement.
A warped neck is when the guitar neck warps upward toward the strings. Frets are pushedup as well, causing the guitar to play badly, sometimes to the point of being unplayable.
Warped necks are just plain bad!
8/6/2019 Learn the Guitar Lessons Part 1
http://slidepdf.com/reader/full/learn-the-guitar-lessons-part-1 29/42
A bowed neck is when the neck is bowed away from the strings, which is how a properly
adjusted neck should be. If too much bow exists, the action and intonation will be
affected, and the guitar will be difficult to play, and can sound out of tune. Bowed necksare good, as long as they are not bowed too much.
A reliable way of telling whether a neck needs adjusting, is not sighting the neck downthe center, as many believe. This is okay to do when inspecting a guitar to see if the neck
is off-kilter side to side (which is rare), but frets will create an optical illusion, preventingvisible evidence of warping or bowing. To do this, look at the guitar fingerboard from the
side. Press the low “E” string down on the first fret with one hand, and the last fret with
the other hand. If the frets are making positive contact with the guitar strings (indicating a possibly warped neck), or if there is a considerable gap between them (indicating a
possibly bowed neck) the guitar should probably be brought in for adjustment. Doing this
adjustment check with a straight-edge or ruler of sufficient length is also acceptable, andwill actually give you a more accurate indication. The string method is handy when a
straight edge is not available.
Hope this clears up some of the mystery of guitar adjustments and terms. A bit of
advice: When purchasing a new or used instrument from a store, always ask them tothrow in a complete set-up, which will include string change, intonation, neck and action
adjustments. If they refuse, and you have to pay a bit for set-up, it’s totally worth the
expense. You’ll know that your guitar is starting out its new life properly adjusted, andyou will better be able to feel the difference if problems come up.
Until our next guitar lesson, best of luck!
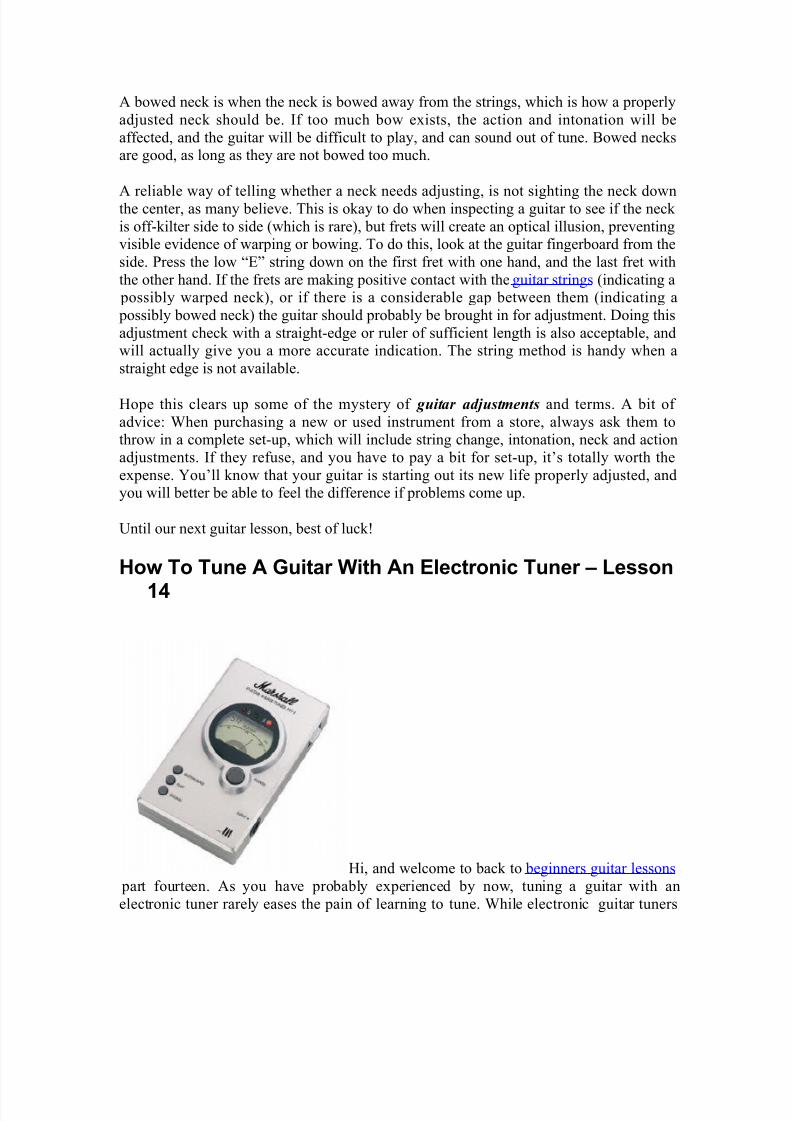
How To Tune A Guitar With An Electronic Tuner – Lesson
14
Hi, and welcome to back to beginners guitar lessons
part fourteen. As you have probably experienced by now, tuning a guitar with an
electronic tuner rarely eases the pain of learning to tune. While electronic guitar tuners
8/6/2019 Learn the Guitar Lessons Part 1
http://slidepdf.com/reader/full/learn-the-guitar-lessons-part-1 30/42
can help you tune more accurately, they will not help when your instrument is drastically
out of whack.
Electronic guitar tuners work on analyzing frequency vibrations in Hertz (Hz). Sinceguitar strings will reach other notes and vibrations on its way to proper pitch, the
electronic tuner can misinterpret these, and think the string is in tune when it is not.
When using any electronic guitar tuner, the guitar should first be tuned by ear to avoid
these false, confusing readings. Let’s go through the steps on how to tune a guitar with
an electronic tuner painlessly and effortlessly. Don’t forget to check out our audio guitar
lessons if you prefer to learn by listening!
How To Tune A Guitar with an Electronic Tuner – Step
1
Tune the guitar by ear. A guitar tuning pitch pipe, the audible note tones on the tuner, or an “E” tuning fork may be used as a guide to achieve approximate tuning.
Step 2
Turn the electronic tuner power on by pressing the power button. The display will lightup and perform a brief calibration cycle.
Step 3
Attach the tuner to the guitar by clipping it onto the headstock, sticking it to the body
surface, or by plugging a guitar into the input jack, (depending on the tuner model).
Step 4
Pick the low E 6th string on the guitar (the thickest string) and view the tuner display.
The target note (E in this case) will appear. Depending on the model, An LED light or LCD arrow will also appear to the left side of the note, indicating whether the note played
is too low (flat=b) or on the right of the note, indicating whether the note played is too
high (sharp=#).
Step 5
Adjust the string’s corresponding tuning key to bring the note up or down in pitch, until
the arrow moves the center position, or the green LED is the sole illuminating light, (with
no red LEDs). The string is now in tune.
Step 6
Repeat steps 4 and 5, for remaining 5A, 4D, 3G, 2B, 1E strings.
8/6/2019 Learn the Guitar Lessons Part 1
http://slidepdf.com/reader/full/learn-the-guitar-lessons-part-1 31/42
Step 7
Disconnect the tuner from the guitar and turn power off by pressing the power button
once again.
That’s about it! Check our lesson on guitar tuning by ear, and your electronic tuner willgive more accurate results without frustrating false readings. See you next time!
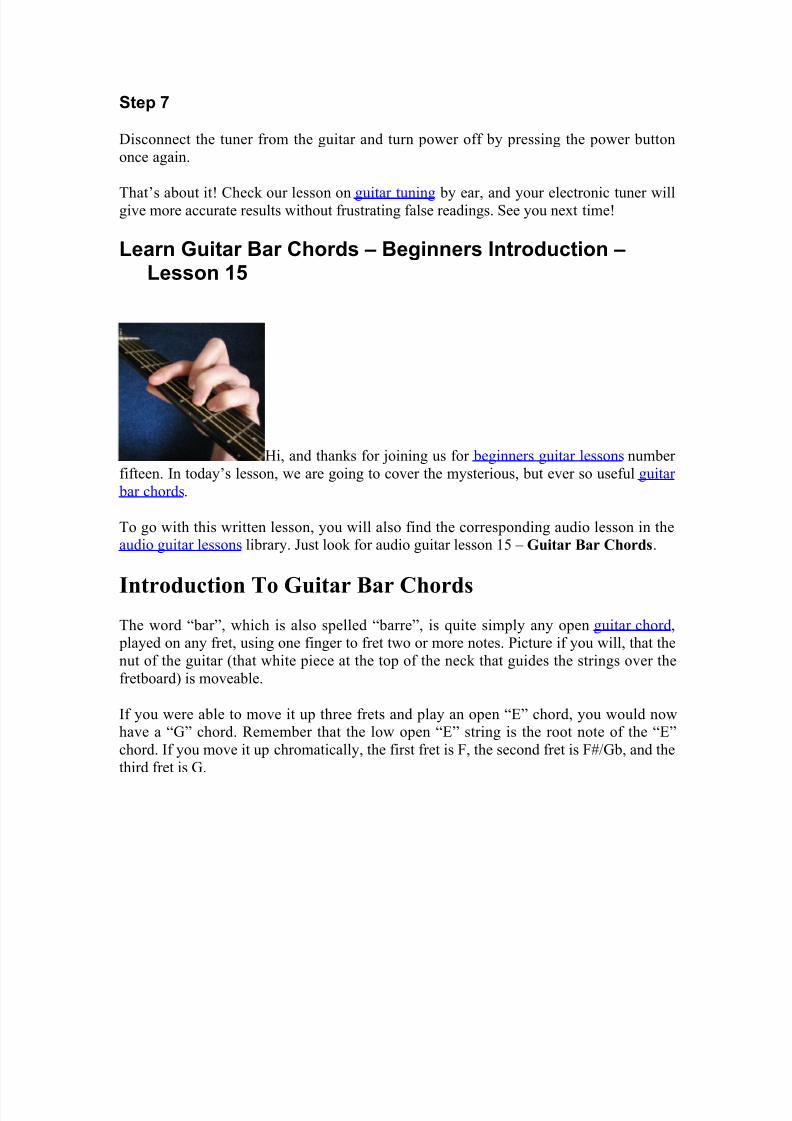
Learn Guitar Bar Chords – Beginners Introduction –Lesson 15
Hi, and thanks for joining us for beginners guitar lessons number
fifteen. In today’s lesson, we are going to cover the mysterious, but ever so useful guitar
bar chords.
To go with this written lesson, you will also find the corresponding audio lesson in theaudio guitar lessons library. Just look for audio guitar lesson 15 – Guitar Bar Chords.
Introduction To Guitar Bar ChordsThe word “bar”, which is also spelled “barre”, is quite simply any open guitar chord, played on any fret, using one finger to fret two or more notes. Picture if you will, that the
nut of the guitar (that white piece at the top of the neck that guides the strings over the
fretboard) is moveable.
If you were able to move it up three frets and play an open “E” chord, you would nowhave a “G” chord. Remember that the low open “E” string is the root note of the “E”
chord. If you move it up chromatically, the first fret is F, the second fret is F#/Gb, and the
third fret is G.
8/6/2019 Learn the Guitar Lessons Part 1
http://slidepdf.com/reader/full/learn-the-guitar-lessons-part-1 32/42
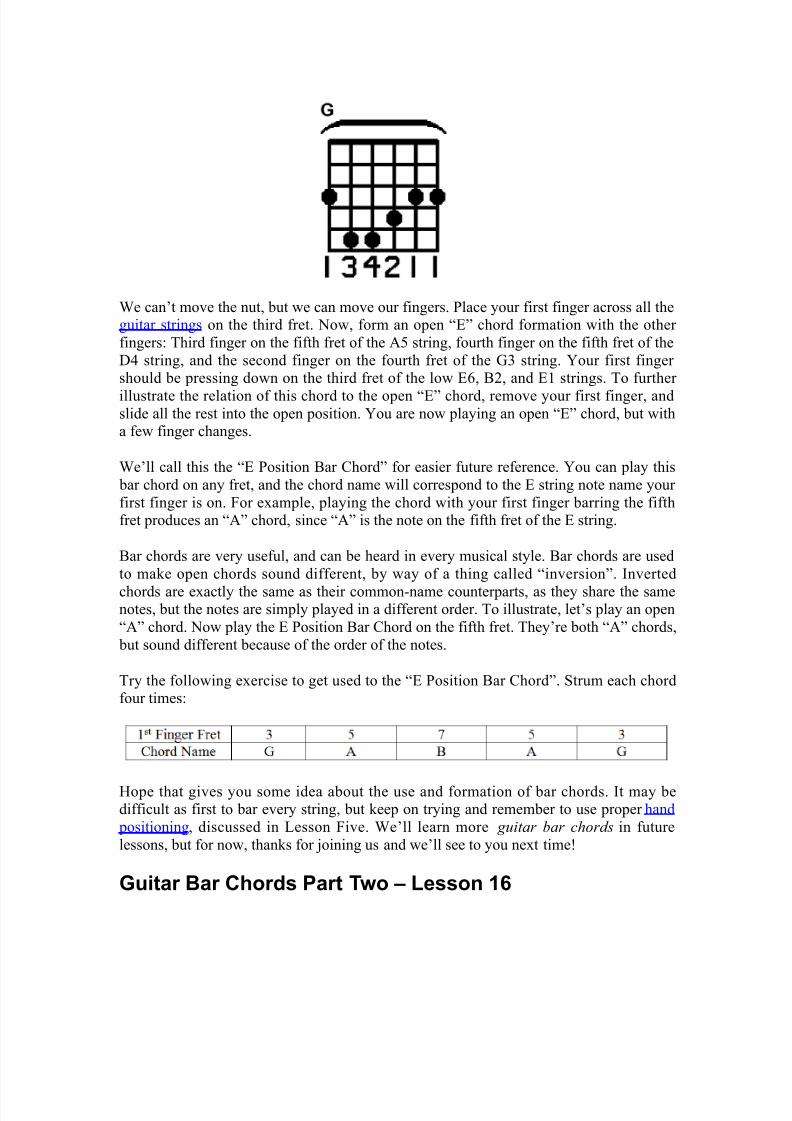
We can’t move the nut, but we can move our fingers. Place your first finger across all theguitar strings on the third fret. Now, form an open “E” chord formation with the other
fingers: Third finger on the fifth fret of the A5 string, fourth finger on the fifth fret of the
D4 string, and the second finger on the fourth fret of the G3 string. Your first finger should be pressing down on the third fret of the low E6, B2, and E1 strings. To further
illustrate the relation of this chord to the open “E” chord, remove your first finger, andslide all the rest into the open position. You are now playing an open “E” chord, but witha few finger changes.
We’ll call this the “E Position Bar Chord” for easier future reference. You can play this
bar chord on any fret, and the chord name will correspond to the E string note name your
first finger is on. For example, playing the chord with your first finger barring the fifthfret produces an “A” chord, since “A” is the note on the fifth fret of the E string.
Bar chords are very useful, and can be heard in every musical style. Bar chords are used
to make open chords sound different, by way of a thing called “inversion”. Inverted
chords are exactly the same as their common-name counterparts, as they share the samenotes, but the notes are simply played in a different order. To illustrate, let’s play an open
“A” chord. Now play the E Position Bar Chord on the fifth fret. They’re both “A” chords,
but sound different because of the order of the notes.
Try the following exercise to get used to the “E Position Bar Chord”. Strum each chordfour times:
Hope that gives you some idea about the use and formation of bar chords. It may bedifficult as first to bar every string, but keep on trying and remember to use proper hand
positioning, discussed in Lesson Five. We’ll learn more guitar bar chords in future
lessons, but for now, thanks for joining us and we’ll see to you next time!
Guitar Bar Chords Part Two – Lesson 16
8/6/2019 Learn the Guitar Lessons Part 1
http://slidepdf.com/reader/full/learn-the-guitar-lessons-part-1 33/42
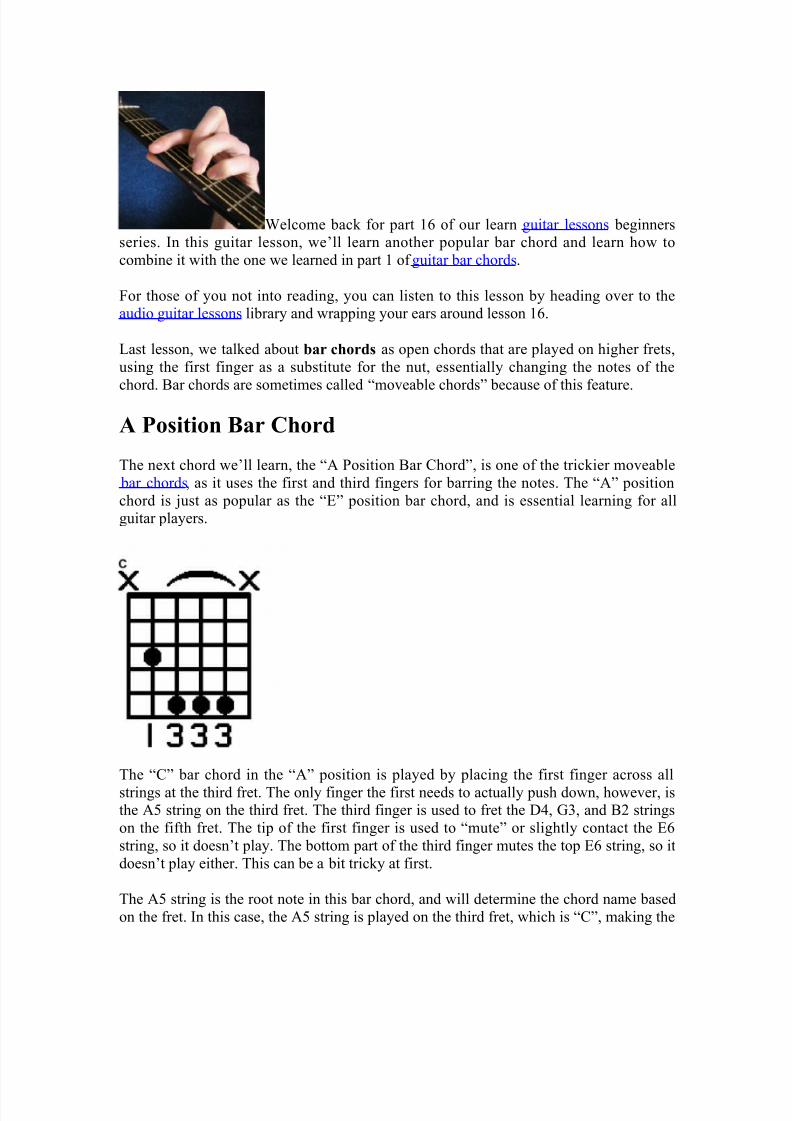
Welcome back for part 16 of our learn guitar lessons beginnersseries. In this guitar lesson, we’ll learn another popular bar chord and learn how to
combine it with the one we learned in part 1 of guitar bar chords.
For those of you not into reading, you can listen to this lesson by heading over to theaudio guitar lessons library and wrapping your ears around lesson 16.
Last lesson, we talked about bar chords as open chords that are played on higher frets,
using the first finger as a substitute for the nut, essentially changing the notes of the
chord. Bar chords are sometimes called “moveable chords” because of this feature.
A Position Bar Chord
The next chord we’ll learn, the “A Position Bar Chord”, is one of the trickier moveable
bar chords, as it uses the first and third fingers for barring the notes. The “A” position
chord is just as popular as the “E” position bar chord, and is essential learning for allguitar players.
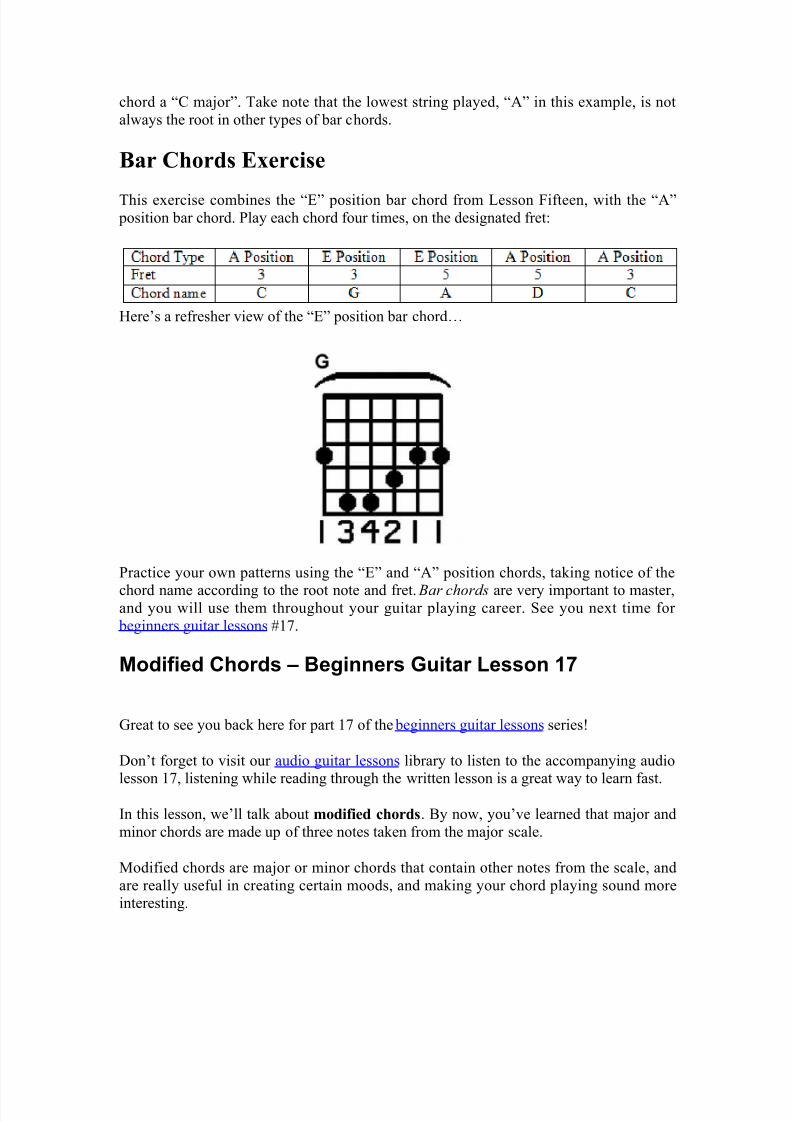
The “C” bar chord in the “A” position is played by placing the first finger across all
strings at the third fret. The only finger the first needs to actually push down, however, isthe A5 string on the third fret. The third finger is used to fret the D4, G3, and B2 strings
on the fifth fret. The tip of the first finger is used to “mute” or slightly contact the E6
string, so it doesn’t play. The bottom part of the third finger mutes the top E6 string, so it
doesn’t play either. This can be a bit tricky at first.
The A5 string is the root note in this bar chord, and will determine the chord name based
on the fret. In this case, the A5 string is played on the third fret, which is “C”, making the
8/6/2019 Learn the Guitar Lessons Part 1
http://slidepdf.com/reader/full/learn-the-guitar-lessons-part-1 34/42
chord a “C major”. Take note that the lowest string played, “A” in this example, is not
always the root in other types of bar chords.
Bar Chords Exercise
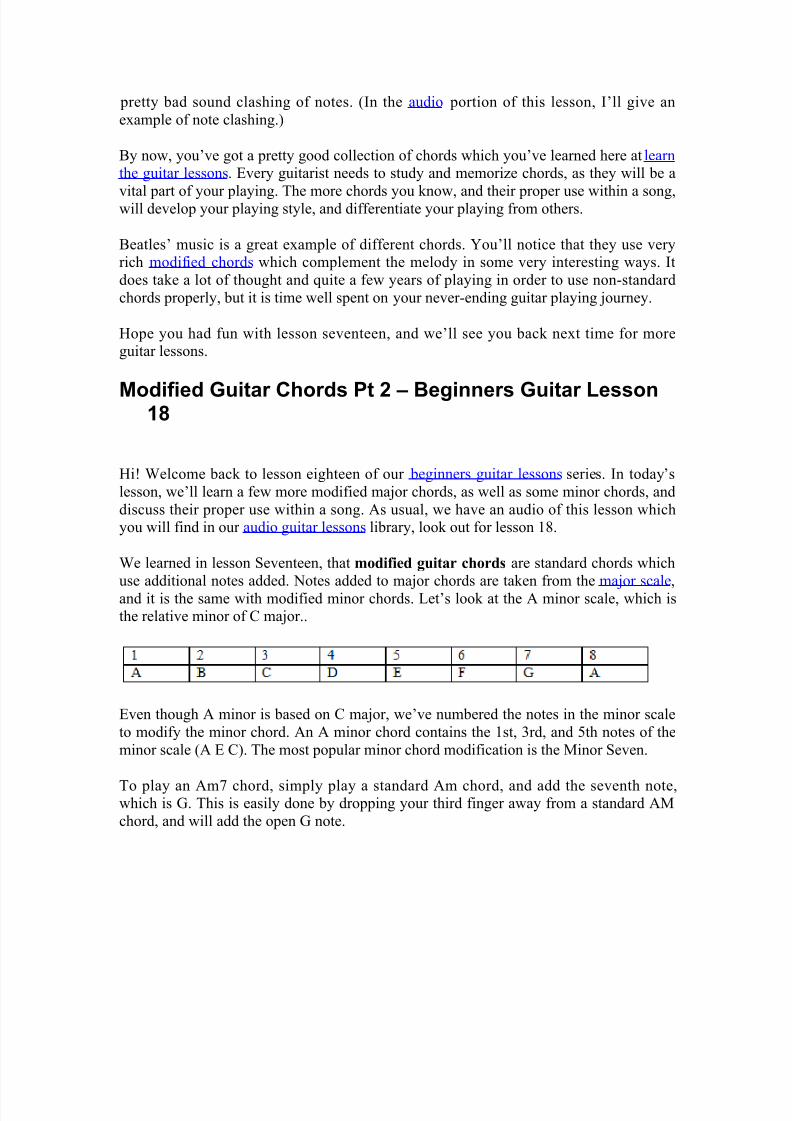
This exercise combines the “E” position bar chord from Lesson Fifteen, with the “A” position bar chord. Play each chord four times, on the designated fret:
Here’s a refresher view of the “E” position bar chord…
Practice your own patterns using the “E” and “A” position chords, taking notice of the
chord name according to the root note and fret. Bar chords are very important to master,and you will use them throughout your guitar playing career. See you next time for
beginners guitar lessons #17.
Modified Chords – Beginners Guitar Lesson 17
Great to see you back here for part 17 of the beginners guitar lessons series!
Don’t forget to visit our audio guitar lessons library to listen to the accompanying audio
lesson 17, listening while reading through the written lesson is a great way to learn fast.
In this lesson, we’ll talk about modified chords. By now, you’ve learned that major and
minor chords are made up of three notes taken from the major scale.
Modified chords are major or minor chords that contain other notes from the scale, and
are really useful in creating certain moods, and making your chord playing sound moreinteresting.

8/6/2019 Learn the Guitar Lessons Part 1
http://slidepdf.com/reader/full/learn-the-guitar-lessons-part-1 35/42
Like everything else in music, there are rules to follow. Remember that each note in the
scale is assigned a number from one through 8, but were going to take the numbering
concept a bit further. If you repeat the notes in a long line, starting with the root note of the scale as number one, you can assign numbers to infinity.
We won’t go quite as far as that, and in fact, we’ll only go the number thirteen. So let’stake C major again as our sample scale, and assign numbers:
The reason we
only go to thirteen is a matter of redundancy, as the names and numbers of notes will
begin to repeat, and cause unnecessary confusion. To modify a guitar chord, we take its basic form, and add another note to it.
We’ll use C Major as our example: The three notes that make up a C Major chord are, C
E and G. If we add the seventh note in the scale, B, we’ve created a Cmajor7 chord.
That’s pretty simple, but of course there are other rules to consider, one of which we’lltalk about now because it comprises a very common chord: the Dominant Seven Chord,
or simply, a Seven Chord. Note that C Major 7 is a seven chord, but it’s a Major 7 chord.
A Dominant Seven/Seven chord uses the same methodology as C Major 7, but theseventh note, B in this case, is flatted.
This is the case for all Dominant Seven chords. You don’t have to say “Dominant”, as the
chord is usually called a “Seven” chord, which is distinguished from the Major Seven, by
not saying “Major”…get it?
Here are some basic modified chords for you to work on. C, D, A, and G Major Seven,
and regular (dominant) Seven chords:
As you work on your guitar chords, note that all modified chords may not fit into every
song. Their use depends on the melody notes used, which we’ll get into more detail in
future lessons. But as a general rule, when using modified chords such a dominant sevenchords, the modified note in the scale also needs to be modified. If not, you’ll have a
8/6/2019 Learn the Guitar Lessons Part 1
http://slidepdf.com/reader/full/learn-the-guitar-lessons-part-1 36/42
pretty bad sound clashing of notes. (In the audio portion of this lesson, I’ll give an
example of note clashing.)
By now, you’ve got a pretty good collection of chords which you’ve learned here at learn the guitar lessons. Every guitarist needs to study and memorize chords, as they will be a
vital part of your playing. The more chords you know, and their proper use within a song,will develop your playing style, and differentiate your playing from others.
Beatles’ music is a great example of different chords. You’ll notice that they use veryrich modified chords which complement the melody in some very interesting ways. It
does take a lot of thought and quite a few years of playing in order to use non-standard
chords properly, but it is time well spent on your never-ending guitar playing journey.
Hope you had fun with lesson seventeen, and we’ll see you back next time for moreguitar lessons.
Modified Guitar Chords Pt 2 – Beginners Guitar Lesson18
Hi! Welcome back to lesson eighteen of our beginners guitar lessons series. In today’s
lesson, we’ll learn a few more modified major chords, as well as some minor chords, and
discuss their proper use within a song. As usual, we have an audio of this lesson whichyou will find in our audio guitar lessons library, look out for lesson 18.
We learned in lesson Seventeen, that modified guitar chords are standard chords which
use additional notes added. Notes added to major chords are taken from the major scale,
and it is the same with modified minor chords. Let’s look at the A minor scale, which isthe relative minor of C major..
Even though A minor is based on C major, we’ve numbered the notes in the minor scale
to modify the minor chord. An A minor chord contains the 1st, 3rd, and 5th notes of the
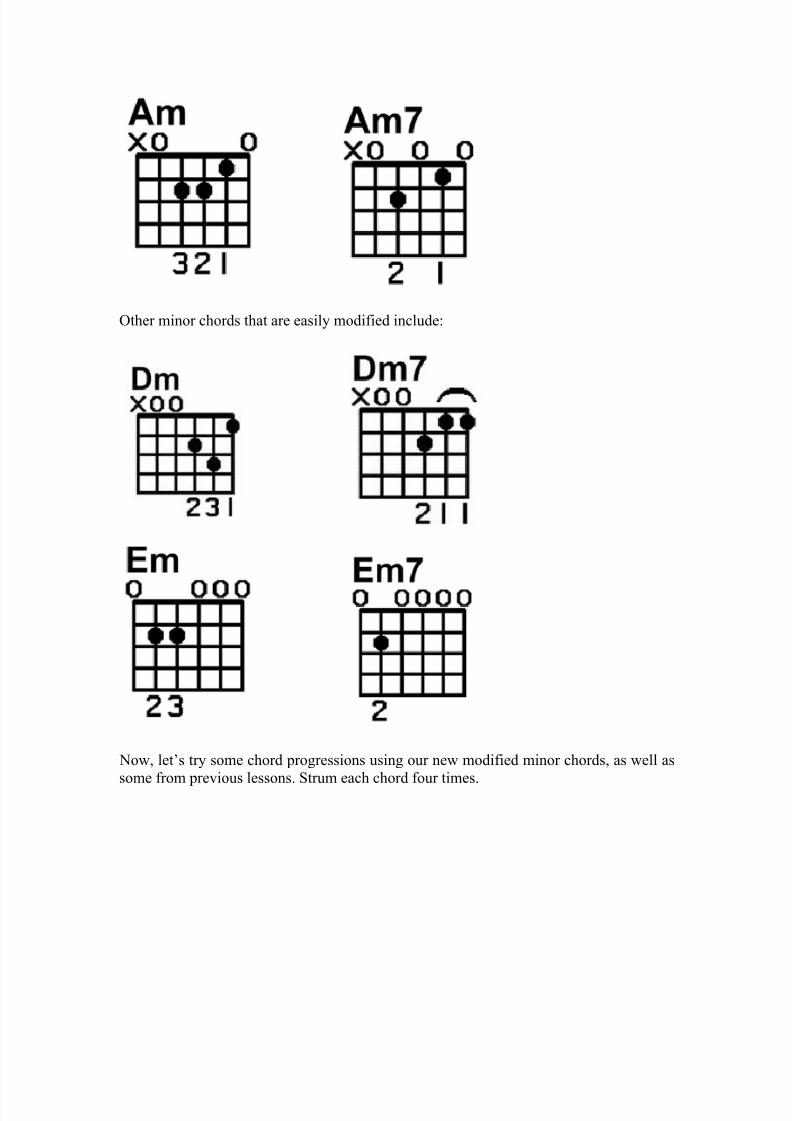
minor scale (A E C). The most popular minor chord modification is the Minor Seven.
To play an Am7 chord, simply play a standard Am chord, and add the seventh note,which is G. This is easily done by dropping your third finger away from a standard AM
chord, and will add the open G note.
8/6/2019 Learn the Guitar Lessons Part 1
http://slidepdf.com/reader/full/learn-the-guitar-lessons-part-1 37/42
Other minor chords that are easily modified include:
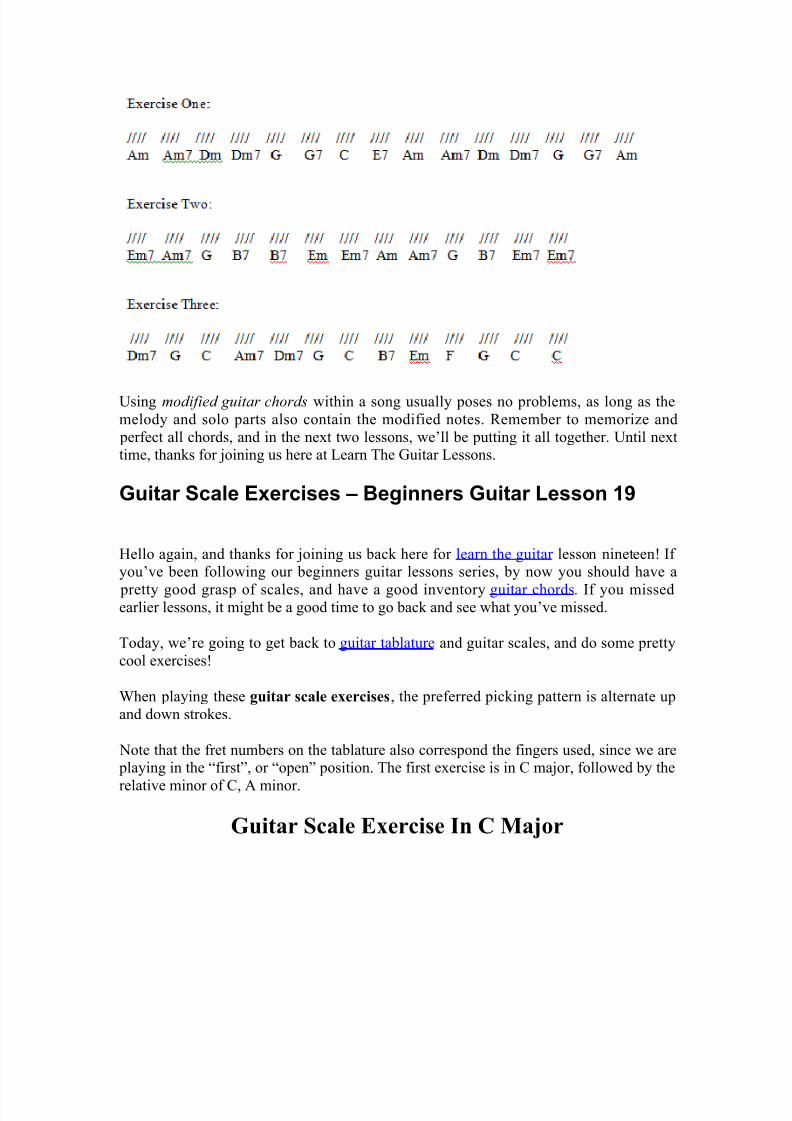
Now, let’s try some chord progressions using our new modified minor chords, as well as
some from previous lessons. Strum each chord four times.
8/6/2019 Learn the Guitar Lessons Part 1
http://slidepdf.com/reader/full/learn-the-guitar-lessons-part-1 38/42
Using modified guitar chords within a song usually poses no problems, as long as the
melody and solo parts also contain the modified notes. Remember to memorize and
perfect all chords, and in the next two lessons, we’ll be putting it all together. Until nexttime, thanks for joining us here at Learn The Guitar Lessons.
Guitar Scale Exercises – Beginners Guitar Lesson 19
Hello again, and thanks for joining us back here for learn the guitar lesson nineteen! If you’ve been following our beginners guitar lessons series, by now you should have a
pretty good grasp of scales, and have a good inventory guitar chords. If you missedearlier lessons, it might be a good time to go back and see what you’ve missed.
Today, we’re going to get back to guitar tablature and guitar scales, and do some pretty
cool exercises!
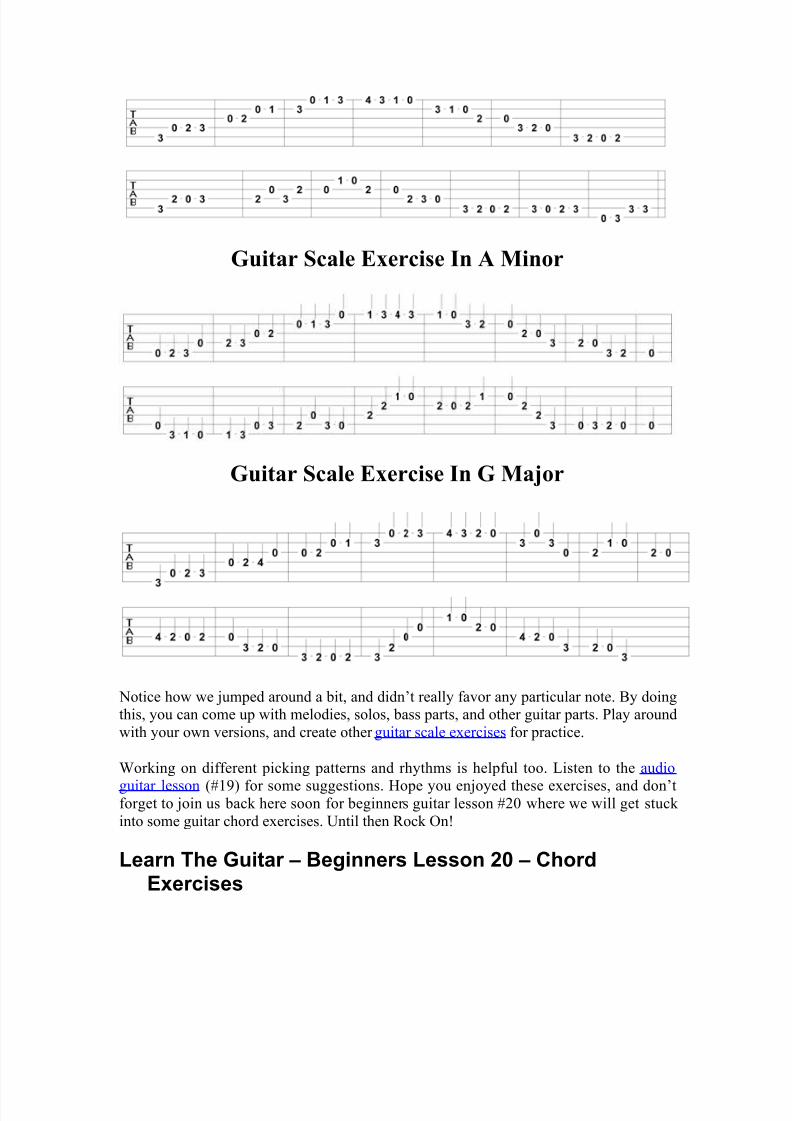
When playing these guitar scale exercises, the preferred picking pattern is alternate up
and down strokes.
Note that the fret numbers on the tablature also correspond the fingers used, since we are playing in the “first”, or “open” position. The first exercise is in C major, followed by the
relative minor of C, A minor.
Guitar Scale Exercise In C Major
8/6/2019 Learn the Guitar Lessons Part 1
http://slidepdf.com/reader/full/learn-the-guitar-lessons-part-1 39/42
Guitar Scale Exercise In A Minor
Guitar Scale Exercise In G Major
Notice how we jumped around a bit, and didn’t really favor any particular note. By doingthis, you can come up with melodies, solos, bass parts, and other guitar parts. Play around
with your own versions, and create other guitar scale exercises for practice.
Working on different picking patterns and rhythms is helpful too. Listen to the audio
guitar lesson (#19) for some suggestions. Hope you enjoyed these exercises, and don’tforget to join us back here soon for beginners guitar lesson #20 where we will get stuck
into some guitar chord exercises. Until then Rock On!
Learn The Guitar – Beginners Lesson 20 – ChordExercises
8/6/2019 Learn the Guitar Lessons Part 1
http://slidepdf.com/reader/full/learn-the-guitar-lessons-part-1 40/42
8/6/2019 Learn the Guitar Lessons Part 1
http://slidepdf.com/reader/full/learn-the-guitar-lessons-part-1 41/42
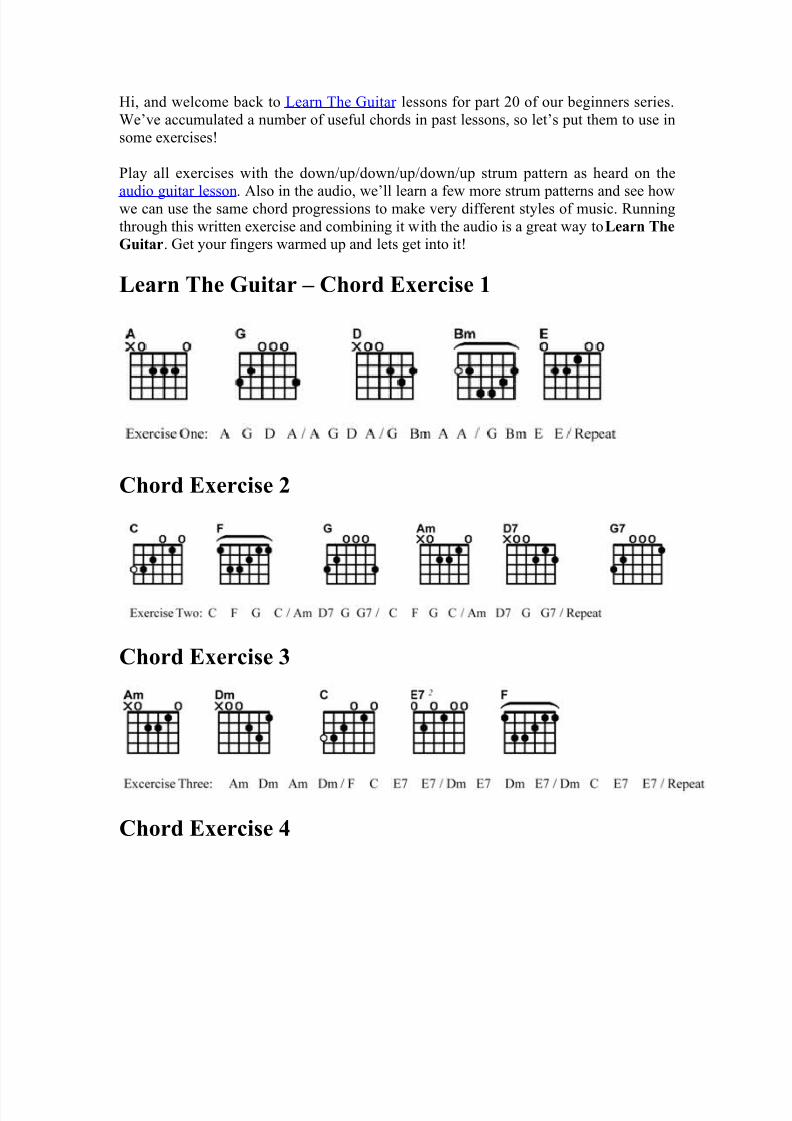
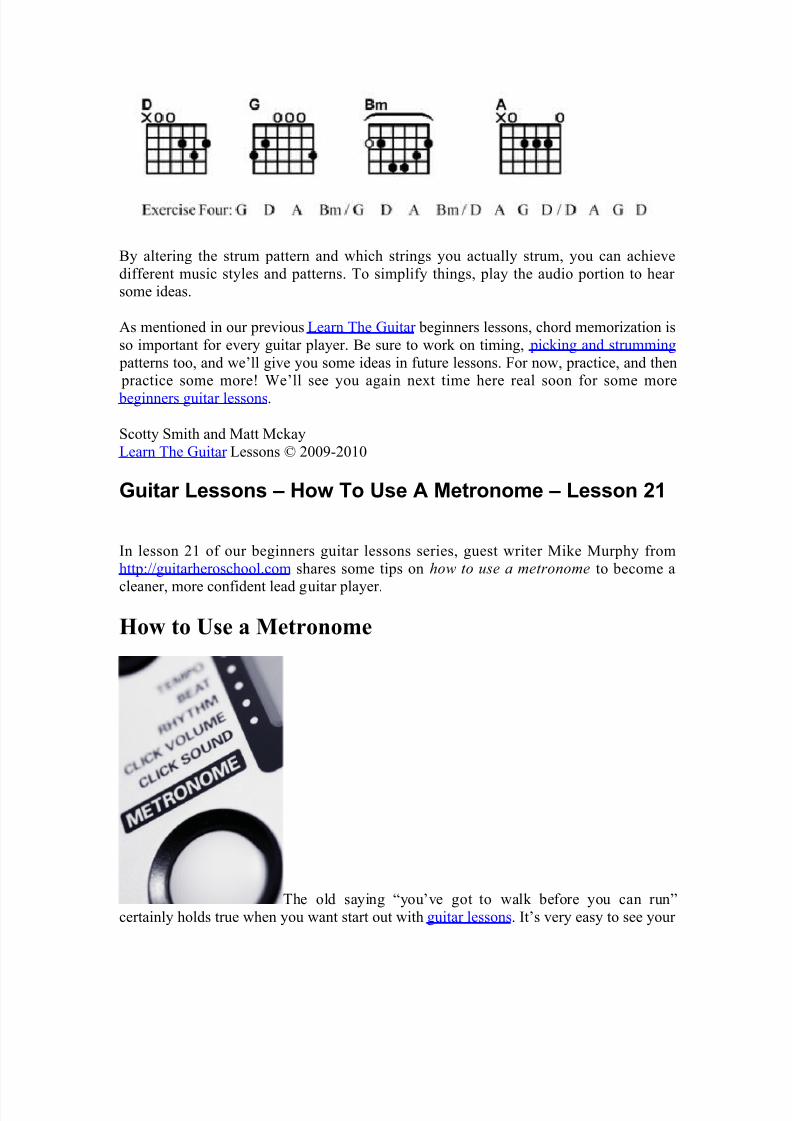
By altering the strum pattern and which strings you actually strum, you can achieve
different music styles and patterns. To simplify things, play the audio portion to hear some ideas.
As mentioned in our previous Learn The Guitar beginners lessons, chord memorization is
so important for every guitar player. Be sure to work on timing, picking and strumming
patterns too, and we’ll give you some ideas in future lessons. For now, practice, and then practice some more! We’ll see you again next time here real soon for some more
beginners guitar lessons.
Scotty Smith and Matt Mckay
Learn The Guitar Lessons © 2009-2010
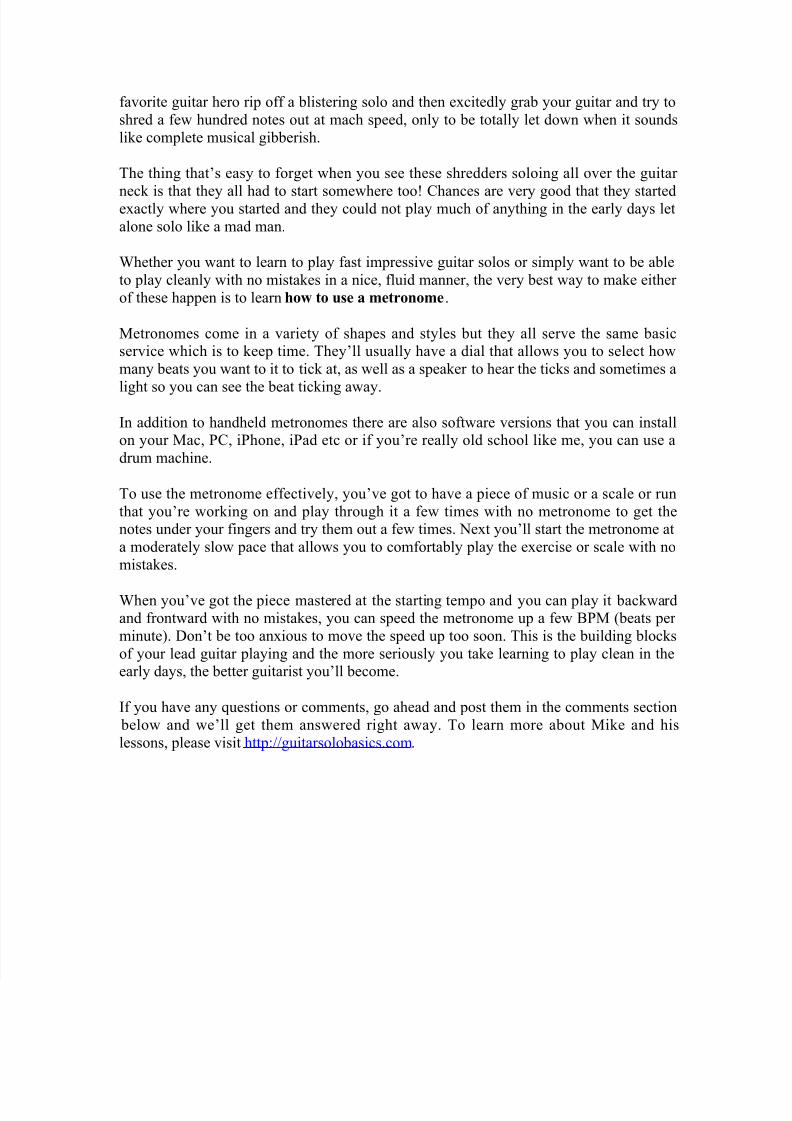
Guitar Lessons – How To Use A Metronome – Lesson 21
In lesson 21 of our beginners guitar lessons series, guest writer Mike Murphy from
http://guitarheroschool.com shares some tips on how to use a metronome to become a
cleaner, more confident lead guitar player.
How to Use a Metronome
The old saying “you’ve got to walk before you can run”
certainly holds true when you want start out with guitar lessons. It’s very easy to see your
8/6/2019 Learn the Guitar Lessons Part 1
http://slidepdf.com/reader/full/learn-the-guitar-lessons-part-1 42/42
favorite guitar hero rip off a blistering solo and then excitedly grab your guitar and try to
shred a few hundred notes out at mach speed, only to be totally let down when it sounds
like complete musical gibberish.
The thing that’s easy to forget when you see these shredders soloing all over the guitar
neck is that they all had to start somewhere too! Chances are very good that they startedexactly where you started and they could not play much of anything in the early days let
alone solo like a mad man.
Whether you want to learn to play fast impressive guitar solos or simply want to be able
to play cleanly with no mistakes in a nice, fluid manner, the very best way to make either
of these happen is to learn how to use a metronome.
Metronomes come in a variety of shapes and styles but they all serve the same basicservice which is to keep time. They’ll usually have a dial that allows you to select how
many beats you want to it to tick at, as well as a speaker to hear the ticks and sometimes a
light so you can see the beat ticking away.
In addition to handheld metronomes there are also software versions that you can installon your Mac, PC, iPhone, iPad etc or if you’re really old school like me, you can use a
drum machine.
To use the metronome effectively, you’ve got to have a piece of music or a scale or run
that you’re working on and play through it a few times with no metronome to get thenotes under your fingers and try them out a few times. Next you’ll start the metronome at
a moderately slow pace that allows you to comfortably play the exercise or scale with no
mistakes.
When you’ve got the piece mastered at the starting tempo and you can play it backwardand frontward with no mistakes, you can speed the metronome up a few BPM (beats per
minute). Don’t be too anxious to move the speed up too soon. This is the building blocks
of your lead guitar playing and the more seriously you take learning to play clean in theearly days, the better guitarist you’ll become.
If you have any questions or comments, go ahead and post them in the comments section
below and we’ll get them answered right away. To learn more about Mike and his
lessons, please visit http://guitarsolobasics.com.