Embed Size (px)
Citation preview
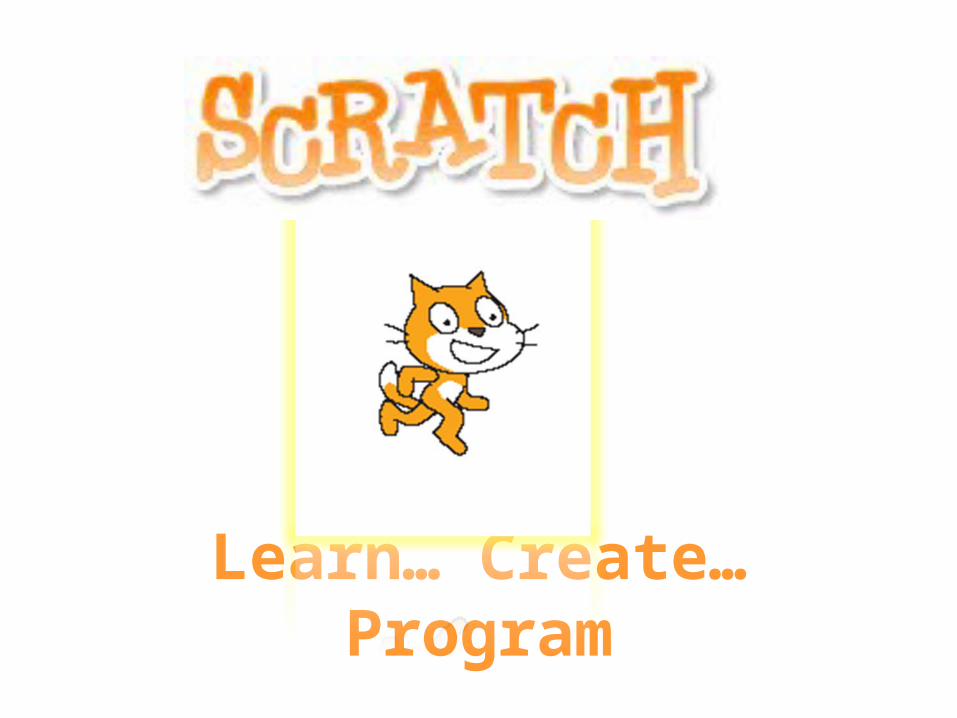
Learn… Create… Program

Manipulation of Multiple Media Connects with youth culture
Scratch is a new graphical programming language designed to support the development of technological fluency.
Tinkerability Allows playful experimenting with program fragments
Scaffolds for Powerful IdeasMakes concepts (such as variables) more tangible and manipulable
About
Connection to Physical World Supports multiple design experiences
http//scratch.mit.edu
The Scratch project is supported by a grant from the National Science Foundation (Grant No. 0325828). Opinions and findings expressed on this poster do not necessarily reflect the views of the NSF.
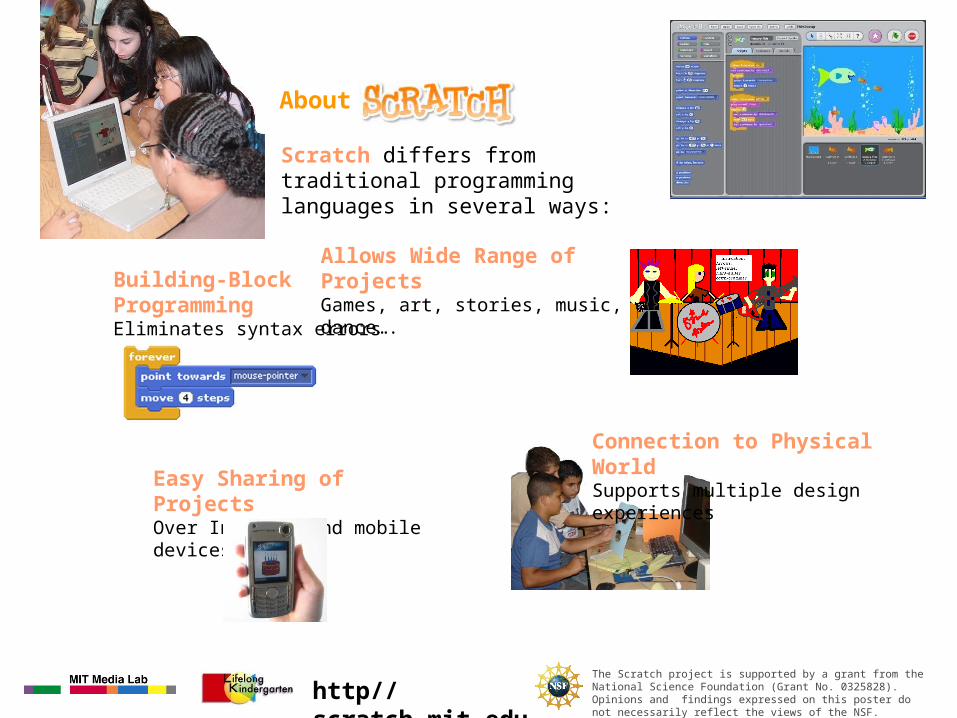
Building-Block Programming Eliminates syntax errors
Scratch differs from traditional programming languages in several ways:
Allows Wide Range of Projects Games, art, stories, music, dance….
Easy Sharing of Projects Over Internet and mobile devices
About
Connection to Physical World Supports multiple design experiences
http//scratch.mit.edu
The Scratch project is supported by a grant from the National Science Foundation (Grant No. 0325828). Opinions and findings expressed on this poster do not necessarily reflect the views of the NSF.

1. Click on Open to retrieve a game.
2. Select the “Games” Folder.
3. Select AmonBoxing as your game to play.
4. Read the instructions on the Right Hand Side.
5. PLAY!
Getting Started

The Scratch Control and Design Screen
Script Area
Stage(White Space)
Sprite List
New Sprite Buttons
Tabs
Blocks
Green Flag
Project Notes
Palate

The Basic Buttons• New Sprite Buttons
– The Scratch objects and characters are called Sprites
• Get a new cat Sprite (Default)
• Paint your own Sprite
• Choose an image for a new Sprite
• Get a surprise Sprite
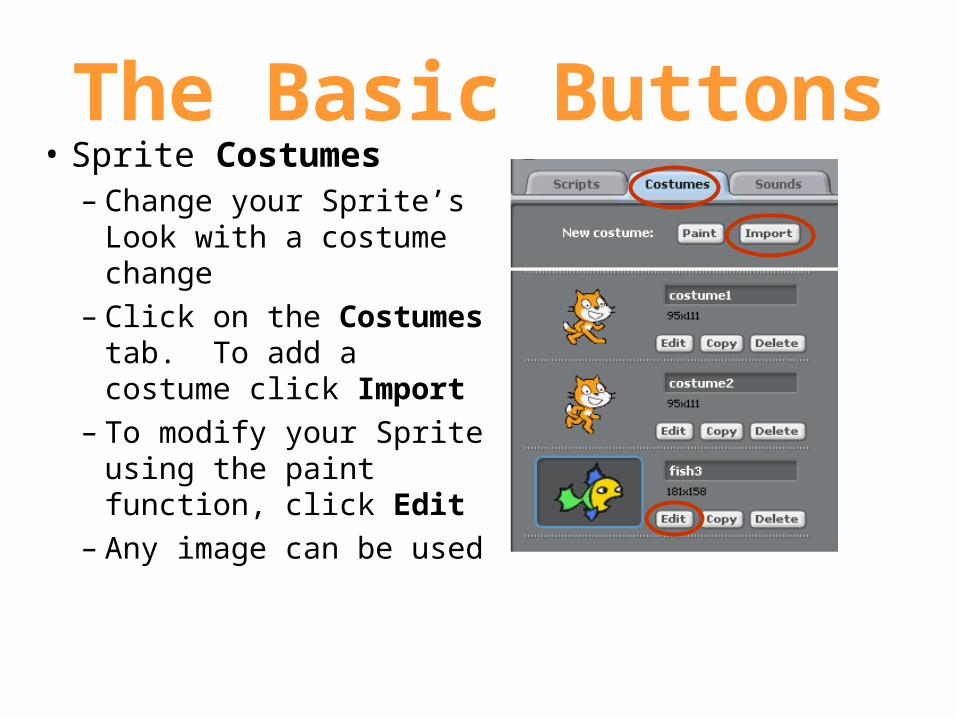
The Basic Buttons• Sprite Costumes
– Change your Sprite’s Look with a costume change
– Click on the Costumes tab. To add a costume click Import
– To modify your Sprite using the paint function, click Edit
– Any image can be used

The Basic Buttons• Scratch Blocks
– By snapping these blocks together you create a script
– When you double click on a script, your program will run
– The Scratch blocks are in 8 color-coded categories based on function
Exercise #1
The “Cat Walk”

Doin’ the “Cat Walk”
• We will create a Sprite fashion show.
• This exercise will teach you how to make your Sprite:
• Change Color• Walk• Undergo a Costume
Change

Setting the Stage• Before you can
begin to move blocks onto the Script Area– Click on the
“Scripts” tab– The tab
should be pale blue

2. Click and pull the block onto the Script Area.
4. Click and pull the block onto the Script Area.
Color Change1. Click on “Control”
from the Palate.
3. Click on “Looks” from the Palate.
5. Snap the two blocks together.

Color Change
- Your Design & Control Center Screen should look like this.
- Hit the space bar and watch your Sprite change colors.

2. Click on and pull the block onto the Script Area. Click on the white holes and type in -139 for (x:) and 0 for (y:). This will be your starting point.
Sprite Starting Position
These are your (x:) and (y:) coordinates for your stage.
1. Click on “Motion” from the Palate.
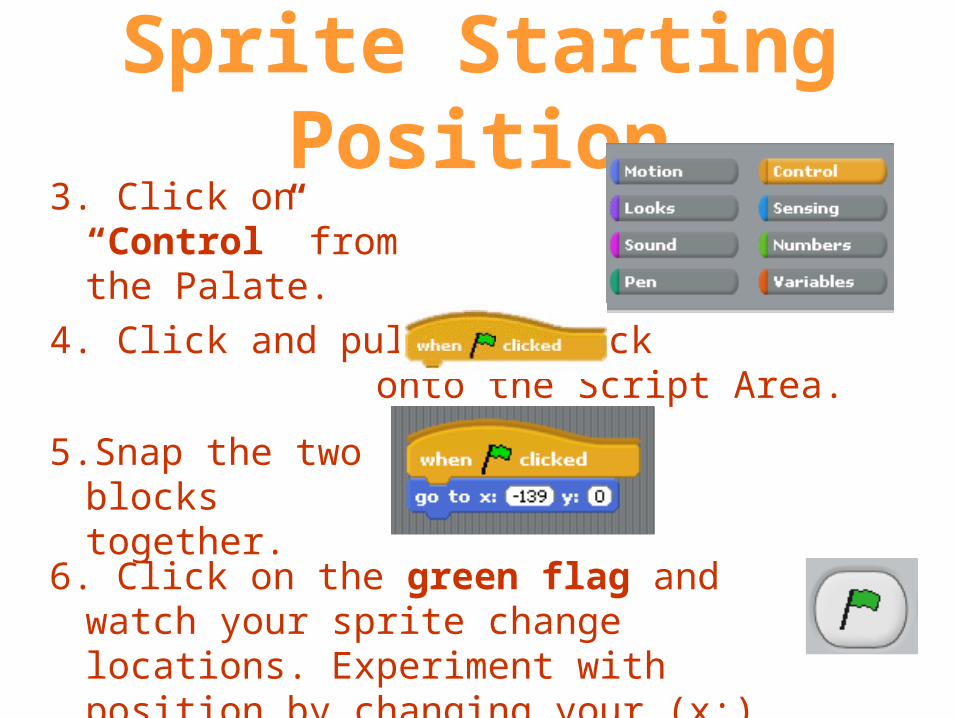
4. Click and pull the block onto the Script Area.
Sprite Starting Position
3. Click on “Control” from the Palate.
5. Snap the two blocks together.
6. Click on the green flag and watch your sprite change locations. Experiment with position by changing your (x:) and (y:) values.

Sprite Starting Position
- Your Design and Control Center Screen should look like this.
- You can now position your Sprite and change colors.

4. Click and pull the block onto the Script Area. Click on the arrow in the costume1 box and select costume2.
2. Click and pull the blocks , , and onto the Script Area.
Walking1. Click on “Control”
from the Palate.
3. Click on “Looks” from the Palate.
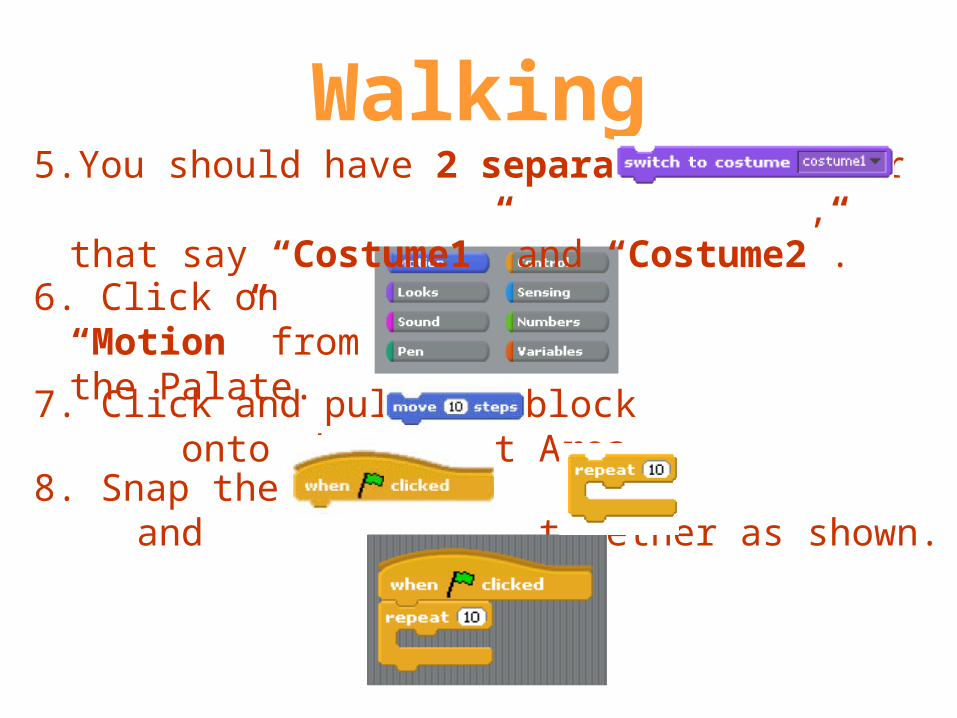
7. Click and pull the block onto the Script Area.
Walking
6. Click on “Motion” from the Palate.
8. Snap the blocks and together as shown.
5. You should have 2 separate blocks for , that say “Costume1” and “Costume2”.

Walking
9. Click on the and drag your new stack of blocks into the space in the block.
8. Stack the remaining blocks in this pattern.
IMPORTANT If you do NOT click on the block then your complete stack of blocks will NOT stay together when moved. The blocks will come apart instead of moving together.

Walking- Press the green flag and watch!
- Experiment with the purple change effects block. Click on the arrow to see the options.
- Press the space bar to see the new changes.
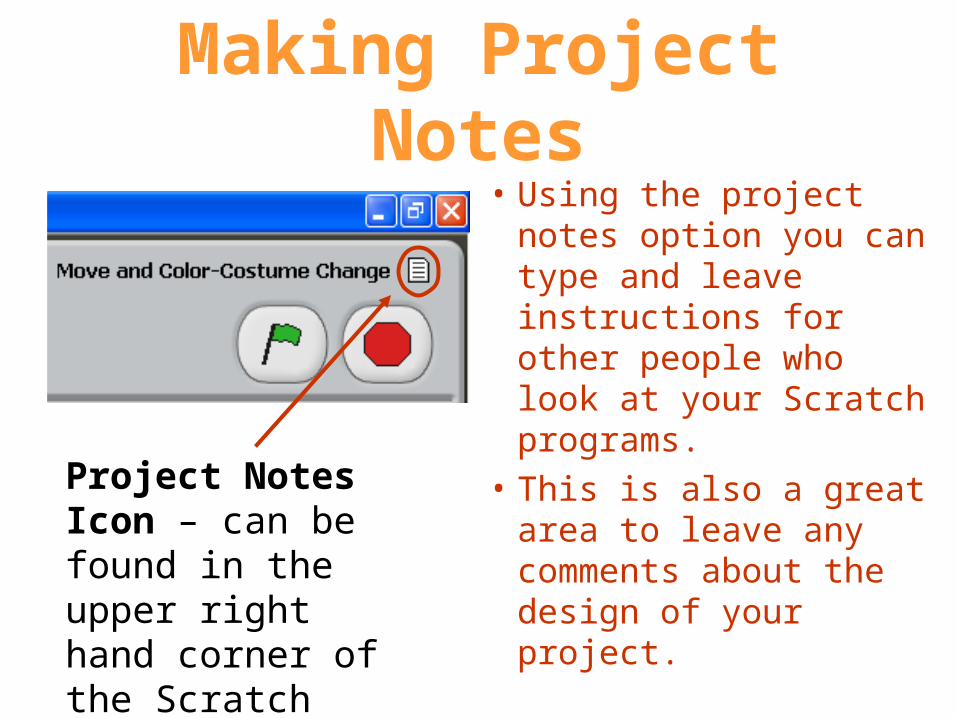
Making Project Notes
• Using the project notes option you can type and leave instructions for other people who look at your Scratch programs.
• This is also a great area to leave any comments about the design of your project.
Project Notes Icon – can be found in the upper right hand corner of the Scratch Design and Control Center Screen

From one Project to Another
• Click on Save to save your work– The file
should be named “Exercise 1”
• Click on New to begin a new program.

Exercise #2
The Digital Picasso

A Digital Picasso with
Animated Painting• We will design digital artwork.• This exercise will teach you how
to:– Create a customized Sprite using:
• The Paint Function• Animation• Sound

Learning How to Paint
From the New Sprite Buttons, Click on the
button to get started! The paint function will appear in the middle of your screen.
We will make a sprite that is your name.

Learning How to Paint
1. Click on the paintbrush and select a color from below.
2. Click on the capital T. A black box and a blue vertical line will appear.
3. Click in the paint area. You will now be able to type your name. Click “OK”.

4. Click and pull the block 4 times into the script area. For two of the blocks, click on the arrow in the 48 box and change the value to 40. The other two stay the same.
2. Click and pull the blocks and onto the scripts area.
1. Click on “Control” from the color palate.
3. Click on “Sound” from the color palate.
Animation & Sound
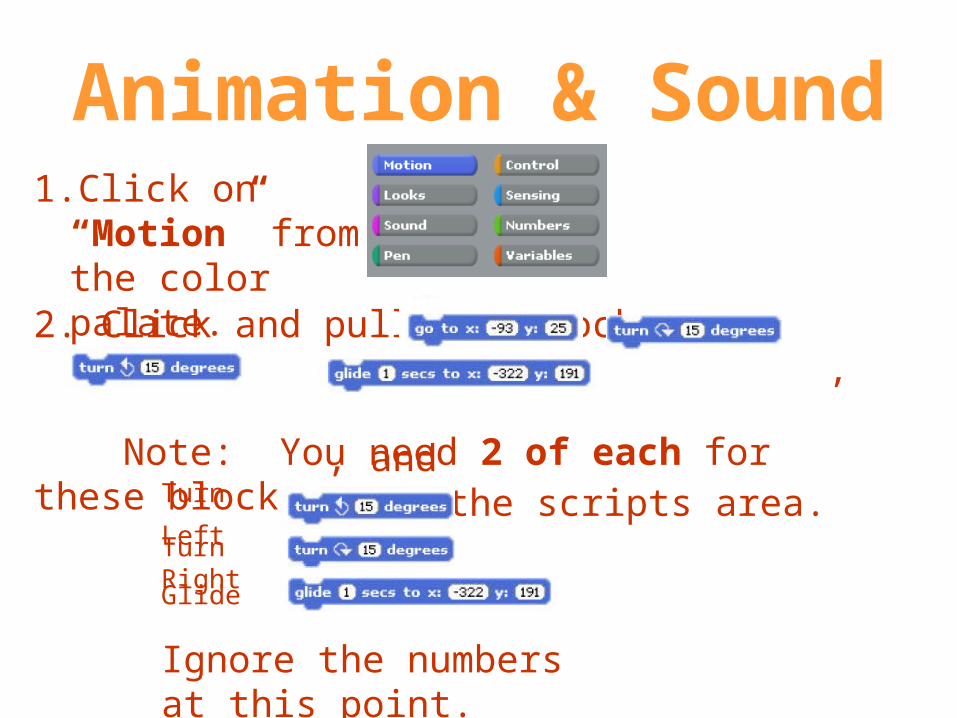
2. Click and pull the blocks , , , and onto the scripts area.
1. Click on “Motion” from the color palate.
Animation & Sound
Note: You need 2 of each for these blocks…Turn Left Turn Right
Glide
Ignore the numbers at this point.

• The should say x: (0), y: (0)
• For the 2 blocks and the 2 blocks have 1 Left and 1 Right stay at 15 degrees
• Type in 30 degrees for the other 2 blocks
Animation & Sound
• In the block type in 3 for the seconds area and (x:) 140 with (y:) as 50
• In another block type in 3 for the seconds and (x:) -135 with (y:) -157
3. Enter your values and variables:
Animation & Sound
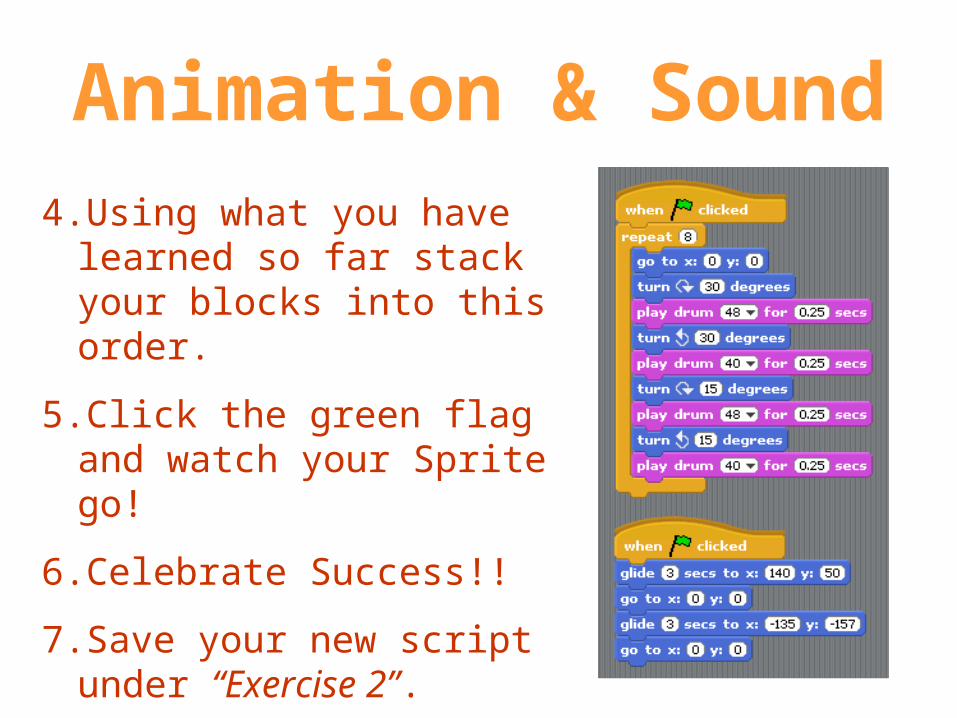
4. Using what you have learned so far stack your blocks into this order.
5. Click the green flag and watch your Sprite go!
6. Celebrate Success!!
7. Save your new script under “Exercise 2”.
8. Open a new page and be creative.

![Βίντεο για εκμάθηση Scratch 1€¦ · Φύλλα εργασίας για εκμάθηση Scratch 1͙4 – Κοκκόρη Αθηνά [3] Εφαρογή σο Scratch:](https://img.pdfslide.us/doc/110x75/5fa1e23ac073f719dc091d73/-f-scratch-1-f-.jpg)